

Page 1

WELCOME
Thank you for choosing the Nokia 6315i. This exceptional new
phone boasts an impressive array of features that are versatile,
easy to use and allows you to enjoy some of the hottest mobile
services available today.
All Digital and supporting the high-speed communications
provided by the CDMA2000 1xEVDO network system, this
phone offers lightning fast downloads for enhanced
multimedia, web browsing and data services. Two LCD
displays present rich full-color content on either the large
inner main display screen, or the smaller outer sub-display
screen. A built-in 1.3 Mega Pixel camera with embedded
flash and video capture, a WAP 2.0 browser, GPS technology
for quick location identification when calling 911, a built-in
speaker phone and voice activated dialing for easy handsfree operation, two-way short, enhanced or multimedia
messaging services so you can send and receive messages
in a variety of forms, T9 predictive text input for effortless text
entries and a USB port for expanded data capabilities
complete this nimble device.
In addition, this phone is equipped with Video on Demand
and Music on Demand capabilities that allow you to select
and play video or audio clips from a mobile entertainment
library that is accessible right from your phone.
These features give you the most of exciting Nokia services
like V Cast, which allows you to download full motion video
clips of breaking news, weather, sports highlights,
entertainment clips and 3D games, or Get It Now, which
allows you to download, ringtones, ringback tones,
wallpapers, games and provides Picture Caller ID.
So unleash all the powerful features of your new
Nokia 6315i and enjoy the latest in wireless technology and
mobile entertainment, all from this one awesome handset.
REV.02 5U01000300A
Page 2

Chapter 4
TABLE OF CONTENTS
1
Chapter 1
Chapter 2
Chapter 3
CHAPTER 1. BEFORE USING YOUR PHONE .................................5
INSIDE THE PACKAGE .....................................................................................6
HANDSET DESCRIPTION.................................................................................7
DISPLAY INDICATORS ...........................................................................................9
BATTERY USAGE...........................................................................................11
BATTERY INSTALLATION ....................................................................................11
BATTERY REMOVAL.............................................................................................12
BATTERY CHARGING ...........................................................................................13
BATTERY HANDLING INFORMATION..........................................................14
DOs.........................................................................................................................14
DON’Ts...................................................................................................................14
CHAPTER 2. BASIC OPERATION ..................................................15
TURNING THE PHONE ON / OFF ..................................................................16
TURNING THE PHONE ON...................................................................................16
TURNING THE PHONE OFF..................................................................................16
ACCESSING THE MENU................................................................................17
MENU SUMMARY .........................................................................................18
BASIC FUNCTIONS ........................................................................................20
MAKING A CALL ...................................................................................................20
ANSWERING CALLS.............................................................................................21
SPEAKER PHONE..................................................................................................21
VIBRATE ON/OFF MODE ......................................................................................21
CALLER ID FUNCTION..........................................................................................21
WAIT/PAUSE FEATURE........................................................................................22
ANSWERING A CALL............................................................................................22
3-WAY CALLING ...................................................................................................23
CALL WAITING FUNCTION ..................................................................................23
ADJUSTING VOLUME ..........................................................................................24
MUSIC PLAYER .....................................................................................................24
DURING A CALL .............................................................................................25
MUTE (UNMUTE)..................................................................................................25
SEND TXT MSG ....................................................................................................25
CONTACTS ............................................................................................................25
RECENT CALLS .....................................................................................................25
TO PHONE/TO BLUETOOTH ................................................................................26
VOICE PRIVACY.....................................................................................................26
MAKING AN EMERGENCY CALL..................................................................27
911 IN LOCK MODE ..............................................................................................27
911 USING ANY AVAILABLE SYSTEM ...............................................................27
USING THE TRANS-FLASH CARD ................................................................28
INSTALLING THE TRANS-FLASH CARD .............................................................28
REMOVING THE TRANS-FLASH CARD...............................................................28
HOW IS MUSIC TRANSFERRED? ......................................................................29
CHAPTER 3. MEMORY FUNCTION...............................................31
STORING A PHONE NUMBER ......................................................................32
ENTERING LETTERS, NUMBERS & SYMBOLS ...........................................33
STANDARD INPUT MODE....................................................................................34
WORD INPUT MODE ............................................................................................35
NUMERIC MODE...................................................................................................36
SYMBOL MODE ....................................................................................................36
MAKING A CALL THROUGH THE CONTACT LIST ......................................37
ONE-TOUCH/TWO-TOUCH DIALING...................................................................37
ONE-TOUCH DIALING:.......................................................................................37
TWO-TOUCH DIALING: ......................................................................................37
CHAPTER 4. MENU FUNCTION ....................................................39
CONTACTS .....................................................................................................40
NEW CONTACT.....................................................................................................40
CONTACT LIST......................................................................................................41
GROUPS ................................................................................................................42
ADD NEW GROUP .............................................................................................42
ASSIGN PHONE NUMBER TO GROUP..............................................................42
CHANGE GROUP NAME ....................................................................................43
Page 3

TABLE OF CONTENTS
2
Chapter 4
SEND TXT MSG. TO A GROUP ..........................................................................43
SEND PIX MSG. GROUP ....................................................................................44
SEND FLIX MSG. GROUP ..................................................................................45
ERASE GROUP ...................................................................................................46
SPEED DIALS.........................................................................................................47
RECENT CALLS ..............................................................................................48
MISSED..................................................................................................................48
RECEIVED ..............................................................................................................49
DIALED...................................................................................................................50
ALL .........................................................................................................................51
VIEW TIMERS ........................................................................................................52
SETTINGS .......................................................................................................53
SOUNDS SETTINGS .............................................................................................53
MASTER VOLUME .............................................................................................53
CALL SOUNDS ...................................................................................................54
ALERT SOUNDS .................................................................................................55
KEYPAD VOLUME ..............................................................................................57
EARPIECE VOLUME...........................................................................................57
SERVICE ALERTS ...............................................................................................58
POWER ON/OFF.................................................................................................59
ALARM SOUNDS ...............................................................................................60
DISPLAY SETTINGS..............................................................................................61
BANNER .............................................................................................................61
BACKLIGHT ........................................................................................................62
CONTRAST .........................................................................................................63
WALLPAPER.......................................................................................................63
DISPLAY THEMES..............................................................................................65
DIAL FONTS .......................................................................................................65
CLOCK FORMAT ................................................................................................66
PHONE SETTINGS ................................................................................................67
STANDALONE MODE ........................................................................................67
SET SHORTCUT KEY ..........................................................................................67
LANGUAGE.........................................................................................................68
LOCATION ..........................................................................................................68
SECURITY ...........................................................................................................69
SYSTEM SELECT................................................................................................70
NAM SELECT......................................................................................................71
CALL SETTINGS....................................................................................................72
ANSWER OPTIONS ............................................................................................72
AUTO RETRY ......................................................................................................72
TTY MODE..........................................................................................................73
ONE TOUCH DIAL ..............................................................................................73
VOICE PRIVACY..................................................................................................74
VOICE SERVICES................................................................................................74
DTMF TONES .....................................................................................................77
BLUETOOTH..........................................................................................................78
BLUETOOTH ON/OFF ........................................................................................78
ADD NEW DEVICE .............................................................................................78
MEMORY ...............................................................................................................80
SAVE OPTIONS ..................................................................................................80
PHONE MEMORY ..............................................................................................80
CARD MEMORY.................................................................................................81
PHONE INFO..........................................................................................................82
MY NUMBER......................................................................................................82
SW VERSION......................................................................................................82
ICON GLOSSARY ...............................................................................................83
TOOLS.............................................................................................................84
CALCULATOR........................................................................................................84
CALENDAR ............................................................................................................85
ADD NEW ...........................................................................................................85
VIEW PLAN LIST.................................................................................................86
ALARM CLOCK......................................................................................................87
WORLD CLOCK .....................................................................................................88
NOTEPAD ..............................................................................................................89
ADD MEMO........................................................................................................89
VIEW MEMO ......................................................................................................89
STOP WATCH........................................................................................................90
Page 4

TABLE OF CONTENTS
3
Chapter 6
Chapter 5
MY ACCOUNT ................................................................................................91
MY ACCOUNT .......................................................................................................91
CHAPTER 5. GET IT NOW..............................................................93
GET IT NOW ...................................................................................................94
GET TUNES & TONES ..........................................................................................94
GET VCAST MUSIC ............................................................................................94
GET NEW RINGTONE.........................................................................................95
RECORDING NEW TONES.................................................................................95
MY RINGTONES .................................................................................................96
MY MUSIC..........................................................................................................97
MY SOUNDS ......................................................................................................97
SYNC MUSIC ......................................................................................................98
MANAGE MUSIC................................................................................................99
GET PIX & FLIX ...................................................................................................100
GET V CAST VIDEO ..........................................................................................100
GET NEW PIX ...................................................................................................100
MY PIX ..............................................................................................................101
MY FLIX ............................................................................................................102
PIX PLACE ........................................................................................................103
TAKE PIX...........................................................................................................104
RECORD FLIX ...................................................................................................106
GET FUN & GAMES............................................................................................108
DOWNLOADING NEW FUN & GAMES ...........................................................108
PLAYING DOWNLOADED FUN & GAMES ......................................................108
GET NEWS & INFO .............................................................................................108
CONNECTING NEWS & INFO ..........................................................................108
GET GOING .........................................................................................................109
CONNECTING GET GOING ..............................................................................109
GET EXTRAS .......................................................................................................109
CONNECTING GET EXTRAS.............................................................................109
GET IT NOW INFO...............................................................................................109
CHAPTER 6. VOICE MAIL, TXT, PIX, FLIX MESSAGING ..........111
WHEN A NEW MESSAGE ARRIVES ...........................................................112
NEW MSG.....................................................................................................113
SEND NEW TXT MESSAGE..............................................................................113
SEND NEW PIX MESSAGE ..............................................................................114
SEND NEW FLIX MESSAGE.............................................................................116
INBOX ...........................................................................................................118
PLAY AGAIN .....................................................................................................118
REPLY ...............................................................................................................118
ERASE INBOX...................................................................................................118
REPLY W. COPY...............................................................................................119
FORWARD........................................................................................................119
SAVE PICTURE (MMS PIX)...............................................................................119
SAVE VIDEO (MMS VIDEO) .............................................................................119
SAVE SOUND ...................................................................................................120
SAVE GRAPHIC ................................................................................................120
SAVE QUICK TEXT............................................................................................120
TO CONTACTS .................................................................................................120
LOCK/UNLOCK .................................................................................................120
MESSAGE INFO ...............................................................................................120
SENT .............................................................................................................121
FORWARD........................................................................................................121
PLAY AGAIN .....................................................................................................121
RESEND............................................................................................................122
ERASE...............................................................................................................122
ERASE SENT.....................................................................................................122
TO CONTACTS .................................................................................................122
LOCK/UNLOCK .................................................................................................122
SAVE QUICK TEXT............................................................................................122
MESSAGE INFO ...............................................................................................122
DRAFTS.........................................................................................................123
SEND ................................................................................................................123
TO CONTACTS .................................................................................................123
Page 5

TABLE OF CONTENT
4
Chapter 7
Chapter 6
Chapter 8
LOCK/UNLOCK .................................................................................................123
ERASE DRAFTS ................................................................................................123
VOICEMAIL ...................................................................................................124
E- MAIL..........................................................................................................125
MOBILE IM....................................................................................................126
GET NEW..........................................................................................................126
MOBILE IM.......................................................................................................126
CHAT .............................................................................................................127
ERASE ALL....................................................................................................128
SETTINGS .....................................................................................................129
ALL MSG SETTINGS...........................................................................................129
AUTO SAVE ......................................................................................................129
AUTO ERASE....................................................................................................129
QUICK TEXT......................................................................................................130
VOICEMAIL#.....................................................................................................130
ENTRY MODE...................................................................................................131
CALLBACK #.....................................................................................................131
ALL MESSAGE SIGNATURE ............................................................................132
TXT MSG SETTINGS ..........................................................................................133
TXT AUTO VIEW ...............................................................................................133
TXT MESSAGE SIGNATURE.............................................................................133
PIX-FLIX MSG SETTINGS...................................................................................134
AUTO RECEIVE.................................................................................................134
PIX-FLIX MESSAGE SIGNATURE .....................................................................134
CHAPTER 7. MOBILE WEB 2.0 ....................................................135
STARTING INTERNET BROWSER...............................................................136
LAUNCHING MOBILE WEB 2.0 ..........................................................................136
BROWSER MENU.........................................................................................136
VZW HOME..........................................................................................................136
ADD FAVORITE ...................................................................................................136
SEARCH ...............................................................................................................137
GO TO URL ..........................................................................................................137
SHOW URL ..........................................................................................................137
BACK ....................................................................................................................137
MANAGE MEMORY............................................................................................137
SETTINGS............................................................................................................138
ADVANCED..........................................................................................................139
EXIT......................................................................................................................139
CHAPTER 8. SAFETY AND WARRANTY ....................................141
SAFETY INFORMATION FOR WIRELESS HANDHELD PHONES ..............142
DRIVING SAFETY ................................................................................................143
ELECTRONIC DEVICES .......................................................................................144
OTHER SAFETY GUIDELINES ............................................................................145
PRECAUTIONS ....................................................................................................146
SAFETY INFORMATION FOR FCC RF EXPOSURE ....................................147
CAUTIONS...........................................................................................................147
SAR INFORMATION.....................................................................................148
FCC HEARING-AID COMPATIBILITY (HAC) REGULATIONS FOR
WIRELESS DEVICES.....................................................................................150
FDA CONSUMER UPDATE ..........................................................................152
PROTECT YOUR WARRANTY .....................................................................156
12 MONTH LIMITED WARRANTY...............................................................157
ADDITIONAL SAFETY INFORMATION .......................................................158
OPERATING ENVIRONMENT.............................................................................158
MEDICAL DEVICES .............................................................................................158
VEHICLES.............................................................................................................159
POTENTIALLY EXPLOSIVE ENVIRONMENTS ..................................................160
EMERGENCY CALLS...........................................................................................160
CERTIFICATION INFORMATION (SAR) .............................................................161
HEARING AID COMPATIBILITY (HAC)...............................................................162
TECHNICAL INFORMATION...............................................................................162
“Licensed by QUALCOMM Incorporated under one or more of the following Patents : U.S.Patent No.
4,901,307 U.S.Patent No. 5,056,109 U.S.Patent No. 5,099,204 U.S. Patent No. 5,101,501 U.S. Patent No.
5,103,459 U.S. Patent No. 5,107,225 U.S.Patent No. 5,109,390.”
Page 6

BEFORE USING
YOUR PHONE
C
H
1
5
This chapter provides important information about using the
Nokia 6315i including:
Chapter 1
INSIDE THE PACKAGE
HANDSET DESCRIPTION
BATTERY USAGE
BATTERY HANDLING INFORMATION
Page 7
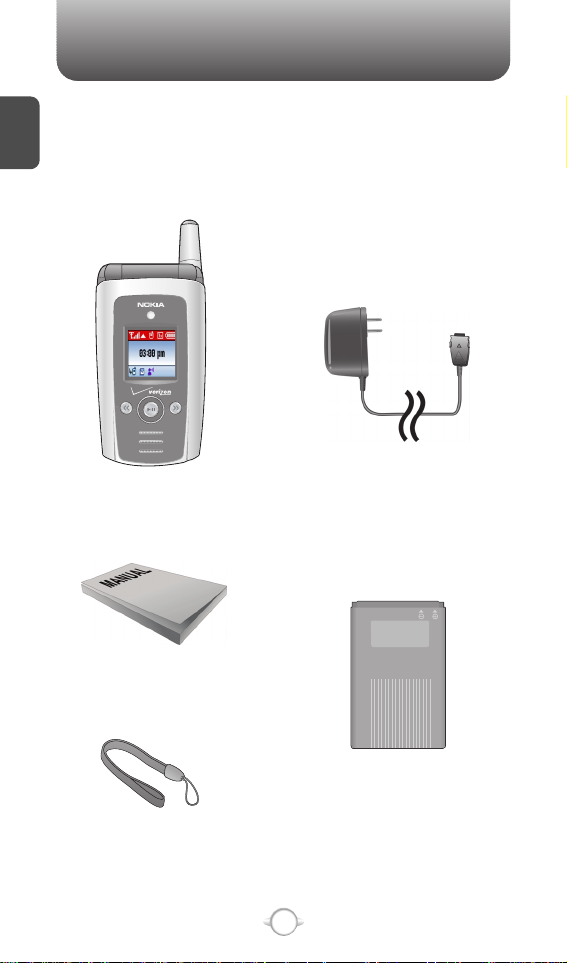
This package should include all items pictured below.
If any are missing or different, immediately contact the retailer
where you purchased the phone.
INSIDE THE PACKAGE
C
H
1
6
Handstrap
User Manual
AC Travel Charger
Handset
Standard Battery
Page 8
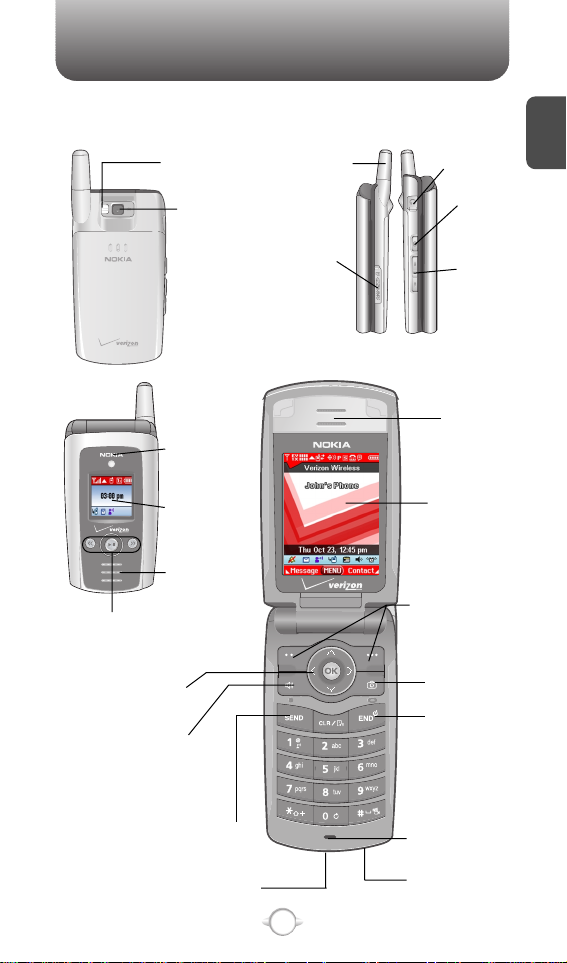
HANDSET DESCRIPTION
C
H
1
7
The Nokia 6315i weighs 4 ounces. The dimensions are 3.5" x 1.9" x .9".
Antenna
Earjack
Camera
Button
Volume
Key
LCD Screen
Function Keys
Send Key
END/
Power Key
Camera Key
Microphone
Chager Jack
Accessories
Connector
Earpiece
Navigation Key
Speaker Key
LED
MP3 Key
Sub LCD
Trans-Flash
Card Slot
Camera
Lens
Camera
Flash
Phone
Speaker
Page 9

C
H
1
8
Press to make or receive a call.
Press to clear a digit from the display or to return
to the previous page. Long press to turn on voice
recognition mode.
Press and hold to enter Vibrate On/Off.
A twice press shall display a plus “+”.
Press to turn the phone on/off, to terminate a call
or to return to the initial page.
In Idle Mode
-
Press Up for Shortcut Key 1, Down for
Shortcut Key 2, Right for Shortcut Key 4
and Left for Shortcut Key 3.
Inside the menu
-
Within a menu, press the Navigation Key
UP/DOWN/LEFT/RIGHT to scroll through
options or press OK to select the function.
(Left Soft Key) Press to access the message
menu or function displayed on bottom line.
(Right Soft Key) Press to access contacts menu
or function displayed on bottom line.
HANDSET DESCRIPTION
Display Indicators
See page 9 for a list of icons.
Soft Key Indicators
Shows the functions currently
assigned to each soft key and
displays some icons.
Text & Graphic area
Shortcut Key 2
Shortcut Key 4Shortcut Key 3
Shortcut Key 1
Short/Long press : Go to Take PIX/FLIX Viewfinder.
Press to turn Speakerphone On or Off.
Message Contacts
Menu
Page 10

C
H
1
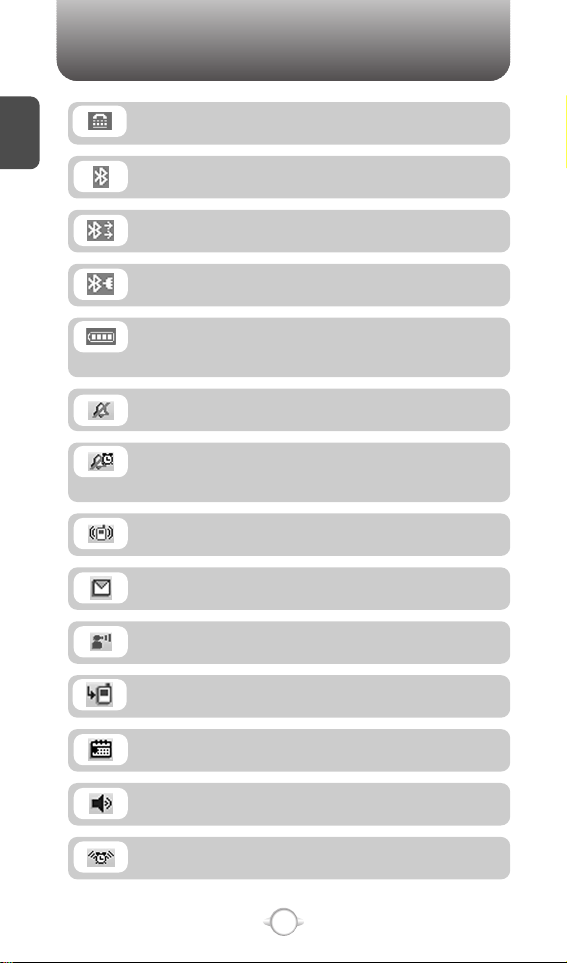
DISPLAY INDICATORS
9
HANDSET DESCRIPTION
Roaming
Phone is out of home area.
Dormant
Phone is in a dormant state during a data call.
Phone reverts to Dormant mode when there hasn’t
been activity on a page for some time – the
connection is still active and you can make and
receive calls.
No Service
Phone cannot receive a signal from the system.
Standalone
The mode that restricts transmitting and
receiving inside the airplane.
SSL (Secured Socket Layer)
Indicating that secure communication between
client and server has been established during
data communication using encryption.
Voice Privacy
Indicates “Voice Privacy” mode.
Signal Strength - Current signal strength: the more lines,
the stronger the signal.
EV : The “EV” service mode indicator shall display with/ without a
progress bar when a 1x-EVDO device has only acquired 1x-EVDO
service (e.g., roaming to a 1x- EVDO service area only).
EV & 1X : The “EV” and “1X” signal strength indicators shall display
with/without a progressive bar when a 1x-EVDO device has acquired
both 1x-RTT CDMA2000 and 1x-EVDO services.
EV & D : The “EV” and “D” signal strength indicators shall display
with/without a progressive bar when a 1x-EVDO device has acquired
both 1x-EVDO service and CDMA IS-95 service.
Data ActiveVoice
GPS Icon
Location Service of your phone is disabled/
enabled.
Page 11
C
H
1
10
HANDSET DESCRIPTION
Voicemail
Indicates you have voicemail messages.
New Messages
New message or voice message.
Calendar Appointment
Event Alarm is active.
Speakerphone
Phone is in speakerphone mode.
Bluetooth
Indicates Bluetooth mode.
BluetoothActive
Indicates Bluetooth Active mode.
BluetoothConn
Indicates Bluetooth Connect.
All Sound Off
Ringer volume is set to off.
Vibrate Only
Phone will vibrate when call is received.
Alarm
Appears when either a calendar or an alarm is set.
Alarm Only
Phone will alert you with an alarm tone when call
is received.
Battery
Battery charging level – the more blocks, the
stronger the charge.
Missed Calls
TTY
TTY mode is active
Page 12

C
H
1
11
BATTERY USAGE
BATTERY INSTALLATION
1
Place the battery on the back of the phone so
the metal contacts match up on the battery and
in the battery cavity.
2
Push the battery down into the battery cavity
until it locks into place.
3
Place the battery cover over the battery and
slide up into place.
Page 13

C
H
1
12
BATTERY USAGE
BATTERY REMOVAL
If the battery is not correctly placed in the compartment, the
handset will not turn on and/or the battery may detach during use.
1
Push down the release latch button, then slide
the battery cover off the phone.
2
Lift the battery up and out of the battery cavity
from the down of the battery.
Page 14
C
H
1
13
BATTERY USAGE
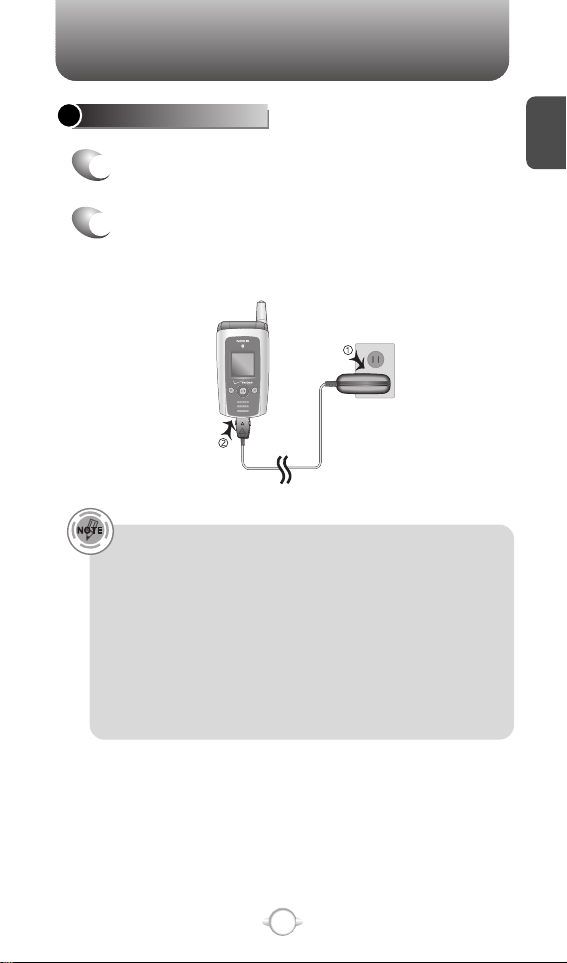
• When you charge the battery with the phone power off, you
will see a charging status screen. You cannot operate the
phone until it is powered on.
• The battery is not charged at the time of purchase.
• Fully charge the battery before use.
• It is more efficient to charge the battery with the handset
powered off.
• The battery must be connected to the phone in order to charge it.
• Battery operating time gradually decreases over time.
• If the battery fails to perform normally, you may need to replace
the battery.
Plug the AC Charger into a standard outlet.
Plug the other end of the AC Charger into the
bottom of your phone. The battery must be
installed onto the phone.
BATTERY CHARGING
1
2
Page 15

BATTERY HANDLING INFORMATION
C
H
1
14
l Only use the battery and charger approved by the
manufacturer.
l Only use the battery for its original purpose.
l Try to keep batteries in a temperature between
41ºF (5ºC ) and 95ºF (35ºC). If the battery is stored
in temperatures above or below the recommended
range, give it time to warm up or cool down before
using.
l Completely drain the battery before recharging.
It may take one to four days to completely drain.
l Store the discharged battery in a cool, dark, and dry
place.
l Purchase a new battery when its operating time
gradually decreases after fully charging.
l Properly dispose of the battery according to local
laws.
l Don’t attempt to disassemble the battery –
it is a sealed unit with no serviceable parts.
l Don’t accidentally short circuit the battery by
carrying it in your pocket or purse with other
metallic objects such as coins, clips and pens.
This may critically damage the battery.
l Don’t leave the battery in hot or cold temps.
Otherwise, it could significantly reduce the capacity
and lifetime of the battery.
l Don’t dispose of the battery into a fire.
DOs
DON’Ts
Page 16

BASIC OPERATION
This chapter addresses and explains the basic features of your phone
including:
Chapter 2
C
H
2
15
TURNING THE PHONE ON / OFF
ACCESSING THE MENU
MENU SUMMARY
BASIC FUNCTIONS
DURING A CALL
MAKING AN EMERGENCY CALL
USING THE TRANS-FLASH CARD
Page 17

C
H
2
TURNING THE PHONE ON
Press and hold until your “Power On” logo
appears and the tone sounds.
• If “Enter Lock Code” appears on the display enter your
4-digit password to unlock your phone.
• The default password is the last 4 digits of your
phone number.
16
TURNING THE PHONE OFF
Press and hold until your “Power Off” logo
appears.
• Immediately change or recharge the battery when
“BATTERY LOW” appears on the display. Memory may
possibly be damaged if the phone turns off due to the
battery completely draining.
• Turn the phone off before removing or replacing the battery.
If the phone is on, unsaved data may be lost.
TURNING THE PHONE ON / OFF
Page 18
ACCESSING THE MENU
C
H
2
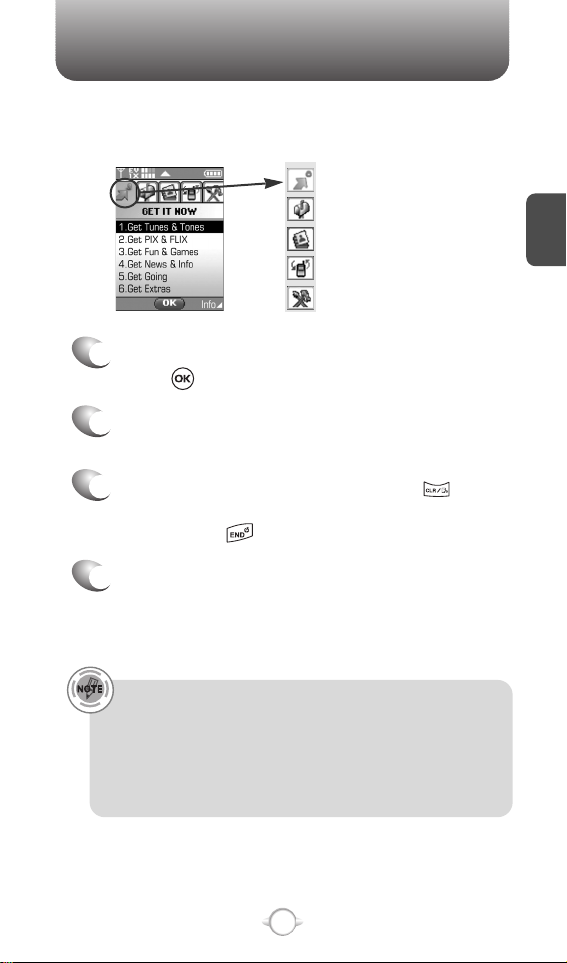
Your phone can be customized via the menu. Each function can be
accessed by scrolling with the Navigation Key or by pressing the
number that corresponds with the menu item.
1
To access the menu in the idle mode,
press [MENU].
2
To scroll through the menu use the Navigation
Key.
3
To return to the previous page, press .
To exit the current menu and return to the idle
mode, press .
4
Press the Navigation Key to enter a function
when its main page is displayed or press its
assigned number to have direct access to
the function.
17
Hotkey
In idle mode, move the Navigation Key as follows to access
these functions:
• Upward movement : Shortcut Key 1
• Downward movement : Shortcut Key 2
• Rightward movement : Shortcut Key 4
• Leftward movement : Shortcut Key 3
GET IT NOW
MESSAGING
CONTACTS
RECENT CALLS
SETTINGS & TOOLS
Page 19

MENU SUMMARY
C
H
2
18
GET IT NOW
MESSAGING
CONTACTS
RECENT CALLS
SETTINGS & TOOLS
1. Get Tunes &
Tones
2. Get PIX & FLIX
3. Get Fun &
Games
4. Get News & Info
5. Get Going
6. Get Extras
1. New Msg
2. Inbox
3. Sent
4. Drafts
5. Voicemail
6. E-mail
7. Mobile IM
8. Chat
1. New Contact
2. Contact List
3. Groups
4. Speed Dials
1. Missed
2. Received
3. Dialed
4. All
5. View Timers
1. My Account
2. Tools
3. Sounds Settings
1. Get V CAST Music
2. Get New Ringtones
3. My Ringtones
4. My Music
5. My Sounds
6. Sync Music
7. Manage Music
1. Get V CAST Video
2. Get New PIX
3. My PIX
4. My FLIX
5. PIX Place
6. Take PIX
7. Record FLIX
1. Get New App.
1. Get New App.
1. Get New App.
1. TXT Msg
2. PIX Msg
3. FLIX Msg
1. Get New App.
Mobile IM
1. Calculator
2. Calendar
3. Alarm Clock
4. World Clock
5. Notepad
6. Stop Watch
1. Master Volume
2. Call Sounds
3. Alert Sounds
1. Get New App.
1. Get New Ringtones
1. Get V CAST Music
1. Record New
1. Get New App.
1. Alarm 1
2. Alarm 2
3. Alarm 3
1. Call Ringtone
2. Call Vibrate
1. TXT Message
2. PIX-FLIX Msg
3.
Voicemail Msg
Page 20

MENU SUMMARY
C
H
2
19
4. Display Settings
5. Phone Settings
6. Call Settings
7. Bluetooth
8. Memory
9. Phone Info
4. Keypad Volume
5. Earpiece Volume
6. Service Alerts
7. Power On/Off
8. Alarm Sounds
1. Banner
2. Backlight
3. Contrast
4. Wallpaper
5. Display Themes
6. Dial Fonts
7. Clock Format
1. Standalone Mode
2. Set Shortcut Key
3. Language
4. Location
5. Security
6. System Select
7. NAM Select
1. Answer Options
2. Auto Retry
3. TTY Mode
4. One Touch Dial
5. Voice Privacy
6. Voice Services
7. DTMF Tones
1. Add New Device
1. Save Options
2. Phone Memory
3. Card Memory
1. My Number
2. SW Version
3. Icon Glossary
1. ERI
2. Minute Beep
3. Call Connect
1. Power On Sound
2. Power Off Sound
1. Alarm Tone
2. Alarm Vibrate
1. Personal
2. ERI Banner
1. Display
2. Keypad
1. Main Screen
2. Front Screen
1. Main Clock
2. Front Clock
1. Left Key
2. Up Key
3. Right Key
4. Down Key
5. Reset All
1. Lock Mode
2. Edit Code
1. Auto NAM
2. Change NAM
1. Voice Dial
2. Voice Setting
3. Train Words
Page 21
BASIC FUNCTIONS
C
H
2
20
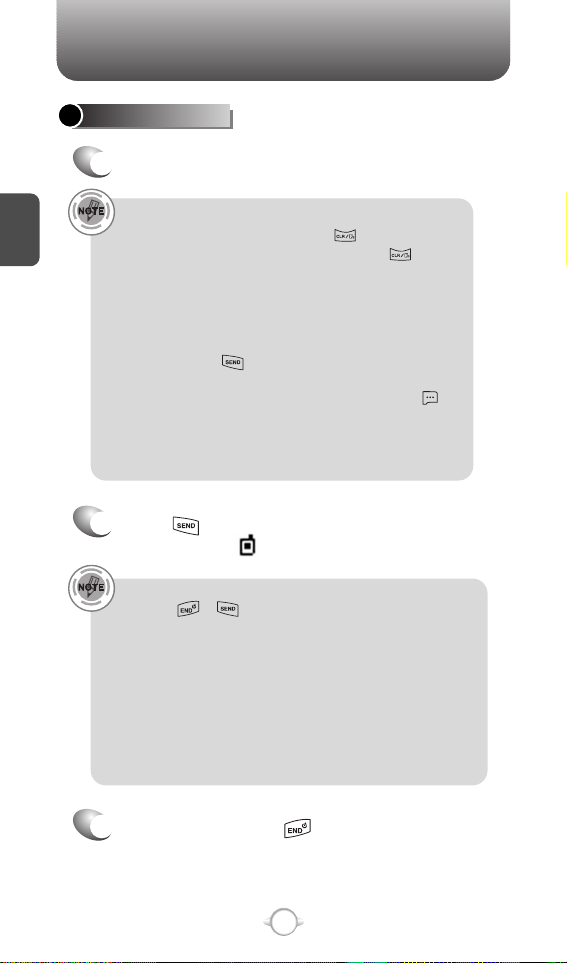
MAKING A CALL
1
Enter a phone number.
To modify the phone number you have entered :
• To erase one digit at a time press .
• To erase the entire number, press and hold .
Phone number display in contact list
If there is no name in the Contact’s name field, the highest
priority phone number is displayed. If no phone numbers
are stored, the email address appears.
All matching entries will be displayed. To call the selected
number, press .
To send the TXT, PIX or FLIX message with phone number :
• Enter a part of the phone number and then press
[OPTIONS], select “New TXT Msg, New PIX Msg or New
FLIX Msg”. Please refer to page 113, page 114 or page
116 for more details on “Send New TXT Message,
Send New PIX Message or Send New FLIX Message”.
2
Press .
The indicator, , appears on the display.
• If “CALL FAILED” appears on the display or the line is busy,
press or .
• If you activate the “AUTO RETRY” function, the phone will
automatically retry. (Refer to page 72).
• When you place or receive a call from stored phone
numbers, the name will be displayed.
• There is another way to make a call through the VR mode,
which is called “VAD (Voice Activated Dialing)”.
Please refer to page 74 (Voice Service) for more details.
• If “Enter Lock Code” appears on the display enter your
4-digit password to unlock your phone.
3
To end a call, press .
Page 22

C
H
2
21
BASIC FUNCTIONS
To ignore incoming calls, press [IGNORE].
ANSWERING CALLS
1
When your phone rings or vibrates, press
to answer the incoming call.
(Depending on your phone’s settings, you may
also answer incoming calls by opening the
phone or by pressing any key.)
2
To end a call, press .
The speaker phone feature lets you hear audio through the speaker and
talk without holding the phone.
1
To activate the speaker phone in idle, answering
or calling modes, press .
2
The phone returns to normal (Speaker Phone Off)
after ending a call or when the phone is turned off
and back on.
VIBRATE ON/OFF MODE
SPEAKER PHONE
To vibrate on/off mode, press and hold .
Identifies caller by displaying their phone number.
If the caller’s name and number are already stored in
your contact list, name will appear. The caller ID is
stored in the recent calls list.
CALLER ID FUNCTION
Page 23

BASIC FUNCTIONS
C
H
2
22
ANSWERING A CALL
1
To answer a call, press any key except , ,
, , or .
2
To end the call, press .
In Auto Answer Mode a call is automatically answered after a
preset number of ring tones. See page 72 for more details.
l To select an answering option, press [MENU] and then
select the “Settings & Tools” by pressing , select
either “Flip Open”, “Any Key”, “Send Only” or “Auto Answer”
lf “Send Only” is selected the phone can only be answered by
pressing . See page 72 for more information.
Pauses are used for automated systems (i.e., voice mail, calling cards).
Insert a pause after a phone number and then enter another group of
numbers. The second set of numbers is dialed automatically after the
pause. This feature is useful for dialing into systems that require a code.
WAIT/PAUSE FEATURE
1
To insert a wait/pause, enter a phone number
and then press [OPTIONS]. Select either
2-Sec Pause (“P”) or a Wait (“W”).
2
Press to dial or to save.
Please refer to page 32 for more details about
storing a phone number.
Page 24

BASIC FUNCTIONS
C
H
2
23
If one of the people you called hangs up during your call, you
and the remaining caller stay connected. If you initiated the call
and are the first to hang up, all three callers are disconnected.
With 3-Way Calling, you can talk to two people at the same time.
When using this feature, the normal airtime rates will be applied for
each of the two calls.
3-WAY CALLING
1
Enter the number you wish to call and then
press .
2
Once you have established the connection,
enter the second number you wish to call and
then press .
3
When you’re connected to the second party,
press again to begin your 3-Way call.
Notifies you of an incoming call when you are already on a call by
sounding a beep tone and displaying the caller’s phone number.
CALL WAITING FUNCTION
1
To answer another call while on the phone,
press . This places the first call on hold.
To switch back to the first caller, press
again.
Call Waiting is a system dependent feature. Please contact your
service provider for details.
Page 25

BASIC FUNCTIONS
C
H
2
24
Adjusts the volume of the ringer, key beep and speaker.
ADJUSTING VOLUME
1
Press [MENU] and then select “Settings &
Tools” menu, press and then select one of
the following.
2
Adjust volume and then press to save it.
Master Volume : Controls the ringer volume.
Keypad Volume : Controls the keypad volume.
Earpiece Volume : Controls the earpiece volume.
l
l
l
• To adjust earpiece volume during a call, press the Navigation
Key up or down.
• To adjust master volume, press short side up/ down key.
• In Idle Mode:
Side Volume Up key Long Press: Volume key shall bring device
out of silence.
Side Volume Down key Long Press: Volume key shall bring
device into silence mode.
Nokia shall not be responsible for any action or liability as a result
of any breach of copyright or other misuse of music contents.
Music Player is for playing WMA files saved on the
Trans Flash Card. To display music list with the phone
closed, press and hold and select a music file
with the Navigation Key, press [PLAY], then
press [PAUSE] or in order to stop the music
player while it is playing with shell closed, it is
required to open the shell and press .
MUSIC PLAYER
Page 26
DURING A CALL
C
H
2
25
Enables you to send a TXT message (SMS) during a call.
SEND TXT MSG
1
Press [OPTIONS] .
To select a phone number in your Recent Calls List:
RECENT CALLS
To display the recent call menu for received, dialed,
and missed calls.
CONTACTS
1
Press [OPTIONS] .
1
Press [OPTIONS] .
The caller cannot hear you or any sounds from your side but you can
still hear him.
MUTE (UNMUTE)
1
Press [MUTE].
To deactivate, press [UNMUTE].
The phone will automatically un-mute in Emergency
Call or Callback mode.
l
l
Page 27

DURING A CALL
C
H
2
26
This menu appears only when connect Bluetooth Audio Device.
TO PHONE/TO BLUETOOTH
1
Press [OPTIONS] .
Increases security during a call. To select “On” or “Off”.
VOICE PRIVACY
1
Press [OPTIONS] .
To Phone : To deactive bluetooth audio device.
To Bluetooth : To active bluetooth audio device.
l
l
Page 28

MAKING AN EMERGENCY CALL
C
H
2
27
The 911 feature automatically places the phone in the Emergency
Call Mode when you dial the preprogrammed emergency number,
911. It also operates in the Lock Mode and out of the service area.
The 911 call service is available even in the Lock Mode.
911 IN LOCK MODE
1
Enter “911” and then press .
When the call ends, the phone returns to the Lock Mode.
2
The call connects.
3
The phone maintain the Emergency Mode
for 5 minutes.
911 USING ANY AVAILABLE SYSTEM
1
Enter “911” and then press .
While the phone is in the Emergency Mode for 5 minutes,
the phone can receive an incoming call from any available
system. However, it can’t make a call.
2
The call connects.
3
The phone will stay in Emergency Mode for
5 minutes.
l
l
The 911 call is not recorded in the recent call list.
Page 29

USING THE TRANS-FLASH CARD
C
H
2
28
INSTALLING THE TRANS-FLASH CARD
1
Open the card hole cover,
and insert the Trans-Flash
card like the arrow indicates.
REMOVING THE TRANS-FLASH CARD
1
To remove the Trans-Flash
card, press and release the
card so that it is disengaged
from the slot. Then slide it out.
When you insert the Trans-Flash card, make sure contact
terminals face down.
File names storing each media in the Trans-Flash card are
“my-pix” for pictures, “my-flix” for videos.
Do not remove the Trans-Flash card while reading or writing
files. Otherwise it could be damaged.
Trans-Flash card is recognized as a mobile disk when
connected to a personal computer.
When disconnecting from PC, please remove the USB
storage equipment on your PC. Otherwise, the stored files
on the Trans-Flash card could be damaged.
l
l
l
l
l
To prevent possible damages, please keep Trans-Flash card slot
closed at all times whether Trans-Flash card is inserted or not.
To make sure the proper function of removable memory, please
use the Trans-Flash card of San Disk.
Page 30
USING THE TRANS-FLASH CARD
C
H
2
29
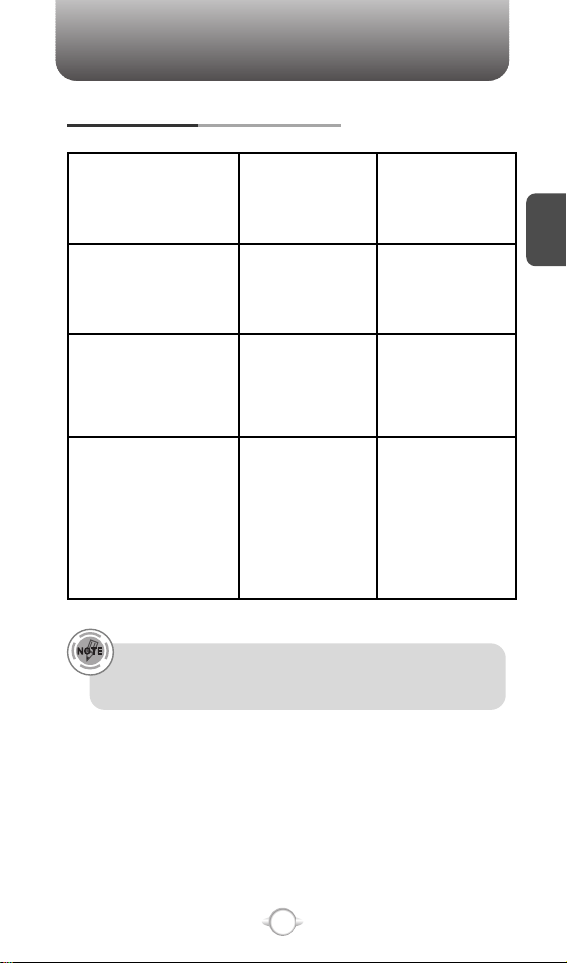
HOW IS MUSIC TRANSFERRED?
Transfer from
PC to Handset
via USB Cable
MP3 Songs
Yes.
Song will be
converted to
WMA format
Song will not
play on the phone
Song will not
play on the phone
Yes
Yes
Yes
WMA Songs
(Music ripped
from CDs, e.g.
unprotected content)
WMA Songs
(Purchased from
a Windows Media
Player 10 music
store such as V
CAST Music, e.g.
protected content)
Transfer from
PC to Handset
via Memory Card
Music acquired from another online store as part of a subscription
service or purchased in another format other than WMA/MP3 (e.g.
AAC, AAC+) will not be recognized by V CAST Music devices.
Page 31

MEMO
C
H
2
30
Page 32

MEMORY FUNCTION
This chapter addresses memory functions including:
Chapter 3
C
H
3
31
STORING A PHONE NUMBER
ENTERING LETTERS, NUMBERS & SYMBOLS
MAKING A CALL THROUGH THE PHONE BOOK
Page 33

Enter a name.
Please refer to page 33 for more details on
entering letters, numbers & symbols.
To change the input mode, press [Abc].
Press the Navigation Key down to select other
options (Mobile1.2, E-mail1.2, etc...).
If entering a phone number, press [OPTIONS]
to select one of the following options:
STORING A PHONE NUMBER
C
H
.
3
The phone book stores up to 500 entries.
1
Enter phone # and press [SAVE]. Choose
“Create New” or “Update Existing” and press
to Select.
2
If “Create New” is selected, the phone number
will appear above a list. Press the Navigation
Key up or down to choose the type of number
you’re adding, as indicated by the icon.
Press to select. If “Update Existing” is
selected, your contact list is displayed. Choose
the entry to add the phone number to, and then
press . You will see the phone number
updated in the existing list.
Press to select.
3
4
To store the entry, press [SAVE].
“CONTACT SAVED” or “CONTACT UPDATED”
will be displayed.
32
l Set Speed Dial
l Set Voice Dial
l Set As Default
l Add Pause
Page 34

Input mode indicator
Word : Input mode
Abc : Abc mode
ABC : ABC mode
123 : Number mode
Symbols : Symbol mode
ENTERING LETTERS, NUMBERS & SYMBOLS
C
H
3
The input mode (Alpha editor) will automatically be
activated when necessary to enter letters and numbers.
As shown below, there are 4 available modes ; Standard
input mode (Abc), Input mode (Word), Numeric mode
(123), and Symbol mode (Symbols). The input mode
indicator appears on the upper right of the display when
letters and numbers are entered. To select the desired
input mode among the 5 modes below, press [Abc],
and then enter letters and numbers.
The following illustrates the function assigned to each key in the Alpha Editor.
33
Abc
Next
Space
Caps Lock
Clear
Send
Press to change mode.
[Word][Abc][ABC][123][Symbols]
Press to view the next matching word if
the highlighted word is not the word you
intended.
Press to accept a word and add a space.
Press to select a letter case of the
standard text input or text input mode.
[Abc], [ABC] and [abc] indicate the
standard text input.
[Word], [WORD] and [word] indicate the
predictive text input.
Press to delete a character to the left of
the cursor.
Send the letters and numbers you enter.
KEY FUNCTION
Page 35

ENTERING LETTERS, NUMBERS & SYMBOLS
Select Abc mode by pressing [Abc].
When you select this mode, the Abc icon appears as a visual
confirmation.
- Find the key that corresponds to the letter you want to enter.
- Press it as many times as needed for the letter to appear on the
screen.
- To enter the name “John”:
Press [ ] J
Press [ ] o
Press [ ] h
Press [ ] n
C
H
3
Use the digit keys to enter letters, numbers and characters.
STANDARD INPUT MODE
1
Enter letters using the key pad as follows:
2
To enter a space, press . The cursor will
automatically move to the next column.
3
Repeat until letters are entered.
There is a 160-letter limit.
4
To delete one digit, press . To delete the
entire entry, press and hold .
To change the input mode, press [Abc].
When entering special character such as
.@?!-, &:’ 1, press repeatedly.
34
Key Pad
2ABC
3DEF
4GHI
:
9WXYZ
A
D
G
:
W
B
E
H
:
X
C
F
I
:
Y
2
3
4
:
Z
A
D
G
:
9
1
Time
Repetitions
2 times
Repetitions
3 times
Repetitions
4 times
Repetitions
5 times
5
To change from lowercase to uppercase,
press .
Page 36

ENTERING LETTERS, NUMBERS & SYMBOLS
C
H
3
The input mode incorporates a built-in-dictionary to determine a word
based on the entered characters. A word can be entered more
quickly by pressing a key once per character.
WORD INPUT MODE
1
Select the Word mode by pressing [Abc].
2
Press a digit key once to enter the character
you want and then enter all the characters to
input the word you want.
3
To view the next matching word, press .
To enter a compound word:
• Enter the first part of the word and then press to accept it.
• Enter the last part of the word and then press to enter the
word.
35
4
To accept the matching word, enter a space
and then press .
To enter “Fun fare” in the input mode.
- After you enter the 1stletter, press [Abc] to select input mode
and to choose the lower case (Word).
- Press and you will see “Fun” highlighted.
Press to select it.
- Press and until you see “ease” highlighted.
Press to select the next matching word, you will see “fare”
and then enter a space.
Page 37

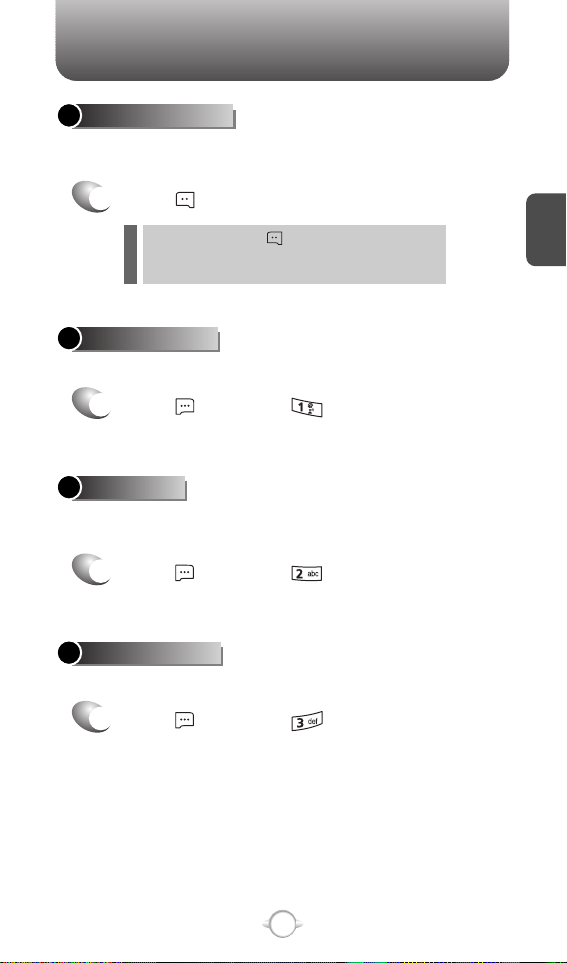
ENTERING LETTERS, NUMBERS & SYMBOLS
NUMERIC MODE
1
Press [Abc] and scroll down to “Symbols”
and press to change to Symbol Mode.
C
H
3
36
1
Press [Abc] and scroll down to “123” and
press to change to Numeric Mode.
2
To enter a number, press a digit key.
Press [ ],
or
Press [ ].
2
Select symbol you want to enter with the
Navigation Key.
l Use the Navigation Key to view a different line of symbols.
SYMBOL MODE
Allows you to enter numbers.
Allows you to enter symbols.
Page 38

MAKING A CALL THROUGH THE CONTACT LIST
C
H
3
37
Ideal for frequently dialed numbers, this feature allows contact entries
to be dialed via the keypad with only one or two key presses.
ONE-TOUCH/TWO-TOUCH DIALING
1-9 : Press and hold the number you wish to connect
for more than 1 second.
ONE-TOUCH DIALING:
10-22 : Press the first digit and second digits of the
memory number short and long
respectively.
TWO-TOUCH DIALING:
Page 39

MEMO
C
H
3
38
Page 40

MENU FUNCTION
This chapter addresses accessing the menu and using its functions
and features to customize your phone.
Chapter 4
C
H
4
39
CONTACTS
RECENT CALLS
SETTINGS
TOOLS
MY ACCOUNT
Page 41

C
H
4
40
Stores up to 500 entries, each of which can be assigned to a group.
Entries can be retrieved by name or group.
CONTACTS
1
2
Press [MENU] and then press
“New Contact”.
Adds a new entry.
NEW CONTACT
To enter a name or number, use the Navigation
Key to select the contact field.
Please refer to page 33 for more details on entering
letters, numbers & symbols.
3
3.1 To save the entry, press [SAVE].
3.2 To return to the previous page, press .
PHONE BOOK FIELDS :
Name/Mobile 1/Home/Work/Email 1/Group/Picture/
Ringtone/Mobile 2/Fax/Email 2.
Under “Mobile 1”, “Mobile 2”, “Home”, “Work” or “Fax” input
the phone number and then by pressing [OPTIONS], you
can choose from the following:
1. Set Speed Dial
2. Set Voice Dial
3. Set As Default
4. Add Pause
l
l
• For each new contact, at least 1 phone number or email
address needs to be saved with the contact. “NO DATA
ENTERED” will be displayed if neither have been added.
• Even though entry name is left empty while the phone number
is provided, the entry will be saved and displayed with phone
number.
Page 42

C
H
4
41
Retrieves an entry by name and calls by simply pressing .
You can review all the entries stored in your contact list or quickly
find an entry by entering a name or its character string.
CONTACT LIST
CONTACTS
1
2
3
4
5
Press [MENU] and then press
“Contact List” or press [CONTACTS].
Enter a name or its character string or scroll
through the list with the Navigation Key.
Please refer to page 33 for more details on
entering letters, numbers & symbols.
The list of names in your contacts is displayed
alphabetically.
To edit the entry, press [EDIT].
To show detail of the entry, press [VIEW].
To call the selected number, press [OPTIONS]
and then select “Call” or press .
To use and manage contacts, press [OPTIONS] then select:
1. New Contact: To add a New Contact.
2. Erase: To delete a contact.
3. Send TXT Msg: To create a TXT message.
4. Send PIX Msg: To create a PIX message.
5. Send FLIX Msg: To create a FLIX message.
6. Call: To call the contact.
7. Erase All: To delete all contact list.
Page 43

C
H
4
42
CONTACTS
GROUPS
Groups allows you to classify phone entries into groups with up to 10
numbers in each group. The existing groups include Family and Work
and they cannot be erased or renamed. You can add up to 28 more
groups which can be changed or erased.
1
3
Press [MENU] and then press “Groups”.
ADD NEW GROUP
Input a new group name.
4
To save it, press [SAVE].
2
To select “New”, press [NEW].
1
3
To assign phone numbers to a Group,
select “Add”, press [OPTIONS].
ASSIGN PHONE NUMBER TO GROUP
Select the contact for the group and then
press [DONE]. “CONTACT ADDED TO
GROUP” will be displayed.
Repeat for each location for the Group.
2
Select a location and then press [MARK].
Your contact entries will be displayed in
alphabetical order.
Page 44

C
H
4
CONTACTS
43
CHANGE GROUP NAME
2
Select an existing group name that you have
added with the Navigation Key.
4
Input a new group name.
5
To save it, press [SAVE].
3
To select “Rename”, press [OPTIONS].
1
Press [MENU], press “Groups”.
1
Press [MENU], press “Groups”.
SEND TXT MSG. TO A GROUP
2
Select an existing group name with the
Navigation Key.
4
Input a “Message”, press [OPTIONS] to select
“Save As Draft”, “Add Graphic”, “Add Sound”,
“Add Quick Text”, “Priority Level” and “Cancel
Msg”.
5
3
To select “Send TXT Msg.”, press [OPTIONS].
5.1. To send the text message, press [SEND].
5.2. To save the text message, press [OPTIONS]
and then select “Save As Draft” and then
press .
Page 45

C
H
4
44
CONTACTS
SEND PIX MSG. GROUP
1
Press [MENU], press “Groups”.
2
Select an existing group name with the
Navigation Key.
4
Input a “Text”, “PIX”, “Sound”, “Subject”, and
then press [OPTIONS] to select “Preview”,
“Add Quick Text”, “Save As Draft”, “Priority
Level”, “Remove PIX”, “Remove Sound”,
“Add Slide” or “Cancel Msg”.
5
3
To select “Send PIX Msg”, press [OPTIONS].
5.1. To send the PIX message, press [SEND].
5.2. To save the PIX message, press [OPTIONS]
and then select “Save As Draft” and then
press .
Page 46

C
H
4
CONTACTS
45
SEND FLIX MSG. GROUP
1
Press [MENU], press “Groups”.
2
Select an existing group name with the
Navigation Key.
4
Input a “Text”, “FLIX”, “Subject”, and then
press [OPTIONS] to select “Preview”, “Add
Quick Text”, “Save As Draft”, “Priority Level”,
“Remove FLIX” or “Cancel Msg”.
5
3
To select “Send FLIX Msg”, press [OPTIONS].
5.1. To send the FLIX message, press [SEND].
5.2. To save the FLIX message, press [OPTIONS]
and then select “Save As Draft” and then
press .
Page 47

C
H
4
46
CONTACTS
When using Erase Group, the saved entries are moved to the
“No Group”.
ERASE GROUP
2
Select an existing group name with the
Navigation Key.
3
To select “Erase”, press [OPTIONS].
4
Select “Yes” to erase it, press .
1
Press [MENU], press “Groups”.
Page 48

C
H
4
CONTACTS
47
In idle mode, calls can be placed to numbers stored in speed dial by
pressing & holding the location number on the key pad. For a 2-digit
location number, press the first number and then press and hold the
second number.
SPEED DIALS
1
2
To assign a phone number to a location, select
the location and then press [SET].
3
Select the contact with the Navigation Key then
press .
4
Select the phone number with the Navigation
Key then press .
5
“SPEED DIAL SET” will be displayed.
• “Unassigned” appears if the location is available.
• To call an assigned number, press & hold the last digit of the
speed dial #.
Press [MENU], press “Speed Dials”.
Page 49

C
H
4
48
RECENT CALLS
Displays information about the 90 most recently missed calls.
Place a call to a missed call number by simply pressing .
To see a list of the 90 most recently missed
calls, press [MENU] and then select
“Recent Calls” menu, press “Missed”.
If the number is already stored in your contacts,
only the name appears. If the number is not
stored, only the phone number appears.
MISSED
1
2
To view missed call details, press [OPEN].
Call details include date, time and phone number.
• After 90 missed calls, the oldest call will automatically
be erased from the history.
• Press [MESSAGE], to send the TXT, PIX or FLIX message.
3
Save : To store the phone number in your phone book.
Details : If the selected entry has already been stored the
contacts list, to view the caller’s information.
Erase : To erase a missed calls listing.
Lock/Unlock : To lock or unlock a missed calls listing.
Erase All : To erase all missed calls listings.
View Timers : To display usage time.
l
l
l
l
l
l
Press [OPTIONS] and then select “Save”
to save it or select “Erase” to delete it.
Page 50

C
H
4
49
RECENT CALLS
Call details include date, time and phone number.
• After 90 received calls, the oldest call will automatically
be erased from the history.
• Press [MESSAGE], to send the TXT, PIX or FLIX message.
Displays information about the 90 most recently received calls.
Place a call to a received call by simply pressing .
RECEIVED
1
To see a list of the 90 most recently received
calls, press [MENU] and then select “Recent
Calls” menu, press “Received”. If the
number is already stored in your contacts, only
the name appears. If the number is not stored,
only the phone number appears.
2
To view received call details, press [OPEN].
3
Save : To store the phone number in your phone book.
Details : If the selected entry has already been stored the
contacts list, to view the caller’s information.
Erase : To erase a received calls listing.
Lock/Unlock : To lock or unlock received calls listing.
Erase All : To erase all received calls listings.
View Timers : To display usage time.
l
l
l
l
l
l
Press [OPTIONS] and then select “Save”
to save it or select “Erase” to delete it.
Page 51

C
H
4
50
RECENT CALLS
Call details include type of call, date, time and phone number.
• After 90 dialed calls, the oldest call will automatically
be erased from the history.
• Press [MESSAGE], to send the TXT, PIX or FLIX message.
Displays information about the 90 most recently dialed numbers.
Place a call to a dialed call by simply pressing .
DIALED
1
To see a list of the 90 most recently dialed
numbers, press [MENU] and then select
“Recent Calls” menu, press “Dialed”.
If the number is already stored in your contacts,
only the name appears. If the number is not
stored, only the phone number appears.
2
To view dialed call details, press [OPEN].
3
Save : To store the phone number in your phone book.
Details : If the selected entry has already been stored the
contacts list, to view the caller’s information.
Erase : To erase a dialed calls listing.
Lock/Unlock : To lock or unlock dialed calls listing.
Erase All : To erase all dialed calls listings.
View Timers : To display usage time.
l
l
l
l
l
l
Press [OPTIONS] and then select “Save”
to save it or select “Erase” to delete it.
Page 52

C
H
4
51
RECENT CALLS
Call details include type of call, date, time and phone number.
• After the 270 received, dialed or missed calls, the oldest
call will automatically be erased from the history.
• Press [MESSAGE], to send the TXT, PIX or FLIX message.
Displays information about the most recent received, dialed and
missed calls.
ALL
1
To see a list of the 270 most recent received,
dialed and missed calls, press [MENU] and
then select “Recent Calls” menu, press “All”.
If the number is already stored in your contacts,
only the name appears. If the number is not
stored, only the phone number appears.
2
3
To view details, press [OPEN].
Save : To store the phone number in your phone book.
Details : If the selected entry has already been stored the
contacts list, to view the caller’s information.
Erase : To erase a recent calls listing.
Lock/Unlock : To lock or unlock recent calls listing.
Erase All : To erase all recent calls listings.
View Timers : To display usage time.
l
l
l
l
l
l
Press [OPTIONS] and then select “Save”
to save it or select “Erase” to delete it.
Page 53

If “Last Call”, “All Calls”, “Received Calls”, “Dialed
Calls”, “Roaming Calls”, “Transmit Kb”, “Received
Kb”, “Total Kb” is selected with Navigation Key.
To reset the timer, press [RESET],
then select “Yes”, press .
To reset all timer, press [RESET ALL],
then select “Yes”, press .
52
C
H
4
RECENT CALLS
Checks the usage time and manages your calls within the limit you
set. The 11 timers include (Last Call, All Calls, Received Calls,
Dialed Calls, Roaming Calls, Transmit Kb, Received Kb, Total Kb,
Last Reset, Lifetime Calls, Lifetime Data Counter):
VIEW TIMERS
Press [MENU], select “Recent Calls” menu,
press “View Timers”.
To return to the previous page, press .
1
2
3
If “Last Reset”, “Lifetime Calls”, “Lifetime Data
Counter” is selected with Navigation Key.
To reset all timer, press [RESET ALL],
then select “Yes”, press .
Page 54

C
H
4
53
SETTINGS
Controls the Ringer volume and alerts you to incoming calls in the
modes listed in the gray box below.
Customizes your phone and optimizes performance through a variety
of settings.
SOUNDS SETTINGS
MASTER VOLUME
2
Select one of the following options by pressing
the Navigation Key to the right.
3
Select one of the available ring types.
To confirm, press .
1
Press [MENU] and then select “Settings &
Tools” menu, press “Sounds Settings” and
then select “Master Volume”.
Low, Medium Low, Medium, Medium High, High.
Vibrate Only
Alarm Only
All Sounds Off
Press [PLAY/STOP] to play/stop sound.
Page 55

C
H
4
54
SETTINGS
54
To select a ringer type for incoming calls:
CALL SOUNDS
2
Select your desired ringer type.
3
Select one of the available ring types.
To confirm, press .
1
Press [MENU] and then select “Settings &
Tools” menu, press “Sounds Settings” and
then select “Call Sounds”, press “Call
Ringtone”.
Up or Down key : 1. Get New App. or select your desired
ringer type.
Press [PLAY/PAUSE] to play/pause sound.
CALL RINGTONE
2
Select “On” or “Off” with the Navigation Key and
then press to save it.
1
Press [MENU] and then select “Settings &
Tools” menu, press “Sounds Settings” and
then select “Call Sounds”, press “Call
Vibrate”.
CALL VIBRATE
Page 56

C
H
4
55
SETTINGS
When selected, this setting alerts you to the following handset changes:
ALERT SOUNDS
1
Press [MENU] and then select “Settings &
Tools” menu, press “Sounds Settings” and
then select “Alert Sounds”, press “TXT
Message”.
TXT MESSAGE
2
Select “Tone”, “Vibrate” or “Reminder” with the
Navigation Key and then select one of the
following options by pressing the Navigation Key.
Tone : 1. Get New App. or select your desired ringer type.
Vibrate : Select “On” or “Off”.
Reminder : Select “Once”, “Every 2 Minutes”,
“Every 15 Minutes” or “Off”.
3
To save, press .
1
Press [MENU] and then select “Settings &
Tools” menu, press “Sounds Settings” and
then select “Alert Sounds”, press
“PIX-FLIX Msg”.
PIX-FLIX MSG
2
Select “Tone”, “Vibrate” or “Reminder” with the
Navigation Key and then select one of the
following options by pressing the Navigation Key.
Tone : 1. Get New App. or select your desired ringer type.
Vibrate : Select “On” or “Off”.
Reminder : Select “Once”, “Every 2 Minutes”,
“Every 15 Minutes” or “Off”.
3
To save, press .
Page 57

C
H
4
56
SETTINGS
56
1
Press [MENU] and then select “Settings &
Tools” menu, press “Sounds Settings” and
then select “Alert Sounds”, press
“Voicemail Msg”.
VOICEMAIL MSG
2
Select “Tone”, “Vibrate” or “Reminder” with the
Navigation Key and then select one of the
following options by pressing the Navigation Key.
Tone : 1. Get New App. or select your desired ringer type.
Vibrate : Select “On” or “Off”.
Reminder : Select “Once”, “Every 2 Minutes”,
“Every 15 Minutes” or “Off”.
3
To save, press .
Page 58

C
H
4
57
SETTINGS
To adjust key pad tone:
KEYPAD VOLUME
2
Select one of the following options by pressing
the Navigation Key to the right.
3
Select one of the available ring types.
To confirm, press .
1
Press [MENU] and then select “Settings &
Tools” menu, press “Sounds Settings” and
then select “Keypad Volume”.
Low, Medium Low, Medium, Medium High, High
Off
To adjust earpiece volume:
EARPIECE VOLUME
2
Select one of the following options by pressing
the Navigation Key to the right.
3
Select one of the available ring types.
To confirm, press .
1
Press [MENU] and then select “Settings &
Tools” menu, press “Sounds Settings” and
then select “Earpiece Volume”.
Low, Medium Low, Medium, Medium High, High
Page 59

SETTINGS
C
H
4
58
The Enhanced Roaming Indicator (ERI) feature displays a text banner
on the display screen informing the handset user of which systems the
wireless device is using as compared to the service plan they
purchased. The ERI Banner text changes to tell a customer if they are
using the: “Verizon Network”, “Extended Network” or “Roaming”.
SERVICE ALERTS
1
Press [MENU] and then select “Settings &
Tools” menu, press “Sounds Settings” and
then select “Service Alerts”, press “ERI”.
ERI (Enhanced Roaming Indicator)
2
Select “On” or “Off” with the Navigation Key and
then press to save it.
Sounds an alert every minute during a call.
1
Press [MENU] and then select “Settings &
Tools” menu, press “Sounds Settings” and
then select “Service Alerts”, press
“Minute Beep”.
MINUTE BEEP
2
Select “On” or “Off” with the Navigation Key and
then press to save it.
Display Settings -> Banner -> ERI Banner must be set for “ON”
for smooth operation of all the functions.
Page 60

SETTINGS
C
H
4
59
Notifies you that a call has been successfully placed.
1
Press [MENU] and then select “Settings &
Tools” menu, press “Sounds Settings” and
then select “Service Alerts”, press
“Call Connect”.
CALL CONNECT
2
Select “On” or “Off” with the Navigation Key and
then press to save it.
Allows you to activate/deactivate the power on tones.
POWER ON/OFF
1
Press [MENU] and then select “Settings &
Tools” menu, press “Sounds Settings” and
then select “Power On/Off”, press
“Power On Sound”.
POWER ON SOUND
2
Select “On” or “Off” with the Navigation Key and
then press to save it.
Allows you to activate/deactivate the power off tones.
1
Press [MENU] and then select “Settings &
Tools” menu, press “Sounds Settings” and
then select “Power On/Off”, press
“Power Off Sound”.
POWER OFF SOUND
2
Select “On” or “Off” with the Navigation Key and
then press to save it.
Page 61

SETTINGS
C
H
4
60
To select a ringer type for alarm sound:
ALARM SOUNDS
2
Select your desired ringer type.
3
Select one of the available ring types.
To confirm, press .
1
Press [MENU] and then select “Settings &
Tools” menu, press “Sounds Settings” and
then select “Alarm Sounds”, press
“Alarm Tone”.
ALARM TONE
2
Select “On” or “Off” with the Navigation Key and
then press to save it.
1
Press [MENU] and then select “Settings &
Tools” menu, press “Sounds Settings” and
then select “Alarm Sounds”, press
“Alarm Vibrate”.
ALARM VIBRATE
Up or Down key : 1. Get New App. or select your desired
ringer type.
Press [PLAY/PAUSE] to play/pause sound.
Page 62

SETTINGS
C
H
4
61
Allows you to customize the display.
DISPLAY SETTINGS
You can choose to display a personal Banner greeting or the
Enhanced Roaming Indicator (ERI) banner on the phone’s screens:
The text greeting can be up to 16 characters and is displayed on
your phone’s screen in standby mode.
BANNER
2
Enter a new personal greeting.
To change the input mode, press [Abc].
3
Press to save it.
1
Press [MENU] and then select “Settings &
Tools” menu, press “Display Settings” and
then select “Banner”, press “Personal”.
PERSONAL
2
Select “On” or “Off” with the Navigation Key and
then press to save it.
1
Press [MENU] and then select “Settings &
Tools” menu, press “Display Settings” and
then select “Banner”, press “ERI Banner”.
ERI BANNER
Page 63

SETTINGS
C
H
4
62
Backlights the display and key pad and activates dimming for easy
viewing in dark places.
BACKLIGHT
2
Select one of the following options with the
Navigation Key.
3
Press to save it.
1
Press [MENU] and then select “Settings &
Tools” menu, press “Display Settings” and
then select “Backlight”, press “Display”.
DISPLAY
7 Seconds, 15 Seconds, 30 Seconds, Always On, Always Off.
2
Select one of the following options with the
Navigation Key.
3
Press to save it.
1
Press [MENU] and then select “Settings &
Tools” menu, press “Display Settings” and
then select “Backlight”, press “Keypad”.
KEYPAD
7 Seconds, 15 Seconds, 30 Seconds, Always On, Always Off.
Page 64

SETTINGS
C
H
4
63
To adjust the display contrast:
CONTRAST
3
Press to save it.
1
Press [MENU] and then select “Settings &
Tools” menu, press “Display Settings” and
then select “Contrast”.
2
Select one of the following options with the
Navigation Key.
Level 1 ~ Level 5
WALLPAPER
MAIN SCREEN
1
Press [MENU] and then select “Settings &
Tools” menu, press “Display Settings” and
then select “Wallpaper”, press
“Main Screen”.
3
Select Default to choose a pre-installed display,
Downloads, PIX # or FLIX # to choose a display
you have downloaded to your phone.
To launch “Get It Now”, press [GET NEW].
To expand selected image, press [VIEW].
4
Select a display from the Animation and the
Graphic list using the Navigation Key and then
press to save it.
2
Select “My PIX” or “My FLIX” with the
Navigation Key.
Page 65

SETTINGS
C
H
4
64
FRONT SCREEN
1
Press [MENU] and then select “Settings &
Tools” menu, press “Display Settings” and
then select “Wallpaper”, press
“Front Screen”.
2
Select Default to choose a pre-installed display,
Downloads, PIX # to choose a display you have
downloaded to your phone.
To launch “Get It Now”, press [GET NEW].
To expand selected image, press [VIEW].
3
Select a display from the Graphic list using the
Navigation Key and then press to save it.
Page 66

SETTINGS
C
H
4
65
DISPLAY THEMES
3
Press to save it.
3
Press to save it.
1
Press [MENU] and then select “Settings &
Tools” menu, press “Display Settings” and
then select “Display Themes”.
2
Select one of the following options with the
Navigation Key.
Default
Business
Tropical
Blue
DIAL FONTS
1
Press [MENU] and then select “Settings &
Tools” menu, press “Display Settings” and
then select “Dial Fonts”.
2
Select “Normal” or “Large” with the
Navigation Key.
Page 67

SETTINGS
C
H
4
66
1
Press [MENU] and then select “Settings &
Tools” menu, press “Display Settings” and
then select “Clock Format” and then
select “Main Clock”.
3
To save, press .
CLOCK FORMAT
MAIN CLOCK
2
Select one of the following with the Navigation Key.
Digital
Analog
Off
l
l
l
To change the main clock’s appearance on the standby screen:
1
Press [MENU] and then select “Settings &
Tools” menu, press “Display Settings” and
then select “Clock Format” and then
select “Front Clock”.
3
To save, press .
FRONT CLOCK
2
Select one of the following with the Navigation Key.
Digital
Analog
Minimize
Off
l
l
l
l
To change the main clock’s appearance on the standby screen:
Page 68

SETTINGS
C
H
4
67
PHONE SETTINGS
The device shall provide the ability for the user to turn off all radios in
order to utilize the native or downloaded capability within the device
when in areas where radio transmission is restricted.
STANDALONE MODE
1
Press [MENU] and then select “Settings &
Tools” menu, press “Phone Settings” and
then select “Standalone Mode”.
2
Select “On” or “Off” with the Navigation Key and
then press to save it.
Your phone offers you the option of assigning a shortcut key
(Up, Down, Left, Right Navigation Key) to a favorite or often-used
function. To assign a shortcut to the key:
SET SHORTCUT KEY
1
Press [MENU] and then select “Settings &
Tools” menu, press “Phone Settings” and
then select “Set Shortcut Key”.
4
To reset all already set shortcut key, press
“Reset All”, then select “Yes”, press .
3
Select one of the following options with the
Navigation Key, press to save it.
2
Select “Left Key”, “Up Key”,
“Right Key” or “Down Key”.
Get It Now/Get Tunes &Tones/Get PIX & FLIX/Get Fun & Games/
Get News & Info/My PIX/My FLIX/My Ringtones/My Music/My
Sounds/Inbox/Email/Chat/IM/Settings & Tools/Alarm Clock/
Calculator/Calender.
Allows you to use the menu functions except making calls, bluetooth.
Page 69

SETTINGS
C
H
4
68
Selects the language in which letters are displayed on the screen.
LANGUAGE
1
Press [MENU] and then select “Settings &
Tools” menu, press “Phone Settings” and
then select “Language”.
3
Press to save it.
2
Select “English” or “Spanish” with the
Navigation Key.
To determine whether or not the network system can detect your
position:
LOCATION
1
Press [MENU] and then select “Settings &
Tools” menu, press “Phone Settings” and
then select “Location”.
3
Press to save it.
2
Select “Location On” or “E911 Only” with the
Navigation Key.
Location On: Your location is now available to the network.
E911 Only: Your location will be hidden from network &
application except 911.
Page 70

SETTINGS
C
H
4
69
4
Press to save it.
Device : Lock, Unlock, On Power Up
Location : Lock, Unlock
Prevents unauthorized use of your phone. The following settings can
be restricted:
Prevents the phone from being used without entering the password first.
SECURITY
1
Press [MENU] and then select “Settings &
Tools” menu, press “Phone Settings” and
then select “Security” and then enter your
password, press .
3
Select “Device” or “Location” and then select one
of the following options with the Navigation Key.
2
Select “Lock Mode”.
LOCK MODE
The default password is the last 4 digits of your phone number.
Page 71

SETTINGS
C
H
4
70
Selects the Preferred System.
SYSTEM SELECT
1
Press [MENU] and then select “Settings &
Tools” menu, press “Phone Settings” and
then select “System Select”.
3
Press to save it.
2
Select one of the following options with the
Navigation Key.
Automatic B
Automatic A
Home Only
3
Enter a “New Code” then press .
4
Enter a “Confirm Code” then press to save it.
1
Press [MENU] and then select “Settings &
Tools” menu, press “Phone Settings” and
then select “Security” and then enter your
password, press .
2
Select “Edit Code”.
EDIT CODE
The default password is the last 4 digits of your phone number.
Changes your Device/Location 4-digit password.
Page 72

SETTINGS
C
H
4
71
Enables Auto NAM (Number Assignment Modules) or manually
selects a NAM.
NAM SELECT
1
Press [MENU] and then select “Settings &
Tools” menu, press “Phone Settings” and
then select “NAM Select”, press
“Auto NAM”.
3
Press to save it.
2
Select one of the following options with the
Navigation Key.
NAM 1 - VERIZON
NAM 2 - VERIZON
Automatically switches phone to proper NAM when you have multiple
NAM registrations.
AUTO NAM
2
Select “On” or “Off” with the Navigation Key and
then press to save it.
1
Press [MENU] and then select “Settings &
Tools” menu, press “Phone Settings” and
then select “NAM Select”, press
“Change NAM”.
Changes the NAM used by the phone when you have multiple
registrations.
CHANGE NAM
Page 73

SETTINGS
C
H
4
72
CALL SETTINGS
ANSWER OPTIONS
1
Press [MENU] and then select “Settings &
Tools” menu, press “Call Settings” and then
select “Answer Options”.
2
Select one of the following with the Navigation Key.
3
To save, press .
To select an answer mode:
Flip Open
Any Key
Send Only
Auto Answer
1
Press [MENU] and then select “Settings &
Tools” menu, press “Call Settings” and then
select “Auto Retry”.
Automatically redials after a set time interval.
2
Retry time field is shown.
(Off, Every 3 Seconds, Every 5 Seconds,
Every 7 Seconds or Every 10 Seconds)
3
To save, press .
AUTO RETRY
Page 74

SETTINGS
C
H
4
73
1
Press [MENU] and then select “Settings &
Tools” menu, press “Call Settings” and then
select “TTY Mode”.
Your phone is able to operate with a TTY (Teletypewriter) device in
both analog and digital modes. This feature is system dependent and
may not be available in all areas.
3
To save, press .
TTY MODE
2
Select one of the following with the Navigation Key.
TTY Full
TTY+ Talk
TTY + Hear
TTY Off
l
l
l
l
1
Press [MENU] and then select “Settings &
Tools” menu, press “Call Settings” and then
select “One Touch Dial”.
ONE TOUCH DIAL
2
Select “On” or “Off” with the Navigation Key and
then press to save it.
Page 75

SETTINGS
C
H
4
74
Enhances voice privacy and avoids tapping during a call.
On : Makes it more difficult to wire tap.
l
1
Press [MENU] and then select “Settings &
Tools” menu, press “Call Settings” and then
select “Voice Privacy”.
VOICE PRIVACY
2
Select “On” or “Off” with the Navigation Key and
then press to save it.
VOICE SERVICES
1
Press [MENU], select “Settings & Tools”
menu, press “Call Settings”, select
“Voice Services”, and press “Voice Dial”.
Voice Dial allows you to call a person by simply saying their name.
To access Voice Dial:
2.1. Press [NEW]. The phone book list will be
displayed alphabetically. Select a name and
then press . Instructions (Press OK and
say name) will be displayed and press .
You will hear “Name Please”.
2.2. Say the name for the voice tag and repeat the
name when prompted. You will hear “Added”.
To play a voice dial:
Highlight the voice tag you want to play and and
then press [PLAY].
To review a voice dial: Highlight the voice tag you
want to review, and press [OPTIONS] and then
select “Detail”.
VOICE DIAL
2
3
4
Page 76

SETTINGS
C
H
4
75
To re-record a voice dial: Highlight the voice tag
you want to re-record and press [OPTIONS]
and then select “Re-record”.
To erase or erase all voice dials: Highlight the
voice tag you want to erase or erase all and
press [OPTIONS] and then select “Erase” or
“Erase All” to erase all voice tags.
To hear a voice dial from speaker: Highlight the
voice tag you want to hear and press [OPTIONS]
and then select “Play Speaker”.
5
6
7
Page 77

C
H
4
76
SETTINGS
1
Press [MENU], select “Settings & Tools”
menu, press “Call Settings”, select
“Voice Services”, and press “Voice Setting”.
VOICE SETTING
2
Under “Set Active”, select “Off”, “Active Flip”
or “Clear Key”.
3
Under “HFK Mode”, select an option
“On” or “Off”, press to save it.
Select Set Active to activate voice-dial. If the handset is connected to
HFK, select HFK to activate voice-dial by simply saying “Wake up”.
When Clear Key is set to be the activation key
1.Press and hold until your phone turns to Voice Recognition
mode.
2.Say the indicator, such as a person's name you saved for the
number you are calling.
Clear Key : Voice Dialing can be activated by pressing and
holding in idle mode.
Active Flip : Voice Dialing can be activated after the flip opens.
Off : Voice Dialing canceled.
l
l
l
Page 78

C
H
4
77
SETTINGS
1
Press [MENU], select “Settings & Tools” menu,
press “Call Settings”, select “Voice
Services”, and press “Train Words”.
TRAIN WORDS
2
Select one of the control words - “Yes”, “No” or
“Wake-Up”. “Please begin recording after the
prompt tone” will be displayed and you will hear
“Now training control words. Please say the
word”. Say the word. You will hear “Again”. Say
the word again. You will hear “Training word
successful”. To undo voice recognition, select a
word you want to undo then press [UNDO].
3
Under “Undo Train All”.
“Undo voice recognition for all procedures?”
will be displayed. Press to undo all trained
words.
Train allows you to use Control words to make a call without using
the keypad. Use to train or untrain Voice Recognition with the control
words, “Yes”, “No” or “Wake-Up”.
1
Press [MENU] and then select “Settings &
Tools” menu, press “Call Settings” and then
select “DTMF Tones”.
3
To save, press .
DTMF TONES
2
Select one of the following with the Navigation Key.
Normal
Long
l
l
To adjust tone length:
Page 79

C
H
4
78
SETTINGS
The Nokia 6315i is compatible with devices that support the
Bluetooth headset and hands-free profile(s)*. You may create and
store 30 pairings within the Nokia 6315i and connect to one device at
a time. The approximate communication range for Bluetooth wireless
technology is up to 30 feet (10 meters).
Pairing is the process that allows the handset to locate establish and
register 1-to-1 connection with the target device.
BLUETOOTH
BLUETOOTH ON/OFF
1
Press [MENU] and then select “Settings &
Tools” menu, press “Bluetooth”.
2
Press [ON/OFF] to activate/deactivate
bluetooth mode.
ADD NEW DEVICE
1
Press [MENU] and then select “Settings &
Tools” menu, press “Bluetooth”.
2
Select “1. Add New Device”, press .
If Blurtooth is set to off, you will be prompted to
“Turn Bluetooth on?”. Select “Yes” and press .
By pressing [SETTINGS], you can choose from the following:
My Phone Name: Your phone’s Bluetooth name will appear to
other in-range Bluetooth devices, depending
on your discovery mode. Enter a new name
and press to save and exit.
Discovery Mode: To Select discovery “On” or “Off”.
If discovery “On” selected, for one minute
other devices can find you.
Read user guide of each Bluetooth accessory that you are trying to
pair with your phone because the instructions may different.
Page 80

C
H
4
79
SETTINGS
5
Once pairing is successful, select “Yes” and
press to connect with ths device.
6
Once paired, you will see the device listed in the
“1. Add New Device” menu.
3
Instructions (Place device you are connecting to
in discoverable mode) will be displayed.
Highlight the device and press .
4
The handset will prompt you for the passkey.
Consult the Bluetooth accessory instructions for
the appropriate passkey (typically “0000” - 4
zeroes). Enter the passkey and press .
By pressing [OPTIONS], you can choose from the following:
Remove Device: To erase selected device.
Rename Device: To rename selected device.
Incoming Security: To Select “Always Ask” or “Always Connect”.
Device Info: To view device information.
Page 81

C
H
4
80
SETTINGS
MEMORY
SAVE OPTIONS
1
Press [MENU] and then select “Settings &
Tools” menu, press “Memory” and then
select “Save Options”.
2
Select “PIX”, “FLIX” or “Sounds”
with the Navigation Key and then select one of the
following options by pressing the Navigation Key.
Phone Memory
Card Memory
3
To save, press .
PHONE MEMORY
1
Press [MENU] and then select “Settings &
Tools” menu, press “Memory” and then
select “Phone Memory”.
2
Select one of the following options by pressing
the Navigation Key.
Memory Usage
My PIX
My FLIX
My Music
My Sounds
3
To display the phone memory information.
4
To save, press .
Page 82

C
H
4
81
SETTINGS
CARD MEMORY
1
Press [MENU] and then select “Settings &
Tools” menu, press “Memory” and then
select “Card Memory”.
2
Select one of the following options by pressing
the Navigation Key.
Memory Usage
My PIX
My FLIX
My Music
My Sounds
3
To display the card memory information.
4
To save, press .
Page 83

C
H
4
82
SETTINGS
PHONE INFO
Displays your phone number.
MY NUMBER
1
Press [MENU] and then select “Settings &
Tools” menu, press “Phone Info” and then
select “My Number”.
3
To return to the previous page, press .
2
You will see the MDN/MIN and
provider name.
Displays the (Software/PRL/ERI/Browser/Get It Now) version.
SW VERSION
1
Press [MENU] and then select “Settings &
Tools” menu, press “Phone Info” and then
select “SW Version”.
3
To return to the previous page, press .
2
You will see the version of software,
browser and others.
Page 84

C
H
4
83
SETTINGS
Displays the Indicator Icons of your cellular telephone.
ICON GLOSSARY
1
Press [MENU] and then select “Settings &
Tools” menu, press “Phone Info” and then
select “Icon Glossary”.
3
To return to the previous page, press .
2
You should see a list of the Indicator Icons of
your cellular telephone with a short label or
description.
Page 85

TOOLS
C
H
4
84
2
Follow the instructions below to calculate
8*6
4-2.5= 9.50
3
To reset, press [CLEAR].
To access the calculator:
CALCULATOR
Input 8.
Move the Navigation Key rightward.
Input 6 and then press the Navigation Key.
Move it leftward.
Input 4 and then press the Navigation Key.
Move it downward.
Input 2 and then press the to input (.).
Press 5.
Then press and you will see the answer.
: X, : -, : /, : +, : ., : Clear, : =.
1
Press [MENU] and then select “Settings &
Tools” menu, press “Tools” and then select
“Calculator”.
• To change the displayed number from positive (+) to negative (-)
and vice versa, press [].
• Press [OPERATOR] to use parenthesis and “Exponent”.
Page 86

TOOLS
C
H
4
85
CALENDAR
ADD NEW
Sets an event and reminds you of that event.
2
3
Move the Navigation Key left, right, up or down to
choose a date in the calendar and then press .
Press [OPTIONS] to 1. Add, 2. Go To Date,
3. Erase, 4. Erase Passed or 5. Erase All.
Press [MONTHLY/WEEKLY] to exchange
display mode.
Use the keypad to set a start time and to
select “am” or “pm”.
START TIME
Use the keypad to enter an appointment in your
schedule.
APPOINTMENT
Use the keypad to change or enter the start date.
START DATE
Use the Navigation Key to select a repeat setting for
the the calendar. (Daily, Weekly, Monthly or Yearly).
RECURRENCE
To set a new event, press [OPTIONS] then
select “Add”. The appointment field is highlighted.
Press the Navigation Key down to set the alarm
options.
Use the keypad to set an end time and to
select “am” or “pm”.
END TIME
1
Press [MENU] and then select “Settings &
Tools” menu, press “Tools” and then select
“Calendar”.
Page 87

C
H
4
86
TOOLS
Use the keypad to change or enter the end date.
END DATE
Use the Navigation Key to select a time zone,
press [SET]. (OFF, EST, EDT, CST, CDT,
MST, MDT, PST, PDT, AKST, AKDT, HAST,
HADT or GMT/UTC).
TIME ZONE
Use the Navigation Key to select vibrate On/Off.
VIBRATE
4
Press [SAVE] to save it or [CLR] to
return to the calendar.
5
The date of the event will be marked on your
calendar.
1
To view the Calendar List:
VIEW PLAN LIST
2
Move the Navigation Key to choose an event and
then press , press [VIEW].
Press [ERASE] and then select “Yes”,
press .
Use the keypad to enter an account.
BY COUNT
Use the keypad to 1. Get New or select the alert
tone you wish to set.
ALERT
Use the Navigation Key to select an alert time
interval option (0 Minutes, 5 Minutes, 10 Minutes,
15 Minutes).
REMINDER
Page 88

C
H
4
87
TOOLS
ALARM CLOCK
Select one of the entries using the Navigation Key.
To set a new alarm, choose alarm 1, 2 or 3.
To edit an existing alarm, select that alarm.
Press .
2
1
The setting field will be highlighted. Press the
Navigation Key down to select alarm options.
3
Use the Navigation Key to select a setting for the
alarm (Once, Daily, Mon - Fri, Weekends).
FREQUENCY
Press [MENU] and then select “Settings &
Tools” menu, press “Tools” and then select
“Alarm Clock”.
Use the Navigation Key to select alarm On/Off.
ALARM
Use the keypad to set a time for the alarm and
to select “am” or “pm”.
TIME
Press [SET], to use the keypad to 1. Get New
App. or select the alert tone you wish to set.
RINGER
To save an alarm setting press [SAVE].
4
Page 89

C
H
4
88
TOOLS
To display the time and date in pre-programmed cities:
WORLD CLOCK
2
4
Select a city by pressing the [CITIES].
Or use the Navigation Key to select another city.
3
The world map appears with the city, its date
and time.
Use the Navigation Key to select another city.
Pressing [DST], turns all cities supporting Daylight Savings
Time on or off.
To return to the previous page, press .
1
Press [MENU] and then select “Settings &
Tools” menu, press “Tools” and then select
“World Clock”.
Page 90

C
H
4
89
TOOLS
Your phone includes an internal notepad that can be used to
compose and store reminders and notes.
NOTEPAD
1
Press [MENU] and then select “Settings &
Tools” menu, press “Tools” and then select
“Notepad”.
ADD MEMO
2
To add a new memo, press [NEW].
Input a new text memo.
(Please refer to page 33 for more details on entering
letters, numbers & symbols.)
1
VIEW MEMO
2
The list of all memos, in saved order, is displayed.
Select a memo and then press [VIEW].
4
3
The selected memo will appear.
To edit it, press [EDIT] and input a new text
memo and then press [SAVE] to save it.
To compose a memo (there is an 80-letter limit):
To view a saved memo:
Press [MENU] and then select “Settings &
Tools” menu, press “Tools” and then select
“Notepad”.
3.2. To erase a memo, press [OPTIONS]
“Erase”.
3.1. To add a new memo, press [NEW].
3.3. To erase all memos, press [OPTIONS]
“Erase All”.
3
To save memo, press [SAVE].
Page 91

C
H
4
90
TOOLS
2
1
3
Simultaneously times up to eight different events. To operate the
stop watch:
STOP WATCH
To measure a time period:
1. To start the stop watch, press [START].
2. To pause it, press [STOP].
3. To resume it, press [START].
To reset it, press [RESET].
To time up to eight events at once:
1. To start, press [START].
2. To stop a time period and continue
measuring another one, press [CONT].
3. To stop the second and continue measuring
a third one, press [CONT].
4. To measure up to six time periods, repeat the
above steps.
5. To stop the stop watch, press [STOP].
6. To review the results, press [VIEW].
7. To return to the stop watch, press .
8. To reset it, press [RESET].
Press [MENU] and then select “Settings &
Tools” menu, press “Tools” and then select
“Stop Watch”.
Page 92

C
H
4
91
MY ACCOUNT
MY ACCOUNT
1
2
Press [MENU], then select “Settings & Tools”
menu, press “My Account”.
Connect “WAP Browser”.
Page 93

92
MEMO
C
H
4
Page 94

GET IT NOW
Your phone provides a unique feature -Get It Now- that enables you
to download ringtones, wallpapers, games and more from your
network to your phone. Please contact your service provider for the
availability of these services.
GET IT NOW
Chapter 5
93
C
H
5
93
Page 95

C
H
5
94
GET IT NOW
GET TUNES & TONES
3
Highlight the music that you want to purchase.
Press [BUY] to purchase.
GET VCAST MUSIC
1
From the Get Tunes & Tones menu, press
“Get V Cast Music”.
2
Browse of Search the catalog to preview the
songs you want.
4
The Confirm Purchase screen will display the
price and items you selected to purchase.
Press [BUY] to accept the terms.
5
You’lll receive a confirmation that your purchase
was successful and your music is available for
download. Press to continue.
7
Press [PLAY] to play the downloaded song
immediately.
6
Highlight Phone Memory or Memory Card for
Storage location (Memory Card is recommended,
and is only an option if a memory card is in your
phone). Press to begin downloading.
Wait for the phone to acquire the content license.
Press when download is complete.
To access the Get Tunes & Tones menu.
Press [MENU], then select “Get it Now” menu,
press “Get Tunes & Tones”.
You can use the V Cast Music option to download music
from the V Cast music catalog.
Page 96

C
H
5
95
GET IT NOW
GET NEW RINGTONES
1
From the Get Tunes & Tones menu, press
“Get New Ringtones”.
3
To download a ringtone, select the application
from the Get New Ringtones menu. Once the
application has launched, follow the directions to
download your ringtones. Downloaded ringtones
are saved to the My Ringtones menu.
2
If you have not downloaded any ringtones or
ringtone applications previously, select
“Get New App.”. The Get It Now browser will
launch. From the Download menu, select a
service provider and press . Then select the
application and press to download it.
4
Your recording is saved with a number.
To rename your recording, scroll to it in the
My Sounds menu, them press [OPTIONS].
Then press “Rename”.
RECORDING NEW TONES
1
From the Get Tunes & Tones menu, press
“My Sounds”.
3
Press to begin recording.
When done, press [STOP] to finish recording.
The recording is automatically saved to your
My Sounds list.
2
Select “Record New”. “Press OK to start
recording” will be displayed.
Page 97

C
H
5
96
GET IT NOW
MY RINGTONES
1
From the Set Tunes & Tones menu, press
“My Ringtones”.
4
To assign downloaded tunes or tones:
Select the tunes or tones you want to assign and
then press [SET AS]. Select “Ringtone”,
“Contact ID” or “Alert Tone” and then press .
By pressing [SET AS], you can choose from the following:
1. Ringtone
2. Contact ID
3. Alert Tone - 1. All Messages
2. TXT Message
3. PIX-FLIX Msg
4. Voicemail Msg
l
2
To play downloaded tunes or tones:
Select the tunes or tones you want to play and
then press [PLAY].
3
To erase downloaded tunes or tones:
Select the tunes or tones you want to erase and
then press [OPTIONS] and select “Erase” and
then select “Yes”, press .
By pressing [OPTIONS], you can choose from the following:
DOWNLOADED RINGTONE :
1. Erase: Erase the current ringtone from your phone.
2. Rename: To edit the ringtone’s title.
3. Ringtone Info: Displays information on the selected ringtone.
PRELOADED SOUND :
1. Erase: Erase the current ringtone from your phone.
2. Ringtone Info: Displays information on the selected ringtone.
Press [PLAY/STOP] to play/stop ringtone.
l
l
Page 98

C
H
5
97
GET IT NOW
To play a saved song, scroll through the list of
tracks and press [PLAY]. Press [MUTE]
to mute the song. Press [OPTIONS] to
1. Play All track, 2. Shuffle or 3. Get V Cast Music.
MY MUSIC
1
From the Get Tunes & Tones menu, press
“My Music”.
2
The My Music Menu consists of Get V Cast
Music and all your saved songs - saved to your
phone or your Trans-Flash card.
3
To download more music, highlight Get V Cast
Music and press . You will connect to the V
Cast service.
4
5
Press to start the song over again.
Press to skip to the next song if there are
other songs to be played. Press to pause or
play the song.
1
From the Get Tunes & Tones menu, press
“My Sounds”.
MY SOUNDS
2
To play downloaded sounds, select the sound
you want to play, then press [PLAY].
Page 99

C
H
5
98
GET IT NOW
SYNC MUSIC
1
Use the USB cable to connect your phone to
your PC.
2
Press [MENU], then select “Get it Now” menu,
press “Get Tunes & Tones”, press
“Sync Music”.
3
Open Windows Media™ Player 10 on your PC
and select the “Sync” tab.
4
Select “Edit Playlist” and select the songs from
your library that you want to sync.
3
4
To erase downloaded sounds, select the sound
you want to erase, then press [OPTIONS].
Select “Erase” or “Erase All”, then press .
To send the PIX message, press [SEND].
Please refer to page 114 for more details on
“Send New PIX Message”.
By pressing [OPTIONS], you can choose from the following:
DOWNLOADED or RECORD SOUND :
1. To PIX Place: To upload selected sound to PIX server.
2. Rename: To edit the sound’s title.
3. Move: To move the selected sound to the other save location.
4. Lock/Unlock: To select “Lock” or “Unlock”.
5. Erase: Erase the current sound from your phone.
6. Erase All: To erase all the sounds in your phone.
7. Sound Info: Displays information on the selected sound.
PRELOADED SOUND :
1. Erase: Erase the current sound from your phone.
2. Erase All: To erase all the sounds in your phone.
3. Sound Info: Displays information on the selected sound.
Press [PLAY/STOP] to play/stop sound.
l
l
Page 100

C
H
5
99
GET IT NOW
5
In Windows Media Player 10, select “V CAST
Mobile Phone - Removable Storage Card” unless
no memory card is available. Start the sync
process in Windows Media Player 10 by pressing
“Start Sync”. Remember, your phone must be in
“Sync Music” mode.
6
When synching completes, disconnect the cable
from your phone and exit “Sync Music”.
7
Under the “Get Tunes & Tones” menu, open
“Manage Music” or “My Music” to view and play
your music.
V CAST Music phones only support music imported from a CD via
Windows Media™ Player 10, purchased from the V CAST Music
Service, or other purchased Windows Media™ formatted music.
iPod®and iTunes®compatible music files are not compatible with
V CAST Music.
MANAGE MUSIC
1
From the Get Tunes & Tones menu, press
“Manage Music”.
2
The Music Library screen will appear. Choose to
manage by 1. Genres, 2. Artists, 3. Albums,
4. Songs, 5. Playlists, 6. Inbox, 7. Play All or
8. Shuffle.
3
Press [CATALOG] to launch the browser.
 Loading...