

Page 1
M
2
Getting Started
Remote Control and Receiver
for Media Center PC with Windows
For distribution only with a new computer
Welcome
Congratulations on your purchase of the Remote Control and Receiver for Media
Center PC with Windows®. The remote control and infrared (IR) receiver (also known
as a remote sensor) let you access and manage your Media Center PC and other
peripheral devices.
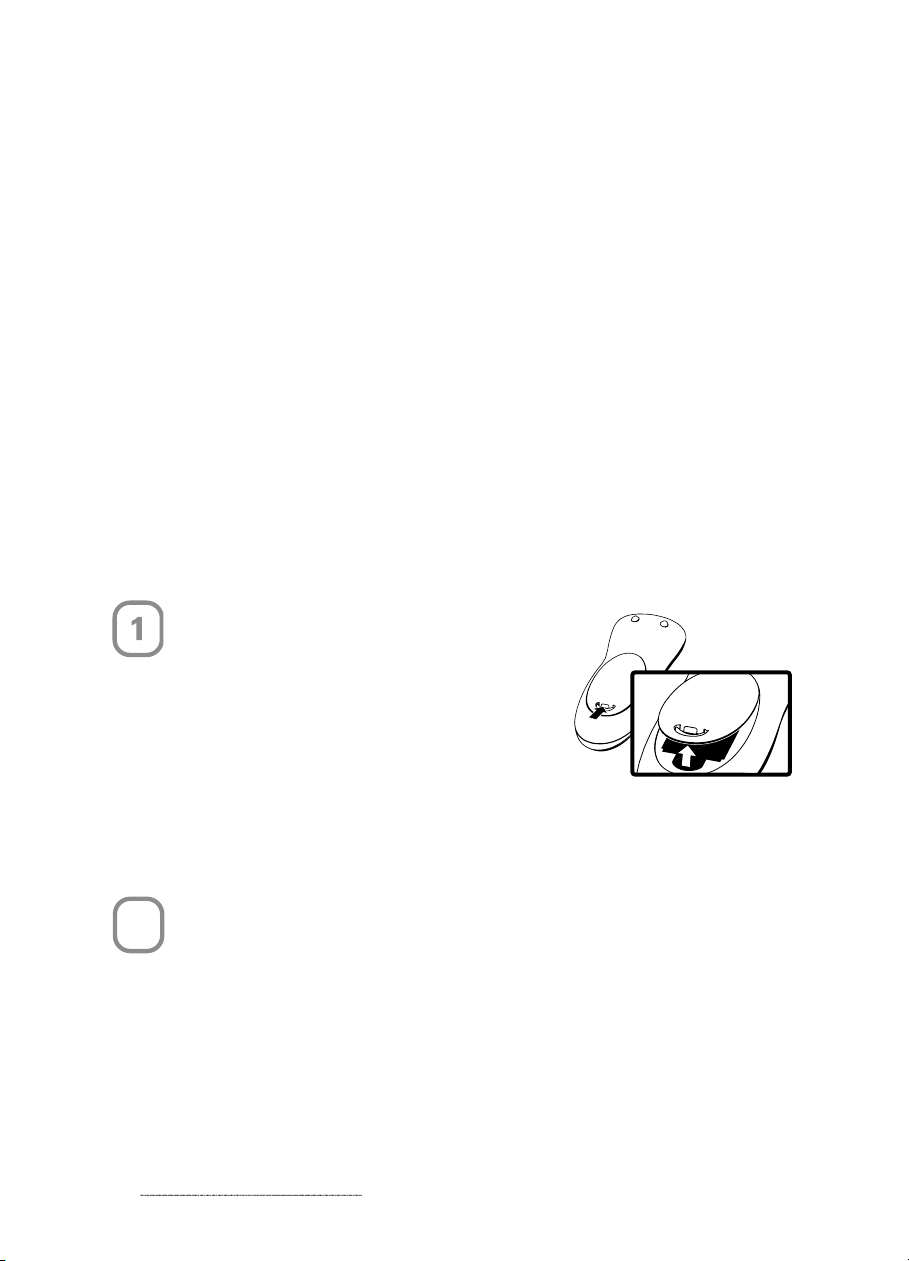
Insert the Batteries
The remote control uses two AA (LR6) batteries,
which are included in the package. Whenever you
insert batteries, always make sure both of them
are new.
To insert the batteries
1 Remove the battery compartment cover by
pressing on its release and lifting up.
2 Insert the batteries, making sure to properly orient the positive (+) and negative (-)
ends as specied by the battery compartment labels.
3 Replace the battery compartment cover.
®
Position the Receiver
For optimum performance, make sure that the distance between the remote and the
receiver doesn’t exceed 20 feet. Keep a direct, unobstructed line of sight between the
receiver and the remote control, and don’t let any natural or articial light shine directly
on the receiver’s IR sensor.
0804 Part No. X10-72473-02
1
Page 2
2
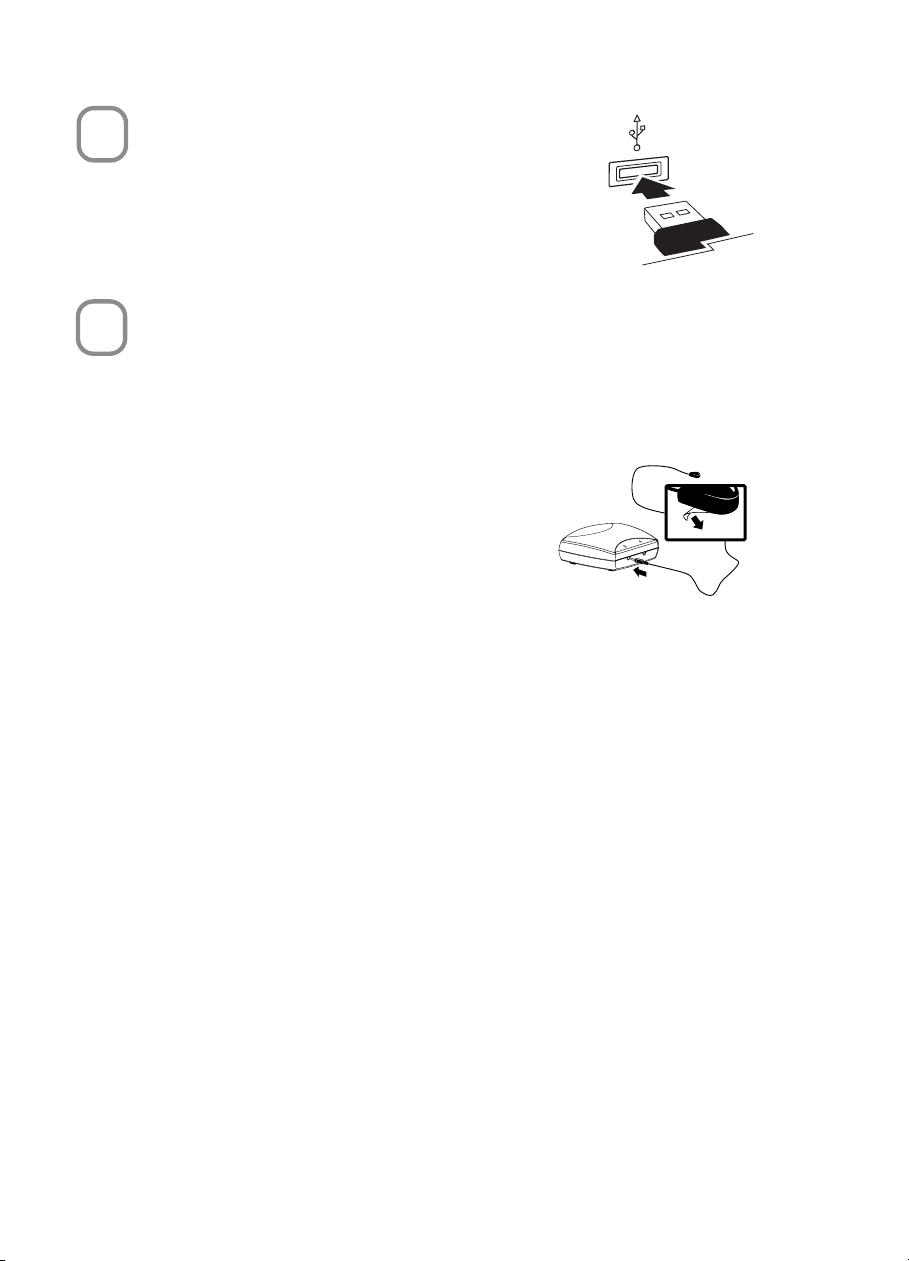
Connect the Receiver
3
4
The receiver relays input from your remote control to your
computer.
To connect the receiver
• With your computer turned on, plug the rectangular
universal serial bus (USB) connector into your computer’s
USB port.
Connect the IR Emitter
If you receive your TV signal through a set-top box, you must connect an IR emitter
(also known as an IR control cable) to the receiver to use the remote control for Media
Center PC with your TV. The receiver includes two IR emitters. You only need to connect
one emitter per set-top box.
To connect an IR emitter
1 Insert the plug at the end of an IR emitter cable into
one of the ports on the back of the receiver.
2 Peel the protective paper from the emitter end and
afx the emitter to the front of the IR sensor lens on
the set-top box.
The IR sensor lens is typically visible on the front of
the set-top box. If you can’t nd the IR sensor lens,
see the documentation that came with your set-top box.
Using the Remote Control
You use the remote control to interact with most of the features in Media Center. No
software or setup procedure is required. Just point the remote control at the receiver,
and then enter your commands.
Your remote control has ve types of buttons:
• Navigation buttons, to move between items on the screen.
• Playback buttons, to control your media (for example, pause or stop).
• Audio-visual (AV) and power buttons, to change channels and adjust volume.
• Numeric keypad buttons, to enter alphanumeric characters or TV channels.
• Teletext and Fastext buttons, to access teletext functionality (if available). For more
information, see “Teletext Buttons” later in this manual.
Page 3

3
Navigation Buttons
Use the navigation buttons on the remote control to move between items on the
screen in Media Center.
Task Control Button
Start Media Center, or go
to the Start menu if Media
Center is already running.
Move to the item above. UP
Move to the item below. DOWN
START
Move to the item on the
left, or move to the menu.
If a slide show is playing,
return to the previous
picture.
Move to the item on the
right, or move from the
menu to the folder items. If
a slide show is playing, skip
to the next picture.
Select the active item. OK
Go to the previous screen. BACK
Show information about
the selected item.
LEFT
RIGHT
MORE
Page 4
4
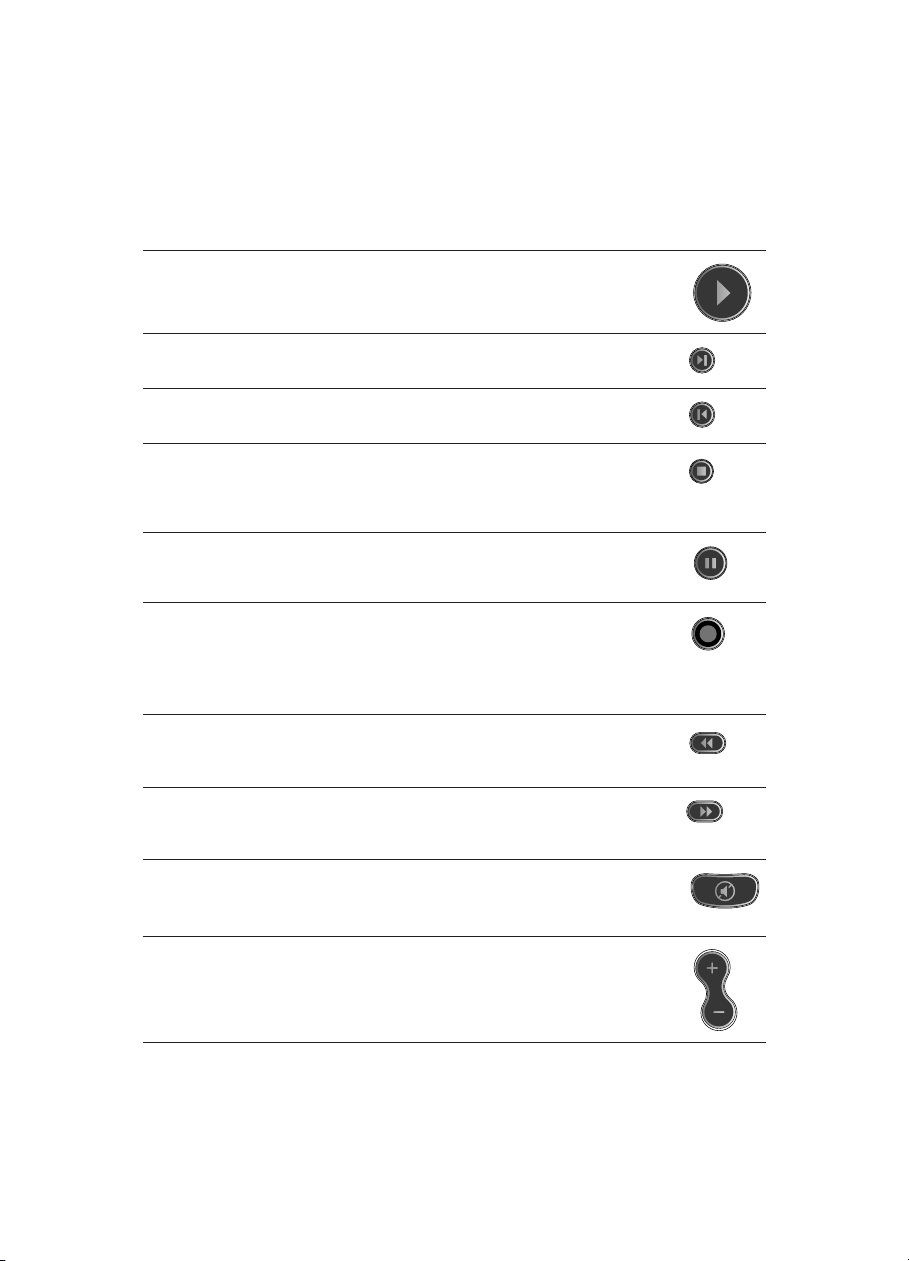
Playback Buttons
Playback buttons in Media Center behave just like similar controls on common home
electronic devices, such as CD or DVD players. Playback buttons are used to control
the playback or display of your media—music, pictures, videos, and TV.
Task Control Button
Play the selected song, Album, or Playlist. PLAY
For Album or Playlist, skip to the next song. For
Recorded TV, skip ahead 29 seconds.
For TV, go back ve seconds. For Album or Playlist, play
the previous song. For DVD, play the previous chapter.
Stop the currently playing media. Press PLAY to start
the track again from the beginning.
Pause the currently playing media. Press PAUSE again
to resume.
Record the TV show to disk. If pressed while live
TV is on, record the current show (if pressed twice,
record the series). If pressed from the Electronic
Programming Guide, record a TV show or TV series to
disk.
Rewind the currently playing media; if pressed
repeatedly, cycles through three rewind speeds from
slowest to fastest.
Speed up the currently playing media; if pressed
repeatedly, cycles through three fast forward speeds
from slowest to fastest.
Mute the sound without stopping playback. Press
MUTE again to turn the sound back on.
SKIP
REPLAY
STOP
PAUSE
RECORD
REW
FWD
MUTE
Adjust the volume. VOL +/VOL -
Page 5
5
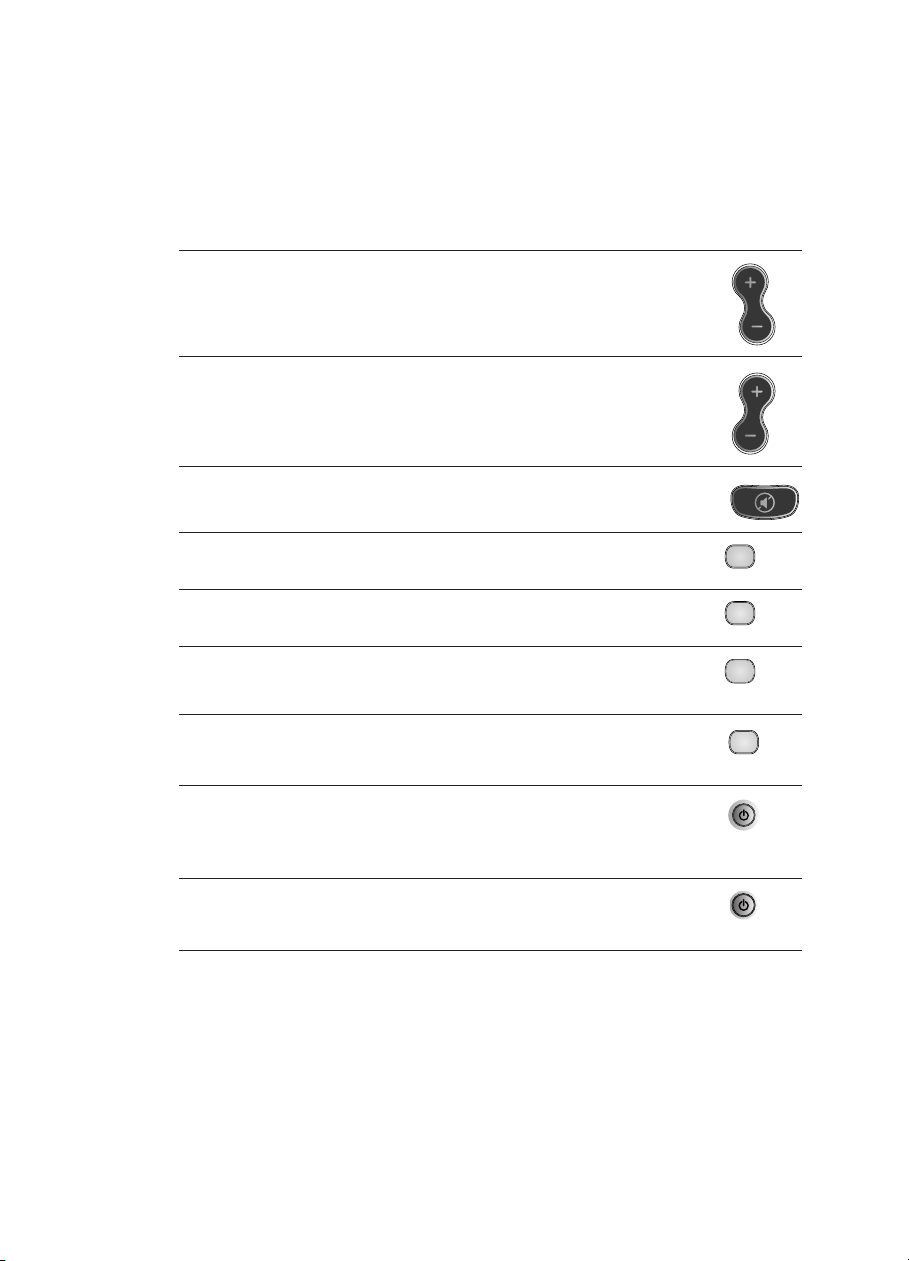
AV and Power Buttons
Use the AV and power buttons to change channels, adjust volume, access a DVD
menu, or to put Media Center in standby mode. Some buttons, such as GUIDE, act as
shortcuts.
Task Control Button
Adjust the volume. VOL +/VOL -
Change the channel. CH/PG + / CH/PG -
Mute the sound. Press MUTE again to turn the
sound back on.
Go to the Electronic Programming Guide. GUIDE
Switch to live TV if TV is not currently playing. If TV is
paused, skip to live programming.
Go to the Recorded TV page. RECORDED TV
Display the DVD menu. DVD MENU
By default, the TV button has no command assigned
to it. This button can “learn” to turn on the TV. For
more information, see “Using the Remote Control
Learning Functionality” later in this manual.
If the computer is on, put the computer in standby
mode. Press the PC button again to bring the
computer out of standby and return to the desktop.
MUTE
LIVE TV
TV
PC
Page 6

6
Numeric Keypad
The numeric keypad consists of numbers from 0 through 9 and two other keys:
ENTER and CLEAR. You can use the numeric keypad to type alphanumeric characters
anywhere in Media Center that you can enter text. If you want to delete characters you
have typed, press CLEAR; press ENTER to submit the characters you have typed. You
can also use the numeric keypad to enter TV channels.
If you’ve ever used an address book in a mobile phone, you’re familiar with how to
use the numeric keypad to type text. Each time you press a key, you scroll through the
characters that are available for that key.
To type text by using the numeric keypad
1 Press a number to scroll through the choices that are available for that key. Each
time you press the key, a different character appears. To backspace, press CLEAR.
2 When the character you want is displayed, press ENTER.
Teletext Buttons
Media Center supports teletext when it is available. The colored Fastext buttons on the
remote control for Media Center PC work much like the teletext buttons on a standard
teletext-enabled TV. For more information about teletext features, see Media Center
Help.
To display Page 100 (teletext home page)
• Press the TELETEXT button (located to the right of the ENTER button). Page 100 will
appear in a few seconds and completely replace the TV picture, but it will not affect
the TV sound.
To access teletext pages
• Enter the three-digit number of the page you want to display by using the numeric
keypad. For example, enter 300 to access the A-Z Teletext Index.
To navigate between teletext pages
• Press the UP and DOWN buttons on your remote control to navigate between Next
and Previous pages.
To use the Fastext buttons
• The red, green, yellow, and blue buttons on your remote control correspond to the
same colored buttons on your TV. Press a colored button on your remote control
to go to a preset page. For example, on page 100, press the green button on the
remote control to go to the New Zealand News Index, or Page 102.
Page 7

7
Using the Remote Control Learning Functionality
The TV, VOL +, and VOL – buttons on the remote control for Media Center PC can
“learn” IR commands from other remote controls. This feature lets you use the TV
button to turn on your TV and the VOL + and VOL - buttons to adjust the volume on your
TV or another device, such as an audio receiver.
Notes
• By default, the VOL + and VOL - buttons on the remote control for Media Center PC
control the system volume on your computer, and the TV button has no command
assigned to it until it “learns” one.
• Do not perform this procedure in bright natural or articial light.
To program buttons on the remote control by using the learning feature
1 Place the remote control for Media Center PC head to head (2 to 3 inches apart)
with the remote control from which it is learning.
2 On the remote control for Media Center PC, press and hold the DVD MENU and OK
buttons at the same time until the remote control lights turn off
(2 seconds).
The remote is now in learning setup mode.
3 On the remote control for Media Center PC, press and release the TV,
VOL +, or VOL – button, depending on which command you want it to learn.
The remote control for Media Center PC lights blink once to conrm the selection.
4 On the remote control that is teaching the command, press and hold the button that
you want the corresponding button on the remote control for Media Center PC to
learn.
The remote control for Media Center PC lights blink twice to conrm the selection.
If the remote did not learn the command, the lights blink quickly four times. To try
again, repeat steps 1 through 4.
5 Repeat steps 1 through 4 for the other buttons that can learn commands.
To restore the default remote control settings
1 Press and hold the DVD MENU button and LEFT navigation button at the same time
until the remote control for Media Center PC lights turn off.
2 Press the OK button.
The remote control for Media Center PC lights blink twice to conrm that the buttons
have been reset. The TV button will have no command assigned to it and the VOL +
and VOL – buttons will adjust the Media Center PC system volume.
If the default settings were not restored, the lights blink quickly four times. To try
again, repeat steps 1 and 2.
Page 8

8
Troubleshooting
If you don’t nd the solution you’re looking for in this section, see Media Center Help
for additional troubleshooting information.
No backlighting appears when I press buttons on the remote. Try inserting new
batteries. The battery power could be low or the batteries could be inserted incorrectly.
When I press a button on the remote, backlighting appears but nothing happens.
Make sure that the following is true:
• You are pointing the remote control directly at the receiver.
• The IR sensor on the receiver is not covered up, and no natural or articial light is
shining directly on it.
• The remote control is within 20 feet of the receiver.
• You have not minimized or exited Media Center. To reactivate Media Center, move
the mouse, and then click anywhere in the Media Center window.
My remote control for Media Center PC doesn’t turn my TV on or off. Make sure that
the following is true:
• You pressed the TV button, rather than another button.
• The POWER button on the TV remote control is working properly. If it’s not, the
remote control for Media Center PC might not receive the correct IR code.
• You followed the intstructions in “Using the Remote Control Learning Functionality”
earlier in this manual.
Customer Support Options
OEM distributed: Since Remote Control and Receiver for Media Center
PC with Windows® came with a new computer or device,
the hardware manufacturer provides technical support and
assistance for this product. Your manufacturer may have
customized the installation with unique components such
as specic device drivers and optional settings to
maximize the performance with their hardware. If you need
technical assistance with Remote Control and Receiver for
Media Center PC with Windows®, please contact your
manufacturer directly as they are the best-qualied to
support the product.
Conditions: Microsoft’s support services are subject to then-current
prices, terms, and conditions, which are subject to change
without notice.
Patent Information
United States and/or International patents pending.
Page 9

9
Regulatory Information
Tested to comply with FCC Standards. For home or ofce use. Not intended for use
in machinery, medical or industrial applications. Any changes or modications not
expressly approved by Microsoft could void the user’s authority to operate this device.
This product is for use with NRTL Listed (UL, CSA, ETL, etc.), and/or IEC/EN 60950
compliant (CE marked) Information Technology equipment. No serviceable parts
included.
This device is rated as a commercial product for operation at +41ºF (+5ºC) to +95ºF
(+35ºC).
This Class B digital apparatus complies with Part 15 of the U.S. Federal
Communications Commission (FCC) rules, Canadian ICES-003 and RSS-210.
Operation is subject to the following two conditions: (1) this device may not cause
interference, and (2) this device must accept any interference received, including
interference that may cause undesired operation.
Cet appareil numérique de la classe B est conforme aux normes NMB-003 et CNR210 du Canada. Son fonctionnement est assujetti aux deux conditions suivantes : (1)
Cet appareil ne peut pas provoquer d’interférences nuisibles et (2) cet appareil doit
accepter toute interférence reçue, y compris les interférences pouvant entraîner un
fonctionnement non désiré.
Microsoft Corporation; One Microsoft Way; Redmond, WA 98052-6399; U.S.A. United
States: (800) 426-9400 Canada (800) 933-4750
Important Battery Information
Caution Use and replace only with AA (LR6) Alkaline, Carbon-Zinc, or Zinc-Chloride
batteries.
General Precautions
• Keep batteries out of reach of children.
• Insert the batteries in the proper direction as indicated by the positive (+) and
negative (-) markings on the battery and battery compartment.
• Do not mix old and new batteries or batteries of different types (for example, carbon
and alkaline batteries).
• Always remove old, weak, or worn-out batteries promptly and recycle or dispose of
them in accordance with Local and National Disposal Regulations.
• If a battery leaks, remove all batteries and recycle or dispose of them in
accordance with the battery manufacturer’s instructions and Local and National
Disposal Regulations. Before inserting new batteries, thoroughly clean the battery
compartment with a damp paper towel, or follow the battery manufacturer’s
recommendations for cleanup. If uid from the battery comes into contact with skin
or clothes, ush skin with water immediately.
• Remove the batteries if your device is to be stored for an extended period of time
without being used.
Page 10

10
Special Precautions
The precautions below are to prevent the sudden release of electrolytes, which these
prohibited actions can cause:
• Do not install the batteries incorrectly. Carefully observe the positive (+) and
negative (-) markings on the battery for proper installation.
• Do not open, puncture, or mutilate the batteries.
• Do not heat batteries.
• Do not use a re to dispose of batteries.
Released battery electrolyte is corrosive, can cause damage to the eyes and skin, and
may be toxic if swallowed.
Product Disposal Information
Dispose of this product in accordance with Local and National Disposal Regulations.
Warning
To protect against risk of re, bodily injury, electric shock or damage to the equipment:
• Do not immerse any part of this product in water or other liquid.
• Do not spray liquid on this product or allow excess liquid to drip inside.
• Do not use this product if it has sustained damage, such as a damaged cord or
plug.
• Disconnect this product or remove its batteries before cleaning.
Manufacturer’s Guarantee and Limitation of Liability
NOTE: The following guarantee is not restricted to any territory and does not affect any statutory rights
that you may have.
The term “Hardware” means the enclosed Hardware. This Manufacturer’s Guarantee does not cover your
data, or any separate software, whether or not packaged or included with the Hardware.
MANUFACTURER GUARANTEE. The Manufacturer guarantees (this “Guarantee”) that on the day you receive
the Hardware and for the nex t three years thereafter that the Hardware will be substantially free from defects in
materials and workmanship.
In the event that the Hardware fails to comply with this Guarantee, Manufacturer shall either, at Manufacturer’s
option,
(a) repair or replace the Hardware or
(b) return the price you paid for the Hardware (if any), provided that you return the Hardware to Manufacturer
with a copy of your receipt of purchase. You may exercise this remedy without charge, except that you are
responsible for any expenses you may incur.
This Guarantee is void if failure of the Hardware results from any accident, abuse or misapplication. Any
replacement Hardware shall be guaranteed for the remainder of the original Guarantee period or thirt y
(30) days, whichever is longer. Manufacturer shall not be liable for any loss or damage that you could have
reasonably avoided, for example, by backing up your software and les regularly.
EXCLUSION OF ALL OTHER TERMS. YOU AGREE THAT THIS GUARANTEE IS YOUR SOLE GUARANTEE IN
RELATION TO THE HARDWARE. MANUFACTURER AND ITS SUPPLIERS MAKE NO OTHER GUARANTEES
OR WARRANTIES WITH RESPECT TO THE HARDWARE AND ANY PRODUCT MANUAL(S) OR OTHER
WRITTEN MATERIALS THAT ACCOMPANY THE HARDWARE. TO THE MA XIMUM EXTENT PERMITTED BY
APPLICABLE LAW AND SUBJECT TO THIS GUARANTEE, MANUFACTURER AND ITS SUPPLIERS DISCLAIM
ALL WARRANTIES, CONDITIONS AND OTHER TERMS, EITHER EXPRESS OR IMPLIED (WHETHER BY
STATUTE, COMMON LAW, COLLATERALLY OR OTHERWISE), INCLUDING BUT NOT LIMITED TO ANY (IF ANY )
IMPLIED WARRANTIES OR CONDITIONS OF MERCHANTABILITY, SATISFACTORY QUALIT Y AND FITNESS
FOR PARTICULAR PURPOSE, LACK OF VIRUSES, LACK OF NEGLIGENCE, LACK OF WORKMANLIKE
EFFORT, TITLE, AUTHORITY, OR NONINFRINGEMENT WITH RESPECT TO THE HARDWARE AND THE
PRODUCT MANUAL(S) OR OTHER WRIT TEN MATERIALS THAT ACCOMPANY THE HARDWARE. ANY IMPLIED
WARRANTIES THAT ARE NOT DEEMED EXCLUDED ARE LIMITED TO THE ORIGINAL GUARANTEE PERIOD OR
TO THE SHORTEST PERIOD PERMITTED BY APPLICABLE LAW, WHICHEVER IS GREATER.
Page 11

11
LIMITATION OF LIABILITY. TO THE MAXIMUM EXTENT PERMITTED BY APPLICABLE LAW AND EXCEPT
AS PROVIDED IN THIS GUARANTEE, MANUFACTURER AND ITS SUPPLIERS SHALL NOT BE LIABLE FOR
ANY DAMAGES WHATSOE VER (INCLUDING WITHOUT LIMITATION, SPECIAL, INCIDENTAL, INDIRECT OR
CONSEQUENCIAL DAMAGES FOR LOSS OF BUSINESS PROFITS, BUSINESS INTERRUPTION, LOSS OF BUSINESS
INFORMATION OR OTHER PECUNIARY LOSS, FOR PERSONAL INJURY, OR FAILURE TO MEET ANY DUTY
INCLUDING OF GOOD FAITH OR REASONABLE CARE, OR FOR NEGLIGENCE) ARISING OUT OF THE USE OR
INABILIT Y TO USE THE HARDWARE, EVEN IF MANUFACTURER OR ANY SUPPLIER HAS BEEN ADVISED OF THE
POSSIBILITY OF SUCH DAMAGES. IN ANY CASE MANUFACTURER’S ENTIRE LIABILITY UNDER ANY PROVISION
OF THIS AGREEMENT SHALL BE LIMITED TO THE AMOUNT ACTUALLY PAID BY YOU FOR THE HARDWARE. THESE
LIMITATIONS DO NOT APPLY TO ANY LIABILITIES THAT CANNOT BE EXCLUDED OR LIMITED BY APPLICABLE
LAWS. THE FOREGOING LIMITATIONS, EXCLUSIONS AND DISCLAIMERS SHALL APPLY TO THE MAXIMUM EX TENT
PERMITTED BY APPLICABLE LAW,
REGISTRATION. You do not need to register your acquisition of the HARDWARE for this Limited Warranty to be
effective.
BENEFICIARY. To the extent allowed by applicable law, this Guarantee is only made to you, the rst user of the
HARDWARE, and there are no third party beneciaries of this Guarantee. It is not intended for and does not
apply to anyone else (except as required by law).
GOVERNING LAW. If you acquired the HARDWARE in the United States of America, the laws of the State of
Washington, U.S.A. apply to this agreement. If you acquired the HARDWARE in the European Union, Iceland,
Norway or Switzerland, then local laws apply. If you acquired this product in Canada, except where expressly
prohibited by local laws, the laws in force in the Province of Ontario, Canada apply to this agreement and each
of the parties hereto irrevocably attorns to the jurisdiction of the courts of the Province of Ontario and further
agrees to commence any litigation which may arise hereunder in the courts located in the Judicial District of
York, Province of Ontario.
If you acquired this Hardware outside of the countries listed above, then local laws may apply.
Information in this document, including URL and other Internet Web site references, is subject to change without notice.
Unless otherwise noted, the example companies, organizations, products, domain names, e-mail addres ses, logos,
people, places, and event s depicted herein are ctitious, and no association with any real company, organization,
product, domain name, e-mail address, logo, person, place, or event is intended or should be inferred. Complying with
all applicable copyright laws is the responsibility of the user. Without limiting the rights under copyright, no part of
this document may be reproduced, stored in or introduced into a retrieval system, or transmitted in any form or by any
means (electronic, mechanical, photocopying, recording, or other wise), or for any purp ose, withou t the express written
permission of Microsoft Corporation.
Microsof t may have patents, patent applications, trademarks, copyright s, or other intellectual property rights covering
subject mat ter in this document. Except as expressly provided in any written license agreement from Microsoft, the
furnishing of this document does not give you any licens e to these patents, trademarks, copyrights, or other intellectual
property.
© 2004 Microsoft Corporation. All rig hts reser ved.
Microsof t and Windows are either regis tered trademarks or trademarks of Microsof t Corporation in the United States
and/or other countries.
The names of actual companies and products mentioned herein may be the trademarks of their respective owners.
Microsof t Corporation grants the purchaser of this product the right to reproduce one (1) copy of the enclosed “Getting
Started” printed guide for each Hardware Device you purchased in the package.
 Loading...