

Page 1
Microsoft Project Training ManualMicrosoft Project Training Manual
1.1.OpenOpen Microsoft Project Template found at G/DATA/Projects(Do not Microsoft Project Template found at G/DATA/Projects(Do not use DZ)/Microsoft Projectuse DZ)/Microsoft Project
--Save As using the project’s title as the MicrosoftSave As using the project’s title as the Microsoft Project file nameProject file name
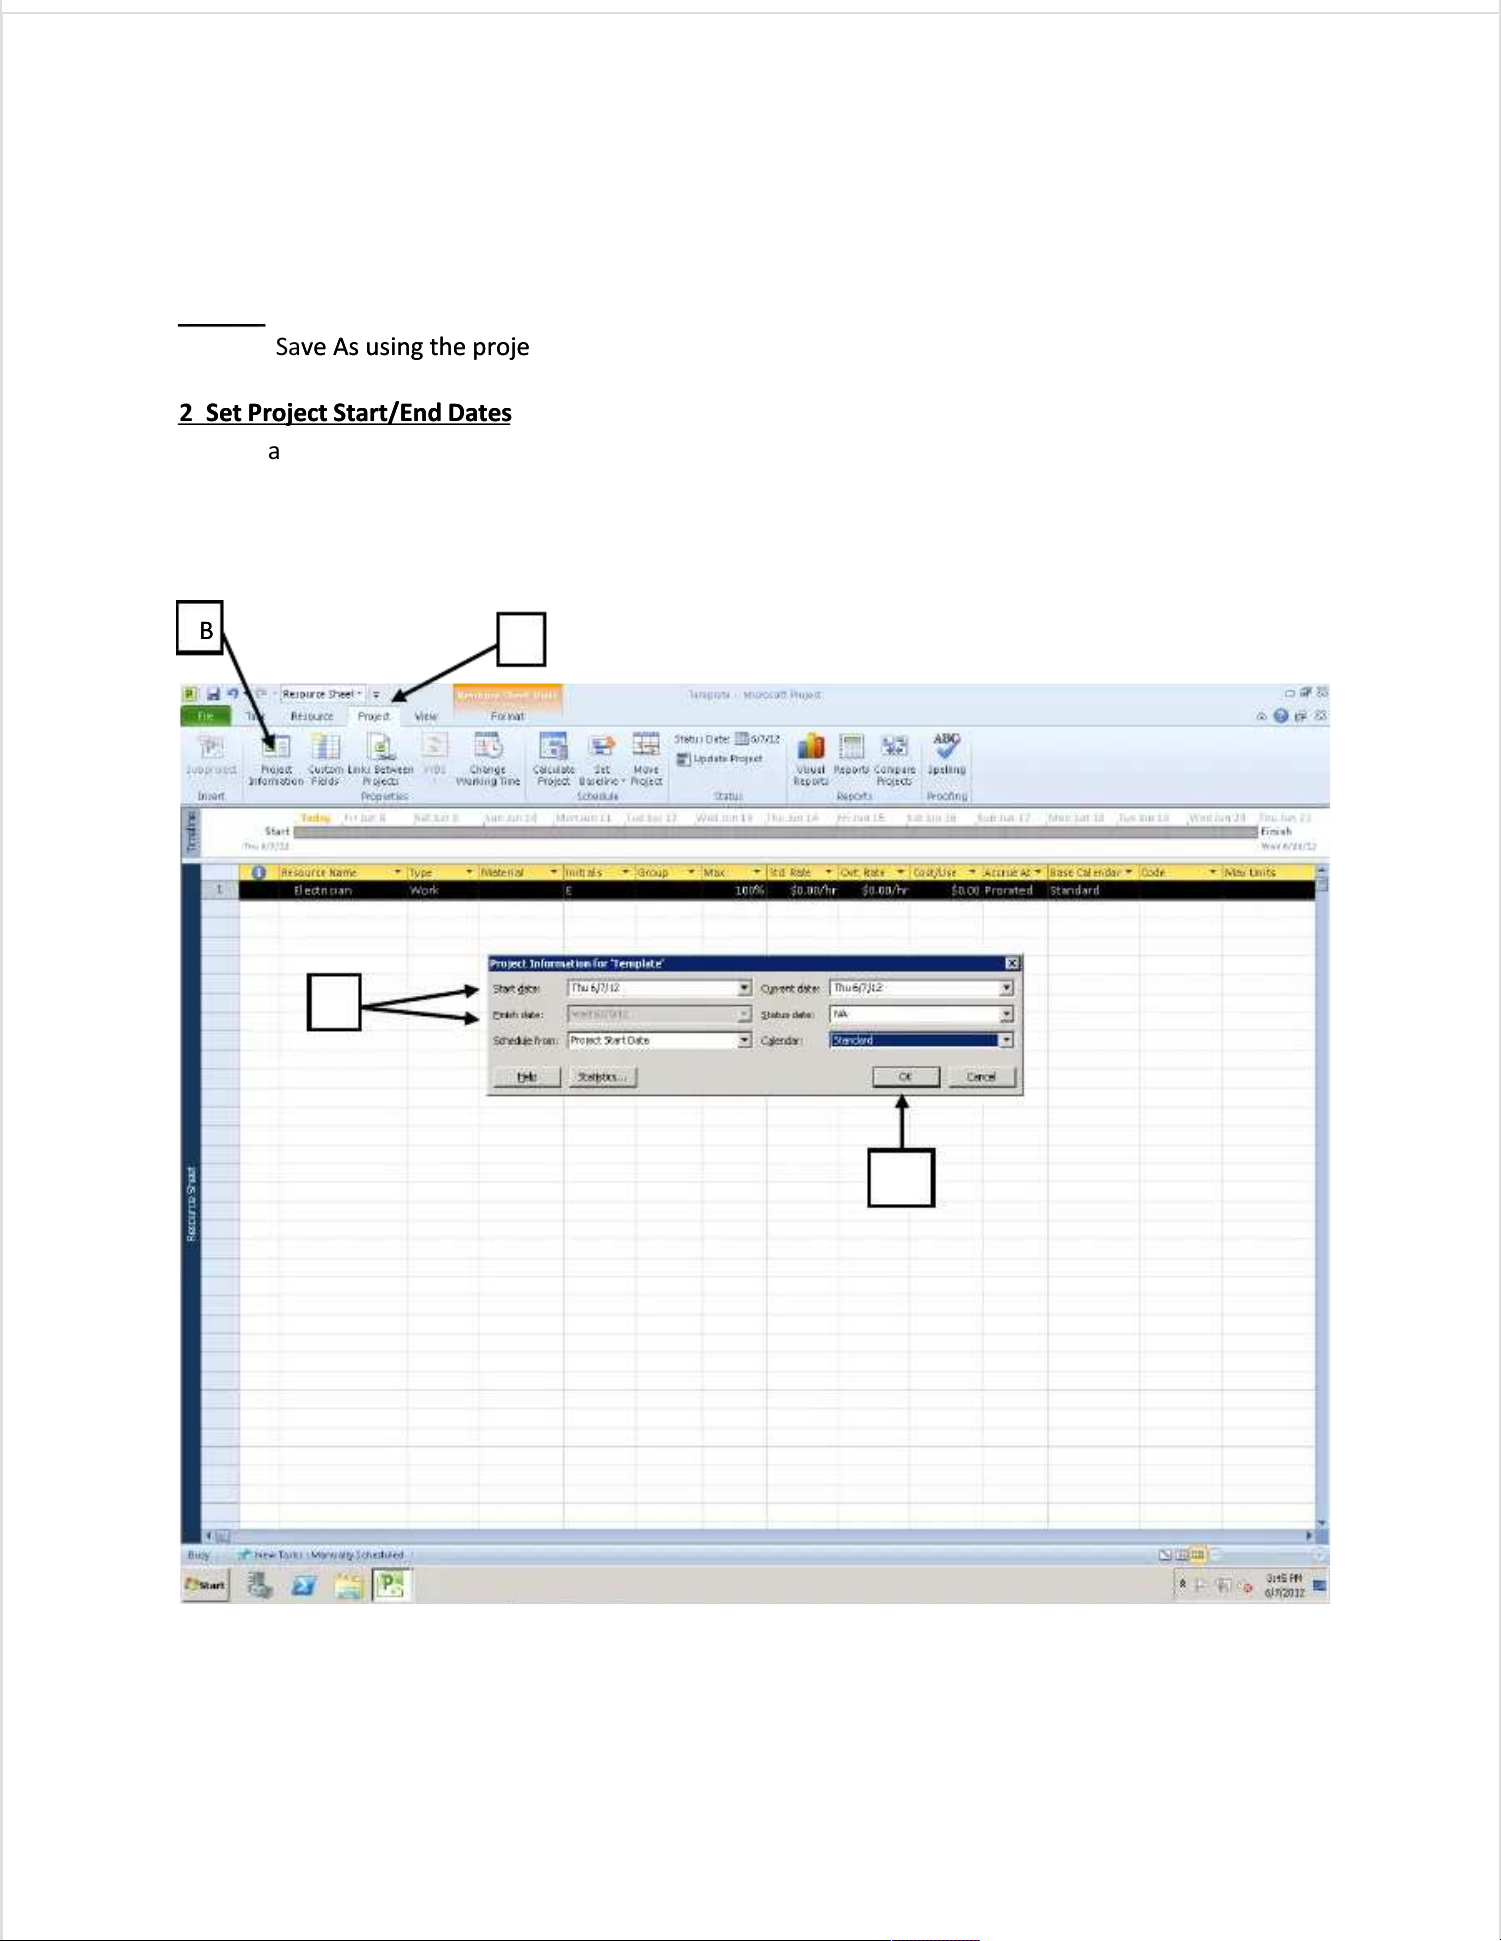
2. Set Project Start/End Dates2. Set Project Start/End Dates
a. Go to the Project Taba. Go to the Project Tab
b. Select Project Informationb. Select Project Information
c. Edit the Project Start date in the window that appears.c. Edit the Project Start date in the window that appears.
d. Hit Ok.d. Hit Ok.
AA
BB
CC
DD
Page 2
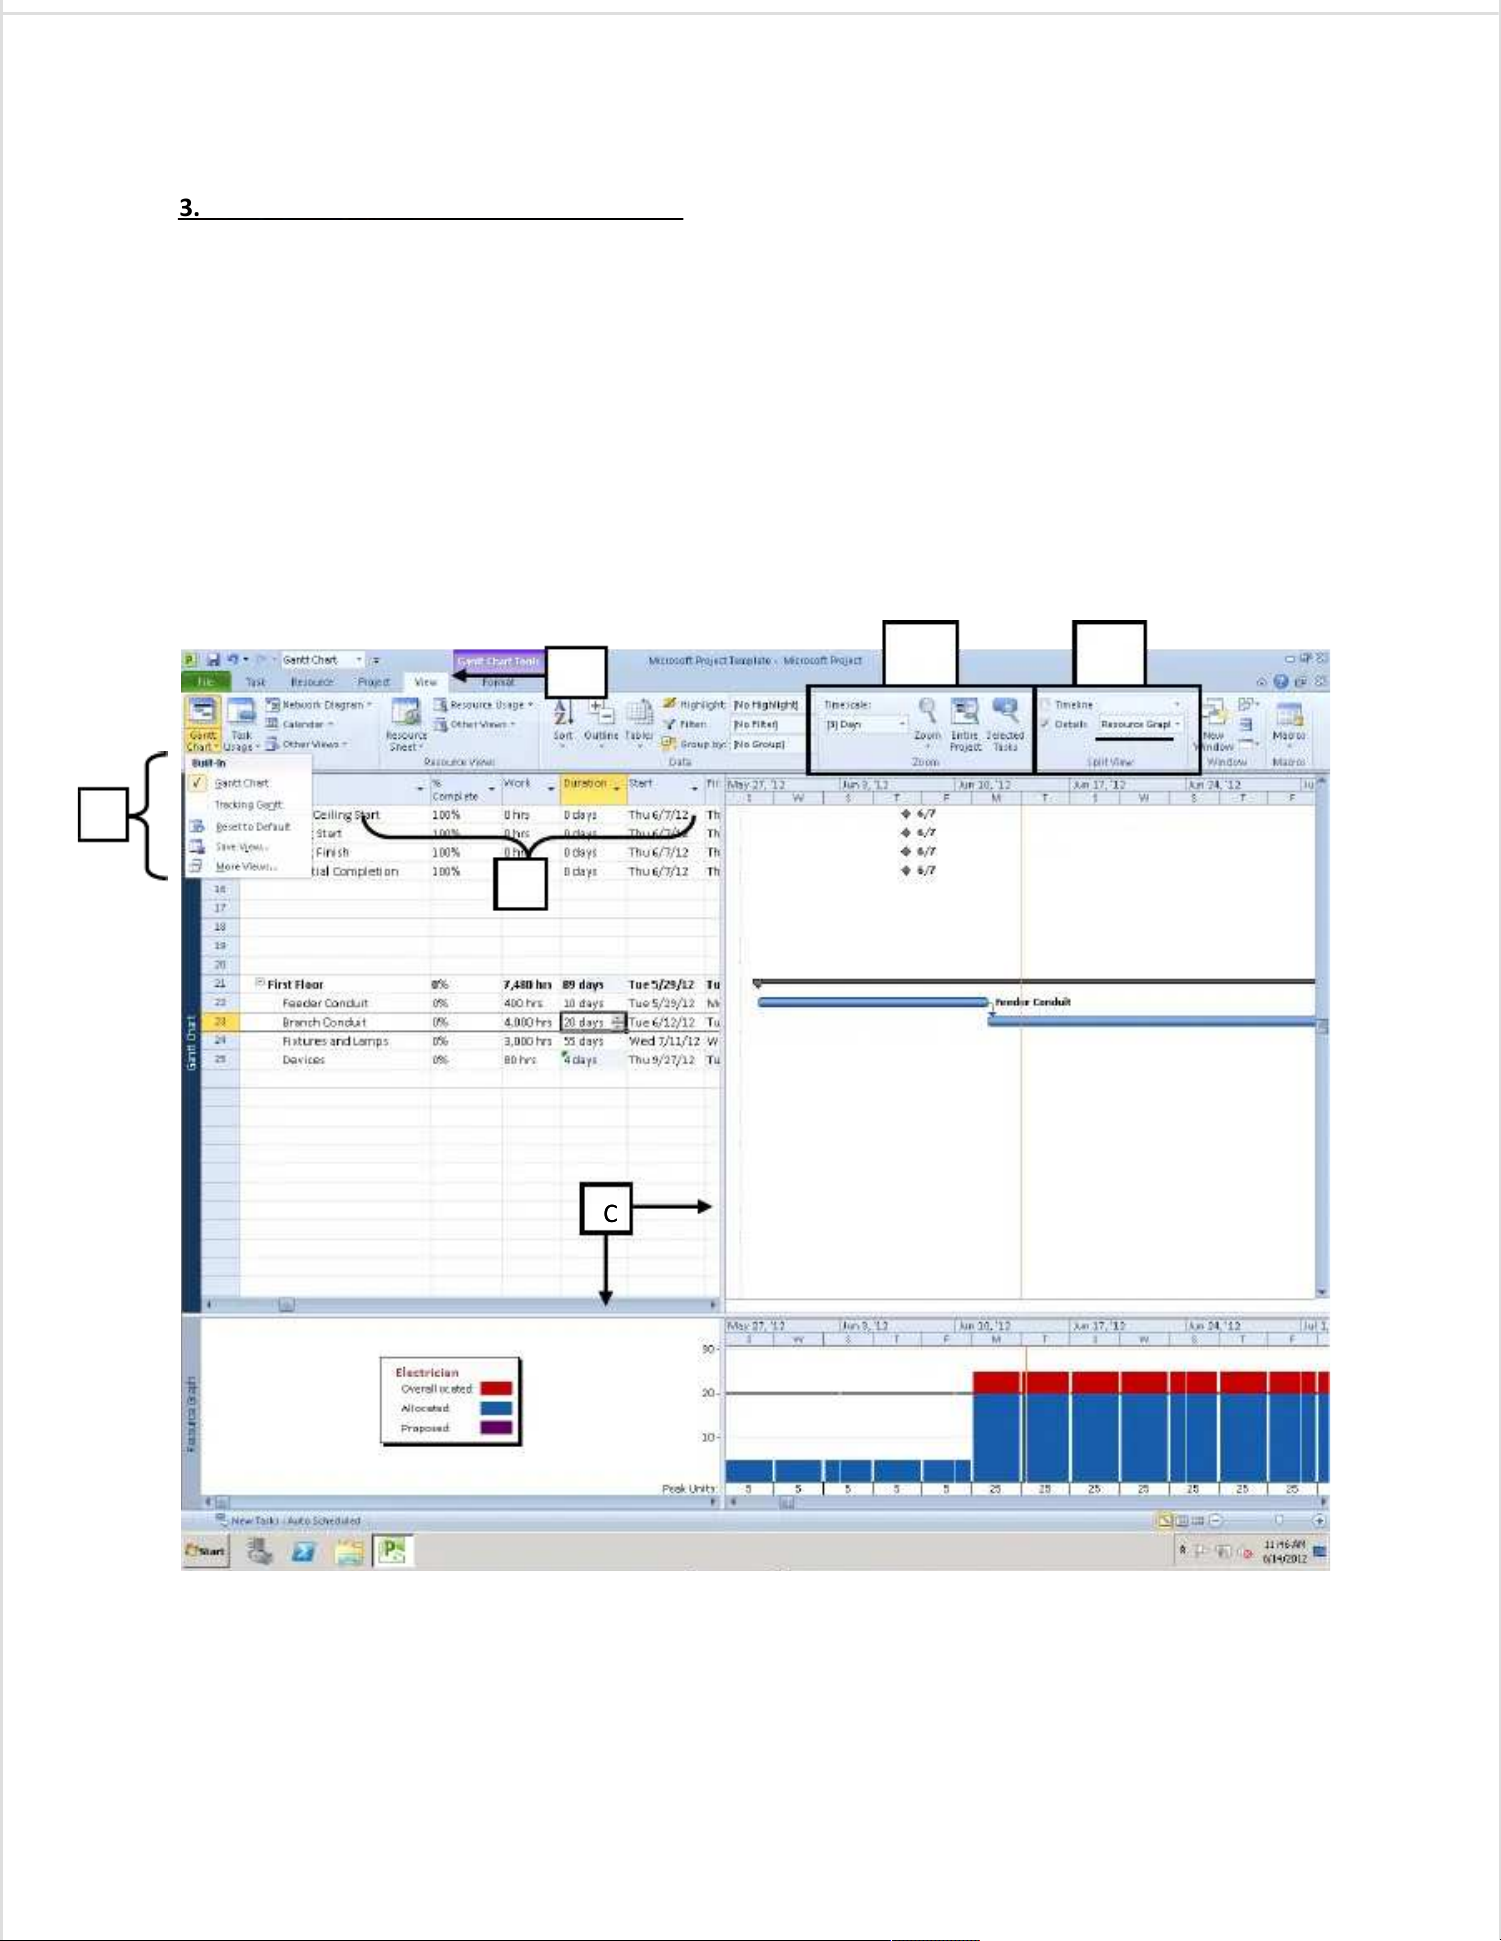
3. Navigating Views Within Microsoft Project3. Navigating Views Within Microsoft Project
a. Select the View Tab.a. Select the View Tab.
b. For our purposes, the Gantt b. For our purposes, the Gantt Chart, Tracking Gantt, and Resource GChart, Tracking Gantt, and Resource Graph will be used, and can beraph will be used, and can be
navigated to from the Gantt Chart dropdown menu.navigated to from the Gantt Chart dropdown menu.
c. Windows can be modified by dragging and dropping the horizontal and vertical lines c. Windows can be modified by dragging and dropping the horizontal and vertical lines that separatethat separate
views. views. This can be used tThis can be used to show or hide columno show or hide columns in the work area.s in the work area.
d. The zoom and timescale can be d. The zoom and timescale can be adjusted with the tools found in box D.adjusted with the tools found in box D.
e. The screen can e. The screen can be split into an upper and a lower work be split into an upper and a lower work area by checking the box next area by checking the box next to Details. Theto Details. The
dropdown menu next to details is used to dropdown menu next to details is used to choose which view is displayed in the bottom portion of thechoose which view is displayed in the bottom portion of the
screen. screen. In this case, the Details box is checked, and the Resource Graph was chosen to be displayed atIn this case, the Details box is checked, and the Resource Graph was chosen to be displayed at
the bottom of the screen.the bottom of the screen.
BB
CC
DD
AA
CC
EE
Page 3
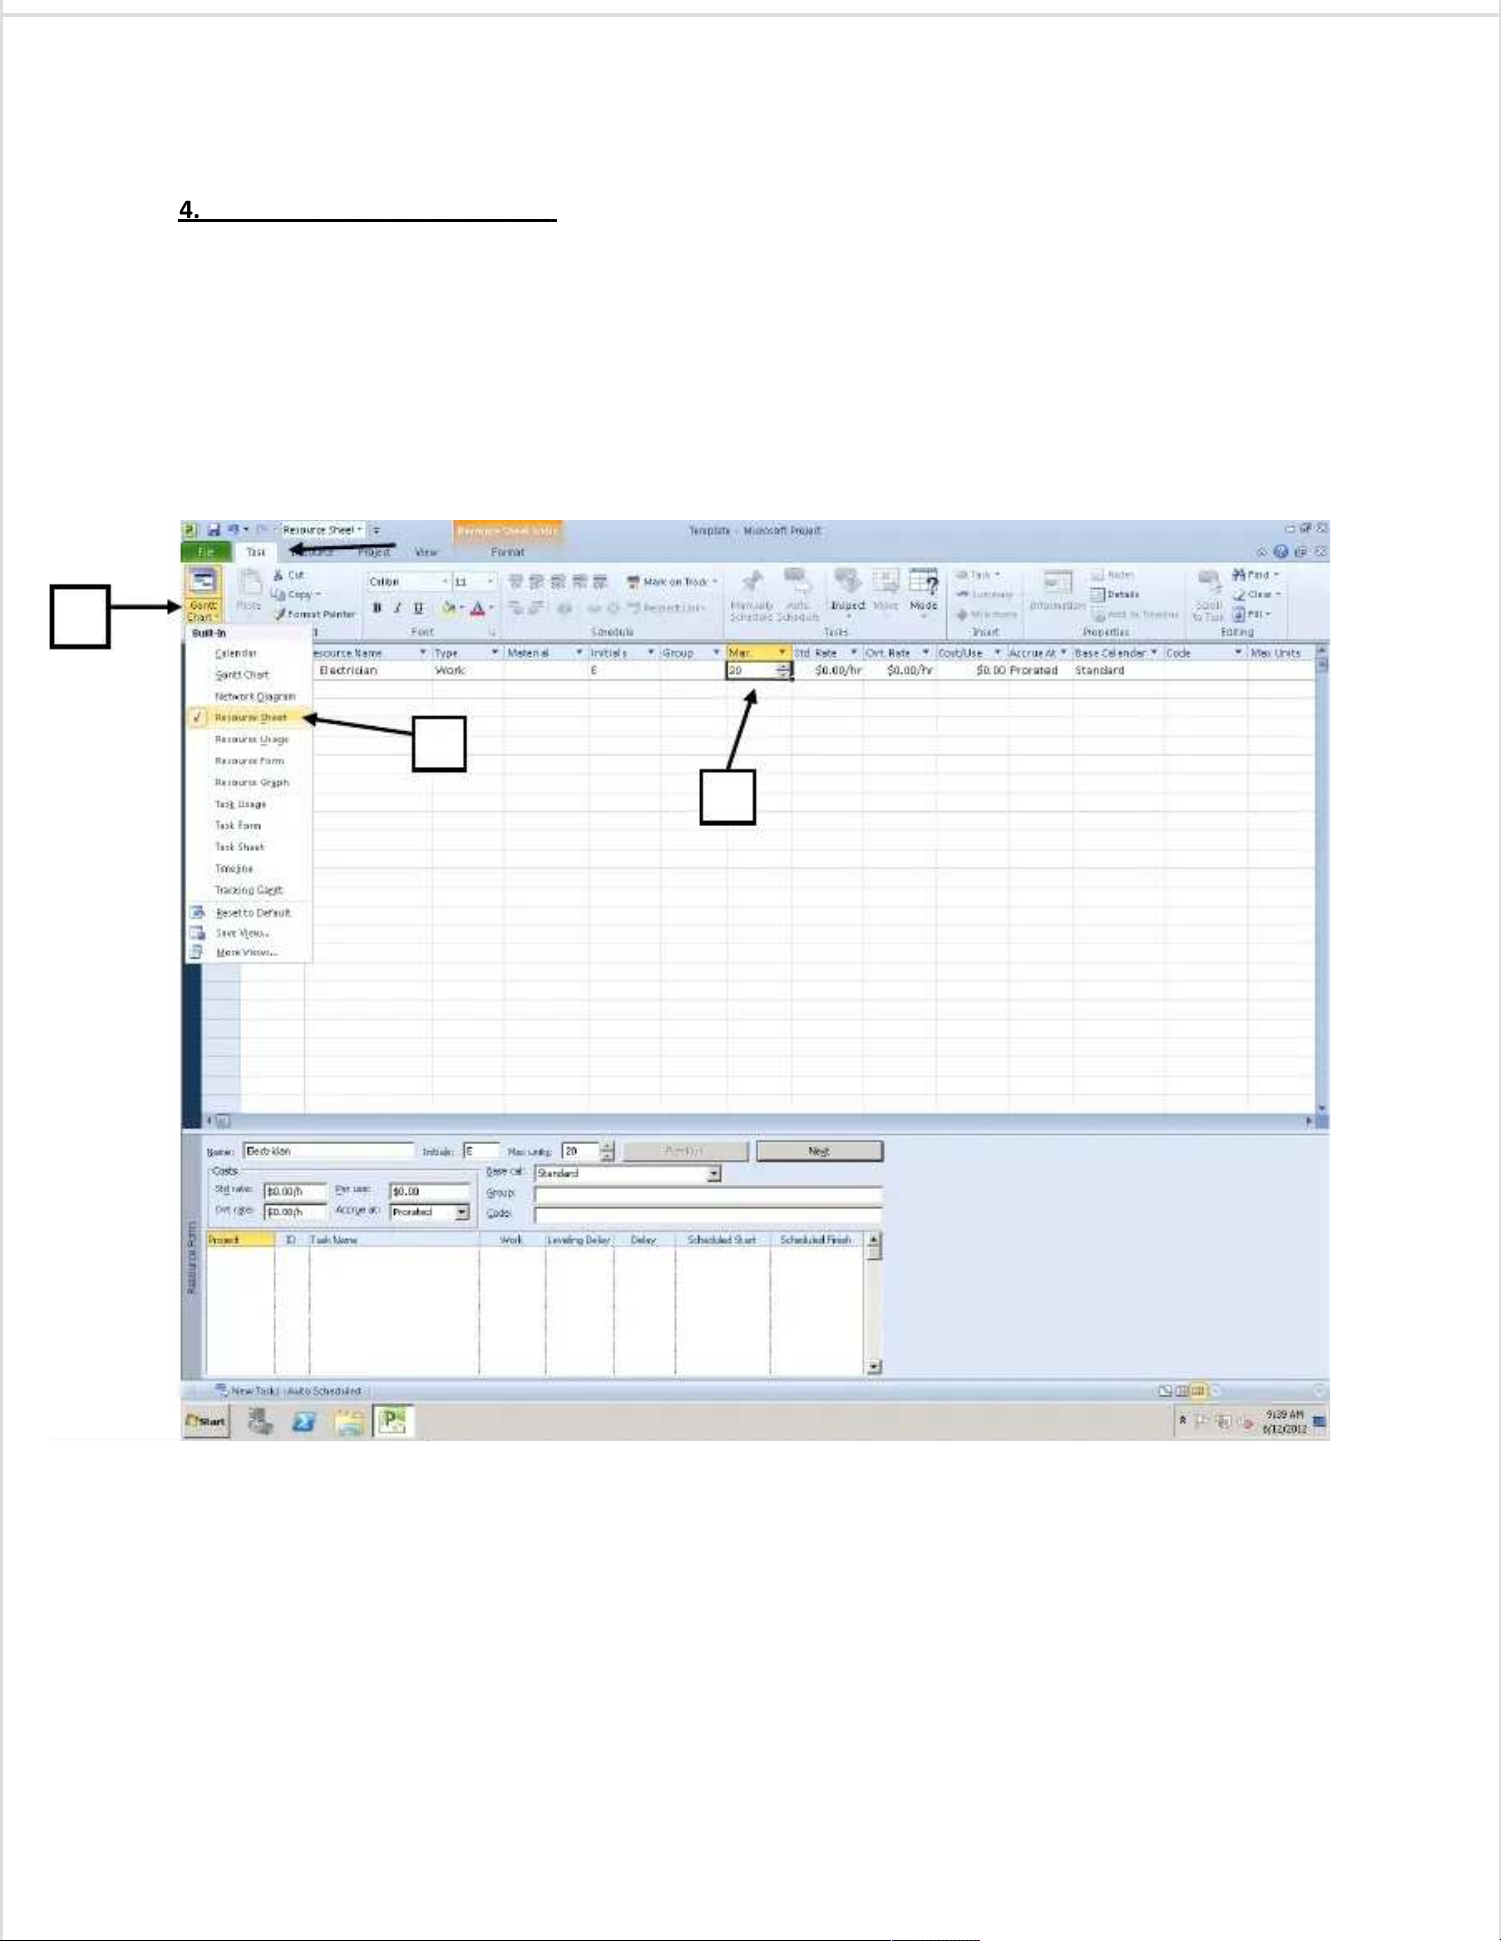
4. Set A Maximum Resource Limit4. Set A Maximum Resource Limit
––
For our purposes, only “Electrician” will be an available resource toFor our purposes, only “Electrician” will be an available resource to
use in Microsoft Project. However, a use in Microsoft Project. However, a maximum number of Electricians must be entered for our maximum number of Electricians must be entered for our projects.projects.
a. Select the Task Tab.a. Select the Task Tab.
b. Click on thb. Click on the drop down menu “Gantt Charte drop down menu “Gantt Chart..””
cc. Select “Resource Sheet. Select “Resource Sheet..””
d. Specify the maximum number of electricians working od. Specify the maximum number of electricians working on the project at n the project at its peak.its peak.
e. Return to the Ge. Return to the Gantt Chart by again using the drop down mantt Chart by again using the drop down menu from part B.enu from part B.
BB
CC
DD
Page 4
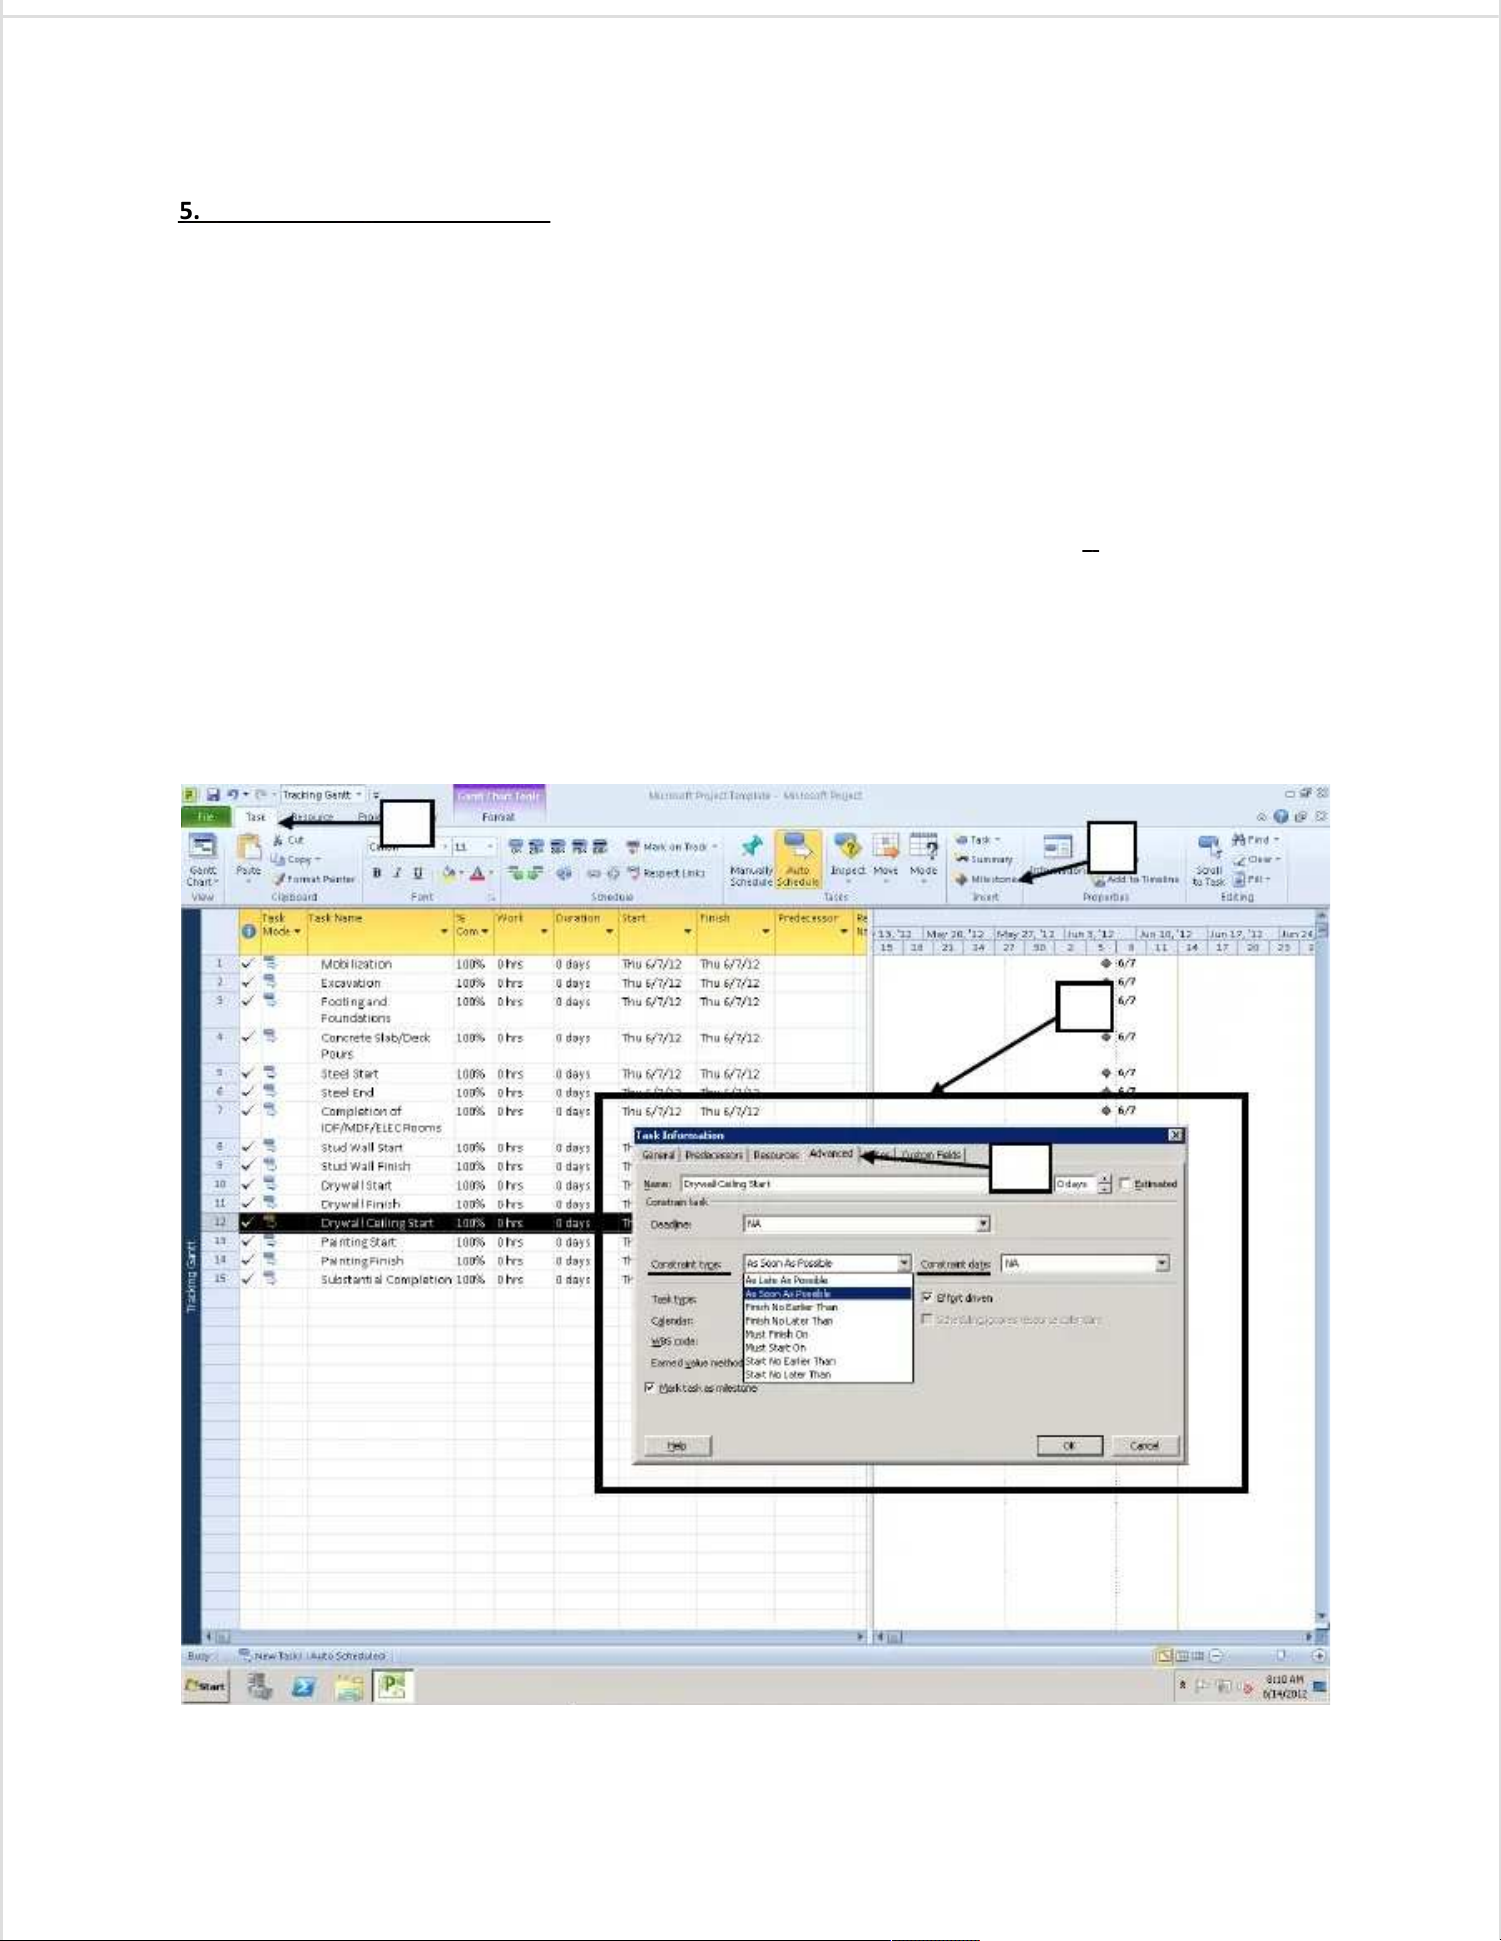
5.5.General Contractor MilestonesGeneral Contractor Milestones––The template already contains several general contractorThe template already contains several general contractor
milestones with generic dates. milestones with generic dates. Be certain to Add, Delete, and MBe certain to Add, Delete, and Modify the Milestones odify the Milestones to reflect theto reflect the
Milestones obtained from the GC’s schedule.Milestones obtained from the GC’s schedule.
To AddTo Add
a. Select the Task Tab.a. Select the Task Tab.
b. Select Milestone.b. Select Milestone.
To EditTo Edit
––
Much like Microsoft Excel, click on the cell you would like Much like Microsoft Excel, click on the cell you would like to modify, and type in your changes.to modify, and type in your changes.
c. Also, more advanced changes can c. Also, more advanced changes can be made by double clicking on a task name be made by double clicking on a task name to bring up the Taskto bring up the Task
Information Window.Information Window.
To DeleteTo Delete––
Right click on the Task Name you would like to Right click on the Task Name you would like to delete, and then select delete, and then select Delete Task.Delete Task.
ConstraintsConstraints––Milestones and Tasks may have hard times that Milestones and Tasks may have hard times that mustmustbe met in order to be met in order to avoid delaying theavoid delaying the
project schedule that can be entered as constraints.project schedule that can be entered as constraints.
d. Select the Advanced Tab in d. Select the Advanced Tab in the Task Information Window(double click on a task to othe Task Information Window(double click on a task to open) where youpen) where you
will find a Constraint Type: drop down menu and a will find a Constraint Type: drop down menu and a dropdown menu to set the Constraint Date.dropdown menu to set the Constraint Date.
AA
BB
CC
DD
Page 5
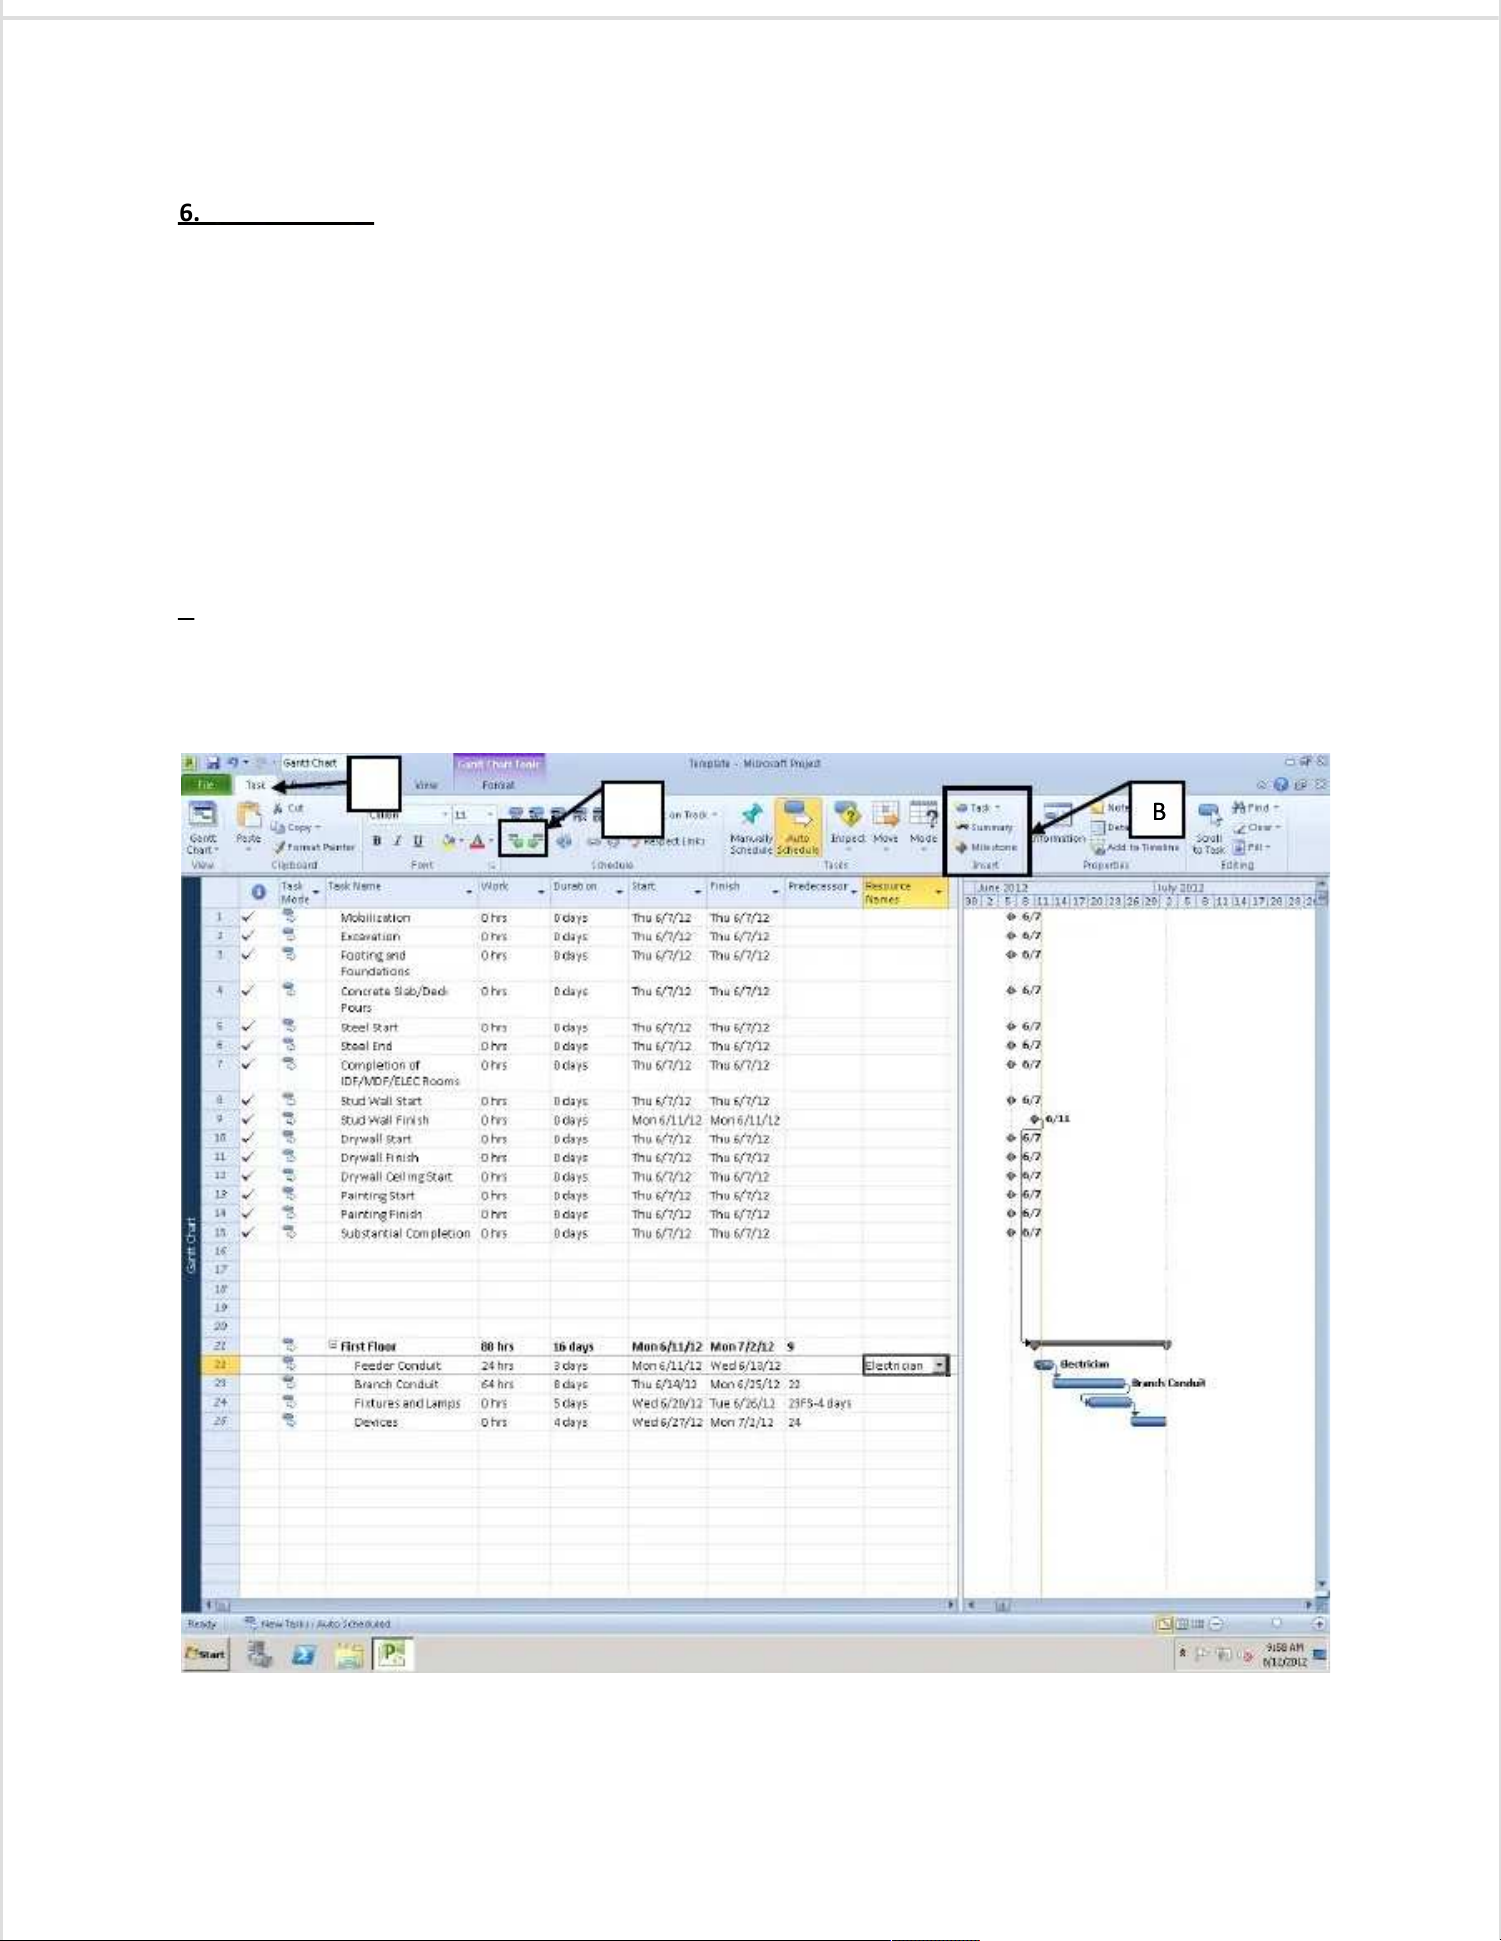
6. Defining Tasks6. Defining Tasks - Microsoft Project allows for the use of both Summary Tasks and Subtasks. - Microsoft Project allows for the use of both Summary Tasks and Subtasks. As perAs per
the PM Manual, Summary Tasks will account for major the PM Manual, Summary Tasks will account for major areas of work on the projecareas of work on the project such as gymnasium,t such as gymnasium,
auditorium, first floor, second floor, or basement. Subtasks will include activities typical of auditorium, first floor, second floor, or basement. Subtasks will include activities typical of the workthe work
performed under a Summary Task such as Fperformed under a Summary Task such as Feeder Conduit, Fixtures and Lamps, or Fire eeder Conduit, Fixtures and Lamps, or Fire Alarm System.Alarm System.
To AddTo Add
a. Select the Task Tab.a. Select the Task Tab.
b.b. First, add a Summary Task by clicking “Summary” and then First, add a Summary Task by clicking “Summary” and then add Sub Tasks under it byadd Sub Tasks under it by clicking onclicking on
“Task.”“Task.”
c. It is possible to indent tc. It is possible to indent tasks once they have been created asks once they have been created using the tools found in box C to using the tools found in box C to switchswitch
tasks back and forth between being summary ttasks back and forth between being summary tasks and sub tasks.asks and sub tasks.
To DeleteTo Delete
––Similar to deleting Milestones, right click on the Similar to deleting Milestones, right click on the task you wish to delete, and ttask you wish to delete, and then selecthen select
Delete Task.Delete Task.
To Edit/Enter Task To Edit/Enter Task InformationInformation––Similar to editing Milestones, select the ceSimilar to editing Milestones, select the cell you would like to change,ll you would like to change,
and enter new information whether it be duration, start date, predecessor, or resources used.and enter new information whether it be duration, start date, predecessor, or resources used.
Additionally, the Task Information window can be opened for entering advanced information by doubleAdditionally, the Task Information window can be opened for entering advanced information by double
clicking on the task of interest.clicking on the task of interest.
AA
BBCC
Page 6
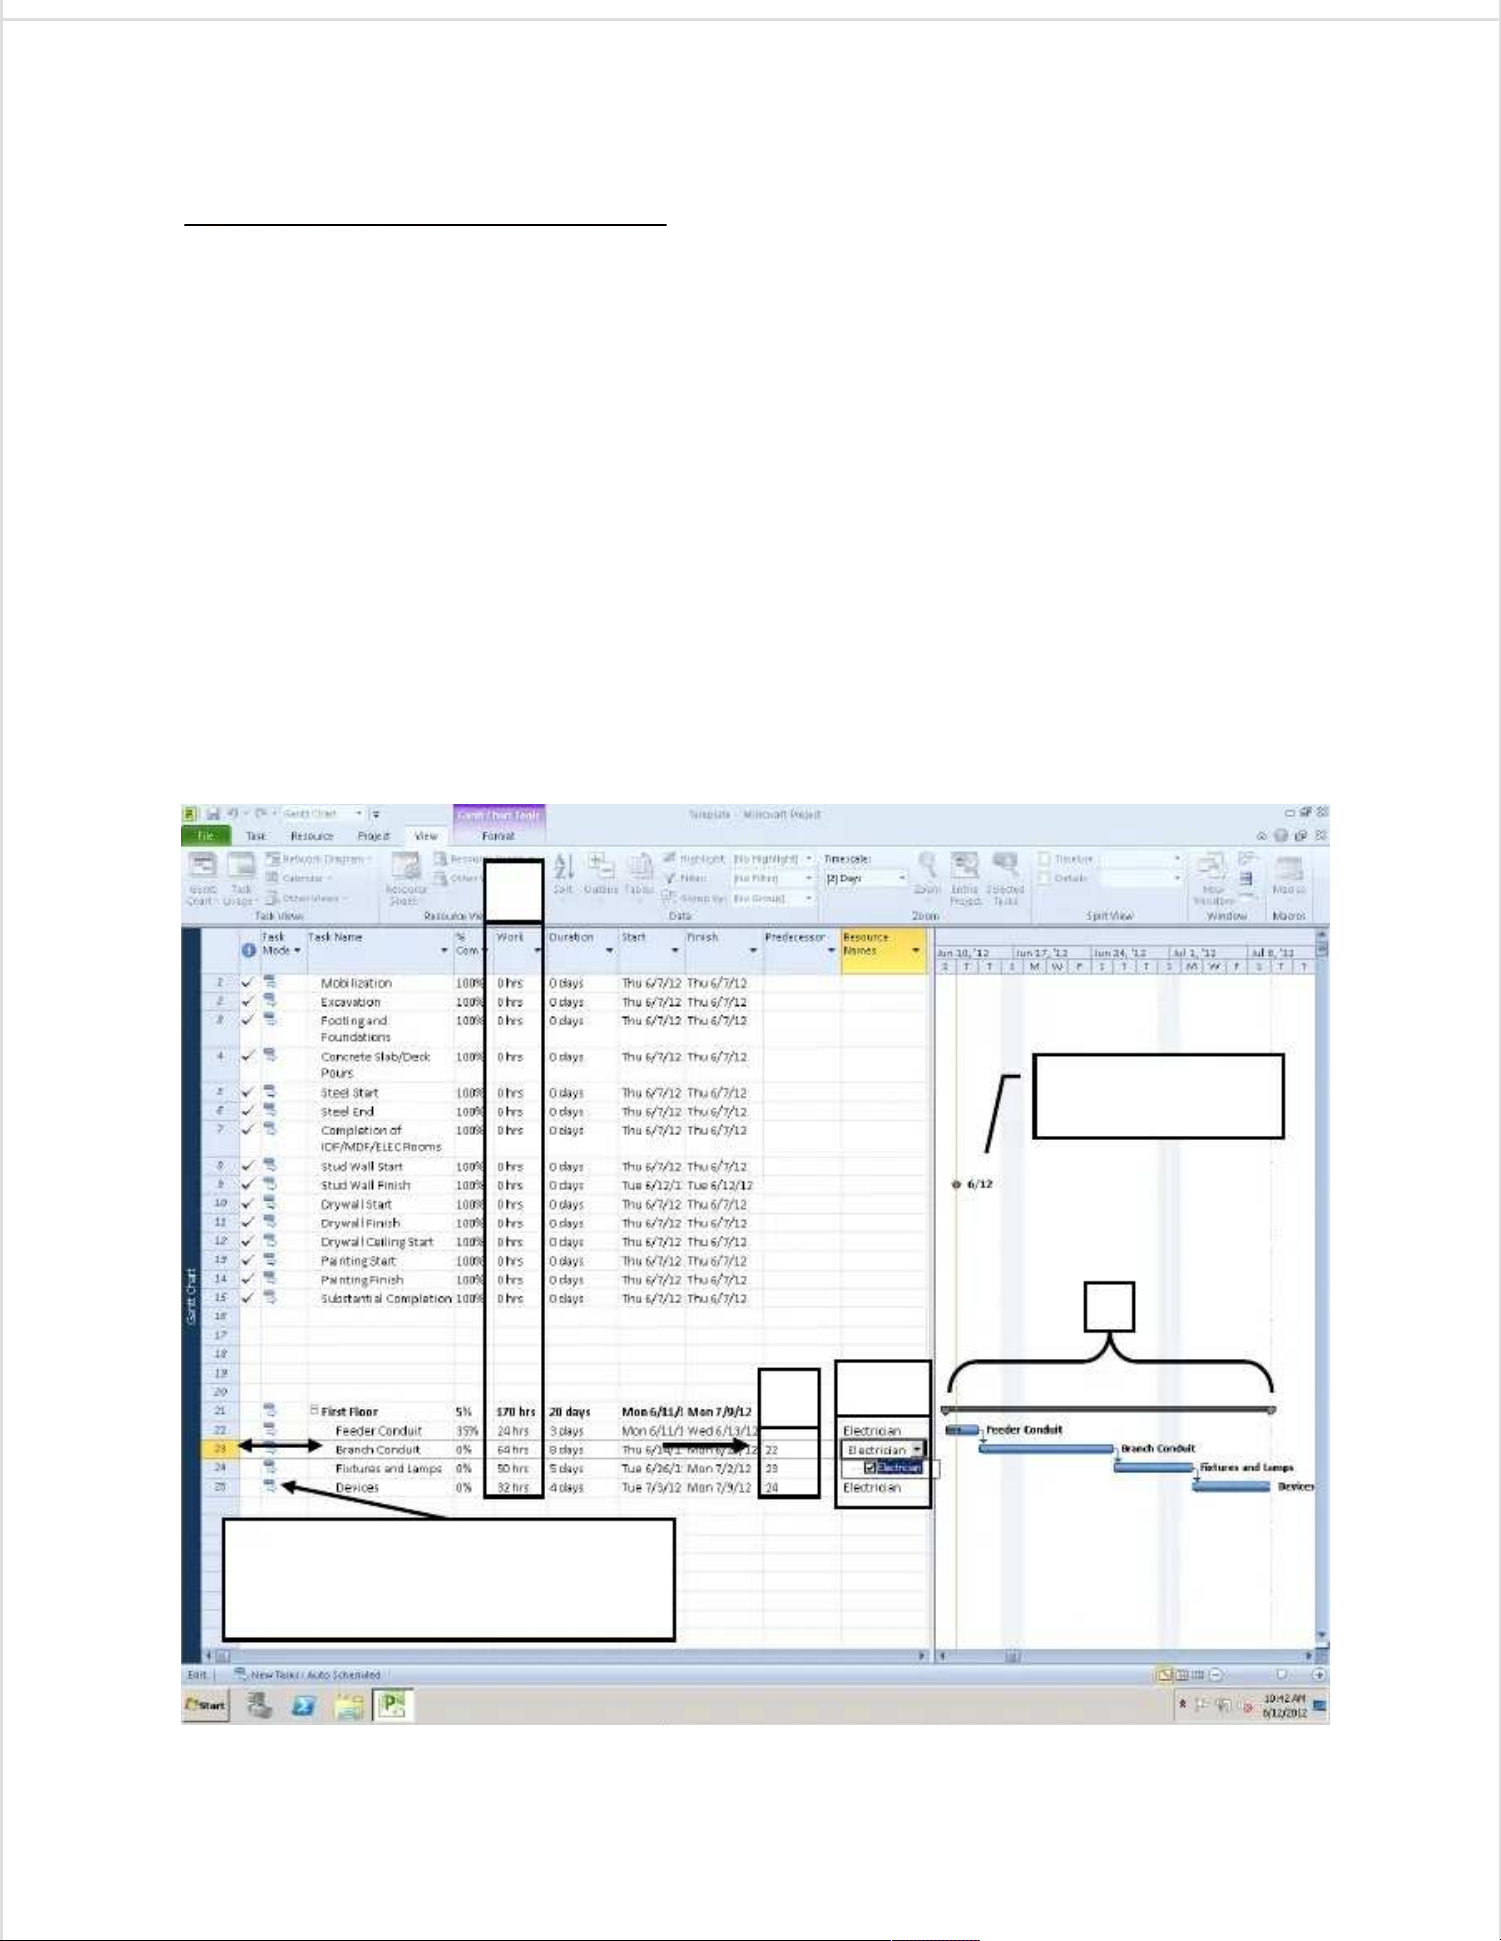
7. Add Work, Links, and Resources to Tasks7. Add Work, Links, and Resources to Tasks
––
To create this example, a date was chosen for the “StudTo create this example, a date was chosen for the “Stud
Wall Finish” Milestone to emphasize the GC’s progress allowing the Wall Finish” Milestone to emphasize the GC’s progress allowing the commencement of electrical workcommencement of electrical work
on the First Floor.on the First Floor.
a.a.Enter the estimated amount of work(hours) into the Work Enter the estimated amount of work(hours) into the Work column. This Template is Work Drivencolumn. This Template is Work Driven
meaning that hours will be held constant if the duration is cmeaning that hours will be held constant if the duration is changed to allow for automatichanged to allow for automatic
updating of our resource graphs.updating of our resource graphs.
b.b.Once a start date Once a start date is set for the Summary Task, begin adding task depeis set for the Summary Task, begin adding task dependencies by enteringndencies by entering
Predecessors for Sub Tasks by Predecessors for Sub Tasks by typing task item numbtyping task item numbers in the Predecessor column. ers in the Predecessor column. Notice inNotice in
the numbered column on the left that the numbered column on the left that Branch Conduit is Task #23, and it is preceded Branch Conduit is Task #23, and it is preceded by Task #22by Task #22
Feeder Conduit.Feeder Conduit.
**Summary Tasks can be linked to follow immediately after Milestones in the same **Summary Tasks can be linked to follow immediately after Milestones in the same way, but inway, but in
order for tasks to automatically update the Task Mode needs torder for tasks to automatically update the Task Mode needs to be on Auto Schedule.o be on Auto Schedule.
c.c.As task dependencies(links) are As task dependencies(links) are added, successive task start/finish dates added, successive task start/finish dates should automaticallyshould automatically
update. Also, the Gantt chart will rearrange itself to reflect the links between tasks.update. Also, the Gantt chart will rearrange itself to reflect the links between tasks.
d.d.Assign Electrician to each task performed by using the Assign Electrician to each task performed by using the drop down menu in Resource Names.drop down menu in Resource Names.
Don’t assign Electrician to Milestones or other tasks performed Don’t assign Electrician to Milestones or other tasks performed by the GC.by the GC.
CC
Denotes the Stud WallDenotes the Stud Wall
Finish MilestoneFinish Milestone
AA
BB
DD
The Task Mode column allows forThe Task Mode column allows for
Auto and Manual schedulingAuto and Manual scheduling
Page 7
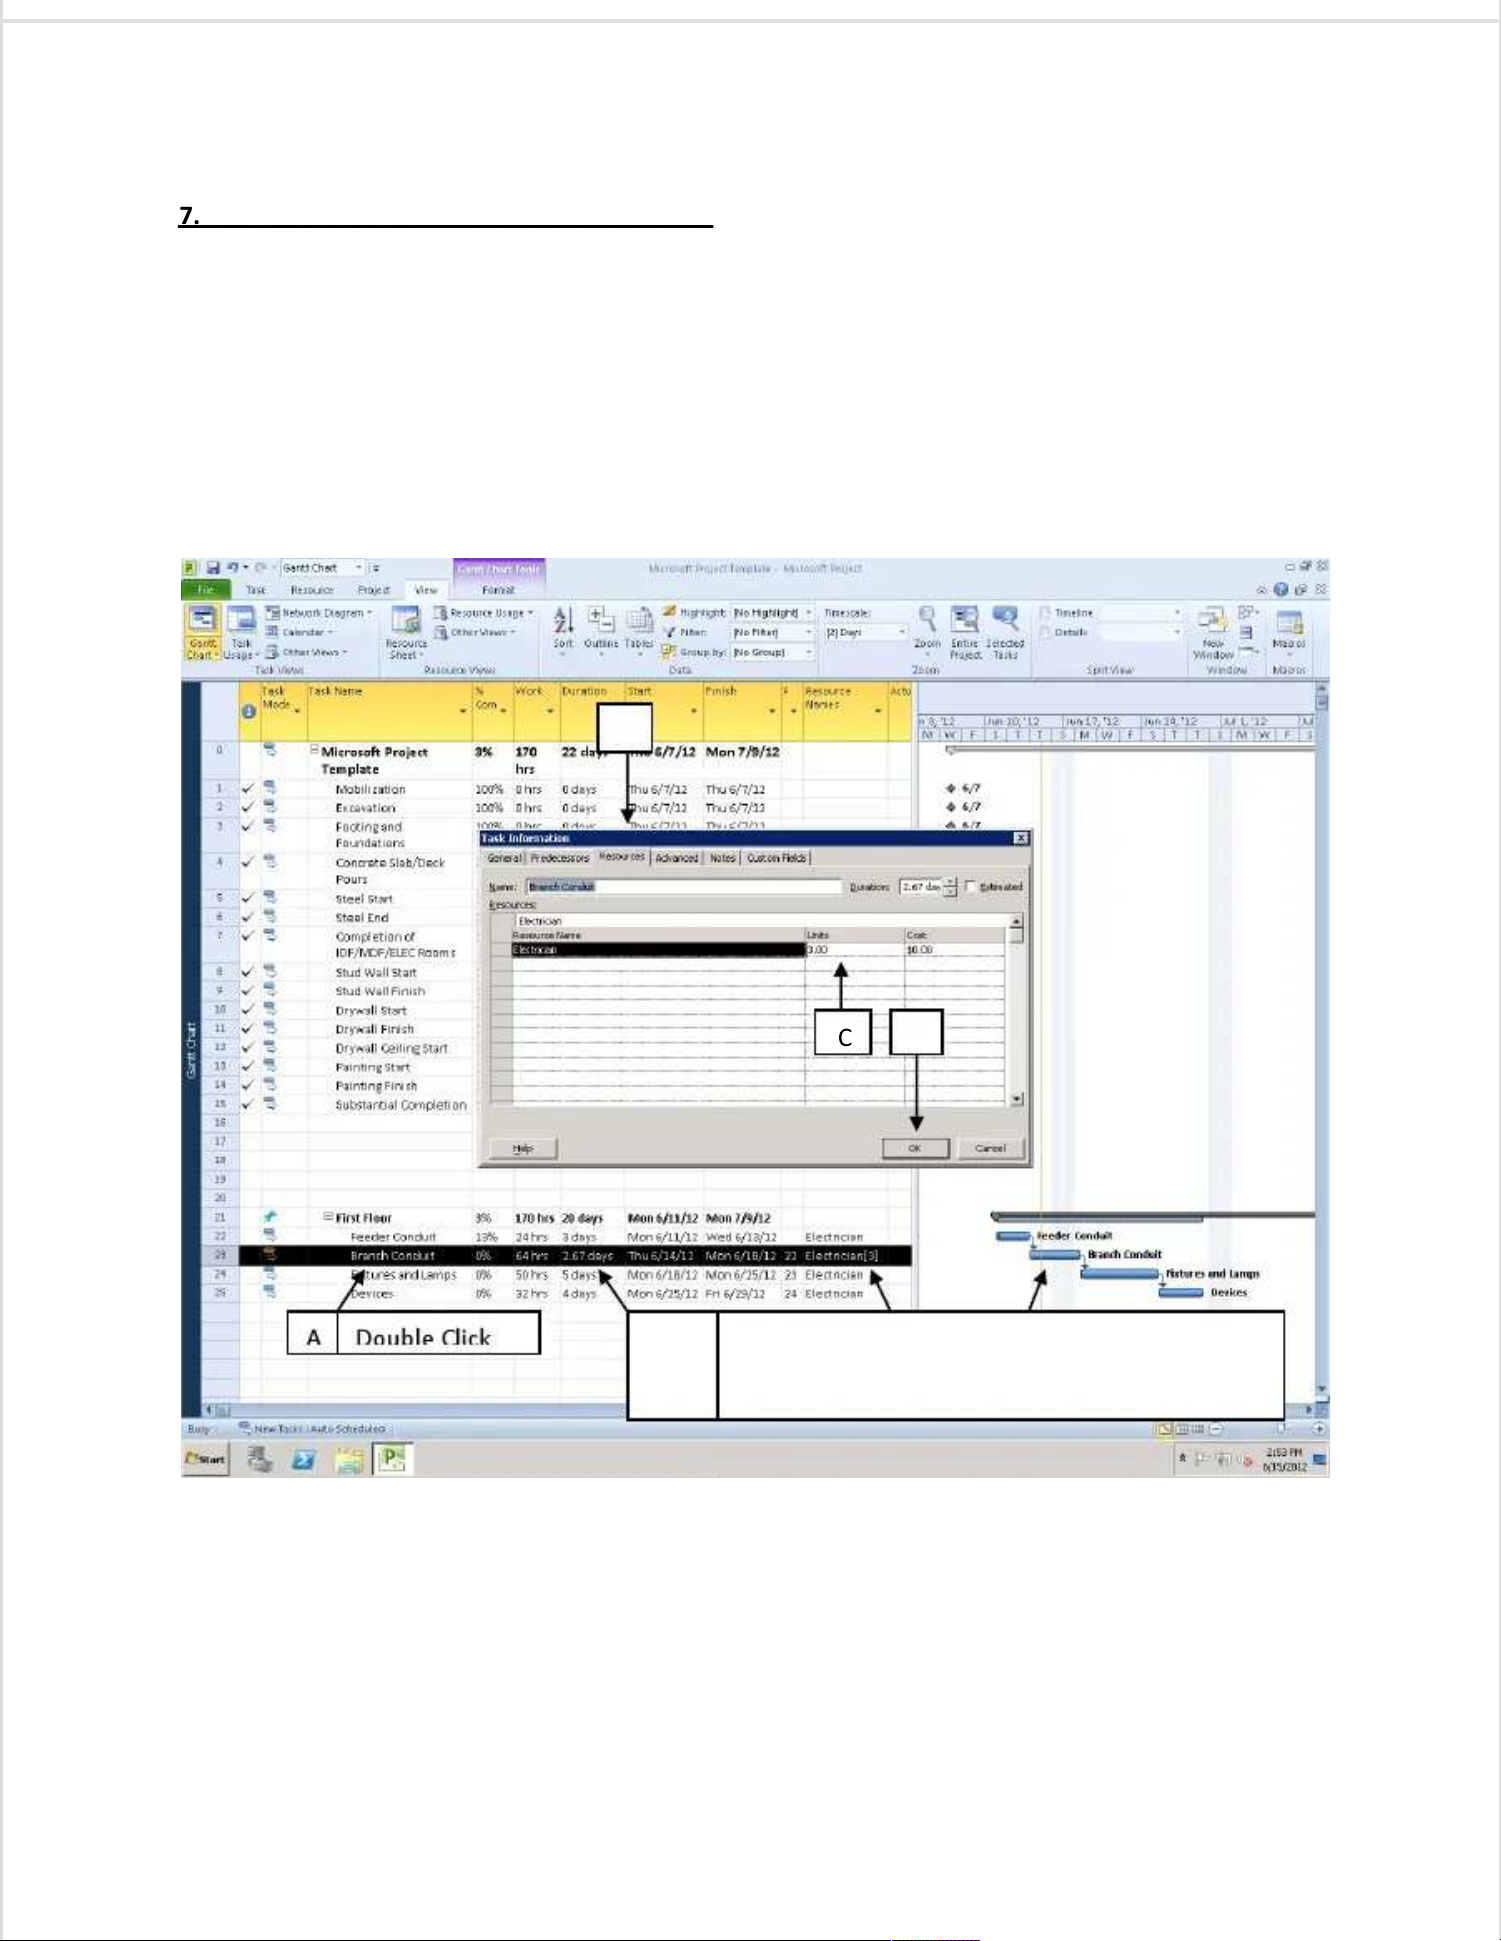
7. Assigning A Number Of Electricians To A Task7. Assigning A Number Of Electricians To A Task
a. Double click on Branch Conduit to bring a. Double click on Branch Conduit to bring up the Task Information window.up the Task Information window.
b. Click on the Resources tb. Click on the Resources tab.ab.
c. Edit the number of electricians tc. Edit the number of electricians to be assigned to that task.o be assigned to that task.
d. Select OK.d. Select OK.
e. Notice how Branch Conduit now has “Electre. Notice how Branch Conduit now has “Electriician[3]” listed under the Resource Names column.cian[3]” listed under the Resource Names column.
Referring to the last Referring to the last page, notice how the Branch page, notice how the Branch Conduit task duration has automatically changed fromConduit task duration has automatically changed from
8 days to 2.67 days with the 8 days to 2.67 days with the addition of more electricians to this task.addition of more electricians to this task.
BB
C C DD
EE
Compare with previous page to notice theCompare with previous page to notice the
changes automatically made.changes automatically made.
Page 8
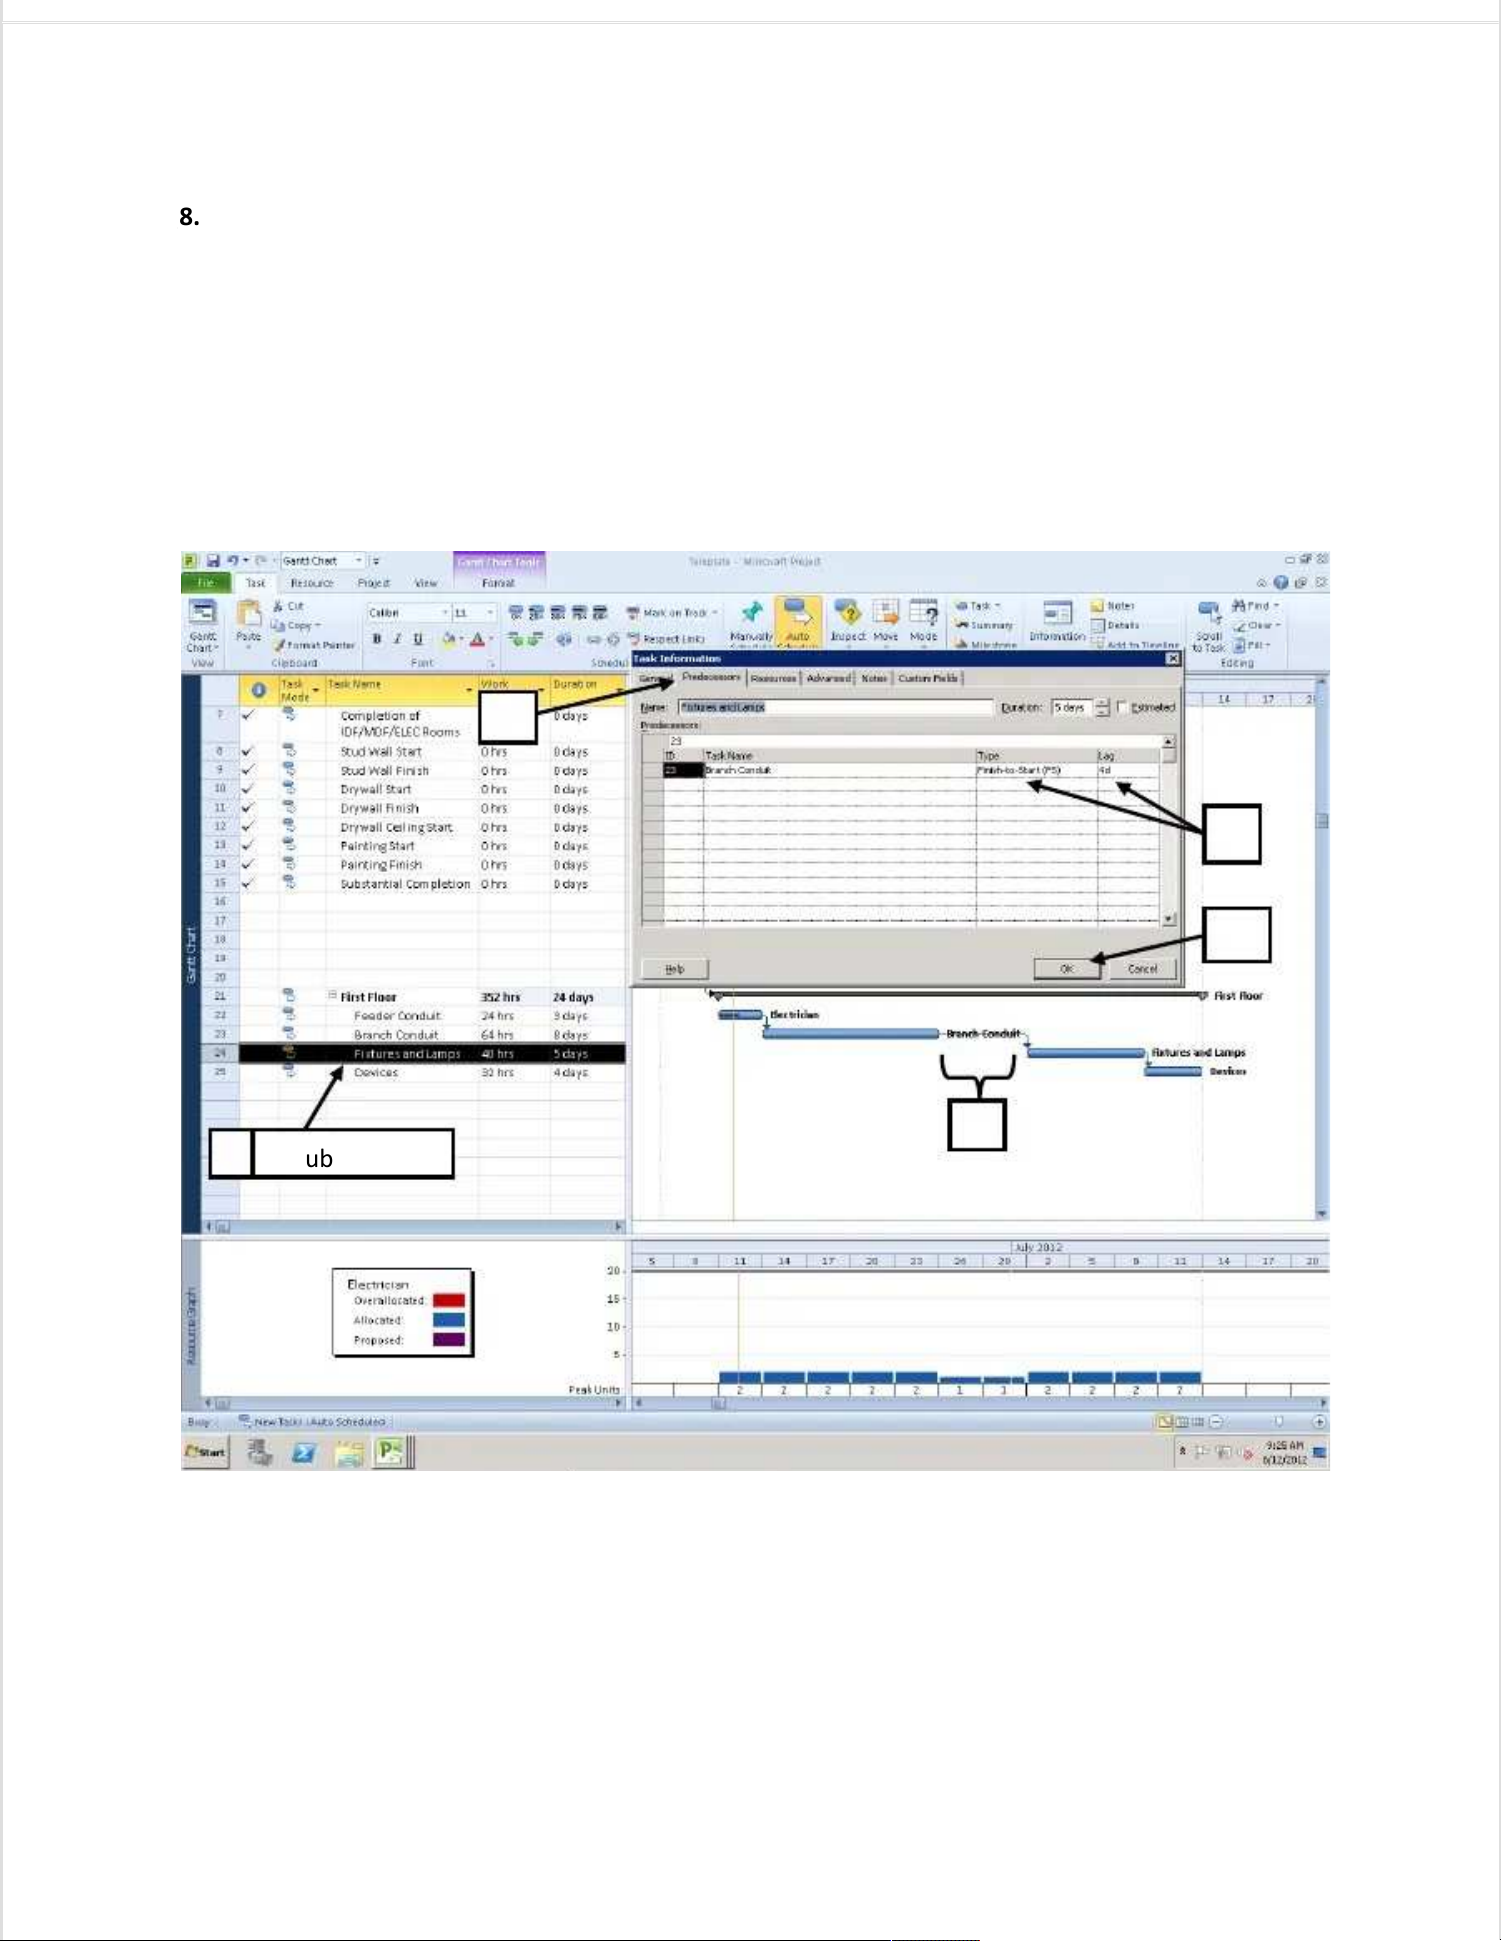
8. Assigning Lag And Lead To Tasks8. Assigning Lag And Lead To Tasks
a. Double click on the task name a. Double click on the task name for which you wish to add Lag/Lead to for which you wish to add Lag/Lead to bring up the Taskbring up the Task
Information window.Information window.
b. Select the Predeceb. Select the Predecessors tab inside the Task Information window.ssors tab inside the Task Information window.
c. Select the Type of Lag/Lead(explained c. Select the Type of Lag/Lead(explained on the following page) and on the following page) and length of the Lag/Lead. length of the Lag/Lead. Any LagAny Lag
less than zero will become Lead less than zero will become Lead in Microsoft Project.in Microsoft Project.
d. Select Ok.d. Select Ok.
e. In this example, the start ofe. In this example, the start of “Fixtures and Lamps” Lags the finish of ““Fixtures and Lamps” Lags the finish of “Branch ConduitBranch Conduit””by four days.by four days.
Double ClickDouble Click
BB
CC
EE
AA
DD
Page 9
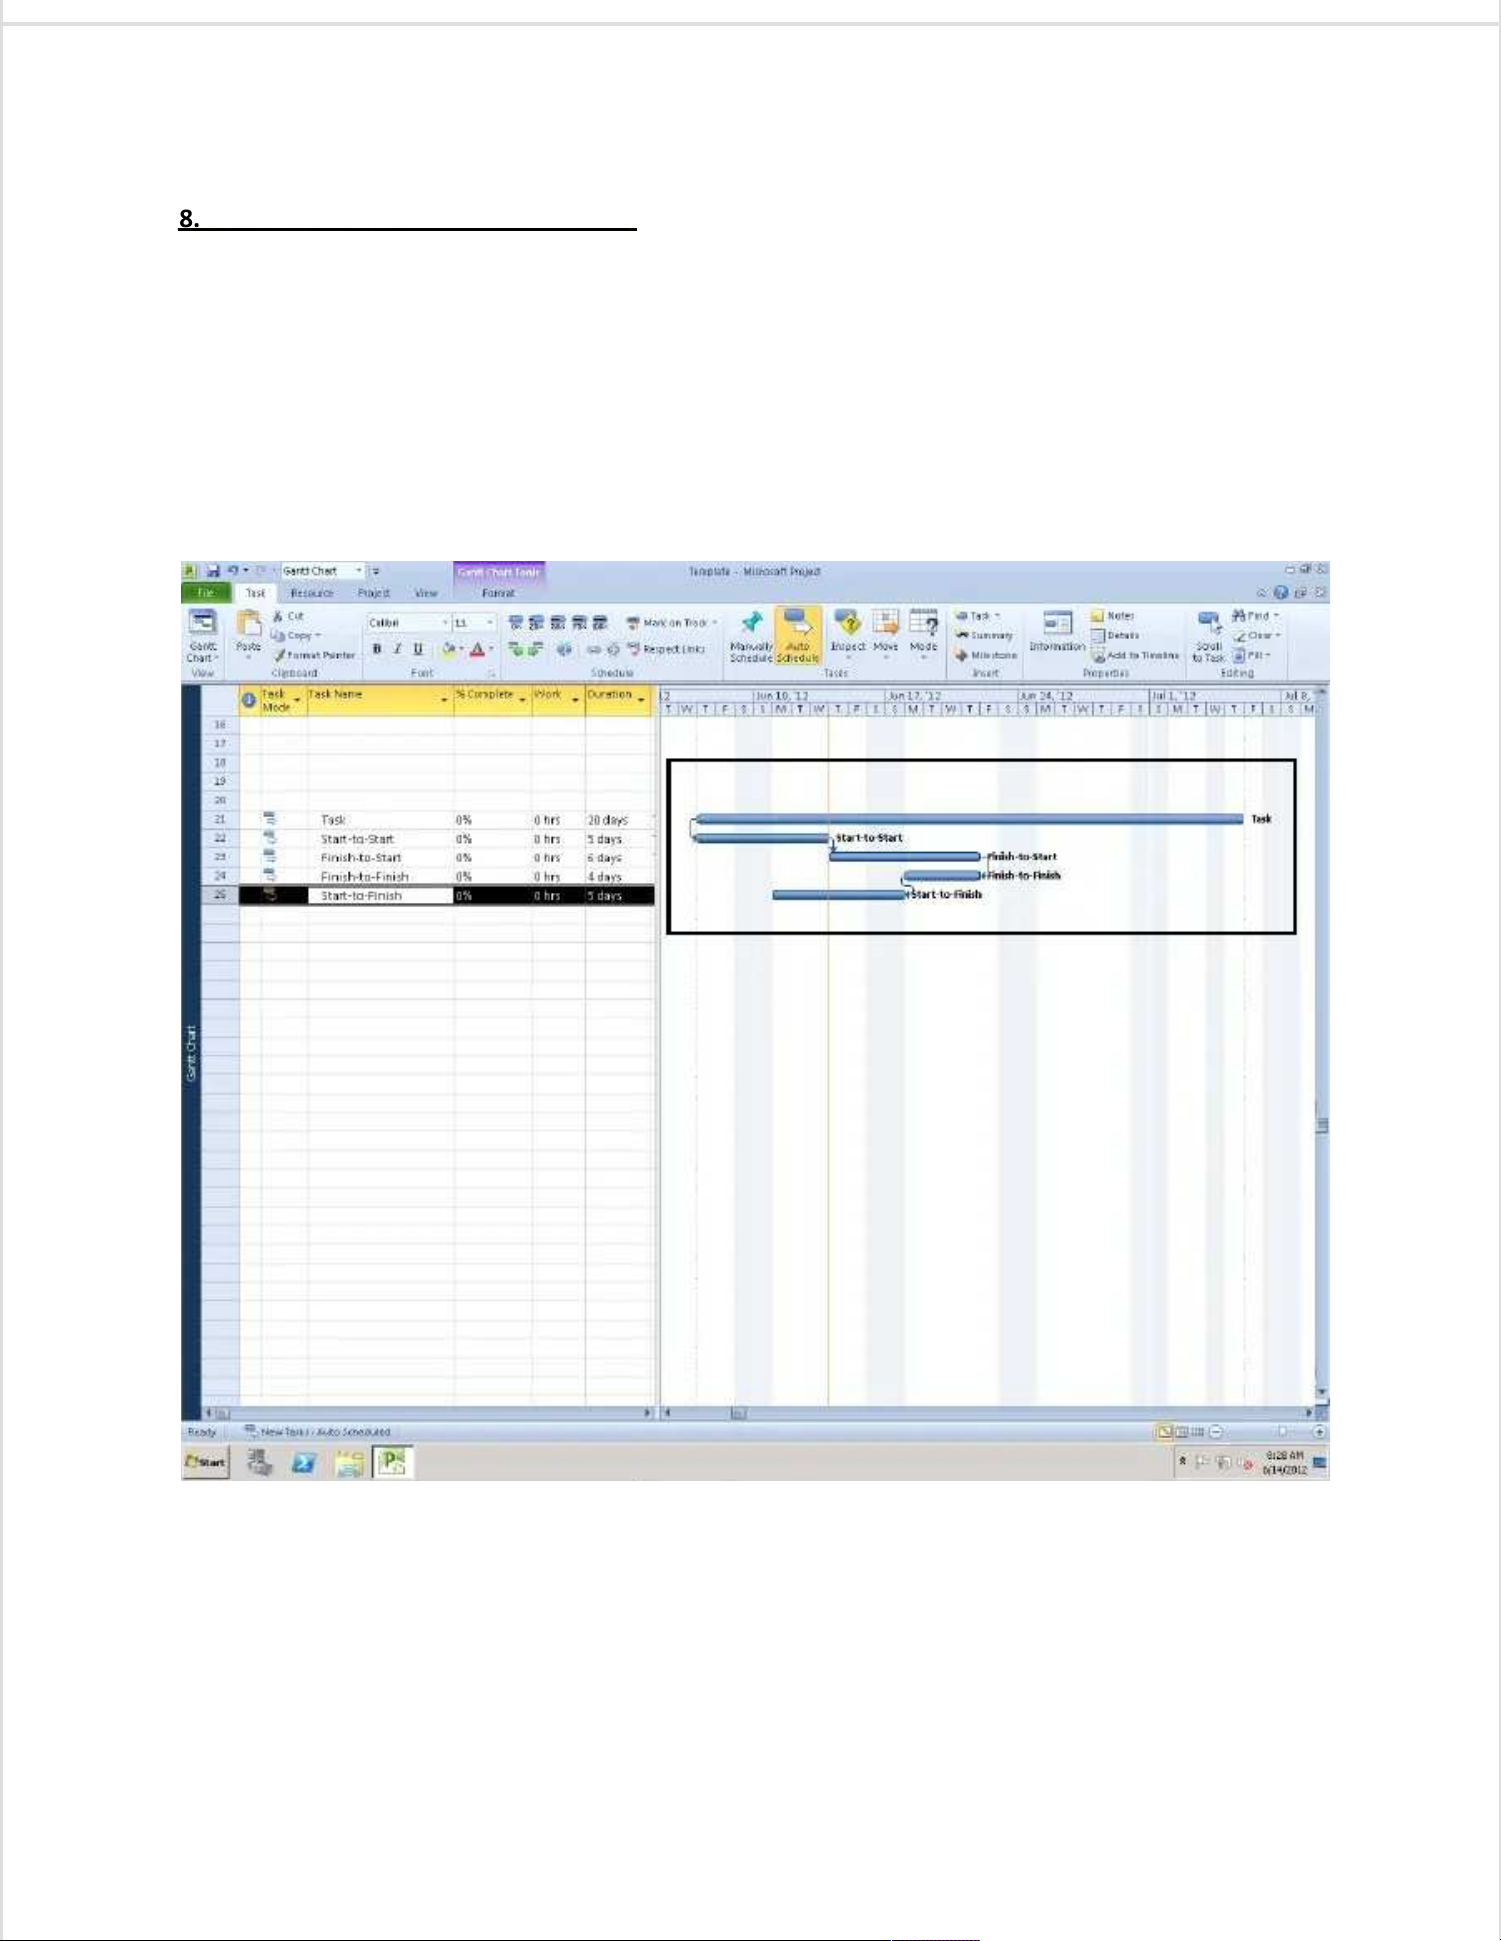
8. Understanding Types of 8. Understanding Types of DependenciesDependencies
The four types of dependencies to choose The four types of dependencies to choose from when linking tasks have been displayed in thefrom when linking tasks have been displayed in the
screenshot below.screenshot below.
Start-to-StartStart-to-Start
relationships mean Task 1(predecessor) must start before Task 2relationships mean Task 1(predecessor) must start before Task 2(successor) can start.(successor) can start.
Finish-to-StartFinish-to-Start
relationships mean Task1 must finish before Task 2 is allowed to start.relationships mean Task1 must finish before Task 2 is allowed to start.
Finish-to-FinishFinish-to-Finish
relationships mean Task 1 must finish so that Task 2 can relationships mean Task 1 must finish so that Task 2 can finish.finish.
Start-to-FinishStart-to-Finish
relationships mean Task 1 must start in order relationships mean Task 1 must start in order for Task 2 to finish.for Task 2 to finish.
Page 10
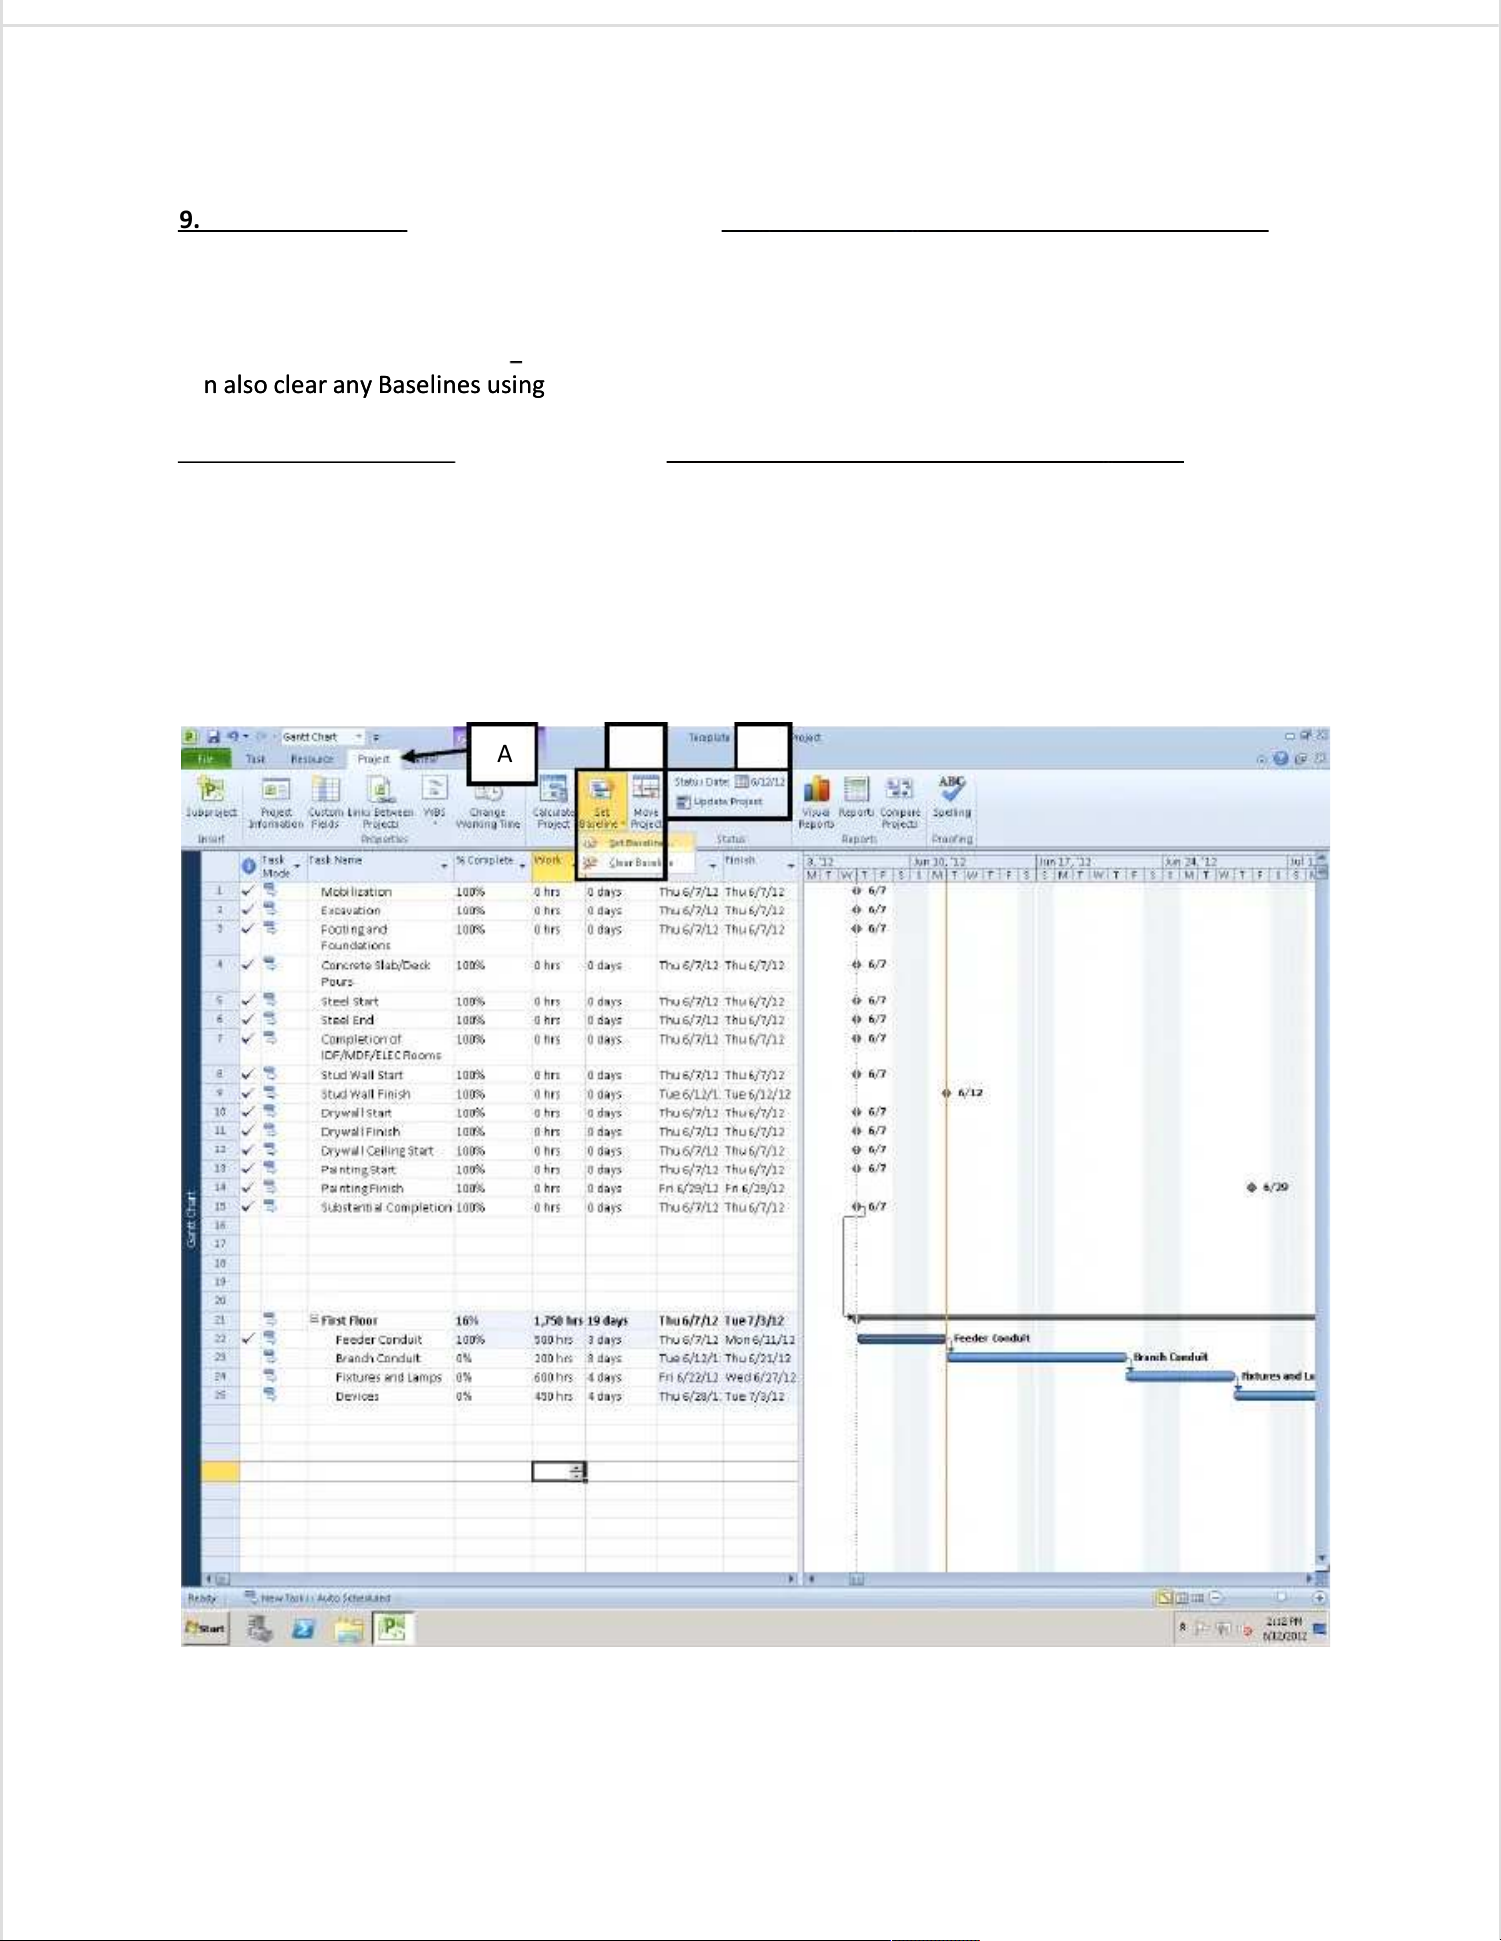
9. Setting A Baseline9. Setting A Baseline
––
Set the Baseline Schedule once the initial project schedule has been created.Set the Baseline Schedule once the initial project schedule has been created.
This allows us to see changes visually when we update tThis allows us to see changes visually when we update the schedule at a later he schedule at a later date.date.
a. Select the Project Tab.a. Select the Project Tab.
b. Select Set Baseline, click on Sb. Select Set Baseline, click on Set Baseline…, and then click OK et Baseline…, and then click OK in the box that appears.in the box that appears.If needed, youIf needed, you
can also clear any Baselines using this drop can also clear any Baselines using this drop down menu as well.down menu as well.
10. Setting A Status Date10. Setting A Status Date
––
Set a Status Date when both creating and updating the schedule to show theSet a Status Date when both creating and updating the schedule to show the
reader when the schedule was reader when the schedule was last updated.last updated.
c. Click on Status Date and select the date for when the schedule was updated. c. Click on Status Date and select the date for when the schedule was updated. The status date will nowThe status date will now
appear on any Gantt Charts, Tracking Gantts, and Resource Graphs that are printed out to show theappear on any Gantt Charts, Tracking Gantts, and Resource Graphs that are printed out to show the
reader when the PM last updated the project schedule.reader when the PM last updated the project schedule.
A A B B CC
Page 11
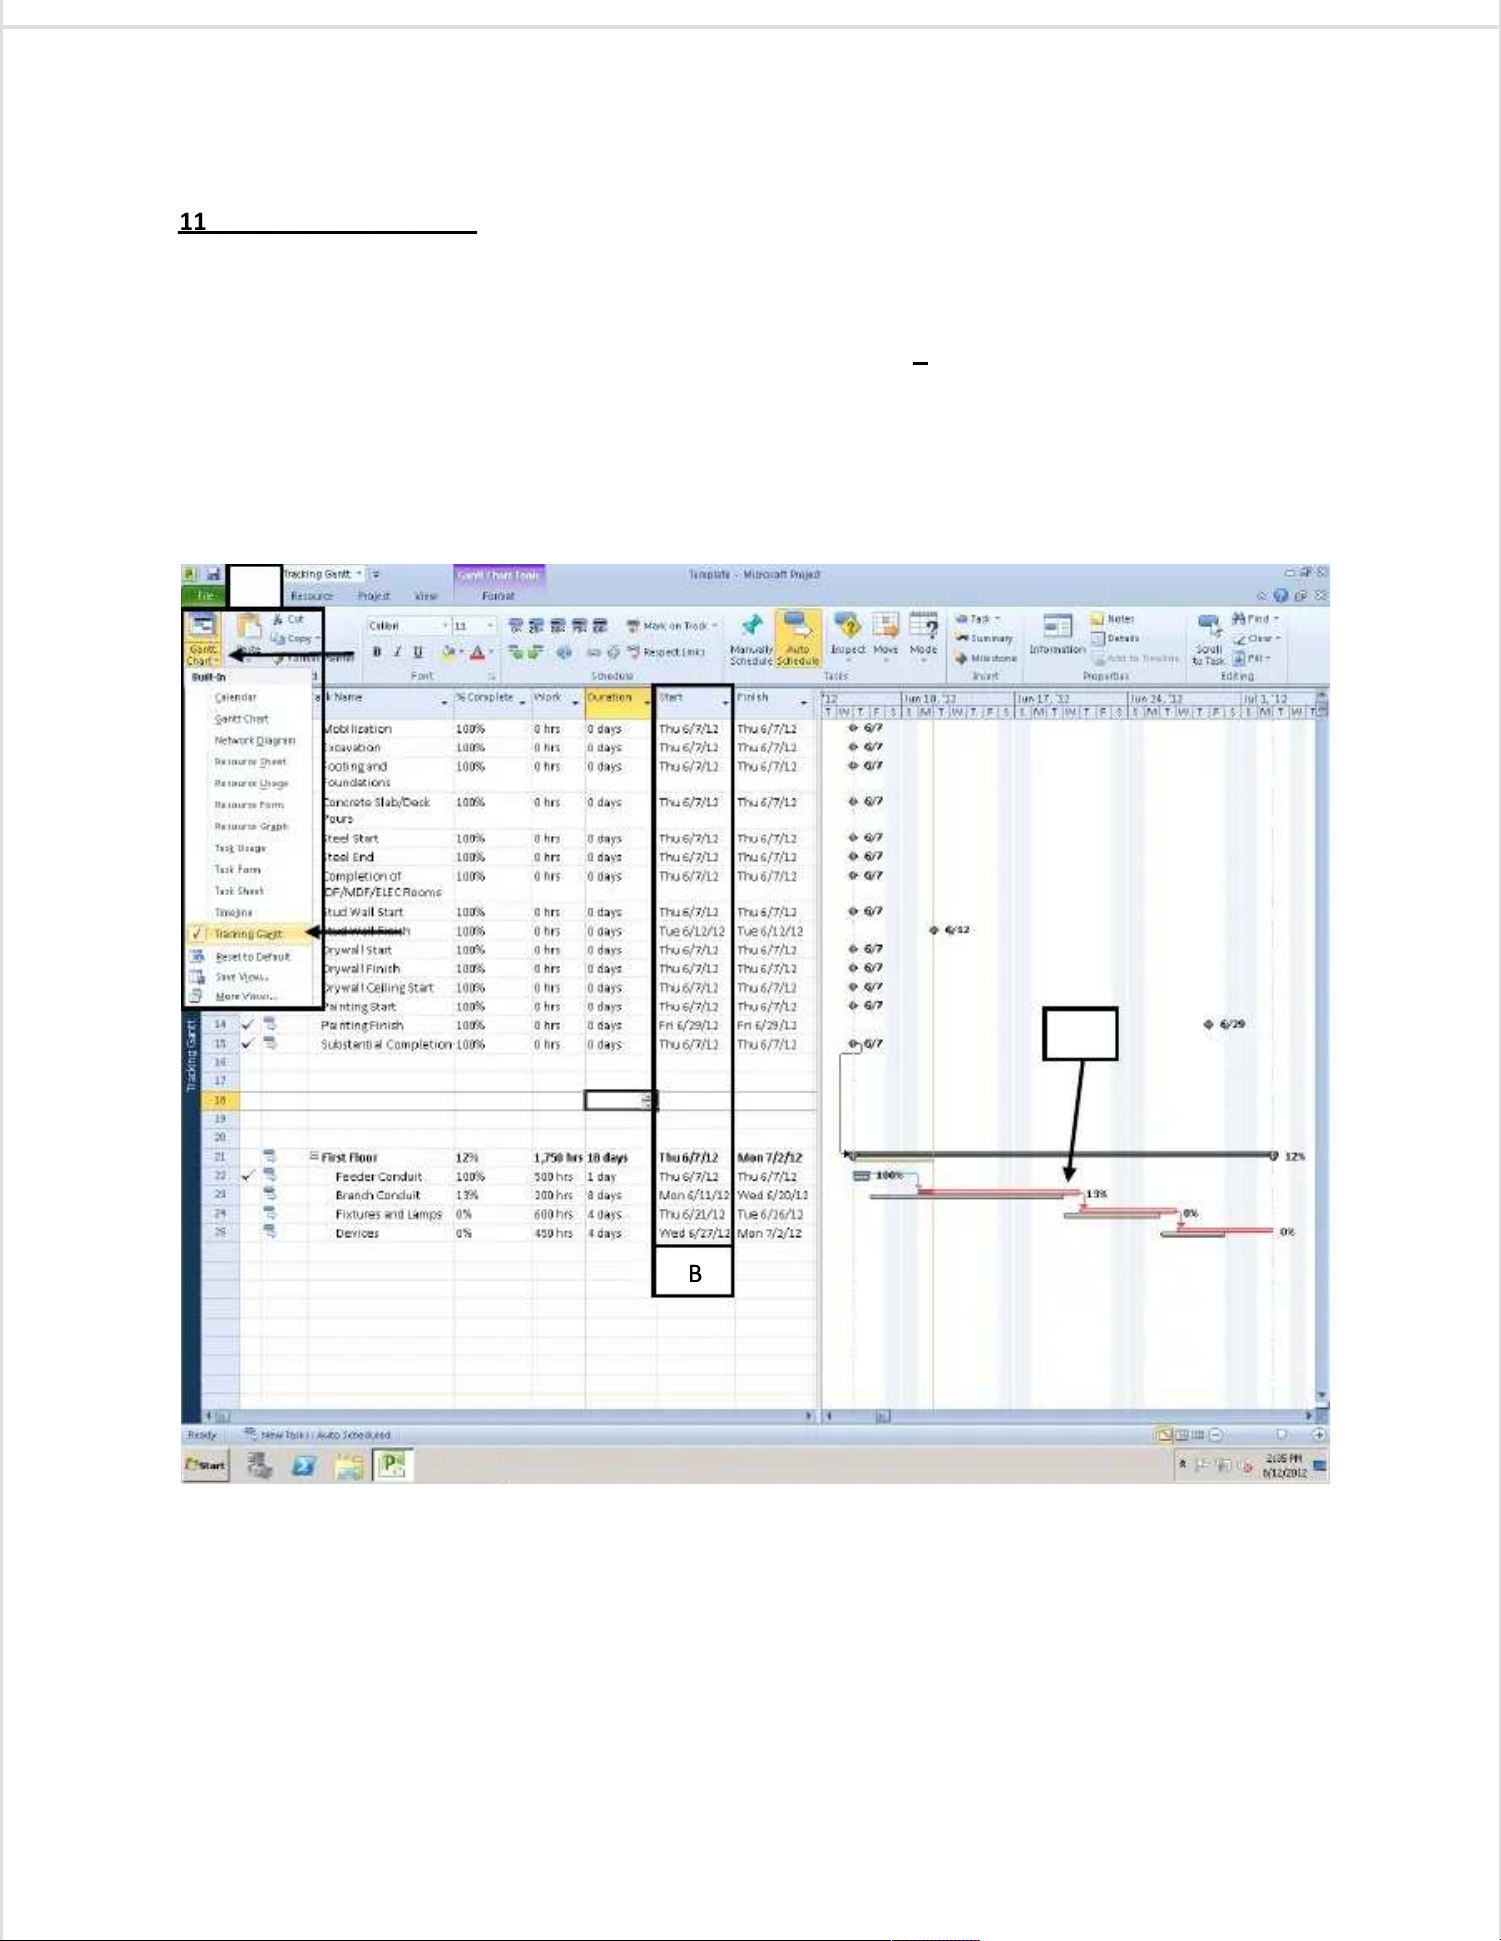
11. Updating The Schedule -11. Updating The Schedule - The “Tracking Gantt” view is best for using visuals to show tasks that haveThe “Tracking Gantt” view is best for using visuals to show tasks that have
run off of the original baseline schedule. run off of the original baseline schedule. Make sure you have a baseline schedule set first.Make sure you have a baseline schedule set first.
Editing Start Dates/Finish Dates/ Durations To Update The ScheduleEditing Start Dates/Finish Dates/ Durations To Update The Schedule
a. Click on the Gantt Ca. Click on the Gantt Chart drop down menu and select Tracking Gahart drop down menu and select Tracking Gantt.ntt.
b. Change any start dates/finish dates/durations that underwent changes since b. Change any start dates/finish dates/durations that underwent changes since the baseline was set.the baseline was set.
c.c. In this example, the “Branch In this example, the “Branch Conduit” task’s start date was Conduit” task’s start date was changed from 6/8/12 to 6/11/12. changed from 6/8/12 to 6/11/12. NoticeNotice
that the progress bar has been split into two portions. that the progress bar has been split into two portions. The bottom portion represents the baselineThe bottom portion represents the baseline
schedule we created, and the top portion schedule we created, and the top portion shows the delay in shows the delay in the updated schedule. the updated schedule. Because autoBecause auto
schedule is turned on, the delay schedule is turned on, the delay in branch conduit is automatically carried into the next tasks.in branch conduit is automatically carried into the next tasks.
AA
BB
CC
Page 12
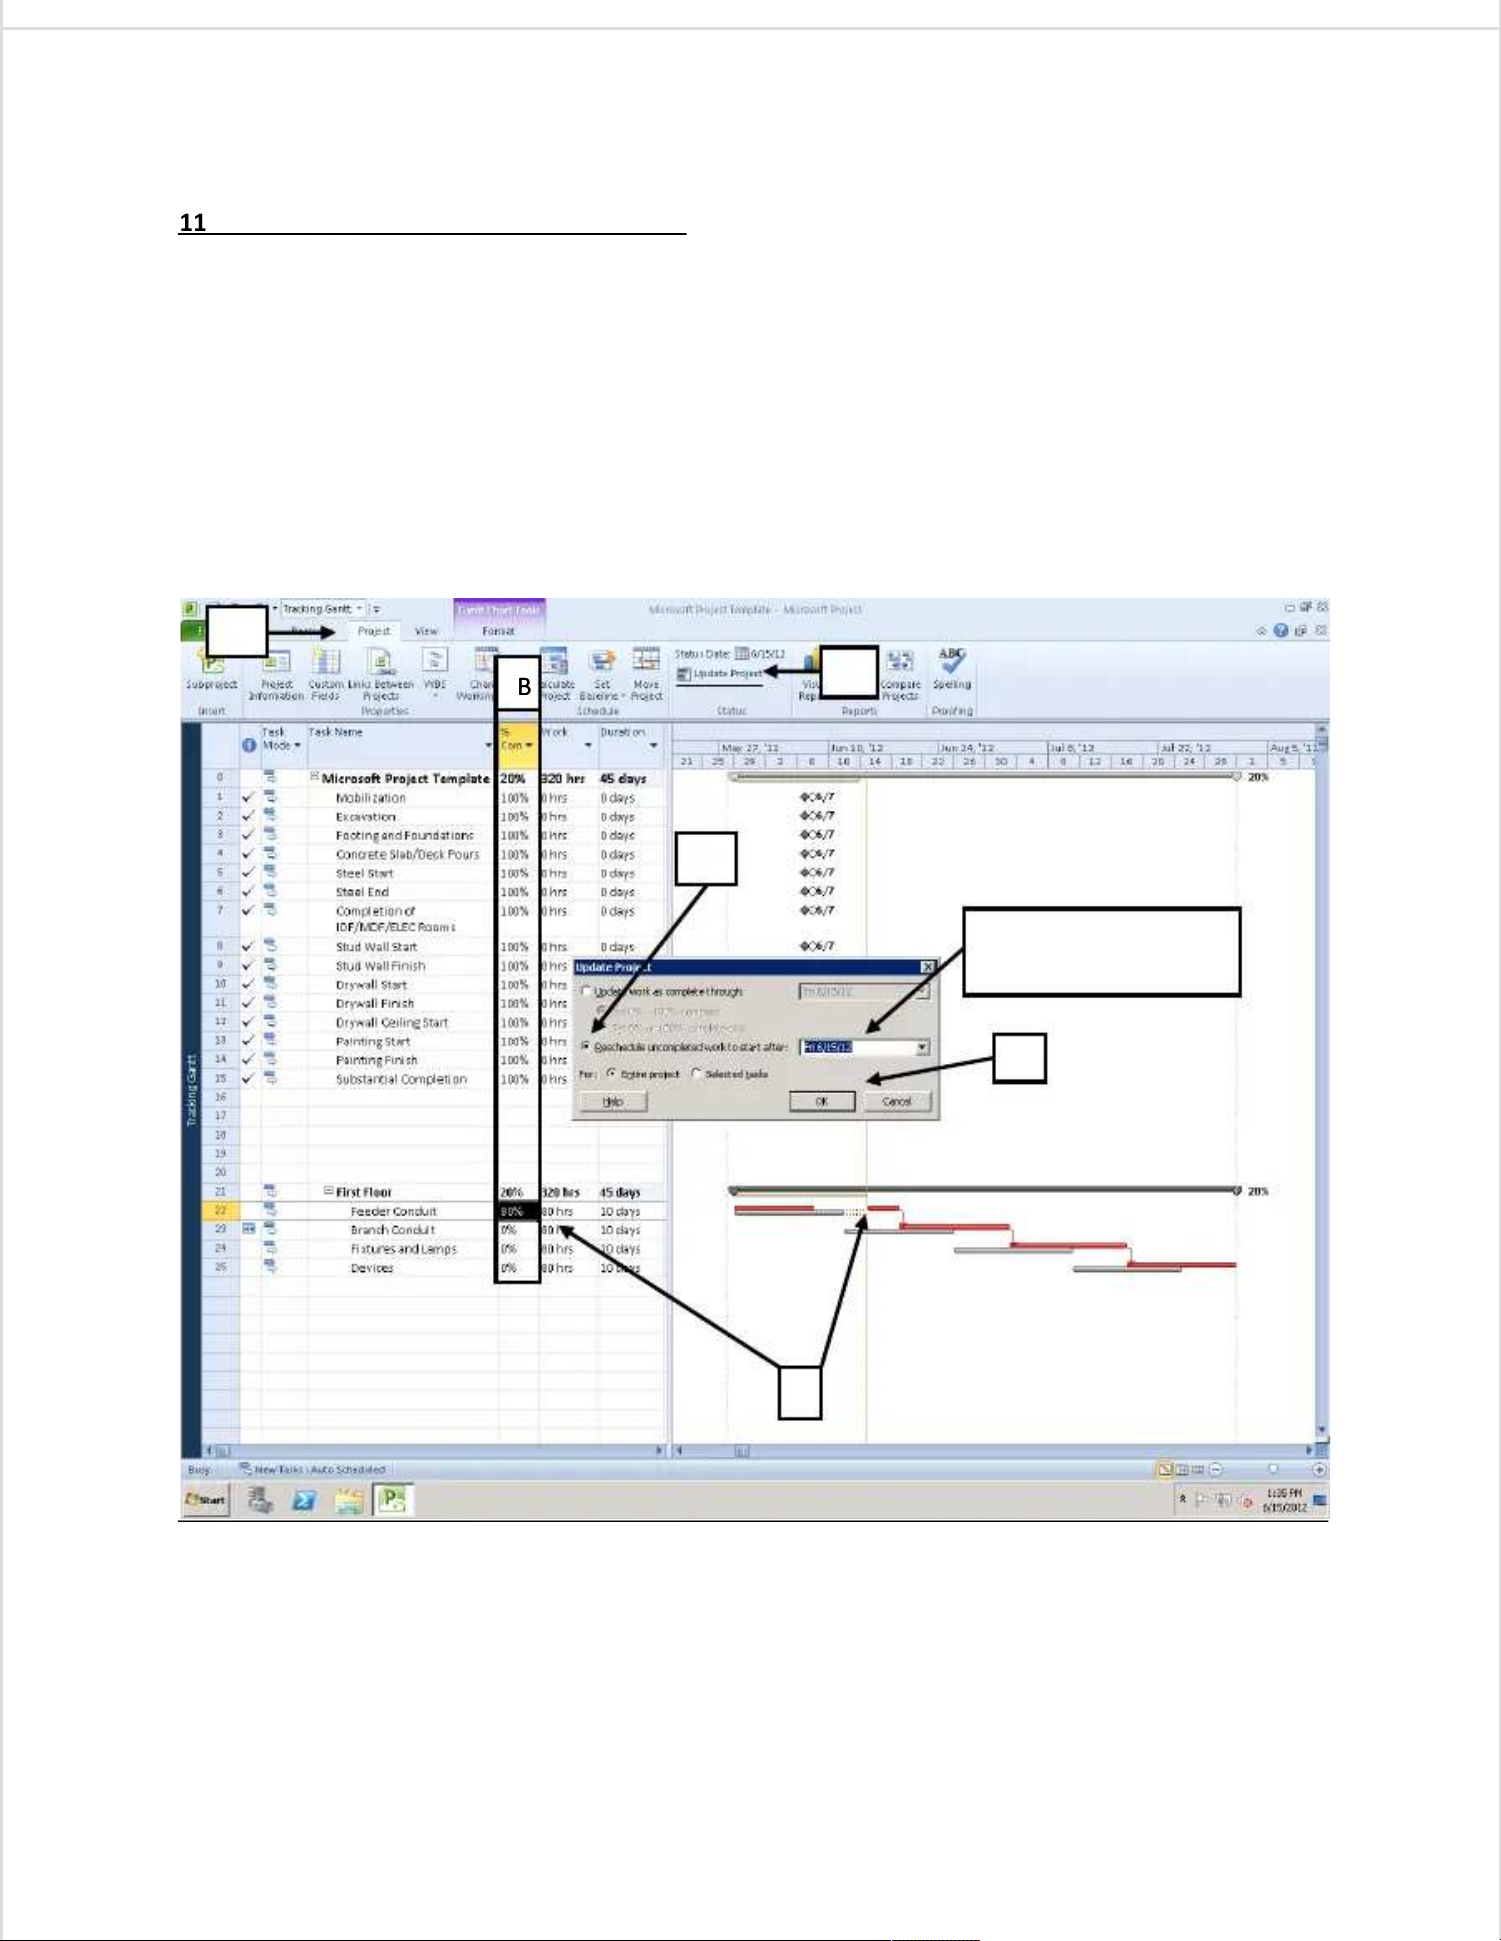
11. Updating The Schedule Using % Complete11. Updating The Schedule Using % Complete
a. Go to the Project Tab.a. Go to the Project Tab.
b. Update % Complete for tasks b. Update % Complete for tasks by modifying the % Complete column.by modifying the % Complete column.
c.c. Once % Complete has been updated for Once % Complete has been updated for all tasks, click on “Update Project.”all tasks, click on “Update Project.”
d. In the Update Project window that appears, select “Reschedule uncompleted work to start after:” andd. In the Update Project window that appears, select “Reschedule uncompleted work to start after:” and
ensure that the status date is set for today’s date.ensure that the status date is set for today’s date.
e. Select OK.e. Select OK.
f. In this example, Feef. In this example, Feeder Conduit is behind schedule, and was updated to %80 complete. Noticed howder Conduit is behind schedule, and was updated to %80 complete. Noticed how
the remaining 20% has been pushed back the remaining 20% has been pushed back to the status date, which in turn to the status date, which in turn pushed back all successivepushed back all successive
tasks.tasks.
AA
BB
CC
DD
Ensure today’s dateEnsure today’s date
is the Status Dateis the Status Date
EE
FF
Page 13
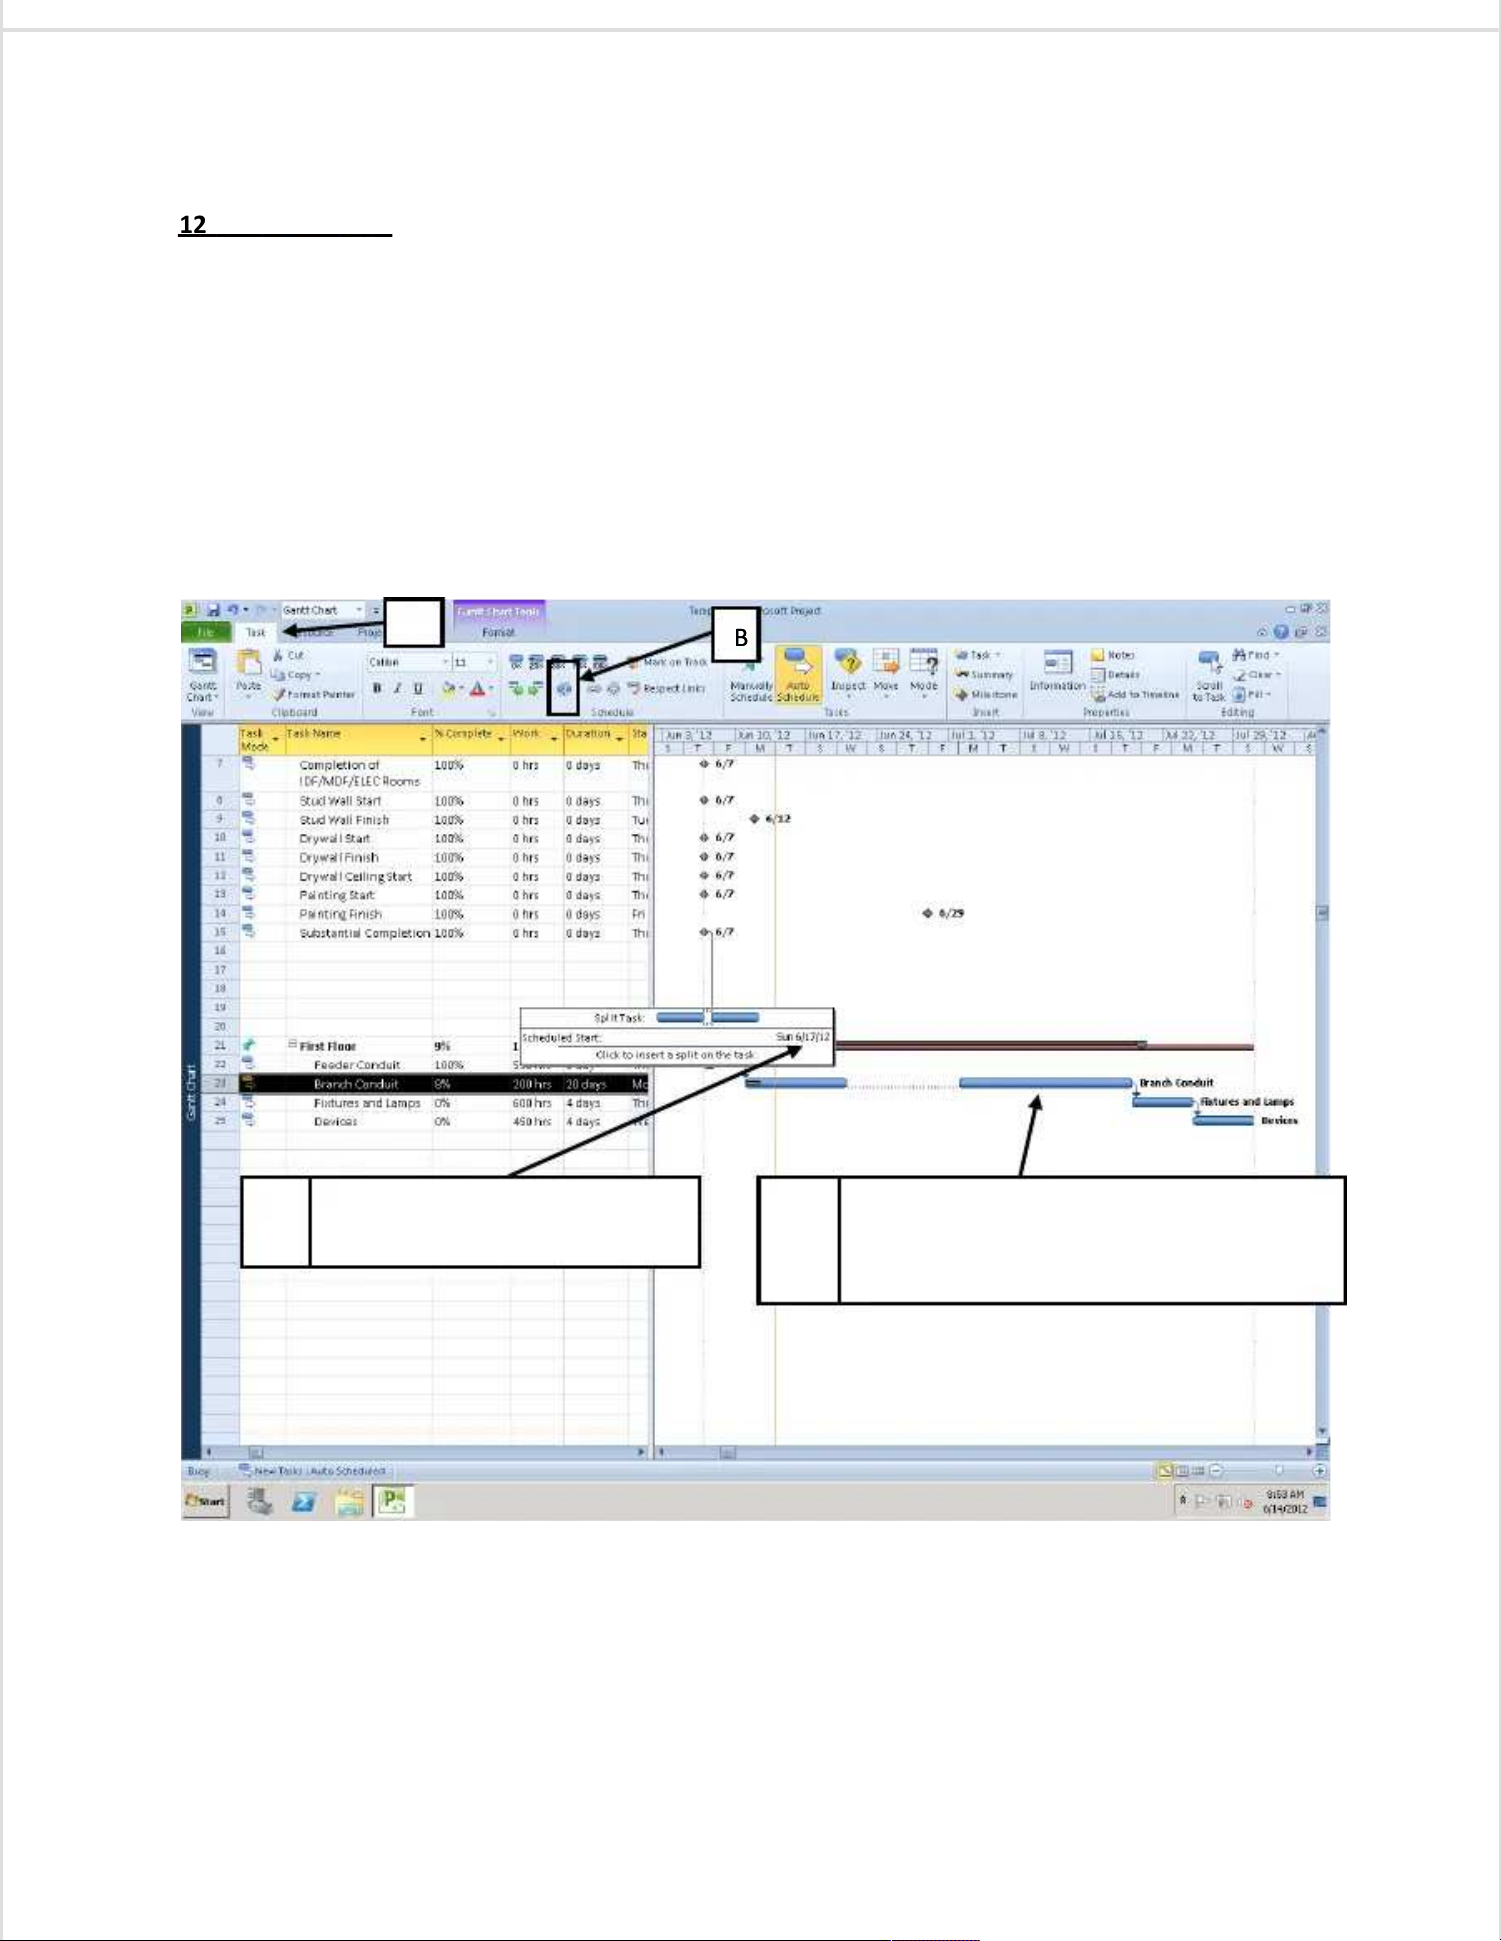
12. Splitting A Task12. Splitting A Task
a. Go to the Task Tab.a. Go to the Task Tab.
b. Click on the Split Task iconb. Click on the Split Task icon
c. Click on the Task bar c. Click on the Task bar to be split while specifying the date of to be split while specifying the date of the split.the split.
d. Click and hold on the leading portion of the d. Click and hold on the leading portion of the newly split task’s bar to drag and drop the newly split task’s bar to drag and drop the task on thetask on the
date work will resume.date work will resume.
AA
BB
In this example, Branch ConduitIn this example, Branch Conduit
was split on Sun 6/17/12.was split on Sun 6/17/12.
Click and hold to drag and drop the Click and hold to drag and drop the newlynewly
created leading portion of Branch Conduitcreated leading portion of Branch Conduit
on the date work will reon the date work will resume.sume.
CC
DD
Page 14
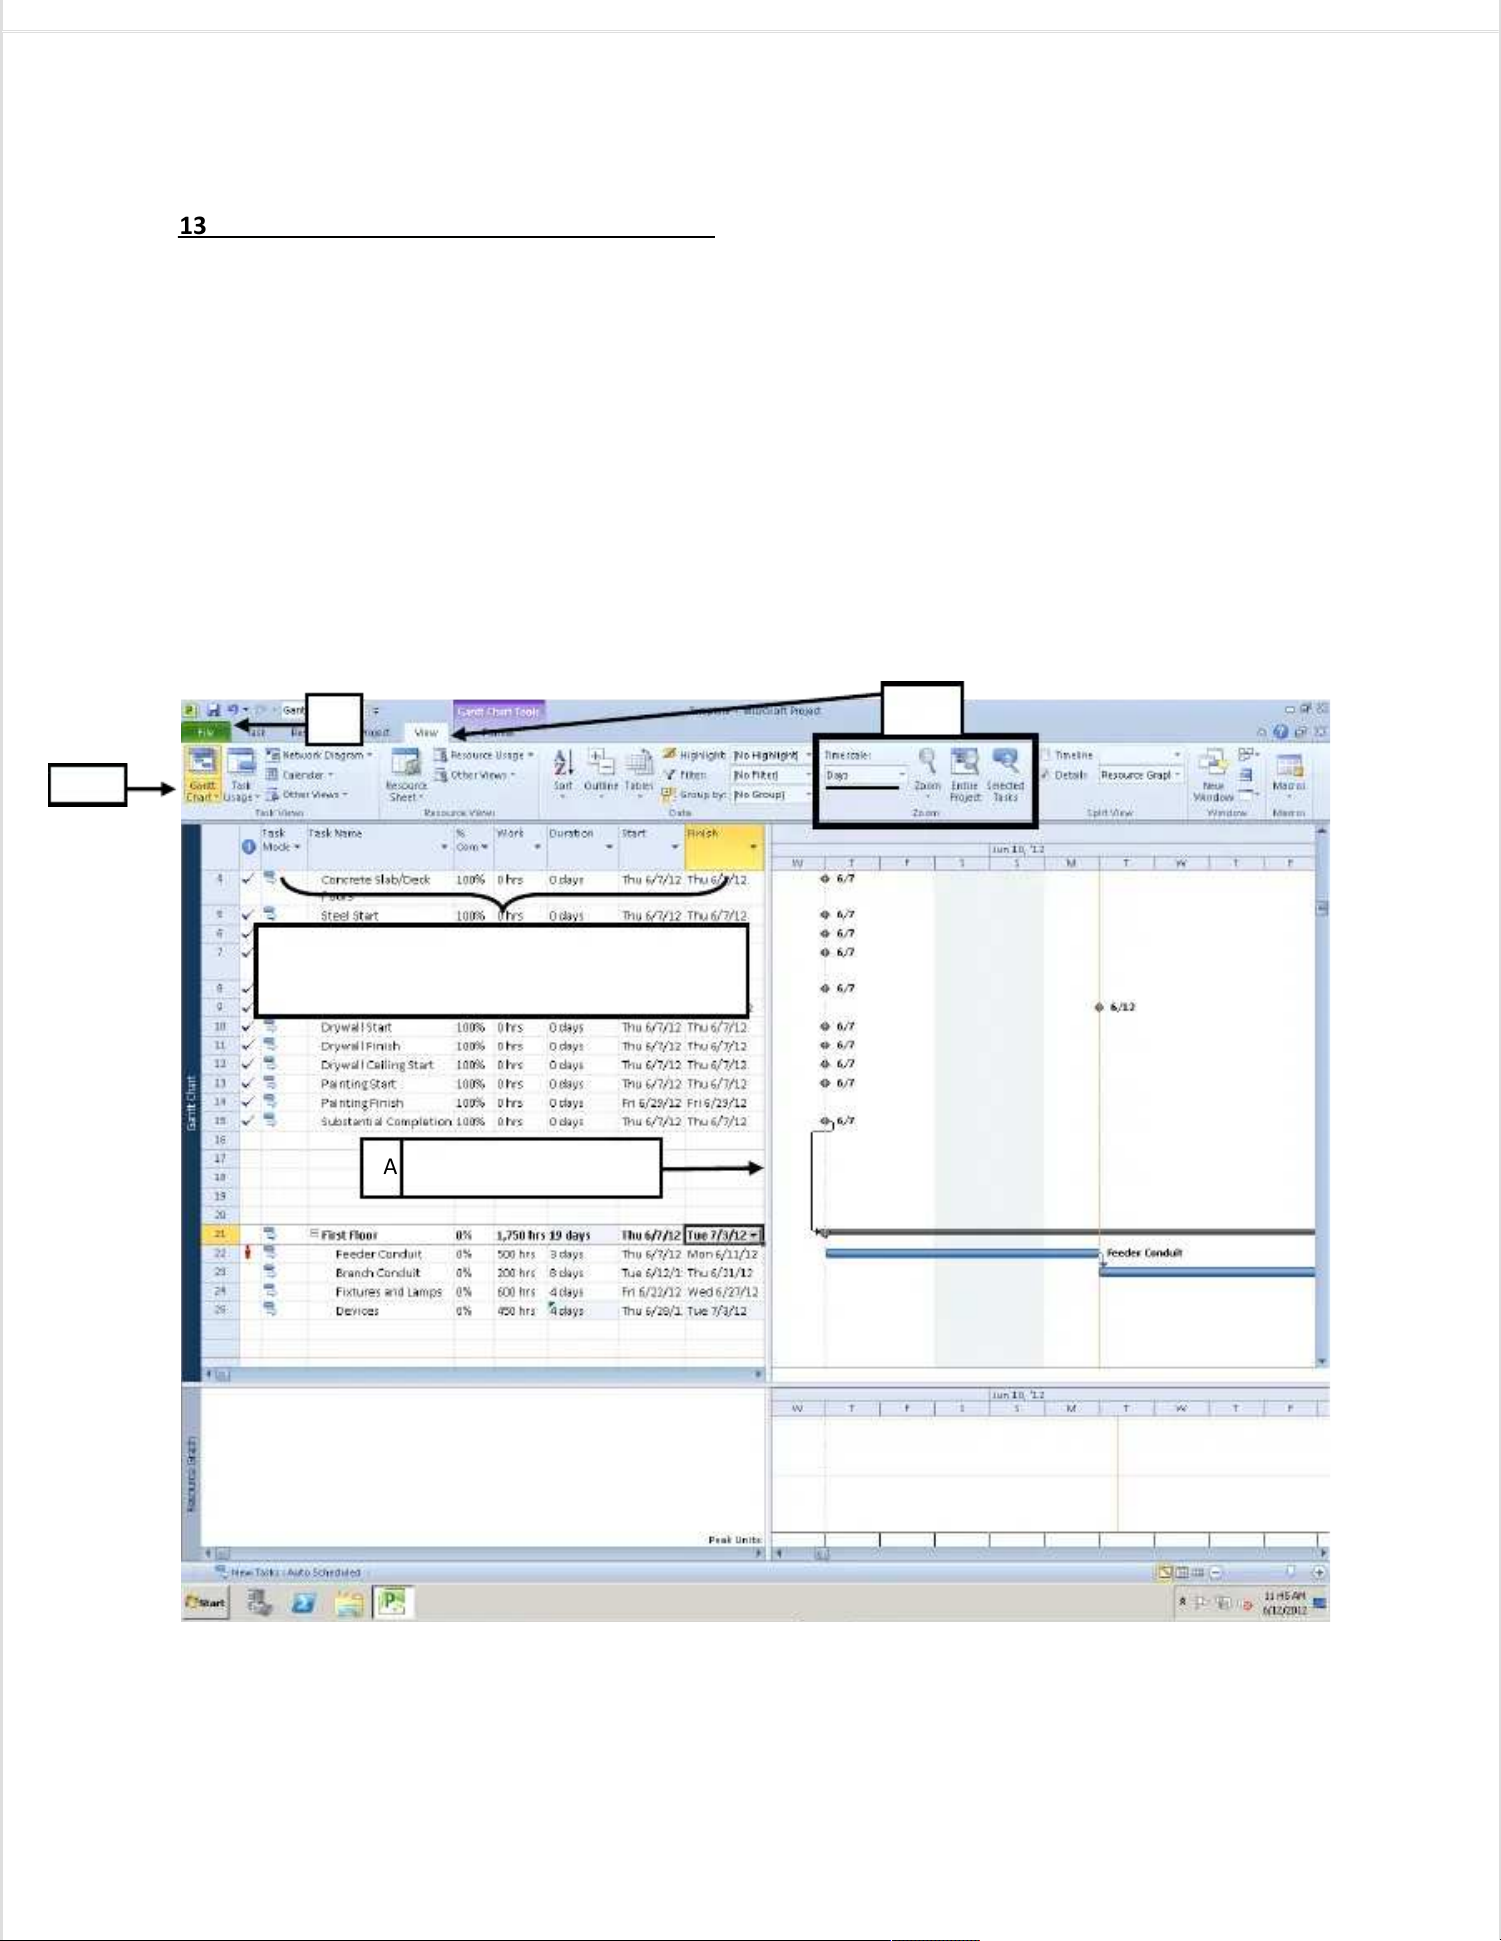
13. Printing The Gantt Chart And Tracking Gantt13. Printing The Gantt Chart And Tracking Gantt
––
First, adjustments must be made to select columnsFirst, adjustments must be made to select columns
and a timeframe that will be included on and a timeframe that will be included on your print out.your print out.
a. Select the vertical bar separating the grid a. Select the vertical bar separating the grid spreadsheet and timeline. spreadsheet and timeline. Drag this bar left/right so thDrag this bar left/right so thee
columns you wish to print are visible. Only the cocolumns you wish to print are visible. Only the columns made visible in this window will appear on thelumns made visible in this window will appear on the
printout.printout.
b. Select a time scab. Select a time scale for your schedule’s bar chartle for your schedule’s bar chartby clicking on the “View” Tab. Next, use theby clicking on the “View” Tab. Next, use the
dropdown timescale menu so select your desired tdropdown timescale menu so select your desired timescale.imescale.
c. Select the File Tab, go to print, select the range of dates to be printed, and then chose thec. Select the File Tab, go to print, select the range of dates to be printed, and then chose the
paper/printer settings as desired.paper/printer settings as desired.
****
Printing the Tracking GanttPrinting the Tracking Gantt
to show how delays to show how delays have affected the schedule is have affected the schedule is very similar. very similar. Go to theGo to the
Gantt Chart drop down menu, select Tracking Gantt, and repeat steps A-C above.Gantt Chart drop down menu, select Tracking Gantt, and repeat steps A-C above.
A A Drag Drag this this middle middle barbar
BB
CC
****
Only columns Task Mode through FinishOnly columns Task Mode through Finish
will appear in the printout.will appear in the printout.
Page 15
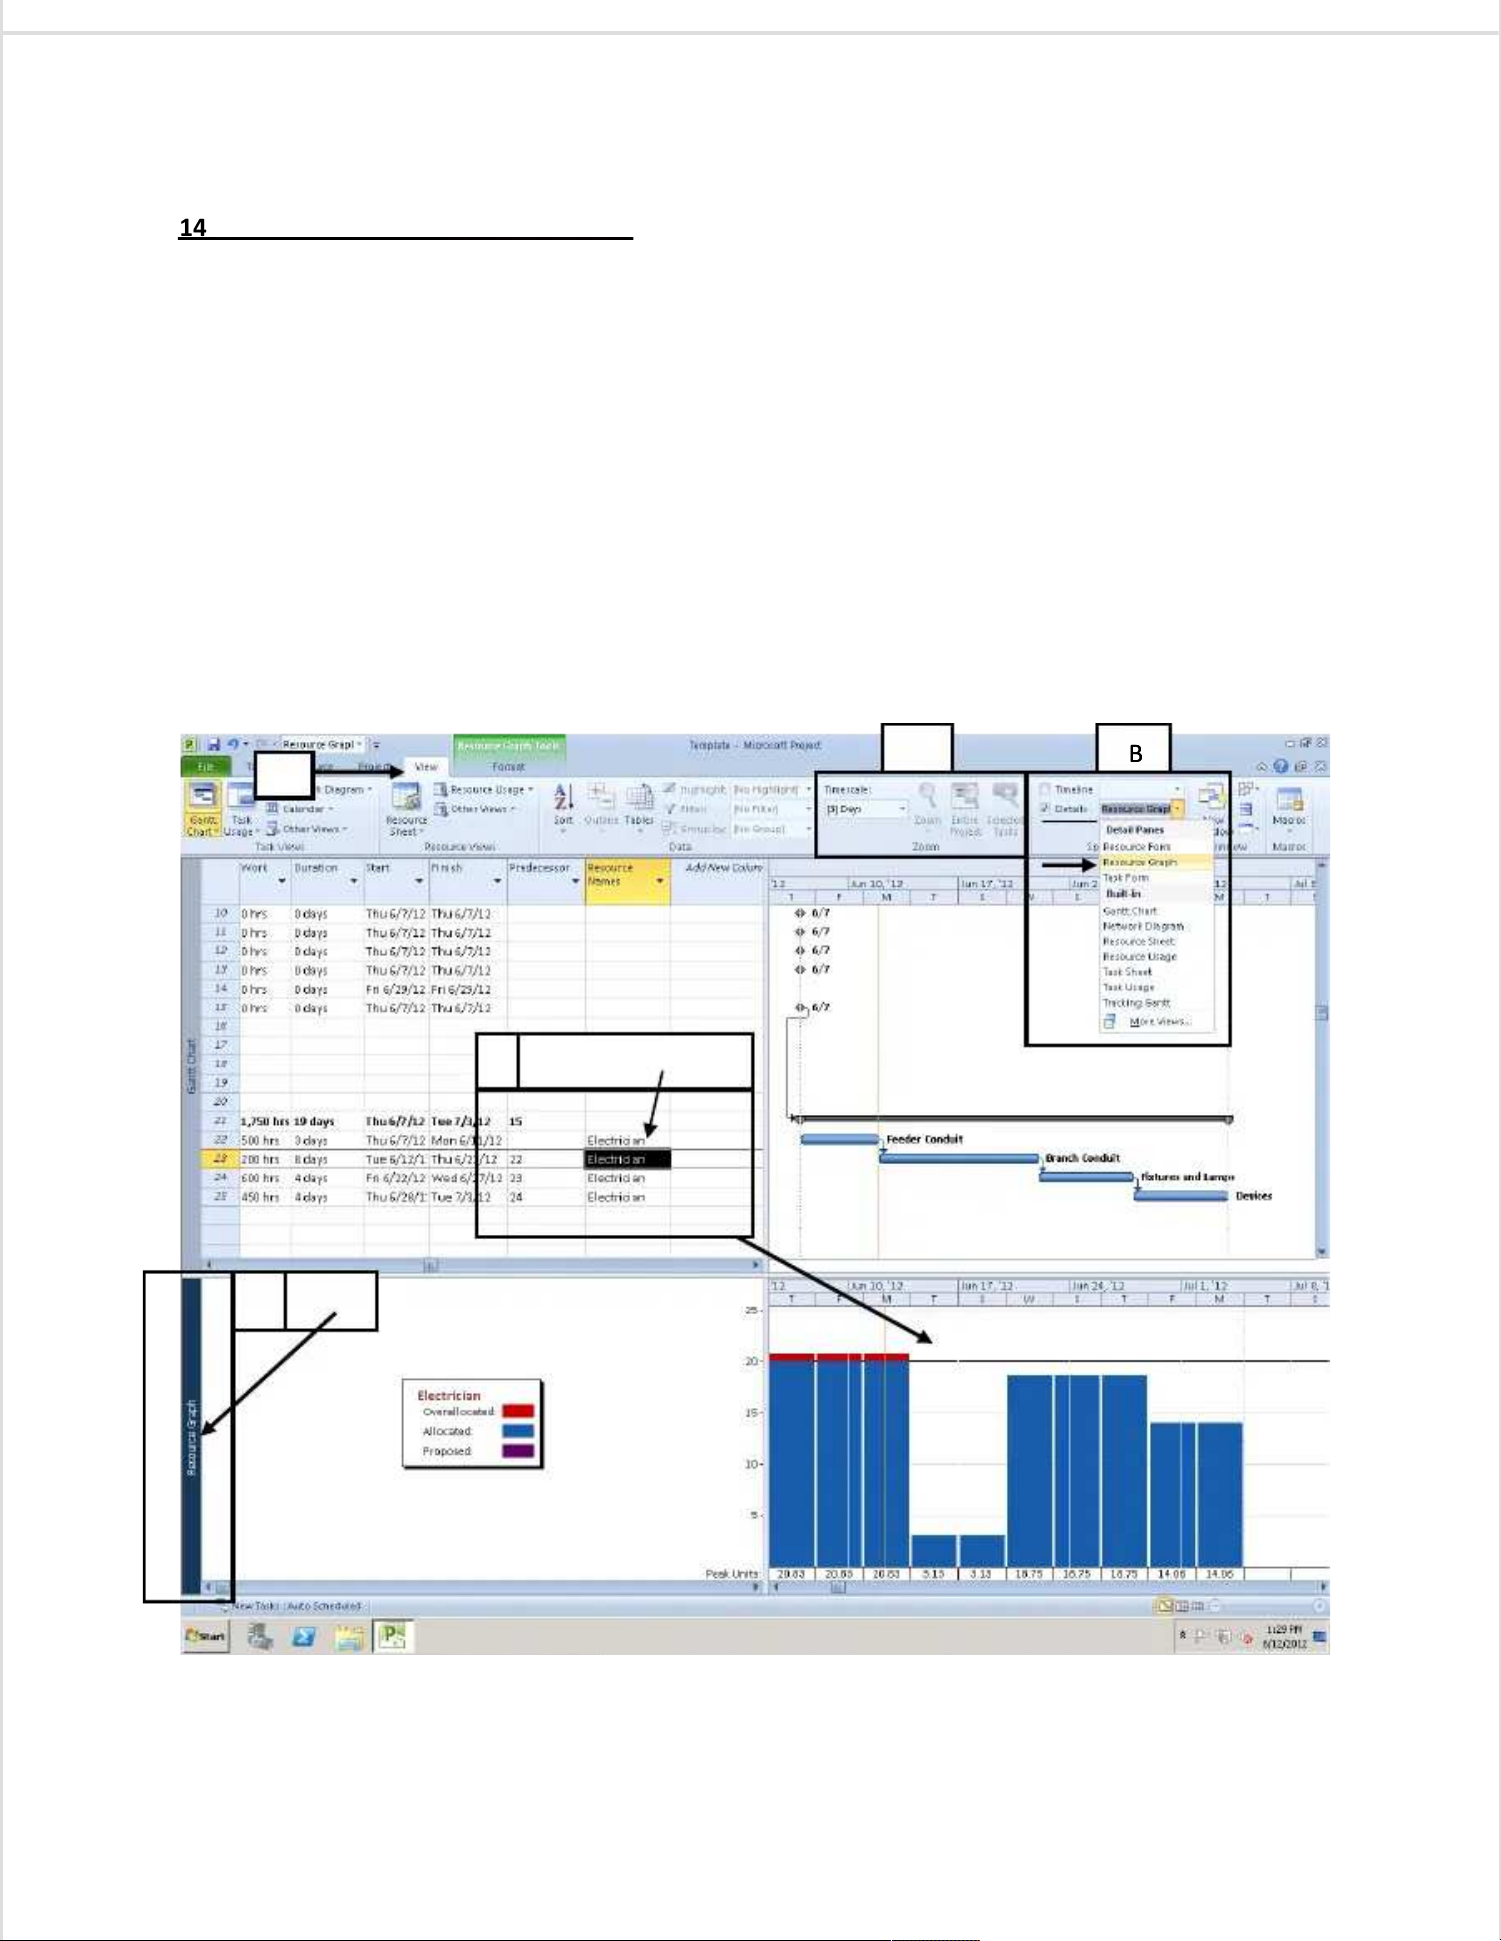
14. Printing the Man-Hour Loading Chart14. Printing the Man-Hour Loading Chart
––
First, we need to make the Man-Hour Loading Chart visibleFirst, we need to make the Man-Hour Loading Chart visible
in Microsoft Project.in Microsoft Project.
a. Select the View Taba. Select the View Tab
b. Check the box next to Details,b. Check the box next to Details, and then use the drop down menu to seand then use the drop down menu to select “Resource Graph.”lect “Resource Graph.”
c. Change the timescale you wish c. Change the timescale you wish to print.to print.
d. Click on a task that d. Click on a task that has Electrician allocated to it as a rehas Electrician allocated to it as a resource, and the Man-Hour Loading Chart forsource, and the Man-Hour Loading Chart for
the entire project will appear in the lower right window.the entire project will appear in the lower right window.
PrintingPrinting
e. Click on “Resource Graph” in e. Click on “Resource Graph” in the lower left of the screen. the lower left of the screen. Notice how “Resource Graph” iNotice how “Resource Graph” is selected ins selected in
dark bluedark blue and “Gantt Chart” is now selected in a light blue. and “Gantt Chart” is now selected in a light blue. This means that the printing function willThis means that the printing function will
now work for the Resource Graph rather than the Gantt Chart.now work for the Resource Graph rather than the Gantt Chart.
f. Select File, tf. Select File, then Print, and notice under Settings that you chen Print, and notice under Settings that you can set a specific range of an set a specific range of dates for printing.dates for printing.
AA
BBCC
D D click click on Elon Electricianectrician
E ClickE Click
 Loading...