

Page 1

Perceptive Pixel by Microsoft
55” Touch Device user guide
Perceptive Pixel by Microsoft
©2013 Microsoft Corporation
1
Page 2

Notice
Perceptive Pixel by Microsoft and the Perceptive Pixel by Microsoft logo are trademarks of the
Microsoft group of companies.
The Perceptive Pixel by Microsoft 55” Touch Device is assembled in the USA.
FCC Class A Notice
This device complies with Part 15 of the FCC Rules. Operation is subject to the following two
conditions: (1) this device may not cause harmful interference, and (2) this device must accept any
interference received, including interference that may cause undesired operation.
NOTE This equipment has been tested and found to comply with the limits for a Class A digital device,
pursuant to Part 15 of the FCC Rules. These limits are designed to provide reasonable protection
against harmful interference when the equipment is operated in a commercial environment.
This equipment generates, uses, and can radiate radio frequency energy and, if it is not installed and
used in accordance with the instruction manual, may cause harmful interference to radio
communications. Operation of this equipment in a residential area is likely to cause harmful
interference, in which case the user will be required to correct the interference at his own expense.
Caution: LED inside. Class 1M laser (LEDs) radiation can be emitted if the LCD display module is
disassembled and operated. The display should never be opened by the user.
Low power, Radio LAN type devices (radio frequency (RF) wireless communication devices), operating
in the 2.4 GHz Band, may be present (embedded) in your display system. This section is only
applicable if these devices are present. Refer to the system label to verify the presence of wireless
devices. Wireless devices that may be in your system are only qualified for use in the United States of
America if an FCC ID number is on the system label.
©2013 Microsoft Corporation
2
Page 3

The power output of the wireless device (or devices), which may be embedded in your display, is well
below the RF exposure limits as set by the FCC.
Changes or modifications not expressly approved by Microsoft may void authority to operate the
equipment under these FCC regulations.
This Class A digital apparatus complies with Canadian ICES-003.
Cet appareil numerique de la classe A est conforme a la norme NMB-003 du Canada.
This device complies with IEC 60950-1 2nd Ed. EN 60950-1:2006/A11:2009/A1:2010/A12:2011, and UL
Standard CSA C22.2 NO. 60950-1-07 INFORMATION TEC.
©2013 Microsoft Corporation
3
Page 4

Introduction
System requirements
List of materials
Installation
Using the PPI Touch Device
Troubleshooting
Specifications
Safety and handling information
Maintenance
5
6
7
8
17
18
26
27
27
Contents
©2013 Microsoft Corporation
4
Page 5
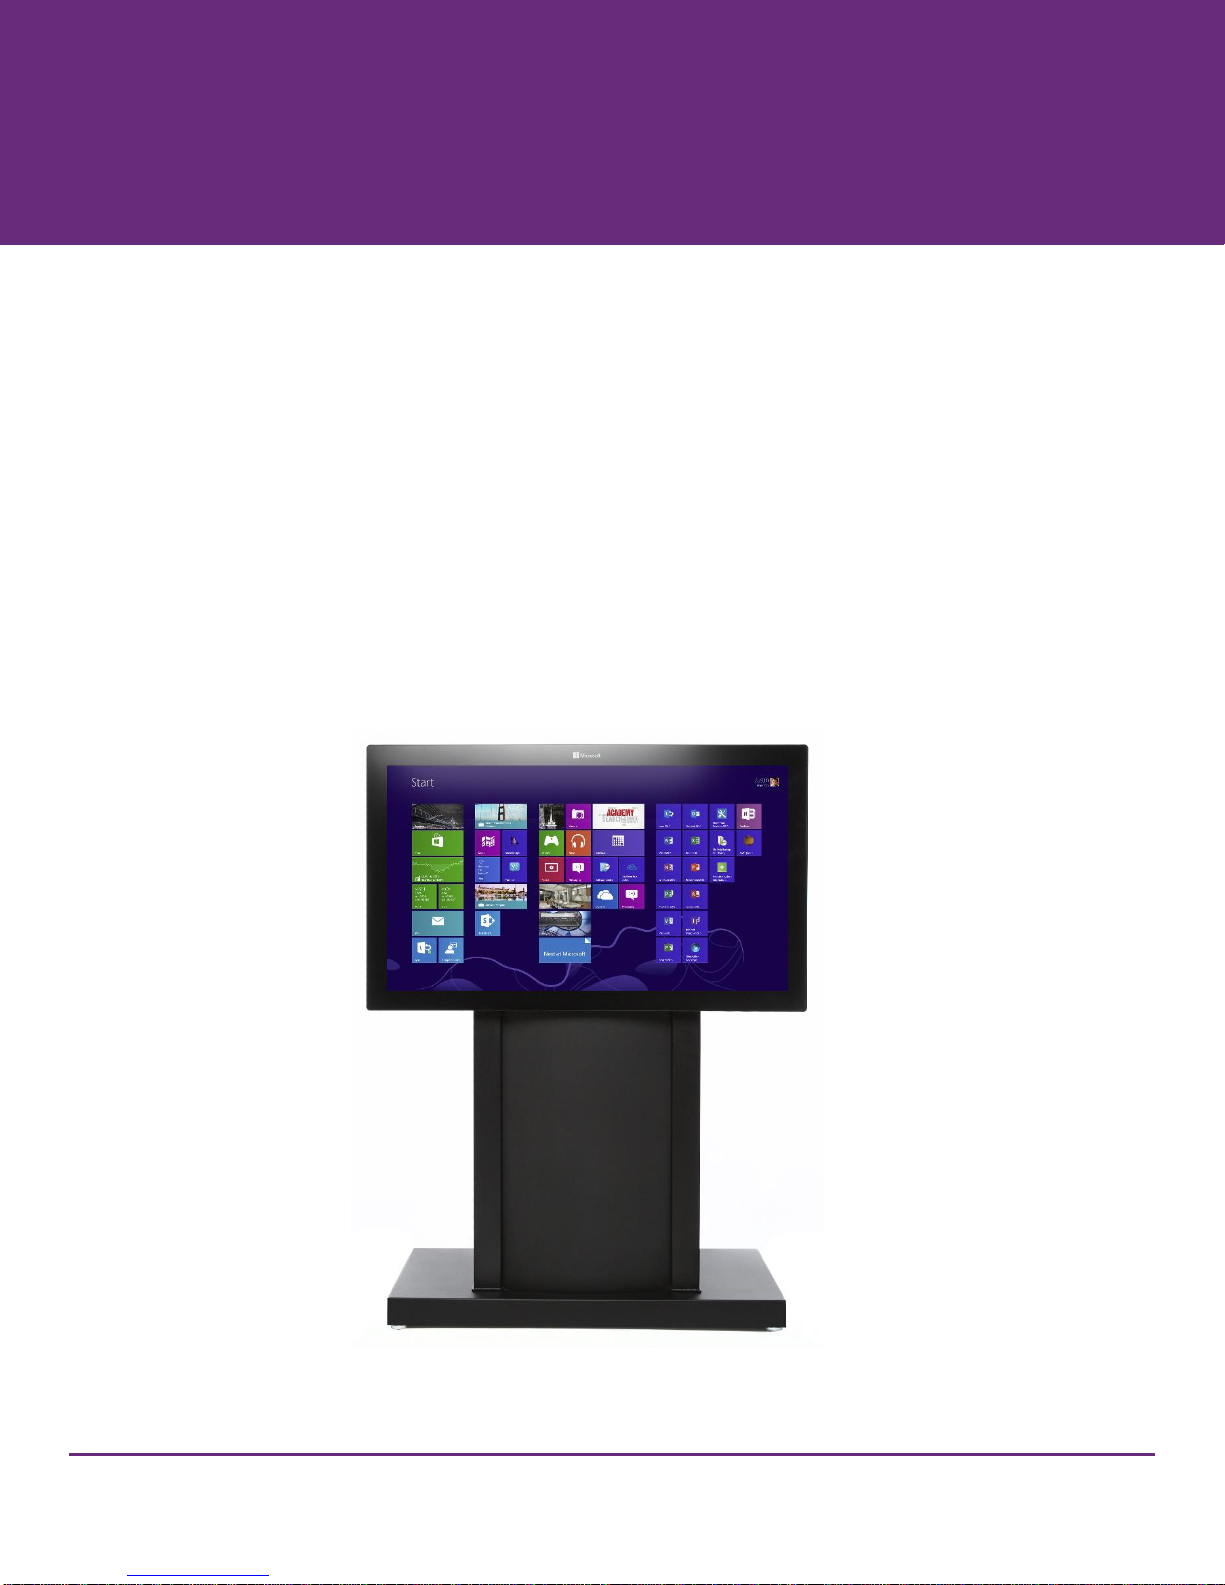
Figure 1. PPI by Microsoft 55” Touch Devices.
Introduction
The PPI by Microsoft 55” Touch Device
The Perceptive Pixel (PPI) by Microsoft 55″ Touch Device is a touch-sensitive computer monitor
capable of detecting and processing a virtually unlimited number of simultaneous on-screen touches.
It has 1920 x 1080 resolution, adjustable brightness of up to 400 nits, a contrast ratio of up to 1000:1,
and a display area of 47.6 x 26.8 inches. An advanced sensor distinguishes true touch from proximal
motions of palms and arms, eliminating mistriggering and false starts. With optical bonding, the PPI
by Microsoft 55” Touch Device virtually eliminates parallax issues and exhibits superior brightness and
contrast. And it has built-in color temperature settings to accommodate various environments and
user preference
©2013 Microsoft Corporation
5
Page 6

System requirements
Use the following guidance when configuring the computer that will power the PPI 55” Touch Device.
Minimum System Requirements
Windows 8 for best experience
- Windows 7 is supported but with reduced OS touch features
1GHz dual-core processor or better
2GB system RAM
Display resolution supporting 1920x1080 (55” & 82”) or 2560x1440 (27”)
- 120Hz refresh rate recommended for best performance (55” only)
Digital video output to connect to DVI input (55”, 82”) or DisplayPort input (27”)
- Dedicated DirectX 11-capable video adapter recommended for best performance
Dedicated USB 2.0 or greater port (not a shared port via USB hub)
- Dedicated USB 3.0 port recommended for best performance
See http://support.microsoft.com/kb/2819660 for the most up-to-date system requirements
information.
©2013 Microsoft Corporation
6
Page 7

Figure 2. Device cables, clockwise from lower left: USB, power, dual-link DVI
List of materials
The following items ship with the PPI 55” Touch Device:
604-0021: Dial-link DVI cable 10 ft. (1) - see figure 2
604-0046: USB cable 3 m. (Type-A, Type-B connectors) -see figure 2
604-0045: Power cable (IEC) 10 ft. - see figure 2. A localized power kit is available for regions outside
North America. Contact PPI technical support for details.
101-0135: Device cleaner (80ml) with microfiber cloth
101-0189: Wall mount kit
Perceptive Pixel by Microsoft 55″ Touch Device user guide
©2013 Microsoft Corporation
7
Page 8
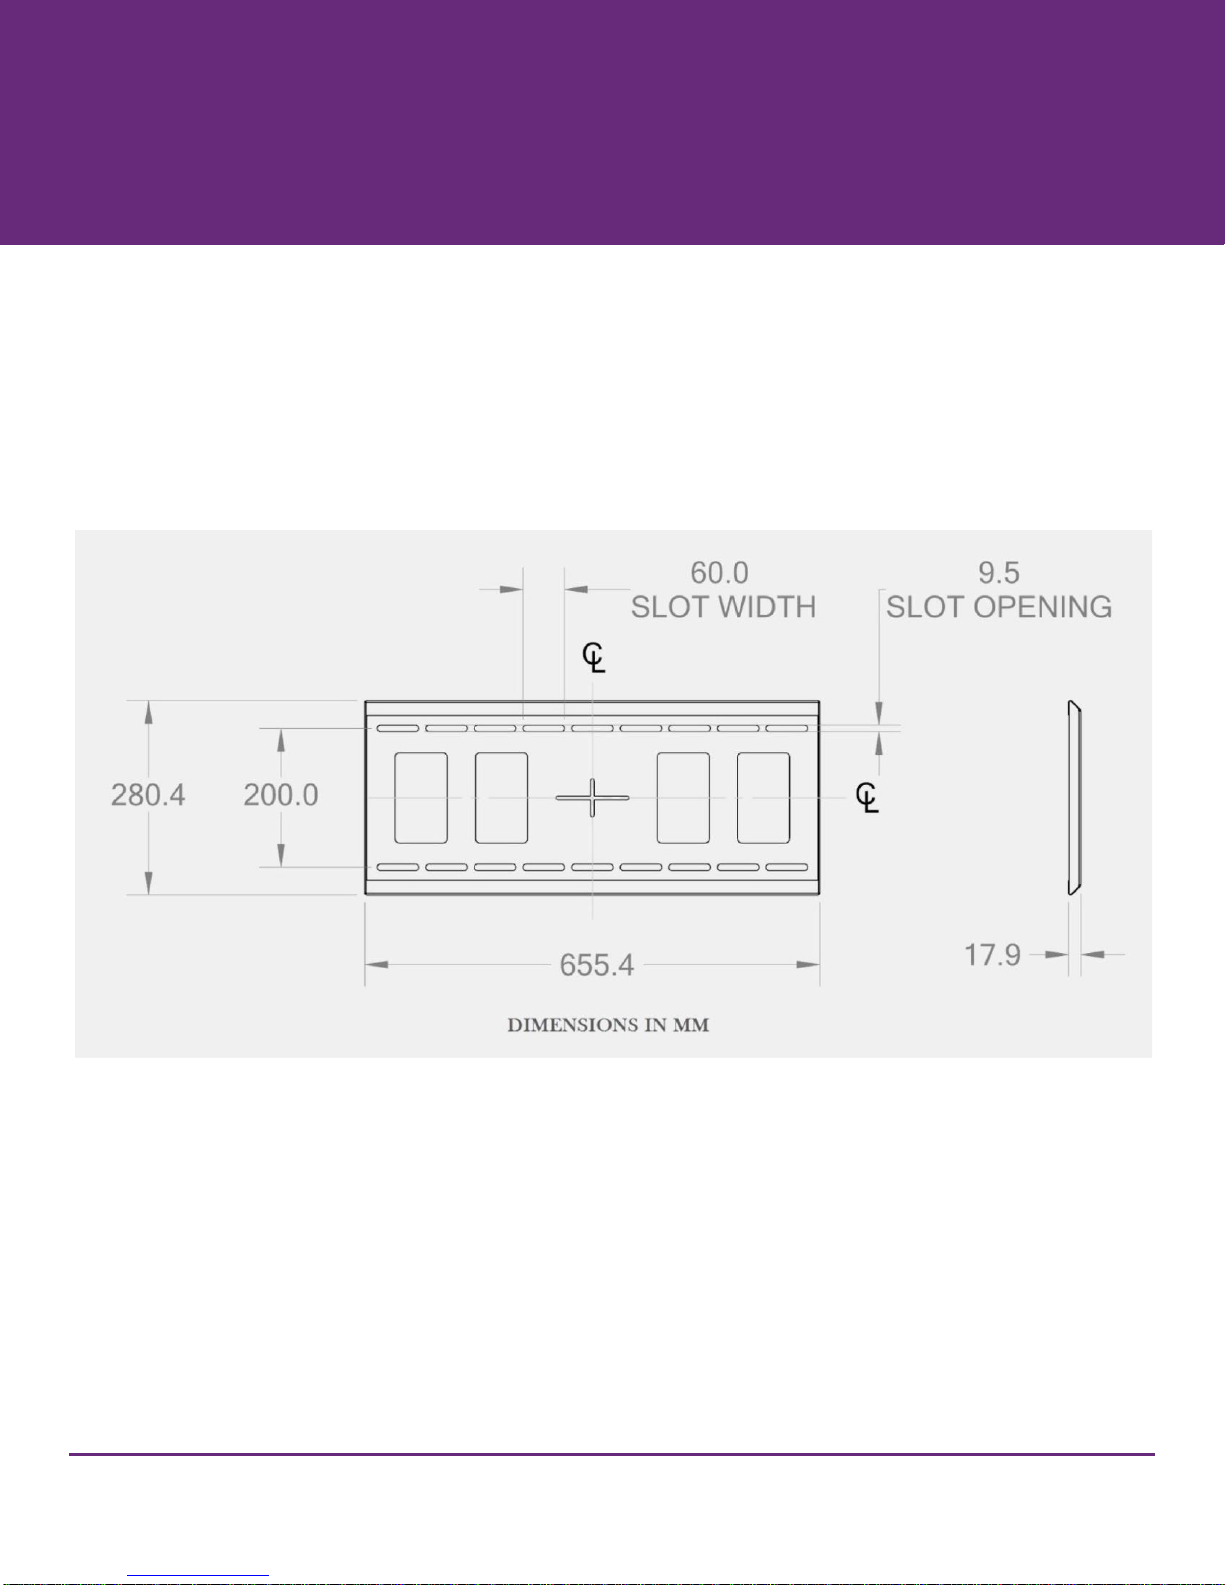
Figure 3. Wall bracket
Installation
Parts
In addition to the PPI 55” Touch Device, you will need the following parts to perform this procedure:
201-0186: Wall bracket - see figure 3
Screws and washers may be needed depending on wall construction (not shipped)
©2013 Microsoft Corporation
8
Page 9

Tools
Optional
These tools are likely to be necessary depending on prior accommodations for the wall bracket:
Pencil
Level
Drill
Screwdriver
Socket set
Required
The following tool is needed for tightening the brackets on the wall mount:
4mm hex Allen wrench tool (ideally of the T-handle variety to apply the necessary torque)
©2013 Microsoft Corporation
9
Page 10

Figure 4. Wall bracket dimensions
Preparation for mounting the PPI 55″ Touch Device
Each installation is unique and it is the responsibility of the installer to ensure that the wall bracket
location and wall construction are adequate for mounting the device. Microsoft is not responsible for
any personal injury or physical damage due to the wall not supporting the installation.
Use the following guidelines to attach the wall bracket to a wall:
1. Determine if the wall is sturdy enough to support the device. The device plus mounting hardware will
weigh up to 90 lbs. Due to the number of different wall construction methods, the PPI 55” Touch Device
does not have specific mounting procedures to attach the wall bracket. Therefore the wall bracket must
be installed with sufficiently robust hardware (5/16″ or 8 mm diameter bolts are generally sufficient,
depending on length) and make optimum use of wall studs or equivalent.
2. It is recommended that the center of the bracket be 55″ from the floor; measure and mark this
dimension. Note that the center of the bracket (the “cross hair” as seen in figure 4) aligns with the
vertical center of the device. Also ensure that the wall bracket is level before hanging the device.
©2013 Microsoft Corporation
10
Page 11

Figure 5. Hooking the top of the device brackets to the wall bracket (side view)
Figure 6. Device rotated down so it hangs on wall bracket (quarter view from rear)
Hanging the PPI 55” Touch Device
1. With two able-bodied people, lift the device just up and over the wall bracket. The device can be tilted
slightly to hook the device-mounted vertical brackets onto the wall bracket.
2. Rotate the device to its vertical position. The device’s weight will naturally facilitate this. Take care not to
pinch fingers.
3. Slowly lower the device to allow the brackets to hold the weight of the device, and hold in place for
several seconds.
4. If desired, you may move the device left or right approximately 3 inches. You will need to lift the device
slightly to do this.
©2013 Microsoft Corporation
11
Page 12

Figure 7. Locking screw uses 4mm hex tool (virtual bottom view of mounted device)
5. For safety, it is recommended that two people continue to hold the device. From below, use the 4mm
Allen wrench to drive the vertical locking brackets upward to fully engage the wall bracket. Note there is
about 1 ¼” of travel for the vertical locking brackets.
©2013 Microsoft Corporation
12
Page 13

Figure 8. Connection ports from left to right: Ethernet (network), USB connection to computer, DVI (2), USB
hub ports for stylus charging and accessories, and AC power
Connecting the cables to the device
You will need the following parts for this procedure:
USB cable as shipped
DVI cable as shipped
Power cable as shipped
Ethernet cable (optional; customer supplied)
After mounting the device, connect the cables to the device’s center rear underside as follows:
1. Insert the dual-link DVI cable(s) into the matching connectors on the device and tighten the
thumbscrews. (Although not required, you may want to use a #1 flat head screwdriver to tighten the
thumbscrews.)
2. Insert the Type-B (square) end of the USB cable into the square Type-B USB connector on the device,
located to the left of the DVI connectors, with the beveled side of the cable connector facing the back
of the device.
3. Insert the Ethernet cable into the Ethernet port to the left of the Type-B USB connector if you wish to
control the device over Ethernet.
4. Insert the female end of the power cable into the power connector, located to the right of the DVI
connectors.
5. Ignore the four Type-A USB connectors for now. These connectors provide battery charging for the
optional PPI by Microsoft Active Stylus. The connectors may also be used by other USB devices. See the
Perceptive PixeI by Microsoft Active Stylus quick guide.
6. Connect the male end of the power cable to the power source. It is recommended that you use a surge
protector for the power cable.
©2013 Microsoft Corporation
13
Page 14

Figure 9. Power switch indicated
Connecting the device and peripherals to the computer
You will need the following parts for this procedure:
Computer meeting system requirements
PPI 55″ Touch Device with USB and DVI cables connected
Connect the cables to the computer as follows:
1. Connect the free end of the DVI cable into the dual-link DVI connection and tighten the thumbscrews.
2. Connect the free end of the USB cable from the device into any of the USB ports on the computer.
Powering on the system
Use the following procedures to apply power to the system.
1. If not already on, turn on your surge protector.
2. Turn the power switch next to the power connector (rear underside) to the 1 position. An amber light
just above the keypad power button should illuminate.
©2013 Microsoft Corporation
14
Page 15

Figure 10. Left: The device has power, but no signal is coming from selected source B, which has an amber
light. Right: The device has power and is getting a signal from selected source, as both the power and source
‘A’ LEDs are green.
Installing drivers and software
The latest Perceptive Pixel Touch Driver can be downloaded from
http://support.microsoft.com/gp/perceptive-pixel.
©2013 Microsoft Corporation
15
Page 16

Windows command
Corresponding touch action
To left-click a file
Tap it with one finger.
To right-click a file
Touch it with one finger and tap the screen with a second.
Alternately, press and hold with one finger.
To double-click a file
Double-tap it with one finger.
To scroll through a file
Drag one finger up to scroll down or drag one finger down to scroll up.
To position a window (left mouse drag)
Touch one finger on the title bar and drag the window.
To resize a window
Touch one finger on the edge of the window and drag the edge.
To zoom in
Place two fingers on the screen and pull them apart.
Alternately, tap the screen with two fingers.
To zoom out
Place two fingers on the screen and pull them together.
To minimize all but active window (shake)
Touch the window title bar and run your finger back and forth. Some
windows, such as dialog boxes, cannot be minimized with shake.
To preview open windows (peek)
Touch the program icon on the Windows Task Bar. Drag one finger to
scroll through different windows open in that program.
To right-click a task bar icon to see the
context menu
Touch and hold the program icon on the Windows Task Bar.
To view Windows 8 charms and menus
Swipe inward from device edge.
Using the PPI Touch Device
Windows 8 Touch conventions
Touching the device screen will tell you if the Perceptive Pixel Touch Service is running. This service
allows certified applications to interact with touches detected on the screen. If the service does not
appear to be running, verify installation of the PPI Touch Driver, then contact technical support at
http://support.microsoft.com/gp/perceptive-pixel or by calling 1 (800) 642-7676.
©2013 Microsoft Corporation
16
Page 17

Troubleshooting
This section contains troubleshooting procedures to solve the following issues:
The device screen is blank.
All or part of the device screen is unresponsive to touch.
The computer is not working.
Gaining remote access to the device for diagnostic purposes.
For troubleshooting assistance, or to resolve issues not covered in this guide, contact PPI support
online at http://support.microsoft.com/gp/perceptive-pixel or by calling 1 (800) 642-7676.
Symptom
The device screen is blank.
Suggested actions
1. Check device power and connections. Also note that the device power button, source button, and
brightness arrow buttons will remember their previous states after the device powers off.
2. Verify the system AC power switch (located at the power cord entry point) is set to the 1 (on) position.
Verify the power indicator is illuminated. If it is amber, press the keypad power button and verify it turns
green. Verify that the video source LED (A or B) indicates the DVI connector is actually connected to the
computer.
3. Verify that your graphics card is set to output 1920 x 1080 video. The device requires this resolution.
4. If the device screen is still blank check the computer power.
©2013 Microsoft Corporation
17
Page 18

Figure 11. PPI 55” Touch Device detected
Symptom
The device screen shows image, but the entire device is unresponsive to touch.
Suggested actions
1. Check device USB connection. If the device is still unresponsive, go to the Start screen to search for and
open the Touch Control Panel.
2. In the Sensors tab make sure the system has detected and placed the following entry in the Sensor
Devices field: PPI by Microsoft 55” Touch Device
3. If the Sensors tab lists your PPI Touch Device, select the PPI by Microsoft 55” Touch Device entry and
click the Properties… button. If not listed, contact technical support.
4. In the Sensor Properties dialog, make sure the following values are present in the Input mapping
section
Map touches to: 1: PPI 55” LCD
Enable as a Windows Touch device: selected
5. Click OK.
6. If the device is still unresponsive, select the Service tab.
7. If the PPI Touch Service is not running, click Start and check if the device is responsive once the service
has started. If the device is now responsive, click OK to close the Touch Control Panel.
©2013 Microsoft Corporation
18
Page 19

Figure 12. Service tab showing that the PPI Touch Service is running
Symptom
The device screen shows image, but a portion of the device screen is unresponsive to touch.
Suggested actions
1. If a portion of the device screen is unresponsive, go to the Start screen to search for the Touch Control
Panel.
2. The Sensors tab will show whether the system has detected that the device is touch-ready as opposed
to merely detecting the device is present.
©2013 Microsoft Corporation
19
Page 20

Figure 13. PPI 55” Touch Device detected
3. If the Sensors tab lists your PPI Touch Device, select it and click the Properties… button. If your PPI
Touch Device is not listed, or you have more than one PPI Touch Device connected to your computer,
contact technical support.
4. In the Sensor Properties dialog, make sure the following values are present in the Input mapping
section:
Map touches to: 1: PPI 55” LCD
Enable as a Windows Touch device: selected
5. If a portion of the device screen is still unresponsive, click Calibrate and follow the directions on screen.
Calibration should be done separately for both pen and touch using a PPI by Microsoft Active Stylus
and a finger. For best results, touch the center of each box until each box becomes bright green. You
may need to shift your fingertip or stylus slightly to get the crosshair to align with the box. Also, you
must wait until the crosshair changes size for a second and then changes color, preferably bright green.
If a box turns red, brown, or a dull green you should move on to other boxes and then come back to it
to make it bright green. You will have calibrated the device properly when all of the boxes are bright
green and the feedback text reads 9 points calibrated, with excellent accuracy.
©2013 Microsoft Corporation
20
Page 21

Figure 14. Sensor View tracking a pair of simultaneous finger touches across the device screen
6. If there is still a problem, select the Advanced tab.
7. Click the Sensor View… button. This launches a diagnostic tool that gives you information about the
touches on the screen. If you notice anything unusual such as a grid square that doesn’t illuminate
when touched, contact technical support.
8. Your support representative may ask you to describe the information displayed next to your finger
touches. Press Esc to exit.
©2013 Microsoft Corporation
21
Page 22

Gaining remote access to the device
Your support representative may ask you for information about your PPI Touch Device when assisting
you with troubleshooting. For instance, they may ask you about the internal temperature of the
device. This information and more is available via a remote connection.
From your web browser, you can remotely access status and configuration menus on the device.
Use the following steps to gain remote access:
1. If you have not already done so, plug the Ethernet cable into the Ethernet port on the bottom center of
the device and plug the other end into the port on the computer.
2. Open web browser on the computer.
3. Using the last four digits from your device’s serial number, type in the following web address:
http://pixel-XXXX, where the XXXX represents the last four digits. Note that the serial number label is
located on the back of the device. For example, for a device with 4713 as the last four digits, the
address for the device would be http://pixel-4713. Be sure to leave the “www” out of the address.
Note: Early versions of the 55” device utilized only the last three digits of the serial number. On these
displays the hostname would be http://pixel-XXX.
The first page you see will be the Control Panel page (see figure 15).
The other pages that you can select by clicking the menu items on the left side are as follows:
Network Configuration - figure 16
Status - figure 17
Color Temperature - figure 18
User Color Temperature - figure 19
©2013 Microsoft Corporation
22
Page 23

Figure 15. Control Panel web page via remote connection. Use this page to change the video source, adjust
the brightness from 1 to 32, or power the device on or off. Click on the menu items on the left to view and
edit more settings.
Figure 16. Network Configuration page. Use this page to view network settings. DHCP (Dynamic Host
Configuration Protocol), is enabled by default.
Static IP mapping is available by turning off DHCP. For static IP mapping you must have a predetermined IP address. You must also know the subnet mask and the address for your device.
©2013 Microsoft Corporation
23
Page 24

Figure 17. Status page. This page is read-only but may be useful when speaking with a support
representative.
Figure 18. Color Temperature page. Use this page to view and change the color temperature. Color
temperature changes the white color balance and may be useful when the device needs to be matched to a
video camera. The default setting is 10000k. To select a custom color temperature, go to the User Color
Temperature page and select one of the four custom User Color Temperatures.
©2013 Microsoft Corporation
24
Page 25

Figure 19. User Color Temperature Configuration page. Use this page to configure the User Color
Temperature that you previously selected in the User Color Temperature page. If you manually type in another
number (1-4) in the User Color Temp field, you will not see the previous gain values for that color
temperature, but clicking Save will preserve any changes made on this page. If you wish to first see the color
gain values for a User Color Temperature, you must first select that User Color Temperature in the User Color
Temperature page and return to this one.
©2013 Microsoft Corporation
25
Page 26

Feature
Value
Display resolution
1920 x 1080
Brightness
400 nits (typical)
Active display area
47.6 x 26.8 inches (1210 x 680 mm)
Contrast ratio
1,000:1 (typical)
Touch input
Fingers, active stylus
Touch points
Unlimited
Touch precision
Sub-pixel
Touch response time
<1 ms (typical)
Surface treatment
Chemically strengthened, anti-smudge/glare, cleanable with
provided device cleaner
Dimensions (in)
50.2 x 29.5 x 2.5 inches (WxHxD)
Dimensions (mm)
1275 x 750 x 65 (WxHxD)
Power supply
110/220 VAC Universal, 50/60 Hz
Power consumption
250 watts (max.)
Appendix
Specifications
©2013 Microsoft Corporation
26
Page 27

Perceptive Pixel
by Microsoft
Safety and handling information
Disconnecting the PPI Touch Device
Disconnect the device by first turning the power switch to the 0 (off) position. Then grasp the female
connector and firmly pull the connector from the device. Never disconnect the power cable from the
device by pulling the cable.
Device repairs
Do not open the device enclosure as there are high-voltage components inside. For repair, contact
PPI support at http://support.microsoft.com/gp/perceptive-pixel or by calling 1 (800) 642-7676.
Maintenance
Cleaning the PPI Touch Device
Clean the surface and refresh the smooth feel of the device screen with the PPI device cleaner
(shipped) and a microfiber cloth. Spray a small amount of the cleaner on the cloth and gently wipe
the screen. Do not spray cleaner directly onto the device screen, as any fluid dripping into the
enclosure may damage the electronics. Note: Do NOT use abrasive cleaners as they will scratch the
surface.
Cleaning the exterior
Should it be necessary, clean the external enclosure using the PPI device cleaner the same as you
would the touch screen. Take care to prevent the device cleaner from entering the enclosure, as any
fluid dripping into the enclosure may damage the electronics.
©2013 Microsoft Corporation
27
Page 28

©2013 Microsoft Corporation
28
 Loading...