

Page 1
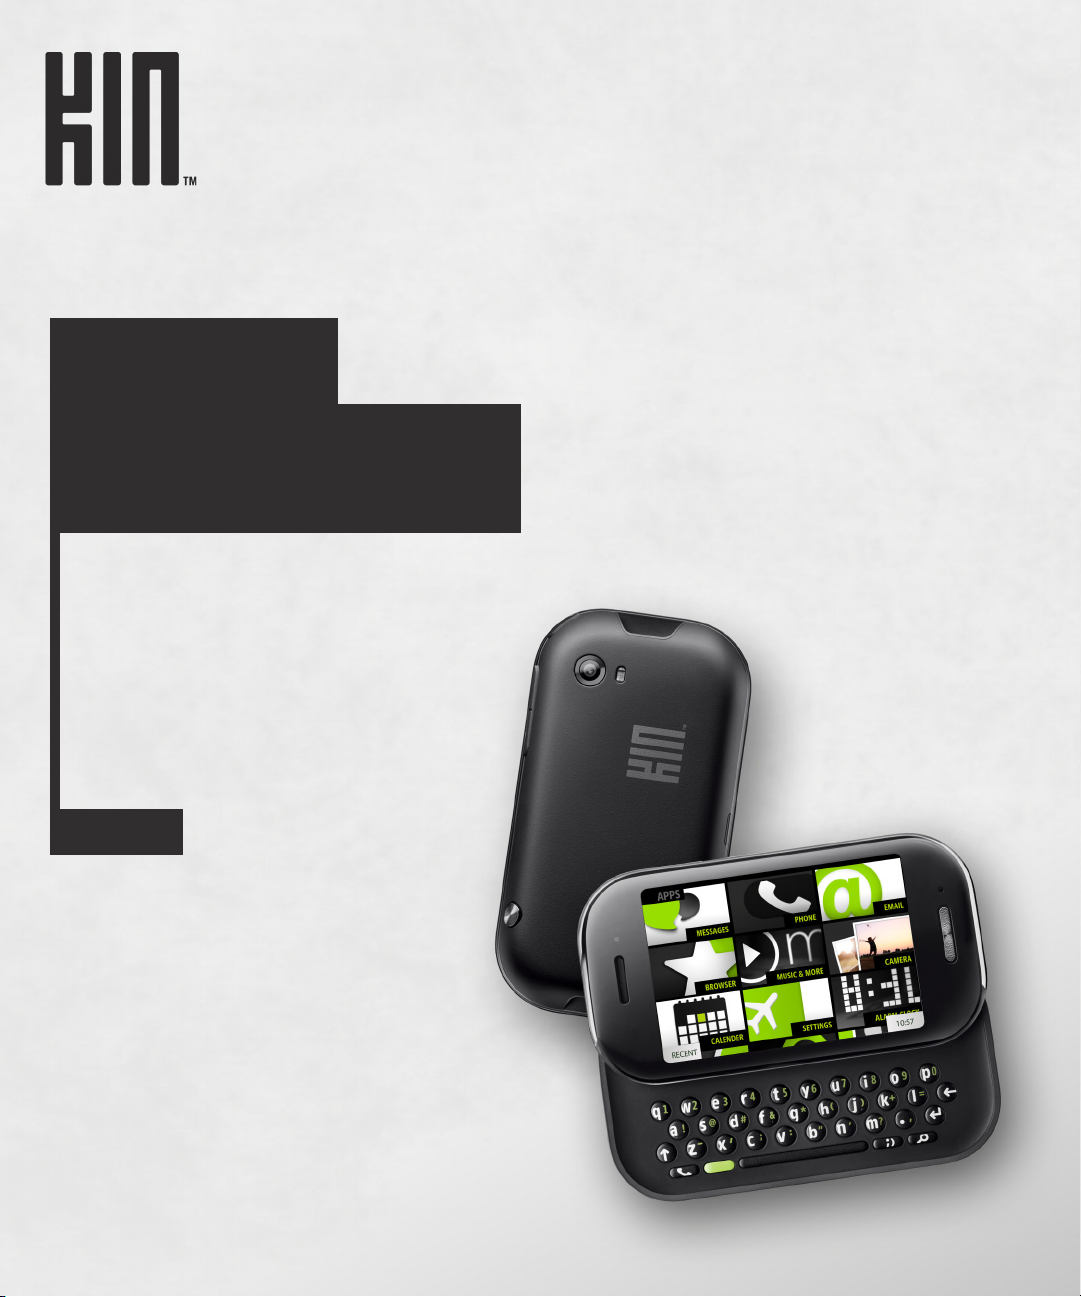
TWOm
USER GUIDE
KIN R1.0.2
Copyright © 2010 Microsoft Corporation.
Model PB20ZUMPB20ZUM
OMPB20VWM
Page 2

CONTENTS
PHONE CONTROLS . . . . . . . . . . . . . . . . . . . . . . . . . . . . . . . . . . . . . . . . . . . . . . . . . . . . . . . . . . . . . . . 7
The outside of your phone . . . . . . . . . . . . . . . . . . . . . . . . . . . . . . . . . . . . . . . . . . . . . . . . . . . . . . . . 7
Turn your phone on/off . . . . . . . . . . . . . . . . . . . . . . . . . . . . . . . . . . . . . . . . . . . . . . . . . . . . . . . . . . 7
Control buttons . . . . . . . . . . . . . . . . . . . . . . . . . . . . . . . . . . . . . . . . . . . . . . . . . . . . . . . . . . . . . . . . . 8
Battery . . . . . . . . . . . . . . . . . . . . . . . . . . . . . . . . . . . . . . . . . . . . . . . . . . . . . . . . . . . . . . . . . . . . . . . . 9
Insert or remove your battery. . . . . . . . . . . . . . . . . . . . . . . . . . . . . . . . . . . . . . . . . . . . . . . . . . . 9
Charge using the USB power adapter . . . . . . . . . . . . . . . . . . . . . . . . . . . . . . . . . . . . . . . . . . . 10
Charge using your computer’s USB port . . . . . . . . . . . . . . . . . . . . . . . . . . . . . . . . . . . . . . . . . 10
Ways to conserve battery power. . . . . . . . . . . . . . . . . . . . . . . . . . . . . . . . . . . . . . . . . . . . . . . . .11
Headset jack . . . . . . . . . . . . . . . . . . . . . . . . . . . . . . . . . . . . . . . . . . . . . . . . . . . . . . . . . . . . . . . . . . .11
Screen lock . . . . . . . . . . . . . . . . . . . . . . . . . . . . . . . . . . . . . . . . . . . . . . . . . . . . . . . . . . . . . . . . . . . 12
Screen orientation. . . . . . . . . . . . . . . . . . . . . . . . . . . . . . . . . . . . . . . . . . . . . . . . . . . . . . . . . . . . . . 12
Touch screen gestures. . . . . . . . . . . . . . . . . . . . . . . . . . . . . . . . . . . . . . . . . . . . . . . . . . . . . . . . . . . .13
Keyboard . . . . . . . . . . . . . . . . . . . . . . . . . . . . . . . . . . . . . . . . . . . . . . . . . . . . . . . . . . . . . . . . . . . . . 15
Typing and navigating in text boxes. . . . . . . . . . . . . . . . . . . . . . . . . . . . . . . . . . . . . . . . . . . . . 16
HOME . . . . . . . . . . . . . . . . . . . . . . . . . . . . . . . . . . . . . . . . . . . . . . . . . . . . . . . . . . . . . . . . . . . . . . . . .18
About Home . . . . . . . . . . . . . . . . . . . . . . . . . . . . . . . . . . . . . . . . . . . . . . . . . . . . . . . . . . . . . . . . . . 18
Manage Home . . . . . . . . . . . . . . . . . . . . . . . . . . . . . . . . . . . . . . . . . . . . . . . . . . . . . . . . . . . . . . . . . 20
Rearrange Apps and Favorites . . . . . . . . . . . . . . . . . . . . . . . . . . . . . . . . . . . . . . . . . . . . . . . . . 20
Add contacts to Favorites . . . . . . . . . . . . . . . . . . . . . . . . . . . . . . . . . . . . . . . . . . . . . . . . . . . . . 20
Remove contacts from Favorites . . . . . . . . . . . . . . . . . . . . . . . . . . . . . . . . . . . . . . . . . . . . . . . 20
Search . . . . . . . . . . . . . . . . . . . . . . . . . . . . . . . . . . . . . . . . . . . . . . . . . . . . . . . . . . . . . . . . . . . . . . . 21
Dashboard . . . . . . . . . . . . . . . . . . . . . . . . . . . . . . . . . . . . . . . . . . . . . . . . . . . . . . . . . . . . . . . . . . . . 21
Dashboard shortcuts. . . . . . . . . . . . . . . . . . . . . . . . . . . . . . . . . . . . . . . . . . . . . . . . . . . . . . . . . 21
Icons and indicators . . . . . . . . . . . . . . . . . . . . . . . . . . . . . . . . . . . . . . . . . . . . . . . . . . . . . . . . . 22
Sound profile. . . . . . . . . . . . . . . . . . . . . . . . . . . . . . . . . . . . . . . . . . . . . . . . . . . . . . . . . . . . . . . . . . 22
Recent apps and messages . . . . . . . . . . . . . . . . . . . . . . . . . . . . . . . . . . . . . . . . . . . . . . . . . . . . . . . 23
GLOBAL SETTINGS . . . . . . . . . . . . . . . . . . . . . . . . . . . . . . . . . . . . . . . . . . . . . . . . . . . . . . . . . . . . . .24
About Global Settings . . . . . . . . . . . . . . . . . . . . . . . . . . . . . . . . . . . . . . . . . . . . . . . . . . . . . . . . . . . 24
Wireless controls . . . . . . . . . . . . . . . . . . . . . . . . . . . . . . . . . . . . . . . . . . . . . . . . . . . . . . . . . . . . . . 26
Airplane mode. . . . . . . . . . . . . . . . . . . . . . . . . . . . . . . . . . . . . . . . . . . . . . . . . . . . . . . . . . . . . . 26
Wi-Fi . . . . . . . . . . . . . . . . . . . . . . . . . . . . . . . . . . . . . . . . . . . . . . . . . . . . . . . . . . . . . . . . . . . . . 26
Bluetooth. . . . . . . . . . . . . . . . . . . . . . . . . . . . . . . . . . . . . . . . . . . . . . . . . . . . . . . . . . . . . . . . . . 27
TWOm User Guide - R1.0.2 - October 7, 2010 2
Page 3

Data roaming . . . . . . . . . . . . . . . . . . . . . . . . . . . . . . . . . . . . . . . . . . . . . . . . . . . . . . . . . . . . . . 28
Themes . . . . . . . . . . . . . . . . . . . . . . . . . . . . . . . . . . . . . . . . . . . . . . . . . . . . . . . . . . . . . . . . . . . . . . 28
Sound . . . . . . . . . . . . . . . . . . . . . . . . . . . . . . . . . . . . . . . . . . . . . . . . . . . . . . . . . . . . . . . . . . . . . . . 28
Screen lock . . . . . . . . . . . . . . . . . . . . . . . . . . . . . . . . . . . . . . . . . . . . . . . . . . . . . . . . . . . . . . . . . . . 29
Browser . . . . . . . . . . . . . . . . . . . . . . . . . . . . . . . . . . . . . . . . . . . . . . . . . . . . . . . . . . . . . . . . . . . . . . .31
Phone . . . . . . . . . . . . . . . . . . . . . . . . . . . . . . . . . . . . . . . . . . . . . . . . . . . . . . . . . . . . . . . . . . . . . . . .31
Email . . . . . . . . . . . . . . . . . . . . . . . . . . . . . . . . . . . . . . . . . . . . . . . . . . . . . . . . . . . . . . . . . . . . . . . . 33
Date & time . . . . . . . . . . . . . . . . . . . . . . . . . . . . . . . . . . . . . . . . . . . . . . . . . . . . . . . . . . . . . . . . . . 33
Language . . . . . . . . . . . . . . . . . . . . . . . . . . . . . . . . . . . . . . . . . . . . . . . . . . . . . . . . . . . . . . . . . . . . . 34
About your phone . . . . . . . . . . . . . . . . . . . . . . . . . . . . . . . . . . . . . . . . . . . . . . . . . . . . . . . . . . . . . . 34
CONTACTS. . . . . . . . . . . . . . . . . . . . . . . . . . . . . . . . . . . . . . . . . . . . . . . . . . . . . . . . . . . . . . . . . . . . . 35
About Contacts . . . . . . . . . . . . . . . . . . . . . . . . . . . . . . . . . . . . . . . . . . . . . . . . . . . . . . . . . . . . . . . . 35
Manage your contacts . . . . . . . . . . . . . . . . . . . . . . . . . . . . . . . . . . . . . . . . . . . . . . . . . . . . . . . . . . . 37
Add a contact . . . . . . . . . . . . . . . . . . . . . . . . . . . . . . . . . . . . . . . . . . . . . . . . . . . . . . . . . . . . . . 37
Edit a contact card . . . . . . . . . . . . . . . . . . . . . . . . . . . . . . . . . . . . . . . . . . . . . . . . . . . . . . . . . . 38
Delete a contact card . . . . . . . . . . . . . . . . . . . . . . . . . . . . . . . . . . . . . . . . . . . . . . . . . . . . . . . . 38
Link/unlink contact cards. . . . . . . . . . . . . . . . . . . . . . . . . . . . . . . . . . . . . . . . . . . . . . . . . . . . . 39
Favorite contacts . . . . . . . . . . . . . . . . . . . . . . . . . . . . . . . . . . . . . . . . . . . . . . . . . . . . . . . . . . . . . . . 39
Contact cards. . . . . . . . . . . . . . . . . . . . . . . . . . . . . . . . . . . . . . . . . . . . . . . . . . . . . . . . . . . . . . . . . . 41
Find a contact . . . . . . . . . . . . . . . . . . . . . . . . . . . . . . . . . . . . . . . . . . . . . . . . . . . . . . . . . . . . . . . . . 41
Find a contact from anywhere on your phone. . . . . . . . . . . . . . . . . . . . . . . . . . . . . . . . . . . . . 41
Find a contact from the Contacts app . . . . . . . . . . . . . . . . . . . . . . . . . . . . . . . . . . . . . . . . . . . 41
PHONE . . . . . . . . . . . . . . . . . . . . . . . . . . . . . . . . . . . . . . . . . . . . . . . . . . . . . . . . . . . . . . . . . . . . . . . .42
About Phone . . . . . . . . . . . . . . . . . . . . . . . . . . . . . . . . . . . . . . . . . . . . . . . . . . . . . . . . . . . . . . . . . . 42
Using a Bluetooth device . . . . . . . . . . . . . . . . . . . . . . . . . . . . . . . . . . . . . . . . . . . . . . . . . . . . . . . . 44
Calling . . . . . . . . . . . . . . . . . . . . . . . . . . . . . . . . . . . . . . . . . . . . . . . . . . . . . . . . . . . . . . . . . . . . . . . 45
Make a call . . . . . . . . . . . . . . . . . . . . . . . . . . . . . . . . . . . . . . . . . . . . . . . . . . . . . . . . . . . . . . . . 45
Answer a call. . . . . . . . . . . . . . . . . . . . . . . . . . . . . . . . . . . . . . . . . . . . . . . . . . . . . . . . . . . . . . . 46
In-call options . . . . . . . . . . . . . . . . . . . . . . . . . . . . . . . . . . . . . . . . . . . . . . . . . . . . . . . . . . . . . . 46
Multiple calls . . . . . . . . . . . . . . . . . . . . . . . . . . . . . . . . . . . . . . . . . . . . . . . . . . . . . . . . . . . . . . 47
End a call. . . . . . . . . . . . . . . . . . . . . . . . . . . . . . . . . . . . . . . . . . . . . . . . . . . . . . . . . . . . . . . . . . 48
Voicemail. . . . . . . . . . . . . . . . . . . . . . . . . . . . . . . . . . . . . . . . . . . . . . . . . . . . . . . . . . . . . . . . . . . . . 48
Voicemail notifications. . . . . . . . . . . . . . . . . . . . . . . . . . . . . . . . . . . . . . . . . . . . . . . . . . . . . . . 48
Call voicemail from the Dialer . . . . . . . . . . . . . . . . . . . . . . . . . . . . . . . . . . . . . . . . . . . . . . . . . 48
Call Log . . . . . . . . . . . . . . . . . . . . . . . . . . . . . . . . . . . . . . . . . . . . . . . . . . . . . . . . . . . . . . . . . . . . . . 48
Phone settings . . . . . . . . . . . . . . . . . . . . . . . . . . . . . . . . . . . . . . . . . . . . . . . . . . . . . . . . . . . . . . . . . 49
TWOm User Guide - R1.0.2 - October 7, 2010 3
Page 4

EMAIL. . . . . . . . . . . . . . . . . . . . . . . . . . . . . . . . . . . . . . . . . . . . . . . . . . . . . . . . . . . . . . . . . . . . . . . . . 50
About Email. . . . . . . . . . . . . . . . . . . . . . . . . . . . . . . . . . . . . . . . . . . . . . . . . . . . . . . . . . . . . . . . . . . 50
Set up an email account . . . . . . . . . . . . . . . . . . . . . . . . . . . . . . . . . . . . . . . . . . . . . . . . . . . . . . . . . 51
Inbox screens. . . . . . . . . . . . . . . . . . . . . . . . . . . . . . . . . . . . . . . . . . . . . . . . . . . . . . . . . . . . . . . . . . 52
Read message screen. . . . . . . . . . . . . . . . . . . . . . . . . . . . . . . . . . . . . . . . . . . . . . . . . . . . . . . . . . . . 55
Email settings . . . . . . . . . . . . . . . . . . . . . . . . . . . . . . . . . . . . . . . . . . . . . . . . . . . . . . . . . . . . . . . . . 55
MESSAGES . . . . . . . . . . . . . . . . . . . . . . . . . . . . . . . . . . . . . . . . . . . . . . . . . . . . . . . . . . . . . . . . . . . .56
About Messages. . . . . . . . . . . . . . . . . . . . . . . . . . . . . . . . . . . . . . . . . . . . . . . . . . . . . . . . . . . . . . . . 56
Messages inbox . . . . . . . . . . . . . . . . . . . . . . . . . . . . . . . . . . . . . . . . . . . . . . . . . . . . . . . . . . . . . . . . 57
Conversation cards . . . . . . . . . . . . . . . . . . . . . . . . . . . . . . . . . . . . . . . . . . . . . . . . . . . . . . . . . . . . . 59
MMS setting . . . . . . . . . . . . . . . . . . . . . . . . . . . . . . . . . . . . . . . . . . . . . . . . . . . . . . . . . . . . . . . . . . 60
CAMERA. . . . . . . . . . . . . . . . . . . . . . . . . . . . . . . . . . . . . . . . . . . . . . . . . . . . . . . . . . . . . . . . . . . . . . . 61
About Camera . . . . . . . . . . . . . . . . . . . . . . . . . . . . . . . . . . . . . . . . . . . . . . . . . . . . . . . . . . . . . . . . . 61
Capture photos and videos . . . . . . . . . . . . . . . . . . . . . . . . . . . . . . . . . . . . . . . . . . . . . . . . . . . . . . . 63
Photo settings . . . . . . . . . . . . . . . . . . . . . . . . . . . . . . . . . . . . . . . . . . . . . . . . . . . . . . . . . . . . . . 65
Video settings . . . . . . . . . . . . . . . . . . . . . . . . . . . . . . . . . . . . . . . . . . . . . . . . . . . . . . . . . . . . . . 66
Full-screen photo viewer . . . . . . . . . . . . . . . . . . . . . . . . . . . . . . . . . . . . . . . . . . . . . . . . . . . . . . . . 66
Photo and video screens . . . . . . . . . . . . . . . . . . . . . . . . . . . . . . . . . . . . . . . . . . . . . . . . . . . . . . . . . 68
Captured screen . . . . . . . . . . . . . . . . . . . . . . . . . . . . . . . . . . . . . . . . . . . . . . . . . . . . . . . . . . . . 69
Favorites screen . . . . . . . . . . . . . . . . . . . . . . . . . . . . . . . . . . . . . . . . . . . . . . . . . . . . . . . . . . . . 69
Albums screen. . . . . . . . . . . . . . . . . . . . . . . . . . . . . . . . . . . . . . . . . . . . . . . . . . . . . . . . . . . . . . 70
Copy photos and videos to/from your computer . . . . . . . . . . . . . . . . . . . . . . . . . . . . . . . . . . . . . . .71
BROWSER . . . . . . . . . . . . . . . . . . . . . . . . . . . . . . . . . . . . . . . . . . . . . . . . . . . . . . . . . . . . . . . . . . . . . 72
About Browser. . . . . . . . . . . . . . . . . . . . . . . . . . . . . . . . . . . . . . . . . . . . . . . . . . . . . . . . . . . . . . . . . 72
Webpage browse screen . . . . . . . . . . . . . . . . . . . . . . . . . . . . . . . . . . . . . . . . . . . . . . . . . . . . . . . . . 74
Favorite webpages. . . . . . . . . . . . . . . . . . . . . . . . . . . . . . . . . . . . . . . . . . . . . . . . . . . . . . . . . . . . . . 76
Search . . . . . . . . . . . . . . . . . . . . . . . . . . . . . . . . . . . . . . . . . . . . . . . . . . . . . . . . . . . . . . . . . . . . . . . 77
Browser settings . . . . . . . . . . . . . . . . . . . . . . . . . . . . . . . . . . . . . . . . . . . . . . . . . . . . . . . . . . . . . . . 77
MUSIC & MORE . . . . . . . . . . . . . . . . . . . . . . . . . . . . . . . . . . . . . . . . . . . . . . . . . . . . . . . . . . . . . . . . .78
About Music & More. . . . . . . . . . . . . . . . . . . . . . . . . . . . . . . . . . . . . . . . . . . . . . . . . . . . . . . . . . . . 78
Sync media from your computer . . . . . . . . . . . . . . . . . . . . . . . . . . . . . . . . . . . . . . . . . . . . . . . . . . 80
On a PC . . . . . . . . . . . . . . . . . . . . . . . . . . . . . . . . . . . . . . . . . . . . . . . . . . . . . . . . . . . . . . . . . . . 80
On a Macintosh. . . . . . . . . . . . . . . . . . . . . . . . . . . . . . . . . . . . . . . . . . . . . . . . . . . . . . . . . . . . . 81
Media player . . . . . . . . . . . . . . . . . . . . . . . . . . . . . . . . . . . . . . . . . . . . . . . . . . . . . . . . . . . . . . . . . . 81
Find a song, video, or podcast . . . . . . . . . . . . . . . . . . . . . . . . . . . . . . . . . . . . . . . . . . . . . . . . . 81
TWOm User Guide - R1.0.2 - October 7, 2010 4
Page 5

Play an item. . . . . . . . . . . . . . . . . . . . . . . . . . . . . . . . . . . . . . . . . . . . . . . . . . . . . . . . . . . . . . . . 82
Playlists . . . . . . . . . . . . . . . . . . . . . . . . . . . . . . . . . . . . . . . . . . . . . . . . . . . . . . . . . . . . . . . . . . . 83
Now Playing screens. . . . . . . . . . . . . . . . . . . . . . . . . . . . . . . . . . . . . . . . . . . . . . . . . . . . . . . . . 83
Control media play . . . . . . . . . . . . . . . . . . . . . . . . . . . . . . . . . . . . . . . . . . . . . . . . . . . . . . . . . . 86
Delete an item. . . . . . . . . . . . . . . . . . . . . . . . . . . . . . . . . . . . . . . . . . . . . . . . . . . . . . . . . . . . . . 87
FM radio screen . . . . . . . . . . . . . . . . . . . . . . . . . . . . . . . . . . . . . . . . . . . . . . . . . . . . . . . . . . . . . . . 87
Listen to media with headset, headphones, or Bluetooth device . . . . . . . . . . . . . . . . . . . . . . . . . 88
Settings . . . . . . . . . . . . . . . . . . . . . . . . . . . . . . . . . . . . . . . . . . . . . . . . . . . . . . . . . . . . . . . . . . . . . . 89
MORE APPS . . . . . . . . . . . . . . . . . . . . . . . . . . . . . . . . . . . . . . . . . . . . . . . . . . . . . . . . . . . . . . . . . . . .90
Calendar . . . . . . . . . . . . . . . . . . . . . . . . . . . . . . . . . . . . . . . . . . . . . . . . . . . . . . . . . . . . . . . . . . . . . 90
Manage calendar events . . . . . . . . . . . . . . . . . . . . . . . . . . . . . . . . . . . . . . . . . . . . . . . . . . . . . . 90
Navigate in calendar . . . . . . . . . . . . . . . . . . . . . . . . . . . . . . . . . . . . . . . . . . . . . . . . . . . . . . . . . 91
Event notifications . . . . . . . . . . . . . . . . . . . . . . . . . . . . . . . . . . . . . . . . . . . . . . . . . . . . . . . . . . 91
Alarm . . . . . . . . . . . . . . . . . . . . . . . . . . . . . . . . . . . . . . . . . . . . . . . . . . . . . . . . . . . . . . . . . . . . . . . . 92
About Alarm . . . . . . . . . . . . . . . . . . . . . . . . . . . . . . . . . . . . . . . . . . . . . . . . . . . . . . . . . . . . . . . 92
Create an alarm. . . . . . . . . . . . . . . . . . . . . . . . . . . . . . . . . . . . . . . . . . . . . . . . . . . . . . . . . . . . . 94
Turn an alarm on and off . . . . . . . . . . . . . . . . . . . . . . . . . . . . . . . . . . . . . . . . . . . . . . . . . . . . . 94
Change an alarm’s settings . . . . . . . . . . . . . . . . . . . . . . . . . . . . . . . . . . . . . . . . . . . . . . . . . . . . 95
Delete an alarm. . . . . . . . . . . . . . . . . . . . . . . . . . . . . . . . . . . . . . . . . . . . . . . . . . . . . . . . . . . . . 95
Alarm notifications. . . . . . . . . . . . . . . . . . . . . . . . . . . . . . . . . . . . . . . . . . . . . . . . . . . . . . . . . . 95
Calculator . . . . . . . . . . . . . . . . . . . . . . . . . . . . . . . . . . . . . . . . . . . . . . . . . . . . . . . . . . . . . . . . . . . . 96
About Calculator. . . . . . . . . . . . . . . . . . . . . . . . . . . . . . . . . . . . . . . . . . . . . . . . . . . . . . . . . . . . 96
Memory. . . . . . . . . . . . . . . . . . . . . . . . . . . . . . . . . . . . . . . . . . . . . . . . . . . . . . . . . . . . . . . . . . . 97
SAFETY, REGULATORY, AND LEGAL INFORMATION . . . . . . . . . . . . . . . . . . . . . . . . . . . . . . . . . .98
Handling and safety precautions . . . . . . . . . . . . . . . . . . . . . . . . . . . . . . . . . . . . . . . . . . . . . . . . . . 98
Battery handling . . . . . . . . . . . . . . . . . . . . . . . . . . . . . . . . . . . . . . . . . . . . . . . . . . . . . . . . . . . . 98
Device handling and use. . . . . . . . . . . . . . . . . . . . . . . . . . . . . . . . . . . . . . . . . . . . . . . . . . . . . . 98
Battery charger handling . . . . . . . . . . . . . . . . . . . . . . . . . . . . . . . . . . . . . . . . . . . . . . . . . . . . 100
Device handling in potentially explosive atmospheres . . . . . . . . . . . . . . . . . . . . . . . . . . . . . .101
Guidelines for persons with pacemakers and implantable medical devices . . . . . . . . . . . . .101
Driving safety . . . . . . . . . . . . . . . . . . . . . . . . . . . . . . . . . . . . . . . . . . . . . . . . . . . . . . . . . . . . . 102
Additional safety information . . . . . . . . . . . . . . . . . . . . . . . . . . . . . . . . . . . . . . . . . . . . . . . . 102
Regulatory and compliance information . . . . . . . . . . . . . . . . . . . . . . . . . . . . . . . . . . . . . . . . . . . 107
FCC notice . . . . . . . . . . . . . . . . . . . . . . . . . . . . . . . . . . . . . . . . . . . . . . . . . . . . . . . . . . . . . . . 107
Exposure to Radio Frequency (RF) signals . . . . . . . . . . . . . . . . . . . . . . . . . . . . . . . . . . . . . . 108
Emergency calls . . . . . . . . . . . . . . . . . . . . . . . . . . . . . . . . . . . . . . . . . . . . . . . . . . . . . . . . . . . 109
FCC enhanced 911 (E911) rules . . . . . . . . . . . . . . . . . . . . . . . . . . . . . . . . . . . . . . . . . . . . . . . .110
TWOm User Guide - R1.0.2 - October 7, 2010 5
Page 6

Hearing aid compatibility with mobile phones . . . . . . . . . . . . . . . . . . . . . . . . . . . . . . . . . . . .110
Recycling Information . . . . . . . . . . . . . . . . . . . . . . . . . . . . . . . . . . . . . . . . . . . . . . . . . . . . . . . 111
Compliance with additional FCC regulations . . . . . . . . . . . . . . . . . . . . . . . . . . . . . . . . . . . . .111
Legal information . . . . . . . . . . . . . . . . . . . . . . . . . . . . . . . . . . . . . . . . . . . . . . . . . . . . . . . . . . . . . .112
KIN end-user license agreement . . . . . . . . . . . . . . . . . . . . . . . . . . . . . . . . . . . . . . . . . . . . . . .112
12-month limited warranty . . . . . . . . . . . . . . . . . . . . . . . . . . . . . . . . . . . . . . . . . . . . . . . . . . .118
INDEX. . . . . . . . . . . . . . . . . . . . . . . . . . . . . . . . . . . . . . . . . . . . . . . . . . . . . . . . . . . . . . . . . . . . . . . . 121
TWOm User Guide - R1.0.2 - October 7, 2010 6
Page 7
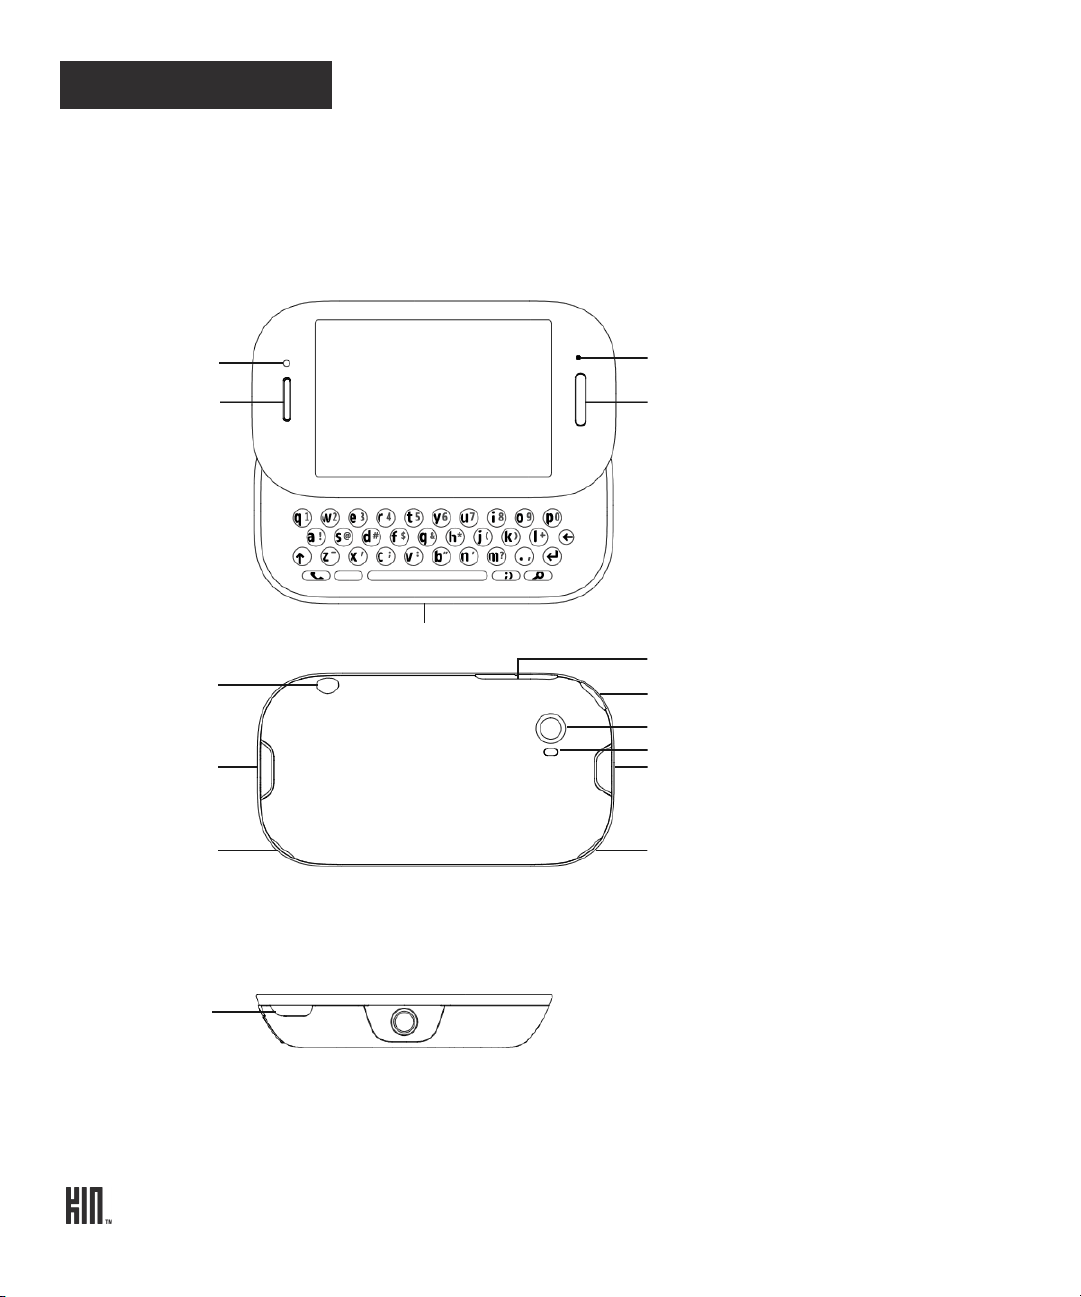
PHONE CONTROLS
Earpiece
BACK button
Headset jack
Microphone
Camera flash
Camera lens
USB power
CAPTURE
- +
POWER button
VOLUME buttons
port
Battery cover latch
button
Speaker
Speaker
Proximity and
light sensors
POWER button
THE OUTSIDE OF YOUR PHONE
TURN YOUR PHONE ON/OFF
1 Press and hold the POWER button to turn your phone on.
2 Press and hold the POWER button again to turn your phone off. The phone will turn off after you
confirm.
TWOm User Guide - R1.0.2 - October 7, 2010 7
Page 8

Note: If you press the POWER button quickly while your phone is on, your phone will go into screen
lock. Screen lock prevents accidental actions if your phone’s buttons are pressed or if your screen is
touched. Read more in “Screen lock” on page 29.
CONTROL BUTTONS
BACK button Use the BACK button to navigate back to where you came from. If you’re on a
screen and editing or adding information, pressing BACK will save your
information, or you’ll be asked if you want to save it.
Press and hold the BACK button to return to the Apps screen at any time.
VOLUME buttons Use the + and - VOLUME buttons to adjust the volume on a call or when
you’re playing music, watching a video, or listening to a podcast. Press the +
VOLUME button to increase the volume; press the - VOLUME button to
lower the volume. To silence an incoming call’s ring, press any button or key.
If no sound is playing, pressing the VOLUME buttons will step through the
sound profiles.
CAPTURE button Use the CAPTURE button to capture photos and videos. When you press the
CAPTURE button, you’ll enter the Camera app > Capture screen. Read more
about capturing photos and videos in “Camera” on page 61.
POWER button Use the POWER button to put your phone into screen lock (press the POWER
button briefly) or turn your phone on/off (press and hold). Read more in
“Turn your phone on/off” above, “Screen lock” on page 12, and “Screen lock”
on page 29.
TWOm User Guide - R1.0.2 - October 7, 2010 8
Page 9
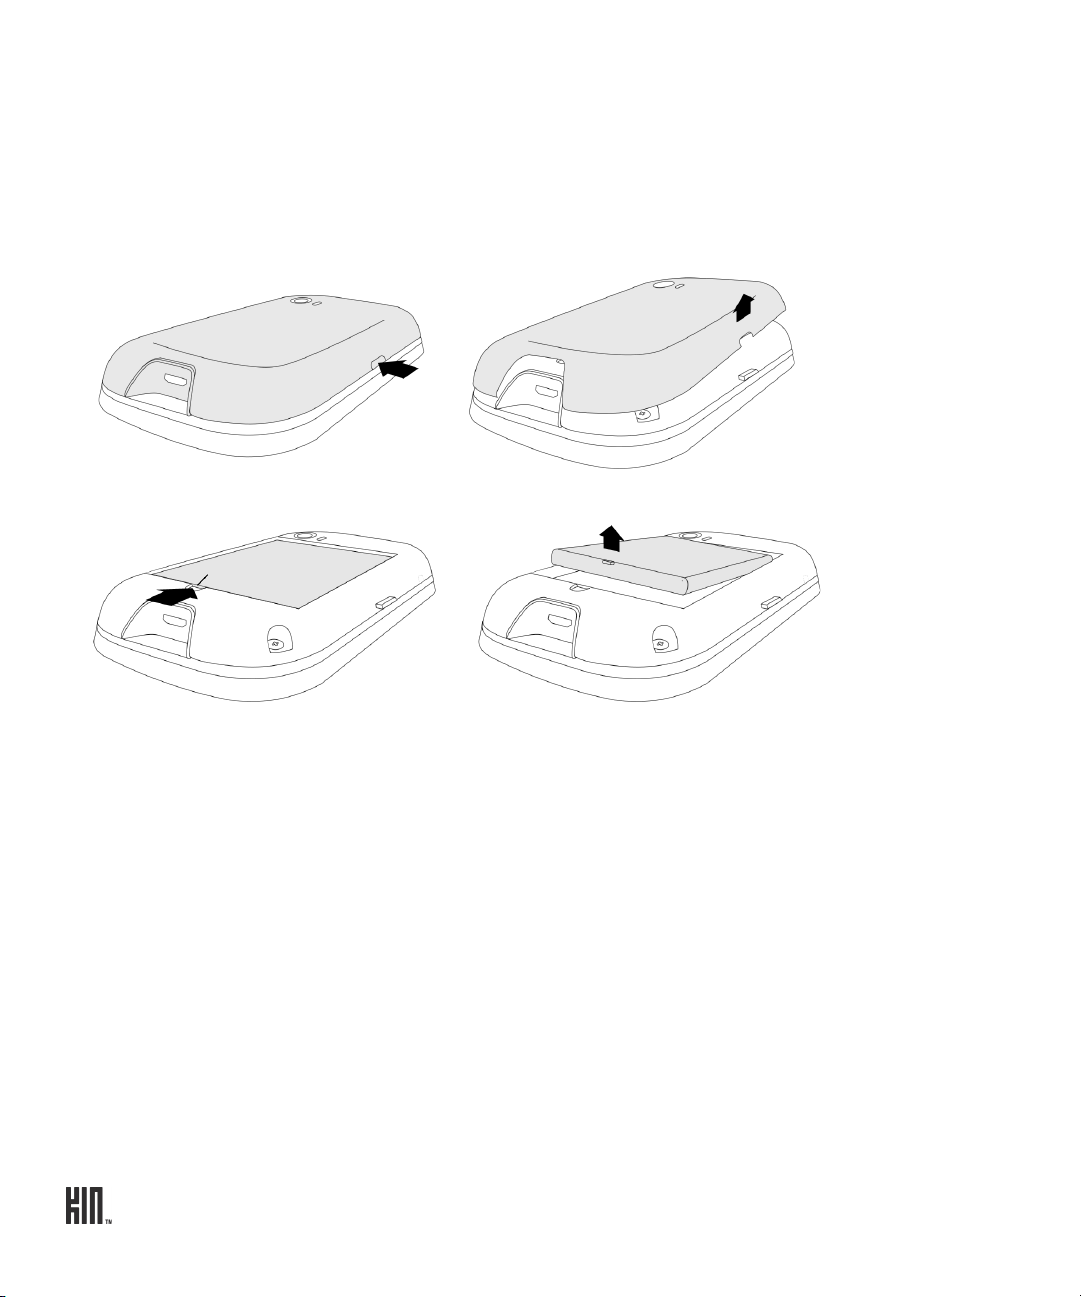
BATTERY
Battery lift tab
Insert or remove your battery
1 Turn your phone over so you are looking at the battery cover.
2 Press the battery cover latch, then carefully lift the cover from your phone, lifting from the side
with the latch.
3 To remove the battery, lift the battery using the battery lift tab.
4 To insert the battery, match the gold-colored contacts on the battery with the gold-colored contacts
in the battery slot. Push the battery firmly into place.
5 Replace the cover, making sure the cover latch snaps back into position.
Battery notes:
• If you plan to leave your phone unattended for an extended period of time, the battery may
discharge if the phone is turned on and not attached to the charger.
• Battery charging times can vary and are dependent on the type of charger and remaining battery
charge. Battery performance will begin to degrade over time, so you may want to consider replacing
the battery if you notice your phone’s talk and standby times are noticeably shorter than normal.
• You may store your battery in the phone when it is not in use; however, the battery will slowly
discharge even if the phone is turned off. If you remove your battery from the phone, store the
battery in a cool, dark, dry place.
• Battery life will vary depending on operating temperature, signal strength, phone feature settings,
network setup, and system use (calls, messaging, etc.).
TWOm User Guide - R1.0.2 - October 7, 2010 9
Page 10
• A shorter screen lock timeout setting will also improve battery life because the screen will go black
sooner.
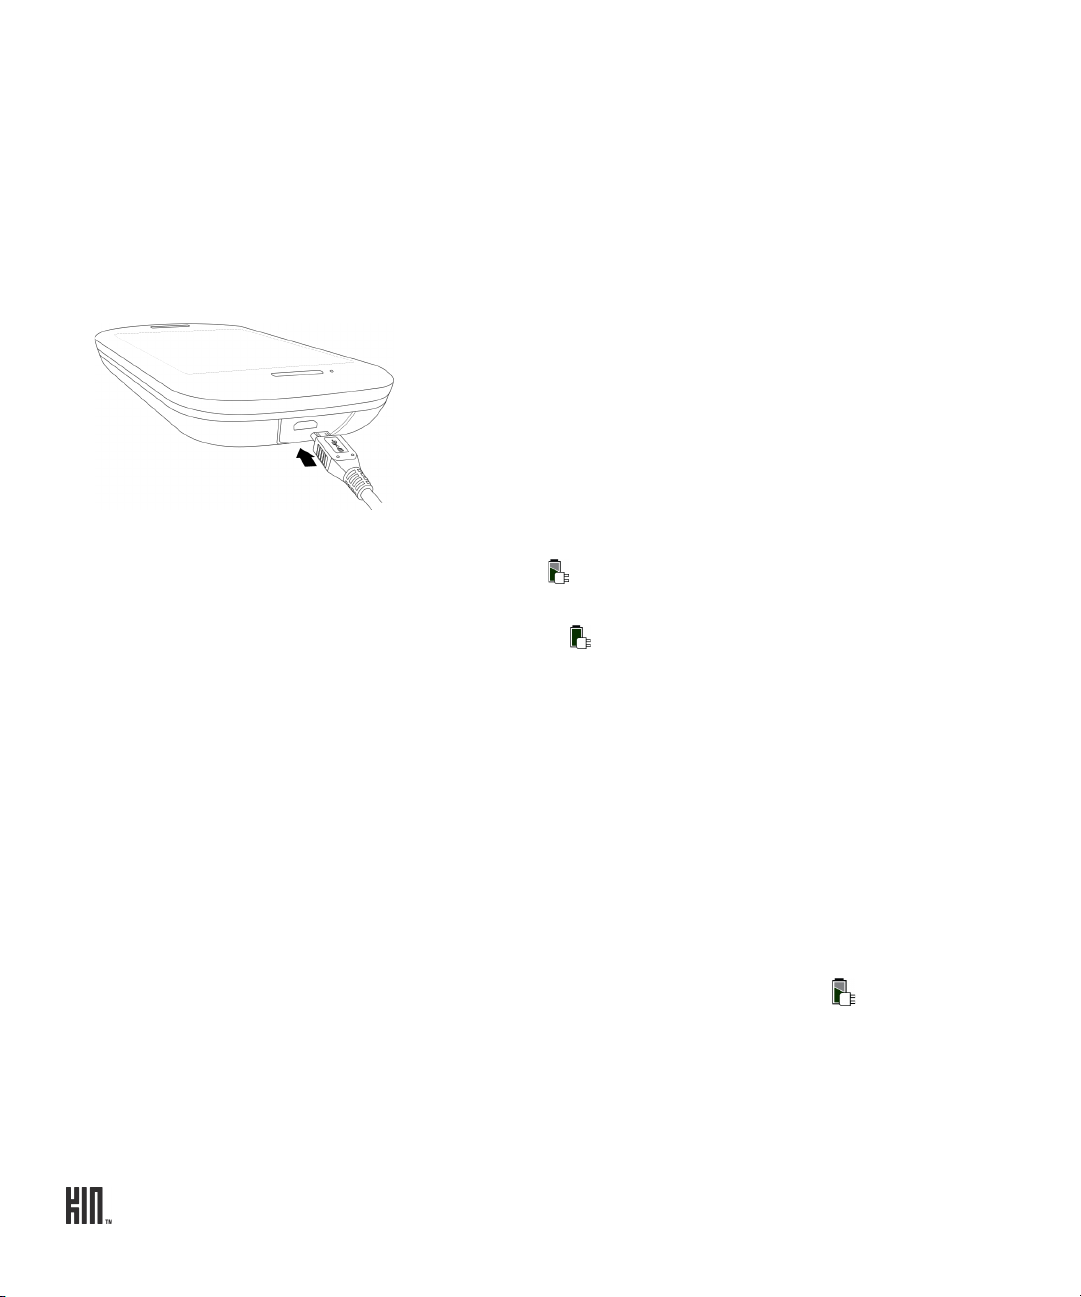
Charge using the USB power adapter
When you first receive your phone it should be charged, but it’s advisable to bring it to a full charge.
The USB power adapter that came in the box with your phone lets you plug your phone into a power
outlet to charge the battery. To charge your phone, follow these steps:
1 Connect the USB power adapter to your phone’s USB/power port.
2 Plug the other end of the USB power adapter to a wall power outlet. While your phone is charging,
you’ll see the charging icon over the battery icon in the lower-right of the screen and in the
Dashboard. (Read more in “Dashboard” on page 21.)
3 When your phone is fully charged, the battery icon will be filled with color.
Charge using your computer’s USB port
Note: Charging your phone via USB (whether from a computer or car-charger) may not provide
enough power to adequately charge your phone. A car charger must be rated at 500 mA to charge
your phone properly.
1 Connect the USB cable to your phone’s USB/power port. (Your USB cable is also used to connect
your phone to the USB power adapter.)
2 Connect the other end of the adapter to your computer’s USB port.
Note: The first time you attach your phone to your PC via USB, you’ll be prompted to install
drivers.
3 While your phone is charging, you’ll see the charging icon over the battery icon in the lower-
right of the screen and in the Dashboard. (Read more in “Dashboard” on page 21.)
Read about importing media to your phone via USB in:
• “Copy photos and videos to/from your computer” on page 71.
• “Sync media from your computer” on page 80.
TWOm User Guide - R1.0.2 - October 7, 2010 10
Page 11
Ways to conserve battery power
Listed below are a few ways you can save your battery power, as well as some facts about battery
usage:
• Adjust wireless settings. If you will not be using your phone’s wireless functionality for a period of
time, you can save power by turning off Wi-Fi or by putting your phone in airplane mode, but
remember you will not be able to receive calls in airplane mode. Read more in “Airplane mode” on
page 26.
• If you are going to be in an area or building that has no cell coverage for a few hours, turn off
your phone or turn on airplane mode and connect to Wi-Fi to conserve power. When you are
out of range of a cell tower your phone will have a shorter standby time because your phone is
searching for a cell tower. This uses more power than if it were already registered with a tower and
simply monitoring.
• If you won’t be using your phone for a period of time, turn it off. Your battery will last two days
if it is turned on and not connected to the charger. Turning off your phone but keeping it connected
to the charger will keep your phone from depleting the battery.
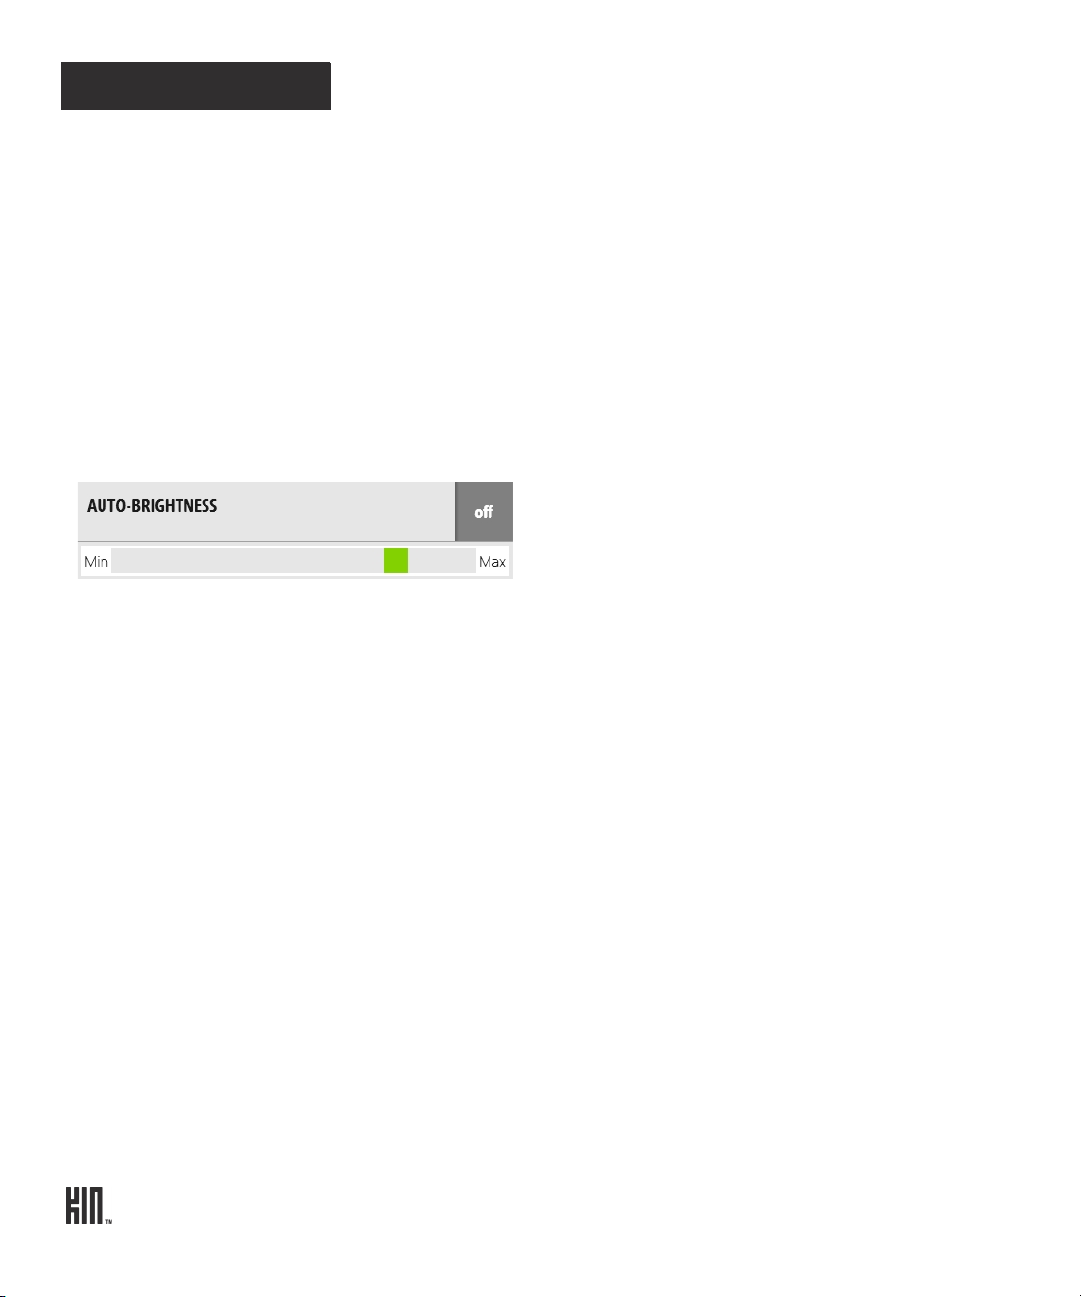
• Turn the Auto-brightness setting on. Auto-brightness is turned on by default. You’ll typically use
more battery power when it’s turned off, unless you manually set the brightness level to stay low.
Read more in “Auto-brightness” on page 30.
• Warm up. The battery capacity will be lower when the temperature is lower. If you think your
phone is too cold, bring it indoors or where the temperature is warmer.
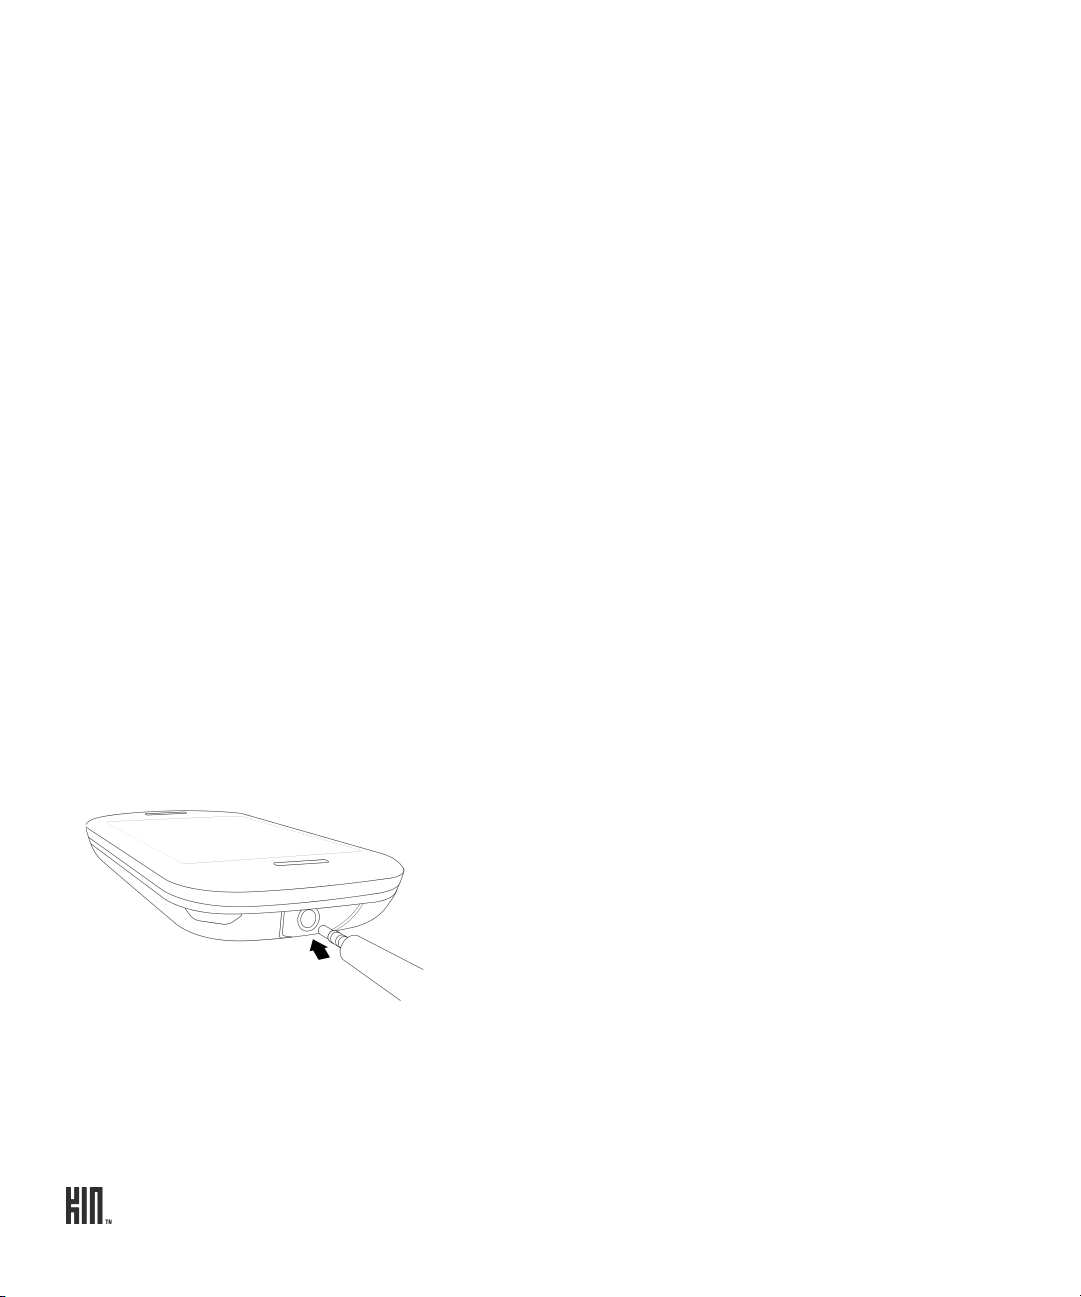
HEADSET JACK
Your phone is designed to use a stereo headset. To use a headset, insert the headset lead into the
headset jack. Be sure to press the headset lead in firmly to secure the connection.
Read about how to use the headset control button(s) in “Can I control a call with a headset?” on page
43 and “Listen to media with headset, headphones, or Bluetooth device” on page 88.
Note: In order to listen to the FM radio in Music & More, you must insert a wired headset or
headphone (the wire works as the antenna).
TWOm User Guide - R1.0.2 - October 7, 2010 11
Page 12

SCREEN LOCK
To prevent accidental key presses or screen touches, lock your screen. While your phone is screen
locked, you’ll still be able to adjust the volume during phone calls and media playback. You’ll also still
receive incoming call and message notifications.
1 Lock your screen by doing one of the following:
• Press the POWER button quickly (the screen will also go dark).
• Simply wait for the screen lock timeout period to elapse. Read how to set the timeout period in
“Auto-lock” on page 29. After 10 seconds in the screen lock state, your phone screen will go black
and remain so until you unlock it, receive a new call, message, or other notification.
2 To unlock the phone, do one of the following:
• Slide the keyboard open.
• Press the BACK button, then flick your finger diagonally toward the upper-right corner.
3 If you’ve set a security PIN and it has locked, you’ll be prompted to type it.
Note: After eight incorrect attempts at typing your PIN, you’ll be prompted to type a specific
number to continue trying. If you type an incorrect PIN a total of ten times, the data on your phone
will be erased (but you will be warned after the ninth attempt).
Warning: Be careful of losing your data if children play with this screen; they may not be able to
understand the warnings.
SCREEN ORIENTATION
Your phone screen will adjust to the way you’re holding your phone or whether you have the keyboard
open. If you hold the screen in “portrait” orientation (with the BACK button at the bottom), then the
screen will display in portrait orientation. If you hold your phone in “landscape” orientation (with the
BACK button on the right) or if you’ve slid the keyboard open, the screen will display in landscape
orientation.
Notes:
• When using the Music & More app, the orientation will always be portrait, except when you use the
keyboard to type search terms.
• When using the Search app, the orientation will always be landscape.
• Screen orientation is based on a gravity measurement in the phone, so if you rotate your phone
while holding it level (with the screen facing up) or while it’s laying on a flat surface, the phone
won’t register the rotation. Tilt the phone up slightly (20-30°) toward you to have the screen
orientation shift correctly.
TWOm User Guide - R1.0.2 - October 7, 2010 12
Page 13

• If the phone is shaking when you rotate it, the orientation won’t change. This is to prevent
unintended rotations while walking, riding on a bus, exercising, or doing something else that might
jolt the phone.
TOUCH SCREEN GESTURES
Tap Touch your fingertip quickly and lightly on the screen. Use this gesture for
selecting items on the screen. You’ll know when you’ve selected an item because
its color changes.
In the Camera full-screen photo viewer, tap once to show the options.
Double tap On some screens (webpages, Camera full-screen photo viewer) you can zoom in/
out by tapping the screen twice, quickly and in succession.
If you double tap an image on a webpage, you’ll show the Save image or Open
link options (if the image is also a link).
Note: If you double tap on a screen where there’s no special double tap action,
your double tap will be treated as a single tap.
Two-finger tap On some screens you can expose additional functions (such as delete or reorder
items) by quickly tapping the screen with two fingers.
• Delete an item by first tapping the screen with two fingers to show the delete
icon X next to each item. Tap the X to delete the item(s). Two-finger tap again
to exit edit mode. When you two-finger tap to exit, be careful not to tap any of
the Xs.
• On the Apps and Favorites screens you can rearrange the contents by first
entering edit mode. Quickly tap the screen with two fingers and you’ll see all
the items on the screen shrink. Drag the item to its new location. Two-finger
tap again to exit edit mode.
TWOm User Guide - R1.0.2 - October 7, 2010 13
Page 14
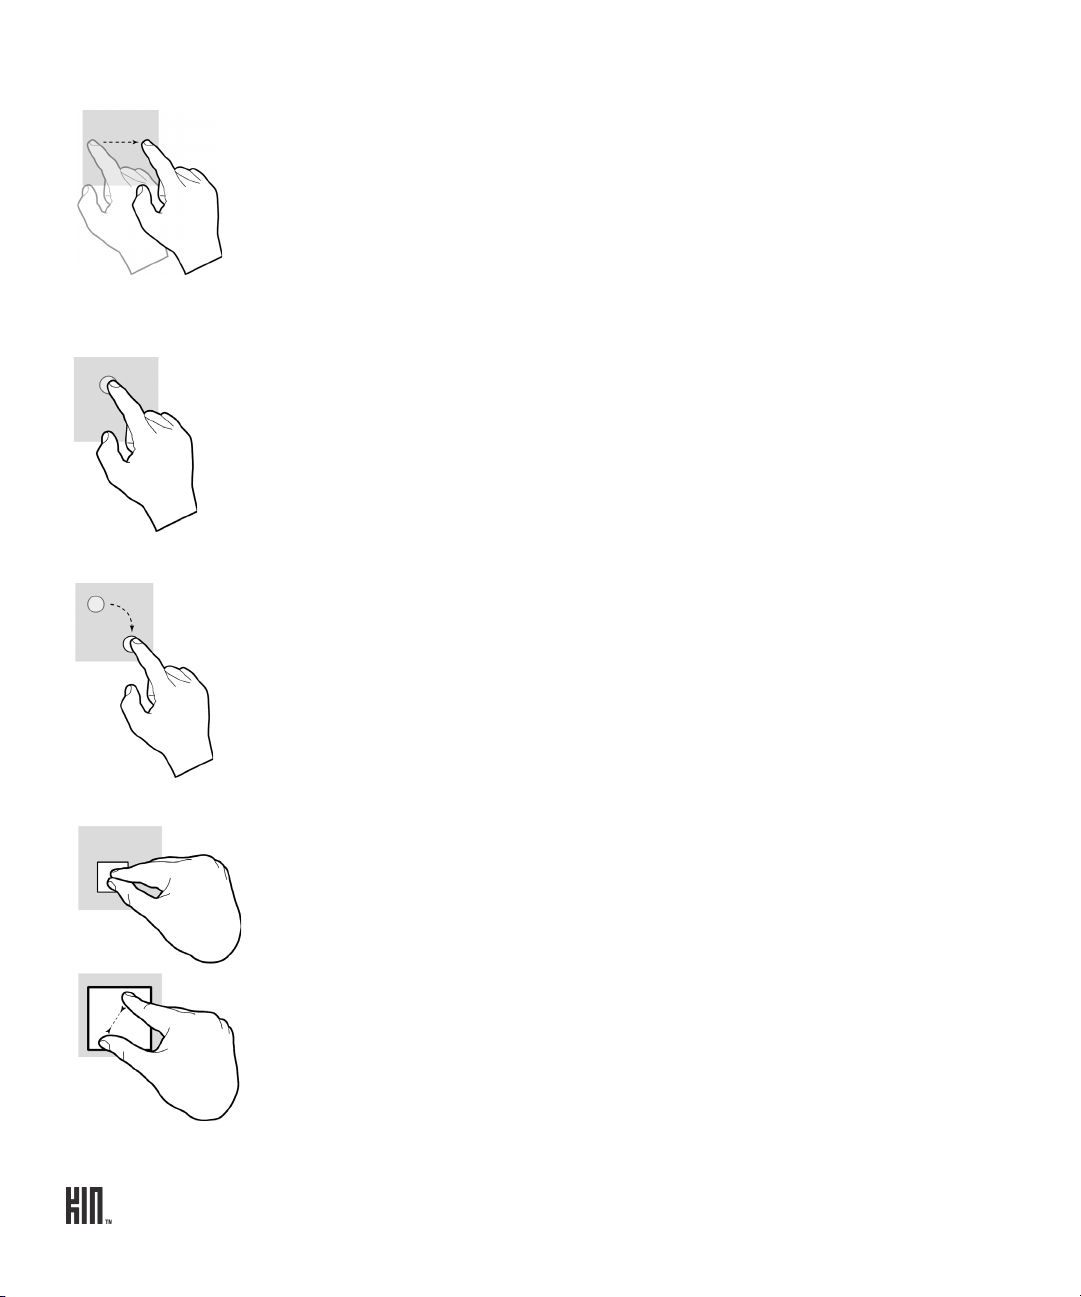
Slide Slide your finger lightly on the screen in an up/down or left/right direction. This
gesture is primarily used for scrolling or panning.
• Slide your finger in an upward direction to scroll down; slide your finger in a
downward direction to scroll up.
• Slide your finger left to move to the right; slide your finger right to move to
the left.
To scroll up or down quickly, flick your fingertip quickly and repeatedly up or
down on the screen. Tap the screen to stop the scrolling.
Touch and hold Touch your finger to the screen and leave it there until the next action is
triggered. For example, touch and hold a text box to magnify it for positioning
the cursor.
Drag After you touch a movable item, if you hold your finger on the item and slide,
the item slides with your finger. This drag gesture is used to rearrange Apps or
Favorites.
Pinch in or out
To zoom in to a webpage or photo, start with your thumb and forefinger together
in the middle of the screen then pull them apart.
To zoom out of a webpage or photo, reverse the motion. Start with your thumb
and forefinger at opposite ends of the screen and pull them together.
TWOm User Guide - R1.0.2 - October 7, 2010 14
Page 15
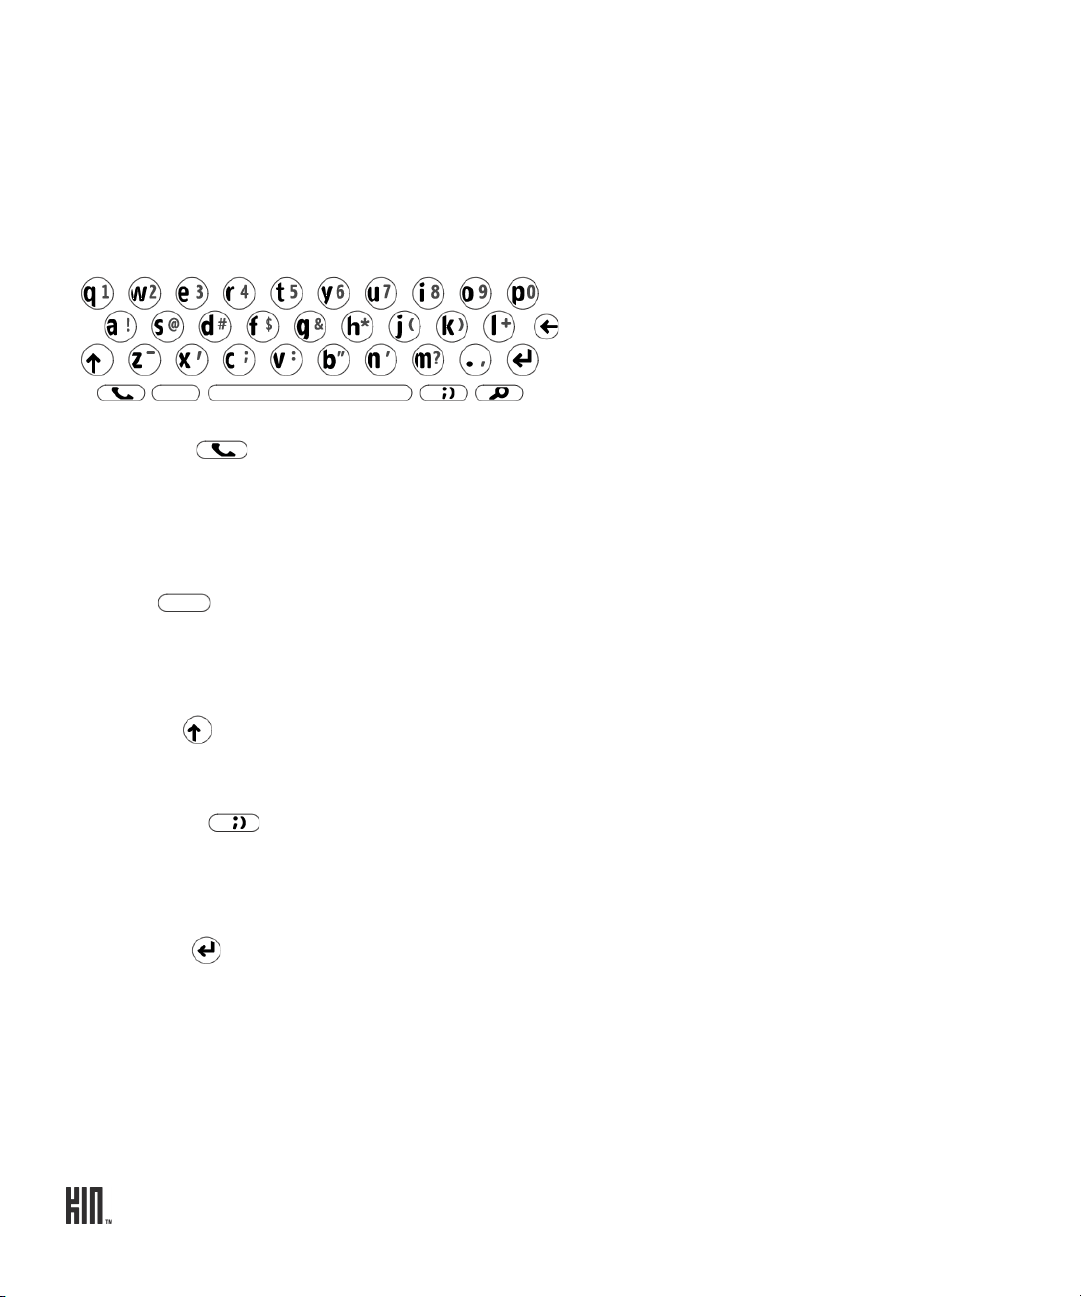
KEYBOARD
To open the phone’s keyboard, hold the phone in landscape orientation with the BACK button on the
right, then slide the screen up using one or both of your thumbs.
The keyboard contains four rows of keys. The bottom row includes a PHONE key (opens the Dialer),
an ALT key, a SPACEBAR, a SYMBOL key, and a SEARCH key. The top row contains the numbers,
which you use in combination with the ALT key.
PHONE key Press the PHONE key to open the Phone app. You will go to either the Dialer or
the Call Log, whichever screen you visited last. From the Dialer you can make
outgoing calls. If you’ve navigated to another screen while in a call, press the
PHONE key to return to the in-call screen. Note that this key doesn’t send or
end a call.
ALT key
Press the ALT key before typing one of the special characters on the keys,
including the numbers on the top row. To type multiple characters, press and
hold the ALT key while typing, or lock the ALT key first by pressing it twice
(press again to unlock).
SHIFT key
Press the SHIFT key before typing an uppercase letter. To type multiple
uppercase letters, press and hold the SHIFT key while typing, or lock the
SHIFT key first by pressing it twice (press again to unlock).
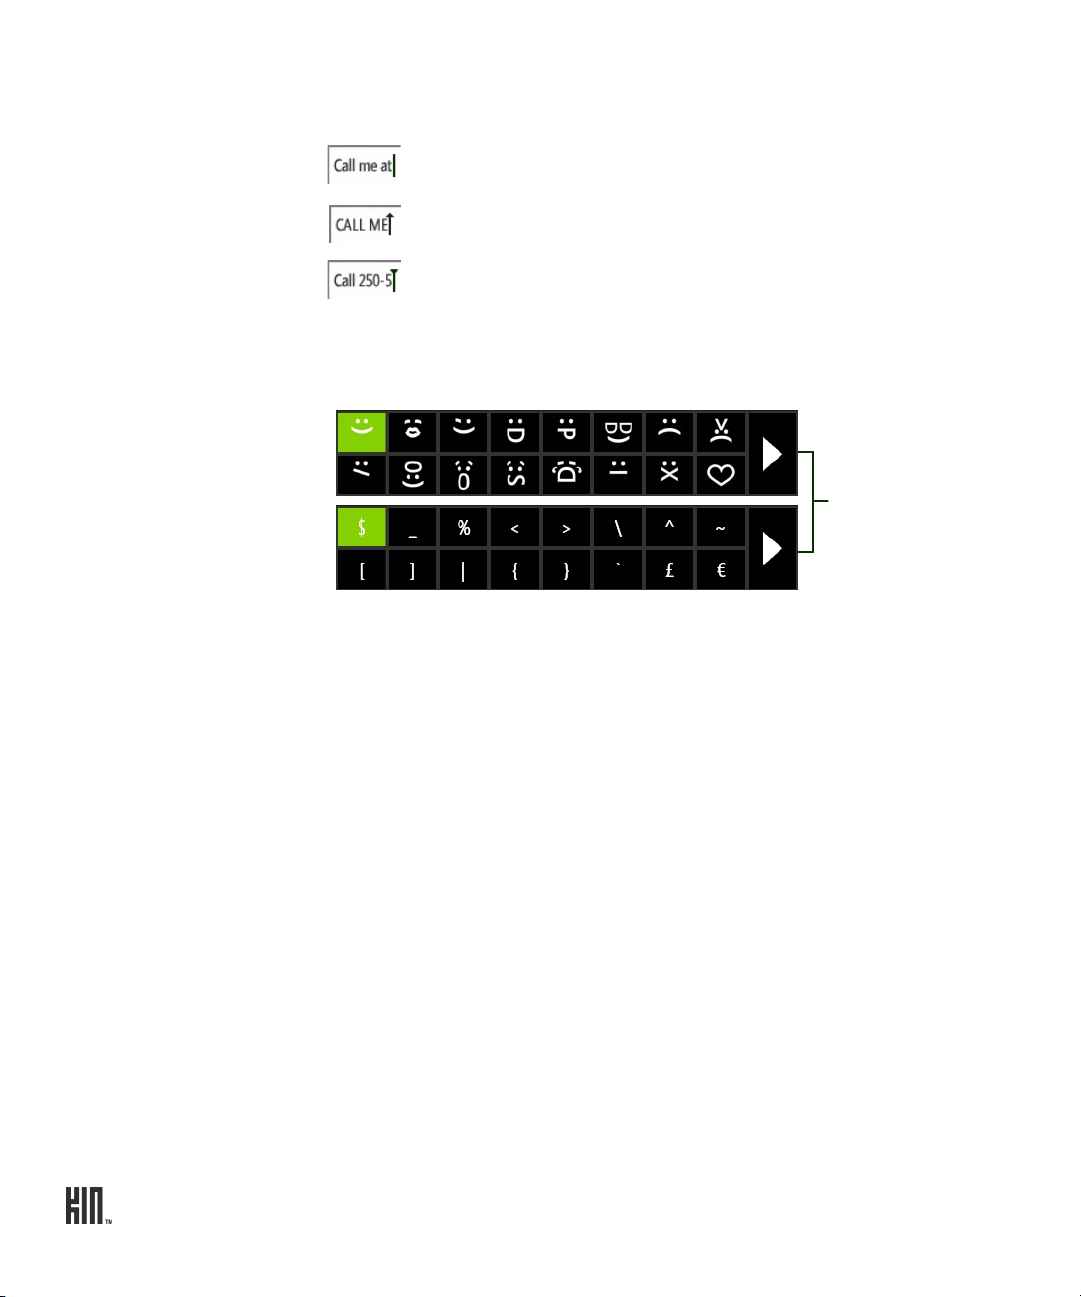
SYMBOL key Press the SYMBOL key to open the emoticon and special character selector.
The first panel that opens contains special characters; tap the arrow on the
right to see the emoticons. Tap an emoticon or a special character to insert it in
your text at the cursor point.
ENTER key
Press the ENTER key to:
• Create a new line in a text box.
• Go to a webpage once you’ve typed an address in the Browser address bar.
• Capture a photo or video.
• Post a status update.
• Jump between the subject and message boxes when writing a message.
TWOm User Guide - R1.0.2 - October 7, 2010 15
Page 16
SEARCH key Press the SEARCH key to go to the My Phone search screen. Read more in
“Search” on page 21.
Typing and navi gating in text boxes
Type in a text box You can tell a text box is ready for typing when you see the cursor
blinking. If you don’t see a blinking cursor, tap the text box to focus it,
then start typing.
If you’ve previously typed text in the Search app text box, when you
return to the Search app, the text will be highlighted and ready for typing.
Move the cursor in a text
box
Type a special letter
character
Type special characters
on keys
After you’ve typed something, if you want to move the cursor, touch and
hold the text box to zoom in, then without lifting your finger, slide your
finger to place the cursor where you want it. Then lift your finger.
Press and hold a key to show the special characters associated with that
key. For example, if you press and hold a key, the special characters
associated with the key appear along the bottom of the screen.
Tap a character to insert it.
Press the ALT key before typing one of the special characters on the keys,
including the numbers on the top row. To type multiple characters, lock
the ALT key by pressing and holding the key.
Lock ALT and SHIFT
keys
TWOm User Guide - R1.0.2 - October 7, 2010 16
To lock these keys, press them twice or press and hold. Press again to
unlock.
Page 17
Text cursor While you're typing, the text cursor shape reflects your current mode of
between panels.
Tap to toggle
typing:
Regular typing mode
SHIFT mode
ALT mode
Type emoticon or special
character
To type an emoticon or special character, press the SYMBOL key and tap
the emoticon or special character from the selector. There are two panels
in total; tap the arrow on the far right to switch.
TWOm User Guide - R1.0.2 - October 7, 2010 17
Page 18

HOME
APPS
FAVORIT ES
ABOUT HOME
What is Home?
Your Home screen is really two screens. When you turn on your phone you’ll see a Home screen
showing your applications, or “Apps”. Slide your finger left to see your favorite contacts on the
Favorites Home screen.
Slide your finger up and down to scroll the contents of each screen. You can start typing a contact
name or app from either of the Home screens to open the Search app’s My Phone screen.
Apps
All the apps that are available on your phone are displayed on this screen. Tap an app to open it. You
can rearrange apps so they appear in the order you like. Read how in “Rearrange Apps and Favorites”
on page 20.
You can also add links to webpages to the Apps Home screen. Read how in “Can I put a link to a
webpage on my Home screen?” on page 74.
Favorites
Displays your favorite contacts, plus a link to all your contacts. You can rearrange your favorite
contacts so they appear in the order you like. Read more in “Rearrange Apps and Favorites” on page
20.
TWOm User Guide - R1.0.2 - October 7, 2010 18
Page 19
Tap a favorite for quick communication. If your favorite has a phone number saved in their info, the
Call, Te xt , or Open options appear. Tapping Open will show the favorite’s contact card, where you’ll
see all the info you’ve saved for this contact. If you tap a favorite without a saved phone number, their
contact card opens. Read more in “Contacts” on page 35.
Where are my status icons?
The connectivity status icons, as well as your battery’s charge state, sound profile, and date and time
are available in the Dashboard. Open the Dashboard by tapping the mini Dashboard on the lower-
right of the screen: If any status needs your attention (for example, if your battery’s
getting low or if you’ve lost network connection), the associated status icon will display in the mini
Dashboard.
Find out what the icons mean and more in “Dashboard” on page 21.
Is there a quick way to launch an app I recently used?
When you tap Recent (in the lower left of the screen), a window opens that displays the last four apps
you used. Tap one of the apps to open it. If you have an unread message, the Messages app will be
there, with an unread message count. The same applies to unread email messages.
Read more in “Recent apps and messages” on page 23.
Can I customize my Home screens?
Yes, you can customize your Home screens, and more:
• Rearrange the order of items on the Apps screen and Favorites screen. Read more in “Rearrange
Apps and Favorites” on page 20.
• Assign a wallpaper that will appear on the screen when locked. Read more in “Screen lock” on page
29.
• Choose sounds to assign to individual contacts when they call. Read more in “Create a new contact
on your phone” on page 37.
TWOm User Guide - R1.0.2 - October 7, 2010 19
Page 20

• Choose sounds for incoming calls, notifications, and alerts. Read more in “Sound” on page 28.
• Choose a theme for your phone that changes the colors used on the screen. Read more in “Themes”
on page 28.
How do I search for a contact on my phone?
From any Home screen, start typing a contact name to open the Search box. Or, you can press the
SEARCH key on your keyboard. Read more in “SEARCH key” on page 16.
MANAGE HOME
Rearrange Apps and Favorites
You can change the position of apps or favorite contacts on the Home screens:
1 From either the Apps or Favorites screen, two-finger tap the screen to enter edit mode. Each item
will shrink and favorite contacts will have an X in the corner.
2 Drag the app or contact you want to move to its new position, then lift your finger.
3 To exit edit mode, two-finger tap the screen again or press the BACK button.
Add contacts to Favorites
To add a contact to the Favorites Home screen:
1 Go to the Favorites Home screen, then tap the plus sign (+) in an empty Favorites slot to open a list
showing all your contacts.
2 Tap a contact to make it a favorite and add it to the Favorites Home screen.
Read more in “Add contacts to Favorites” on page 40.
Note: You can also add a contact to Favorites by opening their contact card and tapping More >
Favorite.
Remove contacts from Favorites
To remove a contact from Favorites (but keep it in All Contacts):
1 Go to the Favorites Home screen, then two-finger tap the screen to enter edit mode. Each contact
will have an X in the corner.
2 Tap the X on the contact you want to remove from favorites.
3 To exit edit mode, two-finger tap the screen again or press the BACK button.
TWOm User Guide - R1.0.2 - October 7, 2010 20
Page 21
Note: You can also remove a contact from Favorites by opening their contact card and tapping More
Tap to open
Dashboard.
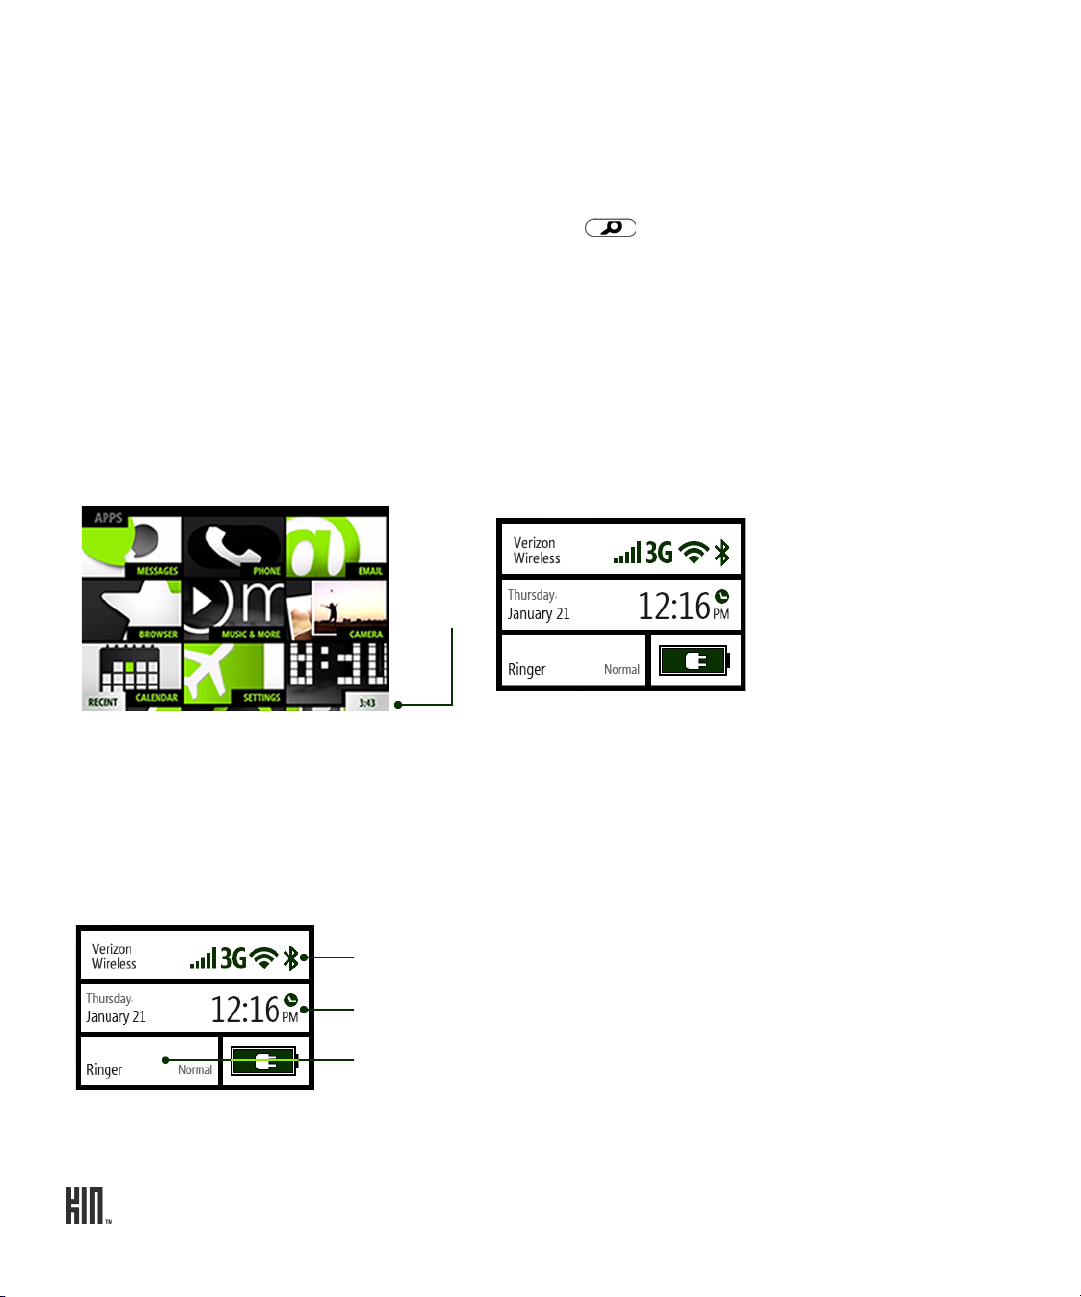
DASHBOARD
Tap to open Wireless controls.
Tap to open the Alarm app.
Tap to change your Sound profile.
> Unfavorite.
SEARCH
From anywhere on your phone, press the SEARCH key to open the Search app. From the My
Phone search screen you can search for contacts and apps that are on your phone. As soon as you start
typing in the My Phone search box, matches will appear.
DASHBOARD
The Dashboard gives you important status information about connectivity, battery charge, sound
profile, alarms, and date and time.
To open the Dashboard, tap the mini Dashboard in the lower-right corner of the screen.
The mini Dashboard always displays the most relevant status information, depending on what you’re
doing. For example, if you’re on a call, the mini Dashboard indicates whether you’re roaming and your
signal strength.
Dashboard shortcuts
Tap a section of the dashboard to open its associated wireless, alarm, or sound setting.
TWOm User Guide - R1.0.2 - October 7, 2010 21
Page 22

Icons and indicators
You’ll see the following icons, indicating connectivity, date and time, sound, and alarm status.
Network connection strength
Low network connection
No network connection
High-speed 3G data network available
3G not available
Roaming outside home network
• Solid icon: Roaming rates apply
• Flashing icon: Home airtime rates
apply (some features/services may
not be available)
Connected to Bluetooth device
Bluetooth services are on, but no
device is connected
Dashboard battery icons:
Battery empty | battery full
Battery charging | battery charged
Airplane mode is on
Connected to Wi-Fi network
Wi-Fi is on, but no network is connected
Slower 1xRTT data network available
1xRTT not available
Telecoil (hearing aid coil) is ready to use.
Read more in “Telecoil” on page 32.
TTY (text telephone) is ready to use. Read
more in “TTY” on page 32.
Alarm is set
mini Dashboard battery icons:
Battery empty | battery full
Battery charging | battery charged
SOUND PROFILE
Open the Dashboard, then tap the current sound profile for Ringer. Choose from Silent, Vibrate,
Soft, Normal, or Loud.
You can also step through the ringer profiles by pressing the VOLUME + or - buttons. To silence your
phone, press and hold the - VOLUME button.
Note: When you step through the sound profiles, the Vibrate profile will do a quick vibration.
TWOm User Guide - R1.0.2 - October 7, 2010 22
Page 23
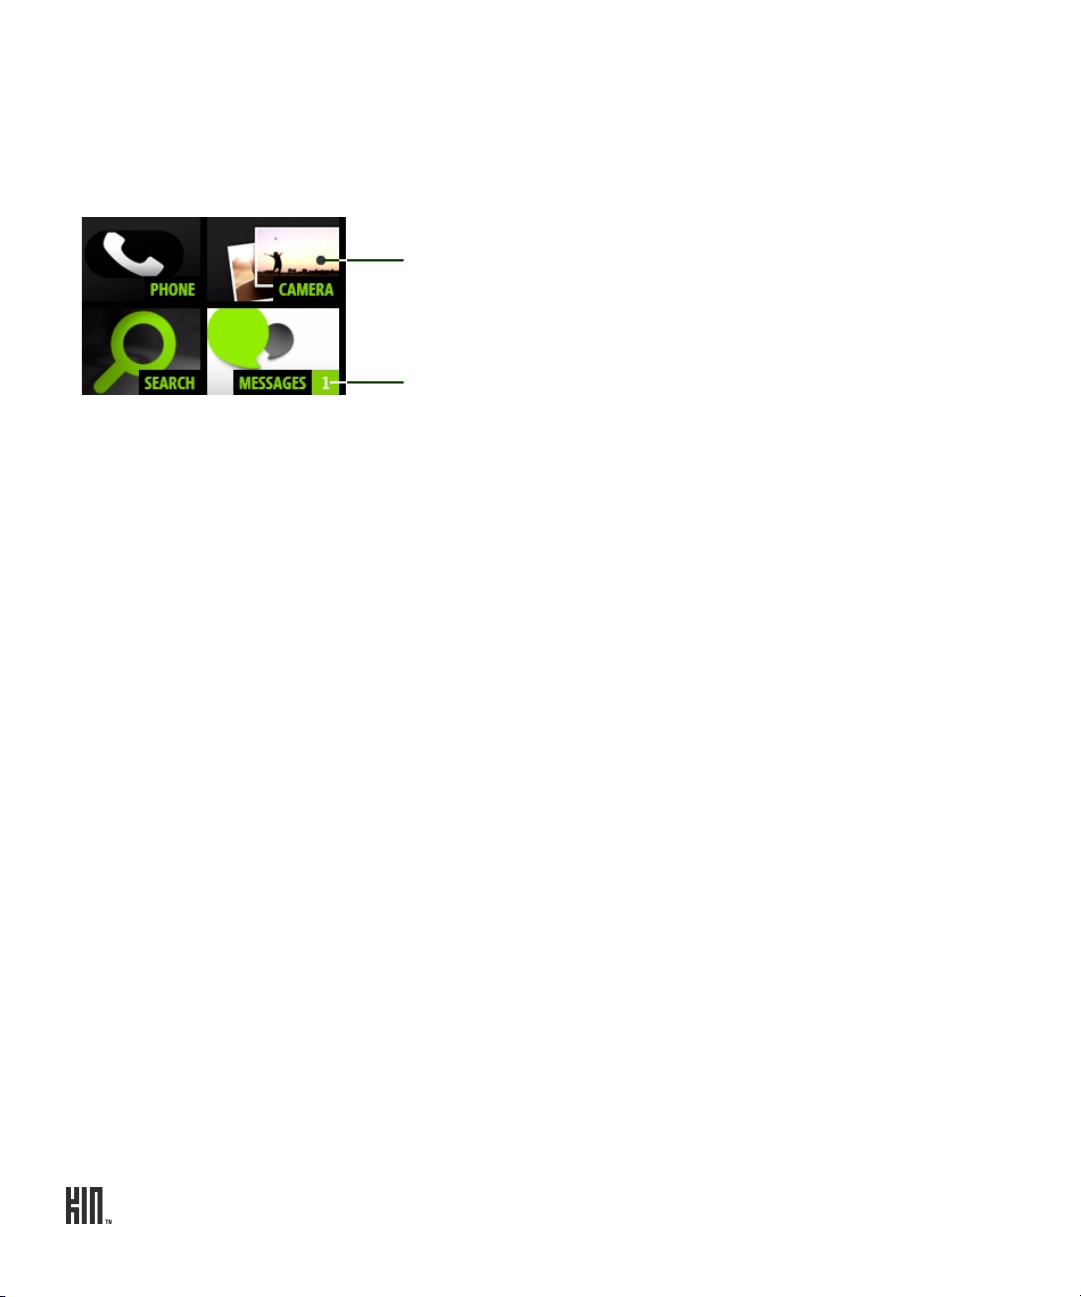
RECENT APPS AND MESSAGES
Tap to open app.
Number of unread messages.
To see the last four apps you’ve opened, tap Recent in the lower-left of the screen. To jump to one of
those apps, simply tap it. Note that if you have unread messages, that app will appear as well with the
number of unread messages noted.
To close the Recent window, tap outside the window or press the BACK button.
TWOm User Guide - R1.0.2 - October 7, 2010 23
Page 24
GLOBAL SETTINGS
This chapter describes the settings that are not specific to individual apps. App-specific settings are
described in the individual app chapters. Most settings toggle on and off. Tap the setting to toggle.
ABOUT GLOBAL SETTINGS
My screen is too dim. How can I brighten it up?
Go to the Apps > Settings > Screen lock screen. Scroll down to the Auto-brightness setting and
turn it off. Now you can adjust the screen brightness by sliding your finger between Min and Max on
the slider bar.
My phone’s screen locks too quickly. How can I adjust this?
Go to the Apps > Settings > Screen lock screen. Tap the Auto-lock timeout setting you prefer.
Note: Once your screen is locked, it will always go black after 30 seconds.
Can I protect my phone with a security PIN?
Yes. Go to the Apps > Settings > Screen lock screen. Scroll down and tap the PIN & security
setting, then tap PIN lock to turn it on and set your four-digit PIN.
How do I turn off my wireless while on an airplane?
Go to the Apps screen, then go to the Settings > Wireless controls screen. Turn Airplane mode on.
My service plan allows me to roam when needed. How can I turn this on?
You control your calling and text and MMS (multimedia) message roaming from the Apps > Settings
> Phone screen.
TWOm User Guide - R1.0.2 - October 7, 2010 24
Page 25
You control data roaming from the Apps > Settings > Wireless controls screen. Scroll down to the
Tap to play sound.
Data Roaming setting and turn it on. You’ll be asked to confirm because extra roaming charges may
apply.
How do I change my ringtone?
1 Go to the Apps > Settings > Sound screen.
2 Tap a sound category (Ringer, Voicemail, Messages) to open the Sound selector. Scroll down to see
all the sounds. You can listen to each sound by tapping the play icon.
3 Tap a sound to set it.
Can I assign different ringtones to different contacts?
Yes, you can do this from the individual contact cards. Read more in “Create a new contact on your
phone” on page 37. The sound set on the contact card overrides the global Ringer setting you choose
on the Sound settings screen.
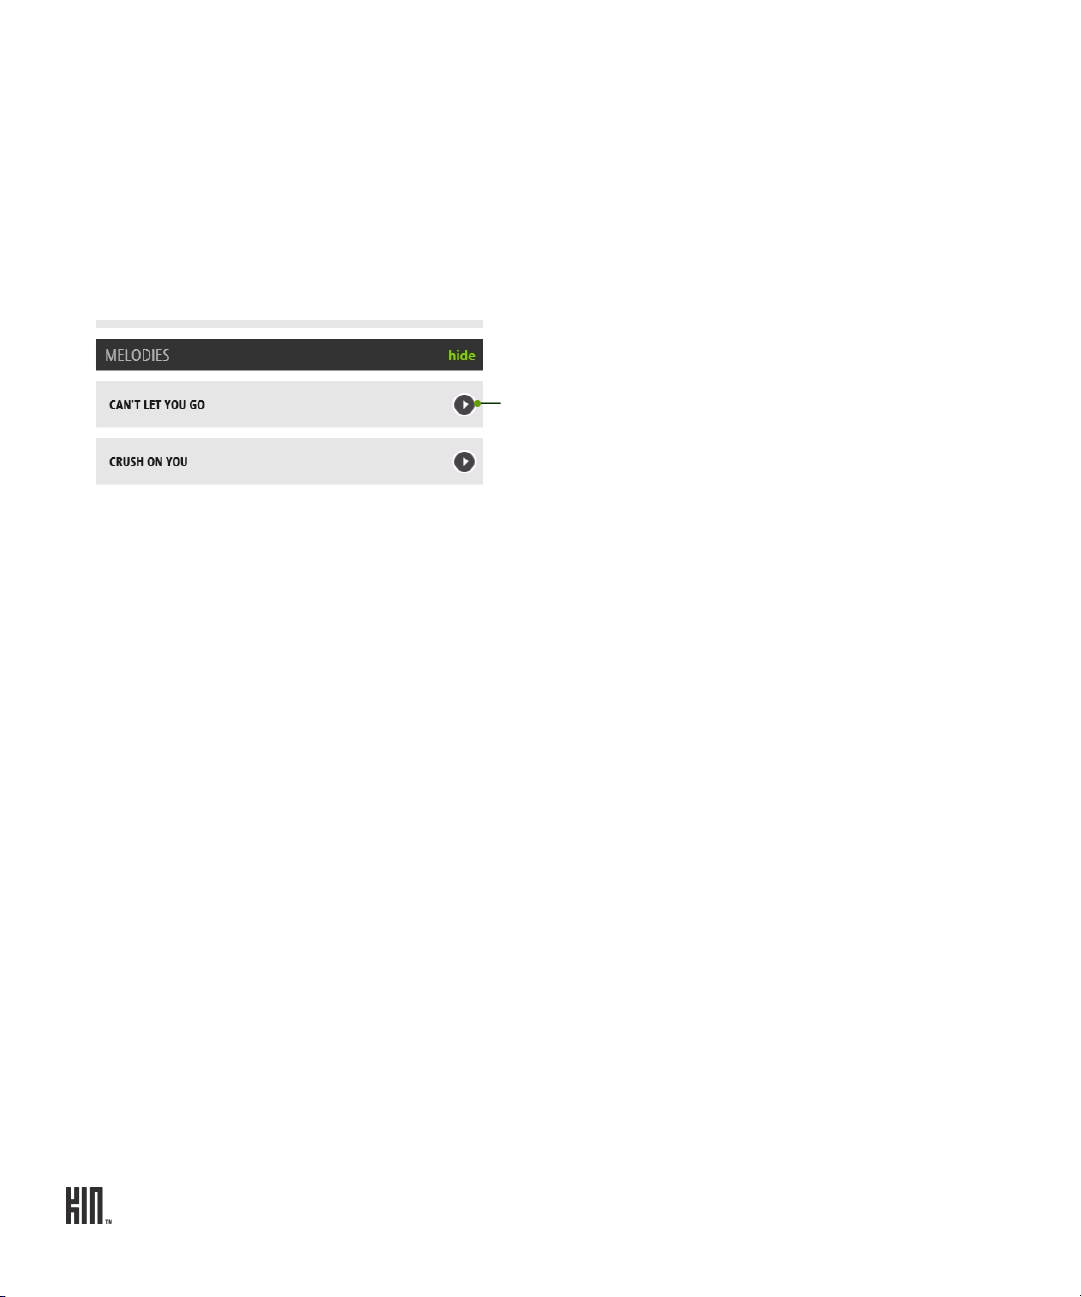
Can I import my own ringtones?
No, but you may be able to purchase ringtones from your mobile operator’s website using your
computer. Any ringtones you purchase will be delivered to your phone via MMS. To assign these
ringtones, go to Apps > Settings > Sound > Melodies on your phone.
Is there any way to customize the colors on my phone?
Go to the Apps > Settings > Themes screen. Tap a color theme from the list. You’ll be prompted to
restart your phone, which you must do before a new theme can be set.
TWOm User Guide - R1.0.2 - October 7, 2010 25
Page 26

WIRELESS CONTROLS
Airplane mode
Turn airplane mode on if you are about to take a flight, or when otherwise required, such as in
hospitals.
When airplane mode is on:
• All radios on the phone except for FM radio are turned off, including Wi-Fi, phone, location
services, and Bluetooth. (When you later turn airplane mode off, the previous settings for all the
radios are restored.)
• If permitted, even with airplane mode on, you can turn Wi-Fi back on.
• You’ll see the airplane icon in the mini Dashboard and full Dashboard.
Wi-Fi
Turn Wi-Fi on to see a list of networks within range.
You can open the Dashboard and check the top row to see Wi-Fi status at any time:
displays when Wi-Fi is on, and the phone is connected to a network.
displays when Wi-Fi is on, but your phone isn’t connected to any network.
No icon displays in the Dashboard when Wi-Fi is off.
Note: You must be connected to a Wi-Fi network to use the Zune Pass catalog. Read more about the
Zune Pass catalog and the Zune Pass in “About Music & More” on page 78 and “What is a Zune Pass
and how do I get one?” on page 79.
Connect to a network
1 Tap a network to connect to it.
2 If required, you’ll be prompted to type a password. Networks secured with passwords display a
padlock next to their signal strength.
3 You can manually connect to a network that’s not listed by tapping Other.
4 Once connected, you’ll see the connection status below the Wi-Fi setting name, and when you
open the Dashboard you’ll see the connected signal strength in the top row.
5 If you tap the connected network on the Wireless settings screen, you can choose to forget this
network, which means you won’t connect automatically when the network is in range. If you want
to check or update the IP from the access point, tap renew lease.
TWOm User Guide - R1.0.2 - October 7, 2010 26
Page 27
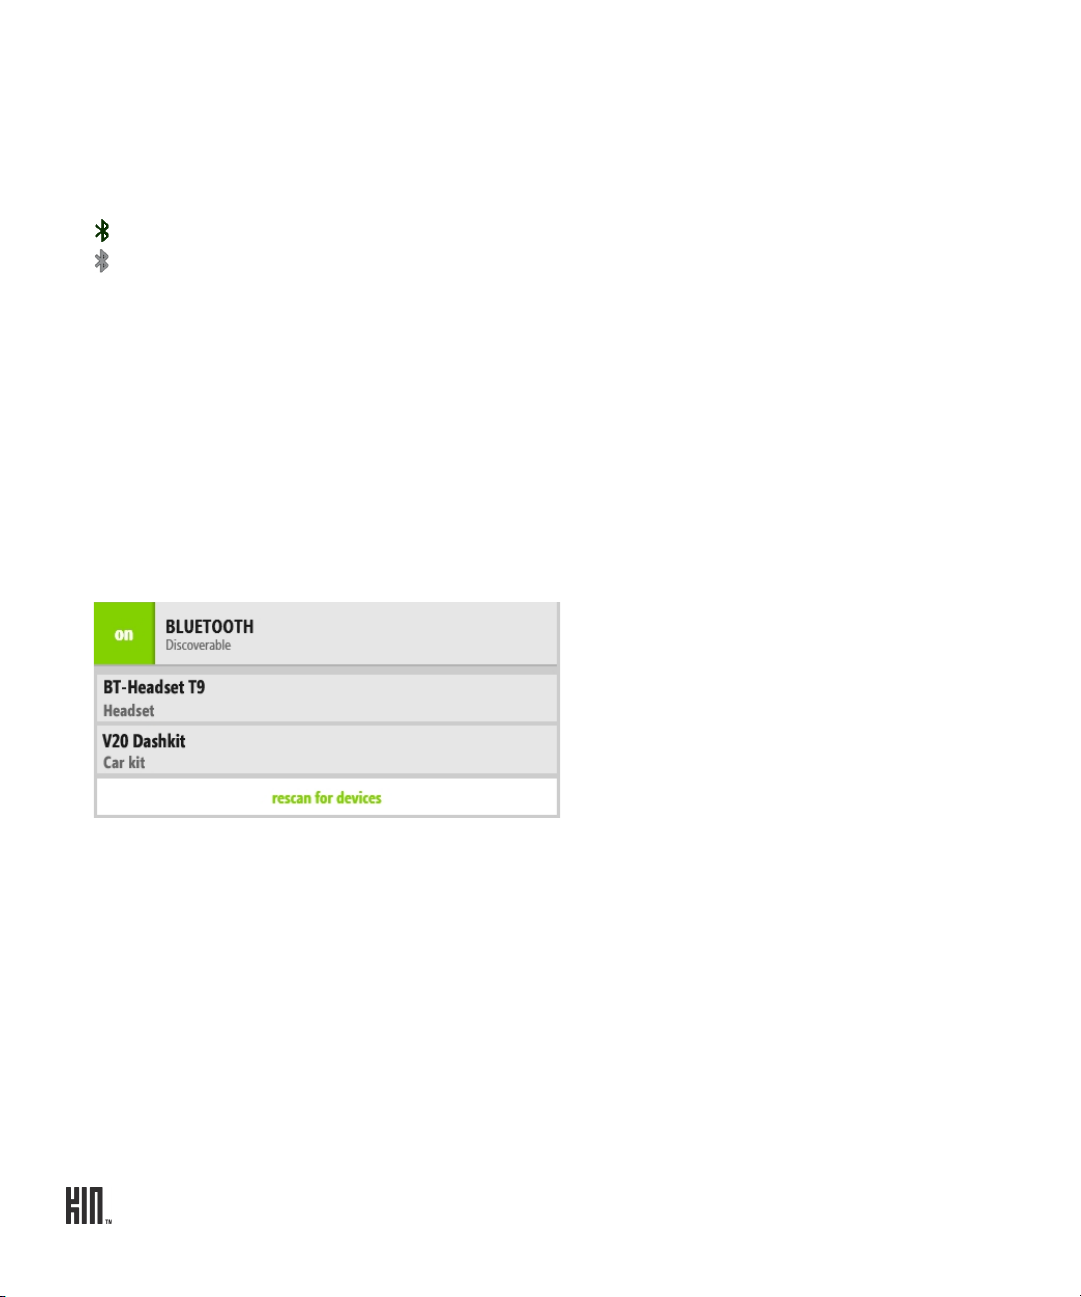
Bluetooth
Turn Bluetooth on to start Bluetooth services. Your phone is automatically “discoverable” when you
have the Wireless Controls screen open and Bluetooth services are on.
You can open the Dashboard and check the top row to see Bluetooth status at any time:
displays when Bluetooth services are on, and the phone is connected to a device.
displays when Bluetooth services are on, but your phone isn’t connected to a device.
No icon displays in the Dashboard when Bluetooth services are off.
Supported Bluetooth profiles
• HSP (Headset Profile) – Allows connections to Bluetooth headsets.
• HFP (Hands Free Profile) – Used by car kits to communicate with the phone while in the car and
by headsets.
• A2DP (Advanced Audio Distribution Profile) – Allows high quality audio to be streamed from the
phone to another Bluetooth device, such as a Bluetooth stereo headset.
Connect to a Bluetooth device
1 Turn Bluetooth services on. All supported devices within range are displayed.
Note: Previously-paired devices are shown at the top of the list and the closest previously-paired
device will start connecting automatically.
2 Make sure your Bluetooth device is on and discoverable before trying to connect. If your Bluetooth
device is ready and you don’t see it in the list, tap Rescan for devices.
3 Tap a device in the list to pair, then connect with your phone. Your phone will automatically try the
PIN 0000; but, if prompted, type the PIN provided by the manufacturer of the Bluetooth accessory,
then tap Pair. If you’re prompted to create a PIN, use at least four characters.
If you’ve previously paired with a device, it will try to connect immediately without prompting you
for a PIN.
TWOm User Guide - R1.0.2 - October 7, 2010 27
Page 28
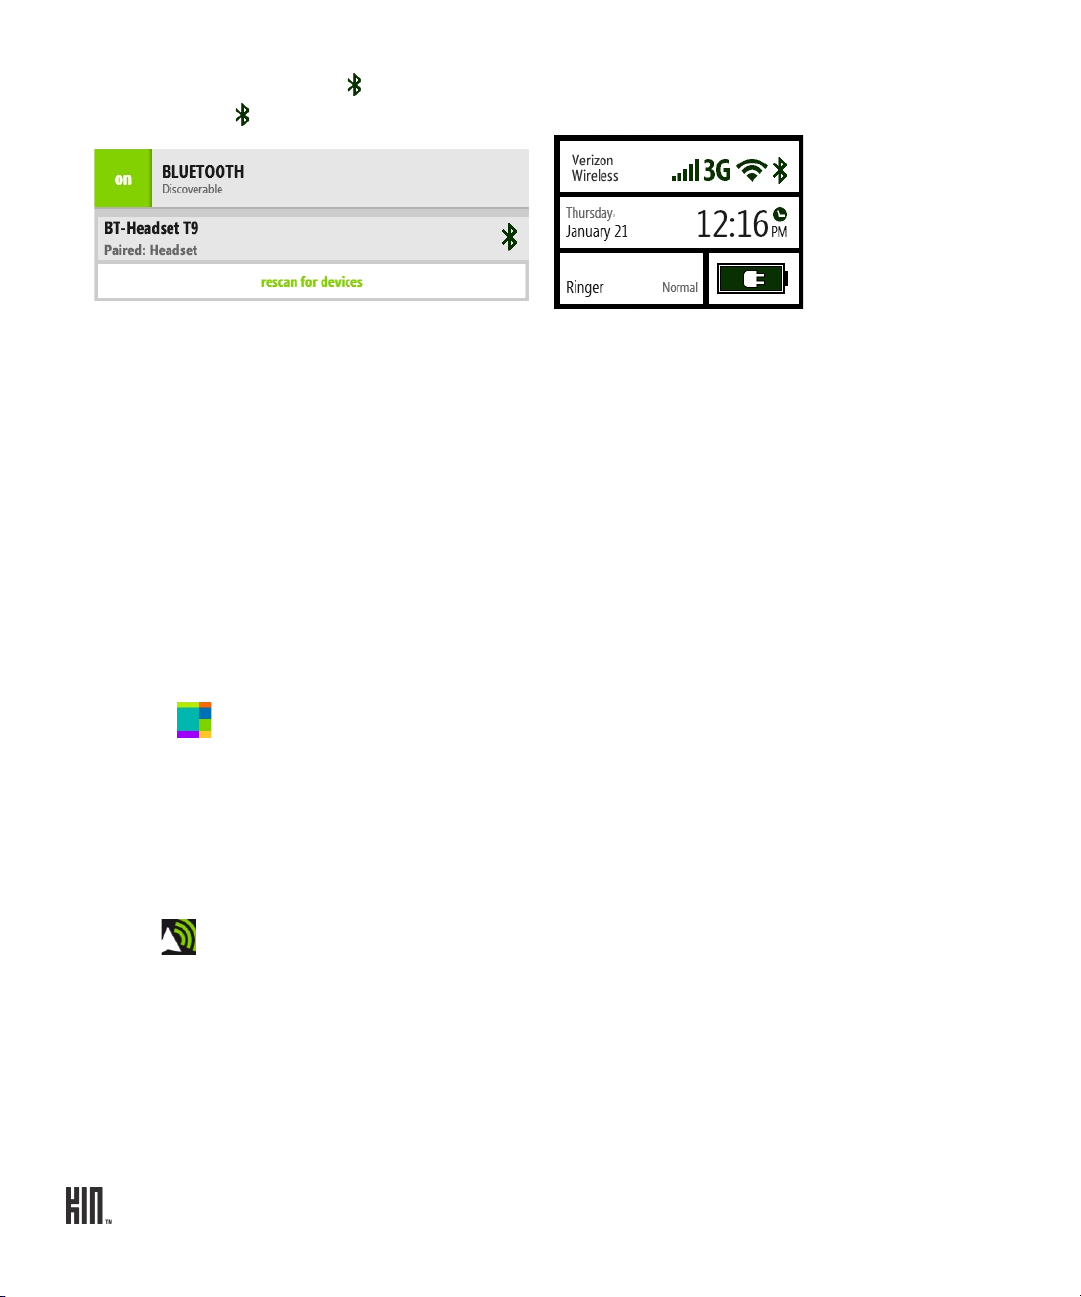
4 Once connected, you’ll see on the settings screen next to the device name, and when you open
the Dashboard will appear in the top row.
5 You can disconnect or unpair a Bluetooth device by tapping it. To switch from the Bluetooth
device to your phone’s speaker during a call, use the Audio source option on the in-call screen.
Notes:
• The phone does not support Bluetooth OBEX profiles, used to exchange contact information
between Bluetooth devices.
• The QDID issued by the Bluetooth SIG (Special Interest Group) for this phone is B014849. (This
number is provided for information only.)
Data roaming
Turn this setting on to allow your phone to roam outside your home network for data connections.
Note: If you turn on data roaming, you may be charged extra fees for roaming.
THEMES
You can customize the colors used on the screens from the Settings > Themes screen:
1 From Themes, tap a theme from the list.
2 Your phone must restart before a new theme can be set. Tap ok at the prompt to restart
immediately.
SOUND
Control the sound volume or switch your sound profile by pressing the VOLUME + or - buttons.
Control which sounds play on your phone from the Settings > Sound screen:
Vibrate Turn this setting on to have your phone vibrate as well as play a sound when
signaling a call or new message. If you have ringer, voicemail, or messages set to
No sound, then your phone won’t vibrate even when this setting is on.
TWOm User Guide - R1.0.2 - October 7, 2010 28
Page 29

Ringer To set the default sound for an incoming call, tap Ringer and choose from the
Sound selector.
Note: If you’ve assigned a specific sound to a contact, that sound will play rather
than the default sound you choose in Sound settings.
Voicemail To set the sound for a new voicemail, tap Voicemail and choose from the Sound
selector.
Messages To set the ringtone for a new text or MMS message, tap Messages and choose from
the Sound selector.
Calendar To set the ringtone for an event reminder, tap Calendar and choose from the
Sound selector.
System sounds Turn this setting on to hear a sound when you:
• Lock your screen - Makes two knocking sounds when locked.
• Unlock your screen - Makes a swishing sound when unlocked.
• Dial phone numbers using the Dialer - Makes touch-tone DTMF sounds as you
touch each number.
• Attach/remove phone to USB charger or USB cable connected to computer Plays four ascending notes when attached; plays four descending notes when
removed.
SCREEN LOCK
Screen lock is a feature that prevents accidental actions if your phone’s buttons are pressed or if your
screen is touched. You can always control media volume while the screen is locked, however.
• To lock your screen, press the POWER button quickly. You can set an automatic screen lock
timeout by following the instructions below in “Auto-lock”.
• To unlock your screen, slide the screen open, or quickly press the BACK button then peel back the
lock screen wallpaper by sliding your finger toward the upper-right corner of the screen. If you just
want to check the time or see your wallpaper, press the BACK or POWER button.
You can control the following screen lock and security settings from the Settings > Screen lock
screen:
Auto-lock If you want your screen to lock automatically after a set period of time, use this
setting. You can choose from: 1 min, 5 mins, 15 mins, and Never.
Note: The lock screen wallpaper always displays in portrait orientation.
TWOm User Guide - R1.0.2 - October 7, 2010 29
Page 30

PIN & security PIN lock - For extra security, you can require that a PIN must be typed before the
screen unlocks. To set this up, tap the PIN & security setting, then turn PIN lock
on. You’ll be prompted to create a four-digit PIN. If you later turn PIN lock off,
your PIN will be forgotten.
Note: After you’ve set PIN lock on, if you can’t remember your PIN, you can still
place an emergency call by tapping Emergency call on the lock screen. After
eight incorrect attempts at typing your PIN, you’ll be prompted to type a specific
number to continue trying (this provides a fail-safe in case your phone is
bumped or if children are playing with it). You’ll have a total of ten attempts to
retry your PIN before your phone data is erased.
Set/change PIN - Once you turn PIN lock on, type a PIN at the prompt (must be
four digits). You’ll be asked to type it again to confirm. Once you’ve set a PIN,
you can change it from the PIN & security screen by tapping Change PIN. Note
that once you set a PIN, you’ll have to type the PIN before you can change any of
the PIN lock settings.
Message display - By default, new message notifications will pop up when your
screen is in PIN lock, showing new message text. If you want to hide the text in
new message notifications during screen lock, turn this setting off.
Time to pin-lock - If you’ve set PIN lock on, then you can choose a timeout that
starts once your screen has locked. Choose from:
• instant (default setting) - PIN lock will begin as soon as your screen locks.
• 1 min - PIN lock will begin 1 minute after your screen locks.
• 5 mins - PIN lock will begin 5 minutes after your screen locks.
• 15 mins - PIN lock will begin 15 minutes after your screen locks.
Auto-brightness Turn auto-brightness on to conserve battery power. When off, you can adjust the
brightness manually, from Min (dim) to Max (bright).
Note: The backlight on your screen will automatically dim after 30 seconds of
inactivity. (You can’t adjust this setting.)
TWOm User Guide - R1.0.2 - October 7, 2010 30
Page 31

Wallpaper To set your lock screen background (wallpaper):
1 Tap Wall pa pe r to go to the Camera app.
2 Either capture a new photo or choose a photo from any of the Camera screens.
3 Once you’ve either captured or tapped a photo, you can crop it (drag and
stretch with your fingertips).
4 Tap Done.
Note: The lock screen only displays in portrait orientation.
You can also change your lock screen wallpaper by starting in the Camera app:
1 Go to the Apps screen and tap Camera.
2 Navigate to the screen that shows the photo you want to assign as wallpaper.
3 Tap the photo to view it full-screen, then tap More > Wallpap er.
BROWSER
You can set the following from the Settings > Browser screen:
Control security settings You can control the following security settings:
• Temporary files are stored on your phone for faster viewing. To delete
all temporary files, tap Delete temporary files.
• Cookies retain webpage preferences and other user data. To delete all
cookies, tap Delete cookies.
• History saves the last 100 pages you’ve visited over the past 20 days. To
delete your history, tap Delete history.
Allow cookies To allow cookies, turn this setting on.
Enable JavaScript To enable JavaScript, turn this setting on.
PHONE
You can control certain calling features on your phone from the Settings > Phone screen:
Phone shortcuts To use phone keyboard shortcuts, turn this setting on. Keyboard shortcuts are
listed in “Can I use the keyboard to control my call?” on page 44.
TWOm User Guide - R1.0.2 - October 7, 2010 31
Page 32

Voicemail number The number currently stored to call voicemail is displayed below the setting
name. To set or change your voicemail number, tap the setting.
Auto-download
MMS
To have MMS messages downloaded automatically, turn this setting on. If
you turn this setting off, messages will download only when you open them
by tapping.
TTY If you plan to attach a TTY device to your phone for making and receiving
phone calls, turn this setting on. While this setting is on, you won’t be able to
hear any audio during a call, so if you want to make a regular call, with audio,
be sure to have this setting off!
With TTY on, you’ll see the TTY icon in the Dashboard.
Note: Cellular-ready TTY devices have a 2.5mm audio jack, but your phone’s
jack is 3.5mm, so you will need a cable adapter when using a TTY device with
the phone.
Telecoil If you plan to use a telecoil device with your phone, turn this setting on.
With telecoil on, you’ll see the telecoil icon in the Dashboard.
Note: Turning telecoil on uses extra battery power.
Emergency tone To hear a special confirmation tone whenever you dial an emergency phone
number, turn this setting on.
Note: You will not hear the emergency tone if your phone’s ringer volume is
set to silent or vibrate.
System select To allow your phone to receive calls and text messages when your mobile
operator’s network is unavailable, select automatic. To prevent your phone
from doing so, select home only.
In certain situations, multiple automatic options may appear:
• Automatic a - You can use any available network in the channel.
• Automatic b - You can use any available network in the channel.
Note: Check with your mobile operator to find out if you’ll be charged extra
when automatic, automatic a, or automatic b is selected.
TWOm User Guide - R1.0.2 - October 7, 2010 32
Page 33

EMAIL
You can configure up to ten email POP and IMAP accounts from the Settings > Email screen. Read
more about setting up accounts in “Set up an email account” on page 51. In addition to setting up
email accounts for viewing on your phone, you can do the following from this screen:
Sync schedule Tap this setting to set a schedule for syncing (refreshing) your email
messages. The default setting is 30 minutes. You can choose a Sync
frequency from every 15 minutes, every 30 minutes, hourly, or
manually.
Ask before deleting Turn this setting on if you want to confirm before a message is deleted
while on the Read Message screen.
Note! Even with this setting turned on, if you delete one or more
messages from the Inbox, you will not be asked to confirm.
Default email account Tap this setting to choose a primary (or default) email account. This
setting only applies if you have set up more than one email account on
your phone.
Days to sync Choose how many days of messages you want synced to your phone.
Options are 1 day, 3 days, 1 week, 2 weeks, 1 month, all.
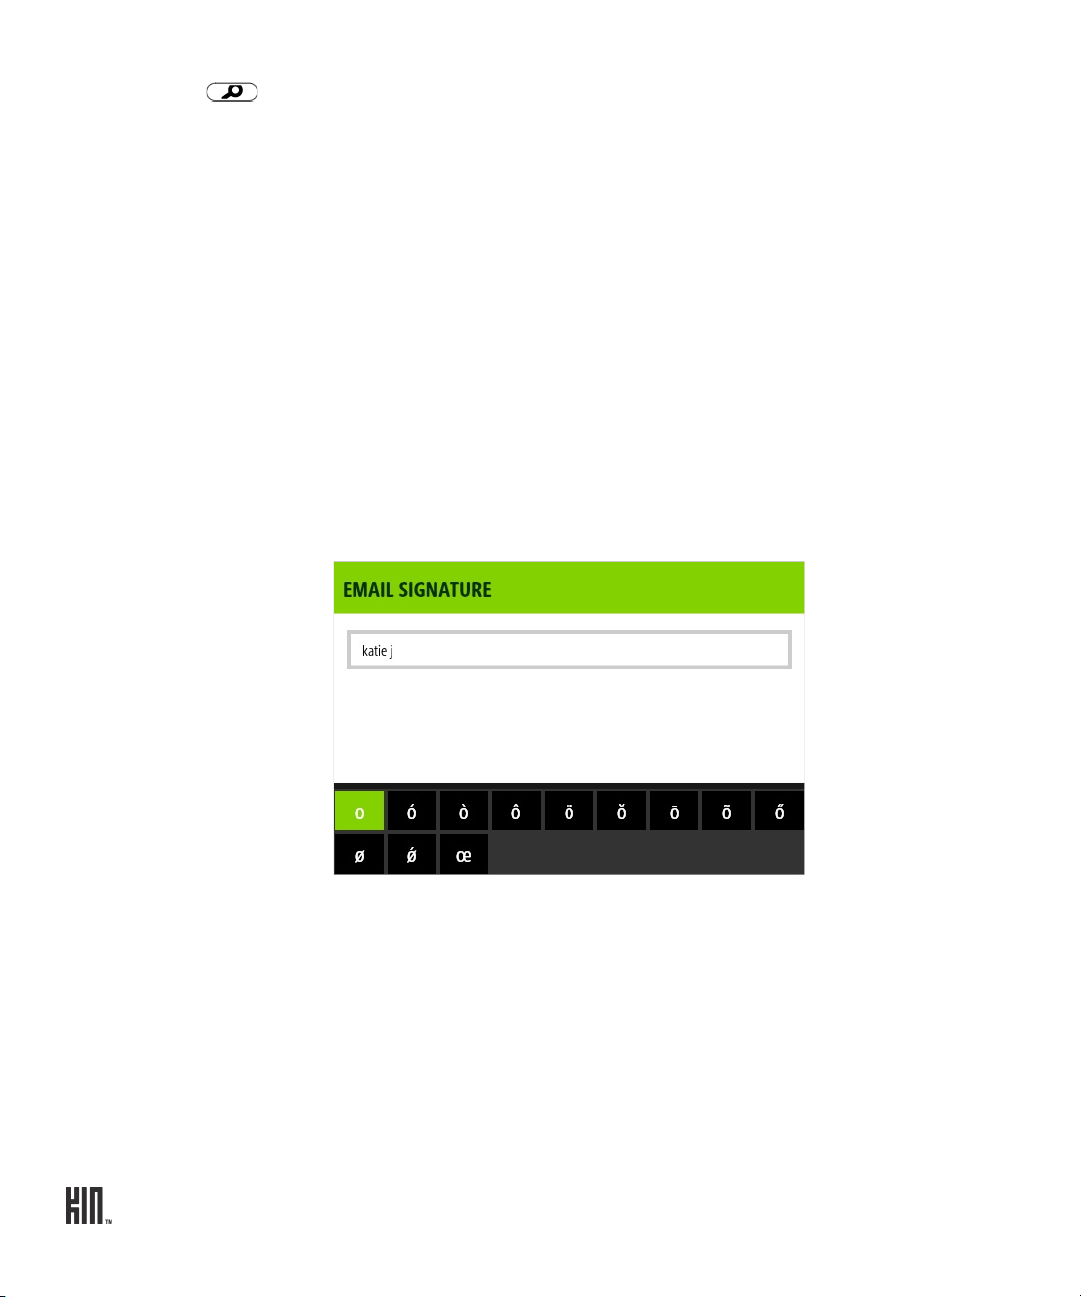
Signature Tap this setting to set your desired signature, which will be
automatically added to the end of each email message you write. You
can type multiple lines by using the ENTER key.
If you’ve set a signature, it displays on the Settings screen as well.
DATE & TIME
You can set the date and time displayed on your phone from the Settings > Date & time screen:
24-hour time Switch to 24-hour time display by turning on the 24-hour clock setting.
When you display the time in 24-hour time format, the day runs from midnight
to midnight and is divided into 24 hours, numbered from 0 to 23 (no AM or PM
is necessary). For example, 3:25 PM would be displayed as 15:25 in 24-hour
time format.
TWOm User Guide - R1.0.2 - October 7, 2010 33
Page 34

Auto-set date &
time
By default, your phone will “auto-set” (get date and time from the network). If
you want to set your date and time manually, turn Auto-set date & time off.
Then you’ll be able to set the date and time manually.
Auto-set time
zone
By default, your phone will “auto-set” (get time zone from the network). If you
want to set your time zone manually, turn Auto-set time zone off. Then you’ll be
able to set the time zone manually.
LANGUAGE
You can control the language that displays on your phone from the Settings > Language screen. All
the languages available to you are displayed on this screen.
1 On the Languages screen, tap the language you want to use.
2 Before a different language can be set, your phone must restart. Tap ok at the prompt.
ABOUT YOUR PHONE
You can view the following information about your phone and more from the Settings > About your
phone screen:
• Your phone number
• Version numbers of phone components
• Phone model
There are also links to:
• Legal - Tap to read the KIN End User License Agreement.
• Erase phone data - Tap to erase all your personal data from the phone. This is a drastic measure as
it erases all your sign-in information, settings, contacts, favorites, photos, videos, music, and
messages from your phone. You will be asked to confirm.
TWOm User Guide - R1.0.2 - October 7, 2010 34
Page 35

CONTACTS
ABOUT CONTACTS
How do I get contacts on my phone?
You must create each contact whose information you want to store on the phone. Read more in “Add
a contact” on page 37.
How do I find my contacts?
The contacts you’ve marked as “favorites” are on the Favorites Home screen, but you can find all your
contacts in a couple of ways:
• From either of the Home screens, start typing your contact’s name and the list of contacts will
resolve to the name you’re typing.
• Press and hold the BACK button, then slide your finger left to go to Favorites. Tap All Contacts.
• Press and hold the BACK button, then slide your finger right to go to Apps. Tap Contacts.
Once you’re on the All Contacts screen, you’ll see a list of all your contacts. (The contacts that you’ve
chosen to be “favorites” will display their latest status and photo on this screen.)
From the All Contacts screen you can find a contact fast:
• View all of your contacts quickly from this screen, which lists everybody. To jump to a contact in
the list, start typing the contact’s name.
• Displays a photo thumbnail if contact is also one of your favorites.
• Displays contacts alphabetically (A-Z) by first name.
TWOm User Guide - R1.0.2 - October 7, 2010 35
Page 36

What are contact cards?
Tap Edit to
change or
info.
PHONE CONTACT CARD
EDIT CONTACT CARD
add contact
Each contact on your phone has at least one “card” that contains information about that person
(email address, phone numbers, photo, etc.).
Contacts can have more than one contact card. You can “link” the cards together so when you find
one card for that person, you’ll find the other. Read more in “What does it mean to link contact
cards?” below.
What does it mean to link contact cards?
If one of your contacts has more than one contact card, you can link the cards together so they’ll all
appear when you view that contact. Each card appears in its own screen; just slide your finger to the
left or right to view the linked cards. Read more in “Link/unlink contact cards” on page 39.
Read more in “Add a contact” on page 37 and “Link/unlink contact cards” on page 39.
Can I create a group of favorite contacts?
Yes. You can tag 51 contacts as favorites, which makes them part of your “Favorites”. These contacts
appear on the right-hand Home screen. Note that linked cards count as one favorite only.
Read more in “Favorite contacts” on page 39.
TWOm User Guide - R1.0.2 - October 7, 2010 36
Page 37

MANAGE YOUR CONTACTS
Add a contact
There’s several ways to add contacts to your phone. Note: When adding a contact or editing an
existing contact, be sure to tap Save before navigating away from the card, or you’ll lose your unsaved
additions or changes.
Create a new contact on
your phone
Add a contact from the
Call Log
1 Go to the Favorites Home screen and tap All contacts. (Alternatively
you can go to the Apps screen and tap Contacts.)
2 Tap New to open a new contact card.
3 Add the contact’s information.
• Tap Choose photo to assign a photo using the Camera app.
• When you add phone numbers to a contact card, add the area code +
the 7-digit number.
• To associate a specific sound (ringtone) to this contact, tap Sound
then choose a sound from the selector that appears.
4 When finished, tap Save.
5 Your contact is added to the All Contacts screen. To have your contact
appear on Favorites, tap the contact to open their card, then tap
Favorite.
1 Go to the Apps screen.
2 Tap Phone.
3 Slide your finger left to view the Call Log.
4 Find the entry you want to save and tap Save.
5 Tap New contact, or tap an existing contact to add this number to
their info.
6 If you’re creating a new contact, complete the contact info.
7 When finished, tap Save.
TWOm User Guide - R1.0.2 - October 7, 2010 37
Page 38

Add a contact from the
Dialer
1 Go to the Apps screen.
2 Tap Phone.
3 Type the new contact’s number in the number field.
4 Tap the + sign to the left of the number.
5 From the list that appears, tap either New contact or one of your
existing contacts.
6 The phone number’s added automatically. Type more information if
you want, then tap Save. You’re returned to the Dialer.
Add a contact after
making a call
1 After ending a call, tap Save contact.
2 From the list that appears, tap either New contact or one of your
current contacts.
3 The phone number is added automatically. Type more information if
you want.
4 When finished, tap Save.
Add a contact or phone
number from a
conversation card
If you’re having a conversation with someone from a number not saved to
Contacts, you can add the number from the conversation card. Read how
in “Save phone number or contact” on page 59.
Edit a contact card
1 Go to the Favorites Home screen and tap All contacts. (Alternatively you can go to the Apps screen
and tap Contacts.)
2 Tap the contact’s name from the screen to open their contact card. Find a contact quickly by typing
the name in the search box on the top of the screen.
3 Tap Edit to open the contact for editing and make your changes.
4 When finished, tap Save.
Delete a contact card
To delete a contact:
1 Go to the Favorites Home screen. If your contact is in Favorites, tap the contact. Otherwise, tap All
contacts, then tap the contact you want to delete to open their contact card. (Alternatively you can
find your contact by going to the Apps screen and tapping Contacts.)
2 Tap More > Delete.
3 You’ll be asked to confirm before your contact is deleted.
TWOm User Guide - R1.0.2 - October 7, 2010 38
Page 39

Link/unlink contact cards
If you have more than one contact card for the same person, you can link the cards. When you search
for a contact, all their linked cards will be found.
1 From any of the contact screens, open a contact card.
2 Tap More > Contact linking to open the Linked Contacts list.
3 Currently-linked contacts are shown at the top of the list.
• If you want to unlink any of the currently-linked contacts, tap Unlink.
•Tap Link another to open the list of contact cards.
• Contact cards with similarities are shown under Linking suggestions.
4 Tap the contact card you want to link, then tap Done.
When you search for and find a contact, each linked card will appear on its own screen.
Notes:
• You can’t link the same contact to more than one set of linked contacts.
• Each editable linked card will have its own edit menu; edits to one card won’t affect the other
linked cards.
• When you add a card to Favorites, all its linked cards will be automatically added to Favorites as
well, but they will appear only once.
• Linked contacts appear only once on each contact screen.
• If you unfavorite a contact, all the associated contact cards will be removed from Favorites as well.
• If you delete a contact with linked cards, only the card you delete will be removed. The other linked
cards will remain on your phone.
FAVORITE CONTACTS
You can add up to 51 contacts to Favorites. Favorites appear on the right-hand side of your Home
screen, labeled FAVORITES. Scroll down to view the full list of favorite contacts.
TWOm User Guide - R1.0.2 - October 7, 2010 39
Page 40

Here’s how to manage your favorite contacts:
Add contacts to Favorites From the Favorites Home screen:
1 Tap the plus sign (+) in an empty slot to open a list of all your
contacts.
2 Tap the contact you want to add as a favorite. To jump to a contact
in the list, start typing the contact’s name.
3 The contact now appears on the Favorites Home screen.
From the All Contacts list:
1 Tap the contact you want to add as a favorite.
2 Tap More > Favorite.
3 Your contact is added to Favorites. You can always reposition this
favorite contact. Read how in “Change a contact’s position on
Favorites” on page 40.
Remove contacts from
Favorites
Change a contact’s position
on Favorites
1 From any contact screen, tap the contact you want to remove as a
favorite.
2 Tap More > Unfavorite.
3 Your contact is removed from Favorites.
Tip: To remove multiple contacts from Favorites, two-finger tap the
Favorites screen to enter edit mode and show the Xs. Tap an X to
unfavorite a contact. Two-finger tap the screen again to exit edit
mode.
1 From the Favorites screen, two-finger tap the screen to enter edit
mode.
2 Touch and hold a contact until the contact expands.
3 Without lifting your finger, drag the contact to the position you
want, then release.
4 Two-finger tap again to exit edit mode.
Note: You can drag a contact to an already-filled position; if you do,
the contact in that spot will move down the screen.
TWOm User Guide - R1.0.2 - October 7, 2010 40
Page 41

CONTACT CARDS
From a contact card, you can:
Call or text From the Favorites Home screen.
• If your contact is a favorite, they will appear on this screen. Tap the
contact to open their contact card, then tap Call at the top of the
screen, or scroll down and tap a different number. To text, scroll down
and tap Text, across from the number.
• If your contact is not part of Favorites, tap All contacts, select your
contact from the list, then tap Call <label>, or tap Tex t to the right
of the number to send a text message.
Write an email 1 Find the contact from either the Favorites screen or the All Contacts
screen (see above).
2 Tap the email address you want to send an email to. A compose screen
opens with that address in the To field.
Open website 1 Find the contact from either the Favorites screen or the All Contacts
screen (see above).
2 If your contact has a personal website, tap the URL to open it using
the Browser.
FIND A CONTACT
Find a contact from anywhere on your phone
1 Press the SEARCH key on your phone’s keyboard.
2 Type the name or number of the contact you want to find.
3 As you type, the matches appear in the My Phone screen.
4 When the contact you’re searching for appears, tap the contact to open their contact card.
Find a contact from the Contacts app
1 From the All Contacts screen, start typing the name (first, middle, or last) or the phone number of
the contact you want to find. The search box will appear as soon as you start typing.
2 The list of contacts resolves to the letters or numbers you’ve typed.
TWOm User Guide - R1.0.2 - October 7, 2010 41
Page 42

PHONE
Tap to add number
to Contacts.
Tap to erase a number.
Touch and hold to clear field.
Tap to call.
Tap to call.
Missed calls
display in
Tap to view only missed
calls or to clear log.
Tap to call
voicemail.
Tap to text
contact back.
Tap to add
to Contacts.
color.
number
ABOUT PHONE
How do I use my phone for calls?
If you’ve stored a contact’s number on the phone, start a call from their contact card. (Read more in
“Contact cards” on page 41.) If you want to call someone not in your Contacts or if you want to use
the Call Log, go to the Phone app. The Phone app has two screens:
• Dialer - Go here to type a number. First press the keyboard’s PHONE key to open the Dialer,
then tap your number on the dial pad. There’s also a shortcut to call voicemail in the Dialer.
• Call Log - From the Dialer, slide your finger left to view the Call Log. Go to the Call Log to see a list
of your incoming, outgoing, and missed calls, with shortcuts to text or call the number back.
When I’m in a call, what does “flash” do?
Flash does a couple of things, depending on the context:
• Set up a conference call - When you’re in a call, add another call by tapping Add call. Once you’re
connected to the second call, tap Flash to merge the calls into one conference call.
• Switch between two calls - When you’re in a call and another call comes in, answering the
incoming call will place the first caller on hold. Tap Flash to switch between the calls.
TWOm User Guide - R1.0.2 - October 7, 2010 42
Page 43

When my phone’s screen is locked, how will I answer a call?
If your screen is locked when you receive a call, you’ll see an incoming call notification on the screen.
• To answer the call - Peel back the lower-left corner of the screen (where Answer appears) by
sliding your finger diagonally on the screen, lower-left to upper-right.
• To text the caller back - Press any of the hardware buttons (POWER, BACK, VOLUME) once to
show the Text and Ignore options, then tap Tex t to open a compose screen addressed to the caller’s
number. The incoming call is ignored.
• To ignore the call - Press the POWER button twice to ignore the call directly; or press any
hardware button once to show the Tex t and Ignore options, then tap Ignore.
Can I control a call with a headset?
You can use the stereo headset that came in the box with your phone, which has a control button.
Pressing the control button will anwer and end a call.
If you’re using a headset with three control buttons, use the outer buttons to control volume. Press the
middle button to control calls:
• One press answers a call and another press ends the active call.
• If a second call comes in, press once to answer the incoming call and put the active call on hold.
• While there is an active call and a call on hold, press once to end the active call.
Caution! If you think you’ll be using the phone while driving, insert the headset or pair your
Bluetooth headset before starting to drive.
Do I have to worry about touching the screen with my face during a call?
No. While you’re on a call, the phone detects the proximity of your face and “locks” the screen.
Specifically, when anything is detected within about three centimeters of the screen, the screen locks.
The screen automatically “unlocks” when you move the phone away from it.
TWOm User Guide - R1.0.2 - October 7, 2010 43
Page 44

Can I use the keyboard to control my call?
Yes, but you must have Phone shortcuts turned on (go to Apps > Settings > Phone). With the
setting on, you can use the following keyboard shortcuts while in a call:
Answer call ENTER key
End call BACKSPACE key
Place call ENTER key
Mute call m key
Toggle speaker x key
Flash call f key
USING A BLUETOOTH DEVICE
Your phone supports the following Bluetooth 2.0 devices and earlier:
• Hands-free headsets
• Hands-free car kits
To use a Bluetooth device to make a call, do the following:
1 Go to the Apps > Settings > Wireless controls screen.
2 Scroll down to the Bluetooth section. Make sure the setting is on.
3 Turn your Bluetooth device on and put it in pairing mode, per the instructions in the device
owner’s manual.
4 Tap Scan for devices, then tap the device you want to use.
5 If you’re prompted to enter a passkey, type it (refer to your device’s owner’s manual if necessary),
then tap Connect.
6 Once you’re paired, tap the device name and tap Connect.
7 Once your Bluetooth device reports it’s connected, you are ready to use it for calls. As soon as you
dial a call, tap Audio source to select your Bluetooth device. To switch to another sound source
during the call, tap Audio source.
Read more in “Connect to a Bluetooth device” on page 27.
TWOm User Guide - R1.0.2 - October 7, 2010 44
Page 45

CALLING
Make a call
Call an existing contact 1 Start typing the contact’s name from either of the Home screens to
open a list of your contacts, then the call button to the right of the
contact’s name.
Alternatively, if the contact is a Favorite, simply tap their photo. If
the contact has a phone number saved, tap call. If the contact isn’t
a Favorite, tap All contacts and select the contact from the list.
2 From the contact card, tap Call <label>.
Use the Call Log 1 Press the PHONE button on the keyboard; or,
Go to the Apps screen and tap Phone to open the Dialer.
2 Slide your finger left to find the Call Log.
3 Tap a log entry to call the number.
Redial a number Redial any call from the Call Log. If a your call doesn’t go through for
any reason (the phone number is busy, you dialed an invalid number,
or there is no service), you can redial the number by tapping Call
back on the call ended screen.
Call someone not in
Contacts
Add a number to Contacts 1 Press the PHONE button on the keyboard; or,
TWOm User Guide - R1.0.2 - October 7, 2010 45
1 Press the PHONE button on the keyboard; or,
Go to the Apps screen and tap Phone to open the Dialer.
2 Type the phone number, then press Call.
3 If your call doesn’t go through for any reason (the phone number is
busy, you dialed an invalid number, or there is no service), you can
redial the number by tapping Call back on the call ended screen.
Go to the Apps screen and tap Phone to open the Dialer.
2 Type the number in the number field.
3 Tap the + sign to the left of the number.
4 Tap an existing contact from the list, or tap New contact.
5 When you’ve finished editing the contact, tap Save. Their contact
card appears.
6 To call this contact, tap the phone number on their contact card.
Page 46

Answer a call
In-call dial pad Elapsed call time In-call option menu Contact card
When a call comes in, you’ll always receive a notification on the screen.
• To answer the call, peel back the lower-left corner of the screen (where Answer appears) by sliding
your finger diagonally on the screen, lower-left to upper-right.
• To ignore the call and route it using your Phone settings, tap Ignore or press the POWER button
twice.
• To ignore the call and reply by text message, tap Text.
• To silence the incoming ring, press any control button.
In-call options
While in a call, you’ll see your options in the on-screen menu. Slide your finger right to type numbers
while in a call; slide your finger left to see the contact card of the person you’re talking to.
Mute To mute your side of the conversation (mutes your microphone) tap Mute on
the in-call screen. The menu option background changes color when selected.
TWOm User Guide - R1.0.2 - October 7, 2010 46
Page 47

Speaker To listen to your call using the speakerphone, tap Speaker on the in-call
screen. The menu option background changes color when selected.
Add a call Read about conference calling in “Multiple calls” on page 47.
Volume control While on a call, you can increase/decrease volume by pressing either the + or -
VOLUME buttons on the phone.
Swap calls When you’re in a call and another call comes in, answering the incoming call
will place the first caller on hold. Tap Flash to switch between the calls.
Dial numbers If you have to type some numbers while in a call (such as to select options),
slide your finger right to use the dial pad, or use the numbers on the keyboard.
Go to contact card To view the contact card of the person you’re talking to, slide your finger left.
Multiple calls
Conference calling You can set up a conference with two other callers:
1 Make your first call from the Dialer screen or a contact card.
2 Once your call has connected, tap Add call to open a list of your contacts
with phone numbers. Choose to Dial new number, or tap a contact from the
list.
3 Tap the contact you want to add, or type the number in the dial pad and tap
Call.
4 Once the call is connected, the in-call screen displays a Flash option. Tap it
to merge all the calls.
Once you’ve tapped Flash, the two calls are “merged” and treated as one call,
which means you can’t drop either of the calls. No Caller ID will be displayed;
you’ll see Connected at the top of the in-call screen.
Call waiting If a call comes in while you’re already on a call, you’ll receive an incoming call
notification. You can choose to Answer or Ignore the call, or Text the person
back.
If you choose to answer the new call, the active call will be put on hold.
Note: To use this feature, call waiting must be part of your service plan.
TWOm User Guide - R1.0.2 - October 7, 2010 47
Page 48

End a call
To end a call, tap End on the in-call screen.
Tip: To add the number to your contacts, tap Save contact after the call ends.
VOICEMAIL
Before you can use the voicemail features described below, be sure you’ve set up voicemail with your
mobile operator.
Voicemail notifications
1 When someone has left you a voicemail, you’ll receive a notification on the screen.
2 To retrieve your message, simply tap the notification to dial your voicemail number, then follow the
voice prompts.
Call voicemail from the Dialer
1 Go to the Apps screen and tap Phone to open the Dialer.
2 Touch and hold the 1 key, then follow the audio prompts.
3 You can also slide left to view the Call Log and tap the Voicemail menu button.
Note: You can manually change your voicemail number from Apps > Settings > Phone. Read more
in “Voicemail number” on page 32.
CALL LOG
The Call Log shows all incoming, outgoing, and missed calls. Missed calls display in colored text;
incoming and outgoing calls display in white text.
To view the Call Log:
1 Go to the Apps screen and tap Phone to open the Dialer.
2 Slide your finger left to find the Call Log. From here you can do the following:
Call the number Tap the log entry to call the number.
TWOm User Guide - R1.0.2 - October 7, 2010 48
Page 49

Send text to the number To send a text message to a number in the Call Log, the number must
already be saved on a contact card.
1 Tap Text next to the number or name to open a conversation card.
2 Type your message to compose, then tap Send.
Read more in “Create a new message” on page 58.
Clear log entries Tap More > Clear log. You’ll be asked to confirm.
View only missed calls Tap More > Missed calls.
To view All calls again, tap More > All calls.
Call voicemail Tap Voicemail to call your voicemail number. The number of voicemail
messages is displayed in the menu in parentheses.
Save a contact from the
log
1 Find the phone number you want to save.
2 Tap Save.
3 Tap an existing contact from the list, or tap New contact.
4 When you’ve finished editing the contact, tap Save. Their contact card
appears.
PHONE SETTINGS
To reach the Phone settings screen, go to Apps > Settings > Phone. From the Phone settings screen
you can:
• Turn phone keyboard shortcuts on and off.
• Edit your voicemail number.
• Choose to automatically download MMS messages.
• Turn on TTY or telecoil functions.
Warning: When you have TTY turned on, no audio is routed through your phone. Be sure to turn
off TTY to make regular phone calls, with audio. Also note that turning telecoil on uses extra battery power.
• Choose to hear a special confirmation tone whenever you dial an emergency number.
• Set your system select preference.
Read more in “Phone” on page 31.
TWOm User Guide - R1.0.2 - October 7, 2010 49
Page 50

EMAIL
ABOUT EMAIL
What email account types can I use on my phone?
You can use any type of email account, including:
• Branded POP/IMAP email accounts
• Other POP/IMAP email accounts
Read more in “Set up an email account” on page 51.
How many email accounts can I set up?
You can set up to ten email accounts.
What information do I need to set up an account?
You’ll need the following information if you have one of the branded accounts (Hotmail, Gmail,
Yahoo! Mail, AOL):
• Your username - The first part of your email address
• Your password - The password you use to sign in to your account.
For other POP/IMAP accounts you’ll also need:
• Incoming server name - This is typically “pop.domain.com”.
• Outgoing server name - This is typically “smtp.domain.com”.
What’s the limit on attaching photos or videos to an email message?
You can attach up to 20 items, totaling no more than 10 MB.
After I set up an email account, where can I see my messages?
Each email account you set up will have its own screen. From the Email app, slide your finger left to
view each Inbox in turn. The first account you set up will display in the first screen, the next account
will display in the screen immediately to the right, and so on for each account you add.
TWOm User Guide - R1.0.2 - October 7, 2010 50
Page 51

After you set up an email account, the last seven days of messages will download to your phone. You
can view the messages in the account’s Inbox. To sync more than 3 days of messages, tap More >
Settings and change the Days to sync setting.
What types of email attachments can I view on my phone?
You can open and save these types of files attached to email messages:
• JPG and PNG image files
• WMV, MP4, 3GP and 3G2 video files
Notes:
• You can’t open or save the following file types attached to email messages:
- BMP, GIF, or TIF images
- MP3 audio files
- PDF files
- Microsoft Office Word/Excel/PowerPoint/OneNote files.
• Attachments must be under 10 MB in size to view and open on your phone.
• You can forward any attachment, even if you can’t open it or save it to your phone.
SET UP AN EMAIL ACCOUNT
1 If you’ve never set up an account, start from:
• Apps > Email
• Apps > Settings > App setup > Email
If you’ve already set up at least one email account, start from:
• Apps > Email > More > Settings > Add account
• Apps > Settings > App setup >Email > Add account
2 Tap the type of email account you want to add. Tap IMAP/POP account if you’re not adding a
branded account.
3 On the screen that appears, type your account information.
4 When finished, tap Done, then wait a moment while you’re signed in to the account.
5 Adjust days of messages that will sync, if you wish. The last week of messages are downloaded to
the account Inbox by default. To change the sync period, tap More > Settings and change the Days
to sync setting.
TWOm User Guide - R1.0.2 - October 7, 2010 51
Page 52

INBOX SCREENS
Every email account you’ve set up is displayed on its own screen. After going into the Email app, slide
your finger left or right to navigate the screens.
From any Inbox you can:
Read a message Tap a message to open it for reading. Tap the More menu to
Forward, Delete, or Mark read/unread. Tap Reply to open a new
message screen. Read more in “Read message screen” on page 55.
Delete a message Two-finger tap the screen to enter edit mode and show the Xs on
each message. Tap an X to delete the associated message. Two-finger
tap the screen again to exit edit mode.
Open folders To view messages in other folders, tap More > Folders. A list of your
account folders appears. Tap a folder to open it and view messages.
Tap a message to read it. From there you can do everything listed in
“Read message screen” on page 55.
Sync messages (refresh
Tap More > Sync.
Inbox)
Open Email settings Tap More > Settings. Read more about settings in “Email settings”
on page 55.
TWOm User Guide - R1.0.2 - October 7, 2010 52
Page 53

Create a new message Tap New to open a new message screen. Then:
1 Complete the To field using one of these methods:
• Tapping a contact from the list that appears, which is a list of all
your contacts that have email addresses saved to contact cards. If
you start typing a name or email address, the list will be limited
to matches.
• Typing a full email address if it’s not saved on any contact card.
2 Tap Type message to open the compose screen where you can type
your subject and message, and attach any files from the Camera
app.
Note: If you want to add more recipients after typing your
message, tap the To field.
3 Add attachments from your Camera screens by tapping Attach.
4 When ready to send, tap Send.
Note: The Send menu item only appears on the screen where you
type your message.
TWOm User Guide - R1.0.2 - October 7, 2010 53
Page 54

CREATE A NEW MESSAGE
Tap New to address your message.
Attachment
indicator
If no email addresses are shown
start typing a name/email
Tap Type message to open the compose screen.
Tap Attach to add photos or
Tap a contact from the list, or
address in the To field to limit
the list to matches.
for a contact, that contact has
more than one; tap the name
videos from Camera.
Tap Send when you’re finished
composing...
Typ e a Subject...
then tap the message area to
type your message.
to choose.
Save a message as draft While writing a message, press the BACK button and tap Save to save
your message to the Drafts folder.
TWOm User Guide - R1.0.2 - October 7, 2010 54
Page 55

Discard a message-inprogress
While writing a message, press the BACK button and tap Discard to
discard your message.
READ MESSAGE SCREEN
Once you open an email message, you can also:
Open and save photo
attachments
Reply to a message Tap Reply to open a new message screen with the current message
Forward a message Tap More > Forward to open a new message screen with the current
Delete a message Tap More > Delete to delete the message. If you have the setting Ask
Mark a message read/
unread
Tap Open next to a photo attachment to preview it (or tap Open all
below the attachments if you have more than one). Once the
attachment is open, tap the photo to open it in full-screen view, then
you can tap Save to save it to your Camera’s Captured screen. Or, if
you’ve opened all the attachments, you can tap Save all below the last
photo to save them your Camera’s Captured screen.
attached.
message attached.
before deleting turned on, then you’ll be asked to confirm before the
message is permanently deleted. Read more in “Ask before deleting” on
page 33.
Tap More > Mark unread/Mark read to toggle the read state of the
message.
EMAIL SETTINGS
To open the Email settings screen, from any Inbox screen, tap More > Settings. Another way to open
Email settings is to go to Apps > Settings, then tap Email.
Read more in “Email” on page 33.
TWOm User Guide - R1.0.2 - October 7, 2010 55
Page 56

MESSAGES
MESSAGES INBOX
Conversation with
someone not
in your contacts.
Unread message
indicator.
Conversation with
one of
your contacts.
Tap to start new
conversation.
Tap message to
open conversation
card.
Type your response here,
then tap Send or press
the ENTER key.
Tap to ad d
attachments
or contacts
to conversation.
Name of contact
you’re having the
conversation with.
CONVERSATION CARD
ABOUT MESSAGES
What kinds of messages appear in the Messages app?
All your text, MMS, and voicemail messages appear in this one app, as well as missed, incoming, and
outgoing calls.
What’s a conversation card?
Every message in the Messages inbox is from a specific phone number. To see all the messages
between you and a specific contact, tap the message in the inbox. The screen that opens is called a
“conversation card”.
TWOm User Guide - R1.0.2 - October 7, 2010 56
Page 57

How do I write a new message? Can I attach a photo or video?
Go to the Apps screen and tap Messages. Then tap New, type the phone number or name of the
contact you want to message, and then write your message. To add a photo or video attachment, tap
Attach. You’ll go to the Camera app where you can capture a new photo or video, or attach one
already saved. Read more in “Create a new message” on page 58.
Will I receive a notification when I get a new message?
Yes. No matter what you’re doing on your phone, a notification will pop up when you receive a new
message. Tap the notification to open the conversation and read the message. Tap the X to dismiss the
notification.
What’s the limit on sending photos and videos via MMS?
If you want to send photos or videos to a phone number via MMS, you can attach up to five photos or
one video (you can’t combine media types). The total size of an MMS message is limited to 1.2 MB.
How do I decide whether to send something via text or MMS message?
You don’t have to worry about it. Just compose your message and add any attachments; your phone
will automatically select the right way to send. In general, when you send a message that’s just text, it
will be sent by text message; when you attach media to your message, it will be sent by MMS.
Note: Text messages are also known as SMS (Short Message Service) messages.
MESSAGES INBOX
All your text, MMS, and voicemail messages appear in this one screen. Your messages are organized
by phone number into “conversations”, most recent conversation appearing at the top of the list.
Conversations that have unread messages display in bold with a colored bar along the left side of the
conversation.
The last message you received or sent in the conversation is displayed in the inbox. To read all the
messages in a specific conversation, tap the message and the “conversation card” will open.
From the inbox you can:
Make a call If you have a conversation to or from a phone number, tap the photo
associated with the conversation to open the contact card, then tap Call
to dial the number.
Call voicemail Tap Voicemail to call your voicemail number.
TWOm User Guide - R1.0.2 - October 7, 2010 57
Page 58

Read a message Tap the conversation to open the conversation card and read the entire
message.
Create a new message 1 Ta p New to start a new conversation.
2 Type the contact name or phone number in the To field. As you type,
contact matches display below the To field. Tap one of the contacts to
add that contact to the To field. To add more recipients, tap More and
tap Add contact.
3 To add a photo, video, or other attachment, tap Type message (at the
bottom of the screen), then tap Add and the attachment type. You can
continue adding attachments up to the limit for your message type.
Note: You can add an existing photo or video, or capture a new one.
Any new photos or videos you attach to a message are also saved to
your Captured screen.
4 Tap Type message to open the text box and type your message. You
can type up to 800 characters.
5 When you’re ready, tap Send.
Delete a conversation 1 Two-finger tap the screen to enter edit mode and show the Xs on each
conversation.
2 Tap an X to delete the associated conversation.
3 Two-finger tap the screen again to exit edit mode.
TWOm User Guide - R1.0.2 - October 7, 2010 58
Page 59

CONVERSATION CARDS
To open a conversation card, tap the latest message from the inbox. From a conversation card you can:
Save phone number or
contact
If you’re having a conversation with someone from a number not saved
to Contacts, you can add the number from the conversation card:
1 Tap the phone number at the top of the screen or tap Save contact
next to the conversation.
2 From the screen that opens, tap Save contact to open the contact
selector. Tap either New contact or tap an existing contact to add the
number to that contact’s info.
3 From the contact card that opens, you’ll see the phone number has
already been added. Type any additional info, then tap Save.
Reply to a message 1 The message box at the bottom of the screen is ready for you to start
typing your message. (You’ll see the blinking text cursor.)
Tip: To start a new line in a message, press the SHIFT key then the
ENTER key.
2 If you’re having a conversation with someone who has more than one
phone number, tap Switch to choose the number you want to use.
3 If you want to add another recipient or an attachment, tap either Add
or, if you have the Switch menu, More > Add and choose from the
submenu.
4 When finished, tap Send.
Save photo attachments To save a photo attachment, tap the attachment to open it in full-screen
view, then tap Save. The photo is saved to the Camera > Captured
screen.
Notes:
• If a photo is protected by DRM (Digital Rights Management), you
will not be able to save or forward the photo.
• You can’t save video attachments to your phone.
Delete a conversation Tap either Delete or More > Delete conversation to delete all the
messages in the conversation. You’ll be asked to confirm.
TWOm User Guide - R1.0.2 - October 7, 2010 59
Page 60

MMS SETTING
You can choose to have MMS messages download automatically, or only when you open the message.
This setting is on by default (MMS messages will download automatically). To change this setting, go
to Apps > Settings > Phone. Read about it in “Auto-download MMS” on page 32.
TWOm User Guide - R1.0.2 - October 7, 2010 60
Page 61

CAMERA
Tap to set
capture settings.
Tap to go to video
capture screen. Tap to delete items.
Tap to remove
items from favorites.
Tap to capture.
Tap to sort by album
instead of by date.
Video item.
ABOUT CAMERA
Where can I see my photos and videos?
The Camera app is organized across multiple screens, from left to right:
• Capture - The screen where you take your photos and videos. Press the CAPTURE button to jump
to the Capture screen. See the location of the CAPTURE button in “The outside of your phone” on
page 7.
• Captured - The screen that stores the photos and videos you captured on the phone, plus any
images you’ve downloaded from the web or saved from message attachments.
• Favorites - The screen that displays all the photos and videos you’ve marked as favorites.
• Albums - The screen that displays all the photos and videos you’ve imported to your phone from
your computer, organized into albums, the same as on your computer.
TWOm User Guide - R1.0.2 - October 7, 2010 61
Page 62

Can I send a photo or video right after I capture it?
Yes, the preview screen will display relevant menu options to Delete, Send via Email or MMS.
Notes:
• You must have at least one email account set up to send via email. If you have more than one email
account set up, the Camera app will use your default email account when sending. Read more in
“Default email account” on page 33.
• You can’t send a video via MMS unless you capture from the Messaging app. Read more in “Create
a new message” on page 58.
What are the specs on this camera?
The built-in camera is 8 megapixels, with an LED flash, auto-focus, and anti-shake. The camera
supports the following resolutions and formats:
Photo - Large 8 MP 3280 x 2462 JPG
Photo - Medium 5 MP 2608 x 1960 JPG
Photo - Small 2 MP 1632 x 1224 JPG
Video - High quality 720P 1280 x 720 MP4 4-8 Mbps
Video - Email VGA 640 x 480 MP4 1 Mbps (max 60 seconds)
Video - MMS qVGA 320 x 240 MP4 256 Kbps (max 30 seconds)
How can I import photos and media on my computer to my phone?
You can import photos, music, and videos to your phone by attaching your phone to your computer
with the USB cable and using the Zune software. Read more in “Copy photos and videos to/from your
computer” on page 71.
What’s the format of my captured photos and videos?
Photos are captured to JPG format. Videos are captured to MP4 format.
Does the camera have auto-focus?
Yes. While capturing a photo, press the CAPTURE button half-way down to focus, then all the way
down to capture. To bypass auto-focus, either press the CAPTURE button all the way down without
pausing, or tap the camera icon on the screen.
TWOm User Guide - R1.0.2 - October 7, 2010 62
Page 63

Note: A few inches in front of the lens to infinity will be focused by default, so if you don’t have time
to use the auto-focus, it shouldn’t be a problem.
CAPTURE PHOTOS AND VIDEOS
To go directly to the Capture screen, press the CAPTURE button on the outside of your phone. You
can also capture from the Camera app:
1 Go to the Apps screen and tap Camera.
2 Slide your finger right to view the Capture screen.
From the Capture screen, you can take photos (in photo mode) or record videos (in video mode) and
then share them:
Zoom during capture Digital zoom is supported in both photo and video modes to 8x actual
size. To zoom in, press the + VOLUME button; to zoom out, press the VOLUME button. You can also tap the screen to toggle the zoom from 1x
to 2x, or pinch in/out to zoom out/in continuously.
Take a photo
1 On the Capture screen, if you don’t see the camera icon , tap the
screen to show the menu, then tap To photo.
2 Frame your photo; when ready to capture, do one of:
• Press the CAPTURE button. To use auto-focus, press the CAPTURE
button half-way down and pause, then continue pressing all the way
down to capture.
• Tap the on-screen camera icon . Auto-focus is bypassed.
• Press the ENTER key . Auto-focus is bypassed.
3 Your photo appears on the preview screen; choose to Delete or Share
it. If you do nothing, your photo is automatically saved to the Captured
screen just to the right.
TWOm User Guide - R1.0.2 - October 7, 2010 63
Page 64

Record a video 1 On the Capture screen, if you don’t see the recording icon on the
screen, tap the screen to show the menu, then tap To video.
2 When ready to record, do one of:
• Press the CAPTURE button.
• Tap the recording icon on the screen.
• Press the ENTER key .
3 To zoom during capture, use one of these methods:
• Tap the screen to toggle between 1x and 2x.
• Press the VOLUME buttons to zoom incrementally.
• Pinch in/out to zoom continuously.
4 To pause during recording, tap the pause icon . Tap it again to
resume recording.
5 To stop recording, do one of:
• Press the CAPTURE button.
• Tap the stop recording icon .
• Press the ENTER key .
6 Your video appears on the preview screen; choose to Delete or Share it.
If you do nothing, your video is automatically saved to the Captured
screen just to the right.
Send a photo or video After you capture a photo or video you can send it from the preview
screen by tapping Share. Choose from Text/MMS or Email to open a
compose screen with the photo or video attached. Note: You can’t send a
video via MMS unless you capture from the Messaging app.
Delete a photo or video After you capture a photo or video you can delete it from the preview
screen by tapping Delete.
You can reach the photo and video settings screens from the Camera capture screen menu. Read more
in “Photo settings” below.
TWOm User Guide - R1.0.2 - October 7, 2010 64
Page 65

Photo settings
From the Capture photo screen, tap Settings. The Photo Capture settings screen opens, where you
can manually adjust these settings:
Resolution Choose from:
• Large - Full-size resolution, largest file size and best quality.
• Medium - A compromise between the best and lowest quality. Good for sending.
• Small - The smallest file size, but lowest quality. Best for sending.
Note: The currently-set resolution doesn’t display on the capture screen, so if you
temporarily change the resolution for a capture session, be sure to change it back.
Mode Choose from:
• Auto - Automatically adjusts exposure based on scene.
• Night - Adjusts the exposure for night lighting.
• Burst - Raises the shutter speed, turns off the flash, and enables burst capture.
When you start capture in this mode, the camera will take three successive photos
without flash and preview the last image captured when finished.
Flash Choose from:
• Auto - Flashes when the camera senses the need.
• Off - Never flashes.
• Always on - Always flashes, except in Burst mode.
Lighting Choose from:
• Auto - Automatically senses the ambient light and adjusts.
• Home - Adjusts to an incandescent light environment.
• Office - Adjusts to a fluorescent light environment.
• Sunny - Adjusts to a bright light environment.
• Cloudy - Adjusts to muted light environment.
TWOm User Guide - R1.0.2 - October 7, 2010 65
Page 66

Video settings
From the Capture Video screen, tap Settings. The Video Settings screen opens, where you can
manually adjust these settings:
Resolution Choose from:
• High quality (HD) - This setting will result in videos with the highest bitrate and
largest file size.
• Email quality - Default setting.
Mode Choose from:
• Auto - Automatically adjusts exposure and light based on scene.
• Night - Adjusts exposure and light for night. Turns on the flash.
FULL-SCREEN PHOTO VIEWER
To view a photo full-screen, from any of the Camera screens, tap the photo thumbnail. To see the
menu and other options, tap the photo again. In the full-screen viewer, you can do the following:
Send a photo 1 On the Captured, Favorites, or Albums screen, find the photo you want to
send and tap it to open the full-screen photo viewer.
2 Tap Share, then tap either Email or Text/MMS to open a compose screen
with the photo attached.
Tip: If the menu is hidden, tap the screen to show it.
TWOm User Guide - R1.0.2 - October 7, 2010 66
Page 67

Zoom and pan On the Captured, Favorites, or Albums screen, tap a photo to open the full-
screen viewer.
• To continuously zoom out from 3x to 1x (original size), pinch two
fingers together.
• To continuously zoom in from 1x to 3x, stretch two fingers apart. You
can also double tap to zoom in from 1x to 2x.
• To pan, touch and hold the screen and slide your finger left/right/up/
down.
• To skip to the next/previous photo, slide your finger left/right.
Favorite/unfavorite a
photo
Set a photo as
wallpaper
1 On the Captured or Albums screen, find the photo you want to favorite or
unfavorite and tap it to open the full-screen viewer.
2 Tap More > Favorite to copy it to the Favorites screen, or Unfavorite to
remove it from the Favorites screen. The menu item that appears depends
on whether your photo is already a favorite or not.
Note: You can also unfavorite a photo from the Favorites screen when in
edit mode. Read more in “Unfavorite” on page 70.
You can customize the lock screen with one of your photos:
1 On the Captured, Favorites, or Albums screen, find the photo you want to
use as wallpaper and tap it to open the full-screen viewer.
2 Tap More > Wall pa pe r.
3 The photo appears in an edit window. Pinch to shrink the default crop
box; drag the crop box around to change the selection.
4 Tap Done to save the photo and assign it as your lock screen background.
Note: You can also set a photo as wallpaper from the Apps > Settings >
Screen Lock screen. Read more in “Wallpaper” on page 31.
TWOm User Guide - R1.0.2 - October 7, 2010 67
Page 68

Assign a photo to a
contact
1 On the Captured, Favorites, or Albums screen, find the photo you want to
assign as a contact photo and tap it to open the full-screen viewer.
2 Tap More > Contact photo.
3 From the list that appears, tap the contact.
4 The photo appears in an edit window. Pinch to shrink the default crop
box; drag the crop box around to change the selection.
5 Tap Done to save the photo and assign it to your contact.
6 The photo now appears on the contact card and on the Favorites Home
screen if you’ve set this contact as a favorite.
Note: You can also assign a photo to a contact from the contact card. Read
more in “Create a new contact on your phone” on page 37.
Add/edit a photo
description
You can add or edit a description for a photo that you’ve captured. The
description is saved as metadata in the photo file.
1 On the Captured screen, find the photo you want to describe and tap it to
open the full-screen viewer.
2 Tap either Add description or the existing description to show the text
box.
3 Type or edit your description. Descriptions are limited to 100 characters.
4 Tap Done to save the description.
Note: Adding or editing a description does not affect the photo’s filename.
Delete a photo 1 On the Captured screen, find the photo you want to delete and tap it to
open the full-screen viewer.
2 Tap More > Delete. You’ll be asked to confirm.
Return to thumbnail
view
From the full-screen viewer, simply press the BACK button to go to
thumbnail view.
PHOTO AND VIDEO SCREENS
The photos and videos you can view in Camera are organized into different screens: Captured,
Favorites, and Albums. Read more below.
TWOm User Guide - R1.0.2 - October 7, 2010 68
Page 69

Captured screen
The Captured screen holds all the photos and videos you’ve captured with your phone. They are
organized by date taken. To delete a photo or video quickly, two-finger tap the screen to enter edit
mode and show the Xs in the corner of each thumbnail. Tap an X to delete the photo or video. Twofinger tap the screen again to exit edit mode.
From this screen you can:
Play a video Tap the video thumbnail to begin play. During play, tap the screen to
show the controls. Read more in “Video Now Playing screen” on page
85.
Send a photo or video Read “Send a photo” on page 66.
Zoom and pan Read “Zoom and pan” on page 67.
Delete photos/videos 1 Tap Edit to enter edit mode and show the Xs.
2 Tap the X next to the photo or video you want to delete. You’ll be
asked to confirm.
3 When finished deleting, tap Done.
Favorite/unfavorite photo Read “Favorite/unfavorite a photo” on page 67.
Set photo as wallpaper Read “Set a photo as wallpaper” on page 67.
Assign photo to contact Read “Assign a photo to a contact” on page 68.
Add description to a photo Read “Add/edit a photo description” on page 68
Favorites screen
The Favorites screen holds all the photos and videos that you’ve marked as “favorites” on your phone.
You can have 100 favorites.
To view the Favorites screen, go to the Camera app and slide your finger left. (The Favorites screen is
immediately to the right of the Captured screen.) You can favorite a photo or video from the Captured
or Albums screen. Read how to add/remove a photo or video from Favorites in “Favorite/unfavorite a
photo” on page 67.
TWOm User Guide - R1.0.2 - October 7, 2010 69
Page 70

In addition, from this screen you can:
FAVORITES SCREEN
EDIT MODE
Tap Edit to
remove items
from favorites.
Unfavorite 1 Tap Edit to enter edit mode and show the Xs.
2 Tap the X next to the photo or video you want to unfavorite.
3 When finished, tap Done to exit edit mode.
You can also unfavorite a photo from the full-screen viewer:
1 Tap the photo you want to unfavorite to open the full-screen
viewer.
2 Tap More > Unfavorite.
Play a video Read “Play a video” on page 69.
Send a photo Read “Send a photo” on page 66.
Zoom and pan Read “Zoom and pan” on page 67.
Set photo as wallpaper Read “Set a photo as wallpaper” on page 67.
Assign photo to contact Read “Assign a photo to a contact” on page 68.
Add description to a photo Read “Add/edit a photo description” on page 68
Albums screen
The Albums screen contains photos you’ve imported from your computer to your phone. The photos
are organized as they were on your computer. Read how to import in “Copy photos and videos to/
from your computer” on page 71.
From this screen you can:
Favorite/unfavorite photo To have any of the photos in your albums also appear in the
TWOm User Guide - R1.0.2 - October 7, 2010 70
Favorites screen, you can favorite them. Read “Favorite/unfavorite a
photo” on page 67.
Page 71

Sort by date or album You can change the sort by toggling the By date/By album menu
options.
COPY PHOTOS AND VIDEOS TO/FROM YOUR COMPUTER
To use the Zune software to copy photos and videos to your phone from your computer and vice versa,
follow these steps:
1 Install the Zune software on your computer. To download and install this software, go to
www.zune.net/setup on your computer and follow the instructions.
2 Once you’ve installed and set up Zune software on your computer, make sure the photos and videos
you want to import to your phone are in your Zune software Collection.
3 Connect your phone to your computer via USB.
4 Open the Zune software if it doesn’t open automatically.
5 From the Zune software on your computer:
• To copy photos and videos from your computer to your phone - Drag the photos and videos in
your Zune software Collection to the phone icon at the lower-left of the page. Progress is
displayed for you on the computer screen. The photos and videos you copy to your phone will
display in your phone’s Albums screen, where you can favorite and share them. Read more in
“Full-screen photo viewer” on page 66
• To copy photos and videos from your phone to your computer - Photos or videos you take
with your phone will appear within the Zune software on the Device > Videos or Device >
Pictures page. Drag the items you want to download to the computer icon in the lower-left of the
page. These photos and videos will then be part of your Zune Collection and will be stored on
your computer in the location specified in the Zune software Settings > Software page.
6 When finished, disconnect your phone from your computer.
TWOm User Guide - R1.0.2 - October 7, 2010 71
Page 72

BROWSER
ABOUT BROWSER
How do I open a webpage?
Open the Browser and start typing the web address. You can either type the top-level domain at the
end of the address (e.g., .com, .net, .org), or tap the appropriate auto-complete option.
If you auto-complete, you’ll be taken to the webpage immediately. Otherwise, tap the arrow to the
right of the address, or press the ENTER key to open the webpage.
How do I search for a webpage?
Type your search terms in the address bar, then tap the magnifying glass to the right of your search
terms.
Can I search a webpage for a specific word or phrase?
No, you can’t search for text within a webpage.
Can I save some pages as favorites?
You can save 50 pages as favorites. To favorite a webpage:
1 On an open webpage, tap the address bar.
2 The address bar will shift down slightly to show the website’s title and the favorites star .
3 Tap the star to show the Favorites menu.
4 Tap Add to favorites.
All your favorite (bookmarked) pages are stored in the Favorites pane above the address bar.
TWOm User Guide - R1.0.2 - October 7, 2010 72
Page 73

Can I zoom in/out of a webpage?
Yes. On websites not specifically designed for mobile phones, double tap the page to zoom in; double
tap again to return to original size. On any webpage, zoom in/out continuously by pinching out/in
with your thumb and forefinger. Read more below in “What should happen when I double tap on a
webpage?”
What should happen when I double tap on a webpage?
It depends on the page and where you double tap.
On websites not specifically designed for mobile phones, double tap to zoom in; double tap again to
zoom out.
If you’re zoomed in on the page or if the page is a mobile site, double tap the following to take the
corresponding action:
Double tap this: To make this happen:
Plain text in a specific section Zooms into that section.
Plain text that is not a specific
Zooms out of that section.
section
Image Shows a context menu with the option to save the image.
Link Shows a context menu with options to:
• View the destination URL.
• Go to the page.
Image that is also a link Shows a context menu with options to:
• View the destination URL.
• Save the image.
• Go to the page.
tel: link Shows a context menu with options to:
• Call the number.
• Send a text message to the number.
• Save the number to contacts.
mailto: link Opens the Email app > new message screen.
TWOm User Guide - R1.0.2 - October 7, 2010 73
Page 74

Can I set a page to use as a home page in the Browser?
No, there is no home webpage setting on the phone.
Can I do online banking or other secure transactions with my phone?
Yes. If a website’s connection is encrypted and the Browser certifies it’s secure, you’ll see “https” and
the padlock icon in the address bar. If you see the open padlock icon , the security certificate is
not valid for the site and the site is not secure.
Can I put a link to a webpage on my Home screen?
Yes, you can “pin” 50 webpages to your App Home screen. Here’s how:
1 With a webpage in view, tap the address bar.
2 The address bar will shift down slightly to show the website’s title and the favorites star .
3 Tap the star to show the Favorites menu options.
4 Tap Pin to apps. Now a link to this webpage will appear on your Apps Home screen. The webpage’s
title is used as the name of the link and it’s not editable.
5 To remove the link, tap Remove from apps in the Favorites menu.
If someone sends me a link in a message, will it open in the Browser if I tap the link?
Yes, if someone sends you a link to a webpage in an email or text message, all you need to do is tap the
link to open it in the Browser.
Can I have more than one webpage open at a time?
No, you can only have one webpage open at a time. Use the Favorites screen to return to webpages.
WEBPAGE BROWSE SCREEN
Opening a webpage is very easy. Follow the instructions in “How do I open a webpage?” on page 72.
Once you’re on a webpage, you can:
Zoom Double tap to zoom in. Double tap again to zoom out. To zoom
in/out continuously, pinch out/in with your thumb and
forefinger.
TWOm User Guide - R1.0.2 - October 7, 2010 74
Page 75

Pan/scroll Slide your finger up/down or left/right to pan within a page. To
pan quickly, slide your finger in the opposite direction that you
want to pan.
Go back To go back one page, tap the back arrow in the address bar.
Continue tapping the arrow to step back through page history.
Stop loading a page
Tap the stop icon .
Pin a page to your Apps screen Learn how in “Can I put a link to a webpage on my Home
screen?” on page 74.
Refresh a webpage Tap the refresh icon in the address bar.
Favorite a webpage Learn how in “Can I save some pages as favorites?” on page 72.
Save an image on a webpage If you see an image on a webpage that you’d like to save to your
Camera’s Captured screen, zoom in to the webpage, double tap
the image, then from the message box that opens, tap Save
image.
Note: You can save the following image file types to your phone
from webpages: .JPG, .GIF, .PNG, .BMP.
Choose values in drop-down
boxes
1 Double tap the page to zoom in.
2 Tap the selection box; all the items in the box appear in a list.
3 Tap the item(s) you want to select.
TWOm User Guide - R1.0.2 - October 7, 2010 75
Page 76

Type in text boxes 1 Double tap the page to zoom in.
Tap to open
text entry
box below.
2 Tap the text box to open a text entry box at the bottom of the
screen.
3 Type your text, then tap outside the text entry box to dismiss
it. Alternatively, after typing the text, you can press the
ENTER key to perform the default text box action (in the
example above, pressing ENTER would begin the search).
Follow a link To follow a link, tap the link. If you’re having trouble tapping it,
zoom in.
If you’d like to know the link’s destination before you navigate,
double tap the link and see the URL in the message box that
opens. To navigate to that destination, tap Open link; to cancel,
tap elsewhere on the webpage.
Note: If you tap a “mailto:” link, the Email app opens. If you tap
a “tel:” link, you will be given the choice to dial, text, or save the
number.
FAVORITE WEBPAGES
To add a webpage to Favorites, read “Can I save some pages as favorites?” on page 72. You are limited
to 50 favorite pages.
To view all your favorite webpages, slide your finger down the webpage browse screen. Your favorites
are stored as thumbnails. While viewing your favorites, you can:
Open a favorite Tap the thumbnail to open the page in the Browser.
TWOm User Guide - R1.0.2 - October 7, 2010 76
Page 77

Edit the website name 1 Two-finger tap the favorite you want to rename to enter edit mode.
2 Tap the favorite you want to rename. The page’s name is
highlighted by default.
3 Start typing to replace the current name.
4 Two-finger tap the screen to save and exit edit mode.
Remove from favorites 1 Two-finger tap the Favorites area of the screen to enter edit mode.
2 Tap the X on the page. The page is removed from your Favorites.
3 Repeat with other favorite pages if you want.
4 When finished, two-finger tap again to exit edit mode.
SEARCH
The web address bar doubles as a web search box. If you type a protocol identifier (e.g., “www”, “http”,
“https”) at the beginning of your entry, or if you close your entry with a “.com”, “.net”, or other website
top-level domain, then the address bar will send you to that website. Otherwise, the address bar treats
your typed entry as a search string and will search the web. As you type in the address bar your
browser history is searched. Sites that you’ve been to recently and that match what you’ve typed will
display below the bar for easy selection.
Once you’ve typed a search string, tap the magnifying glass or press the ENTER key to launch
your search.
BROWSER SETTINGS
To reach the Browser Settings screen:
1 Go to the Apps screen and tap Settings.
2 Tap Browser to open the Browser Settings screen.
Read more in “Browser” on page 31.
TWOm User Guide - R1.0.2 - October 7, 2010 77
Page 78

MUSIC & MORE
Tap to view the
Quickplay menu.
Tap to view
the main menu.
ABOUT MUSIC & MORE
What can I do in the Music & More app?
From the Music & More top-level screen, you can play music, podcasts, and videos that you’ve
downloaded to your phone using the Zune software on your computer. You can also listen to (stream)
music and download music directly to your phone using the Zune Pass catalog (only when connected
via Wi-Fi), and listen to FM radio stations.
Go to Apps > Music & More to see the top-level menus. Toggle between the Quickplay menu on the
left and the main navigation menu on the right by tapping left or right:
Here’s what each menu contains:
• Quickplay - Use the Quickplay menu to control the song or video now playing and to scroll
through the songs or videos you’ve played. To focus on the main navigation menu, tap it on the
right.
• Music - Browse music on your phone using these categories: artists, playlists, songs, genres,
albums.
• Videos - Browse videos you’ve synced from Zune using these categories: TV shows, music videos,
movies, other, and all videos.
• Radio - Listen to FM radio stations.
TWOm User Guide - R1.0.2 - October 7, 2010 78
Page 79

• Zune Pass catalog - Stream or download songs using your Zune Pass. You must be connected to a
Wi-Fi network to use the Zune Pass catalog. Read more in “What is a Zune Pass and how do I get
one?” on page 79 and “Wi-Fi” on page 26.
• Podcasts - Listen to audio and video podcasts that you’ve subscribed to from your computer.
• Settings - Set music and radio preferences, plus find out how much storage space you’re using for
music and videos on your phone.
How can I copy media from my computer to my phone?
Learn how to import your photos and videos in “Copy photos and videos to/from your computer” on
page 71. To import music, read “Sync media from your computer” on page 80.
Can I purchase songs and ringtones for my phone?
You can download music from the Zune Pass catalog on your phone using the Music & More app.
However, to use the catalog, you first need to get a Zune Pass, sign up for a Zune account, and link
your phone to your Zune account. You can take advantage of a free 14-day trial Zune Pass, or purchase
one. Read more in “What is a Zune Pass and how do I get one?” below. You can also purchase music
on your computer using the Zune Marketplace, then sync the music to your phone.
To purchase ringtones, check your mobile operator’s website. If you are able to purchase ringtones,
they will be delivered to your phone via MMS. To assign these ringtones, go to Apps > Settings >
Sound > Ringer > Melodies on your phone.
How will I know when I have a phone call if I’m listening to music?
Your music, video, podcast, or radio sound will pause when you receive an incoming call. The media
will resume playing when you end the call.
What is a Zune Pass and how do I get one?
A Zune Pass is a subscription that lets you stream and download as many songs as you like from Zune
Marketplace on your computer or the Zune Pass catalog on your phone, and listen to them for as long
as you hold your subscription. You can download and keep ten favorite songs each month and play
them even without an active Zune Pass. Note that you must have a Zune Pass to download music from
the Zune Pass catalog in the Music & More app.
Note: You must be connected to a Wi-Fi network before you can use the Zune Pass catalog. Read how
to connect to a Wi-Fi network in “Wi-Fi” on page 26.
To get a Zune Pass, go to www.zune.net/zunepass and follow the links to sign up for a Zune account.
You can get a free 14-day trial pass or purchase a subscription. Here’s more about what you can do
with a Zune Pass:
TWOm User Guide - R1.0.2 - October 7, 2010 79
Page 80

• Browse and search music in the Zune Pass catalog from your phone and Zune Marketplace from
your computer.
• Stream as much music as you want.
• Download movies offered to rent.
• Download music in two ways:
- Download to rent - Download and play back as many songs as you like as long as you keep your
Zune Pass active.
- Download to own - Download 10 songs/month and keep this music forever (no DRM), even if
your Zune Pass is not active.
• Easily transfer songs back to your computer via USB cable and Zune software.
Zune Pass system requirements Zune Pass also requires Zune software and a computer running
Microsoft Windows 7 (any edition), Windows Vista (any edition), Windows XP with Service Pack 2
(Home, Professional, Tablet PC, or Media Center Edition 2005 with Rollup Update 2), or Mac OS X
with Boot Camp running those Windows operating systems. Zune software won't work on versions of
Windows earlier than Windows XP SP2, any 64-bit version of Windows XP, or any version of
Windows Server. Internet access (high speed recommended, internet service fees may apply), and
200 MB free hard drive space also required. See www.zune.net for complete Zune system
requirements.
SYNC MEDIA FROM YOUR COMPUTER
Add music, videos, and photos on your computer to your phone by using the Zune software on your
PC or third-party software on your Macintosh computer.
On a PC
Account setup
1 If you want to sync content you already own, install the Zune software on your computer by going
to www.zune.net/setup.
2 If you also want to add to your collection from the Zune Marketplace, launch the Zune software on
your computer and sign up for a Zune account (you can use your KIN account email address).
Sync with phone
Once you have installed the Zune software and set up your account, follow these steps to sync your
phone with your collection:
1 Connect your phone to your computer via USB.
TWOm User Guide - R1.0.2 - October 7, 2010 80
Page 81

2 Open the Zune software if it doesn’t open automatically. The first time you do this you’ll be
prompted to name your phone, specify sync preferences, then link your phone to your Zune
account (if you have one).
3 Once you’re set up, if you’ve selected to sync automatically, syncing will begin. Otherwise, drag the
items you want to sync from your Collection to the device icon in the lower-left, or right-click the
device icon and select Start sync.
4 When you’ve finished syncing, safely unmount your phone from your computer by unlocking your
phone’s screen.
5 Disconnect the USB cable from your phone and computer.
Repeat these steps whenever you want to update the contents of your phone.
On a Macintosh
If you have a Mac computer, you won’t be able to use the Zune software on your PC, access the Zune
Marketplace, or use your Zune Pass to find and download music to your phone.
If you want to be able to sync your music, photos, and videos to and from your phone, you’ll need to
download and set up third-party software. Once your content is synced to the phone, you can play it
using the Music & More app. Find out more about the third-party Mac software from this website:
http://www.markspace.com/kin.
Note: The MAC OS X sync software for KIN does not provide Zune Pass or Zune Marketplace
capabilities. Zune software (running on particular versions of Windows) is required for Zune content.
See www.zune.net for Zune system requirements.
MEDIA PLAYER
All the music, videos, and podcasts you’ve added to the Zune software on your computer and set to
sync to your phone will display in the Music & More app. Note that while using Music & More, your
phone will display in portrait orientation only, except when searching. (Read more in “Screen
orientation” on page 12.)
Find a song, video, or podcast
To find music or a video to play, go to Apps > Music & More and tap either Music, Video, or
Podcasts. You can then choose a subcategory:
• Music - Playlists, Songs, Genres, Albums, Artists
• Videos - All, TV, Movies, Music (videos)
• Podcasts - Video, Audio
TWOm User Guide - R1.0.2 - October 7, 2010 81
Page 82

Here are some tips about navigating:
Tap to
begin play.
Tap to add to
Now Playing.
Tap to
delete item.
Navigate song list 1 Tap Music > Songs to view your list of songs.
2 If you have more than one song, they are organized alphabetically. You
can jump to songs starting with a particular letter:
• Tap a letter heading to open the on-screen letter selector.
• Tap the letter you want to jump to.
• The list moves to the songs beginning with that letter.
View music artist info 1 Tap Music > Artists to view your list of artists.
2 Tap an artist to open the list of albums by this artist. Slide your finger left
or right to view more info: songs, pictures, bio, or related artists.
View item details 1 Navigate to a song, video, artist, album, podcast, or other category.
2 Tap the item’s name to open the item details screen.
3 From this screen you can view information about the item, start playing
the item, add it to the Now Playing playlist, or delete it.
Play an item
1 Once you’ve navigated to the item you want to play, tap the artwork to begin play immediately.
TWOm User Guide - R1.0.2 - October 7, 2010 82
Page 83

2 Alternatively, open the item details screen by tapping the item’s name, then tap .
Playlists
Your phone has a default playlist called “Now Playing”. You can’t create new playlists on your phone,
but you can sync playlists that you’ve created using the Zune software on your computer.
Add/remove songs
from Now Playing
1 Once you’ve navigated to the item you want to play, tap the name to open
the item details screen.
2 Tap to save the song to the Now Playing playlist.
3 To remove all songs from Now Playing, go to Music > Playlists > Now
Playing, then tap .
Edit playlist synced
from computer
• To remove all songs from your playlist, go to Music > Playlists > <your
playlist name>, then tap .
• To add all songs in your playlist to Now Playing, go to Music > Playlists
> <your playlist name>, then tap .
Start playing a playlist
Go to Music > Playlists > <your playlist name>, then tap .
Now Playing screens
Music and podcasts Now Playing screen
Once you’ve starting playing music or a podcast, you’ll automatically go to the Now Playing screen.
There are two sets of controls you can use on this screen. By default you’ll see the shuffle, repeat, and
rating controls.
TWOm User Guide - R1.0.2 - October 7, 2010 83
Page 84

Tap the artwork to open the volume, pause, play, forward, and back controls.
Press the BACK button to hide
the controls overlay.
Tap title to open
item details.
Tap artwor k
to open
more controls.
From the Now Playing screen you can:
Pause/resume song play
Go back in song play
Tap to pause play; tap to resume play.
Tap once to go to the beginning of the song; tap again to go to
previous song in the playlist.
Fast forward in song
Go to next song
Rewind song
Change volume
Rate song
Shuffle songs
TWOm User Guide - R1.0.2 - October 7, 2010 84
Touch and hold to fast forward through a song.
Tap to advance to the next song in the playlist.
Touch and hold to rewind through a song.
Press to raise or to lower the volume.
Tap the icon to toggle through not rated , positive rating , negative
rating .
Tap to toggle shuffle on and off.
Page 85

Repeat songs
Tap screen
to open
controls.
Press the BACK
button to hide
controls overlay.
Tap to toggle through repeat modes:
• Don’t repeat
• Repeat current song
• Repeat all songs
Video Now Playing screen
Once you tap the video artwork, the video will start playing. Tap the screen again to open the volume,
pause, play, forward, back, and resize controls.
From the video Now Playing screen you can:
Fast forward video
Rewind video
Resize
Go to specific spot in
video
Change volume
Touch and hold to fast forward through a video. Tap to skip forward.
Touch and hold to rewind a video. Tap to skip back.
Tap to toggle between full-screen and regular views.
Slide your finger along the progress bar to go to a specific place in the
video.
Press to raise or to lower the volume.
Dismiss controls Tap the BACK button to dismiss the controls overlay.
FM radio Now Playing screen
Read about the FM Now Playing screen in “FM radio screen” on page 87.
TWOm User Guide - R1.0.2 - October 7, 2010 85
Page 86

Control media play
Even if you are not in the Music & More app while a song, podcast, or FM radio station is playing, you
can control play by pressing one of the VOLUME buttons. (See the location of the VOLUME buttons
in “The outside of your phone” on page 7.)
While in the Music & More app, press one of the VOLUME buttons to open the media controls
overlay. The controls will auto-dismiss after a few seconds, but you can always dismiss them manually
by pressing the BACK button.
TWOm User Guide - R1.0.2 - October 7, 2010 86
Page 87

Delete an item
Tap screen
controls.
Press the BACK
button to hide
controls overlay.
to toggle
To delete music or videos:
1 Tap Music > Songs or Video and keep tapping until you navigate to the item you want to delete.
2 Tap the item’s title (not the art) to open the item’s detail screen.
3 Tap to delete the item from your phone. You’ll be asked to confirm.
FM RADIO SCREEN
Tap Radio from the Music & More top-level screen to go to the FM radio screen.
Note: You must use wired headphones to listen to the FM radio because the wire acts as the antenna.
Like the other Now Playing screens, there are two sets of controls. To toggle between them, tap the
screen.
From the FM radio screen you can:
Find a station Slide your finger along the tuner bar to tune in to a station
Seek stations
quickly. To scan for stations, read below.
Tap to scan to the stations lower on the dial; tap to scan
to the stations higher on the dial.
You can set whether the scan will stop at any station, or just
TWOm User Guide - R1.0.2 - October 7, 2010 87
stations you have preset. Read more in “Radio settings” on
page 89.
Page 88

Add a station to presets
Tap to add a station to the preset list.
Remove a station from presets
View your saved stations
Pause/resume song play
Tap to remove it from the preset list.
Tap to view a list of all the stations on the preset list.
Tap to pause play; tap to resume play.
LISTEN TO MEDIA WITH HEADSET, HEADPHONES, OR BLUETOOTH DEVICE
You can listen to music, videos, podcasts, or the FM radio using the one-button headset that came in
the box. You can also use a three-button headset, stereo headphones, or a Bluetooth device (all
available for purchase separately). Refer to “Headset jack” on page 11 to locate the headset jack on
your phone.
Note: The headset/headphone cable serves as an antenna, so you must have a headset or headphone
plugged in to your phone when using the FM radio.
One-button headset If you use the headset that came in the box, which has an inline
microphone and one control button, use the button to control play as
follows:
• One press – Play/pause.
• Two presses – Go to next song, FM station, or podcast episode; skip
forward in video.
• Three presses – Go to previous song, FM station, or podcast episode;
skip back in video.
Three-button headset • The middle button controls play just like the single button on a one-
button headset (see above).
• Up/down buttons control volume, the same as the volume buttons on
the phone.
Bluetooth headset Once you pair with a Bluetooth stereo headset (read how in “Connect to a
Bluetooth device” on page 27) and start playing music, the sound will
automatically be routed to your headset.
Headphones You can use standard stereo headphones to listen to music.
TWOm User Guide - R1.0.2 - October 7, 2010 88
Page 89

SETTINGS
Control the following from the Music & More > Settings screen:
Music settings • Equalizer - Choose from None, Acoustic, Classical, Electronic, Hip
Hop, Jazz, Pop, or Rock.
• Artists - Choose whether to search for artists by Album only or by
Song and album.
Radio settings • Region - Choose your current location from North America, Europe,
or Japan to set the correct frequency band. Remember to change this
setting if you travel to a different region.
• Seek mode - When you scan forward or back for stations, you can
choose seek to stop at the next station, even if you don’t receive the
station very well, or presets to stop at just those stations that you’ve
saved.
Storage From the Storage screen you can view:
• How many songs, pictures, and videos you’ve copied to your phone.
(Video podcasts are counted but not audio podcasts.)
• How much space you’ve used.
• How much space is still free.
TWOm User Guide - R1.0.2 - October 7, 2010 89
Page 90

MORE APPS
This chapter describes the following apps:
• Calendar
• Alarm
• Calculator
CALENDAR
Manage calendar events
Create a new event
To create a new event, do the following:
1 Go to the Apps Home screen and tap Calendar to view the Today screen. Then tap New.
2 The New Event screen appears. Create your new event:
• Edit the default values for Start and End dates and times by tapping edit next to each value.
•Tap Repeat to choose a repetition option.
•Type the Location and a Note if you wish.
•Tap Reminder to choose when you want to be reminded. Select from None, Event start, 5
minutes, 15 minutes, 30 minutes, 1 hour, 2 hours, 1 day, or 2 days before the start of the event.
Note: By default, a reminder alarm is set for 15 minutes before the event.
•Tap Done to save your event.
Set reminder sound
To set the Reminder sound, which will apply to all events, go to Settings > Sound > Calendar and
choose from the sound selector.
Delete an event
To delete an event, do the following:
1 Find the event you want to delete, then tap it to view its details.
2 Tap Delete. You’ll be asked to confirm.
TWOm User Guide - R1.0.2 - October 7, 2010 90
Page 91

Edit an event
To edit an event, you must open the details of that event. Read more in “Event details” on page 91.
Navigate in calendar
Calendar views
You can view your calendar events from the following screens:
Agenda Your calendar opens in the Agenda view by default. Each day is listed on a
separate screen. Slide your finger left or right to advance or go back in time.
Month From the Agenda view, tap More > Month to view the current month. Slide
your finger left or right to advance or go back in time.
Occasions To view your contacts’ upcoming birthdays and anniversaries, go to the
Calendar app and tap More > Occasions. The next twelve months of
birthdays and anniversaries are displayed.
Event details From the Agenda view, navigate to the event you want to open. Tap it to view
all the details.
You can edit the event by tapping Edit. Make your edits, then tap Done
when finished.
Go to Today
From any day in the Agenda view, tap More > To day to view your events for the current date.
Event notifications
No matter what you’re doing on your phone, a notification will pop up when your event reminder is
set to appear. Tap the notification to open the reminder and read event detail. You can choose the
event reminder sound from Settings > Sound > Calendar.
If you have unread event reminders, you’ll see an asterisk (*) on the Calendar app icon (on the Apps
screen).
TWOm User Guide - R1.0.2 - October 7, 2010 91
Page 92

ALARM
About Alarm
How many alarms can I set?
You can create up to 10 alarms.
If I set an alarm, can I save it even though I don’t want it to go off?
Yes. All you have to do is turn off the alarm. It will remain in your list. Alarms that are off are listed
below alarms that are on. Read more in “Turn an alarm on and off” on page 94.
Can I set an alarm to go off on certain days?
Yes. The days your alarm goes off are determined by the frequency you select. Choices range from Just
once to Every day, and include Weekdays and Weekends. Read more in “Create an alarm” on page
94.
Can I customize the alarm sound?
Yes, you can select from all the sounds available on your phone. Read more in “Create an alarm” on
page 94.
TWOm User Guide - R1.0.2 - October 7, 2010 92
Page 93

Does my phone display an indicator when I have an alarm set?
Alarm indicator
Yes, if you tap the Dashboard, you’ll see the alarm indicator next to the time. You can tap the indicator
to open the Alarms screen.
How long does snooze last?
If you tap Snooze on the alarm notification, the alarm will sound again after 10 minutes.
What happens if I’m on a call when the alarm sounds?
Your call won’t be interrupted, but you’ll receive a visual notification on the screen. If a call comes in
while an alarm is sounding, then the alarm sound will stop, but the notification on your screen will
remain.
What happens if I have my screen locked when an alarm goes off?
If your screen is locked, the alarm notification will appear over the lock screen background.
• To dismiss the alarm and keep the screen locked, peel back the screen.
• To dismiss the alarm and unlock the screen, open the keyboard.
TWOm User Guide - R1.0.2 - October 7, 2010 93
Page 94

• To snooze the alarm and keep the screen locked, tap Snooze or press the BACK button.
What happens if I have a headset attached to the phone and am listening to music when an
alarm goes off?
The alarm will sound through your headset.
What happens if I ignore an alarm when it goes off?
If you don’t Dismiss or Snooze the alarm, it will automatically snooze after five minutes. If you
continue to ignore the alarm, it will automatically dismiss after three hours.
When I’m traveling I set my phone time manually. Is the alarm time based on the network time
or my phone’s time?
The alarm will always look at the phone’s time, not the network time.
Can I add a description to my alarm?
Yes, you can add a note, which will appear as part of the notification and in the Alarm list. A note can
be up to 64 characters (approximately 2 lines).
Create an alarm
1 Go to the Apps screen, then tap Alarm.
2 The first time you open Alarm, you won’t see any alarms listed. Tap New.
3 On the New Alarm screen:
• Set the time by tapping the time selector. Tip: To choose a lower number, tap the top of the
selector column; to choose a higher number, tap the middle or bottom of the selector column.
•Tap Frequency to open the frequency selector and choose from the list. Tap Done when you’ve
made your selection.
•Tap Sound to open the sound selector and choose a sound. Sounds specifically designed for the
Alarm app are listed in the Alarms category. Press the BACK button when you’ve made your
selection.
• Tap the text box and type a note (64 characters or less, which is about 2 lines).
4 Tap Save to set the alarm and return to the Alarms screen.
5 Your alarm is automatically set to on.
Turn an alarm on and off
1 Go to the Apps screen, then tap Alarm.
TWOm User Guide - R1.0.2 - October 7, 2010 94
Page 95

2 Find the alarm you want to turn on/off from the list and tap it.
3 The alarm switches from on to off, or vice versa, depending on its previous setting.
Change an alarm’s settings
1 Go to the Apps screen, then tap Alarm.
2 Tap Edit.
3 From the list, tap the alarm you want to edit to open it for editing.
4 On the Edit Alarm screen, tap any of the settings (time, frequency, sound, note) to make
adjustments.
5 When you’re finished, tap Save or tap Cancel to discard your changes.
Delete an alarm
1 Go to the Apps screen, then tap Alarm.
2 Tap Edit.
3 Find the alarm you want to delete and tap the X to the right of the alarm. Your alarm is deleted
without confirmation.
4 Tap Done to return to your list of alarms.
Alarm notifications
When your alarm goes off, a notification will appear on your phone, no matter what you’re doing. You
will be able to either Dismiss the alarm or Snooze it. (Snooze is 10 minutes.) If you press the BACK
button with the notification showing, the alarm will snooze.
Here are some situations you may be in and how the alarm will behave:
You’re on a phone call when
the alarm goes off
The alarm goes off as you’re
receiving an incoming call
Your headset is plugged in
when the alarm goes off
TWOm User Guide - R1.0.2 - October 7, 2010 95
The alarm won’t sound (don’t want to interrupt your call), but you’ll
see the notification on the screen, where you can dismiss or snooze
it.
If the alarm is sounding, it will stop once the call comes in. The
notification will remain so you can act on it.
The alarm will sound through the headset and the visual notification
will appear on the screen, where you can dismiss or snooze it.
Page 96

You ignore the alarm
notification
If you ignore the alarm for 5 minutes, the alarm will automatically
snooze (for 10 minutes). If you keep ignoring the alarm, after 3
hours of sounding for 5 minutes and snoozing for 10 minutes, the
alarm will dismiss.
Your screen is locked when
the alarm goes off
The notification will appear on the lock screen, where you can tap
Snooze, or peel back the lock screen to dismiss the alarm.
CALCULATOR
About Calculator
What math operations can I perform using the Calculator app?
You can use the Calculator app to do addition, subtraction, multiplication, and division.
Can I use my phone’s keyboard to use the Calculator?
Yes. The keyboard’s number keys work just like the on-screen number buttons. Most of the other
calculator buttons can also be controlled using either the keyboard or the touch screen:
Tap this on the screen ...or type this on the keyboard
+ (add) K
- (subtract) Z
X (multiply) G
÷ (divide) X
= (equals) L
. (decimal point) .
Backspace Backspace
C (clear) C
Does the Calculator have a memory function?
Yes, you can save a number in memory while using the Calculator app. Read more in “Memory” on
page 97 below.
TWOm User Guide - R1.0.2 - October 7, 2010 96
Page 97

Memory
To make certain calculations easier, you can save a number in the Calculator’s memory. When the app
starts, the number in memory is set to zero. You can display this number or change its value using the
on-screen memory keys:
MC Resets the number in memory to zero.
MR Displays the number in memory.
M- Subtracts the currently displayed number from the number in memory.
M+ Adds the currently displayed number to the number in memory.
Note: The number in memory is reset to zero each time the Calculator app is launched from the Apps
Home screen.
TWOm User Guide - R1.0.2 - October 7, 2010 97
Page 98

SAFETY, REGULATORY, AND LEGAL INFORMATION
HANDLING AND SAFETY PRECAUTIONS
Your phone is a mobile device that may break if dropped, subjected to severe shock, or exposed to
water. Please handle the device carefully and read the precautions listed below. These precautions
provide essential information for the safe handling of the product and for the protection of the users
and others from possible harm.
During a call, the sound level on your device may vary, depending on how you are routing the sound.
Keep the volume at a moderate level to prevent damage to your hearing, and be careful not to switch
accidentally to speakerphone while the phone is against your ear.
Battery handling
• Your device uses a removable lithium-ion battery. Lithium-ion batteries are recyclable. Never
dispose of the battery or the unit by incineration or ordinary waste.
• Always turn off your device before removing the battery.
• Never attempt to disassemble or modify the battery.
• Never touch any fluid that may leak from the removable battery, because doing so may result in
injury to the skin or eyes.
• Never drop your device or subject it to severe shock. This may cause the removable battery to leak,
ignite, and/or rupture.
• Always immediately remove your device from the vicinity of any open flame in the event the builtin battery leaks or emits an unusual odor.
Device handling and use
• Never attempt to disassemble, repair, or modify your device. Such action may result in bodily
injury, or damage to the unit or other property.
• Never touch liquid that might leak from a broken liquid crystal display (LCD), because doing so
may cause a skin rash.
• Keep the volume at a moderate level to avoid damage to your hearing.
• Never dispose of your device with ordinary waste.
• Never allow infants, small children, or animals within reach of your device.
TWOm User Guide - R1.0.2 - October 7, 2010 98
Page 99

• Switch off your device or put your device in “airplane mode” when in an aircraft. The use of the
device in an aircraft may be dangerous to the operation of the aircraft, may disrupt the cellular
network, and is illegal. Failure to observe this instruction may lead to suspension or denial of
cellular telephone services to the offender, or legal action, or both.
• Check with your doctor if you have a pacemaker or hearing aid to make sure you can safely use the
device’s cellular and Bluetooth radio frequencies.
• Your phone contains magnets, which may cause damage to credit cards, magnetic ID cards, and
other magnetically encoded materials. Do not place these or other items that are sensitive to
magnetic fields near the mobile device. For example, do not place your phone in the same pocket as
your credit card or hotel key.
• Never attempt to dry the device using a microwave oven.
• Using this device for long periods of time (e.g., messaging and browsing) may cause the device and
the battery charger to get warm. If you feel the device or the battery charger is too warm, avoid
sustained contact with exposed skin otherwise this might cause discomfort, or eventually a burn.
• Certain locations (e.g., hospitals) may restrict the use of any device that emits low-level RF energy.
Always comply with posted prohibitions of the use of RF-emitting devices.
• Do not use the device when at a refueling station.
• Turn your phone off where posted notices so require and observe restrictions on the use of radio
equipment in fuel depots, chemical plants, or where blasting operations are in progress.
• Never allow any metallic objects (e.g., staples, paper clips) to become inserted into your device, as
this could result in the generation of excess heat or fire.
• Never use or store your device in the following locations:
- Anywhere it may be exposed to water (e.g., bathroom, sauna)
- Conditions of high humidity (e.g., rain or fog)
- Conditions of extreme high temperatures (e.g., near fire, in a sealed car)
- In direct sunlight
- Locations or sites subject to strong vibration
• Using this device for long periods of time (e.g., messaging and browsing) may harm your hands or
eyes. For your health and safety, take a 10-15 minute break every hour.
• Use your device in areas with an ambient temperature range of 0ºC to 40ºC (32ºF to 104ºF), with
humidity of 30% to 80%.
• RF signals may affect improperly installed or inadequately shielded electronic systems in motor
vehicles. Check with the manufacturer or its representative regarding your vehicle. You should also
consult the manufacturer of any equipment that has been added to your vehicle.
TWOm User Guide - R1.0.2 - October 7, 2010 99
Page 100

• Do not use chemicals (such as alcohol, benzene, thinners, etc.) or detergents to clean your phone.
There is a risk of this causing fire.
• Do not paint your phone or modify the housing.
• Do not immerse your phone in water.
• Do not use unauthorized accessories.
• Do not disassemble the phone or its accessories. If service or repair is required, return unit to an
authorized service center. If unit is disassembled, the risk of electric shock or fire may result.
• Do not aim your camera at the sun. The sunlight may cause damage to the sensor.
• Do not use your camera’s flash close to a person’s eyes. This may cause the person to lose eyesight
temporarily and result in an accident.
Battery charger handling
• The device is intended for use when supplied with power from the USB power adapter and multifunction micro-USB cable included in the box with your device, or via the included multi-function
micro-USB cable to an approved USB host. Other usage will invalidate any approval given to this
device and may be dangerous.
• Charge the device within the temperature range of 5 to 35 degrees Celsius, or 41 to 95 degrees
Fahrenheit, for the fastest charging time.
• Never place the USB power adapter on any surface that can be marred by exposure to heat; always
place the USB power adapter on a heat-insulating surface.
• Never use a USB power adapter or multi-function micro-USB cable that has received a sharp blow,
been dropped, thrown from a speeding vehicle, or is otherwise damaged; doing so may damage
your device.
• Never place the USB power adapter or micro-USB cable adjacent to any heat source.
• Never leave the USB power adapter or micro-USB cable close to an open container of liquids.
• Never use a worn or damaged USB power adapter or micro-USB cable or plug, or a worn or
damaged extension cord or plug.
• When traveling abroad, never plug the USB power adapter into a power source that does not
correspond to both the voltage and frequency specified on the USB power adapter.
• Always confirm that the USB power adapter plug has been fully inserted into the receptacle to
ensure a secure electrical connection.
• In the event of any unusual odor or smoke, always immediately disconnect the USB power adapter
from the device and the power outlet, then power off the device.
• It is normal for the USB power adapter to become warm when charging. Disconnect the USB
power adapter from the outlet when not in use.
TWOm User Guide - R1.0.2 - October 7, 2010 100
 Loading...