

Page 1
Page 2

Microsoft©
Ofce 365
Connect and Collaborate
Virtually Anywhere, Anytime
KATHERINE MURRAY
Page 3

PUBLISHED BY
Microsoft Press
A Division of Microsoft Corporation
One Microsoft Way
Redmond, Washington 98052-6399
Copyright © 2011 by Katherine Murray
All rights reserved. No part of the contents of this book may be reproduced or transmitted in any form or by any
means without the written permission of the publisher.
Library of Congress Control Number: 2011932154
ISBN: 978-0-7356-5694-9
Printed and bound in the United States of America.
First Printing
Microsoft Press books are available through booksellers and distributors worldwide. If you need support related
to this book, email Microsoft Press Book Support at mspinput@microsoft.com. Please tell us what you think of
this book at http://www.microsoft.com/learning/booksurvey.
Microsoft and the trademarks listed at http://www.microsoft.com/about/legal/en/us/IntellectualProperty/
Trademarks/EN-US.aspx are trademarks of the Microsoft group of companies. All other marks are property of
their respective owners.
The example companies, organizations, products, domain names, email addresses, logos, people, places, and
events depicted herein are ctitious. No association with any real company, organization, product, domain name,
email address, logo, person, place, or event is intended or should be inferred.
This book expresses the author’s views and opinions. The information contained in this book is provided without
any express, statutory, or implied warranties. Neither the authors, Microsoft Corporation, nor its resellers, or
distributors will be held liable for any damages caused or alleged to be caused either directly or indirectly by
this book.
Acquisitions and Developmental Editor: Rosemary Caperton
Editorial Production: Waypoint Press
Technical Reviewer: Mitch Tulloch; Technical Review services provided by Content Master, a member of
CM Group, Ltd.
Copyeditor:
Indexer: Christina Yeager
Cover: Twist Creative
Roger LeBlanc
.
Seattle
Page 4

To all users of technology who are willing to take a chance,
make a choice, and try a new way of doing things so that
we can nurture and enjoy a happy, healthy planet.
—K.M.
Page 5

Page 6

Contents
Introduction xvii
Part I Finding Your Place in the Cloud
Chapter 1 What’s Happening with the World of Work? 3
■
Teams, Teams Everywhere—In the Ofce and Outside of It 4
■
Worldwide Collaboration Is Here 5
■
Going for the Green—With Groups of All Sizes 6
■
Heads in the Cloud (Computing) 7
■
A Closer Look at Ofce 365 8
You Can Use What You’ve Got 9
Big-Time Security 9
Keep It Simple with the Ofce 365 Home Page 10
Stay in Touch with Outlook 11
Sync Your Team with Microsoft SharePoint 13
Real-Time Connection with Microsoft Lync 14
Work with Ofce Web Apps 16
■
What’s Next 16
Chapter 2 Getting Started with Ofce 365 17
■
Creating Your Ofce 365 Account 18
■
A Look Around the Ofce 365 Home Page 19
What do you think of this book? We want to hear from you!
Microsof t is interested in hearing your feedback so we can continually improve our
books and learning resources for you. To participate in a brief online survey, please visit:
microsoft.com/learning/booksurvey
v
Page 7

vi Contents
■
Setting Up a Prole 21
Changing Your Password 22
Changing Your Prole Picture 23
Setting Ofce 365 Preferences 24
■
How Does All This Work? 26
■
What’s Your Service? Different Setups, Different Services 27
■
Getting Ready to Use Ofce 365 28
Installing Microsoft Lync 28
Getting Ready to Use Ofce 2010 31
Setting Up Your Mobile Phone 35
■
How Ofce 365 Meets Small Business Needs 36
The Big Picture: Online and Off 37
Email, Calendars, Meetings, and More 37
Creating a Team Workspace 38
Sharing Documents with Your Team 39
Instant Messaging, Calls, and Web Meetings with
Microsoft Lync 40
Behind-the-Scenes Support: Security and Reliability 41
■
What’s Next 41
Chapter 3 Administering an Ofce 365 Account 43
■
Are You an Administrator? 43
■
An Overview of Your Administrative Tasks 45
■
First Things First: Key Tasks to Complete 46
■
Adding and Managing Ofce 365 Users 47
Adding Users 48
Changing Passwords 54
■
Viewing Domain Properties 55
Adding a Domain to Ofce 365 56
■
Setting Up and Managing Outlook and Exchange 57
Create a Distribution List 59
Page 8

Add External Contacts 60
Migrate Your Email 61
■
Setting Up SharePoint Online 62
Adding Users for SharePoint Online 62
Assigning User Permissions 64
■
Conguring Lync Online 67
Set External Communications 67
Modifying User Information 68
Setting Up Dial-in Conferencing 68
■
Managing Your Subscriptions 70
■
Getting Help with Ofce 365 71
Creating Service Requests 72
Checking System Status 74
■
What’s Next 76
Part II Teamwork in the Cloud
viiContents
Chapter 4 What Your Team Can Do with Ofce 365 79
■
Starting with the End in Mind 80
■
Creating a Shared Space 81
Displaying the Team Site 82
Working with Document Libraries 84
Creating a Space for Announcements 85
■
Sharing Calendars Securely 86
■
Translating Content on the Fly 88
■
Making Instant Contact with Team Members 89
■
Holding Online Meetings 90
■
Broadcasting Presentations Online 92
■
Creating and Modifying a Website 93
■
What’s Next 94
Page 9

viii Contents
Chapter 5 Creating Your Team Site with SharePoint Online 95
■
Planning Your Team Site 96
■
Creating a Simple Team Site—Fast 96
■
Putting Some Thought into the Team Site Design 97
■
Choosing a Site Theme 99
■
Changing the Text Layout of Your Page 101
■
Posting an Update 103
■
Adding and Formatting Pictures 105
Editing Your Picture 107
■
Adding a New Page 109
■
Entering and Editing Content 110
Formatting Your Text 110
Adding Text Styles 111
Applying Markup Styles 112
Coding for Language 112
■
Adding Web Parts 113
■
Sharing Your Site 115
■
What’s Next 116
Chapter 6 Posting, Sharing, and Managing Files 117
■
What Is a Document Library (and Where Is It)? 117
■
Creating a Document Library 119
Adding Documents 120
■
Organizing Document Libraries 122
Ordering Files in Your Document Library 123
Modifying the Current View 124
Adding a New Column to the Document Library 128
Creating a New View for Your Document Library 129
Switching Views 130
■
Working with Document Library Files 130
Adding a New Library Folder 132
Page 10

Starting a New Document 132
Viewing File Properties 133
Checking Out and Checking In Files 134
Setting Alerts 136
■
What’s Next 136
Chapter 7 Adding and Managing Workows 137
■
Introducing Ofce 365 Workows 137
■
Creating a New Workow 139
Setting Workow States 141
Specifying Task Details 142
Editing Your Workow 144
■
Using a Workow for Your Project 145
Checking Workow Status 145
Completing a Workow Task 146
Stopping a Workow 148
ixContents
■
Managing Workows 149
■
What’s Next 149
Chapter 8 Working with Ofce 2010 Web Apps 151
■
A First Look at Ofce Web Apps 152
Introducing Ofce Web Apps 153
How Ofce Web Apps Work 154
Web Apps on Your Phone 156
What You Can—and Can’t—Do with Ofce 365 156
■
Creating, Saving, and Closing a New File 157
■
Working with an Existing File 158
■
Choosing Your Tools 160
■
Levels of Editing in Ofce Web Apps 161
Viewing Your File in Ofce 365 161
Editing in Your Web Browser 162
Taking It to the Desktop 163
Page 11

x Contents
■
Co-authoring with Ofce Web Apps 165
Editing in the Browser 166
Another Way to Co-author in Ofce 365 167
■
Reviewing and Editing Excel Worksheets 168
■
Working with OneNote Notebooks 169
■
What’s Next 172
Chapter 9 Going Mobile with Ofce 365 173
■
How Will You Use Your Phone with Ofce 365? 174
■
Receiving and Sending Email on Your Phone 175
■
Using the Ofce Hub on Your Windows Phone 7 179
■
Last-Minute Word Editing on Your
Mobile Device 182
Editing a Word Document on Your Phone 183
Adding Comments 185
Formatting Text 187
Saving and Sending Your Edited Document 189
■
Reviewing and Updating Excel Data 190
Working with the Worksheet 191
Making Simple Editing Changes 192
Saving and Sending Worksheet Changes 194
■
Tweaking a PowerPoint Presentation on Your Phone 195
Mobile Editing for Your Presentation 196
Saving and Sending Your Presentation 198
■
What’s Next 199
Page 12

Part III Connecting in Real Time
Chapter 10 Email and Organize with Ofce 365 203
■
Introducing Outlook Web App 203
■
Checking and Managing Email 204
Checking, Reading, and Responding to Your Mail 205
Creating a New Message 206
Changing Mail Views 208
Choosing a New Theme 209
Managing Your Mail 210
Setting Mail Preferences 215
Creating a Meeting Request 216
■
Working with Your Calendar 218
Adding an Appointment 219
Changing Your Calendar View 220
Sharing Your Calendar 221
xiContents
■
Importing and Managing Your Contacts 224
Adding New Contacts 224
Importing Contacts 225
Searching for a Contact 226
■
Adding and Completing Tasks 227
■
What’s Next 228
Chapter 11 Talking It Over with Microsoft Lync 229
■
Introducing Microsoft Lync 230
Signing In to Lync 230
Getting Started with Lync 232
Entering a Personal Note 233
Setting Your Location 233
Setting Up Sound and Voice 234
Page 13

xii Contents
■
Working with Contacts in Lync 236
Creating a Contact Group 237
Accepting a Contact Request 239
Setting Privacy Levels for Contact Relationships 240
Tagging Contacts 241
Changing Contact Views 243
Working with Presence and Contact Cards 244
■
Instant Messaging with Your Team 245
■
Making a Call with Lync 248
Launching a Video Call 249
■
Sharing Programs and Files 250
Sharing Your Desktop 251
Sharing Programs 252
Using a Whiteboard 253
■
What’s Next 254
Chapter 12 Designing Your Public Website 255
■
Getting Started with Your Public Website 256
Making Simple Web Changes 256
Setting Up Your Site 258
Applying a Page Background 259
■
Choosing a Theme and Header Style 260
Changing the Site Header 261
Add a Logo to Your Site 262
■
Choosing a Custom Color Scheme 263
■
Adding and Formatting Text 264
Formatting Your Headings 265
Creating Lists 266
Adding Hyperlinks 267
Page 14

■
Inserting, Formatting, and Aligning Images 269
Formatting Your Picture 270
Setting the Alignment for Images 271
■
Adding and Organizing Pages 271
■
Selecting a Navigation Layout 273
■
Adding Gadgets to Your Site 275
■
Optimizing Your Site for Web Search Results 276
■
Previewing and Publishing Your Site 277
■
What’s Next 278
Chapter 13 Integrating All Parts of Ofce 365 279
■
Using It All Together—Online and Off 279
Checking a File Out of Your Document Library 280
Checking a File in After You’re Done Working on It 280
Saving Files to Your Computer 281
Saving Files to Your Document Library 282
xiiiContents
■
Getting Productive with Ofce 365 284
■
Creating an Annual Report 284
Thinking Through Your Content 284
Planning for Production 285
How Ofce 365 Helps Facilitate the Process 285
■
Tracking a Sales Promotion 287
Thinking Through Your Approach 288
Planning for Production 288
How Ofce 365 Can Help with Your Sales Promotion 288
■
Preparing an Online Training Module 290
Thinking Through Your Training 290
Planning for Production 290
How Ofce 365 Can Help with Your Online Training 291
■
Happily Ever After…in the Cloud 292
Page 15

xiv Contents
Appendix A Extras for Great Teams 293
■
Thinking Through Your Group Process 294
■
Team Contact List 294
■
Excel Worksheet with Licenses and Permissions 295
■
Meeting Agenda Template 295
■
Tips for Your Team Site 296
■
Proposal Checklist 297
■
Marketing Checklist 297
Index 299
What do you think of this book? We want to hear from you!
Microsof t is interested in hearing your feedback so we can continually improve our
books and learning resources for you. To participate in a brief online survey, please visit:
microsoft.com/learning/booksurvey
Page 16

About the Author
Katherine Murray has been writing articles and best-selling books about
Microsoft Ofce in all its avors since it was rst released. She’s taught
hundreds of thousands of Ofce users how to be productive (and creative)
in Microsoft Word 2010 Inside Out, Microsoft Ofce 2010 Plain & Simple, and
Microsoft Word 2010 Plain & Simple, as well as through her many articles on
CNET’s TechRepublic and in Windows Secrets. Katherine is also a member of
the Society of Environmental Journalists and writes frequently about earth
care topics. Her book, Green Home Computing for Dummies, was published by
Wiley in 2009.
Katherine’s blog and website, BlogOfce
since 2002. Her new Ofce 365 companion site, Connect & Collaborate,offers
an ongoing source of how-to’s, tips, and strategic case studies for Ofce
users and IT professionals who want to efciently and successfully work in the
Cloud. Katherine’s focus is on delivering essential techniques and insights to
help members of virtual teams who may be developing workow strategies
and managing projects, as well as those who are tasked with bringing those
projects—simple or complex—to completion.
Readers of this ebook, Microsoft® Ofce 365: Connect and Collaborate
Virtually Anywhere, Anytime, can sign up for Katherine’s free
monthly Ofce 365 newsletter “Connect & Collaborate” by clicking here,
and can receive Katherine’s Video Tip of the Month by clicking here.
, has inspired and educated Ofce users
Page 17

Page 18

Introduction
LE T ’ S HE AR IT for freedom. Freedom from your desk. Freedom from those boring
managers’ meetings. Freedom to work anywhere, with anyone, anytime, on almost
any device. Sounds good, right?
Ofce 365 is Microsoft’s smart and simple answer to cloud computing. Using
the various programs in Ofce 365, you can do all the tasks you’re used to
doing in your favorite Ofce applications—write documents, create presentations, check email, manage your calendar, crunch numbers, and more—and
then share what you create in real time on a team site, design and publish a
website, and even create and host live online meetings while you’re traveling
on the train, sitting in a coffee shop, or dialing in on your phone.
This book shows you how you can use cloud computing—and specically,
Ofce 365—to get more done, collaborate more easily, and work more
exibly than you ever have before. From the necessary how-tos about
creating and administering your Ofce 365 account and working with the
various Ofce 365 programs to sharing les with your team, creating a team
site, using Ofce Web Apps, and holding online meetings, you’ll discover how
easy it is to work online and off, accessing and sharing your les whenever
you need to. After you learn about each of the core programs, you can try
strategies for building successful teams, and get some good ideas on practical
ways you can put all this cloud power to work.
Who This Book Is For
Microsoft Ofce 365: Connect and Collaborate Virtually Anywhere, Anytime is
all about cloud solutions for small businesses, focusing on the core software
services (Microsoft Exchange Online, Microsoft SharePoint Online, Ofce Web
Apps, and Microsoft Lync), and demonstrating ways you can create, manage,
and lead teams effectively using the communications and collaborative online
tools.
You’ll nd helpful ideas and solutions in Ofce 365 if you
■
Own or work in a small business and want to be exible where and
when you work.
■
Need to collaborate with others near or far.
xvii
Page 19

xviii Introduction
■
Want to store and work with les online from any point you have web
access.
■
Lead a team online or face to face.
What Is Cloud Computing?
The phrase cloud computing brings to mind for me the feeling of stretching out on a hillside on a summer day while my sons pointed out the animals and shapes they saw in the clouds above. Cloud computing is a little
like that—the ability of your technology to take on the shape you need for
the type of project you need to accomplish. Want to put together a project
team? You can do that in the cloud so that team members all over the globe
can collaborate and communicate easily. Need to create a meeting space for
your regional sales reps? You can create a team site for everyone in the cloud,
using web servers and software, and you can enable every person to log in
from any point they have access to the web.
So where is this cloud? The real denition of the phrase cloud computing
simply means the ability to access les and applications online through
multiple devices—your computer, browser, or phone. Microsoft has already
been offering cloud services through the web in various ways:
■
Windows Live SkyDrive is one of the Windows Live Services, a free
web-based application that enables you to save, store, organize, and
share les easily.
■
Microsoft Ofce Web Apps are available for Word 2010, PowerPoint
2010, Excel 2010, and OneNote 2010, making it possible for you to
save and work with your Ofce les online and collaborate with other
authors. Ofce 2010 Web Apps are free to registered Ofce 2010 users.
■
Microsoft Ofce Live Small Business is a web-based suite of services
that enable you to create and market a website, communicate with
others by email and instant messaging, and store and share les online.
The basic services are free, and you can add specialty features for a
monthly fee.
■
Microsoft Business Productivity Online Suite (BPOS) is a suite of
messaging and communications programs designed to provide the
kind of collaboration support companies need. BPOS includes Microsoft
Exchange Online, Microsoft SharePoint Online, Microsoft Ofce
Communications Online, and Ofce Live Meeting, all for a monthly,
per-user fee.
Page 20

The best news about cloud computing for you as an end user is the added
exibility the services offer you, without additional investment in either
hardware or software. You can simply use your web browser—which is open
anyway, right?—to get to the les you need to work with, make any changes,
and save and share the les as you see t.
The great thing about cloud computing for companies is that it enables them
to expand the services they offer both staff and customers without adding
to their own hardware infrastructure. Web services enable companies to
connect workers and make collaboration possible on a global scale without
adding servers, setting up datacenters, and more. The environment is secure,
exible, and expandable to accommodate as many users as businesses need
to support.
Introducing Ofce 365
Microsoft Ofce 365 is Microsoft’s latest venture into cloud computing,
bringing together tried-and-true programs that make communicating and
collaboration natural online. Ofce 365 includes Microsoft Exchange Online
for email and scheduling, Microsoft SharePoint Online for sharing les and
creating team sites, and Microsoft Lync Online for instant messaging and
online meeting. Ofce 365 mixes the capabilities of those programs with
cloud versions of Ofce Professional Plus programs.
xixIntroduction
What Cloud Computing Means for You
Ofce 365 makes using Ofce in the cloud a simple, natural, and affordable
way to make the most of services you are already familiar with, in ways that
easily extend the technology you are probably already using. Sound too good
to be true? It’s not. Ofce 365 enables you to easily and naturally
■
Collaborate globally in real time.
■
Use programs you already know.
■
Create a virtual ofce where you can work with information securely
while you’re on the go.
■
Use your PC, browser, or phone interchangeably.
■
Keep your information secure.
■
Keep your hardware costs down.
■
Use multiple devices to access and work with les.
Page 21

xx Introduction
■
Create a shared team site.
■
Boost productivity by making it easy for people to work together.
■
Give users instant access to each other with presence technology and
instant messaging.
■
Incorporate social networking in your team communication.
Ofce 365 Versions
Because different types of organizations and businesses have different needs,
three different versions of Ofce 365 are available for end users. These three
versions are
■
Ofce 365 for small businesses Small businesses and profession-
als who don’t have large IT requirements will nd just the set of tools
they need in Ofce 365 for small businesses. This version is easy to try
(free for 30 days) and then low-cost ($6 per user per month at the time
of this book’s publication), and it offers businesses Ofce Web Apps,
Microsoft SharePoint Online, Microsoft Exchange Online, and Microsoft
Lync for instant messaging and online meetings.
■
Ofce 365 for enterprises Enterprises have larger-scale IT needs than
small businesses or individuals, requiring software that can handle a
large number of email accounts, messages, and attachments; provide
guaranteed uptime; offer reporting and support options; and deliver
Active Directory features that enable a single sign-in for end users.
Ofce 365 for enterprises offers all these features and adds on to
standard BPOS services to extend the collaboration and online meeting
capabilities. Ofce 365 for enterprises also offers exible plans so that
businesses of different sizes can tailor the features to get just the kind
of cloud support they need.
■
Ofce 365 for education Educational users face a unique set of
challenges—they need to provide students with access to the latest
software possible, but they have to do it on a shoestring (and perhaps
diminishing) budget. Cloud-based services can help users in education
save money and give students the tools they need to create projects,
collaborate in real time, and learn how to use software in the cloud.
Page 22
WHAT DOES OFFICE 365 ADD TO BPOS?
Microsoft Business Productivity Online Standard Suite, also known
as BPOS, has 40 million users all over the world. This highly success-
ful online software suite offers communication and collaboration
features that make it easy to connect in real time and work together
on projects large and small.
Ofce 365 for enterprises extends the features of BPOS by adding
Microsoft Lync for instant messaging and online meetings, Outlook
Web App for management of email and scheduling, Ofce Web Apps,
and the ability to create reports and administer the account through
a web-based dashboard. The educational version of Ofce 365 also
includes the latest version of Microsoft Live@Edu, which offers cloud
solutions to thousands of schools and millions of students around
the globe.
xxiIntroduction
A Quick Roadmap
Microsoft Ofce 365: Connect and Collaborate Virtually Anywhere, Anytime is
organized in three parts to help you learn about different aspects of setting
up and working with Ofce 365.
Part I, “Finding Your Place in the Cloud,” takes a look at the way people are
working in the cloud today and introduces you to Ofce 365. Chapter 1
looks closely at teams, both inside and outside the ofce environment, and
it takes a look at the way Ofce 365 offers a greener choice for small businesses. Chapter 2 shows you how to create an Ofce 365 account and set up a
prole, and it gives you a big-picture tour of Ofce 365 so that you can begin
planning just what you want to do with the tools. Chapter 3 is for the team
manager or person who will be managing the Ofce 365 site; you’ll learn how
to customize the site, add mobile devices, and set up and manage Microsoft
Exchange, Microsoft SharePoint, and Microsoft Lync online.
Part II, “Teamwork in the Cloud,” is your guide to setting up, organizing,
managing, and helping your team be successful using Ofce 365. Chapter 4
spotlights all the team features you can use to get everybody on the same
Page 23

xxii Introduction
page, calendar-wise; you’ll also nd out how to share les, hold online
meetings, instant message each other, and broadcast presentations. Chapter 5
walks you through creating, editing, and sharing a team site. Chapter 6 shows
you how to create document libraries, share les with team members, and
manage the les in SharePoint Online. You’ll also nd out about working with
le versions, tracking le changes, and comparing and merging les. Chapter
7 shows you how to create and use workows to keep your team moving in
the right direction, and Chapter 8 introduces all things Web App by shining
a light on the capabilities of the various tools and showing you how to work
with les online, coauthor documents, edit worksheets, broadcast presentations, and share notebooks. Chapter 9 rounds out this part of Ofce 365
by focusing on mobile technologies: nd out how to use the various Ofce
Mobile applications to review, edit, and share the les you develop with your
team.
Part III, “Connecting in Real Time,” shows you how to use the communication
and instant-messaging options in Ofce 365 to stay in touch with your team
in real time. In Chapter 10, “Email and Organize with Ofce 365,” you learn
how to use Outlook Web App to import and manage contacts, set email
preferences, organize mail folders, work with your calendars and tasks, and
more. Chapter 11, “Talking it Over with Microsoft Lync,” shows you how to
connect in real time to other online users through instant messaging, voice
calls, and online chats. You’ll learn how to manage transcripts, invite others
to the conversation, and host web meetings. Chapter 12, “Designing Your
Public Website,” shows you how to use the web tools in Ofce 365 to create
a website to showcase your products and services and give your customers a
sense of who you are and what you offer. Chapter 13, “Integrating Ofce 365,”
presents a set of examples that show how you and your team can use the
various tools in Ofce 365 together to create and share business projects.
Let’s Get Started
Now that you have a general sense of the road ahead, let’s get started using
Ofce 365. In Chapter 1, you learn how small businesses are using cloud computing to accomplish business-critical tasks in a exible way. You’ll then get to
dream a little about the cloud shapes you want your Ofce 365 to take as you
begin using this powerful suite of cloud-powered tools.
Page 24

Acknowledgments
One of the best things about writing books is working with the talented team
that makes it all come to life. Big thanks go out to the team that made it
possible for you to be holding this book in your hands today:
Thanks to my editor, Rosemary Caperton, who managed this project with
expert care, championing it from the very start and helping to improve and
further the idea, while dissolving obstacles, nding a path to the resources
we needed, and troubleshooting problems as they arose. (I’d add “She’s able
to leap tall buildings in a single bound,” Rosemary, but I think someone has
already used that.) This book truly
To Steve Sagman at Waypoint Press, Roger LeBlanc, and Mitch Tulloch for
their many talents, expressed though their wonderful design and layout
(Steve), always excellent editing (Roger), and a careful, conscientious, and
constructive technical edit (Mitch).
To Michael Stroh, author of Microsoft Windows Phone 7 Plain & Simple, who
generously contributed some of the illustrations in Chapter 9, and to Kenyon
Brown, Senior Editor at O’Reilly Media (Microsoft Press Division) for his help in
getting us needed resources at a critical hour.
would not be here without her.
xxiiiIntroduction
And to Brent Watanabe, Windows Phone 7 Developer, for his suggestions and
friendly help as we gured out how to capture live Ofce 365 mobile images
to share in the book.
Thanks to one and all! Your efforts and care are very much a part of this book!
Errata and Book Support
The following sections provide information on errata, book support, feedback,
and contact information.
Errata
We’ve made every effort to ensure the accuracy of this book and its
companion content. Any errors that have been reported since this book was
published are listed on our Microsoft Press site at oreilly.com:
http://go.microsoft.com/FWLink/?Linkid= 221811
Page 25

xxiv Introduction
If you nd an error that is not already listed, you can report it to us through
the same page.
If you need additional support, please email Microsoft Press Book Support at
mspinput@microsoft.com.
Please note that product support for Microsoft software is not offered
through the addresses above.
We Want to Hear from You
At Microsoft Press, your satisfaction is our top priority, and your feedback is
our most valuable asset. Please tell us what you think of this book at:
http://www.microsoft.com/learning/booksurvey
The survey is short, and we read every one of your comments and ideas.
Thanks in advance for your input!
Stay in Touch
Let us keep the conversation going! We are on Twitter:
http://twitter.com/MicrosoftPress
Page 26

Finding Your
1
Place in the Cloud
WHETHER YOU’RE just learning about cloud computing for the rst
time or you’ve been saving and sharing les online for a long time, it’s
plain to see that having an online component is a smart way to make
sure your les are always available where and when you need them.
This part of the book starts out by giving you a glimpse at how the work
world is changing—setting the stage for cloud computing—and then
you discover how to create an Ofce 365 account and set up the roles
and permissions you need to get started.
Page 27

Page 28

CHAPTER 1
What’s Happening
with the World of
Work?
IN THIS CHAPTER:
■
Teams,teamseverywhere—in
theofceandoutsideofit
■
Worldwidecollaborationishere
■
Goingforthegreen—with
groupsofallsizes
■
Headsinthecloud(computing)
■
AcloserlookatOfce365
IT’S N O S E C R E T that computers, the web, and social media have all
dramatically changed the way we work. What we used to compose on
typewriters (remember those?) or le away in clangy, metal ling cabinets,
we now take care of completely electronically with just a few keystrokes
and a click of the mouse button.
What you used to do by writing, printing, folding, putting in
an envelope, stamping and mailing, you can now do by simply
composing and clicking Send—and the message reaches the other
person almost instantly.
Although you used to spend hours camped around a big boardroom table, doodling on your legal pad while someone presented
a workshop that wasn’t entirely relevant to your job, today you can
log in to a webcast to catch the bits of a presentation that directly
impact what you need to do today. And you can form teams on the
y to accomplish specic project goals and then disband the team
to go back to your regular tasks.
Technology now enables us to work faster, more productively,
and with more exibly than ever. You can easily pull together the
resources you need for as long as you need them and then let
them go when you’re done. This is a smarter use of resources—and
greener, too—and it results in less overhead for your business. You
don’t need to add computer systems or people to work on specic
project tasks that require some extra help. You can simply go to
the cloud.
3
Page 29

4 Chapter 1 What’s Happening with the World of Work?
Teams, Teams Everywhere—In the Ofce
and Outside of It
We seem to be in a perfect storm of technology and workforce development, where
several important aspects of the way we work are coming together. Since the early ‘60s,
the use of work teams has been on the rise. Fortune 500 companies are full of them.
Most mid-sized businesses have realized that work teams can boost productivity, help
managers manage, and give groups more ownership of the work they perform.
Teams enable individual workers to get together in the name of a common goal—
producing the annual report, for example—and bring their own respective talents
to the mix. Your work team for the annual report might include a writer, an editor, a
graphic designer, a production and layout person, a corporate communications person,
and someone who can provide the nancial detail. And here’s the good news—data is
showing that working in cohesive teams boosts creativity and productivity, and people
seem to be happier at work when they’re part of a successful team. That’s all good.
But add another new development to the mix. Now workers are often on the road,
traveling from region to region, stationed overseas, or perhaps remotely accessing a
corporate network from another continent. The development of new hardware options—
more powerful and affordable laptops, netbooks, and smartphones, as well as improved
video conferencing tools—make this easier than ever to do. In this global and mobile
workforce, how will your team meet its goals? Will the editor know when the writer has
nished the draft? What happens to the deadlines?
The simultaneous development of the pervasive and always-on web and the explosion
in social media technologies has made it easier to stay in touch with all members of your
team wherever they travel and whenever they appear. From any point of web access on
the globe, your teammates can communicate with you. Nice. Working virtually has even
bigger benets as well—when a team works successfully from remote locations, there’s
a reduced need for centralized ofce space, which means lease costs for your company
go down. And that daily one-hour commute into the ofce? Gone, if you’re working from
home. That saves fuel and reduces the carbon your car is pumping into the atmosphere.
Those are just a couple of the large-scale benets that, multiplied exponentially across
the planet, make the world a whole lot greener.
But this brings us back to a critical question. In this exible time of go-anywhere,
do-anything work styles, how do you stay focused on your team objectives and complete
Page 30

Chapter 1 5
Worldwide Collaboration Is Here
your original assignment? How do you organize the work, build libraries of les you all
need, meet together in the same space and time, and keep track of all the pieces of the
project? Facebook isn’t going to help you with that. And your email client—even if it’s
Microsoft Outlook 2010—is limited as far as group space goes.
That’s where Microsoft Ofce 365 comes in. Now you have a shared team space, always
available online, where you can build document libraries, share assets, assign tasks, and
collaborate on all kinds of Ofce projects. Ofce 365 builds on four key technologies—
Microsoft Exchange, Microsoft Lync, Microsoft SharePoint, and Ofce Web Apps—to give
you all the tools and abilities you need as a team to be successful, no matter when or
where you work.
Worldwide Collaboration Is Here
Teams form for all sorts of reasons and have all sorts of goals. Some teams are developed
to meet a specic project objective—for example, putting together an annual report.
There are also leadership teams, program teams, departmental teams, and formal and
informal teams. Pretty much anything you want to create—short-term or long-term, with
a few other people—can be done better in a team. (OK, that’s an editorial opinion—but
experience proves it.)
If your team involves one or more people who seem to be always on the go, you need
■
A way to make les accessible to the remote worker
■
A means of assigning and sharing tasks, appointments, notes, and more
■
An online meeting space groups can call in to or use to gather together
■
A shared site that can be accessed by multiple technologies—laptops, smart-
phones, et al.
■
Translation tools, if your team member’s primary language is different from your
own or you are working on multilingual documents
If you can create a team space that provides all these types of tools, your global team
can log in, share their information, get feedback, and contribute to the project in a way
that makes global access a moot point. They could just as well be logging in from the
coffee shop on the corner!
Page 31
6 Chapter 1 What’s Happening with the World of Work?
THE SOFTER SIDE OF GLOBAL TEAMS
Throughout this book, you’ll get many ideas about ways to create and manage teams
successfully. But here’s something to consider if you’re working with global teams:
different cultures have different expectations about relationships and communication,
so if your new team member is from an Asian country, trust might build more slowly—
and you might need to lay more groundwork—than when you begin to work with a
new teammate from Canada.
In “Tips for Working in Global Teams” (which you can nd at www.ieee.org), author
Melanie Doulton describes “high-context” and “low-context” countries. In high-context
cultures—Indian, Arab, Asian, or Latin—relationships with family and colleagues is
paramount, the entire relationship provides the context for communication, proto-
col is valued and followed, and decisions are made slowly and are often based on
relationships.
In low-context cultures such as North American, Germanic, and Scandinavian cultures,
communication is based less on relationships and more on facts. In other words, the
message carries the meaning, whereas in higher context cultures, the relationship sets
the stage for the way the message is received.
For this reason, be aware that when you’re working with team members from different
cultures, they might hear what you’re saying differently than you think. Take time to
build trust and establish relationships with your global team members and, when in
doubt, check it out.
Going for the Green—With Groups of All Sizes
One of the best aspects of cloud computing is the way it uses—and conserves—
resources. Instead of using millions of computers on desktops that are tied into hundreds
of thousands of servers that are purchased, maintained, and repaired by thousands of
individual companies, cloud computing offers a scalable alternative.
Because applications used in cloud computing are web-based, the number of servers
used increases as more are needed to support the demand. The additional servers then
return to rest when they’re no longer needed. This share-the-load approach, on a large
scale, saves electricity, reduces the need for hardware components, and increases the
efcient use of the resources used to provide the services.
Page 32

Chapter 1 7
Heads in the Cloud (Computing)
As part of a green strategy, companies can choose to use cloud computing to
■
Downsize or offset their ofce space
■
Expand their ability to work globally
■
Support a mobile workforce
■
Reduce use of consumable ofce supplies (paper, ink, le storage)
■
Reduce computer hardware (desktop computers and server systems)
Heads in the Cloud (Computing)
So what are companies doing in the cloud today? IBM commissioned a survey in
July 2009 (“Dispelling the vapor around cloud computing,” which you can nd at
www.ibm.com) to check the pulse of cloud adoption, and they found that many groups
are considering cloud computing in various forms. The survey included respondents who
work in communications, nancial services, the industrial sector, and public services. The
following table shows the distribution of respondents by country.
TABLE 1-1 IBM Sur vey Participants by Country
Country Percentage
Canada 5
China 10
France 10
Germany 10
India 15
Japan 11
UK 9
USA 30
Many companies are already using or are open to using private cloud computing for the
following functions:
■
Business continuity and disaster recovery
■
Data mining
■
Data warehouses
Page 33

8 Chapter 1 What’s Happening with the World of Work?
■
Long-term data archiving
■
Security
■
Testing environment infrastructure
A smaller percentage of companies have adopted a public cloud approach, which
includes the following capabilities:
■
Audio/video/web conferencing
■
Data center network capacity
■
Desktop
■
File storage
■
Server
■
Service help desk
■
Test environment infrastructure
■
Training and demonstration
■
Voice over Internet (VoIP) infrastructure
■
Wide area network (WAN) capacity
Ofce 365 enables you to create a cloud computing approach that offers just what
your business needs require. The four main technologies—Exchange, SharePoint, Ofce
Web Apps, and Lync—enable you to stay in touch by email and scheduling, create a
shared team site (for both intranets and the Internet), collaborate on all sorts of projects
using familiar Ofce applications, and stay in touch with instant messaging and video
conferencing. The next section gives you a bird’s-eye view of the features in Ofce 365.
A Closer Look at Ofce 365
Ofce 365 makes it easy for you to work with the applications and programs you’re
familiar with in the easy-access, always-on world of the web. You can use Ofce 365 to
■
Create a shared team site where you create data libraries, assign tasks, schedule
calendars, and more
Page 34

Chapter 1 9
■
Check everyone’s availability, and schedule online meetings
■
Connect instantly by instant messaging, email, or video calls
■
Keep your les and user accounts secure and keep email safe from spam and
A Closer Look at Ofce 365
scams
■
Create documents, worksheets, presentations, and notebooks, and share them
seamlessly
■
Always work with current updates of Ofce 365 software
■
Create blogs and wikis for your team and for public view
You Can Use What You’ve Got
One of the big features of Ofce 365 is the software’s ability to work with whatever
device you’re using at the moment—your desktop PC or Mac, laptop or netbook,
Android phone, iPhone, Windows Phone, Nokia, or BlackBerry.
You can log in to your Ofce 365 account, work on les, share documents, update tasks,
post to your discussion forum, join a meeting, send instant messages, and more—from
wherever you are at the moment, with whatever device you’ve got. Sweet!
Big-Time Security
Ofce 365 invests in state-of-the-art security, reliability, and recovery technology to
ensure that your les and messages are secure, your data is safe, and you are always able
to access and work with your information. Ofce 365 offers
■
A guaranteed 99.9% uptime Service Level Agreement
■
Data centers with SAS 70 and ISO 27001 certication
■
Geo-redundant, enterprise-grade reliability and disaster recovery
■
Multiple data centers and automatic failovers to ensure your data is safeguarded
■
Up-to-date antivirus and anti-spam protection
Page 35

10 Chapter 1 What’s Happening with the World of Work?
THE IMPORTANCE OF UPTIME
One of Ofce 365’s big promises—and something its users depend on—is the
guaranteed 99.9 percent uptime promise. This means that your team site, your les,
your public website, and all the tools you need will be accessible online 99.9 percent of
the time. This might sound like marketing lingo, but it’s an important promise for teams
and companies that run the majority of their business processes in the cloud.
Nowhere was this need more evident than in a recent cloud outage suffered by
Amazon’s cloud services. In April 2011, a simple error in one availability zone started a
domino-like effect that affected other areas, which resulted in a “re-mirroring storm”
that overwhelmed cloud capacity temporarily. This affected a number of sites—for
example, FourSquare, HootSuite, Quora, and Reddit—and caused a temporary outage.
Microsoft is providing a nancially backed service level agreement (SLA) for Ofce 365
users and has designed Ofce 365 as a comprehensive geo-redundant service so that
data is replicated between geographically distant sites. This means if one site experi-
ences a failure, other sites around the world can continue the processing so that Ofce
365 users won’t experience any loss of services.
Keep It Simple with the Ofce 365 Home Page
When you rst log in to Ofce 365, you see a simple and clear home page that shows
you how to get started with the tools you want to use. The various tools you’ll use in
Ofce 365 are all available on that rst page, making it easy for you to nd your way
around and get to the tools you need. This clean screen design also makes it easy for you
to navigate, regardless of whether you’re viewing the site on your PC, in your browser, or
on your smartphone.
As you can see in Figure 1-1, the navigation bar at the top of the window gives you easy
access to the primary views in Ofce 365. You can get back to your Home page from any
of the other pages; you can click Outlook to work with mail, schedules, and tasks; or you
can click Team Site to display your SharePoint team site. If you are the administrator of
the Ofce 365 account, you can also click Admin on the Home page to access another
screen where you can set up the various programs the way you want them, add and
manage users, and set up the domains you want to use.
Page 36

Chapter 1 11
A Closer Look at Ofce 365
Note What’s an administrator? A person with administrator privileges in Ofce
365 is able to create new accounts, set up users, congure the services
they’ll use (for example, Microsoft Exchange, Microsoft Lync, or Microsoft
SharePoint), set permissions, and get updates to the software. If you have
administrator privileges, check out Chapter 3, “Administering an Ofce
365 Account.”
Choose other Office 365 views. Get help with Office 365.
FIGURE 1-1 The Office 365 Home page makes it easy to begin setting up your space in the clouds.
Stay in Touch with Outlook
When you click Outlook at the top of the Ofce 365 window, you are taken to the
Outlook view, where you can check email, compose new messages, organize your mail,
add appointments to your calendar, create notes, and add tasks. (See Figure 1-2.) If
you’ve used Outlook Web App in the past, Outlook in Ofce 365 will look very familiar
to you.
Page 37

12 Chapter 1 What’s Happening with the World of Work?
FIGURE 1-2 The Outlook view, which includes tools for organizing email and contacting colleagues
and friends.
The folder view on the left side of the screen is where you manage and le away all the
mail you receive. You can create new folders and subfolders as needed, just like you do in
your desktop version of Outlook. Click Mail, Calendar, Contacts, or Tasks in the lower left
corner of the screen to choose the view you want to use to add, modify, review, or delete
those different types of information. The center column of the Outlook window shows
you the contents of the folder you’ve selected (in this case, the Inbox folder). In the far
right panel, you see the contents of the currently selected message. This type of display enables you to scan your email quickly without opening and paging through each
message, saving you time and trouble as you move quickly through your mail.
Also in the Outlook view, you can use the presence icon of a contact (located to the
left of that person’s name) to see his or her online availability. If the icon is green, your
contact is available online. When you click the icon, a list of contact options appears,
giving you a range of choices for contacting the person. You can send an email message,
schedule a meeting, invite the person to chat, and more. (See Figure 1-3.)
Page 38

Chapter 1 13
Click the presence icon for direct contact options.
FIGURE 1-3 You can click the presence icon to display options for contacting someone online.
A Closer Look at Ofce 365
Sync Your Team with Microsoft SharePoint
If you’re organizing and managing a team effort, chances are you’ll spend lots of time in
SharePoint. SharePoint makes it easy for you to create both a team site—where you can
communicate with team members, create document libraries, and more—and a public
website, for the information you want to show the world.
When you click Team Site at the top of the Ofce 365 window, your SharePoint site
appears, looking similar to the one shown in Figure 1-4. Here you can design your team
site, adding content and images and choosing a theme.
FIGURE 1-4 Clicking Team Site displays the SharePoint site your group can use as a common workspace.
Page 39

14 Chapter 1 What’s Happening with the World of Work?
You can click the Edit tool to the left of the Browse tab to display the editing tools for the
SharePoint site. The Ribbon changes to display the Editing Tools tab, which enables you
to format the text on your page and insert new page elements such as pictures, videos,
tables, and more. (See Figure 1-5.)
FIGURE 1-5 To edit and format your SharePoint pages, you’ll find what you need on the Editing Tools
Format tab.
You can click Site Actions on the left side of the Ribbon to display a list of ways you
can modify and interact with your SharePoint site. You’ll learn all about customizing,
formatting, and sharing your site in Chapter 5, “Creating Your Team Site with SharePoint
Online.”
Real-Time Connection with Microsoft Lync
So we’ve talked about using Outlook to handle your email and scheduling needs and
using the SharePoint team site to keep everybody on the same page—what about those
times you need to communicate in real time, using instant messaging or online meetings? Enter Microsoft Lync 2010. Microsoft Lync is an exciting addition to this suite of
online services, enabling you to keep in touch with all your contacts and make calls, set
up meetings, and send ideas and messages on the y.
Page 40

Chapter 1 15
A Closer Look at Ofce 365
Note When you rst log in to Ofce 365, you might need to download
Microsoft Lync by clicking the Install Microsoft Lync link on the control
panel page. The process is pretty painless. You’ll nd the steps in
Chapter 2, “Getting Started with Microsoft Lync.”
The Microsoft Lync window resembles Windows Live Messenger, but you’ll nd that it
includes a different set of tools. (See Figure 1-6.) Adding new contacts is something done
by the administrator so that everyone on the team is using the same address book. (As
an administrator, however, you can change that setting so that individuals can add the
contacts they’d like to include.) You can call a contact by clicking the Call button to the
right of the contact name and choosing the command you want from the displayed list.
FIGURE 1-6 Microsoft Lync includes the tools you need to make instant calls and set up online meetings.
With Microsoft Lync, you can make instant contact with others, make Internet calls,
share audio and video, and host online meetings. You’ll nd out how to use the various
features in Microsoft Lync in Chapter 11, “Talking It Over with Microsoft Lync.”
Page 41

16 Chapter 1 What’s Happening with the World of Work?
Work with Ofce Web Apps
Ofce Web Apps make it super simple for you to save your Ofce 2010 les online, where
you can easily access them from your PC, browser, or phone. If you plan to download,
deploy, and license Ofce 2010 Professional Plus with the pay-as-you-go option, you
can use the Install Your Ofce 2010 Professional Plus subscription link on the Home page
to download the software and sync it with Ofce 365.
This subscription solution is a great way to ensure that you have the latest updates on
the Ofce 2010 software you use. Additionally, you don’t need to have a big IT team to
handle the deployment for you, and you can get help 24 hours a day, 7 days a week and
even make tech support calls as part of the deal. What’s more, you can use the Ofce
2010 applications on your desktop, in your browser, or via your smartphone; save them
to your SharePoint libraries; or share them with others on your team through email, by
instant message, or in a meeting.
What’s Next
This chapter explored the ways our work world is changing and showed that the time is
ripe for cloud computing. Whether you plan to use the cloud yourself—to trade les and
access documents from home, from work, and on the road—or you need to create, manage, and lead a team, this chapter gave you a sense of the big picture in Ofce 365. The
next chapter shows you how to create an Ofce 365 account and set up a prole, and it
shows you how easy it is to accomplish specic business tasks in Ofce 365 so that you
can begin planning just what you want to do with the tools.
Page 42

CHAPTER 2
Getting Started with
Ofce 365
IN THIS CHAPTER:
■
CreatingYourOfce365Account
■
ALookAroundtheOfce365
HomePage
■
SettingUpaProle
■
HowDoesAllThisWork?
■
What’sYourService?Different
Setups,DifferentServices
■
GettingReadytoUseOfce365
■
HowOfce365MeetsSmall
BusinessNeeds
BY N O W, YO U ’RE an old pro at creating a new account and setting
up an online prole, right? You create accounts all the time and are
very familiar with the process of posting your information—just what
you want others to see—in the public prole portions of your accounts.
In this way, Ofce 365 is similar to other sites that want to get you up
and running as smoothly as possible. You’ll set up some of the basics of
your account—user name, password, type of account, and so forth—and
then begin building on those basics to create the kind of online cloud
experience you want to have and share with others.
Businesses of all sizes—with teams of all congurations, working
from all locations—will nd that Ofce 365 makes connecting,
sharing information, and collaborating on projects easy and
intuitive. Because you already know the programs—all the Ofce
2010 favorites—you won’t have a big learning curve. And with its
99.9 percent uptime guarantee, Microsoft promises the site will be
working round the clock—whether or not you have the IT staff to
support it.
So, whether you nd this exciting or not, it all begins here.
Fortunately for you, Microsoft makes the whole process pretty
painless. This chapter shows you how to create your account, set up
your prole, and envision the services you want to make available
for your team in Ofce 365.
17
Page 43

18 Chapter 2 Getting Started with Of ce 365
Creating Your Ofce 365 Account
The rst step in accessing the wonders behind the Ofce 365 curtain involves creating
your own account. Begin by going to www.ofce365.com to sign up. The rst question
Ofce 365 will ask you is to decide whether you want to use the Small Business version
or the Enterprise version of Ofce 365. This book focuses on the features you’ll nd in
the Small Business version, which gives you everything you need for creating a team site,
sharing documents, working with email and instant messaging, hosting online meetings,
and more. The Enterprise version is designed for larger organizations that have sophisticated data needs and require advanced archiving and Active Directory capabilities.
After you choose Small Business, Ofce 365 presents you with a simple form to ll out.
You provide your name and Windows Live ID (and you can sign up for one during this
process if you don’t already have one), and then you pass muster by typing the validation
key and clicking OK. When you click Continue, Ofce 365 lets you know that it will send
your new user name and password to the email address you specied. The Ofce 365
home page then appears, and one by one the various services that are part of Ofce 365
begin to load. (See Figure 2-1.)
FIGURE 2-1 After you sign up for Office 365, the program begins to load your software services.
Tip You’ll see the note, “This may take a few minutes…” only the rst time
you access Ofce 365. After the services are added to your account, you
won’t have this kind of wait time again.
Page 44
Chapter 2 19
Creating Your Ofce 365 Account
WHAT’S A MICROSOFT ONLINE SERVICES ID, ANYWAY?
When you rst visit www.Ofce365.com, you might think the site is asking for
your Windows Live ID. However, if you try to sign in using that tried-and-true
user name and password, you’ll get a rather unfriendly message: You are now
required to sign in at Live.com or You are now required to sign in at MSN. What
does that mean, and how does it get you into Ofce 365?
The answer to the mystery is that your Microsoft Online Services ID and your
Windows Live ID are two different things. To keep Ofce 365 secure (and paid
for), site security is enforced by admitting only licensed users into the site.
This means that the administrator of your Ofce 365 site needs to generate
your Microsoft Online Services ID and password, and that’s done through the
Microsoft Online Ofce Subscription website. If you don’t have a Microsoft
Online Services ID, contact your administrator to get your ID and password so
that you can get into your group’s Ofce 365 site.
You’ll notice also that whatever name you select, Microsoft adds “onmicrosoft.com” to
the name you’ve chosen for your Ofce 365 account. You’ll also nd that the URL for the
public-facing website that is part of your account has “sharepoint.com” appended to it.
These name additions won’t cause you any problem, but make a note of them so that
you remember how to get into your team site and nd your website easily later.
A Look Around the Ofce 365 Home Page
After you enter the necessary Microsoft Online Services ID (or create a new account),
you are presented with the Ofce 365 Home page. The Ofce 365 Home page has a
minimalist design, offering you primary site choices across the top (Home, Outlook, and
Team Site—plus Administrator if you’re, well, the administrator). As Figure 2-2 shows, on
the left side of the screen, you see categories that introduce you to the overall process
and then to each of the primary Ofce 365 services:
■
Start here walks new users through the simple tasks involved in setting up Ofce
365 for everyday use. New users learn how to set up their computers, and learn
about the basics of Ofce 365. Users who will serve as administrators for the site
can go to the Admin page and add new users to the account.
■
Outlook is short for Outlook Web App, the familiar web version of Ofce 2010.
You can use Outlook to check and send email, schedule appointments and tasks,
and set up email and calendar options.
Page 45

20 Chapter 2 Getting Started with Of ce 365
■
Lync contains the settings you congure to send instant messages, set up online
meetings, and share audio and video clips with others on your team using
Microsoft Lync.
■
Team site contains all the options you need to create a team site with Microsoft
SharePoint. You can access your team site, view documents you’re sharing
with others, or create a new Word document, Excel worksheet, PowerPoint
presentation, or OneNote notebook.
Note Clicking each one of the Ofce 365 icons launches a different Ofce Web
App—Word, Excel, PowerPoint, or OneNote—and opens a new docu-
ment. (You’ll learn more about working with Ofce 365 Web Apps in
Chapter 8, “Working with Ofce 2010 Web Apps.”)
■
Website lists the link to your public website, which you can easily modify with the
content, pages, and pictures you want the public to see.
FIGURE 2-2 The Office 365 Home page gives you the links you need to access your mail and manage
your calendar, connect with your team in real time, and work on your Office documents.
Page 46

Chapter 2 21
A Look Around the Ofce 365 Home Page
CHECKING OUT YOUR RESOURCES
On the right side of the Ofce 365 home page, you’ll see the Resources column,
which includes links to more information that can help you get started using
Ofce 365. At the top of the column, you see a search box, which you can use to
locate help content on any topic related to Ofce 365. Just click in the box, type
a word or phrase that describes the type of information you’d like to nd, and
click Search. A pop-up window gives you a list of search results with links to the
information you’re looking for. You can return to Ofce 365 by simply clicking
the close box.
Back on the Ofce 365 Home page, the top article in the Resources area shows
you how to import your contacts to your Outlook Web App address book. You
can also nd out how to set up your smartphone to receive your Ofce 365
mail (which you’ll learn more about later in this chapter), and you can click the
Downloads link to install additional Ofce 365 services.
At the bottom of the Resources column, you’ll see a set of Community links that
display ways you can interact with other Ofce 365 users. You can ask a ques-
tion in one of the Ofce 365 forums, read the Ofce 365 blog, or add your own
thoughts and content to the forum, wiki, or other community efforts.
Setting Up a Prole
Your rst task, after you create your Ofce 365 account, is to tell the program a little
about your preferences and interests. Your prole—similar to ones you’ve probably
created on social media sites—lists the basics about who you are, where you live, and
what language you use. There’s nothing fancy or too involved here, as you can see from
Figure 2-3. Note, however, that the basic info about you—your name and address, for
example—aren’t editable in the prole screen. That’s because the Administrator of your
account is the one responsible for making changes to user accounts. You learn how to set
up and edit user account info in Chapter 3, “Administering an Ofce 365 Account.”
Page 47

22 Chapter 2 Getting Started with Of ce 365
FIGURE 2-3 Configuring your profile.
Changing Your Password
If your Ofce 365 account was created for you—which means that instead of you signing
up for the service and entering the password you want to use to access your account, an
administrator did this for you—you will have received an autogenerated password that
you’ll most likely want to change when you log in to Ofce 365. Here’s how to do that:
1. Click My Prole.
2. Click Change Password.
3. If prompted, sign in again using your user name and password; then click Close.
4. In the Change Password window, type your old password. (See Figure 2-4.)
5. Click in the Create New Password box, and type a new password for your account.
6. Type the new password a second time.
7. Click Submit.
Page 48

Chapter 2 23
FIGURE 2-4 You can change your password in your profile page.
Setting Up a Prole
WHAT MAKES A GOOD PASSWORD?
Your password for Ofce 365 needs to be at least eight characters in length.
To increase the strength of the password—which decreases the risk that your
password will be deciphered by someone else—use a variety of uppercase and
lowercase letters, numbers, and special characters.
The Password Strength bar shows you how strong the password you’re
suggesting will be; you can revise the password as needed to make it as strong
as possible.
Changing Your Prole Picture
Ofce 365 also gives you the option of adding your own photo to your prole so that
others will be able to see your image—or your favorite character, animal, or place—in
various places on Ofce 365. To change the prole picture, follow these steps:
1. On your prole page, click Change Photo. (See Figure 2-5.)
2. Click Browse, and navigate to the folder containing the picture you’d like to use.
3. Click the picture, and click Open.
4. Click Upload. (See Figure 2-6.)
Page 49

24 Chapter 2 Getting Started with Of ce 365
FIGURE 2-5 Click Change Photo to begin the process of changing your profile picture.
FIGURE 2-6 Click Browse, and navigate to the folder containing the picture you want to use.
The new photo appears in your prole photo. You can change the photo at any point by
repeating steps 1 through 4 and choosing a new photo.
Setting Ofce 365 Preferences
You can also change some of your preferences by scrolling to the bottom portion of the
screen, where the items you can change are located. (See Figure 2-7.) You can change the
language in which Ofce 365 is displayed, enter your phone numbers, update your email
address, and sign up to receive more information on various topics related to Ofce 365.
If you want to change the display language, click the Language arrow and choose the
language you want to use. In Contact Preferences, enter your Preferred Phone and
Preferred Mobile Phone numbers if you like. You can also change your Preferred Email by
clicking in the box and typing a new email address.
In the Contact Me About area, you can indicate which (if any) of the topics interest you
enough that you’d like to receive more information about the products and services
listed. To remove yourself from any of the topics, click to clear the checkmarks or click
the Clear All link at the bottom of the list.
Page 50

Chapter 2 25
Setting Up a Prole
To save all the changes on your prole, click the Save button at the bottom of the page.
You can then return to the ofce 365 Home page by clicking Home at the top of the Ofce 365 window.
FIGURE 2-7 Save your profile changes by clicking Save at the bottom of the profile page.
Tip How Do I Change Everything Else? Because Ofce 365 is set up so
that the Administrator of your site sets up and manages user accounts,
some of the prole information is beyond your ability to change. If you’re
also an Admin of the site, you can log in as an Administrator, click Users,
choose the account you want to change, and click Settings. There you’ll
be able to change some of the basic user information, such as location,
address, and more.
Page 51

26 Chapter 2 Getting Started with Of ce 365
How Does All This Work?
Getting your mind around all this cloud possibility—especially when a number of
congurations are available—might feel like a lot to try to imagine all at once. Cloud
services are called that because the software and data centers appear when you need
them and vaporize when you don’t, like clouds—in other words, the resources you need
to use applications, store data, and enable teams to connect are there when you need
them and used elsewhere when you don’t.
This enables businesses of all sizes to get access to the programs and services they
need through a web-based service model. And it means that small businesses—who
have the need for reliable technology but might not have a robust IT staff to support
it—can benet by having guaranteed access to technology that is hosted, supported,
and deployed from the service provider (in this case, Microsoft Online Services). And the
icing on the cake is that the cloud approach is better for the environment because data
centers share resources and services, which also reduces the systems and servers your
own company needs to have to support the work you do.
When you think of all the different services required to keep your business or team
running efciently and effectively and put them in a cloud, the whole conguration
might look something like this simplied diagram:
Online meetings
Shared documents
Guaranteed up-time
Data storage
Collaboration
Email management
Security
Team sites
Real-time communication
Page 52

Chapter 2 27
What’s Your Service? Different Setups, Different Services
What’s Your Service? Different Setups, Different
Services
Ofce 365 is available in three different versions that are designed to give you just what
you need—no more, and no less. Here’s the quick rundown:
■
Ofce 365 for Small Business (which is the focus of this book) includes access to
Ofce Web Apps, up to 50 user accounts, a 25-GB mailbox for each user, mobile
support, the ability to stay in touch with instant messaging, presence technology,
audio and video, and team sites with SharePoint Online. The subscription cost for
Ofce 365 for Small Business is $6 per user.
■
Ofce 365 Enterprise includes all the features of Small Business as well as the
full Ofce Professional Desktop software and pay-as-you-go pricing options.
Enterprise users can also add kiosk plans that offer access to email, documents,
and team sites in Ofce 365. Enterprise users can choose from two different subscriptions: existing Business Productivity Online Suite (BPOS) customers
pay $10 per month; enterprise users who want to purchase the pay-as-you-go
Microsoft Ofce Professional Plus 2010 service pay $24 per month.
■
Ofce 365 for Education provides students with access to the Ofce 365
services—Ofce Web Apps, instant messaging, audio and video, and team sites—
plus the latest version of Microsoft Live@edu, an online community of thousands
of schools. Pricing for Ofce 365 for Education is $10 for educators and staff; the
service is free for students.
IS OFFICE 365 THE NEW OFFICE LIVE SMALL BUSINESS?
In a word, yes. If you previously used Ofce Live Small Business (OLSB) for web
creation and hosting, email, marketing, and more, you might be wondering how
that service might overlap with Ofce 365. Ofce 365 includes all the greatest
features of Ofce Live Small Business, and in late 2011 or early 2012, Microsoft
plans to offer existing OLSB users a free transition to Ofce 365 for three months.
After the initial free period, you can continue with your Ofce 365 for Small
Business account for only $6 a month.
Page 53

28 Chapter 2 Getting Started with Of ce 365
Getting Ready to Use Ofce 365
After you set up and log in to your Ofce 365 account, you need to do a few more things
to get all the services ready to use. Specically, you need to
■
Download and install Microsoft Lync so that you can use instant messaging to
contact others on your team, share audio and video, and hold online meetings.
■
Get ready to use your existing Ofce programs.
■
Set up your mobile phone to work with Ofce 365.
This section walks you through those tasks so that you can begin to arrange your cloud
experience just the way you want it.
Installing Microsoft Lync
Microsoft Lync 2010 is the service that enables you to send instant messages to any
member of your team who is available for contact. You can see the online presence of
team members, share audio and video les, and schedule online meetings, phone calls,
and more. Lync Online is the utility that connects your team in real time, whether you
have something important to discuss or just want to ask somebody a quick question.
Begin the process of downloading and installing Microsoft Lync by clicking Install Lync
2010 in the Lync category of the Ofce 365 Home page. On the Downloads page (shown
in Figure 2-8), choose your version (32-bit or 64-bit) and click Install.
FIGURE 2-8 Install Microsoft Lync 2010 to add instant messaging, presence, audio, and video to your
Office 365 capabilities.
Page 54

Chapter 2 29
Tip Not sure whether you have a 32-bit or 64-bit system? Here’s how to nd
out: Click the Windows Start button and, on the right side of the Start
menu, right-click Computer. Click Properties. In the System settings on
the right side of the screen, you’ll see whether you have a 32-bit or 64-bit
system by looking at the System Type value. Note that if you have a
64-bit version of Windows, you can install either the 32-bit or 64-bit
version of Lync. Microsoft recommends that you use the 32-bit version
unless you have a specic need for the 64-bit version.
Getting Ready to Use Of ce 365
After you click Install, the File Download – Security Warning dialog box appears so that
you can choose whether you want to run or save the Lync install le. It’s OK to go ahead
and run the installation utility directly from Ofce 365 (unless your business has a policy
to the contrary—in which case, you can click Save and save the le to your desktop,
where you can launch it after downloading by double-clicking it).
It will take a few minutes for Lync to download; then you might be prompted to restart
your computer. (Not all computer installations require this, however.) If prompted, restart
your system normally, and Microsoft Lync 2010 should start automatically. If it doesn’t,
follow these steps to launch Lync 2010:
1. Click Start.
2. Click All Programs.
3. Click the Microsoft Lync folder.
4. Choose Microsoft Lync 2010 to start the program.
After Lync launches, it displays the window shown in Figure 2-9. As you can see, it
resembles an instant messaging client such as Windows Live Messenger. There’s one big
difference, though—where are your contacts? Because Ofce 365 is built to be secure
and enable your work with your team, only team members who are part of your Ofce
365 group appear in your Lync window, unless you use Lync for logging on to other
domains as well. Within Ofce 365, your administrator is the one who adds user roles and
permissions so that others will appear in your Lync window, ready for contact. You’ll nd
out more about setting up user accounts in Chapter 3.
Page 55
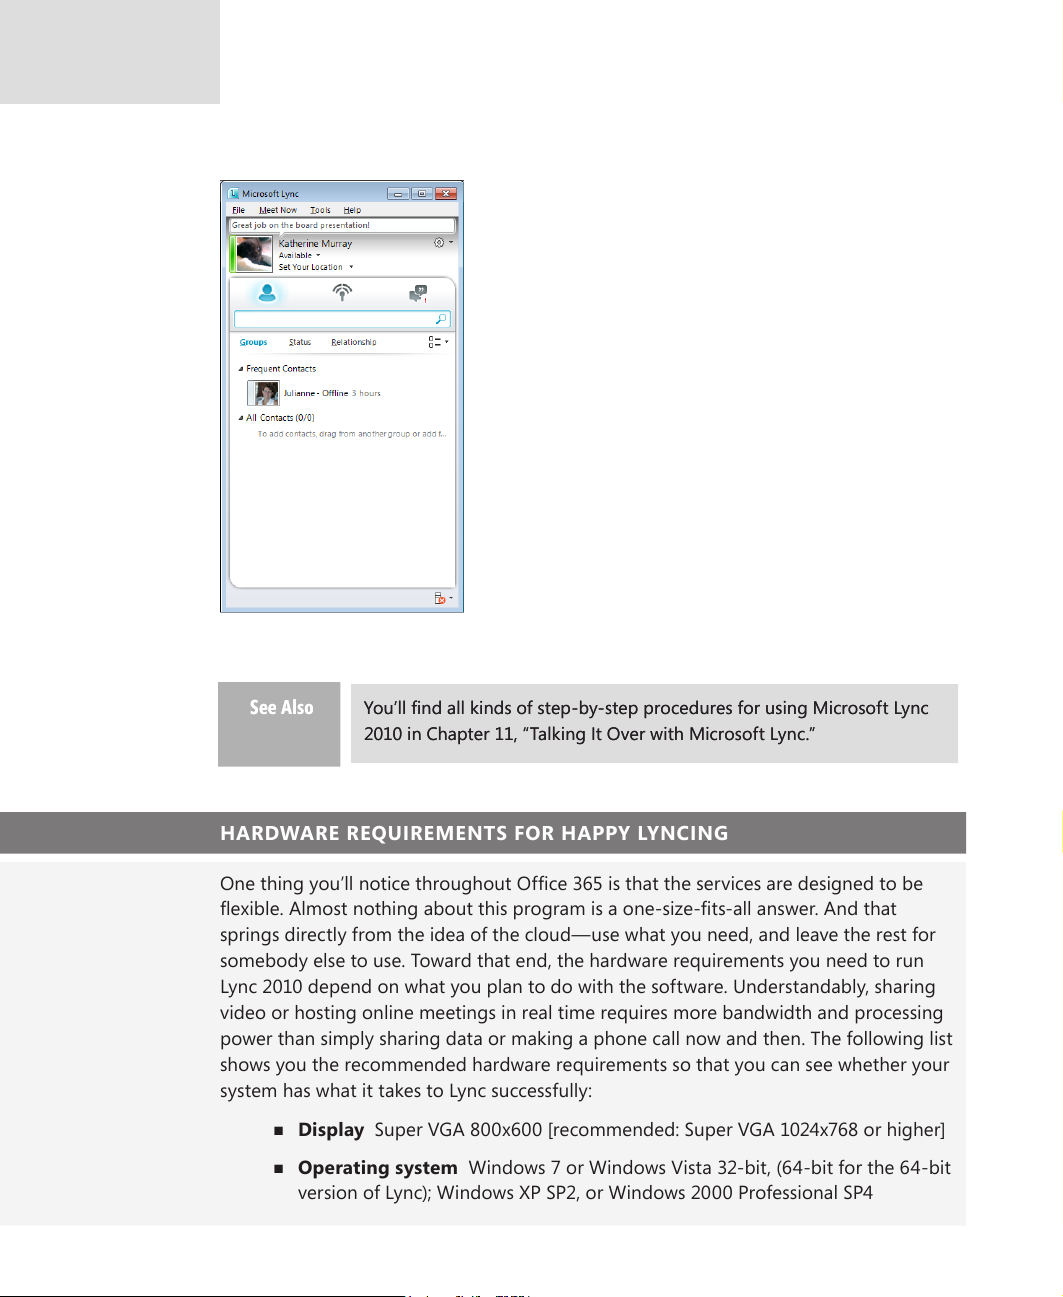
30 Chapter 2 Getting Started with Of ce 365
FIGURE 2-9 Microsoft Lync enables you to reach your colleagues instantly and set up online meetings.
SeeAlso You’ll nd all kinds of step-by-step procedures for using Microsoft Lync
2010 in Chapter 11, “Talking It Over with Microsoft Lync.”
HARDWARE REQUIREMENTS FOR HAPPY LYNCING
One thing you’ll notice throughout Ofce 365 is that the services are designed to be
exible. Almost nothing about this program is a one-size-ts-all answer. And that
springs directly from the idea of the cloud—use what you need, and leave the rest for
somebody else to use. Toward that end, the hardware requirements you need to run
Lync 2010 depend on what you plan to do with the software. Understandably, sharing
video or hosting online meetings in real time requires more bandwidth and processing
power than simply sharing data or making a phone call now and then. The following list
shows you the recommended hardware requirements so that you can see whether your
system has what it takes to Lync successfully:
■
Display Super VGA 800x600 [recommended: Super VGA 1024x768 or higher]
■
Operating system Windows 7 or Windows Vista 32-bit, (64-bit for the 64-bit
version of Lync); Windows XP SP2, or Windows 2000 Professional SP4
Page 56

Chapter 2 31
■
Microprocessing power For just data and voice: Intel Pentium 500 MHz or
Getting Ready to Use Of ce 365
higher; For video: 1 GHz or higher; For online meetings 1.8 GHz or higher
■
Memory 512 MB RAM
■
Hard-disk space 1.5 MB
■
Video card memory 64 MB RAM
■
Audio Microphone and speakers, or headset with microphone
■
Video Video camera or webcam
■
Bandwidth For data only: 56 kbps (kilobyte per second); For data, voice, video,
and online meetings: 350 kbps
Tip If you work with team members all over the world—no problem. The
early version of the Ofce 365 Beta was available for users in Canada,
France, Germany, Hong Kong, Ireland, Italy, Japan, Mexico, Puerto Rico,
Singapore, Spain, United Kingdom, and the United States, but as the
program goes to wider release, support for additional countries will be
added.
Getting Ready to Use Ofce 2010
Ofce 365 offers you different ways to work with the Microsoft Ofce 2010 applications,
depending on what you need to do with the various programs. As part of Microsoft
Ofce 2010, you can access and work with Ofce Web Apps:
■
Word Web App
■
Excel Web App
■
PowerPoint Web App
■
OneNote Web App
Additionally, Outlook Web App enables you to receive and send email, set up meetings,
assign tasks, and perform the most common tasks you use in your desktop version of
Outlook 2010.
Ofce Web Apps are available to you as part of Ofce 365 no matter which version
you are using. These Web Apps are great for creating, editing, sharing, and reviewing
Page 57

32 Chapter 2 Getting Started with Of ce 365
content. What’s more, you can work collaboratively on documents with Word Web App,
partner on presentations with PowerPoint Web App, and co-edit in the same worksheet
with Excel Web App. You’ll nd out more about the capabilities of the Web apps—and
get the play-by-play on how to accomplish different tasks—in Chapter 8.
Tip Ofce 365 Enterprise users also receive access to the latest version of
Microsoft Ofce 2010 Professional Plus, which they can use on a pay-as-
you-go basis. When Enterprise users click to use an Ofce application,
Ofce 365 checks to ensure the user has been assigned a license for
the software. The administrator of the Ofce 365 account handles this
task and ensures that users have the necessary licenses. The cost for the
license is included in the Ofce 365 package the organization selects.
Running Ofce 365 Desktop Setup
You can set up your desktop Ofce 2010 applications to work seamlessly with Ofce 365
by clicking Downloads in the Resources area on the right side of the Ofce 365 Home
page, which takes you to the Downloads page. Click the Set Up button in the Set Up And
Congure Your Ofce Desktop Apps area. Click Run (shown in Figure 2-10) to install and
run the utility.
FIGURE 2-10 The Office 365 Desktop Setup utility connects Office Web Apps to your Office 2010 desktop
applications.
After you run the Ofce 365 Desktop Setup utility, you’ll be able to open and work with
les from Ofce 365 in your Ofce 2010 applications. You’ll also be able to sign in to
Page 58

Chapter 2 33
Getting Ready to Use Of ce 365
your Ofce 365 account by using your Microsoft Online Services ID directly in your Ofce
2010 programs. So it’s a convenience issue, but it also enables you to smooth out any
wrinkles your desktop applications might encounter when you go to save or access les
you’ve saved in Ofce 365.
In the Microsoft Ofce 365 Desktop Setup dialog box, click Continue to set up your
applications and download any necessary program updates. (See Figure 2-11.) Click
Continue. You will be asked to review and access the Ofce 365 user agreement, and
then the utility begins searching for and downloading any available updates.
FIGURE 2-11 The Office 365 Desktop Setup utility configures the applications and downloads any
available updates for your programs.
You can get more information about what’s being downloaded by clicking the Show
More Details link toward the right end of the status bar. The program items being
updated are listed in the center column of the dialog box, and the link wording changes
to Hide Details. (See Figure 2-12.) When the process is nished, click the Restart Now
button to close all applications and reboot your computer so that the changes can
take effect.
Page 59

34 Chapter 2 Getting Started with Of ce 365
FIGURE 2-12 You can view the changes being made by clicking Show More Details and reviewing the list
of updates in the center of the dialog box.
Setting Up Outlook 2010
When all is said and done, your computer restarts and pops back up with one more
conguration screen, most likely telling you that a little manual work is required on your
part. You need to create an email account in your desktop version of Outlook so that the
Ofce 2010 Outlook Web App can interact seamlessly with your desktop version of the
program. The process is simple:
1. Open Outlook 2010.
2. Click on the File tab, and click Add Account.
3. Outlook might add your information automatically in the Auto Account Setup
page. Change the entries if necessary, and click Next.
Tip Check with your administrator if you are unsure about the settings you
need to enter here.
4. Outlook searches for your Exchange Online settings and prompts you to enter
your email address and your use name.
5. Click Finish to complete the process.
Page 60
Chapter 2 35
Getting Ready to Use Of ce 365
Note If you have trouble setting up your Ofce 365 email in Outlook 2010,
return to your Ofce 365 account and type the phrase Connect Outlook
to this account to nd more help on this topic.
Now your desktop versions of Ofce 2010 applications are ready to work with your
Ofce 365 account. You’ll nd out more about this—and all the related how-to tasks—in
Chapter 6, “Posting, Sharing, and Managing Files.”
Setting Up Your Mobile Phone
Ah, now we get to the fun part. Who wants to be stuck at a desk all day working on
some ho-hum report or trying to get some worksheet numbers to balance? Why not do
it at the coffee shop, on the train, or while you’re waiting for the movie to begin? You
can set up your mobile device to access and work with Ofce 365 data in a number of
ways. After you connect your phone, you can check and send email, check your calendar,
schedule appointments, and update your contacts information. You can also use Ofce
2010 Mobile Apps—for Word, Excel, PowerPoint, and OneNote—to carry on the work
you started in Ofce 365.
To set up your mobile phone to work with Ofce 365, follow these steps:
1. On your Ofce 365 Home page, click Setting Up Email on Mobile Phones in the
Resources column on the right side of the window.
2. In the window that appears, click Mobile Phone Setup Wizard.
3. Begin by clicking the arrow and choosing your mobile phone operating system.
(See Figure 2-13.)
4. Finally, choose what you want to be able to do with your phone.
Note The options displayed in the What Would You Like To Do? list depend
on the capabilities of the phone you selected and also on the account
type you have with Ofce 365. For example, if you chose Windows Phone
as your mobile operating system, your choices are Set Up Microsoft
Exchange Email On Your Windows Phone and Set Up POP Or IMAP Email
On Your Windows Phone. However, if you choose a BlackBerry device,
your only choice is Set Up POP Or IMAP Email On A G1.
Page 61

36 Chapter 2 Getting Started with Of ce 365
FIGURE 2-13 Begin by choosing your service provider in the Mobile Phone Setup Wizard.
Setting Up POP and IMAP Email
If you want to check your Ofce 365 email by using a POP or IMAP email account (which
is the default if you don’t use Microsoft Exchange), you can easily set up the account on
your phone by following these steps (note that these instructions were written for the
Windows 7 HTC HD 7 and might change slightly for different phones):
1. On your phone, tap Settings.
2. Tap Email & Accounts.
3. Tap Add An Account, and tap Other Account.
4. Enter your Ofce 365 email address and password.
5. Click Sign In.
The new account opens, and Windows 7 Mobile checks all your settings. After a moment,
the email is synchronized and you will be able to check and send email from your mobile
phone.
How Ofce 365 Meets Small Business Needs
In the chapters that follow, you’ll see all sorts of ways you can use the various Ofce
365 services to collaborate with team members, accomplish tasks, create projects, look
up data, and share what you know. The key to all this is exibility, creativity, and us-
ing just what you need. As you log in—from wherever you log in—and work with les,
messages, sites, and more, you’ll discover that you really can get in and out quickly and
complete the tasks you want to complete. And you can do all this without the huge
Page 62

Chapter 2 37
overhead of servers, desk space, ofce rent, and transportation costs. And it’s supportable even without a highly trained IT department (because the Ofce 365 IT group has
you covered).
In essence, Ofce 365 does what many of us have been waiting for a long time. It offers
us the worry-free, easy-to-afford, and easy-to-support option of using our software
to do what we need to do without having to struggle through all the technical details
required to install and maintain it. This section takes a look at how Ofce 365 might fulll
some of your critical business needs. The idea here is to provide some common examples to spark ideas in your mind and inspire you to try things that work in your unique
situation.
How Ofce 365 Meets Small Business Needs
The Big Picture: Online and Off
Remember the days when you felt like you had to rush from home to ofce because
you were afraid you were going to miss an important email message? Because email
has become a common feature on most phones, that particular anxiety has dissolved
for many of us. But often, reading and even responding to email on the phone can be
limited. What if you need to look something up in a document you just created? What if
another team member has the answer to the question the sender asked? You still need to
wait until you get to the ofce to pull together the information for a satisfactory answer.
Ofce 365 makes it simple and seamless to stay in touch with your team and your les no
matter where you are. You can easily move from your desktop computer to your laptop
to your phone or even to a kiosk in the hotel lobby—looking up report information,
checking your notes, or sending along a le that a teammate needs to review. You can
easily move online and off, knowing that your les are stored in a place you can access
them easily on any device that has web access.
Email, Calendars, Meetings, and More
Being able to access and send email is nothing new; chances are that you’ve been doing
it by phone for a while now. But having your email easily connected to your schedule,
group calendars, appointments, tasks, and more is a plus that helps you stay organized
and synchronized with your team.
In Ofce 365, you can easily get to your inbox and calendar right from the Home
page by clicking the appropriate links under the Outlook category. Outlook Web App
enables you to check and compose email, manage contacts, set up meetings, arrange
appointments, and create and track tasks, all in a single webpage. (See Figure 2-14.)
Page 63

38 Chapter 2 Getting Started with Of ce 365
FIGURE 2-14 Outlook Web App makes it easy to access and work with your email, schedule, and contacts,
and complete tasks all from a single interface.
Tip Ofce 365 Enterprise users have access to Exchange Online, which
functions as a back end to manage communications while Outlook Web
App is the front end. Exchange Online synchronizes received and sent
messages, completed tasks, and more between all the different email
access points you might use—desktop, Web, and phone. In functionality,
Exchange Online is based on Active Directory services, which enable
Enterprise users to access the global directory with all the contacts
available in the organization.
Creating a Team Workspace
One of the challenges of working with a remote team is that there’s no common space
to share les, gather for meetings, or brainstorm about new ideas. Now Ofce 365
enables you to create a shared site where you can keep in touch with your team mem-
bers, create workows to track your projects, add project resources, schedule meetings,
and much more.
Page 64

Chapter 2 39
How Ofce 365 Meets Small Business Needs
The team workspace capability is built on SharePoint Online. As you can see from
Figure 2-15, you can customize your team site by adding all sorts of tools, web parts,
media, and more. You can also create document libraries so that your team members
all have access to the les they need, and you can add pages and content related to the
projects you are creating.
FIGURE 2-15 Your team site in SharePoint Online enables your team to stay in touch, share documents,
schedule events, and much more.
Sharing Documents with Your Team
You can easily open, edit, and share the documents you save in your team site in
SharePoint Online. When you choose to work with a le—a Word document, for example—it opens in Word Web App. You can choose to edit the document if you like, which
opens the le in your version of Word while still keeping the le on the SharePoint server.
You can also choose to edit the le in the Web App if you like.
You can then share the document window with another person on your team if you want
to collaborate on the project in real time. When your other colleagues are working with
the same le, the Ofce Web App you are using lets you know. (See Figure 2-16). The
program locks areas where others are editing and then syncs all the changes so that the
most recent changes to the document are preserved. In this way, you can collaborate on
important les without fear of overwriting another team member’s changes or losing
an important change.
Page 65

40 Chapter 2 Getting Started with Of ce 365
FIGURE 2-16 You can easily work collaboratively in Office 365.
Instant Messaging, Calls, and Web Meetings with
Microsoft Lync
If you use instant messaging to get anything done—for business or for fun—you know
the benet of being able to communicate in real time, either one-to-one or one-to-
many. Microsoft Lync Online, available as part of Ofce 365, provides all the real-
time connection you need by offering an instant communications client with instant
messaging, social media tracking, easy-to-use phone and video calls, and even features
for setting up and hosting meetings. Figure 2-17 shows a Lync Online window in which
two contacts are having a one-to-one conversation.
FIGURE 2-17 You can easily send instant messages to your team members, initiate audio or video calls, or
host meetings with colleagues.
Page 66

Chapter 2 41
By default, Lync Online is set to offer as contacts only those included in your Ofce 365
team, but your administrator can set up your group so that you can communicate with
others inside or outside your organization. What’s more, others outside your group can
be invited in for the meetings you host, so access and permissions don’t pose a problem
(while at the same time giving you the security you need to protect your information).
How Ofce 365 Meets Small Business Needs
Behind-the-Scenes Support: Security and Reliability
Ofce 365 meets all kinds of needs for small businesses, but perhaps none is more
important than this: you are working in a completely secure cloud, designed to provide
multiple layers of protection so that your les, conversations, and collaborative efforts
are safe. Ofce 365 services use 128-bit SSL/TSL encryption, which means that if communication is intercepted by an outside party, the le will be unreadable. Additionally,
Microsoft Trustworthy Computing initiatives are in full force; antivirus signatures are
continually updated, and Forefront Online Protection for Exchange protects and lters
messages.
Tip You can take a closer look at the security measures Microsoft uses
for its Online Services by reading the “Security Features in Microsoft
Online Services” paper available at the Microsoft Download center
(www.microsoft.com/downloads).
Reliability is another promise Ofce 365 keeps well for small businesses. Because all
services are in the cloud, you need to have guaranteed access to Web services to work
reliably and productively. To help ensure that your work is always accessible to your
team, many data centers all over the world host redundant network congurations. So if
one data center is unavailable, another one takes its place so that your work can continue
uninterrupted.
What’s Next
In this chapter, you got the roadmap for creating your account, setting up your prole,
and downloading the software you need to get started. You also had a chance to think
through some of the tasks you want your teammates to be able to accomplish using the
various Ofce 365 tools. If you will be administering the site—that is, managing user
accounts and permissions—the next chapter offers the how-tos for managing Ofce 365
from the administrator side of things.
Page 67

Page 68

CHAPTER 3
Administering an
Ofce 365 Account
IN THIS CHAPTER:
■
AreYouanAdministrator?
■
AnOverviewofYour
AdministrativeTasks
■
FirstThingsFirst:KeyTasks
toComplete
■
AddingandManagingOfce
365Users
■
ViewingDomainProperties
■
SettingUpandManaging
OutlookandExchange
■
SettingUpSharePointOnline
■
ConguringLyncOnline
■
ManagingYourSubscriptions
■
GettingHelpwithOfce365
■
What’sNext
IT C A N B E LONELY at the top. If you’re the person responsible for
setting up or at least managing the Ofce 365 account, you have a whole
set of tasks and decisions to make that will affect the way your team
interacts in the space. But don’t worry—the choices are pretty simple,
and they’re easy to change later if necessary. And what’s more, there’s a
community of administrators (and Microsoft MVPs) who are waiting in
the wings to answer your questions if you get stuck along the way. Nice!
As you think through the way you want your team to interact in the
cloud, you’ll need to make decisions about who will have access
(and what kind of access they will have), which services you want
to use, how you want to manage your email, and how the various
services will be set up to work for your team. This chapter walks
you through all those choices and more so that when it’s time to
get everybody moving, you can hit the cloud running.
Are You an Administrator?
Administrator is an important-sounding word, and what it really
means is this: you get to make decisions about your Ofce 365
account and get things set up the way you want them. With that
glory comes responsibility, and this chapter will help you determine
43
Page 69

44 Chapter 3 Administering an Ofce 365 Account
which items are important for your group and which are not. Specically, you are an
administrator if
■
You are creating and managing the account.
■
It is up to you to add and manage users in the site.
■
You assign and administer the different licenses your teammates use in Ofce 365.
(I’ll say more about that in a minute.)
■
You are charged with setting up the various services the way you want them.
■
You have been charged with a specic goal you’ll be helping your group to
achieve.
■
You are the visionary behind the whole virtual team plan, and you want to see it
work.
■
You’ll be designing, updating, and managing the SharePoint team site in your
account.
You might be taking on one or more of those tasks—or perhaps your role is bigger or
smaller. No matter—in Ofce 365, you can have more than one administrator, so if you
want to share the wealth of features all the better. Just to keep things simple, though,
it’s generally a good idea to have one person in charge of things such as user accounts,
permissions, and licenses. And if you have more than one administrator in the site, be
sure you communicate about big-picture decisions such as whether you want to migrate
email accounts so that other accounts combine with Ofce 365 mail or whether you want
to allow members to include external contacts in Lync Online. Orchestrating those types
of management choices helps you not duplicate—or undo—each other’s efforts.
Tip This is a philosophical consideration, but one great benet of being an
administrator is that you can think through the kind of team experience
you want your members to have. How collaborative will it be? What
types of projects will you be working on? What, ultimately, will a suc-
cessful group look like? Thinking through those questions will help you
make choices consistent with that vision when you set up the services in
Ofce 365.
Page 70

Chapter 3 45
An Overview of Your Administrative Tasks
An Overview of Your Administrative Tasks
So you already know you’re a special person because you’ve got the keys to the
kingdom. When you log in to your Ofce 365 account, if you’re an administrator you’ll
see the Admin link at the top right side of the choices at the top of the screen. When you
click Admin, the Admin Overview page appears, as you see in Figure 3-1.
FIGURE 3-1 The Admin Overview page gives you access to the various ways you can administer the
Office 365 account.
When you rst click Admin after creating your Ofce 365 account, the Admin page shows
the Get Your Team Started area at the top. This special group of links gives you what you
need to know to begin setting up your site for your team. Specically, you can
■
Watch a video clip about the administrative tasks in Ofce 365.
■
See a video of user tasks and learn about Ofce 365 services.
■
Add new users to your account.
■
Add and verify the web domain you want to use with the account.
Page 71

46 Chapter 3 Administering an Ofce 365 Account
The Admin Overview page is divided into three main areas. On the left side are links you
use to manage the users and domains that are part of your Ofce 365 account. Here you
add and remove users, set permissions, enter and change passwords, and update user
properties and licenses. You can also view information about the various domains you set
up to use with Ofce 365, manage your service subscriptions, and check the status of the
system, get help, and review any existing technical support requests you created.
Tip What’s a domain? The domain of your website is the name of the space
online where your Ofce 365 account is stored. For example, in the
examples in this book, the domain is wideworld.onmicrosoft.com.
The area in the center of the page lists the various services available to you in Ofce 365.
Clicking the various links under each of the service names, you will be able to
■
Use the Admin Shortcuts to accomplish common tasks you will likely need to do
regularly—such as reset user passwords, add users, and assign licenses for working
with Ofce 365 services.
■
Set up Outlook to work as you’d like for your computer, complete with email
defaults and group usage.
■
Prepare Lync for your team, and choose whether users can use Lync to
communicate with groups external to your team.
■
Work with your team sites, set user permissions for the site, and create new sites
and pages.
■
Create, design, and edit the public-facing website that is part of your Ofce 365
account.
The column on the right side of the Admin page offers links that provide more
information about administering your Ofce 365 site, connecting a mobile device,
accessing release notes, and downloading the utility you need to connect Lync Online
and the Ofce Web Apps with your desktop applications.
First Things First: Key Tasks to Complete
As you can see, that’s a lot to do! The good news is that you don’t have to tackle it all
at once—you can grow into the features as you get familiar with the services. The most
important thing when you’re starting out if you’re a small business is to accomplish the
following tasks:
Page 72

Chapter 3 47
■
Make sure team members have the permissions and licenses they need to log on
Adding and Managing Ofce 365 Users
and access Ofce 365 services.
■
Make sure email is working the way you want it to for all your team members.
■
Get started on the team site to provide access to the information your team needs.
■
Set up Lync Online to allow le transfer and audio and video transmission if you
want your group to have access to those features.
■
Know how to get help, create service requests, and check system status.
In the sections that follow, you’ll nd out how to do each of these core tasks and prepare
Ofce 365 for the happy arrival of your colleagues.
Adding and Managing Ofce 365 Users
Your rst and perhaps most important task as the administrator of the Ofce 365 account
is to make sure that your team can access the site. Click Users in the Management area
to open the Users page. (See Figure 3-2.) In the Users screen of the Admin view, you can
add and delete new users, edit permissions, and reset user passwords.
FIGURE 3-2 Click Users to add, edit, and update user information in Office 365.
Page 73

48 Chapter 3 Administering an Ofce 365 Account
Adding Users
After you click Users, the listing of team members already added to the site appears in
the work area. If you’re the only one who has accessed the site so far, yours might be
the only email listed. You can add users one by one, if you’re working with a small list, or
you can add many users using a slightly different process. Here are the steps for each—
choose the one you need.
Adding Users One at a Time
If you’ll be working with a small team, or you’ve already created a team and just want
to add a new user or two, the task is as simple as clicking the mouse and typing in a few
pieces of information. Here are the steps:
1. Click New in the Users screen and click User.
2. In the New User Properties screen, add the name, display name, and email address
you want to create for the new user
3. Click Additional Properties if you’d like to add additional information about this
user in the site. (See Figure 3-3.)
4. Click Next.
FIGURE 3-3 Adding a user is as simple as entering a display name and an email address.
Page 74

Chapter 3 49
Adding and Managing Ofce 365 Users
Note You don’t have to enter the person’s rst and last name, but you do need
to enter a display name that will be visible to others in the site. Also, note
that at this point you cannot add an existing email address outside of
your site domain. Later if you’d like to connect an existing email address
to this account, you can do so. See the section, “Migrate Your Email,” to
nd out more.
Tip Other users will be able to view this information in the user’s prole, so
if you’re working with a large team, ll in as much information as you
have. This helps team members feel they know each other and begins the
process of creating a more connected group experience.
After you’ve specied the basic properties for the new user account, you still need
congure additional settings and permissions that control the way the new user will
interact with Ofce 365 services. For more about how to do this, see the section, “Setting
Permissions, User Location, and Sign-In Status,” later in this chapter.
Adding Multiple Users at Once
If you have a number of users to add all at once—perhaps a department manager at
work sent along a le of all the contact information for your team—you can simply
upload the data le directly into Ofce 365 and create users that way.
To add multiple users all at once, follow these steps:
1. Click New, and choose Bulk Add Users.
2. In the Bulk Add Users page (shown in Figure 3-4), click the Browse button to open
the Choose File To Upload dialog box.
3. Navigate to the folder containing the CSV le you want to use, click it, and click
Open.
Tip What’s a CSV le? CSV stands for comma-separated values, and this
common le format is used to store data from tables, worksheets, or
databases. So a CSV le that includes information for your team might
include information that looks like this: User name, First name, Last name,
Display name.
Page 75
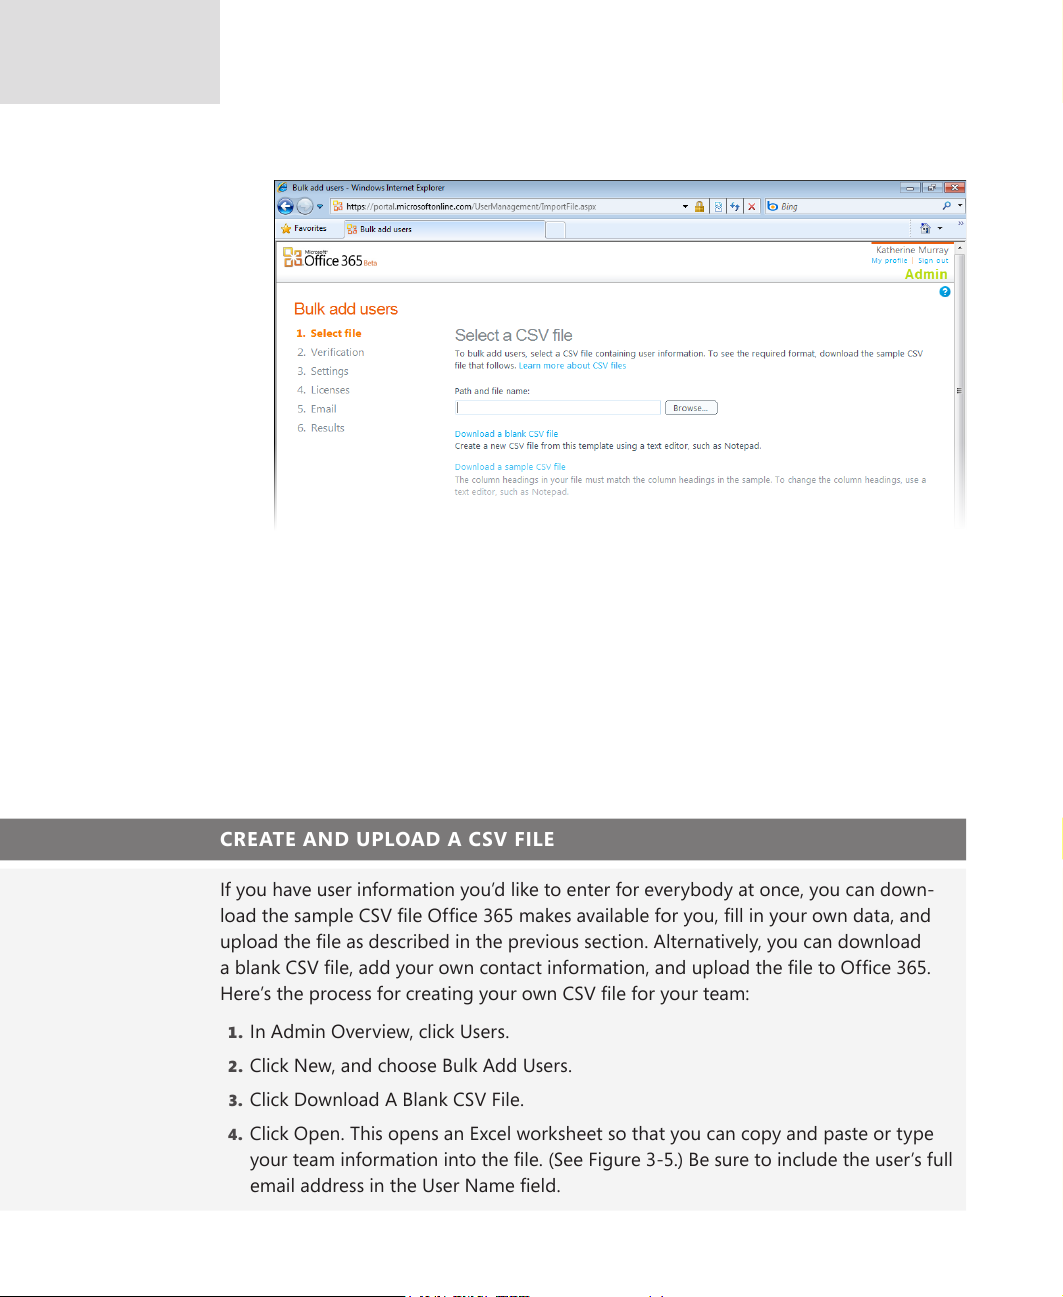
50 Chapter3 Administering an Ofce 365 Account
FIGURE3- 4 Add many users all at once by importing a CSV file.
After Ofce 365 uploads the le, the user names are veried to ensure that all informa-
tion is ready to use. The verication screen shows you which information passed muster
and which produced errors.
You can view any errors produced by clicking the View link in the Log File category. If
you need to make a change to the data le, click the Back button at the bottom of the
screen and then return to the data le, make any corrections, and upload the CSV le
once again.
CREATEANDUPLOADACSVFILE
If you have user information you’d like to enter for everybody at once, you can down-
load the sample CSV le Ofce 365 makes available for you, ll in your own data, and
upload the le as described in the previous section. Alternatively, you can download
a blank CSV le, add your own contact information, and upload the le to Ofce 365.
Here’s the process for creating your own CSV le for your team:
1. In Admin Overview, click Users.
2. Click New, and choose Bulk Add Users.
3. Click Download A Blank CSV File.
4. Click Open. This opens an Excel worksheet so that you can copy and paste or type
your team information into the le. (See Figure 3-5.) Be sure to include the user’s full
email address in the User Name eld.
Page 76

Chapter 3 51
5. Save the le to your Documents library (or another folder where you store
Adding and Managing Ofce 365 Users
team-related les).
6. Return to the Bulk Add Users screen, click Browse, navigate to the CSV le you
just created, and add the le normally.
7. Click Next. Ofce 365 veries the addition of the new users to make sure the
information has been entered correctly.
FIGURE 3-5 When you click Open, Office 365 displays an Excel file with fields already set up to
record user information.
Setting Permissions, User Location, and Sign-In Status
The next step in the process depends on whether you are adding a single new user or
are bulk adding new users. If you are adding only a single new user, the Settings screen is
where you assign permissions and a location to the user. For the Permissions option, you
can choose whether the user is to be an Ofce 365 administrator or not. To set the user
location for an individual user, click the Select A Location arrow and choose the user’s
country from the displayed list. Ofce 365 is available in a number of countries around
Page 77

52 Chapter 3 Administering an Ofce 365 Account
the world, but not all countries have access to the same services. Select the user’s country
for the displayed list, and click Next.
If you are bulk-adding new users, however, the Permissions option is replaced with a Set
Sign-in Status option, where you choose to allow or block access to Ofce 365 services
by the user. If you bulk-add new user accounts before employees are ready to use these
accounts, you can choose Deny to keep the accounts inactive. Then when an employee is
ready to use an account, you can change the sign-in status from Blocked to Allowed. In
addition to conguring sign-in status, you must also specify a location when bulk-adding
users.
Assigning Licenses
The next step involved in getting your users set up to use Ofce 365 involves assigning
them the licenses they need to use the services in the site. Depending on the version
of Ofce 365 you are using, you might have two different sets of licenses available, as
Figure 3-6 shows.
FIGURE 3-6 Click the license you want to assign to the new users you are adding.
Select the check box of the services you want the new user to be able to access. Ofce
365 shows on the right side of the screen the number of licenses you can assign to your
various team members. When you are satised with your selections, click Next.
Page 78

Chapter 3 53
Tip If you nd that as your group grows you’re worrying about the number
of licenses you have available, you can remove user accounts that are no
longer needed to reclaim their licenses so that they can be assigned to
other new users.
Adding and Managing Ofce 365 Users
Sending an Invitation Email
Next Ofce 365 will walk you through the process of sending an email message to the
new team member that includes an autogenerated password. By default, Ofce 365
enters the email address of the administrator who is creating the account. For security
purposes, this email should generally be sent to an administrator and not to the new
user account that is being created. The admin should then communicate the temporary
password to the new user. This is especially true when creating bulk users because you
don’t want each new user to know the temporary password of every other new user
being created.
Click Create. Ofce 365 generates and sends the message, and then displays a report so
that you can see that the message is on its way to the new user. (See Figure 3-7.) Click
Finish to close the Results window and return to the Users window.
FIGURE 3-7 Office 365 lets you know that the email has been sent successfully.
Page 79

54 Chapter 3 Administering an Ofce 365 Account
That’s the whole process for adding users to Ofce 365. At any time, you can add users
individually, add another set of bulk users, or update properties for individual users
as needed. You need to keep an eye on the number of licenses you have available, of
course, but the process itself is a simple one.
Changing Passwords
The users you added will be able to access your Ofce 365 site and log in using the
temporary password that was generated for them when their account was created.
Depending on the security systems in place in your particular business, however, users
might not receive the email or might have trouble logging in. And, of course, some
users—including yours truly—just lose stuff from time to time (which is another reason
to have the temporary password emailed directly to you as the admin).
Ofce 365 knows that as an admin, managing passwords might be one of your biggest
headaches. Luckily, it’s one that can be healed easily. When you get a request to change
a user’s password and help that user access the site, you can do it in ve simple steps.
Here’s how:
1. Log in to Ofce 365, and click Admin.
2. In Admin Shortcuts, click Reset User Passwords.
3. Select the check box of the user whose password you want to change.
4. Click Reset Password. (See Figure 3-8.)
5. Again, your email address as the administrator will appear in the text box. Click the
Reset Password button to email yourself a copy of the new password, which you
can then pass along to the user.
Page 80

Chapter 3 55
FIGURE 3-8 You can easily reset the password in the Users screen of Admin view.
Viewing Domain Properties
Viewing Domain Properties
Another part of your responsibilities as administrator involves keeping an eye on the
domains that are part of your account. Depending on how complex your needs are, this
might be super simple: you might have only one domain registered with Ofce 365. This
enables you to track your team, create a team site, access the services you’ve sign up for,
and so on.
But if your scenario isn’t quite so simple and you are managing multiple domains and
many different sites, being able to display the domain information will be helpful. You
can view the domains in use with your account by clicking Admin and then clicking
Domains in the links on the left side of the Admin Overview screen. (See Figure 3-9.) The
Status column on the right shows you whether the site is currently active or inactive. You
can display the properties of a selected domain by clicking the domain’s radio button to
the left of the domain name and clicking View Properties.
Page 81

56 Chapter 3 Administering an Ofce 365 Account
FIGURE 3-9 View the domains included on your account by clicking Domains in the Management area of
Admin view.
Adding a Domain to Ofce 365
When you sign up for your Ofce 365 account, you are assigned a default domain name
of the form yourcompany.onmicrosoft.com, where yourcompany is a name you specify
during the signup process. This domain name is then used to set up your services, set up
email, and more. You can also add a domain name you already have to your Ofce 365
account if you’d like. If your domain name is registered, you can add it to Ofce 365 by
using the Add A Domain link in the top left column of the domain listing.
Note You must own the domain name you choose to add to the Ofce 365
domains. At any point in the process, you can purchase a domain name
from a domain registration site, such as Network Solutions, and click Add
A Domain to assign it to Ofce 365.
On the Specify Domain screen, click in the text box at the bottom of the page, type
the domain name you want to add (for example, wideworld.com), and click Check
Domain. Ofce 365 displays the information found about that domain in the Domain
Conrmation screen. (See Figure 3-10.)
Page 82

Chapter 3 57
FIGURE 3-10 After you add the domain name and click Check Domain, Office 365 displays the
information found about your pre-existing domain.
Viewing Domain Properties
Click Next to continue the process. In the Verify Domain window, if you’re ready to
transfer the domain to your Ofce 365 account, follow the instructions provided to
create a subdomain, edit the DNS settings, and complete the necessary permissions. You
might need to involve your domain registrar in this process.
Finally, click Verify to nalize the process and make the domain available to Ofce 365.
The entire operation might take up to 72 hours to complete. In the meantime, your
added domain will appear as Pending Verication in the domain table in the Domains
window.
Setting Up and Managing Outlook
and Exchange
Now that you’ve got your users set up in the site, you’re ready to begin setting up your
services. Let’s start with Outlook and Exchange, which you can use to create new mailboxes, create groups, set up calendars, and more.
Page 83

58 Chapter 3 Administering an Ofce 365 Account
Begin the process by clicking Admin and, in the Admin Overview window, click General
Settings in the Outlook area. The Exchange Online screen appears (shown in Figure 3-11),
where you can set up defaults for a number of features, including the following:
■
Add mailboxes
■
Create distribution lists
■
Set up external contacts
■
Add other email accounts to Exchange Online
Tip The Exchange Online settings you enter control the settings available
in other aspects of Ofce 365 as well, including the way email works for
your user accounts and the types of lists and contacts that are available
in the Outlook Web App and in Lync Online.
FIGURE 3-11 Exchange Online enables you to set up the way you want email to work in Office 365.
The Mailboxes features in Exchange Online follow steps similar to the ones you’ve already
taken to set up your users in Ofce 365. You can click New in the Mailboxes screen to
Page 84

Chapter 3 59
Setting Up and Managing Outlook and Exchange
add a new user or click Import Users to upload a CSV le. The list of current users in your
Ofce 365 account are displayed in the table at the bottom of the screen.
` Tip One neat feature in the Mailboxes area is the ability to create a Room
Mailbox. This feature is intended for times when you need to sched-
ule a real, physical location, like a conference room, training room, or
lunch room. You can set up a Room Mailbox and then, when you send
out meeting requests to the team, simply include the room mailbox
on the To list. The room is then scheduled automatically, and others in
the organization know it is no longer available during that time. This,
of course, isn’t a resource you would use if your team members are all
working in the cloud from remote locations, but it’s a cool feature if you
occasionally get together for face-to-face meetings.
Create a Distribution List
You can create a distribution list in Exchange Online to control the ow of outgoing
communications. If you regularly send out status updates from the site, for example, or
you publish a list of site changes on a weekly basis, you can create a distribution list to
make sure that all the users who need to receive that information get the message. To
create a distribution list for your users in Exchange, follow these steps:
1. In the Outlook area of the Admin Overview page, click Distribution Groups.
2. Click New on the Distribution Groups tab.
3. Enter a name, alias, and description for the distribution list.
4. If you want the group to be secure so that people can join the group only by
requesting to be added to the secure list, select the Make This Group A Security
Group check box. (See Figure 3-12.)
5. Click the Membership area, and click Add; then click the user or users you want to
add to the list. Click Add at the bottom of the dialog box and click OK.
6. Choose any additional options—or add other users as owners of the list—and
click Save.
Page 85

60 Chapter 3 Administering an Ofce 365 Account
FIGURE 3-12 You can create a distribution list to send specific communication to selected users.
Add External Contacts
One of the great things about your Ofce 365 account is that you can create a
completely secure space in the cloud where your team can collaborate and focus on
specic tasks at hand. But part of your work is sure to require correspondence with
contacts outside your happy little group, whether they are customers, contractors, or
other colleagues who aren’t part of your Ofce 365 team.
You can set up external contacts to allow users outside your organization to receive
email from and send email to your team. The users you add will actually appear in your
team’s address book, but they won’t be able to access your site. To add an external
contact to your list, follow these steps:
1. In the Admin Overview page, click General Settings in the Outlook area.
2. In the Exchange Online screen, click External Contacts.
3. Click New.
4. Enter the name, alias, and email address of the external contact.
Page 86

Chapter 3 61
5. Click Save. The external contact is added to the list at the bottom of the External
Setting Up and Managing Outlook and Exchange
Contacts screen. (See Figure 3-13.)
FIGURE 3-13 You can create a list of external contacts who will be able to communicate with your
Office 365 team.
The external contact will show up in your address book so that you can send messages to
and receive messages from the person you’ve added to the list.
Migrate Your Email
As you lead your team into the cloud, you might be considering migrating your email
from your traditional server-bound conguration to a new cloud address at Ofce 365.
This enables you to keep all your messaging—address books, rules and alerts, messages,
and more—available online from any point of access, anytime. You can easily move your
existing mailboxes to Ofce 365, or you can keep the mailboxes on the server and use
your Ofce 365 mail alongside the server-based setup.
Ofce 365 enables you to coordinate your various email accounts in a couple of different
ways. If you’re using POP accounts, you can use Connected Accounts in Outlook Web
App to add access to those accounts to your Ofce 365 account. (You’ll learn more about
this in Chapter 10, “Email and Organize in Ofce 365.”)
Page 87

62 Chapter 3 Administering an Ofce 365 Account
For other types of email accounts such as IMAP accounts , you can use the Email
Migration tool to move your email accounts to the mailboxes in Ofce 365. Here are
the steps:
1. In the Admin Overview screen, click General Settings in the Outlook category.
2. Click EMail Migration.
3. Click New.
4. Select the type of email account you’ll be migrating, and click Next.
5. Specify the account information as requested.
6. In the Start Migration page, click Run.
After the migration is complete, Ofce 365 sends you a status email giving you
information about the migration—how many mailboxes and distribution groups
migrated successfully, whether any errors were produced, as well as a report providing
login keys for the migrated mailboxes. Your users will need these keys to log in to their
mail in Ofce 365 after the account has migrated, so be sure to save this information.
Users will change the password after their rst login to the migrated account.
Setting Up SharePoint Online
You will use your SharePoint site to stay in touch with your team, share documents,
assign tasks, post questions, provide updates, and more. You can also use SharePoint to
create your own public website, giving your customers or clients a professional-looking
site where they can nd up-to-date information about your products or services.
As an administrator, your rst task is to make sure all your team members can get into
the SharePoint site and that the basics are in place so that people can begin creating
the team experience you want them to create. This section focuses on setting up users
and permissions, and the rest of the customizing experience (as well as all the how-tos
for basic SharePoint Online tasks) is covered in Chapter 5, “Creating Your Team Site with
SharePoint Online.”
Adding Users for SharePoint Online
Your rst task involves adding users to your SharePoint team site. Even though you have
already set up user accounts in Ofce 365, those users aren’t automatically added to
Page 88

Chapter 3 63
Setting Up SharePoint Online
SharePoint—you need to do that yourself. To add your team members to the SharePoint
site, follow these steps:
1. In the Admin Overview page, click Manage Team Sites in the Team Sites And
Documents area.
2. In the Team Site Settings screen (shown in Figure 3-14), click People And Groups in
the Users And Permissions area.
FIGURE 3-14 SharePoint Online offers a whole world of settings you can use to tailor the way your
site looks and acts.
3. Under Groups in the navigation area on the left side of the screen, click Members
and click New.
4. Click Add Users. The Grant Permissions dialog box appears. (See Figure 3-15.)
5. Enter the email addresses of your team members, separating them with semi-
colons.
6. In the Personal Message box, type a message you want your team members to
receive.
7. Click OK. The new users are added to the Members list.
Page 89

64 Chapter 3 Administering an Ofce 365 Account
FIGURE 3-15 Add your team members to the Users/Groups field by typing their email addresses,
separated by semi-colons.
Assigning User Permissions
Now that you’ve added people to the site, you can set the user permissions so that your
team members can perform the tasks you want them to accomplish in the site. You can
do this in one of two ways in SharePoint Online, and it’s just a bit confusing if you’ve
never worked with SharePoint before.
SharePoint enables you to assign permissions for specic individuals, or you can assign
permissions by groups, and make sure that individual team members are part of the
group you want to have the necessary access level. For example, you might give some
team members the ability to view and change content, while others have only the
permissions they need to review content posted in the site.
SharePoint offers six permission levels: View Only, Enhanced Contribute, Read,
Contribute, Design, and Full Control. Table 3-1 denes each of these permission levels.
Page 90

Chapter 3 65
TABLE 3-1 User Permission Levels in SharePoint Online
Setting Up SharePoint Online
Permission Level Permitted User Action
View Only View content but not edit it
Read View and download content
Contribute View, edit, add to, and remove content
Design View, edit, add to, remove, approve, and customize content
Full Control Has full control of the SharePoint site
Enhanced Contribute View, edit, add to, and remove content, and approve items and
manage lists
The simplest way to work with permissions for your team members is to begin with the
basics: each new member you add to SharePoint is given Member privileges, which
means the new member can read all content on the site and contribute to that content
(through editing, adding, or removing material). So if you’re ne with everyone being
able to read and edit the site, you’re good—no changes are required.
If you want to change the default permission for a specic user—either limiting the
permission so that the user can only read the information, for example, or granting full
control so that the team member can make all kinds of changes on the site (including
adding and removing user accounts), you need to know how to modify permissions.
Here’s how to do that:
1. On the Admin Overview page, click Manage Team Sites in the Team Sites And
Documents category.
2. On the Team Site Settings page, click Site Permissions in the Users And Permissions
area.
3. Click Grant Users Permission Directly (shown in Figure 3-16), and then click the
permission level you want to assign to the team member.
4. Type the text for the email message if you want to send one, and click OK. The
team member is assigned the permission level you selected.
Page 91

66 Chapter 3 Administering an Ofce 365 Account
FIGURE 3-16 Click Grant Users Permissions Directly to choose individual permissions for the users
you select.
GROUP TYPES AND PERMISSIONS IN SHAREPOINT
If you’re working with large teams or coordinating the activities of more than
one team, you might nd the group method easier because you can simply
assign team members to the specic group and then manage the permissions for
everyone all at once. The groups SharePoint sets up by default are these:
■
Members, who can read content and contribute to the content on the site
■
Owners, who have full control of the site
■
Tenant Users, who are given the permissions you assign to your domain group
■
Viewers, who can read all content on the site
■
Visitors, who can read the content on the site when they are granted access
■
Website Designers, who are assigned design privileges
You can use these groups or create a new group with the permissions you
want to provide to your team members by using the controls in the Users And
Permissions area of the SharePoint Settings screen.
Page 92

Chapter 3 67
Conguring Lync Online
Conguring Lync Online
Your nal task for setting up Ofce 365 for the rest of your team involves making sure
Microsoft Lync Online is ready to help members communicate the way you need it to.
Depending on the types of projects you work on and the ways in which you want your
colleagues to connect, you might choose to turn on various features to help les and
messages ow a little more smoothly.
Set External Communications
Begin in the Admin Overview page by clicking General Settings in the Lync area. The
Lync Online Control Panel appears, as you see in Figure 3-17, providing options for you
to allow or disable external communications (meaning that people outside your organization will—or won’t—be able to contact your team in Ofce 365). In addition to setting
up external communications, you can tailor the settings and permissions you’ve assigned
to each user.
FIGURE 3-17 The Lync Online Control Panel enables you to set contact preferences, user permissions, and
dial-in conferencing settings.
Page 93
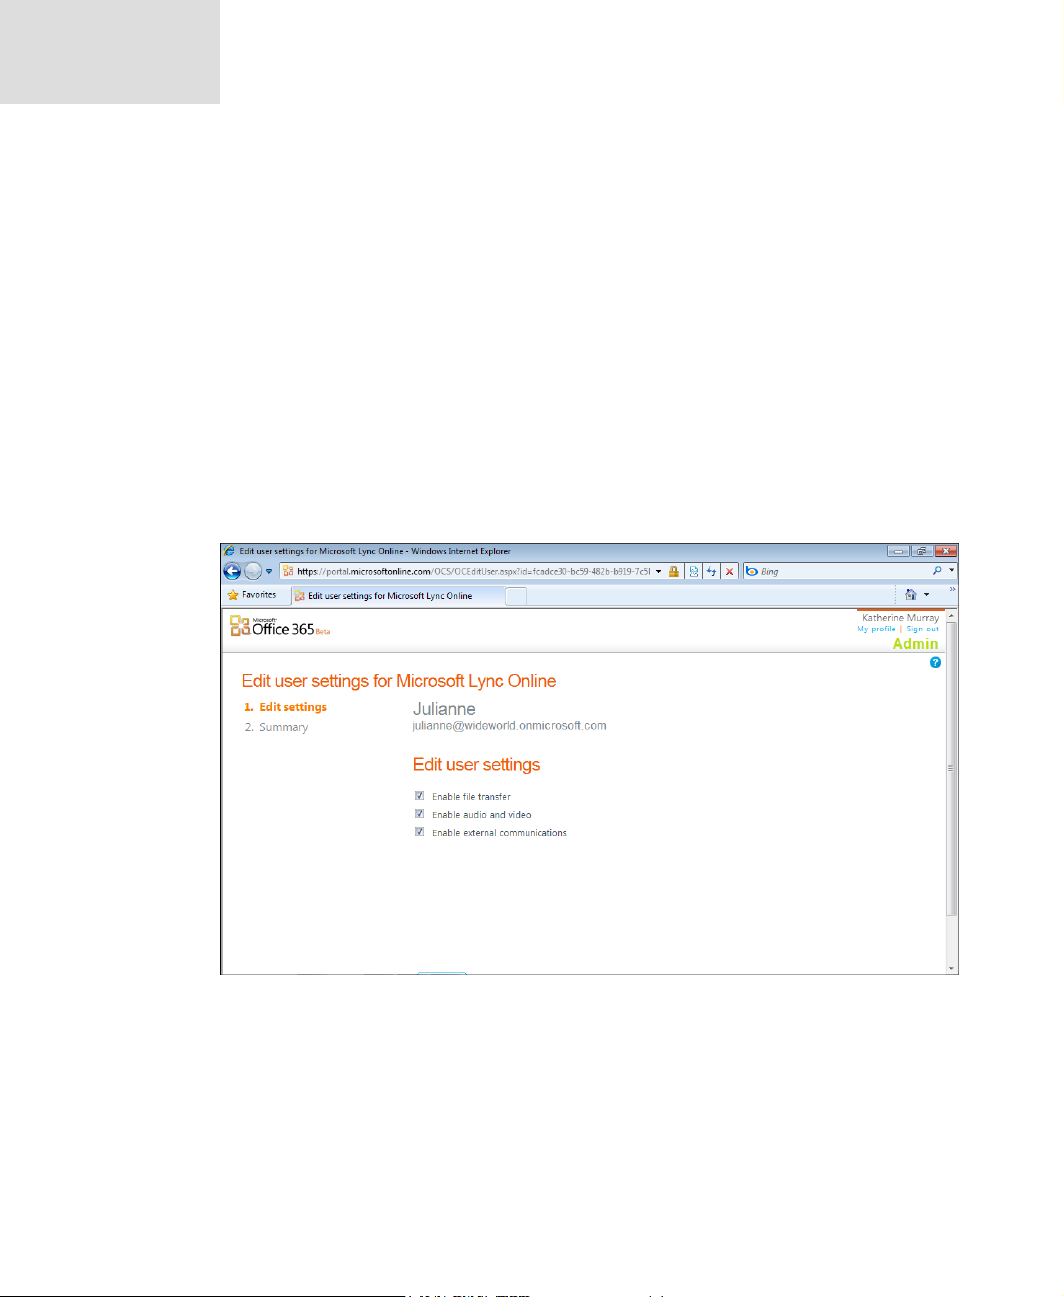
68 Chapter 3 Administering an Ofce 365 Account
Modifying User Information
To change the settings for a particular user, click User Information in the Lync Online
Control Panel. This link takes you to a page listing the various users on your account.
Select the check box for the user with the information you want to change and click Edit
User. As you can see in Figure 3-18, Lync Online displays a window showing the user’s
information so that you can change the settings that do the following:
■
Allow the user to send les using Lync.
■
Enable the user to hear audio and watch video.
■
Let the user communicate with others outside your Ofce 365 team.
By default, all these options are enabled; to disable the capabilities, simply deselect the
check box of the item you want to change.
FIGURE 3-18 You can set program capabilities for individual users in Lync Online.
Setting Up Dial-in Conferencing
In the bottom half of the Lync Online Control Panel, you’ll see information about dial-in
conferencing. This feature enables team members to join an online meeting by call-
ing in. Before you can set up dial-in conferencing in Lync, you need to have an account
Page 94
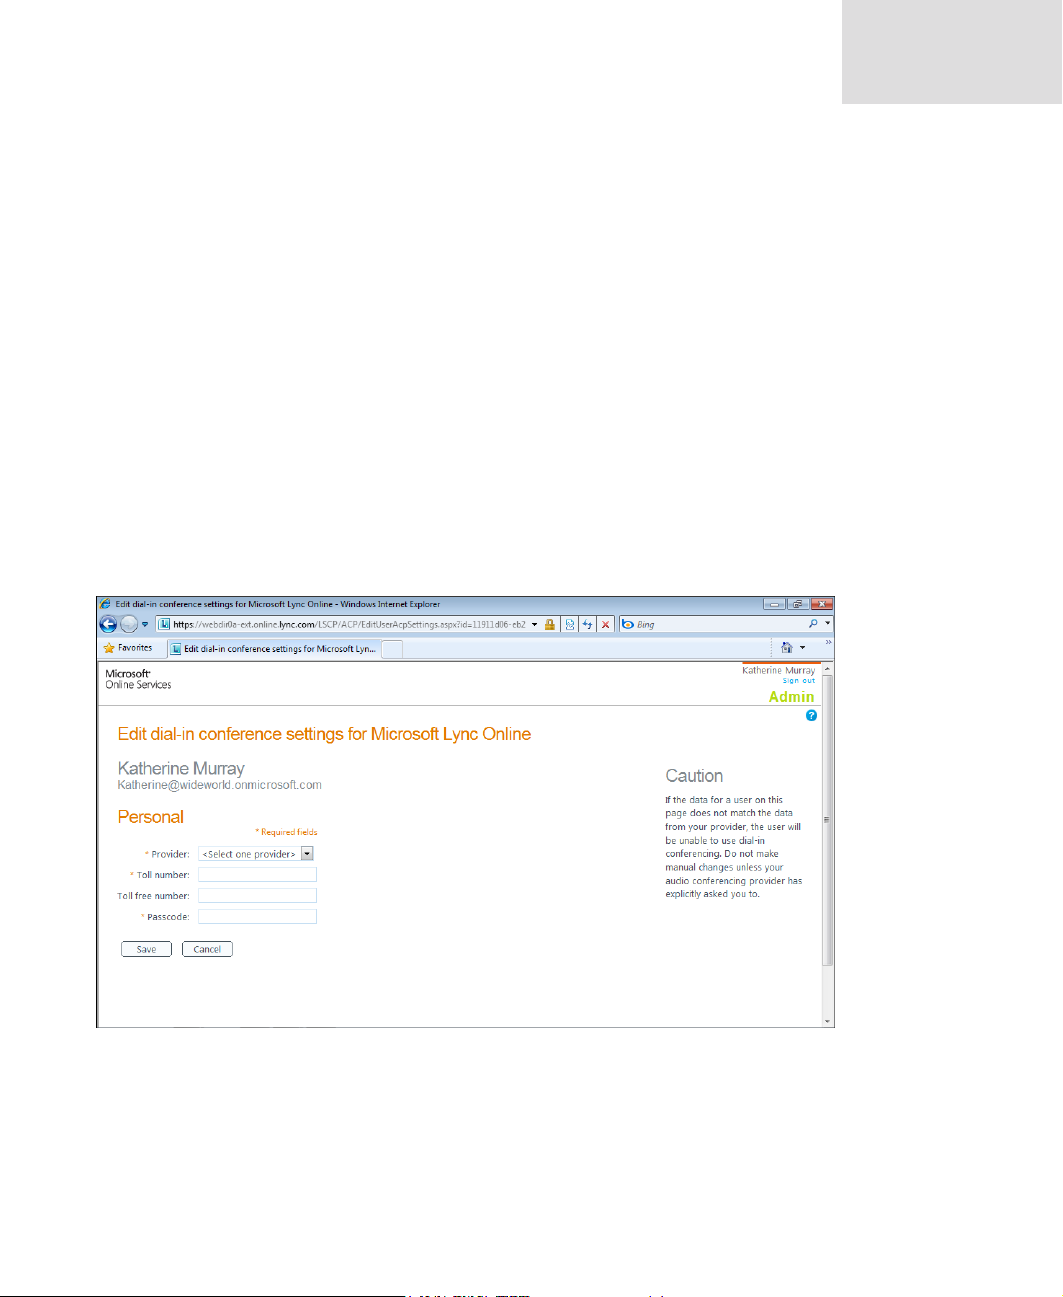
Chapter 3 69
Conguring Lync Online
established with an audio-conferencing vendor. You can then add the information the
vendor provides you—such as the call-in number and password—to each user account
so that your team members can join audio conferencing when you host online meeting
using Lync.
To enter the dial-in conferencing information, click the Manage link. The Edit DialIn Conference Settings window appears. (See Figure 3-19.) You can add the dial-in
conference information to a user account by clicking the user name and following these
steps:
1. Click the Provider arrow, and choose the name of your provider from the list.
2. Type the call-in local number.
3. Type the call-in toll-free number.
4. Type the passcode for the account.
5. Click Save.
FIGURE 3-19 Enter the audio-conferencing access numbers and passcode for each user who will
participate.
NOTE Ofce365cautionsyouthattheinformationyouenterforvarioususersmustmatch
exactlytheinformationprovidedbyyouraudio-conferencingvendor.Otherwise,theuserwon’tbeabletojoinintheconferencewhenthetimecomes.
Page 95
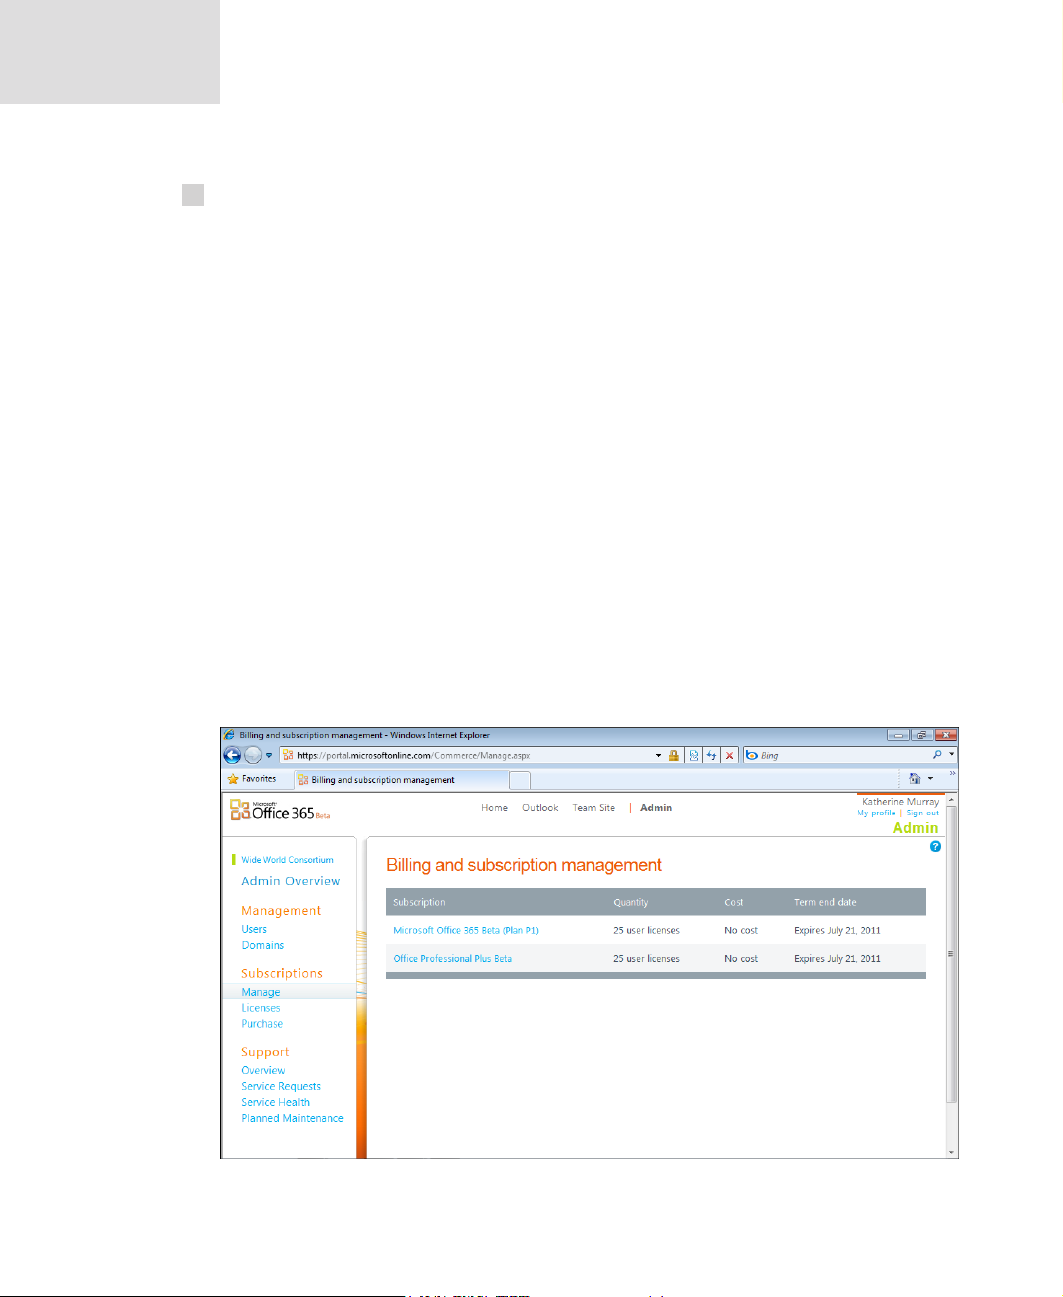
70 Chapter 3 Administering an Ofce 365 Account
Managing Your Subscriptions
One of the beautiful things about Ofce 365 is that it’s built on a model of efciency. You
can purchase only what you need—for only the team members you need—and keep
your costs down and your support load light while moving toward the business-critical
goals on your horizon. To help you manage who uses what and when they use it, Ofce
365 gives administrators the means to review, manage, and change the subscriptions to
the services their teams use.
You’ll nd the tools you need for reviewing and managing subscriptions in the
Subscriptions area on the left side of the Admin Overview page. Each of the three links
offers you a different way to survey your Ofce 365 subscriptions:
■
Manage provides you with a listing of all current subscriptions in use by your
team.
■
Licenses shows the number of licenses you have available (and are using) as part
of your subscriptions.
■
Purchase enables you to instantly add to the subscriptions you already have.
To view your team’s subscriptions in Ofce 365, click the Manage link. The table shown in
Figure 3-20 will appear. (Your subscriptions might look a bit different, of course.)
FIGURE 3-20 In the Subscriptions area, you can review the subscription and licenses available in your
Office 365 account.
Page 96

Chapter 3 71
Getting Help with Ofce 365
Note The image in Figure 3-20 was captured during the beta program, which is
why “No cost” appears in the Cost column.
When you click Licenses, Ofce 365 shows you the number of licenses currently in use by
your team members, as well as the total number of licenses available to you. You can give
users access to services by returning to the Admin Overview page and clicking Assign
User Licenses in the Admin Shortcut area in the top center portion of the screen. Then
click the user name and either select the check boxes of services you want to add or clear
the check boxes of services you want to remove.
Tip If you need to pick up a few more licenses, remove user accounts you’ve
assigned that you no longer need.
Finally, the Purchase window enables you to add to the subscriptions and licenses you
have available in Ofce 365. This enables you to add on to what you need in real time,
without requiring you to leave the site, purchase or download software, or jump through
any of the hoops that installing new programs often requires. Nice!
Getting Help with Ofce 365
Even though Ofce 365 is built on what are likely to be some of your favorite and most
familiar applications, learning the whole lay of the land—and creating the kind of
setup you want—does involve a learning curve. Knowing this, Microsoft has created an
engaged and active support community to help you get the help you need.
You’ll nd access to help throughout Ofce 365, whether you’re working in the Admin
area or not. For general help needs, you can click in the search box at the top of the
right-most column and type a word or phrase that reects what you’re looking for. You
can also click any of the links on the right—including the Community links—to nd
additional how-tos, ask a question in the forums, or read the Ofce 365 blog.
On the Admin Overview page, you also have the option of displaying the Support
Overview page, where you can search for help in the community, see what people are
saying in the forums about the different services, and get a bird’s-eye view of your billing
and service requests. (See Figure 3-21.)
Page 97

72 Chapter 3 Administering an Ofce 365 Account
FIGURE 3-21 The Support Over view page gives you, as an admin, a big-picture look at various help
offerings.
Other help tasks that fall to you as the administrator involve creating service requests for
those times when you need professional assistance with the site, and checking over-
all system status to ensure there are no interruptions in service. These tasks are very
important when you’ve got people logging in from all over the world and the web is
your primary means of connection.
Creating Service Requests
Anyone who has ever spent time on the phone with technical support knows this
universal truth: it is not fun.
First, you’re probably frustrated because the software isn’t working the way it should.
Second, you probably have a deadline hanging over your head, which adds pressure.
Third, as an administrator, you’re at least in some capacity the one who has to gure this
stuff out. So when you’re having trouble with a program or you have a question you or
your team members can’t nd the answer to, what do you do?
Begin by clicking Admin in Ofce 365 to access the Admin Overview page. Then click
Service Requests in the Support area on the left side of the screen. In the Service
Requests window, click New Request. (See Figure 3-22.) This opens a new Service Request
Page 98

Chapter 3 73
Getting Help with Ofce 365
window so that you can ll in the information you need in order to communicate your
problem clearly to tech support.
FIGURE 3-22 You can start a new service request by clicking Service Requests in the Support area of the
Admin Overview page.
Here are the steps to get started lling out the service request form:
1. In the Identify Issue window, identify the problem as clearly as you can. Click the
Service arrow, and choose the service you are having trouble with (Exchange, Lync,
or SharePoint).
2. Click the Service Area arrow, and choose the category that reects what you’re
having trouble with.
3. Click the Problem Description arrow, and choose your questions or issue from the
list.
4. Click Operating System, and choose the operating system running on your
computer. Similarly, choose the Ofce version and browser you use.
5. Click Next.
Page 99

74 Chapter 3 Administering an Ofce 365 Account
6. Enter a title that gives the technician an idea of the problem you’re having.
7. Click in the Description area, and describe the problem fully.
8. In the Error Message area, provide any error messages you receive.
9. Click the arrow to the right of Have You Reproduced This Problem On More Than
One Computer?, click either Have Not Tried, No, or Yes to let the technician know
whether the problem exists on only one system or throughout your site.
10. Click Next.
It’s often helpful for tech support personnel to see what you see when they are
evaluating a problem you’re having. You can capture a screen shot of any error message
or problem you see on-screen and send the image to the technician. To capture the
image, you can simply press Prt Sc while the problem is displayed on the screen and then
paste the picture into your favorite image editor (such as Windows Paint); then save the
le. Attach the le to your service request in the Attach File page by clicking the Attach
A File link. Navigate to the le you want to attach, click Open, and when prompted, click
Yes to afrm that you do want to attach the le.
The le appears in the center of the File Attachments page. You can remove the
attachment if you’d like by clicking the Remove link that appears to the right of the
attached le.
Tip Of course, you aren’t just limited to capturing a screen shot of the
problem—you can use Problem Steps Recorder in Windows 7 to record
the steps that reproduce the problem and then upload the le along with
your service request.
Finally, send your service request to Microsoft by clicking the Submit button. Ofce 365
displays a Conrmation window, providing a summary of your request and providing a
reference number. Click Finish to return to the Service Requests page.
Checking System Status
When you depend on a web-based service to provide connectivity to your team
members and access to your programs and les, making sure the service is up and
running correctly is a major concern. Recognizing this, Ofce 365 keeps you clued in
about challenges and updates in the Ofce 365 system. If you’re having trouble accessing
a service, for example, your rst step in solving the problem is to check the status of the
overall system to make sure there aren’t service glitches somewhere along the way.
Page 100

Chapter 3 75
Getting Help with Ofce 365
To check the system status of Ofce 365, follow these steps:
1. Click Admin to display the Admin Overview screen.
2. In the Support area on the left side of your screen, click Service Health. The Service
Health screen shows you the status of all the different services running in Ofce
365. (See Figure 3-23.)
3. Scroll down the list to check the status of all services.
4. Click the blue-and-white information icon to display the details about a particular
service interruption.
FIGURE 3-23 Check the system status of Office 365 to make sure that all services are up and run-
ning properly.
If you want to nd out when the software will be going through planned maintenance
upgrades, click Planned Maintenance on the left side of the screen. You’ll be able to see
when the next maintenance activities are scheduled, read details about the activity, and
see the date and time the event is scheduled. This information will help you avoid scheduling site events that might be affected by the changes. For example, you might want to
avoid scheduling an online meeting using Lync at the precise time the Lync service is set
to undergo program maintenance.
 Loading...