

Page 1

8290titl.fm Page 1 Monday, February 21, 2000 2:08 PM
Nokia 8290
User Guide
version 0.02
•
8290 UG version 0.02 2/21/00
Page 2

8290titl.fm Page 2 Monday, February 21, 2000 2:08 PM
The wireless phone described in this guide is approved for use in GSM 1900
networks.
Copyright information
Part No. ???????,
© 2000 Nokia Mobile Phones. All rights reserved.
Printed in Canada 04/00
Nokia, Nokia Connecting People and the Original Accessories logos are
trademarks of Nokia Corporation and/or its affiliates.
US Patent No ???????? and other pending patents. T9 text input software
Copyright (C) 1999. Tegic Communications, Inc. All rights reserved.
The information contained in this Owner’s Manual was written for Nokia
phone NSB-7. The right to make changes and improvements to any of the
products described in this guide without prior notice is reserved.
These commodities are authorized by the U.S. Government for export only to
Canada, Mexico, or the United States. They may not be resold, diverted,
transferred, or otherwise disposed of in any other country, either in their
original form or after being incorporated through an intermediate process into
other end-items, without the written approval of the U.S. Department of
State.
FCC/Industry Canada Notice
Your phone may cause TV or radio interference (for example, when using a
telephone in close proximity to receiving equipment). The FCC or Industry
Canada can require you to stop using your telephone if such interference
cannot be eliminated. If you require assistance, contact your local service
facility.
This device complies with part 15 of the FCC rules. Operation is s ubject to the
condition that this device does not cause harmful interference.
8290 UG version 0.02 2/21/00
Page 3

8290ug v2TOC3.fm Page i Friday, February 18, 2000 5:41 PM
Contents
For your safety......................1
Your phone’s label................2
1. Welcome...............................3
Using this guide....................3
Documentation
conventions............................3
Terms....................................... 4
Accessing this guide
online.....................................4
Keys and features .................5
Front.........................................5
Back..........................................5
Left side...................................6
Bottom.....................................6
Network services...................7
Contacting Nokia..................7
2. Before you begin..................9
Preparing your phone
for use ...................................9
Install the SIM card ..............9
Notes about SIM cards......10
Install the battery............. 10
Charge the battery..............10
Remove the battery............11
3. About your phone..............12
Switch on your phone........12
About the Start screen.......13
About indicators and
icons........................................13
4. Making and answering
calls......................................16
Make a call..........................16
Check the signal
strength.................................16
Use the keypad....................16
Use the phone book...........17
Advanced calling options.17
Adjust the earpiece volume
during a call.........................17
End a call......... ....................1 7
Answer a call................. ......18
Caller ID...............................18
Reject a call.........................18
Dial any of the 10 last-
dialed numbers....................18
5. The menu............................19
Using the menus.................19
Selection keys......................19
Scroll keys.............................19
Scroll bar...............................20
Help text...............................20
Menu shortcuts...................20
List of menu shortcuts.......21
6. Entering letters and
numbers...............................25
Standard text input............25
ABC mode.............................25
123 mode..............................27
8290 UG version 2 i 2/18/00
Page 4

8290ug v2TOC3.fm Page ii Friday, February 18, 2000 5:41 PM
Use special characters in
names and phone
numbers 27
7. Phone book 28
Save names and numbers 28
Save a name and
number...................................28
Save a number only............28
Save a name and number
while in a call.......................2 8
If your phone book is full..29
Find names in the phone
book.....................................29
From the Start screen........29
While in a call...................... 2 9
Edit (revise) names and
numbers...............................30
Erase names and numbers . .30
Erase stored names and
numbers.................................30
Erase your entire phone
book........................................30
Two types of memory.........31
Switch between internal
memory and SIM
memory..................................31
Call log ................................32
Look up dialed calls............32
Look up received calls........32
Check for missed calls.......32
Clearing call lists.................34
8. Voice mail..................... ......35
Save the voice mailbox
number.................................36
Work with two phone
lines........................................36
Listen to your voice
messages..............................36
9. Profiles................................37
Select profiles .....................37
10. Advanced calling
features.............................39
Active call options..............3 9
Use call waiting ..................39
Use in-call options .............41
Put a call on hold ...............4 1
Make a new call..................42
Send touch tones............... 42
End all calls.........................43
Access the phone book .......4 3
Access menus......................43
Mute/unmute the
microphone .........................44
Conference calls..................44
Transfer a call .....................45
Call forwarding...................46
Activate call forwarding...46
Cancel call forwarding......47
Check call forwarding
status.....................................47
8290 UG version 2 ii 2/18/00
Page 5

8290ug v2TOC3.fm Page iii Friday, February 18, 2000 5:41 PM
Automatic redial.............. ...48
Activate automatic
redial.......................................48
Calling card.........................48
Save calling card
information...........................48
Choose a calling card.........49
Make a calling card call....50
Use Voice dialing................50
Add a voice tag to a phone
book entry.............................50
Notes about voice tags......51
Make a call using voice
recognition............................52
Play back a voice tag.........52
Change a voice tag.............52
Erase a voice tag.................53
1-touch dialing... ................53
Assign a number to a
1-touch dial key..................54
Call a 1-touch dial
number...................................54
Change 1-touch dialing
numbers.................................54
Erase 1-touch dialing
numbers.................................54
Make an inter n ational call 5 5
Use the phone book............56
Caller groups.......................57
Add names to a caller
group.................................... 57
Remove names from a caller
group......................................57
Assign a ringing tone to a
caller group..........................57
Rename a caller group......58
Assign group graphics.......58
Call timers 59
If you have two phone
lines........................................59
View the call duration.......59
Reset call timers to 0........59
Show call timer during
calls.........................................60
Use call cost limits..............60
Set a call cost limit............60
Remove a call cost limit...61
Show call costs ...................61
View call costs.................... 61
Clear call cost counters....61
Show costs in......................62
11. Customizing your
phone ........... ....................63
Profiles.................................63
Select a profile....................63
Customize the profile....... 63
Rename a profile.................67
Accessory profiles...............67
Set up car profile................68
Restore factory settings .....6 8
Choose the display
language..............................68
8290 UG version 2 iii 2/18/00
Page 6

8290ug v2TOC3.fm Page iv Friday, February 18, 2000 5:41 PM
Set up the clock..................69
Set the clock.........................69
Select the time format......69
Display the clock.................70
Set automatic update of
date and time.......................70
12. Security features..............71
Lock the keypad
(Keyguard)...........................71
PIN and PUK codes.............72
PIN codes...............................73
PUK codes.............................. 7 4
Security code.......................75
Fixed dialing........................75
Turn fixed dialing on or
off............................................76
Add numbers to the fixed
dialing list.............................76
Restricting calls ..................76
Turn on call restrictions....7 6
Set up a closed user
group ...................................77
13. Select a system ............. ...78
14. Text messages ..................79
Set up text messaging....... 79
Save your message
center number......................79
Writing messages................80
Using standard text
input.......................................80
Using predictive text
input.......................................80
Predictive text input
tools........................................81
Save messages in the
outbox....................................84
Send the text message......85
Resend a message from
the outbox...........................85
Read text messages.............86
Read new text messages
now.........................................86
Read new text messages
later....................................... 86
Erase a message..................86
Reply to a message............ 87
Forward a message .............87
Retrieve a number...............88
Message settings.................88
Change settings for
some messages....................88
Change common settings
for all messages..................89
Message storage .................89
Picture messages.................90
Send picture messages......90
Send picture messages
with text................................90
Receive picture
messages...............................91
Other picture message
options...................................91
8290 UG version 2 iv 2/18/00
Page 7

8290ug v2TOC3.fm Page v Friday, February 18, 2000 5:41 PM
15. Your personal digital
assistant...........................92
Calendar...............................92
View the calendar...............92
Enter the date......................92
Enter the time......................93
Send/receive calendar
notes.......................................95
Alarm clock.........................96
Set the alarm clock.............96
Manage the alarm..............96
Turn off the alarm clock....9 7
Business cards.....................97
Send a business card..........97
Send a business card
using IR..................................97
View a received business
card.........................................98
Save a viewed business
card.........................................98
Delete a viewed
business card ........................98
PC Suite...............................98
Calculator............................99
Use the calculator...............99
Convert currency.................99
16. Your phone and other
devices............................101
Fax and data calls.............101
Make a fax or data call..101
Receive a data or fax
call........................................101
Send information via IR...102
Prepare the devices for
infrared connection .........102
Receive data via th e IR
port.......................................102
Send data via the IR
port.......................................102
Check the status of an
IR connection.....................103
Print using IR .................. 103
Print text messages..........103
Print phone book
entries..................................103
17. Fun and games...............105
Games................................105
Snake....................................105
Logic.....................................105
Memory...............................106
Rotation...............................106
Download ringing tones...106
Notification of re ce ived
ringing tone........................106
Listen to received
ringing tones......................107
Save received ringing
tones.....................................107
Discard received ringing
tones.....................................107
8290 UG version 2 v 2/18/00
Page 8

8290ug v2TOC3.fm Page vi Friday, February 18, 2000 5:41 PM
18. Reference information...108
Batteries, chargers, and
accessories.........................108
Important safety
information.......................110
Traffic safety......................110
Operating environment..110
Electronic devices............111
Potentially explosive
atmospheres......................112
Vehicles...............................113
Emergency calls ................113
Make an Emergency
Call.......................................114
Radio Frequency (RF)
Signals.................................115
Care and maintenance....115
Accessories ........................116
Batteries .......................... 117
Chargers an d other
accessories.........................118
19. Technical information...121
20. Troubleshooting .............122
21. Frequently asked
questions (FAQ)..............124
8290 UG version 2 vi 2/18/00
Page 9
8290ug v2.fm Page 1 Friday, February 18, 2000 5:42 PM
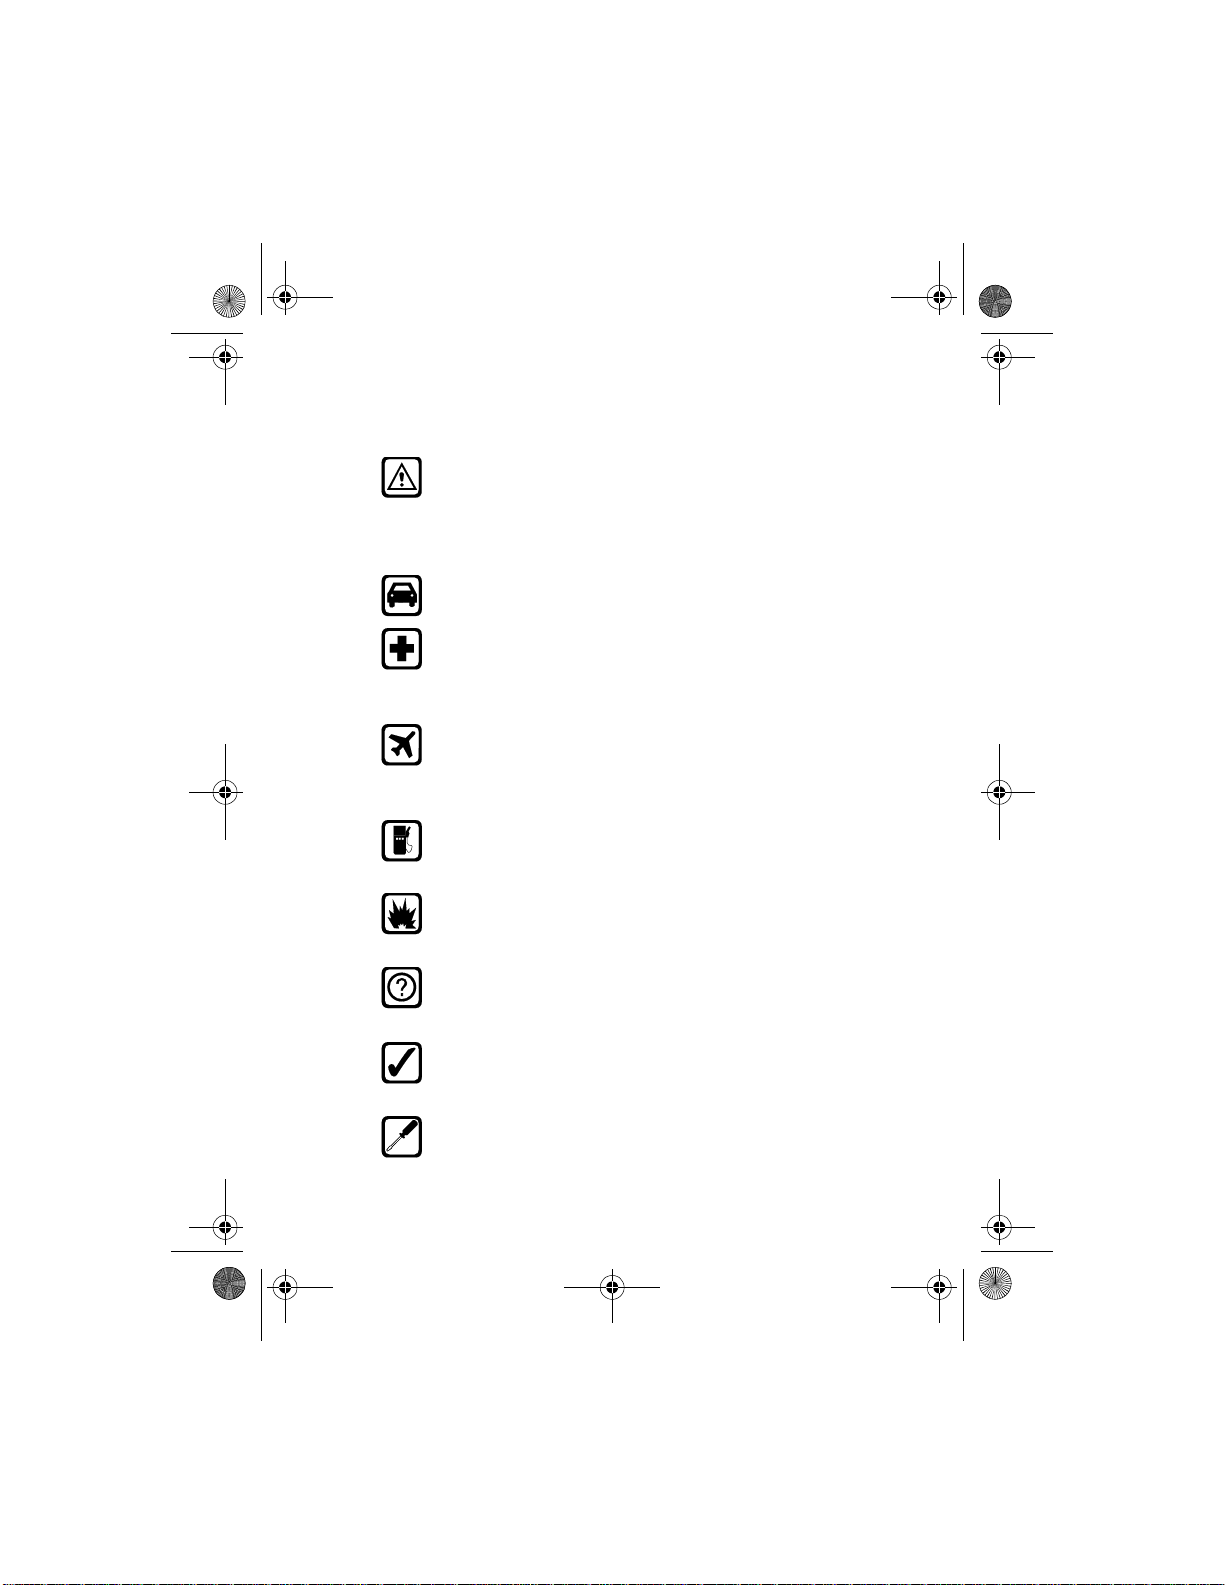
• For your safety
This section provides various safety guidelines. Read this
information before using your mobile phone (which will now be
referred to as “phone”). Failure to comply with these guidelines
could prove either dangerous or illegal. For more detailed safety
information, refer to “Important safety information” on page 11 0.
Road safety comes first
Don’t use a phone while driving. Park the vehicle first.
Switch off in hospitals
Switch off your phone when you are in a hospital or when you are
near medical equipment. Follow any regulations or rules that are
in force.
Switch off on aircraft
Do not use phones on airplanes as this can cause interference with
the navigational equipment. Also, the use of phones on airplanes
is illegal.
Switch off when refueling
Do not use the phone at a refueling point or near fuel or chemicals
of any kind.
Switch off near blasting
Do not use the phone where blasting is in progress. Observe
restrictions and follow any regulations or rules that are in force.
Interference
All phones are susceptible to interference, which could affect
performance. This could impede the making of an emergency call.
Use sensibly
Use only in the normal position (to ear). Avoid unnecessary
contact with the antenna when the phone is on.
Qualified service
Only qualified service personnel can install or repair cellular
phone equipment.
8290 User Gui de v2 2/18/00 [ 1 ]
Page 10

8290ug v2.fm Page 2 Friday, February 18, 2000 5:42 PM
Accessories and batteries
Use only approved accessories and batteries. Do not connect
incompatible products.
Connecting to other devices
When connecting to any other device, read its user’s guide for
detailed safety instructions. Do not connect incompatible
products. Remember to make backup copies of all important data.
Making calls
Make sure the phone is switched on and in service. Enter the
phone number, including the area code, then press . To end
a call press . T o an swer a call press .
Emergency calls
Make sure the phone is switched on and in service. If the word
Clear appears on the screen above the right selection key, press
and hold it to clear the display. Enter the emergency number , then
press . Give your location. Do not end the call until told to do
so.
Infrared precautions
Do not point the infrared (IR) beam at anyone’s eyes or allow it to
interfere with other IR devices.
• Your phone’s label
If you remove your battery (refer to “Remove t he batter y” on page 1 1) you
can find the phone’s label on the back portion of the phone. This label
includes various information about the phone, such as the model number.
If you ever have to call Nokia (refer to “Contacting Nokia” on page 7) or
your service provider (refer to “Contacting your service provider” on
page 8), you might be asked for this information. Therefore, do not remove
the phone’s label.
[ 2 ] 8290 User Guide v 2 2/18/00
Page 11

8290ug v2.fm Page 3 Friday, February 18, 2000 5:42 PM
1. Welcome
Congratulations on your purchase of a Nokia 82908290 mobile phone.
You are now on your way to using a new and exciting tool. However,
before you use your phone, read this chapter. It provides information you
need for using this guide and for contacting Nokia.
• Using this guide
For clarity, this guide uses va rious icons and terms. These icons and terms
are described in “About indicators and icons” on page 13 and “Terms” on
page 4.
Additionally, the guide describes various network services features,
enabled by your service provider. Refer to “Network services” on page 7.
Documentation conventions
This guide uses various types of texts to indicate specific items. These are
called documentation conventions. The table below lists and describes
these conventions.:
Welcome
Convention Description
italic Indicates emphasized text.
Example: You cannot use your phone without this
card.
8290 User Gui de v2 2/18/00 [ 3 ]
Page 12

8290ug v2.fm Page 4 Friday, February 18, 2000 5:42 PM
bold Indicates one of the following items:
• Text displayed on your phone’s screen.
Example: Select or Silent.
• Special text such as Notes and Warnings.
• A Web link. Example: The Nokia World Wide Web
site at www.nokia.com.
Terms
This guide uses the following terms:
• Press means to briefly press and release a button.
• Press xxx means to press the selection key that is below xxx.
• Cross references appear as "see page x."
• Press and hold means to press and hold a button for 1 to 3 seconds
(depending on the feature being used), then release the button.
• Accessing this guide online
The latest version of this User guide may be available on the Nokia World
Wide Web site at www.nokia.com. Go to Phones, US link, and then
perform a search to access this documentation.
[ 4 ] 8290 User Guide v 2 2/18/00
Page 13
8290ug v2.fm Page 5 Friday, February 18, 2000 5:42 PM
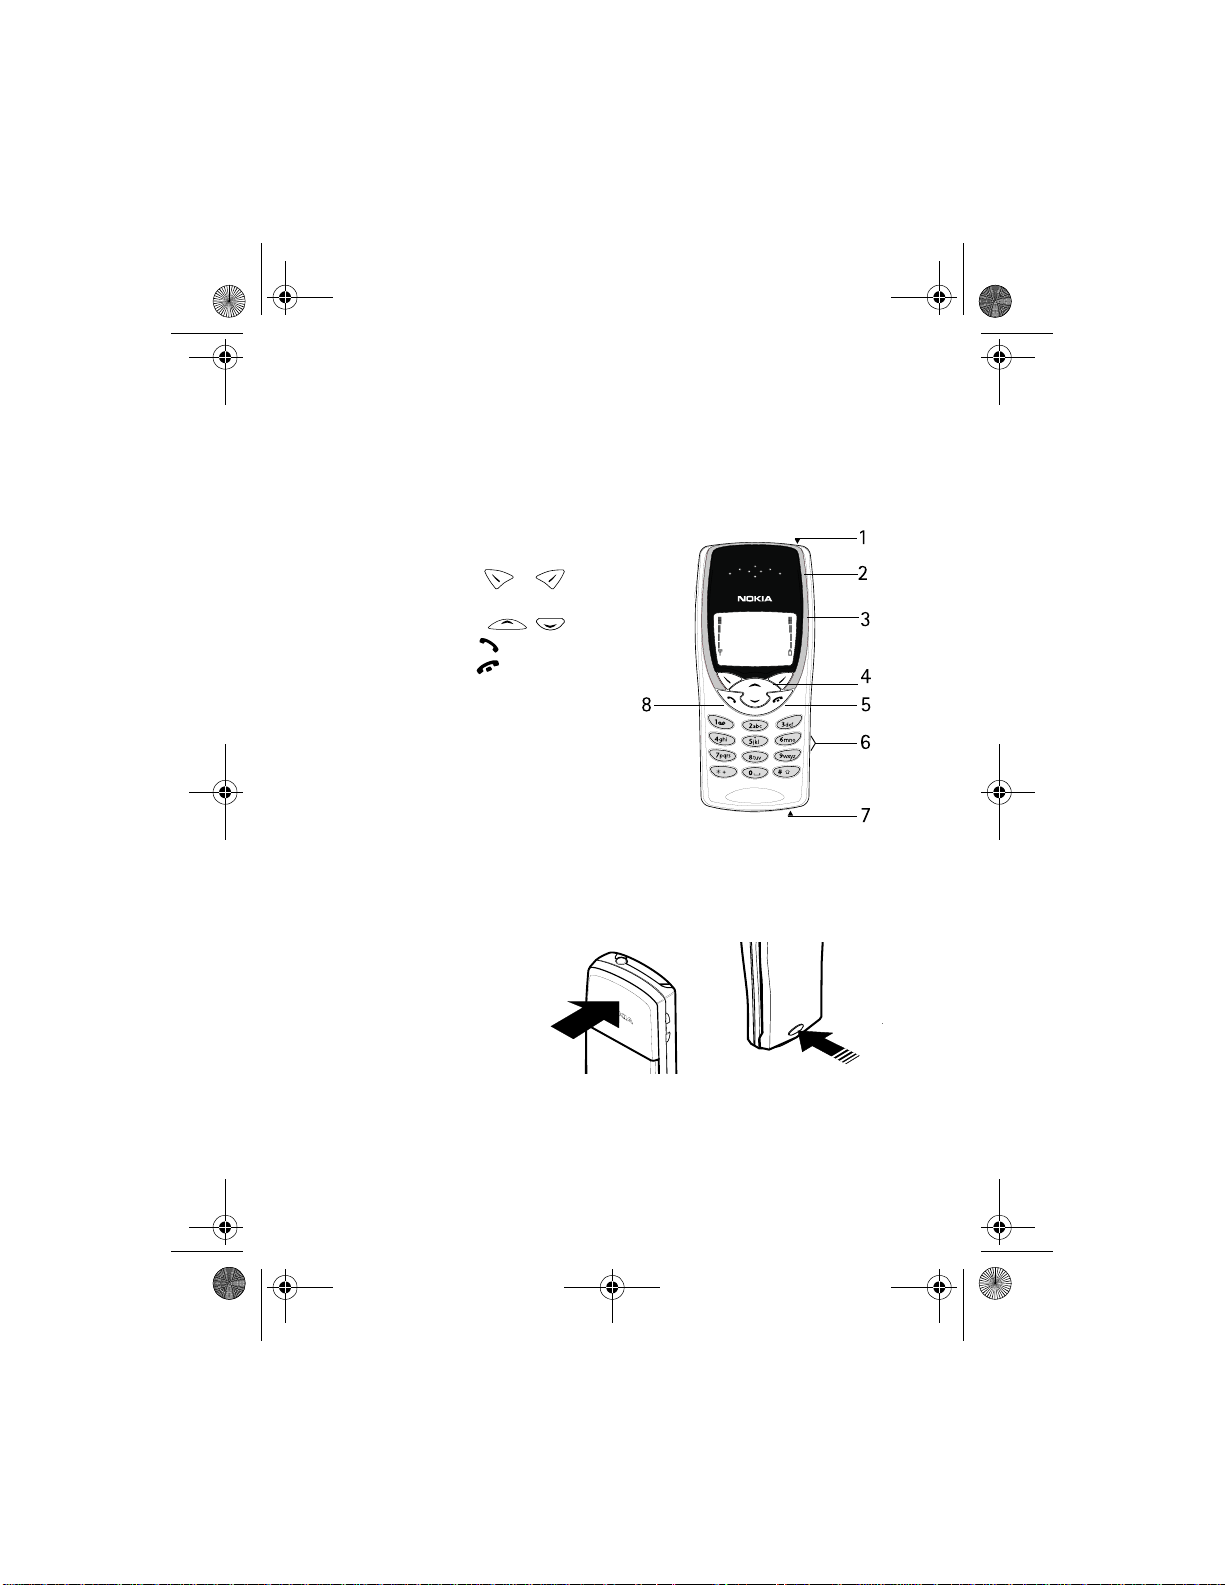
• Keys and features
Front
1- Power key
2- Earpiece
3- Screen
4- Selection
and
scroll keys
5- Talk key
6- End key
7- Number keys
8- Microphone
Welcome
Back
Antenna
8290 User Gui de v2 2/18/00 [ 5 ]
Back cover
release
Page 14

8290ug v2.fm Page 6 Friday, February 18, 2000 5:42 PM
Left side
Earpiece volume buttons
IR port
Bottom
Charger connection Headset/car kit connection
[ 6 ] 8290 User Guide v 2 2/18/00
Page 15

8290ug v2.fm Page 7 Friday, February 18, 2000 5:42 PM
• Network services
A number of features known as network services are described in this
guide. These are special services to which your wireless service provider
can give you access.
These services include the following:
• Voice privacy • Call forwarding
• Call waiting • Send own numbe r
• News and info services • Service command editor
• Cell info display • List of own numbers
• Notifications on SIM update • Caller ID
Before you can take advantage of these network services features, you
must subscribe to them through your service provider.
Your service provider will give you instructions on how to use these
network services. This guide will tell you when you need to contact your
service provider for more step-by-step information.
Whenever this guide talks about a network services feature, the text will
not only tell you that this is a network services feature, but will also
display this icon
Note: Some networks might not support all language-dependent
++
after the first mention of the feature within a chapter .
characters and/or services.
Welcome
• Contacting Nokia
The Nokia Customer Service department is available to provide you with
help or more information. Before you contact this department, however,
please have the following information available:
8290 User Gui de v2 2/18/00 [ 7 ]
Page 16

8290ug v2.fm Page 8 Friday, February 18, 2000 5:42 PM
• The phone’s model number • The phone’s IMEI (serial) number
• Your Zip code
To find the model and serial number, you have to remove the battery. Refer
to “Remove the battery” on page 11 for step-by-step instructions on this
procedure.
Finally, if you are calling about any type of phone accessory, please have
the accessory available. For example, if you are calling about a headset,
please have it handy. This way , if you are asked a specific question about
the accessory, it will be available for quick reference.
Customer Service, USA
Nokia Mobile Phones
7725 Woodland Center Boulevard, Suite 150
Tampa, FL 33614
Tel: 1-888-NOKIA2U (1-888-665-4228)
or (1) 813-880-5850
Fax: (1) 813-249-9619
TTY: 1-800-24NOKIA (1-800-246-6542)
Customer Service, Canada
Nokia Products Ltd.
575 Westney Rd. South
Ajax, Ontario L1S 4N7
Tel: (1) 905-427-6654
[ 8 ] 8290 User Guide v 2 2/18/00
Page 17

8290ug v2.fm Page 9 Friday, February 18, 2000 5:42 PM
2. Before you begin
Before you begin using your phone, you need to perform several tasks. This
section tells you how to complete these tasks.
• Preparing your phone for use
To prepare your phone, you need to perform several steps, which are
described in the following subsections:
•“Install the SIM card” (see below).
•“Install the battery” on page 10
•“Charge the battery” on page 10
Install the SIM card
1 Switch off the phone.
2 With the back of the phone facing
you, press the back cover release
button and slide the back cover off.
Before you begin
3 Lift out the battery.
8290 User Gui de v2 2/18/00 [ 9 ]
Page 18
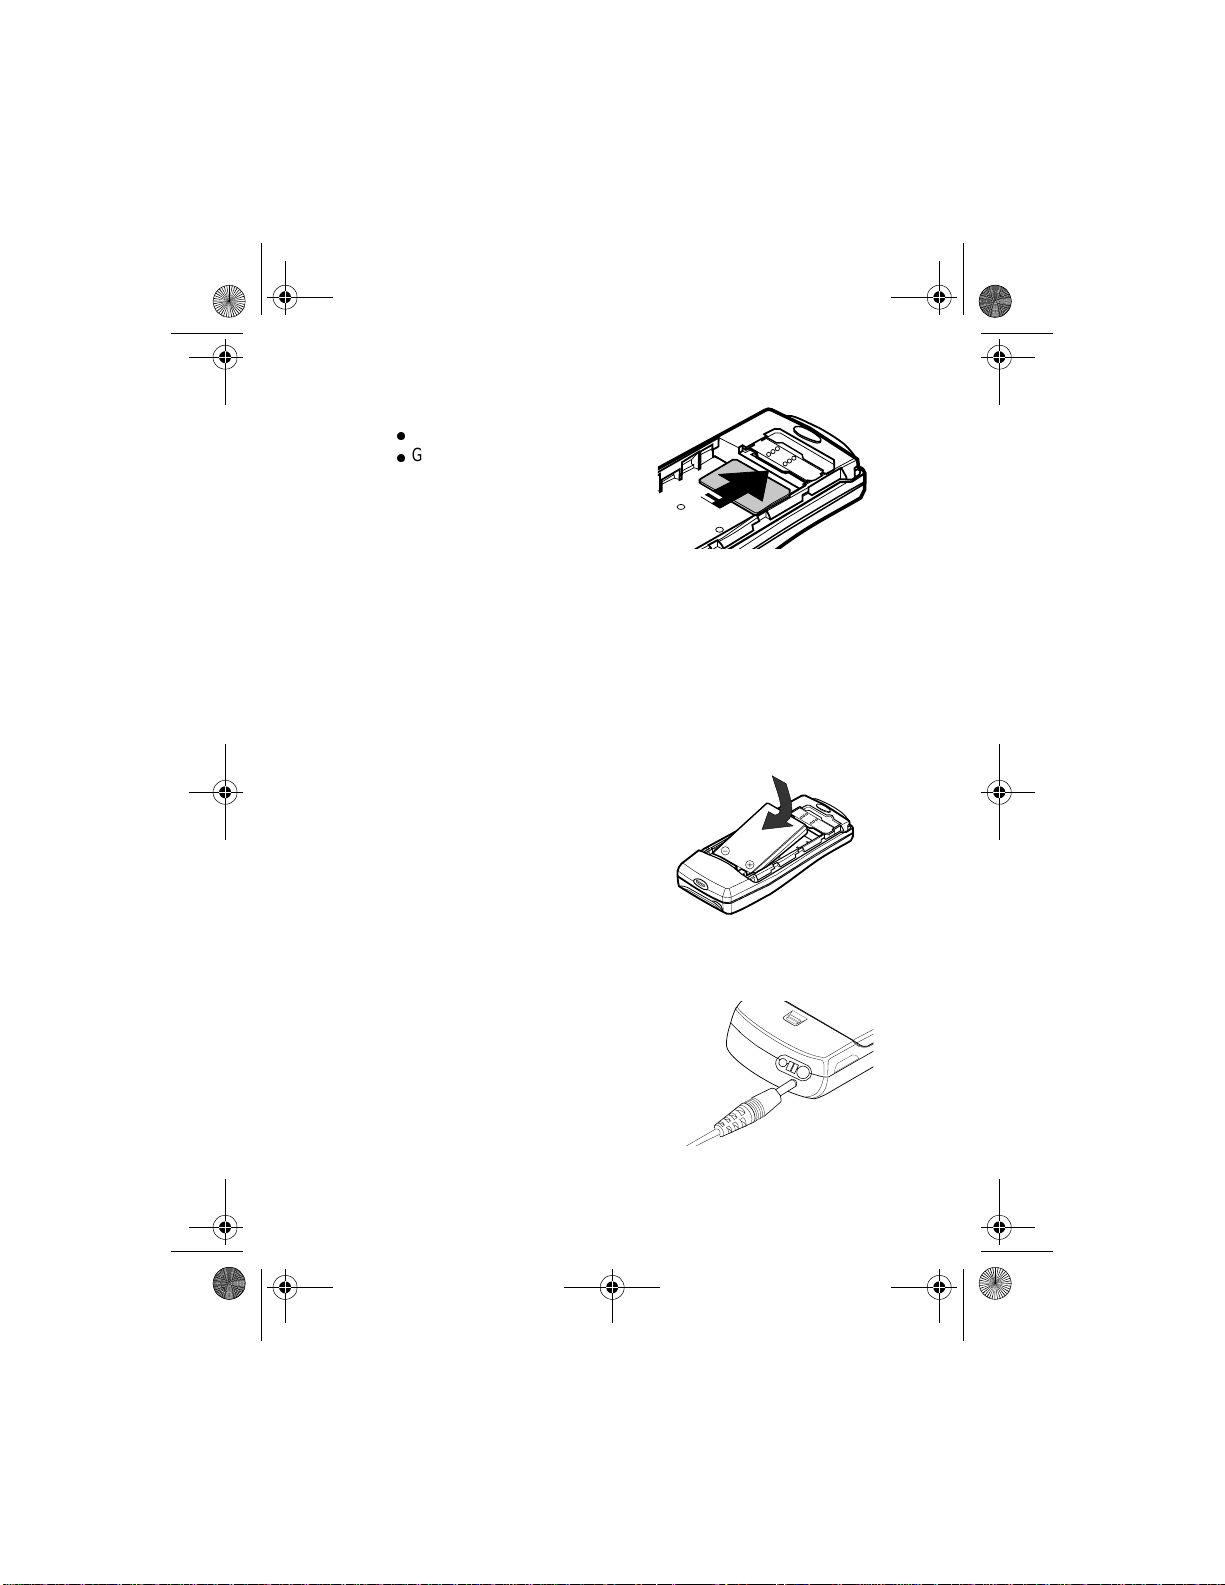
8290ug v2.fm Page 10 Friday, February 18, 2000 5:42 PM
4 Align the SIM card:
l
Beveled corner on the right
l
Gold contact area downward.
5 Insert the SIM ca rd .
Notes about SIM cards
• Keep all miniature SIM cards out of the reach of small children.
• The SIM card and its contacts are easily damaged by scratches or
bending, so be careful when handling, inserting, or removing the card.
• You must remove the battery to access the SIM card. Always make sure
that the phone is switched off before you remove the battery.
Install the battery
1 Place the battery in the
compartment with the label side
facing up and the golden contact
area aligned with the contact
prongs.
2 Slide the battery into place.
3 Slide the cover back into place
Charge the battery
1 Connect the lead from the
charger to the bottom of the
phone.
[ 10 ] 8290 User Guide v2 2/18/00
Page 19

8290ug v2.fm Page 11 Friday, February 18, 2000 5:42 PM
2 Connect the charger to a standard
wall outlet. The the battery power
indicator (or battery bar) appears
on the screen and starts scrolling. If
the phone is on, Charging appears
also.
Note: If the battery is completely
empty, it might take a few minutes before the battery bar
appears on the screen.
Tip: You can use the phone while it’s charging.
3 When the battery bar stops scrolling, the battery charge is complete.
Battery full appears also, if the phone is on.
Note: The charging time depends on the charger and battery that you
use. For example, the charging time for the BLB-2 battery with
the ACP-8 charger is about 2 hours.
4 Disconnect the charger from the phone.
Remove the battery
1 Switch off the phone.
2 Press the back cover release button and slide off the cover.
3 Lift out the battery.
Before you begin
Battery bar
8290 User Guide v2 2/18/00 [ 11 ]
Page 20
8290ug v2.fm Page 12 Friday, February 18, 2000 5:42 PM
3. About your phone
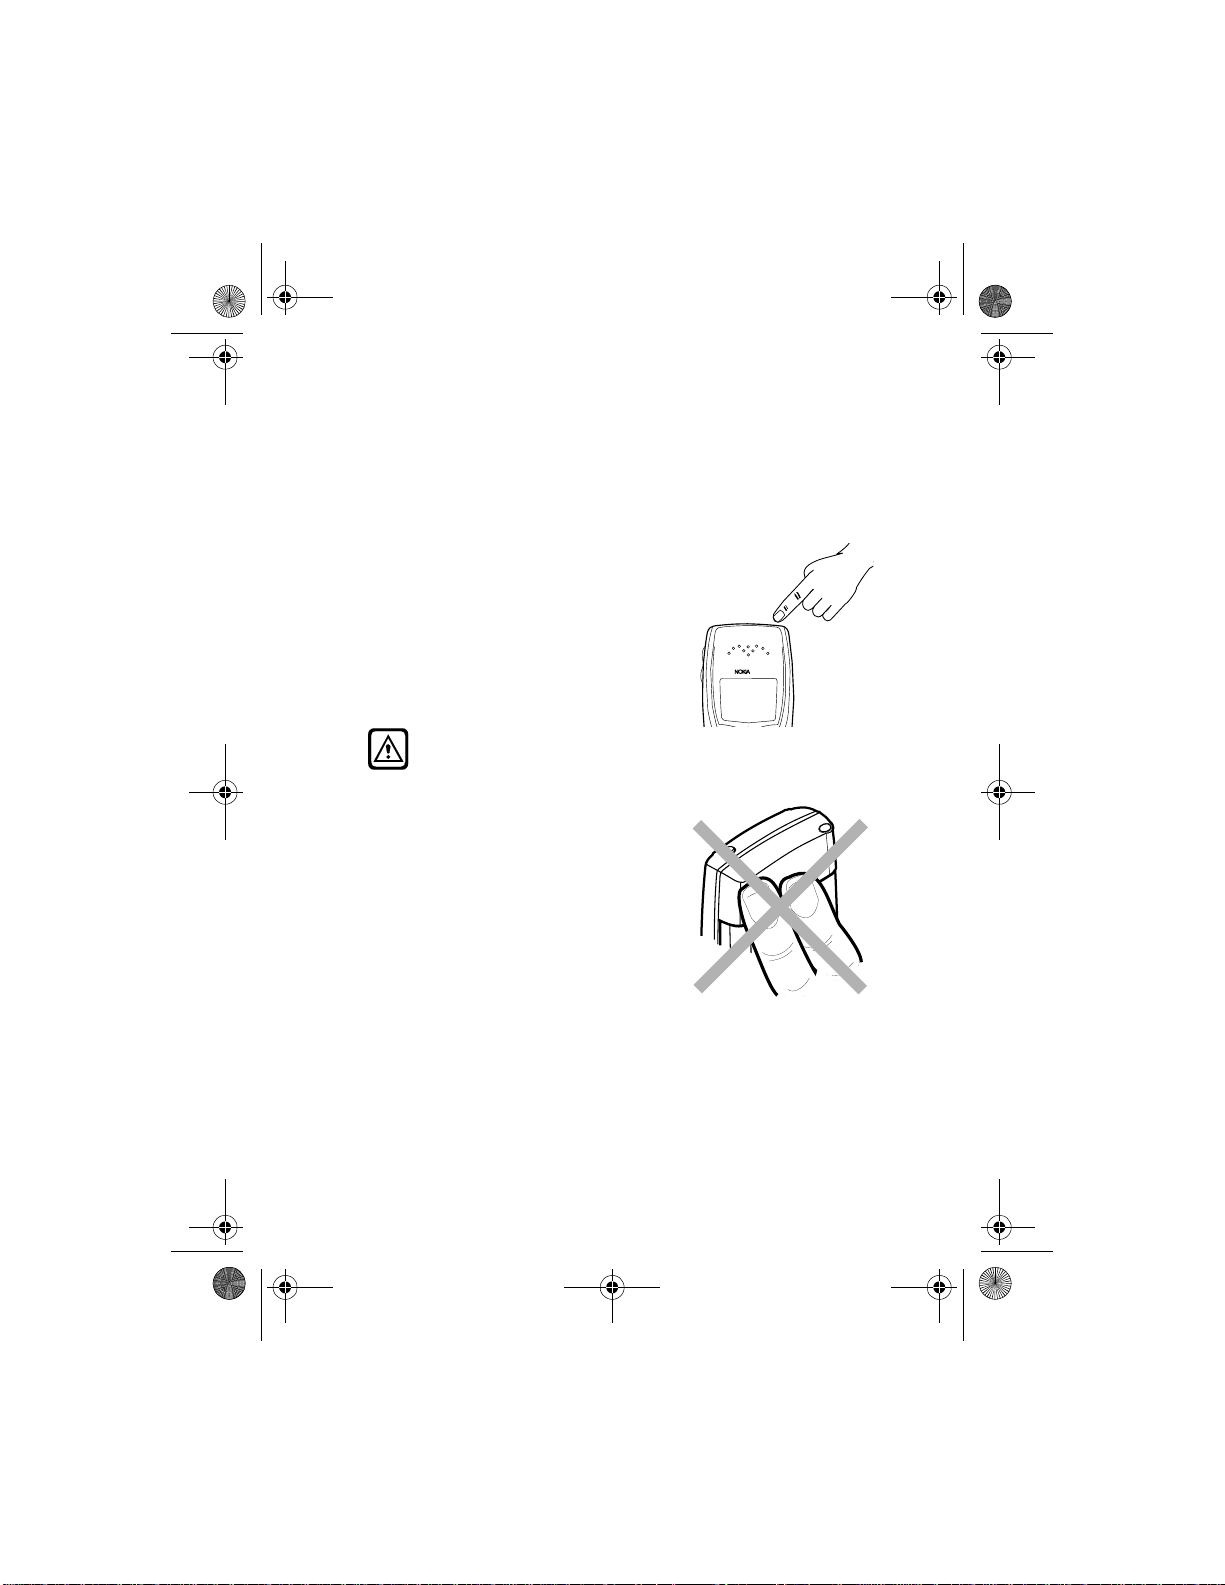
• Switch on your phone
• Press and hold power for more than
a second.
The phone might ask for a Personal
Identification (PIN) code or a
security code. See “PIN and PUK
codes” on page 72 for more
information.
Warning! Do not switch on
the phone in places where wireless phone use is prohibited or
where the use of the phone could cause interference or danger.
Tip: As with any other radio
transmitting device, do not
touch the ante nna unnece ssarily
when the phone is switched on.
Contact with the antenna affects
call quality and might cause the
phone to operate at a higher
power level than needed.
[ 12 ] 8290 User Guide v2 2/18/00
Page 21
8290ug v2.fm Page 13 Friday, February 18, 2000 5:42 PM
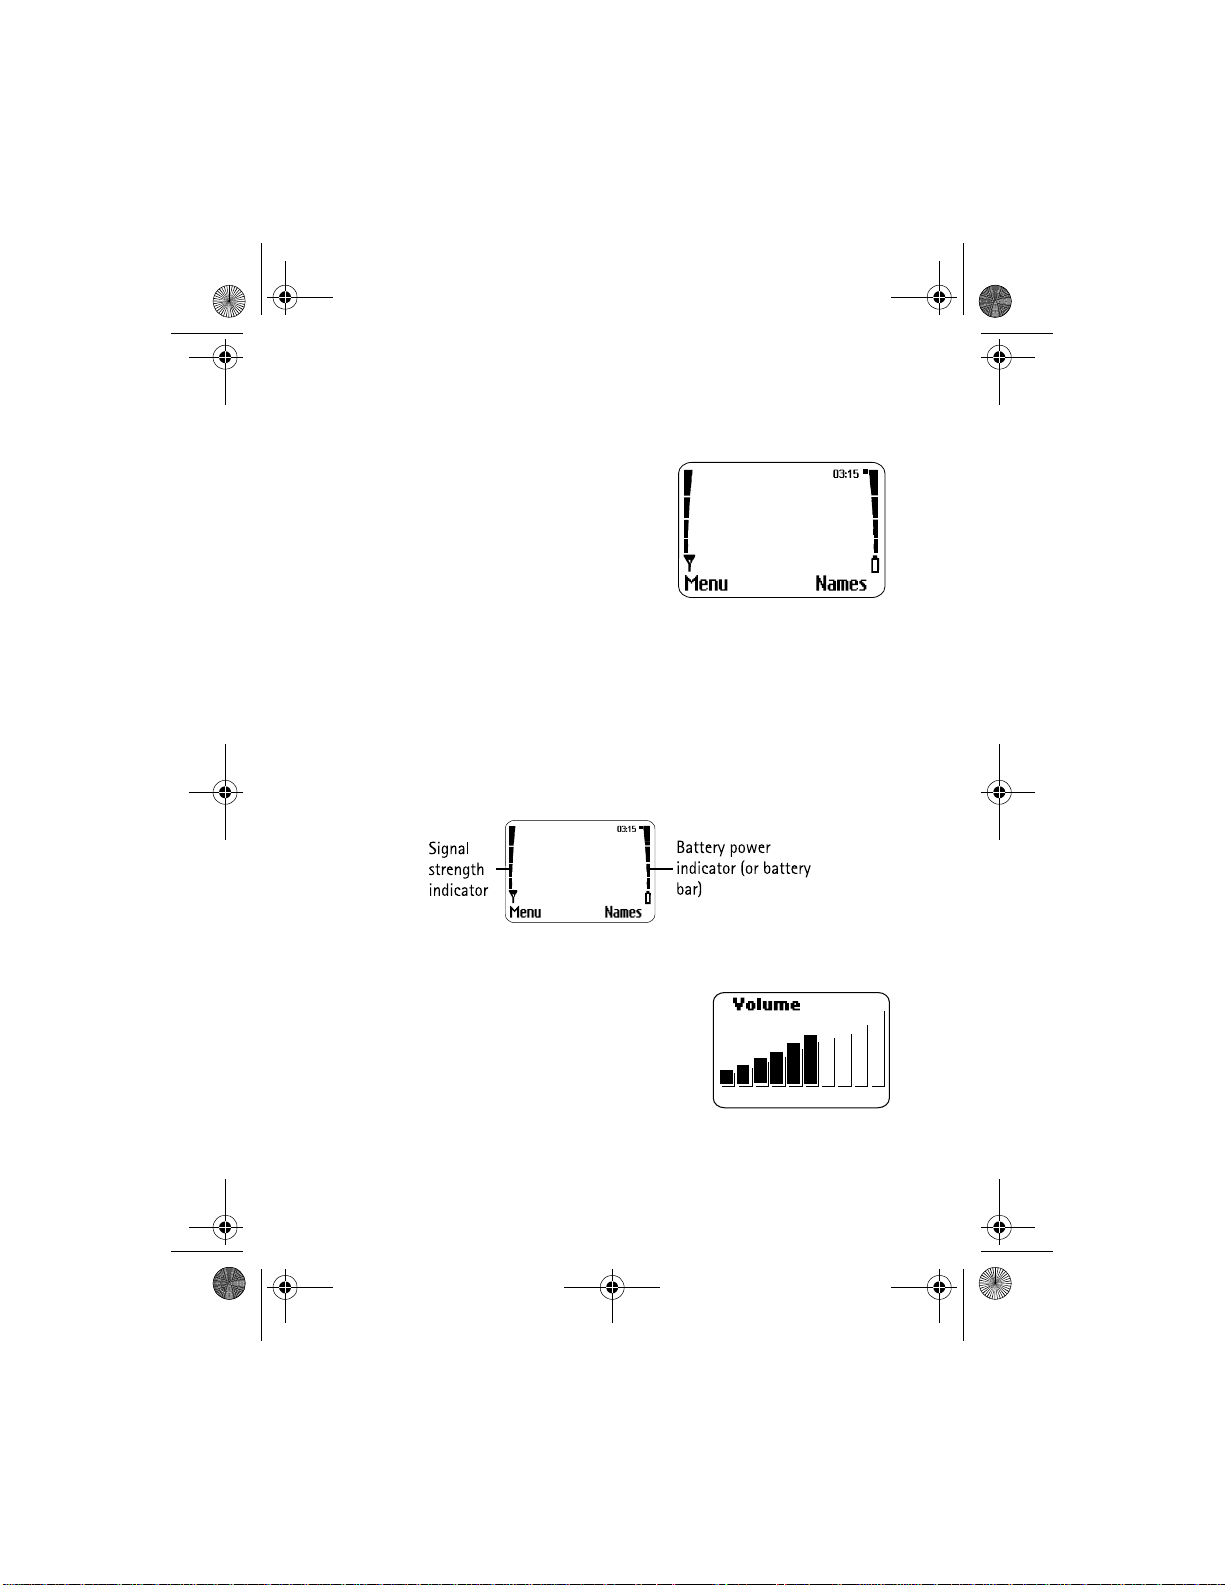
• About the Start screen
When you turn on your phone, the first
screen that appears is the Start screen.
In the middle of the Start screen, you see
information indicating which wireless
network your phone uses. This
information can vary between phones.
Other indicators and icons appear on this
Start screen and are described in the
next section.
About indicators and icons
On your phone, you have two types of identifiers: indicators and icons.
Indicators
Indicators show the status of something. The phone uses three types of
indicators:
About your phone
• Signal strength indicator: Shows the strength of the signal to your
phone.
• Battery power indicator: Shows how much
power is left in your phone’s battery.
• Volume indicator:
Shows the earpiece volume level. Adjust
the volume level with the earpiece volume
buttons on the left side of the phone (see
“Adjust the earpiece volume during a call” on page 17).
8290 User Gui de v2 2/18/00 [ 13 ]
Page 22

8290ug v2.fm Page 14 Friday, February 18, 2000 5:42 PM
Icons
Icons are graphical representations of a specific item or situation. For
example, this icon appears when you have a voice message waiting
to be heard. (Some systems use a different method.)
The rest of this section shows examples of each icon that can appear on
your phone and tells you what these icons indicate.
Line 1 is selected for outgoing calls.
Line 2 is selected for outgoing calls.
You have an active call.
You have one or more new voice messages.
You have one or more new text messages.
(If blinking, text message memory is full.)
Keyguard is on. Your phone will not accept any keypresses.
The alarm clock is set.
The Silent profile is selected.
Incoming voice calls are being forwarded to another number.
You have forwarded all voice calls received on line 1.
You have forwarded all voice calls received on line 2.
You have forwarded all voice calls received on lines 1 and 2.
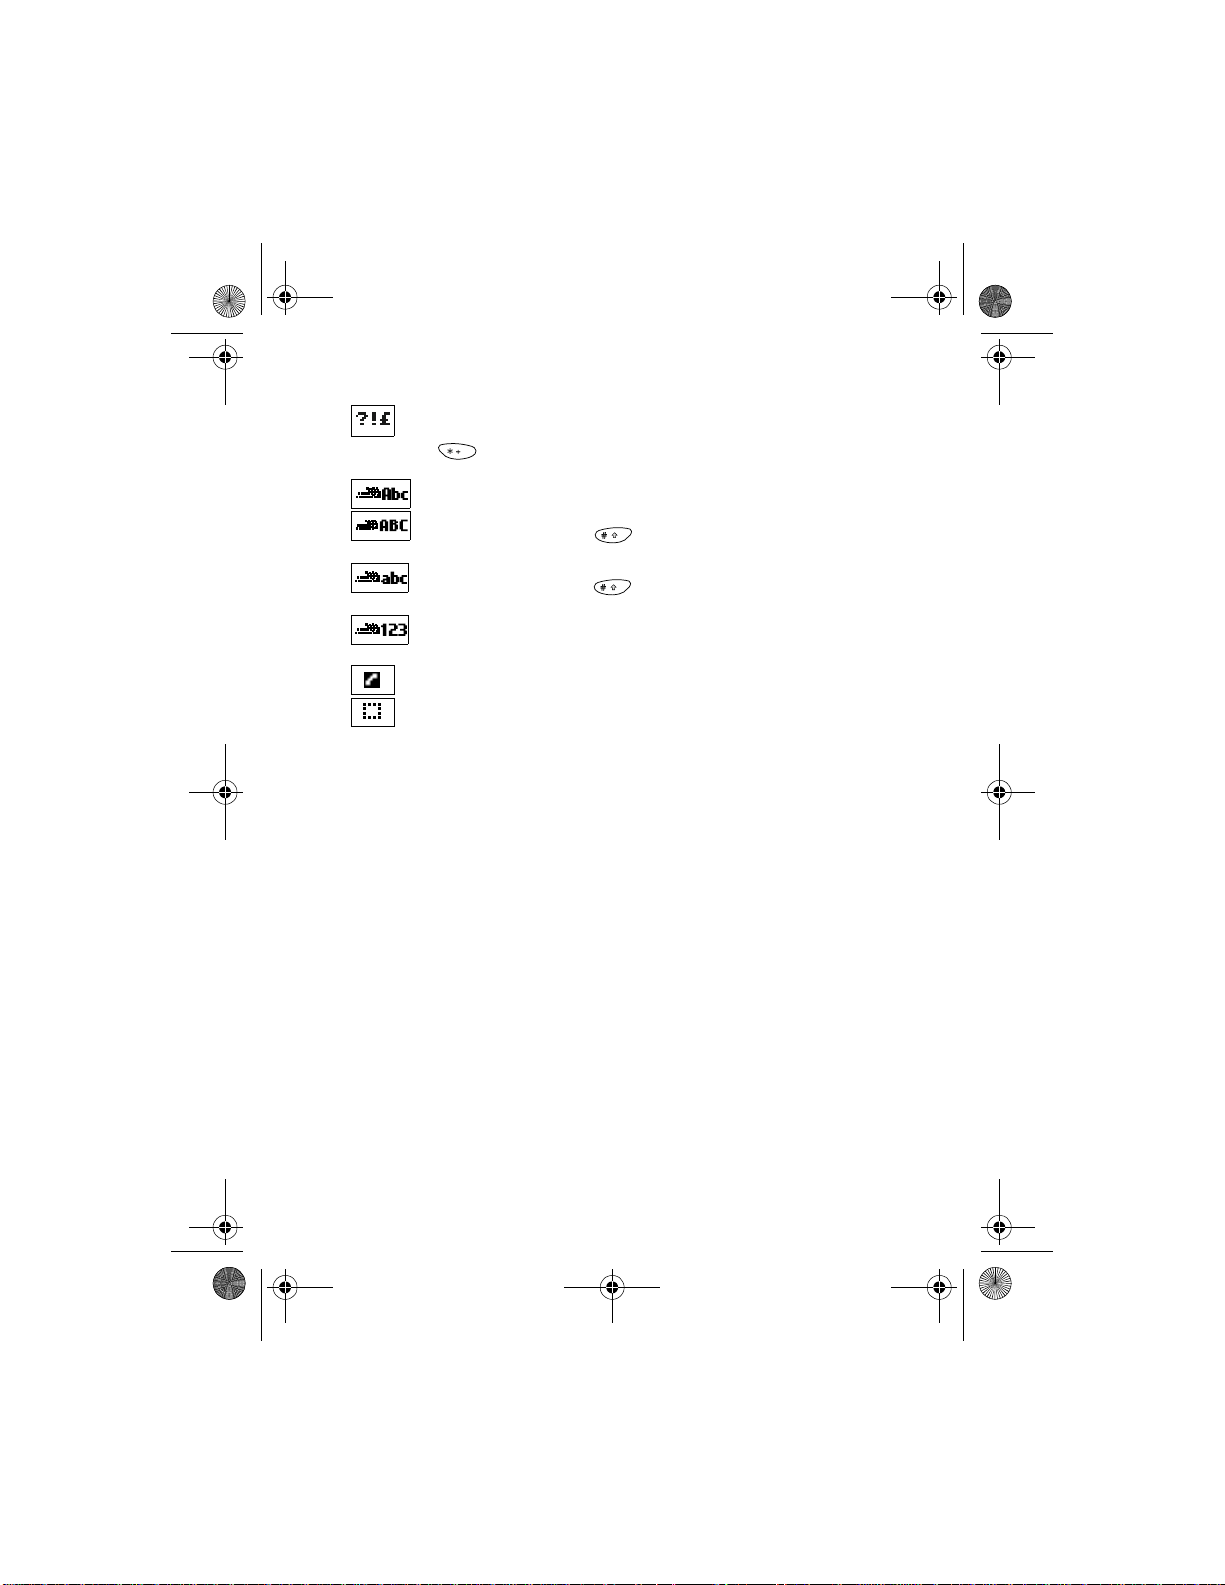
The phone is ready for you to enter a response.
Characters entered will be uppercase letters.
Press to switch letter case.
Characters entered will be lowercase letters.
Press to switch letter case.
Characters entered will be numbers . (When e ntering letters, switch to
numbers by pressing and holding .)
[ 14 ] 8290 User Guide v2 2/18/00
Page 23
8290ug v2.fm Page 15 Friday, February 18, 2000 5:42 PM
You are in “special character” mode. Select a character, then press
Use. (When entering letters, switch to special characters by pressing
the key.)
You are in predictive text mode.
You are in predictive text mode. Characters entered will be
uppercase letters. Press to switch letter case.
You are in predictive text mode. Characters entered will be
lowercase letters. Press to switch letter case.
You are in predictive text mode. Characters entered will
be numbers.
Indicates the current call.
Indicates a call on hold.
About your phone
8290 User Gui de v2 2/18/00 [ 15 ]
Page 24
8290ug v2.fm Page 16 Friday, February 18, 2000 5:42 PM
4. Making and answering
calls
This chapter tells you how to make and receive calls and how to adjust
certain options.
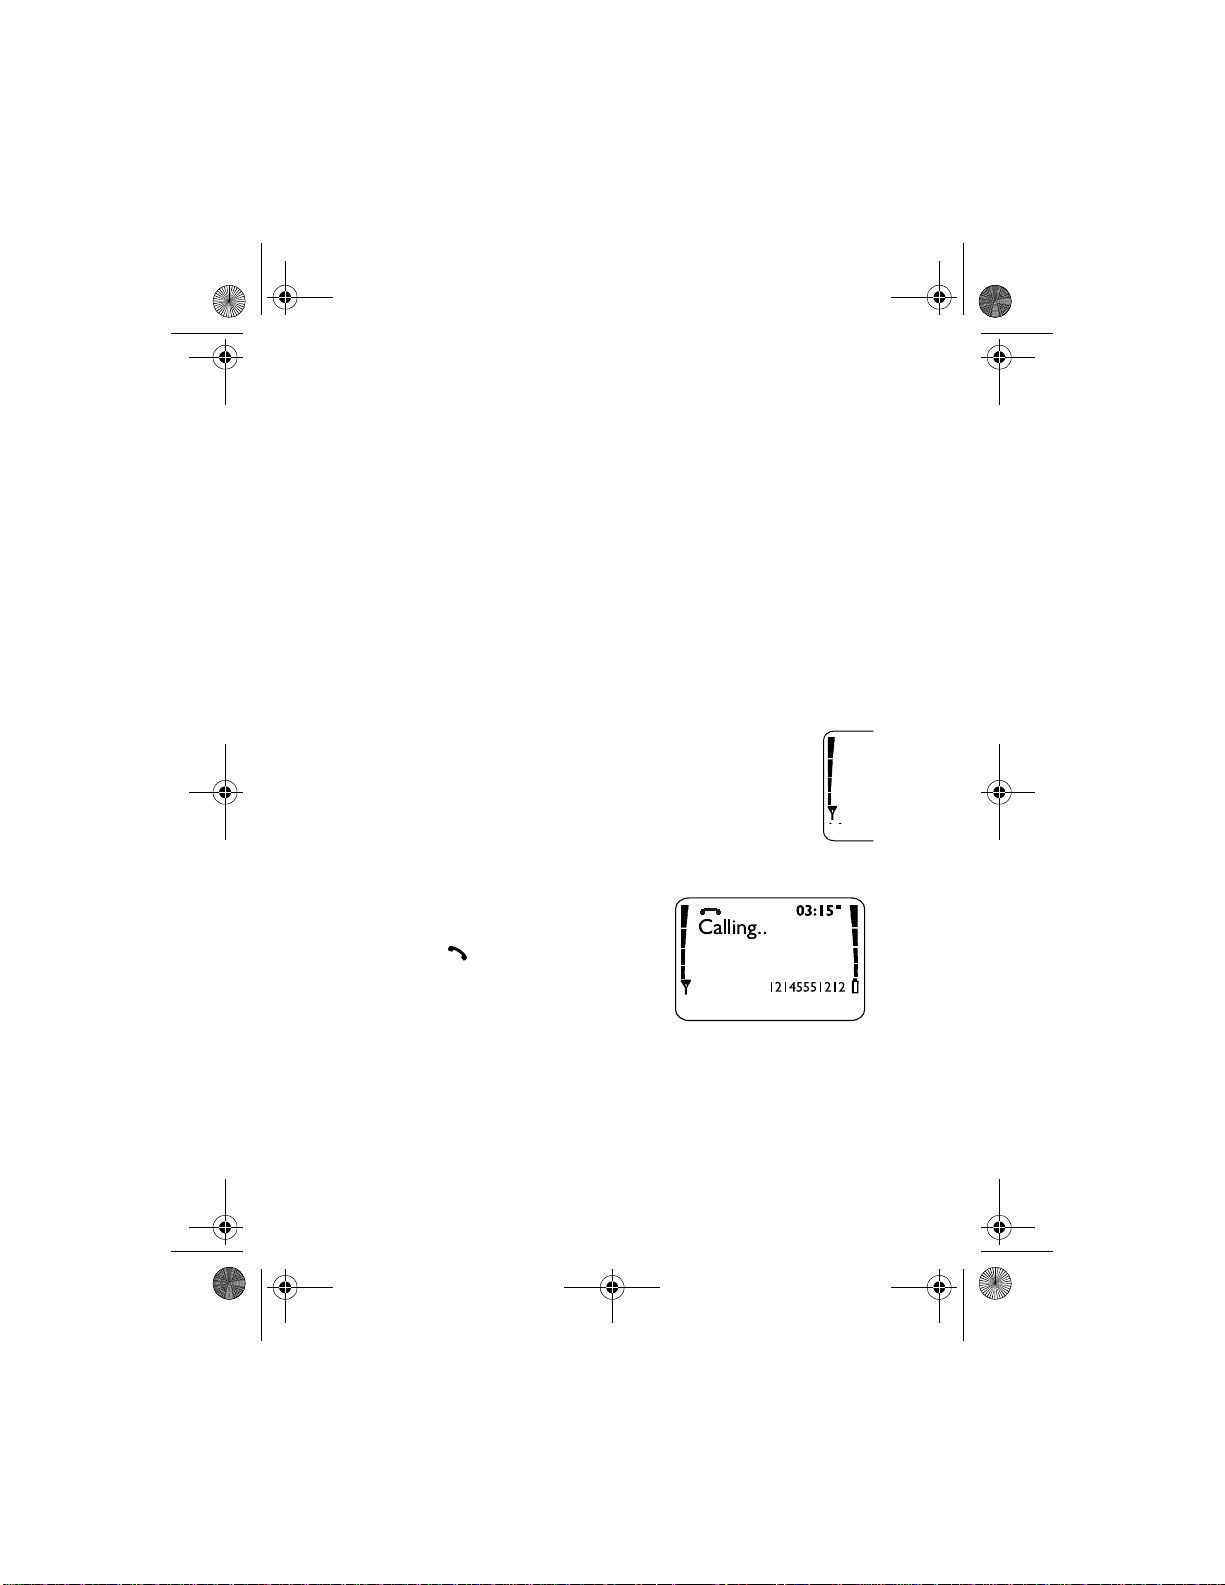
• Make a call
Check the signal strength
The signal indicator on the left side of your phone’s screen
shows the strength of the network radio signal. The indicator
scrolls as the signal strength increases and decreases. To get
the strongest signal, try moving your phone slightly. If you’re
inside a building, move toward a window.
Use the keypad
1 Enter the area code and phone
number.
2 Press .
Hold the phone as you would any other
telephone, with the antenna pointed up
and over your shoulder.
Tip: As with any other radio transmitting device, do not touch the
antenna when the phone is switched on. Contact with the antenna
affects call quality and may cause the phone to operate at a higher
power level than otherwise needed.
[ 16 ] 8290 User Guide v2 2/18/00
Page 25

8290ug v2.fm Page 17 Friday, February 18, 2000 5:42 PM
Warning: Do not switch on the phone when wireless phone use is
prohibited or when it may cause interference or danger.
Use the phone book
1 From the Start screen, press or and scroll to the number
you want.
2 Press to make the call.
Tip: To skip ahead quickly in the list, press the number key that matches
the first letter of the name.
Advanced calling options
• Make an international call: see “Make an international call” on page
55.
• Make a call using the voice tag feature: see “Use Voice dialing” on page
50.
• Make a 1-to uc h c all : see “1-touch dialing” on page 53.
Adjust the e arpiec e volume d uring a
call
Making and answering calls
• To increase the volume of a call, press the upper part of
the volume key.
• To decrease the volume, press the lower part of the
volume key.
If an accessory with its own loudspeaker is connected to your phone, the
volume keys adjust the volume for that accessory.
• End a call
• Press .
8290 User Gui de v2 2/18/00 [ 17 ]
Page 26

8290ug v2.fm Page 18 Friday, February 18, 2000 5:42 PM
• Answer a call
When someone calls you, the phone alerts you (see “Ringing options” on
page 64) and Call flashes on the display.
• To answer, press any key ex c ept Decline or , or open the sliding
cover.
Caller ID
This is a network service that helps identify incoming calls. Contact your
service provider for details
When Caller ID is active, your phone may display the caller’s phone
number. The caller’s name may also appear, if their name and number ha ve
been stored in the phone book (see “Phone book” on page 28), or if the
wireless network supports it.
• Reject a call
• Press Decline. Redial the last-dialed number
• Press twice.
Dial any of the 10 last-dialed numbers
1 Press .
2 Scroll to the number you want to redial.
3 Press again.
[ 18 ] 8290 User Guide v2 2/18/00
Page 27
8290ug v2.fm Page 19 Friday, February 18, 2000 5:42 PM
5. The menu
Your phone offers an extensive range of functions that are grouped in
menus and submenus. Access these menus with the selection keys and
scroll keys, or by entering the appropriate shortcut number.
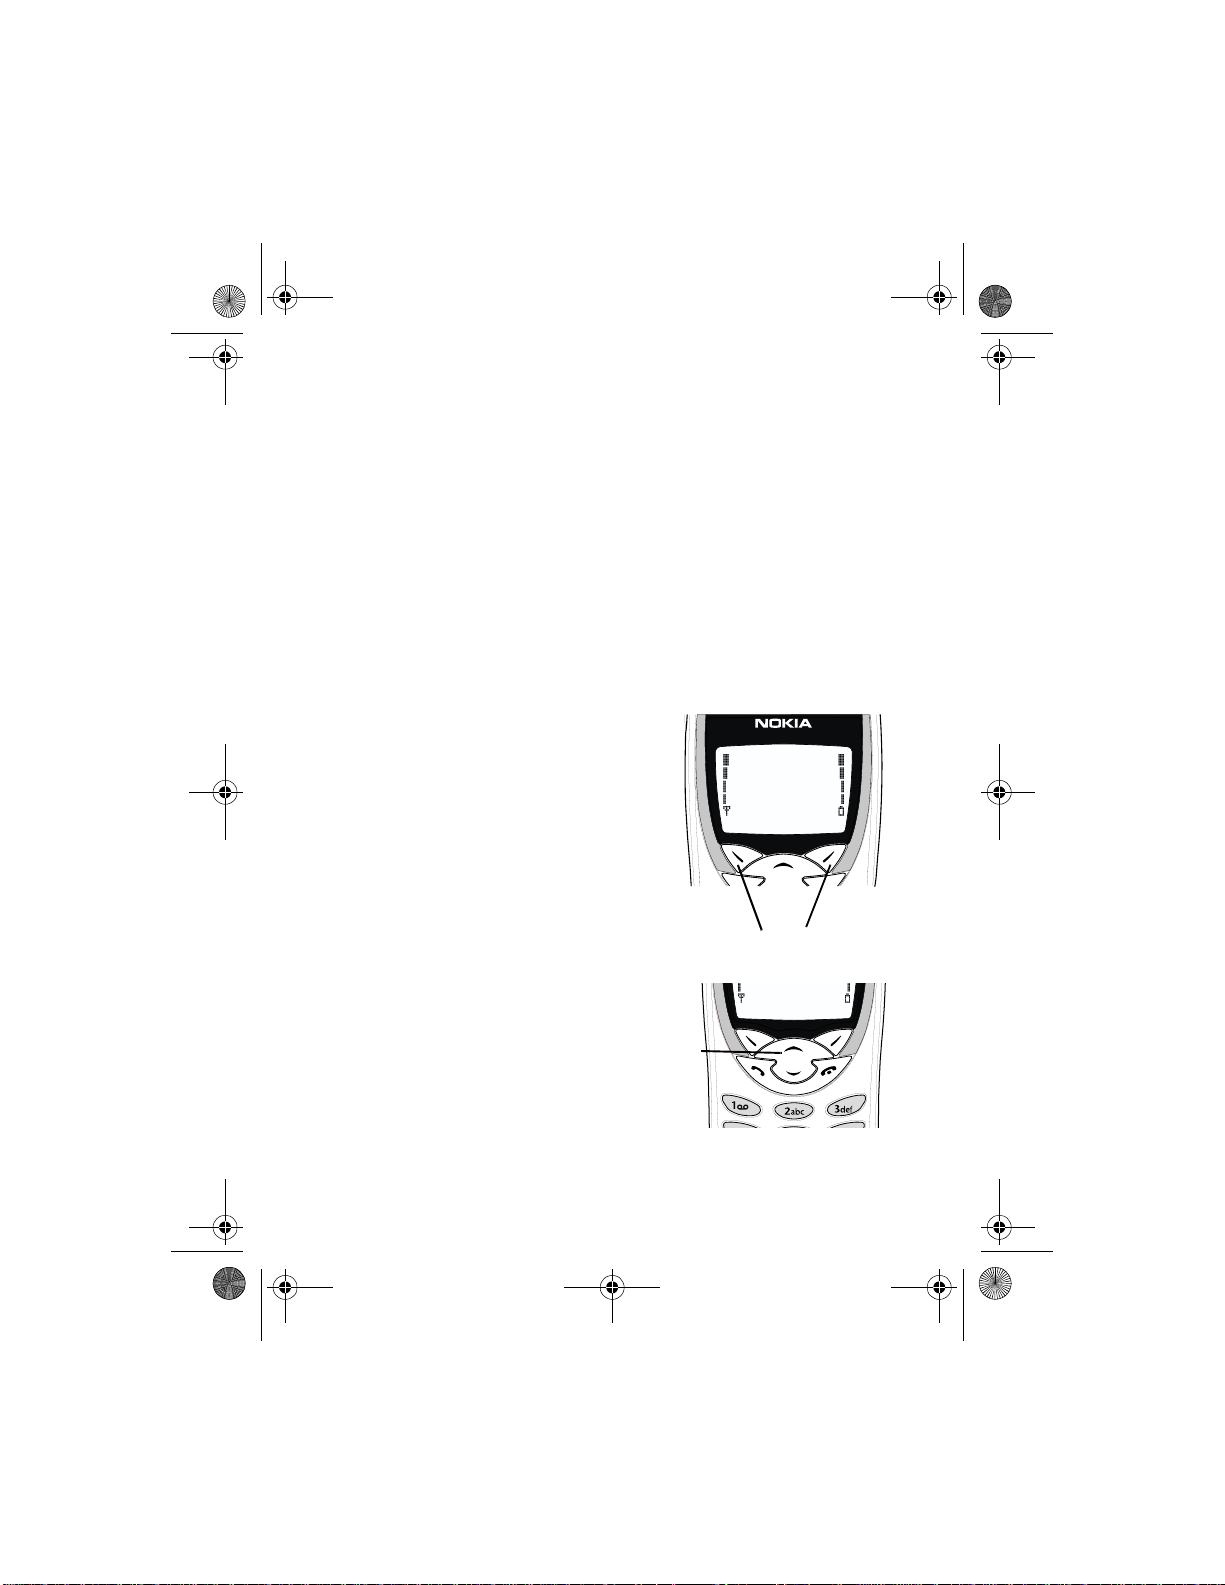
• Using the menus
Selection keys
Below the screen, you will find two
selection keys. Their functions depend on
the text above the keys.
For example, in this screen, the word
Menu appears above the selection key.
Press the key to enter the menu function.
Similarly, press the key under Names to
access phone book functions.
The menu
Scroll keys
Use the scroll keys, located just
below the screen, to scroll
through your phone’s menus and
phone book.
8290 User Gui de v2 2/18/00 [ 19 ]
Scroll keys
Selection keys
Page 28
8290ug v2.fm Page 20 Friday, February 18, 2000 5:42 PM
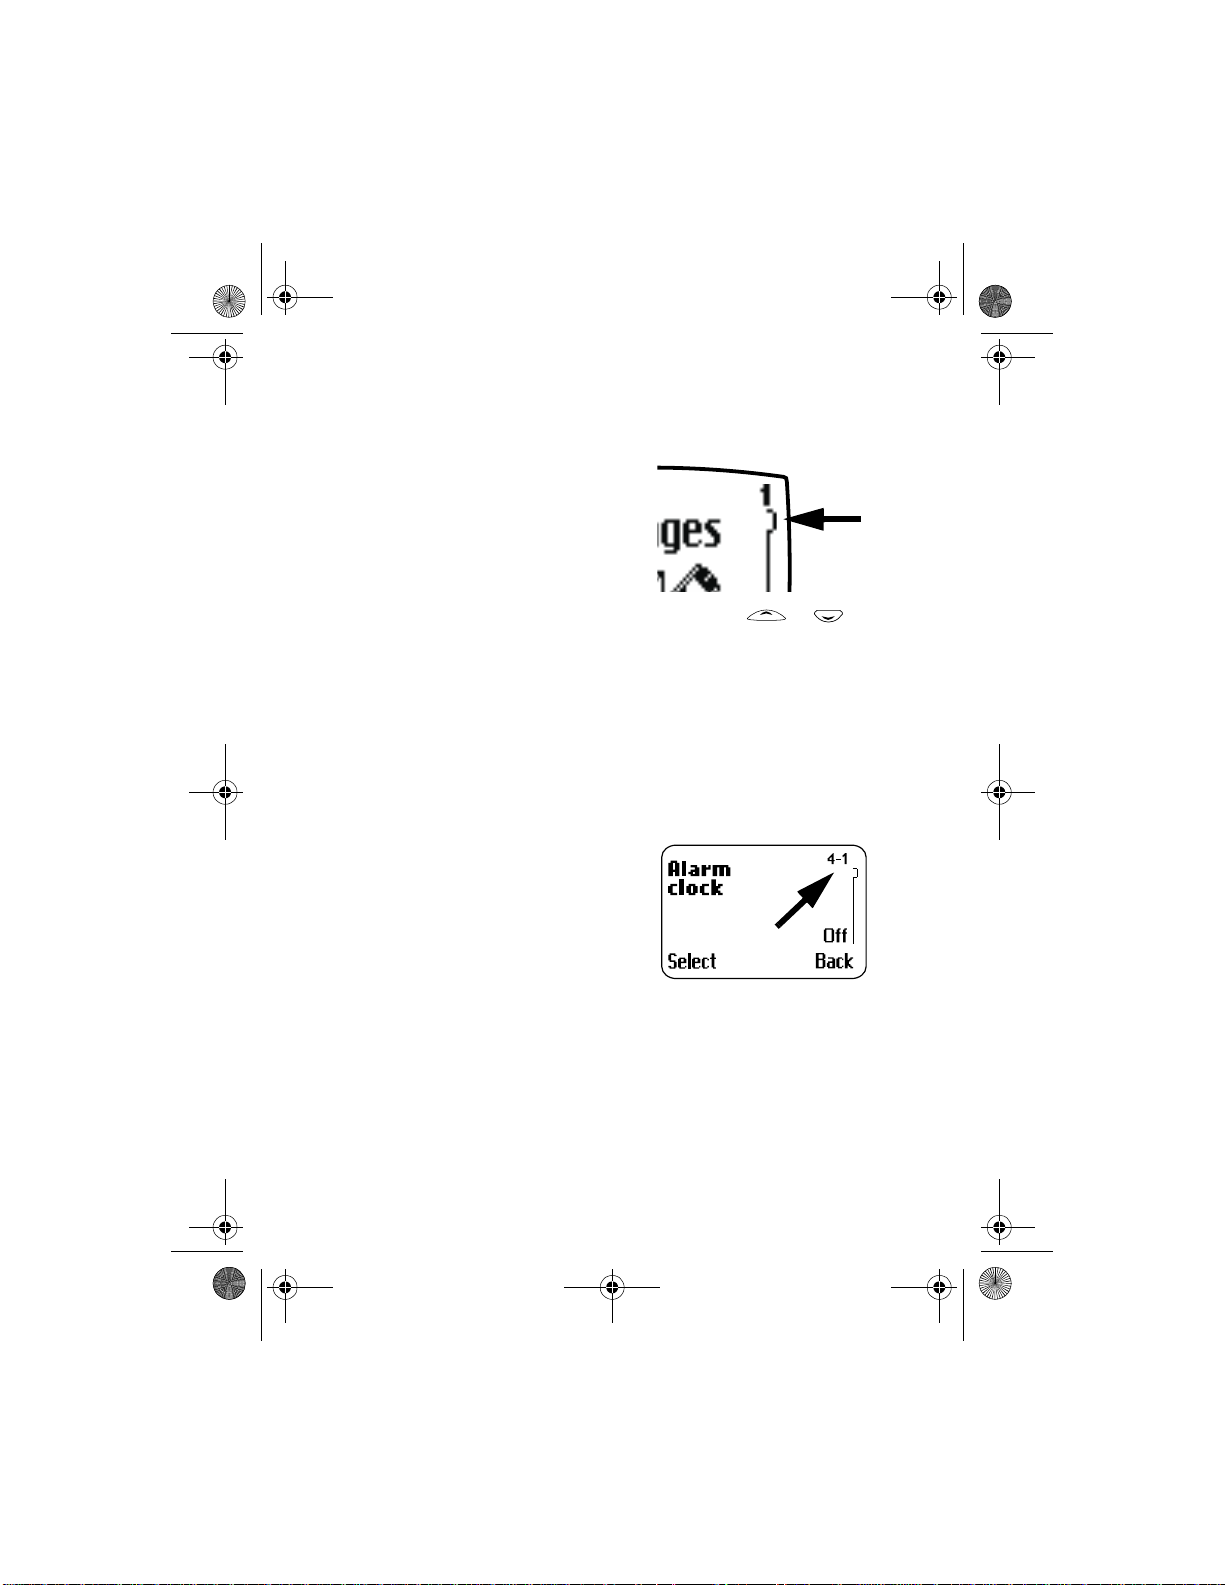
Scroll bar
While using your phone’s menus, a scroll
bar appears at the far right of the screen.
This bar indicates where you are in the
menu. Each numbered “tab” on the bar
represents a different menu item.
For example, press Menu once. The scroll
bar appears with the first (top) tab
displayed. A different tab appears each time you press or .
Help text
Many menu items have brief help text. To view the help text, scroll to the
menu item and wait for about 15 seconds. Press More to see the next
page of the text or Back to exit.
• Menu shortcuts
When you scroll to a menu item, the
menu number appears on the screen
above the scroll bar. If you learn som e of
these menu numbers, you can use them
to quickly get to different features
instead of having to scroll to them
through the menu.
• To use a shortcut, press Menu and then the menu number.
• For faster a cc ess, press Menu, then 0, then the menu number
For example, to get to Alarm Clock, press Menu 0 4 1.
[ 20 ] 8290 User Guide v2 2/18/00
Page 29
8290ug v2.fm Page 21 Friday, February 18, 2000 5:42 PM
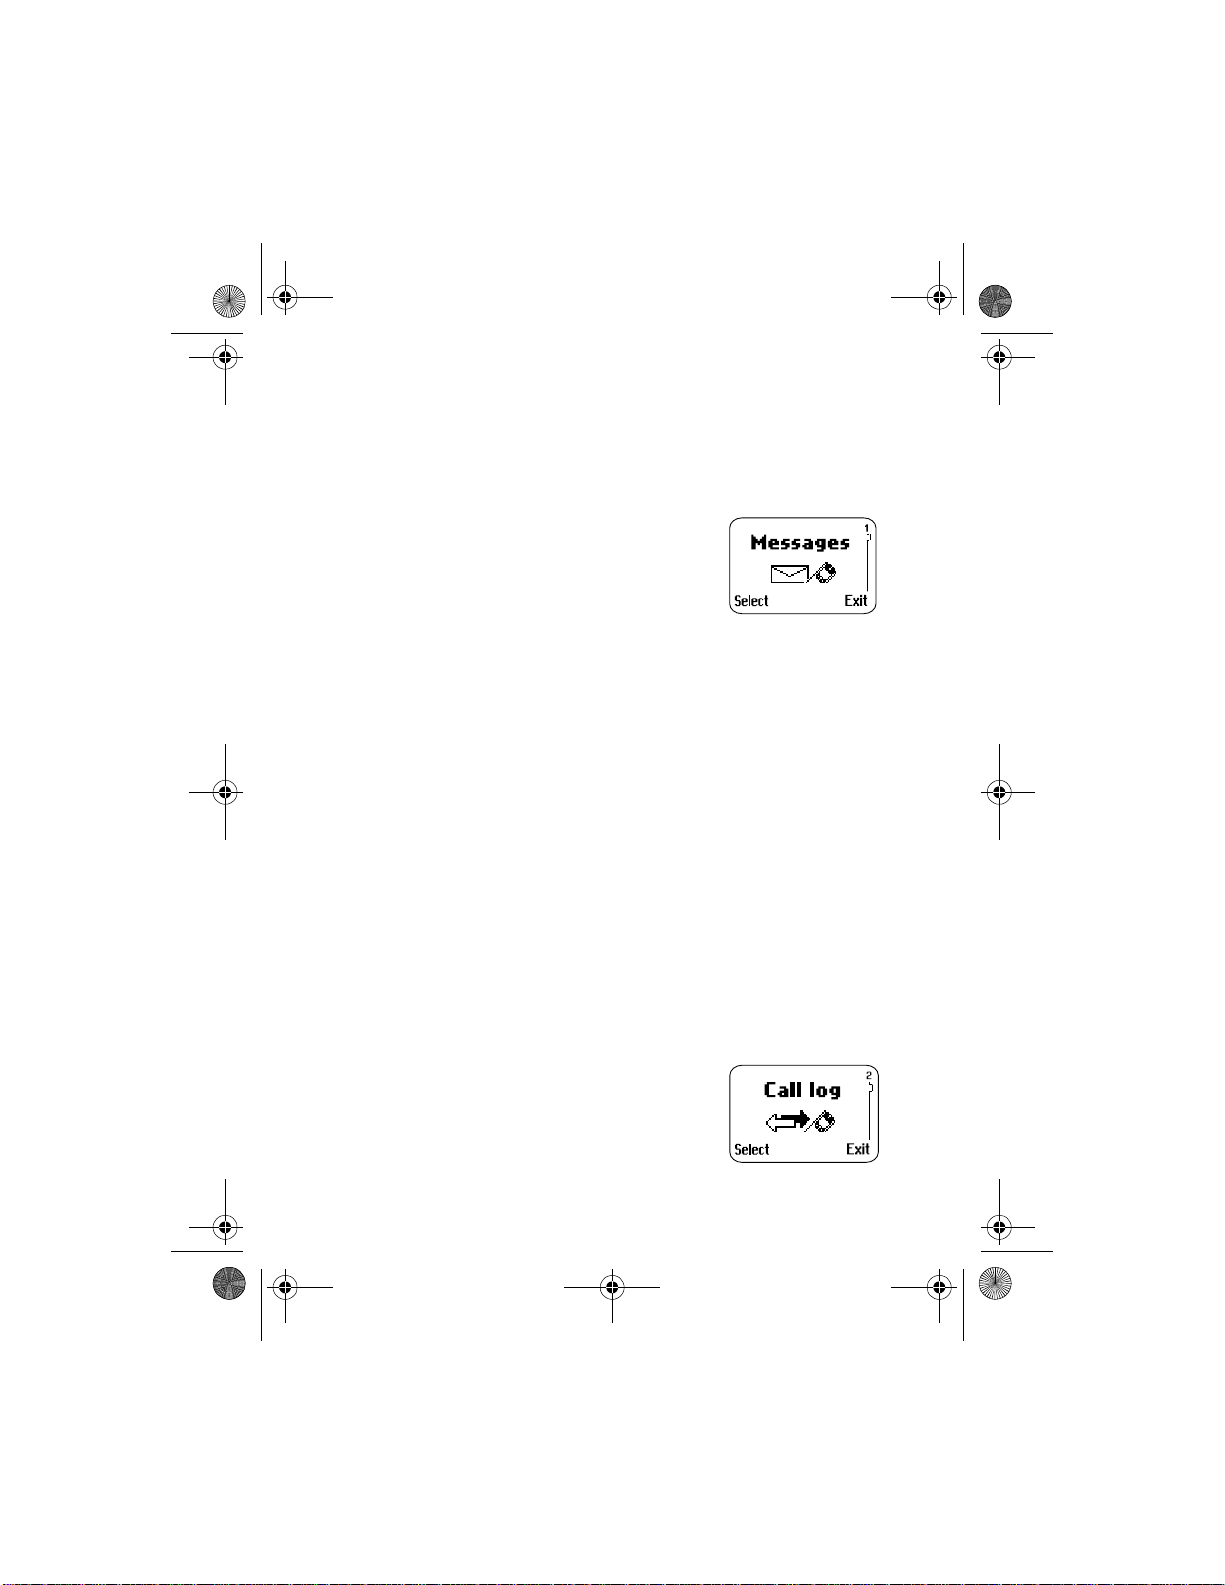
• List of menu shortcuts
Here is an abbreviated list of menu items and their menu shortcuts. Later
chapters tell you how to work with the menus an d explain their functions.
1 Messages
1 Inbox
2 Outbox
3Write messages
4Picture messages
5 Message settings
1 Set 1 (up to five sets may appear)
1 Message center number
2 Messages sent as
3 Message va lidit y
4 Ren ame this set
2Common
1 Delivery reports
2 Reply via same center
6News & info service
7 Service command editor
8 Fax or data call
1 Fax and data
2 Also voice
3 Fax mailbox
4 Data mailbox
9 Voice messages
1 Listen to voice message s
2 Voice mailbox number
2Call log
1Missed calls
2 Received calls
3 Dialed calls
4 Clear call lists
The menu
8290 User Guide v2 2/18/00 [ 21 ]
Page 30

8290ug v2.fm Page 22 Friday, February 18, 2000 5:42 PM
5 Call timers
1Last call
2Current call
3 All calls
4 Received calls
5 Dialed calls
6Clear timers
6 Call costs
1 Last call cost
2 All calls cost
3Clear counters
7 Call cost settings
1 Call cost limit
2Show costs in
3Profiles
1Normal
1Select
2Customize
1 Ringing options
2Ringing tone
3 Ringing volume
4Vibrating alert
5 Message alert tone
6 Keypad tones
7 Warning and game tones
2 Silent
3Meeting
4 Outdoor
5Pager
6Car
1 Lights
2Auto answer
7Headset
1Auto answer
[ 22 ] 8290 User Guide v2 2/18/00
Page 31

8290ug v2.fm Page 23 Friday, February 18, 2000 5:42 PM
4 Settings
1Alarm clock
2Clock
3 Auto update of date and time
4 Call settings
1Automatic redial
2 Calling card
3 Closed user group
4 Send own caller ID when calling
5 Call waiting
6 Line for outgoing calls (see your service provider)
5Phone settings
1Language
2 Cell info display
3 List of own numbers
4 System selection
5 Touch to n e length
6 Notifications on SIM update
7 Restore factory settings
6 Security settings
1 SIM card security
2Phone security
3 Call restrictions
4 Fixed dialing
5 Change access codes
1 Change PIN code
2 Change PIN2 code
3 Change security code
4 Change restriction password
5 Forwarding
(see your service provider)
1 Forward all voice calls
2 Forward if busy
3 Forward if not answered
The menu
8290 User Gui de v2 2/18/00 [ 23 ]
Page 32

8290ug v2.fm Page 24 Friday, February 18, 2000 5:42 PM
4 Forward when phone off or no coverage
5 Forward when not able to take calls
6 Forward all fax calls
7 Forward all data calls
8 Cancel all call forwarding
6Games
1Memory
2Snake
3 Logic
4Rotation
7Calculator
8Calendar
9Infrared
10 SIM services (if supported by your SIM
card and service provider))
[ 24 ] 8290 User Guide v2 2/18/00
Page 33

8290ug v2.fm Page 25 Friday, February 18, 2000 5:42 PM
Entering letters and numbers
6. Entering letters and
numbers
You can enter letters and numbers into your phone for a person’s name
and phone number, writing a text message, and so on. There are two ways
to do this:
• Standard text input, for making entries in the phone book, entering
calendar notes, and renaming caller groups
• Predictive text input, for writing text messages and picture messages.
See “Using predictive text input” on page 80 for more information
• Standard text input
ABC mode
This is the default mode. The ABC icon
appears as visual confirmation.
1 Find the key that is below the letter
you want to enter.
2 Press it as many times as needed for
the letter to appear on the screen.
For example, to enter the name John:
Press J
Press O
Press H
Press N
8290 User Gui de v2 2/18/00 [ 25 ]
Page 34

8290ug v2.fm Page 26 Friday, February 18, 2000 5:42 PM
Depending on the selected display language, the following characters
may be available.
Key Characters Key Characters
1 @, .,?!-1 7 PQRS7
2 ABC2 8 TUV8
3 DEF3 9 WXYZ9
4 GHI4 0 space, 0
5 JKL5 * (See page 27 for
details.)
6 MNO6 # Changes letter case
Note: Some networks may not support all language-dependent
characters.
Enter spaces and punctuation
• To enter a space, press once.
• To enter punctuation, press repeatedly until the character you
want appears.
Erase mistakes
If you make a mistake:
• Press Clear to erase that character.
• Press Clear as needed to erase more than one character, or press and
hold Clear to erase the entire field of characters.
Change letter case
• To switch between uppercase and lowercase letters, press .
The ABC icon switches to abc, showing you are using lowercase letters.
[ 26 ] 8290 User Guide v2 2/18/00
Page 35

&
8290ug v2.fm Page 27 Friday, February 18, 2000 5:42 PM
123 mode
To enter nu mb ers, you can:
• Press and hold and switch to 123 mode. Your phone displays the
icon. Press the appropriate number key to enter a number.
OR
• While in ABC mode, press and hold the corresponding number key until
the number appears.
As with the ABC mode, if you make a mistake
• Press Clear to erase that character.
• To switch back to the ABC mode, press and hold again.
Use special characters in names and phone
numbers
In ABC mode
1 Press and hold . A screen appears with the following special
characters available:
. , ? ! : ; - + # * ( ) ‘ “ _ @ & $ £ % / < > ¿ ¡ § = ¤ ¥
2 Use scroll keys to select the character you want, then press Insert.
In 123 mode:
You can access the following special characters only in 123 mode:
Use this character to send command strings to the network. Cont act
*
your service provider for details.
+ Use this character as a prefix for dialing international numbers.
p Use this character to create a pause that occurs when dialing a
number. Numbers entered to the right of this special character are
automatica ll y sent as touch tones aft er a 2.5-second pau se.
w This character creates a wait; digits to the right of the w are not sent
until you press .
Entering letters and numbers
8290 User Gui de v2 2/18/00 [ 27 ]
Page 36

8290ug v2.fm Page 28 Friday, February 18, 2000 5:42 PM
7. Phone book
Use the phone book to store names and phone numbers.
• A phone book entry can consist of a number only, or a name and
number.
• A name may appear only once in the phone book. If you try to save a
name that already exists in the phone book, the phone asks if you want
to replace the existing name.
• Save names and numbers
Save a name and number
1 Enter the phone number and press
Save.
2 Enter a name, then press OK.
Note: For international dialing, press
twice to enter the +
symbol in front of the phone number.
Save a number only
1 Enter the phone number.
2 Press and hold Save.
The number is saved in your phone book. You can add a name to it later.
Save a name and number while in a call
1 Press Options.
2 Scroll to Names, then press Select.
[ 28 ] 8290 User Guide v2 2/18/00
Page 37

8290ug v2.fm Page 29 Friday, February 18, 2000 5:42 PM
3 Scroll to Add entry, then press Select.
4 Enter the name, then press OK.
5 Enter the phone number, then press OK.
If your phone book is full
If your phone book is full, you can save the phone number to another
memory or replace an existing entry.
• Scroll to the entry you want to replace, then press OK.
• Find names in the phone book
From the Start screen
• Press or .
OR
Press Names. Search appears highlighted.
• Press the number key that matches the first letter of the name.
Phone book
While in a call
1 Press Options.
2 Scroll to Names and press Select.
Search is highlighted.
3 Press the number key that matches the first letter of the name.
OR
4 Press Select.
5 When the box appears, enter the name and press OK. You can en ter
just the first few letters of the name, then pr ess OK. Your phone will
show the closest matching name.
8290 User Gui de v2 2/18/00 [ 29 ]
Page 38

8290ug v2.fm Page 30 Friday, February 18, 2000 5:42 PM
• Edit (revise) names and numbers
At the Start screen:
1 Recall the stored name, press Details, then press Options.
2 Scroll to Edit, then press Select.
3 Edit the name, then press OK.
4 Edit the number, then press OK.
• Erase names and numbers
Erase stored names and numbers
At the Start screen:
1 Recall a stored name.
2 Press Details, then Options.
3 Highlight Erase, then press Select, then OK.
Note: You cannot undo Erase functions, so be careful!
Erase your entire phone book
Caution! This feature erases your entire phone book and can’t be undone!
1 Press Names.
2 Scroll to Erase and press Select.
3 Scroll to Erase all and press Select.
4 Scroll to the memory (Phone or SIM card) you want to erase, then
press Select.
5 When you see Are you sure?, press OK.
6 When the Security code: prompt appears, enter your security code
and press OK.
[ 30 ] 8290 User Guide v2 2/18/00
Page 39

8290ug v2.fm Page 31 Friday, February 18, 2000 5:42 PM
• Two types of memory
Your phone has both phone memory and SIM ca rd memory. Y ou can save
names and numbers in either memory. The internal phone memory can
store 250 names and numbers. The SIM card can hold up to 250 names
and phone numbers (this varies by SIM).
To help determine which memory would be best for you, refer to the
following table:
Internal Memory SIM Card Memory
Name capacity Up to 250 names* Up to 250 names
Phone book
(varies according to
each SIM card)
Can easily transfer
names and numbers to
another phone?
No Yes
Switch between internal mem ory and SI M
memory
1 At the Start screen, press Names.
2 Scroll to Options, then press Select.
3 Scroll to Memory in use, then press Select.
4 Scroll to SIM card or Phone, then pres s Select.
Note: Whenever you insert a SIM card for the first time, or if you insert
a different SIM card, SIM card memory is automatically selected.
8290 User Guide v2 2/18/00 [ 31 ]
Page 40

8290ug v2.fm Page 32 Friday, February 18, 2000 5:42 PM
• Call log
This network feature automatically keeps
track of numbers you’ve dialed, numbers
that have called you, and the time you’ve
spent in calls.
++
Look up dialed calls
Your phone saves the last 10 numbers
you’ve dialed.
1 Press Menu 2 3.
2 Scroll to the number you want to see
information about.
3 To dial the number, press ; for
other options, press Options (see “Options in call lists” on page 33).
Look up received calls
Your phone saves the phone numbers of the 10 most recent calls you’ve
answered, if the caller’s number was available.
1 Press Menu 2 2.
2 Scroll to the number you want to see information about.
3 To dial the number, press ; for other options, press Options (see
“Options in call lists” on page 33).
Check for missed calls
Your phone saves the numbers and names (if available) of the last 10
callers that have tried unsuccessfully to reach you.
The screen tells you how many calls were missed. If the caller’s name and
number are stored in memory, that information appears.
[ 32 ] 8290 User Guide v2 2/18/00
Page 41

8290ug v2.fm Page 33 Friday, February 18, 2000 5:42 PM
After missing a call
1 Press List.
If you have missed more than one call, you can scroll through the list
of numbers.
2 To dial the displayed number, press .
3 For other options, press Options. (See “Options in call lists” below for
more information.)
4 To exit, press Back.
At any time
1 Press Menu 2 1.
2 Scroll to the number you want to see information about.
3 To dial the number, press .
4 For other options, press Options (see “Options in call lists” below).
Options in call lists
When you view the missed calls, received calls, or dialed calls list and
press Options, a list of options appears on your phone’s screen.
Call time shows the date and time of the last call. Use the scroll keys to
scroll through up to five recent call dates/times for the displayed phone
number.
Edit number allows you to edit the displayed number and save it with a
name to your phone book.
Save allows you to enter a name for the number and save both to your
phone book.
Erase erases the number from the call list.
View number displays the phone number if the associated name is
currently displayed.
Phone book
8290 User Gui de v2 2/18/00 [ 33 ]
Page 42

8290ug v2.fm Page 34 Friday, February 18, 2000 5:42 PM
Clearing call lists
This feature clears all the missed, received, and dialed call lists.
1 Press Menu 2 4.
2 Scroll to All, Missed, Dialed, or Received, then pr ess OK.
Note: Missed, received, and dialed calls lists are also erased when you
change the phone security setting (see “Security features” on
page 71) or when you use a SIM card that is not one of the five
most recent cards used with the phone.
[ 34 ] 8290 User Guide v2 2/18/00
Page 43

8290ug v2.fm Page 35 Friday, February 18, 2000 5:42 PM
Voice mail++
8. Voice mail
Voice mail is a network feature that enables those who call you to leave
a voice message.
Note: You can use voice mail with either one or two phone lines.
When you receive a voice message, your phone lets you know by beeping,
displaying an icon on the screen, or showing a text message. The method
of notification depends upon your carrier.
Additionally, if you r eceive more than one voice mail message, your phone
may display the number of messages that you have received. Finally, if you
have subscribed to two different phone lines, the message would indicate
the line to which the message was addressed.
However, even though your phone notifies you of a message, the voice
mail feature is independent of your phone’s software. To use voice mail,
you must have:
• A voice mail subscription
• A voice mailbox number
• A temporary password
These items are provided by your service provider. Your service provider
should also tell you how to record a greeting for your voice mailbox and
how to change the temporary password.
After you obtain this information from your service provider, you must
then save the voice mailbox number given to you to your phone. Refer to
“Save the voice mailbox number” on page 36.
After you have saved your voice mailbox number, refer to “Listen to your
voice messages” on page 36.
Note: If you have difficulty using the voice mail feature, contact your
service provider.
++
8290 User Gui de v2 2/18/00 [ 35 ]
Page 44

8290ug v2.fm Page 36 Friday, February 18, 2000 5:42 PM
• Save the voice mailbox number
1 Press Menu 1 9 2.
2 Enter your voice mailbox number, then press OK.
Note: The number can be up to 32 digits long.
Work with two phone lines
If your particular SIM card supports it, your phone can have two phone
lines. Your service provider can tell you if your SIM card allows the use of
this feature and give you access to two phone lines.
If you decide to use two phone lines, you can select one of the two lines
for outgoing calls, but you can still answer calls on both lines.
If you use two phone lines, you will be given a voice mailbox number for
each line. You need to save each phone line’s voice mailbox number
separately.
To do this, first select the outgoing line and save its voice mailbox number .
Then, select the other line and save its number.
• Listen to your voice messages
If there’s a notification message on your screen, you can get your voice
messages using any of the following methods:
• If you’ve saved your voice mailbox number in your phone, press and
hold to call your voice mailbox.
• Press to open your voice mailbox and follow the directions
provided.
• Call your voice mailbox number as you would any other telephone
number, then follow the directions provided.
[ 36 ] 8290 User Guide v2 2/18/00
Page 45

8290ug v2.fm Page 37 Friday, February 18, 2000 5:42 PM
9. Profiles
The profiles feature lets you adjust and customize the phone’s ringing
tones for different events, environments, and caller groups. There are five
profiles available:
• Normal
• Silent
• Meeting
• Outdoor
• Pager
Normal is the default setting, but it is easy to switch to another profile.
Note: Two additional profiles, Car and Headset, appear only after these
accessories are connected to the phone for the first time.
• Select profiles
1 Press Menu 3.
2 Scroll to the profile you want.
3 Press Options. Select is highlighted.
4 Press OK.
OR
• To access the profiles directly, press and release until the desired
profile is highlighted, then press OK.
For example, to keep your phone from ringing, select the Silent profile. If
you want your phone to ring loudly, select the Outdoors profile.
Profiles
8290 User Gui de v2 2/18/00 [ 37 ]
Page 46

8290ug v2.fm Page 38 Friday, February 18, 2000 5:42 PM
Note: You can customize the profiles and even rename all of them,
except Normal, Car, or Headset. See “Customizing your phone” on
page 63 for more information.
[ 38 ] 8290 User Guide v2 2/18/00
Page 47

8290ug v2.fm Page 39 Friday, February 18, 2000 5:42 PM
10.Advanced calling
features
• Active call options
Advanced calling features
Use call waiting
This network service lets you receive an incoming call when you’re already
in a call. (Contact your service provider for availability.) The phone beeps
to let you know of the incoming call.
Activate/cancel call waiting
1 Press Menu 4 4 6.
2 Scroll to Activate or Cancel.
3 Press OK.
Confirm call waiting status
1 Press Menu 4 4 6.
2 Press Select.
3 Scroll to Status and press OK.
The display shows Active: Voice calls. Scroll to check the status of
other features such as fax or asynchronous data se rvi ces.
8290 User Gui de v2 2/18/00 [ 39 ]
++
Page 48

8290ug v2.fm Page 40 Friday, February 18, 2000 5:42 PM
Answer a waiting call
1 Your phone signals when you have a
call waiting.
2 Press to put the current call on
hold and answer the waiting call.
OR
Press Options, then press Select.
Reject a waiting call
You can just let the phone ring, or follow the steps below.
• Press Decline,
OR
1 Press Options and scroll to Reject.
2 Press Select.
Switch between calls
• Press or Swap.
The icon represents the active call and the icon represents the call
on hold.
End the active call
• Press .
The held call becomes active.
OR
1 Press Options and scroll to End active call.
2 Press Select.
Third call waiting
If you have both an active and a held call and a third call is waiting,
choose one of the following options.
[ 40 ] 8290 User Guide v2 2/18/00
Page 49

8290ug v2.fm Page 41 Friday, February 18, 2000 5:42 PM
Drop an active call to answer the waiting call
• Press .
The held call is unaffected.
End the active call and held call to answer the
waiting call
1 Press Options.
2 Scroll to End all calls .
3 Press .
Use in-call options
During a call, press Options to see the In-call menu. Your choices are:
Choice What it does
Advanced calling features
Hold or
Unhold
New call Makes a call when you have a call in progress.
Touch tones Sends touch to nes .
End all calls Ends all calls.
Names Switches you to the phone book.
Menu Switches you to the menu.
Mute Mutes a call.
Holds or releases a call.
Put a call on hold
1 To put a call on hold, press Hold.
2 To return to the call, press Unhold.
8290 User Guide v2 2/18/00 [ 41 ]
Page 50

8290ug v2.fm Page 42 Friday, February 18, 2000 5:42 PM
Make a new call
1 Enter the second phone number, or recall it from the phone book.
2 Press .
OR
1 Press Options.
2 Scroll to New call, then press Select.
3 Enter the second phone number, or recall it from the phone book.
4 Press Call.
With either method, the first call is automatically put on hold.
Switch between two calls in progress
• Press or Swap.
The icon represents the active call and the icon represents the call
on hold.
End the active call
• Press .
The held call becomes the active call.
Send touch tones
When you press the keys during a call, your phone generates sounds
known as touch tones. Use touch tones to access many automated, overthe-phone services such as voice mail, checking airline arrival/departure
times, and bank balances.
Note: You must be on an active call to send touch tones.
Set touch-tone length
1 Press Menu 4 5 5.
2 Scroll to Short (1/10 second) or Long (1/2 second)
3 Press OK.
[ 42 ] 8290 User Guide v2 2/18/00
Page 51

8290ug v2.fm Page 43 Friday, February 18, 2000 5:42 PM
Save touch tone strings
A touch-tone string is a series of tones in a certain sequence. Use touch
tone strings to send and receive information with your phone. For
example, you can save your office voice mailbox number along with your
password for easy access to your messages.
Store touch tone strings the same way you save phone numbers (see “Save
names and numbers” on page 28).
For frequently used strings of numbers, you can save an entire sequence
of digits in your phone book and send it as a touch tone string.
Send a touch tone string
1 Press Options.
2 Scroll to Touch tones and press OK.
3 Enter a touch tone string or recall a touch tone string from the
phone book and press OK.
End all calls
1 Press Options.
2 Scroll to End all calls , then press Select.
Advanced calling features
Access the phone book
This option appears in the menu as Names.
1 Press Options.
2 Scroll to Names and press Select. Now all your phone book functions
are available. See “Phone book” on page 28 for details.
Access menus
• Scroll to Menus and press OK to access any of your phone’s menus.
8290 User Gui de v2 2/18/00 [ 43 ]
Page 52

8290ug v2.fm Page 44 Friday, February 18, 2000 5:42 PM
Mute/unmute the microph one
You can mute and unmute your phone’s microphone while a call is in
progress. The difference between mute and hold is that mute lets you
hear the other caller.
1 Press Options.
2 Scroll to Mute, then press Select.
3 To unmute the microphone, press Unmute.
Muting and unmuting also affects the microphones of any accessories
connected to the phone.
Conference calls
This network service allows you to make conference calls with your phone.
Check with your service provider for details.
Make a conference call
1 Make a normal call to the first person.
2 Press Options and scroll to New call.
3 Press Select, recall or dial the number of the next party you want to
include, then press Call.
4 After the other party answers, press Options.
5 Scroll to Conference, then press Select.
6 To add other parties to the call, repeat steps 2 through 5.
7 To end the conference call, press .
Have a private conversation with a participant
1 While in a conference call, press Options.
2 Scroll to Private, then press Select.
A list of the participants appears.
++
[ 44 ] 8290 User Guide v2 2/18/00
Page 53

8290ug v2.fm Page 45 Friday, February 18, 2000 5:42 PM
3 Scroll to the person you want to speak with, then press OK.
The other participants can continue talking with each other.
4 To rejoin the conference call, press Options.
5 Scroll to Conference, then press Select.
Drop a participant fr om th e conf e re n ce ca ll
1 While in a conference call, press Options.
2 Scroll to Private, then press Select.
A list of the participants appears.
3 Scroll to the person you want to drop, then press OK.
The other participants can continue talking with each other.
4 Press Options.
5 Scroll to End active ca ll, then press Select.
Transfer a call++
When you have one active and one held call, you can connect the two
calls and disconnect yourself from the call.
Note: Your network must support this feature.
• During a call, press Options, scroll to Transfer, then press Select.
Advanced calling features
8290 User Gui de v2 2/18/00 [ 45 ]
Page 54

8290ug v2.fm Page 46 Friday, February 18, 2000 5:42 PM
• Call forwarding++
This network service lets you forward
your incoming calls to another phone
number.
Note: If you have subscribed to a
second phone line, call
forwarding works separately for
each line. Make sure you have
selected the line you want before you set up any call forwarding.
The following icons appear on your phone’s screen:
Incoming voice calls are being forwarded to another number.
You have forwarded all voice calls that are received on line 1.
You have forwarded all voice calls that are received on line 2.
You have forwarded all voice calls that are received on lines 1 and 2.
Activate call forwarding
1 Press Menu 5.
Scroll to one of the following options:
51 Forward all voice calls
Forwards all voice calls without ringing.
52 Forward if busy
53 Forward if not answe r ed
54 Forward when phone off or no coverage
55 Forward when not able to take calls
Combines the previous three types, and lets you choose a delay time
between 5 and 30 sec o nds.
56 Forw ard all fax calls
57 Forw ard all data calls
[ 46 ] 8290 User Guide v2 2/18/00
Page 55

8290ug v2.fm Page 47 Friday, February 18, 2000 5:42 PM
58 Cancel all call forwarding
2 Press Select.
3 Activate is highlighted; press OK.
4 Select Voice Mail
OR
Select Other number.
5 If you choose Other number, enter th e p hon e nu m ber to wh ic h yo u
want to forward calls, then press OK.
You can press Number to see if you entered the phone number
correctly.
Cancel call forwarding
1 Press Menu 5 1.
2 Scroll to Cancel and press OK.
Note: Canceling all call forwarding may also cancel any automatic
forwarding of calls to voice mail that your service provider has
activated for you. Also, this option may cancel your call
forwarding service. Contact your service provider for details.
Advanced calling features
Check call forwarding status
1 Press Menu 5.
2 Scroll to the call forwarding option you want to check.
3 Scroll to Status, then press OK.
Note: Status is not available for Forward when not able to take calls.
You can press Number to see which phone number the calls are being
forwarded to.
8290 User Gui de v2 2/18/00 [ 47 ]
Page 56

8290ug v2.fm Page 48 Friday, February 18, 2000 5:42 PM
• Automatic redial
This feature redials the number you’re trying to call up to ten times.
Note: Automatic redial will not work while you make or answer another
call.
Activate automatic redial
1 Press Menu 4 4 1.
2 Scroll to On, then pres s OK.
3 Press and hold Back to return to the Start screen.
If the number you dial is busy , your phone immediately redials the number .
If it is still busy , your phone will redial the number up to nine more times.
• Calling card
You can store two calling card numbers in your phone’s memory.
Save calling card information
1 Press Menu 4 4 2.
2 Scroll to the calling card information you want to change, then press
Options.
3 Scroll to Edit, then press OK.
4 Enter your security code, then press OK.
5 At Dialing se qu en ce, press Select. Scroll to the dialing sequence
your card uses (see chart on the next page) then press Select.
[ 48 ] 8290 User Guide v2 2/18/00
Page 57

8290ug v2.fm Page 49 Friday, February 18, 2000 5:42 PM
.
Advanced calling features
Dialing sequence
Access no.
+ Phone no.
+ Card no.
Access no.
+ Card no.
+ Phone no.
Prefix
+ Phone no.
+ Card no.
Note: The order of the following steps may vary, depending on which
dialing sequence your card uses.
6 Enter the access number (usually the 1-800 number listed on the
back of the calling card), then press OK.
7 Enter the card number and/or PIN, then press OK.
8 Your phone displays Save changes? Pre ss OK.
9 Scroll to Card name: and press Select.
10 Enter the card name, then press OK.
Dial the 1-800 acces s number,
then phone number, then card
number (+ PIN if required).
Dial the 1-800 acces s number,
then card number (+ PIN if
required), then phone number.
Dial the prefix (any numbers
that must precede the phone
number) and phone number
you want to dial, then card
number (then PIN, if required).
Use for cards
that require you to:
Cards using
this sequence
MCI, AT&T True
Choice, Sprint
Canada, Unitel
networkMCI,
WorldPhone MCI
GTE, PacBell, AT&T ,
Stentor
Choose a calling card
1 Press Menu 4 4 2.
2 Scroll to the card you want to use, then press Options.
3 Select is highlighted; press OK.
4 Enter your security code, then press OK.
8290 User Gui de v2 2/18/00 [ 49 ]
Page 58

8290ug v2.fm Page 50 Friday, February 18, 2000 5:42 PM
Make a calling card call
1 Enter the phone number, including any prefix (such as 0 or 1) that
your calling card may require. See your calling card for instructions.
2 Press and hold until your phone displays Card call.
3 Your phone displays Wait for tone, then press OK. Wait for the tone,
then press OK.
4 Your phone displays Wait for tone, press OK again. Wait fo r the
tone, then press OK.
This procedure may not work with all calling cards. Follow the directions
on the back of your calling card or contact your long distance company
for more information.
• Use Voice dialing
Your phone’s voice dialing feature lets you dial a number using your voice.
Before using this feature, you need to create entries in the phone book so
you can associate a "voice tag" with the name you wish to dial.
Add a voice tag to a phone book entry
To create entries in the phone book, see “Save names and numbers” on
page 28. By this time you should be familiar with the phone book. If not,
see “Phone book” on page 28.
1 At the Start screen, scroll to the name you want to give a voice tag.
2 Press Details, then Options, and scroll to Add voice tag.
3 Press Select. The phone displays Press Start, then speak afte r tone.
4 Press Start.
You hear several beeps, and Please speak now appears. If you’re
using the headset,relese the button.
5 Speak clearly into the microphone.
[ 50 ] 8290 User Guide v2 2/18/00
Page 59

8290ug v2.fm Page 51 Friday, February 18, 2000 5:42 PM
Note: Do NOT press Quit when you’re finishe d .
The phone automatically stops recording and then saves and replays the
voice tag.
If recording is not successful, your phone displays
Voice syste m error.
Press Options, scroll to Add voice tag, and repeat steps 3 - 5.
Warning: Do not rely only on a voice tag for dialing emergency numbers.
In emergencies, stress causes changes in your voice, which
may keep the phone from recognizing the command.
Notes about voice tags
• Voice tags are not language dependent. Any clearly spoken word or
phrase can serve as a voice tag.
• It’s easier for the phone to differentiate between long, unique voice
tags. For example you might want to record a person’s first and last
names rather than only the first name.
• Voice tags must be shorter than 2 seconds.
• Voice tags are sensitive to background noise. For best results, record
them in a quiet environment.
• If you delete a name, any associated voice tag is also deleted.
• The recording process stops automatically. Pressing Quit aborts the
recording attempt.
Advanced calling features
8290 User Guide v2 2/18/00 [ 51 ]
Page 60

8290ug v2.fm Page 52 Friday, February 18, 2000 5:42 PM
Make a call using voice recognition
1 Hold the phone up to your ear, then
press and hold Names.
When you hear several beeps and Please
speak now appears, release the button
.
Note: If you have the optional headset
attached, press and hold the headset
button, then when the phonebeeps and
Please speak now appears, release the
button.
2 Pronounce the voice tag clearly into the microphone.
Searching appears. When the phone finds the voice tag, Found
appears, and the phone automatically dials the number.
If the phone does not locate a number, No match found. Try again?
appears.
3 Press Yes to try again or Exit to cancel and return to the Start
screen.
Play back a voice tag
1 Press Names and scroll to Voice tags.
2 Press Select, then scroll to the name with the voice tag you want to
hear.
3 Press Options, select Playback, and press OK.
Change a voice tag
1 Press Names and scroll to Voice tags.
2 Press Select, then scroll to the name with the voice tag you want to
change.
3 Press Options, scroll to Change, and press OK.
[ 52 ] 8290 User Guide v2 2/18/00
Page 61

8290ug v2.fm Page 53 Friday, February 18, 2000 5:42 PM
4 The phone displays Press Start, then speak after tone.
5 Press Start.
Note: Refer to “Notes about voice tags” on page 51.
6 The phone repeats your voice tag, and Voice tag saved appears.
Note: If you’re using the headset and the phone does not locate the
number, you will hear an error tone and No match found
appears. To start voice dialing again, press and hold the
headset button immediately after the error tone.
Erase a voice tag
1 Press Names and scroll to Voice t ag s.
2 Press Select, then scroll to the name with the voice tag you want to
change.
3 Press Options, scroll to Erase, and press OK.
Erase voice tag? appears.
4 Press OK to erase the voice tag.
• 1-touch dialing
Advanced calling features
Assign a name and number to a 1-touch dial location so that when you
press this key, the associated number automatically dials.
Note: The first nine numbers stored in SIM memory are automatically
stored in keys 1 thro ugh 9 as 1-touch dial numbers. You can
assign new numbers to the keys, but the names and numbers
must be already stored in the phone book. Refer to “Phone book”
on page 28 for more information.
Key 1 can be set up to access your voice mail. Check with your
service provider for details. Also, any key can be set up to dial
emergency numbers such as 911.
8290 User Gui de v2 2/18/00 [ 53 ]
Page 62

8290ug v2.fm Page 54 Friday, February 18, 2000 5:42 PM
Assign a number to a 1-touch dial key
1 Press Names and scroll to 1-touch dialing.
2 Press Select.
3 Scroll to the first number that shows the message (empty) and press
Assign. A list of names appears.
4 Scroll to the phone book entry you want to assign to this key, press
OK, and Options appears.
Now you can edit the number if needed.
Call a 1-touch dial number
• Press and hold the appropriate key, or press the key then press .
The phone dials the number.
1-touch dialing for key 1
• If your phone is set up for voice mail, you can press and hold and
your phone dials voice mail.
• If you assign a 1-touch number to key 1, press , then press
. The phone dials the 1-touch number.
Change 1-touch dialing numbers
1 Press Names.
2 Scroll to 1-touch dialing and press Select.
3 Scroll to the key that you want to change and press Options.
4 Scroll to Change and press Select.
A list of names appears.
5 Scroll to the new name you want to assign to this key and press OK.
Erase 1-touch dialing numbers
1 Press Names.
[ 54 ] 8290 User Guide v2 2/18/00
Page 63

8290ug v2.fm Page 55 Friday, February 18, 2000 5:42 PM
2 Scroll to 1-touch dialing and press Select.
3 Scroll to the key that you want to erase and press Options.
4 Scroll to Erase and press Select.
5 Press OK to confirm.
• Make an international call
1 Enter the + character (by pressing the
key twice), country code, area
code, and phone number.
2 Press .
Advanced calling features
8290 User Gui de v2 2/18/00 [ 55 ]
Page 64

8290ug v2.fm Page 56 Friday, February 18, 2000 5:42 PM
• Use the phone book
To use phone book menus, begin at the Start screen and press Names.
Then, scroll through the menus to select a particular menu or option.
Option Action
Search Searches for a specific name.
Add entry Enters a new name and number.
Erase Erases names/numbers. You can choose to erase
individual names/numbers, or you can erase all
information at one time.
Copy Copies names/numbers between your phone and SIM
card.
Options Chooses the memory source (SIM card or internal),
phone book view, and shows the memory status.
1-touch dialing Assigns up to nine 1-touch dial locations. Refer to
“1-touch dialing” on page 53 for more information.
Voice tags Programs voice-activated dialing
Caller groups Renames or changes the ringing tone for a caller
group.
[ 56 ] 8290 User Guide v2 2/18/00
Page 65

8290ug v2.fm Page 57 Friday, February 18, 2000 5:42 PM
• Caller groups
You can create groups of names in your phone book and give each group
a different ringing tone. When someone from that group calls, you’ll know
because of the ringing tone.
Add names to a caller group
The name you add to a caller group must first be stored in the phone book.
1 From the Start screen, scroll to the name or number you want.
2 Press Details, then press Options.
3 Scroll to Caller groups and press Select.
4 Scroll to the group you want to give this name to and press Select.
Remove names from a caller group
1 Follow steps 1 through 3 above.
2 Scroll to No group and press Select.
Assign a ringing tone to a caller group
Advanced calling features
1 From the Start screen, press Names.
2 Scroll to Caller groups and press Select.
3 Scroll to the group you want and press Select.
4 Scroll to Group ringing tone and press Select.
5 Scroll to the tone you want to hear when anyone from this group
calls you and press OK.
Tip: You can set your phon e to rin g only when people from certain caller
groups call you, and to be silent for all other call groups. See the
“Caller group” description under “Ringing options” on page 64.
8290 User Gui de v2 2/18/00 [ 57 ]
Page 66

8290ug v2.fm Page 58 Friday, February 18, 2000 5:42 PM
Rename a caller group
You can rename any call group with a name of your own.
1 Follow steps 1 through 3 above.
2 Scroll to Rename group and press Select.
3 Enter the group name, then press OK.
Assign group graphics
Each caller group has a graphic (picture) associated with it. When you get
a call from someone whom you have assigned to a caller group, the
graphic associated with that group flashes on the screen.
To turn the graphic on for a caller group:
1 Press Names, scroll to Caller groups, and press Select.
2 Scroll to the name of the group and press Select.
3 Scroll to Group graphic and press Select.
Note: To see the group graphic before you select it, scroll to
View graphic and press Select. Press Back to retu rn to the m enu.
4 Scroll to On and press Select.
To turn the graphic off, follow the steps above, but scroll to Off in the last
step.
Send a graphic to someone else
1 Follow steps 1 through 3 above.
2 Scroll to Send graphic.
3 Enter the phone number or scroll to find it in your phone book, then
press OK.
For more details on the Send information via IR command, see page 102.
[ 58 ] 8290 User Guide v2 2/18/00
Page 67

8290ug v2.fm Page 59 Friday, February 18, 2000 5:42 PM
View a received graphic
1 When you receive a graphic from someone else, Group graphic
received appears.
2 Press Options and then choose Show to see the graphic, Save to save
it (you must choose which caller group gets the new graphic), or
Discard to discard it.
• Call timers
The phone automatically tracks the
amount of time you’ve spent on calls.
If you have two phone
lines
If you have subscribed to a second phone
line (see “Work with two phone lines” on page 36), call timers are separate
for each of your phone lines. When you view call timers, the call timers
that are shown are for the currently selected outgoing line. However, if
you view call timers while you are in a call, the call timers that are shown
are for the line you are using at that moment.
Advanced calling features
View the call duration
1 Press Menu 2 5.
2 Scroll to Last call, Received calls, Dialed calls or
All calls.
Reset call timers to 0
1 Press Menu 2 5.
2 Scroll to Clear timers, then pres s OK.
3 Enter your security code, then press OK again.
8290 User Gui de v2 2/18/00 [ 59 ]
Page 68

8290ug v2.fm Page 60 Friday, February 18, 2000 5:42 PM
Show call timer during calls
1 Press Menu 2 5.
2 Scroll to Last call, then press Details.
Current call is displayed.
3 Press Select.
4 Scroll to On, then pres s OK.
During a call, the amount of time spent in that call is displayed.
Note: The actual time invoiced for calls by your service provider may vary,
depending on network features, rounding-off for billing, and so
forth.
• Use call cost limits
This feature helps you limit the amount of money you spend on your
mobile phone bills. When the limit you set is reached, no calls can be
made except for emergency calls.
Note: The actual time invoiced for calls by your service provider may
vary, depending on network features, rounding-off for billing, and so
forth.
Set a call cost limit
1 Press Menu 2 7 1.
2 Enter your PIN2 code (see “PIN and PUK codes” on page 72), then
press OK.
3 Scroll to Set, then press OK.
4 Enter the number of charging units or dollars, then press OK.
Tip: Press # to insert a decimal point.
The number of remaining units is shown when the screen is clear.
[ 60 ] 8290 User Guide v2 2/18/00
Page 69

8290ug v2.fm Page 61 Friday, February 18, 2000 5:42 PM
Remove a call cost limit
1 Follow steps 1 and 2 above.
2 Scroll to Off, then press OK.
Advanced calling features
• Show call costs
This network service allows you to check the cost of the last or current
call, or the total cost of all calls that you have made or received since the
counters were last reset. To choose wheth e r call co sts are shown in
charging units or in dollars, see "Show costs in" on page 62.
Note: The actual invoice for calls and services from your service provider
may vary, depending upon network features, taxes, and so forth.
++
View call costs
1 Press Menu 2 6.
2 Scroll to Last call cost (cost of last call, or current call if applicable)
or All calls cost (cost of all calls since counters were last reset).
Clear call cost counters
1 Press Menu 2 6.
2 Scroll to Clear counters, then pre ss OK.
3 Enter your PIN2 code, then press OK.
8290 User Guide v2 2/18/00 [ 61 ]
Page 70

8290ug v2.fm Page 62 Friday, February 18, 2000 5:42 PM
• Show costs in
This feature allows you to choose whether you want to show call costs
and set call cost limits in charging units or in dollars. (If you choose
charging units, contact your wireless service provider for information
about the cost of a charging unit.) This feature appears only if supported
by your service provider and SIM card.
1 Press Menu 2 7 2.
2 Scroll to Currency or Units, then press Select.
3 If you selected Currency:
• Enter the unit price, then press OK.
• Enter the currency name, then press OK.
4 If you chose Units, call costs and call cost limits are measured in
charging units as agreed to by your service provider.
++
[ 62 ] 8290 User Guide v2 2/18/00
Page 71

8290ug v2.fm Page 63 Friday, February 18, 2000 5:42 PM
11. Customizing your
phone
• Profiles
Profiles let you set your phone’s sound settings to whatever environment
you find yourself in, whether it’s a meeting or a soccer game. Each profile
contains settings for your phone’s ringing option, ringing tone, ringing
volume, vibrating alert, message alert tone, keypad tones, and warning
and game tones. Just pick the profile that suits your current
environment: Normal, Silent, Outdoor, Meeting, or Pager.
Note: The Car and Headset profiles do not appear until you attach these
accessories for the first time.
You can modify the settings in each profile, and (except for the Normal,
Car, and Headset profiles) you can rename them.
Select a profile
Customizing your phone
1 Press Menu 3.
2 Scroll to the profile you want to use (for example, Normal) and press
Options.
3 Scroll to Select, then press OK.
Customize the profile
1 Press Menu 3.
2 Scroll to the profile you want to customize (for example, Normal).
3 Press Options.
8290 User Gui de v2 2/18/00 [ 63 ]
Page 72

s
8290ug v2.fm Page 64 Friday, February 18, 2000 5:42 PM
4 Scroll to Customize, then press OK.
The customize options appear.
Ringing options
Choose how a profile notifies you of an
incoming call.
1 Scroll to one of the following, and
Profile =
Ringing option
Ringing tone
Ringing volume
Vibrating alert
Message alert to ne
Keypad tones
Warning and game tone
Automatic answer
Lights
press OK.
Ring: The phone rings.
Ascending: The ringing volume starts low and increases with
successive rings.
Ring once: The phone rings once.
Beep once: The phone makes a short beep.
Caller groups: Sets the phone to ring only if the call is from a person
who belongs to the selected group(s). Scroll to the group(s) you want
and press Mark to select or Unmark to deselect them.
Silent: The phone sounds no tone. Keypad tones, warning and game
tones, and message alert tones are turned off, and the icon
appears at the top of the screen.
2 Press Back, then Yes to save or No to ignore the changes.
Ringing tone
Your phone comes programmed with 35 ringing tones. Also, there are
slots available for downloading up to five more ringing tones.
1 Press Menu 3.
2 Scroll to the profile for which you want to set the ringing tones, and
press Options.
3 Highlight Customize and press OK.
4 Scroll to Ringing tone, then press Select.
5 Scroll to the tone you want, then pause to hear a sample of the tone.
[ 64 ] 8290 User Guide v2 2/18/00
Page 73

8290ug v2.fm Page 65 Friday, February 18, 2000 5:42 PM
6 Press OK to select the tone or continue scrolling to select a different
tone.
Ringing volume
This feature sets the ringing volume for
incoming voice calls and message alert
tones.
1 Press Menu 3.
2 Scroll to the profile whose ringing
volume you want to set, then press
Options.
3 Scroll to Customize, then press OK.
4 Scroll to Ringing volume, then press Select.
5 Scroll to the volume level you wish to use, then pause to hear a
sample of the volume.
6 Press OK to select the volume or continue scrolling to select a
different volume.
Note: If you select Level 5, you see a note stating
VERY LOUD RINGING. Press OK to confirm the setting.
Also when you select Level 5, the phone starts ringing at Level
4, then ascends to Level 5.
Vibrating alert
Your phone has an internal vibrating mechanism. No special battery is
needed to make the phone vibrate when someone calls you.
1 Press Menu 3.
2 Scroll to the profile for which you want to set the vibrating alert, and
press Options.
3 Highlight Customize and press OK.
4 Scroll to Vibrating alert, then press Select.
Customizing your phone
8290 User Gui de v2 2/18/00 [ 65 ]
Page 74

8290ug v2.fm Page 66 Friday, February 18, 2000 5:42 PM
5 Scroll to On or Off and press OK.
If you choose On, your phone vibrates even if you have set Ringing
options (see page 64) to Silent.
Message alert tone
This option sets the tone your phone makes when you get a text message.
1 Press Menu 3.
2 Scroll to the profile whose message alert tone you want to set, then
press Options.
3 Scroll to Customize, then press OK.
4 Scroll to Message alert tone, then press Select.
5 Scroll through the tones until you hear one you like, then press OK.
Keypad tones
This option sets the volume of the tone you hear when you press the
phone’s keys.
1 Press Menu 3.
2 Scroll to the profile whose keypad tones you want to set, then press
Options.
3 Scroll to Customize, then press OK.
4 Scroll to Keypad ton es, then press Select.
5 Scroll through the choices until you hear the level you want, then
press OK.
Warning and game tones
Warning tones are sounds your phone makes for conditions such as errors,
confirmations, power on, battery low, and recharge battery. Game tones
sound while you are playing one of the phone’s games.
1 Press Menu 3.
2 Scroll to the profile for which you want to set the warning tones,
then press Options.
[ 66 ] 8290 User Guide v2 2/18/00
Page 75

8290ug v2.fm Page 67 Friday, February 18, 2000 5:42 PM
3 Scroll to Customize and press OK.
4 Scroll to Warning tones, then press Select.
5 Scroll to On or Off, then press OK.
Rename a profile
1 Press Menu 3.
2 Scroll to the profile you want to rename and press Options.
Note: Remember, you cann ot re na me th e No rmal , C ar, or Head set
profiles.
3 Scroll to Rename and press OK.
4 Enter the new profile name, then press OK.
Accessory profiles
Headset and Car profiles
When you connect your phone to an approved headset or car kit, the
phone automatically selects the Headset or Car profile. These profiles do
not appear in the phone’s menu until you connect the accessory. Also, you
cannot choose a different profile while these accessories are connected.
Your phone remembers any changes you make to the sound settings while
the headset or car kit is connected, and uses them again the next time you
use that accessory.
Set for automatic answer
This profile lets your phone answer incoming calls after just one ring.
Note: This profile is available only when your phone is connected to a
headset or to an approved car kit. This feature does not function
with data calls.
1 Press Menu 3.
2 Scroll to Car or Headset, then press Options.
Customizing your phone
8290 User Gui de v2 2/18/00 [ 67 ]
Page 76

8290ug v2.fm Page 68 Friday, February 18, 2000 5:42 PM
3 Choose Customize and press OK.
4 Scroll to Automatic Answer, then press Select.
5 Scroll to On and press Select.
Set up car profile
If you are using your phone with an approved car kit, you can set lights to
On (lights stay on) or Automatic (after 15 seconds, lights turn off until
the next key is pressed, phone rings, etc.).
• Restore factory settings
You can use Menu 4 5 7 to reset some of the phone settings to their
original values. You must enter the security code.
Note: Restoring factory settings does not erase your phone book.
However, it does erase all customized settings you may have
entered.
• Choose the display language
You can choose your phone’s display
language.
1 Press Menu 4 5 1.
2 Scroll to the language you want,
then press OK.
[ 68 ] 8290 User Guide v2 2/18/00
Page 77

8290ug v2.fm Page 69 Friday, February 18, 2000 5:42 PM
• Set up the clock
Your phone has an internal clock that can
be displayed on the Start screen. It also
features an alarm clock (see “Alarm clock”
on page 96).
Set the clock
1 Press Menu 4 2 2.
2 Enter the current time, using two digits for both hours and minutes.
OR
Enter hours and minutes in 24-hour format.
3 Press OK.
4 Select am or pm and press OK.
Note: If you entered the time in the 24-hour format, am and pm
do not appear.
If this is the first time you have set the clock, the phone asks you to enter
the date. Enter the date in mmddyyyy format and press OK.
Customizing your phone
Select the time format
1 Press Menu 4 2 3.
2 Scroll to Time format, then press Select.
3 Scroll to 24-hour or am/pm.
4 Press OK.
8290 User Gui de v2 2/18/00 [ 69 ]
Page 78

8290ug v2.fm Page 70 Friday, February 18, 2000 5:42 PM
Display the clock
This feature lets you continuously display the time on the Start screen.
1 Press Menu 4 2 1.
2 Scroll to Hide clock or Display clock (only one choice appears,
depending on the current setting).
3 Press Select.
Set automatic update of date and time
If this feature is supported by your wireless service provider, it
automatically updates the clock in your phone in accordance with the
current time zone.
Press Menu 4 3 and choose:
• On: Updates the date and time automatically.
• Confirm first: Requires you to confirm that you want the update.
• Off: Prevents the date and time from being automatically updated.
++
[ 70 ] 8290 User Guide v2 2/18/00
Page 79

8290ug v2.fm Page 71 Friday, February 18, 2000 5:42 PM
12.Security features
• Lock the keypad (Keyguard)
The keypad lock (Keyguard) disables your
keypad to prevent accidental key presses
(for example, when your phone is in your
pocket or purse).
Note: Keyguard does not prevent
unauthorized use of your phone.
• To lock the keys, press Menu, then
.
• To unlock the keys, press Unlock, then .
Note: Connecting your phone to a car kit automatically disables
Keyguard.
Security features
8290 User Guide v2 2/18/00 [ 71 ]
Page 80

8290ug v2.fm Page 72 Friday, February 18, 2000 5:42 PM
• PIN and PUK codes
The following table summarizes how different types of security codes are
used in your phone.
Code Purpose
Security code Required by several phone
features. If phone security is
on, the phone requests the
security code the first time
you use it after installing a
new SIM card.
PIN code If SIM card security is on, the
phone requests the PIN code
every time the phone is
turned o n .
PIN2 code Required by several phone
features.
System
password
Required by the Restrict Calls
feature.
For more
information
See entries for call
timers, calling card,
phone book, and
phone security.
See “PIN and PUK
codes” on page 72.
See entries for show
call costs, call cost
limit, fixed dialing,
and PIN and PIN2
codes.
See “Restricting
calls++” on page 76.
[ 72 ] 8290 User Guide v2 2/18/00
Page 81

8290ug v2.fm Page 73 Friday, February 18, 2000 5:42 PM
PIN codes
The PIN (Personal Identity Number) and PIN2 codes are 4- to 8-digit
numbers that usually come from your service provider along with the SIM
card. Use the PIN code to protect your phone and SIM card against
unauthorized use. The PIN2 code activates some of your phone’s
functions, such as Call Cost Limit (See “Use call cost limits” on page 60).
When the phone requires the PIN or PIN2 code, it displays Enter PIN code:
or Enter PIN2 code:.
• Enter the code then press OK.
Change your PIN or PIN2 code
You can change your PIN or PIN2 code to any 4- to 8-digit number.
1 Press Menu 4 6 5, then pr ess Select.
2 Enter the current PIN code and press OK.
3 Enter the new PIN code and press OK.
4 Enter the new PIN code again to verify, and press OK.
Note: If you make a mistake while entering the code, Code Error
appears. Start again at step 2 and be careful to enter the correct
code. If you enter the wrong code three times in a row, the PIN
code is blocked. To unblock the PIN code, see “PUK codes” on page
74.
Set SIM card security
This feature sets your phone to ask for the PIN code each time the phone
is switched on and prevents unauthorized use of your phone.
1 Press Menu 4 6 1.
2 Enter the PIN code supplied by your service provider, and press OK.
3 Press (up or down) to highlight On and press OK.
To turn off this feature, repeat steps 1 through 3 a bove, but highlight Off
in step 3.
Security features
8290 User Gui de v2 2/18/00 [ 73 ]
Page 82

8290ug v2.fm Page 74 Friday, February 18, 2000 5:42 PM
Note: If you enter the wrong PIN or PIN2 code three times in a row, the
SIM card is automatically blocked or you cannot activate the
function. See "PUK codes" below to unblock the codes.
PUK codes
The PUK (Personal Unblocking Ke y) and PUK2 codes are 4- to 8-digit codes
that also usually come from your service provider along with the SIM car d.
The PUK code unblocks a blocked PIN code, and the PUK2 code unblocks
a blocked PIN2 code.
Unblock a PIN code
1 Press Menu 4 6 5, then pr ess
Change PIN code appears.
2 To unblock the PIN2 code, press (down) to select Change PIN2 code.
3 Press Select.
PIN code blocked appears.
4 Enter the PUK code, then press OK.
Note: If you enter a wrong PUK code ten times in a row, the SIM card
becomes invalid and you must contact your service provider for a
new card.
5 Enter the new PIN code, then press OK.
6 Enter the new PIN code again to verify, and press OK.
Note: You cannot change the PUK or PUK2 code, so keep a record
of them in a safe place. If you lose them, contact your
service provider.
6ELECT
.
If you try to change the PIN2 code, and you enter a wrong
PUK2 code ten times in succession, you can’t use fu nc t i ons
requiring the PIN2 code. Contact your service provider for a
new card.
[ 74 ] 8290 User Guide v2 2/18/00
Page 83

8290ug v2.fm Page 75 Friday, February 18, 2000 5:42 PM
• Security code
You need the security code to access some security features. When the
phone requires the security code, it displays Security code:.
• Enter the code then press OK.
If you enter an incorrect security code five times in a row, the phone will
not accept the correct code for 5 minutes.
This code comes with your phone. The default security code is 12345. To
change the security code:
1 Press Menu 4 6 5, then press select.
2 Scroll to Change security code and press Select.
3 Enter the current security code, then press OK.
4 Enter the new security code, then press OK.
5 Enter the security code again to verify, then press OK.
Keep the code secret and in a safe place, separate from the phone.
• Fixed dialing
Security features
If supported by your SIM card, this feature lets you restrict you r outgoing
calls to phone numbers included in the fixed dialing list or beginning with
the same digit(s) as an entry in the list.
Remember, If you turn fixed dialing on and don ’t have any numbers in the
fixed dialing list, you can’t make any calls!
Note: When fixed dialing is set to on, calls may be possible to certain
emergency numbers in some networks (such as 911 or other
official emergency numbers).
8290 User Gui de v2 2/18/00 [ 75 ]
Page 84

8290ug v2.fm Page 76 Friday, February 18, 2000 5:42 PM
Turn fixed dialing on or off
1 Press Menu 4 6 4.
2 Scroll to On or Off, then press OK.
3 Enter your PIN2 code, then press OK.
Add numbers to the fixed dialing list
1 Press Menu 4 6 4.
2 Scroll to Numbers, then press OK.
3 Scroll to Add, then press Select.
4 Enter your PIN2 code and press OK.
5 Enter a name to go with the restricted phone number, then press OK.
6 Enter the phone number you want to restrict, then press OK.
Repeat steps 3 throu g h 6 fo r eac h number you want to add t o the lis t .
• Restricting calls
This is a network service that lets you restrict the calls your phone can
make and receive. Check with your service provider for details.
Note: When calls are restricted, calls may be possible to certain
emergency numbers in some networks (such as 911 or other
official emergency number).
++
Turn on call restrictions
1 Press Menu 4 6 3.
2 Scroll through the types of calls you can restrict, and press Select
when you se e the one you want.
Outgoing calls: Calls cannot be made.
[ 76 ] 8290 User Guide v2 2/18/00
Page 85

8290ug v2.fm Page 77 Friday, February 18, 2000 5:42 PM
International calls: Calls cannot be made to foreign countries.
International except to home country: When abroad, calls can be
made only within the current country and to your home country (that
is, the country where your home network operator is located.)
Incoming calls: Calls cannot be received.
Incoming c alls if roaming: Calls cannot be received outside your home
area.
Cancel all call restrictions: Turns off all call restrictions. Calls can be
made and received in the usual way.
Note: If you selected Cancel all call restriction s, the following steps are
not available. Also, you can cancel call restrictions on each
option, allowing restrictions on other options to stay in force.
3 Scroll to one of the following options:
Activate: Enter the restriction password and press OK.
Cancel: Enter the restriction password and press OK.
Status: The phone lists the call types with call restriction active.
4 Press OK.
For more information about your restriction password, see “Restricting
calls++” on page 76.
Security features
• Set up a closed user group
This network service specifies the group of people to whom you can call
and who can call you. Preset resets the phone to use a user group that the
SIM card owner has agreed upon with the service provider.
Note: When calls are limited to closed user groups, calls may be possible
to certain emergency numbers in some networks (such as 911 or
other official emergency number).
8290 User Gui de v2 2/18/00 [ 77 ]
++
Page 86

8290ug v2.fm Page 78 Friday, February 18, 2000 5:42 PM
13.Select a system
You can select how your phone chooses a wireless network, as there may
be more than one available. The selection you make stays active until you
change it or change the SIM card.
1 Press Menu 4-5-4.
2 Scroll to Automatic or Manual, then press Select.
• Automatic: The phone automatically selects one of the available
systems.
• Manual: The phone searches for available systems and then lists
them. Scroll to the one you want, then press Select. The phone looks
for a network and displays the result. If you lose connection while in
Manual mode, the phone asks you to select a network again.
[ 78 ] 8290 User Guide v2 2/18/00
Page 87

8290ug v2.fm Page 79 Friday, February 18, 2000 5:42 PM
Text messages++
14.Text messages
The text message network service allows you to send short text messages
to other phones that have text message capability. You can also ask the
service provider to convert the message to other formats such as e-mail
and fax.
++
• Set up text messaging
Before you can send and receive text messages, you must:
• Have a text message subscription through your service provider.
• Know your text message center number.
• Save your text message center number in your phone.
Save your message center number
1 Press Menu.
The Messages menu appears.
2 Press Select.
3 Scroll to Message setting s, then press Select.
4 Choose the set of message settings you want to use (the first one is
the default), then press Select.
Message center number appears.
5 Press Select.
6 Enter your message center number, then press OK.
8290 User Gui de v2 2/18/00 [ 79 ]
Page 88

8290ug v2.fm Page 80 Friday, February 18, 2000 5:42 PM
• Writing messages
Using standard text input
When you select this mode, the ABC icon appears as visual confirmation.
1 Find the key that is below the letter you want to enter.
2 Press it as many times as needed for the letter to appear on the
screen.
For example, to enter the name John:
Press J
Press O
Press H
Press N
See “Standard text input” on page 25 for more information.
Using predictive text input
Predictive text input is the default mode. This method allows you to write
text using a built-in dictionary. You can also add new words to the
dictionary. With predictive text input, you only need to press each number
key once for each letter.
For example, to write Nokia with the English dictionary selected:
(for N) (for o) (for k) (for i) (for a)
The display shows the above words for each key pressed.
Since the displayed word changes after each key stroke, disregard the
word until you have keyed in all the characters.
[ 80 ] 8290 User Guide v2 2/18/00
Page 89

8290ug v2.fm Page 81 Friday, February 18, 2000 5:42 PM
Predictive text input tools
- Use for word entry. Press each key only once for each
letter.
Press to view the next matching word if the underlined
word is not the word you intended.
Spell Press to add a new word to the dictionary.
Press once to accept a word and add a space.
Press and hold to enter a number. indicates
that you can input numbers.
Press to change the character case. indicates
uppercase. indicates lowercase.
Press to select predictive input or standard text input.
and indicate standard text input.
, , and indicate predictive text
input.
Text messages++
Clear Press once to delete the character to the left of the
cursor.
Press once to add a punctuation mark. To change the
underlined symbol, press repeatedly until the
desired symbol appears.
160
Maximum number of characters available. Appears in
the top right corner of the screen and counts down for
each character added.
Select a language and turn on predictive text input
1 Press Menu, then press Select.
8290 User Guide v2 2/18/00 [ 81 ]
Page 90

8290ug v2.fm Page 82 Friday, February 18, 2000 5:42 PM
2 Scroll to Write messages, then press Select.
3 Press Options, scroll to Dictionary, then press OK.
4 Scroll to the language you want, then press OK.
T9 dictionary activated appears.
Turn off predictive text input
• To switch from predictive text input to traditional text input, repeat
steps 1 through 3 abov e, then select Dictionary off.
OR
• While writing the message, press to switch between predictive
text input and standard text input.
Write with predictive text input
1 Press each key once for each letter.
For example, to write “hello” press
, , , , .
• Do not pay attention to the word on
the screen until you hav e fi nished
writing the word.
• Refer to the character counter in the top right of the screen. The
counter shows how many characters are available.
• Press Clear to delete a character.
• Press to change the character case.
• Press and hold the respective number key to insert a number.
• Press to insert a punctuation mark. If it is not correct, press
repeatedly to find the desired punctuation mark.
[ 82 ] 8290 User Guide v2 2/18/00
Page 91

8290ug v2.fm Page 83 Friday, February 18, 2000 5:42 PM
• To insert a symbol, press and hold
. The symbol screen appears.
Select the desired symbol and
press Insert.
2 When you have finished writing,
check the underlined word to see if
it is the word you intended to write.
If the word is correct
• Insert a punctuation mark, if needed. Then press to confirm
the word, enter a space, and begin writing the next word.
If the word is not correct
• Press repeatedly until the desired word appears, then press
to confirm the word.
OR
• Press Options, scroll to Matches, then press OK.
• Scroll to the correct word and press Use.
• Start writing the next word.
Note: When you enter a period to end a sentence, the phone switches
to mode so the that the first letter in the next word will be
uppercase.
If the ? character appears after the word
The word you intended to write is not in the dictionary.
• To add the word to the dictionary press Spell. See “Adding the
desired word to the match list.”
Add the desired word to the match list
If no matches are found in the predictive text input mode, you can add
the word to the dictionary.
1 Press repeatedly until Spell appears in place of Options.
Text messages++
8290 User Gui de v2 2/18/00 [ 83 ]
Page 92

8290ug v2.fm Page 84 Friday, February 18, 2000 5:42 PM
2 Press Spell and enter the word(s) using standard text input (see
“Standard text input” on page 25).
3 Press OK to save the word(s).
Insert numbers
1 To add a number to the message, press and hold until
appears.
2 Key in the desired numbers, then press and hold to return to
ABC mode.
Insert symbols
1 Press and hold until the symbol screen appears.
OR
Press Options and scroll to Insert symbol.
2 Select the desired symbol and press Insert.
Write compound words
1 Write the first part of the word and press to accept it.
2 Write the last part of the compound word and press to enter
the word in memory.
Save messages in the outbox
When you write a text message, it’s a good idea to save it in the outbox.
Then if there is a message delivery problem, you can easily resend the
message.
1 While writing the message, press Options.
2 Scroll to Save, then press OK.
[ 84 ] 8290 User Guide v2 2/18/00
Page 93

8290ug v2.fm Page 85 Friday, February 18, 2000 5:42 PM
Text messages++
Send the text message
1 Press Menu 1 3.
Write messages appears briefly, followed by the message screen.
2 Enter a message of up to 160 characters.
The number of available characters appears in the top right corner
of the screen.
3 Once you have finished writing, press Options, scroll to Send, then
press OK.
4 Enter or recall the recipient’s phone number, then press OK.
Sending message appears.
When the message is successfully sent, Message sent appears .
Note: If you need to exit while writing the message, press
anytime. Later, press Menu 1 3 to return and finish writing the
message. If you turn off the phone without saving the message,
the message will be lost.
• Resend a message from the outbox
Messages in the outbox have one of two icons in front of them. The
icon in front of a message heading shows that you have attempted to
send the message to the text message center. The icon shows that you
have not yet tried to send the message.
1 Scroll to the message, then press Read.
2 Press Options.
3 Scroll to Forward and press OK.
4 Press Options.
Send appears already highlighted.
5 Press OK to send the message.
8290 User Gui de v2 2/18/00 [ 85 ]
Page 94

8290ug v2.fm Page 86 Friday, February 18, 2000 5:42 PM
• Read text messages
Read new text messages now
When you receive a text message, the phone displays Message received
and the indicator, and makes a sound (depending on the “Message
alert tone”; see page 66).
1 To read the message, press Read.
This takes you to the Inbox, with the new message selected.
2 Press Read again to read the message.
Read new text messages later
1 Press Menu 1 1 1.
A list of message headers is displayed. The icon in front of the
header indicates that a message has been read. The icon indicates
that a message has not yet been read.
2 Scroll to the message you want, then press Read.
3 If the message is long, use the scroll keys to scroll through the
message.
The text of the message is followed by the sender’s name or phone
number, reception date, and time
• Erase a message
1 While reading the message, press Options.
2 Scroll to Erase, then press OK.
Your phone asks you to confirm that you want to eras e the message.
3 Press OK.
[ 86 ] 8290 User Guide v2 2/18/00
Page 95

8290ug v2.fm Page 87 Friday, February 18, 2000 5:42 PM
• Reply to a message
1 Press Options.
2 Scroll to Reply, then press OK.
3 Enter your message, then press Options.
4 Scroll to Send, then press OK.
The phone displays the return number.
5 Edit the number if needed, then press OK.
• Forward a message
1 Press Options.
2 Scroll to Forward, then press OK.
The message text appears.
3 Edit the message if necessary, then press Options.
Send appears already highlighted.
4 Press Send.
The Number box appears.
5 Enter the recipient’s phone number, then press OK.
OR
• Press Search to recall a stored name and phone number, then
press OK.
• Press OK again to confi rm.
Text messages++
8290 User Gui de v2 2/18/00 [ 87 ]
Page 96

8290ug v2.fm Page 88 Friday, February 18, 2000 5:42 PM
• Retrieve a number
You can save or dial a phone number that is included in a message.
1 Press Options.
2 Scroll to Use number, then press OK.
3 If more than one number is shown, scroll to the one you want, then
press OK.
The phone displays the number on the screen. You can dial it or save it as
if you had entered it yourself.
• Message settings
You can specify some of the ways your phone handles text messages.
Depending on your SIM card, you can have up to five “sets” of settings—
for example, one for e-mail messages, one for pages, one for faxes, and so
on.
Change settings for some messages
1 Press Menu 1 5.
2 Scroll to the set you want to change the settings for, then press
Select.
3 Scroll to one of these options:
Message center number: Get this number from your wireless service
provider. Enter the message center phone number and press OK, or
press Search to get the number from your phone book (if it is saved
there).
Messages sent as: Scroll to Text, Fax, Page, or E-mail, then press OK.
(In order to receive a converted message, the recipient needs to have
the appropriate terminal device.)
[ 88 ] 8290 User Guide v2 2/18/00
Page 97

8290ug v2.fm Page 89 Friday, February 18, 2000 5:42 PM
Message validity: The amount of time that messages should be stored
at the message center while the network attempts to deliver them.
Choose a time, then press OK.
Rename this set: Enter a new name for this set of message settings,
then press OK.
4 Press Select.
Change common settings for all messages
1 Press Menu 1 5.
2 Scroll to Common, then press Select.
3 Scroll to Delivery reports or Reply via same center, then pres s
Select.
Delivery reports: Scroll to Yes or No, then press OK. Yes means that
the network tries to send delivery reports for the messages you send.
Reply via same center: The network tries to route the reply to this text
message through your own message center.
• Message storage
Text messages++
The inbox and outbox share a given amount of memory in your SIM ca rd.
When this memory is full and there is no more room to store messages,
the message indicator blinks. If you are sent a text message when the
memory is full, the phone displays the message No space: message
waiting. You should delete one or more old messages to make room for
the new message. The network wa it s and resends the message at a later
time.
Note: Depending on your SIM card, the inbox and outbox can contain a
total of up to 50 messages.
To use this feature, set the Delivery reports option to Yes.
8290 User Gui de v2 2/18/00 [ 89 ]
Page 98

8290ug v2.fm Page 90 Friday, February 18, 2000 5:42 PM
• Picture messages
Using Menu 1 4, you can send picture messages with your phone. There
are several images included in your phone, and also space for one
additional picture. All images can be replaced or deleted.
Note: Picture messaging must be supported by your service provider.
Send picture messages
1 Press Menu, then Select.
2 Scroll to Picture Messages and press Select.
3 Scroll to the picture you want to send, then press View.
The picture appears. To choose a different picture, press Back, scroll
to another picture, then press View.
4 Press Options and scroll to Forward.
5 Recall or enter the phone number to which you want to send the
picture message.
Note: The phone number you choose must be able to receive picture
messages.
6 Press OK.
Send picture messages with text
1 Press Menu, then Select.
2 Scroll to Picture Messages and press Select.
3 Scroll to the picture you want to send, then press View.
The picture appears. To choose a different picture, press Back, scroll
to another picture, then press View.
4 Press Options, scroll to Edit text, and press Select.
5 Write a message (up to 121 ch aracters) to go along with the picture,
then press Options.
[ 90 ] 8290 User Guide v2 2/18/00
Page 99

8290ug v2.fm Page 91 Friday, February 18, 2000 5:42 PM
Note: You can use predictive text input or standard text input to
write the message. See “Using predictive text input” on page
80 for more information.
6 Scroll to Send picture and press OK.
7 Enter the phone number to which you want to send the picture
message and press OK.
Sending picture message appears, followed by Picture message
sent.
Note: The phone number you choose must be able to receive
picture messages.
Receive picture messages
1 When your phone displays Picture message received, press View and
the message appears.
2 If the picture has a text message with it, scroll up or down to see the
entire message.
3 Press Save to keep the picture message, or press Back and Exit to
delete it.
Text messages++
Other picture message options
Erase: Deletes the picture you select.
Use number: Automatically lets you save any phone number included in
the text of the picture message.
Details: Shows the phone number of the person who sent you that picture
message.
8290 User Guide v2 2/18/00 [ 91 ]
Page 100

8290ug v2.fm Page 92 Friday, February 18, 2000 5:42 PM
15.Your personal digital
assistant
• Calendar
The calendar keeps track of reminders,
calls you need to make, meetings, and
birthdays. It can even sound an alarm
when it’s time for you to make a call or go
to a meeting.
Warning: Y our phone m ust be switched
on to use this function. Do not
switch on the phone when wireless phone use is prohibited or
when it may cause interference or danger.
View the calendar
• Press Menu 8.
Enter the date
1 Press Options, scroll to
Set the date, and press Select.
2 Enter the current month and day in mmddyyyy format, then press
OK.
(Example: Enter December 31, as 12312000).
Date is set appears.
[ 92 ] 8290 User Guide v2 2/18/00
 Loading...