

Page 1

Phone notes
My [Model] information Information source
My number Wireless provider
Phone serial number
(ESN)
IMEI
Voicemail number Wireless provider
Wireless provi d e r
customer care
Message center number Wireless provider
Default recipient
number (also known as
the e-mail gateway)
On back of your
phone, beneath the
battery
Wireless provider
Wireless provider
Page 2

The wireless phone described in this guide is approved for use in GSM,
TDMA, and AMPS networks.
LEGAL INFORMATION
Part No. _________, Issue No. ___
©2001 Nokia Mobile Phones. All rights reserved.
Nokia is a registered trademark of Nokia Corporation.
Printed in Canada __/2001
Nokia, Nokia Connecting People and the Original Accessories logos are
trademarks of Nokia Corporation and/or its affiliates.
US Patent No 5818437 and other pending patents.
T9 text input software Copyright ©1999-2001. Tegic Communic ations,
Inc. All rights reserved.
Includes RSA BSAFE cryptographic or security protocol software
from RSA Security.
The information contained in this user guide was written for Nokia phone
[Model]. The right to make changes and improvements to any of the
products described in this guide without prior notice is reserved.
EXPORT CONTROLS
This product contains commodities, technology or software exported from
the United States in accordance with the Export Administration
regulations. Diversion contrary to U.S. law is prohibited.
FCC/INDUSTRY CANADA NOTICE
Your phone may cause TV or radio interference (for example, when using
a telephone in close proximity to receiving equipment). The FCC or
Industry Canada can require you to stop using your telephone if such
interference cannot be eliminated. If you require assistance, contact your
local service facility. This device complies with part 15 of the FCC rules.
Operation is subject to the condition that this device does not cause
harmful interference.
Page 3

Radio frequency (RF) signals
THIS MODEL PHONE MEE TS TH E GOV ERNMENT’S REQUIREM ENTS FOR
EXPOSURE TO RADIO WAVES.
You wireless phone is a radio transmitter and receiver. It is designed and
manufactured not to exceed the emission limits for exposure to radio
frequency (RF) energy set by the Federal Communications Commission of
the U.S. Government. These limits are part of comprehensive guidelines
and establish permitted levels of RF energy for the general population. The
guidelines are based on standards that were developed by independent
scientific organizations through periodic and thorough evaluation of
scientific studies. The standards include a substantial safety margin
designed to assure the safety of all persons, regardless of age and health.
The exposure standard for wireless mobile phones employs a unit of
measurement known as the Specific Absorption Rate, or SAR. The SAR
limit set by the FCC is 1.6W/kg.* Tests for SAR are conducted using
standard operating positions accepted by the FCC with the phone
transmitting at its highest certified power level in all tested frequency
brands. Although the SAR is determined at the highest certified power
level, the actual SAR level of the phone while operating can be well below
the maximum value. This is because the phone is designed to operate at
multiple power levels so as to use only the power required to reach the
network. In general, the closer you are to a wireless base station antenna,
the lower the power output.
Before a phone model is available for sale to the public, it must be tested
and certified to the FCC that it does not exceed the limit established by
the government-adopted requirement for safe exposure. The tests are
performed in positions and locations (for example, at the ear and worn on
the body) as required by the FCC for each model. The highest SAR value
for this model phone as reported to the FCC when tested for use at the
ear is 1.17 W/kg, and when worn on the body, as described in this user
guide, is 0.90 W/kg. (Body-worn measurements differ among phone
models, depending upon available accessories and FCC requirements.)
Page 4

While there may be differences between the SAR levels of various phones
and at various positions, they all meet the government requirement.
The FCC has granted and Equipment Authorization for this model phone
with all reported SAR levels evaluated as in compliance with the FCC RF
exposure guidelines. SAR information on this model phone is on file
with the FCC and can be found under the Display Grant section of
http://www.fcc.gov/oet/fccid after searching on FCC ID LJP NPM-2NX.
For body-worn operation, to maintain compliance with FCC RF exposure
guidelines, use only Nokia-approved accessories. When carrying the
phone while it is on, place the phone in the specific carrying case that has
been tested for compliance.
Use of non-Nokia-approved accessories may violate FCC RF exposure
guidelines and should be avoided.
*In the United States and Canada, the SAR limit for mobile phones used
by the public is 1.6 watts/kg (W/kg) averaged over one gram of tissue. The
standard incorporates a substantial margin of safety to give additional
protection for the public and to account for any variations in
measurements. SAR values may vary depending on national reporting
requirements and the network band. For SAR information in other regions
please look under product information at http://www.nokia.com.
Page 5

Contents
1 Safety first . . . . . . . . . . . 1
Safety guidelines . . . . . . . . . 1
Quick guide to functions . . 3
Menu shortcuts . . . . . . . . . . 4
2 Welcome to Nokia . . . . . . 5
Get the most
out of this guide . . . . . . . . . 5
Sign up with
a wireless provider . . . . . . . 6
Before you
contact Nokia . . . . . . . . . . .6
About the antenna . . . . . . .7
3 Review the basics . . . . . . 8
An illustrated
view of the [Model] . . . . . . 8
Remove the back cover . . . . 9
Install the SIM card . . . . . .9
Install the battery . . . . . . . .9
Charge the battery . . . . . . 10
Remove the battery . . . . .11
Important
battery information . . . . .12
Switch on the phone . . . .12
The Start screen . . . . . . . .13
Use the
selection and scroll keys . . 15
Adjust call volume . . . . . .16
Make and answer ca l l s . . . 1 6
Help text . . . . . . . . . . . . . .17
Navigate your
phone’s menus . . . . . . . . . 17
Menu shortcuts . . . . . . . . 19
4 Your phone’s keypad . . . 23
Enter
characters and numbers . 23
5 Phone book . . . . . . . . . . 2 6
Open the Phone book . . . . 26
Customize
your Phone book . . . . . . . . 30
Caller groups . . . . . . . . . . . 30
Your phone’s memory . . . 31
Copy Phone book entries . 33
Business cards . . . . . . . . . 34
View service numbers . . . 35
Call Log . . . . . . . . . . . . . . . 35
6 Use voicemail . . . . . . . . 40
Save your
voice mailbox number . . . 40
Call and
setup your voicemail . . . . 40
Automate voicemail
with dialing codes . . . . . . 41
7 Advanced features . . . . . 4 3
In-call options . . . . . . . . . 43
Call waiting . . . . . . . . . . . . 45
Call forwarding . . . . . . . . . 46
Voice dial . . . . . . . . . . . . . 48
Voice command . . . . . . . . 50
Voice Recorder . . . . . . . . . 51
i
Page 6

1-touch dialing . . . . . . . . .53
International dialing . . . . .54
8 Customize your phone . . 55
Set the display language .55
Profiles . . . . . . . . . . . . . . . .55
Audio settings . . . . . . . . . .58
Download a ringing tone .59
Accessibility solutions . . . .60
For TTY Users . . . . . . . . . . .61
Optional headset . . . . . . . .63
9 Manage phone security . 64
Lock and
unlock the keypad . . . . . . .64
Security levels . . . . . . . . . .64
Fixed dialing . . . . . . . . . . .65
Access codes . . . . . . . . . . . 65
10 Messages . . . . . . . . . . . 6 9
Tips for
composing a message . . . .70
Write and send a message 71
Read messages . . . . . . . . .72
E-mail . . . . . . . . . . . . . . . . .73
Compose and send e-mail 75
Picture messages . . . . . . . .75
Templates . . . . . . . . . . . . . .77
Organize your
messages with folders . . .79
Erase messages . . . . . . . . .81
Predictive text . . . . . . . . . .82
11 Your personal organizer 84
Wallet . . . . . . . . . . . . . . . . .84
Create a wallet card . . . . .86
Calendar . . . . . . . . . . . . . . 90
Set the time and date . . . 94
Alarm clock . . . . . . . . . . . . 95
Use the Calculator . . . . . . 97
12 Your phone
and other devices . . . . . 99
Infrared basics . . . . . . . . . 99
Send and
receive information . . . . 100
PC Connectivity . . . . . . . 101
13 The wireless Internet . 103
The Services menu . . . . . 103
WAP settings . . . . . . . . . 104
Launch the browser . . . . 104
14 Fun and games . . . . . 110
Games main menu . . . . . 110
Start a game . . . . . . . . . . 111
15 Accessories . . . . . . . . 112
16 Reference information 115
Batteries and charger s . . 115
Important
safety information . . . . . 117
17 Care and maintenance 121
Troubleshooting . . . . . . . 122
18 Frequently
Asked Questions (FAQ) 123
19 Glossary . . . . . . . . . . . 125
20 [Model]
Technical information . 129
21 Nokia One-Year
Limited Warranty . . . . 130
22 Index . . . . . . . . . . . . . 135
ii
Page 7

iii
Page 8
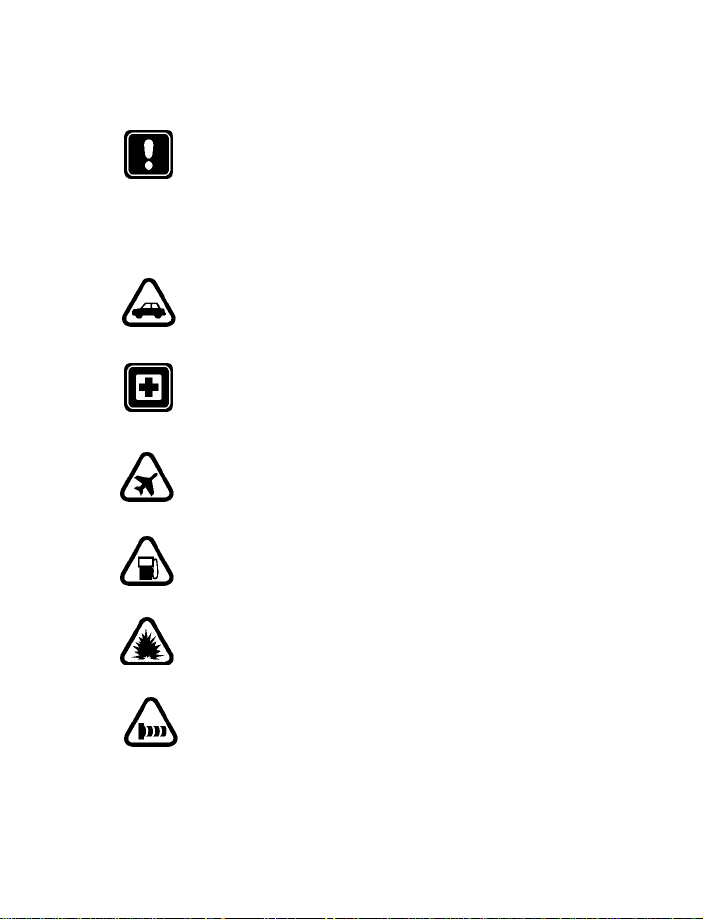
1 Safety first
Read these simple guidelines before you use your phone. Failure
to comply with these guidelines may be dangerous or illegal.
• SAFETY GUIDELINES
The following are important safety precautions for phone use.
Road safety comes first
Do not use a hand-held phone while driving. Park the
vehicle first.
Switch off in hospitals
Follow any regulations or rules. Switch your phone off near
medical equipment.
Switch off while aboard aircraft
Mobile phones can cause interference. Using them on aircraft is
illegal.
Switch off when refueling
Do not use your phone at a refueling point. Do not use it near fuel
or chemicals.
Safety first
Switch off near blasting
Do not use your phone where blasting is in progress. Observe
restrictions, and follow any regulations or rules.
Observe infrared precautions
Do not point the IR beam at anyone’s eyes or allow it to interfere
with other IR devices.
1
Page 9
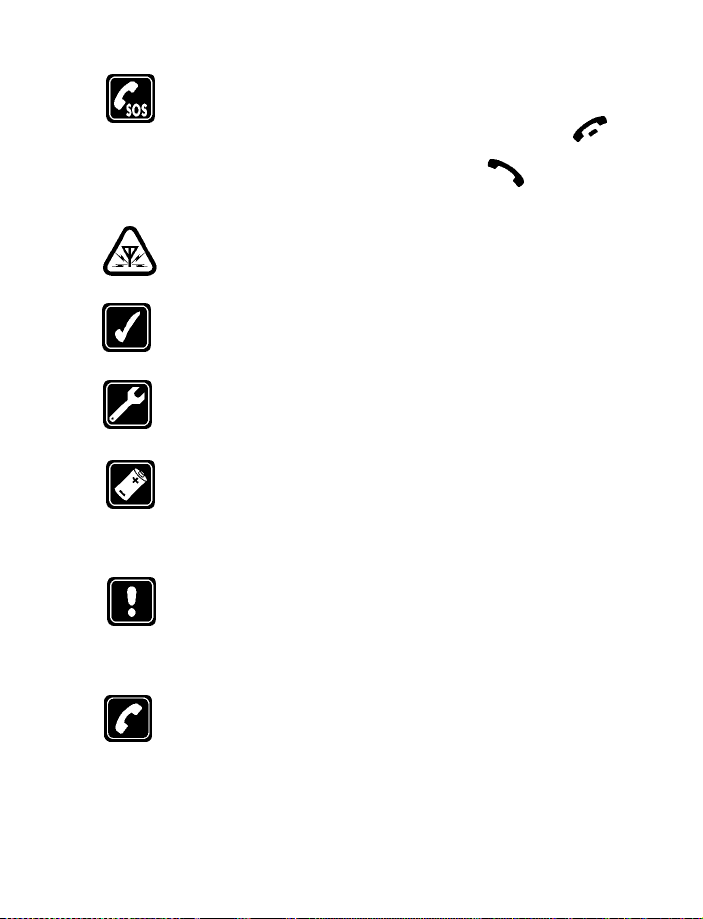
Emergency calls
Make sure the phone is switched on and in service. If the word
Clear appears above the right selection key, press an d hold
to return to the Start screen where an emergency call can be
made. Enter the emergency number and press . Give your
location. Do not end the call until told to do so.
Be aware of interference
All wireless phones may receive interference that could affect
performance.
Use your phone sensibly
Use your phone only in the normal position (next to the ear). Do
not touch the antenna unnecessarily.
Use only qualified service personnel
Equipment must be installed or repaired only by qualified service
personnel.
Use approved accessories and batteries
Use only approved accessories and batteries. Do not connect
incompatible products.
Read instructions before you connect to other devices
When you connect your phone to any other device, read the
device’s user guide for detailed safety instructions. Do not
connect incompatible products. Remember to make backup
copies of all important data.
Make sure the phone is on
Before you make a call, be sure your phone is switched on. To
make and receive calls, you must sign up with a wireless service
provider.
2
Page 10

Safety first
• QUICK GUIDE TO FUNCTIONS
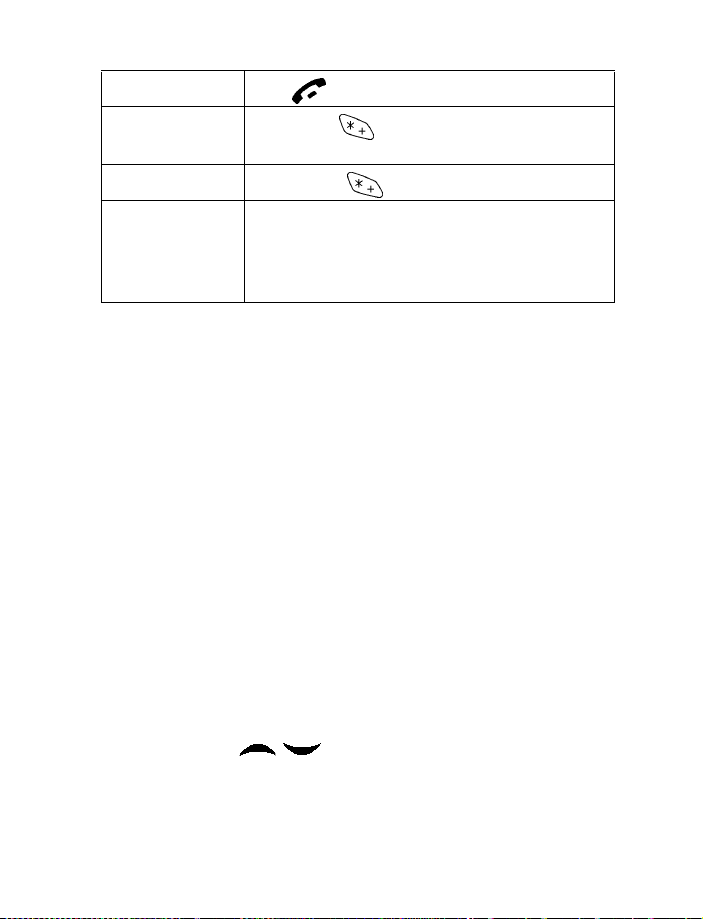
Make a call Enter phone number, press
Answer a call Press
Answer a call with call
waiting
End a call Press
Ignore a call Press Silence when your phone rings
Redial Press twice
Adjust call volume During a call, press up or down on the side volume key to
Use the in-call menu While in a call, press Options
Use 1-touch dialing Press and hold any key 2 through 9
Press
adjust call volume.
or
Answer
Save a name and number Enter a number , press Options
Recall a name/number Press Names
Recall a name/number
during a call
Check voice mail Press and hold OR dial your voice mailbox number
Send a text message Press Menu 01-1. After a pause, write the message.
Send an E-mail message Press Menu 01-1, and write your message. Press Options,
Read new message Press Show
Reply to a message Press Options, select Reply, select As messag
Reply to an E-mail messagePress Options, scroll to Reply, press OK, choose As
Send a business ca rd Re call a name from the phone book, press Details, press
a name and press OK
,
select Find
Press Options, scroll New call, press Select, press Find,
enter the first letter of the name to find
Press Options, scroll to Send, press Select, enter the
recipient’s number, press OK
scroll to Sending options, press Select. Scroll to Sending
profile and press Select. Highlight your e-mail profile,
press Select. Press Options, Accept, enter the e-mail
address, press OK.
,
then press Select
reply option, write the reply, press Options, select Send,
then press OK
e-mail, press Select, then follow instructions for sending
an e-mail message
Options, select Send bus. card, select SMS, enter the
recipient’s number, press OK.
and select Save, then enter
e
, choose a
3
Page 11
• MENU SHORTCUTS
Full list of shortcuts on page 19
1 MESSAGES
Write message . . . . . . . . . . . 01-1
Inbox . . . . . . . . . . . . . . . . . . . 01-2
Outbox. . . . . . . . . . . . . . . . . . 01-3
Archive. . . . . . . . . . . . . . . . . . 01-4
Templates. . . . . . . . . . . . . . . . 01-5
My folders . . . . . . . . . . . . . . . 01-6
Erase messag es. . . . . . . . . . . 01-7
Message set ting s. . . . . . . . . . 01-8
Voice m e ssag e s. . . . . . . . . . . 01-9
Service command editor. . . 01-10
2 CALL LOG
Missed calls. . . . . . . . . . . . . . . 2-1
Received ca lls . . . . . . . . . . . . . 2-2
Dialed numb ers. . . . . . . . . . . . 2-3
Clear call lists . . . . . . . . . . . . . 2-4
Call timers. . . . . . . . . . . . . . . . 2-5
3 PROFILES
Normal. . . . . . . . . . . . . . . . . . . 3-1
Silent . . . . . . . . . . . . . . . . . . . . 3-2
Meeting. . . . . . . . . . . . . . . . . . 3-3
Outdoor . . . . . . . . . . . . . . . . . . 3-4
Pager . . . . . . . . . . . . . . . . . . . . 3-5
4 SETTINGS
Alarm clock . . . . . . . . . . . . . . . 4-1
Time settings. . . . . . . . . . . . . . 4-2
Call settings. . . . . . . . . . . . . . . 4-3
Phone setting s. . . . . . . . . . . . . 4-4
Tone setting s. . . . . . . . . . . . . . 4-5
Accessory settings. . . . . . . . . . 4-6
Security setting s. . . . . . . . . . . 4-7
Restore fa ctory sett in gs. . . . . 4-8
5VOICE
Voice re co rde r . . . . . . . . . . . . .5-1
Record . . . . . . . . . . . . . . .5-1-1
Rec or d i n gs list. . . . . . . . .5-1-2
Voice command s . . . . . . . . . . .5-2
Profiles. . . . . . . . . . . . . . .5-2-1
Voice m a ilbo x. . . . . . . . . .5-2-2
Infrared. . . . . . . . . . . . . . .5-2-3
Voice reco rd er . . . . . . . . .5-2-4
6 ORGANIZER
Calendar. . . . . . . . . . . . . . . . . .6-1
To-do list . . . . . . . . . . . . . . . . .6-2
Wallet. . . . . . . . . . . . . . . . . . . .6-3
7CALCULATOR
8 GAME S
Select game . . . . . . . . . . . . . . .8-1
Snake II. . . . . . . . . . . . . . . 8-1-1
Pass ‘n Ru sh. . . . . . . . . . .8-1-2
Pairs 2. . . . . . . . . . . . . . . .8-1-3
Bumper. . . . . . . . . . . . . . .8-1-4
Settings. . . . . . . . . . . . . . . . . . .8-2
9 INFRARED
Infrared. . . . . . . . . . . . . . . . . . .9-1
10 SERVI C E S
4
Page 12

Welcome t o Nokia
2Welcome to Nokia
Congratulations on your purchase of the Nokia [Model] mobile phone. The
[Model] can be connected to a PC, laptop, or other device using the data
cable or built-in IR port. For more information, please refer to the PC
Connectivity Guide, which can be downloaded from the Internet along
with Nokia PC Suite as follows:
1 Go to www.nokia.com and click on the United S tates hyperlink under
Mobile Phones.
2 Select Phones, and then PC Downloads. From there you can
download the software and documentation to help integrate the
[Model] with your computer
• GET THE MOST OUT OF THIS GUIDE
Follow graphic clues
Icons appear throughout this guide to alert you of important information
or to provide useful tips.
Tip: Indicates a shortcut or alternate method of doing something.
Note: Explains a feature or points out an important concept.
Important: Indicates critical information on using a feature.
Caution: Warns you when you may lose information.
Warning: Helps to avoid injury, phone, or property damage.
Look for updates
From time to time, this guide is updated to reflect changes. The latest
version may be available at Nokia’s Internet site. Go to www.nokia.com
and click on the United States hyperlink under Mobil e Phon e s. Select
Phones, and then PC Downloads.
5
Page 13
• SIGN UP WITH A WIRELESS PROVIDER
To use the network services available in your phone, you’ll need to sign up
with a wireless provider. In many cases, the wireless provider will provide
descriptions of their services and instructions for using features such as:
• Voice mail and voice privacy
• Call waiting, call forwarding, and caller ID
• Messaging
• News and information services
• Selected Internet services
Wireless providers may differ in their support of features. For example,
some may not support all languages available in your phone. Before you
sign up, make sure a wireless provider supports the features you need.
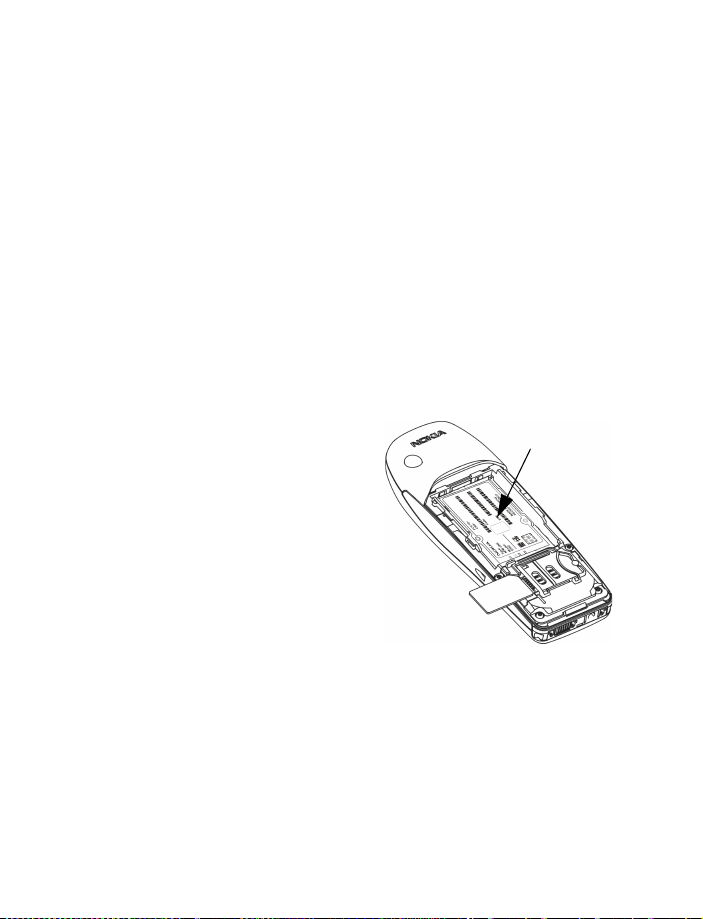
• BEFORE YOU CONTACT NOKIA
If you need help, Nokia Customer Care
is available for assistance. Before
calling, however, please read
“Frequently Asked Questions (FAQ)” on
page 123.
We also recommend that you write
down the following information on the
inside cover of this guide and have it
available if you call. The information can be found on your phone’s label,
which is on back of the phone, beneath the battery.
• The International Mobile Equipment Identifier (IMEI)
• The ESN (Electronic Serial Number)
• We also ask that you write down your zip code
6
Information
label
Page 14

Welcome to No kia
Have your phone or accessory handy
Please have your phone or with you when contacting either of the
numbers below.
Nokia Customer Care Center, USA
Nokia Mobile Phones, Inc.
7725 Woodland Center Boulevard
Suite #150
Tampa, Florida 33614
Tel: 1-888-NOKIA2U (1-888-665-4228)
Fax: 1-813-249-9619
TTY: 1-800-24NOKIA (hearing impaired only)
(1-800-246-6542)
• ABOUT THE ANTENNA
Your phone has a built-in
antenna. As with any other radio
transmitting device, avoid
touching the antenna while the
phone is powered up.
Contact with the antenna affects
call quality and may cause the
phone to operate at a higher
power level than necessary.
External antenna
connection
Customer Interaction
Center, Canada
Nokia Products Ltd.
601 Westney Roa d So uth
Ajax, Ontario L1S 4N7
Tel: 1-888-22NOKIA
(1-888-226-6542)
Fax: 1-905-427-1070
Internal ante nna
7
Page 15
3 Review the basics
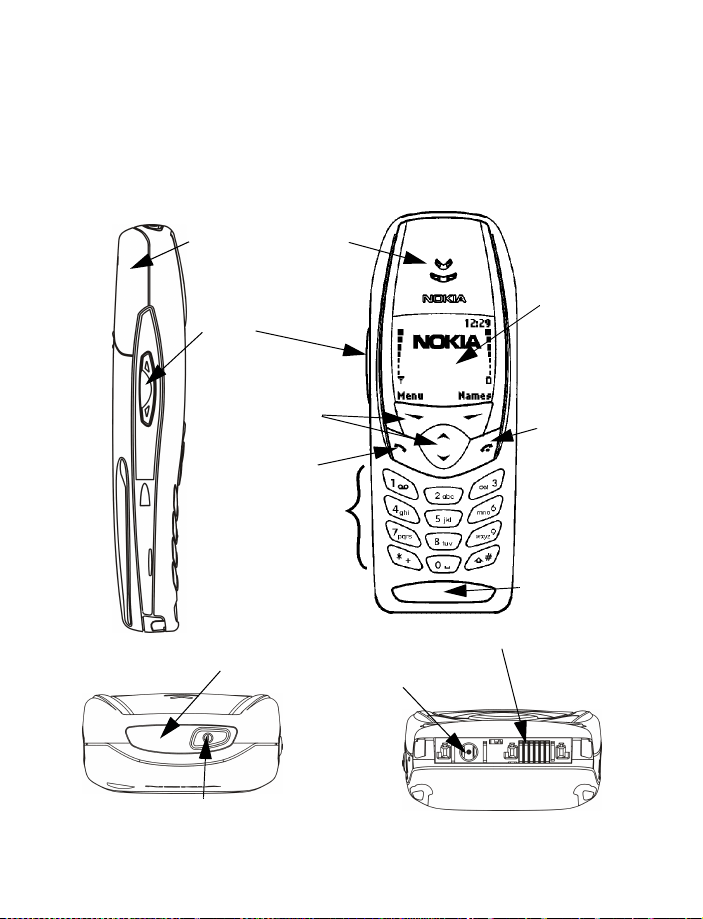
• AN ILLUSTRATED VIEW OF THE [Model]
LEFT SIDE
Internal
antenna
Volume
control
Earphone
FRONT
Display
screen
TOP
Power Key
Selection and
Scroll keys
Talk key
Number keys
IR port
End key
Microphone
Headset/TTY/Data cable Connector
Charger Jack
BOTTOM
8
Page 16
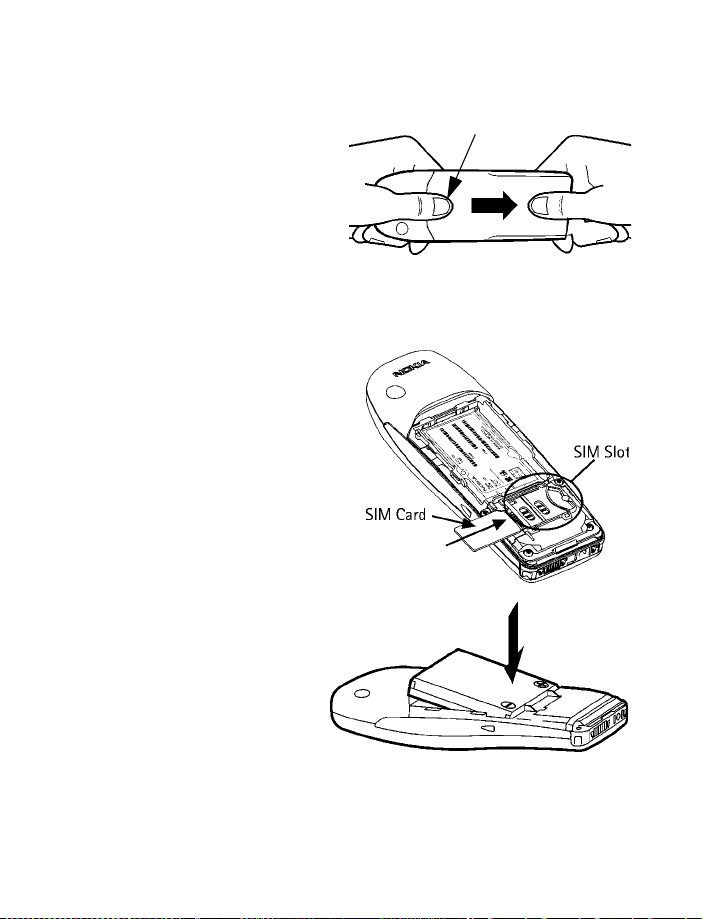
• REMOVE THE BACK COVER
Review the basics
1 With the phone facing
away from you, grip the
bottom end with one thumb
while pressing the cover
release with the other.
2 Slide the cover toward the
bottom end of the phone
(about 1/4 inch) until it
stops. Lift the cover to remove.
COVER RELEASE (PRESS IN)
• INSTALL THE SIM CARD
The SIM slot is between the
battery compartment and the
bottom end of the phone.
• Slide the SIM card into the
slot, beveled corner first and
gold contacts facing down.
• INSTALL THE BATTERY
1 Position the battery so
the gold contacts match
up with those on the
phone. The battery label
should be facing away
from the phone.
2 Insert the battery, prong end first into the battery slot.
9
Page 17

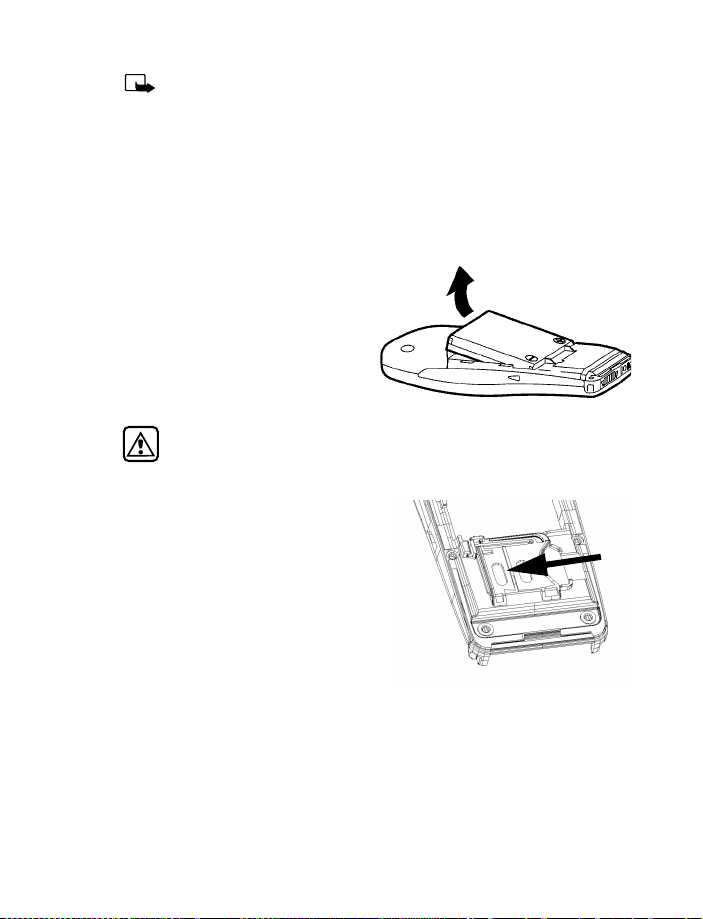
3 Insert the other end of
the battery into the
battery slot.
4 Replace the cover and
slide it toward the top of
the phone until it locks
into place.
• CHARGE THE BATTERY
1 With your phone on or off, connect the plug
from the charger to the bottom of the phone.
2 Plug the charger into a standard AC outlet.
• After a few seconds, the battery indicator
in the display starts to scroll from bottom
to top.
• When the battery is 80% full, the bar on in
the display stops scrolling and Battery full
appears (if the phone is on). To obtain 100%
battery capacity, charge the battery for
another two hours.
10
Page 18
Note: Unplug the phone and charger once charging is complete.
For best performance, charge the battery 24 hours before using
for the first time.
Charging time depends on the charger and battery. For example,
charging time for the BLB-3 battery with the ACP-7U charger is
about 4 hours.
• REMOVE THE BATTERY
1 Remove the back cover as
described on page 9.
2 Pull the battery out with
your fingers.
Warning:Only use your hands to remove the battery. Don’t use an
object such as a coin or knife, as either can damage both the
phone and the battery.
Remove the SIM card
1 If you haven’t already, remove the
back cover and battery as
described earlier in this section.
2 Slide the SIM card out of the slot.
Lift to remove.
Review the basics
2
11
Page 19
• IMPORTANT BATTERY INFORMATION
Important: Recharge your battery only with a charger approved
by Nokia.
You can use your phone while the battery is charging.
If the battery is totally empty, it may take a few minutes for the
battery indicator to appear in the display while charging.
If you switch the phone on when charging is complete, the
message Battery full momentarily appears in the display.
The BLB-3 battery doesn’t need a full discharge before recharging.
If the battery is completely empty, it may need to recharge a few
minutes before you can make or receive calls.
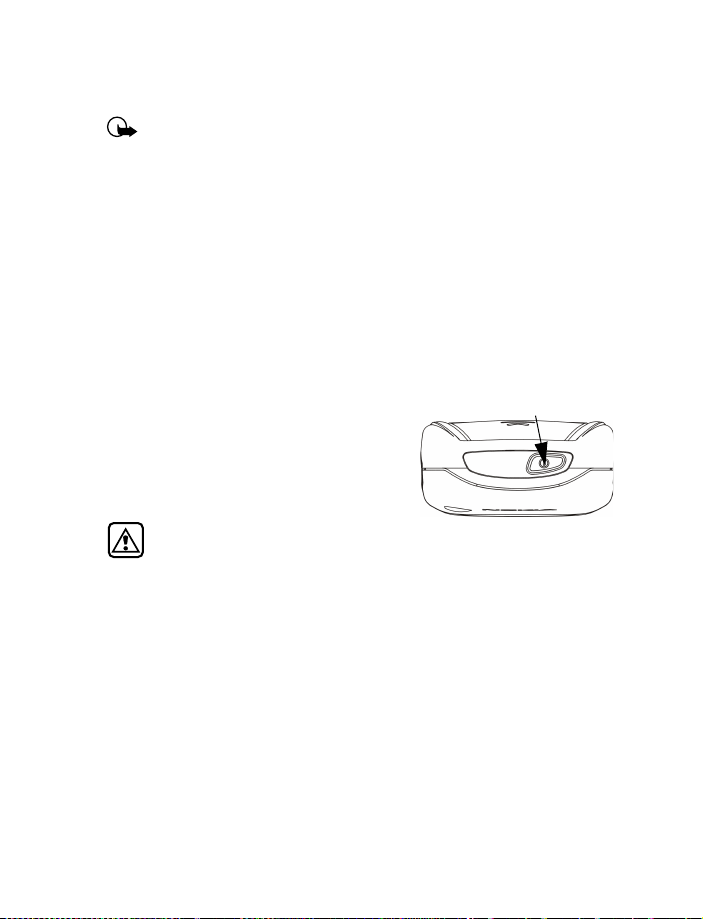
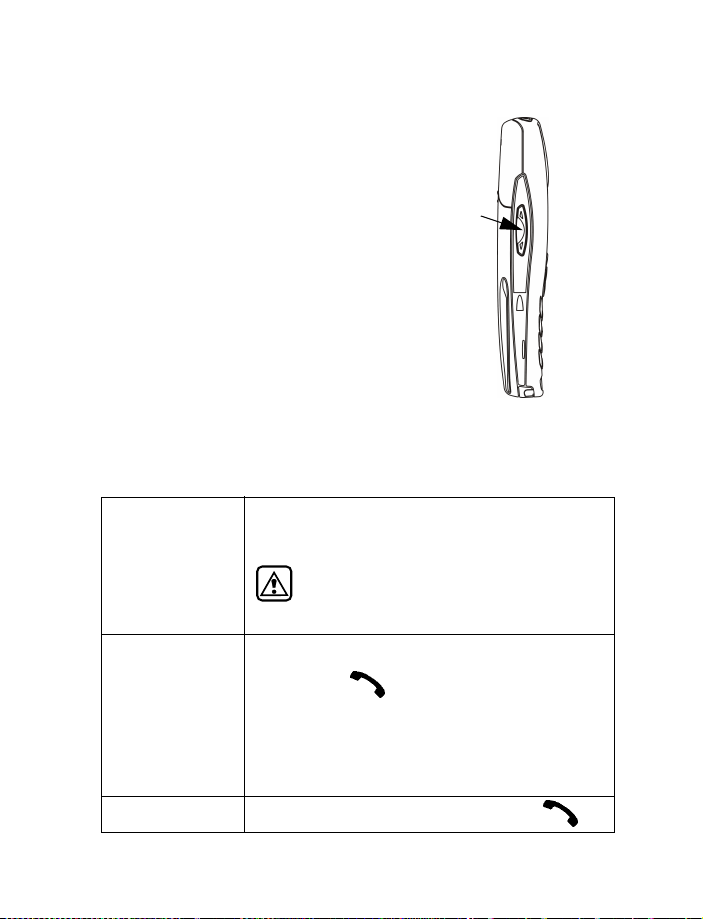
• SWITCH ON THE PHONE
• Press and hold the power key on top of
the phone for two seconds.
Warning: Don’t power-up the
phone where wireless phone use is prohibited or where the use of
the phone could cause interference or danger.
POWER KEY
Set the time and date
When you power-up your phone for the first time, or when you remove
and replace the battery, you’ll be prompted to set the time and date.
1 Enter the correct time and press OK.
2 Enter the correct date and press OK. After a brief pause, the Start
screen appears in your display.
12
Page 20
Review the basics
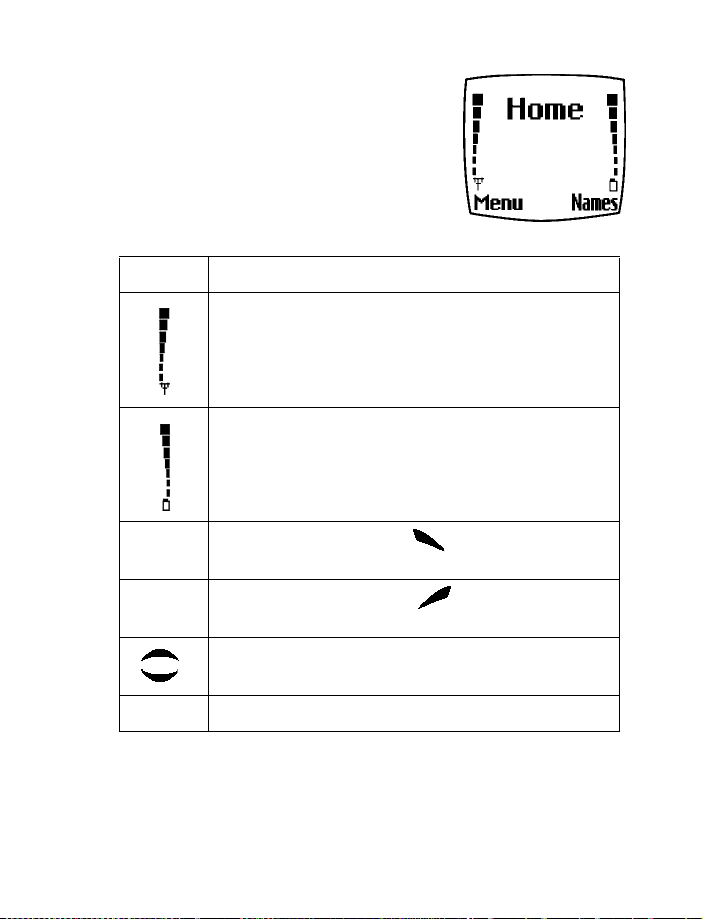
• THE START SCREEN
The Start screen is the “home base” for your
phone and indicates it is in idle mode.
What’s on the Start screen
HOME Your wireless provider’s name may appear here.
Signal strength. A higher bar indicates a stronger signal.
Battery charge level. A higher bar indicates more power
in the battery.
Menu Press the left selection key ( ) under Menu to ent e r
the menu list
Names Press the right selection key ( ) under Names to enter
the Phone book
Press one of the scroll keys at the Start screen to display
the entries in your Phone book, if you have any
A Indicates your are in analog mode
13
Page 21
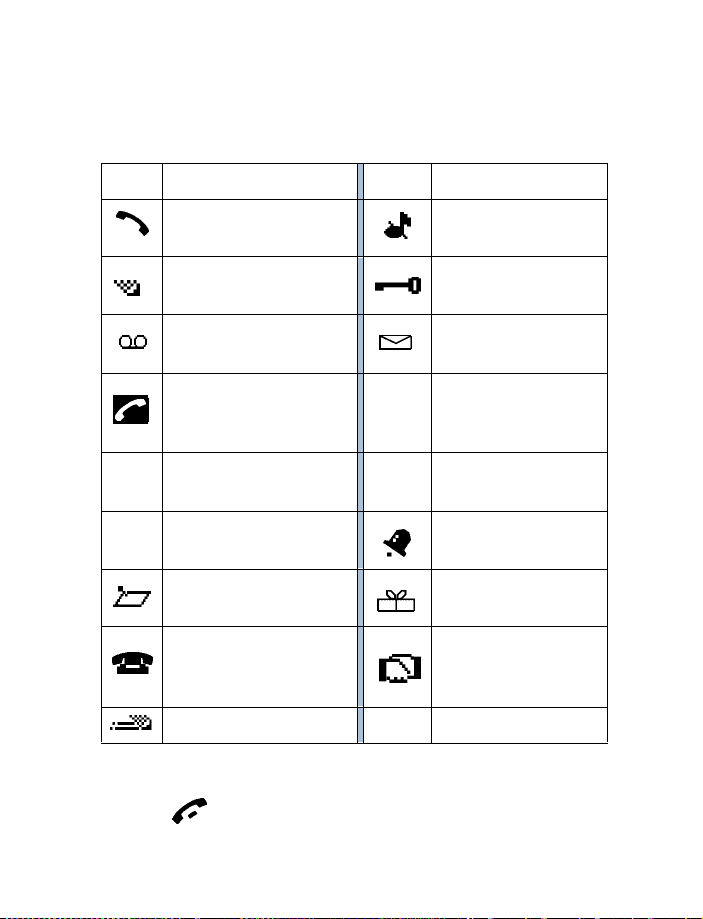
Icons
Your phone uses icons to indicate status, alert you of a message or
meeting, and more.
Icon Indicates... Icon Indicates...
You are in an
active call
Text or number
entry mode
You ha v e
voice messages
When this icon is blinking,
you have a
call waiting
Lowercase text
abc
entry mode
Abc Sentence case text
entry mode
A Memo note is in
your Calendar
A note is in your calendar
to call someone
Predictive text is on
123
The Silent profile has
been selected
Keyguard is active
You have a message
Uppercase text
entry mode
ABC
Number entry mode
An alarm is set
A birthday note is in
your Calendar
You ha v e a
meeting scheduled in
your Calendar
Return to the Start screen from any activity
•Press
14
Page 22
Review the basics
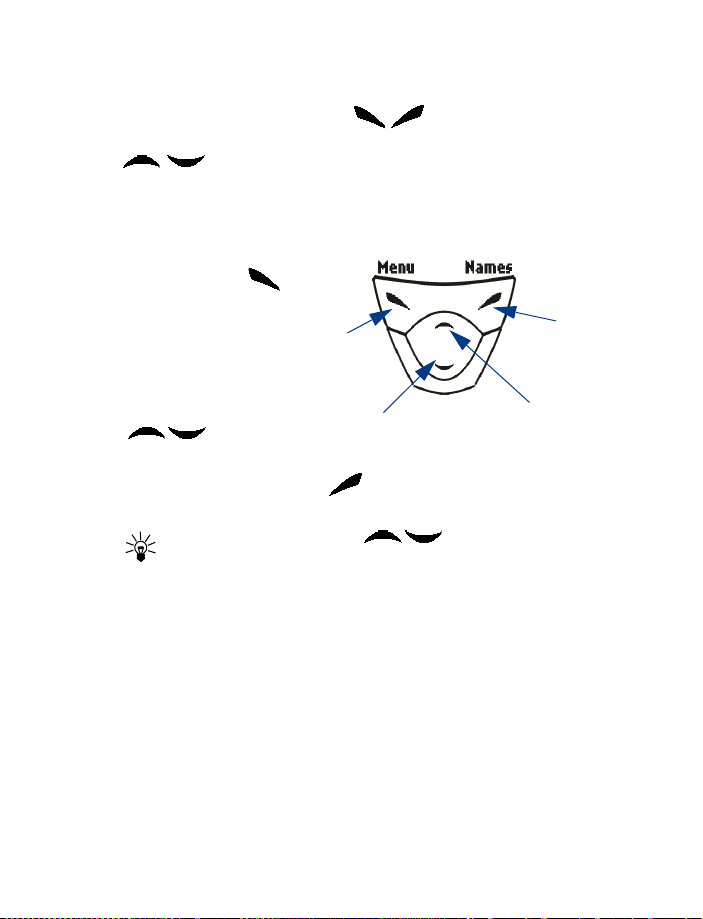
• USE THE SELECTION AND SCROLL KEYS
The left and right selection keys ( ) are beneath each corner of
the display. Between and beneath the selection keys are two scroll keys
, positioned one above the other. Selection keys are used to
enter, select, and exit menus, submenus, and lists, while scroll keys are
used to navigate from within those items. A selection key’s function is
always defined by the text that appears above it in the display.
For example, press the
left selection key ( )
when Menu appears
above it to show the
first of numerous
menus. Then, scroll
through the menus
using the scroll keys
().
Press the right selection key ( ) when Names appears above it to
enter the Phone book.
Tip: Press either scroll key ( ) from the Start screen to
view any entries you may have in your Phone book.
Left
selection
key
Scroll
down
key
Scroll up
key
Right
selection
key
15
Page 23
• ADJUST CALL VOLUME
With the phone facing you, the volume key is
located on the left side of the phone.
While in a call
When you press the volume key, a bar chart
appears in the display indicating the present
volume level.
• Press the top portion of the volume key to
increase your call volume.
• Press the bottom portion of the volume key
to decrease your call volume.
Volume
key
• MAKE AND ANSWER CALLS
Use the following table as a quick guide for basic functions.
Press and hold the power key on top of the phone
for at least 2 se c o nd s .
Switch the
phone on
Make a call
Warning: Do not power-up the phone
when wireless use is prohibited or when the
phone may cause interference or danger.
1 Enter the area code and phone number.
2 Press .
3 Hold the phone with the earpiece
over your ear and microphone near your
mouth, or conn ect and use the h eadset
before entering the number.
Front
of phone
Answer a call When your phone rings or vibrates, press
16
Page 24
Review the basics
End a call Press
Turn Keyguard on Press Menu . With Keyguard on it’s virtually
impossible to make an accidental call
Turn Keyguard off Press Unlock
Silence a call
OR
Decline a call
You can mute the ringing tone of an incoming call
without terminating the call. Press Silence and the
ringing tone is muted. After pressing Silence, you
then have the option to Decline the call
•HELP TEXT
The [Model] displays brief descriptions of most features. To do this, help text
must be activated.
Activate/deactivate help text
1 At the Start screen, press Menu 4-4-6 (Settings - Phone settings -
Help text activation).
2 After a brief pause, On and Off appear in the display.
3 Scroll to On or Off and press Select.
• NAVIGATE YOUR PHONE’S MENUS
Navigate the menus and submenus in your phone using the scroll method
or a shortcut.
Use the scroll method
• At the Start screen, press Menu, then page through the menus using
the scroll keys ( ).
17
Page 25
THE MENU NUMBER AND SCROLL BAR
As you page through menus, the
menu number is indicated in the
upper right corner of the display. A
scroll bar with a tab also appears on
the right side of the display. The tab
moves up or down as you page
through the menus.
1 When the menu you want
appears in the display, press Select.
2 Once inside the menu, use the scroll keys ( ) to highlight
an item or page through submenus. Press to open a highlighted
item or to enter a submenu. Press to exit or return to the
previous menu.
Use a shortcut
You can also go to almost any feature, option, or submenu directly from
the Start screen using a “shortcut.”
•Press Menu, and within 3 seconds, enter the first number of
the menu function you’d like to access. Keep going until you’ve
entered all the numbers.
For example: To turn on the Alarm clock, press Menu 4-1-1
(Menu - 4Settings - 1Alarm clock - 1On).
A complete list of shortcuts is in the following section. Be aware that
some features may be unavailable due to your wireless provider or
lack of your subscription to a feature. In such cases, the phone
displays an error message. If you wish to subscribe to a feature that
is currently disabled, contact your wireless provider.
18
Page 26

• MENU SHORTCUTS
1 MESSAGES
Write messa ge. . . . . . . . . . . . 01-1
Inbox . . . . . . . . . . . . . . . . . . . 01-2
Outbox. . . . . . . . . . . . . . . . . . 01-3
Archive. . . . . . . . . . . . . . . . . . 01-4
Templates. . . . . . . . . . . . . . . . 01-5
My folders . . . . . . . . . . . . . . . 01-6
Erase messag es. . . . . . . . . . . 01-7
All read . . . . . . . . . . . . . 01-7-1
Inbox . . . . . . . . . . . . . . . 01-7-2
Outbox. . . . . . . . . . . . . . 01-7-3
Archive. . . . . . . . . . . . . . 01-7-4
Own folders. . . . . . . . . . 01-7- 5
Message set ting s. . . . . . . . . . 01-8
Default profile. . . . . . . . 01-8-1
Profile 2. . . . . . . . . . . . . 01-8-2
Profile 3. . . . . . . . . . . . . 01-8-3
Profile 4. . . . . . . . . . . . . 01-8-4
Voice m e ssag e s. . . . . . . . . . . 01-9
Listen to
voice messa ges. . . . . . . 01-9-1
Voice mailbox nu m b e r . 01-9- 2
2 CALL LOG
Missed calls. . . . . . . . . . . . . . . 2-1
Received ca lls . . . . . . . . . . . . . 2-2
Dialed numb ers. . . . . . . . . . . . 2-3
Clear call lists . . . . . . . . . . . . . 2-4
All. . . . . . . . . . . . . . . . . . . 2-4-1
Missed. . . . . . . . . . . . . . . 2-4-2
Received . . . . . . . . . . . . . 2-4-3
Dialed. . . . . . . . . . . . . . . . 2-4-4
Call timers. . . . . . . . . . . . . . . . 2-5
Duration of last c all . . . . 2-5-1
Duration of dialed calls . 2-5-2
Duration of rec eiv ed calls2-5- 3
Review the basics
Duration of all ca lls. . . . .2-5-4
Clear timers . . . . . . . . . . .2-5-5
3 PROFILES
Normal . . . . . . . . . . . . . . . . . . .3-1
Select . . . . . . . . . . . . . . . .3-1-1
Customize. . . . . . . . . . . . . 3-1-2
Ringing options . . . .3-1-2-1
Ring. . . . . . . . . . 3-1-2-1-1
Ascending. . . . . 3-1-2-1-2
Ring once . . . . .3-1-2-1-3
Beep once. . . . .3-1-2-1-4
Silen t. . . . . . . . .3-1-2-1- 5
Ringing tone. . . . . . .3-1-2-2
Ringing volum e . . . . 3-1-2-3
Level 1. . . . . . . .3-1-2-3-1
Level 2. . . . . . . .3-1-2-3-2
Level 3. . . . . . . .3-1-2-3-3
Level 4. . . . . . . .3-1-2-3-4
Level 5. . . . . . . .3-1-2-3-5
Vibrating alert . . . . .3-1-2-4
On . . . . . . . . . . .3-1-2-4-1
Off. . . . . . . . . . . 3-1-2-4-2
Messag e ale rt to n e . 3-1-2-5
No tone. . . . . . .3-1-2-5-1
Standard. . . . . . 3-1 -2-5- 2
Special. . . . . . . .3-1-2-5-3
Beep once. . . . .3-1-2-5-4
Ascending. . . . . 3-1-2-5-5
Personal. . . . . . .3-1-2-5-6
Keypad to n es . . . . . . 3-1-2-6
Off. . . . . . . . . . . 3-1-2-6-1
Level 1. . . . . . . .3-1-2-6-2
Level 2. . . . . . . .3-1-2-6-3
Level 3. . . . . . . .3-1-2-6-4
Warnin g t one s . . . . .3-1-2-7
19
Page 27

On. . . . . . . . . . . .3-1-2-7-1
Off . . . . . . . . . . .3-1-2-7-2
Accepted
caller groups. . . . . . .3-1-2-8
All calls . . . . . . .3-1-2-8-1
Family
. . . . . . . . . 3-1-2-8-2
VIP
. . . . . . . . . . . . 3-1-2-8-3
Friends
. . . . . . . . 3-1-2-8-4
Business
. . . . . . . 3-1-2-8-5
Other
. . . . . . . . . . 3-1-2-8-6
Silent. . . . . . . . . . . . . . . . . . . . 3-2
Meeting. . . . . . . . . . . . . . . . . . 3- 3
Outdoor. . . . . . . . . . . . . . . . . . 3-4
Pager . . . . . . . . . . . . . . . . . . . . 3-5
4 SETTINGS
Alarm clock. . . . . . . . . . . . . . . 4-1
On . . . . . . . . . . . . . . . . . . .4-1-1
Off. . . . . . . . . . . . . . . . . . .4-1-2
Time settings. . . . . . . . . . . . . . 4-2
Clock. . . . . . . . . . . . . . . . .4-2-1
Show/Hide clock. . . .4-2-1-1
Set the time . . . . . . .4-2-1-2
Time format. . . . . . . .4-2-1-3
24 hour . . . . . . .4-2-1-3-1
12 hour . . . . . . .4-2-1-3-2
Auto update date/time . .4-2-2
On . . . . . . . . . . . . . . .4-2-2-1
Confirm first. . . . . . .4-2-2-2
Off . . . . . . . . . . . . . . .4-2-2-3
Call settings . . . . . . . . . . . . . . 4-3
Call forwarding. . . . . . . . .4-3-1
Fwd voice c alls . . . . .4-3-1-1
Activate. . . . . . .4-3-1-1-1
Cancel . . . . . . . .4-3-1-1-2
Check status . . .4-3-1-1-3
Fwd if bu s y . . . . . . . .4-3-1-2
Activate. . . . . . .4-3-1-2-1
Cancel . . . . . . . .4-3-1-2-2
Check status . . .4-3-1-2-3
Fwd if not answered 4-3-1-3
Activate. . . . . . .4-3-1-3-1
Cancel . . . . . . . .4-3-1-3-2
Check status . . .4-3-1-3-3
Fwd if out of reach
or phone is off . . . . .4-3-1-4
Activate. . . . . . .4-3-1-4-1
Cancel . . . . . . . .4-3-1-4-2
Check status . . .4-3-1-4-3
Fwd when not
able to take ca lls . . .4-3-1-5
Activate. . . . . . .4-3-1-5-1
Cancel . . . . . . . .4-3-1-5-2
Set delay . . . . . .4-3-1-5-3
10 sec. . . . . .4-3-1-5-3-1
15 sec . . . . .4-3-1-5-3-2
20 sec . . . . .4-3-1-5-3-3
25 sec . . . . .4-3-1-5-3-4
30 sec . . . . .4-3-1-5-3-5
Fwd all fax ca lls . . .4-3-1-6
Activate . . . . . .4-3-1-6-1
Cancel . . . . . . . .4-3-1-6-2
Check status . . .4-3-1-6-3
Fwd all da ta calls. . .4-3-1-7
Activate. . . . . . .4-3-1-7-1
Cancel . . . . . . . .4-3-1-7-2
Check status . . .4-3-1-7-3
Cancel all ca ll
forw a r d in g . . . . . . . .4-3-1 - 8
Equalizer. . . . . . . . . . . . . .4-3-2
Normal . . . . . . . . . . .4-3-2-1
Bright . . . . . . . . . . . .4-3-2-2
Dark. . . . . . . . . . . . . .4-3-2-3
Loudness. . . . . . . . . .4-3-2-4
20
Page 28

Review the basics
Set 1. . . . . . . . . . . . . 4-3-2-5
Set 2. . . . . . . . . . . . . 4-3-2-6
International p refix. . . . . 4-3-3
Automa tic redial. . . . . . . 4-3-4
On. . . . . . . . . . . . . . . 4-3-4-1
Off . . . . . . . . . . . . . . 4-3-4-2
Summa r y after call. . . . . 4-3-5
On. . . . . . . . . . . . . . . 4-3-5-1
Off . . . . . . . . . . . . . . 4-3-5-2
Phone setting s. . . . . . . . . . . . . 4-4
Language. . . . . . . . . . . . . 4-4-1
Automat i c . . . . . . . . 4-4 - 1-1
English. . . . . . . . . . . 4-4-1-2
Français . . . . . . . . . . 4-4-1-3
Español. . . . . . . . . . . 4-4-1-4
Po rt u g uêse. . . . . . . . 4-4-1 - 5
System selec tion. . . . . . . 4-4-3
Automat i c . . . . . . . . 4-4 - 3-1
Manual. . . . . . . . . . . 4-4-3-2
New search . . . . . . . 4-4-3-3
Touch tone s. . . . . . . . . . . 4-4-4
Touch tone length. . 4-4-4-1
Short. . . . . . . . . 4-4-4-1-1
Long . . . . . . . . . 4-4-4-1-2
Start-up tone . . . . . . . . . 4-4-5
On. . . . . . . . . . . . . . . 4-4-5-1
Off . . . . . . . . . . . . . . 4-4-5-2
Tone setting s. . . . . . . . . . . . . . 4-5
Ringing options. . . . . . . . 4-5-1
Ring . . . . . . . . . . . . . 4-5-1-1
Asce ndin g . . . . . . . . 4-5-1- 2
Ring once. . . . . . . . . 4-5-1-3
Beep once . . . . . . . . 4-5-1-4
Silent . . . . . . . . . . . . 4-5-1-5
Ringing tone . . . . . . . . . . 4-5-2
Ringing volum e. . . . . . . . 4-5-3
Level 1 . . . . . . . . . . . 4-5-3-1
Level 2. . . . . . . . . . . 4-5-3-2
Level 3. . . . . . . . . . . 4-5-3-3
Level 4. . . . . . . . . . . 4-5-3-4
Level 5. . . . . . . . . . . 4-5-3-5
Vibrating alert. . . . . . . 4-5-4-1
On. . . . . . . . . . . . . . . 4-5-4-1
Off . . . . . . . . . . . . . . 4-5-4-2
Message alert tone. . . . . 4-5-5
No tone . . . . . . . . . . 4-5-5-1
Standard . . . . . . . . . 4-5-5-2
Special. . . . . . . . . . . 4-5-5-3
Beep once . . . . . . . . 4-5-5-4
Ascending . . . . . . . . 4-5-5-5
Personal. . . . . . . . . . 4-5-5-6
Keypad to n es. . . . . . . . . . 4-5-6
Off . . . . . . . . . . . . . . 4-5-6-1
Level 1. . . . . . . . . . . 4-5-6-2
Level 2. . . . . . . . . . . 4-5-6-3
Level 3. . . . . . . . . . . 4-5-6-4
Warnin g t one s . . . . . . . . 4-5-7
On. . . . . . . . . . . . . . . 4-5-7-1
Off . . . . . . . . . . . . . . 4-5-7-2
Accepted caller groups. . 4-5-8
Accessory settin g s . . . . . . . . . 4-6
Headset. . . . . . . . . . . . . . 4-6-1
Default profile. . . . . 4-6-1-1
Active profile. . 4-6-1-1-1
General. . . . . . . 4-6-1-1-2
Silen t . . . . . . . . 4-6-1-1 - 3
Meeting . . . . . . 4-6-1-1-4
Outdoor . . . . . . 4-6-1-1-5
Pa g e r . . . . . . . . 4-6-1-1-6
Automatic answer. . 4-6-1-2
On. . . . . . . . . . . 4-6-1-2-1
Off . . . . . . . . . . 4-6-1-2-2
Handsfree . . . . . . . . . . . . 4-6-2
Default profile . . . . 4-6-2-1
21
Page 29
Automatic answer. . 4-6-2-2
On. . . . . . . . . . . 4-6-2-2-1
Off. . . . . . . . . . . 4-6-2-2-2
Lights. . . . . . . . . . . . 4-6-2-3
On. . . . . . . . . . . 4-6-2-3-1
Off. . . . . . . . . . . 4-6-2-3-2
Automatic . . . . 4-6-2-3-3
Loopset . . . . . . . . . . . . . . 4-6-3
Use loopset . . . . . . . 4-6-3-1
Yes . . . . . . . . . . 4-6-3-1-1
No. . . . . . . . . . . 4-6-3-1-2
Default profile . . . . 4-8-3-2
TTY/TDD. . . . . . . . . . . . . . 4-6-4
TTY/TDD on. . . . . . 4-6-4-1-1
TTY/TDD off . . . . . 4-6-4-1-2
Security setting s. . . . . . . . . . . 4-7
PIN code requ est. . . . . . . 4-7-1
Fixed dialing . . . . . . . . . . 4-7-2
On. . . . . . . . . . . . . . . 4-7-2-1
Off . . . . . . . . . . . . . . 4-7-2-2
Number list . . . . . . . 4-7-2-3
Security level. . . . . . . . . . 4-7-3
None. . . . . . . . . . . . . 4-7-3-1
Memory . . . . . . . . . . 4-7-3-2
Phone. . . . . . . . . . . . 4-7-3-3
Access codes. . . . . . . . . . 4-7-4
Change
secu r it y code . . . . 4-7-4- 1
Change PIN code. 4-7-4-2
Change PIN2 code 4-7-4-3
Restore fa ctory sett in gs. . . . . 4-8
5VOICE
Voice re co rder. . . . . . . . . . . . . 5-1
Record . . . . . . . . . . . . . . . 5-1-1
Recording s list. . . . . . . . . 5-1-2
Voice co mmand. . . . . . . . . . . . 5-2
Profiles. . . . . . . . . . . . . . .5-2-1
Voice m a ilbo x. . . . . . . . . .5-2-2
Infrared. . . . . . . . . . . . . . .5-2-3
Recorder. . . . . . . . . . . . . . 5-2-4
6 ORGANIZER
Calendar. . . . . . . . . . . . . . . . . .6-1
To-do list . . . . . . . . . . . . . . . . .6-2
Wallet. . . . . . . . . . . . . . . . . . . .6-3
Cards. . . . . . . . . . . . . . . . .6-3-1
Personal n o tes . . . . . . . . .6-3-2
Settings . . . . . . . . . . . . . .6-3-3
Code request . . . . . .6-3-3-1
Change cod e. . . . . . .6-3-3-2
7CALCULATOR
8 GA MES
Select game . . . . . . . . . . . . . . .8-1
Snake II. . . . . . . . . . . . . . . 8-1-1
Pass ‘n Ru sh. . . . . . . . . . .8-1-2
Pairs 2. . . . . . . . . . . . . . . .8-1-3
Bumper. . . . . . . . . . . . . . .8-1-4
Settings. . . . . . . . . . . . . . . . . . .8-2
Game soun ds. . . . . . . . . .8-2-1
On . . . . . . . . . . . . . . . 8-2-1-1
Off. . . . . . . . . . . . . . .8-2-1-2
Game lights . . . . . . . . . . .8-2-2
On . . . . . . . . . . . . . . . 8-2-1-1
Off. . . . . . . . . . . . . . .8-2-1-2
Shakes . . . . . . . . . . . . . . .8-2-3
On . . . . . . . . . . . . . . . 8-2-3-1
Off. . . . . . . . . . . . . . .8-2-3-2
9 IN FRAR ED
Infrared. . . . . . . . . . . . . . . . . . .9-1
10 SE RV IC ES
22
Page 30
Your phone’s keypad
4 Your phone’s keypad
• ENTER CHARACTERS AND NUMBERS
Note: The following content focuses on
entering text messages, but also applies to
any screen that accepts keypad entry, such as
web addresses or names in the Phone book.
•Press Menu 01-1 (Messages - W rite me ssage )
to begin writing a message.
When the message entry screen first opens, you’ll be in text entry mode.
If you’d like to enter numbers, just press and hold until the icon in
the upper left corner of the display changes from Abc to 123.
Note: There are three types of text entry modes:
ABC - Any text you enter is capital letters
Abc - The first letter of each sentence is capitalized
abc - Any text you enter is lower case
Enter text
• Press any key (numbered 1-9) once to insert the first letter on the
key, twice for the second letter, and so on. When you pause, the
letter appearing in the display is accepted and your phone awaits the
next entry.
• Press to accept a word and enter a space
• Press to enter a period (.)
• Press to display special characters. More about special
characters on the following pages
•Press Clear to backspace and erase a character
•Press and hold Clear to backspace continuously, and erase
23
Page 31

Use predictive text input
Predictive text allows you to write messages using a built-in dictionary.
You only need to press each numbered key once to insert each letter.
For example, to write Nokia, with the English dictionary selected, press
each of the following keys once:
(for N) (for O) (for K) (for I) (for A)
The display above shows the letters that appear in your display each time
a key is pressed.
• If a displayed word is correct, press to enter a space and begin
writing the next word
• If a displayed word is not correct, press to see other matches.
To return to the previous word in the list of matches, press Previous
•If ? appears after a word, press Spell to add the word to the dictionary
• Press to insert a period into your message
Special characters and four-way scrolling
1 Press to display the special characters screen.
2 Navigate special characters us ing the 2, 4, 6, and 8 keys much as you
would a joystick. Once a character is highlighted press to in sert
the character into your message.
Scroll left
Scroll up
Scroll right
Insert character
Scroll down
24
Page 32

Available sp ecial characters
Your phone’s keypad
.
)
%
¥
^ î ¿ § # l
Switch between ABC and 123 modes
•Press and hold until the icon in the upper left corner of the
display switches from Abc to 123 (or from 123 to Abc).
Switch between uppercase and lowercase text
• Press to alternate between upper case (ABC), lower case (abc),
and sentence case (Abc) while in text mode.
,
@ / :
* = < > >
¤
‘ ? !
[
]
“ - (
_ ;
{ } \
+
&
£
$
~
25
Page 33

5 Phone book
One of the most useful features in the [Model] is its powerful Phone book.
You can store up to 500 names and th ei r a ss o c i a t ed web, e-mail , an d
street addresses within the Phone book. Each name, or entry as it is called,
has room for up to 5 numbers of various types and 3 text entries.
• OPEN THE PHONE BOOK
1 At the Start screen, pr ess Names. The submenus in the following
table appear in the display. Use the scroll keys ( ) to
highlight an option. Press Select ( ) to activate an option or enter
its submenu.
Phone book menu
Find
Add entry
Edit name
Add
number
Erase
Copy
Settings
1-touch
dialing
Search for a name in your Phone book or list the names
and select from the list
Add a new entry (name and number) to your Phone book
Edit an existing name in your Phone book
Add a number to an existing entry in your Phone book
Erase names and numbers in your Phone book one by one
or all at once
Copy entries from SIM card to Phone or vica versa. You
have the option to copy entries one by one or all at once
Change how you view the Phone book, check your memory
status, and select which memory to use
Show a list of 1-touch dialing numbers, if you’ve assigned
any to keys 1-9
26
Page 34

Phone book menu
Phone book
Voice tags
Service
nos.
Own
numbers
Caller
groups
Show a list of voice dialing numbers, if you’ve assigned
voice tags to any Phone book entries
List the fax, data, and voice numbers saved to your SIM
card by your wireless provider
Display the phone number assigned to your phone
Setup a caller group. You can define ringing tones and
graphics for up to five groups in your Phone book. See
“Caller groups” on page 30 to setup a caller group
Add an entry to the Phone book
1 At the Start screen press Names, scroll to Add entry, and
press Select.
2 Enter a na me fo r the entry and press OK.
3 Enter the area code and number for the entry and press OK.
Number types
Phone numbers are sub-entries of an entry, or a name. Each entry can
hold up to 5 numbers, and you can assign a different “type” to each. Once
assigned, a number type is easily identified by the icon to the left of the
number. The following number types are available:
General Mobile Home Work Fax
Important:If you plan on using Nokia PC Sync to synchronize your
phone book and your PC’s PIM (Personal Information Manager)
application, make sure all phone numbers are assigned the correct
number type. PC Sync uses this information to synchronize
contacts correctly between phone and PC.
27
Page 35

ASSIGN A TYPE TO A NUMBER
1 At the Start screen, pr ess one of the scroll keys ( ) to
display your Phone book entries.
2 Scroll to the entry containing the numbers you wish to change and
press Details.
3 Use the scroll keys to highlight the number you wish to change and
press Options.
4 Scroll to Change type and press Select.
5 Scroll to the number type of your preference and press Select. A
confirmation message appears in the display.
Add an address or note to a Phone book entry
1 With an entry in your Phone book highlighted, press Details.
2 Press Options, scroll to Add info, and press Select.
3 Scroll to E-mail, Web address, Street addr . , or Note and press Select.
4 Enter text with the keypad and press OK.
•Press Clear to backspace and delete text
• Press and hold Clear to backspace continuously and delete text
• Press to switch between letter case (ABC, Abc, or abc)
• Press and hold to switch between text and numbers
•Press to display special characters (such as @, #, and more)
Save a number (only)
1 At the Start screen, en ter the number you’d like to save.
2 Press and hold Options. The number is saved to your Phone book as a
stand-alone entry.
Tip: Save numbers with a + in front to simplify
international dialing.
28
Page 36

Phone book
Display Phone book entries quickly
To display any entries in your Phone book quickly, just press one of the
scroll keys ( ) from the Start screen.
Edit names
1 At the Start screen, pr ess Names and scroll to Edit name .
2 Press Select and scroll to the name you wish to change.
3 Press Edit, modify the name as desired, and press OK once
you’ve finished.
•Press Clear to backspace and delete text
• Press and hold Clear to backspace continuously (and delete)
Erase names and numbers
You can erase single entries in your Phone book or all entries at once.
ERASE A SINGLE ENTRY
1 At the Start screen, pr ess Names, scroll to Erase, and press Select.
2 Ensure One by one is highlighted and press Select.
3 Scroll to the entry you wish to erase and press Erase.
4 Press OK ag ain to confirm th e erasure, or Back to select another.
ERASE ALL NAMES AND NUMBERS
1 At the Start screen, pr ess Names, scroll to Erase and press Select.
2 Ensure Erase all is highlighted and press Select.
3 Scroll to Phone or SIM card and press Erase.
4 Press OK to confirm or Back to select from Phone or SIM card again.
If you pressed OK, you’re prompted to enter the security code (default
is 12345).
5 Enter the security code and press OK to erase or Back to select from
Phone or SIM card again.
29
Page 37

Important: If you enter the wrong security code 3 times in a row,
the phone is blocked and won’t accept a code for 5 minutes.
Assign a primary number
For names containing more than one number, assign the most-dialed
number as the primary number. The primary number is the number dialed
when you dial a name containing multiple numbers.
1 At the Start screen, press or to display a list of Phone
book entries.
2 Scroll to a name containing multiple numbers and press Details.
3 Scroll to the number you’d like to assign as the primary number and
press Options.
4 Scroll to As primary no. and press Select. The primary number is set.
• CUSTOMIZE YOUR PHONE BOOK
Change your Phone book view
You can view the contents of your Phone book as a list or view each entry
as a full display (larger text).
1 At the Start screen, press Names, scroll to Settings, and press Select.
2 Scroll until Phone book view appears in the display and press Select.
3 Scroll to Name list or Name and no. and press Select.
Note: With Name and no. selected, each entry takes up the entire
display but is easier to read.
• CALLER GROUPS
You can add Phone book entries to a caller group, and then assign a
unique ringtone or graphic to that group. This enables you to identify
callers that exist in your caller group by their unique ringtone or graphic.
A caller group can be as small as one person or as large as your entire
Phone book. Caller groups can be renamed to suit your preference.
30
Page 38

Phone book
Setup a caller group
1 At the Start screen, pr ess Names, scroll to Caller groups, and press
Select. The following Caller groups are available.
•Family •Friends •VIP •Business •Other
2 Use the scroll keys ( ) to highlight a group. Press Select to
enter a group, where the following options are available:
Caller group options
Rename group
Group ringing tone
Group logo
Group members
Rename the group to your preference
Set the ringing tone for the group
Turn the logo (graphic) for the caller group on or
off. You can also view the logo or send it to a
compatible phone via SMS
Add or remove members from the caller group
• YOUR PHONE’S MEMORY
Your phone has three options for the use of its memory; Phone, SIM, and
Phone and SIM combined. Only names and numbers saved to the memory
in use will appear in the display.
Which memory is best for you?
To determine which memory is best for you, refer to the following table:
Feature Phone SIM Phone and SIM
Name capacity Up to 500
names
Up to 250
names (varie s
with SIM card)
31
Up to 250 names
Page 39

Feature Phone SIM Phone and SIM
Number capacity Up to 5
numbers per
name
Can use Voice
dialing?
Can transfer
names/numbers to
another phone?
Can store text
information such as
street address, email address, note?
Yes Yes Yes
Via IR or
PC Suite
Up to 3 text
entries per
name
One per name Up to 5 numb e rs
per name
Yes, via SIM Yes, via SIM
No Up to 3 text
entries per name
Select a memory
1 At the Start screen, pr ess Names, scroll to Settings, an d press Select.
2 Scroll until Memory in use appears in the display and press Select.
The following options are available:
Phone and SIM
Phone
SIM card
Data is saved to both Phone and SIM memory
Data is saved to Phone memory only
Data is saved to the SIM card only
3 Scroll to your choice and press Select.
Tip: If you wish to save multiple numbers to a name, or
information such as an e-mail or street address choose Phone or
Phone and SIM.
32
Page 40

Phone book
• COPY PHONE BOOK ENTRIES
1 At the Start screen, pr ess Names, scroll to Copy, and press Select.
2 Scroll to From phone to SIM card or From SIM card to phone and
press Select. The following options appear in the display:
One by one
All
*Primary nos.
3 Scroll to the copy method of your choice and press Select.
a) If you selected One by one, go to step 4.
b) If you selected All or Primary nos., go to step 6.
4 Scroll to the entry you wish to copy and press Copy .
5 Scroll to Keep original or Move original and press OK. The entry is
copied and you’re returned to the list of entries for another selection.
6 If you selected All or Primary nos. in step 3, scroll to Keep original or
Move original and press Select.
7 Press OK to confirm your choice. All entries are copied to the selected
destination. Press Back to return to the previous menu, or press
to exit and return to the Start screen.
Caution: Select Keep original if you’re unsure of which copy
method to use. This method ensures the source files are lef t intact
and copied to the new location. Move original deletes the source
files after copying.
Select and copy entries one by one
Copies all entries from the SIM card or Phone
Copies only primary numbers. This appears only if you
select From phone to SIM. For more information about
primary numbers see “Assign a primary number” on
page 30.
33
Page 41

• BUSINESS CARDS
Create a business card
Business cards aren’t stand-alone entities stored in your phone, they are
actually Phone book entries that have been sent to a compatible device
via IR or SMS.
Send a business card to another device
You can send Phone book entries to other compatible devices via IR or
SMS. Phone book entries sent in this manner are known as “business
cards” (vCards).
Note: If using IR, make sure IR on the other device is enabled.
For more information on IR of the receiving device, refer to its
user guide.
1 At the Start screen, pr ess either scroll key to display the entries in
your Phone book.
2 Scroll to the Phone book entry you wish to send, and press Details.
3 Press Options, scroll to Send bus. card., and press Select.
• If you wish to send Via infrared, go to step 4
• If you wish to send Via SMS, go to s tep 5
4 Scroll to Via infrared, align the infrared ports of both devices, and
press Select. The vCard is sent.
5 Scroll to Via SMS and press Select.
6 Enter the phone number of your recipient or retrieve a number from
your Phone book (by pressing Find) and press OK. The vCard is sent.
RECEIVE A BUSINESS CARD
You can receive business cards (vCards) via IR or SMS. If sending via IR,
ensure that IR is enabled and you’re within 3 feet of the sending device.
Also, the IR ports of both devices must be facing one another.
• When you receive t he business card, y o u’ll hear a tone and Business
card received appears in the display
34
Page 42

Phone book
TO SAVE THE BUSINESS CARD
Press Show, press Options, scroll to Save and press Select.
TO DISCARD THE BUSINESS CARD
Press Exit, then press OK when you’re asked to confirm.
• VIEW SERVICE NUMBERS
Your wireless provider may have s aved your phone, data, and fax n umbers
to your SIM card. To view these numbers:
1 At the Start screen, pr ess Names, Scroll to Service nos. and
press Select.
A list of numbers, if any are available, appear in the display.
2 To view details of a number, scroll to the number and press Details.
Note: This feature may not be supported by your SIM card. If this
is the case, contact your wireless provider to have it enabled.
• CALL LOG
Call log stores information about the last 20 missed, received, or dialed
calls. It also sums the duration of all calls. When the number of calls
exceed 20, the most recent call replaces the oldest. For Call log to
work properly:
• Your wireless provider must support caller ID, and it must be enabled
• Your calls can’t be blocked
• Your phone must be on and within the service area
Tip: If you receive (up to) five calls from the same number , you can
view the time each call occurred using the scroll keys. Your clock
must be set for this feature to work accurately.
View missed calls
Missed calls are calls that were never picked up. You can check for missed
calls two ways:
35
Page 43

1 If # missed ca ll appears in the display, press List.
The phone number appears in the display.
2 Press Options to view details, edit, erase, and more. See “Missed call
options” in the following table for more information.
OR
1 At the Start screen, press Menu 2-1 (Call log - Missed calls).
After a brief pause, a list of missed calls appear in the display (if
any exist).
2 Scroll to a number and press Options to display the options listed in
the following table.
3 Scroll to an option, press Select to activate the option or to enter
its submenu.
Missed call options
Call time
Send message
View number
Edit number
Save
Add to name
Erase
Call
Display the date and time of the missed call
Send a message to the caller
Display the number (and the name if the caller is in
your Phone book)
Edit the number and associate a name with the number
Enter a name for the number and save it to your
Phone book
Add the number to an existing entry in your Phone
book, if the number is not associated with a name
Clear the number from memory
Call the number
36
Page 44

Phone book
View received calls
Received calls are those that have been answered at one time or another.
1 At the Start screen, pr ess Menu 2-2 (Call log - Received calls).
After a brief pause, a list of received calls appear in the display (if
any exist).
2 Scroll to a number and press Options to display the options listed in
the following table.
3 Scroll to an option, press Select to activate the option or enter
its submenu.
Received call options
Call time
Send message
View number
Edit number
Save
Add to name
Erase
Call
Display the date and time of the call
Send a message to the caller
Display the number and the name, if the name of the
caller exists in your Phone book
Edit the number and associate a name with the number
Enter a name for the number and save it to your
Phone book
Add the number to an existing entry in your Phone
book, if the number is not associated with a name
Clear the number from memory
Call the number
View dialed numbers
1 At the Start screen, pr ess Menu 2-3 (Call log - Dialed numbers).
2 After a brief pause, a list of numbers appear in the display.
37
Page 45

3 Scroll to a number and press Options to display the options listed in
the following table.
4 Scroll to an option, press Select to activate the option or enter
its submenu.
Dialed calls option s
Call time
Send message
View number
Edit number
Save
Add to name
Erase
Call
Display the date and time of the call
Send a message to the number
Display the number (and the name if the caller is in your
Phone book)
Edit the number and associate a name with the number
Enter a name for the number and save it to your
Phone book
Add the number to an existing entry in your Phone
book, if the number is not associated with a name
Clear the number from memory
Call the number
Clear call lists
To clear any missed, dialed, or received calls from your phone’s memory:
1 At the Start screen, pr ess Menu 2-4 (Call log - Clear call lists).
After a brief pause, All, Missed, Received and Dialed appear in
the display.
2 Scroll to the call type you’d like to clear and press Select.
38
Page 46

Phone book
View call duration
• For ALL CALLS. At the Start screen, press Menu 2-5-4 (Call log - Call
timers - Duration of all calls). The total duration of all calls (missed,
dialed, and received) appears in the display.
• For the LAST CALL. At the Start screen, press Menu 2-5-1 (Call log
- Call timers - Duration of last call). The duration of your last call
appears in the display.
• For DIALED CALLS. At the Start screen, press Menu 2-5-2 (Call log -
Call timers - Duration of dialed calls). The duration of all dialed calls
appears in the display.
• For RECEIV ED CALLS. At the Start screen, pr ess Menu 2-5-3 (Call log
- Call timers - Duration of received calls). The duration of all received
calls appears in the display.
Show call duration each time you hang up
To display the duration of each call after you hang up:
1 At the Start screen, pr ess Menu 4-3-5 (Settings - Call settings -
Summary after call). After a brief pause, On and Off appear in
the display.
2 Scroll to On or Off and press Select.
Clear call timers
1 At the Start screen, pr ess Menu 2-5-5 (Call log - Call timers -
Clear timers). After a brief pause, you’re prompted to enter the
security code. The default is 12345.
2 Enter the security code and press OK. A note confirming th e timers
have been cleared appears in the display.
Note: Clear timers resets all timers for your phone and
is irreversible.
39
Page 47

6Use voicemail
If you subscribe to voicemail, your wireless provider will furnish you
with a voice mailbox number. Y ou need to save this number to your phone
to use voicemail.
When you receive a voice message, your phone lets you know by beeping,
displaying a message, or both.
If you receive more than one message, your phone shows the number of
messages received.
• SAVE YOUR VOICE MAILBOX NUMBER
Your wireless provider may have already saved your voice mailbox number
to your phone. If so, the number will appear in the display in step 2. Press
OK to leave the number unchanged.
1 At the Start screen, press Menu 01-9-2 (Messages - Voice messages
- Voice mailbox number).
2 After a brief pause, the mailbox entry screen appears in the display.
3 If the box is empty, enter the voice mailbox area code and number.
4 Press OK. Your phone confirms the number has been saved.
Tip: Save yourself the trouble of entering the mailbox codes each
time you dial voicemail. See “Automate voicemail with dialing
codes” later in this section for more information.
• CALL AND SETUP YOUR VOICEMAIL
1 Once you’ve saved the voice mailbox number, press and hold .
2 After the recorded message begins, press , enter your user ID
and follow the recorded instructions.
40
Page 48

Use voicemail
Listen to your voice messages
Once you’ve setup voicemail, you can dial the number one of three ways:
• Dial the number using the keypad
• Press and hold
•Press Listen if there’s a notification message in the display
Once you connect and the pre-recorded greeting begins, press ,
enter your user ID, and follow the recorded instructions.
• AUTOMATE VOICEMAIL WITH DIALING CODES
About dialing codes
You can insert special characters called “dialing codes” into phone
numbers such as voicemail and then save the n umber to a 1-touch dialing
location. Dialing codes instruct the receiving system to pause, wait,
bypass, or accept the numbers that follow them in the dialing string.
Note: Each voicemail service can vary. The examples and steps
that follow are for clarification. Check with your wireless provider
if you have specific questions about your voicemail service.
Write down some information
1 Write down your voice mailbox number
2 Call and check your voicemail as you normally would.
3 Write down your interaction with the recorded prompts. Keep in
mind that each voicemail service may vary. However, It should look
something like this:
Dial 214555 12 12, pause 5 seconds , press , pause 2 seconds, enter
1234, press .
Important: Be precise, you’ll need this information in “Setup
voicemail with dialing codes” on page42.
41
Page 49

INSERT DIALING CODES
Press to cycle through available dialing codes, Once the desired
code appears, pause briefly to insert the code into the dialing string.
Available dialing codes are as follows:
Bypasses a set of instructions
*
+
Precedes an international telephone number
p
Pauses for 2.5 seconds before sending any numbers that follow
w
Wait. Your phone waits for you to press before it sends the
any (numbers) that follow
Setup voicemail with dialing codes
1 At the Start screen, press Names, scroll to 1-touch dialing, and
press Select.
2 Scroll to an empty 1-touch dialing slot and press Assign.
3 Enter your voice mailbox number, including the area code.
4 Refer to the dialing codes table and enter any codes as necessary
using the information that you wrote down earlier.
For example, i f y o u have to pause for 5 se c o nds after conne ct ing to
voicemail, enter p twice (after the voice mailbox number).
Example: 2145551212pp
5 Enter any remaining pauses, PIN codes, and other information that
allows you to listen to your messages, and press OK.
6 Enter a name (such as V oicemail) and press OK. A message appears in
the display confirming your 1-touch dialing location has been saved.
Now, to dial and listen your voicemail, just press and hold the
assigned 1-touch dialing key at the Start screen. No other keypresses
should be necessary.
42
Page 50

Advanced features
7 Advanced features
• IN-CALL OPTIONS
You have numerous options while in a call. The options listed on the
following pages are those available in the most common situations, such
as when you are in a call or when a call is on hold.
1 Press Options while performing any of the following in-call activities.
2 Use your scroll keys to highlight an option.
3 Press Select to activate an option or enter its submenu.
With one call active
Record
Equalizer
End call
New call
Touch tones
Phone book
Menu
Mute
Hold
Record the current phone conversation
Select an equalizer set or create a custom set of
your own
Terminate the call
Place a new call
Enter touch tones manually or recall a string from your
Phone book
Display the Phone book menu
Return to the main menus
Mute the current call. You can hear the other person
but they can’t hear you
Place the current call on hold
43
Page 51

With a call on hold
Record
Equalizer
End call
New call
Phone book
Menu
Mute
Unhold
With one call active and another on hold
Record
Equalizer
End call
End all calls
Conference
Record the current phone conversation
Select an equalizer set or create a custom set
of your own
Terminate the call
Place a new call
Display the Phone book menu
Change the audio properties of your phone
Mute the current call. You can hear the other
person but they can’t hear you
Activates the held call
Record the active phone conversation
Select an equalizer set or create a custom set
of your own
Terminate the active call
End all calls
Connect all parties in a conversation
Touch tones
Phone book
Menu
Enter touch tones manually or recall a string
from your Phone book
Display the Phone book menu
Return to the main menus
44
Page 52

With one call active and another on hold
Advanced features
Mute
Swap Switch form the active call to the one on hold.
Mute the current call. You can hear the other
person but they can’t hear you
• CALL WAITING
If supported by your wireless provider, call waiting notifies you of an
incoming call while you’re in a call. You can then accept, reject, or ignore
the incoming call.
When you receive an incoming call
1 At first, the name or number appears in the
display. After a few seconds, Call 2
appears below Call 1 in the display.
2 Press Answer or to pick up the call.
The first caller is put on hold and Swapped appears in the display.
3 If you don’t pick up the call within 30 seconds, the call is dropped.
Switch between calls
•Press Swap or
End the active call
•Press
End both calls
•Press Options, scroll to End all calls, and press OK
Reject a waiting call
•Press Options, scroll to Decline call and press Select
45
Page 53

Place a new call with one on hold
• While in a call, enter the number for the second call and press
The first caller is put on hold.
• Switch between the two calls by pressing Swap or
• End the active call by pressing
• To end both calls, press Options, scroll to End all calls, and
press Select
• CALL FORWARDING
Call forwarding tells your network to redirect incoming calls to
another number.
Important: Call forwarding is network-dependent and may not
work the same in all networks. Contact your wireless provider
for availability.
Activate call forwarding
1 At the Start screen, pr ess Menu 4-3-1 (Settings - Call settings -
Call forwarding).
2 After a brief pause, the forwarding options listed in the following
table appear in the display.
Call forwarding optio n s
Forward all calls
Forward if busy
Forward if
not answered
Forward if out of
reach
Forward all calls
Forward calls only when your phone is busy
Forward calls if you don’t answer (does not go
to voice mail)
Forward calls when you are not within your
home network, or when the phone is off
46
Page 54

Call forwarding optio n s
Advanced features
Forward when not
able to take calls
Forward all fax calls
Forward all data calls
Cancel all
call forwarding
3 Scroll to the option of your choice and press Select.
4 Scroll to Activate and press Select.
5 Scroll to the destination to which your calls will be forwarded (such
as To other no.) and press OK.
6 Enter the number to which your calls, data, or other information will
be forwarded and press OK.
Your phone calls the network to activate (or cancel) the feature you’ve
requested. The network sends a confirmation note wh en the fe ature has
been activated (or cancelled) successfully.
Forward calls that are not picked up. You can
also specify a time delay (10, 15, 20, 25, 30 sec).
Forward all calls to a fax mailbox
Forward all calls to a data mailbox
Cancel all call forwarding
Cancel call forwarding
• At the Start screen, press Menu 4-3-1-8 (Settings - Call settings Call forwarding - Cancel all call forwarding).
Automatic redial
Occasionally, your network may experience heavy traffic, resulting in a
“fast” busy signal when you dial. With automatic redial activated, your
phone redials the number up to 3 times, and notifies you once the
network becomes available.
• If you want to stop automatic redial, just press
Important: Keep in mind that repeatedly dialing a number such as
one in another country can incur significant expenses.
47
Page 55

ACTIVATE OR DEACTIVATE AUTOMATIC REDIAL
1 At the Start screen, pr ess Menu 4-3-4 (Settings - Call settings -
Automatic redial).
2 After a brief pause, On and Off appear in the display. Scroll to your
choice and press Select.
•VOICE DIAL
You can select up to 10 entries in your Phone book to dial by voice. First,
you’ll need to assign a “voice tag” to those entries you select.
Notes about voice tags
• Voice tags can be no longer than 2 seconds
• There is no need to press Quit during or after recording a voice tag
unless you want to abort. The recording ends automatically
• Choose a quiet location for recording voice tags
• Unique tags are best. For example, “John Smith, work”
• Avoid pauses or silence as you record the voice tag
• If memory is full, Eras e an ex isti ng voic e tag ? appears in the display.
Press OK, scroll to locate a tag to erase, and then press Erase
• To use voice dial, Memory in use must be set to Phone or Phone and
SIM. See “Select a memory” on page 32 for more information
Important: Do not use voice tags to dial in emergencies. Stress can
cause changes in your voice and prevent the phone from
recognizing your commands!
Assign a voice tag
1 At the Start screen, press either scroll key ( ) and scroll to
the entry you’d like to voice tag, and press Details.
2 If the entry has multiple numbers, scroll to the number you wish to
tag and press Options.
48
Page 56

Advanced features
3 Scroll to Add voice tag, press Select, and then press Start.
4 After the phone beeps, pronounce the voice tag clearly into the
microphone from a distance of 6 - 12 inches.
5 If the recording fails, the phone asks if you want to try again. Press
OK to try again or Back to exit.
Voice dial a number
1 At the Start screen, pr ess and hold Names. The phone beeps and
Please speak now appears in the display.
2 Within 3 seconds, pronounce the tag into the microphone.
Once the voice tag is recognized, the tagged entry appears in the
display, replays through the earpiece, and the number is dialed.
VOICE DIAL WI TH THE HEADSET
You can also voice dial a number (or use Voice command) with the
optional HDC-9P headset attached.
1 At the Start screen, press and hold the remote button on the headset.
Your phone beeps and Please speak no w appears in the display.
2 Within 3 seconds, pronounce the tag into the microphone.
Once the voice tag is recognized, the tagged entry appears in the
display, replays through the earpiece, and the number is dialed.
Change or erase a voice tag
1 At the Start screen, pr ess either scroll key ( ) to display
Phone book entries, then scroll to the entry you wish to change.
2 Press Details, scroll to the voice tagged number, and press Options.
3 Scroll to Change or Erase and press Select.
DISPLAY VOICE TAG ENTRIES
1 At the Start screen, pr ess Names.
2 Scroll to Voice tags and press Select. Any voice tags in your Phone
book appear in alphabetical order (if your view is Name list).
49
Page 57

• VOICE COMMAND
You can command your phone to perform 4 different functions with your
voice. Voice command works similar to voice dialing, so you’ll need to
associate a voice tag to each command.
Note: Voice command will not work with the data cable attached.
Add a voice tag for a command
1 At the Start screen, press Menu 5-2 (Voice - Voice command).
2 After a brief pause, the following commands appear in the display.
Available voice commands
Profiles Activate any of the five available profiles
Voice mailbox Dial your voice mailbox
Infrared Activate infrared
Recorder Record a memo or phone conversation
3 Scroll to the command you wish to tag and press Select.
4 Press Options. Add command is highlighted, press Select.
5 Press Start, and when the phone beeps, pronounce the voice tag into
the microphone. The phone replays and saves the tag.
Note: Don’t press Quit unless you want to cancel the recording.
Execute a voice command
After you’ve associated a voice tag with a command, execute the
command as follows:
1 Press and hold Names. Please speak now appears in the display.
2 Pronounce the tag for one of the four available commands.
50
Page 58

Advanced features
Found: <command> appears in the display and the command
is performed.
EXECUTE A VOICE COMMAND WITH THE HEADSET
After you’ve associated a voice tag with a command, you can execute a
voice command with the optional HDC-9P headset attached.
1 At the Start screen, press and hold the remote button on the headset.
The phone beeps and Please speak now appears in the display.
2 Pronounce the tag for one of the four available commands.
Found: <command> appears in the display and the command
is performed.
Tip: You can also engage voice command by pressing and holding
the down volume key on the side of the phone.
Change or erase an existing voice command tag
1 At the Start screen, press Menu 5-2 (Voice - Voice command).
2 After a brief pause, the list of voice commands appear in the display.
3 Scroll to the command with the tag you wish to modify and
press Select.
4 Scroll to Change or Erase and press Select.
a) If you selected Change, press Start, then record the new tag.
b) If you selected Erase, press OK and the selected tag is erased.
• VOICE RECORDER
The [Model] can record both voice memos and phone conversations. The
total of all recordings stored in your phone can’t exceed 3 minutes. If
you’re running out of memory and try to record, you’re asked to erase a
recording before proceeding.
51
Page 59

Record a memo
1 At the Start screen, pr ess Menu 5-1-1 (Voice - Voice
recorder - record).
2 After a brief pause, your phone begins recording and a progress bar
appears in the display to indicate recorded time versus time left.
3 Press Stop to end the recording.
4 Enter a title for the recording (up to 14 characters) and press OK.
View recorded memos
• At the Start screen, press Menu 5-1-2 (Voice - Voice recorder Recordings list).
After a brief pause, your memo or list of memos appear in the display.
Playback a memo
1 At the Start screen, pr ess Menu 5-1-2 (Voice - Voice recorder -
Recordings list).
2 After a brief pause, a list of recordings appears in the display.
3 Scroll to the recording you wish to play and press Options.
4 Ensure Playback is highlighted and press Select.
The recording begins playing, and a progress bar appears in the display as
well as the amount of play time left. If necessary , adjust the volume using
the side volume key.
Erase a memo
1 At the Start screen, pr ess Menu 5-1-2 (Voice recorde r -
Recordings list).
2 After a brief pause, your memo or a list of memos appear in
the display.
3 Scroll to the memo you’d like to erase and press Options.
4 Scroll to Erase and press Select. You’re asked to confirm the erasure.
52
Page 60

Advanced features
5 Press OK and the recording is erased.
Record a phone conversation
1 While in a call, press Options, scroll to Record, and press Select.
2 Your phone begins recording the conversation. A progress bar and
timer appear in the display, indicating the amount of time left.
3 Press Stop to abort the recording. The recording is saved as the time
and date.
• 1-TOUCH DIALING
You can associate any entry in your Phone book with keys 2 through 9,
and then dial those entries by pressing and holding the assigned key.
Assign a key to 1-touch dialing
1 At the Start screen, pr ess Names, scroll to 1-touch dialing and
press Select.
2 Scroll to any empty slot and press Assign.
3 Enter the number (including the area code) and press OK.
4 Enter a na me for the number and press OK.
Make a call with 1-touch dialing
1 Press and hold the key to which an entry has been assigned.
2 Your phone dials the entry assigned to the key.
CHANGE 1-TOUCH DIALIN G NUMBERS
1 At the Start screen, pr ess Names, scroll to 1-touch dialing and
press Select.
2 Scroll to the 1-touch dialing location to change and press Options.
3 Scroll to Change and press Select.
4 Enter the new number and press OK, or press Find to retrieve and
assign a number from your Phone book.
53
Page 61

5 Enter a new name for the entry and press OK.
ERASE 1-TOUCH DIALING NUM BERS
1 At the Start screen, pr ess Names, scroll to 1-touch dialing and
press Select.
2 Scroll to the number that you wish to erase and press Options.
3 Scroll to Erase and press Select. You’re asked to confirm the erasure.
4 Press OK to erase the key assignment.
•INTERNATIONAL DIALING
International numbers require a prefix specific to the country from which
you’re calling. Ensure your phone always has the correct home prefix by
doing both of the following.
Save international numbers with a + in front
Save all international numbers with a + in front. For example, a number
to Finland from the U.S. would look as follows: (+358 123456789).
Set the international prefix
1 Press Menu 4-3-3 (Settings - Call settings - International prefix).
After a brief pause, an entry box appears in the display.
2 Enter the prefix specific to the country from which you are calling and
press OK. For example, in the United States, enter 011.
54
Page 62

Customize your phone
8 Customize your phone
• SET THE DISPLAY LANGUAGE
1 At the Start screen, press Menu 4-4-1 (Settings - Phone
settings - Language).
After a brief pause English, Français, Español, or Portuguêse appear
in the display.
2 Scroll to the language of your choice and press Select.
Note: The Language setting affects the time and date formats of
the Clock, Alarm clock, and Calendar.
• PROFILES
You can pre-select how your phone behaves in different environments
using profiles. Each profile can be customized to your preference.
Select a profile
1 At the Start screen, press Menu 3-1 (Profiles - Normal).
2 Scroll through the following profiles. Press Select once your choice
is highlighted. Press Select again again at the next screen.
• Normal • Silent • Meeting • Outdoor • Pager
Tip: You can briefly press the power key to display the list of
profiles. Each press of the power key thereafter scrolls through the
list. Once a profile is highlighted, press and hold the power key to
select the profile.
Customize a profile
You can customize a profile’s ringing tone, name, and more.
1 At the Start screen, press Menu 3-1 (Profiles - Normal).
55
Page 63

2 Scroll to the profile you wish to personalize and press Select.
3 Scroll to Customize and press Select.
4 Use the scroll keys to highlight any of the following options. Once
you’ve highlighted option you’d like to customize, press Select.
Note: You cannot rename the Normal profile.
Standard profile Options
Ringing options Select the style of your ringing tone
Ringing tone Select a ringing tone for incoming calls
Ringing volume Set the volume of your ringing tone
Vibrating alert Turn vibrating alert on or off
Message alert tone Select the tone for received messages
Keypad tones Set the keypad tone volume and type
Warning tones Turn warning and confirmation tones on or off
Accepted caller
groups
Profile name Rename the profile
Define which calls to accept or not accept
(from the list of caller groups)
Set a timed profile
You can set a profile to expire at a specific time. For example, suppose you
attend an event that requires you silence your phone. You set your phone
to Silent before the event starts, but forget to return it to Normal after
the event is over. During this time, you’ve missed several calls because you
didn’t hear your phone ring. A timed profile helps prevent this, as it
returns your phone to the default profile after it expires.
1 At the Start screen, press Menu 3-1 (Profiles - Normal).
56
Page 64

Customize your phone
2 Scroll to the profile you wish to set for expiration and press Select.
3 Scroll to Timed and press Select.
4 Enter the time for the profile to expire and press OK. The timed profile
appears in the display along with a small “clock” icon.
Select and customize an accessory profile
Note: You must have a headset or other acces sory atta ched to
your phone prior to selecting the Accessory settings menu.
To select and customize profiles for use with the headset, handsfree
device (carkit), loopset, and TTY/TDD:
1 Press Menu 4-6 (Settings - Accessory settings).
2 Scroll to one of the following Accessory profiles and press Select to
enter the option’s submenu and modify its settings.
• Headset • Loopset • TTY/TDD
IF YOU SELECTED HEADSET
• Default profile - Choose the profile you wish to be automatically
activated when a headset is connected
• Automatic answer - Calls are answered automatically after 1 ring
when a headset is connected. Scroll to On or Off and press Select
IF YOU SELECTED LOOPSET
• Use loopset - Enable use of the LPS-1 mobile inductive loopset. Scroll
to Yes or No and press Select.
• Default profile - Choose the profile you wish to be automatically
activated when a loopset is connected
• Automatic answer - Calls are answered automatically after 1 ring
when a loopset is connected. Scroll to On or Off and press Select
57
Page 65

IF YOU SELECTED TTY/TDD
• Use TTY - Enable the use of a TTY/TDD device. Scroll to Yes or No and
press Select.
Note: If the loopset is enabled, you’ll be asked to disable the
loopset before enabling TTY/TDD. Press Yes to disable the loopset
(thus enabling TTY/TDD). Press No to leave the loopset enabled.
• AUDIO SETTINGS
Much like a stereo, you can customize the audio for your [Model]. Choose
from a list of equalizer presets or create a custom set of your own.
Choose an equalizer set
1 At t h e S ta r t screen, press Menu 4-3-2 (Settings -
Call settings - Equalizer).
2 After a brief pause, the following equalizer sets appear in the display.
Equalizer sets
Normal
Bright
Dark
Loudness
Set 1
Set 2
Switches the Equalizer off
Amplifies higher frequencies
Amplifies lower frequencies
Amplifies both higher and lower, but not
middle frequencies
Customizable equalizer setting
Customizable equalizer setting
58
Page 66

Customize your phone
3 Scroll to a set and press Select. The equalizer
setting appears in the display. Press OK to
activate your selection or Back to return.
Create a Custom equalizer set
1 At t he S ta r t screen, press Menu 4-3-2
(Settings - Call settings - Equalizer).
2 After a brief pause, a list of equalizer sets appears in the display. Scroll
to Set 1 (or Set 2) and press Select.
3 Scroll to Edit and press Select. Set 1 appears
in the display with the first bar highlighted.
4 Press Adjust, then use the scroll keys to
adjust the setting. When you’re finished,
press OK.
5 Press to select the next bar. Press
Adjust, then use the scroll keys to adjust the
setting. Continue adjusting each bar until you’re satisfied.
6 Press Back to return to the set list, where you can Activate or Rename
the setting.
CHOOSE AN EQUALIZER SET WHILE IN CALL
1 While in a call, press Options.
2 Scroll to Equalizer and press Select.
3 Scroll to one of the 4 preset equalizer settings and press Activate.
• DOWNLOAD A RINGING TONE
In addition to 30 ringing tones that come with your phone, you can
download up to 10 more over the Internet, or have them sent to your
phone via SMS. You can also create ringing tones of your own and send
them to your phone or other compatible phones using Nokia PC Suite. For
more information on PC Suite, see the PC Connectivity Guide.
59
Page 67

Note: Methods for downloading ringing tones vary with wireless
providers. Some providers allow you to send ringing tones to your
phone via the Internet, but may charge for this service. Contact
your wireless provider for details.
When you receive a ringing tone
Ringing tone received appears in the display.
LISTEN TO THE TONE
1 Press Options, scroll to Playback, and press OK.
2 To stop playing the tone, press Quit or .
DISCARD THE TONE
• Press Options, scroll to Discard, and press OK
SAVE THE TONE
1 Press Options, scroll to Save, and press OK.
2 Scroll to an available slot and press Replace.
• ACCESSIBILITY SOLUTIONS
Nokia is committed to pursuing accessibility solutions for all people,
including individuals with disabilities. We maintain a site on the Internet
that is dedicated to accessibility solutions. For more information about
features, accessories, and other Nokia products designed with
accessibility in mind, visit the Nokia Internet site at
www.nokiaaccessibility.com
Or, contact Nokia Customer Care at 1-800 24NOKIA
Alternate format user guides
This user guide is also available in Braille, large print, audiocassette, and
on disk in a format that can be read by a screen reader.
To request a User Guide in any of these formats, call Nokia Customer Care
at (888) 665-4228. TTY users can contact Nokia at (800) 246-6542.
60
Page 68

Customize your phone
LPS-1 Mobile Inductive Loopset
The LPS-1 loopset gives hearing-impaired users access to digital
telephony for the first time. People using a T-coil equipped hearing aid
can make and receive calls without noise interference.
HOW THE LOOPSET WORKS
The LPS-1 transmits sound to any hearing aid
equipped with a T-coil. The sound from the phone
is amplified and background noise is eliminated.
Wear it around your neck, connect it to your
phone, and speak directly toward the microphone
on the loopset.
For more details on its use, refer to the booklet
that comes with the LPS-1.
Note: The Loopset can be purchased
separately as an accessory.
Other accessibility features
Besides an intuitive interface and TTY/TDD capabilities, other accessibility
features of the [Model] include:
• A nib, or raised dot on top of the five key for keypad reference
• Tactile feedback whenever you press a key
• The ability to send and receive short messages
• 1-touch dialing
• FOR TTY USERS
Until now, most mobile phones were incompatible with TTY devices while
in digital mode. Your [Model] is fully compliant with TTY devices in all modes.
WHAT YOU’LL NEED
In addition to the [Model], you’ll need the following for TTY communication:
• A TTY device that is “cellular ready” or “cellular compatible”
61
Page 69

• A cable for connecting the TTY to your phone. Usually supplied by the
manufacturer of the TTY device
• The Nokia TTY adapter HDA-8, which can be purchased as
an accessory
Important: The Nokia TTY adapter HDA-8 is for use with
compatible TTY devices and headsets only. Please check your TTY
device or headset to ensure that the connection is compatible.
Nokia Original headsets attach directly to the phone and do not
require this adapter. Noki a does not endorse, warrant, or authorize
use of any accessories not manufactured or licensed by Nokia.
Connect TTY hardware
1 The TTY device comes
with a cable. Plug the
larger end of the cable
into the input jack on
the TTY.
2 Plug the other end of
the cable into the TTY
adapter HDA-8.
3 Plug the HDA-8 into
the connector on the bottom of your phone
Make a call with TTY
Note: You must have a loopset or othe r accessory attached to your
phone prior to selecting the following menu.
1 At t he S ta r t screen, press Menu 4-6-4-1-1 (Settings - Accessory
settings - TTY/TDD - Use TTY - Y es).
Note: After selecting Yes, this becomes the default and you won’t
have to do it again unless you turn TTY/TDD off.
2 Press to return to the Start screen.
3 Enter the number you wish to call on the phone and press .
62
Page 70

Customize your phone
4 When the receiving party answers, begin typing your conversation on
the TTY.
End a TTY call
• Press on the phone
Receive a TTY call
1 Make sure the TTY and phone are connected.
2 When the phone vibrates (this setting is up to the user), press
to answer the call, and then type your response on the TTY.
3 To hang up, press on the phone.
• OPTIONAL HEADSET
The HDE-1 headset can be purchased separately as an accessory.
Connect the headset
1 Plug the headset jack into the accessory
connection on the bottom end of your phone.
2 Place the round headset ear plug in your ear.
With the headset connected, you can
make, answer, and end calls as usual.
• Use the keypad to enter numbers
• Press to place a call
• Press to end a call
When in use, the headset microphone
hangs at the side of your head. Although
it may seem far from your mouth, you
can speak at normal volume.
63
Page 71

9 Manage phone security
You can lock your keypad, restrict selective calls, and use security codes
to secure your phone against accidental or unauthorized use.
• LOCK AND UNLOCK THE KEYPAD
Remember to lock your phone’s keypad to prevent accidental calls.
If the keypad is locked, it unlocks when you receive a call. After the call it
automatically reactivates.
LOCK THE KEYPAD
• At the Start screen, press Menu . Keys locked appears in
the display.
UNLOCK THE KEYPAD
• At the Start screen, press Unlock . Keys unlocked appears in
the display.
• SECURITY LEVELS
The security level determines your access to features when a “non-owner”
SIM card is used. A “non-owner” SIM card is one (other than the original)
that is inserted after you power off. There are 3 security levels:
Security levels
Off Owner and Non-owner cards are treated the same
Non-owner cards can access SIM memory. Any changes to
the memory setting requires the security code.
Memory
Phone The security code is required upon power-up
The owner cards has access to all features, but the security
code is required to change a memory setting
64
Page 72

Manage phone security
Set your security level
1 At the Start screen, press Menu 4-7-3 (Settings - Security settings
- Security level).
2 After a brief pause, you’re prompted to enter the security code. The
default code is 12345. Enter the security code and press OK.
3 Scroll to Off, Memory, or Phone and press OK.
• FIXED DIALING
Fixed dialing allows you to define which numbers require PIN2 entry
before they can be dialed. Fixed dialing must be supported by your
wireless provider.
Note: Even with fixed dialing set to On, it may still be possible to
call emergency numbers such as 911.
Set up a fixed dialing list
1 At the Start screen, press Menu 4-7-2-1 (Settings - Security
Settings - Fixed dialing - On).
2 After a brief pause, you’re prompted to enter the PIN2 code. Enter the
PIN2 code and press OK.
3 Enter a number that you wish to restrict access, or press Find and
retrieve a number from your Phone book. Press OK.
• ACCESS CODES
Use access codes to change your security code, PIN code, and PIN2 code.
Note: Avoid using codes similar to emergency numbers such as
911 to prevent accidental dialing of the emergency number.
The security code
The security code controls access to features such as the security level and
is supplied with the phone. The preset code is 12345.
65
Page 73

Note: If you enter the wrong security code five times in
succession, you won’t be able to enter a code for five minutes,
even if you power off the phone between incorrect entries.
CHANGE YOUR SECURITY CODE
Once you change the security code from its preset of 12345, keep the new
code secret, and in a safe place separate from your phone.
1 Press Menu 4-7-4-1 (Settings - Security settings - Access codes -
Change security code).
After a brief pause, you’re prompted to enter the current security code
(default is 12345).
2 Enter the current security code and press OK. You’re prompted to
enter the new security code.
3 Enter the new security code (up to 10 characters) and press OK. You’re
asked to re-enter the new security co de for verification.
4 Enter the new security code again and press OK. A message appears
in the display confirming your security code has been changed.
The PIN code
The PIN code protects the SIM card from unauthorized access. The
PIN code can be 4- 8 digits in length. The default PIN code is 1234. After
three successive incorrect entries the PIN code is blocked and you’ll be
asked to enter the personal unblocking key (PUK) code.
PIN CODE REQUEST
Enable your phone to request the PIN code upon power-up. This provides
extra security in case your phone is lost or stolen.
1 Press Menu 4-7-1 (Settings - Security settings - PIN code request).
2 After a brief pause, you’re prompted to enter the current PIN code
(default is 1234). Enter the PIN code and press OK.
3 Scroll to On and press OK. A message appears in the display
confirming your selection.
66
Page 74

Manage phone security
CHANGE YOUR PIN CODE
Before you can change your PIN code, you’ll need to set your phone to ask
for the PIN code at start-up. See “PIN code request”, which immediately
precedes this section.
1 Press Menu 4-7-4-2 (Settings - Security settings - Access codes -
Change PIN code).
2 After a brief pause, you’re prompted to enter the current PIN code.
Enter the PIN code and press OK.
3 You’re prompted to enter the new PIN code. Enter the new PIN code
and press OK.
4 You’re prompted to re-enter the new PIN code for verification. Enter
the new PIN code again and press OK.
A message appears in the display confirming your PIN code has
been changed.
The PIN2 Code
The PIN2 code is required for features such as Fixed dialing and clearing
Call timers. If you enter an incorrect PIN2 code three times in succession,
the PIN2 code is blocked and you’ll have to enter the PUK2 code. The PIN2
code is supplied with your SIM card.
CHANGE YOUR PIN2 CODE
1 Press Menu 4-7-4-3 (Settings - Security settings - Access codes -
Change PIN2 code). You’re prompted to enter the current PIN2 code.
2 Enter the current PIN2 code and press OK. You’re prompted to enter
the new PIN2 code.
3 Enter the new PIN2 code and press OK. You’re asked to verify the new
PIN2 code by entering it again.
4 Enter the new PIN2 code again and press OK. A message appears in
the display confirming you’ve changed the PIN2 code.
67
Page 75

Personal unblocking key (PUK) codes
PUK and PUK2 codes are used to restore blocked PIN and PIN2 codes.
Both PUK and PUK2 codes are eight characters in length and cannot
be changed. PUK and PUK2 codes must be obtained from your
wireless provider.
Important: If you enter an incorrect PUK or PUK2 code 10 times in
succession, the message SIM rejected appears on the screen and
the SIM card can no longer be used. You must contact your
wireless provider for a new SIM card.
68
Page 76

Messages
10 Messages
If you’re subscribed to a message service, you
can send and receive messages to compatible
phones that also have a message service.
can also send and receive picture messages, email, and faxes if supported by your network.
Composed messages can be up to 160
characters in length. However, you can
received “linked” messages as large as 459
characters. Linked messages are actually several messages tied together.
Message icons
Icons that precede the title of a message indicate the following:
The message has not been read
The message has been read
The message is a delivery report
i
Before you can send and receive messages
You’ll need the following to send and receive messages of any type:
• A messaging service through your wireless provider
• A message center number, which must be saved to your phone (if your
wireless provider hasn’t done so already)
You
Save your message center number
Messages sent by your phone are routed through your wireless provider’s
message center. Normally, this number is saved to your phone by your
wireless provider. To save the number manually, do the following:
69
Page 77

1 At t he S ta r t screen, press Menu - Select, and scroll until Message
settings appears in the display.
2 Press Select, scroll to Default profile, and press Select again.
3 Scroll to Message center number and press Select.
a) If the box which appears in the display is empty, enter the number
given by your wireless provider (up to 21 digits) and press OK.
4 If the box is full, leave the n umber as is a nd press OK .
• TIPS FOR COMPOSING A MESSAGE
Use predictive text input
Predictive text allows you to write messages using a built-in dictionary.
With predictive text input, you only need to press each numbered key
once for each letter.
For example, to write Nokia, with the English dictionary selected, press
each of the following keys only once:
(for N) (for O) (for K) (for I) (for A)
The display above shows the letters for each key pressed.
• If a displayed word is correct, press to enter a space and begin
writing the next word
• If a displayed word is not correct, press to see other matches
•If ? appears after a word, press Spell to add it to your dictionary
• Press to insert a period into your message
• Press to display the special characters screen, where you can
choose from a large variety of symbols and characters to enter into
your message
70
Page 78

Special characters
Messages
)
%
¥
.
,
@ / :
* = < > >
¤
‘ ? !
[
]
_ ;
{ } \
“ - (
+
£
&
$
~
^ î ¿ § # l
Use four-way scrolling
Navigate special characters using the 2, 4, 6, and 8 keys much as you
would a joystick. Once a character is highlighted press to insert the
character into your message.
Scroll up
Scroll left
Scroll down
Scroll right
Insert character
• WRITE AND SEND A MESSAGE
1 At t he S ta r t screen, press Menu 01-1 (Messages - Write message).
2 After a brief pause, the message entry screen appears in the display.
71
Page 79

3 Compose a message using the keypad, then press Options.
4 Scroll to Send and press Select.
5 Enter the recipient’s phone number, including the area code, and
press OK. Your message is sent.
Tip: Press Find to retrieve a number from your Phone book.
• READ MESSAGES
When you receive a message, your phone beeps and Message received
appears in the display as well as the unopened letter icon ( ).
1 Press Show to read the message, or press Exit to move the message
to your inbox.
2 If you have more than one message, scroll to the message of your
choice and press Select to view the message.
Note: When you have unopened messages in your inbox, is
shown in the upper left corner of the Start screen as a reminder.
3 Use the scroll keys to view the whole message if necessary.
Tip: Keep scrolling to view other information, such as the sender
number and time the message was sent.
4 Once you’re finished, press Back to move the message to the Inbox, or
press Options for other choices, such as Reply or Forward.
Message linking
The [Model] can receive messages longer than 160 characters. Messages this
long are actually divided into parts and delivered in sequence. However,
you can start reading the first part of the message before the rest of the
message arrives.
72
Page 80

Messages
Note: The message *Some text missing* indicates part of the
message has not been received. This is normal, and the message
content will be updated as soon as the missing text arrives. If
memory is full, you may have to delete a message from your inbox
before your phone can update the missing text.
Reply to a message
1 While viewing a message, press Options, scroll to Reply, and
press Select.
2 Scroll to a pre-composed reply, or choose an Empty screen, and
press Select.
3 When you’re satisfied with your reply, press Options, scroll to Send,
and press Select.
The number of the original sender appears in the display.
4 Press OK and your reply is sent.
Forward a message
1 While viewing a message, press Options.
2 Scroll to Forward and press Select.
3 Enter the recipient’s phone number, or press Find to retrieve a number
from your Phone book.
4 Press OK. The message is forwarded.
You can send e-mail up to 160 characters in length to anyone with an
e-mail address. First, you’ll need to setup an e-mail profile and modify a
few other settings. It takes just a few minutes, and you only need to do
this once.
Note: You cannot send picture messages with e-mail.
73
Page 81

First, write down a couple of numbers
Write down your Message center number and Default recipient number
(also known as the “e-mail gateway” number) in the following table. Y ou
may need these numbers when setting up your phone for e-mail.
Number Where to find it Write the number below
Message
center
number
Default
recipient
number
The same number used for SMS.
See “Save your message center
number” on page 69
Contact your wireless provider
for this number
Next, setup an e-mail profile
1 At t he S ta r t screen, press Menu - Select and scroll until Message
Settings appears in the display.
2 Press Select, scroll to Profile 2 and press Select again.
3 Press Select when Message center number appears in the display.
4 Enter the message center number obtained from your wireless
provider and press OK.
5 Scroll until Messages sent as appears in the display and press Select.
6 Scroll to E-mail and press OK.
7 Scroll until Default recipient number appears in the display and
press Select.
8 Enter the number given by your wireless provider and press Options.
9 Scroll to Accept and press Select.
Note: Next, we recommend you rename your sending profile to
“E-mail,” which will simplify things later when you’re ready to
send e-mail.
74
Page 82

Messages
10 Scroll until Rename sending profile appears in the display and
press Select.
11 E nter a name for the profile (such as “e-mail”) and press OK.
• COMPOSE AND SEND E-MAIL
Note: See “Tips for composing a message” on page 70 for ways to
write messages faster.
1 At t h e S ta r t screen, press Menu 01-1 (Messages - Write message).
After a brief pause, the message entry screen appears in the display.
2 Compose your message using the keypad and press Options.
3 Scroll to Sending options and press Select.
4 Scroll to Sending profile and press Select.
5 Scroll to the profile for sending e-mail, and press Select.
6 The gateway, or default recipient number should appear in the display.
Press Options, scroll to Accept and press Select.
7 Enter the recipient’s e-mail address and press OK, or press Find to
retrieve it from your Phone book. Your e-mail is sent.
• PICTURE MESSAGES
The [Model] comes with ten pre-loaded pictures and five empty storage slots
(15 total). You can, however , over-write any of the ten pictures that came
with your phone. Pictures can be attached to a message and sent via SMS
to compatible phones. Picture messages behave the same as text
messages, but pictures take up more space than text.
Note: You cannot send a picture message via e-mail.
75
Page 83

Download pictures
You can download pictures, or receive them from compatible phones via
SMS to use in messages and caller groups. You can also create pictures
and send them to your phone or other compatible phones using Nokia
PC Suite.
Note: Methods for downloading pictures vary with wireless
providers. Some providers allow you to send pictures to your phone
from a web page. Contact your wireless provider for details.
When you receive a picture message
When you receive a picture message, Picture Message received appears
in the display.
VIEW THE PICTURE
• Press Options, scroll to Show, and press OK
DISCARD THE PICTURE
• Press Options, scroll to Discard, and press OK
SAVE THE PICTURE
1 Press Options, scroll to Save, and press OK.
2 Scroll to the picture you’d like to replace and press Select.
Compose and send a picture message
Like text messages, picture messages can be up to 160 characters in
length. Picture sizes vary, but a small picture which fills your display
generally takes up about 50 characters (leaving 100 characters
or so for text). If you try to attach a picture to a message which is
almost full of text, a beep sounds and you’re prompted to erase some text
before proceeding.
1 At the Start screen, press Menu 01-1 (Messages - Write message).
2 After a brief pause, the message edit screen appears in the display.
3 Write a message using the keypad (or, enter nothing if you choose),
and press Options.
76
Page 84

Messages
Tip: Attach pictures before adding text. You can then check
remaining space for text in the upper right corner of the display.
4 Scroll to Attach picture and press Select.
A list appears in the display (Picture 1, Picture 2, and so on).
5 Scroll to a picture and press View.
6 Press Attach to insert the picture into your message, otherwise:
a) Press Back, scroll to another picture, and press View again.
b) Press Attach to insert the picture into your message.
7 To send the picture message, press Options, scroll to Send, and
press Select.
8 Enter the phone number for your recipient (or press Find to retrieve a
number from your Phone book) and press OK. The message is sent.
PREVIEW, CHANGE, OR ERASE A PICTURE MESSAGE
1 After a picture has been attached to your message, press Options at
the message edit screen.
2 Scroll to one of the following options and press Select.
a) Preview - Previews the attached message before sending. Press
Back to exit.
b) Change picture - Takes you back to the picture list.
Scroll to highlight a new picture,. Press View and then press
Attach to link the new picture to your message.
c) Erase picture - Press OK to erase the picture from your messa ge,
or press No to return to the list of options.
• TEMPLATES
Templates are short, pre-written messages which can be recalled and sent
as original messages, or used as a quick reply when you’re short on time.
You can also customize an d save an existing template or create a new one
of your own. Templates are stored in the Templates folder.
77
Page 85

Send a template message
1 At t he S ta r t screen, press Menu 01-5 (Messages - Templates).
After a brief pause, the templates folder opens to display a list
of templates.
2 Scroll to the template of your choice and press Select. Available
templates are as follows:
Message Templates
“Please call” “Meeting is ca ncelled”
“I’m at home. Please call” “I’m late. I will be there at”
“I’m at work. Please call” “See you in”
“I’m in a meeting. Call me
later at”
“Sorry, I can’t help you on this” “I will be arriving at”
Note: Pictures are also stored in the Templates folder.
3 If you’d like to send the template as is, press Options, scroll to Send,
and press Select. Then skip to step 4.
If you’d like to modify the template before sending:
a) Scroll to Edit instead of Send and press Select. Y o u’re taken to
the message edit display, where you’re free to edit the template
as you choose.
b) Once you’re finished editing, press Options, scroll to Send, and
press Select if you’d like to send the message without saving.
To save the template before sending:
c) Press Options, scroll to Save message (instead of Send), and press
Select. Replace original appears in the display.
“See you at”
78
Page 86

d) Press OK to save or No to exit.
4 Enter the recipient’s number and press OK. The template is sent.
• You can also press Find to retrieve a number from your
Phone book.
Create a custom template
1 Press Menu 01-1 (Messages - Write message).
After a brief pause, the message entry screen appears in the display.
2 Compose your custom template and press Options.
3 Scroll to Save message, and press Select.
4 Scroll to the Templates folder and press OK. Your message is sav ed as
a template.
• ORGANIZE YOUR MESSAGES WITH FOLDERS
Save messages to folders
You can save messages to an existing folder or to a folder you’ve created.
1 Press Menu 01-1 (Messages - Write message).
After a brief pause, the message entry screen appears in the display.
2 Write your message and press Options.
3 Scroll to Save message and press Select.
4 Scroll to the folder where you’d like to save the message and press OK.
The message is saved.
Messages
View saved messages
1 At t he S ta r t screen, press Menu 01-1 (Messages - Write message).
After a brief pause, Write message appears in the display.
2 Scroll until the folder containing the message you wish to view
appears in the display and press Open.
79
Page 87

3 Once the folder opens, scroll to the message you wish to view and
press Select.
Inbox folder
Messages are automatically stored in the inbox after they’ve been read or
if you press when Message received appears on the Start screen.
Outbox folder
Sent messages are automatically saved in the Outbox.
Archive folder
To make sure that certain messages won’t be overwritten when memory
becomes full, move some of your messages to the Archive folder.
Templates folder
Pictures and pre-written templates are stored in the Templates folder.
My folders
Keep your messages organized by creating custom folders and saving your
messages there.
ADD A FOLDER OF YOUR OWN
1 At the Start screen, press Menu 01 (Messages).
After a brief pause, Write message appears in the display.
2 Scroll until My folders appears in the display and press Open.
3 Press Options. Add folder is highlighted. Press OK.
4 Enter a name for the new folder and press OK. The folder is added.
REMOVE A FOLD E R
Only folders created in My folders can be deleted. The Inbox, Outbox,
Archive, and Template folders are protected. When you delete a folder, all
messages in the folder are deleted as well.
1 At the Start screen, press Menu 01 (Messages).
2 After a brief pause, Write message appears in the display.
80
Page 88

3 Scroll until My folders appears in the display and press Open.
4 Any folders that you’ve created appear in the display. Scroll to the
folder you wish to remove and press Options.
5 Scroll to Delete folder and press OK.
6 You’re asked to confirm the deletion. Press OK if you wish to delete
and Back if you wish to exit.
Move a message to a folder
1 While viewing the message, press Options.
2 Scroll to Move and press Select.
3 Scroll to the destination folder and press OK. The message is moved.
• ERASE MESSAGES
If your message memory becomes full, blinks in the display. You can
do the following to create more space:
• Read some of the unread messages and then erase them
• Erase some of these messages from your folders
Erase a single message
To erase a single message, you need to open it first.
1 Press Menu 01 (Messages).
After a brief pause, Write message appears in the display.
2 Scroll to the folder containing the message you wish to erase and
press Open.
A list of messages appears in the display.
3 Scroll to the message you wish to erase and press Select. The
message opens.
4 Press Options, scroll to Erase, and press Select.
5 You’re asked to confirm the erasure. Press OK to erase the message.
Messages
81
Page 89

Erase all messages in a folder
1 At the Start screen, press Menu 01 (Messages).
2 After a brief pause, Write message appears in the display.
3 Scroll until Erase messages appears in the display and press Select.
4 Scroll to the desired folder or message type that you wish to erase and
press OK. You’re asked to confirm your erasure.
5 Press OK to empty the folder.
• PREDICTIVE TEXT
Writing messages with predictive text is much easier than the traditional
method. Predictive text uses a formula to guess the letter of each word.
It’s very accurate and requires only one press of a key for each letter.
Predictive text input may not be available for all languages.
Tip: Because the “guessed” word changes as you enter letters, try
not to look at the screen until you’ve finished entering the word.
Activate or deactivate predictive text
While writing a message, press and hold Options until T9 dictionary
activated or T9 dictionary deactivated appears in the display.
Change the language for predictive text
1 While writing a message, press Options and scroll to Predictive text.
2 Press Select, scroll to the desired language and press Select again.
82
Page 90

Messages
Write with predictive text
Predictive text allows you to write using a built-in dictionary, and is the
default method of entering text. With predictive text input, you only need
to press each numbered key once for each letter. For example, to write
Nokia, with the English dictionary selected, press the following keys once:
(for N) (for O) (for K) (for I) (for A)
The display above shows the letters for each key pressed.
• If a displayed word is correct, press to enter a space and begin
writing the next word
• If a displayed word is incorrect, press to see other matches. To
return to the previous word in the list of matches, press Previous
If ? appears after the word, the word is not in the dictionary . Y ou need
to add the word to the dictionary (see next).
Add new words to the dictionary
If you encounter a word that predictive text doesn’t recognize, a
question mark (?) follows the word and Spell appears in the lower left of
the display.
• Press Spell, enter your new word using the keypad, and press Save
The word is added to the dictionary as well as the message you’re writing.
NOTES ABOUT ADDING WORDS
• New words that you accept—even accidentally—by pressing Select,
, or deleting the space between two words (thus forming a
compound word) are saved to the dictionary
• Depending on the language and the length of the words, you may be
able to add hundreds of words to the dictionary
• When the dictionary is full, the most recently added word replaces the
first word added.
83
Page 91

11 Your personal organizer
The [Model] has many useful features for organizing your everyday life,
including a calendar, to-do list, and alarm clock. It also has a calculator
that can easily convert domestic and foreign currency, plu s a new feature
called Wallet for making purchases on-line. In this chapter you’ll learn
how to use your phone as a personal digital assistant.
• WALLET
You can store credit card inform ation and other
personal data in a wallet card, and then fetch
this information with your WAP browser for online purchases. Wallet also uses digital
signature for signing and verifying transactions.
WAP purchases and digital signature
capabilities are dependent upon your wireless provider.
Notes about wallet security
• To protect yourself against unauthorized purchases, you can require a
code to be entered each time you use Wallet. See “Activate code
request” on page 85 for instructions.
• Your phone has other security features, including a PIN code that can
protect your phone against unauthorized use. If you activate PIN code
request, your phone asks for the code each time it is turned on.
Without the proper code, your phone cannot be used (except for
emergency calls). See “PIN code request” on page 66 for more info.
Wallet time-out
If Wallet is open for longer than 5 minutes without any user interaction
(keypresses), a query appears in the display asking if you’d like to keep
Wallet open, or exit. If you don’t respond within 5 seconds, the wallet
application closes and your phone returns to the Start screen.
84
Page 92

Your personal organizer
Create a wallet code
The first time you access Wallet, you’ll be asked to create a personalized
wallet code. The wallet code can be 4 -10 digits in length.
1 At t he S ta r t screen, press Menu 6-3 (Organizer - Wallet). After a
brief pause, you’re prompted to enter a wallet code.
2 Enter the 4 - 10 digit code of your choice and press OK. Wallet
prompts you to verify the code.
Note: Create a code that is unique, yet easy to remember. This will
be your key to using Wallet’s features in th e future. Also, keep your
wallet code in a secret place, separate from your phone.
3 Enter the code again for verification and press OK. A message appears
in the display confirming you’ve created a wallet code.
Change your wallet code
1 At t he S ta r t screen, press Menu 6-3 (Organizer - Wallet). After a
brief pause, you’re prompted to enter your wallet code.
2 Enter your wallet code and press OK.
3 Scroll to Settings and press Select.
4 Scroll to Change code and press Select.
5 Enter the original wallet code and press OK.
6 Enter the new wallet code and press OK.
7 Enter the new wallet code again for verification and press OK. A
message appears in the display confirming your change.
Activate code request
To protect yourself against unauthorized purchases, you can require the
wallet code to be entered each time you use Wallet.
1 At t he S ta r t screen, press Menu 6-3 (Organizer - Wallet). After a
brief pause, you’re prompted to enter your wallet code.
2 Enter your wallet code and press OK.
85
Page 93

3 Scroll to Settings and press Select.
4 Scroll to Code request and press Select. You’re prompted to enter the
wallet code.
5 Enter the wallet code and press OK.
6 Scroll to On (or Off to deactivate) and press Select. A message
appears in the display confirming you’ve activated code request.
Reset the wallet code
If you forget the wallet code and wish to erase all the information stored
in Wallet, follow these steps.
Caution: Once you reset the wallet code and clear the contents of
Wallet, you cannot restore this information.
1 At the Start screen, enter
A message appears in the display asking if you want to clear your
wallet’s content and code.
2 If you want to permanently delete your wallet code and its contents,
press OK.
3 Enter the security code and press OK. Your wallet’s code and content
are erased.
#3925538#.
*
• CREATE A WALLET CARD
Wallet cards contain data entry fields for shipping, billing, receipt, and
credit card information. Once you create a wallet card, and if your
wireless provider supports the feature, you’re ready to make on-line
purchases. Wallet can hold up to 5 credit card sets.
1 At the Start screen, press Menu 6-3 (Organizer - Wallet). After a
brief pause, you’re prompted to enter the wallet code.
2 Enter the wallet code and press OK. Scroll to Cards and press Select.
3 Scroll to one of the cards and press Select to choose from the options
in the following table:
86
Page 94

Your personal organizer
Card entry fields
Card info Enter the card holder, type, number, verification value,
expiration day, expiration month, and expiration year
User info Enter your user name and password
Shipping
info
Billing
info
Receipt
info
Copy card Copy the contents of the selected card to one of the other
Clear card Clear the contents of a card
Rename
card
Enter your first, middle, and last name, company name and
address, city, state, zip code, and country
Enter your first, middle, and last name, company name
and address, state, zip code, country, phone number,
e-mail address
Enter the receipt to e-mail address and receipt to
phone number
four cards
Rename the card
Compose a personal note
Wallet can store up to 30 personal notes, such as passcodes or other
sensitive data. Your notes are protected by wallet’s security feature.
1 At the Start screen, press Menu 6-3 (Organizer - Wallet). After a
brief pause, you’re prompted to enter your wallet code.
2 Enter your wallet code and press OK.
3 Scroll to Personal notes and press Select.
4 Press Add new, compose your note, and press Options.
87
Page 95

5 Scroll to Save and press Select.
6 Enter a title for the note and press Options.
7 Scroll to Save and press Select. Your note is saved.
NOTE OPTIONS
Press Options while composing a note to display the list in the
following table:
Options while composing a note
Save Save the note
Insert word Return to composing the note. Y ou can then edit the last
word entered (highlighted by underscore __)
Insert symbol Display a list of special characters to insert into
your note
Predictive
text
Matches Displays a list of other possible matches for the
NOTES LIST
1 Select Personal notes from Wallet’s main menu. You’re presented
with headers of the notes you’ve composed thus far.
2 Press Options with any note header highlighted to display
the following:
Options while viewing notes
View View the contents of the selected note
Add new Compose and save a new note
Turn on predictive text for the available languages
currently selected word
88
Page 96

Options while viewing notes
Your personal organizer
Sort
Erase
Erase all
3 Use the scroll keys to highlight an option. Use the selection keys to
select an option or exit the list.
Sort the list of notes by name or date
Erase the s elected n ote
Erase all notes
89
Page 97

• CALENDAR
The calendar keeps track of reminders, calls you need to make, meetings,
and birthdays. It can even sound an alarm for any of these events.
Open the Calendar
At the Start screen, press Menu 6-1
(Organizer - Calendar). After a brief pause, the
Month view appears in the display with the
current date highlighted by a black box.
Use four-way scrolling
You can move the cursor in some calendar
views using the 2, 4, 6, and 8 keys much the same as a joystick.
Scroll up
Month view
Scroll left
Scroll down
The Month view
The month view provides an overview of
the selected month and weeks. It also
allows you to jump to a specific date.
Any days that appear highlighted in bold
font contain calendar notes such as a
meeting or reminder.
90
Scroll right
Page 98

Your personal organizer
Jump to a date
1 Press Menu 6-1 (Organizer - Calendar).
After a brief pause, the month view appears
in the display.
2 Press Options, scroll to Go to date, and
press Select.
3 Enter the date (for example 12/15/2002) and press OK. The month
view appears in the display with the “jump date” highlighted.
Make a note for a specific date
You can choose from four types of notes; Meeting, Call, Birthday, and
Memo. Your phone asks for further information depending on which
note you choose. You also have the option to set an alarm for any note
that you select.
1 Jump to a date as outlined in the previous section.
2 From the month view (with the jump date highlighted), press Options.
3 Scroll to Make a note, and press Select.
4 Scroll to one of the following note types and press Select.
Meeting Call Birthday Memo
5 Enter your note, press Options, scroll to Save, and press Select.
•For a Meeting note, you’re prompted to enter a start
and end time. You’re then given the option to set an alarm.
•For a Call note, you’re prompted to enter a phone number, a name,
and the time. You’re then given the option to set an alarm.
•For a Birthday note, you’re prompted to enter the person’s name, and
year of birth. You’re then given the option to set an alarm.
•For a Memo note, you’re prompted to enter a date for
the memo. You’re then given the option to set an alarm.
91
Page 99

View calendar notes - the Day view
After you created some calendar notes, you can view them as follows:
1 At the Start screen, press Menu 6-1 (Organizer - Calendar).
After a brief pause, the month view appears in the display with the
current date highlighted. Any dates that contain calendar notes will
be in bold font.
2 Jump, or scroll to the date containing the notes you wish to view.
3 Press Options, scroll to
View day, and press Select. Any
notes you have for the day will appear
in a list format.
Options while viewing notes
1 Press Options while viewing any note to
display those listed in the following table.
2 Scroll to an option. Press Select to activate the option or enter
its submenu.
Note options
View day View the day
Make a note Make another note for the selected date
Erase Erase the note
Edit Edit the note
Move Move the note to another date on your calendar
Repeat
Go to date Jump to another date on your calendar
Enable the note to recur on a regular basis (daily,
weekly, bi-weekly, monthly, and yearly)
92
Page 100

Note options
Your personal organizer
Send note
Copy
Settings
Send the note to another device via Infrared or SMS as
text or in vCal format
Copy the note. You can then “past” the note to
another date
Set the date and time, date and time format, the day
each week starts, and whether you want your notes to
auto-erase after a specified time
Send a Calendar note to another device
SEND A NOTE VIA INFRARED OR SMS
Note: If sending via Infrared, ensure the other device is set to
receive data via IR. For more information on enabling the receiving
device’s IR, refer to the user guide for the receiving device.
1 At the Start screen, press Menu 6-1 (Organizer - Calendar). After a
brief pause, the month view appears in the display.
2 Jump, or scroll to the date containing the note you wish to send.
3 Press Options, scroll to View day, and press Select.
4 Scroll to the note you wish to send and press Options.
5 Scroll to Send note and press Select.
6 Scroll to Send via IR or Send as note and press Select.
7 If you selected Send via IR, align the infrared ports of both devices
and press Select. The note is sent.
8 If you selected Send as note, enter the number for the recipient and
press OK. The note is sent.
93
 Loading...