

Page 1
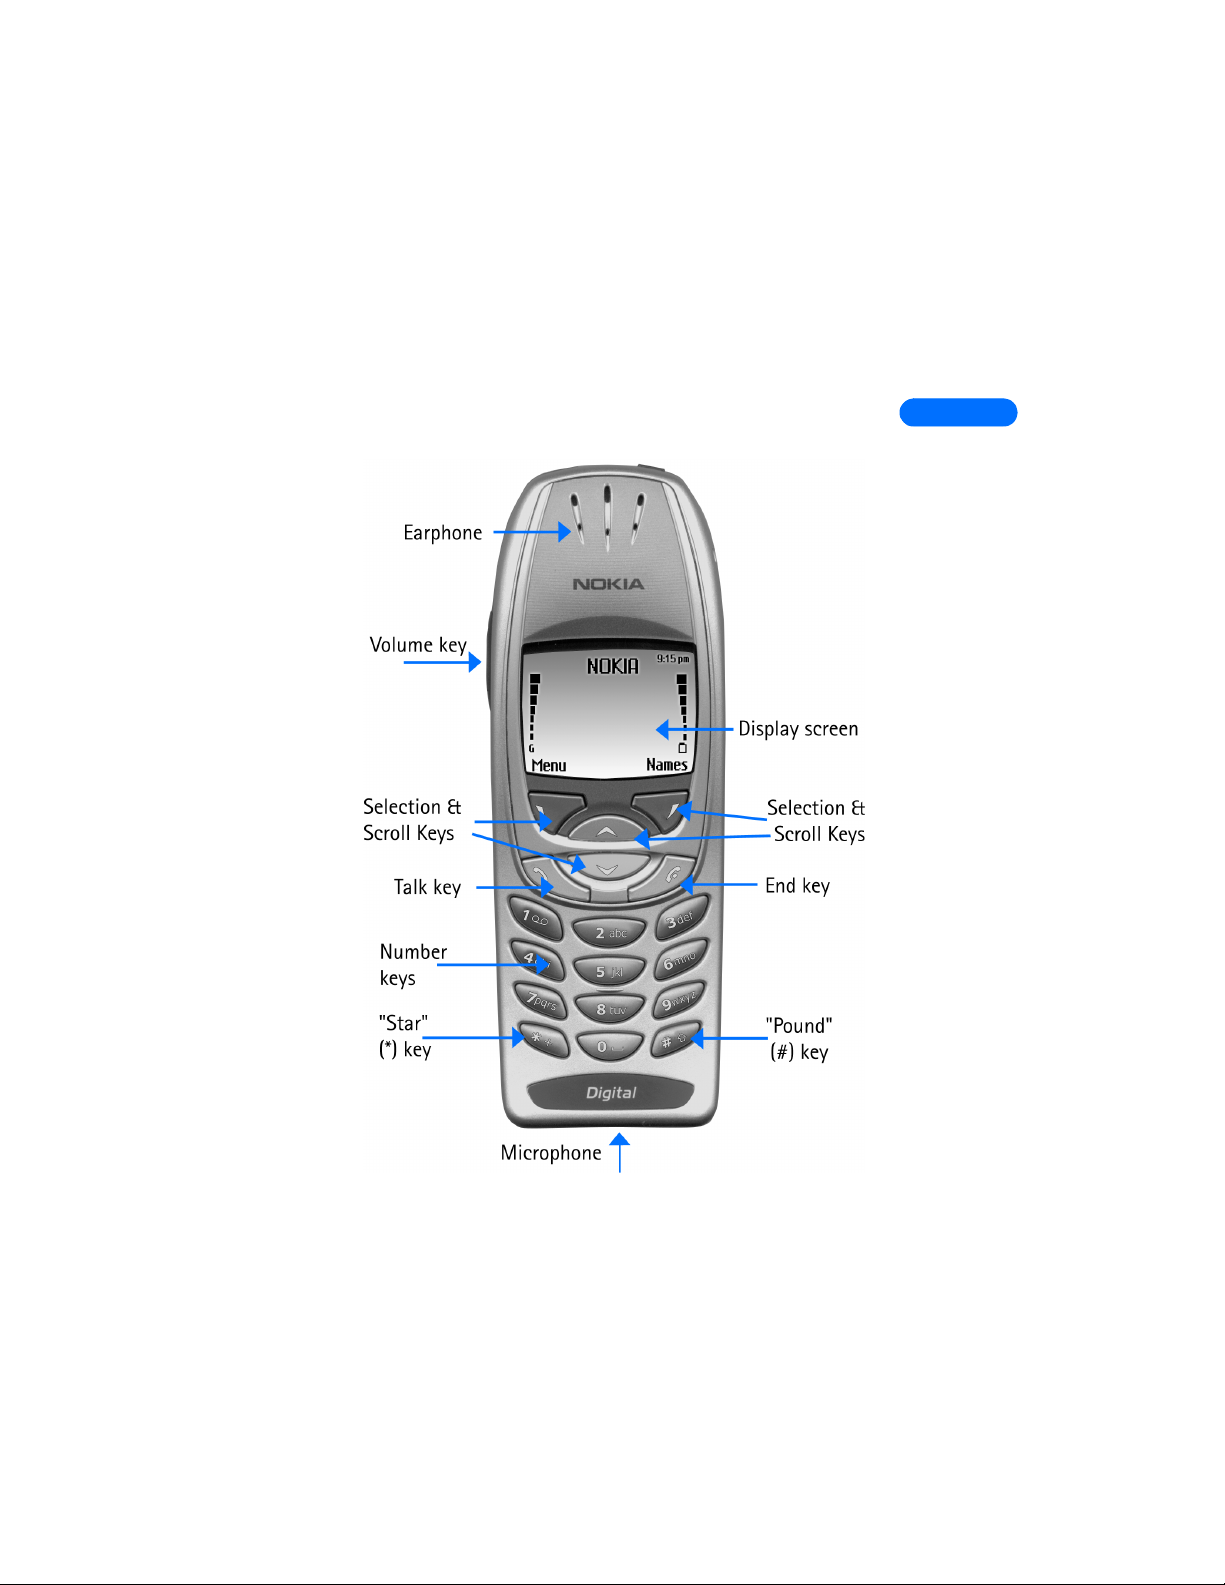
Nokia 6310i at a glance
[ 1 ]
Page 2

Quick guide to functions
Make a call Enter a phone number, press
Answer a call Press or
Answer
------------------------------------------------------------------------
------------------------------------------------------------------------
Answer a call with
call waiting
End a call Press
Silence a call Press Silence
Decline a call Press or press Decline after pressing silence
Redial Press twice
Adjust call volume During a call, press up or down on the side volume key
Use the in-call menu Press Options
Use 1-touch dialing Press key 2 through 9 then press
Save a name and number Enter a number, press Options and select Save
Recall a name/number Press Names, select Find
Recall a name/number
during a call
Check voice mail Press and hold OR call your voice mailbox number
Send a text message Press Menu 01-1. Write the message.
Read new message Press Show, then press
Reply to a message Press Options, select Reply, select As message, choose a reply
Send a business card (an
electronic document
containg contact info)
Press
while in a call
You must first assign a number in
the phonebook to a key.
,
then enter a
name and press OK
Press Options, scroll New call, press Select, press Find, enter first
letter of the name
(contact service provider for complete details)
Select
Press Options, scroll to Send, press
number, press OK
Select
option, write the reply, press Options, select Send, then press OK
Recall a name from the phone book, press
Send bus. card
select
recipient’s number, press
, select Infrared or
OK
.
, enter the recipient’s
Details
SMS
Options
, press
, enter the
,
[ 2 ]
Page 3

The wireless phone described in this guide is approved for use in
GSM 900, 1800 and 1900 networks.
LEGAL INFORMATION
Part No. 9353761, Issue 0.4
Copyright 2002 Nokia Mobile Phones. All rights reserved.
Nokia is a registered trademark of Nokia Corporation.
Printed in Canada DATE HERE
Nokia, Nokia Connecting People and the Original Accessories logos are
trademarks of Nokia Corporation and/or its affiliates.
US Patent No 5818437 and other pending patents.
T9 text input software Copyright 1999-2001. Tegic Communications, Inc.
All rights reserved.
Includes RSA BSAFE cryptographic or security protocol software
from RSA Security.
The information contained in this user guide was written for Nokia phone
6310i. The right to make changes and improvements to any of the products
described in this guide without prior notice is reserved.
EXPORT CONTROLS
This product contains commodities, technology or software exported from
the United States in accordance with the Export Administration regulations.
Diversion contrary to U.S. law is prohibited.
FCC/INDUSTRY CANADA NOTICE
Your phone may cause TV or radio interference (for example, when using
a telephone in close proximity to receiving equipment). The FCC or
Industry Canada can require you to stop using your telephone if such
interference cannot be eliminated. If you require assistance, contact your
local service facility. This device complies with part 15 of the FCC rules.
Operation is subject to the condition that this device does not cause
harmful interference and accepts any interference received, including
interference that may cause undesired operation.
[ 3 ]
Page 4

Contents
Safety first . . . . . . . . . . . . . . . . . . . . . . . . . . . . 11
Safety Guidelines. . . . . . . . . . . . . . . . . . . . . . . . . . . . . 11
Quick tips . . . . . . . . . . . . . . . . . . . . . . . . . . . . . . . . . . .12
Welcome to Nokia. . . . . . . . . . . . . . . . . . . . . . . 13
Get the most out of this guide. . . . . . . . . . . . . . . . . .13
Network services and Your wireless provider . . . . . .14
Before you contact Nokia . . . . . . . . . . . . . . . . . . . . . .14
About the antenna . . . . . . . . . . . . . . . . . . . . . . . . . . .15
Review the basics . . . . . . . . . . . . . . . . . . . . . . . 16
Install the SIM card and battery . . . . . . . . . . . . . . . .17
Charge the battery . . . . . . . . . . . . . . . . . . . . . . . . . . .18
Important battery information. . . . . . . . . . . . . . . . . .19
turn on the phone . . . . . . . . . . . . . . . . . . . . . . . . . . . .19
The start screen . . . . . . . . . . . . . . . . . . . . . . . . . . . . . .20
Use the selection and scroll keys . . . . . . . . . . . . . . . .22
Adjust call volume. . . . . . . . . . . . . . . . . . . . . . . . . . . .23
navigate your phone’s menus. . . . . . . . . . . . . . . . . . .23
help texts . . . . . . . . . . . . . . . . . . . . . . . . . . . . . . . . . . .24
Menu shortcuts . . . . . . . . . . . . . . . . . . . . . . . . . . . . . .25
Use the keypad to enter text. . . . . . . . . . . . . . . 26
Enter characters and numbers . . . . . . . . . . . . . . . . . .26
Enter special characters . . . . . . . . . . . . . . . . . . . . . . .27
[ v ]
Page 5

Phone book . . . . . . . . . . . . . . . . . . . . . . . . . . . 28
Open the Phone book . . . . . . . . . . . . . . . . . . . . . . . . . 28
Phone book options . . . . . . . . . . . . . . . . . . . . . . . . . . 28
Customize your Phone book . . . . . . . . . . . . . . . . . . . 33
Caller groups . . . . . . . . . . . . . . . . . . . . . . . . . . . . . . . . 33
Your phone’s memory. . . . . . . . . . . . . . . . . . . . . . . . . 34
Select a memory . . . . . . . . . . . . . . . . . . . . . . . . . . . . . 35
Copy memory . . . . . . . . . . . . . . . . . . . . . . . . . . . . . . . 36
View service numbers. . . . . . . . . . . . . . . . . . . . . . . . . 37
Voice dialing . . . . . . . . . . . . . . . . . . . . . . . . . . . . . . . . 37
1) Messages . . . . . . . . . . . . . . . . . . . . . . . . . . . . . 40
About text messages . . . . . . . . . . . . . . . . . . . . . . . . . 40
Write and send a message . . . . . . . . . . . . . . . . . . . . . 41
Read messages . . . . . . . . . . . . . . . . . . . . . . . . . . . . . . 42
E-mail Messages. . . . . . . . . . . . . . . . . . . . . . . . . . . . . 43
Compose and send e-mail Messages . . . . . . . . . . . . 43
Picture messages . . . . . . . . . . . . . . . . . . . . . . . . . . . . 44
Templates . . . . . . . . . . . . . . . . . . . . . . . . . . . . . . . . . . 46
Organize your messages with folders . . . . . . . . . . . . 47
Erase messages . . . . . . . . . . . . . . . . . . . . . . . . . . . . . . 49
Predictive text. . . . . . . . . . . . . . . . . . . . . . . . . . . . . . . 50
Use Voice Mail . . . . . . . . . . . . . . . . . . . . . . . . . . . . . . 52
Save your voice mailbox number . . . . . . . . . . . . . . . 52
Automate your voice mailbox with codes . . . . . . . . 53
[ vi ]
Page 6

2) Call log . . . . . . . . . . . . . . . . . . . . . . . . . . . . . . . 55
Missed calls and received calls . . . . . . . . . . . . . . . . .55
Dialed numbers . . . . . . . . . . . . . . . . . . . . . . . . . . . . . .55
Erase recent call lists . . . . . . . . . . . . . . . . . . . . . . . . .56
Call counters and call timers . . . . . . . . . . . . . . . . . . .56
GPRS data counter . . . . . . . . . . . . . . . . . . . . . . . . . . .56
GPRS connection timer . . . . . . . . . . . . . . . . . . . . . . . .56
3) Profiles . . . . . . . . . . . . . . . . . . . . . . . . . . . . . . . 57
Activate a Profile. . . . . . . . . . . . . . . . . . . . . . . . . . . . .57
Timed Profiles . . . . . . . . . . . . . . . . . . . . . . . . . . . . . . .57
Personalize profiles . . . . . . . . . . . . . . . . . . . . . . . . . . .57
Alarm clock . . . . . . . . . . . . . . . . . . . . . . . . . . . . . . . . .58
Time and date settings . . . . . . . . . . . . . . . . . . . . . . . .58
Call settings . . . . . . . . . . . . . . . . . . . . . . . . . . . . . . . . .59
Phone settings . . . . . . . . . . . . . . . . . . . . . . . . . . . . . . . 61
Tone settings . . . . . . . . . . . . . . . . . . . . . . . . . . . . . . . .63
Accessory settings . . . . . . . . . . . . . . . . . . . . . . . . . . . .63
GPRS modem settings. . . . . . . . . . . . . . . . . . . . . . . . .64
Security settings . . . . . . . . . . . . . . . . . . . . . . . . . . . . .65
Restore factory settings . . . . . . . . . . . . . . . . . . . . . . .66
4) Games . . . . . . . . . . . . . . . . . . . . . . . . . . . . . . . . 67
Starting a game. . . . . . . . . . . . . . . . . . . . . . . . . . . . . .67
Settings . . . . . . . . . . . . . . . . . . . . . . . . . . . . . . . . . . . .67
[ vii ]
Page 7

5) Applications. . . . . . . . . . . . . . . . . . . . . . . . . . . 68
Launching an application. . . . . . . . . . . . . . . . . . . . . . 68
Other options available for each application or appli-
cation set . . . . . . . . . . . . . . . . . . . . . . . . . . . . . . . . . . 68
Download A new application. . . . . . . . . . . . . . . . . . . 69
Memory status . . . . . . . . . . . . . . . . . . . . . . . . . . . . . . 69
6) Calculator . . . . . . . . . . . . . . . . . . . . . . . . . . . . .70
performing a calculation . . . . . . . . . . . . . . . . . . . . . . 70
Making a currency conversion. . . . . . . . . . . . . . . . . . 70
7) To-do list. . . . . . . . . . . . . . . . . . . . . . . . . . . . . 72
8) Calendar . . . . . . . . . . . . . . . . . . . . . . . . . . . . . 73
Making a calendar note . . . . . . . . . . . . . . . . . . . . . . . 73
9) Infrared . . . . . . . . . . . . . . . . . . . . . . . . . . . . . . 75
Sending and receiving data via Infrared. . . . . . . . . . 75
infrared connection indicator . . . . . . . . . . . . . . . . . . 75
10)Bluetooth. . . . . . . . . . . . . . . . . . . . . . . . . . . . . 76
Activating and deactivating Bluetooth. . . . . . . . . . . 76
Bluetooth connection. . . . . . . . . . . . . . . . . . . . . . . . . 77
Bluetooth settings . . . . . . . . . . . . . . . . . . . . . . . . . . . 78
11) Extras . . . . . . . . . . . . . . . . . . . . . . . . . . . . . . . 79
Voice Recorder . . . . . . . . . . . . . . . . . . . . . . . . . . . . . . 79
Voice commands. . . . . . . . . . . . . . . . . . . . . . . . . . . . . 80
Wallet . . . . . . . . . . . . . . . . . . . . . . . . . . . . . . . . . . . . . 80
Storing personal card information . . . . . . . . . . . . . . 81
[ viii ]
Page 8

Personal notes . . . . . . . . . . . . . . . . . . . . . . . . . . . . . . .82
Wallet settings . . . . . . . . . . . . . . . . . . . . . . . . . . . . . .82
Countdown timer . . . . . . . . . . . . . . . . . . . . . . . . . . . .83
Stopwatch . . . . . . . . . . . . . . . . . . . . . . . . . . . . . . . . . .83
12)Services (Wireless Internet). . . . . . . . . . . . . . . . 85
Accessing and using WAP services . . . . . . . . . . . . . .86
Making a wireless internet connection . . . . . . . . . . .89
Browse a wireless internet site . . . . . . . . . . . . . . . . .90
Bookmarks . . . . . . . . . . . . . . . . . . . . . . . . . . . . . . . . . .92
Service inbox . . . . . . . . . . . . . . . . . . . . . . . . . . . . . . . .93
The cache memory . . . . . . . . . . . . . . . . . . . . . . . . . . .93
Security indicator . . . . . . . . . . . . . . . . . . . . . . . . . . . .94
Data and fax communication. . . . . . . . . . . . . . . . . . .96
PC Suite . . . . . . . . . . . . . . . . . . . . . . . . . . . . . . . . . . . .97
13)Manage phone security . . . . . . . . . . . . . . . . . . . 99
About security codes. . . . . . . . . . . . . . . . . . . . . . . . . .99
PIN codes . . . . . . . . . . . . . . . . . . . . . . . . . . . . . . . . . .100
PUK codes . . . . . . . . . . . . . . . . . . . . . . . . . . . . . . . . . 101
Security code . . . . . . . . . . . . . . . . . . . . . . . . . . . . . . .101
Use fixed dialing . . . . . . . . . . . . . . . . . . . . . . . . . . . .102
Restrict calls . . . . . . . . . . . . . . . . . . . . . . . . . . . . . . .103
Set up a closed user group . . . . . . . . . . . . . . . . . . . .104
Keypad lock (Keyguard). . . . . . . . . . . . . . . . . . . . . . .104
[ ix ]
Page 9

14)Reference information . . . . . . . . . . . . . . . . . . .106
Batteries and chargers . . . . . . . . . . . . . . . . . . . . . . . 106
Important safety information . . . . . . . . . . . . . . . . . 108
Accessories . . . . . . . . . . . . . . . . . . . . . . . . . . . . . . . . 115
Battery. . . . . . . . . . . . . . . . . . . . . . . . . . . . . . . . . . . . 115
Chargers and other accessories . . . . . . . . . . . . . . . . 117
15)Care and maintenance . . . . . . . . . . . . . . . . . . .119
Troubleshooting . . . . . . . . . . . . . . . . . . . . . . . . . . . . 120
16)Frequently Asked Questions (FAQ) . . . . . . . . . .121
17)Glossary . . . . . . . . . . . . . . . . . . . . . . . . . . . . . 123
18)Technical information . . . . . . . . . . . . . . . . . . 127
19)Nokia One-Year Limited Warranty . . . . . . . . . 128
Safety: the most important call . . . . . . . . . . . . . 134
A Guide to Safe and Responsible Wireless
Phone Use . . . . . . . . . . . . . . . . . . . . . . . . . . . . . . 134
Information from the FDA . . . . . . . . . . . . . . . . . 138
[ x ]
Page 10

Safety first
Read these simple guidelines before using your phone. Failure
to comply with these guidelines may be dangerous or illegal.
• SAFETY GUIDELINES
The following are important safety precautions for phone use.
Road safety comes first
Do not use a handheld phone while driving. Park the
vehicle first.
Switch off in hospitals
Follow any regulations or rules. Switch your phone off
near medical equipment.
Switch off while aboard aircraft
Mobile phones can cause interference. Using them on
aircraft is illegal.
Switch off when refueling
Do not use your phone at a refueling point. Do not use it
near fuel or chemicals.
Switch off near blasting
Do not use your phone where blasting is in progress.
Observe restrictions, and follow any regulations or rules.
Observe infrared precautions
Do not point the infrared (IR) beam at anyone’s eyes or
allow it to interfere with other IR devices.
Emergency calls
Make sure the phone is switched on and in service. If the word
Clear appears above the right selection key, press and hold
to return to the
can be made. Enter the emergency number and press .
Give your location.
Start screen
Do not
end the call until told to do so.
where an emergency call
Page 11
• QUICK TIPS
Observe these brief guidelines for best performance of your phone.
Be aware of interference
All wireless phones may receive interference that could
affect performance.
Use your phone sensibly
Use your phone only in the normal position (next to the
ear). Do not touch the antenna unnecesGGily.
Use only qualified service personnel
Equipment must be installed or repaired only by qualified
service personnel.
Use approved accessories and batteries
Use only approved accessories and batteries. Do not
connect incompatible products.
Read instructions before you connect to
other devices
When you connect your phone to any other device, read
the device’s user guide for detailed safety instructions. Do
not connect incompatible products. Remember to make
backup copies of all important data.
Make sure the phone is on
Before you make a call, be sure your phone is switched on.
To make and receive calls, you must sign up with a
wireless service provider.
Page 12

Welcome to Nokia
Congratulations on your purchase of the Nokia 6310i mobile phone!
Your phone can be connected to a PC, laptop, or other device using
the data cable or built-in infrared (IR) port. For more information,
please refer to the PC Connectivity Guide, which can be downloaded
from the Internet at: www.nokia.com.
• GET THE MOST OUT OF THIS GUIDE
Follow graphic clues
Icons appear throughout this guide to alert you of important
information or to provide useful tips.
Tip: Indicates a shortcut or alternate method of doing
something.
Note: Explains a feature or points out an important concept.
Important: Indicates critical information on using a feature.
Caution: Warns you when you may lose information.
Warning: Helps to avoid injury, phone, or property damage.
Look for updates
From time to time, this guide is updated to reflect changes or
corrections. The latest version may be available at Nokia’s Internet
site at www.nokiausa.com/support/user_guides. An interactive
user guide may be also be available at: www.nokiahowto.com
13
Page 13

• NETWORK SERVICES AND YOUR WIRELESS
PROVIDER
Before you can take advantage of any network service, you’ll need
to sign up with a wireless provider. In many cases, they will provide
descriptions of their services and specific instructions for using
features such as:
• Voice mail
• Call waiting, call forwarding, and caller ID
• Email, text and picture messages
• News and information services
• Other select services, including Internet, GPRS, Java, etc.
Wireless providers may differ in their support of features. Some may
not support all languages available in your phone. Before you sign
up, make sure a wireless provider supports the features that you
need.
• BEFORE YOU CONTACT NOKIA
If you need help, Nokia Customer Service is
available for assistance. However, we
recommend that you write down the
following information and have it available if
you call. Phone specific information can be
found on your phone’s label, which is on back
of the phone, beneath the battery.
• The International Mobile Equipment Identifier (IMEI)
• You may also be asked to provide your zip code
14
Information
label
Page 14

Welcome to Nokia
Have your phone or accessory handy
Please have your phone or accessory with you when you contact any of
the numbers below.
Nokia Customer Care Center, USA
Nokia Mobile Phones, Inc.
7725 Woodland Center Boulevard, Suite #150
Tampa, Florida 33614
Tel: 1-888-NOKIA2U (1-888-665-4228)
Fax: 1-813-249-9619
TTY: 1-800-24NOKIA (for the hearing impaired only)
(1-800-246-6542)
• ABOUT THE ANTENNA
Your phone has a built-in antenna. As with
any other radio transmitting device, avoid
touching the antenna when the phone is
on.
Contact with the antenna affects the
quality of your call and may cause the
phone to operate at a higher power level
than needed.
Watch for possible overheating. It is normal for your phone to
become somewhat hot during use. If the phone becomes too hot,
it automatically drops the call and returns to the Start screen. You
won’t be able to make or receive calls until the phone cools down.
[ 15 ]
Page 15
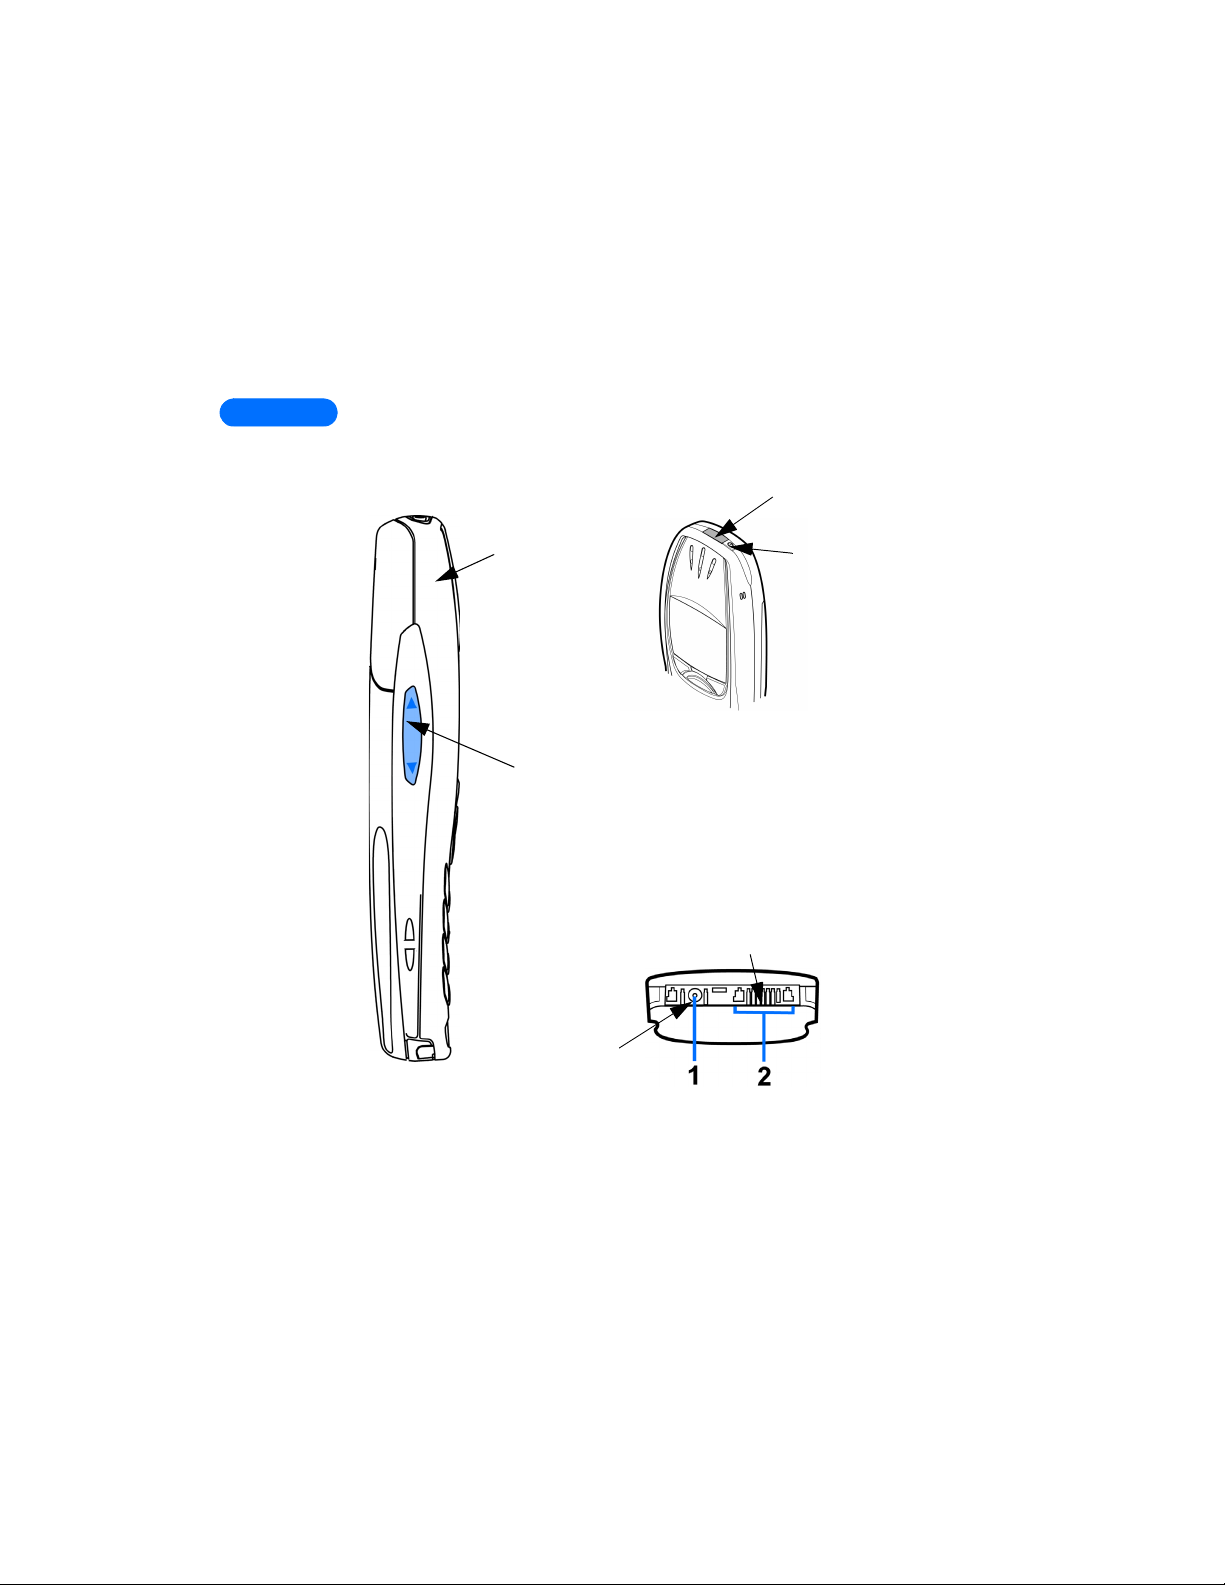
Review the basics
t
LEFT SIDE
Internal
antenna
Volume
control keys
Charger Jack
TOP
Infrared por
Power Key
BOTTOM
Headset/TTY/Data cable Connector
[ 16 ]
Page 16
Review the basics
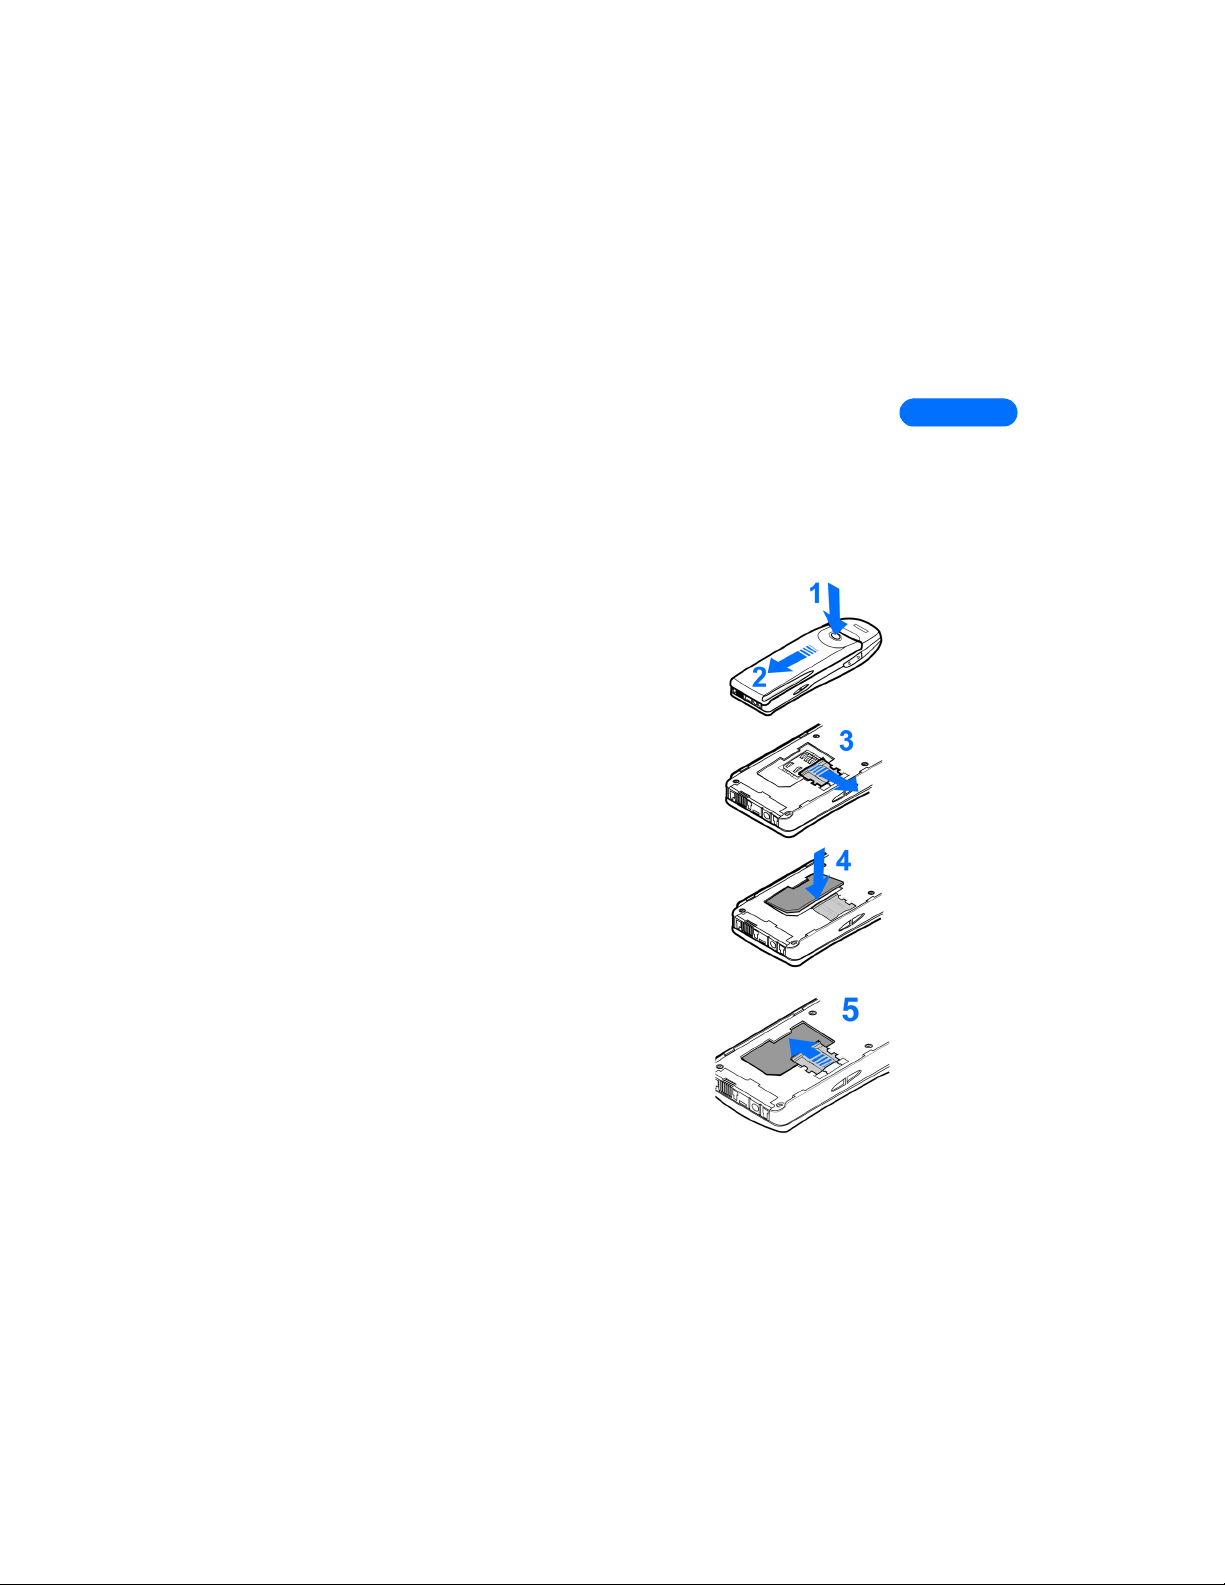
• INSTALL THE SIM CARD AND BATTERY
Caution: Keep all miniature SIM cards out of the reach of small children.
The SIM card and its contacts can easily be damaged by scratches or
bending, so be careful when handling, inserting or removing the card.
Before installing the SIM card, always make sure that the phone is
switched off and then remove the battery.
1 With the back of the phone facing you,
press the release button (1). Slide the
battery off the phone (2).
2 Release the SIM card by sliding the SIM
card holder off (3).
3 Insert the SIM card into the phone (4).
Make sure that the SIM card is inserted
properly and that the golden contact area
on the card is facing downwards.
4 Slide the card holder over the SIM card to
lock the card in its place (5).
[ 17 ]
Page 17

5 Place the battery on the back of the
phone (6) and slide it up the body of the
phone until it locks into place (7).
• CHARGE THE BATTERY
1 With your phone on or off, connect
the plug from the charger to the
bottom of the phone.
2 Plug the charger into a standard AC
outlet.
• After a few seconds, the battery indicator
in the display starts to scroll from bottom
to top.
• When the battery is 80% full, the bar on screen stops scrolling and
Battery full appears (if the phone is on). To obtain 100% battery
capacity, charge the battery for another two hours.
Note: Be sure to unplug the phone and charger once charging
is complete.
For best performance, charge the battery 24 hours before initial use of the
phone.
Charging time depends on the charger and battery. For example, charging
time for the BPS-2 battery using the ACP-12 charger is about ?? hours.
[ 18 ]
Page 18

• IMPORTANT BATTERY INFORMATION
Important:Recharge your battery only with a charger approved
by Nokia. This phone is not compatible with the Nokia battery
charger ACP-9U.
You can use your phone while the battery is charging.
If the battery is totally empty, it may take a few minutes for the
battery indicator to appear in the display while charging. It may also
need to recharge a few minutes before you can make or receive calls.
If you switch the phone on when charging is complete, the message
Battery full momentarily appears in the display.
The battery doesn’t need a full discharge before recharging.
• TURN ON THE PHONE
• Press and hold the power key on top of the
phone for two seconds.
Warning: Don’t switch on the phone
where wireless phone use is prohibited or where the use of
the phone could cause interference or danger.
Review the basics
Enter the time and date
When you switch on your phone for the first time,bbbb you’re prompted
to enter the time and date.
1 Enter the correct time and press OK.
2 Enter the correct date and press OK. After a brief pause, the Start
screen appears in your display.
[ 19 ]
Page 19

• THE START SCREEN
The Start screen is the “home base” for your
phone, and indicates the phone is in idle mode.
What’s on the Start screen
HOME Your wireless provider’s name may appear here.
Signal strength. A higher bar indicates a
stronger signal.
Battery charge level. A higher bar indicates more power
in the battery.
Menu Press the left selection key ( ) under Menu to enter
the menu list
Names Press the right selection key ( ) under Names to
enter the Phone book
Press To return to the Start screen from any activity
Press one of the scroll keys at the Start screen to display
the entries in your Phone book, if you have any
[ 20 ]
Page 20

Icons as indicators
Icon Indicates... Icon Indicates...
Review the basics
You are in an
active call
Text or number
entry mode
You have
voice messages
When this icon is
blinking, you have a
call waiting
Lowercase text
abc
entry mode
Abc Sentence case text
entry mode
A general note is in
your Calendar
You have a note in
your calendar to call
someone
Predictive text is on
The Silent profile has
been selected
Keyguard is active
You have a message
123 Number entry mode
Uppercase text
ABC
entry mode
An alarm is set
A birthday note is in
your Calendar
You have a meeting
scheduled in your
Calendar
[ 21 ]
Page 21

• USE THE SELECTION AND SCROLL KEYS
The left and and right selection keys ( ) are positioned beneath
each corner of the display, respectively. Centered beneath both selection
keys are the two scroll keys .
Use the scroll keys for choosing items in a list, paging through menus, and
so on. Use the selection keys (often referred to as “softkeys”) to open a
highlighted feature or option, to exit or “back out” of a menu, open the
Phone book, and more. A selection key’s function is always determined by
the text appearing above it in the display.
For example, press the
left selection key
() when Menu
appears above it to
show the Messages
menu. Then, scroll
through the rest of the
main menus using the
scroll keys
().
Press the right selection key ( ) when Names appears above it to
enter the Phone book.
Tip: Press either scroll key ( ) from the Start screen to view
any entries you may have in your Phone book.
Left
selection
key
Scroll down key
Scroll up key
Right
selection
key
[ 22 ]
Page 22

• ADJUST CALL VOLUME
Review the basics
With the phone facing you, the volume key
is on the left side of the phone.
• Press the top portion of the key to
increase your call volume.
• Press the bottom portion of the key to
decrease your call volume.
A bar chart appears in the display,
indicating the volume level. There is no
need to confirm any changes.
Volume
key
• NAVIGATE YOUR PHONE’S MENUS
You can navigate the menus and submenus in your phone using the scroll
method or by using shortcuts. This chapters in this user guide parallel the
menu structure of your phone. For example, chapter 4 corresponds to
menu item 4, which is Settings.
Scroll through menus
• At the Start screen, press Menu, then page through the main menus
using the scroll keys ( ).
THE MENU NUMBER AND SCROLL
BAR
As you scroll through the menus, the
menu number is indicated in the
upper right corner of the display. A
scroll bar also appears on the right
side of the display. The scroll bar will
move up or down as you move
through the menus.
1 Once the desired menu appears in the display, press Select to open
the menu.
[ 23 ]
Page 23

2 Once inside a menu, use the scroll keys ( ) to highlight an
item in a list or to page through submenus. Press ( ) to open a
highlighted item. Press to exit or return to the previous menu.
• HELP TEXTS
Your phone displays brief descriptions of most features. To do this, the
help feature must be activated.
Activate/deactivate in-phone help
1 At the Start screen, press Menu 4-4-6 (Settings - Phone settings -
Help text activation).
2 After a brief pause, On and Off appear in the display.
Use the scroll keys to highlight On or Off and press Select. A confirmation
message appears in the display.
Use a shortcut
You can also go to almost any feature or option directly from the Start
screen using what are called “shortcuts.”
•Press Menu, and within 3 seconds, enter the first number of the menu
function that you’d like to access. Keep going until you’ve entered all
of the numbers.
For example: To turn on the Alarm clock, press Menu 4-1-1
(Menu 4Settings -1Alarm clock -1On).
A complete list of shortcuts is in the next section. Be aware that some
menus or features may be unavailable due to your network or lack of
your subscription to the feature(s) in question. In such cases, the
phone will display an error message.
[ 24 ]
Page 24

• MENU SHORTCUTS
1 MESSAGES
WRITE MESSAGE . . . . . . 01-1
INBOX . . . . . . . . . . . . . . 01-2
OUTBOX . . . . . . . . . . . . . 01-3
ARCHIVE. . . . . . . . . . . . . 01-4
TEMPLATES . . . . . . . . . . 01-5
MY FOLDERS . . . . . . . . . 01-6
ERASE MESSAGES . . . . . 01-7
VOICE MESSAGES. . . . . . 01-8
INFO MESSAGES . . . . . . 01-9
SERVICE COMMAND EDITOR01-10
MESSAGE SETTINGS . . . .01-11
2 CALL LOG
MISSED CALLS . . . . . . . . . 2-1
RECEIVED CALLS . . . . . . . 2-2
DIALED NUMBERS . . . . . . 2-3
ERASE RECENT CALL LISTS 2-4
CALL DURATION. . . . . . . . 2-5
GPRS DATA COUNTER. . . . 2-7
GPRS CONNECTION TIMER 2-8
3PROFILES
GENERAL . . . . . . . . . . . . . 3-1
SILENT . . . . . . . . . . . . . . . 3-2
MEETING . . . . . . . . . . . . . 3-3
OUTDOOR . . . . . . . . . . . . 3-4
PAGER . . . . . . . . . . . . . . . 3-5
4 SETTINGS
ALARM CLOCK . . . . . . . . . 4-1
TIME SETTINGS. . . . . . . . . 4-2
CALL SETTINGS. . . . . . . . . 4-3
Review the basics
PHONE SETTINGS . . . . . . . 4-4
TONE SETTINGS . . . . . . . . 4-5
ACCESSORY SETTINGS . . . 4-6
GPRS MODEM SETTINGS. . 4-7
SECURITY SETTINGS . . . . . 4-8
RESTORE FACTORY SETTINGS4-9
5 GAMES
6APPLICATIONS
7CALCULATOR
8TO-DO LIST
9CALENDAR
10 INFRARED
11 B LU ET OO T H
12 EXTRAS
RECORDER . . . . . . . . . . . 12-1
VOICE COMMS.. . . . . . . . 12-2
WALLET . . . . . . . . . . . . . 12-3
COUNTDOWN TIMER. . . . 12-4
STOPWATCH . . . . . . . . . . 12-5
13 SERVICES
HOME. . . . . . . . . . . . . . . 13-1
BOOKMARKS . . . . . . . . . 13-2
SERVICE INBOX. . . . . . . . 13-3
SETTINGS . . . . . . . . . . . . 13-4
GO TO ADDRESS . . . . . . . 13-5
CLEAR THE CACHE . . . . . 13-6
•
[ 25 ]
Page 25
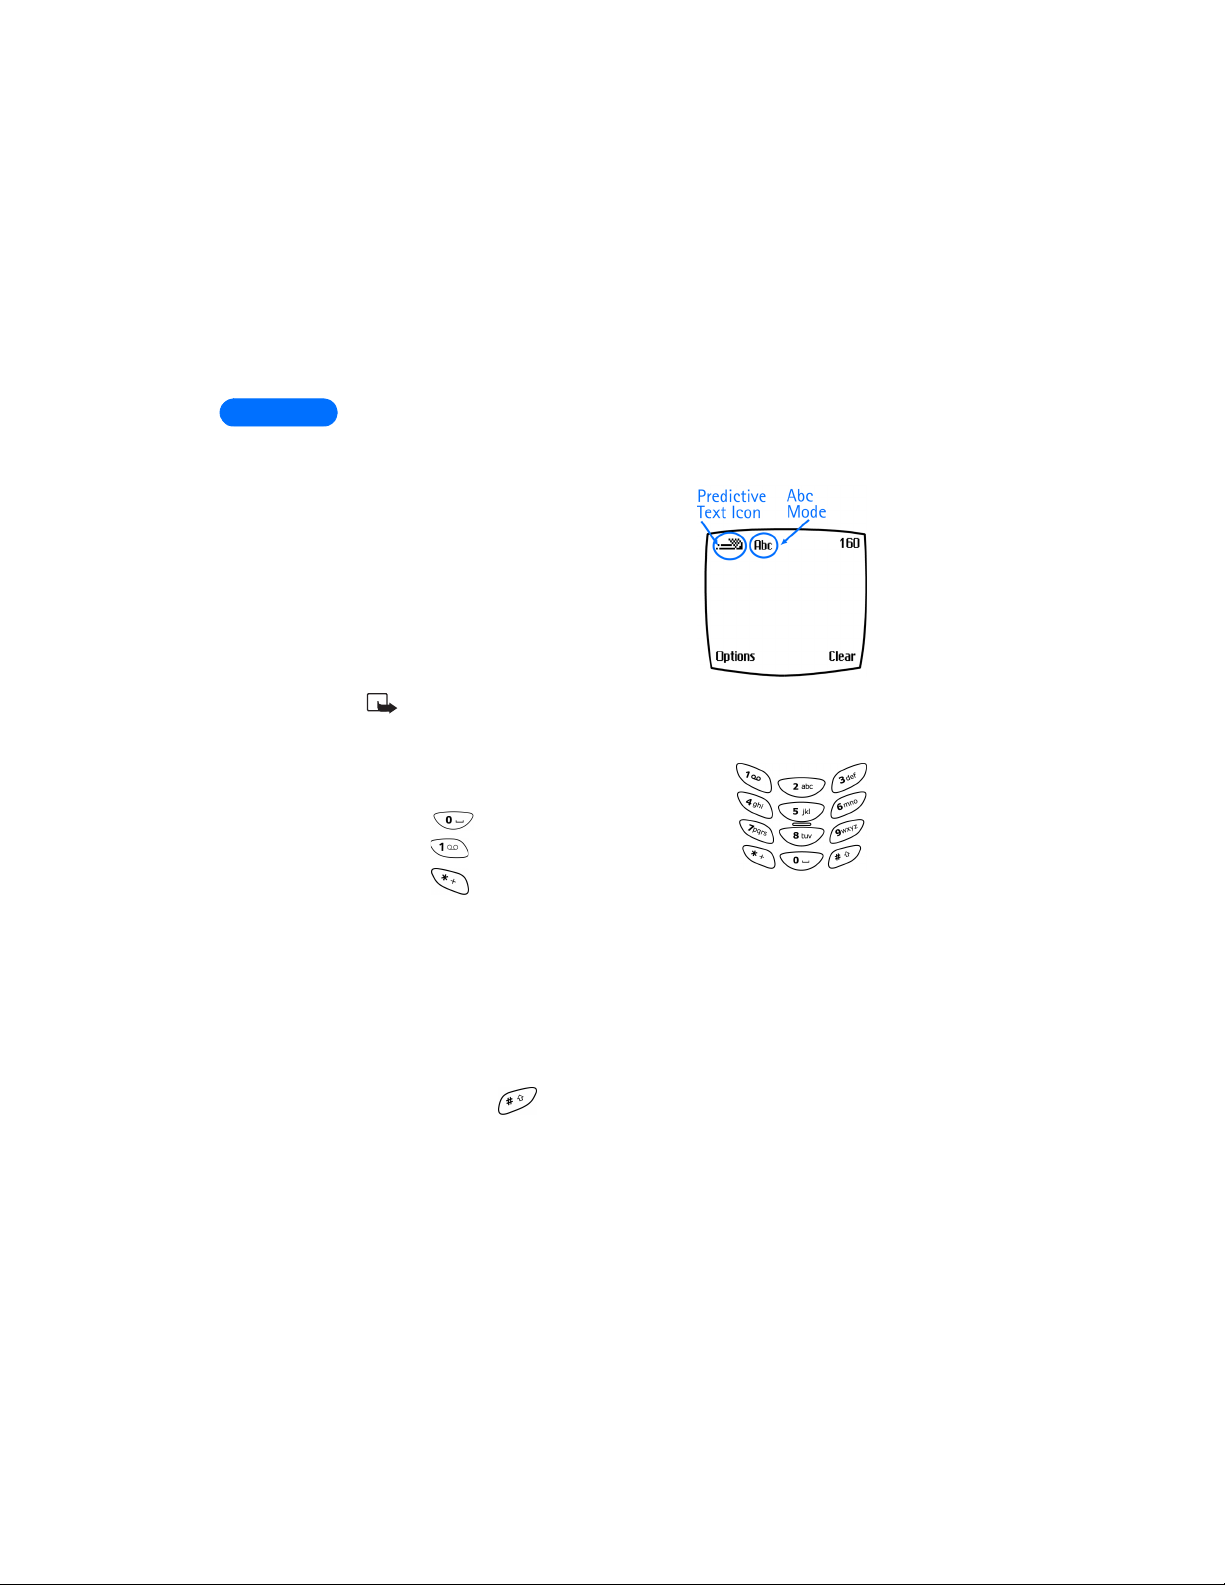
Use the keypad to enter text
• ENTER CHARACTERS AND
NUMBERS
When you enter text, whether to write a
message or enter names and numbers, you
have a choice of using either Abc or 123
mode. Whichever mode you’re currently in is
indicated by the Abc or 123 icon in the upper
left corner of your phone’s display.
Note: Default case in Abc mode is
sentence case, which means the first letter of each sentence is
capitalized. ABC indicates all caps.
• Press a key once to insert the first letter on that
key, twice for the second letter, and so on
• Press to enter a space between words
• Press to enter a period (.)
• Press to display special characters. More
about this on the following pages
•Press Clear to backspace and erase a character
•Press and hold Clear to backspace continuously (and erase)
Tip: Use predictive text to write messages faster. Press and hold Options
to activate/deactivate predictive text. For more information, see
“Predictive text input” on page 46
Switch between ABC and 123 modes
•Press and hold until the icon in the upper left corner of the
display switches from Abc to 123 (or from 123 to Abc).
[ 26 ]
Page 26

Use the keypad to enter text
Switch between uppercase and lowercase
• Press to alternate between uppercase and lowercase characters
while in Abc mode.
• ENTER SPECIAL CHARACTERS
1 While in Abc mode, press to display
a list of special characters.
2 Use the scroll keys ( ) or the
2, 4 6, and 8 keys to highlight a character.
•Press and to move the
cursor up and down
• Press and to move the cursor left and right
•Press Insert to enter a highlighted character into your message.
Press Back to exit special characters without inserting a
character.
[ 27 ]
Page 27

Phone book
Use your Phone book for all your contact information. Names, phone
numbers, web addresses, postal addresses, and e-mail addresses can be
stored in your Phone book. It holds up to 500 names, and you can
associate up to 5 numbers and 4 text entries with each name.
• OPEN THE PHONE BOOK
Press Names at the Start screen. Use the scroll keys ( ) to
browse through the following functions.
• PHONE BOOK OPTIONS
1 At the Start screen, press Names. The following options appear in the
display.
Phone book options
Find Search for a name in your Phone book
Add entry
Edit name Edit an existing name in your Phone book
Erase
Copy Copy Phone book entries to the SIM card or from the
Add number
Settings Change the Phone book view, check memory status,
Add a new name to your Phone book
Erase names and numbers
SIM card to your Phone book
Add another phone number to an existing name
entry (e.g. home, work, fax)
and select which memory you want to use
[ 28 ]
Page 28

Phone book
1-touch dialing
Voice tags Show a list of voice dialing numbers, if any
Service nos.
Own Numbers
Caller groups
2 Use the scroll keys ( ) to highlight an option. Press
Select to activate an option or to enter its submenu.
Show a list of 1-touch dialing numbers, if any
List the fax, data, and voice numbers saved to your
SIM card by your wireless provider
Shows your phone number or numbers if your SIM
card supports multiple phone lines.
Setup a caller group. You can define ringing tones
and graphics for up to five groups in your Phone
book. See “Caller groups” on page 33
Tip:You can view Phone book entries (if you have any) by
pressing either scroll key ( ) from the Start
screen.
Add a name to the Phone book
1 At the Start screen press Names, scroll to Add entry, and
press Select.
2 Enter the name of the entry using the keypad and press OK.
Add an address or note to an entry
1 Locate the entry in your Phone book and press Details.
2 Press Options, scroll to Add info, and press Select.
3 Scroll to E-mail, Web Address, Street addr., or Note and press Select.
4 Enter text with the keypad and press OK when finished. ENTER CROSS
REF TO YOUR PHONE’S KEYPAD
[ 29 ]
Page 29

Note:SIM card phone book memory does not support text entry.
You must enable the Phone’s phone book memory in order to store
e-mail, Web addresses, etc.
Save a number quickly
1 At the Start screen, enter a number to save.
2 Press and hold Options. A message appears on the screen confirming
your number has been saved. The number will appear after
alphabetical entries in your phone book. You can go back later and
add a name to the number.
Tip: Save numbers with a + in front to simplify international dialing.
Save a name and number quickly
1 At the Start screen, enter the number to save.
Options
Press
2
The options in the following table appear in the display (
highlighted). Use the scroll keys ( ) and selection keys
( ) to highlight and select and option, or to exit the display.
Save Save the number
.
Name and number saving options
Save
is
Add to name
Send message Send a text, e-mail, or picture message
Call
3 Press Select.
4 Enter a name for the number and press OK.
Add the number to a name in your Phone book
Call the number
Edit names in your Phone book
1 At the Start screen, press Names.
[ 30 ]
Page 30

Phone book
2 Scroll to Edit name and press Select.
3 Scroll to the name you wish to edit and press Edit.
4 Edit the name and number using the keypad.
•Press Clear to backspace and delete text.
• Press and hold Clear to backspace continuously (and delete)
5 After you’ve finished, press OK to accept your changes.
Erase names and numbers in your Phone book
ERASE A SINGLE ENTRY
1 At the Start screen, press Names.
2 Scroll to Erase and press Select.
3 Scroll to One by one and press Select.
4 Scroll to the entry you wish to erase and press Erase.
5 Press OK to confirm (and erase) or Back to exit.
ERASE ALL NAMES AND NUMBERS
1 At the Start screen, press Names.
2 Scroll to Erase and press Select.
3 Scroll to Erase all and press Select.
4 Scroll to Phone or SIM card and press Select.
5 Press OK to confirm or Back to exit.
If you pressed OK, you’re asked to enter the security code (the default
security code is 12345)
6 Enter the security code and press OK to erase or Back to exit.
Important: If you enter the wrong security code 3 times in a row, the
phone is blocked and won’t accept another code for 5 minutes.
[ 31 ]
Page 31

Assign a primary number
For names in your Phone book with multiple numbers, specify the
number you dial most often (for that name) as the primary number. The
primary number is the number your phone calls when you select a name
for dialing.
1 At the Start screen, press or to display a list of your
Phone book entries.
2 Scroll to any name containing more than one phone number and
press Details.
3 Scroll until the number which you want to assign as primary appears
in the display and press Options.
4 Scroll to As primary no. and press Select. The primary number is set.
Display Phone book entries quickly
To display any entries in your Phone book quickly, just press one of the
scroll keys ( ) from the Start screen.
Tip: Any entries which
display the SIM card icon
( ) in the upper right
corner of the display)
indicate that entry is saved
to the SIM card.
Search the Phone book
quickly
1 At the Start screen, press one of the scroll keys ( ) to
display your Phone book entries.
2 Press a key which contains the first letter of the entry you’re
searching (example; press twice to begin searching for the
name “Evelyn”).
Any entries that begin with “E” appear in the display, as well as a
search box with the magnifying glass icon ( ).
[ 32 ]
Page 32

3 Continue entering letters to locate the entry, or move through and
highlight other entries using the scroll keys.
5 Once you’ve highlighted the desired entry, press Details, and then
Options to add a voice tag, edit the number, add info., send a business
card, and more.
• CUSTOMIZE YOUR PHONE BOOK
Change your Phone book view
You can view the contents of your Phone book one of three ways:
Phone book views
Names list Show three names at a time
Phone book
Name and no
Name only Show one name at a time
SELECT YOUR VIEW:
1 At the Start screen, press Names.
2 Scroll to Settings and press Select.
3 Scroll until Phone book view appears in the display. Press Select.
4 Scroll to Name list, Name and no., or Name only and press Select.
Show one name and one phone number at a time
• CALLER GROUPS
Caller groups enables you to identify callers by the ringing tone or graphic
that you’ve assigned to their group. A group can be as small as one person
or as large as your entire Phone book. You can define the ringing tone and
graphic for up to five pre-defined groups in your Phone book.
Setup a caller group
[ 33 ]
Page 33

1 At the Start screen, press Names.
2 Scroll up to Caller groups and press Select. The following Caller
groups are available.
•Family •Friends •Other
•VIP •Business
3 Use the scroll keys ( ) to highlight a Caller group. Press
Select to enter that group’s option list, where you can rename the
group and change other properties. The following options are
available for each group.
Caller group options
Rename group Rename the group to your preference
Group ringing
tone
Group logo
Group members
• YOUR PHONE’S MEMORY
Your phone provides you with three options for the use of its memory;
Phone, SIM, and Phone and SIM combined. Only names and numbers
saved to the memory you select will appear in the display.
Set the ringing tone for the group
Turn the group graphic on or off. You can also
view the graphic or send it to a compatible
phone via SMS
Add members or remove members from the
caller group
[ 34 ]
Page 34

Phone book
Which memory is best for you?
To determine which memory is best for you, refer to the following table:
Feature Phone SIM Phone and SIM
Name capacity Up to 500
names
Number capacity Up to 5 numbers
per name
Can use Voice
dialing?
Can transfer
names/numbers to
another phone?
Can store email,
street address and
notes
Yes Yes Yes
Yes (using PC
Suite, infrared
or SMS)
Yes No Yes
Up to 250
names (varies
with SIM card)
One number
per name
Yes Yes
Up to 250 names
Up to 5 numbers
per name
• SELECT A MEMORY
1 At the Start screen, press Names.
2 Scroll to Settings and press Select.
3 Scroll until Memory in use appears in the display and press Select.
The following options are available:
Phone and SIM
Numbers are saved to both Phone and SIM memory
Phone Numbers are saved to Phone memory only
SIM card
Numbers are saved to the SIM card only
[ 35 ]
Page 35

4 Scroll to your choice and press Select. Your selection is confirmed.
Tip: If you want to save multiple numbers to a name, choose Phone or
Phone and SIM.
•COPY MEMORY
You can copy entries from your phone memory to the SIM or vice versa.
1 At the Start screen, press Names.
2 Scroll to Copy and press Select.
3 Scroll to From phone to SIM card or From SIM card to phone.
4 Press Select. The following options appear in the display:
One by one
All Copy all selected entries
Primary nos.
5 Scroll to your choice and press Select.
6 Scroll to the entry you’d like to copy and press Copy.
7 Scroll to Keep original or Move original and press OK. Your entry is
copied and a confirmation note appears in the display.
Note: Use Keep original if you’re unsure. It leaves the original
memory entry and simply copies it to the new location. Move
original deletes the original entry and moves it to the new
location., similar to a copy and paste function found on your PC.
Copy selected entries one by one
Copy only primary numbers. Only one primary number
exists for each name This option is available only
when copying entries from Phone to SIM card.
[ 36 ]
Page 36

Phone book
• VIEW SERVICE NUMBERS
Your wireless provider may have saved your phone, data, and fax numbers
to your SIM card. To view these numbers:
1 At the Start screen, press Names.
2 Scroll to Service nos. and press Select.
A list of numbers, if any are available, appear in the display.
3 To view details of a number, scroll to the number and press Select.
Note:This feature may not be supported by your SIM card. Contact
your wireless provider if you receive an error and would like this
feature enabled.
•VOICE DIALING
You can make a phone call by saying a voice tag that has been added to
a phone number. You can add up to ten voice tags. Any spoken word(s),
such as a person’s name(s), can be a voice tag.
Before using voice dialing, note that:
• Voice tags are not language dependent. They are dependent on the
speaker's voice.
• Voice tags are sensitive to background noise. Record them and make
calls in a quiet environment.
• When recording a voice tag or making a call by saying a voice tag,
hold the phone in the normal position near to your ear.
• Very short names are not accepted. Use long names and avoid similar
names for different numbers.
Note:You must say the name exactly as you said it when you
recorded it. This may be difficult in, for example, a noisy
environment or during an emergency, so you should not rely
solely upon voice dialing in all circumstances.
[ 37 ]
Page 37

Adding a voice tag
Save or copy in the phone’s memory the names and phone numbers to
which you want to add a voice tag.
You can also add voice tags to the names in the SIM card, but if you
replace your SIM card with a new one, you first need to delete the old
voice tags before you can add new ones.
1 In standby mode, press or .
2 Scroll to the name to which you want to add a voice tag and press
Details. Scroll to the phone number you want and press Options.
3 Select Add voice tag.
4 Press Start, and clearly say the word(s) you want to record as a voice
tag. After recording, the phone plays the recorded tag.
When the voice tag has been successfully saved, Voice tag saved is
displayed, a beep sounds and a symbol appears after the phone
number with the voice tag.
Making a call by using a voice tag
In standby mode, press and hold the volume down key, or press and hold
Names. A short tone is heard and Speak now is displayed.
Note:When making a data call, you cannot simultaneously make
a voice call. Before placing a call using a voice tag, you must first
end any data calls.
Say the voice tag clearly. The phone plays the recognized voice tag and
then dials the phone number of the voice tag after 1.5 seconds.
If you are using the headset, press and hold the headset key to start the
voice dialing.
Replaying, changing or erasing a voice tag
Press Names and select Voice tags. Scroll to the name with the voice tag
you want, and press Options.
• To replay the voice tag, select Playback.
[ 38 ]
Page 38

Phone book
• To erase the voice tag, select Erase and press OK.
To change the voice tag, select Change. Press Start to add the new voice
tag.
[ 39 ]
Page 39

1
1 Messages
• ABOUT TEXT MESSAGES
You can use your phone to send and receive
text and/or email messages, if your service
provider offers the features. However, before
getting started, there are a few things to
remember about text and email messaging.
Currently, with most carriers, it is only possible
to send SMS (Short Message Service)
messages to other subscribers within the same service provider network.
In order to send a text message to someone on a different network, you
must use the email feature. Whether you choose to send messages as text
messages or email, the process is essentially the same. The difference is in
how you address the message prior to sending.
There are a few more things to know before you begin sending messages,
including:
• The phone to which you send a text message must also support text
or email messages, including subscribing to the service.
• Message length: The maximum length of a received text message is
160 characters. If sending as email message, the email address and
subject line are included in the 160 characters.
• Network variations: The maximum length of a text message may also
depend on the capabilities of the network from which the message
originated. Also, text message format may occasionally be different, as
messages can originate in networks other than your own.
Contact your service provider for more information about text message
services.
[ 40 ]
Page 40

Messages
Message icons
Icons that precede the title of a message indicate the following:
The message has not been read
The message has been read
The message is a delivery report
i
Before you can send and receive messages
You’ll need the following to send and receive messages of any type:
• A messaging service through your wireless provider
• A message center number, which must be saved to your phone (if your
wireless provider hasn’t done so already)
Message center number
Messages sent by your phone are routed through your wireless provider’s
message center. Normally, this number is saved to your phone by your
wireless provider. To save the number manually, do the following:
1 At the Start screen, press Menu - Select, and scroll until Message
settings appears in the display.
2 Press Select, scroll to Default profile, and press Select again.
3 Scroll to Message center number and press Select.
a) If the box which appears in the display is empty, enter the number
given by your wireless provider (up to 21 digits) and press OK.
4 If the box is full, leave the number as is and press OK.
1
• WRITE AND SEND A MESSAGE
1 At the Start screen, press Menu 01-1 (Messages - Write message).
[ 41 ]
Page 41

1
2 After a brief pause, the message entry screen appears in the display.
3 Compose a message using the keypad, then press Options.
4 Scroll to Send and press Select.
5 Enter the recipient’s phone number, including the area code, and
press OK. Your message is sent.
Tip: Press Find to retrieve a number from your Phone book.
• READ MESSAGES
When you receive a message, your phone beeps and Message received
appears in the display as well as the unopened letter icon ( ).
1 Press Show to read the message, or press Exit to move the message
to your inbox.
2 If you have more than one message, scroll to the message of your
choice and press Select to view the message.
Note: When you have unopened messages in your inbox, is
shown in the upper left corner of the Start screen as a reminder.
3 Use the scroll keys to view the whole message if necessary.
Tip: Keep scrolling to view other information, such as the sender
number and time the message was sent.
4 Once you’re finished, press Back to move the message to the Inbox, or
press Options for other choices, such as Reply or Forward.
Reply to a message
1 While viewing a message, press Options, scroll to Reply, and
press Select.
2 Scroll to a pre-composed reply, or choose an Empty screen, and
press Select.
3 When you’re satisfied with your reply, press Options, scroll to Send,
and press Select.
[ 42 ]
Page 42

Messages
The number of the original sender appears in the display.
4 Press OK and your reply is sent.
Forward a message
1 While viewing a message, press Options.
2 Scroll to Forward and press Select.
3 Enter the recipient’s phone number, or press Find to retrieve a number
from your Phone book.
4 Press OK. The message is forwarded.
• E-MAIL MESSAGES
You can send e-mail up to 160 characters in length to anyone with an
e-mail address.
Note: You cannot send picture messages with e-mail.
• COMPOSE AND SEND E-MAIL MESSAGES
Note: See “If the box is full, leave the number as is and press OK.”
on page 41 for ways to write messages faster.
1 At the Start screen, press Menu 01-2 (Messages - Write E-mail).
2 Enter the email address or press Find to select an address stored in the
phone book and press OK.
3 Enter a subject line and press OK
4 Compose your message using the keypad and press Options.
5 Scroll to Sending options and press Send e-mail
1
[ 43 ]
Page 43

• PICTURE MESSAGES
1
Your Nokia phone comes with ten pre-loaded pictures and five empty
storage slots (15 total). You can, however, over-write any of the ten
pictures that came with your phone. Pictures can be attached to a
message and sent via SMS to compatible phones. Picture messages
behave the same as text messages, but pictures take up more space than
text.
Note: You cannot send a picture message via e-mail.
Download pictures
You can download pictures, or receive them from compatible phones via
SMS to use in messages and caller groups. You can also create pictures
and send them to your phone or other compatible phones using Nokia
PC Suite.
Note: Methods for downloading pictures vary with wireless
providers. Some providers allow you to send pictures to your phone
from a web page. Contact your wireless provider for details.
When you receive a picture message
When you receive a picture message, Picture Message received appears
in the display.
VIEW THE PICTURE
•Press Options, scroll to Show, and press OK
DISCARD THE PICTURE
•Press Options, scroll to Discard, and press OK
SAVE THE PICTURE
1 Press Options, scroll to Save, and press OK.
2 Scroll to the picture you’d like to replace and press Select.
[ 44 ]
Page 44

Messages
Compose and send a picture message
Like text messages, picture messages can be up to 160 characters in
length. Picture sizes vary, but a small picture which fills your display
generally takes up about 50 characters (leaving 100 characters
or so for text). If you try to attach a picture to a message which is
almost full of text, a beep sounds and you’re prompted to erase some text
before proceeding.
1 At the Start screen, press Menu 01-1 (Messages - Write message).
2 After a brief pause, the message edit screen appears in the display.
3 Write a message using the keypad (or, enter nothing if you choose),
and press Options.
Tip: Attach pictures before adding text. You can then check
remaining space for text in the upper right corner of the
display.
4 Scroll to Attach picture and press Select.
A list appears in the display (Picture 1, Picture 2, and so on).
5 Scroll to a picture and press View.
6 Press Attach to insert the picture into your message, otherwise:
a) Press Back, scroll to another picture, and press View again.
b) Press Attach to insert the picture into your message.
7 To send the picture message, press Options, scroll to Send, and
press Select.
8 Enter the phone number for your recipient (or press Find to retrieve a
number from your Phone book) and press OK. The message is sent.
PREVIEW, CHANGE, OR ERASE A PICTURE MESSAGE
1 After a picture has been attached to your message, press Options at
the message edit screen.
2 Scroll to one of the following options and press Select.
a) Preview - Previews the attached message before sending. Press
1
[ 45 ]
Page 45

1
• TEMPLATES
Templates are short, pre-written messages which can be recalled and sent
as original messages, or used as a quick reply when you’re short on time.
You can also customize and save an existing template or create a new one
of your own. Templates are stored in the Templates folder.
Send a template message
1 At the Start screen, press Menu 01-5 (Messages - Templates).
2 Scroll to the template of your choice and press Select. Available
Message Templates
“Please call” “I’m late. I will be there at”
“I’m at home. Please call” “See you in”
“I’m at work. Please call” “See you at”
Back to exit.
b) Change picture - Takes you back to the picture list.
Scroll to highlight a new picture,. Press View and then press
Attach to link the new picture to your message.
c) Erase picture - Press OK to erase the picture from your message,
or press No to return to the list of options.
After a brief pause, the templates folder opens to display a list
of templates.
templates are as follows:
“I’m in a meeting. Call me later
at”
“Meeting is cancelled” “I will be arriving at”
“Sorry, I can’t help you with
this.”
[ 46 ]
Page 46

Messages
Note: Pictures are also stored in the Templates folder.
3 If you’d like to send the template as is, press Options, scroll to Send,
and press Select. Then skip to step 4.
If you’d like to modify the template before sending:
a) Scroll to Edit instead of Send and press Select. You’re taken to
the message edit display, where you’re free to edit the template
as you choose.
b) Once you’re finished editing, press Options, scroll to Send, and
press Select if you’d like to send the message without saving.
To save the template before sending:
c) Press Options, scroll to Save message (instead of Send), and press
Select. Replace original appears in the display.
d) Press OK to save or No to exit.
4 Enter the recipient’s number and press OK. The template is sent.
• You can also press Find to retrieve a number from your
Phone book.
Create a custom template
1 Press Menu 01-1 (Messages - Write message).
After a brief pause, the message entry screen appears in the display.
2 Compose your custom template and press Options.
3 Scroll to Save message, and press Select.
4 Scroll to the Templates folder and press OK. Your message is saved as
a template.
1
• ORGANIZE YOUR MESSAGES WITH FOLDERS
Save messages to folders
You can save messages to an existing folder or to a folder you’ve created.
[ 47 ]
Page 47

1
1 Press Menu 01-1 (Messages - Write message).
After a brief pause, the message entry screen appears in the display.
2 Write your message and press Options.
3 Scroll to Save message and press Select.
4 Scroll to the folder where you’d like to save the message and press OK.
The message is saved.
View saved messages
1 At the Start screen, press Menu 01-1 (Messages - Write message).
After a brief pause, Write message appears in the display.
2 Scroll until the folder containing the message you wish to view
appears in the display and press Open.
3 Once the folder opens, scroll to the message you wish to view and
press Select.
Inbox folder
Messages are automatically stored in the inbox after they’ve been read or
if you press when Message received appears on the Start screen.
Outbox folder
Sent messages are automatically saved in the Outbox.
Archive folder
To make sure that certain messages won’t be overwritten when memory
becomes full, move some of your messages to the Archive folder.
Templates folder
Pictures and pre-written templates are stored in the Templates folder.
My folders
Keep your messages organized by creating custom folders and saving your
messages there.
[ 48 ]
Page 48

Messages
ADD A FOLDER OF YOUR OWN
1 At the Start screen, press Menu 01 (Messages).
After a brief pause, Write message appears in the display.
2 Scroll until My folders appears in the display and press Open.
3 Press Options. Add folder is highlighted. Press OK.
4 Enter a name for the new folder and press OK. The folder is added.
REMOVE A FOLDER
Only folders created in My folders can be deleted. The Inbox, Outbox,
Archive, and Template folders are protected. When you delete a folder, all
messages in the folder are deleted as well.
1 At the Start screen, press Menu 01 (Messages).
2 After a brief pause, Write message appears in the display.
3 Scroll until My folders appears in the display and press Open.
4 Any folders that you’ve created appear in the display. Scroll to the
folder you wish to remove and press Options.
5 Scroll to Delete folder and press OK.
6 You’re asked to confirm the deletion. Press OK if you wish to delete
and Back if you wish to exit.
• ERASE MESSAGES
If your message memory becomes full, blinks in the display. You can
do the following to create more space:
• Read some of the unread messages and then erase them
• Erase some of these messages from your folders
1
Erase a single message
To erase a single message, you need to open it first.
1 Press Menu 01 (Messages).
[ 49 ]
Page 49

1
After a brief pause, Write message appears in the display.
2 Scroll to the folder containing the message you wish to erase and
press Open.
A list of messages appears in the display.
3 Scroll to the message you wish to erase and press Select. The
message opens.
4 Press Options, scroll to Erase, and press Select.
5 You’re asked to confirm the erasure. Press OK to erase the message.
Erase all messages in a folder
1 At the Start screen, press Menu 01 (Messages).
2 After a brief pause, Write message appears in the display.
3 Scroll until Erase messages appears in the display and press Select.
4 Scroll to the desired folder or message type that you wish to erase and
press OK. You’re asked to confirm your erasure.
5 Press OK to empty the folder.
• PREDICTIVE TEXT
Writing messages with predictive text is much easier than the traditional
method. Predictive text uses a formula to guess the letter of each word.
It’s very accurate and requires only one press of a key for each letter.
Predictive text input may not be available for all languages.
Tip: Because the “guessed” word changes as you enter
letters, try not to look at the screen until you’ve finished
entering the word.
Use predictive text input
Predictive text allows you to write messages using a built-in dictionary.
With predictive text input, you only need to press each numbered key
once for each letter.
[ 50 ]
Page 50

Messages
For example, to write Nokia, with the English dictionary selected, press
each of the following keys only once:
k, for i and for a. :
The display above shows the letters for each key pressed.
• If a displayed word is correct, press to enter a space and begin
writing the next word
• If a displayed word is not correct, press to see other matches
•If ? appears after a word, press Spell to add it to your dictionary
• Press to insert a period into your message
SPECIAL CHARACTERS.
Press to display the special characters
screen, where you can choose from a large
variety of symbols and characters to enter
into your message. For more information on
entering text using your phone’s keypad, see
“Enter characters and numbers” on page 26
for N, for o, for
Add new words to the dictionary
If you encounter a word that predictive text doesn’t recognize, a
question mark (?) follows the word and Spell appears in the lower left of
the display.
•Press Spell, enter your new word using the keypad, and press Save
The word is added to the dictionary as well as the message you’re writing.
NOTES ABOUT ADDING WORDS
• New words that you accept—even accidentally—by pressing Select,
, or deleting the space between two words (thus forming a
compound word) are saved to the dictionary
• Depending on the language and the length of the words, you may be
1
[ 51 ]
Page 51

1
able to add hundreds of words to the dictionary
• When the dictionary is full, the most recently added word replaces the
first word added.
Activate or deactivate predictive text
While writing a message, press and hold Options until T9 dictionary
activated or T9 dictionary deactivated appears in the display.
Change the language for predictive text
1 While writing a message, press Options and scroll to Predictive text.
•Press Select, scroll to the desired language and press Select again.
WRITING COMPOUND WORDS
To write a compound word quickly (for example, bluejay):
1 Write the first part of the word (blue).
2 Press (do not enter a space). The underline disappears from the
first part.
Write the second part of the word (jay).
• USE VOICE MAIL
If you subscribe to voice mail, your wireless provider will furnish you with
a voice mailbox number. If your service provider doesn’t do it for you , you
will need to save that number to your phone.
When you receive a voice message, your phone lets you know by beeping,
displaying a message, or both.
If you receive more than one message, your phone shows the number
received.
• SAVE YOUR VOICE MAILBOX NUMBER
1 At the Start screen, press Menu 1-8-2 (Messages - Voice messages -
Voice mailbox number).
[ 52 ]
Page 52

Messages
2 Enter the voice mailbox area code and phone number,
OR to retrieve the number from your Phone book as follows:
a) Press Options and then press Find.
b) Scroll until the voice mailbox number is highlighted and
press Select.
c) Press OK.
3 Press Ok. Your phone confirms the number has been saved.
Tip:Save yourself the trouble of entering the voice mailbox
PIN code each time you dial your voice mailbox by using
dialing codes. See “Automate your voice mailbox with codes”
later in this section for more information.
Listen to your voice messages
Once you’ve setup your voice mailbox, you can dial it one of three ways.
• Dial the voice mailbox number using the keypad
• Press and hold .
•Press Listen if there’s a notification message on the screen.
For more information on the use of voice mail, please contact your
wireless service provider.
• AUTOMATE YOUR VOICE MAILBOX WITH CODES
You can insert special codes into entries in your Phone book to automate
tasks such as checking your voice mail. To do this, you’ll need to save your
voice mailbox number, PIN code, and the necessary pause and wait codes
to a 1-touch dialing location (often assigned to the .) The special
dialing codes are as follows:
1
Special Dialing Codes
* Asterisk. Use this character to bypass a set of instructions
[ 53 ]
Page 53

1
+ Plus symbol. Precedes an international telephone number
p Pause. The phone pauses for 2.5 seconds, then automatically
sends the tones (numbers) that follow it in the dialing string
w Wait. The phone waits for you to press the Talk key before it sends
the tones (numbers) that follow
[ 54 ]
Page 54

Call log
2) Call log
The phone logs the phone numbers of missed, received and dialed calls,
and the approximate length and cost of your calls.
The phone logs missed and received calls only if the network supports
these functions, the phone is switched on and within the network’s
service area.
When you press Options in the Missed calls, Received calls and dialed
numbers menus, you can view the date and the time of the call, edit or
erase the phone number from the list, save the number in the phone book,
or send a message to the number.
• MISSED CALLS AND RECEIVED CALLS
To view the list of the last ten phone numbers from which somebody has
tried to call you, press Menu, select call log and Missed calls.
Tip:When a note about missed calls is being displayed,
press List to access the list of phone numbers. Scroll to the
number you would like to call back and press .
To view the list of the last ten phone numbers from which you have most
recently accepted calls (network service), press Menu, select call log and
Received calls.
• DIALED NUMBERS
2
To view the list of the 20 phone numbers that you have most recently
called or attempted to call, press Menu, select Call log and dialed
numbers. See also Last number redialling on page 19.
[ 55 ]
Page 55

• ERASE RECENT CALL LISTS
2
To erase the recent calls lists, press Menu, select call log and select Erase
recent call lists. Select whether you want to delete all the phone numbers
in the recent call lists, or only the numbers in the missed calls, received
calls or dialed numbers lists. You cannot undo the operation.
• CALL COUNTERS AND CALL TIMERS
Press Menu and select call log. Select Call duration and scroll to view the
approximate duration of your incoming and outgoing calls in hours,
minutes and seconds. To clear the timers, the security code is needed.
Each phone line has its own call timers and the timers of the selected line
is displayed.
• GPRS DATA COUNTER
Scroll to check the amounts of data that were last sent and last received,
data sent and received in total, and to clear the counters. The counter unit
is a byte.
• GPRS CONNECTION TIMER
Scroll to check the duration of the last GPRS connection or the total GPRS
connection. You can also clear the timers.
[ 56 ]
Page 56

Profiles
3) Profiles
Your phone has various profiles which allow you to customize your
phone’s tones for different events and environments. You can personalize
the profiles, then activate a specific profile in the appropriate setting.
Available profiles are:
•Normal
• Silent
•Meeting
• Outdoor
•Pager
• ACTIVATE A PROFILE
Press Menu and scroll to Profiles then press Select. Scroll to a profile and
press Select. Then scroll up or down and press Select.
Tip:To change the profile quickly in standby mode, press the
power key , scroll to the profile you want to activate
and press Select.
• TIMED PROFILES
To activate a profile for a certain amount of time (up to 24 hours), select
Timed and set the expiration time. When the timed profile expires, the
previously active profile (that was not timed) becomes active.
3
• PERSONALIZE PROFILES
To personalize the profile, select Personalise. Select the setting you want
to change and make the changes. In addition, you can rename all profiles
except for Normal.
[ 57 ]
Page 57

3
Note:Ringtone settings can also be changed in the Tone settings
menu. see “Tone settings” on page 63. Whatever changes you
make to your Ringtone settings via the Tone settings menu will
override your currently selected Profile. Settings
•ALARM CLOCK
The alarm clock uses the time format set for the clock. The alarm clock
works even when the phone is switched off.
Press Menu, select Settings and Alarm clock. Key in the alarm time and
press OK. To change the time when the alarm time is set, select On.
When the alarm time expires
The phone will sound an alert tone, and flash Alarm! and the alarm time
on the display.
Press Stop to stop the alarm. If you let the phone continue to alarm for a
minute or press Snooze, the alarm stops for a few minutes and then
resumes.
If the alarm time is reached while the phone is switched off, the phone
switches itself on and starts sounding the alarm tone. If you press Stop,
the phone asks whether you want to activate the phone for calls. Press
No to switch off the phone or Yes to make and receive calls.
Note:Do not press Yes when wireless phone use is prohibited or
when it may cause interference or danger.
• TIME AND DATE SETTINGS
Clock
Press Menu, select Settings, Time settings and Clock.
Select Show clock (Hide clock) and the time is shown on the top right of
the display when the phone is in standby mode. Select Set the time, key
in the correct time and press OK. Select Time format and set the 12-hour
or 24-hour time format.
[ 58 ]
Page 58

Profiles
The clock also serves the functions Messages, call log, Alarm clock, timed
Profiles and Calendar.
If the battery is removed from the phone for a long time, you may need to
set the time again.
Auto update of date and time
Press Menu, select Settings, Time settings and Auto update of date & time
(network service). To set the phone to automatically update the time and
date according to the current time zone, select On. To set the phone to
ask for a confirmation before the update, select Confirm first.
Updating the date and time affects the alarm clock, calendar and recorder,
and the alarm notes you have set are now set to the local time. Updating
may cause some calendar notes to expire.
• CALL SETTINGS
Call forwarding
Press Menu, select Settings, Call settings and Call divert (network service).
With call divert you can direct your incoming calls to another number, for
example, to your voice mailbox number. For details, contact your service
provider. Divert options not supported by your SIM card or your network
operator may not be shown.
Select the divert option you want, for example, select Divert if busy to
divert the voice calls when your number is busy or when you reject an
incoming call.
To set the divert setting on, select Activate, to set the divert setting off,
select Cancel, or Check status to check whether the divert is activated or
not. To change the timeout when the call is diverted, first select Set delay
if this is available for the divert option, and then select Activate to set
the divert setting on.
To cancel all the active call diverts at once, select the option Cancel all
diverts.
3
[ 59 ]
Page 59

3
To see the divert indicators in standby mode, see Standby mode on page
13.
Anykey answer
Press Menu, select Settings, Call settings and then Anykey answer. Select
On and you can answer an incoming call by briefly pressing any key,
except and .
Automatic redial
Press Menu, select Settings, Call settings and Automatic redial. Select On
and your phone will make a maximum of ten attempts to connect the call
after an unsuccessful call attempt.
Speed dialing
Press Menu, select Settings, Call settings and Speed dialing. Select On and
the names and phone numbers assigned to the speed dialing keys, from
to , can be dialed by pressing and holding the corresponding
number key.
Call waiting service
Press Menu, select Settings, Call settings and Call waiting service. Select
Activate and the network will notify you of an incoming call while you
have a call in progress (network service). See Call waiting on page 21.
Summary after call
Press Menu, select Settings, Call settings and Summary after call. Select
On and the phone will briefly display the duration and cost (network
service) of the last call.
My number sending
Press Menu, select Settings, Call settings and My number sending. Select
On and your phone number will be displayed to the person you are calling
(network service). Select Preset to reset the phone to the setting, On or
Off, that you have agreed upon with your service provider.
Line for outgoing calls
[ 60 ]
Page 60

Profiles
Line for outgoing calls is a network service to select the phone line (that
is, subscriber number) 1 or 2 for making calls.
Press Menu, select Settings, Call settings and Line for outgoing calls. If
you select Line 2 and have not subscribed to this network service, you will
not be able to make calls. However, calls on both lines can be answered
regardless of the selected line.
If supported by your SIM card, you can prevent the line selection by
selecting the option Lock.
For more information on availability, contact your network operator or
service provider.
Tip:In standby mode, you can switch from one line to the
other by pressing and holding .
• PHONE SETTINGS
Language
Press Menu, select Settings, Phone settings and Language. Select the
language for the display texts. If Automatic is selected, the phone selects
the language according to the information on the SIM card.
Keyguard settings
Press Menu, select Settings, Phone settings and Keyguard settings. Select
On to set the keyguard on and select the time after which the keypad
automatically locks.
3
Cell info display
Press Menu, select Settings, Phone settings and Cell info display. Select
On to set the phone to indicate when it is used in a cellular network based
on Micro Cellular Network (MCN) technology.
If the GPRS connection is set Always online, the info messages may not
be received. In that case, set the GPRS connection to When needed, see
Setting up the phone for a WAP service on page 68.
[ 61 ]
Page 61

3
Welcome note
Press Menu, select Settings, Phone settings and Welcome note. Key in the
note you would like to be shown briefly when the phone is switched on.
To save the note, press Options, and select Save.
Network selection
The cellular network to which your phone is connected can be selected
either manually or automatically.
Press Menu, select Settings, Phone settings and Network selection. Select
Automatic and the phone automatically selects one of the cellular
networks available in your area.
If you select Manual, the phone shows a list of the available networks and
you can select a network that has a roaming agreement with your home
network operator. Otherwise, No access will be displayed and you must
select another network. The phone stays in manual mode until the
automatic mode is selected or another SIM card is inserted into the
phone.
Confirm SIM service actions
See SIM services (Menu 14) on page 78.
Help text activation
To set the phone to show or not to show the help texts, press Menu, select
Settings, Phone settings and Help text activation.
See also Using the menu on page 33.
Start-up tone
To set the phone to play or not to play a start-up tone when the phone is
switched on, press Menu, select Settings, Phone settings and Start-up
tone.
If you have set a welcome note, the start-up tone will not be played, see
Welcome note on page 47.
[ 62 ]
Page 62

Profiles
• TONE SETTINGS
Press Menu, select Settings and then Tone settings. You can find the same
settings in the Profiles menu, see Profiles (Menu 3) on page 43.
Select Incoming call alert to choose how the phone notifies you of an
incoming voice call. The options are Ringing, Ascending, Ring once, Beep
once and Off.
Select Ringing tone, Ringing volume and Vibrating alert for an incoming
voice call and an incoming message. The vibrating alert does not work
when the phone is connected to a charger, desktop stand, or a car kit.
Tip:If you receive a ringing tone via IR or as a text message,
you can save ten ringing tones at a time in the ringing tone
list.
Select Message alert tone to set the alert tone for the incoming messages,
Keypad tones, or Warning tones to set the phone to sound tones, for
example, when the battery is running out of power.
Select Alert to set the phone to ring only upon calls from phone numbers
that belong to a selected caller group. Scroll to the caller group you want
or All calls and press Mark.
• ACCESSORY SETTINGS
The accessory settings menu is shown only if the phone is or has been
connected to one of the following Nokia accessories, headsets HDC-5,
HDE-2 or HDD-1 or handsfree car kit CARK-91.
Press Menu, select Settings and Accessory settings. Select Headset,
Handsfree or Loopset.
Select Default profile to select the profile you want to be automatically
activated when you connect the selected accessory. You can select
another profile while the accessory is connected.
3
[ 63 ]
Page 63

3
Select Automatic answer to set the phone to automatically answer an
incoming call after five seconds. If the Incoming call alert is set to Beep
once or Off, automatic answer will not be in use.
Select Lights to set the lights permanently on, On. Select Automatic to set
the lights on for 15 seconds after a keypress. The Lights option is available
only when Handsfree is selected.
Select Use loopset to set the loopset in use instead of the headset,
Yes. Use loopset is available only when Loopset is selected.
• GPRS MODEM SETTINGS
You can connect the phone via IR, Bluetooth or cable connection to a
compatible PC and use the phone as a modem to enable GPRS
connectivity from the PC.
Press Menu, select Settings and GPRS modem settings. Select Active
access point and activate the access point you want to use. Select Edit
active access point to change the access point settings.
Scroll to Alias for access point and press Rename. Key in the name you
would like for the activated access point and press OK.
Scroll to GPRS access point and press Edit. Key in the Access Point Name
(APN) and press OK.
An Access Point Name is needed to establish a connection to the GPRS
network. You can obtain the Access Point Name from your network
operator or service provider.
You can also set the GPRS modem service settings (Access Point Name) on
your PC by using the Nokia Modem Options software, see Modem setup
on page 80. If you have set the settings on your PC and your phone, note
that the settings made on the PC will be used.
[ 64 ]
Page 64

Profiles
• SECURITY SETTINGS
Note:When security features, which restrict calls, are in use (call
barring, closed user group and fixed dialing), calls may be possible
to certain emergency numbers in some networks (e.g. 112 or other
official emergency number).
Press Menu, select Settings and Security settings. Select
PIN code request
This sets the phone to ask for your PIN code every time the phone is
switched on. Some SIM cards do not allow the PIN code request to be
turned off.
Call restrictions
This option allows you to restrict incoming calls to and outgoing calls
from your phone. A password is required.
Closed user group.
Closed user group is a network service that specifies the group of people
whom you can call and who can call you. For more information contact
your network operator or service provider.
Security level.
• Select Phone and the phone will ask for the security code whenever a
new SIM card is inserted into the phone.
• Select Memory and the phone will ask for the security code whenever
you want to select the phone’s internal memory or to copy from one
memory to another. See Selecting the phone book settings on page 25
and Copying phone books on page 28.
3
Change of access codes
This option allows you to change security code, PIN code, PIN2 code or
barring password. Codes can only include numbers from 0 to 9.
[ 65 ]
Page 65

3
Note:You should avoid using access codes similar to the
emergency numbers, such as 112, to prevent accidental dialing of
the emergency number.
• RESTORE FACTORY SETTINGS
To reset some of the menu settings to their original values, press Menu,
select Settings and Restore factory settings. Key in the security code and
press OK. For example, the names and phone numbers saved in the phone
book are not deleted.
[ 66 ]
Page 66

Games
4) Games
Note:The phone must be switched on to use this function. Do not
switch on the phone when the use of a wireless phone is
prohibited or when it may cause interference or danger.
• STARTING A GAME
Press Menu, select Games and Select game. Select the game you would
like to play, Snake II, Pairs II, Space Impact or Bumper. If available for the
game, select the game type or 1 player and then New game.
You can get instructions about how to use the keys and how the game
works by selecting Instructions from the submenu.
Starting a 2-player game
You may also play Snake II as a 2-player game via the IR port of your
phone with a person who has the same game on a compatible phone.
Before starting a 2-player game, ensure that the IR ports of the two
phones are pointing at each other. See Infrared (Menu 10) on page 57.
To start the game, both players should select the option 2 players. Choose
either Host game to start a new 2-player game or Join game to join a
game after the other player has chosen the Host game option.
• SETTINGS
Use this option to set sounds, lights and vibrator, Shakes, for the game.
The vibrator can be set on only if Vibrating alert is activated, see Tone
settings on page 48.
4
[ 67 ]
Page 67

5
5) Applications
This menu allows the management of Java applications installed on your
phone. Your phone software includes four Java applications designed for
your Nokia phone. Some service providers offer other applications via
mobile Internet services.
• LAUNCHING AN APPLICATION
1 Press Menu, select Applications then View Apps.
2 Scroll to an application (name depends on the application) and press
Options.
3 Scroll to Open and press Select. If the selection is a single application
it will launch.
Otherwise, a list of applications is displayed corresponding to the
selected application set. Scroll to desired application and press Select.
The application launches.
Tip:If an application uses the whole display area, no softkey
names are displayed. Press one of the selection keys
or to show the options list. Then select one of the
options or press Back to continue with the application.
• OTHER OPTIONS AVAILABLE FOR EACH
APPLICATION OR APPLICATION SET
• Erase - to erase the application or application set from the phone.
• Net access - to restrict the application for accessing the network. The
allowed settings are Ask (asks first for net access ), Allowed (net
access allowed), Not allowed (net access not allowed).
• Update check - to check if a new version of the application is
available for download from the mobile Internet services.
• Internet link - to provide further information or additional data for
[ 68 ]
Page 68

Applications
the application from Mobile Service. It is only shown if an Internet
address has been provided with the application.
• View info - to give additional information about the application.
• DOWNLOAD A NEW APPLICATION
You can download new Java applications in different ways:
1 Use the WAP browser to find a Java application from a mobile
internet site, OR
2 Use the Internet to download Java applications to your PC, then use
the Java installer from PC Suite to download the applications in your
phone. CROSS REF TO PC SUITE
Note:that Nokia does not warrant for non-Nokia applications. If
you choose to download access them, you should take the same
precautions, for security or content, as you would with any site.
(CHECK WITH LEGAL)
• MEMORY STATUS
Allows you to view memory available for Applications
1 Press Menu, select Applications then Memory status. You will see the
amount of Free memory and the Total memory.
5
[ 69 ]
Page 69

6
6) Calculator
The calculator in your phone adds, subtracts, multiplies, divides,
calculates the square and the square root and converts currency values.
Note:The phone must be switched on to use this function. Do not
switch on the phone when the use of a wireless phone is
prohibited or when it may cause interference or danger.
This calculator has a limited accuracy and rounding errors may occur,
especially in long divisions.
• PERFORMING A CALCULATION
• Press Menu and select Calculator. When ’0’ is displayed on the screen,
key in the first number in the calculation, press for a decimal
point.
• Press Options and select Add, Subtract, Multiply, Divide, Square,
Square root or Change sign.
Tip:Alternatively, press once to add, twice to
subtract, three times to multiply or four times to divide.
• Key in the second number.
• For a total, press Options and select Equals. Repeat steps 3 to 5 as
many times as necessary.
To start a new calculation, first press and hold Clear.
• MAKING A CURRENCY CONVERSION
Press Menu and select Calculator. To save the exchange rate, press
Options and select Exchange rate. Select either of the displayed options.
Key in the exchange rate, press for a decimal point, and press OK.
The exchange rate remains in the memory until you replace it with
another one.
[ 70 ]
Page 70

Calculator
To make the currency conversion, key in the amount to be converted, press
Options and select In domestic or In foreign.
You can also make the currency conversion in standby mode. Key in the
amount to be converted, press Options and select In domestic or In
foreign.
6
[ 71 ]
Page 71

7
7) To-do list
You can save a note for a task you have to do. The notes can be saved in
priority order. You may be able to save up to 30 notes, but this depends
on how long the notes are.
Note:The phone must be switched on to use this function. Do not
switch on the phone when the use of a wireless phone is
prohibited or when it may cause interference or danger.
Press Menu and select To-do list. Press Options, or scroll to the note you
want and then press Options. Select Add to add a new note. Key in the
subject for the note, press Options and select Save.
Select the priority for the note, High (1), Medium (2), or Low (3). The notes
are listed first in priority order and then in alphabetical order.
• Erase to delete the selected note.
• Edit to modify the contents of the note.
• Edit priority to change the priority level for the note.
• View to view the selected note.
• Go to priority to select the priority level from which you would like to
view notes.
• Save to cal. to save the note as a calendar note.
• Send as text to send the note to another phone as a text message.
[ 72 ]
Page 72

Calendar
8) Calendar
The calendar helps you to keep track of reminders, calls that you need to
make, meetings, and birthdays. The phone sounds an alarm tone when the
set date for an event is reached.
Note: The phone must be switched on to use this function. Do not
switch on the phone when the use of a wireless phone is
prohibited or when it may cause interference or danger.
Press Menu and select Calendar. Scroll to the day you want. If there are
any notes set for the day, the corresponding note type indicator is shown.
If you want to see the day’s notes, press Options and select Day notes. The
note indicator is shown on the first line. You can view a single note by
scrolling to it in day view, then pressing Options and View. The week view
shows four weeks at a time.
The other options for the calendar views may include:
• Options for making a note, for sending a note via IR, or as a note
directly to another phone’s calendar or as a text message.
• Options for erasing, editing, moving and repeating a note and for
copying a note to another day.
• Settings to set, for example, the date, time, date format or time
format. In the Auto erase option, you can set the phone to delete old
notes automatically after a specified time. However, the repeat notes,
for example, birthday notes, will not be deleted.
8
• MAKING A CALENDAR NOTE
Press Menu and select Calendar. Scroll to the date you want, press Options
and select Make a note. Select one of the following note types:
• Meeting - Key in the note, or search for the name in the phone book,
and press OK. Then key in the time for the meeting and press OK. If
you like, select Alarm on and then the alarm time for the note.
[ 73 ]
Page 73

8
• Call - Key in the phone number you want, press OK, and key in the
name and press OK, or search for them in the phone book. Then key
in the time for the call and press OK. If you like, select Alarm on and
then the alarm time for the note.
• Birthday - Key in the person’s name (or search for it in the phone
book), and press OK. Then key in the date of birth, and press OK. Key
in the year of birth (optional), and press OK. If you key in the year, the
note shows you the person’s age after the name. If you like, select
Alarm on and then the alarm time for the note.
• Memo - Key in the note and press OK.
When a tone alert is set, the indicator is displayed when you view the
notes.
When the phone alarms for a note, the phone beeps, and displays the
note. With a call note on the display, you can call the displayed
number by pressing . To stop the alarm and view the note, press
View. To stop the alarm without viewing the note, press Exit.
[ 74 ]
Page 74

Infrared
9) Infrared
You can set up the phone to receive data through its infrared (IR) port. To
use an IR connection, the device with which you want to establish a
connection must be IrDA compliant. You can send or receive data such as
business cards and calendar notes to or from a compatible phone or data
device (for example, a computer) via the IR port of your phone.
Caution: Do not point the IR beam at anyone's eye or allow it to interfere
with other IR devices. This device is a Class 1 Laser product.
Note: The phone must be switched on to use this function. Do not
switch on the phone when the use of a wireless phone is
prohibited or when it may cause interference or danger.
• SENDING AND RECEIVING DATA VIA INFRARED
Ensure that the IR ports of the sending and receiving devices are pointing
at each other and that there are no obstructions between the devices. The
preferable distance between the two devices in an infrared connection is
one metre at most.
To activate the IR port of your phone to receive data via IR, press Menu
and select Infrared. The user of the sending phone selects the desired IR
function to start data transfer.
If data transfer is not started within two minutes after the activation of
the IR port, the connection is cancelled and has to be started again.
9
• INFRARED CONNECTION INDICATOR
When is shown continuously, the IR connection is activated and your
phone is ready to send or receive data via its IR port.
When blinks, your phone is trying to connect to the other device or
a connection has been lost.
[ 75 ]
Page 75

10
10) Bluetooth
You can set up the phone to send and receive data through Bluetooth. In
the Bluetooth menu, you can manage connections and define settings.
Since Bluetooth devices communicate using radio waves, your phone and
the other Bluetooth device do not need to be in line of sight. The two
devices only need to be within a maximum of 10 meters of each other,
although the connection can be subject to interference from obstructions
such as walls or other electronic devices.
In some countries, there may be restrictions on using Bluetooth devices.
Check with your local authorities.
Note:The phone must be switched on to use this function. Do not
switch on the phone when the use of a wireless phone is
prohibited or when it may cause interference or danger.
• ACTIVATING AND DEACTIVATING BLUETOOTH
Press Menu and select Bluetooth. When Bluetooth is displayed, select On
or Off. The phone displays a notification that Bluetooth is activated or
deactivated. When Bluetooth is on, the indicator ? is displayed.
Using Bluetooth consumes the battery and the phone's operating time
will be reduced. Be careful not to let it run in the background when
performing other operations with your phone.
Bluetooth device name
When the user activates the Bluetooth module for the first time, the
phone asks for the Bluetooth device name of your phone by showing Enter
name:, the user can accept the default name or change it. The name can
be up to 15 characters. After the user has accepted the name, Name saved
is shown. Bluetooth device names help you to distinguish one Bluetooth
device or accessory from another.
[ 76 ]
Page 76

Bluetooth
Note: Enter name: does not appear after you have already
changed the name of the device in Bluetooth settings before the
first activation of Bluetooth.
Pairing with Bluetooth Passcode
To create a secure connection, you may need to exchange Bluetooth
Passcodes with the device you are connecting to for the first time. This
operation is called pairing. The Bluetooth Passcode is a 1 to 16 characterlong numeric code. Accessories, as well as data and fax connections to a
compatible computer, require a pairing. Nokia accessories have fixed
passcodes that are supplied with the accessory.
When forming a Bluetooth connection to devices other than a Nokia
accessory, for example to another mobile phone, you can create your own
passcode. This passcode is used only once and you do not have to
memorize it. Make up identical passcodes with the other person with
whom you want to share a Bluetooth connection. If you need to create
the pairing between the two devices again, you can make up a new code.
• BLUETOOTH CONNECTION
Press Menu, select Bluetooth and Search for Bluetooth accessories. The
phone starts searching for devices and accessories. Devices responding to
the inquiry appear on a list of Bluetooth accessories one by one starting
from the device found first. The phone shows the device found last on the
bottom of the list. To end the inquiry, press Stop.
Scroll to the device you want and press Select. When the connection has
been established, the device shows Connected to followed by the device’s
name, and the indicator ?.
If devices have not been paired, the user is asked to enter the passcode of
the desired device. See Pairing with Bluetooth Passcode above.
Note:If the device in the list moves out of range and you try to
connect to it, an error note is shown. You can have only one active
connection at a time.
10
[ 77 ]
Page 77

10
To view the currently active device, press Menu, select Bluetooth and
View active device. From here, you can also disconnect from the device.
To view the list of paired devices, press Menu, select Bluetooth and View
paired devices. The oldest pairing is on the top of the list. When you press
Options under View paired devices, some of the following options may be
available, depending on the status of the device or connection: Assign
short name, to give a name (visible to you only) to the paired device,
Delete pairing to remove the selected device from the list, Request conn.
authorisation to define whether the connection from the paired device is
established automatically (No) or if the phone asks permission before
connecting (Yes).
• BLUETOOTH SETTINGS
The settings are for changing the phone’s own Bluetooth related settings.
Press Menu, select Bluetooth and Bluetooth settings. You have the
following options:
My phone's visibility
To change the way the phone is visible to other Bluetooth devices. The
options are as follows:
• Shown to all, which is the default mode
• Prioritised, to set the phone to be found first by other Nokia phones
searching for Bluetooth devices. The phone can be set to high priority
mode for one minute, after which the phone automatically returns to
the mode it was in before high priority mode. Not in Menu now
• Hidden to make the device non-discoverable, responding only to
devices that it has been paired with.
My phone’s name
To change your phone’s Bluetooth device name, which is shown to others.
Enter the name just as if you were entering text in any other menu, using
a combination of alpha and numeric characters if you wish. There is a limit
of 15 characters.
[ 78 ]
Page 78

Extras
11) Extras
Note: The phone must be switched on to use each of the functions
in this menu. Do not switch the phone on when wireless phone use
is prohibited or when it may cause interference or danger.
• VOICE RECORDER
You can record speech, sounds or an active call for two minutes. For
example, this is useful when recording a name and phone number for
writing them down later.
Note: Obey all local laws governing recording of calls. Do not use
this feature illegally.
Recording
Press Menu, select Extras and Voice recorder.
To start the recording, select Record. To start the recording during a call,
press Options, and select Record.
When recording, hold the phone in the normal position near to your ear.
To end the recording, press Stop.
Key in a new Title for the recording and press OK to save it.
If you do not want to save the recording, press Clear to erase the preset
title. Then press Back and OK.
If you record an active call, the phone automatically saves the recording
by the name Recording.
11
List of recordings
Press Menu > Extras > Voice recorder. Select Recording list, scroll to the
recording you want and press Options.
Select Playback to listen to the selected recording.
Select Edit title. Key in a new name for the recording and press OK.
[ 79 ]
Page 79

11
Select Erase to erase the recording. Press OK to confirm.
Select Add alarm. Key in the date for the alarm and press OK. Key in the
time for the alarm and press OK.
Alarm replaces Add alarm when the alarm is set on. Select Alarm and the
name of the recording, and the date and the time for the alarm are
displayed. To remove the alarm, press Erase and then press OK.
When the alarm time expires, the phone will sound an alert tone,
Recording!, and the alarm time and the name of the recording are
displayed. Press Stop to stop the alarm, and then press Play to play the
recording.
• VOICE COMMANDS
You have a list of phone functions which can be activated by saying a
voice tag. Up to five voice tags for the voice commands can be added.
Press Menu, select Extras and Voice commands. Select the command
folder you want, scroll to the command to which you want to add a voice
tag and press Options. If the command already has a voice tag, the
indicator is shown.
You can add a voice command in the same way as described in Adding a
voice tag..
You can activate the voice command in the same way as making a call by
using a voice tag, INSERT CROSS REF TO VOICE TAGS.
Note: When an application using the GPRS connection is sending or
receiving data, you cannot activate a voice command. To activate a voice
command, end the application using the GPRS connection (WAP, Dial-up).
• WALLET (CAN’T VERIFY CURRENTLY)
In Wallet you can store personal information, such as notes and virtual
cards (for example credit card information). You can also enter a WAP
retail website and pay for your purchases using the wallet feature.
[ 80 ]
Page 80

Extras
When you try to access wallet for the first time, you need to create your
own wallet code at the prompt Create wallet code:. Key in and accept the
wallet code, which can be 4-10 characters long and confirm it at the
prompt Verify wallet code: If the verification succeeds, the phone displays
Wallet code created. Note that there is no limit to the number of times
you can key in the code verification. If you key in a wrong wallet code
several times, the wallet application is blocked for five minutes.
Press Menu, select Extras, and Wallet. The phone displays Enter wallet
code: After you have keyed in the correct code and confirmed it, you can
select Cards, Personal notes or Settings
• STORING PERSONAL CARD INFORMATION
Press Menu, select Extras, Wallet and Cards to view the list of cards. There
are two kinds of cards: Editable cards indicated with and OTA cards
indicated with . The maximum amount of cards is five. To view or edit
card details, select one of the cards and press Select from the following
options:
• Card info to keep track of, for example, card name, type, number and
expiration date.
• Account info to store user name and password.
• Shipping info to store your shipping address.
• Billing info to store the billing address for your credit card(s).
• Receipt info to store phone numbers and e-mail addresses.
• Copy card to make a copy of an existing card in the wallet.
• Clear fields to clear card information fields.
• Rename card to rename the selected card.
11
[ 81 ]
Page 81

• PERSONAL NOTES
11
In personal notes you can store (max 50) sensitive personal notes, for
example, passcodes or notations.
Press Menu, select Extras, Wallet and Personal notes. By pressing Options
you can view notes, add new notes, edit a selected note and sort notes
either by name or by date. Send as text copies the content of the note to
a text message. Copy to calend. copies the title and the note to the
calendar as a reminder. With Use number you can pick one or more
numbers from a note.
• WALLET SETTINGS
Press Menu, select Extras, Wallet and Settings. Select Code request to
switch the Wallet Code Request on or off. Note that you need to key in
the existing Wallet Code before you can switch the code request on or off.
Change code to change the wallet code
Paying for your purchases with wallet
You can access a WAP retail website and pay for your purchases with the
wallet using the following procedure:
Establish a WAP connection, see below.
Enter the WAP store you want, and choose the product you want to buy.
Fill in the payment data form you receive from the service provider by
transferring the information from the wallet: First find the card with the
information you need and select it. If you want to fill in all the fields,
choose Fill in all fields (this is shown only when the WAP page or the card
supports the Electronic Commerce Modeling Language standard). You can
also choose only one information field from a card. The phone displays the
completed form.
Approve the purchase, and the information is sent.
[ 82 ]
Page 82

Extras
• COUNTDOWN TIMER
Press Menu, select Extras and Countdown timer. Key in the alarm time in
hours and minutes and press OK to start the countdown timer. If you like,
write your own note text which is displayed when the time expires, and
press OK. When the timer is running, the indicator is shown in
standby mode.
If the alarm time is reached when the phone is in standby mode, the
phone sounds a tone and flashes the note text you have entered or else
Countdown time up. Stop the alarm by pressing OK. If no key is pressed,
the alarm stops automatically within 30 seconds. Press OK to erase the
note text.
To stop the countdown timer or to change the countdown time:
Press Menu, select Extras and Countdown timer. Select Change time to
set the timer again, or Stop timer to stop the timer.
To view the remaining time, press Menu, select Extras and Countdown
timer to view teh remaining time. To exit, press Back twice or press
• STOPWATCH
You can measure time, take split times or lap times by using the
stopwatch. During timing, the other functions of the phone can be used.
Tip: Using the stopwatch consumes the battery and the phone's
operating time will be reduced.
Time observation and time splitting
Press Menu, select Extras, Stopwatch and Split timing. You can select
Continue if a split timing was set previously, but you received an
incoming call and navigated away from the Stopwatch menu.
Press Start to start the time observation. Press Split every time you want
to take an intermediate time. The intermediate times are listed below the
running time on the display. Scroll to view the times.
Press Stop to end the timing.
11
[ 83 ]
Page 83

11
Press Options and select Start to start the time observation again. The
new time is added to the previous time.
Save to save the time. Key in a name for the measured time and press OK.
If no name is keyed in, the total time is used as a title.
Reset to reset the time without saving it.
Lap times
Press Menu, select Extras, Stopwatch and Lap timing. Press Start to start
the time observation and Lap to take a lap time. Press Stop to stop the lap
timing. Press Options and you can save or reset the lap times. Refer to
Time observation and time splitting above.
VIEWING AND ERASING TIMES
Press Menu, select Extras, and Stopwatch.
If the stopwatch is not reset, you can select Show last time to view the
latest measured time. Select View times. and a list of names or final times
of the time sets is shown, select the time set you want to view.
To delete the saved times, press Options and select Erase times. Select All
at once and press OK, or select One by one and scroll to the times you
want to delete. Press Erase and press OK.
[ 84 ]
Page 84

Services (Wireless Internet)
12) Services (Wireless Internet)
Note: The phone must be switched on to use this function. Do not
switch on the phone when the use of a wireless phone is
prohibited or when it may cause interference or danger.
The WAP services use Wireless Mark-Up Language (WML) on their WAP
pages. Web pages using the Hyper Text Mark-Up Language (HTML) cannot
be viewed on your phone.
• CHECK OUT MILOU WAP CHAPTER
GPRS (General Packet Radio Service)
GPRS is a technology that allows mobile phones to be used for sending
and receiving data over the mobile network. GPRS as such is a data bearer
that enables wireless access to data networks such as the Internet. The
applications that use GPRS are WAP, SMS messaging and the GPRS dialup (for example, Internet and e-mail).
Before you can use GPRS technology
• You need to subscribe to the GPRS service.
For availability and subscription to the GPRS service, contact your
wireless service provider.
• You need to save the GPRS settings for the applications used over
GPRS.
Note:For detailed information on pricing for GPRS and GPRS-
related services, contact your wireless service provider.
12
WAP (Wireless Application Protocol)
You can access various WAP services such as banking, news, weather
reports and flight times. These services are specially designed for mobile
phones and they are maintained by WAP service providers.
[ 85 ]
Page 85

12
Check the availability of WAP services and pricing with your network
operator and/or the service provider whose service you wish to use.
Service providers will also give you instructions on how to use their
services.
• ACCESSING AND USING WAP SERVICES
Save the service settings that are needed to access the WAP service that
you want to use. See Setting up the phone for a WAP service below and
Appearance settings of the WAP browser on page 73.
Make a connection to the given WAP service..
Start browsing the pages of the WAP service.
See Browsing the pages of a WAP service on page 71.
Once you are done with browsing, end the connection to the WAP service.
See Ending a WAP connection on page 72.
Setting up the phone for a WAP service
You may receive the service settings as a text message from the network
operator or service provider that offers the WAP service that you want to
use. For more information, contact your network operator or service
provider.
You can also key in the settings manually. For appropriate settings,
contact your network operator or service provider. The WAP settings may
be available, for example, on the Web site of the network operator or
service provider.
SAVING THE SERVICE SETTINGS RECEIVED AS A TEXT MESSAGE
When you receive the service settings as a text message, Service settings
received is displayed. (Need to verify this)
To save and activate the received settings, press Options and select Save.
If no settings are saved in Active service settings, the settings are saved
under the first free connection set and activated.
[ 86 ]
Page 86

Services (Wireless Internet)
To discard the received settings, press Options and select Discard.
To view the received settings first, press Options and select View. To save
the settings, press Save.
Keying in the service settings manually
Press Menu, select Services, and Settings.
Select Active service settings.
You need to activate the set where you want to save the service settings.
A set is a collection of settings needed for making a connection to a WAP
service. Scroll to the set you would like to activate and press Activate.
Edit active service settings.
Select each of the service settings one by one and key in all the required
settings.
• Settings name - Key in the new name for the settings set and press
OK.
• Homepage - Key in the homepage address of the WAP service that
you want to use, press for a period, and press OK.
• Session mode - Select Permanent or Temporary.
• Connection security - Select On or Off. When the connection security
is On, the phone tries to use a secure connection with the WAP
service. If a secure connection is not available, the connection will not
be made. If you wish to connect anyway, with a non-secure
connection, you must set the connection security to Off.
• Data bearer - Select GSM data or GPRS. For pricing, connection speed
and other information, contact your network operator or service
provider.
• The following options depend on the selected data bearer:
WHEN GSM DATA IS THE SELECTED DATA BEARER:
• Dial-up number - Key in the phone number and press OK (include
+country code).
12
[ 87 ]
Page 87

12
• IP address - Key in the address, press for a period, and press OK.
You obtain the IP address from your network operator or service
provider.
• Authentication type - Select Secure or Normal.
• Data call type - Select Analogue or ISDN.
• Data call speed - Select the speed you want to use, or select
Automatic. Automatic is available only if the current selected data
call type is Analogue. The actual data call speed depends on the
service provider.
• Login type - Select Manual or Automatic. If you select Automatic, the
login type uses the user name and password keyed in the following
settings. If you select Manual, the login information is required when
establishing a connection.
• User name - Key in the user name and press OK.
• Password - Key in the password and press OK.
WHEN GPRS IS THE SELECTED DATA BEARER:
• GPRS connection - Select Always online or When needed. If you select
Always online, the GPRS connection is automatically established
when you switch on the phone. The indicator is shown on the
display in standby mode. The GPRS connection is not closed when you
end a WAP connection. If you select When needed, the GPRS
connection is established when you connect to a WAP service and
closed when you end the WAP connection.
• GPRS access point - Key in the access point name and press OK. An
access point name is needed to establish a connection to a GPRS
network. You obtain the access point name from your network
operator or service provider.
• IP address - Key in the address, press for a period, and press OK.
You obtain the IP address from your network operator or service
provider.
• Authentication type - Select Secure or Normal.
[ 88 ]
Page 88

Services (Wireless Internet)
• Login type - Select Manual or Automatic. If you select Manual when
the GPRS connection is set to Always online, the Always online
connection will be disabled.
• User name - Key in the user name and press OK.
• Password - Key in the password and press OK.
• MAKING A WIRELESS INTERNET CONNECTION
First, make sure that the service settings of the WAP service you want to
use are activated. To activate the settings:
• Press Menu, select Services and Settings. Select Active service
settings and scroll to the set you want to activate and press Activate.
Second, make a connection to the WAP service. There are two ways to
connect:
• Press Menu, select Services and Home.
Tip:To quickly open the homepage of a WAP service:
•In standby mode, press and hold .OR
• Select a bookmark of the WAP service: Press Menu, select
Services, Bookmarks, and select a bookmark. If the bookmark does
not work with the current active service settings, activate
another set of service settings and try again.
• Key in the address of the WAP service: Press Menu, select Services and
then Go to address. Key in the address of the WAP service, press
for special characters, and press OK (availability of this option may
vary by service provider).
Note: It is not necessary to add the prefix http:// in front of the
address since it will be added automatically.
12
[ 89 ]
Page 89

• BROWSE A WIRELESS INTERNET SITE
12
After you have made a connection to the WAP service, you can start
browsing the site. The function of the phone keys may vary in different
WAP services. Follow the text guides on the phone display. For more
information, contact your WAP service provider.
Note: If GPRS is selected as the data bearer, the indicator is
shown on the top left of the display during browsing. If there is an
incoming (or outgoing) call during a GPRS connection, the
indicator will be shown on the top right of the display. The GPRS
connection is suspended.
GENERAL GUIDELINES FOR USING THE PHONE KEYS
1 Use the scroll keys or to browse the WAP page.
2 To select a highlighted item, press .
3 To enter letters and numbers, press the keys - and to
enter special characters, press the key .
Some or all of the following options are available while a WAP connection
is in progress. Press Options and select the option you want.
• Home - to go back to the homepage of the WAP service
• Bookmarks - the list of bookmarks is displayed. (This option may not
appear until you have opened your Home page)
• Edit / Open row / Open link / Open list - to key in text or select a
highlighted item on the WAP page.
• Add bookmark - to add the current WAP page as a bookmark in your
bookmarks list.
• Go to address - to key in the address of the WAP service you want.
• Service inbox - the list of service messages is displayed,.
• Appear. sett. -
• When no WAP connection is in progress: Press Menu, select
Services, Settings and Appearance settings.
[ 90 ]
Page 90

Services (Wireless Internet)
• When a WAP connection is in progress: Press Options and
select Appear. sett.. Select Text wrapping or Show images. Select
On or Off for Text wrapping and Yes or No for Show images. When
Text wrapping is set to On, the text continues on to the next line
if it cannot be shown on one line.
When Show images is set to No, any pictures appearing on the
WAP page are not shown. This can speed up the browsing of WAP
pages that contain a lot of pictures.
• Download sett. - You can set the phone to allow or prevent the
receiving of cookies. A cookie is data that a WAP site saves in your
phone’s browser cache memory. The data can be, for example, your
user information or your browsing preferences. Cookies will be saved
until you clear the cache memory, see The cache memory on page 75..
• When no WAP connection is in progress: Press Menu, select
Services, Settings and Download settings.
• When a WAP connection is in progress: Press Options and
select Download settings. Select Cookies and select Allow or
Reject to allow or prevent the phone to receive cookies.
• Use number - to copy a number from the current WAP page for
saving or calling (and ends the WAP connection). If the WAP page
contains several numbers, you may select the desired one.
• Reload - to reload and update the current WAP page.
• Clear the cache - The information or services you have accessed are
stored in the cache of your phone. A cache is a buffer memory, which
is used to store data temporarily. If you have tried to access or have
accessed confidential information requiring passwords (for example,
your bank account), empty the cache of your phone after each use.
• When no WAP connection is in progress: Press Menu, select
Services, and Clear the cache.
• When a WAP connection is in progress: Press Options and
select Clear the cache.
12
[ 91 ]
Page 91

12
• Security info - to view security information about the current WAP
connection and the server.
• Quit - to quit browsing and end the call.
Ending a WAP connection
When you are using a WAP service, press Options and select Quit. When
Quit browsing? is shown, press Yes.
Alternatively, press . If GSM data is the selected data bearer, press
the WAP service.
• BOOKMARKS
You can save up to 25 WAP page addresses as bookmarks in the phone’s
memory.
WHEN NO WAP CONNECTION IS IN PROGRESS:
Press Menu, select Services and then Bookmarks.
WHEN A WAP CONNECTION IS IN PROGRESS:
Press Options and select Bookmarks. Scroll to the bookmark you want to
use and press Options., then select one of the following options:
• Go to to make a connection to the WAP page associated with the
bookmark.
• Edit or Erase to modify or delete the selected bookmark.
• Send to send the selected bookmark to another phone via SMS, Via
SMS.
• New bookmk. to create a new bookmark without connection to a WAP
service. Key in the address and the title of the WAP page and press OK.
twice. The phone ends the call and terminates the connection to
Note: Your phone may have some pre-installed bookmarks for
sites not affiliated with Nokia. Nokia does not warrant or endorse
these sites. If you choose to access them, you should take the same
precautions, for security or content, as you would with any site.
[ 92 ]
Page 92

Services (Wireless Internet)
Receiving a bookmark
When you have received a bookmark as a text message, press Options and
select View to view the bookmark, Save to save the bookmark, or Discard
to discard it.
• SERVICE INBOX
The phone is able to receive service messages (pushed messages) sent by
your service provider. Service messages are notifications of, for example,
news headlines, and they may contain a text message or the address of a
WAP service.
TO ACCESS THE SERVICE INBOX WHEN NO WAP CONNECTION IS IN
PROGRESS:
When you have received a service message, 1 service message received
will be displayed. Press View to access the Service inbox.
If you press Exit the message is moved to the Service inbox. To access the
Service inbox later, press Menu, select Services, and the Service inbox.
WHEN A WAP CONNECTION IS IN PROGRESS:
Press Options and select Service inbox. Scroll to the message you want
and press Options.
Select Download to activate the WML browser and download the
indicated content. Select Details to display detailed information on the
service notification. Select Erase to delete the selected service
notification.
12
Set the phone to receive service messages
Press Menu, select Services, Settings, Service inbox settings, and Service
messages. To set the phone to receive service messages, select On. If you
select Off, the phone will not receive service messages.
• THE CACHE MEMORY
[ 93 ]
Page 93

• SECURITY INDICATOR
12
If the security indicator is displayed during a WAP connection, the
data transmission between the phone and the WAP gateway or WAP
server (identified by the IP address in the Edit active service settings) is
encrypted.
However, the security indicator does not indicate that the data
transmission between the gateway and the content server (the location
where the requested resource is stored) is secure. It is up to the service
provider to secure the data transmission between the gateway and the
content server.
Digital signature
With the digital signature functionality you can, for example, digitally
sign a bill or a financial contract. The signature can be traced back to you
via the private key and the associated certificate that was used to perform
the signature, so signing using the digital signature is the same as signing
your name to a paper bill, contract or other document.
A digital signature is initiated by a code embedded in a WAP page. Select
a link, for example, the title of the book you want to buy and its price. The
digital signature procedure starts and shows the text to sign. At this point
the header text is Read and the digital signature icon is shown.
Note: If the digital signature icon does not appear, this means that
there is a security breach, and you should not enter any personal
data such as your signing PIN.
To sign the displayed text, select Sign, after you have read all of the text.
Note: The text may not fit within a single screen. Therefore, make
sure to scroll through and read all of the text before signing.
Select the user certificate you want to use. Key in the signing PIN and
press OK. Since the PIN code will not be sent outside the phone, it will
remain secret. The phone displays a confirmation Code accepted. If you
entered a wrong PIN, an error note Code error is displayed, and the phone
[ 94 ]
Page 94

Services (Wireless Internet)
asks you to key in the PIN code again. After the confirmation has been
displayed, the digital signature icon will dissappear, and browsing
continues. The WAP service may display a confirmation of your purchase.
Certificates
There are three kinds of certificates:
1 Server certificates: A server certificate is sent from the server to the
phone and its validity is checked using the authority certificates
stored in the phone or the security module. This way you can be
certain that a WAP gateway or a WAP server is the one it claims to be.
You will see a note on the phone display if the identity of the WAP
server or WAP gateway cannot be verified, if the WAP server or WAP
gateway certificate is not authentic or if you do not have the right
authority certificate in your phone.
2 Authority certificates: Authority certificates are used by some WAP
services, such as banking services, for checking signatures or server
certificates or other authority certificates.
You can download the certificate from a WAP page, if the WAP service
supports the use of authority certificates. After the download, you
can view the certificate and then save or delete it. If you save the
certificate, it is added to the certificate list in the phone. Authority
certificates may also be available in the security module.
3 User certificates: User certificates are issued to users by a Certifying
Authority. They associate a user with a specific private key in a
security module, and they are stored in the module by the SIM card
issuer or the service provider.
12
[ 95 ]
Page 95

12
Security module settings
Press Menu, select Services, Settings and Security module settings. If
there is no security module in the phone, Insert security module is
displayed.
In the Security module settings menu you have the following options:
• Security module details show the security module label, its status,
manufacturer and serial number.
• Module PIN request: The phone asks you for the module PIN code,
which is supplied with the SIM card. Key in the code, and select On to
set the security module to ask for the module PIN code.
• Change module PIN: Key in the current module PIN code. Press
Change and key in the new code twice.
• Change signing PIN shows a list of signing PINs in alphabetical order
if you have more than one signing PIN in your phone. The signing PIN
is supplied with the SIM card. Select the signing PIN you want to
change. Key in the current signing PIN code. Press Change and key in
the new code twice.
Note: If you key in a wrong PIN code several times, the phone may
display PIN code blocked and ask you to key in the PUK code.
Contact your service provider to get the PUK code, and key it in. To
key in the PUK code later, you must first try to use the PIN, and you
will then be asked for the PUK code.
• DATA AND FAX COMMUNICATION
You can transfer data to other compatible devices when your Nokia 6310i
phone is connected to a compatible PC via an IR connection, cable or
Bluetooth.
[ 96 ]
Page 96

Services (Wireless Internet)
To send and receive e-mail and faxes, and to connect to computers and
access the Internet, you also need the appropriate data and fax
communications software installed on your computer. You can use the
Nokia 6310i with a variety of commercially available data and fax
communications applications.
To use your phone as a modem, you first need to install it as a modem.
Communication applications and modem drivers
On the Nokia website, www.forum.nokia.com, you can find the required
system files for data communication and also the instructions for
installation. You can also find documents that advise you on how to set
up devices and applications for use with the Nokia 6310i.
• PC SUITE INSERT USUAL STATEMENT ABOUT PC
SUITE SOFTWARE AND USER GUID
PC Suite contains applications which help you to:
• conveniently manage various phone functions from your PC
• synchronize contacts and calendar items between your phone and
your PC Personal Information Manager.
• draw and edit caller group graphics and picture messages.
• create new ringing tones for your phone.
• select the connection type used when connecting your PC and your
phone.
• back up and restore personal information from phone to PC or to
another phone.
12
Modem setup
Modem setup installs the following components on your PC:
• Nokia 6310i data and fax modem adapters which enable you to use
your phone as a modem in data and fax calls.
• Nokia Modem Options software to set options for the data calls you
[ 97 ]
Page 97

12
make. Here you find the settings for HSCSD and GPRS.
Using data communication applications
Activate the IR connection (Menu 9) or Bluetooth connection (Menu 10)
of your phone, or connect to the other device via the cable.
If you are using the IR connection, make sure that the infrared port of the
phone faces the infrared port of the PC.
Start using the data communications application on the PC.
For information on the use of the application, refer to the instructions for
the application.
Note:Making or answering phone calls during a PC connection is
not recommended as it might disrupt the operation.
Tip: For better performance during data calls, place the phone on a
stationary surface with the keypad facing downward. Do not move
the phone by holding it in your hand during a data call.
[ 98 ]
Page 98

Manage phone security
13) Manage phone security
Your phone is equipped with different security features that allow you to
do the following:
• avoid making accidental calls,
• prevent unauthorized use of your phone, and
• restrict outgoing or incoming calls.
• ABOUT SECURITY CODES
The following table summarizes how different types of security codes are
used in your phone.
Code Purpose
Security code
Required by several phone
features. If phone security is
on, the phone requests the
security code the first time
you use it after installing a
new SIM card.
For more
information
See “Clear call lists”
on page 45, “Reset
call timers to 0” on
page 46, “Clear the
data counter” on
page 49, “Restore
factory settings” on
page 82 and “Erase
your entire phone
book” on page 41.
13
PIN code
If SIM card security is on, the
phone requests the PIN code
every time the phone is
turned on.
[ 99 ]
See “PIN codes” on
page 100.
Page 99

13
Code Purpose
For more
information
PIN2 code
Restriction
password
Required by several phone
features.
Required by the restrict calls
feature.
See entries for show
call costs, call cost
limit, fixed dialing,
and PIN and PIN2
codes.
See “About your
restriction password”
on page 104.
• PIN CODES
The PIN (Personal Identity Number) and PIN2 codes are 4- to 8-digit
numbers that usually come from your service provider along with the SIM
card. Use the PIN code to protect your phone and SIM card against
unauthorized use. The PIN2 code activates some of your phone’s functions,
such as Call cost limit. See “Manage call costs” on page 46.
When the phone requires the PIN or PIN2 code, it displays Enter PIN code:
or Enter PIN2 code:.
Enter the code then press OK.
Set PIN code request
You can activate the PIN code request to prevent unauthorized use of your
phone. If you set the PIN code request to On, your phone will ask for the
code each time you turn the phone on.
1 Press Menu 4 8 1 (Settings > Security settings > PIN code request).
2 Enter the PIN code supplied by your service provider, and press OK.
3 Press (up or down) to highlight On and press OK.
To turn off this feature, repeat steps 1 through 3 above, but highlight Off
in step 3.
[ 100 ]
Page 100

Manage phone security
Change your PIN or PIN2 code
You can change your PIN or PIN2 code to any 4- to 8-digit number.
1 Press Menu 4 8 6 (Settings > Security settings > Change access codes),
scroll to the PIN code you want to change, then press Select.
2 Enter the current PIN code and press OK.
3 Enter the new PIN code and press OK.
4 Enter the new PIN code again to verify, and press OK.
Note: If you make a mistake while entering the code, Code Error
appears. Start again at step 2 and be careful to enter the correct
code. If you enter the wrong code three times in a row, the PIN code
is blocked. To unblock the PIN code, you need a Personal Unblocking
Key (PUK).
• PUK CODES
The PUK (Personal Unblocking Key) and PUK2 codes are 4- to 8-digit codes
that also usually come from your service provider along with the SIM card.
The PUK code unblocks a blocked PIN code, and the PUK2 code unblocks
a blocked PIN2 code.
If you block your phone, you may need to contact your service provider.
When you enter the PUK code given by your service provider, the phone
will ask you to enter and then confirm a new PIN code.
• SECURITY CODE
Note: The default security code is 12345. You need the security
code to access some security features. When the phone requires
the security code, it displays Security code:
Enter the code then press OK.
If you enter an incorrect security code five times in a row, the phone will
not accept the correct code for 5 minutes.
13
[ 101 ]
 Loading...