

Page 1
M
user,s guide.
Microsoft® Broadband Networking
Wired Base Station| MN-100
Page 2

Important
Do not plug a phone jack (RJ-11) into any Ethernet (RJ-45) port on your base station. Doing so might damage the
device. You must use twisted pair cables with RJ-45 connectors that conform to FCC standards in the device’s
Ethernet ports.
Important
Ne branchez pas une ligne téléphonique dans aucuns des port de réseau (RJ45).
Caution
For use with UL Listed, CSA and GS approved personal computers.
Not intended for use in machinery, medical, or industrial applications.
For indoor use only.
Use only the AC Adapter provided with the unit (Model Number: FA-4A030-1).
Avertissement
N’utiliser qu’avec des composantes homologuées UL, CSA ou TUV.
Ne pas utiliser ce dispositif dans une application industrielle ou médicale.
N’utiliser qu’à l’intérieur.
N’utiliser qu’avec le bloc d’alimentation fourni avec cet appareil (No de modéle: FA-4A030-1).
Information in this document, including URL and other Internet Web site references, is subject to change without notice.
Unless otherwise noted, the example companies, organizations, products, domain names, e-mail addresses, logos, people,
places and events depicted herein are fictitious, and no association with any real company, organization, product, domain
name, e-mail address, logo, person, place or event is intended or should be inferred. Complying with all applicable copyright
laws is the responsibility of the user. Without limiting the rights under copyright, no part of this document may be reproduced,
stored in or introduced into a retrieval system, or transmitted in any form or by any means (electronic, mechanical,
photocopying, recording, or otherwise), or for any purpose, without the express written permission of Microsoft Corporation.
Microsoft may have patents, patent applications, trademarks, copyrights, or other intellectual property rights covering subject
matter in this document. Except as expressly provided in any written license agreement from Microsoft, the furnishing of this
document does not give you any license to these patents, trademarks, copyrights, or other intellectual property.
© 2002 Microsoft Corporation. All rights reserved.
Microsof and Windows are either registered trademarks or trademarks of Microsoft Corporation in the United States and/or
other countries.
The names of actual companies and products mentioned herein may be the trademarks of their respective owners.
Page 3

contents.
1 Introduction ........................................................................................ 1
Box Contents ......................................................................................... 1
Your Base Station and Its Connections .............................................. 2
About Your Base Station ...................................................................... 3
Attaching and Detaching the Base Station Stand ......................... 4
Resetting the Base Station .................................................................. 5
Restoring the Factory Default Settings ............................................... 5
About Ethernet Connections ................................................................ 6
Straight-Through and Crossover Cables .......................................... 7
Connecting to Broadband Modems ................................................. 7
2 Planning .............................................................................................. 9
Which Setup Best Matches Your Network?........................................ 9
I want to create a wired network that shares my high-speed
Internet connection with other computers ..................................... 9
I want to configure the base station on a computer that is
running Windows 2000 .................................................................... 9
I want to add the base station to my existing network ................10
I have already connected the base station and have not yet
installed the software ..................................................................... 10
I want to set up the base station without an active Internet
connection ........................................................................................ 10
I want to connect a base station to a Macintosh or other
non-Windows-based computer .......................................................10
3 Setting Up .........................................................................................11
Typical Setup ....................................................................................... 11
Pre-Setup Checklist ......................................................................... 13
Install the Software ......................................................................... 13
Connect the Base Station ...............................................................14
Configure the Base Station ............................................................ 15
Test Your Network ............................................................................ 16
Other Ways to Set Up Your Base Station .......................................... 16
I have already connected my base station and have not yet
installed the software ..................................................................... 16
I want to add my base station to an existing Ethernet network
that already has a hub or switch ................................................... 17
If Your Computer Is on a Domain ......................................................18
Expanding Your Network .................................................................... 18
4 Network Tasks .................................................................................. 19
Log On to Your Workgroup ................................................................. 19
Perform Common Networking Tasks................................................. 20
Allowing Access to an Internet Connection .................................. 20
Page 4

Allowing Access to Files and Folders ............................................. 21
Allowing Access to Printers ............................................................. 23
Sharing Other Peripheral Devices .................................................. 24
Reading E-Mail Messages .............................................................. 24
Playing Games on Your Network and on the Internet .................. 25
Secure Your Network .......................................................................... 25
Protect Your Network from Computers Viruses ............................26
Protect Your Network from Hackers ..............................................26
5 Monitoring ........................................................................................ 27
View the Status of Your Computer .................................................... 28
View the Status of Your Network Connection ..................................28
View the Status of Your Broadband Internet Connection ............... 29
View the Status of Other Network Devices ...................................... 29
View and Change Network Settings .................................................. 29
Customize the Broadband Network Utility ....................................... 29
Update Software, Drivers, and Firmware .........................................30
6 Configuring ....................................................................................... 31
Opening the Base Station Management Tool ..................................32
Logging Off ........................................................................................... 32
Navigating the Base Station Management Tool .............................. 33
Configuring the Base Station ............................................................. 35
Using the Base Station as a Bridge .................................................. 36
Home Page ........................................................................................... 37
Wide Area Network .......................................................................... 37
Local Area Network .........................................................................39
DHCP Client List ............................................................................... 39
Base Station Information ................................................................ 40
Management Settings ........................................................................ 41
Reset the Base Station ................................................................... 41
Restore Factory Default Settings ...................................................42
Back Up Base Station Settings ......................................................43
Restore Base Station Settings from a Backup ............................ 44
Upgrade Base Station Firmware .................................................... 45
Establish Base Station Time Zone ................................................. 46
Synchronize Time to Internet Time Server .................................... 47
Change the Base Station Password .............................................. 48
Local Area Network Settings .............................................................. 49
IP Address and Subnet Mask .........................................................49
DHCP Server .....................................................................................50
Wide Area Network Settings .............................................................. 51
Dynamic Internet Connection ......................................................... 51
Mac Addresses ................................................................................. 52
Static Internet Connection .............................................................. 52
PPPoE Internet Connection ............................................................ 53
Disabled Connection ....................................................................... 53
ii Microsoft Broadband Networking Wired Base Station User’s Guide
Page 5

Security Settings .................................................................................54
Firewall Settings............................................................................... 54
Block Ping Commands ....................................................................54
Network Mode .................................................................................. 55
Port Forwarding ............................................................................... 56
Virtual Demilitarized Zone ..............................................................59
Mac Filtering ..................................................................................... 60
Client Filtering .................................................................................. 61
Base Station Log ............................................................................. 62
7 Troubleshooting ............................................................................... 63
Setup and Hardware Problems ......................................................... 63
Network and Internet Problems ........................................................66
File and Printer Sharing Problems ....................................................68
Reference .......................................................................................... 71
Getting Help ......................................................................................... 71
Visit Us on the Web ......................................................................... 71
Click Help in the Broadband Network Utility ................................. 71
Technical Support ............................................................................ 71
Regulatory Information ....................................................................... 72
United States Radio and TV Interference Regulations ................ 72
Canadian Radio Communication Regulations.............................. 72
Limited Warranty ................................................................................. 73
Technical Specifications..................................................................... 75
System Requirements ........................................................................ 76
Glossary ............................................................................................. 77
Contents iii
Page 6

iv Microsoft Broadband Networking Wired Base Station User’s Guide
Page 7

Important
Install the Setup software
before you connect the base
station. The Setup Wizard
guides you through the
process of connecting and
configuring your base station.
introduction.
Introducing the Broadband
Networking Wired Base Station
Congratulations on your purchase of the Microsoft® Broadband
Networking Wired Base Station. You can use your base station
to share an Internet connection, files, printers, and other devices,
and to play multiplayer games with other computers on an Ethernet
network. This chapter describes your base station and explains its
connections.
Box Contents
Check that you have the following items:
Setup CD-ROM
Install This First!
Wired Base Station
(MN-100)
User’s Guide and
Start Here Guide
Ethernet Cable
Base Station Stand
(Detachable)
Power Supply
Blank Floppy Disk
Page 8
Your Base Station and Its Connections
The base station connects to a computer and to a DSL or cable
modem with Ethernet cables. It then serves as the central point for
your wired network and shares your high-speed Internet connection
with all the computers on the network. The base station provides a
number of security features, including a built-in firewall, Network
Address Translation (NAT), and access control lists. Security is
especially important when an “always-on” Internet connection is
shared among computers on a home or small office network.
You can connect up to four Ethernet devices directly to the
Broadband Networking Wired Base Station, giving them secure,
shared access to the Internet and the network. By connecting
Ethernet hubs or switches to the base station, you can add even
more wired connections.
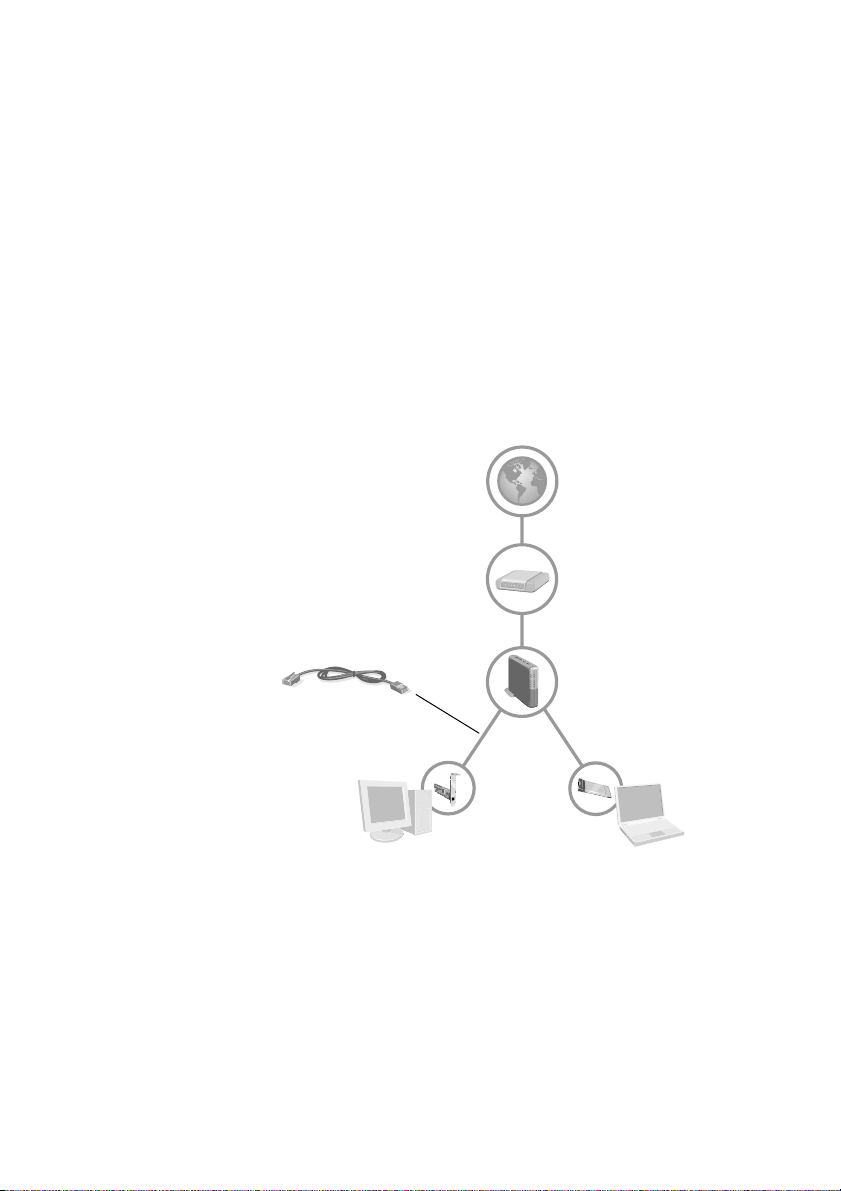
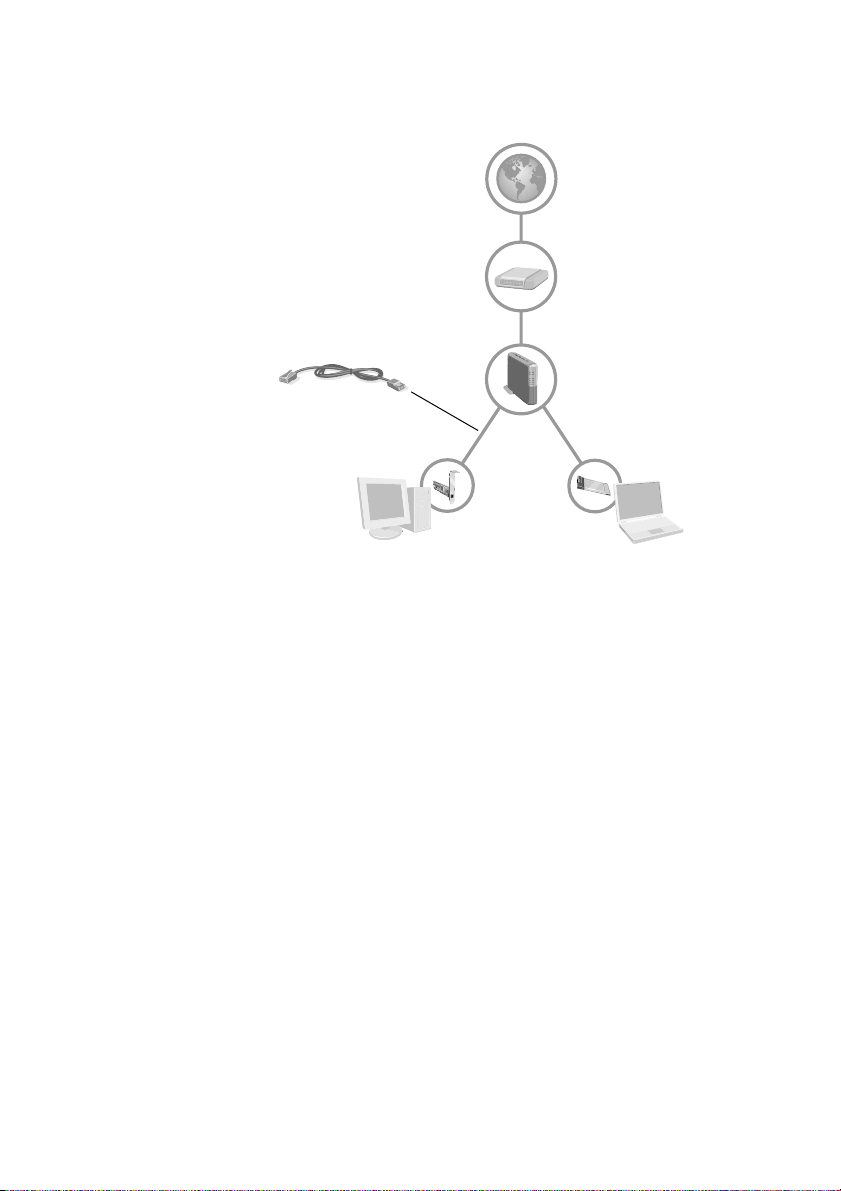
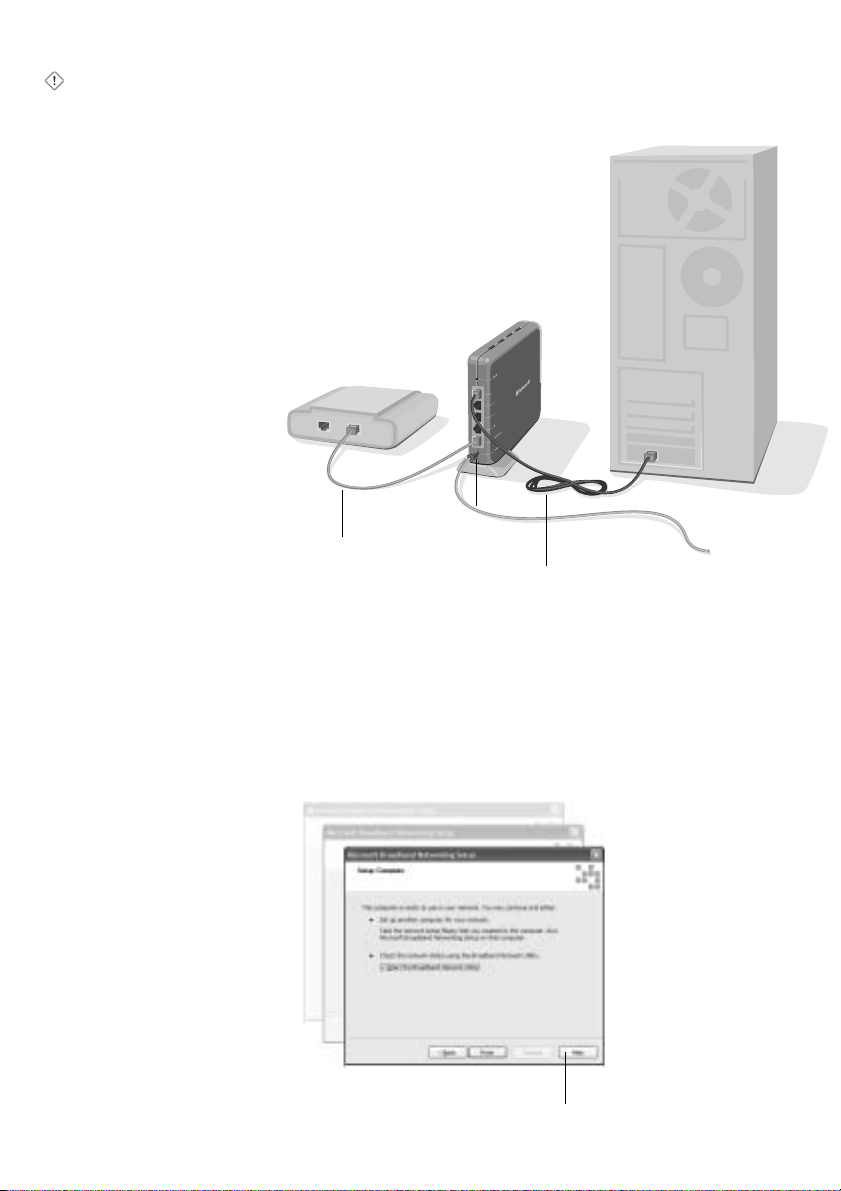
If you set up the base station by using the Typical Setup method,
your network will resemble the following diagram.
Active Internet Connection
Ethernet Connection
Use the provided
blue Ethernet cable
to connect the base
station to your first
computer.
First Computer*
This computer was
originally connected to
your modem. Installing
the software on this
computer configures the
base station.
* To connect to the base station, the first computer requires an installed Ethernet
adapter. (PCI adapter shown here.)
Broadband Modem
(DSL or Cable)
Wired Base Station
Second Computer
You can connect additional
computers to the base
station. Each computer
you add to your network
requires an Ethernet
network adapter. (Notebook
adapter shown here.)
There are also other ways to set up your base station. For an
overview of the most common setup scenarios, see Chapter 2. For
detailed setup instructions, see Chapter 3.
2 Microsoft Broadband Networking Wired Base Station User’s Guide
Page 9
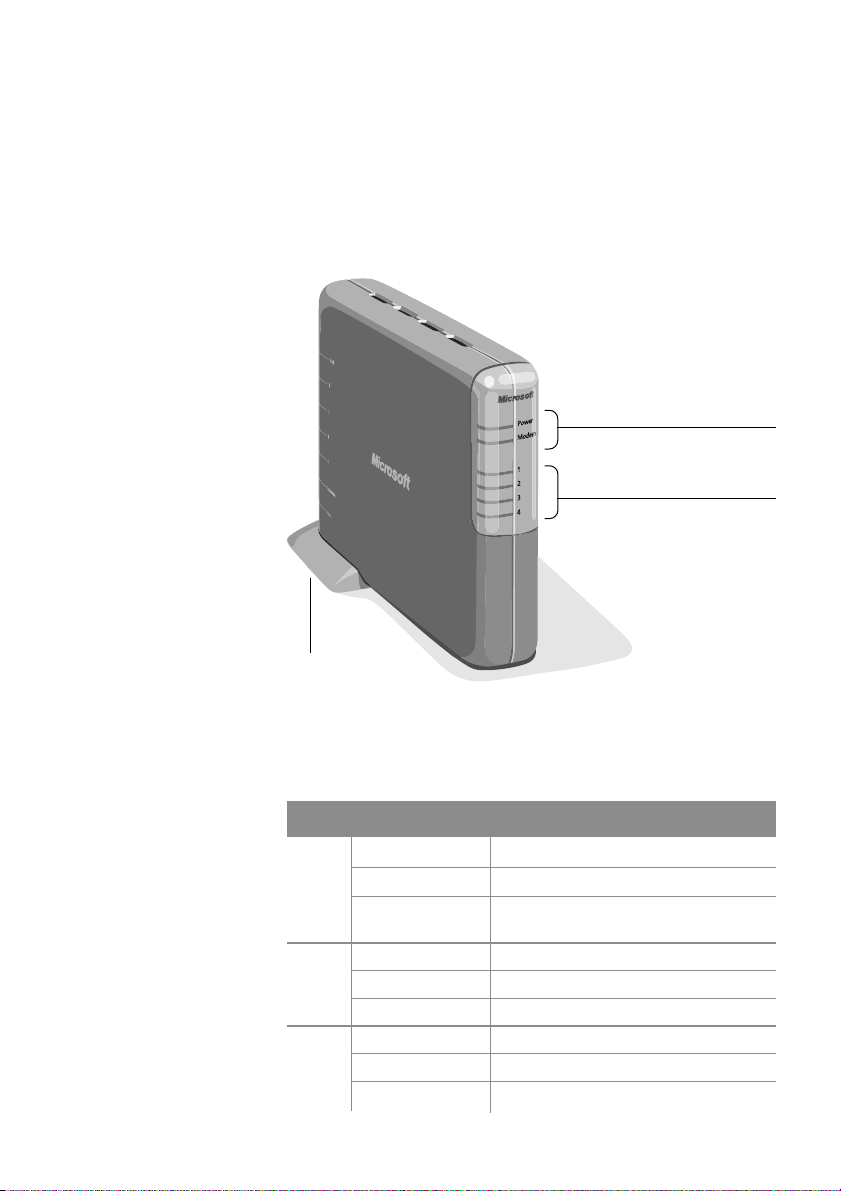
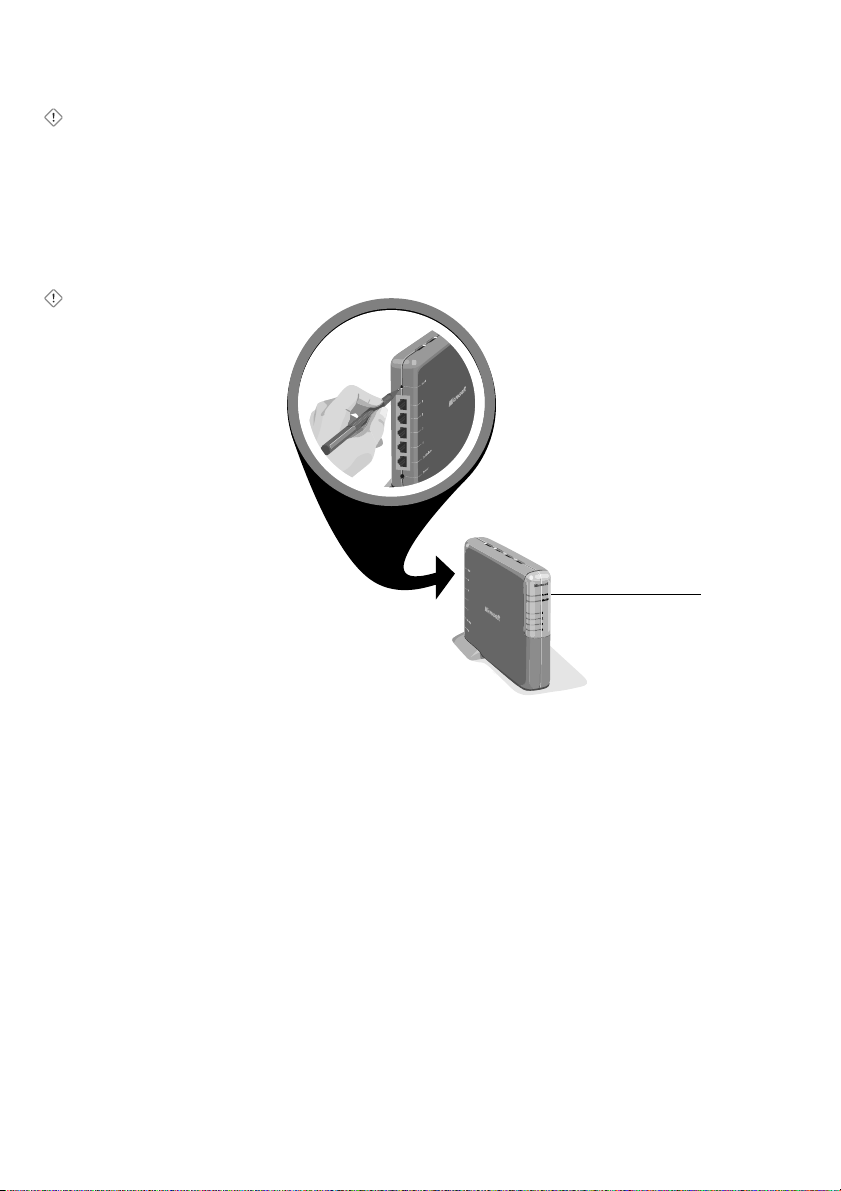
About Your Base Station
The diagrams on the next two pages show the front and back of
the base station, and the location of all ports, controls, and
indicator lights.
Because the base station must be physically connected to a
power outlet and to your DSL or cable modem, it is best to place
the base station near them. You can position the base station
horizontally or vertically by using the provided stand.
Indicator lights display the
status of the Power and
To Modem ports
Indicator lights display the
status of the four Ethernet
ports on the back of the
base station
Optional
Stand
Base Station
(Front View)
The front of the base station has six indicator lights. After the
base station is connected, these lights will be on, off, or blinking,
indicating the following states.
Light Status The Base Station Is:
Power Off Not receiving power.
Orange Receiving power.
Blinking orange
and green Resetting or upgrading firmware.
Modem Off Not connected.
Solid green Connected to the network.
Blinking green Detecting activity on the network.
Link/
Activity
(Ports
1-4)
Off Not connected.
Solid green Connected to the network.
Blinking green Detecting activity on the network.
Chapter 1: Introduction 3
Page 10
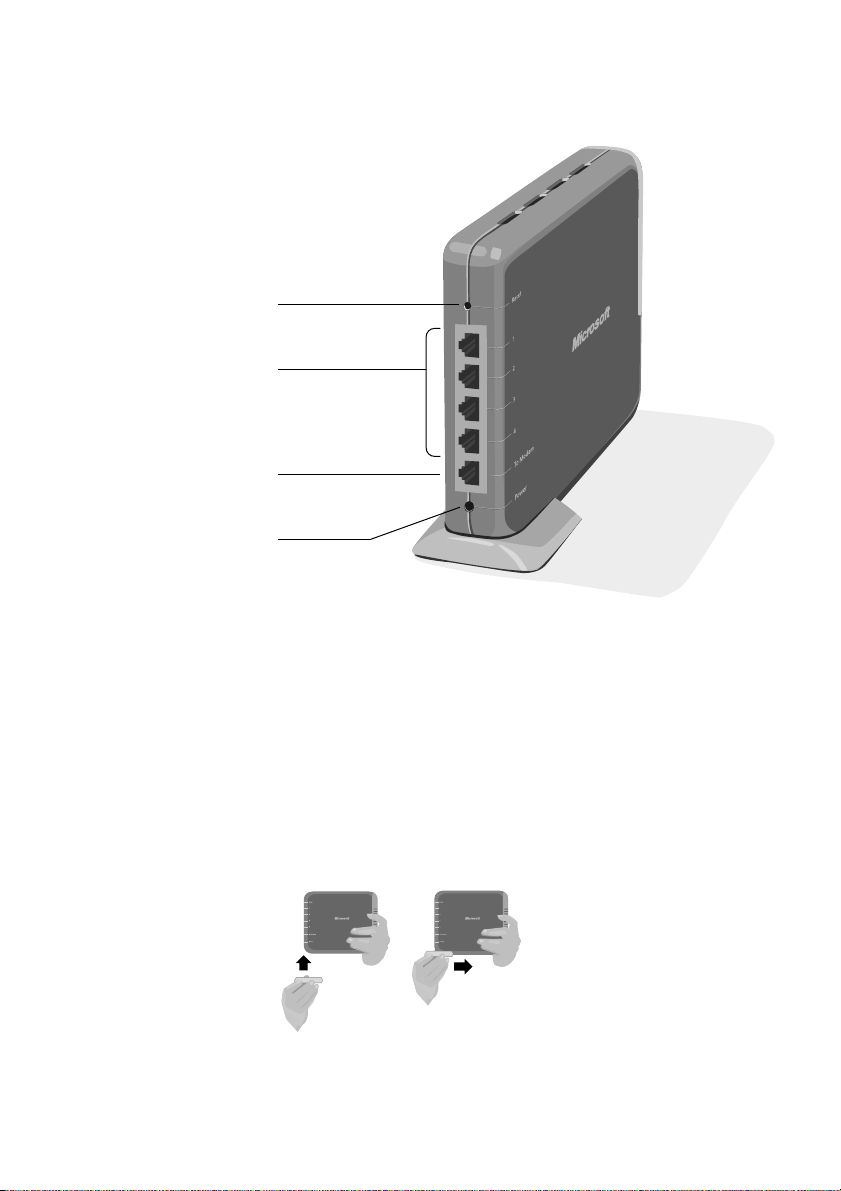
The back of the base station contains four numbered Ethernet
ports, a To Modem port, a Power port, and a Reset button.
Reset Button
Ethernet ports 1-4,
which correspond to
the status indicator
lights on the front
of the base station
To Modem port, which
connects to your modem
with an Ethernet cable
Power Port
Base Station
(Back View)
Attaching and Detaching the Base Station Stand
You can position the base station horizontally or vertically. To
position it vertically, use the detachable stand that is included in
the box.
Attaching the stand
1. Hold the base station and the stand as shown in the diagram.
2. Insert the two rectangular hooks on the stand into the two
rectangular openings on the bottom of the base station, and
then slide the stand toward the center of the base station.
Detaching the stand
Slide the stand away from the center of the base station.
4 Microsoft Broadband Networking Wired Base Station User’s Guide
Page 11
Caution
Do not hold down the Reset
button. Doing so will erase all
your current base station
settings and restore the
factory default settings.
Caution
Do not unplug the base station
during the reset process. If
you unplug the base station,
you will need to start the reset
process again.
Resetting the Base Station
You can reset the base station to correct connectivity problems.
1. Use a pointed object to briefly depress the Reset button on the
back of the base station.
2. Release the button as soon as the green Power indicator light
becomes orange.
The Power indicator light becomes green again when the reset
is complete.
Power Indicator
Light
Restoring the Factory Default Settings
You can restore the factory default settings to the base station if,
for example, you forget your base station password. However, to
restore your Internet connection, you will need to re-enter your
Internet service provider settings and port settings.
1. Use a pointed object to depress the Reset button on the back of
the base station.
2. Hold the Reset button down until the Power indicator light
alternately blinks green and orange.
After you release the Reset button, the Power indicator light
becomes orange and then becomes green again when the reset
is complete. This process takes about 60 seconds.
Chapter 1: Introduction 5
Page 12
About Ethernet Connections
Ethernet is the most commonly used wired network protocol, with
connection speeds of 10 Mbps, 100 Mbps, or higher. Your base
station will transmit data at either 10 or 100 Mbps. The base
station’s auto-negotiation feature automatically determines the rate
of your network connections and uses the fastest speed available.
As you set up your network, keep in mind that power outlets,
fluorescent lights, power supplies, and coiled or extra-long cables
can interfere with Ethernet transmission and also
produce interference.
Use Ethernet cables to connect your base station to devices on your
network. Any Ethernet-compatible network device will have one or
more Ethernet ports. Some examples of network devices are:
O
Routers, gateways, or base stations, such as the Microsoft
Broadband Networking Wired Base Station
O
Broadband modems
O
Computers with Ethernet adapters
O
Ethernet switches and hubs
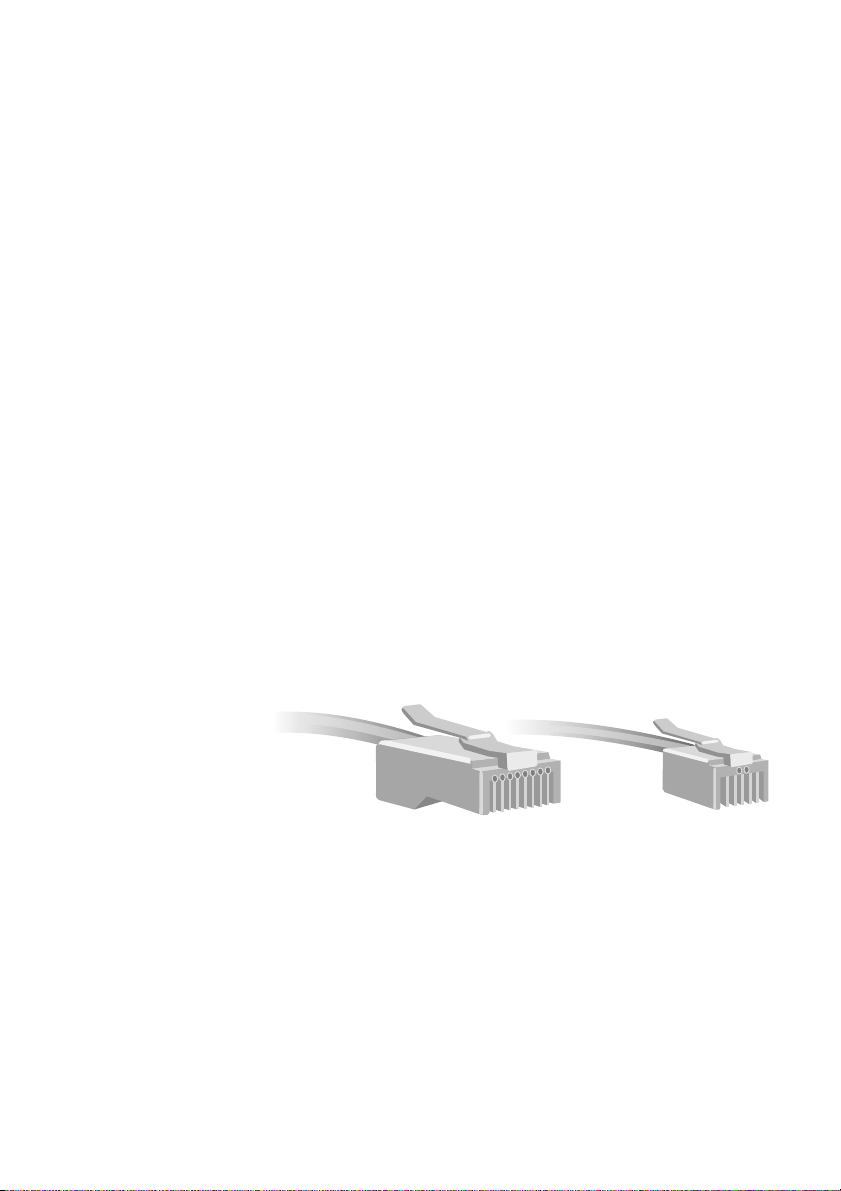
Network components are connected to one another by Ethernet
cables. An Ethernet cable resembles a phone cord, but has larger
connectors at each end. To determine whether a cable is an
Ethernet or phone cable, you can count the number of wires or
contacts visible in the connector at either end of the cable.
Ethernet (RJ-45) connectors and cables contain eight wires, and
phone (RJ-11) connectors contain either four or six wires.
RJ-45 Ethernet
(8 wires)
6 Microsoft Broadband Networking Wired Base Station User’s Guide
RJ-11 Telephone
(4 or 6 wires)
Page 13

Straight-Through and Crossover Cables
Data is sent and received through specific wires within an Ethernet
cable. Depending on the arrangement of its sending and receiving
wires, an Ethernet cable is either a “straight-through” type or a
“crossover” type. The following diagram demonstrates how to
differentiate between the two types.
In a straight-through
Straight-Through
Ethernet Cable
Crossover
Ethernet Cable
cable, the order of
the colored wires
is the same at
both ends.
In a crossover
cable, the order of
the colored wires
is different at
both ends.
Connecting to Broadband Modems
When you connect your base station to a broadband modem, it is
important to use either the cable that came with your modem or the
same type of cable. Many modems use a crossover cable to connect
to the network. If you are unsure about the type of Ethernet cable to
use, see the documentation for your broadband modem.
Chapter 1: Introduction 7
Page 14

8 Microsoft Broadband Networking Wired Base Station User’s Guide
Page 15

2
planning.
Planning Your Network
You can use the Microsoft® Broadband Networking Wired Base
Station as the central point for a wired network to share your highspeed Internet connection with other computers on the network.
This chapter will help you locate the specific setup instructions for
your network configuration.
Which Setup Best Matches Your Network?
The following scenarios describe some common ways to use the
base station. Select the option that best matches your networking
goals.
Option A:
I want to create a wired network that shares my highspeed Internet connection with other computers.
If your computers meet all of the following conditions, see the
Typical Setup method in Chapter 3 to set up the base station.
O
You have one computer (first computer) that is connected to a
broadband modem with an Ethernet cable and has an active
Internet connection.
O
This computer is running one of the following operating systems:
Microsoft Windows
Windows XP.*
O
This computer is not connected to any other computers or
networks.
*If your first computer is running Windows 2000, see Option B.
®
98, Windows 98 SE, Windows Me, or
Option B:
I want to configure the base station on a computer that
is running Windows 2000.
The Setup Wizard will not configure the base station on a computer
that is running Windows 2000. If you are running Windows 2000
and your network scenario matches the Typical Setup, do one of
the following:
O
Configure the base station on a computer that is running
Windows 98, Windows 98 SE, Windows Me, or Windows XP. If
you are also installing a Microsoft Broadband Networking
adapter, you can configure your adapter on the Windows 2000based computer.
Page 16

O
Configure the base station manually, instead of running the
Setup Wizard. For setup instructions, see “Configuring the Base
Station” in Chapter 6.
Option C:
I want to add the base station to my existing network.
If any of your computers is currently connected to a network, you
can remove the computers from the network and connect them to
the base station individually, or you might be able to connect the
entire network to the base station. For instructions on connecting
the base station to an existing Ethernet network, to a HomePNA or
Power Line Communications (PLC) network, or to a computer that is
on a domain, see “Other Ways to Set Up Your Base Station” in
Chapter 3.
Option D:
I have already connected the base station and have not
yet installed the software.
If you have already connected the base station and have not yet
installed the Setup software, see “Other Ways to Set Up Your Base
Station” in Chapter 3.
Option E:
I want to set up the base station without an active
Internet connection.
The Setup Wizard can automatically configure the base station for
you if your computer has an active Internet connection. It is highly
recommended that you establish a broadband Internet connection
before configuring the base station.
If you choose to configure the base station without an active
broadband Internet connection, you can still use the Setup Wizard.
When the wizard attempts to detect your Internet connection, you
can choose to continue (and enter your Internet settings manually)
or quit (and rerun the Setup Wizard when you establish an active
Internet connection).
To enter your Internet settings manually, you will need to know your
connection type (DHCP, PPoE, or static IP address) and the settings
associated with it. If you don’t know this information, ask your
Internet service provider (ISP).
Option F:
I want to connect a base station to a Macintosh or other
non-Windows-based computer.
The Setup Wizard will not configure the base station on a nonWindows-based computer. If you don’t have a Windows-based
computer available, you can configure the base station manually.
For setup instructions, see “Configuring the Base Station” in
Chapter 6.
10 Microsoft Broadband Networking Wired Base Station User’s Guide
Page 17

3
setting up.
Installing, Connecting, and
Configuring Your Wired Base Station
Your Microsoft® Broadband Networking Wired Base Station can be
set up in various ways, depending on how your existing network is
configured. The instructions in this chapter will guide you through
the process of setting up your base station.
Important
Before you connect the
base station, run the Setup
Wizard on the computer
that is attached to your
broadband modem.
Note
If you do not want to use
the Setup software, you
can configure your router
manually. See “Configuring
the Base Station” in
Chapter 6.
Typical Setup
Follow the detailed instructions beginning on the next page if your
existing network configuration matches all of the following
conditions:
O
You have one computer (first computer) that is connected to a
broadband modem with an Ethernet cable and has an active
Internet connection.
O
This computer is running one of the following operating systems:
Microsoft Windows
Windows XP.
O
This computer is not connected to any other computers or
networks.
®
98, Windows 98 SE, Windows Me, or
Page 18
After you set up your base station by using the Typical Setup
method, your network will resemble the following diagram.
Active Internet Connection
Ethernet Connection
Use the provided
blue Ethernet cable
to connect the base
station to your first
computer.
First Computer*
This computer was
originally connected to
your modem. Installing
the software on this
computer configures the
base station.
* To connect to the base station, the first computer requires an installed Ethernet
adapter. (PCI adapter shown here.)
Broadband Modem
(DSL or Cable)
Wired Base Station
Second Computer
You can connect additional
computers to the base
station. Each computer you
add to your network
requires an Ethernet
adapter. (Notebook adapter
shown here.)
Take the following items to the computer that is connected to your
broadband modem with an Ethernet cable.
O
Setup CD-ROM
O
Broadband Networking Wired Base Station
O
Blue Ethernet cable (If the included cable is too short, you can
use any longer, straight-through Ethernet cable.)
O
Power supply (Use only the AC adapter included in the box.)
O
Blank floppy disk
O
This User’s Guide and the Start Here guide
12 Microsoft Broadband Networking Wired Base Station User’s Guide
Page 19

Note
Have you already connected
the base station? See “Other
Ways to Set Up Your Base
Station” later in this chapter.
Pre-Setup Checklist
Before you begin Setup, check the following:
O
Are you a member of the Administrator group?
On computers running Windows
XP, you must be logged on as
a user with administrator privileges to run the Setup Wizard
and make changes to network settings. If you are not logged
on as an administrator, click Start, click Log Off, press
CTRL+ALT+DELETE, and then log on by using an administrator’s
name and password.
O
Are you running any firewall or Internet connection sharing
software on your computers?
Disable all firewall and Internet connection sharing software.
Your base station will provide its own firewall and Internet
connection sharing features.
O
Do you have a Point-to-Point Protocol over Ethernet (PPPoE)
Internet connection or a static Internet Protocol (IP) address?
With these types of Internet connections, the Setup Wizard will
prompt you to enter information—for a PPPoE connection, your
user name, password, and service name; for a static IP
address, the IP, subnet, and ISP gateway addresses. If you know
you have one of these types of connections, gather this
information beforehand.
Step 1: Install the Software
1. Insert the Setup CD-ROM into the CD-ROM drive of the first
computer. If the Setup Wizard does not start automatically after
a few seconds, click My Computer, double-click the drive that
contains your Setup CD-ROM, and then double-click Setup or
Setup.exe.
2. Follow the instructions in the Setup Wizard to install the
software and set up the base station on the computer that is
attached to your DSL or cable modem. When the wizard asks
which device you are setting up, select the base station.
Chapter 3: Setting Up 13
Page 20
Note
During setup, you might be
prompted to restart your
computer.
Note
The Setup Wizard can
automatically detect a
Microsoft MSN modem and
bypass some modem
configuration steps.
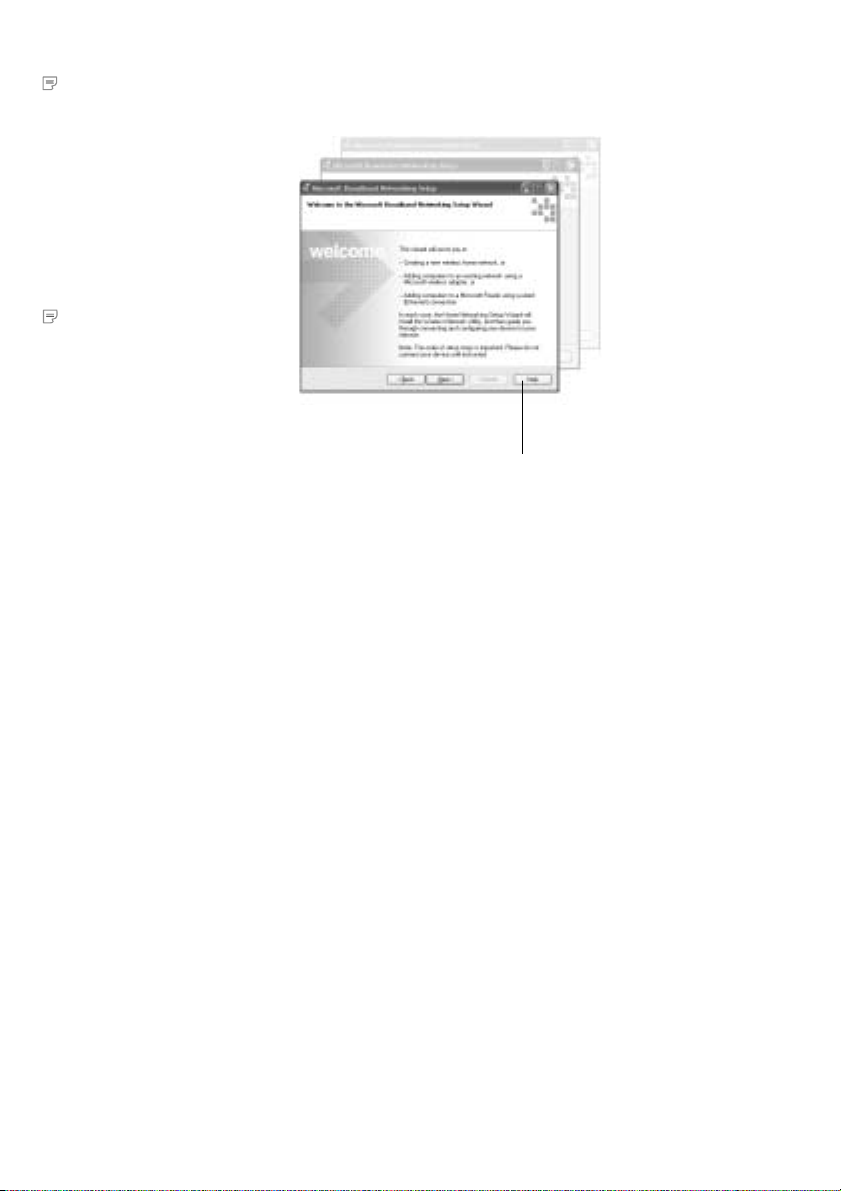
3. Continue following the instructions in the Setup Wizard. If you
have a question, click Help on any page.
Have a question
about Setup?
Click Help.
Step 2: Connect the Base Station
1. Position the base station close to your modem and computer,
and near the center of your intended network area. If you want
to position the base station vertically, attach the stand.
2. When the wizard asks you to connect the base station to the
modem, unplug the modem Ethernet cable from the back of
your computer, and then plug it into the port labeled To Modem
on the back of the base station.
3. Plug one end of the blue Ethernet cable that came with your
base station into the Ethernet port labeled 1 on the back of the
base station, and then plug the other end into the Ethernet port
on the back of your computer.
4. Plug one end of the power supply that came with your base
station into the Power port on the back of the base station, and
then plug the other end into an electrical outlet. The power
indicator light on the front of the base station should go on.
14 Microsoft Broadband Networking Wired Base Station User’s Guide
Page 21
Important
Use the modem’s original
Ethernet cable to connect
to the base station. Use
the provided blue Ethernet
cable to connect the first
computer to the base station.
If the provided cable is too
short, you can use any
longer, straight-through
Ethernet cable.
Your base station setup should now resemble the following
diagram.
First Computer
Base Station
Existing
Broadband Modem
Power
Existing
Ethernet Cable
Port
Blue Ethernet Cable
(Included in Box)
To Po wer
Supply
Step 3: Configure the Base Station
1. Continue following the instructions in the Setup Wizard to
configure your base station.
2. When you reach the end of the Setup Wizard, click Finish.
3. Remove the Setup CD-ROM from the CD-ROM drive, and remove
the floppy disk that contains your network settings (if used) from
the floppy disk drive. You can use the same CD-ROM and floppy
disk to set up additional computers.
Have a question about
Setup? Click Help.
Chapter 3: Setting Up 15
Page 22

Step 4: Test Your Network
To confirm that your network is working properly, do the following:
O
Ensure that your connections are working properly by viewing
the status of your network in the Broadband Network Utility. To
learn more about the Broadband Network Utility, see Chapter 5.
O
Test your Internet connection by opening your Web browser and
visiting a Web site, such as http://www.microsoft.com.
If you are having network problems or you cannot connect to the
Internet through your broadband modem, see “Network and
Internet Problems” in Chapter 7.
Other Ways to Set Up Your Base Station
In addition to the Typical Setup method, there are other ways to set
up the base station, depending on your computer and network
characteristics and the results you want.
If any of your computers are currently connected to a network, you
can remove the computers from the network and connect them to
your base station individually, or you might be able to connect the
entire network to the base station. You can connect several types
of existing networks to the base station, as described in the
following sections.
If you are connecting an existing network to the base station,
disable all Internet connection sharing or firewall software before
you install the Broadband Networking Setup software. The base
station replaces your existing firewall.
I have already connected my base station and have not
yet installed the software.
If you connected the base station before running the Setup Wizard,
the wizard might not be able to access your Internet settings. In
this case, set up your base station by doing the following:
1. Disconnect the base station, and then reconnect your modem
and computer in their original configuration.
2. Ensure that your Internet connection is working.
3. Insert the Broadband Networking Setup CD-ROM into your
CD-ROM drive, and then follow the instructions in the Setup
Wizard.
If the wizard does not start automatically after a few seconds,
click My Computer, double-click the drive that contains your
Setup CD-ROM, and then double-click Setup or Setup.exe.
If you do not want to use the Setup software, you can also
configure the base station manually. For more information about
this option, see “Configuring the Base Station” in Chapter 6.
16 Microsoft Broadband Networking Wired Base Station User’s Guide
Page 23

I want to add my base station to an existing Ethernet
network that already has a hub or switch.
If your computers are networked together through crossover
Ethernet cables or direct parallel, serial, or USB connections,
disconnect them. Then use straight-through Ethernet cables
(including the provided blue cable) to connect each computer to
the base station. If any of the computers does not have an
Ethernet adapter, you will need to connect one.
You do not need to turn off your computer before you plug in the
base station.
To connect an existing Ethernet hub or switch to the base station
1. Choose one of the computers on the network to set up first, and
follow the Typical Setup method (described at the beginning of
this chapter).
2. When the Setup Wizard prompts you to connect your base
station, unplug the modem Ethernet cable from the hub or
switch and plug it into the port labeled To Modem on the back
of the base station. The other end remains plugged into the
modem.
3. Plug one end of the blue Ethernet cable into the Ethernet port
labeled 1 on the back of the base station, and plug the other
end into the uplink port on your hub or switch.
Some uplink ports on hubs have directional switches. If your
base station is not detected after you connect it to the uplink
port of the hub, move the directional switch to the opposite
position and try your connection again.
4. Follow the rest of the instructions in the Setup Wizard.
An alternate connection method is to use a crossover Ethernet
cable to connect the base station to an Ethernet port (rather than
the uplink port) on the hub or switch.
Connecting a Home Phone Line (HomePNA) or Power Line (PLC)
Network to the Base Station
You can connect a HomePNA network to your Broadband
Networking Wired Base Station by using a HomePNA-to-Ethernet
or PLC-to-Ethernet adapter. For more information, see the
documentation that came with your HomePNA or PLC networking
device or contact the manufacturer’s support services.
Chapter 3: Setting Up 17
Page 24

If Your Computer Is on a Domain
If any of the computers that you want to network is already a
member of a domain—for example, if you have a notebook
computer that is on a domain at your office and you want to
connect it to your home network—the Setup Wizard detects this
and skips the file-sharing and printer-sharing sections of setup.
You will not be able to share files and printers with other
computers on the network, but you will be able to access your
computer’s domain when you return to work.
It is possible to switch to a workgroup after setup to access files
on your network. However, you will then have to switch back to the
domain to access your office network. For more information, see
Broadband Network Utility Help. For more information about
domains and workgroups for file and printer sharing, see Chapter 4.
If your computer is a member of a domain, do not change your filesharing or printer-sharing setup while you are setting up the
Broadband Networking Wired Base Station.
Expanding Your Network
You can connect up to four Ethernet devices directly to the Microsoft
Broadband Networking Wired Base Station, and you can connect
even more devices by connecting Ethernet hubs or switches to the
base station. To connect an Ethernet hub or switch to the base
station, see “I want to connect my base station to an existing
Ethernet network” in this chapter.
You can add a computer or other device to the network through an
Ethernet connection if it has an IEEE 802.3-compliant Ethernet
adapter, an available Ethernet port, and an Ethernet cable to
connect the computer to the base station. To determine whether
your device needs a straight-through or crossover Ethernet cable to
connect to the base station, see the documentation that came
with your device.
To connect an Ethernet device to the base station, connect the
Ethernet cable from your device to Ethernet port 2, 3, or 4 on the
back of the base station.
18 Microsoft Broadband Networking Wired Base Station User’s Guide
Page 25
4
network tasks.
Using Your Network
After setting up your wired network, you can perform common
networking tasks, such as making files and printers available to
other computers, and playing multiplayer games. When you need
to check network settings or monitor devices connected to your
network, you can use the Microsoft
This chapter describes how to:
O
Log on to your workgroup.
O
Perform common networking tasks.
O
Secure your network.
Log On to Your Workgroup
After starting your computer, you must always log on to your network
to access shared files, printers, and other resources.
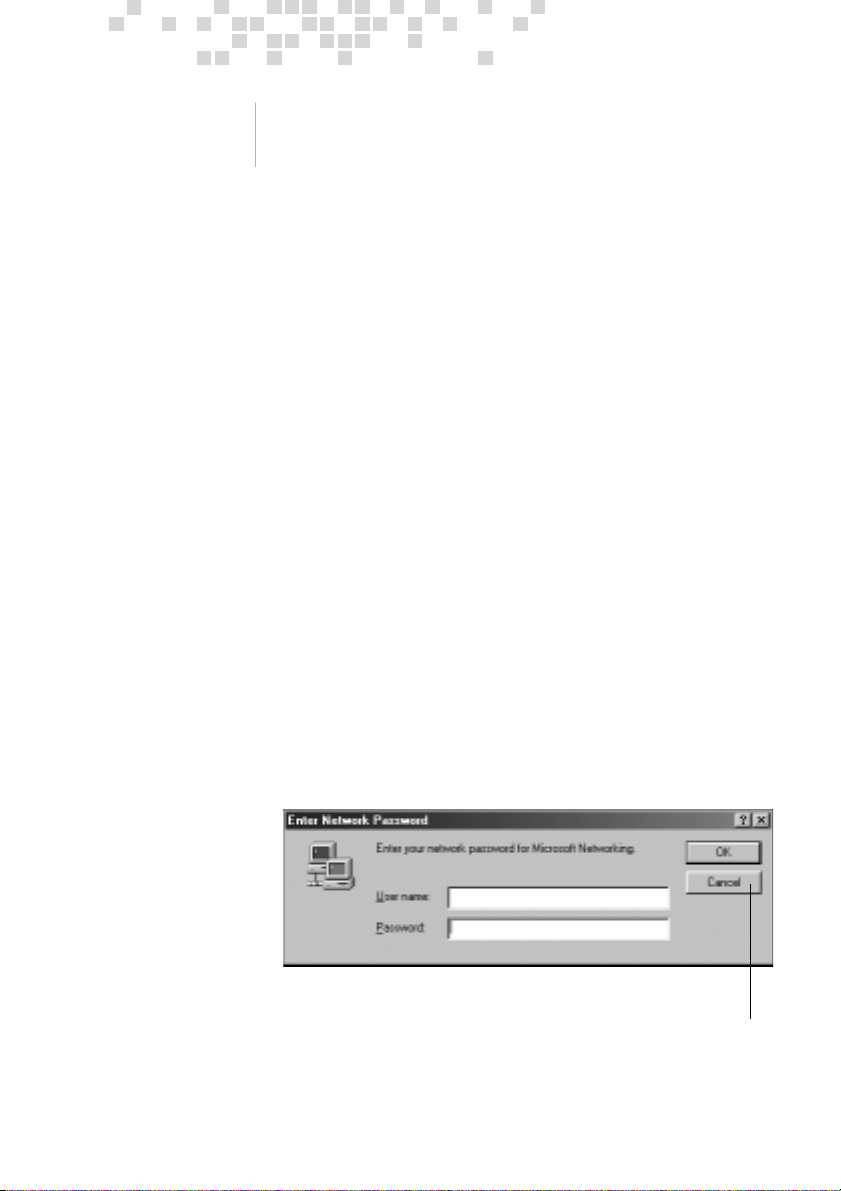
If your computer is running an operating system that displays the
Cancel button, do not click Cancel during the logon process, even
if you decide to leave your password blank. Doing so will prevent
you from accessing shared files and printers on the network. Make
sure that your workgroup name is visible in the logon screen, type
your password, and then click OK.
After you log on, you can perform certain networking functions,
such as accessing the Internet or opening shared files from
Microsoft Windows
Broadband Network Utility to perform these tasks.
®
Explorer. You do not need to open the
®
Broadband Network Utility.
Do Not
Click Cancel
Page 26

To log off and log back on to your network
1. Click Start.
2. Click Log Off. (Or, in Microsoft Windows 2000, click Shut Down,
make sure “Log Off” appears on the menu, and then click OK.)
3. Log on to your network.
After you log on to your network, you can perform certain network
functions, such as opening shared files from Windows Explorer.
Perform Common Networking Tasks
The information in this section will help you get started with the
following tasks:
O
Allowing access to an Internet connection
O
Allowing access to files and folders
O
Allowing access to printers
O
Sharing other peripheral devices
O
Reading e-mail messages on your network
O
Playing games on your network and on the Internet
Important
Before you proceed, check
with your Internet service
provider about its policy
regarding Internet sharing.
Allowing Access to an Internet Connection
With a base station (gateway or router) on your network and a
connection to the Internet through a DSL or cable modem, the
other computers on your network can share that Internet
connection by using Internet Connection Sharing (ICS).
The procedure for accessing the Internet is the same whether your
Internet connection is shared through a base station (gateway or
router) or through ICS in Windows XP. In either case, each computer
on the network needs to have a Web browser, such as Microsoft
Internet Explorer.
About Internet Connection Sharing (ICS)
Internet Connection Sharing is a feature found in Windows 98 SE,
Windows Me, Windows 2000, and Windows XP that allows
computers on a network to access the Internet through a single
connection. If you use a Windows–based computer as your Internet
access point (or ICS host), that computer must be turned on and
you must be logged on to it for the other computers in your network
to connect to the Internet.
For more information, look up “Internet Connection Sharing” in
Windows Help.
20 Microsoft Broadband Networking Wired Base Station User’s Guide
Page 27

To access the Internet from each computer on a network
1. Make sure that you have a Web browser (such as Microsoft
Internet Explorer) installed on each computer that is connected
to your network.
2. On any of the networked computers, open the Web browser.
3. Search for the Web site you want, or enter the address in the
Address bar.
Note that the rate at which you are able to send and receive data
over the Internet is highly dependent on many factors. Adding
another user to your Internet connection typically reduces the
speed of data transfer, but you are unlikely to notice the difference.
Note
For help using the file- and
printer-sharing options in
Windows XP, click Start, click
Help and Support, and then
type “ICS” in the Search box.
Note
If you have Microsoft
Windows 2000 or Windows
XP, you might need to have
administrative privileges (or
be the network administrator)
to share folders with others.
For more information, type
“administrator” in the Search
box in Windows Help.
Allowing Access to Files and Folders
The information in this section provides general guidance for a few
basic file-sharing tasks. For more detailed instructions and
information about sharing files and folders, see Windows Help. To
access Windows Help, click Start, and then click Help (or Help and
Support in Windows XP).
To make it easy to share files and folders, all of your networked
computers should be in the same workgroup. For more
information, look up “workgroup” in Windows Help.
Sharing files and folders is a two-step process. You will need to:
1. Make the files and folders available to the network.
2. Use Windows (Network Neighborhood, My Network Places, or
Windows Explorer) to access the shared files and folders.
To make your files and folders available to the network
While setting up your broadband network, you might have chosen
to share all of your files and folders with the network. If you decide
that you want to share only some of your files and folders with the
network, you can use Microsoft Windows to specify which files and
folders to share.
You can share an entire drive with the network, or you can share
specific folders. Let’s say that you store photographs of your
children in a folder named “Kids” on your computer, and you want
to make the photographs available to your network. To do so, you
would share only the Kids folder and not the other folders on your
computer.
Only the computer users on your network will have access to the files
you share. At times, you might want to prevent users, such as your
children, from accessing particular folders and the files they contain.
If you want to increase the security of your shared files, you can
assign permissions and passwords to your files and folders. For
more information, look up “permission” and “access control” in
Windows Help. (In Windows Me, look up “controlling access.”)
Chapter 4: Network Tasks 21
Page 28

Although you can share files, printers, and other devices on your
network, you cannot share software programs, such as Microsoft
Word or Microsoft Excel. If each computer on the network has
those programs installed, you can share the files that you create
within those programs.
For a computer’s files and folders to be available to the network,
the computer must be turned on and logged on to the network.
Also, if the computer is turned on but in sleep mode, it will not be
accessible from the network. For more information, look up “power
options” in Windows XP Help, or “power management” in Windows
Me, Windows 2000, and Windows 98 Help.
To access and organize your files
Windows Explorer displays the hierarchical structure of files,
folders, and drives on your computer. By using Windows Explorer,
you can copy, move, rename, and search for files and folders. For
example, you can open a folder that contains a file that you want to
copy or move, and then drag the file to another folder or drive.
To open Windows Explorer, click Start, point to All Programs (or
Programs, depending on your version of Windows), point to
Accessories, and then click Windows Explorer.
You can use My Network Places (or Network Neighborhood, in
Windows 2000 and Windows 98) to view all of the shared files and
folders on your network.
My Network Places/Network Neighborhood presents a view of the
network similar to the view of your computer presented by Windows
Explorer. Use My Network Places/Network Neighborhood when you:
O
Want to see all the resources available on the network.
O
Already know where the resource that you want is located.
O
Want to copy files and folders from one network location to
another.
To open My Network Places, click Start, and then click My Network
Places.
To open Network Neighborhood (in Windows 2000 and Windows
98), double-click Network Neighborhood on your desktop.
Before files or folders can be shared on your network, you will need
to do the following:
O
Make the file, folder, or drive available to the network.
O
Use My Network Places or Network Neighborhood to view and
access shared files and folders.
For a computer’s files and folders to be available to the network,
the computer must be turned on. If the computer is in sleep mode,
it will not be accessible from the network. For more information,
type “power options” in the Search box in Windows Help.
22 Microsoft Broadband Networking Wired Base Station User’s Guide
Page 29

To open a file stored on another computer on the network
To complete this task, you must have the program on the local
computer that was used to create the file. For example, if you want
to open a file whose file name extension is .xls, you must have
Microsoft Excel on your computer.
1. Open My Network Places or Network Neighborhood. (See the
earlier instructions on how to open these windows.)
2. Double-click the name of the computer that has the file that you
want to open.
3. Locate the file that you want to open.
4. Double-click the file.
To copy a file from your computer to another place on the network
You need to open only one window -- either Windows Explorer, My
Network Place, or Network Neighborhood -- to complete this task.
Your computer and the computer you want to copy the file to will
both appear in the same window.
1. Open Windows Explorer, My Network Places, or Network
Neighborhood. (See the earlier instructions on how to open
these windows.)
2. On your computer, locate the file that you want to copy to
another computer on the network.
3. Click to highlight the file.
4. On the Edit menu, click Copy.
5. Click the destination folder on the other computer. (You might
need to scroll through the window to find the folder that you
want).
6. On the Edit menu, click Paste.
Allowing Access to Printers
By using Windows, you can print documents on a printer that is
attached to another computer on your network.
The following procedures provide general guidance for a few basic
printer-sharing tasks. The steps that you need to take to complete
these tasks will vary depending on the version of Windows installed
on your computer. For complete instructions and information about
sharing printers, type “printer sharing” in the Search box in
Windows Help.
There is a difference between a “network printer” and a “local
printer” that you share on a network. A network printer connects
directly to the network, rather than to a particular computer, and
can be used by anyone on the network. Most offices have network
printers that are stored in copy rooms accessed by many
Chapter 4: Network Tasks 23
Page 30

Note
Some printer drivers are not
designed for sharing printers.
For more information, see the
documentation that came with
your printer.
employees. A local printer, on the other hand, attaches to a specific
computer, but can be shared with other computers on the network.
You will most likely be using local printers with the Broadband
Network Utility.
Before you can use a printer that is attached to another computer
on your network, you will need to do the following:
O
Make the printer available to the network (this is also known as
sharing a printer).
O
Run the Add Printer Wizard on each computer that you want to
print from. This Installs the printer drivers on each networked
computer that will use the shared printer.
The procedures for sharing a printer and installing drivers differ
depending on your version of Windows. For more detailed
instructions, look up “sharing printers” in Windows Help.
To print to a printer that is attached to another computer on the
network
1. Open the document that you want to print, such as a document
in Microsoft Word.
2. On the File menu, click Print.
3. In the Print dialog box, select the shared printer from the list of
printers.
4. Click OK.
Sharing Other Peripheral Devices
In addition to sharing most printers, you can share storage
devices—such as hard drives, CD-ROM drives, and Zip drives—on
your network. In general, any kind of drive represented by a drive
letter (such as D:\) can be shared.
Storage devices that are not assigned a drive letter (such as tape
drives) cannot be shared. Tape backups of your computer must be
done from the computer that is attached to the tape drive.
In general, scanners, cameras, and CD-ROM burners cannot be
shared with your network.
Reading E-Mail Messages
You can access your e-mail messages from each networked
computer the same way that you would access e-mail messages
without a network (assuming that you have an Internet connection).
Open your e-mail program, or, if you have a Web-based e-mail
account, sign in to your account through your Internet browser.
Keep in mind the following: If you download e-mail messages from
your e-mail account to one computer, those messages will not be
accessible from the other computers on your network. Likewise, if
you share an account with another person, and he or she
24 Microsoft Broadband Networking Wired Base Station User’s Guide
Page 31

downloads mail from the shared account to one computer on the
network, you will not see that mail when you access the account
from another computer.
To illustrate this point, let’s say you share a postal mailbox at your
home with your spouse. If you come home first and take the letters
out of the mailbox, they will no longer be inside the mailbox when
your spouse comes home later and checks for mail.
If you want your e-mail messages to remain available to all users of
your network at any time, you should not download the messages
to one computer. (However, you should delete old messages from
your e-mail account on a regular basis, so that you don’t exceed
the storage space given to you by your e-mail provider.)
Playing Games on Your Network and on the Internet
Many of the most popular games now have multiplayer capability,
allowing two or more players to compete by using a local network.
With network-enabled games, you can use your networked
computers to play games with friends and family members.
Most games come with documentation that explains all you need
to know to configure your network for multiplayer gaming. However,
the following steps might help you prepare for playing games over
the network:
O
If you have purchased a multiplayer game, be sure to install
it on each computer on the network that will be used for
playing games.
O
If you are playing a Web-based game, you might also be
required to pay user fees or download game files to your
computer. Be sure to follow the directions provided on the Web
site.
O
Make sure that the network protocols necessary to run the
games that you want are installed on each computer on your
network. For more information, see the documentation that
came with your games.
O
If you have problems connecting to a Web-based game, you
might need to configure the base station to work with the ports
that your game uses. For more information, see “Port
Forwarding” in Chapter 6.
For information about playing games on the Internet, and for other
game-related information, visit
http://www.microsoft.com/broadbandnetworking/.
Secure Your Network
Protecting the data and programs on your network computers from
security threats, such as computer viruses and hackers, is very
important. The following sections provide general information
about steps you can take to protect your network.
Chapter 4: Network Tasks 25
Page 32

Important
Because Windows XP Internet
Connection Firewall (ICF) will
interfere with file and printer
sharing, do not enable ICF on
virtual private network (VPN)
connections or on client
computers.
Protect Your Network from Computer Viruses
Even with a base station (gateway or router) installed, your network
is still vulnerable to viruses.
To avoid having a problem with viruses on your network, consider
the following suggestions:
O
Educate yourself about how viruses are commonly spread so
that you do not spread one yourself.
• Do not load a program from an untrustworthy source on one
of your network computers. E-mail attachments from people
you don’t know or files from the Internet or online bulletin
boards are particularly risky.
• Never open e-mail attachments that you are not expecting.
• Scan all floppy disks before copying or opening files from
them, or before starting your computer from them.
O
Install an antivirus program on each computer on your network
and use it regularly to check your computers for viruses.
Remember to update the antivirus program on a regular basis.
O
Learn the common signs of viruses: unusual messages that
appear on your screen, decreased system performance, missing
data, and inability to access your hard drive. If you notice any of
these problems on your computer, run your antivirus software
immediately to minimize the chances of losing data.
Protect Your Network from Hackers
The Microsoft Broadband Networking Wired Base Station helps
establish a security layer between your network computers and the
Internet. The security mechanisms provided by the base station
include a firewall and Network Address Translation (NAT).
A firewall is a barrier that helps protect your network from
unauthorized visitors. Like an actual firewall built to help prevent
fire from spreading between adjoining buildings, computer firewalls
help prevent unauthorized communication between an individual
computer or group of networked computers and the Internet.
The firewall specifies what information can be communicated from
the computers on your network to the Internet, and from the
Internet to the computers on your network.
NAT hides the IP addresses of the individual computers on a
network from the Internet so that only the router’s IP address is
visible on the Internet. Hiding these addresses provides another
layer of protection against hackers trying to access the computers
on your network.
26 Microsoft Broadband Networking Wired Base Station User’s Guide
Page 33

5
monitoring.
The Broadband Network Utility
The Microsoft® Broadband Network Utility is automatically
installed on your computer when you install the Setup software.
Use it to check the status of your network or change your network
settings. The Broadband Network Utility also shows the devices
currently connected on your network.
This chapter describes how to:
O
View computer, network connection, and Internet connection
status.
O
View and change network settings.
O
Update network software, drivers, and firmware.
To open the Broadband Network Utility, do one of the following:
O
Double-click the Broadband Network Utility icon
Windows notification area of the tray.
O
Click Start, point to Programs, and then click Microsoft
Broadband Network Utility.
in the
Your Computer Status
Your Network Status
Your Internet
Connection Status
Status of all computers and
devices in your workgroup
Page 34

The following sections describe how to interpret status information
about your network and perform common tasks by using the
Broadband Network Utility.
For more detailed information about any of these tasks, see
Broadband Network Utility Help.
To Open Broadband Network Utility Help
1. Open the Broadband Network Utility.
2. On the Help menu, click Microsoft Broadband Network
Utility Help.
View the Status of Your Computer
This area of the Broadband Network Utility displays information
about the computer that you are currently using. If you cannot
access the Internet, or your network is not available, use the
troubleshooting link to go directly to the list of related topics. For
other network problems, on the Help menu, click Microsoft
Broadband Network Utility, double-click Troubleshooting, and
then click the topic that you want.
View the Status of Your Network Connection
This area of the Broadband Network Utility displays information
about your network connection. If there is a problem with your
connection, on the Help menu, click Microsoft Broadband
Network Utility, double-click Troubleshooting, and then click the
file that you want.
You can also view information about the status of your network
connection by resting the pointer on the Broadband Network Utility
icon
in the Windows notification area of your taskbar or tray.
Broadband Network
Utility Icon
28 Microsoft Broadband Networking Wired Base Station User’s Guide
Page 35

View the Status of Your Broadband Internet
Connection
This area of the Broadband Network Utility lets you know whether
you are currently connected to the Internet. If there is a problem
with your Internet connection, on the Help menu, click Microsoft
Broadband Network Utility, double-click Troubleshooting, and
then click the file that you want.
View the Status of Other Network Devices
This area of the Broadband Network Utility displays information
about all the computers and devices in your workgroup.
To refresh the network device list
O
Right-click any icon in the network device list, and then click
Refresh.
To remove an inactive device from the network device list
O
Right-click the dimmed icon for the device, and then click
Remove from List.
View and Change Network Settings
You can view and change your base station settings from the
Broadband Network Utility. If you have a Microsoft adapter, you can
also view and change its settings in the Broadband Network Utility.
To view and change base station settings
1. On the Tools menu, click Base Station Management Tool.
2. Type the base station password. (The default password
is admin.)
To view and change adapter settings
O
On the Tools menu, click Computer Settings.
Customize the Broadband Network Utility
You can customize the way you view and use the Broadband
Network Utility.
To customize the Broadband Network Utility
O
On the Tools menu, click Options.
Chapter 5: Monitoring 29
Page 36

Update Software, Drivers, and Firmware
Occasionally, Microsoft might provide upgrades to the Broadband
Network Utility software, network drivers, or firmware on the
Microsoft Broadband Networking Web site. When an upgrade is
available, you will automatically be notified. After you log on to a
networked computer, a message will appear in the notification
area of your desktop with a link to the Microsoft Broadband
Networking Web site.
To update network software, drivers, or firmware
1. Open the Broadband Network Utility.
2. On the Help menu, click Check for Updates Online.
3. Follow the instructions on the Microsoft Broadband Networking
Web site to download the most current software, drivers, or
firmware.
30 Microsoft Broadband Networking Wired Base Station User’s Guide
Page 37

6
configuring.
Customizing the Base Station
The Base Station Management Tool is a Web-based utility that you
can use to manage network settings and customize security
options on the Microsoft
Station.
You can establish many base station settings when you run the
Setup Wizard. However, if you want to change a setting, such as
your base station password, or if you have special network
requirements (for example, if you want to establish a Web server
on your network), you can use the Base Station Management Tool
to configure the necessary settings.
If you do not run the Setup Wizard when you set up your network,
you must use the Base Station Management Tool to configure your
network settings.
This chapter explains how to perform the following tasks:
O
Open the Base Station Management Tool and view the current
configuration of your base station.
O
Configure the base station with the settings provided by your
Internet service provider (ISP) so that your networked computers
can connect to the Internet.
O
Manage network time settings, base station password, and
firmware upgrades.
O
Create a backup file of the base station settings.
O
Customize security features, such as firewall settings, media
access control (MAC) filtering, and client filtering.
O
Change the base station configuration from routing mode to
bridging mode.
O
Limit access to the Internet or to particular applications on one
or more of your networked computers by setting up client
filtering.
O
Set up the network to allow unrestricted access to the Internet
from one computer by establishing a virtual demilitarized zone
(DMZ).
O
Configure port forwarding to run applications with special
network requirements.
®
Broadband Networking Wired Base
Page 38

Note
The Base Station
Management Tool cannot be
opened simultaneously on two
different networked
computers.
Opening the Base Station Management Tool
You can open the Base Station Management Tool from the
Microsoft Broadband Network Utility or open it directly from a Web
browser, such as Microsoft Internet Explorer 5 or later, or Netscape
Navigator 4.7 or later.
To open the Base Station Management Tool
1. In the Broadband Network Utility, on the Tools menu, click Base
Station Management Tool.
-orOpen your Web browser, and then enter the base station IP
address in the address field. By default, this address is
http://192.168.2.1. However, you can change this address in
the Base Station Management Tool.
2. To log on, type the base station password that you created when
you ran the Setup Wizard. The base station password is case
sensitive. If you did not run the Setup Wizard, use the default
base station password, admin.
If you do not remember the base station password that you set when
you ran the Setup Wizard, you will need to restore the factory default
settings on the base station and use the default base station
password, admin. When you restore the original settings, you lose
your ISP settings and must reconfigure these settings from the Wide
Area Network page in the Base Station Management Tool.
For information about restoring factory default settings by using
the Reset button on the base station, see page 42.
Logging Off
It is important to log off the Base Station Management Tool after you
have finished using it. Logging off protects the configuration of your
base station so that unauthorized users cannot access and change
your settings. Logging off also ensures that you can open the Base
Station Management Tool from another computer if you need to.
To log off the Base Station Management Tool
O
On any page of the Base Station Management Tool, click Log
Off.
32 Microsoft Broadband Networking Wired Base Station User’s Guide
Page 39

Navigating the Base Station Management Tool
After you log on, the Home page of the Base Station Management
Tool opens. You can use the menu in the left pane to navigate to
the other pages of the Base Station Management Tool.
Chapter 6: Configuring 33
Page 40

The following table lists the menu items in the Base Station
Management Tool and describes the tasks that you can perform
from the pages that those menu items open.
Menu item Tasks
Home View current network settings and activity. For more
Management Reset the base station, back up and restore base station
Local Area Network Enable the Dynamic Host Configuration Protocol (DHCP)
Wide Area Network Specify and configure the type of Internet connection
Security Configure a variety of specialized security functions,
information, see page 37.
settings, upgrade firmware, establish time settings, and
change the base station password. For more
information, see page 41.
server on your base station and set the IP address range
and lease time. For more information, see page 49.
that your base station uses. For more information, see
page 51.
including:
• Firewall
• Port forwarding, including virtual servers and
special applications
• Client filtering
• MAC filtering
For more information, see “Security Settings” on
page 54.
You can also view the base station log from the Security section.
For more information, see page 62.
If you need help at any time, click the Help button available on
each page of the Base Station Management Tool.
34 Microsoft Broadband Networking Wired Base Station User’s Guide
Page 41

Configuring the Base Station
Typically, when you run the Setup Wizard, you can establish the
settings required for your base station to connect to the Internet. If
you completed the Setup Wizard, you only need to use the Base
Station Management Tool when you want to modify your network
settings.
You must use the Base Station Management Tool to establish the
initial settings if any of the following are true:
O
You did not run the Setup Wizard when you connected your
network hardware and installed the network software.
O
You are trying to configure the base station from a computer
running Microsoft Windows
running Windows (for example, a Macintosh).
O
You want to set the base station to bridging mode to extend the
capabilities of an existing wired network.
If any of these situations apply to you, you must initially configure
the base station from the Base Station Management Tool.
To configure the base station in routing mode from the Base
Station Management Tool
1. Connect the base station to a computer. For information about
how to do this, see Chapter 3.
2. On the computer connected to the base station, open your Web
browser, and then enter 192.168.2.1 in the address field.
3. At the logon prompt, enter your password. The default password
is admin.
4. On the Management menu, click Change Password. To change
your password, follow the directions on page 48.
5. Click Wide Area Network. On the Wide Area Network page,
enter the settings provided by your ISP.
®
2000 or from a computer not
Chapter 6: Configuring 35
Page 42

Warning
When you configure the base
station as a bridge, the Base
Station Management Tool is no
longer available.
Using the Base Station as a Bridge
If you already have a functioning network in your home or office,
you can use the base station to expand network connectivity. This
is called bridging, because the base station acts as a bridge
between two networks or segments of a network.
Before you change the base station to bridging mode, make sure
that the following conditions are true:
O
A device on your network, such as your modem, is providing
router capabilities, or a device on your network is providing a
Network Address Translation (NAT) service.
O
There is an existing DHCP server on your network.
O
All devices on your network use static (fixed) IP addresses.
To configure the base station as a bridge
1. Connect the base station to a computer on your network. For
information about how to do this, see “Working with Existing
Networks” in Chapter 3.
2. On the computer connected to the base station, open your Web
browser, and then enter 192.168.2.1 in the address field.
3. At the logon prompt, enter your password. The default password
is admin.
4. On the Management menu, click Change Password. To change
your password, follow the directions on page 48.
5. On the Security menu, click Network Mode.
6. Select the Bridging Mode check box, and then click Yes to
confirm your selection. When you switch from routing mode to
bridging mode, the base station resets. While the reset is in
progress, the power light on the base station blinks and then
turns orange. When the light is solid green, the reset is
complete.
7. After the reset is complete, turn off the computer and the base
station. Remove the cable from the base station Ethernet port
and insert it into the To Modem port. Leave the other end of the
cable connected to the Ethernet port of the computer.
9. Turn on the base station and restart your computer.
36 Microsoft Broadband Networking Wired Base Station User’s Guide
Page 43

Home Page
You can view current base station and Internet connection settings
from the Home page of the Base Station Management Tool. The
following sections describe these settings.
Wide Area Network
The wide area network (WAN) settings provide a summary of the
Internet settings provided by your ISP. The settings that appear will
vary depending on whether your ISP account provides a static
(fixed) IP address, a dynamic Internet connection, or a Point-toPoint Protocol over Ethernet (PPPoE) connection. If your Internet
connection is disabled, the WAN settings will be unavailable.
The following table describes the WAN settings and how to modify
them.
Setting Description Notes
Broadband Appears as If the Base Station Management Tool
connection Connecting, shows that your broadband connection is
Connected, disconnected when you expect it to be
Disconnecting, connected and your ISP provides a
or dynamic Internet connection, try clicking
Disconnected. Release and then Renew to change the
base station IP address. If you have a
PPPoE connection, try clicking Disconnect
and then Connect. You can also try
resetting the base station and your
broadband modem. If you complete
these steps and the Broadband
Connection is still disconnected, contact
your ISP for assistance.
WAN IP address Shows the This is the external (public) IP address
IP address that connects your network to the
provided by Internet.
your ISP. If your ISP provides you an IP address
dynamically (by using a DHCP server),
this address might change periodically.
You can click the Release button and then
the Renew button to get a new IP address.
Releasing your IP address is a good idea
if you are having trouble accessing the
Internet and you have determined that it
is not a problem with the computer. If
renewing the IP address does not resolve
the problem, contact your ISP for
assistance.
Chapter 6: Configuring 37
Page 44

WAN settings (continued)
Setting Description Notes
Subnet mask Your ISP If you are using a static Internet
Default The IP address The gateway setting is automatically
gateway that the base generated when you have a dynamic or
Primary Domain Your ISP In some cases, these settings might be
Name System provides the automatically filled in. Otherwise, you
(DNS) and DNS addresses. can enter them on the Wide Area
Secondary DNS Network page of the Base Station
establishes the connection, you can change the subnet
WAN subnet mask for your wide area network, but you
mask. should use the subnet mask provided by
your ISP. The subnet mask does not
appear when you are using a PPPoE
Internet connection.
station uses to PPPoE connection. If you have a static
send data from (fixed) IP address, your ISP should
your network provide the gateway setting, and you can
to the Internet. enter the setting on the Wide Area
Network page of the Base Station
Management Tool. If you have a dynamic
connection and your Gateway setting is
blank, you should click Release and then
Renew.
Management Tool.
38 Microsoft Broadband Networking Wired Base Station User’s Guide
Page 45

Local Area Network
The Local Area Network (LAN) settings relate to your local network—
that is, how the base station is configured in relation to the devices
on your network.
The following table describes the LAN settings and how to modify
them.
Setting Description Notes
Local IP address The default IP address You can change the local IP address
Subnet mask The subnet mask for You cannot change the subnet mask
DHCP server Appears as Enabled You can change this setting on the
Firewall Appears as Enabled You can change this setting in the
of your base station is on the Local Area Network page of
192.168.2.1. the Base Station Management
Tool, but this is not recommended.
your local network is of your LAN.
255.255.255.0.
or Disabled. Local Area Network page of the
Base Station Management Tool.
or Disabled. Security section of the Base Station
Management Tool.
DHCP Client List
When a DHCP server is enabled on a network, each device (also
called a client, which can be a desktop computer, notebook
computer, or another connected device) leases an IP address for a
specified period of time. The DHCP client list shows all the clients
that have an active lease on an IP address, including the IP
address and MAC address of each client. The list includes any
device with an active lease, even if that device is no longer actively
connected to the network. A client is removed from the DHCP client
list when its lease has expired. The network can support up to 253
clients at one time.
You can specify the IP address lease time from the Local Area
Network page of the Base Station Management Tool. For
information about how to do this, see page 49.
The DHCP client list is relevant to your network only if you have the
DHCP server enabled on the base station. For information about
how to enable or disable the DHCP server, see page 50.
Chapter 6: Configuring 39
Page 46

Base Station Information
You can view current network status in the Base Station
Management Tool, under Network Information. The following table
describes this network information.
Setting Description Notes
Runtime code These settings show When you check for firmware
version and the version numbers upgrades at
Boot code of your firmware. www.microsoft.com/
version broadbandnetworking/
LAN MAC This is the MAC For information about MAC
address address of the base addresses, see page 52.
station.
you should download the version on
the Web only if it is later than the
version shown here.
MAC address This is the MAC For information about MAC
Serial number This is the serial If you need to call Product Suppor t
address that your ISP addresses, see page 52.
sees.
number of your base Ser vices for assistance, you might
station. need to provide the serial number.
40 Microsoft Broadband Networking Wired Base Station User’s Guide
Page 47

Note
You can also reset the base
station by using the reset
button on the base station
itself. For information about
how to perform a hardware
reset, see Chapter 1.
Management Settings
When you want to change the settings related to the management
of your base station (for example, resetting the base station,
backing up or restoring settings, establishing time settings, or
changing the password), use the Management menu in the Base
Station Management Tool. The following sections describe how to
perform management-related tasks.
Reset the Base Station
You can reset the base station when you experience any of the
following problems:
O
You have DHCP enabled on the base station, but the base
station is not assigning IP addresses.
O
The computers on the network are no longer able to connect to
the Internet.
O
The base station is not performing as expected.
When you reset the base station, you are forcing it to reinitialize
and restart all of its functions. The base station settings will not
change when you reset the base station.
To reset the base station
1. Open the Base Station Management Tool, and then click
Management.
2. On the Management menu, click Reset.
3. On the Reset Base Station page, click Reset. While the reset is
in progress, the power light on the base station blinks and then
turns orange. When the light is solid green, the reset is
complete.
If you want to open the Base Station Management Tool after the
reset is complete, enter your base station password on the Logon
page. Do not attempt to log on until the reset is complete and the
power light on the base station is solid green.
Chapter 6: Configuring 41
Page 48

Note
You can also restore the
factory default settings by
using the reset button on the
base station itself. For
information, see Chapter 1.
Restore Factory Default Settings
You can restore the base station to its factory default settings if
absolutely necessary. When you restore factory default settings,
you clear any special base station configurations that you have
established, and you will need to reconfigure your base station
settings or restore these settings from a backup file.
You should restore the original factory default settings only under
the following circumstances:
O
You are experiencing serious problems with your base station,
and resetting the base station does not fix the problem.
O
You cannot remember your base station password.
If you cannot remember your base station password, you will not be
able to open the Base Station Management Tool. In this situation,
you must restore the factory default settings from the base station,
and then use the default password admin to log on to the Base
Station Management Tool and reconfigure your settings.
To restore factory default settings
1. Open the Base Station Management Tool, and then click
Management.
2. On the Management menu, click Back Up and Restore.
3. Under Restore Factory Default Settings, click Restore Factory
Default Settings. While the original factory default settings are
being restored, the power light on the base station blinks and
then turns orange. When the light is solid green, the settings
have been restored.
If you want to open the Base Station Management Tool after the
settings are restored, enter admin as the password on the Logon
page. Do not attempt to log on to the base station until the settings
are restored and the power light on the base station is solid green.
After you restore the factory default settings, you should navigate
to each page of the Base Station Management Tool and reestablish
the network settings you want, or restore the base station settings
by using a backup file. For information about creating a backup file
of your settings, see the following section.
Be sure to establish your unique base station password as soon as
possible after restoring the factory default settings to prevent
unauthorized users from logging on. For information about
changing the base station password, see page 48.
42 Microsoft Broadband Networking Wired Base Station User’s Guide
Page 49

Back Up Base Station Settings
You can back up all your base station settings from the Base
Station Management Tool. The backup can include settings that
you established when you completed the Setup Wizard and the
settings that you modified from the Base Station Management
Tool.
It is a good idea to create a backup file after you have the base
station set up and operating normally. If for some reason the base
station malfunctions, you can restore the factory default settings to
the base station, and then use the backup file to reconfigure your
base station and resume normal operations.
It is recommended that you back up settings whenever you change
settings, such as your base station password.
To back up base station settings
1. Open the Base Station Management Tool, and then click
Management.
2. On the Management menu, click Back Up and Restore.
3. Click Back Up Settings.
4. If you receive a message asking you whether to open or save the
file, click Save.
5. Type a name for the file that contains your base station settings
(or use the default name Config.bin), browse to the folder where
you want to save the file, and then click Save.
Chapter 6: Configuring 43
Page 50

Restore Base Station Settings from a Backup
You can restore settings from a backup file at any time. This
capability is particularly useful if the base station malfunctions and
you must restore the factory default settings. Instead of manually
reconfiguring each of your network settings from the Base Station
Management Tool, you can restore all of your original settings from
the backup file.
To restore base station settings from a backup file
1. On the computer where you saved the backup file of your base
station settings, open the Base Station Management Tool.
2. Enter the current base station password. If you have just
restored the factory default settings to the base station, the
password will be admin.
3. On the Management menu, click Back Up and Restore.
4. Under Restore Base Station Settings from a Backup, type the
path and name of the backup settings file, or click Browse to
search for the file that contains your network settings.
5. Click Restore Settings. While the settings are being restored,
the power light on the base station blinks and then turns
orange. When the light is solid green, the settings have been
restored.
If you want to open the Base Station Management Tool after the
settings are restored, enter your base station password on the
Logon page. Do not attempt to log on until the settings are restored
and the power light on the base station is solid green.
44 Microsoft Broadband Networking Wired Base Station User’s Guide
Page 51

Upgrade Base Station Firmware
Occasionally, Microsoft may provide upgrades to the base station
firmware to improve the performance of your base station. You can
upgrade the firmware from the Base Station Management Tool.
You can perform a firmware upgrade from any of your network
computers, but it is recommended that you use a computer with a
wired (Ethernet) connection to the base station.
During an upgrade, all users connected to the network will lose
network functionality.
To upgrade the base station firmware
1. Open the Base Station Management Tool, and then click
Management.
2. On the Management menu, click Firmware Upgrade.
3. Follow the directions on the screen to upgrade your firmware.
While the firmware is being saved to your base station, the
power light on the base station blinks and then turns orange.
When the light is solid green, the update is complete. If the
upgrade fails, the power light will continue to blink slowly until
you successfully upgrade the firmware. In this situation, you can
try to upgrade the firmware again, or you can reset the base
station.
If you want to open the Base Station Management Tool after a
successful firmware update, enter your base station password on
the Logon page. Do not attempt to log on until the firmware
upgrade is complete and the power light on the base station is
solid green.
Certain programs do not allow pop-up windows from Web browsers.
If you have one of these programs installed on your computer, you
might experience problems when you click the Microsoft
Broadband Networking Web site link on the Upgrade Firmware
page. If you do experience problems, you can open the Microsoft
Broadband Networking site by entering
http://www.microsoft.com/broadbandnetworking/
in the address box of your Web browser and browsing to the update
page, or by turning off the software that prevents pop-up windows.
For information about how to upgrade network software and
drivers from the Broadband Network Utility, see Broadband
Network Utility Help.
Chapter 6: Configuring 45
Page 52

Establish Base Station Time Zone
The base station uses the date and time for client filtering and to
time-stamp entries to the base station log.
The base station system clock is set to the Pacific time zone by
default. You can change the base station time zone from the Base
Station Management Tool.
To change the base station time zone
1. Open the Base Station Management Tool, and then click
Management.
2. On the Management menu, click Set Time.
3. Under Base Station Time Zone, in the drop-down list, click the
time zone you want.
4. Select the Adjust automatically for daylight saving time check
box if you want the base station to adjust for daylight-saving
time.
5. If you selected the Adjust automatically for daylight saving
time check box, type the date that you want daylight-saving time
to start and the date that you want daylight-saving time to end.
You must update these dates each year to correspond with
daylight-saving time.
6. Click Update Time Settings to ensure that the changes that you
made are saved.
46 Microsoft Broadband Networking Wired Base Station User’s Guide
Page 53

Synchronize Time to Internet Time Server
The base station automatically attempts to synchronize with one of
a set of Simple Network Time Protocol (SNTP) servers when it is
connected to the Internet. If you want to synchronize the base
station to a specific SNTP server, you can do so from the Base
Station Management Tool. Before you can set the SNTP server, you
must identify the IP address for the server that you want to use.
To locate an SNTP server
1. Open your Web browser, and go to your favorite search engine
(for example, http://www.msn.com).
2. Enter Time synchronization on the Internet as a search term.
3. Review the search results, and browse to the SNTP server site
that you want to use.
4. Write down the IP address for the SNTP server that you have
accessed.
To synchronize the base station with an SNTP server
1. Open the Base Station Management Tool, and then click
Management.
2. On the Management menu, click Time Settings.
3. Under Synchronize Time to Internet Time Server, type the IP
address for the specific SNTP server that you want to use, and
then click Add.
4. Repeat step 3 for any additional backup SNTP servers that you
want to specify.
Chapter 6: Configuring 47
Page 54

Change the Base Station Password
Access to the Base Station Management Tool is password
protected so that only users who know the base station password
can change your network configuration. If you ran the Setup
Wizard, you were prompted to establish a password. This is your
base station password. If you did not run the Setup Wizard, your
default password is admin. You can change the base station
password from the Base Station Management Tool.
It is a good idea to change your password every two to three
months, or more frequently if you are concerned that an
unauthorized person has administrative access to the base
station.
If at any point you restore the factory default settings for the base
station, the default password admin is also restored. You can use
this password to access the base station, and then create a new
password at the earliest opportunity.
When you change your base station password, be sure to update
your backup file.
To change the base station password
1. Open the Base Station Management Tool, and then click
Management.
2. On the Management menu, click Change Password.
3. In the Current password box, type your current password.
4. In the New password box, type a new password. The base
station password can contain 3–16 alphanumeric characters
and is case sensitive.
5. In the Retype new password box, retype the new password. Do
not use the Copy and Paste commands to add the new
password to the Retype new password box. If you did not type
your password correctly in the New Password box, you will not
know what your password is when you paste it into the Retype
new password box.
6. If you want, in the Log out inactive user in box, type a time
interval. After the specified time interval elapses without
activity, you will need to log on to the Base Station Management
Tool again in order to view or change settings.
7. Click Apply to save the new password.
Be sure to store your password in a safe place. If you forget or
misplace your password and cannot log on to the Base Station
Management Tool, you can restore the base station to the factory
default settings from the base station itself, and then use the
default password admin to open the Base Station Management
Tool. For more information about restoring factory default settings
on the base station, see page 42.
48 Microsoft Broadband Networking Wired Base Station User’s Guide
Page 55

Note
If you set the Broadband
Networking Wired Base
Station to bridging mode, the
settings on the Local Area
Network page in the Base
Station Management Tool will
be unavailable.
Local Area Network Settings
You can configure settings for your local network on the Local Area
Network page of the Base Station Management Tool. This
configuration includes the following:
O
Changing the IP address of your base station and viewing the
subnet mask assigned to your local network.
O
Enabling or disabling a DHCP server on the base station.
O
Setting the IP address range and lease time for the DHCP
server.
O
Entering the local domain name for the DHCP server if
necessary.
Before you configure your local network, take some time to learn
about the options available. The following sections describe each
of the local area network settings.
IP Address and Subnet Mask
The default IP address of your local network is 192.168.2.1. This
address is reserved for private local networks, and it is not visible
to the Internet.
You do not need to change the IP address unless you have a
specific reason to do so—for example, if your modem IP address
overlaps the base station IP address. If you want to change the IP
address of your base station, be sure to change it to another
nonroutable (private) IP address.
The IP addresses assigned to the computers on your local network
by the DHCP server are derived from the base station IP address. If
you change the base station IP address, the DHCP IP address
range will also change.
The subnet mask for your local network is 255.255.255.0. You
cannot change the subnet mask assigned to your local network.
To modify the base station IP address
1. Open the Base Station Management Tool, and then click Local
Area Network.
2. Type a new IP address for the base station.
3. Click Apply to save the changes.
Chapter 6: Configuring 49
Page 56

DHCP Server
The base station DHCP server allocates IP addresses to the
computers on your local network from a specific range of IP
addresses. Each time a computer on your network requests an IP
address, it receives one within the specified IP address range.
Typically, the DHCP server will assign the same IP address to a
client computer.
The base station provides a default IP address range for the DHCP
server to use. If you want, you can select a specified IP address
range when you enable the DHCP server.
To enable the DHCP server on the base station
1. Open the Base Station Management Tool, and then click Local
Area Network.
2. If it is not already selected, select the Enabled check box to
enable the DHCP server on the base station.
3. If you do not want to use the IP address pool specified by the
DHCP server, type a starting IP address and an ending IP
address for the pool. Do not include the base station IP address
in the IP address pool. For example, if you are using the default
base station IP address (192.168.2.1), the address range must
be between 192.168.2.2 and 192.168.2.254.
4. Select a lease time for the assigned IP addresses. The default
time is two hours.
5. Type a local domain name if your ISP provided one for you.
6. Click Apply to save your changes.
50 Microsoft Broadband Networking Wired Base Station User’s Guide
Page 57

Wide Area Network Settings
The wide area network (WAN) settings on your network depend on
your ISP account. ISPs provide broadband customers with one of
three different types of Internet connections:
O
Dynamic
O
Static
O
PPPoE
The Setup Wizard helps you configure your Internet connection. If
you did not run the Setup Wizard, the Broadband Networking Wired
Base Station selects a dynamic connection by default. If you have a
static Internet connection or a PPPoE connection, you can change
the WAN setting from the Wide Area Network page of the Base
Station Management Tool.
You also have the option to disable your network Internet
connection, if necessary.
The following sections describe each type of Internet connection
and how to configure your base station for that option.
Dynamic Internet Connection
If your ISP provides a DHCP server, you should select a dynamic
Internet connection for the WAN. This connection enables your ISP
to assign the IP address to your base station dynamically, based on
the IP addresses available in the ISP’s subnet.
When you select a dynamic Internet connection, you might be
required to enter the host name and the DNS addresses, if your ISP
provided this information.
To establish a dynamic Internet connection
1. Open the Base Station Management Tool, and then click Wide
Area Network.
2. Under Internet Connection Type, click Dynamic.
3. Specify a host name if your ISP provided one to you.
4. Specify a MAC address, and click Clone MAC Address, if
necessary. For information about this option, see the following
section.
5. Specify the DNS primary and secondary addresses, if your ISP
provided you with this information and it has not been obtained
automatically.
6. Click Connect to save the WAN settings.
Chapter 6: Configuring 51
Page 58

MAC Addresses
A MAC address is a unique numerical identifier for a hardware
device, such as a base station or adapter. Your base station has
two MAC addresses, one for the local area network and one for the
wide area network. Each network adapter that you use also has a
MAC address that is assigned at the time of manufacture and
printed on the label.
Some ISPs record the MAC address of the adapter that you use
when you first connect to the Internet. Depending on your ISP
account, you might experience problems if you later use the base
station’s default MAC address to connect to the Internet.
One way to avoid this problem is to clone the MAC address of the
adapter installed in the computer where you initially connected to
the Internet. When you clone the adapter MAC address, it replaces
the base station WAN MAC address, and so each device on your
network, including the base station, appears to have that MAC
address.
To clone a MAC address
1. Open the Base Station Management Tool, and then click Wide
Area Network.
2. In the MAC address box, type the MAC address of the adapter
installed in the computer that is connected to your base station.
The MAC address appears on the label on the underside of your
adapter.
3. Click Clone MAC address.
It is a good idea to record the MAC address of the adapter that you
clone, so that if you lose your settings or no longer have the
adapter, you do not lose your ability to connect to the Internet.
Static Internet Connection
If your ISP account provides a static (fixed) IP address, you should
configure the WAN settings on your base station for a static
Internet connection.
To establish a static Internet connection
1. Open the Base Station Management Tool, and then click Wide
Area Network.
2. Under Internet Connection Type, click Static.
3. Under Static Connection, type the information provided by your
ISP, including the IP address, subnet mask, default gateway IP
address, and DNS addresses (if provided).
4. Click Apply to save the WAN settings.
52 Microsoft Broadband Networking Wired Base Station User’s Guide
Page 59

PPPoE Internet Connection
If your ISP uses a PPPoE connection, you should configure the WAN
settings on your base station for a PPPoE connection.
A PPPoE Internet connection functions like a dial-up connection in
that your user name and password are passed to the ISP for
authentication to establish an Internet connection. This interaction
happens automatically when the base station is turned on.
Unlike a dial-up connection, a PPPoE Internet connection is
persistent unless any of the following occurs: you disable the
connection; the base station is turned off or loses power; or you
specify a maximum idle time, and this time elapses.
To establish a PPPoE Internet connection
1. Open the Base Station Management Tool, and then click Wide
Area Network.
2. Under Internet Connection Type, click PPPoE.
3. Under Point-to-Point Protocol over Ethernet (PPPoE), type your
user name and password.
4. Type a service name if your ISP supplied it.
5. Type a maximum idle time, if your ISP instructs you to. You will
be disconnected from the Internet if the time that you specify
elapses without activity.
6. Type the DNS primary and secondary addresses, if your ISP
provided you with this information.
7. Click Apply to save the WAN settings.
Disabled Connection
You can disable your Internet connection at any time. You might
want to disable your Internet connection in the following situations:
O
When you suspect that an unauthorized individual is accessing
your network.
O
When you want to limit your children’s access to the Internet.
O
When you want to limit the exposure of your local network to
the WAN.
Disabling your Internet connection does not affect your Internet
connection settings in any way. When you reestablish your
connection, your original settings are intact.
To disable the Internet connection
1. Open the Base Station Management Tool, and then click Wide
Area Network.
2. Under Internet Connection Type, click Disabled.
3. Click Apply to disable your Internet connection.
Chapter 6: Configuring 53
Page 60

Security Settings
The Broadband Networking Wired Base Station is configured to
protect your network from the most common hacker attacks and
other security risks. If necessary, you can change the default base
station settings or establish special services from the Security
section of the Base Station Management Tool.
The following sections describe the security features of the base
station and how to customize them.
Be aware that changing security settings might affect whether the
computers on your LAN are able to connect to the LAN and
Internet. You should not change the default security settings unless
you are absolutely clear about your objective in doing so.
Firewall Settings
The Broadband Networking Wired Base Station provides a firewall
to protect your network against malicious transmissions. Just as
the name implies, a firewall acts as a barrier or buffer zone
between your local network and the Internet. It checks data
packets that are being transmitted to your network and discards
any suspicious data.
The firewall is enabled by default, but you can choose to disable it
from the Base Station Management Tool. Do not disable the
firewall unless you have a good reason to do so.
To change the firewall settings
1. Open the Base Station Management Tool, and then click
Security.
2. On the Security menu, click Firewall Settings.
3. Do one of the following:
O
To enable the firewall, select the Enable the integrated
firewall check box.
O
To disable the firewall, clear the Enable the integrated
firewall check box.
4. Click Apply to save your changes.
Block Ping Commands
You can configure the firewall to discard network ping commands.
A ping command is like a short conversation between a device on
the WAN and your base station. When a device on the WAN sends
a ping command, the base station responds.
When you block ping commands, you are telling the base station
not to respond to a ping initiated from the WAN. This security
mechanism hides your network from hackers who might be pinging
random IP addresses to see where they get a response. A response
54 Microsoft Broadband Networking Wired Base Station User’s Guide
Page 61

verifies your network location, and a hacker can then use this
information to send malicious communications to your network.
In general, it is a good idea to discard ping commands sent from
the WAN. The only circumstances in which blocking ping
commands might present a problem are:
O
When your ISP needs to ping your network to ensure that the
connection is still valid.
O
When you or another person needs to check your Internet
connection from an external network. For example, you might
want to do this to make sure that you can access your Web
server.
O
When you are playing games on the Internet, and other players
need to verify your network location and connection speed.
To block ping commands
1. Open the Base Station Management Tool, and then click
Security.
2. On the Security menu, click Firewall Settings.
3. Select the Discard pings check box.
4. Click Apply to save your changes.
Network Mode
You have the option to use the base station for routing services or
as a bridge between two networks. The Broadband Networking
Wired Base Station is set to routing mode by default.
When you change the base station to bridging mode, you disable
Network Address Translation (NAT), which is an important feature
of your network. When NAT is enabled, you can use the single IP
address supplied by your ISP to connect multiple computers to the
Internet. Ordinarily, if you wanted to connect multiple computers,
you would need to arrange additional addresses (for example, by
purchasing additional accounts). NAT enables multiple clients to
share a single connection to the Internet.
If you choose to use the base station as a bridge between two
networks or segments of a network, make sure that another device
on your network (such as a base station, gateway, or router) is
providing NAT service. If you do not have a NAT service on your
network, you should lease an IP address for each computer on your
network. Be aware that each of these IP addresses will be exposed
to the Internet.
Chapter 6: Configuring 55
Page 62

To change the base station network mode
1. Open the Base Station Management Tool, and then click
Security.
2. On the Security menu, click Network Mode.
3. Select the Bridging Mode check box.
4. Click Apply to save your changes.
Port Forwarding
You can configure the ports on your base station to establish
virtual servers or run applications with special network
requirements on your network. This is called port forwarding. To
understand how port forwarding works, you must first understand
ports and their role in data transmission.
Note
Port forwarding involves the
configuration of data ports.
Do not confuse the data ports,
which are logical
programmatic elements, with
physical ports, such as the
Ethernet port on your base
station.
About Ports
Information passes from the Internet to computers on your network
across ports. In any network communication, there is an outbound
(destination) port and an inbound (source) port. These ports are
used in conjunction with the source and destination IP addresses
to establish a connection between two networked computers.
There are many different types of data transmitted across a
network, and certain types of data must pass out of certain ports.
The data type is recognized by the protocol, or rules, that it follows.
For example, the e-mail messages that you send might follow one
type of protocol, whereas the games that you play might follow
another protocol. Typically, the data protocol determines the ports
to which the data is passed.
The Broadband Networking Wired Base Station opens the ports for
certain applications automatically when a client on your local
network transmits data to the WAN. This enables transmission of
some of the more common data sent to and from the Internet,
such as e-mail messages and Web browser data.
To run applications with special network requirements or to
establish a virtual server, however, you might need to change the
port configuration on the base station. You can configure, or
forward, ports from the Base Station Management Tool.
Application-Triggered Port Forwarding
Some applications, such as Internet games and videoconferencing,
require multiple ports for data transmission. File Transfer Protocol
(FTP) data, for example, is sent from your computer to one port and
returns to another port. These multiple port transmissions might
cause problems when NAT is enabled on your base station,
because the NAT service anticipates that data sent to one port will
return to the same port.
56 Microsoft Broadband Networking Wired Base Station User’s Guide
Page 63

The Broadband Networking Wired Base Station has already been
configured to accommodate some common application protocols
that require multiple ports, including FTP, Simple Mail Transfer
Protocol (SMTP), and Post Office Protocol 3 (POP3).
To configure port forwarding for other applications that require
multiple ports, you must specify the outbound (destination) port to
which data following a particular protocol will be sent, and the
inbound (source) port or ports to which related data will return.
Essentially, you are telling the base station how to direct traffic
across the networks.
The inbound ports that you specify will open only when data is sent
to the corresponding outbound port. These ports will close again
after a certain amount of time has elapsed with no data sent to the
inbound port.
You can set ranges of ports, multiple ports, and combinations of
single and multiple ports for the inbound ports.
You can configure the base station to accommodate up to 20
applications. To identify the protocol that an application uses and
the ports to which the data should be sent, see the documentation
for that application.
To establish application-triggered port forwarding
1. Open the Base Station Management Tool, and then click
Security.
2. On the Security menu, click Port Forwarding, and then click
Set up application-triggered port forwarding.
3. In the Description box, type a description of the application that
you want to enable.
4. In the Outbound port box, type the number of the outbound
port. The outbound port should be one number from 0 through
65535. To determine which port the application uses, consult
the documentation for the application.
5. In the Trigger type drop-down list, click the trigger type. The
trigger type should be specified in the documentation for the
application.
6. In the Inbound port(s) box, type the inbound port. The inbound
port can be a single port or a comma-separated list of ports or
port ranges. For example, you could type 4-25, or 243, or 10,
24-50, 74. You are limited to 256 characters.
7. In the Public type drop-down list, click the public type. The
public type should be specified in the documentation for the
application.
8. Select the Enable check box.
9. Click Apply to save the changes you have made.
Chapter 6: Configuring 57
Page 64

If an application does not function correctly after you enable
multiple ports, check the documentation for the application to
verify that you are enabling the correct ports to open. If you have
set the correct ports to open and the application still does not
function properly, you might need to establish a virtual
demilitarized zone (DMZ) on one of the client computers on your
network to run the application. For information about establishing
a DMZ, see page 59.
Persistent Port Forwarding
When you host a server on your network—for example, a Web or
FTP server—you must configure the base station to perform
persistent port forwarding.
Persistent port forwarding is similar to application-triggered port
forwarding in that you are opening inbound ports to allow
particular types of data or data requests to be sent from the
Internet to one of the networked computers. The difference is that
you are opening these inbound ports permanently, rather than
configuring them to open only when there is data sent to an
outbound port. In addition, you are directing the data sent to that
port to a particular computer on your local network.
For example, if you set up a Web server on one of the computers
on your network, you must direct unsolicited requests sent to
Transmission Control Protocol (TCP) Port 80, which handles
Hypertext Transfer Protocol (HTTP) or Web data, to that computer.
An unsolicited request is any data communication that is not
initiated by a computer on your local network.
Although not required, it is recommended that you have a static
(fixed) IP address to host any type of server on your network.
To establish persistent port forwarding, you will need the following
information:
O
The IP address of the server computer on your local network. To
determine the IP address assigned to the computer that you will
use as a server, check the DHCP client list on the Home page of
the Base Station Management Tool.
O
The inbound and private port numbers and protocol that
correspond to the type of data that your server handles.
Some of the common TCP inbound ports include:
O
HTTP Port 80
O
FTP Port 21
O
Telnet Port 23
O
POP3 Port 110
58 Microsoft Broadband Networking Wired Base Station User’s Guide
Page 65

To configure persistent port forwarding
1. Open the Base Station Management Tool, and then click
Security.
2. On the Security menu, click Port Forwarding, and then click
Set up persistent port forwarding.
3. In the Description box, type a description of the server field.
(This step is optional.)
4. In the Inbound port box, type the inbound port to which data
packets sent from the Internet to the server will be passed. The
inbound port can be a single port or a comma-separated list of
ports or port ranges. For example, you could type 4-25, or 243,
or 10, 24-50, 74. You are limited to 256 characters.
5. In the Type box, select the protocol (UDP or TCP) for the port.
6. In the Private IP address box, type the private IP address of the
client computer that is hosting the server.
7. In the Private port boxes, type the private port on the server
that the data will be sent to. To identify the private port number,
consult the documentation for your server software.
8. Click Apply to save the changes you have made.
Virtual Demilitarized Zone
In certain situations, you might want to set up a virtual
demilitarized zone (DMZ) on one of the clients on your network.
When you establish a DMZ, you essentially open all inbound ports
and direct the base station to forward certain inbound data
packets (those that are not in response to a transmission initiated
by a LAN client and not handled through application-triggered or
persistent port forwarding) to a particular computer on your LAN.
This computer becomes the DMZ host.
A DMZ host is useful for experimenting with new games on the
Internet or for setting up a server on your network before you know
which ports to open for that server.
A DMZ, however, should be used only in very specific and finite
situations. The computer that hosts the DMZ is fully exposed to the
Internet, and is thus susceptible to malicious attacks and
unauthorized access. Because the computer is a virtual DMZ
behind the base station, as opposed to a real DMZ out on the
Internet, it has access to the other computers on your LAN. If a
hacker were to upload a virus to the virtual DMZ, the virus could
spread to all the computers on your network.
Because the virtual DMZ that you establish is behind the base
station NAT, the IP address for the DMZ is not public. This means
that the DMZ can resolve most, but not all, connection problems.
Chapter 6: Configuring 59
Page 66

To establish a virtual DMZ
1. Open the Base Station Management Tool, and then click
Security.
2. On the Security menu, click Virtual DMZ (Demilitarized Zone).
3. Select the Enable check box.
4. In the text box, type the IP address assigned to the computer
that will host the virtual DMZ. To determine the IP address, see
the DHCP client list on the Home page of the Base Station
Management Tool.
5. Click Apply to save the changes you have made.
MAC Filtering
You can increase the security on your network by using MAC filtering.
MAC filtering enables you to filter Internet access for local clients
based on the MAC address of the adapter that the clients use.
If you want to use MAC filtering, the first step is to enable
connection control.
Connection Control
You can use connection control to control which wired clients will
be able to connect to the base station and have access to the
Internet and all network resources.
When a wired client cannot connect to the base station, it can
communicate with other clients on the wired local network, but it
cannot:
O
Connect to the Internet.
O
Communicate with wireless clients on the network.
To enable connection control
1. Open the Base Station Management Tool, and then click
Security.
2. On the Security menu, click MAC Filtering.
3. Select the Enable connection control check box.
4. If you do not want unspecified clients to connect to the base
station, in the drop-down list box, click Deny. In this case, any
client whose MAC address is not listed in the MAC Address
table will not be able to connect to the base station or access
the Internet.
5. If you clicked Deny in step 4, in the MAC Address table, specify
the MAC address of any clients that you want to connect to the
base station, and then select the Allow Connection check box.
6. Click Apply to save your changes.
60 Microsoft Broadband Networking Wired Base Station User’s Guide
Page 67

When you enable connection control, be sure you do not prohibit
your own computer from connecting to the base station. If you deny
unspecified MAC addresses from connecting, enter the MAC
address of your adapter into the MAC Address table and select the
connection control check box.
If you do block your own access to the base station, you must
restore the factory default settings by using the reset button on the
base station itself, and then reconfigure the base station. For
information about how to do this, see page 42.
For more information about MAC filtering options, see Broadband
Network Utility Help.
Client Filtering
You can use client filtering to control the Internet access of each
client on your network. This feature is particularly useful if, for
example, you want to restrict the time that your children spend
surfing the Web.
To configure client filtering, you must have the following
information:
O
The private IP address assigned to the client computer. To
determine the IP address assigned to the client computer, check
the DHCP client list on the Home page of the Base Station
Management Tool.
O
The ports for the type of application data to which you want to
control access.
For example, if you want to control Web browsing, specify TCP Port
80 on client 192.168.2.XX.
It is recommended that you assign static IP addresses to each of
the client devices whose access to the Internet you want to control.
To enable client filtering
1. Open the Base Station Management Tool, and then click
Security.
2. On the Security menu, click Client Filtering.
3. In the appropriate box, type the IP address of the client device
whose access to the Internet you want to control.
4. In the Outbound port(s) boxes, type the outbound port protocol
and port number for the data that you want to control.
5. In the appropriate boxes, specify the date and time range when
you want to block access to this data. If you want to filter access
on a particular day, for example, every Sunday, enter the same
time and the same date for the start and end period. If you want
to block access all the time, click Always.
6. Select the Block check box, and then click Apply to save the
client filtering.
Chapter 6: Configuring 61
Page 68

Base Station Log
You can access the base station log for your network from the
Security section of the Base Station Management Tool. This log
records general base station activity and time stamps each log file
entry. If you have any concerns about unusual activity on your
network, review the base station log.
The base station log can maintain up to 256 lines of data. When
the base station log reaches maximum capacity, the base station
deletes the oldest log entries.
To view the base station log
1. Open the Base Station Management Tool, and then click
Security.
2. On the Security menu, click Base Station Log.
62 Microsoft Broadband Networking Wired Base Station User’s Guide
Page 69

7
troubleshooting.
Basic Troubleshooting
This chapter will help you solve installation and setup problems
with your Microsoft
Problems are covered for the following areas:
O
Setup and Hardware Problems
O
Network and Internet Problems
O
File and Printer Sharing Problems
If the problem you are experiencing is not covered in this chapter,
you can find more troubleshooting information in Broadband
Network Utility Help, or on the Microsoft Broadband Networking
Web site at http://www.microsoft.com/broadbandnetworking/.
Setup and Hardware Problems
This section will help you solve problems you might encounter
while running the Setup Wizard or connecting your new networking
hardware.
My computer is not detecting my base station, or my base
station is not working correctly.
O
Make sure that the cables in your network are securely
connected to the correct ports and your network card is properly
seated in the correct slot.
Check all of the following connections: power cables, cables
between the adapter and the network, and cables between the
network and the broadband modem.
Ethernet cables closely resemble standard residential telephone
cables. However, the RJ-45 connectors on Ethernet cables are
larger than the RJ-11 connectors on telephone cables. Although
a standard residential telephone connector can be inserted into
an Ethernet port, the port will not function and the cable might
damage your Ethernet device.
O
Make sure the Link LEDs are illuminated for each connected
Ethernet port. If they are not illuminated, try a different Ethernet
cable or a different network port.
O
Determine which Microsoft Windows® operating system is
installed on your computer.
If you are using Windows 2000, you cannot automatically
configure your base station by using the Setup Wizard. A
®
Broadband Networking WIred Base Station.
Page 70

Windows 2000-based computer can access the base station,
but you will need to configure the base station settings
manually. For more information, see Chapter 6.
I’m having problems running the Setup Wizard.
O
Verify that your computer conforms to the minimum system
requirements for the Microsoft Broadband Networking Wired
Base Station.
When you run the Setup Wizard by using the Typical Setup
Method, the Broadband Network Utility is installed automatically.
If your computer does not meet the minimum system
requirements, the software might not install fully or at all.
I’m getting an error message during installation or setup
O
Follow the instructions in the error message to try to solve the
problem. The following table contains more information about
the error messages that can appear, including possible causes
and solutions for the errors.
Problem Troubleshoot
Setup was unable to detect Possible causes for this error include loose
your base station cable connections, the wrong type of Ethernet
cable (straight-through versus crossover),
cables connected to the wrong ports, or the
base station not receiving power.
If none of these is the cause, try restoring your
base station to factory defaults.
Setup was unable to detect Possible causes for this error include your
a connection to the internet broadband modem not being turned on,
not working, or not having an active Internet
connection.
If you have other computers already connected
to your network, verify that these computers
can still access the Internet correctly.
My broadband modem has a built-in NAT that conflicts with my
Microsoft Broadband Networking Wired Base Station.
O
Turn off Network Address Translation (NAT) on the modem.
If you have more than one component that is running NAT on
your network, some of your programs will not connect to the
Internet, some features in certain programs might not work,
and some components might appear as unavailable in the
Broadband Network Utility. For instructions for turning off NAT
on your modem, see the documentation for your modem.
64 Microsoft Broadband Networking Wired Base Station User’s Guide
Page 71

I am having problems upgrading or restoring my base station
firmware.
You can use the Base Station Management Tool to upgrade the
firmware in your base station or restore a previously saved copy of
your firmware. If you have a problem upgrading or restoring your
base station firmware, the power LED will flash orange and green.
This can be caused by a corrupted file or by restoring the wrong file
to the base station. Try these options in the following order; you
might not need to do all of them.
O
Reset the base station by depressing the reset button for a
short time. After the base station has been reset, try using the
base station again. For instructions on resetting the base
station, see “Resetting the Base Station” in Chapter 1.
O
Upgrade or restore the base station again. If the file you are
using did not work successfully the first time, you can use the
Base Station Management Tool to reinstall the firmware
upgrade. If it does not work correctly the second time, try the
next option.
O
Download a new copy of the firmware, and try upgrading the
base station with the new file. The file you originally used might
be corrupted or incomplete. For instructions for downloading an
upgrade to your firmware, see “Upgrade Base Station Firmware”
in Chapter 6.
O
Restore the base station’s factory default settings. Doing so will
return the firmware to the originally installed version, removing
any updates that you have installed. After the factory default
settings have been restored, you can try updating or restoring
the firmware. For instructions, see “Restoring the Factory
Default Settings” in Chapter 1.
My modem supports both USB and Ethernet connections.
The base station is designed specifically for use with an external
DSL or cable modem that has an active Internet connection. The
base station supports only broadband modems that use Ethernet
connections. If you have a modem with both USB and Ethernet
connections, use the Ethernet connection to connect the modem
to the base station.
If you are switching your modem from a USB connection to an
Ethernet connection, use the Ethernet cable that came with your
modem. If you do not have the cable, see your modem
documentation or contact your Internet service provider to
determine whether you need a straight-through or crossover
Ethernet cable to connect the modem to the base station.
Chapter 7: Troubleshooting 65
Page 72

Network and Internet Problems
This section will help you solve common networking and Internet
problems when you integrate the Microsoft Broadband Networking
Wired Base Station with a new or existing network.
The base station is designed for the Setup Wizard to run before
the hardware is installed; otherwise, the wizard might not correctly
configure your network settings. If you connected the base station
first, see “Other Ways to Set Up Your Base Station” in Chapter 3.
If you replaced your previous router with the Microsoft base
station, make sure that you disabled all of your previous network
settings and removed all unnecessary cabling. When possible, use
the same cables to reconnect your computer
to the network. Doing so can help prevent connectivity problems.
My local network isn’t working.
If you are having problems connecting to other computers on your
local network, try the following:
O
Verify that the base station is plugged into a power source.
O
Verify that the correct cables are securely connected to the
correct ports, and that each connected port has an active Link
or Status light.
If you are having problems with file or printer sharing, see “File and
Printer Sharing Problems” in this chapter.
My network is slow.
O
Try decreasing the number of computers that are
simultaneously accessing your network.
Your network has a limited amount of bandwidth for
transmitting data. As more computers access your network at
the same time, the bandwidth must be split up between all
computers. By reducing the number of computers accessing
your network,
you can increase the bandwidth available to each computer.
You might find that you need more bandwidth to use all of your
computers on the network. If your connection is still too slow,
you can contact your Internet service provider (ISP) to verify that
there are no problems with your connection or to inquire about
upgrading to a faster connection.
My computer can’t find my workgroup.
O
Check the name of the workgroup on another computer on the
network.
The workgroup name is on the Advanced Network Settings
page, which you can open from the Customize Your Network
page in the Broadband Network Utility.
66 Microsoft Broadband Networking Wired Base Station User’s Guide
Page 73

If your computer can’t find your workgroup, it might be looking
for the workgroup by using the wrong name or you might be
logged on to a domain. You cannot be logged on to a domain
and a workgroup at the same time.
I get all the way through setup and it says it was successful, but
the network does not work.
O
If you cannot access the Internet, open the Broadband Network
Utility and check the status of the connection between the base
station and the modem. For more troubleshooting information
about this problem, see Broadband Network Utility Help.
O
If you cannot access shared files or folders, make sure that
you have been given access to the files or folders. For more
information about sharing files and folders and verifying sharing
privileges, see Chapter 4.
O
If you cannot print to a network printer, make sure that the
printer has been made available to the network. For more
information about making a printer available to the network and
verifying the network availability of a printer, see Chapter
4 and Windows Help.
My existing network used to work, and now it doesn’t.
O
Check the installation instructions to make sure that you used
the correct cables, particularly if you are adding the base
station to an Ethernet network that has a hub or switch.
O
Check that no cables were accidentally disconnected from other
parts of your network during the installation process.
O
Verify that the network settings on all of the computers are correct.
O
Verify that the base station settings match the settings required
by your Internet service provider (ISP). For information about
configuring your base station network settings, see “Local Area
Network Settings” in Chapter 6.
My computer can’t find the Internet.
O
Try accessing the Internet from another computer on the
network. If the second computer can access the Internet, the
problem might be with the first computer’s network settings.
If the second computer also cannot access the Internet, the
problem might be with your base station or Internet service
provider (ISP).
O
Check the IP address on another computer in the network.
The IP address is on the Advanced Network Settings screen,
which you can access from the Customize Your Network screen
in the Broadband Network Utility.
Chapter 7: Troubleshooting 67
Page 74

If your computer can’t find the Internet, it might be looking for
the wrong IP address. Although the IP address may have been
correct previously, if you changed ISPs, all of the IP addresses in
your network changed as well. For the correct IP address, see
the documentation that was provided by your ISP.
O
Check the status of the connection to the base station and to
the Internet in the Broadband Network Utility.
If you are still unable to resolve the problem, see Broadband
Network Utility Help.
File and Printer Sharing Problems
This section will help you solve common installation and setup
problems with sharing files and printers on your network. If you
installed your network hardware by using the Setup Wizard, file and
printer sharing might have automatically been configured for you,
depending upon your network configuration.
To learn how to add or share files and printers over your network,
see Chapter 4 and Windows Help.
I cannot access shared files over my network.
To share files between computers on your network, all computers
must belong to the same workgroup. Check the workgroup names
on each computer by using the following instructions.
Windows XP:
1. Click Start, and then click Control Panel.
2. Double-click System, and then click the Computer Name tab.
Windows 2000:
1. Click Start, point to Settings, and then click Control Panel.
2. Double-click System.
3. Click the Network Identification tab.
Windows 98, Windows 98 SE, and Windows Me:
1. Click Start, point to Settings, and then click Control Panel.
2. Double-click Network, and then click the Identification tab.
If you need to change your workgroup name on a computer, click
Change, and then type the correct workgroup name. After
restarting your computer and joining the new workgroup, try
sharing or accessing shared files again.
68 Microsoft Broadband Networking Wired Base Station User’s Guide
Page 75

My printer is connected directly to my computer and is not
being recognized by other computers on my network.
O
Check to make sure that the printer is turned on.
O
Verify that the cable connecting the printer and the computer is
securely attached.
O
Try printing by using the self-test feature built into your printer.
Each printer’s self-test feature is slightly different. See your
printer documentation for specific instructions.
If the printer self-test does not work, see your printer
troubleshooting documentation for more information.
If the printer self-test works correctly, the problem might be with
your network connection or with your printer drivers.
O
Check to make sure all computers on the network have the
proper printer driver installed.
You can install the printer driver by opening the Printers page
in the Control Panel. If Windows prompts you for a driver disk,
use the driver disk that came with your printer. For more
information about configuring your printer, see Windows Help.
O
Verify that all network cables between the computers and the
printer are securely connected.
You can check to see whether the network recognizes a
connection by inspecting the link lights associated with the
Ethernet ports on your hardware. When the cable is connected
successfully, the link light should be illuminated.
If one of your network cables is connected to a network port
that does not have an illuminated link light, there might be a
problem with the cable itself. Try using a different Ethernet
cable to make the connection.
My printer is connected directly to my network, and I cannot
access the printer from the computers on my network.
O
Check to make sure that the printer is turned on.
O
Verify that all network cables between the computers and the
printer are securely connected.
You can check to see whether the network recognizes a
connection by inspecting the link lights associated with the
Ethernet ports on your hardware. When the cable is connected
successfully, the link light should be illuminated.
If one of your network cables is connected to a network port
that does not have an illuminated link light, there might be a
problem with the Ethernet port or the cable itself. Try using a
different Ethernet cable to make the connection.
Chapter 7: Troubleshooting 69
Page 76

O
Try printing by using the self-test feature built into your printer.
Each printer’s self-test feature is slightly different. See your
printer documentation for specific instructions.
If the printer self-test does not work, see your printer
troubleshooting documentation for more information.
If the printer self-test works correctly, the problem might be with
your network connection or with your printer drivers.
O
Check to make sure that all computers on the network have the
proper printer driver installed.
You can install the printer driver by opening the Printers page in
the Control Panel. If Windows prompts you for a driver disk, use
the driver that came with your printer. For more information
about configuring your printer, see Windows Help.
My networked printer is visible on the network, but it does
not print.
O
Try resetting the printer. See your printer documentation for
instructions.
O
If you are troubleshooting a printer that is connected directly to
the network, try printing a test page by using the printer’s
diagnostic features. If the test page prints correctly, the problem
might be in the network or the printer networking settings.
O
Check the program from which you are trying to print to ensure
that printing is enabled and the correct printer is selected.
70 Microsoft Broadband Networking Wired Base Station User’s Guide
Page 77

reference.
Getting Help
Visit Us on the Web
Please visit our Web site at
http://www.microsoft.com/broadbandnetworking/
Click Help in the Broadband Network Utility
Click Help in the Microsoft® Broadband Network Utility for detailed
troubleshooting information.
Technical Support
Product Name:
Microsoft
Support Information Online:
http://support.microsoft.com/directory/productsupportoption.asp
In Canada, visit http://www.microsoft.ca/support/
Online Support:
Work with a Microsoft Support Professional over the Internet.
Submit your issue online:
http://support.microsoft.com/directory/onlinesr.asp
Phone Support:
Toll-free support for U.S. customers: (800) 936-3900. For customers
in Canada: (800) 668-7975. These numbers are only for support
of Microsoft Broadband Networking products. Please do not use
these phone numbers for support of other Microsoft products.
TTY Users:
Microsoft text telephone (TTY/TDD) services are available at
(425) 635-4948 in Washington state or (800) 892-5234
elsewhere in the United States. Call (905) 568-9641 in Canada.
Worldwide:
The support terms listed here are available in the United States
and Canada only.
Support outside the United States and Canada may vary.
For regional contact details, please visit
http://support.microsoft.com/default.aspx?scid=/international.aspx?
Conditions:
Microsoft’s support services are subject to then-current prices,
terms, and conditions, which are subject to change without notice.
®
Broadband Networking Wired Base Station
Page 78

Regulatory Information
United States Radio and TV Interference Regulations
This device complies with Part 15 of the U.S. Federal Communications Commission (FCC) rules. Operation is subject to the
following two conditions: (1) this device may not cause harmful interference, and (2) this device must accept any interference
received, including interference that may cause undesired operation.
The Microsoft hardware device(s) that accompanies this software can radiate radio frequency (RF) energy. If not installed
and used in strict accordance with the instructions given in the printed documentation and software Help file, the device may
cause harmful interference with other radio-communications devices (for example AM/FM radios, televisions, baby monitors,
cordless phones, etc.). Any cable that is connected to the device must be a shielded cable that is properly grounded. There
is, however, no guarantee that RF interference will not occur in a particular installation.
Your Microsoft hardware device has been tested, and it complies with the limits for a Class B digital device in accordance
with the specifications in Part 15 of the FCC Rules. These limits are designed to provide reasonable protection against
harmful RF interference in a residential installation.
To determine if your hardware device is causing interference to other radio-communications devices, disconnect the device
from your computer. If the interference stops, it was probably caused by the device. If the interference continues after you
disconnect the hardware device, turn the computer off and then on again. If the interference stopped when the computer
was off, check to see if one of the input/output (I/O) devices or one of the computer’s internal accessory boards is causing
the problem. Disconnect the I/O devices one at a time and see if the interference stops.
If this hardware device does cause interference, try the following measures to correct it:
•
Relocate the antenna of the other radio-communications device (for example AM/FM Radios, televisions, baby
monitors, cordless phones, etc.) until the interference stops.
•
Move the hardware device farther away from the radio or TV, or move it to one side or the other of the radio or TV.
•
Plug the computer into a different power outlet so that the hardware device and radio or TV are on different circuits
controlled by different circuit breakers or fuses.
•
If necessary, ask your computer dealer or an experienced radio-TV technician for more suggestions. You may find
helpful information in the booklet “The Interference Handbook” (1995), published by the FCC. The booklet is available
from the FCC at 1-888-CALL FCC or at http://www.fcc.gov/cib/Publications/tvibook.html.
Note
Any changes or modifications not expressly approved by Microsoft could void the user’s authority to operate this device.
For use with UL Listed and GS approved personal computers.
Not intended for use in machinery or industrial applications.
Tested to comply with FCC standards. For home and office use. Model Number: MN-100, MN-110, MN-120, MN-130, MN-
150, MN-500, MN-510, MN-520.
Microsoft Corporation
One Microsoft Way
Redmond, WA 98052-6399.
(800) 426-9400 (United States)
(800) 933-4750 (Canada)
Canadian Radio Communication Regulations
This Class B digital apparatus complies with Canadian ICES-003.
Cet appareil numérique de la classe B est conforme à la norme NMB-003 du Canada.
72 Microsoft Broadband Networking Wired Base Station User’s Guide
Page 79

Limited Warranty
PLEASE READ THIS MANUFACTURER’S GUARANTEE CAREFULLY TO UNDERSTAND YOUR RIGHTS AND OBLIGATIONS
MANUFACTURER’S GUARANTEE AND LIMITATION OF LIABILITY
NOTE: The following guarantee is not restricted to any territory and does not affect any statutory rights that you
may have.
The term “Hardware Device” means the enclosed Microsoft Hardware Device. This Manufacturer’s Guarantee does
not cover your data, or any separate software, whether or not packaged or included with the Hardware Device.
MICROSOFT GUARANTEE. Microsoft guarantees (this “Guarantee”) that on the day you receive the Hardware Device and
for the next two (2) years thereafter (a) the Hardware Device will be substantially free from defects in materials and
workmanship, and (b) any support services provided by Microsoft will be substantially as described in applicable written
materials provided to you by Microsoft, and Microsoft support engineers will use reasonable efforts, care and skill to solve
any problem issues. In the event that the Hardware Device fails to comply with this Guarantee, Microsoft shall either, at
Microsoft’s option, (a) repair or replace the Hardware Device or (b) return the price you paid for the Hardware Device (if any),
provided that you return the Hardware Device to Microsoft with a copy of your receipt of purchase. You may exercise this
remedy without charge, except that you are responsible for any expenses you may incur. This Guarantee is void if failure of
the Hardware Device results from any accident, abuse or misapplication. Any replacement Hardware Device shall be
guaranteed for the remainder of the original Guarantee period or thirty (30) days, whichever is longer. Microsoft shall not
be liable for any loss or damage that you could have reasonably avoided, for example, by backing up your software and
files regularly.
EXCLUSION OF ALL OTHER TERMS. YOU AGREE THAT THIS GUARANTEE IS YOUR SOLE GUARANTEE IN RELATION TO THE
HARDWARE DEVICE AND ANY SUPPORT SERVICES. MICROSOFT AND ITS SUPPLIERS MAKE NO OTHER GUARANTEES OR
WARRANTIES WITH RESPECT TO THE HARDWARE DEVICE, THE SUPPORT SERVICES AND ANY PRODUCT MANUAL(S) OR
OTHER WRITTEN MATERIALS THAT ACCOMPANY THE HARDWARE DEVICE. TO THE MAXIMUM EXTENT PERMITTED BY
APPLICABLE LAW AND SUBJECT TO THIS GUARANTEE, MICROSOFT AND ITS SUPPLIERS DISCLAIM ALL WARRANTIES,
CONDITIONS AND OTHER TERMS, EITHER EXPRESS OR IMPLIED (WHETHER BY STATUTE, COMMON LAW, COLLATERALLY
OR OTHERWISE), INCLUDING BUT NOT LIMITED TO ANY (IF ANY) IMPLIED WARRANTIES OR CONDITIONS OF
MERCHANTABILITY, SATISFACTORY QUALITY AND FITNESS FOR PARTICULAR PURPOSE, LACK OF VIRUSES, LACK OF
NEGLIGENCE, LACK OF WORKMANLIKE EFFORT, TITLE, AUTHORITY, OR NONINFRINGEMENT WITH RESPECT TO THE
HARDWARE DEVICE, THE SUPPORT SERVICES AND THE PRODUCT MANUAL(S) OR OTHER WRITTEN MATERIALS THAT
ACCOMPANY THE HARDWARE DEVICE. ANY IMPLIED WARRANTIES THAT ARE NOT DEEMED EXCLUDED ARE LIMITED TO
THE ORIGINAL GUARANTEE PERIOD OR TO THE SHORTEST PERIOD PERMITTED BY APPLICABLE LAW, WHICHEVER IS
GREATER.
LIMITATION OF LIABILITY. TO THE MAXIMUM EXTENT PERMITTED BY APPLICABLE LAW AND EXCEPT AS PROVIDED IN
THIS GUARANTEE, MICROSOFT AND ITS SUPPLIERS SHALL NOT BE LIABLE FOR ANY DAMAGES WHATSOEVER
(INCLUDING WITHOUT LIMITATION, SPECIAL, INCIDENTAL, INDIRECT OR CONSEQUENTIAL DAMAGES, DAMAGES FOR
LOSS OF BUSINESS PROFITS, BUSINESS INTERRUPTION, LOSS OF BUSINESS INFORMATION OR OTHER PECUNIARY
LOSS, FOR PERSONAL INJURY OR FOR FAILURE TO MEET ANY DUTY INCLUDING GOOD FAITH OR REASONABLE CARE,
OR FOR NEGLIGENCE) ARISING OUT OF THE USE OR INABILITY TO USE THE HARDWARE DEVICE, EVEN IF MICROSOFT
HAS BEEN ADVISED OF THE POSSIBILITY OF SUCH DAMAGES. IN ANY CASE MICROSOFT’S ENTIRE LIABILITY UNDER
ANY PROVISION OF THIS AGREEMENT SHALL BE LIMITED TO THE AMOUNT ACTUALLY PAID BY YOU FOR THE HARDWARE
DEVICE. THESE LIMITATIONS DO NOT APPLY TO ANY LIABILITIES THAT CANNOT BE EXCLUDED OR LIMITED BY
APPLICABLE LAWS. THE FOREGOING LIMITATIONS, EXCLUSIONS AND DISCLAIMERS SHALL APPLY TO THE MAXIMUM
EXTENT PERMITTED BY APPLICABLE LAW, EVEN IF ANY REMEDY FAILS ITS ESSENTIAL PURPOSE.
REGISTRATION. You need not return the registration card for this Guarantee to be effective.
BENEFICIARY. To the extent allowed by applicable law, this Guarantee is only made to you, the first user of the Hardware
Device, and there are no third party beneficiaries of this Guarantee. It is not intended for and does not apply to anyone else
(except as required by law).
GOVERNING LAW. If you acquired the Hardware Device in the United States of America, the laws of the State of Washington,
U.S.A., apply to this agreement. If you acquired this Hardware Device in the European Union, Iceland, Norway or Switzerland
then local laws apply. If you acquired this product in Canada, except where expressly prohibited by local laws, the laws in
force in the Province of Ontario, Canada apply to this agreement and each of the parties hereto irrevocably attorns to the
jurisdiction of the courts of the Province of Ontario and further agrees to commence any litigation which may arise hereunder
in the courts located in the Judicial District of York, Province of Ontario.
If you acquired this Hardware Device outside of the countries listed above, then local laws may apply.
QUESTIONS. Should you have any questions concerning this agreement, or if you desire to contact Microsoft for any reason,
please use the address information enclosed in this Hardware Device to contact the Microsoft subsidiary serving your
country, or visit Microsoft on the World Wide Web at http://www.microsoft.com.
Reference 73
Page 80

Limited Warranty Continued
VEUILLEZ VOUS ASSURER QU’APRÈS UNE LECTURE ATTENTIVE VOUS AYEZ BIEN COMPRIS L’ENSEMBLE DES DROITS
ET LIMITATIONS EXPOSÉES DANS CETTE GARANTIE DU FABRICANT
GARANTIE ET EXCLUSION DE RESPONSABILITÉ DU FABRICANT
REMARQUE : La garantie ci-dessous n’est pas limitée à un territoire particulier, et n’influence en aucune manière les
droits légaux dont vous disposez.
« Dispositif matériel » désigne le dispositif matériel Microsoft ci-inclus. Cette Garantie du Fabricant ne s’applique pas à
vos données ou aux logiciels séparés, qu’ils soient ou non emballés ou inclus avec le Dispositif matériel.
GARANTIE MICROSOFT. Microsoft garantit (la « Garantie ») que pour une période de 2 ans à compter de la date de
réception : (a) le Dispositif matériel sera, pour l’essentiel, exempt de vices matériels et de fabrication ; et (b) tout service
d’assistance fourni par Microsoft sera, pour l’essentiel, conforme à la documentation imprimée applicable fournie par
Microsoft, et les ingénieurs du service technique de Microsoft feront des efforts raisonnables pour résoudre toute difficulté
technique. Dans l’éventualité où le Dispositif matériel manque d’être conforme aux stipulations de la présente Garantie,
Microsoft pourra, au choix de Microsoft, (a) réparer ou remplacer le Dispositif matériel ; ou (b) rembourser le prix que vous
avez payé pour le Dispositif matériel (le cas échéant), à condition que le Dispositif matériel soit retourné à Microsoft avec
une copie de votre reçu. Vous êtes libre d’exercer ce recours sans frais, à l’exception que vous êtes seul responsable des
dépenses que vous encourrez. Cette Garantie est nulle si le défaut du Dispositif matériel est causé par un accident, un
traitement abusif ou une mauvaise application. Tout Dispositif matériel de remplacement sera garanti pour le reste de la
période de garantie initiale ou pour trente (30) jours, selon la plus longue de ces périodes. Microsoft n’est en aucun cas
responsable des pertes et dommages que vous auriez pu raisonnablement éviter en sauvegardant régulièrement vos
logiciels et vos données, par exemple.
EXCLUSION DE TOUTES AUTRES CONDITIONS. VOUS RECONNAISSEZ QUE LA GARANTIE CI-DESSUS EST VOTRE SEUL
RECOURS EN CE QUI CONCERNE LE DISPOSITIF MATÉRIEL ET LES SERVICES D’ASSISTANCE. MICROSOFT ET SES
FOURNISSEURS NE FONT AUCUNE AUTRE GARANTIE QUANT AU DISPOSITIF MATÉRIEL, AUX SERVICES D’ASSISTANCE ET
AUX MANUELS DE PRODUIT OU TOUTE AUTRE DOCUMENTATION IMPRIMÉE ACCOMPAGNANT LE DISPOSITIF MATÉRIEL.
DANS TOUTE LA MESURE PERMISE PAR LA RÉGLEMENTATION APPLICABLE ET CONFORMÉMENT À LA GARANTIE,
MICROSOFT ET SES FOURNISSEURS EXCLUENT TOUTE GARANTIE ET AUTRES CONDITIONS, EXPRESSES OU IMPLICITES
(PAR JURISPRUDENCE, DROIT COUTUMIER, SECONDAIRE OU AUTRE), Y COMPRIS, DE MANIÈRE NON LIMITATIVE, TOUTE
GARANTIE IMPLICITE DE QUALITÉ, D’ADÉQUATION À UN USAGE PARTICULIER, D’ABSENCE DE VIRUS, DE NÉGLIGENCE ET
DE DÉFAUT DE FABRICATION, DE TITRE, D’AUTORITÉ OU D’ABSENCE DE CONTREFAÇON EN CE QUI CONCERNE LE
DISPOSITIF MATÉRIEL, LES SERVICES D’ASSISTANCE, LES MANUELS DE PRODUIT ET AUTRES DOCUMENTS IMPRIMÉS
ACCOMPAGNANT LE DISPOSITIF MATÉRIEL. TOUTE GARANTIE IMPLICITE QUI N’EST PAS EXCLUE EST LIMITÉE À LA
PÉRIODE DE GARANTIE D’ORIGINE OU À LA PLUS COURTE PÉRIODE PERMISE PAR LA RÉGLEMENTATION APPLICABLE,
SI CELLE-CI EST PLUS LONGUE.
EXCLUSION DE RESPONSABILITÉ. DANS TOUTE LA MESURE PERMISE PAR LA RÉGLEMENTATION APPLICABLE ET SAUF
STIPULATION CONTRAIRE DANS CETTE GARANTIE, MICROSOFT OU SES FOURNISSEURS NE POURRONT EN AUCUN CAS
ÊTRE TENUS RESPONSABLES DE TOUT DOMMAGE DE QUELQUE NATURE QUE CE SOIT (NOTAMMENT ET DE MANIÈRE
NON LIMITATIVE LES DOMMAGES SPÉCIAUX, ACCESSOIRES, INCIDENTS OU INDIRECTS POUR PERTES DE BÉNÉFICES,
INTERRUPTIONS D’ACTIVITÉ, PERTES D’INFORMATIONS OU AUTRES PERTES PÉCUNIAIRES, POUR PRÉJUDICES
CORPORELS OU MANQUEMENT À TOUTE OBLIGATION (NOTAMMENT L’OBLIGATION DE BONNE FOI ET DE DILIGENCE), OU
POUR DES ACTES DE NÉGLIGENCE, RÉSULTANT DE L’UTILISATION OU DE L’IMPOSSIBILITÉ D’UTILISER LE DISPOSITIF
MATÉRIEL, MÊME SI MICROSOFT OU UN QUELCONQUE FOURNISSEUR A ÉTÉ PRÉVENU DE L’ÉVENTUALITÉ DE TELS
DOMMAGES. EN TOUT ÉTAT DE CAUSE, LA RESPONSABILITÉ TOTALE DE MICROSOFT AU TITRE DE TOUTE STIPULATION
DU PRÉSENT CONTRAT NE SAURAIT EXCÉDER LE MONTANT QUE VOUS AVEZ EFFECTIVEMENT PAYÉ POUR LE DISPOSITIF
MATÉRIEL. CES LIMITATIONS NE S’APPLIQUENT À AUCUNE OBLIGATION QUI NE PEUT ÊTRE EXCLUSE OU LIMITÉE PAR
LES LOIS EN VIGUEUR. LES PRÉSENTES LIMITATIONS ET EXCLUSIONS DEMEURERONT APPLICABLES DANS TOUTE LA
MESURE PERMISE PAR LA RÉGLEMENTATION EN VIGUEUR, QUAND BIEN MÊME UN QUELCONQUE RECOURS NE
PRODUIRAIT PAS D’EFFET.
ENREGISTREMENT. Il n’est pas nécessaire de renvoyer la carte d’enregistrement pour faire valoir la présente Garantie.
BÉNÉFICIAIRE. Dans la mesure permise par la réglementation applicable, la présente Garantie s’applique uniquement à
vous, le premier utilisateur du Dispositif matériel, et aucun tiers ne peut devenir le bénéficiaire de cette Garantie. La
Garantie n’est pas destinée et ne s’applique pas à d’autres personnes que vous (à moins que cela ne soit requis par la loi).
DROIT APPLICABLE. Si vous avez acquis le Dispositif matériel aux États-Unis, ce CLUF est régi par les lois de l’État de
Washington, États-Unis d’Amérique. Si le Dispositif matériel a été acquis en Union Européenne, en Islande, en Norvège ou en
Suisse, le droit local pourra, le cas échéant, s’appliquer. Si vous avez acquis le Dispositif matériel au Canada, les lois en
vigueur de la province d’Ontario, Canada, s’appliqueront à ce contrat et chacune des parties aux présentes accepte les
tribunaux de la province d’Ontario, et accepte d’entamer tout litige lié aux présentes dans les tribunaux situés dans le
District juridique de York, province d’Ontario.
Si vous avez acquis le Dispositif matériel en dehors des pays énoncés ci-dessus, le droit local pourra, le cas échéant, s’appliquer.
QUESTIONS. Pour toute question relative à ce contrat, ou si vous souhaitez contacter Microsoft pour toute autre raison,
veuillez vous reporter à l’adresse fournie dans la documentation accompagnant ce Dispositif matériel pour contacter la
filiale Microsoft desservant votre pays, ou consulter le site Internet de Microsoft à http://www.microsoft.com/.
74 Microsoft Broadband Networking Wired Base Station User’s Guide
Page 81

Technical Specifications
Wired Base Station
Standards IEEE 802.3 Ethernet; IEEE 802.3u Fast Ethernet;
TCP/IP; NAT; DHCP; UDP; FTP; PPPoE; PPTP; L2TP; HTTP; DNS;
IPSec/VPN Pass-through; UPnP; Xbox;
Ports LAN:
O
Four 10/100 Mbps Switched Ethernet/IEEE 802.3 ports
O
RJ-45 connectors
O
UTP/STP Cat 3 or better cabling required for 10Base-T operation
O
UTP/STP Cat 5 or better required for 100Base-TX operation
To Modem:
O
One 10 Mbps Ethernet/IEEE 802.3 port
O
RJ-45 Connector
O
UTP/STP Cat 3 or better cabling required for 10Base-T operation
Data rate 10 and 100 Mbps, full and half duplex
Indicators LAN (Ports 1-4): Link/Activity LED for each port
To Modem: Link/Activity LED
Power: Power/Reset dual color LED
Power 12 V @ 350 mA (Power adapter: 12 V DC @ 500 mA)
Operating Temperature 0 to 40 °C
Storage Temperature -25 to 60 °C
Humidity 10 to 95 percent non-condensing
Emissions FCC Part 15 Class B compliant; Canada ICES-003
Safety UL 60950 / CSA-C22.2 No 60950
Physical Dimensions 1.2” x 5.3” x 6.8” (30.5 x 134.6 x 172.7 mm)
Weight 9.93 oz (281.4g) without power adapter
Reference 75
Page 82

System Requirements
To use the Microsoft Broadband Networking Wired Base Station:
O
Computer with Ethernet network adapter
O
External broadband (cable, DSL, or other) modem with Ethernet port (not compatible
with dial-up modems)
O
Microsoft Internet Explorer 5.0 or Netscape Navigator 4.7 or later to view and use Base
Station Management Tool
O
Available 120V AC power outlet
Additional requirements for using the Microsoft Broadband Networking setup wizard and
Network Utility:
O
Microsoft Internet Explorer 5.0 or later; setup will install Internet Explorer 6.0 browser
components if needed, but will not displace your primary browser.
O
28MB of available hard-disk space if you already have Internet Explorer 5.5 or 6.0; 132 MB
of available hard-disk space if you are installing Internet Explorer for the first time.
O
4x or faster CD-ROM drive
O
VGA or higher-resolution monitor
Recommended:
O
Microsoft Mouse or compatible pointing device
O
3.5” high-density disk drive
76 Microsoft Broadband Networking Wired Base Station User’s Guide
Page 83

glossary.
This glossary contains common terms for wired and wireless
networking.
100Base-T Also known as “Fast Ethernet,” an Ethernet cable standard with a
data transfer rate of up to 100 Mbps.
10Base-T An older Ethernet cable standard with a data transfer rate of up to
10 Mbps.
802.11, 802.11b A family of IEEE-defined specifications for wireless networks.
Includes the 802.11b standard, which supports high-speed (up to
11 Mbps) wireless data transmission. Microsoft
Networking wireless products comply with the 802.11b standard.
802.3 The IEEE-defined specification that describes the characteristics of
Ethernet connections.
access point See wireless access point.
ad hoc network A solely wireless computer-to-computer network. Unlike an
infrastructure network, an ad hoc network does not include a
central base station, router, or gateway.
adapter See network adapter.
base station A device (also known as a router or gateway) that acts as a central
point for networked devices, receives transmitted messages, and
forwards them. Microsoft Broadband Networking base stations can
link many computers on a single network, and can share a secure
Internet connection with wired and wireless devices.
®
Broadband
broadband connection A high-speed connection, typically 256 Kbps or faster. Broadband
services include cable modems and DSL.
broadband modem A device that enables a broadband connection to access the
Internet. The two most common types of broadband modems are
cable modems, which rely upon cable television infrastructure, and
DSL modems, which rely upon telephone lines operating at DSL
speeds.
cable modem See broadband modem.
CAT 5 cable Abbreviation for “Category 5 cable.” A type of Ethernet cable that
has a maximum data rate of 100 Mbps.
client Any computer or program that connects to, or requests the
services of, another computer or program on a network. For a local
area network or the Internet, a client is a computer that uses
shared network resources provided by a server.
Page 84

client/server network A network of two or more computers that rely upon a central server
to mediate the connections or provide additional system resources.
This dependence upon a server differentiates a client/server
network from a peer-to-peer network.
computer name A name that uniquely identifies a computer on the network so that
all its shared resources can be accessed by other computers on
the network. One computer’s name cannot be the same as any
other computer or domain name on the network.
crossover cable See Ethernet cable.
DHCP Acronym for “Dynamic Host Configuration Protocol.” A TCP/IP
protocol that automatically assigns temporary IP addresses to
computers on a local area network. Microsoft Broadband
Networking base stations support the use of DHCP which,
combined with ICS, allows you to share one Internet connection
with multiple computers on a network.
dial-up connection An Internet connection of limited duration that uses a public
telephone network rather than a dedicated circuit or some other
type of private network. The Microsoft Broadband Networking
hardware does not support the use of a dial-up connection to the
Internet.
DNS Acronym for “Domain Name System.” A data query service chiefly
used on the Internet for translating host names into Internet
addresses. The DNS database maps DNS domain names to IP
addresses, so that users can locate computers and services
through user-friendly names.
domain In a networked computer environment, a collection of computers
that share a common domain database and security policy. A
domain is administered as a unit with common rules and
procedures, and each domain has a unique name.
driver Within a networking context, mediates communication between a
computer and a network adapter installed on that computer.
DSL Acronym for “Digital Subscriber Line.” A constant, high-speed
digital connection to the Internet that uses standard copper
telephone wires.
DSL modem See broadband modem.
duplex A mode of connection; full-duplex transmission allows for the
simultaneous transfer of information between the sender and the
receiver. Half-duplex transmission allows for the transfer of
information in only one direction at a time.
dynamic IP address The IP address assigned (using the DHCP protocol) to a device that
requires it. A dynamic IP address can also be assigned to a router
by an ISP.
78 Microsoft Broadband Networking Wired Base Station User’s Guide
Page 85

encryption The process of encoding data to prevent unauthorized access,
especially during transmission. Microsoft wireless hardware relies
upon encryption to ensure that data transmissions cannot be
accessed by users outside the network. Also see WEP.
Ethernet A networking standard that uses cables to provide network access.
Ethernet cable A type of cable that facilitates network communications.
firewall A security system that protects a network from external threats,
such as hacker attacks, originating outside the network. A
hardware firewall is a connection routing device with specific datachecking settings, that protects all of the devices connected to it.
The Microsoft Broadband Networking Base Station includes a
hardware firewall. A software firewall resides on a single computer,
protecting that computer from external threats. See Microsoft
Windows
®
XP Help for more information about the Internet
Connection software firewall.
firmware Software information stored in non-volatile memory on a device.
gateway See base station.
gateway address The IP address used when making a connection outside your
immediate network.
host name The DNS name of a device on a network, used to simplify the
process of locating computers on a network.
hub A device with multiple ports that serves as a central connection
point for communication lines from all devices on a network. When
data arrives at one port, it is copied to the other ports.
ICS Acronym for “Internet Connection Sharing.” A software feature in
Microsoft Windows that allows computers on a network to access
online services through a single Internet connection. Microsoft
Broadband Networking hardware replaces software ICS.
infrastructure network A network configuration in which wireless devices connect to an
existing network.
Internet domain See domain.
IP address Acronym for “Internet Protocol” address. IP is the protocol within
TCP/IP that is used to send data between computers over the
Internet. An IP address is an assigned number used to identify a
computer that is connected to a network through TCP/IP. An IP
address consists of four numbers (each of which can be no greater
than 255) separated by periods, such as 192.168.1.1.
ISP Acronym for “Internet Service Provider.” A company that provides
individuals or companies access to the Internet.
Glossary 79
Page 86

LAN Acronym for “local area network.” A group of computers and other
devices dispersed over a relatively limited area (for example, a
building) and connected by a communications link that enables
any device to interact with any other on the network.
MAC address Acronym for “media access control” address. The address that is
used for communication between network adapters on the same
subnet. Each network adapter is manufactured with its own unique
MAC address.
Mbps Abbreviation of “megabits per second.” A unit of bandwidth
measurement that defines the speed at which information can be
transferred through a network or Ethernet cable. One megabyte is
roughly equivalent to eight megabits.
modem A device that facilitates the transmission and reception of
information between computers.
NAT Acronym for “network address translation.” The process of
converting between IP addresses used within a private network
and Internet IP addresses. NAT enables all of the computers on a
network to share one IP address. The Microsoft Broadband
Networking Base Station supports NAT, which provides an extra
layer of network security by masking the actual IP addresses of the
computers using a base station.
network A collection of two or more computers that are connected to each
other through wired or wireless means. These computers can share
access to the Internet and the use of files, printers, and other
equipment.
network adapter Also known as a “network interface card” (NIC). An expansion card
or other device used to provide network access to a computer,
printer, or other device.
PC Card A peripheral that adds memory, mass storage, modem capability,
or other networking services to portable computers.
peer-to-peer network Also known as a computer-to-computer network. A network of two
or more computers that communicate without using a central
server. This lack of reliance upon a server differentiates a peer-topeer network from a client/server network.
Plug and Play A set of specifications that allows a computer to automatically
detect and configure various peripheral devices, such as monitors,
modems, and printers.
port A physical connection through which data is transferred between a
computer and other devices (such as a printer, monitor, or
modem), a network, or another computer. Also, a software channel
for network communications.
80 Microsoft Broadband Networking Wired Base Station User’s Guide
Page 87

PPPoE Acronym for “Point-to-Point Protocol over Ethernet.” A specification
for connecting users on an Ethernet network to the Internet by
using a broadband connection (typically through a DSL modem).
Microsoft Broadband Networking hardware supports PPPoE for
connections that require it.
protocol A set of rules that computers use to communicate with each other
over a network.
RJ-11 connector An attachment used to join a telephone line to a device such as a
modem.
RJ-45 connector An attachment found on the ends of all Ethernet cables.
router See base station.
server A computer that provides shared resources, such as storage space
or processing power, to network users.
shared folder A folder on a computer that has been made available for other
people to use on a network.
shared printer A printer connected to a computer that has been made available
for other people to use on a network.
sharing To make the resources associated with one computer available to
users of other computers on a network.
SSID Acronym for “Service Set Identifier,” also known as a “wireless
network name.” An SSID value uniquely identifies your network and
is case sensitive.
static IP address A permanent Internet address of a computer (assigned by an ISP).
straight-through cable See Ethernet cable.
subnet A distinct network that forms part of a larger computer network.
Subnets are connected through routers and can use a shared
network address to connect to the Internet.
subnet mask Determines whether two computers on a network can
communicate with each other directly. Similar in form to an IP
address and typically provided by an ISP. An example of a subnet
mask value is 255.255.0.0.
switch A central device that functions similarly to a hub, forwarding
packets to specific ports rather than broadcasting every packet to
every port. A switch is more efficient when used within a high
volume network.
TCP/IP Acronym for “Transmission Control Protocol/Internet Protocol.” A
networking protocol that allows computers to communicate across
interconnected networks and the Internet. Every computer on the
Internet communicates using TCP/IP.
Glossary 81
Page 88

USB Acronym for “universal serial bus.” A hardware standard for easily
connecting peripherals to a computer system.
USB adapter A device that connects to a USB port; the Microsoft Broadband
Networking Wireless USB Adapter is a type of USB adapter.
USB connector The end of the USB cable that is plugged into a USB port.
USB port A rectangular slot in a computer into which a USB connector is
inserted.
WAN Acronym for “wide area network.” A geographically widespread
network that might include many linked local area networks
(LANs).
WEP Acronym for “Wired Equivalent Privacy,” also known as “Wireless
Security.” A wireless network encryption mechanism that protects
data transmitted over wireless networks. If you are operating a
wireless network, it is strongly recommended that you enable WEP.
Wi-Fi A commonly used term to mean the wireless 802.11b standard.
wireless access point A device that exchanges data between wireless computers and
wired computers on a network.
wireless network name See SSID.
WLAN Acronym for “wireless local area network.” A network that
exclusively relies upon wireless technology for the device
connections.
workgroup A group of users working on a common project and sharing
computer files, typically over a LAN. A user who has a home
network that is not being controlled by a domain controller can be
a member of a workgroup.
82 Microsoft Broadband Networking Wired Base Station User’s Guide
Page 89

Page 90

0802 Part No. X08-85248-02
Page 91

My Network Settings
Use this page to record your network settings.
Workgroup or domain name:
Base station password:
Wide Area Network (WAN) Settings
Complete this section only if your network has a base station (gateway or router). You can
obtain this information from your Internet service provider (ISP). Your ISP might not require
all of the settings listed below.
Dynamic IP (DHCP) Settings
Complete this section only if your ISP uses a DHCP connection.
Host name (optional):
Adapter MAC address (optional):
Static IP Address Settings
Complete this section only if your ISP has assigned you a specific IP address.
Static IP address:
Subnet mask:
IP gateway address:
Primary DNS server:
Secondary DNS server:
PPPoE Settings
Complete this section only if your ISP uses PPPoE with your DSL connection.
User name:
Password:
Service name (optional):
Page 92

M
0802 Part No. X08-85248-02
www.microsoft.com/broadbandnetworking
 Loading...