

Page 1

ActiveReports for .NET User Guide
ActiveReports for .NET User Guide | 1
Page 2

ActiveReports for .NET User Guide | 2
Table Of Contents
ActiveReports for .NET User Guide 8
Introducing ActiveReports for .NET 8
ActiveReports Editions 8
Standard Edition Features 8
Professional Edition Features 9
Data Dynamics Copyright Notice 9
ActiveReports for .NET License Agreement and Limited Warranty 10
Frequently Asked Questions 11
Installation and Setup 12
Hardware and Software Requirements 12
Installed Files 13
Troubleshooting Installation 14
Verifying Package Installation 14
Upgrading Reports 14
Changes Between ActiveReports 2.0 and ActiveReports for .NET 14
Converting Microsoft Access Reports 15
Migrating from ActiveReports 2.0 15
Architecture and Concepts 15
Events 16
Hyperlinks 16
Layout Files 17
Localization 17
OutputFormat Strings 17
Parameters 18
Report and Page Settings 19
Report Execution 22
Report Structure 23
Scripting 23
Getting Started 24
ActiveReports Designer 25
Using the ActiveReports WinForm Viewer 25
Page 3

ActiveReports for .NET User Guide | 3
Adding a Report to Your Project 26
Design Surface 27
Loading an Existing Report Layout 28
Report Menu 28
Toolbars 29
Toolbox 29
Adding ActiveReports Controls to the Visual Studio Toolbox 30
Adding an ActiveReport to a Visual Studio .NET Project 31
Adding Field Expressions 33
Binding Reports to a Data Source 33
Using a Data Set 33
Using a Data View 34
Using the DataSource Icon 34
Grouping Data 35
Licensing Applications 36
Localizing the Viewer Control 36
Using Metric Units 38
Saving and Loading RDF Files 38
Saving and Loading RPX Files 39
ActiveReports and the Web 40
ActiveX Viewer Control 40
Manually Configuring Web Samples 43
Using Export Filters 46
Getting Assistance 47
Readme File 47
Product Support 48
Product Registration 48
Technical Support 48
Samples and Walkthroughs 49
Samples 49
Standard Edition Samples 49
Annual Report Sample 50
Page 4

ActiveReports for .NET User Guide | 4
ASP.NET Standard Edition Web Sample 50
Category Selection Sample 51
Cross-Tab Sample 51
Custom Preview Sample 51
Data Reader Binding Sample 51
Data View Binding Sample 51
DataGrid Printing Sample 52
E-mail Sample 52
Hyperlinks and Drill-Down Sample 52
RDF File Viewer Sample 52
Report Assemblies Sample 52
Unbound From Array Sample 53
Unbound From Text File Sample 53
XML Data Sample 53
Professional Edition Samples 53
ASP.NET Web Sample 53
End-User Report Designer Sample 53
Walkthroughs 54
Standard Edition Walkthroughs 54
Walkthrough: Data Bound Reports 55
Walkthrough: Unbound Reports 57
Grouping Data Walkthroughs 61
Walkthrough: Conditional Show-Hide Detail 61
Walkthrough: Group on Simple Fields 64
Group on Unbound Fields 66
Walkthrough: KeepTogether Options 71
Page Numbering Walkthroughs 73
Walkthrough: Page Numbering in the Group Header 73
Walkthrough: Page Numbering in the Page Footer 76
Walkthrough: Summary Fields 79
Walkthrough: Calculated Fields 81
Bookmarks Walkthroughs 83
Walkthrough: Bookmarks with Grouping 84
Page 5

ActiveReports for .NET User Guide | 5
Walkthrough: Bookmarks with Simple Reports 87
Walkthrough: Bookmarks with Subreports 89
Walkthrough: Rich Text and Field Merging 94
Master Detail Reports Walkthroughs 99
Walkthrough: Master Detail Reports with Grouping 100
Walkthrough: Master Detail Reports with Subreports 102
Walkthrough: Master Detail Reports with XML Data 105
Subreports Walkthroughs 107
Walkthrough: Hierarchical Subreports 107
Nested Subreports 110
Walkthrough: Simple Subreports 114
Parameters Walkthroughs 117
Walkthrough: Parameters with Simple Reports 118
Walkthrough: Parameters with Subreports 119
Hyperlinks Walkthroughs 122
Walkthrough: Hyperlinks 123
Walkthrough: Hyperlinks and Bookmarks 125
Walkthrough: Hyperlinks and Simulated Drill-Down Reporting 130
Walkthrough: Conditional Formatting 136
Walkthrough: Using Data Sets Containing Relationships with Subreports 139
Run-Time Reporting Walkthroughs 144
Walkthrough: Creating and Modifying Report Layouts at Run Time 144
Walkthrough: Modifying the Report Data Source at Run Time 153
Walkthrough: Creating Advanced Report Layouts 155
Modifying Report Documents Walkthroughs 157
Walkthrough: Adding Pages 157
Walkthrough: Applying Page Templates 161
Walkthrough: Merging Reports 164
Walkthrough: Style Sheets 167
Scripting Walkthroughs 169
Walkthrough: Scripting and Simple Reports 169
Walkthrough: Scripting and Subreports 172
Page 6

ActiveReports for .NET User Guide | 6
Printing Walkthroughs 176
Walkthrough: Duplexing 177
Walkthrough: Multiple Copies 178
Walkthrough: Orientation 179
Walkthrough: Scaling Pages 181
Walkthrough: Customizing the Viewer Control 183
Walkthrough: Using ActiveX Viewer Control on the Web 185
Walkthrough: Exporting Output 188
Walkthrough: Saving and Loading to a Memory Stream 190
Web Custom Exporting Walkthroughs 193
Walkthrough: Custom Exporting with HTML 193
Walkthrough: Custom Exporting with PDF 199
Walkthrough: Custom Exporting with Excel 202
Walkthrough: Custom Exporting with TIFF 205
Walkthrough: Custom Exporting with RTF 208
Custom Exporting with Plain Text 210
Walkthrough: Deploying Compiled Reports 213
Custom Controls and ChartFX 214
Web Services Walkthroughs 216
Data Set Web Service 216
Data Set Windows Application 217
ActiveReports Document Web Service 219
ActiveReports Document Windows Application 221
Localization Walkthroughs 223
Localizing the Active Reports Viewer control 223
Localizing the ActiveReports Designer 227
Localizing the ActiveReports Engine 231
Professional Edition Walkthroughs 234
Creating an End-User Report Designer Walkthroughs 234
Walkthrough: Creating the Basic Layout for an End-User Report Designer 235
Walkthrough: Adding Code for the End-User Report Designer 237
Walkthrough: Adding Code for the Main Menu 239
Walkthrough: Adding Code for the Property Grid 241
Page 7

ActiveReports for .NET User Guide | 7
Walkthrough: Configuring the ActiveReports Toolbox 242
Walkthrough: Adding Code for the ActiveReports Toolbox 244
Walkthrough: Configuring the Layout Toolbar 245
Walkthrough: Adding Code for the Layout Toolbar 248
Walkthrough: Configuring the Report Toolbar 255
Walkthrough: Adding Code for the Combo Boxes 258
Walkthrough: Adding Code for the Report Toolbar 263
Walkthrough: Adding a Viewer Control for the End-User Report Designer 271
Walkthrough: Deploying ActiveReports Web Applications 273
Configuring the HTTP Handlers 274
Walkthrough: HTTP Handlers 277
Walkthrough: Web Viewer Control 279
Page 8

ActiveReports leverages the latest technologies including XML, scripting and CSS along with open architecture
includes the same power and flexibility of ActiveReports 2.0 and provides complete integration with the Visual
ActiveReports for .NET User Guide | 8
ActiveReports for .NET User Guide
ActiveReports for .NET is a fully-integrated product which combines the features of the Visual Studio
programming languages with user-friendly controls to provide a powerful report designer.
In the ActiveReports for .NET Documentation
Introducing ActiveReports for .NET
Find out more about ActiveReports for .NET, installation and setup information and the features of the
standard and professional editions.
Getting Assistance
Find out the location of the Readme file and how to obtain product support.
Samples and Walkthroughs
Find out how to use different features of ActiveReports in the available samples and walkthroughs.
Introducing ActiveReports for .NET
to provide you with a fully-integrated and user-friendly report designer.
This topic contains information about:
ActiveReports Editions
Find out about the different features of the Standard and Professional editions.
Data Dynamics Copyright Notice
Find out about Data Dynamics copyright information.
ActiveReports License Agreement
Find out about the terms of the ActiveReports License Agreement and Limited Warranty.
Frequently Asked Questions
Find out about Frequently Asked Questions.
Installation and Setup
Learn the details of ActiveReports installation and setup.
Upgrading Reports
Find out about upgrading reports in previous versions of ActiveReports and other report programs.
Architecture and Concepts
Find out about the structure and concepts of report design.
Getting Started
Learn the basics of using ActiveReports for .NET.
ActiveReports Editions
Standard Edition Features
Find out about the features of ActiveReports for .NET Standard Edition.
Professional Edition Features
Find out about the features of ActiveReports for .NET Professional Edition.
Standard Edition Features
ActiveReports for .NET is a complete rewrite of the popular ActiveReports engine and report viewer. It
Studio .NET Environment. ActiveReports for .NET Standard Edition supports the following features:
Designer
Full integration with the .NET environment
l
Page 9

includes the same power and flexibility of ActiveReports 2.0 and provides complete integration with the Visual
HTTP Handler extensions allow report files (RPX) or compiled assemblies containing reports to be dropped
ActiveReports for .NET User Guide | 9
Familiar user interface
l
Use with C# and VB.NET
l
Compilation of reports included as part of the application for speed and security or included separately
l
Designer hosting of .NET and user controls
l
Reporting Engine
Managed code
l
Binding to ADO.NET, XML and custom data sources
l
l Easy deployment with the report processing engine as a single assembly dll
All of ActiveReports 2.0 features
l
Report Viewer
Managed C# code
l
Very small deployment assembly, suitable for use on the Internet
l
Table of Contents/Bookmarks
l
Hyperlinking
l
Export Filters
ActiveReports includes export filters to generate output into Rich Text Format (RTF) for word-processing,
Portable Document Format (PDF), Microsoft Excel worksheets, HTML and DHTML for publishing your reports
to the internet, TIFF for optical archiving and faxing and delimited text for spreadsheets and databases.
Professional Edition Features
ActiveReports for .NET is a complete rewrite of the popular ActiveReports engine and report viewer. It
Studio .NET Environment. ActiveReports for .NET Professional Edition includes all of the features of the
Standard Edition and supports the following additional features:
End-User Report Designer
The control is a run-time designer that may be distributed royalty free. It allows the ActiveReports designer
to be hosted in an application and provides end-user report editing capabilities. The control's methods and
properties provide easy access to save and load report layouts, monitor and control the design environment,
and customize the look and feel to the needs of end users.
ASP.NET Integration
Web server control provides convenience for running and exporting reports in ASP.NET.
l
l
on the server and hyperlinked.
Web Viewer Control
The Web Viewer control allows quick viewing of ActiveReports on the web as well as printing capability
l
with the ActiveXViewer and AcrobatReader ViewerType properties.
HTTP Handlers
The RPX HTTP Handler allows hyperlinking of an ActiveReport on a web page to return a HTML format or
l
PDF format of the report for viewing and/or printing.
Compiled Report HTTPHandler allows hyperlinking of an ActiveReport compiled in an assembly on a web
l
page to a HTML format or PDF format of the report for viewing and/or printing.
Data Dynamics Copyright Notice
Information in this document, including URL and other Internet Web site references, is subject to change
without notice. Unless otherwise noted, the example companies, organizations, products, domain names, e-
Page 10

this document may be reproduced, stored in or introduced into a retrieval system, or transmitted in any form
or by any means (electronic, mechanical, photocopying, recording, or otherwise), or for any purpose, without
the case of an authorized transfer, the transferee must agree to be bound by the terms and conditions of this
The product that you produce and/or distribute is NOT a software development product, a product that is sold
ActiveReports for .NET User Guide | 10
mail addresses, logos, people, places and events depicted herein are fictitious, and no association with any
real company, organization, product, domain name, e-mail address, logo, person, place or event is intended
or should be inferred. Complying with all applicable copyright laws is the responsibility of the user. No part of
the express written permission of Data Dynamics, Ltd.
ActiveReports and the ActiveReports logo are registered trademarks of Data Dynamics, Ltd.
All other trademarks are property of their respective owners.
ActiveReports for .NET License Agreement and Limited Warranty
The product in this package (libraries and object code) is proprietary to Data Dynamics, Ltd. and is protected
by Federal Copyright Law. Data Dynamics retains the title to and ownership of the Product. You are licensed
to use this Product on the following terms and conditions:
LICENSE:
The licensee is defined as the individual software developer utilizing the Product. This license is not for an
entire company but for a single developer. Data Dynamics hereby grants the licensee a nonexclusive license
authorizing the licensee to use the enclosed Product on one computer at a time for development purposes.
Distribution of the application(s) using ActiveReports is royalty-free, requiring no additional license fees. You
may incorporate the sample code into your applications. Use of this product by more than one individual or
by anyone other than the licensee terminates, without notification, this license and the right to use this
product.
YOU MAY NOT:
Distribute, rent, sub-license or otherwise make available to others the software or documentation or copies
thereof, except as expressly permitted in this License without prior written consent from Data Dynamics. In
License Agreement.
RESTRICTIONS:
You may use this Product in your business application for sale or distribution as long as:
primarily to software developers or system integrators or a development environment of any kind. Please
contact Data Dynamics, Ltd. for special commercial licensing provisions in these circumstances.
The software serial number and user must be registered with Data Dynamics in order to receive support or
distribution rights.
You may not remove any proprietary notices, labels, and trademarks on the software or documentation.
You may not modify, de-compile, disassemble, reverse engineer or translate the software.
FILES THAT MAY BE DISTRIBUTED WITH YOUR APPLICATION:
Standard Edition License:
ACTIVEREPORTS.DLL, ACTIVEREPORTS.VIEWER.DLL ACTIVEREPORTS.INTEROP.DLL,
ACTIVEREPORTS.XLSEXPORT.DLL, ACTIVEREPORTS.HTMLEXPORT.DLL, ACTIVEREPORTS.PDFEXPORT.DLL,
ACTIVEREPORTS.RTFEXPORT.DLL, ACTIVEREPORTS.TEXTEXPORT.DLL, ACTIVEREPORTS.TIFFEXPORT.DLL
Professional Edition License:
ACTIVEREPORTS.DESIGN.DLL and ACTIVEREPORTS.WEB.DLL in addition to the Standard Edition files.
US GOVERNMENT RESTRICTED RIGHTS:
Use, duplication or disclosure by the United States Government is subject to restrictions as set forth under
DFARS 252.227-7013 or in FARS 52.227-19 Commercial Computer Software - Restricted Rights.
TERM:
Page 11

consequential damages, such as, but not limited to, loss of anticipated profits, benefits, use, or data resulting
only works on Web Forms, and the other is DataDynamics.ActiveReports.Viewer, which is a viewer control
ActiveReports for .NET User Guide | 11
You may terminate your License and this Agreement at anytime by destroying all copies of the Product and
Product Documentation. They will also terminate automatically if you fail to comply with any term or
condition in this Agreement.
LIMITED WARRANTY:
This software and documentation are sold "as is" without any warranty as to their performance,
merchantability or fitness for any particular purpose. The licensee assumes the entire risk as to the quality
and performance of the software. Data Dynamics warrants that the media on which the Program is furnished
will be free from any defects in materials. Exclusive remedy in the event of a defect is expressly limited to
the replacement of media. In no event shall Data Dynamics or anyone else who has been involved in the
creation, development, production, or delivery of this software be liable for any direct, incidental or
from the use of this software, or arising out of any breach of warranty.
Frequently Asked Questions
Is ActiveReports 100% managed?
ActiveReports includes the following distributable DLLs:
Managed DLLs:
ActiveReports.DLL - This is the reporting engine. Managed and written in C#.
l
ActiveReports.Design.DLL - This is the run-time end user report designer. Managed and written in C#.
l
ActiveReports.Viewer.DLL - This is the Windows Forms viewer. Managed and written in C#.
l
ActiveReports.Web.DLL - This is the Web Forms viewer and RPX handler. Managed and written in C#.
l
ActiveReports.PdfExport.DLL - This is the PDF export filter. Managed and written in C#.
l
ActiveReports.HtmlExport.DLL - This is the HTML export filter. Managed and written in C#.
l
Unmanaged DLLs:
ActiveReports.Interop.DLL - This is the auxiliary COM interop DLL. Unsafe C# code for OLE object hosting
l
and other COM functions.
ARExport*.DLL - These are the export filters. Managed wrappers around unmanaged VC++ code.
l
Note The export DLLs will be converted to managed C# after the first release. The above are the
only distributable DLLs. The core components are all managed and use all of what .NET has to
offer.
ActiveReports also includes the following non-distributable DLLs:
ARDBWizard.DLL - This is the design-time Report Wizard. Managed C#.
l
ARTaskPane.DLL - This is the design-time wizards container. Managed C#.
l
ARVSPackage.DLL - This is the VS Integration package. Unmanaged VC++ (Since integration with VS
l
requires COM, this cannot be done any other way).
Why is the viewer icon grayed out?
The icon may be grayed out for 2 reasons:
1. The control selected in the components list was for the wrong viewer control. ActiveReports has two
separate viewer controls. One is DataDynamics.ActiveReports.WebViewer, which is a viewer control that
that works only on Windows Forms.
2. The correct form is not selected. If a Windows Form or Web Form is not selected in the project, the
viewer icon may be grayed out. Verify the correct viewer component is selected for the project:
For the Windows Form Viewer - DataDynamics.ActiveReports.Viewer - ActiveReports.Viewer(x.x.x.xxxx)
For the WebForm Viewer - DataDynamics.ActiveReports.Web - ActiveReports.WebViewer(x.x.x.xxx)
Page 12

The controls overlap: If the controls are overlapping each other this will prevent the controls from moving
ActiveReports for .NET User Guide | 12
Why am I getting an ambiguous reference error?
This error will occur if the report's class file has "Imports System.Windows.Form" or "using
System.Windows.Form;." The reason for the error is the Windows.Forms namespace and the ActiveReports
namespace have definitions for Textbox, Label etc. In order to prevent the error, the code will need to use
the full System.Windows.Form namespace when referencing Windows.Form objects.
Why are my empty controls not moving up?
Stacked controls will not move up under the following conditions:
1.
up when the empty controls shrink.
2. The controls are being intersected by another control: if the stacked controls have another control to the
left or right that does not line up, it will stop the controls from moving up.
The best solution is to use the Remove Vertical Spacing icon on the .NET layout toolbar. After you place the
controls on the report, leaving a little space between each control, select all of the controls in the stack and
click the icon to remove the white space between them.
How do I distribute the assemblies for ActiveReports for .NET?
There are 2 ways the ActiveReports assemblies can be deployed. Each way depends on your installation
method.
1. If you are copying your project from the development machine to your server, you should set the
ActiveReports references in your project references to CopyLocal = True. This way the ActiveReports
DLLs are in the bin folder of the compiled project.
2. If you are making an installer for your software, you will need to include the ActiveReportsDistrib.MSM
file included with the installation of ActiveReports for .NET. For example, it may be installed in the
C:\Program Files\Data Dynamics\ActiveReports for .NET\Deployment folder.
There is a third way to accomplish this which is not recommended because it is not very easy. There is a
command line utility that you can use to install each DLL in the GAC. The format is 'C:\Program
Files\Microsoft Visual Studio .NET\FrameworkSDK\Bin>gacutil -i assembly'.
Installation and Setup
This topic will help you find out what is necessary to install ActiveReports and direct you to appropriate help
for the installation process.
Requirements
Find out the hardware and software requirements to install ActiveReports for .NET.
Installed Files
Find out what files are installed with ActiveReports for .NET.
Troubleshooting Installation
Find out how to troubleshoot installation issues.
Verifying Package Installation
Find out how to verify successful installation.
Tip Close Visual Studio .NET before running the installation program to allow the help files to
be integrated into Visual Studio s common help collection.
•
Hardware and Software Requirements
This topic includes hardware and software requirements for installing and using ActiveReports for .NET.
Hardware requirements (minimum)
Processor: PC with a Pentium II-class processor 450 MHz
l
Page 13

Deployment\ActiveReportsDistrib.msm
ActiveReports for .NET User Guide | 13
Operating System: Windows® 2000, Windows XP or Windows NT 4.0
l
Software requirements
Microsoft .NET framework
l
Microsoft Visual Studio .NET
l
Installed Files
Folder/Files Description
<Common Files>\Data Dynamics\ActiveReports for .NET
ActiveReports.DLL Run-time engine assembly file
ActiveReports.Design.DLL Designer assembly file
ActiveReports.Interop.DLL Native functions assembly file
ActiveReports.Viewer.DLL Viewer assembly file
ActiveReports.Web.DLL Web assembly file
ActiveReports.Web.Design.DLL Web designer assembly file
ARVSPackage.DLL Visual Studio .NET Integration Package
ActiveReports.HtmlExport.DLL HTML Export DLL
ActiveReports.PdfExport.DLL PDF Export DLL
ARExportTIFF.DLL TIFF Export DLL
ARExportExcel.DLL Excel Export DLL
ARExportRTF.DLL RTF Export DLL
ARExportText.DLL Text Export DLL
ARCol.Hx* ActiveReports Help Integration Collection
ddARRef.HxS ActiveReports Help File--Class Library
ddARUG.HxS ActiveReports Help File--User Guide
License.rtf
<Common Files>\Data Dynamics\ActiveReports for .NET\1033
ARVSPackageUI.DLL Visual Studio .NET integration DLL localized UI
<Common Files>\Data Dynamics\ActiveReports for .NET\Wizards
ARAccessWizard.DLL Access to ActiveReports wizard
ARDBWizard.DLL New Report Wizard Add-In
ARInstallExt.DLL ActiveReports installation auxiliary file
arinstallext.InstallState ActiveReports installation auxiliary file
DDAccessHelper.dll Access wizard auxiliary file
WebKey.exe Web.config key generator
ARTaskPane.DLL Report Wizards IDE Task Pane
Data\Nwind.mdb Samples database file
Data\streamSample.mdb Streaming sample database file
Deployment\arview2.cab ActiveX viewer cab file
Introduction\iddlogo.gif Readme image file
Introduction\itopimage1.gif Readme image file
Introduction\itopimage2.gif Readme image file
Data Dynamics ActiveReports License Agreement and Limited
Warranty
<Application Folder>
ActiveReports merge module file
Page 14

The installation for ActiveReports for .NET gives the user the option to install the program for everyone or the
and verify the "Data Dynamics ActiveReports" entry in the installed products
ActiveReports 2.0. Most of the changes are due to class refactoring and renaming of objects and members to
ActiveReports for .NET User Guide | 14
Introduction\assemblies.gif Readme image file
Introduction\readme.html ActiveReports Readme file
Samples\samples.txt Samples description text file
Samples\CSharp\*.* C# sample projects
Samples\VB\*.* Visual Basic sample projects
Troubleshooting Installation
Why can't other users access or use ActiveReports on my machine?
current user. If it is installed only for the current user, other users on the same machine will not be able to
access it or use it.
I just installed ActiveReports for .NET. Why can't I see the help files?
If the installation was run while Visual Studio was open, the help files will not be integrated until the user
exits Visual Studio and reopens it.
Why do I get, "The installer was interrupted before Data Dynamics ActiveReports for .NET... could
be installed. You need to restart the installer to try again" when I run the ActiveReports Setup?
The most likely cause for this error is a permissions issue. Either the folder the setup is pointing to or the
folder containing the setup files does not have the correct permissions. The user needs to verify the system
account for the local machine has permissions to the folder containing the setup and verify the user installing
the program has the appropriate permissions.
Verifying Package Installation
To verify package installation
1. Open Visual Studio .NET.
2. You should see the ActiveReports logo on the splash screen.
3. Open Help > About Dialog
list.
Upgrading Reports
ActiveReports allows you to upgrade your reports from other versions of ActiveReports and other report
programs.
Changes Between ActiveReports 2.0 and ActiveReports for .NET
Find out about changes between ActiveReports 2.0 and ActiveReports for .NET.
Converting Microsoft Access Reports
Find out about converting Microsoft Access reports to ActiveReports.
Migrating From ActiveReports 2.0
Find out how to migrate reports from ActiveReports 2.0.
Changes Between ActiveReports 2.0 and ActiveReports for .NET
Report Classes
Data Dynamics attempted to keep to a minimum the number of changes to the report object model from
closely match the .NET Framework naming conventions. Listed below are the significant changes in the
object model.
1. ActiveReport.Show removed: ActiveReports class is no longer a Window class. This requires using the
viewer control to preview the output of a report.
Page 15

and a Document class. The new Document class has all the members to save/load RDF files and streams.
ActiveReport to achieve the results you desire. To launch the upsizer, open a project in Visual Studio, click on
ActiveReports for .NET User Guide | 15
2. Strong-typed Section classes: ActiveReports for .NET includes classes for each of the section types with
their own unique properties. The old Section object is still available and the SectionCollection class holds
items of the Section type. The new section classes are Detail, GroupHeader, GroupFooter, PageHeader,
PageFooter, ReportHeader and ReportFooter.
3. New Stylesheet class: Provides access to the styles defined in the report and allows you to change the
individual style item properties.
4. Image control renamed to Picture.
5. Field control renamed to Textbox.
6. Supported justified text alignment option for textboxes and labels.
7. Indirect support of ActiveX controls through .NET wrappers and the new CustomControl class.
8. Three added data source classes which replace the data controls: OleDbDataSource, XmlDataSource and
SqlClientDataSource.
9. Split Pages collection: the Pages class from ActiveReports 2.0 is refactored into a PagesCollection class
10. Changed measurements from twips to inches.
11. Frame control has been removed.
Printing
1. Added PrintController and PrintControllerWithStatus classes to make the printing model similar to
the .NET Framework.
2. Use of the .NET Framework Printer and PrinterSettings classes by the viewer control. An optional
unsafe printer class is also included for advanced printing and print job control similar to the
ActiveReports 2.0 class.
Viewer
1. A rewritten report viewer control to take full advantage of the .NET framework classes.
2. Complete revision of the Toolbar and Tools classes.
3. Separation of the Table of Contents tree control from the TOC collection (renamed to
BookmarksCollection).
4. No binding of the viewer control to an ActiveReport object. Instead, it binds to a Document object.
Converting Microsoft Access Reports
Access reports can be easily converted to ActiveReports format by running the Access upsizer wizard. Due to
differences between products, the extent to which your reports will be converted will depend on your specific
report layout. However, since Data Dynamics provides source code, you can modify the resulting
Tools > ActiveReports Wizard, then click on Access Import. This launches the Access to ActiveReports
Wizard.
Migrating from ActiveReports 2.0
ActiveReports for .NET can use existing ActiveReports 2.0 report layout files (RPX) after some modifications
to the scripting code. ActiveReports 2.0 designer files (DSR/DSX) must be saved as RPX files in the
ActiveReports 2.0 Designer before they can be imported into ActiveReports. Since ActiveReports does not
import any Visual Basic or scripting code into .NET, the code will need to be rewritten using the appropriate
language in the new .NET environment.
Architecture and Concepts
This topic will introduce you to the basic structure and concepts of ActiveReports for .NET to enable efficient
report creation.
Page 16

Events
Out of the three events, the Format event generally is used the most often, followed by the BeforePrint event
Since all controls and section growth have already taken place by the time this event fires, this event may be
Learn how events work in ActiveReports.
Hyperlinks
Learn how hyperlinks can be used in ActiveReports.
Layout Files
Learn about layout files.
OutputFormat Strings
Learn about OutputFormat strings.
Parameters
Learn how parameters function for simple reports and subreports.
Report and Page Settings
Learn how to access report and page settings in ActiveReports.
Report Execution
Learn about report execution in ActiveReports.
Report Structure
Learn about the structure of ActiveReports.
Scripting
Learn how to use scripting with ActiveReports.
Events
ActiveReports for .NET User Guide | 16
In a report, regardless of the type or content of the various sections, there are three events for each section:
Format, BeforePrint and AfterPrint.
Because there are many possible report designs, the event-firing sequence must be dynamic in order to
accommodate individual report demands.
and, in rare circumstances, the AfterPrint event.
Format event
This event fires after the data is loaded and bound to the controls contained in a section, but before the
section is rendered to a page.
The format event is the only event where the section's height may be changed. This section may be used to
set or change the properties of any controls or load subreport controls with subreports.
If the CanGrow or CanShrink property of any control contained with a section, or the section itself, is set to
true, all of the growing and shrinking of controls contained in this section, and the section itself, takes place
in the Format event. Because of this, information about a control or a section's height cannot be obtained in
this event.
BeforePrint event
This event fires before the section is rendered to the page.
The growing and shrinking of the section and all controls contained in a section have already taken place by
the time this event fires. Use this section to resize any controls if needed.
used to get an accurate height of the section, or, if needed, any controls contained in it. Any controls in the
BeforePrint event may be resized but not the height of the section itself.
AfterPrint event
This event fires after the section is rendered to the page.
Although AfterPrint was an important event prior to ActiveReports Version 1 Service Pack 3, it is rarely used
in any of the newer builds of ActiveReports. When you place code in the section events, you likely will place
your code in either the Format event or the BeforePrint event. This event is still useful for drawing on the
page after text has already been rendered to the page.
Hyperlinks
Page 17

ActiveReports for .NET User Guide | 17
ActiveReports for .NET allows you to add hyperlinks to reports to perform a variety of functions. The
hyperlink property can be set to any HTML-style link, items in the Bookmarks collection (TOC) or used to
simulate drill-down reporting. By using the Hyperlink property, reports can have "clickable" controls which
can be used for many purposes, including the ability to run and display other reports.
Layout Files
Report layouts in ActiveReports are automatically saved as RPX files. This is an XML-formatted file which
contains the layout information and can contain the scripts of the report. RPX files using scripting allow
distributed reports to be changed and modified without having to recompile the project. They also make it
possible to use a database of report file names to set up a collection of reports to run. An RPX file using
scripting also can be used as a stand-alone file in a web project or a stand -alone file for the HTTP handler.
Localization
The .NET Framework has made it easy for developers to localize their applications and controls. The
ActiveReports for .NET Viewer Control uses the Hub and Spoke model for localizing resources. The hub is the
main executing assembly. In our case it's the application that hosts the Viewer Control. The spokes are
satellite dlls that contain localized resources for the application.
The satellite dlls are place in subdirectories under the main executing assembly. When the main executing
assembly needs a resource, a ResourceManager object is used to load the required resource. The
ResourceManager uses the thread's CurrentUICulture Property. This property is set by the common language
runtime or it can be set in your code to force a certain UI Culture.
Forcing a certain locale is helpful when you want to test if your satellite dll is loading properly. The
ResourceManager class uses the CurrentUICulture Property to locate subdirectories that should contain a
satellite dll for the current culture. If no subdirectory exists the ResourceManager will use the resource that
was embedded in the assembly.
The Viewer Control is built using the default culture of US English. This is the fallback culture for the Viewer
Control. For more detailed information about how the framework locates satellite dlls, please reference the
help system in Visual Studio .NET or the book Developing International Software, 2nd edition by MS Press
that contains information on localizing applications using the .NET Framework.
OutputFormat Strings
ActiveReports allows you to set formatting strings for date, time, currency, and other numeric values using
the OutputFormat property on the textbox control. The OutputFormat dialog also allows you to
select international currency values and select from various built-in string expressions.
Times:
l hh:mm tt = 09:00 AM
HH:mm = 21:00 (twenty-four hour clock)
l
HH = hours in 24 hour clock
l
hh = hours in 12 hour clock
l
mm = minutes
l
ss = seconds
l
tt = AM or PM
l
Dates:
dddd, MMMM d, yyyy = Saturday, December 25, 1999
l
dd/MM/yyyy = 25/12/1999
l
d or dd = day in number format
l
l ddd = day in short string format (Ex. Sat for Saturday)
dddd = day in string format (Ex. Saturday)
l
Page 18
ActiveReports for .NET User Guide | 18
MM = month in number format
l
MMM = month in short string format (Ex. Dec for December)
l
MMMM = month in string format (Ex. December)
l
y or yy = year in two digit format (Ex. 99 for 1999)
l
yyy or yyy = year in four digit format (Ex. 1999)
l
Currency and numbers:
$00.00 = $25.50
l
$#,##0.00 = $06.25
l
0 = digit or zero
l
# = digit or nothing
l
% = percent-multiplies the string expression by 100
l
Parameters
Parameters and Simple Reports
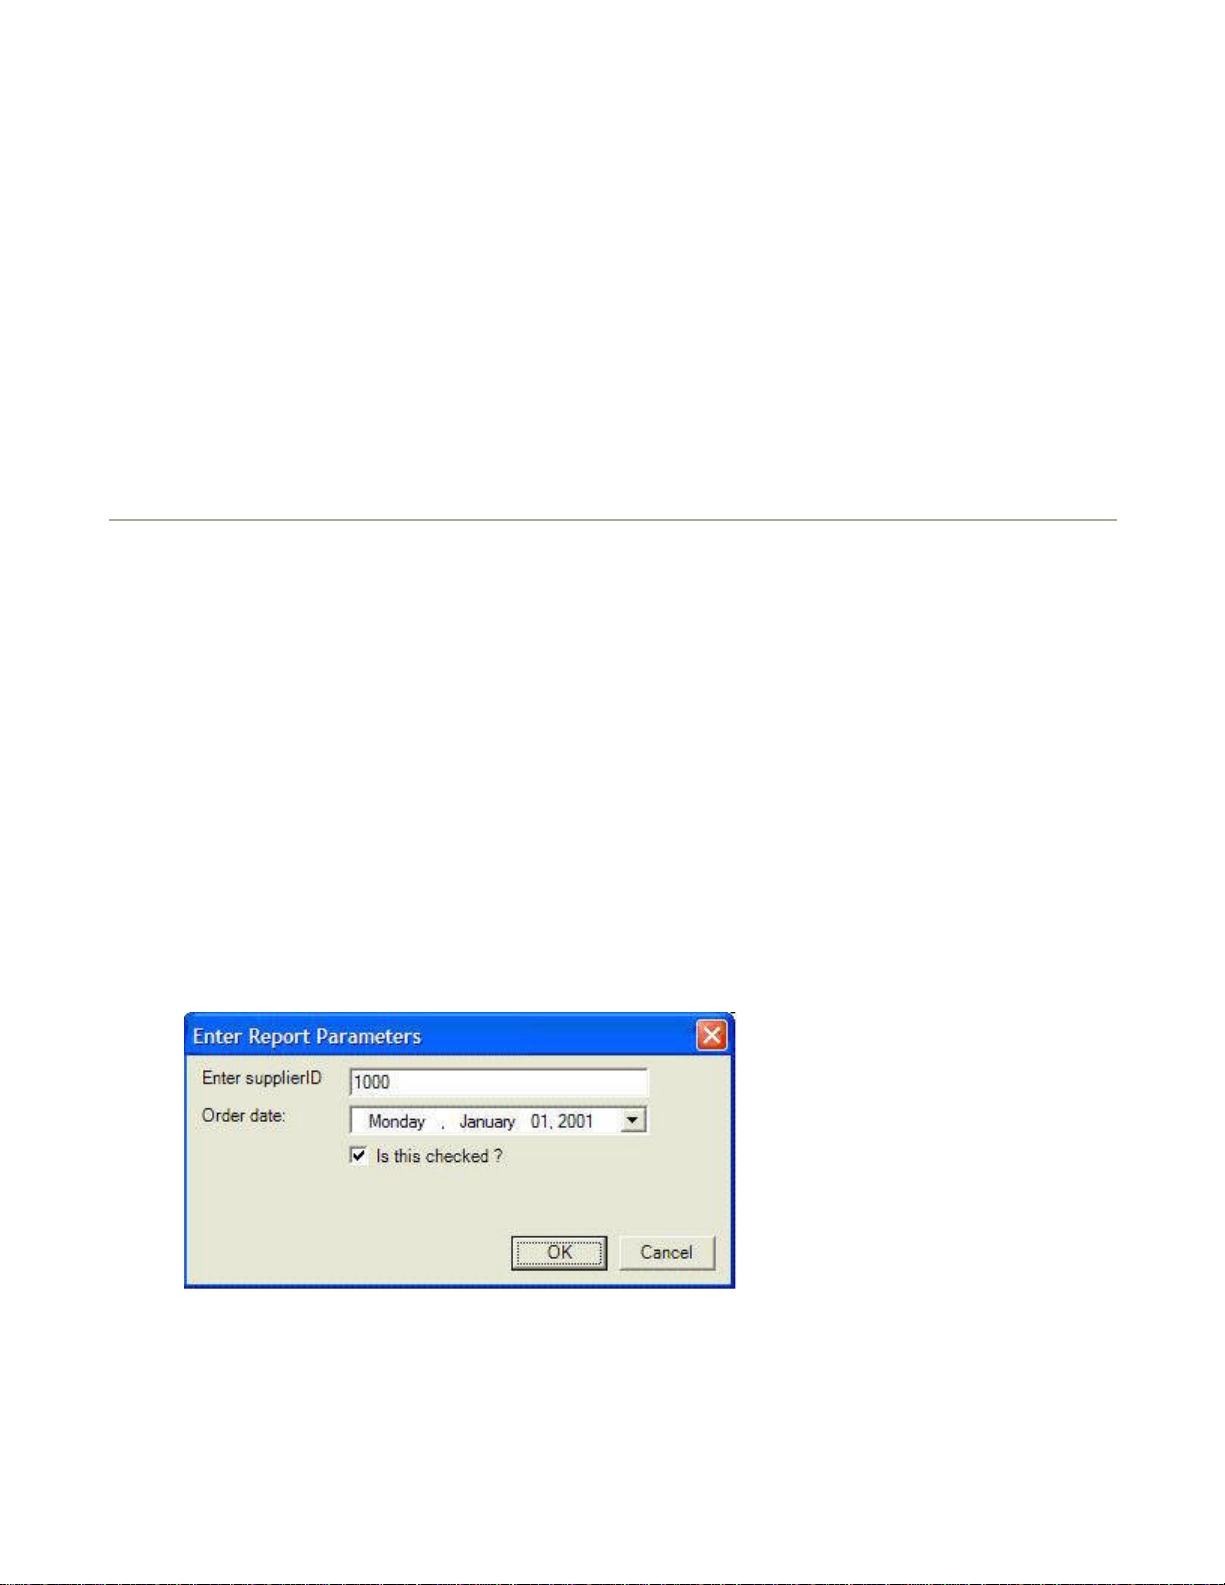
The Parameters dialog can be used to prompt the user for input when reports are generated. If you add <%
FieldName | PromptString | DefaultValue | Type%> to the report s SQL string, it will cause the Parameters
dialog to be displayed.
The Field name is the name of the field you wish to request (e.g. CustomerID or LastName). The Prompt
string is a string value indicating text that will appear in the dialog next to the control (e.g. Enter
Customer ID: ). Setting the default value will automatically set a default value. For example, if you have a
report that generates based on a date, you can have the default for the field set to the current date so users
can just hit "Enter", unless they want to generate a report based on a new date. Type indicates what type of
data will be requested.
The values can be: nothing(string), S for string, D for date, B for Boolean. A string type will give a textbox
for input, a D type will give a calendar drop-down control for input and a B type will give a checkbox for
input.
Note For Strings: If you specify a default value that is enclosed in single or double quotes, it will
be recognized and will output the same quotes to SQL when replacing. For Booleans : if you
specify true/false for DefaultValue it will generate true/false for SQL output. If you specify 0,1, it
will output 0 or 1.
Example: "SELECT * FROM products INNER JOIN categories ON products.categoryid = categories.categoryid
WHERE products.supplierID =<%SupplierID|Enter supplierID|1000%> and OrderDate=#<%Date|Order
date:|1/1/2001|D%># and Discount='<%bool| Is this checked ?|true|B%>'"
•
Note The FieldName is the only required parameter; the rest are optional.
Stored procedures can be used the same way as parameters in ActiveReports. The Sql statement would need
to have the stored procedure call and placeholders for the parameters: "CustOrderHist '<%ID|Enter
Customer ID:|AFLKI%>'". ActiveReports will then replace the parameter text "<%...%>" with whatever the
user types into the dialog to create a call like this: CustOrderHist 'AFLKI'.
Page 19
ActiveReports for .NET User Guide | 19
Parameters and Subreports
Parameters can be used with subreports to connect the subreport to the parent report. By setting a
parameter for the field that links the parent report to the child subreport, the parent report can pass the
information to the child through the parameters. The main differences when working with subreports and
parameters are:
The subreport s ShowParametersUI should be set to False.
l
The subreport s SQL query should be set to use the parameter syntax = <%fieldname%>.
l
Note Both report queries must contain the same field (so the main report must have a
categoryID field and the subreport also must have a categoryID field.
•
•
Report and Page Settings
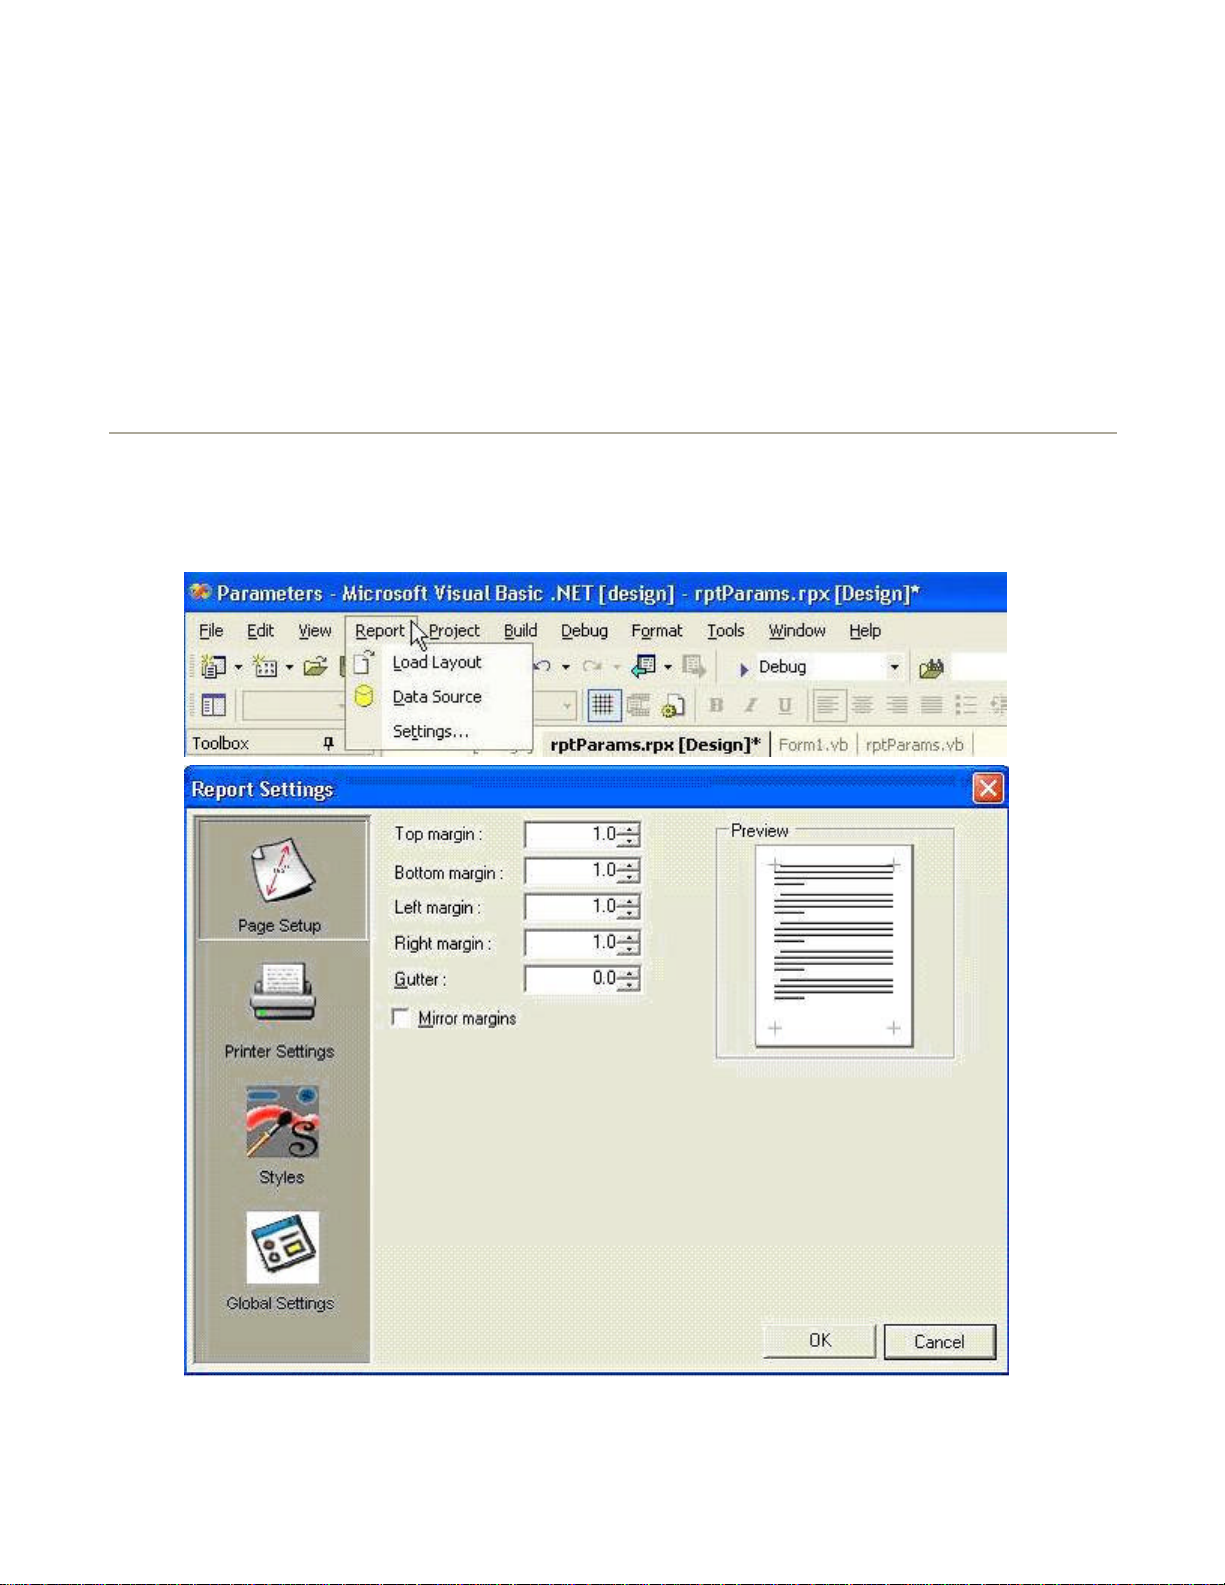
The Page (Report) Setup Dialog
With ActiveReports, page setup in your report can be modified at design time, as well as at run time. The
Page Setup dialog can be accessed by selecting Report > Settings... from the toolbar menu.
From the Page Setup dialog, changes can be made to the report margins (left, right, top and bottom), a
Page 20
ActiveReports for .NET User Guide | 20
gutter can be specified and the Mirror margins option can be selected.
By setting a gutter and selecting Mirror margins, reports can be set up easily for publishing purposes. When
Mirror margins is selected, the inner margins in the report are set for opposite pages to be the same width
and the outside margins for opposite pages to be the same width. Specifying a gutter gives extra space
between the edge of the page and the margins. This allows reports to be bound together.
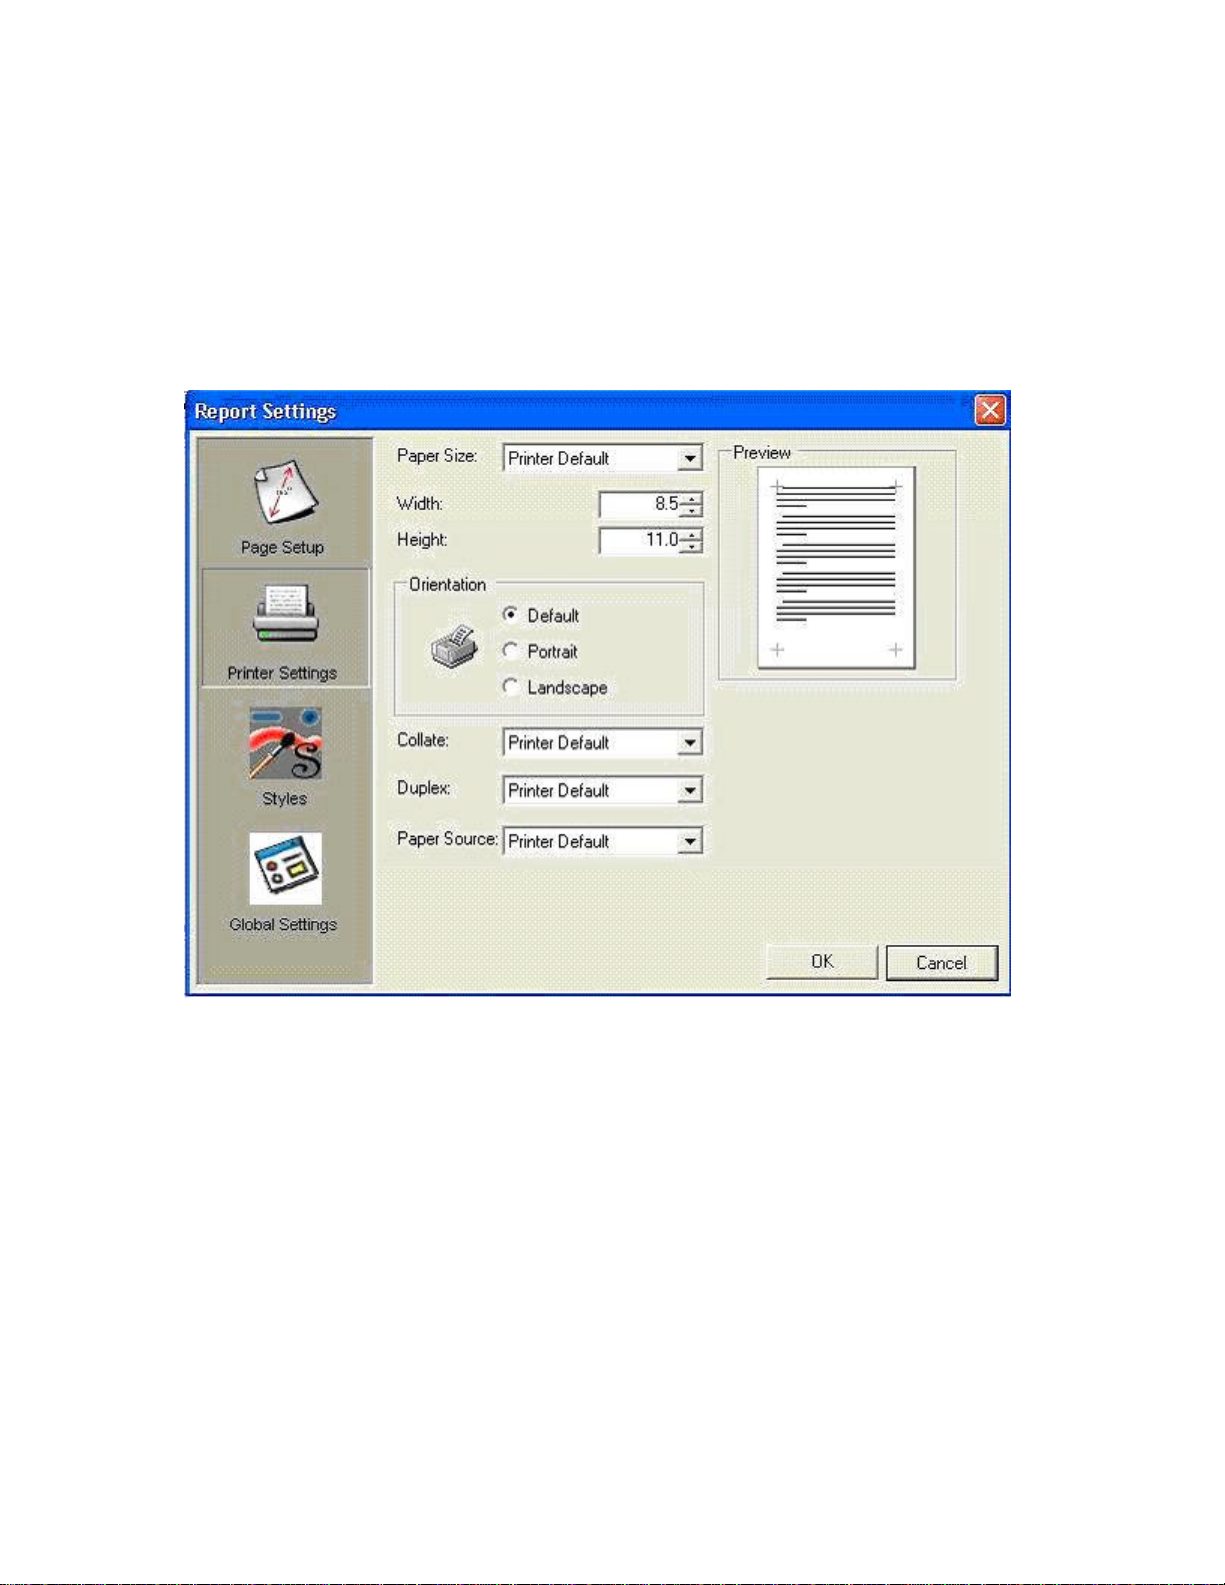
The Printer Settings Dialog
With ActiveReports, printer settings can be modified at design time, as well as run time. The Print Settings
dialog (shown below) can be accessed by selecting Report > Settings... from the toolbar menu and then
selecting the Printer Settings option button from the Report Settings dialog box.
From the Printer Settings dialog, changes can be made to the printer paper size and orientation. A custom
paper size can be set by selecting Custom paper size from the Paper size drop down box. Once this
option has been selected, the width and height options will allow a specific height and width to be set.
The Printer Settings dialog also lets the user choose the type of collation to use, whether or not the report
should be duplexed and the location of the paper source.
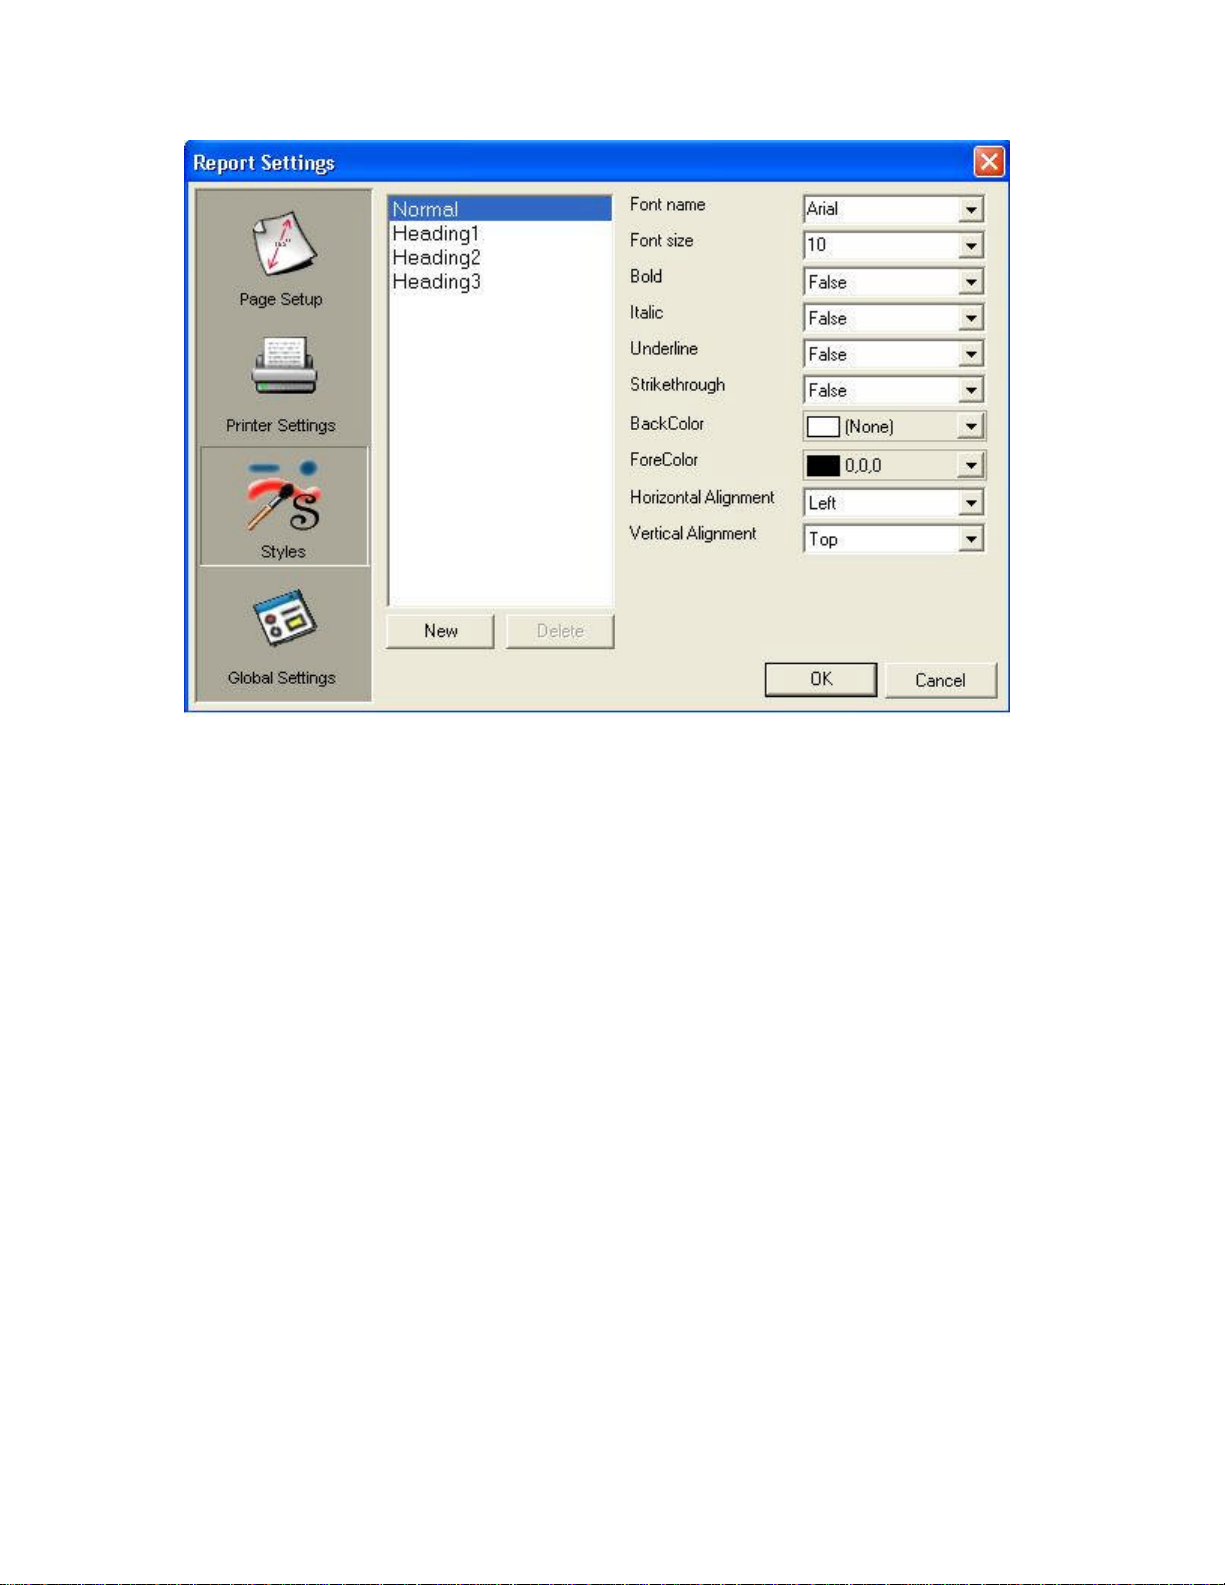
The Styles Dialog
With ActiveReports, style sheet settings can be created and/or applied. The Styles dialog (shown below) can
be accessed by selecting Report > Settings... from the toolbar menu and then selecting the Styles option
button from the Report Settings dialog box.
Page 21
ActiveReports for .NET User Guide | 21
From the Styles dialog, changes can be made to the appearance of text associated with controls, either by
applying an existing style sheet, creating and applying a new style sheet or by modifying and applying an
existing style.
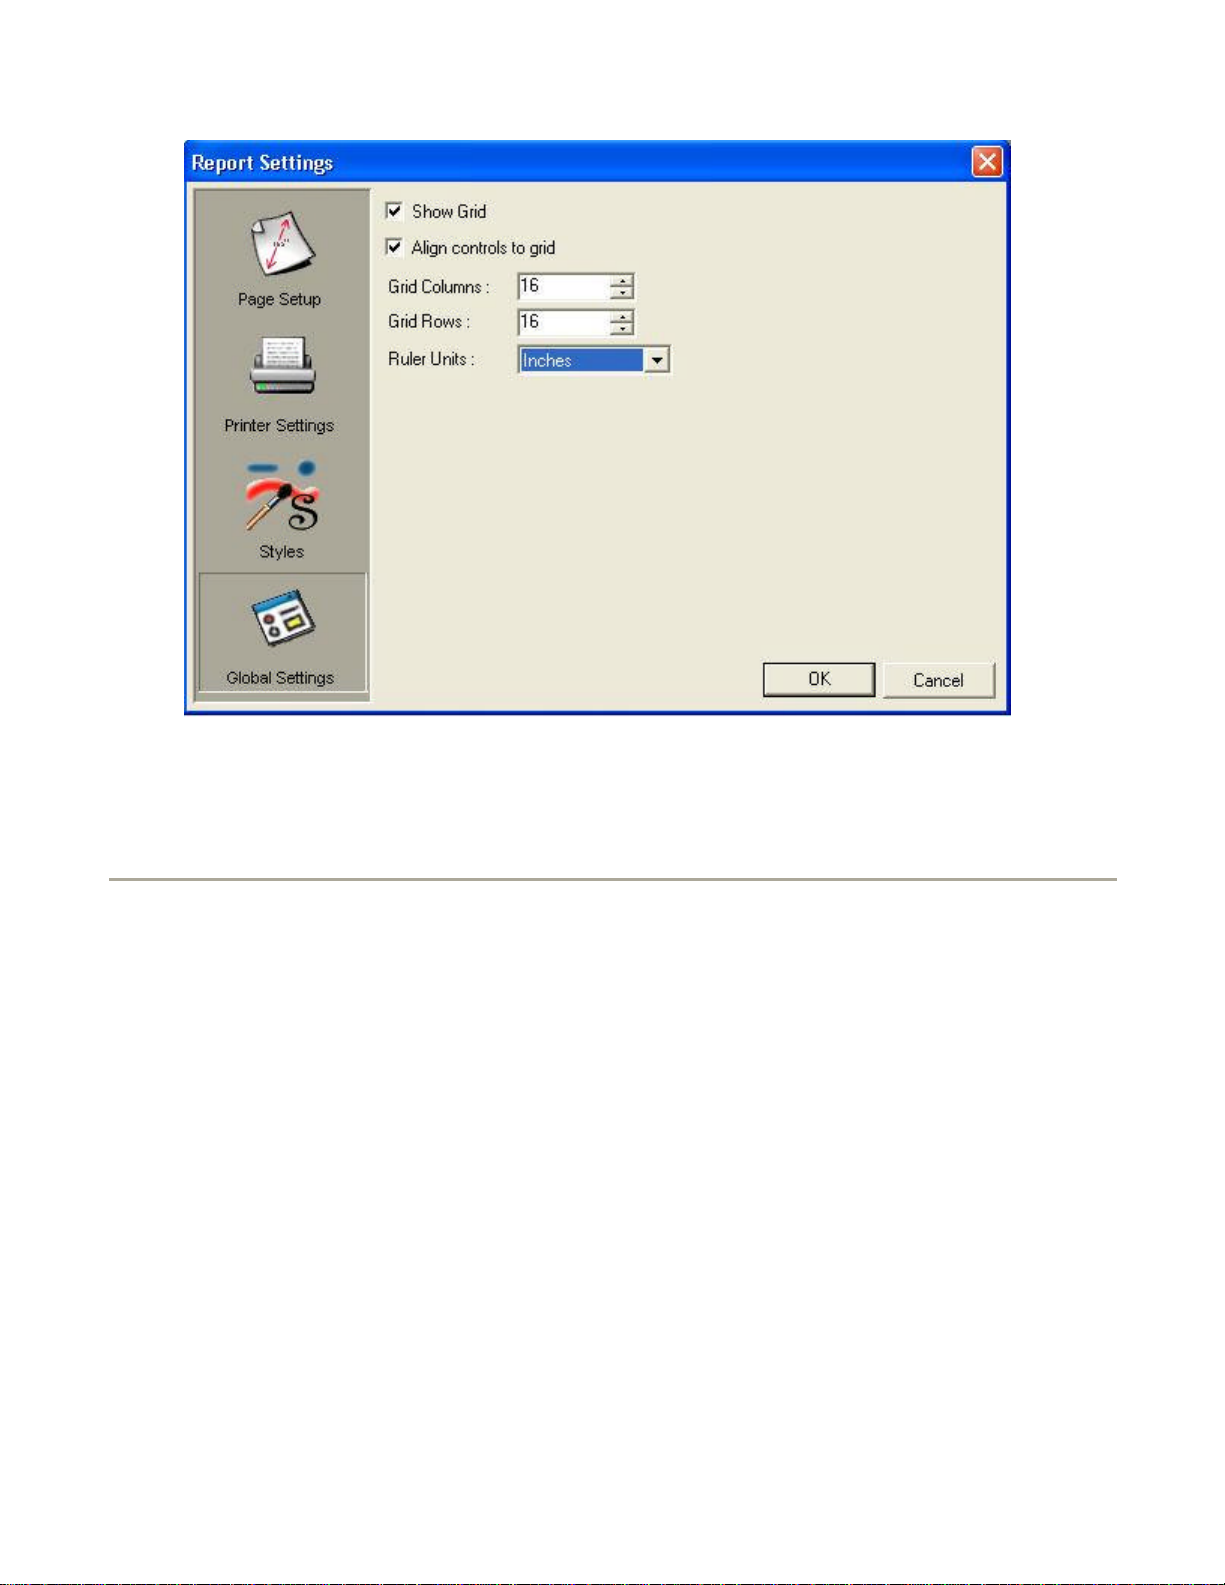
The Global Settings Dialog
With ActiveReports, global report settings can be modified at design time. The Global Settings dialog (shown
below) can be accessed by selecting Report > Settings... from the toolbar menu and then selecting the
Global Settings option button from the Report Settings dialog box.
Page 22
properties might cause DataInitialize to fire. The report validates any changes made to the report structure in
threaded,
The KeepTogether property determines whether a section should print in its entirety on the same page. When
ActiveReports for .NET User Guide | 22
From the Global Settings dialog, changes can be made to the design surface, including showing or hiding the
grid, setting the controls to align to the grid, setting the number of column or rows on the grid and changing
the ruler units to inches or centimeters.
Report Execution
ActiveReports report execution begins by raising the ReportStart event. At this point, accessing data source
ReportStart.
Printer settings are applied next.
If DataInitialize is not fired during the ReportStart event, it will be fired. The data source will be opened. If
there are any parameters in the data source with unset values and "ShowParameterUI" is set to True,
ActiveReports displays a parameters dialog and fires "ParameterUIClosed" when the dialog is closed. If the
report is a subreport and requires parameters, ActiveReports binds the subreport parameters to any fields in
the parent report.
Next, the FetchData event fires. If there is no data, the NoData event is raised.
Group sections are bound and sections begin rendering on pages.
Events are then fired for processing the report header, followed by page header, groups, detail and page
footer for each page in the report. The cancel flag is checked after each event.
The speed in processing and output generation of ActiveReports is attributed to its intelligent, multi-
single-pass processing. ActiveReports will process and render each page as soon as the page is ready. If
ActiveReports is not able to fully render a page because of unknown data elements or because the layout is
not final, it places the page in cache until the data is available.
Summary fields and KeepTogether constraints are two reasons that a page might not be rendered
completely. The summary field is not complete until all the data needed for calculation is read from the data
source. When a summary field such as a grand total is placed ahead of its completion level, such as in the
report header, the report header and all following sections will be delayed until all of the data is read.
this property is set to True, the section will print on the same page without any page breaks. A False setting
Page 23

block on the same page. The property defaults to None which allows the group block to be split across pages.
at run time.
ActiveReports for .NET User Guide | 23
allows the section to be split across two or more pages. If the KeepTogether property is set to True, but the
section is too large for the current page, or to fit fully on the next page, the KeepTogether property will be
ignored.
The GroupKeepTogether property determines whether group header and footer sections will print as a single
When you set this property to All, ActiveReports attempts to print the complete block on the same page
without any page breaks. When a complete block does not fit on a single page, it will be split across two or
more pages. The third option, FirstDetail, prevents any widowed group header sections. The group header
will always print with at least one Detail section.
Report Structure
A report section contains a group of controls that are processed and printed at the same time as a single
unit. ActiveReports defines the following section types:
Report Header
A report can have one report header section that prints at the beginning of the report. This section generally
is used to print a report title, a summary table, a chart or any information that needs only to appear once at
the report's start.
Report Footer
A report can have one report footer section that prints at the end of the report. This section is used to print a
summary of the report, grand totals or any information that needs to print once at the report's end.
Page Header
A report can have one page header section that prints at the top of each page. It is the first section that
prints on the page except when the page contains a report header section. The page header section is used
to print column headers, page numbers, a page title or any information that needs to appear at the top of
each page in the report.
Note It is not recommended to bind controls to a page header as results may be unpredictable.
Page Footer
A report can have one page footer section that prints at the bottom of each page. It is used to print page
totals, page numbers or any other information that needs to appear at the bottom of each page.
Group Header/Footer
A report can consist of single or multiple nested groups, with each group having its own header and footer
sections. The header section is inserted and printed immediately before the Detail section. The footer section
is inserted and printed immediately after the Detail section.
Detail
A report has one Detail section. The detail section is the body of the report and one instance of the section is
created for each record in the report.
Scripting
ActiveReports allows you to use scripting to provide ease in reporting functionality. Scripting permits reports
saved to an RPX file to contain code. This characteristic allows the options of stand-alone reporting and web
reporting without requiring .vb or .cs files. By including scripting when the report is saved as an RPX file, it
can later by loaded, run and displayed directly to the viewer control without using the designer. Scripting can
also be used in conjunction with RPX files to allow distributed reports to be updated without recompiling.
Scripting can be used by adding C# code to the script editor at design time or by using rpt.Script
The script is then saved to the RPX file.
Page 24

ActiveReports for .NET User Guide | 24
The AddNamedItem and AddCode methods are used to add items to the report s script. By using
AddNamedItem or AddCode , code elements from inside the .NET project can be used inside the scripts. By
using AddNamedItem, scripts can become aware of functions in a class contained in the .NET project. By
using AddCode, actual code segments can be added to the script at run time. Since the RPX file can be read
with any text editor, AddCode or AddNamedItem can be used to add secure information to a project, such as
a connection string.
AddScriptReference can be used to add an assembly reference to the script. This will allow users to add a
reference in the script to access assemblies in their projects. AddScriptReference is only needed if the script
accesses assemblies that are not already initialized in the project. For example, to access
"System.Data.DataSet" inside the script, you would need to add a reference by calling
"rpt.AddScriptReference("System.Data.Dll")".
Scripting Concepts to Remember:
Controls referenced inside the script must be public
l
If the RPX file does not have an associated codebehind file, you will need to refer to the controls and
l
sections by calling "rpt.Sections[<sectionname>]" or "rpt.Sections[<sectionname>].Controls
[<controlname>]"
The report instance is referred to in the report as "rpt." This is similar to "me" and "this" in the
l
codebehind files. You must use "rpt" to gain access to the report and its controls
The report class has to be public for scripting to access public methods and/or functions (this is done by
l
default)
•
Getting Started
This topic will show you how to begin using ActiveReports by explaining different aspects of ActiveReports
and showing you how to include it in your Visual Studio .NET IDE (Integrated Development Environment).
ActiveReports Designer
Learn how to use the ActiveReports designer.
Adding ActiveReports Controls to the Visual Studio Toolbox
Learn how to add ActiveReports controls to the toolbox in Visual Studio.
Adding an ActiveReport to a Visual Studio .NET Project
Learn how to add an ActiveReport to a Visual Studio project.
Adding Field Expressions
Learn how to add field expressions to a text box data field.
Binding Reports to a Data Source
Learn how to bind reports to various data sources.
Grouping Data
Learn how to use the GroupHeader to group data in a report.
Licensing Applications
Learn how to license your ActiveReports Applications.
Localizing the Viewer Control
Learn how to localize settings for the ActiveReports Viewer control.
Metric Units
Page 25

ActiveReports for .NET User Guide | 25
Learn how to use metric units with ActiveReports for .NET.
Saving and Loading RDF Files
Learn how to save and load reports as RDF files at run time.
Saving and Loading RPX Files
Learn how to save and load reports as RPX files at run time.
ActiveReports and the Web
Learn about using ActiveReports with the Web.
Using Export Filters
Learn about using the ActiveReports export filters.
Related Sections
Samples
ActiveReports includes many samples which demonstrate applications the developers created for
ActiveReports. These samples show the use of a combination of controls and code to produce various
reports.
Walkthroughs
Learn how to create various types of applications in C# and Visual Basic .NET--one step at a time.
Technical Support
Technical support is available for ActiveReports for .NET in a variety of media.
ActiveReports Designer
With its various tools and qualities, ActiveReports for .NET offers great flexibility in constructing report
projects. In this section, you will learn how to use the different features of the ActiveReports Designer.
ActiveReports WinForm Viewer
Learn how to use the WinForm Viewer to preview a report.
Adding a Report to your Project
Learn how to add a report to a new or existing .NET project.
Design Surface
Learn more about the features of the design surface.
Loading an Existing Report Layout
Learn how to load an existing report layout at design time in ActiveReports.
Report Menu
Learn about the different aspects of the report menu.
Toolbars
Learn how to use the ActiveReports toolbars.
Toolbox
Learn about the functions of the controls on the ActiveReports toolbox.
Using the ActiveReports WinForm Viewer
To use the ActiveReports WinForm Viewer to preview report output
1. Add an ActiveReport to your Visual Studio project and rename it rptMain.
2. Add a new "Windows Form" to your project.
3. Click on the ActiveReports viewer control in the appropriate toolbox and drag it onto Form1.
4. Set the viewer control's Dock property to Fill.
To write the code for the viewer in Visual Basic
Right-click on Form1, and click on View Code to display the code view for the form. At the top left of the
l
code view for Form1, click the drop-down arrow and select (Base Class Events). At the top right of the
Page 26

Private Sub Form1_Load(ByVal sender As Object, ByVal e As System.EventArgs) Handles MyBase.Load
ActiveReports for .NET User Guide | 26
code window, click the drop-down arrow and select Load. This creates an event-handling method for the
Form1_Load event. Add code to the handler to:
Format the viewer to show the report when it is run
l
To write the code for the viewer in C#
Click on the blue section at the top of Form1 to select the form. Click on the events icon in the
l
Properties window to display available events for Form1. Double-click Load . This creates an event-
handling method for the Form1_Load event. Add code to the handler to:
Format the viewer to show the report when it is run
l
The following example shows what the code for the method looks like:
[Visual Basic]
Dim rpt As New rptMain()
Viewer1.Document = rpt.Document
rpt.Run()
End Sub
[C#]
private void Form1_Load(object sender, System.EventArgs e)
{
rptMain rpt = new rptMain();
this.viewer1.Document = rpt.Document;
rpt.Run();
}
Adding a Report to Your Project
To add a report to your project
1. Open a new or existing project.
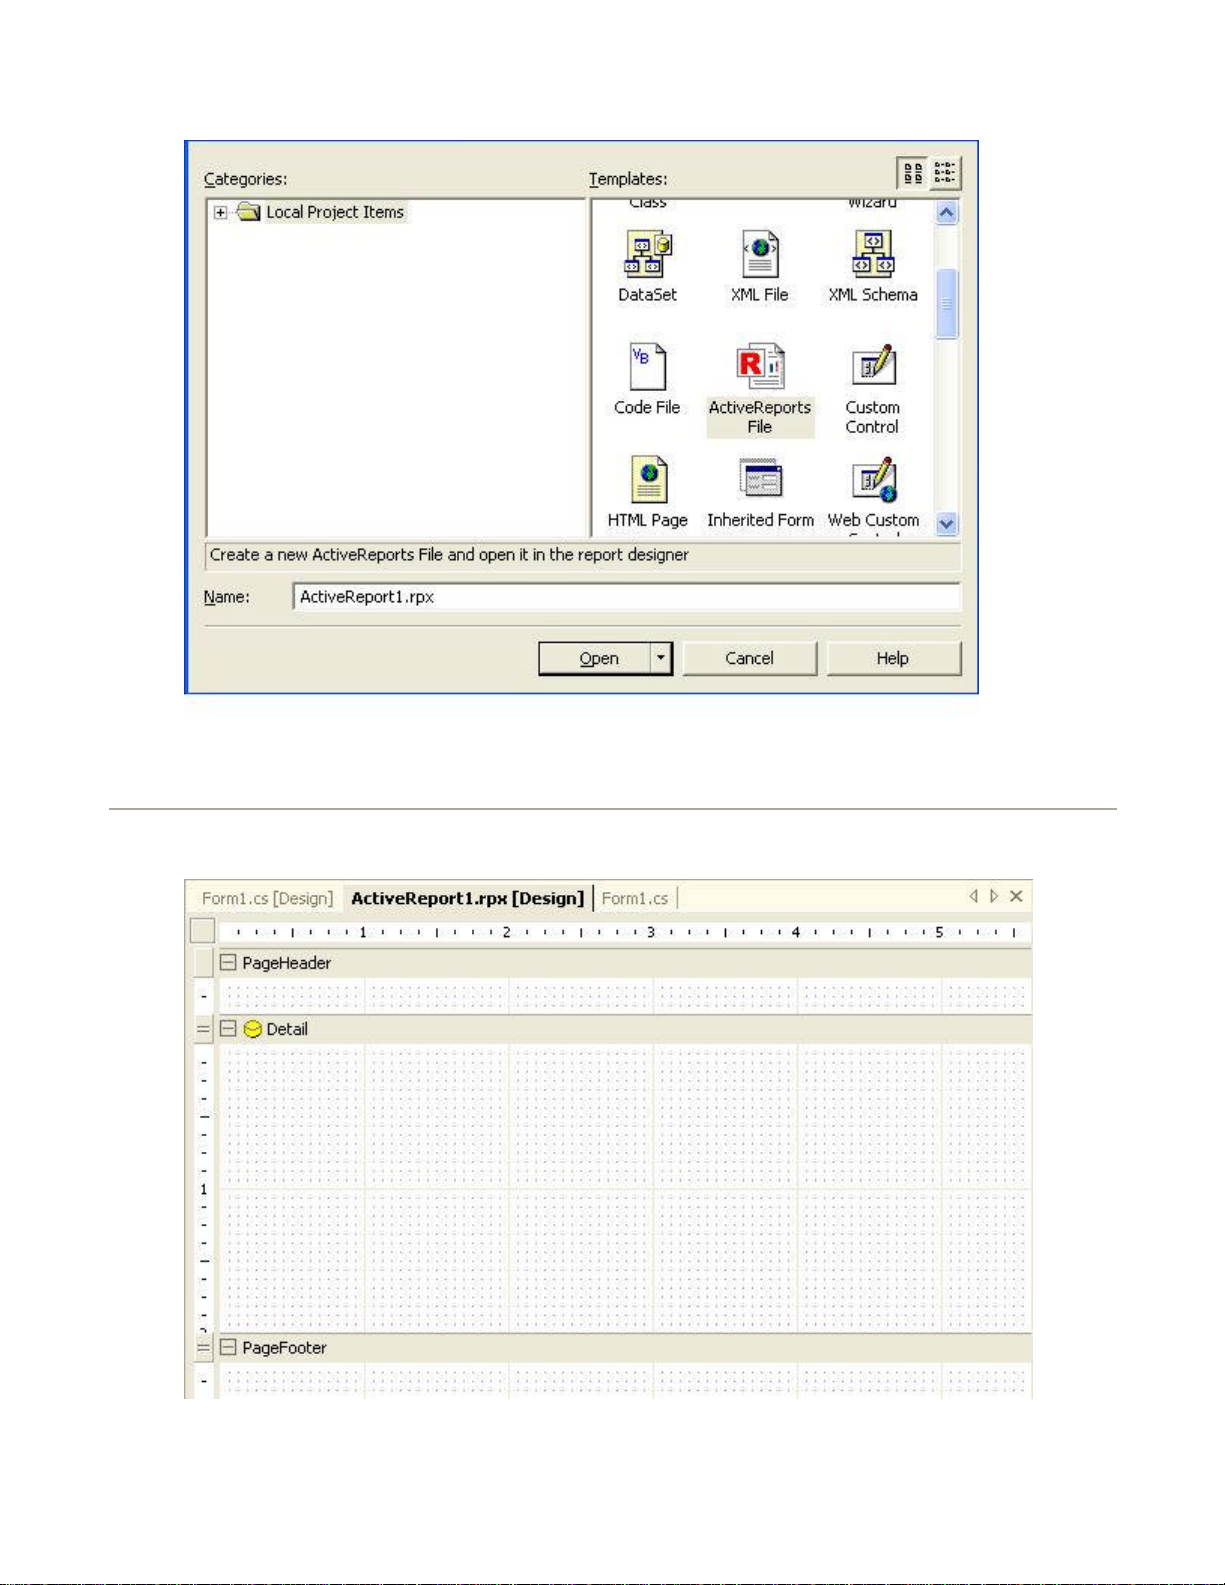
2. Click on Project > Add New Item (Ctrl+Shft+A)
3. Select ActiveReports File and rename the file.
Page 27
The ActiveReports design surface leverages your current knowledge of Visual Studio .NET's designer interface
ActiveReports for .NET User Guide | 27
4. Click Open to add the report to your project.
Design Surface
and provides full integration within the Visual Studio environment.
To access the ActiveReports design surface
Page 28
This section can be used to print column headers, page numbers, page titles, or any
This control can be used to connect the report's data source settings to an existing data
This section can be used to print page totals, page numbers or any other information
ActiveReports for .NET User Guide | 28
1. Open a Visual Studio project.
2. Add an ActiveReport to your project.
3. Once the report is added, you will see the report design surface.
The default ActiveReports design surface is made up of the following base components:
PageHeader section--
l
information that needs to be printed once at the top of each page.
Detail section--This section is the body of the report that prints once for each record in the data source.
l
DataSource icon--
l
source
PageFooter section--
l
that needs to be printed once at the bottom of each page.
Loading an Existing Report Layout
To load an existing Report Layout
1. Open a Visual Studio project.
2. Click on File > Open > File...
3. Select the RPX report layout from from the appropriate location.
4. Click Open to load the report layout.
-or-
5. While in an ActiveReport, click Report > Load Layout.
6. Select the RPX file from the appropriate location.
7. Click Open to load the selected report layout.
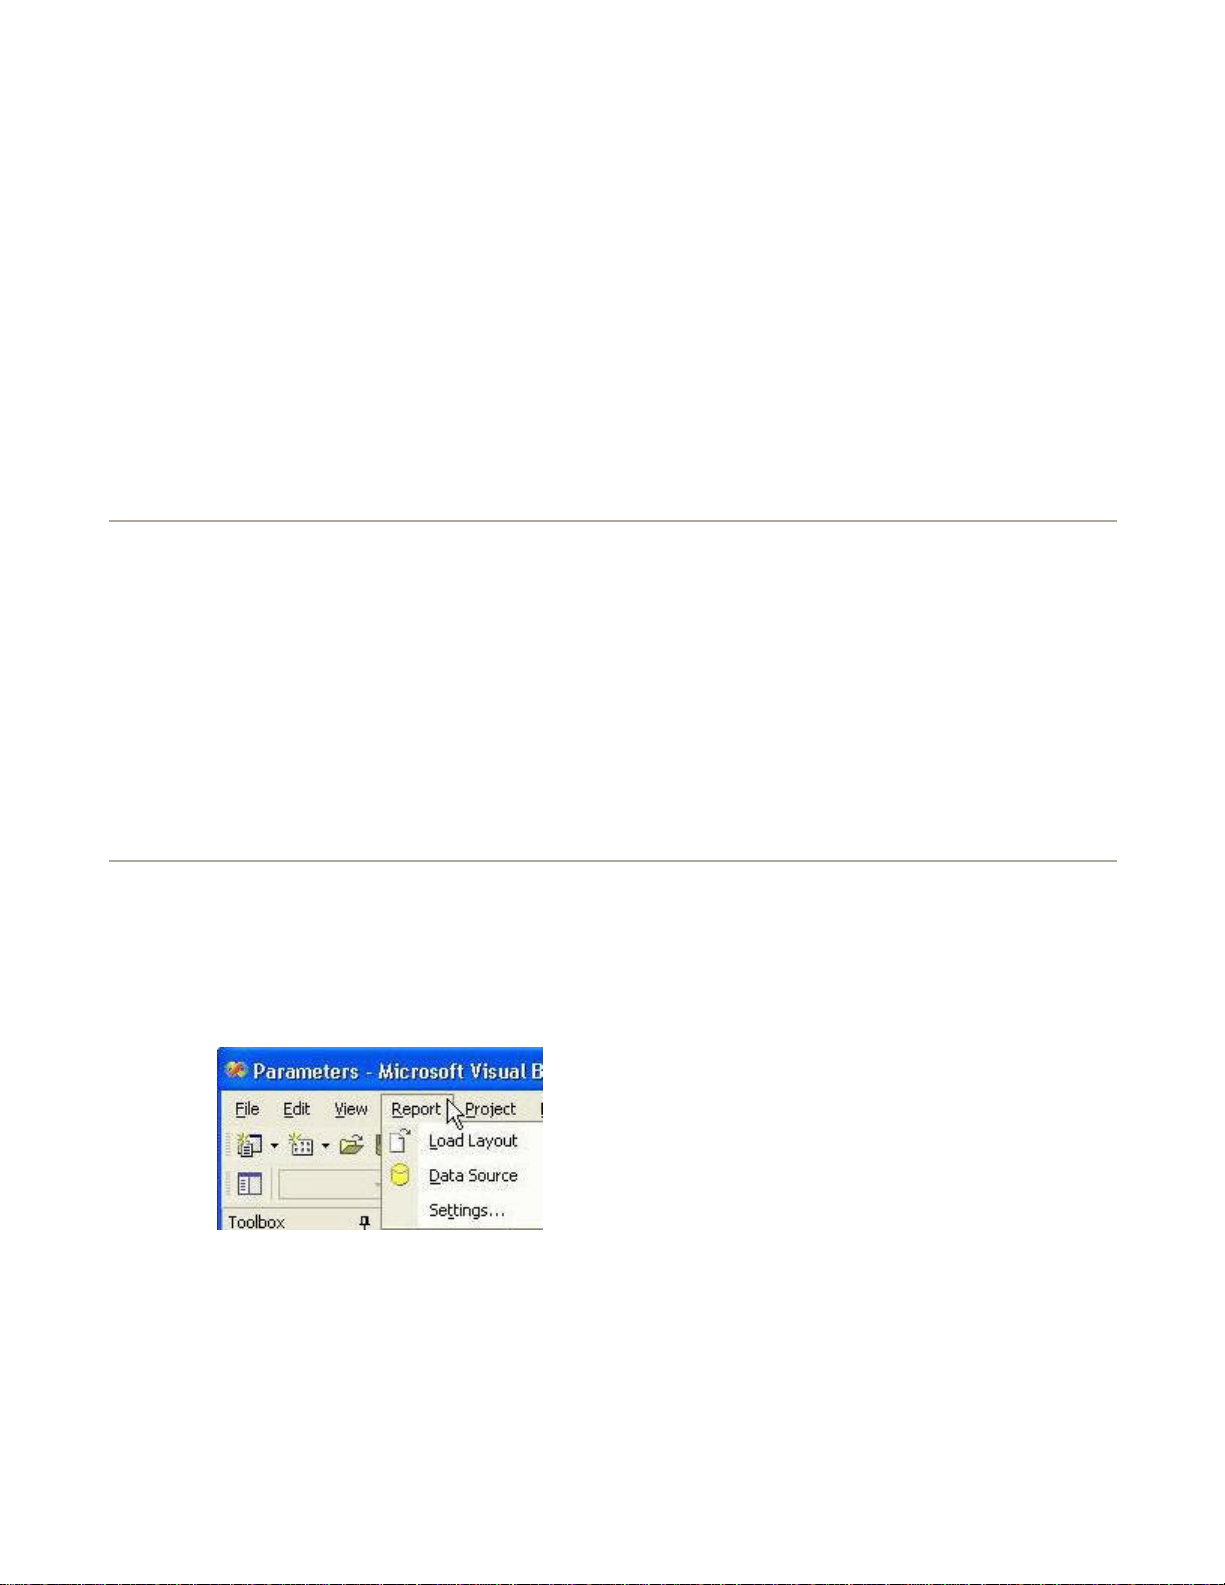
Report Menu
The report menu allows access to load report layouts, modify the report data source or modify report
settings.
To access the report menu
1. Open a new or existing ActiveReport.
2. Click on any section in the report to select it.
3. Click on Report from the main toolbar.
The Report Menu allows the following options:
Load Layout
l
The Load Layout option allows access to load an existing report layout into the open ActiveReport.
Data Source
l
The Data Source option allows access to add Data Source parameters or modify existing Data Source
settings.
Page 29

The toolbars in ActiveReports can be easily customized. ActiveReports' toolbars allow developers to rearrange
ActiveReports for .NET User Guide | 29
Settings
l
The Settings option allows access to change printer or page settings, stylesheets or global settings.
Toolbars
buttons and menu options, as well as hide, display, dock or float toolbars.
To access a toolbar's context menu
Right-click anywhere in the toolbar area
l
The context menu allows you to show or hide toolbars by selecting the toolbar name from the menu. In
addition, you can customize the toolbars or create a new toolbar from the customize option on the menu.
The ActiveReports toolbar is made up of the following components:
Report Explorer--Shows or hides the report explorer tree and the fields list
l
Style Sheets--Sets the style sheet for a control
l
Font--Sets the typeface of the selected label, checkbox or textbox control
l
Size--Sets the font size of the selected label, checkbox or textbox control
l
View Grid--Turns the grid display on or off
l
Reorder Groups--Displays the groups order dialog
l
Edit Script--Starts ActiveReports Script Editor
l
Bold--Sets the bold typeface on or off
l
Italic--Sets the italic typeface on or off
l
Underline--Sets the underline typeface on or off
l
Align Left--Aligns the text left in the control area
l
Align Center--Aligns the text centered in the control area
l
Align Right--Aligns the text right in the control area
l
Justify--Justifies the text in the control area
l
Bullets--Adds bullets to the text in the RichText control area
l
Decrease Indent--Decreases the indent of the text in the RichText control area
l
Increase Indent--Increases the indent of the text in the RichText control area
l
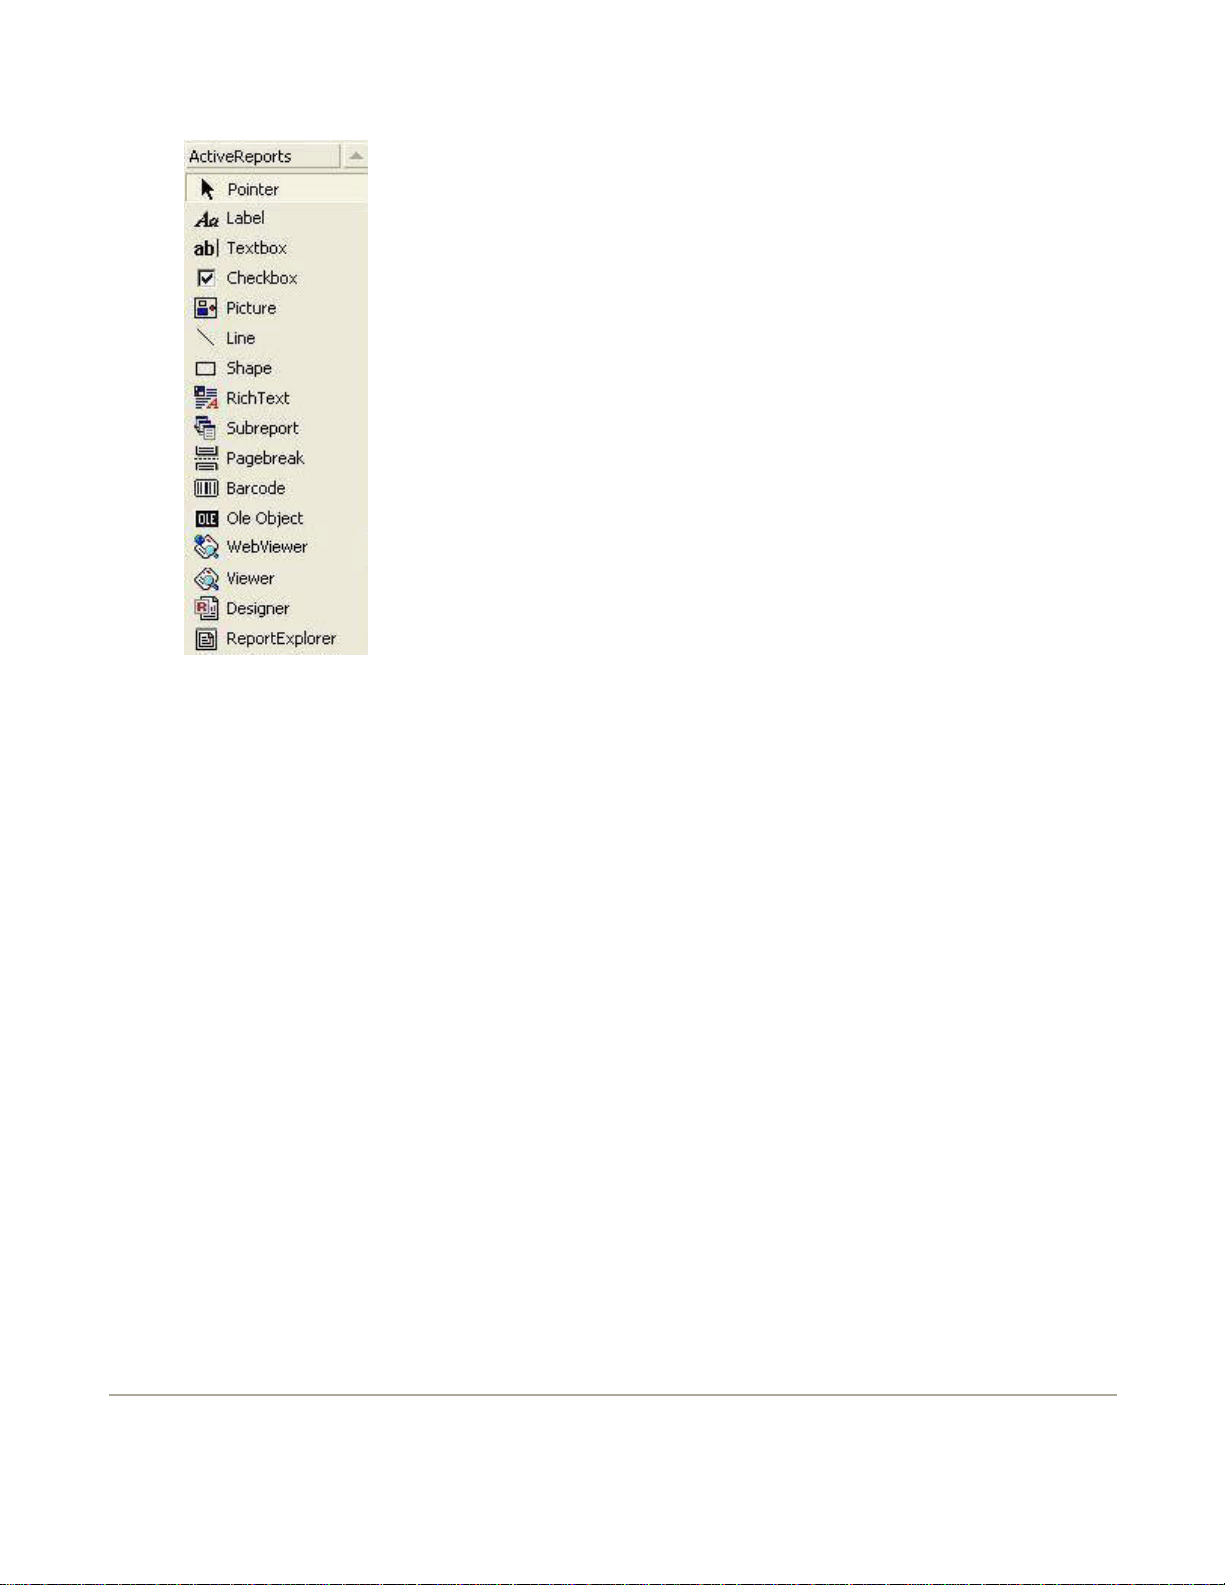
Toolbox
The ActiveReports toolbox displays a variety of controls available for use in ActiveReports. The items
available from the toolbox change depending on the designer currently in use.
Page 30
ActiveReports for .NET User Guide | 30
To access the ActiveReports toolbox
1. Open a Visual Studio project.
2. Add an ActiveReport to the project.
3. Click on View > Toolbox.
4. Click on the ActiveReports tab.
The ActiveReports toolbox is made up of the following components:
Pointer--Allows you to select controls or sections of the report
l
Label--Allows you to insert a new static label control
l
Textbox--Allows you to insert a textbox, bound to a database field or unbound
l
Checkbox--Allows you to insert a checkbox, bound to a database field or unbound
l
Picture--Allows you to insert an image, loaded from a file
l
Line--Allows you to insert a line control
l
Shape--Allows you to insert a rectangle, circle or square shape
l
RichText--Allows you to insert an ActiveReports RichText control
l
Subreport--Allows you to insert a Subreport control to link to another report
l
l PageBreak--Allows you to insert a page break within a selection
Barcode--Allows you to insert an ActiveReports Barcode control
l
Ole object--Allows you to insert an OLE object, bound to a database field, or unbound
l
WebViewer--Allows you to insert a control to view an ActiveReport on the web
l
Viewer--Allows you to insert an ActiveReports Viewer control
l
Designer--Allows you to insert an ActiveReports Designer control
l
ReportExplorer--Allows you to insert an ActiveReports ReportExplorer control
l
Adding ActiveReports Controls to the Visual Studio Toolbox
Page 31

ActiveReports for .NET User Guide | 31
Adding the ActiveReports Controls
To add the controls
1. Right-click on the toolbox tab where you want to add ActiveReports controls.
2. Select Customize Toolbox.
3. Select .NET Framework Components tab.
4. Select the Designer, ReportExplorer, HtmlExport, PdfExport, Viewer and WebViewer controls in
DataDynamics.ActiveReports namespaces in the components list view.
5. Click OK to add the controls to your selected toolbox.
Adding an ActiveReport to a Visual Studio .NET Project
Creating the Project
The first step is creating a new Visual Studio Project.
To create the project
1. From the File menu, click on New and choose Project.
2. Select Project, then Add New Item.
3. Select ActiveReports File and name your new report.
Page 32

ActiveReports for .NET User Guide | 32
4. Click Open to add the report to your project.
5. Visual Studio creates and displays the following ActiveReports designer document.
Page 33

ActiveReports for .NET User Guide | 33
Adding Field Expressions
In ActiveReports, C# expressions can be used in the DataField property to specify textbox output in a report,
such as date/time, mathematical calculations or conditional values. Any field expression should begin with
the equals (=) sign.
Using Field Expressions
To use a mathematical expression
Change the DataField property for the text box to the mathematical calculation desired:
Example: =Quantity*Price
To use a substring
Change the DataField property for the text box to the substring needed. If setting up grouping, change the
GroupHeader's DataField property to the same substring:
Example: =ProductName.Substring(0, 1)
To use date/time
Change the DataField property for the text box to the following:
Example: =System.DateTime.Now.ToString()
To create a conditional value
Change the DataField property for the text box to the conditional statement desired:
Example: =(UnitsInStock > 0)?"In Stock":"Backorder"
Binding Reports to a Data Source
ActiveReports allows much flexibility in binding reports to various kinds of data sources. In this section, you
will learn how to use various methods to bind reports to data sources.
Note DAO and RDO data controls are no longer supported in ActiveReports for .NET. The ADO
data control is converted to an ADO.NET data source. Data controls are removed and replaced
with a report data source dialog accessible from the data source icon on the Detail section of the
report. The XML Data control is converted into an XML data source.
Data Set
Learn how to bind a report to a data source using a data set.
Data View
Learn how to bind a report to a data source using a data view.
Data Source Icon
Learn how to bind a report to a data source using the DataSource icon in the ActiveReports Designer.
Using a Data Set
In addition to being able to set the report s data source at design time, it is also possible to set the report
s data source at run time to a data set. This makes it easy to use data sets created with Microsoft s data
controls in your reports. To use a data set, set the report s DataSource property to the data set being used
and the report s DataMember property to the table from which the report s data is derived.
The following example shows what the code for the method looks like:
[Visual Basic]
Dim rpt As New rptDataView()
rpt.DataSource = Me.dataSet11
rpt.DataMember = "employees"
• •
• •
•
•
[C#]
Page 34

rptDataView rpt = new rptDataView();
located
rpt.DataSource = this.dataSet11;
rpt.DataMember = "employees";
Using a Data View
ActiveReports for .NET User Guide | 34
In addition to using a data set, the report s data source can be set to a data view. This can be useful for
creating reports containing filtered information. To use the data view in the report, set the report s
DataSource property to the data view created from the filtered data set (see Using a Data Set for more
information).
The following example shows what the code for the method looks like:
[Visual Basic]
Dim m_dbPath As String
Dim usView As New DataView()
Private Sub Form1_Load(ByVal sender As System.Object, ByVal e As System.EventArgs) _
Handles MyBase.Load
m_dbPath = getDatabasePath()
Me.oleDbConnection1.ConnectionString = "Provider=Microsoft.Jet.OLEDB.4.0;_
Data Source=" + m_dbPath + "\\NWIND.MDB;Persist Security Info=False"
Me.oleDbDataAdapter1.Fill(Me.dataSet11)
usView = me.dataSet11.Tables("employees"))
usView.RowFilter = "Country = 'USA'"
Me.dataGrid2.DataSource = usView
End Sub
[C#]
DataView usView;
private void Form1_Load(object sender, System.EventArgs e)
{
string m_dbPath = getDatabasePath();
this.oleDbConnection1.ConnectionString = "Provider=Microsoft.Jet.OLEDB.4.0;
Data Source=" + m_dbPath + "\\NWIND.MDB;Persist Security Info=False";
this.oleDbDataAdapter1.Fill(this.dataSet11);
usView = new DataView(this.dataSet11.Tables["employees"]);
usView.RowFilter = "Country ='USA'";
this.dataGrid2.DataSource = usView;
}
•
•
Using the DataSource Icon
ActiveReports makes it easy to bind your report to a data source by using the yellow DataSource icon
in the Detail section of the report design surface or by accessing the DataSource dialog from the Report
Settings menu.
To use the DataSource icon
1. Open a Visual Studio project.
2. Add an ActiveReport to your project.
3. Once the report is added, you will see the report design surface.
4. Click on the yellow DataSource icon in the Detail section of the report.
5. You will then be prompted to select your data source, connection string and query.
To connect to Microsoft Access using Jet 4.0
1. Click on the yellow report DataSource icon in the Detail section.
2. This brings up the report DataSource dialog box.
3. Click on Build...
Page 35

ActiveReports for .NET User Guide | 35
4. Select "Microsoft Jet 4.0 OLE DB Provider" and click Next >>.
5. Enter a database name or click on the ellipsis to browse for the access path to a database.
6. Click Open once you have entered a database name or selected the appropriate access path.
7. Click OK to continue.
8. Enter a SQL statement in the Query box (e.g. "Select * from products").
9. Click OK to return to the report design surface.
To connect to SQL Server
1. Click on the yellow report DataSource icon in the Detail section.
2. This brings up the report DataSource dialog box.
3. Click on the Data Source drop-down arrow and select SqlClient.
4. Click on Build...
5. Select "Microsoft OLE DB Provider for SQL Server" and click Next >>.
6. Select a server.
7. Chose Windows integrated security or a specific username and password.
8. Choose the database for connection and click OK.
9. Enter a SQL statement in the Query box (e.g. "Select * from products").
10. Click OK to return to the report design surface.
To connect to a XML database
1. Click on the yellow report DataSource icon in the Detail section.
2. This brings up the report DataSource dialog box.
3. Click on the Data Source drop-down arrow and select XML.
4. Click on the ellipsis beside File URL to browse for the access path to Customer.xml.
5. Click Open once you have selected the appropriate access path.
6. In the Recordset Pattern field, enter a pattern (e.g. "//ITEM").
7. Click OK to return to the report design surface.
Note In the report data source dialog, there is a <NONE> option for the data source drop-down.
If this option is chosen, it will clear out the data source code in the auto-generated code section.
This option would be used if you had set a data source for the report previously and you no longer
want one.
Grouping Data
In ActiveReports, a report can consist of single or multiple nested groups, with each group having its own
header and footer sections. The header section is inserted and printed immediately before the Detail section.
The footer section is inserted and printed immediately after the Detail section. Up to 32 nested groups are
allowed in a single report.
Note ActiveReports does not order records for grouping. It assumes the data is already sorted in
the same grouping order. The data source needs to be ordered by the field on which you want
your data grouped to achieve the desired results.
Grouping Data in a Report
To group data in a report
1. Right-click in the Detail section of the report design surface, select Insert, and click on Group
Header/Footer.
2. This will insert a new group header/footer section into your report.
3. In the Properties window for the group header, change the DataField property to the field on which you
want your data grouped.
4. Change the name of the group header to reflect the field on which data is being grouped. For example,
"ghCategories" would be the name of the group header field with the DataField property of "CategoryID".
Page 36
ActiveReports for .NET User Guide | 36
Licensing Applications
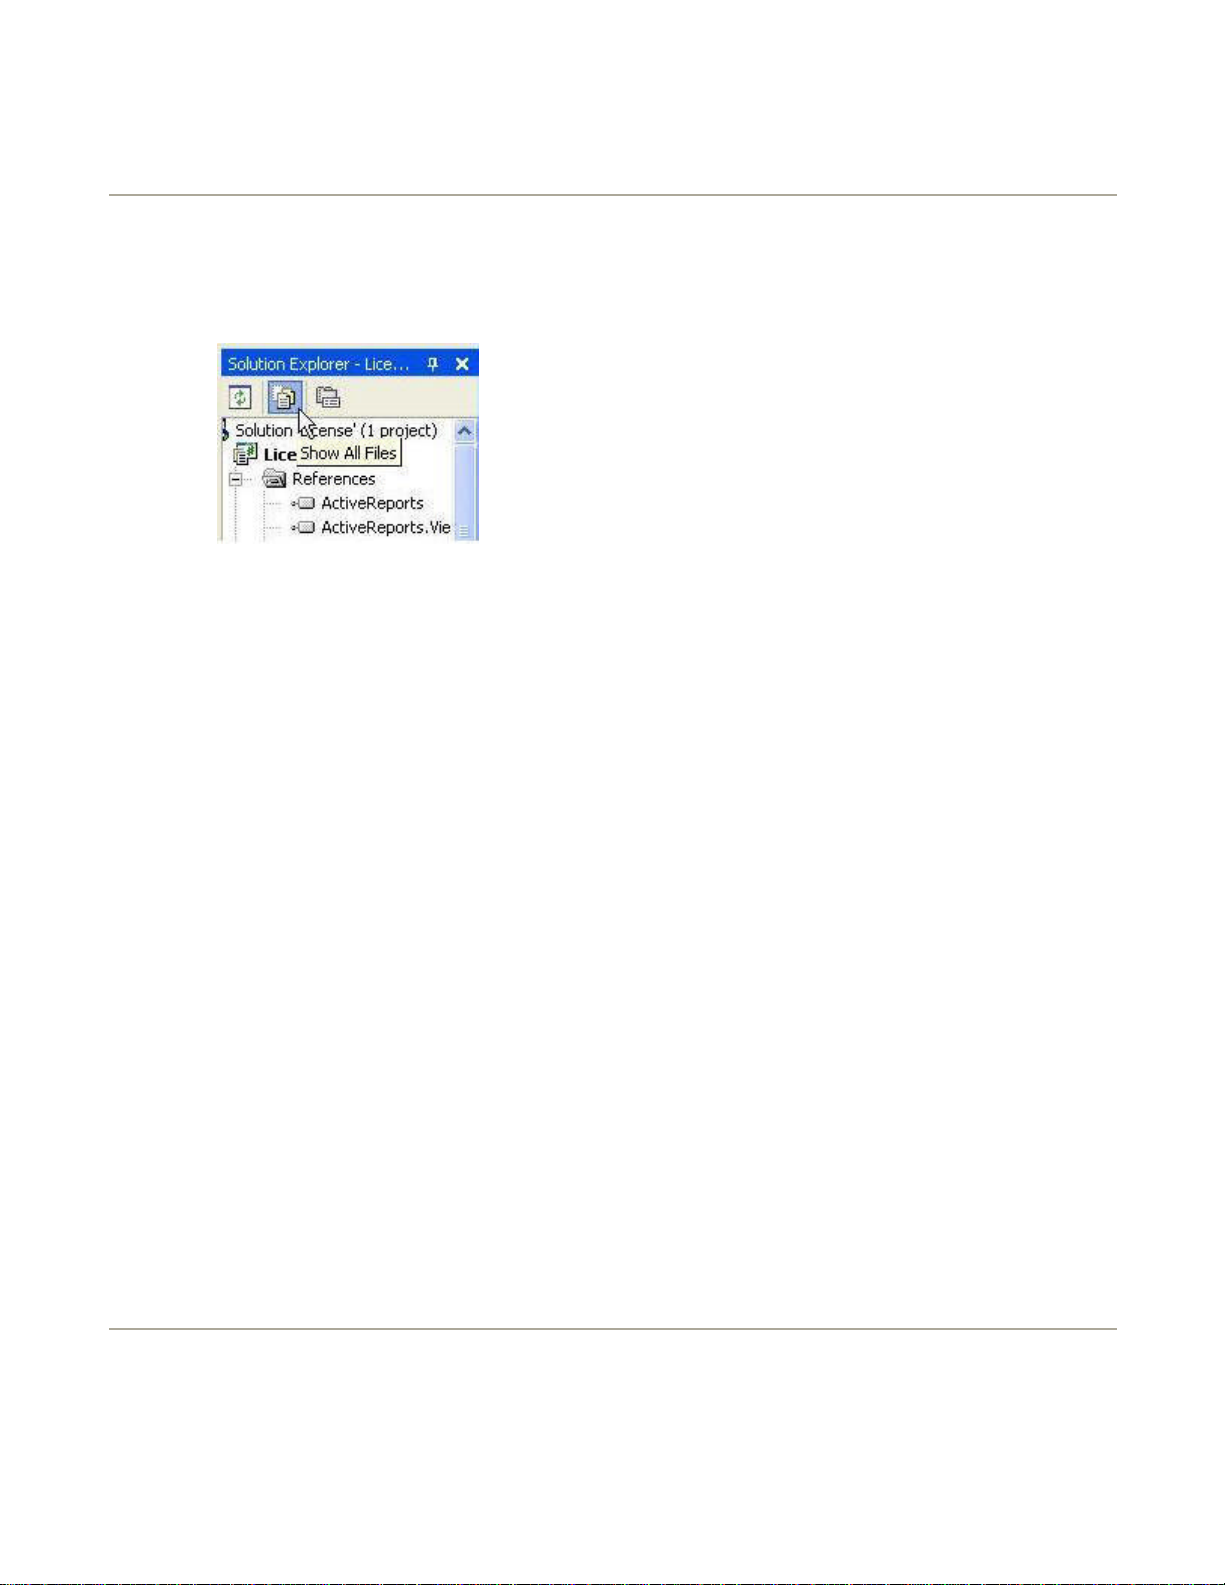
Checking ActiveReports Windows Applications for Licensing
To check an existing ActiveReports Windows application for licensing
1. Open an existing ActiveReports Windows application project.
2. In the Solution Explorer window, choose the "Show All Files" icon.
3. If the ActiveReports application is licensed, you will see a file called "licenses.licx".
4. If the "licenses.licx" file is not listed in your application's file list, you will need to manually set up the
application for licensing.
Manually Licensing Windows Applications
To manually set up Windows applications for licensing
1. Open an existing ActiveReports project or create a new one.
2. On the Project menu, select Add New Item...
3. In the Templates window, choose Text File.
4. Change the name of the text file to "licenses.licx".
5. This adds the "licenses.licx" file to Solution Explorer. Double-click "licenses.licx" to open the file.
6. Add the following line to the text file: "DataDynamics.ActiveReports.ActiveReport, ActiveReports".
7. Save your project. Your ActiveReports Windows application will now be licensed.
Licensing Web Applications
To set up Web applications for licensing
1. Open an existing ActiveReports Web application
2. From the Start Menu, click All Programs > Data Dynamics > ActiveReports.NET > "Create
Web.Config Key"
3. In the Data Dynamics ActiveReports Web Key Generator dialog, enter your name, company and the
serial number.
4. Click on "Create Web.Config".
5. Copy the contents of the generated Web key text.
6. In your ActiveReports Web application, double-click the Web.config file to open it.
7. In the XML view of the Web.config file, paste the contents of the generated Web key text between
<configuration> and <system.web>.
8. Save the project. Your ActiveReports Web application will now be licensed.
Localizing the Viewer Control
In ActiveReports, you can localize settings for the Windows Forms Viewer control by modifying a provided
"strings" text file, generating a resources file, embedding the resources file in your ActiveReports project and
adding the localization code needed in your Form_Load event.
Page 37

Private Sub Form1_Load(ByVal sender As System.Object, ByVal e As System.EventArgs) Handles MyBase.Load
ResourceManager res = new ResourceManager("rptLocalize.localization", this.GetType().Assembly);
ActiveReports for .NET User Guide | 37
Making localization changes to the strings text file
To make changes to the text file
1. Click here (Script/Strings.txt) to open the text file in your browser.
2. Right-click on the text and select "View Source."
3. This will open the file in Notepad. Make changes to localize settings for the viewer control.
4. Click on Save As..., rename your text file "localization.txt" and save it to your location of choice.
Generating the resources file from the text file
To generate the resources file
1. From the Start bar, click on All Programs > Microsoft Visual Studio.NET > Visual Studio .NET Tools >
Visual Studio .NET Command Prompt.
2. Change the prompt path to reflect the location of your localization.txt file.
3. Type "resgen localization.txt localization.resources" .
4. This creates a resources file in the same location as the text file.
Adding the resources file to your Windows application
To add the resources file
1. Open your ActiveReports Windows application which includes a Windows Form with an ActiveReports
Windows Forms Viewer control.
2. In the Solution Explorer window, click on the icon to "Show All Files".
3. Right-click on the name of your project and click Add > Add Existing Item...
4. Select the appropriate file path to the localization.resources file and click Open.
5. This adds the resources file to your application.
Adding code to the Form1_Load event
To write the code for the viewer in Visual Basic
Right-click on Form1, and click on View Code to display the code view for the form. At the top left of the
l
code view for Form1, click the drop-down arrow and select (Base Class Events). At the top right of the
code window, click the drop-down arrow and select Load. This creates an event-handling method for the
Form1_Load event.
To write the code for the viewer in C#
Click on the blue section at the top of Form1 to select the form. Click on the events icon in the
l
Properties window to display available events for Form1. Double-click Load . This creates an event-
handling method for the Form1_Load event.
The following example shows what the code for the method looks like:
[Visual Basic]
Dim res As New ResourceManager("rptLocalize.localization", Me.GetType().Assembly)
Me.Viewer1.Localize = res
Dim rpt As New rptLocalize()
Viewer1.Document = rpt.Document
rpt.Run(True)
End Sub
[C#]
private void Form1_Load(object sender, System.EventArgs e)
{
this.viewer1.Localize = res;
rptLocalize rpt = new rptLocalize();
viewer1.Document = rpt.Document;
rpt.Run(true);
}
Page 38
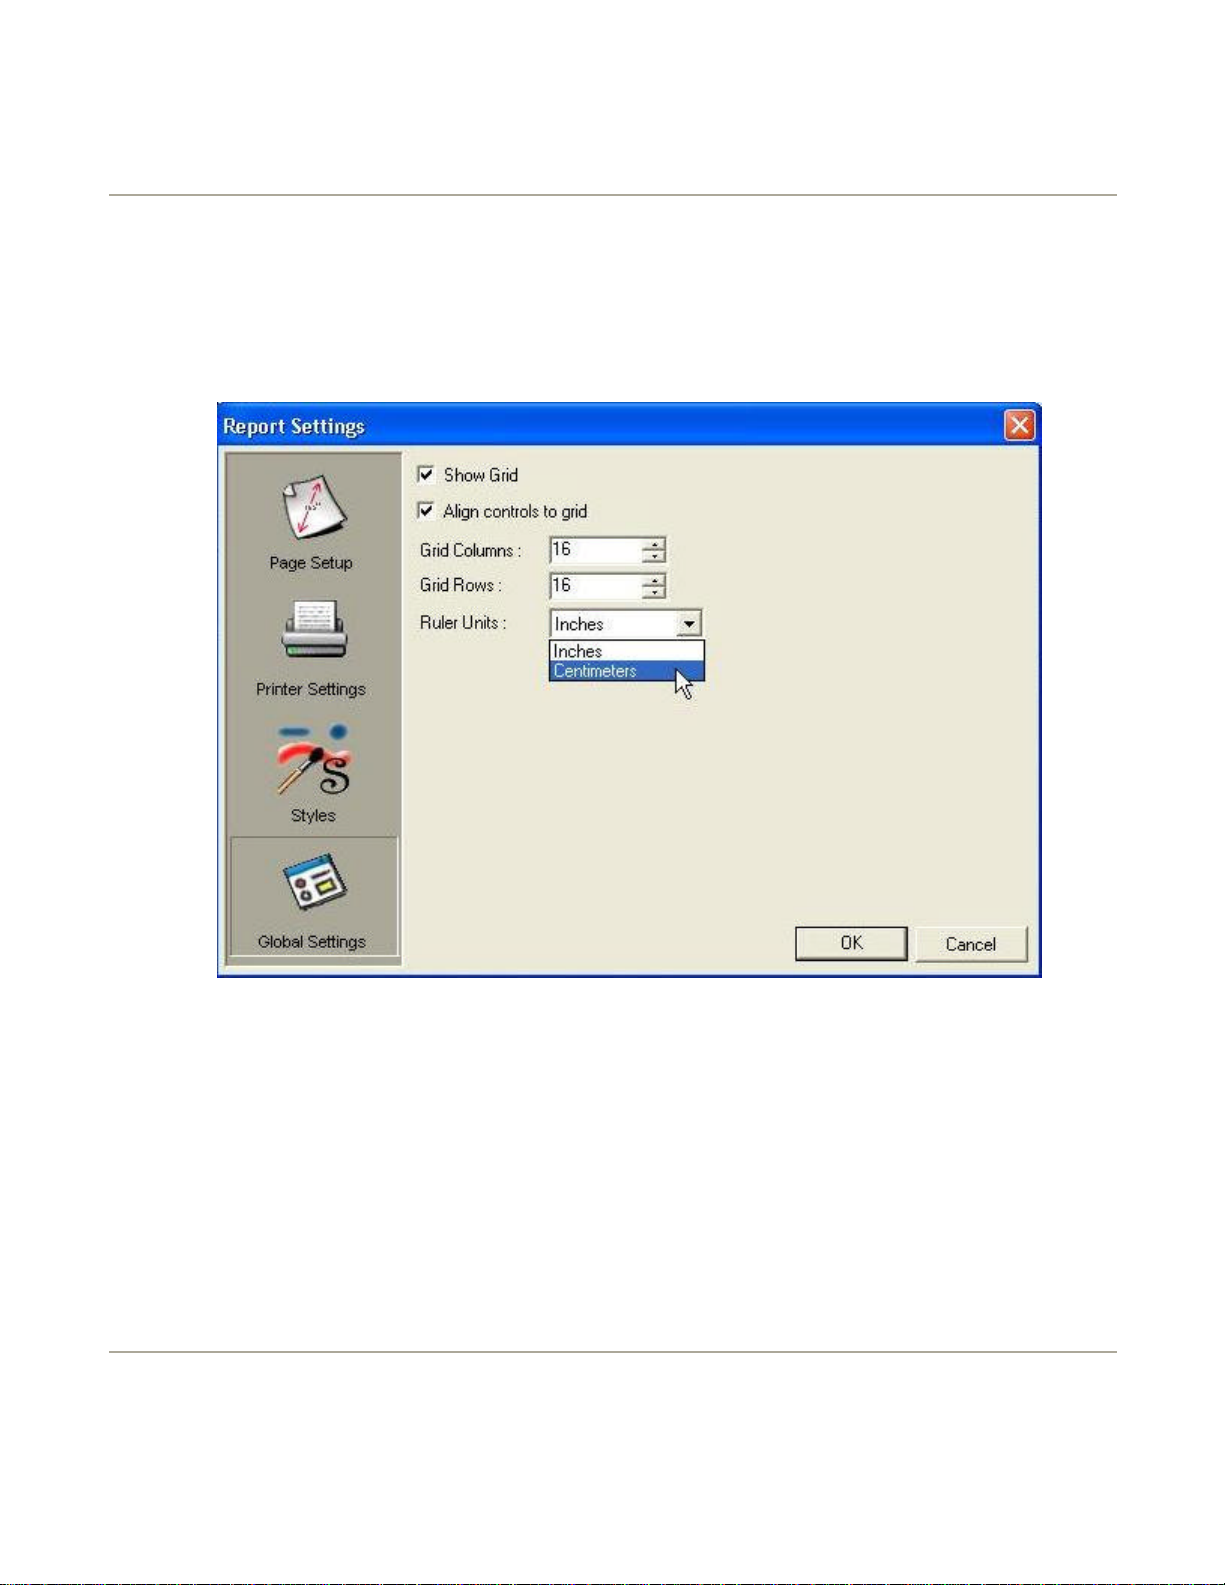
ActiveReports for .NET User Guide | 38
Using Metric Units
In ActiveReports, ruler measurements can be changed from inches to centimeters and centimeters to inches
from design time. Conversion values for centimeters to inches or inches to centimeters can be called at run
time as well.
To change ruler measurements at design time
1. In an existing ActiveReports project, click on Report, Settings...
2. In the Report Settings dialog, click on Global Settings.
3. Change Ruler Units from inches to centimeters or centimeters to inches.
To call a measurement conversion at run time
Call the CmToInch method or InchToCm method whenever needed. For example, if you were working in
l
centimeters and needed to convert a label's position measurements from centimeters to inches at run
time, you would use the following code.
[Visual Basic]
Me.lblMyLabel.Left = ActiveReport.CmToInch(2)
Me.lblMyLabel.Top = ActiveReport.CmToInch(2)
[C#]
this.lblMyLabel.Left = ActiveReport.CmToInch(2);
this.lblMyLabel.Top = ActiveReport.CmToInch(2);
Saving and Loading RDF Files
ActiveReports allows reports to be saved into their own standard format called an RDF file (Report Document
Format). Once a report has been saved to an RDF file, it can be loaded into the viewer control and used to
display reports in custom preview applications.
Page 39

ActiveReports for .NET User Guide | 39
To write the code to save a report as an RDF file in Visual Basic
Right-click in any section of the Windows Form, and click on View Code to display the code view for the
l
Windows Form. Add the following code to create the saveRDF event.
To write the code to save a report as an RDF file in C#
Double-click on the Windows Form to see the code view for the Windows form. Add the following code to
l
create the saveRDF event.
The following example shows what the code for the method looks like:
[Visual Basic]
Dim rpt As New ActiveReport1()
Private Sub saveRDF()
rpt.Run()
rpt.Document.Save(Application.StartupPath + "\\NewRDF.RDF"
End Sub
[C#]
private void saveRDF()
{
ActiveReport1 rpt = new ActiveReport1();
rpt.Run();
rpt.Document.Save(Application.StartupPath + "\\NewRDF.RDF";
}
To write the code to load the saved RDF into the ActiveReports viewer in Visual Basic
Right-click in any section of the Windows Form, and click on View Code to display the code view for the
l
Windows Form. Add the following code to create the loadRDF event.
To write the code to load the saved RDF into the ActiveReports viewer in C#
Double-click on the Windows Form to see the code view for the Windows form. Add the following code to
l
create the loadRDF event.
The following example shows what the code for the method looks like:
[Visual Basic]
Private Sub loadRDF()
rpt.Run()
Viewer1.Document.Load(Application.StartupPath + "\\NewRDF.RDF"
End Sub
[C#]
private void loadRDF()
{
ActiveReport1 rpt = new ActiveReport1();
rpt.Run();
viewer1.Document.Load(Application.StartupPath + "\\NewRDF.RDF");
}
Saving and Loading RPX Files
To write the code to save a report as an RPX file in Visual Basic
Right-click in any section of the Windows Form, and click on View Code to display the code view for the
l
Windows Form. Add the following code to create the saveRPX event.
To write the code to save a report as an RPX file in C#
Double-click on the Windows Form to see the code view for the Windows form. Add the following code to
l
create the saveRPX event.
The following example shows what the code for the method looks like:
Page 40

ActiveReports for .NET User Guide | 40
[Visual Basic]
Dim rpt As New ActiveReport1()
Private Sub saveRPX()
rpt.Run()
rpt.SaveLayout(Application.StartupPath + "\\NewRPX.RPX")
End Sub
[C#]
private void saveRPX()
{
ActiveReport1 rpt = new ActiveReport1();
rpt.Run();
rpt.SaveLayout(Application.StartupPath + "\\NewRPX.RPX");
}
To write the code to load the saved RPX into the ActiveReports viewer in Visual Basic
l Right-click in any section of the Windows Form, and click on View Code to display the code view for the
Windows Form. Add the following code to create the loadRPX event.
To write the code to load the saved RPX into the ActiveReports viewer in C#
Double-click on the Windows Form to see the code view for the Windows form. Add the following code to
l
create the loadRPX event.
The following example shows what the code for the method looks like:
[Visual Basic]
Dim rpt As New ActiveReport1()
Private Sub loadRPX()
rpt.LoadLayout(Application.StartupPath + "\\NewRPX.RPX")
Viewer1.Document = rpt.Document
rpt.Run()
End Sub
[C#]
private void loadRPX()
{
ActiveReport1 rpt = new ActiveReport1();
rpt.LoadLayout(Application.StartupPath + "\\NewRPX.RPX");
viewer1.Document = rpt.Document;
rpt.Run();
}
Note When saving to an RPX file, make sure you save the report before it runs. Saving the
layout after the report runs will result in unwanted data being saved in the layout. If calling
saveRPX inside the report, use the ReportStart event. Also, when saving the report layout, the
script code is the only code that is saved to the file. The code in the report s .cs or .vb file will
not be saved to the RPX file.
•
ActiveReports and the Web
ActiveX Viewer Control
Learn about the properties, methods, and events for the ActiveX Viewer Control.
Manually Configuring Web Samples
Learn how to manually configure ActiveReports Web Samples.
ActiveX Viewer Control
Properties
Page 41

viewer's top and side rulers are shown at
Sets or returns the width of the TOC tree
ActiveReports for .NET User Guide | 41
Property Data Type Description
AllowSplitter Boolean Sets or returns whether or not the
viewer can be split into two windows.
BackColor OLE_COLOR Sets or returns the background color of
the viewer.
BorderStyle BorderStyle Sets or returns the border style.
DataPath String Report file (RDF) URL for asynchronous
downloads.
Object Object Returns an object in a collection
Pages Pages collection Returns a reference to the current pages
collection displayed in the viewer.
PaperColor OLE_COLOR Sets or returns the paper background
color.
Printer Printer Returns a reference to the viewer's
printer object.
ReportSource Object Sets or returns a reference to the linked
subreport.
RulerVisible Boolean Sets or returns whether or not the
run-time.
Status ViewerStatus Returns the status of loading pages into
the viewer cache.
TOC TOC Returns a reference to the table of
contents object.
TOCEnabled Boolean Disables or enables the TOC tree.
TOCVisible Boolean Determines whether the table of
contents tree is visible.
TOCWidth Single
when displayed.
Toolbar DDToolbar Returns a reference to the built-in
toolbar object. The toolbar object allows
you modify the toolbar's icons and tools.
ToolbarVisible Boolean Determines whether the built-in toolbar
is visible.
UseSourcePrinter Boolean Sets/return whether the viewer or
ReportSource printer is used to print the
report.
Zoom Integer Sets or returns the zoom level of the
current page view.
Methods
Method Description
CopyPageToClipboard Copies the indicated page to the clipboard.
Find Searches a report for a specified string.
Localize Allows modification of the caption of the string used in the
MultiplePage Switches the viewer settings so multiple pages can be displayed
PrintReport Prints the viewer pages collection to the selected device.
Sub CopyPageToClipboard([Page])
Sub Find(View As SplitViewTypes, SearchText As String,
Direction As SearchDirectionTypes, MatchCase As Boolean,
MatchWord As Boolean)
preview window.
Localize(index As Integer, str As String)
at one time.
Sub MultiplePage(View As SplitViewTypes, rows As Integer, cols
As Integer)
Sub PrintReport(bDisplayDialog As Boolean)
Page 42

ActiveReports for .NET User Guide | 42
Refresh Refreshes the viewer control.
Sub Refresh()
SinglePage Switches the viewer back to displaying a single page.
Sub SinglePage(View As SplitViewTypes)
Events
Event Description
DblClick Fired when the user double clicks the mouse in the viewer.
Sub DblClick()
Error Occurs when an error fires.
Sub Error(Number As Integer, ByVal Description As
String,ByVal SCode As Long, ByVal Source As String, ByVal
HelpFile As String, ByValHelpContext As Long, CancelDisplay
As Boolean)
FindProgress This event fires when a search is performed on a report
loaded into the viewer. When a search reaches a report's end
or beginning, the event will fire.
Event FindProgress(ByVal Result As
DDActiveReortsViewer2Ctl.FindResults)
HyperLink This event fires when a hyperlink is clicked. The event can be
used to redirect the hyperlink or prevent the link from
activating.
Sub Hyperlink(ByVal Button As Integer, Link As String)
KeyDown Fired when a key is pressed down while the viewer has focus.
Sub KeyDown(KeyCode As Integer, Shift As Integer)
KeyPress Fired When a key is pressed and released while the viewer
has focus.
Sub KeyPress(KeyAscii As Integer)
KeyUp Fired when a key is released while the viewer has focus.
Sub KeyUp(KeyCode As Integer, Shift As Integer)
LoadCompleted Fired when all the pages in the report source have been
loaded into the viewer.
Sub LoadCompleted()
MouseDown Fired when a mouse button is pressed down.
Sub MouseDown(Button As Integer, Shift As Integer, X As
Single,Y As Single)
MouseMove Fired as the mouse moves over the viewer area.
Sub MouseMove(Button As Integer, Shift As Integer, X As
Single, Y As Single)
MouseOver This event fires when the mouse moves over a report page.
If the mouse moves over a control with a hyperlink, then the
link will be returned.
Sub MouseOver(ByVal PageX As Long, ByVal PageY As Long,
ByVal Hyperlink As String)
MouseUp Fired when a mouse button is released.
Sub MouseUp(Button As Integer, Shift As Integer, X As
Single, Y As Single)
PageModeChanged Fired when the viewer switches between displaying a single
page and multiple pages.
Sub PageModeChanged(ByVal MultiplePage As Boolean)
PrintAborted Called in the PrintReport Method when the user cancels a
print job before it finishes.
Sub PrintAborted()
TOCClick Fired on a mouse click in the TOC treeview window.
Page 43

ActiveReports for .NET User Guide | 43
Sub TOCClick(ByVal Button As Integer, ByVal As Long, ByVal
Flags As Long)
TOCSelChange Fired when the TOC selection changes.
Sub TOCSelChange (ByVal ItemIndex As Long)
ToolbarClick Fired when the user clicks on a tool in the viewer toolbar.
Sub ToolbarClick(ByVal Tool As DDTool)
ZoomChanged Fired when the viewer's zoom percentage changes.
Sub ZoomChanged()
Manually Configuring Web Samples
Installing the Sample Web Application
To install the sample web application
1. In the Control Panel, double-click "Administrative Tools." Double-click "Internet Information Services
(Internet Services Manager for Windows 2000)" to open its dialog window.
2. Right-click on "Default Web Site" then click New > Virtual Directory...
3. Click Next when you see the "Virtual Directory Creation Wizard."
4. In the Alias field, enter one of the following folder names, depending on which web sample you need to
configure:
ArWebSampleStdCs
¡
ArWebSampleStdVb
¡
ArWebSampleProCs
¡
ArWebSampleProVb
¡
5. Click Next to continue.
6. Click Browse... to find the folder in which ActiveReports is installed. Find and select the appropriate
folder.
7. Click OK to continue and then click Next.
8. Make sure the "Read" and "Run Scripts" permissions are checked and click Next.
Page 44

ActiveReports for .NET User Guide | 44
9. The ActiveReports Web sample is now installed.
Note If you are only configuring Standard Edition Web Samples, you do not need to complete
the following steps.
Configuring the ActiveReports HTTPHandlers
To configure the HTTPHandler
1. In the Control Panel, double-click "Administrative Tools." Double-click "Internet Information Services" to
open its dialog window.
2. Right-click on the website that you need to configure the HTTPHandlers for, then click Properties .
3. Click on the "Home Directory" tab of the "Default Web Site Properties" dialog.
4. Click on the Configuration button.
5. In the "Application Mappings" window of the Application Configuration dialog, select the list item
with .aspx in the extension column and click Edit. Note that if your machine does not have the ASP.NET
server components installed, the .aspx handler will not show up in the Application Mappings list.
Page 45

ActiveReports for .NET User Guide | 45
6. Select and copy all of the text in the "Executable" field. Click Cancel to return to the Application
Configuration dialog.
7. Click Add in the Application Configuration dialog to add a new Application Mapping.
8. In the Executable field, paste the value copied from Step 6 and enter ".rpx"in the Extension field.
9. Click OK to add the mapping and return to the Application Configuration dialog.
To configure the compiled report handler (continuing from Step 9 in "To Configure the HTTPHandler)
1. In the Application Configuration dialog, click Add to add a new Application Mapping.
Page 46

ActiveReports for .NET User Guide | 46
2. In the Executable field, paste the value copied from Step 6 above.
3. Enter .ActiveReport in the Extension field.
4. Make sure the "Check that file exists" permission is unchecked.
5. Click OK to add the mapping and return to the Application Configuration dialog.
To configure the WebCacheAccessHandler (continuing from Step 9 in "To Configure the HTTPHandler)
1. In the Application Configuration dialog, click Add to add a new Application Mapping.
2. In the Executable field, paste the value copied from Step 6 above.
3. Enter .ArCacheItem in the Extension field.
4. Make sure the "Check that file exists" permission is unchecked.
5. Click OK to add the mapping and return to the Application Configuration dialog.
6. Click OK on the remaining open dialogs to exit the IIS Administrative tool.
Using Export Filters
ActiveReports provides custom components for several formats, including PDF, HTML, RTF, Excel, TIFF and
plain text. Please note the following limitations in use for each ActiveReports export filter:
HTML
Legacy
Not 100% WYSIWYG
Does not support:
Line control
l
Control borders
l
Shapes (other than filled rectangles)
l
l Overlapping controls.
DHTML
Not 100% WYSIWYG
Does not support:
Diagonal line control
l
Control borders
l
Shapes (other than filled rectangles)
l
PDF
WYSIWYG as long as you use the correct fonts with foreign text.
Page 47

Does not support full justification
This topic will show you how to locate Readme information as well as how to obtain support for ActiveReports
l
Excel
Not 100% WYSIWYG
Does not support:
Line control
l
Shapes (other than filled rectangles)
l
Overlapping controls
l
Borders on controls with angled text
l
Tiff
Image of page, so it's 100% WYSIWYG.
RTF
Not WYSIWYG
Does not support:
Line control
l
Backcolors
l
Shapes
l
Overlapping controls
l
Control borders
l
Angled text
l
ActiveReports for .NET User Guide | 47
Text
Not WYSIWYG
Supports plain text only.
Supports encoding for foreign language support.
Getting Assistance
for .NET.
Readme File
Find out how to locate the Readme file.
Product Support
Find out how to obtain product support for ActiveReports for .NET.
Related Sections
Introducing ActiveReports for .NET
ActiveReports leverages the latest technologies including XML, scripting and CSS along with
open architecture to provide a fully-integrated and user-friendly report designer.
Frequently Asked Questions
This section lists questions and answers about ActiveReports for .NET.
Installation and Setup
This topic will help you find out what is necessary to install ActiveReports and direct you to
appropriate help for the installation process.
Samples and Walkthroughs
This section contains sample code and applications that illustrate basic techniques and uses of
ActiveReports.
Readme File
Page 48

ActiveReports for .NET User Guide | 48
The file, Readme.html, will be located in the "Introduction" folder of the root ActiveReports for .NET
installation folder on your computer once the program is installed. Use your Internet browser to open and
view the file.
Product Support
This topic will explain how to register your ActiveReports for .NET purchase and obtain technical support.
In this section
Product Registration
Learn how to register your product purchase with Data Dynamics.
Technical Support
Find how to receive technical support for ActiveReports for .NET.
Product Registration
In order to receive telephone support, product news and upgrade announcements, you must register your
product purchase with Data Dynamics. We encourage you to register your purchase as soon as you receive it
using any of the following:
Fill out the enclosed registration card and mail it to Data Dynamics, 5870 Cleveland Avenue, Columbus,
l
Ohio 43231
Fax the registration card to Data Dynamics at (614) 899-2943
l
Complete the registration form on our website at
l
http://www.datadynamics.com/register/default.htm
Technical Support
Technical support is available for ActiveReports for .NET in a variety of media.
Telephone Support
Telephone support is available for registered users of ActiveReports for .NET for up to five support incidents.
Additional support requests should be directed to the appropriate newsgroup. If desired, additional telephone
support can be acquired by purchasing any of the support packages available through Data Dynamics.
Contact sales@datadynamics.com for details.
When contacting Data Dynamics with support questions, be prepared to provide a serial number, the full
version number of ActiveReports, a complete description of the problem and hardware and operating
environment specifications.
Support telephone number: (614) 895-3142 (9:00am-5:00pm EST)
E-mail Support
E-mail support is available for ActiveReports for .NET. Contact
activereports.support@datadynamics.com.
Website
The Data Dynamics website offers the latest product news, white papers, tutorials, report samples and
product service packs. Please visit the website for the latest news about ActiveReports for .NET before
contacting technical support.
Product Upgrades
Minor upgrades and service packs will be made available for download from the Data Dynamics website free
of charge.
http://www.datadynamics.com/downloads.asp
Major upgrades will carry an upgrade price that is determined separately for each release. You will be eligible
for a free major upgrade if you purchased the product within 30 days of the upgrade release date.
Page 49

assist with any issues encountered using the product. Product announcements will also be posted to the news
ActiveReports for .NET User Guide | 49
KnowledgeBase articles
The Data Dynamics KnowledgeBase contains hundreds of helpful articles for all Data Dynamics products. You
can search the entire KnowledgeBase for keywords or narrow down your search first by choosing a specific
product before submitting your search criteria.
KnowledgeBase (http://www.datadynamics.com/kb)
Newsgroups
The Data Dynamics news server can be used to read and post questions and answers about issues you
encounter with ActiveReports for .NET. Tips and tricks can be communicated with other users and access to
the Data Dynamics technical support team can be gained in an online community forum. Data Dynamics'
technical support engineers monitor the newsgroups constantly and are available to answer questions and
server.
Newsgroup address for ActiveReports for .NET: news://news.datadynamics.com/support.activereports.NET
Samples and Walkthroughs
This section contains example code and sample applications that illustrate basic techniques and uses of
ActiveReports.
In This Section
Samples
Review various samples in C# and Visual Basic .NET.
Walkthroughs
Learn how to create various reports and report constituents with step-by-step instructions.
Related Sections
Introducing ActiveReports for .NET
ActiveReports leverages the latest technologies including XML, Scripting and CSS along with open
architecture to provide you with a fully-integrated and user-friendly report designer.
Getting Assistance
This topic will show you how to locate Readme information as well as how to obtain support for
ActiveReports for .NET.
Samples
ActiveReports includes many samples which demonstrate applications the developers created for
ActiveReports for .NET. These samples show the use of a combination of controls and code to produce
various reports.
In this section
Standard Edition Samples
Provides links to samples of Standard Edition applications.
Professional Edition Samples
Provides links to samples of Professional Edition applications.
Additional Information
Walkthroughs
Walkthroughs give basic step-by-step instructions for common situations in ActiveReports. This feature
makes walkthroughs an excellent way to learn more about the basic features of the product.
Standard Edition Samples
Annual Report
Page 50

ActiveReports for .NET User Guide | 50
Demonstrates subreports, Nested subreports, modifying data source properties at run time,
alternate row highlighting and pagebreak control.
ASP.NET Standard Edition Web Sample
Demonstrates using Standard Edition in ASP.NET. It shows how to use custom exporting without
the Pro Edition server controls or RPX handlers as well as running reports on the server, exporting output
to HTML or PDF streams and pushing content to the client. The sample also demonstrates using the
ActiveX viewer control to view report output on the client machine.
Category Selection
Demonstrates using the ad hoc report filter by modifying the report's SQL query at run time.
Cross-Tab
Demonstrates using unbound data, conditional highlighting and distributing data across columns to
create a cross-tab view and data aggregation.
Custom Preview
Demonstrates using viewer control customization, export filters, rich edit control and mail-merge,
and grouping.
Data Reader Binding
Demonstrates binding to an ADO.NET DataReader object.
Data View Binding
Demonstrates binding to an ADO.NET DataView object.
DataGrid Printing
Demonstrates creating an ActiveReport object dynamically to print a DataGrid control.
E-mail
Demonstrates rendering a stand-alone RPX file to PDF and e-mailing the PDF file as an attachment
using the default mail client.
Hyperlinks and Drill-Downs
Demonstrates using hyperlinks and the viewer hyperlink event to simulate drill-down from one
report to another.
RDF File Viewer
Demonstrates customizing the WinForms viewer control toolbar, loading Report Document Files
(RDF) and using the export filters.
Report Assemblies
Demonstrates distributing reports as separate assembly files and calling them from the main
application .exe file.
Unbound From Array
Demonstrates retrieving data from an array in unbound mode.
Unbound From Text File
Demonstrates retrieving data from a text file in unbound mode.
XML Data
Demonstrates the XML data source and using it to run multi-level reports with and without using
subreports.
Annual Report Sample
The Annual Report Sample demonstrates subreports, Nested subreports, modifying data source properties at
run time, alternate row highlighting and pagebreak control.
To run this sample
1. Open the sample folder at <Installation Folder>\Samples
2. Open the .sln file.
3. Press F5 to start the application.
ASP.NET Standard Edition Web Sample
The ASP.NET Web sample demonstrates using Standard Edition in ASP.NET. It shows how to use custom
exporting without the Pro Edition server controls or RPX handlers as well as running reports on the server,
Page 51

ActiveReports for .NET User Guide | 51
exporting output to HTML or PDF streams and pushing content to the client. The sample also demonstrates
using the ActiveX viewer control to view report output on the client machine.
Note The web samples will need to be configured using the auto-configuration utility or
configured manually before the samples can be run (see Manually Configuring Web Samples
for help). Also, the ASP.NET user machine will need to have ASP.NET write access before running
the samples or an exception may be thrown during execution.
To run this sample
1. Open the sample folder at <Installation Folder>\Samples
2. Open the .sln file.
3. Press F5 to start the application.
Category Selection Sample
The Category Selection Sample demonstrates using the ad hoc report filter by modifying the report's SQL
query at run time.
To run this sample
1. Open the sample folder at <Installation Folder>\Samples
2. Open the .sln file.
3. Press F5 to start the application.
Cross-Tab Sample
The Cross-Tab Sample demonstrates using unbound data, conditional highlighting and distributing data
across columns to create a cross-tab view and data aggregation.
To run this sample
1. Open the sample folder at <Installation Folder>\Samples
2. Open the .sln file.
3. Press F5 to start the application.
Custom Preview Sample
The Custom Preview Sample demonstrates using viewer control customization, export filters, rich edit control
and mail-merge, and grouping.
To run this sample
1. Open the sample folder at <Installation Folder>\Samples
2. Open the .sln file.
3. Press F5 to start the application.
Data Reader Binding Sample
The Data Reader Binding Sample demonstrates binding to an ADO.NET DataReader object.
To run this sample
1. Open the sample folder at <Installation Folder>\Samples
2. Open the .sln file.
3. Press F5 to start the application.
Data View Binding Sample
The Data View Binding Sample demonstrates binding to an ADO.NET DataView object.
Page 52

ActiveReports for .NET User Guide | 52
To run this sample
1. Open the sample folder at <Installation Folder>\Samples
2. Open the .sln file.
3. Press F5 to start the application.
DataGrid Printing Sample
The DataGrid Printing Sample demonstrates creating an ActiveReport object dynamically to print a DataGrid
control.
To run this sample
1. Open the sample folder at <Installation Folder>\Samples
2. Open the .sln file.
3. Press F5 to start the application.
E-mail Sample
The E-mail Sample demonstrates rendering a stand-alone RPX file to PDF and e-mailing the PDF file as an
attachment using the default mail client.
To run this sample
1. Open the sample folder at <Installation Folder>\Samples
2. Open the .sln file.
3. Press F5 to start the application.
Hyperlinks and Drill-Down Sample
The Hyperlinks and Drill-Downs Sample demonstrates using hyperlinks and the viewer hyperlink event to
simulate drill-down from one report to another.
To run this sample
1. Open the sample folder at <Installation Folder>\Samples
2. Open the .sln file.
3. Press F5 to start the application.
RDF File Viewer Sample
The RDF File Viewer Sample demonstrates customizing the WinForms viewer control toolbar, loading Report
Document Files (RDF) and using the export filters.
To run this sample
1. Open the sample folder at <Installation Folder>\Samples
2. Open the .sln file.
3. Press F5 to start the application.
Report Assemblies Sample
The Report Assemblies Sample demonstrates distributing reports as separate assembly files and calling them
from the main application .exe file.
To run this sample
1. Open the sample folder at <Installation Folder>\Samples
2. Open the .sln file.
Page 53

ActiveReports for .NET User Guide | 53
3. Press F5 to start the application.
Unbound From Array Sample
The Unbound From Array Sample demonstrates retrieving data from an array in unbound mode.
To run this sample
1. Open the sample folder at <Installation Folder>\Samples
2. Open the .sln file.
3. Press F5 to start the application.
Unbound From Text File Sample
The Unbound From Text File Sample demonstrates retrieving data from a text file in unbound mode.
To run this sample
1. Open the sample folder at <Installation Folder>\Samples
2. Open the .sln file.
3. Press F5 to start the application.
XML Data Sample
The XML Data Sample demonstrates the XML data source and using it to run multi-level reports with and
without using subreports.
To run this sample
1. Open the sample folder at <Installation Folder>\Samples
2. Open the .sln file.
3. Press F5 to start the application.
Professional Edition Samples
ASP.NET Web Sample
Demonstrates the use of Professional Edition ASP.NET features, including RPX HTTP Handlers, Report
Caching and the Server Viewer Control.
End-User Report Designer Control
Demonstrates a custom End-User Report Designer that can be integrated in your applications to allow
users to modify report layouts.
ASP.NET Web Sample
The ASP.NET Web Sample demonstrates the use of Professional Edition ASP.NET features, including RPX
HTTP Handlers, Report Caching and the Server Viewer Control.
Note The web samples will need to be configured using the auto-configuration utility or
configured manually before the samples can be run (see Manually Configuring Web Samples
for help). Also, the ASP.NET user machine will need to have ASP.NET write access before running
the samples or an exception may be thrown during execution.
To run this sample
1. Open the sample folder at <Installation Folder>\Samples
2. Open the .sln file.
3. Press F5 to start the application.
End-User Report Designer Sample
Page 54

ActiveReports for .NET User Guide | 54
The End-User Report Designer Sample demonstrates a custom End-User Report Designer that can be
integrated in your applications to allow users to modify report layouts.
To run this sample
1. Open the sample folder at <Installation Folder>\Samples\Professional Edition
2. Open the .sln file.
3. Press F5 to start the application.
Walkthroughs
Learn how to create various applications in C# and Visual Basic .NET--one step at a time.
In this section
Standard Edition Walkthroughs
This section includes step-by-step instructions for creating applications in the Standard edition of
ActiveReports for .NET.
Professional Edition Walkthroughs
This section includes step-by-step instructions for creating applications using features available in the
Professional edition of ActiveReports for .NET.
Additional Information
Samples
ActiveReports includes many samples which demonstrate applications the developers created for
ActiveReports. These samples show the use of a combination of controls and code to produce various
reports.
Standard Edition Walkthroughs
Walkthroughs give basic step-by-step instructions for common situations in ActiveReports. This feature
makes walkthroughs an excellent way to learn more about the basic features of the product. For most
walkthroughs, it is assumed that references to the DataDynamics.ActiveReports and
DataDynamics.ActiveReports.Document namespaces have been added to the project.
In this section
ActiveX Viewer Control
Describes how to view and print report output in a web browser.
Advanced Report Layouts
Describes how to create advanced report layouts.
Bookmarks
Describes how to set up Bookmarks to organize reports for easy navigation.
Calculated Fields
Describes how to use a field's DataField property to perform calculations in a report.
Conditional Formatting
Describes how to use the format event to modify the properties of sections or controls at run time.
Custom Exporting
Describes how to set up custom exporting to various formats on the web.
Customizing the Viewer Control
Describes how to customize the viewer control in a report.
Data Bound Reports
Describes how to connect a report to a data source using the DataSource icon.
Data Sets Containing Relationships with Subreports
Describes how to use data sets containing relationships with subreports.
Deploying Compiled Reports
Page 55

ActiveReports for .NET User Guide | 55
Describes how to deploy compiled reports.
Exporting Output
Describes how to use export filters to make reports available in other formats.
Grouping Data
Describes how to incorporate grouping in a report.
Hyperlinks
Describes the incorporation and function of hyperlinks in a report.
Localization
Describes how to localize ActiveReports.
Master Detail Reports
Describes how to implement master detail reports.
Modifying Report Documents
Describes several methods of modifying report documents.
Page Numbering
Describes how to use page numbering in the page footer and in the group header.
Parameters
Describes how to use parameters with simple reports and subreports.
Printing
Describes how to use different printing functions in a report.
Rich Text and Field Merging
Describes how to use Rich Text and field merging in a report.
Run-Time Reporting
Describes how to create dynamic reports at run time.
Saving and Loading to a Memory Stream
Describes how to save reports to and load reports from a memory stream.
Scripting
Describes how to use scripting to generate stand-alone reports, including subreports.
Style Sheets
Describes how to use style sheets in a report.
Subreports
Describes how to add subreports to a report.
Summary Fields
Describes how to add summary fields to a report to calculate totals, counts, averages and other
aggregations.
Unbound Reports
Describes the basics of using the Data_Initialize and Fetch_Data events to connect a report to a data
source.
Web Services
Describes how to use Web Services with ActiveReports.
Walkthrough: Data Bound Reports
In ActiveReports, the simplest reporting style is a tabular listing of fields from a record source.
This walkthrough illustrates the basics of setting up bound reports by introducing the ideas of using the
DataSource icon and connecting textbox controls to the data source through the DataField property.
The walkthrough is split up into the following activities:
Creating a new Visual Studio project
l
Adding an ActiveReport to the Visual Studio project
l
Connecting the data source to a database
l
l Adding controls to contain the data
Viewing the report
l
Page 56
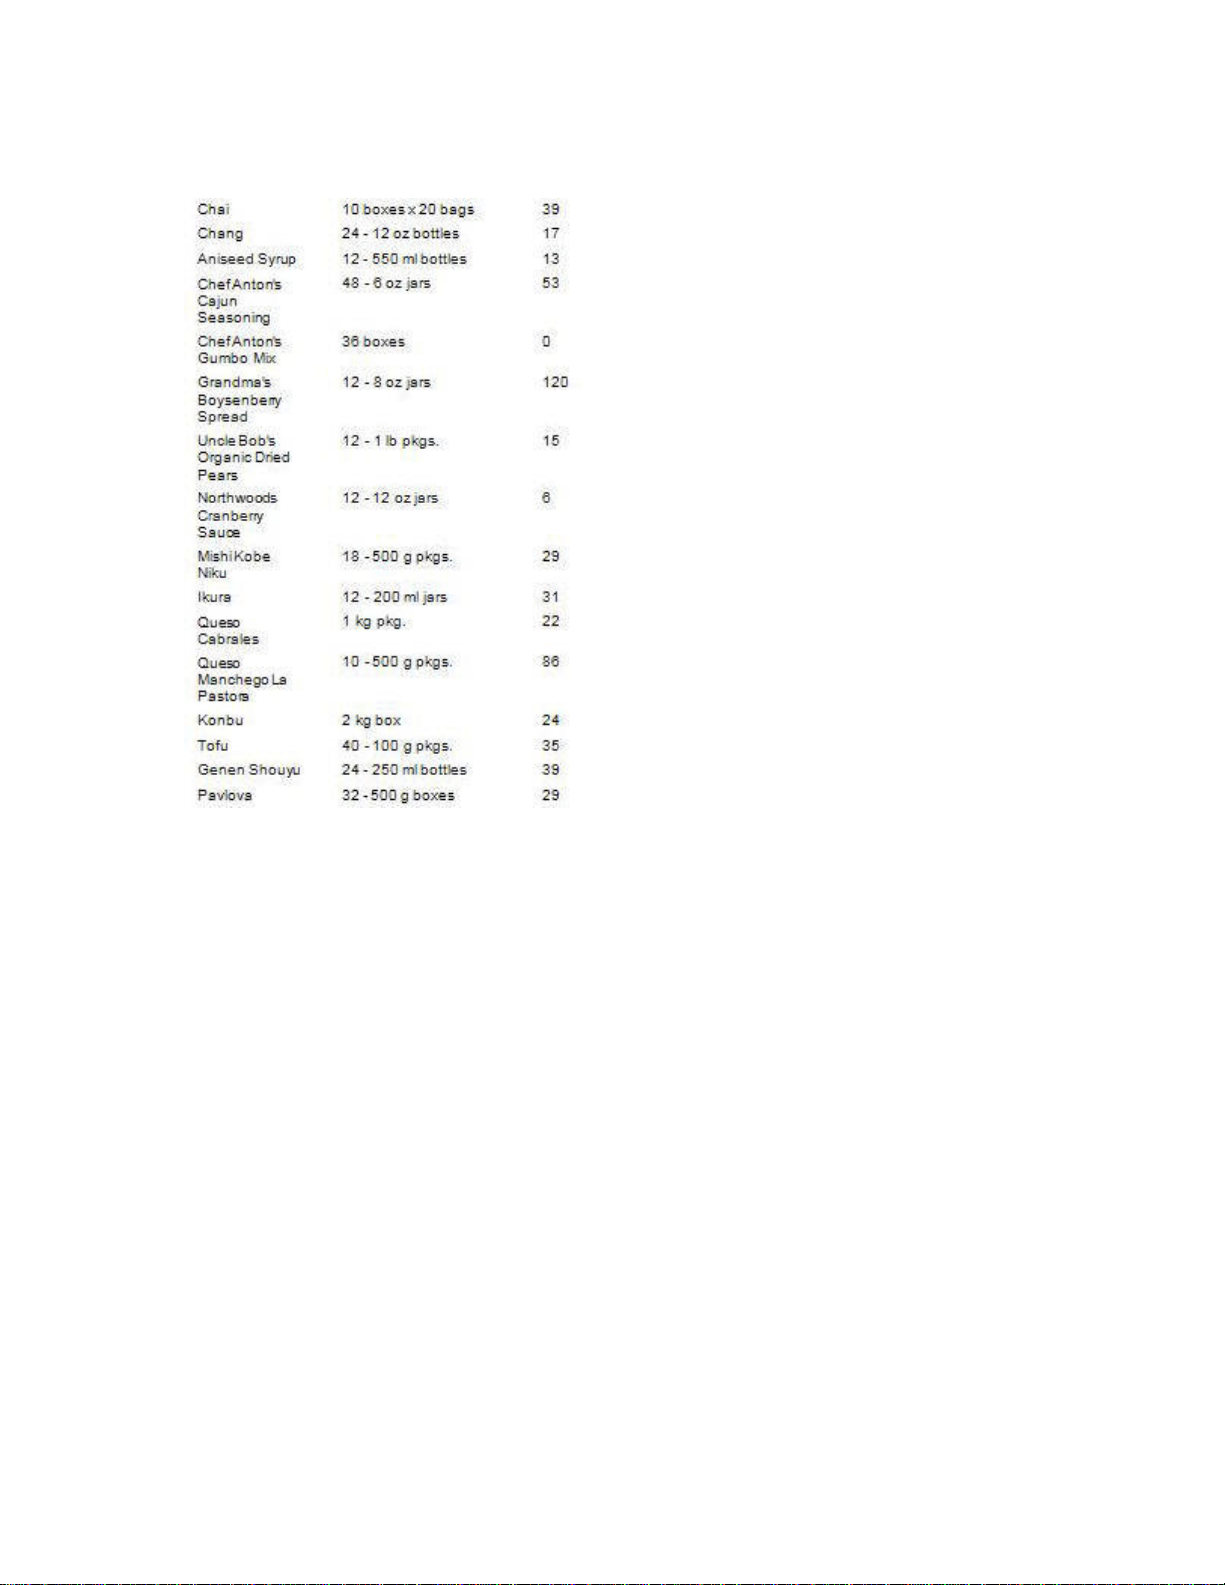
ActiveReports for .NET User Guide | 56
To complete the walkthrough, you must have access to the NorthWind database (Nwind.mdb).
When you have finished this walkthrough, you will have a report that looks similar to the following.
Creating a new Visual Studio project
To create a new Visual Studio project
1. Open Visual Studio.
2. Click on File > New > Project.
3. Select the project type and click on Windows Application.
4. Change the name of your project and click OK.
Adding an ActiveReport to the Visual Studio project
To add an ActiveReport to your project
1. Click on Project > Add New Item .
2. Select ActiveReports file and rename the file rptBound.
3. Click Open.
Connecting the data source to a database
To connect the data source to a database
1. Click on the yellow report DataSource icon in the Detail section. This brings up the report DataSource
dialog box.
2. Click on Build...
3. Select "Microsoft Jet 4.0 OLE DB Provider" and click Next >>.
4. Click on the ellipsis to browse for the access path to Nwind.mdb. Click Open once you have selected the
appropriate access path.
5. Click OK to continue.
6. In the Query field, type "Select * from products".
Page 57

through its programmable object model. You can create a report without setting the report's data source then
ActiveReports for .NET User Guide | 57
7. Click OK to return to the report design surface.
Adding controls to contain data
To add controls to contain data
1. Drag the following fields from the Report Explorer window: ProductName, QuantityPerUnit and
UnitsInStock.
2. Drop these textboxes into the Detail section and arrange them horizontally in the above order.
3. Resize the Detail section to remove extra white space.
Viewing the report
To view the report
1. Add the ActiveReports viewer control to a Windows Form.
2. Add the code needed to set the viewer document equal to the report document. See Using the
ActiveReports WinForm Viewer for help.
Walkthrough: Unbound Reports
ActiveReports gives you complete control to bind reports to any type of data source, including arrays,
load the data from your data source into the report's control at run time. The Fields property allows data
binding between the control and the run-time fields. It also allows the control's DataField property to be set
to any of the run-time defined names. The DataInitialize and FetchData events are used to define the runtime fields and feed the data values of these fields so they can be used with unbound controls.
This walkthrough illustrates the fundamentals of using the DataInitialize and FetchData events to set up an
unbound report.
This walkthrough is split into the following activities:
Adding an ActiveReport to a Visual Studio project
l
Adding code to connect the report to a data source
l
Adding controls to contain the data
l
Using the DataInitialize event to add fields to the report's fields collection
l
Using the FetchData event to populate the report fields
l
Viewing the report
l
To complete the walkthrough, you must have access to the NorthWind database (NWind.mdb).
When you have completed this walkthrough, you will have a report that looks similar to the following.
Page 58

ActiveReports for .NET User Guide | 58
Adding an ActiveReport to a Visual Studio project
To add an ActiveReport to your project
1. Open a new project in Visual Studio.
2. Click on Project > Add New Item .
3. Select ActiveReports file and rename the file rptUnbound.
4. Click Open.
Adding code to connect the report to a data source
To write the code in Visual Basic
Right-click in any section of the design window of rptUnbound, and click on View Code to display the
l
code view for the report. At the top left of the code view for rptUnbound, click the drop-down arrow and
select (Base Class Events). At the top right of the code window, click the drop -down arrow and select
ReportStart. This creates an event-handling method for rptUnbound's ReportStart event. Add code to the
handler to:
Set the data source connection string
l
Set the data source SQL query
l
Open the connection to create the DataReader
l
To write the code in C#
Click in the gray area below rptUnbound to select the report. Click on the events icon in the Properties
l
window to display available events for the report. Double-click ReportStart. This creates an eventhandling method for rptUnbound's ReportStart event. Add code to the handler to:
Set the data source connection string
l
Set the data source SQL query
l
Open the connection to create the DataReader
l
The following example shows what the code for the method looks like:
Page 59

m_cnnString = "Provider=Microsoft.Jet.OLEDB.4.0;Data Source=C:\Program Files\Data _
sqlString = "SELECT * FROM categories INNER JOIN products ON categories.categoryid _
string m_cnnString = "Provider=Microsoft.Jet.OLEDB.4.0;Data Source=C:\Program Files\
Data Dynamics\ActiveReports.NET\Data\NWIND.MDB;Persist Security Info=False";
string sqlString = "SELECT * FROM categories INNER JOIN products ON categories.categoryid
= products.categoryid ORDER BY products.categoryid, products.productid";
ActiveReports for .NET User Guide | 59
[Visual Basic]
Dim m_cnnString As String
Dim sqlString As String
Dim m_reader As OleDbDataReader
Dim m_cnn As OleDbConnection
Private Sub rptUnbound_ReportStart(ByVal sender As Object, ByVal e As System.EventArgs) _
Handles MyBase.ReportStart
Dynamics\ActiveReports.NET\Data\NWIND.MDB;Persist Security Info=False"
= products.categoryid ORDER BY products.categoryid, products.productid"
m_cnn = New OleDb.OleDbConnection(m_cnnString)
Dim m_Cmd As New OleDb.OleDbCommand(sqlString, m_cnn)
If m_cnn.State = ConnectionState.Closed Then
m_cnn.Open()
End If
m_reader = m_Cmd.ExecuteReader()
End Sub
[C#]
private static OleDbConnection m_cnn;
private static OleDbDataReader m_reader;
private void rptUnbound_ReportStart(object sender, System.EventArgs eArgs)
{
m_cnn = new OleDbConnection(m_cnnString);
OleDbCommand m_Cmd = new OleDbCommand(sqlString,m_cnn);
if(m_cnn.State == ConnectionState.Closed)
{
m_cnn.Open();
}
m_reader = m_Cmd.ExecuteReader();
}
Adding controls to the report to contain data
To add controls to the report
Add the following controls to the Detail section of rptUnbound:
l
Control DataField Name Text/Caption Location
TextBox ProductName txtProductName Product Name 0.0625, 0.375
TextBox UnitsInStock txtUnitsInStock Units In Stock 4.75, 0.375
Label (Empty string) lblProductName Product Name 0.0625, 0.0625
TextBox Description txtDescription Description 1.8125, 0.6875
Label (Empty string) lblCategoryDescription Category Description 0.0625. 0.6875
Label (Empty string) lblUnitsInStock Units In Stock 4.75, 0.0625
Label (Empty string) lblCategoryName Category Name 3.125, 0.0625
TextBox CategoryName txtCategoryName Category Name 3.125, 0.375
Line (Empty string) Line1 (Empty string) X1 = 0
Y1 = 1.0625
X2 = 6.5
Y2 = 1.0625
Using the DataInitialize event to add fields
Page 60

ActiveReports for .NET User Guide | 60
To write the code in Visual Basic
Right-click in any section of the design window of rptUnbound, and click on View Code to display the
l
code view for the report. At the top left of the code view for rptUnbound, click the drop-down arrow and
select (Base Class Events). At the top right of the code window, click the drop -down arrow and select
DataInitialize. This creates an event-handling method for rptUnbound's DataInitialize event. Add code to
the handler to:
Add fields to the report's fields collection
l
To write the code in C#
Click in the gray area below rptUnbound to select the report. Click on the events icon in the Properties
l
window to display available events for the report. Double-click DataInitialize. This creates an eventhandling method for rptUnbound's DataInitialize event. Add code to the handler to:
Add fields to the report's fields collection
l
The following example shows what the code for the method looks like:
[Visual Basic]
Private Sub rptUnbound_DataInitialize(ByVal sender As Object, ByVal e As _
System.EventArgs) Handles MyBase.DataInitialize
Fields.Add("CategoryName")
Fields.Add("ProductName")
Fields.Add("UnitsInStock")
Fields.Add("Description")
End Sub
[C#]
private void rptUnbound_DataInitialize(object sender, System.EventArgs eArgs)
{
Fields.Add("CategoryName");
Fields.Add("ProductName");
Fields.Add("UnitsInStock");
Fields.Add("Description");
}
Using the FetchData event to populate the report fields
To write the code in Visual Basic
Right-click in any section of the design window of rptUnbound, and click on View Code to display the
l
code view for the report. At the top left of the code view for rptUnbound, click the drop-down arrow and
select (Base Class Events). At the top right of the code window, click the drop -down arrow and select
FetchData. This creates an event-handling method for rptUnbound's FetchData event. Add code to the
handler to:
Retrieve information to populate the report fields
l
To write the code in C#
Click in the gray area below rptUnbound to select the report. Click on the events icon in the Properties
l
window to display available events for the report. Double-click FetchData. This creates an event-handling
method for rptUnbound's FetchData event. Add code to the handler to:
Retrieve information to populate the report fields
l
The following example shows what the code for the method looks like:
[Visual Basic]
Private Sub rptUnbound_FetchData(ByVal sender As Object, ByVal eArgs As DataDynamics._
ActiveReports.ActiveReport.FetchEventArgs) Handles MyBase.FetchData
Try
m_reader.Read()
Me.Fields("CategoryName").Value = m_reader("CategoryName")
Me.Fields("ProductName").Value = m_reader("ProductName")
Me.Fields("UnitsInStock").Value = m_reader("UnitsInStock")
Me.Fields("Description").Value = m_reader("Description")
eArgs.EOF = False
Catch ex As Exception
Page 61

of your report
ActiveReports for .NET User Guide | 61
eArgs.EOF = True
End Try
End Sub
[C#]
private void rptUnbound_FetchData(object sender, DataDynamics.ActiveReports.ActiveReport.
FetchEventArgs eArgs)
{
try
{
m_reader.Read();
Fields["CategoryName"].Value = m_reader["CategoryName"].ToString();
Fields["ProductName"].Value = m_reader["ProductName"].ToString();
Fields["UnitsInStock"].Value = m_reader["UnitsInStock"].ToString();
Fields["Description"].Value = m_reader["Description"].ToString();
eArgs.EOF = false;
}
catch
{
eArgs.EOF = true;
}
}
Viewing the report
To view the report
1. Add the ActiveReports viewer control to a Windows Form.
2. Add the code needed to set the viewer document equal to the report document. See Using the
ActiveReports WinForm Viewer for help.
Grouping Data Walkthroughs
With ActiveReports, grouping can be easily added to your reports. The following walkthroughs describe
exactly how to include various grouping options in your report.
Conditional Show/Hide Detail
Describes how reports can be grouped to show or hide information based on set conditions.
Group on Simple Fields
Describes how reports can be grouped by using simple fields and setting the DataField property to the
database field on which they are being grouped.
Group on Unbound Fields
Describes how reports can be grouped on unbound fields.
Keeptogether Options
Describes how to use Keeptogether options with grouping in a report.
Walkthrough: Conditional Show-Hide Detail
ActiveReports allows you to hide or show information from the data source in the Detail section
based on conditions in your data. This can be achieved by setting properties of the section in the Format
event based on certain conditions.
This walkthrough illustrates how to create a report based on conditions that will show specific data from your
data source at run time.
This walkthrough is split up into the following activities:
Adding an ActiveReport to a Visual Studio project
l
Connecting the report to a data source
l
Adding controls to the report to contain data
l
Page 62

ActiveReports for .NET User Guide | 62
Adding conditions in code to the Format event
l
Adding code to retrieve data from the data source
l
Viewing the report
l
To complete the walkthrough, you must have access to the NorthWind database (NWind.mdb).
When you have completed this walkthrough, you will have a report that looks similar to the following.
Adding an ActiveReport to a Visual Studio project
To add an ActiveReport to your project
1. Open a new project in Visual Studio.
2. Click on Project > Add New Item .
3. Select ActiveReports file and rename the file rptCondSH.
4. Click Open.
Connecting the report to a data source
To connect the report to a data source
1. Click on the yellow report DataSource icon in the Detail section. This brings up the report DataSource
dialog box.
2. Click on Build...
3. Select Microsoft Jet 4.0 OLE DB Provider and click Next >>
Page 63

to display the code
Private Sub Detail_Format(ByVal sender As Object, ByVal e As System.EventArgs) Handles Detail.Format
ActiveReports for .NET User Guide | 63
4. Click on the ellipsis to browse for the access path to NWind.mdb. Click Open once you have selected the
appropriate access path.
5. Click OK to continue.
6. In the Query field, type "Select * from products ORDER BY productname".
7. Click OK to return to the report design surface.
Adding controls to the report to contain data
To add controls to the report
1. Add a PageHeader/Footer section to the report.
2. Add the following controls to the PageHeader section:
Control Name Text/Caption Location
Label lblProductID Product ID 0, 0
Label lblProductName Product Name 1.0625, 0
Label lblReorderLevel Reorder Level 3.8125, 0
Label lblInStock Units In Stock 2.5, 0
3. Add the following controls to the Detail section:
Control DataField Name Text/Caption Location
TextBox ProductID txtProductID Product ID 0, 0
TextBox ProductName txtProductNameProduct Name 1.0625, 0
TextBox UnitsInStock txtUnitsInStock Units In Stock 2.510, 0
TextBox ReorderLevel txtReorderLevel Reorder Level 3.833, 0
TextBox Discontinued txtDiscontinued Discontinued 5.291, 0
Adding conditions in code to the format event
To write the code in Visual Basic
Right-click in any section of the design window of rptCondSH, and click on View Code
l
view for the report. At the top left of the code view for rptCondSH, click the drop-down arrow and select
Detail. At the top right of the code window, click the drop-down arrow and select Format. This creates an
event-handling method for rptCondSH's Detail_Format event. Add code to the handler to:
Set conditions in the Format event
l
To write the code in C#
Click in the Detail section of rptCondSH to select the section. Click on the events icon in the Properties
l
window to display available events for the section. Double-click Format. This creates an event-handling
method for rptCondSH's Detail_Format event. Add code to the handler to:
Set conditions in the Format event
l
The following example shows what the code for the method looks like:
[Visual Basic]
Dim m_rl As Integer
Dim m_dis As Boolean
If m_rl = 0 And m_dis = False Then
Me.Detail.Visible = True
Me.txtDiscontinued.Text = ""
Me.txtReorderLevel.Text = "Need to Reorder"
Me.txtReorderLevel.ForeColor = System.Drawing.Color.DarkRed
Page 64

to display the code
private void rptCondSH_FetchData(object sender, DataDynamics.ActiveReports.ActiveReport.FetchEventArgs eArgs)
ActiveReports for .NET User Guide | 64
Else
Me.Detail.Visible = False
End If
End Sub
[C#]
int m_rl;
bool m_dis;
private void Detail_Format(object sender, System.EventArgs eArgs)
{
if(m_rl == 0 && m_dis == false)
{
this.Detail.Visible = true;
this.txtDiscontinued.Text = "";
this.txtReorderLevel.Text = "Need to Reorder";
this.txtReorderLevel.ForeColor = System.Drawing.Color.DarkRed;
}
else
{
this.Detail.Visible = false;
}
}
Adding code to retrieve data from the data source
To write the code in Visual Basic
Right-click in any section of the design window of rptCondSH, and click on View Code
l
view for the report. At the top left of the code view for rptCondSH, click the drop-down arrow and select
(Base Class Events). At the top right of the code window, click the drop-down arrow and select
FetchData. This creates an event-handling method for rptCondSH's FetchData event. Add code to the
handler to:
Retrieve information from the data source
l
To write the code in C#
Click in the gray area below rptCondSH to select the report. Click on the events icon in the Properties
l
window to display available events for the report. Double-click FetchData. This creates an event-handling
method for rptCondSH's FetchData event. Add code to the handler to:
Retrieve information from the data source
l
The following example shows what the code for the method looks like:
[Visual Basic]
Private Sub rptCondSH_FetchData(ByVal sender As Object, ByVal eArgs As DataDynamics. _
ActiveReports.ActiveReport.FetchEventArgs) Handles MyBase.FetchData
m_rl = Fields("ReorderLevel").Value
m_dis = Fields("Discontinued").Value
End Sub
[C#]
{
m_rl = (System.Int16)Fields["ReorderLevel"].Value;
m_dis = (System.Boolean)Fields["Discontinued"].Value;
}
Viewing the report
To view the report
1. Add the ActiveReports viewer control to a Windows Form.
2. Add the code needed to set the viewer document equal to the report document. See Using the
ActiveReports WinForm Viewer for help.
Walkthrough: Group on Simple Fields
Page 65
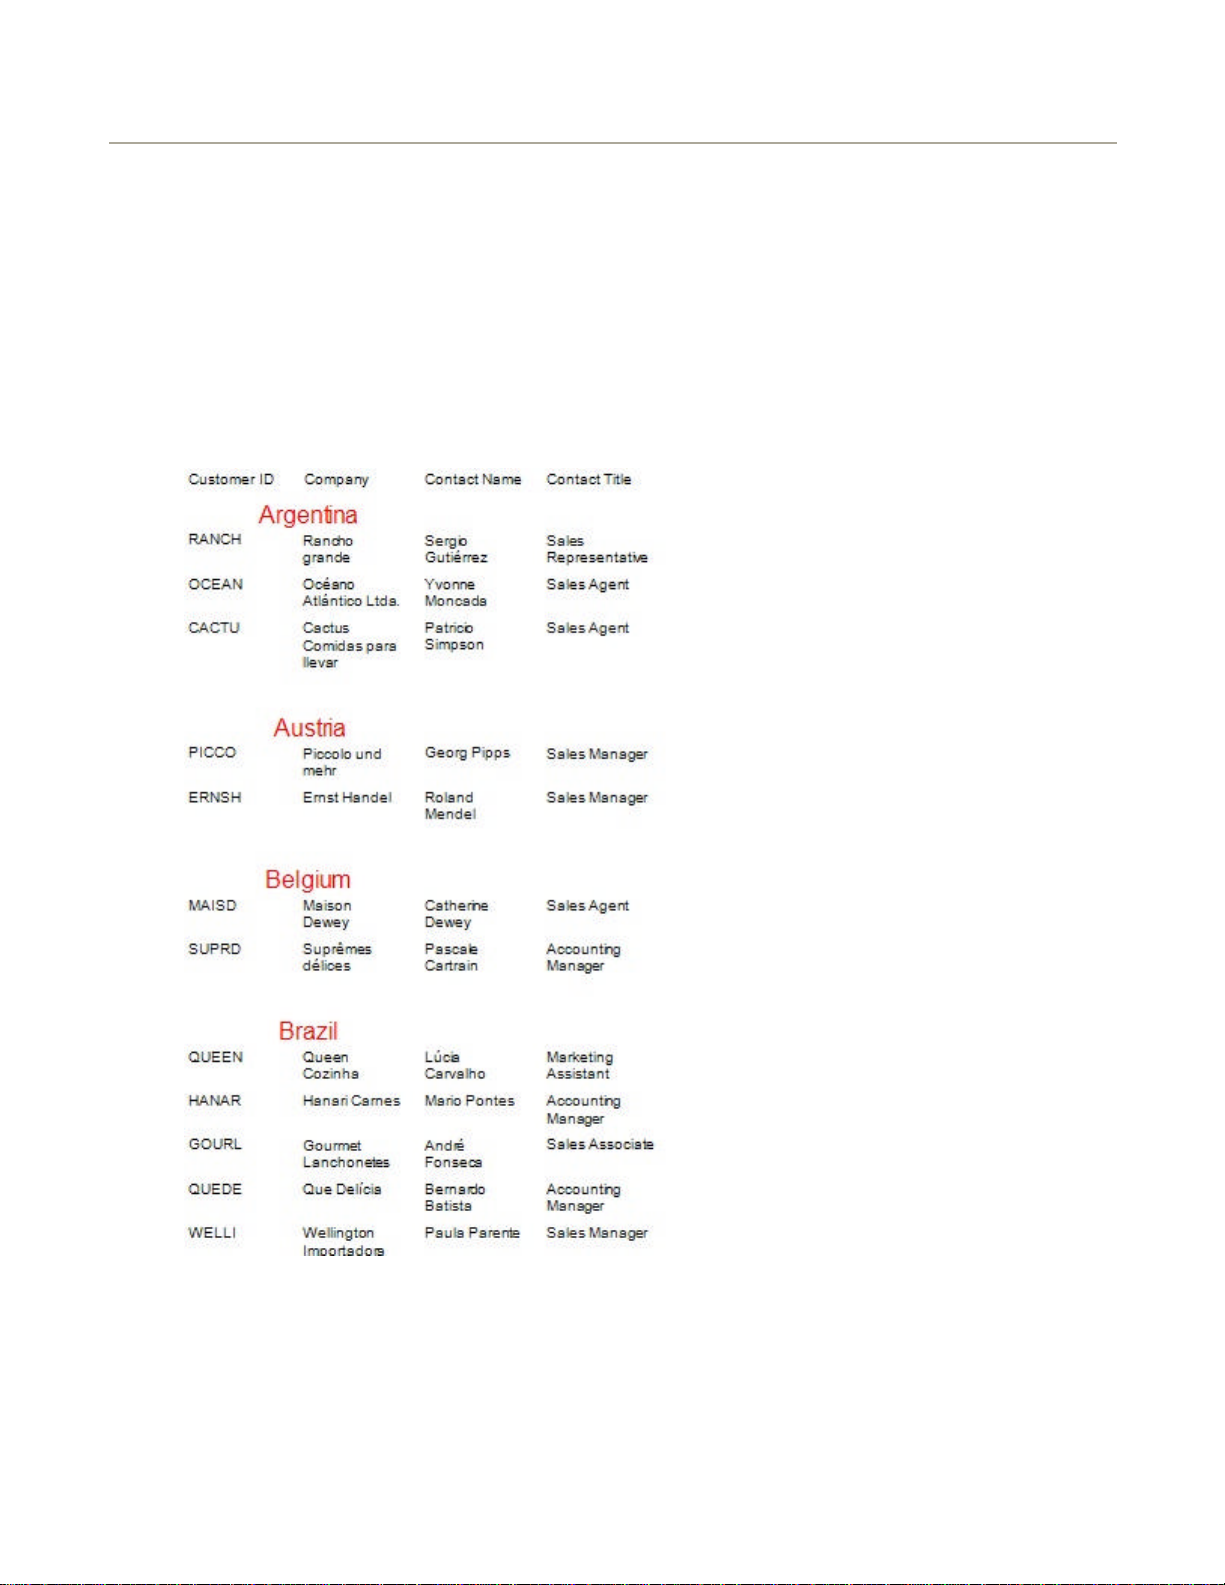
ActiveReports for .NET User Guide | 65
In ActiveReports, reports can be grouped by using a group header with the DataField property set to the
database field on which it is being grouped. ActiveReports allows up to 32 nested groups in a single report.
When using grouping, make sure the returned data set is ordered by the fields on which it is being grouped.
This walkthrough illustrates the basics of setting up grouping on simple fields in a report.
The walkthrough is split up into the following activities:
Adding an ActiveReport to your project
l
Connecting the data source to a database
l
Adding controls to the report to contain data
l
Viewing the report
l
To complete the walkthrough, you must have access to the NorthWind database (Nwind.mdb).
When you have finished this walkthrough, you will have a report that looks similar to the following.
Adding an ActiveReport to your project
To add an ActiveReport to your project
1. Click on Project > Add New Item....
2. Click on ActiveReports File to select it.
3. Change the name of the report to rptSimpleGroup and click Open.
Page 66

ActiveReports for .NET User Guide | 66
4. The ActiveReports design surface is displayed.
Connecting the data source to a database
To connect the data source to a database
1. Click on the yellow report DataSource icon in the Detail section. This brings up the report DataSource
dialog box.
2. Click on Build...
3. Select "Microsoft Jet 4.0 OLE DB Provider" and click Next >>.
4. Click on the ellipsis to browse for the access path to Nwind.mdb. Click Open once you have selected the
appropriate access path.
5. Click OK to continue.
6. In the Query field, type "Select * from customers ORDER BY country".
7. Click OK to return to the report design surface.
Adding controls to contain data
To add controls to the report
1. Add a GroupHeader/Footer section to your report (see Grouping Data for help).
2. Make the following changes to the group header:
Change the name to ghOrderGroup
¡
Change the DataField property to Country
¡
3. Add the following controls to the PageHeader section:
Control Name Text/Caption Location
Label lblCustomerID Customer ID 0, 0
Label lblCompanyName Company Name 1.0729, 0
Label lblContactName Contact Name 2.1875, 0
Label lblContactTitle Contact Title 3.3125, 0
4. Add the following controls to the GroupHeader section:
Control DataField Name Text/Caption Location
Textbox Country txtCountry Country 0.3125, 0.0625
5. Add the following controls to the Detail section:
Control DataField Name Text/Caption Location
Textbox CustomerID txtCustomerID Customer ID 0, 0
Textbox CompanyName txtCompanyName Company Name 1.0625, 0
Textbox ContactName txtContactName Contact Name 2.1875, 0
Textbox ContactTitle txtContactTitle Contact Title 3.3125, 0
Viewing the report
To view the report
1. Add the ActiveReports viewer control to a Windows Form.
2. Add the code needed to set the viewer document equal to the report document. See Using the
ActiveReports WinForm Viewer for help.
Group on Unbound Fields
Page 67

ActiveReports for .NET User Guide | 67
ActiveReports allows you to set up grouping in unbound reports. When setting up grouping, the group
header's DataField property is used in the same manner as a textbox's DataField property to retrieve the
grouping data from the database.
This walkthrough illustrates how to set up grouping in an unbound report.
This walkthrough is split into the following activities:
Adding an ActiveReport to a Visual Studio project
l
Adding code to connect the report to a data source
l
Adding controls to contain the data
l
Using the DataInitialize event to add fields to the report's fields collection
l
Using the FetchData event to populate the report fields
l
Viewing the report
l
To complete the walkthrough, you must have access to the NorthWind database (NWind.mdb).
When you have completed this walkthrough, you will have a report that looks similar to the following.
Adding an ActiveReport to a Visual Studio project
To add an ActiveReport to your project
1. Open a new project in Visual Studio.
2. Click on Project > Add New Item .
3. Select ActiveReports file and rename the file rptUnboundGrp.
4. Click Open.
Adding code to connect the report to a data source
To write the code in Visual Basic
Right-click in any section of the design window of rptUnboundGrp, and click on View Code to display the
l
Page 68

down arrow and select
Files\Data Dynamics\ActiveReports.NET\Data\NWIND.MDB;Persist Security Info=False"
string m_cnnString = "Provider=Microsoft.Jet.OLEDB.4.0;Data Source=C:\Program Files\Data
Dynamics\ActiveReports.NET\Data\NWIND.MDB;Persist Security Info=False";
string sqlString = "SELECT * FROM categories INNER JOIN products ON categories.categoryid = products.
ActiveReports for .NET User Guide | 68
code view for the report. At the top left of the code view for rptUnboundGrp, click the drop-down arrow
and select (Base Class Events). At the top right of the code window, click the dropReportStart. This creates an event-handling method for rptUnboundGrp's ReportStart event. Add code to
the handler to:
Set the data source connection string
l
Set the data source SQL query
l
Open the connection to create the data reader
l
To write the code in C#
Click in the gray area below rptUnboundGrp to select the report. Click on the events icon in the
l
Properties window to display available events for the report. Double-click ReportStart. This creates an
event-handling method for rptUnboundGrp's FetchData event. Add code to the handler to:
Set the data source connection string
l
Set the data source SQL query
l
Open the connection to create the DataReader
l
The following example shows what the code for the method looks like:
[Visual Basic]
Dim m_cnnString As String
Dim sqlString As String
Dim m_reader As OleDbDataReader
Dim m_cnn As OleDbConnection
Private Sub rptUnboundGrp_ReportStart(ByVal sender As Object, ByVal _
e As System.EventArgs) Handles MyBase.ReportStart
m_cnnString = "Provider=Microsoft.Jet.OLEDB.4.0;Data Source=C:\Program _
sqlString = "SELECT * FROM categories INNER JOIN products ON categories.categoryid _
= products.categoryid ORDER BY products.categoryid, products.productid"
m_cnn = New OleDb.OleDbConnection(m_cnnString)
Dim m_Cmd As New OleDb.OleDbCommand(sqlString, m_cnn)
If m_cnn.State = ConnectionState.Closed Then
m_cnn.Open()
End If
m_reader = m_Cmd.ExecuteReader()
End Sub
[C#]
private static OleDbConnection m_cnn;
private static OleDbDataReader m_reader;
private void rptUnboundGrp_ReportStart(object sender, System.EventArgs eArgs)
{
string m_dbPath = getDatabasePath();
categoryid ORDER BY products.categoryid, products.productid";
m_cnn = new OleDbConnection(m_cnnString);
OleDbCommand m_Cmd = new OleDbCommand(sqlString,m_cnn);
if(m_cnn.State == ConnectionState.Closed)
{
m_cnn.Open();
}
m_reader = m_Cmd.ExecuteReader();
}
Adding controls to the report to contain data
To add controls to the report
1. Add a GroupHeader/Footer section to your report (see Grouping Data for help).
2. Make the following changes to the group header:
Change the name to ghCategories
¡
Page 69

down arrow and select
ActiveReports for .NET User Guide | 69
Change the DataField property to CategoryID
¡
Set the GroupKeepTogether property to All
¡
Set the KeepTogether property to True
¡
3. Make the following change to the group footer:
Change the name to gfCategories
¡
4. Add the following controls to the GroupHeader section:
Control DataField Name Text/Caption Location
TextBox CategoryName txtCategoryName Category Name 0.0625, 0.0625
TextBox Description txtDescription Description 0.0625, 0.375
Label (Empty string) lblProductName Product Name 0.0625, 0.6875
Label (Empty string) lblUnitsInStock Units In Stock 4.75, 0.6875
5. Add the following controls to the Detail section:
Control DataField Name Text/Caption Location
TextBox ProductName txtProductName Product Name 0.0625, 0.0625
TextBox UnitsInStock txtUnitsInStock Units In Stock 4.75, 0.0625
6. Add the following controls to the GroupFooter section:
Control DataField Name Text/Caption Misc Details Location
Label TotalLabel lblTotalLabel Total Label (Empty string) 1.875, 0
SummaryType =
SubTotal
SummaryFunc =
TextBoxProductName txtTotalItems Total Items
Line (Empty
Line1 (Empty string) LineWeight = 3 X1 = 1.875
string)
Count
SummaryRunning
= Group
SummaryGroup
= ghCategories
5, 0
Y1 = 0
X2 = 6.4375
Y2 = 0
Using the DataInitialize event to add fields
To write the code in Visual Basic
Right-click in any section of the design window of rptUnboundGrp, and click on View Code to display the
l
code view for the report. At the top left of the code view for rptUnboundGrp, click the drop-down arrow
and select (Base Class Events). At the top right of the code window, click the dropDataInitialize. This creates an event-handling method for rptUnboundGrp's DataInitialize event. Add code
to the handler to:
Add fields to the report's fields collection.
l
To write the code in C#
Click in the gray area below rptUnboundGrp to select the report. Click on the events icon in the
l
Properties window to display available events for the report. Double-click DataInitialize. This creates an
event-handling method for rptUnboundGrp's DataInitialize event. Add code to the handler to:
Add fields to the report's fields collection.
l
Page 70

Private Sub rptUnboundGrp_DataInitialize(ByVal sender As Object, ByVal e As System.EventArgs) Handles MyBase.DataInitialize
down arrow and select
handling method for rptUnboundGrp's FetchData event. Add code to the
Private Sub rptUnboundGrp_FetchData(ByVal sender As Object, ByVal eArgs As DataDynamics.ActiveReports.ActiveReport. _
private void UnboundGrp_FetchData(object sender, DataDynamics.ActiveReports.ActiveReport.FetchEventArgs eArgs)
ActiveReports for .NET User Guide | 70
The following example shows what the code for the method looks like:
[Visual Basic]
Fields.Add("CategoryID")
Fields.Add("CategoryName")
Fields.Add("ProductName")
Fields.Add("UnitsInStock")
Fields.Add("Description")
Fields.Add("TotalLabel")
End Sub
[C#]
private void UnboundGrp_DataInitialize(object sender, System.EventArgs eArgs)
{
Fields.Add("CategoryID");
Fields.Add("CategoryName");
Fields.Add("ProductName");
Fields.Add("UnitsInStock");
Fields.Add("Description");
Fields.Add("TotalLabel");
}
Using the FetchData event to populate the report fields
To write the code in Visual Basic
Right-click in any section of the design window of rptUnboundGrp, and click on View Code to display the
l
code view for the report. At the top left of the code view for rptUnboundGrp, click the drop-down arrow
and select (Base Class Events). At the top right of the code window, click the dropFetchData. This creates an eventhandler to:
Retrieve information to populate the report fields.
l
To write the code in C#
Click in the gray area below rptUnboundGrp to select the report. Click on the events icon in the
l
Properties window to display available events for the report. Double-click FetchData. This creates an
event-handling method for rptUnboundGrp's FetchData event. Add code to the handler to:
l Retrieve information to populate the report fields.
The following example shows what the code for the method looks like:
[Visual Basic]
FetchEventArgs) Handles MyBase.FetchData
Try
m_reader.Read()
Me.Fields("CategoryID").Value = m_reader("categories.CategoryID")
Me.Fields("CategoryName").Value = m_reader("CategoryName")
Me.Fields("ProductName").Value = m_reader("ProductName")
Me.Fields("UnitsInStock").Value = m_reader("UnitsInStock")
Me.Fields("Description").Value = m_reader("Description")
Me.Fields("TotalLabel").Value = "Total Number of " + m_reader("CategoryName") + ":"
eArgs.EOF = False
Catch ex As Exception
System.Windows.Forms.MessageBox.Show(ex.ToString())
eArgs.EOF = True
End Try
End Sub
[C#]
{
try
{
Page 71

Fields["CategoryID"].Value = m_reader["categories.CategoryID"].ToString();
Fields["TotalLabel"].Value = "Total Number of " + m_reader["CategoryName"].ToString() + ":";
ActiveReports for .NET User Guide | 71
m_reader.Read();
Fields["CategoryName"].Value = m_reader["CategoryName"].ToString();
Fields["ProductName"].Value = m_reader["ProductName"].ToString();
Fields["UnitsInStock"].Value = m_reader["UnitsInStock"].ToString();
Fields["Description"].Value = m_reader["Description"].ToString();
eArgs.EOF = false;
}
catch
{
eArgs.EOF = true;
}
}
Viewing the report
To view the report
1. Add the ActiveReports viewer control to a Windows Form.
2. Add the code needed to set the viewer document equal to the report document. See Using the
ActiveReports WinForm Viewer for help.
Walkthrough: KeepTogether Options
ActiveReports allows you to set KeepTogether options for your reports so that group detail is kept together
on one page when printed.
This walkthrough illustrates how to set the KeepTogether and GroupKeepTogether options to allow all group
detail to print together on one page.
This walkthrough is split up into the following activities:
Adding an ActiveReport to a Visual Studio project
l
Connecting the report to a data source
l
Adding controls to the report to contain data
l
Viewing the report
l
To complete the walkthrough, you must have access to the NorthWind database (NWind.mdb).
When you have completed this walkthrough, you will have a report that looks similar to the following.
Page 72

ActiveReports for .NET User Guide | 72
Adding an ActiveReport to a Visual Studio project
To add an ActiveReport to your project
1. Open a new project in Visual Studio.
2. Click on Project > Add New Item .
3. Select ActiveReports file and rename the file rptKeepTG.
4. Click Open.
Connecting the report to a data source
To connect the report to a data source
1. Click on the yellow report DataSource icon in the Detail section. This brings up the report DataSource
dialog box.
2. Click on Build...
3. Select Microsoft Jet 4.0 OLE DB Provider and click Next >>
4. Click on the ellipsis to browse for the access path to NWind.mdb. Click Open once you have selected the
appropriate access path.
5. Click OK to continue.
6. In the Query field, type "SELECT DISTINCTROW Orders.*, [Order Details].*, Products.* FROM Products
INNER JOIN (Orders INNER JOIN [Order Details] ON Orders.OrderID = [Order Details].OrderID) ON
Products.ProductID = [Order Details].ProductID order by orderdate".
7. Click OK to return to the report design surface.
Adding controls to the report to contain data
To add controls to the report
Page 73

ActiveReports for .NET User Guide | 73
1. Add a GroupHeader/Footer section to rptKeepTG (see Grouping Data for help).
2. Make the following changes to the group header:
Change the name to ghOrders
¡
Change the DataField to OrderDate
¡
Change the GroupKeepTogether property to All
¡
Change the KeepTogether property to True
¡
3. Add the following controls to the GroupHeader section:
Control Name Text/Caption Location
Label lblOrderDate Order Date 0, 0
Label lblOrderID Order ID 1.125, 0
Label lblProductName Product Name 2.239, 0
Label lblQuantity Quantity 3.5, 0
Label lblUnitPrice Unit Price 4.75, 0
4. Add the following controls to the Detail section:
Control DataField Name Text/Caption Location Output Format
TextBox orders.OrderID txtOrderID Order ID 1.125, 0 (Empty string)
TextBox ProductName txtProductName Product Name 2.260, 0 (Empty string)
TextBox products.UnitPrice txtUnitPrice Unit Price 4.75, 0 Currency
TextBox OrderDate txtOrderDate Order Date 0, 0 (Empty string)
TextBox Quantity txtQuantity Quantity 3.5, 0 (Empty string)
Viewing the report
To view the report
1. Add the ActiveReports viewer control to a Windows Form.
2. Add the code needed to set the viewer document equal to the report document. See Using the
ActiveReports WinForm Viewer for help.
Page Numbering Walkthroughs
With ActiveReports, page numbering can be set up using either the report's PageHeader/Footer sections or
GroupHeader/Footer section. The following walkthroughs illustrate how to set up page numbering in the
GroupHeader section and in the PageFooter section.
Page Numbering in the Group Header
Describes how to set up page numbering using the report's group header.
Page Numbering in the Page Footer
Describes how set up page numbering using the report's page footer.
Walkthrough: Page Numbering in the Group Header
With ActiveReports, page numbering can be easily applied to groups in a report using the GroupHeader
section.
Page 74

ActiveReports for .NET User Guide | 74
This walkthrough illustrates the basics of setting up page numbering for groups in the GroupHeader section.
The walkthrough is split up into the following activities:
Adding an ActiveReport to a Visual Studio project
l
Connecting the data source to a database
l
Adding controls to the report to contain data
l
Viewing the report
l
To complete the walkthrough, you must have access to the NorthWind database (Nwind.mdb).
When you have finished this walkthrough, you will have a report that looks similar to the following.
Adding an ActiveReport to a Visual Studio project
To add an ActiveReport to your project
1. Click on Project > Add New Item....
2. Select ActiveReports File and rename it rptNumberGH.
3. Change the name of the report and click Open.
Page 75

ActiveReports for .NET User Guide | 75
4. The ActiveReports design surface is displayed.
Connecting the data source to a database
To connect the data source to a database
1. Click on the yellow report DataSource icon in the Detail section. This brings up the report DataSource
dialog box.
2. Click on Build...
3. Select "Microsoft Jet 4.0 OLE DB Provider" and click Next >>.
4. Click on the ellipsis to browse for the access path to Nwind.mdb. Click Open once you have selected the
appropriate access path.
5. Click OK to continue.
6. In the Query field, type "Select * from customers order by country".
7. Click OK to return to the report design surface.
Adding controls to contain data
To add controls to contain data
1. Add a GroupHeader/Footer section to rptNumberGH.
2. Make the following changes to the group header:
Change the name to ghCustomers
¡
Change the DataField property to Country
¡
Change the GroupKeepTogether property to FirstDetail
¡
Change the KeepTogether property to True
¡
3. Add the following controls to the GroupHeader section:
Control Name Text/Caption Misc Details Location
Label lblPage Page (Empty string) 0, 0
Label lblOf Of (Empty string) 0.75, 0
TextBox txtPageNumber # SummaryType = PageCount
0.5, 0
SummaryRunning = Group
SummaryGroup = ghCustomers
TextBox txtPageCount ##
SummaryType = PageCount
SummaryGroup = ghCustomers
1, 0
Label lblCustomerID CustomerID (Empty string) 0, 0.25
Label lblCompanyName CompanyName (Empty string) 1.1875, 0.25
Label lblAddress Address (Empty string) 3.3125, 0.25
Label lblCountry Country (Empty string) 5.125, 0.25
4. Add the following controls to the Detail section:
Control DataField Name Text/Caption Location
TextBox CustomerID txtCustomerID CustomerID 0, 0
TextBox CompanyName txtCompanyName CompanyName 1.1875, 0
TextBox Address txtAddress Address 3.3125, 0
Page 76

ActiveReports for .NET User Guide | 76
TextBox Country txtCountry Country 5.114, 0
Viewing the report
To view the report
1. Add the ActiveReports viewer control to a Windows Form.
2. Add the code needed to set the viewer document equal to the report document. See Using the
ActiveReports WinForm Viewer for help.
Walkthrough: Page Numbering in the Page Footer
With ActiveReports, page numbering can be easily applied to a report using the PageFooter section.
This walkthrough illustrates the basics of setting up page numbering in the PageFooter section.
The walkthrough is split up into the following activities:
Adding an ActiveReport to a Visual Studio project
l
Connecting the data source to a database
l
Adding controls to the report to contain data
l
Viewing the report
l
To complete the walkthrough, you must have access to the NorthWind database (Nwind.mdb).
When you have finished this walkthrough, you will have a report that looks similar to the following.
Page 77

ActiveReports for .NET User Guide | 77
Adding an ActiveReport to a Visual Studio project
To add an ActiveReport to your project
1. Click on Project > Add New Item....
2. Select ActiveReports File and rename it rptNumberPF.
3. Change the name of the report and click Open.
4. The ActiveReports design surface is displayed.
Connecting the data source to a database
To connect the data source to a database
1. Click on the yellow report DataSource icon in the Detail section. This brings up the report DataSource
dialog box.
2. Click on Build...
3. Select "Microsoft Jet 4.0 OLE DB Provider" and click Next >>.
Page 78

ProductName
ActiveReports for .NET User Guide | 78
4. Click on the ellipsis to browse for the access path to Nwind.mdb. Click Open once you have selected the
appropriate access path.
5. Click OK to continue.
6. In the Query field, type "Select * from products order by categoryID".
7. Click OK to return to the report design surface.
Adding controls to contain data
To add controls to contain data
1. Add a GroupHeader/Footer section to rptNumberPF.
2. Make the following changes to the group header:
Change the name to ghProducts
¡
Change the DataField property to categoryID
¡
Change the GroupKeepTogether property to All
¡
Change the KeepTogether property to True
¡
3. Add the following controls to the GroupHeader section:
Control Name Text/Caption Location
Label lblProductID Product ID 0, 0
Label lblProductName Product Name 1.1875, 0
Label lblUnitsInStock Units In Stock 3, 0
Label lblUnitPrice Unit Price 4.375, 0
4. Add the following controls to the Detail section:
Control DataField Name Text/Caption Misc Details Location
TextBox ProductID txtProductID Product ID (Empty string) 0, 0
TextBox
txtProductName Product Name (Empty string) 1.1875, 0
TextBox UnitsInStock txtUnitsInStock Units In Stock (Empty string) 3, 0
TextBox UnitPrice txtUnitPrice Unit Price
OutputFormat =
Currency
4.375, 0
5. Add the following controls to the PageFooter section:
Control Name Text/Caption Misc Details Location
Label lblPage Page (Empty string) 0, 0
Label lblOf Of (Empty string) 0.625, 0
TextBox txtPageNumber #
SummaryType = PageCount
SummaryRunning = All
0.447, 0
TextBox txtPageCount ## SummaryType = PageCount 0.875, 0
Viewing the report
To view the report
1. Add the ActiveReports viewer control to a Windows Form.
2. Add the code needed to set the viewer document equal to the report document. See Using the
ActiveReports WinForm Viewer for help.
Page 79

after it, will be printed. A section with a summary field will be delayed until all the calculations are completed.
ActiveReports for .NET User Guide | 79
Walkthrough: Summary Fields
In ActiveReports, summary fields can be added to any section to calculate totals, counts, averages and other
aggregations. The summary field's placement dictates when the section containing the field, and sections
This allows summary fields to be placed ahead of the corresponding detail.
Summary fields are calculated according to the textbox's Summary properties. A summary textbox is
updated with each new detail record. When a field is placed ahead of the Detail section (i.e. in the
ReportHeader, PageHeader or GroupHeader sections), the Detail section is formatted with each record and
the summary field is updated. When all records for the summary level are read, the header section is printed
followed by the delayed sections.
This walkthrough illustrates how to create a report with a summary field in the GroupFooter section.
This walkthrough is split up into the following activities:
Adding an ActiveReport to a Visual Studio project
l
Connecting the report to a data source
l
Adding controls to the report to contain data
l
Viewing the report
l
To complete the walkthrough, you must have access to the NorthWind database (Nwind.mdb).
When you have completed this walkthrough, you will have a report that looks similar to the following.
Adding an ActiveReport to a Visual Studio project
Page 80

ActiveReports for .NET User Guide | 80
To add an ActiveReport to your project
1. Open a new project in Visual Studio.
2. Click on Project > Add New Item .
3. Select ActiveReports file and rename the file rptSumFields.
4. Click Open.
Connecting the report to a data source
To connect the report to a data source
1. Click on the yellow report DataSource icon in the Detail section. This brings up the report DataSource
dialog box.
2. Click on Build...
3. Select Microsoft Jet 4.0 OLE DB Provider and click Next >>
4. Click on the ellipsis to browse for the access path to NWind.mdb. Click Open once you have selected the
appropriate access path.
5. Click OK to continue.
6. In the Query field, type "SELECT DISTINCTROW Orders.*, [Order Details].*, Products.* FROM Products
INNER JOIN (Orders INNER JOIN [Order Details] ON Orders.OrderID = [Order Details].OrderID) ON
Products.ProductID = [Order Details].ProductID order by orderdate".
7. Click OK to return to the report design surface.
Adding controls to the report to contain data
To add controls to the report
1. Add a GroupHeader/Footer section to rptSumFields.
2. Make the following changes to the group header:
Change the name to ghOrders
¡
Change the DataField to OrderDate
¡
3. Add the following controls to the GroupHeader section:
Control Name Text/Caption Location
Label lblProductID Product ID 1.208, 0
Label lblProductName Product Name 2.489, 0
Label lblUnitPrice Unit Price 4.56, 0
Label lblOrderDate Order Date 0, 0
4. Add the following controls to the Detail section:
Control DataField Name Text/Caption Location Output Format
TextBox products.ProductID txtProductID Product ID 1.218, 0 (Empty string)
TextBox ProductName txtProductName Product Name 2.5, 0 (Empty string)
TextBox OrderDate txtOrderDate Order Date 0, 0 (Empty string)
TextBox products.UnitPrice txtUnitPrice Unit Price 4.562, 0 Currency
5. Add the following controls to the GroupFooter section:
Control DataField Name Text/Caption Location Misc Details
Label (Empty string) lblSalesTotal Daily Sales
Total
TextBoxproducts.UnitPrice txtSalesTotal Sales Total 4.562, 0 OutputFormat = Currency
3, 0 (Empty string)
Page 81

ActiveReports for .NET User Guide | 81
SummaryType = SubTotal
SummaryRunning = Group
SummaryGroup = ghOrders
Label (Empty string) lblWhiteLine (Empty string) 0, 0.25 Background color = white
Note Distinct summarization can be used in a situation when the field's value repeats in several
detail records and the summary function needs to include a single value from all repeating values.
To do this, you would need to set the DistinctField property of the summary field to the
appropriate value and set the SummaryFunc property to the appropriate distinct summary
function.
Viewing the report
To view the report
1. Add the ActiveReports viewer control to a Windows Form.
2. Add the code needed to set the viewer document equal to the report document. See Using the
ActiveReports WinForm Viewer for help.
Walkthrough: Calculated Fields
ActiveReports allows you to use a textbox's DataField property to perform calculations based on the value of
specific data fields.
This walkthrough illustrates how to create a simple report using calculated fields.
The walkthrough is split up into the following activities:
Adding an ActiveReport to a Visual Studio project
l
Connecting the report to a data source
l
Adding controls to the report to contain data
l
Viewing the report
l
To complete the walkthrough, you must have access to the NorthWind database (Nwind.mdb).
When you have finished this walkthrough, you will have a report that looks similar to the following.
Page 82
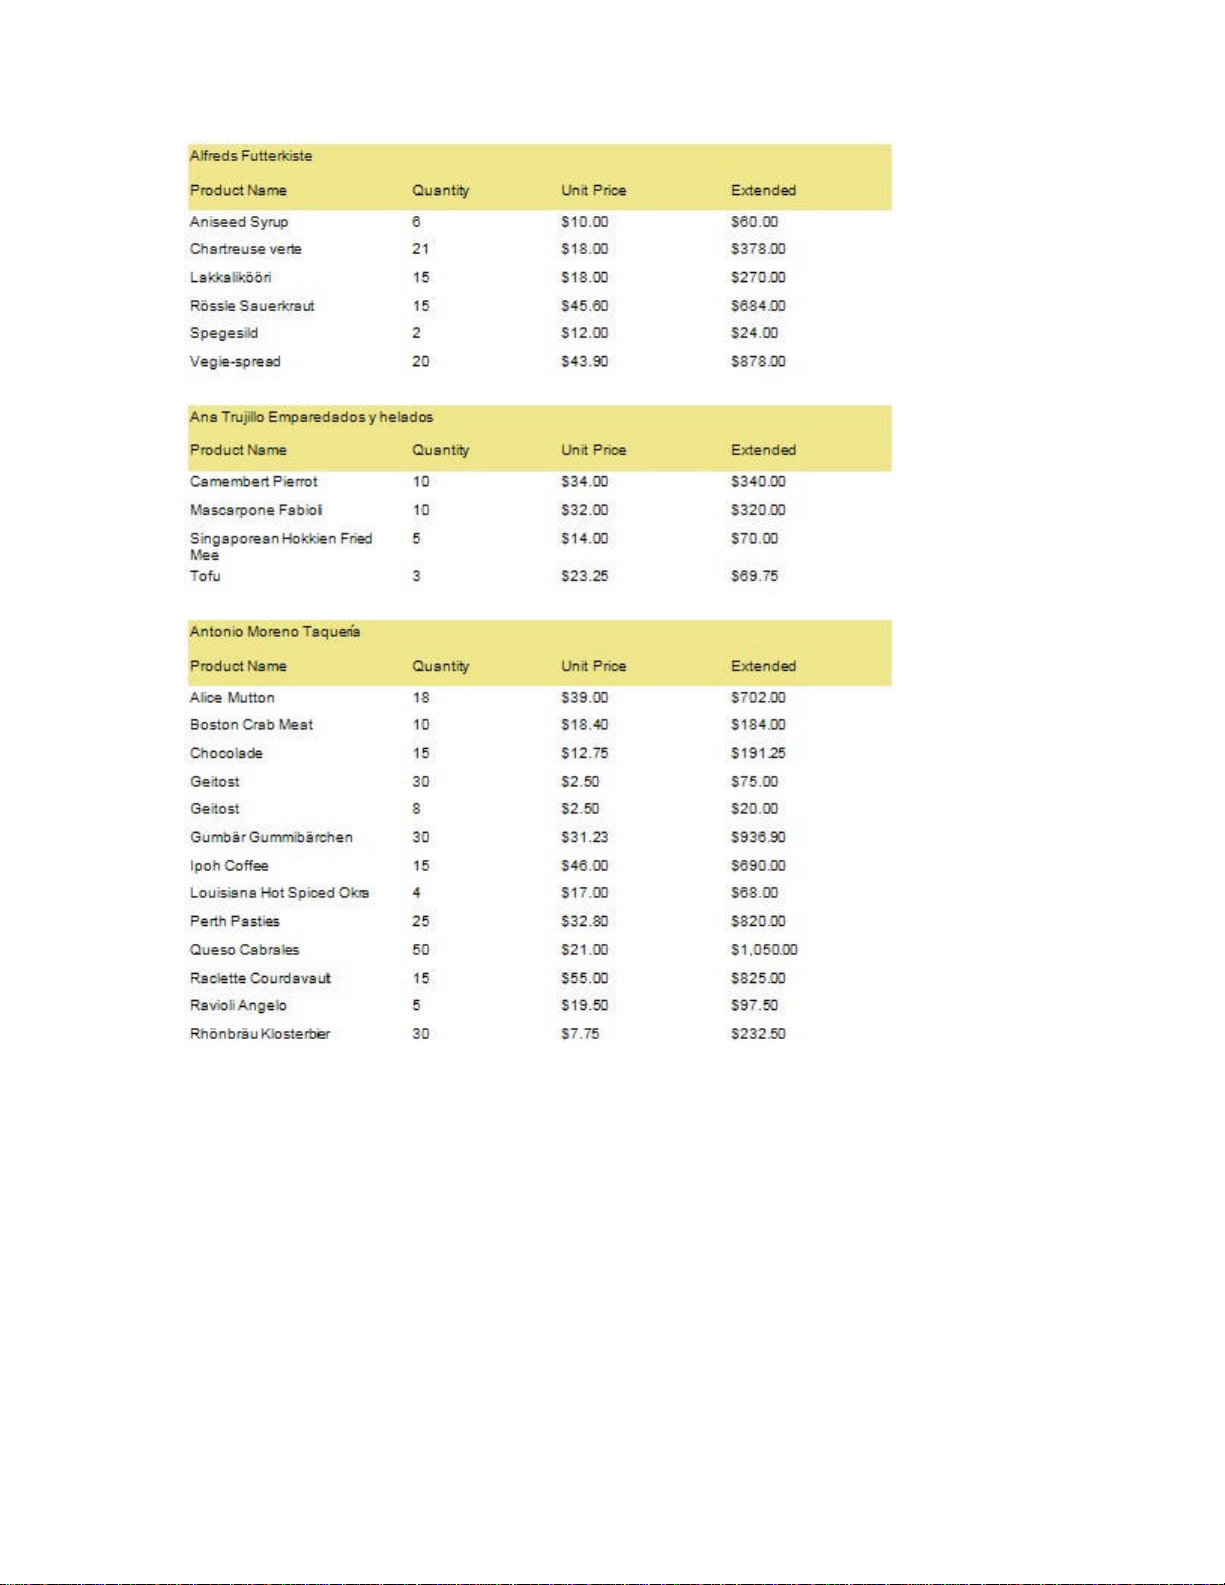
ActiveReports for .NET User Guide | 82
Adding an ActiveReport to a Visual Studio project
To add an ActiveReport to your project
1. Open a new project in Visual Studio.
2. Click on Project > Add New Item .
3. Select ActiveReports file and rename the file rptCalFields.
4. Click Open.
Connecting the data source to a database
To connect the data source to a database
1. Click on the yellow report DataSource icon in the Detail section. This brings up the report DataSource
dialog box.
2. Click on Build...
3. Select "Microsoft Jet 4.0 OLE DB Provider" and click Next >>.
4. Click on the ellipsis to browse for the access path to Nwind.mdb. Click Open once you have selected the
Page 83

ActiveReports for .NET User Guide | 83
appropriate access path.
5. Click OK to continue.
6. In the Query field, type "Select Customers.CompanyName, Products.ProductName, [Order
Details].UnitPrice, [Order Details].Quantity FROM Products INNER JOIN ((Customers INNER JOIN Orders
ON Customers.CustomerID = Orders.CustomerID) INNER JOIN [Order Details] ON Orders.OrderID =
[Order Details].OrderID) ON Products.ProductID = [Order Details].ProductID WHERE (((DatePart("yyyy",
[OrderDate])) = 1995)) ORDER BY Customers.CompanyName, Products.ProductName".
7. Click OK to return to the report design surface.
Adding controls to contain data
To add controls to the report
1. Add a GroupHeader/Footer section to rptCalFields.
2. Make the following changes to the group header:
Change the name to ghProducts
¡
Change the DataField to CompanyName
¡
3. Add the following controls to the GroupHeader section:
Control DataField Name Text/Caption Location
TextBox CompanyName txtCompanyName Company Name 0, 0
Label (Empty string) lblProductName Product Name 0, 0.3125
Label (Empty string) lblUnitPrice Unit Price 3.437, 0.3125
Label (Empty string) lblQuantity Quantity 2.0625, 0.3125
Label (Empty string) lblExtended Extended 5, 0.3125
4. Add the following controls to the Detail section:
Control DataField Name Text/Caption Location OutputFormat
TextBox ProductName txtProductName Product Name 0, 0 (Empty string)
TextBox Quantity txtQuantity Quantity 2.0625, 0 (Empty string)
TextBox UnitPrice txtUnitPrice Unit Price 3.437, 0 Currency
TextBox = Quantity * UnitPrice txtExtended Extended 5, 0 Currency
Viewing the report
To view the report
1. Add the ActiveReports viewer control to a Windows Form.
2. Add the code needed to set the viewer document equal to the report document. See Using the
ActiveReports WinForm Viewer for help.
Bookmarks Walkthroughs
Setting up Bookmarks (formerly called Table of Contents) allows reports to be organized and easily
navigated. By default, no Bookmarks are created when a report is run. However, by adding simple code to
the desired section event, Bookmark entries can be set up as the report runs.
Bookmarks with Grouping
Describes how Bookmarks can be used with grouping.
Bookmarks with Simple Reports
Describes how Bookmarks can be used with simple reports.
Bookmarks with Subreports
Page 84
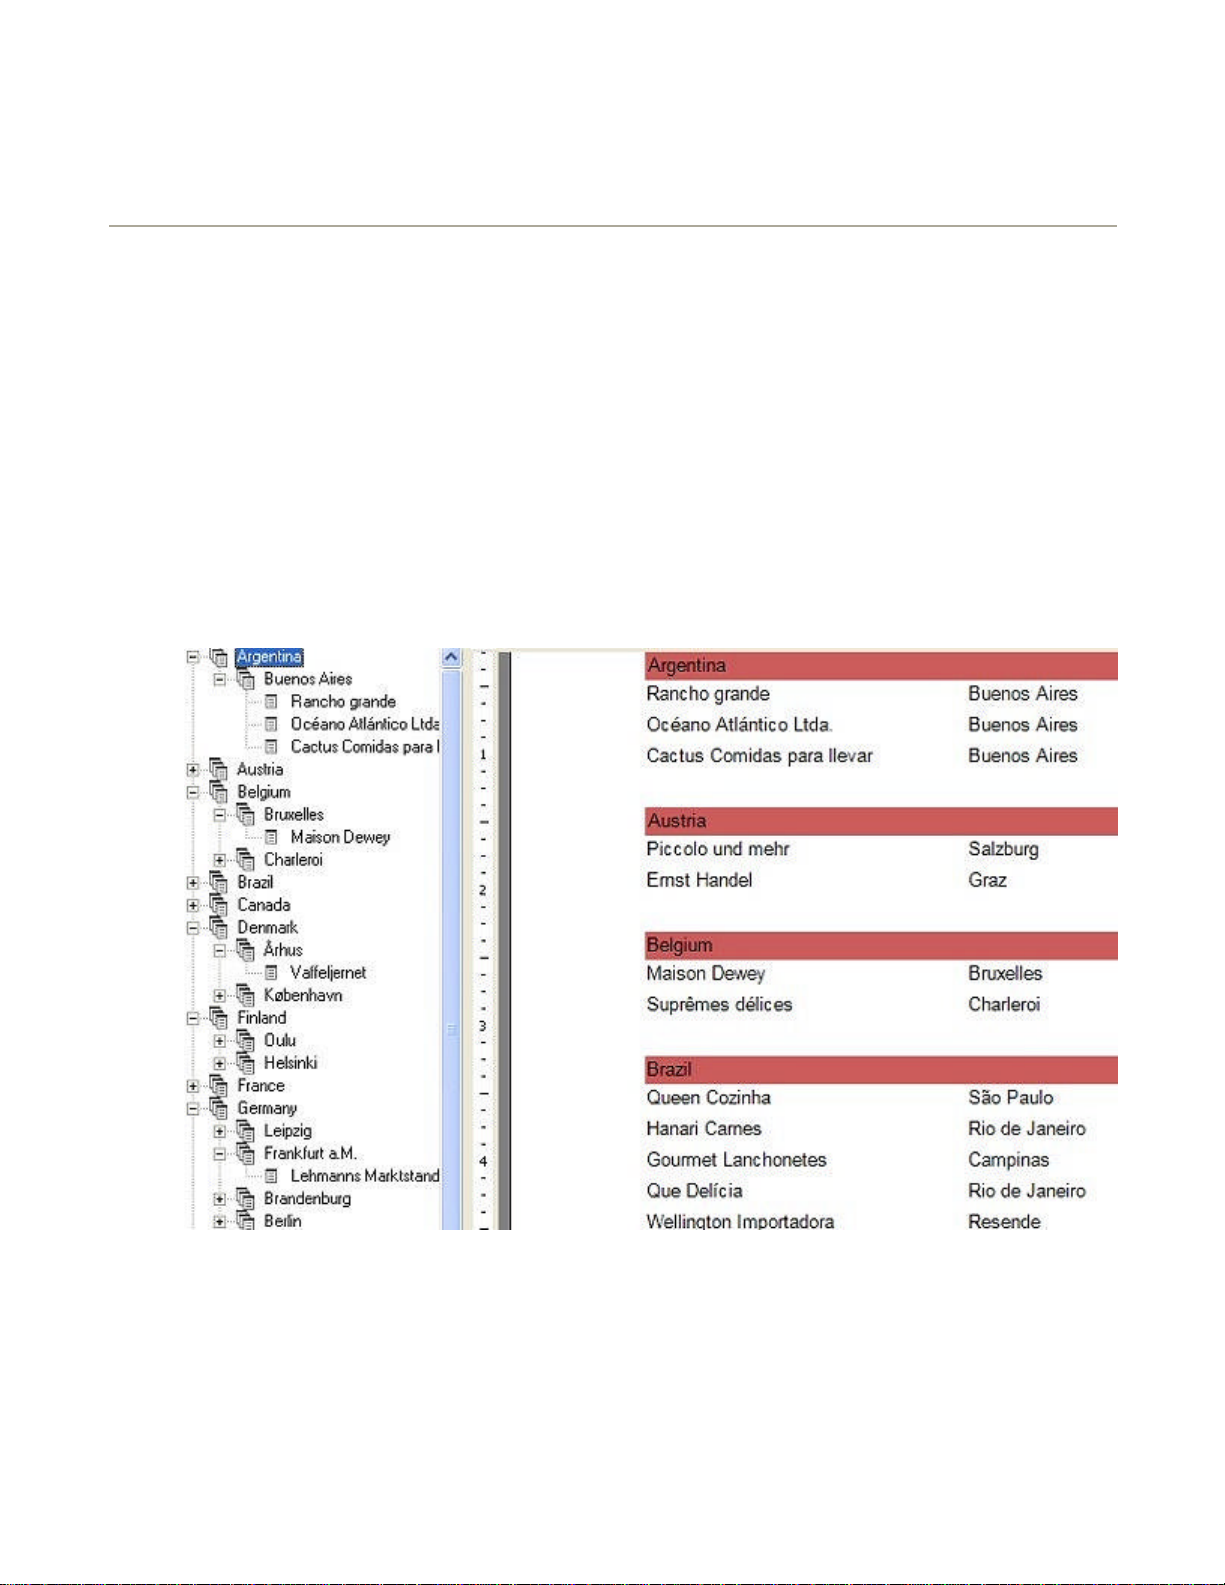
ActiveReports for .NET User Guide | 84
Describes how Bookmarks can be used with subreports.
Walkthrough: Bookmarks with Grouping
ActiveReports allows Bookmarks to be easily set up and used with grouping by adding code to the
Detail_Format event of the report and in the group header Format event.
This walkthrough illustrates how to set up and use Bookmarks with grouping in a report.
This walkthrough is split up into the following activities:
Adding an ActiveReport to a Visual Studio project
l
Connecting the report to a data source
l
Adding controls to the report to contain data
l
Adding code to the Detail_Format event
l
Adding code to the group header Format event
l
Viewing the report
l
Viewing the Bookmarks collection with the report
l
Adding special bookmarks at run time
l
To complete the walkthrough, you must have access to the NorthWind database (Nwind.mdb).
When you have completed this walkthrough, you will have a report that looks similar to the following.
Adding an ActiveReport to a Visual Studio project
To add an ActiveReport to your project
1. Open a new project in Visual Studio.
2. Click on Project > Add New Item .
3. Select ActiveReports file and rename the file rptGroupBM.
4. Click Open.
Page 85

Private Sub Detail_Format(ByVal sender As Object, ByVal e As System.EventArgs) Handles Detail.Format
Me.Detail.AddBookmark(txtCountry.Text + "\" + txtCity.Text + "\" + txtCompanyName.Text)
Detail.AddBookmark(txtCountry.Text + "\\" + txtCity.Text + "\\" + txtCompanyName.Text);
ActiveReports for .NET User Guide | 85
Connecting the report to a data source
To connect the report to a data source
1. Click on the yellow report DataSource icon in the Detail section. This brings up the report DataSource
dialog box.
2. Click on Build...
3. Select Microsoft Jet 4.0 OLE DB Provider and click Next >>
4. Click on the ellipsis to browse for the access path to NWind.mdb. Click Open once you have selected the
appropriate access path.
5. Click OK to continue.
6. In the Query field, type "Select * from customers order by country".
7. Click OK to return to the report design surface.
Adding controls to the report to contain data
To add controls to the report
1. Add a GroupHeader/Footer section to rptGroupBM
2. Make the following changes to the group header:
Change the name to ghCustomers
¡
¡ Change the DataField property to Country
3. Add the following control to the GroupHeader section of rptGroupBM:
Control DataField Name Text/Caption Location
TextBox Country txtCountry Country 0, 0
4. Add the following controls to the Detail section of rptGroupBM:
Control DataField Name Text/Caption Location
TextBoxCompanyName txtCompanyNameCompany Name 0, 0
TextBoxCity txtCity City 2.375, 0
Adding code to the Detail_Format event
To write the code in Visual Basic
Right-click in any section of the design window of rptGroupBM, and click on View Code to display the
l
code view for the report. At the top left of the code view for rptGroupBM, click the drop-down arrow and
select Detail. At the top right of the code window, click the drop-down arrow and select Format. This
creates an event-handling method for rptGroupBM's Detail_Format event.
To write the code in C#
Click in the Detail section of rptGroupBM to select the section. Click on the events icon in the Properties
l
window to display available events for the section. Double-click Format. This creates an event-handling
method for rptGroupBM's Detail_Format event.
The following example shows what the code for the method looks like:
[Visual Basic]
End Sub
[C#]
private void Detail_Format(object sender, System.EventArgs eArgs)
{
}
Page 86
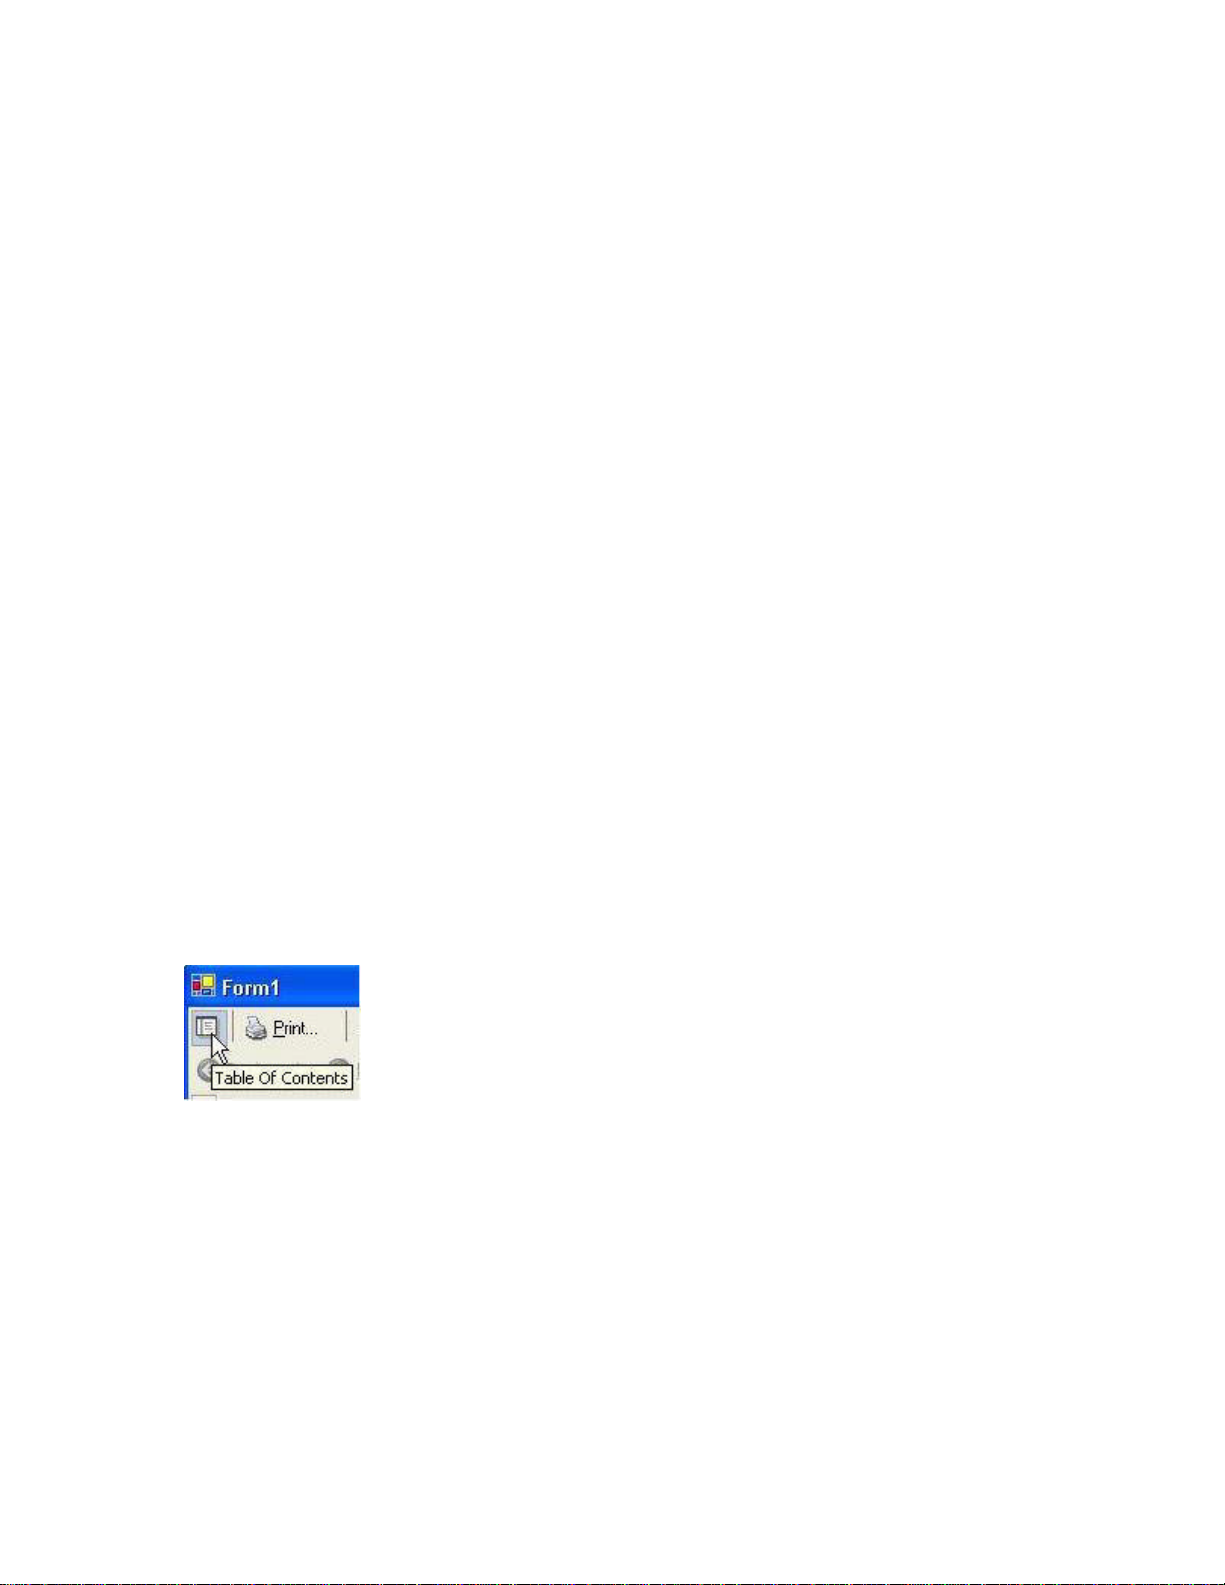
Private Sub ghCustomers_Format(ByVal sender As Object, ByVal e As System.EventArgs) Handles _
Private Sub Detail_Format(ByVal sender As Object, ByVal e As System.EventArgs) Handles Detail.Format
ActiveReports for .NET User Guide | 86
Adding code to the ghCustomers_Format event
To write the code in Visual Basic
Right-click in the GroupHeader section of the design window of rptGroupBM, and click on View Code to
l
display the code view for the report. At the top left of the code view for rptGroupBM, click the drop-down
arrow and select ghCustomers. At the top right of the code window, click the drop-down arrow and select
Format. This creates an event-handling method for rptGroupBM's ghCustomers_Format event.
To write the code in C#
Click in the GroupHeader section of rptGroupBM to select the section. Click on the events icon in the
l
Properties window to display available events for the section. Double-click Format. This creates an
event-handling method for rptGroupBM's ghCustomers_Format event.
The following example shows what the code for the method looks like:
[Visual Basic]
ghCustomers.Format
Me.ghCustomers.AddBookmark(txtCountry.Text)
End Sub
[C#]
private void ghCustomers_Format(object sender, System.EventArgs eArgs)
{
this.ghCustomers.AddBookmark(txtCountry.Text);
}
Viewing the report
To view the report
1. Add the ActiveReports viewer control to a Windows Form.
2. Add the code needed to set the viewer document equal to the report document. See Using the
ActiveReports WinForm Viewer for help.
Viewing the Bookmarks Collection
To view the Bookmarks collection
1. Press F5 to run the report.
2. Click on the "Table of Contents" icon to view the Bookmarks collection.
Adding Special Bookmarks at Run Time
To create and add special bookmarks to the bookmarks collection at run time, you will need to add the
bookmarks to the report document's pages collection since the bookmarks are generated from the pages
collection.
[Visual Basic]
Dim i As Integer
Try
For i = 0 To Me.Document.Pages.Count - 1
Me.Document.Pages(1).AddBookmark("New Bookmark", 8)
Next
Catch ex As Exception
End Try
End Sub
Page 87

ActiveReports for .NET User Guide | 87
[C#]
private void Detail_Format(object sender, System.EventArgs eArgs)
{
for(int i = 0; i<Document.Pages.Count;i++)
{
this.Document.Pages[i].AddBookmark("New Bookmark", 25);
}
}
Walkthrough: Bookmarks with Simple Reports
ActiveReports allows Bookmarks to be easily set up and used in simple reports by adding code to the
Detail_Format event of the report.
This walkthrough illustrates how to set up and use Bookmarks in a simple report.
This walkthrough is split up into the following activities:
Adding an ActiveReport to a Visual Studio project
l
Connecting the report to a data source
l
Adding controls to the report to contain data
l
Adding code to the Detail_Format event to setup Bookmarks
l
Viewing the report
l
Viewing the Bookmarks collection with the report
l
Adding special bookmarks at run time
l
To complete the walkthrough, you must have access to the NorthWind database (Nwind.mdb).
When you have completed this walkthrough, you will have a report that looks similar to the following.
Adding an ActiveReport to a Visual Studio project
To add an ActiveReport to your project
1. Open a new project in Visual Studio.
2. Click on Project > Add New Item .
3. Select ActiveReports file and rename the file rptBmarks.
4. Click Open.
Connecting the report to a data source
To connect the report to a data source
Page 88

to display the code
Private Sub Detail_Format(ByVal sender As Object, ByVal e As System.EventArgs) Handles Detail.Format
Private Sub Detail_Format(ByVal sender As Object, ByVal e As System.EventArgs) Handles Detail.Format
ActiveReports for .NET User Guide | 88
1. Click on the yellow report DataSource icon in the Detail section. This brings up the report DataSource
dialog box.
2. Click on Build...
3. Select Microsoft Jet 4.0 OLE DB Provider and click Next >>
4. Click on the ellipsis to browse for the access path to NWind.mdb. Click Open once you have selected the
appropriate access path.
5. Click OK to continue.
6. In the Query field, type "Select * from categories inner join products on categories.categoryid =
products.categoryid order by categoryname, productname".
7. Click OK to return to the report design surface.
Adding controls to the report to contain data
To add controls to the report
Add the following controls to the Detail section of rptBmarks:
l
Control DataField Name Text/Caption Location
TextBoxProductName txtProductName Product Name 1.125, 0
TextBoxCategoryNametxtCategoryName Category Name 0, 0
TextBoxUnitsInStock txtUnitsInStock Units In Stock 2.25, 0
TextBoxUnitsOnOrder txtUnitsOnOrder Units On Order 3.375, 0
TextBoxUnitPrice txtUnitPrice Unit Price 4.5, 0
Adding code to the Detail_Format event
To write the code in Visual Basic
Right-click in any section of the design window of rptBmarks, and click on View Code
l
view for the report. At the top left of the code view for rptBmarks, click the drop-down arrow and select
Detail. At the top right of the code window, click the drop-down arrow and select Format. This creates an
event-handling method for rptBmarks' Detail_Format event. Add code to the handler to:
Set up Bookmarks
l
To write the code in C#
Click in the Detail section of rptBmarks to select the section. Click on the events icon in the Properties
l
window to display available events for the section. Double-click Format. This creates an event-handling
method for rptBmarks' Detail_Format event. Add code to the handler to:
Set up Bookmarks
l
The following example shows what the code for the method looks like:
[Visual Basic]
Me.Detail.AddBookmark(txtCategoryName.text)
End Sub
[C#]
private void Detail_Format(object sender, System.EventArgs eArgs)
{
Detail.AddBookmark(txtCategoryName.Text);
}
The following example shows what the code for the method looks like to set up leveled Bookmarks:
[Visual Basic]
Me.Detail.AddBookmark(txtCategoryName.Text + "\" + txtProductName.Text)
Page 89

Private Sub Detail_Format(ByVal sender As Object, ByVal e As System.EventArgs) Handles Detail.Format
ActiveReports for .NET User Guide | 89
End Sub
[C#]
private void Detail_Format(object sender, System.EventArgs eArgs)
{
Detail.AddBookmark(txtCategoryName.Text + "\\" + txtProductName.Text);
}
Viewing the report
To view the report
1. Add the ActiveReports viewer control to a Windows Form.
2. Add the code needed to set the viewer document equal to the report document. See Using the
ActiveReports WinForm Viewer for help.
Viewing the Bookmarks Collection
To view the Bookmarks collection
1. Press F5 to run the report.
2. Click on the "Table of Contents" icon to view the Bookmarks collection.
Adding Special Bookmarks at Run Time
To create and add special bookmarks to the bookmarks collection at run time, you will need to add the
bookmarks to the report document's pages collection since the bookmarks are generated from the pages
collection.
[Visual Basic]
Dim i As Integer
Try
For i = 0 To Me.Document.Pages.Count - 1
Me.Document.Pages(1).AddBookmark("New Bookmark", 8)
Next
Catch ex As Exception
End Try
End Sub
[C#]
private void Detail_Format(object sender, System.EventArgs eArgs)
{
for(int i = 0; i<Document.Pages.Count;i++)
{
this.Document.Pages[i].AddBookmark("New Bookmark", 25);
}
}
Walkthrough: Bookmarks with Subreports
ActiveReports allows Bookmarks to be easily set up and used in subreports by adding code to the
Detail_Format event of the parent and child reports.
This walkthrough illustrates how to set up and use Bookmarks in a subreport.
This walkthrough is split up into the following activities:
Page 90

ActiveReports for .NET User Guide | 90
Adding two ActiveReports to a Visual Studio project
l
Connecting the parent report to a data source
l
Adding controls to the report to contain data
l
Adding the code needed to save the current record's CategoryID to use in the subreport's SQL query
l
Adding the code to create a new data source, setting its connection string, setting its SQL query and
l
setting the new data source equal to the subreport's data source.
Adding code to the Detail_Format event for both reports to setup Bookmarks
l
Viewing the report
l
Viewing the Bookmarks collection with the report
l
Adding special bookmarks at run time
l
To complete the walkthrough, you must have access to the NorthWind database (Nwind.mdb).
When you have completed this walkthrough, you will have a report that looks similar to the following.
Adding two ActiveReports to a Visual Studio project
To add two ActiveReports to a Visual Studio project
1. Open a new project in Visual Studio.
2. Click on Project > Add New Item .
3. Select ActiveReports file and rename the file rptMainBM.
4. Click Open.
5. Click on Project > Add New Item .
6. Select ActiveReports file and rename the file rptSubBM.
7. Click Open.
Connecting the parent report to a data source
To connect the parent report to a data source
1. Click on the yellow report DataSource icon in the Detail section. This brings up the report DataSource
dialog box.
Page 91

to display the code
Private Sub rptMainBM_FetchData(ByVal sender As Object, ByVal eArgs As DataDynamics.ActiveReports.ActiveReport. _
private void rptMainBM_FetchData(object sender, DataDynamics.ActiveReports.ActiveReport.FetchEventArgs eArgs)
(Empty string)
(Empty string)
CategoryName
(Empty string)
ActiveReports for .NET User Guide | 91
2. Click on Build...
3. Select Microsoft Jet 4.0 OLE DB Provider and click Next >>
4. Click on the ellipsis to browse for the access path to NWind.mdb. Click Open once you have selected the
appropriate access path.
5. Click OK to continue.
6. In the Query field, type "Select * from categories".
7. Click OK to return to the report design surface.
Adding controls to the report to contain data
To add controls to the reports
1. Add the following controls to the Detail section of rptMainBM:
Control DataField Name Text/Caption Location
Label
Label
TextBox
Subreport
2. Add the following controls to the Detail section of rptSubBM:
Control DataField Name Text/Caption Location
TextBox ProductName txtProductName ProductName 1.187, 0.06
Label (Empty string) lblProductName Product Name: 0.06, 0.06
lblProducts Products 1.0625, 0.25
lblCategoryName Category Name: 0, 0
txtCategoryName CategoryName 1.06, 0
ctlSubreport (Empty string) 1.0625, 0.5
Adding the code needed to save the current record's categoryID
To write the code in Visual Basic
Right-click in any section of the design window of rptMainBM, and click on View Code
l
view for the report. At the top left of the code view for rptMainBM, click the drop-down arrow and select
(Base Class Events). At the top right of the code window, click the drop-down arrow and select
FetchData. This creates an event-handling method for rptMainBM's FetchData event. Add code to the
handler to:
Save the current record's categoryID to use in the subreport's SQL query
l
To write the code in C#
Click in the gray area below rptMainBM to select the report. Click on the events icon in the Properties
l
window to display available events for the report. Double-click FetchData. This creates an event-handling
method for rptMainBM's FetchData event. Add code to the handler to:
Save the current record's categoryID to use in the subreport's SQL query
l
The following example shows what the code for the method looks like:
[Visual Basic]
Dim m_categoryID As String
FetchEventArgs) Handles MyBase.FetchData
m_categoryID = Me.Fields("CategoryID").Value
End Sub
[C#]
string m_categoryID;
{
m_categoryID = Fields["CategoryID"].Value.ToString();
}
Page 92

to display the code
. This
Private Sub Detail_Format(ByVal sender As Object, ByVal e As System.EventArgs) Handles Detail.Format
DataDynamics.ActiveReports.DataSources.OleDBDataSource subDS = new DataDynamics.
to display the code
ActiveReports for .NET User Guide | 92
Adding the code to create a new data source
To write the code in Visual Basic
Right-click in any section of the design surface of rptMainBM, and click on View Code
l
view for the report. At the top left of the code view for rptMainBM, click the drop-down arrow and select
rptMainBM. At the top right of the code window, click the drop-down arrow and select Detail_Format
creates an event-handling method for the report's Detail_Format event. Add code to the handler to:
Create a new DataDynamics OleDBDataSource
l
Set the new data source's connection string
l
Set the new data source's SQL query
l
Set the subreport's data source equal to the new data source
l
To write the code in C#
Click in the Detail section of rptMainBM to select the section. Click on the events icon in the Properties
l
window to display available events for the Detail section. Double-click Format. This creates an eventhandling method for rptMainBM's Detail_Format event. Add code to the handler to:
Create a new DataDynamics OleDBDataSource
l
Set the new data source's connection string
l
Set the new data source's SQL query
l
Set the subreport's data source equal to the new data source
l
The following example shows what the code for the method looks like:
[Visual Basic]
Dim rpt As New rptSubBM()
Dim subDS As New DataDynamics.ActiveReports.DataSources.OleDBDataSource()
subDS.ConnectionString = Me.ds.ConnectionString
subDS.SQL = "Select * from products where categoryID = " + m_categoryID
rpt.DataSource = subDS
Me.ctlSubreport.Report = rpt
End Sub
[C#]
private void Detail_Format(object sender, System.EventArgs eArgs)
{
rptSub rpt = new rptSubBM();
ActiveReports.DataSources.OleDBDataSource();
subDS.ConnectionString = this.ds.ConnectionString;
subDS.SQL = "Select * from products where categoryID = " + m_categoryID;
rpt.DataSource = subDS;
ctlSubReport.Report = rpt;
}
Adding code to the Detail_Format event for both reports
To write the code in Visual Basic
Right-click in any section of the design window of rptMainBM, and click on View Code
l
view for the report. At the top left of the code view for rptMainBM, click the drop-down arrow and select
Detail. At the top right of the code window, click the drop-down arrow and select Format. This creates an
event-handling method for rptMainBM's Detail_Format event.
Right-click in any section of the design window of rptSubBM, and click on View Code to display the code
l
view for the report. At the top left of the code view for rptSubBM, click the drop-down arrow and select
Detail. At the top right of the code window, click the drop-down arrow and select Format. This creates an
event-handling method for rptSubBM's Detail_Format event.
To write the code in C#
Click in the Detail section of rptMainBM to select the section. Click on the events icon in the Properties
l
window to display available events for the section. Double-click Format. This creates an event-handling
Page 93

Private Sub Detail_Format(ByVal sender As Object, ByVal e As System.EventArgs) Handles Detail.Format
Private Sub Detail_Format(ByVal sender As Object, ByVal e As System.EventArgs) Handles Detail.Format
Me.Detail.AddBookmark(CType(Me.ParentReport.Sections("Detail").Controls("txtCategoryName"), _
this.Detail.AddBookmark(((TextBox)(this.ParentReport.Sections["Detail"].Controls["txtCategoryName"])).
Private Sub Detail_Format(ByVal sender As Object, ByVal e As System.EventArgs) Handles Detail.Format
ActiveReports for .NET User Guide | 93
method for rptMainBM's Detail_Format event.
Click in the Detail section of rptSubBM to select the section. Click on the events icon in the Properties
l
window to display available events for the section. Double-click Format. This creates an event-handling
method for rptSubBM's Detail_Format event.
The following example shows what the code for the method looks like for rptMainBM:
[Visual Basic]
Me.Detail.AddBookmark(txtCategoryName.text)
End Sub
[C#]
private void Detail_Format(object sender, System.EventArgs eArgs)
{
Detail.AddBookmark(txtCategoryName.Text);
}
The following example shows what the code for the method looks like for rptSubBM:
[Visual Basic]
TextBox).Text + "\" + Me.txtProductName.Text)
End Sub
[C#]
private void Detail_Format(object sender, System.EventArgs eArgs)
{
Text + "\\" + this.txtProductName.Text);
}
Viewing the report
To view the report
1. Add the ActiveReports viewer control to a Windows Form.
2. Add the code needed to set the viewer document equal to the report document. See Using the
ActiveReports WinForm Viewer for help.
Viewing the Bookmarks Collection
To view the Bookmarks collection
1. Press F5 to run the report.
2. Click on the "Table of Contents" icon to view the Bookmarks collection.
Adding Special Bookmarks at Run Time
To create and add special bookmarks to the bookmarks collection at run time, you will need to add the
bookmarks to the report document's pages collection since the bookmarks are generated from the pages
collection.
[Visual Basic]
Dim i As Integer
Page 94

ActiveReports supports field merged reports using the RichText control. The RichText control can contain field
ActiveReports for .NET User Guide | 94
Try
For i = 0 To Me.Document.Pages.Count - 1
Me.Document.Pages(1).AddBookmark("New Bookmark", 8)
Next
Catch ex As Exception
End Try
End Sub
[C#]
private void Detail_Format(object sender, System.EventArgs eArgs)
{
for(int i = 0; i<Document.Pages.Count;i++)
{
this.Document.Pages[i].AddBookmark("New Bookmark", 25);
}
}
Walkthrough: Rich Text and Field Merging
placeholders that are replaceable with their values (merged) at run time.
This walkthrough illustrates how to create a mail-merge report using the RichText control.
This walkthrough is split up into the following activities:
Adding an ActiveReport to the Visual Studio project
l
Connecting the report to a data source
l
Adding controls to the report to contain data
l
Adding fields to the RichText control
l
Using the FetchData event to get information from the data source
l
Adding code to update field values in the RichText control for each record
l
Adding code to the group header BeforePrint event
l
Viewing the report
l
To complete the walkthrough, you must have access to the NorthWind database (NWind.mdb).
When you complete this walkthrough, you will have a report that looks similar to the following:
Page 95

ActiveReports for .NET User Guide | 95
Adding an ActiveReport to the Visual Studio project
To add an ActiveReport to your project
1. Open a new project in Visual Studio.
2. Click on Project > Add New Item .
3. Select ActiveReports file and rename the file rptLetter.
4. Click Open.
Connecting the report to a data source
To connect the report to a data source
1. Click on the yellow report DataSource icon in the Detail section. This brings up the report DataSource
dialog box.
2. Click on Build...
3. Select Microsoft Jet 4.0 OLE DB Provider and click Next >>
4. Click on the ellipsis to browse for the access path to NWind.mdb. Click Open once you have selected the
appropriate access path.
5. Click OK to continue.
6. In the Query field, type "SELECT
Customers.CustomerID, Customers.CompanyName,
Customers.ContactName, Customers.Address,
Customers.City, Customers.Region, Customers.Country, Customers.PostalCode, Orders.OrderID,
Orders.OrderDate, [Order Subtotals].Subtotal
FROM Customers INNER JOIN ([Order Subtotals] INNER JOIN Orders ON [Order Subtotals].OrderID =
Orders.OrderID) ON Customers.CustomerID = Orders.CustomerID".
7. Click OK to return to the report design surface.
Adding controls to the report to contain data
To add controls to the report
1. Add a GroupHeader/Footer section to rptLetter.
Page 96

(Empty string)
(Empty string)
OrderDate
ActiveReports for .NET User Guide | 96
2. Make the following changes to the group header:
Change the name to ghCustomerID
¡
Change the DataField property to CustomerID
¡
Change the ColumnLayout property to False
¡
Change KeepTogether property to True
¡
3. Make the following changes to the group footer:
Change the name to gfCustomerID
¡
Change the ColumnLayout property to False
¡
Change KeepTogether property to True
¡
4. Change the KeepTogether property for the group header and group footer to True. Change the NewPage
property of the group footer to After.
5. Add the following controls to the PageHeader section:
Control Name Text/Caption Location
Picture imgLogo (Empty string) 4, 0
Label lblNorthWind NorthWind 5, 0.0625
Label lblTraders Traders 5, 0.4375
6. Add the following controls to the GroupHeader section:
Control DataField Name Text/Caption Misc Details Location
RichText (Empty string) rtf
Textbox Subtotal txtTotalOrders
Label (Empty string) lblOrderID Order ID (Empty string)
Label (Empty string) lblOrderDate Order Date (Empty string)
Label (Empty string) lblAmount Amount (Empty string)
(Empty string) 0, 0
Visible = False
OutputFormat = Currency
SummaryType = SubTotal
5.437,
0.0625
SummaryGroup =
ghCustomerID
0.875,
2.25
1.875,
2.25
4.375,
2.25
7. Add the following controls to the Detail section:
Control DataField Name Text/Caption Misc Details Location
Textbox OrderID txtOrderID Order ID Align: right 0.8125, 0
Textbox
Textbox Subtotal txtSubtotal Subtotal
txtOrderDate Order Date OutputFormat = Long Date 1.875, 0
OutputFormat = Currency
Align: right
4.3125, 0
8. Add the following controls to the GroupFooter section:
Control Name Text/Caption Location
Label lblYours Yours, 0.1875, 0.125
Label lblNTAP Accounts Receivable 0.1875, 0.4375
Page 97
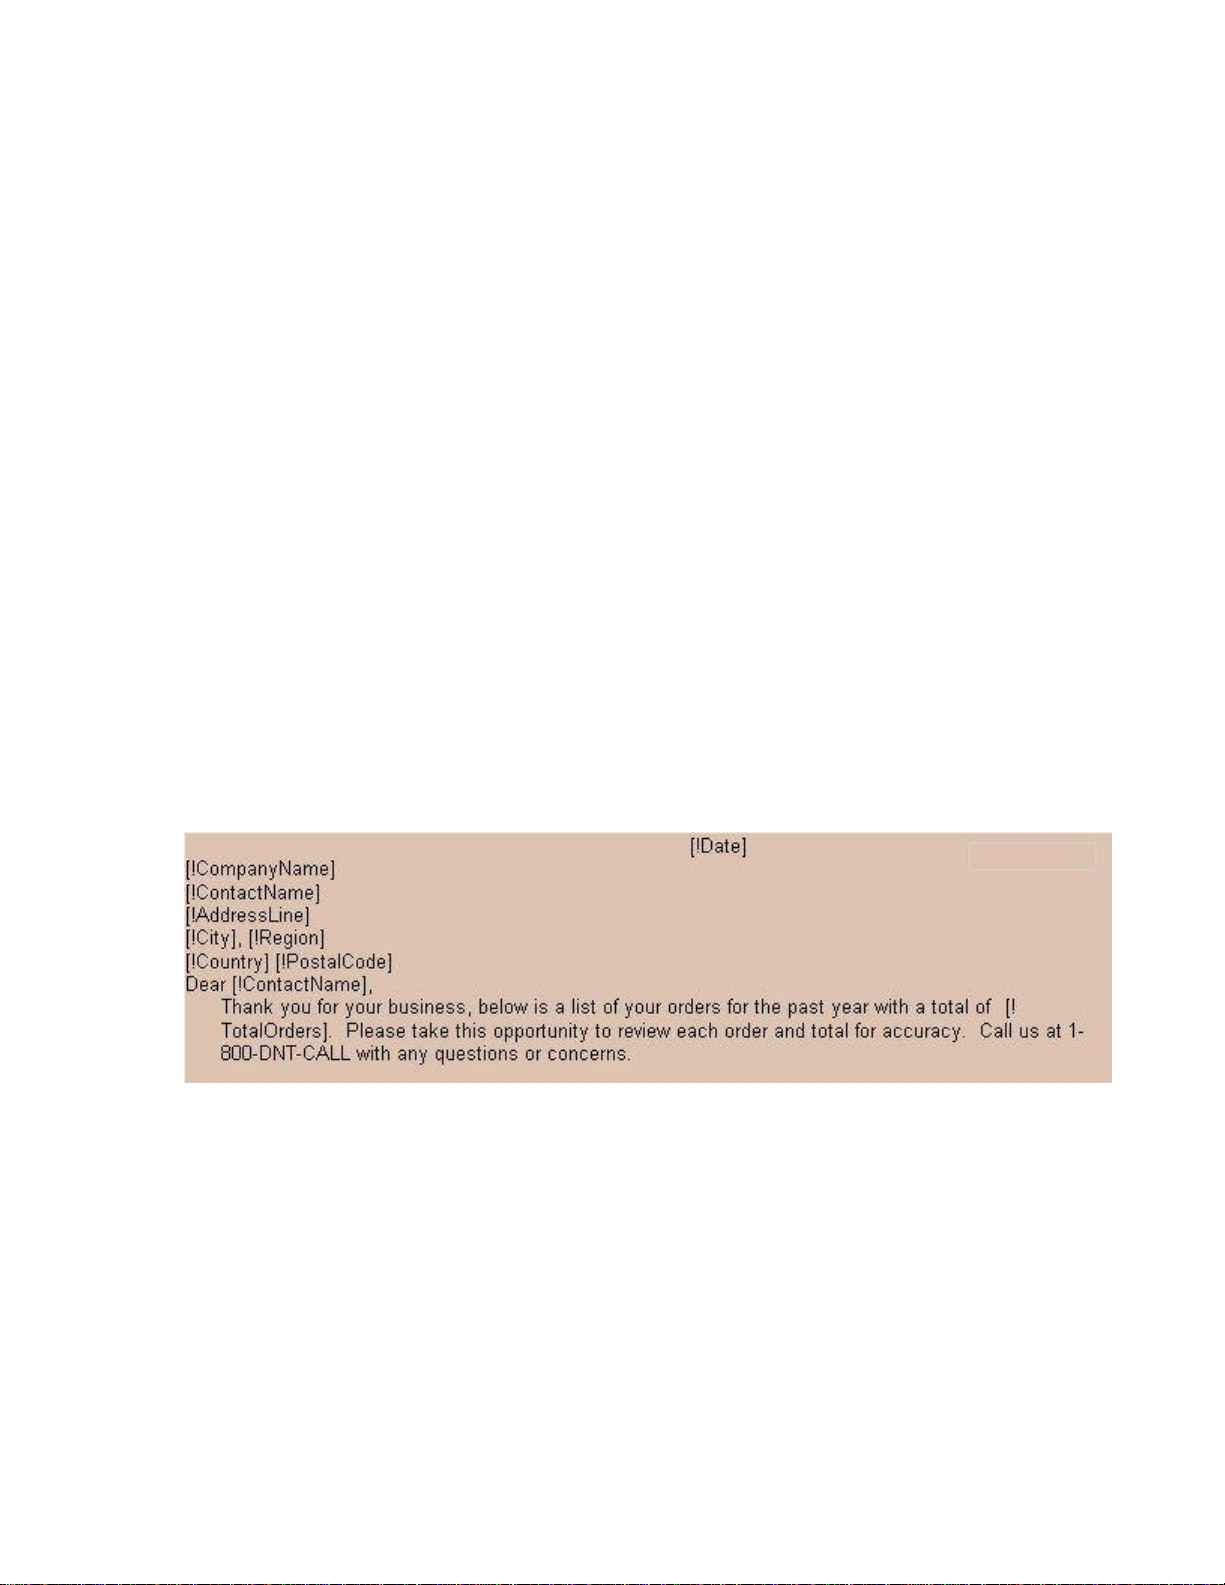
ActiveReports for .NET User Guide | 97
9. Add the following controls to the PageFooter section:
Control Name Text/Caption Location
Label lblNWAddress NorthWind Traders, One Portals Way, Twin Points WA
98156
Adding fields to the RichText control
To add fields to the RichText control
1. Double-click inside the RichText control box to select it.
2. Right-click inside the box and choose Insert Field.
3. Insert the following fields in the following order:
¡ Date
CompanyName
¡
ContactName
¡
AddressLine
¡
City
¡
Region
¡
Country
¡
PostalCode
¡
ContactName
¡
TotalOrders
¡
4. Add the following text to the RichText control box: "Dear [!ContactName], Thank you for your business,
below is a list of your orders for the past year with a total of [!TotalOrders]. Please take this opportunity
to review each order and total for accuracy. Call us at 1-800-DNT-CALL with any questions or concerns.
5. Your RichText control should be arranged like the following.
0, 0.0625
Using the FetchData event to get information from the data source
To write the code in Visual Basic
Right-click in any section of the design window of rptLetter, and click on View Code to display the code
l
view for the report. At the top left of the code view for rptLetter, click the drop-down arrow and select
(Base Class Events). At the top right of the code window, click the drop-down arrow and select
FetchData. This creates an event-handling method for rptLetter's FetchData event. Add code to the
handler to:
Retrieve information from the data source
l
To write the code in C#
Click in the gray area below rptLetter to select the report. Click on the events icon in the Properties
l
window to display available events for the report. Double-click FetchData. This creates an event-handling
method for rptLetter's FetchData event. Add code to the handler to:
Retrieve information from the data source
l
Page 98

Private Sub rptLetter_FetchData(ByVal sender As Object, ByVal eArgs As DataDynamics.ActiveReports. _
private void rptLetter_FetchData(object sender, DataDynamics.ActiveReports.ActiveReport.FetchEventArgs eArgs)
. This creates an
ActiveReports for .NET User Guide | 98
The following example shows what the code for the method looks like:
[Visual Basic]
Dim m_companyName As String
Dim m_contactName As String
Dim m_addressLine As String
Dim m_city As String
Dim m_region As String
Dim m_country As String
Dim m_postalCode As String
ActiveReport.FetchEventArgs) Handles MyBase.FetchData
m_companyName = Fields("CompanyName").Value
m_contactName = Fields("ContactName").Value
m_addressLine = Fields("Address").Value
m_city = Fields("City").Value
If Fields("Region").Value Is System.DBNull.Value Then
m_region = ""
Else
m_region = Fields("Region").Value
End If
m_country = Fields("Country").Value
m_postalCode = Fields("PostalCode").Value
End Sub
[C#]
string m_companyName;
string m_contactName;
string m_addressLine;
string m_city;
string m_region;
string m_country;
string m_postalCode;
{
m_companyName = Fields["CompanyName"].Value.ToString();
m_contactName = Fields["ContactName"].Value.ToString();
m_addressLine = Fields["Address"].Value.ToString();
m_city = Fields["City"].Value.ToString();
if(Fields["Region"].Value is System.DBNull)
m_region = "";
else
m_region = Fields["Region"].Value.ToString();
m_country = Fields["Country"].Value.ToString();
m_postalCode = Fields["PostalCode"].Value.ToString();
}
Adding code to update the field values in the Rich Text control
To write the code in Visual Basic
Right-click in any section of the design window of rptLetter, and click on View Code to display the code
l
view for the report. At the top left of the code view for rptLetter, click the drop-down arrow and select
ghCustomerID. At the top right of the code window, click the drop-down arrow and select Format. This
creates an event-handling method for rptLetter's ghCustomerID_Format event. Add code to the handler
to:
Update the field values in the RichText control
l
To write the code in C#
Click in the GroupHeader section of rptLetter to select it. Click on the events icon in the Properties
l
window for ghCustomerID to display available events for the section. Double-click Format
event-handling method for rptLetter's ghCustomerID_Format event. Add code to the handler to:
Update the field values in the RichText control
l
The following example shows what the code for the method looks like:
Page 99

Private Sub ghCustomerID_Format(ByVal sender As Object, ByVal e As System.EventArgs) Handles ghCustomerID.Format
Private Sub ghCustomerID_BeforePrint(ByVal sender As Object, ByVal e As System.EventArgs) Handles _
ActiveReports for .NET User Guide | 99
[Visual Basic]
Me.rtf.ReplaceField("CompanyName", m_companyName)
Me.rtf.ReplaceField("ContactName", m_contactName)
Me.rtf.ReplaceField("AddressLine", m_addressLine)
Me.rtf.ReplaceField("City", m_city)
Me.rtf.ReplaceField("Region", m_region)
Me.rtf.ReplaceField("Country", m_country)
Me.rtf.ReplaceField("PostalCode", m_postalCode)
Me.rtf.ReplaceField("Date", System.DateTime.Today.Date)
End Sub
[C#]
private void ghCustomerID_Format(object sender, System.EventArgs eArgs)
{
this.rtf.ReplaceField("CompanyName", m_companyName);
this.rtf.ReplaceField("ContactName", m_contactName);
this.rtf.ReplaceField("AddressLine", m_addressLine);
this.rtf.ReplaceField("City", m_city);
this.rtf.ReplaceField("Region", m_region);
this.rtf.ReplaceField("Country", m_country);
this.rtf.ReplaceField("PostalCode", m_postalCode);
this.rtf.ReplaceField("Date", System.DateTime.Today.Date.ToString());
}
Adding code to the Group Header BeforePrint Event
To write the code in Visual Basic
Right-click in any section of the design window of rptLetter, and click on View Code to display the code
l
view for the report. At the top left of the code view for rptLetter, click the drop-down arrow and select
ghCustomerID. At the top right of the code window, click the drop-down arrow and select BeforePrint .
This creates an event-handling method for rptLetter's ghCustomerID_BeforePrint event.
To write the code in C#
Click in the GroupHeader section of rptLetter to select it. Click on the events icon in the Properties
l
window for ghCustomerID to display available events for the section. Double-click BeforePrint. This
creates an event-handling method for rptLetter's ghCustomerID_BeforePrint event.
The following example shows what the code for the method looks like:
[Visual Basic]
ghCustomerID.BeforePrint
Me.rtf.ReplaceField("TotalOrders", Me.txtTotalOrders.Text)
End Sub
[C#]
private void ghCustomerID_BeforePrint(object sender, System.EventArgs eArgs)
{
this.rtf.ReplaceField("TotalOrders",this.txtTotalOrders.Text);
}
Viewing the report
To view the report
1. Add the ActiveReports viewer control to a Windows Form.
2. Add the code needed to set the viewer document equal to the report document. See Using the
ActiveReports WinForm Viewer for help.
Master Detail Reports Walkthroughs
With ActiveReports, Master Detail reports can be created quickly and easily. The following walkthroughs
describe how to create different types of Master Detail reports.
Page 100

ActiveReports for .NET User Guide | 100
Master Detail Reports with Grouping
Describes how Master Detail reports can be created using grouping.
Master Detail Reports with Subreports
Describes how Master Detail reports can be created with subreports.
Master Detail Reports with XML Data
Describes how Master Detail reports can be created using XML data.
Walkthrough: Master Detail Reports with Grouping
ActiveReports allows you to create Master Detail reports with grouping by using the GroupHeader and Detail
sections to contain data from master files and detail files.
This walkthrough illustrates how to create a Master Detail report using grouping to organize the report.
This walkthrough is split up into the following activities:
Adding an ActiveReport to a Visual Studio project
l
Connecting the report to a data source
l
Adding controls to the report to contain data
l
Viewing the report
l
To complete the walkthrough, you must have access to the NorthWind database (NWind.mdb).
When you have completed this walkthrough, you will have a report that looks similar to the following.
Adding an ActiveReport to a Visual Studio project
To add an ActiveReport to your project
1. Open a new project in Visual Studio.
2. Click on Project > Add New Item .
3. Select ActiveReports file and rename the file rptMD.
4. Click Open.
Connecting the report to a data source
To connect the report to a data source
 Loading...