

Page 1
User Guide
Microseven® Stationary HD Megapixel IP Camera
Series
M7B15/M7D12
M7B37-W
M7B57-WPS
M7B77-WPS
Microseven Systems, LLC
Walnut, California, USA
Page 2

Copyright Notice
©2016 Microseven Systems, LLC
All Rights Reserved.
Microseven Systems, LLC provides this user’s guide “as is” without warranty of any kind, either
express or implied, including, but not limited to the implied warranties of merchantability and
fitness for a particular purchase. Microseven Systems, LLC may make improvements and/or
changes in the product(s) and/or the program(s) described in this manual at any time and
without notice.
This publication could contain technical inaccuracies or typographical errors. Changes are made
periodically to the information herein; these changes will be incorporated in new editions of
this publication.
Microseven System, LLC
404 South Lemon Ave, Suite 9
Walnut, California 91789, USA
TEL (909) 348 – 5577
Email support@microseven.com
Website www.microseven.com
Trademarks
Any product names used herein are for identification purposes only and may be trademarks of
their respective companies. Microseven is a registered trademark of Microseven Systems, LLC.
Page 3

M7 Stationary HD Megapixel IP Camera Series
User Manual
Table of Contents
1 System Installation ................................................................................................................................ 1
1.1 Basic System Requirements .......................................................................................................... 1
1.2 Software and Firmware Upgrade .................................................................................................. 1
1.2.1 Obtaining the Latest Software and Firmware ....................................................................... 1
1.2.2 Installing or Upgrading Microseven Software ...................................................................... 2
1.2.3 Upgrading the Camera Firmware .......................................................................................... 5
2 Initial Camera Setup .............................................................................................................................. 7
2.1 Using the Cam Locator .................................................................................................................. 7
3 Camera Management and Operations ............................................................................................... 11
3.1 Using the Microseven Camera Management Software (M7CMS) .............................................. 11
3.1.1 The M7CMS Interface ......................................................................................................... 11
3.1.2 Monitoring Control ............................................................................................................. 12
3.1.3 View Bar (View Mode, View Option and View Playback controls) ..................................... 12
3.1.4 System Configuration .......................................................................................................... 12
3.1.5 Add/Remove Camera, Camera Groups ............................................................................... 13
3.1.6 User Account ....................................................................................................................... 15
3.1.7 Manual and Scheduled Recording of Live Video ................................................................. 15
3.1.8 Establishing Advanced Camera Properties ......................................................................... 17
3.1.9 Camera Tab ......................................................................................................................... 18
3.1.10 Video Tab ............................................................................................................................ 20
3.1.11 Detection Tab ...................................................................................................................... 21
3.1.12 Capture & Snapshot Tab ..................................................................................................... 22
3.1.13 Recording Tab ..................................................................................................................... 23
3.1.14 User Accounts Tab .............................................................................................................. 25
3.1.15 System Tab .......................................................................................................................... 25
3.2 Local Video Playback ................................................................................................................... 26
© 2001 - 2016 Microseven Systems, LLC Page | i
Page 4

M7 Stationary HD Megapixel IP Camera Series
Camera Model
Device Type
M7B15/M7D12/M7B57 built before Nov 2015
MYM7
M7B15/M7D12/M7B37/M7B57
MYM7i
M7B77
MYM71080i
User Manual
1 System Installation
1.1 Basic System Requirements
To ensure proper system performance, Microseven requires Microsoft Windows 7 or above and an Intel
core i3 or faster multicore processor. For POE installations, Microseven recommends using a POE+
switch providing up to 25.5 watts per port (IEEE 802.3).
1.2 Software and Firmware Upgrade
1.2.1 Obtaining the Latest Software and Firmware
Microseven enhances features and functionality through regular firmware and software updates. To
take advantage of the newest enhancements, it is important to upgrade your camera(s) with the latest
firmware and software available. This section presents the steps for downloading setup files onto your
local system. The setup files contain installers that will upgrade your system with the latest camera
software.
1. Go to Microseven’s download site located at http://www.microseven.com/downloads.
2. Locate the “Software Downloads” section.
3. Click the ‘Download Now’ button. This will automatically download a file with the .exe extension
(Windows) or .dmg extension (Mac) into your local Download folder.
Note: Clicking the hyperlink text will open a “What’s New” web page containing change log
information for all revisions.
4. Locate the “Firmware Downloads” section on Microseven’s download site.
5. Determine the device type associated with your camera model as shown in the following table.
6. Click the ‘Download Now’ button next to the camera’s appropriate device type. This will
automatically download a setup file with a .pkg extension into your local Download folder.
Important: Installing an incompatible version of firmware may render your camera inoperable. If you
have any questions regarding the firmware version or your camera’s device type, please contact
Microseven support at support@microseven.com prior to installing the firmware.
© 2001 - 2016 Microseven Systems, LLC Page | 1
Page 5

M7 Stationary HD Megapixel IP Camera Series
User Manual
1.2.2 Installing or Upgrading Microseven Software
This section describes how to install or upgrade Microseven camera software including the Cam Locator
and Microseven Camera Management System (M7CMS) onto your local system. The Cam Locator is used
to establish initial camera settings and M7CMS is used to configure advanced camera options and
features.
Microseven software is installed or upgraded in two basic steps. The first step involves running a setup
file (*.exe or *.dmg) that unpacks a software installation program (Setup Wizard) onto your local system
(see Section 1.2.1 for instructions on downloading the setup file onto your local system). The second
step includes running an installation wizard that installs the Cam Locator and M7CMS onto your local
system.
To install or upgrade Microseven software, perform the following steps:
1. Go to the download folder on your local system and locate the setup file (*.exe file (Windows)
or *.dmg file (Mac)). Double-click the setup file to open the Setup Wizard.
2. Click the ‘Next’ button to continue.
3. Accept the default location or choose another location for the installation of Microseven
software. Click ‘Next’ to continue.
© 2001 - 2016 Microseven Systems, LLC Page | 2
Page 6
M7 Stationary HD Megapixel IP Camera Series
User Manual
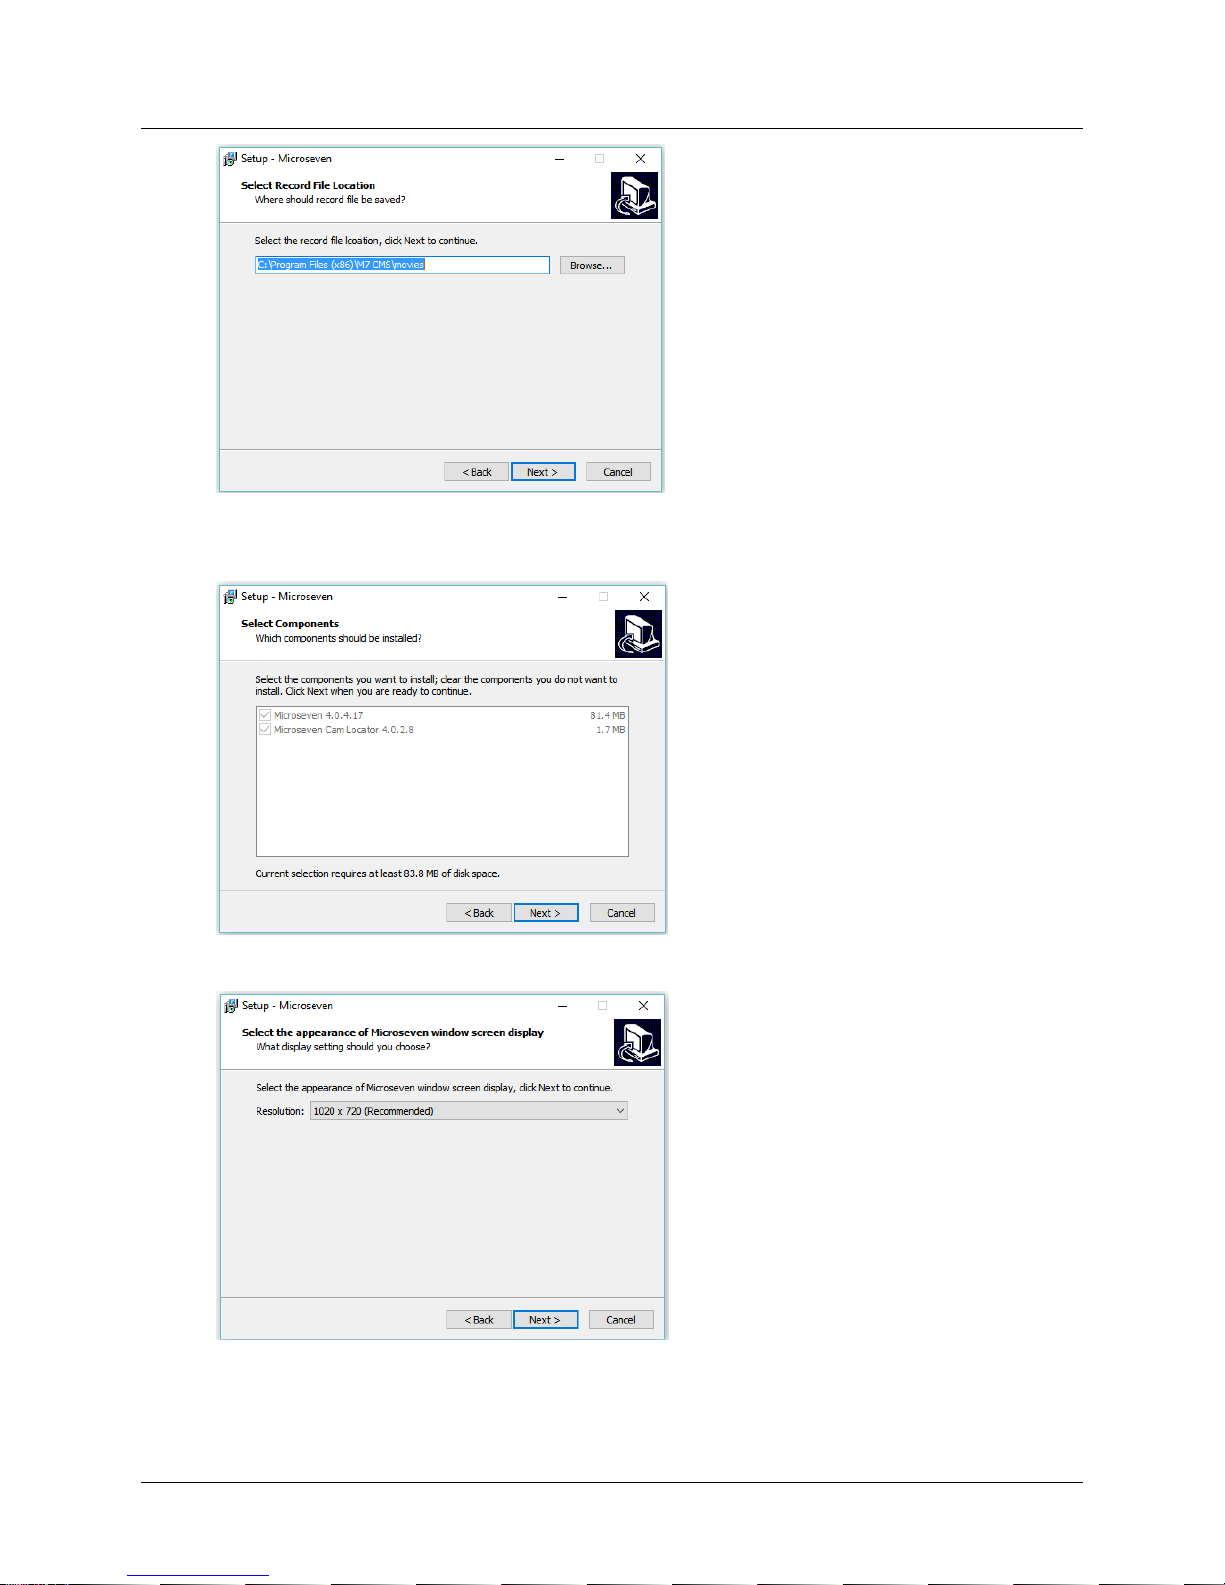
4. Accept the default location or choose another location for the storage of record and snapshot
files. Click ‘Next’ to continue.
5. By default, both software components are selected. Click ‘Next’ to continue.
6. Choose the display resolution. Click ‘Next’ to continue.
© 2001 - 2016 Microseven Systems, LLC Page | 3
Page 7

M7 Stationary HD Megapixel IP Camera Series
User Manual
7. Select the default location or specify a different location for the Start Menu folder. Click ‘Next’.
8. Setup installs a Cam Locator icon and M7CMS launch icon on your desktop by default.
Uncheck any icon you don’t want installed on your desktop. Click ‘Next’ to continue.
9. Click ‘Install’ to continue with the installation. Once the installation has completed, click ‘Finish’
to exit Setup and launch the Microseven Cam Locator.
© 2001 - 2016 Microseven Systems, LLC Page | 4
Page 8
M7 Stationary HD Megapixel IP Camera Series
User Manual
1.2.3 Upgrading the Camera Firmware
This section describes how to upgrade the Microseven camera firmware using the setup file downloaded
onto your local system (see Section 1.2.1).
1. Power on the camera using the provided power supply and connect an Ethernet cable between
the camera and your router. Wait at least 60 seconds before beginning the set up to allow full
enablement of the hardware and network recognition.
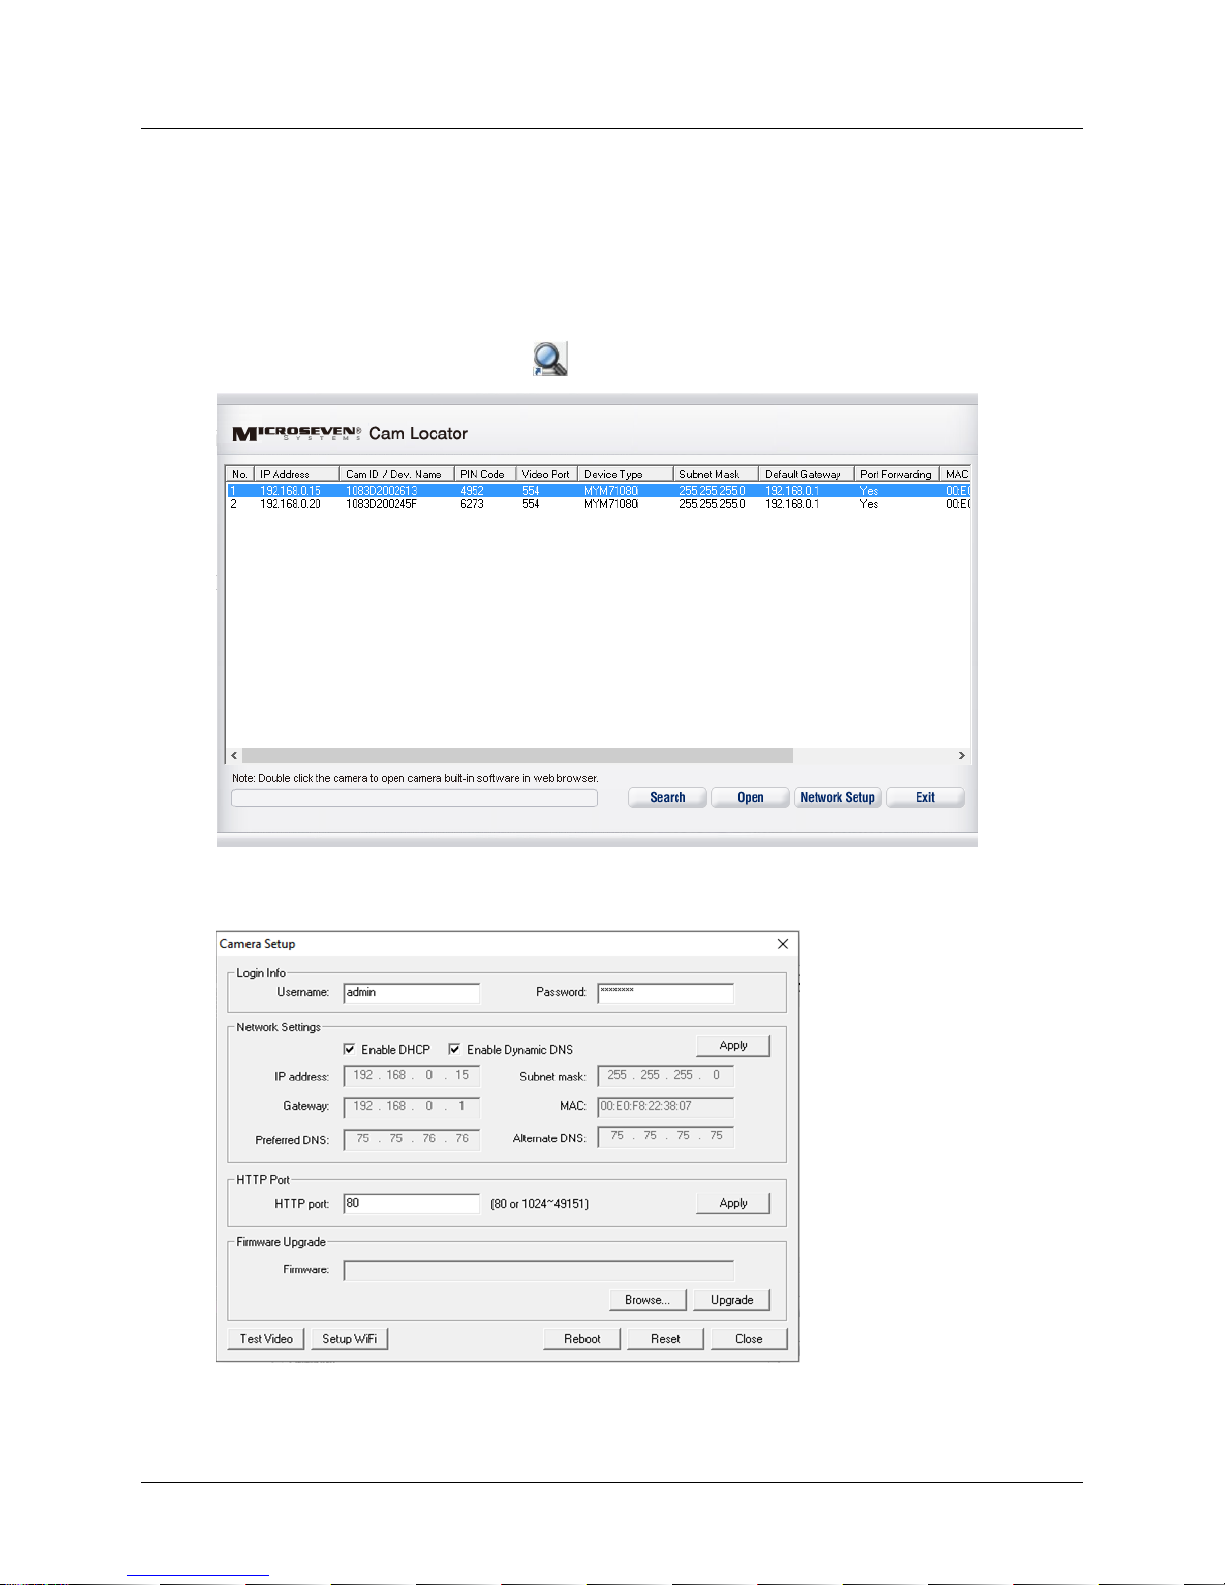
2. Click the Cam Locator desktop icon to open the Microseven Cam Locator window.
3. Select the camera you wish to configure and click the ‘Network Setup’ button to open the
Camera Setup window.
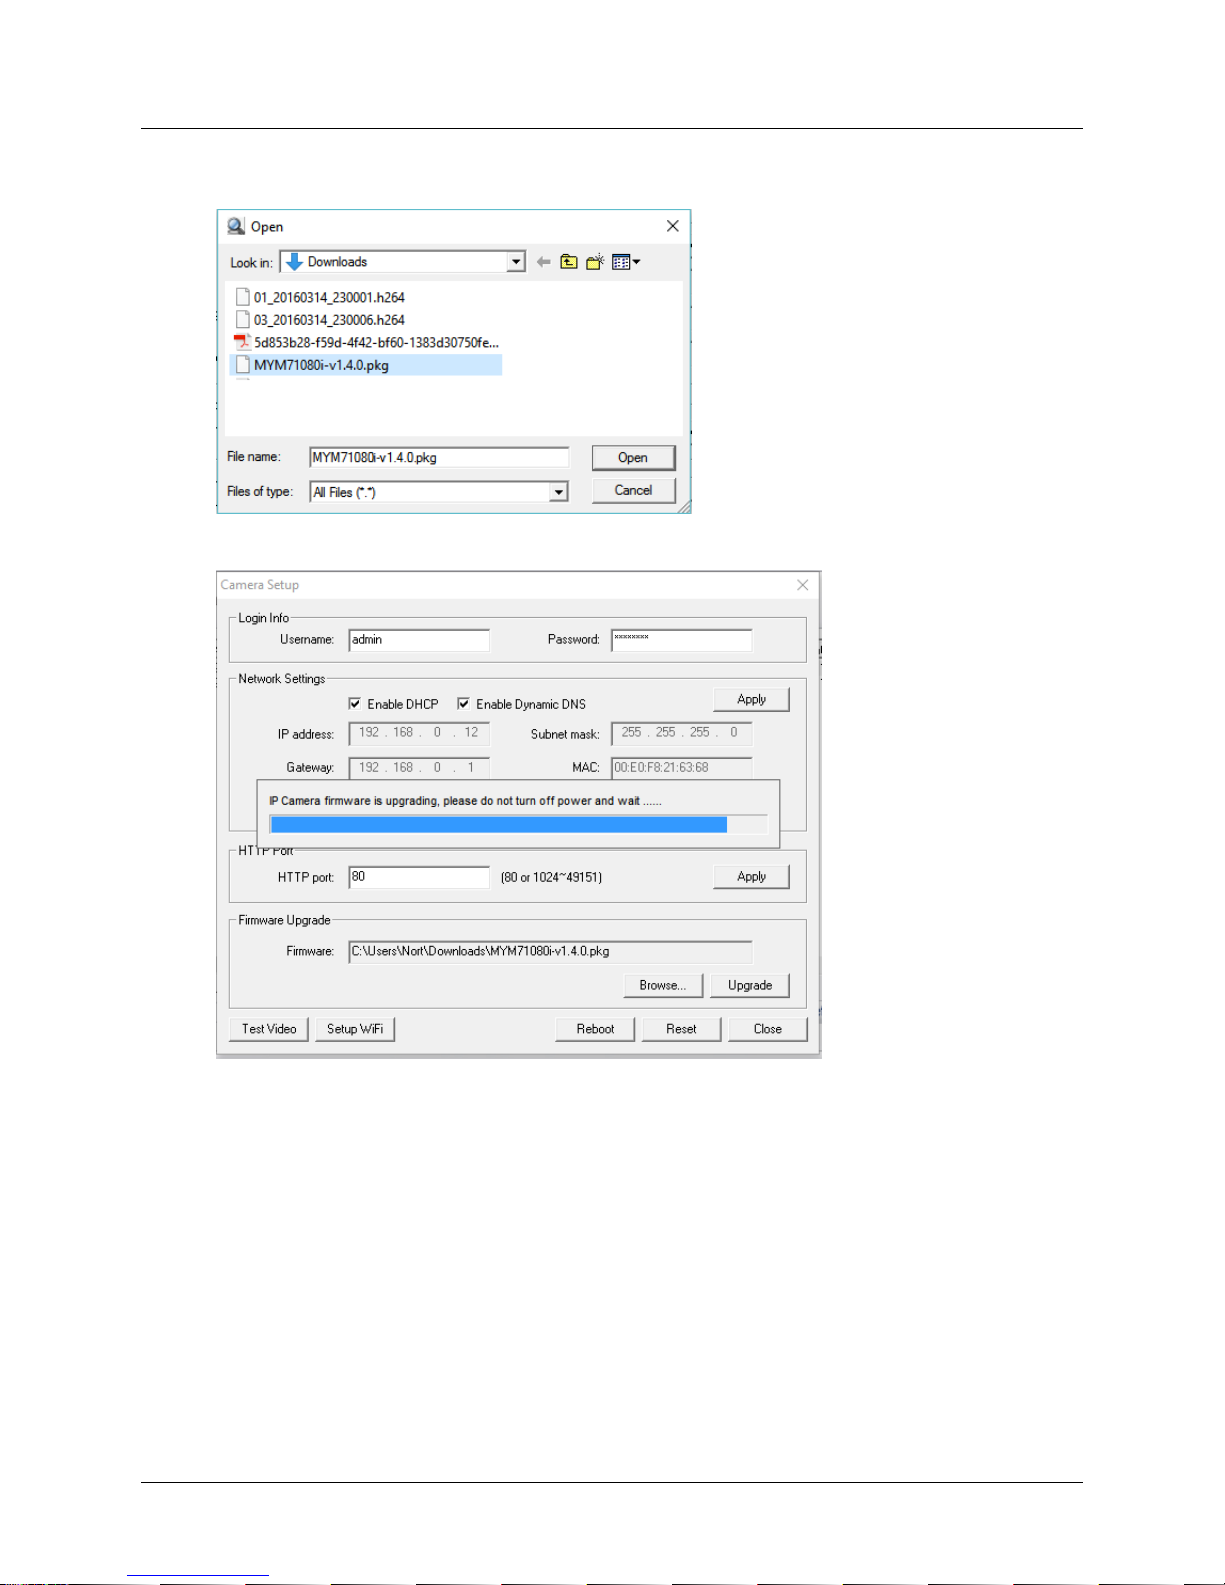
4. On the Camera Setup window, click ‘Browse’ to open a browse menu and select the appropriate
“*.pkg” file.
© 2001 - 2016 Microseven Systems, LLC Page | 5
Page 9
M7 Stationary HD Megapixel IP Camera Series
User Manual
5. Click ‘Open’ to transfer the “*.pkg” file name to the “Firmware” field of the Camera Setup dialog
window.
6. Click the ‘Upgrade’ button on the Camera Setup dialog.
7. After the firmware is successfully upgraded, a confirmation window appears.
8. Click ‘OK’ to close the window.
© 2001 - 2016 Microseven Systems, LLC Page | 6
Page 10

M7 Stationary HD Megapixel IP Camera Series
Section
Description
Login Info
Username, Password
The Login Info section at the top of the Camera Setup window displays
Username and Password fields. The default username is “admin” and the
default password is “password”.
User Manual
2 Initial Camera Setup
2.1 Using the Cam Locator
The Microseven Cam Locator searches the local network for cameras and devices supporting multicast
traffic.
1. Make sure the camera(s) are powered up and connected to the local network with a standard
Cat5e Ethernet cable between the camera and your router. Allow one minute (60 seconds)
before beginning the set up process in order to fully enable the camera's hardware and allow it
to be recognized by your network.
2. Click the Cam Locator desktop icon to open the Microseven Cam Locator. Highlight the
desired camera from the list and click the ‘Network Setup’ button to bring up the Camera
Setup window.
Note: If a network camera does not appear in the Cam Locator, confirm the camera's power adapter
and Ethernet cable are properly connected. Click the ‘Search’ button again to find your camera.
The following table contains instructions on establishing initial camera settings including Login Info,
Network Settings, HTTP Port, Firmware Upgrade, Test Video, and Setup WiFi settings found on the
“Camera Setup” menu.
© 2001 - 2016 Microseven Systems, LLC Page | 7
Page 11

M7 Stationary HD Megapixel IP Camera Series
Section
Description
Network Settings
Enable DHCP
IP address
Subnet mask
Gateway
Enable Dynamic DNS
Preferred DNS
Alternate DNS
MAC
Network settings will use either a dynamic or static IP addressing protocol.
Dynamic IP addressing (default): DHCP-enabled routers dynamically assign
IP address, subnet mask, and default gateway camera parameters. By
default, the DHCP server typically accommodates dynamic DNS operations. If
needed, the Preferred DNS and Alternate DNS information can usually be
found within the router's setup pages or within the modem's configuration
established by your ISP.
1. Ensure the ‘Enable DHCP’ checkbox is checked (graying out the IP
address, Subnet mask, and Gateway fields).
2. Make sure the ‘Enable Dynamic DNS’ checkbox is checked (graying
out the Preferred DNS and Alternate DNS fields).
3. Click ‘Apply’ to save the settings, then allow 60 seconds for the
camera to restart.
4. To confirm the changes were accepted, go back to the Cam Locator's
main page, click ‘Search’ and review the displayed settings
Static IP addressing: For implementations using a static IP protocol:
1. Uncheck the ‘Enable DHCP’ checkbox and manually enter the
preconfigured IP address (mapped to the camera’s MAC address),
Subnet mask, and Gateway parameters.
2. Uncheck the ‘Enable Dynamic DNS’ checkbox and enter the
Preferred DNS and Alternate DNS address (e.g. 8.8.8.8 and 8.8.4.4).
3. Click ‘Apply’ to save the settings, then allow 60 seconds for the
camera to restart.
4. To confirm the changes were accepted, go back to the Cam Locator's
main page, click ‘Search’ and review the displayed settings
The MAC address is displayed for informational purposes and is not editable
from the Network Settings menu.
HTTP Port
The HTTP port is set to 80 by default. You may customize the HTTP port to
equal a standalone number or a number within the range of 0 to 49151
(0~49151). Click ‘Apply’ to save the settings, then allow 60 seconds for the
camera to restart. To confirm the changes were accepted, go back to the
Cam Locator's main page, click ‘Search’ and review the displayed settings.
Firmware Upgrade
See Section 1.2.3 for instructions on upgrading the camera firmware.
Test Video
The Test Video function provides a quick way to check if the camera’s
network settings were successfully established for video display. With a
successful network configuration, a web browser displays the camera’s live
video after clicking the ‘Test Video’ button found on the bottom of the
Camera Setup window.
Troubleshooting tip: If the video test fails with the error message “Fail to
connect to camera. Check network and firewall settings”, check your
User Manual
© 2001 - 2016 Microseven Systems, LLC Page | 8
Page 12

M7 Stationary HD Megapixel IP Camera Series
Section
Description
Antivirus software settings and add the camera IP address to a list of
exceptions where the antivirus software overlooks the IP camera(s) during
virus scanning and protection operations.
Setup Wi-Fi
Click the ‘Setup WiFi’ button found at the bottom of the Camera Setup
window to bring up a Wireless Settings window.
Initially, the Wireless Settings window displays a single item, the ‘Enable
wireless’ checkbox. Check the ‘Enable wireless’ box to display SSID, Network
type, Security type, Encrypt type, and Password fields and a ‘Test wireless
settings’ button on the window.
Click the ‘Search’ button next to the SSID field to bring up a Wireless Device
window.
Click the ‘Search’ button next to the SSID field to see a list of available
devices broadcasting their SSID. Select the device of your choice and click
‘Add’.
User Manual
© 2001 - 2016 Microseven Systems, LLC Page | 9
Page 13

M7 Stationary HD Megapixel IP Camera Series
Section
Description
On the Wireless Settings window, the SSID, Network type, Security type, and
Encrypt type fields should now be populated from the router’s information.
Enter your Wi-Fi password into the Password field. Click ‘Test’ to test
whether a Wi-Fi connection was successfully established. Click ‘Apply’ to
save all settings.
Test your camera’s Wi-Fi network connection by disconnecting the Ethernet
cable. Wait for about 60 seconds, use cam locator to find the camera with
Wi-Fi connection.
User Manual
© 2001 - 2016 Microseven Systems, LLC Page | 10
Page 14

M7 Stationary HD Megapixel IP Camera Series
Main viewer displays live video
(shown in 4 window view mode)
Dynamic side panels
View bar with
clickable icons
Button bar with access to camera configuration, user account, and recording features
User Manual
3 Camera Management and Operations
3.1 Using the Microseven Camera Management Software (M7CMS)
3.1.1 The M7CMS Interface
The M7CMS interface provides numerous tools for configuring, managing, and administering your
Microseven camera system.
The interface is divided into a main viewer section in which live video is displayed and
expandable/collapsible side panels. In the basic viewing mode, the “Online Cameras” side panel is
displayed. In View Playback mode, the “Set Camera” and “Set Playback Date and Time” panels are
displayed.
Note: The PTZ Control feature is not available with the current M7CMS version.
© 2001 - 2016 Microseven Systems, LLC Page | 11
Page 15

M7 Stationary HD Megapixel IP Camera Series
Button
Description
/
Motion detection alerts is on/off
/
Microphone input is on/off
/
Camera is connected/disconnected
/
Audio is off /on
/
Record is off /on
Snapshot button (hover to display snapshot save path
Hard drive free space (hovering displays remaining hard drive space)
I/O trigger alerts (not applicable to M7 series)
User Manual
3.1.2 Monitoring Control
Camera monitoring functionality that is available on the ‘Online Cameras’ side panel is presented in the
following table.
3.1.3 View Bar (View Mode, View Option and View Playback controls)
The bottom portion of the M7CMS window contains clickable icons with the following viewing
functionality:
View mode: Click the icon to choose a display configuration from a single pane up to a
maximum of 16 panes
View option: Click to toggle between a full window display and a normal window display
View playback: Click icon to open access to recorded and saved videos (see Section 3.3 for
video playback instructions)
3.1.4 System Configuration
The Configuration button located on the bottom of the M7CMS window provides access to the System
Configuration menu when clicked.
The System Configuration menu provides the ability to:
Set User ID and Password
Establish User ID/Password persistence
Set the startup screen mode
Manage program exit validation requirements
Establish M7CMS startup parameters
Set record file lengths
© 2001 - 2016 Microseven Systems, LLC Page | 12
Page 16

M7 Stationary HD Megapixel IP Camera Series
User Manual
3.1.5 Add/Remove Camera, Camera Groups
Adding new camera groups, deleting camera groups, adding cameras into camera groups, and deleting
cameras from a camera group is accomplished from the ‘Add Camera’ button located on the bottom of
the M7CMS window.
To add a camera group, perform the following steps:
1. Click the ‘Add Camera’ button found on the bottom of the M7CMS window.
2. The Microseven Camera popup menu is displayed.
3. Click the ‘Add Group’ radio button.
4. Click ‘OK’.
5. A new window with a ‘Camera Group List’ tab is displayed.
6. Type a name in the ‘Group Name’ field.
7. Click ‘Add’.
8. The new camera group will now be displayed in the ‘Name’ list.
9. Click ‘OK’ to save the changes and click ‘Close’ to close the window.
© 2001 - 2016 Microseven Systems, LLC Page | 13
Page 17

M7 Stationary HD Megapixel IP Camera Series
User Manual
To remove a camera group, perform the following steps:
1. Click the M7CMS ‘Add Camera’ button to display the Microseven Camera popup menu.
2. Click the ‘Add Group’ radio button.
3. Click ‘OK’ to display a Microseven Camera window and Camera Group List tab.
4. From the list, select the camera group you wish to delete.
5. Click ‘Delete’.
6. Click ‘OK’ to save the changes and click ‘Close’ to close the window.
To add a camera to an existing camera group, perform the following steps:
1. Click the M7CMS ‘Add Camera’ button to display the Microseven Camera popup menu.
2. Click the ‘Add Camera’ radio button and select the group of your choice from the pulldown
menu.
3. Click ‘OK’ to close the dialog box and open the Camera List menu.
4. If necessary, click the ‘Search’ button to search for cameras. A list of results will be displayed in a
search window. Select a camera from the list of results.
5. In the Search window, highlight the camera from the list and click the ‘Select’ button to pre-load
the camera information.
6. Click the ‘Add’ button to add the camera to the camera group.
7. Click ‘OK’ to save the changes and close the window.
Note: M7CMS allows you to add IP cameras using CamID and PIN information supplied by the Cam
Locator. In situations where the CamID and PIN information is not available, a camera can be added to
the system using the camera’s IP address. Port forwarding is required for cameras added to the system
via IP address. If CamID and PIN information is available, port forwarding is not required.
© 2001 - 2016 Microseven Systems, LLC Page | 14
Page 18

M7 Stationary HD Megapixel IP Camera Series
User Manual
To remove a camera from a camera group, perform the following
1. Follow “Add Camera” steps 1-5.
2. Select the camera you wish to remove from the group and click the ‘Delete’ button. This does
not delete the camera, but simply removes the camera from the group.
3. Click ‘OK’ to save the changes and close the window.
3.1.6 User Account
User account credentials can be modified with M7CMS. Click the ‘User account’ button located on the
bottom of the M7CMS window to access user account controls.
To modify user ID and password information for M7CMS accounts, perform the following steps:
1. Click the ‘User account’ button to launch a ‘User List’ window.
2. Add a new user by typing a name in the ‘User ID’ field and password in the ‘Password’ field.
3. Use the check boxes in the ‘User Privilege’ section to assign camera setup, camera operation,
record schedule setting, and record playback privileges.
4. Click ‘Add’. The name and associated user privileges will be displayed in in the user list.
5. Click ‘OK’ to save the user and close the window.
3.1.7 Manual and Scheduled Recording of Live Video
M7CMS provides the optional ability to record live video directly to your PC. Live recordings can be
initiated manually with the ‘Manual REC’ radio dial button or based on a set schedule using the
‘Schedule REC’ radio dial and ‘Set Schedule’ buttons.
3.1.7.1 Manual Recording
1. Click the ‘Manual REC’ radio dial button on the M7CMS button bar.
2. Click the ‘record’ button on the Online Cameras pane. A red record button indicates the
camera is actively recording video. Clicking the ‘record’ button again stops the recording
(indicated by a grey record button ).
© 2001 - 2016 Microseven Systems, LLC Page | 15
Page 19
M7 Stationary HD Megapixel IP Camera Series
User Manual
3.1.7.2 Scheduled Recording
Recordings can be scheduled per camera and for specific dates and times in either a continuous mode or
an alerts-based mode.
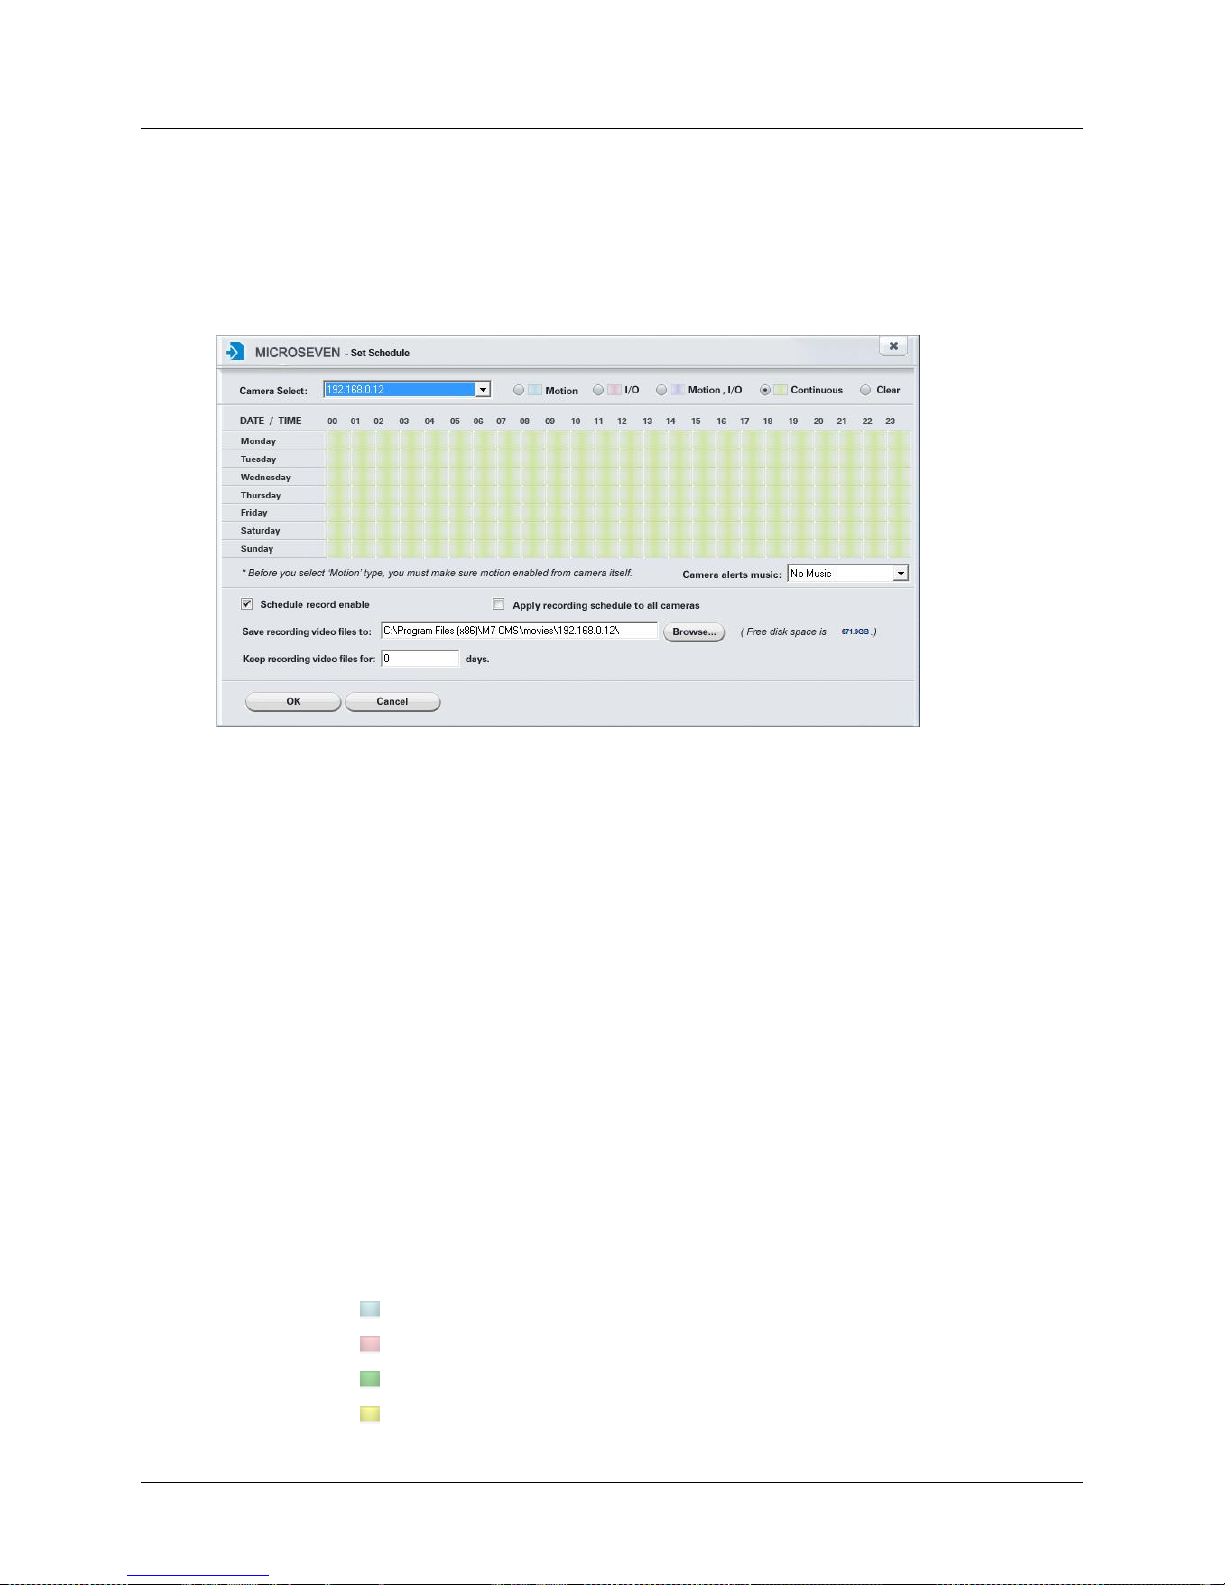
1. Click the ‘Schedule REC Setting’ radio button and the ‘Set Schedule’ button to open a “Set
Schedule” window.
2. Select the camera of your choice from the ‘Camera Select’ drop down menu.
3. Decide if you would M7CMS to record live video on a continuous basis or prefer to only record
video in accordance with predefined alert-based events.
Continuous Recording Mode
1) Click the ‘Continuous’ radio button.
2) Set the Continuous Recording Schedule by highlighting all DATE/TIME cells (one cell is
equal to one hour).
Alerts Recording Mode
1) Click the radio button(s) next to one of the following recording options:
a. Motion (initiate recording when a motion detection alert is triggered)
b. I/O (initiate recording when an input/output fault event is detected)
c. Motion, I/O (alert is triggered with either event)
2) Click on the cells (or drag the cursor across multiple cells) of the timetable representing
the DATE/TIME of your schedule. One cell is equal to one hour.
The color of the cell indicates the recording methods
(Light blue) Motion detection trigger
(Pink) I/O alerts detection trigger
(Dark blue) Motion detection trigger + I/O alerts detection trigger
(Yellow) Continuous
© 2001 - 2016 Microseven Systems, LLC Page | 16
Page 20
M7 Stationary HD Megapixel IP Camera Series
User Manual
4. Once you have selected your recording options, you must click the ‘Schedule record enable’ box
to enact the settings.
5. Accept the default save path or set a folder path of your choice by clicking ‘Browse’.
6. If you wish to schedule continuous recording for all cameras, check the ‘Apply recording
schedule to all cameras’ box.
7. Specify the number of days to maintain recording video files on your local system. The default is
0 days. M7CMS monitors the amount of hard disk space available and, if required, removes old
files to free up hard disk space.
8. If you would like an audible sound to be emitted upon an alert event, select from one of 39
sound variations using the music drop-down list. A brief audio preview will be played upon its
selection.
9. Click ‘OK’ to save the settings.
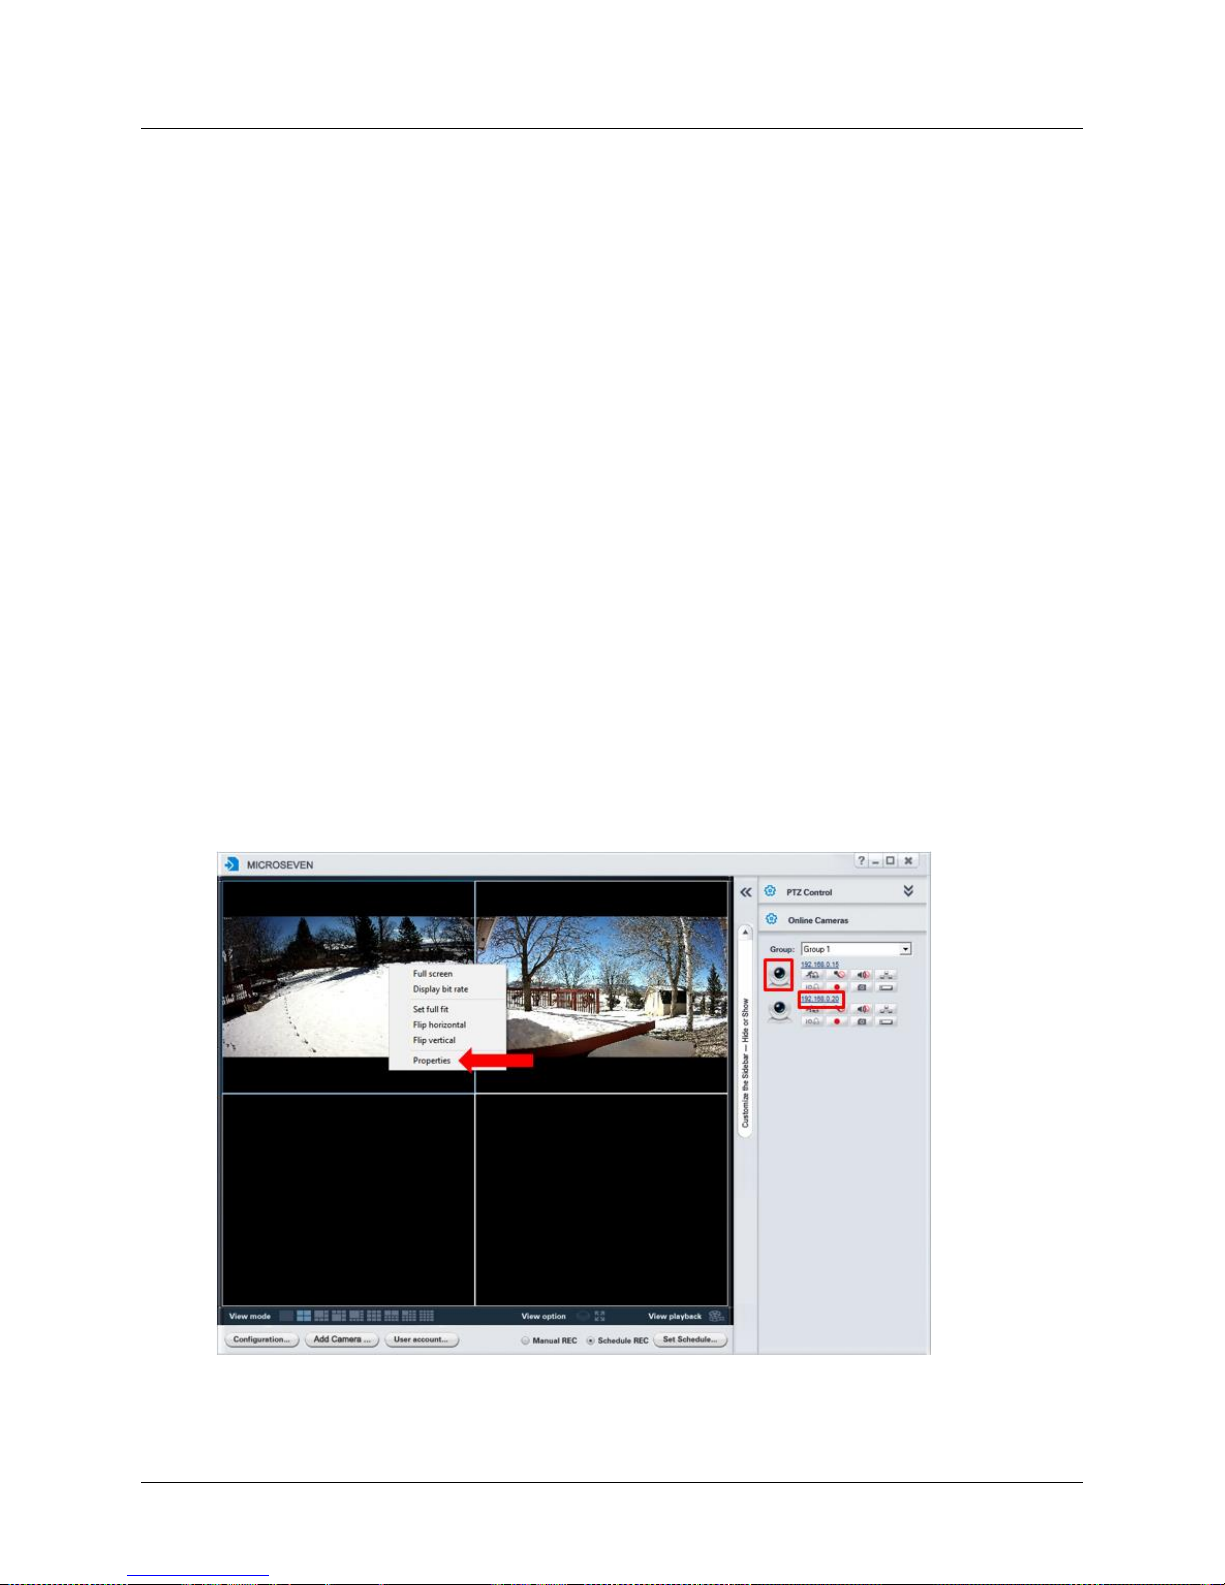
3.1.8 Establishing Advanced Camera Properties
Numerous camera settings can be established and configured from the Camera Properties menu. This
menu can be activated in any one of the following three ways:
1) Double-click on a M7CMS video pane to activate it. Right-click on the activated video pane to
bring up a short-cut menu and then select ‘Properties’ from this menu.
--or--
2) Click on the camera icon in the Online Cameras pane
--or--
3) Click on the IP address hyperlink in the Online Cameras pane
The Camera Properties window contains two rows of main tabs that, when clicked, present one or more
sub-menus from which numerous camera and network configuration properties can be established.
© 2001 - 2016 Microseven Systems, LLC Page | 17
Page 21
M7 Stationary HD Megapixel IP Camera Series
User Manual
The functionality and settings available under each main tab and sub-menu is discussed in the following
section.
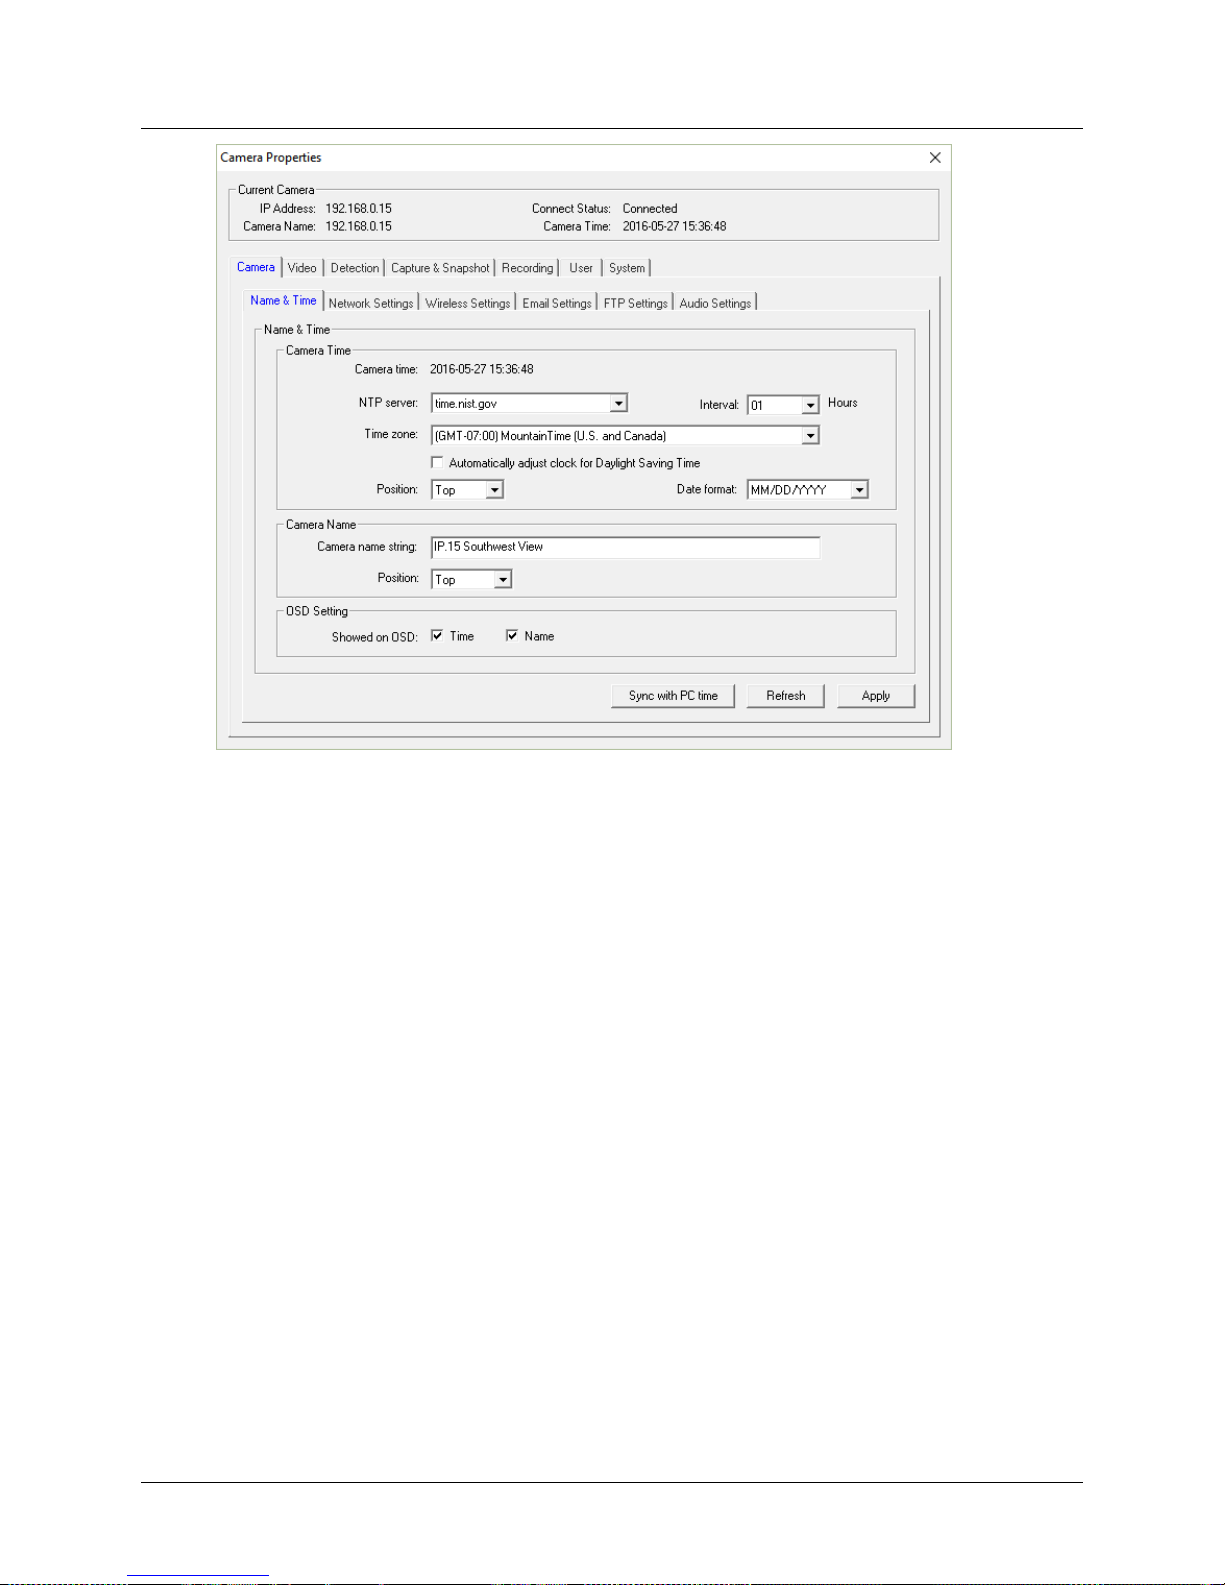
3.1.9 Camera Tab
3.1.9.1 Name & Time
1. Establish Camera Time parameters.
a. Select the National Time Protocol (NTP) server of your choice. Choose from
time.nist.gov, time.windows.com, timelkriss.re.kr, or time.nuri.net.
b. Alternatively, you can set the time settings to sync with your PC time by clicking the
‘Sync with PC time’ button located at the bottom of the window.
c. Select and NTP server polling interval between one to 24-hours.
d. Select the time zone closest to your location.
e. Check the ‘Automatically adjust clock for Daylight Saving Time’ box to sync the clock
settings with daylight savings time.
f. You can choose to Position the camera time display on the top or bottom of the video
window. Make sure to check the ‘Time’ checkbox in the OSD Setting if you want the
camera time to appear on the screen.
g. Select the date format of your choice (MM/DD/YYYY, YYYY-MM-DD, or MM/DD/YYYY).
© 2001 - 2016 Microseven Systems, LLC Page | 18
Page 22

M7 Stationary HD Megapixel IP Camera Series
User Manual
2. Establish Camera Name parameters.
a. Camera Name String: Name the camera to distinguish it from other cameras. The
maximum length for the name is 30 characters.
b. Position: Display the camera name on the top or bottom of the video window. Make
sure to check the ‘Name’ checkbox in the OSD Setting if you want the camera name to
appear on the screen.
3. For On Screen Display (OSD), check the camera and name box to display it on the screen.
4. Use the ‘Refresh’ button to reset all field contents.
5. Click ‘Apply’ to save the settings.
3.1.9.2 Network Settings
1. By default, the camera network is set to DHCP and the IP address, subnet mask, and default
gateway parameters are automatically assigned.
For static IP implementations, disable the DHCP setting by selecting Static IP address type.
Manually enter your preconfigured IP address (mapped to the camera’s MAC address), Subnet
mask, and Gateway parameters.
2. The DNS type is set to ‘Dynamic DNS’ by default. You can change the DNS type to ‘DNS’ when
using static IP addressing and use primary DNS address of 8.8.8.8 and an alternate DNS address
of 8.8.4.4, if desired.
3. The HTTP port is set to 80 by default.
4. The default port for RTSP is 554.
5. The default port for RTMP is 1935.
6. If your router is configured to use UPnP settings, check the Enable UPnP box. Click the ‘Test
UPnP’ button to test that your router has appropriately mapped the port forwarding
parameters.
7. Click ‘Apply’ to save the settings.
3.1.9.3 Wireless Settings
1. Click the ‘Search’ button to open wireless device search dialog.
2. Highlight the wireless device from the search list, then click the ‘Add’ button.
3. Select the Infra Network type when using a wireless router
4. Select the Security type associated with your route (choose from None/WEP/WPA-PSK/WPA2-
PSK)
5. Enter your wireless network password.
6. Click ‘Apply’ to save the settings.
3.1.9.4 Email Settings
M7CMS supports three event detection types including motion detection, video lost detection and I/O
alerts. When the event is detected, M7CMS will send an alert message and a captured snapshot to your
email box.
© 2001 - 2016 Microseven Systems, LLC Page | 19
Page 23

M7 Stationary HD Megapixel IP Camera Series
User Manual
M7CMS uses the following default email server and account settings:
1. SMTP server name: mail.mym7.com
2. Server port: 587
3. Encrypt type: SMMARTTLS
4. Authentication: On
5. Username: noreply@mym7.com
6. Password: grayed out
7. Sender: noreply@mym7.com
8. Enter up to three email addresses in the ‘Send to’ field(s)
9. Enter a Subject line (e.g. M7 Camera Alert) and a Message (optional unless adding more than
one email address).
10. Click ‘Apply’ to save the settings.
Note: Email alerts are only available with firmware version v1.4.0 or later.
3.1.9.5 FTP Settings
M7CMS provides the option of sending video (motion only) by FTP to your hosting server. When
available, M7CMS will upload your camera snapshots to a specified FTP folder within a defined time
interval.
1. Enter the FTP server name, FTP server port, username, password, and the FTP server path for
your FTP account.
2. Test the FTP settings by clicking the ‘Test’ button. If the test passes, click ‘Apply’ to save settings.
3.1.9.6 Audio Settings
M7CMS supports 2-way voice intercom using the following parameters for audio encoding (M7B77 and
M7B57 only):
1. The Encoded mode is set to G711 by default.
2. Audio is enabled by default for Primary, Secondary, and Tertiary streams.
3. Audio input type is set to ‘Line in’ by default. Keep the default setting for best audio
performance.
4. Audio input volume (1-100) is set to 10 by default.
5. Audio output volume (1-100) is set to 95 by default.
6. Click ‘Apply’ to save the settings.
3.1.10 Video Tab
3.1.10.1 Video Setup
Video Setup establishes live camera video parameters and live image qualities. Default settings are
shown under the Camera Setup properties dialog and Video > Video Setup tab.
1. The video format is set to ‘NTSC’ by default.
© 2001 - 2016 Microseven Systems, LLC Page | 20
Page 24

M7 Stationary HD Megapixel IP Camera Series
User Manual
2. Video coding is set to ‘mainprofile’ by default.
3. To optimize system performance, Microseven suggests the following default primary,
secondary, and tertiary settings for the bit rate, I-frame interval, and maximum frame rate:
• Primary: 2048, 25, 50
• Secondary: 200, 10, 20
• Tertiary: 128, 07, 15
4. The bit rate type is set by default to VBR (variable bit rate).
5. Click the ‘Smartphone and Pad’ button to establish a large or small window when viewing video
on mobile smartphone and tablet devices.
6. Click ‘Apply’ to save the settings.
3.1.10.2 Display Setup
1. Display Setup provides Brightness, Contrast, Saturation, Hue, and Exposure value (EV)
adjustments.
2. Click ‘Set Default” to restore all values to system default settings.
3. Click ‘Apply’ button to save the changes.
Tip: IR night vision can be brightened or darkened by increasing or decreasing the exposure value.
3.1.10.3 Infrared Light Setup
Click the radio button to either ‘Turn on’ or ‘Turn off’ the current camera’s IR lights in night vision. For
cameras situated behind a glass pane, you can eliminate IR glare by turning the IR lights off. When the IR
light setting is turned off, the option to select an IR-Cut option of either ‘Black and white mode’ or ‘Color
mode’ becomes available.
3.1.11 Detection Tab
3.1.11.1 Motion Detection
M7CMS provides flexible event detection capabilities that can be calibrated to suit most environments.
1. Set the motion sensitivity level, where 100 is the most sensitive to movement and 1 is the least
sensitive. The sensitivity level is set to 50 by default.
2. Select the number of snapshots that will be taken when motion is detected (between 1 and 3).
Snapshot is set to 1 by default.
3. Check any of the actions you wish to enable when M7CMS detects motion. Choose from ‘Send
email’, ‘Snapshot to SD Card’, Upload snapshot to FTP’, ‘Record to SD Card’, and/or ‘Upload
record to FTP’.
4. Schedule motion detection for specific day(s) of the week and for 1 to 4 time duration blocks.
5. Check the ‘Apply to everyday’ box if you wish to copy the current setting to all days of the week.
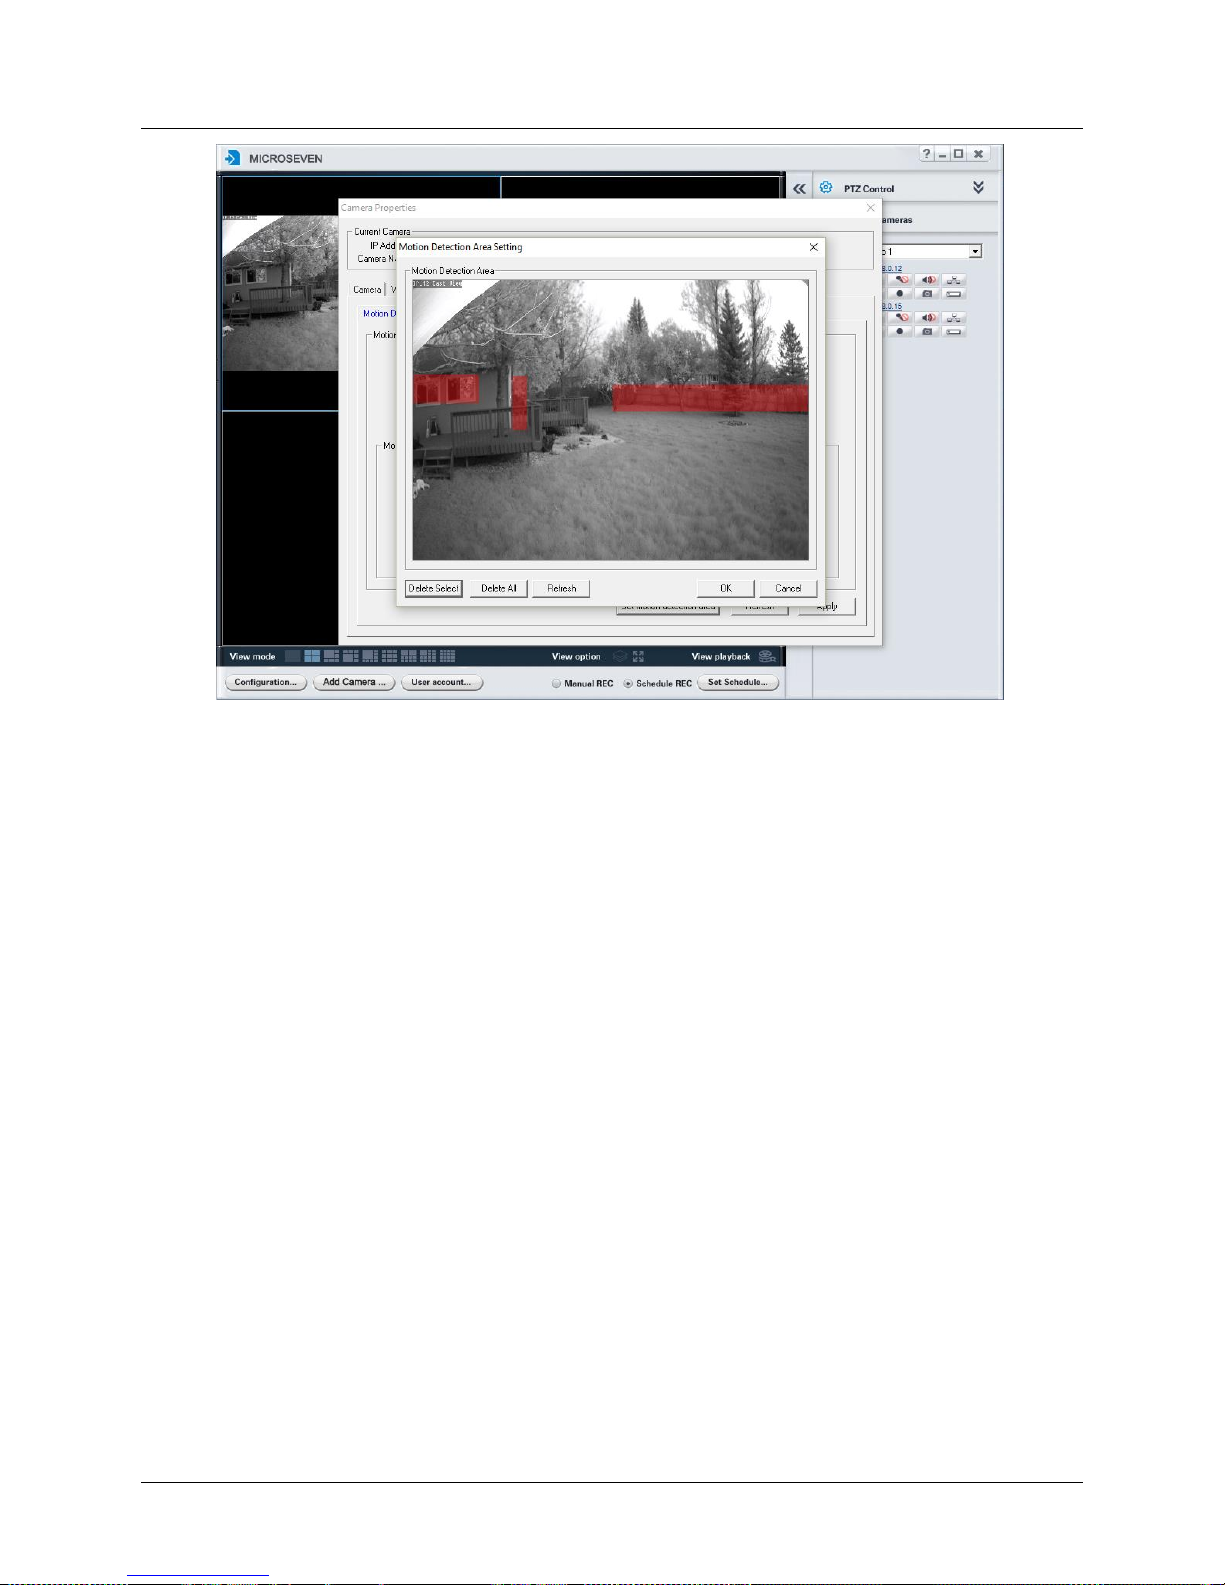
6. Click the ‘Set motion detection area’ button to display a Motion Detection Area Setting window.
© 2001 - 2016 Microseven Systems, LLC Page | 21
Page 25
M7 Stationary HD Megapixel IP Camera Series
User Manual
7. Left click and drag the cursor across the desired motion detection area. The selected area(s) will
be highlighted in red. Up to four different motion detection areas can be set.
8. Click ‘Apply’ to save the current settings.
3.1.12 Capture & Snapshot Tab
3.1.12.1 Auto Capture
Auto Capture automatically captures snapshots according to a user-defined schedule and can send the
snapshots to an FTP server, email account, or the camera’s MicroSD card.
1. Use the File mode drop down menu to choose a naming convention for auto captured files. The
Date/Time Suffix option creates a filename using the first two digits of the year, month, day,
hour, minute, and second (e.g. P16052721145400.jpg). The Overwrite option activates the File
name field where you can type a file name. The Date/Time Suffix file mode is selected by
default.
2. Check the box beside the delivery method(s) you want to enable. You can choose from Enable
auto capture to FTP, Enable auto capture to Email, Enable auto capture to SD Card.
3. Set the capture interval for each enabled option. The default interval is set to 60 seconds.
4. Set the Auto capture schedule including the day and duration for each day.
5. Check the ‘Apply to everyday’ box if you wish to copy the current setting to all days of the week.
6. Click Apply button to save and apply the current settings.
© 2001 - 2016 Microseven Systems, LLC Page | 22
Page 26

M7 Stationary HD Megapixel IP Camera Series
User Manual
3.1.13 Recording Tab
The Recording tab provides the ability to set recording schedules, establish various recording options,
and query the video and snapshot files stored on the camera’s on-board MicroSD card. Recorded video
and snapshots stored on your MicroSD card can be downloaded and saved to your PC.
3.1.13.1 Record Query
From the Record Query tab, you can search, display, playback, and download video and snapshots from
your camera’s onboard MicroSD card.
Querying and playing video files
1. Select the date and time range for your query using the ‘From:’ and ‘To:’ dropdown lists.
2. Click the ‘Query’ button to search the MicroSD card for files matching your query. A list of all
matching files is displayed in the Record Query window.
3. Double-click on any file in the list to play the selected video in a separate window.
© 2001 - 2016 Microseven Systems, LLC Page | 23
Page 27

M7 Stationary HD Megapixel IP Camera Series
User Manual
Downloading video files from the MicroSD card to your PC
1. The queried files can be selected and downloaded to your local system.
2. Left-click to select a single file or use “left-click + shift” to select multiple files.
3. Click the ‘Download’ button to download the selected files from the camera’s on-board MicroSD
card to your local system.
4. The files are saved in the .avi format. Microseven recommends using the freeware VLC player to
view the downloaded video files.
3.1.13.2 Snapshot Query
From the Snapshot Query tab, you can search, display, preview, and download snapshot files from your
camera’s onboard MicroSD card.
Querying and viewing snapshot files
1. Select the date and time range for your query using the ‘From:’ and ‘To:’ dropdown lists.
2. Click the ‘Query’ button to execute your query for the established date and time range.
3. All files matching your query will be displayed in the Snapshot Query window.
4. Double-click on any file in the list to display the selected snapshot in a separate preview
window.
Downloading snapshots from the MicroSD card to your PC
1. The queried files can be selected and downloaded to your local system.
2. Left-click to select a single file or use “left-click + shift” to select multiple files.
3. Click the ‘Download’ button to download the selected files from the camera’s on-board MicroSD
card to your local system.
4. The files are saved in the .jpg format.
© 2001 - 2016 Microseven Systems, LLC Page | 24
Page 28

M7 Stationary HD Megapixel IP Camera Series
User Manual
3.1.13.3 Record Schedule
Recording schedules can be set for specific days of the week, intervals, or durations.
1. Check the ‘Schedule Rec Enable’ box.
2. Use the dropdown menu to select a day of the week to schedule a recording.
3. Set from 1 to 4 time duration blocks for the day’s recording.
4. Check ‘Apply to everyday’ if you wish to copy the current setting to all days of the week.
5. Click ‘Apply’ to save the settings.
Tip: The Record Schedule tab is Motion detection settings are found under the Detection tab.
3.1.13.4 Record Options
The Record Options tab is used to control motion and 24x7 recording.
1. Enter a recording file length between 15-900 seconds.
2. Choose the recording stream (primary=default, secondary, or tertiary).
3. Click ‘Apply’ to save the settings. Changes to the recording stream type will cause the camera to
reboot automatically after clicking ‘Apply’.
3.1.14 User Accounts Tab
M7CMS provides three levels of users including: 1) Administrator (superuser), 2) User and 3) Guest. The
Administrator is the only user who can change the properties of the camera. User and Guest are
permitted to view the video stream.
1. Enter the User or Guest username and password.
2. Re-type the password to confirm the entry.
3. Click ‘Apply’ to save the settings and close the dialog.
Note: In addition to a space, the following eight characters cannot be used in the password: $ = “ \
# % + ? \
3.1.15 System Tab
3.1.15.1 Storage
M7CMS displays SD card information including Status, Total Size, and Free Size. Power off the camera
before installing the MicroSD card. The maximum capacity is up to 128 GB MicroSD card as SDHX.
3.1.15.2 Firmware Upgrade
The Firmware Upgrade window displays camera Device type, Cam ID, PIN code, and Firmware version.
Refer to Section 1.2 for detailed instructions on performing a firmware upgrade.
3.1.15.3 System Log
User actions and warning messages are displayed on the System Log tab. Click ‘Reset’ to clear the log
records.
© 2001 - 2016 Microseven Systems, LLC Page | 25
Page 29

M7 Stationary HD Megapixel IP Camera Series
User Manual
3.2 Local Video Playback
This section describes how to play video files that have been downloaded to your PC.
1. Open the M7CMS window.
2. Click the ‘View playback’ icon.
3. When in the ‘View playback’ mode, the “Select Cameras” pane and “Set Playback Date and
Time” pane will be displayed on the right side of the M7CMS window.
4. Choose the camera from the ‘Camera’ dropdown menu and the playback date and time from
the ‘Set Time’ dropdown menu.
5. A list of files available for playback will be listed in the Recording File window.
© 2001 - 2016 Microseven Systems, LLC Page | 26
Page 30

M7 Stationary HD Megapixel IP Camera Series
User Manual
6. Select one or more recording files from the list by checking the box next to the name of the
file(s) you wish to select. Alternatively, you can check the ‘Select all’ check box to select all
displayed files.
7. Click the ‘Play’ button to play the files in the viewer.
8. Click the snapshot icon to save a snapshot of the video to the established path (hover over
the icon to display the file save path).
9. Click the save file icon to open a Save As dialog window and save the record file in *.mp4 or
*.avi format. You can play the output files with M7CMS or other media player.
© 2001 - 2016 Microseven Systems, LLC Page | 27
 Loading...