

Page 1

DG0849
Demo Guide
PolarFire Dual Camera Video Kit
Page 2

Microsemi makes no warranty, representation, or guarantee regarding the information contained herein or the suitability of
its products and services for any particular purpose, nor does Microsemi assume any liability whatsoever arising out of the
application or use of any product or circuit. The products sold hereunder and any other products sold by Microsemi have
been subject to limited testing and should not be used in conjunction with mission-critical equipment or applications. Any
performance specifications are believed to be reliable but are not verified, and Buyer must conduct and complete all
Microsemi Headquarters
One Enterprise, Aliso Viejo,
CA 92656 USA
Within the USA: +1 (800) 713-4113
Outside the USA: +1 (949) 380-6100
Sales: +1 (949) 380-6136
Fax: +1 (949) 215-4996
performance and other testing of the products, alone and together with, or installed in, any end-products. Buyer shall not
rely on any data and performance specifications or parameters provided by Microsemi. It is the Buyer’s responsibility to
independently determine suitability of any products and to test and verify the same. The information provided by Microsemi
hereunder is provided “as is, where is” and with all faults, and the entire risk associated with such information is entirely
with the Buyer. Microsemi does not grant, explicitly or implicitly, to any party any patent rights, licenses, or any other IP
rights, whether with regard to such information itself or anything described by such information. Information provided in this
document is proprietary to Microsemi, and Microsemi reserves the right to make any changes to the information in this
document or to any products and services at any time without notice.
Email: sales.support@microsemi.com
www.microsemi.com
©2019 Microsemi, a wholly owned
subsidiary of Microchip Technology Inc. All
rights reserved. Microsemi and the
Microsemi logo are registered trademarks of
Microsemi Corporation. All other trademarks
and service marks are the property of their
respective owners.
About Microsemi
Microsemi, a wholly owned subsidiary of Microchip Technology Inc. (Nasdaq: MCHP), offers a comprehensive portfolio of
semiconductor and system solutions for aerospace & defense, communications, data center and industrial markets.
Products include high-performance and radiation-hardened analog mixed-signal integrated circuits, FPGAs, SoCs and
ASICs; power management products; timing and synchronization devices and precise time solutions, setting the world's
standard for time; voice processing devices; RF solutions; discrete components; enterprise storage and communication
solutions, security technologies and scalable anti-tamper products; Ethernet solutions; Power-over-Ethernet ICs and
midspans; as well as custom design capabilities and services. Learn more at www.microsemi.com.
50200849. 1.0 2/19
Page 3

Contents
1 Revision History . . . . . . . . . . . . . . . . . . . . . . . . . . . . . . . . . . . . . . . . . . . . . . . . . . . . . 1
1.1 Revision 1.0 . . . . . . . . . . . . . . . . . . . . . . . . . . . . . . . . . . . . . . . . . . . . . . . . . . . . . . . . . . . . . . . . . . . . . . . 1
2 PolarFire Dual Camera Video Kit . . . . . . . . . . . . . . . . . . . . . . . . . . . . . . . . . . . . . . . 2
2.1 Design Requirements . . . . . . . . . . . . . . . . . . . . . . . . . . . . . . . . . . . . . . . . . . . . . . . . . . . . . . . . . . . . . . . 3
2.2 Prerequisites . . . . . . . . . . . . . . . . . . . . . . . . . . . . . . . . . . . . . . . . . . . . . . . . . . . . . . . . . . . . . . . . . . . . . . 3
2.3 Demo Resources . . . . . . . . . . . . . . . . . . . . . . . . . . . . . . . . . . . . . . . . . . . . . . . . . . . . . . . . . . . . . . . . . . . 3
2.4 Installing the Demo GUI . . . . . . . . . . . . . . . . . . . . . . . . . . . . . . . . . . . . . . . . . . . . . . . . . . . . . . . . . . . . . . 4
2.5 Setting Up the Demo . . . . . . . . . . . . . . . . . . . . . . . . . . . . . . . . . . . . . . . . . . . . . . . . . . . . . . . . . . . . . . . . 4
2.5.1 Setting Up the Hardware . . . . . . . . . . . . . . . . . . . . . . . . . . . . . . . . . . . . . . . . . . . . . . . . . . . . . . 4
2.5.2 Programming the PolarFire Device . . . . . . . . . . . . . . . . . . . . . . . . . . . . . . . . . . . . . . . . . . . . . . 5
2.6 Running the Demo . . . . . . . . . . . . . . . . . . . . . . . . . . . . . . . . . . . . . . . . . . . . . . . . . . . . . . . . . . . . . . . . . . 9
Microsemi Proprietary DG0849 Demo Guide Revision 1.0 iii
Page 4

Figures
Figure 1 PolarFire Video Kit (DVP-102-000512-001) . . . . . . . . . . . . . . . . . . . . . . . . . . . . . . . . . . . . . . . . . . . 2
Figure 2 Creating New Project . . . . . . . . . . . . . . . . . . . . . . . . . . . . . . . . . . . . . . . . . . . . . . . . . . . . . . . . . . . . 5
Figure 3 View Programmer . . . . . . . . . . . . . . . . . . . . . . . . . . . . . . . . . . . . . . . . . . . . . . . . . . . . . . . . . . . . . . . 6
Figure 4 Running Script . . . . . . . . . . . . . . . . . . . . . . . . . . . . . . . . . . . . . . . . . . . . . . . . . . . . . . . . . . . . . . . . . 7
Figure 5 Run Passed-Notification . . . . . . . . . . . . . . . . . . . . . . . . . . . . . . . . . . . . . . . . . . . . . . . . . . . . . . . . . . 8
Figure 6 Video_Contol GUI . . . . . . . . . . . . . . . . . . . . . . . . . . . . . . . . . . . . . . . . . . . . . . . . . . . . . . . . . . . . . . . 9
Figure 7 FlashPro5 COM Port . . . . . . . . . . . . . . . . . . . . . . . . . . . . . . . . . . . . . . . . . . . . . . . . . . . . . . . . . . . . 9
Figure 8 Connecting the GUI and Video kit . . . . . . . . . . . . . . . . . . . . . . . . . . . . . . . . . . . . . . . . . . . . . . . . . 10
Figure 9 Connection Successful . . . . . . . . . . . . . . . . . . . . . . . . . . . . . . . . . . . . . . . . . . . . . . . . . . . . . . . . . . 10
Figure 10 Adjusting Contrast and Brightness . . . . . . . . . . . . . . . . . . . . . . . . . . . . . . . . . . . . . . . . . . . . . . . . . 11
Figure 11 Adjusting Colors . . . . . . . . . . . . . . . . . . . . . . . . . . . . . . . . . . . . . . . . . . . . . . . . . . . . . . . . . . . . . . . 11
Figure 12 Edge Detection Option . . . . . . . . . . . . . . . . . . . . . . . . . . . . . . . . . . . . . . . . . . . . . . . . . . . . . . . . . . 12
Figure 13 PIP Menu . . . . . . . . . . . . . . . . . . . . . . . . . . . . . . . . . . . . . . . . . . . . . . . . . . . . . . . . . . . . . . . . . . . . 12
Microsemi Proprietary DG0849 Demo Guide Revision 1.0 iv
Page 5

Tables
Table 1 Design Requirements . . . . . . . . . . . . . . . . . . . . . . . . . . . . . . . . . . . . . . . . . . . . . . . . . . . . . . . . . . . . 3
Table 2 Jumper Settings . . . . . . . . . . . . . . . . . . . . . . . . . . . . . . . . . . . . . . . . . . . . . . . . . . . . . . . . . . . . . . . . 4
Microsemi Proprietary DG0849 Demo Guide Revision 1.0 v
Page 6

Revision History
1 Revision History
The revision history describes the changes that were implemented in the document. The changes are
listed by revision, starting with the most current publication.
1.1 Revision 1.0
The first publication of this document.
Microsemi Proprietary DG0849 Demo Guide Revision 1.0 1
Page 7
PolarFire Dual Camera Video Kit
2 PolarFire Dual Camera Video Kit
This document describes how to run the imaging and video demo using the PolarFire Video Kit, Dual
Camera sensor module, and a HDMI monitor. The demo design features a fully integrated solution
created using Microsemi Libero SoC PolarFire
The demo demonstrates the following functions:
• MIPI CSI-2 RX to read the camera input
• CFA (Color filter array) to RGB (red, green, blue) conversion
• Display controller
• Picture in picture (PIP)
• Edge detection
• Image enhancements such as contrast, brightness, color balance
Note: The solution includes a user-friendly GUI used to control these image/video settings.
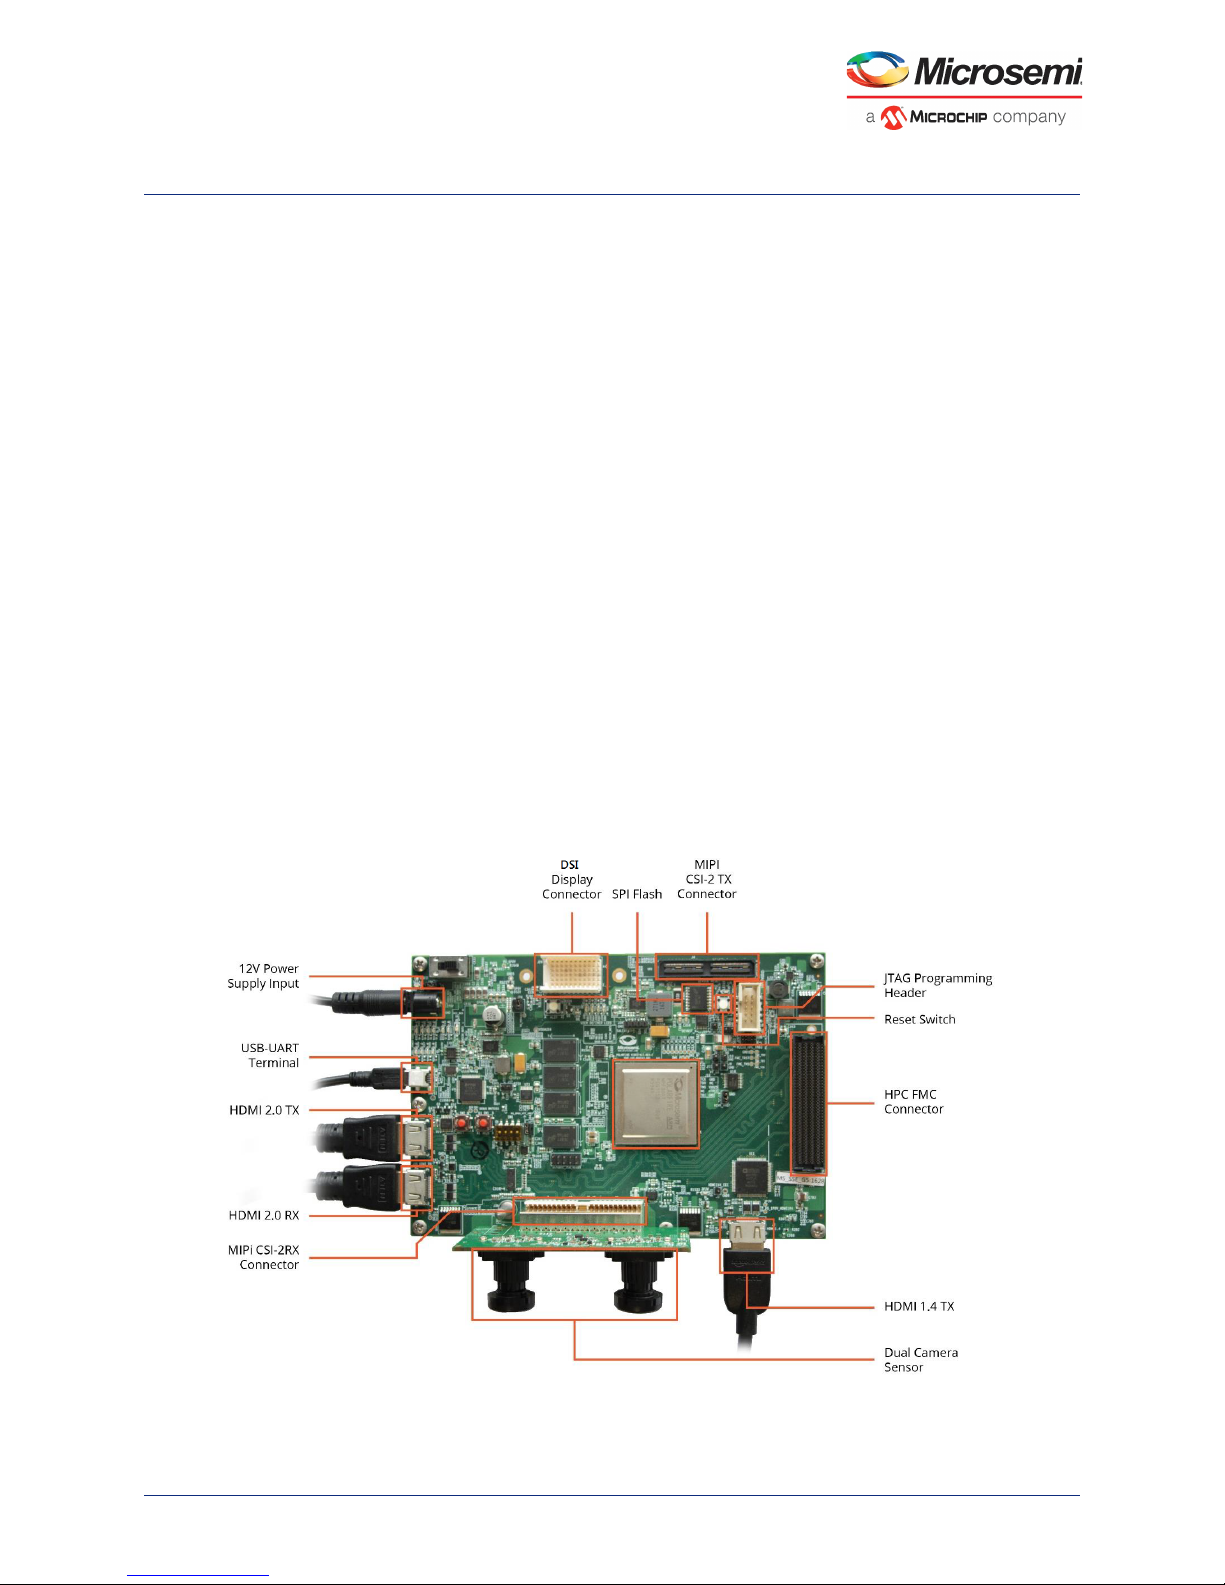
The PolarFire Video Kit (DVP-102-000512-001) features:
• A 300K LE FPGA (MPF300T, FCG1152)
• HDMI 1.4 transmitter (ADV7511) chipset and corresponding connector
• HDMI 2.0 with rail clamps and redrivers and corresponding connectors
• Dual camera sensor featuring IMX334 Sony image sensor
• Image sensor interface to support upto two MIPI CSI-2 cameras
• DSI Interface
• NVIDIA Jetson Interface
• A high pin count (HPC) FMC connector to connect to high-speed interfaces (like HDSDI)
For more information about this video kit, see
https://www.microsemi.com/existing-parts/parts/150747.
The following figure highlights the various features of the PolarFire Video Kit.
Figure 1 • PolarFire Video Kit (DVP-102-000512-001)
®
to help customers build prototypes quickly.
Microsemi Proprietary DG0849 Demo Guide Revision 1.0 2
Page 8

PolarFire Dual Camera Video Kit
2.1 Design Requirements
The following table lists the hardware and software required to run the demo.
Table 1 • Design Requirements
Design Requirement Description
Hardware
-PolarFire VIDEO KIT DVP-102-000512-001 REV 1.0
-Image Sensor module LI-IMX334-MIPI-MICRO v1.0
-USB A to mini-B cable
-HDMI cable HDMI A Male to Male cable
-HDMI monitor Any display with HDMI input
-Power Adapter 12V, 5A
-Host PC OS: Windows 7 or later, with HDMI TX port
Software
-Program_Debug_PolarFire_v2.3_win.exe This executable installs FlashPro PolarFire
v2.3 used to program the FPGA
Note: For HDMI 2.0, do not use a HDMI converter with the monitor or the Host PC.
2.2 Prerequisites
Before you start:
1. Download the programming files and the TCL script from:
http://soc.microsemi.com/download/rsc/?f=mpf_dg0849_liberosocpolarfirev2p3_pf
2. Download the GUI from:
http://soc.microsemi.com/download/rsc/?f=mpf_dg0849_liberosocpolarfirev2p3_gui
3. Download and install the program and Debug software from:
https://www.microsemi.com/document-portal/doc_download/1243650-download-programming-anddebug-polarfire-v2-3-for-windows
Note: On this web page, you are prompted to download the Program_Debug_PolarFire_v2.3_win.exe
binary file. Installation of this executable installs FlashPro and SmartDebug used for FPGA programming
and debugging. FlashPro is used in this demo.
2.3 Demo Resources
The programming files folder contains the following resources:
• A programming file (STP file): This file is the FPGA bitstream to be programmed.
• A binary file (BIN file) for the on-board SPI flash: This file is the user application that is executed
by the Mi-V soft processor in the FPGA. The file is stored in SPI flash and is used to initialize the
fabric RAMs at device power-up.
• A TCL script file: This script stores the TCL instructions to program the PolarFire device and the
SPI Flash.
Follow these steps to make the TCL file compatible with your setup.
1. Unzip the <programming files>.zip file.
2. Open the TCL file using a text editor like notepad++
3. Update the location of the STP and BIN files as per your file system paths.
4. Replace the path separator ‘\’ with ‘/’ when copying the Windows file paths.
5. Save and close the TCL file.
Microsemi Proprietary DG0849 Demo Guide Revision 1.0 3
Page 9

PolarFire Dual Camera Video Kit
2.4 Installing the Demo GUI
To install the GUI:
1. Extract the Installer.rar file from the <$DownloadedFolder>\Installer folder and run the
setup.exe file.
2. Click Yes for any message from User Account Control.
The Video Control GUI installation wizard is displayed.
3. Confirm the installation directory locations for the GUI and the National Instruments products and
click Next.
4. Accept the license agreement, and click Next.
5. Review the summary and click Next.
The installation proceeds with a progress bar. After the installation, a confirmation message is displayed.
6. Click Next to exit the installation wizard.
7. Restart the host PC when prompted.
The Video_Control GUI is installed.
2.5 Setting Up the Demo
Setting up the demo involves the following steps:
1. Setting Up the Hardware, page 4
2. Programming the PolarFire Device, page 5
2.5.1 Setting Up the Hardware
Setting up the hardware involves interfacing the dual camera sensor module with the PolarFire Video Kit
and verifying the jumper settings. The following steps describe how to connect the camera module to
video kit.
1. Connect the J1 connector of the dual camera sensor module to J38 interface of the video kit.
2. Connect the video kit and the HDMI monitor through J2 (HDMI 1.4) of the video kit using the HDMI
cable.
3. Connect the Host PC and the video kit through J12 of the video kit using the USB mini cable.
4. Connect the power supply cable to J20 of the video kit.
5. Ensure that the following jumper settings are set on the video kit.
Table 2 • Jumper Settings
Jumper Default Position Functionality
J15 Open SPI Slave and Master mode selection. By Default SPI
master
J17 Open 100K PD for TRSTn, by default 1K PD is connected.
J19 Pin 1&2 Default: XCVR_VREF is connected to GND
J28 Pin 1&2 Default: Programming through the FTDI
J24 Pin 2&4 Default: VDDAUX4 voltage is set to 3V3
J25 Pin 5&6 Default: Bank4 voltage is set to 1V8
J36 Pin 1&2 Default: Board power up through the SW4
SW4 OFF (Pin 2-3,5-6 Positions) Power ON\OFF switch
SW6 OFF position user slide switch, Default OFF position
J20 12Volts Input 12V input to the board
6. Power-up the HDMI monitor.
7. Power-up the board using the SW4 slide switch.
Microsemi Proprietary DG0849 Demo Guide Revision 1.0 4
Page 10

PolarFire Dual Camera Video Kit
The PolarFire dual camera video and imaging hardware is set up. See the next section to program the
PolarFire device.
2.5.2 Programming the PolarFire Device
The TCL script is used to program the PolarFire device. The FlashPro software can execute the TCL
script file.
Follow these steps:
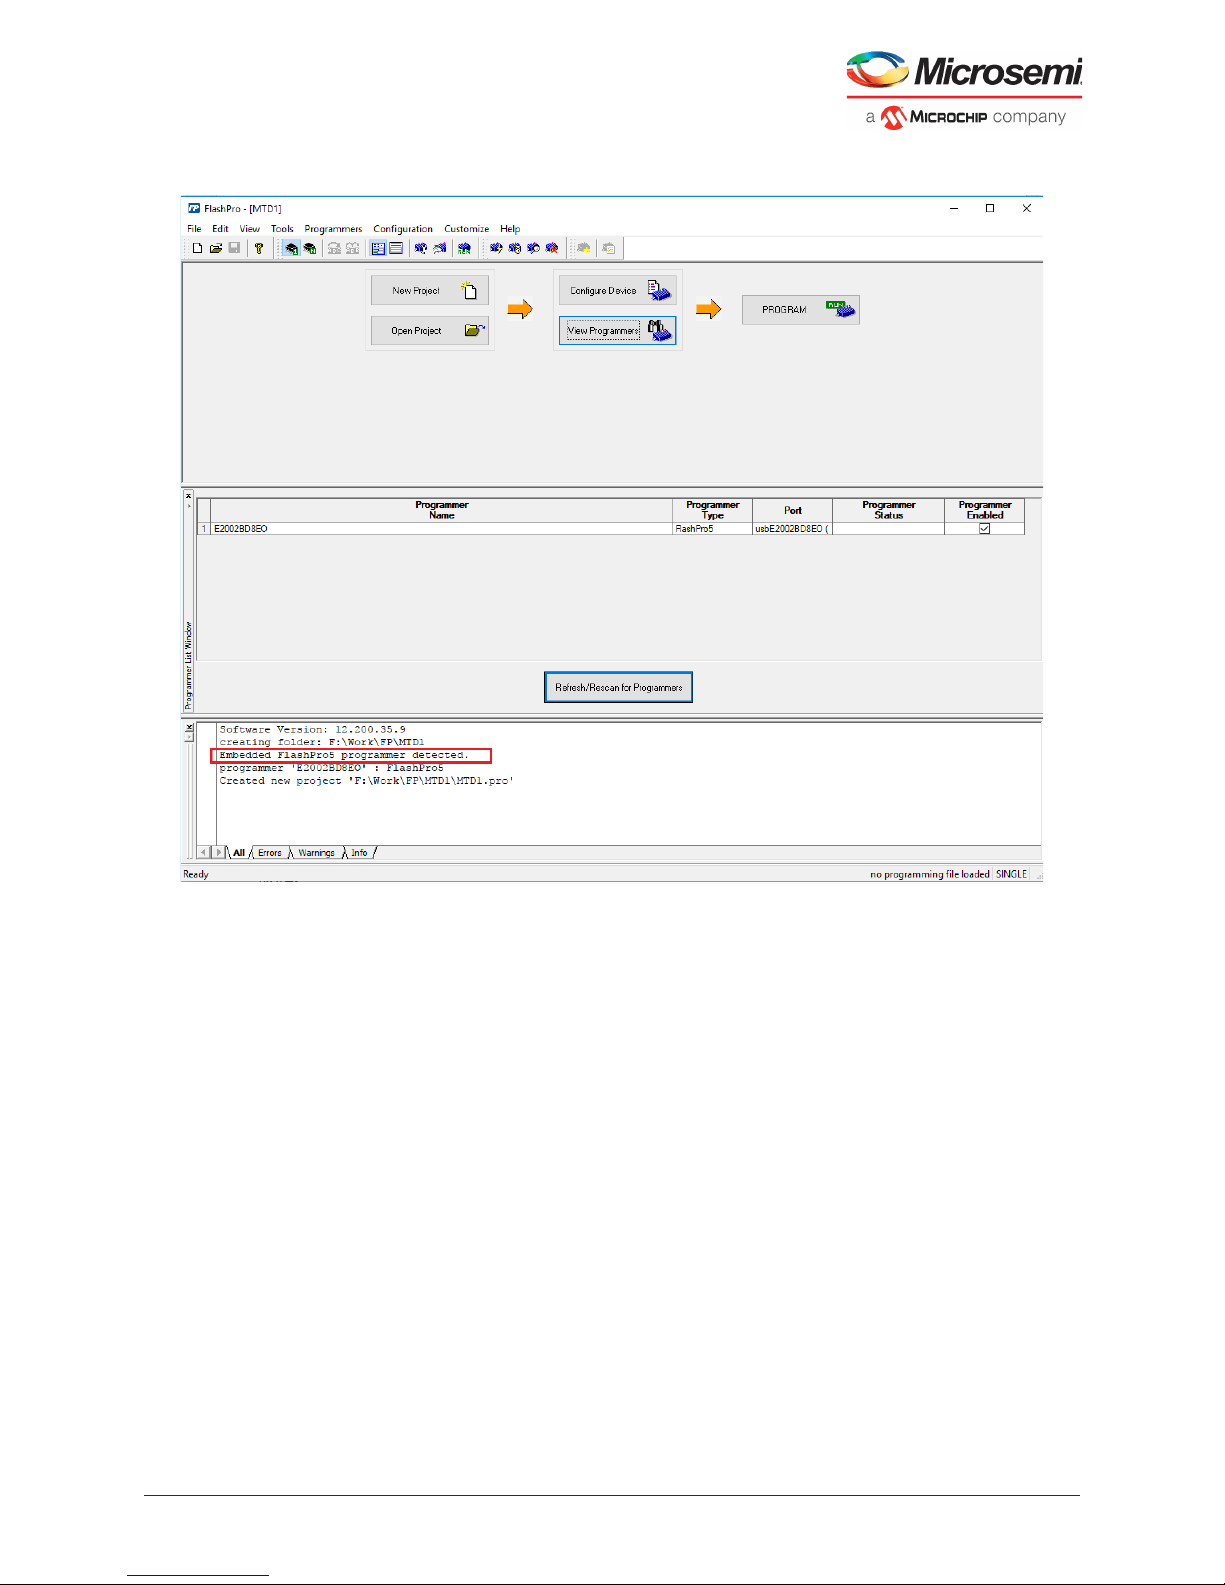
1. Open FlashPro and create a new project as shown in the following figure.
Figure 2 • Creating New Project
Microsemi Proprietary DG0849 Demo Guide Revision 1.0 5
Page 11
PolarFire Dual Camera Video Kit
2. Verify that the FlashPro5 programmer is detected and displayed as shown in the following figure.
Figure 3 • View Programmer
3. Select File -> Run script. The Execute Script dialog box opens as shown in the following figure.
Microsemi Proprietary DG0849 Demo Guide Revision 1.0 6
Page 12

PolarFire Dual Camera Video Kit
Figure 4 • Running Script
4. Use the Browse option to select the Script.tcl file from the following design files folder:
<script file location>
Note: In the TCL file, ensure that the path separator ‘\’ is replaced with ‘/’ when using a Windows PC.
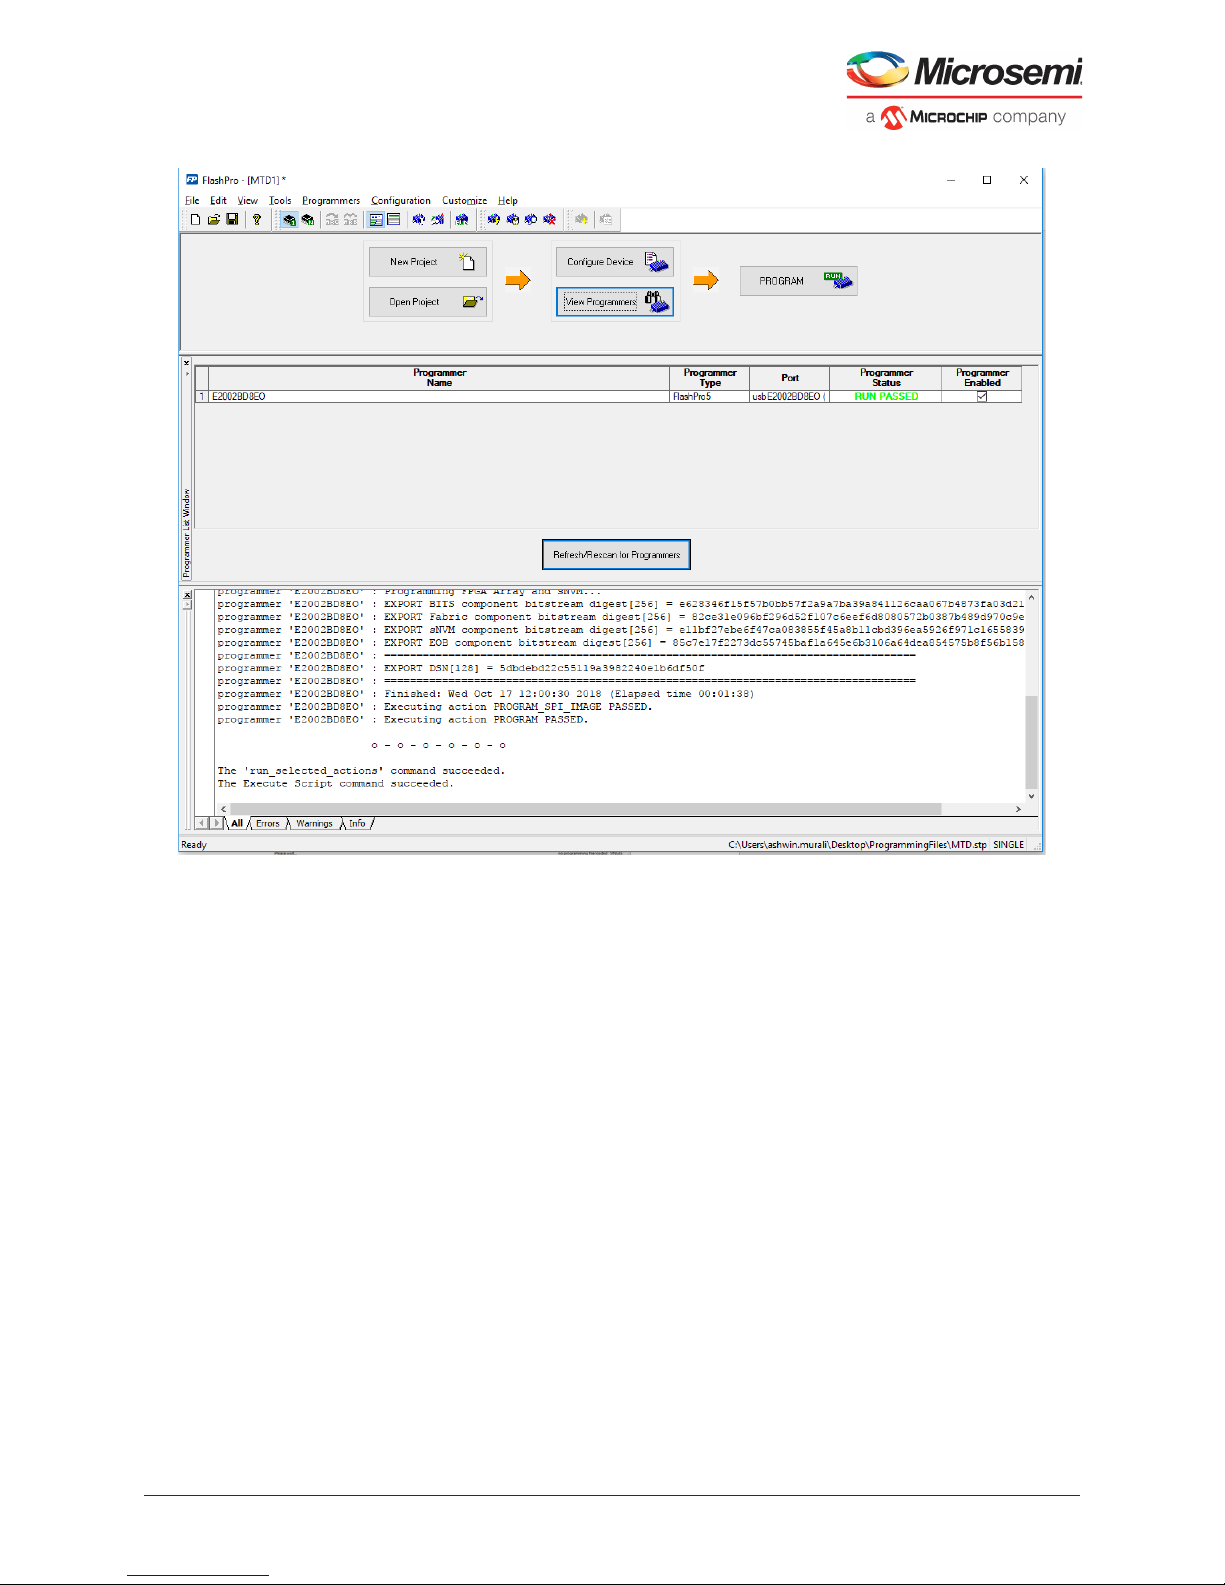
5. Select Run to run the script. Once complete, a message appears in the log as shown in the following
figure.
Microsemi Proprietary DG0849 Demo Guide Revision 1.0 7
Page 13
PolarFire Dual Camera Video Kit
Figure 5 • Run Passed-Notification
The PolarFire device and SPI Flash are programmed.
Power cycle the board using switch SW4. The camera feed from the 2 cameras is displayed on the HDMI
monitor as Picture in Picture.
Microsemi Proprietary DG0849 Demo Guide Revision 1.0 8
Page 14
PolarFire Dual Camera Video Kit
2.6 Running the Demo
Running the demo involves verifying the imaging and video settings using the Video_Control GUI and
then observing the result on the HDMI monitor.
To use the demo GUI:
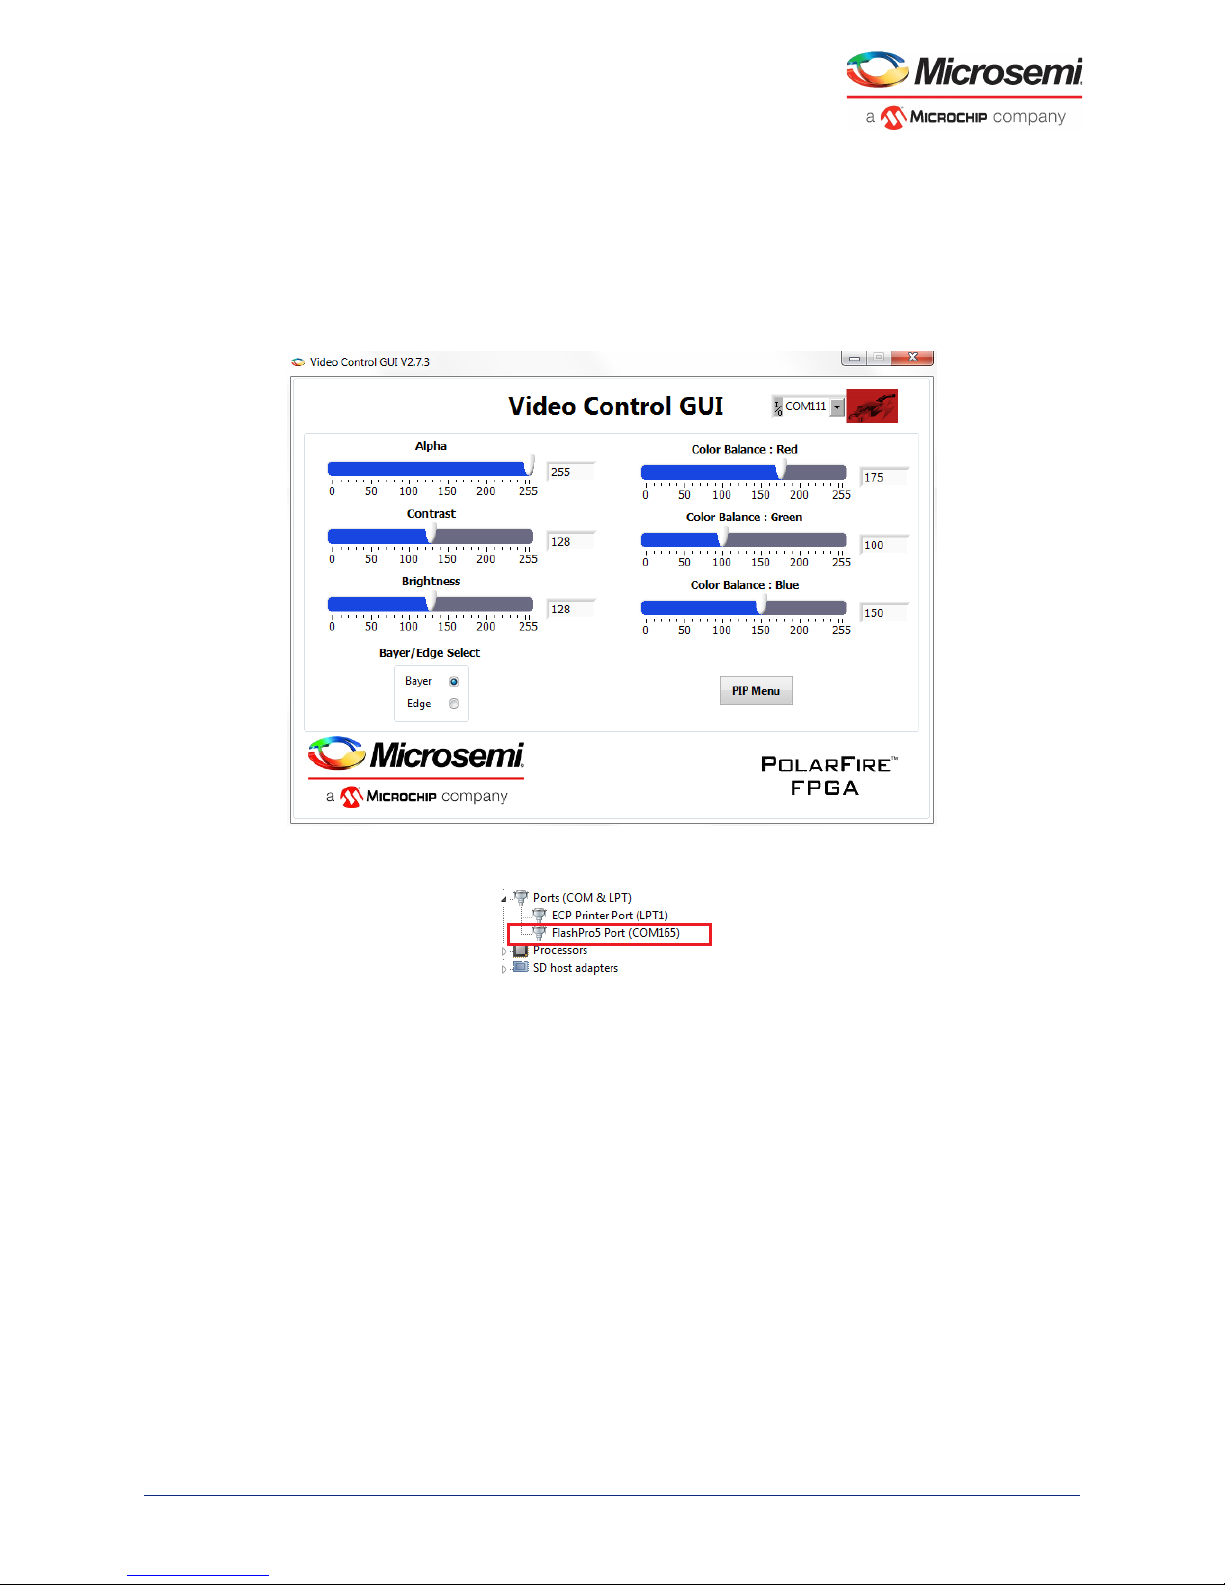
1. Start the Video_Control GUI from the installation directory.
The GUI is displayed as shown in the following figure.
Figure 6 • Video_Contol GUI
2. Note the FlashPro5 COM port from Device Manager.
Figure 7 • FlashPro5 COM Port
3. Select the same FlashPro5 COM port on the GUI and select the Connect option.
Microsemi Proprietary DG0849 Demo Guide Revision 1.0 9
Page 15

PolarFire Dual Camera Video Kit
Figure 8 • Connecting the GUI and Video kit
4. The connect button turns green to indicate that the connection is successful.
Figure 9 • Connection Successful
Microsemi Proprietary DG0849 Demo Guide Revision 1.0 10
Page 16
PolarFire Dual Camera Video Kit
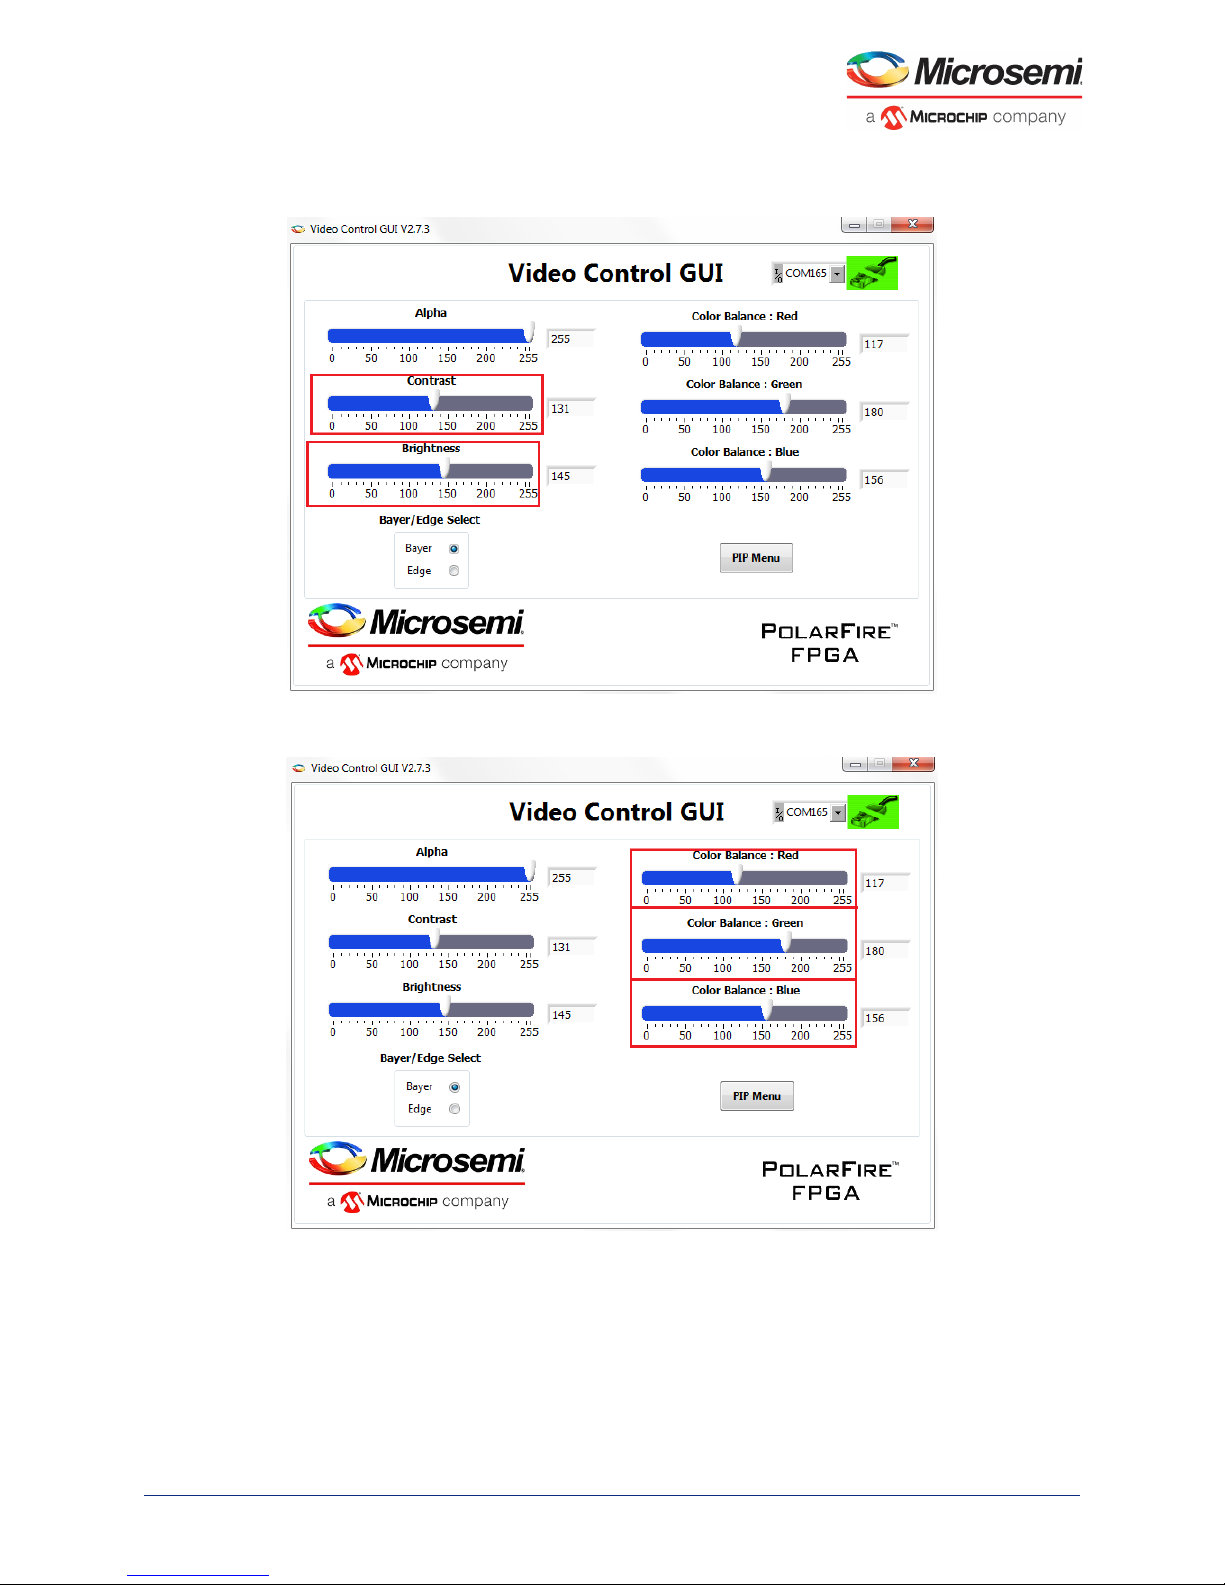
5. Use the Contrast and Brightness sliders to adjust the contrast and brightness and observe the
change on the HDMI monitor. These sliders are highlighted in the following figure.
Figure 10 • Adjusting Contrast and Brightness
6. Similarly, adjust the color balance of the image using the color balance sliders.
Figure 11 • Adjusting Colors
7. Similarly, adjust the Alpha slider. The alpha blending feature enables adjusting the transparency of
the PIP image. When the alpha value is adjusted to minimum (0), the image disappears.
8. Switch to edge detection mode using the Edge option.
Microsemi Proprietary DG0849 Demo Guide Revision 1.0 11
Page 17

PolarFire Dual Camera Video Kit
Figure 12 • Edge Detection Option
9. Select PIP Menu to change the PIP settings.
10. In the PIP Menu, the source of the PIP window can be selected between Camera 1 and Camera 2
using PIP: Source Select. The position of the PIP window can be moved anywhere within the
screen by dragging it. The Auto Mode Start option moves the PIP window automatically. The speed
of this movement can be controlled using the Auto Mode Step slider.
Figure 13 • PIP Menu
This concludes the demo.
Microsemi Proprietary DG0849 Demo Guide Revision 1.0 12
 Loading...