

Page 1

MS-96 Vial Reader User’s Guide
v3.2.0, Feb 2009
EM-20357-1V320
Page 2

Copyright and Disclaimer
Copyright ©2009 by Microscan Systems, Inc.
S.W. th Street, Renton, WA, U.S.A. 98057
(425) 226-5700 FAX: (425) 226-8682
All rights reserved. The information contained herein is proprietary and is provided solely for the purpose of allowing
customers to operate and/or service Microscan manufactured equipment and is not to be released, reproduced, or used
for any other purpose without written permission of Microscan.
Throughout this manual, trademarked names might be used. Rather than place a trademark (™) symbol at every
occurrence of a trademarked name, we state herein that we are using the names only in an editorial fashion, and to the
benefit of the trademark owner, with no intention of infringement.
Disclaimer
The information and specifications described in this manual are subject to change without notice.
Latest Manual Version and Warranty Information
For the latest version of this manual and warranty information, visit our website at: www.microscan.com.
Technical Support
For technical support, email: helpdesk@microscan.com.
Microscan Systems, Inc.
Tel: 425 226 5700
Fax: 425 226 8250
helpdesk@microscan.com
Microscan Europe
Tel: 31 172 423360
Fax: 31 172 423366
Microscan Asia Pacific
R.O. Tel: 65 6846 1214
Fax: 65 6846 4641
Page 3

Contents
CHAPTER 1 Before You Begin... 1-1
MS-96 Vial Reader Hardware Components 1-1
Operating System 1-2
Monitor Resolution 1-2
Recommended Tools 1-2
Related Documentation 1-2
CHAPTER 2
CHAPTER 3 MS-96 Vial Reader Overview 3-1
v3.2.0, Feb 2009 MS-96 Vial Reader User’s Guide iii
Installing Hardware & Software 2-1
Installing Hardware 2-2
Installing the 0300 Framegrabber & Cables 2-2
Connecting Cables 2-4
Installing Software 2-6
Installing Visionscape® and MS-96 Vial Reader Software 2-6
Troubleshooting 2-6
Adjusting the Sensor 2-6
Adjusting the Light Intensity 2-8
Testing the MS-96 Vial Reader 2-9
Modes 3-2
Vialreader.ini 3-2
Page 4

Contents
INI File Keys Not Accessible Through the Program 3-4
Modifying a Key 3-5
CHAPTER 4 Menus, Buttons, & Options 4-1
Menus 4-2
Enter Password 4-2
File Menu 4-3
Modify AVP File 4-3
Select Another AVP File 4-9
Save Current AVP Job to File 4-10
Create an Automatically Learned AVP 4-10
Manually Create a New AVP File 4-11
Modify Data File Format 4-14
Modify Image File Format 4-15
Change Data File Folder 4-16
Change Image File Folder 4-17
Configure Menu 4-17
Comm Settings 4-18
Failure Message 4-18
Printer Settings 4-19
Program Timers 4-20
Select Trigger 4-21
About Menu 4-21
Buttons 4-22
Turn Live Video On 4-23
Read Box Data Matrix 4-23
Show Complete Box 4-23
Create Array Text File 4-25
Create One Column File 4-26
Print Label 4-26
Save Images 4-27
View Contrast Values 4-27
Run Once 4-28
Reset Counts 4-28
Quit 4-28
Checkboxes 4-29
Always Create Files 4-29
Always Print A Label 4-29
Pass/Fail Based on the Number of Vials Decoded 4-29
When the Checkbox is Checked 4-29
iv MS-96 Vial Reader User’s Guide v3.2.0, Feb 2009
Page 5

When the Checkbox is Not Checked 4-31
Beep On Read 4-32
Fields 4-32
Fail Inspections 4-32
Pass Inspections 4-32
Process Time (ms) 4-33
Total Inspections 4-33
Total Time (ms) 4-33
Text Boxes 4-33
File Base Name 4-33
Number Expected 4-34
Read Complete 4-34
Options 4-34
Rack Density 4-34
Contents
APPENDIX A Setting Up the Zebra Printer A-1
APPENDIX B
MS-96 Vial Reader ActiveX API B-1
Properties B-2
Methods B-3
Events B-3
Index Index-1
v3.2.0, Feb 2009 MS-96 Vial Reader User’s Guide v
Page 6

Contents
vi MS-96 Vial Reader User’s Guide v3.2.0, Feb 2009
Page 7

1
CHAPTER 1 Before You Begin...
Before you install your MS-96 Vial Reader hardware and software, make sure
you have all of the necessary components. This chapter helps you prepare for a
successful installation.
1
Before You Begin...
MS-96 Vial Reader Hardware Components
The MS-96 Vial Reader hardware may be purchased in two configurations:
• The MS-96 Vial Reader with 10 foot cable
• The MS-96 Vial Reader with 25 foot cable
The MS-96 Vial Reader with 10 foot cable consists of the following:
TABLE 1–1. MS-96 Vial Reader w/10 Foot Cable Hardware Components
Qty Part # Description
1 PCI-10020 PCI-0300 Analog Video digitizer
1 286-019603 MS-96 Vial Reader reader head with 10
foot cable
1 030-014700 Camera cable, 10 foot
1 010-015900 I/O cable, 10 foot
1 030-012400 Internal I/O cable
v3.2.0, Feb 2009 MS-96 Vial Reader User’s Guide 1-1
Page 8

Chapter 1 Before You Begin...
The MS-96 Vial Reader with 25 foot cable consists of the following:
TABLE 1–2. MS-96 Vial Reader w/25 Foot Cable Hardware Components
Qty Part # Description
1 PCI-10020 PCI-0300 Analog video digitizer
1 286-019600 MS-96 Vial Reader reader head with 25
1 030-014701 Camera cable, 25 foot
1 030-015901 I/O cable, 25 foot
1 030-012400 Internal I/O cable
Operating System
You can use the MS-96 Vial Reader with the following operating systems:
foot cable
• Windows 2000 SP4
• Windows XP SP2
Monitor Resolution
The screen resolution for your MS-96 Vial Reader system should be set to 1024 x
768.
Recommended Tools
• A screwdriver set
Related Documentation
We suggest that you start with this manual and then refer to the following
manuals that are included on the CD:
• PCI-0300 Analog Video Digitizer User Manual
• Visionscape
1-2 MS-96 Vial Reader User’s Guide v3.2.0, Feb 2009
®
User’s Manual
Page 9

2
CHAPTER 2 Installing Hardware &
2
Software
This chapter describes how to install the MS-96 Vial Reader hardware, the
Visionscape
system.
Specifically, this chapter describes:
• “Installing Hardware” on page 2-2
• “Installing Software” on page 2-6
• “Troubleshooting” on page 2-6
®
and MS-96 Vial Reader software, and how to troubleshoot the
Software
Installing Hardware &
v3.2.0, Feb 2009 MS-96 Vial Reader User’s Guide 2-1
Page 10

Chapter 2 Installing Hardware & Software
Installing Hardware
Installing the 0300 Framegrabber & Cables
Use the following procedure to install the framegrabber and cables:
1. Remove the cover of the PC.
2. Locate an open PCI slot.
3. Unscrew a port access cover on the PC.
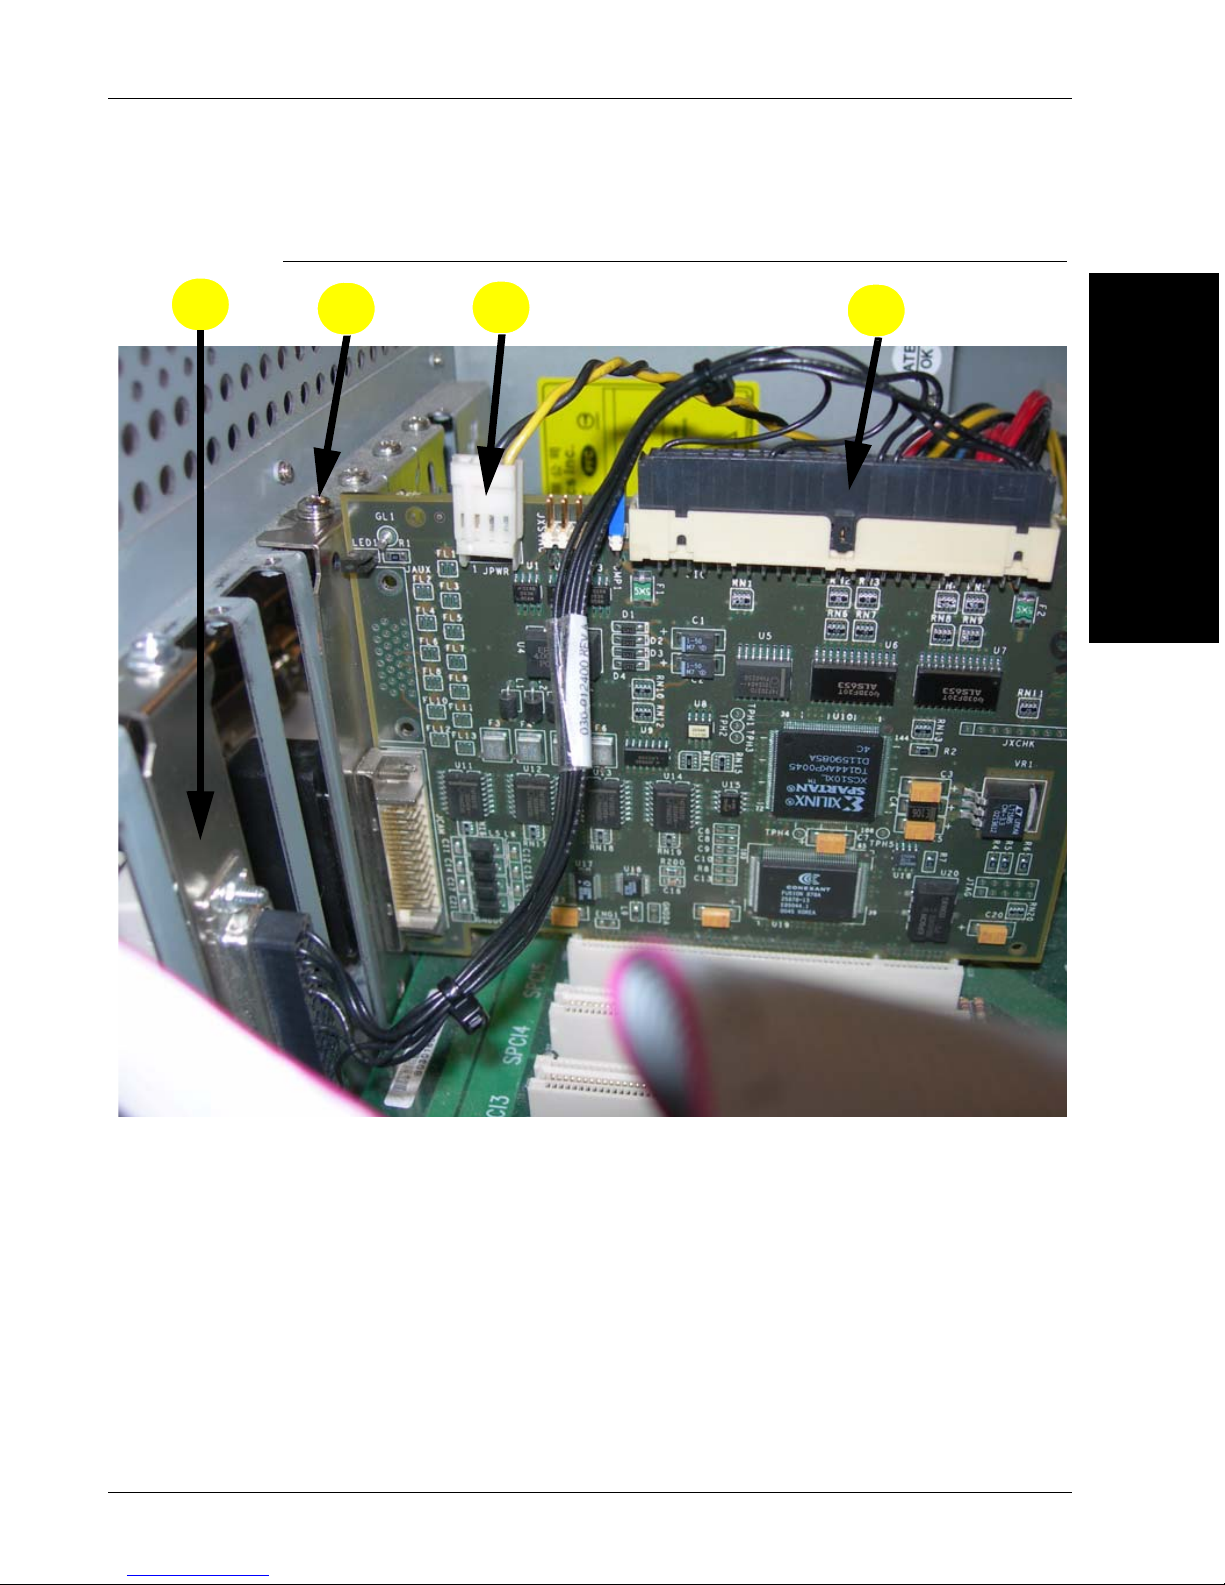
4. Install the 0300 framegrabber board by aligning the gold fingers and
pressing the module firmly into the slot.
5. Fasten the 0300 framegrabber board with a port access screw
(see Figure 2–1).
6. Unscrew another port access cover on the PC.
7. Insert the internal I/O connector into the open port access cover
(see Figure 2–1).
2-2 MS-96 Vial Reader User’s Guide v3.2.0, Feb 2009
Page 11
Installing Hardware
7
8
9
5
FIGURE 2–1. Installing the 0300 and the Internal I/O Connector & Cable
2
Software
Installing Hardware &
8. Install the camera power connector that is supplied with your board
(see Figure 2–1). Make sure the other end is connected to PC power.
9. Install the internal I/O cable (see Figure 2–1).
10. Replace the cover of the PC.
v3.2.0, Feb 2009 MS-96 Vial Reader User’s Guide 2-3
Page 12
Chapter 2 Installing Hardware & Software
Connecting Cables
Use the following procedure to connect the MS-96 Vial Reader cables:
1. Connect the power cord, network cable (if used), mouse and keyboard to the
PC.
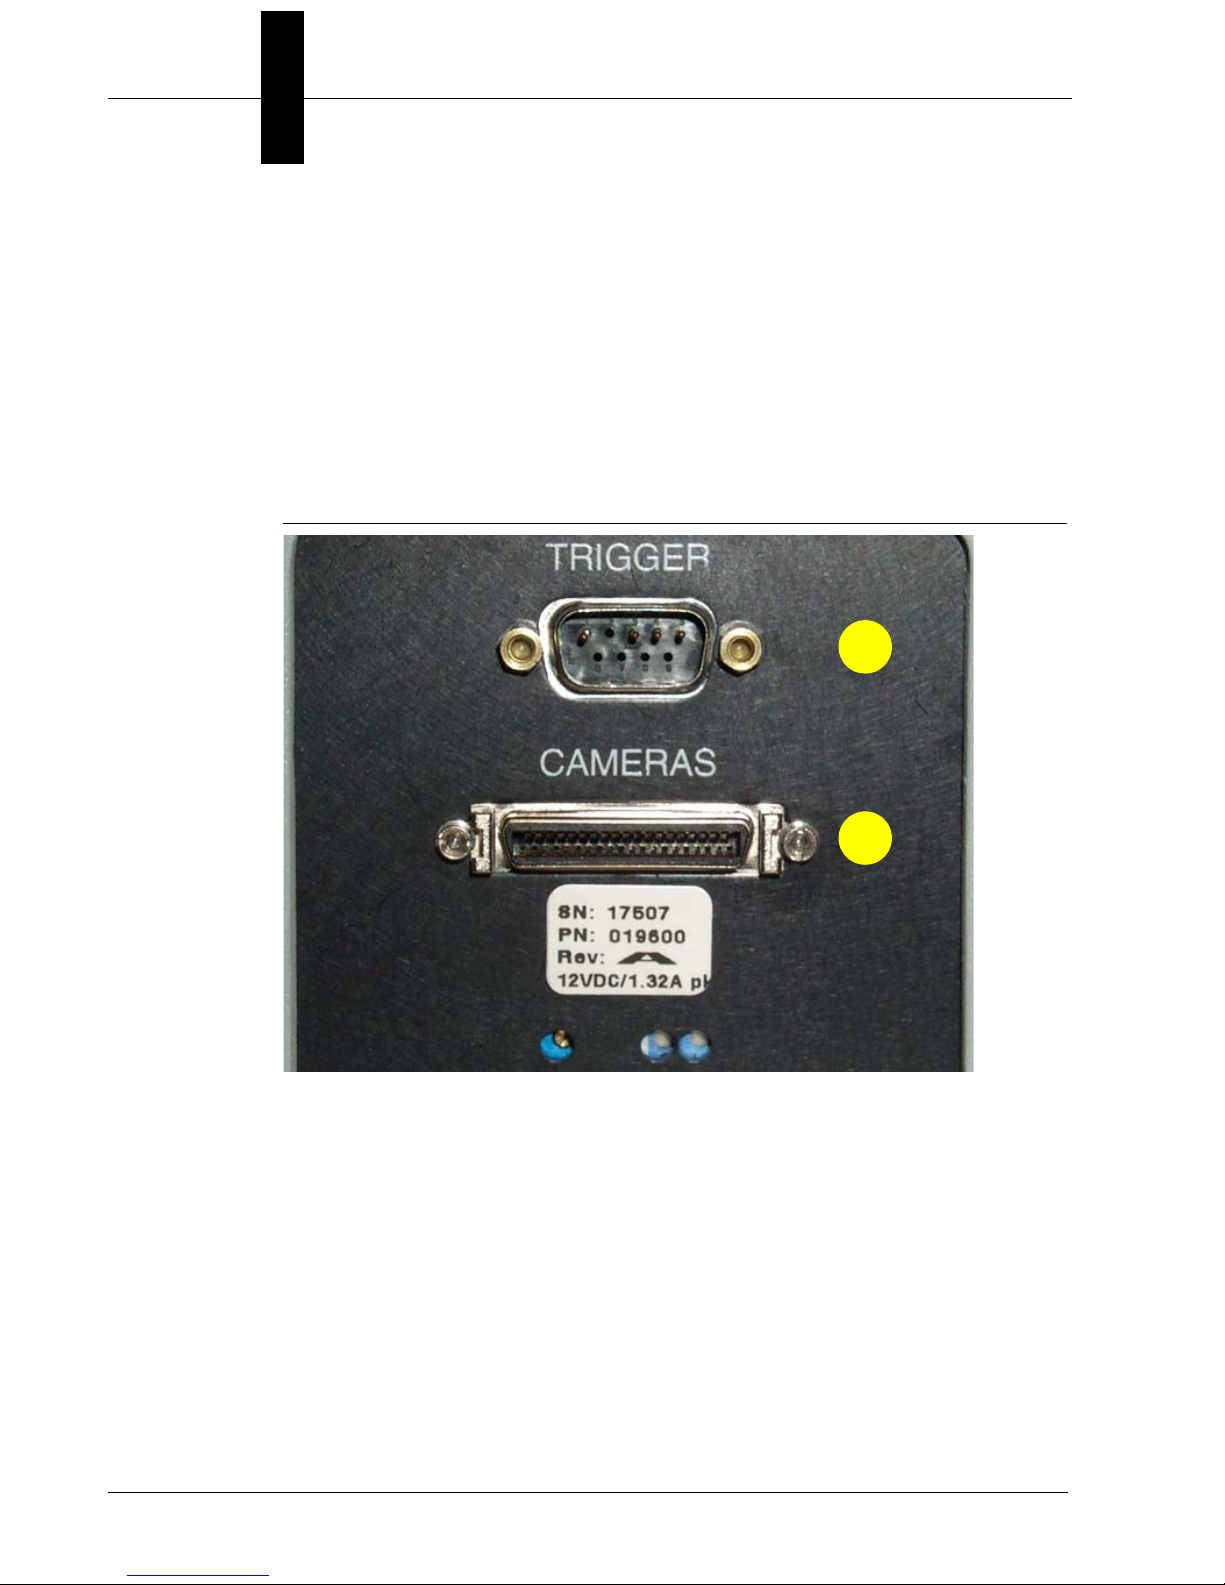
2. Connect one end of the camera cable (P/N 030-014700) to the MS-96 Vial
Reader reader head, as shown in Figure 2–2.
FIGURE 2–2. MS-96 Vial Reader Reader Head — Back Face
3
2
3. Connect the 9 pin end of the trigger cable (P/N 010-015900) to the 9 pin
connector on the MS-96 Vial Reader reader head, as shown in Figure 2–2.
2-4 MS-96 Vial Reader User’s Guide v3.2.0, Feb 2009
Page 13
Installing Hardware
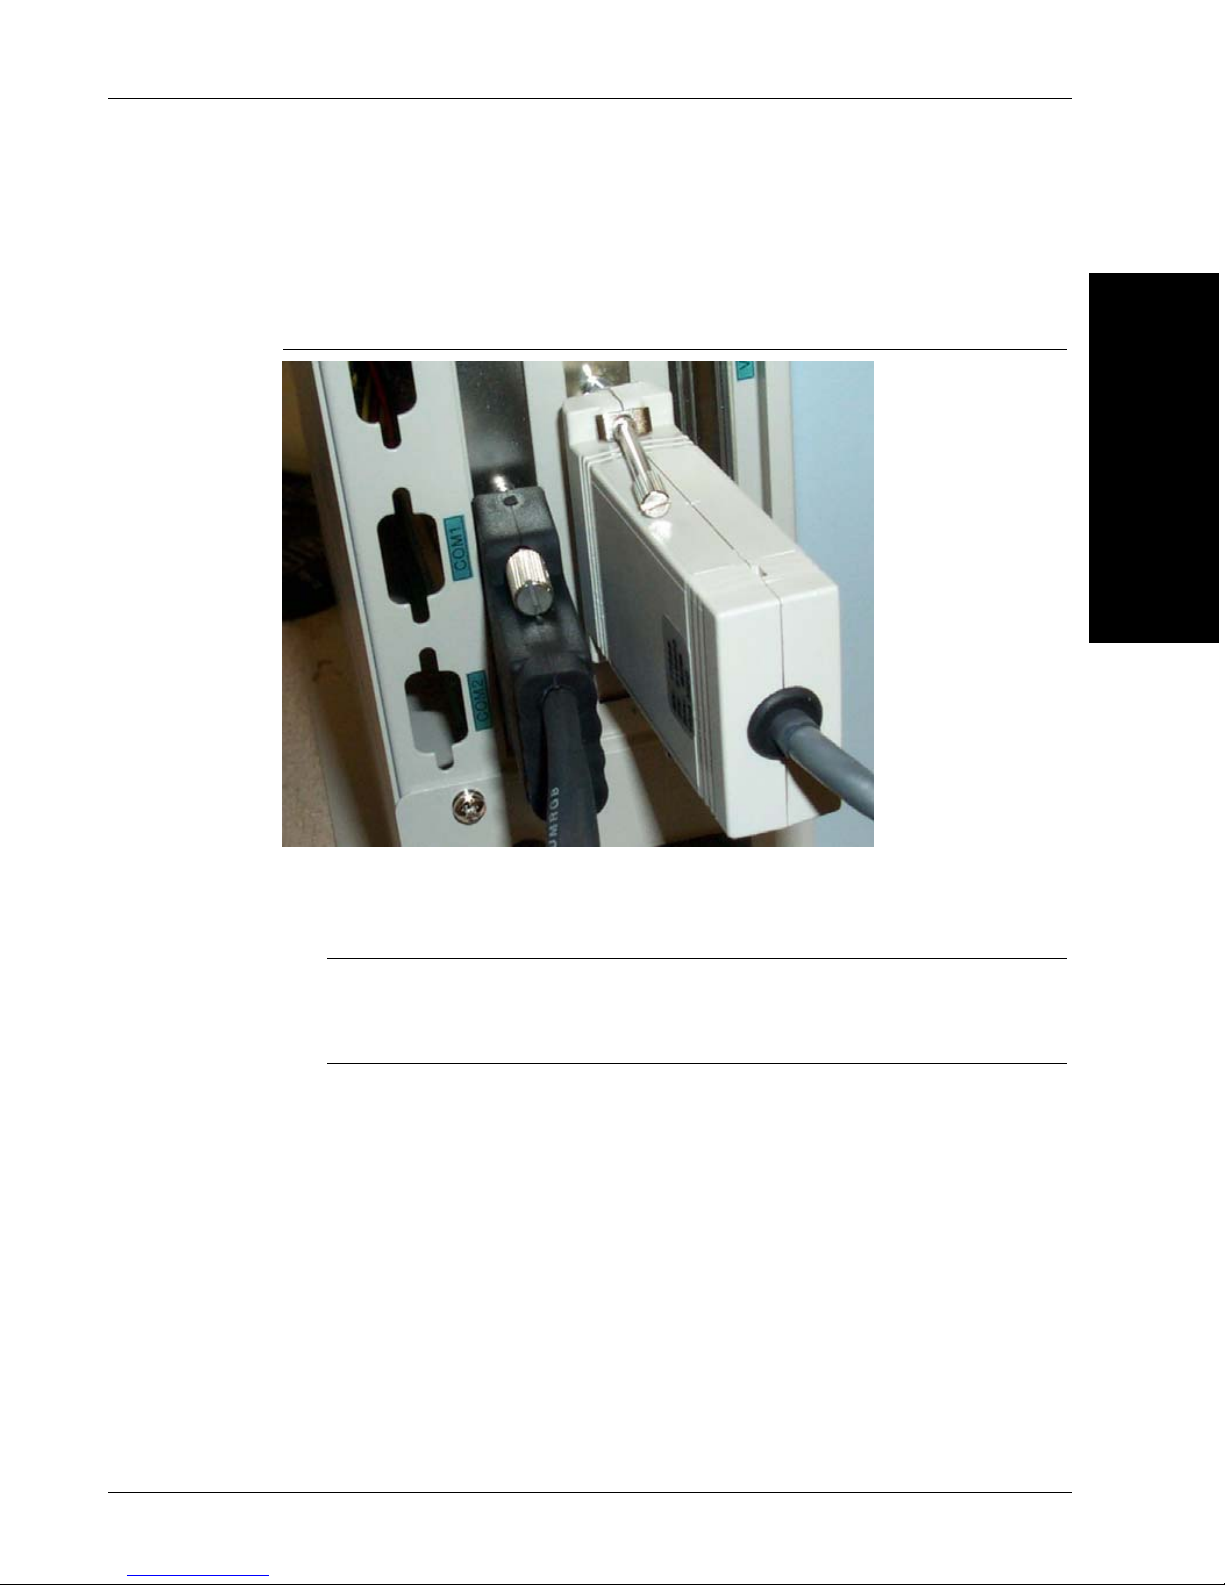
4. Connect the camera cable (P/N 030-014700) and the other end of the trigger
cable (P/N 010-015900) to the back of the PC, as shown in Figure 2–3.
FIGURE 2–3. PC with Cables Attached
5. Boot the PC. Check for the red light from the sensor in the back left corner
of the MS-96 Vial Reader reader head.
2
Software
Installing Hardware &
Note: If the red light from the sensor is not on, re-check the connection
between the camera cable and sensor cable on both ends. If this does not turn
on the sensor, check the internal power connection to the 0300 board.
v3.2.0, Feb 2009 MS-96 Vial Reader User’s Guide 2-5
Page 14

Chapter 2 Installing Hardware & Software
Installing Software
Installing Visionscape® and MS-96 Vial Reader Software
Use the following procedure to install the Visionscape® V3.7.2 and MS-96 Vial
Reader software:
1. Insert the CD (provided) into a CD drive on the PC or in another PC
accessible via your local intranet.
2. Connect to the CD drive. If the CD drive is local, the web page interface will
be shown automatically. If the CD drive is not local, select SETUP.HTML.
3. From the web page interface, select Visionscape Studio 3.7.2.
4. After the Visionscape
When the reboot process is finished, the HTML page should be displayed
again.
5. Select MS-96 Vial Reader 3.2.0 to install the MS-96 Vial Reader program.
You must accept the Microscan End User License Agreement and may
specify an installation location during the installation.
The installation is now complete.
Troubleshooting
This section contains specific information about the following:
• “Adjusting the Sensor” on page 2-6
• “Adjusting the Light Intensity” on page 2-8
• “Testing the MS-96 Vial Reader” on page 2-9
®
installation is complete, the PC must be rebooted.
Adjusting the Sensor
Use the following procedure to adjust the sensor:
1. Place a keyed rack of vials atop the MS-96 Vial Reader reader head.
2. Wait for the read to complete.
2-6 MS-96 Vial Reader User’s Guide v3.2.0, Feb 2009
Page 15

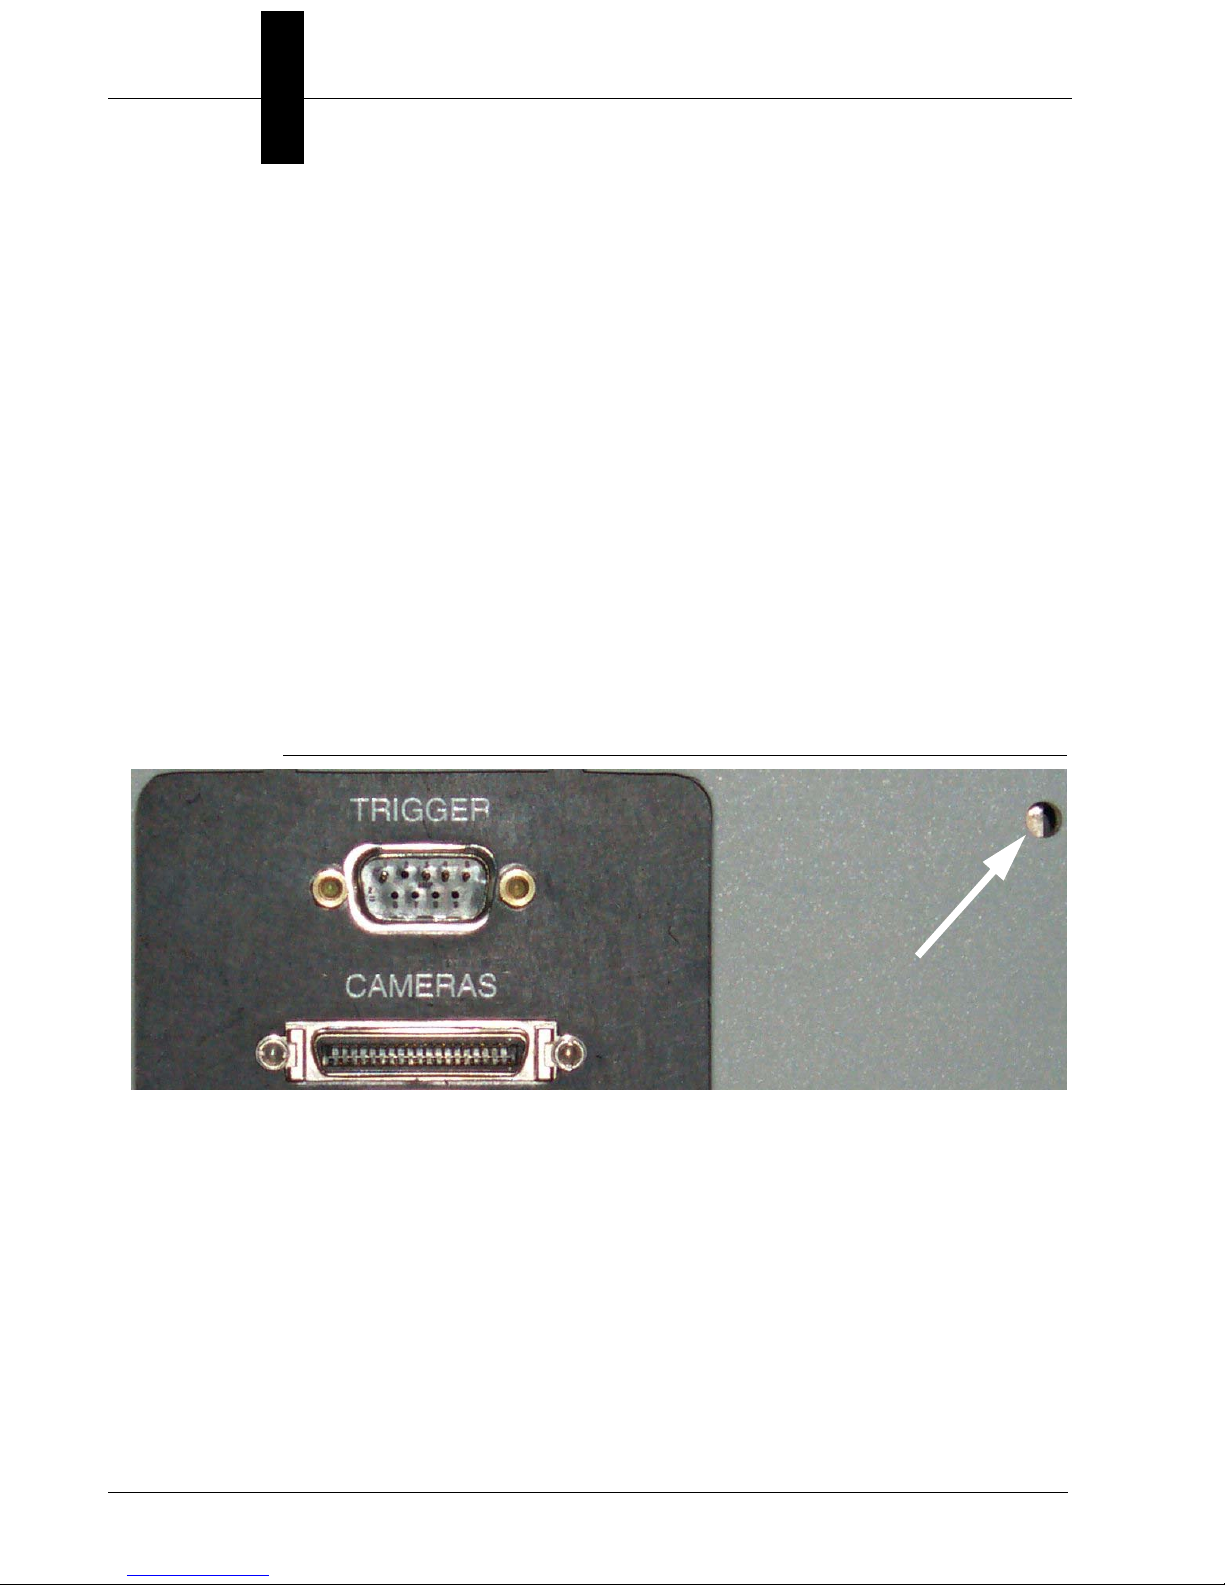
Troubleshooting
3. Push the rack to the front right corner.
4. Notice the screw and two LEDs on the back of the MS-96 Vial Reader reader
head, as shown in Figure 2–4.
FIGURE 2–4. MS-96 Vial Reader Reader Head
2
Software
Installing Hardware &
5. Adjust the screw until the yellow sensor light is on and blinking slowly.
6. Rotate the rack 180°. The sensor should not trigger a read.
7. Push the rack of vials to the back left corner. The sensor should not trigger a
read.
8. If either of these two conditions trigger a read, adjust the sensor until the
yellow light is not lit. Repeat this procedure starting at step 1.
v3.2.0, Feb 2009 MS-96 Vial Reader User’s Guide 2-7
Page 16
Chapter 2 Installing Hardware & Software
Light Adjustment Screw
Adjusting the Light Intensity
The light intensity may be adjusted by rotating the screw accessible from the
back of the MS-96 Vial Reader reader head.
Use the following procedure to adjust the light intensity:
1. With the MS-96 Vial Reader software running, enter the password.
2. Click on the Turn Live Video On button to turn on live video.
3. Place a rack on the MS-96 Vial Reader reader head.
4. To reduce the light intensity, rotate the light adjustment screw
counter-clockwise (see Figure 2–5).
5. To increase the light intensity, rotate the light adjustment screw
clockwise (see Figure 2–5).
FIGURE 2–5. Light Adjustment Screw
6. When the matrices are clearly visible, turn live video off (by clicking on the
Turn Live Video Off button).
7. Remove and replace the rack on the MS-96 Vial Reader reader head to
trigger a cycle.
8. Click on the Show Complete Box button.
9. Check the Contrast Values Enabled checkbox.
–For light on dark matrices, the contrast should be between 75 and 100.
–For dark on light matrices, the contrast should be between 25 and 45.
2-8 MS-96 Vial Reader User’s Guide v3.2.0, Feb 2009
Page 17

Testing the MS-96 Vial Reader
Use the following procedure to test the MS-96 Vial Reader:
Troubleshooting
1. With the PC booted, and the MS-96 Vial Reader running, place a rack of
vials atop the MS-96 Vial Reader reader head. The red LEDs should
illuminate. When the read is complete, remove the rack of vials.
2. Push the rack of vials to each of the four corners, pressing the Run Once
button after each move.
3. Trigger the read using the hardware trigger.
4. Ensure that the system reads all the vials under all of these conditions.
2
Software
Installing Hardware &
v3.2.0, Feb 2009 MS-96 Vial Reader User’s Guide 2-9
Page 18

Chapter 2 Installing Hardware & Software
2-10 MS-96 Vial Reader User’s Guide v3.2.0, Feb 2009
Page 19

3
CHAPTER 3 MS-96 Vial Reader Overview
The MS-96 Vial Reader Data Matrix reading system collects images from a rack
of either 24 or 96 pipettes and provides a text array of string values that can be
output to a text file or retrieved through ActiveX calls.
The program starts a Visionscape
an acceptable framegrabber exists, connects to the framegrabber, opens the
previously saved AVP file, and awaits a trigger. The trigger is user configurable
to be either the sensor on the top of the MS-96 Vial Reader reader head, the
completion of a bar code read from a reader attached to a serial port of the PC
running the software, or an input through ActiveX. After a trigger is received, the
LED lights illuminate the bottom of the rack, images are taken, images are
processed to determine the contents of the Data Matrix codes, the lights are
turned off, and the results are ready for display and transmission.
®
AVP backplane to determine whether or not
3
Overview
MS-96 Vial Reader
v3.2.0, Feb 2009 MS-96 Vial Reader User’s Guide 3-1
Page 20

Chapter 3 MS-96 Vial Reader Overview
Modes
You can operate the MS-96 Vial Reader in one of two modes:
• Supervisor — This mode enables menus and buttons that are not enabled in
Operator mode. You can create, modify, and save AVP files. You can modify
formats for data files and image files. You can also adjust settings for
communications and printing.
• Operator — In this mode, you can read vials, and save information to a text
file, but you cannot adjust settings. The following menus and buttons are
disabled:
–File menu
– Configure menu
– Run Once button
Vialreader.ini
An example of the vialreader.ini file is shown below:
[Password]
ProgrammersPassword=password
[Form_Defaults]
AlwaysCreateFile=False
AlwaysPrint=False
BeepOnRead=False
BoxDisplayViewTop=True
CheckNumber=True
DataFileDir=C:\Program Files\VialReader\Data
DisableOverwriteWarningMessage=False
DisablePasswordMode=False
FailureMessage=Decode Failure
FilenameBaseDefault=
HideUI=False
ImageFileDir=C:\Program Files\VialReader\Images
– Save Images button
– Turn Live Video On/Off button
3-2 MS-96 Vial Reader User’s Guide v3.2.0, Feb 2009
Page 21

IncludeDataFileBase=True
IncludeImageFileBase=True
NumberExpected=96
OneColTextFile2LineHeader=False
RackDensity=96
SettleTime=250
TriggerDelay=150
TriggerType=0
UseDefaultDataFilenameFormat=True
UseDefaultImageFilenameFormat=True
VerifyRackInPlaceToOutputData=False
[RS232]
CommPort=0
Baud=9600
Parity=N
DataBits=8
StopBits=1
Vialreader.ini
3
Overview
[Zebra_Format]
LabelLength=500
LabelHomeX=0
LabelHomeY=0
FieldOriginX=100
FieldOriginY=100
DMOrientation=N
ElementSize=5
PrinterDotsPerMM=6
LabelUnits=dots
[AVP_Info]
Filename24=C:\Program Files\VialReader\24Default.avp
Filename96=C:\Program Files\VialReader\96Default.avp
MS-96 Vial Reader
v3.2.0, Feb 2009 MS-96 Vial Reader User’s Guide 3-3
Page 22

Chapter 3 MS-96 Vial Reader Overview
INI File Keys Not Accessible Through the Program
There are seven INI file keys that you cannot modify from the user interface.
These keys are intended to solve specific customer concerns.
• ProgrammersPassword (String) — This is the string that allows entry to the
functionality hidden for the general users.
• DisableOverwriteWarningMessage (Boolean) — With this value set to
“True”, saving a text file to the same name will not generate a warning
message by the software. The default is “False”.
• DisablePasswordMode (Boolean) — Setting this key to “True” will cause
the program to always display the controls enabled by correctly entering the
password. Also, the Password menu item is not visible. The default is
“False”.
• FilenameBaseDefault (String) — This value will be placed into the File
Base Name: textbox at program startup. The default for this setting is “”
(null string).
• HideUI (Boolean) — This key can be used with the ActiveX support to
cause the Initializing splash screen and the UI to not be visible upon program
startup. The default is “False”.
• OneColTextFile2LineHeader (Boolean) — Setting this key to “True” causes
the one column text file to suppress the second line of the header of the file.
This provides compatibility to the previous versions of the text file which
expect only a single header line. The default is “False”.
• VerifyRackInPlaceToOutputData (Boolean) — This key determines whether
or not the data should be output on the condition that the trigger sensor was
only tripped momentarily. If True, the program checks for a positive state on
the sensor before outputting the data to the counters, the text files, the
ActiveX output or the printer.
3-4 MS-96 Vial Reader User’s Guide v3.2.0, Feb 2009
Page 23

Modifying a Key
To modify a key:
1. Close the MS-96 Vial Reader program.
2. Open the INI file with a text editor.
3. Change to the appropriate key.
INI File Keys Not Accessible Through the Program
4. Save the file.
5. Exit the text editor.
6. Restart the MS-96 Vial Reader software.
3
Overview
MS-96 Vial Reader
v3.2.0, Feb 2009 MS-96 Vial Reader User’s Guide 3-5
Page 24

Chapter 3 MS-96 Vial Reader Overview
3-6 MS-96 Vial Reader User’s Guide v3.2.0, Feb 2009
Page 25

4
CHAPTER 4 Menus, Buttons, & Options
The MS-96 Vial Reader operates in either Supervisor mode or Operator mode.
Supervisor mode offers you more menus and more buttons. In Operator mode,
the following menus and buttons are disabled:
•File menu
• Configure menu
• Run Once button
• Save Images button
• Turn Live Video On/Off button
The remainder of this chapter describes:
• “Menus” on page 4-2
• “Buttons” on page 4-22
• “Checkboxes” on page 4-29
• “Fields” on page 4-32
4
Options
Menus, Buttons, &
• “Text Boxes” on page 4-33
• “Options” on page 4-34
v3.2.0, Feb 2009 MS-96 Vial Reader User’s Guide 4-1
Page 26

Chapter 4 Menus, Buttons, & Options
Menus
This section describes the following menus:
• “Enter Password” on page 4-2
• “File Menu” on page 4-3
• “Configure Menu” on page 4-17
• “About Menu” on page 4-21
Enter Password
Click Enter Password (or press Alt-P) to display the Password dialog box, as
shown in Figure 4–1.
FIGURE 4–1. Password Dialog Box
1. Enter the password and click OK.
Note: The default password is “password.”
After you click on the OK button, the following occurs:
– You are placed into Supervisor mode.
– The File and Configure menus are displayed.
– The Turn on Live Video, Save Images, and Run Once buttons are
displayed.
Note: To change the password, you must edit the ProgrammersPassword entry
in Vialreader.ini.
4-2 MS-96 Vial Reader User’s Guide v3.2.0, Feb 2009
Page 27

File Menu
FIGURE 4–2. File Menu
Menus
4
Modify AVP File
When you select this menu item, the Enter Data Matrix Datums dialog box is
displayed, as shown in Figure 4–3.
Options
Menus, Buttons, &
v3.2.0, Feb 2009 MS-96 Vial Reader User’s Guide 4-3
Page 28

Chapter 4 Menus, Buttons, & Options
FIGURE 4–3. Enter Data Matrix Datums Dialog Box
4-4 MS-96 Vial Reader User’s Guide v3.2.0, Feb 2009
Page 29

Menus
Datums
Note: The Automatic Learning function (File > Create Automatically Learned
AVP) eliminates the need for you to adjust individual parameters. Use it to set
these parameters.
The following datums are listed alphabetically.
• Cell Size — The nominal width and height of a matrix cell in pixels. A
matrix cell is the individual dark or light area that represents a binary 0 or 1.
The goal for proper tuning of the system is 5.
Range: 2 - 20
• Finetune Method — The options are:
– Allow Outlined Cells — Enabling this option helps the algorithm
decode a Data Matrix with outlined cells only. In this case, the On and
Off cells have little or no contrast but they are separated by edges of the
cells. The default is Off.
Note: Not suggested for use with the MS-96 Vial Reader.
– Allow Severe Damage — Enabling this option will increase the
robustness of the software in reading data matrices with severe border
damage.
Note: This option may allow an increased population of Data Matrices
to be read and is recommended for the MS-96 Vial Reader.
– Allow Steep Angle — In some Data Matrix reading applications, it is
not possible to set up the camera such that the focal plane is parallel
with the surface of the Data Matrix label. When the focal plane and the
label surface form a steep angle, the Data Matrix in the image will have
severe geometrical distortion.
4
Options
Menus, Buttons, &
Note: Not suggested for use with the MS-96 Vial Reader.
– Decode Near Center — The camera tries to read the symbol that is
closest to the center of the FOV. The default is Off.
Note: This option may allow an increased population of Data Matrices
to be read and is recommended for the MS-96 Vial Reader.
v3.2.0, Feb 2009 MS-96 Vial Reader User’s Guide 4-5
Page 30

Chapter 4 Menus, Buttons, & Options
– Ensure Within ROI — Enabling this option ensures that no Data Matrix
is located unless it is fully inside the ROI. The default is Off.
Note: Not suggested for use with the MS-96 Vial Reader.
– Ignore Single Edges — This option causes the decoder to ignore single
edges during the Data Matrix locate process. This speeds up the locate
process in the presence of unrelated lines found in the image near the
Data Matrix. The defaults is Off.
Note: Not suggested for use with the MS-96 Vial Reader.
– Intensity Enhance — This option is used to read marks of poor quality.
For example, some data matrices may be marked so poorly that some
cells are almost invisible compared to the rest of the cells. Using this
option may help decode some marginal data matrices.
Note: This option may allow an increased population of matrices to be
read and is recommended for the MS-96 Vial Reader.
– No Quiet Zone Clutter — This default option will attempt to locate a
Data Matrix even if the background is noisy and cluttered. When the
Data Matrix is printed on a clean background, enabling this option will
increase the locating process speed.
Note: Not suggested for use with the MS-96 Vial Reader.
– Position Enhance — This option attempts to reduce the number of error
correction bits used during decoding.
Note: Not suggested for use with the MS-96 Vial Reader.
• Graphics Level — This datum selects the amount of graphics displayed at
the completion of step execution. The options are:
– Show Graphics — When enabled, Data Matrix locating graphics and
any decoded text will be displayed.
– Show None — When enabled, no graphics are drawn.
• Height/Width (pixels) — The height/weight of the matrix in pixels. The
goal for proper training of the system has this parameter set to 5 to 5.5 times
the row/column value.
Range: 30 to 600 (0 for Unknown)
4-6 MS-96 Vial Reader User’s Guide v3.2.0, Feb 2009
Page 31

Menus
• Image Style — The options are:
– Auto — Both Image Style types are decodable.
– Mirror — The Data Matrix is viewed as a mirror image.
– Normal — The Data Matrix is viewed as is.
• Matrix Polarity — This datum specifies the border and background color
orientation. Options include:
– Auto — Both Matrix Polarity types are decodable.
– Dark on Light — Dark cells on a light background.
– Light on Dark — Light cells on a dark background.
• Minimum Edge Strength — This datum informs the algorithm to search
for the edge of a matrix whose intensity exceeds this value.
Range: 5 to 100
• Robust Locate — When enabled, the system will first look for a matrix
matching the given specifications. If it fails to find a matrix, the matrix size
parameters will be relaxed and the system will try to find the matrix up to
two more times.
Note: This parameter may allow an increased population of matrices to be
read and is recommended for the MS-96 Vial Reader.
• Rows/Columns (cells) — The number of matrix rows and columns
including the border cells. The MS-96 Vial Reader only works with square
matrices.
Range: 0 - 144
• Threshold Method — Local or Adaptive cannot replace Global because
each is slower and less stable than Global for most of the applications. By
default, all three selections are enabled:
4
Options
Menus, Buttons, &
– Adaptive — May produce better decode results when the background of
the matrix is uneven due to marking or lighting.
v3.2.0, Feb 2009 MS-96 Vial Reader User’s Guide 4-7
Page 32

Chapter 4 Menus, Buttons, & Options
– Global — A single threshold value is used to determine if a cell is dark
or light for all cells.
– Local — May yield less error used in the error correction algorithm
when matrix rows or columns are not equally spaced.
Note: Selecting all three methods may allow an increased population of
matrices to be read and is recommended for the MS-96 Vial Reader.
• Tool Time Out (ms) — This datum is the maximum time to search for a
matrix. When a matrix is not found and decoded by this time, this step fails
and the program execution continues.
Note: Typically, this parameter does not require adjustment for the proper
operation of the MS-96 Vial Reader.
Range: 0 - 2000
• Warp Method — This datum specifies the matrix warping method.
– Fast — Increase the reading speed. Uses approximation to reduce the
computation time. This may produce a higher error bit rate than Slow.
– Slow (Default) — Enable when receiving a high error bit rate.
Note: Selecting the slow warp may allow an increased population of
matrices to be read and is recommended for the MS-96 Vial Reader.
• Warp Percent (x100) — This datum enlarges the captured image before
the Data Matrix decode tools are run. The maximum allowed value of 500%
is 25 times as large as the original image within the input ROI. Selecting a
scale factor can improve performance of the tools placed within it, since the
image will be tuned for the Data Matrix algorithm’s preferred size.
Typically, the best performance for the MS-96 Vial Reader can be achieved
with settings between 150 and 250, depending upon the physical cell size of
the matrices.
The tuning goal of the system is to set the Warp Percent to a value such
that the matrices are sized at ~5 x rows. Currently, this value can only be
4-8 MS-96 Vial Reader User’s Guide v3.2.0, Feb 2009
Page 33

derived by opening the AVP file in AppFactory and being set by someone
familiar with AppFactory.
Range: 50 - 500
Select Another AVP File
When you select this menu item, the Select an AVP File to Open dialog box is
displayed, as shown in Figure 4–4.
FIGURE 4–4. Select an AVP File to Open Dialog Box
Menus
4
Options
Menus, Buttons, &
v3.2.0, Feb 2009 MS-96 Vial Reader User’s Guide 4-9
Page 34

Chapter 4 Menus, Buttons, & Options
Save Current AVP Job to File
When you select this menu item, the Save Current AVP Job to File dialog box is
displayed, as shown in Figure 4–5.
FIGURE 4–5. Save Current AVP Job to File Dialog Box
Note: Save the job with the density information as part of the text of the job as
the 24 and 96 density jobs are not interchangeable.
Create an Automatically Learned AVP
Prior to running each individual read head, we recommend that a specific vision
job (AVP extension file) be created for each read head you have for either or both
of the two densities you will be running. This step will assure that any individual
camera variations are corrected for in your specific vision job.
1. Enter the password for the MS-96 Vial Reader program (the default is
“password”).
2. Place a full rack of vials with Data Matrix codes on top of the MS-96 Vial
Reader reader head.
4-10 MS-96 Vial Reader User’s Guide v3.2.0, Feb 2009
Page 35

3. Ensure the density of the rack is set to the density of the rack in place on the
MS-96 Vial Reader reader head.
4. Select File > Create an Automatically Learned AVP File.
5. When the job creation process is complete, save the new AVP file with a
unique name.
6. Repeat this procedure for the other density rack if you will be using both
densities.
7. Repeat this procedure for any other MS-96 Vial Reader reader heads as
needed.
Manually Create a New AVP File
Menus
When you select this menu item, a dialog prompts you to enter the Data Matrix
parameters for the codes currently on the MS-96 Vial Reader reader head. Then,
the program steps through setting the RectWarp locations for the four cameras.
We recommend that you use this option only should the automatic learn function
not work properly. At the completion of the adjustment cycle, an option for
saving the file is presented. We strongly recommend that you save the file at this
time with a unique name.
Adjusting the Boxes Around the Groups of Vials
Use the following procedure to adjust the boxes around the groups of vials:
1. Place a keyed rack of vials atop the MS-96 Vial Reader reader head.
2. Click Enter Password. The default password is “password”.
3. Click File and Modify AVP.
4. Select Adjust Box Around Groups of Vials.
5. Move the box so that the X-Y locator is centered in the middle of the array of
6 vials (3 across and 2 down), as shown in Figure 4–6, or 24 vials (6 across
and 4 down), as shown in Figure 4–7.
4
Options
Menus, Buttons, &
v3.2.0, Feb 2009 MS-96 Vial Reader User’s Guide 4-11
Page 36

Chapter 4 Menus, Buttons, & Options
FIGURE 4–6. Centering the X-Y Locator (24 Vials)
FIGURE 4–7. Centering the X-Y Locator (96 Vials)
4-12 MS-96 Vial Reader User’s Guide v3.2.0, Feb 2009
Page 37

Menus
6. Adjust the rotation of the box to ensure that the box is square with the group
of vials.
7. Adjust the sides of the box so that the RectWarp movement handles are
centered on the middle column divider vertically and the middle row divider
horizontally.
8. Click OK.
9. Repeat steps 5 through 8 three times (for cameras 2 through 4).
10. From the initial screen, click Update. When asked if you wish to save the
file, click Yes, and save the file using a new, unique name.
11. Test this adjustment by placing a rack atop the MS-96 Vial Reader reader
head and determining if all vials are read.
4
Options
Menus, Buttons, &
v3.2.0, Feb 2009 MS-96 Vial Reader User’s Guide 4-13
Page 38

Chapter 4 Menus, Buttons, & Options
Modify Data File Format
When you select this menu item, the Set the format for the Data filename dialog
box is displayed, as shown in Figure 4–8.
FIGURE 4–8. Set the Format for the Data Filename Dialog Box
If you uncheck Use default date filename format, you will see the screen
shown in Figure 4–9. Don’t overlook the Warning displayed in Figure 4–9.
FIGURE 4–9. Use data filename format Unchecked
4-14 MS-96 Vial Reader User’s Guide v3.2.0, Feb 2009
Page 39

Modify Image File Format
When you select this menu item, the Modify Image File Format dialog box is
displayed, as shown in Figure 4–10.
FIGURE 4–10. Set the Format for the Image Filename
Menus
4
If you uncheck Use default image filename format, you will see the screen shown
in Figure 4–11. Don’t overlook the Warning displayed in Figure 4–11.
FIGURE 4–11. Use default image filename format Unchecked
Options
Menus, Buttons, &
v3.2.0, Feb 2009 MS-96 Vial Reader User’s Guide 4-15
Page 40

Chapter 4 Menus, Buttons, & Options
Change Data File Folder
When you select this menu item, the Select folder for data files dialog box is
displayed, as shown in Figure 4–12.
FIGURE 4–12. Select Folder for Data Files Dialog Box
4-16 MS-96 Vial Reader User’s Guide v3.2.0, Feb 2009
Page 41

Change Image File Folder
When you select this menu item, the Select folder for image files dialog box is
displayed, as shown in Figure 4–13.
FIGURE 4–13. Select Folder for Image Files Dialog Box
Menus
4
Configure Menu
FIGURE 4–14. Configure Menu
Options
Menus, Buttons, &
v3.2.0, Feb 2009 MS-96 Vial Reader User’s Guide 4-17
Page 42

Chapter 4 Menus, Buttons, & Options
Comm Settings
When you select this menu item, the RS232 Settings dialog box is displayed, as
shown in Figure 4–15.
FIGURE 4–15. RS232 Settings Dialog Box
Failure Message
When you select this menu item, the Set the Failure Message dialog box is
displayed, as shown in Figure 4–16.
FIGURE 4–16. Set the Failure Message Dialog Box
4-18 MS-96 Vial Reader User’s Guide v3.2.0, Feb 2009
Page 43

Printer Settings
When you select this menu item, the Printer Settings dialog box is displayed, as
shown in Figure 4–17.
FIGURE 4–17. Printer Settings Dialog Box
Menus
4
• Printer Dots Per Millimeter — This parameter sets the software to the
density capability of the printer.
• Units — This parameter sets the units for the current setup.
• Label Length — This parameter sets the label length. Click the white space
to the right of the slider to increment 10 dots at a time.
Range: 1 - 9999 dots
• Label Home X/Y — This parameter sets the label location. Click the white
space to the right of the slider to increment 10 dots at a time.
Range: 0 - 9999 dots
Options
Menus, Buttons, &
v3.2.0, Feb 2009 MS-96 Vial Reader User’s Guide 4-19
Page 44

Chapter 4 Menus, Buttons, & Options
• Field Origin X/Y — This parameter sets the field origin. Click the white
space to the right of the slider to increment 10 dots at a time.
Range: 0 - 9999 dots
• Element Size — This parameter sets the size of each Data Matrix element
(cell) in terms of printer dots.
Range: 1 - 50 dots
• Orientation — This parameter sets the orientation of the Data Matrix on the
label.
Program Timers
When you select this menu item, the Set the Program Timers dialog box is
displayed, as shown in Figure 4–18.
FIGURE 4–18. Set the Program Timers Dialog Box
• Settle Time — This parameter specifies the time, in milliseconds, between
the part sensor being tripped and the camera starting to acquire an image.
Click the white space to the right of the slider to increment 10 ms at a time.
4-20 MS-96 Vial Reader User’s Guide v3.2.0, Feb 2009
Page 45

Range: 1 - 750 ms
• Trigger Delay Time — This parameter specifies the time, in milliseconds,
that the trigger must remain on before a trigger signal is seen by the MS-96
Vial Reader reader. Click the white space to the right of the slider to
increment 10 ms at a time.
Range: 1 - 750 ms
Select Trigger
When you select this menu item, the Select Trigger Options dialog box is
displayed, as shown in Figure 4–19.
FIGURE 4–19. Select Trigger Options Dialog Box
Menus
4
• Hardware sensor — This parameter uses the integral sensor on the MS-96
Vial Reader reader head to initiate a read cycle when a rack is placed on the
MS-96 Vial Reader reader head in the proper orientation.
• Barcode read complete — This parameter initiates a read cycle when a
string is received from the currently selected serial port. If no serial port is
selected, then this may not be selected.
About Menu
The About Menu displays the Microscan address, phone number, and fax
number.
Options
Menus, Buttons, &
v3.2.0, Feb 2009 MS-96 Vial Reader User’s Guide 4-21
Page 46

Chapter 4 Menus, Buttons, & Options
Buttons
FIGURE 4–20. MS-96 Vial Reader Buttons
4-22 MS-96 Vial Reader User’s Guide v3.2.0, Feb 2009
Page 47

Turn Live Video On
This is a toggle. When you click this button, all other buttons and all menu items
are disabled, and the button changes to Turn Live Video Off. When you click
this button again, all other buttons and all menu items are enabled, and the button
changes to Turn Live Video On.
Read Box Data Matrix
If the RS232 port is initialized, this button allows a single Data Matrix containing
the data from a complete rack to be read at once by using a hand held reader
connected to the serial port. Then, the data is displayed on the screen.
Show Complete Box
Buttons
This button displays the information from the last rack read. If the information
shown is from the rack on the MS-96 Vial Reader reader head, then “Read
Complete” on a green background is displayed on the screen below the Beep on
Read checkbox.
The Show Complete Box button offers two views, top and bottom. Select the
view using the Top and Bottom checkboxes in the View Perspective area of the
box. The view you select is saved and provided the next time you click on the
Show Complete Box button.
If you are in Supervisor mode, the Contrast Values Enabled checkbox is
enabled. See Figure 4–21 and Figure 4–22.
4
Options
Menus, Buttons, &
v3.2.0, Feb 2009 MS-96 Vial Reader User’s Guide 4-23
Page 48

Chapter 4 Menus, Buttons, & Options
FIGURE 4–21. Data String Display Window (24 Vials)
FIGURE 4–22. Data String Display Window (96 Vials)
4-24 MS-96 Vial Reader User’s Guide v3.2.0, Feb 2009
Page 49

Create Array Text File
This button creates a file with 8 lines of data, each with 12 elements, comma
delimited, and terminated with a CRLF pair. The first element in the array is A1,
followed by A2, A3 through H12. For example:
000144001,000144002,000144003,000144004,000144005...
000144013,000144014,000144015,000144016,000144017...
000144025,000144026,000144027,000144028,000144029...
000144037,000144038,000144039,000144040,000144041...
000144049,000144050,000144051,000144052,000144053...
000144061,000144062,000144063,000144064,000144065...
000144073,000144074,000144075,000144076,000144077...
000144085,000144086,000144087,000144088,000144089...
By default, the array text file will be located in the following directory:
drive:\Program Files\VialReader\Data
Buttons
4
You can modify the location using the Change Data File Folder menu item.
Depending upon the selected file format, the array text file name will be the text
you entered into the File Base Name text box plus the .txt file extension. For
example:
First Batch.txt
Note: If you click on the Create Array Text File button, and the File Base Name
text box is empty, an error is displayed. You must enter text in the File Base
Name text box before you click on the Create Array Text File button.
If you create a file with a name that already exists, a warning message, asking
you if the file should be overwritten, is displayed. To disable this message, set the
“DisableOverwriteWarningMessage” key to False in the [Form_Defaults] section
of the Vialreader.ini file.
For more information about creating files, see “Always Create Files” on
page 4-29.
Options
Menus, Buttons, &
v3.2.0, Feb 2009 MS-96 Vial Reader User’s Guide 4-25
Page 50

Chapter 4 Menus, Buttons, & Options
Create One Column File
This button creates a one column text file where each element in the rack is
identified by row and column label, such as A1. For example:
Date & time of Trace: 04 Jan 2002 11:10:09 AM
Rack Base Name:
A01; 0001443240
A02; 0001445472
.
.
.
H12; 0001443237
The one column text file will be located in the following directory:
drive:\Program Files\VialReader\Data
You can modify the location using the Change Data File Folder menu item.
Depending upon the selected file format, the one column text file name will be
the text you entered into the File Base Name text box, plus _1Col, plus the .txt
file extension. For example:
First Batch_1Col.txt
Note: If you click on the Create One Column File button, and the File Base
Name text box is empty, an error is displayed. You must enter text in the File
Base Name text box before you click on the Create One Column File button.
If you create a file with a name that already exists, a warning message, asking
you if the file should be overwritten, is displayed. To disable this message, set the
“DisableOverwriteWarningMessage” key to False in the [Form_Defaults] section
of the Vialreader.ini file.
For more information about creating files, see “Always Create Files” on
page 4-29.
Print Label
This button prints the label to the Zebra printer
4-26 MS-96 Vial Reader User’s Guide v3.2.0, Feb 2009
Page 51

Save Images
This button saves the four images taken by the four cameras as .TIF files. The
files are located in the directory specified by the Create A New AVP Job menu
item. By default, the file naming convention is:
1_Current Date_Current Time_File Base.tif
View Contrast Values
When you click on this button, the View Contrast Values window is displayed, as
shown in Figure 4–23 and Figure 4–24.
FIGURE 4–23. View Contrast Values Window (24 Vials)
Buttons
4
Options
Menus, Buttons, &
v3.2.0, Feb 2009 MS-96 Vial Reader User’s Guide 4-27
Page 52

Chapter 4 Menus, Buttons, & Options
FIGURE 4–24. View Contrast Values Window (96 Vials)
Run Once
This button allows you to cycle the Vial Read once.
Reset Counts
This button resets the Total Inspections, Good Inspections, and Bad Inspections
to zero (0).
Quit
This button closes the MS-96 Vial Reader. You have to select Yes to close the
MS-96 Vial Reader.
4-28 MS-96 Vial Reader User’s Guide v3.2.0, Feb 2009
Page 53

Checkboxes
Always Create Files
When this checkbox is checked, the MS-96 Vial Reader creates an array text file
and a one column text file upon the completion of every cycle. For more
information about the array text file, see “Create Array Text File” on page 4-25.
For more information about the one column text file, see “Create One Column
File” on page 4-26.
Always Print A Label
When this checkbox is checked, the MS-96 Vial Reader creates a single Data
Matrix containing the complete information from a rack. It prints a label
containing this matrix to a previously configured Zebra™ bar code printer at the
completion of each read cycle. See Appendix A, “Setting Up the Zebra Printer,”
for information about setting up a print driver for this function.
Checkboxes
4
Pass/Fail Based on the Number of Vials Decoded
When this checkbox is checked, the MS-96 Vial Reader compares the number of
successful Data Matrix decodes to the expected value. If there is a difference, the
cycle is considered a failure and an error message is posted.
When the Checkbox is Checked
If the number of expected decodes is less than the number decoded, and the
Pass/Fail based on the number of vials decoded checkbox is checked, a
screen similar to the one in Figure 4–25 is displayed.
Options
Menus, Buttons, &
v3.2.0, Feb 2009 MS-96 Vial Reader User’s Guide 4-29
Page 54

Chapter 4 Menus, Buttons, & Options
FIGURE 4–25. Expected Decodes Less Than Number Decoded
If the number of expected decodes is greater than the number decoded, and the
Pass/Fail based on the number of vials decoded checkbox is checked, a
screen similar to the one in Figure 4–26 is displayed.
FIGURE 4–26. Expected Decodes Greater Than Number Decoded
4-30 MS-96 Vial Reader User’s Guide v3.2.0, Feb 2009
Page 55

Checkboxes
When the Checkbox is Not Checked
If the number of expected decodes is greater than the number decoded, and the
Pass/Fail based on the number of vials decoded checkbox is not checked, a
screen similar to the one in Figure 4–27 or Figure 4–28 is displayed.
FIGURE 4–27. No Extra Message Box Displayed (24 Vials)
4
Options
Menus, Buttons, &
v3.2.0, Feb 2009 MS-96 Vial Reader User’s Guide 4-31
Page 56

Chapter 4 Menus, Buttons, & Options
FIGURE 4–28. No Extra Message Box Displayed (96 Vials)
Beep On Read
When this checkbox is checked, the PC beeps at the completion of a read.
Fields
Fail Inspections
This field displays the total number of inspections that failed.
Pass Inspections
This field displays the total number of inspections that passed.
4-32 MS-96 Vial Reader User’s Guide v3.2.0, Feb 2009
Page 57

Process Time (ms)
This field displays the time (in milliseconds) for the vision tools to run.
Total Inspections
This field displays the total number of inspections that occurred since either the
program started or the counters were reset.
Total Time (ms)
This field displays the time (in milliseconds) from the trigger initiation until the
data is ready.
Text Boxes
Text Boxes
File Base Name
This text box contains the characters that you want to be included in each of the
file names for the saved data and image files.
Note: These characters are invalid: \ / : * ? " < > |
For example, assume you type “First Batch” into the File Base Name text box.
After you click on the Save Images button, the directory drive:\Program
Files\VialReader\Images will contain the files shown in Figure 4–29.
FIGURE 4–29. File Base Name Example
4
Options
Menus, Buttons, &
v3.2.0, Feb 2009 MS-96 Vial Reader User’s Guide 4-33
Page 58

Chapter 4 Menus, Buttons, & Options
1_20020104-103321_FirstBatch.tif
File Extension
File Base Name
Time of Day (hhmmss)
Year (yyyymmdd)
Camera Number
Notice the format of the file name:
Note: To have default text entered into the file name base when the program first
starts, add that text, without punctuation, to the “FilenameBaseDefault” key in
the [Form_Defaults] section of the Vialreader.ini file. For example, to have
“My_file” show in the File Base Name text box at startup, the entry in the
Vialreader.ini file should be:
Number Expected
Read Complete
Options
Rack Density
FilenameBaseDefault=My_file
This horizontal scroll bar sets the expected number of matrixes that will be
decoded in a single cycle. This scroll bar is used in conjunction with the
Pass/Fail Based on the Number of Vials Decoded check box to pass or fail a
rack.
This text box illuminates when a read is finished, and remains illuminated until
you remove the rack from the read head.
This option box sets the density of the vials in the rack. The choices are 24 and
96.
4-34 MS-96 Vial Reader User’s Guide v3.2.0, Feb 2009
Page 59

A
APPENDIX A Setting Up the Zebra Printer
Use the following procedure to set up the Zebra printer:
1. Select Start > Settings > Printers > Add Printer.
The Add Printer Wizard is displayed.
2. Select My Computer, and click on Next.
3. Select LPT1: and click on Next. (We’ll redirect the printer output to the
network later to actually see it.)
4. Under “Manufacturers,” scroll down and select Generic.
5. Under “Printers,” select Generic / Text Only, and click on Next.
6. Keep the existing driver (if it exists), and click on Next.
7. Set the “Printer Name” to include the text “Zebra,” select No for making this
the default printer, and click on Next.
8. Select Not Shared, and click on Next.
9. Select No for a test page, and click on Finish.
10. If the system asks for the location of the driver file, enter:
drive:\Program Files\Vialreader\
and select UNIDRV.DLL in that directory.
A
Printer
Setting Up the Zebra
v3.2.0, Feb 2009 MS-96 Vial Reader User’s Guide A-1
Page 60

Appendix A Setting Up the Zebra Printer
A-2 MS-96 Vial Reader User’s Guide v3.2.0, Feb 2009
Page 61

B
APPENDIX B MS-96 Vial Reader ActiveX
API
FIGURE B–1. ActiveX API Window
v3.2.0, Feb 2009 MS-96 Vial Reader User’s Guide B-1
B
ActiveX API
MS-96 Vial Reader
Page 62

Appendix B MS-96 Vial Reader ActiveX API
Properties
• bBeepOnReadStatus() As Boolean — Boolean value that specifies whether
the PC speaker sounds at the completion of a read cycle.
• bPassFailCheckStatus() As Boolean — Boolean value that specifies whether
the cycle passes or fails based on the count of the matrices read.
• bSensorState() As Boolean — Boolean value of the current sensor state.
True means the sensor is triggered.
• Enabled() As Boolean — Boolean value that specifies whether the UI allows
user interaction.
• FailureMessage() As String — String value used when the Data Matrix is
not decoded.
• lProcessTime() As Long — Long value of one cycle process time in
milliseconds (read only).
• lTotalTime() As Long — Long value of one cycle time from trigger through
data availability in milliseconds (read only).
• nNumberExpected() As Integer — Integer value of the number of matrices
expected for a successful read.
• nNumberFound() As Integer — Integer value of the number of data matrices
decoded (read only).
• nTriggerType() As Integer — Integer value for trigger types. 0 is hardware
sensor, 1 is RS232 input, 2 is ActiveX.
• nRackDensity() As Integer — Integer value of density of vials in a single
rack. Allowable values are 24 and 96.
• OneDimensionalRackData() As Variant — Variant array (24 or 96 zero
based, depending upon the density) of the rack string data contents (read
only).
• RackData() As Variant — Variant array (4, 6 or 8,12 zero based, depending
upon the density) of the rack string data contents (read only).
• SnapStatus() As Variant — Variant array of Integer values of the four camera
snapshots. 0 is success. All other values are errors (read only).
B-2 MS-96 Vial Reader User’s Guide v3.2.0, Feb 2009
Page 63

Methods
Methods
• Visible() As Boolean — Boolean value of whether the UI is visible.
• Disconnect() — Release control of the interface from the EXE process. The
EXE process is not stopped.
• LoadUI() — Start the UI process.
• Read() — Perform a single read cycle on the EXE process.
• SaveImages() — Save the images from the last cycle to a file.
• Shutdown() — Start a timer that will shutdown the UI process in half a
second.
Events
• DensityOptionChangeComplete() — Event is fired when the density option
change has been completed by the EXE process.
• DuplicateFound(ByVal nCount As Integer, strDuplicates As String) —
Event fired when duplicate data matrices are decoded from the same rack.
• ReadComplete() — Event fired when a read cycle is complete.
• SensorStateChanged(bState As Boolean) — Event fired when the hardware
sensor changes state.
• UIClosing() — Event fired when the UI is closing.
• UILoaded() — Event fired when the UI load is complete.
B
ActiveX API
MS-96 Vial Reader
v3.2.0, Feb 2009 MS-96 Vial Reader User’s Guide B-3
Page 64

Appendix B MS-96 Vial Reader ActiveX API
B-4 MS-96 Vial Reader User’s Guide v3.2.0, Feb 2009
Page 65

Index
A
About Menu 4-21
ActiveX B-1
Adjusting
lighting intensity
the sensor 2-6
Allow
severe damage
Always
create files
print a label 4-29
Automatic Learning 4-5
AV P
create
an automatically learned 4-10
manually 4-11
B
Barcode read complete 4-21
Baud Rate
setting
4-18
Beep On Read 4-32
Buttons
create
array text file 4-25
one column file 4-26
one column text file 4-26
quit 4-28
read box data matrix 4-23
reset counts 4-28
2-8
4-5
4-29
run once 2-9, 4-28
save images 4-27, 4-33
show complete box 2-8, 4-23
turn live video
off 2-8
on 2-8, 4-23
C
Cables
connecting
2-4
Cell Size 4-5
Change
data file folder
4-16
image file folder 4-17
Checkboxes
always create files
4-29
always print a label 4-29
beep on read 4-32
Comm Settings 4-18
Components 1-1, 1-2
Configure Menu 4-17
comm settings 4-18
failure message 4-18
printer settings 4-19
program timers 4-20
select trigger 4-21
Connecting Cables 2-4
Create
an automatically learned avp
array text file 4-25
button 4-25
new avp manually 4-11
one column
file button 4-26
text file 4-26
4-10
v3.2.0, Feb 2009 MS-96 Vial Reader User’s Guide Index-1
Page 66

Index
D
Data Bits
setting
4-18
Decode Near Center 4-5
DisableOverwriteWarningMessage 3-4
DisablePasswordMode 3-4
E
Element Size 4-20
Enter Password 4-2
F
Fail
based on the number of vials decoded
inspections 4-32
Failure Message 4-18
Field Origin X/Y 4-20
Fields
fail inspections
4-32
pass inspections 4-32
process time (ms) 4-33
total inspections 4-33
File Base Name 4-33
File Menu 4-3
change data file folder 4-16
change image file folder 4-17
modify avp file 4-3
modify data file format 4-14
modify image file format 4-15
save current avp job to file 4-10
select another avp file 4-9
FilenameBaseDefault 3-4
Finetune Method 4-5
H
Hardware
components
1-1, 1-2
sensor 4-21
Height/Width (pixels) 4-6
HideUI 3-4
Horizontal Scroll Bar
number expected
I
4-34
Image Style 4-7
INI File Keys
not accessible
3-4
4-29
Initialization File 3-2
Installing
internal i/o connector
2-2
ms-96 software 2-6
software 2-6
visionscape software 2-6
Intensity Enhance 4-6
Internal I/O Connector
installing
K
2-2
Key
modifying
L
3-5
Label
home xy
4-19
length 4-19
Light Intensity
adjusting
M
2-8
Matrix Polarity 4-7
Menus
about
4-21
configure 4-17
file 4-3
Minimum Edge Strength 4-7
Modes
operator
3-2
supervisor 3-2
Modify
avp file
4-3
data file format 4-14
image file format 4-15
key 3-5
Monitor Resolution 1-2
MS-96
installing software
2-6
testing 2-9
N
Number Expected
horizontal scroll bar
O
4-34
OneColTextFile2LineHeader 3-4
Index-2 MS-96 Vial Reader User’s Guide v3.2.0, Feb 2009
Page 67

Index
Operator 3-2
Orientation 4-20
P
Parity
setting
4-18
Pass
based on the number of vials decoded
inspections 4-32
Password
enter
4-2
Printer
dots per millimeter
4-19
settings 4-19
Process Time (ms) 4-33
Program Timers 4-20
ProgrammersPassword 3-4
Q
Quit 4-28
R
Read
box data matrix
4-23
complete 4-34
Reset Counts 4-28
Resolution
monitor
1-2
Robust Locate 4-7
Rows/Columns (cells) 4-7
Run Once Button 2-9, 4-28
S
Save
current avp job to file
4-10
images button 4-27, 4-33
Select
another avp file
4-9
trigger 4-21
Sensor
adjusting
2-6
Setting Up Zebra Printer A-1
Settle Time 4-20
Show Complete Box Button 2-8, 4-23
Software
installing
2-6
4-29
Stop Bits
setting
4-18
Supervisor 3-2
T
Testing the MS-96 Vial Reader 2-9
Text Boxes
file base name
4-33
read complete 4-34
Threshold Method 4-7
Tool Time Out (ms) 4-8
Total Inspections 4-33
Trigger Delay Time 4-21
Troubleshooting 2-6
Turn Live Video
off button
2-8
on button 2-8, 4-23
U
Units 4-19
V
VerifyRackInPlaceToOutputData 3-4
Vialreader.ini 3-2
View
contrast values
4-27
perspective 4-23
Visionscape
installing
W
2-6
Warp
method
4-8
percent (x100) 4-8
Z
Zebra Printer
setting up
A-1
v3.2.0, Feb 2009 MS-96 Vial Reader User’s Guide Index-3
 Loading...