

Page 1

Quick Start Guide
MS-3 CCD Reader
This guide is de si gn e d t o g e t y o ur reader up and run ning quickly.
When connected to a ho st computer with Windows ope rating
system (98 or abo ve), you can us e ESP (Easy Setup Progr am) to
configure and control your MS-3 CCD Reade r. In addition to ESP,
you can send c ommand s to your reader by se rial command.
For a full explanation of the
refer to the
representative for the
in digital and print formats.
P/N 83-210038 Rev D 1
Help
section of
MS-3 CCD Reader User’s Manual,
MS-3 CCD
ESP
or contact your Microscan sales
’s commands and features,
available
Page 2

Step 1 — Check Required Hardware
Caution: If using your own power supply, be certain that it is wired
correctly and supply voltage is 10 to 28VDC. Incorrect wirin g or v o lt age can cause software or equipment failures.
If connecting to a host with an IB-131 Interface Box, you will need
the following:
Item
a
1 FIS-0003-1XXXG MS-3 CCD Reader
2 FIS-0001-0035G IC-332 Adapter
3 99-000018-01 IB-131 Interface Box
4 Host Computer
5 61-300026-03
97-100004-15
(90-264 VAC, 24VDC)
6
97-000002-01
(90-264 VAC, +5VDC)
7 99-000017-01 Optional Object Detector
a. See “Connect the System” on page 3 for diagram of
Part Number Description
Null Modem Configuration
Cable
Power Supply
system.
2 MS-3 CCD Reader Quick Start Guide
Page 3
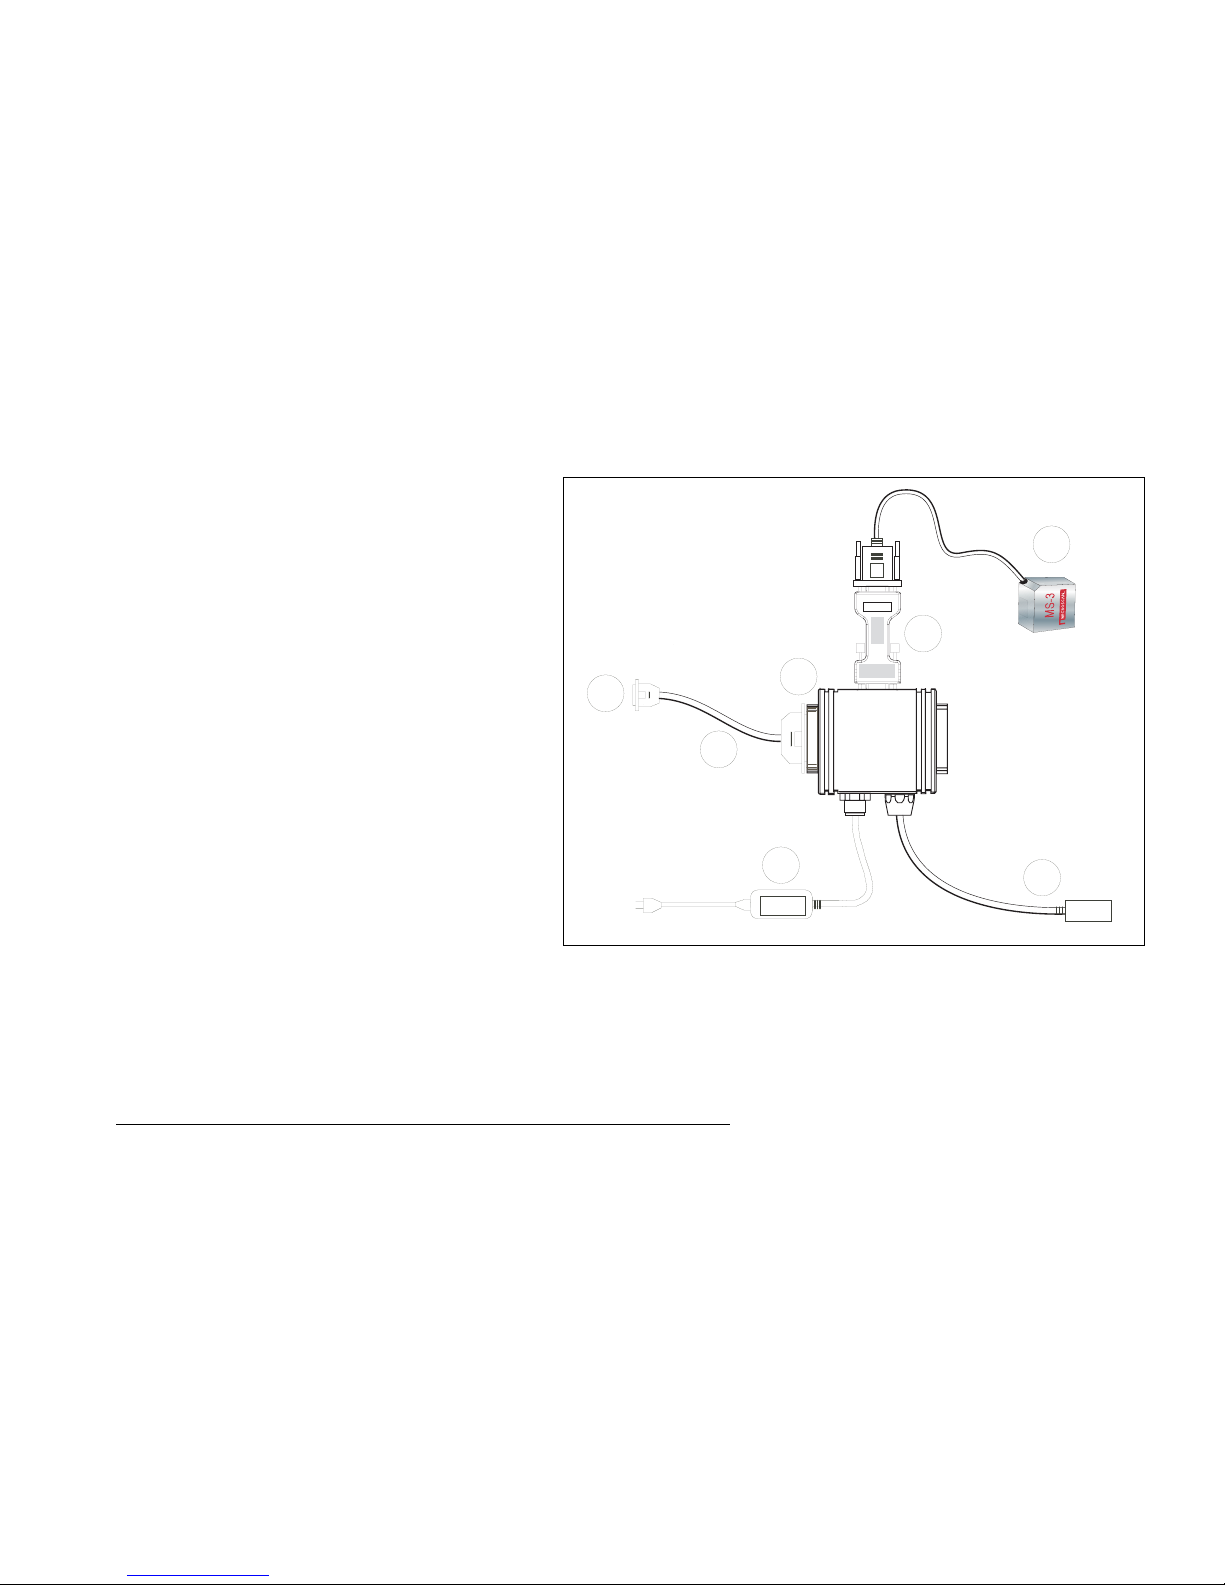
Step 2 — Connect the System
Caution: Be certain all cables are connected BE FORE applying
power. Always power down BEFORE disconnecting cables.
To connect the system, do the following:
1. Connect the read er ( 1) to
the “SCANNER” c onn ecto r
on the IC-331 interface
converter (2) using the
attached 3-foot cable.
1
2. Connect the IC-3 31
directly to the “SCANNER”
15 pin connector on the
IB-131 (3).
3. Connect the Hos t C om -
puter (4) to the IB-131
“HOST” 25-pin connector
via the Null Modem Con-
2
figuration Cable (5).
4. Connect Power Supply
(6) to the IB-13 1
“POWER” connector.
5. Apply power to the system.
1
2
4
3
5
6
Scanner
Host
Network
7
Hardware Connections
1. Since power supply is included in the single cabling assembly, the reader cable
should not exceed 3 feet. RS-232 cabling from the IB-131 to the host can be up
to 47 feet p ro vid ed i t d oe s not in cl ud e pow er i n pu t
2. If using your own null modem RS-232 host cable, be certain that the host’s TxD
connects to the reader’s RxD and the reader’s TxD connects to the host’s RxD.
MS-3 CCD Reader Quick Start Guide 3
Page 4

Step 3 — Install ESP
(ESP stands for Easy Setup Program.)
With your reader connected to a host computer with Windows
operating system (98 or above), you can use ESP for configuration
and control.
If downloading from your “Microscan Tools” CD:
1. Insert your “Microscan Tools” CD in y ou r comput er’s CD drive.
2. Choose ESP Software from the main menu.
3. Launch Setup.exe under ESP and follow the prompts.
If downloading from the web:
1. Go to http://www.microscan.com/downloadcenter/
2. Create a new “myMicros can ” memb er ac co unt or, if you are
already a member, enter your user name and password.
3. Click the Download Software link and extract t he latest version of
ESP to a director y of your choic e. No te wher e your ESP.exe file
is stored on your har d d ri ve .
4. At the end of the install p rocess, the followi ng icon should ap pear
on your desk top :
5. Click the ESP icon to start the program.
4 MS-3 CCD Reader Quick Start Guide
Page 5

Step 4 — Select Reader Model in ESP
When you start the
program, the following
menu will appear.
1. Select MS-3 CCD
from the menu and
click OK. If yo u d o
not want to make
this selection every
time you load ESP,
uncheck “Show this
window at Startup”.
2. Select the default
name (MS-3 CCD-1,
for example) or type
in a file name of your
choice and cli ck OK.
3. Click Yes when the
following dialog box appears:
Note: If you need to select another model later, you can find it in
App Mode under Model on the menu bar.
MS-3 CCD Reader Quick Start Guide 5
Page 6

Step 5 — Autoconnect
1. In the Connecting... dialog, if your communications port is not
the default COM1, use th e pull down ar row to cha nge your co mmunications port.
2. Click the Start button.
When connected, the reader’s settings will be loaded into ESP
and the CONNECTED message will appear in a green box in the
status bar at the bottom right of your screen.
3. If the connection fails, enable a different Com Port, check connections, and try again.
Tip
: If you do not see the
at the bottom of your dialog, try expanding the
CONNECTED
or
DISCONNECTED
ESP
window horizontally .
message
6 MS-3 CCD Reader Quick Start Guide
Page 7

Step 6 — Position Symbol and Reader
h
t
is
Skew
S
1. Set up a symbol at th e dis t an ce you will be using in your application .
Note: If using an I 2/5 symbol, verify that the number of characters
in the symbol being scanned matches the symbol length enabled for
the I 2/5 symbol type (default is 10 and 6).
2.Avoid bright light or IR light from other sources, including other
readers.
3. Pitch the symbol or reader at a minimum of ±15° to avoid specular
reflection (the return of direct, non-diffused light).
Bar code
label
canner
axis
Til
ax
Pitc
axis
Scan line
Symbol/Reader Positioning
Note: Code 39 is the default symbol type enabled. If you are uncertain as to your symbology type, enable all symbologies by selecting
the Auto Discriminate macro in Terminal mode.
MS-3 CCD Reader Quick Start Guide 7
Page 8

Step 7 — Test for Read Rate
If you don’t have a test symbol, print out this page and use the symbol
here for testing. With this test you can learn the percent age o f decodes
per images
on the top of the reader.
captured
By ESP
After connecting to the reader, ESP will open in Setup Mode.
1. Click the Test button in Setup Mode to begin the
read rate test.
by
observing
the active LEDs
Code 39 Test Symbol
You can also find test
symbols packaged with
your Microscan Tools CD.
(20% through 100 %)
2. Follow the i nst ru ctions on the Setup Mode screen.
3. To end the read rate test, click the Stop button.
Note: If the reader is in the default Continuous Read mo de , it will
read and beep repeatedly as long as a readable symbol remains in
the read range, and as long as the Read Cycle configuration has not
changed.
By Serial Command
Send a <C> to begin the read rate test.
Send a <J> to end the read rate test.
8 MS-3 CCD Reader Quick Start Guide
Page 9

Step 8 — Configure the Reader
By ESP
To change reader settings, or to access the Utilities or
Terminal window, click the App Mod e button.
To return to Setup Mode, click the Setup Mode button.
By Serial Command
From your terminal program or the Terminal screen in
ESP, you can enter serial commands and configuration and utility com-
mands.
Note: Y o u can learn the current s etting of an y par ameter by in serting
a question mark after the number, as in <K100?>. To see all K com-
mands, send <K?>.
MS-3 CCD Reader Quick Start Guide 9
Page 10

10 MS-3 CCD Reader Quick Start Guide
 Loading...