

Page 1

MS-1 Scan Engine
User Manual
P/N 84-000001 Rev
A
Page 2

Copyright and Disclaimer
Copyright ©2015
Microscan Systems, Inc.
Tel: +1.425.226.5700 / 800.762.1149
Fax: +1.425.226.8250
All rights reserved. The information contained herein is proprietary and is provided solely for the purpose of allowing customers to operate and/or service Microscan manufactured equipment and is not to be
released, reproduced, or used for any other purpose without written permission of Microscan.
Throughout this manual, trademarked names might be used. We state herein that we are using the names
to the benefit of the trademark owner, with no intention of infringement.
Disclaimer
The information and specifications described in this manual are subject to change without notice.
Latest Manual Version
For the latest version of this manual, see the Download Center on our web site at:
www.microscan.com.
Technical Support
For technical support, e-mail: helpdesk@microscan.com.
Warranty
For current warranty information, see: www.microscan.com/warranty.
Microscan Systems, Inc.
United States Corporate Headquarters
+1.425.226.5700 / 800.762.1149
United States Northeast Technology Center
+1.603.598.8400 / 800.468.9503
European Headquarters
+31.172.423360
Asia Pacific Headquarters
+65.6846.1214
ii MS-1 Scan Engine User Manual
Page 3

Table of Contents
Chapter 1 Quick Start
Step 1 Check Hardware..................................................................................1-2
Step 2 Connect the System ............................................................................1-3
Step 3 Install ESP ...........................................................................................1-4
Step 4 Select Model........................................................................................1-5
Step 5 Autoconnect.........................................................................................1-6
Step 6 Position the MS-1 Scan Engine...........................................................1-7
Step 7 Configure the MS-1 Scan Engine ........................................................1-8
Step 8 Save Configuration in ESP ..................................................................1-9
Chapter 2 Setup and Operation
Electrical Interface ..........................................................................................2-2
Configuration...................................................................................................2-5
Chapter 3 Installation
Mounting the MS-1 Scan Engine ....................................................................3-2
Window Materials............................................................................................3-3
Optical Components .......................................................................................3-5
Electrical Components....................................................................................3-6
Window Placement .........................................................................................3-7
Tilt, Skew, and Pitch .......................................................................................3-8
Flex Cable.....................................................................................................3-10
Chapter 4 Using ESP
EZ Mode .........................................................................................................4-2
Application Mode ............................................................................................4-3
Menu Toolbar..................................................................................................4-4
Autoconnect ................................................................................................. 4-12
View ............................................................................................................. 4-14
Navigating in ESP ........................................................................................ 4-15
Send/Receive Options ................................................................................. 4-16
Chapter 5 Communications
Communications by ESP ................................................................................5-2
Communications Serial Commands................................................................5-3
Host Port Connections ....................................................................................5-4
Host Port Protocol...........................................................................................5-5
Preamble.........................................................................................................5-6
Postamble .......................................................................................................5-7
Communications Mode ...................................................................................5-8
Keyboard Mapping..........................................................................................5-9
USB Keyboard Key Codes............................................................................5-10
Chapter 6 Read Cycle
Read Cycle by ESP ........................................................................................6-2
Read Cycle Serial Commands........................................................................6-3
MS-1 Read Cycle Overview............................................................................6-4
Number of Symbols ........................................................................................6-5
Time Between Identical Decodes ...................................................................6-6
Trigger Mode...................................................................................................6-7
Continuous Read 1 Output Emulation ............................................................6-9
Serial Trigger Character (Delimited) .............................................................6-10
Start Trigger Character (Non-Delimited) .......................................................6-11
Introduction
MS-1 Scan Engine User Manual
iii
Page 4

Table of Contents
Stop Trigger Character (Non-Delimited)....................................................... 6-12
No Decode Timeout ..................................................................................... 6-13
Decodes Before Output ................................................................................ 6-14
No Read Message........................................................................................ 6-15
Shutter Speed .............................................................................................. 6-16
Chapter 7 Symbologies
Symbologies by ESP ...................................................................................... 7-2
Symbologies Serial Commands ..................................................................... 7-3
Code 39.......................................................................................................... 7-4
Codabar.......................................................................................................... 7-6
Interleaved 2 of 5............................................................................................ 7-8
Code 128/EAN-128 ...................................................................................... 7-10
Code 93........................................................................................................ 7-11
GS1 DataBar (RSS) ..................................................................................... 7-12
MSI Code ..................................................................................................... 7-13
Plessey Code ............................................................................................... 7-14
Industrial 2 of 5............................................................................................. 7-15
UPC/EAN ..................................................................................................... 7-17
PDF417 ........................................................................................................ 7-20
China Postal Code ....................................................................................... 7-21
Symbology Identifier..................................................................................... 7-22
Chapter 8 Terminal
Terminal Window............................................................................................ 8-2
Find ................................................................................................................ 8-3
Send ............................................................................................................... 8-4
Macros............................................................................................................ 8-5
Terminal Window Menus................................................................................ 8-6
Chapter 9 Utilities
Serial Utility Commands ................................................................................. 9-2
Read Rate ...................................................................................................... 9-3
Differences from Default................................................................................. 9-4
Firmware ........................................................................................................ 9-5
Device Control................................................................................................ 9-7
Default/Reset/Save ........................................................................................ 9-8
Reader Status Request .................................................................................. 9-9
Hardware Default ......................................................................................... 9-10
Appendices
Appendix A General Specifications................................................................A-2
Appendix B Electrical Specifications ..............................................................A-5
Appendix C Serial Configuration Commands.................................................A-6
Appendix D Communications Protocol.........................................................A-10
Appendix E ASCII Table...............................................................................A-11
Appendix F Using an External Trigger .........................................................A-12
Appendix G Glossary of Terms ....................................................................A-13
iv
MS-1 Scan Engine User Manual
Page 5

About the MS-1 Scan Engine
The key features of the 32-Bit MS-1 Scan Engine are:
• Ultra-compact size
• CCD image sensor
• 32-bit processor
• RS-232 TTL or USB 1.1 (Keyboard Mode) conne
(Virtual COM serial emulation also supported)
• Up to 530 scans per second
• Up to 55 decodes per second
• High Density and Low Density options
• Low power draw (voltage: 5V; current: 150 mA)
D illumination
• LE
•
No moving parts
• ESP and K command support
ctivity
About This Manual
Introduction
This manual provides complete information on setting up, integrating, and configuring the
MS-1 Scan Engine. The sections are presented in the order in which the MS-1 might be
set up and made ready for operation.
Highlighting
Serial commands, highlighted command fields, and default command settings are highlighted
in rust bold. Cross-references and web links are highlighted in blue bold. References to
ESP, its toolbar headings (Communications, Read Cycle, Symbologies, etc.), menu
topics, and other points of emphasis, are highlighted in Bold Initial Caps.
Host Communications
There are two ways to configure and test the MS-1 Scan Engine:
Microscan’s Windows-based
•
ease
of use and visual responses to user adjustments.
• Serial commands, such as <K200,0>, that can be sent from ESP’s Term inal or anothe
te
rminal program.
ESP
(Easy Setup Program) Software, which offers point-and-click
r
MS-1 Scan Engine User Manual
v
Page 6
Warning and Caution Summary
WARNING
LED LIGHT
DO NOT VIEW DIRECTLY WITH OPTICAL INSTRUMENTS
CLASS 1 LED PRODUCT WITH CLASS 1 INTERNAL RADIATION
Maximum LED Output: 141.2µW
IEC 60825-1:1993+A1:1997+A2:2001
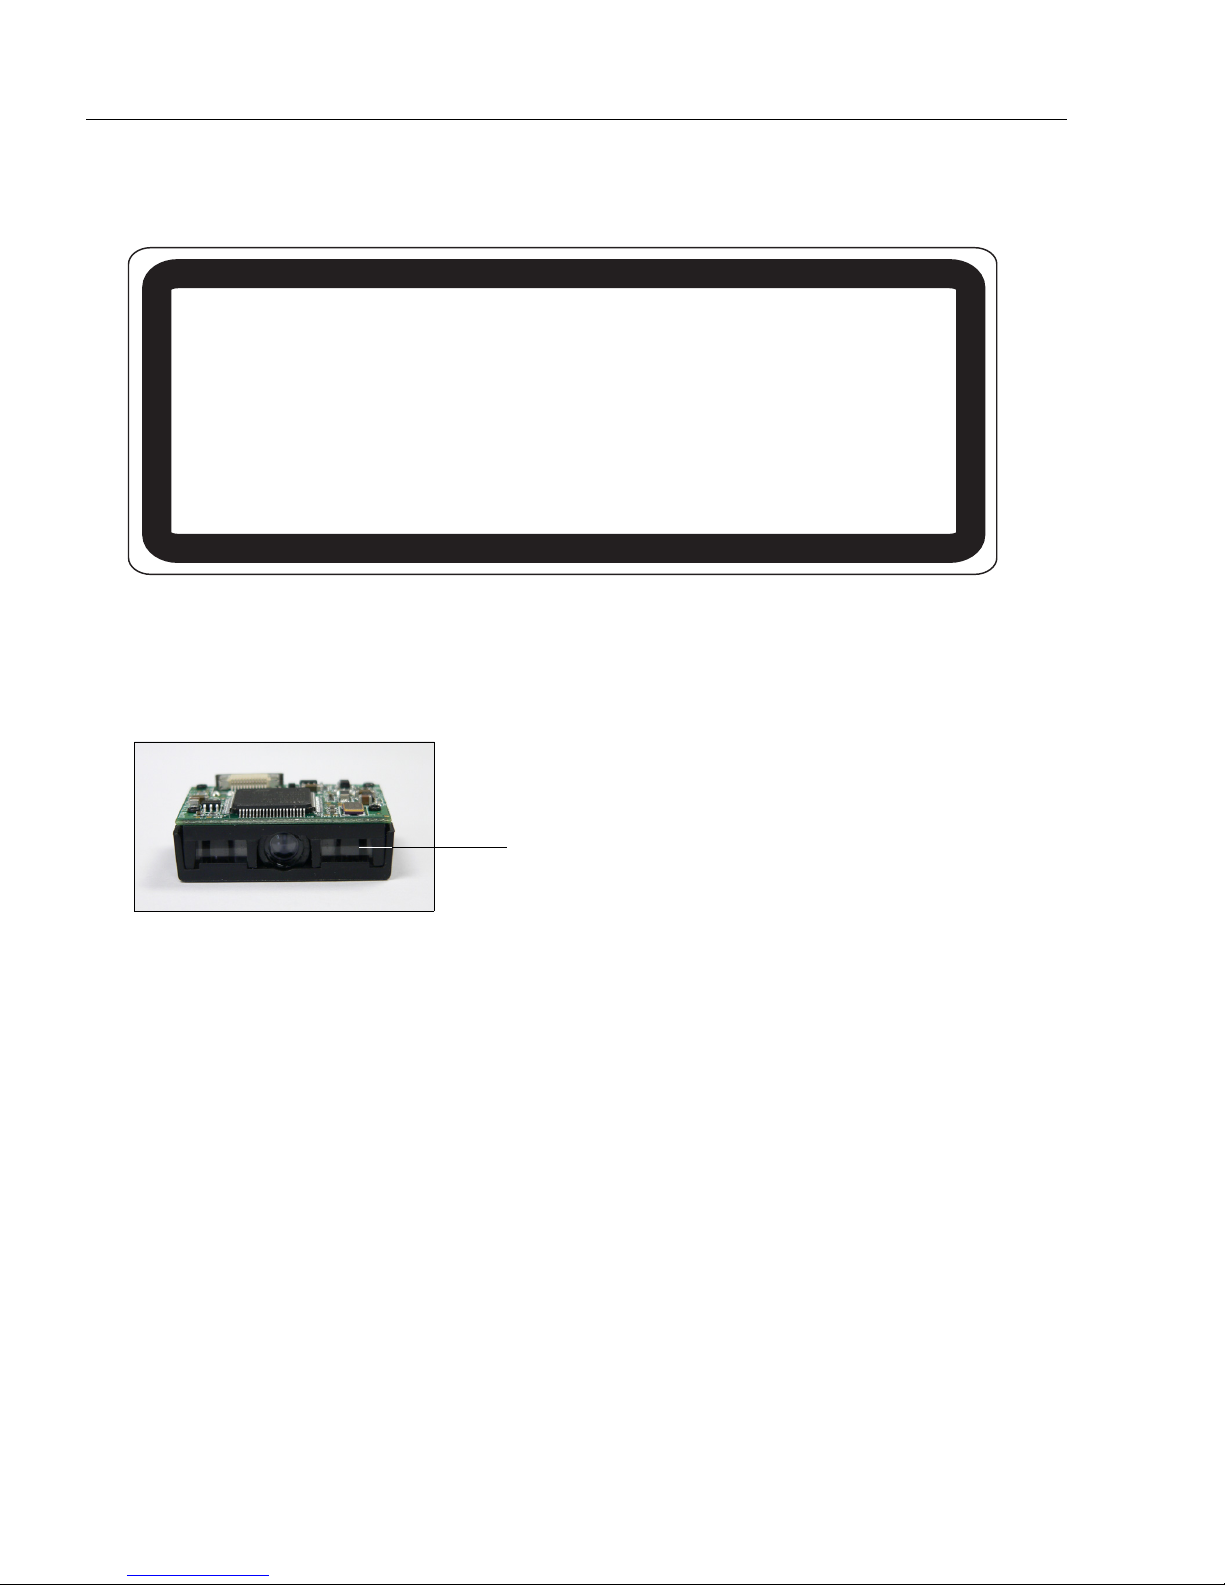
LED Aperture Window
Warning and Caution Summary
• Viewing the MS-1’s LED output with optical instruments such as magnifiers, eye loupes,
r microscopes within a distance of 100 mm could cause serious eye injury.
o
• Maximum LED output: 14
Location of the MS-1’s LED aperture window:
•
1.2µW
CAUTION: Use of controls or adjustments or performance of procedures other than those
specified herein may result in hazardous radiation exposure.
IMPORTANT: The MS-1 is intended for connection to a UL-listed direct plug-in power unit
marked Class II and rated 5 VDC at 3.5 Watts, or greater if using electrical accessories.
European models must use a similarly rated Class I or Class II power supply that is certified
to comply with safety standard EN 60950.
vi
MS-1 Scan Engine User Manual
Page 7

Statement of Agency Compliance
Introduction
The MS-1 has been tested for compliance with FCC (Federal Communications Commission)
regulations and has been found to conform to all applicable FCC Rules and Regulations.
To comply with FCC RF exposure compliance requirements, this device must not be co-located
or operate in conjunction with any other antenna or transmitter.
Changes or modifications not expressly approved by the party responsible for compliance
could void the user’s authority to operate the equipment.
The MS-1 has been tested for compliance with CE (Conformité Européenne) standards
and guidelines, and has been found to conform to applicable CE standards, specifically
the EMC requirements EN 55024:1998+A1:2001+A2:2003, ESD EN 61000-4-2, Radiated
RF Immunity EN 61000-4-3, ENV 50204, EFT EN 61000-4-4, Conducted RF Immunity EN
61000-4-6, EN 55022:1998+A1:2000+A2:2003 for Class A products, Class B Radiated
Emissions, and Class B Conducted Emissions.
The MS-1 has been tested by an independent electromagnetic compatibility laboratory in
accordance with the applicable specifications and instructions.
MS-1 Scan Engine User Manual
vii
Page 8

Statement of RoHS Compliance
Statement of RoHS Compliance
All Microscan readers with a ‘G’ suffix in the FIS number are RoHS-Compliant. All compliant
readers were converted prior to March 1, 2007. All standard accessories in the Microscan Product
Pricing Catalog are RoHS-Compliant except 20-500013-01 and 98-000039-02. These products
meet all the requirements of “Directive 2002/95/EC” European Parliament and the Council of
the European Union for RoHS compliance. In accordance with the latest requirements, our
RoHS-Compliant products and packaging do not contain intentionally added Deca-BDE,
Perfluorooctanes
trace levels. To view the document stating these requirements, please visit:
http://eur-lex.europa.eu/LexUriServ/LexUriServ.do?uri=CELEX:32002L0095:EN:HTML
and
http://eur-lex.europa.eu/LexUriServ/LexUriServ.do?uri=OJ:L:2006:372:0032:0034:EN:PDF
Please contact your sales manager for a complete list of Microscan’s RoHS-Compliant products.
This declaration is based upon information obtained from sources which Microscan believes to be reliable, and
from random sample testing; however, the information is provided without any representation of warranty,
expressed or implied, regarding accuracy or correctness. Microscan does not specifically run any analysis on our
raw materials or end product to measure for these substances.
The information provided in this certification notice is correct to the best of Microscan’s knowledge at the date of
publication. This notice is not to be considered a warranty or quality specification. Users are responsible for
determining the applicability of any RoHS legislation or regulations based on their individual use of the product.
In regards to “RoHS Directive 2011_65_EU” Microscan produces Monitoring and Control Instruments as well as
Industrial Monitoring & Control Instruments as defined within the directive. Microscan has developed and is
implementing a RoHS2 compliance plan with the intention of bringing all active products listed in our current
marketing literature within full compliance as per the directive deadlines.
Key milestones for the transition plan are as follows:
• Complete internal product audit by July 2014.
• Initial “Monitoring and Control Instruments” RoHS2 compliant products available by December 2014
• Initial “Industrial Monitoring & Control Instruments” RoHS2 compliant products available by July 2015
• All new products introduced in 2015 are expected to be WEEE & R
Microscan will mark the products with the ‘CE’ marking that complies with the RoHS2 process to acquire ‘CE’ certification
per the example given: Example >> Machinery directive + EMC directive + RoHS2 = Declaration of Conformity.
(PFOS) or Perfluorooctanic Acid (PFOA) compounds above the maximum
oHS2 compliant.
viii MS-1 Scan Engine User Manual
Page 9

1 Quick Start
Step 1 Check Hardware................................................................................................................1-2
Step 2 Connect the System ..........................................................................................................1-3
Step 3 Install ESP.........................................................................................................................1-4
Step 4 Select Model......................................................................................................................1-5
Step 5 Autoconnect....................................................................................................................... 1-6
Step 6 Position the MS-1 Scan Engine......................................................................................... 1-7
Step 7 Configure the MS-1 Scan Engine ..................................................................................... 1-8
Step 8 Save Configuration in ESP................................................................................................1-9
Contents
This chapter is designed to get your MS-1 Scan Engine up and running quickly. Following
these steps will allow you to get a sense of the MS-1’s capabilities and to test symbol
decode performance.
Detailed setup information for installing the MS-1 into your application can be found in the
subsequent sections.
MS-1 Scan Engine User Manual
1-1
Page 10
Check Hardware
Caution: Be sure that all cables are connected BEFORE applying power to the
system. Always power down BEFORE disconnecting any cables.
Step 1 — Check Hardware
MS-1 Demo Kit Contents
Item Description
MS-1 Scan Engine, 32-bit, HD
1
MS-1 Scan Engine, 32-bit, LD
2 PCBA Demo Board (Supports 32-bit MS-1 or legacy 16-bit MS-1)
Two M1.6 x .35 x 4 mm screws, button or pan head, Philips drive, stainless steel
3
or corrosion-resistant plating
Flex Strip/FFC Jumper Cable, contacts: 12, 0.5 mm center, one side only,
4
+/- 3 mm length
5
USB Virtual COM cable, RJ45 plug to USB, 2.3 meters length
6 MS-1 Scan Engine Demonstration Guide
100 mm
Note: If you are using a USB Virtual COM cable, download the Virtual COM Port Driver
from the Download Center on the Microscan website: www.microscan.com.
1-2
MS-1 Scan Engine User Manual
Page 11
Quick Start
Caution: Be sure that all cables are connected BEFORE applying power to the
system. Always power down BEFORE disconnecting any cables.
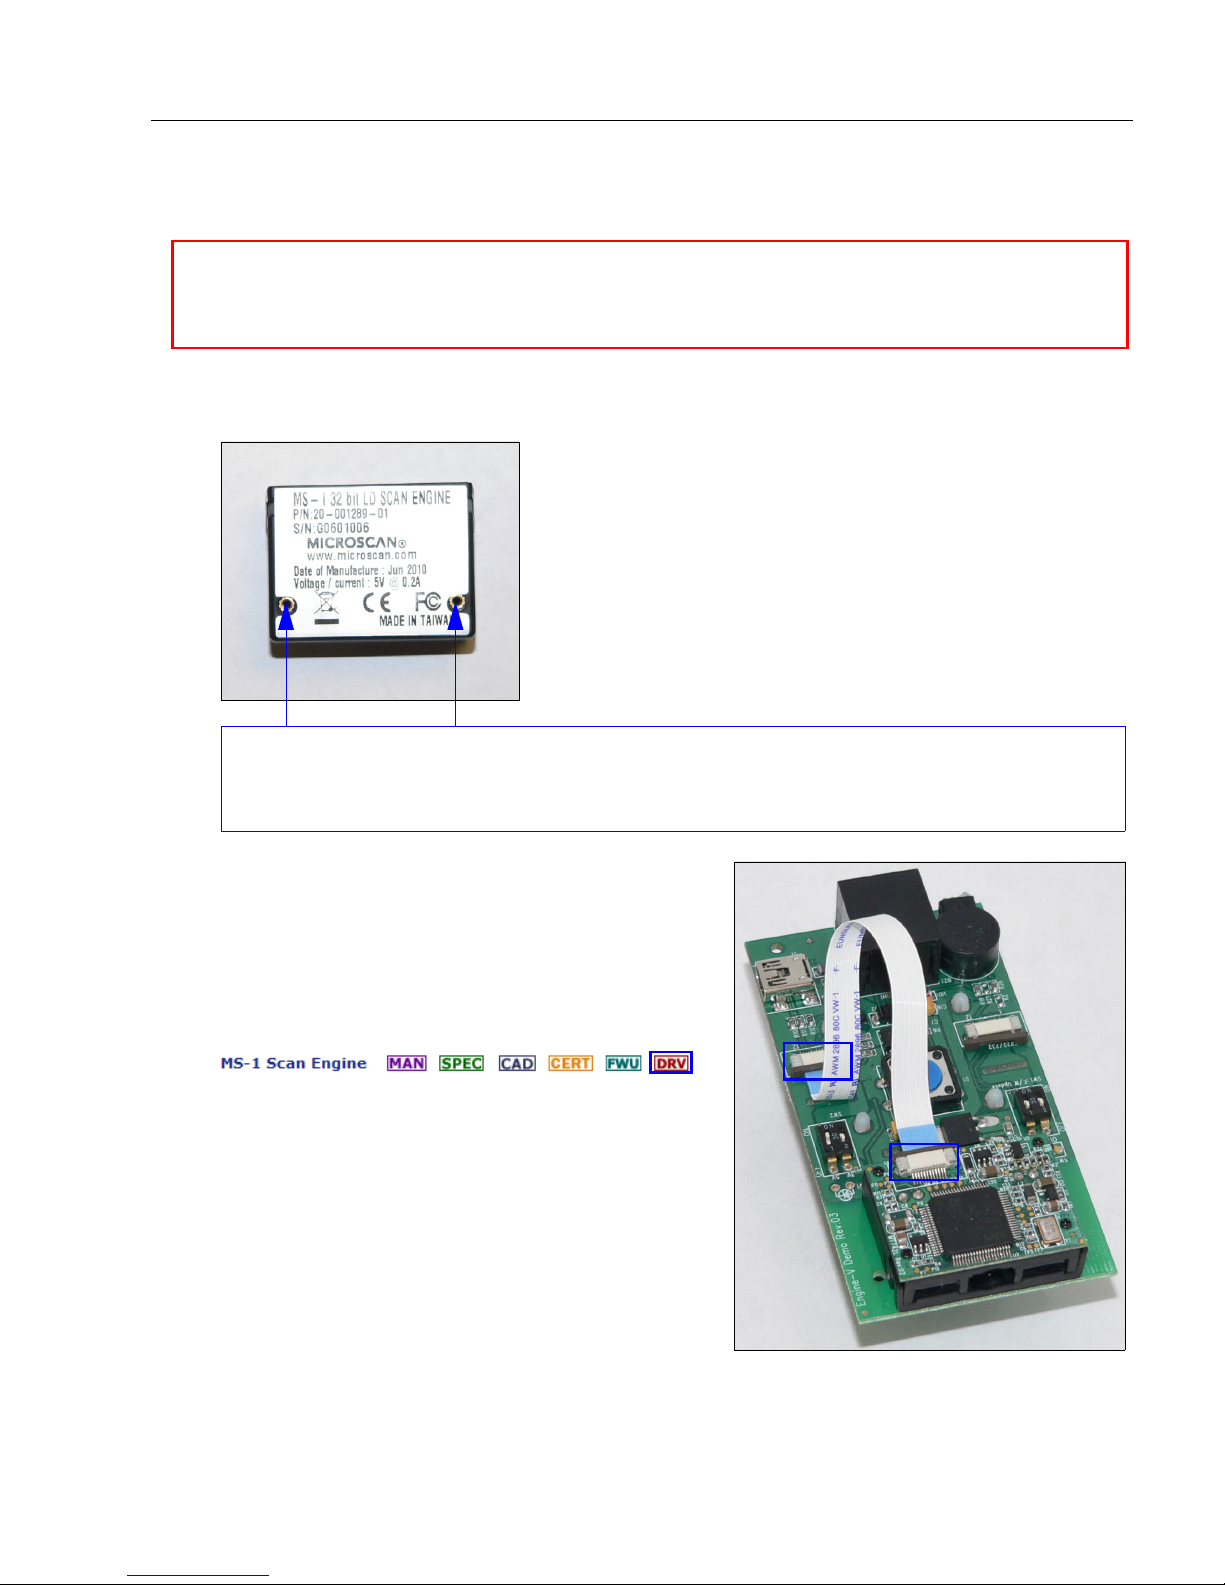
Screw holes for mounting the MS-1 are located on the base of the unit and on
the demo board. Use the M1.6 x .35 x 4 mm screws provided.
Step 2 — Connect the System
The MS-1 Scan Engine can be connected directly to a host computer using a demo board.
1. Attach the MS-1 to the demo board, label side down, as shown below.
2.
Once the MS-1 is affixed to the demo board, push
th
e ends of the flex cable into the connector
the MS-1 and the demo board as shown at right.
3. If you are using a USB Virtual COM cable,
download the Virtual COM Port Driver
Download Center on the Microscan website:
www.microscan.com.
4. Plug the RJ45 end of the USB Virtual CO
cable into th
(If using m
mini-USB co
5. Plug the USB end of the USB Virtual COM
le into the USB port on the host computer
cab
(If using mini-USB: Plug mini-USB cable into
USB connector on host computer.)
6. Insert a 9V battery into the battery bay on th
un
derside of the board. (If using mini-USB or
USB Virtual COM: Power is supplied by the connection to the host computer.)
e connector on the demo boa
ini-USB: Plug mini-USB ca
nnector at J1.)
s on
from the
M
rd.
ble into
.
e
MS-1 Scan Engine User Manual
1-3
Page 12

Install ESP
Step 3 — Install ESP
ESP Software can be found in the Download Center at www.microscan.com.
1. Follow the prompts to install ESP from the Microscan Tools Drive.
2. Click on the ESP icon to run the program.
Minimum System Requirements
• 233 MHz Pentium PC
•
Windows 8, 7, Vista, or XP operating system (32-bit or 64-bit)
•
Internet Explorer 6.0 or higher
128 MB RAM or greater
•
160 MB free disk space
•
• 800 x 600 256 color display (1024 x 768 32-bit color recommended)
1-4
MS-1 Scan Engine User Manual
Page 13
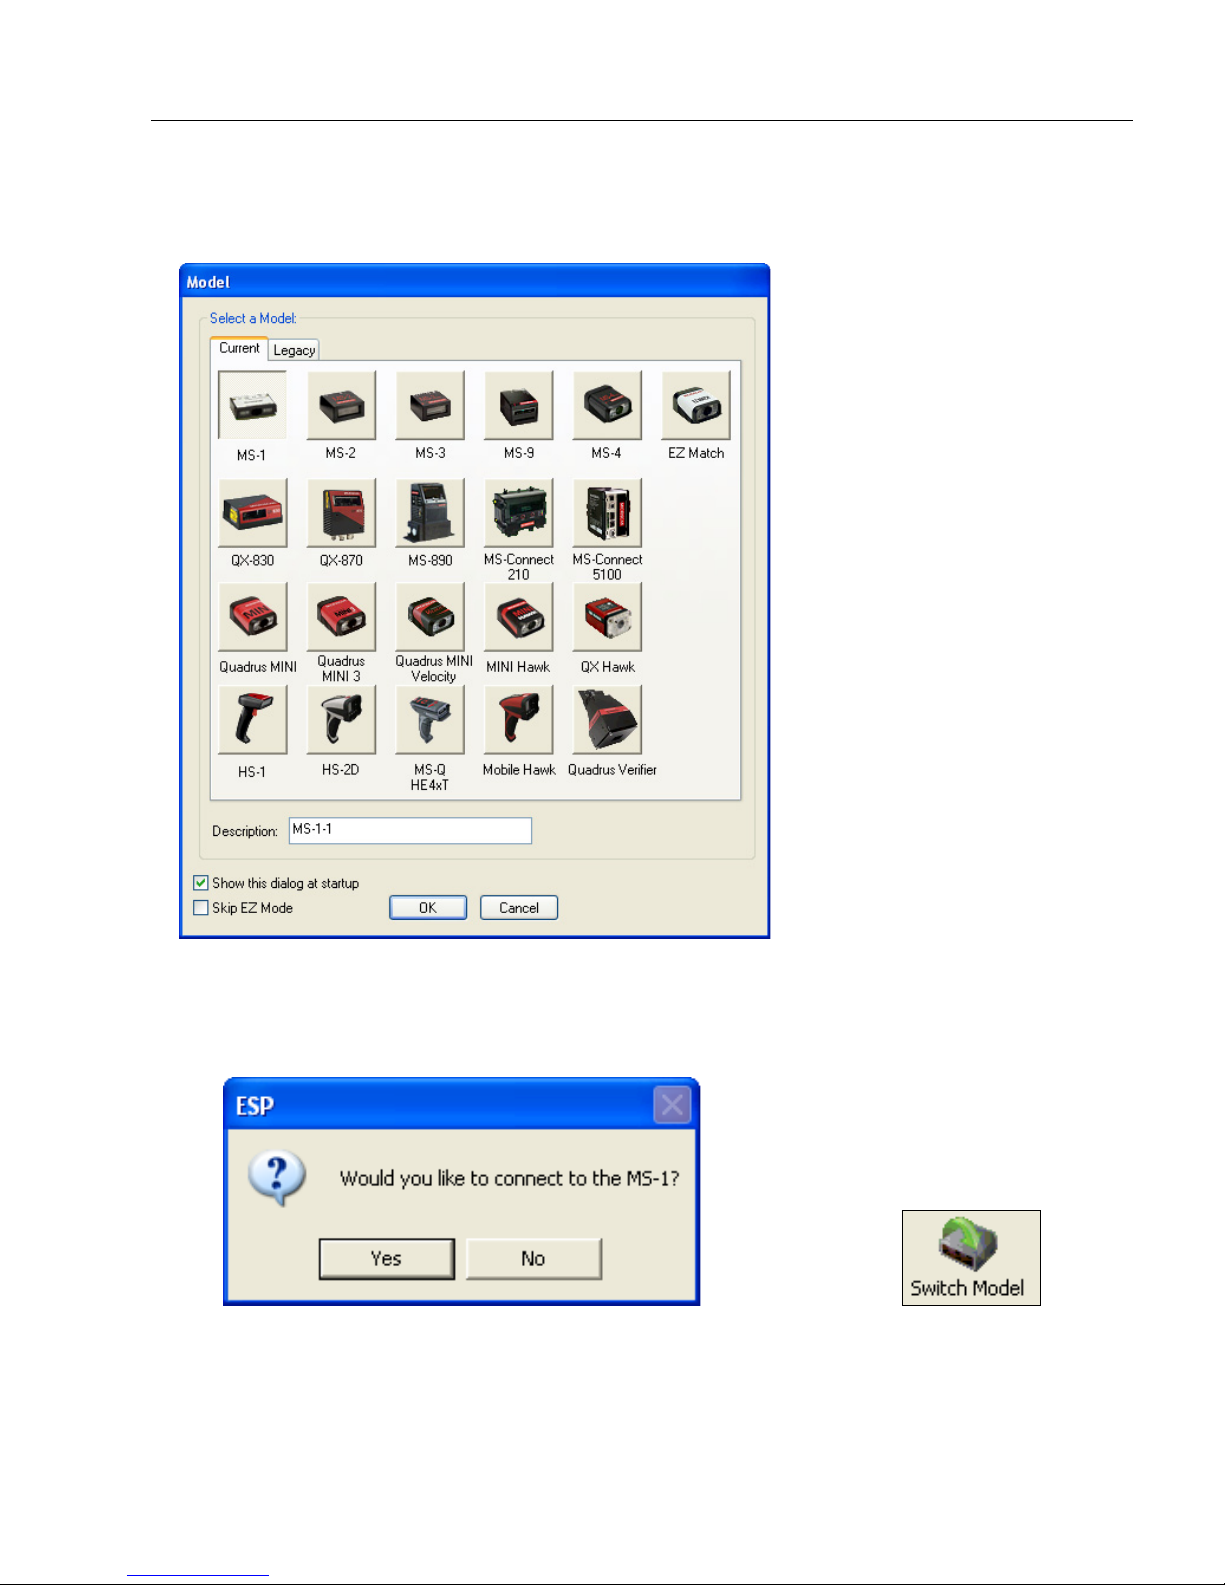
Step 4 — Select Model
When you start ESP, the following menu will appear:
Quick Start
1. Click the button showing the MS-1 Scan Engine.
2. Click OK.
Note:
You can also double-click the MS-1 Scan Engine button to make your selection.
3. Click Yes when this dialog appears:
Note: If you need to select another model later, click the Switch Model button near
the top of the screen or use Model > New Model in the menu toolbar.
MS-1 Scan Engine User Manual
1-5
Page 14
Connect
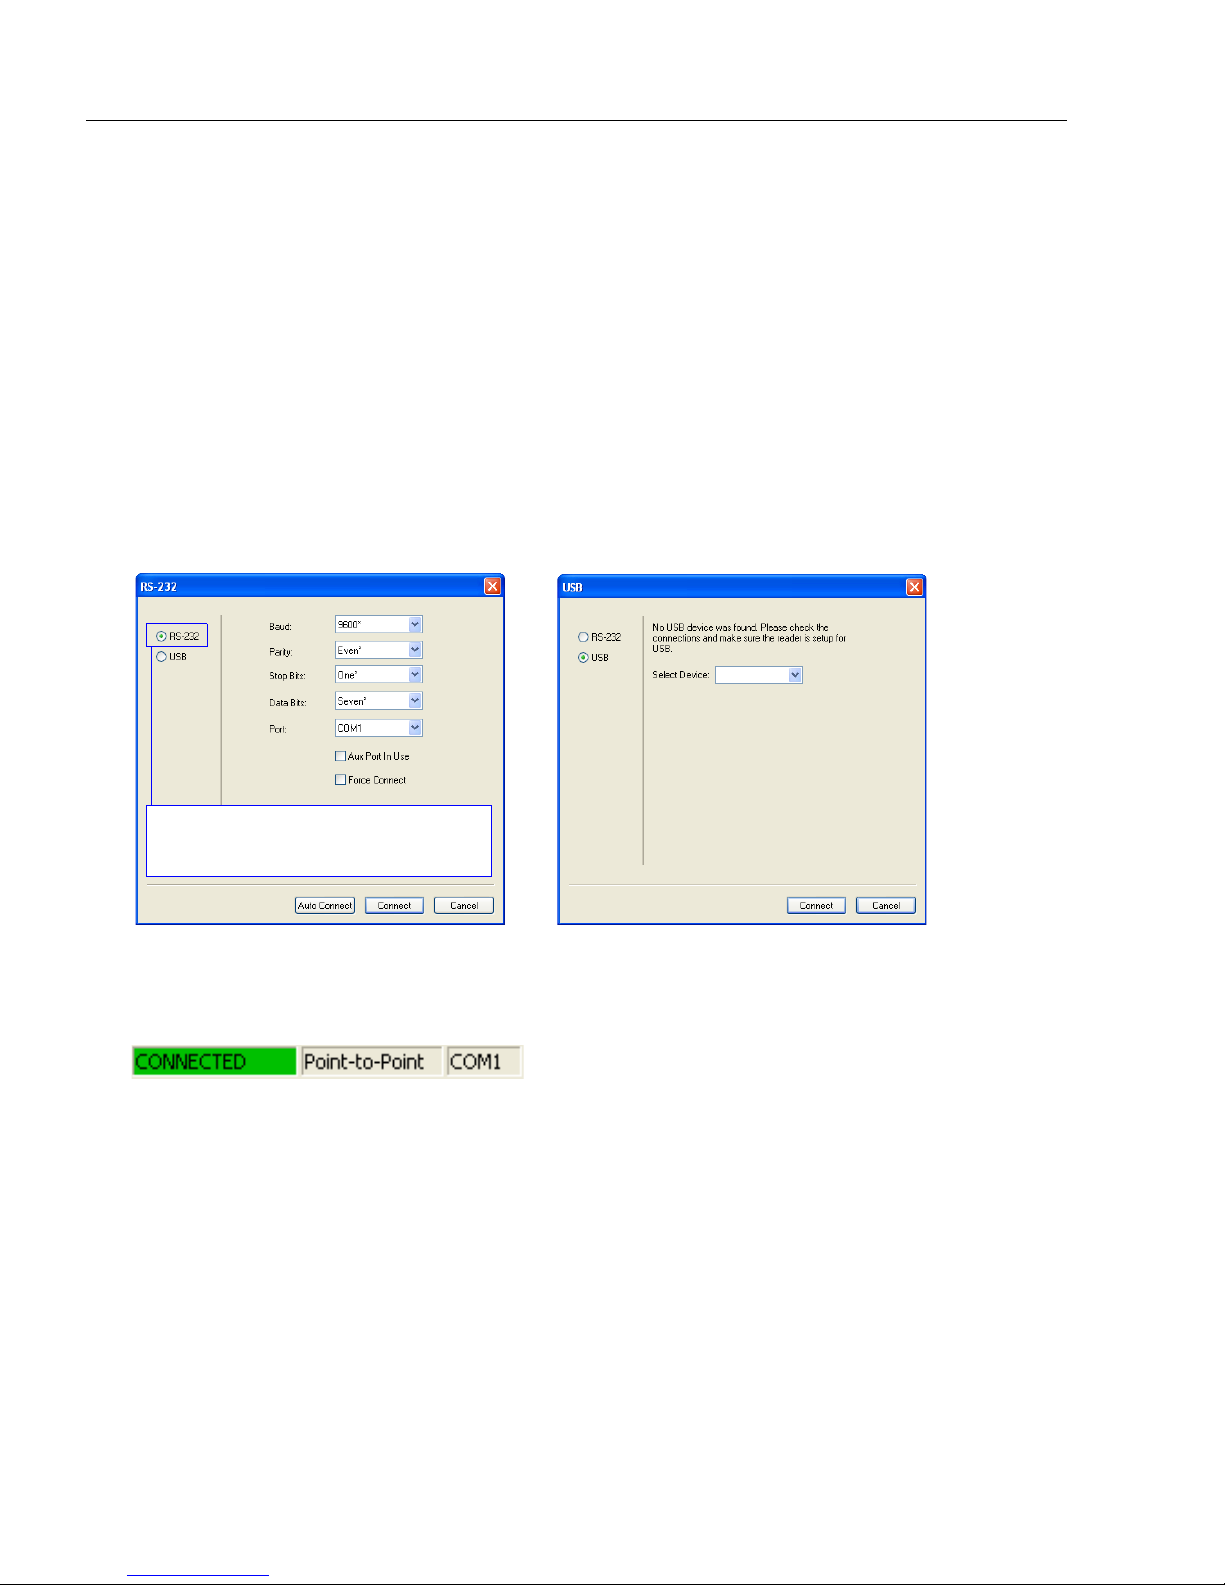
RS-232 Connection Wizard
USB Connection Wizard
Important: If using the USB Virtual
COM cable, select RS-232.
Step 5 — Connect
Connection Wizard
To connect using the Connection Wizard:
• Click Connect on the menu toolbar, and then select Connection Wizard.
• Select RS-232 or USB to activate the appropriate display.
• Configure settings as required by the application, and click Connect.
Important: MS-1 demo kits are in USB Virtual COM mode by default, and ship with
Virtual COM Cable. Select RS-232 in the dialog shown below to communicate with the
de
mo kit.
MS-1s that are sold in the standard 8-pack (FIS-0001-800XG) are in RS-232 by defau
Sel
ect RS-232 to communicate with the reader.
a
lt.
• When a connection is established, the green indicator in the status bar at the bottom
right of the screen will be visible:
Important: The MS-1 is in Continuous Read Mode by default. For best connection
results, be sure that no decodable symbols are within the reader’s field of view while
attempting to connect.
1-6
MS-1 Scan Engine User Manual
Page 15
Quick Start
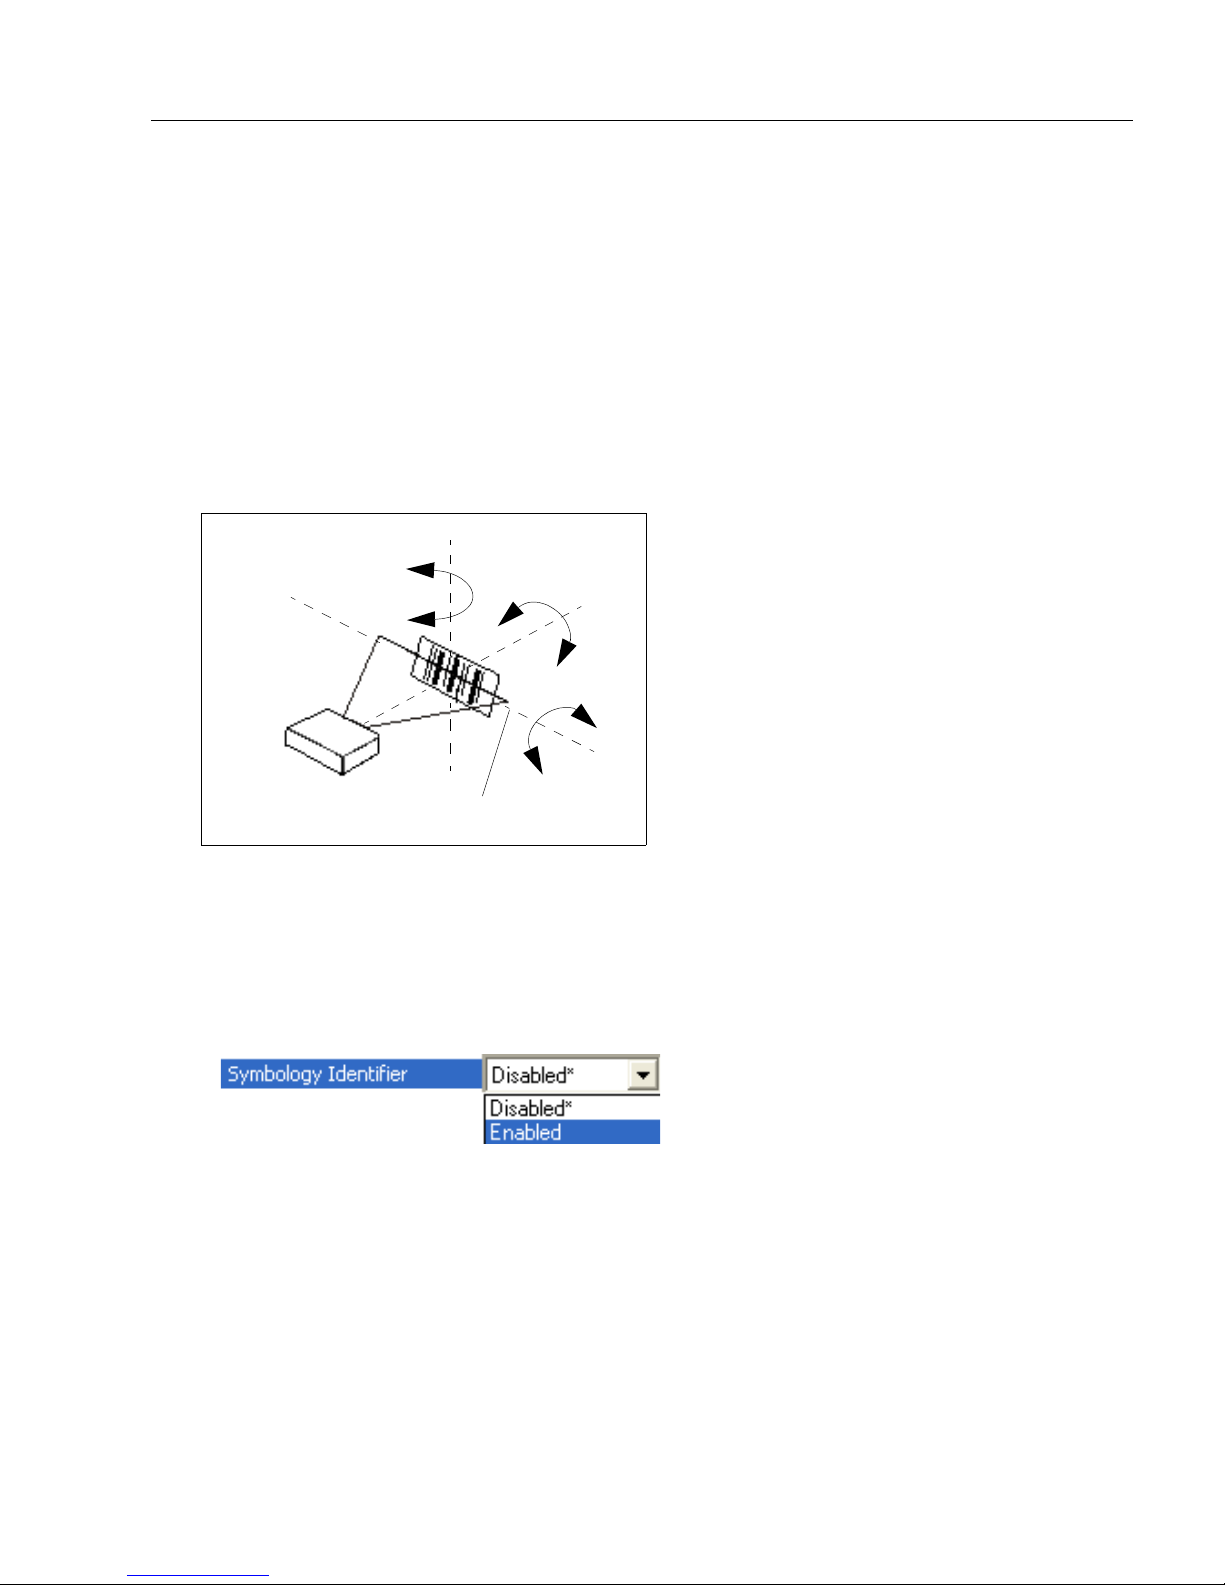
MS-1 and Symbol Orientation
MS-1
Skew axis
Tilt
axis
Pitch
axis
Scan line
Step 6 — Position the MS-1 Scan Engine
• Set up a symbol at the distance you will be using in your application. Refer to the Read
Ranges for your MS-1 model (High Density or Low Density) to determine the optimal
distance.
Note: If you are using an Interleaved 2 of 5 symbol, verify that the number or characters
being scanned matches the symbol length enabled for Interleaved 2/5 (default is 10 and 6).
• Avoid bright light or infrared light from other sources, including other readers.
• Pitch the MS-1 or symbol at a minimum of ±15° to avoid specular reflection (the return
irect, non-diffused light).
d
• Avoid excessive skew or pitch. Maximum skew is ±30°; maximum pitch is ±30°.
of
Note: Code 39 is the default symbology enabled. If you are uncertain of your symbology,
perform the following steps:
1. Enable all symbologies using ESP.
2. Enable Symbology Identifier at the bottom of ESP’s Symbologies tree control.
3. Decode the symbol and compare the symbology identifier character to the list on page
7-22 to determine your symbology.
4. Disable all other symbologies.
MS-1 Scan Engine User Manual
1-7
Page 16
Configure the MS-1 Scan Engine
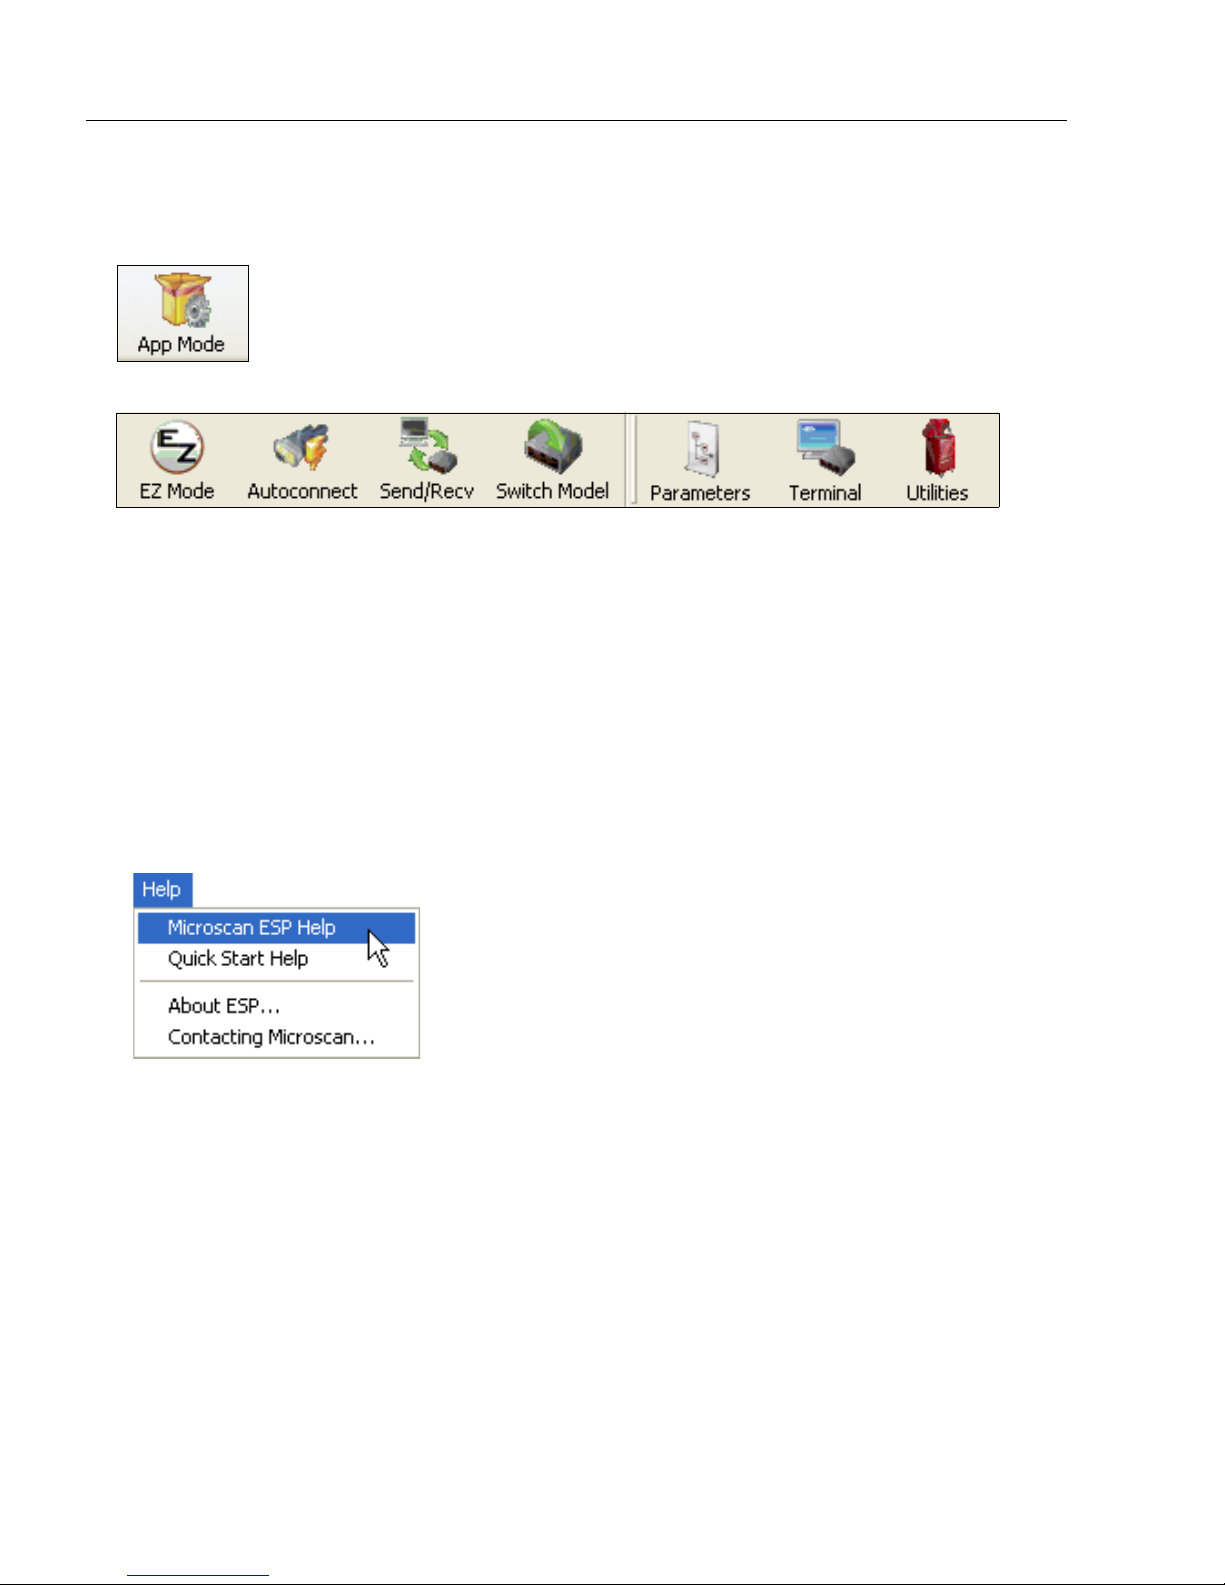
Step 7 — Configure the MS-1 Scan Engine
To make setup changes, click the App Mode button.
The following modes are accessible by clicking the buttons in the first row of
• Click the EZ Mode button to return to EZ Mode.
• Click the Autoconnect button to establish communication.
• Click the Send/Recv button to send or receive commands.
• Click the Switch Model button to open the model menu, or to return to a previous model.
• Click the Parameters button to show the tabbed tree controls for Communication, Read
Cycle, and Symbologies.
• Click the Terminal button to display decoded symbol data and to send serial commands
to the imager using text or macros.
• Click the
For further details, see ESP Help in the dropdown Help menu.
Utilities
button to show the tabbed interfaces for Differences from Default and Firmware.
App Mode
icons:
1-8
MS-1 Scan Engine User Manual
Page 17
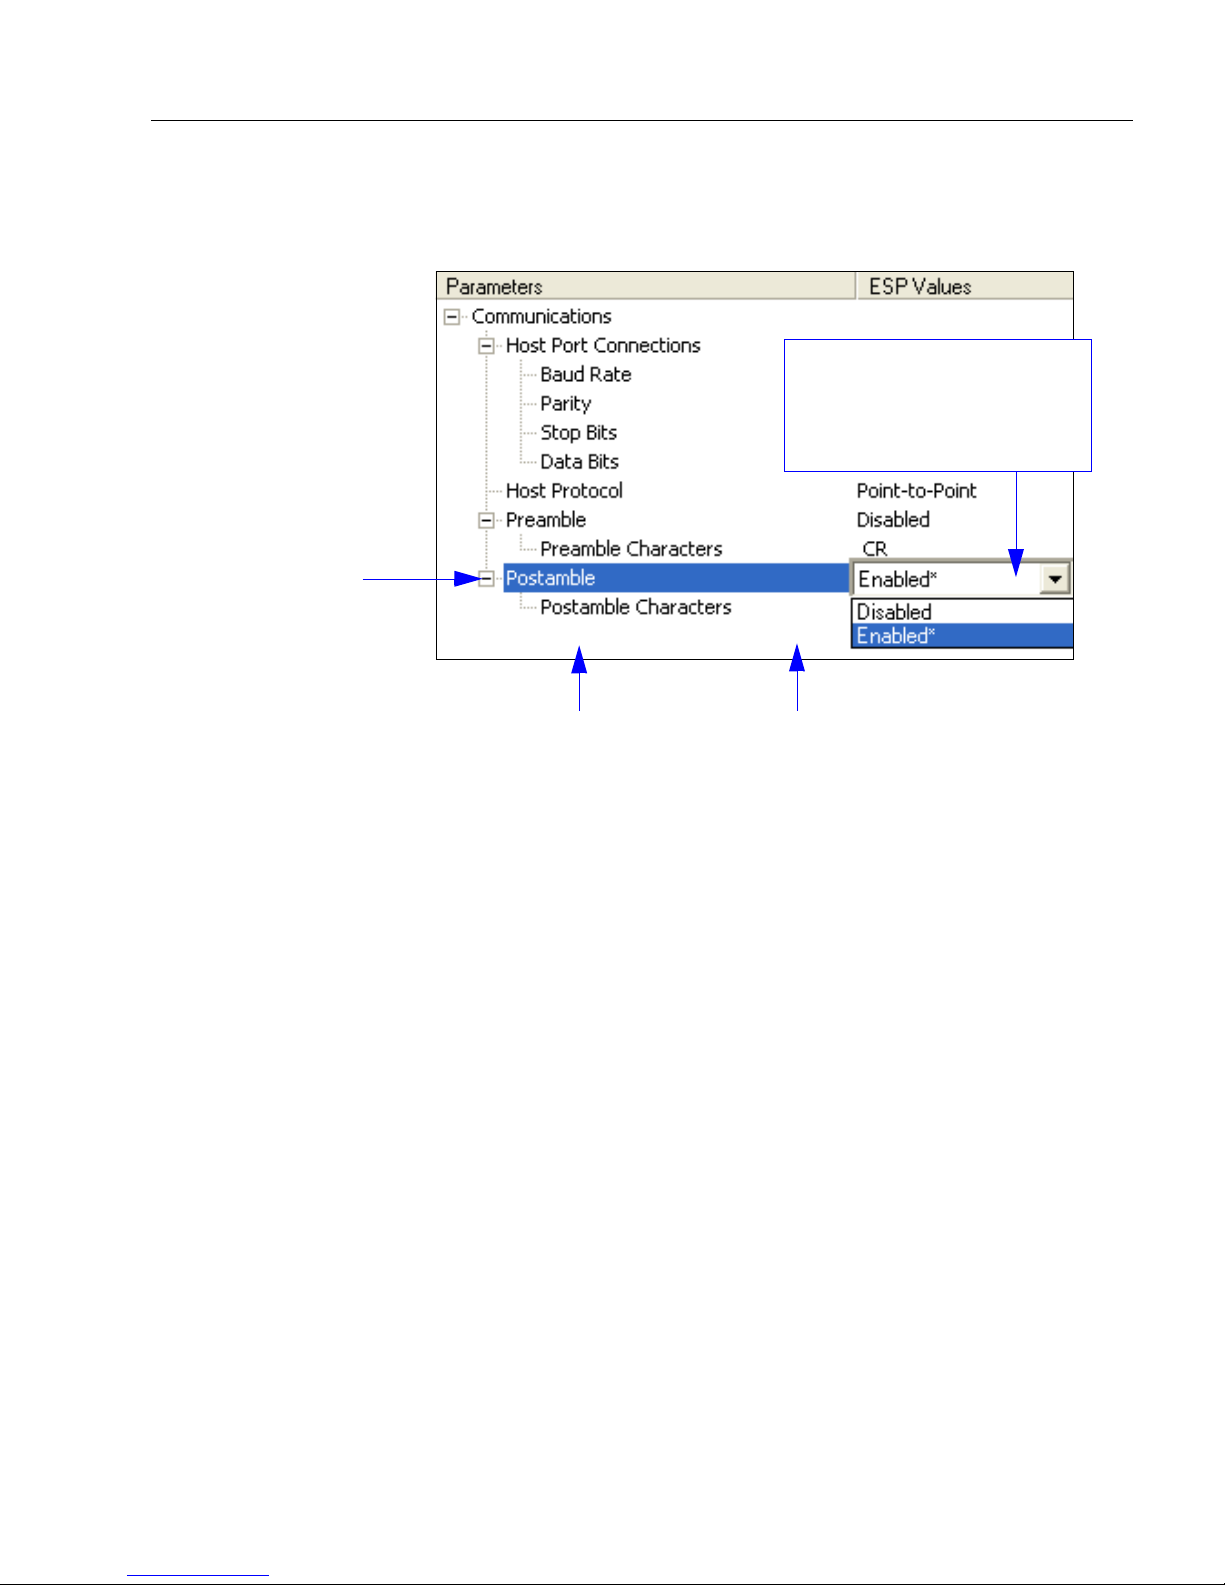
Step 8 — Save Changes in ESP
1. Left-click on the +
to
expand th
e
de
sired tree.
2. Double-click on th
e
de
sired parameter
and click once in th
e
selection box
to view
options.
5. Right-click on the open
screen and select Save to
Re
ader to implement the
command in the MS-1.
4. Left-click again on the
open screen to complete
your selection.
3. Place your cursor in the
selection box, scroll down to
the setting you wa
nt to
change
, and click once o
n
t
he setting.
To make changes to a configuration setting:
Quick Start
Saving Options
• Send, No Save. Changes will be lost when power is re-applied to the MS-1.
• Send and Save. This activates all changes in current memory and saves to th
• Send and Save, Including Factory. This activates all changes in current memory
MS-1 Scan Engine User Manual
r power-on.
fo
saves to
e MS-1
the MS-1 for power-on, and saves the Communications Mode setting.
,
1-9
Page 18

Save Changes in ESP
1-10
MS-1 Scan Engine User Manual
Page 19

2 Setup and Operation
Electrical Interface ........................................................................................................................ 2-2
Configuration................................................................................................................................. 2-5
Contents
This section describes the flex cable pin assignments.
MS-1 Scan Engine User Manual
2-1
Page 20
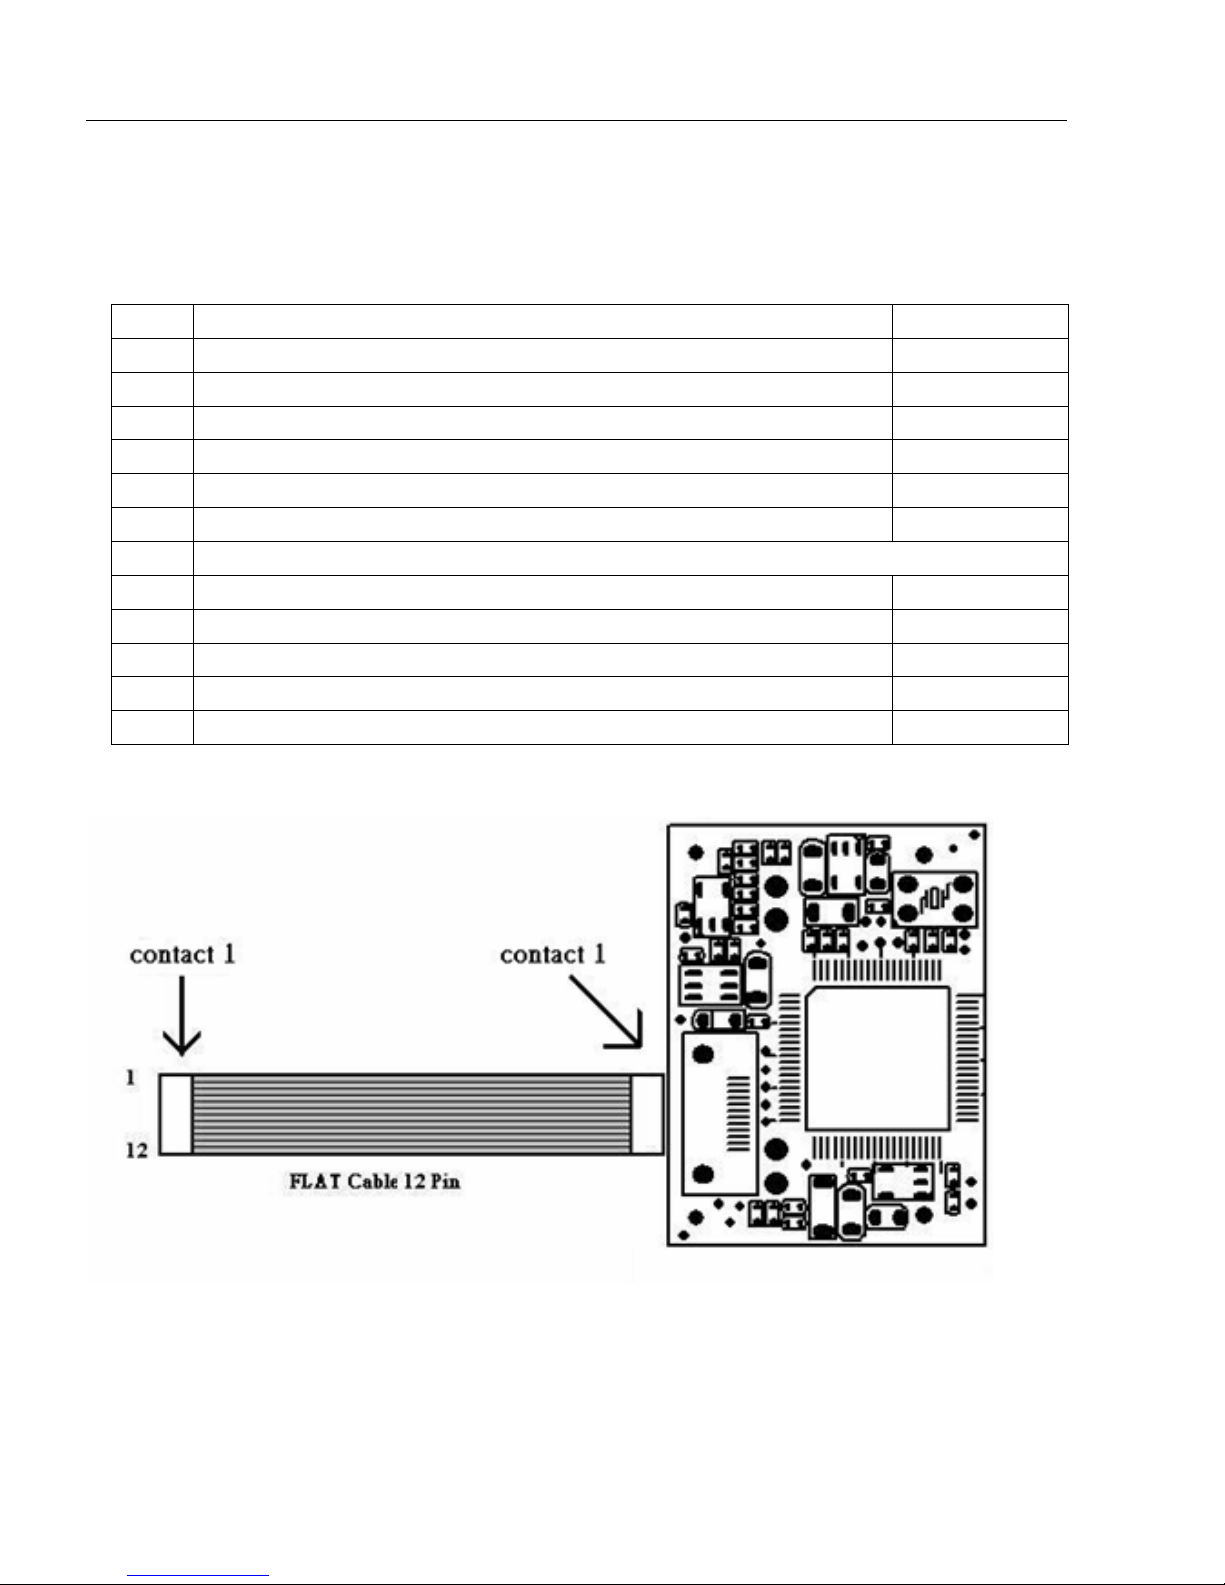
Electrical Interface
MS-1 Scan Engine
MS-1 end
(12 contacts)
Host end
(12 contacts)
Electrical Interface
Flex Cable Pinout (Host Side)
Pin Host RS-232 TTL In/Out
1 +5V Power (VCC) In
2 TTL_RxD In
3 Trigger Input In
4 Power Enable In
5 TTL_TxD Out
6 TTL_RTS Out
7 GND
8 USB_D+ In/Out
9 LED (Engine Status) Out
10 TTL_CTS In
11 Beeper (Decode Indicator) Out
12 USB_D– In/Out
Flex Cable
2-2
MS-1 Scan Engine User Manual
Page 21

Setup and Operation
Contact Assignments (Host Side of Flex Cable)
Pin Name I/O Description Electrical Equivalence
+5V Power
1
2RxDIn
3TriggerIn
4
(VCC)
Power
Enable
In
Scan engine power supply.
Important: Must be connected to
a 5V power supply.
Serial input (reception from host
system).
For firmware update use.
0 = Lighting on.
Scan engine reads, decodes,
and sends information to host.
1 = Lighting off.
Scan engine stops reading,
decoding, and transmitting.
0 = Scan engine on.
1 = Scan engine off, except during
data transmission and when writing
setup parameters to non-volatile
memory.
Serial output (transmission to
5TxDOut
6RTSOut
host system).
For firmware update use.
Scan engine requests permission
from host to transmit on TxD line.
MS-1 Scan Engine User Manual
2-3
Page 22
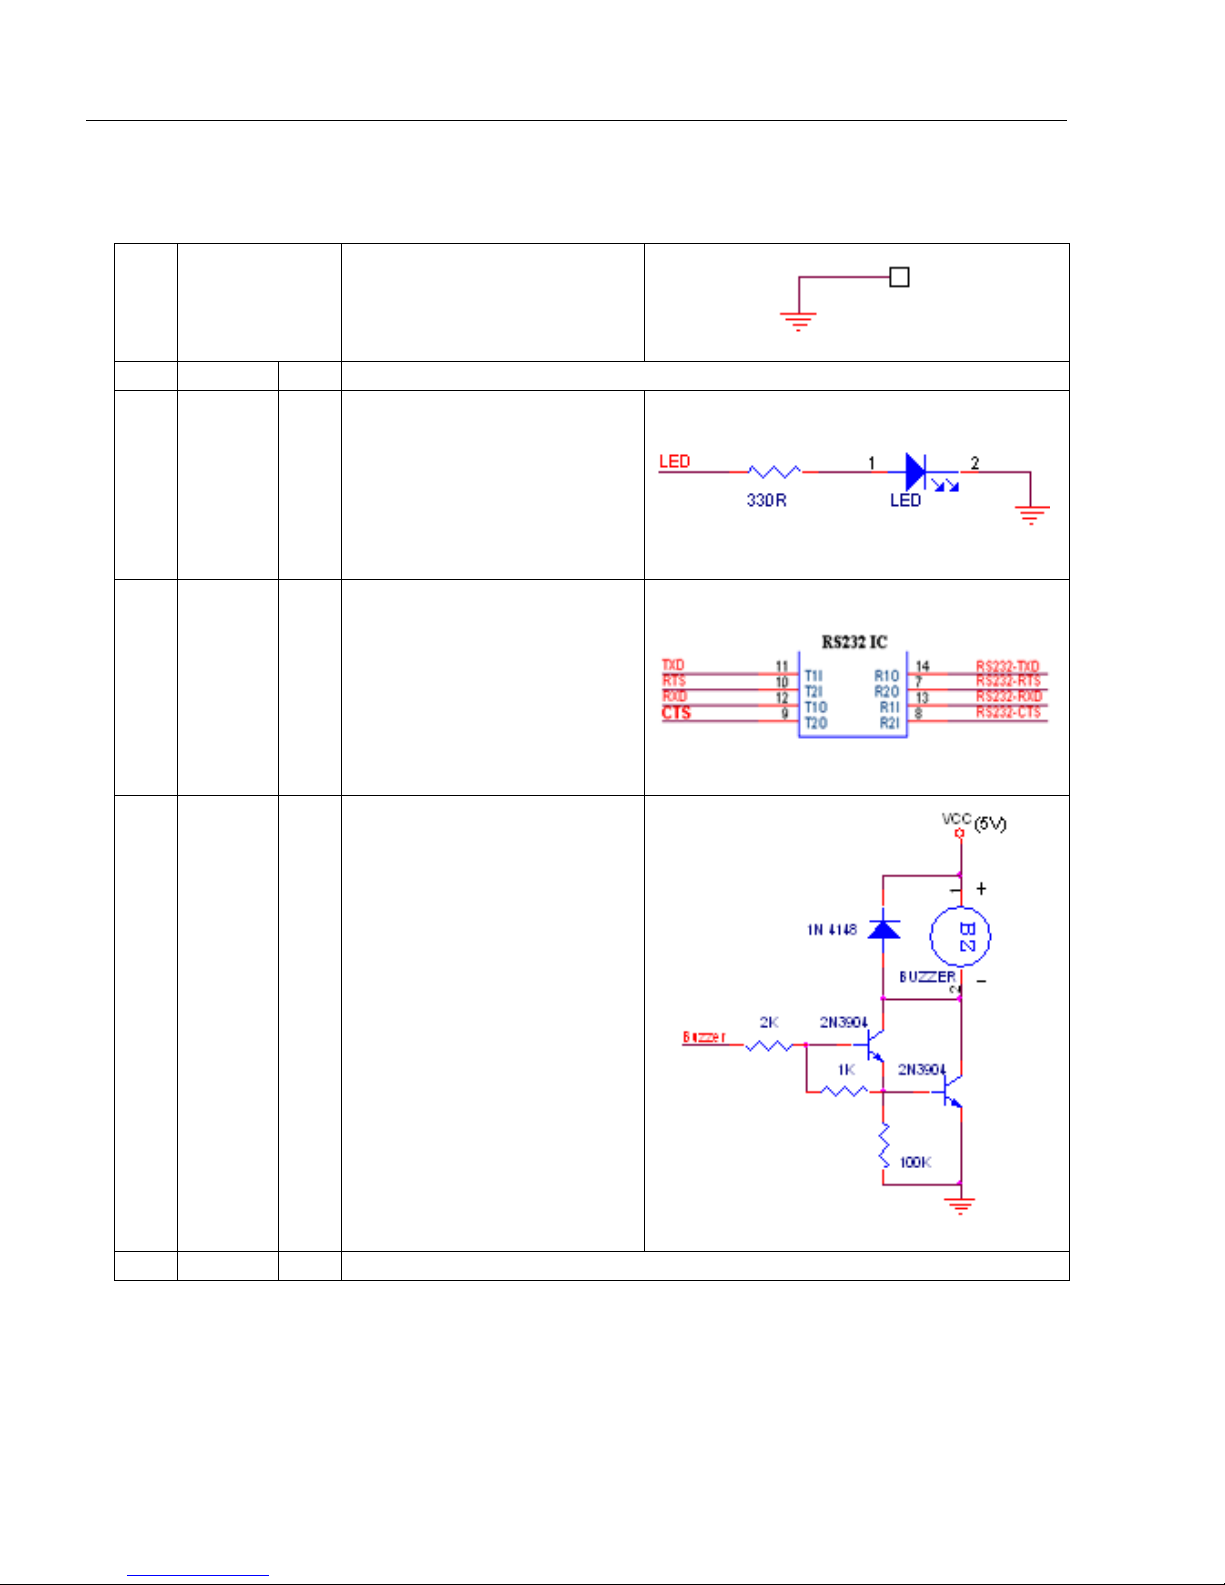
Electrical Interface
Contact Assignments (cont.)
7GND Ground
8USB_D+In/Out USB data (+)
9LEDOut CCD engine status display.
Host authorizes scan engine to
10 CTS In
transmit on TxD line (RTS/CTS
hardware protocol).
Active = symbol successfully
11 Beeper Out
12 USB_D– In/Out USB data (–)
decoded.
Low level = inactive; awaiting
decode.
2-4
MS-1 Scan Engine User Manual
Page 23

Setup and Operation
Configuration
The MS-1 Scan Engine can be configured using ESP (the preferred method), or serial K
commands. Refer to the following chapters in this manual for specific information about
configuring the MS-1:
Quick Start helps you get the MS-1 Scan Engine up and running quickly, to allow you to
get a sense of the MS-1’s capabilities and to test symbol decode performance.
Using ESP helps you understand the basic structure and elements of ESP, which is the
configuration software that you will use to set up the MS-1 for operation.
Communications explains how to set up communications between the MS-1 and a host.
Read Cycle explains the spatial and timing parameters associated with your application.
Symbologies
Terminal describes the Terminal window and Macro functions in ESP, which can be used
to configure and test the MS-1.
Utilities
describes the various symbol types that can be decoded by the MS-1 Scan Engine.
explains the operational commands that can also be sent to the MS-1 from Terminal.
MS-1 Scan Engine User Manual
2-5
Page 24

Configuration
2-6
MS-1 Scan Engine User Manual
Page 25

3 Installation
Mounting the MS-1 Scan Engine ..................................................................................................3-2
Window Materials.......................................................................................................................... 3-3
Optical Components ..................................................................................................................... 3-5
Electrical Components..................................................................................................................3-6
Window Placement ....................................................................................................................... 3-7
Tilt, Skew, and Pitch ..................................................................................................................... 3-8
Flex Cable................................................................................................................................... 3-10
Contents
This section describes how to integrate the MS-1 mechanically.
MS-1 Scan Engine User Manual
3-1
Page 26

Mounting the MS-1 Scan Engine
Recommended screw
torque: < 3 kgf
Mounting the MS-1 Scan Engine
Mechanical Dimensions
3-2
MS-1 Scan Engine User Manual
Page 27

Installation
Window Materials
Spectral Transmission 85% minimum from 640 to 690 nm
Material Glass, Acrylic
Acrylic has superior optical qualities and relatively good
impact resistance at a low initial cost. However, acrylic has
surface sensitivity to environmental factors, including chemicals,
mechanical stress, and UV light, commonly produced by
extrusion, cell casting, or injection molding. Acrylic is suitable
for ultrasonic welding. Microscan recommends that you use
an anti-reflective (AR) coating on both sides of the window.
Coating Inside and/or outside anti-reflective coating on the window.
The coating must provide 1% maximum reflectivity from 640
to 690 nm at the window. An anti-reflective coating can
reduce the light that is reflected back to the host case.
Window Placement Determining the window tilt angle is important because part
of the emitted light will always be reflected back from the
window surface.
Note: This reflective light cannot reach the photodiode of
the scan engine.
Adding a window can reduce the working range of the scan engine because there is a
signal loss when passing through window material. Choose a window material to minimize
loss but also to provide the best protection vs. cost for your application.
The following window materials are recommended:
Acrylic: Acrylic is relatively low-cost and has good optical clarity. It is also resistant to
accidental impact. It is sensitive to some chemicals, ultraviolet light, and severe mechanical
stress. Acrylic is produced by extrusion, cell casting, or injection molding. Acrylic is suitable
for ultrasonic welding.
CR-39: CR-39 has a hard surface and does not usually require coating treatment unless it
will be used in extraordinarily harsh environments. It is fairly resistant to accidental impact.
CR-39 is a thermal-setting plastic produced by cell casting. CR-39 is not suitable for
ultrasonic welding.
No matter what window material you choose, do not tint the window. Because the MS-1 is
a CCD scan engine, an anti-reflective coating is not necessary.
MS-1 Scan Engine User Manual
3-3
Page 28

Window Materials
Window Materials Vendors
AR Coating Companies
• JDS Uniphase — http://www.jdsu.com/products/custom-optics.html
• Dontech, Inc. — http://www.dontech.com/
• TSP, Inc. — http://www.tspinc.com/
Window Fabrication Companies
• Nelson Nameplate — http://www.nelsonusa.com/
• Cadillac Plastic — http://www.cadillacplastic.com/
• Reading Plastic Fabricators — http://www.readingplastic.com/
• G-S Supplies — http://www.gssupplies.com/
• Laurel Industries — http://www.laurelindustries.com/
3-4
MS-1 Scan Engine User Manual
Page 29

Installation
Optical Components
For the scan engine to achieve optimal performance, damage to optical components must
be avoided.
• Avoid scrubbing the optical surface and never wipe the optical surface with a dry cloth.
• You may spray glass cleaner on a non-abrasive cloth and then gently wipe the module
window.
• Do not touch the optical components.
MS-1 Scan Engine User Manual
3-5
Page 30

Electrical Components
Electrical Components
Avoid damage from electrostatic discharge by minimizing physical contact with the integrated
circuits and other electrical components in the scan engine.
• Keep the scan engine in the anti-static case until you are ready to install it in your device.
• Use grounding wrist straps when handling the scan engine.
3-6
MS-1 Scan Engine User Manual
Page 31

Installation
Window Placement
The function of the window is to keep dust and other particulates out of the host case and
to protect the scan engine.
MS-1 Scan Engine User Manual
3-7
Page 32

Tilt, Skew, and Pitch
Symbol
EAN (13 digits) 37 mm
0.33 mm (13
mil)
0.39 mm
(15.6 mil)
R
R > or = 25
mm
R > or = 25
mm
d
90 mm 120 mm
PCS
0.9 (printed on photographic
paper)
Tilt, Skew, and Pitch
Be aware of the tolerance for the tilt, pitch, and skew of the symbol you are trying to scan.
3-8
MS-1 Scan Engine User Manual
Page 33

Installation
Tilt
axis
Skew axis
Pitch
axis
Tilt
Tilt interferes with successful decodes if all the bars in the symbol are not inside the scan
width, or if the tilt is greater than 25 degrees.
Skew
Skew reduces bar width, and affects high-density symbols more than low or medium
density symbols. Decoding may be possible with a skew angle of up to 65 degrees.
Pitch
Pitch reduces bar height. Decoding may be possible with a pitch angle of up to 75
degrees. Reducing pitch increases decoding efficiency. A low pitch angle (2–3 degrees
minimum) is helpful because it prevents specular reflection.
MS-1 Scan Engine User Manual
3-9
Page 34

Flex Cable
MS-1 Scan Engine
MS-1 end
(12 contacts)
Host end
(12 contacts)
Flex Cable
Connecting the Flex Cable
1. Open the flex cable connector clip. Use a small screwdriver or other pointed object to
ex
tend the clip so that the end of the flex cable can be inserted.
2. Remove the flex cable carefully.
3. Install a new flex cable as required. The flex cable connectors must be in direct cont
the scan engine connectors.
with
act
3-10
MS-1 Scan Engine User Manual
Page 35

4 Using ESP
EZ Mode........................................................................................................................................4-2
Application Mode...........................................................................................................................4-3
Menu Toolbar................................................................................................................................4-4
Autoconnect ................................................................................................................................4-12
View ............................................................................................................................................4-14
Navigating in ESP .......................................................................................................................4-15
Send/Receive Options ................................................................................................................4-16
Contents
This section is designed to help you understand the basic structure and elements of ESP
(Easy Setup Program).
When you open ESP, unless otherwise specified in the ESP Preferences dialog accessible
from the Options heading on the menu toolbar, you will enter EZ Mode for initial setup.
From there, you can enter Application Mode (App Mode) and access three configuration
menus (Communications, Read Cycle, and Symbologies), a Terminal interface, and a
Utilities interface.
ESP can be used to configure the MS-1 Scan Engine in three main ways:
• Tree Controls: Each configuration menu contains a list of all option settings that pertain
to that specific element of MS-1 operation. For example, the Communications menu
shows a Host Port Connections option, and then a list of the sub-options Baud Rate,
Parity, Stop Bits, and Data Bits. Each of these sub-options is configurable by using
dropdown menus.
• Graphic User Interfaces: MS-1 settings can be configured using such point-and-click
tools as radio buttons, zoom in/zoom out sliders, spin boxes, check boxes, and drag-and-drop
functions.
• Terminal: ESP’s Terminal allows you to send serial configuration and utility commands
directly to the MS-1 by typing them in the provided text field.
Information about using ESP in specific applications is provided in subsequent sections.
For
ESP
system requirements, see
MS-1 Scan Engine User Manual
Minimum System Requirements
in Chapter 1,
Quick Start
4-1
.
Page 36

EZ Mode
Enter App Mode to
access configuration
trees and other setup
features.
If you are unsure what type of
symbology you are using, click
Autodiscriminate to enable all
symbologies.
EZ Mode
EZ Mode offers instructions on positioning the MS-1 in relation to a test symbol, and also
features an Autodiscriminate function that automatically enables all symbologies.
4-2
MS-1 Scan Engine User Manual
Page 37

Using ESP
Menu toolbar.
Click this icon to return to
EZ Mode.
Click the Parameters icon to return to full
App Mode view from Terminal or Utilities.
Click on tabs in this row to
access configuration trees
like the one shown below.
Click here to open the Terminal or
Utilities views.
Application Mode
From EZ Mode, you can click on the App Mode button to access specific configuration
menus, Utilities tools, and a Terminal window where serial commands can be entered.
Note: The App Mode and EZ Mode buttons appear in the same position to allow easy
switching between these primary modes.
Note: See the corresponding sections of this manual for specific information on any of the
views or modes mentioned above.
MS-1 Scan Engine User Manual
4-3
Page 38

Menu Toolbar
(Save to Reader)
(Receive Reader
Settings)
Menu Toolbar
File > New
Whenever New is selected, the default configuration of ESP is
loaded.
Open/Save
When Save or Save As is selected, the ESP configuration is
saved to the host computer’s hard drive and available whenever
the same file is selected under Open.
Important: When you save menu changes to your hard drive,
these changes are not saved to the MS-1.
shows how settings can be saved and received between ESP
and the MS-1, and ESP and the host hard drive.
The illustration below
Import/Export
Import converts the ASCII settings from a text file to ESP configuration settings.
Export converts the active ESP configuration settings to an ASCII text file.
4-4
MS-1 Scan Engine User Manual
Page 39

Using ESP
Model
In the Model menu you can select any of the models supported by ESP. When you choose
a different model, the connection to your present model will be terminated.
To connect to another model, select New Model, choose a new model from the pop-up
menu that appears, and click OK.
Note: When you save an ESP file, you are saving the settings of all the models defined in
that file.
MS-1 Scan Engine User Manual
4-5
Page 40

Menu Toolbar
The Toolbar Style
options allow you to
determine how ESP
will display the mode
options in the two rows
at the top of the screen.
Options
The Options menu allows you to save memos and set up ESP
Preferences.
Note: Preferences will be saved and loaded into ESP whenever ESP
is opened next, whether or not you save the ESP file.
Preferences > General Tab
Reload Last File
At startup, reloads the last file saved to the host computer’s hard drive.
Show Model Prompt
At startup, shows the model menu displaying all supported readers.
Show Connect Prompt
At startup, displays the Would you like to connect to the MS-1? prompt.
Receive After Connect
At startup, loads the MS-1’s settings into ESP. (This is not recommended if you want to
preserve your ESP settings for future use.)
Skip EZ Mode
At startup, skips EZ Mode and opens directly in App Mode.
Enable Send and Save as Factory Settings
This option must be selected to enable Send and Save, Including Factory.
4-6
MS-1 Scan Engine User Manual
Page 41

Using ESP
Preferences > Terminal Tab
Show Non-Printable Characters
When Show Non-Printable Characters is enabled, characters such as “CRLF” will be
displayed in the Terminal window. When Enhanced Format is checked, the characters
are displayed with more detailed formatting.
Change Keyboard Macros
Clicking the Change Keyboard Macros button brings
up the Function Keys dialog. In this dialog you can
select the desired function key and then enter your
macro keystrokes in the associated key map. For
example, to make Ctrl-F2 the keystroke to send a trigger
character, select F2, then in the Ctrl row, enter <trigger
character> and click OK. Then whenever the Ctrl-F2
keystroke is pressed, the trigger character will start the
read cycle.
Note: The F1 key is reserved for opening ESP Help and the F3 key is reserved for the
Find Next function.
Change Font
Allows you to modify the font used for decode data received from the MS-1 on the Terminal
screen.
Change Echo Font
Allows you to modify the font used for command characters typed into the Terminal view.
Enable Echo
Allows you to enter command characters in Terminal.
Display Incoming Data Even When Not in Focus
When Display Incoming Data Even When Not in Focus is enabled, data from the MS-1
will continue to appear in the Terminal even when ESP is not the top window.
MS-1 Scan Engine User Manual
4-7
Page 42

Menu Toolbar
Preferences > Bar Code Options Tab
The Bar Code Options dialog allows you to set the size of user-created symbols.
Sizing Information
Sets the bar width or module width (in mils, or thousandths of an inch) of user-created
symbols.
Example: A bar width of 14 is 0.014 inches.
Caption
Allows you to define and position a human-readable caption for the symbol you create.
4-8
MS-1 Scan Engine User Manual
Page 43

Preferences > Advanced Tab
Send XON with Autoconnect
Sends an
routine.
XON (Begin Transmission
) command to the MS-1 before starting the
Using ESP
Autoconnect
Ask to Save ESP File when Quitting
When enabled, prompts the user to save a .esp file when ending a session.
The .esp file will be saved in the location of your choice.
MS-1 Scan Engine User Manual
4-9
Page 44

Menu Toolbar
Preferences > Advanced Tab (cont.)
Connect to Reader via TCP/IP
When enabled, shows a TCP/IP option on the Select Protocol dialog.
Note:
Use Default Storage Location
When enabled, automatically stores data in ESP’s Application Data folder.
This option should only be selected if you intend to connect using an Ethernet adapter.
4-10
MS-1 Scan Engine User Manual
Page 45

Using ESP
Document Memo
The information you type in the Document Memo field will appear in a context-sensitive text
box whenever your cursor hovers over the Document Memo item on the Options menu.
Model Memo
Similar to Document Memo, the information you type in the Model Memo field will appear
in a context-sensitive text box whenever your cursor hovers over the Model Memo item on
the Options menu. Memos created in Model Memo are specific to the model enabled
when the message was created.
Note:
Memos must be saved in a
If you do not save your current session, any memos that you have entered during the session
will be discarded, and will be unavailable in your next session.
MS-1 Scan Engine User Manual
.esp
file if you want them to available in your next session.
4-11
Page 46

Autoconnect
• Once you have
chosen
the corre
ct
port, click Start to
conn
ect.
Autoconnect
•
If your RS-232 connection attempt fails, you can use
between
• If your communications port is not the default COM1, use the dropdown menu to change
your port.
the MS-1 and the host.
Autoconnect
to establish a connection
When you are connected, you will see the green connection indicator in the status bar at
the bottom right of your screen:
4-12
MS-1 Scan Engine User Manual
Page 47

Autoconnect (cont.)
• Click Connect on ESP’s
menu toolbar, and then
select Connect
on the
d
ropdown menu.
• When the Connect
ion
Se
ttings dialog appe
ars,
check the Force Con
nect
box and click Connect.
If your RS-232 host settings cannot be changed to match the MS-1’s settings:
Using ESP
MS-1 Scan Engine User Manual
4-13
Page 48

View
View
The View menu allows you to move quickly between interfaces without using the icon
buttons on the App Mode toolbar.
Notice that each menu item corresponds with the icon buttons at the top of the ESP window.
4-14
MS-1 Scan Engine User Manual
Page 49

Using ESP
1. Left-click on the + to
expand menu items.
2. Double-click the desir
ed
parameter and single-click
in the selection box to vi
ew
opt
ions.
3. Place your cursor in th
e
selection box, scroll down to
the setting you want t
o
chan
ge, and single-click
the setting.
4. Left-click again on the open
screen to complete th
e
sel
ection.
5. Right-click on the open screen and select Save to Reader to implement the command in th
e
MS-1. You can send the command without saving it, you can
send and save the command
si
multaneously, or you can
send and save the command
and modified factory communications
def
aults simultaneously.
The X indicates
that the setting
is the default.
Navigating in ESP
To change MS-1 settings, or to access the Terminal or Utilities views, click the App Mode
button.
To return to EZ Mode, click the EZ Mode button.
To make changes to configuration settings in the tree controls:
MS-1 Scan Engine User Manual
4-15
Page 50

Send/Receive Options
Send/Receive Options
To a c c es s Receive, Save, and Default options, click the Send/Recv button. You can also
access these options by right-clicking in any of the configuration views.
Receiving
From the Send/Recv menu, select Receive Reader Settings.
Caution: Do not select this option if you do not want to upload the MS-1’s settings. For
example, if your ESP file has a number of custom settings that you want to maintain and
download into the MS-1, these settings would be lost by choosing Yes.
This is useful if you want to receive (upload) the MS-1’s settings and save them as a file
for future use. For example, if your MS-1 has settings that you do not want to change,
choosing Yes would allow you to load those settings to ESP and save them in an ESP file
for later retrieval.
Receiving the MS-1’s settings will also assure that you will not be subsequently saving any
unwanted changes that you or someone else has made previously in ESP.
Saving
Send, No Save (<A>)
Saves ESP settings to current memory.
Send and Save (<Z>)
Activates all changes in current memory and saves to the MS-1 for power-on.
Send and Save, Including Factory (<Zp>)
Activates all changes in current memory, saves to the MS-1 for power-on, and saves the
Communications Mode setting.
Important: Enable Send and Save as Factory Settings must be selected in General
Preferences for this command to function.
4-16
MS-1 Scan Engine User Manual
Page 51

Using ESP
Defaulting
When you select Default Current Menu Settings or Default all ESP Settings, you are
only defaulting the ESP settings.
Advanced Options
Send Current View
This is the same as Save to
Reader > Send No Save except
that only the commands in the current
tree control are sent.
Send Current Command
Saves only the command that is
currently selected in the tree control.
Add/Remove Exception
After you perform a Receive Reader Settings command1 and you click on the Advanced
Options > Add Exception option, you may see a list of serial commands. These are
commands that may be in your MS-1’s firmware but are not included in (or are different
from) your current version of ESP. When exceptions are present, the Exceptions button
will appear to the right of the other mode buttons (
When no exceptions are present, the button will disappear.
You can edit exception commands by double-clicking on them and changing them as
needed.
It is important to note that these commands will be saved to your MS-1 whenever you
send a Save to Reader command, or an <A> or <Z> command.
Also, if there is a corresponding ESP menu item, the ESP Value column for that item will
be blank following a Receive Reader Settings command.
Communication, Read Cycle, Symbologies).
1. From the Send/Recv button, or by right-clicking in any blank section of a tree control.
MS-1 Scan Engine User Manual
4-17
Page 52

Send/Receive Options
4-18
MS-1 Scan Engine User Manual
Page 53

5 Communications
Communications by ESP ..............................................................................................................5-2
Communications Serial Commands.............................................................................................. 5-3
Host Port Connections..................................................................................................................5-4
Host Port Protocol.........................................................................................................................5-5
Preamble.......................................................................................................................................5-6
Postamble..................................................................................................................................... 5-7
Communications Mode .................................................................................................................5-8
Keyboard Mapping........................................................................................................................5-9
USB Keyboard Key Codes..........................................................................................................5-10
Contents
This section explains how to set up communications between the MS-1 and a host.
With Microscan’s ESP (Easy Setup Program), configuration changes can be made in the
ESP tree controls and then sent and saved to the MS-1. The user can also send serial
commands to the MS-1 via ESP’s Terminal.
MS-1 Scan Engine User Manual
5-1
Page 54

Communications by ESP
Click this button to
bring up the App Mode
view, then click the
Communication tab.
To open nested options,
single-click the +.
To change a setting,
double-click the setting
and use your cursor to
scroll through the
options.
Communications by ESP
5-2
MS-1 Scan Engine User Manual
Page 55

Communications
Communications Serial Commands
Host Port Connections <K100,baud rate,parity,stop bits,data bits>
Keyboard Mapping <K116,keyboard layout,caps lock mode,number lock>
Communications Mode <K117,communications mode>
Host Port Protocol <K140,protocol>
Preamble <K141,status,preamble character(s)>
Postamble <K142,status,postamble character(s)>
MS-1 Scan Engine User Manual
5-3
Page 56

Host Port Connections
Host Port Connections
The following settings define the basic transmission speeds and digital standards that
ensure common formatting.
Baud Rate, Host Port
Usage: Can be used to transfer data faster or to match host port settings.
Definition: The rate at which the MS-1 and host transfer data back and forth.
Serial Cmd: <K100,baud rate,parity,stop bits,data bits>
Default: 9600
Options: 1 = 1200 2 = 2400 3 = 4800
4 = 9600 5 = 19.2K 6 = 38.4K
Parity, Host Port
Usage: Only changed if necessary to match host setting.
Definition: An error detection routine in which one data bit per character is set to 1 or 0
so that the total number of bits in the data field is either even or odd.
Serial Cmd: <K100,baud rate,parity,stop bits,data bits>
Default: Even
Options: 0 = None 1 = Even 2 = Odd
Stop Bits, Host Port
Usage: Only changed if necessary to match host setting.
Definition: One or two bits added to the end of each character to indicate the end of
the character.
Serial Cmd: <K100,baud rate,parity,stop bits,data bits>
Default: One
Options: 0 = One 1 = Two
Data Bits, Host Port
Usage: Only changed if necessary to match host setting.
Definition: One or two bits added to the end of each character to indicate the end of
the character.
Serial Cmd: <K100,baud rate,parity,stop bits,data bits>
Default: Seven
Options: 0 = Seven 1 = Eight
5-4
MS-1 Scan Engine User Manual
Page 57

Communications
Host Port Protocol
Usage: In general, the point-to-point protocols will work well in most applications.
They require no address and must use RS-232 or RS-422 communications
standards.
Definition: Protocols define the sequence and format in which information is transferred
between the MS-1 and the host.
Serial Cmd: <K140,protocol>
Default: Point-to-Point
Options: 0 = Point-to-Point
1 = Point-to-Point with RTS/CTS
Note: The preamble <K141> and postamble <K142> character strings can be used to
frame the decoded data in both protocol modes.
Point-to-Point (Standard)
Usage: Used only with RS-232 or RS-422.
Definition: Standard Point-to-Point requires no address and sends the data to the
host whenever it is available, without a request or handshake from the host.
Serial Cmd: <K140,0>
Point-to-Point with RTS/CTS
Usage: An MS-1 initiates a data transfer with an RTS (request-to-send) transmission.
The host, when ready, responds with a CTS (clear-to-send) and the data is
transmitted. RTS and CTS signals are transmitted over two dedicated wires
as defined in the RS-232 standard. Used only with RS-232.
Definition: Point-to-Point with RTS/CTS (request-to-send/clear-to-send) is a simple
hardware handshake protocol that allows an MS-1 to initiate data transfers
to the host.
Serial Cmd: <K140,1>
MS-1 Scan Engine User Manual
5-5
Page 58

Preamble
Preamble
Preamble Status
Usage: Useful for identifying and controlling incoming data. For example, defining
the preamble as a carriage return and a line feed causes each decoded
message to be displayed on its own line.
Definition:
Serial Cmd: <K141,status,preamble character(s)>
Default: Disabled
Options: 0 = Disabled 1 = Enabled (within any protocol)
Preamble Characters
Serial Cmd: <K141,status,preamble character(s)>
Default: ^M (carriage return)
Options: To enter control characters within a serial command, hold down the Ctrl
Defines a one to four character data string that can be added to the beginning
of the decoded data.
key while typing the desired character.
Example: <K141,1,CTRL-m> to enter the control character ^M.
5-6
MS-1 Scan Engine User Manual
Page 59

Communications
Postamble
Postamble Status
Usage: Useful for identifying and controlling incoming data. For example, defining
the postamble as a carriage return and a line feed causes each decoded
message to be displayed on its own line.
Definition: Allows the user to enable or disable up to four postamble characters that
can be added to the end of the decoded data.
Serial Cmd: <K142,status,postamble character(s)>
Default: Enabled
Options: 0 = Disabled 1 = Enabled (within any protocol)
Postamble Characters
Serial Cmd: <K142,status,postamble character(s)>
Default: ^M^J (carriage return/line feed)
Options: To enter control characters within a serial command, hold down the Ctrl
key while typing the desired character.
Example: <K142,1,CTRL-m CTRL-j> to enter ^M^J.
MS-1 Scan Engine User Manual
5-7
Page 60

Communications Mode
Communications Mode
Definition: Allows the user to determine the method of reader communication.
Important: You must send a <Zp> to the reader or Send and Save,
Including Factory from ESP after changing this parameter.
Note:
If you are using an MS-1 Demo Kit, the Communications Mode default is
USB Virtual COM.
Serial Cmd: <K117,communications mode>
Default: RS-232
Options: 0 = RS-232
1 = USB Native (HID)
2 = USB Virtual COM
5-8
MS-1 Scan Engine User Manual
Page 61

Keyboard Mapping
Communications
Definition:
Serial Cmd: <K116,keyboard layout,caps lock mode,number lock>
Default: English (U.S.)
Options: 0 = English (U.S.)
Allows the user to determine language of the USB keyboard.
1 = English (UK)
2 = German
3 = French
4 = Japanese
5 = Spanish
6 = Italian
7 = Universal
8 = Swiss
9 = Czech
Caps Lock Mode
Definition:
Serial Cmd: <K116,keyboard layout,caps lock mode,number lock>
Default: Off
Options: 0 = Off
Allows the user to set caps lock.
1 = On
2 = Free
Number Lock
Definition:
Serial Cmd: <K116,keyboard layout,caps lock mode,number lock>
Default: Alphanumeric
Options: 0 = Numeric
MS-1 Scan Engine User Manual
Allows the user to set number lock.
1 = Alphanumeric
5-9
Page 62

USB Keyboard Key Codes
USB Keyboard Key Codes
When in USB keyboard mode, the reader will output the following ASCII symbols as the
specified key code. All output data that is not transmitted in USB configuration mode is
transmitted as a key code. This includes symbol data, Code 128 application record separator,
No Read message, Preamble, and Postamble.
Hex Key Code Hex Key Code Hex Key Code
00 Ctrl+@ D2 F3 F7 Right Ctrl up
01 Ctrl+A D3 F4 F8 Right Shift down
02 Ctlr+B D4 F5 F9 Right Shift up
03 Ctrl+C D5 F6 FA Left Win down
04 Ctrl+D D6 F7 FB Left Win up
05 Ctrl+E D7 F8 FC Right Win down
06 Ctrl+F D8 F9 FD Right Win up
07 Ctrl+G D9 F10
08 Ctrl+H DA F11
09 Ctrl+I DB F12
0A Ctrl+J DC HOME
0B Ctrl+K DD END
0C Ctrl+L DE RIGHT Arrow
0D Ctrl+M DF LEFT arrow
0E Ctrl+N E0 UP arrow
0F Ctrl+O E1 DOWN arrow
10 Ctrl+P E2 Page Up
11 Ctrl+Q E3 Page Down
12 Ctrl+R E4 TAB
13 Ctrl+S E5 Back TAB
14 Ctrl+T E6 ESC
15 Ctrl+U E7 ENTER
16 Ctrl+V E8 Backspace
17 Ctrl+W E9 Delete
18 Ctrl+X EA Left Alt down
19 Ctrl+Y EB Left Alt up
1A Ctrl+Z EC Left Shift down
1B Ctrl+[ ED Left Shift up
1C Ctrl+\ EF Left Ctrl down
1D Ctrl+] F0 Left Ctrl up
1E Ctrl+^ F3 Numeric Pad Enter
1F Ctrl+_ F4 Right Alt down
D0 F1 F5 Right Alt up
D1 F2 F6 Right Ctrl down
5-10
MS-1 Scan Engine User Manual
Page 63

Contents
Read Cycle by ESP ...................................................................................................................... 6-2
Read Cycle Serial Commands......................................................................................................6-3
MS-1 Read Cycle Overview.......................................................................................................... 6-4
Number of Symbols ......................................................................................................................6-5
Time Between Identical Decodes ................................................................................................. 6-6
Trigger Mode ................................................................................................................................ 6-7
Continuous Read 1 Output Emulation .......................................................................................... 6-9
Serial Trigger Character (Delimited) ........................................................................................... 6-10
Start Trigger Character (Non-Delimited) ..................................................................................... 6-11
Stop Trigger Character (Non-Delimited) ..................................................................................... 6-12
No Decode Timeout.................................................................................................................... 6-13
Decodes Before Output .............................................................................................................. 6-14
No Read Message ...................................................................................................................... 6-15
Shutter Speed............................................................................................................................. 6-16
6 Read Cycle
After you’ve established communications you will need to address the spatial and timing
parameters associated with your application. This section explains those parameters.
MS-1 Scan Engine User Manual
6-1
Page 64

Read Cycle by ESP
To change a setting,
double-click the
setting and use your
cursor to scroll
through the options.
Click this button
to bring up the
App Mode view,
and then click the
Read Cycle tab.
To open nested options,
single-click the +.
Read Cycle by ESP
6-2
MS-1 Scan Engine User Manual
Page 65

Read Cycle Serial Commands
Read Cycle
Trigger Mode
Serial Trigger Character <K201,serial trigger character>
No Decode Timeout <K220,0,seconds>
Decodes Before Output <K221,decodes before output>
Number of Symbols <K222,number of symbols>
Start Trigger Character <K229,start character>
Stop Trigger Character <K230,stop character>
Time Between Identical
Decodes
Shutter Speed <K544,shutter speed>
No Read Message <K714,status,No Read message>
<K200,trigger mode>
<K503,time between identical decodes>
MS-1 Scan Engine User Manual
6-3
Page 66

MS-1 Read Cycle Overview
MS-1 Read Cycle Overview
The MS-1 outputs symbol data as soon as it is decoded. There is no “End of Read Cycle”
option. Multiple symbol operations are emulated by controlling the read cycle duration
and the time allowed between identical consecutive decodes.
The following conditions also apply:
1. In Single symbol mode, a read cycle ends only on a decode, falling trigger, or timeout.
2. In Multiple symbol mode, the read cycle begins on a triggered event, but starts over
after any symbol has been decoded.
3. There is no “new trigger” feature.
4. There is no timeout for External Level mode.
5. There is no Continuous Read 1 Output setting in Trigger Mode, but this setting ca
be emulated by following the steps described in
Continuous Read 1 Output Emulation
n
.
6-4
MS-1 Scan Engine User Manual
Page 67

Read Cycle
Number of Symbols
Usage: Commonly used in shipping applications where an object contains individual
symbols for part number, quantity, and other values.
Definition: This feature allows one trigger event to decode all symbols present.
Conditions: The following conditions apply:
• When Number of Symbols is set to Single, the read cycle ends wh
o
ne symbol is decoded and output.
• When Number of Symbols is set to Multiple, all decoded symbol data
(for both the same and different symbols) is output while the read
is active and/or no timeout has occurred.
• If set to Multiple and Time Between Identical Decodes is less
th
e decode time (typically about 4ms), the same symbol data ca
output multiple times.
Number of Symbols
than
n be
en
cycle
Definition: Numb
a single read cycle.
Serial Cmd: <K222,number of symbols>
Default: 1
Options: 0 = Multiple
1 = Single
er of Symbols is the number of different symbols that can be read in
MS-1 Scan Engine User Manual
6-5
Page 68

Time Between Identical Decodes
Time Between Identical Decodes
Usage: Can be used to prevent repetition of data output. Also useful for emulating
Multiple symbol operations. When used in conjunction with Number of
Symbols set to Multiple, Time Between Identical Decodes can be set so
that more than one symbol can be read within a read cycle.
Definition: Determines the length of time that the MS-1 will wait before it outputs the
same symbol’s data a second time.
Serial Cmd: <K503,time between identical decodes>
Default: 0
Options: 0 to 2550 ms
6-6
MS-1 Scan Engine User Manual
Page 69

Read Cycle
Initiate Read Cycle:
Object #1, moving in front of the
detector beam, causes a
change in the trigger state,
which initiates the read cycle.
End Read Cycle:
The same object, moving out of
the detector beam, causes
another change in the trigger
state, which ends the read cycle.
Trigger Mode
Definition: The Trigger is the event that initiates a read cycle.
Serial Cmd: <K200,trigger mode>
Default: Continuous Read
Options: 0 = Continuous Read
2 = External Level
3 = External Edge
4 = Serial Data
5 = Serial Data and Edge
Continuous Read
Usage: Continuous Read is useful in testing symbol readability or MS-1 functions. It
is not recommended for normal operations.
Definition: In Continuous Read, trigger input options are disabled and the MS-1 is
always in the read cycle. If a single symbol stays within read range for
multiple read cycles, its data will be transmitted repeatedly until it leaves
the read range.
The MS-1 sends replies to serial commands that require responses when
symbol data is transmitted.
Note: No Read
Serial Cmd: <K200,0>
options have no affect on
Continuous
Read.
External Level
Usage: This mode is effective in an application where the speeds of the conveying
apparatus are variable and the time the MS-1 spends reading each object
is not predictable. It also allows the user to determine if a No Read has
occurred.
Definition: External Level allows the read cycle (active state) to begin when a trigger
(change of state) from an external sensing device is received. The read
Serial Cmd: <K200,2>
MS-1 Scan Engine User Manual
cycle persists until the object moves out of the sensor range and the active
trigger state changes again.
6-7
Page 70

Trigger Mode
Initiate Read Cycle:
Object # 1, moving in front of the
detector beam, causes a change in
the trigger state, which initiates the
read cycle.
Initiate Second Read Cycle:
Object # 2, moving in front of the
detector beam, causes another
change in the trigger state. This signal initiates a new read cycle and
ends the previous read cycle unless
Timeout
is enabled and a good read
or timeout has not occured.
External Edge
Usage: This mode is highly recommended in any application where conveying
speed is constant, or if spacing, object size, or read cycle timeouts are
consistent.
Definition: External Edge, as with Level, allows the read cycle (active state) to begin
when a trigger (change of state) from an external sensing device is
received. However, the passing of an object out of sensor range does not
end the read cycle. The read cycle ends with a good read output, or,
depending on the End of Read Cycle setting, a timeout or new trigger
occurs.
Serial Cmd: <K200,3>
Serial Data
Usage: Serial Data is effective in a highly controlled environment where the host
knows precisely when the object is in the field of view. It is also useful in
determining if a No Read has occurred.
Definition: In Serial Data, the MS-1 accepts an ASCII character from the host or
controlling device as a trigger to start a read cycle. A Serial Data trigger
behaves the same as an External Edge trigger.
Serial commands are entered inside angle brackets, as shown here: <t>.
Serial Cmd: <K200,4>
Note: In Serial Data, sending a non-delimited start serial character will start a read cycle;
however, a non-delimited stop serial character has no effect.
Serial Data and Edge
Usage: Serial Data and Edge is seldom used but can be useful in an application
that primarily uses an external sensing device but occasionally needs to be
triggered manually.
An auxiliary terminal can be connected to the auxiliary port so the user can
send the serial trigger character through the MS-1 to the host.
Definition: In this mode the MS-1 accepts either a serial ASCII character or an external
trigger pulse to start the read cycle.
Serial Cmd: <K200,5>
Note: In Serial Data, sending a non-delimited start serial character will start a read cycle;
however, a non-delimited stop serial character has no effect.
6-8
MS-1 Scan Engine User Manual
Page 71

Read Cycle
Continuous Read 1 Output Emulation
Usage: Continuous Read 1 Output can be useful in applications where it is not
feasible to use a trigger and all succeeding symbols contain different
information. It is also effective in applications where the objects are presented
by hand.
The MS-1 does not offer this feature, but it can be emulated by following
the steps described below.
Definition: In Continuous Read 1 Output Emulation, the trigger must be active
(grounded) for as long as the MS-1 needs to be scanning symbols. The
MS-1 will only output symbol data once while that symbol remains in the
MS-1’s field of view. If the symbol is removed and then presented again, it
must be removed from the field of view for the amount of time specified in
the Time Between Identical Decodes value before the MS-1 will decode
the symbol again. However, if a new symbol is presented, the MS-1 will
decode it and output symbol data immediately.
Setting Up Continuous Read 1 Output Emulation
1. Set Number of Symbols to Multiple.
Serial Cmd: <K222,0>
2. Set Time Between Identical Decodes to 500 (ms).
Serial Cmd: <K503,500>
3. Set Trigger Mode to External Level.
Serial Cmd: <K200,2>
Important: Continuous Read 1 Output Emulation is not recommended for automated
environments, because there is typically no reliable way to verify whether or not a symbol
was missed.
MS-1 Scan Engine User Manual
6-9
Page 72

Serial Trigger Character (Delimited)
Serial Trigger Character (Delimited)
Usage: Allows the user to define the trigger character and delimiters that start
and stop the read cycle.
Definition: A serial trigger is considered an online host command and requires the
same command format as all host commands. It must be entered within
angle bracket delimiters < > or, in the case of non-delimited triggers, it must
define individual start and stop characters.
Serial Cmd: <K201,serial trigger character>
Default: ^] (<GS>)
Options: Any single ASCII character, including control characters, except NUL (00 in
hex), an existing host command character, or an on-line protocol character.
Control characters entered on the command line are displayed in the menu
as mnemonic characters.
Note: Serial Data or Serial Data and Edge triggering mode must be
enabled for Serial Trigger Character to take effect.
6-10
MS-1 Scan Engine User Manual
Page 73

Read Cycle
Start Trigger Character (Non-Delimited)
Usage: Useful in applications where different characters are required to start a
read cycle.
Definition: A single ASCII host serial trigger character that starts the read cycle and is
not enclosed by delimiters such as < and >.
Non-delimited Start characters can be defined and will function according
to the trigger event.
When defining Start trigger characters, the following rules apply:
•In External Edge the MS-1 looks only for the Start trigger characte
nd ignores any Stop trigger character that may be defined.
a
•In External Level the Start trigger character begins the read cycle and
the St
been decoded and the symbol data transmitted, the MS-1 remains in
External Level
•In Serial Data and Edge trigger mode, either a Start trigger characte
o
Serial Cmd: <K229,start trigger character>
Default: NUL (00 in hex) (disabled)
Options: Two hex digits representing any ASCII character except XON and XOFF.
op trigger character ends it. Note that even after a symb
trigger read cycle until a Stop character is received.
r a hardware trigger can start an edge trigger read cycle.
ol has
r
r
MS-1 Scan Engine User Manual
6-11
Page 74

Stop Trigger Character (Non-Delimited)
Stop Trigger Character (Non-Delimited)
Usage: Useful in applications where different characters are required to end a
read cycle.
Definition: A single ASCII host serial trigger character that ends the read cycle and is
not enclosed by delimiters such as < and >.
Non-delimited Stop characters can be defined and will function according
to the trigger event.
When defining Stop trigger characters, the following rules apply:
•In External Edge the MS-1 looks only for the Start trigger characte
nd ignores any Stop trigger character that may be defined.
a
•In External Level the Start trigger character begins the read cycle and
the St
been decoded and the symbol data transmitted, the MS-1 remains in
External Level
•In Serial Data and Edge trigger mode, either a Start trigger characte
o
Serial Cmd: <K230,stop trigger character>
Default: NUL (00 in hex) (disabled)
Options: Two hex digits representing any ASCII character except XON and XOFF.
op trigger character ends it. Note that even after a symbol ha
trigger read cycle until a Stop character is received.
r a hardware trigger can start an edge trigger read cycle.
r
s
r
6-12
MS-1 Scan Engine User Manual
Page 75

Read Cycle
No Decode Timeout
Usage: Useful in tightly-controlled applications that require a read cycle to end
before the next object appears.
Definition: The duration of the read cycle as measured from either the beginning of the
read cycle or from the last decode.
Serial Cmd: <K220,0,seconds>
Note: The first parameter is always a zero (0) and does not change.
Default: 2
Options: 1 - 4095
The MS-1 times out if no symbol is decoded during the No Decode Timeout period. If a
symbol is decoded before the timeout expires, the timeout period starts again.
No Decode Timeout only applies to Edge, Serial Data, and Serial Data and Edge trigger
modes.
In Single symbol mode (<K222,1>), No Decode Timeout is the maximum amount of time
the MS-1 will attempt to decode after a trigger is activated.
In Multiple symbol mode (<K222,0>), No Decode Timeout is the time in which there are
no decodes—not the time since the trigger was activated. That is, if the MS-1 continues to
decode symbols presented to it, it will not exit the read cycle unless the time between
decodes exceeds the time set in No Decode Timeout.
For Level trigger mode, the read cycle ends when the trigger falls, or when a symbol is
decoded and output in Single symbol mode.
MS-1 Scan Engine User Manual
6-13
Page 76

Decodes Before Output
Decodes Before Output
Note: When setting up, determine if the MS-1’s scan rate is capable of scanning your
longest symbol the required number of times.
Usage: Useful for increasing the reliability of decodes for symbologies that do not
have internal error checking.
Definition: The number of decodes required per symbol before its data is sent.
Requires the MS-1 to decode a symbol successfully a designated number
of times before data is output.
Serial Cmd: <K221,decodes before output>
Default: 0
Options: 0 to 10 (0 = “Auto-adaptive”)
Note: If the MS-1 is in Single symbol mode and it doesn’t achieve the number of required
decodes during the read cycle, a No Read message will be output.
Note: Higher Decodes Before Output settings will decrease the throughput rate.
6-14
MS-1 Scan Engine User Manual
Page 77

Read Cycle
No Read Message
Note: A No Read message can only be transmitted when in Single symbol mode and no
decodes occur.
Usage: Used in applications where the host needs serial verification that a symbol
has not been read.
Definition: When enabled, and if no symbol has been decoded before timeout or the
end of the read cycle, the No Read message will be transmitted to the host.
No Read Status
Serial Cmd: <K714,status,No Read message>
Default: Enabled
Options: 0 = Disabled 1 = Enabled
No Read Message
Definition: Any combination of ASCII characters can be defined as the No Read
message.
Serial Cmd: <K714,status,No Read message>
Default: No Read
Options: 1 to 20 ASCII characters.
Note: A No Read
has been sent).
message is not output when the MS-1 is disabled (when an
<I>
command
MS-1 Scan Engine User Manual
6-15
Page 78

Shutter Speed
Shutter Speed
Shutter Speed allows shutter speed to be controlled automatically, set to a specific value,
or defined within a fixed range.
Important: Shutter Speed settings should not be changed unless they are being
increased to accomodate a fast line speed in a dynamic application.
Usage: Faster shutter speeds may be necessary in faster-moving applications.
Slower shutter speeds are useful in slower, lower-contrast applications.
Definition: Shutter speed is the amount of time that the sensor is exposed to light.
Serial Cmd: <K544,shutter speed>
Default: Automatic
Options: 0 = Automatic
1 = Slow
2 = Medium
3 = Fast
6-16
MS-1 Scan Engine User Manual
Page 79

Contents
Symbologies by ESP.................................................................................................................... 7-2
Symbologies Serial Commands ................................................................................................... 7-3
Code 39........................................................................................................................................ 7-4
Codabar........................................................................................................................................ 7-6
Interleaved 2 of 5.......................................................................................................................... 7-8
Code 128/EAN-128 .................................................................................................................... 7-10
Code 93...................................................................................................................................... 7-11
GS1 DataBar (RSS) ................................................................................................................... 7-12
MSI Code ................................................................................................................................... 7-13
Plessey Code ............................................................................................................................. 7-14
Industrial 2 of 5........................................................................................................................... 7-15
UPC/EAN ................................................................................................................................... 7-17
PDF417 ...................................................................................................................................... 7-20
China Postal Code ..................................................................................................................... 7-21
Symbology Identifier................................................................................................................... 7-22
7 Symbologies
This section describes the various symbol types that can be decoded by the MS-1 Scan
Engine.
See the following sites for additional symbology information:
http://www.aimglobal.org/standards/aimpubs.asp
http://barcodes.gs1us.org/dnn_bcec/Default.aspx?tabid=82
MS-1 Scan Engine User Manual
7-1
Page 80

Symbologies by ESP
To change a setting,
double-click the
setting and use your
cursor to scroll
through the options.
Click this button to
bring up the App Mode
view, and then click the
Symbologies tab.
To open
nested
options,
single-click
the +.
Symbologies by ESP
7-2
MS-1 Scan Engine User Manual
Page 81

Symbologies
Symbologies Serial Commands
Symbology Identifier <K450,unused,symbology identifier status>
Code 39 <K470,status,check character status,check character output status,
0,0,minimum symbol length,full ASCII set>
Codabar <K471,status,0,start/stop match output status,0,symbol length status,
symbol length,check character status,check character output status>
Interleaved 2 of 5 <K472,status,check character status,check character output status,
symbol length #1,symbol length #2>
Code 128/EAN 128 <K474,status,0,minimum symbol length,1,1,0,application record
separator character>
Code 93 <K475,status,0,minimum symbol length>
PDF417 <K476,status>
DataBar-14 (RSS-14) <K482,status>
DataBar Limited (RSS Limited) <K483,status>
DataBar Expanded (RSS
Expanded)
MSI Code <K486,status,check character mode,check character output status,
Plessey Code <K487,status,check character output status,0,minimum symbol
Industrial 2 of 5 <K488,status,check character status,check character output status,
UPC/EAN <K489,UPC-A status,UPC-E status,EAN-8 status,EAN-13 status,
China Postal Code <K498,check digit mode,min length,max length>
<K484,status>
0,minimum symbol length>
length>
format,symbol length #1,symbol length #2>
supplementals required,supplemental 2 status,supplemental 5 status,
UPC-A as EAN-13,UPC-E as UPC-A,EAN-8 as EAN-13>
MS-1 Scan Engine User Manual
7-3
Page 82

Code 39
Code 39
Usage: Code 39 is the most widely used non-retail 1D symbology.
Definition: An alphanumeric symbology with unique start/stop code patterns, composed
of 9 black and white elements per character, 3 of which are wide.
Serial Cmd: <K470,status,check character status,check character output status,0,0,
minimum symbol length,full ASCII set>
Default: Enabled
Options: 0 = Disabled 1 = Enabled
Check Character Status (Code 39)
Definition: When enabled, the MS-1 will verify a Modulus 10 check character in order
to identify the decode as successful.
Serial Cmd: <K470,status,check character status,check character output status,
0,0,minimum symbol length,full ASCII set>
Default: Disabled
Options: 0 = Disabled 1 = Enabled
Check Character Output Status (Code 39)
Usage: Check Character Output Status, when added to the symbol, provides
additional data security.
Definition: When enabled, the check character is read and output along with the symbol
data. When disabled, symbol data is output without the check character.
Note: With Check Character Output Status and an External or Serial
trigger option enabled, an invalid check character calculation will cause a
No Read message to be transmitted at the end of the read cycle.
Serial Cmd: <K470,status,check character status,check character output status,
0,0,minimum symbol length,full ASCII set>
Default: Disabled
Options: 0 = Disabled 1 = Enabled
7-4
MS-1 Scan Engine User Manual
Page 83

Symbologies
Minimum Symbol Length (Code 39)
Usage: Minimum Symbol Length helps prevent truncations and increases data
integrity by ensuring that only one symbol length will be accepted.
Definition: Specifies the exact number of characters that the MS-1 will recognize (this
does not include start and stop characters and check characters). The
MS-1 ignores any symbology that is less than the specified length.
Serial Cmd:
Default: 0
Options: 0 to 32
<
K470,
status,check character status,check character output status,0,0,
symbol length,full ASCII set>
minimum
Full ASCII Set (Code 39)
Usage: Must be enabled when reading characters outside the standard character
set (0-9, A-Z, etc.)
The user must know in advance whether or not to use the Full ASCII Set
option. Since Full ASCII Set requires two code words to encode one
character, it is less efficient.
Definition: Standard Code 39 encodes 43 characters; zero through nine, capital “A”
through capital “Z”, minus symbol, plus symbol, forward slash, space,
decimal point, dollar sign, and percent symbol. When Full ASCII Set is
enabled, the MS-1 can read the full ASCII character set, from 0 to 255.
Serial Cmd:
Default: Disabled
Options: 0 = Disabled 1 = Enabled
<
K470,
symbol length,
status,check character status,check character output status,0,0,minimum
full ASCII set
>
MS-1 Scan Engine User Manual
7-5
Page 84

Codabar
Codabar
Usage: Used in photo-finishing and library applications. Previously used in medical
applications, but not typically used in newer medical applications.
Definition: Codabar is a 16-bit character set (0 through 9, and the characters $, :, /, .,
+, and –) with start/stop codes and at least two distinctly different bar
widths.
Serial Cmd: <K471,status,0,start/stop output status,0,symbol length status,symbol
length,check character status,check character output>
Default: Disabled
Options: 0 = Disabled 1 = Enabled
Start/Stop Output Status (Codabar)
Definition:
Serial Cmd: <K471,status,0,start/stop output status,0,symbol length status,symbol
Default: Enabled
Options: 0 = Disabled 1 = Enabled
When enabled, the start and stop characters will be present in the data output
of the decoded symbol.
When disabled, the start and stop characters will not be present in the data
output of the decoded symbol.
Note: Because the start and stop characters are included as part of the
data, the characters must be included as part of the length in a fixed length
mode of operation.
length,check character status,check character output>
Symbol Length Status (Codabar)
Definition: When set to Any/Minimum, any symbol length is considered valid.
When set to Fixed, the MS-1 will check the symbol length against the
Symbol Length Status parameter.
Serial Cmd: <K471,status,0,start/stop output status,0,symbol length status,symbol
length,check character status,check character output>
Default: Any/Minimum
Options: 0 = Any/Minimum 1 = Fixed
7-6
MS-1 Scan Engine User Manual
Page 85

Symbologies
Symbol Length (Codabar)
Definition: Specifies the number of characters that the MS-1 will recognize, including
start and stop check characters. The
Note: When setting Symbol Length to any value other than 0, add 2 to
account for reserved spaces. For example, if your symbol has 3 characters,
set Symbol Length to 5.
Note: If Symbol Length is set to 0 and Symbol Length Status is set to Any/
Minimum, all symbol lengths are decoded.
Serial Cmd: <K471,status,0,start/stop output status,0,symbol length status,symbol
length,check character status,check character output>
Default: 6
Options: 0 to 32
Check Character Status (Codabar)
Definition:
Serial Cmd: <K471,status,0,start/stop output status,0,symbol length status,symbol
Default: Disabled
Options: 0 = Disabled
When disabled, the MS-1 will not perform any character checking calculations
on decoded Codabar symbols.
When set to
calculation on the symbol. If the symbol does not pass this calculation, it will
not be decoded.
length,check character status,check character output>
1 = Enabled (Modulus 16)
Modulus 16
, the MS-1 will perform a Modulus 16 check character
Check Character Output (Codabar)
Definition: When this field is disabled and a check character calculation is enabled, the
MS-1 will strip the verified check character from the symbol data output. This
condition must be accounted for if a minimum length is also being used.
When enabled, the MS-1 will output the check character as part of the
symbol data. This condition must be accounted for if a minimum length is
also being used.
Serial Cmd: <K471,status,0,start/stop output status,0,symbol length status,symbol
length,check character status,check character output>
Default: Disabled
Options: 0 = Disabled 1 = Enabled
MS-1 Scan Engine User Manual
7-7
Page 86

Interleaved 2 of 5
Interleaved 2 of 5
Usage: Interleaved 2 of 5 has been popular because it is the most dense symbology
for printing numeric characters less than 10 characters in length; however,
Microscan does not recommend this symbology for any new applications
because of inherent problems such as truncation.
Definition: A dense, contimuous, self-checking, numeric symbology. Characters are
paired together so that each character has five elements, two wide and
three narrow, representing numbers 0 through 9, with the bars representing
the first character and the interleaved spaces representing the second
character. (A check character is highly recommended).
Serial Cmd: <K472,status,check character status,check character output status,symbol
length #1,symbol length #2>
Default: Disabled
Options: 0 = Disabled 1 = Enabled
Check Character Status (Interleaved 2 of 5)
Usage: This option is not typically used, but it can be enabled for additional security
in applications where the host requires redundant check character verification.
Definition: An error correcting routine in which the check character is added.
Serial Cmd: <K472,status,check character status,check character output status,symbol
length #1,symbol length #2>
Default: Disabled
Options: 0 = Disabled 1 = Enabled
Check Character Output Status (Interleaved 2 of 5)
Definition: When enabled, a check character is sent along with the symbol data for
added data security.
<
Serial Cmd:
Default: Disabled
Options: 0 = Disabled 1 = Enabled
7-8
K472,
length #1,symbol length #2>
status,check character status,
check character output status
MS-1 Scan Engine User Manual
,symbol
Page 87

Symbologies
Symbol Length #1 (Interleaved 2 of 5)
Usage: Useful in applications where I 2/5 symbols of a specific length are
required.
Definition: The Symbol Length # 1 field is one of two fields against which the
decoded symbol is compared before accepting it as valid or rejecting it.
Serial Cmd: <K472,status,check character status,check character output,symbol length
#1,symbol length #2>
Default: 10
Options: 0 to 32
Symbol Length #2 (Interleaved 2 of 5)
Usage: Useful in applications where I 2/5 symbols of a specific length are
required.
Definition: The Symbol Length # 2 field is one of two fields against which the
decoded symbol is compared before accepting it as valid or rejecting it.
Serial Cmd: <K472,status,check character status,check character output,symbol length
#1,symbol length #2>
Default: 6
Options: 0 to 32
Range Modes (Interleaved 2 of 5)
Variable Length
To set for any length, Symbol Length # 1 and Symbol Length # 2 must both equal zero.
Minimum Length
To set for minimum length, both Symbol Length # 1 and Symbol Length # 2 must be equal
to each other and set to the desired minimum length, but these numbers cannot be zero.
Fixed Length
To set for a fixed length, Symbol Length #1 and Symbol Length #2 must not be equal to
each other. The symbol will be decoded if the character length is equal to Symbol Length
# 1 or Symbol Length # 2. If Symbol Length # 1 equals zero, then the symbol will only be
decoded if it is equal to Symbol Length # 2. If Symbol Length # 2 equals zero, then the
symbol will only be decoded if it is equal to Symbol Length # 1.
Examples:
Length 1 Length 2 Required Symbol Length
00Any
>0 0 Exactly Length 1
0 >0 Exactly Length 2
>0 >0 Exactly Length 1 or Length 2
>0 Same value as Length 1
Length 1 up to maximum symbol length (Range:
Length 1 to 32)
MS-1 Scan Engine User Manual
7-9
Page 88

Code 128/EAN 128
Code 128/EAN 128
Usage: Code 128 is a smaller symbology useful in applications with limited space
and high-security requirements.
Definition: A very dense alphanumeric symbology. It encodes all 128 ASCII characters,
it is continuous, has variable length, and uses multiple element widths
measured edge to edge.
Serial Cmd:
Default: Disabled
Options: 0 = Disabled 1 = Enabled
Minimum Symbol Length (Code 128/EAN 128)
Usage: Minimum Symbol Length helps prevent truncations and increases data
Definition: This specifies the exact number of characters that the MS-1 will recognize
Serial Cmd:
Default: 0
Options: 0 to 32
<
K474,
character>
integrity by ensuring that only one symbol length will be accepted.
(this does not include start, stop, and check characters). The MS-1 ignores
any symbol not having the specified length.
<
K474,
character>
status
status
,0,minimum symbol length,1
,0,
minimum symbol length,1,1,0,
,1,0,
application record separator
application record separator
Application Record Separator Character (Code 128/EAN 128)
Definition:
Serial Cmd: <
Default:
Options:
7-10
This is an ASCII character that serves as a separator in formatted output.
K474,
character>
NUL
Any ASCII character (7 bit)
status
,0,minimum symbol length,1
,1,0,
application record separator
MS-1 Scan Engine User Manual
Page 89

Symbologies
Code 93
Usage: Used in some clinical applications.
Definition: Code 93 is a variable-length, continuous symbology employing four element
widths. Each Code 93 character has nine modules that may be either black
or white. Each character contains three bars and three spaces.
Serial Cmd: <K475,status,0,minimum symbol length>
Default: Disabled
Options: 0 = Disabled 1 = Enabled
Minimum Symbol Length (Code 93)
Definition: Specifies the minimum number of characters that the MS-1 will recognize,
not including the start and stop check characters. The MS-1 ignores any
symbol smaller than the specified length.
Note: When setting Minimum Symbol Length to any value other than 0,
add 1 to account for a reserved space. For example, if your symbol has 3
characters, set Symbol Length to 4.
Serial Cmd: <K475,status,0,minimum symbol length>
Default: 10
Options: 0 to 32
MS-1 Scan Engine User Manual
7-11
Page 90

GS1 DataBar (RSS)
GS1 DataBar (RSS)
Note: GS1 DataBar symbologies were previously known as “Reduced Space Symbology”,
or “RSS”.
DataBar-14 (RSS-14)
Note: DataBar-14 was previously known as “RSS-14”.
Usage: Used in the grocery, retail, and prescription drug industries where 14-digit
EAN item identification may be needed.
Definition: DataBar-14 is a minimum length symbology that encodes 14 digits, including
a 1-digit indicator. DataBar-14 is 96 modules wide. It can be stacked in two
rows, it can read omnidirectionally if printed in full height, or horizontally if
height-truncated for small marking.
Serial Cmd: <K482,status>
Default: Disabled
Options: 0 = Disabled
1 = Enabled
DataBar Limited (RSS Limited)
Note: DataBar Limited was previously known as “RSS Limited”.
Usage: DataBar Limited is designed to be read by laser scanners and CCD readers.
It is not recommended for omnidirectional slot scanners.
Definition:
Serial Cmd: <K483,status>
Default: Disabled
Options: 0 = Disabled
Encodes a smaller 14-digit symbol (74 modules wide) that is not omnidirectional.
1 = Enabled
DataBar Expanded (RSS Expanded)
Note: DataBar Expanded was previously known as “RSS Expanded”.
Usage: Used to encode primary and supplementary data in retail point-of-sale and
other applications.
Definition:
Serial Cmd: <K484,status>
Default: Disabled
Options: 0 = Disabled
DataBar Expanded is a variable length symbology that can encode supplementary
information in addition to the 14-digit EAN item identification number and is
capable of encoding up to 74 numeric or 41 alphabetic characters.
1 = Enabled
7-12
MS-1 Scan Engine User Manual
Page 91

Symbologies
MSI Code
Status (MSI Code)
Usage: Used for inventory control and the identification of storage containers and
locations in warehouse environments.
Definition: MSI Code is a numeric, continuous symbology in which each character
consists of four bits in a binary format.
Serial Cmd: <K486,status,check character mode,check character output status,
0,minimum symbol length>
Default: Disabled
Options: 0 = Disabled 1 = Enabled
Check Character Mode (MSI Code)
Definition: This field is set to perform a Modulus 10 calculation by default. It can also
be set to perform a Double Modulus 10 calculation.
Serial Cmd: <K486,status,check character mode,check character output status,
0,minimum symbol length>
Default: Modulus 10
Options: 1 = Modulus 10 2 = Double Modulus 10
Check Character Output Status (MSI Code)
Definition: When this field is enabled, the MS-1 will output the check digit with symbol
data. When disabled, the MS-1 will not output the check digit with symbol
data.
Serial Cmd: <K486,status,check character mode,check character output status,
0,minimum symbol length>
Default: Disabled
Options: 0 = Disabled 1 = Enabled
Minimum Symbol Length (MSI Code)
Definition:
Serial Cmd: <K486,status,check character mode,check character output status,
Default: 6
Options: 0 to 32
This field specifies the minimum number of characters the MS-1 will recognize,
including a check character.
0,minimum symbol length>
MS-1 Scan Engine User Manual
7-13
Page 92

Plessey Code
Plessey Code
Status (Plessey Code)
Usage: Used primarily in library and retail applications.
Definition: Plessey Code consists of pairs of wide and narrow bars representing binary
data which, taken in units of 12, define hexadecimal characters.
Serial Cmd: <K487,status,check character output status,0,minimum symbol length>
Default: Disabled
Options: 0 = Disabled 1 = Enabled
Check Character Output Status (Plessey Code)
Definition: When this field is enabled, the check character will be output with symbol
data. When disabled, the check character will not be output with symbol
data.
Serial Cmd: <K487,status,check character output status,0,minimum symbol
length>
Default: Disabled
Options: 0 = Disabled 1 = Enabled
Minimum Symbol Length (Plessey Code)
Definition:
Serial Cmd: <K487,status,check character output status,0,minimum symbol length>
Default: 0
Options: 0 to 32
This field specifies the minimum number of characters the MS-1 will recognize,
including a check character.
7-14
MS-1 Scan Engine User Manual
Page 93

Symbologies
Industrial 2 of 5
Status (Industrial 2 of 5)
Usage: Used primarily in warehouse sortation, photo finishing, and the sequential
numbering of airline tickets.
Definition: Microscan recommends that Industrial 2 of 5 always be used with fixed
symbol length settings in any application. Symbol Length # 1 and Symbol
Length # 2 can both be set to 0 to allow the MS-1 to decode Industrial 2 of
5 symbols of varying lengths.
Serial Cmd: <K488,status,check character status,check character output status,format,
symbol length #1,symbol length #2>
Default: Disabled
Options: 0 = Disabled 1 = Enabled
Check Character Status (Industrial 2 of 5)
Definition: When this field is enabled, a check character is added.
Serial Cmd: <K488,status,check character status,check character output status,format,
symbol length #1,symbol length #2>
Default: Disabled
Options: 0 = Disabled 1 = Enabled
Check Character Output Status (Industrial 2 of 5)
Definition: When this field is enabled, the check character will be output with symbol
data. When disabled, the check character will not be output with symbol
data.
<
Serial Cmd:
Default: Disabled
Options: 0 = Disabled 1 = Enabled
K488,
symbol length #1,symbol length #2>
status,check character status,
check character output status
,format,
Format (Industrial 2 of 5)
DefinitionL Defines the number of start and stop check characters.
Serial Cmd: <K488,status,check character status,check character output status,format,
symbol length #1,symbol length #2>
Default 3 start / 3 stop
Options: 0 = 3 start / 3 stop 1 = 2 start / 2 stop
MS-1 Scan Engine User Manual
7-15
Page 94

Industrial 2 of 5
Symbol Length # 1 (Industrial 2 of 5)
Definition: This field specifies the number of characters that the MS-1 will recognize,
including start and stop characters and check characters. The MS-1
ignores any symbol with fewer than the specified number of characters.
Because Industrial 2 of 5 is a continuous symbology, it is prone to substitution
errors. Therefore, a symbol length must be defined and a symbol must contain
an even number of characters.
Serial Cmd: <K488,status,check character status,check character output status,format,
symbol length #1,symbol length #2>
Default: 10
Options: 0 to 32
Symbol Length # 2 (Industrial 2 of 5)
Definition: This field specifies the number of characters that the MS-1 will recognize,
including start and stop characters and check characters. The MS-1
ignores any symbol with fewer than the specified number of characters.
Because Industrial 2 of 5 is a continuous symbology, it is prone to substitution
errors. Therefore, a symbol length must be defined and a symbol must contain
an even number of characters.
Serial Cmd: <K488,status,check character status,check character output status,format,
symbol length #1,symbol length #2>
Default: 6
Options: 0 to 32
Range Modes (Industrial 2 of 5)
Variable Length
To set for any length, Symbol Length # 1 and Symbol Length # 2 must both equal zero.
Minimum Length
To set for minimum length, both Symbol Length # 1 and Symbol Length # 2 must be
equal to each other and be any number other than zero.
Fixed Length
To set for a fixed length, Symbol Length #1 and Symbol Length #2 must not be equal to
each other.
7-16
MS-1 Scan Engine User Manual
Page 95

UPC/EAN
UPC-A Status (UPC/EAN)
Symbologies
Usage:
Definition: UPC (Universal Product Code) is a minimum length, numeric, continuous
Serial Cmd:
Default: Enabled
Options: 0 = Disabled 1 = Enabled
Used primarily in point-of-sale applications in the retail industry.
symbology. UPC can have two- or five-digit supplemental bar code data
following the normal code. The UPC Version A (UPC-A) symbol is used to
encode a 12-digit number. The first digit is the number system character,
the next five are the manufacturer number, the next five are the product
number, and the last digit is the checksum character.
EAN is the European version of the UPC symbology and is used in European
market applications.
When enabled, the MS-1 will read UPC-A symbols.
<
K489,UPC-A status
required,supplemental 2 status,supplemental 5 status,UPC-A as EAN-13,
UPC-E as UPC-A,EAN-8 as EAN-13>
,UPC-E status,EAN-8 status,EAN-13 status,supplementals
UPC-E Status (UPC/EAN)
Definition: This field is enabled by default and will decode all UPC-E symbols.
<
K489,
Serial Cmd:
required,supplemental 2 status,supplemental 5 status,UPC-A as EAN-13,
UPC-E as UPC-A,EAN-8 as EAN-13>
Default: Enabled
Options: 0 = Disabled 1 = Enabled
UPC-A status,
UPC-E status
,EAN-8 status,EAN-13 status,supplementals
EAN-8 Status (UPC/EAN)
Definition: This field is enabled by default and will decode all EAN-8 symbols.
<
K489,
Serial Cmd:
required,supplemental 2 status,supplemental 5 status,UPC-A as EAN-13,
UPC-E as UPC-A,EAN-8 as EAN-13>
Default: Enabled
Options: 0 = Disabled 1 = Enabled
MS-1 Scan Engine User Manual
UPC-A status,UPC-E status,
EAN-8 status
,EAN-13 status,supplementals
7-17
Page 96

UPC/EAN
EAN-13 Status (UPC/EAN)
Definition: This field is enabled by default and will decode all EAN-13 symbols.
<
K489,
Serial Cmd:
required,supplemental 2 status,supplemental 5 status,UPC-A as EAN-13,
UPC-E as UPC-A,EAN-8 as EAN-13>
Default: Enabled
Options: 0 = Disabled 1 = Enabled
UPC-A status,UPC-E status,EAN-8 status,
EAN-13 status
,supplementals
Supplementals Required (UPC/EAN)
Definition: A supplemental is a 2 or 5-character symbol appended to the main symbol.
When enabled, the MS-1 decodes supplemental symbol data that has been
appended to the standard UPC or EAN symbol.
<
K489,
Serial Cmd:
required,supplemental 2 status,supplemental 5 status,UPC-A as EAN-13,
UPC-E as UPC-A,EAN-8 as EAN-13>
Default: Disabled
Options: 0 = Disabled 1 = Enabled
UPC-A status,UPC-E status,EAN-8 status,EAN-13 status,
supplementals
Supplemental 2 Status (UPC/EAN)
Definition: A 2-character symbol appended to the main symbol.
<
K489,
Serial Cmd:
required,supplemental 2 status,supplemental 5 status,UPC-A as EAN-13,
UPC-E as UPC-A,EAN-8 as EAN-13>
Default: Disabled
Options: 0 = Disabled 1 = Enabled
UPC-A status,UPC-E status,EAN-8 status,EAN-13 status,supplementals
Supplemental 5 Status (UPC/EAN)
Definition: A 5-character symbol appended to the main symbol.
<
K489,
Serial Cmd:
required,supplemental 2 status,supplemental 5 status,UPC-A as EAN-13,
UPC-E as UPC-A,EAN-8 as EAN-13>
Default: Disabled
Options: 0 = Disabled 1 = Enabled
UPC-A status,UPC-E status,EAN-8 status,EAN-13 status,supplementals
7-18
MS-1 Scan Engine User Manual
Page 97

UPC-A as EAN-13 (UPC/EAN)
Definition: When enabled, UPC-A will be transmitted as EAN-13.
<
K489,
Serial Cmd:
required,supplemental 2 status,supplemental 5 status,UPC-A as EAN-13,
UPC-E as UPC-A,EAN-8 as EAN-13>
Default: Enabled
Options: 0 = Disabled 1 = Enabled
UPC-A status,UPC-E status,EAN-8 status,EAN-13 status,supplementals
UPC-E as UPC-A (UPC/EAN)
Definition: When enabled, UPC-E will be transmitted as UPC-A.
<
K489,
Serial Cmd:
required,supplemental 2 status,supplemental 5 status,UPC-A as EAN-13,
UPC-E as UPC-A,EAN-8 as EAN-13>
Default: Disabled
Options: 0 = Disabled 1 = Enabled
UPC-A status,UPC-E status,EAN-8 status,EAN-13 status,supplementals
EAN-8 as EAN-13 (UPC/EAN)
Symbologies
Definition: When enabled, EAN-8 will be transmitted as EAN-13.
<
K489,
Serial Cmd:
required,supplemental 2 status,supplemental 5 status,UPC-A as EAN-13,
UPC-E as UPC-A,EAN-8 as EAN-13>
Default: Disabled
Options: 0 = Disabled 1 = Enabled
UPC-A status,UPC-E status,EAN-8 status,EAN-13 status,supplementals
MS-1 Scan Engine User Manual
7-19
Page 98

PDF417
PDF417
Usage:
Definition:
Serial Cmd: <K476,status>
Default: Enabled
Options: 0 = Disabled 1 = Enabled
Used in applications where a large amount of information (over 32 characters
needs to be encoded within a symbol, typically where the symbol is transported
from one facility to another. For example, an automobile assembly line
might use a single symbol with multiple fields of information that will be
read at several stations along the way, without reference to a database.
A two-dimensional, multi-row (3 to 90), continuous, variable length symbology
that has high data capacity for storing up to 2,700 numeric characters,
1,800 printable ASCII characters, or 1,100 binary characters per symbol.
Each symbol character consists of 4 bars and 4 spaces in a 17-module
structure.
)
7-20
MS-1 Scan Engine User Manual
Page 99

China Postal Code
Definition: When enabled, the MS-1 will read China Postal Code symbols.
Serial Cmd: <K498,status,check digit mode,min length,max length>
Default: Disabled
Options: 0 = Disabled 1 = Enabled
Check Digit Mode
Definition: When this field is enabled, a check digit is added.
Serial Cmd: <K498,status,check digit mode,min length,max length>
Default: Disabled
Options: 0 = Disabled 1 = Enabled
Min Length
Definition: Determines the minimum symbol length.
Serial Cmd: <K498,status,check digit mode,min length,max length>
Default: 11
Options: 1-48
Symbologies
Max Length
Definition: Determines the maximum symbol length.
Serial Cmd: <K498,status,check digit mode,min length,max length>
Default: 48
Options: 1-48
MS-1 Scan Engine User Manual
7-21
Page 100

Symbology Identifier
Symbology Identifier
Definition: The Symbology Identifier is a standard prefix set of characters that
identifies the symbol type.
When enabled, the MS-1 analyzes and identifies the symbology and adds a
three-character identifying prefix to the data:
•] (closed bracket character) indicating the presence of a symbology identifier.
• A, C, E, I, P, M, G, F, e
(A = Code 39; C = Code 128/EAN-128; E = UPC/EAN; I = Interleaved
2 of 5; P = Plessey; M = MSI Code; G = Code 93; F = Codabar; e
Dat
aBar)
• Modifier
Serial Cmd: <K450,unused,symbology identifier status>
Default: Disabled
Options: 0 = Disabled 1 = Enabled
Explanation of Modifiers for Code 39, Codabar, and I-2/5
• For Code 39, Codabar, and Interleaved 2 of 5, the modifier indicates Check Character
and Check Character Output status.
• For Code 39 only, Full ASCII must be enabled to see modifiers 4, 5, and 7.
= GS1
Modifier Check Character
0 Disabled N/A No
1 Enabled Enabled No
3 Enabled Disabled No
4 Disabled N/A Yes
5 Enabled Enabled Yes
7 Enabled Disabled Yes
Example: ]A5 indicates a Code 39 symbol with Check Character and Check Character
Output enabled and Full ASCII conversion performed.
Check Character
Output
Full ASCII conversion performed
(Code 39 only)
Explanation of Modifiers for Other Symbologies
• For Code 128/EAN-128, a 1 indicates EAN-128; otherwise the modifier is 0.
• For all other symbologies, the modifier is 0.
7-22
MS-1 Scan Engine User Manual
 Loading...