

Page 1
Page 2
Important Safety Instructions........................................................ .. .. .. .. .
Contents and equipment .................................................... .. .. .. .. .. .. .. .. .. ..
Package Content.............................................................. .. .. .. .. .. .. .. .. .. .. .. ..
Front Panel.......................................................... .. .. .. .. .. .. .. .. .. .. .. .. .. .. .. .. .. ..
Rear Panel............................................................. .. .. .. .. .. .. .. .. .. .. .. .. .. .. .. .. ..
The Remote Control............................................................. .. .. .. .. .. .. .. .. .. .. .
Using the Remote control............................................................... .. .. .. .. .. ..
Batteries.......................................................... .. .. .. .. .. .. .. .. .. .. .. .. .. .. .. .. .. .. .. ..
Notes on Using Batteries............................................................... .. .. .. .. .. ..
How To Con ne ct Your Digital TV Receiver..................................................
Basic Operation.......................................................... .. .. .. .. .. .. .. .. .. .. .. .. .. ..
Power On/Off an d St an db y.. .. .. .. .. .. .. .. .. .. .. .. .. .. .. .. .. .. .. .. .. .. .. .. .. .. .. .. .. .. .. .. .. .. .. ..
Changing Channels...................................................................... .. .. .. .. .. ..
Adjusting the Volume.................................................................. .. .. .. .. .. .. ..
TV sound Mode Selection.............................................................. .. .. .. .. .. ..
Display Program Information................................................................ .. .. .
Adjusting Aspect Ratio….............................................................. .. .. .. .. .. .. .
Signal State........................................................... .. .. .. .. .. .. .. .. .. .. .. .. .. .. .. .. ..
Subtitle On/ Off .. .. .. .. .. .. .. .. .. .. .. .. .. .. .. .. .. .. .. .. .. .. .. .. .. .. .. .. .. .. .. .. .. .. .. .. .. .. .. .. .. .. .. .. .
Vie wi ng t he E PG I nf or ma ti on .. .. .. .. .. .. .. .. .. .. .. .. .. .. .. .. .. .. .. .. .. .. .. .. .. .. .. .. .. .. .. .. .. .. .
Menu Tree............................................................. .. .. .. .. .. .. .. .. .. .. .. .. .. .. .. .. .. .
Using the On-Screen Display Menu......................................................
Channel Menu................................................................. .. .. .. .. .. .. .. .. ..
Option Menu.......................................................... .. .. .. .. .. .. .. .. .. .. .. .. .. ..
Lock Menu.......................................................... .. .. .. .. .. .. .. .. .. .. .. .. .. .. .. .
FCC Customer Information........................................................... .. .. .. .. .. .
Trouble shooting.................................................... .. .. .. .. .. .. .. .. .. .. .. .. .. .. .. .. ..
Specification........................................................ .. .. .. .. .. .. .. .. .. .. .. .. .. .. .. .. .. .
Auxiliary Channel Selection.......................................................................
TO PREVENT FIRE OR SHOCK HAZARD, DO NOT USE AN EXTENSION CORD,
RECEPTACLE OR OTHER OUTLET UNLESS THE BLADES CAN BE TO PREVENT
BLADE EXPOSURE.
TO PREVENT FIRE OR SHOCK HAZARD. DO NOT EXPOSE THIS APPLIANCE.
TO RAIN OR MOISTURE.
TO PREVENT ELECTRICAL SHOCK, MATCH WIDE BLADE PLUG TO WIDE
SLOT FULLY INSERTED.
This appliance should not be exposed to water and no object filled with liquid such as a vase
should be placed on the unit.
This lightning flash with
arrowhead symbol in an
equilateral triangle alerts
users to the presence of
uninsulated dangerous
voltage within the
products enclosure that
may be of sufficient
magnitude to constitute
a risk of electric shock to
persons.
Warning: To reduce the risk of
electric shock, do not remove
cover(or bark). No user
serviceable parts inside. Refer
servicing to qualified service
personnel.
The exclamation mark
within an equilateral
triangle alerts users
to the presence of
important operating
and maintenance
(servicing) instructions
in the literature
accompanying the
appliance.
RISK OF ELECTRIC SHOCK
DO NOT OPEN
CAUTION
WARNING
Important Safety InstructionsContents
1 2
2-3
4-6
4
4
4
5
6
6
6
7
8-9
8
8
8
8
9
9
9
9
9
9
10
11-16
11-1 2
12-14
14-16
17
18
19
ATSC T V RE CEIVER ATSC T V RE CEIVER
Page 3
1.
2.
3.
4.
5.
6.
7.
8.
9.
10.
11.
12.
13.
14.
15.
16.
17.
18.
19.
Read Instructions-All the safety and operating instructions should be read before the appliance is
operated.
Retain Instructions-The safety and operating instructions should be retained for future reference.
Heed Warnings-All warnings on the appliance and in the operating instructions should be adhered
to.
Follow Instructions-All operating instructions should be followed.
Water and Moisture-The appliance should not be used near water.
Cart and Stands-The appliance should only be used with a cart or stand that is recommended by
the manufacturer.
Wall or Ceiling Mounting-The appliance should be mounted to a wall or ceiling only as recommended
by the manufacturer.
Ventilation-The appliance should be well situated so that its location or position does not interfere
with its proper ventilation.
Heat-This appliance should be placed away from heat sources such as radiators, heat registers
and stoves.
Power Sources-The appliance should only be connected to a power supply as described in the
operating instructions or as marked on the appliance.
Grounding or Polarization-Precautions should be taken.
Power Cord Protection-Power supply cord should be routed so that it is not likely to be walked on,
pinched by items placed upon it against the cord and its end.
Cleaning-The appliance should be cleaned only as recommended by the manufacturer.
Power Lines-An outdoor antenna should be located away from power lines.
Outdoor Antenna Grounding-If an outside antenna is connected to the receiver , the antenna
system must be grounded so as to provide against voltages and built-up static charges.
Non-use Periods-The power cord of the appliance should be unplugged from the outlet when left
unused for a long period of time.
Object and Liquid Entry-Care should be taken so that objects do not fall, and liquids are not
spilled into the enclosure through openings.
Conditions Requiring Service-The appliance should be serviced by qualified service personnel
when:
The power-supply cord or the plug has been damaged.
Objects have fallen on or liquid has been spilled into the appliance.
The appliance has been exposed to rain.
The appliance does not appear to operate normally or exhibits a marked change in performance.
This appliance should not be exposed to water and no objects filled with liquids such as a vase should
be placed on the unit. Where the MAINS plug or an appliance coupler is used as the disconnect
device, the disconnect device shall remain readily operable.
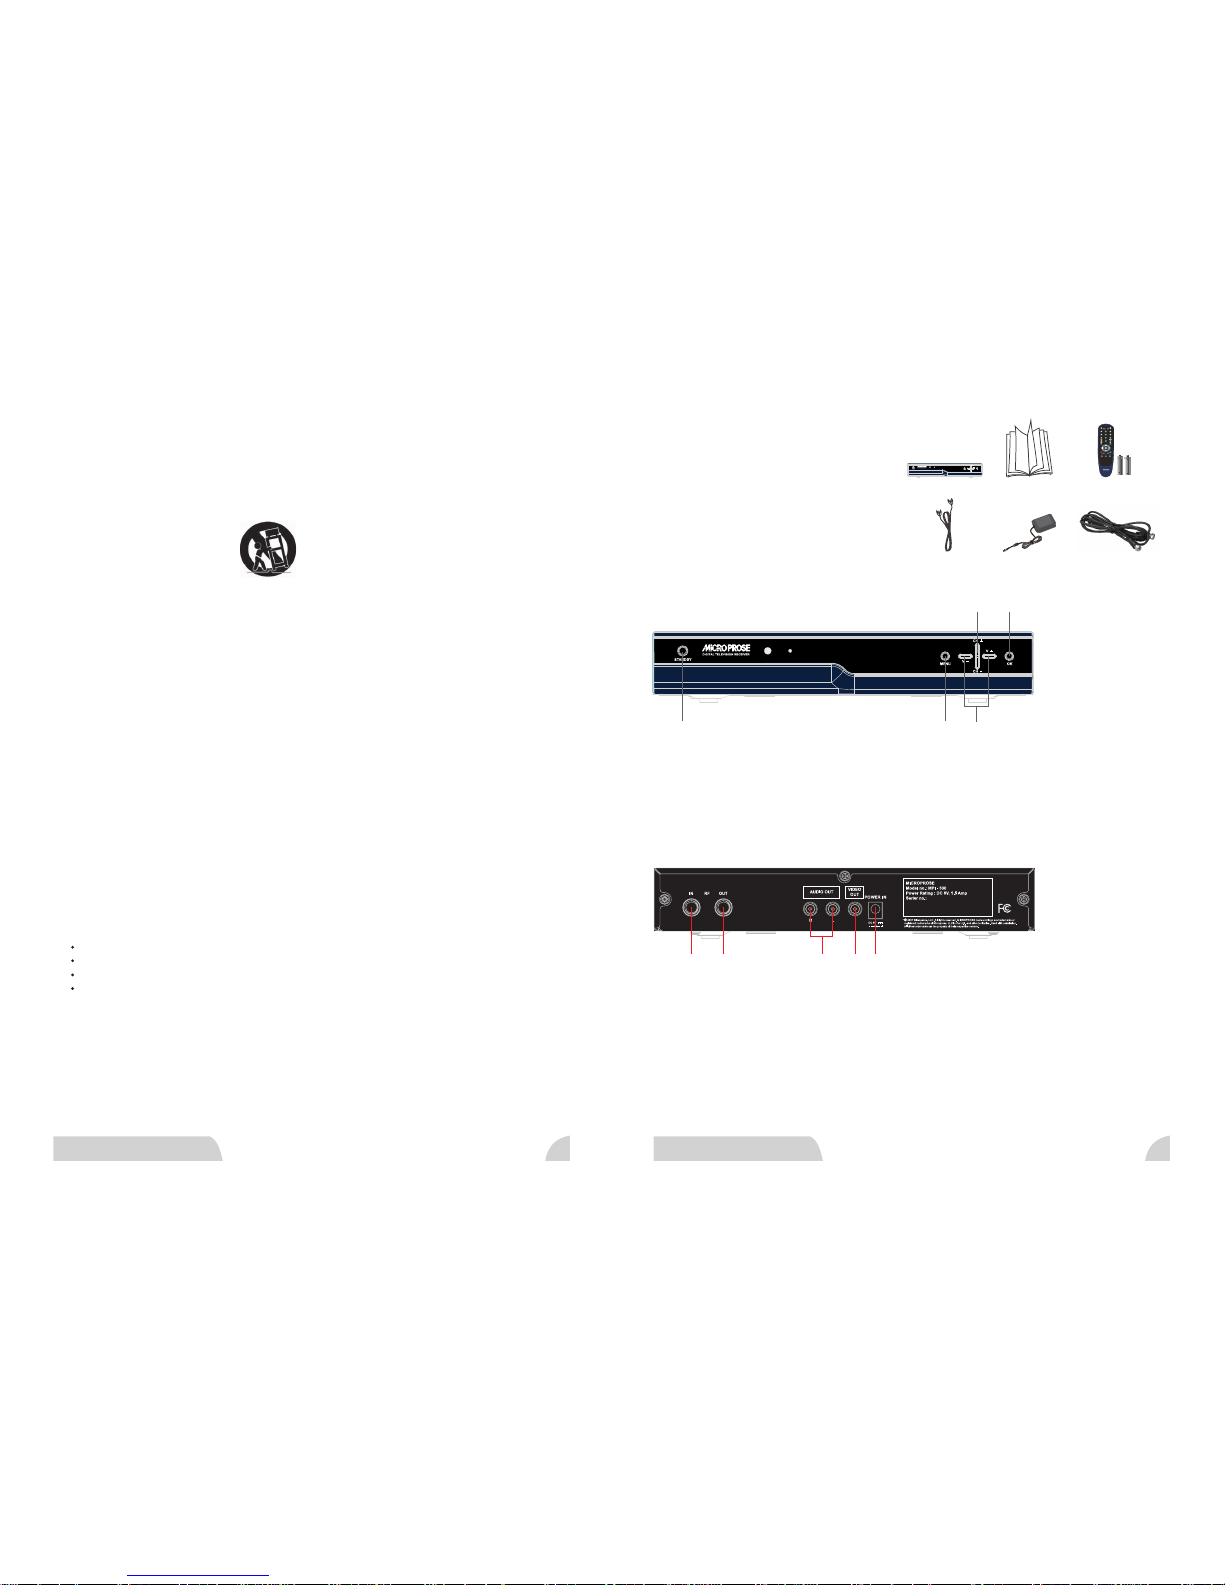
Remo te Cont rol
AAA Bat terie s(x2)
MPI- 500 Rec eiver
AV Conn ectio n Cable
User M anual
AC Adap ter
RF Coa xial Ca ble
1 2
3
4
5
1 2
3 4 5
1. STA ND BY: t oggle s unit be tween o n and sta ndby mo de.
2. ME NU: Dis plays t he main m enu.
3. V+ /-: Adj usts th e volum e level .
4. CH +/-: Ch anges c hanne ls up/ do wn.
5. OK : Selec ts a menu o r confi rms the s elect ed oper ation .
1. IN : Recei ves the s ignal f rom ant enna.
2. OU T: Sup por ts a shar e anten na outp ut.
3. AUD IO OUT (L /R ): Two s ter eo chan nel aud io outp ut.
4. VI DEO OUT: Co mposi te vide o outpu t.
5. PO WER IN: C onnec ts to AC Adap ter.
1. MP I-500 R eceiv er
2. Us er Manu al
3. Re mote Co ntrol
4. AV Con ne cti on Cabl e
5. AC Ada pter
6. RF C oaxia l Cable
Front Panel
Rear Panel
Package Contents
Cont en ts a nd Equi pm en t
3 4
ATSC T V RE CEIVER ATSC T V RE CEIVER
Page 4
The Remote Control
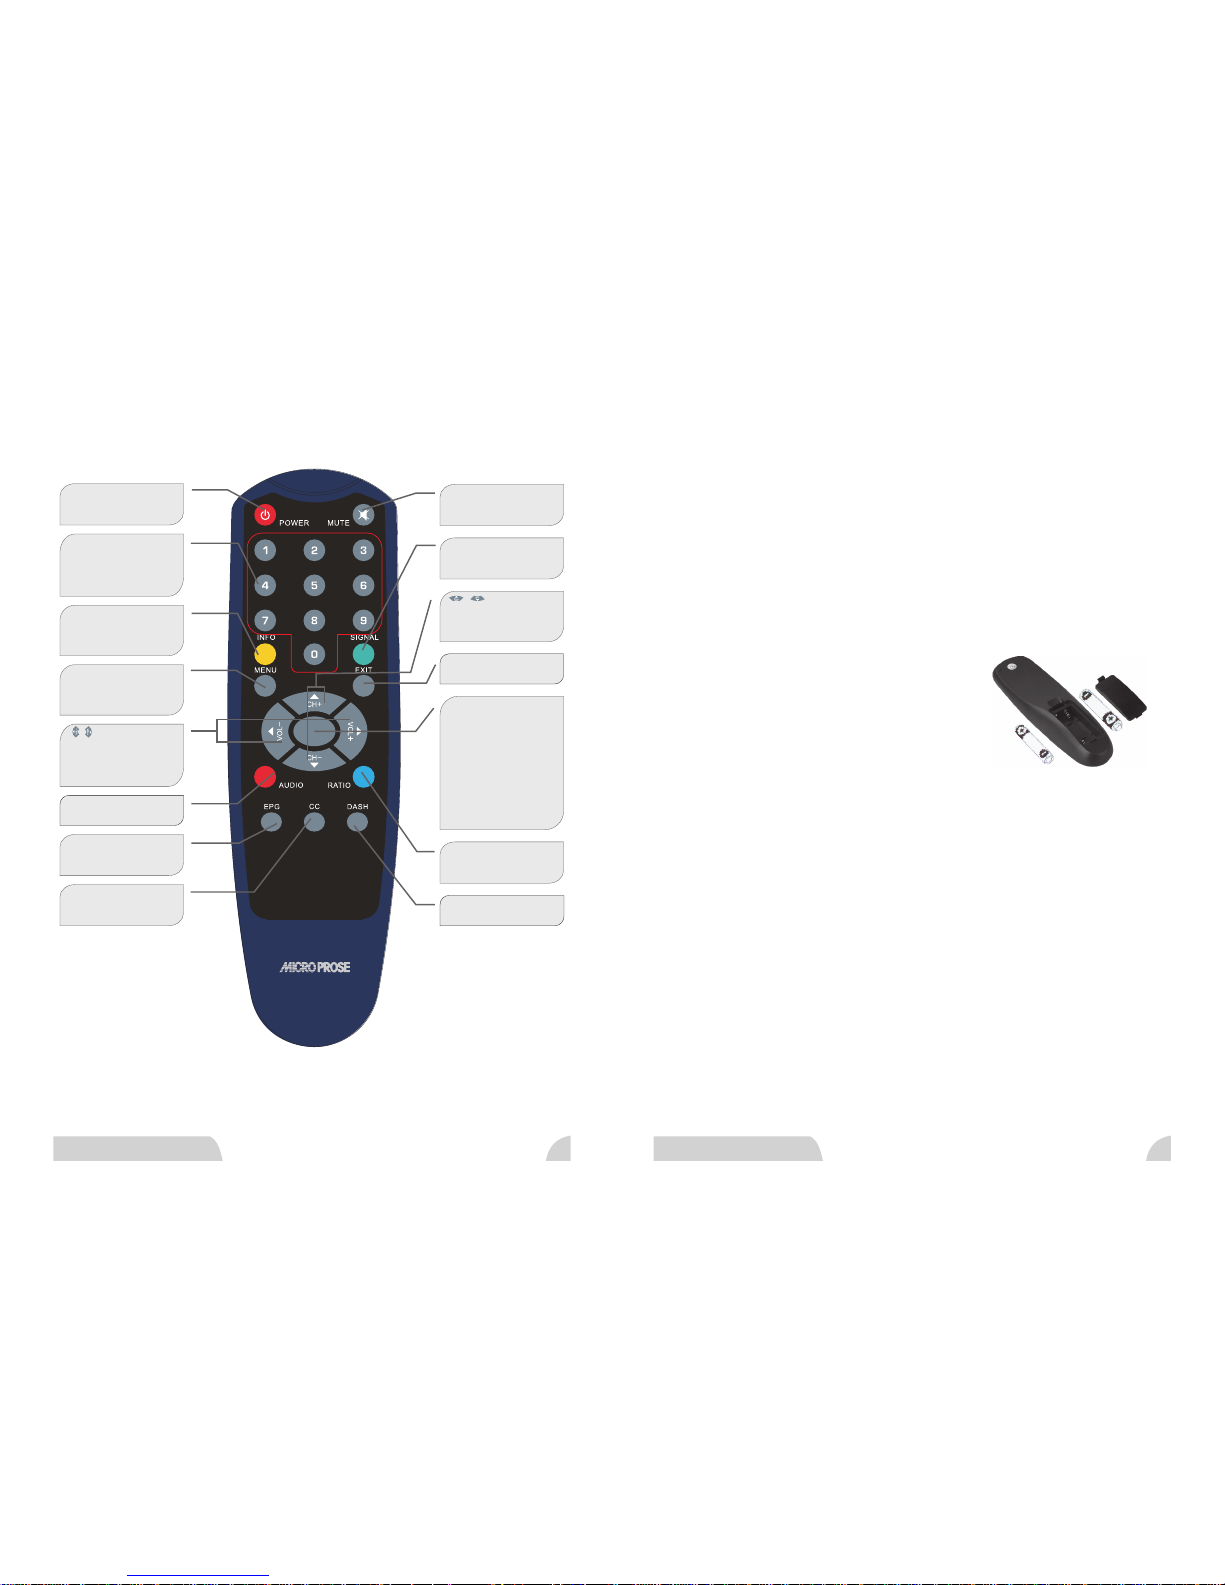
POW ER
swi tches t he STB ON /
STAN DBY mod e.
MUT E
Tempo raril y turns
off s ound vo lume.
0-9 N umeri cal key s
Ent ers num eric va lues
and s elect s the
cha nnel di rectl y by
ent ering i ts numb er.
EPG
Dis plays t he simp le TV
Pro gram gu ide.
CC
Cho oses Cl ose
Cap tion.
AUD IO
Cha nges th e audio .
INF O
Dis plays t he prog ram
inf ormat ion box i n the
scr een.
MEN U
Ope ns up the m enu or
ret urn to th e previ ous
men u.
SIG NAL
Dis plays t he rece ived
sig nal str ength .
RATI O
Cha nges th e displ ay
asp ect rat io.
DAS H
Aux iliar y selec t chann el.
Inc rease s or decr eases
the v olume .
Mov es the cu rsor to t he
lef t/rig ht menu o ption .
Cha nges ch annel s.
Mov es the cu rsor to t he
up/ down me nu opti on.
ENT ER
Ent ers and c onfir ms
any d ata to th e STB
in th e menu sy stem.
Thi s key is us ed
to se lect th e item.
Pre ss whil e viewi ng
TV, t he name a nd
num ber of ch annel s
is di splay ed.
Whe n using t he remo te cont rol, ai m it at rem ote con trol se nsor wi ndow on t he unit , If ther e is an
obj ect bet ween th e remot e contr ol and th e signa l remot e contr ol sens or wind ow on the u nit, th e
rem ote con trol ma y not ope rate.
Not e: When u sing th e remot e contr ol, ple ase not e:
Do no t strik e or drop t he remo te. Do no t expos e the rem ote con trol to l iquid s and do no t place i t
in hu mid env ironm ents.
Do no t insta ll or pla ce the re mote co ntrol i n direc t sunli ght. Th e he at ma y damag e the rem ote
con trol.
If th e remot e contr ol sens or wind ow on the u nit is in d irect s unlig ht or str ong lig ht, the r emote
con trol ma y not ope rate no rmall y. In th is situ ation , chang e the lig ht sour ce or rea d just th e angle
of yo ur unit , or oper ate the r emote c ontro l from a lo catio n close r to the re mote co ntrol s ensor
win dow on th e displ ay.
You wi ll ne ed to ins tall th e suppl ied bat terie s into th e remot e contr ol to mak e it oper ate
fol lowin g the ins truct ions be low.
1. Op en the li d of the re mote co ntrol b atter y compa rtmen t.
2. In sert tw o size- AAA batt eries .
Ens ure tha t the bat terie s are ins erted w ith the p ositi ve
and n egati ve term inals i n the cor rect di recti on
cor respo nding t o the (+) a nd (-) ma rks in th e batte ry
com partm ent.
3. In stall t he lid of t he remo te cont rol bat tery co mpart ment.
The u se of the w rong ty pe of bat terie s may cau se chem ical le aks and /or exp losio n. Plea se note
the f ollow ing:
Alw ays ens ure tha t the bat terie s are ins erted w ith the p ositi ve and ne gativ e termi nals in t he
cor rect di recti on as sho wn in the b atter y compa rtmen t.
Dif fe ren t types o f batte ries ha ve diff ere nt char acter istic s. Do not m ix diff er ent t ypes.
Do no t mix old a nd new ba tteri es. Mix ing old a nd new ba tteri es will s horte n batte ry life a nd/or
cau se chem ical le aks fro m the old b atter ies.
Whe n batte ries fa il to fun ction , repla ce them i mmedi ately.
Che mical s which l eak fro m batte ries ma y cause s kin irr itati on. If an y chemi cal mat ter see ps out
of th e batte ries, w ipe it up i mmedi ately u sing a dr y cloth .
Due t o varyi ng stor age con ditio ns, the b atter y life fo r the bat terie s inclu ded wit h your un it may
be sh orten ed. If th e remot e contr ol is not u sed for a l ong per iod of ti me, rem ove the b atter ies.
Notes on Using Batteries
Batteries
Using the Remote Control
ENT ER
ATSC T V RE CEIVER
5 6
EXI T
Exi ts a menu .
ATSC T V RE CEIVER
/
/
Page 5
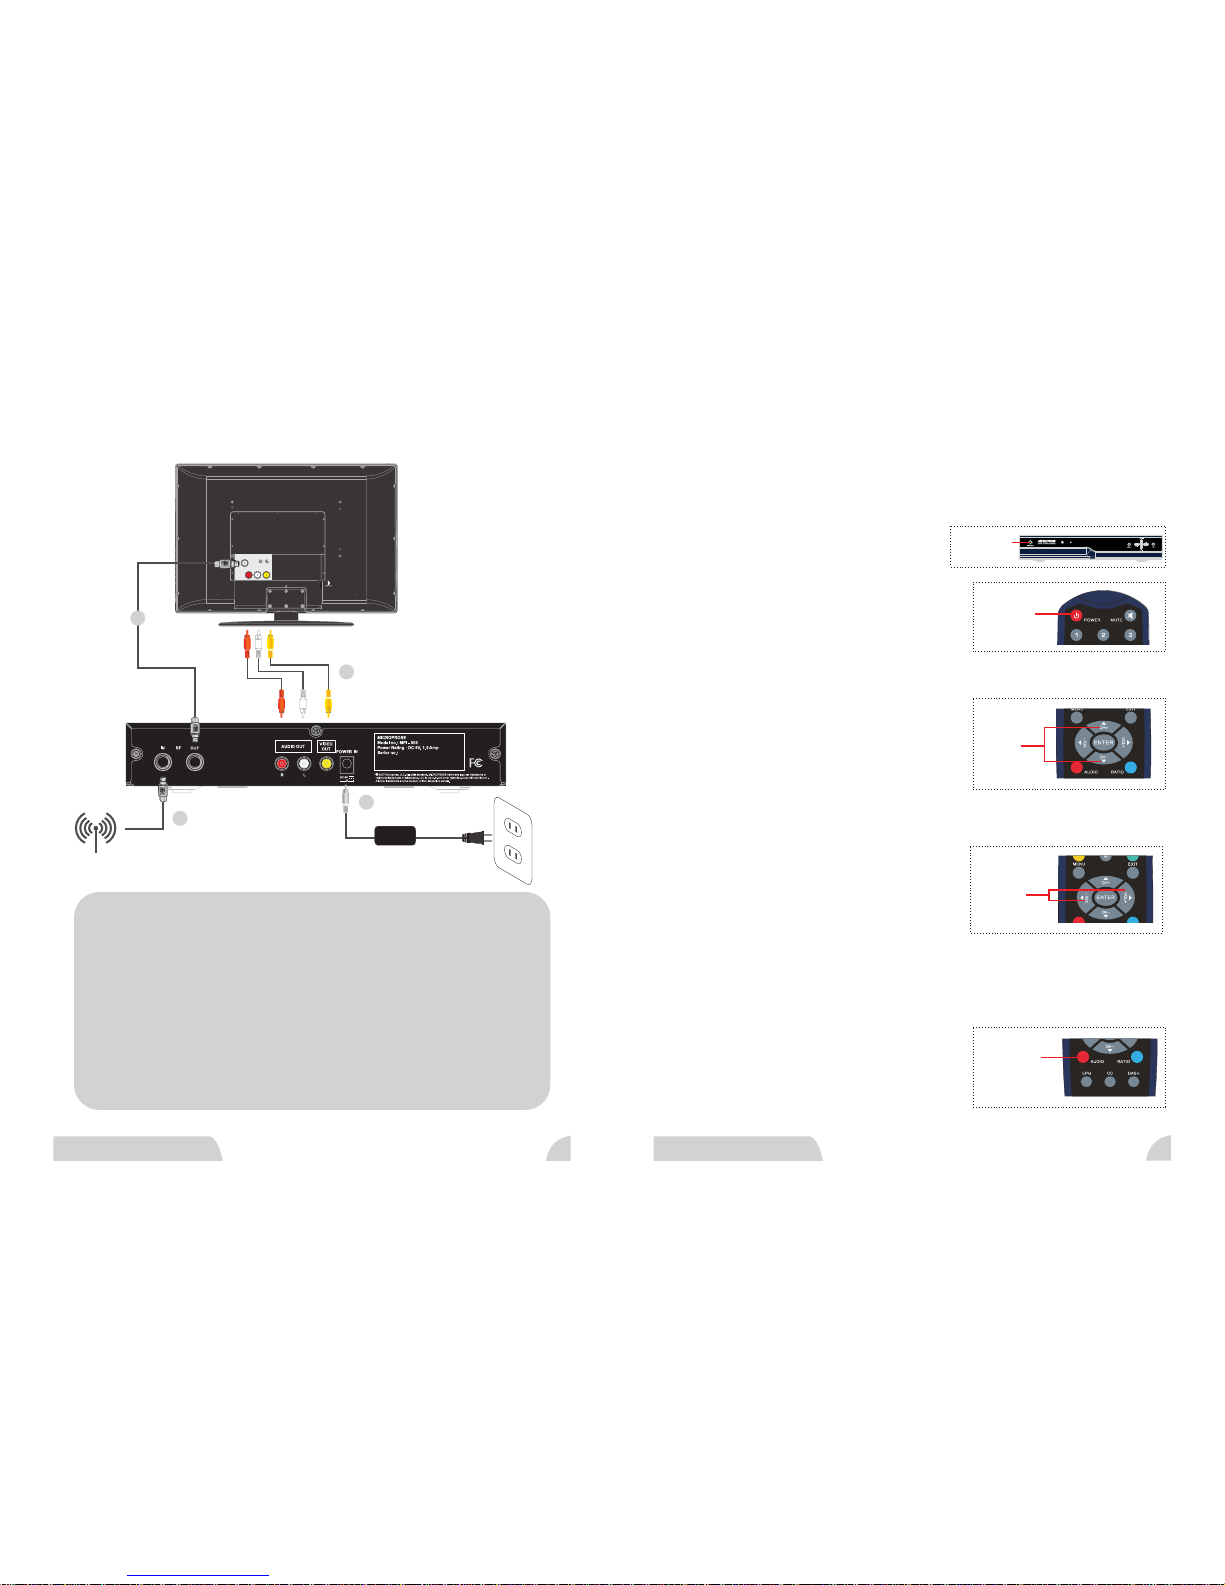
How To Connec t Your Digi ta l TV R eceiv er
Aft er the po wer cor d is plug ged int o a wall ou tlet, t he unit w ill ent er stan dby mod e and the r ed
ind icato r will be o n.
Turn o n th e un it
In st andby m ode, pr ess STAN DB Y but ton a t the
con trol pa nel on th e unit, o r POWER b utton o n the
rem ote con trol. T he u nit w ill tur n on and po wer
ind icato r will li ght up in b lue bef ore pic ture ap pears .
Turn o ff t he u nit
Pre ss STAND BY bu tton at t he cont rol pan el, or
POW ER on the r emote c ontro l once mo re, and t he
uni t will tu rn off.
POW ER
Changing Channels
Usi ng CH+ /- b utton o n your un it or on th e remot e
con trol to s equen tiall y selec t the TV ch an nel s
ava ilabl e in your c hanne l list.
Usi ng nume rical b utton s to dire ctly in put cha nnel.
Eg. To se le ct ch annel 8 , press 8 b utton o n the
rem ote con trol. To se lect ch annel 1 2, pres s 1
but ton and t hen 2 on th e remot e contr ol. Usi ng
CH+ b utton t o retur n to the pr eviou s chann el.
Power On/ Off and Standby
CH+ /-
Adjusting the Volu me
Pre ss V+ but ton on yo ur unit o r press V OL+
but ton on yo ur remo te cont rol to in creas e volum e.
The v olume i ndica tor wil l incre ase in le ngth as
vol ume ris es.
Pre ss V- butt on on you r unit or p ress VO L- butt on
on yo ur remo te cont rol to de creas e volum e. The
vol ume ind icato r will de creas e in leng th as vol ume
fal ls.
VOL +/-
TV sound Mode Selection
Pre ss AUDI O butto n to sele ct Digi tal TV
Sou nd mode .
Not e: Item s avail able wi ll depe nd on the T V
sou nd syst em bein g broad caste d.
AUD IO
Mut e setti ng:
1. Pr ess MUT E butto n on your r emote c ontro l
to te mpora rily cu t off the s ou nd.
2. Pr ess MUT E butto n again , or VOL+ /- to
res tore th e sound .
Basi c Op er ation
7
8
Con nect Di gital T V Recei ver to An ten na
Con nect Di gital T V Recei ver to Tel ev isi on
Com posit e AV con nec tion
Con nect Di gital T V Recei ver to Po wer Out let
(Req uired ) - Recei ver mus t be conn ected t o eithe r a rooft op or att ic inst alled a ntenn a or a TV top Ant enna.
NOTE - I f your Ant enna co nnect ion is a Twin -Lead w ire, yo u must pu rchas e a 300 Ohm t o 75 Ohm Tra nsfor mer.
Scre w the Twin- l eads on to the Tra nsfor mer, the n caref ully pl ug the Tra nsfor med int o the RF- IN Conn ectio n
on the R ear of th e MPI-5 00 Digi tal TV Rec eiver.
Atta ch incl uded RF c onnec tor cab le to the R F OUT Conn ectio n on the Re ar of the D igita l TV Rece iver
Atta ch the ot her end o f the RF Ca ble to th e Antenn a IN Conn ectio n on the re ar of you r Televisi on.
NOTE - I f your Telev ision i s of an old er type t hat doe s not hav e a round C OAX con necti on, but i nstea d has two
300 Oh m Screw Term inals , you wil l need to p urcha se a Balu n Transf ormer. At tach it t o the scr ew lead s on the
Televi sion, a nd then a ttach t he RF Cab le to the o ther si de of the B alun
For BE ST PICTU RE resu lts, co nnect ing the R eceiv er to a TV (T hat is eq uippe d) Comp osite AV is r ecomm ended
(Con sult yo ur Televis ion Own ers Man ual for l ocati on, con necti ons and I nput Se lecti on Feat ure to us e such Si gnal In puts. )
Conn ect the E xtern al Powe r Adapte r Pak to th e Read PO WER IN po rt on the M PI-50 0 Digit al TV Rece iver FI RST.
Conn ect AC Cor d end of Ex terna l Power P ak to AC Wall O utlet ( M icrop rose Re comme nds usi ng a Surg e Prote ctor Po wer Str ip.)
1.
2.
3.
2A.
To
Ant enna
AUDIO VIDEO
ANTENNA
300 OHMANTENNA
TEL EVISI ON
MPI -500
DTV R ECEIV ER
2A
2
1
3
STAN DB Y
ATSC T V RE CEIVER ATSC T V RE CEIVER
Page 6
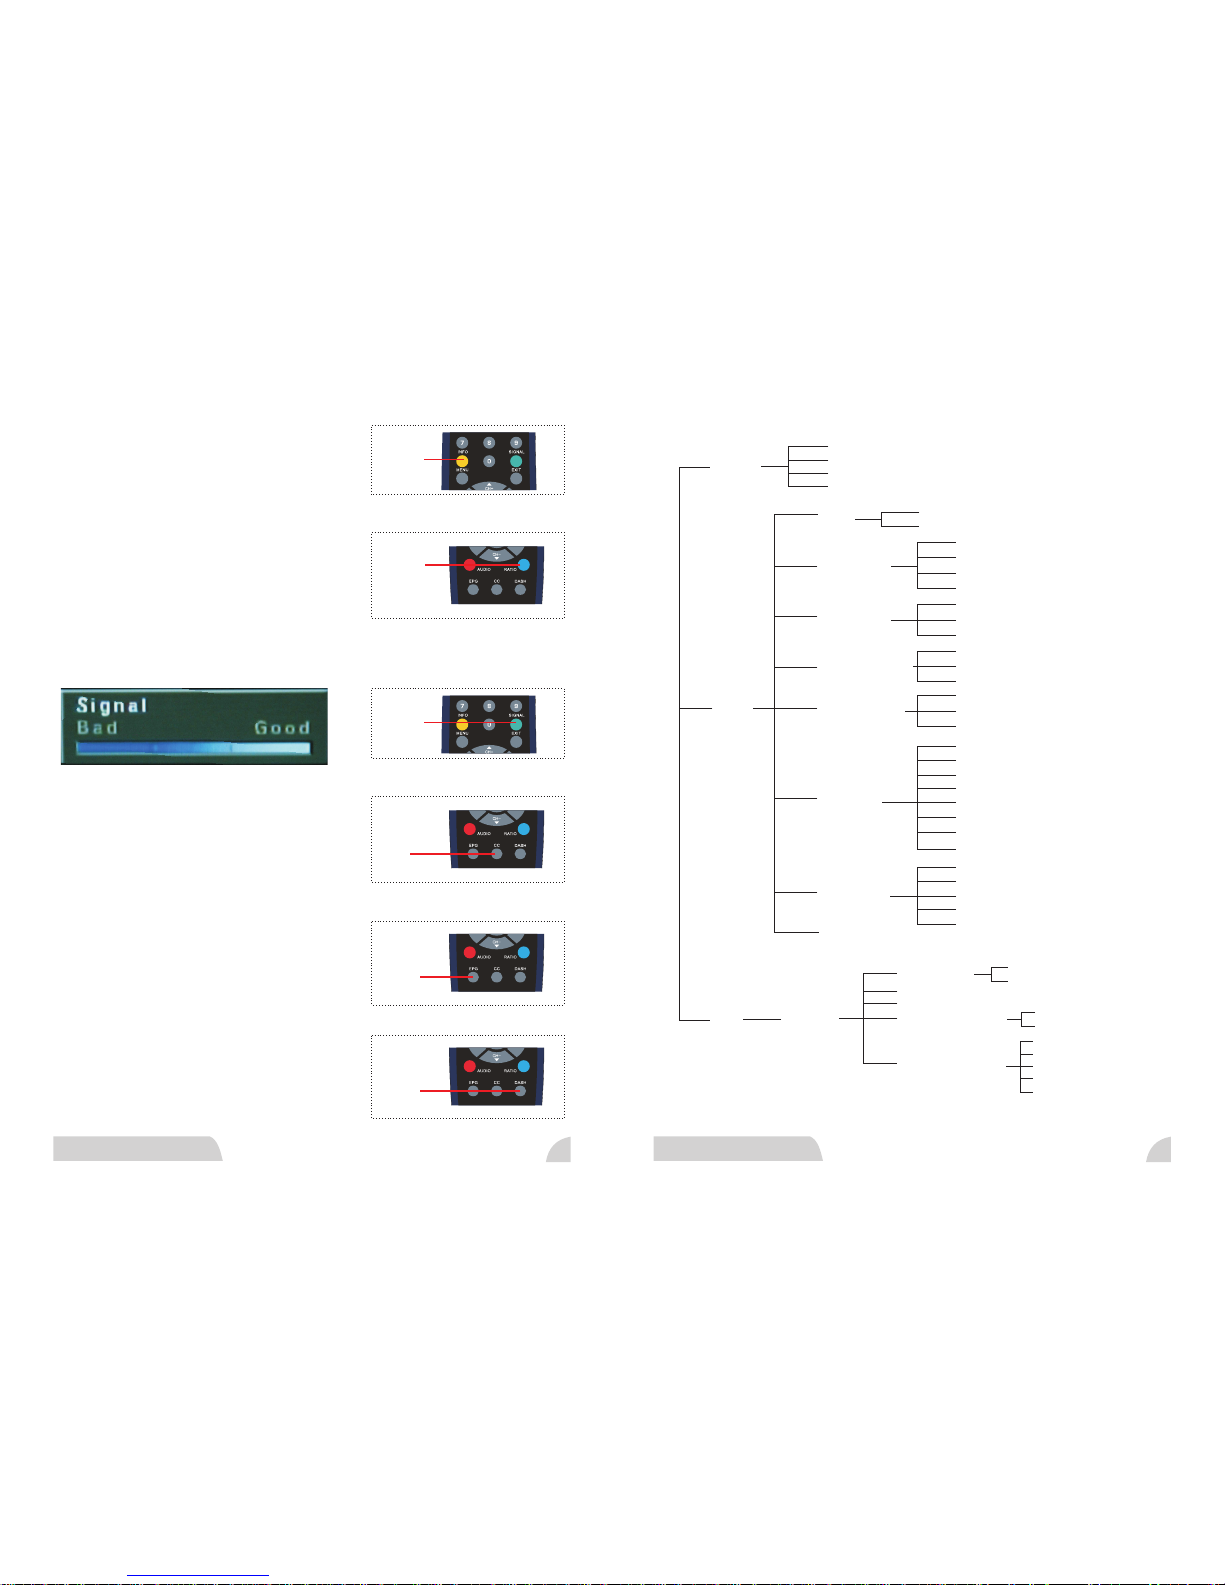
Signal State
Whi le view ing a pro gram, p ress IN FO butt on to dis play
pro gram in forma tion an d press E XIT but to n to ex it
fro m this fu nctio n.
INF O
Vie wi ng t he E PG ( informationElectronic Program Guide )
Subtitle On/ Off
CC
EPG
The U nit sup ports E PG func tion. You c an pres s EPG
but ton to na vigat e all TV pr og ram s you had s aved.
Thi s funct ion dep ends on p rogra m servi ce supp ort.
Pre ss CC but ton to di splay a mong CC 1-4,
Text1 -4 and of f.
Pre ss EXIT t o exit th e subti tle.
Pre ss SIGN AL butt on to dis play th e recei ved sig nal str ength .
Cha nnel
Cha nnel Sc an
Cha nnel Add
Cha nnel Ed it
Man ual Sca n
Opt ion
Clo ck
Cur rent Ti me
Tim e Zon e
Asp ect Rat io
Set b y progr am
Let ter box
cro pped
squ eezed
Lan guage
Eng lish
Spa nish
Fre nch
Aud io Lang uage
Eng lish
Spa nish
Fre nch
Cap tion Se lect
ACC
DCC
DCC S ervic e
DCC V iew
Fon t Size
Fon t Type
Tex t Color
Tex t Opaci ty
BG Co lor
BG Op acity
Edg e Color
Edg e Type
Sle ep Mode
off
1 hou r
2 hou r
4 hou r
8 hou r
Out put Cha nnel
Loc k
Pas sword
Set P asswo rd
Blo ck Chan nel
Loc k Syste m
On
Off
TV Ra ting- Child ren
Age
Fan tasy Vi ol enc e
TV Ra ting- Child ren
Age
Dia logue
Lan guage
Sex
Vio le nce
Adjusting Asp ec t Ra ti o
Press RATIO button on your remote control to select
the image aspect ratio you prefer.
Press the button several times to cycle through various
ratios.
RATI O
Auxiliary Channel Selection
Whi le view ing TV, pre ss DASH b utton a nd then e nter
you r desir ed chan nel num ber and s tatio n numbe r for
you r wante d progr am.
DAS H
Menu Tr ee
9 10
SIG NAL
ATSC T V RE CEIVER ATSC T V RE CEIVER
Display Program Information
Page 7
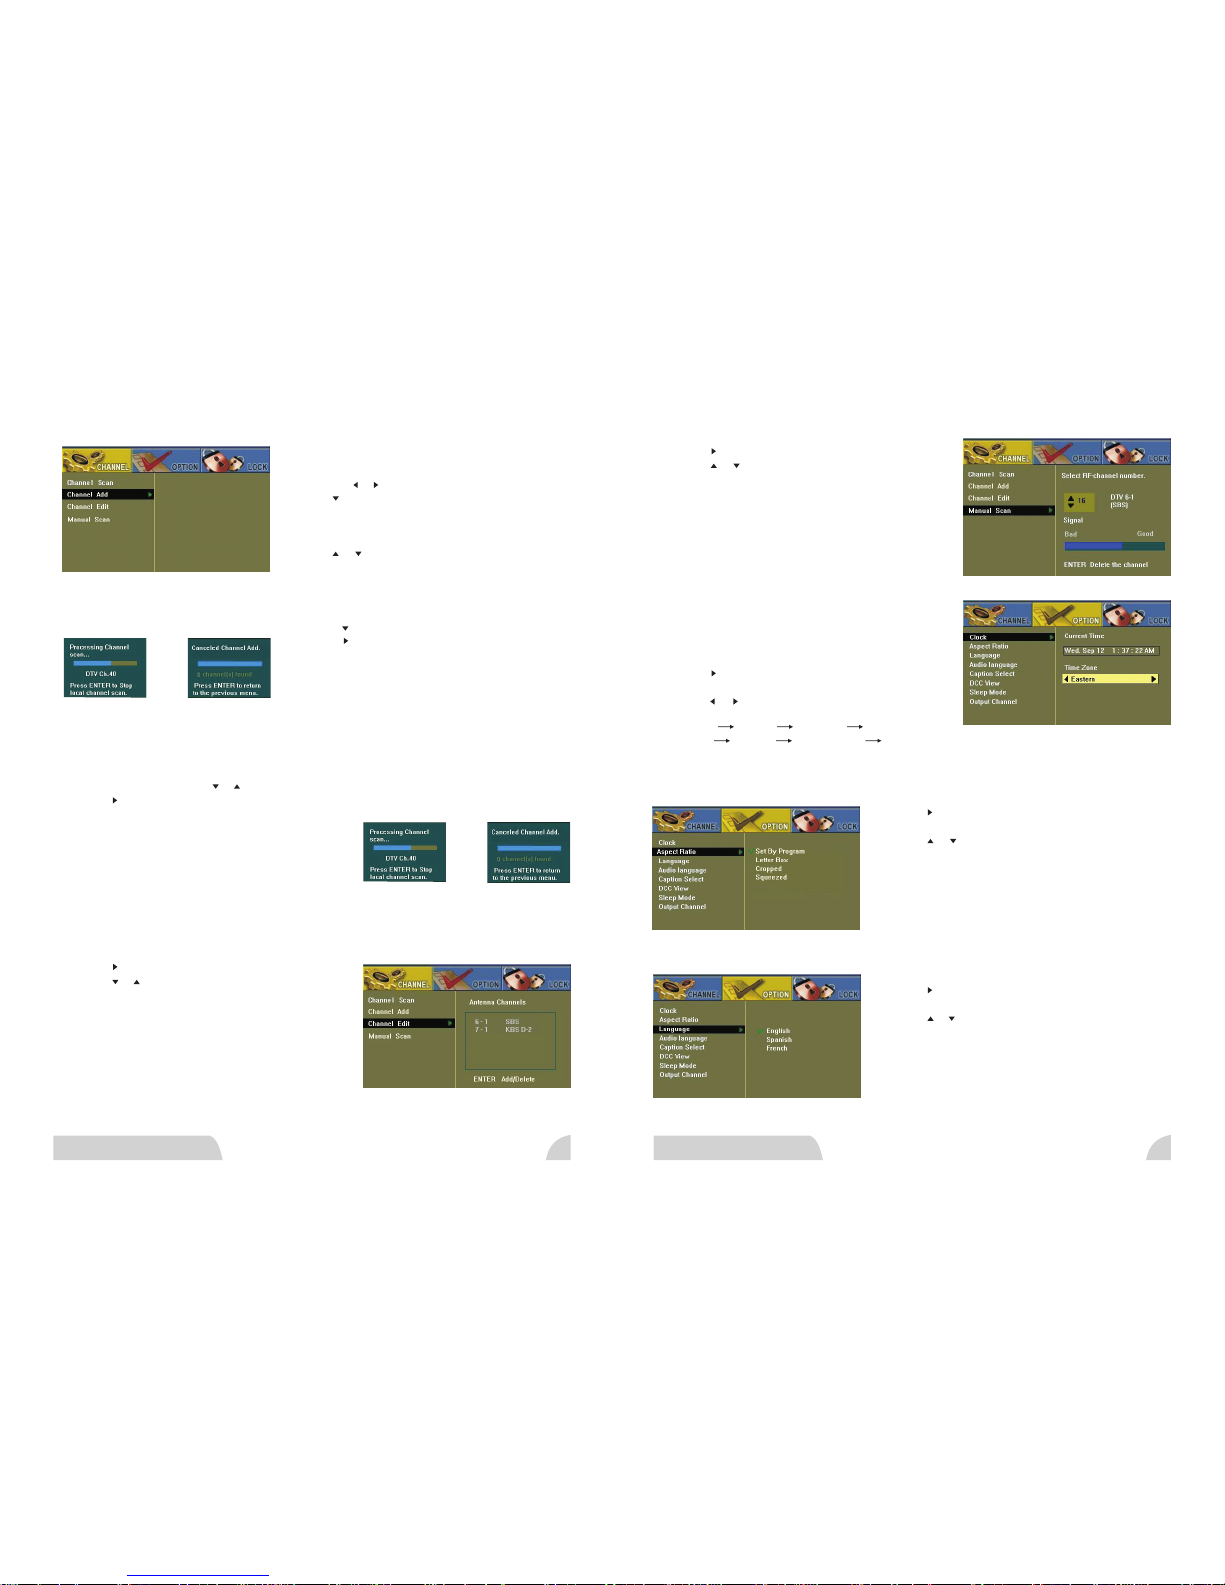
1. Pr ess MEN U butto n to disp lay the O SD menu .
2. Pr ess MEN U or EXIT t o close t he menu .
3. Us e the or to h ighli ght the d esire d conte nt.
4. Us e to scro ll down t o a corre spond ing
fun ction .
5. If n o butto ns are pr essed , the men u close s
aut omati cally a fter 60 s econd s.
6. Us e or to scr oll thr ough to a c orres pondi ng
fun ction .
1. Pr ess in th e CHANN EL icon .
2. Pr ess or EN TER to st art cha nnel sc annin g
aut omati cally .
3. If y ou want t o stop th e Chann el Scan d uring
sca nning , press M ENU or EN TER.
4. Wh en Chan nel Sca n is done , Compl eted
Cha nnel Sc an scre en will a ppear .
5. Pr ess ENT ER or MEN U to retu rn to the p revio us
men u.
1. Go t o Chann el Add usi ng or .
2. Pr ess or EN TER to st art add ing the c hanne ls.
3. If a c hanne l is alre ady sca nned by C hanne l Scan,
or st ored in c hanne l list, i t skips t hat cha nnel.
4. If y ou pres s MENU or E NTER to s top thi s
ope ratio n, the Ca ncele d Chann el Add sc reen wi ll
app ear.
5. Pr ess ENT ER or MEN U to retu rn to the p revio us
men u.
1. Pr ess or EN TER on th e menu Ch annel E dit.
2. Pr ess or to m ove to th e desir ed chan nel.
3. Pr ess ENT ER to add o r delet e the cha nnel on y our
cha nnel li st.
4. Pr ess ENT ER or MEN U to retu rn to the p revio us
men u.
1. Pr ess or EN TER on th e menu Ma nual Sc an.
2. Pr ess or to m ove to th e speci fic cha nnel.
3. You ca n view th e signa l stren gth met er to hel p you
adj ust you r anten na syst em.
4. Pr ess ENT ER to add o r delet e the cha nnel on y our
cha nnel li st.
5. Pr ess ENT ER or MEN U to retu rn to the p revio us menu .
Man ual Sca n
Cha nnel Ed it
Cha nnel Ad d
Cha nnel Sc an
Usin g th e On -Scre en D is play( OS D) M enu
Clo ck
1. Th e cu rre nt time w ill be au tomat icall y set by DT V
cha nnel.
2. Th e co rre ct time z one mus t be set fo r all oth er
fun ction s to work p roper ly (Gui de, Inf o, Chan nel
ban ner, et c)
3. Pr ess or EN TER on th e menu Cl ock to hi ghlig ht
the T ime Z one ico n.
4. Pr ess or to c hange t he area y ou are in .
5. Tim e zone se quenc e :
Eas tern Ce ntral M ounta in Paci fic
Alas ka Hawa ii New F. L and Atla ntic
6. Pr ess ENT ER or MEN U to retu rn to the p revio us menu .
Asp ect Rat io
1. Pr ess or EN TER on th e menu As pect Ra tio to
sel ect the d ispla y mode.
2. Pr ess or to s elect a n avail able mo de.
3. Acc ordin g the hig hligh ted mod e, the di splay
for mat wil l be chan ged.
4. Pr ess ENT ER or MEN U to retu rn to the p revio us
men u.
Lan guage
1. Pr ess or EN TER on th e menu La nguag e to
cha nge the m enu lan guage d ispla y.
2. Pr ess or to s elect a m enu lan guage .
3. Acc ordin g the hig hligh ted lan guage , all the m enu
dis play wi ll be cha nged.
4. LG DT1111 supp orts :
Eng lish, S panis h, and Fr ench.
5. Pr ess ENT ER or MEN U to retu rn to the p revio us
men u.
Channel Menu
Option Menu
11 12
ATSC T V RE CEIVER ATSC T V RE CEIVER
Page 8
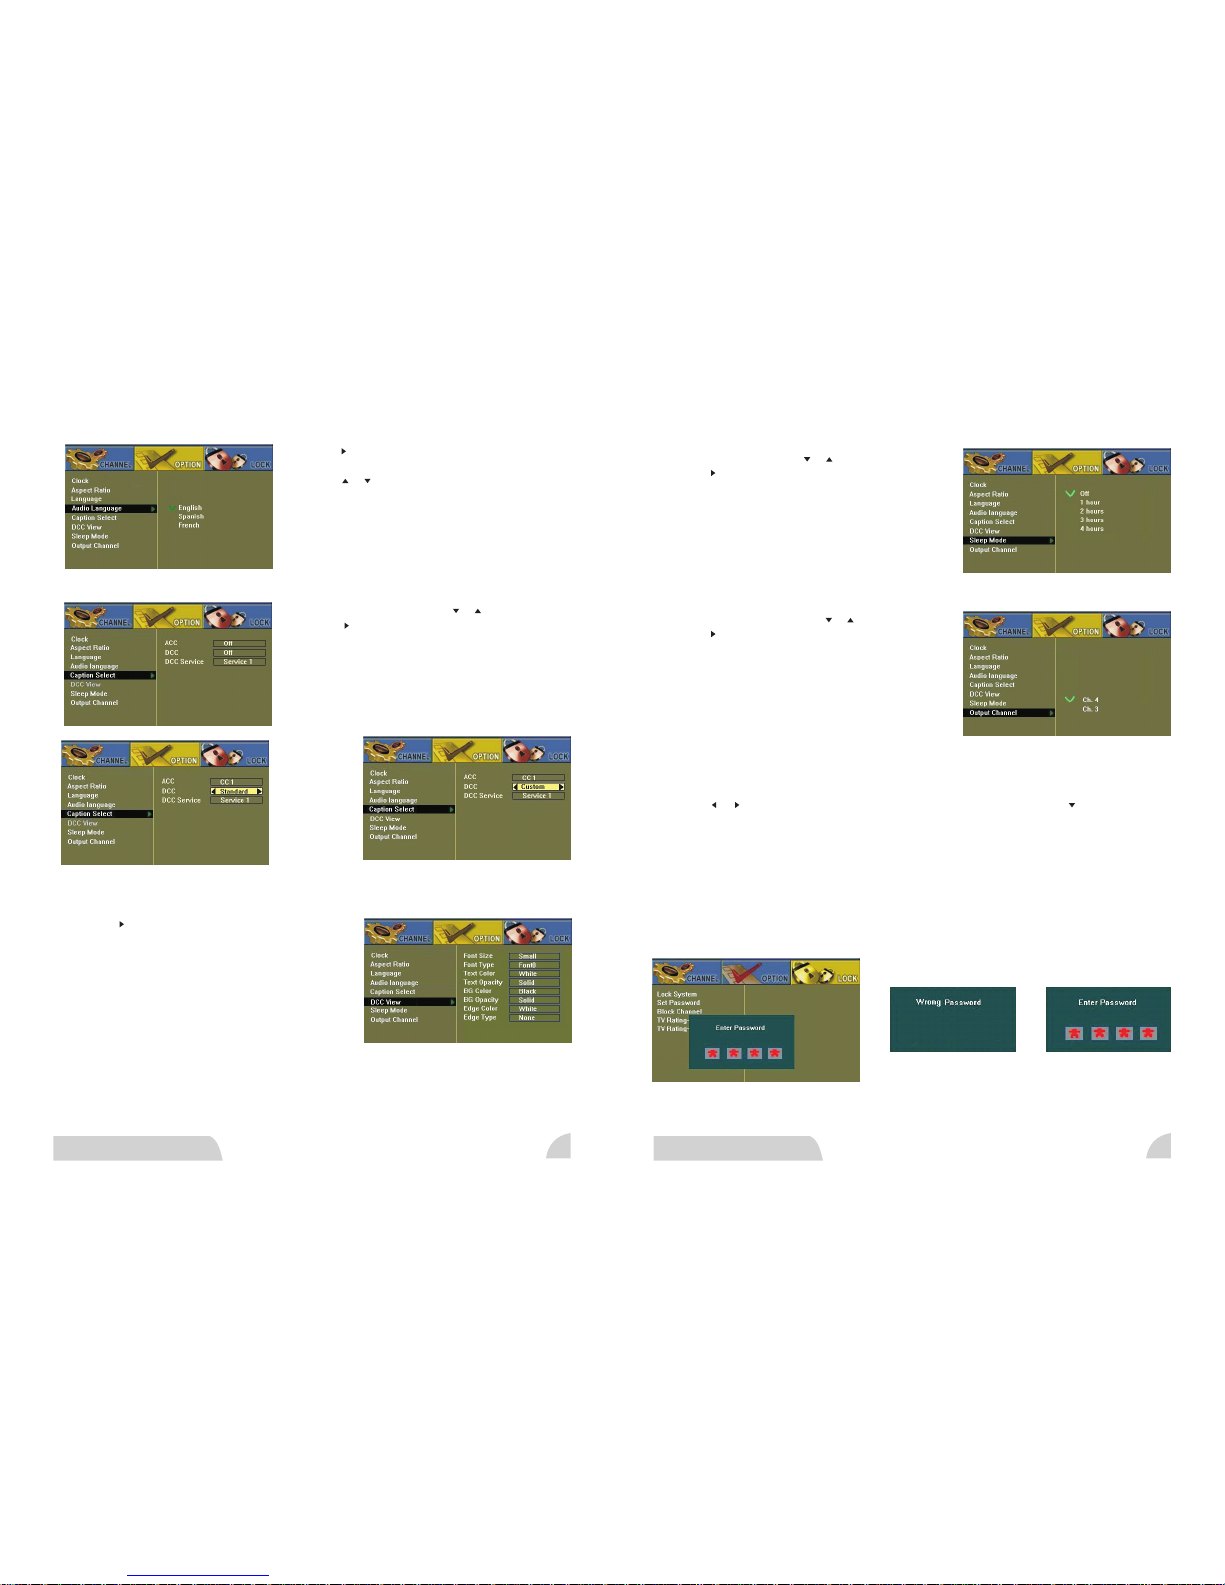
Aud io Lang uage
1. Pr ess or EN TER on th e menu Au dio Lan guage
to se lect an a vaila ble aud io lang uage.
2. Pr ess or to s elect y our def ault la nguag e.
3. Pr ess ENT ER or MEN U to retu rn to the p revio us
men u.
* If th ere are o ther au dio lan guage s, then t he
pri mary au dio lan guage o f the cha nnel wi ll
be he ard.
Cap tion Se lect
1. Go t o Capti on Sele ct usin g or .
2. Pr ess or EN TER to se lect Ca ption O ption s.
3. Go t o ACC i f you w ant to di splay E IA-60 8 Capti on.
4. Go t o DCC if yo u want to d ispla y EIA-7 08 Capt ion.
5. Se lect St andar d to see DC C.
6. Se lect Cu stom, i f you wan t to cust omize D CC look
on DC C View Me nu .
7. Pr ess ENT ER or MEN U to retu rn to the p revio us
men u.
DCC V ie w
1. If D CC Cust om Mode i s selec ted, .
2. Pr ess or EN TER to se lect DC C View Op ti ons .
3. Go t o Font Si ze if you w ant to ch ange fo nt size o f
DCC F ont.
4. Go t o Font Typ e if y ou wa nt to cha nge fon t type of
DCC F ont.
5. Go t o Text Co lor if yo u want to c hange t ext col or of
DCC F ont.
6. Go t o Text Op acity i f you wan t to chan ge text o pacit y
of DC C Font.
7. Go t o BG Colo r if you wa nt to cha nge bac kgrou nd
col or of DCC F ont.
8. Go t o BG Opac ity if yo u want to c hange b ackgr ound op acity o f DCC Fon t.
9. Go t o Edge Co lor if yo u want to c hange e dge col or of DCC F ont.
10. G o to Edge Ty pe i f you w ant to ch ange ed ge type o f DCC Fon t.
11. Pr es s ENT ER or MEN U to retu rn to the p revio us menu .
Sle ep Mode
1. Go t o Sleep M ode usi ng or .
2. Pr ess or EN TER to se lect Sl eep Mod e Optio ns.
3. Se lect Of f to turn o ff Auto ma tic S leep.
4. Se lect ap propr iate ti me to aut omati cally t urn off T V.
5. Pr ess ENT ER or MEN U to retu rn to the p revio us
men u.
Out put Cha nnel (O ption al)
1. Go t o Outpu t Chann el usin g or .
2. Pr ess or EN TER to se lect Ou tput Ch annel O ption s.
3. Se lect ap propr iate ch annel t o TV.
4. Pr ess ENT ER or MEN U to retu rn to the p revio us
men u.
1. Pr ess MEN U butto n.
2. Pr ess or bu tton on r emote c ontro l to high light t he LOCK i con and p ress bu tton. P asswo rd
pro mpt win dow wil l appea r.
3. En ter you r 4-dig it Pass word by p ressi ng the NU MBER bu tton on t he remo te cont rol. Th e
def ault co de is 000 0 and the M AGIC co de is 777 7.
4. If y ou ente r Magic c ode, Ne w Passw ord pro mpt men u will ap pear.
Ent er and re -ente r your ne w 4-dig it pass word by p ressi ng the NU MBER bu tton on t he remo te
con trol.
Lock Menu
13 14
ATSC T V RE CEIVER ATSC T V RE CEIVER
Page 9
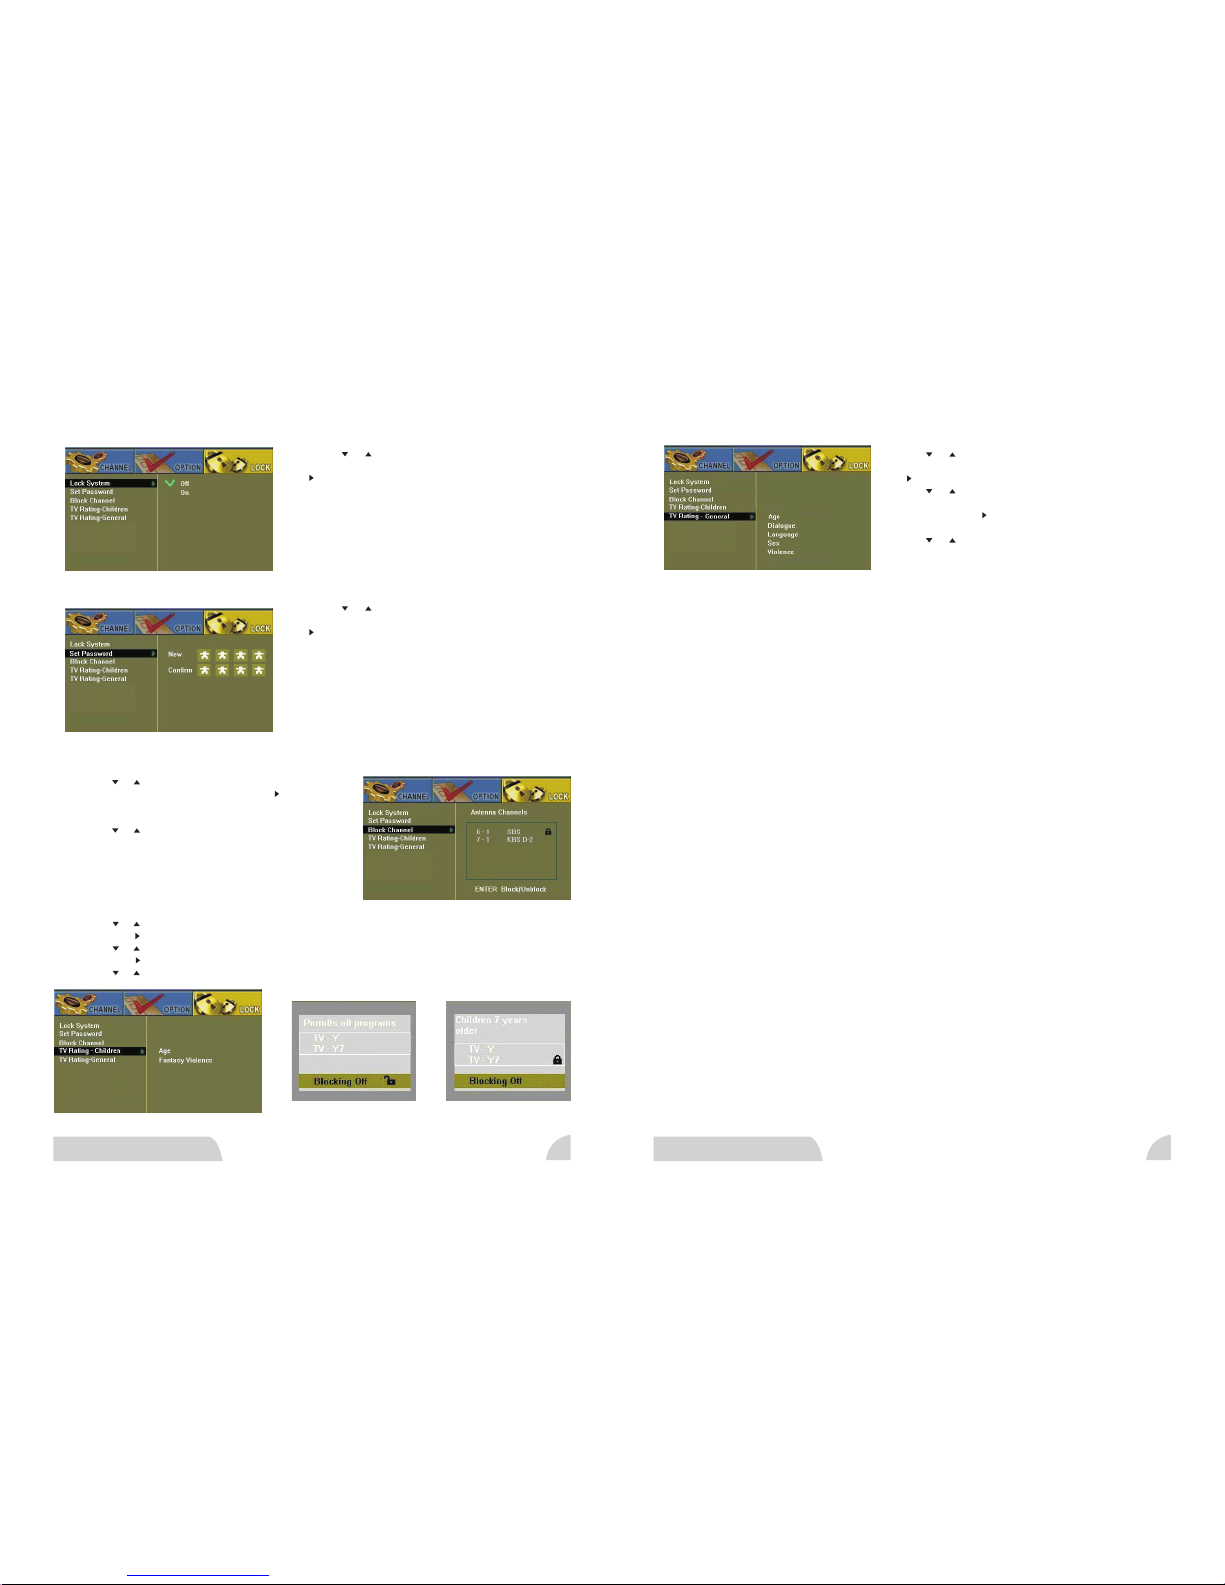
Loc k Syste m
1. Pr ess or bu tton on t he remo te cont rol to
hig hligh t Lock Sy stem an d press E NTER or
but ton to ch ange se tting .
2. If y ou want t o use the r ating c ontro l, On sho uld
be ch ecked . Or If you d o not wan t to use th e
rat ing con trol, O ff shou ld be che cked.
Set P asswo rd
1. Pr ess or bu tton on t he remo te cont rol to
hig hligh t Set Pas sword a nd pres s ENTER o r
but ton to ch ange se tting . Passw ord pro mpt
men u will ap pear.
2. En ter and r e-ent er your n ew 4-di git pas sword
by pr essin g the NUM BER but ton on th e remot e
con trol.
Blo ck Chan nel
1. Pr ess or bu tton on t he remo te cont rol to hi ghlig ht
Blo ck Chan nel and p ress EN TER or bu tton to
cha nge set ting. An tenna C hanne ls menu w ill app ear.
2. Pr ess or bu tton on t he remo te cont rol to hi ghlig ht
cha nnel an d press E NTER bu tton to b lock or u nbloc k
cha nnel.
1. Pr ess or bu tton on t he remo te cont rolle r to high light T V Ratin g - Child ren and p ress
ENT ER or but ton to ch ange se tting .
2. Pr ess or bu tton on t he remo te cont rolle r to high light A ge or Fan tasy Vi ol enc e and pre ss
ENT ER or but ton to ch ange se tting . Block ing men u windo w will ap pear.
3. Pr ess or bu tton on t he remo te cont rol to se lect bl ock lev el or unb locki ng.
TV Ra ting - Ch ildre n
TV Ra ting - Ge neral
1. Pr ess or bu tton on t he remo te cont rol to
hig hligh t TV Rati ng - Gene ral and p ress EN TER
or bu tton to c hange s ettin g.
2. Pr ess or bu tton on t he remo te cont rol to hi ghlig ht
Age , Dialo gue, La nguag e, Sex or V io len ce , and
pre ss ENTE R or butt on to cha nge set ting. B locki ng
men u windo w will ap pear.
3. Pr ess or bu tton on t he remo te cont rol to se lect
blo ck leve l or unbl ockin g.
15 16
ATSC T V RE CEIVER ATSC T V RE CEIVER
Page 10
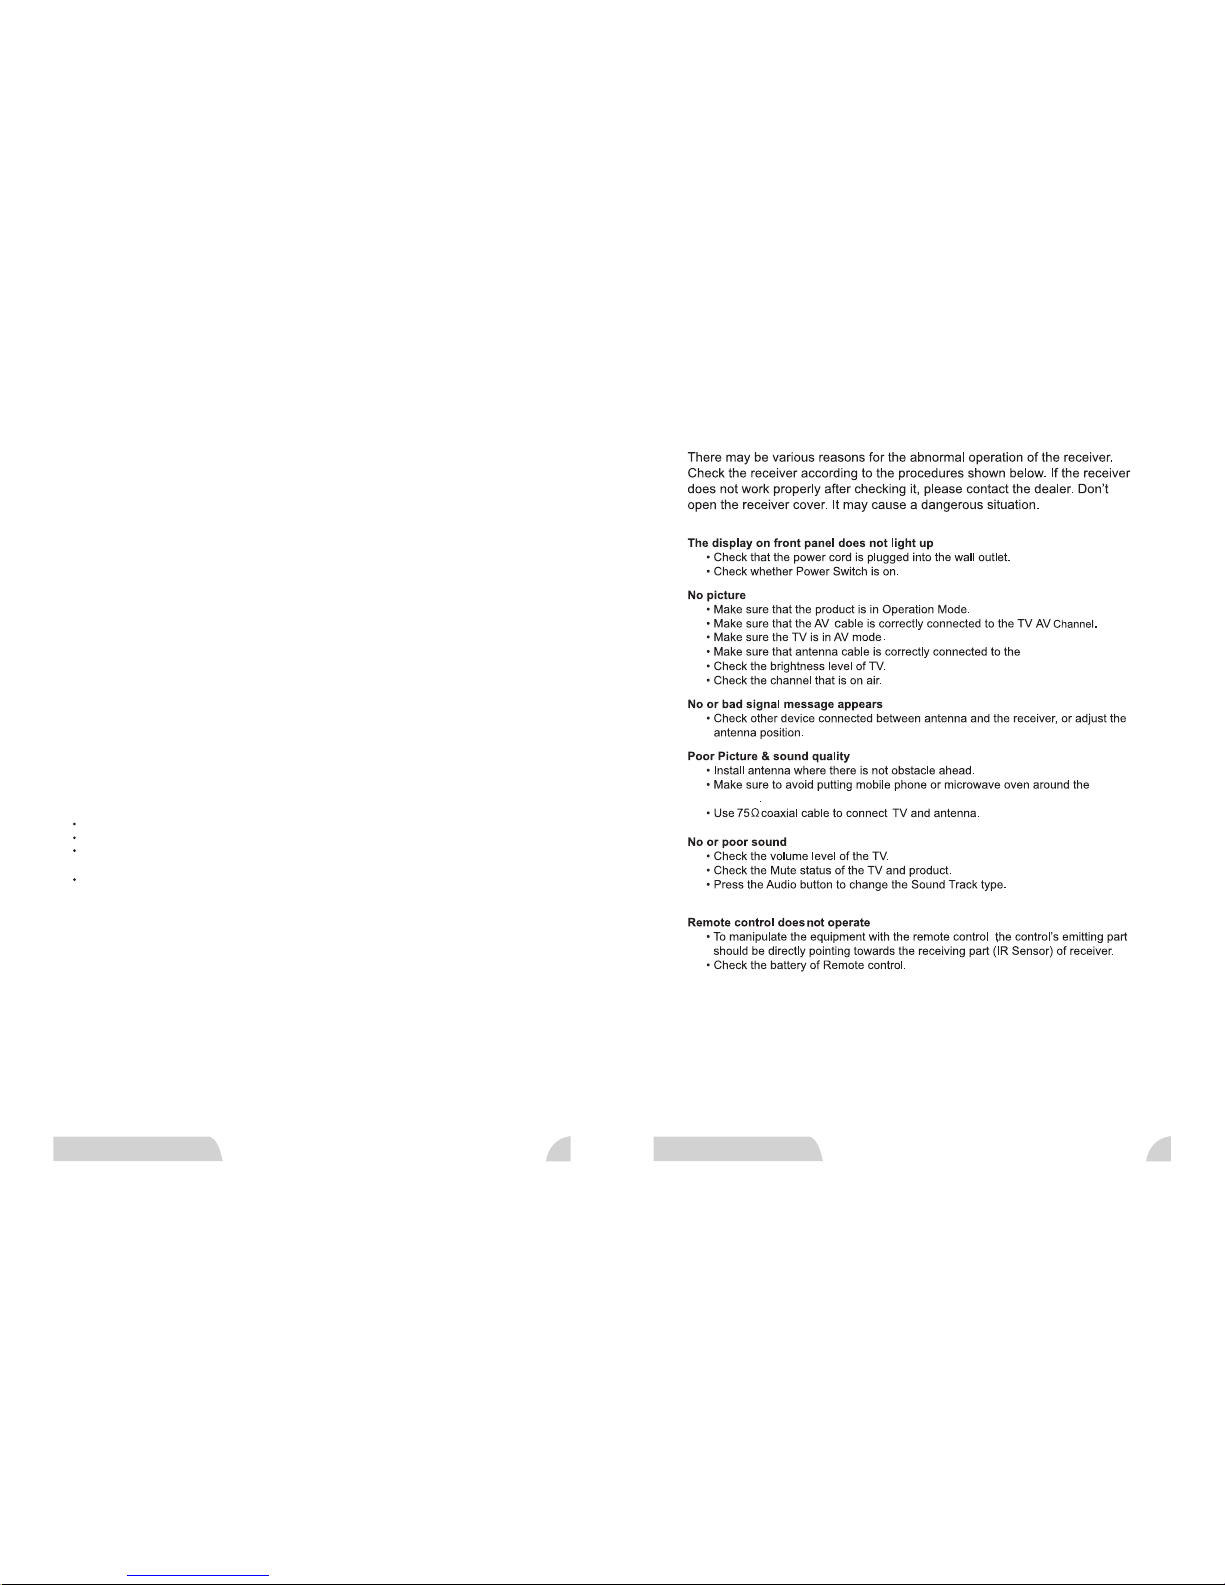
FCC Cu st om er Info rm at ion
MPI -500
MPI -500.
Trouble Shooting
17 18
ATSC T V RE CEIVER ATSC T V RE CEIVER
Thi s devic e compl ies wit h Part 15 o f the FCC R ules. O perat ion is su bject t o the fol lowin g two
con ditio ns: (1) t his dev ice may n ot caus e harmf ul inte rfere nce, an d (2) thi s devic e must ac cept
any i nterf erenc e recei ved, in cludi ng inte rfere nce tha t may cau se unde sired o perat ion.
Res ponsi ble Par ty:
Mic ropro se Syst ems, LL C.
120 9 Orang e Stree t
Wil mingt on, DE 19 801
1-8 88-69 4-726 5
Tra de Na me: Mic ropro se
Type o f Equip ment: D igita l Telev ision R eceiv er
Mod el No. MP I-500
Fed eral Co mmuni catio ns Comm issio n (FCC) : Thi s equip ment co mplie s with Pa rt 15 of th e
FCC r ules.
Thi s equip ment ge nerat es, use s, and ca n radia te radi o frequ ency en ergy an d, if not i nstal led
and u sed in ac corda nce wit h the ins truct ions, m ay caus e harmf ul inte rfere nce to ra dio
com munic ation s. Howe ver, the re is no gu arant ee that i nterf erenc e will no t occur i n a parti cular
ins talla tion. I f this eq uipme nt does c ause ha rmful i nterf erenc e to radi o or tele visio n recep tion,
whi ch can be d eterm ined by r emovi ng and ap plyin g power t o the equ ipmen t, the us er is
enc ourag ed to try t o corre ct the in terfe rence b y one or mo re of the f ollow ing mea sures :
Reo rient o r repla ce the re ceivi ng ante nna.
Inc rease t he sepa ratio n betwe en the eq uipme nt and re ceive r.
Con nect th e equip ment in to an out let on a ci rcuit d iffer en t fro m that wh ich the r eceiv er is
con necte d.
Con sult th e deale r or an exp erien ced rad io / TV tec hnici an for he lp.
Shi elded c ables m ust be us ed with t his uni t to ensu re comp lianc e with th e Class B F CC limi ts.
CAU TION: C hange s or modi ficat ions no t expre ssly ap prove d by the ma nufac turer r espon sible
for c ompli ance co uld voi d the use r
Page 11
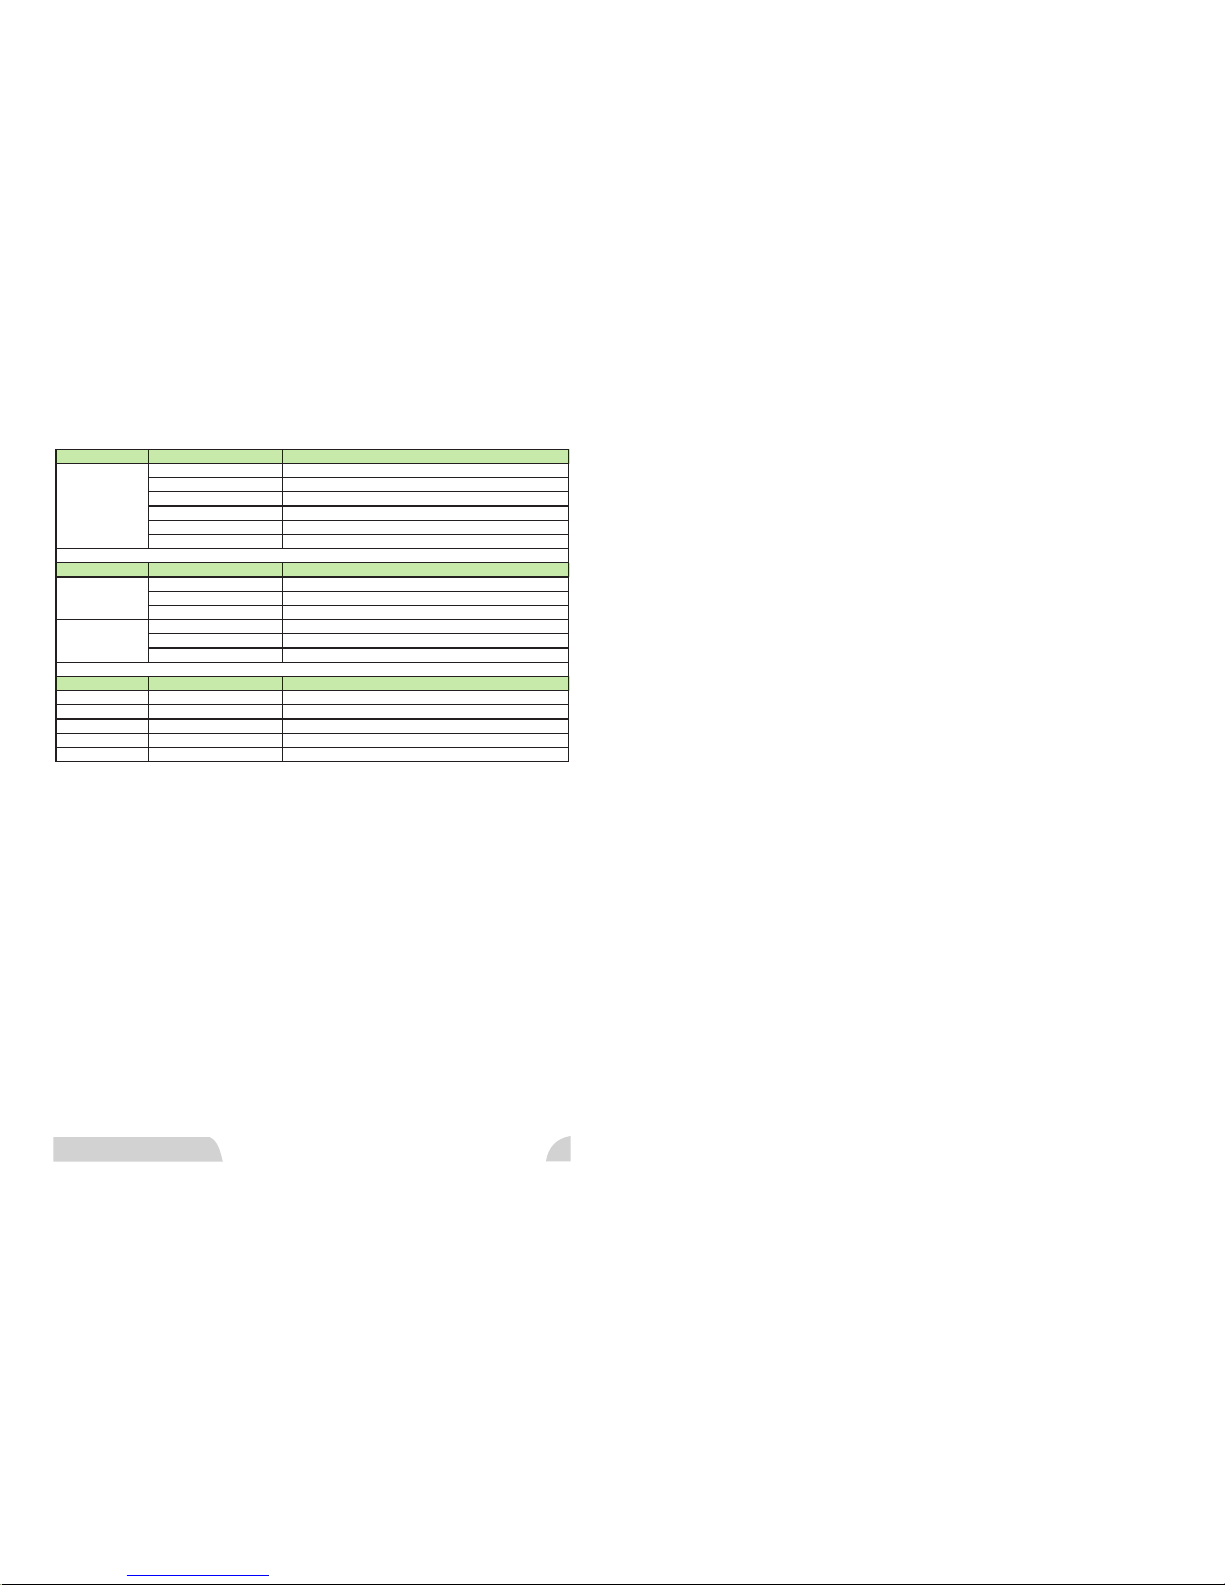
Specification
Receiver Input Item Specification
Signal In
Input Frequency Range 54 MHz ~ 807 MHz
RF Connector Type F Female Type
Modulation Format 8VSB,QAM
Channel Bandwidth 6MHz
Video Decoder MPEG-2 MP@HL
Audio Decoder Dolby AC3 2 Channels,MPEG Audio
Receiver Output Item Specification
Video output Composite(RCA) x1
Aspect Ratio Set By Program,Letter Box,Cropped,Sequeezed
Video Format NTSC
Sampling frequency 32, 44.1, 48KHz
Analog Audio output L/R(RCA) 2Ch
Digital Audio output N/A
General Item Specification
Power supply Adaptor input Voltage ~100-240VAC, 50/60Hz
Adaptor output DC 6V / 1.5A
Consumption max 10Watts
Dimension Size 255(L)x208(W)x42(H)mm
Weight 0.9kg
Audio
Video
19
ATSC T V RE CEIVER
 Loading...