

EN
REF QV-1
Vet

EN
Table of Contents
1. Introduction....................................................................................3
1.1 Before You Start
1.2 Intended Use
1.3 Test Principle
1.4 Packaging
2. Accessory List...............................................................................5
3. Product Overview..........................................................................5
4. Operation Summary......................................................................7
5. Before Testing................................................................................7
6. Precautions, Limitations and Warnings.......................................8
6.1 Care of Your qLabs® Vet
6.2 Patient Health Status
6.3 Performing a Test
6.4 Collecting Blood Sample
6.5 Electromagnetic Compatibility
7. Powering the qLabs® Vet ON and OFF........................................9
7.1 Power Connection
7.2 Powering the qLabs® Vet On
7.3 Powering the qLabs® Vet Off
8. qLabs® Vet Settings.....................................................................11
8.1 Enter Setup Mode
8.2 Setting the Date
8.3 Setting the Time
8.4 Setting the Normal Range
8.5 Patient ID Setup
8.6 Lot Number Setup
8.7 Selecting Language
9. Perform a Test.............................................................................14
9.1 Entering Test mode
9.2 Insert a Test Strip
9.3 Entering the Patient ID
9.4 Conrming the Patient ID
9.5 Selecting the Species
9.6 Entering the Strip Code and Lot Number (if enabled)
1

EN
9.7 After Conrming the Code
9.8 Heating Up
9.9 Getting a Finger stick Sample
9.10 Performing the Test
9.11 Results and Explanation
9.12 Finishing the Test
10. Reviewing Previous Results.......................................................21
10.1 Displaying QC Test Results
10.2 Displaying Patient Test Results
11. Quality Control..............................................................................25
11.1 Onboard QC Tes
11.2 Liquid QC Test
12. Maintenance.................................................................................25
12.1 Care and Cleaning of Your Screen
12.2 Installing/Replacing Batteries
12.3 Maintenance
13. Troubleshooting...........................................................................27
14. Symbols........................................................................................29
15. Performance Characteristics & Product Specications.........30
15.1 Operation Condition
15.2 Product Specications
16. Warranty........................................................................................31
17. Contact Address and Phone Number........................................33
2

EN
1. Introduction
1.1 Before You Start
Before using qLabs® Vet, read the User’s Manual carefully.
1.2 Intended Use
The qLabs® Vet is intended for use with qLabs® Vet test strips for in vitro
quantication measurement of a patient’s PT and APTT.
The qLabs® Vet is for veterinary use only.
The qLabs® Vet is validated for use with canine and feline samples
only.
1.3 Test Principle
qLabs® Vet automatically detects the insertion of a qLabs® test strip and
heats the strip to a preset operating temperature. After a drop of blood is
applied to the strip, the capillary channels carry the blood to the reaction
zones, where the blood mixes with pre-printed reagents and starts to
coagulate. Each strip contains two reaction zones. Each reaction zone
contains a pair of metallic electrodes, to which a constant voltage is
applied by the qLabs® Vet. As the coagulation of the blood proceeds, the
current monitored across the two electrodes changes. The qLabs® Vet
detects the change of the current in the test zone and determines the PT
and/or APTT results. The qLabs® Vet and test strips provide APTT, PT
results.
1.4 Packaging
The qLabs® Vet was packed individually.
Upon receipt of package, please open and remove the packaging
materials. Place the qLabs® Vet on a at surface and connect the power
adapter.
Do not keep the qLabs® Vet in direct sunlight, near a high heat source, or
near an area with a strong magnetic eld.
3
2. Accessory List
qLabs® Vet includes the following accessories:
• Power Adapter
• User’s Manual
• Quick Start Guide
• Data Manager Installation DVD
• Data Manager Operation Guide
• eCable
NOTES:
• To avoid the possibility of damage, use only the power adapter
supplied with the qLabs
• Standard AA batteries can also be used for qLabs
• The qLabs
®
eStation can be purchased separately from Micropoint
Biotechnologies, Inc. Please contact your local distributor for
ordering information.
®
Vet.
®
Vet.
EN
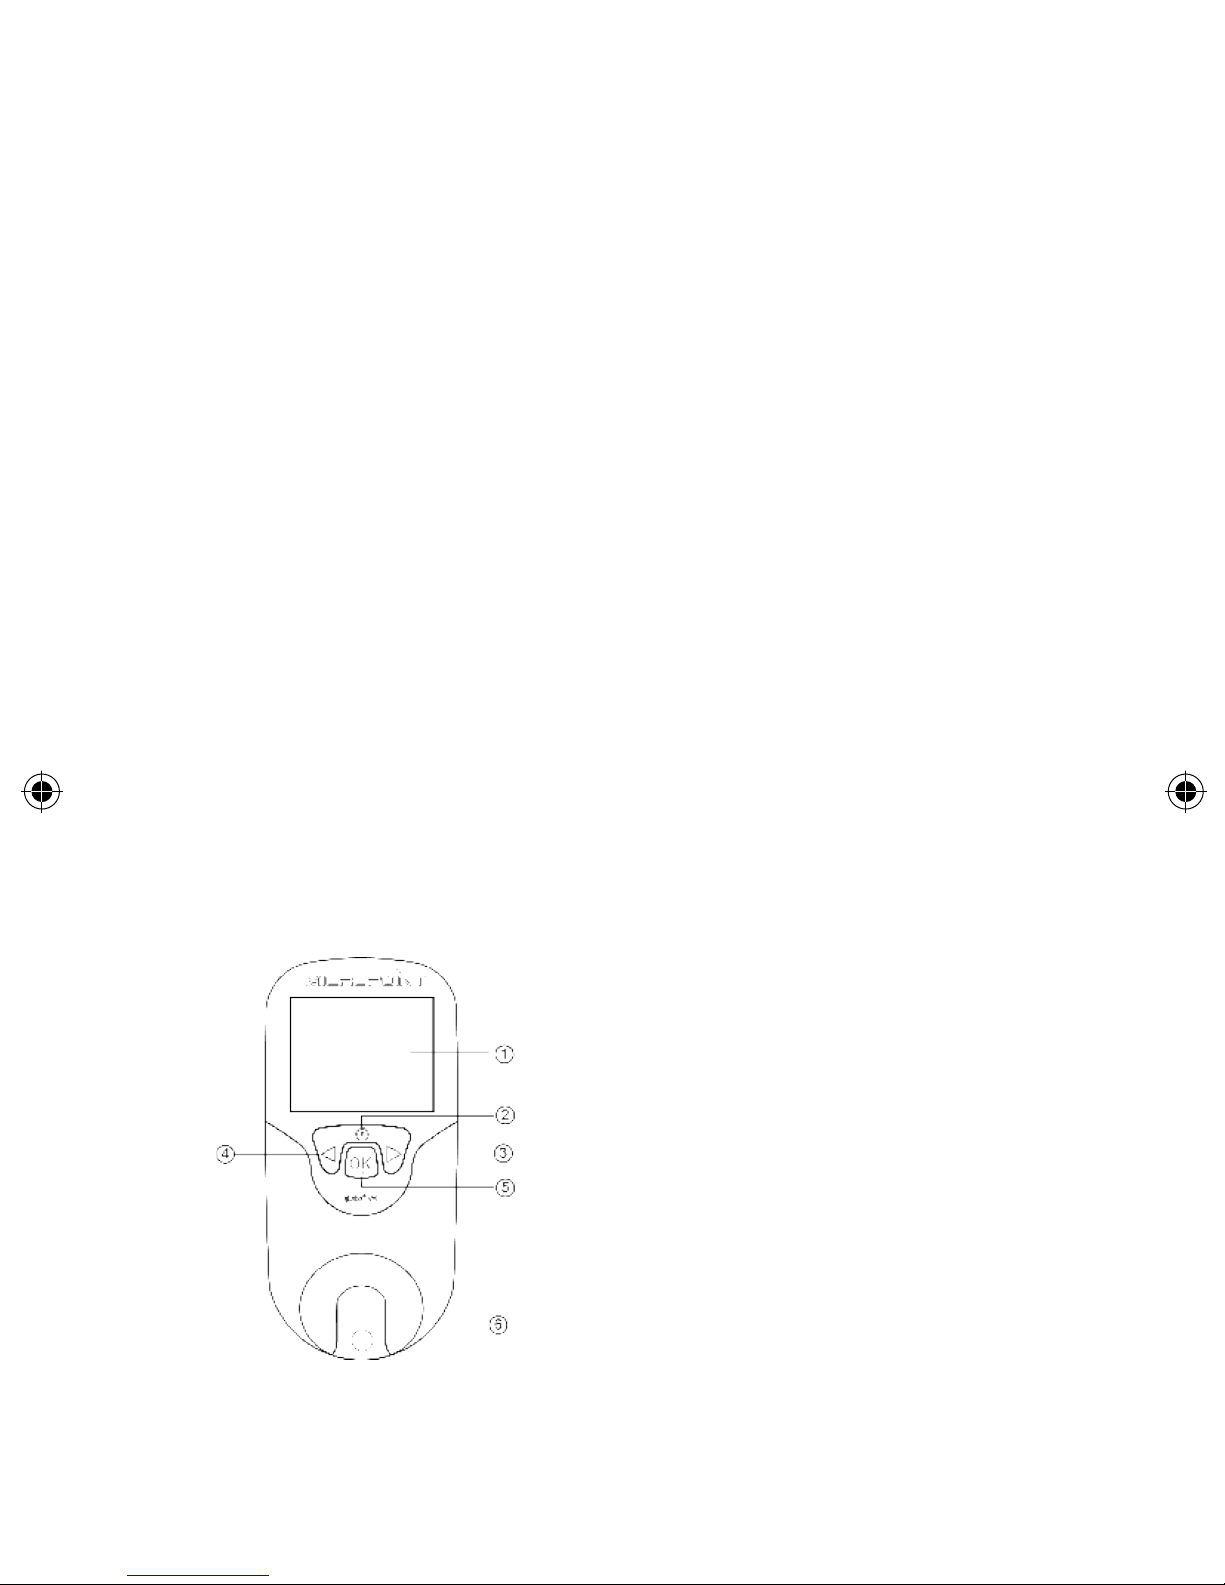
3. Product Overview
Identication of Components
Front View
1) LCD Screen
2) Returning/Power Button
3) Right Button
4) Left Button
5) OK Button
6) Test Strip Guide
4
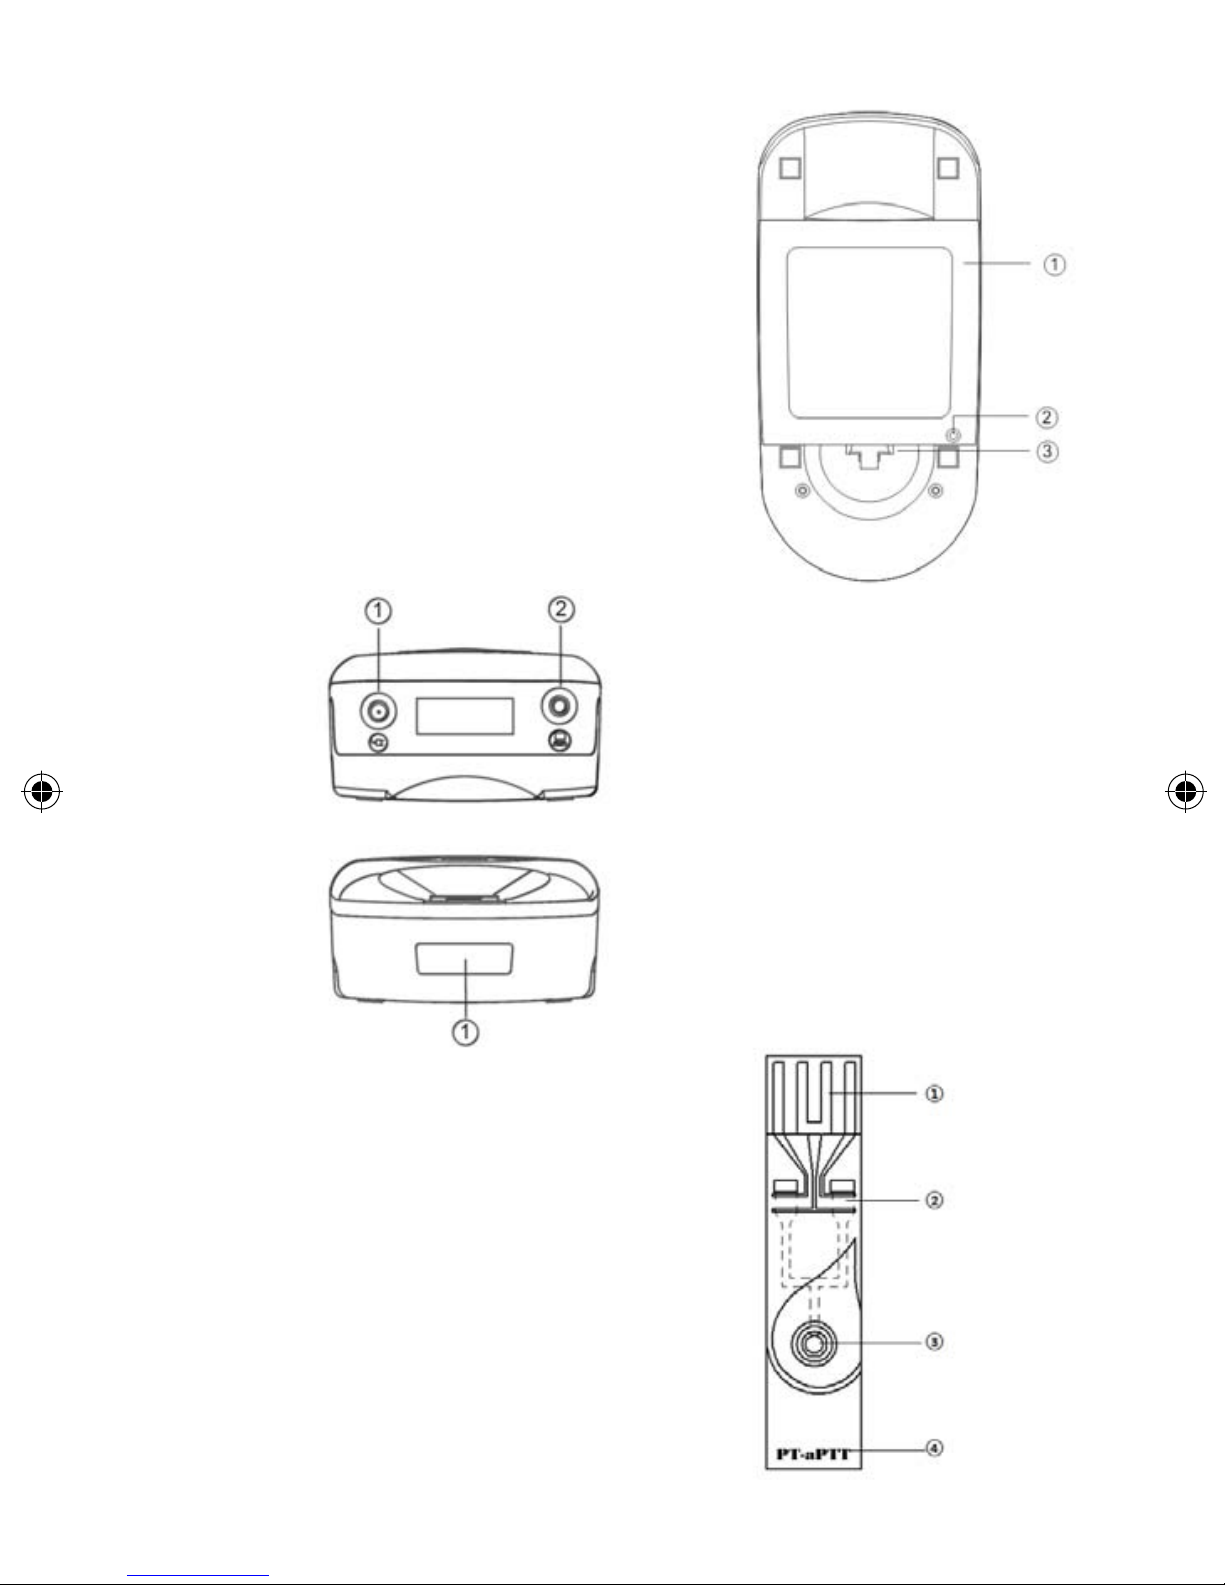
Back View
1) Battery Cover
2) Battery Cover Screw
3) Battery Cover Release
EN
Top View
1) Power Supply Jack
2) Data Port
Bottom View
1) Barcode Scanner (Laser)
qLabs® Vet Test Strip
1) Electrode Leads
2) Test Zone
3) Sample Well
4) Test Name
5
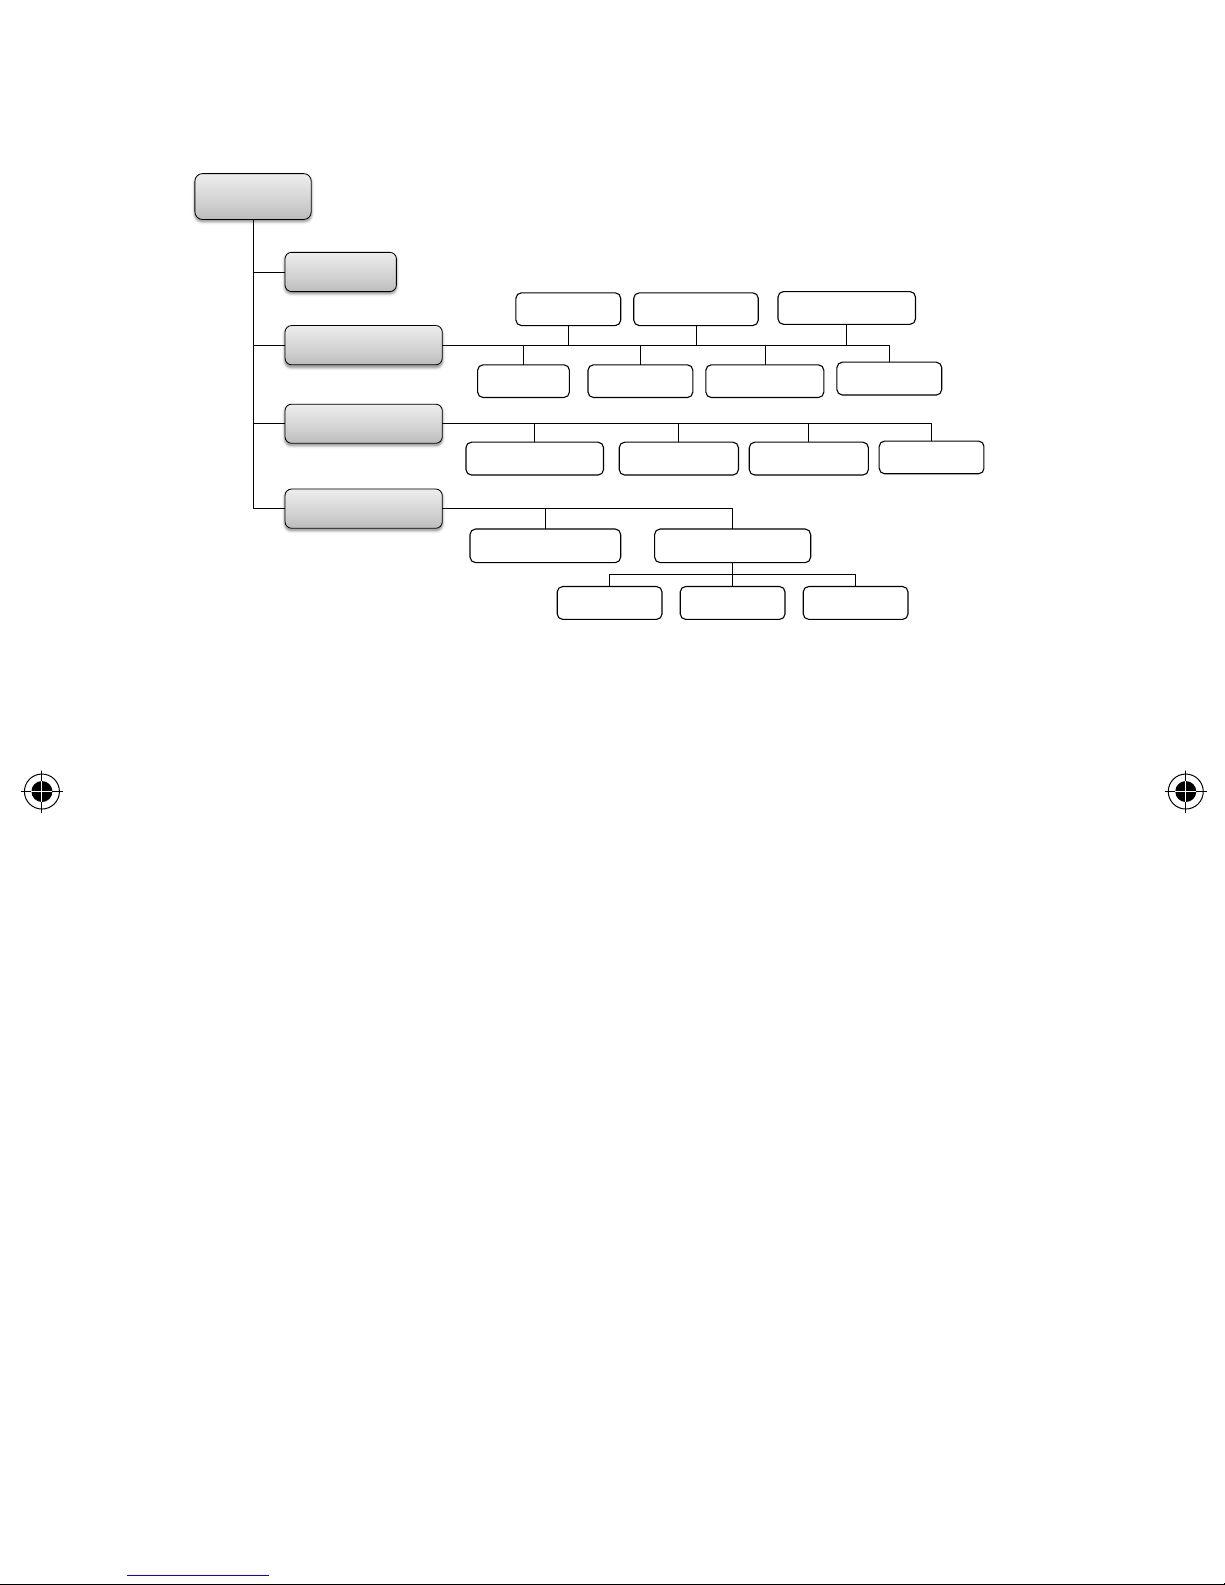
4. Operation Summary
Operation
Preparation
Date Setting
Meter Setup
Power ON Time Setting
Performing a Test
Enter Patient ID and
or Strip Lot Number
Reviewing Previous
Results
Review QC Data Review Patient Data
Normal Range
Setting
Select Species
Patient ID
Collect Sample
EN
Lot Number
Language
Test Sample
Upload Data Print DataDelete Data
5. Before Testing
Before using qLabs® Vet to do a test, you will need:
• qLabs
• Power supply or batteries
If you are testing fresh venous blood samples, you will also need:
• 21-gauge needle or larger with 1.0 mL syringe
• Sterile alcohol
• Disposable glove
• Puncture-resistant container for medical sharps
• Sterile band aid
• Bio-hazardous container
Or if you are testing citrated whole blood samples, you will also need:
• Eppendorf tube rack
®
Vet test strip
• 200 uL pipette and pipette tips
• Disposable glove
• Sterile alcohol
• Disposable venous blood lanet
• 1.8 or 2.7 mL 3.2% (w/v) sodium citrate venous collection tube
• Bio-hazardous container
6

6. Precautions, Limitations and
Warnings
qLabs® Vet is used only for animals in vitro diagnostics.
Before using this system, take special note of CAUTIONS
throughout this User’s Manual.
®
As with all diagnostic tests, qLabs
be scrutinized in light of a specic patient’s condition and
anticoagulant therapy. Any results exhibiting inconsistency
with the patient’s clinical status should be repeated or
supplemented with additional test data or repeated with
other testing methods.
Vet’s test results should
EN
6.1 Care of Your qLabs
• The qLabs
®
Vet is a delicate instrument and should be handled
®
Vet
with care. Dropping or other mishandling may cause malfunction of
qLabs® Vet.
• The qLabs
®
Vet should be transported in a carrying case or a
secure container.
• DO NOT spill any liquid on the qLabs
®
Vet. If it happens,
immediately contact local distributor from Micropoint
Biotechnologies, Inc.
• DO NOT store the qLabs
• DO NOT use the qLabs
®
Vet below -10 ºC or above 40 ºC.
®
Vet for any other types of test strips not
provided by Micropoint Biotechnologies, Inc.
6.2 Patient Health Status
Current patient health status may cause inaccurate or unexpected test
results. It is important to take certain health factors into consideration
when interpreting the test results and deciding on a course of action for
your patients. Failure to do so may lead to an incorrect interpretation of
the test result.
7

6.3 Performing a Test
EN
• The qLabs
®
Vet should be operated on a level surface that is free
of vibration. Testing on an uneven or unstable surface may cause
®
inaccurate results. DO NOT hold the qLabs
Vet in your hands
during the testing.
• The blood sample must be applied to the test strip immediately
after collection. Otherwise, the blood sample may begin clotting,
causing inaccurate results.
• DO NOT move or touch the qLabs
®
Vet during testing.
DO NOT switch power supplier from adapter to battery or
vice versa during testing!
6.4 Collecting Blood Sample
• Use only fresh non anti-coagulated whole blood and citrated whole
blood. Do not use plasma.
• The drop of blood must be a minimum of 10 μL.
• Hematocrit ranges between 30% and 55% will not affect test
results.
6.5 Electromagnetic Compatibility
• This equipment has been tested and found to comply with
applicable EMC emission requirements as specied in EN 61326-1:
2006 and EN 61326-2-6: 2006, immunity to electrostatic discharge
as specied in IEC 61000-4-2, and immunity to radio-frequency
interference at the frequency range and test levels specied in IEC
61000-4-3. The emissions of the energy used are low and not likely
to cause interference in nearby electronic equipment.
• Do not use this instrument in a dry environment, especially if
synthetic materials are present. Synthetic clothes, carpets,
etc., may damage static discharges in a dry environment. That
may cause incorrect operation or damage to the device. The
recommended humidity operating range is 10% to 90%.
• Do not use this instrument near cellular or cordless telephones,
walkie talkies, garage door openers, radio transmitters, or
other electrical or electronic equipment that are sources of
electromagnetic radiation, as these may interfere with the proper
operation of the instrument.
8

OK
NEXT
-
+
DD/MM/YY HH:MM
01/02/12
12:00
SET MEM
OFF
VER
EN
7. Powering the qLabs® Vet ON and
OFF
7.1 Power Connection
The qLabs® Vet comes with a power supply which must be plugged into
®
the qLabs
standard AA batteries (See Section 12.2).
Vet power supply jack. Alternatively, the qLabs® Vet can use 4
bottom of the screen provide hints for the functions of the
buttons.
7.2 Powering the qLabs® Vet On
The messages on the four-cell grid displayed at the
When the qLabs® Vet is initially powered on,
it will beep and automatically enter Setup
mode. In the Setup mode you can change
the qLabs® Vet settings, or
Press the “OK” button to view the prompt to
insert a test strip.
When qLabs
on the monitor:
Turning the qLabs
1) Press and hold the “Power” button for 2 seconds to turn on the
qLabs
2) Insert a fresh test strip if you are ready to perform a test. The
qLabs
• Perform a test, or
• Check the version of the software and the manufacturer information
by pressing “VER” button, or
®
Vet is in the standby mode, you have two choices to power
®
Vet, or
®
Vet will then prompt you to conrm the strip code.
®
Vet ON in CHOICE 1, allows the user to:
9
V8.0.02
MICROPOINT
S/N
023300E1200001
• Enter Setup mode by pressing “SET” button to change the Vet
SET MEM
OFF
VER
SHUT DOWN
BACK
OFF
setting, or
• Enter Memo mode by pressing “MEM” button to review previous
results.
®
Turning the qLabs
• Perform a test.
Vet ON in CHOICE 2, allows the user to:
ENENEN
complete information for all of these options.
7.3 Powering the qLabs® Vet Off
In the interface where the monitor prompts
See the appropriate sections of this User’s Manual for
you to insert a test strip, press the functional
“OFF” button to enter the shut down mode.
In shut down mode, the user can:
• Press the functional “OFF” button to
turn off and enter standby mode, or
• Press functional “BACK” button to
return to the previous interface.
NOTES:
• Manually turn off the qLabs
batteries.
• If the qLabs
automatically and enter standby mode.
®
Vet is left idle for about 5 minutes, it will turn off
®
Vet if not in use to conserve the
10

8. qLabs® Vet Settings
OK
NEXT
-
+
DD/MM/YY HH:MM
01/02/12
12:00
SET MEM
OFF
VER
OK
NEXT
-
+
DD/MM/YY HH:MM
01/02/12
12:00
OK
NEXT
-
+
DD/MM/YY HH:MM
01/02/12
12:00
Follow the steps below to set up the qLabs® Vet.
8.1 Enter Setup Mode
When the qLabs® Vet is turned on for the rst
time, it will automatically enter to the Setup
Mode.
When the qLabs® Vet is powered on from
standby mode, a prompt to insert a test strip
will appear. Press the functional “SET” button
to enter the Setup Mode.
EN
8.2 Setting the date
The date format is DD/MM/YY. The rst
set of digit (YY) will be highlighted. Use the
functional “+” and “-”buttons to change the
date.
Press functional “NEXT” button to go to the
second digit (MM) after a correct date is
selected. Change the month and the date
using the same method.
11

8.3 Setting the Time
OK
NEXT
-
+
DD/MM/YY HH:MM
01/02/12
12:00
OK
NEXT
- +
DD/MM/YY HH:MM
01/02/12
12:00
NORMAL RANGE
OK
NEXT
-
+
5
CANINE
PT
APTT
16
15
43
LO HI
NORMAL RANGE
OK
NEXT
-
+
5
CANINE
PT
APTT
16
15
43
LO HI
The time is in 24-hour format: “HH:MM” (Hour: Minute)
After the day setting, the setting option will
prompt you to the hour setting mode. The
hour will be highlighted on the display. Use
“+” and “-” functional buttons to adjust the
hour. Press “NEXT” functional button when
you have the correct hour on the display.
The minute will be highlighted on the display.
Use “+” and “-” buttons to change the
minute. Press “NEXT” button when you have
the correct minute on the display.
EN
8.4 Normal Range Setup
An target range of PT and APTT for each supported aminal species
may be set to alert the user when the results are out of range.
First, use “+” or “-” buttons to select the
species.
Press”NEXT” to accept. The next settable
item will be highlighted
Then, use “+” or “-” buttons to set the
low and high limit of PT and APTT for the
selected species. Press “NEXT” to accept
current setting and go to the next item.
12
8.5 Patient ID Setup
PATIENT ID
OK
NEXT
-
+
ON
LOT NUMBER
OK
NEXT
-
+
ON
LANGUAGE
√ ENGLISH
FRANçAIS
DEUTSCH
ITALIANO
8.6 Lot Number Setup
EN
You can use “+” or “-” buttons to set the
input of Patient ID ON or OFF.
If you set the Patient ID ON, the meter will
prompt you to input the Patient ID before you
process a patient test.
Press “Next” button to enter the QC Lockout
Setup interface. Press “OK” button to return
to main menu.
You can press the functional “+” and “-”
buttons to enable or disable the LOT
NUMBER input function. If the LOT NUMBER
input function is enabled, you will be asked
to enter the Lot Number before performing
each test. The Lot Number contains the
expiration date of the strip or liquid control.
The meter will check whether the strip is
expired. If it is expired, the meter will report
an error.
NOTE: Please make sure the date setting is correct if you want to use the
input function of LOT NUMBER.
8.7 Selecting Language
You can use right button “ ” or left button
“ ” to select desired language and then
press “OK” button to return to main menu.
NOTE:
• The language option may be different, depending on the software
conguration.
13

9. Perform a Test
SET MEM
OFF
VER
PATIENT ID
ON
PATIENT ID
ON
9.1 Entering Test Mode
When the qLabs® Vet is turned on by
pressing the “OK” button, the display screen
will prompt the user to insert a test strip. Go
to Section 9.2 for test strip insertion.
When the qLabs® Vet is turned on by
inserting a new test strip, the display screen
will prompt the user to enter patient ID or
enter the strip code if patient ID function is
turned off.
EN
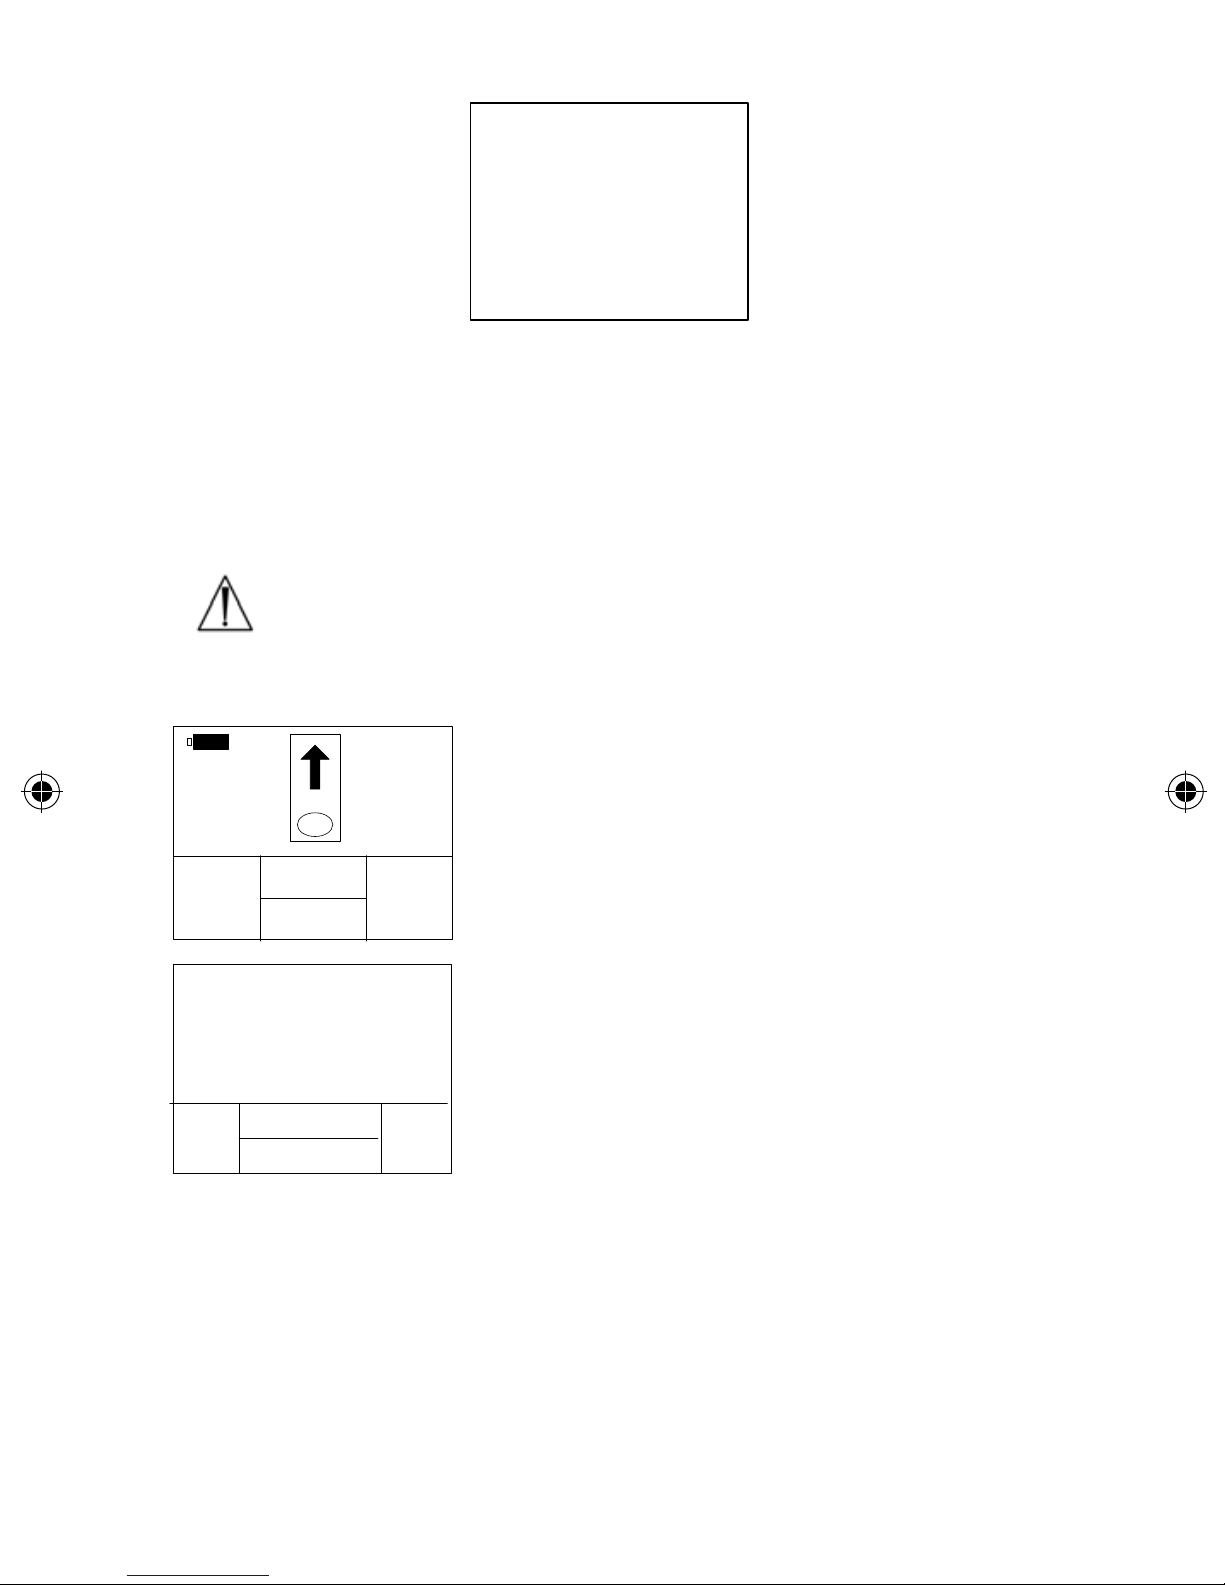
9.2 Insert a Test Strip
Remove a fresh test strip from its foil pouch.
Insert the strip into the test strip guide.
The following two observations indicate that
you inserted the strip correctly:
1) The electrode leads go in rst.
2) You can read test strip name clearly on
the end of strip, left to right.
If the input of patient ID is set to ON, go to Section 9.3 for entering the
patient ID; otherwise, jump directly to Section 9.5 for entering the strip code.
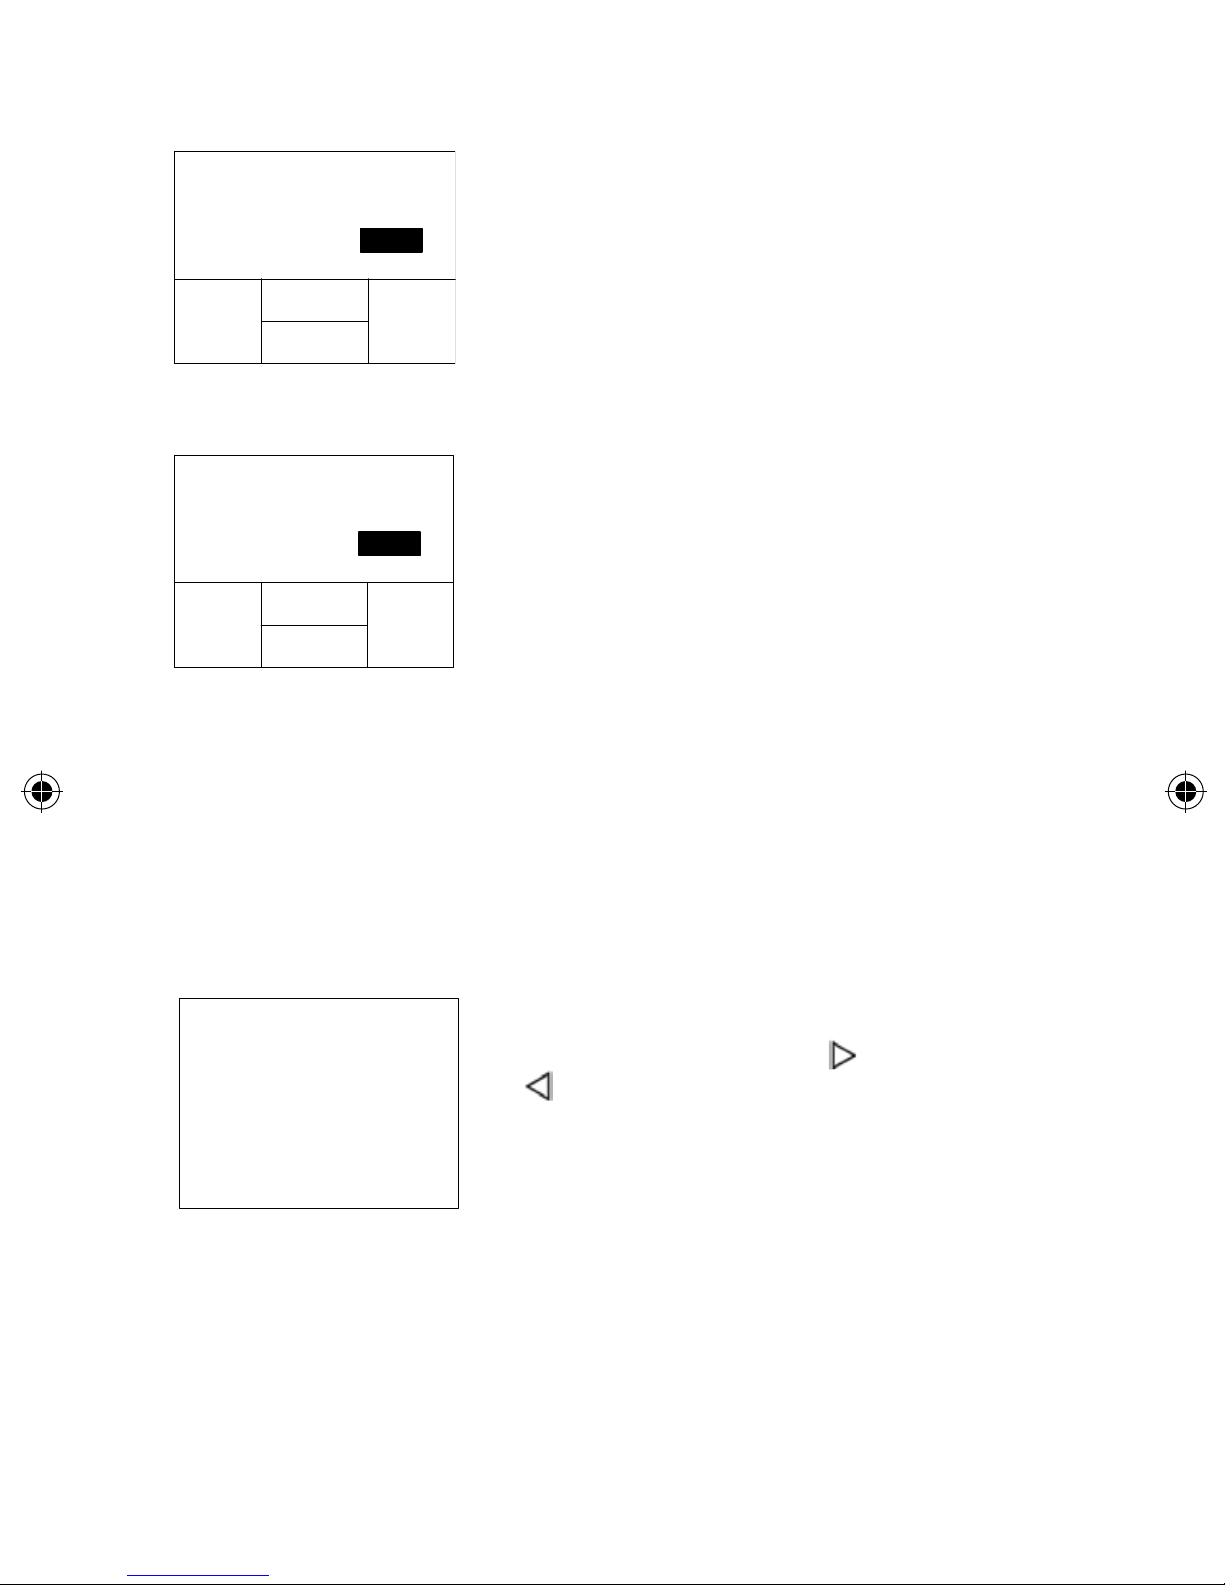
9.3 Entering the Patient ID
The Patient ID can be composed of numbers
or letters, with a length of no more than 16
digits.
Press “
or press “ ” to input Patient ID via barcode
scanner.
” to manually input the Patient ID
14

9.3.1 Manual Input
PATIENT ID
NEXT
OK
-
+
----------
A000
-
PATIENT ID
OK
NEXT
ON
0123456789
SPP:
OK
-
+
√ CANINE
FELINE
OTHER
Use “+” and “-” buttons to change the
highlighted digit. Press “NEXT” button to
accept and advance to next digit.
If the input of the Patient ID is completed,
press “OK” button to accept.
9.3.2 Auto Scan
In the Patient ID INPUT/SCAN interface, press “SCAN” and scan the
patient barcode from a distance of approx. 15cm (6 inches).
The meter beeps once the barcode has been read successfully. The
barcode information appears in the CONFIRM interface.
If a barcode is not scanned, the scanner turns off after 10 seconds.
ENEN
Do not stare directly at the laser beam.
9.4 Conrming the Patient ID
If the Patient ID is entered correctly, press
“OK” button to conrm.
Otherwise, press “
Section 9.3 until all numbers are correctly
entered.
9.5 Selecting the Species
” or “ ” to repeat
Use “+” and “-” buttons to switch highlighted
item in the species list. Select the species
you are testing. Press ”OK” to conform.
15

9.6 Entering the Strip Code and Lot Number (if enabled)
STRIP CODE
OK
ON
PT/APTT
471213408
LOT : 3052E0503
STRIP CODE
OK
NEXT
ON
PT/APTT
P
471213408
LOT: 3052E0503
-
+
STRIP CODE
OK
NEXT
ON
PT/APTT
P
471213408
LOT: 3052E0503
-
+
EN
NOTES:
• If the Lot Number Input function is enabled, you will be asked to
input the strip code and the lot number; otherwise, you just need to
input the lot number.
• The Strip Code contains information of the type of test. After
you entered the Strip Code, the test name will be recognized
automatically and displayed on the screen.
• A different type of test may have different length of code. Make sure
both the length and each digit are exactly the same with those on
the pouch.
If the displayed strip code and lot number
(if enabled) match those on the strip pouch,
press “OK” button to conrm. Otherwise, you
can use “
or use “ ” to enter the code via barcode
scanner. Press “OK” button to conrm the
code after the strip code is correctly entered.
” to manually input the strip code
9.6.1 Manual Input
To change numbers more quickly, hold down the functional “+” and “-”
buttons.
Use “+” and “-” buttons to change the rst
digit highlighted.
Press “NEXT” button to accept and advance
to next digit.
16

9.6.2 Auto Scan
EXPIRED STRIP!
OK
HEATING
ADD BLOOD
User can also use the built-in barcode
scanner to scan the strip code on the pouch.
9.7 After Conrming the Code
If you input the lot number, the meter will
automatically check whether the strip is
expried after conrming the code is correctly
entered. If it is expired, an error will be
reported. As a result, you need to use strips
within the expiration date to perform the test.
If you didn’t input the lot number, the meter
will skip the expiration date inspection and
start the test directly.
ENEN
9.8 Heating Up
9.9 Collecting a Sample
After the heating is complete, collect whole blood samples and run test.
Refer to the test strip insert for detailed sample collecting procedures.
After conrming the code, the qLabs® Vet will
heat up automatically for the test.
When qLabs® Vet is ready for sample testing,
it will beep and prompt the user to apply a
blood sample.
17

NOTE:
TESTING
67s
ADD BLOOD
120s
• To avoid mechanical hemolysis of the blood sample,
nonheparinized syringe with 21 gauge needle or larger is highly
recommended.
• Since the interstitial uid (thromboplastin) will accelerate the clotting
process, vascular puncture action is preferably a one-time action so
as to minimize the interstitial uid from entering into the blood sample.
• Excitement of the patient should be minimized when collecting the
sample. The clotting reaction and test results will be affected when
the patient is extremely exciting. Sedatives and analgesics can also
affect the blood clotting process.
• When collecting the sample, follow the guidelines and procedures
for blood collection as instructed by the veterinary clinic.
9.10 Performing the Test
Disuse the rst drop of blood needle disuse, then apply a total of about
10-20 microliter blood sample to sample well of the strip.
Make sure to apply the blood sample directly on the sample well of the
strip. DO NOT move the qLabs
®
Vet while adding the blood to the strip.
EN
NOTES:
• There is a 10 minutes time limit for the user to apply the blood sample.
When the time limit is reached, the qLabs® Vet will display an error code.
After the blood sample is added, the qLabs®
Vet will perform the test automatically.
If insufcient blood sample is added, the
qLabs® Vet will not begin its testing and will
continue to prompt the user to add blood
sample.
18

21.6
AP TT
8.2
PT
PID0002
-
+
When testing is complete, the qLabs® Vet
CODE: 471213408
LOT: 3052E0503
01/05/2014 14:30
SET MEM
OFF
VER
will beep and the test results will appear on
the screen along with the patient ID and test
time.
If the test results need to be reported
instantly, press “ ” button to print or
upload the results.
NOTE:
• A qLabs® eStation or qLabs® eCable is needed to support the
upload/print function.
EN
NOTES:
• Test results are automatically stored in the qLabs
including all the information of the test (See Section 10 for reviewing
past results).
• The qLabs
9.11 Results and Explanation
Please read qLabs
of test results.
9.12 Finishing the Test
Remove and discard the used test strip into a sharps or other puncture
proof container. It is recommended to power off the qLabs
full, the new test result will overwrite the oldest test.
®
Vet can store up to 200 test results. If the memory is
®
Vet test strips package inserts for detailed explanation
not in use.
When the “ ” button is pressed, the qLabs®
Vet will prompt the user to remove the test
strip.
®
Vet memory
®
Vet when it is
19

21.6
AP TT
8.2
PT
PID0002
-
+
SET MEM
OFF
VER
EN
Before turning off the meter, press the “ ”
button to return to the test mode.
Remove the test strip from the meter.
To perform another test, please use a fresh
test strip. Please use a different nger for a
new test.
20

SET MEM
OFF
VER
RESULTS
BACK
OK
PATIENT TESTS
QC TESTS
NO RECORD
PT
13.1
-
+
N-1
C1
PT
28.4
C2
EN
10. Reviewing Previous Results
Follow these steps to review previous results that are stored in the meter
memory.
In the Test Mode where the display prompts
the user to insert a test strip. Press “MEM”
button.
Select the type of results you want to view:
Display QC TEST results
Display PATIENT TEST results
10.1 Displaying QC Test Results
The meter stores up to 12 QC results chronologically. The most recent
result is named “N-1”. The least recent result is named “N-12”.
If no results exist, the meter will prompt “NO
RECORD”.
Press the “+” and “-” buttons to switch
between QC result. Press “ ” button to exit.
21

10.2 Displaying Patient Test Results
OK
03/08 a010010001
03/08 a010010013
02/08 a010040215
02/08 a030010005
21.6
AP TT
8.2
PT
PID0002
-
+
CODE: 471213408
LOT: 3052E0503
01/05/2014 14:30
Whenever a test is successfully performed, the result is automatically
stored in the meter memory along with the date of the test. The meter
memory will store up to 200 results.
Press the “á” button to select previous
results. Each page lists four results; use
the functional “â” button to scroll down to
review the next four results.
EN
Press the “
Mode.
Press the “OK” button to view the detailed
information of the selected test including PT,
and/or APTT, QC results, and Patient ID.
Use the “+” and “-” buttons to scroll through
the detailed results.
Press the “
Press the “ ” button to view more detailed
information and operation options.
” button to return to the Test
” button to exit.
10.2.1 Deleting Patient Test Results
Press the “
Use “+” and “-” buttons to toggle between deleting all results or the
current result.
” button to enter “delete setting” interface.
22

8.1
OK
-
+
DELETE
CURRENT
8.1
OK
-
+
DELETE
ALL
Press the “OK” button to conrm or press “ ” button to exit.
DELETED
NO RECORD
2
OK?
If the option to delete the current result is
selected, the “DELETED” symbol will ash on
the display for a short time, the subsequent
results will be displayed.
EN
If the option to delete all results is selected,
the display will show “NO RECORD”.
10.2.2 Printing Patient Test Results
Press the “
NOTE:
”button to enter “print setting” interface.
In print setting interface, press the “ ” and
“ ” to set up the number of test results will
be printed. Press “OK” to conrm printing.
®
eStation is required for printing the test results.
• A qLabs
23

10.2.3 Uploading Patient Test Results
ß
Press the “ ” button to upload the selected
results to the qLabs® Data manager.
EN
24

EN
11. Quality Control
11.1 Onboard QC Test
The qLabs® Vet also measures the clotting time in the Quality Control
(QC) zone of PT or APTT strip. If the QC result fails to fall within a
predetermined range, the qLabs® Vet will display an error code rather than
give a possible erroneous PT or APTT result.
This safety measure guards the user against situations in which the
qLabs
temperatures or humidity (which could happen if the foil pouch is torn or
punctured).
11.2 Liquid QC Test
Micropoint Biotechnologies, Inc. has optional liquid controls for qLabs®
Vet system. The qLabs® PT and APTT liquid controls are used with
qLabs® PT and APTT test strips to verify the qLabs® system performance,
respectively. It is recommended that two levels of liquid controls are used
to perform the test.
The qLabs® PT and APTT liquid controls can be purchased separately
from Micropoint Biotechnologies, Inc. Please refer to the qLabs® PT and
APTT liquid controls package insert for detailed operation instructions.
®
PT or APTT test strip may have been subjected to very high
QC test.
Only use qualied qLabs® PT and APTT Controls for
12. Maintenance
12.1 Care and Cleaning of Your Screen
Follow these steps for cleaning the qLabs Vet:
NOTE:
• No maintenance is required other than routine cleaning.
• Clean display screen with a clean damp cloth. If necessary, a mild
detergent or disinfectant (such as 5% bleach solution or 70%
isopropyl alcohol) may be used.
• Clean the area around the test strip guide with a swab or a pad that
has been dampened with alcohol or 5% bleach solution.
25

12.2 Installing/Replacing Batteries
Follow these steps to install/replace the batteries:
EN
1) Turn the qLabs
®
Vet upside down.
2) Remove the battery cover screw.
3) Remove the battery cover by pressing down on the battery cover
release, remove the old batteries.
4) Replace with 4 standard AA batteries. Follow the direction for
battery placement (+ and – ends) inside the battery compartment.
5) Fasten the battery cover. Tighten the battery cover screw.
NOTE:
• Turning the qLabs
®
Vet off manually when it is not being used will
help conserve the battery power.
• Settings for date, time, and target range will not be saved if
batteries are replaced, though past test results will be saved.
• If storing the Vet for an extended period, completely remove the
batteries before the next use.
Dispose of the batteries in compliance with local regulations.
12.3 Servicing
All servicing and adjustment must be performed by Micropoint
Biotechnologies, Inc.’s service engineers only.
26

13. Troubleshooting
EN
ERROR CODE DISCRIPTION
qLabs® ElectroMeter is
not connected to qLabs
eStation.
The qLabs® eStation is Out of
thermal paper.
NO COAG
The meter did not detect
coagulation.
CORRECTIVE
ACTIONS
®
®
Connect the qLabs
ElectroMeter to the qLabs
eStation properly.
Replace the thermal paper.
Retest with a new strip. If
this error message appears
again, the result must be
checked using another
method.
®
E001 Low battery power.
E002 Heating process timeout.
The ambient temperature is
E003
E004
E005
outside of the operational
temperature range.
Insufcient blood was added
to the sample well.
Internal QC check out of
specications.
Replace batteries or use
power adapter as a power
source.
Turn off the meter and let
it equilibrate at ambient
temperature (10-35°C) for
at least 5 minutes before
performing additional tests.
Move the meter and strip to
a location that is within the
operational range of 10 °C to
35 °C and repeat the test.
Retest with a new strip and
make sure one big drop of
blood is correctly added to
the sample well.
1. Make sure the strip is
within the expiry date.
2. Make sure the Strip Code
is entered correctly.
3. Retest with a new strip.
27

EN
ERROR CODE DISCRIPTION
E006
E008 Barcode scanner error. Restart the meter and retry.
E010 The operation has timed out.
E011
External liquid QC check out
of specications.
You inserted a used test
strip, or you applied a blood
sample to the test strip
before the meter warm-up
was complete.
CORRECTIVE
ACTIONS
1. Make sure the strip and
liquid controls are within
the expiry date.
2. Make sure the Strip Code
is consistent with the
code printed on the liquid
controls vial label.
3. Retest with a new strip.
Please ensure the sample is
added within 2 minute after
the 'add sample' indicator
is ashing
Retest with a new strip. Make
sure to add sample within 2
minutes after the 'add blood'
indicator is ashing.
E013
E014
E02x
The strip is defective or
improperly operated when
adding sample.
The value of HCT may be out
of range 30%-55%.
There is an error when calculating PT or APTT.
Retest using a new strip.
Make sure the operation of
adding sample is exactly
correct according to the user
manual guidance.
Patients with abnormal HCT
value may be recommended
to test the PT and/or APTT
using another method.
Retest with a new strip.
28

14. Symbols
SYMBOLS EXPLANATION SYMBOLS EXPLANATION
EN
Caution. Read
Carefully
Avoid Liquid
Spills
Separate
Collection
Temperature
Limitation
Laser Radiation
Risk
Lot Number
Expiry Date
Fragile
Biological Risk
DO Not Reuse
Manufacturer
Consult
Instructions For
Use
Catalog
Number
Serial Number
29

15. Performance Characteristics &
Product Specications
15.1 Operation Condition
EN
Temperature
Humidity 10% and 90%
Atmospheric Pressure 700 hPa and 1060 hPa
15.2 Product Specications
CPU 32 V1 ColdFire
Display screen 128×96 LCD
Test memory 200 test results
Barcode scanner
Power
between 10ºC and 35ºC (50ºF
and 95ºF)
Laser Class 2, according to EN
60825-1:2007
Battery: 4 X AA batteries
Supply: Input: 110-240 VAC,
50-60 Hz
Output: 7 VDC
Power: 6 W
Size
Weight 154 g (without batteries)
Warranty period 2 years
135mm x 65mm x 34.5mm
(L× W × H)
30

16. Warranty
Use of the qLabs® Vet
EN
The qLabs
®
Vet (the “Meter”) is designed for individual point-of-care
coagulation test. Proper adherence to the instructions in the User’s
Manual and package insert is critical to proper operation.
WARNING: Failure to comply with the user manual could lead to
inaccurate results and incorrect medication dosing which could
result in injury or death.
Limited Warranty
Micropoint Biotechnologies, Inc. guarantees to the original purchaser
of the Meter that the Meter is free from material defects in material and
workmanship for two years from the date of purchase. This warranty does
not guarantee the uninterrupted operation of the meter.
Micropoint Biotechnologies, Inc.’s only liability and purchaser’s only
remedy under this warranty is that during the warranty period Micropoint
Biotechnologies, Inc. shall replace or repair, at no charge, any Meter
component with defects in material or workmanship. MICROPOINT
BIOTECHNOLOGIES, INC. MAKES NO OTHER WARRANTIES
AND EXPRESSLY EXCLUDES ANY IMPLIED WARRANTY OF
MERCHANTABILITY, NONINFRINGEMENT OR FITNESS FOR A
PARTICULAR USE.
The only user serviceable parts of the Meter are the battery, the cleaning
door and the battery door. Tampering with any other portion of the Meter,
abusing the Meter or using the Meter in a manner inconsistent with its
user manual will void this warranty. This warranty does not apply to any
component that is damaged by improper storage or accident or that is
subject to alteration, misuse, tampering or abuse. Before returning any
defective components, you must obtain a “Return Material Authorization”
number and return instructions from Micropoint Biotechnologies, Inc.
Technical Support by calling +86 755 86296766.
MICROPOINT BIOTECHNOLOGIES, INC. ENTIRE LIABILITY IN
CONNECTION WITH THE METER, REGARDLESS OF THE LEGAL
OR EQUITABLE BASIS OF ANY CLAIM, IS LIMITED TO THE
PURCHASE PRICE OF THE METER. IN NO EVENT WILL MICROPOINT
BIOTECHNOLOGIES, INC. BE LIABLE FOR ANY INCIDENTAL, INDIRECT,
SPECIAL, CONSEQUENTIAL, OR PUNITIVE LOSS OR DAMAGES IN ANY
WAY RELATED TO THE METER, OR ANY THIRD PARTY CLAIMS, EVEN
31

EN
IF MICROPOINT BIOTECHNOLOGIES, INC. OR ITS DISTRIBUTORS ARE
AWARE OF THE POSSIBILITY OF SUCH CLAIM OR DAMAGES AND
NOTWITHSTANDING THE ESSENTIAL PURPOSE OF ANY REMEDY.
32

17. Contact Address and phone
number
Customer Service and Technical Support
Available 8:30 AM to 5:30 PM (Beijing Standard Time), Monday-Friday.
Tel: +86 755 86296766
Micropoint Biotechnologies, Inc.
6F, No.3, Industry 5 Road, Shekou,
Shenzhen, Guangdong 518067, China
Tel: +86 755 86296766
Fax: +86 755 86673903
www.micropointbio.com
EN
33

qLabsqLabs
®
Micropoint Biotechnologies, Inc.
6F, No. 3, Industry 5 Road
Shekou, Shenzhen, Guangdong
Tel. : +86 755 86296766
Fax : +86 755 86673903
E-mail : info@micropointbio.com
www. micropointbio.com
©2014 Micropoint Biotechnologies, Inc. All rights reserved. Printed in China.
®
qLabs
and Micropoint® are registered trademarks of Micropoint Bioscience, Inc.
China, 518067
P/N MP400401 Rev. A4
 Loading...