

Page 1

User Guide
VoIP Telephone
Model No.: SP5101
Website: http://www.micronet.info
0
Page 2

TABLE OF CONTENTS
1. INTRODUCTION.....................................................5
1.1 Packet Content............................................................................................... 5
1.2 Key Features .................................................................................................. 5
2. GENERAL DEFINITIONS.......................................6
2.1 Telephone appearance .................................................................................. 6
2.2 Key Definition.................................................................................................8
2.3 Keys with “123” number mode..................................................................... 9
2.4 Keys with “ABC” character mode .............................................................. 11
2.5 Keys with “abc” character mode................................................................ 12
2.6 Menu keys..................................................................................................... 13
2.7 LCD Display..................................................................................................13
2.7.1 LCD Display in initializing mode.....................................................................13
2.7.2 LCD Display in IDLE state................................................................................13
2.7.3 LCD Display in OFF-HOOK state.....................................................................14
2.7.4 LCD Display in DISCONNECTED state...........................................................14
2.7.5 LCD Display for RINGING state.......................................................................14
2.7.6 LCD Display for DIALING state........................................................................14
2.7.7 LCD Display for Incoming Call state...............................................................15
2.7.8 LCD Display in CONNECTED state.................................................................15
2.7.9 LCD Display in Call Waiting state....................................................................15
2.7.10 LCD Display for firmware upgrading mod......................................................16
2.7.11 LCD Display for saving and rebooting mode.................................................16
2.7.12 LCD Display for edit mode...............................................................................16
2.8 Editing Display............................................................................................. 17
2.9 LED Display.................................................................................................. 18
3. LCD MENU OPERATION .....................................20
3.1 Call Records................................................................................................. 20
3.1.1 Received............................................................................................................21
1
Page 3

3.1.2 Dialed Calls .......................................................................................................22
3.1.3 Missed ...............................................................................................................22
3.1.4 Delete All ...........................................................................................................23
3.2 Phone Book.................................................................................................. 23
3.2.1 New Entry..........................................................................................................23
3.2.2 View Entry .........................................................................................................24
3.2.3 Search Entry......................................................................................................25
3.2.4 Memory Check..................................................................................................25
3.3 Networking Setting ...................................................................................... 26
3.3.1 IP Mode..............................................................................................................26
3.3.2 IP Address.........................................................................................................26
3.3.3 Net Mask............................................................................................................27
3.3.4 Default GW ........................................................................................................27
3.3.5 DNS Setting.......................................................................................................27
3.3.6 PPPoE................................................................................................................28
3.3.7 SNTP..................................................................................................................28
3.4 SIP setting .................................................................................................... 29
3.4.1 Proxy Setting.....................................................................................................29
3.4.2 User Setting.......................................................................................................30
3.5 Phone Setting............................................................................................... 31
3.5.1 Alarm Setting ....................................................................................................32
3.5.2 Ring Setting.......................................................................................................33
3.6 Mail Box........................................................................................................ 34
3.6.1 Information........................................................................................................34
3.6.2 MailBox No........................................................................................................34
3.6.3 MailBox Key ......................................................................................................34
3.6.4 Voice Mail Dial...................................................................................................34
3.7 Function Keys .............................................................................................. 34
3.7.1 New Entry..........................................................................................................35
3.7.2 From PhoneBook..............................................................................................35
3.7.3 View Entry .........................................................................................................35
3.8 Reboot........................................................................................................... 35
4. BASIC FUNCTION................................................36
4.1 Power on and initialization..........................................................................36
2
Page 4

4.2 Making Calls................................................................................................. 36
4.2.1 OFF-HOOK Dialing............................................................................................36
4.2.2 Redial (OFF-HOOK Dialing) .............................................................................36
4.2.3 Pre-Dial..............................................................................................................36
4.2.4 Redial (ON-HOOK Dialing)...............................................................................37
4.2.5 Dial during connected......................................................................................37
4.2.6 Memory Dial ......................................................................................................37
4.3 Answer Calls ................................................................................................ 37
4.3.1 Answer the call in the ringing state................................................................37
4.3.2 Answer the call in the connect state...............................................................37
4.4 Hold and Retrieve Calls............................................................................... 38
4.5 Transfer......................................................................................................... 38
4.5.1 Consultant Transfer..........................................................................................38
4.5.2 Blind Transfer....................................................................................................38
4.6 Conference................................................................................................... 39
5. WEB ADMINISTRA TION ......................................40
5.1 Factory Default.............................................................................................40
5.2 Configuring the SIP Phone through Web Pages....................................... 40
5.3 Installation Wizard ....................................................................................... 44
5.4 Advanced Configuration ............................................................................. 47
5.4.1 Network Configuration.....................................................................................47
5.4.2 SIP Configuration .............................................................................................52
5.4.3 System Configuration ......................................................................................53
5.4.4 Number Configuration...................................................................................... 55
5.4.5 Media Configuration.........................................................................................58
5.4.6 Device Management.........................................................................................62
5.5 System Status .............................................................................................. 66
5.5.1 Network Status..................................................................................................66
5.5.2 Version Information:.........................................................................................67
5.6 Reboot........................................................................................................... 68
6. TELNET COMMAND LINES.................................69
6.1 [help] command........................................................................................... 70
6.2 [quit] command............................................................................................ 70
3
Page 5

6.3 [debug] command........................................................................................ 71
6.4 [reboot] command ....................................................................................... 71
6.5 [pbook] command........................................................................................ 71
6.6 [commit] command...................................................................................... 72
6.7 [ping] command........................................................................................... 72
6.8 [time] command........................................................................................... 72
6.9 [ifaddr] command......................................................................................... 73
6.10 [pppoe] command........................................................................................ 74
6.11 [flash] command .......................................................................................... 75
6.12 [sysconf] command..................................................................................... 76
6.13 [sip] command ............................................................................................. 77
6.14 [security] command..................................................................................... 78
6.15 [line] command ............................................................................................ 79
6.15.1 Busy Forward ....................................................................................................79
6.15.2 No Response.....................................................................................................79
6.15.3 Unconditional....................................................................................................79
6.16 [voice] command ......................................................................................... 80
6.17 [phone] command........................................................................................ 80
6.18 [tos] command............................................................................................. 81
6.19 [prefix] command......................................................................................... 82
6.20 [rom] command............................................................................................ 83
6.21 [auth] command........................................................................................... 84
6.22 [passwd] command...................................................................................... 85
4
Page 6

1. INTRODUCTION
The Micronet SP5101 VoIP desktop telephone highly integrates DSP/codec
system-on-chip solutions to provide the industry’s highest voice quality.
For ease-of-use functionality, SP5101 provides well compatibility with many
well-known IP-PBX, and many user-friendly feature buttons of conference, call
pick up, transfer, Redial, Hold …etc. The simple operation and configuration
are most suitable for residential, SOHO, and enterprise applications.
1.1 Packet Content
Before you start installing the device, verify the following items are in the
package:
● SP5101 IP Telephone
● Quick Installation Guide
● User’s Manual CD
● Power adapter
1.2 Key Features
● Compliant with IETF SIP standards
● Support G.711A/µ-law and G.729 codecs
● Well compatibility with well-known IP-PBX (Micronet SP5211, Asterisk,
Siemens, Alcatel, Lucent and NEC)
● Rich call features
DND (Do Not Disturb)
Call waiting
Call Conference (3-way)
Call hold / retrieve
Call forward (Busy, No-Answer and Unconditional)
Call transfer (attended / unattended )
Call pickup
● User-friendly function buttons
● Call details list and message waiting indicator
● Support outbound proxy and STUN for NAT traversal
● Support QoS to ensure voice quality
● Cost-effective, suitable for pure VoIP environment
5
Page 7
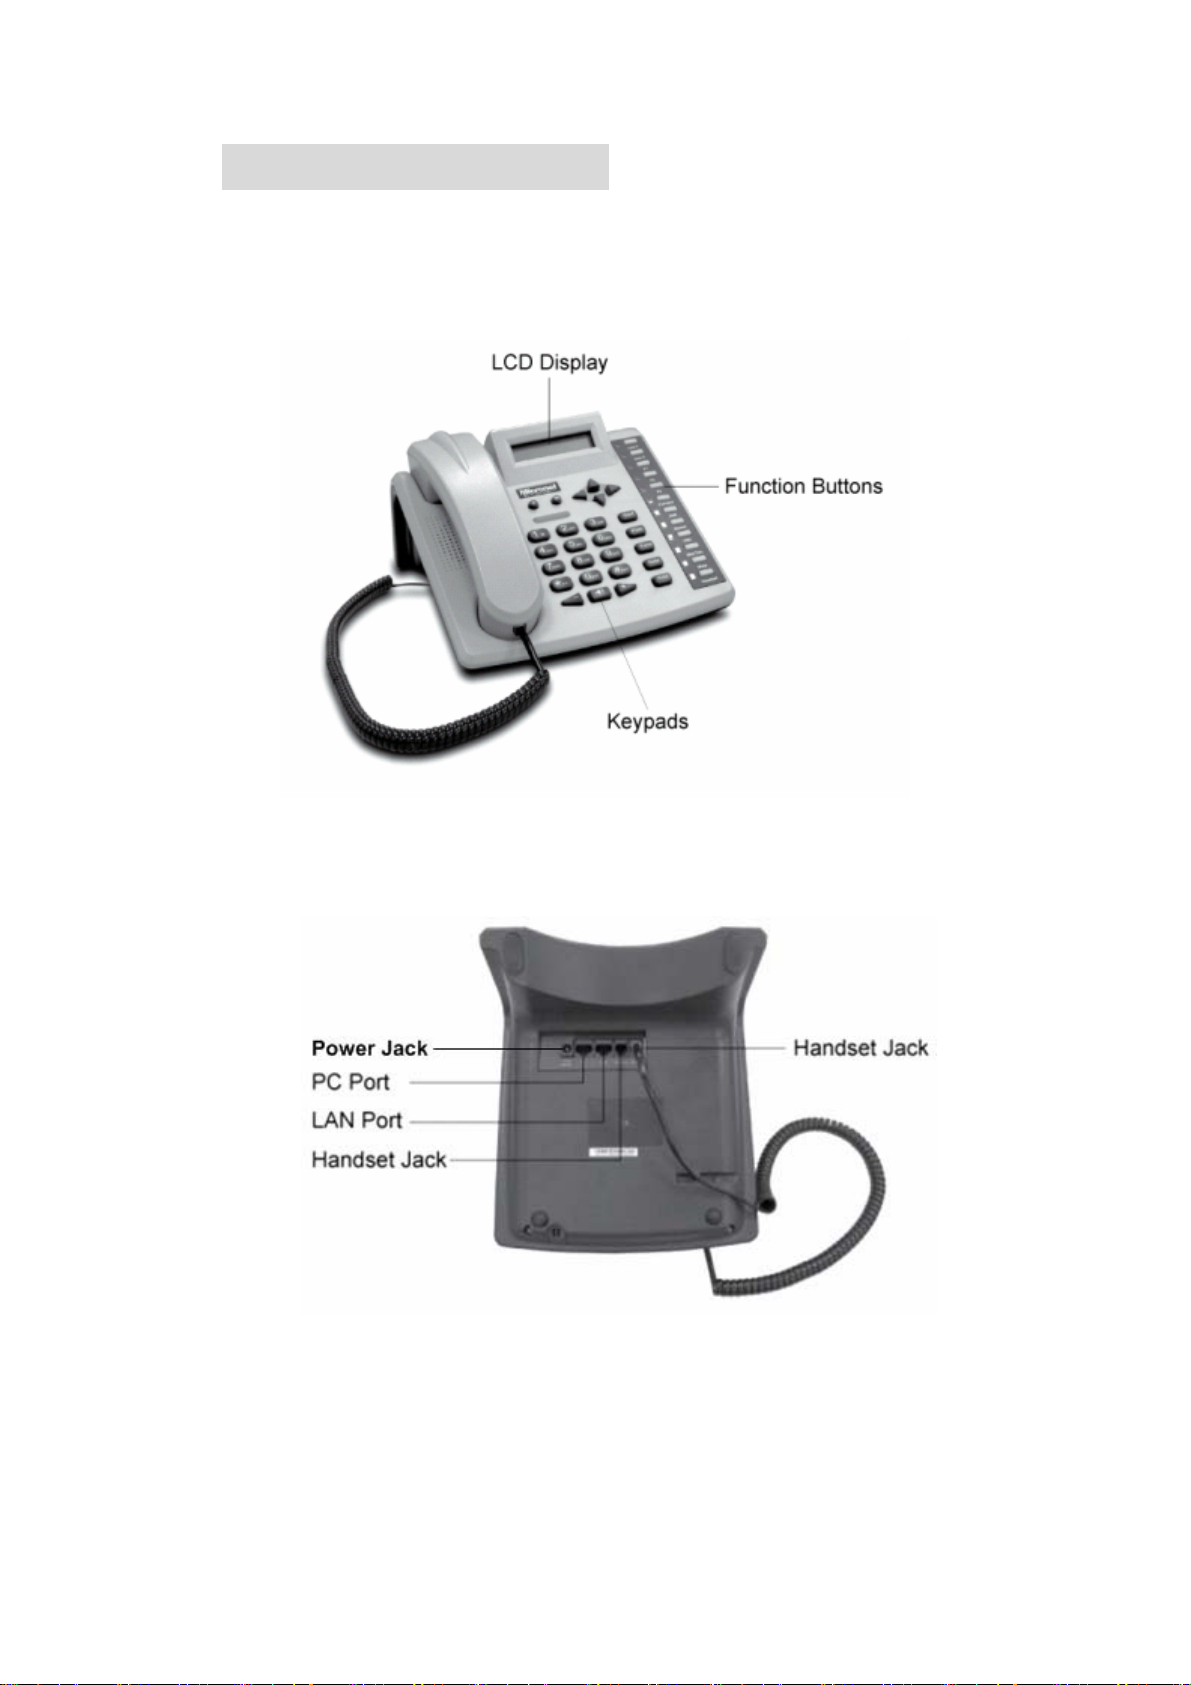
2. General Definitions
2.1 T elephone appearance
Front View
Bottom shell
6
Page 8

7
Page 9

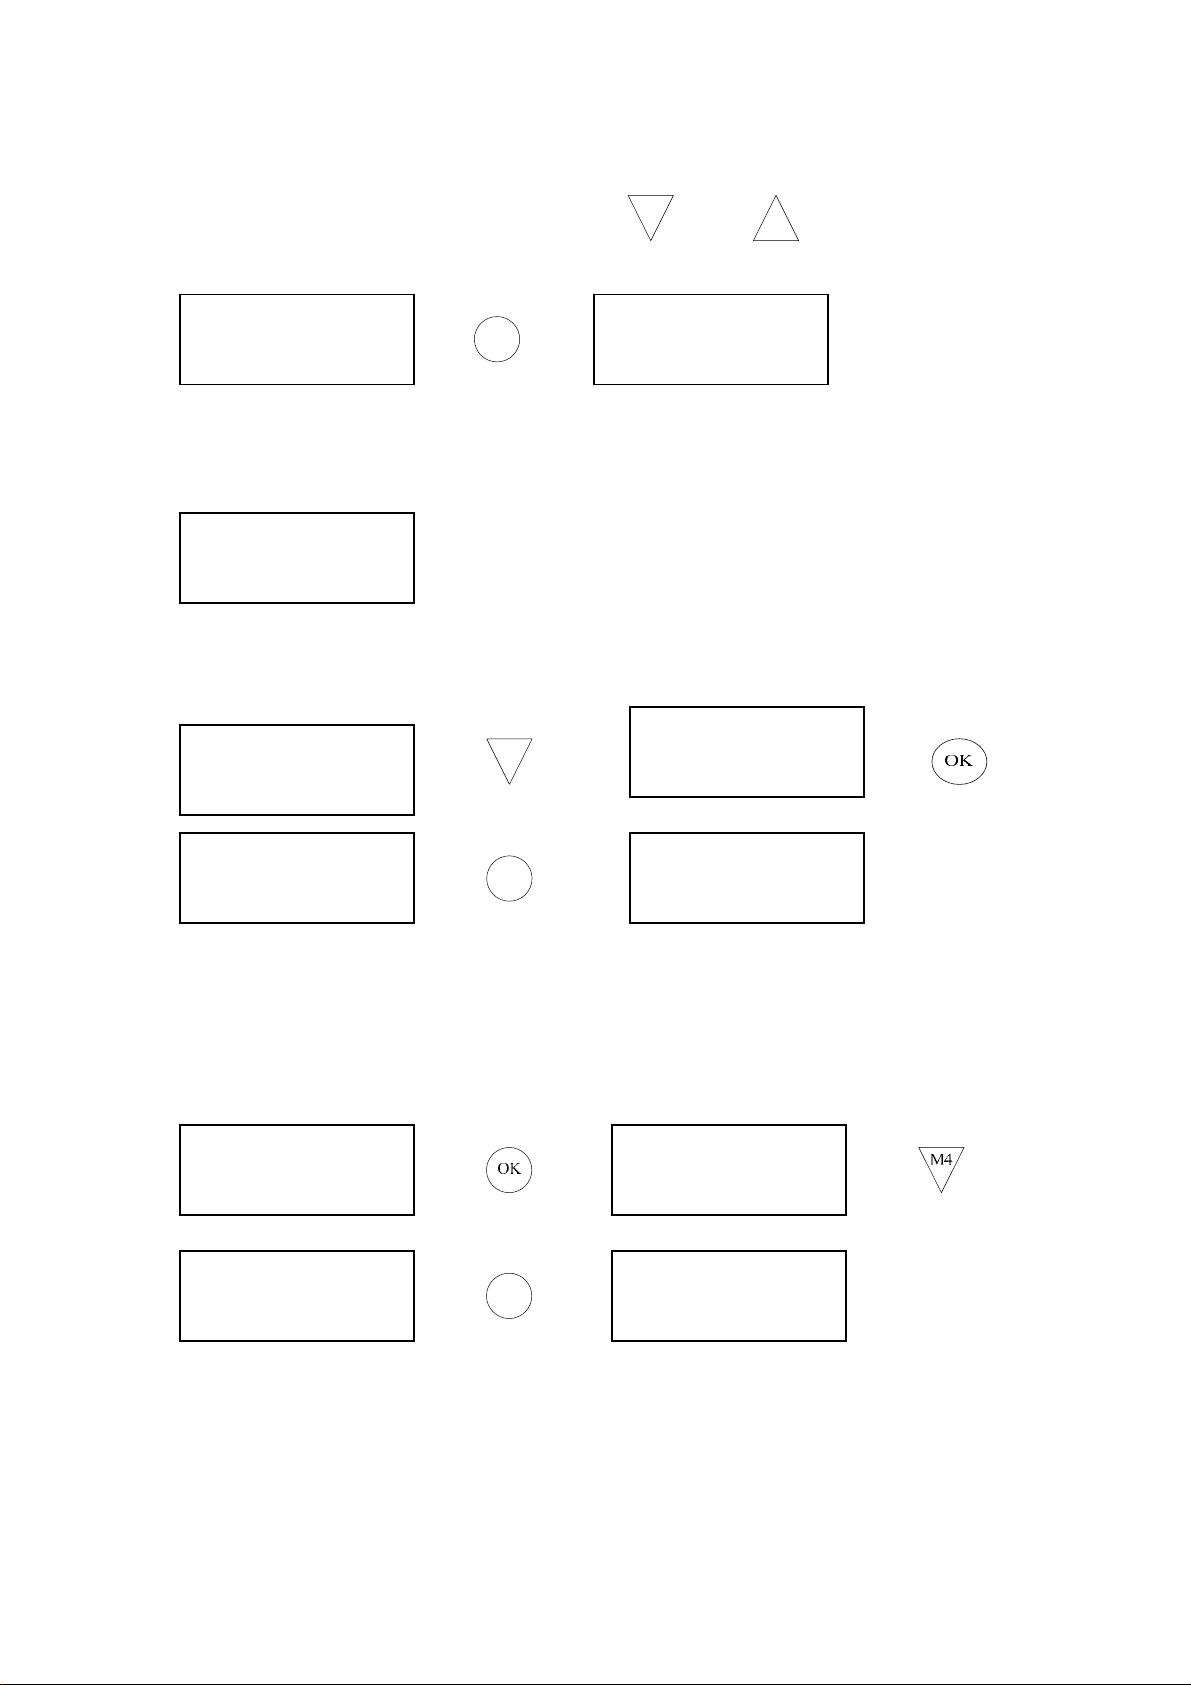
2.2 Key Definition
NO KEYPAD FUNCTION
1. Press this key to confirm a menu selection, a setting,
or a phone entry.
1 OK
2. When in menu mode, pressing this key will select the
menu selection highlighted.
3. When entering phone setting or menu selection
entry, pressing this key will confirm the entry.
2 C
3
4
5
M1
M2
M3
M4
1. Cancel for the menu setting or number typing.
2. Reject the incoming calls
Adjust the volume
Adjust the volume
Speaking without picking up handset
UP arrow key
Left arrow and return key for the menu setting
1. Right arrow
2. Enter key for the menu setting
1. Down arrow key
2. Enter Phone Book directory
K1 Line1
K2 Line2
K3 F1
K4 F2
K5 F3
K6 Forward
Line1 switch key
Line2 switch key
Memory key 1
Memory key 2
Memory key 3
Direct forward
8
Page 10

NO KEYPAD FUNCTION
K7 DND
K8 Missed
K9 VMS
K10 Blind Tran
K11 Mute
K12 Headset
K13 Conf
K14 Pick
K15 Trans
K16 Redial
K17 Hold
DND
Missed calls
Voice Mail
Blind transfer
Mute
Headset mode switch
Conference
Call Pickup
Transfer
Redial
Call hold / Call retrieve
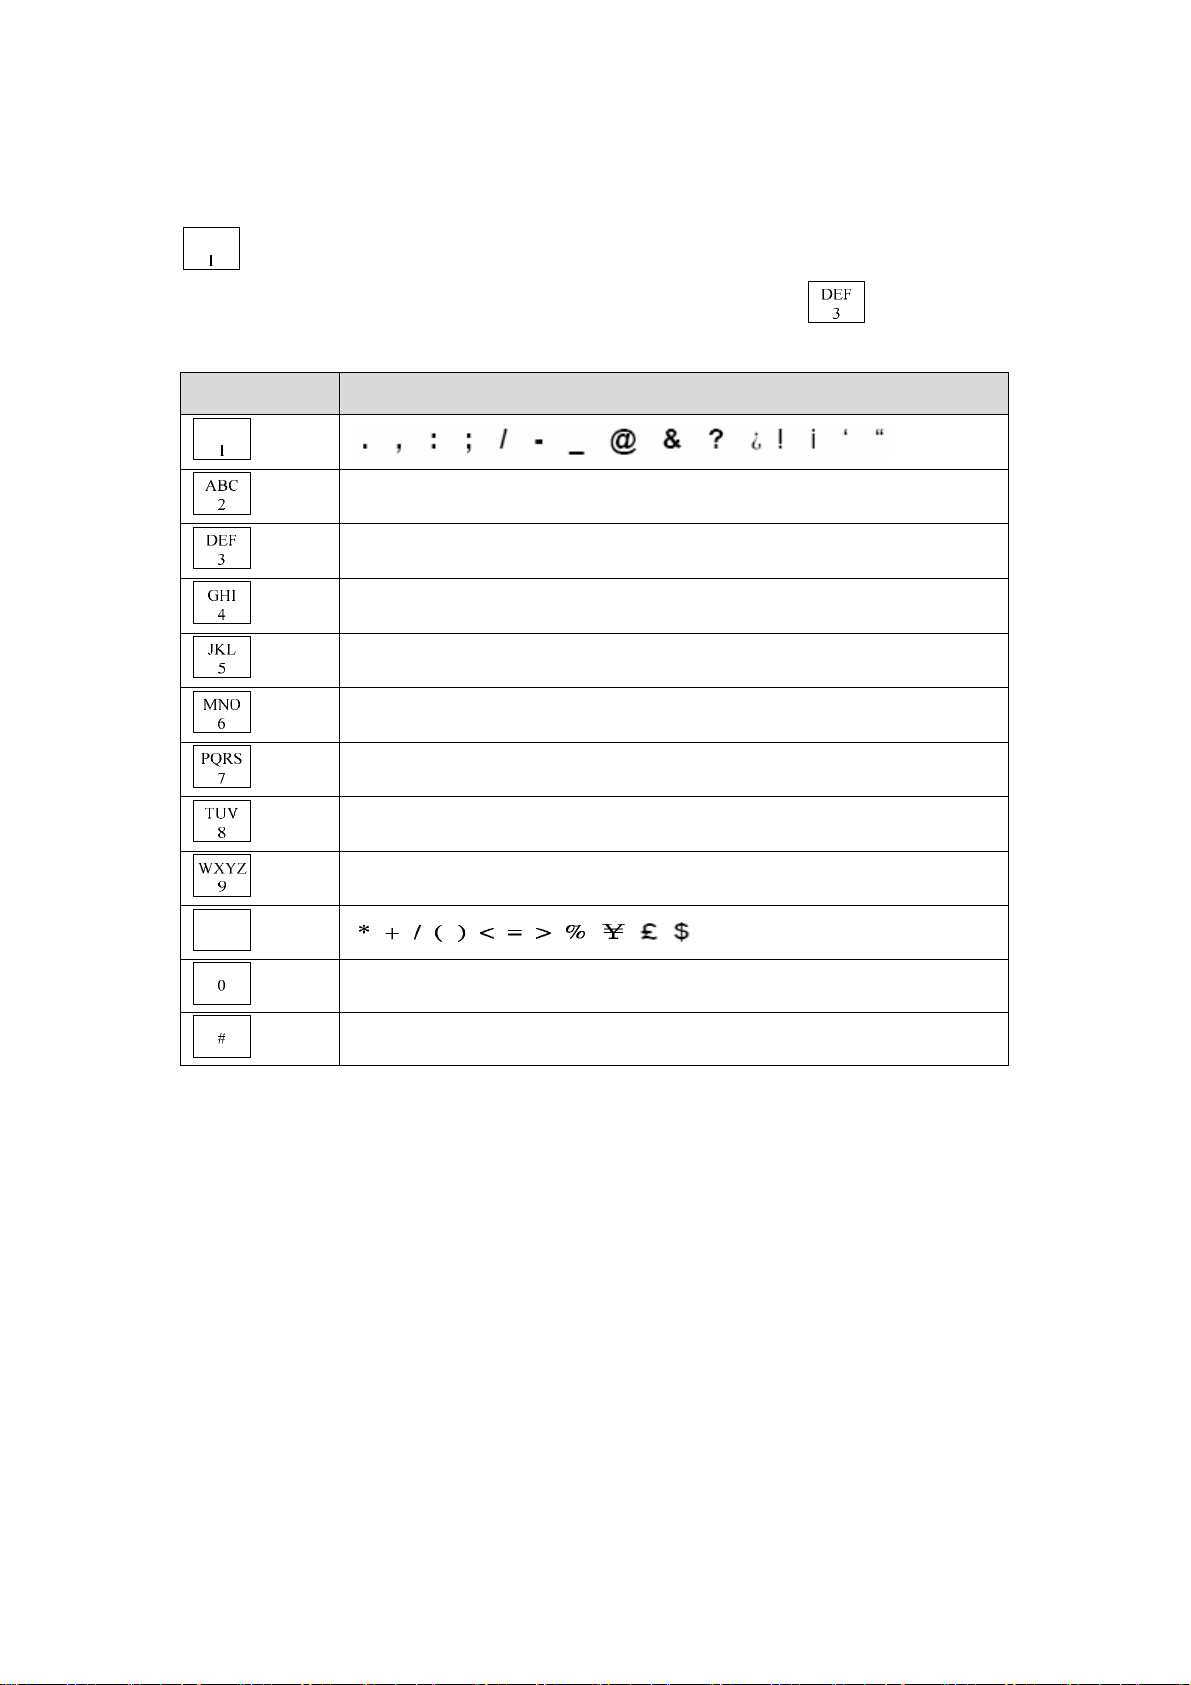
This phone could support three methods for the text input, such like this: “123”,
“ABC”, “abc”. “123” is for the number inputs, “ABC” is for the uppercase
character inputs; “abc” is for the lowercase character inputs.
User could press the button to exchange these three methods.
2.3 Keys with “123” number mode
Users could only enter the digits in the “123” mode as following:
Key Numbers in “123” input method
S33
S30
S28
S32
S23
1
2
3
4
5
S18
6
9
Page 11

7
8
9
*
0
Input method switch key
*
#
S29
S10
S11
S04
S17
S12
10
Page 12
2.4 Keys with “ABC” character mode
Users could enter the characters with the uppercase in this mode. The key
could only input the special symbols and press more times to pick up
the symbols you want. If users press two times on the key , the input
character will be E.
Key Characters with uppercase in “ABC” input method
*
S33
S30
S28
S32
S23
S18
S29
S10
S11
S04
S17
A B C
D E F
G H I
J K L
M N O
P Q R S
T U V
W X Y Z
Space
S12
Input method switch key
11
Page 13
2.5 Keys with “abc” character mode
Users could enter the characters with the uppercase in this mode. The key
could only input the special symbols and press more times to pick up
the symbols you want. If users press two times on the key , the input
character will be e.
Key
Characters with uppercase in “ABC” input method
*
S33
S30
S28
S32
S23
S18
S29
S10
S11
S04
S17
a b c
d e f
g h i
j k l
m n o
p q r s
t u v
w x y z
Space
S12
Input method switch key
12
Page 14
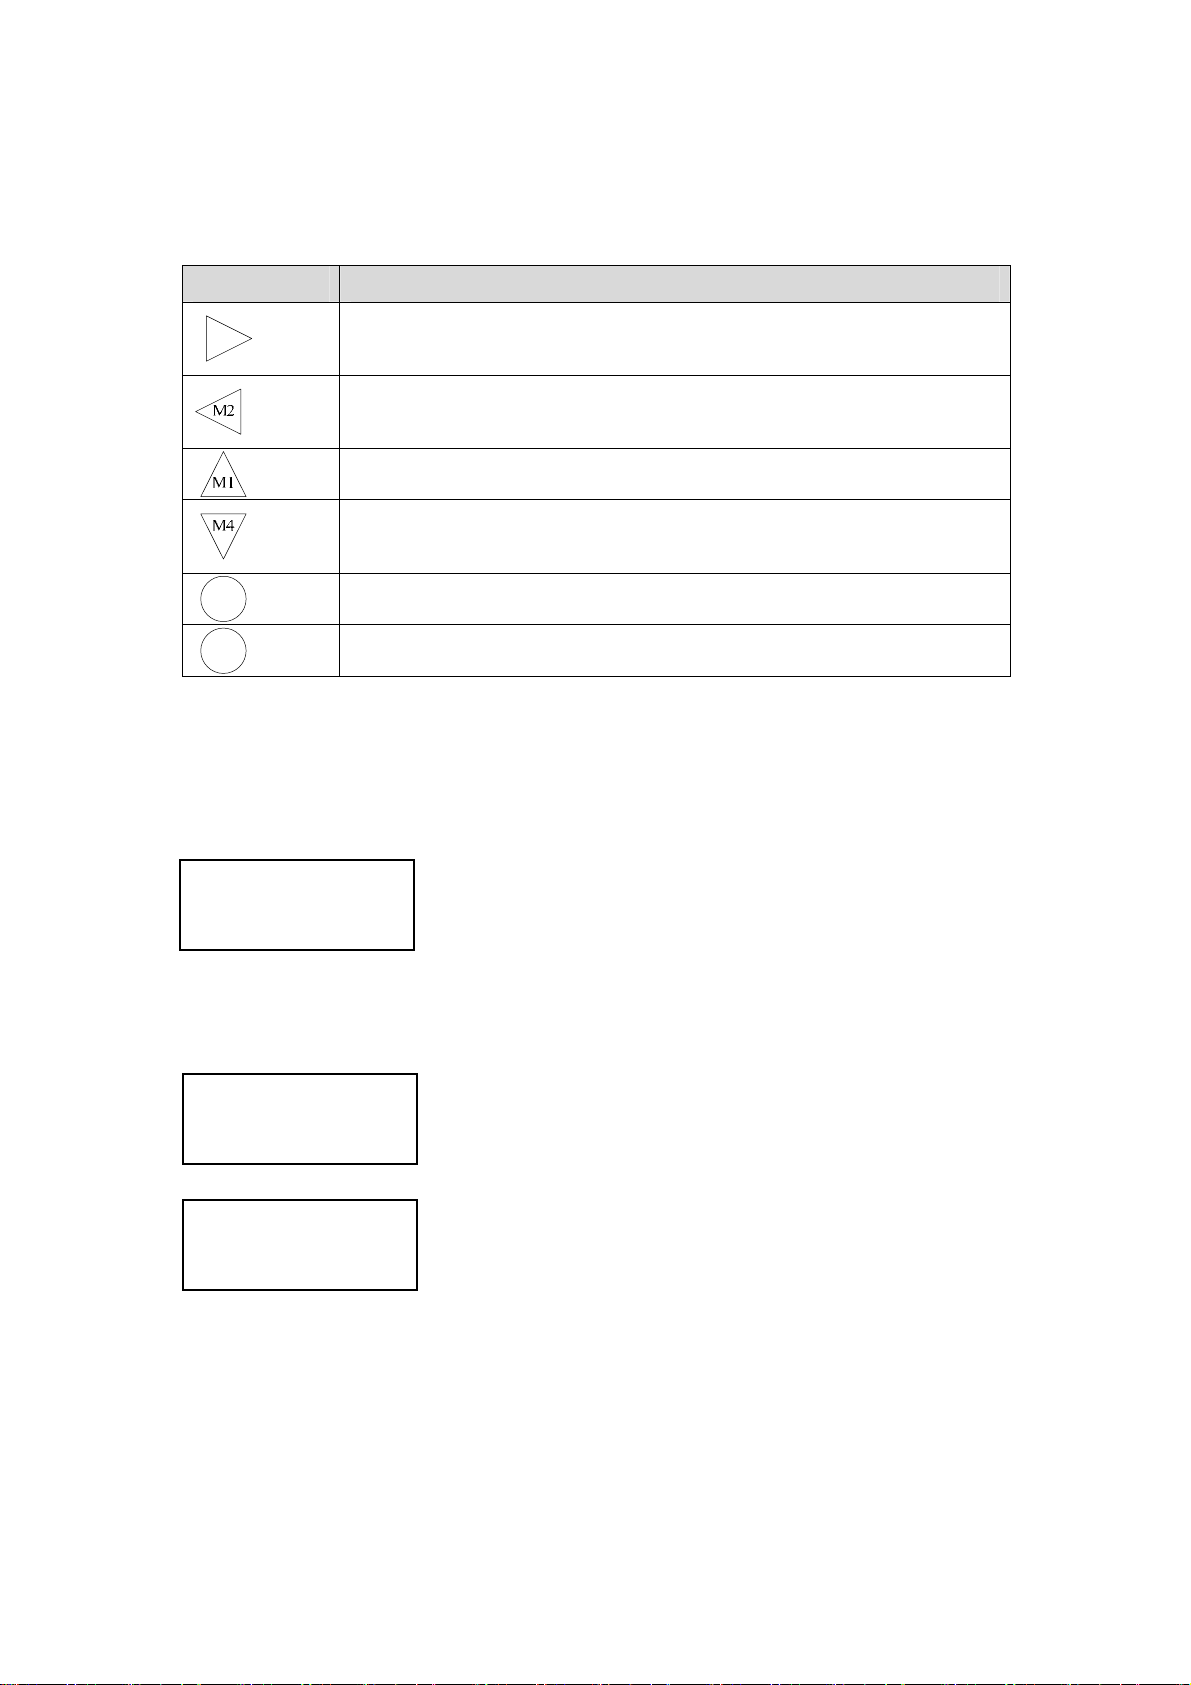
2.6 Menu keys
There are four keys to help users enter, exit or pick up the configuration tables
for changing. Please check out the following info:
Key
M3
OK
C
Functions descriptions
Press the right arrow key in the IDLE mode to enter the main
menu.
Press the left arrow key will help users to return the original table or
exit the main menu
Press the up arrow key to scroll up configuration items.
1. Press the down arrow key to scroll down configuration items.
2. Enter Phone Book directory.
Enter the selected configuration table.
Return to the original table or exit the main menu key.
2.7 LCD Display
2.7.1 LCD Display in initializing mode
1970/01/01 00:00
Initializing…
Status during the system initializing
2.7.2 LCD Display in IDLE state
2006/05/10 10:10
SipPhone SP5101
2006/05/10 10:10
Register Fail
Displaying in the IDLE mode while the network and
registration were ok. (User can change display name
from SIP configuration)
Registrations fail during the IDLE mode
13
Page 15

2.7.3 LCD Display in OFF-HOOK state
2006/05/10 10:10
Network Fail
Line 1 Dial…
Line 2 Dial…
Network fail during the IDLE mode (WAN port
detection or get IP failed with DHCP and PPPoE)1
LCD displaying while the phone was in the OFFHOOK
state.
LCD displaying while the phone was in the OFFHOOK
state.
2.7.4 LCD Display in DISCONNECTED state
2006/05/10 10:10
SipPhone SP5101
After the remote side sends the BYE message,
LPSP5101 will automatically return IDLE state.
2.7.5 LCD Display for RINGING state
Incoming call…
208
Incoming call with the calling name or number
2.7.6 LCD Display for DIALING state
Line 1 Dialing…
9999
Making a outgoing call with the dialed number
Line 2 Dialing…
9999
Making a outgoing call with the dialed number
14
Page 16

2.7.7 LCD Display for Incoming Call state
Jaosn
65605
When it received incoming call, it will show incoming
call display name and Line number
2.7.8 LCD Display in CONNECTED state
Line 1 Talking…
00:00:10
Line 2 Talking…
00:00:10
During the talking state and running the timer
During the talking state and running the timer
Mute…
00:00:10
Transfer…
Hold…
Parking…
In Conference…..
00:10:10
The timer will still go on while the mute function was
enabled during the conversation.
Transfer action during the call.
Hold the established call.
Parking the call.
Enable the conference function and start the timer
from the beginning.
2.7.9 LCD Display in Call Waiting state
Line 1 Talking.……
65605
Under conversation and LPSP5101 received
incoming call. LCD of LPSP5101 will display incoming
call number.
User can press Line button to pick up call waiting or
15
Page 17

presses C button to reject call waiting.
2.7.10 LCD Display for firmware upgrading mode
Download…
Download…
Writing…
Completed…
Please reboot
Firmware file downloading mode
Writing the firmware after the firmware downloading
Request for the rebooting after the firmware
upgrading
2.7.11 LCD Display for saving and rebooting mode
Saving…
Saving the configurations while users had be changed
Rebooting…
Users reboot this unit from the remote side
Rebooting?
Please Wait…
Request for the keypad pressing to reboot
Users reboot this unit by the keypad pressing
2.7.12 LCD Display for edit mode
The characters and digits were entered from the left to the right side. The
16
Page 18

cursor will be blinking every 500ms just like the example as above:
John
→
John
208
→
208
If the users enter the incorrect info, the LCD will show as following:
Invalid Input…
2.8 Editing Display
a Cursor
Under the characters or digits, the cursor will be displayed and the characters
or digits will be blinking. It was shown as “_” with the LCD showing. Users
could press the right or left arrow keys to make the cursor move to the right or
left side. The blinking time for the on and off will be 500ms.
b Insert the characters or numbers
All the characters and numbers were entered from the left to the right side.
While users enter a new character, the cursor will move to the right side of the
entered character or numbers and wait for the next one.
c Delete the characters or numbers
User could use the cancel key for erasing the entered characters or digits. It
will only erase the characters or digits, which are in the left side of the cursor.
d Rapid delete the characters or numbers
All the info will be dropped while users press the keypad for 3 seconds
and all the entered info will be deleted and exit the edit mode.
e Exit the edit mode
Users could press the keypad for 3 seconds to exit the edit mode during
the editing.
Or move the cursor to the left side of the LCD and without any characters and
numbers; press the cancel key to exit the edit mode.
17
Page 19

2.9 LED Display
While users power on this phone set, all the LED will be lighted up before the
system initializing procedure finished. The function LED will be light while
users press the function keys; and will be blink while users press the function
keys for twice. The following definitions are for the LED:
LED Key Function description
LED1
LED2
K1 LED
K2 LED
K3 LED
K4 LED
K5 LED
K6 LED
K7 LED
K8 LED
K1
1 Flashing for the incoming call.
Flash time : 200ms on; 200ms off
2 Lighting for the OFFHOOK.
1. Flashing for the line holding
Flash time : 500ms on; 500ms off
K2
500ms on; 1000ms off
2. Lighting for the line in use.
K3
K4
K5
Light up while user press this for the speed dial
Light up while user press this for the speed dial
Light up while user press this for the speed dial
1. Light up while user enabled forward function
K6
(unconditional/ No Answer/ Busy).
2. Light off when user diable forward function.
K7
1. Light up while users enable the DND function
2. Off while users disable the DND function
1. Light up while user has missed call.
K8
2. Light Off while users checked out the miss
called records
K9 LED
K10 LED
K11 LED
K12 LED
K9
K
K
K
1. Light up while users have the voice mail
2. Off while users checked out the voice mail
records
Press during communication to do blind transfer.
1. A communicate with B→Blind Tran. + C’s
number→hear nothing (C ring) → Blind transfer
2. A communicate with B→Blind Tran. + C’s
10
number→C Busy → hear special tone then
retrieve B immediately
3. A communicate with B→Blind Tran. + C’s
number (not finished) →Blind Tran. Retrieve
call
1. Light up while users enable the mute
11
2. Off while users cancel the mute
1. Light up when user is using headset mode.
12
2. HEADSET button works the same like
18
Page 20

hook/speaker button. When having incoming
call, press HEADSET button can pick up call
and press again can hang up call.
3. When in communication, press HEADSET
button can switch voice path to headset.
19
Page 21

3. LCD Menu Operation
During the menu operation, there is no cursor for the configuration tables
selecting. The LCD will show just like this:
Users could press the up or down arrow keys to move on different item. This
sign will guide you to choose the configuration tables. In the main menu, it will
exit the menu and back to the IDLE mode if there is no action for 30 seconds.
The LCD menu includes eight tables in the menu tree: Call Records, Phone
Book, Networking setting, SIP setting, Phone setting, Mail Box, Function Keys,
and reboot.
3.1 Call Records
>Call Records
>Phone Book
¾ Received Calls
Call Record List
Dial Out
Detail
Add to Book
Delete
¾ Dialed Calls
Call Record List
Dial Out
Detail
Add to Book
Delete
¾ Missed Calls
Call Record List
Dial Out
Detail
Add to Book
Delete
¾ Delete All
Delete all?
This phone set could support 10 entries for the received / dialed / missed calls.
The sorting will be based on the latest period. If there could be matched with
the phone book, LCD will show the name; or show the number only.
20
Page 22
→
3.1.1 Received
Showing the received calls; pressing the
M4
and
M1
button to check
out the other received calls.
>Received Calls
>Dialed Calls
OK
→
>John
>12345678
The LCD will show as following while there is no any record for the received
calls:
No Records!!
● Dial out
>John
>12345678
→
M4
→
>John
>12345678
→ →
>Dial Out
>Detail
→
OK
→
Line 1 Dialing..
John
● Detail
The Detail will show the date and time for the calls as following:
>John
>12345678
>Dial Out
>Detail
→ →
→
OK
→
>Dial Out
>Detail
2006/05/10
10:10:10
● Add to Phone
→
→
This allow user add the unknown number into the phone book. After the new
21
Page 23
entry added, show all the entries in the phone book to verify by users. If users
press the button, the flow will be just like the actions in the phone book
>John
>12345678
→
→
>Dial Out
>Detail
→
→
>Dial Out
>Detail
Entry name
● Delete
>John
>12345678
>Dial Out
>Detail
>Add to Book
>Delete
→
→
→
→
M4
M4
OK
>Detail
→
>Add to Book
→
OK
→
>Dial Out
→
>Detail
→
→
>Detail
→
>Add to Book
→
M4
→
Delete it?
→
→
OK
→
Delete ok…
→
>12345678
3.1.2 Dialed Calls
All the LCD displaying or actions are as same as the flow of Received. Please
check out the chapter 6.1 for the detail as above.
3.1.3 Missed
All the LCD displaying or actions are as same as the flow of Received. Please
check out the chapter 6.1 for the detail as above.
22
Page 24

3.1.4 Delete All
This will delete all the records of the received, dialed and missed calls.
Delete it?
→
→
Delete ok…
3.2 Phone Book
This phone set could support 90 entries of the phone book. Users could add,
modify, delete, and dial out all the entries in the phone book. If the name and
number had been added in the phone book, the LCD has to show the name if it
is the incoming call.
In the view mode, the name has to be sorted by the characters.
¾ New Entry
Input Name
Input Number
¾ View Entry
Phone Book List
Dial Out
Modify Entry
z Entry Name
z Entry Number
Delete Entry
z Delete it?
Detail
¾ Search Entry
Input Name
Memory Check
3.2.1 New Entry
A Input Name
It could support the number and character typing in this mode.
In the phone book entries, this isn’t permitted for the same name. If users enter
the different number with the same name, the LCD will show as following:
Input Name
Joh
Overwrite Entry?
23
Page 25

This is allowed the same number with the different name. For the name of the
incoming call displaying, the phone set will show up the latest record
configured by users.
This isn’t permitted for the empty info about the name in this mode. If users
press the button without any info for the name, the LCD will show as
following and return to the New Entry table after a few seconds:
Invalid Input…
>New Entry
>View Entry
→
B Input Number
After users enter the valid name for the New Entry, the LCD will show as
following and it only supports the number typing in this mode:
Input Name
John
→
OK
Input Number
→
12345678
After saving the name and number for the new entry, LCD will show up the
exist records:
>123
>ABC
John
3.2.2 View Entry
In this mode, the phone has to sort the name by the characters. The priority of
sorting just like this: Number > Uppercase character > Lowercase character.
>123
>ABC
Bob
alex
jason
24
Page 26

Users could press the button to select the action in the view mode.
If there is no any entry for the phone book, LCD will show the massage as
following:
No Records!!
Dial Out
Press on specific phone book entry, phone will be off-hook and dial out
automatically.
Modify Entry
Here user can modify name and number of existed phone book data.
Delete Entry
Delete it?
→
OK
→
Delete ok…
Detail
Press to see detail name and number of this phone book entry.
3.2.3 Search Entry
This mode could support the numbers or characters typing. If the entered
name couldn’t be matched with the existed records, on LCD will show the first
entry of this phone book.
Input Name
→
OK
→
>ABC
>abc
3.2.4 Memory Check
Phone set could support about 90 entries for the phone book; it will show the
records for the unused and used entries.
25
Page 27

2 Used
88 Free
3.3 Networking Setting
¾ IP Mode
Fixed
DHCP
PPPoE
¾ IP Address
¾ Net Mask
¾ Default GW
¾ DNS Setting
Primary DNS
Second DNS
¾ PPPoE
ID
Password
Reconnect
SNTP
¾ SNTP
Server IP
Time Zone
Mode
3.3.1 IP Mode
M4
Press the
M1
or
button to select the IP mode.
3.3.2 IP Address
Enter IP address for Fixed IP mode. Under this mode can only input digits.
IP Address:
10.1.1.3
26
Page 28

3.3.3 Net Mask
All the operation is just like the IP Address configuring. It will be shown as
following from the LCD:
IP Mask:
255.0.0.0
3.3.4 Default GW
All the operation is just like the IP Address configuring. It will be shown as
following from the LCD:
If users input the invalid value for the IP address, Net Mask or Default Gateway,
LCD will show as following and return to the original setting of this
configuration table:
Default GW:
10.1.1.254
Invalid Input…
3.3.5 DNS Setting
Primary DNS
It supports the number typing in this table only.
Primary DNS:
168.95.192.1
Second DNS
It supports the number typing in this table only.
Second DNS:
168.95.1.1
27
Page 29

3.3.6 PPPoE
ID
It could support the number or character typing in this mode.
User Name:
pppoe
Password
For the protecting policy, LCD will use the asterisk to replace the info showing.
For the password modify displaying, the LCD will clean all the asterisks and
showing the cursor as following:
Password:
*****
Password:
*****
→
OK
Password:
→
Modify?
→
OK
Password:
→
Reconnet
Please press the button
3.3.7 SNTP
>ON
>OFF
Mode
M1
or to enable or disable this function.
Please press the button or to enable or disable this function.
>ON
>OFF
28
Page 30

Server IP
To enter SNTP server IP address. It supports the number typing and Domain
typing.
Server IP:
168.95.195.12
Time Zone
M4
for increasing the zone value.
Pressing the
M1
for decreasing and
The button will save the changed.
Zone:
GMT +8:00
3.4 SIP setting
All the menu operations are as same as the Networking setting.
¾ Proxy Setting
Proxy IP
Proxy Port
OutPx IP
OutPx Port
¾ User Setting
ID
Password
Phone Num
Local Port
3.4.1 Proxy Setting
3.4.1.1. Proxy IP
It could support the number and character typing for the IP or domain.
29
Page 31

Proxy IP:
10.1.1.2
Proxy IP:
proxy.com
3.4.1.2. Proxy Port
Configuring the Proxy port in this table; it could only support the number typing.
The max value is 65535.
Proxy Port:
5060
3.4.1.3. OutPx IP
This is the setting for the Outbound Proxy. It could support the number and
character typing for the IP or domain.
OutPx IP:
10.1.1.2
OutPx IP:
outpx.com
3.4.1.4. OutPx Port
This could only support the number typing only. The max value is 65535
OutPx Port:
5060
3.4.2 User Setting
3.4.2.1. ID
It could support the number or character typing for the ID.
RegID:
100
3.4.2.2. Password
It could support the number or character typing for the ID. LCD will show the
asterisks to replace the password.
RegPwd:
***
For the modify displaying, the LCD will empty the all the asterisks and showing
30
Page 32

the cursor as following:
Password:
***
Password:
→
→
Password:
→
Modify?
→
3.4.2.3. Phone Num
It could support the number typing only.
PhoneNum:
100
3.4.2.4. Local Port
It could support the number typing only and the max value is 65535.
Local Port:
5060
3.5 Phone Setting
¾ Alarm Setting
Add
View All
Del All
¾ Ring Setting
Ringer Volume
Volume 1
Volume 2
Volume 3
Volume 4
Ringer Melody
Melody 1
Melody 2
Melody 3
31
Page 33

3.5.1 Alarm Setting
There are some definitions for the Alarm clock, please check out the detail as
following:
If the alarm clock had been set and the time is up:
z The phone will be ring in the IDLE and MENU state only.
z If the phone isn’t in the IDLE or MENU state, the phone will ring while the
state back to the IDLE or MENU.
z If the state don’t return to the IDLE or MENU for 30 minutes, the clock will
cancel and don’t ring the phone.
z Ringing the phone every 20 seconds.
z For the ringing tone, depends on the ring melody setting.
z Stop ringing until users pick up the phone set or hand free.
3.5.1.1. Add
This phone set could support 3 entries for the Alarm.
If all the three entries had been taken, LCD will show the message as following
and back to the original page:
No Room!! >New Entry
→
OK
→
>View All
If users enter the incorrect month or date, please show the message as
following and back to the original page:
Invalid Input…
→
OK
→
>New Entry
>View All
Switch to the Time setting while users press the button in the Date
setting:
Set Date:
YY/MM/DD
→
OK
→
Set Time:
HH:MM
The entire format for the date and time are as following:
Year: 2000 ~ 2099; Month: 01 ~ 12; Date: 01~31; Hour: 00 ~ 23;
Minute: 00~59
The schedule will be everyday while user didn’t enter the date for the alarm
clock.
The format of the time setting is as following:
32
Page 34

>01 06/01/01 10:20
>02 EveryDay 10:11
3.5.1.2. View All
>01 06/01/01 10:20
>02 EveryDay 10:11
→
M4
→
01 06/01/01 10:20
>>02 EveryDay 10:11
→
→
→
→
3.5.1.3. Del All
Delete All?
>View All
>Delete All
Deleting…
→
OK
→
→
→
>01 06/01/01 10:20
>02 Empty
Deleting…
Del the alarm? >Delete Entry
→
3.5.2 Ring Setting
3.5.2.1. Ringer Volume
There are four levels for the volume adjustment and the default is level 2.
The symbol “>” will point out the current level for this phone set.
M4
Pressing the
and
>Volume 1
>Volume 2
While users stop the selection for 1 second, phone will play the ring to verify
→
M1
button to select the volume level for the ring.
M4
→
33
>Volume 2
>Volume 3
Page 35

the ring volume.
3.5.2.2. Ringer Melody
This phone set could support four types of ring melody.
>Melody 1
>Melody 2
→
M4
→
>Melody 1
>Melody 2
→
OK
→
Saving …
→
>Melody 1
>Melody 2
3.6 Mail Box
¾ Information
¾ MailBox No.
¾ MailBox Key
¾ Voice Mail Dial
3.6.1 Information
If VNS LED lights up, you can view voice mail information from this item.
Below:
Information:
2 new, 1 old
3.6.2 MailBox No.
3.6.3 MailBox Key
3.6.4 Voice Mail Dial
3.7 Function Keys
¾ New Entry
34
Page 36

Input Number
Press the key…
¾ From PhoneBook
Phone Book List
Press the key…
¾ View Entry
Function Key list
F1:
F2:
F3:
Users could configure the Function Keys for the speed dial or special IP-PBX
function. For the function keys configuration, users could input the new number
or select the entries from the Phone Book.
3.7.1 New Entry
Set function key number and key button. User needs to input number
first and then defines which key to match the number.
3.7.2 From PhoneBook
User can define one phone book data to match memory function key,
so that user can press function key to do speed dial.
3.7.3 View Entry
The view mode could only for the entries showing. If users want to
modify the entry, only to add the New Entry or change Phone Book
configurations.
3.8 Reboot
Reboot?
→
OK
Please Wait…
→
35
Page 37

4. Basic Function
4.1 Power on and initialization
During the initialization procedure:
1 All the LED will light on till the initialization procedure was finished.
2 All the LED will light on if there is error during the procedure.
3 On LCD will show “Initializing”.
4.2 Making Calls
There are some ways to make outgoing calls:
1 OFF HOOK Dialing
2 Redial (OFF-HOOK Dialing)
3 Pre-Dial (ON-HOOK Dialing)
4 Redial (ON-HOOK Dialing)
5 Dial during connected
6 Memory Dial
4.2.1 OFF-HOOK Dialing
The maximum digit is 16. If users enter more than 16 digits, the number will
move on the LCD displaying. User can press Speaker button, pick up handset,
C
or press line button to dial out. The
button could delete the digits.
4.2.2 Redial (OFF-HOOK Dialing)
User can press redial button during off-hook mode, phone will dial out the
latest record of the dialed list.
4.2.3 Pre-Dial
User can press the numbers while the phone is in the IDLE state then pressing
the button will change to OFF-HOOK state and dial out this number.
C
The
mode.
button could delete the digits as same as the OFF-HOOK dialing
36
Page 38

During the Pre-dial function:
1 This is permitted to enter and dial out the digits “*” and “#”.
2 If the dialed number could be matched with the list in the phone book,
LCD will display the name of this record.
4.2.4 Redial (ON-HOOK Dialing)
This will show all the records of the dialed list. After the records selected,
pressing the or button, the number will be dialed out.
4.2.5 Dial during connected
Pressing the or buttons could switch the Line 1 and Line 2. If
the Line 1 was connected, it will be put on hold.
If the line has been put on hold, it can not dial out another call.
4.2.6 Memory Dial
The memory dial function could support the dialing from the IDLE of
OFF-HOOK state. User can press memory function key or make phone
off-hook first to dial out memory key.
4.3 Answer Calls
The LCD will show up the name if the incoming calls could be matched with the
records from the phone book; or show the phone number if couldn’t find out the
records.
4.3.1 Answer the call in the ringing state
User can press Speaker button, Line button, or pick up handset to answer the
incoming call.
4.3.2 Answer the call in the connect state
During the call was established, press the button and to hold
the current line and answer another incoming call.
37
Page 39

4.4 Hold and Retrieve Calls
There are two ways to hold the current calls and retrieve them back:
1 Press another idle line button or to hold the current line
and switch to another IDLE line.
2 Press the Hold function keys to hold the current calls.
During the hold status, the LED of Line will flash.
4.5 Transfer
SP5101 could support the call transfer with two types, one is the Consultant,
and another is the Blind transfer.
The transfer could be initialized only for the state as above.
i Dial another call during the connect state
ii Answer another call during the connect state
4.5.1 Consultant Transfer
Consultant Transfer scenario:
A communicate with B→Tranf or Line hear dial tone+ C’s
number→C pick up → A hangs up → B communicate with C
A communicate with B→Tranf or Line hear dial tone+ C’s number
→ C busy/ring →Tranf or original Line →Retrieve call with B
A communicate with B→Tranf or Line hear dial tone+ C’s number
→ C reject →Tranf →Retrieve call with B
A communicate with B→Tranf or Line hear dial tone+ C’s
number→C reject → press Line to hang up C and hear dial tone
again → press original Line to retrieve call
A communicate with B→Tranf or Line hear dial tone+ C’s
number→C ring→ A hangs up → Blind transfer
4.5.2 Blind Transfer
Blind Transfer Scenario:
A communicate with B→Blind Tran. + C’s number→hear nothing (C
ring) → Blind transfer
A communicate with B→Blind Tran. + C’s number→C Busy → hear
special tone then retrieve B immediately
A communicate with B→Blind Tran. + C’s number (not finished)
→Blind Tran. Retrieve call
38
Page 40

4.6 Conference
User needs to specify conference function to be local conference or
server-based conference.
Conference Scenario:
A. Local Conference:
(1) A communicate with B→Conf or Line hear dial tone+ C’s
number→C pick up → press Conf again to build
conference
(2) A communicate with B→Conf or Line hear dial tone+ C’s
number→C refuse to join conference → press Line to
hang up C and hear dial tone again → press original Line
to retrieve call
B. Server-based Conference:
(1) A communicate with B→Conf implement sever-based
conference scenario
39
Page 41

5. Web Administration
5.1 Factory Default
DESCRIPTION DEFAULT VALUE
IP 10.1.1.3
Net Mask:
Default Gateway: 192.168.1.254
SIP Proxy:
SIP account 1001
SIP Port: 5060
Proxy Port: 5060
RTP Port: 16384
Digit Timeout: 5s
Call waiting: Off
Call transfer On
255.255.0.0
10.1.1.2
5.2 Configuring the SIP Phone through Web Pages
The HTTPD web management interface provides user an easier way to
configure rather than command line method through TELNET.
The configuration function and steps are similar with the way through
command line. Please refer to the chapter 4-Configuring the SIP Phone
through Telnet command lines for more detail information. Below is a guide for
user to configure via web interface.
40
Page 42

Step 1. Browse the IP Address predefined via
Keypad
Please enter IP address (user have to set via LCD menu first) of SIP Phone in
web browser . If user failed to set IP address via LCD menu, the default IP
address of SIP Phone is 10.1.1.3, user can try to connect to SIP Phone via
this default IP via web interface.
41
Page 43

Step 2. Input the login name and password
Login name: root / user
Note:
Login with “user” only has authority as below:
1. Modify network configuration
2. Modify Phone Book
3. Change login password of “user”
4. Reboot
Password (The same with TELNET): Null (just press confirm, no
need to key in password in default value)
Note: User can set password later via web interface.
42
Page 44

Step 3. Enter the web interface main screen
After enter login name and password, user can see web interface main screen
as below.
Step 4. Start to configure
After enter web management interface, user can see four main items.
1. Installation Wizard: User can follow steps in wizard to make first-time
initial configuration.
2. Advanced Configuration: This menu includes other advanced
configuration items. Please press triangle figure to list all items below
Advanced Configuration.
3. System Status: User can check SIP Phone current status here.
4. Reboot: After make any change, user has to reboot SIP Phone to apply
change.
Button Definition:
1. OK: After change or input any parameter, press this button will save data
into SIP Phone.
2. CANCEL: Press this button will clean data input by user and restore to
original data.
(A) ADD: Add a new data.
(B) DELETE: Delete a specific data according to index number.
43
Page 45

5.3 Installation Wizard
Installation Wizard includes three steps:
(A) Network Connection Mode: User has to select SIP Phone network
mode as Static IP, DHCP or PPPoE.
44
Page 46

(B) Network Configuration: After selecting network connection mode, user
has to input related network parameters.
(1) Static IP: User has to input IP, subnet mask, default gateway, and
DNS server address.
(2) PPPoE: User has to input PPPoE connection user name and
password.
45
Page 47

(C) Protocol Configuration: After setting network, user has to set SIP
related parameters.
- Primary Proxy Address and port: If user select Proxy mode in
item A, please input Primary Proxy address and signaling port of
Proxy.
- Secondary Proxy Address and port: User can also input
secondary Proxy server and port for backup.
- Outbound Proxy Address and port: User can input outbound
Proxy and port if necessary.
- Phone Number: Registering Phone number of SIP Phone.
- Registering Account Name and password: If Proxy server need
registration authentication please input user name and password
here.
46
Page 48

5.4 Advanced Configuration
5.4.1 Network Configuration
(1) Network Configuration
Network Connection Mode: User has select network configuration mode
first, then configuration page will display related items.
(a) Static IP: If user selects Static IP mode, following items will be
displayed.
- IP Address: Set IP Address of SIP Phone
- Subnet Mask: Set the Subnet Mask of SIP Phone
- Default Gateway: Set Default routing gateway of SIP Phone
- Primary DNS Address: Set Primary Domain Name Server IP
address.
- Secondary DNS Address: Set Secondary Domain Name Server
IP address.
- HTTP Port for WEB Management: Set port number for user to
configure SIP Phone via WEB management. Default value is 80.
(b) DHCP: If user selects DHCP mode, following items will be
displayed.
- DNS Server Obtained Mode: When SIP Phone is in DHCP or
PPPoE mode, user can determine DNS address is obtained from
server or set manually.
- Primary DNS Server: If user determines to set DNS address
manually, please set Primary Domain Name Server IP address
here.
- Secondary DNS Server: If user determines to set DNS address
manually, please set Secondary Domain Name Server IP
47
Page 49

address here.
- HTTP Port for WEB Management: Set port number for user to
configure SIP Phone via WEB management. Default value is 80.
-
48
Page 50

(c) PPPoE: If user selects PPPoE mode, following items will be
displayed.
- DNS Server Obtained Mode: When SIP Phone is in DHCP or
PPPoE mode, user can determine DNS address is obtained from
server or set manually.
- Primary DNS Server: If user determines to set DNS address
manually, please set Primary Domain Name Server IP address
here.
- Secondary DNS Server: If user determines to set DNS address
manually, please set Secondary Domain Name Server IP
address here.
- PPPoE User ID: Set PPPoE authentication User Name.
- PPPoE User Password: Set PPPoE authentication password.
- PPPoE Retry: Enable/Disable auto-retry function after PPPoE
disconnection. If user enables this function, after PPPoE being
disconnected, SIP Phone will automatically reboot to re-connect,
and after reboot, if SIP Phone still can’t get contact with server,
SIP Phone will keep trying to connect. After re-connected, SIP
Phone will also restart system. On the other hand, if user
disables this function, SIP Phone won’t reboot and keep trying to
connect.
- Send PPPoE Echo Request: Enable or Disable PPPoE Echo
function. If user enabled this feature, SIP Phone will send out
echo request to check PPPoE connection status. Please notice
that if user disables this function, SIP Phone cannot detect if
PPPoE connection is still alive or not.
- HTTP Port for WEB Management: Set port number for user to
configure SIP Phone via WEB management. Default value is 80.
49
Page 51

(2) Behind NAT
- Behind IP Sharing: Select if enable SIP Phone behind IP Sharing
router function.
- IP Sharing Public IP Address: Set Public IP Address of IP
Sharing router for SIP Phone to work behind IP sharing.
- STUN Server address: If user wants to use STUN function, user
must enable Behind NAT Device function then inputting STUN
Server address.
- STUN Server port: If the STUN server port doesn’t any restriction,
you don’t input any port data.
-
50
Page 52

(3) SNTP
- SNTP Mode: Enable / Disable the Simple Network Time Protocol
function
- SNTP Server Address: Set SNTP Server Address.
When SNTP server is available, enable SIP Phone SNTP
function to point to SNTP server IP address so that SIP Phone
can get correct current time.
- Time Zone-GMT: Set time zone for SNTP Server time.
User can set different time zone according to the location of SIP
Phone. For example, in Taiwan the time zone should be set as
8,which means GMT+8.
51
Page 53

5.4.2 SIP Configuration
(1) SIP Main Configuration
- Primary Proxy Address and port: If user select Proxy mode in
item A, please input Primary Proxy address and signaling port of
Proxy.
- Secondary Proxy Address and port: User can also input
secondary Proxy server and port for backup.
- Outbound Proxy Address and port: User can input outbound
Proxy and port if necessary.
- Phone Number: Registering Phone number of SIP Phone.
- Registering Account Name and password: If Proxy server need
registration authentication please input user name and password
here. Registering Account Name and password: If Proxy server
need registration authentication please input user name and
password here.
(2) SIP Advanced Configuration
- Prefix String: set prefix string. If user ID contains alphabets, user
can set it as prefix string here. For example, if Account Name is
123, SIP Phone will sent out messages as Account Name @”IP
address of Proxy”, if user set prefix as abc, SIP Phone will set out
as abc123@”IP address of Proxy”. This function is for special
proxy server.
- Expire Time: Set expire time of registration. SIP Phone will keep
re-registering to proxy server before expire timed out
- Display Name: Set SIP Phone display name for caller ID
information.
- Local SIP Port: Set SIP UDP port.
- RTP Port: Set RTP port for sending voice data.
52
Page 54

5.4.3 System Configuration
(1) Feature Configuration:
- Inter Digit Time: Set the DTMF inter digit time (second). To set
the duration (in second) of two pressed digits in dial mode as
timed out. If after the duration user hasn’t pressed next number,
SIP Phone will dial out all number pressed.
- Keypad DTMF Type: set DTMF type. User can select DTMF type
SIP Phone transmits.
- End of Dial Key: select end of dialing key, e.g. set end of dial key
as * button, after finished pressing dialing number then press *
will dial out.
53
Page 55

(2) Function Key Configuration:
- Conference : Set the Conference mode. Default: Local
Conference. But now it is not support Server Conference mode
yet!
- Group Pick up: Set Group Pick up code, you might contact with
your IP-PBX system administrator.
- Specific Pick up: Set Specific Pick up code, you might contact
with your IP-PBX system administrator.
- F1: User-defined function key.
- F2: User-defined function key.
- F3: User-defined function key.
- Forward: “Local forward”. Set Forward type and number.
- DND: ”Local Do Not Disturb”
- MWI: Set support which type Voice Mail. Default: Proxy
(NOTIFY).
54
Page 56

5.4.4 Number Configuration
(1) Phone Book
- Add Data: User can specify 50 sets of phone book via web
interface. Please input index, Name, E.164 number, IP Address,
port of the destination device, drop prefix, and insert number.
1. name: Specify name for one pbook data
2. e.164: set phone number of callee.
- Delete Data: User can delete any configured phone book data by
index.
55
Page 57

(2) Hotline
If user set SIP Phone as hotline mode, once SIP Phone is off-hook, it will
automatically dials phone number (Proxy Mode) set in hotline table.
56
Page 58

(3) Digit Manipulation
- add: Add a rule to drop or insert prefix digits of incoming call.
- prefix: Set which prefix number to implement digit manipulation
rule.
- drop: Enable or disable drop function. If this function is enabled,
Phone will drop prefix number on incoming call.
- insert: Set which digit to insert.
- delete: Delete a digit manipulation rule by index.
57
Page 59

5.4.5 Media Configuration
(1) Codec
- Codec Priority: set codecs priority in order. Please notice that
user can set from 1 to 5 codecs as their need. For example, user
can only set first priority as G.723.1, and set the others as x, that
means only G.723.1 is available.
- Packet Size: User can set different packet size for each codec.
58
Page 60

(2) Voice
- Volume: Adjust the volume of Ringer, Receive (Local side
hearing), transmit (remote side hearing), DTMF.
- Echo Cancelor: Enable / Disable (it is suggested to always
Enable this function).
59
Page 61

(3) Tone Configuration
- Ring Back Tone: Set ring back tone parameters.
- Busy Tone: Set busy tone parameters.
- Dial Tone: Set dial tone parameters.
- 2nd Dial Tone: Set 2nd dial tone parameters.
- Ring Tone: Set ring tone parameters.
60
Page 62

(4) Payload Type
- RFC2833 Payload Type: Change RFC2833 Payload type. This is
for special request from the other site, if RFC2833 payload types
of 2 sites are different, it may cause some problem of connection.
61
Page 63

5.4.6 Device Management
(1) Login Password
- Change password configuration: First select login name as root
or user, then enter current password, new password and confirm
new password again to set new password.
62
Page 64

(2) Software Upgrade
- Download Mode: Select download method as TFTP or FTP
- TFTP/FTP Server IP Address: Set TFTP server IP address
- FTP Login: Set FTP login name and password
- Target File name: Set file name prepared to upgrade
- Target File Type: Select which sector of SIP Phone to upgrade
Note:
After upgrade Application, please remember to execute Flash Clean,
which will clean all configurations become factory values except
Network settings..
63
Page 65

(3) Provision Server
- Provision Server Address: set Provision server IP address.
- Provision Server Login User Name: set Provision Server login
user ID.
- Provision Server Login User Password: set Provision Server
login user password.
- Provision Server Cycle Time: set Provision Server update cycle
time.
64
Page 66

(4) Flash Clean
Press CLEAN will clean all configurations except Network Configuration of
SIP Phone and reset to factory default value.
Note:
User must re-configure all commands all over again (except Network
Configuration).
65
Page 67

5.5 System Status
5.5.1 Network Status
Display all current network status of SIP Phone.
66
Page 68

5.5.2 Version Information:
Display software version.
67
Page 69

5.6 Reboot
Press reboot will reset SIP Phone.
Note:
To execute reboot via web browser, SIP Phone will automatically save all
data before reboot. To execute reboot via TELNET command, please
remember to do Commit Data before Reboot System.
68
Page 70

6. T elnet command lines
After setting the IP Address of SIP Phone and reboot, (please refer to LCD
Menu: 5-3.4.5), user can enter into Telnet command lines.
Note:
1. After user enter SIP Phone configuration via telnet, please use
login: ”root”, password: null, press enter to enter command lines. If user
forgets password, please contact with the distributor, we will generate a
specific password according to your MAC address of SIP Phone. MAC
address is on a label at the bottom of your case in format with
“0001a8xxxxxx”.
2. User must input lower-case command, but contents of configurations
such as SIP alias or user name etc, user can set as capital case.
3. If user wants to disable or clean any input data, please set value as “x”.
4. After any change of configuration, please remember to do commit
command to save changes and then reboot command to reboot system.
Telnet Commands:
Command Description
1
2
3
4
5
6
7
8
9
10
11
12
13
14
15
16
17
18
19
20
21
22
help
quit
debug
reboot
pbook
commit
ping
time
ifaddr
pppoe
flash
sysconf
sip
security
line
voice
phone
tos
prefix
rom
auth
passwd
help/man/? [command]
quit/exit/close
show debug message
reboot local machine
Phonebook information and configuration
commit flash rom data
test that a remote host is reachable
show current time
internet address manipulation
PPPoE stack manipulation
clean configuration from flash rom
System information manipulation
SIP information manipulation
Security information manipulation
Line information manipulation
Voice information manipulation
Setup of call progress tones and ringing
IP Packet ToS (Type of Service)values
Prefix drop/insert information manipulation
ROM file update
Set configuration items for “administrator” user.
Password setting information and configuration
1. After setting the IP Address of SIP Phone SP5101 and reboot, (please refer
to LCD Menu), user can enter Telnet command lines.
69
Page 71

A
Note:
1.
fter user enter SIP Phone configuration via telnet, please use
login: ”root”, password: null, press enter to enter command lines.
2. If user forget login password, please contact with your distributor, we
will generate one new password according to LAN Phone’s MAC
address. Please login with “mac” and this new password.
3. User must input lower-case command, but contents of configurations
such as SIP alias or user name etc, user can set as capital case.
4. After any change of configuration, please remember to do commit
command to save changes and then reboot command to reboot
system.
6.1 [help] command
Type help or man or ? to display all the command lists. The following figure is
shown all commands of SIP Phone SP5101.
Command Description
1
2
3
4
5
6
7
8
9
10
11
12
13
14
15
16
17
18
19
20
21
22
help
quit
debug
reboot
pbook
commit
ping
time
ifaddr
pppoe
flash
sysconf
sip
security
line
voice
phone
tos
prefix
rom
auth
passwd
help/man/? [command]
quit/exit/close
show debug message
reboot local machine
Phonebook information and configuration
commit flash rom data
test that a remote host is reachable
show current time
internet address manipulation
PPPoE stack manipulation
clean configuration from flash rom
System information manipulation
SIP information manipulation
Security information manipulation
Line information manipulation
Voice information manipulation
Setup of call progress tones and ringing
IP Packet ToS (Type of Service)values
Prefix drop/insert information manipulation
ROM file update
Set configuration items for “administrator” user.
Password setting information and configuration
6.2 [quit] command
Type quit/exit/close will logout SIP Phone SP5101 and Telnet Program.
70
Page 72

6.3 [debug] command
This command is for engineers to debug system of SIP Phone SP5101. User
can add debug flag via command debug –add “debug flags”, and then start
debug function via command debug –open. When SIP Phone SP5101 is
working on screen will display related debug messages. Most frequently used
debug flag are “sip”, “fsm”, “msg”…etc.
6.4 [reboot] command
After typing commit command, type reboot to restart the SIP Phone SP5101.
6.5 [pbook] command
SIP Phone SP5101 can support 90 phone book data.
1. -print: display phone book data. User can print all data in phone book by
command (pbook –print).
2. -add: add a new record in phone book table by giving name and e.164
number of callee endpoint.(pbook –add name “X” e164 “X”)
3. -delete: delete a record of certain listed index in phone book table.
(pbook –delete “index number”)
4. -modify: modify record of a certain index in phone book .
(pbook –modify “index” name “X” e164 “X”)
71
Page 73

6.6 [commit] command
Save any changes after configuring the SIP Phone SP5101.
6.7 [ping] command
Command ping can test which the IP address is reachable or not.
Usage: ping “IP address”
The message will display packets transmitting condition or no answer from the
IP address.
6.8 [time] command
When SIP Phone SP5101 enable SNTP function and be able to connect with
SNTP server, type time command will show the current time retrieved from
SNTP server.
72
Page 74

6.9 [ifaddr] command
Configure and display the SIP Phone SP5101 IP information.
1. –print: print out all current configurations of ifaddr command.
2. -ip, -mask, -gate: Set SIP Phone SP5101 IP Address, subnet mask
and default gateway respectively.
3. -ipmode: Set SIP Phone network mode to be Fixed IP, DHCP or
PPPoE.
When User set IP mode to be fixed IP, please set IP, subnet
Mask, default gateway as mentioned in item 2.
If User set IP mode to be DHCP, SIP Phone will search for DHCP
server to capture IP address after reboot.
If user set IP mode to be PPPoE, please remember to set related
parameters under [pppoe] command.
4. -sntp: When SNTP server is available, enable SIP Phone SP5101
SNTP function and assign SNTP server IP address so that SIP Phone
can capture current time from SNTP server. (ifaddr –sntp 1
“xxx.xxx.xxx.xxx”)
5. –autodns: specify the way to obtain DNS server address. When
phone is under DHCP or PPPoE mode, user can let phone to capture
DNS server address from server automatically or specify the address
manually.
6. -dns: User can set primary and secondary Domain Name Server IP
address. Once SIP Phone can connect with DNS server, user can
specify URL address instead of IP address for Proxy Server and phone
book IP address...etc. (ifaddr –dns 1 “primary DNS server
address” –dns 2 “secondary DNS server address”)
7. –timezone: User can set different time zone according to the location
SIP Phone is. For example, in Taiwan the time zone should be set as
8,which means GMT+8. (GMT+8: ifaddr –timezone 8)
8. –timeformat: Set time display format as 12 or 24 hours.
(ifaddr –timeformat 0/1, 0 as 24 hours, 1 as 12 houts)
9. -ipsharing: If SIP Phone SP5101 is behind a IP-sharing , user must
enable IP sharing function and specify public IP
address.(ifaddr –ipsharing 0/1 “public IP address of IP sharing” , 0
for disable and 1 for enable)
10. –server: Set Provision Server address.
73
Page 75

11. –id: Input ID of Provision server.
12. –pwd: Input Password of Provision server.
13. –emstime: Set provision cycle time.
14. –stun: Input STUN server address. (ifaddr –stun 1 61.220.2.2) But you
must take notice when you use this function, you must enable
“ipsharing” function.
15. –stunport: Input port of STUN server.
Note:
Some Proxy servers support endpoint behind NAT function, in this
case SIP Phone doesn’t have to enable IP sharing function, please
contact with your Proxy Server vendor for detail information.
6.10 [pppoe] command
1. -print: display all current configurations and information.
2. –id: to set PPPoE authentication user name.
3. –pwd: to set PPPoE authentication password.
74
Page 76

4. –reboot: Select enable or disable this function. If user enables this
function, after PPPoE disconnected, SIP Phone will
automatically reboot to re-connect, and after reboot, if SIP
Phone still can’t connect with server, SIP Phone will keep
trying to connect. On the other hand, if user disables this
function, SIP Phone won’t reboot and keep trying to connect.
(pppoe –reboot 0/1)
5. –echo: to set PPPoE send echo request function or not. Under some
ISP sending echo request will cause abnormal behavior for LAN
Phone, however, if user disable echo function, when ISP
disconnect, LAN Phone will not try to reconnect. Suggest for
most ISPs this function need to be enabled. Please refer to
pppoe –reboot function.
6.11 [flash] command
This command will clean the configuration stored in the flash rom to default
value and reboot the SIP Phone SP5101.
Note:
1. After user upgrade new software version, suggested to execute
this command to make sure new software work well on SIP Phone
SP5101.
2. To execute the command flash –clean, all configuration of SIP
Phone SP5101 stored in flash will be cleaned. It is authorized for
the user whose login name is “root” only.
75
Page 77

6.12 [sysconf] command
1. -print: display all current configurations.
2. -idtime: set the duration(in second) of two pressed digits in dial mode
as timed out. If after the duration user hasn’t pressed next
number, SIP Phone will dial out all number pressed.
3. -keypad: set DTMF type .User can select DTMF type SIP Phone
receive and transmit.(sysconf –keypad 0/1 , 0 for in band ,1
for RFC2833.)
4. -2833type: change RFC2833 Payload type.
5. -eod: select end of dialing key, e.g. set end of dial key as “*” button ,
after finished pressing dialing number then press “*” will dial
out. (sysconf –eod 0/1/2 , 0 for no end of dial key , 1 for “*”
button, 2 for “#” button )
6. –privacy: this function can only work in Japan and also user’s service
platform supports Japan
standard telecom CLIR specification. When this function is set
as Japan mode, other users can hide their caller ID by press
special code before dial out phone number.
7. –phone: set in SIP message to add user=phone parameter or not. If
user enables this function, in SIP message will add this
parameter.
8. –waiting: User can enable or disable Call Waiting function.
9. –transfer: User can enable or disable Transfer function.
10 –pick: Set Call Group Pick up Code. After setting this code, user can
do Group Call Pick Up with this special code.
11. –spick: Set Call Specific Pick up Code. After setting this code, user
can do Single Call Pick Up with this special code
12. –park: Set Call Park Code. Set special access code for Call Park
function.
13. –mwi: Enable/Disable MWI function and specify MWI method to be
client or server-based. (0: OFF, 1: Client(Subscribe),2:
Proxy(NOTIFY))
14. –mwiexpires: If user set MWI method as client-based. Here can
define the interval time of phone to send subscribe
message to check voice mail.
15. –mwinumber: Set voice mail box number.
16. –atanswer: enable/disable auto answer function of Phone. If this
function is enabled, phone will answer incoming
automatically.
76
Page 78

6.13 [sip] command
1. –print: display all current configurations.
2. –px: set proxy server IP address or URL address (sip –px “IP
address or URL of Proxy server”).
3. –px2: set alternative proxy server IP address or URL address. If phone
failed to register first proxy, it will try to register this alternative proxy.
4. –pxport: set listening port of Proxy server.
5. –outpx: set IP address of outbound proxy server. After user set
outbound proxy, all packets form SIP Phone will be sent to outbound
proxy server.
6. –prefix: set prefix string. If user ID contains alphabets, user can set it
as prefix string here. For example, if Account Name is 123, SIP Phone
will sent out messages as Account Name @”IP address of Proxy”, if
user set prefix as abc, SIP Phone will set out as abc123@”IP
of Proxy”. This function is for special proxy server.
address
7. –line: identify one number for the SIP Phone SP5101 to register to the
Proxy (SIP –line “line number”).
Note: In proxy mode please remember to set user account information
under security command.
8. –domain: set Domain of phone.
77
Page 79

9. –expire: set expire time of registration. SIP Phone will keep
re-registering to proxy server before expire timed out.
10. –port: set listening UDP port or SIP Phone.
11. –rtp: set RTP port number. SIP Phone will use this port to send and
receive voice.
12. –sexpire: set the session timer.
13. –minse: set the mini session timer.
6.14 [security] command
1. –print: display all current configurations.
2. -name: set user ID of SIP Phone SP5101 for registering. User can set
user name and password for registering. If password is no need,
please set user name the same as line number or SIP Phone won’t
register successfully.
3. –pwd: set account password for registering.
78
Page 80

6.15 [line] command
1. –print: display all current configurations.
2. –fwd: set forward function.
There are 3 selections in Forward type, user must select under which condition
to forward calls.
6.15.1 Busy Forward
When SIP-Phone is in busy status, the incoming call will be forwarded to the
assigned phone number.
6.15.2 No Response
When SIP-Phone hasn’t been picked up for around 10 seconds, the incoming
call will be forwarded to the assigned phone number.
6.15.3 Unconditional
It is included the above two types. Whether the SIP-Phone is in which status,
calls will be automatically forwarded to the assigned phone number.
–hotline: set hotline number.(‘X’ for disable)
79
Page 81

6.16 [voice] command
The voice command is associated with the voice codec setting information.
1. -print: display voice codec information and configuration.
2. -send: three voice packet size can be configured as 20 ms, 40 ms or
60 ms.(only 30 and 60 ms for G..723.1)
3. -priority: set codecs priority in order. Please notice that user can set
from 1 to 5 codecs as their need, for example, voice –priority g723 or
voice –priority g729 711a g711u means SIP Phone can support only
one codec or four codecs.
4. -volume: There are three types can be adjustable, voice volume, input
gain and DTMF volume. Voice volume means the volume user can
hear, input gain means the volume the other side can hear from SIP
Phone, DTMF means DTMF transmitting volume. (voice –volume
voice “value of volume”, voice –volume input “value of volume”,
voice –volume dfmt “value of volume”)
Note: It is for advanced administrator use only. Please ask your distributor
before changing any settings of this command.
6.17 [phone] command
1. -print: Print current call progress tone configurations (ring: ring
80
Page 82

tone, rbt: ring back tone, bt: busy tone, dt: dial tone). This
parameter should be accompanied with tone type.
2. -ring: To set RING tone value. The played tone type, when
Phone ha incoming call.
3. -rbt: To set Ring Back Tone value. The played tone type, when
Phone dials out a call.
4. -bt: To set Busy Tone value. The played tone type, when Phone
dials to a destination that is busy.
5. -dt: To set Dial Tone value. The played tone type, when hook off
the Phone.
6.18 [tos] command
TOS/DiffServ (DS) priority function can discriminate the Differentiated Service
Code Point (DSCP) of the DS field in the IP packet header, and map each
Code Point to a corresponding egress traffic priority. As per the definition in
RFC2474, the DS field is Type-of-Service (TOS) octet in IPv4. The
recommended DiffServ Code Point is defined in RFC2597 to classify the traffic
into different service classes. The mapping of Code Point value of DS-field to
egress traffic priorities is shown as follows.
81
Page 83

1. High priority with DS-field.
Expected Forwarding (EF) 101110 ====> 46 (Decimal System)
Assured Forwarding (AF) 001010 ====> 10 (Decimal System)
010010 ====> 18 (Decimal System)
011010 ====> 26 (Decimal System)
100010 ====> 34 (Decimal System)
2. Low Priority with DS-field:
Assured Forwarding (AF) 001100 ====> 12 (Decimal System)
010100 ====> 20 (Decimal System)
011100 ====> 28 (Decimal System)
100100 ====> 36 (Decimal System)
001110 ====> 14 (Decimal System)
010110 ====> 22 (Decimal System)
011110 ====> 30 (Decimal System)
100110 ====> 38 (Decimal System)
000000 ====> 0 (Decimal System)
1. -print : display all current configurations.
2. –rtptype: set DSCP value of signaling packets from 0 to 63
3. –siptype: set DSCP value of RTP packets from 0 to 63
Note: This command won’t be functional until whole network
environment support DSCP function, e.g. all routers or switches in your
network have enabled DSCP feature.
6.19 [prefix] command
This command is for digit manipulation.
1. -add: Add a rule to drop or insert prefix digits of incoming call.
z prefix: Set which prefix number to implement prefix rule.
82
Page 84

z drop: Enable or disable drop function. If this function is enabled,
Gateway will drop prefix number on incoming call.
z insert: Set which digit to insert on incoming call.
Example: prefix -add prefix 100 drop 1 insert 2000
2. -modify: Modify a rule to drop or insert prefix digits of incoming call.
Example: prefix –modify 100 drop 0 insert 200
3. -delete: Delete a rule to drop or insert prefix digits of incoming call.
Example: prefix –delete modify 100 drop 0 insert 200
6.20 [rom] command
1. -print: show all current configurations and version information.
2. -app: upgrade main application code.
Note:
After upgrade Application, please remember to execute
flash –clean command, which will clean all configurations become
factory values except IP address.
3. -s: it is necessary to prepare TFTP/FTP server IP address for upgrading
firmware rom file.
4. -f: the file name prepared for upgrading is necessary as well.
5. –method: specify download method to be TFTP or FTP(0 for TFTP.1 for
FTP)
6. –ftp: specify user name and password for FTP download method.
For example: User prepares to upgrade the latest app rom file – lpsip.100,
83
Page 85

the TFTP server is 192.168.1.1, User has to input command as below:
rom –app –s 192.168.1.1 –f lpsip.100
Command rom –print can show current version installed in SIP Phone
SP5101.
6.21 [auth] command
For security concern, the “root” user can customize some configurable items
for “administrator” user.
1. -“item name”: Assign the configurable item for “administrator” user.
Example:
auth -ifaddr 1
auth -sip 1
auth -voice 1
Now the Administrator can use these command which Root user
assign to them.
2. -print: Display the configurable items for “administrator” user.
84
Page 86

6.22 [passwd] command
For security protection, user has to input the password before entering
application user/config mode. Two configurations of login name/password
are supported by the system.
1. –set: set password of “root” users or “administrator” users.
(passwd –set root/administrator “password”)
2. –clean: clean up password restored before, and user can
login :”root/administrator”, password: ”press enter”.
User who requests authorization to execute all configuration
commands needs to login with “root”. If a user login with
“administrator”, commands below are not functional:
85
 Loading...