

Page 1
4
Owner’s Guide
September 2008
www.MicroNet.com
Page 2

FCC Compliance Statement
Federal Communications Commission
Radio Frequency Interference Statement
This equipment has been tested and found to comply with the limits for a Class B digital device, pursuant to
part 15 of the FCC Rules. These limits are designed to provide reasonable protection against harmful interference
in a residential installation. This equipment generates, uses and can radiate radio frequency energy and, if not
installed and used in accordance with the instructions, may cause harmful interference to radio or television
reception, which can be determined by turning the equipment off and on. The user is encouraged to try to
correct the interference by one or more of the following measures:
1. Reorient or relocate the receiving antenna.
2. Increase the separation between the equipment and receiver.
3. Connect the equipment into an outlet on a circuit different from that to which the receiver is connected.
4. Consult the dealer or an experienced radio/TV technician for help.
Changes or modifications not expressly approved by the party responsible for compliance could void the user’s
authority to operate the equipment.
Only use shielded cables, certified to comply with FCC Class B limits, to attach this equipment. Failure to install
this equipment as described in this manual could void the user’s authority to operate the equipment.
Canadian Department of Communications Compliance: This equipment does not exceed Class B limits per radio
noise emissions for digital apparatus set out in the Radio Interference Regulation of the Canadian Department of
Communications. Operation in a residential area may cause unacceptable interference to radio and TV reception
requiring the owner or operator to take whatever steps are necessary to correct the interference.
Conformite aux regiements du Department Canadien de Communications: Cet equipement n’excede pas les
limites de Classe B concernaut les bruits des emissions de radio pour le dispositif digital etablies par le Reglement
d’Interference de Radio du Departement Canadien de Communications. L’operation de cet equipement dans un
quartier residential peut occasionner des parasites inacceptables dans la reception de la radio ou de la television
exigeant le proprietaire ou l’operateur de faire routes les necessaires pour corriger cet interference.
FTZ/BTZ German Postal Service Notice: We hereby certify that the ADV, SB, SBS, SS, SBX, SBT, MO, MS, MR, MT,
MD, CPK, CPKT, CPKD, DD and DDW products are in compliance with Postal Regulation 1046/1984 and are RFI
suppressed. The marketing and sale of the equipment was reported to the German Postal Service. The right to
retest this equipment to verify compliance with the regulation was given to the German Postal Service.
Bescheinigung des Herstellers/Importeurs: Hiermit wird bescheinigt, daB der/die/das: SB, SBS, SS, SBX, SBT,
MO, MS, MR, MT, MD, CPK, CPKT, CPKD, DD, DDW in Ubereinstimmung mit den Bestimmungen der: VFG1046,
VFG243 funk-enstort ist. Der Deutschen Bundespost wurde das Inverkehrbringen dieses Gerates angezeigt
and die Berechtigung zur Uberprdfung der Serie auf Einhaltung der Bestimmungen eingeraumt MicroNet
Technology, Inc.
RAIDBank4 Owner’s Manual
2
Page 3

Warranty
Limitations of Warranty and Liability
MicroNet Technology has tested the hardware described in this manual and reviewed its
contents. In no event will MicroNet or its resellers be liable for direct, indirect, incidental, or
consequential damage resulting from any defect in the hardware or manual, even if they have
been advised of the possibility of such damages. In particular, they shall have no liability
for any program or data stored in or used with MicroNet products, including the costs of
recovering or reproducing these programs or data.
During the specified warranty period, MicroNet guarantees that the product will perform
according to specifications determined by the manufacturer, and will be free of defects. Parts
and labor of the received product, and replacement parts and labor are guaranteed during
the specified warranty period. The warranty covers defects encountered in normal use of the
product, and does not apply when damage occurs due to improper use, abuse, mishandling,
accidents, sand, dirt, excessive dust, water damage, or unauthorized service. The product must
be packed in its original packing material when shipped, or the warranty will be void. In all
cases, proof of purchase must be presented when a warranty claim is being made.
This manual is copyrighted by MicroNet Technology. All rights are reserved. This documentation
may not, in whole or part, be copied, photocopied, reproduced, translated, or reduced to any
electronic medium or machine readable form without prior consent in writing from MicroNet.
MicroNet and the MicroNet logo are registered trademarks of MicroNet Technology. Microsoft
Windows and the Windows Logo are registered trademarks of Microsoft Corporation. All other
trademarks are the property of their respective owners.
Technical Support Policy
If you have a problem installing your system or suspect it is malfunctioning, please contact
the Authorized MicroNet Reseller from whom you purchased the system. If the reseller fails
to resolve the problem, please visit our support page at www.micronet.com/support,
or call MicroNet’s Help Desk for assistance at (310) 320-0772. Please have the model, serial
number, date of purchase, and the reseller’s name available before calling. If possible, call
from a telephone near the system so we can more readily direct you to make any necessary
system corrections, should they be required.
Returning Materials
If a reseller or MicroNet Technician finds it necessary to have the system returned for testing
or servicing, a Return Materials Authorization (RMA) number will be issued. The RMA number
must be placed on the outside of the carton in large, visible letters near the address label.
Return the complete system including all cables and software. The system must be packed
in the original packing materials and shipped prepaid. MicroNet will repair the system and
return it prepaid by similar common carrier and priority. Please record the RMA number and
make reference to it when inquiring on the status of the system. A returned unit found to be
fault-free will carry a $65.00 charge for service and repackaging.
RAIDBank4 Owner’s Manual
3
Page 4

Welcome
Welcome From MicroNet Technology
We are pleased that you have chosen the RAIDBank4. Our systems are designed
for speed, reliability, compatibility, and performance. We think you will find the
system easy to install, and a productive addition to your computer system.
This manual presumes that you are familiar with standard computer operations;
this includes copying files, opening documents, clicking with the mouse, and
organizing files or folders within other folders. If you are unfamiliar with
these operations, please consult the User’s Guide that was supplied with your
computer system. Your computer dealer and local user’s groups are also good
sources of information. After you are comfortable with the operation of your
computer, continue reading this manual which describes hardware installation
and operation.
Your comments assist us in improving and updating our products. Please feel
free to share them with us. Please send comments to:
MicroNet Technology
Attn: Customer Service
19260 Van Ness Ave
Torrance, CA 90501
info@micronet.com
RAIDBank4 Owner’s Manual
4
Page 5

Table of Contents
Table of Contents
FCC Compliance Statement
Warranty Information
Welcome Note
Table of Contents
Chapter 1. Getting Started
Features and Benefits
System Requirements and Compatibility
Unpacking the RAIDBank4
What’s Included
Choosing a place for your RAIDBank4
The RAIDBank4 Interface Components
Communications and Control
Hot Plug Drive Replacement
Connecting the RAIDBank4
RAID Configuration Methods
Chapter 2. Understanding RAID
RAID
RAID 0
RAID 1
RAID 10
RAID 3
RAID 5
RAID Set
Volume Set
Online Capacity Expansion
Array Roaming
Hot Swappable Disk Support
Instant Availability/Background Initialization
Online RAID Level and Stripe Size Migration
Hot Spare Drives
Hot Swap Disk Rebuild
Chapter 3. RAID Controls-LCD Interface
Conventions
Login Procedure
The Main Menu Configuration Tree
1. Quick Volume/RAID Setup
2. RAID Set Functions
3. Volume Set Functions
4. Physical Drive Functions
5. RAID System Functions
6. Additional System Functions
Chapter 4. Built in Web-Based Administration
Introduction
Preparation
Login Procedure
The Main Menu Configuration Tree
1. Quick Volume/RAID Setup
2. RAID Set Functions
3. Volume Set Functions
2
3
4
5
7
7
7
8
8
8
9
10
10
11
12
13
13
14
14
14
15
15
15
15
16
16
17
17
17
17
17
18
18
18
18
19
20
21
24
25
27
29
29
29
29
30
31
32
34
RAIDBank4 Owner’s Manual
5
Page 6

Table of Contents
4. Physical Drive Functions
5. System Controls
6. System Information
Chapter 5. Host Computer Setup
1. Volume Setup and Apple Macintosh
2. Volume Setup on Microsoft Windows
Chapter 6. Troubleshooting
Daily Use Tips
General Use Precautions
Frequently Asked Questions
General
Mac and Mac OS Specific
Windows Specific
Appendix A. Getting Help
Appendix B. RAID Level Comparison Table
Appendix C. Terminal Session Setup
Appendix D. Glossary of RAID Terms
Appendix E. Product Specifications
37
38
44
45
45
46
47
47
47
48
48
49
50
52
53
54
57
64
RAIDBank4 Owner’s Manual
6
Page 7

1-Getting Started
Chapter 1. Getting Started
Thank you for purchasing The MicroNet RAIDBank4 storage solution. With speed, high
capacity, ease of use, and support for numerous applications, RAIDBank4 is the ideal solution
for all of your data storage needs.
Please take advantage of the information contained within this manual to ensure easy setup
and configuration. If at any time you require technical assistance, MicroNet’s Help Desk is
available at 310-320-0772 or at www.micronet.com/support
Features and Benefits
The RAIDBank4 Subsystem is a high-performance RAIDBank4 built around a powerful 64bit
controller designed to meet or exceed the highest industry standards. Outstanding features
include:
• eSATA-300andUSB2.0hostconnectionsformaximumhostflexibility
• SATAII,NCQenableddrivechannels
• ConfigurableRAIDengineforhighdataprotection
• On-linevolumeexpansionandmigrationwithnosystemdown-time
Featuring high performance and availability RAID technology and advanced array management
features, The RAIDBank4 can serve in several applications:
• As a high speed local storage device for a dedicated workstation
• As a high-speed, fault tolerant server-attached storage device
• As a redundant backup station
System Requirements and Compatibility
The RAIDBank4 features a high speed eSATA 300 and a USB 2.0 connections, providing nearly
universal connectivity. While the RAIDBank4 can function with a variety of hardware and
software combination, MicroNet has tested and approved the RAIDBank4 for compatibility
with the following architectures:
Apple Hosts:
•G4-733 and better, Mac OS-X revisions 10.4.8 and newer (eSATA utilizing MicroNet’s eSATA
PCI-X host bus adapter, MicroNet part number SATAPCIX4)
•G5 and Mac Pro desktops with a PCI Express Slots, OS 10.4.8 and newer (eSATA utilizing
MicroNet’s eSATA-PCIX host bus adapter, MicroNet part number SATAPCIE2)
Windows Hosts:
•Pentium 3-800 and better, Windows revisions 2000/XP/2003/Vista (eSATA utilizing
MicroNet’s eSATA-PCIX host bus adapter, MicroNet part number SATAPCIX4)
•Pentium D-2800 and better with PCI expressports,Windowsrevisions2000/XP/2003/Vista
(eSATA utilizing MicroNet’s eSATA-PCIX host bus adapter, MicroNet part number SATAPCIE2)
RAIDBank4 Owner’s Manual
7
Page 8

1-Getting Started
Unpacking the RAIDBank4
Please unpack your RAIDBank4 in a static free environment, carefully making sure not to
damage or discard any of the packing material. If the RAIDBank4 appears damaged, or if
any items of the contents listed below are missing or damaged, please contact your dealer or
distributor immediately.
In the unlikely event you may need to return the RAIDBank4 for repair or upgrade, please
use the original packing material to ensure safe transport.
What’s Included
Your RAIDBank4 comes with the following items:
1 RAIDBank4 unit
4 Disk Drive Modules
1 RAIDBank4 CD containing this manual in PDF format
1 Ethernet cord
1 RJ11-DB9 serial cord
1 power cord
1 eSATA cable
1 USB 2.0 cable
Choosing a location for your RAIDBank4
When selecting a place to set up your RAIDBank4, be sure to follow these guidelines:
•Placeonaflatandstablesurfacecapableofsupportingatleast25lbs
• Place the RAIDBank4 close enough to the computer for the host connection cable to reach.
•Useagroundedwalloutlet.
•Avoid an electrical outlet controlled by wall switches or automatic timers. Accidental disruption
of the power source may wipe out data in the memory of your computer or RAIDBank4.
•Keeptheentiresystem awayfrompotential sourcesofelectromagneticinterference,such
as loudspeakers, cordless telephones, etc.
CAUTION! Avoid direct sunlight, excessive heat, moisture, shock and
!
vibration, or dust
RAIDBank4 Owner’s Manual
8
Page 9
1-Getting Started
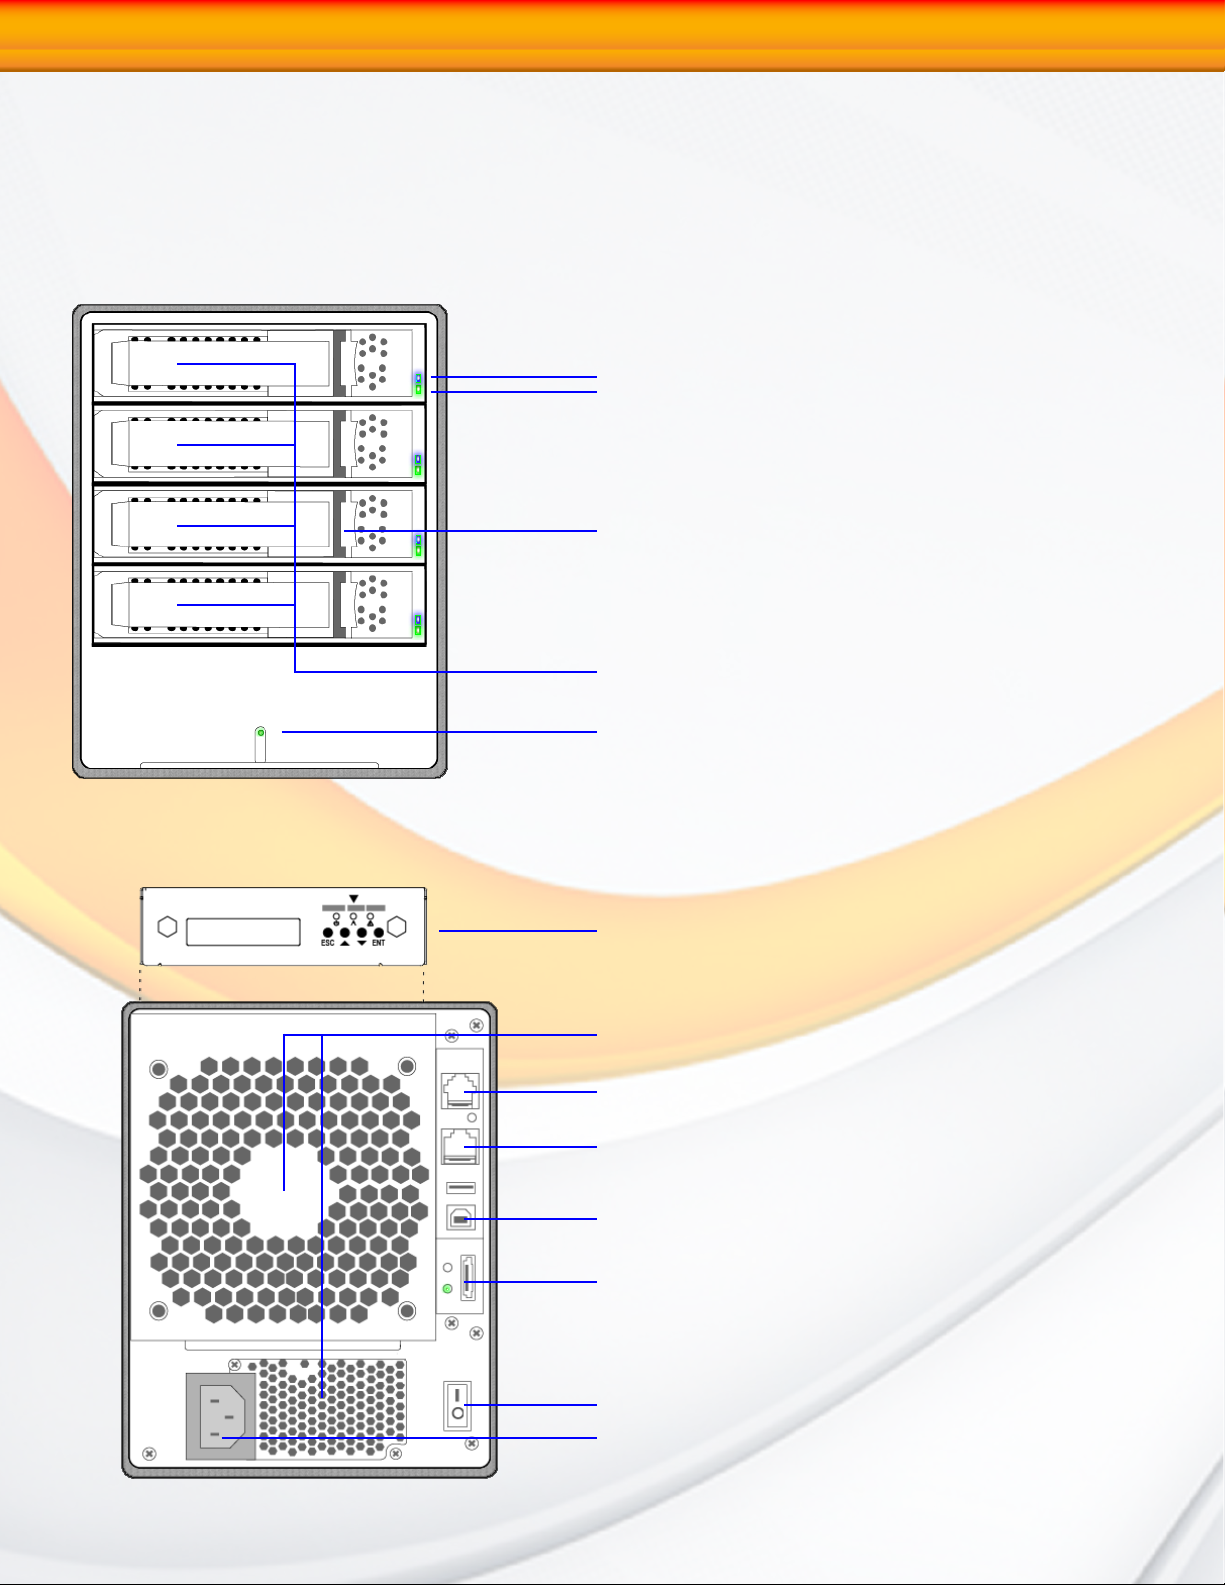
The RAIDBank4 interface components
The following figures illustrate the connector locations for the RAIDBank4.
FRONT VIEW
Disk Activity LED
Disk Power LED
Canister Release Latch
REAR VIEW
Disk Canisters
Power/Status Indicator Light
LCD Panel with Keypad
Fan vents (DO NOT BLOCK!)
RS232 Port (reserved)
LAN monitoring Port
Host USB Port
RAIDBank4 Owner’s Manual
Host eSATA Port
Master Power Switch
AC Power Connector
9
Page 10
1-Getting Started
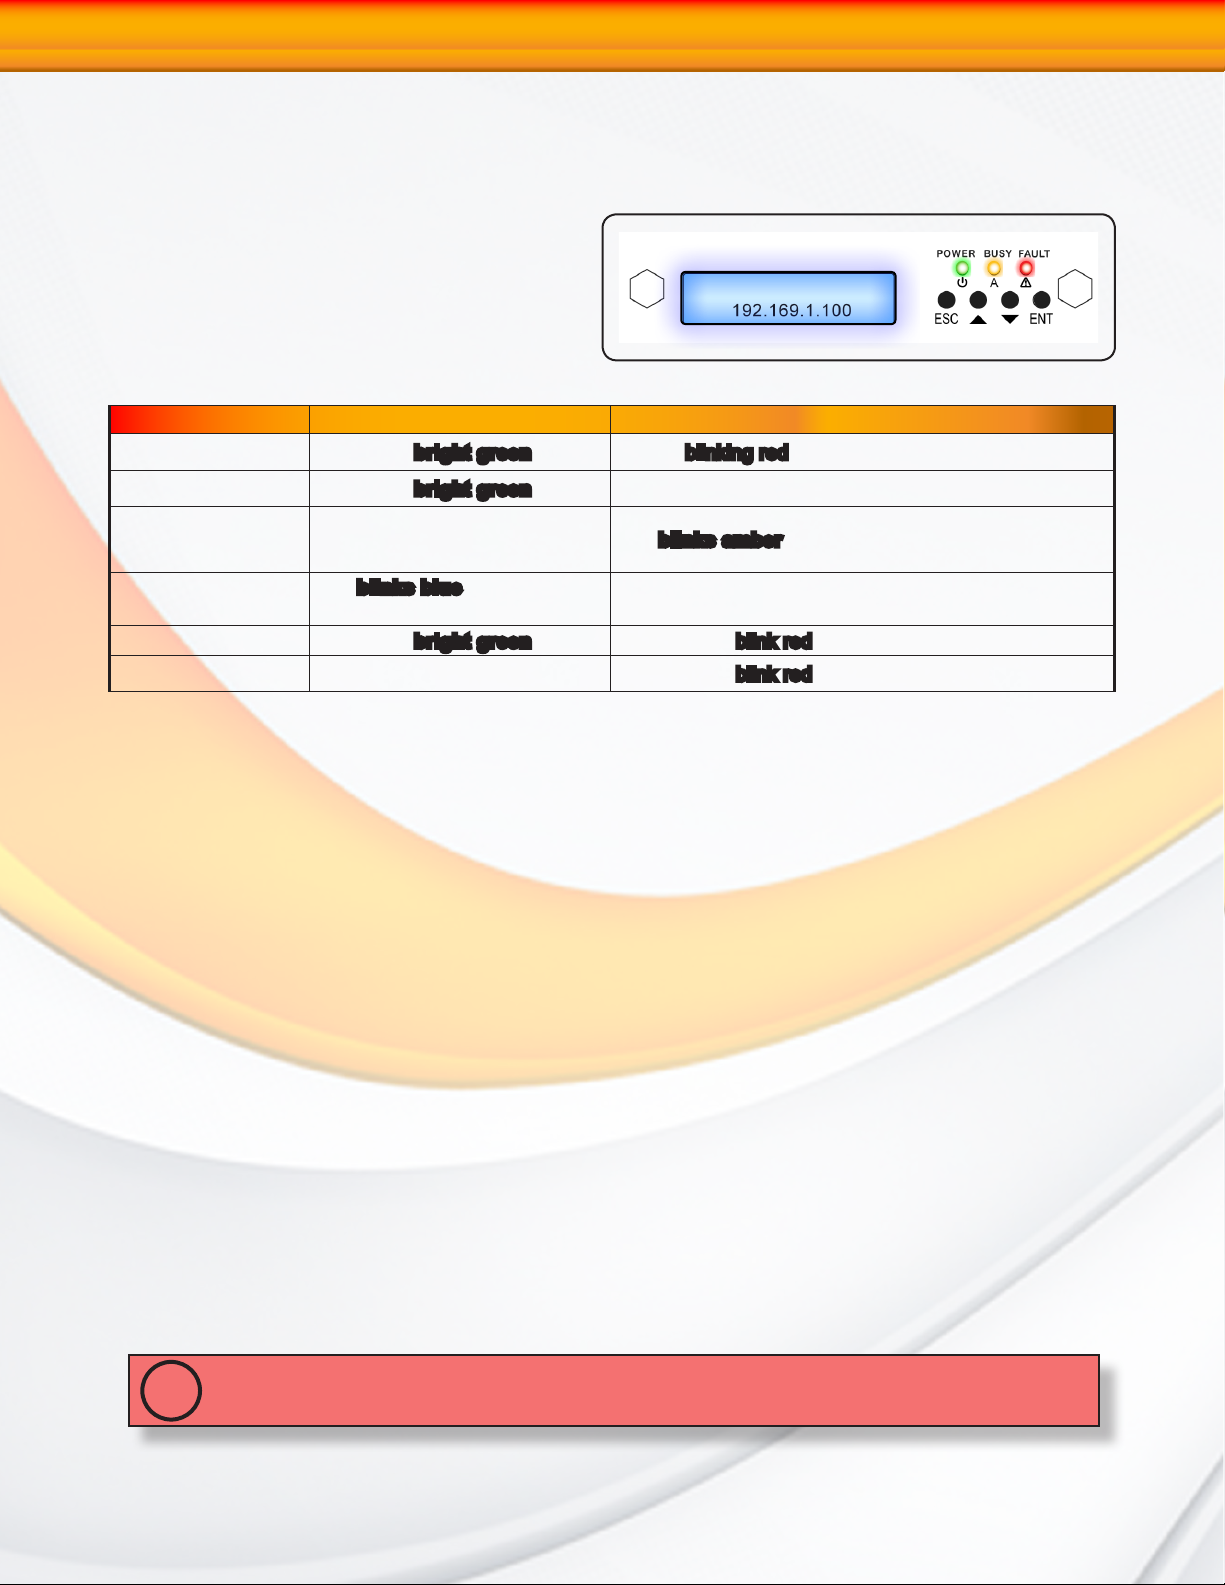
Communication and Control
RAID functions including creation, modification, and monitoring can be accomplished through
the LCD Control panel or the web based
administration user interface. The LCD status
panel informs you of the RAIDBank4’s current
operating status at a glance, as shown here:
LED Normal Status Problem Indication
Power LED (Front) LED glows bright green Dark or blinking red on system error.
Power LED (LCD) LED glows bright green Dark on power-on
Busy LED LED is dark LED blinks amber
MicroNet Tech
Disk Activity LED
Disk Power LED LED glows bright green This LED will blink red if there is a disk error.
System Fault LED LED remains dark This LED will blink red if there is a system error.
LED blinks blue during hard
drive read and write activity
N/A
Hot plug Drive Replacement
In the event of a drive failure, the RAIDbank4 supports the ability to hot-swap drives without
powering down the system. A data module can be removed and replaced without powering
off the unit or taking the system off line. In a fault tolerant array, the RAID rebuilding will
proceed automatically in the background (see Section 2.Understanding RAID for more
information.)
A drive failure will illuminate amber the drive indicator light above the failed drive on the
front of the RAIDBank4. To replace a drive, please follow these steps:
1. Press down on the drive release latch (see page 8, “The RAIDBank4 Interface components”)
to release the drive tray
2. Gently pull out the disk drive tray handle and slide out the drive tray.
3. To replace: Slide in the replacement drive tray with the tray handle open. When the tray is
slid all the way into the RAIDBank4, push the tray handle closed.
IMPORTANT: NEVER remove a drive tray without replacing it. Operating the RAID with a drive
tray missing will disrupt airflow and may cause the RAIDBank4 to fail.
!
RAIDBank4 Owner’s Manual
10
Page 11
1-Getting Started
Connecting the RAIDBank4
Connecting the RAIDBank4 requires an available power socket, and a host with one of the
following interfaces:
•AUSB2.0port
•AnexternalSATAhostbusconnectorwithlargeLUNandportmultipliersupport
•TheEthernetremotemanagementrequiresanavailableEthernetjacktoahuborswitchon
your network.
1. Plug the AC adapter cord into the power port on the back of the drive. The plug should
not require much effort to insert. If the plug will not go in, do not force it; the plug is
probably upside down. Rotate the plug and try again. Incorrectly inserting the plug
could damage the drive and void the warranty.
2. Plug the power cord into the power socket
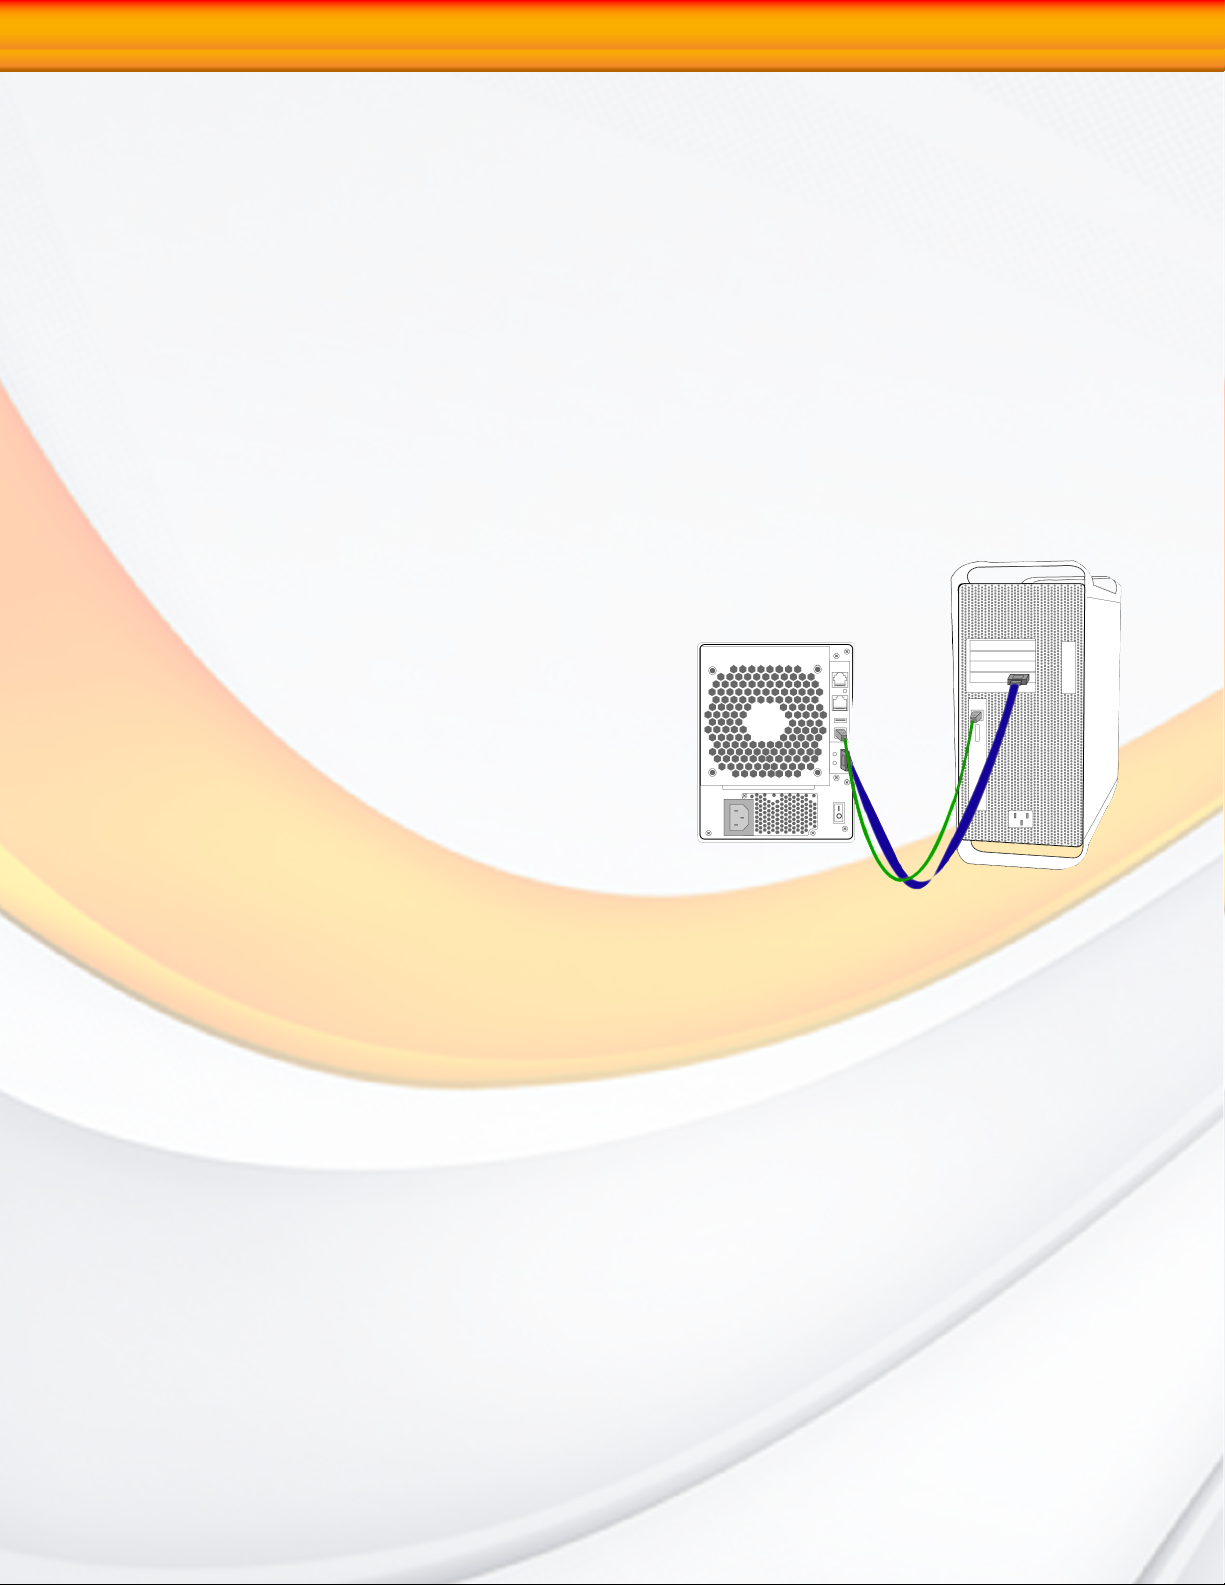
3. Connect the appropriate cable to your host. USB and eSATA plugs are shaped so they can
only be properly inserted one way. Be sure to insert the plugs properly
or you may damage the drive and void the warranty.
(USB) Connect the square USB 2.0 connector
(type B) of the included USB cable to a the
square USB plug on the RAIDBank4 (illustrated
right in green), and the rectangular end to a
free USB port on your computer.
(eSATA) Connect the included eSATA cable to
a free eSATA port on your computer (illustrated
right in blue.) If your computer does not
have eSATA ports, you may purchase an eSATA
expansion card for your computer. Contact your
authorized MicroNet reseller for further details.
4. Flip the power switch located on the back of the RAIDBank4 to the “ON” position
(labelled “-”.)
RAIDBank4 Owner’s Manual
11
Page 12
1-Getting Started
RAID System Management Controls
Following the hardware installation, the RAIDBank4 must be configured and the volume
set units initialized before they are ready to use. This can be accomplished by one of the
following methods:
• Frontpaneltouch-controlkeypad
• Webbrowser-basedRAIDmanagement
These user interfaces can access the built-in configuration and administration functions that
reside in the controller’s firmware. They provide complete control and management of the
controller and disk arrays, requiring no additional hardware or software.
Using the front panel touch-control keypad
The front panel keypad and liquid crystal display (LCD) are the primary user interface for the
RAIDBank4. All configuration and management (with the exception of firmware upgrades)
of the controller can be performed from this interface. The LCD provides a system of screens
with areas for information, status indication, or menus. The LCD screen displays up to two
lines at a time of menu items or other information.
Note:
The RAIDBank4 allows only one method
to access menus at a time.
The four function keys at the button of the front panel perform the following functions:
Key Function
Up Arrow
Down Arrow
ENT Key
ESC Key
The main menu can be activated by hitting the ENT key. Use the up and down arrow buttons to highlight a menu item. Press ENT to select the highlighted item. Press the UP/
DOWN to browse the selection. Press ESC to return to the previous screen.
Using the web browser-based RAID management
The RAIDBank4 controller firmware includes a complete HTML-based weblet application that
allows all configuration and monitoring to be performed across any IP based network, and
utilizes standard web browsers for interfacing.
To ensure proper communications between the RAIDBank4 and Web browser-based RAID
management,Pleaseconnectastandard,Cat5EthernetcabletotheRJ45networkjackonthe
back of your RAIDBank4 and attach to your existing network. In order to access the web
administration utility please note the IP address displayed on the LCD screen. You may launch
your firmware-embedded TCP/IP & Web Browser-based RAID manager by entering http://[IP
Address] in your web browser. The RAIDBank4 controller default username is “admin” and
there is no password assigned from the factory. Please refer to Chapter 6, section 6.2 for more
information on proper network settings.
Use to scroll the cursor Upward / Rightward
Use to scroll the cursor Downward / Leftward
Submit Selection Function (Confirm a selected item)
Return to Previous Screen (Exit a selection configuration)
RAIDBank4 Owner’s Manual
12
Page 13
2-Understanding RAID
Chapter 2. Understanding RAID
The RAIDBank4 controller subsystem is a high-performance SATA2 drive bus disk array
controller. When properly configured, the RAIDBank4 can provide non-stop service with
a high degree of fault tolerance through the use of RAID technology and advanced array
management features.
The RAIDBank4 can be configured to RAID levels 0, 1, 10, 3, and 5, as well as disk spans
and direct mapping. RAID levels other than 0 are able to tolerate a hard disk failure without
impact on the existing data, and failed drive data can be reconstructed from the remaining
data and parity drives. RAID configuration and monitoring is accessible through the LCD
front control panel or the built in web administration interface. The RAIDBank4 features the
following high availability functions:
•RAIDLevels0,1,10,3,5,diskspans,anddirectmappingSupport
•Upto4discreteLUNsupport
•OnlineCapacityExpansion
•OnlineRAIDLevelMigration
•LogicalDriveCapacityExtension
•ArrayRoaming
•AutomaticDriveFailureDetection
•AutomaticFailedDriveRebuilding
•HotSpareDiskDrives
•InstantAvailability/BackgroundInitialization.
techniques described by Garth Gibson, Randy Katz,
and David Patterson in papers written while they
were performing research into I/O subsystems at
the University of California at Berkeley. There are
six Berkeley RAID Levels, usually referred to by the
names RAID Level 1, etc., through RAID Level 6.
FYI:
The Berkeley RAID levels are a family of
disk array data protection and mapping
This section will help you gain understanding of how these functions can serve your needs best.
RAID
RAID is an acronym for Redundant Array of Independent Disks. It is an array of multiple
independent hard disk drives that provide high performance and fault tolerance through
support of several levels of the Berkeley RAID techniques. An appropriate RAID level is
selected when the volume sets are defined or created, and is based on disk capacity, data
availability (fault tolerance or redundancy), and disk performance considerations. The
RAIDBank4 controller makes the RAID implementation and the disks’ physical configuration
transparent to the host operating system, which means that the host operating system drivers
and software utilities are not affected regardless of the RAID level selected.
RAIDBank4 Owner’s Manual
13
Page 14
2-Understanding RAID
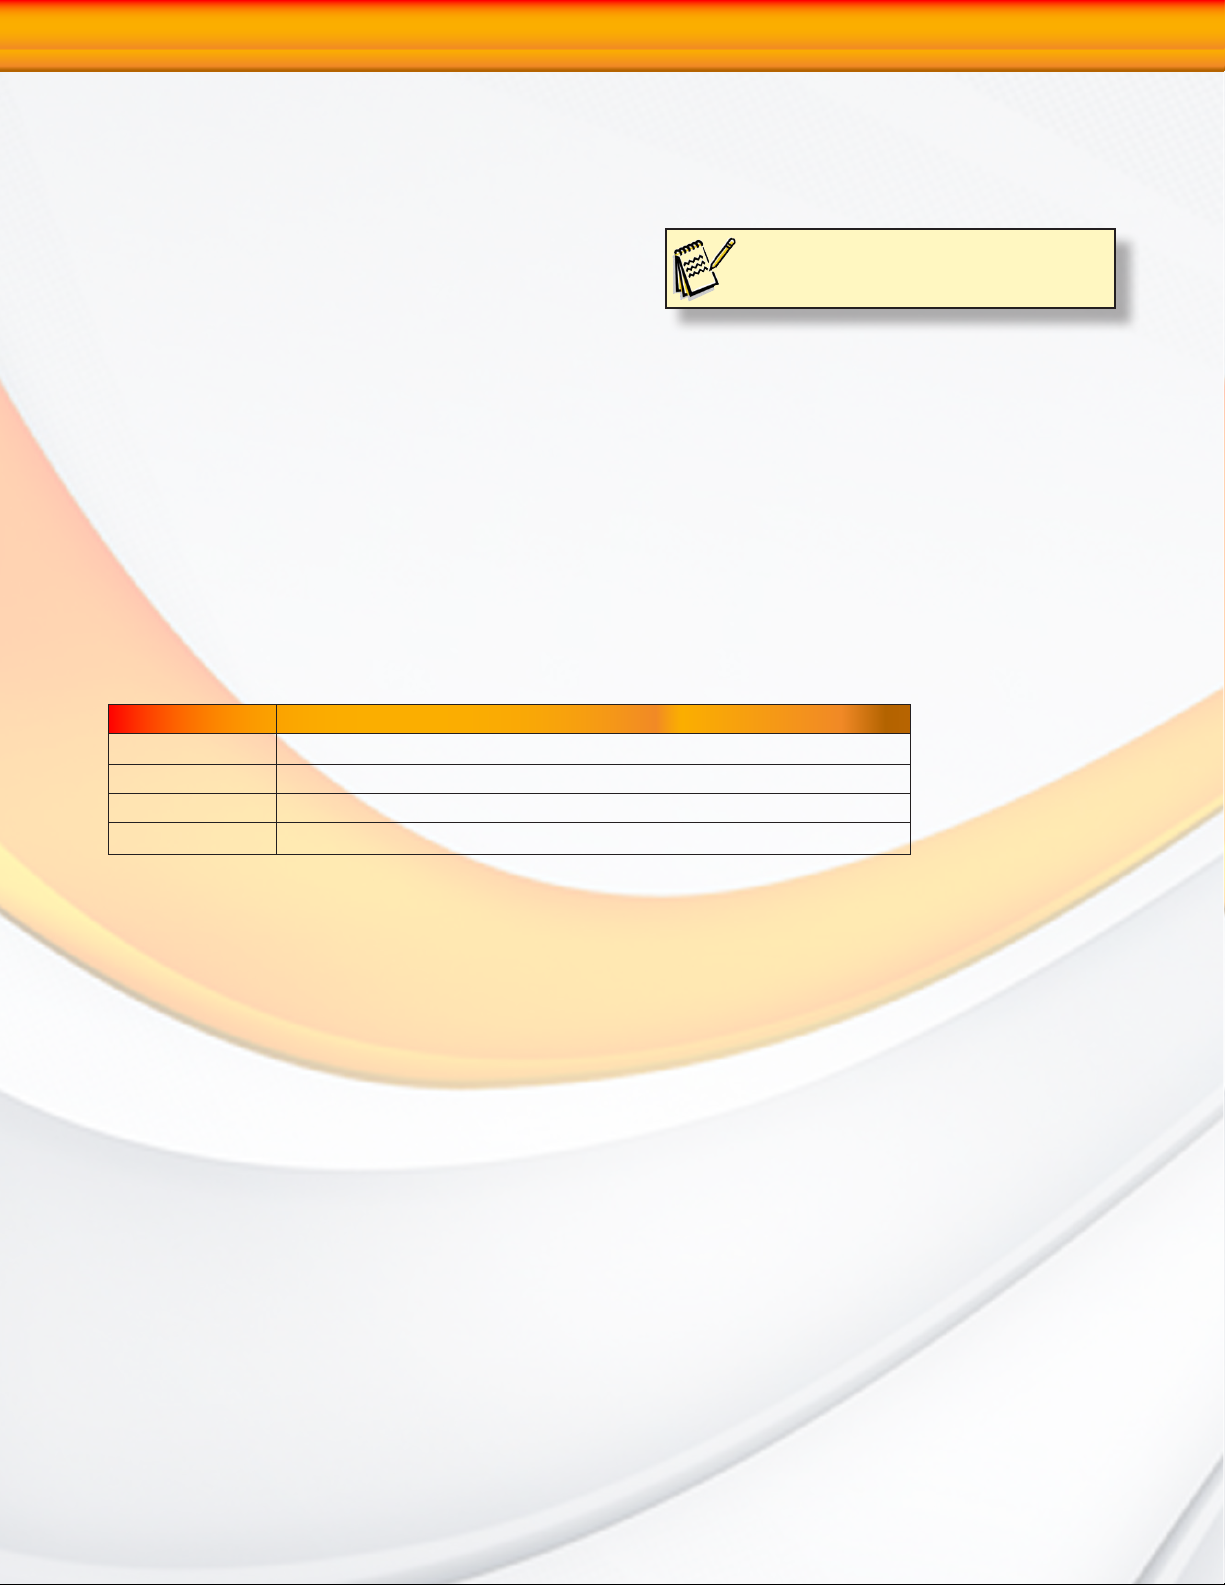
RAID 0 (Striping)
ThisRAIDalgorithmwritesdataacrossmultiplediskdrivesinsteadofjustonediskdrive.RAID
0 does not provide any data redundancy, but
does offer the best high-speed data throughput.
RAID 0 breaks up data into smaller blocks and
then writes a block to each drive in the array.
Pros: Disk striping enhances both read and
write performance because multiple drives
are accessed simultaneously,
Cons: The reliability of RAID Level 0 is less than
any of its member disk drives due to its lack
of redundancy.
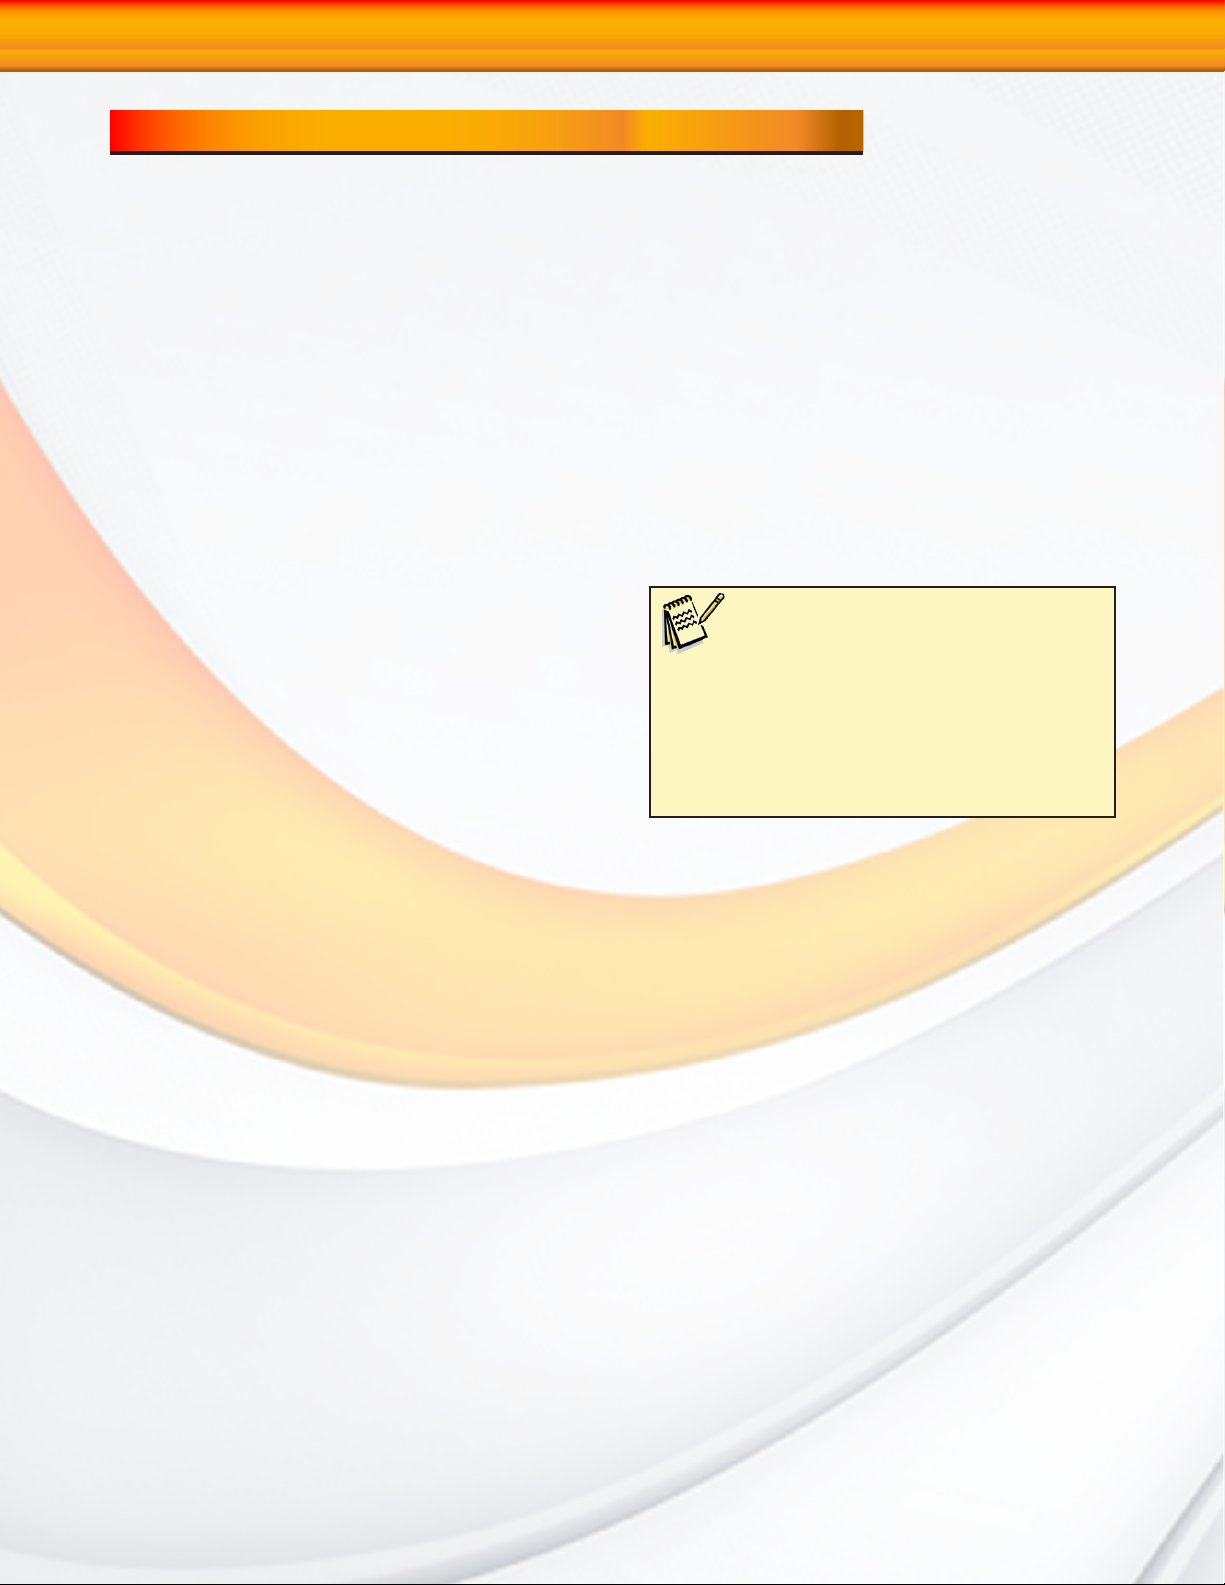
RAID 1 (Disk Mirroring)
RAID 1, also known as “disk mirroring”, distributes duplicate data simultaneously to 2 disk drives.
Pros: RAID 1 offers extremely high data reliability
as all the data is redundant. If one drive
fails, all data (and software applications)
are preserved on the other drive. Read
performance may be enhanced as the
array controller can access both members
of a mirrored pair in parallel.
Cons: RAID 1 volume requires double the raw
data storage capacity. During writes, there
will be a minor performance penalty when
compared to writing to a single disk.
RAID 10 (Striped Mirror)
RAID 10 is a combination of RAID 0 and RAID 1, combing striping with disk mirroring. RAID
Level 10 combines the fast performance of
Level 0 with the data redundancy of Leve1 1.
In this configuration, data is distributed across
several disk drives, similar to Level 0, which are
then duplicated to another set of drive for data
protection. RAID 10 provides the highest read/
write performance of any of the Hybrid RAID
levels, but at the cost of doubling the required
data storage capacity.
Pros: Fastest read/write performance of any of
the Hybrid RAID levels High data reliability
as all the data is redundant.
Cons: Requires double the raw data storage capacity
RAIDBank4 Owner’s Manual
14
Page 15
2-Understanding RAID
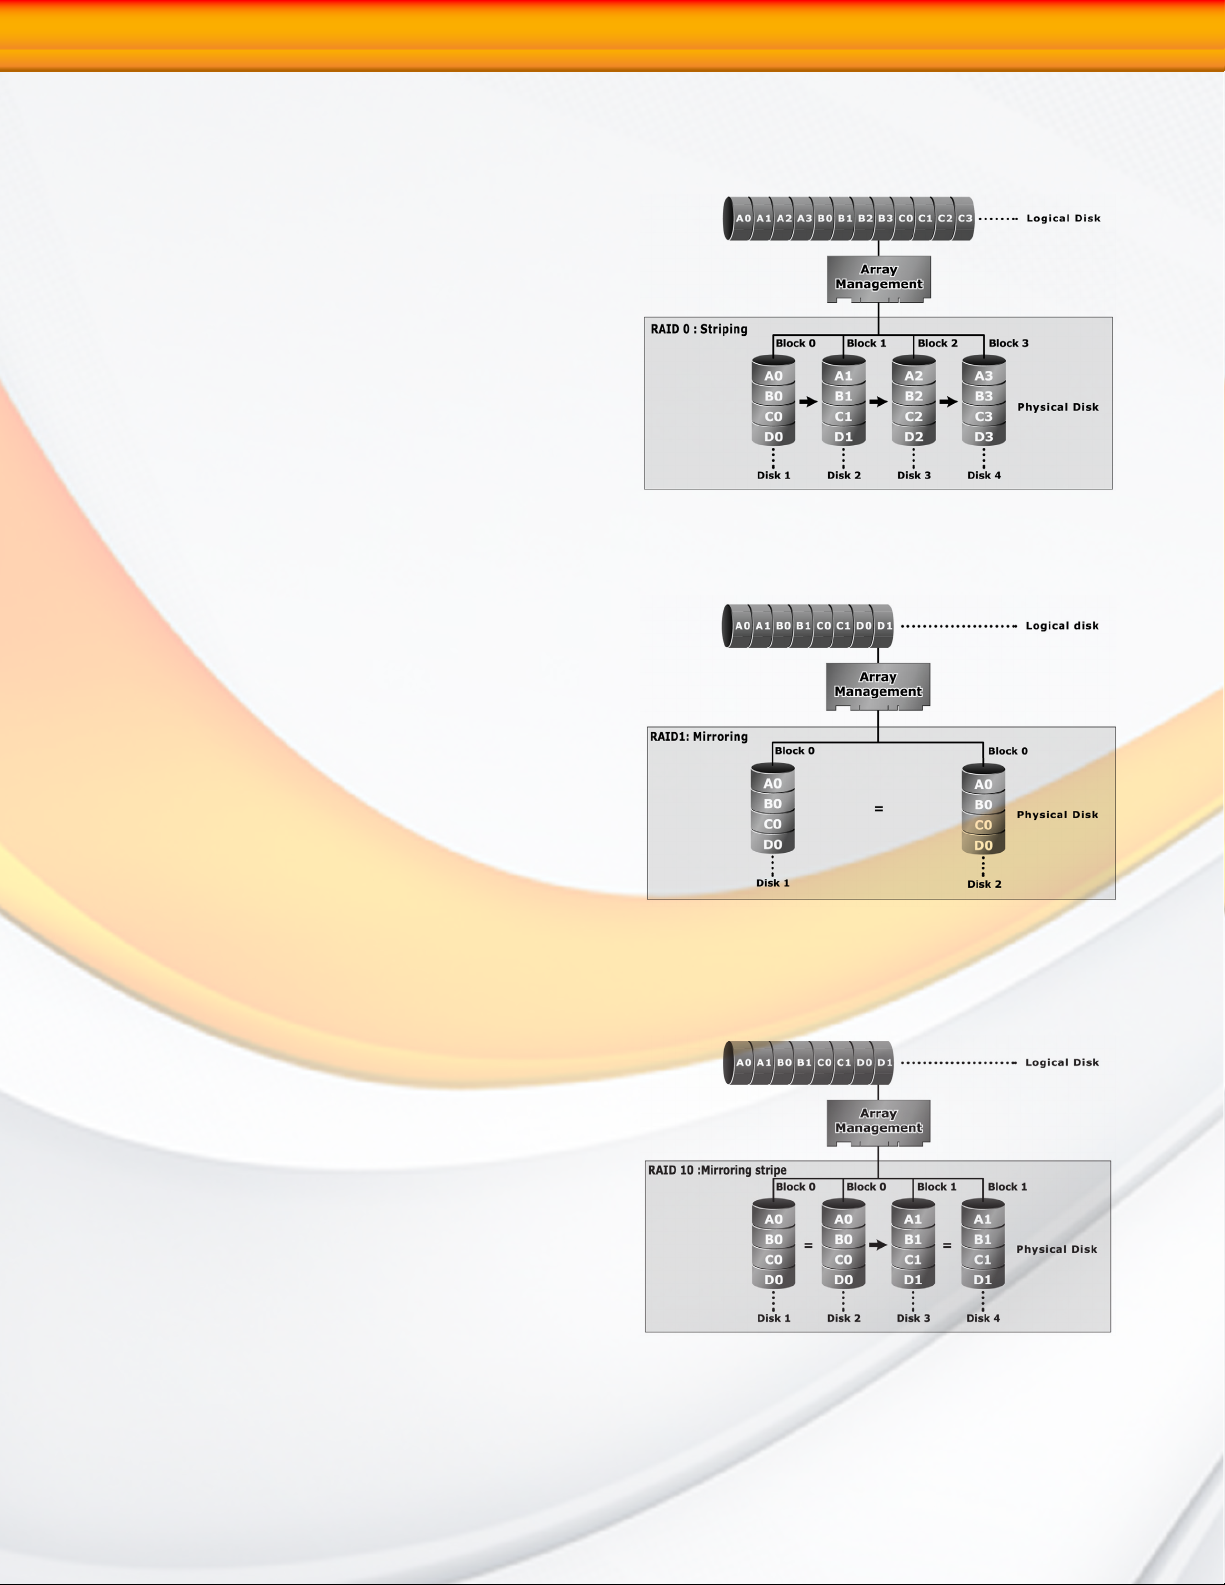
RAID 3
RAID 3 provides disk striping and complete
data fault tolerance though a dedicated parity
drive. RAID 3 breaks up data into smaller
blocks, calculates parity on the blocks, and
then writes the blocks to all but one drive in
the array. The parity data created is then written
to the last drive in the array. If a single drive
fails, data is still available by computing the
inverse operation on the data and parity of the
contents corresponding strips of the surviving
member disk. RAID 3 is best for applications
that require very fast large block data transfer
rates or long data blocks
Pros: Very good large file transfer performance. Fault tolerant.
Cons: Not well suited for transaction processing or other I/O request-intensive applications.
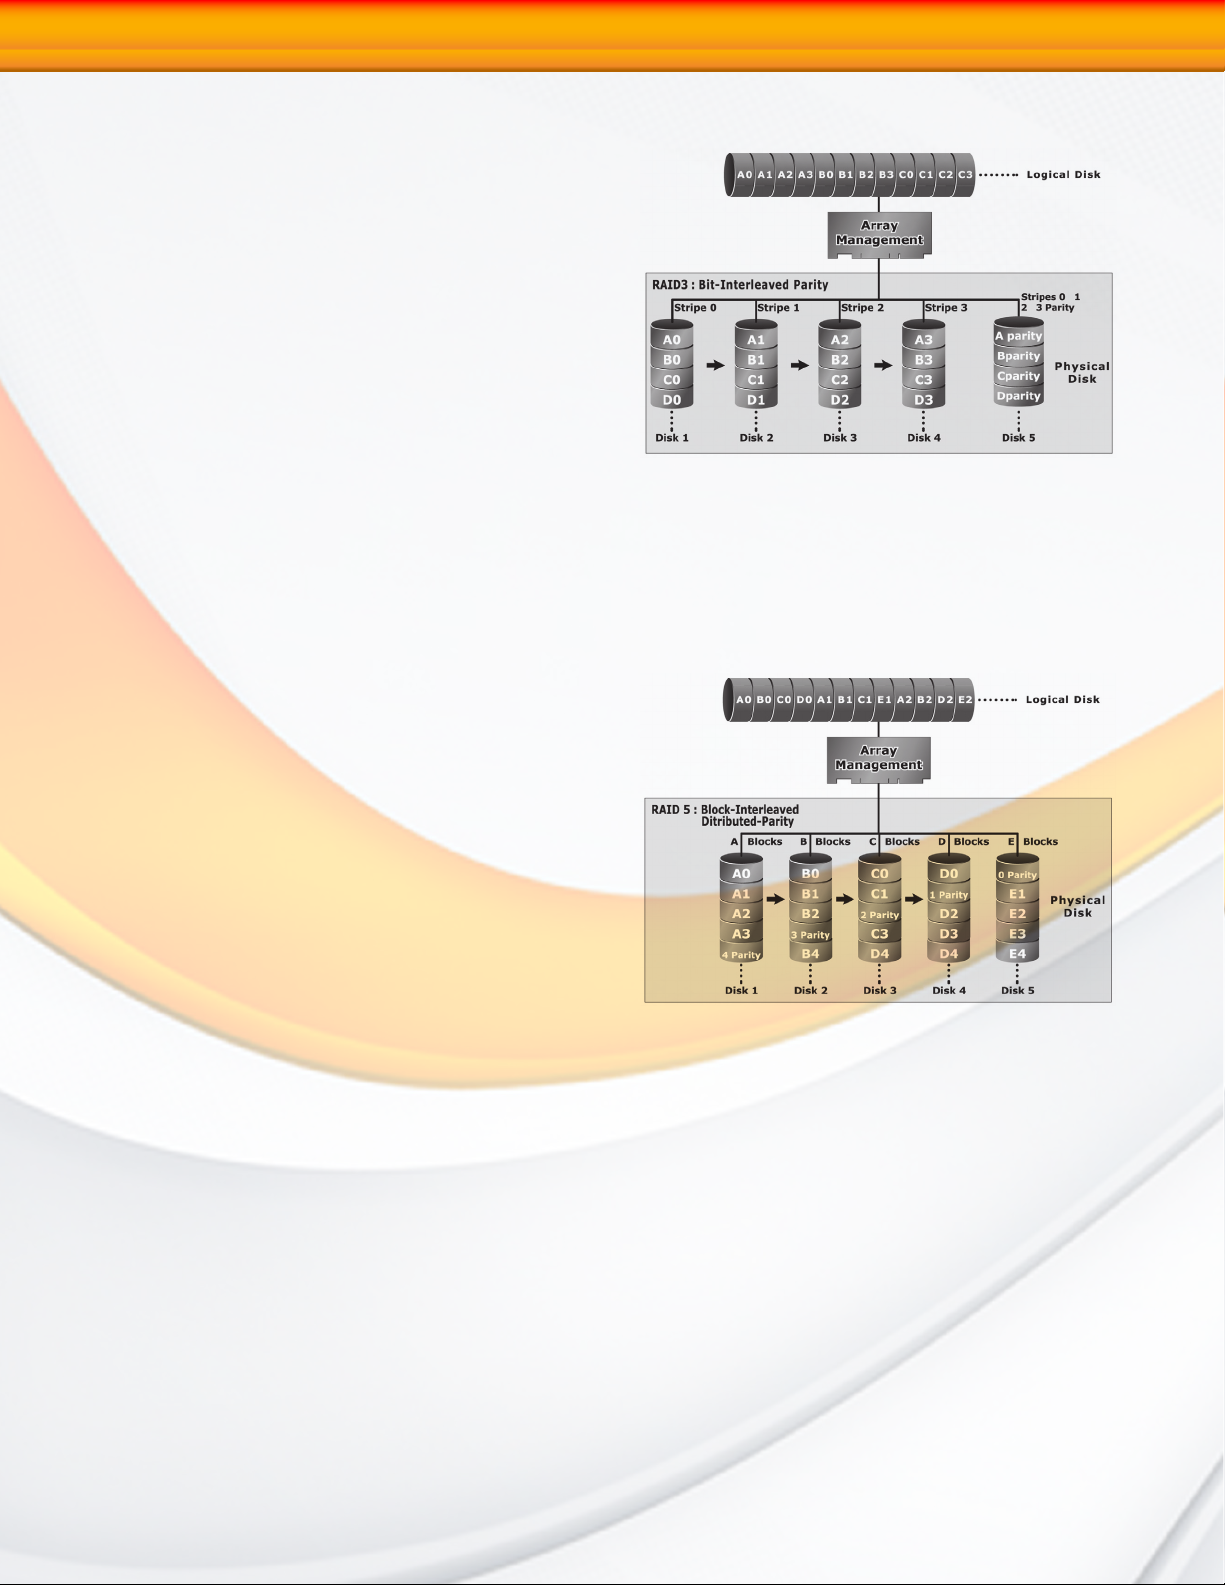
RAID 5
RAID 5 is sometimes called striping with parity
at byte level. In RAID 5, the parity information
is written to all of the drives in the subsystems
rather than concentrated on a dedicated parity
disk. If one drive in the system fails, the parity
information can be used to reconstruct the data
from that drive. All drives in the array system
can be used to seek operation at the same time,
greatly increasing the performance of the RAID
system. RAID 5 is the most often implemented
RAID algorithm in RAID arrays.
Pros: Very good general transfer performance.
Fault tolerant.
Cons: Can be slower then RAID 3 at large size file transfers
RAID Set
A RAID Set is a group of disks containing one or more volume sets. The MicroNet RAIDBank4
supports as follows:
• UptothreeRAIDSetsaresupported.PleasenotethatmultipleRAIDSetsonthesame
disks are not supported.
• FromonetofivedrivescanbeincludedinanindividualRAIDSet.
• AVolumeSetmustbecreatedeitheronanexistingRAIDsetoronagroupofavailable
individual disks (disks that are not yet a part of a RAID set). If there are pre-existing
RAID sets with available capacity and enough disks for specified RAID level desired,
then the volume set will be created in the existing RAID set of the user’s choice.
RAIDBank4 Owner’s Manual
15
Page 16
2-Understanding RAID
Volume Set
A Volume Set is seen by the host system as a single logical device. It is organized in a RAID
level with one or more physical disks. RAID level refers to the level of data performance
and protection of a Volume Set. A Volume Set capacity can consume all or a portion of
the disk capacity available in a RAID
Set. Multiple Volume Sets can exist
on a group of disks in a RAID Set.
Additional Volume Sets created in a
specified RAID Set will reside on all
the physical disks in the RAID Set.
Thus each Volume Set on the RAID Set
will have its data spread evenly across
all the disks in the RAID Set.
Data
Data Data Parity Parity
Disk 1 Disk 2 Disk 3 Disk 4
A 4 Disk RAIDset may contain two volumes. Volume 1 can be
assigned a RAID 5 level of operation while Volume 2 might be
assigned a RAID 0+1 level of operation.
Data Data
• Volume SetsofdifferentRAID
levels may coexist on the same
RAID Set.
• Themaximumaddressablesizeofasinglevolumesetis2Terabytes.
• UptoeightvolumesetscanbecreatedinaRAIDset
Parity
Free Space
Volume 1
Volume 2
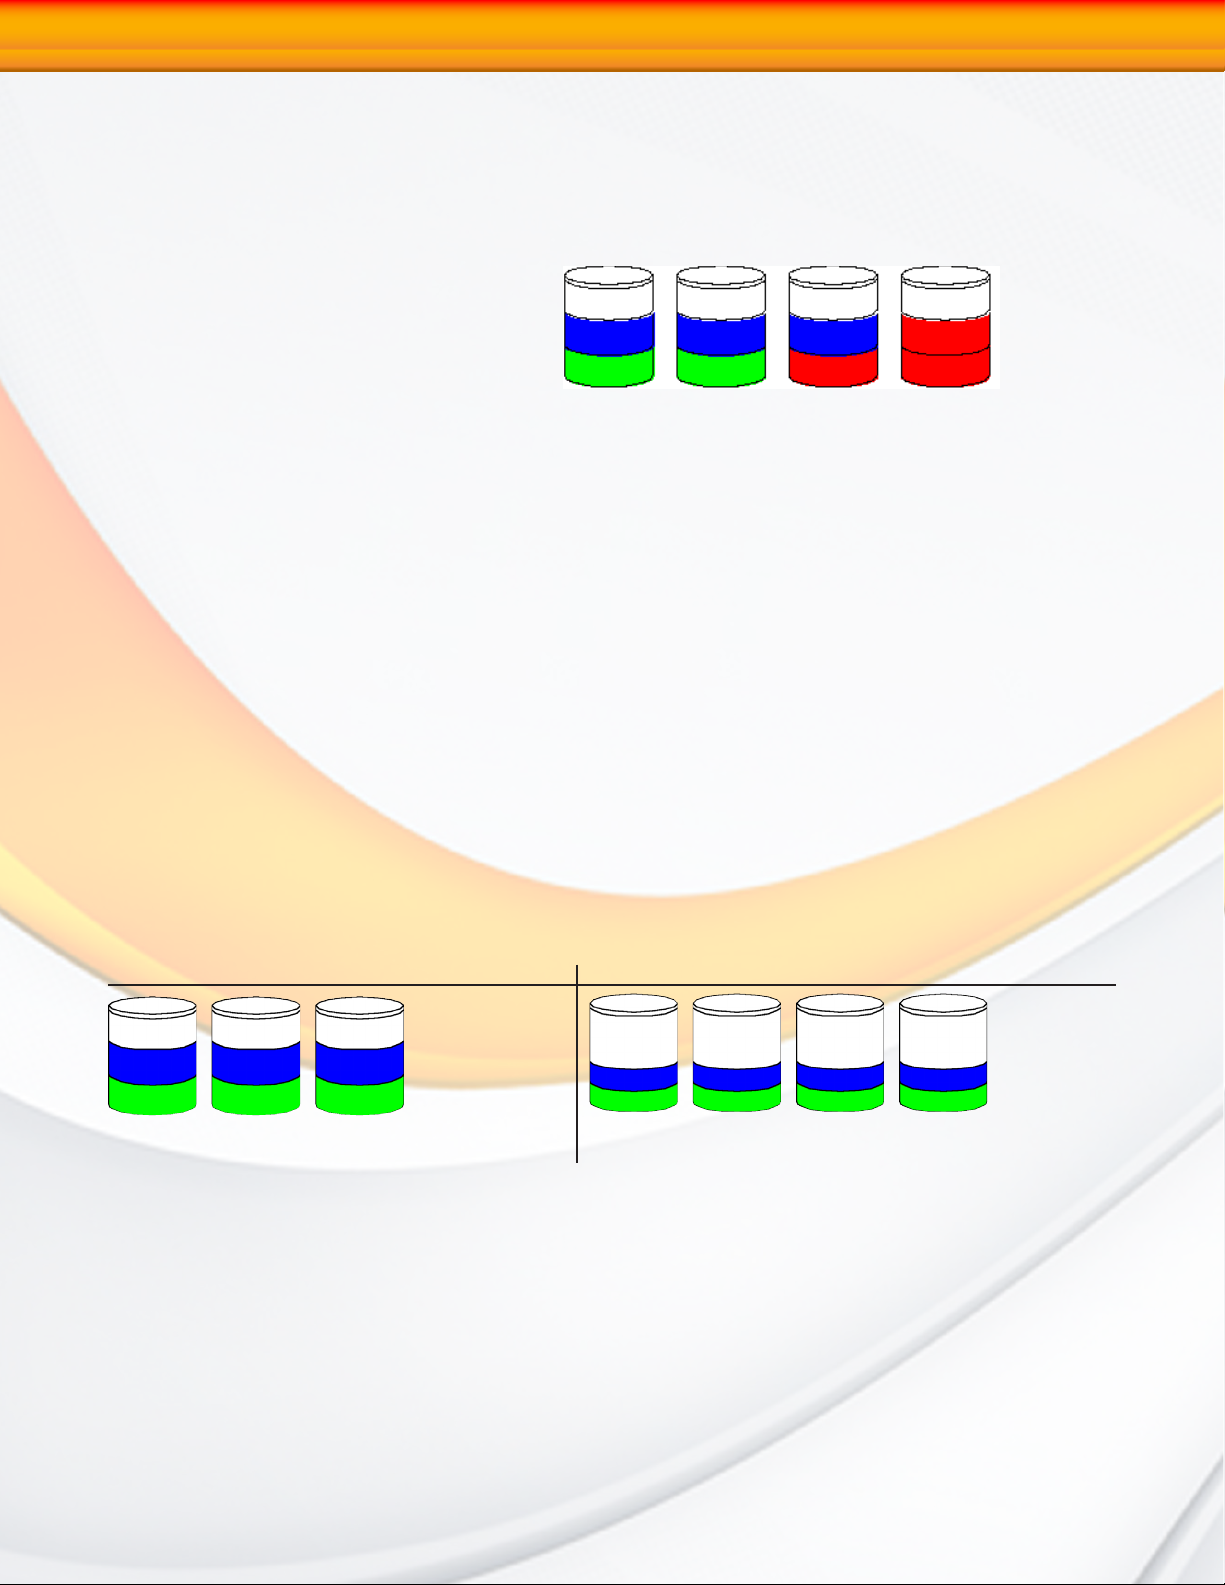
Online Capacity Expansion
Online Capacity Expansion makes it possible to add one or more physical drives to a volume set,
while the server is in operation, eliminating the need to store and restore after re-configuring
the RAID set. When disks are added to a RAID set, unused capacity is added to the end of the
RAID set. Data on the existing volume sets residing on that RAID set is redistributed evenly
across all the disks. A contiguous block of unused capacity is made available on the RAID set.
The unused capacity can create additional volume set. The expansion process is illustrated
as following figure:
Before Expansion: Disk Array A, 600GB After Disk Expansion: Disk Array A, 800GB
Free Space
200GB
Vol 1 (200GB)
Vol 2 (200GB)
Disk 1
200GB
The RAIDBank4 controller redistributes the original volume set over the original and newly added disks, using the same faulttolerance configuration. The unused capacity on the expanded RAID set can then be used to create additional volume sets,
with a different fault tolerance setting if required.
Disk 2
200GB
Disk 3
200GB
Disk 1
200GB
Disk 2
200GB
Disk 3
200GB
Disk 4
200GB
Free Space
400GB
Vol 1 (200GB)
Vol 2 (200GB)
Array Roaming
The RAIDbank4 stores configuration information both in NVRAM and on the disk drives,
and can protect the configuration settings in the case of a disk drive or controller failure.
Array roaming allows the administrator the ability to move a complete RAID set to another
system without losing RAID configuration and data on that RAID set. Should the RAIDBank4
enclosure cease to function, the RAID set disk drives can be moved to another RAIDBank4,
inserted in any order, and become instantly available.
RAIDBank4 Owner’s Manual
16
Page 17

2-Understanding RAID
Hot Swappable Disk support
Your RAIDBank4 has a built in protection circuit to support replacement of disk drives
without having to shut down or reboot the RAID. In case of drive failure, the failed drive can
be removed from the RAIDBank4 and replaced with a new drive without disrupting dataflow
to the host computer.
Instant Availability/Background Initialization
RAID 0 and RAID 1 volume set can be used immediately after the creation, whereas RAID
3 and 5 volume sets must be initialized to generate parity information. RAIDBank4 features
both foreground and background initialization modes for RAID 3 and RAID 5 volumes- In
background mode, the initialization proceeds as a background task and the volume set is
fully accessible for system reads and writes without requiring a reboot and waiting for the
initialization completion. Furthermore, the RAID volume set is also protected against a single
disk failure while initialing. Background initialization takes longer to complete and host
disk access will be slower during the initialization process. Foreground Initialization must
be completed before the volume set is ready for system accesses, but the RAID Initialization
completes faster.
Online RAID Level and Stripe Size Migration
Users can migrate both the RAID level and stripe size of an existing volume set, while the
RAIDBank4 is online and the volume set is in use. Online RAID level/stripe size migration
can prove helpful during performance tuning activities as well as at the addition of physical
disks to the RAIDBank4. For example, in a system using two drives in RAID level 1, you could
add capacity and retain fault tolerance by adding one drive. With the addition of third disk,
you have the option of adding this disk to your existing RAID logical drive by migrating from
RAID level 1 to 5. The result would be parity fault tolerance and double the available capacity
without taking the system offline.
Hot Spare Drives
A hot spare drive is an unused online available drive predesignated for replacing a failed
disk drive. Any unused online available drive installed but not belonging to a RAID set can
be defined as a hot spare drive. Hot spares permit you to replace failed drives automatically
without powering down your RAIDBank4. When your RAIDBank4 detects a drive failure in a
RAID 1,10,3 or 5 volume sets the system will automatically and transparently rebuild using any
available hot spare drive(s). The volume set(s) will be reconfigured and rebuilt in background,
while the RAIDBank4 continues to handle system requests. During the automatic rebuild
process, system activity will continue as normal, but system performance will be reduced and
the affected volume(s) will not be fault tolerant until the rebuild process is complete.
Hot-Swap Disk Rebuild
A Hot-Swap function can be used to rebuild disk drives in arrays with data redundancy such
as RAID level 1, 10, 3, and 5. If a hot spare is not available at time of drive failure, the failed
disk drive must be replaced with a new disk drive so that the data on the failed drive can be
rebuilt. Upon insertion of a replacement disk, the RAIDBank4 automatically and transparently
rebuilds failed drives in the background with user-definable rebuild rates. The RAIDBank4
will automatically restart the system and the rebuild if the system is shut down or powered
off abnormally during a reconstruction procedure condition. Please note that the affected
volume(s) will not be fault tolerant until the rebuild process is complete.
RAIDBank4 Owner’s Manual
17
Page 18

3-RAID Control-LCD
Chapter 3. RAID Controls- LCD Interface
This Chapter describes the menu and control structure for your RAIDBank4 using the front
panel, serial port, or via Telnet. The RAIDBank4 configuration utility is firmware-based and
its operation is independent of host computer type or operating system.
Conventions
In this chapter, menu navigation is
described as follows:
UP/DOWN scrolling through options
ENT making selections
ESC Cancelling current menu choice
Login Procedure
MicroNet Tech
By Default, The RAIDBank4 ships without a password defined (user changeable to protect the
internal RAIDBank4 from unauthorized entry). The controller will check the password only
when entering the main menu from the initial screen The RAIDBank4 will automatically go
back to the initial screen when it does not receive any command in twenty seconds.
The Main Menu Configuration Tree
1. Quick Volume/RAID Setup
2. RAID Set Function 2.1 Create RAID Set
2.2 Delete RAID Set
2.3 Expand RAID Set
2.4 Offline RAID Set
2.5 Activate RAID Set
2.6 Create Hot Spare
2.7 Delete Hot Spare
2.8 RAID Set Information
3. Volume Set Function 3.1 Create Volume Set
3.2 Delete Volume Set
3.3 Modify Volume Set
3.4 Check Volume Set Consistency
3.5 Stop Volume Set Consistency
3.6 Display Volume Info
4. Physical Drives 4.1 Display Drive Information
4.2 Create Pass-Through Disk
4.3 Modify Pass-Through Disk
4.4 Delete Pass-Through Disk
4.5 Identify Selected Drive
5. RAID System Controls 5.1 Mute The Alert Beeper
5.2 Alert Beep Setting
5.3 Change Password
5.4 JBOD/RAID Operation
5.5 RAID Rebuild Priority
RAIDBank4 Owner’s Manual
18
Page 19
3-RAID Control-LCD
5.6 Max SATA Mode Support
5.7 Host NCQ Setting
5.8 Volume Read Ahead Cache
5.9 Staggered HDD Spin Up control
5.10 HDD Idle Spindown
5.11 Empty tray LED Control
5.12 HDD SMART Status Polling
5.13 Disk Capacity Truncation
5.14 Serial Port Configuration
5.15 Reset Controller
6. Additional System Functions 6.1 Ethernet Configuration
6.2 View System Events
6.3 Clear All Event Buffers
6.4 Hardware Monitor
6.5 System Information
CONSIDERATIONS FOR RAID VOLUME CREATION
Your RAIDBank4 is capable of creating large logical volumes (LUNS) in excess of 2 Terabytes.
!
Large LUNS (>2TB) must be supported by the host bus adapter and the host Operating System to
be usable. Windows 2003, Vista, Windows 2008, Mac OS X >10.4.8, and Linux distributions with
appropriate kernels all support large LUNS. Windows XP and prior cannot address large LUNS natively
over USB, and must use eSATA host bus adapters that have RAID support to be usable. MicroNet offers such
host bus adapters- consult your MicroNet authorized reseller for more information.
1. Quick Volume/RAID Setup
Quick Volume And RAID Setup is the fastest way to prepare a RAID and volume set, and
needs few keystrokes to complete. This function creates a single RAIDset and one volume set,
and you can modify the RAID level, stripe size, capacity, and designating drives as Hot Spares.
The created RAIDset will have the following properties (default setting values can be changed
after configuration is completed):
Parameter Setting
Volume Name Volume Set#00
Host Channel/ Drive Select SATA/0
Cache Mode Write Back
SATA Xfer Mode SATA300+NCQ
1.1 Specify desired RAID level and spare configuration
1.2 Select volume set capacity size. When choosing >2TB support, make sure the host operating
system can support the volume (see “Consideration for RAID volume creation” above)
1.3 Select stripe sizes for the current volume set. This parameter specifies the size of the stripes
written to each disk in a RAID 0, 1, 10, or 5 volume set. You can set the stripe size to 4 KB, 8
KB, 16 KB, 32 KB, 64 KB, or 128 KB. A larger stripe size provides better-read performance,
especially if your computer does mostly sequential reads. However, if you are sure that your
computer does random read requests more often, choose a small stripe size.
1.4 Specify foreground or background initialization. Background initialization will make
the volume immediately available to host access, but initialization will complete slower.
Foreground Initialization must be completed before the volume set ready for system
accesses, but will complete quicker.
RAIDBank4 Owner’s Manual
19
Page 20
3-RAID Control-LCD
2. RAID Set Functions
Select the RAID Set Function to manually configure the RAID set for the first time or delete/
reconfigure existing RAID sets. The RAID Set function allows more complete control over
the RAID creation process, but requires more interaction then the Quick Volume/RAID Setup
option. To enter a RAID Set Functions, press ENT to enter the Main menu. Scroll to select
the “RAID Set Functions” option and press ENT to enter further submenus. All the RAID set
submenus will be displayed.
2.1 Create A New RAID Set
Choose “RAID Set Function”
from the main menu. Select the
“Create RAID Set” and press ENT.
Select the drives to be used in the
RAIDSet. Press UP/DOWN buttons
to select specific physical drives,
and press the ENT key to associate
the selected physical drive with
RAID set.
RAID 0 requires 1 or more physical drives per RAID set.
RAID 1 requires at least 2 physical drives per RAID set.
RAID 1 + Spare requires at least 3 physical drives per RAID set.
RAID 3/5 requires at least 3 physical drives per RAID set.
RAID 3/5 + Spare requires at least 4 physical drives per RAID set.
the current RAID set. When all
required drives are added press ENT to commit. The RAIDSet is now ready for volume creation
(See Section 3.1 “Create a Volume Set”)
Note:
The numbers of physical drives in a specific RAID set
determine the RAID levels that can be implemented with the
2.2 Delete Existing RAID Set
Once this option is selected, scroll to select the RAID set number to delete and press ENT.
A Confirmation screen appears, and press ENT to delete the existing RAID set. A second
confirmation screen will appear, and choose “Yes” to complete the deletion.
2.3 Expand Existing RAID Set
The Expand existing RAID Set function allows the user to
add disk drives to the RAID set that already exists. To expand
an existing RAID set, scroll to choose the “Expand Existing
RAID Set” option. Scroll to select the RAID set number to be
expanded and then press ENT. If there is an available disk,
Note:
If a disk drive fails during
RAID set expansion and
a hot spare is available, an auto
rebuild operation will occur after
the RAID set expansion completes.
then the Select Drive Channel x appears. Scroll to select the
target disk and then press ENT to select it. Press ENT to start the expansion process. The
new added capacity will be available for new volume sets. To define one or more volume sets,
follow the instruction presented in the Volume Set Function to create the volume sets. When
RAID migration is in progress, migration status is displayed in the RAID and volume status
areas of the RAID Set information.
IMPORTANT: Once the RAID Set expansion process has started it cannot be stopped. The process
!
must complete before any other RAID functions will be available.
2.4 Offline RAID set
You can selectively offline RAID Sets to limit access or for diagnostics. Select the RAIDset to
bring offline and press ENT. Following confirmations, all Hdds of the selected RAIDset will
be put into offline state, spun down and fault LED will be in fast blinking mode.
RAIDBank4 Owner’s Manual
20
Page 21

3-RAID Control-LCD
2.5 Activate RAID set
Following a drive failure, the affected Parity or mirrored RAIDset will operate in degraded
mode, and will continue to function until the unit is reset. Following a reset, in order for a
degraded RAIDset to be available to the host it must be activated. Select “Activate RAID Set”
option. Scroll to select the RAID set number to be activated and then press ENT.
ACTIVATING AN INCOMPLETE RAIDSET
When one of the disk drives is removed and the RAID rebooted, the RAID set state will change to
!
Incomplete and will not be available at first boot. To force the RAIDset to be available, use the
Activate RAIDSet (2.5) option. The RAIDset will become available in degraded state.
2.6 Create Hot Spare Disk
Hot spare disks are disks predesignated to be available for parity or mirrored volumes to
rebuild volume data upon a RAID member disk failure. To designate a disk as a hot spare,
select the “Create Hot Spare”, select the disk and press ENT to set.
2.7 Delete Hot Spare Disk
To delete hot spare, choose the “Delete Hot Spare Disk” option. Select the hot spare to delete
and then press ENT to select it. The confirmation screen appears, and press ENT to delete
the hot spare.
2.8 Display RAID Set Information
Scroll to the Display RAID Set Information option and press ENT. Select the RAID set desired,
and the RAID set information will be displayed. Scroll through the available options to see
RAID Set Name, Total Capacity, Free Capacity, Number of Member Disks, Min. Member Disk
Capacity and RAIDSet State.
3. Volume Set Function
A volume set is seen by the host system as a single logical device, and is organized in a RAID
level with one or more physical disks. RAID level refers to the level of data performance and
protection of a Volume Set. The RAIDBank4 supports up to 4 simultaneous volume sets in
varying RAID level configurations. Creating volume sets require that a RAIDset is already
defined- to create a RAIDset please see section 2.1 “Create RAIDset” of this chapter. A Volume
Set capacity can consume all or a portion of the disk capacity available in a RAID Set, and
multiple Volume Sets can exist on a group of disks in a RAID Set. All Volume Sets created in
a specified RAID Set will reside on all the physical disks in the RAID Set, and the data spread
evenly across all the disks in the RAID Set. To enter a Volume Set Function, press ENT to enter
the main menu. Scroll to select the Volume Set Functions option and then press ENT to enter
further submenus.
3.1 Create RAID Volume Set
3.1.1 To create a new volume set, choose “Volume Set Functions” from the Main menu. Select the
“Create Volume Set” and press ENT.
3.1.2 select the desired RAIDset from the screen and Press ENT. The volume set attributes screen
will appear.
3.1.3 Select wether large LUN support is to be used. Large LUNS (>2TB) must be supported by the
RAIDBank4 Owner’s Manual
21
Page 22

3-RAID Control-LCD
host bus adapter and the host Operating System to be usable. Windows 2003, Vista, Windows
2008, Mac OS X >10.4.8, and Linux distributions with appropriate kernels all support large LUNS.
Windows XP and prior cannot address large LUNS natively over USB, and must use eSATA host
bus adapters that have RAID support to be usable. MicroNet offers such host bus adapters- consult
your MicroNet authorized reseller for more information.
3.1.4 The volume set attributes screen shows the volume set default configuration value that is
currently being configured. The volume set attributes are:
Volume Name Default name is RAIDbank-VOL#nn. You can rename the volume set
name providing it does not exceed 15 characters.
RAID Level RAID level 0,1, 0+1 (10), 3 and 5.
Stripe Size This parameter sets the size of the segment written to each disk in a
RAID 0, 1, 3, or 5 logical drive. You can set the stripe size to 4 KB,
8 KB, 16 KB, 32 KB, 64 KB, or 128 KB. A larger stripe size produces
better-read performance for mostly sequential reads. For better
random reads performance, select a smaller stripe size.
Write Cache Mode RAIDBank4 supports Write-Through and Write-Back Caching algo-
rithms. In the Write-Back caching method, modications to data in
the cache aren’t copied to the cache source until absolutely necessary, whereas Write-Through cache data is written to the storage and
the cache memory simultaneously. Write-back caching yields better
performance than write-through caching because it reduces the number of write operations to disk, but is also more prone to data loss due
to service interruptions.
HOST Channel (SATA/USB) RAIDBank4 supports two host channels. Host Channel 0 is the host
eSATA interface, and Channel 1 is the USB 2.0 host interface.
Drive Number (LUN 0-4) RAIDBank4 supports 4 logical units. Any Volume Set may be mapped
to eSATA and/or USB host channels independently.
Host SATA Transfer Mode. SATA150, SATA150+NCQ, SATA300, SATA300+NCQ (default.)
SIMULTANEOUS HOST CHANNEL VOLUME MAPPING
The RAIDBank4 can map a Volumeset to both host channels simultaneously for clustering environment.
!
Never attempt to mount the same volume on both channels without proper clustering software.
Mounting the same volume on both channels without proper software can result in
data corruption or loss!
Press the UP/DOWN buttons to select the attributes. Press the ENT to modify each attribute of
the default value. Using UP/DOWN buttons to select attribute value or press ENT to accept the
default value. To complete the attribute definition, press ESC
3.1.5 Enter the appropriate volume size to fit your application. Each volume set must have a
selected capacity which is less than or equal to the total capacity of the RAID set on which
it resides.
3.1.6 Press ENT to select foreground initialization or ESC to select background initialization.
Background initialization allows immediate access to the new volume but at an increase volume
creation time. Foreground initialization does not allow access to the host until completion but at
a faster completion rate.
RAIDBank4 Owner’s Manual
22
Page 23

3-RAID Control-LCD
3.2 Delete Volume Set
Scroll to choose the Delete Existing Volume Set option. Select the RAID set number and
volume set to delete and press ENT. At the subsequent confirmation screen, press ENT to
confirm deletion.
3.3 Modify Volume Set
Use this option to modify an existing volume set attributes as described in the above section.
To modify volume set attributes scroll to choose the “Modify Volume Set Attribute option” from
the “RAID set system” function. Select the RAID set number to modify and press ENT. Select the
volume set number that user want to modify and press ENT. The volume set attributes screen
shows the volume set setting configuration attributes that was currently being configured.
Select attribute to change and Press the ENT to modify the default value. Select attribute value
and press the ENT to accept the selection value. Choose this option to display the properties
of the selected Volume Set; you can modify all values except the capacity.
Note:
When a volume set is migrating from one RAID level to another, a volume set stripe size changes, or when a disk
is added to a RAID set the volume state will change to migrating. During migration. The migration status will be displayed
in the volume state area of the LCD display. No additional volume changes can be performed until migration completes.
3.4 Check Volume Set Consistency
To check volume set consistency from volume set system function, scroll to choose the “Check
Volume Set Consistency” option. Select the RAID set number to check and press ENT. Select
the volume set number to check and press ENT. At the subsequent confirmation screen, press
ENT to start the volume set consistency check.
3.5 Stop Volume Set Consistency Check
To stop volume set consistency check from volume set system function, scroll to choose the
“Stop Volume Set Consistency Check” and then press ENT.
3.6 Display Volume Set Information
To display volume set information, scroll to choose the “Display Volume Information” option
and then press ENT. Select the RAID set number that user wants to show and press ENT.
Select the volume set number to display and press ENT. The volume set attributes screen
shows the volume set setting configuration value that was currently being configured. See this
chapter, section 3.1-”Create RAID Volume Set” for the various RAID attribute descriptions.
RAIDBank4 Owner’s Manual
23
Page 24

3-RAID Control-LCD
4. Physical Drive Functions
Choose this option from the Main Menu to select a physical disk and to perform the operations
listed below. To enter a Physical Drive Functions, press ENT to enter the main menu. Scroll
to select the Physical Drive Functions option and then press ENT to enter further submenus.
All physical drive submenus will be displayed.
4.1 Display Drive Information
Select the View Drive Information option and press ENT. Select the drive to display. The drive
information screen shows the Model Name, Serial Number, Firmware Rev., Device Capacity,
Current SATA Transfer mode, Supported SATA Transfer mode, and Device State.
4.2 Create a Pass-Through Disk
A Pass-through disk can be defined to dedicate a single disk as not controlled by the RAIDBank4
firmware and thus cannot be a part of a RAID set. Instead, the disk is available to the operating
system as an individual disk. To create a Pass-Through disk, select the Create Pass-Through
Disk option and press ENT. Select the drive number to create, and the drive attributes will be
displayed. Select attribute to modify and then press ENT. Select attribute value and press the
ENT to accept the selection value.
4.3 Modify Pass-Through Disk
To modify Pass-Through Disk attributes, scroll to choose the “Modify Pass-Through Drive”
option, and then press ENT. The Select Drive Function menu will show all Pass-Through Drive
number items. Select the Pass-Through Disk to modify and press ENT. The attributes screen
shows the Pass-Through Disk setting value currently configured. Select the desired attribute
to modify and Press ENT to modify the default value. Select attribute value and press ENT to
accept the selection. After completing the modification, press ESC to enter the confirmation
screen and then press ENT to accept.
4.4 Delete Pass-Through Disk
To delete pass-through drive from the pass-through drive pool, scroll to choose the “Delete
Pass-Through Drive option”, and then press ENT. The Select Drive Function menu will show
all Pass-Through Drive number items. Select the Pass-Through Disk to delete and press ENT.
The Delete Pass-Through confirmation screen will appear. Press ENT to confirm deletion.
4.5 Identify Selected Drive
This function is designed to prevent removing the wrong drive by illuminating the selected
disk HDD LED Indicator. To identify the selected drive from the physical drive pool, scroll to
choose the “Identify Selected Drive” option and press ENT. Select the Disk to identify and
press ENT. The selected disk HDD LED indicator will flash.
RAIDBank4 Owner’s Manual
24
Page 25

3-RAID Control-LCD
5. RAID System Functions
To control the RAID System, Select the “RAID System Function” option and then press ENT
to enter further submenus. Scroll to select the submenus and then press ENT to enter the
specified function.
5.1 Mute The Alert Beeper
Select the “Mute The Alert Beeper” function to mute the RAIDBank4 alert buzzer. Press ENT
in the dialog box to turn the beeper off temporarily. The buzzer will still activate on any
subsequent fault.
5.2 Alert Beeper Setting
The Alert Beeper setting function item is used to enable or disable the RAIDBank4 controller
alarm tone generator. Scroll to the “Alert Beeper Setting” selection and press ENT. Press ENT
at the confirmation screen to accept the function.
5.3 Change Password
The RAIDBank4’s administrative functions can be protected with a password. To set or change
the RAIDBank4 password, scroll to the “Change Password” selection and press ENT. The New
Password: screen appears, and a new password may be entered. If the LCD front panel is used,
use the UP/DOWN keys to select the letters and ENT to move to the next letter; When done,
Press ENT repeatedly until the confirmation screen will be displayed. To disable the password,
press ENT repeatedly in the password field and ENT in the confirmation screen. The existing
password will be cleared.
5.4 JBOD/RAID Configuration
The RAIDBank4 controller can be used in JBOD (Just a Bunch Of Drives) mode, which allows
each drive to be presented separately to the host. To use this mode, make sure to erase any
existing RAID sets.
5.5 RAID Rebuild Priority
The RAID Rebuild Priority is a relative indication of how much processor time the controller
devotes to a rebuild operation. The RAIDBank4 allows user to choose the rebuild priority
(low, normal, high) to balance volume set access and rebuild tasks appropriately.
To set or change the RAIDBank4 RAID Rebuild Priority, Select “RAID Rebuild Priority” option
and press ENT. Set the rebuild value at the rebuild priority selection screen that appears, and
press ENT at the confirmation screen.
5.6 Maximum SATA Mode
The RAIDBank4 uses 4 discrete SATA busses for its disk channels. These drive channels can
support up to SATA300 and NCQ (Native Command Queuing,) A SATA function controlling
dynamic rearranging of data fetching commands for maximum performance. Please do not
change this setting unless instructed by MicroNet’s technical support.
RAIDBank4 Owner’s Manual
25
Page 26

3-RAID Control-LCD
5.7 Host Channel NCQ Setting
The RAIDBank4 supports Native Command Queuing (NCQ) over the eSATA host connection.
The NCQ algorithms allow I/O operations to be performed out of order to optimize performance.
Since different host bus adapters have some compatibility differences in NCQ implementation,
The default setting on this option is Disable for better compatibility. To enable NCQ, choose
the option that matches your eSATA host bus adapter:
•ESB2/MACPro/Siliconlimage:IntelESB2,MACPro,MicroNet,andSiliconImagebasedadapters
•ICH:IntelICHseriesbasedadapters
•Marvell6145:Marvell6145basedadapters
•nVidia:NvidianForcebasedadapters
5.8 HDD Read Ahead Cache
Enabled by default. Please do not change this setting unless instructed by MicroNet’s Technical Support.
5.9 Staggered HDD Spinup control
The RAIDBank4 employs a staggered disk mechanism startup sequence to minimize power supply
strain. Please do not change this setting unless instructed by MicroNet’s Technical Support.
5.10 HDD Idle Spindown Control
The RAIDBank4 can automatically spin down disks that haven’t been accessed for a certain
amount of time to reduce power consumption. This value is used to determine idle time
before spinning down the disk(s).
5.11 Empty tray LED Control
(ON or OFF) If this option is selected, the disk error LED will light on a slot without a disk.
5.12 HDD SMART Status Polling
The RAIDBank4 reads and reports the SMART (Self-Monitoring, Analysis, and Reporting Technology)
status of each disk drive mechanism. This option is enabled by default, and should not be disabled
unless instructed by MicroNet’s Technical Support.
5.13 Disk Capacity Truncation Mode
Disk Truncation is used to decrease disk usable space for compatibility purposes. Please do
not change this setting unless instructed by MicroNet’s Technical Support.
5.14 Serial Port Configuration
The RAIDBank4 has provisions for an RS232 host management connection. In order to use the
RS232, a special cable has to be used (not included)- consult your authorized Micronet reseller
for more information. To set or change the RAIDBank4 communications port configuration,
Scroll to the “Terminal Port Configuration” selection and press ENT. The communications port
configuration defaults are 115200 Baud., 1 Stop bit operation. The baud rate (1200-115200)
and stop bits (1,2) are user selectable. Handshaking and parity are fixed at none.
5.15 Reset Controller
To reset the RAIDBank4, select “Reset Controller” and then
press ENT. Press ENT at the confirmation screen to reset
the controller.
RAIDBank4 Owner’s Manual
IMPORTANT: Controller Reset
!
can only be performed if no host
or drive activity is present.
26
Page 27

3-RAID Control-LCD
6. Additional System Functions
The following system functions are located in the main menu and control miscellaneous
system functions.
6.1 Ethernet Configuration
The RAIDBank4’s Ethernet port is preconfigured for DHCP operation. This menu option
allows the user to reconfigure IP functionality for static IP address or custom MAC address.
6.1.1 DHCP (enabled by default)
DHCP (Dynamic Host Configuration Protocol) is a protocol that lets network administrators
manage centrally and automate the assignment of IP (Internet Protocol) configurations on a
computer network. Select this option if you wish to use the DHCP address services in your
network. Move the cursor bar to DHCP Function item, then press ENT to show the DHCP
setting. Select the “Disabled’ or ‘Enabled” option to enable or disable the DHCP function.
6.1.2 Manual (Static) IP Address
Select this option to manually configure the IP address of the controller. Make sure that the
assigned IP address is in the same range of your default router address and that it is unique
to your private network. To set a static IP address, move the cursor bar to the Main menu
Ethernet Configuration Function item and then press ENT. The Ethernet Configuration menu
appears on the screen. Move the cursor bar to Local IP Address item, then press ENT to show
the default address setting in the RAID controller. You can reassign the IP address of the
controller (use the UP/DOWN keys on the front panel for each digit.)
6.1.3 HTTP Port Number
The HTTP port number is the TCP Port used for the web
user interface. The default port is 80, and can be changed
per user specification. To access the web UI with a port
other then 80, point your browser to http://<IPADDRESS>:<HTTP PORT>
6.1.4 Telnet Port Number
The Default Telnet TCP port is 23, and can be changed per user specification.
6.1.5 SMTP Port Number
The Default Telnet TCP port is 25, and can be changed per user specification.
6.1.6 Ethernet Address
A MAC address stands for Media Access Control address and is your computer’s unique
hardware number. This option should not normally be modified.
6.2 View System Events
To view the RAIDBank4 events, select the “Show System Events” option and press ENT. The
system events logged will be displayed. System events are logged chronologically, and may
be scrolled through.
Note:
The RAIDBank4 cannot use
ports 7168-8191 for IP services.
RAIDBank4 Owner’s Manual
27
Page 28

3-RAID Control-LCD
6.3 Clear all Event Buffers
To clear all events in the system log, scroll to select the “Clear all Event Buffers” option and
press ENT. The confirmation message will be displayed and press the ENT to clear all event
buffers or ESC to abort the action.
6.4 Hardware Information
To view the RAIDBank4 controller’s hardware monitor information, Scroll to select the
“Hardware Information” option and press ENT. All hardware information will be displayed.
Scroll to browse all the hardware information. The Hardware Monitor Information provides the
temperature, fan speed (chassis fan) and voltage of the internal RAIDBank4. The temperature
items list the current states of the controller board and backplane.
The Platinum RAID has an audiovisual alert system to inform the user of environmental
failure. The warning messages will indicate through the LCD, LED and alarm buzzer. The
following is a table of monitoring threshhold values:
Monitored Item Warning Condition
Controller Board Temperature > 60° Celsius
Controller Fan Speed < 1900 RPM
Power Supply +12V < 10.5V or > 13.5V
Power Supply +5V < 4.7V or > 5.3V
Power Supply +3.3V < 3.0V or > 3.6V
CPU Core Voltage +1.2V < 1.08V or > 1.32V
6.5 System Information
Choose this option to display Main processor, CPU Instruction cache/ and data cache size,
firmware version, serial number, controller model name, and the cache memory size. To check
the system information, press ENT to enter the main menu. Scroll to select the Show System
Information option, and then press ENT. All major controller system information will be
displayed. Scroll to browse all the system information.
RAIDBank4 Owner’s Manual
28
Page 29

4-RAID Control-Web Interface
Chapter 4. RAID Controls- Web Interface
Introduction
The RAIDBank4 controller firmware includes a complete HTML-based application that allows all
configuration and monitoring to be performed across any IP based network, and utilizes standard
web browsers for interfacing. This Chapter describes the menu and control structure for your
RAIDBank4 using the web interface. The RAIDBank4 configuration utility is firmware based and
its operation is independent of host computer type or operating system.
Preparation
To ensure proper communications between the RAIDBank4 and Web browser-based RAID
management, Please connect a standard, Cat5 Ethernet cable to the RJ45 network jack on
the back of your RAIDBank4 and atach to your existing network. In order to access the
web administration utility please note the IP address displayed on the LCD screen. Launch
your firmware-embedded TCP/IP & Web Browser-based RAID manager by entering http://
[IP Address] in your web browser. The RAIDBank4 controller default User Name is “admin”
and there is no password assigned from the factory. Please refer to section 6.2 for more
information regarding security.
Login Procedure
The controller will prompt for user ID and password when
initially logging in. The default user ID is “admin” and no
password (leave the password field blank). The RAIDBank4
ships without a password defined, but is user changeable to
protect the internal RAIDBank4 from unauthorized entry.)
Upon login, the unit will display the user interface and system
information as illustrated:
Note:
RAIDBank4’s web control
applet has been tested for use with
Microsoft Internet Explorer >6.x and
Netscape 4.7/Gecko based browsers
or newer, and Apple Safari. Other
browsers may be compatible, please
check www.micronet.com/support for
the latest information.
Note:
The Default User ID is
admin
There is no password by default;
leave the password blank when
logging in.
RAIDBank4 Owner’s Manual
29
Page 30

4-RAID Control-Web Interface
The Main Menu Configuration Tree
1. Quick Volume/RAID Setup
2. RAID Set Functions
2.1 Create RAID Set
2.2 Delete RAID Set
2.3 Expand RAID Set
2.4 Offline RAID Set
2.5 Activate RAID Set
2.6 Create Hot Spare
2.7 Delete Hot Spare
2.8 Rescure RAID Set
3. Volume Set Functions
3.1 Create Volume Set
3.2 Delete Volume Set
3.3 Modify Volume Set
3.4 Check Volume Set Consistency
3.5 Stop Volume Set Consistency
4. Physical Drives
4.1 Create Pass Through Disk
4.2 Modify Pass-Through Disk
4.3 Delete Pass-Through Disk
4.4 Identify Selected Drive
5. RAID System Controls
5.1 System Configuration
5.2 EtherNet Configuration
5.3 eMail Notification Configuration
5.4 SNMP Configuration
5.5 NTP Configuration
5.6 View Events/Mute buzzer
5.7 Generate Test Event
5.8 Clear Event Buffer
5.9 Change Password
5.10 Upgrade Firmware
5.11 Restart Controller
6. System Information
6.1 RAIDset Hierarchy
6.2 System Information
6.3 Hardware Monitor
RAIDBank4 Owner’s Manual
30
Page 31

4-RAID Control-Web Interface
1. Quick Volume/RAID Setup
CONSIDERATIONS FOR RAID VOLUME CREATION
Your RAIDBank4 is capable of creating large logical volumes (LUNS) in excess of 2 Terabytes.
!
Large LUNS (>2TB) must be supported by the host bus adapter and the host Operating System to
be usable. Windows 2003, Vista, Windows 2008, Mac OS X 10.4.8, and Linux distributions with
appropriate kernels all support large LUNS. Windows XP and prior cannot address large LUNS natively
over USB, and must use eSATA host bus adapters that have RAID support to be usable. MicroNet offers such
host bus adapters- consult your MicroNet authorized reseller for more information.
Quick Volume And RAID Setup is the fastest way to prepare a RAID and volume set, and
needs few keystrokes to complete. This function creates a single RAIDset and one volume set,
and you can modify the RAID level, stripe size, capacity, and designating drives as Hot Spares.
The created RAIDset will have the following properties (default setting values can be changed
after configuration is completed):
Parameter Setting
Volume Name Volume Set#00
Host Channel/ Drive Select SATA/0
Cache Mode Write Back
SATA Xfer Mode SATA300+NCQ
1.1 Specify desired RAID level and spare
configuration
1.2 Select volume set capacity size. When
choosing >2TB support, make sure the
host operating system can support the
volume (see “Consideration for RAID
volume creation” above)
1.3 Select stripe sizes for the current volume
set. This parameter specifies the size of
the stripes written to each disk in a
RAID 0, 1, 10, or 5 volume set. You can
set the stripe size to 4 KB, 8 KB, 16 KB,
32 KB, 64 KB, or 128 KB. A larger stripe
size provides better-read performance,
especially if your computer does mostly
sequential reads. However, if you are sure that your computer does random read requests
more often, choose a small stripe size.
1.4 Specify foreground or background initialization. Background initialization will make
the volume immediately available to host access, but initialization will complete slower.
Foreground Initialization must be completed before the volume set ready for system
accesses, but will complete quicker.
1.5 When all selections have been made, check the “Confirm The Operation” checkbox and
click to commit or to revert all options to default.
RAIDBank4 Owner’s Manual
31
Page 32

4-RAID Control-Web Interface
2. RAID Set Functions
Select the RAID Set Function to manually configure the RAID set for the first time or delete/
reconfigure existing RAID sets. The RAID Set functions allows more complete control over
the RAID creation process, but requires more interaction then the Quick Volume/RAID Setup
option. To enter a RAID Set Functions, Click on the “RAID Set Functions” menu, and the RAID
set submenus will be displayed.
2.1 Create A New RAID Set
Note:
The numbers of physical drives in a specific RAID set
determine the RAID levels that can be implemented with the
RAID set.
RAID 0 requires 1 or more physical drives per RAID set.
RAID 1 requires at least 2 physical drives per RAID set.
RAID 1 + Spare requires at least 3 physical drives per RAID set.
RAID 3/5 requires at least 3 physical drives per RAID set.
RAID 3/5 + Spare requires at least 4 physical drives per RAID set.
Choose “RAID Set Function” from the main
menu. clink on the “Create RAID Set” menu
option. Check the checkbox corresponding
to the disks to be used in the RAIDSet.
Yoy may also name the resulting RAIDset
(optional.) When all selections have been
made, check the “Confirm The Operation”
checkbox and click to commit or
to revert all options to default. The
RAIDSet is now ready for volume creation
(See Section 3.1 “Create a Volume Set”)
2.2 Delete Existing RAID Set
Once this option is selected, a table will
appear with the available RAID set(s).
Check the radio button next to the RAIDset(s) to be deleted, check the “Confirm The Operation”
checkbox and click to commit or to revert all options to default. A Confirmation
screen appears prior to the deletion.
2.3 Expand Existing RAID Set
Instead of deleting a RAID set and recreating it with additional disk drives, the Expand existing
RAID Set function allows the user to add disk drives to the RAID set that already exists.
When this option is selected, a table will appear with the available RAID set(s). Check the
radio button next to the RAIDset(s) to be expanded, and click the Button. if spare disks
are available, they will be listed. Check the radio button next to the drive(s) to add, check the
“Confirm The Operation” checkbox and click to commit or to revert all options to
default. A Confirmation screen appears prior to the expansion. The new added capacity will
be available for new volume sets. To define one or more volume sets, follow the instruction
RAIDBank4 Owner’s Manual
32
Page 33

4-RAID Control-Web Interface
presented in the Volume Set Function to create the volume sets. While RAID migration is in
progress, migration status will be displayed in the RAID and volume status areas of the RAID
Set information.
IMPORTANT: Once the RAID Set expansion process has started it cannot be stopped. The process
!
must complete before any other RAID functions will be available.
2.4 Offline RAID set
You can selectively offline RAID Sets to limit access or for diagnostics. Check the radio button
next to the RAIDset(s) to be brought offline, check the “Confirm The Operation” checkbox
and click to commit or to revert all options to default. Following confirmations, all
Hdds of the selected RAIDset will be put into offline state, spun down and fault LED will be
in fast blinking mode. Offline RAIDSets will be online on the next reboot.
2.5 Activate RAID set
Following a drive failure, the affected RAID set will operate in degraded mode, and will
continue to function until the unit is reset. Following a reset, in order for a degraded RAID
set to be available to the host it must be activated. Select “Activate RAID Set” option. A table
will appear with the available RAID set(s). Check the radio button next to the RAID set to be
activated, check the “Confirm The Operation” checkbox and click to commit or to
revert all options to default. A Confirmation screen appears prior to the activation.
ACTIVATING AN INCOMPLETE RAIDSET
When one of the disk drives is removed and the RAID rebooted, the RAID set state will change to
!
Incomplete and will not be available at first boot. To force the RAIDset to be available, use the
Activate RAIDSet (2.5) option. The RAIDset will become available in degraded state.
2.6 Create Hot Spare Disk
Hot spare disks are disks predesignated to be available for parity or mirrored volumes to
rebuild volume data upon a RAID member disk failure. To designate a disk as a hot spare,
select “Create Hot Spare”, Check the radio button next to the disk from the list of available
drives, check the “Confirm The Operation” checkbox and click to commit or to revert
all options to default. A Confirmation screen appears prior to the operation conclusion.
2.7 Delete Hot Spare Disk
To delete hot spare, choose the “Delete Hot Spare Disk” option. Check the radio button next
to the disk from the list of hot spare designated devices, check the “Confirm The Operation”
checkbox and click to commit or to revert all options to default. A Confirmation
screen appears prior to the operation conclusion.
RAIDBank4 Owner’s Manual
33
Page 34

4-RAID Control-Web Interface
2.8 Rescue RAID Set
In rare cases, It may be possible to recover a failed RAIDset by using this feature. Please make
sure that any failed disk drives have been replaced prior to attempting this procedure. When
this choice is selected, a command prompt will appear. The two command choices available
are ‘RESCUE’ and ‘SIGNAT’. It is strongly recommended you contact MicroNet support prior
to using this function.
2.8.1 If the replaced disk was a member of the RAIDset and is simply out of synchronization,
you may attempt signature recovery by typing ‘SIGNAT’ in the command box, and checking
the “Confirm the operation” checkbox. Click to commit or to revert all options to
default. A Confirmation screen appears prior to the operation conclusion.
2.8.2 If the replaced disk is new, you may attempt to force RAID rebuild by typing ‘RESCUE’ in the
command box, and checking the “Confirm the operation” checkbox. Click to commit or
to revert all options to default. A Confirmation screen appears prior to the operation conclusion.
3. Volume Set Function
A volume set is seen by the host system as a single logical device, and is
organized in a RAID level with one or more physical disks. RAID level refers to
the level of data performance and protection of a Volume Set. The RAIDBank4
supports up to 4 simultaneous volume sets in varying RAID level configurations.
Creating volume sets require that a RAIDset is already defined- to create a
RAIDset please see Section 2.1 “Create RAIDset” of this chapter. A Volume Set
capacity can consume all or a portion of the disk capacity available in a RAID
Set, and multiple Volume Sets can exist on a group of disks in a RAID Set. All
Volume Sets created in a specified RAID Set will reside on all the physical disks
in the RAID Set, and the data spread evenly across all the disks in the RAID Set.
To access volume set functions, click on the “Volume Set Functions” Option the
main menu (illustrated right) and click to select desired menu option.
3.1 Create RAID Volume Set
CONSIDERATIONS FOR RAID VOLUME CREATION
Your RAIDBank4 is capable of creating large logical volumes (LUNS) in excess of 2 Terabytes.
!
Large LUNS (>2TB) must be supported by the host bus adapter and the host Operating System to
be usable. Windows 2003, Vista, Windows 2008, Mac OS X 10.4.8, and Linux distributions with
appropriate kernels all support large LUNS. Windows XP and prior cannot address large LUNS natively
over USB, and must use eSATA host bus adapters that have RAID support to be usable. MicroNet offers such
host bus adapters- consult your MicroNet authorized reseller for more information.
RAIDBank4 Owner’s Manual
34
Page 35

4-RAID Control-Web Interface
3.1.1 To create a new volume set, choose “Volume Set Functions” from the Main menu. Select the
“Create Volume Set.”
3.1.2 Check the radio button next to the appropriate RAIDset and click to commit or
to revert all options to default. The volume set attributes screen will appear.
The volume set attributes screen shows the volume set default configuration value that is currently
being configured. The volume set attributes are:
Volume Name Default name is RAIDbank-VOL#nn. You can rename the volume set
name providing it does not exceed 15 characters.
RAID Level RAID level 0,1, 0+1 (10), 3 and 5.
Volume Capacitty Capacity in GB up to the maximum allowed by RAIDset capacity and
RAID Level
Large LUN support (>2TB) Large LUNS (>2TB) must be supported by the host bus adapter
and the host Operating System to be usable. Windows 2003, Vista,
Windows 2008, Mac OS X >10.4.8, and Linux distributions with
appropriate kernels all support large LUNS. Windows XP and prior
cannot address large LUNS natively over USB, and must use eSATA
host bus adapters that have RAID support to be usable. MicroNet
offers such host bus adapters- consult your MicroNet authorized
reseller for more information.
Stripe Size This parameter sets the size of the segment written to each disk in a
RAID 0, 1, 3, or 5 logical drive. You can set the stripe size to 4 KB,
8 KB, 16 KB, 32 KB, 64 KB, or 128 KB. A larger stripe size produces
better-read performance for mostly sequential reads. For better
random reads performance, select a smaller stripe size.
Volume Cache Mode RAIDBank4 supports Write-Through and Write-Back Caching algo-
rithms. In the Write-Back caching method, modications to data in
the cache aren’t copied to the cache source until absolutely necessary, whereas Write-Through cache data is written to the storage and
the cache memory simultaneously. Write-back caching yields better
performance than write-through caching because it reduces the number of write operations to disk, but is also more prone to data loss due
to service interruptions.
RAIDBank4 Owner’s Manual
35
Page 36

4-RAID Control-Web Interface
Host eSATA channel
Transfer Mode
HOST Channel (SATA/USB) RAIDBank4 supports two host channels. Host Channel 0 is the host
Drive Number (LUN 0-4) RAIDBank4 supports 4 logical units. Any Volume Set may be mapped
SIMULTANEOUS HOST CHANNEL VOLUME MAPPING
The RAIDBank4 can map a Volumeset to both host channels simultaneously for clustering environment.
!
Never attempt to mount the same volume on both channels without proper clustering software.
Mounting the same volume on both channels without proper software can result in
SATA150, SATA150+NCQ, SATA300, SATA300+NCQ (default.)
eSATA interface, and Channel 1 is the USB 2.0 host interface.
to eSATA and/or USB host channels independently.
data corruption or loss!
When all options are set, check the “Confirm The Operation” checkbox and click to
commit or to revert all options to default. A Confirmation screen appears prior to the
operation conclusion.
3.2 Delete Volume Set
To delete a Volume Set, choose the “Delete Volume Set” option. A table will appear with the
available Volume Sets. Check the radio button next to the Volume Set to be deleted, and check
the box labelled “Confirm the operation.” Click the Button.
3.3 Modify Volume Set
To modify a Volume Set, choose the “modify Volume Set” option. A table will appear with the
available Volume Sets. Check the radio button next to the Volume Set to be modifed, and click
the Button. A table will appear with the modifiable attributes (refer to section 3.1 in this
chapter for attribute descriptions.) You can modify all values except the capacity.
Note:
When a volume set is migrating from one RAID level to another, a volume set stripe size changes, or when a disk
is added to a RAID set the volume state will change to migrating. During migration. The migration status will be displayed
in the volume state area of the LCD display. No additional volume changes can be performed until migration completes.
3.4 Check Volume Set Consistency
To check the internal integrity of a Volume Set, choose the “Check Volume Set” option. A table
will appear with the available Volume Sets. Check the radio button next to the Volume Set to
be checked, and check the box labelled “Confirm the operation.” Click the Button.
3.5 Stop Volume Set Consistency Check
To stop a consistency check already in progress, choose the “Stop Volume Set Check” option. A
table will appear with the available Volume Sets. check the radio button next to the Volume Set
to be aborted, and check the box labelled “Confirm the operation.” Click the Button.
RAIDBank4 Owner’s Manual
36
Page 37

4-RAID Control-Web Interface
4. Physical Drive Functions
4.1 Create a Pass-Through Disk
A Pass-through disk can be defined to
dedicate a single disk as not controlled
by the RAIDBank4 firmware and thus
cannot be a part of a RAID set. Instead,
the disk is available to the operating
system as an individual disk. To create
a Pass-Through disk, select the “Create
Pass-Through” Disk option. A table will
appear with available disks that are not
already mapped to a RAIDset, hot spare,
or existing passthroughs. Check the radio
button next to the desired disk, and enter
the values for the volume cache mode, host
eSATA transfer rate, host channel and LUN
number (for more information on these attributes please see section 3.1- Create Volume Set
in this chapter.) When all fields are finalized, check the box labelled “Confirm the operation”
and Click click to commit or to revert all options to default.
SIMULTANEOUS HOST CHANNEL VOLUME MAPPING
The RAIDBank4 can map a Volumeset to both host channels simultaneously for clustering environment.
!
Never attempt to mount the same volume on both channels without proper clustering software.
Mounting the same volume on both channels without proper software can result in
data corruption or loss!
4.2 Modify Pass Through Disk
To modify the attributes of a pass through disk, choose the “modify Pass Through” option. A
table will appear with the available pass through disks. Check the radio button next to the
disk to be modified, and modify the desired attributes in the below table (refer to section
section 3.1- Create Volume Set in this chapter for attribute descriptions.) Click the Button
to finalize or to revert all options to default.
4.3 Delete Volume Set
To delete a Pass through disk, choose the “Delete Pass Through” option. A table will appear
with the available pass through disks. Check the radio button next to the disk to be deleted,
and check the box labelled “Confirm the operation.” Click the Button to finalize or
to revert all options to default.
4.4 Identify Selected Drive
This function is designed to prevent removing the wrong drive by illuminating the selected disk
HDD LED Indicator. To identify selected drive from the physical drive pool, choose the “Identify
Drive” option. A table will appear with the available disks. Check the radio button next to the
disk to be identified, and click the button. Click the button when done.
RAIDBank4 Owner’s Manual
37
Page 38

4-RAID Control-Web Interface
5. System Controls
5.1 System Configuration Functions
This menu contains various feature and environmental options of the RAIDBank4. The following
subsections discuss each attribute’s descriptions (bold denotes default value.) When all desired
options are entered, check the box labelled “Confirm the operation” and Click the Button to
finalize or to revert all options to default.
5.1.1
5.1.2
5.1.3
5.1.4
5.1.5
5.1.6
5.1.7
5.1.8
5.1.9
5.1.10
5.1.11
5.1.12
5.1.13
5.1.14
5.1.1 System Beeper Setting (enabled/disabled)
This function enables or disables the RAIDBank4 alert buzzer. It is not recommended to turn the
buzzer off as it will not provide audible cues when faults occur.
5.1.2 Background Task Priority (ultralow, low, normal, high)
The Background Task Priority is a relative indication of how much time the controller devotes
to a background initialization or rebuild operations. The RAIDBank4 allows user to choose
the rebuild priority (ultralow, low, normal, high) to balance volume set access and rebuild
tasks appropriately. The lower the priority, the greater the responsiveness of the RAID to host
activity, but at a cost of longer background task completion.
5.1.3 Terminal Port Configuration
The RAIDBank4 has provisions for an RS232 host management connection. In order to use the
RS232, a special cable has to be used (not included)- consult your authorized Micronet reseller
for more information. The communications port configuration defaults are 115200 Baud.,
1 Stop bit operation. The baud rate (1200-115200) and stop bits (1,2) are user selectable.
Handshaking and parity are fixed at none
RAIDBank4 Owner’s Manual
38
Page 39

4-RAID Control-Web Interface
5.1.4 JBOD/RAID Configuration (RAID/JBOD)
The RAIDBank4 controller can be used in JBOD (Just a Bunch Of Drives) mode, which allows
each drive to be presented separately to the host. To use this mode, make sure to erase any
existing RAID sets.
5.1.5 Maximum SATA Mode (SATA150, SATA150+NCQ, SATA300, SATA300+NCQ)
The RAIDBank4 uses 5 discrete SATA busses for its disk channels. These drive channels
can support up to SATA320 and support NCQ (Native Command Queuing,) A SATA function
controlling dynamic rearranging of data fetching commands for maximum performance.
Please do not change this setting unless instructed by Micronet’s Technical Support.
5.1.6 Host Channel NCQ Setting (ESB2/MACPro/Siliconlimage)
The RAIDBank4 supports Native Command Queuing (NCQ) over the eSATA host connection.
The NCQ algorithms allow I/O operations to be performed out of order to optimize performance.
Since different host bus adapters have some compatibility differences in NCQ implementation,
The default setting on this option is Disable for better compatibility. To enable NCQ, choose
the option that matches your eSATA host bus adapter:
•ESB2/MACPro/Siliconlimage:IntelESB2,MACPro,MicroNet,andSiliconImagebasedadapters
•ICH:IntelICHseriesbasedadapters
•Marvell6145:Marvell6145basedadapters
•nVidia:NvidianForcebasedadapters
5.1.7 HDD Read Ahead Cache (Enabled/Disabled)
Enabled by default. Please don’t change this setting unless instructed by MicroNet Technical Support.
5.1.8 Volume Read Ahead Cache (Normal/Aggressive/Conservative/Disabled)
Controls the volume read cache algorithm. Depending on the type of data, a more aggressive
or less aggressive caching algorithm will yield better performance.
5.1.9 Staggered HDD Spinup control (0.7S)
The RAIDBank4 employs a staggered disk mechanism startup sequence to minimize power supply
strain. Please do not change this setting unless instructed by Micronet’s Technical Support.
5.1.10 HDD Spindown Control (5 Minutes)
The RAIDBank4 can automatically spin down disks that haven’t been accessed for a certain
amount of time to reduce power consumption. This value is used to determine idle time
before spinning down the disk(s).
5.1.11 HDD Empty slot LED (ON/OFF)
This option lights the disk error LED on a slot without a disk.
5.1.12 HDD SMART Status Polling (enabled/disabled)
The RAIDBank4 reads and reports the SMART (Self-Monitoring, Analysis, and Reporting
Technology) status of each disk drive mechanism. This option is enabled by default, and
should not be disabled unless instructed by Micronet’s Technical Support.
RAIDBank4 Owner’s Manual
39
Page 40

4-RAID Control-Web Interface
5.1.13 Auto Activate Incomplete RAID (enabled/disabled)
This option determines the default behavior of the RAIDBank4 when booting up with a
degraded Volume set. When enabled, the RAIDBank4 will attempt to activate a degraded
volume on boot.
5.1.14 Disk Capacity Truncation Mode
Disk Truncation is used to decrease disk usable space for compatibility purposes. Please do
not change this setting unless instructed by Micronet’s Technical Support.
5.2 Ethernet Configuration
This menu contains The Ethernet specific
functions of the RAIDBank4. The following
subsections discuss each attribute’s
descriptions. When all desired options are
entered, check the box labelled “Confirm
the operation” and Click the Button
to finalize or to revert all options to
default.
5.2.1 DHCP Function (enable/disable)
DHCP (Dynamic Host Configuration
Protocol) is a protocol that lets network
administrators manage centrally and
automate the assignment of IP (Internet
Protocol) configurations on a computer
network. Select this option if you wish to
use the DHCP address services in your
network. DHCP may be “Disabled’ or
‘Enabled.”
5.2.2 Manual (Static) IP Address
Select this option to manually configure the IP address of the controller. Make sure that the
assigned IP address is in the same range of your default router address and that it is unique
to your private network.
5.2.3 Gateway IP address
If a static IP address is assigned, Enter the router address of your network in this field.
5.2.4 Subnet Mask
If a static IP address is assigned, enter your network subnet mask in this field. If you don’t
know your network’s subnet mask, consult your network administrator.
5.2.5 HTTP Port Number (80)
The HTTP port number is the TCP Port used for the web user
interface. The default port is 80, and can be changed per user
specification. To access the web UI with a port other then 80,
point your browser to http://<IPADDRESS>:<HTTP PORT>
RAIDBank4 Owner’s Manual
Note:
The RAIDBank4 cannot use
ports 7168-8191 for IP services.
40
Page 41

4-RAID Control-Web Interface
5.2.6 Telnet Port Number (23)
The Default Telnet TCP port is 23, and can be changed per user specification.
5.2.7 SMTP Port Number (25)
The Default Telnet TCP port is 25, and can be changed per user specification.
5.2.8 Ethernet MAC Address
A MAC (Media Access Control) address is your computer’s unique hardware number. This
option should not normally be modified.
5.3 Alert by Mail Configuration
The RAIDBank4 features an SMTP
manager, and can send email notifications
for various RAIDBank4 conditions. The
following subsections discuss each
attribute’s descriptions. When all desired
options are entered, check the box labelled
“Confirm the operation” and Click the
Button to finalize or to revert
all options to default.
5.3.1 SMTP Server IP address
The SMTP (Simple Mail Transport
Protocol) server is an external server
that relays your network’s outgoing mail.
Enter your network’s SMTP server’s
network IP address in this field. If you do
not know your SMTP server’s IP address,
consult your network administrator.
5.3.1
5.3.2
5.3.3
5.3.4
5.3.5
5.3.2 Sender Name and Credentials
In the sender name field, enter a name
that will identify the RAIDBank4 as the sender of the email. “RAIDBank4” or the attached host
name would be most appropriate. The mail address is not important, but should be used to
validate the RAIDBank4 as the sender. The user Account and password fields may be required
to authenticate the RAIDBank4 to the SMTP server- consult your network administrator for
more information.
5.3.3 Recipients
The RAIDBank4 can send notifications to up to 4 recipients. Enter the respective names and
email addresses in this section.
RAIDBank4 Owner’s Manual
41
Page 42

4-RAID Control-Web Interface
5.3.4 Event Notification Configuration
This table allows the administrator to specify the level of notification provided by the
RAIDBank4. Check the radio button next to the desired notification leve. The available choices
are:
Notification Level Description
Disable Event Notification No Event Notification Will Be Sent
Urgent Error Notification Send Only Urgent Event
Serious Error Notification Send Urgent And Serious Event
Warning Error Notification Send Urgent, Serious And Warning Event
Information Notification Send All Event
5.3.5 Notification for No Event
Check the box next to “Notification for no event” to receive periodic emails when no event
occurs. This option is beneficial for remote assurance of continuous proper operation.
5.4 SNMP Configuration
The RAIDBank4 supports Simple Network Management
Protocol (SNMP) agent for monitoring by an SNMP-based
management application (also known as an SNMP manager)
can monitor the disk array. If you are already running an
SNMP management application at your site, it can monitor
the RAIDBank4. Consult your SNMP management software
documentation before entering the relevant information
into the fields. When all desired options are entered, check
the box labelled “Confirm the operation” and Click the
Button to finalize or to revert all options to default.
5.5 NTP (Network Time Protocol) Configuration
The RAIDBank4 can synchronize its internal clock to an
outside Network Time (NTP) server. This option allows
for configuration of the NTP service. To obtain an NTP
server, check with your network administrator or for a list
ofpublicserversrefertotheNTPPublicServicesProject
at http://ntp.isc.org. Enter the NTP server IP addresses
and select your time zone. When all desired options are
entered, check the box labelled “Confirm the operation”
and Click the Button to finalize or to revert all
options to default.
5.6 View Events/Mute Beeper
Use this entry to view events. If the buzzer is active, you may temporarily mute it using this option.
RAIDBank4 Owner’s Manual
42
Page 43

4-RAID Control-Web Interface
5.7 Generate Test Event
The RAIDBank4 can generate test events to confirm remote notifications are properly working.
To generate a test event, select “Generate Test Event,” check the box labelled “Confirm the
operation” and click the Button.
5.8 Clear Event Buffer
Select “Clear Event Buffer” to clear the event log. Check the box labelled “Confirm the
operation” and Click the Button to finalize or to revert all options to default.
5.9 Modify Password
The RAIDBank4’s administrative functions can be protected with a password. To set or change
the RAIDBank4 password, select “Modify Password”. The following screen has three fieldsEnter original password, Enter New Password, and Confirm (Re-Enter) New Password. Type the
current password in the “Enter Original Password” field (leave blank if no current password
defined.) Enter and reenter the new password in the next two fields (the entries are case
sensitive) to set a new password. To complete the operation, check the box labelled “Confirm
the operation” and Click the Button to finalize or to revert all options to default.
5.10 Upgrade Firmware
The RAIDBank4’s firmware (operating control software) can be field upgradable. MicroNet
Support may direct you as to the operation of this option.
5.11 Restart Controller
To reset the RAIDBank4, select “Reset Controller” , check the box labelled “Confirm the
operation” and Click the Button to finalize or to revert all options to default.
RAIDBank4 Owner’s Manual
43
Page 44

4-RAID Control-Web Interface
6. Information Functions
6.1 RAIDSet Hierarchy
This option will display the current physical and logical configuration of the RAIDBank4.
The RAIDset(s), disk channels, and Volume Set(s) are each clickable, and will pull up the
respectiveinformationabouteachobject.
6.2 System Information
Choose this option to display various components of the RAIDBank4, as illustrated in this table:
Component Value
Controller Name RAIDBank4
Firmware Version V1.45 2008-04-29
BOOT ROM Version V1.45 2008-3-14
Serial Number xxx
Unit Serial #
Main Processor 400MHz 88F5182
CPU ICache Size 32KBytes
CPU DCache Size 32KBytes / Write Back
System Memory 128MB / 400MHz
Current IP Address 192.168.1.100
6.3 Hardware Information
To view the RAIDBank4 controller’s hardware monitor information, select the “Hardware
Information” option. All hardware environmental information will be displayed. Scroll to
browse all the hardware information. The Hardware Monitor Information provides the
temperature, fan speed (chassis fan) and voltage of the internal RAIDBank4. The temperature
items list the current states of the controller board, backplane, and disk drives.
RAIDBank4 Owner’s Manual
44
Page 45

5-Host Computer Setup
Chapter 5 - Host Computer Setup
This chapter is an overview of setting up storage volumes on Macintosh and Windows
based computers. To ensure complete installation and ease of use, take a few minutes
to read this chapter before installation.
1. Volume Setup on Apple Macintosh
Installation on a MacOS system requires MacOS X or greater, and any of the
following:
1. Compatible SATA Host Bus Adapter with external ports.
2. USB 2.0 port
Before you begin, please make sure you are logged in with administrative
privileges. If you are unsure about your privilege level, please consult your
!
Macintosh OS-X user manual or with your system administrator.
1.1 Launch the “Disk Utility” application located under Applications/Utilities folder.
1.2 Highlight your new drive and select the “Partition” tab
1.3 Select the new partition map type.
1.4 For each partition in the volume scheme, select the desired file system
format and volume name (optional)
1.5 Click the “Options” button. Select “Apple Partition Map” in the dialog box and click “OK”.
1.6 Click “Apply.” Your RAIDBank4 is ready to use!
1.3
1.3
1.2
1.4
RAIDBank4 Owner’s Manual
1.6
1.5
45
Page 46

5-Host Computer Setup
2. Volume Setup on Microsoft Windows 2000/XP/2003/Vista
Installation on a Windows system requires a Windows Installation with a properly installed
and configured SCSI host bus. Please verify that your assigned SCSI ID is unique among the
host SCSI chain, and verify that the terminator is attached and lit at the end of the chain.
2.1 Open the disk management console. A list of the attached drives and their respective
volumes will appear. Each Volume set will appear as an individual disk in the management
console. Upon the first time the RAIDBank4 is connected, a “Initialize and Convert Disk Wizard”
should appear when the disk management console is run. You may use the Wizard to set up
the volume, or follow the next steps for manual configuration.
Note:
The Disk Management Console can be found under \Windows\System32\diskmgmt.msc on your system
drive. For an illustrated guide, please see http://www.fantomdrives.com/support/faqs/hdfaqpc.php4#8
2.2 Right-click on a RAIDBank4 volume. If it’s not initialized, a red “No Entry” logo will cover the
disk icon. Right click on the disk and select “Initialize Disk.” Follow the on-screen instructions.
2
3
2.3 Right click the initialized volume (The area right of the disk icon.) In the context menu,
select “New Partition.” Follow the on screen instructions. In the File System pop-up menu, select
NTFS. The default formatting option is Full format. A Full format will take about 30-90 minutes.
AQuickformatwilltakejustafewminutes,butwilldolessverifyingoftheDrivethanaFull
format. Click Start. Once the format process is complete, your RAIDBank4 is ready to use.
RAIDBank4 Owner’s Manual
46
Page 47

6-Troubleshooting
Chapter 6 - Troubleshooting
Daily Use Tips
• ReadthisUser’sGuidecarefully.Followthecorrectprocedurewhensettingupthedevice.
• Additionalapplicationsoftwaremayhavebeenincludedwithyourdrive.Pleasereviewthe
documentation included with this software for information on the operation and support
of this software. The documentation can usually be found in an electronic format on the
installation CD.
• Alwaysoperateyourdriveonasteady,levelsurface.Donotmovetheunitwhileit’sturnedon.
• Plugyourdriveintoagroundedelectricaloutlet.Theuseof“ground-defeating”adapters
will cause damage not covered by your warranty.
• Do not open your hard drive or attempt to disassemble or modify it. Never insert any
metallicobjectintothedrivetoavoidanyriskofelectricalshock,re,short-circuitingor
dangerous emissions. Your drive contains no user serviceable parts. If it appears to be
malfunctioning, contact MicroNet Support.
• RAIDBank4iscompatiblewiththeleadingharddiskrepairanddefragmentationsoftware.
We recommend using this software to maintain peak performance and data-integrity of
your drive. Contact your local software retailer for more information about the software
best suited for your computer.
General Use Precautions
• Do not exposethe hard drive to temperatures outsidetherange of5°C (41°F) to 45°C
(104°F).Doingsomaydamagethedriveordisgureitscasing.Avoidplacingyourdrive
near a source of heat or exposing it to sunlight (even through a window.)
• Neverexposeyourdevicetorain,oruseitnearwater,orindamporwetconditions.Doing
soincreasestheriskofelectricalshock,short-circuiting,reorpersonalinjury.
• Alwaysunplugtheharddrivefromtheelectricaloutletifthereisariskoflightningorifit
will be unused for an extended period of time.
• Donotplacethedrivenearsourcesofmagneticinterference,suchascomputerdisplays,televisions
or speakers. Magnetic interference can affect the operation and stability of your RAIDBank4.
•Donotplaceheavyobjectsontopofthedriveoruseexcessiveforceonit.
• Neverusebenzene,paintthinners,detergentorotherchemicalproductstocleantheoutside
of the RAIDBank4. Instead, use a soft, dry cloth to wipe the device.
RAIDBank4 Owner’s Manual
47
Page 48

6-Troubleshooting
Frequently Asked Questions
General FAQ
Q: Can I leave my RAIDBank4 on all the time, or should I turn it off when not in use?
A: The RAIDBank4 is meant to be left on, but does not add any limitations on being turned
off. Drive reliability is definitely affected by repeated power cycles, and the RAIDBank4
cannot alleviate this. In addition, Micronet recommends that the drive’s power supply is
connected through a UPS or surge protector; In the case of a power surge, or brown/black
out, the hard drive’s sensitive electrical components will not be damaged. Lastly, as long as
the RAIDBank4 is configured as a parity or mirrored RAID, you will be able to sustain a
disk failure without losing access to your data.
Q: The green LEDs keep blinking on some or all the disk modules. Is something wrong?
A: The blinking disk activity light means that the disk is not being used for a RAIDset, spare,
or disk passthrough and is available to use. Refer to sections 2.1 and 3.1 of chapters 3 or
4 for more information.
Q: The WebUI/LCD Front panel is not responding!
A: The RAIDBank4 can only be accessed for management through one method at any time.
Make sure no other management connections are active, and retry to access the unit.
Q: Can I increase my RAIDBank4’s volume capacity?
A: Larger drive modules may be available for your Model. Consult your MicroNet reseller for
more information.
Q: Can I have more than one RAIDBank4 on my computer?
A: Yes! Please call MicroNet Help Desk if you have questions about your particular
configuration.
Q: What is the warranty period for RAIDBank4?
A: RAIDBank4’s standard warranty is One-year limited. Optional extended warranty and
overnight exchange programs are available, consult your Micronet dealer or www.MicroNet.
com for information.
Q: The RAIDBank4 reports Disk capacity is ‘1250GB’, But when I connect it to the computer,
The OS reports the disk capacity as 1165GB. Where is the missing capacity?
A: Disk drive manufacturers use the base 10 gigabyte measurement, , which defines a GByte as
1000 x 1000 x 1000. Some operating systems report disk capacity using Base 2 nomenclature,
which define a GByte as 1024 x 1024 x 1024. Regardless of which scheme is used, there is
exactly the same amount of usable capacity.
RAIDBank4 Owner’s Manual
48
Page 49

6-Troubleshooting
Q: I’m trying to access the RAIDBank4 using the front panel. When I push enter, it asks me to verify
the password. I defined a password, and I enter it, but then the ENTkeyjustmovesthecursor
over another space and the arrow keys change the characters to use and the ESC take me back
to the IP Address screen.
A: Please press the ENT key to move the cursor over another space until the end of the password
line is reached (16 character including space) to confirm the password.
Q: Can I boot from my RAIDBank4?
A: Yes! As long as your host hardware and operating system support booting from eSATA or
USB. Refer to your computer’s documentation for more information
Q: Files are missing or corrupted
A: Run your computer’s disk repair utility.
Macintosh related FAQ
Q: Disk Utility does not display my drives (Mac)
A: If the options in Disk Utility are dimmed, you are not logged in as administrator. If you
know the name and password for an administrator, click the lock icon (Tiger and prior)
and enter the information. If the RAIDBank4 volumes are still not appearing, turn off the
RAIDBank4, check all cable connections, wait 10 seconds and re-power on the RAIDBank4.
You may need to reboot your Macintosh for the drives to be seen.
Q: Why is my Drive asking me to format it? It was already formatted and it contains data.
A1: Run a disk repair utility on the drive.
A2: Perform permission repair on your system drive. Open the disk utility (located in
/Applications/Utilities/Disk Utility.app.) Select your system drive (usually the first disk
listed) and click "Repair Disk Permissions" in the "First Aid" Tab.
A3: Restart your computer. As soon as the bootup chime sounds, press and hold down the
option-command-p-r key combination to reset the PRAM. Release the keys when the chime
sounds a second time.
Please refer to your Mac manual for more information on these procedures
Q: My computer does not recognize the Drive.
A: First, check to make sure that all of your connections are secure, and that the power switch
is in the "ON" position. Then check if your RAIDBank4 is listed in the Apple System Profiler.
If the problem persists, verify that the port used is functioning.
Q: I'm trying to copy files to/from FAT32 volumes or network shares, and it keeps failing.
A: FAT32, HFS+, and other file system formats allow different standards of filename length or
use of special characters. Rename the offending file(s) and try the operation again.
Q: I have a FAT32 disk, and when I try to copy a large file I get an error saying there is not
enough room on the drive-- I have lots of free space!
A: FAT32 only allows files up to 4GB in size. To copy larger files, please reformat the volume
using MacOS Extended Format.
RAIDBank4 Owner’s Manual
49
Page 50

6-Troubleshooting
Windows related FAQ:
Q: I do not see my Drive listed in the My Computer window, but it does appear in the Device
Manager list.
A: Right-click on My Computer. Select Manage in the pop-up menu. In the Computer Management
window, select Storage, then select Disk Management. In the Disk Management window,
you should see a list of available storage devices. Look for the Disk that has a capacity
closest to your RAIDBank4 volume(s). Right-click on the right-hand box; in the pop-up
menu select Delete Partition. Once you do this, it will say “Online" & "Unallocated”. Rightclick on the box and select Create New Partition in the pop-up menu. When the Partition
Wizard appears, select Primary Partition and click on Next. You will see a default value for
the Drive; click Next. You will then see a drive letter (you can change this drive letter if you
wish); click Next. You will then be asked to format the Drive.
Q: My Drive was working fine yesterday but now its gone!
A: The disk may have been shut down without being dismounted, or may have failed. If you do
not hear and feel the drive spin up when you connect the power, the drive will need to be
replaced. Also, if you verify that the computer input and the drive data cable are working,
and the computer still does not detect the drive by showing you the system tray icon or
by listing the drive in the Device Manager after you plug in the drive, the drive is bad and
needs to be replaced. If data recovery is desired, please contact an established professional
data recovery firm. For a checklist of what qualities you might seek, see www.drivesavers.
com/why_drivesavers/index.html or www.ontrack.com/services.
Some software applications may be helpful in situations where the drive hardware is seen,
but the volume is simply corrupt. A couple examples are www.stellarinfo.com, www.
binarybiz.com, and www.prosofteng.com. There are many companies that provide these
services, it is best to be selective. Micronet does not refer or recommend any data recovery
service as we are not affiliated with these companies in any way.
If the computer does detect the volumes, you may be able to repair or recover the data with
your computer’s disk repair utility or a third party utility.
Q: Where are the drivers for Microsoft Windows 2000/XP/2003/Vista?
A: Windows 2000 and newer already include all the necessary drivers! No additional drivers
are necessary.
Q: Do you have “DOS Driver” for the RAIDBank4? How about Windows 98 or NT 4?
A: No.
Q: Does the RAIDBank4 work with Norton Ghost?
A: Yes. Norton Ghost 2003 or newer support USB drives. Micronet does not provide any
additional drivers.
RAIDBank4 Owner’s Manual
50
Page 51

6-Troubleshooting
Q: When I leave my computer idle for a while, my Drive won’t work properly.
A: The most likely cause is that your computer is going into sleep mode. The immediate
solution is to shut down your computer and turn off the Drive, and then restart your
computer. Once your computer is completely booted up, turn on the Drive. You should
see the drive in the Windows Explorer. To prevent this problem from recurring, open the
“Power Settings/Energy Saver” and set it to never go into sleep mode.
Q: After I connected the Drive to my PC, I got the following alert message: HI-SPEED USB
Device Plugged into non-HI-SPEED USB Hub.” What does this mean?
A: Windows 2000 and XP users will get this alert message if you plugged the Drive into a
USB port that only supports USB 1.1. This can work but will not support larger then 2TB
volumes, and only the first logical unit mapped to USB (disk 0). Additionally, the volume
will operate USB 1.1 speeds.
If an issue cannot resolved by using our FAQ, please contact Technical Support via the Micronet
support site at http://www.micronet.com/support
RAIDBank4 Owner’s Manual
51
Page 52

A-Getting Help
Appendix A- Getting Help
If you experience problems with your RAIDBank4, please contact your Authorized MicroNet
Reseller for assistance. If the reseller is unable to resolve your issue, please contact MicroNet’s
Help Desk for assistance. Please have the model, serial number, date of purchase, and reseller’s name available before making contact. If possible, call from a telephone near the system
so we can direct you in any necessary system corrections.
How To Contact MicroNet Technology, Inc.
MicroNet Technology, Inc.
19260 Van Ness Avenue
Torrance, CA 90501
(310) 320-7272 Sales
(310) 328-0202 Sales Fax
(310) 320-0772 Help Desk & Customer Service
http://www.MicroNet.com
MicroNet Technology can also be reached via email at the following addresses:
Sales: sales@micronet.com
Help Desk: support@micronet.com
RAIDBank4 Owner’s Manual
52
Page 53

B-RAID Level Comparison Table
Appendix B: RAID Level Comparison Table
RAID
Description M i n .
Level
0 Also known as striping
Data distributed across multiple
drives in the array. There is no data
protection
1 Also known as mirroring.
All data replicated on 2 Separate
disks. This is a high availability
Solution,
10 Also known as Block-Interleaved
Parity. Data and parity information
is subdivided and distributed across
all disk. Parity must be the equal
to the smallest disk capacity in the
array. Parity information normally
stored on a dedicated parity disk.
3 Also known as Bit-Interleaved
Parity. Data and parity information
is subdivided and distributed across
all disk. Parity must be the equal
to the smallest disk capacity in the
array. Parity information normally
stored on a dedicated parity disk.
5 Also known Block-Interleaved
Distributed Parity.
Data and parity information is
subdivided and distributed across
all disk. Parity must be the equal
to the smallest disk capacity in the
array. Parity information normally
stored on a dedicated parity disk.
Max.
Drives
1 4 ( N )
2 2 1 Disk Greater than RAID
4 4 ( N / 2 )
3 4 ( N - 1 )
3 4 ( N - 1 )
Capacity Fault Tolerance Data
Drives
Disks
Disks
Disks
Disks
No fault tolerance Very High Very High for
3,5
Greater than RAID
3,5
Lower than RAID 1,
10
greater than a single
drive
Lower than RAID 1,
10
greater than a single
drive
Transfer Rate
Reads are higher
Than a single disk;
Writes similar to a
single disk
Transfer rates more
similar to RAID 1 than
RAID 0
Reads are similar to
RAID 0;
Writes are slower than
a single disk
Reads are similar to
RAID 0;
Writes are slower than
a single disk
I/O
Request Rates
Both Reads and Writes
Reads are twice faster
than a single disk;
Write are similar to a
single disk.
Reads are twice faster
than a single disk;
Writes are similar to a
single disk.
Reads are approximately
twice as fast as a single
disk;
Writes are similar to a
single disk.
Reads are similar to
RAID 0;
Writes are slower than a
single disk.
RAIDBank4 Owner’s Manual
53
Page 54

C-Terminal Session Setup
Appendix C- Terminal Session Setup
The RAIDBank4 has provisions for an RS232 host management connection. In order to use
the RS232, a special cable has to be used (not included)- consult your authorized Micronet
reseller for more information. The communications port configuration defaults are 115200
Baud, 1 Stop bit operation, no handshaking and no parity. For changing these settings,
please see section 5 of chapters 3 or 4.
Serial host management requires a VT100 compatible terminal, or a PC operating in an
equivalent terminal emulation mode. All RAIDBank4 monitoring, configuration and administration functions can be exercised from the terminal session.
There are a wide variety of Terminal Emulation packages, but for the most part they should
be very similar. The following setup procedure is a sample VT100 Terminal session utilizing
Hyper Terminal use Version 3.0 or higher.
Step 1: Most versions of Windows include HyperTerminal, Typically located in Start menu ->
Programs -> Accessories -> Communications -> Hyper Terminal. Please see your Microsoft
Windows™ Documentation for more information about HyperTerminal.
Step 2: Open HYPERTRM.EXE.
Step 3: Enter a name for your Terminal Session and Click OK.
RAIDBank4 Owner’s Manual
54
Page 55

C-Terminal Session Setup
Step 4. Select an appropriate connecting port in your Terminal. Click OK
Step 5: Configure the port parameter settings. Bits per second: “115200”, Data bits: “8”,
Parity: “None”, Stop bits: “1”, Flow control: “None”. Click OK
Step 6: Open the File menu, and then open Properties.
RAIDBank4 Owner’s Manual
55
Page 56

C-Terminal Session Setup
Step 7: Open the Settings Tab.
Step 8. Open the Settings Tab. Function, arrow and ctrl keys act as: Terminal Keys,
Backspace key sends: Crtl+H, Emulation: VT100, Telnet terminal: VT100, and Click OK.
The VT-100 session is now configured. Press “X” key to display the disk array Monitor
Utility screen on your VT100 Terminal.
RAIDBank4 Owner’s Manual
56
Page 57

D-Glossary
Appendix D- Glossary
ATA Acronym for “AT Bus Attachment” - a standard interface to IDE hard disks. Western
Digital’s IDE disk interface was standardized by ANSI to form the ATA specification using a
16-bit ISA bus.
Cache cache is a fast-access memory bank that serves as an intermediate storage for data that
is read from or written to secondary storage. Typically, high-speed caches are implemented in
RAM, though they can also be implemented on disk when speed is not a critical requirement.
Caches generally improve the efficiency of read operations due to the principles of “spatial
and temporal locality of data”. They can also improve the efficiency of write operations. See
also: Write Back Cache, Write Through Cache
Degraded Mode/Status All arrays, with the exception of RAID 0, are designed to handle
disk failures. However, there is limit on the number of hard disks that can fail before the
array is rendered inoperative. For instance, this limit value is 1 for RAID 1, 3, and 5. In the
case of RAID 10 or 50, the upper bound is equal to the number of parity groups. When the
number of disk failures occurring in an array are less than or equal to this upper bound, the
array is denoted to be in a degraded state. The failure of the disks does not impair reading
from or writing to the array. However, it impairs the efficiency of throughput in all RAID
types (with the exception of RAID 1) since data requested by read operations may have to be
“reconstructed” using parity. In the case of RAID 1 the throughput of read operations is cut in
half if a drive fails. Operating in degraded mode is considered an acceptable alternative only
for short durations. Generally this duration should span no more time than that required to
inform the user of the failures and to replace the failed disks with suitable spares.
Dirty Data Dirty data is data that has been written to a cache but has not been “flushed,” or
written to its final destination, typically some secondary storage device.
Disk Array A Disk Array is a logical disk comprised of multiple physical hard disks. The
number of hard disks in an disk array is dictated by the type of the array and the number of
spares that may be assigned to it. Furthermore, whether a disk array can be built using part
of the space on a disk (as opposed to being forced to use the whole disk) depends upon the
implementation. Disk Arrays are typically used to provide data redundancy and/or enhanced
I/O performance.
Disk Block Data is stored on disks in blocks that are generally of a predefined size. This size
is typically a value such as 512 bytes, 1 KB, 2 KB, etc. When a record is written to a disk, the
blocks used for that record are dedicated to storing the data for that record only. In other
words two records are not permitted to share a block. Consequently, a block may be only
partially used. For instance, assume a disk has a block size of 1 KB and a user record written
to it has a size of 3148 bytes. This implies that the user record will be written into 4 blocks,
with the contents of one of the blocks being only partially filled with (3148 – 3072) 76 bytes
of data.
RAIDBank4 Owner’s Manual
57
Page 58

D-Glossary
Driver A piece of software that controls a hardware device. Typically drivers provide an
interface by which applications can use the device in a uniform and hardware-independent
manner.
DHCP (Dynamic Host Configuration Protocol) a protocol that lets network administrators
manage centrally and automate the assignment of IP (Internet Protocol) configurations on
a computer network. When using the Internet’s set of protocols (TCP/IP), in order for a
computer system to communicate to another computer system it needs a unique IP address.
Without DHCP, the IP address must be entered manually at each computer system. DHCP
lets a network administrator supervise and distribute IP addresses from a central point. The
purpose of DHCP is to provide the automatic (dynamic) allocation of IP client configurations
for a specific time period (called a lease period) and to eliminate the work necessary to
administer a large IP network.
Ethernet A local-area network standard that is currently the most prevalent with an estimated
80%ofdesktopsconnectedusingthisstandard.ItwasdevelopedjointlybyXerox,DECand
Intel and employs a bus or star topology.
Fibre Channel A high-speed, full duplex serial communication scheme permitting data
transfer rates of up to 4 Gigabit per second with a roadmap extending up to 10 Gigabit per
second. The actual transfer rates and the distance over which they apply vary depending on
the physical media used such as video coaxial, shielded twisted pair, single/multi mode optical
fiber etc.
File System A file system is a layer between applications and the disks to which their I/O
is directed. File systems serve to hide the details of the physical layout of files on the disk,
allowing applications to address files as a contiguous logical area on disk accessible by a
name regardless of their physical location on the storage device.
Hot Spare One or more disks in a RAID array may fail at any given time. In fact, all RAID
types with the exception of RAID 0 provide methods to reconstruct the array in the event of
such an occurrence. A commonly used tactic is to earmark a hard disk that is not being used
by any RAID array as a backup. In the event a hard disk in a RAID array fails, this backup
is automatically mobilized by the RAID controller to step in place of the failed hard disk.
The data in the failed hard disk is “reconstructed” and written into the new hard disk. In the
case of a RAID 1, data is reconstructed by simply copying the contents of the surviving disk
into the spare. In the case of all other RAID types, reconstruction is performed using parity
information in the working hard disks of that RAID array. This backup hard disk is known as
a “hot” spare since the fail-over process is performed dynamically on a server within the same
session i.e., without the necessity for re-booting or powering down.
IDE Acronym for “Integrated Device Electronics”. A hard disk drive interface standard
developed by Western Digital and introduced. Also knows as Parallel ATA.
Logical Drive A logical drive is comprised of spaces from one or more physical disks and
presented to the operating system as if it were one disk.
RAIDBank4 Owner’s Manual
58
Page 59

D-Glossary
Logical Unit (LUN) a SCSI protocol entity which may be addressed by the actual input/
output (I/O) operations of a Logical Drive. Each SCSI-type target provides one or more logical
units.
Native Command Queuing (NCQ) a technology designed to increase performance of SATA
hard disks by allowing the disk firmware to internally optimise the order in which read and
write commands are executed. This can result in increased performance for workloads where
multiple simultaneous read/write requests are outstanding, which occurs most often in servertype applications.
Online Capacity Expansion The ability to add space to an existing RAID array within a
session while preserving the RAID type and data within the array is known as online capacity
expansion. The availability of this feature enables the user to add space to a RAID array as and
when required without rebooting, thereby obviating the need for precise forecasts of capacity
requirements for the future.
Parity A mathematical function that serves as a method for error verification and correction.
In strict technical terms the parity of a group is set to 1 if the number of bits in the group that
are set to 1 is odd, and 0 otherwise. For instance, the parity of N bytes of data is obtained by
determining the number of ith bits in the N bytes that are set to 1. If that number is odd, then
the ith bit of the result is set to 1. This may sound complicated, but in reality the result can
be obtained by simply evaluating the XOR of the N bytes. Parity allows one error in a group
(of bytes) to be corrected.
Parity Group Complex RAID types such as RAID 10 or RAID 50 are built using two levels
of hierarchy. For instance, consider a RAID 50. A RAID 50 array is comprised of a group of
RAID5arraysatthefirsttier.EachRAID5arrayinthefirsttierisusedjustlikeaharddisk
in creating a RAID 0 at the next tier. The result is a RAID 50. In this example, each RAID 5
array at the first tier is denoted as a parity group. Each parity group is self-contained in the
sense that it is capable of withstanding a disk failure within its group and reconstructing the
data in the failed disk from parity information contained within that group.
Partition The space contributed to each array on a physical drive is referred to as a
partition.
PCI An acronym for “Peripheral Component Interconnect”. It is Intel’s local bus standard
that supports up to four plug-in PCI cards per bus. Since PCs can have two or more PCI
buses, the number of PCI cards they can support are a multiple of four. The current PCI
bus implementation (version 2.2) incorporates two 64-bit slots at 66 MHz. Consequently, the
highest throughput achievable using such a bus is 528 MB/sec.
PCI-X An enhanced version of PCI version 2.2. It supports one PCI slot per bus when running
at 133 MHz, two slots when running at 100 MHz and four slots when running at 66 MHz.
It is intended to provide throughputs in excess of 1 GB/sec using a 64-bit wide 133 MHz
implementation.
RAIDBank4 Owner’s Manual
59
Page 60

D-Glossary
Performance Performance is an important criterion on which a customer judges a RAID
controller. There are a number of popular benchmarking utilities that are available to
measure the I/O performance of a controller. Some of these utilities simulate specific real-life
applications and provide the user a score indicating the controller’s overall performance in
that niche. Others allow the user to specify tests with specific I/O characteristics and generate
throughput numbers corresponding to each specification. The nature of the tests a user may
wish to conduct on a controller depends on the application space in which that controller is
anticipated to be deployed.
Physical Drive A single tangible drive is referred to as a physical drive.
Primary Storage Main memory i.e., RAM is frequently referred to as primary storage.
RAID Abbreviation of Redundant array of independent disks. It is a set of disk array
architectures that provides fault-tolerance and improved performance.
RAID Type There are a number of RAID formats that are widely used. Some of the well-known
uni-level types are RAID 0, RAID 1, RAID 3, RAID 5 and RAID 6. The prevalent complex types
are RAID 10 and RAID 50. ,
RAID 0 RAID 0 utilizes simple striping, with the data being distributed across two or more
disks. No data redundancy is provided. The figure below illustrates a purely hypothetical
RAID 0 array comprised of three disks – disks A, B, and C – with four stripes – each uniquely
colored – across those disks. Advantage: Striping can improve the I/O throughput by allowing
concurrent I/O operations to be performed on multiple disks comprising the RAID 0 array.
However, this RAID type does not provide any data redundancy.
RAID 1 An array that uses a single pair of disks. Both disks in the pair contain the same
data It provides the best data protection but can’t improve system performance. And storage
space for the same data capacity should be double than in general cases. Hence storage cost
doubles. The capacity of RAID 1 will be the size of the smaller HDD, so we suggest you
connect HDDs of the same sizes to save HDD space. Advantage: RAID 1 ensures that if one
of the disks fails, its contents can be retrieved from the duplicate disk. Furthermore, a RAID
1 array can also improve the throughput of read operations by allowing separate reads to be
performed concurrently on the two disks.
RAID 3 RAID 3 utilizes a striped set of three or more disks with the parity of the strips (or
chunks) comprising each stripe written to a disk. Note that parity is not required to be written
to the same disk. Furthermore, RAID 3 requires data to be distributed across all disks in the
array in bit or byte-sized chunks. Assuming that a RAID 3 array has N drives, this ensures that
when data is read, the sum of the data-bandwidth of N – 1 drives is realized. The figure below
illustrates an example of a RAID 3 array comprised of three disks. Disks A, B and C comprise
the striped set with the strips on disk C dedicated to storing the parity for the strips of the
corresponding stripe. For instance, the strip on disk C marked as P(1A,1B) contains the parity
for the strips 1A and 1B. Similarly the strip on disk C marked as P(2A,2B) contains the parity
for the strips 2A and 2B. Advantage: RAID 3 ensures that if one of the disks in the striped
set (other than the parity disk) fails, its contents can be recalculated using the information
RAIDBank4 Owner’s Manual
60
Page 61

D-Glossary
on the parity disk and the remaining functioning disks. Consequently read operations can
be time-consuming when the array is operating in degraded mode. If the parity disk itself
fails, then the RAID array is not affected in terms of I/O throughput but it no longer has
protection from additional disk failures. Also, a RAID 3 array can improve the throughput of
read operations by allowing reads to be performed concurrently on multiple disks in the set.
Disadvantage: Due to the restriction of having to write to all disks, the amount of actual disk
space consumed is always a multiple of the disks’ block size times the number of disks in the
array. This can lead to wastage of space.
RAID 5 A RAID 5 array is similar to a RAID 4 array in that, it utilizes a striped set of three
or more disks with parity of the strips (or chunks) comprising a stripe being assigned to the
disks in the set in a round robin fashion. The figure below illustrates an example of a RAID
5 array comprised of three disks – disks A, B and C. For instance, the strip on disk C marked
as P(1A,1B) contains the parity for the strips 1A and 1B. Similarly the strip on disk A marked
as P(2B,2C) contains the parity for the strips 2B and 2C. Advantage: RAID 5 ensures that if
one of the disks in the striped set fails, its contents can be extracted using the information on
the remaining functioning disks. It has a distinct advantage over RAID 4 when writing since
(unlike RAID 4 where the parity data is written to a single drive) the parity data is distributed
across all drives. Also, a RAID 5 array can improve the throughput of read operations by
allowing reads to be performed concurrently on multiple disks in the set.
RAID 10 A RAID 10 array is formed using a two-layer hierarchy of RAID types. At the lowest
level of the hierarchy are a set of RAID 1 arrays i.e., mirrored sets. These RAID 1 arrays in
turn are then striped to form a RAID 0 array at the upper level of the hierarchy. The collective
result is a RAID 10 array. The figure below demonstrates a RAID 10 comprised of two RAID
1 arrays at the lower level of the hierarchy – arrays A and B. These two arrays in turn are
striped using 4 stripes (comprised of the strips 1A, 1B, 2A, 2B etc.) to form a RAID 0 at the
upper level of the hierarchy. The result is a RAID 10. Advantage: RAID 10 ensures that if
one of the disks in any parity group fails, its contents can be extracted using the information
on the remaining functioning disks in its parity group. Thus it offers better data redundancy
than the simple RAID types such as RAID 1, 3, and 5. Also, a RAID 10 array can improve the
throughput of read operations by allowing reads to be performed concurrently on multiple
disks in the set.
RAID 50 A RAID 50 array is formed using a two-layer hierarchy of RAID types. At the lowest
level of the hierarchy is a set of RAID 5 arrays. These RAID 5 arrays in turn are then striped to
form a RAID 0 array at the upper level of the hierarchy. The collective result is a RAID 50 array.
The figure below demonstrates a RAID 50 comprised of two RAID 5 arrays at the lower level of
the hierarchy – arrays X and Y. These two arrays in turn are striped using 4 stripes (comprised
of the strips 1X, 1Y, 2X, 2Y, etc.) to form a RAID 0 at the upper level of the hierarchy. The result
is a RAID 50. Advantage: RAID 50 ensures that if one of the disks in any parity group fails, its
contents can be extracted using the information on the remaining functioning disks in its parity
group. Thus it offers better data redundancy than the simple RAID types, i.e., RAID 1, 3, and 5.
Also, a RAID 50 array can improve the throughput of read operations by allowing reads to be
performed concurrently on multiple disks in the set.
RAIDBank4 Owner’s Manual
61
Page 62

D-Glossary
Read Ahead Motivated by the principle of “spatial locality”, many RAID controllers read
blocks of data from secondary storage ahead of time, i.e., before an application actually
requests those blocks. The number of data blocks that are read ahead of time is typically
governed by some heuristic that observes the pattern of requests. The read-ahead technique
is particularly efficient when the spatial distribution of an application’s requests follows a
sequential pattern.
Read-Modify-Write This is a term used to characterize an efficient methodology using
which parity is calculated and written into a RAID array. However, before we describe this
methodology, let us briefly touch upon the most obvious and brute-force way of determining
and writing parity (in response to a write operation) into a RAID array. Assume that data is
being written into a strip on the RAID array that supports redundancy by the use of parity. Let
us denote this as the target strip. Also assume that there are N strips per stripe including the
parity strip and the target strip. Then to recalculate parity for that stripe, the following steps
may be taken. First the contents of the N – 2 non-parity strips (belonging to the same stripe as
the target strip) have to be read. This is followed by N – 2 XOR operations on the contents of
theN–2stripsthatwerejustreadplusthenewcontentsofthetargetstrip.Thisisfollowed
by 1 operation to write the new data into the target strip and 1 operation to update the value
of the parity strip. In all the total number of read, XOR and write operations are N – 2, N – 2,
and 2 respectively adding up to a grand total of 2N – 2. Let us now discuss the “read-modifywrite” method for calculating and writing parity. It is based on simple algebra, and is more
efficient than the method described earlier when the value of N is large. Suppose d1, d2,…
dt,… dN-1 are the data contents of the N – 1 non-parity strips with dt being the contents of
the target strip. Let, p = d1 ^ d2 ^ … dt ^ …^ dN-1 Now suppose that the new data to be
written into the target strip is d’t.We wish to determine the value of p’ = d1 ^ d2 ^ … d’t ^
…^ dN-1. Now, p ^ p’ = (d1 ^ d2 ^ … dt ^ …^ dN-1) ^ (d1 ^ d2 ^ … d’t ^ …^ dN-1) p ^ p’
= dt ^ d’t, since ^ operation is commutative and associative p’ = dt ^ d’t ^ p In other words,
the new parity can be evaluated by calculating the XOR of the old data in the target strip, the
new data for the target strip and the old parity. Clearly this requires only 2 reads – one for the
old data and the old parity – followed by 2 XOR operations with 2 writes – one for writing
the new data into the target strip and the new parity, giving us a grand total of 6 operations.
Why is this better? When the value of N is large, i.e., the size of the parity group is large; the
brute-force method utilizes far more operations!
Read Through Using this methodology, a read operation not only reads data from secondary
storage into system memory but also places the data into the cache such that future need for
the same data can be addressed expeditiously by directing a read operation for that data into
the cache only.
Rebuild When a RAID array enters into a degraded mode, it is advisable to rebuild the array
and return it to its original configuration (in terms of the number and state of working disks)
to ensure against operation in degraded mode
SATA Acronym for “Serial ATA”. A hard disk drive interface standard developed to enhance
connectivity and speed over the IDE, or Parallel ATA disk interface. Current generation SATAII
supports speeds up to 300MB/S.
RAIDBank4 Owner’s Manual
62
Page 63

D-Glossary
SCSI acronym for “Small Computer System Interface”, SCSI is a set of standards for physically
connecting and transferring data between computers and peripheral devices. The SCSI standards
define commands, protocols, and electrical and optical interfaces. SCSI is most commonly used for
hard disks and tape drives, but it can connect a wide range of other devices, including scanners
and CD drives. Most modern storage protocols are based on the SCSI Block Protocol.
Secondary Storage Mass storage devices such as hard disks, magneto-optical disks, floppy
disks and tapes are frequently referred to as secondary storage.
Stripe A stripe is a logical space that spans across multiple hard disks with each constituent
hard disk contributing equal strips (or chunks) of space to the stripe. In the figure below,
strips 1, 2, and 3 from hard disk 1, 2, and 3 respectively comprise a (purple colored) stripe.
Synonym: majorstripe
Stripe Set A stripe set is a set of stripes that spans across multiple hard disks. In the figure
below, the displayed stripe set has 4 stripes, with strip number 1 comprised of the purple
strips 1A, 1B and 1C. Stripe number 2 is comprised of the green strips 2A, 2B and 2C etc.
Stripe Size This is the size of the strips that constitute each stripe. This term is a misnomer
– though prevalent – since it should appropriately be called strip size or chunk size.
TCP/IP This is an acronym for “Transmission Control Protocol/Internet Protocol”. It is
comprised of two parts TCP and IP. The former, i.e., TCP is a peer-to-peer connection oriented
protocol that guarantees the delivery of data packets in the correct sequence between two
peers. The latter, i.e., IP is the protocol that defines and governs addressing, fragmentation,
reassembly and time-to-live parameters for packets.
Volume Set A volume set is a concatenation of storage elements that may be RAID arrays,
JBODs, or simply areas of disks that are not part of RAID arrays.
Write-back Cache a caching scheme that acknowledges the write request as complete before
data is written to the final storage location. This methodology can improve the efficiency
of write operations under favorable circumstances, but is at risk of data incoherencies in a
system that is not protected from power fluctuations or failures.
Write-through Cache When a cache is operating in write-through mode, data written into the
cache is also written to the destination secondary storage devices. Essentially write completion
does not occur until the data is written to secondary storage. Thus the contents of the cache
and the secondary storage are always consistent. The advantage is that the possibility of data
corruption is greatly reduced. The disadvantage is that write-through operations are more time
consuming
XOR Function All RAID arrays (with the exception of RAID 0, RAID 1 and RAID 10) require
paritytobecalculatedandwrittentothearrayinconjunctionwithdata.Typicallytheparityis
a simple XOR on the bytes comprising a stripe. This is a computationally intensive operation
that many modern RAID controllers perform using a dedicated ASIC often referred to as a
XOR-engine.
RAIDBank4 Owner’s Manual
63
Page 64

E-Product Specifications
Appendix E: Product Specifications
System Architecture
Marvell Orion advanced I/O processor
PCI Express Interconnect
Dual XOR DMA engines capable of reading from up to eight sources, perform bitwise XOR
between the eight sources, and writes the result to a destination.
128MB on-board DDR2-400 SDRAM with ECC protection
Marvell SATA ll drive channel controller
NVRAM for RAID configuration & transaction log
Write-through or write-back cache support
Firmware in Flash ROM for easy upgrades
Disk Bus Interface
4 hot swappable, SATA2-NCQ, 7200 RPM Disk Drives
4 discrete SATA2 drive channels
48-bit LBA support allows disk exceeding 137GB
Staggered Spin-Up of Individual Disk to minimize Power-on Surge
RAID Features
RAID level 0, 1 (0+1), 3, 5, Span, JBOD, disk passthrough
Multiple RAID selection
Array roaming
Online RAID level/ stripe size migration
Online capacity expansion and RAID level migration simultaneously
Automatically and transparently rebuilds hot spare drives
Hot swappable disk drives
Instant availability and background initialization
Automatic drive insertion / removal detection and rebuilding
Field-upgradeable firmware in flash ROM
Firmware-embedded management via Front Panel, web browser-based RAID management,
RS232 Terminal session, and/or telnet Session
Dual Concurrent Host Bus Channels
External SATA-300 channel; Transfer rate up to 300MB/sec with Native Command Queuing
support
USB 2.0 host channel, 480mbit EHCI transfers enabled
Monitors / Indicators
LCD Display and Control Panel for setup, alarm mute and configuration
4 drive LED indicators and 3 environment LED indicators
Environment and drive failure indication through LCD, LED and alarm buzzer
RAIDBank4 Dimensions:
Width: 4.85”
Depth: 6.5”
Height: 9.1”
RAIDBank4 Owner’s Manual
64
Page 65

E-Product Specifications
Weight:
9 lbs empty
15 lbs with drives.
Power Consumption:
Normal operation: 2.3 AC Amps @ 115 Volts
Spin up (peak): 3.70 AC Amps @ 115 Volts
Power Requirements:
Internal Auto-sensing 180W power supply (90-240vac) (47-62Hz)
Operating Environmental Specifications:
Temperature 5ºC - 55ºC (41ºF - 131ºF)
Humidity 10% - 90% RH (Non-condensing)
RAIDBank4 Owner’s Manual
65
Page 66

MicroNet Techology
19260 Van Ness Ave
Torrance, CA 90501
www.MicroNet.com
9-17-2008 Rev 4 (RB4M4)
The material in this document is for information only and is subject to change without notice. While reasonable efforts have been made in the preparation of
this document to assure its accuracy, MicroNet Technology assumes no liability resulting from errors or omissions in this document, or from the use of the
information contained herein.
MicroNet Technology reserves the right to make changes in the product design without reservation and without notification to its users.
MicroNet and the MicroNet logo are registered trademarks of MicroNet Technology. Macintosh, and the MacOS Logo are trademarks of Apple Computer
Inc. Microsoft Windows and the Windows Logo are registered trademarks of Microsoft Corporation. All other logos and trademarks are the property of their
respective owners.
Copyright © 1999, 2008 MicroNet Technology. All rights reserved. This publication may not be reproduced, stored in a retrieval system, or transmitted in any
form or by any means, in whole or in part, without the prior written consent of MicroNet Technology, 19260 Van Ness Ave., Torrance CA 90501.
 Loading...