

Page 1
MaxNAS
Owner’s Guide
October 2008
www.MicroNet.com
Page 2

Table of Contents
Table of Contents
Table of Contents ................................................................................................................................................ 2
FCC Compliance Statement ................................................................................................................................ 4
Warranty Information ......................................................................................................................................... 5
Welcome Note ..................................................................................................................................................... 6
Chapter 1- Getting Started ................................................................................................................................. 7
1. Features and Benefits ............................................................................................................................... 7
2. System Requirements and Compatibility ................................................................................................. 7
3. Unpacking the MaxNAS ........................................................................................................................... 8
4. What’s Included ........................................................................................................................................ 8
5. Choosing a place for your MaxNAS .......................................................................................................... 8
6. The MaxNAS Interface Components ......................................................................................................... 9
7. Visual and Audible Indicators ................................................................................................................ 10
8. Hot Plug Drive Replacement ................................................................................................................. 10
Chapter 2- Connecting the MaxNAS ................................................................................................................ 11
1. Connections ............................................................................................................................................. 11
2. Accessing the System Administration for the first time ........................................................................ 11
2.1 Wizard Installation and Usage ...................................................................................................... 12
2.2 Launching the GUI, DHCP Environment ..................................................................................... 13
2.3 Static IP Environment ................................................................................................................... 13
2.4 Logging In ..................................................................................................................................... 13
3. LCD Operation ......................................................................................................................................... 14
3.1 USB Copy ........................................................................................................................................ 14
3.2 Management Mode ........................................................................................................................ 14
4. Attaching External Disks ......................................................................................................................... 15
5. USB Target Mode .................................................................................................................................... 15
Chapter 3- Administering the MaxNAS ............................................................................................................ 16
The Main Configuration Tree ..................................................................................................................... 17
1. Status Displays ........................................................................................................................................ 18
1.1 System Status ................................................................................................................................. 18
1.2 System Information ....................................................................................................................... 18
1.3 USB Printer Information ............................................................................................................... 18
1.4 Attached UPS Monitor Status ........................................................................................................ 19
1.5 Power Management ....................................................................................................................... 19
1.6 About This MaxNAS ...................................................................................................................... 19
2. Storage Configuration ............................................................................................................................ 20
2.1 Disk Info ........................................................................................................................................ 20
2.2 RAID Menu .................................................................................................................................... 20
2.3 Folder (Share) Configuration ........................................................................................................ 24
2.4 File System Check ......................................................................................................................... 26
2.5 Stackable iSCSI Host Service ........................................................................................................ 27
2.6 Mounting ISO Disk Images .......................................................................................................... 28
2.7 nSync Backup Service Configuration ........................................................................................... 29
3. Network Configuration ........................................................................................................................... 30
3.1 LAN1 Configuration ...................................................................................................................... 30
3.2 LAN2 Configuration ...................................................................................................................... 32
3.3 Network Services Configuration ................................................................................................... 32
4. Accounts Configuration .......................................................................................................................... 34
4.1 Authentication Configuration ....................................................................................................... 34
4.2 Group Administration ................................................................................................................... 35
4.3 Local User Configuration .............................................................................................................. 35
4.4 Batch User Creation ...................................................................................................................... 36
MaxNAS Owner’s Manual
2
Page 3

Table of Contents
5. System Control Functions ...................................................................................................................... 36
5.1 Remote Notification Configuration ............................................................................................... 37
5.2 Event Logs ..................................................................................................................................... 37
5.3 System Time .................................................................................................................................. 37
5.4 Save/Recover System Settings ....................................................................................................... 38
5.5 Module Management ...................................................................................................................... 38
5.6 Reset to Factory Default ............................................................................................................... 38
5.7 Update Firmware ........................................................................................................................... 38
5.8 Change Administrator Password ................................................................................................... 39
5.9 Reboot/Shutdown ......................................................................................................................... 39
5.10 Scheduled Power On/Off ............................................................................................................ 39
5.11 Log out the Adminstration Interface .......................................................................................... 39
5.12 Change the User Interface Language ......................................................................................... 39
Chapter 4- Connecting Users ........................................................................................................................... 40
1. SMB/CIFS User Access Configuration .................................................................................................... 40
1.1 Mapping a Network Drive (Windows) ......................................................................................... 40
1.2 Mapping a Newtork Drive (OS-X) ................................................................................................ 41
2. Using Webdisk ........................................................................................................................................ 42
3. Using iSCSI ............................................................................................................................................. 44
3.1 Windows 2000 and newer ............................................................................................................. 44
3.2 Mac OS X ....................................................................................................................................... 46
4. Backing up with NSync .......................................................................................................................... 48
4.1 Adding a task ................................................................................................................................ 48
4.2 Setting up an NSync target ........................................................................................................... 48
4.3 Setting up an FTP target ............................................................................................................... 49
4.4 Designating a MaxNAS or PlatinumRAID NSync Targets ............................................................ 49
5. Connecting to a MaxNAS Attached Printer ........................................................................................... 49
5.1 Windows XP .................................................................................................................................. 49
5.2 Windows Vista ............................................................................................................................... 50
5.3 Mac OS X ....................................................................................................................................... 51
Chapter 5- Understanding RAID ...................................................................................................................... 52
RAID ............................................................................................................................................................ 52
RAID 0 ........................................................................................................................................................ 52
RAID 1 ........................................................................................................................................................ 53
RAID 5 ........................................................................................................................................................ 53
Hot Swappable Disk Support .................................................................................................................... 53
Hot Spare Drives ........................................................................................................................................ 54
Hot Swap Disk Rebuild .............................................................................................................................. 54
Chapter 6- Troubleshooting ............................................................................................................................. 55
Daily Use Tips ............................................................................................................................................. 55
General Use Precautions ............................................................................................................................ 55
Resetting the MaxNAS ................................................................................................................................. 56
Frequently Asked Questions ...................................................................................................................... 57
Appendix A- Getting Help ............................................................................................................................... 59
Appendix B- RAID Level Comparison Table ................................................................................................... 60
Appendix C- Active Directory ........................................................................................................................... 61
Appendix D- Supported UPS List .................................................................................................................... 62
Appendix E- Glossary ...................................................................................................................................... 65
Appendix F- Product Specifications ................................................................................................................. 72
Appendix G- Licence and Copyrights ............................................................................................................. 74
MaxNAS Owner’s Manual
3
Page 4

FCC Compliance Statement
Federal Communications Commission
Radio Frequency Interference Statement
This equipment has been tested and found to comply with the limits for a Class B digital device, pursuant to
part 15 of the FCC Rules. These limits are designed to provide reasonable protection against harmful interference
in a residential installation. This equipment generates, uses and can radiate radio frequency energy and, if not
installed and used in accordance with the instructions, may cause harmful interference to radio or television
reception, which can be determined by turning the equipment off and on. The user is encouraged to try to
correct the interference by one or more of the following measures:
1. Reorient or relocate the receiving antenna.
2. Increase the separation between the equipment and receiver.
3. Connect the equipment into an outlet on a circuit different from that to which the receiver is connected.
4. Consult the dealer or an experienced radio/TV technician for help.
Changes or modifications not expressly approved by the party responsible for compliance could void the user’s
authority to operate the equipment.
Only use shielded cables, certified to comply with FCC Class B limits, to attach this equipment. Failure to install
this equipment as described in this manual could void the user’s authority to operate the equipment.
Canadian Department of Communications Compliance: This equipment does not exceed Class B limits per radio
noise emissions for digital apparatus set out in the Radio Interference Regulation of the Canadian Department of
Communications. Operation in a residential area may cause unacceptable interference to radio and TV reception
requiring the owner or operator to take whatever steps are necessary to correct the interference.
Conformite aux regiements du Department Canadien de Communications: Cet equipement n’excede pas les
limites de Classe B concernaut les bruits des emissions de radio pour le dispositif digital etablies par le Reglement
d’Interference de Radio du Departement Canadien de Communications. L’operation de cet equipement dans un
quartier residential peut occasionner des parasites inacceptables dans la reception de la radio ou de la television
exigeant le proprietaire ou l’operateur de faire routes les necessaires pour corriger cet interference.
FTZ/BTZ German Postal Service Notice: We hereby certify that the ADV, SB, SBS, SS, SBX, SBT, MO, MS, MR, MT,
MD, CPK, CPKT, CPKD, DD and DDW products are in compliance with Postal Regulation 1046/1984 and are RFI
supclicked. The marketing and sale of the equipment was reported to the German Postal Service. The right to
retest this equipment to verify compliance with the regulation was given to the German Postal Service.
Bescheinigung des Herstellers/Importeurs: Hiermit wird bescheinigt, daB der/die/das: SB, SBS, SS, SBX, SBT,
MO, MS, MR, MT, MD, CPK, CPKT, CPKD, DD, DDW in Ubereinstimmung mit den Bestimmungen der: VFG1046,
VFG243 funk-enstort ist. Der Deutschen Bundespost wurde das Inverkehrbringen dieses Gerates angezeigt
and die Berechtigung zur Uberprdfung der Serie auf Einhaltung der Bestimmungen eingeraumt MicroNet
Technology, Inc.
MaxNAS Owner’s Manual
4
Page 5

Warranty
Limitations of Warranty and Liability
MicroNet Technology has tested the hardware described in this manual and reviewed its contents. In no event
will MicroNet or its resellers be liable for direct, indirect, incidental, or consequential damage resulting from any
defect in the hardware or manual, even if they have been advised of the possibility of such damages. In particular, they shall have no liability for any program or data stored in or used with MicroNet products, including the
costs of recovering or reproducing these programs or data.
During the specified warranty period, MicroNet guarantees that the product will perform according to specifications determined by the manufacturer, and will be free of defects. Parts and labor of the received product, and
replacement parts and labor are guaranteed during the specified warranty period. The warranty covers defects
encountered in normal use of the product, and does not apply when damage occurs due to improper use, abuse,
mishandling, accidents, sand, dirt, excessive dust, water damage, or unauthorized service. The product must be
packed in its original packing material when shipped, or the warranty will be void. In all cases, proof of purchase must be presented when a warranty claim is being made.
This manual is copyrighted by MicroNet Technology. All rights are reserved. This documentation may not, in
whole or part, be copied, photocopied, reproduced, translated, or reduced to any electronic medium or machine
readable form without prior consent in writing from MicroNet.
MicroNet and the MicroNet logo are registered trademarks of MicroNet Technology. FireWire, the FireWire logo,
Macintosh, and the MacOS Logo are trademarks of Apple Computer Inc. Microsoft Windows and the Windows
Logo are registered trademarks of Microsoft Corporation. All other trademarks are the property of their respective owners.
Technical Support Policy
If you have a problem installing your system or suspect it is malfunctioning, please contact the Authorized
MicroNet Reseller from whom you purchased the system. If the reseller fails to resolve the problem, call
MicroNet’s Help Desk for assistance at (310) 320-0772. Please have the model, serial number, date of purchase,
and the reseller’s name available before calling. If possible, call from a telephone near the system so we can
more readily direct you to make any necessary system corrections, should they be required.
Returning Materials
If a reseller or MicroNet Technician finds it necessary to have the system returned for testing or servicing, a
Return Materials Authorization (RMA) number will be issued. The RMA number must be placed on the outside
of the carton in large, visible letters near the address label. Return the complete system including all cables
and software. The system must be packed in the original packing materials and shipped prepaid. MicroNet will
repair the system and return it prepaid by similar common carrier and priority. Please record the RMA number
and make reference to it when inquiring on the status of the system. A returned unit found to be fault-free will
carry a $65.00 charge for service and repackaging.
MaxNAS Owner’s Manual
5
Page 6

Welcome
Welcome From MicroNet Technology
We are pleased that you have chosen the MaxNAS. Our systems are designed for speed,
reliability, compatibility, and performance. We think you will find the system easy to install,
and a productive addition to your computer system. Please take a moment to register your
product online at www.MicroNet.com.
This manual presumes that you are familiar with standard computer operations; this includes
copying files, opening documents, clicking with the mouse, and organizing files or folders
within other folders. If you are unfamiliar with these operations, please consult the User’s Guide
that was supplied with your computer system. Your computer dealer and local user’s groups
are also good sources of information. After you are comfortable with the operation of your
computer, continue reading this manual which describes hardware installation and operation.
Your comments assist us in improving and updating our products. Please feel free to share
them with us. Please send comments to:
MicroNet Technology
Attn: Customer Service
19260 Van Ness Ave
Torrance, CA 90501
Internet: http://www.MicroNet.com
MaxNAS Owner’s Manual
6
Page 7

1-Getting Started
Chapter 1- Getting Started
Thank you for purchasing The Micronet MaxNAS storage solution. With speed, high capacity, ease of use, and support for numerous applications, MaxNAS is the ideal solution for all
of your data storage needs.
Please take advantage of the information contained within this manual to ensure easy setup
and configuration. If at any time you require technical assistance, Micronet’s Help Desk is
available at 310-320-0772 or email us at Support@micronet.com
1. Features and Benefits
MaxNAS is a versatile and powerful storage solution, allowing it to be utilized in several
different roles:
• As a shared storage device for multiple PCs, Macs, and UNIX/Linux workstations
• As a central, fault tolerant data server for a home or small business network
• As a central backup station
• As a central hub for print services, media streaming, and unattended downloading
Benefits:
• Easy-to-use for non-MIS personnel
• SATA (Serial ATA) disk channel interface
• Networked Storage on Gigabit Ethernet
• Easy to use Graphical User Interface
Data Reliability Features:
• RAID Level 0, 1, 5, 6, Span
• Multiple LUN support
• RAID Auto Rebuild
• Network Backup
• Hot Swap/Hot Spare disk support
• Disk Roaming
Networking Features:
• 2x 10/100/1000 auto-sensing Ethernet ports
• Ethernet link aggregation with failover and
load balancing
• iSCSI services concurrent with NAS
Network Services:
• Windows Client Support with Active
Directory integration
• UNIX/Linux Client Support
• Apple OS X Client Support
• FTP, Webdisk, Secure Webdisk
• DLNA streaming server
• Attach and share USB and eSATA devices
2. System Requirements and Compatibility
The MaxNAS is designed for universal compatibility. It features SMB/CIFS, NFS, FTP, iSCSI,
USB direct attachment, as well as Webdisk/Secure Webdisk http-based connectivity for host
access. This manual will address Windows XP and newer, and Macintosh OS X 10.4 and
newer hosts only but the concepts and connectivity features are available to other operating
environments as well.
MaxNAS Owner’s Manual
7
Page 8

1-Getting Started
3. Unpacking the MaxNAS
Please unpack your MaxNAS in a static free environment, carefully making sure not to
damage or discard any of the packing material. If the RAID subsystem appears damaged, or
if any items of the contents listed below are missing or damaged, please contact your dealer
or distributor immediately.
In the unlikely event you may need to return the MaxNAS for repair or upgrade, please use
the original packing material to ensure safe transport.
4. What’s Included
Your MaxNAS comes with the following items:
1 MaxNAS unit
5 Disk Drive Modules
1 Set of drive locking keys
1 MaxNAS Product CD
1 Quick Install Guide
1 power cord
2 Cat5e Gigabit Ethernet cable
5. Choosing a place for your MaxNAS
When selecting a place to set up your Disk Array, be sure to follow these guidelines:
• Place on a flat and stable surface capable of supporting at least 25lbs
• Place the Disk Array close enough to a network jack for the Ethernet cable to reach it.
• Use a grounded wall outlet.
• Avoid an electrical outlet controlled by wall switches or automatic timers. Accidental disruption
of the power source may wipe out data in the memory of your computer or Disk Array.
• Keep the entire system away from potential sources of electromagnetic interference, such
as loudspeakers, cordless telephones, etc.
• Avoid direct sunlight, excessive heat, moisture, or dust.
MaxNAS Owner’s Manual
8
Page 9
1-Getting Started
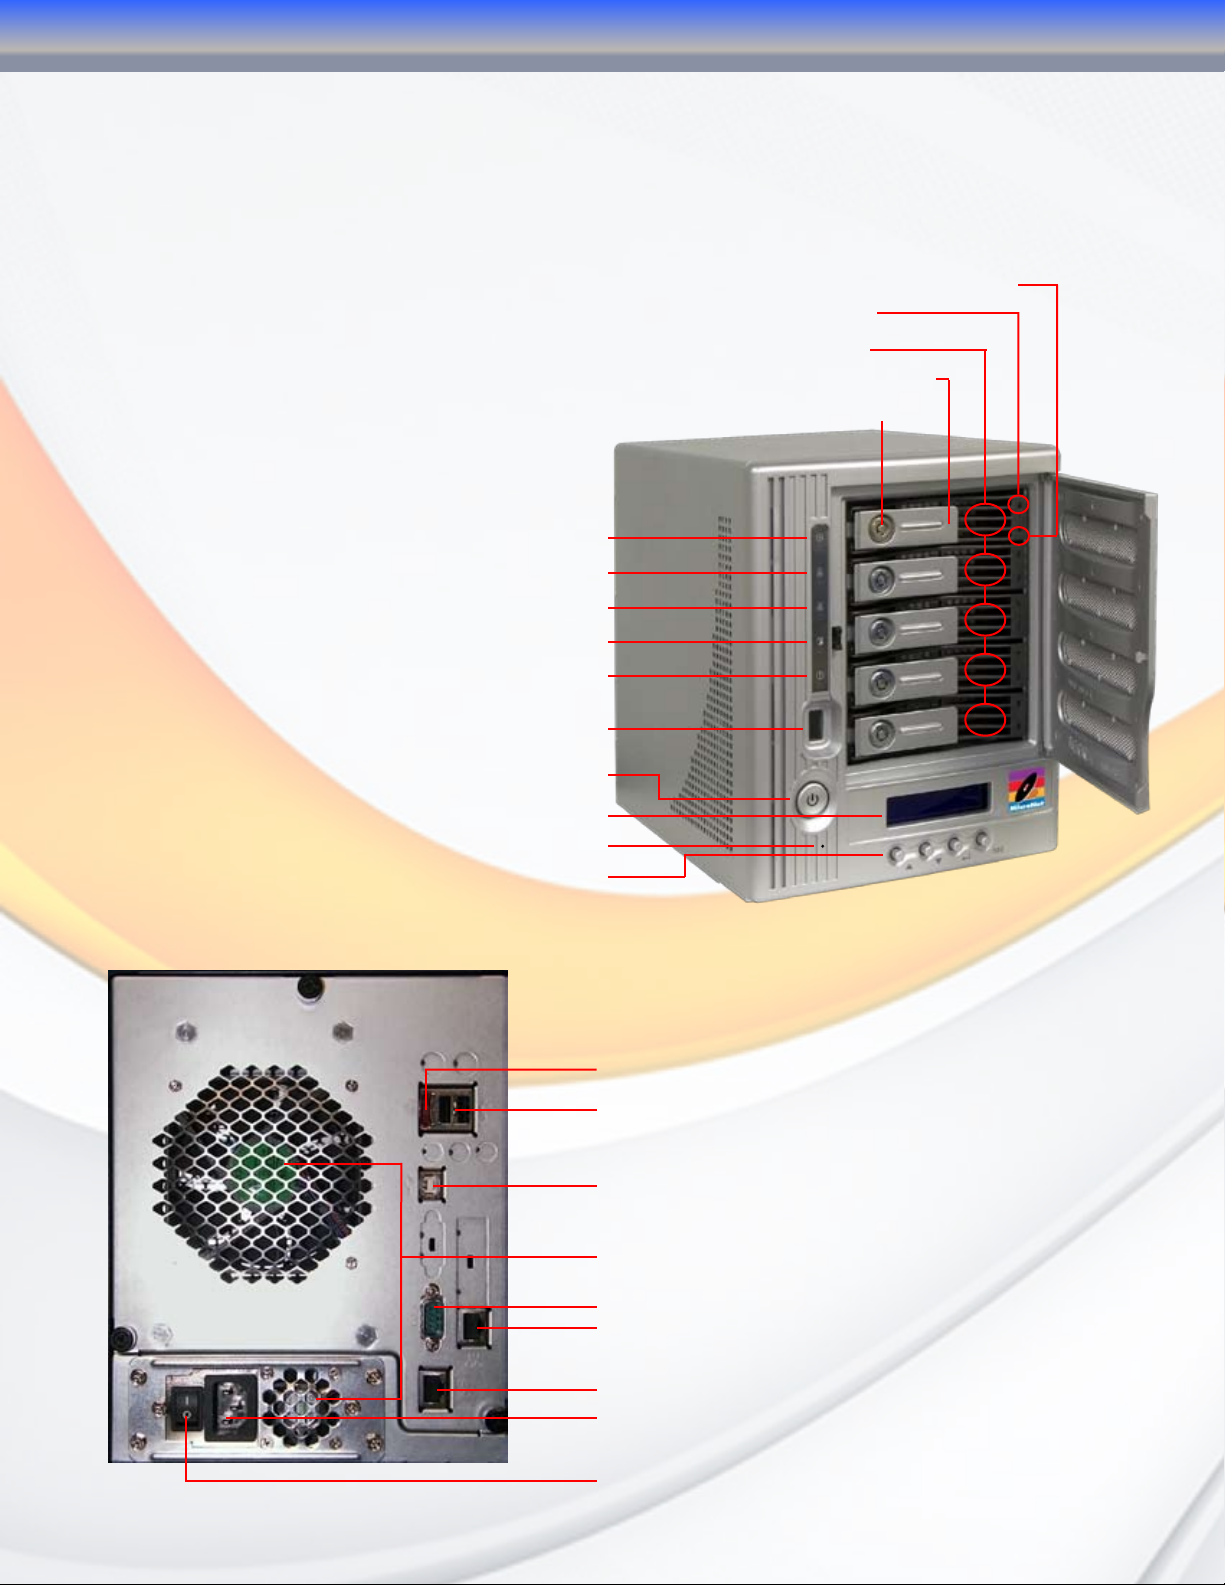
6. The MaxNAS interface components
The following figures illustrate the connector locations for the RAID subsystems.
FRONT VIEW
Disk Drive Activity/Fault Indicator LED
Disk Drive Power LED
Disk Drive Canisters
Disk Canisters Release latch
Disk Lock
Firmware Indicator LED
LAN 1 activity LED
LAN 2 activity LED
USB Copy indicator LED
Error Status LED
Front USB Expansion Port
Power Switch
System Display Screen
Recessed Reset Button
LCD Control Navigation Keys
REAR VIEW
eSATA Expansion Port
USB Expansion Ports (2)
USB Target Mode Port
Fan Exhaust Vents (DO NOT BLOCK!)
UPS Communication Port (serial)
LAN 2 RJ45 Connector
LAN 1 RJ45 Connector
Power Connector
Master Power Switch
MaxNAS Owner’s Manual
9
Page 10

1-Getting Started
7. Visual and Audible Indicators
The MaxNAS has an LCD panel, LEDs, and a buzzer to inform the user of the overall health
and function of the unit. The following chart describes the various conditions indicated:
Indicator Normal Status Problem Indication
Firmware LED
LAN1 LED
LAN2 LED
USB Copy LED
System Error LED Off
Power Button LED
Disk drive power LED Glows blue LED does not light up
Disk Activity/Fault
LED
Glows amber at boot or firmware
update. Dark after.
Blinks green when there is network
activity on the LAN 1 port. A steady
green glow means there is a link but
no activity.
Blinks green when there is network
activity on the LAN 1 port. A steady
green glow means there is a link but
no activity
Glows blue during USB copy
operation
Glows blue on Power Up
Blinks blue on eSATA access
Off/blinks green during hard drive
read and write activity
Dark at boot
LED does not light up (no link)
LED does not light up (no link)
N/A
Glows red to indicate system fault. Log into the
management GUI for further information
LED does not light up on power
Blinks red to indicate disk drive error
8. Hot plug Drive Replacement
In the event of a drive failure, the RAID subsystem supports the ability to hot-swap drives
without powering down the system. A disk can be disconnected, removed, or replaced with a
different disk without taking the system off-line. In a fault tolerant array, the RAID rebuilding
will proceed automatically in the background (see chapter 5, “Understanding RAID” for more
information.)
A drive failure will illuminate amber the Disk Activity/Fault LED on the affected drive canister.
To replace a drive, please follow these steps:
1. Make sure the drive locking mechanism (see page 9, “The MaxNAS Interface components”)
is in the up-down position (use the included key to turn the mechanism.)
2. Click down on the drive release latch (see page 9, “The MaxNAS Interface components”) to
release the drive tray.
3. Gently pull out the disk drive tray handle and slide out the drive tray.
4. To replace: Slide in the replacement drive tray with the tray handle open. When the tray is
slid all the way into the MaxNAS, push the tray handle closed.
IMPORTANT: NEVER remove a drive tray without replacing it. Operating the RAID with a drive tray
missing will disrupt airow and may cause the MaxNAS to fail.
!
MaxNAS Owner’s Manual
10
Page 11
2-Connecting the MaxNAS
Chapter 2- Connecting the MaxNAS
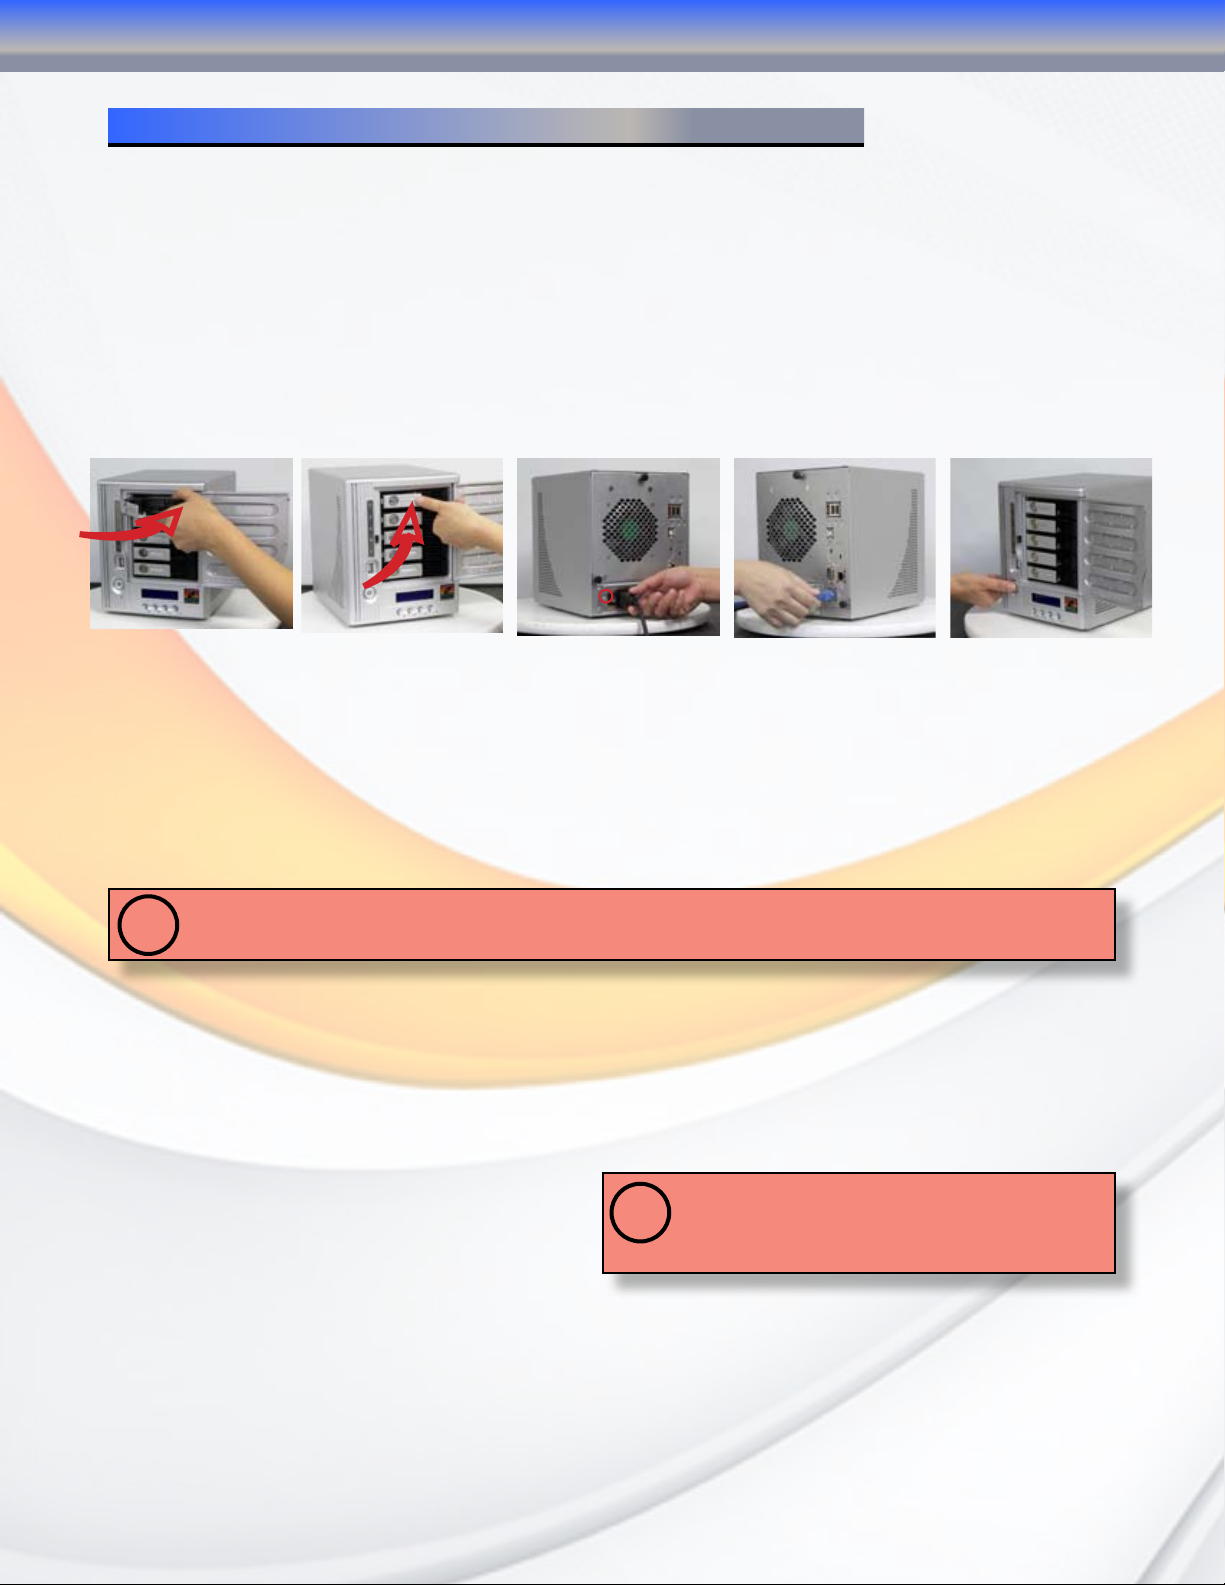
1. Connect Your MaxNAS
Place on a flat and stable surface capable of supporting at least 25lbs, and close enough to
the available network jack to reach with an Ethernet cable.
Step 1. Remove the disk canisters from the packing material and carefully insert into the MaxNAS.
Step 2. Secure each canister into position and push the latch until it snaps into place.
Step 3. Connect the provided power cord into the universal power socket on the back panel.
Plug the other end of the cord into a power socket. Make sure the power switch is in
the on position (“-”)
Step 1- Insert
Canisters
Step 4. Connect an Ethernet cable from your network to LAN1 (DHCP environment) or LAN2
(static IP) port on the back panel.
Step 5. Press the power button on the front panel. The MaxNAS will boot. The Power indicator
light should glow blue, and the LAN LED corresponding to the connected interface will
glow or blink green. All the HDD Power LEDs on each HDD tray should glow blue.
IMPORTANT! If Any LED glows red and the system emits a continuous beeping sound, then the system is
reporting fault. Refer to Appendix A: Troubleshooting for further information.
!
Step 2- Secure
Canister Latches
Step 3- Connect Power
and turn on switch
Step 4- Connect
Network Cable
Step 5- Press Power
Key
2. Accessing System Administration for the first time
The MaxNAS comes pre-configured with the LAN1 Ethernet port set to DHCP (Dynamic Host
Configuration Protocol) and the LAN2 Ethernet port set to a static IP address, 192.168.2.100.
The current IP addresses are displayed on the LCD panel. The default WINS (Windows Internet
Naming Service) for the MaxNAS is “MaxNAS”. Included with your MaxNAS is a discovery wizard
for Mac and PC, which allows click-and-select
simplicity; simply install the wizard software,
launch it, and the wizard discovers your
MaxNAS for administration.
IMPORTANT! If you are adding a MaxNAS to a
network with existing MaxNAS products, please make
!
sure to assign each unit a different name. See Chapter
3, Section 2.3 for more information.
MaxNAS Owner’s Manual
11
Page 12
2-Connecting the MaxNAS
2.1 Wizard Installation and Usage
IMPORTANT! The setup wizard uses TCP port 10000 and UDP ports 11000-11001 For communication. If you
are using a software rewall, please make sure to unblock those ports in order for the wizard to get access
!
to the MaxNAS.
2.1.1 Macintosh OS X
The wizard application for Mac OS X is located on your MaxNAS CD in the
“wizards” folder. You may launch the wizard directly from the CD, or you
can copy it to your Applications directory. Launch the wizard by double
clicking the “Setup Wizard” Icon.
2.1.2 Microsoft Windows
The wizard installation files for Windows are located on your MaxNAS CD in the “wizards”
folder. Install the wizard by double click
the file named “setup.exe” and follow the
instructions on the screen. Once complete,
you may launch the MicroNet setup wizard
by clicking the “Setup Wizard” shortcut (by
default the shortcut is installed to “StartAll Programs- MicroNet- MicroNet Setup
Wizard- Setup Wizard”.)
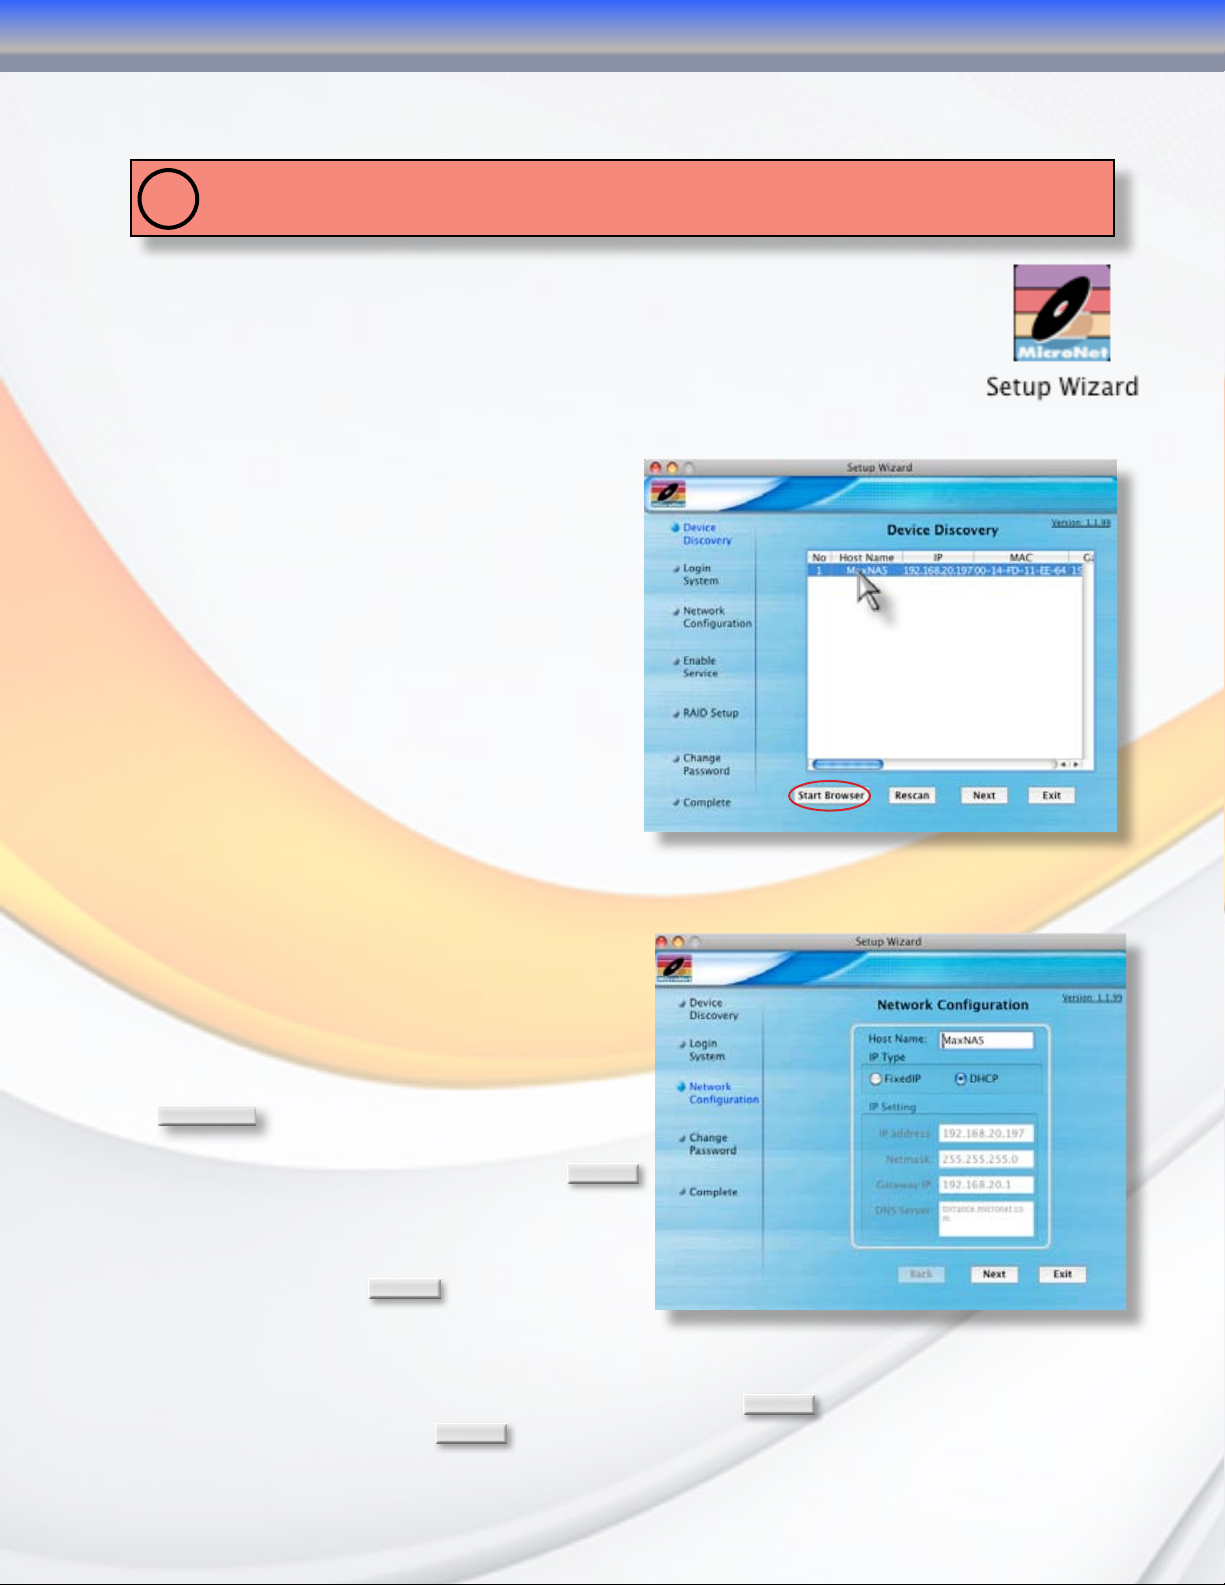
2.1.3 Using the Wizard
When the wizard is launched, it will briefly
display a welcome window followed by
the main application Interface (Illustrated
right) at the Device Discovery Stage. All
discovered MicroNet MaxNAS devices will
appear in the main discover windows, including the following details:
IP Address
MAC Address
Gateway
Netmask
DNS domain
LAN port connected
Firmware revision
Addressing Mode
(DHCP/Static)
To administer a MaxNAS, select the unit
desired in the device discovery window click
Start Browser
to launch the web administration
interface. If the MaxNAS is outside your
subnet mask and unreachable, click
Next
to change the IP address assignment.
2.1.3.1 Logging in- Enter the administative login
(default is “admin”) and password (default is
“admin”) and click
Next
.
2.1.3.2 In the Network Configuration screen you
may change the hostname, enable/disable DHCP or set static IP addressing. Click “Next” to
continue. No changes must be made to continue. For more information regarding Network
configuration, please see Chapter 3, Section 3. Click
Password screen or click
Exit
to end the wizard session.
Next
to proceed to the Change
MaxNAS Owner’s Manual
12
Page 13
2-Connecting the MaxNAS
2.1.3.3 You may change the password by entering a new “New Password” field, and re-enter
the password (case sensitive) in the “Confirm Password” field. Click
the wizard session.
2.2 Launching the IP Storage Administration GUI, DHCP Environment
Windows hosts can access the MaxNAS via WINS. Mac OS X and *nix based workstations may not support
WINS and would require your network administrator to provide the newly assigned IP address before accessing
!
the MaxNAS.
2.2.1 Make sure your MaxNAS is connected via LAN1 to a hub or a switch that is connected
to the DHCP server
2.2.2 (Windows hosts) Point your browser to “http://
MaxNAS”
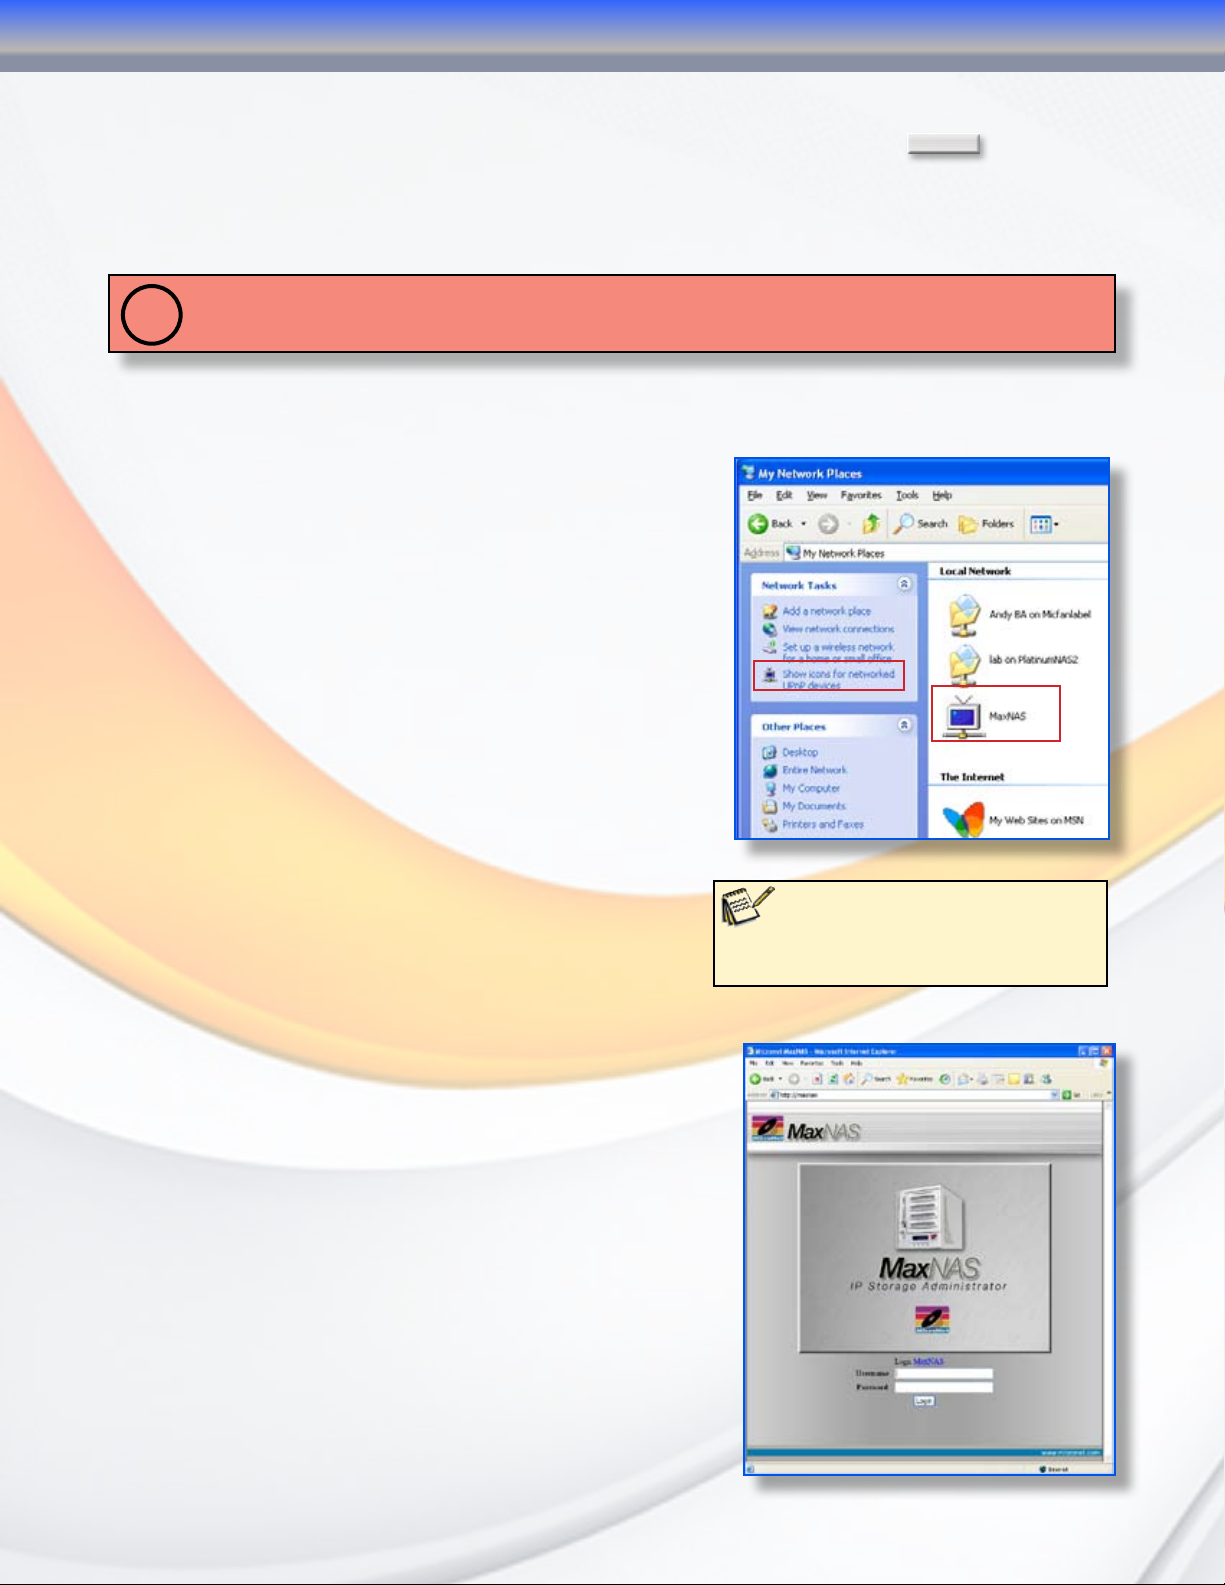
2.2.3 (Windows UPNP enabled hosts) Windows XP
and newer support UPNP discovery. To enable
UPNP, navigate to “My Network Places” and select
“Show icons for networked UPnP devices.” Confirm
the operation in the confirmation dialog box.
Once UPnP is enable, a Remote UPnP device icon
should appear. Double Click the UPnP icon for the
MaxNAS, and a browser session will automatically
launch.
End
to conclude
2.3 Launching the IP Storage Administration GUI, Static IP Environment
2.3.1 Make sure your MaxNAS is connected via LAN2
to a hub or a switch that is connected to your
workstation
2.3.2 Configure the IP address of your workstation
to 192.168.2.101, subnet mask 255.255.255.0.
Refer to your operating system’s documentation
for more information on this procedure.
2.3.3 Point your browser to “http://192.168.2.100”
2.4 Logging In
The default User ID and password on the MaxNAS are:
UserID: admin
Password: admin
Enter the userID and password, and click the “Login”
button. You are now ready to administer and customize
your MaxNAS.
Note:
The UPNP Icon for MaxNAS may
blink in the explorer windows. This is normal
behavior.
MaxNAS Owner’s Manual
13
Page 14
2-Connecting the MaxNAS
3. LCD Operation
The MaxNAS is equipped with an LCD on the front for easy status display and setup. There
are four buttons on the front panel to control the LCD functions: Up (▲), Down (▼), Enter (↵)
and Escape (ESC) keys. The following table illustrates the keys on the front control panel:
Icon Function Description
▲ Up Button Select the previous configuration settings option.
▼ Down Button Select the next configuration settings option.
↵
ESC Escape Escape and return to the previous menu.
During normal operation, the LCD will be in Display Mode. The following information will
rotate every one-two seconds on the LCD display.
Item Description
Host Name Current host name of the system.
WAN Current WAN IP setting.
LAN Current LAN IP setting.
Link Aggregation Current Link Aggregation status
Disk Info Current status of disk slot has been installed
RAID Current RAID status.
System Fan Current system fan status.
CPU Fan Current CPU fan status
2008/06/16 12:00 Current system time.
Enter Enter the selected menu option, sub-menu, or parameter setting.
3.1 USB Copy
The USB Copy function enables you to copy files stored on USB devices such as USB disks
and digital cameras to the MaxNAS with a press of a button. To use USB copy, Plug your
USB device into the front USB port, and press the Down Button (▼). The LCD will display
MicroNet MaxNAS
USB Copy?
Press Enter (↵) to initiate the process. All of data on the external disk will be copied into
system share named “USBcopy”.
3.2 Management Mode
To enter into front panel management mode,
press Enter (↵). An “Enter Password” prompt will
show on the LCD. The default LCD password is
“0000”. Enter the system password followed by
Note:
You can also change the admin password
using the Web Administration Interface (“System”
-> “Administrator Password.”) For more on the Web
Administration Interface, see Chapter 3: System
Management.
Enter (↵).
Item Description
LAN Setting IP address and netmask of your LAN1 port.
WAN Setting IP address and netmask of your LAN2 ports.
Link Agg. Setting Select Load Balance or Failover.
Change Admin Passwd Change administrator’s password for LCD operation.
Reset to Default Reset system to factory defaults.
Exit Exit Management Mode and return to Display Mode.
MaxNAS Owner’s Manual
14
Page 15

2-Connecting the MaxNAS
4. Adding External Disks
The MaxNAS has two rear USB ports, one front USB port, and one eSATA port for attaching
external storage devices such as the Fantom Drives G-Force Megadisk lines of products,
formatted in FAT32 or NTFS. Please note that NTFS volumes will be available in read only
mode. The MaxNAS supports up to 6 external storage devices. Attached disks are accessible by
navigating to \\[MaxNAS]\usbhdd\sd[x]\[y]
Where: [MaxNAS] is the netbios name or IP
address of the MaxNAS, [x] refers to the port the
disk is attached to, and [y] refers to the partition
number. See chapter 4, Connecting Users, for more
information on accessing shared data.
5. USB Target Mode
Your MaxNAS can present storage as an external USB disk device, connected via the USB type “A”
target mode port on the back of the unit. Space for USB target mode must be allocated in RAID
management screen (see chapter 3, Section 2.2.5 for more information), and will be recognized
as an unformatted disk when initially connected to a host. Since the space allocated resides on
the RAID, it will enjoy all performance and fault tolerance features afforded by the MaxNAS.
IMPORTANT: The MaxNAS cannot format
!
external disks. In order to access external disks
over the network, make sure your external disk
is formatted as FAT32 or NTFS. The MaxNAS
can access NTFS partitions for reading only.
MaxNAS Owner’s Manual
15
Page 16
3-Administering the MaxNAS
Chapter 3- Administering the MaxNAS
This chapter describes the menu and control structure for your MaxNAS. The RAID subsystem
configuration utility is firmware-based and its operation is independent of host computer type
or operating system.
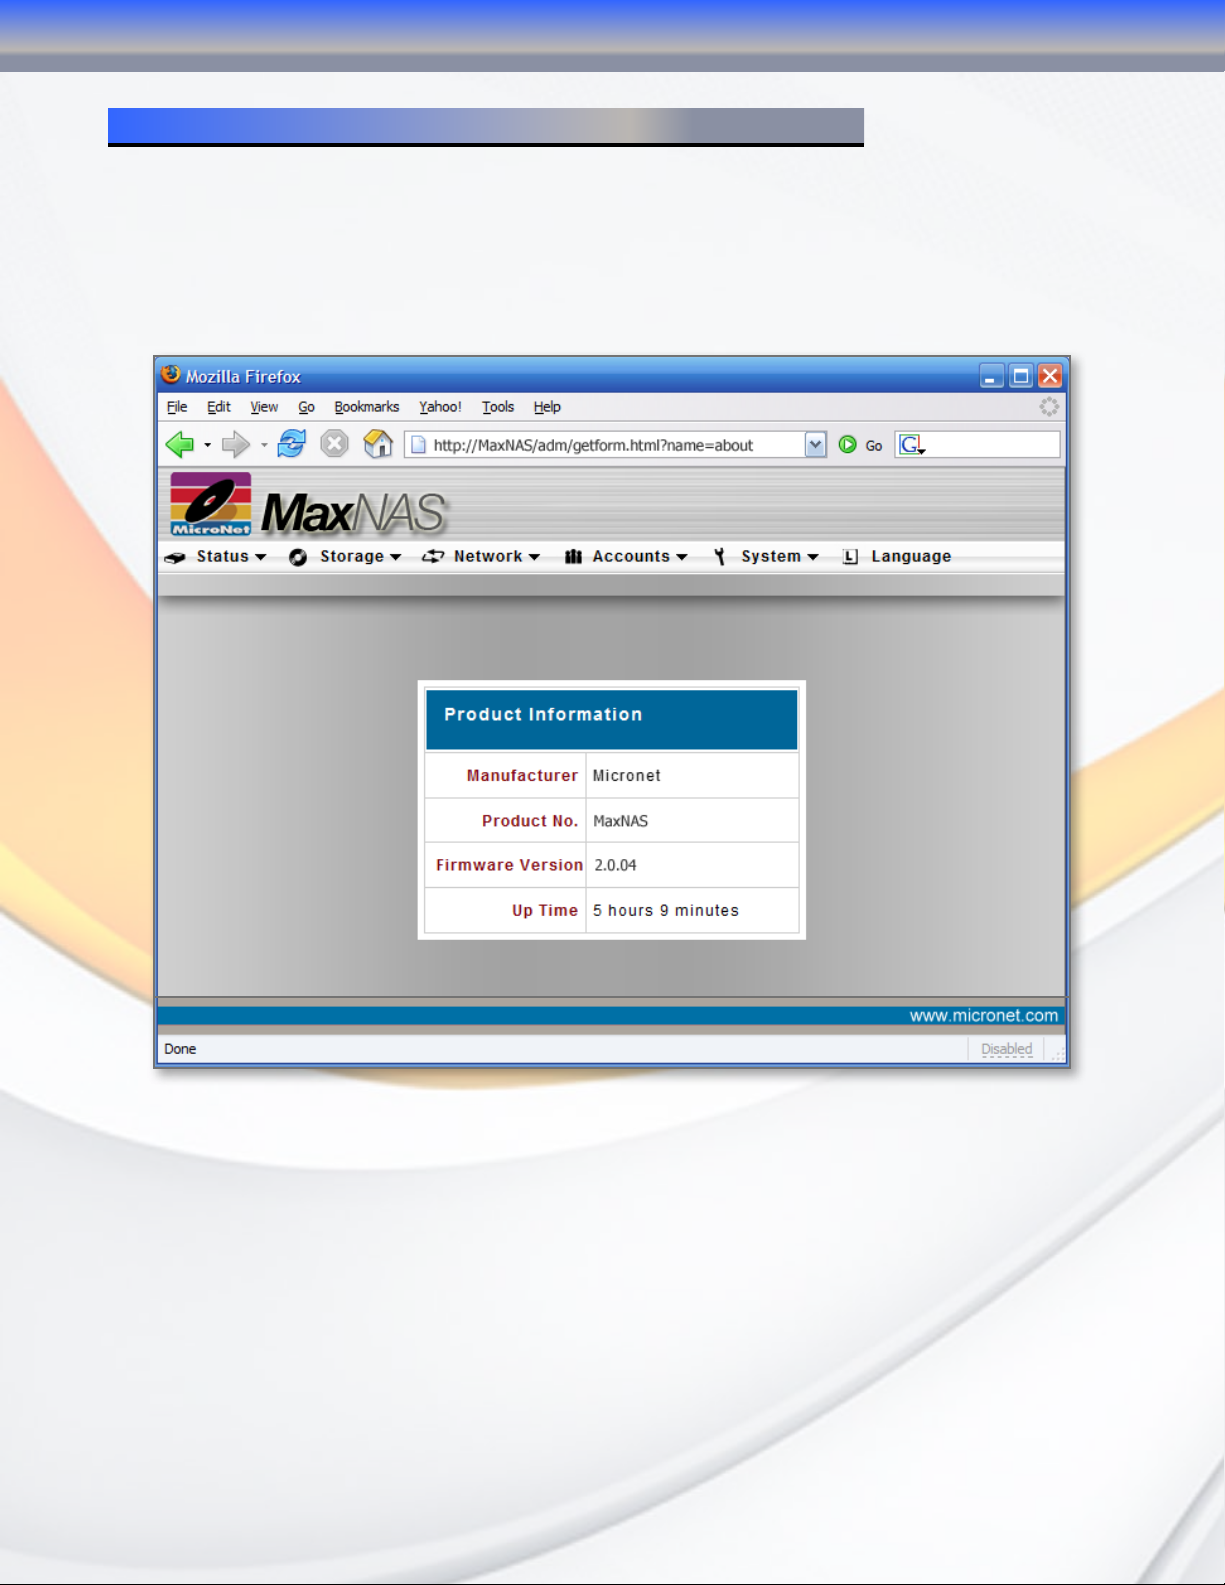
At initial login, the user will be greeted with the Product Information Screen:
The administration user interface utilizes the pulldown menu desktop motif, and is organized
as illustrated in the following table:
MaxNAS Owner’s Manual
16
Page 17
3-Administering the MaxNAS
The Main Menu Configuration Tree
1. Status 1.1 System Status Information
1.2 USB Printer
1.3 Monitored UPS Status
1.4 Wake-on-LAN Configuration
1.5 Scheduled Power-On Configuration
1.6 Product Information (About)
2. Storage Configuration 2.1 Disk Information
2.2 RAID Configuration
2.3 Folder (Shares) Configuration
2.4 Filesystem check
2.5 Stackable iSCSI Host Mode
2.6 Mount ISO Disk Image
2.7 nSync Synchronization Configuration
3. Network Configuration 3.1 LAN 1 Interface setup
3.2 LAN 2 Interface setup
3.3 Feature and Function Configuration
4. Accounts and Permissions 4.1 Authentication services configuration
4.2 Local User Configuration
4.3 Local Group Configuration
4.4 Batch User Creation
5. System Configuration 5.1 Remote Notification
5.2 System Event Logs
5.3 System Time
5.4 Save/Recover System Configuration
5.5 Add On Module Management
5.6 Reset MaxNAS to Factory Defaults
5.7 Update Firmware
5.8 Change Administrator Password
5.9 Reboot/Shutdown
5.10 Logout from Administration applet
5.11 Interface Language
MaxNAS Owner’s Manual
17
Page 18
1. Status Displays
1.1 System Status
The Status window contains the
basic system functionality indicators
including current CPU load, uptime,
disk information and health, and
running services. To view the System
Status, select “System” from the
Status Menu.
1.2 System Information
This field is the verbose description
that will describe this particular
MaxNAS. To access the System
Information definition field, select
“Info” from the Status Menu. In the
following screen, enter a descriptive
name such as “Accounting Storage
Server,” that will differentiate it
from other storage devices on the
network. Click
Cancel
or
to abort.
Apply
to confirm,
3-Administering the MaxNAS
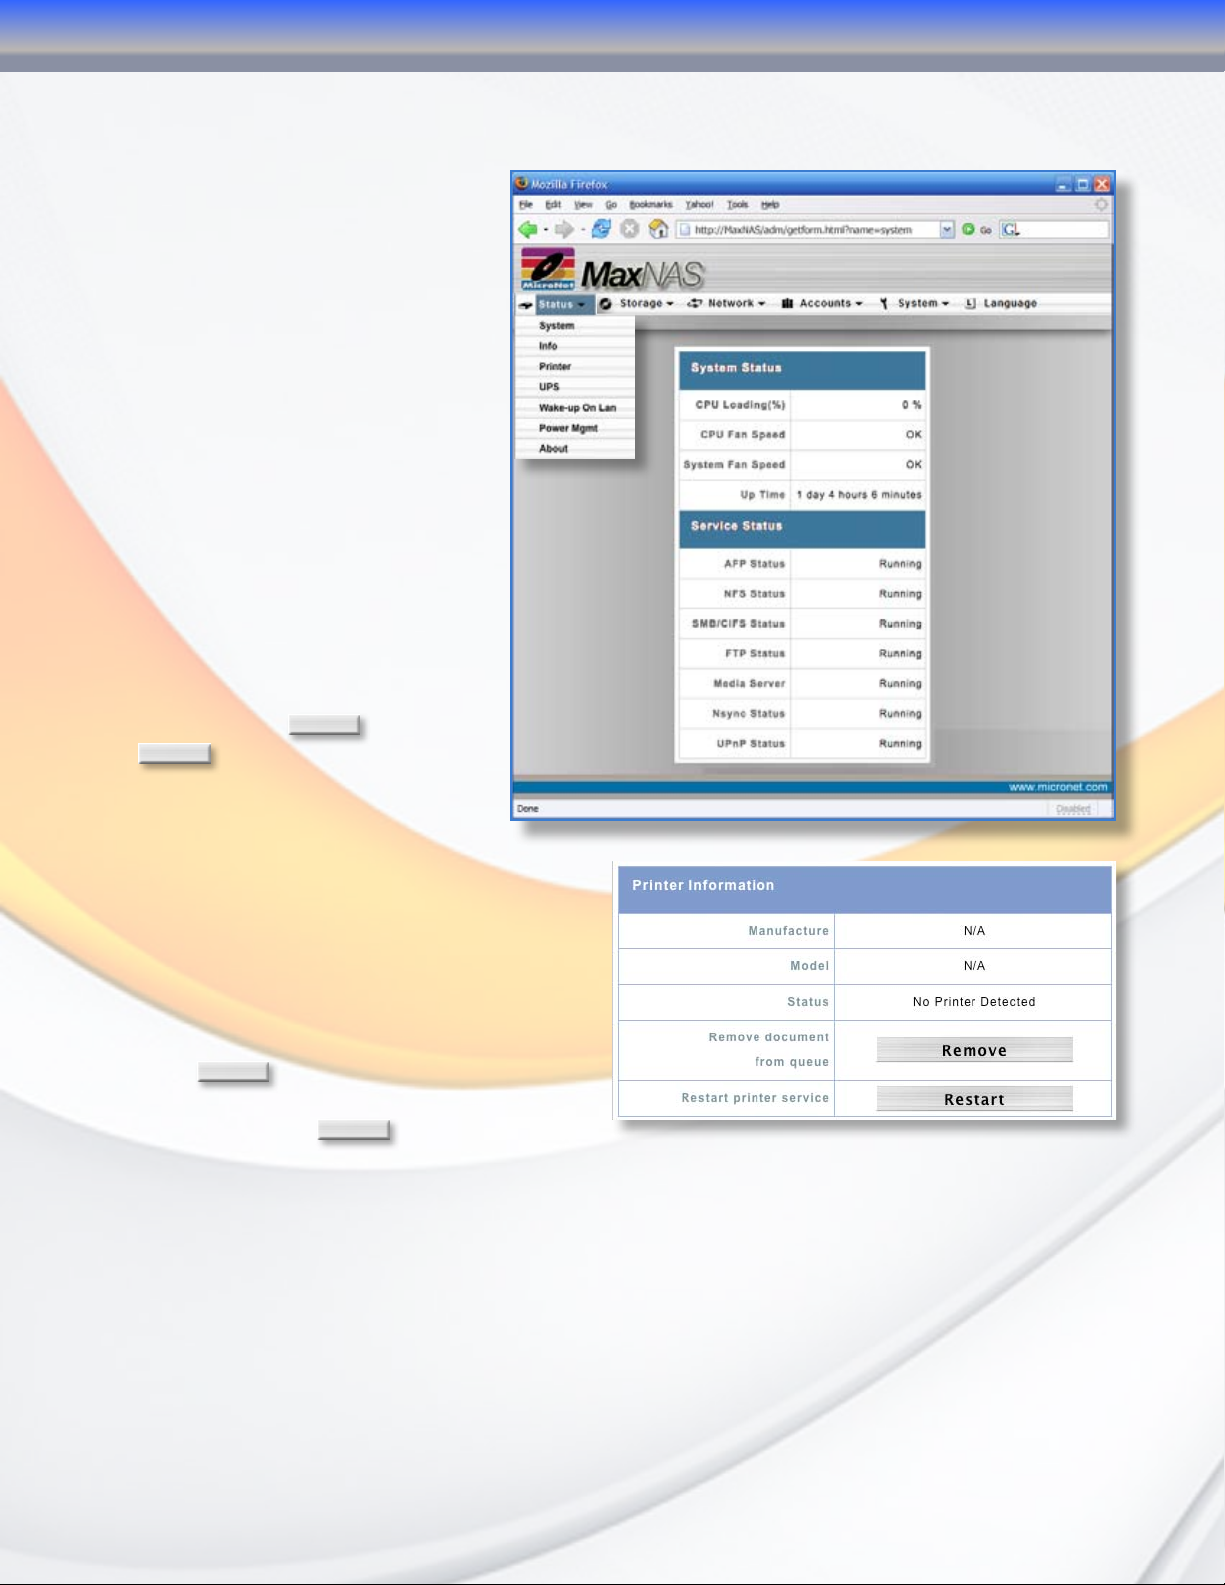
1.3 USB Printer Information
The MaxNAS can act as a print
server to an attached USB disk server. To
access the printer information page for the
attached printer, select “Printer” from the
Status menu. The Printer manufacturer and
model information will appear as well as the
current status (online or offline). You may
remove a document from the print queue by
clicking
Remove
. If the Printer service becomes
inoperable you may reset the printer host
service by clicking
Restart
.
MaxNAS Owner’s Manual
18
Page 19
3-Administering the MaxNAS
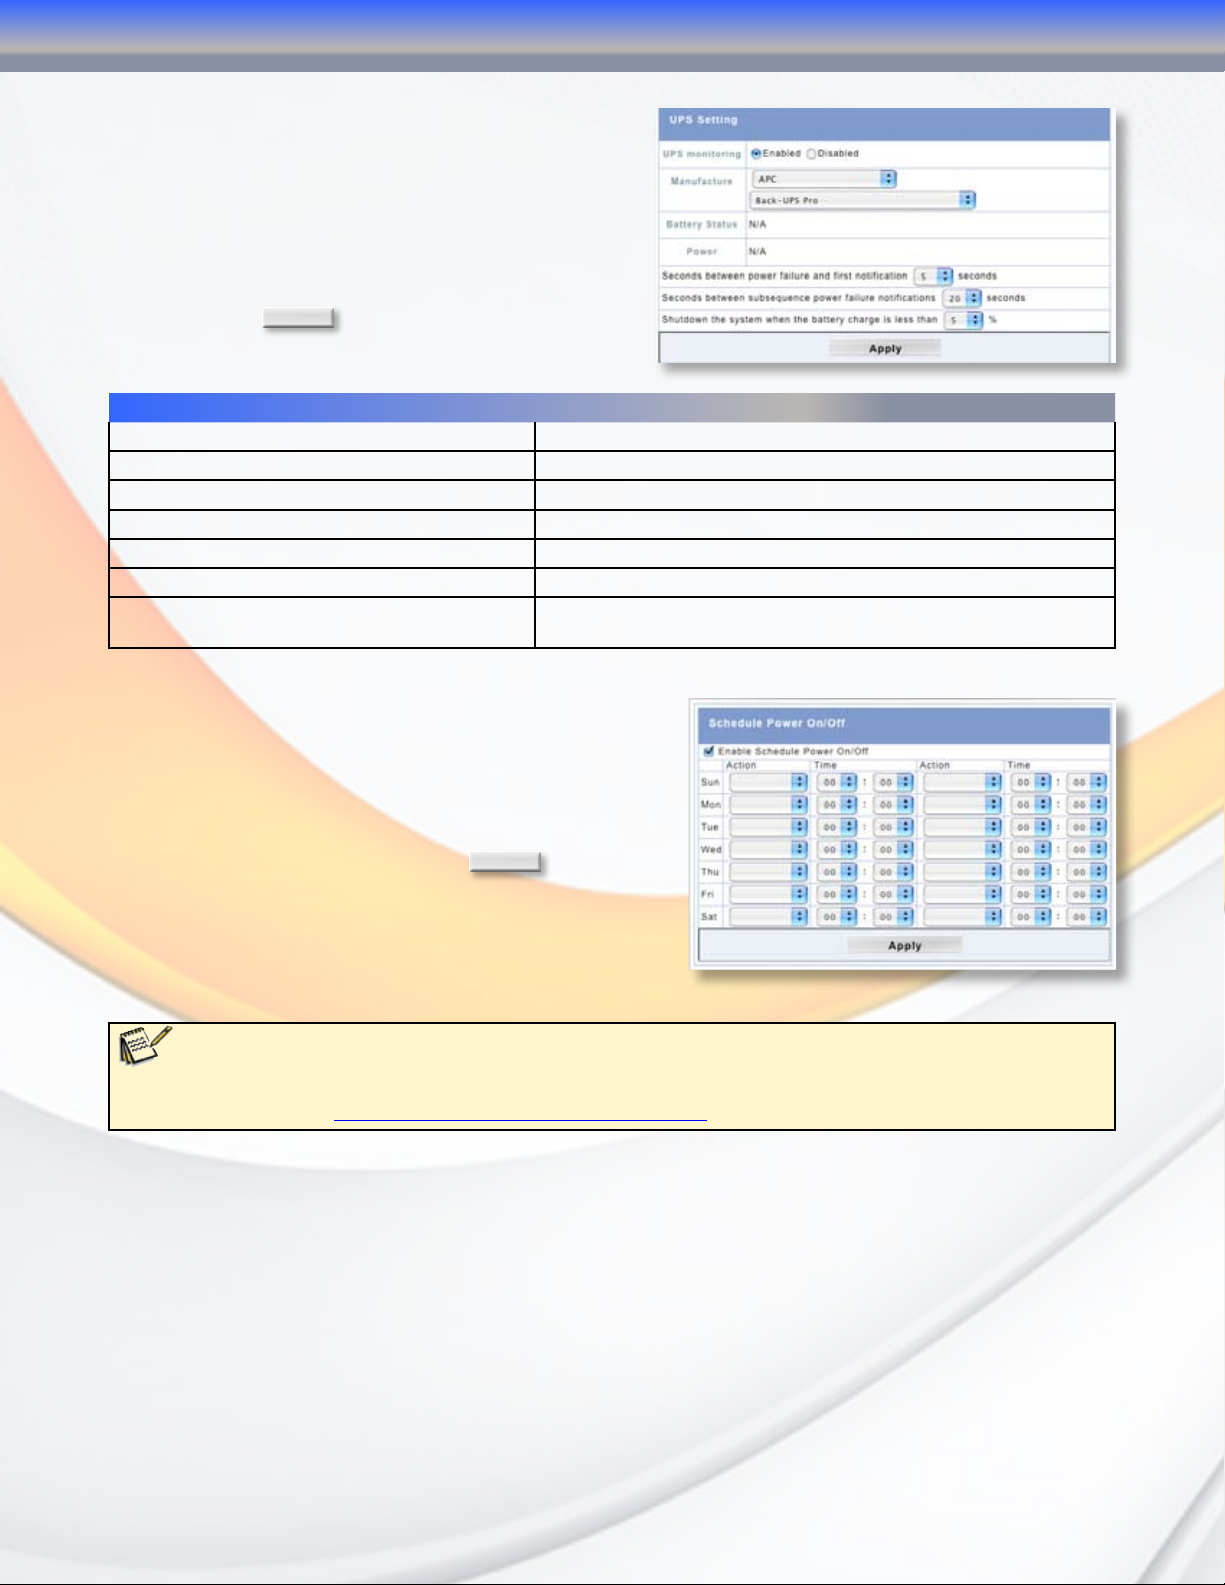
1.4 Attached UPS Monitor Status
The MaxNAS will monitor and respond to UPS
status messages from a compatible attached
UPS (for a list of compatible devices, please
see appendix D.) To access the UPS monitoring
control , select Status -> UPS. The following
table describes the options available. To confirm
settings, click
Item Description
UPS Monitoring Enable or disable UPS monitoring.
Manufacturer Choose the UPS manufacturer and model number from the dropdowns.
Battery Status Current status of the UPS battery
Power Current status of the power being supplied to the UPS
Seconds between power failure and first notification Delay between power failure and first notification in seconds.
Seconds between subsequent power failure notifications Delay between subsequent notifications in seconds.
Shutdown the system when the battery charge is
less than [n]%
Apply
.
Amount [n] of UPS battery remaining before system should autoshutdown.
1.5 Power Management
The MaxNAS can turn itself on and off according to a
user preset schedule. To control the power schedule,
navigate to “Status” -> “Power Management.” To
enable the scheduler, check “Enable Timer” as shown
right. Enter the desired times to power on and off for
each day of the week, and click
Apply
to activate.
In order to access the MaxNAS during its scheduled
downtime, the system employs the “Wake on LAN
(WOL)” protocol. To enable WOL, navigate to “Status”
-> “Wake up on LAN” and enable the service.
Note:
The MaxNAS will only wake in response to a special network command specific to the Wake on LAN protocol
called “Magic Packet.” For more information on how to generate a magic packet as well as WOL, consult your operating
system documentation or http://en.wikipedia.org/wiki/Wake-on-LAN
1.6 About this MaxNAS (Info)
The About page details the name and firmware revision of the MaxNAS. It is the page that
displays upon initial login.
MaxNAS Owner’s Manual
19
Page 20
3-Administering the MaxNAS
2. Storage Configuration
The storage configuration menu contains the following submenus:
• Disks (Informational)
• RAID
• Folder (Share)
• File System Check
• iSCSI stacked target host control
• ISO disk image mounting service
• nSync Task Configuration
• Advanced Options
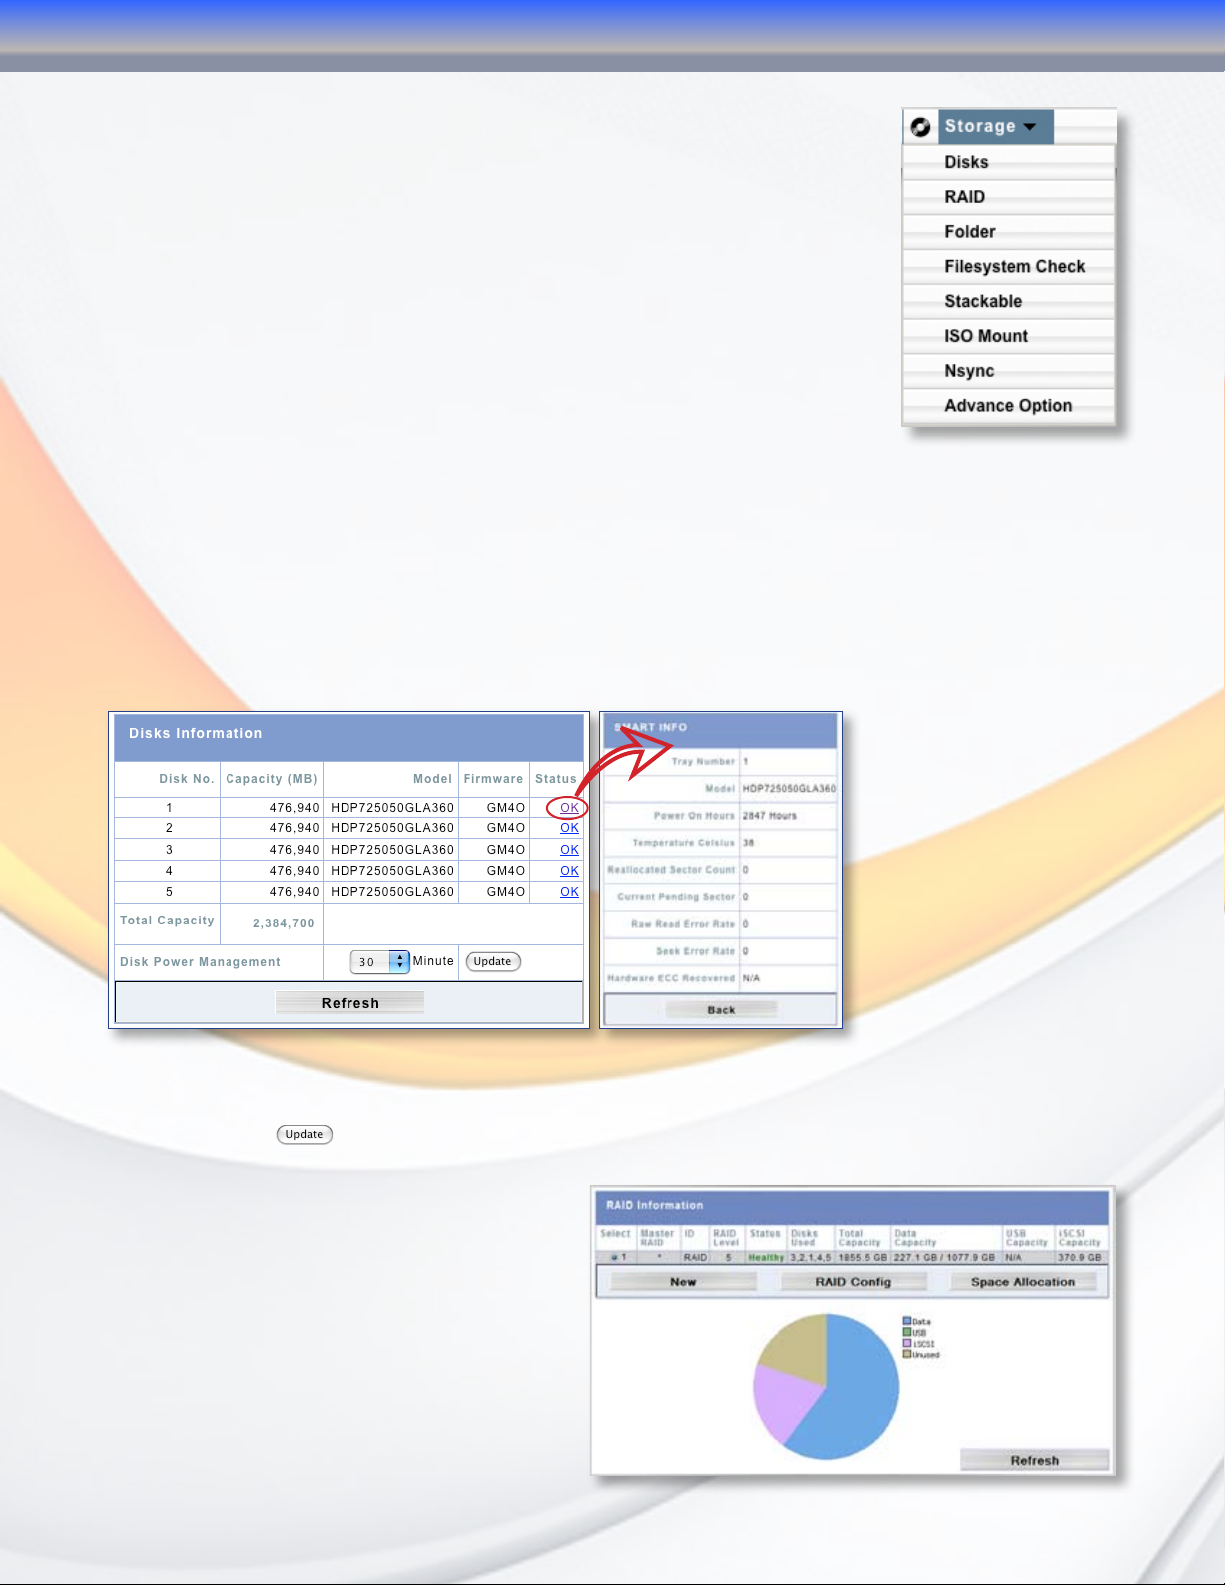
2.1 Disks (Info)
The disks menu displays the current capacity, the disk firmware revision, and current status,
including SMART (Self-Monitoring, Analysis, and Reporting Technology) status of each disk
drive mechanism. To view the Disk Info screen, navigate to “Storage” -> “Disks”. The rightmost
column, “Status,” will display the most recent SMART reported health status for each disk
mechanism. To view the SMART results, click on the smart status indication next to the
specified disk mechanism, and the detailed information will appear.
The MaxNAS can power down the disks when they are not accessed to save power. To enable
disk power management, specify the idle time in minutes in the “Disk Power Management”
Field and click .
2.2 RAID Menu
The RAID configuration screen displays
the current storage organization of the
MaxNAS, including RAID level, usable
capacity along with target allocation, health
and current operation progress the status
of your RAID volumes. To view the RAID
status screen, select “RAID” from the Storage
Menu. The MaxNAS comes preconfigured
MaxNAS Owner’s Manual
20
Page 21
3-Administering the MaxNAS
as a single RAID5 volume (See Chapter 5, Understanding RAID, for more information on RAID
and RAID levels.) The following is a description of each information element:
Item Description
Select Used to select the current RAID volume.
Master RAID The RAID volume currently designated as the Master RAID volume.
ID ID of the current RAID volume. Each volume must have a unique ID
RAID Level Shows the current RAID conguration.
Status Indicates status of the RAID. Can read either Healthy, Degraded, or Damaged.
Disks Used Hard disks used to form the current RAID volume.
Total Capacity Total capacity of the current RAID.
Data Capacity Indicates the used capacity and total capacity used by user data.
USB Capacity Indicates the capacity allocated to USB target mode.
iSCSI Capacity Indicates the capacity allocated to iSCSI.
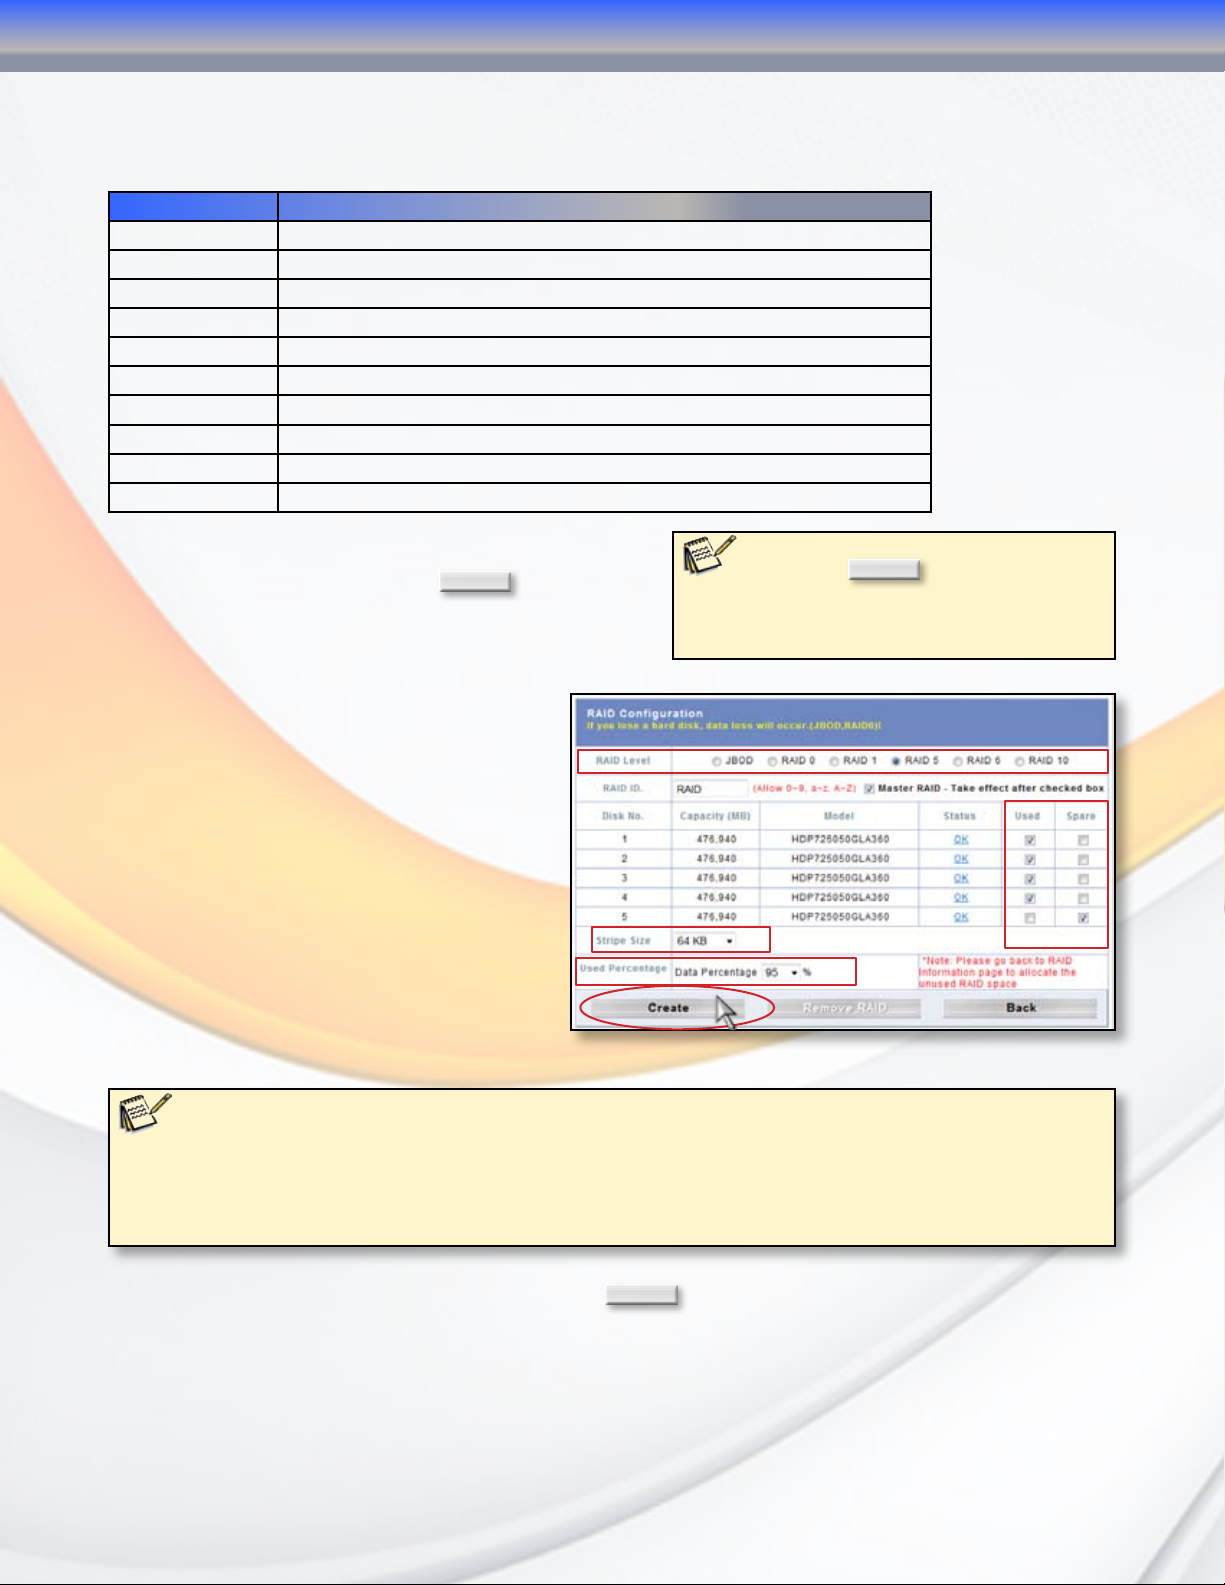
2.2.1 Create RAIDset To create a new RAIDset, click
New
on the RAID
information screen (see above, section 2.2.) The
RAID Creation page will appear.
Note:
If clicking
RAID creation screen there isn’t sufficient space to
create a new RAIDset. A RAIDset will have to be
removed before a new RAIDset can be defined.
New
does not activate the
A. Select RAID Level (JBOD, RAID 0,1,5,6
or 10)
B. Check the disk modules to be used for
RAID or as hot spare(s)
C. Select the Stripe Size (4K - 4096K,
default 64K). Larger stripe size will aid
in large file sequential transfers while
smaller stripe size will aid in small or
random file transfers.
D. Select the percentage of the resulting
C
D
B
volume to be used for network access.
Remaining space may be allocated for
iSCSI or USB target mode.
Master RAID
In a multiple RAID configuration, one RAID volume must be designated as the Master RAID volume. The Master
RAID volume will store all installed modules and system settings. If the Master RAID is changed to another location (i.e.
assigning HDD 2 to be the Master RAID volume after HDD 1 had been previously assigned), then all modules must be
reinstalled. In addition, all system folders that were contained on the Master RAID volume will be invisible. Reassigning
this volume to be the Master RAID will make these folders visible again.
A
When all options have been checked, click
Create
. The MaxNAS will begin initialization.
Please note that the shares cannot be created while RAIDset initialization is in progress.
MaxNAS Owner’s Manual
21
Page 22
3-Administering the MaxNAS
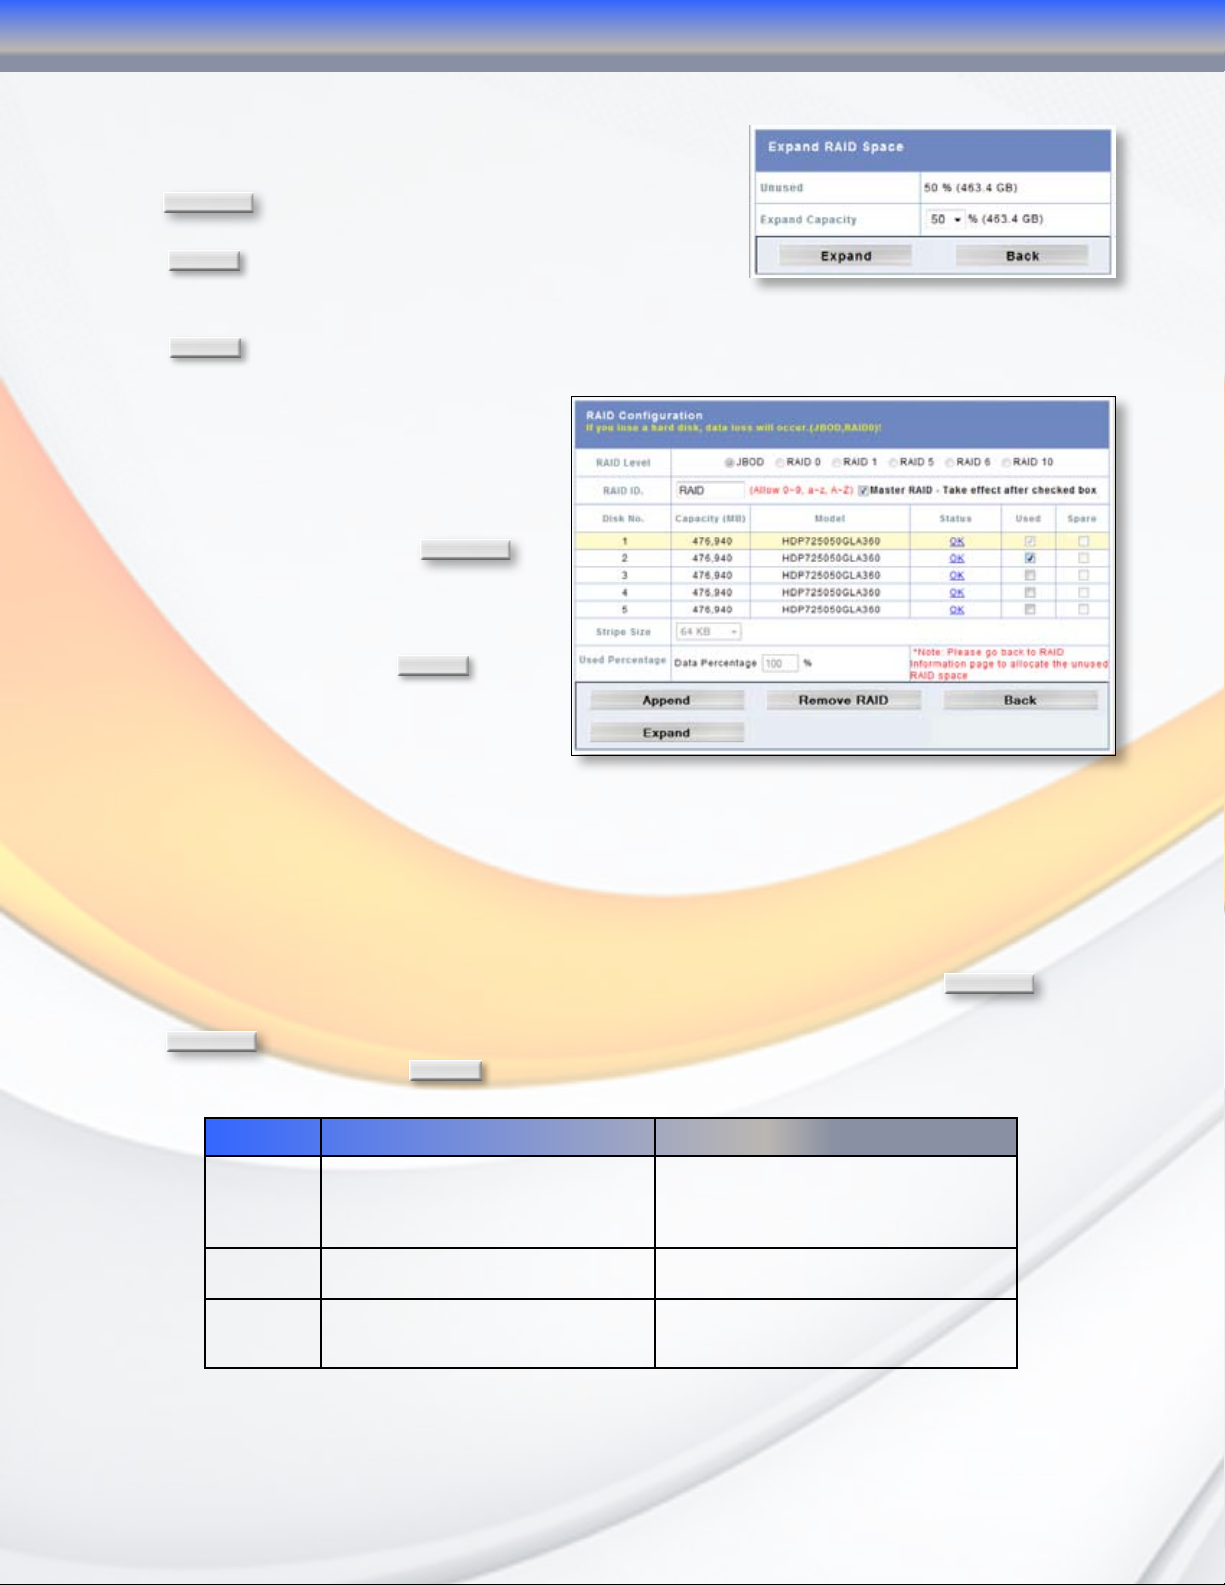
2.2.2 Expanding NAS volumes To expand the network accessible space of a RAIDset to take over unused space, select the desired RAIDSet and click section 2.2.) The RAID Configuration page will appear. Click Select the new percentage of the resulting volume to be used for network access. Remaining space may be allocated for iSCSI or USB target mode. Click
2.2.3 Appending disks to RAIDset If an existing RAIDset does not use all available disk mechanisms it may be expanded onto the unused disk(s.) To expand an existing RAIDset, Select the desired RAIDSet and click the RAID information screen (see above, section 2.2.) The RAID Configuration page will appear. Select the desired available disk(s) and click
RAID Config
Expand
Expand
on the RAID information screen (see above,
. The Expand RAID Space screen will appear.
to complete the operation.
RAID Config
Append
on
.
2.2.4 Migrating RAIDSet The MaxNAS allows RAIDsets to migrate on to unused disk modules as well as change the RAID level to fully utilize resources or to afford user flexibility. Online RAID level/stripe size migration can prove helpful during performance tuning activities as well as at the addition of physical disks to the MaxNAS. For example, in a system using two drives in RAID level 1, you could add capacity and retain fault tolerance by adding one drive. With the addition of third disk, you have the option of adding this disk to your existing RAID logical drive by migrating from RAID level 1 to 5. The result would be parity fault tolerance and double the available capacity without taking the system offline. To migrate a RAID 0, RAID 1, or RAID 5 volume, Select the desired RAIDSet and click
RAID Config
on the
RAID information screen (see above, section 2.2.) The RAID Configuration page will appear.
Click
migration scheme and click
Migrate RAID
From
RAID 0
RAID 1 [RAID 1] HDDx2 to [RAID 0] HDDx2-5 [RAID 1] HDDx2 to [RAID 5] HDDx3-5
. A list of possible RAID migration configurations will be listed. Select the desired
OK
The following is a table of possible RAID migrations:
To
[RAID 0] HDDx2 to [RAID 0] HDDx3-5
[RAID 0] HDDx3 to [RAID 0] HDDx4-5
[RAID 0] HDDx4 to [RAID 0] HDDx5
RAID 0 RAID 5
[RAID 0] HDDx2 to [RAID 5] HDDx3-5
[RAID 0] HDDx3 to [RAID 5] HDDx4-5
[RAID 0] HDDx4 to [RAID 5] HDDx5
RAID 5 X
MaxNAS Owner’s Manual
[RAID 5] HDDx3 to [RAID 5] HDDx4-5
[RAID 5] HDDx4 to [RAID 5] HDDx5
22
Page 23
3-Administering the MaxNAS
2.2.5 Delete RAIDSet To Delete a RAIDset, Select the desired RAIDSet and click screen (see above, section 2.2.) The RAID Configuration page will appear. Click on and confirm the operation in the following confirmation dialog.
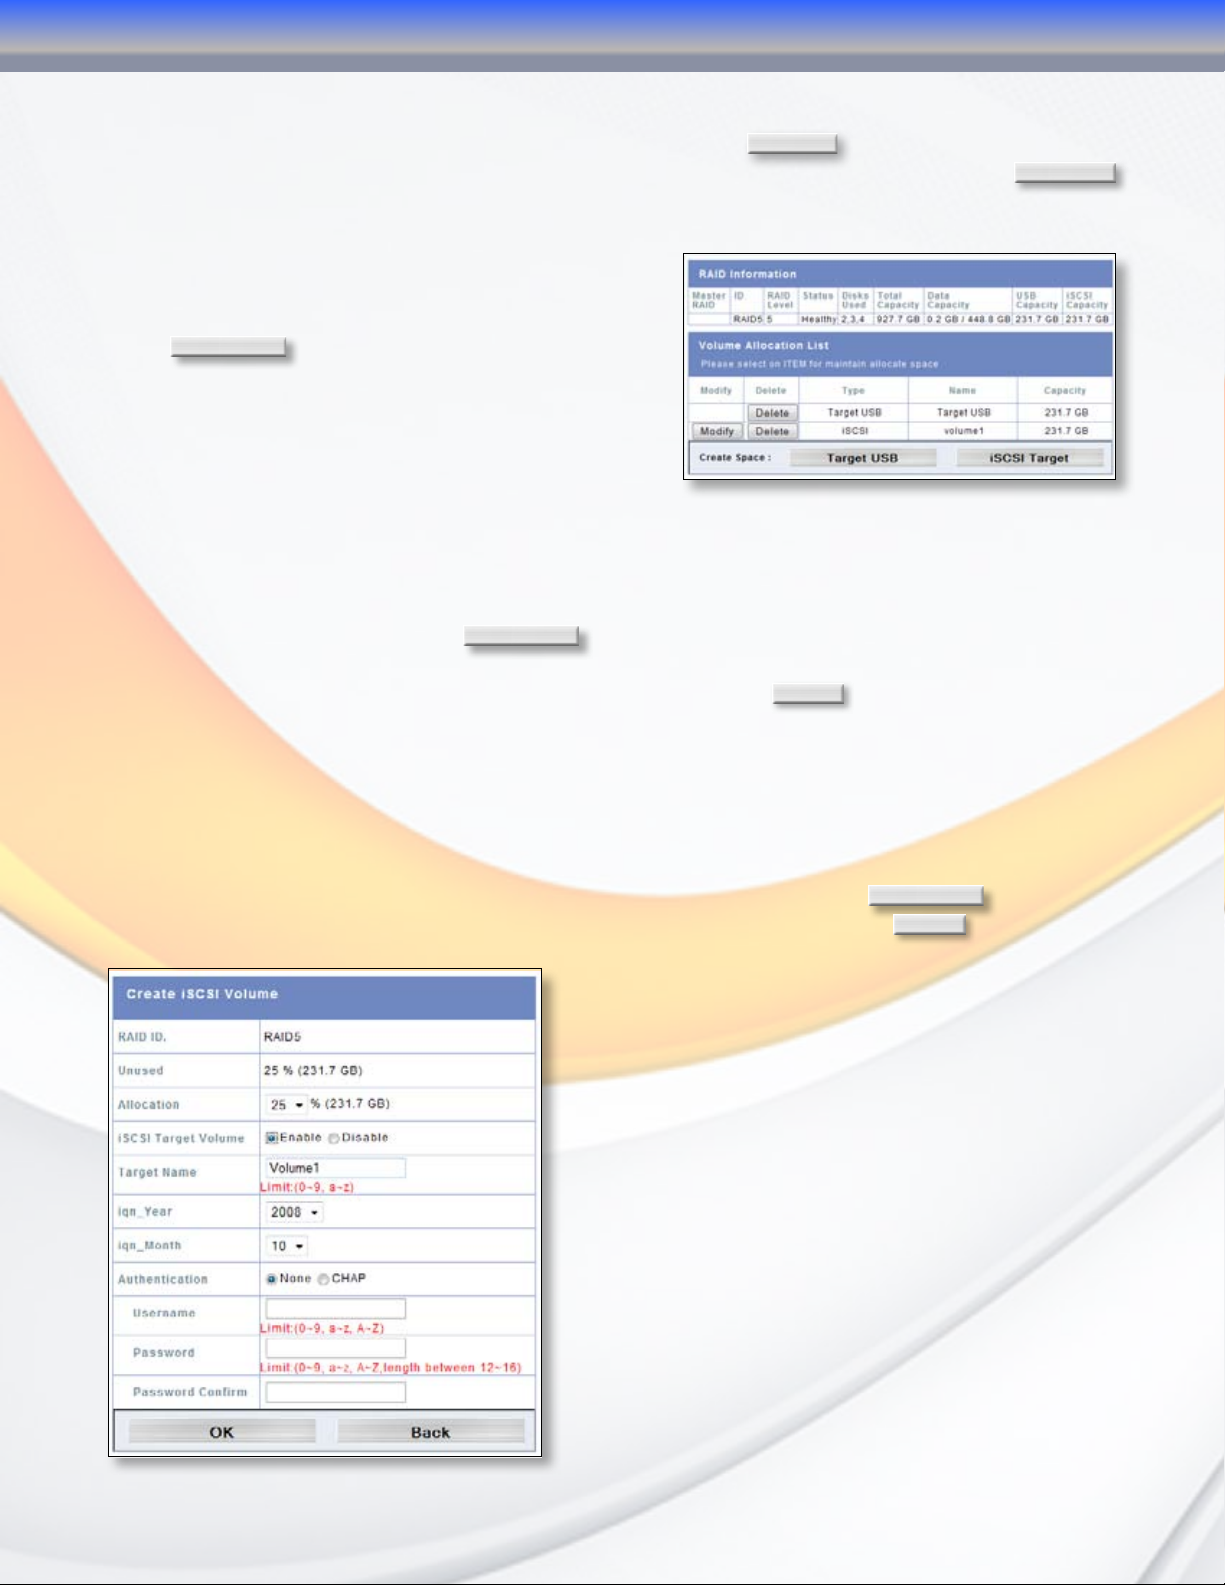
2.2.6 Space Allocation To control space allocation for Target USB and iSCSI volumes, Select the desired RAIDSet and click
Space Allocation
on the RAID information screen
(see above, section 2.2.) The RAID Information and
Volume Allocation List windows will appear. The
Volume Allocation List displays the space allocated
for Target USB and iSCSI volumes on the current
RAID volume. Here you may create, modify, and
delete target volumes.
Allocating Space for Target USB Volume
To allocate space for a Target USB volume on
the current RAID volume, click
Target USB
. The Create Target USB Volume screen appears.
Designate the percentage that should be allocated to the Target USB volume by selecting the
appropriate percentage from the Allocation dropdown. Click
volume. The Target USB volume will appear to a host connected via the USB type “A” target
mode port on the back of the unit, and will be recognize as an unformatted disk when initially
connected. Since the space allocated resides on the RAID, it will enjoy all performance and fault
tolerance features afforded by the MaxNAS.
RAID Config
OK
on the RAID information
Remove RAID
to create the Target USB
Allocating Space for iSCSI Volume
To allocate space for an iSCSI volume on the current RAID volume, click
iSCSI Volume” screen appears. Enter the values as listed below, and click
ID of current RAID volume.
Percentage and amount of available space on current RAID volume.
Percentage and amount of space allocated to Target iSCSI volume.
Enable or Disable the iSCSI Target service.
Name of the iSCSI Target (used for stackable host service)
Select the current year from the dropdown.
Select the current month from the dropdown.
CHAP security authentication (on or off)
CHAP Security: Username.
Enter a password.
Reenter the chosen password
iSCSI Target
OK
. The “Create
to confirm.
MaxNAS Owner’s Manual
23
Page 24
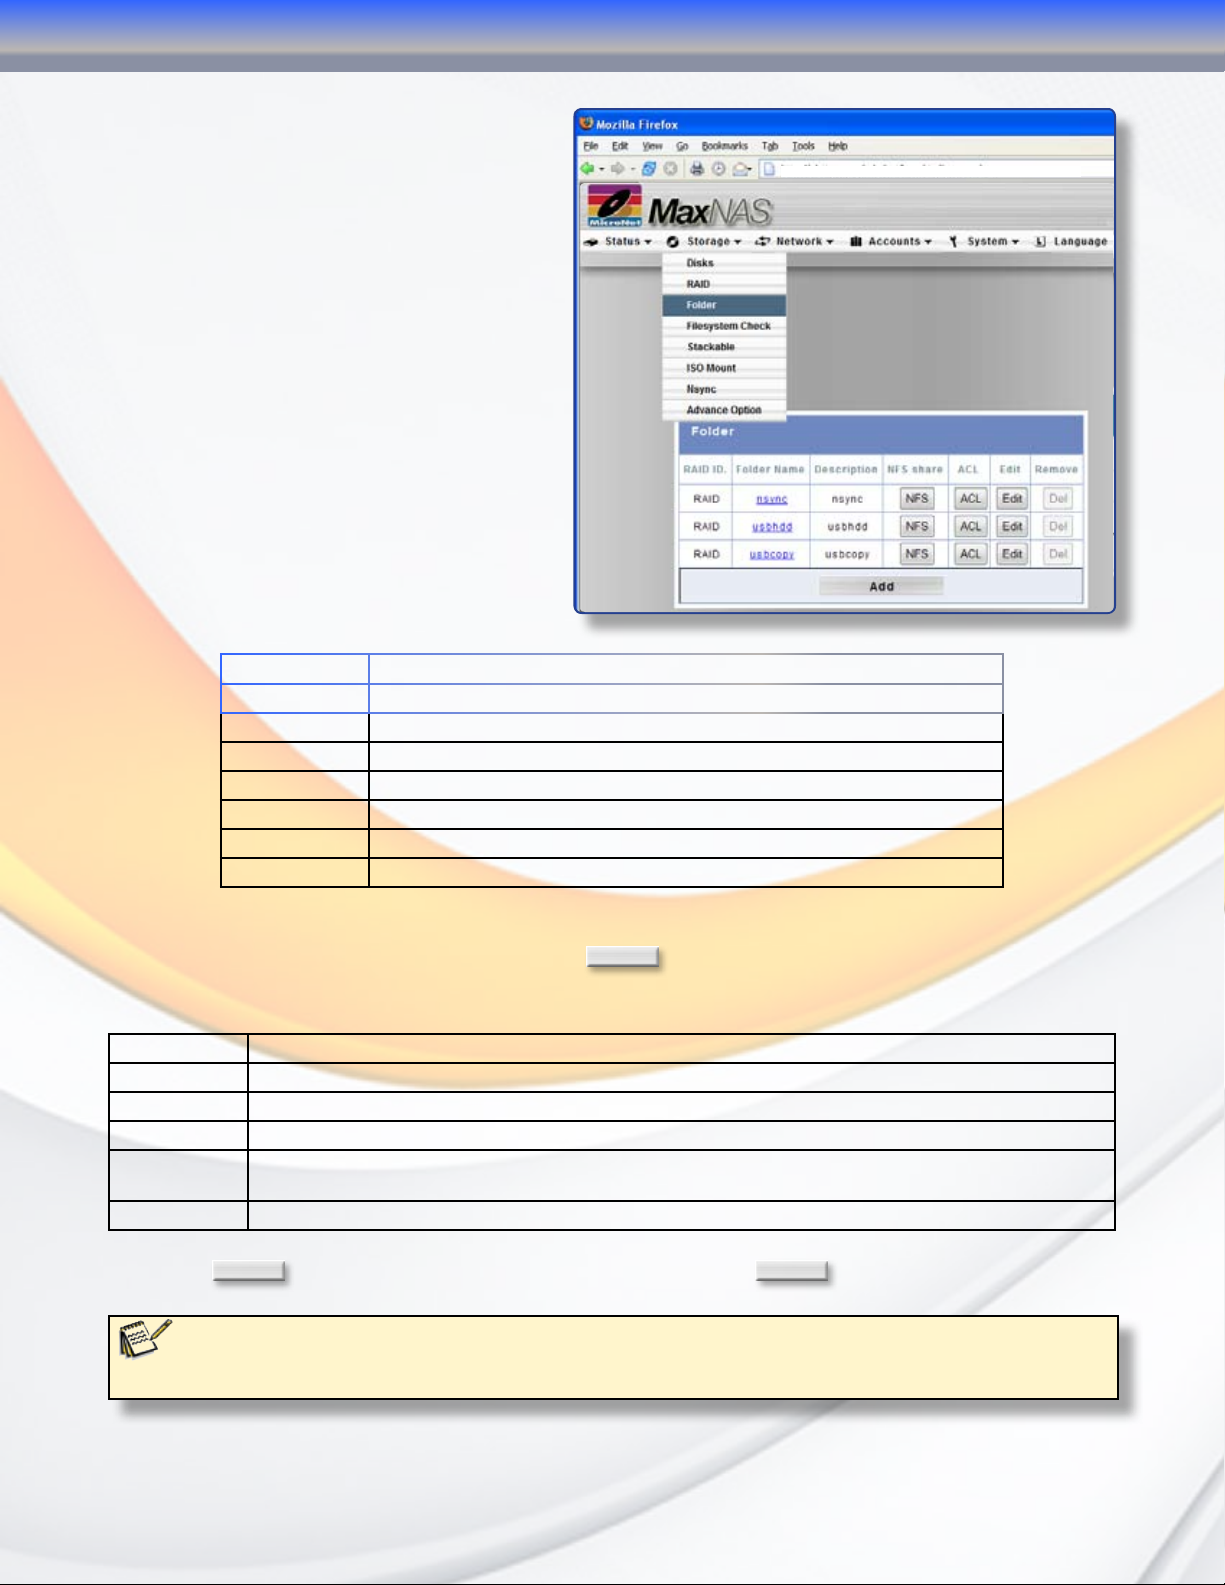
2.3 Folder (Share) Configuration
3-Administering the MaxNAS
The Folder Screen, accessible through
Storage -> Folder, allows you to create
and configure folders on the RAID storage
volume. The interface windows contains
the following elements:
RAID ID The RAIDset housing the share folder
Folder name Displays the name of the Share folder.
Description Provides a description of the Folder.
(NFS) Button Click (NFS) to to configure NFS access.
(ACL) Button Click (ACL) (Access Control List) to configure user access to this folder.
(Edit) Button Click (Edit) to edit and modify the Folder’s name and description.
(Del) Button Click (Del) to delete the folder. A screen appears asking to confirm deletion.
(Add) Button Click this button Add new folders
http://maxnas/adm/getform.html?name=share
2.3.1 Adding Folders (Shares) New shares can be created by clicking the
Add
button from the Folder screen. The Add
Folder Interface Contains controls for the following elements:
RAID ID Select the RAIDSet to use for the share from the pulldown list
Folder name Enter the name of the Folder.
Description Provide a description the Folder.
Browseable Whether the share will be visible when the MaxNAS is viewed through “network browsing”. Yes/No
Public Whether the share will be accessible to all regardless of permissions. Public shares will ignore ACL lists.
Yes/No
Share size limit Maximum space available in gigabytes up to the share size.
Click the
Note:
You must set the ACL for each folder to allow access by specific users and groups; otherwise the folder will
not be accessible. Remember to set ACLs whenever a new group or user are added to the MaxNAS.
Apply
button to complete the folder creation or
Cancel
to abort.
MaxNAS Owner’s Manual
24
Page 25

3-Administering the MaxNAS
2.3.2 Editing Folders (Shares) Share properties can be modified by clicking the The Edit Folder Interface Contains controls for the following elements:
Edit
button corresponding to the share.
RAID ID Select the RAIDSet to use for the share from the pulldown list
Folder name Enter the name of the Folder.
Description Provide a description the Folder.
Browseable Whether the share will be visible when the MaxNAS is viewed through “network browsing”. Yes/No
Public Whether the share will be accessible to all regardless of permissions. Public shares will ignore ACL lists.
Yes/No
Share size limit Maximum space available in gigabytes up to the share size.
Click the
Apply
button to complete the folder creation or
2.3.3 NFS Configuration To access and edit the NFS configuration, click
NFS
corresponding to the folder required.
The NFS configuration screen will appear.
In this screen you can add, edit existing or
remove mount points for the selected share. to
add a new mount point, click
Add
to launch the new NFS share window,
and enter the following values:
Allowed Host(s) IP address or range•
Privilege level (Read Only/Writable)•
Guest OS (*nix/AIX)•
Click
point, or
Apply
to create the NFS mount
Back
to return to the
Configuration screen. To edit an
existing mount point, click
Edit
and all NFS share options will be
available for editing. To remove an
NFS share, click
Remove
.
Cancel
to abort.
MaxNAS Owner’s Manual
25
Page 26

3-Administering the MaxNAS
2.3.4 Access Control Lists Folder permissions are controlled via ACLs (Access Control Lists.) To access and edit ACLs, click folder required. The Access control screen will appear. This screen allows you to configure access to the selected Folder for the users and groups. Select a user or a group from the left hand column and then click
Writable
to configure their access
level. To remove a user access or
limitation, select the user from the
appropriate column and click
corresponding above. If your MaxNAS
is a member of an Active Directory,
you may specify Active Directory
users and groups permissions as
well (AD users will appear in amber,
and AD groups will appear in blue.)
Click
Apply
modification, or
ACL
corresponding to the
Deny
,
Read Only
, or
Remove
to complete the ACL
Close Window
to abort.
Available
Users and
Groups
Users and
Groups
Denied
Access
Users and
Groups
Granted
Read Only
Access
Users and
Groups
Granted Full
Access
IMPORTANT: The ACL control Screen
!
is a popup window. Make sure your
browser allows popup windows for
your MaxNAS session.
2.3.5 Deleting Folders (shares) Shares can be removed by clicking to the folder required. A confirmation screen will appear. Click
ACL
to delete the share, or
Del
corresponding
Cancel
to abort.
Note:
The
out (unavailable) for system reserved shares.
Del
button will be greyed
2.4 Perform file system check
Under normal circumstances it should not be necessary to perform a file system check on the
MaxNAS. However, if the unit experienced a power outage or abrupt disconnection, it may be
useful to manually perform a file system check. To perform a file system check, navigate to
“Storage” -> “Filesystem Check”
MaxNAS Owner’s Manual
26
Page 27

2.5 Stackable iSCSI Host Service
The MaxNAS can aggregate up to 5
iSCSI targets and offer all networking
services to those targets, regardless of
where the storage is located physically.
To access the Stackable Host Service
control, navigate to “Storage” ->
“Stackable” and the Stack Target List
screen will appear. In this screen you
can add, edit existing or remove mount
points.
2.5.1 Adding a new iSCSI target To add a new iSCSI Target, click
Add
to launch the Add new iSCSI Target
window, and enter the following values:
3-Administering the MaxNAS
A
B
C
D
E
F
A. Target Sevice enable/disable
G
B. Target IP Address
C. Target IQN (iSCSI Qualified Name).
H
I
The MaxNAS can detect the IQN
for most iSCSI initiators by clicking
Discovery
.
D. Authorized username (for CHAP enabled iSCSI target)
E. Authorized password (for CHAP enabled iSCSI target)
F. Export share name- the name of the shared folder that will appear for network mounting,
limited to lower case and numeral characters.
G. Export share name description
H. Check whether the share is browsable (see section 2.3 for more information)
I. Check whether the share is public. If a share is non public, ACLs will have to be defined in the
Stacked Target List window (see section 2.3 for more information)
To complete the operation, click
Apply
or
Back
to abort. In order for the MaxNAS to share the
volume, it will have to be formatted for MaxNAS use.
WARNING: Formatting the iSCSI target will erase all
!
existing data! Exercise caution before proceeding!
To format the stack, click
Format
corresponding to the iSCSI mount required on the stack list screen.
2.5.2 Set Stackable Share Permissions Folder permissions are controlled via ACLs (Access Control Lists.) To access and edit ACLs, click
ACL
corresponding to the iSCSI mount required. The Access control screen will
appear. Please refer to section 2.3.4 of this chapter for more information.
2.5.3 Edit Stackable parameters To modify a Stackable shared iSCSI Target, click
Edit
to launch the edit iSCSI Target window,
MaxNAS Owner’s Manual
27
Page 28

3-Administering the MaxNAS
Please refer to section 2.5.1 of this chapter for more information.
2.5.4 Delete a Stackable shared iSCSI mount To delete an stackable shared iSCSI mount, click corresponding to the desired iSCSI mount. A confirmation dialog box will appear. Click
Cancel
or
to abort.
OK
to remove the mount,
2.5.5 Reconnect an offline iSCSI target In case of lost connectivity between the MaxNAS and the iSCSI target shared, it may be necessary manually reconnect. Please make sure that the iSCSI target device is online and accessible, and click
Reconnect
corresponding to the desired iSCSI mount. The connection should be
re-established.
2.6 Mount and Share ISO disk image
The MaxNAS can mount ISO disk images
and present them as networked shares.
To access the ISO mount control, navigate
to “Storage” -> “ISO Mount” and the
ISO Mount List screen will appear. In
this screen you can add, edit existing or
remove ISO image shares.
Delete
WARNING: Deleting a Stackable shared
!
iSCSI mount will erase all data on it!
2.6.1 Adding a new ISO image share To add a new ISO image share, select the sharepoint where the ISO image resides from the pulldown, and click
Select
to launch the Mount Table window.
You can navigate the chosen share file
system on the bottom left window,
and a list of allowable disk images will
appear on the bottom right pane. Select
the image to be mounted from the
bottom right pane, and optionally enter
a custom mount point in the “Mount As”
Entry box above. Click
Add
to mount
the image, and it will be accessible to
network clients in the path shown at the top left windowpane. ISO Shares will be accessible
according to the parent share access controls.
2.6.2 Removing ISO image shares To remove ISO image shares, select the desired share from the mounted list windowspane (top left) and click
Remove
. Alternatively, you may remove all shared ISO images by clicking
Remove All
. No data
will be lost by this operation.
2.6.3 Temporarily unmount ISO image shares To temporatily unmount ISO image shares, select the desired share from the ISO mount list screen and click
Unmount
. No data will be lost by this operation.
MaxNAS Owner’s Manual
28
Page 29

3-Administering the MaxNAS
2.7 nSync Backup Service
nSync is an FTP compatible synchronization method
that allows backup and restoration of a share folder to
another MaxNAS Target or any FTP server. When using
nSync between two MaxNAS units, the synchronization
also supports secure encryption. nSync can scheduled
to run once, daily, weekly, or monthly. The available
bandwidth for nSync tasks can be limited to reduce
impact on network availability. The nSync configuration
screen is accessible by selecting “nSync” from the
Storage menu.
2.7.1 Create new nSync backup task To create a new nSync task, click task control page will appear with the following elements:
Task Name Enter a name for the nSync scheduled job.
Target Manufacturer Select whether the target is a MaxNAS or FTP
server.
Target IP Address The IP address of your target server
Nsync Source
Folder
AUTH ID The account ID on the target server.
AUTH Password The password for the AUTH ID on the target server.
Scheduled Time The time when the Nsync task will run.
Schedule Type Select whether to run the Nsync task daily, weekly,
The share folder you want to backup. See section
2.3 for more information
or monthly. Day of week and day of month are user
selectable.
Add
. The Add nSync
It is recommended the nSync link be tested before it is committed for connectivity and to
verify proper credentials. When the nSync task is created and all task fields have been entered,
click the (Test Connection) button to verify the address and credentials. Once the task has
been verified, enter the scheduled time and frequency, and click
LAN configuration, or
Cancel
to abort. See Chapter 4 Section 4 for additional information.
Apply
to complete set the
2.7.2 Modify an existing nSync task To modify an existing nSync task, check the checkbox next to the task name and click
Modify
Refer to section 2.5.1 for detailed field information. It is recommended the nSync link be tested
before it is committed for connectivity and to verify proper credentials. When the modifications to
the nSync task are entered, click
has been verified, click
Modify
Test Connection
to verify the address and credentials. Once the task
to complete set the LAN configuration, or
Cancel
to abort.
2.7.3 Deleting an existing nSync task To delete an existing nSync task, check the checkbox next to the task name and click confirmation dialog box will appear. Click
OK
to remove the nSync task, or
Cancel
Delete
. A
to abort.
MaxNAS Owner’s Manual
29
Page 30

3-Administering the MaxNAS
2.7.4 Running an nSync backup task A task will launch automatically as scheduled, but may also be launched manually by checking the checkbox next to the task name to run and clicking
Success
In Progress
at any time to launch a window with the
“Last Status” section will display a button labelled
backup is complete. Click either
In Progress
or
log of the task.
2.7.5 Restoring to a previously synchronized state To restore a previously synchronized state, check the checkbox next to the task name to restore and click and will change to
Restore Success
at any time to launch a window with the log of the restoration.
Restore
. The “Last Status” section will display a button labelled
Restore Success
when the restoration is complete. Click either
2.7.6 Setting transfer speed limits The nSync process can consume as much or as little of the available network bandwidth as it is allowed to utilize. The more bandwidth that is available, the faster the nSync task can complete, but at a cost of less available user bandwidth. The available nSync bandwidth can be controlled by selecting a value in the bandwidth setting control box (ranging from 256
Kbit/Sec to unlimited) and clicking
Apply
.
Start
in the action section. The
and will change to
Success
when the
In Progress
In Progress
or
3. Network Configuration
Network Configuration is accessible by selecting the network menu. It consists
of setting LAN port specific functions for each interface, and Network services,
accessible via submenus (illustrated right.)
3.1 LAN1 Configuration
The LAN Configuration screen for the LAN1 Interface allows for the following controls:
When you are ready to commit changes click
Apply
.
3.1.1 Host Name The host name is the WINS name for the MaxNAS, and will be the name shown in your Windows network.
MaxNAS Owner’s Manual
30
Page 31

3-Administering the MaxNAS
3.1.2 Domain Suffix The Domain Name refers to your DNS network suffix. This value is necessary for proper DNS or Active Directory network participation. Consult your network administrator for more information regarding this value.
3.1.3 MAC Address A unique Media Access Control (MAC) address. This value is not modifiable.
3.1.4 Jumbo Frames Support Jumbo frame support is a feature which allows Ethernet hardware to send, receive, or transport Ethernet frames greater then 1518 bytes in size, which is the standard Ethernet packet size. The MaxNAS supports jumbo frames of 4000 and 16000 bytes MTU. Jumbo frames can only function if all the network devices can support the same size jumbo packets, so please verify that all your client devices, hubs, switches, and gateways can support it before you enable jumbo frames.
WARNING: Make sure all your client devices,
!
hubs, switches, and gateways can support Jumbo
frames of the proper size before enabling this
feature. Failure to do so may render the network
port of your MaxNAS inaccessible!
3.1.5 DHCP DHCP Allows for dynamic IP address assignment on TCP/IP networks. It is the preferred method to manage IP address assignments and is the default assignment of the LAN1 port on the MaxNAS. You may set a static IP address by disabling DHCP.
3.1.6 Static IP The IP address, Netmask, Gateway, and DNS Servers are only required if DHCP is disabled. Consult your network administrator for more information on these values as they are unique to your network.
3.1.7 IP Forwarding The MaxNAS can route IP traffic from LAN2 to LAN1 using IP forwarding. When used in conjuction with DHCP services on LAN2 (see section 3.2.4) the MaxNAS can act as a router within a two subnet environment. To enable IP routing, check the “enabled” checkbox and follow the on screen instructions.
3.1.8 Link Aggregation The MaxNAS supports IEEE 802.3ad link aggregation, which defines a method for using multiple Ethernet network cables/ports in parallel to increase the link speed beyond the limits of any one single cable or port and to increase the redundancy for higher availability. The following modes of operation are available:
Failover: When one port fails the other one will take over.•
Load Balance: Ethernet traffic will flow along both Ethernet ports.•
802.3ad: Links two Ethernet ports in parallel to increase throughput. •
IMPORTANT: 802.3ad link aggregation requires
!
the use of a link aggregation capable router.
Consult your router’s documentation to assure
compatibility and conguration instructions.
MaxNAS Owner’s Manual
31
Page 32

3-Administering the MaxNAS
3.2 LAN2 Configuration
The LAN Configuration screen for the LAN2 Interface allows for
the following controls:
Jumbo Frame Support
IP Address
Netmask
DHCP Server
When you are ready to commit changes click
3.2.1 MAC Address A unique Media Access Control (MAC) address. This value is not modifiable.
3.2.2 Jumbo Frames Support Jumbo frame support is a feature which allows Ethernet hardware to send, receive, or transport Ethernet frames greater then 1518 bytes in size, which is the standard Ethernet packet size. The MaxNAS supports jumbo frames of 4000 and 16000 bytes. Jumbo frames can only function if all the network devices can support the same size jumbo packets. Please verify that all your client devices, hubs, switches, and gateways can support it before you enable jumbo frames.
Apply
.
WARNING: Make sure all your client devices,
!
hubs, switches, and gateways can support jumbo
frames of the proper size before enabling this
feature. Failure to do so may render the network
port of your MaxNAS inaccessible!
3.2.3 Static IP The LAN configuration for the LAN2 port is similar to the Primary Interface but only allows modification of the IP address and Netmask. The LAN2 Interface does not support DHCP address assignment.
3.2.4 DHCP Server DHCP allows for dynamic IP address assignment on TCP/IP networks. Your MaxNAS can serve as a DHCP server to a network attached on LAN2. When enabled, it will dynamically assign an available IP address from the range specified between the “Start IP” entry box and the “End IP” entry box as well as DNS server addresses.
3.3 Network Services Configuration
The MaxNAS offers the following network services:
• SMB/CIFS (Server Message Block) or “Windows” Networking
• Webdisk (Web Browser Storage) and Secure Webdisk
• UPNP (Universal Plug and Play) automatic detection and configuration
• Apple File Protocol Service
• NFS Service • FTP Service
• nSync Target Service • DLNA Streaming
It is recommended that you disable services you will not require for security purposes.
See Chapter 4 for details on how to use these technologies in Windows and Macintosh
environments.
MaxNAS Owner’s Manual
32
Page 33

3-Administering the MaxNAS
3.3.1 SMB/CIFS The Server Message Block network protocol is the most widely used network protocol. It is used by all variants of the Microsoft Windows operating system, Apple Macintosh OS X, and most Unix and Linux variants include support for it even if using a different networking protocol. You may enable or disable SMB/CIFS support by navigating to “Network” -> “Service.” Click
3.3.2 Webdisk/Secure Webdisk The Webdisk functionality allows your shares to be accessible from any web browser with a path to the MaxNAS. This is a powerful networking option and must be used with care in networks that are externally accessible to the internet. Webdisk and Secure Webdisk must have different TCP ports in order to be used simultaneously. You may enable or disable Webdisk and Secure Webdisk support as well as user definable TCP ports by navigating to “Network” -> “Service.” Click
Apply
to complete the operation.
Apply
to complete the operation.
3.3.3 UPNP Universal Plug and Play UPNP allows automatic discovery of the MaxNAS Administration Interface by clients that support the protocol. You may enable or disable UPNP support by navigating to “Network” -> “Service.” Click
Apply
to complete the operation.
3.3.4 Apple File Protocol Services The AFP protocol is used by Apple Mac OS 9.x and prior for networking and is supported by all Mac OS-X hosts as well. To enable AFP support navigate to “Network” -> “Apple Network Configuration.” You may enable, disable, set the character languageset, and specify zone (optional). Click
Apply
to complete the operation.
3.3.5 NFS Services NFS (Network File System) is a network file system protocol originally developed by Sun Microsystems in 1983 allowing a user on a client computer to access files over a network as easily as if the network devices were attached to its local disks. It is most commonly used on Unix and Linux based networks. You may enable or disable NFS server support by navigating to “Network” -> “NFS.” Click
Apply
to complete the operation.
3.3.6 FTP Services FTP (File Transfer Protocol) is a commonly used, open standard protocol for exchanging files over any network that supports the TCP/IP protocol (such as the Internet or an intranet). Virtually every computer platform supports the FTP protocol. This allows any computer connected to a TCP/
MaxNAS Owner’s Manual
33
Page 34

3-Administering the MaxNAS
IP based network to manipulate files on another computer on that network regardless of
which operating systems are involved (if the computers permit FTP access.) There are many
existing FTP client and server programs, and many of these are free. You may enable or
disable FTP server support as well as supported file character set language by navigating to
“Network” -> “FTP.” Click
3.3.7 nSync Target Service nSync is an FTP compatible synchronization method that allows backup and restoration of a share folder to another MaxNAS Target or any FTP server. When using nSync between two MaxNAS units, the synchronization also enables secure encryption. You may enable or disable nSync target support by navigating to “Network” -> “nSync.” Click
3.3.8 Mediabolic DLNA Server The MaxNAS provides media streaming service to standalone networked home media adapters that support the UPnP-AV protocol or are Digital Living Network Alliance (DLNA) standard compliant. This allows shared digital media such as music, pictures, and movies with any compatible device throughout your entire home. For more information and a list of compatible devices please visit www.dlna.org
Apply
to complete the operation.
Apply
to complete the operation.
To configure the media server, navigate to “Network” -> “Media Server” and the Media Manager
Settings window will appear. To enable or disable the streaming service, check the radio
button corresponding to “enable” or “disable” and click
Apply
. The service will index and
share all compatible media files in the shares checked in the bottom pane. The media server
will appear to your compatible DMA (digital media adapter) as “MaxNAS:Mediabolic Server.”
4. Accounts Configuration
Account Configuration allows for users and groups creation and integration
into a Microsoft Windows Active Directory or domain. Account Configuration is
accessible from the “Accounts” menu.
4.1 Authentication Configuration
The MaxNAS can authenticate with and use Microsoft server resources
such as WINS (Windows Internet Naming Service,) Workgroup or
Domain assignment, and ADS. The Microsoft Support configuration
screen is accessible from “Accounts” -> “Authentication.” This screen
displays the directory support parameters of the system as follows:
WINS Server: Specifies the WINS server if necessary.•
Workgroup/Domain Name: Specifies the SMB/CIFS Work •
Group/NT Domain name.
ADS Support: Enabled to join a Microsoft domain/AD or •
disabled for workgroup support.
MaxNAS Owner’s Manual
34
Page 35

3-Administering the MaxNAS
ADS Server Name: Specifies the AD domain controller or •
NT PDC.
ADS Realm: Specifies the fully qualified ADS realm (Domain).•
Administrator ID/password: Domain administrator credentials- •
required for permission to join an Active Directory.
Consult your network administrator for assistance with joining
the MaxNAS to an Active Directory. When all fields have been
entered, click
“Appendix C- Active Directory” for more information.
4.2 Group Administration
When providing shares to non Active Directory clients, the
MaxNAS provides its own user and group administration.
The Local Group Administration screen is accessible by
selecting “Groups” from the Accounts menu. Permissions and
authorization for users and groups are assigned to each folder
shared- See section 2.3 of this chapter for more information.
Apply
to begin the authentication process. See
4.2.1 Creating Groups To create a new group, click
Add
in the Local Group
Configuration screen (illustrated above, right.) In the
following screen enter the new group name and assign
users by selecting the desired users from the “Group List”
pane and clicking the button. Please note that spaces,
slashes or commas are not valid for group names. Click
Apply
to finalize the action or
Back
to abort.
4.2.2 Removing Groups To remove a group, select the group in the Local Group Configuration Screen to remove and click
Delete
.
4.2.3 Modifying Existing Groups You may modify any groups’ user membership by selecting the group and clicking
Modify
. The
Local Group Setting dialog will appear. To add a user to the group, highlight the desired users in
the “Users List” pane and click the button. To remove a group membership from the selected
user, highlight the desired users in the “Member List” pane and click the button. When changes
to the user’s group membership are complete, click
Apply
to finalize the action.
4.3 Local User Configuration
When providing folder access to non Active Directory clients,
the MaxNAS provides its own user and group administration.
Creating and administering user accounts are accessible by
selecting “Users” from the Accounts menu. This screen allows
you to configure local user settings and assign or remove
group membership. Permissions and authorization for users
and groups are assigned to each folder shared- See section 2.3
of this chapter for more information.
MaxNAS Owner’s Manual
35
Page 36

3-Administering the MaxNAS
4.3.1 Creating Users To create a new user, click screen. In the following screen (see illustration right) enter the new username, password in the “Password” and “Confirm” fields, and assign group membership by selecting the desired groups from the “Group List” pane and clicking the button. Please note that spaces, slashes or commas are not valid for user names. Click action or
Back
to abort.
4.3.2 Removing Users To remove a user, select the group in the Local User Configuration screen to remove and click
Delete
.
4.3.3 Modifying Existing Users You may change user passwords and group assignment by clicking the
To change a user password, enter the new password in the “Password” and “Confirm” •
fields. Click
Apply
to finalize the action or
To modify a user’s group membership, highlight the desired group in the “Group List” •
pane and click the button to add a new group membership. To remove a group
membership from the selected user, highlight the desired group in the “Group Member”
pane and click the button. When changes to the user’s group membership are
complete, click
Apply
4.4 Batch User and Group Creation
The MaxNAS can import lists of users and groups for batch user and group creation. The list
must be a comma-separated plain text (*.txt) in this line format:
Add
in the User Configuration
Apply
to finalize the
to finalize the action or
Back
to abort.
Back
to abort.
Modify
button.
[USERNAME], [PASSWORD], [GROUP]
To import a user list for batch creation, navigate to “Accounts” -> “Batch Mgmt”. Select the text
file previously created, or click
Import
to complete the operation.
Edit
to create the list manually or edit the loaded file. Click
5. System Control Functions
The system control functions, accessible from the “System” menu,
facilitate the following functions via submenus:
• Remote Notification Configuration
• Event Logs
• System Time
• Save/Recover System Setting
• Configure Add-on Modules
• Reset MaxNAS to Factory Default
• Upgrade Firmware • Change Administrator Password
• Reboot/Shutdown • Schedule On/Off
• Logout from Administration • Change the user Interface Language
5.11
5.1
5.2
5.3
5.4
5.5
5.6
5.7
5.8
5.9
5.10
MaxNAS Owner’s Manual
36
Page 37

3-Administering the MaxNAS
5.1 Remote Notification Configuration
The MaxNAS features an SMTP manager and can send email notifications for various
subsystem conditions in addition to the audible buzzer. The following table discuss each
attribute’s descriptions.
Enable or Disable system beeper that beeps when a problem occurs.
Enable or Disable e-mail notification of system problems.
Enter your network’s SMTP server’s network IP address and port (commonly 25)
Set SMTP Authentication type and SMTP account ID and password (in both
“Account Password” and “Confirm Account Password” fields.) This may be
required to authenticate the MaxNAS to the SMTP server. Some SMTP servers
do not require a user ID and password. Consult your network administrator for
more information.
Set the sender address for the email alert
Recipients’ (up to 4) e-mail addresses for notification of system events.
When all desired options are entered click
functionality, click
Test
to generate a test email.
Apply
. To verify your SMTP settings and connectivity
5.2 Event Logs
From the System menu, choose the Logs item and
the System Logs screen appears. This screen lets
IMPORTANT: The logs will display in a popup
!
window. Make sure your browser allows popup
windows for your MaxNAS session.
you configure and manage system logs which
provide a history of system usage. A description
of each item follows:
I<< < > >>I Use these buttons to browse the log pages.
INFO Provides all log information including warning messages and error messages.
WARN Shows all warning messages and error messages only.
ERROR Shows only error messages.
GO Specify the number of lines per page and click Go.
Ascending Shows logs by date in ascending order.
Descending Shows logs by date in descending order.
Download Logs Download the whole system log in a .tar.gz format. This file can then be forwarded to MicroNet
Technical Support for troubleshooting.
5.3 System Time
To set the system time and date, navigate to “System” -> “Time” and the Time screen appears. Set
the desired date, time, and time zone. When all desired options are entered, click
Apply
MaxNAS Owner’s Manual
37
Page 38

3-Administering the MaxNAS
5.4 Save/Recover System Setting
When all configuration options for the MaxNAS are
entered and the unit is functioning correctly, it is
recommended that you save your system settings to
a settings file for safekeeping. Should the MaxNAS
ever have to be reformatted or reset, you will then be able to retrieve all your settings, users,
groups, and permissions from this file. To access the Save/Recover System Settings screen,
select “System” -> “Config Mgmt.”
• To save current settings to a file, click
• To retrieve an existing settings file, click
select your saved settings file. Click
in the following confirmation dialog.
5.5 Module Management
MicroNet strives to continually improve and
from time to time will release additional
features, or modules, for the MaxNAS. Modules
offer additional functionality without replacing
the base operating code or firmware. Modules
will either be made available on MicroNet’s
website or provided by MicroNet Technical
Support. To access the module management, navigate to “System” -> “Module Mgmt.”
• To install a new module, click
select the module file. Click
Install
following confirmation dialog.
• To enable, disable, or uninstall a module, check the checkbox left of the module and click
the respective function button
Uninstall
following confirmation dialog.
Download
Upload
Browse
next to the Module file entry box. Navigate and
. The file will download to your computer.
Browse
next to the Upload entry box. Navigate and
to retrieve the settings and confirm the operation
to begin the upload, and confirm the operation in the
,
Enable
, or
Disable
. Confirm the operation in the
5.6 Reset to Factory Default
Should it become necessary to reset all settings to
factory default, access the Reset to Factory Settings
WARNING: Resetting to factory default will
!
erase all data!
screen from “System” -> “Factory Default.” Click
Apply
to reset the unit, and confirm the operation
in the following confirmation dialog.
5.7 Update Firmware
MicroNet strives to continually improve our
products, and from time to time will release
firmware updates for the MaxNAS. Firmware will
either be made available on MicroNet’s website or
provided by MicroNet Technical Support. To access
the Firmware Upgrade, navigate to “System” -> “Firmware Upgrade.” Click
Firmware entry box. Navigate and select your
saved settings file. Click
Apply
to begin the
upload and confirm the operation in the following
IMPORTANT: Make sure all user data and
!
system settings are backed up before updating
rmware!
confirmation dialog.
MaxNAS Owner’s Manual
Browse
next to the
38
Page 39

3-Administering the MaxNAS
5.8 Change Administrator Password
To change the administrator password or the LCD access password navigate to “System” ->
“Administrator Password” and the Administration password screen appears. Enter the new
password in the “New Password” field and re-enter the password (case sensitive) in the “Confirm
to
Apply
to confirm.
IMPORTANT: Use the Reboot/Shutdown
!
system functions to turn off the unit cleanly.
Shutting down using the power button may
result in data loss!
Apply
to confirm.
Password” field. When both fields are entered click
5.9 Reboot/Shutdown
To cleanly shut down or reboot the MaxNAS navigate
to “System” -> “Reboot and Shutdown.” In the following
screen, click
Reboot
to restart the unit or
Shutdown
turn off the unit.
5.10 Log Out of the Administration Interface
To log out of the MaxNAS Administration User Interface navigate to “Log Out” at the right
edge of the menu bar. A confirmation dialog will appear. Confirm the operation to log out to
the main login page.
5.11 Change the User Interface Language
The MaxNAS supports multiple language user interface, including English, French, German, Italian,
and Chinese. To change the user interface language select “Language” from the Menu. In the
following screen select the desired interface language. Click
MaxNAS Owner’s Manual
39
Page 40

4-Connecting Users
Chapter 4- Connecting Users
Once the MaxNAS has been configured with storage, shares, users, groups, and permissions it
is ready to accept user connections. The MaxNAS supports SMB/CIFS network services as well
as Webdisk/Secure Webdisk user connections. This chapter includes discussion on both of those
services and connection methods.
1. SMB/CIFS User Access Configuration
SMB shares are accessible from Windows 95 and newer, OS-X 10.2 and newer, and most Unix/
Linux based workstations. Instructions are included for Windows and Macintosh based hosts. *nix
users should consult the specific distribution and/or SAMBA documentation for usage instruction.
1.1 Mapping a Network Drive (Windows)
To access the MaxNAS from a Windows based host, open “My Network Places” (Windows
XP) or “Network Neighborhood” on Windows 98/2000. The MaxNAS is called “MaxNAS” in
workgroup “Workgroup” by default. Double click to see the available shares. Alternatively, you
may use Window’s search function to look for computers named “MaxNAS.”
You can map share folders on the MaxNAS so you can access them through the My Computer
folder in Windows. Connect to the shared network folders on the MaxNAS as follows:
1.1.1 Double click “My Computer”
1.1.2 In the menu bar select “Tools” -> “Map Network Drive”
1.1.3 The Map Network Drive… window appears.
• Select the desired drive letter in the “Drive” field
• Use the Browse button to find the folder over your network,
or enter the share manually as “\\[MaxNAS]\[sharename]”
where [MaxNAS] is the name or IP address of the MaxNAS and
[sharename] is a specific share being mapped.
• Check the “Reconnect at Logon” checkbox to
make the share reconnect on reboot.
• Click Finish. If the share is not public a
“Connect As…” window appears. Enter an
authorized User name and Password.
• Click OK. The share folder appears as the
drive you assigned in your My Computer
window. You can now access this folder as
though it were a drive on your computer.
MaxNAS Owner’s Manual
40
Page 41

4-Connecting Users
1.2 Mapping a Network Drive (OS-X)
The simplest method to locate and connect your MaxNAS to an OS-X workstation is by using
the Finder Network browser.
If you can’t locate the computer or server within the network browser, you may be able to find
it by typing its network address in the Connect to Server dialog, accessible from the “Go” ->
“Connect to Server” Finder menu option.
In the server address field, enter
“smb://[MaxNAS]/[sharename]” where
[MaxNAS] is the name or IP address
of the MaxNAS, and [sharename] is a
specific share being mapped, and click
the “Connect” button.
If the share is not public a “SMB/CIFS File
System Authentication” window appears.
Enter an authorized User name and
Password, and click
Select a share and click
selected share will appear on your
desktop.
OK
.
OK
. The
MaxNAS Owner’s Manual
41
Page 42

4-Connecting Users
2. Using Webdisk
The MaxNAS provides a WebDisk function that allows you to access the system over the
Internet from any browser.
IMPORTANT: Make sure that WebDisk Support or Secure WebDisk Support is enabled in the Service Support screen
!
in the system’s Network menu. Please see chapter 3, section 3.3.2 for more information
2.1 Logging In
Webdisk can operate normally (unsecured) or in secured mode. To access Webdisk
normally, navigate to the MaxNAS home page in your web browser using http://[MaxNAS],
where [MaxNAS] is either the WINS name or IP address of your MaxNAS. To access Webdisk
securely, navigate to the MaxNAS home page
in your web browser using https://[MaxNAS]
where [MaxNAS] is either the Netbios name
or IP address of your MaxNAS. In the Login
page type in the assigned User ID and
password previously created.
Note:
The When initially logging in to secure webdisk,
you may see this dialog (illustrated right.) Accept the
SSL certificate to allow access to the secure Webdisk.
Accepting the certificate permanently will prevent this
window from appearing in subsequent logins.
The WebDisk page will appear showing
folders made currently available to you via
the Access Control List (ACL) in the Folder
item under Storage menu. Click on a folder
name to enter the folder. The folder’s page
will appear, displaying files and folders.
MaxNAS Owner’s Manual
File Operations Buttons
42
Page 43

4-Connecting Users
2.2 The Webdisk control interface
The webdisk interface consists of the following elements:
Name Displays the names of folders and files.
Size Shows the size of folders and files.
Type Displays the type of folders and files.
Modified Shows the time of most recent modification of folders and files.
Files are accessible for download by clicking them.
2.3 File Operations
The file operations button bar is located undeneath the table header row. Buttons on the folder
page allow you to create a new folder, upload files and delete files in the folder.
Up
New Folder
Change user password
Logout from the webdisk session.
Goes to the previous folder level.
Creates a new folder.
New File Upload
Delete Selected
To upload a file from your computer to the current folder click
dialog as illustrated:
Browse
Click
Deletes selected files and folders. To select files for deletion, check the box next to each file to
delete.
and locate the file to upload. Click
OK
New File Upload
to upload the file to the current folder.
to activate the upload
MaxNAS Owner’s Manual
43
Page 44

4-Connecting Users
3. Using iSCSI
iSCSI allows two devices to negotiate and then exchange SCSI commands using IP networks.
iSCSI takes a popular high-performance local storage bus and emulates it over wide-area
networks, creating a storage area network (SAN). Unlike some SAN protocols, iSCSI requires no
dedicated cabling; it can be run over existing switching and IP infrastructure. As a result, iSCSI is
often seen as a low-cost alternative to Fibre Channel which requires dedicated infrastructure.
A Note about iSCSI performance
iSCSI performance is completely dependent on the Ethernet hardware (HBAs, switches, routers, and cabling at every
hop between the MaxNAS and the initiator) network load, system load, and initiator computing power and load. For optimal results,
use a dedicated network for iSCSI with jumbo frames enabled, low latency switches with jumbo frames and 802.3ad support, dual
TCP Offload Engine NICs, and qualified gigabit Ethernet cabling throughout. Finally, iSCSI performance can be improved through
separation of iSCSI traffic and ordinary Ethernet user traffic. Mixing traffic not only impairs SAN performance, but also creates
a potential security risk since storage data is accessible on the user LAN. The most common means of separation is creating a
new LAN segment physically separate from your LAN and keeping that segment isolated from other regular Ethernet segments.
Alternatively, create a virtual LAN (VLAN) on your switch, limiting iSCSI traffic to the virtual LAN and keeping regular traffic out.
Consult your network administrator for more information on best practices for your environment.
SIMULTANEOUS iSCSI VOLUME MAPPING ON MULTIPLE HOSTS
The MaxNAS can accept multiple host initiators simultaneously for clustering and SAN environments. Never attempt to mount
!
the same volume on both channels without proper clustering software.
Mounting the same volume on both channels without proper software can result in data corruption or loss!
3.1 Microsoft Windows 2000 and newer
3.1.1 (Windows 2000/XP) Download and install the iSCSI Initiator from the Microsoft iSCSI technology
site at http://www.microsoft.com/windowsserver2003/technologies/storage/iscsi/default.mspx
3.1.2 (All Versions) Start the iSCSI Initiator by double-clicking its icon on the desktop
or start menu. The iSCSI Initiator properties window will appear.
3.1.3 Select the Discovery tab. Under Target Portals,
click Add. Enter the IP address or the netbios name of the
MaxNAS Click
OK
.
MaxNAS Owner’s Manual
44
Page 45

4-Connecting Users
3.1.4 On the iSCSI Initiator Properties window, select the Targets tab. With the iSCSI target
highlighted, click
connection, check the “Automatically restore this connection” checkbox. If you have not enabled
CHAP authentication on the MaxNAS click
Under Advanced Settings check the CHAP login information checkbox and enter your
username and password. Click
OK
to commit CHAP
authentication, and
iSCSI Initiator properties window.
Log On
. The Log On to Target dialogue will appear. To enable a persistent
OK
. If you have enabled CHAP, click
OK
on the
Advanced
.
Enable CHAP
3.1.5. Open the disk management console. A list of the attached drives and their respective
volumes will appear. Each Volume set will appear as an individual disk in the management
console. Upon the first time the MaxNAS iSCSI volume is connected, an “Initialize and Convert
Disk Wizard” should appear when the disk management console is run. You may use the
Wizard to set up the volume or follow the next steps for manual configuration.
Note:
The Disk Management Console can be found under \Windows\System32\diskmgmt.msc on your system
drive. For an illustrated guide, please see http://www.fantomdrives.com/support/faqs/hdfaqpc.php4#8
MaxNAS Owner’s Manual
45
Page 46

4-Connecting Users
3.1.6 Right-click on the iSCSI volume. If it’s not initialized a red “No Entry” logo will cover the disk
icon. Right click on the disk and select “Initialize Disk.” Follow the on-screen instructions.
3.1.7 Right click the initialized
volume (The area right of the
disk icon.) In the context menu
select “New Partition.” Follow the
on screen instructions. In the File
System pop-up menu, select NTFS.
The default formatting option is
Full format. A Quick format will
take just a few minutes but will do
less verifying of the drive than a
full format. Click Start. Once the
format process is complete your
iSCSI volume is ready to use.
3.2 OS-X >10.4.10 Host Setup
The MaxNAS has been tested and
qualified for use with the GlobalSAN initiator from Studio Network Solutions. It can be obtained
from their web site at http://www.studionetworksolutions.com.
3.1.6
3.1.7
Before you begin please make sure you are logged in with administrative privileges.
If you are unsure about your privilege level, please consult your Macintosh OS-X
!
user manual or with your system administrator.
3.2.1 Download and install the GlobalSAN initiator. Follow the installation
instructions provided on the website.
3.2.2 Launch the globalSAN iSCSI initiator control from the System Preference
Pane (/Applications/System Preferences.app)
3.2.3 Click (illustrated below). In the
IP Address entry box enter the IP address
of the MaxNAS and the iSCSI Qualified
Name (IQN) in the target name field. The
IQN is listed in the MaxNAS iSCSI target
page (see Chapter 3, section 2.2.6 for more
information). Click
OK
to continue.
MaxNAS Owner’s Manual
46
Page 47

3.2.4 Select the MaxNAS IQN from the
target list and click
Log On
. The iSCSI
connection screen will appear. If you
enabled CHAP, enter your CHAP username
and password in the CHAP security area
(ss illustrated). Click
Connect
to complete
the operation.
3.2.5 Launch the “Disk Utility” application
located under Applications/Utilities folder.
3.2.6 Highlight your new drive and select
the “Partition” tab
3.2.7 Select the new partition map type.
3.2.8 Select the desired file system format and volume name
for each partition in the volume scheme (optional.)
4-Connecting Users
3.2.9 Click
Options
. Select “Apple Partition Map” or “GUID” in
the dialog box and click
3.2.10 Click
Apply
3.2.6
. Your MaxNAS iSCSI volume is ready to use!
OK
3.2.7
.
3.2.6
3.2.8
3.2.10
3.2.9
MaxNAS Owner’s Manual
47
Page 48

4-Connecting Users
4. File Backup With nSync
You can backup a share folder to another MaxNAS or MicroNet PlatinumRAID (Nsync target)
or any FTP server. When using Nsync between Nsync devices, you have the option to transmit
files securely. To backup files regularly, you can set up a scheduled synchronization task to
run only once, daily, weekly, or monthly. You can also limit the bandwidth of your Nsync
tasks, so other users on the network can share the bandwidth equally. To configure Nsync
jobs, navigate to “Network” -> “Nsync.” Below is a description of each field:
Item Description
Task name The name of your Nsync task.
Server The IP address of your target server
Share folder The share folder you would want to backup.
Last Time The time when the last Nsync task was executed.
Last Status The status of your last Nsync task.
Action Administrator can run or stop an Nsync task by pressing the action button.
Bandwidth Setting Bandwidth control on Nsync tasks.
Add Click to add a Nsync task
Modify Click to modify an Nsync task.
Restore Restore share folder from an Nsync target.
Delete Click to delete an Nsync task. Backup files on Nsync target is also deleted.
4.1 Adding an Nsync Task From the Nsync Information screen, click Add to display the Add Nsync Task screen.
Item Description
Task Name The name of your Nsync task.
Manufacturer Select whether the target is a Thecus Product (e.g. MaxNAS) or FTP server.
Target Server IP Address The IP address of your target server.
Source Folder The share folder you want to backup.
Nsync Task Name The name of your Nsync task.
Authorized Username on
Target Server
Password on Target Server The password for the username on the target server.
Test Connection Click to check the connection to the Target Server.
Schedule Schedule backup of your share folders.
Time The time when the Nsync task will run.
Type
Apply Click to submit the task.
The account name on the target server.
Select whether to run the Nsync task daily, weekly, or monthly.
Daily: input the time of day to execute Nsync task.
Weekly: input which day of the week to execute the task.
Monthly: decide which day of the month to execute the task.
4.2 Setting Up an Nsync Target on an Nsync Device
On the Nsync target server, the administrator of that server has to set up a user account with
a folder named “nsync” and grant write access.
On the Nsync server, add a user for Nsync source (ex. nsyncsource1). See Chapter 3, •
Section 4.2 for detailed instructions.
On the Nsync server, grant that user (ex. nsyncsource1) write access to the • nsync
folder. See Chapter 3, Section 2.3 for detailed instructions.
The target server will start accepting Nsync tasks from server using that ID and password.
MaxNAS Owner’s Manual
48
Page 49

4-Connecting Users
4.3 Setting Up an Nsync Target on Another Device
If you selected “Other Device” when setting up your Nsync task, the MaxNAS will use the
FTP protocol to back up the share folder. On the external storage device, make sure there is
a folder named “nsync”, and the Auth ID has writable permission in that folder.
4.4 Designating MaxNAS or PlatinumRAID as an Nsync Target
The MaxNAS can act as an Nsync server, enabling another Nsync-equipped MicroNet NAS at
a remote location backup their files to your MaxNAS. From the Network menu, choose the
Nsync Target item, and the Nsync Target Server Setting screen appears. Enable the service
and click
5. Connecting to MaxNAS Attached Printers
With a USB Printer attached, the MaxNAS can offer central network printing to all your
networked computers.
!
OK
.
IMPORTANT! Before you begin, please make sure the driver for your printer is properly
installed on your computer. Please consult your printer manufacturer for up to date drivers
for your host operating system
5.1 Windows XP SP2
To set up the Printer Server in Windows XP SP2, follow the steps below:
Go to Start > Printers and Faxes.1.
Click 2. .
The Add Printer Wizard appears on 3.
your screen. Click
Next
.
Select “A network printer, or a printer 4.
attached to another computer” option.
Select “Connect to a printer on the 5.
Internet or on a home or office network”,
and enter “http://<MaxNAS>:631/
printers/usb-printer in the entry
box, where <MaxNAS> is the IP address
or Netbios name of the MaxNAS. Click
Next
.
Your Windows system will ask you to install drivers for your printer. Select correct 6.
driver for your printer.
Your Windows system will ask you if you want to set this printer as “Default Printer”. Select 7.
Yes and all your print jobs will be submitted to this printer by default. Click
Click 8.
Finish
. Your printer is ready to use!
Next
.
MaxNAS Owner’s Manual
49
Page 50

4-Connecting Users
5.2 Windows Vista
To set up the Printer Server in Windows Vista, follow the steps below:
5.2.1 Open Printer Folder from the Control
Panel.
5.2.2 Click .
5.2.3 Select Add a network, wireless or
Bluetooth printer.
5.2.4 Select The printer that I want isn’t
listed. You can press The printer that
I want isn’t listed to go into next page
without waiting for Searching for available
printers to finish.
MaxNAS Owner’s Manual
50
Page 51

5.2.5 Click Select a shared printer by name.
In the address entry box, type
http://<MaxNAS>:631/printers/usbprinter in the box, where <MaxNAS> is the
IP address or Netbios name of the MaxNAS.
Click
Next
.
4-Connecting Users
http://<MaxNAS_IP_Address>:631/printers/usb-printer
5.2.6 Select or install a printer click
OK
.
You can choose to set this printer as the
default printer by checking the Set as
the default printer box. Click
Next
to
continue.
Click
Finish
. Your printer is ready to use!
5.3 MacOS X
The following instructions are based on printer installation
on a Mac OS X 10.5 based host. Other Mac OS X hosts are
configured similarly.
5.3.1 Access the printer control panel,
located in System Preferences.
5.3.2 Click the in the “Print & Fax” control
panel (illustrated right.)
5.3.3 In the Printer Browser that follows,
Select the “IP” option (circled in the
bottom illustration,) and enter the
following values:
Protocol Internet Printing Protocol - IPP
Address [MaxNAS IP Address]:631
Queue /printers/usb-printer
Name User defined
Location User defined
Print Using Select your printer driver
5.3.4 Click to complete the
installation. The printer is ready to use.
MaxNAS Owner’s Manual
51
Page 52

5-Understanding RAID
Chapter 5- Understanding RAID
The MaxNAS controller subsystem is a high-performance SATA drive bus disk array controller.
When properly configured, the RAID subsystem can provide non-stop service with a high degree
of fault tolerance through the use of RAID technology and advanced array management features.
The RAID subsystem can be configured to RAID levels 0, 1 (0+1), and 5. RAID levels other
than 0 are able to tolerate a Hard Disk failure without impact on the existing data, and failed
drive data can be reconstructed from the remaining data and parity drives. RAID configuration
and monitoring can be done through the LCD front control panel or serial port. The MaxNAS
features the following high availability functions:
• RAID Levels 0,1,5,6 and Span
support
• Global Online Spare
• Automatic Drive Failure Detection
• Automatic Failed Drive Rebuilding
• Hot Spare Disk Drives
• Instant Availability/Background
Initialization.
Garth Gibson, Randy Katz, and David Patterson in papers written
while they were performing research into I/O subsystems at the
University of California at Berkeley. There are six Berkeley RAID
Levels, usually referred to by the names RAID Level 1, etc., through
RAID Level 6.
FYI:
The Berkeley RAID levels are a family of disk array
data protection and mapping techniques described by
This section will help you gain
understanding of how these functions can serve your needs best.
RAID
RAID is an acronym for Redundant Array of Independent Disks. It is an array of multiple
independent hard disk drives that provide high performance and fault tolerance through
support of several levels of the Berkeley RAID techniques. An appropriate RAID level is
selected when the volume sets are defined or created, and is based on disk capacity, data
availability (fault tolerance or redundancy), and disk performance considerations. The RAID
subsystem controller makes the RAID implementation and the disks’ physical configuration
transparent to the host operating system, which means that the host operating system drivers
and software utilities are not affected regardless of the RAID level selected.
RAID 0 (Striping)
This RAID algorithm writes data across multiple
disk drives instead of just one disk drive. RAID
0 does not provide any data redundancy, but
does offer the best high-speed data throughput.
RAID 0 breaks up data into smaller blocks and
then writes a block to each drive in the array.
Pros: Disk striping enhances both read and
write performance because multiple drives
are accessed simultaneously,
Cons: The reliability of RAID Level 0 is less than any of its member disk drives due to its lack of redundancy.
MaxNAS Owner’s Manual
52
Page 53

5-Understanding RAID
RAID 1 (Disk Mirroring)
RAID 1, also known as “disk mirroring”,
distributes duplicate data simultaneously to
pairs of disk drives.
Pros: RAID 1 offers extremely high data reliability
as all the data is redundant. If one drive
fails, all data (and software applications)
are preserved on the other drive.
Read performance may be enhanced as the
array controller can access both members
of a mirrored pair in parallel.
Cons: RAID 1 volume requires double the raw data storage capacity
Performance penalty when compared to writing to a single disk.
RAID 10
RAID 10 is a combination of RAID 0 and RAID
1, combing striping with disk mirroring. RAID
Level 10 combines the fast performance of
Level 0 with the data redundancy of Leve1 1.
In this configuration, data is distributed across
several disk drives, similar to Level 0, which are
then duplicated to another set of drive for data
protection. RAID 10 provides the highest read/
write performance of any of the Hybrid RAID
levels, but at the cost of doubling the required
data storage capacity.
Pros: Fastest read/write performance of any of the Hybrid RAID levels
High data reliability as all the data is redundant
Cons: Requires double the raw data storage capacity
RAID 5
RAID 5 is sometimes called striping with parity
at byte level. In RAID 5, the parity information
is written to all of the drives in the subsystems
rather than concentrated on a dedicated parity
disk. If one drive in the system fails, the parity
information can be used to reconstruct the data
from that drive. All drives in the array system
can be used to seek operation at the same time,
greatly increasing the performance of the RAID
system. RAID 5 is the most often implemented
RAID algorithm in RAID arrays.
Pros: Very good general transfer performance
Fault tolerant
Cons: Can be slow at large size file transfers
MaxNAS Owner’s Manual
53
Page 54

RAID 6
Also known as dual parity, RAID 6 is similar to
RAID 5, but offers double the fault tolerance
by performing two parity computations on
overlapping subsets of the data. RAID 6 offers
fault tolerance greater that RAID 1 or RAID
5 but only consumes the capacity of 2 disk
drives for distributed parity data. RAID 6 is
an extension of RAID 5 that uses a second
independent distributed parity scheme. Data is
striped on a block level across a set of drives,
and then a second set of parity is calculated
and written across all of the drives.
Pros: Very good general transfer performance
Fault tolerant
Cons: Can be slow at large size file transfers
5-Understanding RAID
Hot Swappable Disk support
Your MaxNAS has a built in protection circuit to support replacement of disk drives without
having to shut down or reboot the RAID. In case of drive failure, the failed drive can be
removed from the MaxNAS and replaced with a new drive without disrupting dataflow to the
host computer.
Hot Spare Drives
A hot spare drive is an unused online available drive, which is ready for replacing a failed
disk drive. In a RAID level 1 or 5 RAID set, any unused online available drive installed but not
belonging to a RAID set can be defined as a hot spare drive. Hot spares permit you to replace
failed drives automatically without powering down your MaxNAS. When your MaxNAS detects
a drive failure, the system will automatically and transparently rebuild using any available hot
spare drive(s). The RAID set will be reconfigured and rebuilt in background, while the RAID
subsystem continues to handle system requests. During the automatic rebuild process, system
activity will continue as normal, but system performance and fault tolerance will be affected.
Hot-Swap Disk Rebuild
A Hot-Swap function can be used to rebuild disk drives in arrays with data redundancy such
as RAID level 1(0+1), 3, and 5. If a hot spare is not available at time of drive failure, the failed
disk drive must be replaced with a new disk drive so that the data on the failed drive can
be rebuilt. If a hot spare is available, the rebuild starts automatically when a drive fails. The
RAID subsystem automatically and transparently rebuilds failed drives in the background with
user-definable rebuild rates. The RAID subsystem will automatically restart the system and
the rebuild if the system is shut down or powered off abnormally during a reconstruction
procedure condition. Please note that the system may no longer be fault tolerant during
degraded operation or the rebuild process- Fault tolerance will be lost until the damaged drive
is replaced and the rebuild operation is completed.
MaxNAS Owner’s Manual
54
Page 55

6-Troubleshooting
Chapter 6- Troubleshooting
Daily Use Tips
• Read this User’s Guide carefully. Follow the correct procedure when setting up the device.
• Additional application software may have been included with your drive. Please review the
documentation included with this software for information on the operation and support
of this software. The documentation can usually be found in an electronic format on the
included CD.
• Always operate your drive on a steady, level surface. Do not move the unit while it is turned on.
• Plug your drive into a grounded electrical outlet. The use of “ground-defeating” adapters
will cause damage not covered by your warranty.
• Do not open your MaxNAS or attempt to disassemble or modify it. Never insert any metallic
object into the drive to avoid any risk of electrical shock, fire, short-circuiting or dangerous
emissions. If it appears to be malfunctioning, please contact MicroNet Support.
• Do not power off the MaxNAS from the power button, as it may cause data loss.
General Use Precautions
• Do not expose the MaxNAS to temperatures outside the range of 5°C (41°F) to 45°C (104°F).
Doing so may damage the drive or disfigure its casing. Avoid placing your drive near a
source of heat or exposing it to sunlight (even through a window.)
• Never expose your device to rain, or use it near water, or in damp or wet conditions. Doing
so increases the risk of electrical shock, short-circuiting, fire or personal injury.
• Always unplug the hard drive from the electrical outlet if there is a risk of lightning or if it
will be unused for an extended period of time.
• Don’t place the drive near sources of magnetic interference, such as computer displays, televisions
or speakers. Magnetic interference can affect the operation and stability of your MaxNAS.
• Do not place heavy objects on top of the drive or use excessive force on it.
• Never use benzene, paint thinners, detergent or other chemical products to clean the outside
of the MaxNAS. Instead, use a soft, dry cloth to wipe the device.
MaxNAS Owner’s Manual
55
Page 56

6-Troubleshooting
Resetting the MaxNAS
Should the MaxNAS become inaccessible (blinking fault light, forgotten password) or if
directed by MicroNet support, please follow the below procedure to reset the MaxNAS to
factory default:
1. If the unit is functioning, ping the MaxNAS from the host to obtain
its IP address. Write down the IP address.
2. Shut down the MaxNAS and disconnect the Ethernet cable(s)
3. Power on the MaxNAS and immediately press hold the recessed
reset button (circled right) with a paper clip.
4. Continue to hold the reset button until the MaxNAS emits a loud
beep (approximately 2 minutes).
6. Plug the Ethernet cable back into LAN port 1.
7. Navigate your Explorer or browser window to HTTP://XXX.XXX.
XXX.XXX (where the X’s represent the MaxNAS’s IP address.)
8. You will see a simple dialog box that has three options:
Choose Reset to Factory Default and click
9. You should see a confirmation dialog pop up telling you that the MaxNAS is reset. Reboot
the MaxNAS to complete the procedure.
Apply
. Click
Yes
in the confirmation dialog box.
MaxNAS Owner’s Manual
56
Page 57

6-Troubleshooting
Frequently Asked Questions
Q: I Forgot the Login or Password
A: If you forget your network IP address or your password, you can reset the MaxNAS to its
default settings. Please see “Resetting your MaxNAS” in the troubleshooting section.
Q: I forgot my IP Address/I can’t find the MaxNAS on the network!
A: The current IP Address for both LAN1 and LAN2 will be displayed on the LCD screen. If you
do not have physical access to the MaxNAS, you may use the MaxNAS Setup wizard on the
MaxNAS product CD. You may also download the wizard from MicroNet’s support site at
www.micronet.com/support
Q: I’m having trouble map a network share in Windows
A: Windows only allows connection to a network resource using a single set of user credentials.
The network resource you are trying to acces may have already been accessed using a different
user name and password. To connect using
a different user name and password, first
disconnect any existing mappings to this
network share. To check out existing
network connections, open a command
prompt and type “net use”; You may then
disconnect the sessions by typing
“net use <session> /DELETE”
where <session> is the session revealed
above (illustrated right.) Alternatively, the most sure way to clear all existing network connection
is to log out and back in to your Windows session.
Q: There is a fault light and/or the buzzer is beeping!
A: Do not turn off or reset the unit! Follow these steps to identify and correct the alarm:
1. Refer to Chapter 1, Section 7 to identify the alert., and login to the MaxNAS administration
user interface.
2. Go to the System menu and choose Logs item.
3. The System Log screen appears.
4. Click the Error button and all recorded errors appear. The log entries will help you
diagnose the problem. If there is a failed hard drive, see Chapter 1, section 8- “Replace
Hard Drives”
5. If you are unable to solve the problem, please contact MicroNet Support.
Q: Can I increase my MaxNAS’s volume capacity?
A: Larger drive modules may be available for your Model. Consult your MicroNet reseller for
more information.
Q: Can I have more than one MaxNAS in the network?
A: Yes. Please call MicroNet Help Desk if you have questions about your particular
configuration.
MaxNAS Owner’s Manual
57
Page 58

6-Troubleshooting
Q: What is the warranty period for MaxNAS?
A: MaxNAS standard warranty is One-year limited. Optional extended warranty and overnight
exchange programs are available, consult your MicroNet dealer or visit www.MicroNet.com
for additional information.
Q: My Stackable Share is empty! Where’s my data?
A: The connectivity between the MaxNAS and the iSCSI target shared may have been disrupted,
and has not been re-established automatically. Ensure that the target iSCSI device is online
and accessible, and perform reconnected as described in Chapter 3, Section 2.5.5.
Q: I have my MaxNAS configured as a RAID5, which means it can sustain a disk failure. This
means I don’t need to worry about backing up my data, right?
A: Although RAID5 does provide tolerance for disk failure, it does not prevent damage due to
fire, flood, or other types of disaster, nor can it prevent virus damage or accidental deletion.
ALWAYS BACK UP YOUR DATA.
MaxNAS Owner’s Manual
58
Page 59

A-Getting Help
Appendix A: Getting Help
If you experience problems with your MaxNAS, please contact your Authorized MicroNet
Reseller for assistance. If the reseller is unable to resolve your issue, please contact MicroNet’s
Help Desk for assistance. Please have the model, serial number, date of purchase, and
reseller’s name available before making contact. If possible, call from a telephone near the
system so we can direct you in any necessary system corrections.
How To Contact MicroNet Technology, Inc.
Mail: MicroNet Technology, Inc.
19260 Van Ness Avenus
Torrance, CA 90501
Phone: (310) 320-0772 Help Desk & Customer Service
Web: http://www.MicroNet.com/help
email: support@MicroNet.com
MaxNAS Owner’s Manual
59
Page 60

B-RAID Level Comparison Table
Appendix B: RAID Level Comparison Table
RAID
Description Min.
Level
Span Also known as disk spanning. Data
is distributed sequentially to all
drives. There is no data protection.
0 Also known as striping
Data distributed across multiple
drives in the array simultaneously.
There is no data protection
1 Also known as mirroring
All data replicated on N Separated
disks. N is always a multiple of 2.
This is a high availability Solution,
but due to the 100% data duplication,
it is also a costly solution.
10 Also known as striped mirroring. Data
and parity information is subdivided
and distributed across all disks. This
is a high availability Solution, but
due to the 100% data duplication, it
is also a costly solution.
5 Also known Block-Interleaved
distributed Parity. Data and parity
information is subdivided and
distributed across all disk. Parity
must be the equal to the smallest
disk capacity in the array. Parity
information normally stored on a
dedicated parity disk.
6 Also known as dual parity. Similar
to RAID 5, but does two different
parity computations or the same
computation on overlapping subsets
of the data. The RAID 6 can offer
fault tolerance greater that RAID
1 or RAID 5 but only consumes
the capacity of 2 disk drives for
distributed parity data reliability
similar to RAID 0.
1 4 (N)
1 4 (N)
2 4 1/(N )
4 4 1/2 (N)
3 5 (N-1)
4 5 (N-2
Drives
Max.
Drives
Capacity Data
Reliability
Disks
Disks
Disks
Disks
Disks
Disks)
No data protection Same as a single disk same as a single disk
No data
Protection
Lower than RAID 6,
Higher than RAID 5
Lower than RAID 6,
higher than RAID 5
Lower than RAID 1, 10
Higher than a single
drive
Highest Reliability Reads are similar to
Data
Transfer Rate
Very High Very High for
Reads are higher
Than a single disk;
Writes similar to a single disk
Reads are similar to
RAID 0
Writes are similar to
single disk
Reads are similar to
RAID 0;
Writes are slower than
RAID 0
RAID 0;
Writes are slower than
RAID 5
I/O
Request Rates
Both Reads and Writes
Reads are twice faster
than a single disk;
Write are similar to a
single disk.
Reads are similar to
RAID 0
Writes are similar to single disk
Reads are similar to
RAID 0;
Writes are slower than a
single disk.
Reads are similar to
RAID 0;
Writes are slower than a
single disk.
MaxNAS Owner’s Manual
60
Page 61

C-Active Directory
Appendix C: Active Directory
With Windows 2000, Microsoft introduced Active Directory (ADS), which is a large database/
information store. Prior to Active Directory the Windows OS could not store additional information in
its domain database. Active Directory also solved the problem of locating resources; which previously
relied on Network Neighborhood, and was slow. Managing users and groups were among other issues
Active Directory solved.
What is Active Directory?
Active Directory was built as a scalable, extensible directory service that was designed to meet
corporate needs. A repository for storing user information, accounts, passwords, printers, computers,
network information and other data, Microsoft calls Active Directory a “namespace” where names can
be resolved.
ADS Benefits
ADS lets the MaxNAS easily integrate with the existing ADS in an office environment. This means the
MaxNAS is able to recognize your office users and passwords already on the ADS server, and allow the
network administrator to seamlessly control the MaxNAS as another network resource. This feature
significantly lowers the overhead of the system administrator. For example, corporate security policies
and user privileges on an ADS server can be enforced automatically on the MaxNAS.
IMPORTANT: the MaxNAS respects active directory users and groups only for purposes of initial access. User ACLs
!
will only propagate for the writing account.
MaxNAS Owner’s Manual
61
Page 62

D- Support UPS List
Appendix D: Supported UPS List
The MaxNAS can support UPS communication with the following UPS communication protocols:
SEC protocol
Generic RUPS model
Generic RUPS 2000 (Megatec M2501 cable)
PhoenixTec protocol
Safenet software
The following Models have been tested and approved for compatibility:
Brand Series Model Notes
Ablerex MS-RT
ActivePower 1400VA
AEC MiniGuard UPS 700 M2501 cable
Back-UPS Pro
Matrix-UPS
Smart-UPS
APC
Belkin
Best Power
Centralion Blazer
Clary ST-800
Compaq T1500h
Cyber Power
Systems
Deltec PowerRite Pro II
Dynex 975AVR
Effekta MI/MT/MH 2502 cable
Energy Sistem (various)
ETA mini+UPS WinNT/Upsoft cable
ETA mini+UPS PRO UPS Explorer cable
Ever UPS
Ever-Power 625/1000
Exide NetUPS SE
Back-UPS 940-0095A/C cables, 940-0020B/C cables, 940-0023A cable
Back-UPS Office 940-0119A cable
Masterswitch Not a UPS - 940-0020 cable
Back-UPS RS 500 custom non-USB cable
Regulator Pro serial
Resource
Home Office F6H350-SER, F6H500-SER, F6H650-SER
Universal UPS F6C800-UNV, F6C120-UNV, F6C1100-UNV, F6H500ukUNV
Fortress (newer)
Fortress Telecom
Axxium Rackmount
Patriot Pro
Patriot Pro II
Patriot INT51 cable
Micro-Ferrups
Fortress/Ferrups f-command support
NET *-DPC
AP *-PRO
320AVR, 500AVR, 650AVR, 700AVR, 800AVR
850AVR, 900AVR, 1250AVR,. 1500AVR, Power99
550SL, 725SL, CPS825VA, 1100AVR, 1500AVR-HO
MaxNAS Owner’s Manual
62
Page 63

D- Support UPS List
Brand Series Model Notes
PowerPal P-series
Fenton
Technologies
Fairstone L525/L625/L750
Fideltronik
Fiskars
Gamatronic
Gemini UPS625/UPS1000
HP
INELT Monolith 1000LT
Infosec iPEL 350, 500, 750, 1000
Ippon (various)
Liebert UPStation GXT2 contact-closure cable
Masterguard (various)
Meta System
MGE UPS
SYSTEMS
MicroDowell B.Box BP 500, 750, 1000, 1500
Microsol
Mustek
Nitram Elite 500, 2002
Oneac EG/ON Series advanced interface
Online P-Series
OnLite AQUA 50
PowerPal L-series
PowerOn
PowerPure
Ares 700 and larger
Other Ares models
PowerRite MAX
PowerServer 10, 30
All models with alarm interface
MP110/210
MS-T
MS
µPS3/1
R3000 XR
R5500 XR
HF Line 1..4 boards, /2 5..8 boards
HF Millennium 810, 820
HF TOP Line 910, 920, 930, 940, 950, 960, 970, 980
ECO Network
ECO 305, 308, 311, 511, 516, 519, 522
ally HF 800, 1000, 1250, 1600, 2000, 2500
Megaline 1250, 2500, 3750, 5000, 6250, 7500, 8750, 10000
NOVA AVR 600 Serial
NOVA AVR 1100 Serial
Pulsar Ellipse USBS Serial cable, S, Premium USBS Serial cable, Premium S
Ellipse Office 600 Serial cable, 750 Serial cable, 1000 Serial cable, 1500 Serial cable
Pulsar EXtreme C / EX RT
Comet EX RT Serial port, 3:1 Serial port
Pulsar Esprit
Evolution S 1250, 1750, 2500, 3000 Serial Port
Pulsar M 2200, 3000, 3000 XL Serial Port
Pulsar
Comet EXtreme
Comet / Galaxy (Serial) Utalk Serial Card (ref 66060), HID COM Serial Card (ref 66066)
Solis 1.0 1000VA, 1.5 1500VA, 2.0 2000VA, 3.0 3000VA
Rhino 6.0 6000VA, 7.5 7500VA, 10.0 10000VA, 20.0 20000VA
Various
Powermust
750, M1000, M1050, M1500, M1800
M2000, M2100, M2500, M3000
700, 1000, 1500, 1000 RT2U, 1500 RT2U, MX 4000 RT, MX 5000 RT
Evolution, EXtreme C, ES+, ESV+, SV, ESV, EX, EXL, PSX, SX, Extreme
400VA Plus, 600VA Plus, 800VA Pro
1000VA Plus, 1400VA Plus, 2000VA USB
Serial Port
MaxNAS Owner’s Manual
63
Page 64

D- Support UPS List
Brand Series Model Notes
Orvaldi various not 400 or 600
SMK-800A
Powercom
Powercom
PowerGuard PG-600
PowerKinetics 9001
PowerTech Comp1000 DTR cable power
Power Walker Line-Interactive VI1000
Powerware
Powerwell PM525A/-625A/-800A/-1000A/-1250A
Repotec
SMS (Brazil) Manager III
SOLA 325, 520, 610, 620, 330
SOLA/BASIC
Mexico
Socomec
Sicon
Soltec Winmate 525/625/800/1000
Soyntec Sekury C 500, 800
SquareOne
Power
SuperPower HP360, Hope-550
Sweex
Sysgration UPGUARDS Pro650
Tecnoware Easy Power 1200
Tripp-Lite
Trust UPS 1000 Management PW-4105
UNITEK Alpha 500 IC, 1000is, 500 ipE
UPSonic
Victron/IMV
ULT-1000
TrustTrust 425/625
BNT-1000AP
Advice Partner/King Pr750
BNT-2000AP
3110, 3115, 5119, 5125, 5119 RM, PW5115
PW5125PW9120, PW9125, 9120, 9150, 9305
RPF525/625/800/1000
RPT-800A
RPT-162A
various ISBMEX protocol
Egys 420 VA
QP1000
500/1000 smart - shipped with SafeNet
500/1000 contact closure - shipped with
UPSmart
BC100060 800VA
SmartUPS
SmartOnline
(various) Lan 2.2 interface - black 73-0844
cable
LAN Saver 600
Power Guardian
(various)
Lite crack cable
MaxNAS Owner’s Manual
64
Page 65

E-Glossary
Appendix E: Glossary
Active Directory an implementation of LDAP directory services by Microsoft for use in
Windows environments. Active Directory allows administrators to assign enterprise wide
policies, deploy programs to many computers, and apply critical updates to an entire
organization. An Active Directory stores information and settings relating to an organization
in a central, organized, accessible database. Active Directory networks can vary from a small
installation with a few hundred objects, to a large installation with millions of objects. Active
Directory was released first with Windows 2000.
ATA Acronym for “AT Bus Attachment” - a standard interface to IDE hard disks. Western
Digital’s IDE disk interface was standardized by ANSI to form the ATA specification using a
16-bit ISA bus.
Cache cache is a fast-access memory bank that serves as an intermediate storage for data that
is read from or written to secondary storage. Typically, high-speed caches are implemented in
RAM, though they can also be implemented on disk when speed is not a critical requirement.
Caches generally improve the efficiency of read operations due to the principles of “spatial
and temporal locality of data”. They can also improve the efficiency of write operations. See
also: Write Back Cache, Write Through Cache
Common Internet File System (CIFS) a network protocol for sharing files, printers, serial
ports, and other communications between computers. CIFS is based on the widely-used SMB
protocol.
Degraded Mode All RAID schemes with the exception of RAID 0 are designed to handle
disk failures. However, there is limit on the number of hard disks that can fail before the
array is rendered inoperative. For instance, this limit value is 1 for RAID 1, 3, and 5. In the
case of RAID 10 or 50, the upper bound is equal to the number of parity groups. When the
number of disk failures occurring in an array are less than or equal to this upper bound, the
array is denoted to be in a degraded state. The failure of the disks does not impair reading
from or writing to the array. However, it impairs the efficiency of throughput in all RAID
types (with the exception of RAID 1) since data requested by read operations may have to be
“reconstructed” using parity. In the case of RAID 1 the throughput of read operations is cut in
half if a drive fails. Operating in degraded mode is considered an acceptable alternative only
for short durations. Generally this duration should span no more time than that required to
inform the user of the failures and to replace the failed disks with suitable spares.
Device Driver A piece of software that controls a hardware device. Typically drivers provide
an interface by which applications can use the device in a uniform and hardware-independent
manner.
Dirty Data data that has been written to a cache but has not been “flushed,” or written to its
final destination, typically some secondary storage device.
MaxNAS Owner’s Manual
65
Page 66

E-Glossary
Disk Array A Disk Array is a logical disk comprised of multiple physical hard disks. The number
of hard disks in an disk array is dictated by the type of the array and the number of spares that
may be assigned to it. Furthermore, whether a disk array can be built using part of the space on
a disk (as opposed to being forced to use the whole disk) depends upon the implementation.
Disk Arrays are typically used to provide data redundancy and/or enhanced I/O performance.
Disk Block Data is stored on disks in blocks that are generally of a predefined size. This size
is typically a value such as 512 bytes, 1 KB, 2 KB, etc. When a record is written to a disk, the
blocks used for that record are dedicated to storing the data for that record only. In other
words two records are not permitted to share a block. Consequently, a block may be only
partially used. For instance, assume a disk has a block size of 1 KB and a user record written
to it has a size of 3148 bytes. This implies that the user record will be written into 4 blocks,
with the contents of one of the blocks being only partially filled with (3148 – 3072) 76 bytes
of data.
DNS (Domain Name Server) A system that stores information associated with domain names
in a distributed database on networks, such as the Internet. The domain name system (domain
name server) associates many types of information with domain names, but most importantly,
it provides the IP address associated with the domain name. It also lists mail exchange servers
accepting e-mail for each domain. In providing a worldwide keyword-based redirection
service, DNS is an essential component of contemporary Internet use.
Dynamic Host Configuration Protocol (DHCP) a client-server networking protocol. A
DHCP server provides configuration parameters specific to the DHCP client host requesting,
generally, information required by the client host to participate on an IP network. DHCP
also provides a mechanism for allocation of IP addresses to client hosts. DHCP emerged as a
standard protocol in October 1993.
Ethernet A local-area network standard that is currently the most prevalent with an estimated
80% of desktops connected using this standard. It was developed jointly by Xerox, DEC and
Intel and employs a bus or star topology.
File System A file system is a layer between applications and the disks to which their I/O
is directed. File systems serve to hide the details of the physical layout of files on the disk,
allowing applications to address files as a contiguous logical area on disk accessible by a
name regardless of their physical location on the storage device.
FTP (File Transfer Protocol) is a commonly used, open standard protocol for exchanging
files over any network that supports the TCP/IP protocol (such as the Internet or an intranet).
Virtually every computer platform supports the FTP protocol. This allows any computer
connected to a TCP/IP based network to manipulate files on another computer on that network
regardless of which operating systems are involved (if the computers permit FTP access.)
There are many existing FTP client and server programs, and many of these are free.
Hot Spare One or more disks in a RAID array may fail at any given time. In fact, all RAID
types with the exception of RAID 0 provide methods to reconstruct the array in the event of
such an occurrence. A commonly used tactic is to earmark a hard disk that is not being used
MaxNAS Owner’s Manual
66
Page 67

E-Glossary
by any RAID array as a backup. In the event a hard disk in a RAID array fails, this backup
is automatically mobilized by the RAID controller to step in place of the failed hard disk.
The data in the failed hard disk is “reconstructed” and written into the new hard disk. In the
case of a RAID 1, data is reconstructed by simply copying the contents of the surviving disk
into the spare. In the case of all other RAID types, reconstruction is performed using parity
information in the working hard disks of that RAID array. This backup hard disk is known as
a “hot” spare since the fail-over process is performed dynamically on a server within the same
session i.e., without the necessity for re-booting or powering down.
IDE Acronym for “Integrated Device Electronics”. A hard disk drive interface standard
developed by Western Digital and introduced. Also knows as Parallel ATA.
IEEE 802.3ad Link Aggregation a method for using multiple Ethernet network cables/
ports in parallel to increase the link speed beyond the limits of any one single cable or port,
and to increase the redundancy for higher availability. The following modes of operation are
available:
Failover: When one port fails, the other one will take over.•
Load Balance: Ethernet traffic will flow along both Ethernet ports.•
802.3ad: Linkage two Ethernet ports in parallel to increase throughput. •
Logical Drive A logical drive is comprised of spaces from one or more physical disks and
presented to the operating system as if it were one disk.
iSCSI (“Internet SCSI”) a protocol allowing clients (called initiators) to send SCSI commands
(CDBs) to SCSI storage devices (targets) on remote servers. It is a popular Storage Area
Network (SAN) protocol.
MAC (Media Access Control) Address In computer networking a Media Access Control
address (MAC address) is a unique identifier attached to most forms of networking equipment.
All Ethernet devices have unique MAC addresses.
NFS (Network File System) a network file system protocol originally developed by Sun
Microsystems in 1983, allowing a user on a client computer to access files over a network
as easily as if the network devices were attached to its local disks. NFS, like many other
protocols, builds on the Open Network Computing Remote Procedure Call (ONC RPC) system.
The Network File System protocol is specified in RFC 1094, RFC 1813, and RFC 3530
Online Capacity Expansion The ability to add space to an existing RAID array within a
session while preserving the RAID type and data within the array is known as online capacity
expansion. The availability of this feature enables the user to add space to a RAID array as and
when required without rebooting, thereby obviating the need for precise forecasts of capacity
requirements for the future.
Parity A mathematical function that serves as a method for error verification and correction.
In strict technical terms the parity of a group is set to 1 if the number of bits in the group that
are set to 1 is odd, and 0 otherwise. For instance, the parity of N bytes of data is obtained by
determining the number of ith bits in the N bytes that are set to 1. If that number is odd, then
the ith bit of the result is set to 1. This may sound complicated, but in reality the result can
MaxNAS Owner’s Manual
67
Page 68

E-Glossary
be obtained by simply evaluating the XOR of the N bytes. Parity allows one error in a group
(of bytes) to be corrected.
Partition The space contributed to each array on a physical drive is referred to as a
partition.
PCI An acronym for “Peripheral Component Interconnect”. It is Intel’s local bus standard
that supports up to four plug-in PCI cards per bus. Since PCs can have two or more PCI
buses, the number of PCI cards they can support are a multiple of four. The current PCI
bus implementation (version 2.2) incorporates two 64-bit slots at 66 MHz. Consequently, the
highest throughput achievable using such a bus is 528 MB/sec.
PCI Express (Peripheral Component Interconnect Express) officially abbreviated as PCI-E or
PCIe, is a computer host bus interface format introduced by Intel in 2004. PCI Express was
designed to replace the general-purpose PCI expansion bus, the high-end PCI-X bus and the
AGP graphics card interface. Unlike previous PC expansion interfaces, rather than being a bus
it is structured around point-to-point serial links called lanes. Each lane is capable of 250MB/S
in each direction (PCIe 1.1) or 500MB/S in each direction (PCIe 2.0)
PCI-X An enhanced version of PCI version 2.2. It supports one PCI slot per bus when running
at 133 MHz, two slots when running at 100 MHz and four slots when running at 66 MHz.
It is intended to provide throughputs in excess of 1 GB/sec using a 64-bit wide 133 MHz
implementation.
Physical Drive A single tangible drive is referred to as a physical drive.
Primary Storage Main memory i.e., RAM is frequently referred to as primary storage.
RAID Abbreviation of Redundant array of independent disks. It is a set of disk array
architectures that provides fault-tolerance and improved performance.
RAID Type There are a number of RAID formats that are widely used. Some of the well-known
uni-level types are RAID 0, RAID 1, RAID 3, RAID 5 and RAID 6. The prevalent complex types
are RAID 10 and RAID 50. ,
RAID 0 RAID 0 utilizes simple striping, with the data being distributed across two or more
disks. No data redundancy is provided. The figure below illustrates a purely hypothetical
RAID 0 array comprised of three disks – disks A, B, and C – with four stripes – each uniquely
colored – across those disks. Advantage: Striping can improve the I/O throughput by allowing
concurrent I/O operations to be performed on multiple disks comprising the RAID 0 array.
However, this RAID type does not provide any data redundancy.
RAID 1 An array that uses a single pair of disks. Both disks in the pair contain the same
data It provides the best data protection but can’t improve system performance. And storage
space for the same data capacity should be double than in general cases. Hence storage cost
doubles. The capacity of RAID 1 will be the size of the smaller HDD, so we suggest you
connect HDDs of the same sizes to save HDD space. Advantage: RAID 1 ensures that if one
MaxNAS Owner’s Manual
68
Page 69

E-Glossary
of the disks fails, its contents can be retrieved from the duplicate disk. Furthermore, a RAID
1 array can also improve the throughput of read operations by allowing separate reads to be
performed concurrently on the two disks.
RAID 5 A RAID 5 array is similar to a RAID 4 array in that, it utilizes a striped set of three
or more disks with parity of the strips (or chunks) comprising a stripe being assigned to the
disks in the set in a round robin fashion. The figure below illustrates an example of a RAID
5 array comprised of three disks – disks A, B and C. For instance, the strip on disk C marked
as P(1A,1B) contains the parity for the strips 1A and 1B. Similarly the strip on disk A marked
as P(2B,2C) contains the parity for the strips 2B and 2C. Advantage: RAID 5 ensures that if
one of the disks in the striped set fails, its contents can be extracted using the information on
the remaining functioning disks. It has a distinct advantage over RAID 4 when writing since
(unlike RAID 4 where the parity data is written to a single drive) the parity data is distributed
across all drives. Also, a RAID 5 array can improve the throughput of read operations by
allowing reads to be performed concurrently on multiple disks in the set.
RAID 10 A RAID 10 array is formed using a two-layer hierarchy of RAID types. At the lowest
level of the hierarchy are a set of RAID 1 arrays i.e., mirrored sets. These RAID 1 arrays in
turn are then striped to form a RAID 0 array at the upper level of the hierarchy. The collective
result is a RAID 10 array. The figure below demonstrates a RAID 10 comprised of two RAID
1 arrays at the lower level of the hierarchy – arrays A and B. These two arrays in turn are
striped using 4 stripes (comprised of the strips 1A, 1B, 2A, 2B etc.) to form a RAID 0 at the
upper level of the hierarchy. The result is a RAID 10. Advantage: RAID 10 ensures that if one
of the disks in any parity group fails, its contents can be extracted using the information on
the remaining functioning disks in its parity group. Thus it offers better data redundancy
than the simple RAID types such as RAID 1, 3, and 5. Also, a RAID 10 array can improve the
throughput of read operations by allowing reads to be performed concurrently on multiple
disks in the set.
Read Ahead Motivated by the principle of “spatial locality”, many RAID controllers read
blocks of data from secondary storage ahead of time, i.e., before an application actually
requests those blocks. The number of data blocks that are read ahead of time is typically
governed by some heuristic that observes the pattern of requests. The read-ahead technique
is particularly efficient when the spatial distribution of an application’s requests follows a
sequential pattern.
RAID Rebuild When a RAID array enters into a degraded mode, it is advisable to rebuild the
array and return it to its original configuration (in terms of the number and state of working
disks) to ensure against operation in degraded mode
SATA Acronym for “Serial ATA”. A hard disk drive interface standard developed to enhance
connectivity and speed over the IDE, or Parallel ATA disk interface. Current generation SATAII
supports speeds up to 300MB/S.
SCSI This is an acronym for “Small Computer System Interface”. It is a high-speed parallel
communication scheme permitting data transfer rates of up to 320 MB/sec using the Ultra320
specification. The current specification supports up to 15 devices per channel with domain
validation and CRC error checking on all transferred data.
MaxNAS Owner’s Manual
69
Page 70

E-Glossary
Secondary Storage Mass storage devices such as hard disks, magneto-optical disks, floppy
disks and tapes are frequently referred to as secondary storage.
Secure Sockets Layer (SSL) is a cryptographic protocol which provide secure communications
on the Internet. SSL provides endpoint authentication and communications privacy over the
Internet using cryptography. In typical use, only the server is authenticated (i.e. its identity is
ensured) while the client remains unauthenticated; mutual authentication requires public key
infrastructure (or PKI) deployment to clients. The protocols allow client/server applications to
communicate in a way designed to prevent eavesdropping, tampering, and message forgery.
Secure Webdisk uses SSL. Also known as: Transport Layer Security (TLS)
Server Message Block (SMB) a network protocol mainly applied to share files, printers,
serial ports, and miscellaneous communications between nodes on a network. It also provides
an authenticated Inter-process communication mechanism. SMB and its successor, CIFS, are
the native network protocol used by the Microsoft Windows family, and is also used by Apple
MacOS X and is available for virtually every UNIX and Linux operating system.
Stripe A stripe is a logical space that spans across multiple hard disks with each constituent
hard disk contributing equal strips (or chunks) of space to the stripe.
Stripe Set A stripe set is a set of stripes that spans across multiple hard disks. In the figure
below, the displayed stripe set has 4 stripes, with strip number 1 comprised of the purple
strips 1A, 1B and 1C. Stripe number 2 is comprised of the green strips 2A, 2B and 2C etc.
Stripe Size This is the size of the strips that constitute each stripe. This term is a misnomer –
though prevalent – since it should appropriately be called strip size or chunk size.
TCP/IP (Transmission Control Protocol/Internet Protocol) A pair of communications
protocols that implement the protocol stack on which the Internet and most commercial
networks run. TCP is a peer-to-peer connection oriented protocol that guarantees the delivery
of data packets in the correct sequence between two peers. IP is the protocol that defines and
governs addressing, fragmentation, reassembly and time-to-live parameters for packets.
UPnP AV (UPnP Audio+Video) Networked Device Interoperability Guidelines, part of the
UPnP standards supervised by the DLNA (Digital Living Network Alliance), a forum of vendors
and manufacturers who work in the home entertainment industry.
Windows Internet Naming Service (WINS) is Microsoft’s implementation of NetBIOS
Name Server (NBNS) on Windows, a name server and service for NetBIOS computer
names. Effectively, it is to NetBIOS names what DNS is to domain names - a central store
for information, However the stores of information have always been automatically (e.g. at
workstation boot) dynamically updated so that when a client needs to contact a computer
on the network it can get its update normally DHCP allocated address. Networks normally
have more than one WINS server and each WINS server should be in push pull replication,
MaxNAS Owner’s Manual
70
Page 71

E-Glossary
the favoured replication model is the HUB and SPOKE, and thus the WINS design is not
central but distributed, each WINS server holds a full copy of every other related WINS system
records. There is no hierarchy in WINS (unlike DNS) but like DNS its database can be queried
for the address to contact rather than broadcasting a request for which address to contact.
The system therefore reduces broadcast traffic on the network, however replication traffic can
add to WAN / LAN traffic.
Write-back Cache When a cache is operating in write-back mode, data written into the cache
is not immediately written out to its destination in secondary storage unless the heuristics
governing the flushing of dirty data demands otherwise. This methodology can improve the
efficiency of write operations under favorable circumstances. However, its use can potentially
lead to incoherencies in a system that is not protected from power fluctuations or failures.
Write-through Cache When a cache is operating in write-through mode, data written into the
cache is also written to the destination secondary storage devices. Essentially write completion
does not occur until the data is written to secondary storage. Thus the contents of the cache
and the secondary storage are always consistent. The advantage is that the possibility of data
corruption is greatly reduced. The disadvantage is that write-through operations are more time
consuming
MaxNAS Owner’s Manual
71
Page 72

F-Product Specifications
Appendix F: Product Specifications
System Architecture
CPU: Ultra Low Voltage Intel® 1.5GHz Celeron® M Processor
System RAM: 512MB DDR
NVRAM: On-board non volatile memory for firmware
Disk Interface: 5 channel SATA2-300 with NCQ drive controller
Network Interface: Dual Gigabit Ethernet host controllers
Expansion Ports: 3x USB 2.0 Type A Ports for external disk and printer hosting
1x eSATA port for external disk hosting
1x USB 2.0 Type B target port
System Displays: LCD Control Panel For basic configurations and status display
5 x LED (DOM, Network Activity x 2, USB Copy, System Busy)
5 x Disk status LED monitors
Disk Mechanisms: 5 hot swappable, 7200 RPM SATA2-300 NCQ enabled disk drives
Network Services
Dual Channel Gigabit Ethernet with multiple subnet support
Fixed/Dynamic IP Assignment
802.3ad based failover and link aggregation
Platforms supported:
Windows 98/ME/NT/2000/XP
Apple OS X
UNIX/Linux/BSD
Any web enabled platform via ftp or webdisk
Services Provided:
SMB/CIFS Common Internet File System
Apple File Protocol (AFP 3.1)
Network File System (NFS v3)
Microsoft NT Domain Controller (PDC) Integration
Microsoft Active Directory Authentication (AD) Integration
iSCSI Target supporting the following initiators:
Microsoft iSCSI Initiator v2.0.4
StarPort Initiator V3.5.2
MAC OS: globalSAN iSCSI initiator version 3.0 (1150)
Linux: open-iscsi 2.0-865
UPNP Universal Plug and Play for easy detection and configuration
Webdisk web storage support
FTP File Transfer Protocol
USB Storage Server
USB Print Server
Nsync Backup and Synchronization service
Disk Quotas per share
MaxNAS Owner’s Manual
72
Page 73

F-Product Specifications
System Features
RAID level 0, 1, 5, 6, 10 and Span configurations
Multiple RAID and LUN support
Automatically and transparently rebuilds hot spare drives
Hot swappable disk drives
Disk S.M.A.R.T. status monitoring
Instant availability and background initialization
Disk Roaming
RAID Level Migration
Automatic drive insertion / removal detection and rebuilding
Field-upgradeable firmware in flash ROM
Firmware-embedded management via web browser-based RAID management
UPS monitoring via RS-232 and system shutdown on low battery
Wake-on-LAN and Scheduled Power On/Off
Fault Notification: Email notification
Buzzer notification
LCD
MaxNAS Dimensions:
Height 230 mm/9”
Width 190 mm/7.5”
Depth 230 mm/9”
Weight:
18 lbs with drives.
Power Consumption:
Normal operation: 1.0 AC Amps @ 115 Volts
Spin up (peak): 2.70 AC Amps @ 115 Volts
Power Requirements:
Internal Auto-sensing power supply (90-240vac) (47-62Hz)
Environmental Specifications:
Operating Temperature: 0ºC - 40ºC (32ºF - 104ºF)
Humidity: 20% - 85% RH (Non-condensing)
Certifications: CE, FCC, BSMI, C-Tick, RoHS Compliant
MaxNAS Owner’s Manual
73
Page 74

G-Licence and Copyright
Appendix G: Licence and Copyright
This product included copyrighted third-party software licensed under the terms of GNU
General Public License. Please see THE GNU General Public License for extra terms and
conditions of this license.
Source Code Availability
Micronet has exposed the full source code of the GPL licensed software. For more information
on how you can obtain our source code, please visit http://www.micronet.com
Copyrights
• This product includes cryptographic software written by Eric Young (eay@cryptsoft.com).
• This product includes software developed by Mark Murray.
• This product includes software developed by Eric Young (eay@cryptsoft.com).
• This product includes software developed by the OpenSSL Project for use in the OpenSSL Toolkit (http://www.
openssl.org/).
• This product includes PHP, freely available from (http://www.php.net/).
• This product includes software developed by the University of California, Berkeley and its contributors.
• This product includes software developed by Winning Strategies, Inc.
• This product includes software developed by the Apache Group for use in the Apache HTTP server project
(http://www.apache.org/).
• This product includes software developed by Softweyr LLC, the University of California, Berkeley, and its
contributors.
• This product includes software developed by Bodo Moeller.
• This product includes software developed by Greg Roelofs and contributors for the book, "PNG: The Denitive
Guide," published by O'Reilly and Associates.
• This product includes software developed by the NetBSD Foundation, Inc. and its contributors.
• This product includes software developed by Yen Yen Lim and North Dakota State University.
• This product includes software developed by the Computer Systems Engineering Group at Lawrence Berkeley
Laboratory.
• This product includes software developed by the Kungliga Tekniska Högskolan and its contributors.
• This product includes software developed by the Nick Simicich.
• This product includes software written by Tim Hudson (tjh@cryptsoft.com).
• This product includes software developed by Christopher G. Demetriou for the NetBSD Project.
CGIC License Terms
Basic License
CGIC, copyright 1996, 1997, 1998, 1999, 2000, 2001, 2002, 2003, 2004 by Thomas Boutell and Boutell.Com, Inc.
Permission is granted to use CGIC in any application, commercial or noncommercial, at no cost. HOWEVER, this
copyright paragraph must appear on a "credits" page accessible in the public online and ofine documentation
of the program. Modified versions of the CGIC library should not be distributed without the attachment of a clear
statement regarding the author of the modifications, and this notice may in no case be removed. Modifications
may also be submitted to the author for inclusion in the main CGIC distribution.
MaxNAS Owner’s Manual
74
Page 75

G-Licence and Copyright
GNU General Public License
Version 2, June 1991
Copyright © 1989, 1991 Free Software Foundation, Inc.
51 Franklin St, Fifth Floor, Boston, MA 02110-1301 USA
Everyone is permitted to copy and distribute verbatim copies of this license document, but changing it is not
allowed.
PREAMBLE
The licenses for most software are designed to take away your freedom to share and change it. By contrast, the
GNU General Public License is intended to guarantee your freedom to share and change free software--to make
sure the software is free for all its users. This General Public License applies to most of the Free Software
Foundation's software and to any other program whose authors commit to using it. (Some other Free Software
Foundation software is covered by the GNU Library General Public License instead.) You can apply it to your
programs, too.
When we speak of free software, we are referring to freedom, not price. Our General Public Licenses are designed
to make sure that you have the freedom to distribute copies of free software (and charge for this service if you
wish), that you receive source code or can get it if you want it, that you can change the software or use pieces of
it in new free programs; and that you know you can do these things.
To protect your rights, we need to make restrictions that forbid anyone to deny you these rights or to ask you to
surrender the rights. These restrictions translate to certain responsibilities for you if you distribute copies of the
software, or if you modify it.
For example, if you distribute copies of such a program, whether gratis or for a fee, you must give the recipients
all the rights that you have. You must make sure that they, too, receive or can get the source code. And you must
show them these terms so they know their rights.
We protect your rights with two steps: (1) copyright the software, and (2) offer you this license which gives you
legal permission to copy, distribute and/or modify the software.
Also, for each author's protection and ours, we want to make certain that everyone understands that there is no
warranty for this free software. If the software is modified by someone else and passed on, we want its recipients
to know that what they have is not the original, so that any problems introduced by others will not reect on the
original authors' reputations.
Finally, any free program is threatened constantly by software patents. We wish to avoid the danger that
redistributors of a free program will individually obtain patent licenses, in effect making the program proprietary.
To prevent this, we have made it clear that any patent must be licensed for everyone's free use or not licensed at
all.
The precise terms and conditions for copying, distribution and modification follow.
TERMS AND CONDITIONS FOR COPYING, DISTRIBUTION AND MODIFICATION
0. This License applies to any program or other work which contains a notice placed by the copyright
holder saying it may be distributed under the terms of this General Public License. The "Program", below, refers
to any such program or work, and a "work based on the Program" means either the Program or any derivative
work under copyright law: that is to say, a work containing the Program or a portion of it, either verbatim or with
modifications and/or translated into another language. (Hereinafter, translation is included without limitation in
the term "modication".) Each licensee is addressed as "you".
Activities other than copying, distribution and modification are not covered by this License; they are outside its
scope. The act of running the Program is not restricted, and the output from the Program is covered only if its
MaxNAS Owner’s Manual
75
Page 76

G-Licence and Copyright
contents constitute a work based on the Program (independent of having been made by running the Program).
Whether that is true depends on what the Program does.
1. You may copy and distribute verbatim copies of the Program's source code as you receive it, in any
medium, provided that you conspicuously and appropriately publish on each copy an appropriate copyright
notice and disclaimer of warranty; keep intact all the notices that refer to this License and to the absence of any
warranty; and give any other recipients of the Program a copy of this License along with the Program.
You may charge a fee for the physical act of transferring a copy, and you may at your option offer warranty
protection in exchange for a fee.
2. You may modify your copy or copies of the Program or any portion of it, thus forming a work based on
the Program, and copy and distribute such modifications or work under the terms of Section 1 above, provided
that you also meet all of these conditions:
a) You must cause the modified files to carry prominent notices stating that you changed the files and the
date of any change.
b) You must cause any work that you distribute or publish, that in whole or in part contains or is derived
from the Program or any part thereof, to be licensed as a whole at no charge to all third parties under the terms
of this License.
c) If the modified program normally reads commands interactively when run, you must cause it, when
started running for such interactive use in the most ordinary way, to print or display an announcement including
an appropriate copyright notice and a notice that there is no warranty (or else, saying that you provide a warranty)
and that users may redistribute the program under these conditions, and telling the user how to view a copy of
this License. (Exception: if the Program itself is interactive but does not normally print such an announcement,
your work based on the Program is not required to print an announcement.)
These requirements apply to the modified work as a whole. If identifiable sections of that work are not derived
from the Program, and can be reasonably considered independent and separate works in themselves, then this
License, and its terms, do not apply to those sections when you distribute them as separate works. But when
you distribute the same sections as part of a whole which is a work based on the Program, the distribution of the
whole must be on the terms of this License, whose permissions for other licensees extend to the entire whole,
and thus to each and every part regardless of who wrote it.
Thus, it is not the intent of this section to claim rights or contest your rights to work written entirely by you;
rather, the intent is to exercise the right to control the distribution of derivative or collective works based on the
Program.
In addition, mere aggregation of another work not based on the Program with the Program (or with a work based
on the Program) on a volume of a storage or distribution medium does not bring the other work under the scope
of this License.
3. You may copy and distribute the Program (or a work based on it, under Section 2) in object code or
executable form under the terms of Sections 1 and 2 above provided that you also do one of the following:
a) Accompany it with the complete corresponding machine-readable source code, which must be distributed
under the terms of Sections 1 and 2 above on a medium customarily used for software interchange; or,
b) Accompany it with a written offer, valid for at least three years, to give any third party, for a charge no
more than your cost of physically performing source distribution, a complete machine-readable copy of the
corresponding source code, to be distributed under the terms of Sections 1 and 2 above on a medium customarily
used for software interchange; or,
c) Accompany it with the information you received as to the offer to distribute corresponding source code.
(This alternative is allowed only for noncommercial distribution and only if you received the program in object
MaxNAS Owner’s Manual
76
Page 77

G-Licence and Copyright
code or executable form with such an offer, in accord with Subsection b above.)
The source code for a work means the preferred form of the work for making modifications to it. For an
executable work, complete source code means all the source code for all modules it contains, plus any associated
interface definition files, plus the scripts used to control compilation and installation of the executable. However,
as a special exception, the source code distributed need not include anything that is normally distributed (in
either source or binary form) with the major components (compiler, kernel, and so on) of the operating system
on which the executable runs, unless that component itself accompanies the executable.
If distribution of executable or object code is made by offering access to copy from a designated place, then
offering equivalent access to copy the source code from the same place counts as distribution of the source code,
even though third parties are not compelled to copy the source along with the object code.
4. You may not copy, modify, sublicense, or distribute the Program except as expressly provided under
this License. Any attempt otherwise to copy, modify, sublicense or distribute the Program is void, and will
automatically terminate your rights under this License. However, parties who have received copies, or rights, from
you under this License will not have their licenses terminated so long as such parties remain in full compliance.
5. You are not required to accept this License, since you have not signed it. However, nothing else grants
you permission to modify or distribute the Program or its derivative works. These actions are prohibited by law
if you do not accept this License. Therefore, by modifying or distributing the Program (or any work based on
the Program), you indicate your acceptance of this License to do so, and all its terms and conditions for copying,
distributing or modifying the Program or works based on it.
6. Each time you redistribute the Program (or any work based on the Program), the recipient automatically
receives a license from the original licensor to copy, distribute or modify the Program subject to these terms and
conditions. You may not impose any further restrictions on the recipients' exercise of the rights granted herein.
You are not responsible for enforcing compliance by third parties to this License.
7. If, as a consequence of a court judgment or allegation of patent infringement or for any other reason (not
limited to patent issues), conditions are imposed on you (whether by court order, agreement or otherwise) that
contradict the conditions of this License, they do not excuse you from the conditions of this License. If you cannot
distribute so as to satisfy simultaneously your obligations under this License and any other pertinent obligations,
then as a consequence you may not distribute the Program at all. For example, if a patent license would not
permit royalty-free redistribution of the Program by all those who receive copies directly or indirectly through
you, then the only way you could satisfy both it and this License would be to refrain entirely from distribution of
the Program.
If any portion of this section is held invalid or unenforceable under any particular circumstance, the balance of
the section is intended to apply and the section as a whole is intended to apply in other circumstances.
It is not the purpose of this section to induce you to infringe any patents or other property right claims or
to contest validity of any such claims; this section has the sole purpose of protecting the integrity of the free
software distribution system, which is implemented by public license practices. Many people have made generous
contributions to the wide range of software distributed through that system in reliance on consistent application
of that system; it is up to the author/donor to decide if he or she is willing to distribute software through any
other system and a licensee cannot impose that choice.
This section is intended to make thoroughly clear what is believed to be a consequence of the rest of this
License.
8. If the distribution and/or use of the Program is restricted in certain countries either by patents or by
copyrighted interfaces, the original copyright holder who places the Program under this License may add an
explicit geographical distribution limitation excluding those countries, so that distribution is permitted only in or
among countries not thus excluded. In such case, this License incorporates the limitation as if written in the body
of this License.
MaxNAS Owner’s Manual
77
Page 78

G-Licence and Copyright
9. The Free Software Foundation may publish revised and/or new versions of the General Public License
from time to time. Such new versions will be similar in spirit to the present version, but may differ in detail to
address new problems or concerns.
Each version is given a distinguishing version number. If the Program specifies a version number of this License
which applies to it and "any later version", you have the option of following the terms and conditions either of
that version or of any later version published by the Free Software Foundation. If the Program does not specify
a version number of this License, you may choose any version ever published by the Free Software Foundation.
10. If you wish to incorporate parts of the Program into other free programs whose distribution conditions
are different, write to the author to ask for permission. For software which is copyrighted by the Free Software
Foundation, write to the Free Software Foundation; we sometimes make exceptions for this. Our decision will be
guided by the two goals of preserving the free status of all derivatives of our free software and of promoting the
sharing and reuse of software generally.
NO WARRANTY
11. BECAUSE THE PROGRAM IS LICENSED FREE OF CHARGE, THERE IS NO WARRANTY FOR THE PROGRAM,
TO THE EXTENT PERMITTED BY APPLICABLE LAW. EXCEPT WHEN OTHERWISE STATED IN WRITING THE
COPYRIGHT HOLDERS AND/OR OTHER PARTIES PROVIDE THE PROGRAM "AS IS" WITHOUT WARRANTY OF
ANY KIND, EITHER EXPRESSED OR IMPLIED, INCLUDING, BUT NOT LIMITED TO, THE IMPLIED WARRANTIES
OF MERCHANTABILITY AND FITNESS FOR A PARTICULAR PURPOSE. THE ENTIRE RISK AS TO THE QUALITY
AND PERFORMANCE OF THE PROGRAM IS WITH YOU. SHOULD THE PROGRAM PROVE DEFECTIVE, YOU
ASSUME THE COST OF ALL NECESSARY SERVICING, REPAIR OR CORRECTION.
12. IN NO EVENT UNLESS REQUIRED BY APPLICABLE LAW OR AGREED TO IN WRITING WILL ANY
COPYRIGHT HOLDER, OR ANY OTHER PARTY WHO MAY MODIFY AND/OR REDISTRIBUTE THE PROGRAM AS
PERMITTED ABOVE, BE LIABLE TO YOU FOR DAMAGES, INCLUDING ANY GENERAL, SPECIAL, INCIDENTAL OR
CONSEQUENTIAL DAMAGES ARISING OUT OF THE USE OR INABILITY TO USE THE PROGRAM (INCLUDING
BUT NOT LIMITED TO LOSS OF DATA OR DATA BEING RENDERED INACCURATE OR LOSSES SUSTAINED BY
YOU OR THIRD PARTIES OR A FAILURE OF THE PROGRAM TO OPERATE WITH ANY OTHER PROGRAMS),
EVEN IF SUCH HOLDER OR OTHER PARTY HAS BEEN ADVISED OF THE POSSIBILITY OF SUCH DAMAGES.
END OF TERMS AND CONDITIONS
MaxNAS Owner’s Manual
78
Page 79

MicroNet Techology
19260 Van Ness Ave
Torrance, CA 90501
www.MicroNet.com
10-30-2008 Rev 1c
The material in this document is for information only and is subject to change without notice. While reasonable efforts have been made in the preparation of
this document to assure its accuracy, MicroNet Technology assumes no liability resulting from errors or omissions in this document, or from the use of the
information contained herein. Some definitions and terminology are provided courtesy of Wikipedia contributors from Wikipedia, The Free Encyclopedia.
MicroNet Technology reserves the right to make changes in the product design without reservation and without notification to its users.
MicroNet and the MicroNet logo are registered trademarks of MicroNet Technology. Apple, Macintosh, Mac OS X, and the MacOS Logo are trademarks of
Apple Computer Inc. Microsoft Windows and the Windows Logo are registered trademarks of Microsoft Corporation. All other logos and trademarks are the
property of their respective owners.
Copyright © 1999, 2008 MicroNet Technology. All rights reserved. This publication may not be reproduced, stored in a retrieval system, or transmitted in any
form or by any means, in whole or in part, without the prior written consent of MicroNet Technology, 19260 Van Ness Ave., Torrance CA 90501.
 Loading...