


User’s Manual
IP Telephony Gateway
Model No.: SP5001C, SP5001D, SP5002A, SP5012A
World Wide Web: www.micronet.com.tw ; www.micronet.info

1
About this User’s Manual
This User’s Manual gives users basic steps on installation and operation.
Please read this manual chapter by chapter.
Chapter 1. Introduction
Introduce the IP Telephony Gateway to users in terms of feature,
appearance, and application.
Chapter 2. Startup
Help user complete basic configuration.
Chapter 3. Operation
Show user how to use the device to process phone call and FAX.
Chapter 4. Web Administration
Provide command reference of Web Interface for advanced setting.
Chapter 5. IVR/Keypad Management
Provide instructions on configuring the IP Telephony gateway via Keypad
on the phone set.
Chapter 6. Specification
List the specification of the gateway in detail.
Online Upgrade
Please refer to http://www.micronet.info/ for additional support.

2
Table of Content
1...Introduction.............................................................................................. 4
1.1 Key Features ................................................................................................ 5
1.2 Physical Description ..................................................................................... 6
1.3 Application.................................................................................................. 10
2...Startup.................................................................................................... 13
2.1 Login into the System................................................................................. 13
2.2 Network Configuration................................................................................ 15
2.3 SIP Configuration ....................................................................................... 17
2.4 VPN Configuration...................................................................................... 19
2.5 DDNS ......................................................................................................... 21
3...Operation................................................................................................ 22
3.1 Make a Call ................................................................................................ 22
3.1.1 Make PSTN Call (SP5001D only) ................................................................. 22
3.2 Speed Dial / P2P call.................................................................................. 23
3.3 Call Forward ............................................................................................... 24
3.4 Call Hold / Call Waiting / Conference ......................................................... 25
3.5 FAX............................................................................................................. 26
4...Web Administration............................................................................... 27
4.1 Phone Book................................................................................................ 27
4.2 Phone Setting............................................................................................. 27
4.2.1 Call Forward .................................................................................................. 27
4.2.2 SNTP Settings............................................................................................... 27
4.2.3 Volume Settings ............................................................................................ 27
4.2.4 Block Settings................................................................................................ 28
4.2.5 Caller ID ........................................................................................................ 28
4.2.6 Dial Plan Setting............................................................................................ 28
4.2.7 Flash Time Setting......................................................................................... 30
4.2.8 Call Waiting Setting....................................................................................... 30
4.2.9 T.38 (FAX) Setting ......................................................................................... 31
4.3 Network ...................................................................................................... 32
4.3.1 Status............................................................................................................. 32
4.3.2 WAN Settings ................................................................................................ 32
4.3.3 LAN Settings ................................................................................................. 32
4.3.4 DDNS Settings .............................................................................................. 33
4.3.5 VLAN Settings ............................................................................................... 33
4.3.6 PPTP Settings ............................................................................................... 34

3
4.3.7
DMZ * ............................................................................................................ 34
4.3.8 Virtual Server * .............................................................................................. 34
4.4 SIP Settings................................................................................................ 35
4.4.1 Service Domain ............................................................................................. 35
4.4.2 Port Settings.................................................................................................. 35
4.4.3 Codec Settings .............................................................................................. 35
4.4.4 Codec ID Settings ......................................................................................... 36
4.4.5 DTMF Setting ................................................................................................ 36
4.4.6 RPort Setting ................................................................................................. 36
4.4.7 Other Settings ............................................................................................... 37
4.5 NAT Trans. / STUN..................................................................................... 38
4.6 Others......................................................................................................... 39
4.6.1 Auto Config.................................................................................................... 39
4.6.2 ICMP Setting ................................................................................................. 39
4.6.3 PTT Setting ................................................................................................... 39
4.7 System Auth. .............................................................................................. 40
4.8 Save Change.............................................................................................. 40
4.9 Update........................................................................................................ 40
4.9.1 New Firmware ............................................................................................... 40
4.9.2 Default Setting............................................................................................... 41
4.10 Reboot........................................................................................................ 41
5...IVR / Keypad Management.................................................................... 42
6...Specification........................................................................................... 44

4
1. Introduction
Micronet SP5001C, SP5001D, SP5002A and SP5012A IP Telephony
Gateway is designed to connect standard telephone devices to IP-based
telephony networks, providing users with high-quality VoIP service.
SP5001C / SP5002A provides:
● 1/2 FXS port(s) for phone set, FAX machine, or PBX’s trunk
SP5001D provides:
● 1 FXS port for phone set, FAX machine, or PBX’s trunk
● 1 PSTN port for PSTN lifeline that tranceives PSTN calls as backup
even if VoIP fails.
SP5012A provides:
● 1 FXS port for phone set, FAX machine, or PBX’s trunk
● 1 FXO port for PSTN line or PBX’s extension to make communication
between PSTN and IP clients.
With built-in router function, they offer internet access sharing to co-located
PCs. The simple operation and configuration features are the most suitable
for residential and SOHO applications.

5
1.1 Key Features
z Compliant with IETF SIP standards
z Provide 2 10/100M RJ-45 ports for WAN and LAN connection
z Support G.729a/b, G.711a/µ-law, and G.726 codecs
z Support up to 3 SIP service domains
z Support STUN and Outbound proxy for NAT traversal
z Support VAD, CNG, EC, and Adaptive Jitter Buffer
z Support FSK / DTMF caller ID display
z Support Call Hold / Call Waiting / Call Forward
z Support 3-way conference
z Provide phone address book and speed dialing function
z Transmit voice and FAX (T.38 and in-band)
z Support PPTP client for VPN
z Support IP ToS/DSCP, and 802.1q/p for QoS
z Easy management via WEB and IVR/keypad

6
1.2 Physical Description
SP5001C:
SP5001C Front Panel
LED Status Description
PWR On/Green Power On
STATUS On/Amber Line Registered
TEL On/Amber Phone set off-hook
LAN On/Green Link On
WAN On/Green Link On
SP5001C Rear Panel
---------------------------------------------------------------------------------------------------
RESET Factory default button. Press and hold for 5 seconds to reset
WAN RJ-45 port of 10/100M for connecting to modem
LAN RJ-45 port of 10/100M for connecting to PC or hub/switch that
connects PCs
TEL RJ-11 port for connecting to phone set or PBX trunk
---------------------------------------------------------------------------------------------------

7
SP5001D:
SP5001D Front Panel
LED Status Description
PWR On/Green Power On
PSTN On/Amber PSTN mode / VoIP Unregistered
TEL On/Amber Phone set off-hook
LAN On/Green Link On
WAN On/Green Link On
SP5001D Rear Panel
---------------------------------------------------------------------------------------------------
RESET Factory default button. Press and hold for 5 seconds to reset
WAN RJ-45 port of 10/100M for connecting to modem
LAN RJ-45 port of 10/100M for connecting to PC or hub/switch that
connects PCs
TEL RJ-11 port for connecting to phone set or PBX trunk
PSTN RJ-11 port for connecting to PSTN (lifeline)
---------------------------------------------------------------------------------------------------

8
SP5002A:
SP5002A Front Panel
LED Status Description
PWR On/Green Power On
TEL1 On/Amber Line Registered
TEL2 On/Amber Line Registered
LAN On/Green Link On
WAN On/Green Link On
SP5002A Rear Panel
---------------------------------------------------------------------------------------------------
RESET Factory default button. Press and hold for 5 seconds to reset
WAN RJ-45 port of 10/100M for connecting to modem
LAN RJ-45 port of 10/100M for connecting to PC or hub/switch that
connects PCs
TEL1 RJ-11 port for connecting to phone set or PBX trunk
TEL2 RJ-11 port for connecting to phone set or PBX trunk
---------------------------------------------------------------------------------------------------

9
SP5012A:
SP5012A Front Panel
LED Status Description
PWR On/Green Power On
TEL On/Amber Line Registered
LINE On/Amber Line Registered
LAN On/Green Link On
WAN On/Green Link On
SP5012A Rear Panel
---------------------------------------------------------------------------------------------------
RESET Factory default button. Press and hold for 5 seconds to reset
WAN RJ-45 port of 10/100M for connecting to modem
LAN RJ-45 port of 10/100M for connecting to PC or hub/switch that
connects PCs
LINE RJ-11 port for connecting to PSTN or PBX extension
TEL RJ-11 port for connecting to phone set or PBX trunk
---------------------------------------------------------------------------------------------------

10
1.3 Application
SP5001C:
● 1 RJ-11 FXS port is provided for phone set or PBX's trunk line
connection
● 2 RJ-45 ports of 10/100M are provided for WAN and LAN connection
● The IP telephony gateway can share Internet access with LAN clients
SP5002A:
● 2 RJ-11 FXS ports are provided for phone set or PBX's trunk line
connection
● 2 RJ-45 ports of 10/100M are provided for WAN and LAN connection
● The IP telephony gateway can share Internet access with LAN clients

11
SP5001D:
● 1 RJ-11 FXS port is provided for phone set or PBX's trunk line
connection
● 1 RJ-11 PSTN port is provided to tranceive PSTN calls as backup even
if VoIP fails
● 2 RJ-45 ports of 10/100M are provided for WAN and LAN connection
● The IP telephony gateway can share Internet access with LAN clients
SP5012A:
● 1 RJ-11 FXS port is provided for phone set or PBX's trunk line
connection
● 1 RJ-11 FXO port is provided for PSTN or PBX's extension connection,
and for PSTN client to communicate with IP client
● 2 RJ-45 ports of 10/100M are provided for WAN and LAN connection
● The IP telephony gateway can share Internet access with LAN clients

12
VPN (Virtual Private Network)
The IP telephony gateway series supports PPTP client for VPN function. It
can establish VPN tunnel with PPTP server, and get access to the peer
private network as if it is located in the same LAN.
For special condition that SIP proxy server is located in the private network of
CO site, the gateway can register, and request a phone call via the VPN
tunnel.
Please refer to the section 2.4 VPN Settings.

13
2. Startup
2.1 Login into the System
The embedded web configuration allows you to use a web browser to
manage the IP Telephony gateway.
Step 1. Connect LAN port to your managing PC. Or, connect the gateway
with PC by hub/switch.
Step 2. Launch your web browser with http://192.168.123.1:9999/. Please
configure IP address of PC with 192.168.123.x.
Step 3. The Password screen now appears. Type “root” in the user name
field and your password (none by default) in the password field.
Step 4. Click on Login.
Login Screen
Step 5. After a successful login, you will see the screen System Information
as shown below.

14

15
2.2 Network Configuration
By default, the gateway is in NAT mode (router mode) and can share Internet
access with PCs. Go to [ Network / WAN Settings ], and configure WAN
setting according to actual condition. In default IP type of DHCP client, it
requests necessary IP information from your ISP automatically.
-----------------------------------------------------------------------------------------------------
Note: Different ISPs require different methods of connecting to the Internet. Please
consult your ISP to select right IP type (Fixed IP, PPPoE) of WAN.
-----------------------------------------------------------------------------------------------------

16
-----------------------------------------------------------------------------------------------------
Parameter Description
-----------------------------------------------------------------------------------------------------
LAN Mode Bridge: pure VoIP gateway
NAT: VoIP router
IP Type Select Fixed IP, DHCP (default), or PPPoE
IP IP address provided by ISP
Mask Subnet mask provided by ISP
Gateway ISP’s IP address gateway
DNS Server1/2 IP address of primary/secondary DNS server
MAC MAC address
PPPoE
Username User Name provided by ISP for the PPPoE connection
Password Password provided by your ISP for the PPPoE connection
-----------------------------------------------------------------------------------------------------
When Router mode is disabled, the unit is just a pure VoIP gateway. In LAN
mode, select Bridge to disable router mode.
-----------------------------------------------------------------------------------------------------
Note:
1. Please save and reboot the system to take effect. Go to [ Save Change ] to save
configuration, and the system will reboot automatically.
2. Please unplug LAN port when LAN mode is Bridge. Just keep WAN port plugged.
----------------------------------------------------------------------------------------------------

17
2.3 SIP Configuration
Go to [ SIP Settings / Service Domain ]. Each port can be configured to
register 3 different service domains.
-----------------------------------------------------------------------------------------------------
Parameter Description
-----------------------------------------------------------------------------------------------------
Phone No. Select specific port to configure
Active Select “On” to activate
User Name IP telephony number of the line
Register Name User’s ID
Register Password Password
Domain Server Domain server IP
Proxy Server SIP proxy IP and Port (default: 5060)
<sip_proxy_ip>:<sip_proxy_port>
Outbound Proxy Outbound proxy IP and Port
<outbound_proxy_ip>:< outbound_proxy_port>
Status Registered or not.
-----------------------------------------------------------------------------------------------------
Go to [ NAT Trans. / STUN Setting ] to set up STUN On, if necessary.

18
-----------------------------------------------------------------------------------------------------
Note: Please save and reboot the system to take effect. Go to [ Save Change ] to save
configuration, and the system will reboot automatically.
-----------------------------------------------------------------------------------------------------

19
2.4 VPN Configuration
IP telephony gateway supports PPTP client for VPN. It can establish VPN
tunnel with PPTP server. Go to [ Network / PPTP Settings ], and set PPTP
server address, and authentication information (username, password).
-----------------------------------------------------------------------------------------------------
Parameter Description
-----------------------------------------------------------------------------------------------------
PPTP Server Set IP address of PPTP server
PPTP Username Set username for authentication to set up VPN tunnel
PPTP Password Set password for authentication to set up VPN tunnel
-----------------------------------------------------------------------------------------------------
Click on Submit, and save to take effect.

20
After tunnel is established, the gateway gets one private IP address
(Interface 2) from PPTP server as shown in [ Network / Status ].

21
2.5 DDNS
DDNS allows you to map the static domain name to a dynamic IP address.
You must get an account, password and your static domain name from the
DDNS service providers.
● DDNS makes the gateway accessible for other client to call in P2P
(peer-to-peer) mode, when the IP address is dynamic.
● DDNS setting is not necessary when IP call is tranceived via service
domain only.
Go to [ Network / DDNS Settings ] and set up DDNS.
-----------------------------------------------------------------------------------------------------
Note: Please save and reboot the system to take effect. Go to [ Save Change ] to save
configuration, and the system will reboot automatically.
-----------------------------------------------------------------------------------------------------

22
3. Operation
3.1 Make a Call
By default, call is sent via the first registrar server only. The telephone
number of clients in the second/third service domain will be not accessible.
Make a Call
Press <telephone_number> + #
-----------------------------------------------------------------------------------------------------
Note:
● Once the first registration fails, the second realm will be activated.
● The gateway can always receive incoming call from the client of either regi stered
service domain.
● The gateway is accessible for P2P client to dial the configured telephone num bers.
DDNS setting is necessary when WAN IP address is dynamic.
-----------------------------------------------------------------------------------------------------
3.1.1 Make PSTN Call (SP5001D only)
SP5001D provides 1 RJ-11 port for PSTN lifeline, and can tranceive PSTN
calls even if VoIP fails.
Make PSTN Call
VoIP Unregistered:
● Press <pstn_number>
VoIP Registered:
● Press 0
*
to switch to PSTN mode
● press <pstn_number>

23
3.2 Speed Dial / P2P call
Speed dial
Press <index> + #
Go to [ Phone Book / Speed Dial Setting ]. User can create 10 entries (0~9)
in Speed Dial Phone List.
-----------------------------------------------------------------------------------------------------
Parameter Description
-----------------------------------------------------------------------------------------------------
Position Speed dial index, 0~9
Name Alias of the specific entry
URL It can be…
● Telephone number of registered client
● PSTN number (if server provides off-net call )
● Address-like URL (peer-to-peer call)
<telephone_number> @ <peer_device_ip_address>
<pstn_number> @ <peer_fxo_gateway_ip_address>
-----------------------------------------------------------------------------------------------------

24
3.3 Call Forward
Go to [ Phone Setting / Call Forward ]. There are 3 selections in Forward type.
User must select the condition under which to forward calls.
-----------------------------------------------------------------------------------------------------
Parameter Description
-----------------------------------------------------------------------------------------------------
All Forward Forward the call in any conditions
● Off: call forward disabled.
● On/IP: Call forward to IP. It disables other 2 forwarding types.
● PSTN: Call forward to PSTN. It disables other 2 forwarding types.
Busy Forward When the phone is in busy status, forward the call
● Off: call forward disabled.
● On: IP Call forward to IP.
No Answer Forward When the phone is not picked up for a period of time,
forward the call
● Off: call forward disabled.
● On/IP: Call forward to IP.
● PSTN: Call forward to PSTN.
Name Alias of the forwarding number
URL Destination number (that call is forwarded to) or
address-like URL. It can be…
● Telephone number of registered client
● PSTN number (if server provides off-net call )
● Address-like URL (Calling party has to support P2P call.)
-----------------------------------------------------------------------------------------------------

25
3.4 Call Hold / Call Waiting / Conference
The IP telephony gateway provides telephony features, as call hold, call
waiting, and 3-way conference.
● Call Hold: Hold a existing call
● Call waiting: Hold a existing call, and answer a new incoming call
● 3-way conference: Talk with other 2 party in the same session.
Call Hold
● Press Hook or Flash to hold
● Press Hook or Flash again to resume
Call Waiting
● Voice “do-do” informs of a new call when a
talk is in progress
● Press Hook or Flash to hold the existing
call, and proceed to the new call
● Press Hook or Flash to switch between two
calls
3-way
Conference
● Establish a call
● Press Hook or Flash to hold
the existing call
● Hear a dial tone and dial to establish another
● Press Hook or Flash again
-----------------------------------------------------------------------------------------------------
Note:
● Adjust “Flash Time” to make Hook key work, if necessary. Set up the time to suit
the connected phone set. Please refer to the section 4.2.7 Flash Time Setting
.
● Call waiting function has to be enabled. Please refer to the section 4.2.8 Call
Waiting Setting.
-----------------------------------------------------------------------------------------------------

26
3.5 F AX
Send FAX
● Press <fax_number> to connect fax machine
● Start to send FAX
T.38 FAX: Go to [ Phone Setting / T.38 (FAX) Setting ]. Click on “On” and
enable T.38 to tranceive FAX over IP.
In-band FAX: disable T.38 and choose G.711 codec as top priority. Please
refer to the section 4.4.3 Codec Settings.
-----------------------------------------------------------------------------------------------------
Note: When sending in-band FAX (in G.711), please disable T.38 and choose G.711
codec as top priority. Please refer to the section 4.4.3 Codec Settings
.
-----------------------------------------------------------------------------------------------------
27
4. Web Administration
4.1 Phone Book
Please refer to the section 3.2 Speed Dial / P2P call.
4.2 Phone Setting
4.2.1 Call Forward
Please refer to the section 3.3 Call Forward.
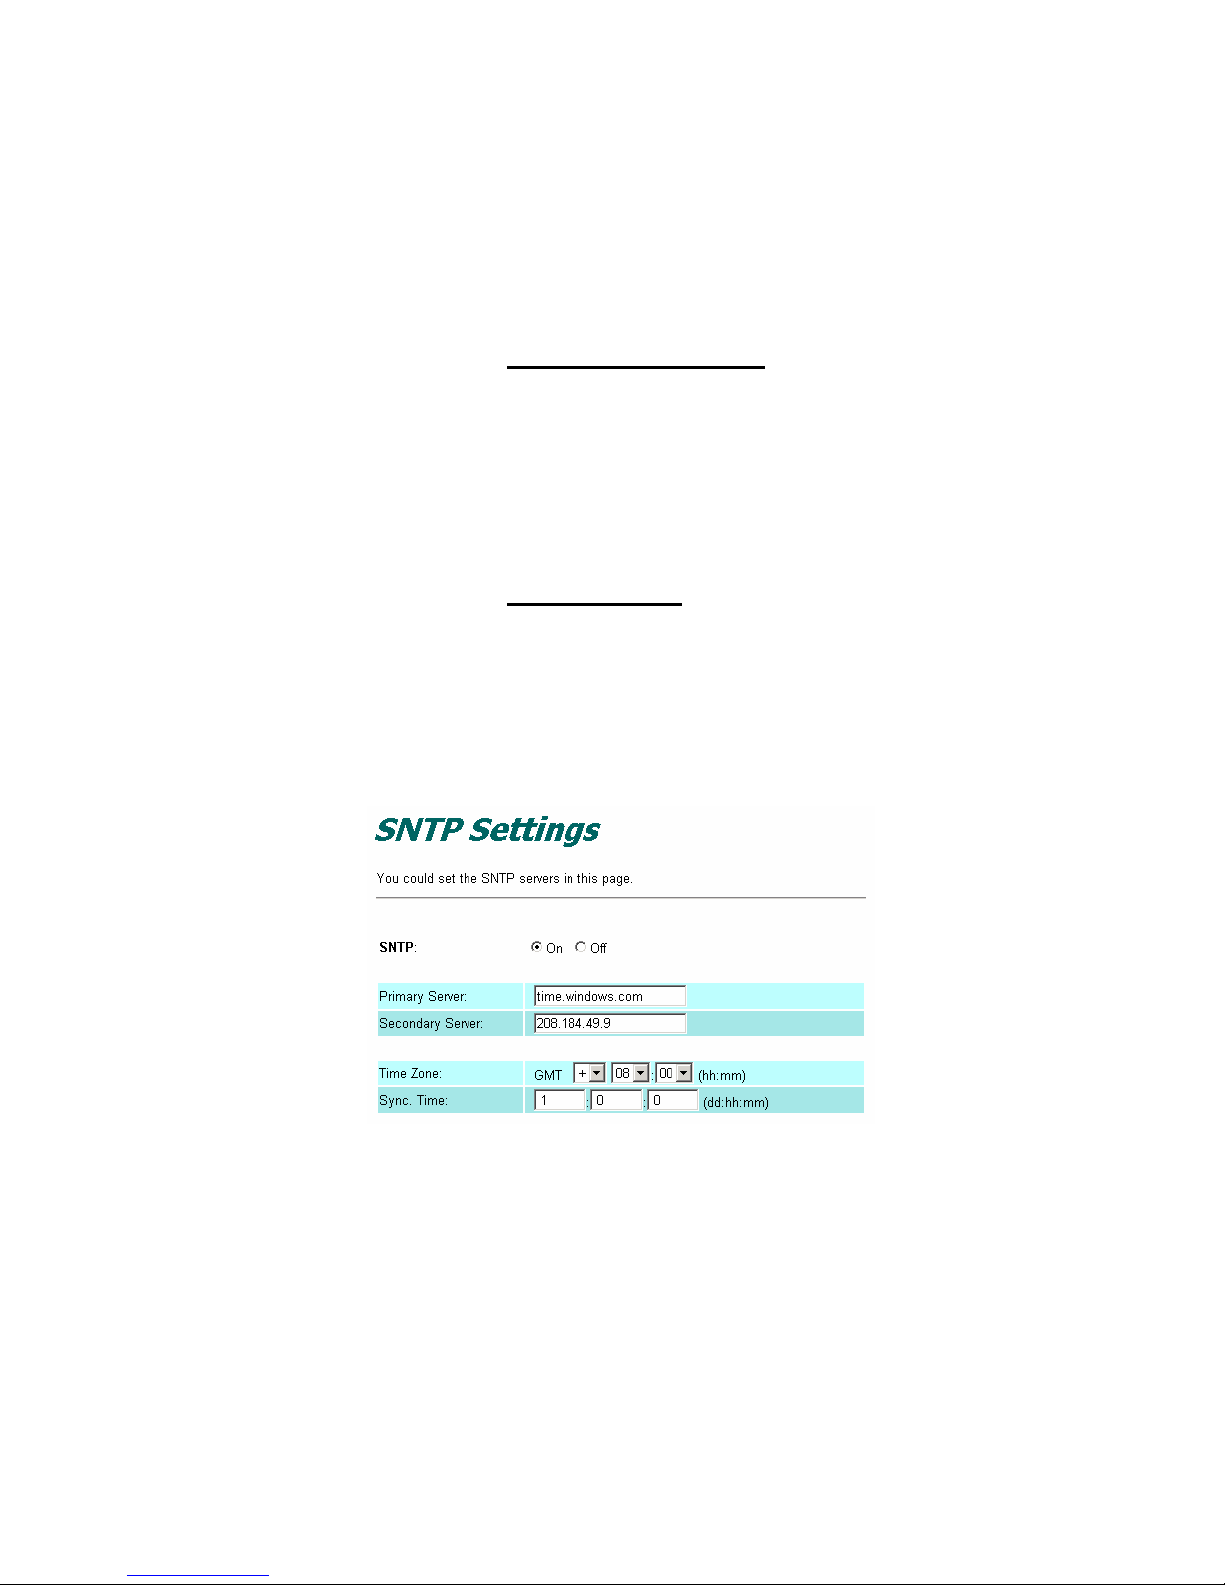
4.2.2 SNTP Settings
User can set up the primary and second SNTP Server IP Address, to get the
date/time information.
4.2.3 Volume Settings
User can set up the Handset Volume, Ringer Volume, and the Handset Gain.
● Handset Volume: adjust the volume that you hear from the handset.
● Ringer Volume: adjust the ringer volume of phone set
● Handset Gain: adjust the volume that the gateway sends out to the
other side.

28
4.2.4 Block Settings
User can set up the gateway to block incoming calls and the period.
4.2.5 Caller ID
User can set the device to show Caller ID in your PSTN Phone. The gateway
supports FSK and DTMF.
4.2.6 Dial Plan Setting
User can set dialing plan and timeout to send a phone call after dialing
number is input.

29
-----------------------------------------------------------------------------------------------------
Parameter Description
-----------------------------------------------------------------------------------------------------
Replace Prefix code On: enable “Replace rule”
Off: disable “Replace rule”
Replace rule Replace matched prefix with another
Dial Plan If dialed numbers match the rule, numbers is sent out. If
not, numbers would not be sent out. Plan with prefix “0” is
invalid
Auto Prefix Prepend the prefix before the dialed number is sent out
Prefix Unset Plan Auto prefix is ignored when matching unset prefix
Auto Dial Time
Set up timeout to send a phone call after dialing
number is input without pressing “#”
-----------------------------------------------------------------------------------------------------
Example:
Replace Rule: 001 + 006 + 009 → 005
Input Sent out
001-6601 005-6601
006-5211 005-5211
009-4644 005-4644
Dial Plan: *xx + #xx + 11x + xxxxxxxx
Rule Allowable input number
*xx
*01, *02, *15, *89, …
#xx #11, #28, #96
11x 111, 112, 113, ..., 119, 110
xxxxxxxx Any 8-digit number, 12345687, 97856412, …

30
* means: keypad* on the phone
x means: digit 0, 1, 2~9
# means: keypad # on the phone
+ means: or
Auto prefix: 02 (0000~9999)
Input Sent out
22183656 02-22183656
82265630 02-82265630
Prefix Unset Plan: 1 + 0 + xxxxxx
● With prefix “0”, auto prefix “02” is not prepended to dialing number
● With prefix “1”, auto prefix “02” is not prepended to dialing number
● With 6-digit number, auto prefix “02” is not prepended to dialing number
Auto Prefix Input Sent out
02 0075 0075
02 1075 1075
02 2075 02-2075
02 22075 02-22075
02 222075 222075
4.2.7 Flash Time Setting
User can set up “Flash Time” to detect flash signal initiated by pressing Hook
or Flash key.
4.2.8 Call Waiting Setting
User can enable Call Waiting function.

31
4.2.9 T.38 (FAX) Setting
Please refer to the section 3.5 FAX.

32
4.3 Network
4.3.1 Status
User can check the current Network setting.
4.3.2 WAN Settings
Please refer to the section 2.2 Network Configuration.
4.3.3 LAN Settings
User can configure for LAN clients.

33
-----------------------------------------------------------------------------------------------------
Parameter Description
-----------------------------------------------------------------------------------------------------
IP IP address of LAN port. Default gateway IP of LAN clients in the
local network
Mask Subnet mask
MAC MAC address
DHCP Server “On” means DCHP server enabled. By enabling the DHCP
server, the router will automatically give your LAN clients an IP
address
Start/End IP The IP range is released by DHCP
Lease Time Time period that the DHCP lends an IP address to your LAN
clients
-----------------------------------------------------------------------------------------------------
4.3.4 DDNS Settings
Please refer to the section 2.5 DDNS.
4.3.5 VLAN Settings
User can configure VLAN and prioritization respectively for voice and data
packets.

34
4.3.6 PPTP Settings
Please refer to the section 2.4 VPN Configuration.
4.3.7 DMZ *
Open another page http://192.168.123.1:9999/dmzset.htm. With the function
enabled, the gateway will re-direct all packets going to your WAN port IP
address to a particular IP address in your LAN.
* will be available in the later version.
4.3.8 Virtual Server *
Open another page http://192.168.123.1:9999/vsset.htm. With the function
enabled, it allows you to re-direct a particular service port number (from the
Internet/WAN Port) to a particular LAN IP address and its service port
number.
* will be available in the later version.

35
4.4 SIP Settings
4.4.1 Service Domain
Please refer to the section 2.3 SIP Configuration.
4.4.2 Port Settings
User can set up SIP and RTP ports.
4.4.3 Codec Settings
User can set up the Codec priority, RTP packet length, and VAD function.
Please follow service provider’s suggestion to configure.

36
4.4.4 Codec ID Settings
User can set up codec ID for different codec. This ID represents the codec
used to encode data in the Track.
4.4.5 DTMF Setting
User can set up the method of DTMF transmission: In-band, RFC2833, or
SIP Info.
4.4.6 RPort Setting
User can set up the RPort Enable/Disable. “RPort” is an extension to SIP for

37
Symmetric Response Routing. This behavior is not desirable in many cases.
Please configure it according to your service provider.
4.4.7 Other Settings
User can set up the Hold by RFC, Voice/SIP QoS and SIP expire time in this
page.
-----------------------------------------------------------------------------------------------------
Parameter Description
-----------------------------------------------------------------------------------------------------
Hold by RFC Enable or disable
Voice QoS (1-63) Assign a specific value for the first 6 bits of the IP ToS/DS
(DiffServ) field in the Voice (RTP) packet header.
SIP QoS (1-63) Assign a specific value for the first 6 bits of the IP ToS/DS
(DiffServ) field in the Voice (RTP) packet header.
-----------------------------------------------------------------------------------------------------
NOTE:
● The function can discriminate the IP DSCP of the DS field in the IP packet header,
and map each Code Point to a corresponding egress traffic priority.
● Junction devices (switch or router), within a converged network of voice and data,
should support TOS / DiffServ to identify and prioritize voice traffic (QoS higher
than 0) over others (QoS= 0).
● Setting Voice/SIP QoS as 46, voice is tra nsmitted to Internet in the service class of

38
EF (Expedited Forwarding).
-----------------------------------------------------------------------------------------------------
SIP expire time the time used to inform proxy server of the valid duration of
registration information.
-----------------------------------------------------------------------------------------------------
4.5 NAT Trans. / STUN
Please refer to the section 2.3 SIP Configuration.

39
4.6 Others
4.6.1 Auto Config
User can disable Auto Configuration or enable the function by TFTP/FTP.
Please contact with your service provider for necessary information.
4.6.2 ICMP Setting
User can set the gateway to reply ICMP echo request or not. Setting this
function to “ON”, you will get reply when you PING this gateway. Setting this
function to “Off”, you get no reply when you PING this gateway.
4.6.3 PTT Setting
Select the PTT setting for FXS interface by different country. When you
finished the setting, please click on the Submit button.

40
4.7 System Auth.
Change system login name and password.
4.8 Save Change
Click on the Save button. The system will automatically restart and the new
setting will take effect.
4.9 Update
4.9.1 New Firmware
User can upgrade the system via TFTP or HTTP in this page. Please
upgrade the firmware by the following steps:
-----------------------------------------------------------------------------------------------------
Parameter Description
-----------------------------------------------------------------------------------------------------
Method Upgrade via HTTP or TFTP
Code Type Select the firmware code type, Risc or DSP code.
File Location Click on the Browse button to locate the firmware file. Or you
can type the correct path and the filename in the field.
TFTP Server IP address of TFTP server
-----------------------------------------------------------------------------------------------------

41
Click on the Update button to start upgrading.
4.9.2 Default Setting
Click on the Restore button. Then, the system will restore factory default
setting and automatically restart again. Changed network and SIP setting will
be removed.
4.10 Reboot
Press the reboot button. The system will restart automatically.

42
5. IVR / Keypad Management
You can use the PSTN phone keypad to operate the IP Telephony gateway.
Please follow the instruction to configure.
IVR Action IVR Menu
Choice
Parameter(s) Notes
Dial out from
PSTN Line
0# None
Press 0# can pass relay to
PSTN Line, user can dial
out from PSTN Line.
(SP5001D only)
Unlock keypad
setting
#190# None
After you unlock keypad
setting, then you may
configure the ATA.
Reboot #195# None
After you hear “Option
Successful,” hang-up. The
system will reboot
automatically.
Factory Reset #198# None
System will automatically
Reboot.
WARNING!!
ALL “User-Changeable”
NONDEFAULT SETTINGS
WILL BE LOST! This will
include network and service
provider data.
Check WAN IP
Address
#126# None
IVR will announce the
current WAN IP address of
the gateway.
Check LAN IP
Address
#120# None
IVR will announce the
current LAN IP address of
the gateway.
Check IP Type #121# None
IVR will announce if DHCP
in enabled or disabled.
Check the Phone
Number
#122# None
IVR will announce current in
use VoIP number.
Check Network
Mask
#123# None
IVR will announce the
current network mask of the
gateway.
Check Gateway
IP Address
#124# None
IVR will announce the
current gateway IP address
of the gateway.
Check Primary
DNS Server
Setting
#125# None
IVR will announce the
current setting in the
Primary DNS field.
Check Firmware
Version
#128# None
IVR will announce the
version of the firmware
running on the gateway.
Set DHCP client #111# None
The system will change to
DHCP Client type
Set Static IP
Address
#112xxx*xxx*x
xx*xxx#
Enter IP address using
numbers on the
telephone keypad.
DHCP will be disabled and
system will change to the
Static IP type.

43
Use the * (star) key when
entering a decimal point.
Set Network
Mask
#113xxx*xxx*x
xx*xxx#
Enter value-using
numbers on the
telephone keypad.
Use the * (star) key when
entering a decimal point.
Must set Static IP first.
Set Gateway IP
Address
#114xxx*xxx*x
xx*xxx#
Enter IP address using
numbers on the
telephone keypad.
Use the * (star) key when
entering a decimal point.
Must set Static IP first.
Set Primary DNS
Server
#115xxx*xxx*x
xx*xxx#
Enter IP address using
numbers on the
telephone keypad.
Use the * (star) key when
entering a decimal point.
Must set Static IP first.
Set Codec #130+[1-8]#
1:G.711 u-Law,
2: G.711 a-Law,
3: G.723.1,
4: G.729a,
5: G.726 16K,
6: G.726 24K,
7: G.726 32K,
8: G.726 40K,
You can set the codec you
want to the first priority.
Set Handset Gain #131+[00~15]# Handset Gain from 0~15
You can set the Handset
gain to proper value, default
is 6.
Set Handset
Volume
#132+[00~12]#
Handset Volume from
0~12
You can set the Handset
volume to proper value,
default is 10.

44
6. Specification
Model SP5001C SP5001D SP5002A SP5012A
Standard IETF SIP (RFC3261)
Telephone Port 1 FXS 1 FXS
1 PSTN (lifeline)
2 FXS 1 FXS
1 FXO
Ethernet Port 2 10/100M ports for WAN and LAN connection
Voice Codec:
● G.711: 64k bit/s (PCM)
● G.726: 16k / 24k / 32k / 40k bit/s (ADPCM)
● G.729A: 8k bit/s (CS-ACELP)
● G.729B: adds VAD & CNG to G.729
CNG, EC (G.168), VAD
Adaptive Jitter Buffer
Gain (Voice Volume) Settings
Provide Call Progress Tone
DTMF In-band, SIP Info, RFC2833
Telephony Speed dial (10 sets)
Call Forward / Call Hold / Call Waiting
3-way Conference
Caller ID Display (DTMF / FSK)
Call Block (Do Not Disturb)
SIP Server Registrar Server (3 SIP accounts)
Outbound proxy
QoS IEEE802.1q/p, VLAN & Port prioritization
IP ToS / DSCP
Router NAT, VPN (PPTP client)
DMZ
*, Virtual Server*
NAT Traversal STUN
Networking Static assign, PPPoE, DHCP
Management Web / Keypad (IVR)
Environment Temperature: 0 - 40 degree C
Humidity: 10% to 90%
Power Supply 12VDC, 1A
Emission CE
* will be available in the later version.
Date: 2006 / 05 / 10
 Loading...