

Micron Transport LT User Manual

Copyright Notice
User’s Guide
1
TransPort LT
User’s Guide
Copyright Notice
The information in this document is subject to change without prior notice in order
to improve reliability, design, and function and does not represent a commitment
on the part of the manufacturer. In no event will the manufacturer be liable for
direct, indirect, special, incidental, or consequential damages arising out of the
use or inability to use the product or documentation, even if advised of the
possibility of such damages. Except as stated in the applicable Micron Electronics
limited warranty, Micron, by this manual, makes no other express warranties and
all other warranties, including, without limitation,
THE IMPLIED WARRANTY OF
MERCHANTABILITY AND THE IMPLIED WARRANTY OF FITNESS FOR A
PARTICULAR PURPOSE ARE HEREBY DISCLAIMED
.
This document contains proprietary information that is protected by copyright. All
rights are reserved. No part of this document may be photocopied, reproduced, or
translated to another language without the prior written consent of:
Micron Electronics, Inc.
900 E. Karcher Road
Nampa, Idaho 83687
Phoenix is a trademark of Phoenix Technologies Ltd. CardSoft is a trademark of
SystemSoft Corporation. AutoCAD and Autoshade are trademarks of Autodesk,
Inc. IBM, OS/2, and VGA are trademarks of International Business Machines
Corp. Lotus, 1-2-3, and Symphony are trademarks of Lotus Development Corp.
Windows, Word, MS-DOS, and Microsoft are trademarks of Microsoft Corp. VESA
is a trademark of Video Electronics Standards Association.
MS-DOS, Windows 3.1, 95/98/2000 and Windows NT are trademarks of Microsoft
Corp. Pentium II and MMX are trademarks of Intel Corporation. Other product
names mentioned herein are used for identification purposes only and may be
trademarks and/or registered trademarks of their respective companies. While
reasonable efforts have been made to ensure the accuracy of this manual, the
manufacturer and distributor assume no liability resulting from errors or omissions
in this manual, or from the use of the information contained herein.
P/N MAS001602-00, TransPort LT,
BGJ, 01-20-2000
Copyright 2000 Micron Electronics Inc. All Rights Reserved.

2
This page intentionally left blank.

Table of Contents
3
Table of Contents
User’s Guide....................................................................... 1
Copyright Notice.................................................................... 1
Welcome ............................................... ...... ....... ...... ....... .... 7
Purpose.................................................................................. 7
Reader.............................................................................. 7
Further Reading..................................................................... 7
Areas Covered....................................................................... 7
Manual Conventions.............................................................. 9
Manual Comments................................................................. 9
Getting Started................................................................. 11
Unpacking the TransPort LT............................................... 11
Personal Inventory.............................................................. 12
System Information ........................................................ 12
Heat, Cold, Humidity, and Glare......................................... 13
Surge Suppressors ............................................................. 13
Work Location...................................................... ...... .......... 13
Operating Environment................................................... .... 15
Introducing Your TransPort LT....................................... 17
TransPort LT Features......................................................... 17
Using Your Computer for the First Time ........................... 19
Connecting the AC Adapter............................................ 19
Turning on the TransPort LT.......................................... 20
Understanding POST........................................................... 21
Adjusting the LCD Display.................................................. 22
Turning Off Your Computer ................................................ 22
APM Mode...................................................................... 22
Restarting Your Computer.................................................. 22
Tips for Using Your Computer............................................ 23
Traveling with Your Computer............................................ 24
Handling Spills..................................................................... 25
Storing the Computer for Long Periods............................ 25
Using the Keyboard............................................................. 25
Using the Embedded Numeric Keypad .......................... 27
Using Special Function Keys......................................... 27
Using the Touchpad............................................................ 28
Reading the System Status Lights.................................... 29
Connecting Peripheral Devices......................................... 31
Using the Flex-Bay.............................................................. 33
To Remove a Device from the Flex-Bay........................ 34
To Install a Device in the Flex-Bay................................. 34
Using the SmartBay Utility............................................. 34
Using the Floppy Drive....................................................... 35
Using the CD-ROM Drive.................................................... 37
Using the Hard Drive........................................................... 39
Removing the Hard Drive............................................... 40
Installing a Hard Drive.................................................... 41
Using the Battery................................................................. 41
Charging the Battery...................................................... 41
Safely Using the Battery................................................. 42
Removing the Battery..................................................... 42
Installing the Battery....................................................... 43
Monitoring the Battery Charge....................................... 43
Using the Battery Gauge................................................ 44
Using PowerProfiler to Monitor the Battery.................... 44
Battery Warnings............................................................ 45
Using the Modem ................................................................ 46
Precautions Before Use................................................. 46
Description of 56K.......................................................... 47
Modem Specifications.................................................... 48
Installing the Modem Driver in Windows 95/98................ 49
Modem Commands........................................................ 49
Using AT commands...................................................... 50
Basic AT Commands..................................................... 51
Video Features and Configuration.................................. 53
Resolution and Color Depth............................................... 53
Configuring Display Features......................................... 54
Selecting a Monitor Type............................................... 54
Changing Color Depth and Resolution........................... 55
Changing the Video Driver............................................. 56
Working with PC Cards....................................................... 58
Maintaining PC Cards.................................................... 59
Using PC Cards ............................................................. 59

Table of Contents
4
Using Options................................................................... 63
AC Adapter........................................................................... 63
Auto Adapter........................................................................ 63
Battery Pack......................................................................... 64
Memory Modules.................................................................. 64
Before You Install Memory............................................. 64
Installing a Memory Module............................................ 65
CD-ROM Drive................................................................... ... 67
DVD-ROM Drive Module...................................................... 67
Secondary Battery............................................................... 67
Port Replicator....................................................... ..... ...... ... 68
Features of the Port Replicator....................................... 68
Installing a Port Replicator.............................................. 69
Removing a Port Replicator............................................ 70
Drivers and System Resources....................................... 71
Drivers .................................................................................. 71
IRQs ...................................................................................... 71
Service Pack 6A for Windows NT 4.0................................. 72
Installing the LAN Driver in Windows 98........................... 73
Using System Setup......................................................... 75
Starting System Setup......................................................... 75
Main Menu............................................................................ 77
Advanced Menu................................................................... 81
Security Menu...................................................................... 83
Power Menu...................................................... ...... ..... ......... 84
Boot Menu ............................................................................ 87
Exit Menu.............................................................................. 88
Using System Security..................................................... 89
System Passwords.............................................................. 89
Creating a Password...................................................... 89
Deleting a Password....................................................... 90
Requiring a Boot Password............................................ 90
Locking the Hard Drive Boot Sector............................... 90
Locking the Floppy Drive................................................ 90
Locking the Keyboard..................................................... 91
Using Power Management Options ................................ 93
Maximum Power Saving Mode........................................... 93
Standby Mode...................................................................... 93
Suspend Mode..................................................................... 94
Suspend Mode Precautions........................................... 94
Using PowerProfiler............................................................ 95
Creating a Save-To-Disk Partition.................................. 97
Software Utilities.............................................................. 99
MRestore CD-ROM .............................................................. 99
MCRC (Micron Customer Resource Center)..................... 99
PartitionMagic...................................................................... 99
Drive Image 3.0.................................................................... 99
Drive Image Professional.................................................. 101
Drive Image System Requirements.............................. 101
Creating Image Files.................................................... 101
Advanced Options ........................................................ 107
Disable SmartSector Copying...................................... 107
Verify Disk Writes......................................................... 107
ImageShield................................................................. 108
Split Image File Into Multiple Files................................ 108
Restoring Image Files.................................................. 108
Resize Options............................................................. 114
Advanced Options ........................................................ 114
Check for File System Errors....................................... 115
Skip Bad Sector Check ................................. ............... 115
Verify Check Writes...................................................... 115
PartitionMagic.................................................................... 115
Partition Information..................................................... 116
Partition Map................................................................ 116
Partition List........................................ ..... ...... ...... ..... .... 116
PartitionMagic Help...................................................... 117
ReadMe File................................................................. 117
Completing Tasks Manually......................................... 117
Selecting a Hard Disk................................................... 117
Selecting a Partition..................................................... 118
Applying Changes to Your System............................... 118
Changing PartitionMagic Preferences.......................... 119
Ignore OS/2 EA Errors on FAT..................................... 119
Skip Bad Sector Checks........................................... .... 120
Set as Read-Only for PartitionMagic............................ 120
Creating Partitions........................................................ 121

Table of Contents
5
Creating Bootable Partitions......................................... 121
To Create a Partition.................................................... 122
Scenarios ..................................................................... 125
Deleting Partitions........................................................ 125
Changing Partition Labels............................................ 126
Formatting Partitions.................................................... 127
Converting FAT to FAT32 ............................................ 128
Converting FAT to NTFS.............................................. 128
Drive Copy.................................................................... 130
Copying Entire Drives................................................... 130
PHDISK Utility.................................................................... 132
Help Screen.................................................................. 132
CREATE Option ....................... .................................... 132
Automatic Memory Size Calculation............................. 133
User-specified Memory Size......................................... 133
/Partition or /P............................................................... 133
/CREATE Option Syntax.............................................. 133
REFORMAT Option...................................................... 133
INFO Option................................................................. 133
PHDISK Sign-on Message........................................... 134
Unrecognized Option.................................................... 134
PHDISK/CREATE Failed to Execute............................ 134
Fatal Error .................................................................... 134
Save-To-Disk Partition Exits......................................... 134
First Two Sectors Bad.................................................. 134
Restoring your Computer ............................................. 137
To (re)install your Operating System:.............................. 137
Windows 98:................................................................. 137
Windows NT 4.0 Workstation:...................................... 138
To (re)install your original applications and drivers:..... 138
Troubleshooting............................................................. 139
Operating Problems.......................................................... 139
Infrared Problems.............................................................. 140
Modem Problems............................................................... 141
Specifications................................................................. 143
System Specifications ...................................................... 143
Recording the Computer Hardware Configuration..... 145
Appendix A - Regulatory ............................................... 149
FCC Notice......................................................................... 149
Federal Communications Commission (FCC) Part 68
Statement 149
CTR21 Statement............................................................... 151
Canadian Radio Interference Regulations...................... 151
CLASS 1 LASER PRODUCT ............................................. 151
Power Cord Requirement................................................. 152
Appendix B - Important Safety Instruction .................. 155
Battery Disposal................................................................ 157
Appendix C - Abbreviations .......................................... 159
Appendix D - Glossary................................................... 161

6
This page intentionally left blank.

Purpose
Welcome
7
Chapter 1 - Welcome
Thank you for buying a micronpc.com computer. This User’s Guide is intended for
both first-time and experienced computer users. Please review the following
information to get the most out of this manual.
Purpose
This manual contains information to instruct and guide you on everyting from
setup and maintenance to configuring the system and creating disk partitions. The
purpose of this manual is to help you enjoy all the features the TransPort LT offers
and information to help you operate and setup the computer for optimal
performance.
Reader
This manual is designed to assist all users—from beginner to advanced.
The first two chapters are intended for all users. The rest of the manual is targeted
toward the reader who has a basic understanding of how computers work and
how to use them.
If you are new to using computers, see the Glossary for explanations of general
computing terms that are used in this manual. The Glossary also provides
informatio n about some of the differences between notebook computers and
desktop computers.
Further Reading
Along with this manual you should consult and read all the manuals and
documentation included with all software and hardware applications used with this
computer.
Your computer shipped from the factory with several software programs installed.
The software may include its own online or printed documentation. Refer to the
documentation or the Help options in the software for more information.
Areas Covered
Getting Started:
This section includes a description of the parts you received and
general operating guidelines. This chapter contains important computer use and
computer care considerations to help you get started.
Introducing Your TransPort LT:
This section provides a description of the
features of the TransPort LT along with basic operation.
Video Features and Configuration:
This section describes the display
capabilities of your computer and information on working with PC cards.

Areas Covered
Welcome
8
Using Options:
This section provides an overview to numerous options with
which you can increase the uses for your TransPort LT. If you have purchased
accessories, refer to this chapter for instruction, if not, you may want to find out
what kinds of options you have with your TransPort LT.
Drivers and System Resources:
This section gives you basic information about
drivers and system IRQs.
Using System Setup:
This section describes how to operate the System Setup
Utility that is provided in the computer’s ROM BIOS. No changes should be made
in Setup unless the result of the change is known and understood.
Using System Security:
This section describes the security options provided
with your computer.
Using Power Management Options:
This section provides information on how
to keep your TransPort LT supplied with power.
Creating a Save-To-Disk Partition:
This section describes your computer’s
save-to-disk partition and provides instructions for adding memory modules to
your computer.
Software Utilities:
This section explains the MRestore CD, which includes Drive
Image, Partition Magic and Drive Copy--three very powerful software tools--and
the PHDISK (save-to-disk) utility.
Restoring your Computer:
This section explains how to restore the Operating
System or drivers.
Troubleshooting:
This section provides a simple guide to common
troubleshooting techniques.
Specifications:
This section lists the specifications of your TransPort LT.
Recording the Computer Hardware Configuration:
Use this section to record
the System Setup program settings.

Manual Conventions
Welcome
9
Manual Conventions
The following conventions are used throughout this manual:
N
OTE
:
Notes: Important information and useful tips concerning the operation of your
computer.
C
AUTION
:
Caution: Failure to follow directions could result in loss of data or damage
to equipment. Failure to heed these warnings could negate the user
warranty.
W
ARNING
:
Warning: Failure to follow directions will result in loss of data or damage to
equipment, and/or could result in physical harm. Failure to heed these
warnings could negate the user warranty.
Special Text
The text if formatted to set off unique information or instructions. Review the
following examples of special text used throughout this manual:
•
Screen (window) names, functions, or anything that appears on the screen
is formatted in bold: Click OK, the
Standards
screen, the
Edit
menu.
•
Keyboard functions are indicated by brackets: Press [Enter], use the [Alt]
key. When keys should be held down symultaniously they are separated by
the + sign: Press [Ctrl+Alt+Delete].
•
Screen messages are indicated by quotes: the message “Enter your
username and password” will appear.
•
Anything that you need to type in should appear in italics: Enter the word
password
.
Manual Comments
We want to make this guide as useful as possible and welcome your comments.
Please provide the page and the manual part number (MAS001602-00) when you
send comments to: manuals@micronpc.com.

10
This page intentionally left blank.

Unpacking the TransPort LT
Getting Started
11
Chapter 2 - Getting Started
Congratulations on the purchase of your Micron Transport LT notebook computer.
Whether you are new to using a notebook computer or are an experienced user,
this user manual can help you get the most from your computer.
Unpacking the TransPort
LT
The TransPort LT comes securely packaged in a sturdy shipping carton. Open the
box and carefully remove the contents. If anything is missing or damaged, please
contact Micron Electronics immediately. All systems should include the following
items:
•
The TransPort LT computer
•
An AC adapter
•
An AC power cord
•
User’s manual
•
A CD or DVD-ROM Drive
•
A 3.5-inch Floppy Drive
N
OTE
:
Items included may vary. Please check the packing slip included with your
TransPort LT for the exact items you should have received.

Personal Inventory
Getting Started
12
Personal Inventory
This TransPort LT computer system is designed for years of productive and
pleasurable computing. Use this section to keep notes about details of your
purchase. Update this section when you add new options.
System Information
Please record your computer’s operating information. If you should require
technical support in the future, the following information will help the Micron
Support Technician locate the specifications for your system and aid in returning it
to normal operation.
Micron Technical Support:
1-888-FIX-MYPC (1-888-349-6972)
Technical Support File Library:
http://support.micronpc.com/library/
Address:
Micron Electronics, Inc.
900 East Karcher Road
Nampa, Idaho 83687
Technical Support Internet Mail:
1. To send an email to Technical Support visit the Micron Electronics Website:
http://support.micronpc.com/contact/support/.
2. Click on the
Support Department
for your specific need.
Web site:
www.micronpc.com
Type of LCD screen display:
•
12.1" Color TFT XGA LCD
•
13.1” Color TFT XGA LCD
Model and Serial Number Information
Purchase Date
Model Number
Serial Number
Order Number
Customer Number
Manual Number MAS001602-00

Heat, Cold, Humidity, and Glare
Getting Started
13
CPU Type:
__________________________________
Hard Disk Capacity:
___________________________
Memory Capacity:
___________________________
N
OTE
:
If your system arrives in cold weather, do not apply power to the computer until it
has reached room temperature.
Heat, Cold, Humidity, and
Glare
Find a spot for your computer that’s not too hot, too cold, too dark, or too bright.
Glare can make it hard to read the screen. Overheating can destroy computer
components, so allow plenty of room for air to circulate around the case. Do not
place your TransPort LT in direct sunlight.
W
ARNING
:
Do not expose the notebook to cold (frost) or heat, do not leave the
notebook in a car, and do not drop it, spill fluids on it, or open the case. This
can destroy the notebook and void the warranty. The system’s Liquid
Crystal Display (LCD) video display may be damaged by exposure to
intense sunlight, which builds up excessive heat inside the display
enclosure. Only exposure to indirect or subdued sunlight is recommended.
Surge Suppressors
Your computer has its own electrical filters, fuses, and protections, and even its
own built-in surge suppressor. However we strongly recommend using a highquality, external surge suppressor. An external surge suppressor looks like an
extension cord with several grounded outlets. It will help shield your computer
from lightning strikes, surges, shorts, and other electrical hazards.
Work Location
Your TransPort LT generally will run well in conditions you are comfortable in. But
extremes of temperature and humidity can be challenging to your system’s parts.
There are, however, some things you can tolerate that the computer can’t —
things like static electricity, dust, water, steam, and oil.

14
This page intentionally left blank.

Operating Environment
Getting Started
15
Operating Environment
You can use your computer under a wide range of environmental conditions.
However, to ensure long use and continued high performance, consider the
following factors when setting up your computer:
•
Set the computer on a flat, stable surface. To prevent damage to the
computer’s hard disk drive avoid using the computer where it will be
exposed to strong vibration.
•
Place the computer away from electromagnetic or radio frequency
interference (for example, television/stereo sets, copying machines, and air
conditioners).
•
Avoid using or storing the computer where it will be exposed to extreme
temperatures. In particular, do not leave the computer in direct sunlight,
over a radiator, or near a heat source for a long period of time. High
temperature can damage the circuitry.
•
Avoid exposing the computer to high or low humidity. Extreme humidity can
contribute to disk drive failure.
•
If you are using the computer with the AC adapter, do not allow anything to
rest on the power cord. Do not place the computer where people can step
on or trip over the cord.
•
The openings on the computer are provided to protect the computer from
overheating. To ensure reliable operation, leave about 10 cm (4 inches)
around the computer for unobstructed air circulation. Avoid exposing the
computer to dust or smoke.

16
This page intentionally left blank.
TransPort LT Features
Introducing Your TransPort LT
17
Chapter 3 - Introducing Your TransPort LT
Your computer is a lightweight portable computer that includes features to meet
your computing needs at home or on the road.
TransPort LT Features
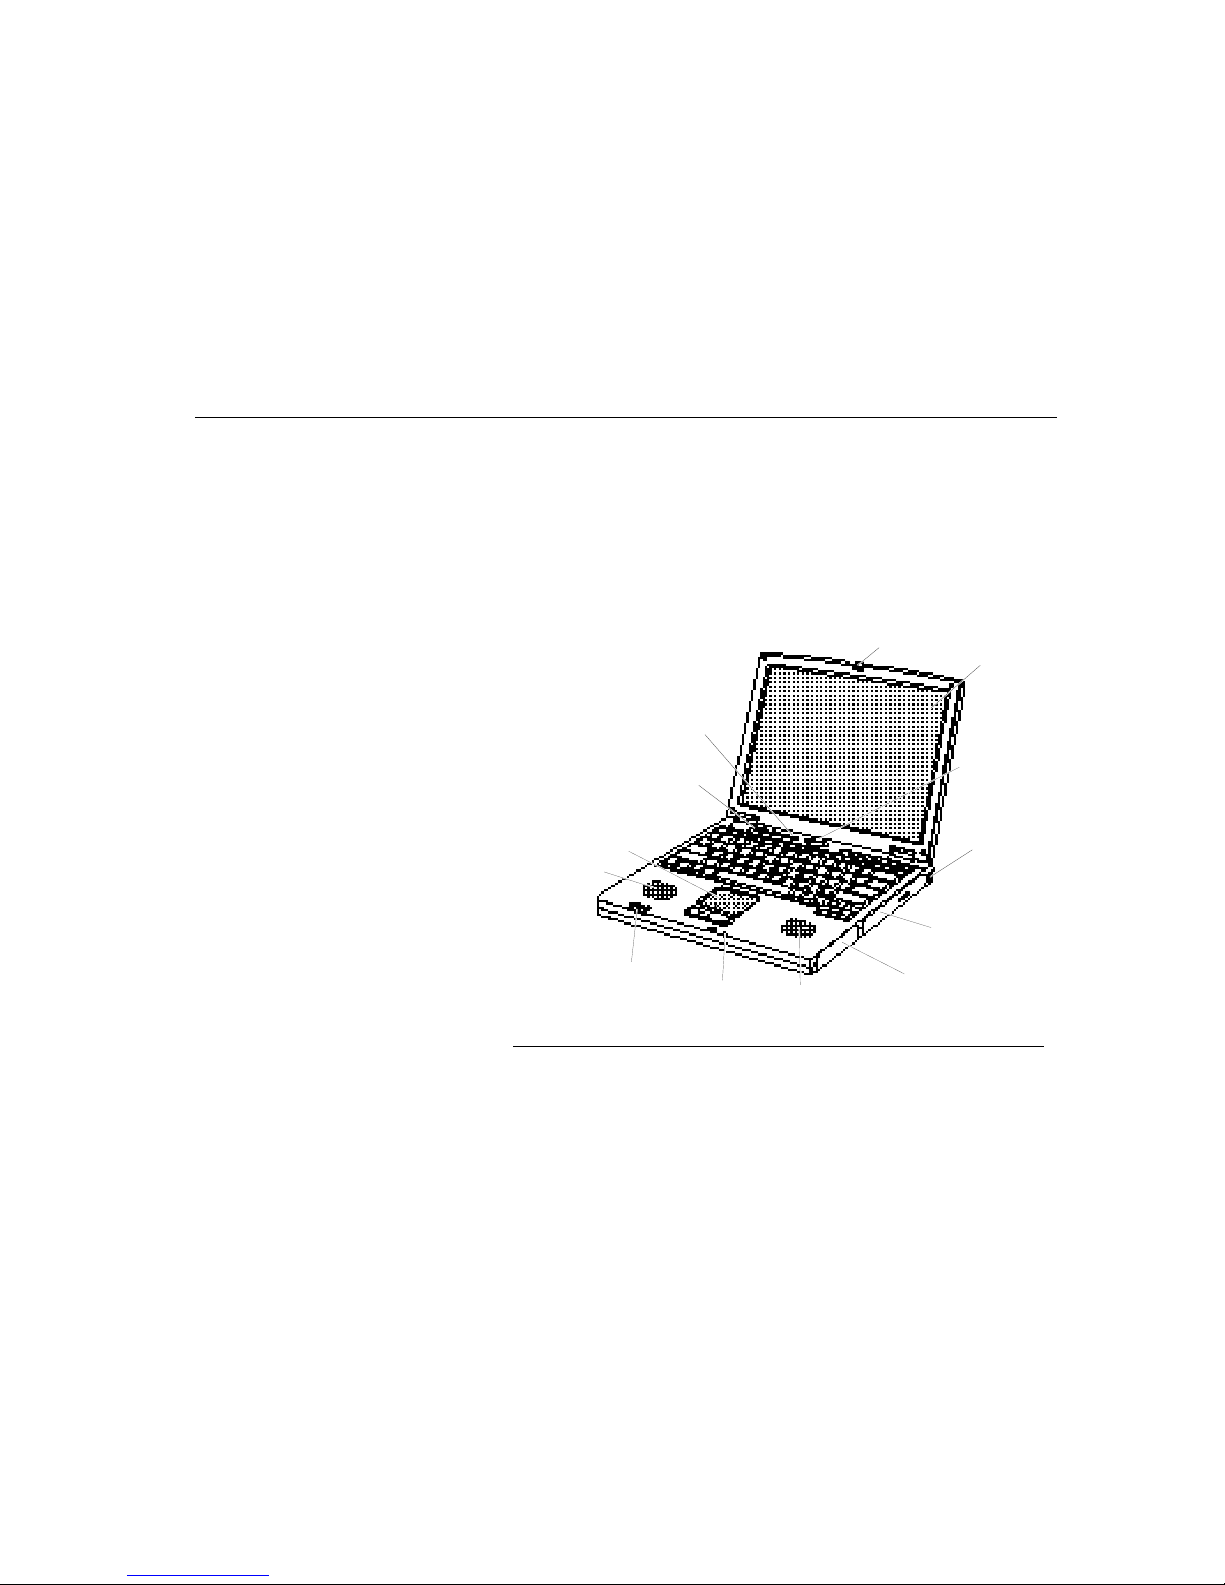
Figure 1, Figure 2, and Figure 3 illustrate the features of your computer.
Figure 1. Front and Right view of Computer
Cover latch
LCD
Power button
Touchpad &
Mouse Buttons
Speaker
Status lights
Microphone
CD-ROM drive
Speaker
Volume control
Kensington lock
Status lights
Battery compartment
TransPort LT Features
Introducing Your TransPort LT
18
Figure 2. Bottom View of Computer
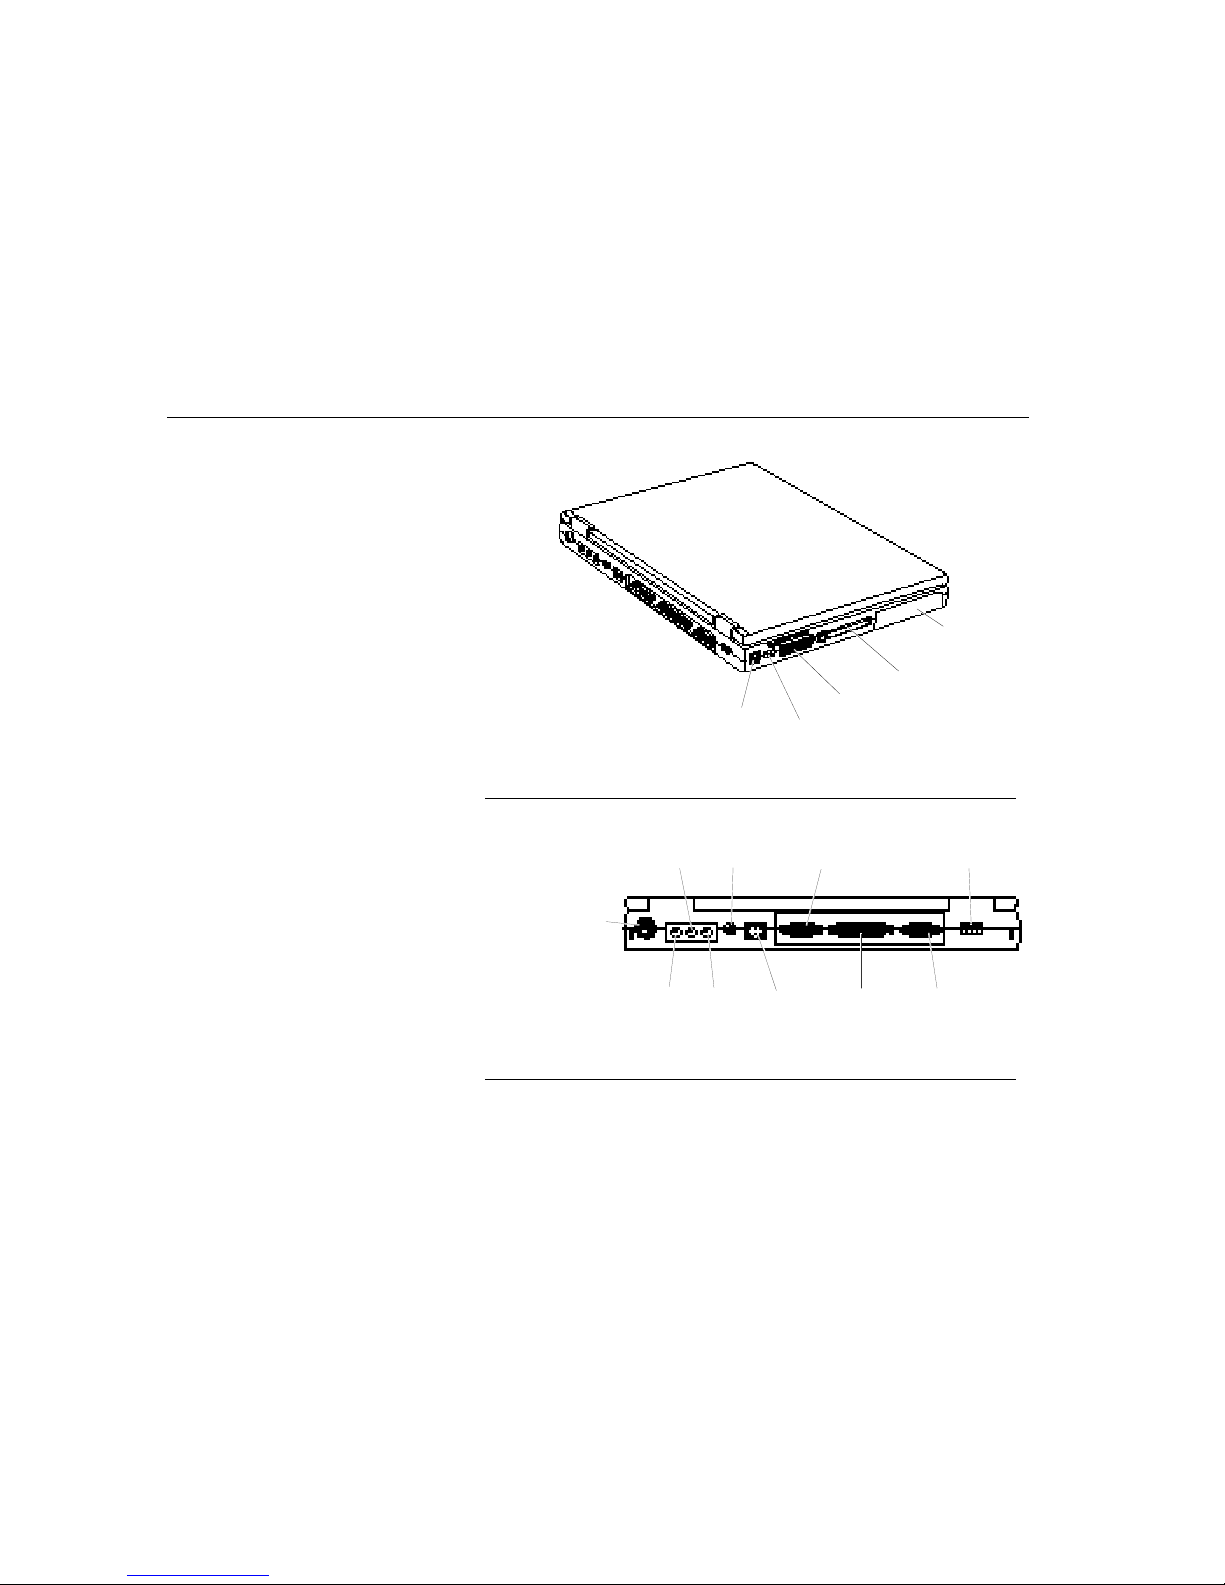
Figure 3. Back View of Computer
Hard drive
compartment
PC Card compartme nt
Fan vent
Infrared port
Modem jack
(Optional)
LAN port
(Optional)
Parallel port
PS/2™
mouse and
keyboard
port
Video port
Serial port
Power
Connector
USB port
Line-in
Microphone
jack
Headphone
jack

Using Your Computer for the First Time
Introducing Your TransPort LT
19
Using Your Computer for
the First Time
This section gives you detailed information on using your computer for the first
time.
Your computer runs on power from the battery in the computer or from an
electrical outlet. The first time that you use your computer, fully charge the battery
by attaching the power cord to the computer and to an electrical outlet.
Connecting the AC Adapter
To attach the power cord:
1. Plug the AC adapter into the power connector on the back side of the computer
(Figure 4).
2. Connect the power cord to the AC adapter and then to an electrical outlet.
Figure 4. Connecting the AC Adapter
The battery starts charging as soon as you plug the power cord into an electrical
outlet. The battery charges faster if the computer is off.
If the battery is fully depleted and the computer is turned off, the battery charges
in about two and a half hours. If the computer is turned on, the battery charges in
about four hours. When the battery is charging, the battery charge light is amber.
When the battery is fully charged, the light turns green.
See ”Using the Battery” on page 41 for more information on using your computer’s
battery.
Power connector
Power cord
AC Adapter
Using Your Computer for the First Time
Introducing Your TransPort LT
20
C
AUTION
:
The best kind of AC power source to connect your TransPort LT to is a UPS
(Uninterrupted Power Supply). If you do not have an UPS, use a power strip
with a built-in surge protector. Do not use inferior extension cords as this
may result in damage to your TransPort LT. The TransPort LT comes with
its own AC adapter. Do not use a different adapter to power the computer,
and do not use the AC adapter to power other electrical devices. Damage to
the computer that is caused by using a different power source will not be
covered under warranty.
Turning on the TransPort LT
To turn on the computer’s power for the first time:
1. Push the cover latches on the front of the cover to the right and hold.
2. Lift up the cover.
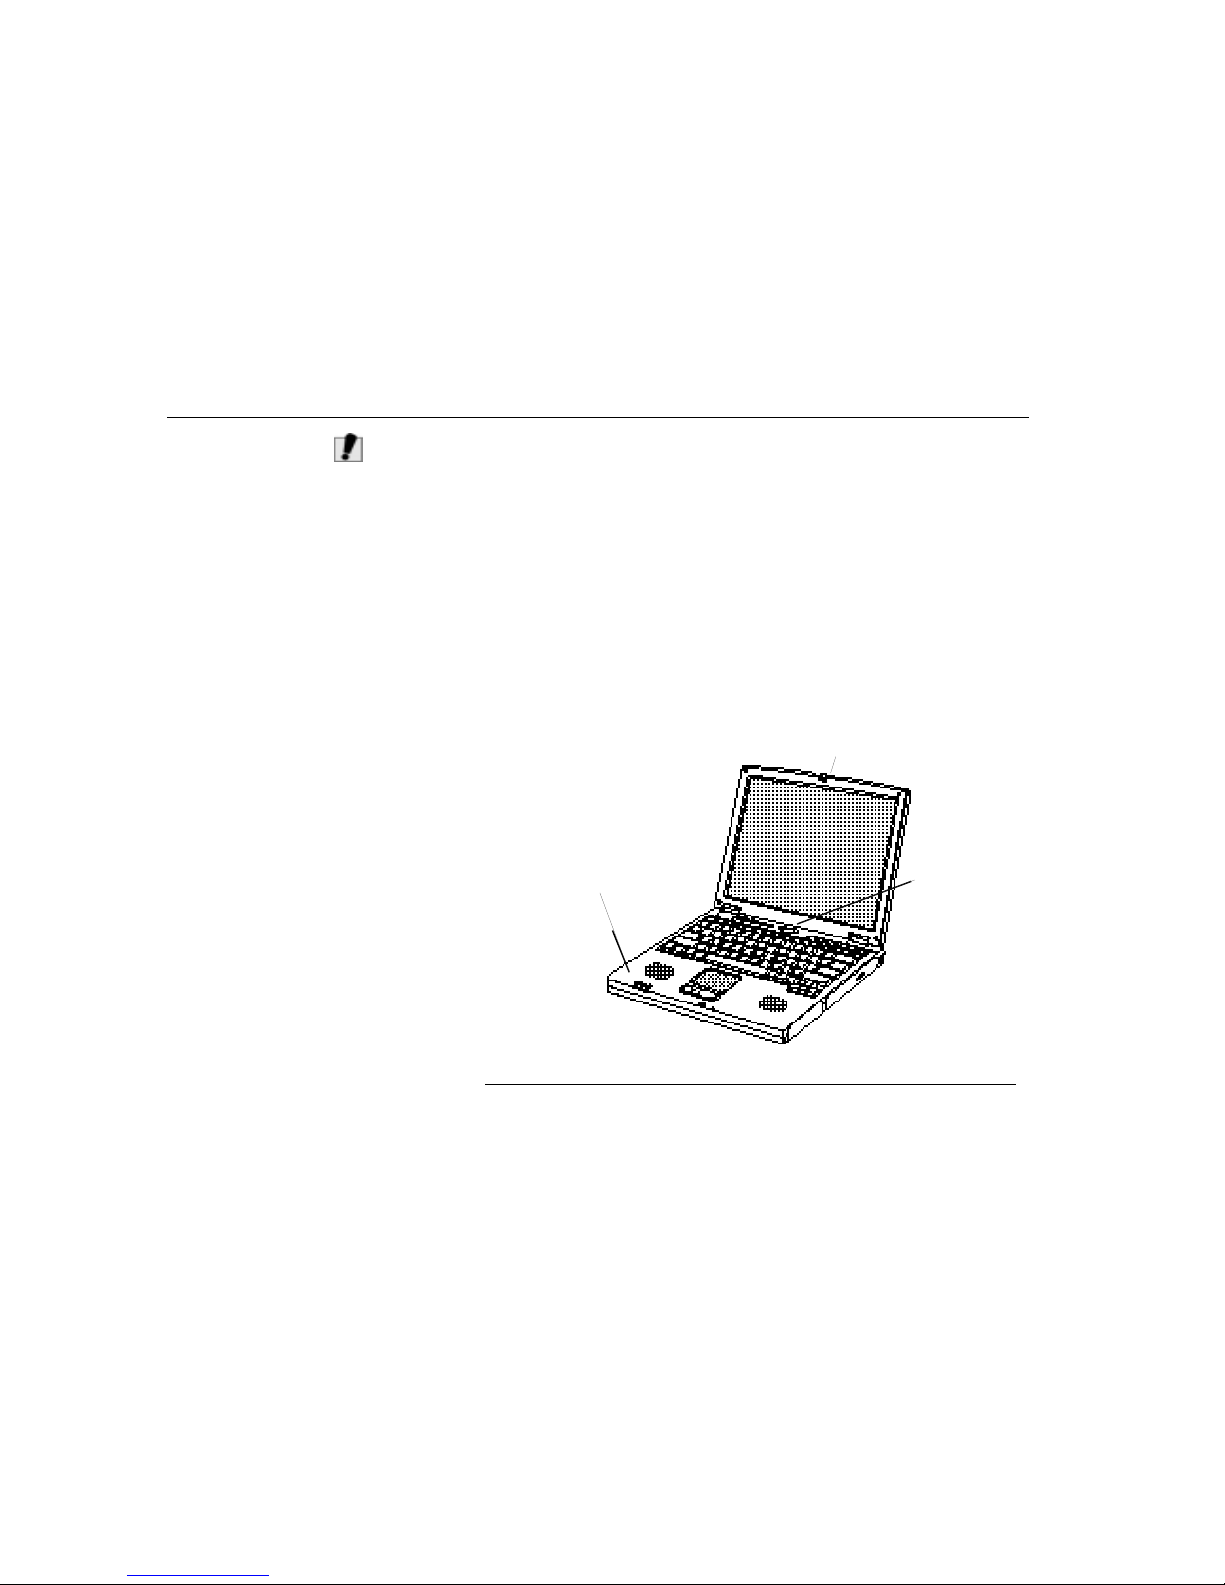
3. Press and then release the power button (Figure 5).
The power light is green when the computer’s power is on.
Figure 5. Turning On the Computer’s Power
Power light
Power button
Cover latch

Understanding POST
Introducing Your TransPort LT
21
C
AUTION
:
Never turn off or reset your TransPort LT while the hard disk or floppy disk
is in use and the FDD and/or HDD status icon is lit; doing so can result in
loss or destruction of your data. Always wait at least five seconds after
turning off your TransPort LT before turning it back on. Turning the power
on and off in rapid succession can damage the TransPort LT’s electrical
circuitry.
Before you run your system for the first time on battery power, recharge the
battery fully to prepare the battery pack for maximum service. When
selecting a suitable working location, please consider the ventilation,
temperature, dust and dirt, plus electromagnetic and RF interference. The
selected location should provide a sturdy and reasonably level surface with
at least four inches of open space around the computer cabinet for proper
airflow. Your computer functions best at room temperature. Choose a
location free from extreme heat or cold.
Except for PC cards, never connect or disconnect any equipment or
components while the system power is on.
It is important not to operate the notebook on soft surfaces--such as a bed-as this will cover the ventilation holes of the notebook.
There is one fan on the left side of the notebook, which will turn on when the
CPU temperature exceeds 60 degrees Celsius. The fan will turn off when the
CPU temperature is below 50 degrees Celsius.
W
ARNING
:
If the temperature continues to rise above the CPU allowable limit--either
due to a defective fan, or the notebook being operated in an excessively hot
environment, or a soft surface that covers the ventilation holes--then the
notebook will shut down and all unsaved data will be lost.
Understanding POST
When you turn on your computer, a procedure called POST (Power-On Self-Test)
automatically runs to test the computer components. Several messages appear
on the screen during POST.
Screen messages are built into the computer to report both normal and abnormal
system conditions. If an error message appears, take any action suggested in the
message. If the message identifies the error condition but does not suggest any
corrective action, write down the message and contact micronpc.com Technical

Adjusting the LCD Display
Introducing Your TransPort LT
22
Support (1.888.FIXMYPC or 1.888.349.6972). (See ”Troubleshooting” on page
139.)
Adjusting the LCD Display
You may wish to adjust the LCD (Liquid-Crystal Display) when you begin using
your computer. A TFT (Thin-Film Transistor) LCD does not require adjustment for
contrast because the contrast is set to remain at maximum.
To adjust the LCD:
•
Press [Fn+Up Arrow] to increase the display brightness.
•
Press [Fn+Down Arrow] to decrease the display brightness.
N
OTE
:
When the AC adapter is removed and the system is using battery power, the
brightness level will decrease.
Turning Off Your Computer
N
OTE
:
If your computer has a Windows (98, NT 4.0, 2000) Operating System, turn off
your computer by performing the shutdown procedure described in this section.
Otherwise, you may lose data.
APM Mode
Advanced Power Management (APM)
To turn off the computer:
1. Click
Start
on the taskbar.
2. Click
Shut Down
.
3. Select the
Shut Down
option.
4. Click OK.
•
If the Operating System is Windows 98 or Windows 2000, the computer
turns off.
•
If the Operating System is Windows NT, you will receive a shutdown
message and you must press the power button to turn off the computer.
Restarting Your Computer
You may need to restart (reboot) your computer when installing hardware or
software or if the computer does not respond to your input. A warm (or soft) boot

Tips for Using Your Computer
Introducing Your TransPort LT
23
prompts you to save your files, turns off the computer, and then restarts the
computer. A cold boot turns off the computer without saving your files.
To perform a warm (or soft) boot:
1. Click
Start
on the taskbar.
2. Click
Shut Down
.
3. Select the
Restart
option.
4. Click OK or
Yes
.
5. Save your files if prompted. Your computer will reboot.
N
OTE
:
Do not perform a cold boot unless your keyboard and touchpad have no effect
and you cannot perform a warm boot. When you perform a cold boot, you will lose
data unless it was saved to a storage medium.
You can also perform a soft boot by saving your files and pressing [Ctrl+Alt+Del].
You can perform a cold (or hard) boot by pressing the power button to turn the
computer off, waiting ten seconds, and then pressing the power button to turn the
computer on.
Tips for Using Your
Computer
The following information will help you avoid potential problems as you use your
Transport LT:
C
AUTION
:
Do not try to disassemble your computer. Opening the system chassis
voids your warranty. Only an authorized manufacturer service center can
replace or add any parts inside the chassis. For more information, contact
micronpc.com Technical Support at 1-888-FIX-MYPC (1-888-349-6972).
•
Follow all the instructions and cautions in your computer user
documentation.
•
The LCD has a polarized surface and can be damaged easily. To prevent
damage, avoid touching the screen.
•
Use only micronpc.com approved AC adapters, auto adapters, memory
modules and other options.
•
Because a notebook computer is small and has restricted air flow around
components, it is more likely to overheat than a desktop computer. A fan
inside your computer runs when needed to help eliminate some heat. Make

Traveling with Your Computer
Introducing Your TransPort LT
24
sure the fan vent on the right side of your computer is not blocked when
you use the computer. (See Figure 1 on page 17 and Figure 2 on page 18
for the location of the vent.) Occasionally check the vents and remove any
accumulated dust on the outside.
•
Avoid using or storing the computer in extremely hot or cold areas, such as
a car on a hot day. Keep the computer away from heaters and out of direct
sunlight. Exposure to excessive heat may damage computer components.
•
If you have left your computer in a hot place, let it cool down slowly to room
temperature (with the LCD panel open) before using it.
•
Do not remove the memory-module compartment door, or try to install a
memory module when the computer is on. (See ”Installing a Memory
Module” on page 65 for the location of the door.) (For information on
installing memory modules, see “Installing a Memory Module” on page 65.)
•
Set up your computer work area to avoid physical strain. Sit with your back
straight and supported by your chair. Adjust your chair or work table so that
your arms and wrists can remain in a relaxed position, parallel with the
floor. Avoid bending or twisting your wrists as you work. Your hands should
“float” slightly above the keyboard. Refer to a book on office ergonomics for
more information on setting up your work area.
•
Take frequent breaks from working at the computer to rest your eyes and
stretch your muscles.
•
Remember to save your data files frequently and to make backup copies of
your files.
Traveling with Your
Computer
If you are traveling by airplane, follow these tips:
•
Take the computer with you as carry-on luggage. Do not check the
computer with your baggage.
•
Allow the computer and disks to go through the X-ray security devices. Do
not hand-carry disks through the walk-through metal detectors, this can
cause data loss.
•
Make sure that the battery is charged or the power cord is easily
accessible. You may be required to turn on the computer for airport security
personnel.
•
Be prepared to turn off the computer during take off and landing.
•
Contact your airline for information about using an optional airline adapter
to power your computer while traveling by airplane.

Handling Spills
Introducing Your TransPort LT
25
Handling Spills
Do not spill anything on your computer. The best way to avoid spills is to avoid
eating and drinking around your computer. If you do spill something on your
computer, turn off your computer, unplug it immediately, and do the following:
•
If you spill liquid on the keyboard, drain as much of the liquid from the
keyboard as possible. Be careful not to let the liquid drip onto the LCD
panel. Allow the system to dry for several days before trying to use it.
•
If you spill liquid on an external keyboard or keypad, unplug it and drain as
much of the liquid as possible. Allow the keyboard to sit at room
temperature for a full day before trying to use it.
N
OTE
:
Sweet liquids leave a sticky residue that may jam the keyboard despite your
efforts to dry it.
•
If you spill liquid on the LCD panel, clean it immediately with a soft cloth
and denatured alcohol. Do not use water, acetone, aromatic solvent, or dry,
rough towels to clean it.
N
OTE
:
Some liquids damage the polarized LCD screen. If your screen is damaged,
contact your authorized manufacturer’s service center for a replacement.
Storing the Computer for
Long Periods
If possible, leave the power cord connected to the computer and an electrical
outlet when the computer is not in use. This extends the life of the battery and
keeps the battery fully charged.
If you will not be using the computer for a long period of time (a month or more),
you should charge the battery until it is completely full. After you have done so,
remove the battery from the unit.
Using the Keyboard
Your computer has an 87 key keyboard (Figure 6). By pressing designated key
combinations, you can have access to all the key functions of a full-sized
keyboard.

Using the Keyboard
Introducing Your TransPort LT
26
Figure 6. Keyboard
N
OTE
:
Although the layout of the keys on your computer’s keyboard is different from that
of a desktop computer’s keyboard, the keyboard feels like a full-sized keyboard
when you use it. The distance between the keys (the pitch) is the same as on a
full-size keyboard (19 mm).
The keys on the keyboard can be grouped into the following categories:
•
Full-sized Alphanumeric typewriter keys are arranged like a standard
typewriter keyboard and are used for text entry. The Windows keys on the
left side of the spacebar open the Windows
Start
menu and perform other
special functions. The Internet key on the right side of the space bar is
used to start your Internet browser.
•
Function keys, when pressed together with the [Fn] key, enable special
functions.
•
Cursor and Screen control keys move the cursor. They may perform other
functions, depending on your software.
Function and Special Purpose Hotkeys
Embedded Numeric Keypad
Function Key
Alphanumeric
Keys
Cursor and Screen
Control Keys
Internet Key

Using the Keyboard
Introducing Your TransPort LT
27
Using the Embedded Numeric
Keypad
Your keyboard includes a numeric keypad, which is a group of keys that you can
set to type numbers and mathematical symbols, such as the plus sign (Figure 7).
A number or symbol on the right corner of each keypad key shows its numeric
function.
Figure 7. Numeric Keypad
Press [Num Lock] to turn on the embedded numeric keypad. The numeric
functions of the keypad are enabled and the Num Lock light turns on. (See
”System Status Lights” on page 29 for the location of the Num Lock light.)
While the numeric functions are enabled, you can temporarily return a key to its
normal function by pressing [NumLock].
To turn the numeric keypad off, press [Num Lock] again. The Num Lock light turns
off.
Using Special Function Keys
The [Fn] key activates special functions when it is pressed in combination with
another key. Table 1 shows the special key combinations.
TABLE 1. Description of Special Function Keys
[Fn] Key
Combination
Function
[Fn+F2]
Status:
Displays the battery gauge in the upper-right corner of
your screen. The gauge closes in a few seconds, or you can
press [Esc] to close the gauge. (See ”Using the Battery Gauge”
on page 44 for more information on the battery gauge.).
[Fn+F3]
LCD/CRT:
Switches the display between the LCD, the external
monitor, and simultaneous display on both the LCD and the
external monitor.
Using the Touchpad
Introducing Your TransPort LT
28
N
OTE
:
When you press a function key combination, the system sound may be
temporarily muted or repeat.
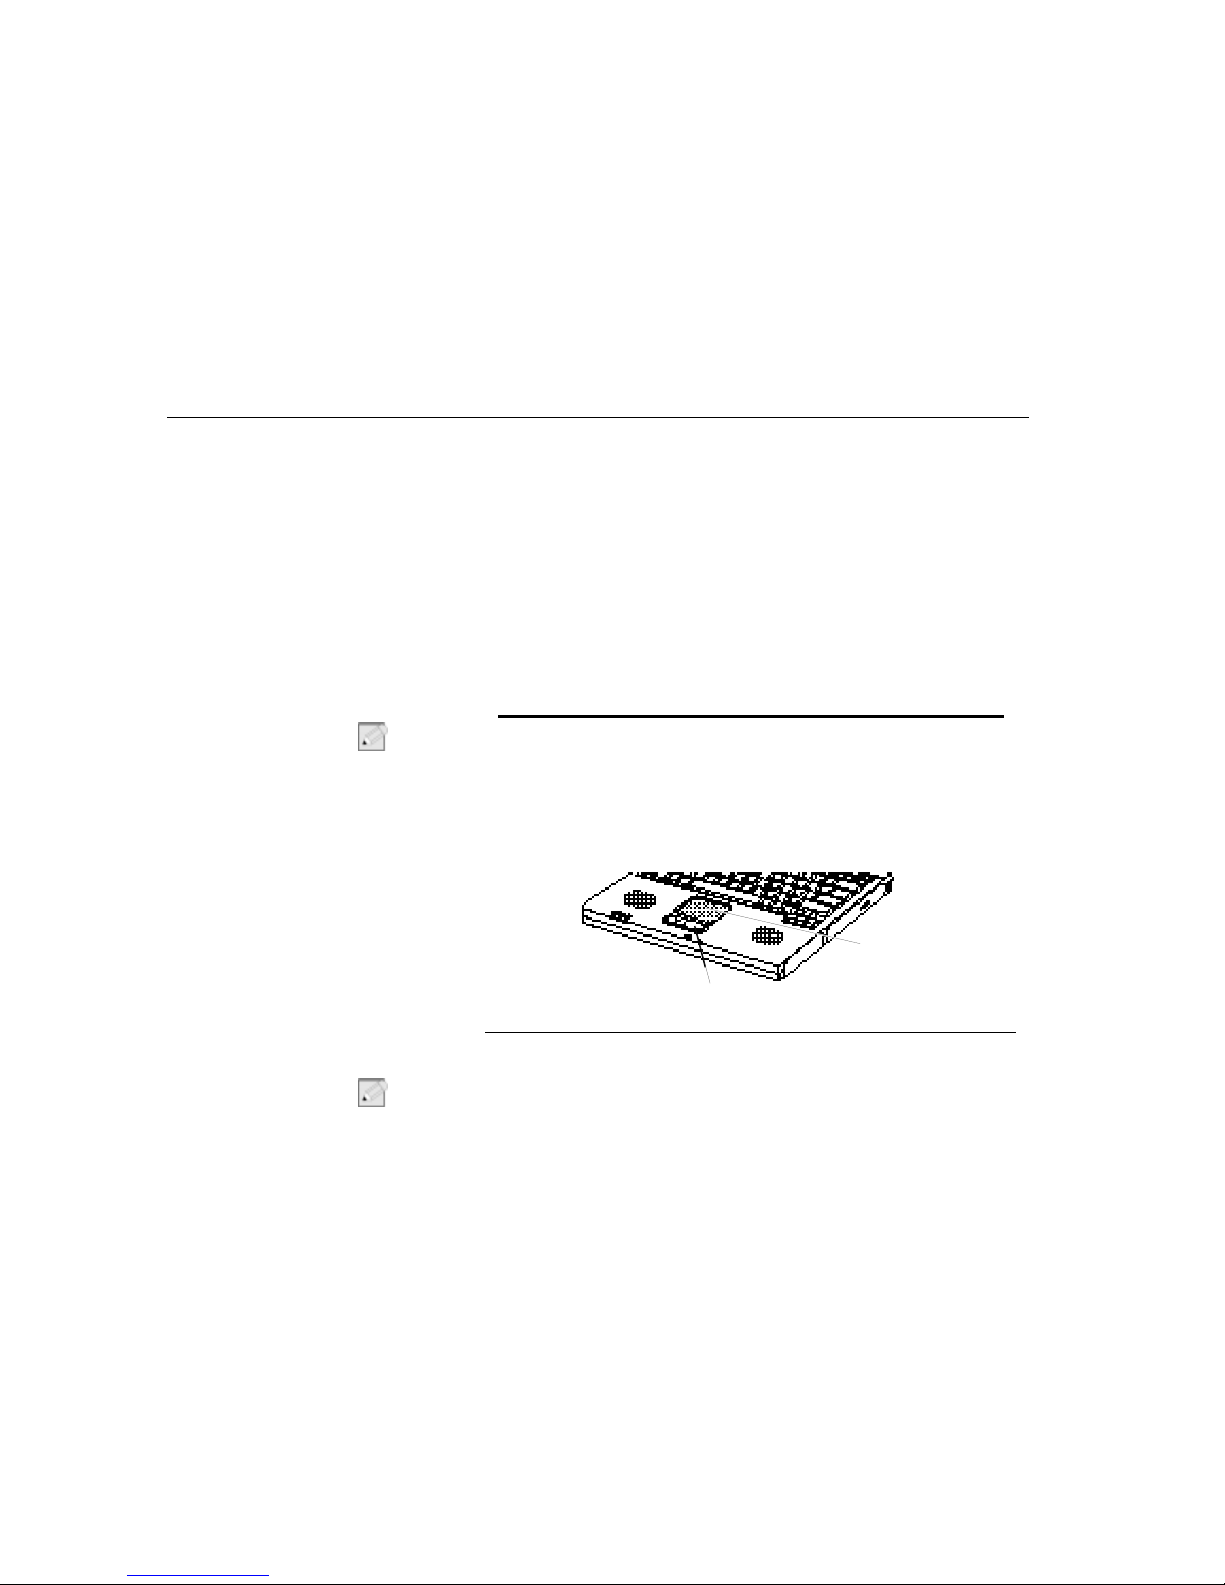
Using the Touchpad
Your computer is equipped with a touchpad, which is an integrated-pointing
device that is used to perform standard mouse functions (Figure 8). The touchpad
is an advanced and reliable pointing device that works with the touch of your
finger.
Figure 8. Using the Touchpad
Table 2 explains how to use the touchpad.
N
OTE
:
Press on the touchpad gently. The touchpad responds to light pressure.
[Fn+F4]
Standby:
Puts the computer into standby mode. To resume
normal operation from standby, press the power button.
[Fn+F5]
KeyLock:
Locks the keyboard and activates password protection.
Type your password and press [Enter] to unlock the keyboard.
The [Fn+F5] key combination has no effect unless a password is
enabled and Password on boot is enabled in System Setup. The
Num Lock, Caps Lock, and Scroll Lock lights blink when the
keyboard is locked.
[[Fn+F10]
Scroll Lock:
In some applications, sets the cursor-control keys to
scroll the page up or down while the cursor position does not
change. Pressing [Fn+F10] again turns off the scrolling function.
[Fn+up
Arrow]
Brightness up:
Increases the LCD brightness.
[Fn+down
Arrow]
Brightness down:
Decreases the LCD brightness.
Mouse buttons
Touchpad
Reading the System Status Lights
Introducing Your TransPort LT
29
TABLE 2. Using the Touchpad
You can use the buttons below the touchpad in the same way you would use
standard mouse buttons. For more information on these features and other
features supported by your mouse driver such as button assignment, see the
Mouse
properties in the
Control Panel
.
For information on attaching and using another pointing device or keyboard with
your Transport LT, see “Connecting Peripheral Devices” on page 31.
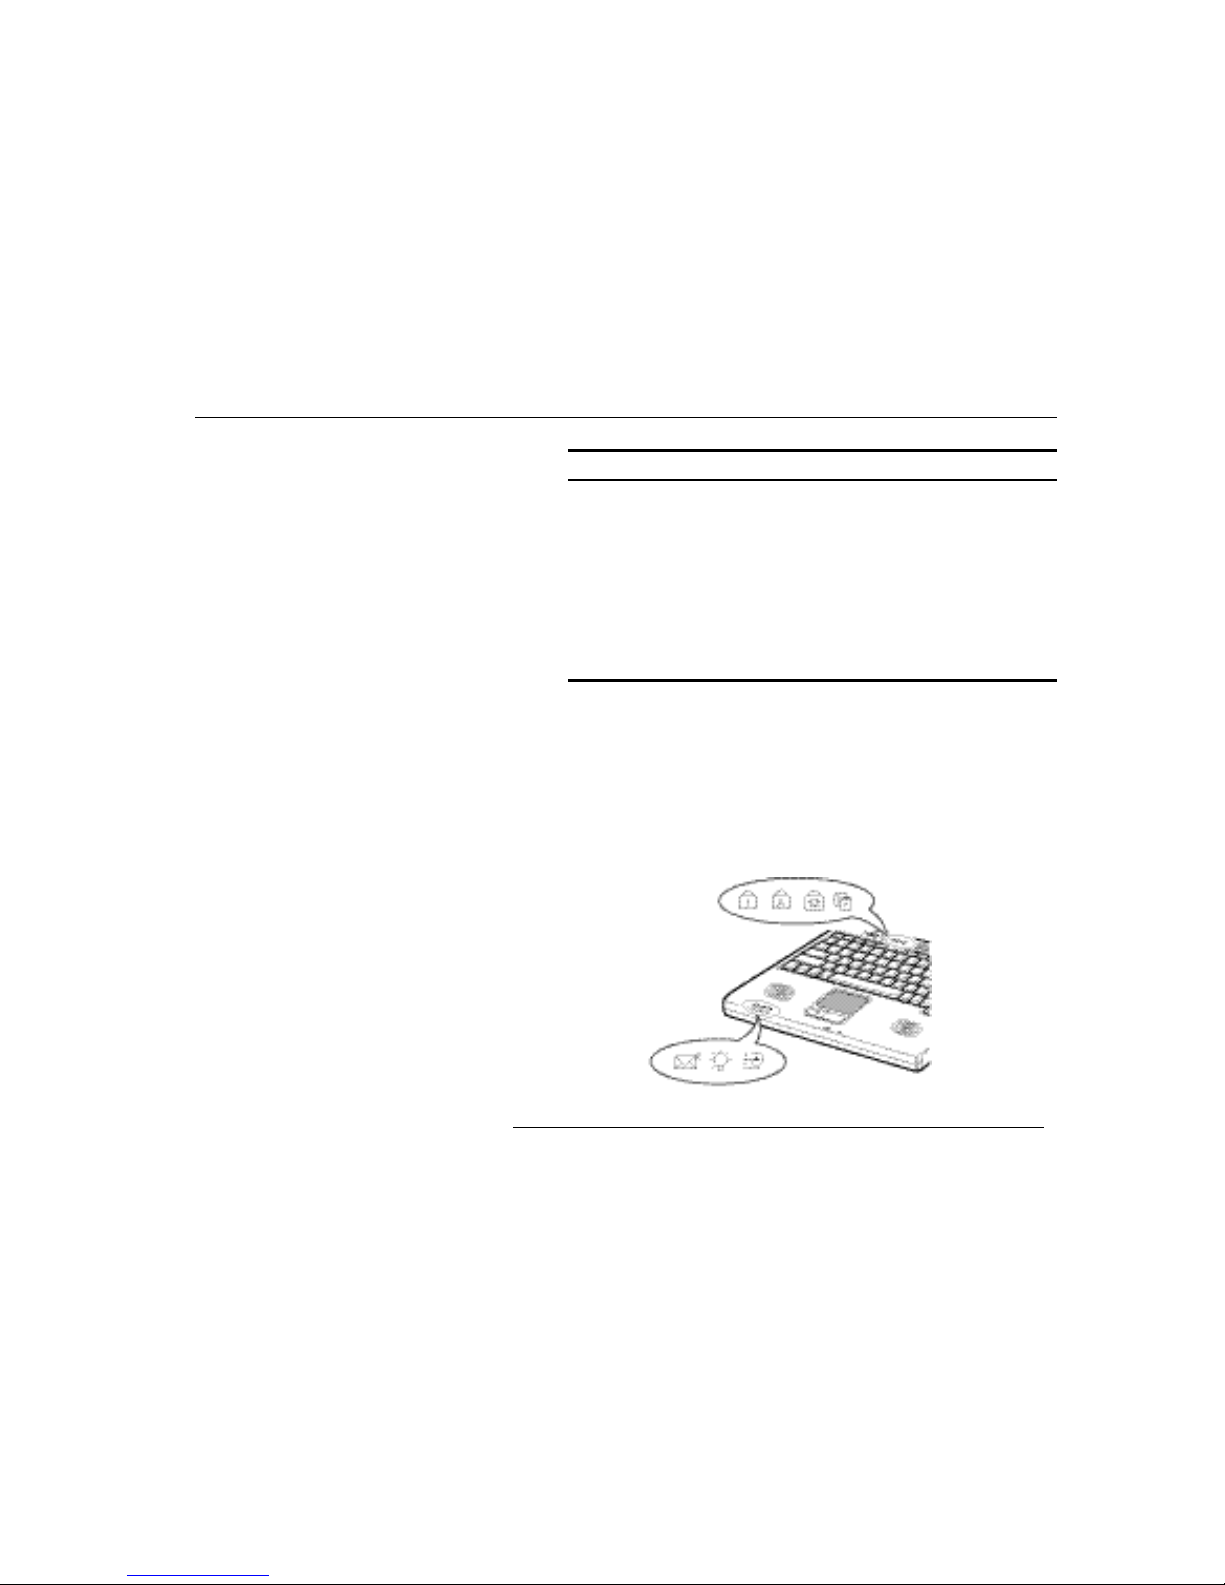
Reading the System Status
Lights
System Status lights show the status of computer functions. The lights appear on
the left edge of the computer and left side of the power button (Figure 9).
Figure 9. System Status Lights
Mouse Action How To
Move cursor Place your finger on the touchpad and slide your finger
in the direction you want the cursor to move. The faster
you move your finger, the faster the cursor moves
across the screen.
Click Tap the touchpad once with your finger.
Double-click Tap the touchpad twice with one finger.
Scroll up/down Place you finger on the right hand side of the touchpad
and slide it up or down to scroll the current window.
Scroll left/right Place you finger on the bottom of the touchpad and
slide it left or right to scroll the current window.
Reading the System Status Lights
Introducing Your TransPort LT
30
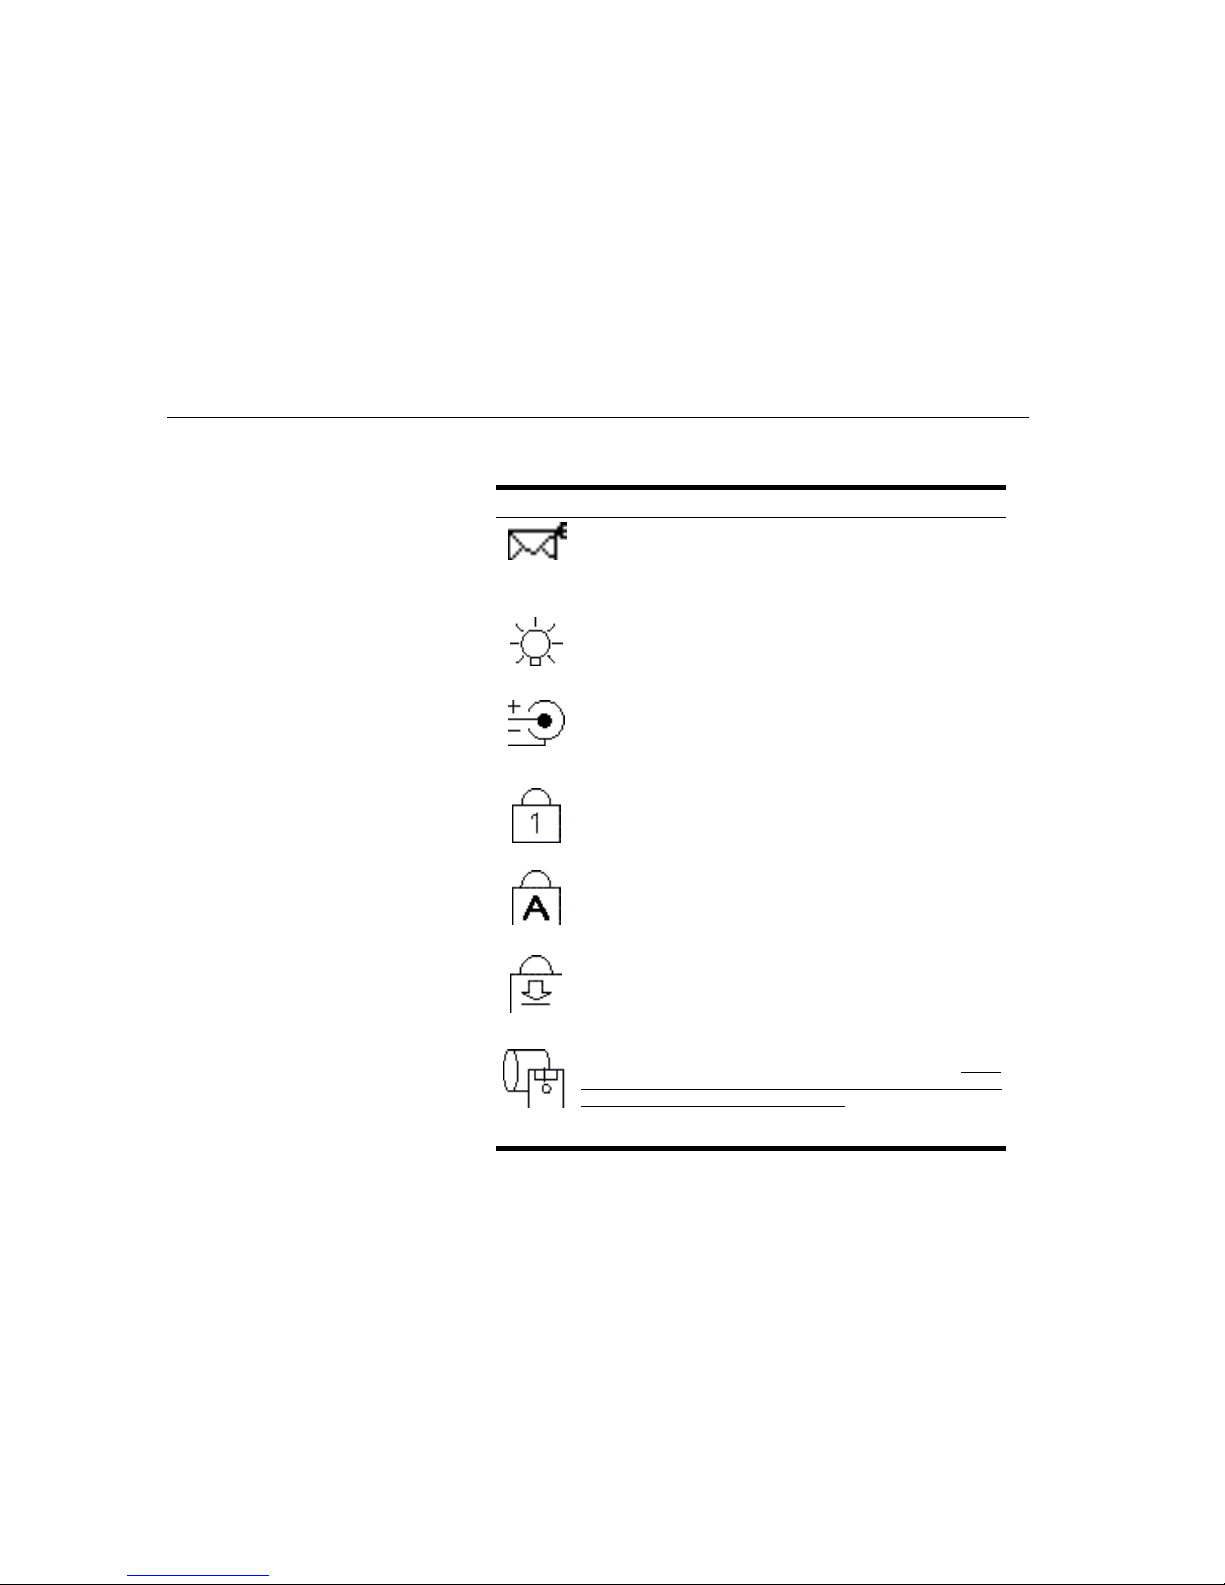
Table 3 describes the meaning of the lights.
TABLE 3. System Status Lights
Icon Function of Light
E-mail
: Light is on when e-mail arrives.
To enable this function, you need to register your E-mail Account in
the
Register E-mail Account
window. Select
Start >Program
>
StartUp
>
Internet Launcher
to register an E-mail account. This is
currently only available in WIndows 98.
Power light:
Light is green when the computer is on.
Battery charge light:
When the power cord is connected, the light
indicates the battery’s charge status. The light is amber when the
battery is charging normally. The light is green when the battery is
fully charged. (See ”Charging the Battery” on page 41 for more
information about charging the battery.)
Num Lock light:
The light is on when the embedded numeric keypad
is activated. See ”Using the Embedded Numeric Keypad” on page
27 for a description of the keypad.
Caps Lock light:
The light is on when the caps lock function is
activated. When the function is activated, all alphabetic characters
you type will be in upper case.
Scroll Lock light:
The light is on when the scroll lock function is
activated. The scroll lock function affects cursor movement and text
scrolling in some applications. This is a software specific function.
Refer to the appropriate software manuals for a description of the
[Scroll Lock] key.
Drive light:
The light is on when the hard dri ve or flopp y drive is being
accessed. Do not turn your computer off when this light is on. When
the light is amber, the flop py d r iv e is being accessed. When the light
is green, the hard drive is being accessed. For a CD-ROM or DVDROM drive, check the light on the drive itself to see if the drive is
being accessed.
 Loading...