

Page 1

P420m/P320h HHHL PCIe SSD Installation Guide
Introduction
Installation Guide
P420m and P320h Half-Height, Half-Length PCIe NAND Flash SSDs
Introduction
This document describes how to install a Micron® P420m or P320h half-height, half-length (HHHL) PCI Express
(PCIe) NAND Flash solid state drive (SSD).
Sections include:
• P420m overview
• P320h overview
• System recommendations
• Components provided by Micron
• Installing the drive
• Installing the software
• Verifying the installation
• Using the P420m or P320h as a boot drive
• Troubleshooting
• LED codes
®
PDF: 09005aef8497e00a
P420m_P320h_HHHL_installation_guide.pdf - Rev. V 12/14 EN
Products and specifications discussed herein are for evaluation and reference purposes only and are subject to change by
Micron without notice. Products are only warranted by Micron to meet Micron's production data sheet specifications. All
information discussed herein is provided on an "as is" basis, without warranties of any kind.
1
Micron Technology, Inc. reserves the right to change products or specifications without notice.
© 2012 Micron Technology, Inc. All rights reserved.
Page 2

P420m/P320h HHHL PCIe SSD Installation Guide
Introduction
Contents
P420m Overview .............................................................................................................................................. 4
P320h Overview ............................................................................................................................................... 5
System Recommendations ................................................................................................................................ 7
Hardware ..................................................................................................................................................... 7
Software ....................................................................................................................................................... 7
Components Provided by Micron ...................................................................................................................... 8
Hardware ..................................................................................................................................................... 8
Software ....................................................................................................................................................... 8
Installing the Drive ........................................................................................................................................... 9
Installing the Support Pack Software ............................................................................................................... 12
Installing the Driver on a Windows System .................................................................................................. 12
Installing the Driver on a Linux System ........................................................................................................ 13
RHEL and SLES ...................................................................................................................................... 13
Citrix XenServer ..................................................................................................................................... 14
Ubuntu .................................................................................................................................................. 14
Installing the Driver on a VMware System .................................................................................................... 16
VMware ESX 5.0/5.1 ............................................................................................................................... 16
VMware Inbox Driver in ESX 5.5 .............................................................................................................. 16
Uninstalling the Driver ........................................................................................................................... 16
Installing RealSSD Manager ........................................................................................................................ 17
Linux Systems ........................................................................................................................................ 17
Windows Systems ................................................................................................................................... 18
VMware Systems .................................................................................................................................... 18
Removing RSSDM .................................................................................................................................. 19
Updating the Firmware Unified Binary Image .............................................................................................. 20
Verifying the Installation ................................................................................................................................. 21
Using the P420m or P320h as a Boot Drive ....................................................................................................... 22
Windows Server 2012/2012 R2 and Windows 8/8.1 ....................................................................................... 22
Windows Server 2008 and Windows 7 .......................................................................................................... 23
SUSE 11.x x64 ............................................................................................................................................. 25
RHEL 7.x x64 .............................................................................................................................................. 26
RHEL 6.x x64 .............................................................................................................................................. 27
RHEL 5.x x64 .............................................................................................................................................. 29
Ubuntu 12.04–12.04.3 LTS ........................................................................................................................... 30
Citrix XenServer ......................................................................................................................................... 32
Troubleshooting ............................................................................................................................................. 33
Windows Driver .......................................................................................................................................... 33
Linux Driver ............................................................................................................................................... 35
VMware Driver ........................................................................................................................................... 39
RealSSD Manager ....................................................................................................................................... 44
Configuration Issues ................................................................................................................................... 46
Performance Issues .................................................................................................................................... 46
Drive Behavior Issues ................................................................................................................................. 47
LED Codes ..................................................................................................................................................... 50
References ..................................................................................................................................................... 51
Revision History ............................................................................................................................................. 52
Rev. V, 12/14 ............................................................................................................................................... 52
Rev. U, 8/14 ................................................................................................................................................ 52
Rev. T, 7/14 ................................................................................................................................................. 52
Rev. S, 6/14 ................................................................................................................................................. 52
PDF: 09005aef8497e00a
P420m_P320h_HHHL_installation_guide.pdf - Rev. V 12/14 EN
2
Micron Technology, Inc. reserves the right to change products or specifications without notice.
© 2012 Micron Technology, Inc. All rights reserved.
Page 3

P420m/P320h HHHL PCIe SSD Installation Guide
Introduction
Rev. R, 4/14 ................................................................................................................................................ 52
Rev. Q, 3/14 ................................................................................................................................................ 52
Rev. P, 2/14 ................................................................................................................................................. 52
Rev. O, 10/13 .............................................................................................................................................. 52
Rev. N, 04/13 .............................................................................................................................................. 52
Rev. M, 03/13 .............................................................................................................................................. 53
Rev. L, 01/13 ............................................................................................................................................... 53
Rev. K, 11/12 ............................................................................................................................................... 53
Rev. J, 10/12 ................................................................................................................................................ 53
Rev. I, 05/12 ................................................................................................................................................ 53
Rev. H, 04/12 .............................................................................................................................................. 53
Rev. G, 04/12 .............................................................................................................................................. 53
Rev. F, 03/12 ............................................................................................................................................... 54
Rev. E, 02/12 ............................................................................................................................................... 54
Rev. D, 12/11 .............................................................................................................................................. 54
Rev. C, 12/11 .............................................................................................................................................. 54
Rev. B, 12/11 ............................................................................................................................................... 55
Rev. A, 12/11 ............................................................................................................................................... 55
PDF: 09005aef8497e00a
P420m_P320h_HHHL_installation_guide.pdf - Rev. V 12/14 EN
3
Micron Technology, Inc. reserves the right to change products or specifications without notice.
© 2012 Micron Technology, Inc. All rights reserved.
Page 4
P420m/P320h HHHL PCIe SSD Installation Guide
P420m Overview
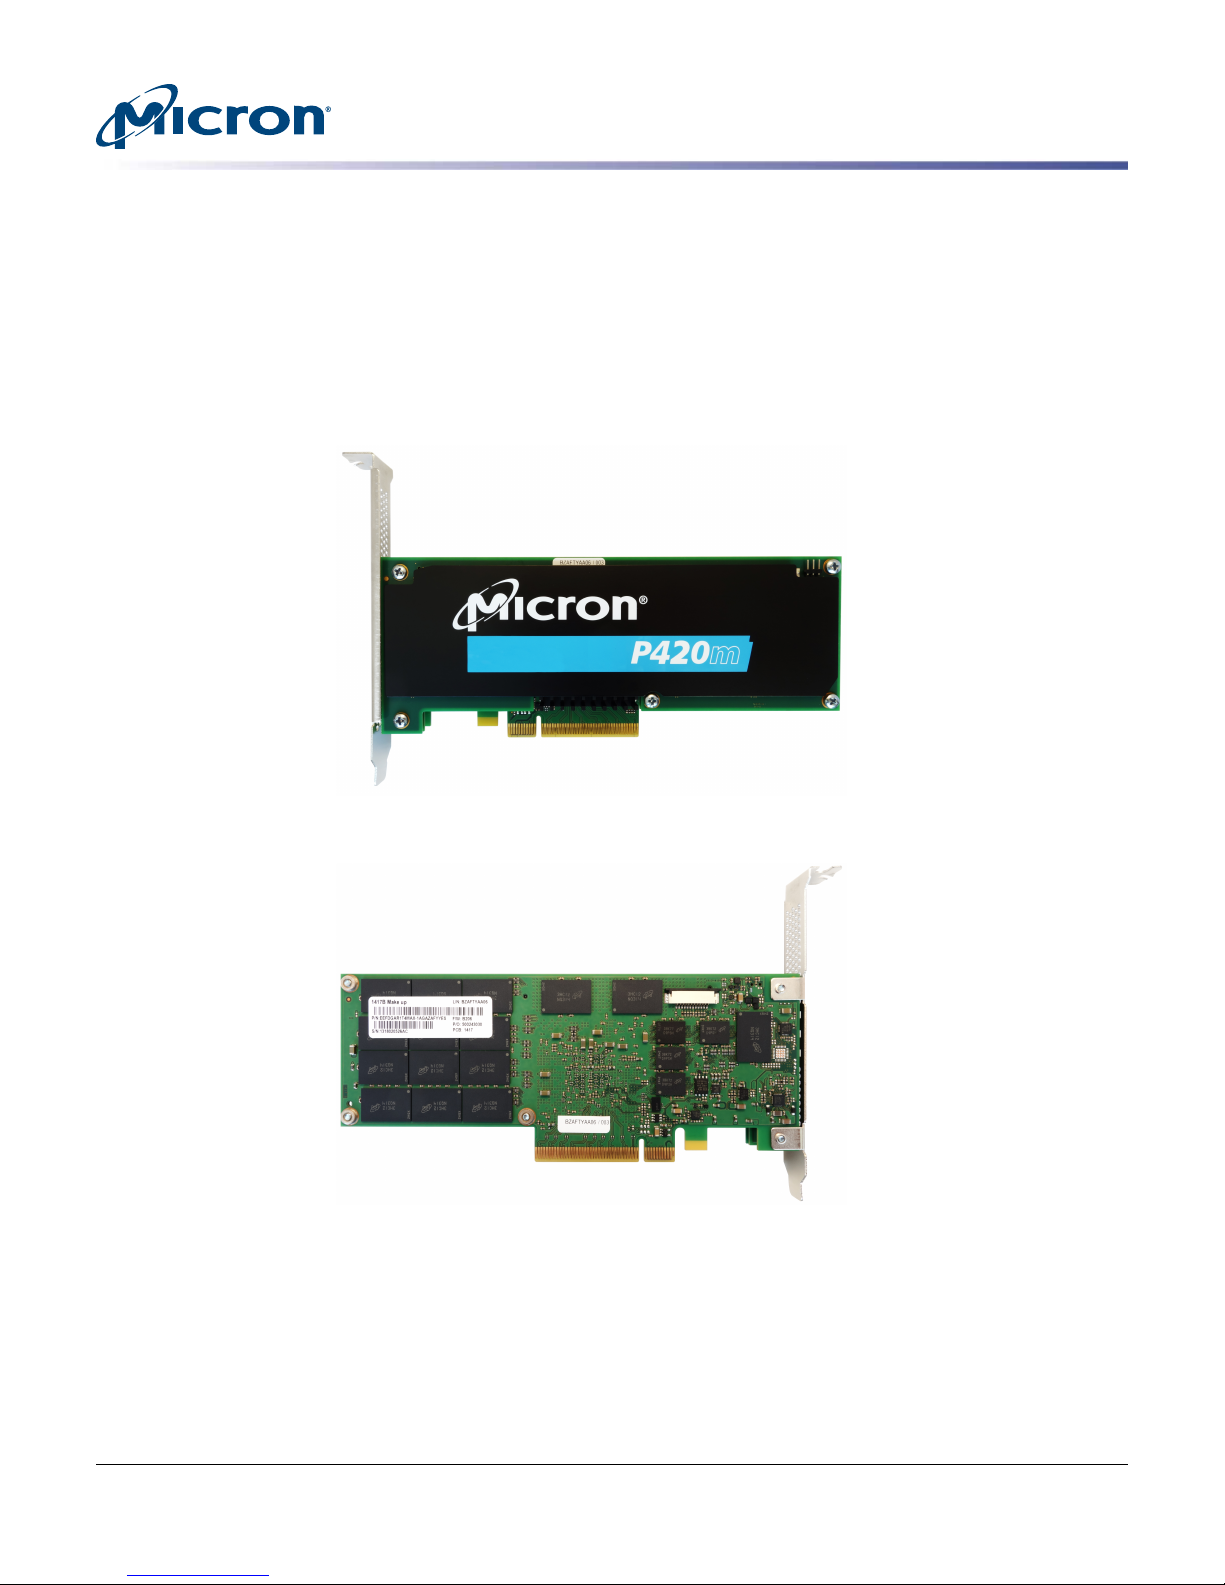
The P420m SSD conforms to the PCIe Card Electromechanical (CEM) specification version 2.0, section 6.1 (low profile add-in card size). This is also called the half-height,
half-length (HHHL) form factor.
The P420m HHHL drive is available in two capacities: 700GB and 1.4TB. Both options
have the same HHHL form factor and support a x8 link width PCIe Gen2-compatible
motherboard slot.
Figure 1: P420m HHHL Top View (Component Side)
P420m Overview
Figure 2: P420m HHHL Bottom View (Solder Side)
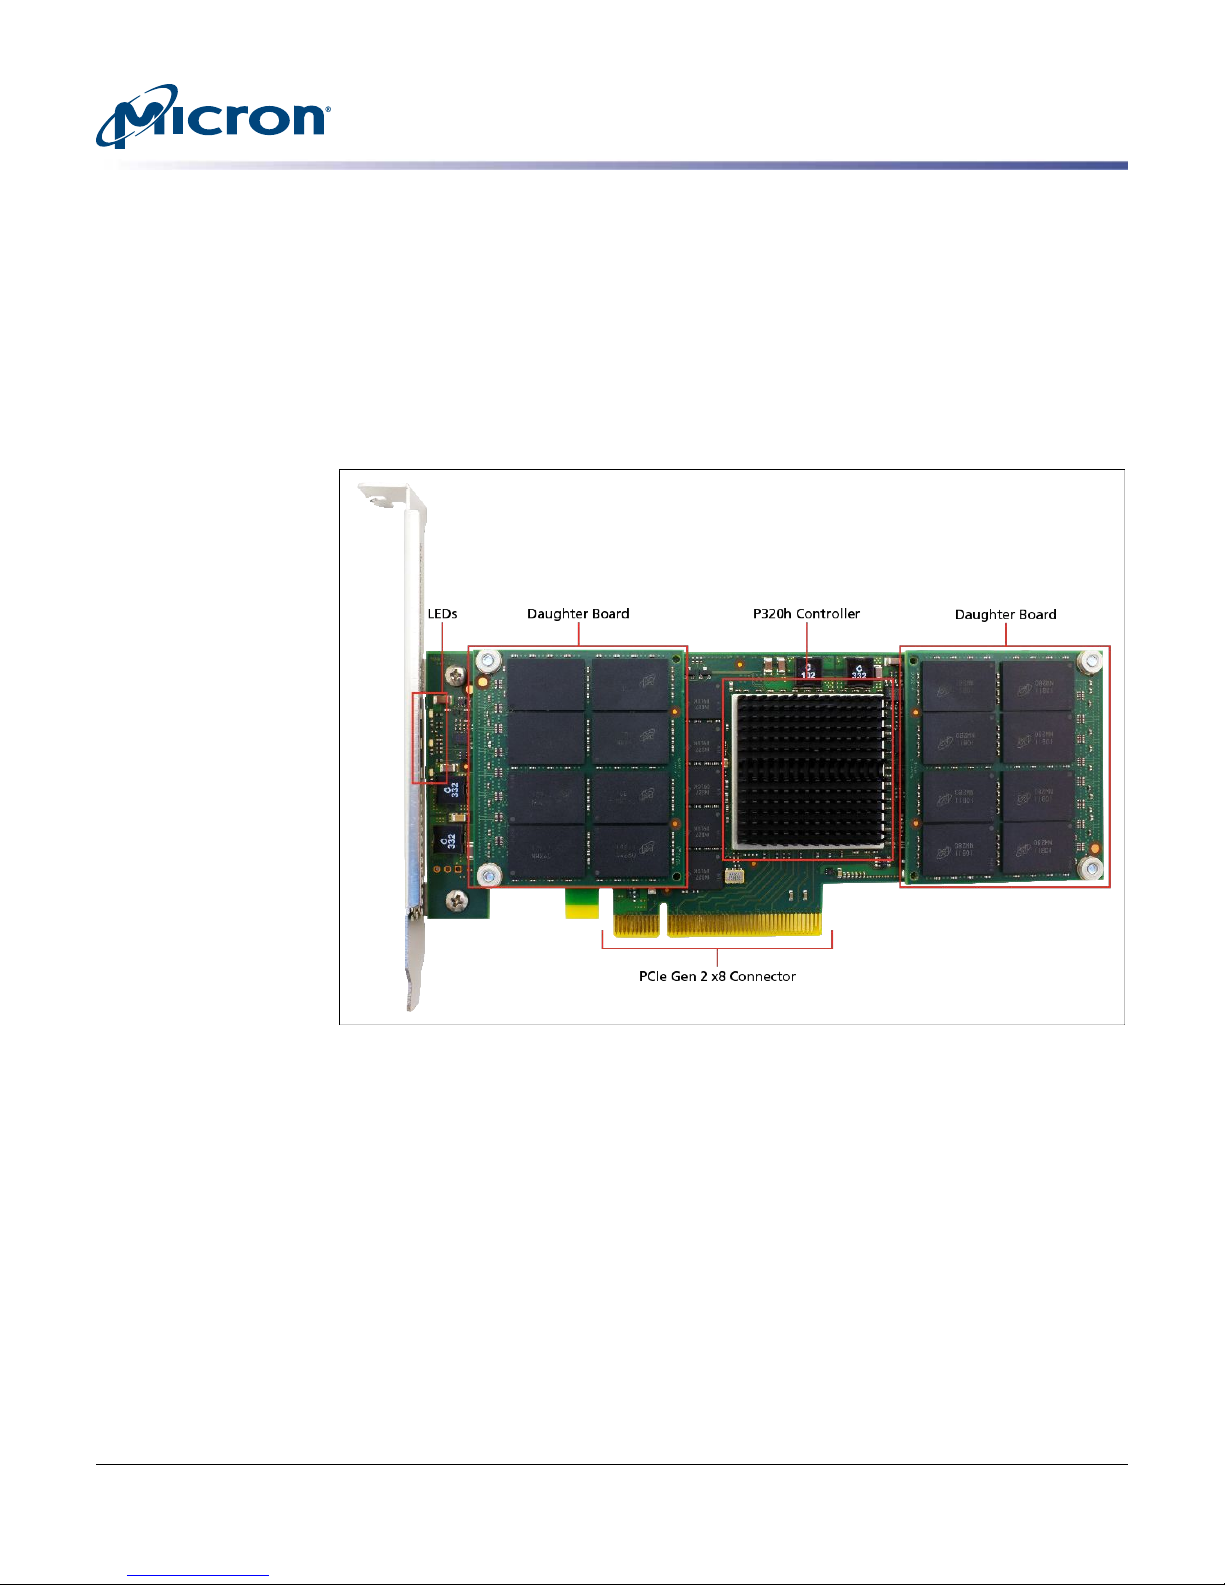
A total of 64 NAND placements are on the drive. The 700GB drive has four NAND die
per package and the 1.4TB drive has eight NAND die per package. NAND are placed on
both the component and solder sides of the drive along with the component and solder
sides of two daughter boards, as shown in Figure 1 and Figure 2.
Figure 1 shows the drive’s LEDs. The state of these LEDs, such as color and blinking pattern, convey information about the drive’s status and behavior. See Table 2 (page 50)
for LED descriptions.
PDF: 09005aef8497e00a
P420m_P320h_HHHL_installation_guide.pdf - Rev. V 12/14 EN
4
Micron Technology, Inc. reserves the right to change products or specifications without notice.
© 2012 Micron Technology, Inc. All rights reserved.
Page 5
P420m/P320h HHHL PCIe SSD Installation Guide
P320h Overview
The P320h SSD conforms to the PCIe Card Electromechanical (CEM) specification version 2.0, section 6.1 (low profile add-in card size). This is also called the half-height,
half-length (HHHL) form factor.
The P320h HHHL drive is available in two capacities: 350GB and 700GB. Both options
have the same HHHL form factor and support a x8 link width and PCIe Gen2-compatible motherboard slot.
Figure 3: P320h HHHL Top View (Component Side)
P320h Overview
PDF: 09005aef8497e00a
P420m_P320h_HHHL_installation_guide.pdf - Rev. V 12/14 EN
5
Micron Technology, Inc. reserves the right to change products or specifications without notice.
© 2012 Micron Technology, Inc. All rights reserved.
Page 6
P420m/P320h HHHL PCIe SSD Installation Guide
Figure 4: P320h HHHL Bottom View (Solder Side)
P320h Overview
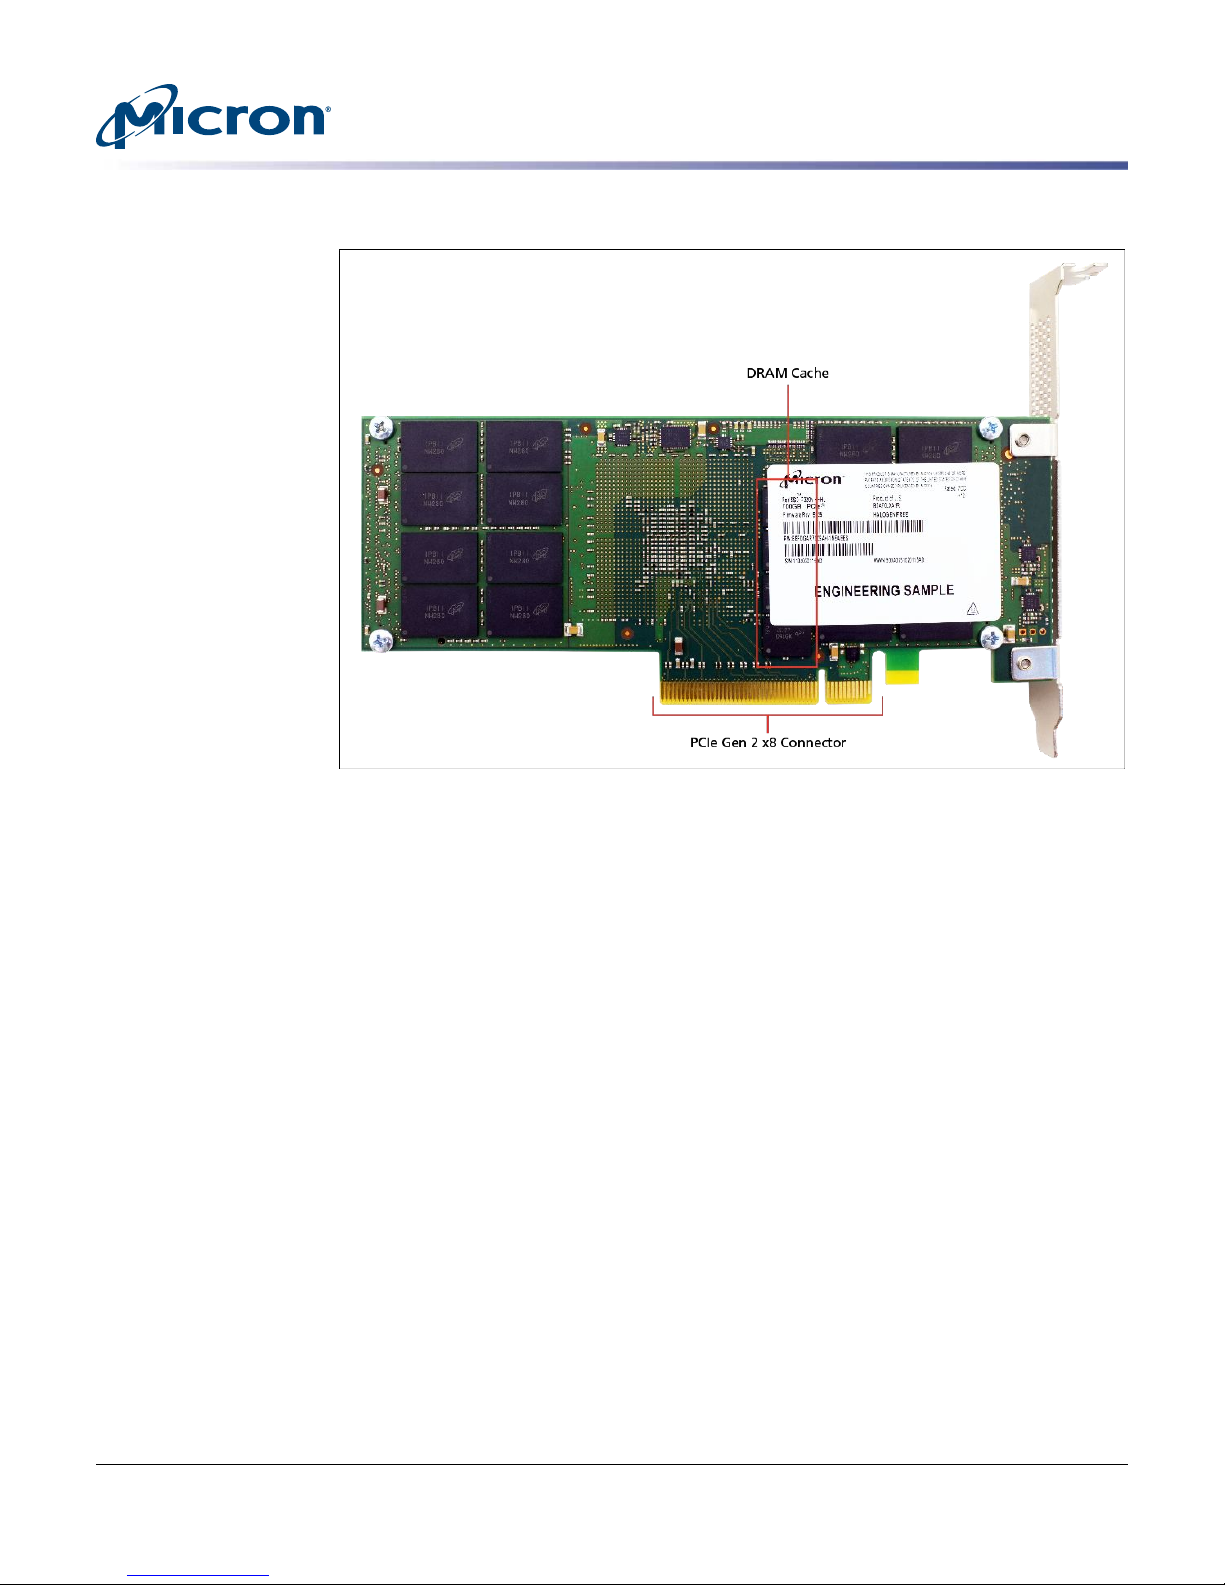
A total of 64 NAND placements are on the drive. The 350GB drive has four NAND die
per package and the 700GB drive has eight NAND die per package. NAND are placed on
both the component and solder sides of the drive along with the component and solder
sides of two daughter boards, as shown in Figure 3 and Figure 4.
Figure 3 shows the drive’s LEDs. The state of these LEDs, such as color and blinking pattern, convey information about the drive’s status and behavior. See Table 2 (page 50).
PDF: 09005aef8497e00a
P420m_P320h_HHHL_installation_guide.pdf - Rev. V 12/14 EN
6
Micron Technology, Inc. reserves the right to change products or specifications without notice.
© 2012 Micron Technology, Inc. All rights reserved.
Page 7
System Recommendations
To help achieve optimal drive performance, review the system recommendations and
requirements listed in this section.
Hardware
Table 1: Hardware Recommendations and Requirements
Category Recommendation
System • Enterprise server class system with Intel® Tylersburg,
Processor • 64-bit processor (required)
Memory 6GB DRAM (minimum)
Chipset Intel 5520 or later generation chipset
Slots PCIe Gen2 x8 link width slot (required)
Power 25W-compatible PCIe slot
P420m/P320h HHHL PCIe SSD Installation Guide
System Recommendations
Sandy Bridge, or later class chipset motherboard
• “Performance” optimized legacy or UEFI BIOS
Single, dual, or higher number of processors can be used
• Intel® Xeon™ (Nehalem-EP) or better processor with four or
more cores/processors
• 12MB local cache
• Processor with clock speed greater than 3GHz
Note: A PCIe Gen1 slot can be used, but drive performance
will be impacted
Note: No external power connection is required for drive
Software
The P420m and P320h drives support the following operating systems and software:
• Microsoft Windows® Server 2012 R2 (x86-64), Hyper-V (x86-64)
• Windows Server 2012 (x86-64), Hyper-V (x86-64)
• Windows Server 2008 R2 SP1 (x86-64), Hyper-V (x86-64)
• Windows 8, 8.1 (x86-64 and x86)
• Windows 7 (x86-64 and x86)
• Red Hat® Enterprise Linux (RHEL) 5.5–5.10, 6.0–6.5, 7 (x86-64)
•
SUSE™ Linux Enterprise (SLES) 11 SP1, SP2, SP3 (x86-64)
• VMware 5.0, 5.1 (x86-64)
• VMware 5.5 (inbox driver)
• Citrix XenServer 6.0.2, 6.1, and 6.2
• Ubuntu 12.04–12.04.3 LTS Server (64-bit)
Note: The P420m and P320h drives are compatible with the Windows 32/64-bit operating systems listed above. Linux support is for 64-bit operating systems only. If your operating system is not in the list of supported operating systems and software, it may be
possible to install and use the drive; however, Micron does not guarantee compatibility.
PDF: 09005aef8497e00a
P420m_P320h_HHHL_installation_guide.pdf - Rev. V 12/14 EN
7
Micron Technology, Inc. reserves the right to change products or specifications without notice.
© 2012 Micron Technology, Inc. All rights reserved.
Page 8

P420m/P320h HHHL PCIe SSD Installation Guide
Components Provided by Micron
Hardware
Micron provides the number of P420m/P320h drives in the appropriate capacity that
were ordered or specified by the customer.
NOTE: The drive is not usable until the support pack software is downloaded from mi-
cron.com and installed in the host system. For specific OEMs, the support pack is provi-
ded either separately on micron.com or directly from Micron.
Software
Micron provides support pack software which contains:
• Micron-specific P420m and P320h drivers (required)
• Linux driver source code and makefile for non-supported Linux operating systems
• Drive firmware update as a unified binary image (UBI) file (required)
• RealSSD Manager (RSSDM) drive management software
• P420m/P320h installation guide (this guide)
Visit micron.com and go to the Software tab to access and download the support pack.
Components Provided by Micron
PDF: 09005aef8497e00a
P420m_P320h_HHHL_installation_guide.pdf - Rev. V 12/14 EN
8
Micron Technology, Inc. reserves the right to change products or specifications without notice.
© 2012 Micron Technology, Inc. All rights reserved.
Page 9
Installing the Drive
To install the P420m or P320h drive:
1. Power down the system.
2. Ensure you are ESD-grounded before touching the drive or host system.
3. Remove the drive from the ESD packaging and verify it is not damaged.
If you suspect that the board is damaged, contact your local Micron representative
or the P420m/P320h applications team.
4. Remove the lid or case from the host system to expose the PCIe slots into which
the drive will be inserted.
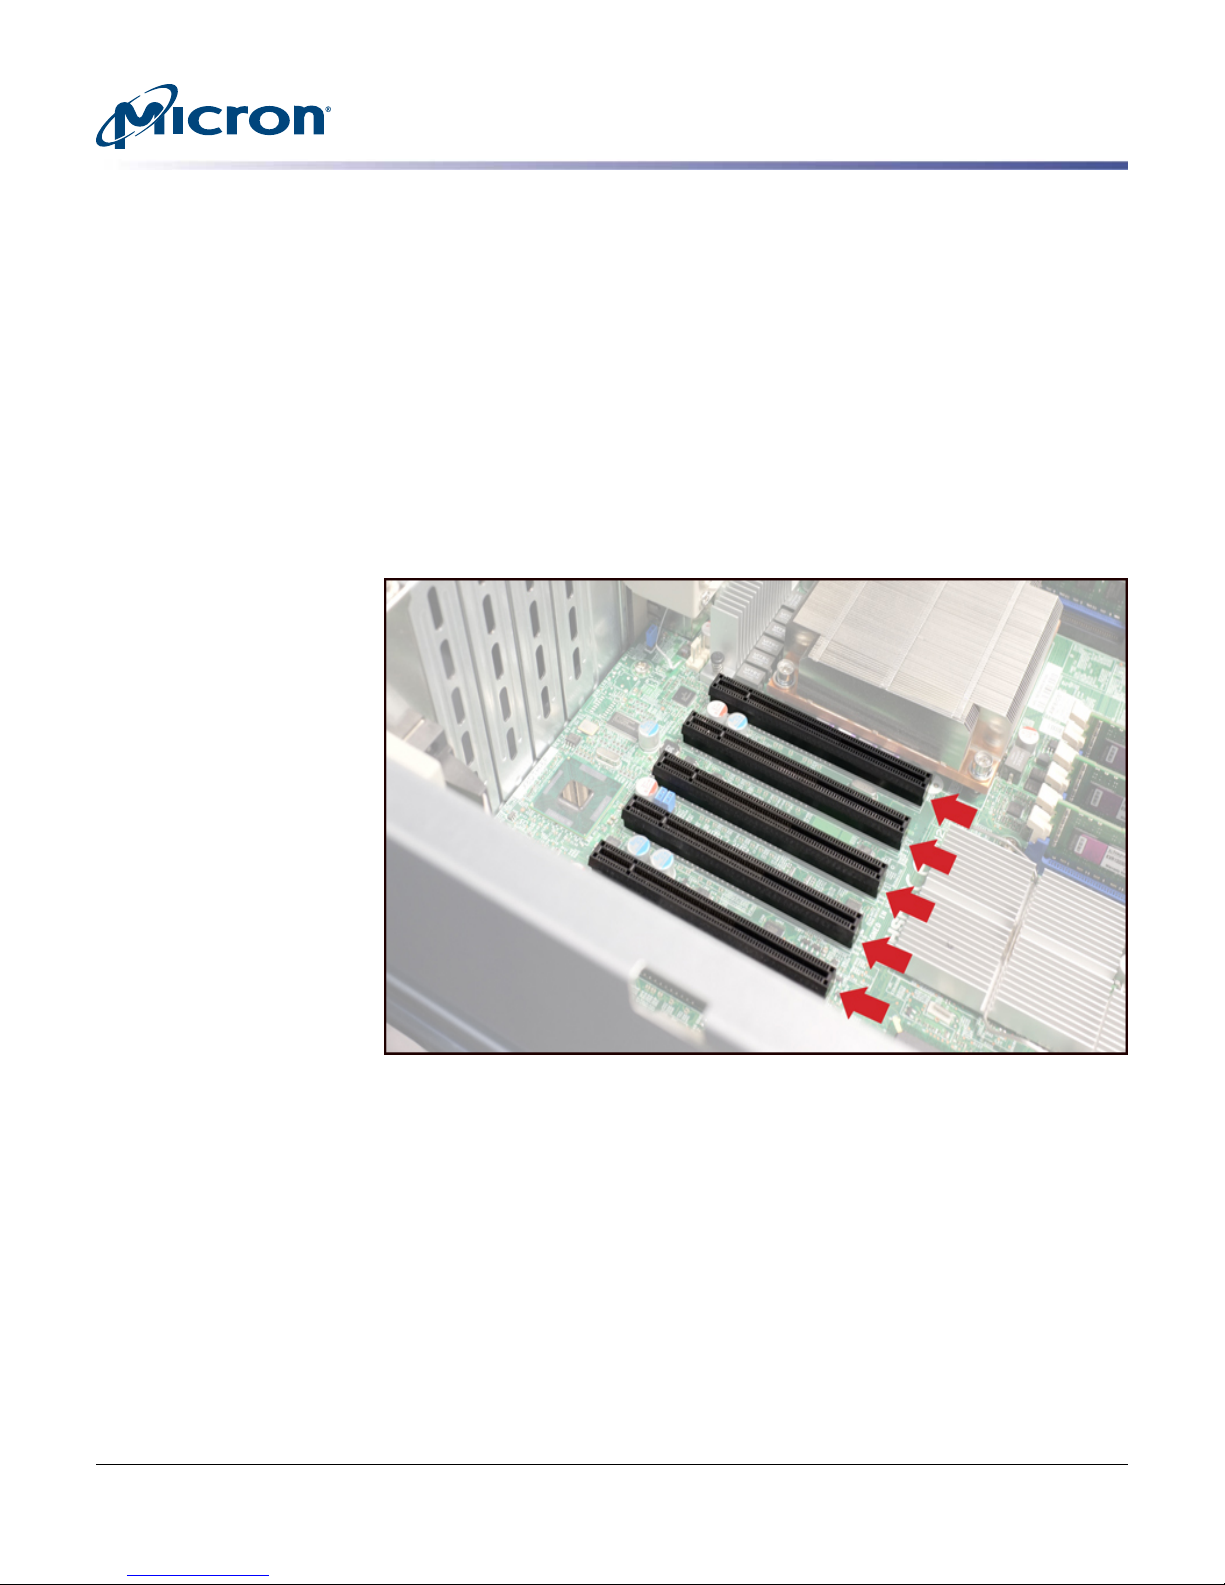
5. Locate an available Gen2 x8 PCIe slot (Figure 5) and verify the slot is 25W-capable.
Check the system or motherboard documentation for information on locating and
identifying PCIe slots.
Figure 5: Available Gen2 x8 PCIe Slots
P420m/P320h HHHL PCIe SSD Installation Guide
Installing the Drive
6. Insert the drive into the PCIe slot (Figure 6 and Figure 7).
PDF: 09005aef8497e00a
P420m_P320h_HHHL_installation_guide.pdf - Rev. V 12/14 EN
9
Micron Technology, Inc. reserves the right to change products or specifications without notice.
© 2012 Micron Technology, Inc. All rights reserved.
Page 10
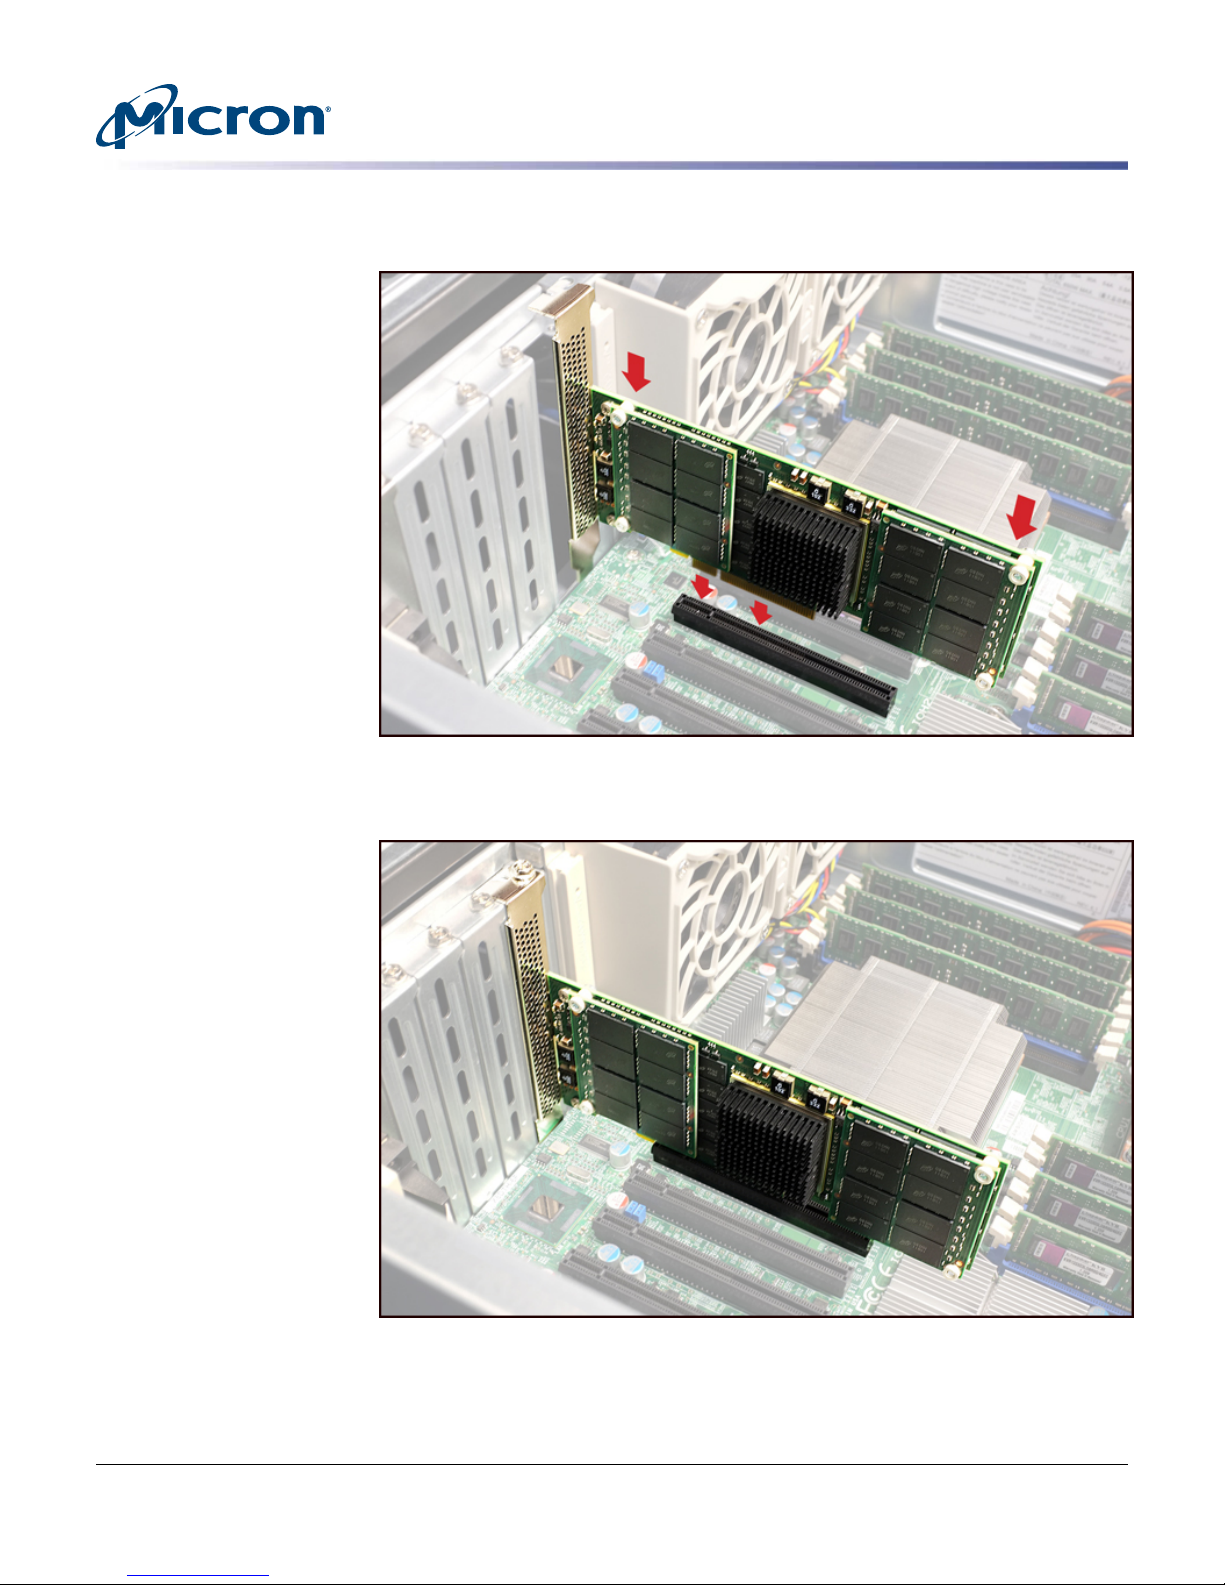
Figure 6: Inserting the Drive into a PCIe Slot
Note: P320h drive shown.
P420m/P320h HHHL PCIe SSD Installation Guide
Installing the Drive
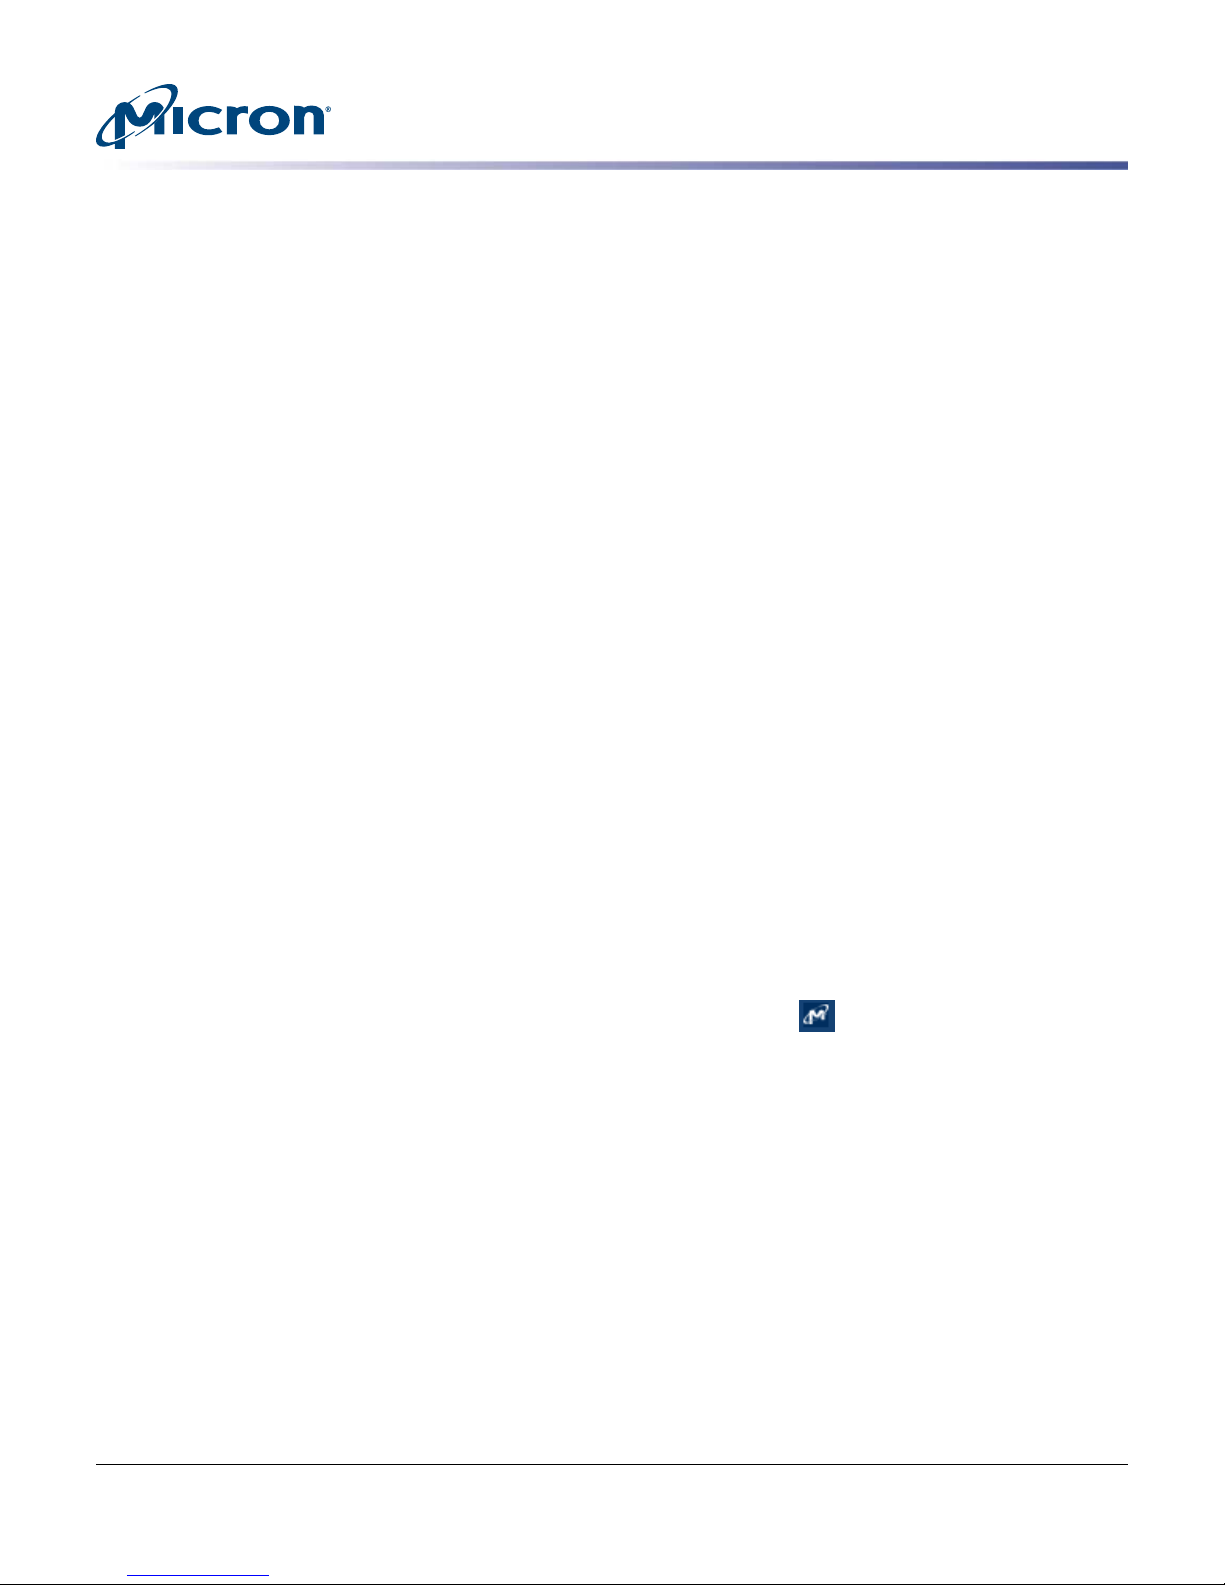
Figure 7: Drive Installed
7. If possible, ensure the LEDs on the drive will be visible when the system cover is
replaced.
8. Power on the system.
PDF: 09005aef8497e00a
P420m_P320h_HHHL_installation_guide.pdf - Rev. V 12/14 EN
10
Micron Technology, Inc. reserves the right to change products or specifications without notice.
© 2012 Micron Technology, Inc. All rights reserved.
Page 11

P420m/P320h HHHL PCIe SSD Installation Guide
Installing the Drive
9. When the system powers back on, check the LED state on the drive. The LED closest to the PCIe connector on the bottom of the drive should be solid green, indicating the drive is ready to be used. If it is not, refer to Table 2 (page 50) for a
description of the LED codes.
10. Replace the lid or case on the system.
11. Verify the host system successfully boots into the operating system. If it does not,
see Troubleshooting (page 33).
PDF: 09005aef8497e00a
P420m_P320h_HHHL_installation_guide.pdf - Rev. V 12/14 EN
11
Micron Technology, Inc. reserves the right to change products or specifications without notice.
© 2012 Micron Technology, Inc. All rights reserved.
Page 12

P420m/P320h HHHL PCIe SSD Installation Guide
Installing the Support Pack Software
This section describes how to install the P420m/P320h support pack software in the following operating systems:
• Windows
• Linux
• VMware
Note: Refer to the README document in the folder for your operating system for additional notes on version-specific release behavior.
Installation consists of the following steps:
1. Verify the drive is physically installed in the system.
2. Install the driver.
3. Install RealSSD Manager (RSSDM).
4. Update the unified binary image (UBI).
5. Reboot the system.
6. Verify the installation was successful.
Installing the Driver on a Windows System
Before installing the driver, review the following:
Installing the Support Pack Software
• Always use the .msi file for installing the device driver package unless you are installing the driver as part of the Windows installation process.
• If you have an older P32xx driver for Windows installed through Device Manager, you
must uninstall and remove the driver using Device Manager before installing the new
driver using the .msi file.
1. Power down the system.
2. Boot into Windows.
3. Locate the Windows Driver folder in the support pack software and double-click
the MicronPCIeSSDDriversx64.msi or MicronPCIeSSDDriversx86.msi file based
on your system architecture.
4. Review and accept the terms of the license agreement, and then click Install.
If you do not agree with the licensing terms, cancel the installation by clicking
Cancel.
5. Follow the instructions on the screen.
6. Click Finish when the installation is complete.
The drive is installed. It may be necessary to open the Windows Device Manager
and click the Scan for Hardware Changes button to see the drive and its driver.
7. Install the RSSDM software, as described in Installing RealSSD Manager
(page 17).
Removing an Existing Driver
Do not use the Device Manager to uninstall the driver. Follow these instructions for
proper removal.
1. Open the Windows Control Panel.
2. Under Programs select Uninstall a program.
3. Select the Micron driver.
4. Click Uninstall and wait for the process to complete.
PDF: 09005aef8497e00a
P420m_P320h_HHHL_installation_guide.pdf - Rev. V 12/14 EN
12
Micron Technology, Inc. reserves the right to change products or specifications without notice.
© 2012 Micron Technology, Inc. All rights reserved.
Page 13

P420m/P320h HHHL PCIe SSD Installation Guide
Installing the Driver on a Linux System
This section describes how to install the driver in RHEL, SLES, Citrix XenServer, and
Ubuntu. Start by powering down the system and then booting into Linux.
RHEL and SLES
Locate the package driver for your operating system in the /Linux Driver folder of the
support pack :
• RHEL version 7: kmod-mtip32xx-3.8.1-1.el7.x86_64.rpm
• RHEL version 6.1–6.5: kmod-mtip32xx-<version>.el6.x86_64_rhel6ux.rpm
• RHEL version 6.0: kmod-mtip32xx-<version>.el6.x86_64_rhel6.rpm
• RHEL versions 5.5, 5.6, 5.7 and 5.8: mtip32xx-<version>.x86_64_rhel5ux.rpm
• SLES 11: mtip32xx-kmp-default-<version>.<kernel_version>.x86_64.rpm
Removing an Existing Driver
If a drive with Micron driver version 1.2.30 or earlier has been installed, uninstall the
existing driver:
1. Run the following command as a root user: rpm -e <driver-name>
where <driver-name> is the name of the package driver for your operating system.
(See the previous section to locate the appropriate rpm file for your system.)
2. Run depmod as a root user.
3. Reboot the system.
Installing the Support Pack Software
Upgrading a Driver
1. Run the following command as a root user: rpm -Uvh <rpm-name>
where <rpm-name> is the name of the package driver for your operating system.
2. Run depmod as a root user.
3. Reboot the system.
Installing a New Driver
1. Run the following command as a root user: rpm -ivh <rpm-name>
where <rpm-name> is the name of the package driver for your operating system.
2. Run depmod as a root user.
3. Reboot the system.
PDF: 09005aef8497e00a
P420m_P320h_HHHL_installation_guide.pdf - Rev. V 12/14 EN
13
Micron Technology, Inc. reserves the right to change products or specifications without notice.
© 2012 Micron Technology, Inc. All rights reserved.
Page 14

Citrix XenServer
P420m/P320h HHHL PCIe SSD Installation Guide
Installing the Support Pack Software
The support pack includes several ISO images; make sure to select the image that
matches the build ID of your system. The driver will not install correctly if the wrong
ISO image is used. To find the build ID of your system:
1. In XenCenter, click XenServer Host.
2. Click the General tab.
3. Scroll down and expand Version Details to view the build number. The last six dig-
its of the ISO name corresponds to the build ID.
Removing an Existing Driver
1. Open a shell on the XenServer host as root.
2. Uninstall the RPMs:
# rpm -e mtip32xx-modules-xen-<xen_kernel_version>
# rpm -e mtip32xx-modules-kdump-<xen_kernel_version>
<xen_kernel_version> can be determined with uname -r.
Installing a New Driver or Upgrading a Driver
1. Copy the ISO image from the support pack software to the XenServer host system.
2. Open a shell on the XenServer host as root.
3. Mount the ISO image loopback:
# mount -o loop /path/to/mtip32xx-<version>.iso /mnt
4. Change the directory to /mnt:
# cd /mnt
5. Run the installer:
# ./install.sh
6. Load the driver:
# modprobe mtip32xx
Ubuntu
Installing a New Driver
1. Verify the package dkms is installed.
2. In the command prompt or terminal window in the Gnome Display Manager,
3. Copy the release mtip32xx-dkms-<version>.deb binary to the host.
4. Run the following command to install the package:
PDF: 09005aef8497e00a
P420m_P320h_HHHL_installation_guide.pdf - Rev. V 12/14 EN
open a shell as root and run the following command:
# dpkg -s dkms
If the package is installed, the first few lines of output will appear as:
Package: dkms
Status: install ok installed
...
Note: If the package is not installed, the first few lines of output will appear as:
Package: dkms is not installed and no info is available
If the dkms package is not installed, install it using the following command:
# apt-get install dkms
If prompted, press Y to install the package and all of its dependencies. If the installation fails, run the following command when prompted: run apt-get -f install.
# dpkg -i /path/to/mtip32xx-dkms-<version>.deb
14
Micron Technology, Inc. reserves the right to change products or specifications without notice.
© 2012 Micron Technology, Inc. All rights reserved.
Page 15

P420m/P320h HHHL PCIe SSD Installation Guide
Installing the Support Pack Software
5. Reboot the system.
Upgrading the Driver
1. Copy the release mtip32xx-dkms-<version>.deb binary to the host system.
2. Run the following command as root to install the package:
# dpkg -i /path/to/mtip32xx-dkms-<version>.deb
3. Reboot the system.
Removing an Existing Driver
1. In the command prompt or terminal window in the Gnome Display Manager, run
the following command to remove the driver package:
# dpkg -r mtip32xx-dkms
2. Run the following command to unload the driver:
# rmmod mtip32xx
PDF: 09005aef8497e00a
P420m_P320h_HHHL_installation_guide.pdf - Rev. V 12/14 EN
15
Micron Technology, Inc. reserves the right to change products or specifications without notice.
© 2012 Micron Technology, Inc. All rights reserved.
Page 16

P420m/P320h HHHL PCIe SSD Installation Guide
Installing the Driver on a VMware System
This section describes how to install the P420m/P320h driver on a VMware ESX 5.0/5.1
system and the VMware inbox driver on an ESX 5.5 system.
VMware ESX 5.0/5.1
1. Copy the installer .zip file from the VMware folder in the support pack software to
your system.
2. Run the following command:
# esxcli software vib install -d=/<full_path_to_offline_zip>
Where <full_path_to_offline_zip> is the path to the VMware installer file. The
complete directory path must be specified even if the zip file is in the currently
running directory; otherwise, an error will be reported. The command output will
look similar to the following:
~ # esxcli software vib install -d=/mtip32xx-1.0.3.zip
Installation Result Message: The update completed successfully, but the system
needs to be rebooted for the changes to be effective.
Reboot Required: true
VIBs installed: Micron_bootbank_block-mtip32xx-1.0.3-1OEM.500.0.0.472560
VIBs removed:
VIBs skipped:
Installing the Support Pack Software
VMware Inbox Driver in ESX 5.5
With VMware 5.5, the Micron driver is available as an inbox driver included with the
ESX kernel install image. The inbox driver automatically installs when updating to kernel 5.5.
If you have installed the Micron driver on a system running a VMware version prior to
ESX 5.5, you must uninstall the driver before you can use the inbox driver. Additionally,
review the VMware driver information in the Troubleshooting section for important information regarding the migration of datastores previously created in ESX 5.0 and 5.1 to
ESX 5.5.
Uninstalling the Driver
Run the following command to remove an existing driver:
# esxcli software vib list | grep mtip
The command output will look similar to the following:
block-mtip32xx 1.0.2-10OEM.500.0.0.472560 Micron VMwareCertified 2012-06-01
~ #
~ # esxcli software vib remove --vibname=block-mtip32xx:
1.0.2-1OEM.500.0.0.472560
Removal Result
Message: The update completed successfully, but the system needs to be rebooted for
the changes to be effective.
Reboot Required: true
VIBs installed:
VIBs removed: Micron_bootbank_block-mtip32xx_1.0.2-1OEM.
500.0.0.472560
VIBs Skipped:
PDF: 09005aef8497e00a
P420m_P320h_HHHL_installation_guide.pdf - Rev. V 12/14 EN
16
Micron Technology, Inc. reserves the right to change products or specifications without notice.
© 2012 Micron Technology, Inc. All rights reserved.
Page 17
Installing RealSSD Manager
This section describes how to install RealSSD Manager (RSSDM) after installing the
P420m/P320h driver. If RSSDM is already installed on the system, the latest version can
be installed over the existing version.
RSSDM enables you to monitor and configure P420m and P320h drives and perform
tasks such as firmware updates and secure erase operations. RSSDM can be run two
ways: using the graphical user interface (GUI) or command line interface (CLI).
The RSSDM GUI can be used to manage P420m and P320h drives installed in a local
system and remotely monitor those on the network, whereas the CLI can be used on local drives only. To use the RSSDM GUI, the RSSDM Agent must be running on each system containing the drive(s) you want to manage. The agent is installed with RSSDM.
Note: With support pack version 138.03.00 or later, it is no longer necessary to download and install Oracle JRE 1.7 x64 for RSSDM; Oracle JRE is bundled in the RSSDM installer.
Linux Systems
Note: The *.run files referenced in this section may need to be changed to an executable. To do so, enter the following in the command prompt: chmod +x <*.run filename>
Installing RSSDM in Linux
P420m/P320h HHHL PCIe SSD Installation Guide
Installing the Support Pack Software
Run the following command:
sudo ./RealSSDManager-<version>-linux-64-Setup.run
Note: sudo is not required if root user.
RSSDM (both the GUI and CLI) is installed in the following location:
/opt/MicronTechnology/RealSSDManage
Starting the RSSDM Agent in Linux
1. Navigate to /opt/MicronTechnology/RealSSDManager.
2. Run the following command:
./RealSSDManagerRemoteAgentStart.run
The agent icon appears in the system taskbar:
Stopping the RSSDM Agent in Linux
1. Right-click the agent icon in the system taskbar.
2. Click Stop RSSDM Agent.
You can also stop the agent by navigating to the RSSDM installation path and running the following command:
./RealSSDManagerRemoteAgentStop.run
Running the RSSDM GUI in Linux
1. Make sure the agent is running on the system.
2. Navigate to the installation path.
3. Run the following command:
./RealSSDManagerClient.run
PDF: 09005aef8497e00a
P420m_P320h_HHHL_installation_guide.pdf - Rev. V 12/14 EN
17
Micron Technology, Inc. reserves the right to change products or specifications without notice.
© 2012 Micron Technology, Inc. All rights reserved.
Page 18

Windows Systems
P420m/P320h HHHL PCIe SSD Installation Guide
Installing the Support Pack Software
Running the RSSDM CLI in Linux
In the command prompt, run the following command: rssdm
To obtain help with using the CLI, run: rssdm -?.
Installing RSSDM in Windows
1. Run the RealSSDManager setup.exe file located in the RealSSD Manager folder in
the support pack software.
2. Click Next when the installation wizard starts.
3. Follow the instructions on the screen.
4. Click Finish when complete.
Both the RSSDM GUI and CLI are installed.
Starting the Agent in Windows
1. Open the Windows Start menu.
2. Click All Programs > RealSSD Manager > RealSSDManager Remote Agent Start.
The agent icon appears in the system taskbar:
You can also start the agent by navigating to the RSSDM installation path and running the following command:
RealSDManagerRemoteAgentStart.exe
VMware Systems
Stopping the Agent in Windows
1. Right-click the agent icon in the system taskbar.
2. Click Stop RSSDM Agent.
You can also stop the agent by navigating to the RSSDM installation path and running the following command:
RealSSDManagerRemoteAgentStop.exe
Running the RSSDM GUI in Windows
1. Make sure the agent is running on the system.
2. Open the Windows Start menu.
3. Click All Programs > RealSSD Manager > RealSSD Manager Client.
Running the RSSDM CLI in Windows
In the command prompt, run the following command: rssdm.exe
To obtain help with using the CLI, run: rssdm -?.
To install RSSDM on a VMware system, run the following command as a root user:
esxcli software vib install --viburl=<vib-file> --maintenance-mode
Where <vib_file> is specified in the RSSDM VMware directory in the support pack.
To upgrade RSSDM on a VMware system, run the following command as a root user:
esxcli software vib update --viburl=<vib-file> --maintenance mode
PDF: 09005aef8497e00a
P420m_P320h_HHHL_installation_guide.pdf - Rev. V 12/14 EN
18
Micron Technology, Inc. reserves the right to change products or specifications without notice.
© 2012 Micron Technology, Inc. All rights reserved.
Page 19

Removing RSSDM
P420m/P320h HHHL PCIe SSD Installation Guide
Installing the Support Pack Software
Running the RSSDM CLI in VMware
The Micron RealSSD Manager CLI binary is installed in the following location:
/opt/micron/bin/rssdm
To use the CLI, you must reference the installation path above or add the directory /opt/
micron/bin to your path. Because the ESXi root file system is a ramdisk image, any
changes made to the path will be lost following a restart. To make the changes automatically made upon restart, edit the default profile:
1. For ESXi 5.0, open vi /etc/profile; for ESXi 5.1, open vi /etc/profile.local.
2. Edit the last of the file to be: export PATH=$PATH:/opt/micron/bin
3. Save and exit the file.
4. Reboot the system.
To remove RSSDM in Windows, run the Uninstall option from the Windows Start
menu > All Programs > RealSSDManager.
To remove RSSDM in Linux, run the following command in the /opt/MicronTechnology/RealSSDManager/ directory: ./UninstallRealSSDManager
To remove RSSDM in VMware, run the following command as root user:
esxcli software vib remove -n micron-rssdm --maintenance-mode
PDF: 09005aef8497e00a
P420m_P320h_HHHL_installation_guide.pdf - Rev. V 12/14 EN
19
Micron Technology, Inc. reserves the right to change products or specifications without notice.
© 2012 Micron Technology, Inc. All rights reserved.
Page 20

P420m/P320h HHHL PCIe SSD Installation Guide
Updating the Firmware Unified Binary Image
This section describes how to update the UBI for the P420m or P320h drive. The UBI
should be updated after installing the support pack software.
The UBI contains the latest firmware and option ROM for the drive. The installation instructions are the same for Windows, Linux, and VMware systems and require RSSDM
to be installed.
1. Run RSSDM.
2. Select the P420m or P320h drive.
3. Open the Device menu and select Update Firmware UBI.
4. Locate the UBI file in the support pack directory.
5. Click Update UBI.
6. Click OK to confirm the update.
7. Click OK when complete.
8. Exit RSSDM.
9. Power cycle the system.
Installing the Support Pack Software
PDF: 09005aef8497e00a
P420m_P320h_HHHL_installation_guide.pdf - Rev. V 12/14 EN
20
Micron Technology, Inc. reserves the right to change products or specifications without notice.
© 2012 Micron Technology, Inc. All rights reserved.
Page 21

Verifying the Installation
1. In the operating system, verify the drive appears as a recognized device and that
the driver has been loaded.
2. Verify that the drive is online and ready to be used.
• In Windows:
a. Open the Disk Management tool (refer to the documentation for your specif-
ic version of Windows). The newly installed drive should display.
b. A dialog box may appear that prompts you to initialize the master boot re-
cord (MBR) for the drive. Select OK and continue. The drive should appear as
“Online” with “Basic” as the format status. If the option to initialize the MBR
does not appear, right-click the drive number in the Disk Management tool
and select Initialize Drive from the pop-up menu. Once this operation completes, the drive should appear as Online with Basic as the format status.
• In Linux:
a. After the system boots to the desktop, open a terminal window.
b. Run modinfo mtip32xx. The version and module information displays if the
driver is installed. Otherwise, follow the installation steps in Installing the
Driver on a Linux System (page 13).
c. Run fdisk – l | grep rssd*. The drive should appear as /dev/rssd<x> device.
Where <x> is the drive letter, which is typically “a” for one drive. The letter
increments for each additional drive in the system.
3. Run RSSDM (either the GUI or CLI) and check the status of the drive.
a. If using the GUI, verify that RSSDM loads and that the drive information is
shown.
b. If using the CLI, run rssdm –L and rssdm –L –d and verify that the drive infor-
mation firmware and status indicate that the drive is present and functional.
P420m/P320h HHHL PCIe SSD Installation Guide
Verifying the Installation
PDF: 09005aef8497e00a
P420m_P320h_HHHL_installation_guide.pdf - Rev. V 12/14 EN
21
Micron Technology, Inc. reserves the right to change products or specifications without notice.
© 2012 Micron Technology, Inc. All rights reserved.
Page 22

P420m/P320h HHHL PCIe SSD Installation Guide
Using the P420m or P320h as a Boot Drive
Using the P420m or P320h as a Boot Drive
This section describes how to install a supported operating system (OS) on a P420m or
P320h drive with the bootable option feature:
• Windows Server 2012 (x64)
• Windows Server 2012 R2 (x64)
• Windows 8, 8.1 (x64 and x86)
• Windows Server 2008 R2 (x64)
• Windows 7 (x64 and x86)
• SUSE 11.x (x64)
• RHEL 7.x (x64)
• RHEL 6.x (x64)
• RHEL 5.x (x64)
• Ubuntu 12.04 LTS
• Citrix XenServer 6.1
These instructions can be performed only on P420m and P320h drives with the bootable option feature. The bootable option is determined by part number (see the Part
Numbering Information section on the product data sheet for details).
Before you begin, make sure:
• The BIOS setting on your system sees the SSD as being bootable and it has been configured to point to the Micron PCIe SSD as the primary boot device.
• The drive is installed in the system as described in "Installing the Drive" and "Installing the Support Pack Software."
Windows Server 2012/2012 R2 and Windows 8/8.1
Before you begin, it is recommended to remove all storage devices from the system except for the P420m/P320h drive or the original OS boot drive.
1. Download and unzip the support pack software.
2. Go to Windows Driver/os_install_drivers and navigate to the subdirectory for
your operating system:
• Windows Server 2012 x64: /x64/win8-server2012
• Windows Server 2012 R2 x64: /x64/win81-server2012r2
• Windows 8.1 x64: /64/win81-server2012r2
• Windows 8.1 x86: /x86/win81
• Windows 8 x64: /64/win8-server2012
• Windows 8 x86: /x86/win8
3. Copy the contents of the subdirectory for your operating system to external removable media, such as a USB drive. (For example, for Windows Server 2012 x64,
copy the contents of the /x64/win8-server2012 subdirectory.
4. Insert the Windows operating system CD/DVD and the USB drive containing the
support pack files into the system and reboot.
5. When prompted, select the option to boot from a CD/DVD.
6. Enter the Windows product key that came with the CD/DVD, if prompted.
7. Select Core (command line) or GUI to begin the installation. (GUI is recommended for most users.)
PDF: 09005aef8497e00a
P420m_P320h_HHHL_installation_guide.pdf - Rev. V 12/14 EN
22
Micron Technology, Inc. reserves the right to change products or specifications without notice.
© 2012 Micron Technology, Inc. All rights reserved.
Page 23

P420m/P320h HHHL PCIe SSD Installation Guide
Using the P420m or P320h as a Boot Drive
8. Select Custom (Install Windows Only) when prompted for type of installation.
9. When the installation directory prompt appears, select Load Driver and locate the
driver files for the P420m or P320h located on the USB drive.
Note: The installer may specify the USB drive directory with a different drive letter
(such as C:\) than what was originally assigned on the host system.
Windows attempts to find the driver located on the USB drive.
10. Select the Micron Device driver when prompted for a driver, and then click Next.
11. Remove the USB drive from the system.
The Where do you want to install Windows dialog appears again. The drive should
appear as a new drive number.
Note: The drive may be labeled with "unallocated space" and contain a capacity
close to the user capacity rated for the drive. (For example, a 350GB drive may appear as 326GB.)
If you receive a setup error at this point, you may need to do the following:
a. Cancel the installation.
b. With the installation DVD and USB drive in the system, reboot the system to
the version of Windows already installed on the bootable primary drive. You
may need to change the BIOS setting to point to the original drive.
c. Use Windows Explorer to find the Windows installation DVD, expand the root
directory, and run the setup.exe file located on the installation DVD.
d. Follow steps 6–13.
e. Exit Windows and power down the system.
f. Power up the system.
g. If necessary, change the BIOS primary boot drive setting to point to the
P420m/P320h drive, and then reboot the system.
h. Verify that Windows boots from the P420m/P320h drive.
12. Select the drive and click Next.
The Windows installation continues and may take several minutes to complete.
During this time, the system reboots automatically several times. Do not attempt
to reboot from the CD/DVD.
13. After the installation completes, remove the Windows CD/DVD and reboot the
system.
14. Verify the system boots from the OS installed on the drive.
Windows Server 2008 and Windows 7
Before you begin, it is recommended to remove all storage devices from the system except for the P420m/P320h drive or the original OS boot drive.
1. Download and unzip the support pack software.
2. Go to Windows Driver/os_install_drivers and navigate to the subdirectory for
your operating system:
• Windows Server 2008 R2 x64: /x64/win7-server2008r2
• Windows 7 x64: /x64/win7-server2008r2
• Windows 7 x32: /x86/win7
3. Copy the contents of the subdirectory for your operating system to external removable media, such as a USB drive. (For example, for Windows Server 2008 R2
x64, copy the contents of the /x64/win7-server2008r2 subdirectory.
PDF: 09005aef8497e00a
P420m_P320h_HHHL_installation_guide.pdf - Rev. V 12/14 EN
23
Micron Technology, Inc. reserves the right to change products or specifications without notice.
© 2012 Micron Technology, Inc. All rights reserved.
Page 24

P420m/P320h HHHL PCIe SSD Installation Guide
Using the P420m or P320h as a Boot Drive
4. Insert the Windows operating system CD/DVD and the USB drive containing the
support pack files into the system and reboot.
5. When prompted, select the option to boot from a CD/DVD.
6. Select your operating system.
7. Select Core (command line) or GUI to begin the installation. (GUI is recommended for most users.)
8. Select Custom (advanced) when prompted for type of installation.
9. When the installation directory prompt appears, select Load Driver and locate the
driver files for the P420m or P320h located on the USB drive.
Note: The installer may specify the USB drive directory with a different drive letter
than what was originally assigned on the host system (such as C:\).
Windows attempts to find the driver located on the USB drive.
10. Select Micron Device Driver when prompted for a driver, and then click Next.
11. Remove the USB drive from the system.
The Where do you want to install Windows dialog appears again. The drive should
appear as a new drive number.
Note: The drive may be labeled with unallocated space and contain a capacity
close to the user capacity rated for the drive. (For example, a 350GB drive may appear as 326GB.)
If you receive a setup error at this point, you may need to do the following:
a. Cancel the installation.
b. With the installation DVD and USB drive in the system, reboot the system to
the version of Windows already installed on the bootable primary drive. You
may need to change the BIOS setting to point to the original drive.
c. Use Windows Explorer to find the Windows installation DVD, expand the root
directory, and run the setup.exe file located on the installation DVD.
d. Follow steps 6–13.
e. Exit Windows and power down the system.
f. Power up the system.
g. If necessary, change the BIOS primary boot drive setting to point to the
P420m/P320h drive, and then reboot the system.
h. Verify that Windows boots from the P420m/P320h drive.
12. Select the drive and click Next.
The Windows installation continues and may take several minutes to complete.
During this time, the system reboots automatically several times. Do not attempt
to reboot from the CD/DVD. No user intervention is required.
13. After the installation completes, remove the Windows CD/DVD and reboot the
system.
14. Verify the system boots from the OS installed on the drive.
PDF: 09005aef8497e00a
P420m_P320h_HHHL_installation_guide.pdf - Rev. V 12/14 EN
24
Micron Technology, Inc. reserves the right to change products or specifications without notice.
© 2012 Micron Technology, Inc. All rights reserved.
Page 25

SUSE 11.x x64
P420m/P320h HHHL PCIe SSD Installation Guide
Using the P420m or P320h as a Boot Drive
Before you begin, locate the appropriate ISO file you will need for the service pack version of SUSE installed in the system. (This file is contained with the support pack software in the Linux Driver subdirectory.)
• For SP3: mtip32xx-kmp-default-<driver_version>_3.0.76_0.9-1.x86_64.iso
• For SP2: mtip32xx-kmp-default-<driver_version>_3.0.13_0.27-1.x86_64.iso
• For SP1: mtip32xx-kmp-default-<driver_version>_2.6.32.12_0.7-1.x86_64.iso
1. Extract the correct ISO image and copy it to a USB drive or burn it to a CD.
To copy to a USB drive, you must use a CD burning tool (such as Daemon Tools or
Nero) that allows you to view the contents of the ISO image so that it can be extracted to the USB drive. A USB drive is recommended, unless your system contains two CD-ROM drives.
Note: You can use the following dd command to extract the files to the USB drive;
however, this command removes any existing data on the USB drive and replaces
it with the extracted ISO image contents:
dd if=<mtip32xx-kmp-default-<kernel_version>.x86_64.iso of=/dev/sdX
where /dev/sdX is the device path of the target USB drive
If the USB drive contains important files, it is highly recommended to back up the
files on alternate media before using this command.
2. Insert the SUSE boot CD/DVD and USB drive containing the P420m/P320h driver
image into the system and reboot.
3. When the initial installation screen appears, press F6 and select Yes.
4. Select the USB drive when prompted for the driver, and then select OK.
The driver files are installed. When complete, the installer returns to the same
screen prompt.
5. Select Back to continue the installation.
6. Remove the USB drive.
The installation continues and may take several minutes to complete.
7. Select the Expert Settings tab when the Installation Settings menu displays.
8. Select the Bootloader Installation option.
9. Verify grub is the boot loader type and change the default boot location from Boot
from Boot Partition to Boot from Master Boot Record.
Make sure only the Boot from Master Boot Record option is selected.
10. Click Next and verify the Bootloader was installed successfully message appears.
11. Click OK and then Finish.
The installer displays two messages confirming the new settings.
12. Select I agree, and then Yes for each.
13. Select Reboot.
If an installer error message displays, click OK and select Exit or Reboot twice to
reboot the system. The CD can remain in the system.
14. When the system reboots, boot from the CD/DVD.
15. Select Boot from Hard Drive when prompted. Make sure that no other bootable
media is connected to the system to make sure the system boots from the SSD.
The system should boot from the OS on the SSD.
16. Remove the CD from the system.
17. Reboot the system again and make sure the system boots directly from the SSD
without the installer CD.
PDF: 09005aef8497e00a
P420m_P320h_HHHL_installation_guide.pdf - Rev. V 12/14 EN
25
Micron Technology, Inc. reserves the right to change products or specifications without notice.
© 2012 Micron Technology, Inc. All rights reserved.
Page 26

RHEL 7.x x64
P420m/P320h HHHL PCIe SSD Installation Guide
Using the P420m or P320h as a Boot Drive
These instructions are relevant for UEFI boot only. Legacy boot is not supported at this
time.
1. Copy the P420m/P320h driver disk image from the support pack software to external removable media such as a USB drive.
For example, for a USB drive (/dev/sdb), copy the image to the drive, substituting
your particular string for <kernel_version>:
dd if=mtip32xx-diskimage-<kernel_version>_rhel7.img of=/dev/sdb bs=512
conv=fsync
The <kernel_version> for RHEL 7.0 is 3.10.0-123.el7.x86_64.
2. Boot the RHEL 7.x DVD in UEFI mode with a UEFI-enabled P420m/P320h drive.
3. When the first RHEL screen appears, select Install Red Hat Enterprise Linux 7.0
and press e.
4. Move the cursor to the end of the 'linuxefi' line and add 'inst.dd'; for example:
linuxefi /images/pxeboot/vmlinuz inst.stage2=hd:LABEL=RHEL-7.0\x20Server.x86_64 quiet inst.dd
5. Press CTRL-x to start the installation.
6. When prompted for the driver package, select the number corresponding to the
USB key containing the driver image and press enter. (Typically, the USB key is
'sda' or 'sdb').
7. The utility searches for the image and displays the list of drivers found in the package. Only one driver should be listed and it will appear similar to:
DD: Checking device /dev/sda
DD: Processing DD repo /media/DD/rpms/x86_64 on /dev/sda
Page 1 of 1
Select drivers to install
1) [ ] /media/DD/rpms/x86_64/kmod-mtip32xx-3.8.1-1.el7.x86_64.rpm
# to toggle selection, 'n' -next page, 'p' -previous page or 'c' continuous
8. Press c and then enter to install the driver.
9. Press c and enter again to continue.
10. Proceed with the normal installation until just before the final boot into the new
OS.
11. Press CTRL+ALT+F2 to open a new terminal.
12. Type 'chroot' into the newly created system image:# chroot /mnt/sysimage
13. Rebuild the initramfs with the included mtip32xx module using the following
command:# mkinitrd -f --with=mtip32xx /boot/
initramfs-3.10.0-123.el7.x86_64.img 3.10.0-123.el7.x86_64
Note: The above command is for RHEL 7.0 only. If using a newer kernel than the
one that shipped with RHEL 7.0, the command may need to be changed for the
specific kernel version used.
14. Press CTRL+ALT+F7 to return to the GUI screen.
15. Click Reboot. The OS should successfully boot into RHEL 7.x.
PDF: 09005aef8497e00a
P420m_P320h_HHHL_installation_guide.pdf - Rev. V 12/14 EN
26
Micron Technology, Inc. reserves the right to change products or specifications without notice.
© 2012 Micron Technology, Inc. All rights reserved.
Page 27

RHEL 6.x x64
P420m/P320h HHHL PCIe SSD Installation Guide
Using the P420m or P320h as a Boot Drive
1. Copy the P420m/P320h driver disk image from the support pack software to external removable media such as a USB drive.
For example, for a USB drive (/dev/sdb):
a. Create a single partition (/dev/sdb1).
b. Use mke2fs to create an ext2 file system or use the Disk Utility tool to format
the USB drive to create an ext2 file system type on that partition.
c. Use the MOUNT command or Mount Volume option in the Disk Utility tool
to specify a mount point for the ext2 file system.
d. Locate the following image file from the Support Pack\Linux Driver folder:
mtip32xx-diskimage<kernel_version>_rhel6uX.img
e. Copy the image file to the newly mounted directory on the USB drive.
2. Insert the RHEL boot CD/DVD and the USB drive containing the P420m/P320h
driver image into the system and reboot.
3. Press ESC when the initial installation screen appears.
4. Enter the following command at the prompt to start the installation: linux dd
5. When the installer prompts for the driver update disk:
a. Select the device path that points to the USB drive from step 1.
b. Select the image file on the drive and press OK.
The installer loads the driver.
Note: More than one device node may be displayed. Browse to each device node to
find the USB drive and its image file.
6. Optional: If you intend to use the Linux Volume Manager (LVM), follow these additional steps. Otherwise, continue to Step 7.
a. Press Ctrl+Alt+F2 to get to a command prompt.
b. Enter: mkdir /etc/lvm
c. Create /etc/lvm/lvm.conf and add the following lines:
devices {
types = [ "mtip32xx", 16]
}
d. Press Ctrl+Alt+F6 to return to the installer.
e. At the last screen before the installation finishes (Congratulations, your Red
Hat Enteprise Linux Installation is complete), press Ctrl+Alt+F2 to get to a
command prompt and do the following:
• Change root to the boot image: chroot /mnt/sysimage
• Edit /etc/lvm/lvm.conf and add the following to the Devices section: types
= [ "mtip32xx", 16 ]
• Back up the initramfs file in /boot: mv /boot/initramfs-<kernel_version> .img /boot/initramfs-<kernel_version>.img.BAK
• Create a new initramfs file: /sbin/dracut /boot/initramfs-<kernel_version>.img <kernel_version>
Note: For example, for RHEL 6.1 64-bit, the command would be:
/sbin/dracut /boot/initramfs-2.6.32-131.0.15.el6.x86_64.img
2.6.32-131.0.15.el6.x86_64
PDF: 09005aef8497e00a
P420m_P320h_HHHL_installation_guide.pdf - Rev. V 12/14 EN
<kernel_version> can be obtained from the command uname-r.
• Type exit to exit the chroot environment.
27
Micron Technology, Inc. reserves the right to change products or specifications without notice.
© 2012 Micron Technology, Inc. All rights reserved.
Page 28

P420m/P320h HHHL PCIe SSD Installation Guide
Using the P420m or P320h as a Boot Drive
• Press Ctrl+Alt+F6 to return to the GUI. Finish the installation by clicking
Reboot.
Note: Steps 7 and 8 below apply only if your system is booting from a uEFI shell
and your drive has been configured with a uEFI boot setting. If your drive has been
configured for a legacy boot setting, skip these steps. (Except for specific OEMs,
most customer bootable drives are configured with a legacy boot setting, which
means steps 7 and 8 can be skipped.)
7. (uEFI boot only) When the installer reaches the disk partitioning step, /dev/rssda
must be configured to have a minimum 50MB partition of type EFI (or VFAT).
This partition contains the EFI boot binary. It is recommended that all of the /dev/
rssdX drives also be configured with the same size and type (VFAT) partition, even
though the installer will only allow the EFI partition on /dev/rssda to be mounted
to /boot/efi.
8. (uEFI boot only) Continue the OS installation, but do not reboot when the installation completes. Before rebooting, perform these steps:
a. Press Ctrl+Alt+F2 to get to a command prompt.
b. Run the following commands for each drive beyond /dev/rssda, replacing X
with the number of the VFAT partition:
parted -s /dev/rssdX toggle 1 boot
dd if=/dev/rssda1 of=/dev/rssdX1
The last command assumes /dev/rssda1 is the EFI partition that gets mounted to /boot/efi. If a different partition is used for EFI, substitute that partition for /dev/rssda1 in the above command. Similarly, it assumes the VFAT
partition on the other drives is /dev/rssdX1. If a different partition is used for
VFAT on these other drives, make sure to adjust the 1 to reflect the correct
partition number.
c. Press Ctrl+Alt+F6 to return to the GUI installer and reboot.
9. (Legacy boot only) Continue with the installation until you are prompted for the
type of install.
a. Select Create Custom Layout.
The GUI menu displays all storage devices detected by the OS.
b. Locate and select /dev/rssda under the Hard Drive tab.
c. Click Create to create a new partition.
You are prompted to specify the mount point and file system type and size.
• For the mount point, specify: /
• For the file system, specify: ext4
Note: ext2 and ext3 file systems are alternate choices for the file system.
d. Specify Fixed for the partition size, and then click Next.
The /dev/rssda1 partition should indicate the size and mount point you
specified earlier.
Note: The actual size of the partition depends on the type of installation. The
installer will notify you if the partition size is too small for the OS installation.
A minimum of 2GB is recommended to install Linux desktop. (Less space is
required for a basic server.) However, it is recommended to double the minimum space requirement to allow space for applications and file storage.
e. Repeat step c but specify swap for the file system.
PDF: 09005aef8497e00a
P420m_P320h_HHHL_installation_guide.pdf - Rev. V 12/14 EN
28
Micron Technology, Inc. reserves the right to change products or specifications without notice.
© 2012 Micron Technology, Inc. All rights reserved.
Page 29

RHEL 5.x x64
P420m/P320h HHHL PCIe SSD Installation Guide
Using the P420m or P320h as a Boot Drive
Note: It is recommended to allocate at least 100GB for the swap size.
The /dev/rssda1 partition should be created and appear in the Partition Layout screen.
f. Click Next.
g. Select Write Changes to Disk when prompted.
The partitions are created.
h. After the partitions are written, verify the boot load image is pointing to /dev/
rssda to make sure the master boot record is written.
i. Click Next.
10. Continue through the installation prompts until the Installation is Complete message appears.
11. Select Reboot when prompted to complete the installation.
12. Verify the OS boots from the SSD.
A /boot partition must created while installing RHEL 5.x on the drive. This /boot partition must be:
• Separate from the / (root) partition
• The first partition on the device
• The primary partition
• At least 200MB
1. Using the dd command, binary copy the P420m/P320h driver disk image from the
support pack software to external removable media such as a USB drive.
Note: The dd command removes any existing data on the USB drive and replaces
it with the extracted ISO image contents. If the USB drive contains important files,
it is highly recommended to back up the files on alternate media before using this
command.
2. Using the dd command, binary copy the anaconda update image from the support
pack software to a second external drive.
3. Insert the RHEL OS CD/DVD and the two external drives in the system and reboot.
4. Enter the following command to start the installation: linux dd updates
5. When prompted for the driver update disk and anaconda update disk, select the
external drives from steps 1 and 2. Both drives must be selected.
6. After loading the driver, install the OS as usual.
Note: During the RHEL 5.x installation, your installation may not be bootable unless certain requirements are met. When this occurs, a message such as the following appears in the fifth console: Selected cylinder exceeds maximum supported by
BIOS.
(Press Ctrl+ALT+F5 to switch to the fifth console and see the message; press Ctrl
+Alt+F6 to return to the installer.)
This issue is due to a limitation in the BIOS and grub bootloader. To work around
this condition, make sure that the stage2 file of grub bootloader is accessible by
stage1 of the grub bootloader through BIOS routines. To be compliant, create a
separate primary /boot partition of at least 200MB as the first partition of the
drive.
PDF: 09005aef8497e00a
P420m_P320h_HHHL_installation_guide.pdf - Rev. V 12/14 EN
29
Micron Technology, Inc. reserves the right to change products or specifications without notice.
© 2012 Micron Technology, Inc. All rights reserved.
Page 30

Ubuntu 12.04–12.04.3 LTS
Network connectivity and a USB drive are required for this procedure. Be aware that any
data on the USB drive is erased during this process.
1. Make sure the legacy option rom is enabled on the P420m/P320h drive. If it is enabled, the drive will be presented as a boot target in the legacy BIOS menu.
2. If you are installing a version of Ubuntu older than 12.04.3 on a P420m drive, create an EXT2 file system on a USB drive on a separate Linux system, mount it, and
then copy the appropriate release tarball onto it. When complete, unmount and
remove the USB drive.
3. Insert the USB drive you created and the Ubuntu DVD in the system.
4. Boot the Ubuntu DVD. Do not boot EFI mode. If you are installing 12.04.3 or later,
or if you are installing on a P320h drive, go to step 12.
5. Proceed through the normal installation until you reach the Setup Users and Pass-
words option. Press Alt+F2 and then enter to activate the console.
6. Mount the USB drive:
# mount -t ext2 /dev/sda1/mnt
7. Change directory /mnt and decompress the driver package:
# cd /mnt
# tar zxvf mtip32xx-<driver_version>-<ubuntu_kernel_version>.dkms.tar.gz
8. Load the mtip32xx driver:
# insmod /mnt/mtip32xx-<version>/mtip32xx.ko
9. Verify the driver loaded properly:
# dmesg | tail -n 40
10. Output similar to the following should print:
Micron RealSSD PCIe Block Driver Version 3.5.0
mtip32xx 0000:47:00.0: 2 NUMA node(s)
mtip32xx 000047:00.0: Using NUMA node 0 (closest: 1,0 probe on 0:2)
mtip32xx 0000:47:00.0: PCI INT A -> GSI 80 (level, low) -> IRQ 80
mtip32xx 0000:47:00.0: setting latency timer to 64
mtip32xx 0000:47:00.0: Node 0 on package 0 has 6 cpus: 0 2 4 6 8 10
mtip32xx 0000:47:00.0: irq 131 for MSI/MSI-X
mtip32xx 0000:47:00.0: ASIC-FPGA design, HS rev 0x800, 8 slot groups, 256 slots
mtip32xx 0000:47:00.0: Time to device ready: 0 ms
mtip32xx 0000:47:00.0: Affinitizing IRQ 131 to cpu 0 on node 0
mtip32xx 0000:47:00.0: Serial No.: 000000001309020454FC
mtip32xx 0000:47:00.0: Firmware Ver.: B2081900
mtip32xx 0000:47:00.0: Model: Micron 420m-MTFDGAR1T4MAX
mtip32xx 0000:47:00.0: Security: 0001
mtip32xx 0000:47:00.0: Capacity: 2734926768 sectors (1335413 MB)
mtip32xx 0000:47:00.0: Write protect progress: 0% (209715 blocks)
rssda: unknown partition table
P420m/P320h HHHL PCIe SSD Installation Guide
Using the P420m or P320h as a Boot Drive
Note: If the last line does not state unknown partition table, make sure the parti-
tion table is not GPT; otherwise, subsequent steps will not work. To do this, run the
following command then restart at step 4:
# dd if=/dev/zero of=/dev/rssda bs=512 count=1000
11. Unmount and remove the USB drive. Press ALT+F1 to return the to the installer
GUI and continue with the installation.
12. At the disk partitioning step, select the manual partition option. (If you select automatic partitioning, the subsequent steps will fail because the installer will use a
GPT partition by default.)
PDF: 09005aef8497e00a
P420m_P320h_HHHL_installation_guide.pdf - Rev. V 12/14 EN
30
Micron Technology, Inc. reserves the right to change products or specifications without notice.
© 2012 Micron Technology, Inc. All rights reserved.
Page 31

P420m/P320h HHHL PCIe SSD Installation Guide
Using the P420m or P320h as a Boot Drive
13. Create the / (root) partition on the /dev/rssdX device node, as well as any other
mount points such as <swap>, /home, or /opt. If desired, create a separate /boot
partition on the drive (otherwise it will be created as part of the / (root) partition).
14. At the end of the installation, an error message "Installation step failed" appears.
Ignore the error message and continue with the next step.
15. Press ALT+F2 to return to a shell prompt. If you are installing 12.04.3 or later, or if
you are installing on a P320h drive, go to step 18.
16. Insert the USB drive again and mount the file system:
# mount -t ext2 /dev/sda1 /mnt
17. Copy the mtip32xx driver binary file into the kernel driver directory and then unmount and remove the USB drive:
#cp -f /mnt/mtip32xx-<version>/mtip32xx.ko /target/lib/modules/'uname -r' /
kernel/drivers/block/mtip32xx
# unmount /mnt
18. Get a chrooted bash environment:
# chroot /target
# bash
If you are installing 12.04.3 or later, or if you are installing a P320h drive, go to step
20.
19. Resolve module dependencies and rebuild initramfs:
# depmod -a
# mkinitramfs -o/boot/initrd.img-'uname-r'
20. Install legacy grub and dkms:
#mkdir -p /boot/grub
# apt-get update
# apt-get install grub dkms
Press Y to proceed, if prompted.
21. Create or edit /boot/grub/device.map such that it contains this entry only:
(hd0) /dev/rssda
22. If present, edit /etc/default/grub and comment out GRUB_DISABLE_LINUX_UUID
23. Update grub:
# update-grub -y
24. Install grub in /dev/rssda:
# grub-install /dev/rssda
If this fails with The file /boot/grub/stage1 not read correctly error message, perform
the following steps:
a. Run grub directly:
# grub --boot-drive=/dev/rssda --device-map=/boot/grub/device.map
b. At the grub prompt, enter the following commands:
1. find /boot/grub/stage1
This command should print (hd0,0) or similar. If an error occurs, you may
have a GPT partition on the drive already. That partition must be cleared and
the process started again at step 4.
2. root (hd0,0)
Where (hd0,0) was copied from step 1 in this section.
3. setup (hd0)
You may need to press enter several times until the prompt returns.
4. quit
25. Type exit and press Enter twice to return to the top-level console.
26. Press ALT+F1, select Continue > Continue without boot loader.
Ignore the warning No boot loader installed and continue.
PDF: 09005aef8497e00a
P420m_P320h_HHHL_installation_guide.pdf - Rev. V 12/14 EN
31
Micron Technology, Inc. reserves the right to change products or specifications without notice.
© 2012 Micron Technology, Inc. All rights reserved.
Page 32

Citrix XenServer
P420m/P320h HHHL PCIe SSD Installation Guide
Using the P420m or P320h as a Boot Drive
27. Complete the installation and reboot the system. Make sure you do not update the
grub package using Ubuntu updates.
To use the P420m/P320h as a boot device in XenServer, only one drive can be used to
store the operating system during the installation. The installation process may not
work correctly if there are two or more drives installed.
Note: The support pack includes several ISO images; make sure to select the image that
matches the build ID of your system. The driver will not install correctly if the wrong
ISO image is used.
To find the build ID of your system:
1. In XenCenter, click XenServer Host.
2. Click the General tab.
3. Scroll down and expand Version Details to view the build number. The last six dig-
its of the ISO name corresponds to the build ID.
To use the P420m/P320h as a boot device in XenServer:
1. Copy the mtip32xx iso image file that is used to load the driver on the XenServer to
a USB device.
2. Boot from the XenServer CD/DVD.
3. When prompted to load a device driver, press F9 and load the mtip32xx iso image
from the USB device.
4. Remove the USB device.
5. Press Ctrl+Alt+F2 to open a terminal.
6. Locate the major number of the P420m/P320h drive through a shell:
[root@localhost ~]# Is -lh /dev/rssda
brw-rw----. 1 root disk 252, 0 Jun 10 18:14 /dev/rssda
In this example, the major number is 252.
7. Edit the /opt/xensource/installer/diskutil.py file using an editor of your choice
and add P420m/P320h to the disk_nodes variable in /opt/xensource/installer/
diskutil.py (between the device nodes /dev/ida and /dev/rd), replacing <major_num> with the number you obtained in step 6:
disk_nodes +=[ (<major_num>, x*16) for x in range (16) ]
8. Save and exit.
9. Start the installation by entering the following command:
#/opt/xensource/installer/init
10. Continue the installation and select the P420m/P320h device node (for example, /dev/rssda) as a disk for virtual machine storage when prompted.
11. Select Yes for supplemental pack installation.
12. After the preinstallation step is complete, provide the supplemental pack (for example, oem:mtip32xx 6.1.0-59235p) when prompted by inserting the USB device
again and locating the mtip32xx driver.
13. After the mtip32xx driver is installed, select SKIP when prompted for additional
supplemental packs.
14. Installation is complete when the installer ends at the shell.
15. Enter the reboot command to boot the XenServer.
PDF: 09005aef8497e00a
P420m_P320h_HHHL_installation_guide.pdf - Rev. V 12/14 EN
32
Micron Technology, Inc. reserves the right to change products or specifications without notice.
© 2012 Micron Technology, Inc. All rights reserved.
Page 33

Troubleshooting
Windows Driver
P420m/P320h HHHL PCIe SSD Installation Guide
Troubleshooting
Review the information in the following sections if you encounter issues with installation or drive operation:
• Windows Driver (page 33)
• Linux Driver (page 35)
• VMware Driver (page 39)
• RealSSD Manager (page 44)
• Configuration Issues (page 46)
• Performance Issues (page 46)
• Drive Behavior Issues (page 47)
W-1: Drive is not appearing online or times out in the Windows Disk Manager with an
I/O error
Confirm the drive and Micron driver have been successfully installed. Check whether
the LED status on the drive is blinking with an alternating flashing pattern. If this flashing pattern occurs, wait until the LED stops blinking (this can take several minutes), reboot the system, and try again. Review the Windows System Event or Linux message
logs for drive messages related to this event.
W-2: Unable to upgrade to the latest Micron driver for Windows using the MSI installer
file
When using the MSI installer file in the latest support pack, the Micron driver fails to
upgrade from an older version installed from an earlier support pack.
1. Uninstall the previous driver:
a. Open the Windows Control Panel.
b. Select Programs > Uninstall a program.
c. Select the Micron driver.
d. Click Uninstall and wait for the process to complete.
2. Open the Windows Device Manager.
3. Open the IDE ATA/ATAPI controller tree and right-click the P320h Controller.
4. Select Update Driver Software.
5. Click Browse my computer for driver software.
6. Click Let me pick from a list of device drivers on my computer.
7. Click Have Disk.
8. Click Browse and go to the support pack directory containing the appropriate
driver files. For example: Support Pack Root Directory\Windows Driver\Server2008R2 or \Windows Driver\Server2012
9. Click OK.
a. If the driver has been signed by Microsoft, the driver icon will have a green
checkmark next to it and the description will state This driver is digitally sign-
ed.
b. If the driver has not been signed by Microsoft, the driver icon will not have a
green checkmark next to it and the description will state This driver has an
Authenticode(tm) signature.
During this upgrade, the Micron driver will appear without a checkmark (appearing as it has not been signed by Microsoft).
PDF: 09005aef8497e00a
P420m_P320h_HHHL_installation_guide.pdf - Rev. V 12/14 EN
33
Micron Technology, Inc. reserves the right to change products or specifications without notice.
© 2012 Micron Technology, Inc. All rights reserved.
Page 34

P420m/P320h HHHL PCIe SSD Installation Guide
Troubleshooting
10. Select the driver you want to install (in this case, option b).
11. Click Next to install the driver.
The latest driver should now be installed correctly.
W-3: Delay in detection of surprised-removed drive while IO is in progress
In some cases during a surprise removal, depending on the type of IO that is running on
the drive, the drive may take some time to disappear from the Windows Device Manager instead of disappearing immediately. Depending on the timing between the driver
execution path and surprise removal event, device entries will be removed within few
seconds or after the timeout period for an outstanding command expires. This is expected behavior. The delay it takes for the drive to disappear in the Device Manager under
certain conditions can be safely ignored.
W-4: In Windows 8, upgrading the driver requires a restart before the new driver is loaded
In the Windows 8 kernel, after upgrading the driver to later version, Windows may request a restart of the computer to complete the driver upgrade. Because the upgrade
process involves changes to the Windows registry and other areas, a system restart
helps confirm the updated driver completes successfully without impacting other processes in the Windows OS. The Windows kernel, specifically the plug and play driver,
the bus driver, and the storport driver, determine if a reboot is required (it is not required in some cases, depending on the state of the devices in the system; the Micron
driver does not request the restart). It is recommended to restart the computer if
prompted.
W-5: In Windows 8.1 and Windows Server 2012 (build versions earlier than 9477), uninstalling the driver using the MSI installer/control panel is not successful
In Windows 8 kernel build versions earlier than 9477, uninstalling the driver using the
MSI installer/Windows control panel will not complete until the driver is removed via
the Device Manager. To workaround this issue, update the Windows OS build to a version greater than 9477.
W-6: The OS installation on a P420m/P320h drive fails with the error: "Windows cannot be installed on this partition"
If the OS installation on a P420m/P320h drive fails intermittently with the above error,
perform a secure erase on the drive using RSSDM before installing the OS.
W-7: System may intermittently perform poorly or stop responding with the latest Micron driver in Windows Server 2008 R2
When the latest Micron driver is used with the Windows Server 2008 R2 OS, the system
may intermittently perform poorly or stop responding. A supported hotfix is available
from Microsoft to resolve this issue:
http://support.microsoft.com/kb/2468345
To apply this hotfix, the system must be running either Windows Server 2008 R2 or Windows Server 2008 R2 Service Pack 1 (SP1).
Follow these steps to ensure the miniport drivers that use the storport.sys driver can access more than 4GB of physical memory:
PDF: 09005aef8497e00a
P420m_P320h_HHHL_installation_guide.pdf - Rev. V 12/14 EN
34
Micron Technology, Inc. reserves the right to change products or specifications without notice.
© 2012 Micron Technology, Inc. All rights reserved.
Page 35

P420m/P320h HHHL PCIe SSD Installation Guide
Troubleshooting
1. Install the hotfix provided by Microsoft on the affected computers running Win-
dows Server 2008 R2.
2. Create a registry entry under Storport miniport driver:
a. Click Start.
b. Enter regedit in the Start Search box, and then press enter.
c. Locate and then click the following registry subkey:
HKEY_LOCAL_MACHINE\SYSTEM\CurrentControlSet\services\<MINIPORT>\ParametersNote
Note: <MINIPORT> is the name of the storport miniport driver.
d. Open the Edit menu, choose New, and click DWORD Value.
e. Enter Supports64BitAddressing, and then press enter.
f. Right-click Supports 64Bit Addressing, and then click Modify.
g. In the Value data box, enter a nonzero value.
h. Exit Registry Editor.
W-8: After uninstalling the driver using MSI installer, the drive is listed as an "unknown device" instead of "mass storage controller" under Other Devices in the Device
Manager
When the driver is uninstalled using MSI installer, the P420m/P320h drive is detected as
an unknown device instead of displaying as a mass storage controller. The issue persists
after a reboot.
Linux Driver
Uninstall the unknown device in the Device Manager and execute the "scan for hardware changes" option. The P420m/P320h drive should now be listed as a mass storage
controller under Other Devices.
W-9: In a system running Windows 7 with two drives installed, uninstalling the driver
for one drive results in a "not digitally signed" message for the other drive in the Storage Controller section of the Device Manager
This is an expected behavior in Windows 7 kernel and should not be treated as an error.
L-1: Driver upgrade may be ignored in Linux initial RAM disk (initrd) multi-kernel
configurations
In a multi-kernel configuration Linux boot environment with different initrds installed
in custom locations for each OS version, the Linux driver's RPM installer will install the
Micron driver in the default initrd specified in the system's /boot directory. This may be
a different initrd from which the user is actually booting. This may result in a Micron
driver upgrade that may be ignored during a system reboot.
Make sure the default initrd filename and location are configured in the /boot directory
prior to upgrading the Linux driver for each specific kernel. Once all initrd files are updated with the new driver, the boot environment can be reconfigured back to your custom settings.
PDF: 09005aef8497e00a
P420m_P320h_HHHL_installation_guide.pdf - Rev. V 12/14 EN
35
Micron Technology, Inc. reserves the right to change products or specifications without notice.
© 2012 Micron Technology, Inc. All rights reserved.
Page 36

P420m/P320h HHHL PCIe SSD Installation Guide
Troubleshooting
L-2: Install errors are occurring after an attempt was made to install the driver from
the appropriate rpm file
Verify the version of RHEL or SLES you are using. The Micron driver supports either
RHEL 5.5 and later or SLES 11 and later. Run uname –a to check the kernel version. It
should be 2.6.25 or later to install the driver. If your operating system or kernel version
is earlier, upgrade to the latest Micron-supported Linux operating system release and
re-install the driver.
L-3: Performance data using iostat is unavailable
The Linux driver contains an internal parameter that disables support for iostat. To enable iostat support:
1. Download the latest support pack. The driver name is mtip32xx.
Run Ismod | grep mti* to determine the name of the driver (referenced as <driver_name> in the instructions below).
2. Log in as root.
Root access is required. If you do not have root access, enable access:
a. Enter the following command:
/lib/modules/` uname –r` /extra/<driver_name>/<driver_name>.ko
b. Run chmod 777<driver_name>.ko to adjust write permissions.
3. Install the latest Linux driver from the support pack following the instructions in
this guide. After installation, follow these steps:
a. Verify the driver name following step 1 in this section.
b. Verify that /dev/rssda appears when fdisk –| is run.
4. Uninstall the driver and reinstall the driver with stats flag enabled:
a. Enter the following command:
modprobe –r <driver_name>
b. insmod /lib/modules/`uname –r` /extra/<driver_name>/<driver_name>.ko
stats=1
5. Run some I/O on the drive using any I/O stress tool such as FIO or Vdbench. Dur-
6. Verify the diskstat counts for rssd or stat output are being populated.
L-4: XenServer installation script displays warning message
When trying to install the Linux driver in XenServer 6.1 using the install.sh script for a
second time (after installing the driver using install.sh and removing the XenServer
RPMs mtip32xx-modules-xen and mtip32xx-modules-kdump), the following warning
message appears:
Warning: 'Micron mtip32xx driver' is already installed
This is expected behavior. The install.sh script originates from the XenServer host; it is
not a file maintained or updated by Micron.
L-5: In RHEL 5.x, the 16th partition (/dev/rssda16) is inaccessible because the driver
supports 15 partitions only
By design in RHEL 5.x, the kernel supports 16 minor devices, which includes the entire
disk plus 15 partitions.
PDF: 09005aef8497e00a
P420m_P320h_HHHL_installation_guide.pdf - Rev. V 12/14 EN
ing this time, run one of the following commands:
• cat /proc/diskstat or
• cat /sys/block/rssda/stat
36
Micron Technology, Inc. reserves the right to change products or specifications without notice.
© 2012 Micron Technology, Inc. All rights reserved.
Page 37

P420m/P320h HHHL PCIe SSD Installation Guide
Troubleshooting
In RHEL 6.x and SLES 11, the kernel supports a maximum 255 partitions; therefore, the
maximum number of minor devices is 256, which supports 255 partitions.
Make sure to create no more partitions than what is actually supported by your operating system kernel.
L-6: How to perform an orderly or surprise removal/insertion with Micron's 2.5-inch
drives using SLES 11 SPI operating system without errors
In SLES 11 SP1, to perform a surprise removal and surprise insertion without error, you
must append a correction to the kernel boot line. This is a known limitation of the SLES
kernel.
Append the following line to the kernel boot command line to support orderly surprise
removal/insertion:
pci=noaer nox2apic
1. Open grub file /boot/efi/EFI/redhat/grub.conf in UEFI BIOS and /boot/grub/
menu.lst in legacy BIOS.
2. Add pci=near nox2apci option to kernel boot command line:
kernel /boot/vmlinuz-2.6.32-358.el6.x86_64 ro root=UUID=516031cae380-4855-9d7a-c4a30799973a rd_NO_LUKS rd_NO_LVM LANG=en_US.UTF-8
rd_NO_MD SYSFONT=latarcyrheb-sun16 crashkernel=128M KEYBOARDTYPE=pc
KEYTABLE=us rd_NO_DM rhgb quiet pci=noaer nox2apic
L-7: Stale entry may be created in /etc/mtab file after surprise removal of mounted file
system for the P420m/P320h drive
If a file system is mounted on the drive and the drive is surprise removed, the drive will
go into FTL rebuild state on the next surprise insertion. After FTL rebuild completes, the
system will restore the previous device node (/dev/rssdX), but you may notice a stale
entry in /etc/mtab file. Additionally, the new node will be detected as the next available
letter of rssdX,
To clear the stale mtab entry, issue an unmount for this device node entry or restart the
system.
L-8: Using the P420m/P320h as a boot drive in RHEL 5.x
The RHEL 5.x kernel does not provide a default boot loader to boot into RHEL 5.x;
therefore, a /boot partition must created while installing RHEL 5.x on the drive.
This /boot partition must be:
• Separate from the /(root) partition
• The first partition on the device
• The primary partition
• At least 200 MB
Continue to install the OS on the drive following the instructions in Using the P420m or
P320h as a Boot Drive (page 22).
PDF: 09005aef8497e00a
P420m_P320h_HHHL_installation_guide.pdf - Rev. V 12/14 EN
37
Micron Technology, Inc. reserves the right to change products or specifications without notice.
© 2012 Micron Technology, Inc. All rights reserved.
Page 38

P420m/P320h HHHL PCIe SSD Installation Guide
Troubleshooting
L-9: Enabling processor C-states can have a significant negative performance impact
on the P420m/P320h drive
On high-performance SSDs like the P320h and P420m installed in Nehalem- and Sandybridge-class Intel CPUs, processor C-states can have a significant negative performance
impact. Enabling C-states actually starts disabling portions of the CPU core(s) when it
detects low/no-load conditions on the processor. This reduces the number of cores
available to handle incoming IO threads, which can reduce performance.
For optimal performance results, disable processor C-states prior to running IO on the
drive. To disable C-states, add the following to your kernel boot line:
intel_idle.max_cstate=0 processor.max_cstate=1
For more information on C-states, see http://www.hardwaresecrets.com/article/611
L-10: NUMA rebinding may be required to obtain better IO performance on P420m/
P320h drives installed in some multiprocessor or multicore systems
When the Linux driver is loaded, each drive gets assigned a node in the /dev directory
with the 'rssd' prefix. These nodes are the entry points through which normal queued
IO is performed. The NUMA-aware Micron driver will place a node here called 'numa'
which will provide information on NUMA bindings it is using for the drive. To obtain
better performance on P320h/P420m drives, the IO submission threads must also be affinitized to the same node as the driver's device instance memory and IO completion
threads. The NUMA node the driver has bound the p320h/p420m device to, and the
processor where the node is located, should be same as that of the node which is physically close to the slot where the drive resides. Otherwise, IO performance could be significantly reduced.
To rebind the drive's node to the NUMA node that the drive is physically close to:
1. Obtain the NUMA binding of device by entering the following command:
cat /sys/block/rssdX/numa
Sample output: Node: 0 (on package 0) PCI device closest to node 1 Device memory on node 0 Cores: 0 2 4 6 8 10 IRQ: 0 wq0: 0 wq1: 2 wq2: 4 wq3: 0 wq4: 2 wq5: 4
wq6: 4 wq7: 2
In the example output, the driver has bound the drive to processor node 0. However, because the drive is physically close to processor node 1, you must rebind the
processor node.
2. Rebind the processor node by entering the following command:
echo "rssdX=Y" > /sys/module/mtip32xx/drivers/pci:mtip32xx/numa_bindings
Where: X = drive letter and Y = the node near the PCIe device
For example, if device /dev/rssda was used (one drive in the system) and node 0
was originally bound, but node 1 is physically closer, use the following command:
echo "rssda=1" > /sys/module/mtip32xx/drivers/pci:mtip32xx/numa_bindings
L-11: Which operating systems support orderly/surprise removal/insertion?
Orderly/surprise removal/insertion is supported on RHEL 6.x, RHEL 7.x, and SLES 11
SP2/SP3 OS versions only.
PDF: 09005aef8497e00a
P420m_P320h_HHHL_installation_guide.pdf - Rev. V 12/14 EN
38
Micron Technology, Inc. reserves the right to change products or specifications without notice.
© 2012 Micron Technology, Inc. All rights reserved.
Page 39

VMware Driver
P420m/P320h HHHL PCIe SSD Installation Guide
Troubleshooting
L-12: Can orderly/surprise removal/insertion be performed on an OS-bootable drive?
No, orderly/surprise removal/insertion should not be attempted on an OS-bootable
drive. The file system may become corrupted and the system unresponsive.
L-13: Error message after installing the Micron driver on XenServer 6.2 systems
The following error appears after installing the Micron driver on Xenserver 6.2: Error:
Module mtip32xx is in use.
This error occurs when a background process holds the existing driver module.
Run the following command to release the kernel process holding the existing driver
module: undevtrigger
L-14: Can hdparm be used instead of RealSSD Manager to run a secure erase operation or read SMART data on the P420m/P320h drive?
The hdparm tool versions 9.15–9.41 has a bug (http://sourceforge.net/p/hdparm/bugs/
49/) in the hdio_taskfile structure that has incompatible bit fields in the Linux kernel.
This prevents the tool from reliably performing a secure erase operation or issuing ATA
commands to the drive.
VM-1: How do I configure VMware to increase drive performance?
Using paravirtualized network and storage adapters can increase performance by reducing the I/O overhead of the device driver within each virtual machine (VM). VMs
running Windows or Linux have different support requirements for paravirtual controllers for boot devices. In general, without including the VMware tools in the boot image
of a VM running Windows, you will not be able to boot from a paravirtual storage controller. For VMs running Linux, it is possible to boot and install the OS on a paravirtual
storage controller without VMware tools.
Note: Always install the latest VMware tools driver in each VM to take full advantage of
paravirtual hardware.
VM-2: What configurations can increase performance?
In Windows systems, use the PVSCSI storage adapter and set the maximum queue
depth to 255 in the VM's registry settings.
In Linux systems, modify, build, and install a modified version of the PVSCSI driver to
reach 255 queue depth in Linux. (The maximum queue depth of the standard PVSCSI
driver is set to 64. )
Set the kernel parameter Disk.SchedNumReqOutstanding to 255.
ESXi Kernel prior to ESX5.5i:
• In VSphere, click on the Configuration tab for the server and select Software > Advanced Settings.
• Change the Disk.SchedNumReqOutstanding from 32 to the maximum queue depth
value (255).
• Enable storage I/O control on all datastores by opening VSphere and selecting Stor-
age > Datastore > Properties.
PDF: 09005aef8497e00a
P420m_P320h_HHHL_installation_guide.pdf - Rev. V 12/14 EN
39
Micron Technology, Inc. reserves the right to change products or specifications without notice.
© 2012 Micron Technology, Inc. All rights reserved.
Page 40

P420m/P320h HHHL PCIe SSD Installation Guide
Troubleshooting
ESX5.5i and later:
1. Enable the Secure Shell (SSH) option in ESX 5.5i kernel.
2. Open an SSH session with the host.
3. Enter the following command to obtain the name of the Micron drive:
esxcli storage core device list | grep t10*
One or more devices should appear. The Micron drive name starts with t10.ATA*.
4. Copy the entire device name string.
5. Enter the following command to display Micron drive values:
esxcli storage core device list -d <drive_name_string>
6. Enter the following command to change the queue depth value (the queue depth
value appears under No of outstanding IOs with competing worlds:):
esxcli storage core device set -d <drive_name_string> -O 255
7. Enter the following command to verify the new setting:
esxcli storage core device list -d <drive_name_string>
VM-3: How do I configure the PVSCSI adapter's settings in Windows?
Change the disk queue depth for a paravirtualized SCSI adapter:
1. Open the Windows Registry Editor (Start > Run > regedit).
2. Navigate to the following path; if the end of the path is not created, create the last
keys:
HKEY_LOCAL_MACHINE\SYSTEM\CurrentControlSet\Services
3. In the Device Key, create or modify a string value named DriverParameter.
4. Set the value data of DriverParameter to MaxQueueDepth=255. Do not remove the
quotation marks from the MaxQueueDepth value.
5. Reboot the guest operating system.
Note: ESX LUN Queue Depth (default setting is 30 on Emulex and 32 on QLogic) needs
to be changed if you want to go beyond 64 with the PVSCSI drive.
VM-4: Where does the device name t10.ATA_________### come from?
The P320h/P420m drive contains an ATA interface for management commands. The
SCSI driver translates the SCSI inquiry (and other) requests to the appropriate ATA
command. This is not true for I/O READ/WRITE commands which use a proprietary extension to AHCI and the NCQ command protocol to reach the 256 queue depth (255
with 1 reserved for internal commands).
The SCSI driver supports the SAT-3 specification which uses the t10 format for device
identification. VMware displays this format as the device identifier.
VM-5: Is raw device mapping (RDM) supported?
VMware does not support RDM of local storage; however, numerous online articles describe how to perform manual mapping of any local storage device to RDM, both physical and virtual RDM.
In performance tests run at Micron, an average improvement in latency of 5µs was seen
over standard VMDK mapping.
PDF: 09005aef8497e00a
P420m_P320h_HHHL_installation_guide.pdf - Rev. V 12/14 EN
40
Micron Technology, Inc. reserves the right to change products or specifications without notice.
© 2012 Micron Technology, Inc. All rights reserved.
Page 41

P420m/P320h HHHL PCIe SSD Installation Guide
Troubleshooting
VM-6: Can the P320h/P420m SCSI driver be unloaded?
VMware does not support the ability to unload a device driver unless the driver load
fails and there are no kernel resources with open handles to the driver API; therefore,
after the driver loads successfully, there is no way to unbind the kernel handles to the
storage driver, resulting in the P320h/P420m SCSI driver that cannot be unloaded.
VM-7: Module information for mtip32xx-scsi indicates conflicting information about
the signed state of the driver
For ESXI 5.0: VMware no longer signs the binary image during certification; only the installation package is signed. To verify the driver installation image is signed, run the following command:
~ # esxcli software vib list | grep mtip
The output should appear as follows:
scsi-mtip32xx-scsi 2.3.0-1OEM.500.0.0.472560 Micron VMwareCertified 2012-11-29
"VMware Certified" indicates the installation package is signed and certified by
VMware.
VM-8: Can the driver version be downgraded to an older version?
The following error may occur when trying to install an older version of the Micron
driver on a system running a newer version of the driver:
"The following problems were encountered trying to resolve dependencies: Requested
VIB 'name of the VIB file' is obsoleted by the host."
Uninstall any existing driver version before installing the older version. Refer to the instructions in this guide for removing a driver.
VM-9: When using tools such as esxcfg-scsidevs -l to inspect device details, the vendor
appears as ATA rather than Micron
VMware lists the vendor as ATA for compliance with the SAT specification. Changing
this value violates the specification. For actual vendor details, see the device identifier
and model information.
VM-10: A datastore cannot be created on the drive immediately following a SANITIZE
or SECURE ERASE operation; how can a datastore be created?
Because the kernel maintains its own cache of information, the kernel may become
confused following a SANITIZE or a SECURE ERASE operation when there was a previous partition table or datastore on the device. When the kernel attempts to retrieve information from its cache, it may receive an error. In these cases, the kernel marks the
device as read-only and a reboot is required to resolve the issue.
Note: It is recommended to unmount any datastores on the drive prior to performing a
SECURE ERASE or SANITIZE operation, and then reboot the system to ensure the kernel has the proper state of the partition table and any related formatting.
PDF: 09005aef8497e00a
P420m_P320h_HHHL_installation_guide.pdf - Rev. V 12/14 EN
41
Micron Technology, Inc. reserves the right to change products or specifications without notice.
© 2012 Micron Technology, Inc. All rights reserved.
Page 42

P420m/P320h HHHL PCIe SSD Installation Guide
Troubleshooting
VM-11: The model number of the drive appears as 'Model: mtip32xx' for some drives
and as 'Model: Micron P420m-MTF' for others when listing devices using the esxcfgscsidevs -l command
Model number reporting is based on the device identifier type. For P320h drives, the
product identifier field (mtip32xx), which is a static field, is reported. For P420m drives,
the model number (P420m-MTF), which is gathered by the device rather than a static
field, is reported. This provides backward-compatibility with drivers including and prior
to version 2.4.10.
This model number reporting is implemented in driver version 2.5.5 and ensures that
datastore signatures are compatible with the next version of VSphere 2013 (v5.5). It also
ensures that P420m drives formatted on ESXi 5.0 or 5.1 systems do not have to regenerate signatures (only P320h drives must regenerate signatures).
VM-12: What steps should I perform on my system before upgrading from ESX 5.0/5.1
to ESX 5.5?
1. Migrate all of your virtual machines and datastores off of the P320h/P420m drive.
2. Uninstall the Micron driver for ESX 5.0/5.1. (This driver cannot be used with the
ESX 5.5 inbox driver.)
3. Perform the kernel upgrade process according to the VMware documentation. The
inbox driver for the P320h/P420m is automatically installed during this process.
4. Reformat all P320h/P420m drives within the ESX 5.5 environment.
5. Create new datastores using the P320h/P420m drives in ESX 5.5.
6. Copy all of your migrated data back to the new datastore(s) created in ESX 5.5.
Note: If you are using a P320h drive and upgraded the kernel before migrating your data
from the datastores created in ESX 5.0/5.1, follow the instructions in VM-13, and then
continue with the installation steps above.
Note: If you are using a P420m drive, you should not encounter any migration issues
from ESX 5.0/5.1 to ESX 5.5. However, it is recommended to migrate any data in your
datastores before upgrading the kernel version.
VM-13: I have a system with P320h drives and upgraded from ESX 5.0/5.1 to 5.5, but I
did not transfer the datastores. How do I access the datastores created during the ESX
5.0/5.1 installation?
Note: This issue applies to P320h drives and should not occur with P420m drives.
Note: The driver will not load on an AMD + ATI chipset-based server, currently identi-
fied as HP Proliant DL385 G7 and G8 servers. There is no workaround for this system.
The cause of this issue has to do with the signature change between ESX 5.5 and ESX
5.0/5.1 datastores with P320h drives. The ESX 5.5 kernel may not recognize the signatures of datastores using the P320h created in ESX 5.0/5.1; therefore, any pre-existing
datastores may not mount after the ESX 5.5 kernel loads because the datastores are not
recognized by the kernel. A temporary workaround is to manually re-import each datastore with their existing signature; however, this re-import process must be repeated
upon each reboot.
The following VMware articles provide steps on how to re-import and maintain the signature of your existing datastores:
• http://kb.vmware.com/selfservice/microsites/search.do?cmd=displayKC&doc-
Type=kc&externalId=1011387
PDF: 09005aef8497e00a
P420m_P320h_HHHL_installation_guide.pdf - Rev. V 12/14 EN
42
Micron Technology, Inc. reserves the right to change products or specifications without notice.
© 2012 Micron Technology, Inc. All rights reserved.
Page 43

P420m/P320h HHHL PCIe SSD Installation Guide
Troubleshooting
• http://pubs.vmware.com/vsphere-50/index.jsp?topic=%2Fcom.vmware.vsphere.stor-
age.doc_50%2FGUID-5A4E2248-12CB-4A10-B167-79D3D13D3751.html
To ensure the datastores are persistent after reboots in ESX 5.5, mount the datastores
manually, migrate your virtual machines and virtual disks to a temporary device, and
then migrate your data from the temporary device back to the datastores you created in
ESX 5.5.
The following steps provide a workaround for migrating your data from datastores previously created using the P320h in ESX 5.0/5.1 within the ESX 5.5 environment:
1. Log in to the server console.
2. Enter the following at the command prompt to list the mounted datastores and
volume signatures: esxcli storage filesystem list
3. Enter the following to list the snapshot volume: esxcli storage vmfs snapshot list
4. Make note of the VMFS UUID and volume name.
5. Mount the snapshot volume and list the new mount name.
6. Enter the following at the command prompt: esxcli storage vmfs snapshot mount
–volume-uuid=<VMFS UUID>
Where VMFS UUID is the value noted in step 4.
7. Repeat step 2. Note your snapshot volume name(s) should appear in the filesystem list.
8. Log in to the Vsphere client and migrate your virtual machines and virtual disks
with the VMFS UUID and volume ID defined earlier.
9. Complete steps 4–6 in VM-12 to move your virtual machines and data onto the
new datastores created in ESX 5.5.
See the following for complete details on performing the migration process: http://
pubs.vmware.com/vsphere-51/index.jsp?topic=%2Fcom.vmware.vsphere.vcenterhost.doc%2FGUID-23E67822-4559-4870-982A-BCE2BB88D491.html
VM-14: I want to upgrade my system from ESX 5.0/5.1 to 5.5 or later, but I do not see
the ability to migrate my VMs and virtual disks to an alternate datastore. How can I
restore functionality of my datastores after an upgrade?
You must re-sign the datastore volumes to allow for permanent auto-mounting of the
datastores. Follow these steps during the installation of ESX 5.5:
1. List the current snapshot volumes along with their signatures by entering the following command at the kernel console command line: esxcli storage vmfs snap-
shot list
2. Generate a new signature for the volume by entering the following command: esxcli storage vmfs snapshot resignature --volume-uuid=<old_signature_value>
3. For each VM file (*.vmx) path that references the old datastore, perform the following steps:
a. Remove the VM from the hypervisor inventory but do not delete it or any
other virtual disks.
b. Edit the VM configuration file and replace the old datastore uuid with the
new uuid value.
c. For each changed VM configuration, add them again to the virtual machine
inventory and re-run the virtual machine to make sure they load.
PDF: 09005aef8497e00a
P420m_P320h_HHHL_installation_guide.pdf - Rev. V 12/14 EN
43
Micron Technology, Inc. reserves the right to change products or specifications without notice.
© 2012 Micron Technology, Inc. All rights reserved.
Page 44

RealSSD Manager
P420m/P320h HHHL PCIe SSD Installation Guide
Troubleshooting
VM-15: Can the P320h/P420m drive be installed on an AMD-based CPU and chipset
platform?
The P320h/P420m drive can be installed on an AMD-based system using an ESX version
prior to ESX 5.5i.
On systems using ESX5.5i and later, the Micron driver is not able to initialize the drive in
the kernel, resulting in the drive not appearing as a device node in the /dev/disks list.
To work around this issue, it is recommended to use an Intel CPU and chipset platform
(all versions of ESX are supported on these platforms), or downgrade the kernel version
to ESX 5.0 or 5.1i.
RSSDM-1: The RSSDM GUI does not display correctly or does not load
For support pack versions earlier than 138, the RSSDM GUI requires that 64-bit Oracleonly JRE version 1.6 update 10 or later be installed on the system before it can be used.
Ensure that multiple versions of Java are not running on the system and that the system
path is pointing to an Oracle Java version 1.6 update 10 or later. The RSSDM CLI does
not require Java. All RSSDM functions are available through the CLI if Java is not preinstalled on the host system.
RSSDM-2: The firmware was successfully updated on the drive, but RSSDM still shows
the previous version
Restart (warm boot) the system and run RSSDM again. The updated firmware version
should display correctly.
RSSDM-3: The Flash Translation Layer (FTL) rebuild status in the RealSSD Manager
(RSSDM) does not steadily increase and may decrease
The firmware rebuild percentage reported by RSSDM during the FTL rebuild process
may increase or decrease. This is expected behavior because of the firmware algorithm
that reports the progress of the FTL rebuild (the rebuild percentage is just an estimate of
completion of the rebuild progress). Whenever a drive experiences a nonstandard or
unexpected power-down event, the drive needs to rebuild its internal LBA-to-NAND address lookup (FTL) tables to prevent data loss. The drive does not respond to host commands during this rebuild. Because this process takes some time to complete, RSSDM
records the percentage complete until the drive is online again. The progress of the rebuild is reported in both the RSSDM CLI and GUI.
RSSDM-4: System recognizes the drive, but the drive does not appear in RSSDM
The system detects the drive (in Windows Disk Manager/Device Manager or in Linux
using fdisk -l); however, in the RSSDM GUI agent or command line, the following error
message displays: "You must run the Agent as a privileged user with admin rights in order to issue the required API command." To correct this issue:
In Linux: Either log in as a root user with root privileges or use 'sudo rssdm -L' to run
the CLI or 'sudo RealSSDManagerClient.run' to launch the GUI agent. You will need to
run RSSDM in /opt/MicronTechnology/RealSSDManager if you have not modified your
shell path to include this directory.
PDF: 09005aef8497e00a
P420m_P320h_HHHL_installation_guide.pdf - Rev. V 12/14 EN
44
Micron Technology, Inc. reserves the right to change products or specifications without notice.
© 2012 Micron Technology, Inc. All rights reserved.
Page 45

P420m/P320h HHHL PCIe SSD Installation Guide
Troubleshooting
In Windows: Do one of the following options: Run RSSDM as an administrator in the
command prompt, or change the Windows Security Policy and disable Admin Approval
mode.
Option 1: Run RSSDM as an administrator in the command prompt:
1. Open the Windows Start menu > All Programs > Accessories.
2. Right-click Command Prompt > Run as Administrator.
3. Launch the RSSDM GUI agent or run RSSDM CLI in the command line prompt.
Option 2 (preferred): Change the Security Policy and disable Admin Approval mode:
1. Open the Windows Start menu and enter Run in the Search programs and files
field.
2. Enter secpol.msc.
3. Open Local Policies > Security Options.
4. Disable the option User Account Control: Run all administrators in Admin Ap-
proval Mode.
5. Reboot the system.
6. Restart the RSSDM GUI agent or run RSSDM CLI in the command line prompt.
RSSDM-5: RSSDM does not display drive information
The latest version of RSSDM in support pack 134 and later does not display drive information when used with a previously installed Micron driver version from an earlier support pack.
Update both RSSDM and the Micron driver using support pack release 134 or later, and
then reboot the system to make sure both versions are installed. The RSSDM GUI agent
and CLI should now detect the drives.
RSSDM-6: The drive appears online in RSSDM and the LED is green; however, the
dmesg logs indicate the drive is not responding to I/O commands
Use RSSDM to obtain the debug data from the drive and then send the data to the Micron application engineering (AE) team for review. Also try to determine if the problem
is specific to the drive or to the system by testing the drive in a different PCIe slot in the
same system, and then testing the drive in a different system.
RSSDM-7: PREPARE TO REMOVE command fails on a P320h/P420m drive configured
as a boot drive
Running the PREPARE TO REMOVE command in RSSDM (GUI or CLI) fails on a P320h/
P420m drive configured as a boot drive.
In Windows, RSSDM reports "The drive has rejected the operation" with status code 42;
in Linux, the prepare to remove operation completes with errors and the OS fails with
an I/O error.
This is the expected behavior for the drive. Do not attempt run the PREPARE TO REMOVE command in RSSDM on any P320h/P420m drive configured as a boot drive.
PDF: 09005aef8497e00a
P420m_P320h_HHHL_installation_guide.pdf - Rev. V 12/14 EN
45
Micron Technology, Inc. reserves the right to change products or specifications without notice.
© 2012 Micron Technology, Inc. All rights reserved.
Page 46

Configuration Issues
C-1: A secure erase must be performed on the drive, but RSSDM is prompting for a
password; what is the password?
The password for performing a secure erase on the drive is ffff (lower case).
C-2: How is write cache enabled?
In support pack releases 134 and later, the RSSDM CLI and GUI each provide an option
to enable the drive write cache. Because the drive does not contain a capacitor-backed
write cache, data may be lost and/or UECC errors may occur if the drive encounters an
unexpected power loss when the write cache setting is enabled.
If you plan to enable write cache to improve performance, make sure to review the
warning message that appears in RSSDM when you attempt to enable this option. Additionally, make sure no surprise (unexpected) power-down events occur on the system. If
you are uncertain whether these surprise power-down events may occur, leave the setting in its default disabled state.
Note: On the P420m drive, which contains a capacitor-backed write cache, the write
cache setting is permanently enabled and cannot be disabled.
C-3: Performing a SANITIZE BLOCK ERASE operation on an NTFS partition while running I/O stress tests does not abort the I/O operations
P420m/P320h HHHL PCIe SSD Installation Guide
Troubleshooting
Performance Issues
If Iometer or other Windows-based I/O stress tool is running on an NTFS-formatted
partition and while the I/O is in progress a SANITIZE BLOCK ERASE is performed using
RSSDM, the I/O operations do not abort.
This is expected behavior. To avoid this behavior, unmount the NTFS partitioned volume before executing the SANITIZE BLOCK ERASE command using RSSDM.
C-4: The system hangs when issuing an I/O during a SANITIZE BLOCK ERASE operation
Issuing I/Os during a SANITIZE BLOCK ERASE operation may cause abort conditions
while the driver queues incoming requests while it waits for the drive operation to complete. After the drive operation completes, the driver will issue all queued I/O requests if
there are any remaining following the operation. The file system and partition table will
no longer be present after this operation completes. This is expected behavior. The datastore should be unmounted before issuing the SANITIZE BLOCK ERASE operaiton.
P-1: The drive is not responsive and the LED is not solid green
Check the LED codes in Table 2 (page 50).
P-2: Performance tests run on the drive are lower than the values specified in the data
sheet
Follow these steps to optimize the performance of the drive:
1. Verify you are following Micron's recommended SSD testing flow when running
performance tests on the drive. See Micron's Best Practices for SSD Performance
Management technical marketing brief for details on the testing flow.
PDF: 09005aef8497e00a
P420m_P320h_HHHL_installation_guide.pdf - Rev. V 12/14 EN
46
Micron Technology, Inc. reserves the right to change products or specifications without notice.
© 2012 Micron Technology, Inc. All rights reserved.
Page 47

P420m/P320h HHHL PCIe SSD Installation Guide
Troubleshooting
2. Verify the Power Limiting setting on the drive is disabled. In the command line,
run: rssdm -L -d
Power limiting throttles host I/O traffic to keep drive power under the 25W PCIe
CEM slot limit. The side effect of this behavior is reduced performance.
3. Make sure the system running the performance tests meets the hardware requirements listed in System Recommendations (page 7).
4. Follow the recommendations documented in Micron's How System Settings Im-
pact PCIe SSD Performance white paper.
5. Update the Micron driver and firmware to the version available in the latest support pack on micron.com.
6. Check the drive temperature to verify that thermal limiting is not affecting performance:
a. Run rssdm -S.
b. Check SMART attribute 194 (enclosure temperature) and compare value to
the temp throttle threshold in C.
c. If the enclosure temperature is greater than or equal to the threshold temper-
ature, performance decreases.
P-3: How can the Power Limiting setting be enabled on the drive?
If your system is running a support pack release later than B126.01, the power limiting
setting is disabled by default.
Note: Enabling the power limit setting has a performance impact. Observed performance will be lower with this setting enabled. However, the RMS maximum power of the
drive will be under 25W.
To enable the power limiting setting, use the RSSDM command line interface (CLI):
Drive Behavior Issues
DB-1: When disabling an ATA channel using Windows Device Manager in Windows
Server 2008, the Microsoft Management Console (MMC) stops responding, the computer will not shut down, and a "Stop 0x0000009F" message appears after 10 minutes
This is an issue specific to Microsoft Windows and is not related to the Micron driver.
The issue has been corrected for Windows Server 2008 as a hot fix; check the Microsoft
web site for details.
DB-2: A partition on the drive is not accessible in the Windows Disk Manager if a power loss occurs shortly after the partition is created
In the Windows 7 x64 environment, if a partition is created, formatted, and written to
on a P320h/P420m drive and a sudden power loss occurs, the partition will not be accessible via the Windows Disk Manager on power-up. This is a known issue with this
Windows environment. The issue and workaround is documented at: http://
support.microsoft.com/kb/2001877
1. In the command line, type the following command where <Drive_id> is the ID
number of the drive, which can be found by running rssdm -L:
rssdm –M –p 1 –n<Drive_id>
2. Power-cycle the system.
3. Verify the setting change by running the following command:
rssdm –L –d
PDF: 09005aef8497e00a
P420m_P320h_HHHL_installation_guide.pdf - Rev. V 12/14 EN
47
Micron Technology, Inc. reserves the right to change products or specifications without notice.
© 2012 Micron Technology, Inc. All rights reserved.
Page 48

P420m/P320h HHHL PCIe SSD Installation Guide
Troubleshooting
DB-3: The Percentage Lifetime Used or Write Protect Progress SMART parameter report shows 100% for the drive
These reports both indicate the drive is in the write protect state. In this state, no additional data can be written to the drive (the drive is in a read-only mode). All data on the
drive is preserved and can be read or backed up. Back up the data on the drive. After the
data is backed up, it is highly recommended to replace the drive and refrain from using
it.
DB-4: What are the behavior characteristics of a drive that becomes too hot? Can the
drive still be used? What steps can be taken to reduce the drive's temperature?
Two mechanisms control temperature and prevent damage to the drive: thermal limiting and thermal shutdown. Thermal limiting is a dynamic mechanism that monitors
temperature in the background while host I/O traffic is being processed on the drive. If
the drive temperature exceeds a preset limit, host traffic will be progressively reduced
until the temperature goes below the threshold point. Once below this threshold point,
host traffic will be unthrottled and full performance restored. If the temperature continues to increase above the threshold point, host IOPS will continue to be throttled until
the drive is in the thermal shutdown state. In this state, the drive will be disabled from
all I/O traffic but will continue to be recognized by the system.
To verify the state:
• In Linux: run the rssdm –L command or check the Linux message logs (the drive will
be reported to be in the thermal shutdown state).
• In Windows: check the Event/Error log and verify a thermal shutdown event occurred.
To recover from a thermal shutdown state:
1. Shut down the system.
2. Remove the drive from the system and allow it to cool.
3. If the drive is running firmware older than version 1.45, upgrade the firmware to
the latest available support pack release.
4. Check the drive placement in the system motherboard and make sure there is sufficient airflow around the drive, as specified in the data sheet. If possible, place the
drive in a PCIe slot that provides unobstructed airflow.
5. Power the system on.
6. Run the rssdm –L command to verify the drive temperature.
If the temperature remains below the thermal threshold limit, the drive is ready for
use at full performance. If the temperature exceeds the thermal threshold limit,
the drive can still be used but performance will be reduced because of the thermal
limiting effect.
DB-5: After an FTL rebuild is complete or after a secure erase is performed to recover
from the security locked state, the drive is listed in /dev/disks (discovered) after a certain time interval
The kernel is responsible for scheduling the discovery after the driver signals a rescan.
There is always a possibility that the discovery process takes longer because the kernel
decides when to schedule the discovery. The normal frequency of re-scan is every five
minutes. Wait until the kernel runs the discovery process again.
DB-6: Upgrading P420m drive firmware version earlier than 208.11 to version 208.11
or later may result in future errors if IO is run on the drive
PDF: 09005aef8497e00a
P420m_P320h_HHHL_installation_guide.pdf - Rev. V 12/14 EN
48
Micron Technology, Inc. reserves the right to change products or specifications without notice.
© 2012 Micron Technology, Inc. All rights reserved.
Page 49

P420m/P320h HHHL PCIe SSD Installation Guide
Troubleshooting
Follow these steps to correctly update the firmware on a P420m drive:
1. Back up all data on the drive to alternate media.
2. Use RSSDM to update the firmware on the drive.
3. Power cycle the system to enable the new firmware.
4. Immediately perform a SECURE ERASE operation on the drive before running any
IO.
Note: The SECURE ERASE operation is not required if:
• The existing firmware and the upgrade version are both earlier than version
208.11.
• The existing firmware is at least version 208.11 and the upgrade is later than ver-
sion 208.11.
5. After the SECURE ERASE operation completes successfully, the drive is ready for
use.
PDF: 09005aef8497e00a
P420m_P320h_HHHL_installation_guide.pdf - Rev. V 12/14 EN
49
Micron Technology, Inc. reserves the right to change products or specifications without notice.
© 2012 Micron Technology, Inc. All rights reserved.
Page 50

LED Codes
P420m/P320h HHHL PCIe SSD Installation Guide
Table 2: LED Codes
LED State
DescriptionGreen Amber Red
Off Off Off Power is off.
Flashing alternately
(200ms)
On Off Off Either an ATA command is being processed or
Flashing
Off Off PCIe/NAND host activity is in process. The drive is
(30ms)
Flash error
code
Flash error
code
Off Power is on and the drive is busy with an internal
operation. When the operation completes, the
LED should change to solid green.
power is on; firmware is initialized and there is
no host activity. The drive is operational in either
state.
busy, but operational.
Flash error
code
An error code. Error codes are three digits and
are displayed by blinking the first digit, then the
second, then the third with pauses in between
and a long pause before repeating. The drive is
not operational.
LED Codes
Firmware fatal error codes:
• 112: Failure during DRAM initialization
• 113: Not enough DRAM to run in the configured mode
• 313: DRAM UECC error
• 441: Error during chip initialization
• 411: Incorrect drive parameters in the firmware image
Off Flashing
(30ms)
Off The drive is backing up internal data to NAND.
The drive is busy, but operational.
Off On Off The drive is in the safe or “parked” mode. Inter-
nal data has been written to NAND and the drive
is safe to power down.
Off Off On The drive requires a secure erase or has encoun-
tered a critical error. The drive is not operational.
PDF: 09005aef8497e00a
P420m_P320h_HHHL_installation_guide.pdf - Rev. V 12/14 EN
50
Micron Technology, Inc. reserves the right to change products or specifications without notice.
© 2012 Micron Technology, Inc. All rights reserved.
Page 51

References
P420m/P320h HHHL PCIe SSD Installation Guide
•
Micron® RealSSD™ Manager (RSSDM) User Guide
• PCIe Express CEM Specification Version 2.0
Java Runtime Environment version 1.7 x64 and later
•
References
PDF: 09005aef8497e00a
P420m_P320h_HHHL_installation_guide.pdf - Rev. V 12/14 EN
51
Micron Technology, Inc. reserves the right to change products or specifications without notice.
© 2012 Micron Technology, Inc. All rights reserved.
Page 52

Revision History
Rev. V, 12/14
Rev. U, 8/14
Rev. T, 7/14
Rev. S, 6/14
Rev. R, 4/14
P420m/P320h HHHL PCIe SSD Installation Guide
Revision History
• Removed RHEL 7 driver installation section and consolidated with RHEL 5.5-6.x instructions
• Added RHEL 7 driver installation instructions
• Updated Troubleshooting section (added L-11 through L-14, updated VM-1, added
VM-15)
• Added RHEL 7 support
• Updated the Troubleshooting section (VM-2)
Rev. Q, 3/14
Rev. P, 2/14
Rev. O, 10/13
• Updated RealSSDManager file names (for installation and removal) for Linux systems
• Updated SLES files names in the "Using the P420m or P320h as a Boot Drive" section
• Updated Windows instructions in the Using the P420m or P320h as a Boot Drive section
• Added note to Citrix XenServer installation instructions
• Updated Troubleshooting section
• Updated supported software in System Recommendations section
• Updated Windows 2008 Server, Windows 2012 Server, Ubuntu 12.04–12.04.02 LTS instructions, added Citrix XenServer instructions in Using the P420m or P320h as a Boot
Drive section
• Updated Troubleshooting section
• Added P420m
• Added support for Citrix XenServer, Ubuntu, and VMware
• Updated Troubleshooting section
• Reorganized content
Rev. N, 04/13
• Updated Supported Operating Systems and Software section
PDF: 09005aef8497e00a
P420m_P320h_HHHL_installation_guide.pdf - Rev. V 12/14 EN
52
Micron Technology, Inc. reserves the right to change products or specifications without notice.
© 2012 Micron Technology, Inc. All rights reserved.
Page 53

Rev. M, 03/13
Rev. L, 01/13
Rev. K, 11/12
Rev. J, 10/12
Rev. I, 05/12
P420m/P320h HHHL PCIe SSD Installation Guide
Revision History
• Added Using the P320h as a Boot Drive section
• Updated Troubleshooting section
• Updated Supported Operating Systems and Software section
• Updated Troubleshooting section
• Added support for Windows 7 and Windows 8
• Updated Troubleshooting section
• Updated Troubleshooting section
• Added Windows Server 2012 Hyper-V (x64)
Rev. H, 04/12
Rev. G, 04/12
• Updated system hardware recommendations
• Updated the instructions for updating the device driver for a new or existing Windows
installation
• Updated the list of supported RHEL versions
• Updated all instructions for installing the P320h support pack on a Linux system
• Revised the list of supported operating systems and software
• Removed the instructions for updating a driver on an existing Windows system
• Revised the instructions for updating a driver on a new Windows system; instructions
now cover installation for new and existing Windows systems
• Revised the "Installing the P320h Support Pack on a Windows System" section to remove reference to deleted instructions
• Revised the list of supported operating systems and software in the "Supported Operating Systems and Software" section
• Revised the list of supported RHEL versions in the "Installing the P320h Support Pack
on a Linux System" section
• Moved instructions for verifying the installation so that they are after instructions for
installing both hardware and software
• Minor revisions to the steps in the "Verifying the Installation" section
• Revised the LED code description for when the green LED is off, the amber LED is off,
and the red LED is on
• Revised the installation order so that hardware installation instructions appear first in
the document
• Updated the order of the steps in the "Installing the P320h Support Pack" section
PDF: 09005aef8497e00a
P420m_P320h_HHHL_installation_guide.pdf - Rev. V 12/14 EN
53
Micron Technology, Inc. reserves the right to change products or specifications without notice.
© 2012 Micron Technology, Inc. All rights reserved.
Page 54

Rev. F, 03/12
Rev. E, 02/12
P420m/P320h HHHL PCIe SSD Installation Guide
Revision History
• Revised the "Installing the P320h Software Prerequisites" section to indicate that the
P320h hardware must be installed before installing the software
• Revised the bulleted list in the introduction to reflect new installation order and include LED codes and installation verification
• Added installation note to the "Installing the RSSDM Software on a Linux System"
section
• Removed the "micron" prefix from the instructions in the "Installing the P320h Driver
for SLES 11" section
• Updated the driver package name in the "Installing the P320h Support Pack on a Linux System" section
• Updated the name of the rpm for SLES to micron-mtip32xx-kmp-default in the instructions for installing the P320h driver for SLES
• Updated the list of supported RHEL versions in the "Supported Operating Systems
and Software" section
• Updated the instructions for installing the P320h driver for RHEL
• Updated the instructions for installing the P320h driver for SLES
Rev. D, 12/11
Rev. C, 12/11
• Minor revision to the P320h Overview section
• Added problem/solution to Troubleshooting section
• Converted document to XML
• Added the following sections (merged from the support pack quick start guide):
– Installing the P320h Support Pack
– Installing the P320h Support Pack on a Windows System
– Updating the Device Driver (New Installation)
– Updating the Device Driver (Existing Installation)
– Installing the P320h Support Pack on a Linux System
– Installing the P320h Driver for RHEL 5.6 and Later
– Installing the P320h Driver for SLES 11
– Installing the RSSDM Software on a Linux System
– Updating the P320h Firmware Unified Binary Image (UBI)
• Made minor revisions to the following sections:
– Introduction
– Installing the P320h Hardware
– System Recommendations
– Hardware Recommendations
– Software Requirements
– Software
PDF: 09005aef8497e00a
P420m_P320h_HHHL_installation_guide.pdf - Rev. V 12/14 EN
54
Micron Technology, Inc. reserves the right to change products or specifications without notice.
© 2012 Micron Technology, Inc. All rights reserved.
Page 55

Rev. B, 12/11
Rev. A, 12/11
P420m/P320h HHHL PCIe SSD Installation Guide
Revision History
– Prerequisites
– Installation Verification
– References
• Updated all pictures of the P320h to include daughter cards and I/O bracket
• Removed references to the P320h data sheet
• Revised RealSSD P320h overview section
• Renamed hardware "requirements" sections to "recommendations"
• Revised the hardware Recommendations table
• Revised the Prerequisites section
• Updated the hardware installation and installation verification instructions
• Updated the troubleshooting section
• Initial release of document
8000 S. Federal Way, P.O. Box 6, Boise, ID 83707-0006, Tel: 208-368-4000
www.micron.com/products/support Sales inquiries: 800-932-4992
Micron and the Micron logo are trademarks of Micron Technology, Inc.
All other trademarks are the property of their respective owners.
PDF: 09005aef8497e00a
P420m_P320h_HHHL_installation_guide.pdf - Rev. V 12/14 EN
55
Micron Technology, Inc. reserves the right to change products or specifications without notice.
© 2012 Micron Technology, Inc. All rights reserved.
 Loading...