

Micron P420m, P320h Installation Manual

P420m/P320h HHHL PCIe SSD Installation Guide
Introduction
Installation Guide
P420m and P320h Half-Height, Half-Length PCIe NAND Flash SSDs
Introduction
This document describes how to install a Micron® P420m or P320h half-height, half-length (HHHL) PCI Express
(PCIe) NAND Flash solid state drive (SSD).
Sections include:
• P420m overview
• P320h overview
• System recommendations
• Components provided by Micron
• Installing the drive
• Installing the software
• Verifying the installation
• Using the P420m or P320h as a boot drive
• Troubleshooting
• LED codes
®
PDF: 09005aef8497e00a
P420m_P320h_HHHL_installation_guide.pdf - Rev. V 12/14 EN
Products and specifications discussed herein are for evaluation and reference purposes only and are subject to change by
Micron without notice. Products are only warranted by Micron to meet Micron's production data sheet specifications. All
information discussed herein is provided on an "as is" basis, without warranties of any kind.
1
Micron Technology, Inc. reserves the right to change products or specifications without notice.
© 2012 Micron Technology, Inc. All rights reserved.

P420m/P320h HHHL PCIe SSD Installation Guide
Introduction
Contents
P420m Overview .............................................................................................................................................. 4
P320h Overview ............................................................................................................................................... 5
System Recommendations ................................................................................................................................ 7
Hardware ..................................................................................................................................................... 7
Software ....................................................................................................................................................... 7
Components Provided by Micron ...................................................................................................................... 8
Hardware ..................................................................................................................................................... 8
Software ....................................................................................................................................................... 8
Installing the Drive ........................................................................................................................................... 9
Installing the Support Pack Software ............................................................................................................... 12
Installing the Driver on a Windows System .................................................................................................. 12
Installing the Driver on a Linux System ........................................................................................................ 13
RHEL and SLES ...................................................................................................................................... 13
Citrix XenServer ..................................................................................................................................... 14
Ubuntu .................................................................................................................................................. 14
Installing the Driver on a VMware System .................................................................................................... 16
VMware ESX 5.0/5.1 ............................................................................................................................... 16
VMware Inbox Driver in ESX 5.5 .............................................................................................................. 16
Uninstalling the Driver ........................................................................................................................... 16
Installing RealSSD Manager ........................................................................................................................ 17
Linux Systems ........................................................................................................................................ 17
Windows Systems ................................................................................................................................... 18
VMware Systems .................................................................................................................................... 18
Removing RSSDM .................................................................................................................................. 19
Updating the Firmware Unified Binary Image .............................................................................................. 20
Verifying the Installation ................................................................................................................................. 21
Using the P420m or P320h as a Boot Drive ....................................................................................................... 22
Windows Server 2012/2012 R2 and Windows 8/8.1 ....................................................................................... 22
Windows Server 2008 and Windows 7 .......................................................................................................... 23
SUSE 11.x x64 ............................................................................................................................................. 25
RHEL 7.x x64 .............................................................................................................................................. 26
RHEL 6.x x64 .............................................................................................................................................. 27
RHEL 5.x x64 .............................................................................................................................................. 29
Ubuntu 12.04–12.04.3 LTS ........................................................................................................................... 30
Citrix XenServer ......................................................................................................................................... 32
Troubleshooting ............................................................................................................................................. 33
Windows Driver .......................................................................................................................................... 33
Linux Driver ............................................................................................................................................... 35
VMware Driver ........................................................................................................................................... 39
RealSSD Manager ....................................................................................................................................... 44
Configuration Issues ................................................................................................................................... 46
Performance Issues .................................................................................................................................... 46
Drive Behavior Issues ................................................................................................................................. 47
LED Codes ..................................................................................................................................................... 50
References ..................................................................................................................................................... 51
Revision History ............................................................................................................................................. 52
Rev. V, 12/14 ............................................................................................................................................... 52
Rev. U, 8/14 ................................................................................................................................................ 52
Rev. T, 7/14 ................................................................................................................................................. 52
Rev. S, 6/14 ................................................................................................................................................. 52
PDF: 09005aef8497e00a
P420m_P320h_HHHL_installation_guide.pdf - Rev. V 12/14 EN
2
Micron Technology, Inc. reserves the right to change products or specifications without notice.
© 2012 Micron Technology, Inc. All rights reserved.

P420m/P320h HHHL PCIe SSD Installation Guide
Introduction
Rev. R, 4/14 ................................................................................................................................................ 52
Rev. Q, 3/14 ................................................................................................................................................ 52
Rev. P, 2/14 ................................................................................................................................................. 52
Rev. O, 10/13 .............................................................................................................................................. 52
Rev. N, 04/13 .............................................................................................................................................. 52
Rev. M, 03/13 .............................................................................................................................................. 53
Rev. L, 01/13 ............................................................................................................................................... 53
Rev. K, 11/12 ............................................................................................................................................... 53
Rev. J, 10/12 ................................................................................................................................................ 53
Rev. I, 05/12 ................................................................................................................................................ 53
Rev. H, 04/12 .............................................................................................................................................. 53
Rev. G, 04/12 .............................................................................................................................................. 53
Rev. F, 03/12 ............................................................................................................................................... 54
Rev. E, 02/12 ............................................................................................................................................... 54
Rev. D, 12/11 .............................................................................................................................................. 54
Rev. C, 12/11 .............................................................................................................................................. 54
Rev. B, 12/11 ............................................................................................................................................... 55
Rev. A, 12/11 ............................................................................................................................................... 55
PDF: 09005aef8497e00a
P420m_P320h_HHHL_installation_guide.pdf - Rev. V 12/14 EN
3
Micron Technology, Inc. reserves the right to change products or specifications without notice.
© 2012 Micron Technology, Inc. All rights reserved.
P420m/P320h HHHL PCIe SSD Installation Guide
P420m Overview
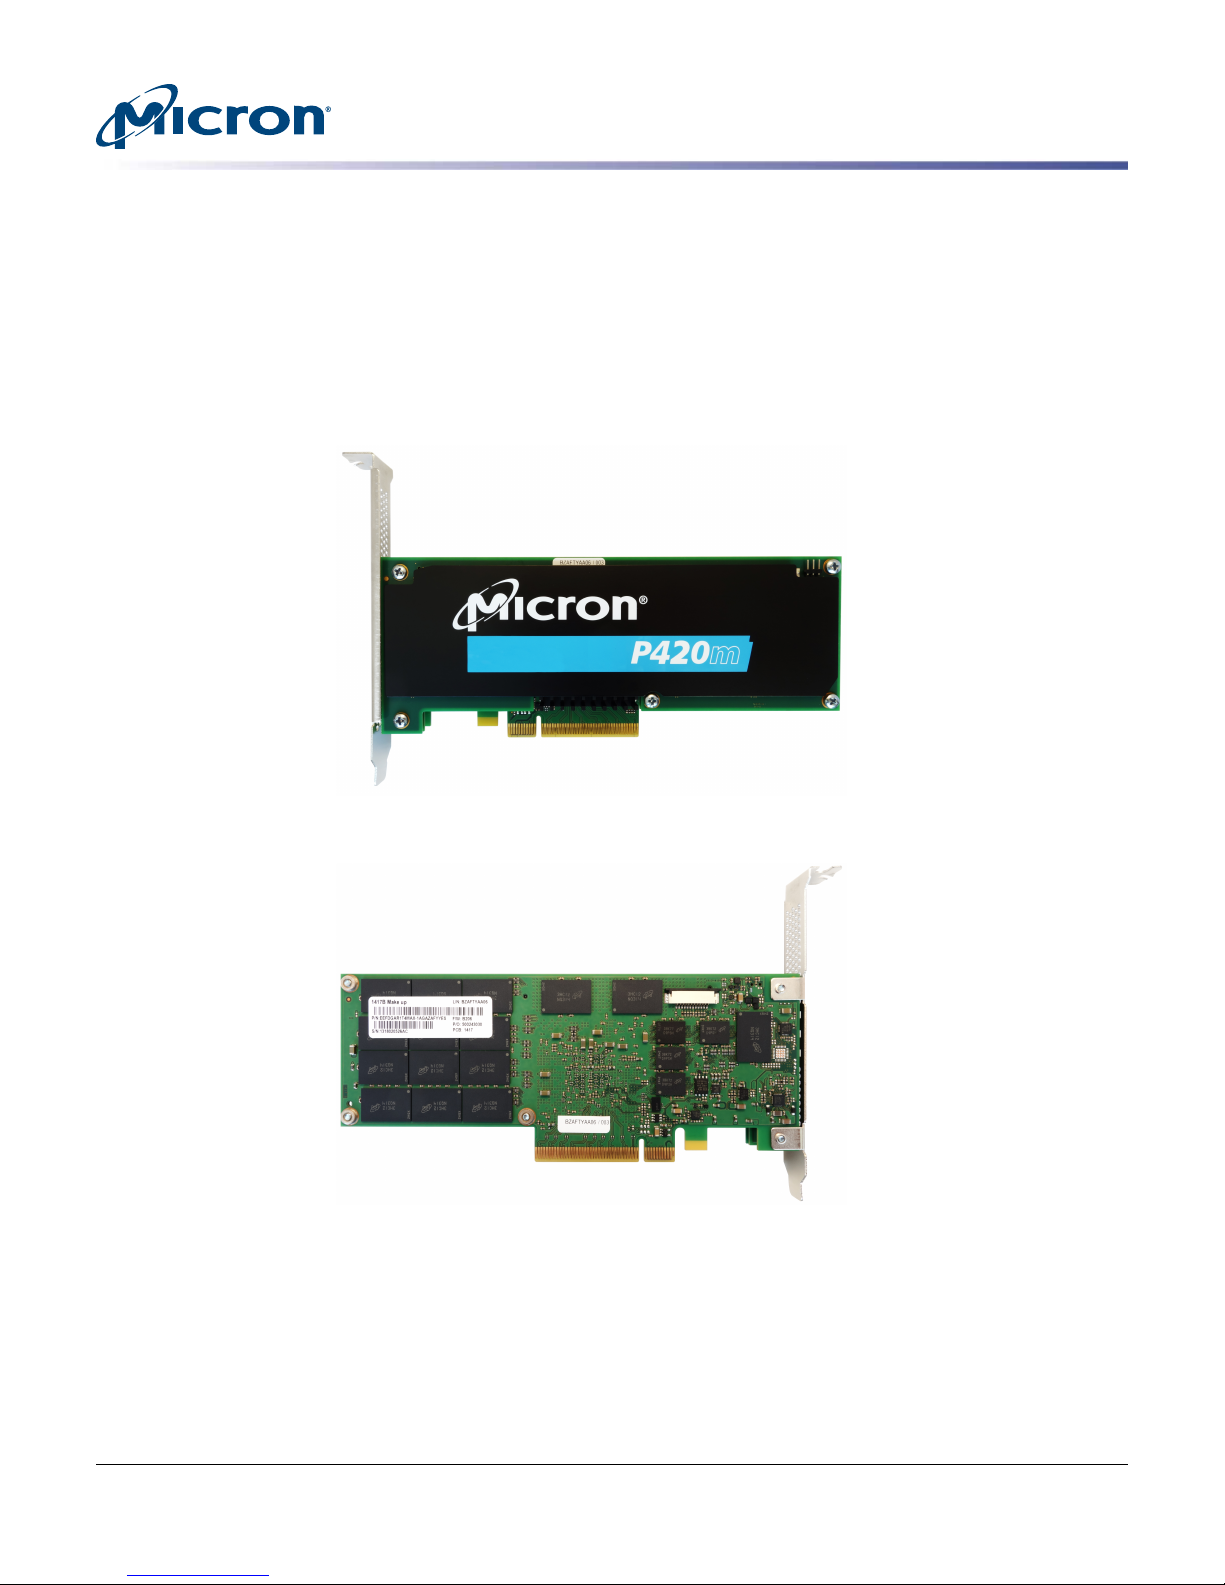
The P420m SSD conforms to the PCIe Card Electromechanical (CEM) specification version 2.0, section 6.1 (low profile add-in card size). This is also called the half-height,
half-length (HHHL) form factor.
The P420m HHHL drive is available in two capacities: 700GB and 1.4TB. Both options
have the same HHHL form factor and support a x8 link width PCIe Gen2-compatible
motherboard slot.
Figure 1: P420m HHHL Top View (Component Side)
P420m Overview
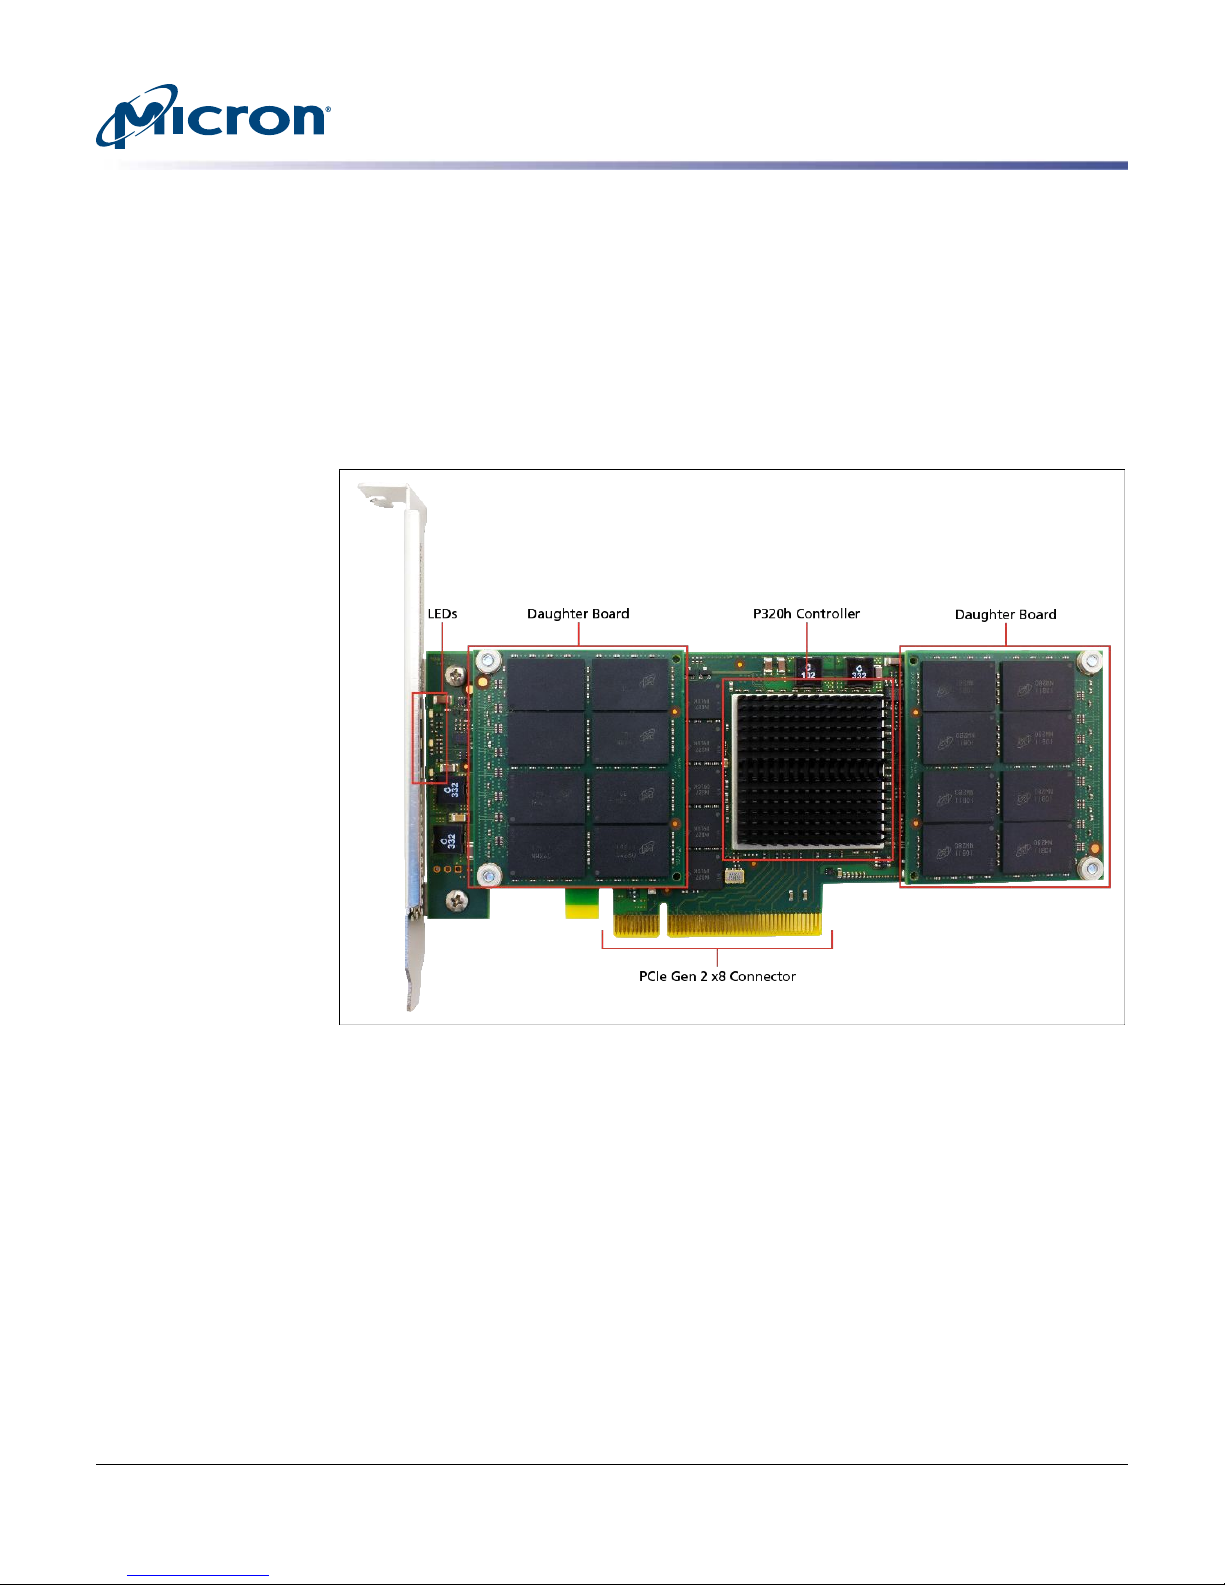
Figure 2: P420m HHHL Bottom View (Solder Side)
A total of 64 NAND placements are on the drive. The 700GB drive has four NAND die
per package and the 1.4TB drive has eight NAND die per package. NAND are placed on
both the component and solder sides of the drive along with the component and solder
sides of two daughter boards, as shown in Figure 1 and Figure 2.
Figure 1 shows the drive’s LEDs. The state of these LEDs, such as color and blinking pattern, convey information about the drive’s status and behavior. See Table 2 (page 50)
for LED descriptions.
PDF: 09005aef8497e00a
P420m_P320h_HHHL_installation_guide.pdf - Rev. V 12/14 EN
4
Micron Technology, Inc. reserves the right to change products or specifications without notice.
© 2012 Micron Technology, Inc. All rights reserved.
P420m/P320h HHHL PCIe SSD Installation Guide
P320h Overview
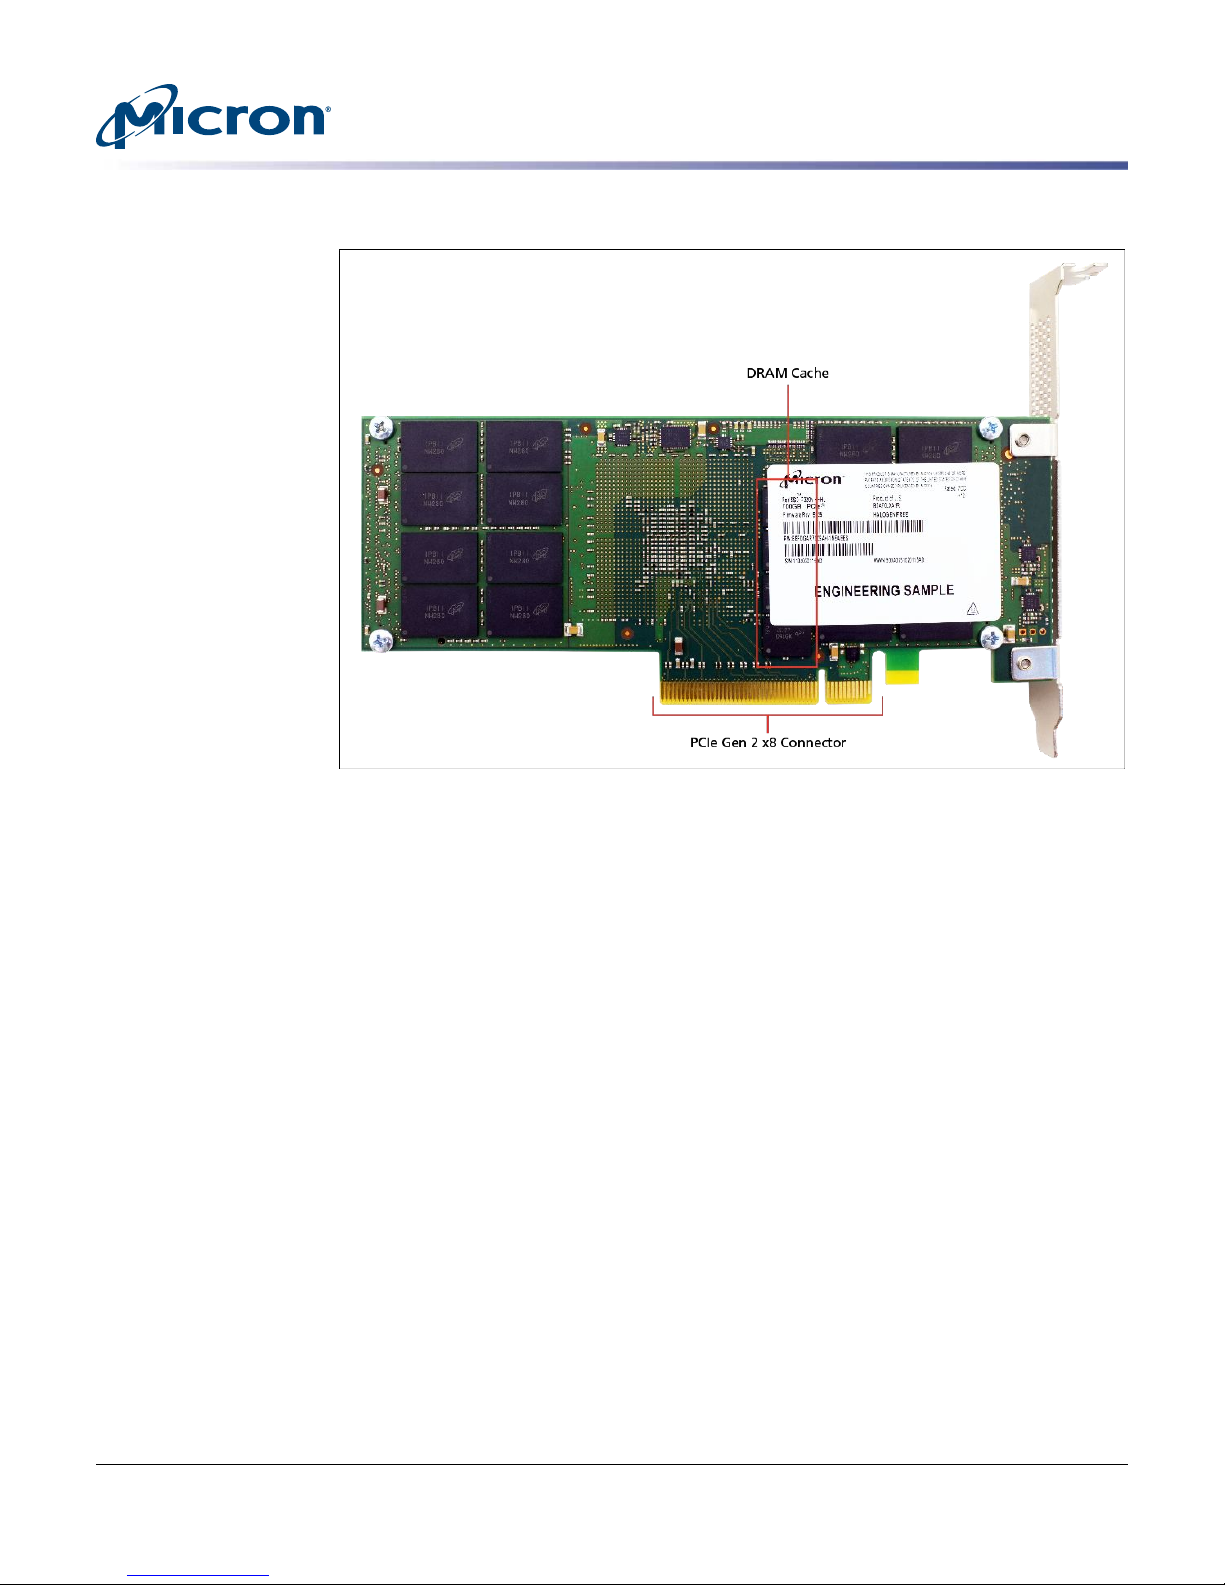
The P320h SSD conforms to the PCIe Card Electromechanical (CEM) specification version 2.0, section 6.1 (low profile add-in card size). This is also called the half-height,
half-length (HHHL) form factor.
The P320h HHHL drive is available in two capacities: 350GB and 700GB. Both options
have the same HHHL form factor and support a x8 link width and PCIe Gen2-compatible motherboard slot.
Figure 3: P320h HHHL Top View (Component Side)
P320h Overview
PDF: 09005aef8497e00a
P420m_P320h_HHHL_installation_guide.pdf - Rev. V 12/14 EN
5
Micron Technology, Inc. reserves the right to change products or specifications without notice.
© 2012 Micron Technology, Inc. All rights reserved.
P420m/P320h HHHL PCIe SSD Installation Guide
Figure 4: P320h HHHL Bottom View (Solder Side)
P320h Overview
A total of 64 NAND placements are on the drive. The 350GB drive has four NAND die
per package and the 700GB drive has eight NAND die per package. NAND are placed on
both the component and solder sides of the drive along with the component and solder
sides of two daughter boards, as shown in Figure 3 and Figure 4.
Figure 3 shows the drive’s LEDs. The state of these LEDs, such as color and blinking pattern, convey information about the drive’s status and behavior. See Table 2 (page 50).
PDF: 09005aef8497e00a
P420m_P320h_HHHL_installation_guide.pdf - Rev. V 12/14 EN
6
Micron Technology, Inc. reserves the right to change products or specifications without notice.
© 2012 Micron Technology, Inc. All rights reserved.
System Recommendations
To help achieve optimal drive performance, review the system recommendations and
requirements listed in this section.
Hardware
Table 1: Hardware Recommendations and Requirements
Category Recommendation
System • Enterprise server class system with Intel® Tylersburg,
Processor • 64-bit processor (required)
Memory 6GB DRAM (minimum)
Chipset Intel 5520 or later generation chipset
Slots PCIe Gen2 x8 link width slot (required)
Power 25W-compatible PCIe slot
P420m/P320h HHHL PCIe SSD Installation Guide
System Recommendations
Sandy Bridge, or later class chipset motherboard
• “Performance” optimized legacy or UEFI BIOS
Single, dual, or higher number of processors can be used
• Intel® Xeon™ (Nehalem-EP) or better processor with four or
more cores/processors
• 12MB local cache
• Processor with clock speed greater than 3GHz
Note: A PCIe Gen1 slot can be used, but drive performance
will be impacted
Note: No external power connection is required for drive
Software
The P420m and P320h drives support the following operating systems and software:
• Microsoft Windows® Server 2012 R2 (x86-64), Hyper-V (x86-64)
• Windows Server 2012 (x86-64), Hyper-V (x86-64)
• Windows Server 2008 R2 SP1 (x86-64), Hyper-V (x86-64)
• Windows 8, 8.1 (x86-64 and x86)
• Windows 7 (x86-64 and x86)
• Red Hat® Enterprise Linux (RHEL) 5.5–5.10, 6.0–6.5, 7 (x86-64)
•
SUSE™ Linux Enterprise (SLES) 11 SP1, SP2, SP3 (x86-64)
• VMware 5.0, 5.1 (x86-64)
• VMware 5.5 (inbox driver)
• Citrix XenServer 6.0.2, 6.1, and 6.2
• Ubuntu 12.04–12.04.3 LTS Server (64-bit)
Note: The P420m and P320h drives are compatible with the Windows 32/64-bit operating systems listed above. Linux support is for 64-bit operating systems only. If your operating system is not in the list of supported operating systems and software, it may be
possible to install and use the drive; however, Micron does not guarantee compatibility.
PDF: 09005aef8497e00a
P420m_P320h_HHHL_installation_guide.pdf - Rev. V 12/14 EN
7
Micron Technology, Inc. reserves the right to change products or specifications without notice.
© 2012 Micron Technology, Inc. All rights reserved.

P420m/P320h HHHL PCIe SSD Installation Guide
Components Provided by Micron
Hardware
Micron provides the number of P420m/P320h drives in the appropriate capacity that
were ordered or specified by the customer.
NOTE: The drive is not usable until the support pack software is downloaded from mi-
cron.com and installed in the host system. For specific OEMs, the support pack is provi-
ded either separately on micron.com or directly from Micron.
Software
Micron provides support pack software which contains:
• Micron-specific P420m and P320h drivers (required)
• Linux driver source code and makefile for non-supported Linux operating systems
• Drive firmware update as a unified binary image (UBI) file (required)
• RealSSD Manager (RSSDM) drive management software
• P420m/P320h installation guide (this guide)
Visit micron.com and go to the Software tab to access and download the support pack.
Components Provided by Micron
PDF: 09005aef8497e00a
P420m_P320h_HHHL_installation_guide.pdf - Rev. V 12/14 EN
8
Micron Technology, Inc. reserves the right to change products or specifications without notice.
© 2012 Micron Technology, Inc. All rights reserved.
Installing the Drive
To install the P420m or P320h drive:
1. Power down the system.
2. Ensure you are ESD-grounded before touching the drive or host system.
3. Remove the drive from the ESD packaging and verify it is not damaged.
If you suspect that the board is damaged, contact your local Micron representative
or the P420m/P320h applications team.
4. Remove the lid or case from the host system to expose the PCIe slots into which
the drive will be inserted.
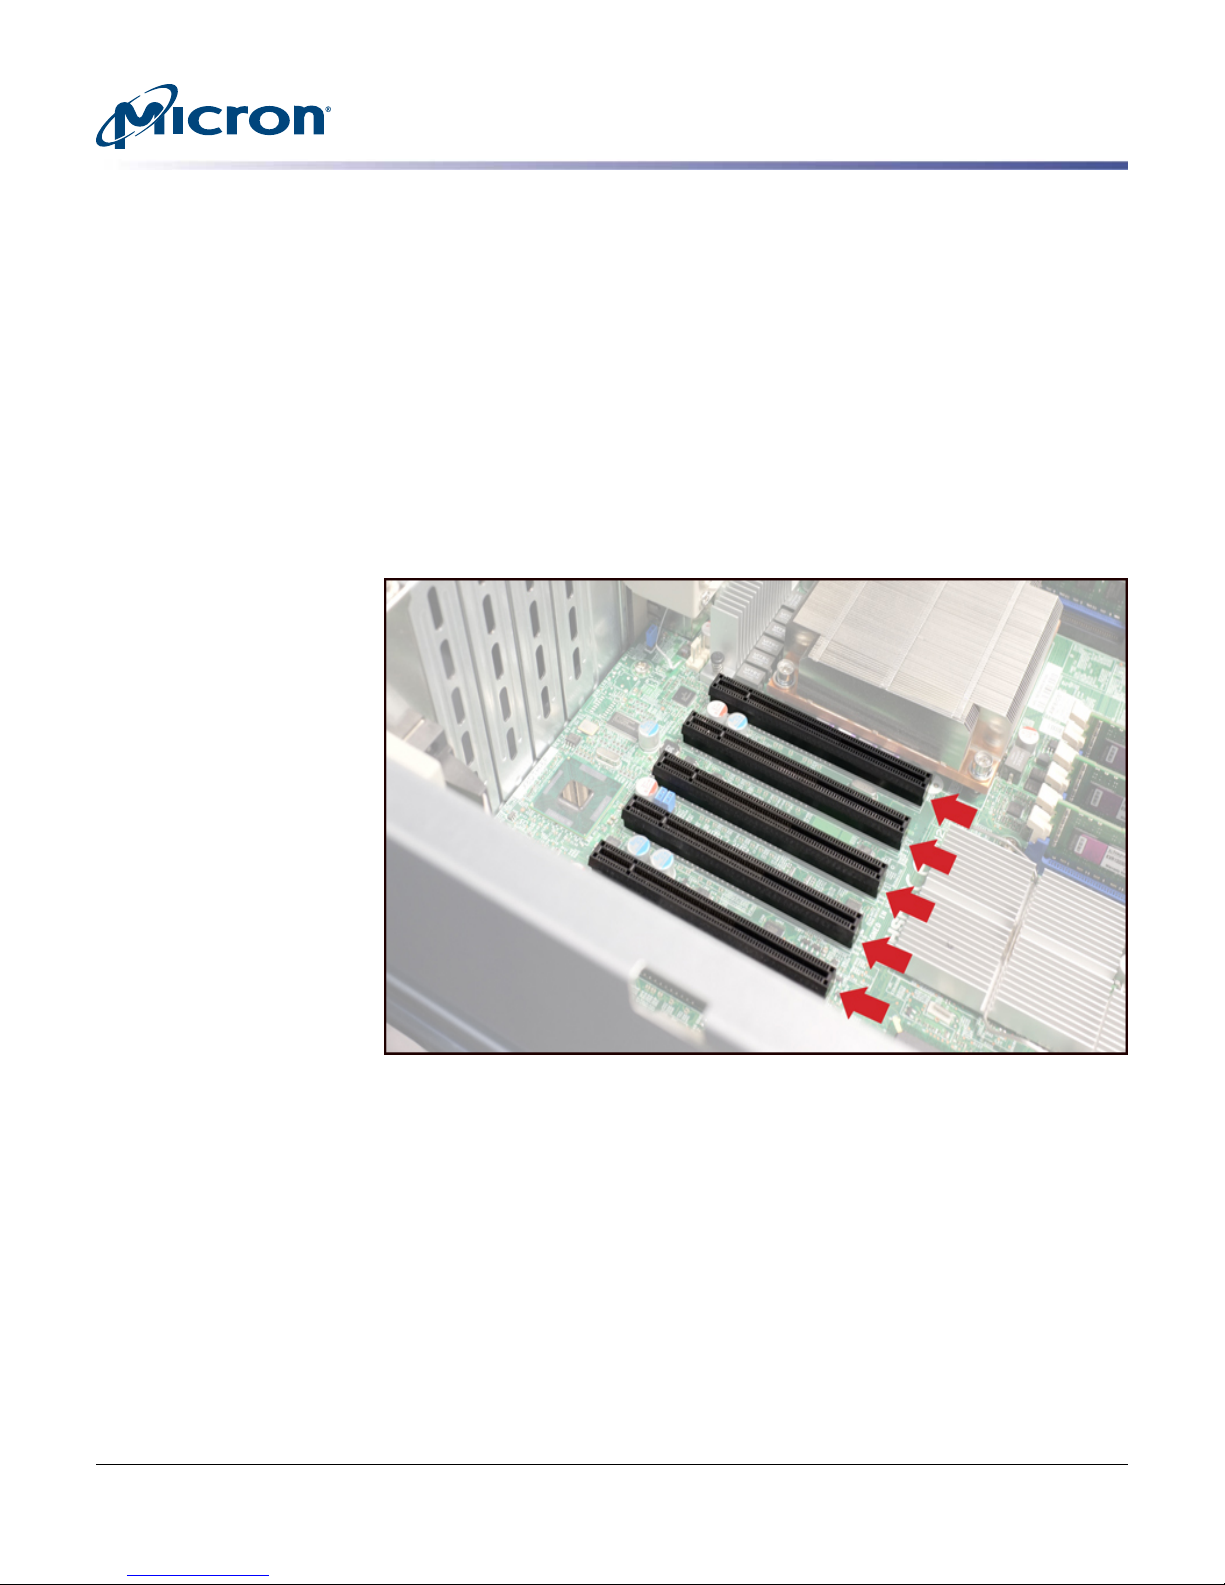
5. Locate an available Gen2 x8 PCIe slot (Figure 5) and verify the slot is 25W-capable.
Check the system or motherboard documentation for information on locating and
identifying PCIe slots.
Figure 5: Available Gen2 x8 PCIe Slots
P420m/P320h HHHL PCIe SSD Installation Guide
Installing the Drive
6. Insert the drive into the PCIe slot (Figure 6 and Figure 7).
PDF: 09005aef8497e00a
P420m_P320h_HHHL_installation_guide.pdf - Rev. V 12/14 EN
9
Micron Technology, Inc. reserves the right to change products or specifications without notice.
© 2012 Micron Technology, Inc. All rights reserved.
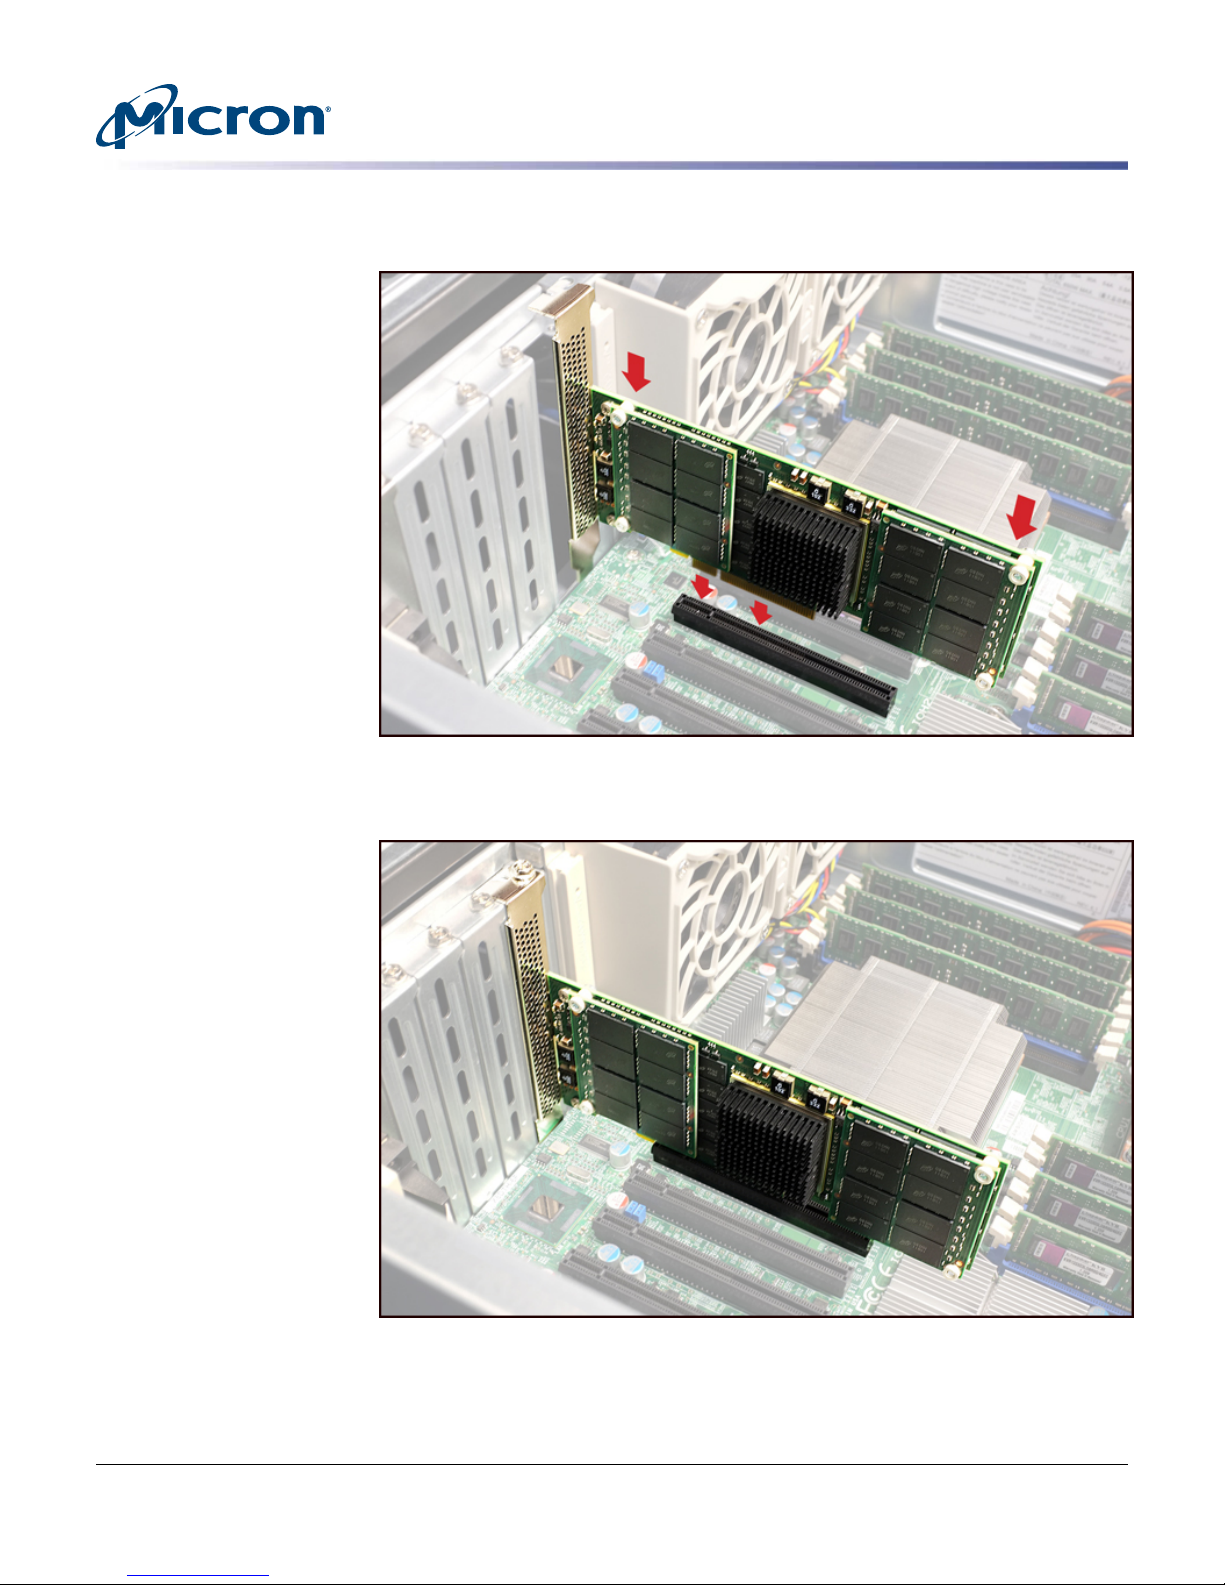
Figure 6: Inserting the Drive into a PCIe Slot
Note: P320h drive shown.
P420m/P320h HHHL PCIe SSD Installation Guide
Installing the Drive
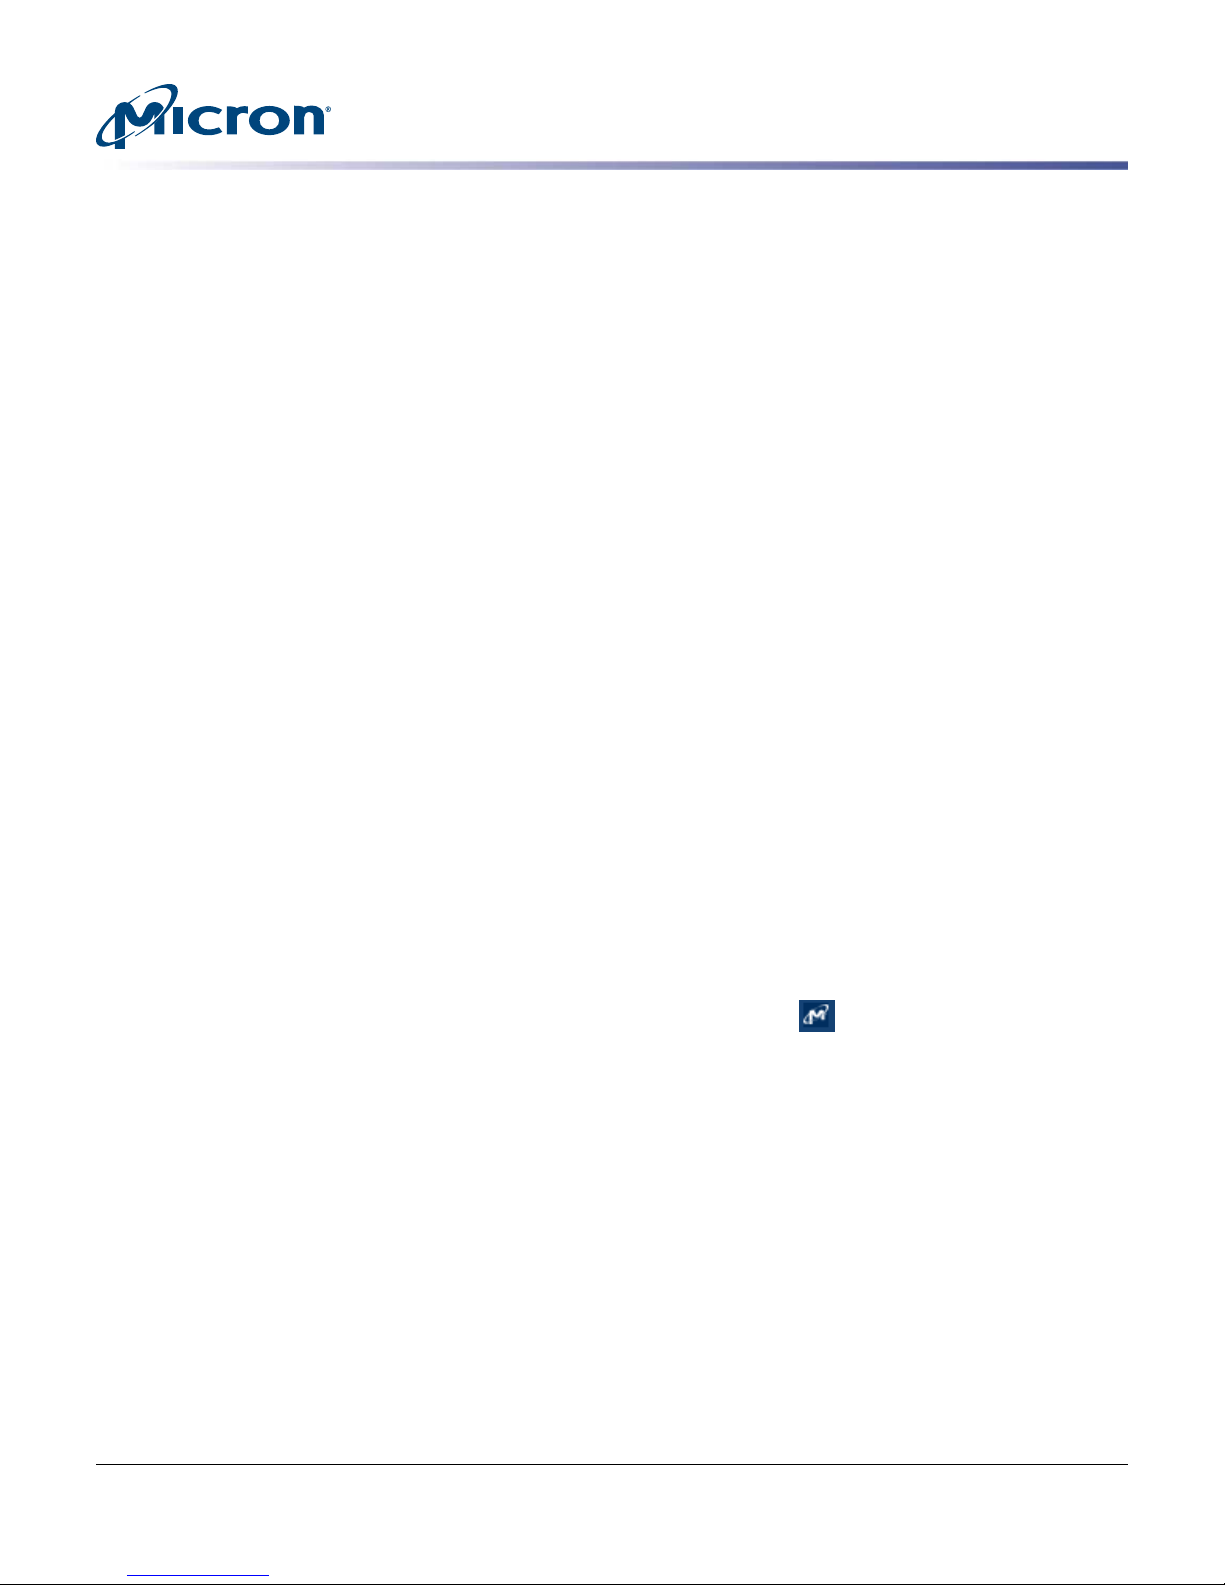
Figure 7: Drive Installed
7. If possible, ensure the LEDs on the drive will be visible when the system cover is
replaced.
8. Power on the system.
PDF: 09005aef8497e00a
P420m_P320h_HHHL_installation_guide.pdf - Rev. V 12/14 EN
10
Micron Technology, Inc. reserves the right to change products or specifications without notice.
© 2012 Micron Technology, Inc. All rights reserved.

P420m/P320h HHHL PCIe SSD Installation Guide
Installing the Drive
9. When the system powers back on, check the LED state on the drive. The LED closest to the PCIe connector on the bottom of the drive should be solid green, indicating the drive is ready to be used. If it is not, refer to Table 2 (page 50) for a
description of the LED codes.
10. Replace the lid or case on the system.
11. Verify the host system successfully boots into the operating system. If it does not,
see Troubleshooting (page 33).
PDF: 09005aef8497e00a
P420m_P320h_HHHL_installation_guide.pdf - Rev. V 12/14 EN
11
Micron Technology, Inc. reserves the right to change products or specifications without notice.
© 2012 Micron Technology, Inc. All rights reserved.

P420m/P320h HHHL PCIe SSD Installation Guide
Installing the Support Pack Software
This section describes how to install the P420m/P320h support pack software in the following operating systems:
• Windows
• Linux
• VMware
Note: Refer to the README document in the folder for your operating system for additional notes on version-specific release behavior.
Installation consists of the following steps:
1. Verify the drive is physically installed in the system.
2. Install the driver.
3. Install RealSSD Manager (RSSDM).
4. Update the unified binary image (UBI).
5. Reboot the system.
6. Verify the installation was successful.
Installing the Driver on a Windows System
Before installing the driver, review the following:
Installing the Support Pack Software
• Always use the .msi file for installing the device driver package unless you are installing the driver as part of the Windows installation process.
• If you have an older P32xx driver for Windows installed through Device Manager, you
must uninstall and remove the driver using Device Manager before installing the new
driver using the .msi file.
1. Power down the system.
2. Boot into Windows.
3. Locate the Windows Driver folder in the support pack software and double-click
the MicronPCIeSSDDriversx64.msi or MicronPCIeSSDDriversx86.msi file based
on your system architecture.
4. Review and accept the terms of the license agreement, and then click Install.
If you do not agree with the licensing terms, cancel the installation by clicking
Cancel.
5. Follow the instructions on the screen.
6. Click Finish when the installation is complete.
The drive is installed. It may be necessary to open the Windows Device Manager
and click the Scan for Hardware Changes button to see the drive and its driver.
7. Install the RSSDM software, as described in Installing RealSSD Manager
(page 17).
Removing an Existing Driver
Do not use the Device Manager to uninstall the driver. Follow these instructions for
proper removal.
1. Open the Windows Control Panel.
2. Under Programs select Uninstall a program.
3. Select the Micron driver.
4. Click Uninstall and wait for the process to complete.
PDF: 09005aef8497e00a
P420m_P320h_HHHL_installation_guide.pdf - Rev. V 12/14 EN
12
Micron Technology, Inc. reserves the right to change products or specifications without notice.
© 2012 Micron Technology, Inc. All rights reserved.

P420m/P320h HHHL PCIe SSD Installation Guide
Installing the Driver on a Linux System
This section describes how to install the driver in RHEL, SLES, Citrix XenServer, and
Ubuntu. Start by powering down the system and then booting into Linux.
RHEL and SLES
Locate the package driver for your operating system in the /Linux Driver folder of the
support pack :
• RHEL version 7: kmod-mtip32xx-3.8.1-1.el7.x86_64.rpm
• RHEL version 6.1–6.5: kmod-mtip32xx-<version>.el6.x86_64_rhel6ux.rpm
• RHEL version 6.0: kmod-mtip32xx-<version>.el6.x86_64_rhel6.rpm
• RHEL versions 5.5, 5.6, 5.7 and 5.8: mtip32xx-<version>.x86_64_rhel5ux.rpm
• SLES 11: mtip32xx-kmp-default-<version>.<kernel_version>.x86_64.rpm
Removing an Existing Driver
If a drive with Micron driver version 1.2.30 or earlier has been installed, uninstall the
existing driver:
1. Run the following command as a root user: rpm -e <driver-name>
where <driver-name> is the name of the package driver for your operating system.
(See the previous section to locate the appropriate rpm file for your system.)
2. Run depmod as a root user.
3. Reboot the system.
Installing the Support Pack Software
Upgrading a Driver
1. Run the following command as a root user: rpm -Uvh <rpm-name>
where <rpm-name> is the name of the package driver for your operating system.
2. Run depmod as a root user.
3. Reboot the system.
Installing a New Driver
1. Run the following command as a root user: rpm -ivh <rpm-name>
where <rpm-name> is the name of the package driver for your operating system.
2. Run depmod as a root user.
3. Reboot the system.
PDF: 09005aef8497e00a
P420m_P320h_HHHL_installation_guide.pdf - Rev. V 12/14 EN
13
Micron Technology, Inc. reserves the right to change products or specifications without notice.
© 2012 Micron Technology, Inc. All rights reserved.

Citrix XenServer
P420m/P320h HHHL PCIe SSD Installation Guide
Installing the Support Pack Software
The support pack includes several ISO images; make sure to select the image that
matches the build ID of your system. The driver will not install correctly if the wrong
ISO image is used. To find the build ID of your system:
1. In XenCenter, click XenServer Host.
2. Click the General tab.
3. Scroll down and expand Version Details to view the build number. The last six dig-
its of the ISO name corresponds to the build ID.
Removing an Existing Driver
1. Open a shell on the XenServer host as root.
2. Uninstall the RPMs:
# rpm -e mtip32xx-modules-xen-<xen_kernel_version>
# rpm -e mtip32xx-modules-kdump-<xen_kernel_version>
<xen_kernel_version> can be determined with uname -r.
Installing a New Driver or Upgrading a Driver
1. Copy the ISO image from the support pack software to the XenServer host system.
2. Open a shell on the XenServer host as root.
3. Mount the ISO image loopback:
# mount -o loop /path/to/mtip32xx-<version>.iso /mnt
4. Change the directory to /mnt:
# cd /mnt
5. Run the installer:
# ./install.sh
6. Load the driver:
# modprobe mtip32xx
Ubuntu
Installing a New Driver
1. Verify the package dkms is installed.
2. In the command prompt or terminal window in the Gnome Display Manager,
3. Copy the release mtip32xx-dkms-<version>.deb binary to the host.
4. Run the following command to install the package:
PDF: 09005aef8497e00a
P420m_P320h_HHHL_installation_guide.pdf - Rev. V 12/14 EN
open a shell as root and run the following command:
# dpkg -s dkms
If the package is installed, the first few lines of output will appear as:
Package: dkms
Status: install ok installed
...
Note: If the package is not installed, the first few lines of output will appear as:
Package: dkms is not installed and no info is available
If the dkms package is not installed, install it using the following command:
# apt-get install dkms
If prompted, press Y to install the package and all of its dependencies. If the installation fails, run the following command when prompted: run apt-get -f install.
# dpkg -i /path/to/mtip32xx-dkms-<version>.deb
14
Micron Technology, Inc. reserves the right to change products or specifications without notice.
© 2012 Micron Technology, Inc. All rights reserved.

P420m/P320h HHHL PCIe SSD Installation Guide
Installing the Support Pack Software
5. Reboot the system.
Upgrading the Driver
1. Copy the release mtip32xx-dkms-<version>.deb binary to the host system.
2. Run the following command as root to install the package:
# dpkg -i /path/to/mtip32xx-dkms-<version>.deb
3. Reboot the system.
Removing an Existing Driver
1. In the command prompt or terminal window in the Gnome Display Manager, run
the following command to remove the driver package:
# dpkg -r mtip32xx-dkms
2. Run the following command to unload the driver:
# rmmod mtip32xx
PDF: 09005aef8497e00a
P420m_P320h_HHHL_installation_guide.pdf - Rev. V 12/14 EN
15
Micron Technology, Inc. reserves the right to change products or specifications without notice.
© 2012 Micron Technology, Inc. All rights reserved.

P420m/P320h HHHL PCIe SSD Installation Guide
Installing the Driver on a VMware System
This section describes how to install the P420m/P320h driver on a VMware ESX 5.0/5.1
system and the VMware inbox driver on an ESX 5.5 system.
VMware ESX 5.0/5.1
1. Copy the installer .zip file from the VMware folder in the support pack software to
your system.
2. Run the following command:
# esxcli software vib install -d=/<full_path_to_offline_zip>
Where <full_path_to_offline_zip> is the path to the VMware installer file. The
complete directory path must be specified even if the zip file is in the currently
running directory; otherwise, an error will be reported. The command output will
look similar to the following:
~ # esxcli software vib install -d=/mtip32xx-1.0.3.zip
Installation Result Message: The update completed successfully, but the system
needs to be rebooted for the changes to be effective.
Reboot Required: true
VIBs installed: Micron_bootbank_block-mtip32xx-1.0.3-1OEM.500.0.0.472560
VIBs removed:
VIBs skipped:
Installing the Support Pack Software
VMware Inbox Driver in ESX 5.5
With VMware 5.5, the Micron driver is available as an inbox driver included with the
ESX kernel install image. The inbox driver automatically installs when updating to kernel 5.5.
If you have installed the Micron driver on a system running a VMware version prior to
ESX 5.5, you must uninstall the driver before you can use the inbox driver. Additionally,
review the VMware driver information in the Troubleshooting section for important information regarding the migration of datastores previously created in ESX 5.0 and 5.1 to
ESX 5.5.
Uninstalling the Driver
Run the following command to remove an existing driver:
# esxcli software vib list | grep mtip
The command output will look similar to the following:
block-mtip32xx 1.0.2-10OEM.500.0.0.472560 Micron VMwareCertified 2012-06-01
~ #
~ # esxcli software vib remove --vibname=block-mtip32xx:
1.0.2-1OEM.500.0.0.472560
Removal Result
Message: The update completed successfully, but the system needs to be rebooted for
the changes to be effective.
Reboot Required: true
VIBs installed:
VIBs removed: Micron_bootbank_block-mtip32xx_1.0.2-1OEM.
500.0.0.472560
VIBs Skipped:
PDF: 09005aef8497e00a
P420m_P320h_HHHL_installation_guide.pdf - Rev. V 12/14 EN
16
Micron Technology, Inc. reserves the right to change products or specifications without notice.
© 2012 Micron Technology, Inc. All rights reserved.
Installing RealSSD Manager
This section describes how to install RealSSD Manager (RSSDM) after installing the
P420m/P320h driver. If RSSDM is already installed on the system, the latest version can
be installed over the existing version.
RSSDM enables you to monitor and configure P420m and P320h drives and perform
tasks such as firmware updates and secure erase operations. RSSDM can be run two
ways: using the graphical user interface (GUI) or command line interface (CLI).
The RSSDM GUI can be used to manage P420m and P320h drives installed in a local
system and remotely monitor those on the network, whereas the CLI can be used on local drives only. To use the RSSDM GUI, the RSSDM Agent must be running on each system containing the drive(s) you want to manage. The agent is installed with RSSDM.
Note: With support pack version 138.03.00 or later, it is no longer necessary to download and install Oracle JRE 1.7 x64 for RSSDM; Oracle JRE is bundled in the RSSDM installer.
Linux Systems
Note: The *.run files referenced in this section may need to be changed to an executable. To do so, enter the following in the command prompt: chmod +x <*.run filename>
Installing RSSDM in Linux
P420m/P320h HHHL PCIe SSD Installation Guide
Installing the Support Pack Software
Run the following command:
sudo ./RealSSDManager-<version>-linux-64-Setup.run
Note: sudo is not required if root user.
RSSDM (both the GUI and CLI) is installed in the following location:
/opt/MicronTechnology/RealSSDManage
Starting the RSSDM Agent in Linux
1. Navigate to /opt/MicronTechnology/RealSSDManager.
2. Run the following command:
./RealSSDManagerRemoteAgentStart.run
The agent icon appears in the system taskbar:
Stopping the RSSDM Agent in Linux
1. Right-click the agent icon in the system taskbar.
2. Click Stop RSSDM Agent.
You can also stop the agent by navigating to the RSSDM installation path and running the following command:
./RealSSDManagerRemoteAgentStop.run
Running the RSSDM GUI in Linux
1. Make sure the agent is running on the system.
2. Navigate to the installation path.
3. Run the following command:
./RealSSDManagerClient.run
PDF: 09005aef8497e00a
P420m_P320h_HHHL_installation_guide.pdf - Rev. V 12/14 EN
17
Micron Technology, Inc. reserves the right to change products or specifications without notice.
© 2012 Micron Technology, Inc. All rights reserved.
 Loading...