

Page 1

Model RFT9709
Transmitter
Instruction Manual
March 1999
Page 2

Page 3

Model RFT9709
Transmitter
Instruction Manual
For technical assistance, phone the Micro Motion Customer
Service Department:
• In the U.S.A., phone 1-800-522-6277, 24 hours
• Outside the U.S.A., phone 303-530-8400, 24 hours
• In Europe, phone +31 (0) 318 549 443
• In Asia, phone 65-770-8155
Copyright ©1999, Micro Motion, Inc. A l l rights reserved.
Micro Motion, ELITE, BASIS and ProLink are registered trademarks of Micro Motion,
Inc., Boulder, Colorado. Rosemount and SMART FAMILY are registered trademarks
of Rosemount, Inc., Ede n Prai rie, Minnesota. HART is a registered tradem ark of the
HART Communication Foundation, Austin, Texas. Modbus is a registered trademark
of Modicon, Inc., North Andover, Massachusetts.
Page 4

Page 5

Table of Contents
Before You Begin
About this manual . . . . . . . . . . . . . . . . . . . . . . . . . . 1
About the transmitter. . . . . . . . . . . . . . . . . . . . . . . . 1
Configuration and calibration . . . . . . . . . . . . . . . . . 1
Proving the Coriolis flowmeter . . . . . . . . . . . . . . . . 2
Step 1 Mounting
1.1 Location requirements. . . . . . . . . . . . . . . . . . . . . . . 3
Hazardous area installations. . . . . . . . . . . . . . . . . . 3
1.2 Mounting options. . . . . . . . . . . . . . . . . . . . . . . . . . . 4
1.3 Installation in user-supplied enclosure . . . . . . . . . . 4
1.4 Optional NEMA-housing installation . . . . . . . . . . . . 5
Step 2 Wiring
2.1 General guidelines . . . . . . . . . . . . . . . . . . . . . . . . . 7
2.2 Power supply wiring and grounding . . . . . . . . . . . . 8
2.3 Sensor wiring . . . . . . . . . . . . . . . . . . . . . . . . . . . . . 9
2.4 Output wiring. . . . . . . . . . . . . . . . . . . . . . . . . . . . . . 17
. . . . . . . . . . . . . . . . . . . . . . . . . . . . . . . . . . . . . .
Cable types . . . . . . . . . . . . . . . . . . . . . . . . . . . . . . . 10
Remotely-installed temperature detector . . . . . . . . 11
Cable connections to sensor and RFT9709 . . . . . . 12
Primary and secondary mA outputs . . . . . . . . . . . . 18
HART multidrop network wiring. . . . . . . . . . . . . . . . 19
RS-485 output. . . . . . . . . . . . . . . . . . . . . . . . . . . . . 20
Frequency/pulse output. . . . . . . . . . . . . . . . . . . . . . 21
Control output . . . . . . . . . . . . . . . . . . . . . . . . . . . . . 22
External zero switch wiring . . . . . . . . . . . . . . . . . . . 23
Viscosity measurement or pressure
compensation . . . . . . . . . . . . . . . . . . . . . . . . . . 24
. . . . . . . . . . . . . . . . . . . . . . . . . . . . . . . . . . . .
. . . . . . . . . . . . . . . . . . . . . . . . . . . . . . . . . .
1
3
7
RFT9709 Transmitter Inst ruction Manual
Step 3 Startup
3.1 Initialization . . . . . . . . . . . . . . . . . . . . . . . . . . . . . . . 27
3.2 Flowmeter zeroing. . . . . . . . . . . . . . . . . . . . . . . . . . 27
Zeroing procedure. . . . . . . . . . . . . . . . . . . . . . . . . . 28
Diagnosing zero failure . . . . . . . . . . . . . . . . . . . . . . 28
3.3 Event registers . . . . . . . . . . . . . . . . . . . . . . . . . . . . 29
3.4 Totalizer reset . . . . . . . . . . . . . . . . . . . . . . . . . . . . . 30
3.5 Process measurement . . . . . . . . . . . . . . . . . . . . . . 30
. . . . . . . . . . . . . . . . . . . . . . . . . . . . . . . . . . . . .
27
i
Page 6

Table of Contents
continued
Troubleshooting
4.1 General guidelines. . . . . . . . . . . . . . . . . . . . . . . . . . 31
4.2 Transmitter diagnostic tools. . . . . . . . . . . . . . . . . . . 32
Diagnostic LED . . . . . . . . . . . . . . . . . . . . . . . . . . . . 32
Fault outputs . . . . . . . . . . . . . . . . . . . . . . . . . . . . . . 32
4.3 Interrogation with the ProLink
Output test and trim . . . . . . . . . . . . . . . . . . . . . . . . . 33
4.4 Power supply. . . . . . . . . . . . . . . . . . . . . . . . . . . . . . 35
4.5 Wiring . . . . . . . . . . . . . . . . . . . . . . . . . . . . . . . . . . . 35
4.6 Master reset. . . . . . . . . . . . . . . . . . . . . . . . . . . . . . . 37
4.7 Customer service. . . . . . . . . . . . . . . . . . . . . . . . . . . 37
. . . . . . . . . . . . . . . . . . . . . . . . . . . . . . . . . . .
®
program . . . . . . . . . 33
Appendixes
Appendix A RFT9709 Specifications . . . . . . . . . . . . . . . . . . 39
Appendix B Ordering Information . . . . . . . . . . . . . . . . . . . . . 45
Appendix C Switch Settings . . . . . . . . . . . . . . . . . . . . . . . . . 47
Appendix D Open Collector Configuration . . . . . . . . . . . . . . 53
Appendix E Decontamination and Return Goods
Policy – USA. . . . . . . . . . . . . . . . . . . . . . . . 55
Appendix F Decontamination and Return Goods
Policy – Europe. . . . . . . . . . . . . . . . . . . . . . 57
31
Index
. . . . . . . . . . . . . . . . . . . . . . . . . . . . . . . . . . . . . . . . . . . . . . .
59
ii
RFT9709 Transmitter Ins truction Manual
Page 7

Table of Contents
continued
Tables
Table 2-1 Sensor-wiring terminal designations. . . . . . . . . 13
Table 2-2 Output-wiring terminal designations . . . . . . . . . 17
Table 2-3 Sensors affected by pressure. . . . . . . . . . . . . . 24
Table 3-1 Parameters that affect event registers . . . . . . . 29
Table 4-1 Conditions indicated by diagnostic LED . . . . . . 32
Table 4-2 Normal resistance for flowmeter circuits. . . . . . 36
Table 4-3 Input and output ratings . . . . . . . . . . . . . . . . . . 36
Table 4-4 Default values after a master reset. . . . . . . . . . 38
Table A Performance specifications. . . . . . . . . . . . . . . . 39
Table B RFT9709 model number matrix . . . . . . . . . . . . 45
Table C-1 Communications configuration . . . . . . . . . . . . . 48
Table C-2 Security modes. . . . . . . . . . . . . . . . . . . . . . . . . 49
Figures
RFT9709 components . . . . . . . . . . . . . . . . . . . 2
Figure 1-1 RFT9709 approvals tag . . . . . . . . . . . . . . . . . . 3
Figure 1-2 RFT9709 dimensions . . . . . . . . . . . . . . . . . . . . 4
Figure 1-3 Factory-supplied NEMA-housing dimensions. . 6
Figure 2-1 RFT9709 wiring terminals. . . . . . . . . . . . . . . . . 7
Figure 2-2 Power-supply wiring and grounding
connections . . . . . . . . . . . . . . . . . . . . . . . . 8
Figure 2-3 Cable types. . . . . . . . . . . . . . . . . . . . . . . . . . . . 10
Figure 2-4 Terminating flowmeter cable. . . . . . . . . . . . . . . 10
Figure 2-5 RFT9709 terminals for sensor wiring . . . . . . . . 13
Figure 2-6 Wiring to ELITE
Figure 2-7 Wiring to BASIS
DL sensors. . . . . . . . . . . . . . . . . . . . . . . . . 15
Figure 2-8 Wiring to Model DT sensors . . . . . . . . . . . . . . . 16
Figure 2-9 Terminating output-wiring shields and drains. . 17
Figure 2-10 mA output terminals . . . . . . . . . . . . . . . . . . . . . 18
Figure 2-11 Typical HART
Figure 2-12 RS-485 wiring . . . . . . . . . . . . . . . . . . . . . . . . . . 20
Figure 2-13 Frequency/pulse output terminals. . . . . . . . . . . 21
Figure 2-14 Control output terminals . . . . . . . . . . . . . . . . . . 22
Figure 2-15 Remote-zero switch wiring . . . . . . . . . . . . . . . . 23
Figure 2-16a Pressure transmitter wiring, internally
powered . . . . . . . . . . . . . . . . . . . . . . . . . . . 25
Figure 2-16b Pressure transmitter wiring, externally powered
(multidrop network) . . . . . . . . . . . . . . . . . . 25
Figure 3-1 Diagnostic LED and zero button. . . . . . . . . . . . 27
Figure 4-1 Diagnostic LED. . . . . . . . . . . . . . . . . . . . . . . . . 32
Figure 4-2 ProLink
®
PC-Interface connections . . . . . . . . . 34
Figure 4-3 Power-supply wiring and grounding terminals . 35
Figure C-1 Switches . . . . . . . . . . . . . . . . . . . . . . . . . . . . . . 47
Figure C-2 Diagnostic LED and zero button. . . . . . . . . . . . 51
Figure D-1 Configuring open collector mode . . . . . . . . . . . 53
®
CMF sensors . . . . . . . . . . . . 14
®
F, Model D, and
®
network wiring . . . . . . . . . . . . . 19
RFT9709 Transmitter Inst ruction Manual
iii
Page 8

iv
RFT9709 Transmitter Ins truction Manual
Page 9
Before You Begin
About this manual
About the transmitter
Configuration and calibration
This instruction manual explains how to install the Micro Motion® Model
RFT9709 transmitter for use with Micro Motion Coriolis flow sensors. For
more information about the sensor, see the appropriate sensor
instruction manual.
CAUTION
Improper installation could cause measurement error
or transmitter failure.
For personal and system safety, follow all instructions to
ensure transmitter will operate correctly.
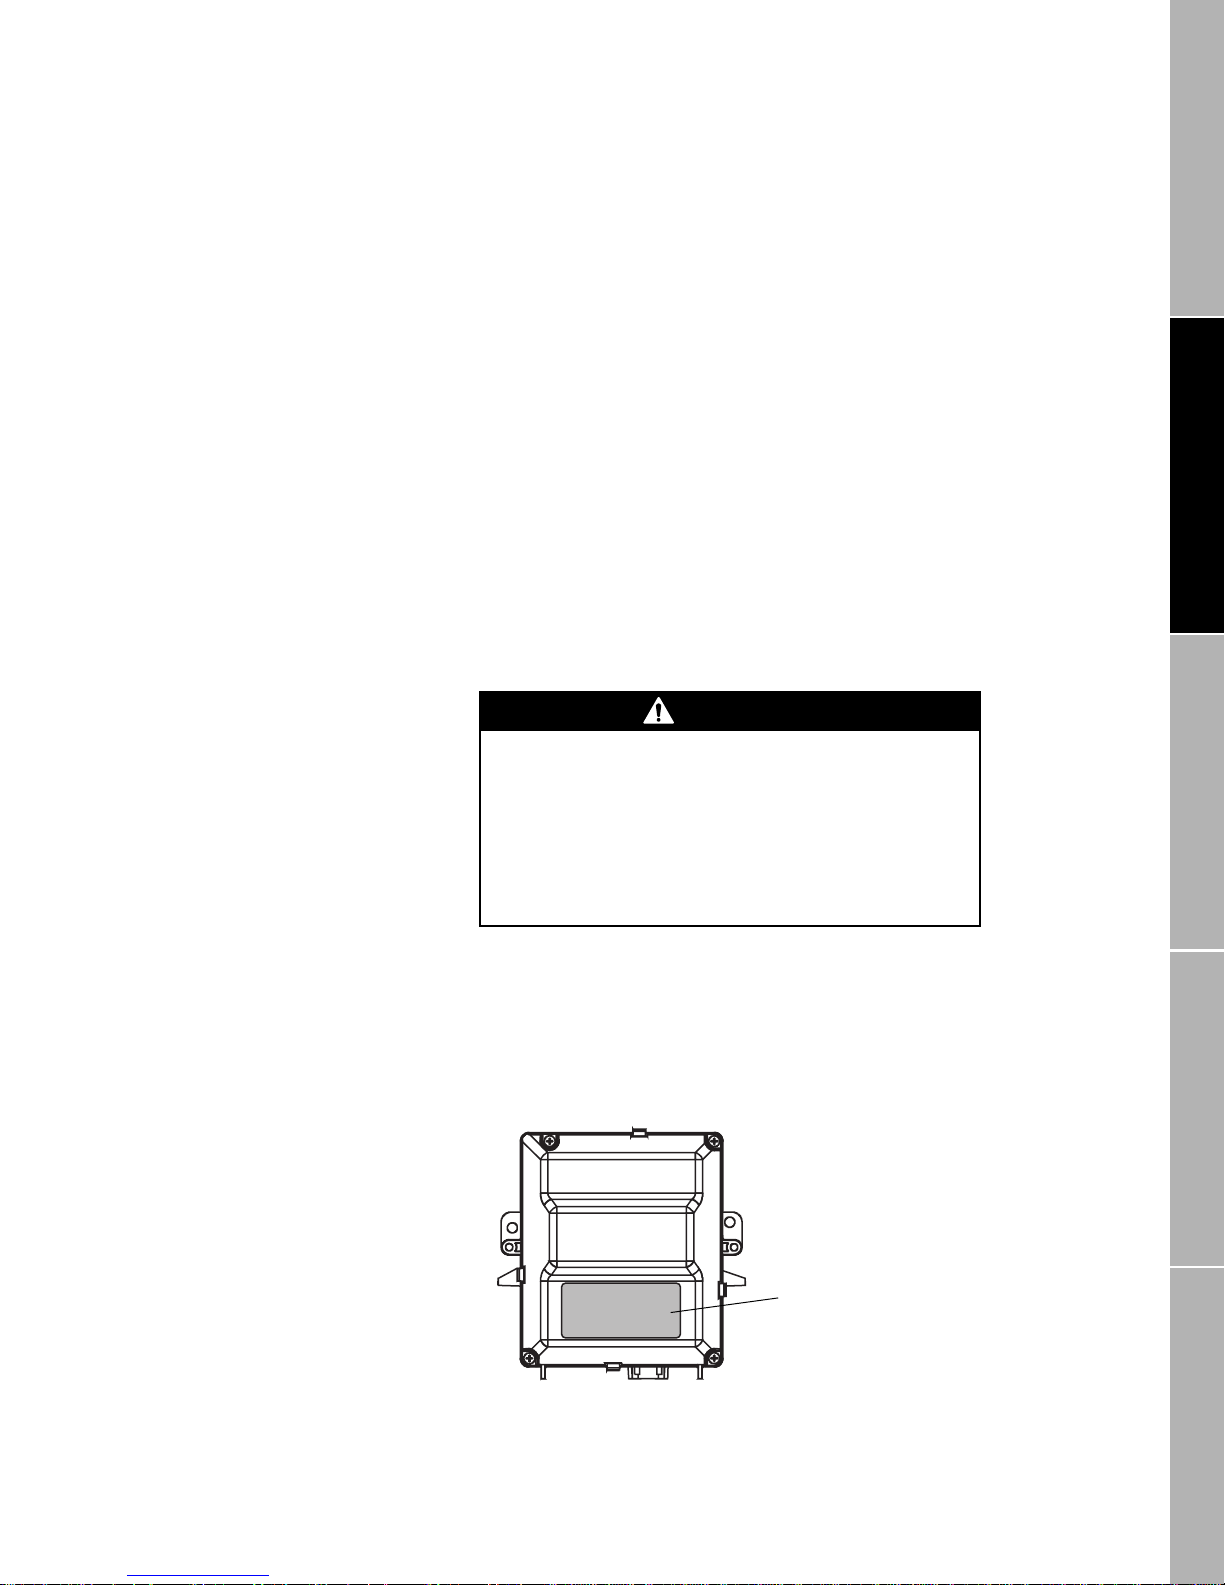
The Model RFT9709 transmitter is a microprocessor-based transmitter
for fluid process measurement. The transmitter works with Micro Motion
sensors to measure mass or volume flow, density, and temperature.
Components of the transmitter are illustrated on the following page.
An RFT9709 transmitter and a sensor are ordered together as a Coriolis
flowmeter. The factory can provide any of three standard configuration
options:
• Gross volume, API table 5A
• Gross standard volume, API table 5A
• Not configured
Wiring Startup TroubleshootingBefore You Begin Mounting
RFT9709 Transmitter Inst ruction Manual
For specific configuration details, see the calibration certificate that is
shipped with the sensor. To meet API requirements, the user must
supply an external RTD that is accurate to ±0.1°F. The external RTD
calibration must be configured in the transmitter. The factory can
configure the transmitter if the RTD calibration is provided.
Changes to the configuration are possible with a custom version of
Micro Motion’s ProLink
RFT9709.
• The standard ProLink software cannot be used with the RFT9709.
Contact the factory for additional ProLink information.
• The Rosemount
with the RFT9709.
®
software program, designed specifically for the
®
hand-held HART® Communicator cannot be used
1
Page 10

Before You Begin
continued
Proving the Coriolis flowmeter
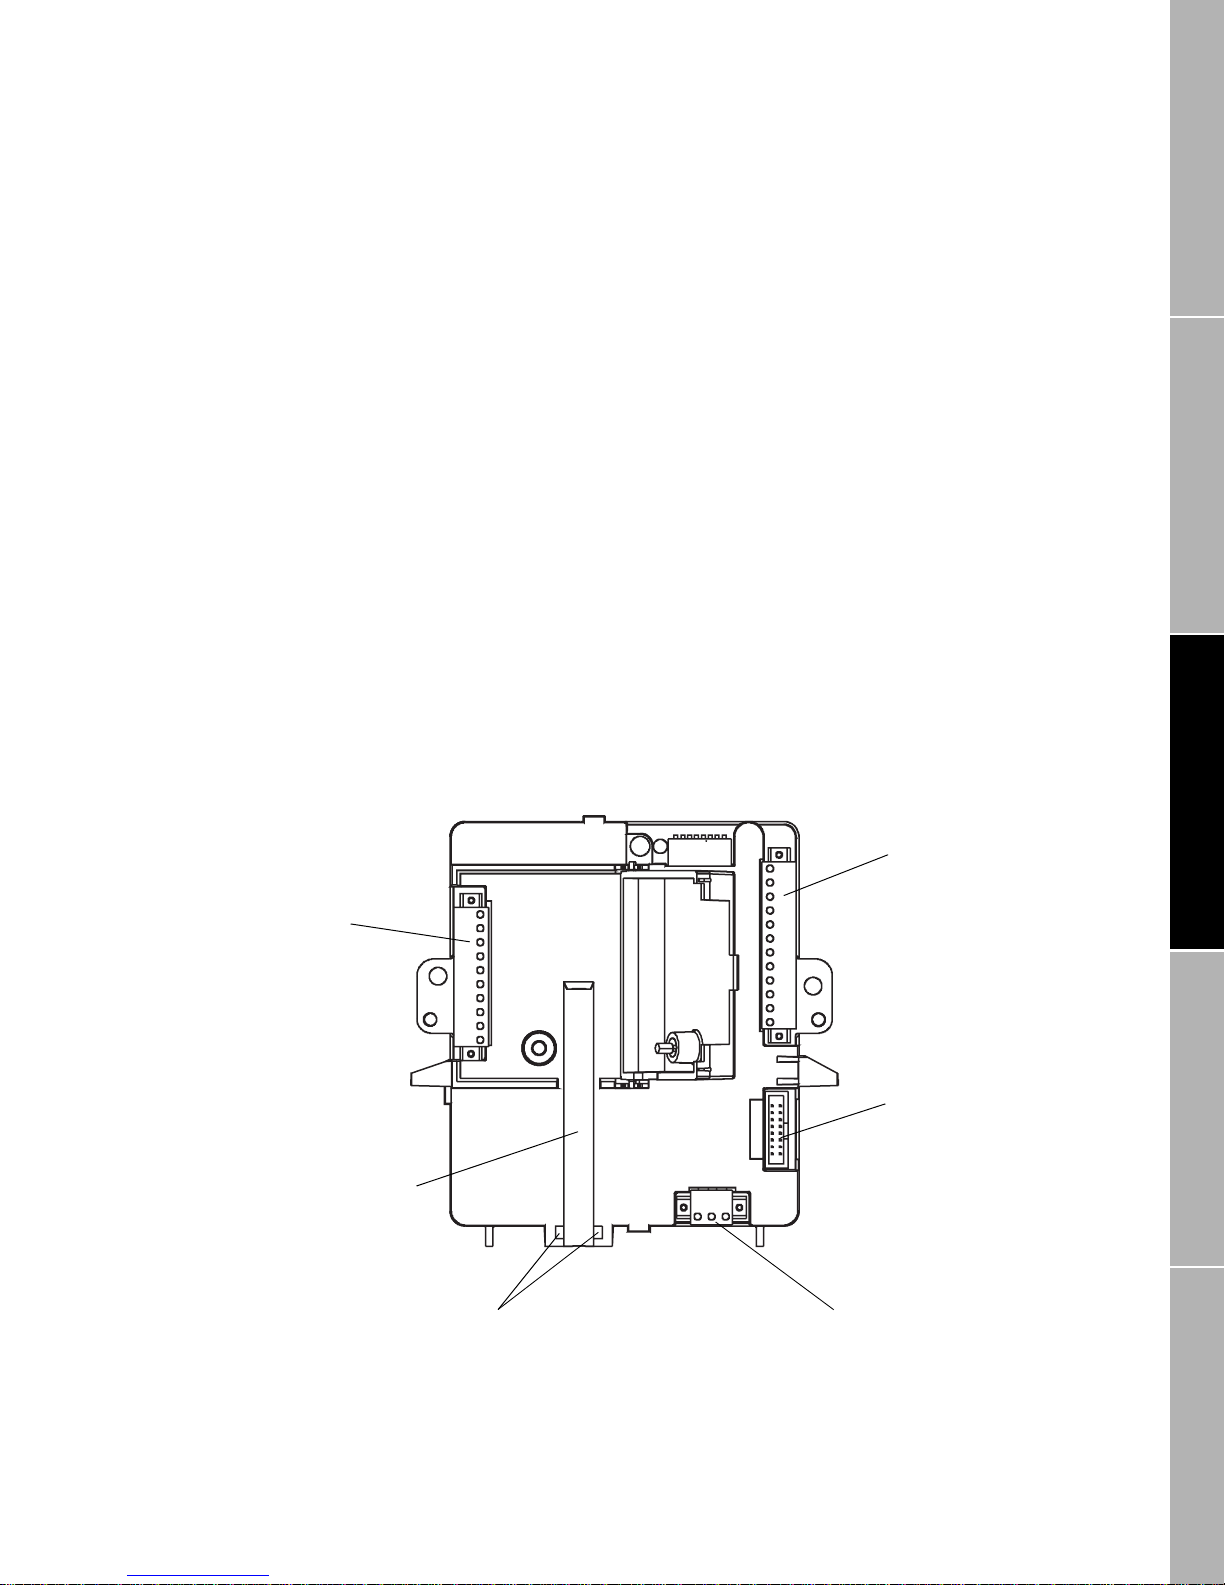
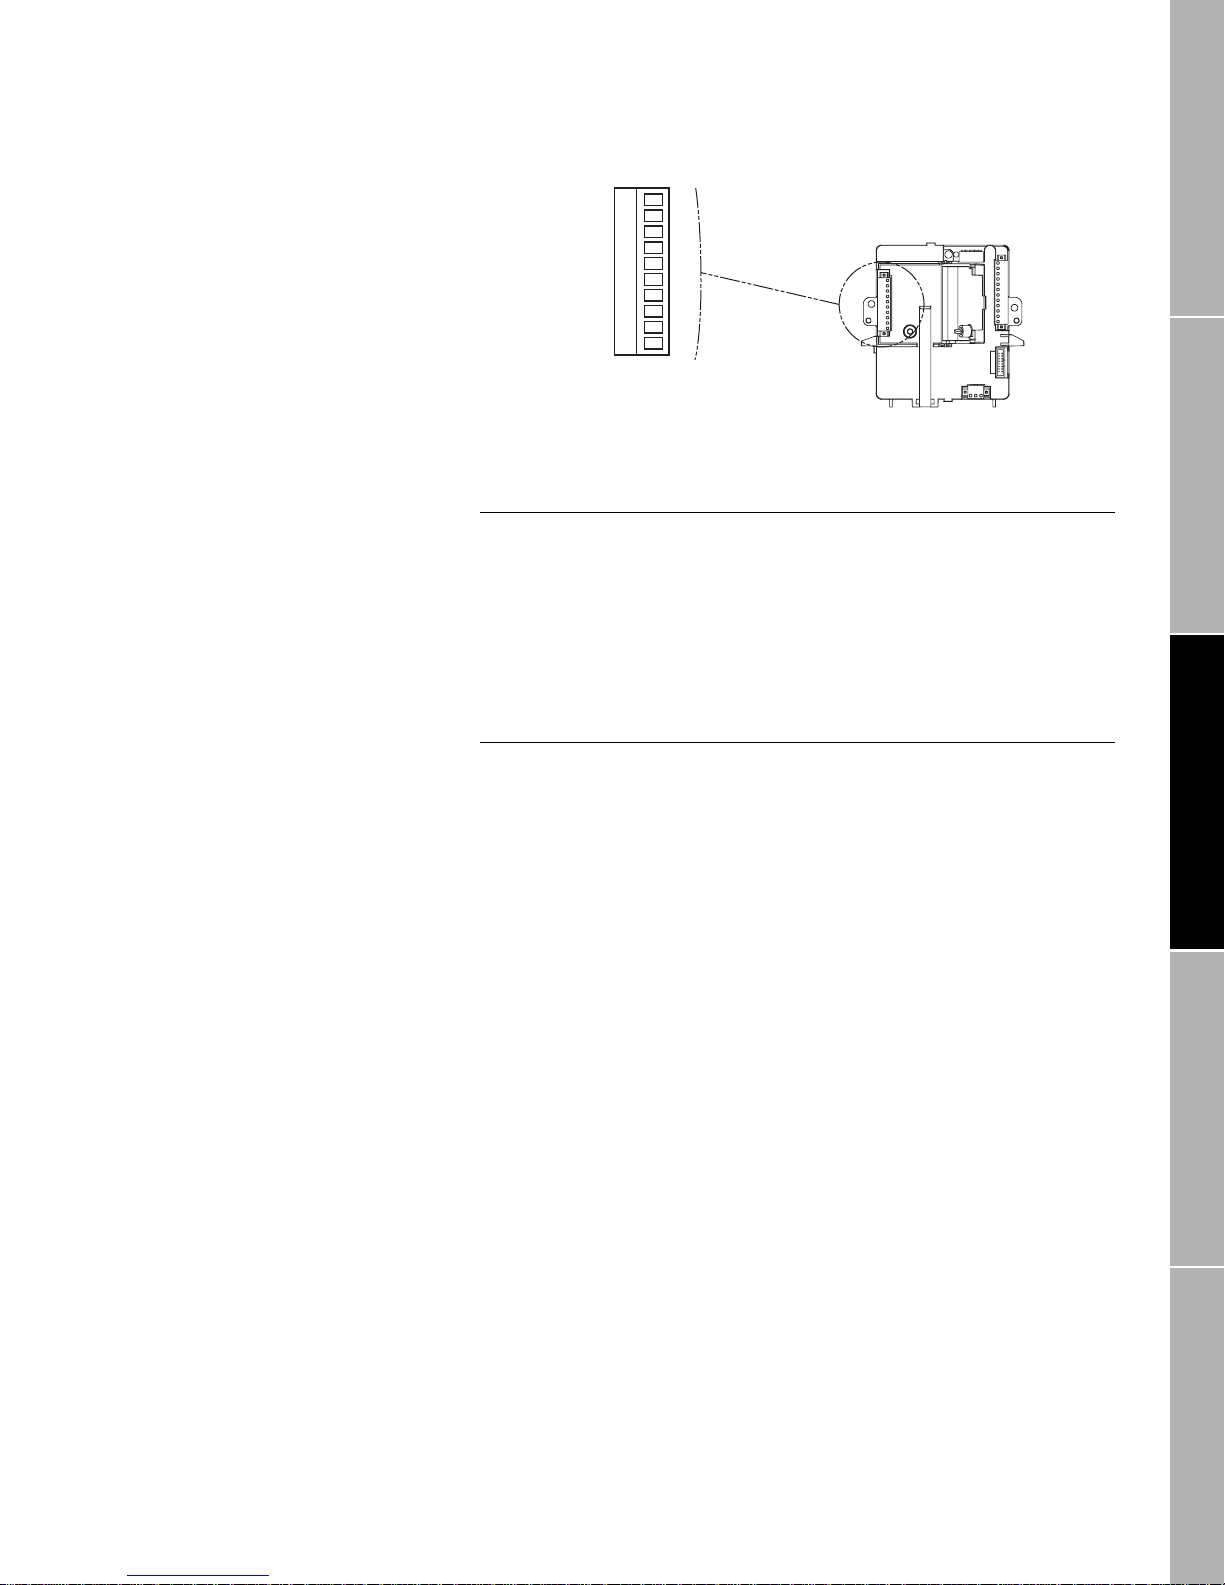
RFT9709 components
Sensor cable
wiring connector
Mounting
boss
Zero button
Proving Micro Motion flowmeters can be accomplished using
conventional proving methods. Micro Motion publishes a comprehensive
applications manual, which describes in detail how to prove Coriolis
meters. For additional information, contact the Micro Motion Customer
Service Depa rtment:
• In the U.S.A., phone
1-800-522-MASS
(1-800-522-6277)
• Outside the U.S.A., phone 303-530-8400
• In Europe, phone +31 (0) 318 549 443
• In Asia, phone 65-770-8155
Diagnostic LED
Configuration switches
Output wiring
connector
Wiring
access
cover
shown
open
Mounting boss
Channel for
routing
sensor cable
Slots for cable ti e
16-pin connector for
future application
Power-supply
wiring ter m in al s
2
RFT9709 Transmitter Ins truction Manual
Page 11
Installation
Step 1 Mounting
1.1 Location requirements
Hazardous area
installations
• Mount the RFT9709 in a user-supplied or factory-supplied NEMA-4
(IP65) enclosure.
• Locate the RFT9709 where it is accessible for service.
• Locate the RFT9709 where the ambient temperature remains between
–40 and 122°F (–40 and 50°C).
• Locate the RFT9709 where humidity is less than 90%.
• Total length of cable from the sensor to the RFT9709 must not exceed
1000 feet (300 meters).
• In hazardous areas, install the RFT9709 as described below.
Read the RFT9709 approvals tag before installing the transmitter. The
approvals tag is attached to the RFT9709 housing. See Figure 1-1.
WARNING
Failure to comply with requirements for intrinsic
safety in a hazardous area could result in an
explosion.
• Install the RFT9709 in an env iron me nt th at i s c om pat ible
with the hazardous area specified on the approvals tag.
• For installations that require intrinsic safety, use this
document with Micro Motion UL installation instructions.
Wiring Startup TroubleshootingBefore You Begin Mounting
Figure 1-1.
RFT9709 approvals tag
RFT9709 Transmitter Inst ruction Manual
• For a complete list of approvals, see
page 4 3.
• For an intrinsically safe or hazardous area installation, use this manual
with Micro Motion UL-D-IS Installation Instructions.
Hazardous area approvals
Approvals tag
,
3
Page 12
Mounting
continued
1.2 Mounting options
1.3 Installation in usersupplied enclosure
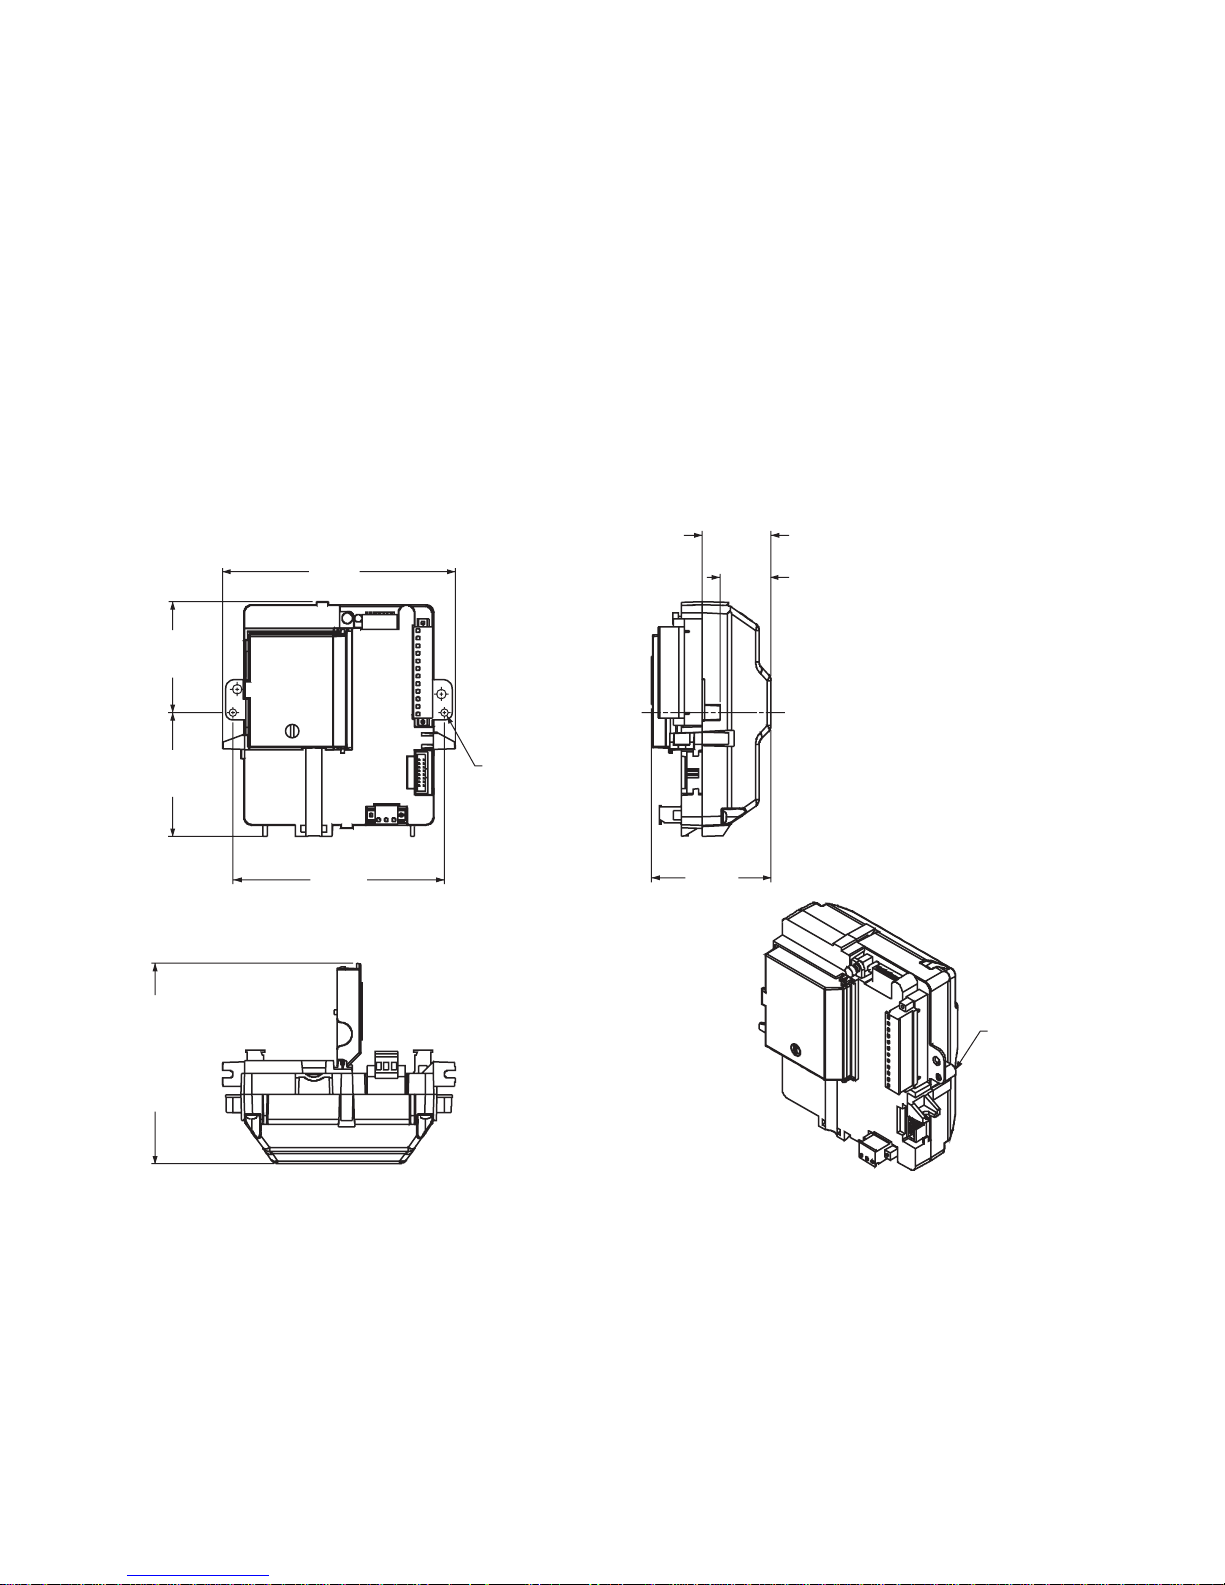
Figure 1-2. RFT9709 dimensions
2 15/16
(74)
3 1/4
(83)
inches
(mm)
6 1/8
(156)
5 9/16
(141)
Dimensions in
2X
2X
The RFT9709 has these installation options for mounting on any flat
surface:
• For mounting in a user-supplied NEMA-4 (IP65) enclosure
• Pre-installed by the factory in an optional NEMA-4 (IP65) enclosure
• Install the RFT9709 with two screws to a flat mounting surface. Micro
Motion does not supply mounting screws.
• Install with wiring terminals facing away from the mounting surface.
• RFT9709 dimensions are provided in Figure 1-2.
1 13/16
(46)
1 11/32
(34)
Mounting boss
2X
Use #8-32 (M4)
screws with flat
washers and lock
washers for
mounting
3 5/32
(80)
Minimum
clearance
to open
access cover
5 1/4
(134)
4
Mounting
2X
boss
RFT9709 Transmitter Ins truction Manual
Page 13

Mounting
continued
1.4 Optional NEMA-housing
installation
An optional NEMA-4 (IP65) housing is available from the factory, or the
enclosure may be user-supplied.
Factory-supplied housing
If the RFT9709 is ordered with the factory-supplied NEMA-4 (IP65)
housing, Micro Motion installs the transmitter in the enclosure.
• Install the NEMA enclosure with four bolts. Micro Motion does not
supply mounting bolts.
• Mount to any flat, stable surface.
• NEMA housing dimensions are provided in Figure 1-3, page 6.
User-supplied housing
Any user-supplied NEMA-4 (IP65) enclosure of an appropriate size may
be used to house the RFT9709. Dimensions of the RFT9709 are
provided in Figure 1-2, page 4.
Conduit openings
Whether the optional NEMA housing is supplied by the user or the
factory, the user must add three conduit openings for power-supply
wiring, input wiring, and output wiring.
• Locate the housing so these openings are accessible for installation of
wiring and so the housing cover can be fully opened for access to the
RFT9709 inside.
• To help prevent moisture from entering the housing, install the housing
so conduit openings are pointed downward, if possible. To maintain the
enclosure’s NEMA rating, all conduit openings must be fully sealed
after wiring is installed.
• Recommended size for conduit openings is 3/4-inch (20 mm).
Wiring Startup TroubleshootingBefore You Begin Mounting
CAUTION
Failure to protect the RFT9709 from moisture could
cause a short circuit, which would result in
measurement error or flowmeter failure.
To avoid risk of condensation of excessive moisture in the
NEMA housing:
• Seal all con duit openings.
• Install drip legs in cable or conduit.
• Close and fully tighten all NEMA-housing covers.
RFT9709 Transmitter Inst ruction Manual
5
Page 14
Mounting
continued
Figure 1-3. Factory-supplied NEMA-housing dimensions
Dimensions in
10 7/16
2X
(266)
Minimum
clearance
to open
access cover
11 7/8
(301)
inches
(mm)
2X
2X
2X
8 7/16
(215)
5 11/16
(145)
7 3/16
(183)
9 11/16
(247)
2X
Cover hinge
0.31
4X Ø
(8)
9 3/16
(234)
7 11/16
(196)
11 11/16
(297)
Mounting feet can be installed in
optional orientation as shown
5 5/16
(136)
1/4
2X
(6)
4X 5/16-18 UNC
for mounting feet
1 3/8
4X
(35)
flat head screw
(included)
cover-access
2X
screw
Housing requires instal l ati on of three conduit openings
for power-supply wiring, input wiring, and output wiring.
Recommended opening size: 3/4-inch (20 mm).
6
RFT9709 Transmitter Ins truction Manual
Page 15
Installation
Step 2 Wiring
2.1 General guidelines
Figure 2-1. RFT9709 wiring terminals
Sensor cable
wiring connector
Figure 2-1 illustrates the locations of the terminals for power-supply
wiring, wiring to the sensor, and output wiring.
• Terminal blocks may be unplugged from the RFT9709 (after removing
two screws) for easier installation of wiring. Always tighten screws after
re-installing terminal blocks.
• Install all conduit, cable and wiring to meet local code requirements.
For an RFT9709 installed in a NEMA enclosure:
• The RFT9709 may be installed in a user-supplied or factory-supplied
NEMA-4 (IP65) enclosure, as described in Section 1.4, page 5. The
enclosure requires three separate conduit openings for power-supply
wiring, sensor wiring, and output wiring.
• Conduit openings must remain sealed to maintain the NEMA-4 (IP65)
rating. Use conduit seals or cable glands that provide a complete seal
with the conduit openings.
Wiring Startup TroubleshootingBefore You Begin Mounting
Output wiring
connector
Wiring
access
cover
shown
open
Channel for
routing
sensor cable
Slots for cable tie
RFT9709 Transmitter Inst ruction Manual
16-pin connector for
future application
Power-supply
wiring ter m in al s
7
Page 16
Wiring
continued
2.2 Power supply wiring and
grounding
For power-supply wiring and grounding, follow these guidelines:
• The RFT9709 requires an 11 to 30 VDC power supply.
• Do not install unfiltered DC power cable in the same conduit or cable
tray as sensor cable or output wiring.
• If the sensor installation must comply with UL standards, refer to
Micro Motion UL-D-IS Installation Instructions.
• Refer to the wiring diagram presented in Figure 2-2.
WARNING
Failure to comply with requirements for intrinsic
safety in a hazardous area could result in an
explosion.
Po wer-supply wiring is not intrinsically safe.
• Keep power-supply wiring separated from intrinsically
safe sensor wiring and outpu t wiring.
• For intrinsically safe sensor installations, use this
document with Micro Motion UL installation instructions.
CAUTION
Installation with power supply on could cause
transmitter damage or failure.
Turn off power before connecting power supply wiring.
Figure 2-2. Power-supply wiring and grounding connections
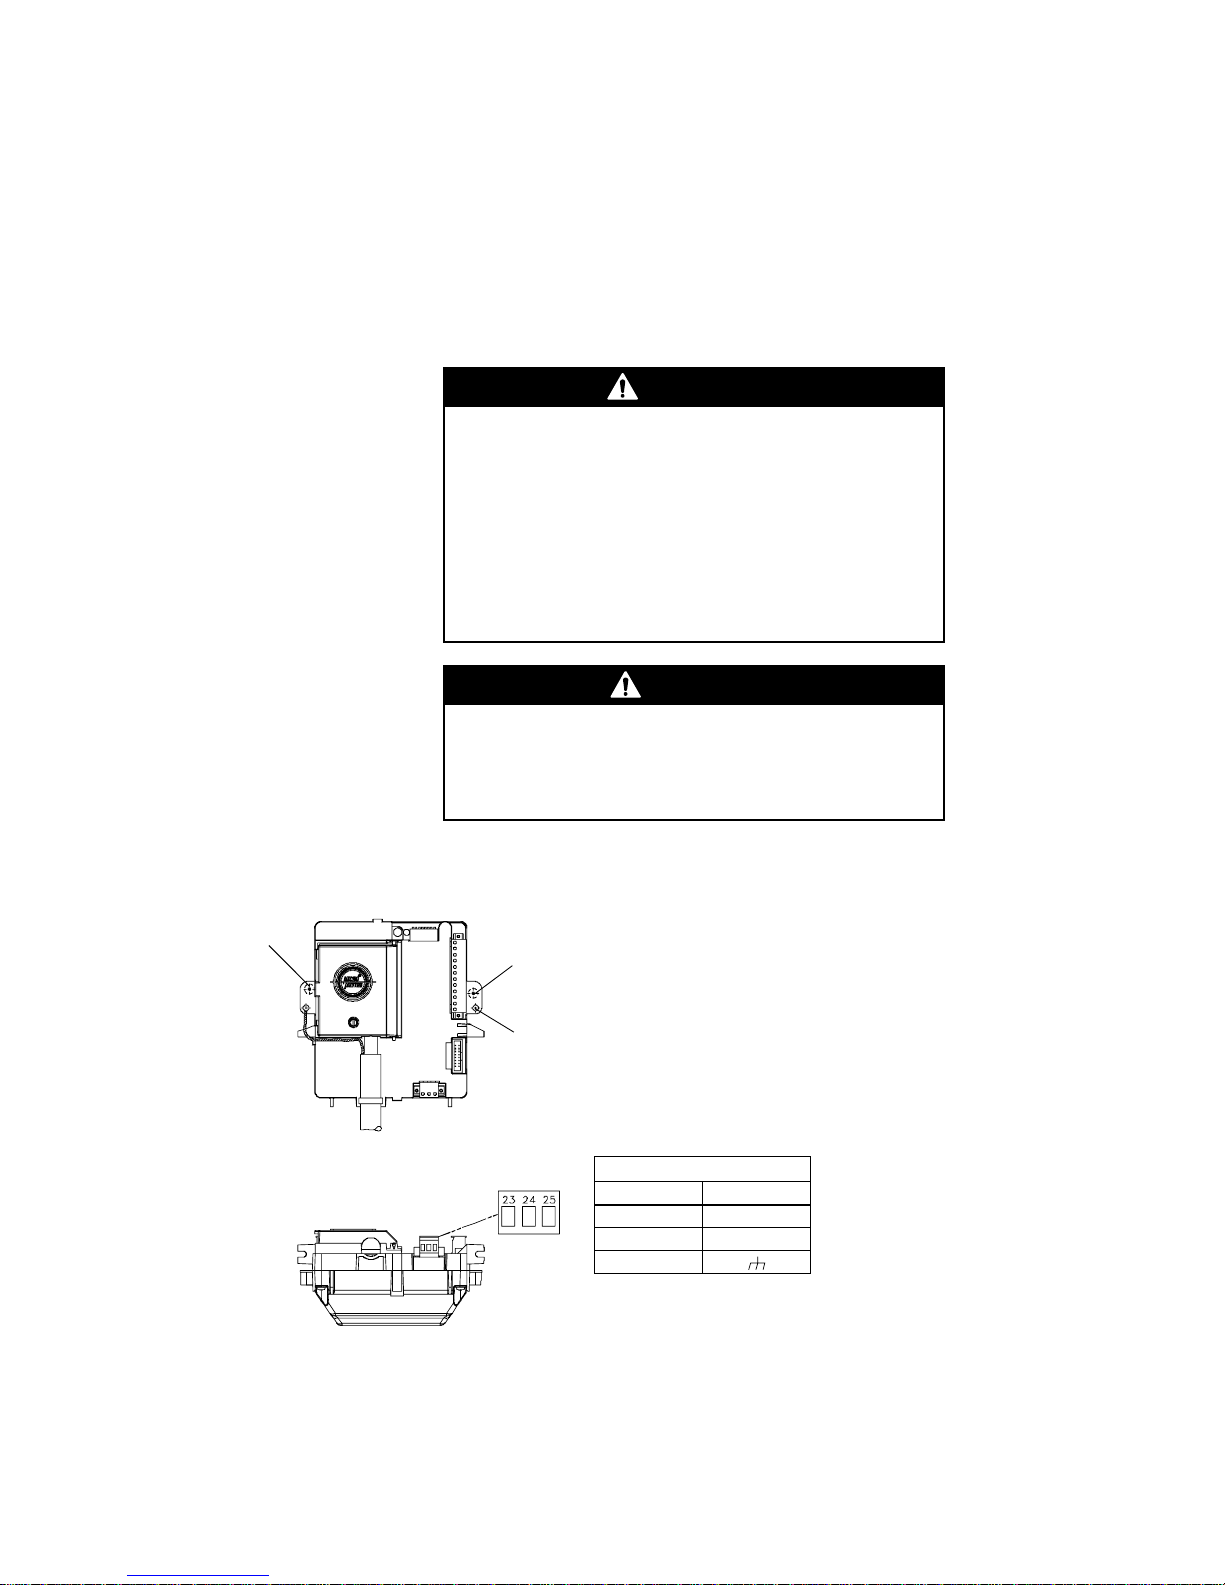
#6-32 ground nut
#6-32 ground nut
Mounting boss
If equipment ground is not established via
mounting, connect a low-im pedance ground at
either ground nut.
11–30 VDC power supply
Terminal Function
If national standards are not in effect , adhere to these standards for
ground wiring:
•
Use copper wire, 14 AWG (2.5 mm²) or lar ger wire size for grounding.
•
Keep all ground leads as shor t as po ssi ble, less than 1 ohm i m pedance.
•
Connect power-supply ground lead directly to earth ground , or follow plant
standards if a separate high-integrity intrinsically safe ground scheme is used.
23 DC–
24 DC+
25
8
RFT9709 Transmitter Ins truction Manual
Page 17
Wiring
continued
2.3 Sensor wiring
The instructions in this section explain how to connect a fully prepared
Micro Motion flowmeter cable to the RFT9709 and a sensor. The sensor
can be a Model D, DL, DT, ELITE
®
, or BASIS® sensor.
• The procedure for preparing Micro Motion flowmeter cable and cable
glands is described in the instructions that are shipped with the cable.
• Install cable and wiring to meet local code requirements.
• Use Micro Motion color-coded cable.
• Total length of cable from the sensor to the RFT9709 must not exceed
1000 feet (300 meters).
WARNING
Failure to comply with requirements for intrinsic
safety in a hazardous area could result in an
explosion.
Sensor wiring is intrinsically safe.
• Keep intrinsically safe sensor wiring separated from
power-supply wiring and output wiring.
• For intrinsically safe sensor installations, use this
document with Micro Motion UL installation instructions.
CAUTION
Improper installation of cable or conduit could cause
inaccurate measurements or flowmeter failure.
Wiring Startup TroubleshootingBefore You Begin Mounting
Keep sensor cable away from devices such as
transformers, motors, and power lines, which produce
large magnetic fields.
RFT9709 Transmitter Inst ruction Manual
9
Page 18
Wiring
continued
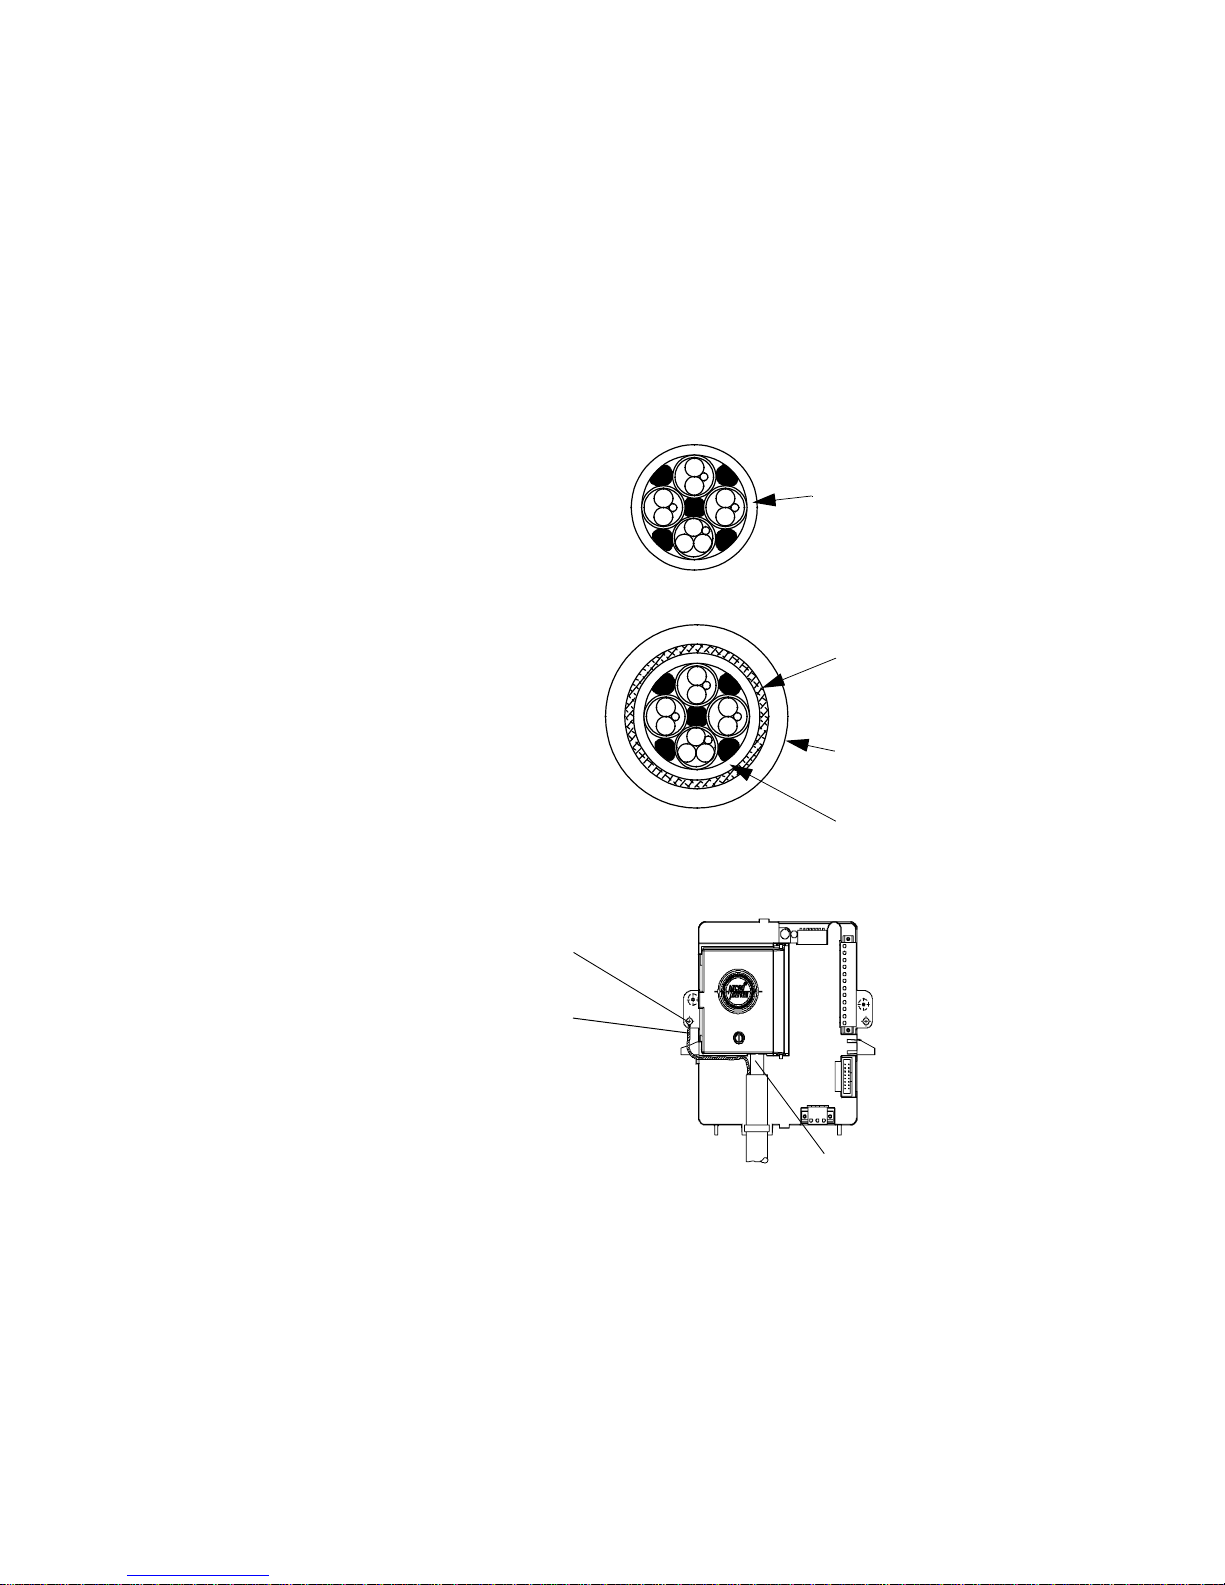
Cable types
Figure 2-3.
Cable types
Micro Motion supplies 9-wire jacketed, shielded, or armored cable, as
illustrated in Figure 2-3.
• All cable types are acceptable for cable tray installation.
• All cable types must have the jacket extend under the wiring terminals
access cover, as illustrated in Figure 2-4.
• Shielded and armored cable must have the braided shield terminated
as illustrated in Figure 2-4.
Jacketed cable
Jacket
Shield e d o r
armored cable
Braided shield
Outer jacket
Figure 2-4.
Terminating flowmeter
cable
Jacket
Mounting boss
Braided shield
For shielded or
armored flowmeter
cable, connect
braided shield at
mounting boss
Jacket must extend
under access cover
10
RFT9709 Transmitter Ins truction Manual
Page 19

Wiring
continued
Remotely-installed
temperature detector
A temperature signal is transmitted to the RFT9709 from a temperature
detector (RTD) on the flow tube inside the sensor case. This signal is
carried by three wires of the flowmeter cable: the yellow, orange and
violet wires (see Table 2-1, page 13).
To meet API requirements, a user-supplied external temperature
detector can be installed remotely by the user. This external temperature
detector, instead of the RTD inside the sensor, is wired to the RFT9709.
• The external RTD must be accurate to ±0.1°F (±0.05°C).
• RTD calibration information must be configured in the RFT9709.
Requirements for installing a user-supplied external temperature
detector:
• Locate the external temperature detector as close to the sensor as
possible.
• Use an individually shielded 3-wire cable of 22 AWG (0.3 mm²) or
larger wires to connect the external temperature detector to the
flowmeter.
• Wiring diagrams are provided in Figure 2-6, Figure 2-7, and Figure 2-8
on pages 14 through16.
Procedure for installing the user-supplied external temperature
detector:
1. At the sensor junction box, before connecting the flowmeter cable,
identify the yellow, orange and violet wires that come from inside the
sensor.
2. Disconnect these wires from the terminal block, and tie all three
together with a wire nut to protect exposed wire ends.
3. Connect three wires from the external temperature detector to the
terminals, as illustrated in Figure 2-6, Figure 2-7, or Figure 2-8. If the
temperature detector has a fourth wire, it remains unconnected.
4. Make flowmeter cable connections as illustrated in Figure 2-6,
Figure 2-7, or Figure 2-8.
Wiring Startup TroubleshootingBefore You Begin Mounting
RFT9709 Transmitter Inst ruction Manual
11
Page 20

Wiring
continued
Cable connections to
sensor and RFT9709
Wiring connections from the sensor to the RFT9709 are made at the
RFT9709 terminals indicated in Figure 2-5. Instructions for wiring the
sensor and transmitter are provided below and on the following pages.
The wiring procedure is the same for the sensor and RFT9709. Refer to
the wiring diagrams on pages 14 through 16, and follow these steps:
1. Insert the stripped ends of the individual wires into the terminal
blocks. No bare wires should remain exposed.
• At the sensor, connect wiring inside the sensor junction box.
• At the RFT9709, connect wiring to the intrinsically safe terminals for
sensor wiring, indicated in Figure 2-5. The flowmeter cable outer
jacket must extend under the RFT9709 wiring terminals access
cover.
• For easier connection of wiring, terminal blocks can be unplugged
from the RFT9709. Two captive screws hold each terminal block in
place.
2. Locate the wires by color as indicated in Table 2-1.
3. Tighten the screws to hold the wires in place.
4. Tightly close all housing covers.
• Tighten the sensor junction-box cover. Tighten all four cover screws.
• Close the RFT9709 sensor-wiring access cover and tighten the
screw that holds it in place.
• If the RFT9709 is installed in a NEMA enclosure, tightly close all
NEMA housing covers.
CAUTION
Exposing the RFT9709 to moisture, or failure to seal
the sensor junction box, could cause a short circuit.
A short circuit would result in measurement error or
flowmeter failure.
To avoid risk of condensation or excessive moisture:
• Seal all con duit openings.
• Install drip legs in cable or conduit.
• Fully tighten sensor j unction box cover.
• Close and tighten all NEMA housing covers.
12
RFT9709 Transmitter Ins truction Manual
Page 21
Wiring
continued
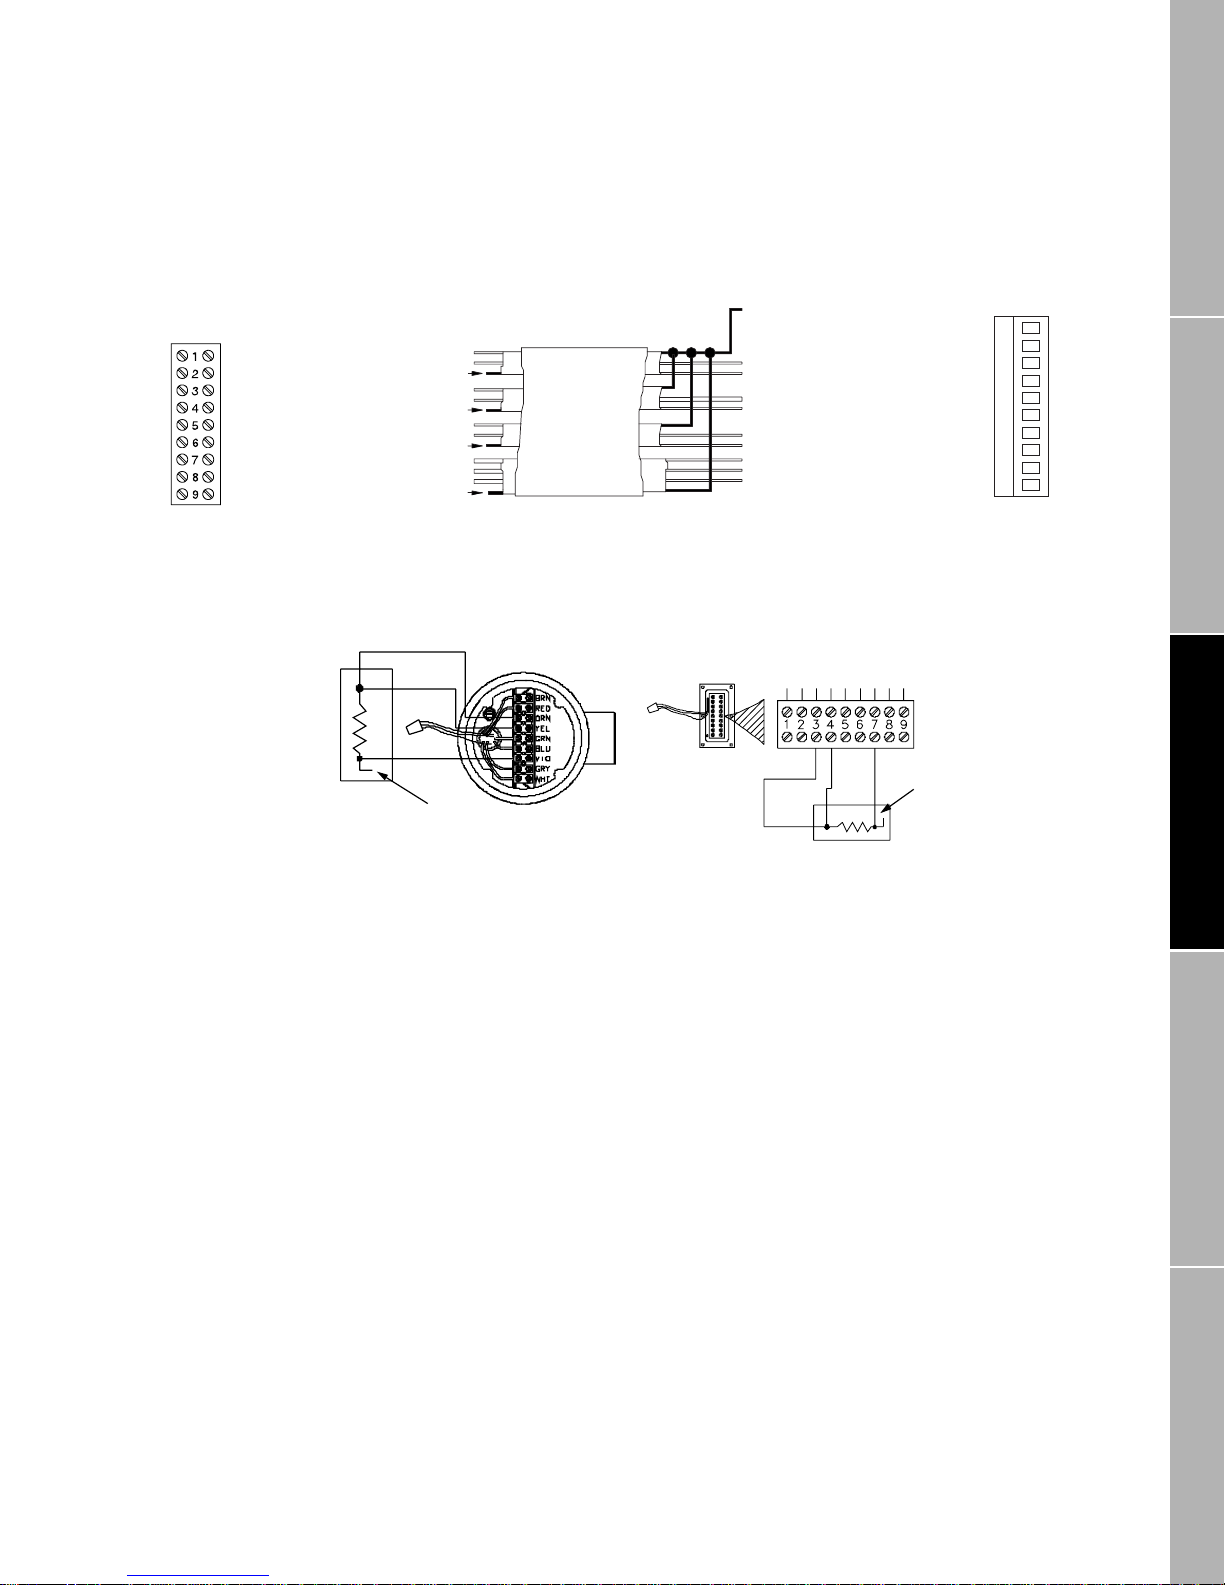
Figure 2-5.
RFT9709 terminals for
sensor wiring
Table 2-1.
Sensor-wiring terminal
designations
Drain wires
*
Drive +
Drive –
Temperature –
Temperature return
Left pickoff +
Right pickoff +
Temperature +
Right pickoff –
Left pickoff –
9 8 7 6 5 4 3 2 1 0
*Combined drain wir es.
Wire
color
Black*
Sensor
terminal
RFT9709
terminal Function
No connection** 0 Drain wires*
Brown11Drive +
Red22Drive –
Orange 3 3 Temperature –
Yellow 4 4 Temperature return
Green 5 5 Left pickoff +
Blue 6 6 Right pickoff +
Violet 7 7 Temperature +
Gray 8 8 Right pickoff –
White 9 9 Left pickoff –
* C ombined drain wires f ro m brown / red, green/white, and gray/blue pairs, and
yellow/orange/violet tr ip let .
**Cut off drain wires and prote ct from shorting to any meta l or te rminals.
Wiring Startup TroubleshootingBefore You Begin Mounting
RFT9709 Transmitter Inst ruction Manual
13
Page 22
Wiring
continued
Figure 2-6. Wiring to ELITE® CMF sensors
ELITE® sensor
Green
White
Brown
Violet
Yellow
Orange
terminals
Flowmeter
cable
Maximum cable length 1000 ft. (300 m)
Brown
Red
Green
White
Blue
Gray
Orange
Violet
Yellow
Prepare cable in accordance with the instructions
that are shipped with the cable
Blue
Gray
Red
Clip drain wire back
Clip drain wire back
Clip drain wire back
Clip drain wire back
Optional remote temperature detector (RTD) wiring (required for API)
3-wire or 4-wire
RTD
No connection
Violet
Yellow
Orange
ELITE
terminals
®
sensor
Blue
Gray
Red
Green
White
Brown
1. In the sensor junction box, identify the violet, yellow, and
orange wires that come from the sensor.
2. Disconnect these wires from the terminal block, then tie
all three together with a wire nut to protect exposed wire
ends.
3. Connect three wires from the external RTD to the
terminals from Step 2, as illustrated at left. If the RTD has
a fourth wire, it remains unconnected.
Black
(Drains from all
wire sets)
Brown
Red
Green
White
Blue
Gray
Orange
Violet
Yellow
RFT9709
terminals
Black (drains)
Brown
Red
Orange
Yellow
Green
Blue
Violet
Gray
White
0
1
2
3
4
5
6
7
8
9
14
RFT9709 Transmitter Ins truction Manual
Page 23
Wiring
continued
Figure 2-7. Wiring to BASIS® F, Model D, and DL sensors
BASIS®, Model D
or DL sensor
terminals
Brown
Red
Orange
Yello w
Green
Blue
Violet
Gray
White
3-wire or 4-wire
Flowmeter
cable
Maximum cable length 1000 ft. (300 m)
Black
(Drains from all
Brown
Clip drain wire back
Clip drain wire back
Clip drain wire back
Clip drain wire back
Red
Green
White
Blue
Gray
Orange
Violet
Yellow
wire sets)
Brown
Red
Green
White
Blue
Gray
Orange
Violet
Yellow
Optional remote temperature detector (RTD) wiring (required for API)
BASIS®, Model D or DL
sensor terminals
RTD
No connection
D600 sensor
terminals
Brown
RFT9709
terminals
Black (drains)
Red
Orange
Y ellow
Green
Blue
Violet
Gray
White
Brown
Red
Orange
Yellow
Green
Blue
Violet
Gray
White
0
1
2
3
4
5
6
7
8
9
Wiring Startup TroubleshootingBefore You Begin Mounting
No connection
3-wire or 4-wire
RTD
1. In the sensor junction box, identify the violet, yellow, and orange wires that come from inside the sensor.
2. Disconnect these wires from the terminal block, then tie all three together with a wire nut to protect
exposed wire ends.
3. Connect three wires from the external RTD to the terminals from Step2, as illustrated above. If the RTD
has a fourth wire, it remains unconnected.
RFT9709 Transmitter Inst ruction Manual
15
Page 24

Wiring
continued
Figure 2-8. Wiring to Model DT sensors
Model DT
sensor terminals
User-supplied metal
junction box with
terminal block
Brown
Red
Orange
Yellow
Green
Blue
Sensor wire number
Violet
Gray
White
Earth
ground
Flowmeter
cable
Maximum cable length 1000 ft. (300 m)
Black
(Drains from all
Brown
Clip drain wire back
Clip drain wire back
Clip drain wire back
Clip drain wire back
Red
Green
White
Blue
Gray
Orange
Violet
Yellow
Prepare cable in accordance with the instructions
that are shipped with the cable
wire sets)
Brown
Red
Green
White
Blue
Gray
Orange
Violet
Yellow
Optional remote tem perature detector (RTD) wiring (require d for API)
Model DT
sensor terminals
Brown
Red
Orange
Yellow
Green
Blue
Violet
Gray
1. In the sensor junction box, identify the violet, yellow, and
orange wires that come from the sensor.
2. Disconnect these wires from the terminal block, then tie
all three together with a wire nut to protect exposed wire
ends.
3. Connect three wires from the external RTD to the
White
terminals from Step 2, as illustrated at left. If the RTD has
a fourth wire, it remains unconnected.
RFT9709
terminals
Black (drains)
Brown
Red
Orange
Yellow
Green
Blue
Violet
Gray
White
0
1
2
3
4
5
6
7
8
9
No connection
3-wire or 4-wire
RTD
16
RFT9709 Transmitter Ins truction Manual
Page 25

Wiring
continued
2.4 Output wiring
Output wiring terminal designations are described in Table 2-2. Output
functions and wiring are described in detail through page 25. Follow
these general guidelines for output wiring:
• Use individually shielded pairs of 22 AWG (0.3 mm²) or larger wires for
connections between the RFT9709 and any peripheral device.
• Maximum wire length between the RFT9709 and any peripheral device
is 500 feet for 22 AWG wire (150 meters for 0.3 mm² wire), 50 feet for
28 AWG wire (15 meters for 0.1 mm² wire).
• Shields and/or drain wires must be terminated at the RFT9709 (see
Figure 2-9) or at the peripheral device.
WARNING
Failure to comply with requirements for intrinsic
safety in a hazardous area could result in an
explosion.
Output wiring is not intrinsically safe.
• Keep output wiring separated from power-supply wiring
and intrinsically safe sensor wiring .
• Follow all output wiring instructions to ensure the
RFT9709 and any connected devices will operate
correctly.
Wiring Startup TroubleshootingBefore You Begin Mounting
Table 2-2.
Output-wiring terminal
designations
Figure 2-9.
Terminating output-wiring
shields and drains
Terminals Function
11 and 12 Primary variable (PV) mA output
13 and 14 Secondary variable (SV) mA output
15 and 16 RS-485 I/O
17 and 18 Frequency/pulse output
19 and 18 Control output
20 and 18 Remote zero input
21 and 22 Pressure transmitter (or DP ce ll)
#6-32 ground nut
Mounting boss
Terminate shields and/or drain wires at
mounting boss or ground nut, or
terminate them at peripheral device.
RFT9709 Transmitter Inst ruction Manual
17
Page 26

Wiring
continued
Primary and secondary
mA outputs
Figure 2-10.
mA output terminals
Primary and secondary output signals can be independently configured,
and can represent mass flow rate, gross volume flow rate, gross
standard volume flow rate, density, or temperature. With a pressure or
differential pressure transmitter, the primary and secondary output
signals can also represent pressure, differential pressure, or viscosity.
RFT9709 terminals
for output wiring
11 12 13 14
15 16 17 18 19 20 21 22
PV+ (signal line)
PV– (return)
SV+ (signal line)
SV– (return)
PV = Primary variable
SV = Secondary variable
Output performance and requirements
• The mA outputs produce a 4-20 mA current, and can supply power for
loop-powered process indicators such as the Micro Motion PI 4-20
Process Indicator.
• Primary and secondary mA output loops are isolated and floating.
Additional grounding will result in optimum performance, and optimum
HART communication on the primary mA output. Ensure that mA
output loops are grounded at the external device.
• The maximum allowable length for mA signal wiring is determined by
measuring resistance over the signal wires and through the receiver
device. Total loop resistance must not exceed 1000 ohms.
18
Output fault setting
The mA outp ut s ca n be se t t o pr od u ce downscale or up sc a le fault l eve ls.
• If set to downscale (switch 7 off), a fault drives the outputs to 0-2 mA
• If set to upscale (switch 7 on), a fault drives the outputs to 22-24 mA
Low-flow cutoffs
If an mA output is configured to represent a flow rate, flow values below
the user-defined low-flow cutoff cause the output to default to the level
that represents zero flow.
Slug-flow inhibit
The RFT9709 senses density outside user-selected limits. An mA output
configured to represent a flow rate holds at the last measured flow rate
before a slug-flow condition occurred, for a programmed time of 0-60
seconds, then defaults to the output level that represents zero flow.
Damping
A wide range of filter constants is available for damping on flow, density,
or temperature. Additional damping may be applied to mA outputs.
RFT9709 Transmitter Ins truction Manual
Page 27

Wiring
continued
HART multidrop network
wiring
The Bell 202 physical layer is used for digital communication with the
HART protocol. Devices in a HART multidrop network communicate by
sending and receiving signals to and from one another.
Up to 15 transmitters can be connected using the Bell 202 standard.
Other Rosemount
®
SMART FAMILY® transmitters can also participate in
a HART network.
• Using multiple transmitters in a HART network requires assigning a
unique address from 1 to 15 to each transmitter. Assigning an address
of 1 to 15 to the RFT9709 causes the primary mA output to remain at a
constant 4 mA level.
• A HART-compatible control sy st em ca n communica te w ith any device
in a HART network over the same 2-wire pair.
Configuration switches on the RFT9709 allow the choice of Bell 202 or
RS-485 physical layers for HART or Modbus
®
communications. Make
sure switches are set as instructed in Section C.2, page 47, before
attempting to use the RFT9709 in a HART multidrop network.
Figure 2-11 shows how to connect multiple transmitters to a host
controller for Bell 202 HART digital communication.
• The Bell 202 standard requires twisted-pair wire.
• SMART FAMILY devices require a minimum loop resistance of
250 ohms. Loop resistance must not exceed 1000 ohms.
• Connect the mA outputs from each transmitter together so they
terminate at a common load resistor, with at least 250 ohms
impedance, installed in series.
Wiring Startup TroubleshootingBefore You Begin Mounting
Figure 2-11. Typical HART® network wiring
RFT9739
ProLink®
PC Interface
(Bell 202)
Resistor
(250 ohm
load)
PV+11PV–
RFT9709
field-mou nt
PV+17PV–
12
18
4-20mA
IFT9701
RFT9739
rack-moun t
PV+
PV–
CN2-
CN2-
Z30
D30
SMART
FAMILY®
transmitter
DC source required for
other HART
passive transmitters
SMART
FAMILY
transmitter
®
4-20 mA
24
DC
For optim um HART communic ation, m ak e sure the
output loop is single-point grounded to instrument
grade grou nd.
RFT9709 Transmitter Inst ruction Manual
19
Page 28

Wiring
continued
RS-485 output
Figure 2-12. RS-485 wiring
One RFT9709 and
a host controller
A
Host
controller
120 ohm 1/2 watt
(if required – see note)
B
The RS-485 physical layer is used for serial communication with the
HART or Modbus protocol. Multiple transmitters can participate in an
RS-485 multidrop network.
• Under HART protocol, up to 32 transmitters can participate in the
network. Each transmitter must have a unique tag name. If polling
addresses are used, up to 16 transmitters can have unique polling
addresses from 0 to 15.
• Under Modbus protocol, up to 15 transmitters can participate in the
network. Each transmitter must have a unique polling address from
1to 15.
• Configuration switches on the RFT9709 allow the choice of Bell 202 or
RS-485 physical layers for HART or Modbus communications. Make
sure switches are set as instructed in Section C.2, page 47, before
attempting to use the RFT9709 in an RS-485 multidrop network.
Figure 2-12 shows how to connect one transmitter or multiple
transmitters to a host controller for RS-485 serial communication.
• Install twisted-pair, shielded cable, consisting of 24 AWG (0.25 mm²) or
larger wire, between the RFT9709 and an RS-485 communication
device. Maximum cable length is 4000 feet (1200 meters).
• Some installations require a 120-ohm, ½-watt resistor at both ends of
the network cable to reduce electrical reflections.
120 ohm 1/2 watt
(if required – see note )
15
RFT9709
16
Multiple RFT9709s an d
a host controller
Host
controller
A
120 ohm 1/2 watt
(if required – see note)
B
Note:
For long-distance communication, or if
noise from an e xternal so urce interf e res
with the signal, install 120-ohm ½-watt
resistors across terminals of both end
devices.
20
15 16
RFT9709
15 16
RFT9709
120 ohm 1/2 watt
(if required – see note )
RFT9709 Transmitter Ins truction Manual
15
RFT9709
16
Page 29

Wiring
continued
Frequency/pulse output
Figure 2-13.
Frequency/pulse output
terminals
The frequency/pulse output represents
mass, mass flow rate, gross
volume, gross volume f low rate, gross standard volume, or gross
standard volume flow rate,
Terminal 18 is a common return for the frequency/ pu ls e
output, the control output, and the external zero input.
independent of the mA outputs.
RFT9709 terminals
for output wiring
11 12 13 14 15 16
17 18
19 20 21 22
FREQ (signal line)
F GND (return)
Output performance and requirements
• The frequency/pulse output can be used with any Micro Motion
peripheral device except the DMS Density Monitoring System and the
PI 4-20 Process Indicator, which do not have frequency inputs.
• For use with receivers other than Micro Motion peripheral devices,
check the instruction manual for the receiver to make sure its inputvoltage and electrical-current ratings match the output-voltage and
electrical-current ratings of the RFT9709.
• RFT9709 output is a nominal +23 V square wave, unloaded. Any load
will decrease the peak voltage level.
• Output impedance is 3.3 kohm.
• The frequency/pulse output loop is isolated and floating. Additional
grounding will result in optimum performance. Ensure that the
frequency/pulse output loop is grounded at the external device.
• If necessary, the frequency output can be configured for open collector
mode. For instructions, see Appendix D, page 53. When used in the
open collector mode, the output circuit is rated to 30 VDC, with 0.1
ampere maximum sinking capability.
Wiring Startup TroubleshootingBefore You Begin Mounting
RFT9709 Transmitter Inst ruction Manual
Output fault setting
The frequency/pulse output can be set to produce downscale or upscale
fault levels.
• If set to downscale (switch 7 off), a fault drives the output to 0 Hz
• If set to upscale (switch 7 on), a fault drives the outputs to 15-19 kHz
Low-flow cutoff
Flow values below the user-defined low-flow cutoff cause the output to
default to the level that represents zero flow.
21
Page 30

Wiring
continued
Slug-flow inhibit
The RFT9709 senses density outside user-selected limits. The output
holds at the last measured flow rate before a slug-flow condition
occurred, for a programmed time of 0-60 seconds, then defaults to 0 Hz.
Damping
A wide range of filter constants is available for damping on flow .
Control output
Figure 2-14.
Control output terminals
The control output can indicate flow direction, RFT9709 zeroing in
progress, fault alarm, event 1, or event 2.
RFT9709 terminals
for output wiring
11 12 13 14 15 16 17
18 19
20 21 22
Terminal 18 is a common return for the frequency/pulse
output, the control outpu t, and the external zero input.
F GND (return)
CNTRL (signal line)
Output performance
• When configured to indicate flow direction, the output is high (+23 V)
when indicating forward flow, and low (0 V) when indicating reverse
flow .
• When configured to indicate RFT9709 zeroing in progress, the output
is low (0 V) when zeroing is in progress and high (+23 V) at all other
times.
• When configured to indicate faults, the output is low (0 V) when a fault
condition exists and high (+23 V) during normal operation.
• When configured to indicate event 1 or event 2, the output switches ON
(0 V) or OFF (+23 V) when the flow rate, flow total, density,
temperature, pressure, or viscosity of the process fluid achieves a
programmed setpoint.
• RFT9709 output is nominal 0 or +23 V, unloaded.
• Output impedance is 3.3 kohm.
• If necessary, the control output can be configured for open collector
mode. For instructions, see Appendix D, page 53. When used in the
open collector mode, the output circuit is rated to 30 VDC, with 0.1
ampere maximum sinking capability.
22
RFT9709 Transmitter Ins truction Manual
Page 31

Wiring
continued
External zero switch wiring
Figure 2-15.
Remote-zero switch wiring
The RFT9709 can be configured to allow flowmeter zeroing from an
external switch.
• The switch must be a momentary-type contact, normally open, and
must carry 1 mA of current in the closed position. The open circuit
voltage is 23 VDC.
• The flowmeter zeroing procedure is described in Section 3.2, page 27.
WARNING
Failure to comply with requirements for intrinsic
safety in a hazardous area could result in an
explosion.
External zero switch wiring is not intrinsically safe.
Keep external zero switch wiring separated from
power-supply wiring, intrinsically safe sensor wiring, and
any other intrinsicall y safe wiring.
RFT9709 terminals
for output wiri ng
11 12 13 14 15 16 17
Remote
switch
Wiring Startup TroubleshootingBefore You Begin Mounting
18
19
F GND (return)
20
21 22
ZERO+ (signal line)
Terminal 18 is a common return for the frequency/pulse
output, the control outpu t, and the external zero input.
RFT9709 Transmitter Inst ruction Manual
23
Page 32

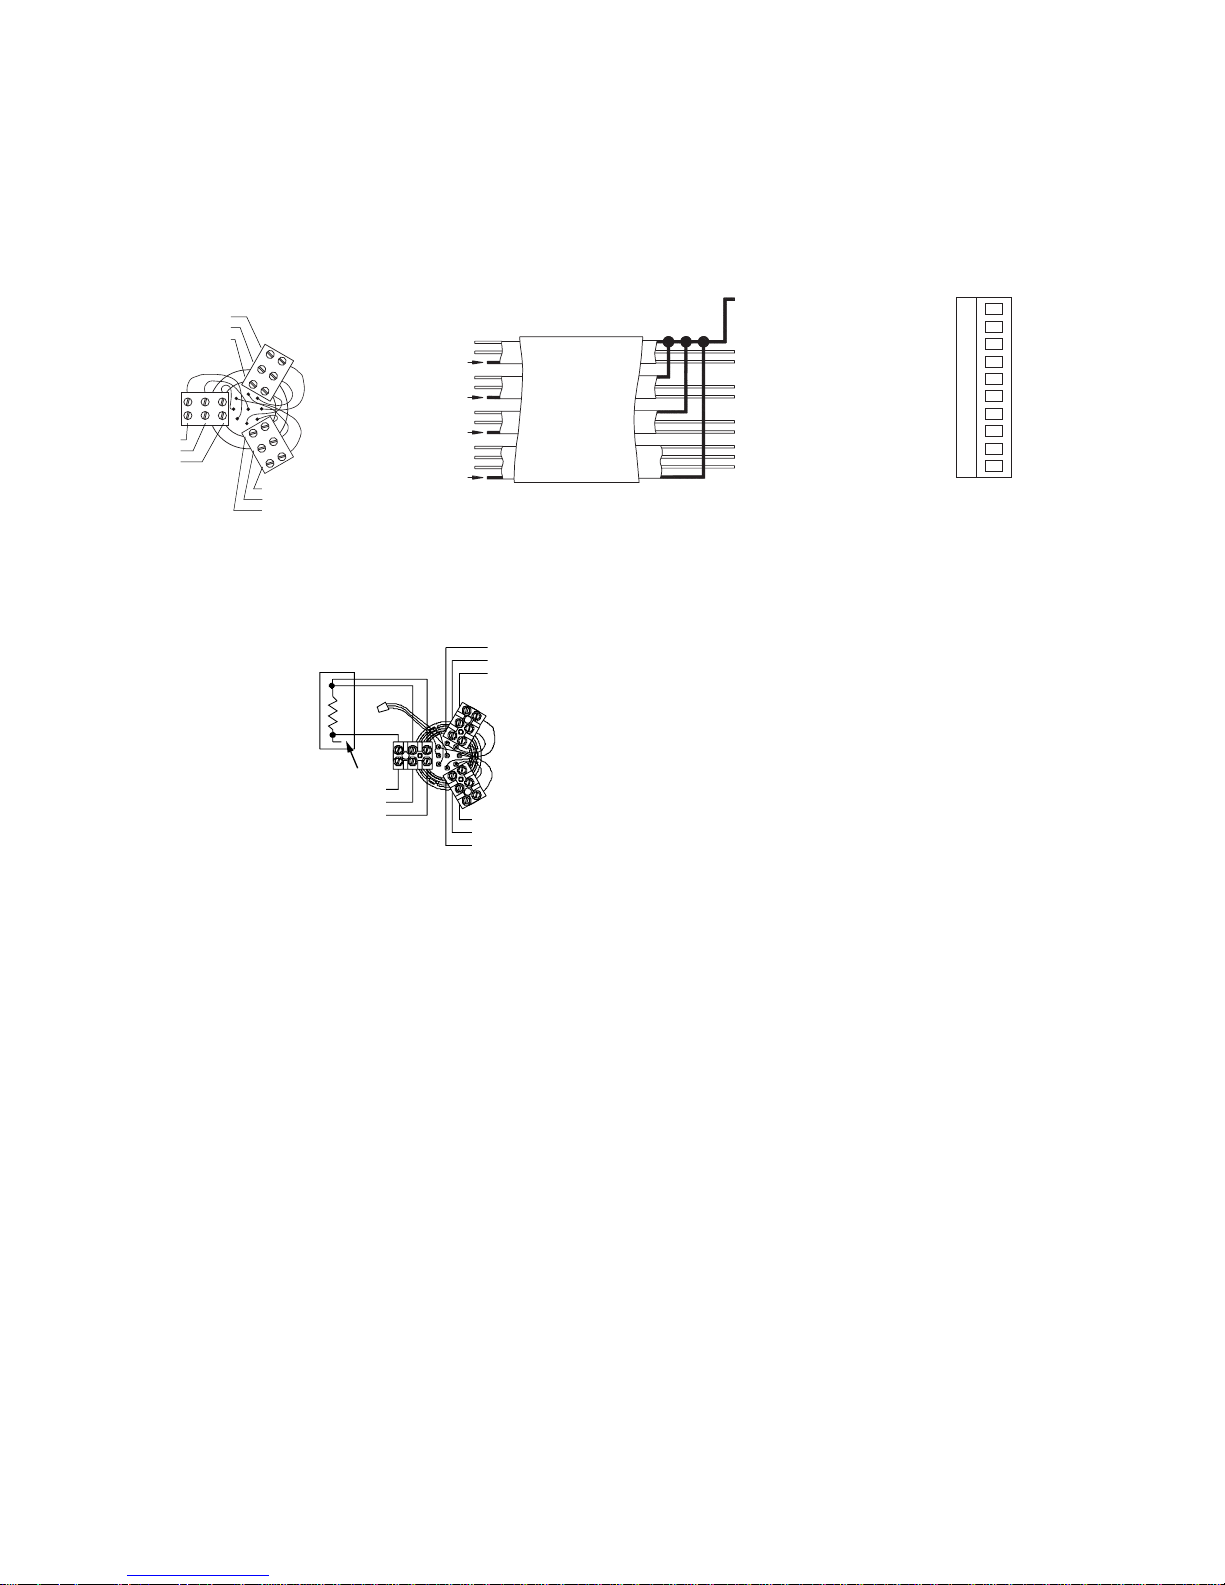
Viscosity measurement or
pressure compensation
The RFT9709 accepts pressure input signals from a pressure
transmitter for viscosity measurement, pressure indication, or pressure
compensation.
RFT9709 performance
• Using input from a differential pressure transmitter (DP cell), the
RFT9709 can calculate viscosity.
• If a pressure transmitter connected to a host controller measures
gauge pressure at the sensor input, the RFT9709 can compensate for
the pressure effect on the sensor. Pressure compensation is required
only for the sensor models listed in Table 2-3, page 24.
• With a pressure transmitter or DP cell, the RFT9709 primary variable
(PV) and secondary variable (SV) outputs can represent pressure.
• When using the pressure transmitter as part of a HART multidrop
network, the RFT9709 PV output remains fixed at 4 mA.
Pressure transmitter requirements
• The pressure transmitter must be a HART SMART FAMILY device.
• The pressure transmitter can be powered from the RFT9709, or
externally powered as part of a HART multidrop network. See
multidrop network wiring
, page 19.
HART
Multidrop network requirements
• The pressure transmitter must be assigned a unique multidrop address
from 1 to 15.
• The RFT9709 must be assigned a unique multidrop address from 0 to
15. Assigning an address other than 0 fixes the RFT9709 primary
variable (PV) output at 4 mA.
Table 2-3.
Sensors affected by
pressure
Configuration options
• The pressure transmitter can be configured with a Rosemount Model
275 HART Communicator, attached either to the RFT9709 HART loops
or directly to the pressure transmitter.
• To configure the RFT9709 for pressure compensation or viscosity
measurement, a special version of the ProLink program is required.
The HART Communicator cannot be used for RFT9709 configuration.
(Contact the factory for additional ProLink information.)
®
ELITE
CMF100
CMF200
CMF300
CMF400
BASIS
F050
F100
F200
®
Model D
D300
D600
DL100
DL200
24
RFT9709 Transmitter Ins truction Manual
Page 33

Wiring
continued
Wiring instructions
Instructions for wiring the RFT9709 to a pressure transmitter are
provided below.
• Use Figure 2-16a for an internally powered configuration.
• Use Figure 2-16b for an externally powered (multidrop) configuration.
Failure to comply with requirements for intrinsic
safety in a hazardous area could result in an
explosion.
Pressure transmitter wiring is not intrinsically safe.
Keep pressure transmitter wiring separated from
power-supply wiring, intrinsically safe sensor wiring, and
any other intrinsicall y safe wiring.
Figure 2-16a. Pressure transmitter wiring, internally powered
RFT9709 ter min als
for output wiring
11 12 13 14 15 16 17 18 19 20
WARNING
Pressure transmitter
VF+/DP+
21 22
(signal line)
DP– (retur n)
SMART only
(1151 or 3051)
Figure 2-16b. Pressure transmitter wiring, externally powered (multidrop network)
Pressure transmitter
SMART only (1151 or 3051)
RFT9709 terminals
for output wiring
PV+ (signal line)
11 12
13 14 15 16 17 18 19 20 21 22
PV– (return)
250 ohm ±5%
0.5 W
250 ohm ±5%
0.5 W
24 VDC
Power
supply
RFT9709 Transmitter Inst ruction Manual
25
Page 34

26
RFT9709 Transmitter Ins truction Manual
Page 35

Installation
Step 3 Startup
3.1 Initialization
3.2 Flowmeter zeroing
After wiring has been connected, power can be applied. During
initialization, the RFT9709 diagnostic LED (see Figure 3-1) remains on
continuously, while the RFT9709 performs a self-diagnostic test. After
initialization is completed, the LED blinks ON once per second to
indicate proper RFT9709 operation.
At startup, the power source must provide a minimum of 2 amperes of
inrush current at a minimum of 11 volts and a maximum of 7 watts at the
RFT9709 power input terminals.
Flowmeter zeroing establishes flowmeter response to zero flow and sets
a baseline for flow measurement.
• Zeroing is necessary when the flowmeter is first put into operation, and
if either the transmitter or sensor is replaced or reinstalled.
• Zeroing is not necessary every time power is applied to the transmitter,
or when a new process fluid is run through the sensor.
• Zeroing is accomplished with the RFT9709 zero button (see
Figure 3-1) or a special version of the ProLink program. The HART
Communicator cannot be used for zeroing the flowmeter. (Contact the
factory for additional ProLink information.)
• The zeroing procedure is described on page 28.
CAUTION
Wiring Startup TroubleshootingBefore You Begin Mounting
Figure 3-1.
Diagnostic LED and zero
button
RFT9709 Transmitter Inst ruction Manual
Failure to zero the flowmeter at initial startup could
cause the transmitter to produce inaccurate signals.
Zero the flowmeter before putting the flowmeter in
operation.
Zero button Diagnostic LED
27
Page 36

Startup
continued
Zeroing procedure
1. Prepare the flowmeter for zeroing:
a. Install the sensor according to the sensor instruction manual.
b. Apply power to the RFT9709, then allow it to warm up for at least
30 minutes.
c. Ensure the RFT9709 is in a security mode that allows flowmeter
zeroing (see
Security modes
, page 49).
d. Run the process fluid to be measured through the sensor until the
sensor temperature reading approximates the normal process
operating temperature.
2. Close the shutoff valve downstream from the sensor.
3. Make sure the sensor is completely filled with the process fluid under
normal process conditions of temperature, density, pressure, etc., and
ensure zero flow through the sensor.
CAUTION
Flow through the sensor du ring flo wmeter zer oing wi ll
result in an inaccurate zero setting.
Make sure fluid flow through the sensor is
stopped during flowmeter zeroing.
completely
Diagnosing zero failure
4. Zero the flowmeter in any of three ways:
• Press and hold the zero button for at least five seconds. Figure 3-1,
page 27, shows the location of the button.
• An external contact closure can be used for zeroing. Close the
contact for at least 5 seconds. (Refer to
External zero switch wiring
page 23, for wiring instructions.)
• Issue an auto zero command using a special version of the ProLink
program. The HART Communicator cannot be used for zeroing the
flowmeter. (Contact the factory for additional ProLink information.)
During zeroing, the diagnostic LED remains on continuously . The default
zero time will range from 20 to 90 seconds, depending on the sensor.
After the zeroing procedure has been completed, the LED again blinks
ON once per second to indicate normal operation.
If zeroing fails, the LED blinks ON four times per second to indicate an
error condition. An error condition could indicate:
• Flow of fluid during zeroing
• Partially empty flow tubes
• An improperly mounted sensor
To clear a zeroing error, re-zero the flowmeter after correcting the
problem, or abort the procedure by cycling power to the RFT9709.
,
28
RFT9709 Transmitter Ins truction Manual
Page 37

Startup
continued
3.3 Event registers
Table 3-1.
Parameters that affect
event registers
Event registers are provided for security requirements for custody
transfer applications. When the RFT9709 is configured for security
mode 8 (see
Security modes
, page 49), the RFT9709 meets security
requirements for custody transfer described in National Institute of
Standards and Technology (NIST) Handbook 44.
Event registers record one change for each change "session." A change
session begins when the transmitter is taken out of security mode 8, and
ends when security mode 8 is reentered. After a change session is
ended, security event registers will increase by one (1) if any of the
parameters listed in Table 3-1 have been changed. Each register counts
up to 999, then rolls over to zero. Event registers cannot be reset.
Event registers can be read using a special version of the ProLink
program. The HART Communicator cannot be used for viewing these
registers. (Contact the factory for additional ProLink information.)
Configuration register
Mass flow cutoff
Flow damping
Volume flow cutoff
Flow direction
Primary m A scaling factors
Secondary mA scaling factors
Calibration regist er
Mass flow units
Volume flow units
Auto zero calibration
Density calibration
Flow calibration factor
Meter factors
Frequency output scaling factors
• Frequency
•Rate
Primary m A output trim
Secondar y m A out put trim
Primary m A output assignment
Secondar y m A out put assignment
Control output assignment
Master reset
Density calibration factors
• Density A and Density B
• K1, K2, and FD
• Density temperature coefficient
Pressure compensa tion factors
• Flow factor
• Density factor
• Flow calibration pressure
Wiring Startup TroubleshootingBefore You Begin Mounting
RFT9709 Transmitter Inst ruction Manual
29
Page 38

Startup
continued
3.4 Totalizer reset
3.5 Process measurement
Mass and volume totalizers cannot be reset independently. When one
totalizer is reset, the other is also reset.
A special version of the ProLink program is required for totalizer control.
The HART Communicator cannot be used for totalizer control. (Contact
the factory for additional ProLink information.)
WARNING
When the totalizers are stopped, the frequency/pulse
output is disabled.
If the frequency/pulse output is used for process control,
failure to set control devices for manual operation could
affect process control.
• Before stopping the totalizers, set process control
devices for manual operation.
• To enable the frequency/pulse output, restart the
totalizers.
After flowmeter zeroing has been completed as described in
Section 3.2, page 27, the flowmeter is ready for process measurement.
30
RFT9709 Transmitter Ins truction Manual
Page 39

Troubleshooting
4.1 General guidelines
Troubleshooting a Micro Motion flowmeter is performed in two parts:
1. Tests of wiring integrity
2. Observation of the transmitter's diagnostic tools, which include the
diagnostic LED and fault output levels
CAUTION
During troublesho oting, the transmitte r could pr oduce
inaccurate flow signals.
For personal and system safety:
• Set control devices for manual operation while
troubleshooting the flowmeter.
• If terminal blocks are unplugged from the transmitter,
cycle power to th e transm itter after re connecti ng terminal
blocks.
Wiring Startup TroubleshootingBefore You Begin Mounting
Follow these general guidelines when troubleshooting a Micro Motion
flowmeter:
• Before beginning the diagnostic process, become familiar with this
instruction manual and with the instruction manual for the sensor.
• While troubleshooting a problem, leave the sensor in place, if possible.
Problems often result from the specific environment in which the
sensor operates.
• Check all signals under both flow and no-flow conditions. This
procedure will minimize the possibility of overlooking some causes or
symptoms.
RFT9709 Transmitter Inst ruction Manual
31
Page 40

Troubleshooting
continued
4.2 Transmitter diagnostic
tools
Diagnostic LED
Fault outputs
Table 4-1.
Conditions indicated by
diagnostic LED
In some situations, troubleshooting requires use of the transmitter's
diagnostic tools, which include the diagnostic LED and fault output
levels.
• Transmitter operating conditions indicated by the diagnostic LED are
listed in Table 4-1.
• The diagnostic LED is illustrated in Figure 4-1.
The RFT9709 has downscale and upscale fault levels. To set fault levels,
see
Switch Settings
, Appendix C.
Downscale
Under fault conditions:
• mA outputs go to 0-2 mA
• frequency/pulse output goes to 0 Hz
Upscale
Under fault conditions:
• mA outputs go to 22-24 mA
• frequency/pulse output goes to 15-19 kHz
Diagnostic LED does this: Condition
Blinks ON once per second
(25% ON, 75% OFF)
Remains ON continuous ly Startup a nd ini t ia liza t ion, zero in pro gres s
Blinks ON three times, then OFF
for 1 second
Blinks OFF once per seco nd
(75% ON, 25% OFF)
Blinks ON 4 times per second Fault condition
Normal operat i on
Communication con f ig urat ion mode
(configuration switch 8 in ON position)
Slug flow (density below or above userdefined limits)
Figure 4-1.
Diagnostic LED
32
Diagnostic LED
RFT9709 Transmitter Ins truction Manual
Page 41

Troubleshooting
continued
Before You Begin Mounting Wiring Startup Troubleshooting
4.3 Interrogation with the
ProLink
®
program
Output test and trim
The transmitter provides diagnostic messages, which can be viewed
using a special version of the ProLink program. (The HART
Communicator cannot be used for troubleshooting.) Contact the Micro
Motion Customer Service Department for the special ProLink software
version:
• In the U.S.A., phone 1-800-522-6277
• Outside the U.S.A., phone 303-530-8400
• In Europe, phone +31 (0) 318 549 443
• In Asia, phone 65-770-8155
Figure 4-2 (next page) explains how to connect the ProLink PC Interface
adaptor to the RFT9709.
Fault detection indicates an interruption in the functional integrity of the
sensor and the electronics, including the sensor pickoff coils, drive coil,
and RTD. F aults, such as a short or an open circuit, are detected by the
ProLink program.
The RFT9709 runs continuous self-diagnostic tests. If these tests reveal
a failure, the ProLink program displays an error message. Self-testing
allows the RFT9709 to check its own circuitry.
The RFT9709 works with a Micro Motion flow sensor to provide flow
information. Therefore, many of the troubleshooting checks pertain only
to the sensor. However, the ProLink program enables the user to
perform other tests:
• Performing an mA output test forces the transmitter to produce a userspecified current output of 2 to 22 mA.
• Performing a frequency/pulse output test forces the transmitter
to produce a user-specified frequency output between 0.1 and
15,000 Hz.
• Performing an mA output trim allows adjustment of the primary and
secondary mA outputs against a highly accurate external standard
such as a digital multimeter (DMM) or receiving device.
RFT9709 Transmitter Inst ruction Manual
If the transmitter is in security mode 8, mA output test, mA output trim,
and frequency/pulse output test cannot be performed.
• Perform mA trim and/or test procedures, if necessary, with the ProLink
program.
• For more information, see
Security mode 8
, page 50 .
33
Page 42

Troubleshooting
continued
Figure 4-2. ProLink® PC-Interface connections
HART (Bell 202)
ProLink
loops
PV terminals
11 and 12
®
HART
(Bell 202)
loops
RFT9709
PC Interface
11
PV+
or
PV–
12
R1
(Note 1)
R3
(Note 3)
R2
DCS or PLC
with internal
resistor
(Note 2)
1. If necessary, add resistance in the loop by installing resistor R1. SMART FAMILY devices require a minimum loop
resistance of 250 ohms. Loop resistance must not exceed 1000 ohms, regardless of the communication setup.
CAUTION
If the primary variable (PV) analog output is being used for flow control, connecting the PC Interface
to the output loop could cause the transmitter 4-20 mA output to change, which would affect flow
control devices.
For personal and system safety, set control devices for manual operation before connecting the PC Interface to the
RFT9709 primary variable milliamp output loop.
2. The DCS or PLC must be configured for an active milliamp signal.
3. Resistor R3 is required if the DCS or PLC does not have an internal resistor.
34
RFT9709 Transmitter Ins truction Manual
Page 43

Troubleshooting
continued
Before You Begin Mounting Wiring Startup Troubleshooting
4.4 Power supply
Figure 4-3.
Power-supply wiring and
grounding terminals
4.5 Wiring
Check to be certain the power-supply is 11-30 VDC. Ensure all wires are
properly terminated. The RFT9709 power-supply and ground terminals
are labeled as illustrated in Figure 4-3.
11–30 VDC power supply
Terminal Function
23 DC–
23 24 25
For transmitter wiring instructions, refer to
24 DC+
25
Installation Step 2
, page 7.
Wiring problems are often incorrectly diagnosed as a faulty sensor. At
initial startup of the RFT9709, always check the following:
1. Proper sensor cable, and use of shielded pairs
a. Proper wire termination
b. Wires on correct terminals
c. Wires making good connections at RFT9709 terminals
d. Wires making good connections at the sensor terminals
2. Wires properly connected at any intermediate terminal junction, such
as the user-supplied junction box between a Model DT sensor and
RFT9709.
If a fault condition is indicated, follow these instructions:
1. Shut off power supply to the RFT9709.
2. Unscrew the two screws that hold the terminal blocks to the
RFT9709, and unplug the terminal blocks from the connectors.
3. Use a digital multimeter (DMM) to measure resistance between wire
pairs at the RFT9709 terminals:
• Drive coil, check terminals 1 and 2
• Left pickoff coil, check terminals 5 and 9
• Right pickoff coil, check terminals 6 and 8
• RTD, check RFT9709 terminals 3 and 7
4. If the measured resistance is outside the range listed in Table 4-2,
page 36, repeat the measurements at the sensor terminals.
5. Reinsert the terminal blocks and restore power to the RFT9709.
6. Use the DMM and the guidelines listed in Table 4-3, page 36, to
troubleshoot the flowmeter.
RFT9709 Transmitter Inst ruction Manual
35
Page 44

Troubleshooting
continued
Table 4-2. Normal resistance for flowmeter circuits
Notes
• Te m perat u re sensor value increases 0.38675 oh m s per °C i ncr ease in temperature.
• Nominal resistance values will vary 40% per 100°C. However, confirming an open coil or shorted coil is more important than
any slight deviation from the resist ance values presented below.
• Resistance across t erminals 6 and 8 ( r i ght pickoff) should be within 10% of resistance across te rminals 5 and 9 (left pickoff).
• Resistance values depend on the sensor model and date of m anufacture.
Circuit W ire colors Sensor terminals Nominal resistance range
Drive Coil Brown to Red 1 to 2 8 to 2650Ω
Left Pickoff Green to White 5 to 9 15.9 to 300Ω
Right Pickoff Blue to Gray 6 to 8 15.9 to 300Ω
Te m perat ure Sensor Orange to Violet 3 to 7 35 to 17 5Ω depending on process fluid
Lead Length Compensator Yellow to Violet 4 to 7 35 to 175Ω depending on process fluid
Table 4-3. Input and output ratings
Transmitter terminal
number Input or output Approximate value
1 to 2 Drive signal output to sensor 1 .2 to 14 V pea k-to-peak at flow tube natural freq uency
3 to 4 Lead length compensat or in put 10 mVDC maximum
5 to 9 Left pickoff input 3.4 mV/Hz peak-to-peak sine wave
6 to 8 Right pickoff input 3.4 mV/Hz peak-t o-peak sine wave
7 to 4 Te m perat ure input 30 mV at 0°C, +0.14 mVDC per °C
Power terminals (+ to –) Line voltage input 11 to 30 VDC
11 to 12 Primary mA output 4-20 m A
13 to 14 Secondary mA output 4-20 mA
15 to 16 RS-485 I/O ±5 V square wave
17 to 18*
19 to 18* Zero in progress 23 VDC when not in progress, 0 VDC when in progress
19 to 18* Flow direction output 23 VDC with forward, 0 VDC with reverse
19 to 18* Alarm output 23 VDC normal, 0 VDC with fault
20 to 18* Remote zero input 23 VDC
21 to 22* Pressure transmitter input 0.3 to 11 VDC
*Optional configuration
Frequency/pulse output 23 VDC peak-to-peak square wave (+23 VDC at zero flow)
36
RFT9709 Transmitter Ins truction Manual
Page 45

Troubleshooting
continued
Before You Begin Mounting Wiring Startup Troubleshooting
4.6 Master reset
Use the RFT9709 configuration switches to perform a master reset. A
master reset causes user-configured communication options to default
to the setup used by HART communication devices, causes all other
configuration options to return to their default values, and
requires
complete characterization and reconfiguration of the transmitter.
Table 4-4 lists master reset defaults for characterization and
configuration variables.
To perform a master reset:
1. Note the position of switch 5.
2. Shut off power to the RFT9709.
3. Set switches 1, 2, and 3 to the OFF position.
4. Set switches 4, 5, 6, and 8 to the ON position.
5. Restore power. Wait until the diagnostic LED blinks ON three times
followed by a 1-second pause.
6. Set switches 4, 5, 6, and 8 to the OFF position.
7. Shut off power to the RFT9709. Wait 30 seconds, then restore power.
8. If switch 5 was originally in the ON or USR position configure
communications as described in
Communication settings
, page 47.
9. Reconfigure the transmitter. (A special version of the ProLink
software program is required for field configuration. Contact the
factory for ProLink information.)
T o avoid an unintentional master reset
, set switches 4, 6, and 8 to the
OFF position after performing a master reset. If switches are left in the
ON position, another master reset will occur the next time power to the
RFT9709 is shut off and then restored.
4.7 Customer service
After the user performs a master reset, and switch 8 is returned to the
OFF position, the diagnostic LED blinks ON four times per second until
the user characterizes the sensor. Use a special version of the ProLink
program to characterize the sensor. The HART Communicator cannot
be used for characterization. (Contact the factory for additional ProLink
information.) After characterization is completed, the LED blinks ON
once per second to indicate normal RFT9709 operation.
For technical assistance, phone the Micro Motion Customer Service
Department:
• In the U.S.A., phone 1-800-522-6277, 24 hours
• From outside the U.S.A., phone 303-530-8400, 24 hours
• In Europe, phone +31 (0) 318 549 443
• In Asia, phone 65-770-8155
RFT9709 Transmitter Inst ruction Manual
37
Page 46

Troubleshooting
continued
Table 4-4. Default values after a master reset
Characterization variables
Default Default
Flow calibration factor 1.00005.13 Pressure
Density Pressure polling No
Density A 0.0000 g/cc Field device tag DP CELL!
K1 density constant 5000.00 Pressure input at 4 mA 0.00 psi
Density B 1.0000 g/cc Pressure input at 20 mA 1000.00 psi
K2 density constant 50000.00 Pressure correction for flow 0.00% per psi
Density temperature coefficient 4.44% per 100°C Pressure correction for density 0.00 g/cc per psi
FD density constant 0.000 Flow calibration pressure 0.00 psi
Mass flow factor 1.0 RTD parameters
Volume flow factor 1.0 0°C = 100.0 Ω
Density factor 1.0 10 0° = 13 8. 5 Ω
Viscosity calibration factor 1.000000.00000 API table Disabled
Measurement units
Default Default
Mass flow unit g/sec Temperature unit °C
Volume flow unit l/sec Viscosity unit centipoise
Density unit g/cc Pressure unit psi
Field device variables
Default Default
Mass flow cutoff 0.00 g/sec Low slug flow limit 0.0000 g/cc
Volume flow cutoff 0.0000 l/sec High slug flow limit 5.0000 g/cc
Flow direction Forward only Int ernal damping o n density 2.00 sec
Internal dampi ng on flow 0.80 sec Internal damping on tem pera tu re 4.00 sec
Transmitter output variables
Default Default
Primary m A output variable M as s flow Frequency/pul se out put variable Mass flow
Upper range value 160.00 g/sec Frequency 10000.00 Hz
Lower range value –160.00 g/sec Rate 15000.00 g/sec
Added damping 0.00 sec Maximum pulse width 0.50 sec
Secondary m A output variable Temperature Control output Flow direction
Upper range value 450.00°C Slug durat i o n 1.00 sec
Lower range value –240.00°C Polling address 0
Added damping 0.00 sec Burst mode Off
Burst command 2
Device information
Default Default
Tran sm i t te r t ag name
Description
Message
M. RESET
CONFIGURE XMTR
MASTER RESET
DATA DESTROYED
Date 01/
JAN
/95
-
ALL
Sensor model Unknown
Sensor flow tube material Unknown
Sensor flange type Unknown
Sensor flow tube liner material None
Communication settings
(standard communication)*
Default Default
Baud rate 9600 baud Protocol and physical layer Modbus RTU mode
Stop bits and parity 1 stop bit, odd parity
(8 bits) on RS-485 , and
HART (Bell 202) on PV
*Switch 5 set to the USER-DEFINED position. See Appendix C, page 47, for information on setting switches.
38
RFT9709 Transmitter Ins truction Manual
Page 47

Appendix
A RFT9709 Specifications
Performance specifications
Sensor model Mass flow accuracy
ELITE liquid
BASIS liquid
D (except DH38), DT and DL liquid
DH38 liquid
Sensor model Mass flow repeatability
ELITE liquid
BASIS liquid
D (except DH38), DT and DL liquid
DH38 liquid
Sensor model Density accuracy Density repeatability
ELITE (except high-pressu re CMF010P) liquid
ELITE high-pressure CMF0 10 P liquid
BASIS liquid only ±0 .002 g/cc ±0.001 g/cc
D6, D12, D25, D40,
DH100, DH150
DH6, DH12,
DH38
D65, DL65, DT65,
D100, DT100,
D150, DT150, DH300
D300, D600,
DL100, DL200
gas
gas
gas
gas
gas
gas
gas
gas
gas
gas
liquid only ±0 .002 g/cc ±0.001 g/cc
liquid only ±0 .004 g/cc ±0.002 g/cc
liquid only ±0 .001 g/cc ±0.0005 g/cc
liquid only ±0 .0005 g/cc ±0.0002 g/cc
±0.10% ± [(zero stability / flow rate) x 100]% of rate
±0.50% ± [(zero stability / flow rate) x 100]% of rate
±0.20% ± [(zero stability / flow rate) x 100]% of rate
±0.70% ± [(zero stability / flow rate) x 100]% of rate
±0.15% ± [(zero stability / flow rate) x 100]% of rate
±0.65% ± [(zero stability / flow rate) x 100]% of rate
±0.15% ± [(zero stability / flow rate) x 100]% of rate
±0.50% ± [(zero stability / flow rate) x 100]% of rate
±0.05% ± [½(zero stability / flow rate) x 100]% of rate
±0.25% ± [(zero stability / flow rate) x 100]% of rate
±0.10% ± [½(zero stability / flow rate) x 100]% of rate
±0.35% ± [(zero stability / flow rate) x 100]% of rate
±0.05% ± [½(zero stability / flow rate) x 100]% of rate
±0.30% ± [(zero stability / flow rate) x 100]% of rate
±0.05% ± [½(zero stability / flow rate) x 100]% of rate
±0.25% ± [½(zero stability / flow rate) x 100]% of rate
±0.0005 g/cc
±0.002 g/cc
±0.002 g/cc
±0.008 g/cc
1
1
±0.0002 g/cc
±0.001 g/cc
±0.001 g/cc
±0.004 g/cc
Sensor model Temperature accuracy Temperature repeatability
All sensors, Micro Motion sen sor RTD ±1°C ± 0.5% of re adi n g in °C ±0.02°C
All sensors, user-supplied sensor RTD
1
Flow accuracy includes the combined effects of repeatability, linearity, and hysteresis. All specifications for liquids are based on
reference conditions of water at 68 to 77°F (20 to 25°C) and 15 to 30 psig (1 to 2 bar), unless otherwise noted. For values of zero
stability, refer to product specifications for each senso r.
2
The user can install an extern al te m perat u re detector, for the sensor, that is accurate to within ±0.1°F. Temp erat ur e accuracy
within ±0.5°F is required for API.
RFT9709 Transmitter Inst ruction Manual
2
±0.5°F ±0.04°F
39
Page 48

RFT9709 Specifications
Functional specifications
continued
Outputs
Analog
Two independently configured analog outputs, designated as primary
and secondary, can represent mass flow rate, gross volume flow rate,
gross standard volume flow rate, density, or temperature. With a
pressure transmitter, can also provide indication for pressure or
viscosity. Internally powered 4-20 mA current outputs. Galvanically
isolated to ±50 VDC, 1000 ohm load limit. Out-of-range capability: 2-22
mA.
Milliamp (mA) output rangeability
•Flow
-
Maximum span determined by sensor specifications.
-
Range limit determined by sensor maximum rate.
-
Minimum recommended span (% of nominal flow range):
ELITE CMF sensors 2.5%
BASIS F sensors 10%
D, DT, and DL sensors 10%
D300, D600 sensors 5%
High-pressure (DH) sensors 20% typical
• Density 0.0 to 5.0 g/cc range limit
0.1 g/cc minimum span
• Temperature –400 to 842°F (–240 to 450°C) range limit
36°F (20°C) minimum span
Frequency/pulse
One frequency/pulse output can be configured to indicate mass, mass
flow rate, gross volume flow rate, gross standard volume flow rate, or
gross standard volume, independent of analog outputs. Internally
powered, 0-23 V square wave, unloaded; 3.3 kohm impedance at 23 V,
galvanically isolated to ±50 VDC. In open collector configuration: sinking
capability, 0.1 amps in "on" condition (0 volt le v el) , 30 VDC compliance i n
"off" condition. Signal can be scaled up to 10,000 Hz. Out-of-range
capability to 15,000 Hz. Programmable pulse width for low frequencies.
Downscale or upscale fault indication: downscale (switch 7 off), output
goes to 0 Hz; upscale (switch 7 on), output goes to 15-19 kHz.
Control
One control output can represent flow direction, fault alarm, zero in
progress. Internally powered, digital level, 0 or 23 V, 3.3 kohm pull-up,
galvanically isolated to ±50 VDC. In open collector configuration: sinking
capability, 0.1 amps in "on" condition (0 volt level), 30 VDC compliance
in "off" condition.
40
RFT9709 Transmitter Ins truction Manual
Page 49

RFT9709 Specifications
continued
Communication
Switches on the RFT9709 allows selection of the Bell 202 standard for
HART digital communication, and/or the RS-485 serial standard for
HART or Modbus communication.
• Bell 202 signal is superimposed on primary variable mA, and available
for host system interface. Frequency 1.2 and 2.2 kHz, amplitude 0.8 V
peak-to-peak, baud rate 1200 baud. Requires 250 to 1000 ohms load
resistance.
• RS-485 signal is a ± 5 V square wave referenced to transmitter ground.
Baud rates from 1200 baud to 38.4 kilobaud can be selected.
API-2540 standard tables
The RFT9709 calculates both reference and on-line density, and
standard and gross standard volume, based on API equation 2540 for
Generalized Petroleum Products and Generalized Crude Oils. T otalizers
and inventories for gross volume are independent of totalizers and
inventories for gross standard volume.
Compensation accomplished by the following
user-specified
API-2540
standard tables:
• 5 A/B/D
• 6 A/B/C/D
• 23 A/B/D
• 24 A/B/C/D
• 53 A/B/D
• 54 A/B/C/D
These additional specifications are
required
:
• For "C" tables (6C, 24C, and 54C), also specify the thermal expansion
coefficient.
• For even-numbered tables (6 A/B/C/D, 24 A/B/C/D, and 54 A/B/C/D),
also specify the reference density.
For tables 53 and 54 (53 A/B/D and 54 A/B/C/D), a reference
temperature of 15°C is used per the API-2540 standard table. The
reference temperature can be changed using the special version of
ProLink software.
Input for pressure
transmitter
RFT9709 Transmitter Inst ruction Manual
The RFT9709 can communicate with a HART SMART FAMILY pressure
transmitter using the Bell 202 physical layer and HART communications
protocol. The pressure transmitter can be externally powered as part of
a HART multidrop network, or powered internally from the RFT9709.
When using the pressure transmitter as part of a HART multidrop
network, the RFT9709 primary variable (PV) output remains fixed at
4mA.
The pressure transmitter may be configured by a Rosemount Model 275
HART Communicator attached to the RFT9709 HART loops. To
configure the RFT9709 for pressure compensation or viscosity
measurement, a special version of the ProLink program is required. The
HART Communicator cannot be used for RFT9709 configuration.
(Contact the factory for additional ProLink information.)
41
Page 50

RFT9709 Specifications
continued
Low-flow cutoff
Slug-flow inhibit
Damping
Fault indication
Output testing
Power supply options
Flow values below the user-defined low-flow cutoff cause digital, mA,
and frequency outputs to default to zero flow levels.
RFT9709 senses density outside user-selected limits. Flow output holds
at last measured value prior to slug condition, for a programmed time of
1-60 seconds, before defaulting to the level that represents zero flow.
Wide range of programmed filter time constants for damping on flow,
density, and temperature. Additional damping may be applied to mA
outputs.
Faults can be indicated by user-selected downscale (0-2 mA, 0 Hz) or
upscale (22-24 mA, 15-19 kHz) output levels. The control output can
also be configured to indicate a fault condition at 0 V.
Current source
RFT9709 can produce a user-specified current between 2 and 22 mA on
a 4-20 mA output.
Frequency source
RFT9709 can produce a user-specified frequenc y between 0.1 and
15,000 Hz.
11 to 30 VDC, 7 watts typical, 14 watts maximum, fused with IEC 127-3
1.6A/125V, time-lag, subminiature. At startup, transmitter power source
must provide a minimum of 1.6 ampere of short-term current at a
minimum of 12 volts at the RFT9709 power input terminals.
Environmental limits
Environmental effects
Ambient temperature limits
Operating: –40 to 122°F (–40 to 50°C)
Storage: –40 to 176°F (–40 to 80°C)
Humidity limits
Meets SAMA PMC 31.1-1980
Vibration limits
Meets SAMA PMC 31.1-1980, Condition 2
Ambient temperature effect on transmitter
On mA outputs: ±0.005% of span/°C
On mA input: ±0.01% of span/°C
42
RFT9709 Transmitter Ins truction Manual
Page 51

RFT9709 Specifications
continued
Hazardous area approvals
Weight
When properly installed with an approved sensor, the RFT9709
transmitter can be installed in the following areas:
UL
Class I, Div. 2, Groups A, B, C, and D. Provides nonincendive sensor
outputs for use in Class I, Div. 2, Groups A, B, C, and D; or intrinsically
safe sensor outputs for use in Class I, Groups C and D, and Class II,
Groups E, F, and G.
UL Division 2 nonincendive parameters
Parameter
V
OC
I
SC
C
a
L
a
Analog output
(Terminals 11-12, 13-14)
36.5 V 16 V
22 mA 51 mA
0.135 µf 1.5 µf
100 mH 37 mH
CSA
Approval pending
Standard housing 1.5 lb (0.68 kg)
Housed in factory-supplied NEMA-4 (IP65) enclosure 6.5 lb (2.9 kg)
Frequency/pulse output
(Terminals 17-18)
RFT9709 Transmitter Inst ruction Manual
43
Page 52

44
RFT9709 Transmitter Ins truction Manual
Page 53

Appendix
B Ordering Information
RFT9709 model number matrix
Code Tran smitter model
RFT9709 RFT9709 transm itter
Code Ho using options
S Standard
N Optional factory-supplied NEMA-4 (I P 65) enclosure
Code P ower supply
1 11 to 30 VD C
Code Co nnector options
C Terminal block connections — all connectors i nc lu ded
Code Approval
M Micro Motion standard — no approvals
U UL intrinsically safe — U.S.A. approvals agency
RFT9709 Transmitter Inst ruction Manual
45
Page 54

Ordering Information
continued
Micro Motion instruction
manuals
Sensors
Transmitters
ALTUS™ platform
To obtain any of the Micro Motion instruction manuals listed below,
contact the Micro Motion Customer Service Department:
• In the U.S.A., phone
1-800-522-MASS
(1-800-522-6277)
• Outside the U.S.A., phone 303-530-8400
• In Europe, phone +31 (0) 318 549 443
• In Asia, phone 65-770-8155
•ELITE® Sensor Instruction Manual
• R-Series Flowmeter Instruction Manual
• R-Series Flowmeter with F
•BASIS
®
Sensor Instruction Manual
OUNDATION
™ fieldbus
• Model D and DT Sensors Instruction Manual
• Model DL Sensor Instruction Manual
•ELITE® Model RFT9739 Field-Mount Transmitter Instruction Manual
•ELITE
•BASIS
®
Model RFT9739 Rack-Mount Transmitter Instruction Manual
®
Model IFT9701 Transmitter Instruction Manual
• Model RFT9709 Transmitter Instruction Manual
• Model RFT9712 Remote Flow Transmitter Instruction Manual
• Model 5300 Transmitter with F
•ALTUS™ Installation Manual
•ALTUS
•ALTUS
•ALTUS
•ALTUS
™
Detailed Setup Manual
™
Discrete Batch Control Applications Manual
™
HFCS/Brix Applications Manual
™
Net Oil Computer Applications Manual
• Installing Relays for the ALTUS
• Printer Setup for the ALTUS
OUNDATION
™
Applications Platform
™
Applications Platform
™
fieldbus
Communications
Peripheral products
Wiring instructions
• Using ProLink® Software with Micro Motion® Transmitters
• Using the HART
• Using Modbus
®
Communicator with Micro Motion® Transmitters
®
Protocol with the Micro Motion® ELITE® Model
RFT9739 Transmitter
• RFT9739 Transmitter-Specific Command Specification
• RFT9709 Transmitter-Specific Command Specification
• RFT9712 Transmitter-Specific Command Specification
• DMS Density Monitoring System Instruction Manual
• DRT Digital Rate Totalizer LCD Instruction Manual
• DRT Digital Rate Totalizer LED Instruction Manual
• FMS-3 Flow Monitoring System LCD Instruction Manual
• FMS-3 Flow Monitoring System LED Instruction Manual
• NFC Net Flow Computer Instruction Manual
• NOC Net Oil Computer Instruction Manual
• PI 4-20 Process Indicator
• 9-Wire Flowmeter Cable Preparation and Installation
• Cable Gland Assembly Instructions
• UL-D-IS Installation Instructions
• CSA-D-IS Installation Instructions
• SAA-D-IS Installation Instructions
• Power-Supply Wiring for the D600 Sensor
• Input Signal Wiring for Peripheral Devices
46
RFT9709 Transmitter Ins truction Manual
Page 55

Appendix
C Switch Settings
C.1 Configuration switches
Figure C-1.
Switches
C.2 Communication settings
Switches on the RFT9709 (see Figure C-1) control the following
transmitter functions:
• Communications settings
• mA output settings
• Zeroing method
• Security
1 2 3 4 5 6 7 8
Switch
number
Switches at left shown in
OFF position.
Switch position
OFF ON
1 OFF SEC1
2 OFF SEC2
3 OFF SEC3
4
5STDUSR
6
7DOWNUP
8OPCONFIG
Switch 5 enables the user to choose the standard communication
configuration, or user-defined parameters. With switch 8 in the ON
(CNFG) position, switches 1 through 6 can be used for setting userdefined communication parameters.
RFT9709 Transmitter Inst ruction Manual
Standard communication setting
To use the standard communication configuration, set switch 5 to the
STD position. Setting the switch in this position establishes the following
communication parameters:
• HART protocol, at 1200 baud, on the primary-variable (PV) mA output
• Modbus protocol, in RTU mode (8 bit), at 9600 baud, on the RS-485
output
• 1 stop bit, odd parity
User-defined communication settings
To establish user-d efi ned se ttin gs, set switches as instr u cte d in
Table C-1, page 48. In the user-defined setting, until they are changed or
after a master reset, communication parameters match those listed
above.
47
Page 56

Switch Settings
continued
Table C-1. Communications configuration
Instructions
Before beginning, make note of the positions of switches 1, 2, an d 3. Then, for each setting:
1. Begin with switch 8 in the CNFG position, and switches 1 through 6 in the OFF position. The diagnostic LED flashes ON 3 times
and pauses, which indicates t he t rans m i tter is in the communication configuratio n m ode.
2. Set designated switches to the ON position as indi cated below.
3. Press and hold the zero button for five seconds, until the diagnostic LED remains ON for 3 seconds, which indicates the setting
has been accepted by the RFT9709.
When done:
1. Reset switches 1, 2, and 3 to the appropriat e pos i tions.
2. Set switch 5 to the USER position.
3. Set switches 4 and 6 to the O FF po si tion.
4. Set switch 8 to the OPR position.
Note
If switches 4, 5, 6, and 8 are left in the ON position after configuration, a master reset w ill occur the next time power to the
RFT9709 is shut off and the n restored. To avoid an unexpected master reset, make sure switches 4 , 6, and 8 are left in the OFF
position after confi gurat i on.
Baud rate
1200 baud ON ON
2400 baud ON ON ON
4800 baud ON ON
9600 baud ON ON ON
19,200 baud ON ON ON
38,400 baud ON ON
Stop bits and parity
1 stop bit, no parity ON
1 stop bit, odd parity ON ON
1 stop bit, even parity ON ON ON
2 stop bits, no parity ON ON
2 stop bits, odd parity ON ON ON
2 stop bits, even parity ON ON
Data bits, protocol, physical layer
HART (Bell 202) on primary mA ON ON ON ON
HART on RS-485 ON ON ON
Modbus RTU mode (8 bits) on RS-485 ON ON
Modbus ASCII mode (7 bits) on RS-485 ON ON ON
Modbus RTU mode (8 bits) on RS-485
and HART on primary mA
Modbus ASCII mode (7 bits) on RS-485
and HART on primary mA
Switch
1
Switch
1
Switch
1
ON ON ON
ON ON ON ON
Switch
2
Switch
2
Switch
2
Switch
3
Switch
3
Switch
3
Switch
4
Switch
4
Switch
4
Switch
5
Switch
5
Switch
5
Switch
6
Switch
6
Switch
6
48
RFT9709 Transmitter Ins truction Manual
Page 57

Switch Settings
continued
C.3 Fault output settings
C.4 Security modes
Table C-2. Security modes
Switch settings
Switch 1
Switch 2
Switch 3
Mode
1
OFF
OFF
OFF
Fault outputs can be set for downscale or upscale levels.
Downscale
If switch 7 is set to the DWN position:
• mA outputs go to 0-2 mA
• frequency/pulse output goes to 0 Hz
Upscale
If switch 7 is set to the UP position
• mA outputs go to 22-24 mA
• frequency/pulse output goes to 15-19 kHz
Switches 1, 2, and 3 are security switches, which enable the user to
disable flowmeter zeroing, disable resetting of totalizers, and writeprotect all configuration and calibration parameters. Switch settings
enable any of eight possible security modes. See Table C-2.
• Security modes 1 through 7 are entered immediately when switches
1 through 3 are set.
• For information about security mode 8, see pages 50 and 51.
Mode
2
OFF
OFF
ON
Mode
3
OFF
ON
OFF
Mode
4
OFF
ON
ON
Mode
5
ON
OFF
OFF
Mode
6
ON
OFF
ON
Mode
7
ON
ON
OFF
Mode
8*
ON
ON
ON
Function/
parameter
Zeroing with zero button
Zeroing with digital
communication
Totalizer r e s et, no flow
Totalizer reset, with flow
Configuration and
calibration param eters
* Security mode 8 is not entered when switches are set. For more information about security mo de 8, see pages 50 through 51.
Mode
1
Mode
2
Disabled Disabled Disabled Disabled Disabled Disabled Disabled
Mode
3
Disabled Disabled Disabled Disabled
Disabled Disabled Disabled
Disabled Disabled Disabled Disabled Disabled Disabled
Write-
protected
Mode
4
Write-
protected
Mode
5
Write-
protected
Mode
6
Write-
protected
Mode
7
Write-
protected
Mode
8
Write-
protected
RFT9709 Transmitter Inst ruction Manual
49
Page 58

Switch Settings
continued
Security mode 8
When security is set for mode 8, the RFT9709 meets security
requirements for custody transfer described in National Institute of
Standards and Technology (NIST) Handbook 44.
Once the RFT9709 is configured for security mode 8, the security mode
cannot be changed unless a master reset is performed. A master reset
causes all configuration parameters to return to their default values, and
requires complete characterization and reconfiguration of the
transmitter
. See Section 4.6, page 37.
If the user attempts to enter a new security mode or change the
RFT9709 configuration after entering security mode 8:
• Internal totalizers stop counting
• The frequency/pulse output goes to 0 Hz
• mA outputs go to 4 mA
• Event registers record changes made to defined configuration and
calibration parameters. See Section 3.3, page 29.
The security breach continues, and totalizers and outputs remain
inactive, until the RFT9709 is reconfigured for security mode 8, or until a
master reset has been performed. Custody transfer event registers are
not affected by a master reset.
Before entering security mode 8
, perform milliamp trim and/or test
procedures, if necessary. Milliamp output trim, milliamp output test, and
frequency/pulse output test cannot be performed after security mode 8
is entered. A special version of the ProLink program is required to
perform these procedures. A HART Communicator cannot be used.
(Contact the factory for additional ProLink information.) See
and trim
, page 33.
Output test
50
To enter security mode 8:
1. Note the position of switch 5.
2. Set switch 8 to the ON position. The diagnostic LED flashes ON three
times and pauses, which indicates the RFT9709 is in the
configuration mode.
3. Set switches 1, 2, and 3 to the ON position.
4. Set switches 4, 5, and 6 to the OFF position.
5. Press and hold the zero button for 5 seconds. The diagnostic LED will
remain on for 2 to 3 seconds to indicate security mode 8 has been
entered. Figure C-2 illustrates the location of the zero button and
diagnostic LED.
6. Reset switch 5 to the desired position (as noted in Step 1).
7. Reset switch 8 to the OFF (OPERATE) position. The diagnostic LED
flashes on once per second (25% on, 75% off), which indicates the
RFT9709 is in the normal operating mode.
RFT9709 Transmitter Ins truction Manual
Page 59

Switch Settings
continued
Figure C-2.
Diagnostic LED and zero
button
Zero button Diagnostic LED
To verify the transmitter is in security mode 8:
1. Configure the security mode, as described above.
2. Wait until the diagnostic LED blinks ON once per second.
3. Move switch 1, 2, or 3 to the OFF position.
4. If the diagnostic LED blinks ON 4 times per second, the RFT9709 is
in security mode 8.
To make changes to configuration or calibration parameters once
security mode 8 is entered:
1. Set switches 1, 2, and 3 to the OFF position.
2. Make changes using the switches (see
Communication settings
,
page 47) or with a special version of the ProLink program. The HART
Communicator cannot be used. (Contact the factory for additional
ProLink information.) Event registers record changes made to defined
configuration and calibration parameters (see Section 3.3, page 29).
3. Set switches 1, 2, and 3 to the ON position.
RFT9709 Transmitter Inst ruction Manual
To reenter security mode 8:
If security mode 8 has been established previously, and the security
mode has been temporarily changed, it is not necessary to use the zero
button to reenter security mode 8. In such a case, resetting switches 1,
2, and 3 to the ON position will reenter security mode 8 immediately.
If a master reset has been performed (see Section 4.6, page 37), it is
necessary to use the zero button method to reenter security mode 8.
See the procedure on the previous page.
To change from security mode 8 to another security mode:
1. Perform a master reset (see Section 4.6, page 37).
2. Perform characterization and reconfiguration procedures using a
special version of the ProLink program. The HART Communicator
cannot be used. (Contact the factory for additional ProLink
information.)
3. Set switches 1, 2, and 3 to the desired positions, See Table C-2,
page 49.
51
Page 60

52
RFT9709 Transmitter Ins truction Manual
Page 61

Appendix
D Open Collector Configuration
If desired, the RFT9709 frequency/pulse and control outputs can be
configured for open collector mode.
• When used in the open collector mode, the output circuit is rated to
30 VDC, with 0.1 ampere maximum sinking capability.
• To wire the RFT9709 outputs, see
page 7.
Installation Step 2
CA UTION
The open collector configuration procedure
cannot be reversed.
Configuring the frequency/pulse or control outputs for
open collector mode requires jumpers on the RFT9709
to be cut. Once cut, the jumpers cannot be reconnected.
, starting on
Figure D-1.
Configuring open collector
mode
Do not cut jumpers unless you are certain your process
requires outputs in open collector mode.
To configure outputs for open collector mode, jumpers on the RFT9709
must be cut. Refer to Figure D-1.
• To configure the frequency/pulse output for
open collector mode, cut jumper JP2.
• To con figure the control output for open
collector mode, cut jumper JP1.
RFT9709 Transmitter Inst ruction Manual
53
Page 62

54
RFT9709 Transmitter Ins truction Manual
Page 63

Appendix
E Decontamination and
Return Goods Policy – USA
A Return Material Authorization Number (RMA) must be obtained prior
to returning any equipment to Micro Motion for any reason. The RMA
number can be obtained by calling the Customer Service Department at
1-800-522-6277 between 6:00 AM and 5:30 PM (Mountain Time),
Monday through Friday, except holidays.
To help ensure that both you and Micro Motion are providing a safe
working environment for our employees and conforming with OSHA
regulations, the following equipment return requirements must be
followed. Failure to follow these requirements may result in additional
charges for cleaning and decontamination.
To comply with Department of Transportation (DOT) regulations, the
equipment you return must be thoroughly cleaned and decontaminated
of all foreign substances (e.g., process fluid) prior to shipment to Micro
Motion. This decontamination requirement applies to the sensor tubes,
sensor case exterior, sensor case interior, and electronics. If you
suspect that the sensor case interior may be contaminated, the case
must be drained by drilling a hole or removing the purge plug(s), and
then flus hed to remo v e c ontami nant s from the c ase in terior. T o a v oid risk
of explosion, do not drill the case if a combustible gas may be present.
The flow tubes must be cleaned and decontaminated of all foreign
substances. Shipping equipment that has not been decontaminated may
violate DOT regulations. The requirements for packaging and labeling
hazardous substances are listed in DOT regulations (49 CFR 172,178,
and 179).
RFT9709 Transmitter Inst ruction Manual
A DECONTAMINATION/ CLEANING STATEMENT form must be
completed. If the statement is not completed, the customer may be
charged for decontamination and cleaning. If the equipment has been
exposed to a known hazardous substance with any characteristic that
can be identified in the Code of Federal Regulations, 40 CFR 261.20
through 261.24, then the chemical abstracts number and hazardous
waste number/hazard code must be stated in the space provided on the
form.
Material Safety Data Sheets (MSDS) for all substances that came in
contact with the equipment must be supplied. This includes substances
used for decontamination and cleaning. If the equipment has been
exposed only to food-grade substances or potable water, or substances
for which an MSDS is not available, a Decontamination/Cleaning
Statement form is acceptable.
Please ship one piece of equipment per package and include two copies
of the Decontamination/Cleaning Statement and MSDS. The package
should be shipped to the address on the Decontamination/Cleaning
Statement form.
55
Page 64

Decontamination/Cleaning Statement
RMA number:
Equipment to be returned:
Substance 1 Substance 2
Common name of
substance exposed to
equipment
Chemical abstract number
see 40 CFR 261*
(if applicable)
Hazardous waste number/
hazard code
see 40 CFR 261*
(if applicable)
Describe decontamination
process, list substances
used for decontamination
and cleaning
I hereby certify that the above listed equipment being returned is clean and has been decontaminated of
any hazardous substances, and poses no health or safety risks. Furthermore, it is my understanding that the
equipment being returned complies with OSHA and DOT regulations.
By:
(Please print)(Signature)
Job title:
Company name:
FAX number:
Date:
Phone number:
IMPORTANT:
•
RMA number must be noted on the shipping package.
•
Two copies of this DECON TAMINATION/CLEAN ING STATEMENT and Material Saf et y Data Sheet (MSDS), if
required, must be included — one attached to the outside of the box and one inside of the shipping package.
Ship equipment to: Micro Motion, Inc.
6930 Winchester Circle, Dock #6
Attn: RMA #________
Boulder, CO 80301
*Refer to Micro Motion Equipment Return Requirements (page 55).
Page 65

Appendix
F Decontamination and
Return Goods Policy – Europe
To conform with Dutch ARBO regulations and to provide a safe working
environment for our employees, Micro Motion has instituted the following
Return/Repair conditions. Strict adherence to these conditions is
required.
Returned equipment that does not conform to the requirements listed
below will NOT be processed. If Micro Motion finds evidence of
contamination, we may, at our option, have the sensor cleaned or
returned AT YOUR EXPENSE, after notifying you of the contamination.
1. The equipment must be COMPLETELY cleaned and decontaminated
prior to shipment to Rosemount. This decontamination procedure
applies to the sensor tubes, sensor case exterior, and the transmitter.
2. A Repair and/or Warranty Request Sheet (RWRS) is REQUIRED for
all process fluids that have been in contact with the equipment. This
includes fluids used to clean the equipment.
3. If the equipment being returned has been used on a food-grade
process fluid, for which no RWRS is available, a statement listing all
process fluids and certifying decontamination is acceptable. Please
fill out the accompanying Decontamination Statement PRIOR to
returning the equipment.
4. The RWRS document must be included in the shipping package.
RFT9709 Transmitter Inst ruction Manual
57
Page 66

Repair and/or Warranty Request Sheet
Please do not fill in the shaded ar eas
Company: Contact:
Address:
Tel No: Fax No:
Reference / Order numbers Installation data
Customer reference Delivery date
Purchase orde r N o
MMI No
Type of order
…
Repair … Calibration
…
Replacement … Investigation/Quote… Report needed
…
Other:
Sensor information Transmitter information
Model Model
Serial No Serial No
Tag No Tag No
Flange type Power supply
Sensor condition Process conditions
Tubes empty
Case empty
Decontamination st at em en t
Type of cleaning material
used
Warning! For the health and safety of our goods handli ng/inspection department, a Decontamination Stateme nt M U ST be
filled in with this form. Please be specific with the information provided.
Calibration data
…
yes / … no Medium
…
yes / … no Chemical formula
…
yes / … no Maximum temperature
…
Exchange
Date of installation
Date of failure
…
Return (after exchange)
Operating pressure
…
No warranty
…
Warranty
…
Extended warranty
Maximum process flow
Primary output Units = 4mA = 20mA =
Secondar y output Units = 4mA = 20mA =
Frequency output 1 pulse = Freq. = Rate =
Description of failure
Remarks/Instructions
Return (shipping) instructions
Ship to address:
Shipped by: Ship date:
Remarks
Page 67

Index
Page numbers in
A
About this manual
Accuracy
Agency approvals
Ambient temperature limits
Analog output.
API specification
Approvals.
Approvals tag
ARBO.
ASCII mode.
B
Baud rate
Before you begin
Bell 202.
Braided shie ld.
C
Cable
Calibration.
Characterization.
CMF sensor.
Communication.
39
approved areas
hazardous area installation
order an approved transmitter
See
communication configuration
master reset default values
See also
communication configuration
communication output specification
configuration swit ches
multidrop network
pressure transmitter input specification
10
cable types
connections to sensor and RFT9709
installation guidel ine s
maximum length to sensor
sensor wiring
BASIS, D, and DL
DT
ELITE
terminating
types
10
wiring instruction manuals
master reset default values
security mode 8
security modes
configuration
master reset default values
using switches
output spec ification
bold
indicate illustrations.
1
43
3
45
42
See
mA outputs
41
See
Agency approvals; Approvals tag
3
Return goods policy
See
Modbus protocol
48
38
1
HART protocol
48
47
19
See
Flowmeter cable, terminating
10
5, 9
3, 9
9–16
15
16
14
10
46
See
Configuration
See also
Configuration
38
50
49, 51
See
Sensor; Wiring
See also
HART; Modbus; ProLink program
48
38
47
41
41
12
41
Conduit
general wiring guidelines
openings in NEMA (IP65) housing
sensor wiring
wiring guidelines
Configuration
master reset default values
pressure transmitter
security modes
Configuration switches
Bell 202 multidrop network
communicat ion configur ation
fault outputs
master reset
RS-485 output
security
Control output
fault indication
open collector configuration
performance
specification
CSA
approved areas
instruction manual
Customer service
Cutoff
42
D
D sensor.
Damping specific ati on
Data bits
communicat ion configur ation
master reset default values
Decontamination.
Default characterization and configuration values
DH sensor.
Diagnosti c LED.
after zeroing
conditions indicated by
during startup
during zeroing
master reset
troubleshooting
Differential pressure transmitter.
Dimensions
IP65 housing
NEMA housing
RFT9709
DL sensor.
DMS Density Monitoring System
frequency/pulse output
9
7
1
49, 51
49
37
20
49–51
See also
.
22
42
22
40
43
37
See
Sensor; Wiring
See
See
Sensor; Wiring
See also
28
27
28
37
31–32,
6
6
4
See
Sensor; Wiring
8
5
38
24
47–51,
47
19
47–48
Outputs
53
53,
46
42
48
38
Return Goods Policy
Startup; Troubleshooting
32
32
See
Pressure transmitter
21
38
RFT9709 Transmitter Inst ruction Manual
59
Page 68

Index
continued
Downscale
configuration swit ches
fault indication
DP cell.
DT sensor.
E
Effect.
ELITE sensor.
Environmental effects on sensor and transmitter
Environmental limits
Event registers
External zero
F
F sensor.
Fault output.
Flowmeter
Frequency/pulse output
Functional specifications
Fuse
G
Grounding
H
Handbook 44
HART Communicator.
See
See
parameters that affect
security mode 8
external switch wiring
configuration swit ches
specification
troubleshooting with
cable
10,
connections to sensor and RFT9709
instruction manual for cable preparation
maximum length to sensor
sensor wiring
BASIS, D, and DL
DT
ELITE
terminating
normal resistance range for flowmeter circuits
proving
open collector configuration
open collector mode
security mode 8
specification
test
33, 42
totalizer reset
42
ground nut
intrinsically safe installations
power supply and
event registers
security mode 8
program
32, 42
Pressure transmitter
See
Sensor; Wiring
Environmental effects
See
29
See
Sensor; Wiring
See also
42
10
16
14
2
40
30
8
49
Sensor; Wiring
42
29
50–51
23
23,
Troubleshooting
49
32
15
10
21–22
21–22
50
40–42
8
29
50
See
HART protocol; ProLink
3
See also
.
53,
8
12
46
Outputs
53
42
36
HART protocol.
Bell 202 multidrop network
communicat ion configur ation
configuration and calibration
configuration swit ches
mA outputs
master reset
master reset default values
pressure transmitter input specification
RS-485 output
specifications
communication output
pressure transmitter
Hazardous areas.
agency approvals
installing in
order an approved transmitter
Humidity limits
I
Initialization
Instruction manuals
list of
46
proving
Intrinsically safe installations
agency approvals
external zero switch wiring
grounding
order an approved transmitter
output wiring
power-supply wiring
pressure transmitter wiring
sensor wiring
IP65 housing
conduit openings
dimensions
factory supplied
installation
mounting options
user supplied
wiring guidelines
L
See
LED.
Location
Low-flow cutoff specification
M
mA outputs
3
Bell 202 multidrop network
communicat ion configur ation
configuration swit ches
master reset default value
performance and requirements
pressure transmitter input specification
rangeability specification
security mode 8
specification
temperature effect on
test
33, 42
trim
33
See also
18
37
3
42
.
27
2
8
17
9, 12
6
5
5
Diagnostic LED
18–19
40
ProLink program
20
See also
43
See also
43
8
5
5
4
7
See also
.
50
42
19
48
1
47
38
41
41
Intrinsically safe installations
45
Startup
3
23
45
25
42
Outputs
19
47–48
47–48
38
40
41
27
18
41
60
RFT9709 Transmitter Ins truction Manual
Page 69

Index
continued
Master reset
communicati ons configuration
default characterization and configuration values
procedure
security mode 8
user-defin ed communication settings
Modbus protocol.
Bell 202 multidrop network
communication configuration
configuration swit ches
instruction manual
master reset default values
pressure transmitter input specification
RS-485 output
Model number
Mounting
flat-sur face installation
IP65 housing installation
location requirements
NEMA housing installation
options
Mounting boss
power-supply grounding
terminating flowmeter cable
terminating output wiring
MSDS.
Multidrop network
Bell 202
pressure transmitter
RS-485
N
National Institute of Standards and Technology
event registers
security mode 8
NEMA housing
conduit openings
dimensions
factory supplied
installation
mounting options
user supplied
wiring guidelines
NIST.
Normal resistance range for flowmeter circuits
O
Open collector configuration
Open collector mode
frequency/pulse output
Ordering information
OSHA.
37
50
See also
47
46
20
45
3–6
3
4
See
Return goods policy
19
24
20
29
50
5
6
5
5
4
5
7
See
National Institute of Standards and Technology
45–46
See
Return goods policy
48
ProLink program
19
48
38
4
5
5
8
10
17
53
53,
21–22
47
41
36
38
Outputs
control
22
open collector configuration
output performance
specification
fault indication
frequency/pulse
open collector configuration
open collector mode
performance and requirements
security mode 8
specification
test
33
totalizer reset
mA
Bell 202 multidrop network
communicat ion configur ation
configuration swit ches
HART communication
performance and requirements
pressure transmitter input specification
rangeability
security mode 8
specification
temperature effect on
test
33, 42
trim
33
ratings
36
RS-485
specifications
test
33, 42
test and trim
wiring
17–25
Bell 202 multidrop network
control
frequency/pulse
general requirements
mA outputs
ProLink PC Interface
RS-485 multidrop network
terminal designations
terminals
control output
frequency/pulse output
mA outputs
RS-485 output
terminating shields and drains
P
Parity
communicat ion configur ation
configuration swit ches
master reset default values
Performance specificati on s
Physical layer
communicat ion configur ation
master reset default values
PI 4-20
frequency/pulse output
mA outputs
32
40
20
40–41
33
22
18–19
18
40
21–22
50
40
30
50
40
21–22
22
18
22
21–22
47
18
42
17
34
17
20
47
38
39
38
21
53,
53,
19
47–48
19
20
21
48
48
21
18
17
53
53
41
RFT9709 Transmitter Inst ruction Manual
61
Page 70

Index
continued
Power supply
grounding
pressure transmitter
specification
terminals
troubleshooting
wiring
Pressure.
compensation
measurement
sensors affected by
Pressure transmitter
configuring
input specifications
multidrop network requirements
requirements
RFT9709 performance with
wiring
external power
internal power
Primary output.
Process measurement
ProLink program.
protocol
configuration and calibration
connecting to RFT9709
event registers
instruction manual
master reset
troubleshooting with
Proving
R
Rangeability
mA outputs
Remote temperature detect or.
Repair.
Repeatability
Return goods policy
Europe
USA
RFT9709 transmitter
about
components
dimensions
model number
ordering a transmitter
specifications
terminals
output wi ring
power supply and grounding
sensor wiring
wiring
outputs
RTD
sensors
RMA.
RS-485
communication configuration
communication output specification
configuration swit ches
multidrop network
wiring
8
8
8,
42
8
35
8
8,
See also
Pressure transmitter
24
24
24
24
25
See also
See also
29
46
37–38
2
40
See
Return Goods Policy
39
57–58
55–56
1
2
4
45
39–43
7
17
13
See also
.
7–25
17–25
11–12, 14, 15,
9–16
See
Return Goods Policy
20
20
25
24
41
25
25
mA output
30
HART protocol; Modbus
34
33–34
45
Wiring
16
47
24
1
See
48
24
RTD
8
41
RTD
installing
remote wiring
requirements
RTU mode.
RWRS.
S
Secondary output
Security
breach
configuration swit ches
event registers
modes
Sensors
accuracy
affected by pressure
instruction manual
normal resistance range
repeatability
troubleshooting
wiring
Slug flow
SMART FAMILY
Bell 202 multidrop network
pressure transmitter
Specifications
accuracy
API-2540 standard tables
communication
control output
damping
environmental effect s
environmental limits
fault output
frequency/pulse out put
hazardous area approvals
input for pressure transmitter
low-flow cutoff
mA outputs
output testing
outputs
power supply
repeatability
slug-flow inhibit
weight
Startup
initialization
process measurement
totalizer reset
zeroing
Stop bits
communicat ion configur ation
master reset default values
Switch.
T
11
DT sensors
ELITE sensors
procedure
11
16
14,
11
See
Modbus protocol
See
Return goods policy
See also
.
18
50
29
See also
49–51
security mode 8
.
50–51
39
24
46
39
31
9–16
RTD
11
42
24
39–43
39
41
40
42
42
42
42
40
42
40–41
42
39
42
43
27–30
27
30
27–28
diagnosing zero failure
procedure
See
28
Configuration switches; External zero
15
mA output
47
Event registers
36
19
41
42
40
43
41
30
28
48
38
62
RFT9709 Transmitter Ins truction Manual
Page 71

Index
continued
Temperature
effect on transmitter
limits
42
mounting location
Terminals
intrinsically safe
output
power supply and grounding
sensor
Test
outputs
Totalizer reset
security
Transmitter.
Trim
mA output
Troubleshooting
customer service
diagnostic LED
diagnostic tools
fault output
frequency/pulse output test
general guidelines
input and output ratings
mA outputs
master reset
normal resistance range for flowmeter circuits
open circuits
power suppl y
ProLink program
test and trim outputs
wiring
zero failure
U
UL
approved areas
hazardous area installation
instruction manual
order an approved transmitter
power-supply wiring and grounding
Upscale
configuration swit ches
fault indication
V
Vibration limits
Viscosity measurement
W
Weight
7
17
BASIS
D and DL
DT
ELITE
15
16
14
33
30
49
See
transmitter
33
conditions indicated by
32
test
33
trim
33
35–36
28
42
43
42
3
12
8
15
Pressure transmitter; RFT9709
31–38
37
32
32
32
33
31
36
37–38
35–36
35
33–34
33
43
3
46
45
8
49
32, 42
24
36
Wiring
7–25
Bell 202 multidrop network
cable types
connections to sensor and transmitter
See
faulty.
general guidelines
grounding
instruction manuals
IP65 housing requirements
NEMA housing requirements
outputs
17–25
Bell 202 multidrop network
control
frequency/pulse
general requirements
mA
18–19
RS-485
terminating shields and drains
power supply
pressure compensation
pressure transmitter
external power
internal power
ProLink PC Interface
RS-485 multidrop network
RTD
11
sensors
terminals
troubleshooting
viscosity measurement
zero switch
Z
Zero button
communicat ion configur ation
security modes
startup
Zeroing
configuration swit ches
external switch wiring
failure
9–16
BASIS sensor
channel for routing cable
D and DL sensor
DT sensor
ELITE sensor
terminating flowmeter cable
output wiring
power supply and grounding
sensor wiring
27
27–28
28
10
10,
Troubleshooting
7
8
8,
46
22
21–22
20
20,
8
8,
25
25
25
15
16
14
7
17
13
35–36
23
23,
51
24
34
15
24
47
23,
17
5
20
23
19
5
7
48
19,
10
8
12
19
17
RFT9709 Transmitter Inst ruction Manual
63
Page 72

64
RFT9709 Transmitter Ins truction Manual
Page 73

Page 74

Visit us on the Internet at www.micromotion.com
Micro Motion Europe
Groeneveldselaan 6
3903 AZ Veenendaal
The Netherlands
Tel +31 (0) 318 549 549
Fax +31 (0) 318 549 559
Micro Motion Asia
1 Pandan Crescent
Singapore 128461
Republic of Singapore
Tel (65) 777-8211
Fax (65) 770-8003
Micro Motion Inc. USA
Worldwide Headquarters
7070 Winchester Circle
Boulder, Colorado 80301
Tel (303) 530-8400
(800) 522-6277
Fax (303) 530 -8 459
©1999, Micro Motion, Inc.
All rights reserved
P/N 3003091, Rev. A (3/99)
recycled paper
 Loading...