

Page 1

screen with handwriting
Special features:
2.0 mega pixel CMOS camera
Windows Mobile 6.1
Pocket MSN
Windows Media Player
Bluetooth
ActiveSync
GPS with integrated MAPS
FM Radio
T-Flash card compatible
Touch
recognition
3.2-inch 65K color display
E-mail
Wi-Fi
Declaration
Certain functions referred in this document may be network services and
require support by your network operator or service provider. Please
check with your network operator or service provider for more details.
For your safety, please read “For your safety” and “Safety information”
in this document before you use this device.
Symbols that may occur in this document are defined as below:
< > stands for soft keys and buttons; “ “ stands for display information on
phone screen;[ ]stands for menus.
Disclaimer: Micromax will not bear any responsibility for any
incompliance with the guidelines mentioned in this manual; or improper
use of the mobile phone. Our company keeps the right to make
modifications to any of the content here in this user guide without public
announcement in advance. The content of this manual may vary from the
actual content displayed in the mobile phone. In such a case, the latter
shall govern.
-I-
Page 2

Contents
1. YOUR DEVICE 1
GETTING STARTED 8
2.
CALL FUNCTIONS 20
3.
CALL HISTORY 26
4.
ENTERING TEXT 28
5.
SETTINGS 32
6.
PIM 45
7.
MESSAGING 53
8.
TAKE YOUR OFFICE WITH YOUR SMART PHONE
9.
65
SYNC YOUR DEVICE 69
10.
BROWSE THE WEB 72
11.
ENTERTAINMENT 82
12.
FILE EXPLORER 90
13.
GPS 90
14.
USE A T-FLASH CARD 92
15.
MANAGE PROGRAMS AND MEMORY ON YOUR
16.
SMART PHONE
CARE AND MAINTENANCE 97
17.
TROUBLESHOOTING 99
18.
93
Page 3
keep your hands free to
operate the vehicle while
driving. Your first
consideration while driving
Follow any restrictions.
Wireless devices can cause
which could affect
ENHANCEMENTS AND
Use only approved
SWITCH OFF WHEN
refueling point. Do not use
CONNECTING TO OTHER
When connecting to any
other device, read its user
or detailed safety
Obey any local battery
19. SAFETY INFORMATION 107
For your safety
Read these simple guidelines before using the device. Not following them
may be dangerous or illegal. Refer to “Safety information”.
ROAD SAFETY COMES FIRST
Obey all local laws. Always
should be road safety.
INTERFERENCE
All wireless devices may be
susceptible to interference,
performance.
BAT TERI ES
enhancements and batteries.
Do not connect incompatible
products.
DEVICES
guide f
instructions. Do not connect
incompatible products.
BACK-UP COPIES Remember
to make back-up copies or
keep a written record of all
SWITCH OFF IN AIRCRAFT
interference in aircraft.
SWITCH OFF IN HOSPITALS
Follow any restrictions. Switch
the device off near medical
equipment.
REFUELING
Do not use the device at a
near fuel or chemicals.
PROTECT THE ENVIRONMENT
Do not dispose of batteries in
a fire or as household trash.
recycling laws or environment
protection policy.
PROTECT THE CHILDREN
Do not store any small parts
Page 4

important information.
of the device such as a
SOS
the phone function of the
number, then press the Talk
key. Give your location. Do
not end the call without
memory card where children
may access them.
EMERGENCY CALLS Ensure
device is switched on and in
service. Enter the emergency
permission.
Page 5
key
port
key
1. Yo u r Device
Keys and parts
Planform view
Side view
Volume
Earphone hole
USB
Power
key
Camera
Page 6
Front view
Receiver
Rear view
2
Talk key
End key
MicroPhone
Page 7
Camera
Speaker
Page 8
Key Function
Volu me key 1. Press the up key or the down key to adjust the
Tal k key Press to answer an incoming call or dial a call.
Power 1. When device is on, press to enter in sleep
End key Press to end a call.
Camera key Press this key to enter the camera preview screen.
volume; 2. When the phone rings for an incoming
call, press the up key or the down key to mute the
rin ge r.
mode; 2.While in sleep mode, press to wake the
device up; 3.When device is on, press and hold to
choose to switch the device off; 4.When device is
off, press and hold to switch it on.
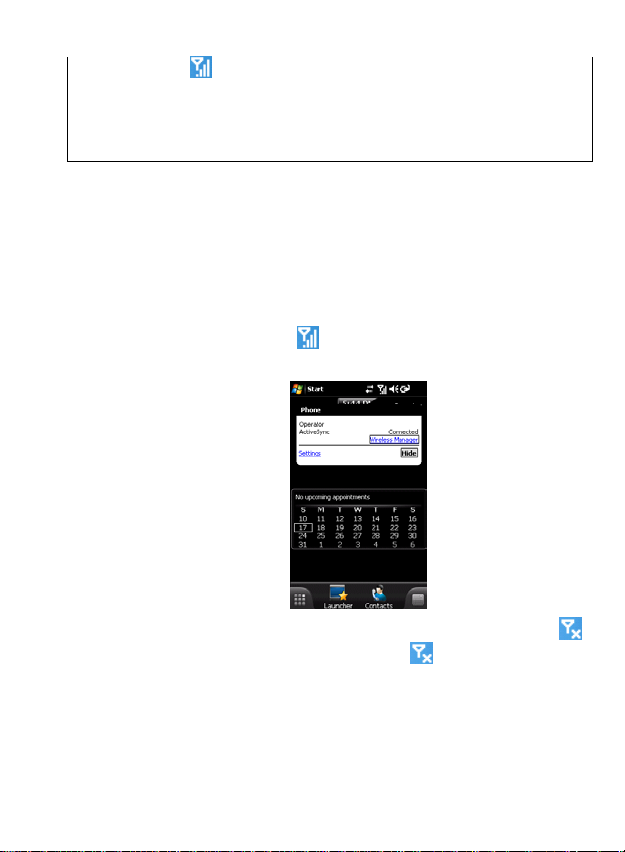
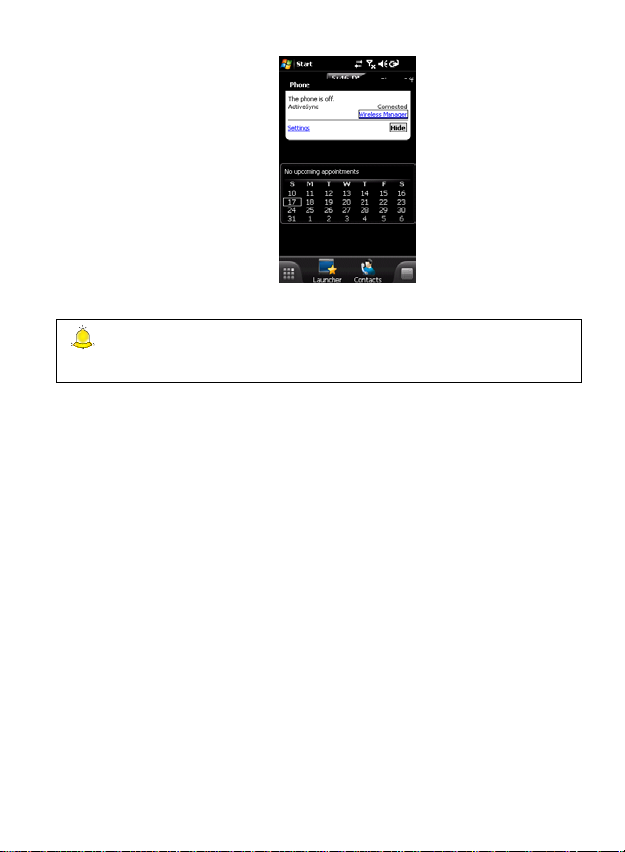
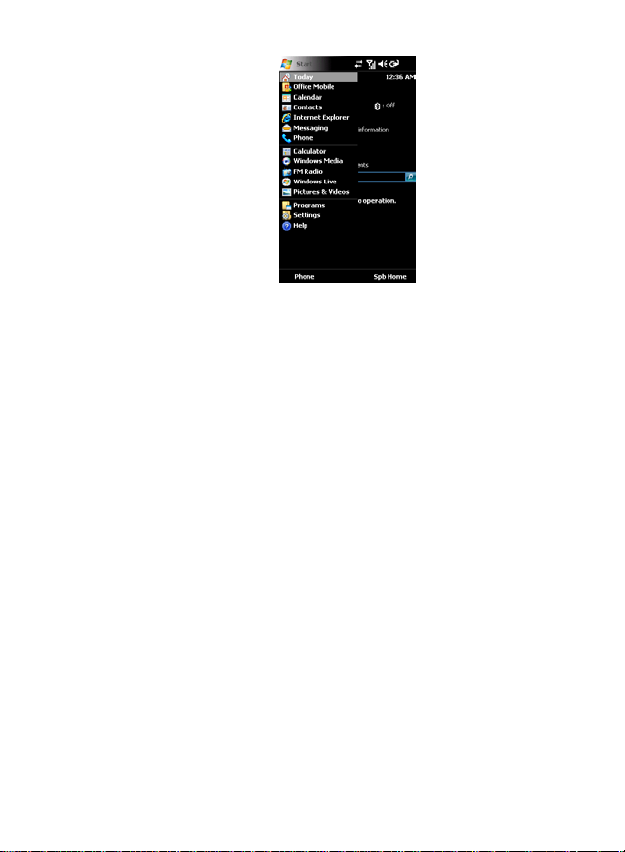
Today
Tap[Start→To day]to enter in the [Today ] screen where your upcoming
appointments, active tasks, and information about e-mail messages are
displayed. View the following table to see what you can do in the
[Today ] screen.
4
Page 9
No. Name Function
Start Tap here to pop up the Start menu.
1
Time and date Tap here to change the time and
2
Program section Tap a section to open the program
3
Device
4
5
6
locked/unlocke
d
Menu Tap here to access Matrix Menu of
SPB Home Tap here to access SPB Home .
date, or set an alarm.
that is associated with that section.
Tap here to lock the device. Read
“Lock the device”.
your device.
Status bar Tap any icon on the status bar to
7
The [Today] screen is accessible from anywhere by tapping
→Today]. You can tap[Start→Settings→Personal→Today]to
[
view details.
Page 10
customize the[Today]screen, including the background picture.
Status icons
The following table lists common status indicators that may appear at
the top and bottom of the phone screen, and on the [Today] screen. If
you are not sure about what an icon exactly means, tap the icon to pop
up a message box that gives detailed description about the icon and
enables you to change settings.
Icons Meaning
Signal strength.
Lost signal. Your device is searching for a signal.
No signal.
Phone function is switched off.
Ringer On
Ringer Off
Vibrator on
Your device receives a wireless data exchange request.
Pending alarm
Missed call
Make an emergency call without SIM card.
Call waiting
6
Page 11
New MSN instant message.
Multiple notifications.
No connection.
Synchronizing.
ActiveSync connected.
GPRS available
GPRS connection is active.
Invalid or missing SIM card.
Battery charging.
Battery level. You can tap this icon to view how much
power is left and to set the idle time while [On
battery power]or [On external power].
Low battery.
No battery.
Your device receives a Bluetooth connection request.
Page 12

2. Getting Started
Before you begin, you need to prepare your device by installing the SIM card,
which is supplied by the service provider.
Warning: The SIM card and its contacts can easily be damaged by scratches or
bending, so be careful when handling, inserting, or removing the card. Follow the user
guide provided by the SIM card provider. Keep all SIM cards out of the reach of small
children.
Installing the SIM card
(1) Press and hold power key, and switch off your device.
(2) Remove the back cover and battery.
(3) Open the SIM card cover.
(4) Push the SIM card into the slot.
Using a T-Flash card
Your W900 phone is compatible with a T-Flash card. A T-Flash card expands
the phone’s memory capacity and thus allows you to backup or save more
files and data.
(1)Press and hold power key,and switch off your device.
(2)Remove the back cover and battery.
(3)Open the T-Flash card cover.
(4)Push the T-Flash card into the slot
Important: To avoid missing any data, do not remove the T-Flash card in the
middle of a read-write operat i on.
Installing the battery
(1) Press and hold power key,and switch off your device.
8
Page 13
(2) Remove the back cover and battery.
(3) Position the battery so the gold colored contacts match up with
those on the device. Insert the battery, contact end first into the slot.
Snap the other end of the battery into place. Slide the battery cover
towards the top of the phone to lock the cover into place.
Charging the battery
Your device is powered by a rechargeable Li-Ion battery.
Using a charger
(1) Install the battery into your device. Insert the charger plug into the
charger connector of your device.
(2) When it starts charging, the battery icon becomes
[Start→Settings→System→Power]or simply tap this icon to view the
progress of the charging.
. Yo u can tap
(3) When battery charge is complete, the battery icon is displayed as
.
(4) Disconnect the charger from the standard wall outlet first and then
from your device.
Note:
1. Use batteries and chargers approved by provider. Using unapproved ones may
cause explosion.
2. The phone takes about 2-5 hours to charge and the exact time may vary depending
on the circumstances of your phone dur ing charging.
3. The full performance of a new battery is achieved only after two or three complete
charging and disc h argi ng cycles.
Battery strength indicator
When the battery is low, the battery icon becomes
When the battery charge level is too low for the phone to operate, the
phone switches itself off and you may lose some data that hasn’t been saved
yet. To avoid this from happening, charge the battery as soon as the battery
.
9
Page 14
is low.
Switch on/off your device
Switch on/off
When the device is off, press and hold the power button to switch it on. Note
that it may take a few seconds for the device to operate after it’s switched
on.
When the device is on, press and hold power button, and switch it off. If the
device is locked, unlock it first.
When the device is on, press power button to enter in sleep mode. While in
sleep mode, you can press power button to wake your device up.
Warning: When your phone enters in low power sleep mode, its call function is
still active. For safety, make sure to switch off the phone funct ion and remove the
battery when wireless ph one use is prohibited.
When you switch on the device without a SIM card, a text message saying
“Invalid or missing SIM card…” and a missing SIM card icon
displayed.
If the PIN-check feature is enabled on your SIM card, the device asks for a PIN
code when you switch it on.
If you enter an incorrect PIN code three times in succession, the SIM card is
blocked. You must enter the PUK code to unblock the SIM card.
When your phone is out of service, you can see an “Out of service” message
and an icon
be restricted when the phone is out of service.
displayed on the screen. Calls incoming and outgoing will
will be
Warning: 1. Do not switch the phone ON wh ere a wireless phone/device usage is
prohibited or when it may cause interference or danger. You can click the signal
10
Page 15
strength indicator
function.
2. Your phone has a built-in antenna. Do not touch the antenna unnecessarily when
the phone is switched on; otherwise, it may affect call quality and may cause the
phone to operate at a higher power level than other w ise needed.
Turn on/off phone function
Turn on phone function
With the battery and SIM card properly installed, you can press and hold the
power button to switch on the device. When the device is switched on and
within service area, you can use the phone function.
Turn off phone function
Tap the signal strength indicator
the phone in flight mode and switch off the phone function.
and select [Wireless Manager]to switch off the phone
and select[Wireless Manager]to put
After you turn on the flight mode, the signal strength indicator becomes .
To retrieve the phone function, you can just tap
.
manager
]
and select[Wireless
11
Page 16
Warning:Make sure to switch off the ph one function when wireless phone use is
prohibited
Aligning the screen
When switching on the device for the first time after purchase, follow the
instructions on the phone screen to make some basic settings.
Aligning the touch screen
To align the touch screen, just tap the center of the + symbol wherever it
moves until it disappears automatically. The calibration makes the phone
respond accurately to your taps.
Realigning the touch screen
Realign the touch screen if the phone does not respond accurately to your
taps. Follow the instructions below to do so:
(5) Tap [Start→Settings→System→Screen].
Tap [Align screen]on the[General]tab and start to align the screen by
following the instructions on the screen.
When aligning the screen, you should try to always tap at the right center of
12
Page 17

the + symbol.
Screen orientation
Your phone allows you to change the screen orientation as needed.
Tap [Start→Settings→System→Screen].
On the[ General]tab, tap the screen orientation you want. You can
switch between[Portrait]and [Landscape].
To view more content or increase the readability in some programs that
allow text size adjustment, you can tap the[Tex t s ize]tab to increase or
decrease the font size.
Reminders
You can choose how to be notified of a new SMS, MMS, or an upcoming
appointment or alarm clock.
Message
Special sound (customizable)
Vibration
Tap[Start→Settings→Personal→Sounds & Notifications]to customize the
reminders. Read “Sounds and notifications” for more details.
Start
You can choose which items appear in the [Start] menu.
(1) Tap [Start→Settings→Menus].
(2) Select the check boxes of the items you want to appear in the [Start]
menu. You can set up to seven items.
13
Page 18
Programs
Tap [Start→Programs]to view all programs available with your phone.
SPB
SPB Mobile Shell introduces the next generation of a user interface while
keeping all the advantages of Windows. You will be able- while only using
one hand- to get information, launch programs, make calls and navigate your
device in a simple and flexible manner.
SPB Home
SPB Home is a Today plug-in user interface that gives you up-to-date
information at a glance, such as time, weather, calendar, upcoming
appointments, next alarm, and shows new SMS or MMS messages, missed
calls, new emails, and new voicemail. It also has a fully customizable Lifestyle
layout where you can add your own favorite widgets for one-tap access.
14
Page 19
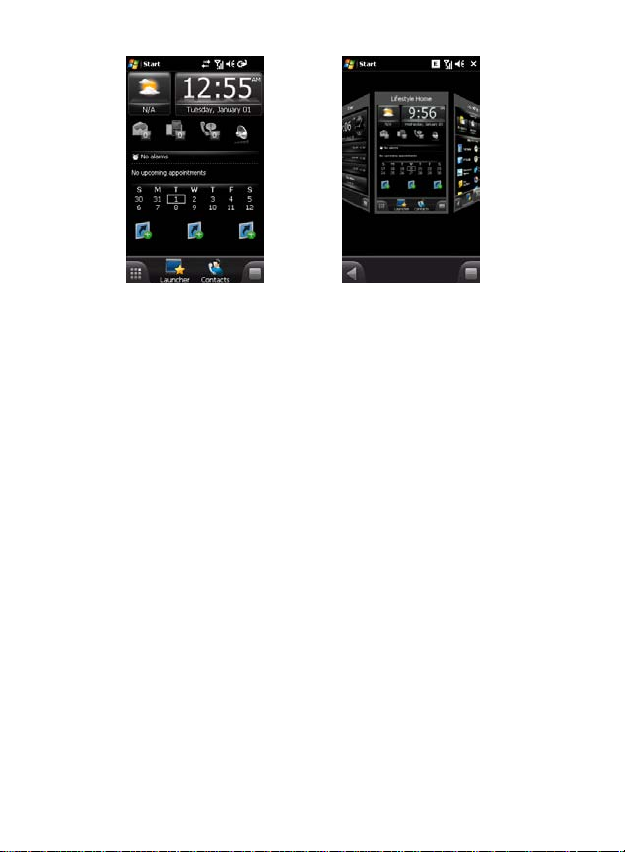
SPB Home has two components: Professional Home (disabled by default) and
Lifestyle Home. Switching between them can be done using any of the
following ways:
From the Menu button .
From the Tabs button that shows you all of SPB Mobile Shell tabs in the
selected views style (carousel or tiles).
At the bottom of SPB Home, there is a toolbar that allows you to switch
between SPB Mobile Shell components and access the Menu button to view
the available options of the selected tab.
Professional Home
The Professional Home functionality is implemented by means of widgets as
in Lifestyle Home. There is a wide range of widgets to choose from for all
purposes. Adding of up to 5 pages to the Professional Home is also
supported.
The Professional Home gives you a quick and easy way to check your device
status. You can see your most important information with a quick glance, for
the fastest and most direct way to use your device. For example, you can
open your Inbox to read new emails with just a tap, or with a few key clicks.
The Professional Home layout provides you by default with the following
information:
The weather forecast icon on the upper left for the selected city. Tap to
open the weather details page where you can update forecast or access the
weather options.
In the upper middle you have four icons for email, SMS, Profile, and missed
calls. For example, when you receive an email you will see the email icon
15
Page 20

highlighted with the number of new emails you have in your inbox. You can
open your Inbox to read new emails with just a tap, or with a few key presses.
Note: The voice mail may not work due to your service provider. Some providers
notify only by SMS about unread voicemails.
With the speaker indicator on the upper right, you can adjust the following
phone profiles on your device. Select Normal, Silent, or Vibrate from the
profiles popup. You can also edit the normal profile. If you have SPB Phone
Suite installed, you may use those profiles instead of the default ones by
enabling the corresponding option in SPB Mobile Shell settings.
The digital clock in the middle displays your current time and date. Tap to
open the time screen for more details.
Under the digital clock you will find the alarm notification bar when an alarm
time is set and the corresponding option in SPB Mobile Shell settings is
enabled. If you have SPB Time installed, SPB Mobile Shell will show the next
alarm information from SPB Time instead of the system alarm clock.
You will find the next appointment notification bars (if available) in the lower
part of Professional Home
The calendar displays the days that correspond to the selected month and
year settings. The selected date is your device’s current setting. You can see
a full month, three weeks, two weeks, one week or disable the calendar from
the corresponding option in SPB Mobile Shell options. Tap to open the
Agenda page.
Lifestyle Home
Most of the Lifestyle Home functionality is implemented by means of
widgets. There are widgets for all purposes: widget-based photo contacts,
media player, profiles, weather, world time, and wireless manager, etc.
Make your own Home screen using those widgets and personalize your
Smart phone by changing the background of the widgets screen. You can
download additional free backgrounds right from your phone using the
Online Catalog (Internet connection is required).
16
Page 21
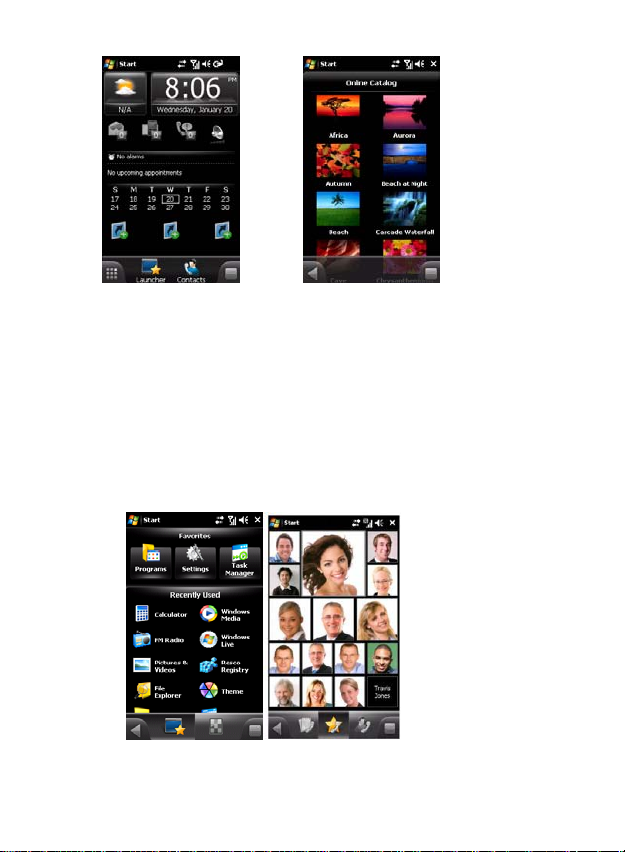
Launcher Tab
The Launcher tab adds a fast and convenient way to navigate through your
device. All of the pages are kinetic scrolling supported. Launcher tab has two
main pages: Launcher and SPB Menu. The Launcher shows you the Pinned
shortcuts, recently used programs, and finger friendly task manager. SPB
Menu contains all of your device programs, settings, and tools
well-organized in categories.
At the bottom of the Launcher pages, there is a toolbar that allows you to
return to the Home tab and access the Menu button to view the available
options ofthe selected page.
Contacts Tab
17
Page 22

The Contacts tab helps you to manage your contacts and calls using many
useful features such as call history, photo speed dial, smart contact search,
drag-and-drop to edit your favorite layout, kinetic scrolling, easy assigning
and cropping of contact picture, set a unique ringtone for each of your
favorite contacts, and more.
To open the available options for a contact (for example, contact or shortcut)
simply tap and hold the item.
Contacts tab have three pages: Favorite Contacts, Call Log, and SPB Contacts.
TodayScreen
Tap[Start→Settings→To day], on the [Items] page select [Items] check
boxes. Selected items will appear on the today screen.
Lock/Unlock the device
Device locked/unlocked
(6) On the[Tod ay ]screen, tap <Device unlocked> to lock the device.
When the device is locked, tap <Unlock> at the bottom left of the screen and
then tap <Unlock> to unlock the device.
Note: If you don’t see the menu to lock the device on the [Today] screen, just
tap[Start→Settings→Personal→Today→Items], and select the check box for
18
Page 23

[Device Lock].
Protect your device with a password
You can enable a password to prevent unauthorized access to your device.
(1) Tap[Start→Settings→Personal→Lock].
(2) Select the[Prompt if device unused for…]check box.
(3) In the box to the right select the time period you want.
(4) In the [Password type] box, select the type of password you want to
use.
(5) Enter a password, and then confirm the password.
(6) Tap <ok> to save.
(7) With the above done, your device locks itself if it’s left inactive for the
selected amount of time, and you need to enter the password in order
to use the phone. Read “Lock” for more details.
Lock the SIM card
You can lock your SIM card with the PIN code. The original PIN code is
supplied by your network operator. Follow the instructions below to enable
the PIN-check:
(7) Tap[Start→Settings→Personal→Phone], on the [Security] page select
the[Require PIN when phone is used]check box.
Enter the PIN code.
Tap <ok> to confirm.
If you want to change the PIN code, just tap [Change PIN].
19
Page 24

3. Call Functions
Your phone keeps call records and allows you to take notes or record the
conversation when you are on a call.
Access the phone function
Press
button to enter the [Phone] screen as below:
Use the PIN code
In general, a PIN code is supplied with the SIM card when you purchase.
If the PIN-check feature is enabled on your SIM card, your phone asks for
the code each time you switch the phone on or each time you try to
access the [Phone] screen.
If you want to enable or disable the PIN-check feature while in the
[Phone] screen, tap[Menu→Options→Phone]and select or clear the
[Required PIN when phone is used]check box.
Note: If you enter an incorrect PIN code three times in succession, the SIM
card is blocked. You must enter the P U K code to un block the SIM card.
Making a call
20
Page 25

You can make a call by using the keypad, the Contacts, speed dial or call
history.
Use the keypad
(8) On the [Today ] screen, tap <Phone> to enter the [Phone] screen.
(9) Enter your desired phone number by tapping the keypad, and then
tap
(10) Ta p
Clear a wrong input:When entering a phone number, you can tap
to clear the last digit or tap and hold
Use the Contacts
You can make a call to a phone number that is saved in <Contacts>.
(11) On the [Today ] screen, tap <Contacts> to enter the [Contacts]
menu.
Tap your desired contact and tap <Call> to dial.
Use the call history
(12) On the Phone keypad, tap <Call history> button.
(13) Ta p [Menu→Filter] to select the type of calls you want to view. For
example, if you want to v iew all call records, just
[Menu→Filter→All Calls].
(14) Tap your desired call record and then tap <Call> to dial.
Use speed dial
You can assign speed dials for frequently-called phone numbers so you
can dial a number with a single tap.
(15) On the Phone keypad, tap[Speed dial→Menu→New]to enter
contacts list. In the Contacts list, tap your desired contact or tap
[Menu→New Contact] to create a new contact then tap
[Select].After tap[Select], enter Speed Dial screen.
or simply press button to dial.
or simply press button to end the call.
to clear the entire number.
21
Page 26
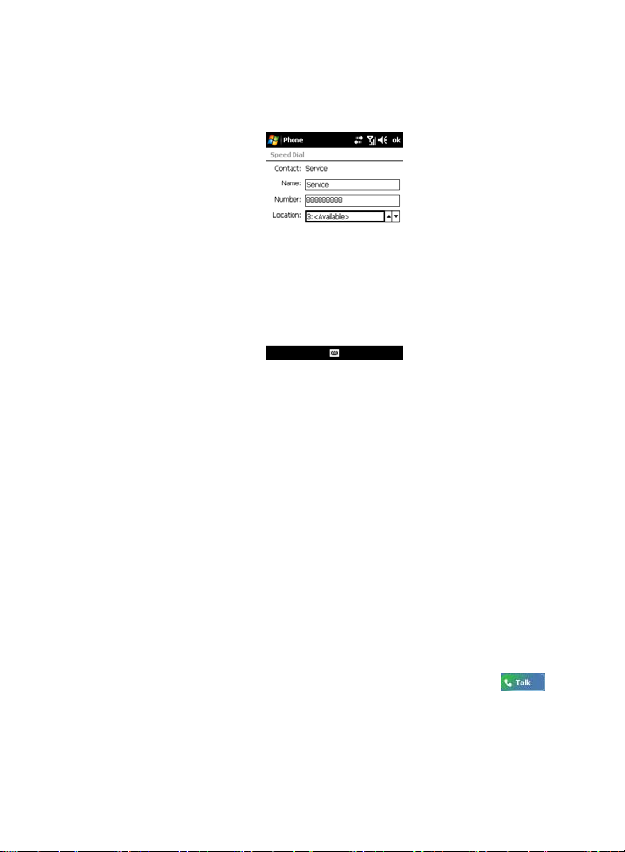
(16) Tap the up/down arrows in[Location]box to select an available
speed dial number. Then tap <ok> button to save. Note that
number 1 is reserved for Voice Mail.
On the Phone keypad, tap and hold the speed dial number assigned to
the contact you want to call for 1-3 seconds. If the speed dial number is a
two-digit one, tap the tens digit first and then tap and hold the single
digit for 1-3 seconds.
When you are trying to assign a speed dial number that is already
occupied by another contact, the phone asks “Speed Dial location
already in use. Overwrite?” Tap <Yes> to replace the previous contact
with the new one or tap <No> to cancel.
Change or delete a speed dial number
On the Phone keypad, tap <Speed dial> button to enter the speed dial
number list. Tap and hold the one you want to delete or change and
then tap [Delete] or [Edit].
Make an emergency call
On the Phone keypad, enter an emergency number and tap
button to dial.
Make an international call
22
Page 27

(17) On the Phone keypad, tap and hold
(+) appears.
(18) Enter the country code, area code and phone number.
(19) Tap
Enter voice mail phone number
The speed dial number 1 is reserved for[Voice Mail].
(1) On the Phone keypad, tap[Speed dial→Voicemail].
(2) Tap [Service→Voicemail and Text Messages], and tap <Get
Settings>.
(3) Enter the voice mail box number supplied by your network
operator in the appropriate box.
Adjust the volume
Adjust the call volume:
While on a call, you can
tap
or, press the up key or the down key to increase or decrease the call
volume.
button to dial.
button to increase or decrease the call volume.
button until a Plus symbol
Change system and ringer volume settings:Tap
adjust the incoming call tone or tap
reminders or MP3 playback. You can also select[Off]to mute the phone.
Note: When you select [Vibrate], the sound icon changes to be .
Answer or reject a call
Tap <Answer> to answer an incoming call. If an earphone is connected,
you can simply press the <Talk> key on the earphone to answer the call.
Tap <Ignore> to reject an incoming call. If you reject the call, it may be
23
and then tap to
to adjust the volume of
Page 28

forwarded to another phone number or sent to your voice mail,
depending on your settings. When you receive a phone call with
earphone connected to your phone, you can press and hold the <Tal k >
key on the earphone to ignore the phone call.
End a call
While on a call, you can press
Phone keypad to end the call.
Options during a call
Call waiting(Network-dependent)
If you receive a call while on a call, you have the option to ignore or
answer the new call. If you select to answer, the phone allows you to
switch between the calls or connect both calls.
(20) Answer the new call and put the previous one on hold.
Tap the
to the previous one.
Switch between calls
Tap the
Make a conference call(Network-dependent)
(21) Hold the first call to make or answer another call.
(22) With the conference call successfully connected, [Conference]
appears at the top of the [Phone] screen.
(23) To add a new party to the conference call, just tap
dial the number.
Take notes during a call
Your phone allows you to take a note while on a call. [Call history]
provides easy access to any notes taken during a call.
button or press to end the new call and reconnect
button to switch between the two calls.
button or tap button on the
and
Create a note:
24
Page 29

(24) While on a call, tap the <Note> button at the bottom of the screen.
(25) Enter your note and tap <ok> button to save.
Access a note:
In the [Call history] list, tap and hold the name or number for your
desired phone call entry containing the note, and select [View note] in
the pull-down menu to read the note. You can also access the note
directly from[Start→Programs→Notes].
Mute a call
During a call, you can tap the <Mute> button to mute your microphone
so that the person with whom you are speaking cannot hear you, but
you can still hear him/her.
Note: Call waiting and conference call are both network dependent, contact
your service provider for more inform ation.
25
Page 30

4. Call History
Your phone keeps records of your missed, outgoing and incoming calls.
For [Call history] to work properly, your service provider must support
caller ID and it must be enabled, your calls cannot be blocked, and your
phone must be on and within the service ara.
Call history
On the [Today] screen, tap <Phone> to enter the [Phone] screen. On the
Phone keypad, tap <Call history> button.
View details
To change the [Call history] view, tap[Menu→Filter]and select a
different view.
All calls : View all calls listed in the order of call time.
Missed
Outgoing
Incoming
Tap your desired call entry and your phone will pop up details of the call,
such as the call time and duration.
Create a Contact from Call history
(26) Tap and hold the phone call entry you want and then tap [Save to
Contacts] in the pull-down menu.
(27) Enter information about the call entry and then tap <ok> button
to save.
Call timers
(28) In [Call history] menu, tap[Menu→Call timers]to view duration of
all calls and recent calls.
:View missed calls only.
:View outgoing calls only.
:View all incoming calls.
26
Page 31

Tap <Reset> to reset the [Recent calls] counter.
27
Page 32

5. Entering Text
Input screen
Change the text input method
On the input screen, tap the input selector arrow ▲ at the bottom
center of the screen to bring up options of text input methods. You can
use the on-screen keyboard or a handwriting recognition feature such as
Block Recognizer, Letter Recognizer, and Transciber to enter text.
Use Qwerty
You can enter text by tapping keys on the on-screen keyboard supplied by
Qwerty input method.
(1) From a program, tap the input selector arrow and then tap
[Qwerty].
(2) Enter text by tapping keys on the on-screen keyboard.
Use Block Recognizer
With block recognizer, you can use a single stroke to write letters,
numbers, symbols, and punctuations, which are then converted into
typed text.
28
Page 33

(3) From a program, tap the input selector arrow and then tap [Block
Recognizer].
(4) Write characters, numbers, and symbols in the designated writing
area.
Enter letters by writing in the abc (left) area of the box.
Enter numbers by writing in the 123 (right) area of the box.
Enter symbols and punctuations by tapping in either area of the
box and then writing the desired character.
For help with writing characters with Block Recognizer, tap the question
mark near the writing area.
Use the on-screen keyboard
You can enter text by tapping keys on the on-screen keyboard.
(1) From a program, tap the input selector arrow and then tap
[Keyboard].
(2) Enter text by tapping keys on the on-screen keyboard.
29
Page 34

Use Letter Recognizer
With Letter Recognizer, you can write individual letters, numbers, and
punctuation and have them converted into typed text.
(1) From a program, tap the input selector arrow and then tap [Letter
Recognizer].
(2) Write characters, numbers, and symbols in the designated writing
area.
Enter capital letters by writing in the ABC (left) area of the box.
Enter lower case letters by writing in the abc (middle) area of the
box.
Enter numbers by writing in the 123 (right) area of the box.
Enter punctuation and symbols by tapping in either area of the box
and then writing the desired character.
For help with writing characters with Letter Recognizer, tap the question
mark near the writing area.
30
Page 35

Use Transcriber
This input method allows you to write in cursive, print or mixed
(consisting of both cursive and print). Your phone recognizes and
converts your writing into typed text.
31
Page 36

6. Settings
You can customize your phone’s settings to suit your preferences.
Personal
Tap[Start→Settings→Personal]to access the following settings options.
Owner information
(29) Ta p[Start→Settings→Personal→Owner information].
On the[Identification]tab, enter your personal information.
On the[Notes]tab, enter additional information that you want the phone
to display each time you switch it on.
Note: You must select the [Notes] check box on the [Options]tab to make
your phone display the information that is entered on the [ Notes] tab.
On the[Options]tab, select the [Identification information] and [Notes]
check boxes to allow for easy identification of the device in case it is lost.
Today
Tap[Start→Settings→Personal→Today].
Theme:
On the[Appearance]tab, you can set a background image on the [Today]
screen.
(30) Select the[Use this picture as the background]check box.
(31) Tap [Browse] to view a list of your picture files.
(32) In [Folder], select the folder that contains the picture you want
32
Page 37

to use.
(33) In [Type], select the file type of the picture.
(34) Tap the file name of the picture you want to use.
(35) To share a theme with your friends, tap the theme, and then tap
<Beam>.
Items to be displayed:
(36) Ta p[Start→Settings→Personal→Tod ay].
(37) On the [Items] tab, select the check box for the items you want the
phone to display on the [To d ay] screen.
(38) Ta p <ok> to save your change.
Sounds and notifications
(39) Ta p[Start→Settings→Personal→Sounds and notifications].
On the[Sounds]tab, you can enable sounds for [Events], [Programs],
[Screen taps] and [Hardware buttons].
On the [Notifications] tab, you can customize the reminders for each
event listed in the [Event] pull-down list. Customizable items for each
event may var y.
More sounds
You can connect your phone to a computer with a cable and download
sounds from the computer.
(40) Connect the phone to a PC with a USB cable. When connected,
ActiveSync program automatically starts.
Click [ My computer→Mobile devices→My W indows mobile
device→Application Data→Sounds]on the PC. Copy the sound files you
want to this folder.
Buttons
33
Page 38

On the[Program buttons]tab, you can reassign programs or shortcuts to
program buttons.
Program Buttons:
(41) Ta p[Start→Settings→Personal→Buttons→Program buttons]. A list
of buttons and their current assignments is displayed.
(42) Tap the button you want to reassign.
In the[Assign a program]box, tap the program or shortcut you want to
assign.
Tap <ok> button to save the change.
Up/Down Control:
If the Up/Down Scroll Key responds too fast or too slow, adjust the
speed for scrolling on the[Up/Down Control]tab.
Phone
Tap[Start→Settings→Personal→Phone].
On the [Phone] tab, You can select the ring tone, keypad tone and the
ring type.
On the [Security] tab,
You can enable PIN-check feature to protect your phone from
unauthorized use. PIN code is supplied by your service provider and can
be changed.
(43) Ta p[Require PIN when phone is used], enter the PIN and tap
<Enter> to confirm.
(44) To change the PIN, tap [Change PIN].
Call barring
34
Page 39

(45) Ta p[Start→Settings→Personal→Phone].
(46) On the[Services]tab, tap [Call barring] and tap [Get settings…].
(47) Select the type of incoming and/or outgoing calls you want to block.
Caller ID
(48) Ta p[Start→Settings→Personal→Phone].
(49) On the[Services]tab, tap[Caller ID]and tap [Get settings…].
(50) Ta p [Everyone] to show your identity to all people when you are
calling them. To prevent your identity from being displayed to
others, tap [No one].
Call forwarding
(51) Ta p[Start→Settings→Personal→Phone].
(52) On the[Services]tab, tap[Call forwarding]and tap [Get settings…].
(53) Select the way to forward incoming calls to a different phone
number based on your situation.
Call waiting
(54) Ta p[Start→Settings→Personal→Phone].
(55) On the[Services]tab, tap[Call waiting]and tap [Get settings…].
(56) Ta p [Notify me] if you want to be notified of incoming calls when
you are already on a call. If not, tap [Do not notify me].
Voice Mail and Text Messages
(57) Ta p[Start→Settings→Personal→Phone].
(58) On the[Services]tab, tap[Voice Mail and Text Messages]and tap
[Get settings…].
(59) Enter the voice mail or text message phone number in the
35
Page 40

appropriate box.
Fixed dialing
Fixed dialing is a network service that you can use to restrict your phone
to dial only the phone number(s) or area code(s) that you specify in a
fixed dialing list. When you try to make calls to any other numbers
(emergency numbers excluded), your phone tells “Phone call
prohibited!”
Your phone requires the PIN2 code to activate fixed dialing feature.
(60) Ta p[Start→Settings→Personal→Phone].
(61) On the[Services]tab, tap[Fixed dialing]and tap [Get settings…].
(62) Select the [Enable fixed dialing] check box.
(63) Ta p [Menu→Add].
(64) In [Add or change the number pattern], enter the phone number or
area code you want to be restricted to and tap <Done>. Repeat
steps 4 and 5 to add more numbers.
(65) Ta p <Done> again.
(66) Enter PIN2 code and tap <Done> to save the settings.
Network
View available networks
You can view all wireless networks available to you.
(67) Ta p[Start→Settings→Personal→Phone→Network].
(68) Under [Network selection], select [Manual]. The list of available
networks is displayed.
Set preferred networks
You can set your preferred networks in the order you want your device to
access them. For example, if your first preferred network is unavailable,
your device will try to access your second preferred network.
36
Page 41

(1) Ta p[Start→Settings→Personal→Phone→Network].
(2) Ta p [Set networks] and follow the instructions on the screen.
Manually select a network
There may be times when you want to manually select a different
wireless network to use.
(1) Tap [Start→Settings→Personal→Phone→Network].
(2) Under [Network selection], tap [Manual] and select the network
you want to use.
(3) When your current network is unavailable, tap [Select], and
manually select a different network to use.
Menus
To add a program to the [Start] menu, you should:
(69) Tap[Start→Settings→Personal→Menus]to access the list of all
programs available in your phone.
(70) Select the check box for the items you want to add.
(71) Ta p <ok> to save.
Input
Tap [Start→Settings→Personal→Input].
(72) On the[Input method]tab, select an input method and you can
customize its settings to suit your preference.
(73) On the [Options] tab, you can select the voice recording format and
the default zoom level for writing and typing.
(74) While in text input screen, tap the input selector arrow at the
bottom center of the screen and tap [Options] to quickly access the
[Input] menu under [Settings].
Lock
37
Page 42

Tap [Start→Settings→Personal→Lock.
On the [Password] tab,
(75) Select the [Prompt if device unused for] check box and select your
desired time period. Your phone asks for a password after being left
inactive for the specific amount of time.
(76) Under [Password type] selector, select the type of password you
would like to use. When you select [Strong alphanumeric], the
password should be at least 7 characters long and should contain
upper and lower case letters, numbers and punctuations.
(77) Enter a password, and then confirm the password.
On the [Hint] tab,
Enter a phrase that will help you remember your password, but doesn’t
allow others to guess your password. The hint will be displayed after the
wrong password is entered five times.
Note: If you forget the password, you need to reset your device.
Resetting the phone also clears all data saved and all programs you
installed.
System
The[About]tab provides some tips for setting this menu.
About
On the[Version]tab, you can view some important information about
your device, including the type of processor and the amount of memory
installed.
On the[Device ID]tab, you can change your device name. If you
synchronize multiple devices with the same PC, each device must have a
unique name.
On the [Copyrights] tab, you can view the copyright information.
38
Page 43

Memory
Tap[Start→Settings→System→Memory].
On the [Main] tab, the amount of memory allocated to file and
data storage versus program storage is displayed, as well as the
amount of memory in use versus the available memory.
On the [Storage card] tab, you can see how much memory is
available on a storage card that is inserted into your device.
Remove programs
Tap[Start→Settings→System→Remove programs]and tap the program
you want to remove. Tap <Remove> button to remove the selected
program.
Note: Only programs that you installed can be removed. Programs
that come in your device cannot be removed.
Regional settings
Tap[Start→Settings→System→Regional settings].
This menu allows you to customize the settings based on your location.
For example, you may want to change the phone’s settings for
convenient use when you are on a business trip in another place. There
are total five tabs to make regional settings: [Region], [Number],
[Currency], [Time] and [Date].
clean boot
Tap
Start→Settings→System→CLEAN BOOT]and input number
[
1234 according to the instruction on the screen. Then tap <YES> to
reset the phone’s settings.
39
Page 44

Note: Clean Boot operation clears all data saved in the phone and all
customized settings you m ade. The pho ne automatically restarts after Clean Boot.
To avoid data loss, backup copies of important data before cleanup.
Clock and alarms
Tap[Start→Settings→System→Clock and alarms].
On the [Time] tab, you can view or change the time and date in your
home country or visiting country.
The [Alarms] tab allows you to set up to three alarms with your phone.
The instruction below tells you how to set an alarm.
(78) Select a check box to activate an alarm clock;
(79) Ta p [<Description>] and enter a name for the alarm;
(80) Tap the day of the week for the alarm. You can select multiple days
by tapping each desired day. For example, if you tap M and F, the
alarm rings at the set time on Monday and Friday. Dates selected
will be highlighted.
(81) Tap the time to open a clock and set the time for the alarm.
(82) Tap the alarm icon to specify the type of alarm you want. You can
choose a single sound, a repeating sound, or vibration.
(83) Ta p <ok> to save.
40
Page 45

On the [More] tab, select the [Display the clock on the title bar in all
programs] check box to show the time in all programs.
To change the time and date format, tap
Start→Settings→System→Regional settings].
[
Power
(84) Ta p[Start→Settings→System→Power].
(85) On the [Power] tab, you can view the battery charge level.
(86) On the [Advanced] tab, you can make your phone enter in sleep
mode after being left inactive for the specific amount of time.
Select the [Turn off device if not used for] check box under [On battery
power] and select the time period. For example, if you select “5 minutes”,
the phone enters in sleep mode after being left inactive for 5 minutes
when using battery power.
Select the [Turn off device if not used for] check box under [On
external power] and select the time period. For example, if you select
“30 minutes”, the phone enters in sleep mode after being left inactive for
30 minutes when charging is in progress.
41
Page 46

Note: When the device is in sleep mode, you can press power key to wake it
up. New text messages, incoming calls or alarm reminder also wake your phone
up.
Backlight
Tap [ Start→Settings→System→Backlight ]to make settings to the
backlight.
Certificates
Tap [Start→Settings→System→Certificates].
Use personal certificate to identify yourself.
Use root certificates to identify the root certification authorities.
Screen
Tap[Start→Settings→System→Screen].
On the [General] tab, you can select the screen orientation or align the
screen if it does not respond accurately to your taps.
On the [Text size] tab, you can adjust the font size.
On the [Clear Type] tab, you can enable clear type to smooth the edges
of screen fonts for many programs.
Error reporting
Tap[Start→Settings→System→Error reporting]to enable or disable
error reporting.
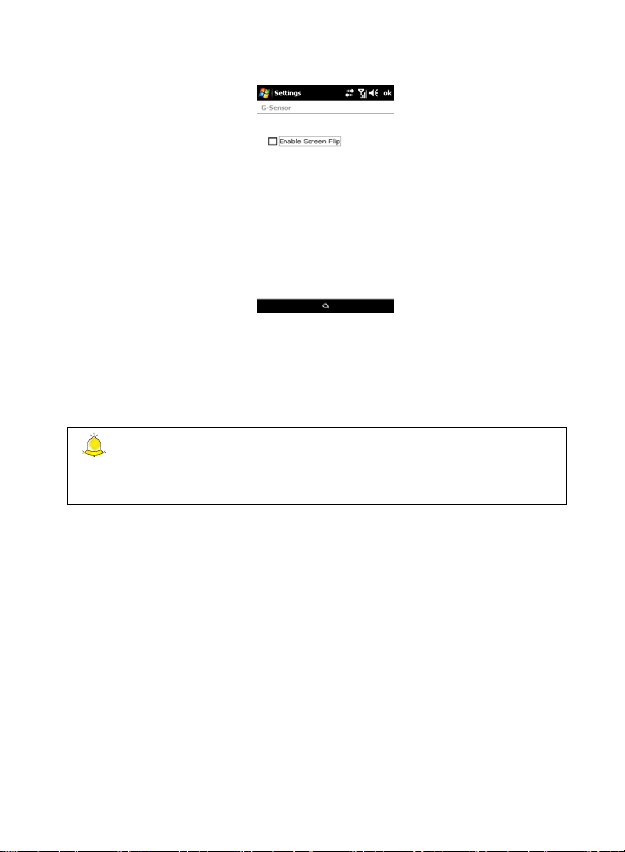
Gravity sensor Setting
Tap[Start→Settings→System→Gsensor Setting]to select automatic
rotate screen in all application or in selected application.
42
Page 47
Encryption
Tap[Start→Settings→System→Encryption]to encryption files on a
storage card that you have inserted. Encrypted files can be read only by
this device.
Note: Encrypted files cannot be recovered after hard reset or clearing
storage.To help prevent data loss, abck up data from storage cards to another
location.
Task manager
Using Task Manager, you can view running programs and delete them to
free up the memory space that’s occupied by them.
43
Page 48

44
Page 49

7. PIM
You can synchronize your phone with the PC via ActiveSync to transfer
data in the Microsoft Outlook or Microsoft Exchange server between the
phone and PC.
Contacts
You can save contacts in your SIM card and in your phone’s memory. The
SIM card and phone’s memory are physically separate, but they are used
as a single entity called Contacts.
Contacts in SIM card:Each contact entry in SIM card can contain a name
and a number. The amount of entries that you can save in a SIM card
depends on the memory of your SIM card.
Contacts in phone:Contacts saved in the phone’s memory can contain
the name, phone numbers, email address as well as many other details
including birthday or anniversary.
Create a phone contact
(87) On the [Today ] screen, tap <Contacts>, tap <New> and then select
[Outlook Contact] to create a new contact to be saved in the
phone.
45
Page 50

(88) Enter the Contact’s name and other details.
(89) If you want, enter [Notes] tab to create a note for the Contact.
(90) Ta p <ok> to save.
Create a SIM contact
(91) On the [Today ] screen, tap <Contacts> , tap <New> and then select
[SIM Contact]to create a new SIM contact.
(92) Enter the name and mobile phone number.
(93) Ta p <ok> to save.
View Contacts
On the [Today] screen, tap <Contacts> to view your Contacts list.
Contact saved in the phone may contain more than one phone number.
In the Contacts list, the phone shows the type of phone number
displayed under the name. For example, if the phone number displayed
under the name in the Contacts list is the work phone number, a letter
“w” appears right after the number; and if it’s the home phone number,
a letter “h” appears.
Tap your desired Contact entry to view details.
Find a contact
There are several ways to find a contact when your Contacts list is long.
(1) On the [Today] screen, tap <Contacts>.
(2) If you are not in Name view, tap [Menu→View by→Name].
(3) Do one of the following:
Begin entering a name in the provided text box until the contact
you want is displayed. To show all contacts again, tap the text box
and clear the text,
Use the alphabetical index displayed at the top of the contact list.
Filter the list by categories. In the contact list, tap [Menu→Filter].
Then, tap a category you’ve assigned to a contact. To show all
46
Page 51

contacts again, select [All Contacts].
When working in Company view, you can filter by categories you’ve
assigned to contacts. Then, only the companies with contacts that have
that category assigned to them will appear in the list.
Change view
In the Contac ts list, tap[Menu→Options]to change the Contacts view.
Filter
In the Contacts list, tap[Menu→Filter]to view all Contacts or recently
viewed contacts or No categories contacts.
Edit a contact
On the [Today] screen, tap <Contacts> and tap your desired Contact
entry to view details. Tap [Menu→Edit] to change the details.
47
Page 52

Delete a contact
On the [Today] screen, tap <Contacts> and tap your desired Contact
entry. Then, tap [Menu→Delete Contact] and select <Ye s> to delete the
contact.
Tasks
[Tasks] program keeps track of your tasks to get done.
New task
(94) Tap[Start→Programs→Tas ks→Menu→New task]to create a
new task.
Edit the subject as well as other details of the task.
To group a task when creating, tap [Categories] and select the check box
for the category you want. To create a new category, tap <New> in the
categories list, enter the category name and tap <Done> or <ok> to save.
Enter the [Notes] tab to create a note for the task.
You can easily create a short, to-do type task. Simply tap the [Tap here to
add a new task] box.
To set reminders for newly-created tasks, tap [Menu→Options] in the
task list and tap [Set reminders for new items].
To change details of a task, tap the task and tap <Edit>.
48
Page 53

Notes
You can use this program to take a memo or record with your phone.
Create a note
(95) Ta p[Start→Programs→Notes→New].
(96) You can create a note by directly writing or drawing on the screen,
tapping the on-screen keypad or recording.
(97) When creating a note, tap and hold anywhere on the note paper to
pop up a menu and tap [Insert date] to insert the date.
To record in a note
(98) Ta p[Start→Programs→Notes]and tap <New> to create a new note
or tap a note from the notes list to open the note.
Tap [Menu→View recording toolbar].
Keep the microphone of the phone to your mouth or other sound
source.
Tap
to record. When recording, tap to stop. The recording
appears in the note as
.
Tap
Select a voice recording format
Tap[Start→Settings→Personal→Input]on the [Options] tab to select a
voice recording format.
Rename or move a note
In the notes list, tap your desired note and tap
[Menu→Tools→Rename/Move...]to rename or move the note.
Change note template
in a note to play the voice record. Tap on the
recording toolbar to adjust the volume.
49
Page 54

(99) In the notes list, tap[Menu→Options].
(100) Select your preferred template from the[Default template]
selection box. The selected template will be used for all new notes
to be created.
Send a note by MMS
In the notes list, tap and hold the note you want to send to bring up
options. Then tap [Send…] to send the note through MMS.
Calendar
You can use the calendar in your device to schedule an appointment,
meeting, or other events.
Tap[Start→Calendar]to view your appointments. If you have no
appointments in the calendar, the phone displays “No appointment.”
Schedule an appointment
(101) On the [To d ay] screen, tap[Start→Calendar].
(102) Tap[Menu→New appointment].
Enter information about the appointment.
Tap [Starts]and[Ends]to change the start time and end time.
50
Page 55

If you want to be notified of the appointment, tap
[Reminder→Remind me].
Tap the [Notes] tab to create a note.
Tap < ok > to save.
Update an appointment
(103) On the [To d ay] screen, tap[Start→Calendar].
(104) Tap an appointment, and then tap <Edit> to update the
information about the appointment.
(105) Tap < ok > to save your change.
To make your phone set reminders for a new appointment automatically,
tap [Menu→Tools→Options→Appointments], and on the
[Appointments] tab select the [Set reminders for new items]check box.
Send a meeting request
Use Calendar to schedule meetings via e-mail with contacts who use
Outlook or Outlook Mobile.
(106) Enter the information about a meeting in an appointment.
(107) Tap[Attendees] and then tap the name of the contact you want
to invite.
(108) Tap <ok> to save.
(109) The meeting request will be sent to the attendees through your
Outlook E-mail the next time you sync your device with a PC or
when you connect your device to the mail server. Notes that you
created on the [Notes] tab will be sent along with the meeting
request.
Search
Note: [Attendees] only allows Contacts with e-mail addresses.
51
Page 56

The [Search]function in your device helps you find the information you
need quickly and easily.
(110) Tap[Start→Programs→Search].
(111) Enter the key words on the [Search for] blank.
(112) Select a search scope under the [Type] pull-down selection menu.
(113) Tap < Search> to start searching for matches based on the key
words and the search scope.
To quickly find your largest files, you may select [Larger than 64 KB]
under the [Type] selection menu.
Calculator
The calculator in your device adds, subtracts, multiplies and divides.
Tap[Start→Programs→Calculator]to use your device as a calculator.
Help
Tap [Start→Help]to get some help information about using the device.
52
Page 57

8. Messaging
The messaging function in your device allows you to send and receive
E-mail, text messages or multimedia messages. If you don’t have an
e-mail address, register one from the ISP or e-mail service provider.
Note: When you are synchronizing your device with PC via ActiveSync, you
cannot conn ect to GPRS.
Tap[Start→Messaging], and then select a message type or a folder to
view.
Outlook E-mail
Use your Mobile Outllook to send and receive e-mails with your device.
Also, you can synchronize your Mobile Outlook with the Exchange Server
or PC Outlook.
Set up an account
(114) Tap [Start→Messaging].
(115) Tap [ Setup E-mail].
(116) Enter your e-mail address, and tap <Next>.
53
Page 58

Auto configuration attempts to download necessary e-mail
server settings so that you do not need to enter them manually.
Once auto configuration has finished, tap <Next>.
Enter your name and account display name, and tap <Next>.
Select [Automatic Send/Receive]
54
Page 59

Tap <Finish> to save.
You can now use the account to connect to your E-mail server.
Clear an Outlook email account
Select the account you desired to clean then tap [Menu→Delete”], and
tap <Yes> to clear the account.
Compose and send an e-mail
(117) Tap an E-mail account you want to send an e-mail.
(118) Tap [Menu→New].
(119) In [To ], enter the e-mail address of the recipient. To access
addresses from [Contacts], tap [To ].
55
Page 60

(120) Enter the subject in [Subject] and your message.
(121) Tap [Menu→Insert] to add pictures or files as attachments.
(122) If you want to add a voice note as attachment, tap
[Menu→Insert→Voice note], and tap
recorded are attached to the e-mail automatically.
(123) To check the spelling, tap [Menu→Spell check].
(124) Tap < Send> to send, or tap <ok> and then <Ye s > to save the e-mail
message in [Drafts] of Outlook E-mail.
Receive an e-mail
(125) Tap [Start→Messaging] then tap the Eamil account you want to
receive email.
(126) Tap [Menu→Send/Receive].
(127) New e-mail messages are downloaded to [Inbox] folder, and
messages in the device [Outbox] are sent.
(128) By default, no attachment is downloaded, If you want to read the
entire message, tap [Menu→Download message]. The message
will download the next time you send and receive an e-mail. This
will also download message attachments if you had selected those
options when you set up the e-mail account.
to record. Voice notes
56
Page 61

Notes: E-mail messages are sent immediately if you are working online. If
you are working offline, e-mail messages are moved to the [Outbox] folder and
will be sent t he next time you connect.
Manage messages and folders
You can synchronize Outlook e-mail on the PC with your device
Outlook. You can also specify the subfolders of the [Inbox] folder
are synchronized.
For a POP3 e-mail account, if you move your incoming e-mail
messages from the Inbox to a newly-created folder, the next time
you connect to the account, your e-mail server will see that these
messages have been removed from the Inbox and will then delete
them from the server. This operation avoids multiple copies of the
same message, but also keeps you from accessing messages that
you moved to the new folder from elsewhere but your device.
For an IMAP e-mail account, the e-mail messages that you moved
to a newly-created folder are kept on the server so that you can
access them anywhere, on your device or PC, from the server.
E-mail messages in the newly-created folder are synchronized with
your e-mail server only when you are connected to the serve r, t h i s
is also when you can create a new folder, or rename/delete a folder.
For each message account, tap[Menu→Tools→Manage folders]
to manage folders.
MMS
You can use MMS message account to send and receive multimedia
messages only when your SIM card supports it.
MMS SETTINGS
Normally,it is unnecessary to set your MMS settings manually and your
device automatically set it. If your device does not set it automatically,
you will set it according to the following steps please:
MMS settings
57
Page 62

Ta p [Start→Settings→Connections→Connections], and then tap
[My Work Network→Add a new modem connections].
Select Celluar Line(GPRS) under the [Select a modem] pull-down
selection menu.
Tap [Next], enter access point name, you can obtain it from your
network operator.
Tap [Next], and then tap [Finish].
Tap [Start→ Messaging→Messages], and then tap [Menu →MMS
settings]. On MMS profiles tab, tap [New] then enter [Profile
Settings] tab, if there are many settings on your MMS profiles tab,
delete some ones from Profile tab firstly, then edit Profile Name,
MMSC Address, IP Address and port, you can get them from your
network operator. Select appropriate connection under Data
Connection pull-down selection menu and appropriate Gateway
under Gateway pull-down selection menu and then tap [ok] to save
settings.
58
Page 63

Tap [Receiving options] tab to make receiving settings as below:
Retrieve messages immediately: Typically, you receive a
notification whenever a new message is available. You can select
automatic under [Home Reception] pull-down selection menu and
automatic under [Roaming Reception] pull-down selection menu to
download new messages automatically. You can also select manual
or reject under the two pull-down selection menu.
Reject Anonymous:Select this check box to block anonymous
incoming messages.
Allow delivery report:Select this check box to allow a delivery
report to be sent to the original message sender.
Allowed message Types:Select this check box to allow incoming
messages type.
Tap [Sending options] tab to make sending settings as below:
Validity Period: Choose the validity period of your message. You
can also select the [Delivery report] check box to require delivery
report for your message
Delivery Time:Choose the time to send your MMS.you can select
to send your messages immediately or after 1 hour or more to send
59
Page 64

your MMS.
Messages Size:Select size of MMS to be sent.
Message Types:Select messages type to be sent under pull-down
selection menu.
Hide Sender: Select this check box to hide sender while sending
MMS.
Create and edit a message
Your message can consist of multiple slides (images, video/audio clips, or
text) which can be edited and rearranged at any time.
Tap[Start→Messaging→Messages], and then tap [Menu→New→MMS].
You are taken to a screen with pre-made templates where you can
choose one to use.
Edit your MMS according to the corresponding instructions below:
1. Enter your recipient and subject for your message.
2. Tap picture area to display your available picture and video files.
3. Tap within the insert text area to edit the text message.
4. Tap within the insert audio area to enter an audio clip.
60
Page 65

6. Tap [Menu]:
• Preview:Tap here to preview your message.
• Recipients:Tap [Recipients→Add Recipient] to choose recipients
from your contacts list; Tap [Recipients→Check Names] to check
your recipients names.
• Slide : Ta p [Add Slide] to add an additional slide to your
message.Tap [Slide Setting] to set text style and play duration and
background color and layout of slide.Tap [Delete] to remove a slide
from your message. Tap [Slide Reorder] to alter the order of slides
of your message.
• Tap [Menu→Insert]
• Image or Video:Insert an image or video to your message.
• Audio:Insert an audio to your message.
• Record Audio:Open a recorder and you can record an audio to
insert to your message.
• Frames:After inserting an image, you can add a frame to this
image.
• Attachments:Add an attachment (file, appointment and business
card) to your message.
• My Text: Insert some existing text message to your messages or
edit your text to use later.
• Remove:Remove selected media or audio or text etc from your
message.
• Priority:Select a priority to send your message.
• Tap [Save To]
61
Page 66

• Draft :Save this message to your draft.
• MMS Templates:Save this message as a template to use later.
7. Tap [Send] to send your message.
Text messages
You must enter text messages service center number before you can use
your text messages account on your device.
(129) On the [Tod ay ] screen, tap <Phone> to enter the [Phone]
screen.
(130) Tap [Menu→Options→Services→Voice mail and text
messages], and tap <Get settings>.
(131) Enter the text messages service center number supplied by
your service provider, and then tap <ok> to save.
Compose and send a message
(132) Tap[Start→Messaging→messages], and tap
[Menu→New→SMS] .
(133) Enter phone numbers of one or more recipients, separating
them with a semicolon. To access phone numbers from
[Contacts], tap <To>.
(134) Enter your message. To quickly add common messages, tap
[Menu→My text] and tap a desired message.
(135) Tap [Send].
(136) If you want to use your signature at the end of your
message, tap
[Start→Messaging→messages→Menu→Options→Accounts→
Signatures].
Select [messages] in Signatures tab, and then select the [Use signature
with this account] check box and enter your signature in the box below.
If you want to use your signature when replying and forwarding text
messages, select the [Use when replying and forwarding].
62
Page 67

If you want to know when a text message is received, before sending the
message, tap [Menu→Message options], and then select the [Request
message delivery notification] check box.
Pocket MSN
Pocket MSN on your mobile device provides practically instant access to
your up-to-date MSN Hotmail Inbox, your MSN Messenger Contacts list
and options for customizing your Pocket MSN experience.
Tap [Start→Programs→Messenger].
With Pocket MSN you can
See who’s online.
Send and receive MSN instant message.
Notify your MSN Messenger Contacts when you are online.
Block your MSN Messenger Contacts so as to keep them from seeing you
online or sending instant messages to you.
To use MSN Messenger, you need a Microsoft .NET Passport. After
obtaining a Passport, you also need to:
(137) Set up an account in MSN Messenger.
(138) Sign in to MSN Messenger.
Set up an account
Before you can use MSN Messenger, you must set up the instant
messaging account to use. For MSN Messenger Service, you must have a
Microsoft .NET Passport or Hotmail account. And you need to connect to
the Internet to use MSN Messenger.
Sign in and out
(139) Tap [Start→Programs→Messenger].
63
Page 68

(140) To sign in, tap [sign in] on the bottom of Messenger screen.
Follow the directions on the screen.
(141) To sign out, tap[Menu→Sign out].
64
Page 69

9. Take your office with your Smart Phone
Word Mobile
You can create and edit documents and templates in Word Mobile, or
copy Word documents and templates created on the PC to your device
and edit them on the device.
Create a Word Mobile document
(142) Tap[Start→Office Mobile→Word Mobile].
(143) Tap [ Menu→Options], and then select the default template form
from the [Default template] selection box. Tap <ok> to save.
(144) Tap < New>.
A blank Word Mobile template appears in the form you selected in step
(2).
In the edit window, tap <View> to use options such as [Toolbar], [Wrap
to Window] and [Zoom].
For more information about Word Mobile, read[Start→Help]on your
device.
65
Page 70

Excel Mobile
You can create and edit documents and templates in Excel Mobile, or
copy Excel documents and templates created on the PC to your device
and edit them on the device.
To create a new Excel Mobile document, tap [ Start→Office
Mobile→Excel Mobile], and then tap <New> to open a blank workbook.
When creating or editing an Excel Mobile document, tap
[View→Toolbar]to see what tools you can use.
For more information about Excel Mobile, read[Start→Help]on your
device.
Tips on Excel Mobile
The following tips help you work easier with Excel Mobile.
Tap [View→Full screen]to see as much of your workbook as
possible.
Tap[View→Freeze panes]to freeze row or columns of a worksheet.
To unfreeze a row or column, tap[View→Unfreeze panes]
Tap[View→Split]to view the worksheet in four divided sections. To
66
Page 71

undo the split, tap[View→Remove split]
PowerPoint Mobile
You can use the PowerPoint Mobile to view slide shows created in .ppt
or .pps format with PowerPoint 97 and later versions.
Many presentation elements built into the slide shows such as slide
transitions and animations will playback on the device. If the
presentation is set up as a timed slide show, one slide will advance to the
next automatically. Links to URLs are also supported.
PowerPoint features not supported on your device include:
Rearranging or editing slides: PowerPoint Mobile on your device is a
viewer only.
Start a slide show presentation
(145) Tap[Start→Office Mobile→PowerPoint mobile].
(146) In the presentation list, tap the slide show you want to view.
(147) Tap the current slide to advance to the next slide.
If the presentation is set up as a timed slide show, slides will advance
automatically.
Stop a slide show presentation
In a PowerPoint Mobile presentation, tap [
Navigate between slides
If a presentation is set up as a timed slide show, one slide will advance to
the next automatically. However, if the presentation is not timed or you
simply want to go to another slide out of sequence, you can do that
easily in a PowerPoint Mobile presentation.
→End Show].
(148) Tap[Start→Programs→PowerPoint mobile].
(149) Open the presentation you want to view.
(150) Tap[
→Next/Previous] or tap[Go to Slide], and tap the slide
67
Page 72

you want to view.
Note: If you have zoomed in to see a slide in more detail, you
cannot navigate to another slide until you zoom out. Tapping [Next] or
[Previous] may play an animation on a slide rather than navigate to
another slide.
OneNote Mobile
Tap[Start→Office Mobile→OneNote Mobile], you can use the OneNote
Mobile to creat notes with text, photos, and voice recordings.
To create a new OneNote, tap[Start→Office Mobile→OneNote Mobile],
and then tap <New> to open a blank note.
When creating or editing a note document, tap [Menu→Take Picture]to
take a picture.
When creating or editing an Excel Mobile document, tap [Menu→Insert
Recording]to record a voice or music
.
68
Page 73

10. Sync Your Device
Sync via ActiveSync
To sync your device with a computer via ActiveSync, you need to first
install the Microsoft ActiveSync software on your computer.
ActiveSync can be used to:
Sync your device with PC
Change synchronization settings
Exchange data between your device and PC
Install or remove programs on your device
Note: You cannot sync yo ur e-mails or calendar if you don’t use Microsoft
Outlook on your PC.
Synchronize your information
ActiveSync doesn’t synchronize all types of information automatically,
but only those you have selected to be synchronized. In [ActiveSync] on
your device, tap [Menu→Options], and then select the check box for any
items you want to synchronize.
Synchronize Outlook E-mail
When you synchronize Outlook e-mail on the PC with your device, e-mail
messages are synchronized as follows:
Messages in the Inbox folder on your PC are copied to the Inbox folder of
the Outlook e-mail account on your device. The default sync settings are
to synchronize messages from the last four days only, the first 100 lines of
each message, and to sync attachment fewer than 100KB for each
message only.
Messages in the Outbox folder on your device are transferred to
Exchange Server or Outlook and then sent from those programs.
When you delete a message on your device, it’s deleted from your PC the
next time you synchronize.
69
Page 74

E-mail messages in the subfolders under other Outlook E-mail folders are
synchronized only when they are selected in the ActiveSync.
Note: Text messages and multimedia messages are not received via
synchronization. Inst ead, they are s ent to your device via y our service provider.
Sync your Contacts
Contacts stored on your device can be synchronized with similar Outlook
Contacts on your PC.
During synchronization, new items entered on your device are copied to
the PC and vice versa.
Sync your calendar
Calendar appointments stored on your device can be synchronized with
similar items on the Outlook or calendar of your PC.
During synchronization, new items entered on your device are copied to
the PC and vice versa.
Note: The default s ync settings are to synchroni ze calendar appointments
from the last two weeks and all from-now-on calendar ap poi nt m ents .
Sync your tasks
Tasks stored on your device can be synchronized with similar items on
the Outlook of your PC.
During synchronization, new items entered on your device are copied to
the PC and vice versa. Handwritten notes and drawings are saved as
pictures.
Sync your notes
There are two ways to synchronize your notes, Notes synchronization
and Files synchronization. Notes synchronization synchronizes notes on
your device with Outlook notes on your PC, while Files synchronization
synchronizes any device files with your PC.
70
Page 75

Use Notes synchronization : In [ActiveSync] on your device, tap
[Menu→Options], and then select the [Notes] check box. All notes in
[My Documents] and its subfolders on your device will appear in Outlook
Notes on your PC. Handwritten text or drawings in notes will appear on
your PC as pictures. In addition, all notes in Outlook on the PC will be
synchronized and will appear in [Notes] on your device.
Use Files synchronization : In [ActiveSync] on your device, tap
[Menu→Options], and then select the [Files] check box. A subfolder is
created in [My Documents] folder on your PC. All Word Mobile files,
Excel Mobile files and .pwi files stored in [My Documents] and its
subfolders on your device are synchronized. In addition, all .doc files on
your PC are synchronized. Password-protected files cannot be
synchronized.
ActiveSync may convert files during synchronization. For more
information on synchronization or file conversion, read ActiveSync Help
on the PC.
Note: When you delete or modify an item on your device, it’s deleted or
modified from PC the next time you synchronize. Vice Versa
ActiveSync Error
Error information displays on your device when some errors happen
during synchronization.
To know more about an error, tap the prompt button on the PC
ActiveSync screen.
Some error stops autosync. If the autosync is not done, sync your device
manually. When manual synchronization is done, your device retrieves
autosync settings. For more information, read the ActiveSync Help on
the PC.
71
Page 76

11. Browse the Web
Notes:
1. Before you can browse the web on your Smart Phone, make sure the
GPRS service is enabled on your SIM card. When GPRS connection is active,
a status icon appears at the top of the sc reen.
2. When you sync your device with PC through ActiveSync, GPRS
connection will be disabled.
3.You can browse the web on your Smart Phon e through WIFI.
Connect to GPRS
Use an existing connection
Tap[Start→Settings→Connections→Connections, and then tap[Manage
existing connections]under[My ISP]. Then, tap and hold[My ISP]
to pop up a menu, and then tap[Connect]to connect to GPRS.
Create a new connection
(151) First, obtain the following information from your ISP.
ISP server phone number
User ID
Password
Tap [Start→Settings→Connections→Connections].
Tap [ Add a new modem connection] under[My ISP], and then enter
needed information according to the instructions.
To use a cellular phone network, select [Cellular Line] under [Select a
modem] selection box. To use GPRS connection, select[Cellular Line
(GPRS) ].
72
Page 77

For more information, tap
Disconnect a GPRS connection
To inactivate a GPRS connection, tap the Signal strength icon
then tap <Wireless Manager>, and then tap [Menu→DisConnect
Cellular Data] to disconnect an active GPRS connection.
WIFI
You can browse the web on your Smart Phone through WIFI.
Create a wifi connection
(1) Tap [Start→Settings→Connections→Wireless Manager], make
sure the [Wi-Fi] is on.
at the top right of the screen.
and
73
Page 78

(2) Tap [Start→Settings→Connections→Wi-Fi], and then tap and
hold an available connection to bring up options. Tap [Connect] to
connect according to the instructions step by step.
(3) When the available connection is connected, you can browse the
web on your Smart Phone through WIFI.
74
Page 79

Internet Explorer
(1) Tap [Start→Internet Explorer]to open IE.
(2) Enter a URL into the address line. Or, tap the arrow to the
right of the address line and select from the pull-down list an URL
that you have previously accessed.
(3) Tap
Internet sharing
Internet Sharing connects your desktop or notebook computer to the
Internet by using your device’s data connection (GPRS or EDGE). You can
to connect to the website.
75
Page 80

choose to connect via USB or Bluetooth.
If you want to use a USB cable connection, you must first install
Microsoft ActiveSync version 4.5 or later on the computer.
Note:
1. To be used as a MODEM, your device must have a SIM card that supports
web browsin g. Consult yo ur service provider for mor e details.
2. If you want to use a USB cable connection, you must first install Microsoft
ActiveSync version 4.5 or later on the computer.
3. If you want to use a Bluetooth connection, make sure your computer has
built-in Bluetooth capability. If your computer does not have Bluetooth, you can
connect and use a Bluetooth adapter.
.4. If your device has not been set up with a data connection yet, tap
[Menu→Bluetooth settings] or[Menu→Connection settings] on the Internet
Sharing screen.
To set up your device as a USB modem
(1) Connect your device to the computer using the USB cable.
(2) Tap [Start→Programs→Internet Sharing].
(3) Select[USB]for [PC Connection].
(4) In the Network Connection list, select the name of the connection
that your device uses to connect to the Internet.
(5) When installation is finished, right click <My Computer> on the PC,
and then click [Properties→Hardware→Device
Manager→Network Adapter] and you can see a Windows Mobile
Network Card.
(6) Tap <Connect> and you can enjoy surfing the web on the PC.
(7) To disconnect the Internet sharing, tap <Disconnect> on your
device
76
Page 81

To set up your device as a Bluetooth modem
For the computer to use the Internet connection of your device, activate
Internet Sharing on your device, then set up a Bluetooth Personal Area
Network (PAN) between the computer and your device.
(1) On your device, turn on Bluetooth and set it to visible mode by
following the steps in “To turn Bluetooth on and make your device
visible” section in Bluetooth.
(2) Connect your device to other Bluetooth device by following the
steps in “Connect to other Bluetooth devices” in Bluetooth.
(3) Tap[Start→Programs→Internet sharing
(4) Select Bluetooth PAN as the PC Connection.
(5) From the Network Connection list, select the name of the
connection that your device uses to connect to the Internet.
(6) Tap Connect.
(7) On your computer, set up a Bluetooth Personal Area Network (PAN)
with your device:
For Windows Vista:
a. Click Start > Control Panel > Network and Internet > Network
and Sharing Center.
77
]
Page 82

b. Click Manage network connections and then under Personal
Area Network, double-click Bluetooth Network Connection.
c. In the Bluetooth Personal Area Network Devices dialog box, select
your device, and then click Connect.
For Windows XP:
a. Tap Start > Control Panel > Network Connections.
b. Under Personal Area Network, click the Bluetooth Network
Connection icon.
c. Under Network Tasks, click View Bluetooth network devices.
d. In the Bluetooth Personal Area Network Devices dialog box, select
your device, and then click Connect.
Note If the Bluetooth adapter or dongle on your computer was inst alled
using a third party provid ed driver, o pen the Bluetooth software that came
with the Bluetooth adapt er to connect your computer and device via
Bluetooth. Refer to the Bluetooth adapter documentation f or more
information.
(8) On the Internet Sharing screen on your device, check if a connected
status message is displayed, which indicates that your computer
has been successfully connected to the Internet using your device
as a Bluetooth modem?
(9) To disconnect the Internet sharing, tap <Disconnect> on your
device.
Bluetooth
Bluetooth is a short-range wireless communications technology. Devices
with Bluetooth capabilities can beam data (exchange information) over a
distance of about 10 meters without requiring a physical connection.
Turn on/off Bluetooth
Tap [Start→Settings→Connections→Bluetooth], and then select the
78
Page 83

[Turn on Bluetooth]check box to turn on the Bluetooth on your device.
Make your device visible to other devices
(152) Tap[Start→Settings→Connections→Bluetooth. Select the check
box for[Turn on Bluetooth]and[Make this device visible to other
devices], and then tap <ok>.
Note: Simply selecting the[Make t his device visible to ot her devices]
check box also turns on the Bluetooth.
Connect to other Bluetooth devices
You can connect your device wirelessly to another Bluetooth device that
is within 10 meters away from your device, and that is tured on and
visible. When connecting, the same password is needed on both devices.
To ensure smooth transmission, avoid obstacles, such as concrete wall or
metallic equipments, between the two devices that are connected.
(153) Tap[Start→Settings→Connections→Bluetooth].
(154) Select the check box[Turn on Bluetooth]and[Make this
device visible to other devices].
(155) Tap the [Devices] tab, and then tap [Add new device…].
Your device starts to search for available Bluetooth devices and
display all Bluetooth devices found in a list.
(156) Tap the device you want to connect, and then tap <Next>.
Enter a password containing 1-16 characters on your
device. Enter the same password on the other Bluetooth
device that is connected.
(157) Tap <Next>.
(158) Tap <Finish>.
79
Page 84

Accept a Bluetooth connection
(159) F irst, make sure your device is turned on and visible.
(160) When your device receives a Bluetooth connection request
from another Bluetooth device, tap <Yes> to accept.
(161) Enter the same password that has been entered on the
other device.
(162) Tap < Finish>.
Rename a Bluetooth device
(163) Tap[Start→Settings→Connections→Bluetooth].
(164) On the [Devices] tab, tap and hold the device you want to
rename, and then tap [Edit].
(165) Enter the new name for the device, and then tap <Save> to
save your change.
Delete a Bluetooth device
(166) Tap[Start→Settings→Connections→Bluetooth].
(167) On the [Devices] tab, tap and hold the device you want to
delete, and then tap [Delete].
Beam files with Bluetooth
With Bluetooth, you can beam appointments, tasks, Contacts
information or pictures etc. to other Bluetooth devices.
For example, to beam a picture, you should:
1) Tap[Start→Programs→Pictures and videos].
2) Tap and hold the picture you want to beam and then tap
[Beam…] from the pop-up menu.
3) Your device starts to search for available devices.
80
Page 85

4) Tap the device to which you want to beam the selected
picture, and then it starts beaming.
Receive a Bluetooth beam
(1) Tap [Start→Settings→Connections→Beam], and then select the
[Receive all incoming beams]check box.
(2) Ensure that your device is turned on, visible, and within close range
of the device that is beaming the information.
(3) When prompted to receive an incoming beam, tap <Yes> to receive
the beamed information.
All files received will be saved into[File Explorer→My Documents].
Use a Bluetooth earphone
Before you can use a Bluetooth earphone, you need to connect the
earphone to your device. Follow “Connect to other Bluetooth devices”
on how to connect your Bluetooth earphone.
81
Page 86

12. Entertainment
Entertain yourself with the Windows Media Player, funny games, a 2.0
Megapixel Camera, and FM Radio all in your Smart Phone.
Windows Media Player
Use the Windows Media Player embedded in your device to play audio
files in MP3 formats such as .asf, .wma, .wmv and .mp3, or video/audio
files in Windows Media formats. To check the Windows Media formats
compatible with your device, visit http://www.windowsmedia.com
Tap[Start→Program→Windows Media]to start the Windows Media
Player on your device.
Add a file to library
(168) Tap[Menu→Library]to open the media library.
(169) Tap the arrow to the right of [Library] to pop up a pull-down menu.
If a storage card is in use, select [My device] or [Storage card].
(170) Tap[Menu→Update library...]and the phone automatically adds
all available music files to the library.
82
 Loading...