

Page 1

Q4310
User Guide
www. micromaxinfo.c om
Page 2

Con tents
The Andr oid Adva nta ge .................................................................... 2
Read Me First ..................................................................................... 2
Under stand Y our P hone .................................................................... 3
Inser t SI M and Me mory Ca rd ........................................................... 4
Charging the Battery ......................................................................... 5
Google Accou nt.................................................................................. 6
Play S tore ........................................................................................... 6
Notific ations ....................................................................................... 7
Phone S ecurit y .................................................................................. 8
Finger print ........................................................................................ 10
Batter y Save r Mod e ........................................................................ 11
Setti ngs and Networks ................................................................ .... 11
Pair With Blu etoot h Devices .......................................................... 12
Airplane Mod e................................................................ .................. 13
Google Maps................................ ..................................................... 13
Opera ting Te mpera ture S pecific ations ......................................... 14
Safet y Pr ecautio ns .......................................................................... 14
Taking Care o f your device ............................................................. 15
Batter y Rec ommen dations ............................................................. 16
Tempera ture a nd Humidit y ............................................................ 16
Recycle your P hone ........................................................................ 16
Disc laimer ......................................................................................... 16
Copyrig ht .......................................................................................... 17
1
Page 3

Th e Android Advantage
Welcome to the world of Micromax. Y ou have just become the proud owner
of the Micromax Q43 10 Android Nougat device, which provides you a host
of advanced and des irable features to give you an ama zing experi ence.
Read Me First
Please read all s afety precautions and this user guide carefully
before us ing your device to ensur e safe and proper use.
The des criptions in this us er guide a re based on the default settings
of your devi ce.
Available features and additional services may var y by device,
software , or s erv ice provider.
Applications and their functions may var y based on the country,
region, software or har dware specifications. Micromax is not liable for
performance issues caused by third -party applic ations.
Panic Button
Your devic e s upports the Panic button functionality which lets you call
emergency servi ces for immediate assis ta nce i n cas e of an emergency
situation.
Pres s the Power key 3 times in quic k suc cession and your device initiates a
call to the emergency number 1 12, which will direct the call to conce rned
departments for help.
You can invoke the Panic button even when the devic e is locked.
2
Page 4
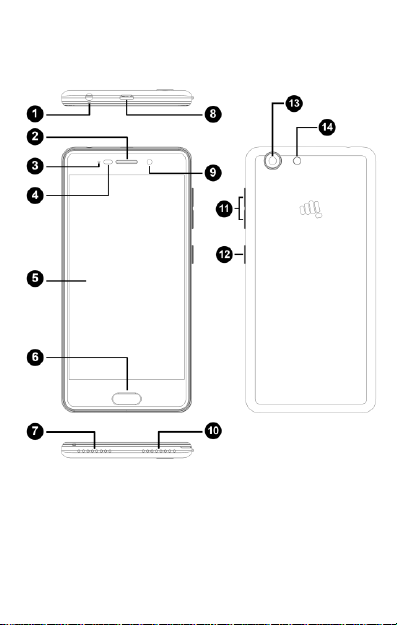
Understand Your Phone
3
Page 5
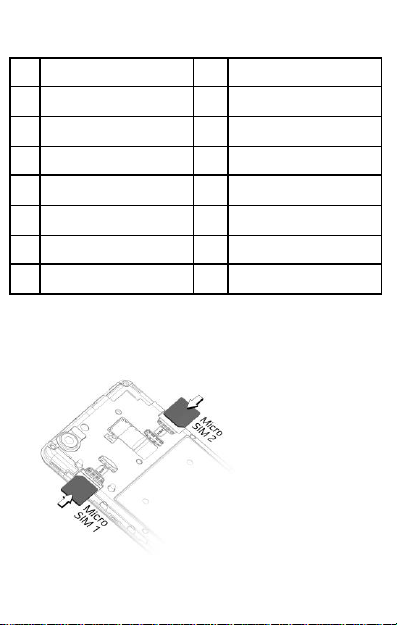
1
Headset Jack
9
Front Camera
2
Ear piece
10
MIC
3
Notification Light
11
Volume Up/Down
4
Proxi mity Sensor
12
Power On/Off
5
Display
13
Camera
6
Fingerprint S canner
14
Flash
7
Speaker
8
USB Jack
Insert SIM and Memory Card
1. Switch off your phone, r emove the back cover and insert the SIM card(s)
as s hown:
4
Page 6
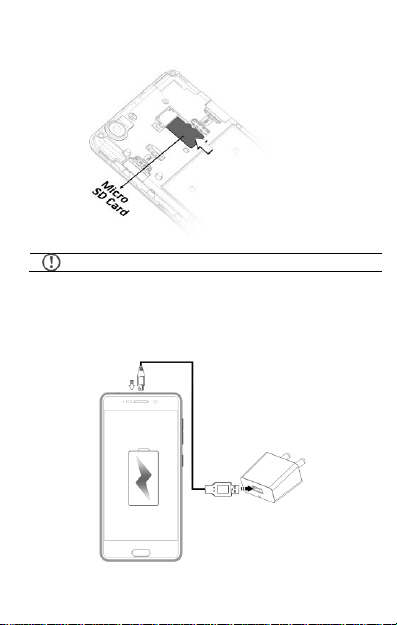
Please keep the SIM car d out of the reach of c hildren.
2. Insert the micr o SD card as shown:
Charging the Battery
Before us ing the device for the first time, we recommend you to fully charge
the battery.
5
Page 7
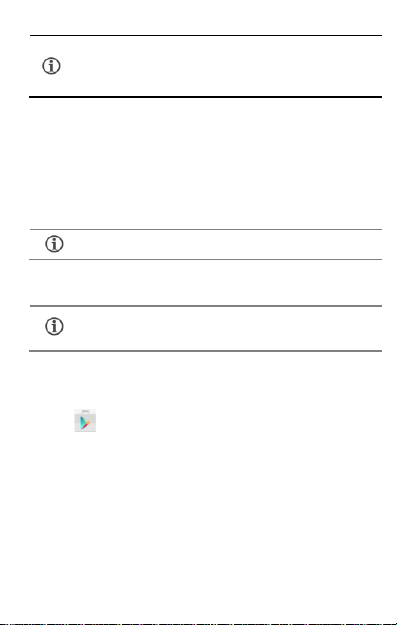
Use only Micromax char gers and c ables. Other char gers or
cables may damage the battery or your device. T his will
invalidate your phone war ranty.
Internet connection i s re qui red to s et up Google account.
If you do not hav e an exis ting Google ac count, you may
crea te one from the account configuri ng step.
Goog le Account
Your Google Account lets you take full advantage of applic ations and
ser vices offer ed by Google Play S tore. Configure your Google account on
this handset to get ac cess to your Gmail, Google Play Stor e, Google Maps,
and much more.
You can configure your Google ac count from S ettings Accounts Add
a cc o un t Go o gl e.
Play Store
After you have c onfigured your google account, you can ac cess play store
by tapping ic on and choos e to download from unl imited entertainment
sourc es, applica ti ons, games, movies , and books.
To v iew and manage the lis t of all inbuilt, downloaded, and running
applications, go to S ettings Ap ps.
6
Page 8
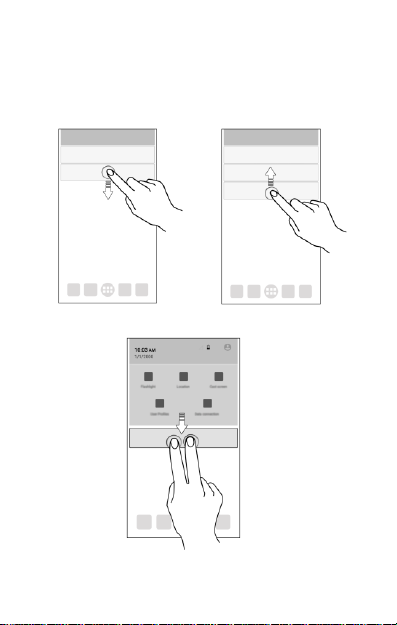
Notifications
Notifications i nform you of new messages and events as a nd when they
appear o n the devic e.
Op e n Notif ication pane l C l os e No ti fi c a ti on pa ne l
Op en Qui c k S e tt in gs
7
Page 9
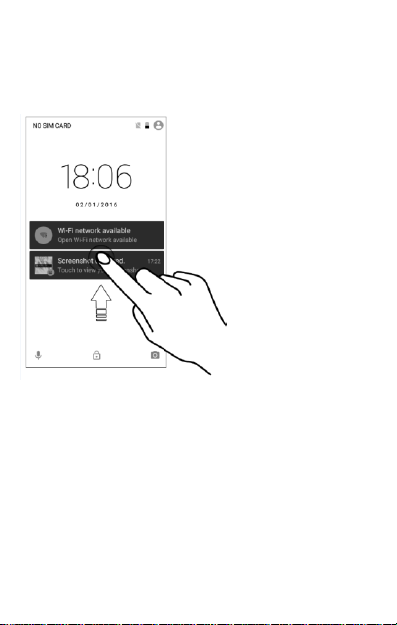
Quick Settings allow acces s to basic phone features suc h a s A irplane
Mode, Wi-Fi, Br ightness levels, and many more.
Phone Security
You can unl ock your phone using a variety of methods.
The default unlock method is
S wi pe. To unlock the screen,
just swi pe up on the lock
scr een.
To s et other unlocki ng methods, go to Sett ings Securit y Sc reen
l oc k.
8
Page 10
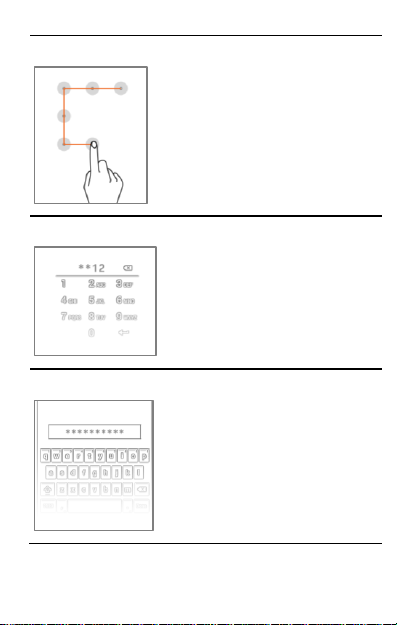
P at t er n
Draw your pattern to unlock! Y ou ca n set
your own pattern by connecting the dots to
prevent your phone from unauthorized
acces s.
P IN
Enter your PIN to unlock your phone! You
can s et a PI N as your s creen pass word.
P as sw or d
Enter your pas sword to unlock! You can
set your des ired pas sword a s your screen
passw ord.
9
Page 11
Fi ng erprint
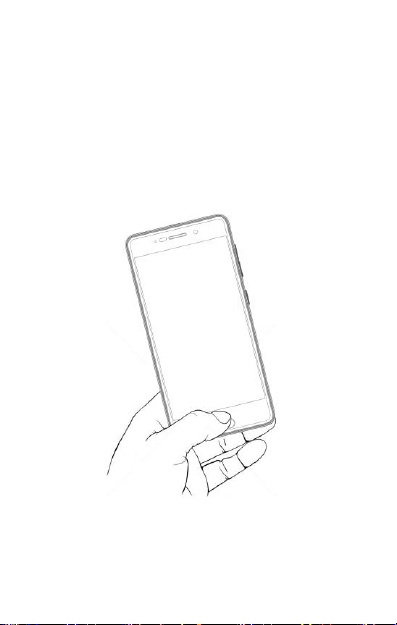
You can add your fi ngerpr ints and use the finger print sensor to unlock the
device or acces s apps.
1. Go to S e tti n gs → S ec ur i t y → Fi ng er p r in t
2. Unlock the sc reen (if sc reen lock i s set).
3. Follow the on-s creen ins tructions .
4. Place your finger on the scanner as s hown below, till the s can is
complete.
5. Your fingerpri nt is added once the scan is complete.
You can enroll new finger pri nts in a similar manner.
10
Page 12

By default, the acces s point name gets configured once you
inser t the SIM, Or , your networ k provider sends the access
point name settings v ia SMS. You may need to install these
settings. If the access point names are not listed by default,
please contact your networ k provider for the same.
Battery Saver Mode
Your phone comes with a Battery Saver Mode that:
Saves power s ignificantly by running only the essential apps
while turni ng off backgr ound data.
Restri cts the background data for apps like Gmail, Twitter,
Facebook, etc. and limits the phone’s per formance to extend the
battery life.
Automatically s witches off w hen the phone is connec ted to a
charger .
To enable Batte ry Saver mode go to Settings Battery and s elect Battery
s a ver.
Set tings and Networks
Your phone can connect to vari ous networ ks and devices . You can also
transfer files to/from your PC through the data cable.
C onnect to th e Internet
Go to S et tin gs S IM cards and enable C ellu lar data on your preferred
SIM.
You might also need to configure the acc ess point name for the data
connection to wor k.
You can configure the acc ess point name fr om
S et tings Mor e Cellu lar n etworks A ccess Point Names and
selec t from the list.
11
Page 13
Your mobile oper ator will charge you bas ed on your data
usage.
Tetherin g & Port abil ity
You can use your devi ce as a modem and connect your P C or laptop to the
Internet, when r equired.
Go to S e tti ngs More Tet hering & p ortab le hots pot
US B Tet hering
1. Connect your phone with your PC /Laptop via USB cable.
2. Select the US B tet hering option.
3. Select your phone network as the network connection in your
PC/laptop and get acces s to the Internet.
Wi- Fi Hotsp ot
1. Enable the P ortable Wi-F i hotspot opti on.
2. Enable Wi-Fi on the other Wi -Fi enabled PC /laptop/handset and
choose your phone as a Wi -Fi network to connect with it.
3. View and configure Wi -Fi hotspot se tti ngs by tapping Set up Wi-F i
ho t spot option.
B lu etoo th Tether ing
1. Pair your phone with a Bluetooth enabled PC/laptop via Bluetooth
pairi ng option.
2. Select the B lueto oth tether ing option in your phone.
3. On the paired PC/laptop, select the Bluetooth device (your phone )
and choose to connect to the I nternet.
Pair With Bluetooth Devices
Go to S e tti n gs Bl ue to o th
1. If Bluetooth is off, turn it on. Your phone sc ans and displays the
Bluetooth devices in range.
12
Page 14
If the devic e you want to pair with is not in the list, make sure
the Bluetooth on that dev ice is turned on, then tap and
selec t Re fr e s h to se arch again.
Internet connection is requir ed for usi ng Google Maps.
When you use the map, you use your Inte rnet connection to
transfer data to and from your phone.
Google Maps applic ation may not be available in every
street, country or region.
Micromax does not guarantee the acc uracy of any
direc tional s ervices .
2. Tap the ID of the other dev ice in the li st to pair with it.
3. You may be prompted to confirm pas skey/pair ing code on one of the
devices . The passkey/pairing code may display on one of the
devices .
4. Tap P air to confir m the pass key/pairing code and pair the devices.
On succes sful pairi ng, your phone connects to the device.
Airp lane Mode
Airplane Mode all ows you to disa ble all mobile networks , Wi-Fi, and
Bluetooth connections. T o activate the air plane mode, open Quick settings
and selec t A i r pl an e m od e .
Goog le Maps
Google Maps i s a web-based service offered by Google Inc. whic h offers you
acces s to various map-bas ed ser vices. You can view var ious streets,
landmarks and can even plan your r outes w ith the help of Google Maps.
Settings r equired for Google Maps acce ss include:
1. Enable location ac cess from Set tings Location .
2. Tap to s ta rt using Google Maps.
13
Page 15
Maximum device operating
temperature
45°C
Device opera ti ng temperature
range
-10°C to 45°C
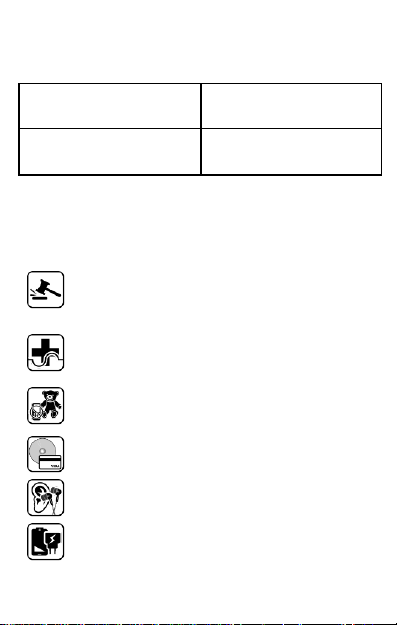
Switch off your device in any area with poten tial explosive atmosphere such as
refueling stations, fuel d epots, chemical plants or p laces wh ere b lasting
operation is in progress. Sparks arising out of radio frequency may cause fire or
explosion. Remember to compl y with legal req uirements and local restrictions
when using the phone.
Your Ph one’s radio waves may interfere with medical devices.
Preferably maintain a d istance of 15.3 cm (6 inches) between a wireless device
and implanted medical devices such as p acemaker or cardioverter defibrillator.
Switch off your device when regulations require you to do so.
Always keep the p hone and accessories out of reach of small ch ildren . Small
parts such as th e SI M card can be dismantled and swallowed by sm all children.
Do n ot place th e p hone n ear electromagn etic d ata carriers such as cred it/Debit
cards. Information stored on them could be lost.
Permanent damage to hearing may occur if you use earph on es at h igh volume
for prolonged periods. Set y our vol ume to a saf e level.
The mains vol tage (V) specified on the p ower suppl y unit must not be exceeded
to prevent damage to the charging device. The power sup ply mu st be plugged
into an easily accessible AC power socket when charging the battery.
Operating Temperatu re Specifications
Safet y Precautions
14
Page 16
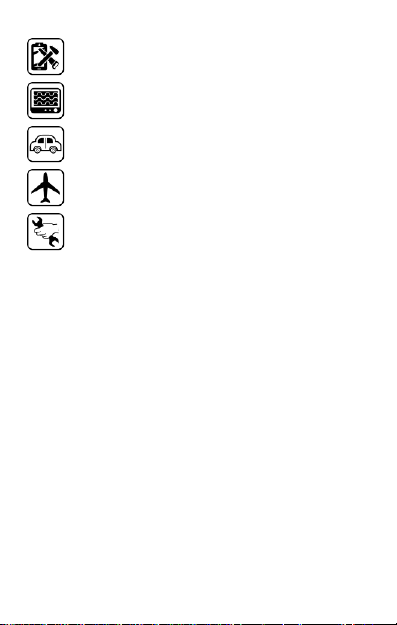
You may only open the p hone to replace the battery (if n ot inb uilt), SIM card. All
other chang es to this device are strictly prohibited and will invalidate th e
warran ty.
The phone may cause interferen ce in the vicinity of TV sets, radios and PCs.
Do not use th e phone while d riving. Please put the phone safely in the phone
stand. Do n ot put it onto any spot from which it may fall down during collision or
emergency braking.
Flight is influenced by interference caused b y the phone. It is n ot advised to
switch on a ph one d uring flight.
Please repair the device at Micromax authorized service center only. Repairing
the device by yourself in val idates the warranty rules.
Taki ng Care of your device
Your device is a product of su perior design and craftsmanship an d should b e h andled with
care in the following ways:
Keep the d evice dry. Precipitation, humidity, and all types of liquids can rust the
electronic circuits. If your device g ets wet, wipe it with a dry cl oth and take it to an
authorized service center.
Do n ot store the device in high or cold temperature. Extreme temperatures can
shorten the life of electron ic d evices and damage b atteries.
Do not use or store th e device in dusty , dirty areas. Its moving parts and electronic
components can get damaged.
Do not attemp t to open the d evice other th an as instructed in this guide.
Do not drop , knock, shake or bend the device. Rou gh handling can break internal
circuit boards an d fine m echanics.
Do not use harsh ch emicals, cleaning solven ts, or strong deterg ents to clean the
device. On ly use a soft, clean, dry cloth to clean the surface of the d evice.
Do not store or bring your device near magn etic fields for exten ded period of time.
15
Page 17

Battery Recommendations
We recom mend you to charge the device at room tem perature range.
Batteries h ave life cycles. Af ter a ful l charge, if th e p ower reserve of the b attery tends
to deplete in ordinately faster th an usual, the b attery life is at an end.
Use only Microm ax charg ers and cab les. Micromax will not be held responsible for
user’s safety when using incompatible accessories or supplies.
Temp erature and Humidity
The device is designed for use within a temperature ran ge of -20 ˚ c ± 5 to 45˚c ± 5,
storag e within the temperature range of - 30 ˚c ± 5 to 65˚c ± 5. In case of violation of these
temperature con ditions, the device can be damaged and battery life can be reduced.
The recommend ed humidity for m ain tain ing the d evice is in the ran ge 50 to 55%.
Do n ot expose your device to extreme temperatures or humidity.
Note: Micromax wil l not b ear any responsibility for any in com pliance with the ab ove
mentioned guidelines or improper usage of the mobile phone.
Recycle your Phone
specified collection point for recycling of such hazardous waste.
Collection and proper recovery of your electronic waste equipment at the time of d isposal
will allow u s to help preserve the en vironment. Recycling of the electron ic waste equ ipment
will ensure safety of human health and environ ment. For more information on best p ractices
for disposal of electronic and electrical waste, please visit to our web site:
www.m icromaxinfo.com /weee.php .
The W EEE logo (shown at the left) appears on the product (b attery,
handset, and charger) to indicate that this product must not be disposed of
or dum ped with your oth er household wastes. You are liable to d ispose of
all your electronic or electrical waste equipm ent by relocating over to the
Di sclaimer
The colors, specifications, fu nction s and g raphics shown/mentioned in th e user
manual may differ f rom the actu al product. In such a case, the latter shall govern.
Images shown are for representation purp ose only. Specifications are subject to
16
Page 18

change without prior notice. Micromax keep s the rig ht to modify the content in this
user guide without prior n otice.
Up on f irst use of y ou r device, your device will send information related to your
mobile, IMEI nu mbers, location detail s and other software d etails th rou gh SMS*
automatically. This information may be u sed as further specified in M icromax
privacy policy**.
Talk and standby times are affected by network preferences, type of SIM cards,
connected accessories and individual usage patterns. Services and som e featu res
may be depend ent on the network, service/content providers, SIM card s,
compatibility of the devices used and the con tent formats sup ported.
Oth er product logos an d com pany names mentioned herein may be trademarks
or trade n ames of their respective owners.
Availabl e storage memory may vary based on the phone software.
*Operator tariff sh all be app licab le f or SMS.
**Microm ax privacy policy is availabl e at www.m icromaxinfo.com.
Cop yright
All rights reserved. Reproduction, transfer, d istribution or storage of p art or all of th e
contents in this document in an y form without the prior written permission of Micromax is
strictl y prohibited.
Product Support
Helpline Numb er : 18605008286
Workin g Hours : Monday to Saturday (Excep t National
& Publ ic Holidays)
Email Support (India) : in fo@m icromaxinfo.com
Email Support (International Market) : [email protected]
Website : www.micromaxinfo.com
10 AM to 6: 30 PM
17
Page 19

SAR Information
S AR Co mp l ia n ce
Your device is designed not to exceed th e l imits of emission of radio waves
recom mended by international guidelines.
SAR (Specific Absorption Rate) is the measurement of body -absorbed RF quantity
when the device is in use. SAR value is ascertained according to the highest RF level
generated during laboratory tests.
The SAR value of the device m ay d epend on factors such as proximity to the network
tower, or use of accessories.
The SAR value of the device at the head and body are 0.44 W/kg and 1.53 W/kg
respectively averaged over 1 gm of human tissue.
S AR Re c om me nd a ti on s
Use a wireless hands-free system (head phone, h eadset) with a low p ower Bluetooth
emitter.
Keep your calls short an d use SM S whenever more convenient. This ad vice appl ies
especially to children, adolescents an d pregnant women.
Prefer to use your handset when the signal quality is good .
People havin g active medical im plants should preferab ly keep the handset at least
15 cm away from the implant.
Maintain a preferable distance of 15 mm from the d evice.
T h e FCC Advi ce
Many people mistakenly assume that u sing a cell phone with a l ower reported SAR valu e
necessaril y decreases a user’s exposure to RF emissions, or is somehow “ saf er” than
using a cell phone with a high SAR value. Wh ile SAR values are an im portan t tool in
judging the maximum possible exposure to RF energy from a p articular m odel of cell
phone, a single SAR value does not provide su fficient information about the amoun t of RF
exposure under typical usage conditions to reliably compare ind ividual handset models.
W or ld Health Organi zat ion (WHO) Advi ce
Organizations such as th e W orld Health Organization and the U S F ood and Drug
Administration have stated that if people are concerned an d want to redu ce their exposure
they cou ld use a hands -free device to keep th e h andset away from the h ead an d body
during ph one cal ls, or red uce th e amoun t of tim e spent on the phone.
18
Page 20
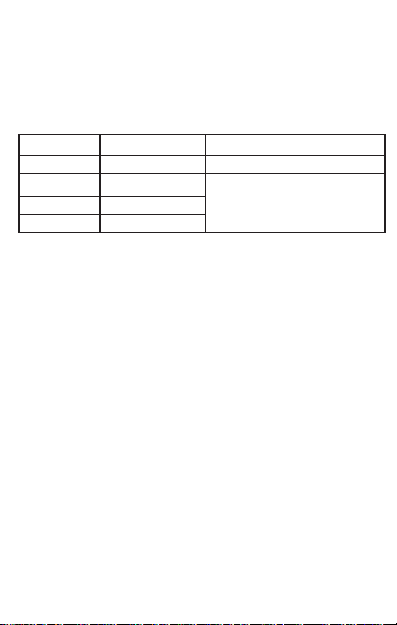
C o un try
H e l plin e
E m a il
Ind ia
1860-500-8286
Sri Lanka
0117-271271
ccdesk. [email protected]
Bangladesh
880-1673556699
Nepal
977-9721604522
Warranty Statemen t
Micromax cong ratulates an d thanks you for showin g con fidence in Microm ax products
and becoming our val ued customer. To ensure a d elightful product exp erience, Micromax
recom mends reading the User Gu ide carefully and contacting our customer care. For
further information , please log onto our website www.microm axinfo.com, Email us, or
contact our help line n umbers listed below.
Workin g Hours : Monday to Saturday (Excep t National & Publ ic Hol idays)
10 AM to 6:30 PM
Website : www.micromaxinfo.com
Micromax Informatics Ltd. (hereinafter called “Micromax”) warran ts the Produ ct to be free
from defects in materials and workmanship, arising under n orm al use from the date of
orig inal purchase when brand new.
This Warranty is subject to the following terms an d con ditions:
1. Mic roma x provides 1 year warranty on the transceiver and 6 months warranty
for the b attery and accessories included in the sal es pack, applicable from th e
da te of purcha se.
2. Th e wa rranty is confined to the orig in al pu rch aser of the product only and is not
transfe rable .
3. I t is the resp onsibility of the customer to visit the Microm ax authori zed
servi ce center for required services.
4. W arranty will be applicable only after inspection of the device and clearance
of co ndition by authorized serv ice center personnel.
5. C ustom er shoul d kindly take a backup of all the personal contents and
remo ve any confidential, propri etary, or personal information from th e
de vic e before handing over the h andset f or service.
6. The co mp any shall no t be liable for problems ari sing ou t of any 3rd party
softwa re b eing used by the custom er.
7. Re pai rs under warran ty pe riod shall be c arried out by the company a uthorized
pe rsonne l only. For fu rther d etails, please visit our website:
19
Page 21

www.m icro maxinfo.com or the centralized helpline.
8. Wa rranty will not be applicable under the following circumstances:
a) Da mag e due to any liquid, Mechanical stre ss, impact, high voltage,
ne glig ence, misuse, accident or natu ral d isa sters
b) Use of charger or battery not include d in the Gift B ox of this device.
c) Wa rranty also do es not cov er crack s in device display or device o uter
hou sing .
d) The ha ndset IMEI number/serial no ., the acc essories date cod e, water
ind ic ator or the warranty seal ha s been removed, era sed, d efaced, a ltered
or is illegible.
e) The def ect was caused by defective function of the service provider
cellul ar network, unauthorized software or other system.
In the above cases, repairs will be done subject to availability of parts and on
a cha rgeable basis o nly.
9. Th e c ompany’s obligation
prov idi ng rep lacement of part/s only. If the company is not able to repair the
han dset covered under warranty then it can be re placed by same model of the
han dset.
10. W here ver lo cal service presence* is there, standard warranty terms as
spec ifi ed will be honored.
11. Mic roma x rese rves the right to charge a service fee fo r repair/ service of any
na ture th at is not covered by this warranty.
12. All warran ty information, products and specifications are subject to change
witho ut p rior notice.
V a li d for devi ces sol d out side I ndia:
13. Servi ce wi ll no t be ap plicable wi thout th e warranty card and va lid pro of
of purc hase/Invoice/Bill.
14. For limi ted warranty to be valid, all information on the limited warranty
ca rd ha s to be complete including the stamp an d C- sticker (o n the proof
of purc hase/Invoice/Bill) from the authorized distributor.
*Mic roma x reserves the right to withdraw these services without any pri or no tic e.
under
this warranty shall be limited to repair or
20
Page 22
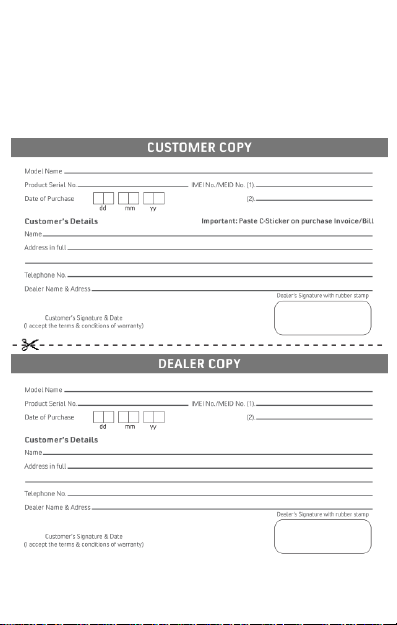
Micromax Informatics Ltd. (hereinafter referred to as "Micromax") guaran tees to the
purchaser th at th is product carries a warranty for th e p eriod mentioned ab ove,
commencing from the date of purchase. The company wil l rep air free of charge any part or
parts of the p rod uct, if th e d efect is due to th e faul ty material or workmanship.
21
Page 23

22
 Loading...