

Page 1

Table of Contents
........................................ 3
............................................. 4
............................. 12
..................................................... 20
.................................... 29
................................... 31
1. Know Your Device
2. Getting Started
2.1 Insert SIM Card ......................................... 4
2.2 Charge the Battery ..................................... 5
2.3 Insert Memory Card ................................... 6
2.4 Switch On the Device ................................ 7
2.5 Shut Down the Device ............................... 7
2.6 Lock/Unlock the Screen ............................. 8
2.7 Change the Orientation .............................. 9
2.8 Adjust Volume .......................................... 10
2.9 Use the Earphone .................................... 10
2.10 Reset the Tablet ....................................... 11
3. Using the Touch Screen
3.1 Get Around .............................................. 12
3.2 Touch and Hold ........................................ 13
3.3 Drag an Item ............................................ 13
3.4 Scroll or Swipe ......................................... 14
3.5 Using the Pinch Zoom Feature ................ 15
3.6 Double-Tap .............................................. 16
3.7 Extended Home Screen ........................... 17
3.8 Arrange and Work with Applications ......... 17
3.9 Add Widgets ............................................. 18
3.10 View Notifications ..................................... 19
4. Features
4.1 Calling ...................................................... 20
4.2 Messaging ................................................ 22
4.3 Music ....................................................... 23
4.4 Change the Wallpaper .............................. 23
4.5 Gallery...................................................... 25
4.6 Manage Downloads.................................. 25
4.7 Manage Your Calendar ............................. 26
4.8 Settings .................................................... 26
4.9 Connect with PC ...................................... 2 7
4.10 Set the Language and Keyboard .............. 27
4.11 View Available Storage Space .................. 27
4.12 View Information About Device ................. 28
5. Connect to Internet
5.1 Connect to Wi-Fi ...................................... 29
5.2 Connect via SIM Card .............................. 30
5.3 Connect to VPN ....................................... 30
6. Managing Accounts
6.1 Why Use a Google Account? .................... 31
1
Page 2

6.2 Manage Accounts .................................... 31
33
............................................. 35
......................................... 36
................................ 37
........................ 38
.................................................. 40
................................................... 40
6.3 Start Gmail ............................................... 31
6.4 Google Search ......................................... 32
7. Download Applications From Android
7.1 How to Download an Application .............. 33
7.2 How to Uninstall an Application ................ 33
8. Google MAPS
9. Troubleshooting
9.1 Device shuts down after startup ............... 36
9.2 Cannot copy file or play music ................. 36
9.3 The tablet is hanging with no response.
10. Device Specifications
11. Taking Care of Your Device
11.1 Recycle Your Device ................................ 39
12. Disclaimer
13. Copyright
Market
How can I solve this? ............................... 36
2
Page 3
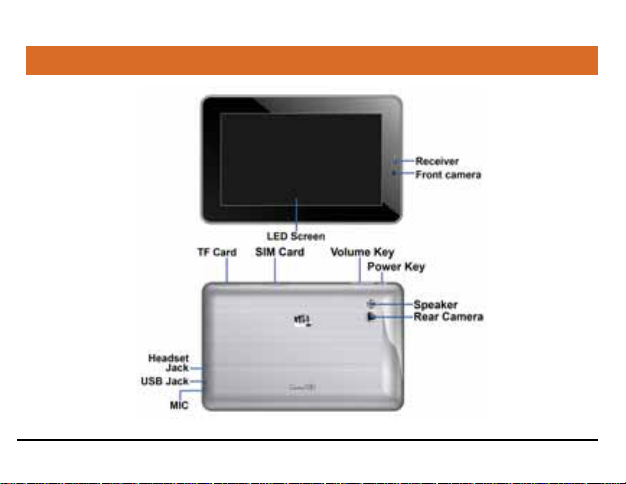
11.. KKnnooww YYoouurr DDeevviiccee
3
Page 4
22.. GGeettttiinngg SSttaarrtteedd
card slot.
2. Insert the SIM card correctly in the
card slot
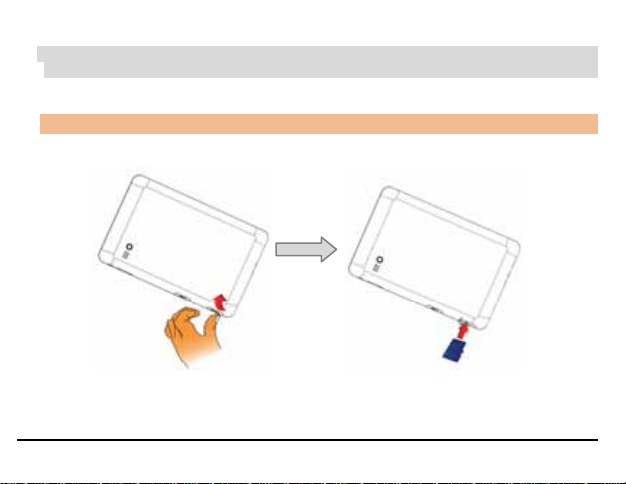
22..11 IInnsseerrtt SSIIMM CCaarrdd
When you subscribe to a cellular service, you will receive a SIM card with subscription details, such as
your personal identification number (PIN) and optional services.
1. Switch off the tablet and open the SIM
4
Page 5
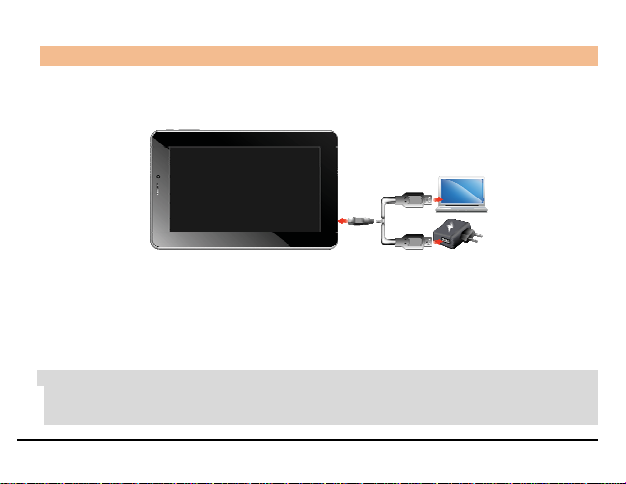
22..22 CChhaarrggee tthhee BBaatttteerryy
Before using the device for the first time, it is recommended that you charge the battery. You can charge
the device with the charger that comes in the packaging, or by connecting the device to a PC with a USB
cable.
Please charge the device in the following conditions:
¾ If the battery power is low or if the power icon shows no power.
¾ If the device stops responding to the Power button i.e. the device is not getting switched on.
¾ Device automatically shuts down.
Note:
x Slight heating during charging is normal.
x Please charge the unit fully once in a month if it is not in use.
5
Page 6
Remark:
x If the power is empty, the device will shut down automatically.
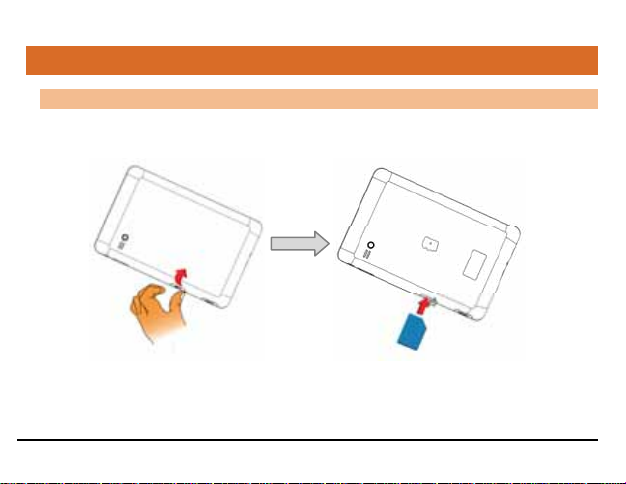
22..33 IInnsseerrtt MMeemmoorryy CCaarrdd
To store additional files and applications, you need to insert a memory card.
1. Switch off the tablet and open the SD card
slot.
2. Insert the memory card correctly in
the slot.
6
Page 7

22..44 SSwwiittcchh OOnn tthhee DDeevviiccee
To switch on the device, long press the power key, as illustrated in the following image:
The system will boot and show the home screen.
22..55 SShhuutt DDoowwnn tthhee DDeevviiccee
To shut down the device:
1. Long press the Power key.
2. Tap OK in the Power Off confirmation pop-up that appears.
7
Page 8
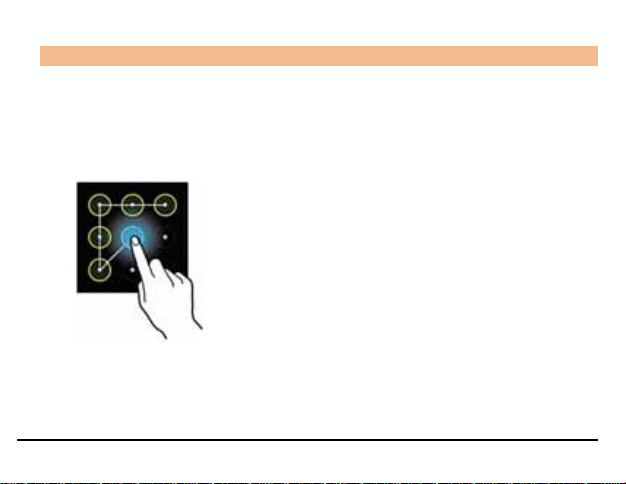
22..66 LLoocckk//UUnnlloocckk tthhee SSccrreeeenn
Short press the Power key to lock/unlock the screen.
To unlock the screen, you may set any of the following screen locking method:
¾ Slide the lock symbol towards the unlock symbol.
¾ Provide PIN or Password, as set by you.
¾ Draw a pattern, as illustrated below.
Slide unlock will be the default unlocking method in the tablet. To unlock the screen:
1. Press the power key to wake up the screen.
2. Hold and drag the lock icon towards the unlock icon.
You may be required to unlock your tablet in a different way based on the unlock method set by you.
8
Page 9
Note:
x You can set your unlock method from (Application Menu) Ȼ Ȼ Security Ȼ Screen lock
and then choosing your desired method.
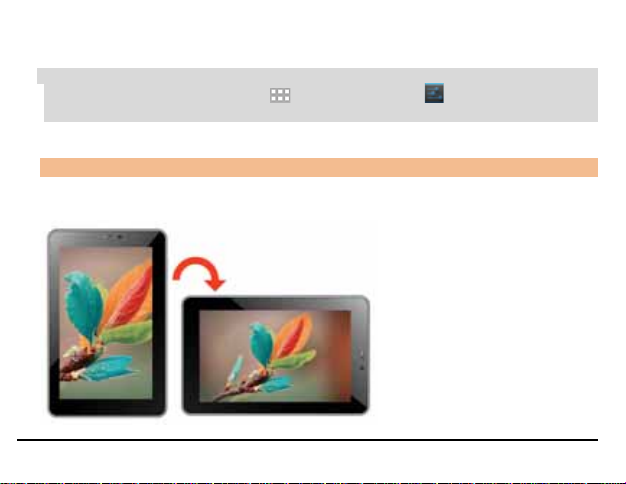
22..77 CChhaannggee tthhee OOrriieennttaattiioonn
Your device has the capability to retain the orientation of the screen in horizontal view even when
rotated by 90°, or multiples of 90°, as illustrated in the following image:
9
Page 10
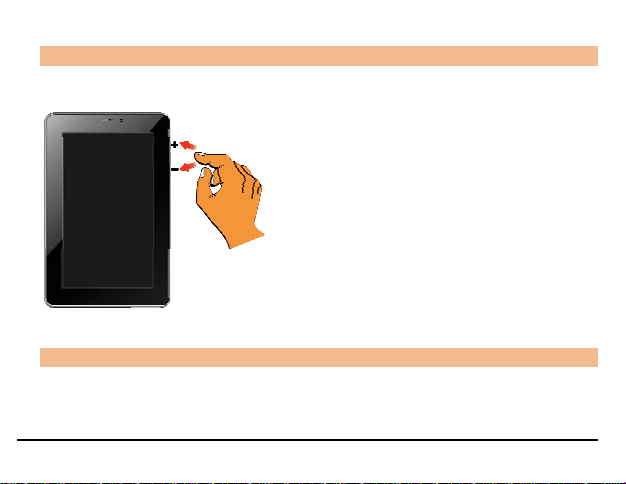
22..88 AAddjjuusstt VVoolluummee
You can adjust the volume of your device by using the volume keys on the right side of the tablet as
shown in the following image:
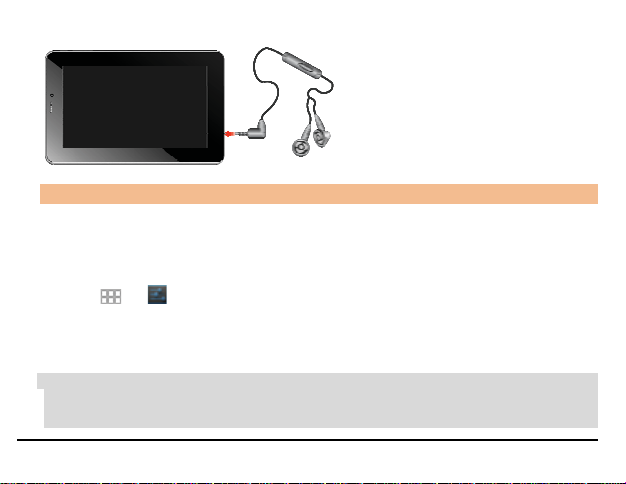
22..99 UUssee tthhee EEaarrpphhoonnee
You can use the earphone to listen to music or during video calls. Please insert the earphone on the
earphone socket as illustrated in the following image:
10
Page 11
22..1100 RReesseett tthhee TTaabblleett
If required, you can take a backup of your data and reset factory settings of the tablet. When you choose
to reset the tablet, all data in the internal memory of the tablet gets erased; however clearing the data
in the SD card is optional.
To reset your tablet:
1. Go to
2. If required, select the Erase internal SD card option to remove all data from your inserted memory
card and then tap Reset tablet.
3. Tap Erase everything.
Note:
x Reset tablet is an irreversible action. Once erased, data cannot be retrieved.
x Wireless connection needs to be done again.
Ȼ Ȼ Reset Ȼ Factory data reset.
11
Page 12
33.. UUssiinngg tthhee TToouucchh SSccrreeeenn
Use your fingers to manipulate icons, buttons, menus, the onscreen keyboard, and other items on the
touch screen. You can also change the screen's orientation.
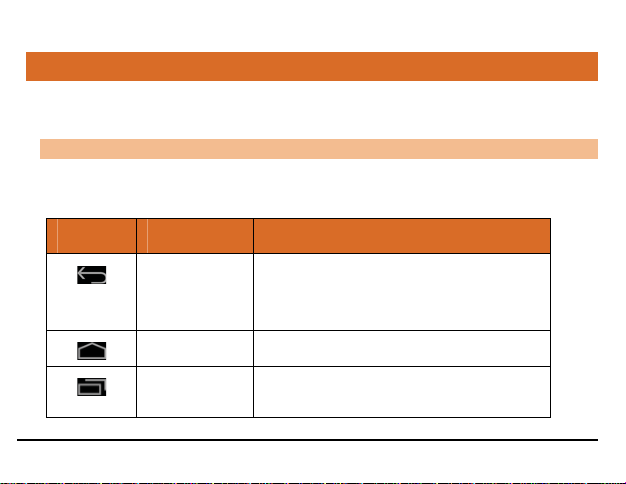
33..11 GGeett AArroouunndd
At the bottom left corner of the screen, you will find three navigation buttons. They are always available,
no matter what you are doing with your device (except some applications); you can always get back to
the main Home screen or return to previous screens using these buttons.
Icons Name Description
Back Takes you back to the previous screen you were
working on, even if it was in a different application.
Once you are back to the Home screen, you can’t go
back any further.
Home Use this key to return to the Home screen directly.
Context Menu Displays the task manager with all currently running
applications.
12
Page 13

33..22 TToouucchh aanndd HHoolldd
Tap and hold an item to view the list of actions based on the selected item and condition. Also, you can
move an item from the Menu screen to the Home screen using this method.
33..33 DDrraagg aann IItteemm
Tap and hold an item and move your finger on the screen until you reach the target position. The item
follows your finger.
13
Page 14

You can generally drag items from one location to another on the home screen. Also, you can delete
items from the home screen by holding the item and dragging it to the Remove label that becomes
available only when you hold the item on the Home screen.
33..44 SSccrroollll oorr SSwwiippee
To scroll a list, slide your finger across the surface of the screen upwards or downwards (without
dragging an item).
14
Page 15

Place a finger on the screen and steadily slide your finger in the desired direction. For example, when
you are viewing a picture, to view the next picture, swipe left.
33..55 UUssiinngg tthhee PPiinncchh ZZoooomm FFeeaattuurree
You can open any image or web page and then use your thumb and index finger to zoom the display
through the pinch gesture as illustrated in the following image.
15
Page 16

33..66 DDoouubbllee--TTaapp
Tap quickly twice on a webpage, map, or other screen to zoom. For example, double-tap a section of a
webpage in the browser to zoom that section. You can also double-tap to control the Camera zoom, in
Maps, and in some other applications.
16
Page 17

33..77 EExxtteennddeedd HHoommee SSccrreeeenn
The Home screen consists of the 5 panels that extend beyond the display width to provide more space
for adding shortcuts, widgets, and folders.
Slide your finger horizontally across the screen to scroll to the left or right side extended home screen.
33..88 AArrrraannggee aanndd WWoorrkk wwiitthh AApppplliiccaattiioonnss
To see all your apps, go to (Application Menu) screen.
The Application Menu screen displays the grid view of all your applications, including the ones
downloaded from Android Market. You can move the app icons to any of your Home screens.
Application Menu allows you to:
17
Page 18

¾ Place an app icon on a home screen: Touch and hold any desired app icon, slide your finger and lift
your finger to drop the icon in place.
¾ Explore your widgets: Tap the Widgets tab at the top of the Application Menu screen.
¾ Get more apps: Tap the
To remove an app icon from the Home screen, touch and hold it, slide your finger toward the top of the
screen, and drop the app over the Remove link on the home screen.
33..99 AAdddd WWiiddggeettss
Widgets allow placing application shortcuts on your home screen. You can now place analog clock,
calendar, and other such sections of your tablet on the home page and access them directly! To view the
list of widgets available, just tap the
icons to the widgets screen, as shown below.
icon.
launcher icon on the Home screen and swipe through menu
To add any widget to your home screen, tap and hold the desired widget on the widget screen and
18
Page 19

release the hold at the home screen location, where you want to place the selected widget. You may be
asked to make further choices before the widget activates. If there is no room where you dropped it, the
widget would not get added to the Home screen.
33..1100 VViieeww NNoottiiffiiccaattiioonnss
Notification panel informs you of new messages and events. The Notifications panel displays the current
day, date, time and the battery percentage of the device. To open the notification panel, tap the time
and signal icons in the bottom right corner of the screen. You can clear all the notifications from the
notifications panel by tapping on
options that include:
¾ Airplane Mode: Turn on/off the airplane mode.
¾ WLAN: Activate or deactivate the WLAN connection feature.
¾ Data Connection: Switch on/off the data connection.
¾ Auto-rotate screen: Activate/deactivate the gravity sensor to auto-rotate screen orientation.
¾ Display: Adjust the screen brightness
¾ Notifications: Activate or deactivate the notification icons to be displayed on the home screen.
¾ Settings: Navigate to the Settings section.
You can tap to respond to any notification in the notification panel.
icon. Tap the icon in the notification panel to view other
19
Page 20

44.. FFeeaattuurreess
44..11 CCaalllliinngg
Note:
x To use the calling and SMS feature, ensure that a valid SIM card is inserted in the SIM slot correctly.
4.1.1 Making a call
Tap the
a call to your desired number. On the dial pad, tap the
desired contact number and tap the
section.
You may tap
contacts list and select the number to make call.
4.1.2 In Call Options
¾ Press the Volume up/ down keys on the right side to adjust the call volume.
¾ Tap
¾ Tap
launcher icon on the Home screen and then tap the icon to open the dialer and make
icon to search the phonebook for some
icon to set your desired call preferences in the Call Settings
to open the Call log and select a number to make call or tap to open the
to add another person to the call.
to mute your voice so that the device’s MIC will not transmit voice to the other end. You
20
Page 21

can resume transmitting your voice by tapping again.
¾ Tap
¾ Tap
¾ Tap
4.1.3 Conference Call
Your device supports conference calls (network service) between more than two people.
to listen via the speaker.
to view the dial pad.
to end the call.
If you dial or accept a new call when you are already on a call, you can merge the calls into a conference
call.
To make a conference call:
1. Make a call to the first participant.
21
Page 22

2. When you are connected, tap and dial another number. The first participant is put on hold.
You can make the next call from the phone tab, the call log, or your contacts.
3. When you are connected, tap
4. You can also swap calls by tapping
Note: Your device supports conference calls (network service) between a select numbers of participants
depending to the service provider.
4.1.4 Make an International Call
To dial an international number, touch and hold the 0 key to enter the Plus (+) symbol, and then enter
the international country prefix, followed by the phone number in the dial pad.
44..22 MMeessssaaggiinngg
Your P650E gives you the feature of messaging through which you can send and receive messages
anytime on the go.
Tap the
In the messaging screen, tap the
pictures, videos, audio, and slide show to a message by tapping the
messaging settings and view the list of other options by tapping the
icon in the Apps Menu to open the messaging feature.
to start the conference call.
.
icon to compose a new message. You may attach files, such as
icon. Also, you may configure
icon.
22
Page 23

44..33 MMuussiicc
You can easily transfer your favorite music from a PC to your P650E and experience a world of
interesting and melodious music.
Tap the Music icon
icons in music interface to enjoy the features of your music player.
Press the tablet’s volume up/down keys on the right side of the device to adjust the volume.
You can use an SD card to enhance the storage capacity for your multimedia files such as music, photos,
emails, and so on.
44..44 CChhaannggee tthhee WWaallllppaappeerr
Go to Ȼ Ȼ Display Ȼ Wallpaper
Or
You can change your wallpaper by long pressing on the home screen. A list of choices will get displayed
in a popup from where you can choose the location of your desired wallpaper. Touch and hold anywhere
on a Home screen that is not occupied. A list of options appears to choose from, as illustrated below:
from the Application Menu or the home screen. Use the intuitive buttons and
23
Page 24

Tap to choose from the following wallpaper sources:
¾ Gallery: Choose from the picture gallery stored in your device.
¾ Live Wallpapers: Choose from a list of live wallpapers.
¾ Wallpapers: Choose from thumbnails of built-in wallpaper images.
Note:
x You can also download additional wallpapers from the Android Market.
24
Page 25

44..55 GGaalllleerryy
Ȼ
You can use the Gallery to view pictures, play videos, and share files.
Go to
Note:
x To share any picture or video, tap and hold the picture(s) or video(s) that you want to share and tap
44..66 MMaannaaggee DDoowwnnllooaaddss
Files and other items downloaded using the browser or in other way can be stored at any desired
possible location of your choice.
To view and manage the list of applications installed on your tablet, go to
Manage apps. Tap the desired tab to view the filtered list of apps according to their category, such as
Downloaded, On SD Card, and Running. You may tap any application for actions, such as Move to SD
card, Clear data, and Force stop.
Ȼ and then tap the desired album to open and view its contents.
the icon to share via e-mail or any other application installed in your device. Tap icon to
view the list of other options available for the selected image(s) or video(s).
Ȼ Ȼ Apps
25
Page 26

44..77 MMaannaaggee YYoouurr CCaalleennddaarr
The in-built calendar lets you view and edit your daily schedules. Touch the Calendar icon to access
the calendar.
¾ To change the calendar view, tap the desired view tab and get the Day, Week, Month, or Agenda
view of the calendar.
¾ Scroll vertically to view the other dates on the calendar. In the Day or Week views, spread your
fingers apart or pinch them together to zoom in or out.
¾ Tap the
¾ You may add an account to synchronize events in the calendar. To add an account to your calendar,
¾ To add an event for the selected date, tap
44..88 SSeettttiinnggss
Go to Ȼ to access the system settings.
You can choose settings and preferences for:
¾ Wireless & Networks: Turn on Wi-Fi, check data usage, and so on.
icon at the top right corner of the Calendar to set your calendar preferences and
settings.
icon at the top right corner of the Calendar and select Settings. In the Settings screen tap
tap
ADD ACCOUNT at the top-right corner and select the account to be synchronized.
icon at the top right corner of the Calendar.
26
Page 27

¾ Device: Set device preferences for user profiles, display, storage, battery information, and
applications.
¾ Personal: Set preferences such as accounts & sync, location services, security, language & input, and
reset.
¾ System: Settings such as date and time, accessibility, developer options, and view information
about tablet.
44..99 CCoonnnneecctt wwiitthh PPCC
Use the USB cable to connect the device to a PC or laptop, the device will pop up the USB connection
menu. You can start transferring files through the portable device dialog that opens.
44..1100 SSeett tthhee LLaanngguuaaggee aanndd KKeeyybbooaarrdd
Go to Ȼ Ȼ Personal Ȼ Language & input for keyboard, language, input methods, text to
speech output, and pointer speed.
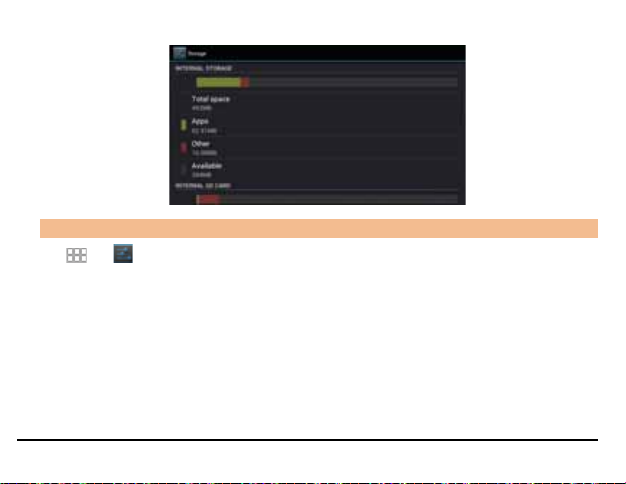
44..1111 VViieeww AAvvaaiillaabbllee SSttoorraaggee SSppaaccee
Go to Ȼ Ȼ Device Ȼ Storage to view the details of the current storage capacity of the
device, as shown in the following image:
27
Page 28
44..1122 VViieeww IInnffoorrmmaattiioonn AAbboouutt DDeevviiccee
Tap Ȼ Ȼ System Ȼ About tablet for viewing information about your P650E.
28
Page 29

55.. CCoonnnneecctt ttoo IInntteerrnneett
To enjoy various features like Browser, Email, Gmail, Android Market Applications, Google Search,
Downloads, and so on, you need to first configure your Internet connection.
For this, you can go to
¾ Enable Wifi (If you have a Wi-Fi network within range with the required credentials). You can pick
the available network from the list displayed.
¾ Tap More and then configure any one of VPN or Mobile networks.
55..11 CCoonnnneecctt ttoo WWii--FFii
To connect to Wi-Fi:
1. Go to
2. Under Wireless & Networks, next to Wi-Fi, tap ON to enable Wi-Fi.
3. Tap the desired Wi-Fi service from the list.
4. Provide the Wi-Fi credentials for logging in.
¾ Tap ADD NETWORK to add your Wi-Fi manually.
¾ Tap
to view the list of advanced options and set your preferences.
Ȼ and do one of the following:
Ȼ to access the Settings.
29
Page 30

55..22 CCoonnnneecctt vviiaa SSIIMM CCaarrdd
To connect to the Internet with the data pack on SIM card:
1. Go to
2. Tap Mobile networks and then check the Data enabled option and tap A cce ss Point Names to
Note:
x If your data card is outside its circle, please select the Data roaming option.
Ȼ Ȼ Wireless & Networks Ȼ More.
select from the available list of APNs.
55..33 CCoonnnneecctt ttoo VVPPNN
You can use VPN to connect your device to the Internet.
To enable VPN:
1. Go to
2. Since VPN is a secured network, you need to first set password for your tablet.
3. Provide the required PIN/Password.
4. Add your network/server settings.
Ȼ Ȼ Wireless & Networks Ȼ More Ȼ VPN.
30
Page 31
66.. MMaannaaggiinngg AAccccoouunnttss
66..11 WWhhyy UUssee aa GGooooggllee AAccccoouunntt??
Your Google Account lets you take full advantage of Google applications and services that you may want
to use, such as Gmail, Maps, and various other applications.
66..22 MMaannaaggee AAccccoouunnttss
You can set up a corporate, email, or Google account on your device.
1. Go to
2. Select the type of account to be added (For example, Email, Google, etc).
3. Follow the directed instructions with valid login credentials and configure the required email
Note:
x You may also be able to add other kinds of accounts, depending on your apps.
Ȼ Ȼ Accounts & sync Ȼ ADD ACCOUNT.
account on the device.
66..33 SSttaarrtt GGmmaaiill
Ȼ
You can use Gmail to read and write email from the device. All your emails are always up-to-date and
available no matter where you check it from.
31
Page 32

But Gmail is not just about email, your Gmail name and password signs you into to all Google apps and
services, including Google search, news and weather, people, market, maps, places, talk, calendar,
downloads and many more.
To launch Gmail, tap the Gmail icon
The first time you launch Gmail, you will be asked to sign-in or create an account. You can sign-in using
any of your existing Gmail account(s) or create a new one.
Note:
x You need to have Internet connectivity to access Google and all the other associated features
described above.
x Please refer to ‘Connect to Internet’ section to know how to configure your Internet connection.
66..44 GGooooggllee SSeeaarrcchh
Google Search can help you find anything you need on the web.
Touch the
icon on the Application Menu to access Google search.
from the Application Menu.
32
Page 33

77.. DDoowwnnllooaadd AApppplliiccaattiioonnss FFrroomm AAnnddrrooiidd MMaarrkkeett
The Android devices offer users access to unlimited entertainment sources. You can download applications,
games, movies, and books from the ever increasing Android market. New items get added almost daily to
the market to give users a never ending fun experience.
77..11 HHooww ttoo DDoowwnnllooaadd aann AApppplliiccaattiioonn
To download applications, games, videos, wallpaper etc:
1. Configure and activate your Internet connection
2. Go to
3. View the details and download items, as desired.
Note:
x Not all items are free of cost in the Android Market.
Ȼ to access the Google Android Market.
77..22 HHooww ttoo UUnniinnssttaallll aann AApppplliiccaattiioonn
To uninstall an application:
33
Page 34

1. Go to Ȼ Ȼ Device Ȼ Apps Ȼ Manage apps. List of applications under different
category tabs will be displayed.
2. Tap to the desired tab to view the filtered list of apps according to their category, such as
Downloaded, On SD Card, and Running.
3. Tap the application to be uninstalled.
4. Tap Uninstall.
34
Page 35

88.. GGooooggllee MMAAPPSS
Google Maps is a web based service offered by Google Inc. which offers you access to various map based
services. You can view various streets, landmarks and can even plan your routes with the help of Google
Maps. This serves as a useful application for your day-to-day usage.
Note:
x Internet connection is required for using Google Maps. For information on activating internet
connection, refer to section ‘Connect to Internet’.
x The Google Maps application may not be available in every market, country or region.
x Micromax does not guarantee the accuracy of any directional services.
x When you use the map, you use your Internet connection to transfer data to and from your tablet.
Required Settings:
x Go to Ȼ Ȼ Personal Ȼ Location services.
x Enable GPS satellites option.
To open Google Map, go to
Ȼ and start using Google Maps.
35
Page 36

99.. TTrroouubblleesshhoooottiinngg
99..11 DDeevviiccee sshhuuttss ddoowwnn aafftteerr ssttaarrttuupp
¾ Power is not enough, please charge your device.
99..22 CCaannnnoott ccooppyy ffiillee oorr ppllaayy mmuussiicc
¾ Please check if the connection between the computer and the device is proper and correct.
¾ Check whether the memory storage space is already full.
¾ Check if the USB cable is not damaged.
¾ Check if USB is disconnected.
99..33 TThhee ttaabblleett iiss hhaannggiinngg wwiitthh nnoo rreessppoonnssee.. HHooww cca
¾ Restart the tablet by long pressing and holding the power key.
ann II ssoollvvee tthhiiss??
36
Page 37

1100.. DDeevviiccee SSppeecciiffiiccaattiioonnss
Voltage 3.7V
Battery Capacity 3000 mAh
AC-DC adaptor I/P & O/P Input: AC: 100-300V
Environmental Rating 4Ԩ -40Ԩ
Humidity Range
Battery and Charger
Output: DC: 5V/1.5A
Less than 80%
37
Page 38

1111.. TTaakkiinngg CCaarree ooff YYoouurr DDeevviiccee
Your device is a product of superior design and craftsmanship and should be handled with care. The
following suggestions will help you protect your device:
x Do not store the device in high or cold temperature. Extreme temperatures can shorten the life of
electronic devices and damage batteries.
x Keep the device dry. Precipitation, humidity, and all types of liquids or moisture can contain
minerals that will rust electronic circuits.
x Do not use or store the device in dusty, dirty areas. Its electronic components can get damaged.
x Do not drop, knock, shake or bend the device. Rough handling can break internal circuit boards
and fine mechanics.
x Do not use harsh chemicals, cleaning solvents, or strong detergents to clean the device. Only use a
soft, clean, dry cloth to clean the surface of the device.
x Do not store your device near magnetic fields or allow your device to come in contact with
magnetic fields for extended period of time as it may interfere with the electronic circuits and
display.
x Use manufacturer approved batteries, chargers, accessories and supplies. Micromax will not be
held responsible for user’s safety when using unapproved accessories or supplies. This goes
against the warranty rules.
38
Page 39

x Do not attempt to repair the device by your own. Repairing the device by yourself other than our
authorized service agents/centers goes against the warranty rules.
1111..11 RReeccyyccllee YYoouurr DDeevviiccee
The WEEE logo (shown at the left) appears on the product (battery, device, and charger)
to indicate that this product must not be disposed off or dumped with your other
household wastes. You are liable to dispose of all your electronic or electrical waste
equipment by relocating over to the specified collection point for recycling of such
hazardous waste.
Collection and proper recovery of your electronic waste equipments at the time of disposal will allow us
to help preserve the environment. Recycling of the electronic waste equipment will ensure safety of
human health and environment. For more information on best practices for disposal of electronic and
electrical waste, please visit to our web site: www.micromaxinfo.com/weee.php
39
Page 40

1122.. DDiissccllaaiimmeerr
x The colors and specifications shown/mentioned in the user manual may differ from the actual
product. Images shown are for representation purpose only. Other product logos and company
names mentioned herein may be trademarks or trade names of their respective owners.
x Images shown in this User Guide are for representation only. Other product logos and company
names mentioned/used herein may be trademarks or trade names of their respective owners.
Micromax keeps the right to make modifications to the content in this user guide without any
prior notice.
x The functions explained or listed in this manual may differ from the actual functions appearing in
the tablet. In such a case, the latter shall govern. We do not guarantee the absolute accuracy of
the User Guide Vis-a vis the actual tablet.
x Talk and Standby time are affected by Network preferences and individual usage patterns.
x Specifications are subject to change without prior notice. Services and some features may be
dependent on the network, or service content provider.
1133.. CCooppyyrriigghhtt
x All rights reserved. Reproduction, transfer, distribution or storage of part or all of the contents in
this document in any form without the prior written permission of Micromax is strictly prohibited.
40
 Loading...