

Page 1

User
Guide
Page 2

Page 3

User Guide
1 Welcome
Thank you for purchasing the Micromax P500 Funbook. Pro You are now the proud owner of the P500 Funbook Pro which
offers you a wide range of exciting features designed to give you a rich and fulfilling tablet PC experience. Your P500
Funbook Pro is packaged with the following state of the art features and much more:
Android 4.0.3 (Ice Cream Sandwich) OS
25.7 cm Capacitive multi-touch screen with Pinch Zoom
Front Camera (300 K Pixels)
Memory: 8GB/1GB DDR3 Expandable up to 32 GB
Gravity Sensor/ Accelerator Sensor
HD Video (1080 Pixels, MPEG2/4, AVI, WMV, MOV)
5600 mAh Battery (* 5 Hours Browsing time)
3G USB Dongle Support via USB
HDMI Out (2160 Pixels)/ Wi-Fi 802.11 b/g USB 2.0
* Depends on the network condition and other running processes in the Funbook.
Micromax Funbook Pro Page 1
Page 4

User Guide
Table of Contents
1 Welcome.........................................1
2 Know Your Device...........................3
2.1 Input and Output Interfaces................4
3 Getting Started................................5
3.1 Charging the Battery ...........................5
3.2 Switching on the Device......................5
3.3 Shut Down the Device.........................6
3.4 Lock the Screen...................................6
3.5 Unlock the Screen...............................6
3.6 Change the Orientation.......................6
3.7 Adjust Volume......................................7
3.8 Status Bar.............................................7
3.9 Get Around...........................................8
4 Using the Touch Screen..................9
4.1 Arrange and work with Applications.10
4.2 Extended Home Screen....................10
4.3 Add Widgets.......................................11
4.4 View Toolkits.......................................12
5 Features .......................................14
5.1 Change the Wallpaper.......................14
5.2 Manage Accounts..............................15
5.3 Why Use a Google Account..............16
Micromax Funbook Pro Page 2
5.4 Start Gmail.........................................17
5.5 Google Search ..................................17
5.6 Manage Downloads..........................18
5.7 Manage Your Calendar.....................18
5.8 Settings..............................................19
5.9 Connecting with PC..........................19
5.10 Set the Language and Keyboard.....19
5.11 View Available Storage Space .........20
5.12 Date & Time Setting..........................21
5.13 View About Device Information........21
5.14 Use the HDMI out Feature...............21
6 Accessing the Internet..................22
6.1 Connect to Wi-Fi ...............................22
6.2 Set up Internet Connection via
Ethernet Cable...........................................23
6.3 Connect to VPN ................................23
6.4 Connect to Internet via USB Dongle24
6.5 How to Uninstall an Application.......24
6.6 Perform a Factory Reset..................26
6.7 Troubleshooting.................................26
7 Specifications...............................28
8 Taking Care of Your Device...........29
Page 5
User Guide
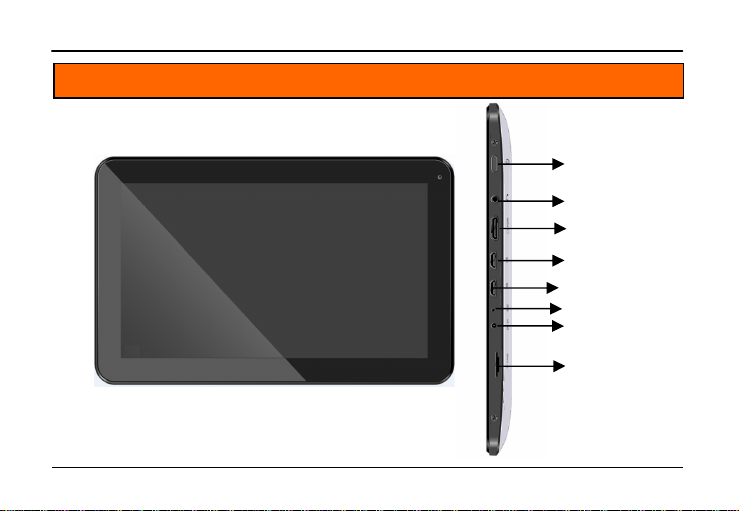
SSDD CCaarrdd sslloott DDCC IInnppuutt RReesseett 33..55 mmmm SStteerreeoo JJaacckk PPoowweerr kkeeyy HHDDMMII-- ((HHiigghh DDeeffiinniittiioonn
MMuullttiimmeeddiiaa IInntteerrffaaccee))
2 Know Your Device
Micromax Funbook Pro Page 3
MMiinnii UUSSBB ppoorrtt
MMiinnii UUSSBB ppoorrtt
Page 6

User Guide
2.1 Input and Output Interfaces
DC In
Earphone Jacket 3.5mm stereo jack
USB Socket 2 Micro USB Port (OTG and Host)
TF card socket Micro SD Card Reader/ Supports 32 GB max
Reset Reset Socket
HDMI Out Jack For output to HD TVs
Micromax Funbook Pro Page 4
DDCC--iinnppuutt jjaacckk 55VV 11..55AA
Page 7
3 Getting Started
User Guide
33..11 CChhaarrggiinngg tthhee BBaatttteerryy
PPlleeaassee cchhaarrggee tthhee ddeevviiccee iinn tthhee ffoolllloowwiinngg ccoonnddiittiioonnss::
If the battery power is low or if the power icon shows no power
If Power button does not respond i.e. the device is not getting switched on.
Device automatically shuts down.
When the top right led continuously blinks.
Note: Slight heating during charging is normal. When the charging icon becomes static, it indicates that the
battery is full.
FFiirrsstt TTiimmee UUssaaggee
Please charge the device for 6 hours for the first time; thereafter every subsequent full charge will take only 4
hours. Please charge the unit fully once in a month if it is not in use.
Remark: If the power is empty, the device will shut down automatically.
3.2 Switching on the Device
To switch on the device, long press and hold the power key. The system will boot and show the main screen.
Micromax Funbook Pro Page 5
Page 8
User Guide
3.3 Shut Down the Device
Press the power key for a few seconds.
Device Option Menu will appear. Choose the appropriate option Power off / Standby / Cancel to shut down the
device.
3.4 Lock the Screen
Short press the Power key to lock / unlock the screen.
3.5 Unlock the Screen
Depending on the screen lock setting, you might be required to:
Slide the lock symbol towards the unlock symbol.
Draw a pattern, or provide a PIN or password.
Note: You can set your unlock method by tapping > Personal> Security> Screen Lock and then choosing
your desired method.
3.6 Change the Orientation
Your device has the capability to retain the orientation of the screen in horizontal view even when rotated by 90,
or multiples of 90 degree.
Micromax Funbook Pro Page 6
Page 9
User Guide
3.7 Adjust Volume
Press the Volume+, Volume- keys to increase or decrease the volume of the device.
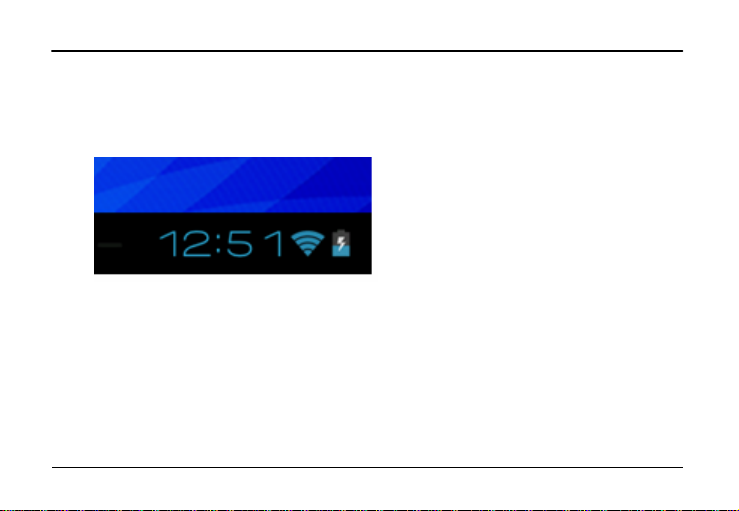
3.8 Status Bar
The status bar appears at the lower right corner of the screen.
Displays Wi-Fi Status (if connected), Battery Status, time, Setting menu and back button.
Micromax Funbook Pro Page 7
Page 10
User Guide
3.9 Get Around
At the bottom of the screen, you will find three Navigation buttons. They are always available. No matter what
you are doing with your device, you can always get back to the main Home screen or return to previous screens:
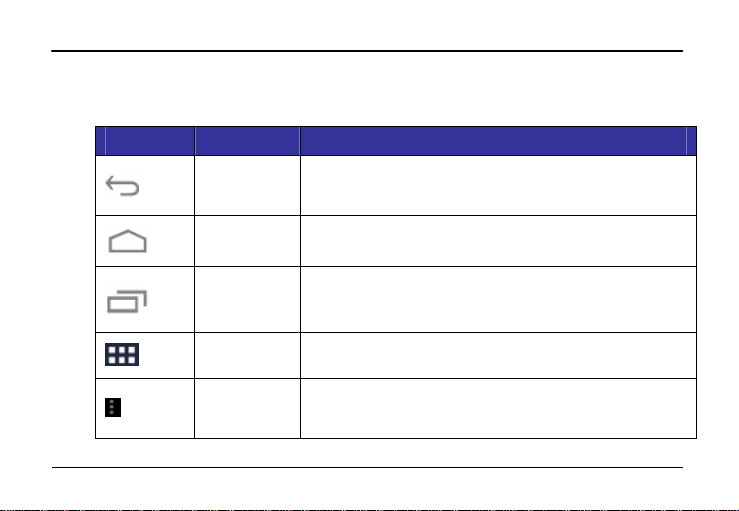
Icons Name Description
Micromax Funbook Pro Page 8
Back
Home
Recent apps
All Apps
Context
Opens the previous screen you were working in, even if it was in a
different app. Once you back up to the Home screen, you can’t go back
any further in your history.
Opens Home. If you're viewing a left or right Home screen, opens the
Central Home screen.
Opens a list of thumbnail images of apps you've worked with recently.
To open an app, touch it. To remove a thumbnail from the list, swipe it
left or right.
Appears at the upper right screen. Opens the applications menu from
where you can touch and access the various applications.
In different applications, tapping on this will display the operation
settings interface. It is displayed at the top right corner or the lower
left corner of the screen.
Page 11

User Guide
4 Using the Touch Screen
Use your fingers to manipulate icons, buttons, menus, the onscreen keyboard, and other items on the touch
screen. You can also change the screen's orientation.
Touch: Acts on items on the screen, such as application and settings icons, to type letters and symbols using
the onscreen keyboard, or to press onscreen buttons.
Touch & hold: Touch and hold an item on the screen until an action occurs. For example, to open a menu for
customizing the Home screen, you can touch an empty area on the Home screen until a menu opens.
Drag: Touch and hold an item and move your finger on the screen until you reach the target position. For
example, you can drag to reposition shortcuts on the Home screen
Swipe or slide: Quickly slide your finger across the surface of the screen, (without dragging an item). For
example, you can slide a Home screen left or right to view the other Home screens.
Double-tap: Tap quickly twice on a webpage, map, or other screen to zoom. For example, double-tap a
section of a webpage in Browser to zoom that section to fit the width of the screen. You can also double-tap
to control the Camera zoom, In Maps, and in other applications.
Pinch: In some applications (Such as Maps, Browser, and Gallery) you can zoom in and out by placing two
fingers on the screen at once and pinching them together (to zoom out) or spreading them apart (to zoom
in).
Rotate the screen: Through the device’s G-sensor, the orientation of the screen rotates with the Device as
you turn it from upright to its slide and back again.
To type something, such as a name, password, or search terms, just touch where you want to type. A
Micromax Funbook Pro Page 9
Page 12

User Guide
keyboard pops up that lets you type into the field.
4.1 Arrange and work with Applications
To see all your apps, touch the Apps icon on any Home screen.
The Apps screen opens where you can see all your applications, including those downloaded from Android
Market. You can move the app icons to any of your Home screens.
From All Apps, you can:
Move between screens: Swipe left or right, or tap the right or left side of the screen (without touching any
application).
Place an app icon on a Home screen: Touch and hold the app icon, slide your finger, and lift your finger to
drop the icon in place.
Explore your widgets: Touch the Widgets tab at the top of any All Apps screen.
Get more apps. Touch the Shop icon.
To remove an app icon from the Home screen, touch and hold it, slide your finger toward the top of the screen,
and drop the app over the Remove icon.
4.2 Extended Home Screen
The Home screen consists of the 5 panels that extend beyond the display width to provide more space for
adding shortcuts, widgets and folders.
Slide your finger horizontally across the screen to scroll to the left or right side panels. As you scroll, the
Micromax Funbook Pro Page 10
Page 13

User Guide
indicator at the top of the display shows your current position.
4.3 Add Widgets
Widgets are like windows into your apps. They are available from the Apps tab for you to move onto your Home
screens.
To see your widgets:
1 Touch the Apps icon on your Home screen.
2. Touch Widgets at the top of the screen.
From the main Widgets screen, you can:
Move between screens: Swipe left or right
Drag a widget to a Home screen: Touch and hold the widget's icon, slide your finger where you want to
place it, and lift your finger.
Drag an existing widget to the Cross icon to delete the widget from the Home screen.
You may be asked to make further choices before the widget activates. If there is no room where you dropped it,
the widget would not get added to the Home screen.
Micromax Funbook Pro Page 11
Page 14

User Guide
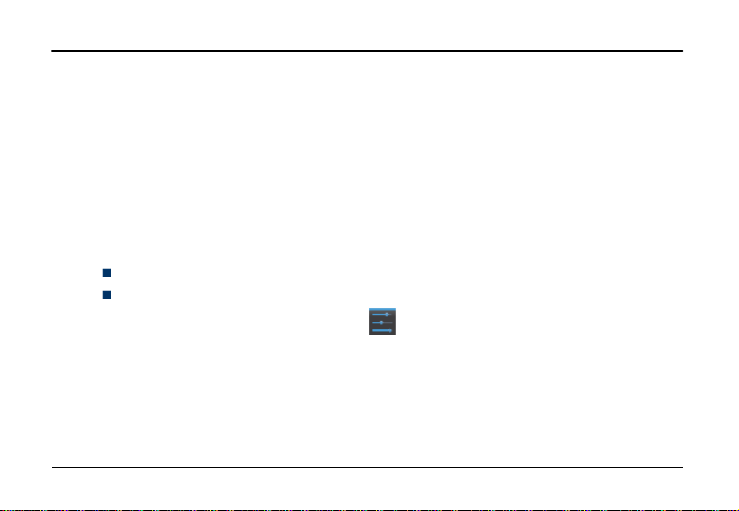
4.4 View Toolkits
Touch on the lower right portion of the screen to open the toolkit. The toolkits menu allows you to readily
access some common or often used preferences and settings:
To expand the menu, swipe your finger upward over the menu. The Toolkit pops up for you to set your
preferences.
Micromax Funbook Pro Page 12
Page 15

User Guide
To close the toolkit menu, swipe your finger down from the top of the screen.
Touch on the desired setting to set the preference.
Touch on the notification on the toolkit to view the notification.
Micromax Funbook Pro Page 13
Page 16
User Guide
5 Features
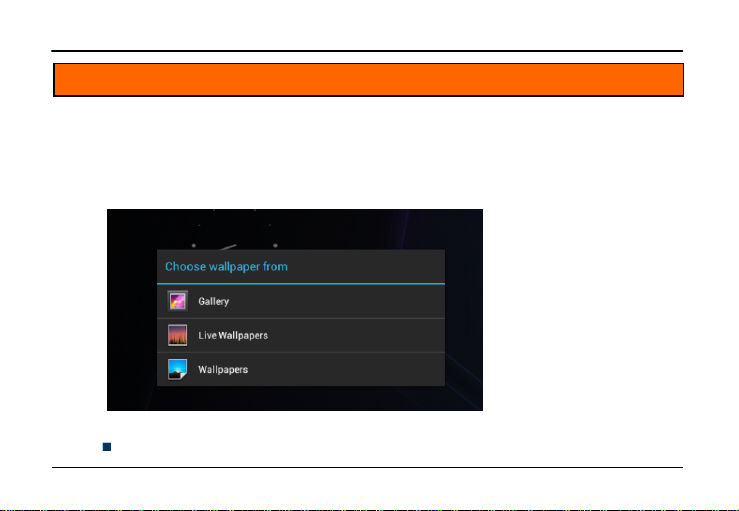
5.1 Change the Wallpaper
Wallpapers are images from Gallery (pictures you shot with Camera, or stored in the memory card and so on),
still images included with the system, and live images (such as an animation or a map that centers on your
location). They take the place of the default background for your Home screens.
1. Touch and hold anywhere on a Home screen that is not occupied. A list of options appears.
2. Touch a wallpaper source:
Gallery: Choose from pictures that you have taken with Camera or downloaded to your device.
Micromax Funbook Pro Page 14
Page 17

User Guide
Live Wallpapers: Choose from a list of live wallpapers.
Wallpapers: Choose from thumbnails of default images, or touch a thumbnail for a larger version.
You can download additional wallpapers from the Android Market.
3. Touch the desired wallpaper, picture or video to set the wallpaper.
Related settings
Settings > Device > Display > Wallpaper
5.2 Manage Accounts
You can set up a corporate, email, Facebook or Gmail account on your device. You can do this via the Accounts
& sync settings screen:
1. From a Home or main menu screen, touch the Settings icon.
2. Under Personal, touch Accounts & sync.
Micromax Funbook Pro Page 15
Page 18

User Guide
You may also be able to add other kinds of accounts, depending on your apps.
5.3 Why Use a Google Account
A Google account lets you organize and access your personal information from any computer or mobile device:
Synchronize Gmail and calendar. When you sign in to your device with a Google account, your Gmail and
Calendar are synchronized with the Gmail server.
Use other Google services. Your Google Account also lets you take full advantage of any other Google apps
and services that you may want to use, such as Gmail, Google Maps, Navigation, Android Market, YouTube,
Messaging, and many more.
Micromax Funbook Pro Page 16
Page 19

User Guide
5.4 Start Gmail
You can use Gmail to read and write email from any mobile device or browser. All your email is always up to
date and available no matter where you check it from.
But Gmail is not just about email. Your Gmail name and password signs you into to all Google apps and services,
including Search, News and Weather, people, market, maps, navigation, places, talk, Calendar and downloads
and many more.
1. To launch Gmail, touch the Gmail icon on a Home or Apps screen.
The first time you launch Gmail, you are asked to sign in or create an account. You can sign in using any of
your existing Gmail accounts to open the Inbox.
2. Touch the icons and menu along the bottom of the screen to archive, throw away, label, or perform other
actions on that message.
3. Swipe left or right to read the previous or next conversation.
Note: You need to have Internet connectivity to access Google and all the other associated features
described above.
Please refer to Accessing the Internet section 6 to know how to configure your Internet connection.
5.5 Google Search
Google Search can help you find anything you need on the web.
Touch the icon on the all apps screen to access google search.
Micromax Funbook Pro Page 17
Page 20

User Guide
As you type, suggestions from Google web search appear below the Search box.
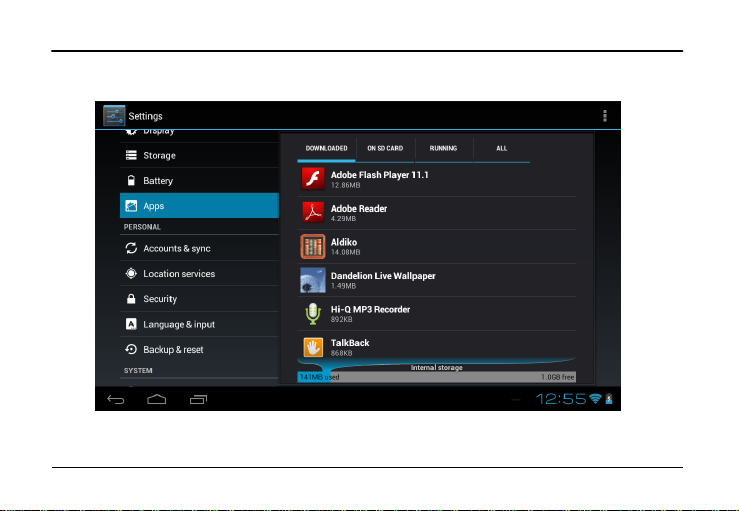
5.6 Manage Downloads
Files, and other items you download using the browser or in other ways can be stored in the location of your
choice.
Go to Settings> Device> Apps to view the applications and downloads on your tablet.
Tap on the application or download for actions such as move to SD card, clear, disable, force Stop etc.
5.7 Manage Your Calendar
The Calendar app lets you view and edit your schedules.
Using an existing Google Account, the first time you open the Calendar application, it displays any existing
calendar events from that Google Account on the web. As you edit events from any device or web browser, they
are synchronized automatically across all the places you need them.
Touch the Calendar icon to access the calendar.
To change the Calendar view, touch the date at the top and choose Day, Week, Month, or Agenda.
Swipe to scroll vertically or horizontally. In the Day or Week views, spread your fingers apart or pinch them
together to zoom in or out.
Touch the icon at the top right to set your calendar preferences and perform settings.
From any of these views, you can:
Micromax Funbook Pro Page 18
Page 21

User Guide
Read or edit event details. Touch an event to view its details.
Manage events and calendars. Touch icons across the top or Menu to search or create events, return to
today, or adjust settings.
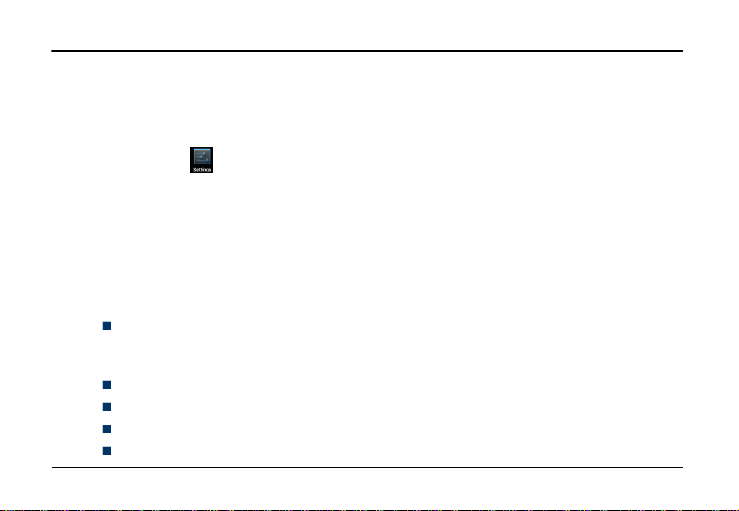
5.8 Settings
Press the settings icon to access the system settings.
You can choose settings and preferences for:
Wireless & Networks: Turn on Wi-Fi, check data usage and so on.
Device: Set device preferences for sound, display, storage, battery information, apps and so on.
Personal: Set preferences such as Accounts and Synch, Location and services, Security, language input,
backup and reset.
System: Settings such as date and time, accessibility, Developer options, view information about tablet.
5.9 Connecting with PC
Use the USB cable to connect the device to a PC or laptop, the device will pop up the USB connection menu. You
can start transferring files through the portable device dialog that opens.
5.10 Set the Language and Keyboard
Tap Settings> Personal> Language & Input for keyboard, language, input methods, text to speech, and pointer
Micromax Funbook Pro Page 19
Page 22

speed.
5.11 View Available Storage Space
User Guide
11..11.. TTaapp oonn MMeennuu>> ttoo aacccceessss tthhee SSeettttiinnggss..
2. Tap Storage under Device section.
The storage details displays.
Micromax Funbook Pro Page 20
Page 23

User Guide
5.12 Date & Time Setting
Tap Settings> System > Date & Time for setting the time zone and time format.
5.13 View About Device Information
Tap Settings>System> About Tablet for viewing information about the P500 Funbook Pro.
5.14 Use the HDMI out Feature
The HDMI Out feature makes it possible to share what’s on your tablet with an even bigger screen and an even
bigger audience.
Just attach the HDMI cable to the HDMI socket on your P500 Funbook Pro and you can watch a movie in
your living room on your HDTV.
Give a presentation in a conference room on an HD projection screen.
And use educational apps to teach an entire classroom. Your friends, coworkers, clients, and students all get
to have an excellent view of your presentation.
Micromax Funbook Pro Page 21
Page 24
User Guide
6 Accessing the Internet
For enjoying various features like Browser, Email, Gmail, Android Market, Google Search, Downloads and so on,
you need to first configure your Internet connection.
For this, you can go to Settings and do one of the following:
Enable Wi-Fi (If you have a Wi-Fi network within range with the required credentials). You can pick the
available network from the list displayed.
Tap More and then configure any one of Ethernet, VPN, or Mobile Networks.
6.1 Connect to Wi-Fi
For connecting to Wi-FI:
1. Tap on Menu> to access the Settings.
2. Under Wireless & Networks, tap and enable Wi-Fi.
3. Tap the desired Wi-Fi service from the list.
4. Provide the Wi-Fi credentials for logging in.
You can also scan to search for Wi-Fi network or Add Network to add your Wi-Fi manually.
Tap to set your advanced preferences.
Micromax Funbook Pro Page 22
Page 25

User Guide
6.2 Set up Internet Connection via Ethernet Cable.
You can connect your device to the Internet via the Ethernet cable that you normally use for connecting our PC
to the Internet. In the case of P500 Funbook Pro, you need a USB cable and USB LAN connector for this purpose.
1. Connect the mini 2 USB cable with this device. Next, connect the other end of the mini 2 USB cable with the
USB LAN connector.
2. Connect your Internet service provider’s Ethernet cable with the connector.
3. Tap on Menu> to access the Settings.
4. Under Wireless & Networks, tap More.
5. Tap Ethernet from the list.
6. Follow the steps as suggested.
6.3 Connect to VPN
You can use VPN to connect your device to the Internet.
1. Tap on Menu> to access the Settings.
2. Tap More under Wireless & Networks.
Since VPN is a secured network, you need to first set password for your tablet
2. Provide the required PIN/Password.
Micromax Funbook Pro Page 23
Page 26

User Guide
3. Add your network/server settings.
6.4 Connect to Internet via USB Dongle
You can use the 3G USB Dongle (Data card) that comes with this device to connect you to the Internet.
1. Connect the Mini 2 USB connector to the port on the P500 Funbook Pro( the port is located at the right side
of the PC).
2. Connect the other end of the Mini 2 USB connector with the USB dongle.
Note: ideally, when you plug in the USB dongle, the connectivity should be automatically configured and a
notification to this effect should display. If not, proceed with step 3 below.
3. Tap Menu> Settings> Wireless & Networks> More.
4. Tap Mobile Networks and then check the Data Enabled option and tap the Access Point Names to select
from the available list.
Note: If your data card is outside its circle, please checkmark the Data Roaming option.
6.5 How to Uninstall an Application
1. Tap on Menu> to access the Settings.
2. Tap on Apps under Device. A list of applications will display.
3. Tap on the application to be uninstalled.
Micromax Funbook Pro Page 24
Page 27
User Guide
4. Tap Uninstall.
Micromax Funbook Pro Page 25
Page 28
User Guide
6.6 Perform a Factory Reset
You can perform a factory rest of your device so that all the settings are returned to the settings original settings
when you bought the device.
11.. TTaapp oonn MMeennuu>> ttoo aacccceessss tthhee SSeettttiinnggss..
2. Tap Backup & Reset under personal section in settings.
3. Tap Factory Data Reset> Reset Tablet.
6.7 Troubleshooting
66..77..11 DDeevviiccee sshhuuttss ddoowwnn aafftteerr ssttaarrttuupp
Power is not enough, please charge your device.
66..77..22 CCaannnnoott ccooppyy ffiillee oorr ppllaayy mmuussiicc
Please check if the connection between the computer and the device is correct proper and correct.
Check whether the memory storage space is already full.
Check if the USB cable is not damaged or not
Check if USB is disconnected
Micromax Funbook Pro Page 26
Page 29

User Guide
66..77..33 TThhee ttaabblleett iiss hhaannggiinngg wwiitthh nnoo rreessppoonnssee.. HHooww ccaann II rreesseett tthhee TTaabblleett??
When the tablet is hanging with no response or has crashed, use a small pointed object such as a pin to short
press the reset socket; the tablet will be forced to shut down.
Remark: Unless unable to shut down, do not use the reset button. We recommend you to shut down the device
by normal method. Frequent resetting may affect your device.
Micromax Funbook Pro Page 27
Page 30
User Guide
7 Specifications
Screen Resolution 11002244
TF Card socket Micro SD (Push)
Loudspeaker 1 W/ 8 Ohm
BBaatttteerryy aanndd PPoowweerr
Power 5600 mAh
Capacity 3.7 Volts
Micromax Funbook Pro Page 28
660000 PPiixxeellss
Page 31
User Guide
8 Taking Care of Your Device
Your device is a product of superior design and craftsmanship and should be handled with care: The following
suggestions will help you protect your device:
Do not store the device in high or cold temperature. Extreme temperatures can shorten the life of electronic
devices and damage batteries.
Keep the device dry. Precipitation, humidity, and all types of liquids or moisture can contain minerals that will
rust electronic circuits. If your device does get wet, remove the battery without turning on the device, wipe it
with a dry cloth and take it the service center.
Do not use or store the device in dusty, dirty areas. Its moving parts and electronic components can get
damaged.
Do not drop, knock, shake or bend the device. Rough handling can break internal circuit boards and fine
mechanics.
Do not use harsh chemicals, cleaning solvents, or strong detergents to clean the device. Only use a soft, clean,
dry cloth to clean the surface of the device.
Do not store your device near magnetic fields or allow your device to come in contact with magnetic fields for
extended period of time as it may interfere with the electronic circuits and display.
Use manufacturer approved batteries, chargers, accessories and supplies. Micromax will not be held responsible
for user’s safety when using unapproved accessories or supplies. This goes against the warranty rules.
Do not attempt to repair the device by your own. Repairing the device by yourself other than our authorized
service agents/centers goes against the warranty rules.
Micromax Funbook Pro Page 29
Page 32

User Guide
Recycle Your Gadget
The WEEE logo (shown at the left) appears on the product (battery, handset, and
charger) to indicate that this product must not be disposed off or dumped with your
other household wastes. You are liable to dispose of all your electronic or electrical
waste equipment by relocating over to the specified collection point for recycling. of
such hazardous waste.
Specified collection points for recycling of such hazardous waste. Collection and proper recovery of your
electronic waste equipments at the time of disposal will allow us to help preserve the environment. Recycling
of the electronic waste equipment will ensure safety of human health and environment. For more information
on best practices for disposal of electronic and electrical waste, please visit to our web site:
www.micromaxinfo.com/weee.php.
Disclaimers
Micromax reserves the right to make modifications to any of the content in this user guide without prior
notification. The content of this guide may vary from the actual content displayed in the Tablet PC. In such a
case, the later shall govern.
All the pictures in this manual are for representation purpose only. Products appearance, color, design and
specifications are subject to change without prior notice.
The image and color of the device used in the manual is not necessarily the actual image of the device you
have purchased. It depends on the choice of the device you have purchased.
Micromax Funbook Pro Page 30
Page 33

User Guide
Copyrights
All rights reserved. Reproduction, transfer, distribution or storage of part or all of the contents in this
document in any form without the prior written permission of Micromax is strictly prohibited.
Customer Support
Helpline Number- 18605008286
Working Hours: Monday to Saturday 10: AM to 6:30 PM (Except National and Public Holidays).
Email Support: info@micromaxinfo.com
For more information on P250 Funbook Alpha, please visit our website at www.micromaxfunbook.com.
Micromax Funbook Pro Page 31
Page 34

 Loading...