

Page 1
A80 User Guide
Page 2

User Guide
1
1
WWeellccoommee
Congratulations on becoming the proud owner of the Micromax A80
Android mobile phone. You have now joined the millions of satisfied
Micromax customers spread across the Globe. Your A80 device offers
you these exciting features and much more:
Android 2.3.4 (Gingerbread)
9.525 CM touch screen
Band mode: GSM 900/1800
WCDMA 2100 MHz
5 MP FF Camera/0.3 Front Camera
External memory (Supports up to 32 GB)
800 Mhz Processor
Multimedia
Gravity sensor
Bluetooth 2.0/ USB 2.0
Wi-Fi 802.11 b/g/n
The colors and specifications shown/mentioned in the user manual
may differ from the actual product. Images shown are for
representation purpose only. Other product logos and company names
mentioned herein may be trademarks or trade names of their respective
owners.
Model – A80 2
Page 3

User Guide
1 Welcome 2
2 Phone Layout 6
2.1 Keya and Parts .................................................................................................. 6
2.2 Icons and Indicators ........................................................................................ 7
3 Getting Started 8
3.1 Insert SIM Card.................................................................................................. 8
3.2 Insert Memory card ......................................................................................... 9
3.3 Unlock the phone.............................................................................................. 9
3.4 Set Your Screen Lock ................................................................................. 10
4 Placing and Receiving Calls 11
4.1 To place a call by Dialing .......................................................................... 11
4.2 End a call ............................................................................................................ 12
4.3 Options During a Call .................................................................................. 12
4.4 Conference Call .............................................................................................. 12
4.5 Disable Phone Calls (Airplane mode) ............................................... 13
4.6 Using the Touch screen ............................................................................. 14
4.7 Using the Phone’s Buttons ...................................................................... 15
4.8 Open and Close the Launcher .............................................................. 16
4.9 Switch to Recently Used Application ................................................. 17
5 The Home Screen 18
5.1 Customize Home Screen .......................................................................... 19
55..11..11AAdddd iitteemmss ttoo tthhee HHoommee ssccrreeeenn ...................................................................................................................... 119
6 Working With Menus 20
6.1 Context Menus ................................................................................................ 20
6.2 Options menus ................................................................................................ 20
6.3 Menu Icons ........................................................................................................ 21
7 Aisha 21
8 Connect to the Internet 22
Model – A80 3
TTaabbllee ooff CCoonntteenntts
s
9
Page 4

User Guide
8.1 Access Internet via Wi-Fi .......................................................................... 23
9 Managing Notifications 23
9.1 Open the Notifications Panel ................................ .................................. 23
9.2 Respond to Notifications ........................................................................... 24
9.3 Clear all Notifications .................................................................................. 24
9.4 Close Notifications Panel.......................................................................... 25
9.5 Toolkits ................................................................................................................. 25
10 Messaging 26
10.1Create and Send Multimedia Message ........................................... 27
10.2Forward a message .................................................................................... 27
10.3Lock a Message ............................................................................................ 28
10.4. Using the Onscreen Keyboard .......................................................... 29
10.5Enter Various Characters......................................................................... 30
11 Multimedia 30
11.1Camera................................................................................................................ 30
11..11..11TTaakkee aa PPiiccttuurree oorr vviiddeeoo ........................................................................................................................................................ 331
11..11..22SShhoooott VViiddeeooss .................................................................................................................................................................................................... 331
11..11..33GGaalllleerryy ................................................................................................................................................................................................................................ 332
11..11..44SShhaarree aann AAllbbuumm ........................................................................................................................................................................................ 333
11.2Music ................................ .................................................................................... 33
11..11..55CCoonnttrrooll PPllaayybbaacckk VVoolluummee .............................................................................................................................................. 335
11.3FM Radio............................................................................................................ 35
11.4Record Sounds............................................................................................... 36
12 Manage Accounts 37
12.1Why Use a Google Account ................................................................... 37
12.2Google Search ............................................................................................... 37
13 Connect to Networks and Devices 37
13.1Connect to Internet ...................................................................................... 38
Model – A80 4
1
1
2
3
5
Page 5

User Guide
13.2Connect to Wi-Fi Networks ..................................................................... 38
13.3Pair With Bluetooth Devices .................................................................. 38
1133..33..11CCoonnnneecctt ttoo IInntteerrnneett vviiaa yyoouurr PPhhoonnee ............................................................................................ 338
13.4Install Secure Certificate from SD Card .......................................... 39
14 Applications 40
15 Phone Settings 40
16 Health and Safety Information 42
17 Taking Care of Your Device 45
Model – A80 5
8
Page 6
2
2
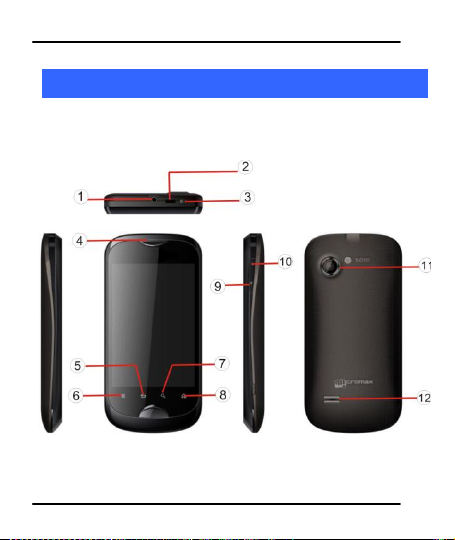
PPhhoonnee LLaayyoouutt
2.1 Keya and Parts
User Guide
Model – A80 6
Page 7
User Guide
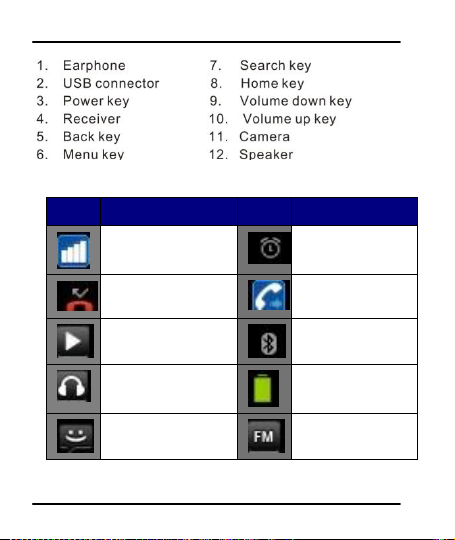
Icons
Indicators
Icons
Indicators
Signal strength
indicator
Alarm has been set
New missed calls
Call Divert
Unconditionally
Music player is on
Bluetooth is on
The headphone is
being used
Battery level
New message
FM Radio is on
2.2 Icons and Indicators
Model – A80 7
Page 8
User Guide
3
3
GGeettttiinngg SSttaarrtteedd
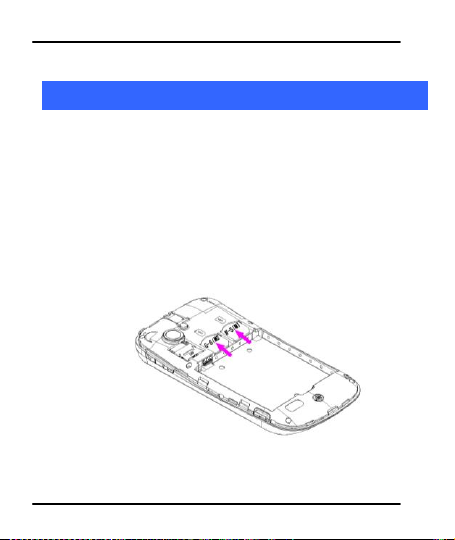
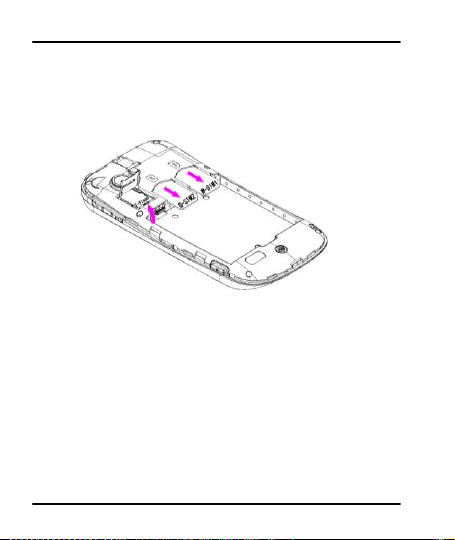
3.1 Insert SIM Card
TThhee AA8800 iiss aa DDuuaall SSIIMM mmoobbiillee pphhoonnee aalllloowwiinngg yyoouu ttoo uussee tthhee
ffaacciilliittyy ooff ttwwoo nneettwwoorrkkss..
TToo iinnsseerrtt SSIIMM ccaarrdd((ss))::
1. Switch off the mobile phone and remove the rear cover and
battery.
2. Insert the SIM card correctly in the card slot(s) (See figure
below).
3. Finally insert the battery and replace the rear cover of the
mobile phone.
Model – A80 8
Page 9
User Guide
3.2 Insert Memory card
1. Power off the mobile phone, then remove the rear cover and
battery.
2. Insert the memory card into the slot as shown.
3. Finally insert the battery and the rear cover of the mobile
phone.
UUssee oonnllyy ccoommppaattiibbllee mmeemmoorryy ccaarrddss aapppprroovveedd bbyy MMiiccrroommaaxx wwiitthh
tthhiiss ddeevviiccee.. IInnccoommppaattiibbllee mmeemmoorryy ccaarrddss mmaayy ddaammaaggee tthhee ddeevviiccee
oorr ccoorrrruupptt tthhee ddaattaa ssttoorreedd iinn tthhee ccaarrdd..
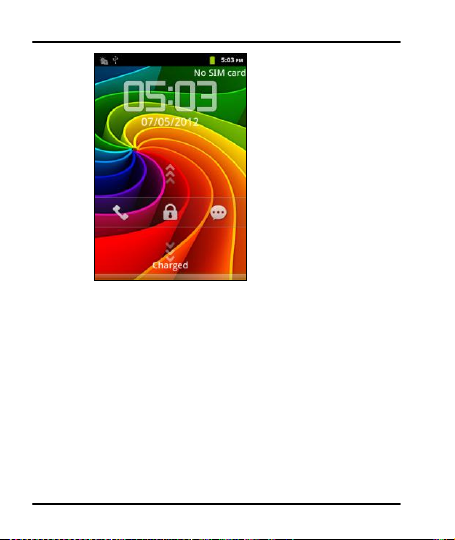
3.3 Unlock the phone
YYoouu mmaayy nneeeedd ttoo pprroovviiddee PPIINN,, PPaasssswwoorrdd,, oorr ddrraaww aa ppaatttteerrnn ttoo
uunnlloocckk yyoouurr pphhoonnee.. TToo uunnlloocckk tthhee ssccrreeeenn::
11.. PPrreessss tthhee ppoowweerr kkeeyy ttoo wwaakkee uupp tthhee pphhoonnee..
Model – A80 9
Page 10
User Guide
2. Drag the screen up to unlock.
To set the unlock method:
Tap Settings> Security> Set up screen lock to set your type of
screen lock.
3.4 Set Your Screen Lock
YYoouu ccaann sseett yyoouurr ssccrreeeenn lloocckk aass aa sseeccuurriittyy mmeeaassuurree.. YYoouu mmaayy aallssoo
bbee rreeqquuiirreedd ttoo lloocckk yyoouurr ssccrreeeenn bbyy aa ppoolliiccyy sseett bbyy aann eemmaaiill oorr
ootthheerr aaccccoouunntt yyoouu aadddd ttoo yyoouurr pphhoonnee..
1. On the main menu, touch Settings > Security.
22.. TToouucchh SSeett uupp ssccrreeeenn lloocckk..
Model – A80 10
Page 11

User Guide
3. Choose the type of locking as desired. You can set your screen
lock on the basis of pattern, PIN, Password or none.
4
4
PPllaacciinngg aanndd RReecceeiivviinngg CCaallllss
YYoouu ccaann ddiiaall aa pphhoonnee nnuummbbeerr oorr ttoouucchh aa nnuummbbeerr iinn yyoouurr
ccoonnttaaccttss..
YYoouu ccaann aallssoo ppllaaccee ffrroomm tthhee CCaallll lloogg oorr ccoonnttaaccttss..
4.1 To place a call by Dialing
1. Touch the phone icon on the Home screen or touch the
Phone tab from Contacts or the Call log.
2. Touch the keys to enter the phone number. To correct a
wrong number, touch to erase the digits.
To dial an international number, touch and hold the 0 key to
enter the Plus (+) symbol, and then enter the international
country prefix, followed by the phone number.
Touch the icon to dial the number.
Press the Volume Up/ Down keys to adjust the call volume.
You can access Call Logs, Contacts or groups from the dialer
screen.
Model – A80 11
Page 12

4.2 End a call
User Guide
WWhhiillee dduurriinngg aa ccaallll,, ttoouucchh tthhee
iiccoonn..
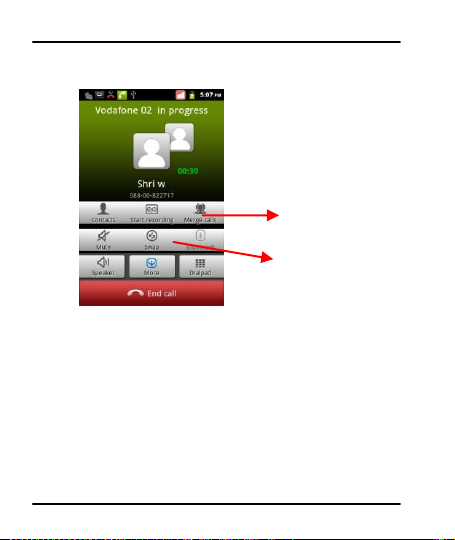
4.3 Options During a Call
WWhheenn aa ccaallll iiss iinn pprrooggrreessss,, yyoouu ccaann ppuutt iitt oonn hhoolldd,, iinniittiiaattee aa
pphhoonnee ccoonnffeerreennccee,, mmuuttee yyoouurr mmiiccrroopphhoonnee eettcc..
To place a call on hold, touch the Hold icon.
Take the call off hold by touching the Unhold icon.
Touch the Mute icon to mute your voice at the other end.
Unmute the microphone by touching the Mute icon again.
Touch the speaker icon to turn on/off the speaker.
You can also view or hide the dialpad during a call.
4.4 Conference Call
IIff yyoouu ddiiaall oorr aacccceepptt aa nneeww ccaallll wwhheenn yyoouu aarree aallrreeaaddyy oonn aa ccaallll,,
yyoouu ccaann oorr mmeerrggee tthhee ccaallllss iinnttoo aa ccoonnffeerreennccee ccaallll..
1. Place a call to the first participant.
2. When you are connected, touch the Add call icon, the first
participant is put on hold and you are prompted to dial the
second contact.
3. Place the next call, using the phone tab, the Call log, or your
contacts.
Model – A80 12
Page 13
User Guide
Touch to swap calls
Touch to merge the calls
into a conference call.
4. When you are connected, touch Merge calls. The participant is
added to the conference call.
You can add as many callers as your carrier supports.
Recommendation: Contact your service provider to know
whether they support conference calls and how many
participants you can include.
4.5 Disable Phone Calls (Airplane mode)
SSoommee llooccaattiioonnss mmaayy rreeqquuiirree yyoouu ttoo ttuurrnn ooffff yyoouurr mmoobbiillee,, WWii--FFii,,
aanndd BBlluueettooootthh wwiirreelleessss ccoonnnneeccttiioonnss.. YYoouu ccaann ttuurrnn ooffff aallll tthheessee
ccoonnnneeccttiioonnss aatt oonnccee bbyy ppllaacciinngg yyoouurr pphhoonnee iinn AAiirrppllaannee mmooddee..
1. Press and hold the Power button.
2. Drag notification panel down then touch the Airplane mode.
Model – A80 13
Page 14

User Guide
4.6 Using the Touch screen
YYoouu ccaann uussee tthhee ttoouucchh ssccrreeeenn iinn tthhee ffoolllloowwiinngg wwaayyss::
Touch: Acts on items on the screen, such as ap plication and
settings icons, to type letters and symbols using the onscreen
keyboard, or to press onscreen buttons.
Touch and hold: Touch and hold an item on the screen until
an action occurs.
Drag: Touch and hold an item and move your finger on the
screen until you reach the target position.
Swipe or slide: Quickly slide your finger across the surface of
the screen, (without dragging an item). For example, slide
the screen up or down to scroll a list,.
Double-tap: Tap quickly twice on a webpage, map, or other
screen to zoom. For example, double-tap a section of a
webpage in Browser to zoom that section to fit the width of
the screen. You can also double-tap to control the Camera
zoom, in Maps, and in other applications.
Pinch: In some applications (Such as Maps, Browser, and
Gallery) you can zoom in and out by placing two fingers on
the screen at once and pinching them together (to zoom out)
or spreading them apart (to zoom in).
Rotate the screen: On most screens, the orientation of the
screen changes as you rotate it. You can turn this feature on
and off.
Model – A80 14
Page 15
User Guide
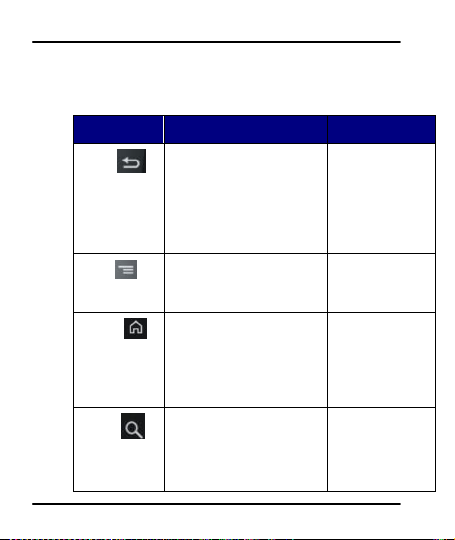
Button
Press
Press and hold
Back
Opens the previous
screen you were working
on,
If the onscreen keyboard
is open, closes the
keyboard
Menu
Opens a menu with items
that affect the current
screen or Application.
Home
Open the Home screen, If
you are viewing the left
or right Extended Home
screen, opens the central
Home screen.
Opens the most
recently
Used
applications
screen.
Search
On the home screen,
opens Google search to
search your phone and
the web. In many
applications, opens a
Opens Google
search by
voice.
4.7 Using the Phone’s Buttons
TThhee pphhoonnee’’ss bbuuttttoonnss aanndd ssoofftt bbuuttttoonnss ooffffeerrss aa lloott ooff ffuunnccttiioonnss
aanndd sshhoorrttccuuttss..
Model – A80 15
Page 16

User Guide
Search box for searching
within the application.
Touch an application to
open it.
Slide the Launcher left
or right to bring more
icons into view.
4.8 Open and Close the Launcher
TToouucchh tthhee LLaauunncchheerr IIccoonn
YYoouu ccaann aadddd aann aapppplliiccaattiioonn iiccoonn ttoo tthhee HHoommee ssccrreeeenn bbyy pprreessssiinngg
aanndd hhoollddiinngg iitt uunnttiill iitt vviibbrraatteess aanndd eenntteerrss HHoommee ssccrreeeenn aanndd tthhee
rreelleeaassee yyoouurr ffiinnggeerr..
PPrreessss HHoommee iiccoonn oorr BBaacckk iiccoonn ttoo cclloossee tthhee LLaauunncchheerr..
Model – A80 16
ttoo ooppeenn tthhee mmaaiinn mmeennuu..
Page 17

User Guide
Touch an icon to open
an application
4.9 Switch to Recently Used Application
11.. PPrreessss aanndd hhoolldd tthhee iiccoonn ffoorr aa ffeeww sseeccoonnddss..
2. Touch an icon to open its application. Or press to
return to the current application.
Model – A80 17
Page 18

User Guide
Tap items on the Home screen
to open them. Touch and hold an
empty spot to add a shortcut to
an application, a widget and so
on
Touch the menu icons to open the
menus on the screen such as home
screen, main menu, call logs and so
on.
The status bar shows the time,
signal strength, battery status, and
notification icons.
5
5
TThhee HHoommee SSccrreeeenn
When you sign in, the home screen opens.
The main menu screen is your starting point to access all the
features on your phone.
At the top of the screen, the Status bar displays the time,
status, and notifications.
Touch the main menu icon at the bottom of the screen to
view all installed applications.
Model – A80 18
Page 19

User Guide
5.1 Customize Home Screen
YYoouu ccaann aadddd aapppplliiccaattiioonnss,, sshhoorrttccuuttss,, wwiiddggeettss,, aanndd ootthheerr iitteemmss ttoo
aannyy ppaarrtt ooff tthhee HHoommee ssccrreeeenn oorr cchhaannggee tthhee wwaallllppaappeerr..
55..11..11 AAdddd iitteemmss ttoo tthhee HHoommee ssccrreeeenn
11.. PPrreessss ttoo ooppeenn tthhee HHoommee ssccrreeeenn..
2. Touch > Add+ or just touch and hold an empty location
on the Home screen.
3. A menu for adding the following pops up.
Shortcuts: Add shortcuts to applications, a bookmarked
webpage, a favorite contact, a destination in Maps, a music
play list, etc. The shortcuts available depend on the
applications you have installed.
Custom Shortcut: Lets you define your own shortcut
Widgets: Add any application (widgets) to your Home screen,
Including clock, music player, pictures and so on . You can
also download widgets from Android Market.
Folders: Add a folder where you can organize Home screen
items, or folders that contain all your contacts, contacts with
phone number, or starred contacts. Your folder’s contents are
kept up to date automatically.
Wallpapers:Choose different types of wallpapers as desired.
Model – A80 19
Page 20

User Guide
Options menu
Context menu
6
6
WWoorrkkiinngg WWiitthh MMeennuuss
TThhee pphhoonnee pprroovviiddeess yyoouu wwiitthh CCoonntteexxtt mmeennuuss aanndd OOppttiioonnss
mmeennuuss ffoorr aacccceessssiinngg tthhee ffeeaattuurreess iinn aann iinnttuuiittiivvee wwaayy..
6.1 Context Menus
You can open context menu by touching on any screen.
Not all screens have context menus. If you touch on a
screen that has no context menu, nothing happens.
6.2 Options menus
OOppttiioonnss mmeennuuss ccoonnttaaiinn ttoooollss tthhaatt aappppllyy ttoo ssppeecciiffiicc iitteemmss oonn tthhee
ssccrreeeenn.. YYoouu ccaann ooppeenn aann ooppttiioonn bbyy ttoouucchhiinngg aanndd hhoollddiinngg aann iitteemm
Model – A80 20
Page 21

User Guide
Opens the dialer
Opens messaging
Opens the main menu
Opens the call logs
Opens the browser
oonn tthhee ssccrreeeenn.. NNoott aallll iitteemmss hhaavvee ooppttiioonnss mmeennuuss..
WWhheenn yyoouu ttoouucchh aanndd hhoolldd ssoommee iitteemmss oonn aa ssccrreeeenn,, aann OOppttiioonnss
mmeennuu ooppeennss..
6.3 Menu Icons
YYoouu hhaavvee tthhee ffoolllloowwiinngg mmeennuu iiccoonnss ttoo eeaassiillyy lleett yyoouu aacccceessss iittss
iimmppoorrttaanntt ffeeaattuurreess::
7
7
AAiisshhaa
Your Superfone Infinity comes with Aisha, an interactive
assistant which follows your voice commands and even talks to
you. Use the interactive features of Aisha to get things done for
you. For more information on how to use Aisha, please refer to
the Flyer that comes with your phone’s packaging.
Model – A80 21
Page 22

User Guide
Before you start using Aisha, you would need to do the
following:
1. Connect to the Internet (refer to section 8)
2. Tap on the Aisha icon and it will automatically install the
required data on to your SD card. Proceed with the
installation as suggested.
NNooww yyoouu aarree rreeaaddyy ttoo uussee AAiisshhaa.. PPlleeaassee rreeffeerr ttoo tthhee AAiisshhaa FFllyyeerr
tthhaatt ccoommeess aalloonngg wwiitthh yyoouurr AA8800 ttoo eexxpplloorree tthhee wwoorrlldd ooff aaiisshhaa..
8
8
CCoonnnneecctt ttoo tthhee IInntteerrnneett
TToo ccoonnffiigguurree yyoouurr IInntteerrnneett::
1. Go to Settings> Wireless & Networks >Mobile
Networks >access point names.
3. Select the access point name or change the access point name
for your Internet connectivity as provided by the service
provider of your SIM card.
By default, your network provider sends the access point
name settings via SMS, or it comes with your SIM card. You
may need to install these settings. After this, you can choose
from the listed access point names. If the access point names
are not listed by default, please contact your network provider
for the same.
3. After you have selected or configured the access point name,
Model – A80 22
Page 23

User Guide
go to SSeettttiinnggss>> SSIIMM MMaannaaggeemmeenntt>> DDaattaa CCoonnnneeccttiioonn and tap
the desired data connection to enable Internet connection.
8.1 Access Internet via Wi-Fi
TToo bbrroowwssee tthhee IInntteerrnneett vviiaa WWii--FFii::
1. Go to Menu> settings> wireless & networks and then enable
Wi-Fi.
2. Next, go to Menu> settings> wireless & networks > Wi-Fi
Settings and then select the WIFI connection listed under
Wi-Fi networks.
9
9
MMaannaaggiinngg NNoottiiffiiccaattiioonnss
NNoottiiffiiccaattiioonn iiccoonnss iinnffoorrmmss yyoouu ooff nneeww mmeessssaaggeess aanndd eevveennttss,,
WWhheenn yyoouu rreecceeiivvee aa nnoottiiffiiccaattiioonn,, iittss iiccoonn aappppeeaarrss iinn tthhee ssttaattuuss
bbaarr,, aalloonngg wwiitthh aa ssuummmmaarryy tthhaatt aappppeeaarrss oonnllyy bbrriieeffllyy..
9.1 Open the Notifications Panel
Drag the status bar down from the top of the screen as shown
below.
Model – A80 23
Page 24

User Guide
TThhee NNoottiiffiiccaattiioonnss ppaanneell ddiissppllaayyss yyoouurr nneettwwoorrkk pprroovviiddeerr nnaammee
aanndd aa lliisstt ooff yyoouurr ccuurrrreenntt nnoottiiffiiccaattiioonnss..
9.2 Respond to Notifications
Open the notification panel and touch a notification to
respond to it.
What happens next depends on the notification. For example,
for network disconnection notification, the list of configured
network opens for you to reconnect.
9.3 Clear all Notifications
Open the Notifications panel
Model – A80 24
Page 25

User Guide
Touch the desired event at the panel. All event-based
notifications are cleared; ongoing notifications remain in the
list.
9.4 Close Notifications Panel
Drag the tab at the bottom of the Notifications panel to the
top of the screen. Or just press the back button. The panel
also closes when you touch a notification to respond to it.
9.5 Toolkits
YYoouu ccaann ttaapp oonn tthhee TToooollkkiittss mmeennuu ttoo aacccceessss mmaannyy ttoooollss ttoo hhaannddllee
tthhee sseettttiinnggss ooff yyoouurr pphhoonnee..
Model – A80 25
Page 26

User Guide
Touch to compose a
new text or
multimedia message.
Touch to open a
messaging
conversation
0
110
MMeessssaaggiinngg
YYoouu ccaann uussee MMeessssaaggiinngg ttoo eexxcchhaannggee tteexxtt mmeessssaaggeess aanndd
mmuullttiimmeeddiiaa mmeessssaaggeess wwiitthh yyoouurr ffrriieennddss oonn tthheeiirr mmoobbiillee pphhoonneess..
You can also press the key and open the context menu
to work on messages and their settings.
Model – A80 26
Page 27

User Guide
AA MMeessssaaggee bbeeccoommeess aann MMMMSS iiff yyoouu sseenndd iitt ttoo aann eemmaaiill aaddddrreessss,,
oorr aadddd mmuullttiimmeeddiiaa mmeeddiiaa ffiillee((ss))..
10.1 Create and Send Multimedia Message
1. Touch compose new message.
2. Enter or select a mobile phone number.
3. Touch the composition text box and enter your message body.
4. Touch the key to attach various types of attachments
55.. TToouucchh ttoo sseenndd tthhee mmuullttiimmeeddiiaa mmeessssaaggee..
10.2 Forward a message
1. Open a message. and then touch that message in a message
Model – A80 27
Page 28

User Guide
Touch to forward the
message.
Tap to lock the message.
conversation window.
22.. TToouucchh FFoorrwwaarrdd iinn tthhee mmeennuu tthhaatt ooppeennss..
33.. AAdddd aa ccoonnttaacctt..
44.. TToouucchh SSeenndd iiccoonn ttoo sseenndd tthhee mmeessssaaggee..
You can also Copy message text, Save message to SIM card,
View message details and delete message
10.3 Lock a Message
YYoouu ccaann lloocckk aa mmeessssaaggee ssoo iitt wwoonn’’tt bbee ddeelleetteedd iiff yyoouu rreeaacchh yyoouurr
ssttoorraaggee lliimmiittss..
11.. TToouucchh aanndd hhoolldd mmeessssaaggee iinn aa mmeessssaaggee wwiinnddooww..
Model – A80 28
Page 29

User Guide
Tap this icon to select
desired contact from
phonebook
Touch once to capitalize
the next letter you type.
Touch and hold for caps.
Press space or a
punctuation mark to enter
the highlighted suggestion.
2. Touch Lock message in the menu that opens. Unlock a
message by touching and holding it and then touch Unlock
message.
10.4 . Using the Onscreen Keyboard
SSoommee aapppplliiccaattiioonnss ddiissppllaayy tthhee kkeeyybbooaarrdd bbyy ddeeffaauulltt.. IInn ootthheerrss,,
yyoouu ttoouucchh aa tteexxtt ffiieelldd wwhheerree yyoouu wwaanntt ttoo eenntteerr tteexxtt,, ttoo ooppeenn tthhee
kkeeyybbooaarrdd..
Use the icon to erase characters.
Model – A80 29
Page 30

User Guide
After typing, press icon to close the keyboard.
10.5 Enter Various Characters
Press the symbols key to switch to the numbers and symbols
keyboard.
Touch and hold the text field to open a menu and to copy/cut
texts.
1
111
MMuullttiimmeeddiiaa
11.1 Camera
Your camera’s pictures and videos are stored in the SD card, so
you must insert one to use the Camera. You can copy pictures
and videos from the SD card to a PC and vice versa.
Model – A80 30
Page 31

User Guide
Drag left/right to toggle
between video/camera
mode.
Touch to take a picture/ video.
Touch settings to change
them
11..11..11 TTaakkee aa PPiiccttuurree oorr vviiddeeoo
TToouucchh tthhee CCaammeerraa iiccoonn iinn tthhee mmaaiinn mmeennuu..
Adjust the exposure, and other settings as you wish.
Frame your subject on screen.
Touch the shutter icon on the screen.
11..11..22 SShhoooott VViiddeeooss
Drag the control to the video position
Adjust the quality, effect, and other settings if you wish.
Point the lens to the scene you want to capture
Model – A80 31
Page 32

User Guide
Touch to switch to
camera
Slide left or
right to view
more albums
Album of photos
and videos
Touch the start video icon.
Touch the stop video icon to stop shooting.
11..11..33 GGaalllleerryy
Model – A80 32
YYoouu ccaann uussee tthhee GGaalllleerryy ttoo vviieeww ppiiccttuurreess aanndd ppllaayy vviiddeeooss aanndd
sshhaarree ffiilleess..
1. Touch the Gallery icon in the main menu.
2. Open Gallery from the camera by tapping and touching
Gallery.
33.. TToouucchh aann aallbbuumm ttoo ooppeenn aanndd vviieeww iittss ccoonntteennttss..
4. Peek into an album stack by touching it with two fingers and
spreading them apart.
55.. TToouucchh aa ppiiccttuurree oorr aa vviiddeeoo iinn aann aallbbuumm ttoo vviieeww iitt..
Page 33

User Guide
Touch a tab to view
your library in one
of four ways
Touch to open the
album, songs or playlist.
11..11..44 SShhaarree aann AAllbbuumm
11.. OOppeenn tthhee mmaaiinn GGaalllleerryy wwiinnddooww..
22.. PPrreessss MMeennuu ttwwiiccee..
33.. CChheecckk oorr uunncchheecckk tthhee aallbbuummss yyoouu wwaanntt ttoo sshhaarree..
4. Touch Share at the bottom of the screen. In the menu that
opens, touch the application to use to share the selected
albums.
YYoouu ccaann sshhaarree vviiaa eemmaaiill,, BBlluueettooootthh,, GGmmaaiill aanndd mmeessssaaggiinngg..
11.2 Music
YYoouu ccaann eeaassiillyy ttrraannssffeerr yyoouurr ffaavvoorriittee mmuussiicc ffrroomm yyoouurr PPCC ttoo tthhee
SSDD ccaarrdd aanndd eexxppeerriieennccee aa wwhhoollee wwoorrlldd ooff iinntteerreessttiinngg aanndd
mmeellooddiioouuss mmuussiicc..
Model – A80 33
Page 34

User Guide
YYoouu ccaann rreettuurrnn ttoo tthhee mmaaiinn lliibbrraarryy ssccrreeeenn ffrroomm mmoosstt ootthheerr
ssccrreeeennss iinn tthhee MMuussiicc aapppplliiccaattiioonnss bbyy pprreessssiinngg MMeennuu aanndd
ttoouucchh LLiibbrraarryy..
Model – A80 34
Page 35

Touch to open
the current playlist
Touch to shuffle the
current playlist
Touch to repeat
the current playlist;
touch again to repeat
the current track.
Drag the slider to
go directly to a
section of a track
Skip tracks, stops or
resume playback.
User Guide
11..11..55 CCoonnttrrooll PPllaayybbaacckk VVoolluummee
PPrreessss tthhee pphhoonnee’’ss vvoolluummee uupp//ddoowwnn kkeeyyss oonn tthhee rriigghhtt ssiiddee ooff tthhee
mmoobbiillee pphhoonnee.. AA ppaanneell ooppeennss ttoo sshhooww tthhee ccuurrrreenntt mmeeddiiaa vvoolluummee;;
tthhee iinnddiiccaattoorr mmoovveess aass yyoouu aaddjjuusstt tthhee vvoolluummee..
11.3 FM Radio
YYoouu ccaann lliisstteenn ttoo yyoouurr ffaavvoorriittee FFMM cchhaannnneellss uussiinngg tthhee iinnbbuuiilltt FFMM
rreecceeiivveerr ooff yyoouurr pphhoonnee..
Model – A80 35
Page 36

User Guide
Touch to navigate
channels
Touch to play or
pause the FM
Radio
Turn on the
speaker
Touch to navigate
channel
Touch to view
the channels list.
Touch to add to
Favorite list
11.4 Record Sounds
YYoouu nneeeedd ttoo hhaavvee aa mmiiccrroo SSDD ccaarrdd iinnssttaalllleedd oonn yyoouurr pphhoonnee ttoo uussee
ssoouunndd rreeccoorrddeerr..
1. Tap to start recording a voice clip. “Recording” appears
when it is recording a voice clip.
2. Tap to stop and save the recording.
Model – A80 36
Page 37

User Guide
2
112
MMaannaaggee AAccccoouunnttss
YYoouu ccaann sseett uupp aa ccoorrppoorraattee,, GGooooggllee aaccccoouunntt eettcc oonn yyoouurr ddeevviiccee.. YYoouu
ccaann ddoo tthhiiss bbyy ttaappppiinngg SSeettttiinnggss>> AAccccoouunnttss && ssyynncc>> AAdddd AAccccoouunntt::
YYoouu mmaayy aallssoo bbee aabbllee ttoo aadddd ootthheerr kkiinnddss ooff aaccccoouunnttss,, ddeeppeennddiinngg oonn
yyoouurr aapppplliiccaattiioonn..
12.1 Why Use a Google Account
YYoouurr GGooooggllee AAccccoouunntt lleettss yyoouu ttaakkee ffuullll aaddvvaannttaaggee ooff GGooooggllee
aapppplliiccaattiioonnss aanndd sseerrvviicceess tthhaatt yyoouu mmaayy wwaanntt ttoo uussee,, ssuucchh aass
GGmmaaiill,, GGooooggllee MMaappss,, NNaavviiggaattiioonn,, AAnnddrrooiidd MMaarrkkeett,, YYoouuTTuubbee,,
MMeessssaaggiinngg,, aanndd mmaannyy mmoorree..
12.2 Google Search
GGooooggllee SSeeaarrcchh ccaann hheellpp yyoouu ffiinndd aannyytthhiinngg yyoouu nneeeedd oonn tthhee wweebb..
TToouucchh tthhee iiccoonn oonn tthhee aallll aappppss ssccrreeeenn ttoo aacccceessss ggooooggllee
sseeaarrcchh..
3
113
CCoonnnneecctt ttoo NNeettwwoorrkkss aanndd DDeevviicceess
YYoouurr pphhoonnee ccaann ccoonnnneecctt ttoo aa vvaarriieettyy ooff nneettwwoorrkkss aanndd ddeevviicceess,,
iinncclluuddiinngg WWii--FFii,, GGPPRRSS,, BBlluueettooootthh,, ddeevviicceess,, ssuucchh aass hheeaaddsseettss.. YYoouu
Model – A80 37
Page 38

User Guide
ccaann aallssoo ttrraannssffeerr ffiilleess ttoo//ffrroomm yyoouurr PPCC tthhrroouugghh tthhee ddaattaa ccaabbllee..
13.1 Connect to Internet
Refer to section 8.
13.2 Connect to Wi-Fi Networks
Refer to Section 8.1.
13.3 Pair With Bluetooth Devices
1. Go to Settings > Wireless & networks> Bluetooth settings.
2. If Bluetooth is off, check Bluetooth to turn it on. Your phone
scans and display the Bluetooth devices in range.
3. If the device you want to pair with is not in the list, make it
discoverable.
4. If your phone stops scanning before you make the other
device discoverable, touch Scan for devices.
5. Touch the ID of the other device in the list in Settings to pair
them. If you are prompted to enter a password, try entering
0000 or 1234 (the most common password), If the pairing is
successful, your phone connects to the device.
1133..33..11 CCoonnnneecctt ttoo IInntteerrnneett vviiaa yyoouurr PPhhoonnee
YYoouu ccaann bbrroowwssee tthhee IInntteerrnneett oonn yyoouurr PPCC uussiinngg yyoouurr mmoobbiillee
pphhoonnee.. TToo ddoo tthhiiss::
1. Connect your mobile phone to your PC via the USB adaptor.
Model – A80 38
Page 39

User Guide
2. Go to Menu> Settings> Wireless & Networks> Tethering &
portable hotspot > and then touch USB Tethering.
AA pprroommpptt ffoorr iinnssttaallllaattiioonn wwiillll aappppeeaarr oonn yyoouurr PPCC.. PPrroocceeeedd aass
ssuuggggeesstteedd..
IInn ccaassee ooff LLiinnuuxx ,, WWiinnddoowwss 77 aanndd VViissttaa OOSS,, tthhee ddrriivveerrss ggeett
aauuttoommaattiiccaallllyy iinnssttaalllleedd..
HHoowweevveerr,, iinn ccaassee ooff WWiinnddoowwss XXPP,, yyoouu nneeeedd ttoo mmaannuuaallllyy iinnssttaallll
tthhee ddrriivveerrss..
13.4 Install Secure Certificate from SD Card
IIff yyoouurr VVPPNN oorr WWii--FFii NNeettwwoorrkk rreellyy oonn sseeccuurree cceerrttiiffiiccaatteess,, yyoouu
mmuusstt oobbttaaiinn tthhee cceerrttiiffiiccaatteess aanndd ssttoorree tthheemm iinn yyoouurr pphhoonnee’’ss
ssttoorraaggee,, bbeeffoorree yyoouu ccaann ccoonnffiigguurree aacccceessss ttoo tthhoossee VVPPNN oorr WWii--FFii
nneettwwoorrkkss oonn yyoouurr pphhoonnee..
YYoouu mmaayy nneeeedd ttoo ddoowwnnllooaadd tthhee cceerrttiiffiiccaatteess ffrroomm aa wweebbssiittee....
1. Copy the certificate from your computer to the root of the SD
2. Touch Settings> Application> Security.
3. Touch Install from SD card under Credential Storage.
4. Touch the file name of the certificate to install. Only the names
5. If prompted, enter the certificate’s password and touch OK.
Model – A80 39
card.
of certificates that you have not already installed on your
phone are displayed.
Page 40

User Guide
6. Enter a name for the certificate and touch OK.
4
114
AApppplliiccaattiioonnss
YYoouu pphhoonnee ccoommeess wwiitthh aa hhoosstt ooff aapppplliiccaattiioonnss lliikkee GGooooggllee SSeeaarrcchh,,
GGmmaaiill,, llaattiittuuddee,, FFaacceebbooookk,, mmii--ssttoorree,, mmii--bbuuddddyy,, MMaappss aanndd mmuucchh
mmoorree wwhhiicchh ccaann hheellpp yyoouu iinn mmaannyy wwaayyss..
YYoouu mmaayy nneeeedd IInntteerrnneett ccoonnnneeccttiioonn aanndd//oorr GGooooggllee aaccccoouunntt ttoo
uussee tthheessee aapppplliiccaattiioonnss.. FFoorr mmoorree iinnffoorrmmaattiioonn oonn hhooww ttoo ccoonnnneecctt
ttoo tthhee IInntteerrnneett,, pplleeaassee rreeffeerr sseeccttiioonn 88 ooff tthhee UUsseerr mmaannuuaall..
AApppplliiccaattiioonnss lliikkee MMii--ssttoorree lleettss yyoouu aacccceessss lliivvee..mmiiccrroommaaxxiinnffoo..ccoomm
aanndd ddoowwnnllooaadd wwaallllppaappeerr,, mmuussiicc rriinnggttoonneess aanndd ssoo oonn ffoorr yyoouurr
pphhoonnee..
WWiitthh MMiibbuuddddyy,, yyoouu ccaann sshhaarree rreeaall ttiimmee llooccaattiioonn bbeettwweeeenn yyoouu aanndd
yyoouurr bbuuddddiieess aanndd kkeeeepp ttrraacckk ooff eeaacchh ootthheerr aannyyttiimmee.. IItt eevveenn lleettss
yyoouu vviieeww yyoouurr ccuurrrreenntt llooccaattiioonn ooff yyoouurr bbuuddddiieess oonn GGooooggllee mmaapp..
5
115
PPhhoonnee SSeettttiinnggss
YYoouu ccaann ggoo ttoo SSeettttiinnggss ttoo ccoonnffiigguurree hhooww yyoouurr pphhoonnee llooookkss,,
ssoouunnddss,, ccoommmmuunniiccaattiioonn,, pprriivvaaccyy,, aanndd ooppeerraattiioonnss iinn aa vvaarriieettyy ooff
wwaayyss::
Model – A80 40
Page 41

User Guide
Communication
Dual SIM setting
Lets you choose your active SIM and
associated features
Call Settings
Lets you set call preferences
Wireless &
Nertworks
Sets you set your connectivity settings
System
User profiles
Set your profiles such as silent, meeting,
outdoor and so on.
Display
Choose display settings
Language and
Keyboard
Choose language and keyboard
preferences
Date and Time
Set date and time
Schedule Power
On/Off
Schedule your phone to power off at
specific times
Schedule Airplane
On/Off
Schedule your phone to switch to airplane
mode at specific times
Application
Manage application and their preferences
Model – A80 41
Page 42

User Guide
Accounts &
Sync
Synchronize your data with a email
accounts.
Privacy
Set privacy for your phone data
Security
Set security of your phone or SIM card
Location
Choose the preference for Location
services such as GPS, Wireless networks
and so on
Storage
View and manage SD card/phone
memory space.
Others
Accessibility
Set preference for accessibility related
applications
Voice Input and
Output
Set voice recognition and voice input
settings
About Phone
View about Phone information
6
116
HHeeaalltthh aanndd SSaaffeettyy IInnffoorrmmaattiioonn
PPlleeaassee rreeaadd tthhee ffoolllloowwiinngg gguuiiddeelliinneess rreeggaarrddiinngg tthhee uussee ooff yyoouurr pphhoonnee..
NNoott ffoolllloowwiinngg tthheemm mmaayy bbee ddaannggeerroouuss oorr iilllleeggaall..
Model – A80 42
Page 43

User Guide
CCeerrttiiffiiccaattiioonn IInnffoorrmmaattiioonn ((SSAARR))
YYoouurr pphhoonnee iiss ddeessiiggnneedd nnoott ttoo eexxcceeeedd tthhee lliimmiittss ooff eemmiissssiioonn ooff
rraaddiioo wwaavveess rreeccoommmmeennddeedd bbyy iinntteerrnnaattiioonnaall gguuiiddeelliinneess.. TThheessee
gguuiiddeelliinneess iinncclluuddee ssaaffeettyy mmaarrggiinnss ddeessiiggnneedd ttoo aassssuurree tthhee
pprrootteeccttiioonn ooff aallll ppeerrssoonnss,, rreeggaarrddlleessss ooff aaggee aanndd hheeaalltthh..
SSAARR ((ssppeecciiffiicc aabbssoorrppttiioonn rraattee)) iiss tthhee uunniitt ooff bbooddyy--aabbssoorrbbeedd RRFF
qquuaannttiittyy wwhheenn tthhee pphhoonnee iiss iinn uussee.. SSAARR vvaalluuee iiss aasscceerrttaaiinneedd
aaccccoorrddiinngg ttoo tthhee hhiigghheesstt RRFF lleevveell ggeenneerraatteedd dduurriinngg llaabboorraattoorryy
tteessttss..
TThhee ttrruuee SSAARR lleevveell dduurriinngg pphhoonnee uussaaggee wwiillll bbee ffaarr lloowweerr tthhaann
TThhee SSAARR vvaalluuee ooff tthhee pphhoonnee mmaayy cchhaannggee ddeeppeennddiinngg oonn ffaaccttoorrss
TThhee hhiigghheesstt SSAARR vvaalluuee ooff tthhee ddeevviiccee iiss 00..990044 WW//kkgg ((hheeaadd)) aanndd
TThhee SSAARR vvaalluuee mmaayy ddiiffffeerr ddeeppeennddiinngg oonn nnaattiioonnaall rreeppoorrttiinngg,,
SSAARR RReeccoommmmeennddaattiioonnss
UUssee aa wwiirreelleessss hhaannddss--ffrreeee ssyysstteemm ((hheeaaddpphhoonnee,, hheeaaddsseett)) wwiitthh aa
PPlleeaassee kkeeeepp yyoouurr ccaallllss sshhoorrtt aanndd uussee SSMMSS wwhheenneevveerr mmoorree
Model – A80 43
tthhiiss lleevveell..
ssuucchh aass hhooww cclloossee yyoouu aarree ttoo aa nneettwwoorrkk bbaassee ssttaattiioonn,, uussee ooff
aacccceessssoorriieess aanndd ootthheerr eennhhaanncceemmeennttss..
11..229955 WW//kkgg ((bbooddyy)) aavveerraaggeedd oovveerr 11 ggmm ooff hhuummaann ttiissssuuee..
tteessttiinngg rreeqquuiirreemmeennttss aanndd tthhee nneettwwoorrkk bbaanndd..
llooww ppoowweerr BBlluueettooootthh eemmiitttteerr..
ccoonnvveenniieenntt.. TThhiiss aaddvviiccee aapppplliieess eessppeecciiaallllyy ttoo cchhiillddrreenn,,
Page 44

User Guide
aaddoolleesscceennttss aanndd pprreeggnnaanntt wwoommeenn..
PPrreeffeerr ttoo uussee yyoouurr cceellll pphhoonnee wwhheenn tthhee ssiiggnnaall qquuaalliittyy iiss ggoooodd..
PPeeooppllee hhaavviinngg aaccttiivvee mmeeddiiccaall iimmppllaannttss sshhoouulldd pprreeffeerraabbllyy kkeeeepp
tthhee cceellll pphhoonnee aatt lleeaasstt 1155 ccmm aawwaayy ffrroomm tthhee iimmppllaanntt..
MMaaiinnttaaiinn aa pprreeffeerraabbllee ddiissttaannccee ooff 1155 mmmm ffrroomm tthhee ddeevviiccee..
SSaaffee DDrriivviinngg
DDoo nnoott uussee tthhee pphhoonnee wwhhiillee ddrriivviinngg.. WWhheenn yyoouu hhaavvee ttoo uussee tthhee
PPlleeaassee ddoo nnoott ppuutt tthhee pphhoonnee oonnttoo aannyy ppaasssseennggeerr sseeaatt oorr aannyy
DDuurriinngg FFlliigghhtt
FFlliigghhtt iiss iinnfflluueenncceedd bbyy iinntteerrffeerreennccee ccaauusseedd bbyy tthhee pphhoonnee.. IItt iiss
IInn HHoossppiittaallss
YYoouurr PPhhoonnee’’ss rraaddiioo wwaavveess mmaayy iinntteerrffeerree wwiitthh tthhee ffuunnccttiioonniinngg
DDoo nnoott ccaarrrryy tthhee wwiirreelleessss ddeevviiccee iinn tthhee bbrreeaasstt ppoocckkeett..
TTuurrnn ooffff tthhee pphhoonnee iiff tthheerree iiss aannyy rreeaassoonn ttoo ssuussppeecctt tthhaatt
Model – A80 44
pphhoonnee,, pplleeaassee uussee tthhee ppeerrssoonnaall hhaannddss--ffrreeee kkiitt..
ppllaaccee ffrroomm wwhhiicchh iitt mmaayy ffaallll ddoowwnn iinn ccaassee ooff vveehhiiccuullaarr ccoolllliissiioonn
oorr eemmeerrggeennccyy bbrraakkiinngg..
iilllleeggaall ttoo uussee aa pphhoonnee oonn tthhee aaiirrppllaannee.. PPlleeaassee ttuurrnn ooffff yyoouurr pphhoonnee
oorr sswwiittcchh ttoo fflliigghhtt mmooddee dduurriinngg aa fflliigghhtt..
mmeeddiiccaall ddeevviicceess.. CCoonnssuulltt aa pphhyyssiicciiaann oorr tthhee mmaannuuffaaccttuurreerr ooff tthhee
mmeeddiiccaall ddeevviiccee ttoo ddeetteerrmmiinnee wwhheetthheerr tthheeyy aarree aaddeeqquuaatteellyy
sshhiieellddeedd ffrroomm eexxtteerrnnaall RRaaddiioo FFrreeqquueennccyy.. SSwwiittcchh ooffff yyoouurr ddeevviiccee
wwhheenn rreegguullaattiioonnss iinnssttrruucctt yyoouu ttoo ddoo ssoo..
iinntteerrffeerreennccee iiss ttaakkiinngg ppllaaccee..
Page 45

User Guide
UUnnssaaffee AArreeaass
117
YYoouurr ddeevviiccee iiss aa pprroodduucctt ooff ssuuppeerriioorr ddeessiiggnn aanndd ccrraaffttssmmaannsshhiipp aanndd
sshhoouulldd bbee hhaannddlleedd wwiitthh ccaarree:: TThhee ffoolllloowwiinngg ssuuggggeessttiioonnss wwiillll hheellpp yyoouu
pprrootteecctt yyoouurr pphhoonnee::
Model – A80 45
PPlleeaassee ttuurrnn ooffff yyoouurr pphhoonnee wwhheenn yyoouu aarree cclloossee ttoo aa ggaass ssttaattiioonn oorr
iinn tthhee vviicciinniittyy ooff aannyy ppllaaccee wwhheerree ffuueell aanndd cchheemmiiccaall
pprreeppaarraattiioonnss,, oorr aannyy ootthheerr ddaannggeerroouuss ggooooddss aarree ssttoorreedd..
7
TTaakkiinngg CCaarree ooff YYoouurr DDeevviiccee
KKeeeepp tthhee ddeevviiccee ddrryy.. IIff yyoouurr ddeevviiccee ggeettss wweett,, rreemmoovvee tthhee bbaatttteerryy
wwiitthhoouutt ttuurrnniinngg oonn tthhee ddeevviiccee,, wwiippee iitt wwiitthh aa ddrryy ccllootthh aanndd ttaakkee
iitt tthhee sseerrvviiccee cceenntteerr..
DDoo nnoott ssttoorree tthhee ddeevviiccee iinn hhiigghh oorr ccoolldd tteemmppeerraattuurree.. HHiigghh
tteemmppeerraattuurreess ccaann sshhoorrtteenn tthhee lliiffee ooff eelleeccttrroonniicc ddeevviicceess aanndd
ddaammaaggee bbaatttteerriieess..
DDoo nnoott uussee oorr ssttoorree tthhee ddeevviiccee iinn dduussttyy,, ddiirrttyy aarreeaass.. IIttss mmoovviinngg
ppaarrttss aanndd eelleeccttrroonniicc ccoommppoonneennttss ccaann bbee ddaammaaggeedd..
DDoo nnoott aatttteemmpptt ttoo ooppeenn tthhee ddeevviiccee ootthheerr tthhaann aass iinnssttrruucctteedd iinn
tthhiiss gguuiiddee.. RReeppaaiirriinngg tthhee pphhoonnee bbyy yyoouurrsseellff ootthheerr tthhaann oouurr
aauutthhoorriizzeedd sseerrvviiccee aaggeennttss//cceenntteerrss ggooeess aaggaaiinnsstt tthhee wwaarrrraannttyy
rruulleess..
DDoo nnoott ddrroopp,, kknnoocckk,, oorr sshhaakkee tthhee ddeevviiccee.. RRoouugghh hhaannddlliinngg ccaann
bbrreeaakk iinntteerrnnaall cciirrccuuiitt bbooaarrddss aanndd ffiinnee mmeecchhaanniiccss..
DDoo nnoott uussee hhaarrsshh cchheemmiiccaallss,, cclleeaanniinngg ssoollvveennttss,, oorr ssttrroonngg
Page 46

User Guide
ddeetteerrggeennttss ttoo cclleeaann tthhee ddeevviiccee.. OOnnllyy uussee aa ssoofftt,, cclleeaann,, ddrryy ccllootthh ttoo
cclleeaann tthhee ssuurrffaaccee ooff tthhee ddeevviiccee..
DDoo nnoott ssttoorree yyoouurr ddeevviiccee nneeaarr mmaaggnneettiicc ffiieellddss oorr aallllooww yyoouurr
ddeevviiccee ttoo ccoommee iinn ccoonnttaacctt wwiitthh mmaaggnneettiicc ffiieellddss ffoorr eexxtteennddeedd
ppeerriioodd ooff ttiimmee..
BBaatttteerryy RReeccoommmmeennddaattiioonnss::
PPlleeaassee ppuutt tthhee bbaatttteerryy iinn aa wweellll--vveennttiillaatteedd ppllaaccee oouutt ooff ddiirreecctt
ssuunnlliigghhtt.. CChhaarrggee tthhee bbaatttteerryy aatt rroooomm tteemmppeerraattuurree rraannggee..
IIff tthhee ttiimmee ssppaann ooff tthhee bbaatttteerryy aafftteerr cchhaarrggiinngg bbeeccoommeess mmuucchh
sshhoorrtteerr tthhaann uussuuaall,, tthhee bbaatttteerryy lliiffee iiss aatt aann eenndd.. RReeppllaaccee tthhee
bbaatttteerryy wwiitthh aa nneeww bbaatttteerryy ooff tthhee ssaammee mmaakkee aanndd ssppeecciiffiiccaattiioonn..
DDoo nnoott ddiissccaarrdd tthhee bbaatttteerryy wwiitthh hhoouusseehhoolldd ttrraasshh.. PPlleeaassee ddiissppoossee
ooff uusseedd bbaatttteerryy aaccccoorrddiinngg ttoo yyoouurr llooccaall eennvviirroonnmmeennttaall llaawwss aanndd
gguuiiddeelliinneess..
UUssee mmaannuuffaaccttuurreerr aapppprroovveedd bbaatttteerriieess,, cchhaarrggeerrss,, aacccceessssoorriieess aanndd
ssuupppplliieess.. MMiiccrroommaaxx wwiillll nnoott bbee rreessppoonnssiibbllee ffoorr uusseerr’’ss ssaaffeettyy
wwhheenn uussiinngg uunnaapppprroovveedd bbaatttteerriieess oorr aacccceessssoorriieess..
DDiissccllaaiimmeerrss
MMiiccrroommaaxx wwiillll nnoott bbeeaarr aannyy rreessppoonnssiibbiilliittyy ffoorr aannyy iinnccoommpplliiaannccee
wwiitthh tthhee aabboovvee mmeennttiioonneedd gguuiiddeelliinneess oorr iimmpprrooppeerr uussaaggee ooff tthhee
mmoobbiillee pphhoonnee..
TThhee ccoonntteenntt ooff tthhiiss mmaannuuaall mmaayy vvaarryy ffrroomm tthhee aaccttuuaall ccoonntteenntt
ddiissppllaayyeedd iinn tthhee mmoobbiillee pphhoonnee.. IInn ssuucchh aa ccaassee,, tthhee llaatteerr sshhaallll
ggoovveerrnn..
MMiiccrroommaaxx kkeeeeppss tthhee rriigghhtt ttoo mmaakkee mmooddiiffiiccaattiioonnss ttoo aannyy ooff tthhee
Model – A80 46
Page 47

User Guide
ccoonntteenntt iinn tthhiiss uusseerr gguuiiddee wwiitthhoouutt ppuubblliicc aannnnoouunncceemmeenntt oorr
pprriioorr nnoottiiffiiccaattiioonn..
CCooppyyrriigghhttss::
AAllll rriigghhttss rreesseerrvveedd.. RReepprroodduuccttiioonn,, ttrraannssffeerr,, ddiissttrriibbuuttiioonn oorr ssttoorraaggee
ooff ppaarrtt oorr aallll ooff tthhee ccoonntteennttss iinn tthhiiss ddooccuummeenntt iinn aannyy ffoorrmm wwiitthhoouutt
tthhee pprriioorr wwrriitttteenn ppeerrmmiissssiioonn ooff MMiiccrroommaaxx iiss ssttrriiccttllyy pprroohhiibbiitteedd.
FFoorr PPrroodduucctt SSuuppppoorrtt::
Helpline number: 01144770044
Working Hours: Monday to Saturday 10:00 AM to 6:30 PM
(Except National & Public holidays)
Email Support: service.superfone@micromaxinfo.com
For more information, please visit our website
www.micromaxinfo.com
Model – A80 47
.
.
 Loading...