

Page 1
A113
User Guide
Page 2

WELCOME
Welcome to the Micromax family. Congratulations on becoming a proud
owner of the Micromax A113 Android phone. Your A113 device offers you
the following exciting features and much more:
Android Jelly Bean 4.1.2 Platform: Your A113 comes packaged with
Android 4.1.2 OS meaning that your mobile phone is based on a
versatile operating system.
8 Megapixel Camera (with Auto-focus): The 8 Megapixel camera
allows you to take crisp and sharp high quality pictures and videos any
time.
1.2 GHz, Quad core Processor: To give you speed in handling your
applications.
11.93 CM capacitive Touch screen: Gives you an intuitive and friendly
Interface allowing you to operate your phone with finesse.
Pinch Zoom Feature: You can use the pinch zoom feature to magnify
images and web pages displayed on your interface.
Intelligent User Interface: The Intelligent and highly intuitive User
interface makes your access to the features a smooth ride.
Dual SIM: You can enjoy the features of two SIM on your handset.
Wi-Fi: The W i-Fi features lets you connect wirelessly and seamlessly
with your Wi-Fi network for Internet connectivity.
Bluetooth 3.0: Lets you exchange files and information with Bluetooth
enabled devices.
Memory Card Support: Expandable up to 32GB it helps you store your
Model A113 2
Page 3

multimedia files.
THE ANDROID ADVANTAGE
An Android TM phone can perform many of the same functions as a
computer and you can customize according to your own needs. For
example, you can add and remove applications or upgrade existing
applications to improve the functions. At Android market, you can
download a range of applications and games from an ever growing
collection. You can also integrate applications on your android phone
with other applications and with online services that you use.
READ ME FIRST
Please read all safety precautions and this manual carefully
before using your device to ensure safe and proper use.
The descriptions in this manual are based on the default settings
of your device.
Available features and additional services may vary by device,
software, or service provider.
Applications and their functions may vary by country, region,
software or hardware specifications. Micromax is not liable for
performance issues caused by third-party applications.
D
IISSCCLLAAIIMMEERRS
D
Model A113 3
S
::
Talk and Standby time are affected by Network preferences , type
of SIM card, and individual usage patterns.
Specif ications are subject to change without prior notice. Services
Page 4

and some features may be dependent on the network, or service
Information: Provides useful information
Warning: Situations that could cause injury to yourself or others
Caution: Situations that could cause damage to your device or other
equipment
Tips to help you with the features.
content provider.
Images shown in this User Guide are for representation only.
Other product logos and company names mentioned/used herein
may be trademarks or trade names of their respective owners.
The functions explained or listed in this manual may differ from
the actual functions appearing in the device. In such a case, the
latter shall govern.
Micromax reserves the right to make modif ications to the
content in this user guide without any prior notice.
I
NNSSTTRRUUCCTTIIOONNAALL
I
Before you start, please familiarize yourself with the icons you will see in
this manual:
Model A113 4
I
CCOONNS
I
S
Page 5

CONTENTS
WELCOME 2
THE ANDROID ADVANTAGE 3
READ ME FIRST 3
DISCLAIMERS: ............................................................................. 3
INSTRUCTIONAL ICONS ................................................................. 4
CONTENTS 5
PHONE LAYOUT 8
INSERT SIM CARD ....................................................................... 9
INSERT MEMORY CARD 9
TURN THE PHONE ON AND OFF 10
CHARGE THE BATTERY ............................................................... 11
UNLOCK THE PHONE .................................................................. 12
USING THE TOUCH SCREEN 13
TOUCH AND HOLD...................................................................... 13
DRAG AN ITEM ........................................................................... 14
SCROLL .................................................................................... 14
SWIPE ...................................................................................... 15
USING THE PINCH ZOOM ............................................................ 15
DOUBLE-TAP ............................................................................. 16
CHANGE THE ORIENTATION ......................................................... 17
PLACING AND RECEIVING CALLS 18
Model A113 5
Page 6

MAKE A CALL ............................................................................ 18
CONFERENCE CALL ................................................................... 18
MAKE AN INTERNATIONAL CALL ................................................... 19
END A CALL .............................................................................. 20
DISABLE PHONE CALLS .............................................................. 20
USING THE HANDSET’S KEYS ...................................................... 20
THE HOME SCREEN 21
SWITCH BETWEEN HOME SCREENS ............................................ 21
CUSTOMIZE HOME SCREEN ........................................................ 21
MENU ICONS ............................................................................. 23
WORKING WITH MENUS 23
CONTEXT MENU ........................................................................ 23
OPTIONS MENUS ....................................................................... 24
MANAGING NOTIFICATIONS 25
OPEN THE NOTIFICATIONS PANEL ................................................ 25
MESSAGING 27
CREATE AND SEND MULTIMEDIA MESSAGE ................................... 28
FORWARD A MESSAGE ................................................................ 29
LOCK A MESSAGE ...................................................................... 30
USING THE ONSCREEN KEYBOARD .............................................. 30
USE VOICE COMMAND ............................................................... 31
MULTIMEDIA 32
CAMERA ................................................................................... 32
GALLERY .................................................................................. 33
MUSIC ...................................................................................... 33
COPY SONGS FROM YOUR PC .................................................... 34
FM RADIO ................................................................................ 34
Model A113 6
Page 7

RECORD SOUND ....................................................................... 35
CONNECT TO NETWORKS AND DEVICES 35
CONNECT TO THE INTERNET ....................................................... 35
USING A113 AS A MODEM FOR INTERNET CONNECTIVITY ............... 36
PAIR WITH BLUETOOTH DEVICES ................................................ 37
MANAGE ACCOUNTS 38
GOOGLE ACCOUNT .................................................................... 38
START GMAIL ............................................................................ 38
SYNCHRONIZE CONTACT LIST ..................................................... 39
APPLICATIONS 39
MAPS ..................................................................................... 40
GPS (GLOBAL POSITIONING SYSTEM) ......................................... 40
SAFETY PRECAUTIONS 41
TAKING CARE OF YOUR DEVICE 43
COPYRIGHT .............................................................................. 46
Model A113 7
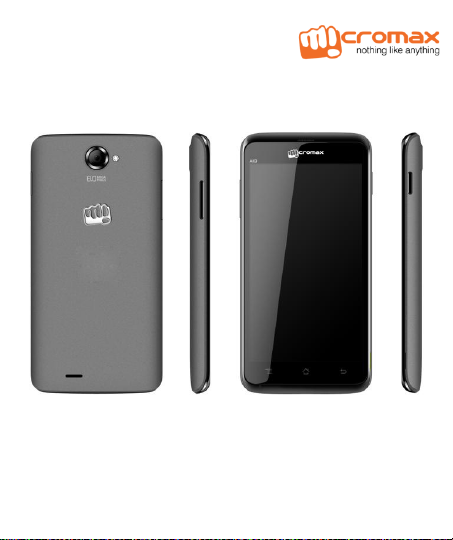
Page 8
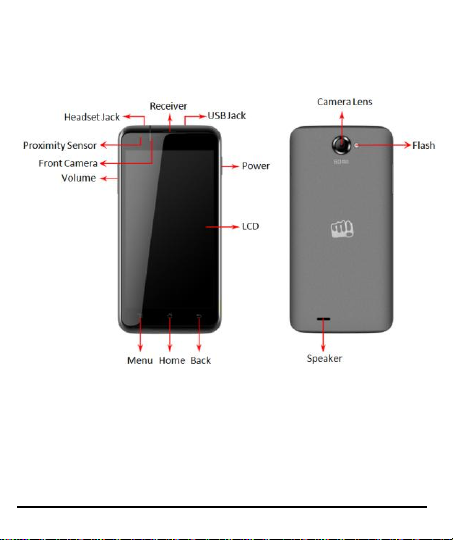
PHONE LAYOUT
Model A113 8
Page 9
I
Please keep the SIM Card out of the reach of small children.
The card and the contacts are vulnerable to damage due to
scratching or bending. Therefore, be careful when using, inserting
or removing the cards
M
D
NNSSEERRTT
I
SSIIM
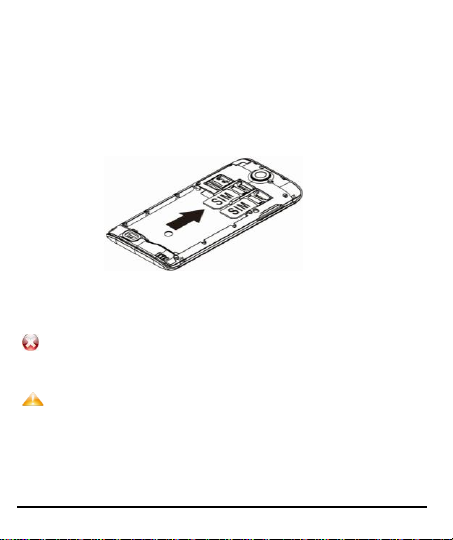
When you subscribe to a cellular service, you will receive a Subscriber
Identity Module (SIM) card.
To insert SIM card(s):
1. Switch off the mobile phone and remove the rear cover and battery.
2. Insert the SIM card correctly in the card slot(s) (See figure below).
CCAARRD
3. Finally insert the battery and place back the rear cover of the mobile
phone.
INSERT MEMORY CARD
To store additional multimedia files, you must insert a memory card.
Model A113 9
Page 10
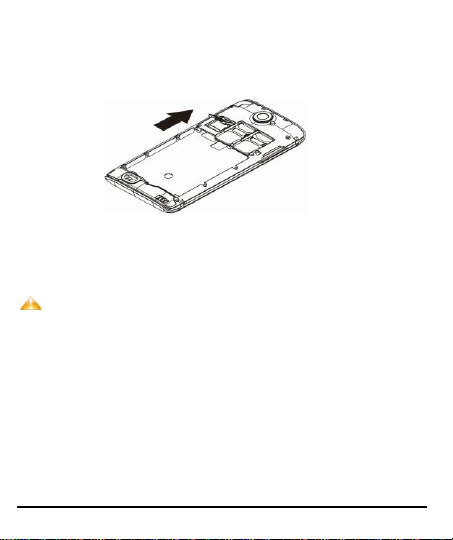
1. Power off the mobile phone, and then remove the rear cover and
Use only compatible memory cards approved by Micromax
with this device. Incompatible memory cards may damage
the card or the device and corrupt the data stored in the
card.
battery.
2. Open the memory card slot and insert the memory card into the slot.
3. Finally insert the battery and the rear cover of the mobile phone.
TURN THE PHONE ON AND OFF
Switch On: Press and hold the Power key for a few seconds.
Switch Off: Press and hold the power key and select switch off.
Model A113 10
Page 11
C
HHAARRGGEE TTHHEE
C
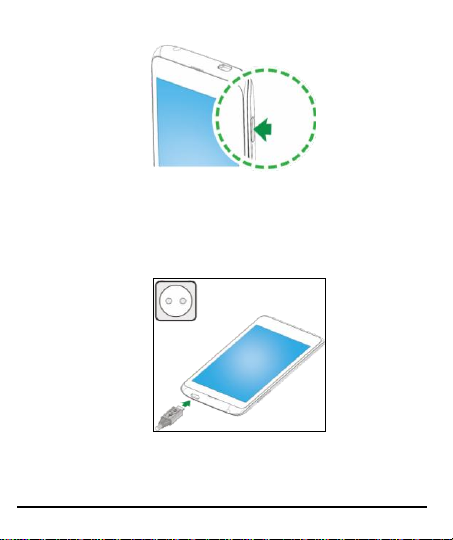
Before using the device for the first time, you must charge the battery.
You can charge the device with a travel adapter or connecting the device
to a PC with a USB cable.
1. Connect the charger to a wall outlet
2. Connect the charger to the device.
Model A113 11
B
Y
AATTTTEERRY
B
Page 12

..
Tip: You can charge your handset using the USB port and USB
cable.
Use only Micromax approved chargers and cables. Unapproved
chargers or cables can cause batteries to explode or damage your
device.
We suggest you charge the battery for 4 hours continuously for the
first time.
U
NNLLOOCCKK TTHHEE
U
You may need to provide PIN, Password, or draw a pattern to unlock your
phone(depending on the lock settings). To unlock the screen:
1. Press the power key to wake up the phone.
2. Hold and drag the unlock icon to unlock.
You may be required to unlock your phone based on the unlock method
in settings.
To set the unlock method:
1. On the main menu, touch Settings > Security > Screen lock.
2. Choose the type of locking as desired. You can set your screen lock on
the basis of pattern, PIN, Password or none.
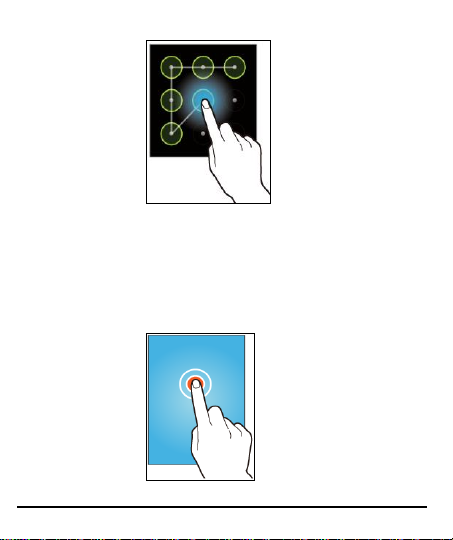
To use pattern Lock, in step 2 above, choose Pattern lock. You can draw
your desired pattern by connecting the dots as shown with an example
below.
Model A113 12
P
P
HHOONNE
E
Page 13
USING THE TOUCH SCREEN
You can use the touch screen in the following ways:
T
OOUUCCHH AANNDD
T
Touch and hold an item. An action occurs depending on the situation.
H
D
OOLLD
H
Model A113 13
Page 14
D
I
M
TTEEM
I
RRAAGG AANN
D
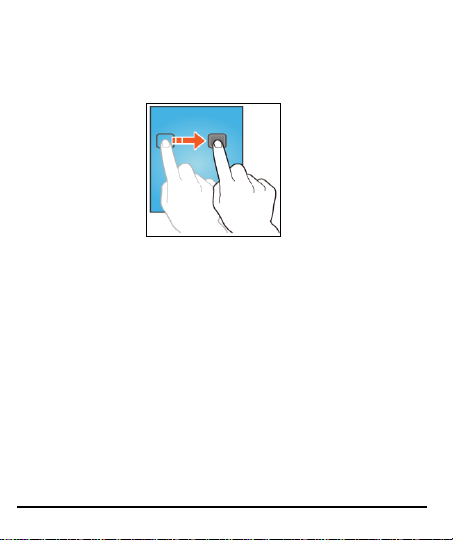
Touch and hold an item and move your finger on the screen until you
reach the target position.
Tap and hold the item, and slide your finger across the screen. The item
follows your finger.
You can generally drag items on the home screen.
S
L
CCRROOLLL
S
Quickly slide your finger across the surface of the screen, (without
dragging an item). For example, slide the screen up or down to scroll a
list.
Model A113 14
Page 15

S
E
WWIIPPE
S
Place a finger on the screen, and steadily slide your finger in the desired
direction.
For example, when you are viewing a picture, to view the next picture,
swipe left.
U
U
Model A113 15
SSIINNGG TTHHEE
P
P
IINNCCHH
Z
Z
OOOOM
M
Page 16

You can open any image or web page and then use your thumb and index
finger to zoom the display through the pinch gesture as illustrated below.
D
E
-
P
-
TTAAP
OOUUBBLLE
D
Tap quickly twice on a webpage, map, or other screen to zoom. For
example, double-tap a section of a webpa ge in Browser to zoom that
section to fit it to screen size. You can also double-tap to control the
Camera zoom, in Maps, and in other applications.
Model A113 16
Page 17

C
HHAANNGGEE TTHHEE
C
On most screens, the orientation of the screen changes as you rotate it.
You can turn this feature on and off.
You can change the screen orientation by rotating the handset.
Model A113 17
O
RRIIEENNTTAATTIIOONN
O
Page 18

PLACING AND RECEIVING CALLS
You can dial a phone number or touch a number in your contacts.
You can also place a call from the Call log or messages.
M
C
AALLLL
C
number.
volume.
AAKKEE AA
M
1. Tap the icon on main menu or the home screen to dial the desired
2. Tap on any of the Phone, Call Log or Contacts tab to make a call.
3. Tap on the contact to dial the number.
4. Press the Volume Up/ down keys on the left side to adjust the call
In Call Options
Touch to add another call.
Touch the icon to mute your voice so that the phone’s MIC will not
transmit voice to the other end. You can resume transmitting your
voice by pressing the icon again.
Touch to put the call on hold.
Touch the icon to listen via the speaker.
End the call by pressing the icon.
C
OONNFFEERREENNCCEE
C
Model A113 18
C
L
AALLL
C
Page 19

Your device supports conference calls (dependent on network service)
between select number of participants, including yourself.
If you dial or accept a new call when you are already on a call, you can
merge the calls into a conference call.
1. Place a call to the first participant.
2. When you are connected, touch the icon and dial a number, the first
participant is put on hold.
3. When you are connected with the second participant, touch the icon. A
conference call will become active.
M
AAKKEE AANN
M
To dial an international number, touch and hold the ‘0’ key from the dial
pad to enter the Plus (+) symbol, and then enter the international country
prefix, followed by the phone number.
Model A113 19
I
NNTTEERRNNAATTIIOONNAALL
I
C
C
AALLL
L
Page 20

1. Touch the / icon to dial the number.
Button
Press
Press and hold
Back: Opens the previous screen you
were working on.
If the onscreen keyboard is open,
closes the keyboard
Menu: Opens a menu with items that
affect the current screen or
Application.
Home: Open the Home screen, If you
are viewing the left or right Extended
Home screen, opens the central Home
Opens the most
recently used
2. Press the Volume Up/ down keys on the left side to adjust the call volume.
E
A
C
L
NNDD
E
While during a call, touch the icon to end the call.
D
IISSAABBLLEE
D
AALLL
A
C
P
C
S
C
AALLLLS
HHOONNEE
P
Some locations may require you to turn off your mobile, Wi-Fi, and
Bluetooth wireless connections.
Press and hold the Power button and then choose Airplane Mode.
U
U
The phone’s buttons offer a lot of functions and shortcuts.
Model A113 20
SSIINNGG TTHHEE
H
AANNDDSSEET
H
T
’
K
S
SS
EEYYS
’
K
Page 21

screen.
applications.
THE HOME SCREEN
When you start up and unlock the phone, the home screen opens.
The main screen is your starting point to access all the features on your
phone.
Touch the launcher icon at the bottom of the screen to view all
installed applications. You can add an application icon to the Home
screen by pressing and holding it until it vibrates and enters Home screen
and the release your finger.
S
B
WWIITTCCHH
S
B
You can shift between the home screens. Swipe left or right on the home
screen to display the next home screen.
EETTWWEEEENN
H
H
OOMMEE
S
CCRREEEENNS
S
S
C
UUSSTTOOMMIIZZEE
C
Model A113 21
H
H
OOMMEE
S
CCRREEEEN
S
N
Page 22

When the device is in idle mode, you will see the idle screen. From the
idle screen, you can view indicator icons, widgets, shortcuts to
applications, and other items.
The idle screen has multiple panels. Scroll left or right to the panels on
the idle screen.
Add Widgets and icons to home screen
You can customize the idle screen by adding shortcuts to applications or
items in applications, widgets, or folders. To add items to the idle screen.
Enter Launcher and long press and hold an application till the screen
vibrates, and then release your finger hold.
Rearrange or Remove Widgets and Icons on your Home Screen
Long press and hold the widget or icon you want to move. Once the
device vibrates, don't release your hold on the icon. Drag the widget or
icon to a new location on the screen.
Model A113 22
Page 23

M
Opens the dialer
Opens messaging
Opens the main menu
Opens the contacts list
I
S
CCOONNS
I
EENNUU
M
You have the following menu icons to easily let you access its important
features:
WORKING WITH MENUS
The phone provides you with Context menus and Options menus for
accessing the features in an intuitive way.
C
C
You can open context menu by touching on any screen.
Not all screens have context menus. If you touch on a screen that has
no context menu, nothing happens.
Model A113 23
OONNTTEEXXTT
M
U
EENNU
M
Page 24

Context Menu
O
M
S
M
EENNUUS
PPTTIIOONNSS
O
Options menus contain tools that apply to specific items on the screen.
You can open an option by touching and holding an item on the screen.
Not all items have options menus.
Model A113 24
Page 25

Options Menu
When you touch and hold some items on a screen, an Options menu
opens.
MANAGING NOTIFICATIONS
Notification icons inform you of new messages and events.
When you receive a notification, its icon appears in the status bar, along
with a summary that appears only briefly.
O
O
Drag the status bar down from the top of the screen as shown below.
Model A113 25
PPEENN TTHHEE
N
OOTTIIFFIICCAATTIIOONNSS
N
P
P
AANNEEL
L
Page 26

The Notifications panel displays your network provider’s name and a list
of your current notifications.
Respond to Notifications
1. Open the notification panel and touch a notification to respond to
it.
2. What happens next depends on the notification.
From the notifications panel, you can use the following options:
Wi-Fi: Activate or deactivate the WLAN connection feature.
Bluetooth: Activate or deactivate the Bluetooth wireless connection
feature.
GPS: Activate or deactivate the GPS feature.
Data Connection: Choose data connection or disable data connection.
Brightness Control : Adjust brightness according to your requirement.
Model A113 26
Page 27

Auto rotation: Activate or deactivate the auto rotation feature.
WLAN
Bluetooth
GPS
Data
Connection
AutoRotation
Brightness
Control
Close Notifications Panel
Drag the tab at the bottom of the Notifications panel to the top of the
screen. Or just press the back button. The panel also closes when you
touch a notification to respond to it.
MESSAGING
You can use Messaging to exchange text messages and multimedia
messages.
Model A113 27
Page 28

A Message becomes an MMS if you send it to an email address, or
Touch to open
a message
add multimedia media file(s).
You can use Messaging to exchange text messages and multimedia
messages with your friends.
You can also press the key and open the context menu to work
on messages and their settings.
A Message becomes an MMS if you send it to an email address, or
add multimedia media file(s).
C
RREEAATTEE AANNDD
C
1. Touch icon.
2. Enter or select a mobile phone number. You can also touch
Model A113 28
S
S
EENNDD
M
UULLTTIIMMEEDDIIAA
M
M
EESSSSAAGGE
M
E
Page 29

icon to add a contact from the contact list.
Tap to lock the message.
Touch to forward the
message.
3. Touch the composition text box and enter your message body.
4. Touch button and then to attach various types of
attachments.
5. Touch / to send the multimedia message.
F
OORRWWAARRDD AA MMEESSSSAAGGE
F
1. Open a message and then touch that message in a message
conversation window.
E
2. Touch Forward in the menu that opens.
3. Add a contact.
Model A113 29
Page 30

4. Touch / to send the message.
You can also Copy message text, View message details and delete
message.
L
M
E
OOCCKK AA
L
M
You can lock a message so it won’t be deleted if you reach your storage
limits.
1. Touch and hold message in a message window.
2. Touch Lock in the menu that opens. Unlock a message by touching and
holding it and then touch Unlock.
U
SSIINNGG TTHHEE
U
Some applications display the keyboard by default. In others, you touch a
text field where you want to enter text, to open the keyboard.
EESSSSAAGGE
O
NNSSCCRREEEENN
O
K
EEYYBBOOAARRD
K
D
Model A113 30
Page 31

Press space or a
punctuation mark to enter
the highlighted suggestion.
Tap this icon to select
desired contact from
phonebook
Touch once to capitalize
the next letter you type.
Touch and hold for caps.
Use the icon to erase characters.
After typing, press icon to close the keyboard.
Press the symbols key to switch to the numbers and symbols keyboard.
Touch and hold the text field to open a menu and to copy/cut texts.
U
V
C
D
SSEE
OOIICCEE
U
V
Menu > Voice Search
Use voice commands to access various useful features on your handset.
1. Tap on icon.
Model A113 31
C
OOMMMMAANND
Page 32

2. Issue your desired voice command to the phone.
MULTIMEDIA
C
A
AAMMEERRA
C
Your camera’s pictures and videos are stored in the SD card, so you must insert
one to use the Came ra. You can copy pictures and videos from the SD card to a
PC and vice versa.
Take a Picture or video
Touch the Camera icon in the main menu.
Adjust the exposure and other settings if you wish.
Touch the icon to click pictures.
Shoot Videos
Select the video mode.
Adjust the quality, effect, and other settings, if you wish.
Model A113 32
Page 33

Tap the start video icon to start or stop recording.
G
Y
AALLLLEERRY
G
You can use the Gallery to view pictures and play videos and share files.
1. Touch the Gallery icon in the main menu or in camera mode.
2. Touch an album to open and view its contents.
3. Touch a picture or a video in an album to view it and even share with your
Share an Album
Open the main Gallery window.
M
M
Model A113 33
friends.
1. Long press an album or image to select the object.
2. You can select multiple albums/pictures/videos that you want to share.
3. Tap the key to share the selected items.
4. You can share via e-mail, Bluetooth, Email, messaging and so on.
C
UUSSIIC
You can easily transfer your favorite music from your PC to the SD
card and experience a whole world of interesting and melodious
music.
Touch the key or the intuitive buttons and icons in the music
interface to enjoy the features of your music player.
Press the phone’s volume up/down keys on the left side of the
Page 34

mobile phone to adjust the volume.
You can use an SD card to enhance the storage capacity for
your various multimedia files such as music, photos emails
and so on.
Notes, tips, or additional information
C
S
OOPPYY
OONNGGSS FFRROOMM YYOOUURR
C
S
Just connect the Handset to your PC using the USB cable and transfer
your favorite songs.
M
R
O
AADDIIO
FFM
R
You can listen to your favorite FM channels using the inbuilt FM receiver
of your phone.
1. Touch the key or the intuitive buttons and icons on the phone in Radio
interface to enjoy the features of your inbuilt FM radio.
Model A113 34
PPCC
Page 35

2. Press the phone’s volume up/down keys on the left side of the mobile phone
to adjust the volume.
R
S
D
S
OOUUNND
EECCOORRDD
R
Menu > Sound recorder
Tap the icon to start recording. Tap the Ic on to stop the recording.
CONNECT TO NETWORKS AND DEVICES
Your phone can connect to a variety of networks and devices, including
Internet, Wi-Fi, GPRS, Bluetooth, devices, such as headsets. You can also
transfer files to/from your PC through the data cable.
C
OONNNNEECCTT TTOO TTHHEE
C
To configure your Internet:
1. Go to Settings>Wireless & Networks>More>Mobile Networks>Access
Model A113 35
I
NNTTEERRNNEET
I
T
Page 36

point names.
2. Select the access point name or change the access point name f or your
Internet connectivity as provided by the service provider of your SIM card.
By d efault, your network provider sends the access point name settings via
SMS, or it comes with your SIM card. Y ou may need to install these settings.
After this, you can choose from the listed access point names. If the access
point na mes are not listed by default, please contact your network provider
for the same.
U
3
SSIINNGG
U
AA11113
You can use your device as a modem and connect your PC or laptop to
the Internet when required. This means that you can browse the Internet
on your PC using your mobile phone. To do this:
1. Connect your mobile phone to your PC via the USB cable.
2. Go to Settings> Wireless & Networks> Tethering & portable hotspot and
then touch USB Tethering.
A prompt driver for installation will appear on your PC. Proceed as
suggested.
In case of Linux, Windows 7 and V ista OS, the drivers get automatically
installed.
However, in case of Windows XP, you need to manually install the
drivers. If you do not have the driver, you can download it from
www.micromaxinfo.com.
Note: Your mobile operator will charge you based on your GPRS data
usage.
Connectivity via Wi-Fi Hotspot
Model A113 36
AASS AA
M
OODDEEMM FFOORR
M
I
NNTTEERRNNEETT
I
C
OONNNNEECCTTIIVVIITTY
C
Y
Page 37

You need to insert a Data Service enabled SIM card on your phone to use
your A113 as a router.
1. Go to Settings> Wireless & networks>More>Tethering & Portable
hotspot.
2. Configure your Wi-Fi hotspot as suggested.
3. Make sure your computer has Wi-Fi. After connecting to the
Wireless network, you can use the GPRS service from your A113.
Note: Your mobile operator may charge you based on your GPRS data
usage.
Bluetooth Tethering
You can share your phone’s internet connection via Bluetooth.
1. Go to Settings>Wireless & networks>More>Tethering &
Portable hotspot> Bluetooth tethering.
2. Select the Bluetooth Tethering option to share your phone’s
internet connection.
P
W
AAIIRR
P
1. Go to Settings > Wireless & networks and tap Bluetooth and turn it on.
2. Your phone scans and displays the Bluetooth devices in range.
3. If the device you want to pair with is not in the list, make it discoverable.
4. If your phone stops scanning before you ma ke the other device
5. Touch the ID of the other device in the list in Settings to pair them. If you
Model A113 37
B
IITTHH
LLUUEETTOOOOTTHH
W
B
discoverable, touch Scan for devices.
are prompted to for a passkey, enter the passkey on one device and enter
D
EEVVIICCEES
D
S
Page 38

the same passkey you entered in the other device to be paired. If the
pairing is successful, your phone connects to the device.
MANAGE ACCOUNTS
You can set up a corporate, Google account etc on your device. You can
do this by tapping Settings> Accounts> Add Account:
You may also be able to add other kinds of accounts, depending on your
application.
G
A
T
CCCCOOUUNNT
L
OOOOGGLLEE
G
Your Google Account lets you take full advantage of Google applications
and services that you may want to use, such as Gmail, Maps, Navigation,
and various other applications.
S
S
You can use Gmail to read and write email from any mobile device or
browser. All your email is always up to date and available no matter
where you check it from.
But Gmail is not just about email. Your Gmail name and password signs
you into to all Google apps and services, including Calendar; People, for
keeping track of your contacts; for storing and organizing your pictures;
Google Reader, for keeping up with your online reading; Google
Documents, for working with documents, spreadsheets, or drawings; and
many more.
Model A113 38
TTAARRTT
A
G
MMAAIIL
G
Page 39

S
YYNNCCHHRROONNIIZZEE
S
Settings> Accounts>Add Account
To synchronize an account you will need to first have a Gmail account . You
can either add a new account or can use existing account.
1. Enter your Email ID and Password and tap Next.
2. Choose the account options that display and tap
Follow the suggested steps.
Your contacts synchronization will be complete in a few seconds.
To Auto-Sync an Existing Account:
You can sync your Gmail contacts to your phone and vice versa.
It is recommended to save your contacts to your Gmail account. Because you
may lose your contacts stored in your phone after a factory reset.
1. Tap on an existing account.
2. Tap Sync Contacts. (All phone contac ts will be copied to that email
For this feature to work, you need to have Internet c onnectivity via your SIM or
Wi-Fi. If your Sync does not proceed as expected, check whether data option is
set to ON.
C
OONNTTAACCTT
C
account with details).
L
T
IISST
L
.
NNeexxtt.
APPLICATIONS
You phone comes with a host of applications to make your life easier and
more convenient. Explore the various applications and the features that
come with your device and enjoy the advantage.
Model A113 39
Page 40

MMAAPPSS
Google Maps is a web based service offered by Google Inc. which offers you
access to various map based services. You can view various streets, landmarks
and can even plan your routes with the help of Google Maps. It also comes with
a navigation system (GPS required) which gives turn by turn route guidance
while driving or walking. You can even download maps for offline usage. This
serves as a useful application for your day to day usage.
Note:
Internet connection is required for using Google Maps. For
information on activating internet connection refer to the section
‘Connect to the Internet’.
The Google Maps application may not be available in every market,
country or region.
Micromax does not warrant the accuracy of any directional services.
When you use the map, you use your internet connection to transfer
data to and from your phone. To avoid data transfer costs, you can
download and save the map to your phone.
To select the required settings;
1. Go to Settings> Personal> Location Access.
2. Enable Access my Location option and GPS satellites.
3. Tap the Maps icon in the applications menu to start using Google Maps.
S
G
LLOOBBAALL
P
OOSSIITTIIOONNIINNGG
P
GGPPS
((G
Model A113 40
S
S
YYSSTTEEM
M
))
Page 41

Global Positioning System is a satellite based system that provides location
Remember to comply with legal requirements and local
restrictions when using the phone, for example, in airplanes,
petrol stations, hospitals.
Your Phone’s radio waves may interfere with the functioning of
inadequately shielded medical devices. Consult a physician or
the manufacturer of the medical device to determine whether
they are adequately shielded from external Radio Frequency.
information to the users. Your d evice has an in-built receiver that receives
signals from the satellites.
You can drop down the notification panel and tap on the GPS icon to turn
on/off the GPS.
Alternatively, you can;
1. Go to Settings> Personal> Location Access.
2. Enable Access my Location option and GPS satellites.
You can use these settings for using applications such as Google Maps.
Note:
GPS services are dependent on the services provided by your mobile
operator. If you do not have appropriate service on your mobile then
you may not be able to use the GPS service.
As GPS consumes battery life, it is advised that you switch on GPS
only when it is needed.
SAFETY PRECAUTIONS
Model A113 41
Page 42

Switch off your device when regulations posted instruct you to
do so.
Always keep the phone and accessories out of reach of small
children. Small parts such as the SIM card, dust cap, lens ring
and lens cap as well as the micro SD card can be dismantled and
swallowed by small children.
Do not place the phone near to electromagnetic data carriers
such as credit cards and floppy disks. Information stored on
them could be lost.
Permanent hearing loss may occur if you use earphones or
headphones at high volume. You can adapt over time to a
higher volume, which may sound normal but can be damaging
to your hearing. Set your volume to a safe level. If you
experience discomfort or buzzing in your ears, reduce the
volume or discontinue use of your earphones or headphones.
Ring tones, info tones and hands-free talking are reproduced
through the loudspeaker. Do not hold the phone to the ear
when it rings or when you have switched on the hands-free
function.
The mains voltage (V) specified on the power supply unit must
not be exceeded. Otherwise the charging device may be
damaged. The power supply must be plugged into an easily
accessible AC mains power socket when charging the battery.
The only way to turn off the charging device after charging the
battery is to unplug it.
You may only open the phone to replace the battery, SIM and
microSD card. You must not open the battery under any
circumstances. All other changes to this device are strictly
prohibited and will invalidate the warranty.
Model A113 42
Page 43

The phone may cause interference in the vicinity of TV sets,
radios and PCs.
Use only Micromax specified batteries and charging devices.
All batteries can cause property damage, injury or burns if a
conductive material such as jewelry, keys or beaded chains
touch exposed terminals. Exercise care in handling any charged
battery, particularly when placing it inside your pocket, purse or
other container with metal objects. Do not dispose of batteries
in fire as they may explode.
1. Do not use the phone while driving. When you have to use
the phone, please use the personal hands-free kit.
2. Please put the phone safely in the phone stand. Do not put
it onto any passenger seat or any place from which it may
fall down in case of vehicular collision or emergency
braking.
Flight is influenced by interference caused by the phone. It is
illegal to use a phone on the airplane. Please turn off your
phone during a flight.
Professional service: The phone must be installed or repaired
by no personnel other than professionals. You are likely to
suffer a huge risk when you install or repair this phone by
yourself, which also goes against the warranty rules.
TAKING CARE OF YOUR DEVICE
Your device is a product of superior design and craftsmanship and should
be handled with care: The following suggestions will help you protect
your phone:
Keep the device dry. Precipitation, humidity, and all types of
Model A113 43
Page 44

liquids or moisture can contain minerals that will rust electronic
circuits. If your device does get wet, remove the battery without
turning on the device, wipe it with a dry cloth and take it the
service center.
Do not store the device in high or cold temperature. High
temperatures can shorten the life of electronic devices and
damage batteries.
Do not use or store the device in dusty, dirty areas. Its moving
parts and electronic components can be damaged.
Do not attempt to open the device other than as instructed in this
guide. Repairing this phone by yourself other than our
authorized service agents/centers goes against the warranty
rules.
Do not drop, knock, or shake the device. Rough handling can
break internal circuit boards and fine mechanics.
Do not use harsh chemicals, cleaning solvents, or strong
detergents to clean the device. Only use a soft, clean, dry cloth to
clean the surface of the device.
Do not store your device near magnetic f ields or allow your
device to come in contact with magnetic fields for extended
period of time.
Location: The socket-outlet shall be installed near the
equipment and shall be easily accessible.
Battery Recommendations
Please put the battery in a cool and well-ventilated place out of
direct sunlight. We recommend you to charge the battery at
Model A113 44
Page 45

room temperature range.
Batteries have life cycles. If the time that the battery powers
equipment becomes much shorter than usual, the battery life is
at an end. Replace the battery with a new battery of the same
make and specification.
Use manufacturer approved batteries, chargers, accessories and
supplies. Micromax will not be held responsible for user’s safety
when using unapproved accessories or supplies.
Do not discard the battery with household trash. Please dispose
of used battery according to your local environmental laws and
guidelines.
Warnings on Battery:
(a) Please use appointed battery in case of explosion risk.
(b) Please dispose of lifeless battery under guidance.
Recycle your Phone
The WEEE logo (shown at the left) appears on the
product (battery, handset, and charger) to indicate that
this product must not be disposed off or dumped with
all your electronic or electrical waste equipment by relocating over to the
specified collection point for recycling of such hazardous waste.
Collection and proper recovery of your electronic waste equipments at
the time of disposal will allow us to help preserve the environment.
Recycling of the electronic waste equipment will ensure safety of human
health and environment. For more information on best practices for
disposal of electronic and electrical waste, please visit to our web site:
www.micromaxinfo.com/weee.php
Model A113 45
your other household wastes. You are liable to dispose of
Page 46

C
C
All rights reserved. Reproduction, transfer, distribution or storage of part
or all of the contents in this document in any form without the prior
written permission of Micromax is strictly prohibited.
Model A113 46
OOPPYYRRIIGGHHT
T
 Loading...