

Page 1

1
Installation and System
Requirements
............................6
Registration ..........................8
System Requirements ...........8
Installing TechTool Pro ..........9
What’s Installed ..................10
TechTool Pro Parts ..............12
Contacting Technical
Support ............................15
About Micromat Computer
Systems Inc. .....................16
Getting Started........................17
Launching TechTool Pro .....18
Sample Session ...................19
Navigation Window ............20
MultiTester .........................21
Reports................................22
Preferences .........................23
TechTool Protection
Control Panel ...................24
Troubleshooting Using
TechTool Pro ............................26
Preventive Maintenance .....27
Troubleshooting Hints ........27
Recovering Deleted Files .....29
Repairing Drive Problems ...29
Repairing Problems .............30
Optimization ......................31
Testing Components ..........32
Checking for Viruses ...........33
Checking for Software
Conflicts ...........................34
In-Depth Testing .................35
Reference..................................36
Navigation Window ............37
Controls & Displays ............37
View ....................................38
Filter ....................................38
Test List .............................. 39
Tests....................................40
Audio Tests .........................41
Auto-Pilot ...........................45
Benchmark Tests .................49
Cache Tests ........................51
Clock Tests .........................53
Components Test ...............55
Data Recovery ....................58
Desktop Test .......................64
Directory Maintenance .......69
Drives ..................................70
File Structure Tests ..............73
Finder Info ..........................75
Floppy Tests ........................77
Internet Tests ......................82
Mathematics ......................84
Modem Tests ......................86
MultiTester Tests .................91
Network Tests .....................94
Optimization ......................96
PRAM Tests .........................99
Processor Tests .................102
RAM Tests .........................104
ROM Test .........................111
Scanner Test......................113
Serial Ports .......................115
Software Conflicts ............118
Surface Scan .....................120
System Files ......................122
Video ................................125
Video Geometry ...............128
Virus .................................131
Volume Structure ..............133
VRAM ...............................138
Wipe Data ........................140
Control Palette .................143
TechTool Pro Preferences ..146
TechTool Protection
Control Panel .................149
Trash Cache ......................152
Diagnostics .......................158
Virus .................................159
Table of Contents
Contents
Next
more...
Page 2

2
Problems and Solutions Using
TechTool Pro
..........................161
Problems and Solutions
Using TechTool Pro ...........162
Flashing question
at startup ..............162
Computer freezes
at startup ..............162
Drive will not mount
on the desktop .......162
Recovering files that
have been deleted ..163
Recovering files on a
damaged drive .......163
Intermittent crashes ....163
Sluggish performance .164
Generic or incorrect
icons ......................164
Computer settings
don’t stay set .........164
Strange computer
behavior ................164
Optimization will
not complete ..........164
Hard Drive space is
disappearing ..........165
Making a TechTool
Startup Volume ......165
Troubleshooting
TechTool Pro
..........................166
Troubleshooting
TechTool Pro......................166
Computer does not
startup from the CD 167
Not enough RAM to
boot from the CD ...167
Program will not accept
the serial number ...168
Control Panel indicates
serial number in use 168
TechTool Pro crashes
during testing .........168
Can’t select a
volume for repair
or optimization ......169
Glossary ..................................170
Contents
Prev
Next
Page 3
3
User’s Guide and
Reference Manual
www.micromat.com
Contents
Prev
Next
Using this Manual
Page 4

4
Copyright Information
©2000 Micromat Computer Systems, Inc. All rights reserved.
This manual, as well as the software described in it, is furnished under license and may
only be used or copied in accordance with the terms of such license. The information in
this manual is furnished for informational use only, is subject to change without notice and
should not be construed as a commitment by Micromat, Inc. Micromat, Inc., assumes no
responsibility or liability for any errors or inaccuracies that may appear in this book.
Except as permitted by such license, no part of this publication may be reproduced, stored
in a retrieval system, or transmitted, in any form or by any means, electronic, mechanical,
recording, or otherwise, without the prior written permission of Micromat, Inc.
Trademarks:
TechTool is a registered trademark of MicroMat, Inc. MacEKG, DriveTech, and TechTool
Pro are trademarks or registered of Micromat, Inc. Micromat, and The 3-D "M" Micromat
logo, are trademarks or registered trademarks of Micromat, Inc. All rights reserved. Apple,
Macintosh, Finder, AppleTalk, MacOS are trademarks or registered of Apple Computer, Inc.
All rights reserved. All other trademarks and registered trademarks are property of their
respective holders.
Printed in the USA.
Part number: MM00777
Contents
Prev
Next
Page 5
5
Using This Manual
This manual was prepared in the Adobe® Acrobat® PDF format
for viewing on screen. You may also print out selected pages or the entire
manual on your local printer.
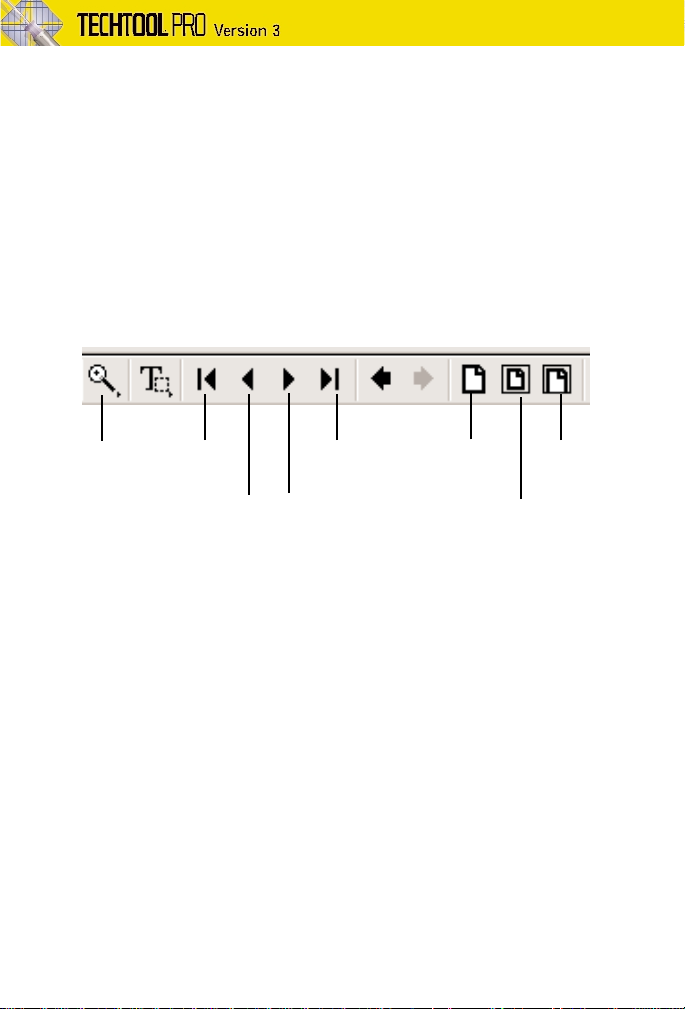
Using the Manual on screen
Use the scroll bar at the right of this screen to scroll through the entire manual.
You may also click on Contents, Prev or Next buttons in the upper right to
view the Table of Contents or move to the Previous or Next page. Clicking the
items in the Contents will jump to that page. The standard tools on the Acrobat
Reader toolbar shown below may also be used to navigate this document.
Printing portions of the Manual
You may print pages at any time by selecting Print from the File menu. Follow
the on screen instructions that appear for your specific printer.
The page sizes for this manual are 4.75 inches wide by 7 inches tall. If your
printer software has the ability to print 2 pages side-by-side, you may select this
option in your Print Options prior to printing. Refer to the instructions provided
with your printer for additional information.
Zoom-
in/out
Next
Page
Next
Section
Previous
Page
Previous
Section
Actual
Page Size
Fit Page
Width
Fit Entire
Page
Contents
Prev
Next
Page 6

6
Installation
and System
Requirements
Contents
Prev
Next
Page 7

7
Introduction
Thank you for purchasing TechTool Pro! We have worked hard to make TechTool
Pro the most powerful and easy-to-use problem-solving utility available for the
Macintosh. With TechTool Pro you will be able to:
• Diagnose and repair problems with your drives.
• Scan for and eradicate computer viruses.
• Check for software conflicts.
• Recover lost data.
• Test critical computer components and subsystems.
• Do routine maintenance on your computer.
• Reveal the culprits which cause your Macintosh to crash.
• Verify system configurations.
• Check critical software like the system and enablers.
• Test new equipment.
• Make sure that your computer is running as fast as it should.
Most importantly, TechTool Pro allows you to test your computer like a
professional without the need of years of experience or a computer degree.
TechTool Pro allows you to check the intricate components of your Macintosh
with a simple click of your mouse. When TechTool Pro finds a problem with your
computer, it will either fix it for you or it will suggest steps you can take to
correct the situation.
Consider TechTool Pro your personal Macintosh technician—always ready to
help, and only a mouse click away.
Contents
Prev
Next
Page 8

8
Registration
Please take a moment to register the program. Your serial number is your proof
of ownership of TechTool Pro. Keep it in a safe place since you may need it when
you make future updates, upgrades, or need technical support. By regisitering,
you also give us a means to help you determine your serial number in case it is
lost. Most importantly, registration is required to receive technical support for
TechTool Pro.
The easiest way to register is to do so online. Simply visit Micromat’s web site at
www.micromat.com and click Register. Fill out and submit the online form and
you are finished. If you do not have Internet access, then you should fill out the
registration card and mail it directly to Micromat.
System Requirements
• Color-capable Macintosh computer with minimum 640x480 display.
• System software version 7.5.5 or later.
• Drive capable of reading CD-ROMs.
• Minimum 5 megabytes of RAM above that required by the OS.
• Hard disk drive.
Note that these requirements may change with future updates. Please refer to
the ReadMe file on the CD for additional changes.
Contents
Prev
Next
Page 9
9
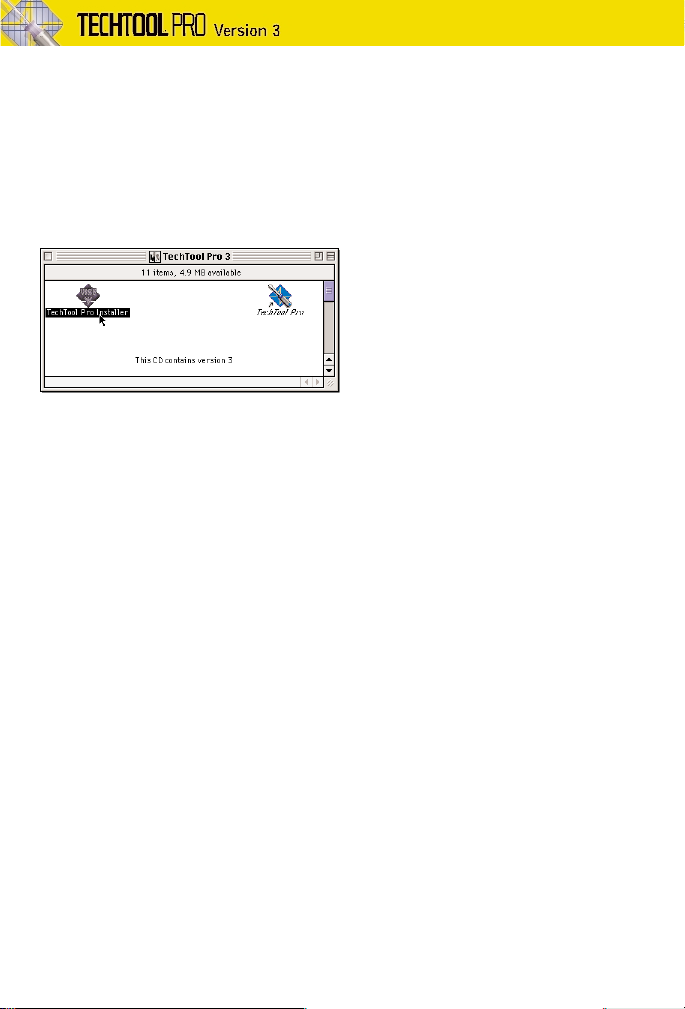
Installing TechTool Pro
TechTool Pro utilizes an automated installer to correctly place the TechTool Pro
application and all ancillary files in their proper locations. The installer offers
several installation options and these are explained in detail on the TechTool Pro
installation screen. To install:
• Insert the TechTool Pro CD.
• Double-click the TechTool® Pro Installer icon.
• Read the explanatory text on the
installer screen and then follow
the prompts.
Contents
Prev
Next
Page 10
10
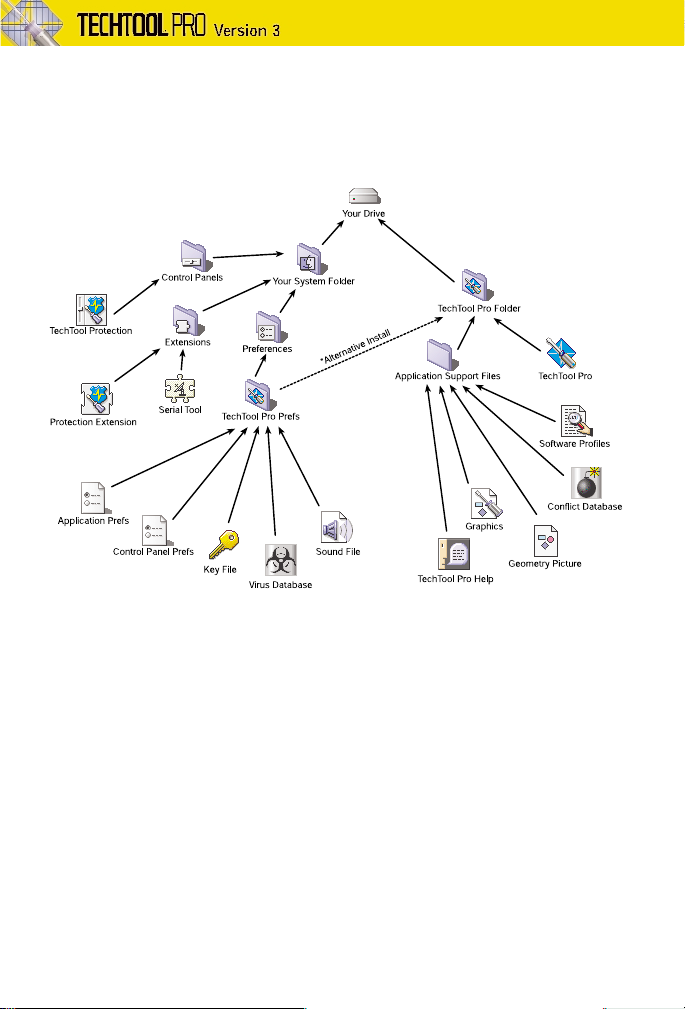
What’s Installed
The TechTool Pro installer will install the following components as indicated
below:
Note that this installation may vary in future updates.
Contents
Prev
Next
Page 11
11
TechTool Pro Parts
Following is a brief description of the files and folders that are installed by
TechTool Pro. Full details on the functions of these items are provided
throughout this manual.
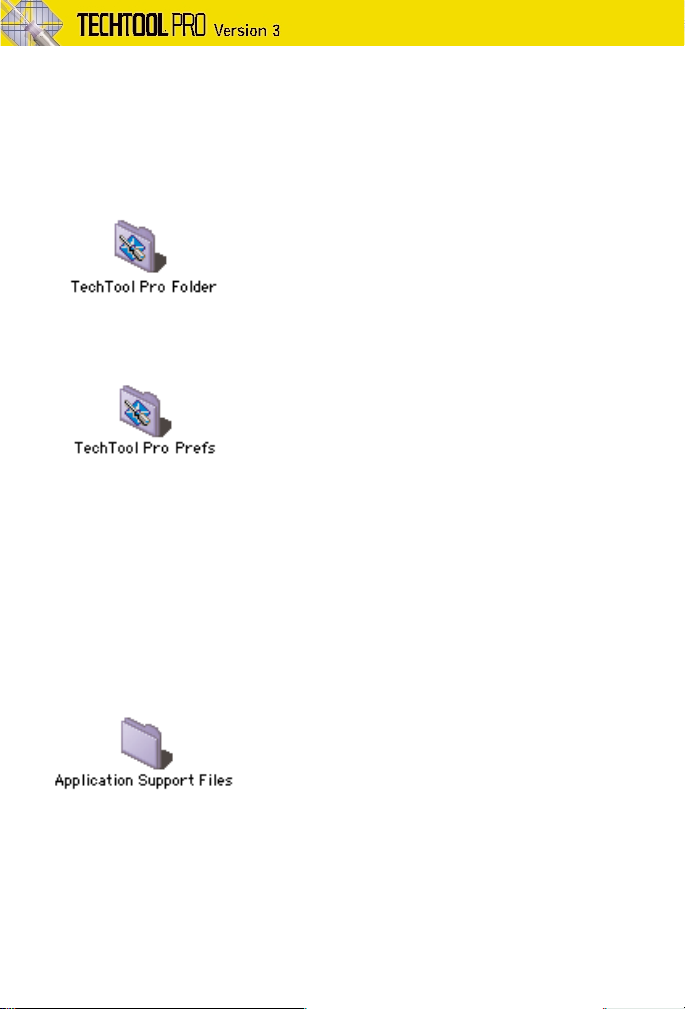
TechTool Pro Folder
This folder contains the TechTool Pro program and its necessary support files.
TechTool Pro Prefs Folder
The TechTool Pro Prefs folder contains the various preference files used by both
the TechTool Pro main application and the TechTool Protection control panel set.
The TechTool Protection control panel requires that a copy of this folder resides
in the System Folder’s Preferences folder. However, a copy can also be kept in
the TechTool Pro Folder. This makes it easy to use the program on another
drive/volume where you would like the TechTool Pro application, but don’t
require a system folder and the TechTool Protection control panel set. Just copy
the entire TechTool Pro Folder (with the TechTool Pro Prefs Folder included) to
the second volume, and you will have everything necessary to run the program
from the second volume.
Application Support Files
This folder contains various data files required for the operation of TechTool Pro.
Contents
Prev
Next
Page 12
12
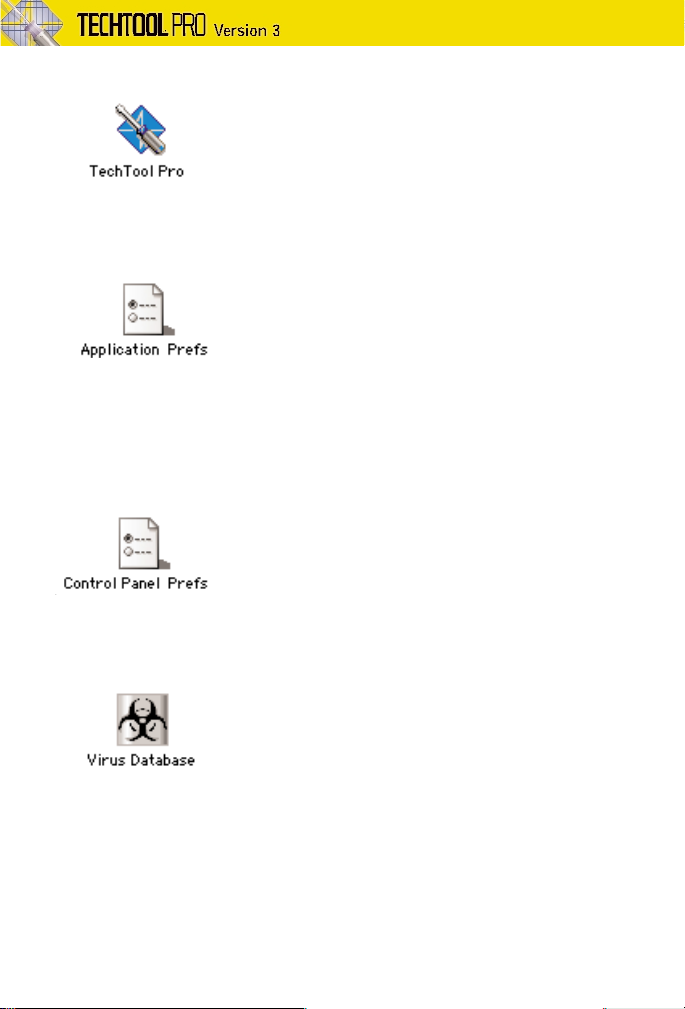
TechTool Pro
Resides in the TechTool Pro Folder. This is the main application and the item that
you double click to launch the program.
Application Prefs
Resides in the TechTool Pro Prefs folder. It contains the preferences for the
TechTool Pro application itself. If the TechTool Pro Prefs folder resides both in the
System Folder’s Preferences folder and the TechTool Pro Folder, the application
preferences in the TechTool Pro Folder will take precedence over those in the
Preferences folder.
Control Panel Prefs
Resides in the TechTool Pro Prefs folder. It contains the preferences for the
TechTool Protection control panel.
Virus Database
Resides in the TechTool Pro Prefs folder. This file contains the information
required for the virus checking tests of TechTool Pro.
Contents
Prev
Next
Page 13
13
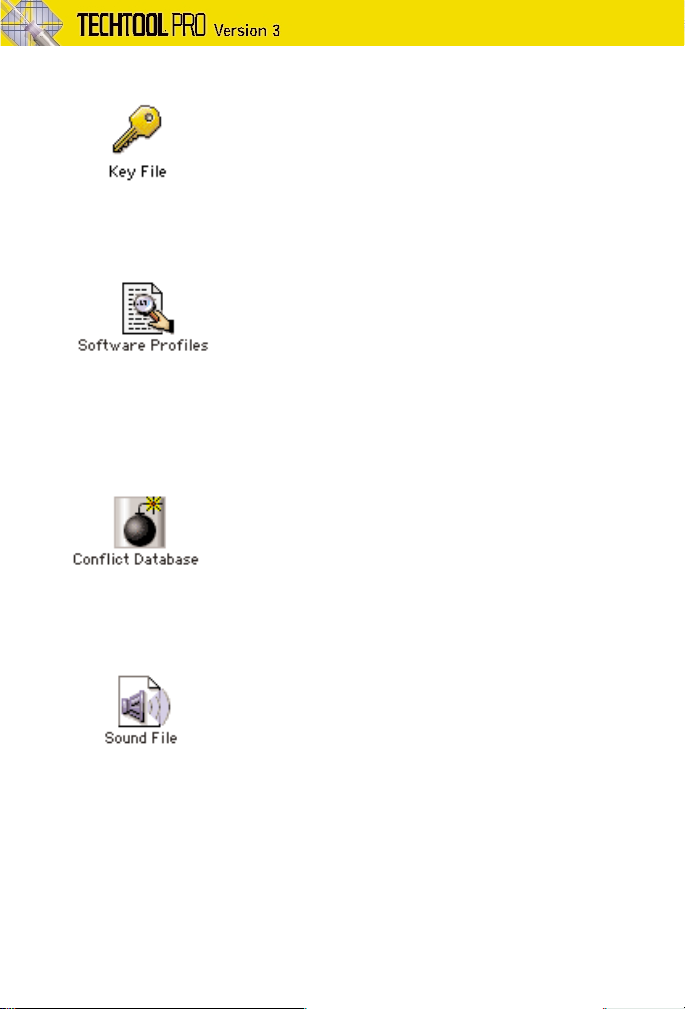
Key File
Resides in the TechTool Pro Prefs folder. This file contains the serial number and
personalization information for TechTool Pro.
Software Profiles
Resides in the Application Support Files folder. It contains a database of software
information used by TechTool Pro. This information is necessary to perform the
File Tests. It checks the Finder, System, Enablers, Updates, MacOS ROM, and
System Resource files.
Conflict Database
Resides in the Application Support Files folder. This file contains the database of
known software conflicts used by TechTool Pro.
Sound File
Resides in the TechTool Pro Prefs folder. This file contains the various warning
and control sounds heard while using TechTool Pro. This file may be alternately
installed in the Application Support Files folder.
Contents
Prev
Next
Page 14
14
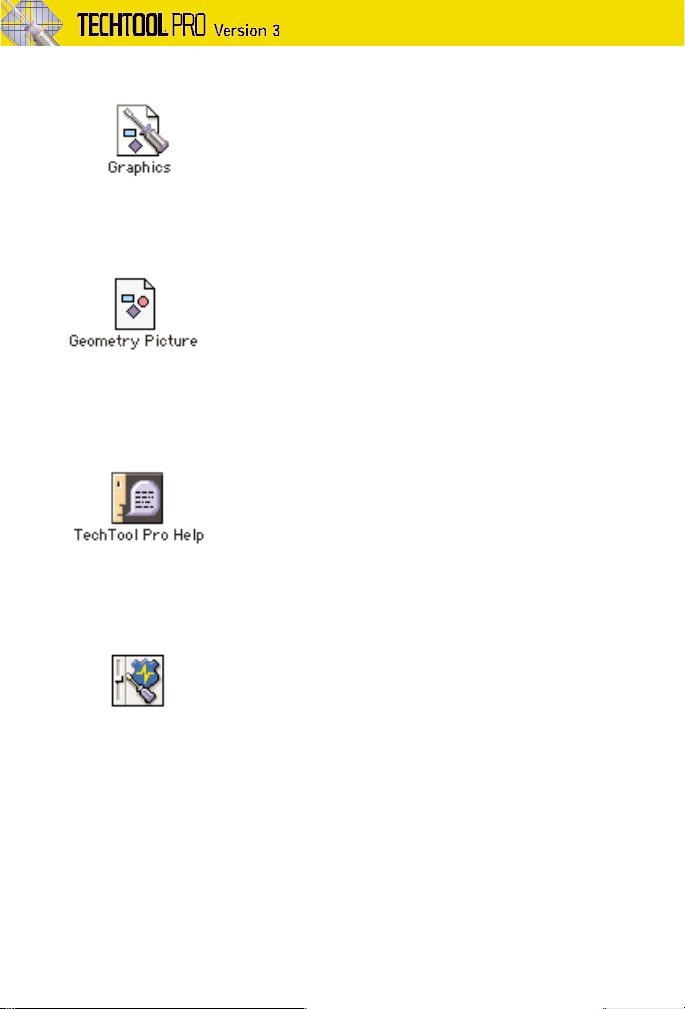
Graphics
Resides in the Application Support Files folder. This file contains graphic elements
used by the TechTool Pro application.
Geometry Picture
Resides in the Application Support Files folder. This pict file holds the Custom
Picture used in the Video Geometry test. To use your own image in the test,
replace this file with a pict image of your choice named Geometry Picture.
TechTool Pro Help
Resides in the Application Support Files folder. This file contains help and advice
information.
TechTool Protection
Resides in the Control Panels folder. This control panel works together with the
Protection Extension to provide automatic security for your computer. This
includes an automatic check of your directory structure, regular backup of your
disk’s directory, maintenance of the Trash Cache (which allows you to easily
“unerase” deleted files), and virus checking routines.
Contents
Prev
Next
Page 15

15
Protection Extension
Resides in the Extensions folder. The Protection Extension implements the
automatic routines controlled by the TechTool Protection control panel (see
above).
Serial Tool
Resides in the Extensions folder. This file is an Apple Communications Toolbox
item. It is used in the Serial Ports tests, and in the Modem tests to allow
TechTool Pro to test all available ports.
Contacting Technical Support
Micromat provides technical support to its customers by telephone, email and
U.S. Mail. For a current listing of our telephone numbers and other contact
information, please refer to the back cover of this manual or visit our website at
www.micromat.com. Technical support is available Monday through Fridays
(excluding public holidays), from 8:30 AM to 5:00 PM PST
If you wish to contact technical support, you will need to have your TechTool
Pro serial number and version number ready. Our automated phone attendant
will require you to enter this information before connecting you to a technician.
Please be near your computer when you phone, since our technicians will need
to ask you questions about your system, and will attempt to guide you through
solving any problems.
Please have the following information ready for the support technician, and be
sure to include it in any email or U.S. postal mail you send to Micromat.
• A Brief description of your problem.
• Version number of your TechTool Pro software. (Example: TechTool Pro 3.01)
• Version of Macintosh System software you are running. (Example: Mac OS
8.6.1)
• Type of computer and configuration. (Example: Apple Macintosh 8600,
48MB of RAM, 4GB internal hard drive.)
Contents
Prev
Next
Page 16

16
• A list of peripheral devices and accessories attached, such as external hard
drives, scanners, printers, recordable CD-ROM devices etc.
• If you are using a third party Video Card, please have the make and model
number available.
• If you are connected to a network, including a cable modem or DSL modem
that uses the network connection, mention the type of network and devices
being used.
• Modem type and speed (Example: Apple Internal 56k).
Micromat News (for notification of updates and other information):
Micromat maintains a notification system called Micromat News. This allows us
to inform our customers of updates and upgrades by email. If you wish to
receive these notifications, please follow the instructions below:
1. Send an email message to listmanager@micromat.com. (You must send the
message from the email account that you wish to subscribe.)
2. Message body should say ONLY the following:
SUBSCRIBE MICROMATNEWS
(note that “micromatnews” is one word)
3. You’ll receive confirmation of your free subscription and you’ll automatically
be notified whenever a new update is released.
About Micromat Computer Systems Inc.
Micromat Inc. has been developing Macintosh diagnostic utilities since 1989. As
the first company to offer diagnostic products for Macintosh, Micromat has
pioneered many new technologies for helping Macintosh users bring their
computers back to life, and to keep them running their absolute best. When
NASA needed to conduct micro-gravity computer experiments in space, they
chose our first product, MacEKG, for its ability to test the behavior of computer
equipment outside the confines of the Earth’s gravity. We were more than
happy to help, because NASA not only put us miles above other utility software
products, they gave us the honored distinction of being the first computer
diagnostic ever to be used in space.
Contents
Prev
Next
Page 17

17
Getting Started
Contents
Prev
Next
Page 18

18
Launching TechTool Pro
After successfully installing TechTool Pro, locate the TechTool Pro Folder. Inside
you’ll find the TechTool Pro application. Double click the TechTool Pro icon to
Launch the program.
The first time you launch TechTool Pro, you’ll be presented with a dialog box
with three fields for your name, company name, and product serial number.
Your serial number is listed on the registration card included with the TechTool
Pro package. Enter the appropriate information into the corresponding fields.
Contents
Prev
Next
Page 19

19
Sample Session
When you first launch TechTool Pro you will see the Navigation Window and the
MultiTester panel open on the screen. The MultiTester contains a standard suite
of tests that will do a thorough analysis of your computer’s drives and
components. To run these tests, all you need to do is click the BEGIN button
on the MultiTester panel. If problems are found, you will be notified and offered
the option to make repairs. When the tests are completed you will be presented
with a report detailing any problems found and the results of any repairs. If
repairs cannot be made, the TechTool Pro report will give you information on
how to proceed. This is all that is required to do a comprehensive check of your
computer system.
Contents
Prev
Next
Page 20
20
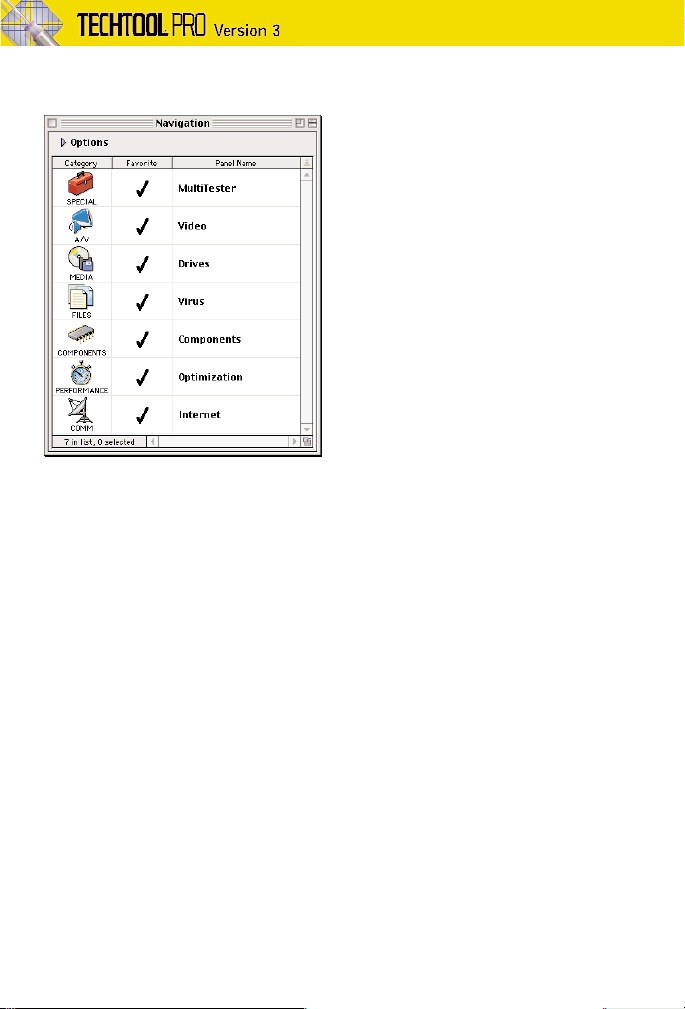
Navigation Window
The Navigation Window can be thought of as TechTool’s Center of Operations. It
lists each test suite and utility available in the TechTool program so that you can
work with it individually. When you double-click on a test, an individual test
panel opens with the options for that test.
The Navigation Window has a number of options that make it easy to use. You
can drag it to any spot on the screen and size it to your liking. If you wish, you
can choose a large format display to make it easier to read. Each test displays
an icon indicating its category, such as Drives or Communications. You are able
to sort the list based on a variety of criteria. In addition, you can choose favorite
tests and list only your favorites, or list only tests that contain a certain “string”
of characters in their name.
Contents
Prev
Next
Page 21
21
MultiTester
The MultiTester is one of the panels in the Navigation Window. It contains a
variety of tests that you can run as a suite on your computer. To see what tests
are available in the MultiTester, click on the Options disclosure triangle.
Each test may be selected individually by checking its box. The tests may be run
on all the attached physical drives or on selected volumes. To run the tests on
the selected drives/volumes just click the BEGIN button.
Contents
Prev
Next
Page 22
22
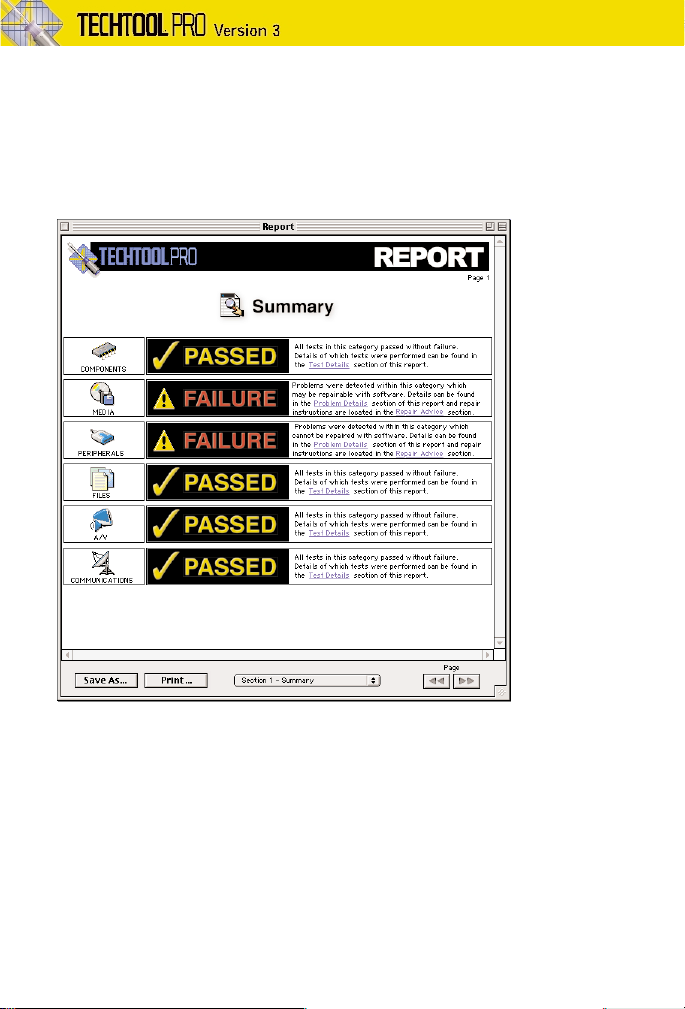
Reports
As tests are performed in TechTool Pro, the data for the final report is being
generated. Upon completion of the tests this report is displayed. It lists which
tests passed and failed, any action taken, and advice on how to proceed if
further action is recommended. The report may be saved as a Simple Text
document and printed for future reference.
Contents
Prev
Next
Page 23
23
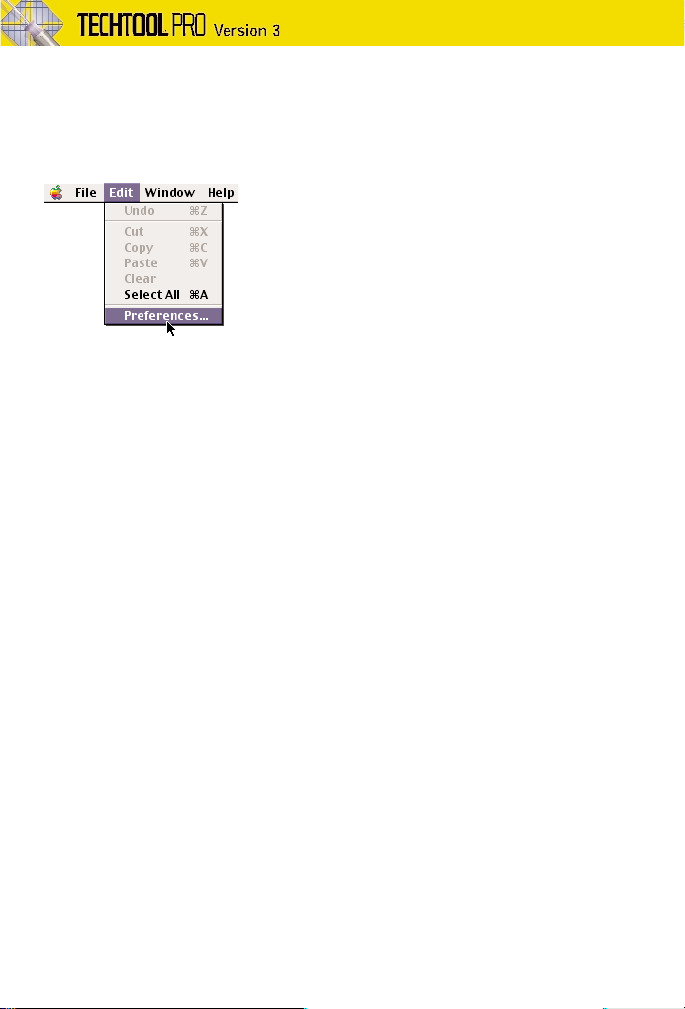
Preferences
TechTool Pro allows you to control and save certain program settings from the
Preferences dialog. These are set by choosing the Preferences… option under
the Edit menu.
By adjusting preferences you can customize how TechTool Pro behaves—from
whether it uses sound and speech, to how its window settings and dialogs are
displayed.
Contents
Prev
Next
Page 24

24
TechTool Protection Control Panel
When you install TechTool Pro, the TechTool Protection control panel and the
Protection Extension are placed in the active System Folder. These two items work
in tandem to provide extra protection for your system. The TechTool Protection
control panel allows you to configure the operation of the Protection Extension,
and to change the default settings for it, if you wish. By default, TechTool
Protection does a diagnostic scan of your volumes at startup to try to spot any
directory corruption before it becomes serious. If problems are found, you will
be warned so that you can take further action. In addition, a backup of your
volume’s directory is made at shutdown. This can often help with data recovery
in the case of volume structure problems. TechTool Protection allows you to
perform a scan of your drive(s) in order to detect the presence of any known
Macintosh viruses. The extension also maintains a Trash Cache that allows you
to retrieve deleted files within the currently set limits for the cache (configurable
by you).
Contents
Prev
Next
Page 25
25
The Trash Cache is useful not only for “undeleting” items you have purposely
trashed, but can often assist in recovering data from documents you were
working on during a computer crash.
Contents
Prev
Next
Page 26

26
Troubleshooting Using
TechTool Pro
Contents
Prev
Next
Page 27

27
Preventive Maintenance
One of the most valuable functions of TechTool Pro is its ability to assist you in
finding and repairing problems with your computer before they get out of
hand. For maximum protection, it is important that TechTool Pro is actually
installed on your system. When you install TechTool Pro you install extensions
which regularly check your volume(s) and backup your directories. In addition,
it is a good idea to run the basic suite of tests in MultiTester on a regular basis
(for example monthly) to more thoroughly check your system. This will help
ensure that your computer is running at its full potential, and minimize the
chance of crashes and data loss. It is important to keep valuable data backed
up. A hard drive or volume will always fail at some point in time. While TechTool
Pro should be able to bring your drive back to life, the insurance provided by a
backup is important. A little time spent maintaining backups and checking your
system regularly, may save you many hours of recovery and repair down the
road.
Troubleshooting Hints
Computers are complex electronic devices that can sometimes be daunting to
troubleshoot. Their proper operation depends on the reliable functioning of
both sophisticated hardware and software. TechTool Pro was designed to do as
much for you as possible in the event of a computer problem. It also has
functions to help you extinguish small problems before they become big
problems. But here are a few tips which can help ensure that you are back in
business as soon as possible.
Backup Before Repairing
If you are experiencing problems be sure and immediately attempt to backup
any important data that hasn’t already been saved. Do this before trying to
make any repairs. It may be impossible to retrieve your data later if the
problems get progressively worse as the computer is used. Also, consider
archival backups. This simply means that instead of having one backup, keep
several backups made on different dates. That way, if you should discover a file
was damaged, and was backed up damaged, you can refer to a prior backup.
Be Prepared
Keep your version of TechTool Pro up-to-date. Know where the TechTool Pro CD
is located in case you need it. If you have updated your copy of TechTool Pro
over the Internet and don’t have the latest version of TechTool Pro on CD, then
be sure you have copied the updated TechTool Pro program folder to another
location (such as a removable disk) in case you need to use it. Keep current
Contents
Prev
Next
Page 28

28
backups of your work. Know where to find your TechTool Pro serial number, in
case you need to call Micromat Tech Support.
Eliminate Easy Problems First
Try starting with extensions off (hold the shift key while booting) and see if that
eliminates the problem. Run through all the tests in the MultiTester and opt to
repair whatever problems might be found. Check the Desktop files and the
PRAM (TechTool Pro can do this for you). It’s possible one of the above items will
help pinpoint or solve the problem.
Simplify/Isolate
Eliminate as many variables as possible. If your problem appears to be with an
internal volume, then power down your machine and disconnect all external
devices. If it is with an external drive/volume, then connect only that drive to
the computer. Startup and run TechTool Pro from the TechTool Pro CD if
possible. This will eliminate the possibility of extension conflicts or system
corruption.
Keep Your Software Fresh
Many computer problems are actually software problems. The producers of
most software will release regular updates to address incompatibilities and other
issues that they discover. Do your best to have current versions of software,
extensions, drivers, etc. Staying current may keep problems from developing in
the first place, and updating an older piece of software may actually solve a
nagging problem.
Make Use of Available Resources
There are many sources of assistance available to help you solve problems.
These include local Macintosh Users Groups, specialized newsgroups on the
Internet, and websites, listserves, and tech support provided by software and
hardware vendors.
Document What You Do
As you try to solve your computer problems, keep notes about what you do
and the outcome of these actions. This can be a valuable reference for you later
and can be extremely helpful if you need to talk to a tech support
representative. Knowing exactly what was done and the results (including any
error messages) can make problem solving much easier. In addition, if you
continue to have problems at a later time, you may be able to spot a pattern
that would otherwise elude you.
Contents
Prev
Next
Page 29

29
Recovering Deleted Files
Deleted files can usually be retrieved if the Trash Cache was active when a file
was erased. To recover a deleted file, simply go to the TechTool Protection
control panel in the Control Panels folder, select Trash Cache, click the Displayed
Cached Files button, and drag the deleted files back out onto the desktop. If
Trash Cache was not active, the chances of recovery may have been
diminished. The Data Recovery panel might be able to recover the file for you.
Repairing Drive Problems
You probably already know the importance of your hard drive. It contains the
data that allows the computer to boot, as well as the programs you use and the
files you’ve created. In most cases, this manual will refer to a drive as a
“volume.” A volume is simply a unit of storage that appears as an icon at the
upper right side of your desktop. A CD-ROM is a volume. Your hard drive is a
volume. A floppy disk is a volume. A removeable disk is a volume. A mounted
drive from another server is a volume. The term “hard drive” and “volume” are
almost interchangeable. Though a hard disk can contain more than one volume
(multiple partitions), a volume cannot contain more than one hard drive. (This
is not entirely true. Some forms of RAID disk setups can make many drives
appear as one volume).
When you double-click a volume icon, and view the contents of that volume,
you’re not seeing the true nature of that volume. Every volume contains many
invisible files and data files. This allows the computer to access the data on that
particular volume. Items, such as the file catalog or directory, the extents tree
and a host of other objects; dictate how data is stored on a particular device
(see the Glossary section of this manual for definitions of these terms). These
items comprise the “volume structure” of a particular volume. In most cases,
when a drive fails and then is repaired with a utility like TechTool Pro, it is not
the physical drive that is being repaired. It is the software that comprises the
volume structure. If there is a problem with the structure of a volume, it can
prevent the computer from being able to boot or prevent you from having
access to your data. If there is an actual problem with the physical drive, like an
electrical or mechanical problem, software will not be able to correct the
problem.
TechTool Pro is unique in that it can check the mechanical and electronic aspects
of a drive (Drive panel), as well as repair the volume structures (MulitTester
panel and Volume Structure panel).
Contents
Prev
Next
Page 30

30
Repairing Problems
First start by using the MuliTester panel of the program. This will conduct a
series of abbreviated tests that can repair most volume problems, if found. Be
sure the Volume Structure, Surface Scan and Drives tests are checked. If
TechTool Pro finds a problem, it will ask you if you wish to repair the problem. If
you still have access to your files, you should stop the test at this point. Make a
current backup of your important files prior to proceeding with repairs. Then
run the tests again and allow the repairs to proceed.
After the program has made repairs, it will create a pseudo-volume (which is a
replica of your volume) on the desktop. This allows you to pre-check a repair
before committing the changes and making them permanent. The pseudovolume will behave like a normal volume: you can open files and folders. Once
you’re satisfied that the proposed repairs are accurate, the Replace button will
make the repair permanent and will dismount the pseudo-volume.
In the unlikely event that the MultiTester routines are unable to repair the
volume, open the Volume Structure panel from the Navigation window. Check
all of the test options and make sure Validate & Repair is selected. Using the
Control Palette, run the tests and allow repairs to proceed.
If the repair is successful, the volume is probably in good shape. If the volume
structures cannot be repaired, you should either reinitialize the volume, or
reformat the drive and restore your data.
Contents
Prev
Next
Page 31

31
Optimization
In order to gain maximum performance from your hard drive, it is a good idea
to defragment/optimize it occasionally. This will rearrange the data on your
drive so that the data for each file is on a contiguous area of the drive, and all
free space is consolidated into one contiguous area. Optimization is done from
the Optimization panel of TechTool Pro. Before optimizing, you should validate
the volume structures of the volume (and repair if necessary). This can be done
either by running the full suite of tests in MulitTester or directly from the
Volume Structure panel itself. Once the volume passes the Volume Structure
tests, proceed to the Optimization panel, select the volume, and click on the
Optimize button.
Contents
Prev
Next
Page 32

32
Testing Components
To check the chips on your computer go to the MultiTester panel and select the
following tests: RAM, ROM, VRAM, PRAM, Processor, Components, and Cache.
Then click BEGIN. This will run a test suite on each component and report any
problems.
Contents
Prev
Next
Page 33

33
Checking for Viruses
A virus is a small program that can invade your computer and damage your
files or volumes. Viruses may cause bizarre computer behavior and can wreak
havoc on a system. It is a good idea to check for them regularly, particularly if
you get files and programs from sources such as the Internet. To check for
viruses, simply use the Virus panel in the TechTool Pro application; or use the
virus checking portion of the TechTool Protection control panel. If a virus is
found, you will be alerted and told what action was taken by TechTool Pro and
how to proceed.
Contents
Prev
Next
Page 34

34
Checking for Software Conflicts
Because all the software on your computer is sharing the same memory when it
is operating; it is possible for programs that are running simultaneously to
interfere with each other. This can lead to crashes and other problems. Using a
frequently updated database of known conflicts, TechTool Pro allows you to
check for this type of problem. Use the Software Conflicts panel and run all the
tests. At the conclusion of the tests, a report will detail any conflicts found and
recommend possible solutions.
Contents
Prev
Next
Page 35

35
In-Depth Testing
The Auto-Pilot panel allows you to create a custom suite of tests that you may
run for long periods of time. This is very useful when attempting to isolate an
intermittent problem. Drag the desired tests to the Auto-Pilot panel and
configure each test as you wish. Then click Begin. Each test will automatically
be run in order. You may configure the tests to be run multiple times in order
to thoroughly exercise your components. This is particularly useful when you
are suspicious of faulty components, like RAM.
Contents
Prev
Next
Page 36

36
Reference
Contents
Prev
Next
Page 37

37
Navigation Window
The Navigation window is your “Center of Operations” for TechTool Pro. It lists
all the test suites and utilities available within the TechTool Pro application. To
access any of the tests, simply double-click its entry in the list section of the
window. The Navigation Window may be configured to make accessing your
favorite tests as easy as possible.
Controls & Displays
Options
The Options disclosure triangle displays a number of controls that allow you to
configure the Navigation window. Click on the triangle to display the options.
Contents
Prev
Next
Page 38

38
View
Allows you to display the Navigation icons in small or large format.
Show Favorites Only
When you select this option only your checked test suites will be shown in the
list portion of the Navigation window. Favorites are chosen by clicking to place
a checkmark in the Favorites column of the Test Display portion of the window.
Filter
The Filter text box allows you to view only tests that contain a certain series of
characters. As you enter characters into the Filter text box, the Navigation
Window will interactively display only those tests that contain the characters
you have typed. For instance, if you wanted to see only the test suites that test
RAM, typing “RAM” into the filter field would shorten the Navigation test list
like this:
Contents
Prev
Next
Page 39

39
Test List
The Test list section of the Navigation panel is divided into three columns:
Cat(egory), Fav(orites), and Panel Name. If you click in a column heading,
the tests will be sorted according to that column. For example, if you click in
the Favorites heading all your selected favorites will appear at the top of the list
sorted alphabetically. The items not chosen as favorites will follow in
alphabetical order. Clicking on the Panel Name heading will sort the list
alphabetically by name, and clicking on the Category heading will sort by tool
type. Clicking the “stacked triangle” on the right of the headings will reverse
the sort order.
Each test or utility belongs to one of the following categories:
Special: Utilities that allow you to work with multiple tests.
A/V: Tools for testing the audio or visual components of your
system.
Media: Tools for working with your drives and other media.
Files: Tools for working with (or on) files.
Components: Tools for analyzing the electronic components
within your system.
Contents
Prev
Next
Page 40

40
Peripherals: Tools for checking external and third-party
peripherals.
Performance: Tools relating to checking and improving the
speed and performance of your system.
Communications: Tools for checking computer
communications.
Sorting by category allows you to easily choose all tests that relate to only that
category. For example, if you are having problems with a drive, then sorting by
category easily allows you to see all the drive tests.
Tests
Double-clicking on a test listing in the Test list window will open the panel for
that test suite. This allows you to set the parameters and options for that
particular test suite prior to actually running those tests. Most test panels have a
Control Palette button on their lower right that will display the Control Palette
when clicked.
The following sections provide descriptions of each test suite and utility
available from the Navigation Window.
Contents
Prev
Next
Page 41

41
Audio Tests
One of the features of the Macintosh that has always set it apart from, and
ahead of, other platforms is its advanced, built-in audio features. Without the
need for external devices or cards, any standard Macintosh can perform
advanced audio signal processing. In fact, the first computer game to deploy
digital audio sound was released only for Macintosh.
TechTool Pro has a multitude of audio tests to help you verify the proper
operation of your Macintosh audio circuits. The Audio panel also offers a
microphone frequency response test that actually checks the microphone by
sending an audio signal out of the speaker while simultaneously sampling the
sound back into the computer with the microphone.
Test & Function Descriptions
Square Wave
Utilizes internal synthesizer to generate square wave.
Sine Wave
Utilizes internal synthesizer to generate sine wave.
Combination
Utilizes internal synthesizer to generate combination sine and square wave.
Contents
Prev
Next
Page 42

42
Sawtooth Wave
Utilizes internal synthesizer to generate sawtooth wave.
Triangular Wave
Utilizes internal synthesizer to generate triangular wave.
Sampled Output
Loads sampled digital audio file and plays sound at sample rate.
Channel Timing
Times the number of milliseconds necessary to allocate and deallocate several
sound channels.
Multi-Channel
Determines the maximum number of sound channels that can be opened
simultaneously.
Up Frequency
Generates square wave while incrementing frequency level.
Down Frequency
Generates square wave while decreasing frequency level.
Up Timbre
Generates sawtooth wave while incrementing frequency level.
Down Timbre
Generates sawtooth wave while decreasing frequency level.
Left Channel
Sends sampled sound out of the left speaker (only noticeable on computers
with stereo speakers attached).
Right Channel
Sends sampled sound out of the right speaker (only noticeable on computers
with stereo speakers attached).
Panning
Pans sampled sound between left and right speakers (only noticeable on
computers with stereo speakers attached).
Mic. Frequency
Samples and displays the microphone frequency.
Contents
Prev
Next
Page 43

43
Controls & Displays
Meters
Displays two meters:
• Microphone Frequency— Displays the frequency levels detected by the
microphone during the Mic. Frequency test.
• VU Meter— A volume unit meter for audio input. Activated upon opening
the panel.
Waveforms
Allows selection of the Waveform tests.
Channel Audio
Allows selection of the Channel Audio tests.
Peripheral
Allows selection of the peripherals used in the tests.
Control Button
Brings up the Control Palette.
Usage Notes
Like the Video Geometry tests, all Audio tests (except for Open Channel and
Multi-Channel) are non-qualified tests. This means that there are no pass/fail
marks. It is up to the user to determine whether the computer produced
acceptable results.
All stereo tests (Left Channel, Right Channel and Panning) require the computer
to be attached to stereo speakers to achieve the desired effect. Without
separate speakers, the output of these tests will be monophonic.
Older Macintosh computers will not be able to utilize the microphone
frequency response test if they do not support simultaneous audio in and out.
Before executing the microphone frequency response test, you should position
the microphone close to one of the Macintosh speakers and be sure the volume
is turned up slightly above normal listening level. When the test is executing,
TechTool Pro will emit various frequencies from the speaker as the sound is input
to the microphone. The frequency display will create a graph bar for each
frequency emitted.
Like the other audio tests, the microphone frequency response test is not meant
to return a pass or fail result. Its purpose is to display the frequencies that the
microphone is capable of detecting. Bear in mind that this is not a fair
assessment of the microphone, since the quality of the speakers attached to the
Macintosh will have a great bearing on the output of the frequencies.
Contents
Prev
Next
Page 44

44
Common Questions
Q: Why can’t I select certain tests in the Audio panel?
A: Some Macintosh models do not have the audio capabilities that TechTool
Pro inspects. In those cases, TechTool Pro will gray out those tests.
Q: Why don’t I receive a pass or fail screen after running tests in the Audio Panel?
A: The Audio test in TechTool Pro is an interactive, subjective test. In other
words, it is up to the user to determine whether the tests passed or failed.
Q: Why doesn’t the VU Meter register any activity?
A: You may not have a sound input device installed or selected in the Sound
control panel.
Contents
Prev
Next
Page 45

45
Auto-Pilot
TechTool Pro makes it easy to run several tests manually, but sometimes the
conventional method of running a test, changing panels, running a test, etc.
can be too time consuming. TechTool Pro allows you to automate a test session
by using the Auto-Pilot Panel and by creating Test Suites.
To run a group of tests automatically, just drag the desired test panels from the
Navigation window to the Auto-Pilot Panel. You can execute all the tests in the
list by simply pressing the Begin button. This allows you to run your test
session with little, if any, interaction with the program. If you would like to
perform repetitive testing, the Repeat Count option allows you to select from 1
to 1000 test sessions to be run consecutively. Each time TechTool Pro completes
a test session, the selected tests will be repeated until the number of sessions
selected has been reached.
Contents
Prev
Next
Page 46

46
Controls & Displays
Test List
Displays the Category and Name of each test to be executed by Auto-Pilot. To
add a test to Auto-Pilot simply drag it into the Test List from the Navigation
window. To remove a test from the Test List, select the test and press the delete
key.
Change/Select Device
Allows you to select which volume or device a particular panel will test.
Options
• Stop on Errors—This option causes TechTool Pro to halt any Auto-Pilot session
if a failure is detected.
• Restart Computer—This option configures Auto-Pilot to reboot the system
after each test session.
• Shutdown When Completed—This option instructs Auto-Pilot to shutdown
the computer after all test sessions have been executed.
• Repeat Count—This slider lets you select the number of times the tests will
automatically be performed.
Sessions Remaining Field
This field displays the number of Auto-Pilot sessions remaining to be executed.
Restart Countdown
This field displays a ten-second countdown that occurs before the computer is
about to be restarted. The countdown enables you to terminate an Auto-Pilot
session (by clicking the STOP button) before the system restarts. This field will
only be activated if Auto-Pilot is configured for Auto-Boot.
Begin/Stop Button
This button starts or terminates an Auto-Pilot session.
Contents
Prev
Next
Page 47

47
Test Suites
TechTool Pro allows you to save Auto-Pilot settings for future use. For example, if
you have situations where you only wish to run certain selections in the RAM
and Mathematics panels, you could create a suite that would represent those
settings. The next time you wish to run that particular configuration, you would
simply LOAD the test suite you had previously created. Here are the steps for
creating and later using a test suite:
• Launch TechTool Pro.
• Configure Auto-Pilot to use the desired tests.
• Select Save... from the File menu.
• Give the file a unique name.
If you wish to load a test suite you have created:
• Launch TechTool Pro.
• Select Open... from the File menu.
• Navigate to your saved test suite file.
• Double-click the file name or select OPEN.
• Auto-Pilot will configure itself according to the settings of the test suite.
A handy feature of the test suite option is that you can invoke Auto-Pilot just by
naming your test suite file so that its name begins with “Auto-Pilot.” Following
is an example:
• Configure Auto-Pilot as desired.
• Select Save... from the File menu.
• Name the test suite “Auto-Pilot My Suite”
• Quit TechTool Pro.
• Double-click the Auto-Pilot My Suite test suite file.
TechTool Pro will automatically launch and begin an Auto-Pilot session based on
the tests you configured when you saved the suite.
Contents
Prev
Next
Page 48

48
Common Questions
Q: Why can’t I drag the Video Geometry test over to Auto-Pilot?
A: Auto-Pilot cannot simulate interactive tests requiring user feedback. Since
Auto-Pilot cannot perform these tests, they are rejected by the test field.
Q: If I change settings for a test suite in the Navigation window, will it affect my
settings in the Auto-Pilot panel?
A: No. The preferences for Auto-Pilot tests are separate from those for the
Navigation Window.
Contents
Prev
Next
Page 49

49
Benchmark Tests
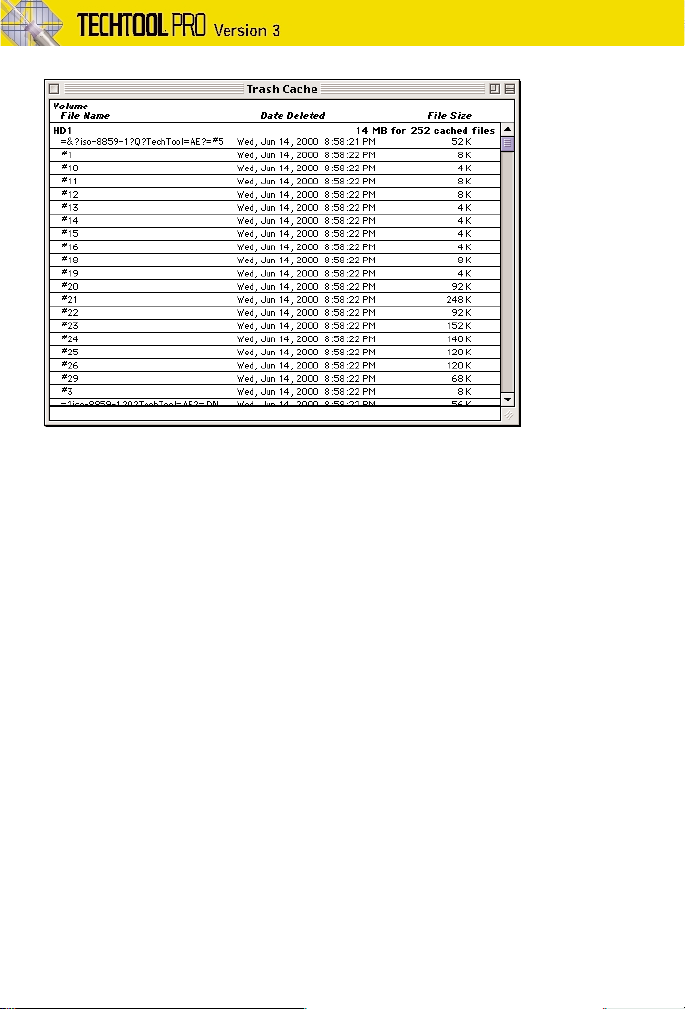
Computer users are often concerned about how fast their systems operate. The
never-ending quest for better performance has created a significant industry of
acceleration devices for computers. The question is, how do you tell if your
computer is really running any faster after it’s been upgraded? The answer is
benchmark tests. These are tests designed for the sole purpose of determining
computational speeds and rendering the results in a numeric format for
comparison. For a computer manufacturer to simply say, “Our computers are
faster than our competitor’s” is not enough. People need hard evidence to
believe such a claim; and the proof is in the numbers.
TechTool Pro provides several popular benchmark tests that will help you
compare your computer’s performance to that of other computers or against
itself for upgrade testing.
Test & Function Descriptions
Whetstone
Tests mathematical processing speed using floating-point integer calculations.
Results are displayed in whetstones per second. Larger numbers are better.
Dhrystone
Tests speed of string operations. Results are displayed in Dhrystones per second.
Larger numbers are better.
Cycle
Calculates the number of event loops processed per second. Larger numbers
are better. NOTE: System extensions will affect cycles per second.
Contents
Prev
Next
Page 50

50
Sieve
Tests mathematical processing speed calculating prime numbers. Results reflect
sieve executions per second. Larger numbers are better.
Sort
Calculates the time necessary to sort a complex array. Results reflect amount of
time necessary to complete test. Smaller numbers are better.
Controls & Displays
Test Select
Allows you to choose the Benchmark test you wish to run.
Control Button
Brings up the Control Palette.
Common Questions
Q: Why does the cycle rate differ so greatly with extensions on as opposed to
extensions off?
A: System extensions add hooks to the System’s event loop. Most extensions
intercept the event loop looking for messages that they were intended to
trap. For instance, a macro program intercepts an event related to
keystrokes which could be an instruction to invoke a macro. As you add
more extensions to your system, the cycle rate of the machine decreases
meaning the computer is operating more slowly than it would with less or
no extensions.
Contents
Prev
Next
Page 51

51
Cache Tests
Macintosh computers that have a PowerPC processor have an instruction cache
built into the CPU called Level 1 cache. This cache speeds up processing speed
by storing frequently used instructions. A good analogy to this would be writing
down frequently used phone numbers on Post-It notes and keeping them on
your wall for quick reference instead of having to look them up in the
telephone book every time they are needed.
The next step above Level 1 cache is Level 2 cache. This is generally an optional
card that is attached to the Macintosh logic board or integrated into the
machine’s logic board. Some third party upgrade cards also come with L2
cache. Just as the L1 cache holds frequently used CPU instructions, the L2 cache
is a repository for frequently used blocks of memory.
TechTool Pro will show you how much L1 and L2 cache your system has
available and will verify that it is working properly.
Test & Function Descriptions
L1 Performance
This test checks the amount of L1 cache contained in the computer and will
verify that it is operational.
L2 Performance
This test checks the amount of L2 cache contained in the computer and will
verify that it is operational.
Contents
Prev
Next
Page 52

52
Controls & Displays
Cache Size Fields
Displays the amount of memory in the L1 and L2 cache.
Test Select
Allows you to select which verification test will be performed.
Control Button
Brings up the Control Palette.
Common Questions
Q: Why does my ancient 68K Macintosh fail the L2 cache? I know that it did not
come with L2 cache. So why is it failing?
A: Apple did not create any mechanism to detect the presence of L2 cache. So
the L2 cache is inherently “blind” (if L2 is there and is damaged, the test
fails and if L2 is not there the test still fails). We’ve worked closely with
Apple on this problem and there is currently no way around this. Future
versions of the system may allow us to do this.
Q: I have a third party processor upgrade card installed in my machine that
includes its own L2 cache. TechTool Pro does not recognize it and either reports
the L2 cache installed on the motherboard or does not report it at all. Why?
A: In some cases, third party upgrade cards are accompanied by software to
make the upgrade visible to the system. Generally, TechTool Pro will see the
correct L2 cache size and test it correctly. However, if this software is not
active (possibly because extensions are off or you booted from the TechTool
Pro CD) this information may not appear correctly. In that case TechTool Pro
may test the L2 cache installed on the logic board instead.
Contents
Prev
Next
Page 53

53
Clock Tests
The term “clock speed,” when used in computer jargon, refers to a measure of
performance, much like the automobile industry refers to the power of an
engine in terms of “horse power.” Computer users can improve their computer
performance by finding ways to increase their clock speed. This can be
accomplished by either buying a new machine or upgrading the existing
computer with an accelerator or faster clock chip.
The Macintosh clock provides base timing signals to the CPU. This dictates how
many instructions per second the CPU can process. Sometimes comprised of a
crystal unit and clock circuit, the computer’s clock determines the “heart beat”
of the computer. The faster the rate, the faster the computer runs. The clock
rate is measured in megahertz (MHz). One megahertz represents 1,000,000
pulses per second. The original 1984 Macintosh ran at a whopping 8MHz or
8,000,000 pulses per second (don’t confuse this with IPS – instructions per
second). A Macintosh G4 might run at 500MHz or 500,000,000 pulses per
second – quite a difference.
While clock speed has become the industry benchmark for comparing
computer speeds, it is not the absolute speed indicator that represents
computer performance. For instance, an old Macintosh G3 modified to run at
500Mhz may seem like it would perform better than a Power Macintosh G4
running at 450MHz, but that is not the case. The improved processor, newer
bus architecture, and accelerated I/O of the G4 will boost performance above
what can be achieved from older-generation systems.
TechTool Pro will help you verify your clock speed and test the circuit that
comprises your Macintosh clock. While this is helpful in diagnosing an ailing
machine, you will also find it useful for testing upgrades to verify that
advertised gains in clock speed are being realized.
Contents
Prev
Next
Page 54

54
Test & Function Descriptions
Read Register
This test checks the clock circuitry output by requesting several thousand read
commands and verifying the contents.
Write Register
The Write test checks the clock circuitry input by sending several thousand write
commands and verifying that the contents of the clock registers contain what
was sent by the program.
Controls & Displays
Test Select
Allows you to choose one or both of the clock tests.
Clock Speed as reported by System
This field displays the clock speed as determined by the MacOS during boot.
Clock Speed as reported by TechTool Pro
This field displays the results of a timing algorithm that calculates the
approximate clock speed.
Control Button
Brings up the Control Palette.
Common Questions
Q: My computer is supposed to have a clock speed of 150MHz. Why does TechTool
Pro report that my clock speed is 147MHz?
A: There are a couple of reasons why this could be happening. TechTool Pro
employs a complex algorithm to estimate the clock rate of your machine.
While this is accurate in most cases, there are situations where other
software or hardware elements of your system might affect the outcome of
TechTool Pro’s calculation. In particular, interference by extensions and
networking can cause the test to report a low result. To get a more accurate
report, try running the test again with all extensions disabled and network
services, such as AppleTalk and file sharing, turned off.
Contents
Prev
Next
Page 55

55
Components Test
The original Macintosh Plus (1986) contained four integrated circuits on the
logic board that were very important to the operation of the computer. They
were the VIA1, VIA2, SCC and SCSI chips. Shortly after the release of the first
PowerPC Macs, Apple began implementing the functionality of these chips into
newer, hybrid chips. These not only emulated the functions of the original chips
(for backward compatibility), but also added additional functionality to support
the evolution of the platform.
Your computer may have few, if any, of the tested components. However, these
tests will still check the functionality of the new chips that now implement the
functions of the original chips. A description of those chips and their functions
is listed below for historical reference.
The VIA1 and VIA2 Chips
The 6522 VIA or Versatile Interface Adapter is an integrated circuit that was
originally developed by Rockwell International as a generic computer interface
circuit. It handled all of the Macintosh user input, such as from the mouse and
keyboard, as well as helps in the operation of the floppy drives. Some
computers have a second VIA which would handle timing and other functions
for NuBus slot devices like video cards and modems. This chip was phased out
with the introduction of the PCI format expansion slot.
The SCC Chip
The 5380 SCC or Serial Communication Controller is an integrated circuit that
was originally developed by Zilog Incorporated for processing computer serial
communications. It is the primary circuit model used in the operation of the
serial ports that allows the use of modems, printers, and other input/output
devices.
Contents
Prev
Next
Page 56

56
The SCSI Chip
The 8530 SCSI integrated circuit was originally designed by AMD to provide an
easy interface to the ANSI standard of the SCSI parallel communication
protocol. This chip provides the pathway interface for both internal and
external SCSI. While the SCSI format is now a thing of the past, many users add
cards to their systems that give them a SCSI port. This allows them to use older
devices on newer generation systems.
Any problems with the above chips (or their hybrid counterparts), can make
your computer unreliable or completely inoperable. A faulty VIA can cause
numerous problems on the Macintosh including inconsistent cursor movement
or complete failure of the mouse and keyboard. It can also cause unpredictable
and untraceable freezes or system crashes. In the very worst case, it can prevent
the Macintosh from booting. Indications of a damaged or faulty SCC are poor
serial communications, no serial communications, or possible problems with the
floppy drive (if the system has one). Signs of a faulty or inoperable SCSI chip
are poor SCSI read/writes, repetitive SCSI read/writes, or the complete inability
to communicate with SCSI devices. This chip is often damaged when a faulty
cable or device is plugged into the bus. TechTool Pro checks all four of these
components or their hybrid counterparts.
Test Descriptions
The component tests are designated by the four component names they
encompass: VIA1, VIA2 (if installed), SCC and SCSI (if installed). The tests are
comprised of assembler routines that test the individual registers of each chip at
the lowest level available. By setting and checking each register, TechTool Pro is
able to verify the proper operation of each component.
Controls & Displays
Test Select
This is a group of check boxes that signify each component test available.
Control Button
Brings up the Control Palette.
Contents
Prev
Next
Page 57

57
Common Questions
Q: Why can’t I select the VIA2 test?
A: Your computer does not have this particular component. Many models did
not employ this processor.
Q: Why can’t I select the SCC test?
A: It is possible that your system may not have this chip or its equivalent
hybrid. It is also possible that there is software that is interfering with
TechTool Pro’s ability to control and test the SCC chip. Some programs, such
as fax and network software, will often take over complete control of the
chip and not allow low level operations from outside programs. TechTool Pro
checks for this condition and will prevent the operation of the SCC test if it
will possibly interfere with the operation of your computer. Try restarting
with extensions and AppleTalk disabled.
Q: Why can’t I select the SCSI test?
A: Your computer probably does not have this particular component. Older
Macs came with built in SCSI, but newer Macs do not contain SCSI unless
you add a third party SCSI card.
Contents
Prev
Next
Page 58

58
Data Recovery
The Data Recovery panel can be used to resurrect damaged volumes, recover
lost data from a crashed drive, and retrieve files that were erased by accident.
This panel is usually used when the drive is completely inaccessible and
attempts to repair the volume using the Volume Structures routines did not
succeed.
If you can still access the drive and all or some of your data, consider backing
up before proceeding, especially if you’ll be using the Resurrect feature. If the
data cannot be copied normally, then you can use Data Recovery to try to
rescue your data.
When using Data Recovery it is important to recover files to a second volume to
lessen the chance of overwriting other critical data on the original volume.
Some of the options of the Data Recovery panel work in unison with the data
saved by the TechTool Protection control panel. It stores important file location
data, allowing TechTool Pro to easily find files and, in most cases, quickly restore
a lost volume to its earlier state. If the TechTool Pro extension and control panel
were not installed, a volume recovery will be more complicated. Without the
vital data that TechTool Protection saves, you will need to recover the files to
another drive/volume, reinitialize the damaged volume, and then copy the
recovered files back to the original volume. The TechTool Pro installer
automatically installs and activates the control panel and extension. If you have
removed or disabled these important components, you should seriously
consider reinstalling or reactivating them to help guard against a potential
future catastrophe. If you have multiple volumes on your system, be sure that
Contents
Prev
Next
Page 59

59
TechTool Protection is set to protect ALL of your volumes. The default is to
simply protect your system volume.
In the event that the TechTool Protection File is not available or the damage to
the volume is too serious, you should still be able to recover most, if not all, of
your data. The Data Recovery panel offers options and features that make
recovering your data very easy.
Controls & Displays: Recovery Options
Resurrect Protected Volume – This allows TechTool Pro to attempt a full volume
recovery provided that a valid Protection File was created for the volume by the
TechTool Protection control panel. Be aware that TechTool Pro will replace the
current directory of the volume with the previously saved Protection copy of
your directory. Any changes made after the Protection File was updated may be
lost. You can tell that TechTool Pro recognizes a Protection File if the information
about your drive in the volume window says Protected: <date>. The <date>
indicates when the Protection File was made.
TechTool Pro will search all local volumes for the TechTool Protection File that is
relevant to the target volume. If such files are found, TechTool Pro will select the
most current Protection File. When you instruct TechTool Pro to resurrect the
volume, that Protection File will be used in the attempt to restore the volume to
its original state. If no serious structural or mechanical problems prevent a
recovery, your lost volume will appear in the Finder with most, if not all, of your
files intact.
Recover Files Using Protection Data – This option allows you to access an
available Protection File to recover a file or to undelete a file that was
accidentally deleted. This is especially useful for files that were deleted but not
saved using TechTool Protection’s Trash Cache feature. As long as the Protection
File for the volume has not been updated by the TechTool Protection control
panel since you deleted the file youhave a good chance of retrieving it.
Remember, TechTool Pro extensions must have been installed and active in order
to have a valid Protection File for the volume. If you are unable to recover the
file(s) using this option, consider utilizing the “Recover Files By Scanning
Directory” or “Recover Files By Scavenging Volume” options.
Recover Files By Scanning Directory – Selecting this option will search for files
using available directory structure information existing on the volume/drive.
This routine is faster than using “Recover Files By Scavenging Volume.”
Recover Files By Scavenging Volume – Selecting this option will search the entire
volume for valid files. This option is useful if you have not installed TechTool Pro
on this volume, if TechTool Protection did not create a Protection File for this
volume, or if the Protection File cannot be found. Since scavenging must
Contents
Prev
Next
Page 60

60
examine every sector of a drive, it may take a long time to build the recovery
list, especially on large volumes. However it may be worth the wait if it can save
you the frustration of losing a file that may have been accidentally deleted.
Controls & Displays: File Location Parameters
There are three Find File methods. If one of them does not find your files you
should consider trying the others; they each use different techniques to scan
your drive or volume. The following methods work in concert with the above
recovery options for narrowing your search in the Data Recovery panel:
Find All Files – This option will scan the entire target volume for files that can
recovered. Once TechTool Pro has scanned the volume, it will present a list of all
files found.
Find Files By Name – This option allows you to search for a specific file based on
the name of the file. After choosing the volume to search, you will be prompted
to enter a name or a name segment to be used in the search. Once TechTool Pro
has scanned the volume, it will present a list of files that match the search
criteria you have specified.
Find Files By Example – This option allows you to search for files based on their
unique type and creator codes. Every Macintosh file has a type and creator
code that uniquely identifies the type of document and the application with
which it is associated. After choosing the volume you wish to search you will be
prompted to select an example file of the type you wish to use in the search.
For example, if you were searching for a lost Microsoft Excel file, you could
“show” TechTool Pro what kind of file you were seeking (by navigating to an
Excel document on another volume). Once TechTool Pro has scanned the
volume it will present a list of the files it found that have the chosen type and
creator codes.
Recover Files
This button brings up the standard Volume Selection dialog.
Contents
Prev
Next
Page 61

61
Choose the volume you wish to search. Then click OK. TechTool Pro will display
the Recovery Window.
The window is divided into two sections. The left half relates to the files that
were found and the right side refers to the files you wish to be recovered.
Following are the main components of the window:
Found Files: – This list on the left of the Recovery Window will display files that
match your search criteria. You can use the disclosure triangle beside a folder to
open it and display its contents.
File Information – Located below the Found Files: list, this information box
contains details about the volume and the search results.
Progress Bar – As the volume is searched, a progress bar is displayed below the
File Information box. This is only active during the recovery process.
Files to Recover: – This list on the right of the Recovery Window contains the files
you have selected for recovery.
Recovery Information – Located below the Files to Recover: list, this information
box displays the total disk space required to hold the files in the list. It also
displays the total disk space available on the selected recovery volume. A green
check beside the items indicates that enough space is available for recovery to
occur. A warning symbol means the destination does not have enough space to
hold the selected files.
Contents
Prev
Next
Page 62

62
Destination – To the right of the Recovery Information box is the Destination
information and selection box. It displays the selected destination volume (or
indicates if one is not yet selected). Clicking the Select button in the box will
display the standard Volume Selection dialog. This allows you to select a
destination on which to save the selected files. Do not save them back onto the
original volume. This may overwrite data that is not yet recovered. You may use
the Eject button to eject the currently selected volume (if it is removable) and
insert another. The Eject button will be grayed out for non–removable volumes.
Double–clicking a file or folder in either the Found Files: or Files to Recover:
list will move it from one list to the other. Selecting a file or folder in either
window by clicking on it once and then choosing the appropriate double-arrow
will also transfer it to the opposite list as above.
You may use command-A to select all files, or shift-click or command-click to
select multiple items in either list. Once you have transferred the files you wish
to recover to the Files to Recover: list and have chosen a destination volume,
simply click the Recover button to recover the files from the original volume to
the chosen destination. Note that the Recover button will be grayed out if there
is not enough space on the destination volume.
Common Questions
Q: My hard drive and Zip drive are grayed out and I cannot select them for
Resurrect Protected Volume. Why?
A: In order to recover data from a volume, it is sometimes necessary to
dismount the volume from the desktop. This means that the volume is no
longer available for use by the System. There are three conditions that will
prevent TechTool Pro from allowing you to operate with a volume:
The volume contains the active system.
Since the computer needs constant access to the System files, a System
volume cannot be dismounted for the Resurrect Protected Volume option.
You will need to boot from another volume or from the TechTool Pro CD-
ROM, which has a bootable System file.
The volume contains the active TechTool Pro application.
TechTool Pro will not allow you to perform the Resurrect Protected Volume
operation on the volume where TechTool Pro is residing and running. You
will need to run TechTool Pro from another volume such as the TechTool Pro
CD-ROM.
Contents
Prev
Next
Page 63

63
The drive has no media.
Removable drives, such as Zip and DVD-RAM, will not be a selectable
option if they presently do not contain a disk cartridge. Insert the cartridge
you wish to work on and then click the Scan for Missing Volumes button
in the standard Volume Selection dialog to update the volume list in the
Data Recovery panel.
Q: Can I recover files to a network volume?
A: Yes, the TechTool Pro CD contains the necessary networking extension to
mount a remote shared volume over an AppleTalk network. Remember,
though, that copying files over the network is usually slower than copying
them to a local volume.
Step-By-Step Recovery Over a Network:
• Boot the computer that has the volume needing recovery from the
TechTool Pro CD.
• At the Desktop go to the Apple Menu and select Chooser.
• In the Chooser select the network computer to which you wish to recover
files.
• Enter the User ID and Password (if applicable) for the network volume
selected. The volume should appear on the Desktop.
• Launch TechTool Pro from the TechTool Pro CD.
• Choose the Data Recovery panel from the Navigation Window.
• Select the recovery options you wish to use.
• Choose the List Files button.
• Use the standard Volume Selection dialog to choose the volume from
which you wish to recover files and click OK.
• TechTool Pro will now search for files matching your search criteria and
display the results in the Recovery window.
• Transfer the files you wish to recover from the Found Files: list to the Files
to be Recovered: list.
• Click the Select button and choose the network volume you previously
mounted.
• Click the Recover button—the selected files will be saved to the network
volume. If the Recover button cannot be selected then there may not be
enough room to hold the selected files.
Contents
Prev
Next
Page 64

64
Q: How can I select multiple files or folder within the Data Recovery window?
A: Hold down the Command key as you click on files or folders that you wish
to recover.
Desktop Test
The Desktop Database is comprised of one or more invisible files that reside on
Finder-mountable volumes. It contains file-to-parent application information
and other attributes related to individual files. Data stored in the Desktop
includes file and application icons, type and creator codes, file comments, and
semi-critical directory information. The Desktop Database records are updated
on an individual basis each time a new application is introduced (copied or
mounted) to a given system. The Finder scans the new application for a BNDL
resource, which provides the Desktop Database with icon and file type
information for the application and its respective document icons. Once the
Desktop has been updated for the new application, that application no longer
needs to remain present on the system for its document icons to be correctly
displayed at the Finder.
The Desktop Database, formerly the Desktop File, has been problematic since
the first Macs were released in 1984. A problem that plagues the Desktop is
bad data, often referred to as corruption. During normal use, the Desktop will
be updated often by the System, Finder, or other applications. In the event that
these updates are interrupted for any reason, because of a crash or an extension
conflict, the data stored could be written incorrectly. In most cases the bad data
may not affect anything important or be immediately noticeable, but it is
possible for vital file segments to become damaged, rendering the machine
completely useless or prone to crashes and freezes.
Contents
Prev
Next
Page 65

65
Rebuilding the Desktop is often necessary when documents fail to launch after
double-clicking them, or when custom icons are unexpectedly replaced with
generic document or application icons. Traditionally, holding the Option and
Command keys before the Finder loads will force the invisible Desktop
Databases to be rebuilt. This is sometimes ineffective because if the original
Desktop Databases were damaged, then rebuilding them only yields updated
Desktop Databases that may still be damaged.
TechTool Pro provides better solutions to rebuilding the Desktop. First, it
provides a check/repair routine that can repair almost any Desktop related
problem. Also, it can actually delete the original Desktop Database files. The
Finder is the watchdog of the Desktop Databases. If the Finder loads and
notices that a volume does not have Desktop files, it will begin the process of
creating a new Desktop Database. TechTool Pro also allows you to save and
restore Desktop Database files, in case something goes wrong with the rebuild.
Test & Function Descriptions
Backup Desktop
Allows the user to optionally save the Desktop Database files so that they can
be used by the Restore Desktop option later, if needed. These Desktop files are
saved to a folder with the same name as the volume inside the folder that holds
the TechTool Pro application.
Restore Desktop
Allows the user to restore a Desktop Database previously saved with the Backup
Desktop button. You would not normally need to use Restore Desktop. It is only
included as an option so that you may return the Desktop to its previous state if
needed.
Check/Repair Desktop
This test checks the file integrity of the Desktop Database and scans your
volume’s applications to make sure that there is a valid entry for each
application’s icon set (BNDL). This test should repair any difficulty you might be
having with generic icons, provided that the parent application is resident.
If the Check/Repair Desktop finds an application that does not have a valid entry
in the Desktop Database, TechTool Pro will create an entry. To make an entry,
TechTool Pro must force all other applications to quit, including the Finder. If
you know you’ll be running the Check/Repair Desktop function, you may want
to quit all other applications before launching TechTool Pro.
When you manually execute the Check/Repair Desktop, TechTool Pro will prompt
you to select the volume(s) containing the Desktop Database you wish to
examine.
Contents
Prev
Next
Page 66

66
Delete Desktop
Deletes the Desktop Databases. The next time the Finder is launched, it will
create a new Desktop.
Controls & Displays
Backup
Allows you to backup or restore the Desktop Database files.
Repair
Allows you to check/repair or delete the Desktop.
Usage Notes
Backing up the Desktop:
Some users may find it desirable to save their Desktop Database prior to
check/repair or deleting it for rebuild. This is not necessary, but provides a
method to undo any potential side effects by using the Restore Desktop
button. If you wish to save a copy of the Desktop Databases, be sure to do so
BEFORE clicking the Delete Desktop button. The delete routine will not remind
you or prompt you to save. If booted from a locked volume or CD-ROM the
Desktop Databases and Finder Info comments cannot be saved.
Deleting the Desktop Database:
When you click the Delete Desktop button, all applications running (except
TechTool Pro) will be forced to quit (including the Finder). This is to avoid
potential wrestling over command of the Desktop Database files. It is
recommended that Delete Desktop be performed when booting and running
from your normal startup volume.
You will then be prompted to select the volume(s) from which you wish to
delete the Desktop Databases. If you want to keep comments you have made in
the Finder’s Get Info window, be sure to check the Save Info Comments box.
Contents
Prev
Next
Page 67

67
Remember that there is at least one Desktop Database to be deleted for each
volume on your system, excluding write-protected media like CD-ROMs. To do
a thorough job we suggest you delete the Desktop Database files from all
available volumes.
The deletion takes only a few seconds. When finished, you’ll receive
confirmation:
TechTool Pro will prompt you to restart the computer after it deletes the Desktop
Database files. It’s up to the Finder to then create the new Desktop Databases
and to rebuild them. When you see the following progress box after the restart,
you’ll know the new Desktops files are being created:
Don’t interrupt the process! Nothing terrible will happen if you do; however,
you’ll end up with a bunch of generic document icons and will have to start
again. Depending on the number of files and size of your volumes, this could
take a long time.
Restoring the Desktop Database:
If for some reason you wish to restore the previous Desktop Databases, follow
these steps:
• Click the Restore Desktop button.
• You will be presented with two dialog boxes explaining what will occur.
• You will then be prompted to choose a volume from the standard volume
selection dialog. Select the volume you wish to restore.
• Click the Restore button to start the routine.
Contents
Prev
Next
Page 68

68
• Click Restart when prompted.
Potential Side Effects
• Documents that have lost their parent applications will become generic
document icons.
• Comments will be lost unless the Save Info Comments box is checked.
• The Finder may repeatedly rebuild the Desktop Databases with each
successive restart. This constant rebuild problem is an odd bug that can
sometimes occur with the Apple extension Macintosh Easy Open. The same
thing will apparently happen if you rebuild the regular way. Should this
occur, try this:
• Disable Macintosh Easy Open.
• Delete the Desktop Databases again with TechTool Pro.
• Enable Macintosh Easy Open.
• Let the Finder complete the rebuild.
Common Questions
Q: I keep a lot of files and folders on my Desktop. Will I lose these by deleting the
Desktop?
A: No. The Desktop that you see at the Finder, the open area where the trash
can and your drive icons live, is in no way related to the invisible Desktop
Database which TechTool Pro deletes. This correlation between names
confuses many people. Apple should name the Desktop Databases
something else.
Q: “Deleting the desktop” sounds so drastic. What if something goes wrong with
deleting the Desktop? Will I lose everything on my hard drive?
A: Definitely not. Think of the Desktop Database files as preference files. When
you delete an application’s preference file, a new one is created the next
time the application is launched. In this case, the Finder will just create new
Desktop Database files the next time it is launched.
Q: Why should I save my Desktop files before rebuilding the Desktop and what
should I do with the saved files afterwards?
A: TechTool Pro allows you to save the Desktop files just in case something goes
wrong with the rebuild. In this case, you have a method of “undoing” the
rebuild by using the Restore Desktop button. If you are confident that a
rebuild was successful, you can trash the saved Desktop files.
Contents
Prev
Next
Page 69

69
Q: When the computer restarts after I delete the Desktop it freezes. Why?
A: You are probably experiencing an extension problem. Try disabling
extensions when the computer restarts by holding down the shift key.
Directory Maintenance
The directory of a volume stores information about the files and folders stored
on the volume and where they are located. As files and folders are added and
deleted from the volume, the data structures that hold this information may
become fragmented. This lowers the speed that this vital information can be
accessed by the system. Rebuilding the directory structures optimizes them and
improves overall system performance.
Controls & Displays
Information Screen
This screen shows a variety of information about your directory structures. In
particular it lists the following:
• Current Volume: – the volume currently under examination.
• Format: – the format of the volume, either HFS or HFS+.
• Block Size: – the size of the blocks for the current volume’s format.
Contents
Prev
Next
Page 70

70
The screen also displays a graph of the selected volume’s directory allowing you
to visually see the condition of fragmentation of the directory structures. The
information is coded as below:
• Green – contiguous areas of the directory.
• Blue – free space in the directory.
• Red – fragmented areas of the directory.
Select Volume(s)
This button brings up the volume selection dialog.
Update Graph
This button displays a pictorial representation of the current state of the
selected volume’s directory in the Information Screen.
Rebuild
The Rebuild button rebuilds and optimizes the directory structures of the
selected volume.
Drives
While there are utilities available to help recover lost files and repair damaged
directory information, few utilities examine the mechanics of the hard drive.
The controller board, heads, spindle motor, and head armature are just a few
items that deserve equal, if not more, attention than the software attributes of
the drive. Should one of these items fail, no software recovery program alone
will be able to save your data.
Contents
Prev
Next
Page 71

71
TechTool Pro tests many important elements of your hard drive including the
controller I/O, memory, and head-positioning mechanism to name just a few.
These universal tests are applicable to almost any drive types. Some of the tests
can even be performed on CD-ROM drives.
Test & Function Descriptions
Self Diagnostic
This test initiates a self-diagnostic on the target drive. These routines are
designed by the drive manufacturer and provide excellent insight into the
operational condition of the drive.
Test Unit Ready
Determines whether the target drive is able and ready to receive commands.
Read Buffer
This test is used in conjunction with the WRITE BUFFER command as a
diagnostic function for testing target memory and the bus integrity.
Write Buffer
This test is used in conjunction with the READ BUFFER command as a diagnostic
function for testing target memory and the bus integrity.
Seek
The SEEK command provides a way for the initiator to position the device in
preparation for access to a particular logical block.
Random Read
Reads data from a random memory location.
Random Write
Writes data to a random free storage location.
Linear Read
Reads blocks of data linearly.
Linear Write
Writes blocks of data linearly to a free storage location.
Rezero Unit
This test is used to determine the target drive’s ability to position the actuator
at cylinder zero.
Contents
Prev
Next
Page 72

72
Controls & Displays
Test Select
Allows you to select which drive tests will be executed.
Control Button
Brings up the Control Palette.
Common Questions
Q: When I test my CD-ROM drive at the Drive panel, the Read Buffer, Write Buffer,
Random Read, Random Write, Linear Read and Linear Write tests reports that
these tests are unavailable. Is there something wrong with the drive?
A: No. In order for TechTool Pro to be able to run these tests a file must be
written to the drive. Even the read tests require that we write a file so that
we can verify the validity of the read. Since the CD-ROM is a read-only
device, any test that involves writing data will not be available for testing.
Q: Does TechTool Pro test USB and FireWire drives?
A: Yes. TechTool Pro is fully compatible with these types of drives.
Contents
Prev
Next
Page 73

73
File Structure Tests
The File Structures panel of TechTool Pro is used to determine whether individual
files are damaged. Some of the items checked by this panel are:
Resources:
• Verifies that resource length is correct.
• Checks that resource map follows resource data.
• Verifies that type list offset is correct.
• Determines if reference list offset is correct.
• Checks if resource data length is correct.
• Verifies that resource name length is correct.
PPC native code in data fork:
• Determines if valid data fork exists.
• Verifies that fragment location and offset are valid.
• Scans data fork to determine if declared code is actually present.
• Tests for code fragment type matches.
• Verifies that fragment length is correct.
The combination of these tests can quickly determine the state of all the files on
your volumes. Use these tests when looking for corrupted files.
Test & Function Descriptions
All Resource Files
Checking this radio button indicates that all resource files should be tested.
Contents
Prev
Next
Page 74

74
Applications Only
Checking this radio button indicates that only application files should be tested.
Validate PPC Native Code
Checking this box will cause the tests to validate PowerPC code fragments
while testing file structures.
Controls & Displays
Test Select
Allows you to select the File Structure tests you wish to perform.
Control Button
Brings up the Control Palette.
Common Questions
Q: Will the File Structure tests repair any broken files they find?
A: In some cases they will, but in most cases the data needed to repair the files
will not be available. If the files cannot be repaired then they need to be
replaced from known good copies or backups.
Contents
Prev
Next
Page 75

75
Finder Info
The Finder Info panel corrects problems with the Finder information of a file. It
will scan the selected volume(s) and validate and optionally repair problems
that are found:
Bundle Bits
This resource within applications determines which documents belong to an
application. If this resource is not correctly configured, the result will be generic
icons for documents or failure of the application to launch when those
documents are double-clicked.
File Dates
Sometimes file and creation dates will be incorrect because the Macintosh clock
was incorrect when the file was created or modified. This results in files with
improbable file dates such as January 1, 1904. While determining the true dates
for a file may not be possible, TechTool Pro will change the file dates to the
computer’s current date if they are obviously incorrect.
Custom Icons
If you assign a custom icon to a file or application, a custom icon bit is set so
that the Finder knows it should display the custom icon instead of the normal
icon for that file. Sometimes this custom icon bit will be set incorrectly and the
custom icon will not display. TechTool Pro will correct this problem by properly
setting the bit.
Contents
Prev
Next
Page 76

76
Test & Function Descriptions
Bundle Bits
Allows you to activate or deactivate the Bundle Bit test and repair routine.
File Dates
Allows you to activate or deactivate the File Date test and repair routine.
Custom Icon
Allows you to activate or deactivate the Custom Icon test and repair routine.
Validate Only
Allows you to designate TechTool Pro to only scan for and display found
problems. The problems will not be repaired.
Validate and Repair
Allows you to designate TechTool Pro to both scan for and repair problems
based on the selected tests.
Controls & Displays
Test Select
Allows you to select the tests you wish to perform.
Test/Repair
Allows you to choose to validate only or to both validate and repair if problems
are found.
Control Button
Brings up the Control Palette.
Common Questions
Q: I’ve run all of the Finder Info tests and my Microsoft Word icons are still generic.
What do I do now?
A: Be sure that the parent application for the document, in this case Microsoft
Word, is on the volume. If it’s not, there is no reference to the correct icon
for that file. If the parent application is on the drive, it’s probable that the
problem lies in the Desktop Database and not in the application or
document file. Go to the Desktop section of this manual and learn how to
repair the Desktop Database files.
Contents
Prev
Next
Page 77

77
Floppy Tests
The floppy disk drive is a viable storage device on many Macintosh models.
Although floppy disks are used less now than in the past, they are still an
important means of distributing programs and data files. They also provide an
easy and convenient way to backup smaller files. Many owners of new model
Mac computers will buy an external floppy drive to attach to their USB port,
enabling them to have access to legacy files and backups.
TechTool Pro’s Floppy Drive panel offers a method of cleaning your floppy drive
to prevent problems. This should be done as part of a regular maintenance
routine. You will need to obtain a floppy drive cleaning kit. These kits can be
obtained directly from Micromat and most computer retailers. Added to the
benefit of repairing units that are malfunctioning due to dirty heads, TechTool
Pro offers some diagnostic features otherwise found on industrial test systems.
With only a few clicks of the mouse, you can find out if your floppy drive is
good, salvageable, or requires replacement.
Test & Function Descriptions:
Clean Drive
• Overview: Imation, the company that manufactures the cleaning disk sold
separately by Micromat, recommends that the read/write heads be cleaned
every 40 hours of operation. If you have an Imation USB SuperDisk floppy
drive you should contact Imation for a special cleaning disk. In environments
Contents
Prev
Next
Page 78

78
where there is a large amount of airborne debris, head cleaning should be
performed on a more frequent basis. Think of periodic head cleaning as
preventative maintenance: clean heads mean less trouble in the future.
• Prepare the Cleaning Disk (First time use only) Remove the protection tab
from the cleaning diskette.
• Dispense Cleaning Fluid Dispense six (6) drops of cleaning solution onto the
fabric exposed by the head access slot on the metal hub side of the cleaning
diskette.
• Start Cleaning Routine Select Clean Drive and then choose RUN in the
Control Palette.
• Insert Cleaning Disk TechTool Pro will prompt you to insert the cleaning disk.
• TechTool Pro Cleans Drive As TechTool Pro cleans the drive, you might hear an
abrasive sound as the routine sweeps the drive. This does not mean that the
diskette is harming your system. In fact, the cleaning fabric is less abrasive
than industry specifications for actual magnetic recording media.
• Cleaning Completion TechTool Pro will take approximately 30 seconds to
complete the cleaning cycle. As it cleans, you can monitor its progress by
watching the progress bar.
• Completion When the TechTool Pro cleaning routine is complete, it will eject
the cleaning diskette. Mark one of the boxes on the back of the cleaning
diskette for usage reference. Put the cleaning diskette back in its protective
bag and store it for future use.
Contents
Prev
Next
Page 79

79
Quick Test
The Quick Test is similar to the Read Test, but does not test every track and
sector. It is meant to be used for fast verification of drives where the 20 minutes
required for a full test is unacceptable. Should any of the Quick Test routines
fail, it is recommended that the full Read Test be employed for verification.
This test utilizes either the 800K or 1.44M Test Disk depending on the model
disk drive. Creating test disks is explained further in this section.
The test takes approximately 1 minute on either a 1.44M or 800K drive.
• Select Test Disk Select the appropriate Test Disk. If you are using an 800K
drive (Macintosh II or below) use the 800K Test Disk. If you are using a
1.44M drive (SE/30 and above) then use the 1.44M Test Disk.
• Start Quick Test Routine Select Quick Test and then click RUN from the
Control Palette.
• Insert Test Disk TechTool Pro will prompt you to insert the test disk.
• Test Completion TechTool Pro will take approximately 1 minute to complete
the test cycle. As the tests proceed, you can monitor progress by watching
the progress bar. When the Quick Test routine is complete, it will eject the
test diskette. If any test failures occur TechTool Pro will prematurely end the
entire test, eject the test disk, and display the error in the Test Log.
Read Test
The Read Test verifies several aspects of the accuracy of your floppy drive. This
test utilizes either the 800K or 1.44M Test Disk depending on the model disk
drive. This test verifies the following aspects of the drive:
• Relative Head Alignment
• Read Integrity
• Head to Head Integrity
• Random Seek
• Maximum Seek
The test takes approximately 12 minutes on a 1.44M drive. An 800K drive will
take approximately 19 minutes to complete.
• Select Test Disk Select the appropriate Test Disk. If you are using an 800K
drive (Macintosh II or below) use an 800K Test Disk. If you are using a 1.44M
drive (SE/30 and above) then use a 1.44M Test Disk.
• Start Read Test Routine Select the Read Test and then choose RUN from the
Control Palette.
• Insert Test Disk TechTool Pro will prompt you to insert the test disk.
Contents
Prev
Next
Page 80

80
• Test Completion TechTool Pro will take approximately 12 to 19 minutes to
complete the test cycle. When the Read Test routine is complete, it will eject
the test diskette. If any test failures occur, TechTool Pro will prematurely end
the entire test, eject the test disk, and display the error in the Test Log.
Write Test
The Write Test verifies the write integrity of your floppy drive. The test takes
approximately 23 minutes on a 1.44M drive. An 800K drive should take
approximately 22 minutes to complete the test. You must create a scratch disk
for use by the Write Test prior to running the test.
Creating Disks for the Write Test
The Write Test does not use data that currently exists on the floppy for
verification. Instead, it writes data to a scratch diskette and reads the data back
to verify that the information was properly recorded.
You should use high-quality diskettes as scratch disks, since any defects on the
disk will cause a failed Write Test and an incorrect drive diagnosis.
1) Use a high-quality diskette of the same type as your drive. In other words, if
you have a 1.44M floppy drive, use a 1.44M diskette (these always have an
HD symbol stamped on them). If you have an 800K floppy drive, use an
800K floppy disk. Most drives are 1.44M and only very old Macintosh models
(prior to 1987) use the 800K drive.
2) While at the Finder, insert the diskette into the floppy drive.
3) If the Finder prompts you, initialize the disk then click the Erase button.
4) When the initialization is complete, eject the disk and mark it as a scratch
diskette.
Start Write Test Routine
Select the Write Test and then choose RUN from the Control Palette.
Insert Test Disk
TechTool Pro will prompt you to insert the scratch disk.
Test Completion
TechTool Pro will take approximately 23 minutes to complete the test cycle.
When the Write Test routine is complete, it will eject the scratch diskette. If any
test failures occur, TechTool Pro will prematurely end the entire test, eject the
scratch disk, and display the error in the Test Log.
Contents
Prev
Next
Page 81

81
Controls & Displays
Create Test Disk
The primary floppy disk test employed by TechTool Pro is alignment. Alignment
indicates the ability of a drive to accurately position its read/write head over the
sectors of a disk. When a drive is out of alignment, the heads do not correctly
position themselves. This results in read and write errors.
To properly check alignment with TechTool Pro it is necessary to use alignment
disks. These are disks that were created on known good floppy drives and
contain precision alignment information.
You should create a test disk only on a properly functioning floppy drive. If you
are not currently having difficulties with your floppy drive, you do not need to
create your test disk on a different machine. Follow these steps to create your
test disk:
1) Use the Disk Type: popup menu to select the appropriate disk format for the
type of floppy drive you wish to test. Then click the Build button.
2) TechTool Pro will prompt you to insert a blank diskette of the appropriate
format. Use a high-quality diskette and insert the diskette into any floppy
drive.
3) TechTool Pro will create the test disk. This can take a very long time since the
program verifies each track and sector as it is written. If for any reason you
wish to cancel the build, click the Cancel button.
Test/Function Select
Allows you to choose the type of floppy test you wish to perform.
Eject Disk
The Eject Disk button will eject a floppy disk currently in the drive.
Control Button
Brings up the Control Palette.
Contents
Prev
Next
Page 82

82
Internet Tests
The Internet
testing capabilities incorporated into TechTool Pro allow you to verify the
connectivity between your Macintosh and your Internet Service Provider (ISP)
or another host. Instead of using an e-mail program or a web browser to check
your Internet connectivity, TechTool Pro can run an independent test of your
connection. TechTool Pro can execute a domain name lookup and will also ping
the specified host to see if possible problems exist.
Test & Function Descriptions
Lookup Name
This test will confirm the ISP domain that you entered in the Host Name field
and return an IP number. A reverse domain name search is then executed with
the IP number to determine whether the correct host name is returned.
Ping Host
A series of communication packets are sent to the target host. These “pings”
are then sent back to the machine under test and the integrity of the data, as
well as the round-trip time, is analyzed to determine acceptable connectivity.
Controls & Displays
Test Select
Allows you to click to select which test(s) to perform.
Host Name Field
This field is used to enter the target host domain name or address for the tests.
Control Button
Brings up the Control Palette.
Contents
Prev
Next
Page 83

83
Usage Notes
In order for this test to run successfully you must have a current, live
connection to your ISP. Be sure that you have selected an appropriate host
name in the Host Name field. For example, to check communication between
your computer and a web server you might enter:
www.micromat.com
To test connections to a mail server you could enter:
mail.micromat.com
To test
connections between specific hosts, simply replace the domain with the
appropriate domain name. For example, if you wish to test communications
with your ISP’s mail server, and your email address is john@monster.net, you
would enter:
mail.monster.net
Common Questions
Q: Where would I find my Internet Service Provider’s domain name or address?
A: Usually when you first sign up with an Internet Service Provider (ISP), they
provide you with documentation that tells you how to correctly setup the
Internet software on your computer. In that documentation you should be
able to locate your Internet Service Provider’s domain name or email
address.
Contents
Prev
Next
Page 84

84
Mathematics
This panel allows you to check for correct operation of your computer’s
mathematical processing hardware and software routines. Ancient models of
Macintosh use a separate chip called a floating-point unit or FPU. This is also
sometimes called a math coprocessor. If available, this chip helps the CPU
calculate floating-point and other complex math operations and functions.
While many machines have separate and independent FPU chips, the recent
trend has been to super-integrate these circuits into the CPU. This saves the
manufacturer money by reducing the number of components and assembly
time. The user gains by reduced product costs and a nominal computational
speed increase since an integrated FPU does not have to contend with bus
arbitration and the other delays of processor-to-processor communications.
Whatever type of mathematical processing your computer employs, TechTool
Pro will test it by requesting both simple and complex floating point
calculations from the system. These are thousand-iteration tests that use a
cascading scheme that exponentially increase in complexity.
Contents
Prev
Next
Page 85

85
Test & Function Descriptions
TechTool Pro uses the follow computational functions to test the accuracy and
timing of the FPU chip or FPU circuit of the CPU:
Add/Subtract Binary To Binary
Multiply/Divide Binary to Decimal
Square Root Decimal to Binary
Round Integral Base-E Logarithm
Truncate Integral Base-2 Logarithm
Remainder Base-E Exponential
Binary Log Base-2 Exponential
Binary Scale Cosine
Controls & Displays
Test Select
Allows you to check the test(s) you wish to perform.
Control Button
Brings up the Control Palette.
Common Questions
Q: Many years back, Intel had problems with the math calculations on their
Pentium processor. Would TechTool Pro’s Mathematics tests help me find a
similar problem if it existed on my Macintosh?
A: Yes. The Pentium chip failed several floating-point calculations similar to the
ones employed by TechTool Pro. Should your FPU or CPU begin to
incorrectly calculate floating-point operations, TechTool Pro will flag that test
as failed.
Contents
Prev
Next
Page 86

86
Modem Tests
One of the most popular peripheral add-ons would have to be the modem.
Modems let your Macintosh communicate with popular online services, your
bank, shopping services, and the Internet. Modems will eventually become a
thing of the past, making way for high-bandwidth digital connections like DSL
and T1. However, they probably will always be on laptop computers for the
wayward traveller that may not have access to a broadband connection.
The modem takes binary signals from your Macintosh serial or USB port and
turns them into a series of tones (MOdulate-DEModulate) that are compatible
with conventional phone lines. Just like everything else in the computer
business, modems have become faster and better over the years.
Those of you who have had to configure a modem to get it to work with a
particular service have probably suffered some configuration problems.
Handshaking, AT commands, and S registers can make setting up a modem
daunting. As you try different configurations with no success, you may have
wondered, “Is this modem even working correctly?” TechTool Pro offers a
battery of tests that allow you to test the most critical functions of your
modem. Since TechTool Pro’s Modem test panel utilizes the Apple’s
Communications Toolbox, you can test any Hayes-compatible modem
regardless of which port it uses.
Contents
Prev
Next
Page 87

87
Before running the modem test, be sure to read the Port and Dialing
configuration sections. Note also that some modems do not support all the selftests.
Test & Function Descriptions
Carrier
Connects to a user-defined host computer and establishes an initial connection.
Signal Quality
Executed during the carrier test, this test measures the quality of the phone
line.
Line Level
Executed during the carrier test, this test measures the line level of the phone
line.
Dialing Prefix:
This is where you enter a telephone number prefix if necessary. For instance, if
you need to dial a “9” to reach an outside line.
Host Phone Number:
This is where you enter the telephone number to connect to an outside host
such as your Internet Service Provider.
Ignore Dial Tone
Check this option to ignore dial tone detection (blind dialing).
Pulse Dial
Check this option if the phone service requires pulse dialing.
ROM Self-Test
Initiates the modem self test routine (if it has one) and interprets the results.
Register
Performs a read/write test of the modem configuration registers.
User Memory
Tests the modem memory (if present) allocated to user settings.
Digital Loopback Req
Tests whether modem can enter digital loopback mode.
Analog Loopback
Initiates an internal analog loopback test.
Contents
Prev
Next
Page 88

88
Analog Self-Test
Initiates a self-test of the analog circuitry.
Speaker Test
Takes phone off hook to dial four times, each time at a different speaker
volume.
Dial Tone
Determines whether the modem is attached to a live phone line.
Hook Test
Tests the hook relays (the switch that “picks up the phone”).
Modem DTE
This test confirms proper communication between the computer and the
modem.
DTE Maximum
This test determines the maximum possible communication speed between the
modem and the computer. This is useful for revealing whether your computer’s
ports are fast enough to communicate with a high-speed modem.
Controls & Displays
Line Tests
Allows you to choose tests concerned with line integrity and quality.
Dial
Allows you to choose dialing options.
Modem Components
Allows you to choose tests to perform on the modem itself.
Line Control
Allows you to perform operations on the line.
Rate Tests
Allows choice of tests to check modem speed.
Port Select
Brings up a dialog allowing you to select the port to which the modem is
attached and various port parameters. See below for further details.
Control Button
Brings up the Control Palette.
Contents
Prev
Next
Page 89

89
Configuring Modem Port
To configure the modem port:
• Click the Port Select button. The following dialog will appear:
• Hold down the Method pop-up menu and select Serial Tool. If the Serial Tool
option is not available, it means that the Serial Tool was not installed in the
System Folder and needs to be reinstalled using the TechTool Pro installer.
• Select the port the modem is attached to in the Current Port field.
• Set BAUD RATE to 9600
• Set PARITY to NONE
• Set DATA BITS to 8
• Set STOP BITS to 1
• Set HANDSHAKE to NONE
• Set HOLD CONNECTION to disabled.
• Click OK.
Configuring Dial Settings
• If your phone service does not support touch-tones, enable the Pulse Dial
option.
• If your modem is attached to a PBX, enter the appropriate information to
gain an outside line in the Dialing Prefix: field. In most cases you would insert
9,.
• Enter the phone number of a computer service in the Host Phone Number:
field. This could be the phone number of your BBS, your Internet Service
Provider, or another computer with a modem ready to accept calls.
Contents
Prev
Next
Page 90

90
Common Questions
Q: Why is the carrier test option grayed-out?
A: That test will not be available until you enter a host telephone number.
Q: Why are the Signal Quality and Line Level test options grayed-out?
A: These two tests are executed during a carrier test. If the carrier test has not
been selected or configured, Signal Quality and Line Level tests will not be
available.
Q: Why do the results from the Signal Quality and the Line Level tests report
unavailable after testing?
A: Your modem probably does not support these types of tests.
Q: Why does my new modem keep failing the User Memory test? The modem
seems to be working fine.
A: Some newer modems do not have a User Memory feature and this would
explain why your modem fails this test consistently. The user memory was
used with older modems when software was not used to store information
like frequent phone numbers and settings. Since software now controls
these aspects of the modem, many modem vendors no longer employ this
feature.
Q: When I go to the Modem panel a message appears stating, “Communications
ToolBox Missing.” What is the Communications ToolBox and how do I get this
to work?
A: The Communication ToolBox error is indicating that the Serial Tool
extension (which is a part of the TechTool Pro installation) is either not
enabled, is missing, or is damaged. Usually enabling the extension or
reinstalling the Serial Tool from the TechTool Pro installer resolves this
problem.
Q: Will the Modem tests check my DSL, ISDN, Frame Relay, T1, or cable modem?
A: These are digital connections. Hayes-compatible modems are analog
devices. To test the above digital devices use the Internet panel to check for
connectivity.
Contents
Prev
Next
Page 91

91
MultiTester Tests
The MultiTester panel allows you to easily run a comprehensive suite of tests on
your computer. One mouse click is all that is needed to perform a thorough
check of your computer and many of its peripherals. By clicking the Options
disclosure triangle you can see the list of tests that can be run by MultiTester.
Each test can be activated or deactivated by clicking to check or uncheck its
box. Using Select Volumes allows you to choose whether to run the tests on all
the attached volumes/drives or on only selected ones. Once your choices are
made, just click on BEGIN to perform all the selected tests for the selected
volumes.
Test & Function Descriptions
RAM
The RAM test will do a quick check of the memory chips in your computer.
RAM problems can cause intermittent crashes that are not dependent on the
particular software you are using.
ROM
The ROM test checks the ROM chips on your computer. ROM stores your
computer’s hard wired System routines.
Contents
Prev
Next
Page 92

92
VRAM
This test checks the video memory of your system.
PRAM
The PRAM stores various System settings. This test checks the integrity of this
component.
CPU
This test will check your computer’s central processing unit—the heart of your
computer.
Components
These tests verify the operation of various peripheral chips such as the serial
chips and SCSI chip if present.
Cache
This test checks the special fast memory, or cache, on your computer.
Mathematics
These tests verify the operation of the math hardware and software routines of
your computer.
Volume Structure
These tests check the validity of the directory and other critical volume data
structures on local volumes.
Drives
This tests the proper hardware operation of your drives.
Surface Scan
This tests for physical damage to the surface of your drives. Also known as a
Block Scan.
Finder Info
This checks for corruption in the Finder Info of all your files, such as bad
modification dates, bundle bits, and custom icons.
File Structure
This test checks for corruption in the structure of your files.
Virus
This test will scan your drive for files that are infected with a known virus or
other virus-like programs.
Contents
Prev
Next
Page 93

93
Software Conflicts
This test will check all the software on your computer and attempt to locate
programs that will conflict with each other.
System Files
This test will check the critical operating system files for modification or
corruption.
Controls & Displays
Options
Displays and allows you to choose the tests performed by MultiTester.
Select Volumes
Allows you to perform the tests on the volume(s) or drive(s) of your choice.
BEGIN
Starts the selected tests on the selected volumes.
Contents
Prev
Next
Page 94

94
Network Tests
The networking hardware and software of your Macintosh is very important if
your computer resides on a local area network (LAN). The ability to print,
communicate with other computers in your local network, and connect to
Internet services is dependent on proper operation of these components.
The network tests incorporated in TechTool Pro permit you to verify that your
network connection is working properly. It is necessary to have at least one
other device on your network (printer, router, or another computer) to use
these tests since it is necessary to ping another device to determine
communication abilities.
Test & Function Descriptions
All Zones
This test will broadcast and receive on all available zones on your network to
confirm proper network communications.
Local Zone Only
This test will broadcast only to other devices that are available within the same
network zone as your machine.
Contents
Prev
Next
Page 95

95
Show Network Devices
This button will display a node list of what devices were found on the network
and display the zones that were accessed during the test.
Controls & Displays
Test Select
Allows you to select the test you wish to perform.
Show Network Devices
Displays a node list of network devices.
Control Button
Brings up the Control Palette.
Usage Notes
The Network panel sends a getNameList command to an available zone.
Successful returns from all machines, including the machine on which the tests
are executed, determines whether testing was successful.
Common Questions
Q: After running the Network test the dialog box indicated the zone as “*.” Why?
A: The asterisk “*” represents the local zone. If your computer is connected to
a LocalTalk bridge that enables you to have multiple zones, then the node
list will display the actual zone names.
Contents
Prev
Next
Page 96

96
Optimization
As your hard drive saves and deletes files, the file system will instruct the drive
mechanism on where and how to store the information. It can place this
information anywhere there is available free space on the drive. If there is not a
contiguous area on which to save a file then your drive will fragment it, saving
a piece here and a piece there. This is transparent to you. Although the file itself
appears as one complete logical item, in most cases it is actually physically
scattered around the disk in many pieces.
Fragmented files can slow down file access on your hard drive. Instead of your
drive being able to scoop up a requested file in one swoop, it must find all the
pieces at various places on the drive. This increases the amount of time needed
to read and write files and results in a degradation of performance.
A cure for fragmented files is to optimize your drive. This involves using
software (such as TechTool Pro) to rearrange all of the file fragments and
reassemble them into contiguous areas on the disk. This is done much like the
game “Hanoi Towers” is played. Several files may be moved until the target file
will have enough free space to be written contiguously. This process is repeated
many times until all or most of the files are no longer fragmented.
There are two methods for optimizing files on a disk. One is to use low-level
calls, rewriting the directory and extents information. This method involves
many modifications to the basic file structure of the drive. While this method is
fast, it could cause a loss of some or all of your data in the event of a power
failure, crash or some other event that interrupts recreation of critical drive files.
Contents
Prev
Next
Page 97

97
The other method, employed by TechTool Pro, uses standard file write-copy-
delete methods to rearrange the files. While this method is sometimes slower
than using low-level calls, it is far safer since there is no risk to the data. You can
literally unplug your machine during optimization with no ill effect to your drive
or data.
Controls & Displays
Information Screen
This screen shows information about space usage on your volume. In particular
it lists the following:
• Current Volume: – the volume currently selected.
• Format: – the format of the volume, either HFS or HFS+.
• Block Size: – the size of the blocks for the current volume’s format.
The screen also displays a graph of the selected volume’s disk usage allowing
you to visually see the fragmentation of the volume.
The information is coded as below:
• White – disk space used by the directory on the volume.
• Green – space used by contiguous files on the volume.
• Blue – free space on the volume.
• Red – space occupied by fragmented files on the volume.
Select Volume(s)
This button brings up the standard Volume Selection dialog.
Update Graph
This button displays a pictorial representation of the current state of the
selected volume’s use of space on the Information Screen.
Optimize
Selecting this button will quit all open applications except TechTool Pro and
then begin optimization on the selected volume(s). It is recommended that the
computer be restarted upon completion of optimization.
Usage Notes
The optimization feature should be used as a general disk maintenance routine
for your Macintosh.
It is highly recommended that you perform a Volume Structure test (and repair
if necessary) prior to running optimization on the volume. This will allow
Contents
Prev
Next
Page 98

98
TechTool Pro to optimize more efficiently and keep any volume structure
problems from getting worse during optimization.
Common Questions
Q: Do I need to run the optimization feature from my TechTool Pro CD every time I
want to optimize my hard drive(s)?
A: Not necessarily. If you are using OS 8.6 or below TechTool Pro can optimize
the boot volume and/or the program volume. However, if you are using OS
9 or above, then you must both boot your computer and run TechTool Pro
from a volume other than the one you are attempting to optimize.
Q: When I run the optimization feature, I get a message indicating that “there
isn’t enough contiguous free space” on my volume. What does this mean?
A: In order for TechTool Pro to perform the optimization feature on your
volume, you must have enough available free space on the volume for the
routines to operate. TechTool Pro uses an extremely safe method of
optimizing. It uses high-level file moves to move each file to a contiguous
area of the volume before it deletes the original copy of the file. However,
this means that TechTool Pro must have enough contiguous free space on
your volume to hold your largest file. If there is not enough contiguous
space, then TechTool Pro will issue the warning indicating that it cannot
proceed. If this happens then you need to temporarily copy some files to
another volume to make more room available. As a general rule, it is
recommended that you have at least 15% free space available on your
volume. However, the amount of free space necessary to optimize is
dependent on a number of factors, including the degree of fragmentation
and the size of the files on the volume being optimized.
Contents
Prev
Next
Page 99

99
PRAM Tests
Pronounced “pee-ram,” the parameter RAM is a non-volatile RAM chip residing
on your Macintosh motherboard. This device holds special parameters
independent of the System or hard drive. Some of these settings include mouse
speed and designated startup device. This information is stored in the standard
area of PRAM (usually the high 128 bytes). Below the upper 128 bytes is an
area of PRAM that contains more critical settings like boot services, manufacture
date and hours of use (mandate), and other reserved areas used by the System
software.
Some software and hardware developers have used the reserved lower areas of
PRAM to store settings. Although Apple has been warning developers not to
use reserved sections of PRAM because they are used by System software, some
vendors have adopted this practice. This can lead to reliability problems with
your computer. Inexplicable crashes and freezes are mild symptoms. In some
scenarios, the computer will not even boot. Changing the System, removing
extensions, or “zapping” the PRAM using the conventional method does not
cure the problem. The traditional method—hold the command, option, P and R
keys—only clears the upper bytes of RAM where the problem does not reside.
Historically, the only way to correct lower PRAM problems was to open up the
computer and momentarily remove the PRAM battery. This would clear all of
the PRAM memory allowing the Mac ROM to replace the data with default
settings. TechTool Pro will clear ALL of PRAM without the need to disassemble
the computer. The program also offers the ability to save the PRAM data before
it is cleared and the ability to restore this information should the need arise.
TechTool Pro also allows you to test the physical memory that comprises the
PRAM.
Contents
Prev
Next
Page 100

100
Test & Function Descriptions
The PRAM panel employs the same memory testing routines for PRAM that are
used by the RAM test panel. For test details please refer to the Test & Function
Descriptions area of the RAM test section.
TechTool Pro allows you to save and restore your PRAM data using conventional
file saving methods. The Save PRAM button will copy the contents of the
PRAM data and save it as a file to your hard disk. The Restore PRAM button
will restore the data saved in a PRAM data file to the PRAM chip.
Clicking the Clear PRAM button empties the contents of the PRAM chip in
order to correct potential PRAM problems. You’ll be prompted to save the
contents of your PRAM in case you’ve forgotten. The program will quickly clear
the PRAM chip and the computer will automatically be rebooted. The reboot is
necessary to avoid potential problems that might be caused by software such as
the System or extensions when they attempt to use the now empty PRAM chip.
When the PRAM is cleared and the Macintosh is rebooted, the computer ROM
will check the PRAM. If the contents are not valid (they won’t be since it has
been cleared) the ROM will install the factory default settings. Some models of
Macintosh keep track of the Date of Manufacture and Hours of Use (the
Mandate). If this information is maintained by your Macintosh model, it will be
automatically restored at this time. Many people find the thought of “clearing”
the PRAM distressing, since they feel they will lose some important information.
This is not the case. Apple designed the PRAM to be self-sufficient should the
PRAM battery wear out or fail.
Controls & Displays
Test Select
Allows you to select the various PRAM tests.
Clear PRAM
This control will clear the contents of PRAM. The factory default settings will be
loaded back into the PRAM from ROM next time the computer is rebooted. In
addition, the mandate information will be restored if appropriate. Using this
button will force a restart immediately after the PRAM is cleared.
Save PRAM
This button will save the contents of PRAM to a file. This is the data that will be
used if you decide later to restore the original PRAM settings.
Contents
Prev
Next
 Loading...