

Page 1

i
User Guide and
Reference Manual
Page 2

ii
©2001 Micromat Computer Systems Inc.
This manual, as well as the software described in it, is furnished under
license and may only be used or copied in accordance with the terms of
such license. The information in this manual is furnished for informational
use only, is subject to change without notice and should not be construed as a commitment by Micromat Inc. Micromat Inc. assumes no
responsibility or liability for any errors or inaccuracies that may appear
in this book.
Except as permitted by such license, no part of this publication may be
reproduced, stored in a retrieval system, or transmitted, in any form or by
any means, electronic, mechanical, recording, or otherwise, without the
prior written permission of Micromat Inc.
Trademarks
Drive10 is a trademark of Micromat Inc.
Apple and Macintosh are trademarks of Apple Computer Inc.
Any other trademarks are of their respective owners.
Printed in the USA.
Part number: MM01297
Page 3

iii
Installation and System Requirements . . . . . . . . . . . . . . . . . . . . . . . .1
Introduction . . . . . . . . . . . . . . . . . . . . . . . . . . . . . . . . . . . . . . . . . .2
Registration . . . . . . . . . . . . . . . . . . . . . . . . . . . . . . . . . . . . . . . . . .2
System Requirements . . . . . . . . . . . . . . . . . . . . . . . . . . . . . . . . . .2
Installing Drive 10 . . . . . . . . . . . . . . . . . . . . . . . . . . . . . . . . . . . . .2
What’s Installed . . . . . . . . . . . . . . . . . . . . . . . . . . . . . . . . . . . . . . .2
Contacting Technical Support . . . . . . . . . . . . . . . . . . . . . . . . . . . .2
About Micromat Inc. . . . . . . . . . . . . . . . . . . . . . . . . . . . . . . . . . . .3
Using Drive 10 . . . . . . . . . . . . . . . . . . . . . . . . . . . . . . . . . . . . . . . . . . . . .5
Launching Drive 10 (including entering serial number) . . . . . . . .6
Sample Session . . . . . . . . . . . . . . . . . . . . . . . . . . . . . . . . . . . . . . .7
Reports . . . . . . . . . . . . . . . . . . . . . . . . . . . . . . . . . . . . . . . . . . . . .7
Reference/Tests . . . . . . . . . . . . . . . . . . . . . . . . . . . . . . . . . . . . . . . . . . .9
Drive 10 Window . . . . . . . . . . . . . . . . . . . . . . . . . . . . . . . . . . . .10
Controls & Displays . . . . . . . . . . . . . . . . . . . . . . . . . . . . . . . . . . .10
Test Panel . . . . . . . . . . . . . . . . . . . . . . . . . . . . . . . . . . . . . .10
Options . . . . . . . . . . . . . . . . . . . . . . . . . . . . . . . . . . . . . . . .10
Drive Panel . . . . . . . . . . . . . . . . . . . . . . . . . . . . . . . . . . . . . .11
Select Volume . . . . . . . . . . . . . . . . . . . . . . . . . . . . . . . . . . .11
Start Button . . . . . . . . . . . . . . . . . . . . . . . . . . . . . . . . . . . . .11
Skip Button . . . . . . . . . . . . . . . . . . . . . . . . . . . . . . . . . . . . .11
Progress Bar . . . . . . . . . . . . . . . . . . . . . . . . . . . . . . . . . . . .11
Tests . . . . . . . . . . . . . . . . . . . . . . . . . . . . . . . . . . . . . . . . . . . . . .11
Unit Ready . . . . . . . . . . . . . . . . . . . . . . . . . . . . . . . . . . . . . .12
Supply Voltage . . . . . . . . . . . . . . . . . . . . . . . . . . . . . . . . . . .12
Self-Diagnostic . . . . . . . . . . . . . . . . . . . . . . . . . . . . . . . . . . .12
Rezero Unit . . . . . . . . . . . . . . . . . . . . . . . . . . . . . . . . . . . . .12
Format Check . . . . . . . . . . . . . . . . . . . . . . . . . . . . . . . . . . .13
Spare Sectors . . . . . . . . . . . . . . . . . . . . . . . . . . . . . . . . . . .13
Reference/Tests continued
Surface Scan . . . . . . . . . . . . . . . . . . . . . . . . . . . . . . . . . . . .13
Random Read . . . . . . . . . . . . . . . . . . . . . . . . . . . . . . . . . . .13
Random Write . . . . . . . . . . . . . . . . . . . . . . . . . . . . . . . . . . .14
Seek . . . . . . . . . . . . . . . . . . . . . . . . . . . . . . . . . . . . . . . . . . .14
Linear Read . . . . . . . . . . . . . . . . . . . . . . . . . . . . . . . . . . . . .14
Linear Write . . . . . . . . . . . . . . . . . . . . . . . . . . . . . . . . . . . . .14
Read Buffer . . . . . . . . . . . . . . . . . . . . . . . . . . . . . . . . . . . . .15
Write Buffer . . . . . . . . . . . . . . . . . . . . . . . . . . . . . . . . . . . . .15
Volume Structure . . . . . . . . . . . . . . . . . . . . . . . . . . . . . . . . .15
Volume Header . . . . . . . . . . . . . . . . . . . . . . . . . . . . . . .15
Extents File . . . . . . . . . . . . . . . . . . . . . . . . . . . . . . . . . .16
Catalog File . . . . . . . . . . . . . . . . . . . . . . . . . . . . . . . . . .16
Attributes File . . . . . . . . . . . . . . . . . . . . . . . . . . . . . . . .16
Startup File . . . . . . . . . . . . . . . . . . . . . . . . . . . . . . . . . .16
Allocation File . . . . . . . . . . . . . . . . . . . . . . . . . . . . . . . .18
Optimization . . . . . . . . . . . . . . . . . . . . . . . . . . . . . . . . . . . . . . . . .18
Reports . . . . . . . . . . . . . . . . . . . . . . . . . . . . . . . . . . . . . . . . . . . .21
Save As . . . . . . . . . . . . . . . . . . . . . . . . . . . . . . . . . . . . . . . .22
Print . . . . . . . . . . . . . . . . . . . . . . . . . . . . . . . . . . . . . . . . . . .22
Cancel . . . . . . . . . . . . . . . . . . . . . . . . . . . . . . . . . . . . . . . . .22
Repair . . . . . . . . . . . . . . . . . . . . . . . . . . . . . . . . . . . . . . . . . .22
Menus . . . . . . . . . . . . . . . . . . . . . . . . . . . . . . . . . . . . . . . . . . . . .23
Drive 10 Menu . . . . . . . . . . . . . . . . . . . . . . . . . . . . . . . . . . .23
Control Menu . . . . . . . . . . . . . . . . . . . . . . . . . . . . . . . . . . . .23
Services Menu . . . . . . . . . . . . . . . . . . . . . . . . . . . . . . . . . . .24
Commonly Asked Questions . . . . . . . . . . . . . . . . . . . . . . . . . . . . . . .25
Short Cuts and Hidden Features . . . . . . . . . . . . . . . . . . . . . . . . . . . .27
Glossary . . . . . . . . . . . . . . . . . . . . . . . . . . . . . . . . . . . . . . . . . . . . . . . . .29
Table of Contents
Page 4

iv
Page 5

Installation and
System Requirements
1
Page 6

Introduction
Thank you for purchasing Drive 10! We have worked hard to
make Drive 10 the most powerful and easy-to-use drive utility
available for Macintosh computers running under Mac OS X.
Drive 10 allows you to test your HFS or HFS+ drives like a professional. If Drive 10 finds a problem, it will tell you exactly what
is wrong and offer suggestions on how to proceed. It will also
give you the option of repairing the problem if this is possible.
Registration
Please take a moment to register. Your serial number is your
proof of ownership of Drive 10. Keep it in a safe place since you
may need it when you make future updates or upgrades. If you
lose your serial number we may be able to find it for you if you
are registered. In addition, registration is required to receive free
technical support for Drive 10. You pay only the toll charge. This
is subject to change without notification.
The easiest way to register is online. Simply go to Micromat’s
web site at www.micromat.com and click Register. Fill out and
submit the online form and you are done. There is no need to mail
in the registration card. If you do not have Internet access then
you may fill out the registration card and mail it directly
to Micromat.
System Requirements
•A Macintosh running Mac OS X (Mac OS X 10.1 or higher
recommended).
•CD-ROM or DVD Drive.
Note that these requirements may change with future updates.
Installing Drive 10
To install:
•Insert the Drive 10 CD.
• Drag the icon for the Drive 10 package from the CD to your
hard drive.
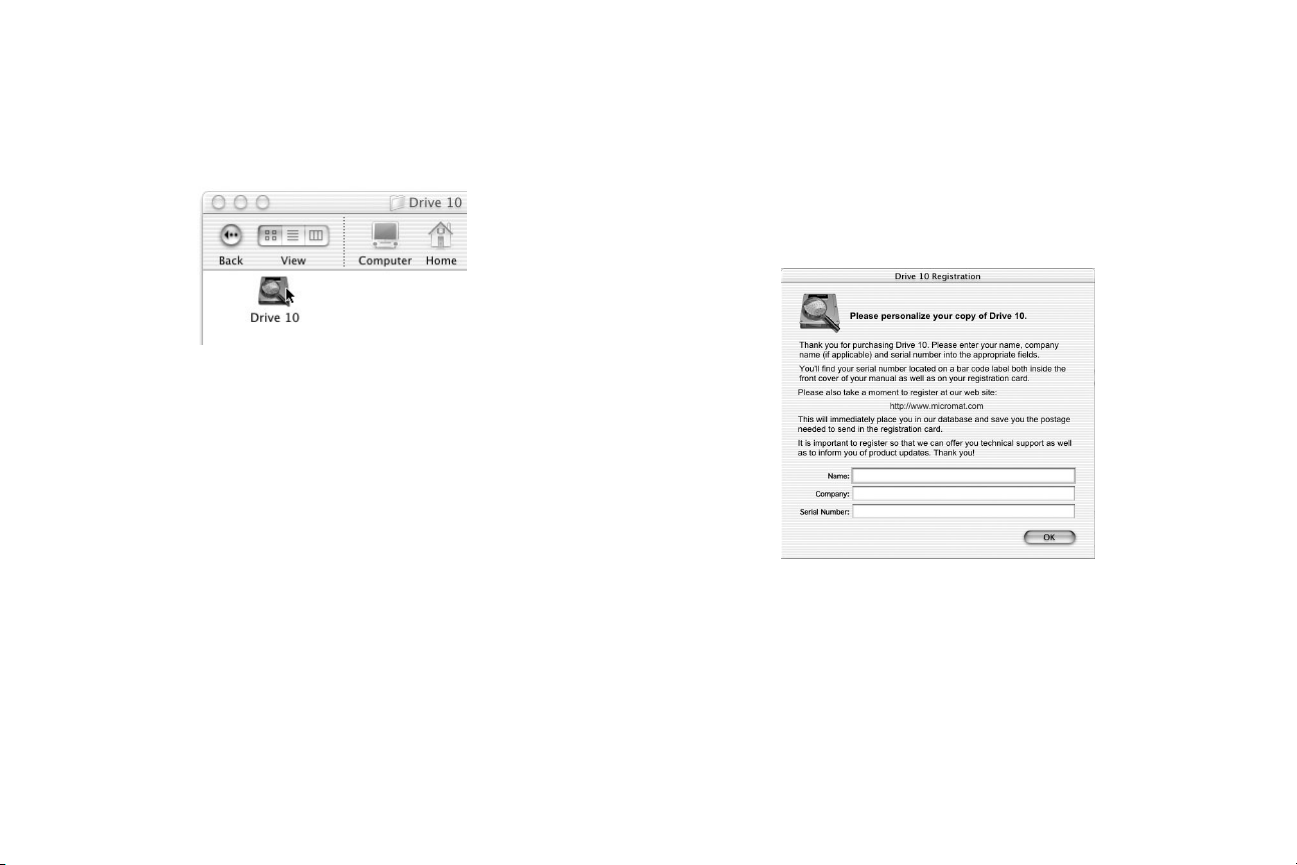
What’s Installed
When you install Drive 10 you install the Drive 10 package. The
package contains all the program components in one
convenient location.
Drive 10
2
Page 7

Contacting Technical Support
Micromat provides technical support to its customers by telephone or email (techsupport@micromat.com). For a current listing
of telephone numbers and other contact information, please refer
to the back cover of this manual or visit our website at
www.micromat.com. Technical support is available Monday
through Friday (excluding public holidays), from 9:00 AM to 5:00
p.m., Pacific Time.
If you wish to contact technical support by telephone you will
need to have your Drive 10 serial number and version number
ready. Our automated phone attendant will require you to enter
this information before connecting you to a technician. Please be
near your computer when you phone, since our technicians will
need to ask you questions about your system, and will attempt to
guide you through solving any problems.
Please have the following information ready for the support technician, and be sure to include it in any email you send
to Micromat.
•A brief description of your problem.
•Version number of your Drive 10 software.
•Type of Macintosh and configuration. (Example: Apple
Macintosh G4/466, 256M RAM, 30G internal hard drive.)
About Micromat Inc.
Micromat Computer Systems Inc. has been developing
Macintosh diagnostic utilities since 1989. As the first company to
offer diagnostic products for Macintosh, Micromat has pioneered
many new technologies for helping Macintosh users bring their
computers back to life and to keep them running their
absolute best.
3
Page 8

4
Page 9

Using Drive 10
5
Page 10
Launching Drive 10
After successfully installing Drive 10, locate the program on the
hard drive and launch Drive 10 by double-clicking its icon.
Drive 10 will prompt you to log in using an administrator account.
You will need to enter an administrator password. This is usually
the password you chose when you first installed Mac OS X. You
must have administrator privileges since Drive 10 is doing checks
and/or repairs on a system-wide level.
The first time you launch Drive 10 after installation, you will be
presented with a dialog box containing fields for your name, company name, and product serial number. Your serial number is listed on the registration card included with Drive 10 and also on
the backside of the front cover of your Drive 10 manual. Enter the
appropriate information into the corresponding fields.
6
Page 11
Sample Session
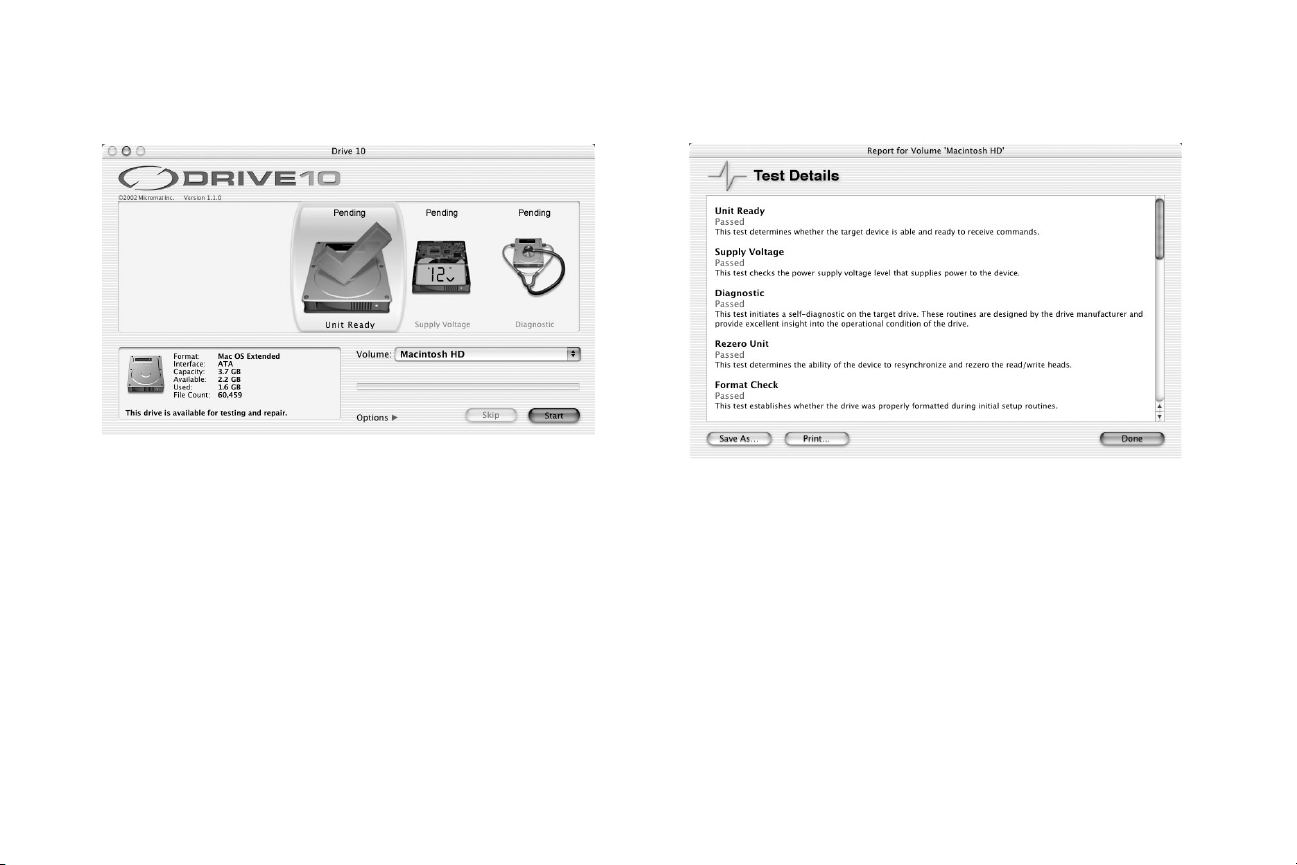
After launching Drive 10 you will see Drive 10’s main window. From here
you can run a full suite of Drive 10 tests. Together, these tests will perform a
thorough analysis of your computer’s drives. To run the tests, press the Start
button. As the tests are running you can monitor their progress on the
screen. The current test is highlighted under Drive 10’s magnifier. When all
tests are completed you will be presented with a Report detailing the tests
performed, any problems found, and giving you the option to attempt
repairs if necessary. As an added precaution, you might consider backing
up any important data to a second drive before proceeding with repairs. If
repairs cannot be made, Drive 10 will offer advice on how to proceed.
This is all that is required to perform a comprehensive check of the drives
attached to your computer.
Reports
As tests are run in Drive 10 a report is generated. When tests are
completed this report is displayed on the screen. It lists which
tests passed and failed and offers advice on how to proceed. If
problems were found that might be repairable, you will have the
option to attempt repairs at this time. The Report may be saved
as a text document and also printed for future reference.
7
Page 12

8
Page 13

Reference
9
Page 14

Drive 10 Window
The main Drive 10 window is the Control Center for Drive 10. It
lists all the tests available in the Drive 10 application, allows you
to choose the tests you wish to run, and to select the volumes on
which you wish to run them. It also provides information about the
currently selected volume and indicates the progress of testing
as it occurs.
Controls & Displays
Test Panel
The Test Panel provides a graphic representation of the Drive 10
tests. The name of each test is shown below its graphical representation and the status of the test is shown above. As tests are
run, the display scrolls across the screen with the current test
appearing under the magnifier.
Options
The Options disclosure triangle allows you to display the individual Drive 10 tests. Click on the disclosure triangle to display/hide
the test list. Clicking in the appropriate check box will select/deselect any particular test.
10
Page 15

Holding down the shift key while clicking in a check box will allow
you to select/deselect all the tests with only one click.
Volume Panel
This panel indicates the currently selected volume. It displays the
volume's format (either Mac OS Standard [HFS] or Mac OS
Extended [HFS+]), the interface by which the volume is connected, its capacity, the amount of space available and used on the
volume, and the number of files on the volume. It also indicates
the status of the volume (whether or not it is ready to be
repaired).
Volume Select:
This popup menu allows you to choose the volume on which the
selected tests will be performed.
Start Button
Pressing this button begins a test suite, stepping through the currently selected tests.
Skip Button
Pressing this button terminates the current test and continues
with the next test (or terminates the suite if it was on the
last test).
Progress Bar
The progress bar is above the Skip button and gives a visual indication of the progress of the current test. Numeric Step and/or
Task counters are displayed above the progress bar as tests are
performed.
Tests
Drive 10 analyzes your volumes using a variety of sophisticated
test routines. To display the test list use the Options disclosure
triangle. Tests containing a check mark in the box to the left of the
test name will be performed when pressing the Start button.
There are two types of tests in Drive 10—low-level and high-level.
Low-level tests make calls directly to the disk’s controller through
the device driver. The controller returns a result of Pass or Fail
and this result is then reported by Drive 10. If the test is not supported by the disk, then Drive 10 will report a result of
Unavailable. High-level tests make multiple calls to disk routines
and then verify that the results are correct. They actually exercise
the disk to be sure it is working properly. High-level tests return a
result of Pass or Fail. As Drive 10 is running and tests are completed, the result—Pass, Fail, or Unavailable—is shown above the
test icon in the status section of the Test Panel.
11
Page 16

Following is a description of each test available in Drive 10:
Unit Ready
Unit Ready is a low-level test. It determines whether the target
drive is able and ready to receive commands. This test will not
typically fail. A failure indicates that the drive has spun down for
some reason, such as a loss of power.
Supply Voltage
This is a low-level test that checks the power supply voltage level
that powers your drive. Although the test cannot determine the
actual voltage to the drive, it will let you know if the voltage is
within the allowable tolerances for the drive. A test failure may
indicate a problem with either the computer’s power supply or
the drive itself.
Self-Diagnostic
Self-Diagnostic is a low-level test that initiates self-test routines
built into the drive itself. These routines are designed by the drive
manufacturer and provide excellent insight into the operational
condition of the drive. A failure may indicate a serious mechanical
or electrical problem with the drive.
Rezero Unit
This is a low-level test that determines the drive’s ability to resynchronize and rezero the read/write heads. A test failure may indicate that the drive is faulty.
12
Page 17

Format check
This is a low-level test that establishes whether the drive was
properly formatted during initial setup. A test failure indicates that
the drive may need to be reinitialized. Reinitializing will erase all
data on the entire drive. You will need to backup to a different
drive prior to reinitializing.
Spare Sectors
This is a low-level test that checks the service tracks to determine
whether there are enough spare blocks left for block repairs.
When a drive is manufactured, a certain number of sectors are
held in reserve. These spare sectors are used to replace sectors
that become damaged during regular operation of the drive and
that can no longer store data reliably. Damage to the disk surface
may be caused by a manufacturing defect, head crash, or other
causes. When a damaged sector (also called a bad block) is
found it is locked out so that it cannot be used again. The damaged sector is replaced by an available spare sector—either during
a reinitialization or on the fly as the drive is used. If the drive runs
out of spare sectors, then bad blocks can no longer be removed
from service and the drive will no longer be able to hold data reliably. Hence, if this test fails, the drive may need to be replaced.
Surface Scan
Surface Scan is a high-level test that checks the disk surface for
bad blocks. Bad blocks are areas of media that cannot store data
reliably. All disks have a few bad blocks when they are made, but
these are mapped-out by the manufacturer. Mapping out bad
blocks prevents data from being written to these defective areas
of the media. Occasionally a good block will go bad. If this
occurs and a file resides on that block, the file may be corrupted.
If the Surface Scan test locates any bad blocks, then the drive
may need to be reinitialized (which will erase all data on the entire
physical drive). Reinitializing checks for bad blocks and will map
them out if possible. If the bad blocks cannot be mapped out,
then the initialization will fail and the drive will probably need to
be replaced.
Random Read
This is a high-level test that is used in conjunction with the
Random Write test. It verifies that data can be reliably read from
random memory locations. This is important, since it exercises the
ability of the drive to accurately read data from across the disk’s
surface. A test failure may indicate that the disk needs to be reinitialized or replaced.
13
Page 18

Random Write
This is a high-level test that is used in conjunction with the
Random Read test. It verifies that data can be reliably written to
random memory locations. This is important, since it exercises the
ability of the drive to accurately write data across the disk surface. A test failure may indicate that the disk needs to be
reinitialized or replaced.
Seek
Seek is a low-level test that checks the ability of the initiator to
position the device heads in preparation for access to a particular
logical block on the drive. A failure may indicate that the drive
is faulty.
Linear Read
This is a high-level test that is used in conjunction with the Linear
Write test. It verifies that data can be reliably read from a linear
set of blocks on the drive. This test is important, since it exercises
the ability of the drive to accurately read data from a contiguous
run of sectors on the disk. A test failure may indicate that the
drive needs to be reinitialized or replaced.
Linear Write
This is a high-level test that is used in conjunction with the Linear
Read test. It verifies that data can be reliably written to a linear
set of blocks on the drive. This test is important, since it exercises
the ability of the drive to accurately write data to a contiguous run
of sectors on the disk. A test failure may indicate that the drive
needs to be reinitialized or replaced.
14
Page 19

Read Buffer
The Read Buffer is a memory cache in the drive itself that temporarily holds data that is to be read from the disk. The Read
Buffer test is a high-level test that is used in conjunction with the
Write Buffer test. It checks that data can be reliably read from the
buffer. An error indicates either a problem with the buffer memory
itself, or with the memory data bus.
Write Buffer
The Write Buffer is a memory cache in the drive itself that temporarily holds data that is to be written to the disk. The Write
Buffer test is a high-level test that is used in conjunction with the
Read Buffer test. It checks that data can be reliably written to the
buffer. An error indicates either a problem with the buffer memory
itself, or with the memory data bus.
Volume Structure
There are a variety of invisible files, settings, and parameters that
the Macintosh file system uses to locate files and free disk space,
and for other maintenance and management routines. These are
known collectively as the Volume Structures. The Catalog and
Disk Directory are part of the volume structures. Damage to these
critical data structures can result in lost or damaged files and
may necessitate a complete reinitialization of the disk.
Drive 10 can scan your drives for problems related to the numerous structures that are necessary for the them to operate correctly. If problems are found, Drive 10 will indicate this in its Report
and you can then choose to repair the damage to help reduce
the chance of future problems.
Drive 10 can analyze and attempt to repair the following
attributes of a volume:
Volume Header
This block of data is created when the volume is created and
contains important data about the rest of the volume such as
its name, number of files and folders, and the amount of free
space available on the volume. This information is written
when the volume is initialized. Whenever the volume is mounted, portions of this information are read into a volume control
block for use by the system. Since the volume header con-
15
Page 20

tains information concerning the layout of the entire volume, it
is absolutely critical that this data is correct. If this data is
badly corrupted, then the volume may not be able to be
accessed by Drive 10 or any other repair utility. In that case,
the volume will need to be reinitialized.
Extents File
Extents are the allocation blocks (storage locations on the
disk) assigned to hold a file. The Extents File is a B-tree and
keeps track of the extents data for the entire volume. It is an
overflow file and stores those file extents that are not stored in
the volume header (in the case of the startup, attributes, allocation, catalog, and extents overflow files themselves) or in a
catalog file record (in the case of all other files). Damage to
the Extents File can cause file corruption if it occurs in a regular file’s extents data. If the extents data for a volume structure
file itself is damaged, then the effect can be much
more insidious.
Catalog File
The Catalog File keeps track of the hierarchy of all the files and folders on the volume. It is organized as a B-tree and consists of header nodes, index nodes, and leaf nodes. Problems in the Catalog File
can cause file corruption, disappearing files, and/or improper location of files and folders in the folder hierarchy. For example, damage
in the Catalog File can cause files to disappear—or keep them from
being able to be opened, moved, copied, or deleted. It can cause
all files to appear at the root level of the volume or even cause a
folder, all subfolders, and all files in the subfolders to disappear.
Attributes File
The exact organization of the attributes B-tree is still under
development by Apple. The Attributes File is not used by
Mac OS X at this time, but may be used in the future.
Startup File
The Startup File is a special file intended to hold data needed
when booting, but before the volume is mounted. It is essentially a generalization of the boot blocks, but provides a much
larger, variable-sized amount of storage.
Allocation File
The Allocation File acts as the main directory. It keeps track of
the allocation blocks that are currently used to store files and
the blocks that are free for the entire volume. The Allocation
File is a bitmap that contains one bit for each allocation block
in the volume. If the bit is clear, the corresponding allocation
block is not currently used by any file and hence is available
for use. Problems in the Allocation File can result in incorrect
values being given for free or used space on the volume.
16
Page 21

If any problems are found with the above volume structure
files, Drive 10 will indicate this in its Report. You may then
attempt to repair the problem by choosing the Report’s Repair
button. As an added precaution be sure to have any important
data backed up to another drive before doing repairs
if possible.
Note: Drive 10 cannot repair the volume structures of an
active drive. To perform repairs on a drive it must be unmounted. This means that you must both startup the computer and
run Drive 10 from another volume. Drive 10 ships on a
bootable CD, so that you can startup the computer and run
Drive 10 directly from the Drive 10 CD if necessary. To startup from the CD, hold down the “C” key while restarting the
computer with the Drive 10 CD in the drive. (For your convenience, these instructions are printed on the face of the
CD itself.)
When you boot from the Drive 10 CD, the Drive 10 application will automatically launch. You will not have full Mac OS X
functionality at this time since this is not possible when booting from an Mac OS X CD. When you are finished running
Drive 10, simply quit the program from the Drive 10 menu.
Once Drive 10 quits, the computer will automatically restart. It
will typically restart from whatever volume was chosen in the
Startup Disk preferences.
When Drive 10 is instructed to make volume structure repairs,
it will attempt to create new, valid volume structures in memory. If successful, you will be presented with a summary report
called the Technical Comparison. Drive 10 has not yet made
any changes to the drive.
The Technical Comparison displays important technical information about both the original directories and the newly created directories stored in memory. This includes details such as
the total number of folders, files, etc. This data can help you
17
Page 22

decide whether or not to commit to the volume repair.
Differences between the new and old directories are highlighted. Green indicates a normal change and red indicates an
unusual change. Note that a red change is not necessarily a
bad change. It is just a change that is unusual and suggests
that you consider the ramifications of the change carefully
before committing to the repair. If red changes are present, be
sure that any important data is backed up before accepting
the repair. To accept the repair, press the Replace or Repair
button. This will delete the original directories and replace
them with the new ones.
If the damage to the volume was severe enough that Drive 10
could not create new directories, or if an examination of the
Te chnical Comparison indicates that the new directories are
not correct, then the volume will probably need to be reinitialized. This will erase all data on the volume.
Optimization
Optimization has two goals: to defragment the files on your drive
and to consolidate the free space into one large block. This can
improve the performance of the drive. Note that optimization can
only be performed on HFS+ volumes.
As a drive saves and deletes files, the file system instructs the
drive mechanism on where and how to store the information. It
can place this information anywhere there is available free space
on the drive. If there is not a contiguous free area large enough to
store a file, then the file system will fragment the file. It will save a
piece here and a piece there. This is transparent to you. Although
a file may appear to be one complete logical item, in most cases
it is actually physically scattered around the disk in many pieces.
Fragmentation can effect the speed of file access on your drives.
It increases the amount of time needed to read and write files
resulting in less than optimal performance. Instead of the drive
being able to scoop up a requested file in one swoop, it must
locate the pieces of a file on the drive and then reconstruct the
file. If the free space is fragmented, writing a file may require it to
be broken up into many pieces and each individual piece separately written to the disk.
There are two types of fragmentation: file fragmentation and disk
fragmentation. File fragmentation occurs when an individual file is
broken into multiple segments. Disk fragmentation refers to the
free space on the drive being broken into segments. Drive 10 can
eliminate both types of fragmentation to fully optimize your drives.
This is done much like the game "Hanoi Towers" is played.
18
Page 23

Several files may be moved until the target file will have enough
free space to be written contiguously. This process is repeated
many times until all or most of the files are no longer fragmented.
You should do a volume structure test with Drive 10 and repair
any problems that might be found before optimizing. Since optimizing moves many files around on the drive, any pre-existing
problems could be made worse during optimization. If there are
no problems on the drive then it is safe to optimize it.
The Optimization feature of Drive 10 is available from the Drive
10 Services menu. To optimize, choose the option Optimize
Volume… (cmd-O).
This will bring up the Volume Optimization window.
The Volume Optimization window contains the following controls
and displays:
• Volume: allows you to select the volume to optimize. This
area also provides status information about the
selected volume.
• Cancel: allows you to cancel Optimization.
• Analyze: constructs a graph showing space usage on
the volume.
• Progress Bar: shows the progress of the Analysis.
After selecting Analyze, the Optimization of Volume <vol-
ume name> window will appear.
19
Page 24

This window displays information about the space usage on the
volume, the Optimization controls, and other information about
the volume and the progress of Optimization.
The top portion of the window displays a large graph showing
how the space on the selected volume is used. This allows for an
easy visual check of its state of fragmentation. The volume is represented as a grid of equal sized segments. The amount of data
represented by a segment depends on the total size of the volume. Segments that contain data are indicated in blue. Those
that contain no data are white. The display can be configured to
show the amount of fragmentation in each segment. A “bubble”
inside a segment indicates the level of fragmentation. The larger
the bubble the higher the fragmentation. A dark bubble indicates
the amount of file fragmentation and a light bubble indicates disk
fragmentation. You may choose whether or not to display the file
or disk fragments in the graph by checking the appropriate boxes
in the Optimization window. The progress of optimization can be
tracked by noting changes in the bubbles in the graph.
The Optimize: popup allow you to choose the type of defragmen-
tion you wish to perform.
• File and Disk Fragments: completely optimizes the volume.
This option does file defragmentation followed by free space
defragmentation.
• File Fragments Only: defragments the files. This will leave
the files scattered around on the disk.
You may start or stop the optimization process using the
following buttons:
• Optimize: this button begins the optimization process.
• Cancel: pressing this button will quit optimization.
The Optimization Window also displays the information:
Volume Information
• Capacity: total size of the volume.
• File Count: the total number of files on the volume.
• Used Space: the amount of space used by data on
the volume.
• Free Space: the amount of space available for use to
store data.
20
Page 25

Fragment Status
• File Fragments: the number of file fragments on the volume.
• Disk Fragments: the number of free space fragments on the
volume.
Progress Bar
The Progress Bar is a visual indication of the progress of optimization. As optimization progresses the block being worked
on will be indicated above the bar and the amount of space
remaining to relocate will be listed below.
When optimization is complete there will be zero File
Fragments and one Disk Fragment remaining. In other words,
all the files will be defragmented and all the free space will be
contained in one contiguous block.
Usage Notes
The optimization feature should be used as a general disk maintenance routine for your Macintosh. Although a fragmented volume
will not cause your Macintosh to malfunction, it may keep it from
performing to its full potential.
Optimization is very safe if performed on a volume with no directory problems. It is extremely important to do a volume struc-
ture check of the volume before optimizing. If any problems
are found they should be resolved before optimizing.
Optimizing moves many files around on the drive. If there is corruption in the volume directories, then this corruption could easily
get worse as these files are being relocated. It is possible that a
minor volume problem could spread and become a serious problem, possibly resulting in data loss.
In order to optimize a volume it must be unmounted. This means
that nothing can be running on the volume. You must both boot
your computer and run Drive 10 from a volume other than the one
you are attempting to optimize. If the Optimize button is grayed
out, then something is most likely active on the volume you have
selected. To optimize your normal startup hard volume you would
typically boot the computer directly from the Drive 10 CD.
Directions for doing this are printed on the face of the CD.
Report
A report is displayed when Drive 10 completes a test run. This
report details each test that was run, the test status (whether it
21
Page 26

passed, failed, or was unavailable), a brief description of the test,
and advice on how to proceed if the test failed.
The following buttons may appear at the bottom of the
Report window:
Save As…
Pressing Save As… will bring up the file save dialog allowing the
report to be saved as a standard text file.
Print…
Pressing Print. . . will bring up the print dialog allowing the report
to printed.
Done
Pressing Done will dismiss the report.
If problems are found the Done button will be replaced by the following two buttons.
Repair
Pressing Repair will instruct Drive 10 to proceed with repairs.
Cancel
Pressing Cancel will dismiss the report and no repairs will be
attempted.
22
Page 27

Menus
Drive 10 includes a number of menu options that allow additional
methods of accessing program functions.
Drive 10 Menu
This is the Drive 10 application menu. The following functions are
available from this menu:
• About Drive 10—brings up the About Drive 10
information panel.
• Hide Drive 10 (cmd-H)—closes the Drive 10 window.
Selecting Drive 10 from the dock will redisplay the window.
• Hide Others—hides all windows except the Drive 10 window.
• Show All—shows all the previously hidden windows.
• Quit Drive 10 (cmd-Q)—quits the program.
Control Menu
Following are the functions available from this menu:
• Start (cmd-R)—runs the currently selected Drive 10 tests.
• Skip (cmd-J)—terminates the current test and continues with
the next test (or terminates testing if it on the last test).
• Stop (cmd-.)—stops the current run of tests.
• Enable All Tests (cmd-A)—selects all tests.
• Disable All Tests (cmd-D)—deselects all tests.
23
Page 28

Services Menu
The Services Menu contains the following Drive 10 function:
• Check for Product Update . . . : connects to the Micromat
website and checks to see if an update is available for the
running version of Drive 10. If so, you may download it
directly from the Download page.
• Update Volume List (cmd-U) : rescans the computer for
available volumes. Use this option if an attached volume
does not appear in the Volume test list.
• Rebuild Volume Structures . . . (cmd-B) : executes the vol-
ume rebuild routines of Drive 10. See Volume Structures
above for more information.
• Optimize Volume . . . (cmd-O) : choose this option to optimize a volume. See Optimization above for more information.
24
Page 29

Commonly Asked
Questions
25
Page 30

Why must I enter an administrator password to
run Drive 10?
Drive 10 needs access to the all the files on the drive in order to
do its diagnosis and repair. Hence, it is necessary to verify that
you have administrator privileges before the program launches.
Why is the Repair button greyed out in the Report when
problems are found which need to be repaired?
In order to repair a volume it must be dismounted. This means
that you must boot the computer and run Drive 10 from another
volume. Once you have done this, you will be able to choose the
Repair button.
Is Drive 10 able to check a UFS initialized volume?
No. Drive 10 can only work on Macintosh initialized HFS and
HFS+ volumes.
Can I select multiple volumes and have Drive 10 diagnose
them in one run?
You can only select one drive at a time for diagnosis and repair.
Can Drive 10 check a network volume?
No. Drive 10 can only work with drives physically attached to the
computer on which it is running.
How do I initialize a drive in OS X?
Mac OS X includes a program called Disk Utility that allows initialization of disks. Disk Utility is typically located in the Utilities
folder (inside the Applications folder). After launching Disk Utility,
select the volume and choose the Erase option.
Is Drive 10 able to optimize HFS or UFS initialized volumes?
No. Drive 10 can only optimize a volume that was initialized
HFS+.
26
Page 31

Short Cuts and
Hidden Features
27
Page 32

cmd-R: Runs the Drive 10 test suite.
cmd-.: Terminates the test suite.
space, return, or enter: Starts/Stops the test suite.
P: Pauses test execution.
R: Resumes test execution after a pause.
cmd-J: Skips the currently executing test.
esc: Skips the next test.
shift-click test selection box: Propagates the changed check
box status to all tests.
cmd-A: Selects all tests.
cmd-D: Deselects all tests.
cmd-B: Rebuilds the selected volume.
cmd-H: Hides the Drive 10 window.
cmd-Q: Quits Drive 10.
cmd-U: Updates the volume list.
cmd-O: Optimize Volume.
28
Page 33

Glossary
29
Page 34

Allocation Block: An Allocation Block is the smallest logical unit
of storage recognized by the file system. It is an integral number
of disk sectors (usually 512 bytes).
B-Tree: A B-tree (or binary-tree) is a data structure where each
record is linked to two other records. Graphically it resembles a
tree with leaves. Data stored in a B-tree may be retrieved much
faster than data stored as a simple list. A volume’s Catalog file is
a B-tree.
Bad Block: A Bad Block is a disk sector that resides on a location of a disk where the surface is physically damaged. The sector can no longer hold data reliably.
Backup: An exact copy of computer information. In case of data
loss or corruption the original data can be retrieved from
the backup.
Boot Blocks: The boot blocks reside at a special location on a
drive. They contain information that is read as the computer starts
up and that is necessary for the startup process to complete.
Booting: The term booting originated from bootstrap. It is the
process by which the computer starts itself and reads the
Operating System. When you boot from a CD you are starting
and reading the OS from the CD.
Bus: A Bus is the path that transmits information between a
computer and connected devices. An example is the SCSI bus,
which connects the computer to SCSI devices such as
hard drives.
Byte: A Byte is a unit of information stored in the computer. A
byte consists of eight bits. An ASCII character consists of
one byte.
Chip: A Chip, or Integrated Circuit, is a miniature electronic component with specialized functions within the computer. Chips
include the serial communications controller, SCSI chip, and the
CPU itself.
Circuit: A conductor through which an electric current can flow;
the entire course traversed by an electric current. Parts and components assembled to function together in an electric or electronic device or system.
Device: A device is any piece of equipment that can be attached
to a computer. These might include a monitor, disk drive, printer,
etc. Devices are also known as Peripherals.
Disk: A Disk is a flat circular device for storing computer data.
The data might be stored magnetically or optically. The most
common disks are floppy disks made of flexible plastic, hard disks
made of metal, and CD-ROM disks made of plastic.
Disk Drive: A device for controlling and accessing data stored
on a disk or disk pack.
Drive: A Drive is a computer peripheral that stores data. It might
use a tape cartridge, a disk, or other medium. A drive may be
“read only” or “read/write.”
30
Page 35

Driver: A Driver (or device driver) is software that lets a computer communicate with a device. When you purchase a new device
its driver is usually provided as part of the software that comes
with it.
File System: Every volume uses a file system to organize the
information stored on it. A file system keeps track of where files
are located on the volume. The Macintosh typically uses either
the HFS or HFS+ filing system.
FireWire: FireWire is Apple’s name for the high speed IEEE
1394 bus standard. It can handle data rates of up to 400Mbps
and is commonly used to connect hard drives and video cameras
to the Macintosh.
Firmware: This is software that has been permanently recorded
into ROM (Read Only Memory). It is a cross between hardware
and software.
Format: Format refers to the physical layout of the recording
magnetic markers that divide the disk into sectors and tracks.
This is the foundation on which the logical initialization of the
drive is based.
GB: See Gigabyte.
Gigabyte: A Gigabyte consists of 1,024 Megabytes.
Head: A mechanism that reads, writes, or erases data on a stor-
age medium.
Head Crash: A Head Crash refers to contact between a
read/write head and the surface of the media on a floppy or a
hard disk drive. This usually results in damage to the disk surface
and possible loss of data.
HFS: HFS stands for Hierarchical Filing System and is also
known as Macintosh OS Standard Format. It is a method of formatting storage devices for Macintosh computers.
HFS+: Macintosh OS Extended Format is a method of formatting storage devices attached to Macintosh computers.
Compared to the earlier HFS it supports more files and increases
the efficiency of storage on larger drives.
I/O: An acronym for input/output.
IDE/ATA: IDE stands for Integrated Device Electronics. These
devices (sometimes called ATA devices) conform to the ATA (AT
Attachment Standard) which specifies how peripherals communicate with the computer.
Initialize: Initializing is a process of preparing a storage medium
to hold data. During initialization the volume structures for a volume are created specifying locations for storing data. Initialization
erases directory information; however, the data from files may still
be left on the volume.
Kb: Kilobit or 1024 bits.
KB: Kilobyte or 1024 bytes.
Kbps: Kilobits per second.
31
Page 36

KBps: Kilobytes per second.
Low-Level Format: Low-level formatting removes and then
recreates the markers that organize the data on a drive. All data
on the drive is erased. Low-level formatting is usually followed
by initializing.
Mb: See Megabit.
Mbps: Megabits per second.
MB: See Megabyte.
MBps: Megabytes per second.
Megabit: A unit of measure for storage capacity. One megabit is
equivalent to 1,048,576 bits.
Megabyte: A unit of measure for storage capacity. One
megabyte is equivalent to 1,048,576 bytes.
OS: OS stands for Operating System. This is the software that
allows you to interact with your computer and that keeps track of
files, peripherals, programs, networks, etc.
Partition: Disks can be divided into subsections called partitions.
The computer recognizes each partition as a separate unit (often
called a volume).
Root Directory: The top level of a volume’s directory. It may contain subdirectories (otherwise known as folders).
SCSI: See Small Computer System Interface.
SCSI Chip: The SCSI Chip allows the Macintosh to communi-
cate with SCSI devices. Most Macintosh computers use the
8530 SCSI chip.
SCSI Conflict: A SCSI Conflict occurs when two or more SCSI
devices share the same ID number on the same bus. This can
keep the devices from working reliably.
Sector: A Sector is a small portion of a disk drive’s track and
contains 512 bytes of data.
Small Computer System Interface: Also known as SCSI, this
is a parallel interface standard that specifies how peripherals
communicate with the computer. There are several varieties of
SCSI. The transfer rate for standard SCSI built into the
Macintosh is 4MBps. The maximum rate for SCSI is 80MBps.
Termination: A technique of capping the end of a signal bus to
prevent resonance from occurring within a signal. The SCSI bus
requires a terminator at each end.
Universal Serial Bus: A medium speed protocol for connecting
devices to a computer. It is superceding ADB on the newer
Macintosh computers. USB is hot-swappable and has a maximum
transfer rate of 12Mbps.
USB: See Universal Serial Bus.
Volume: A volume refers to a logical storage unit seen by the
computer as a single item. This may be a floppy disk, an entire
hard drive, or a partition on a hard drive.
32
Page 37

33
 Loading...