

Page 1
EN
1
Ofce blood pressure
measurement device
with built-in
Blood Pressure targets.
Instruction Manual
Page 2

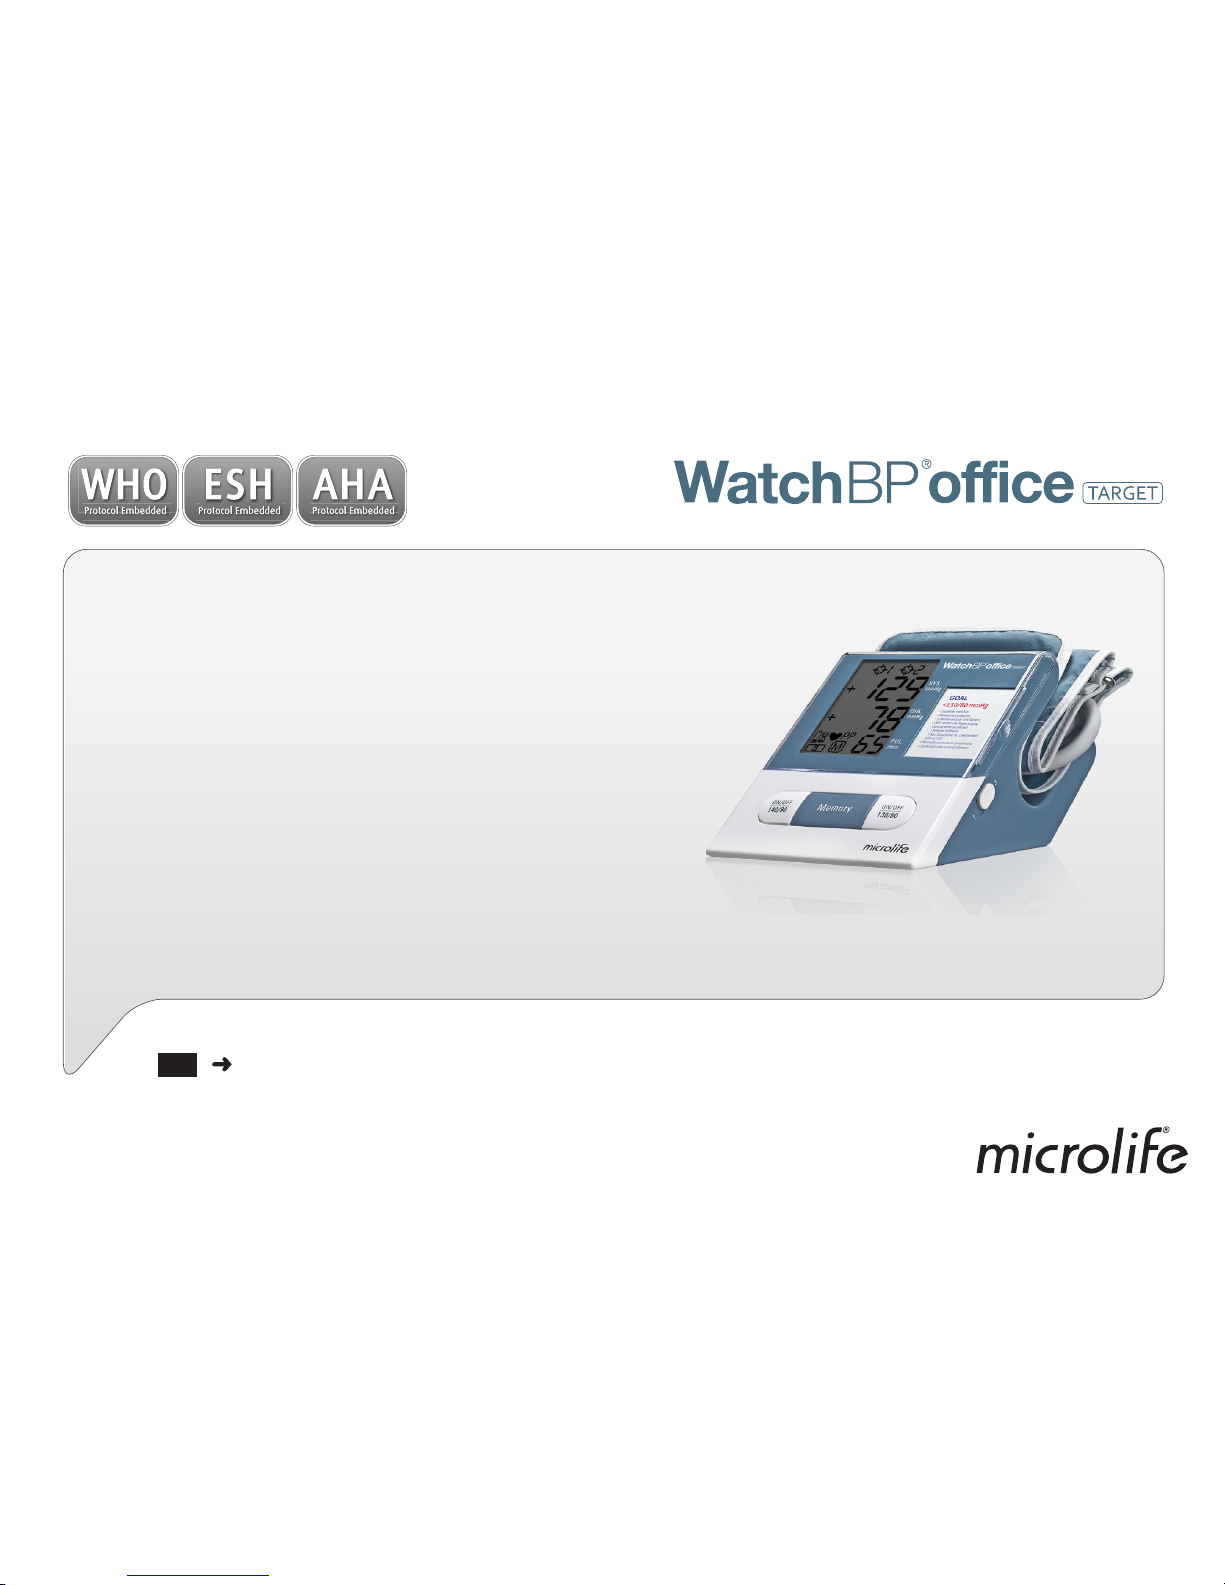
WatchBP Ofce Target is designed with built-in blood pressure targets to provide
convenient, accurate and reliable ofce blood pressure measurements. It follows the
recommended guidelines of the European Society of Hypertension (ESH)1, American Heart
Association (AHA)2, American Diabetes Association (ADA)3 and World Health Organization
(WHO)4.
1
O’Brien E, Asmar R, Beilin L, Imai Y, et al. European Society of Hypertension recommendations for conventional, ambulatory and home blood pressure
measurement. European Society of Hypertension Working Group on Blood Pressure Monitoring. J Hypertens 2005;23:697-701.
2
Pickering TG, Hall JE, Appel LJ, et al. Recommendations for Blood Pressure Measurement in Humans and Experimental Animals:
Part 1: Blood Pressure Measurement in Humans: A Statement for Professionals From the Subcommittee of Professional and Public Education of the American
Heart Association Council on High Blood Pressure Research. Hypertension 2005;45;142-161.
3
American Diabetes Association. Standards of Medical Care in Diabetes–2006. Diabetes Care, 2006;29; Supplement 1.
4
World Health Organization, International Society of Hypertension Writing Group. 2003 World Health Organization (WHO) / International Society of
Hypertension (ISH) Statement on Management of Hypertension. J Hypertens 2003,21:1983-1992.
Page 3

EN
Product description
Name of parts and display ................................. 3–4
Components and accessories...... ........................... 5
Before using WatchBP Ofce Target
Activating the device ............................................. 6
Selecting and tting the correct cuff .................. 6–8
Selection of operation modes
«Single» or «Triple» Mode («Double» Mode as
option) ................................................................. 10
Press «140/90» or «130/80» ..............................10
Trafc light indications
Green light ...........................................................11
Red light ............................................................... 11
Viewing and deleting of measurements
Viewing the stored values ................................... 12
Pulse pressure (PP) .............................................. 12
Deleting the stored values ................................... 13
Replacing slot-in instruction card .........................13
Appendix
Battery and power adaptor ........................... 14–15
Error messages ............................................... 16–18
Safety, care, accuracy test and disposal ......... 19–20
Technical specications ....................................... 21
Table of Contents
Page 4
3
SYS.
mmHg
DIA.
mmHg
PUL.
/min
1
3
3
SYS.
DIA.
PUL.
mmHg
mmHg
/min
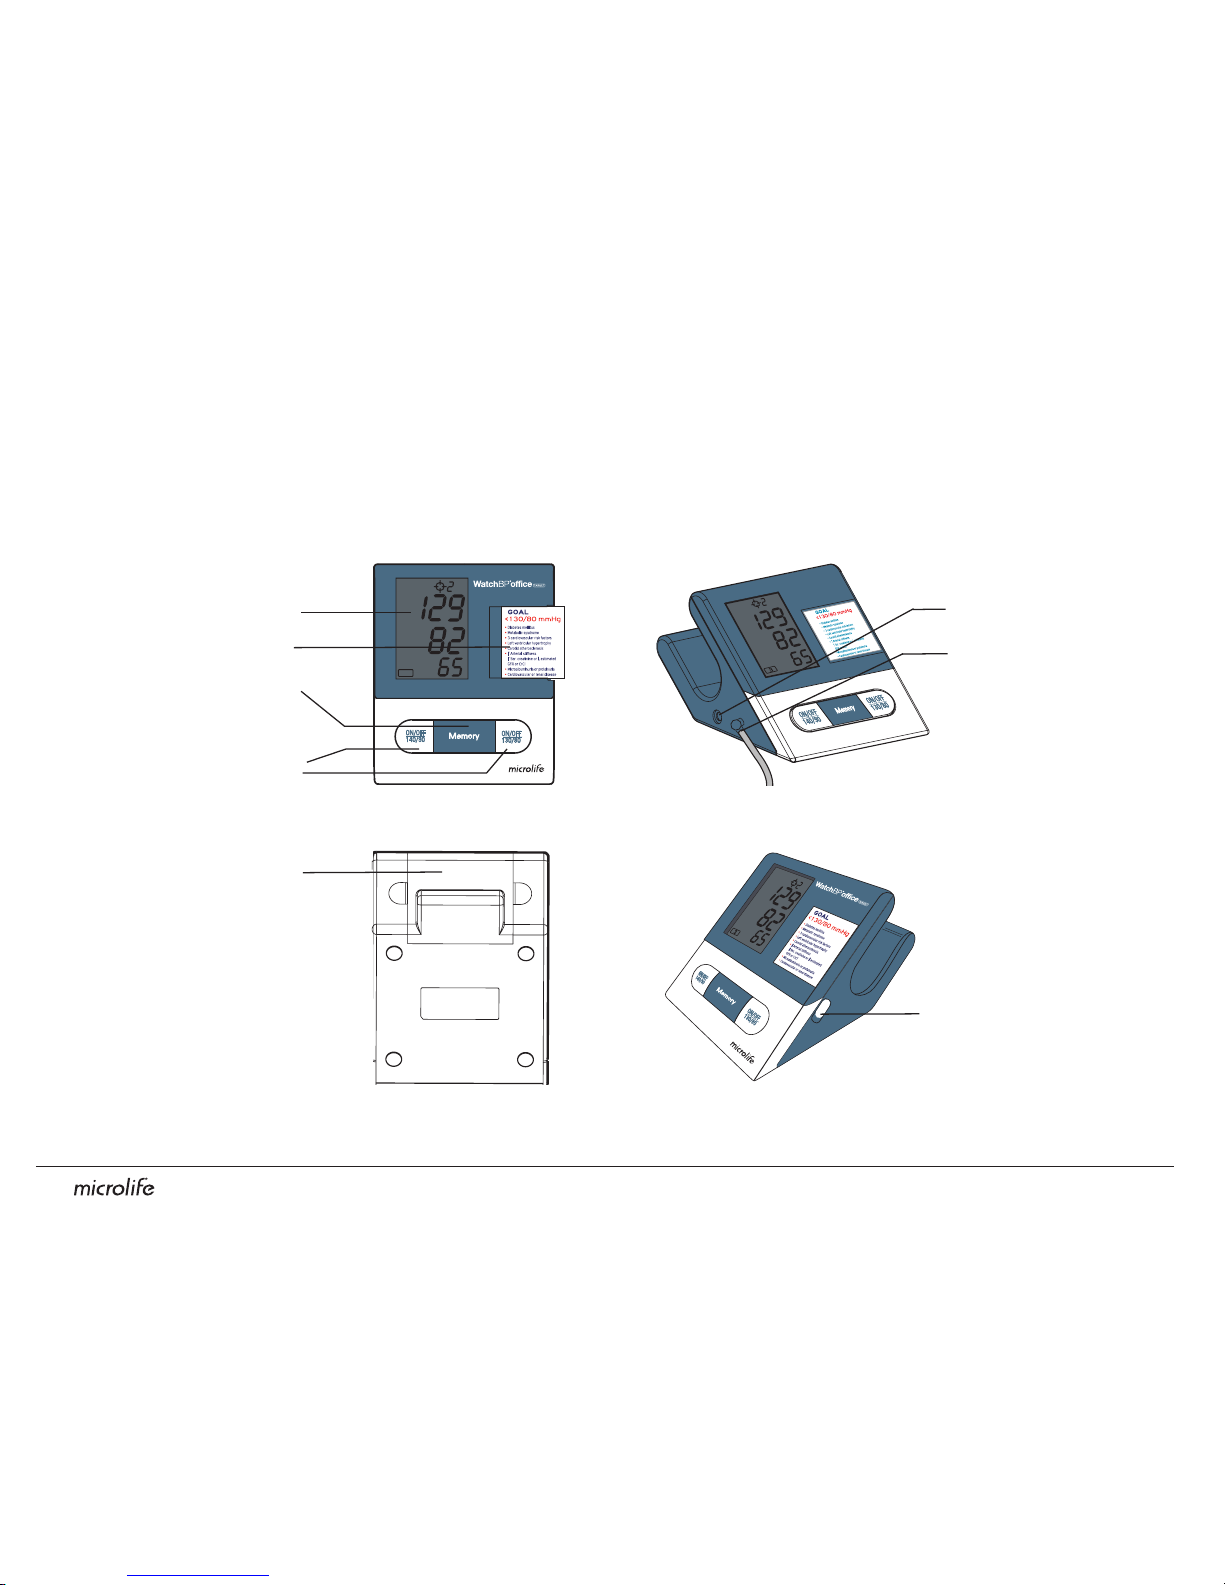
Main Adaptor
Cuff Socket
Mode Switch
Display
Instruction
M Button (Memory)
Start/Stop Button
Product description
Name of parts
Battery Compartment
Page 5
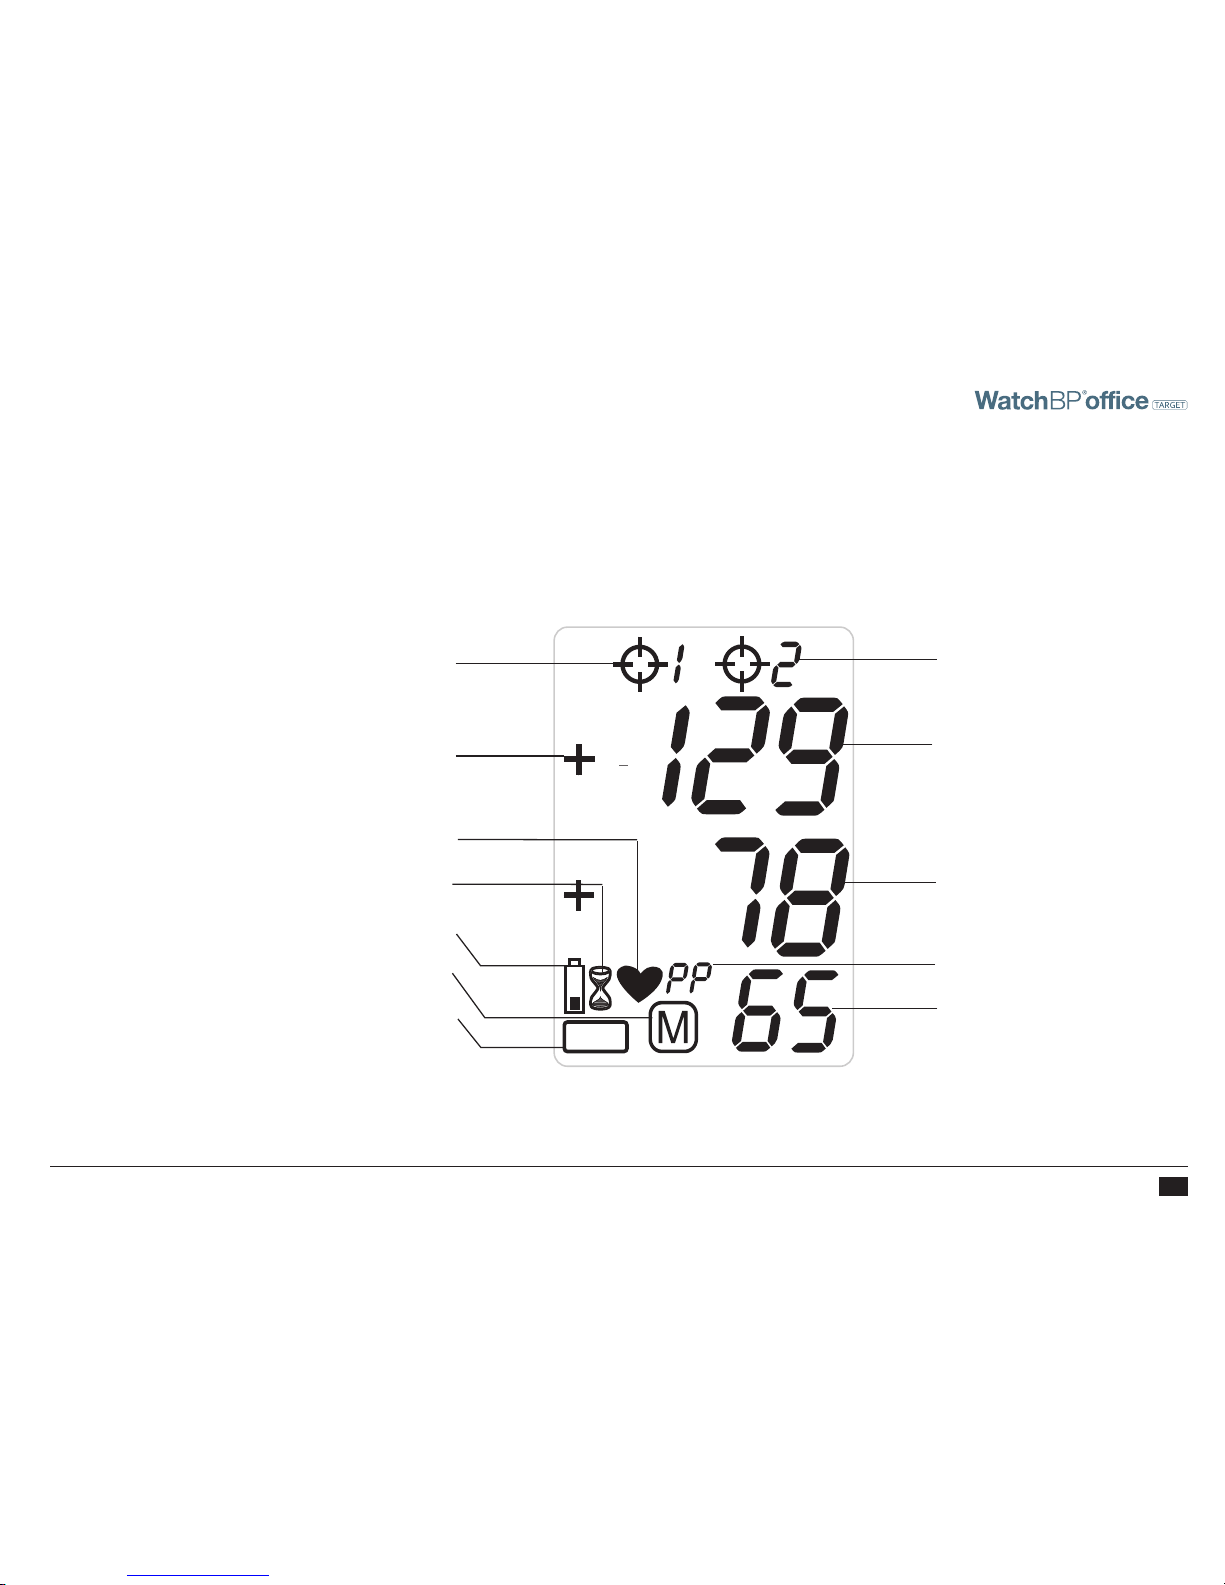
4
EN
Target 1 < 140/90
Difference to Target setting
Heart Beat
Interval Time
Battery Symbol
Memory
Triple Mode
Target 2 < 130/80
Systolic Value
Diastolic Value
Pulse Pressure (PP)
Pulse Rate
3
Display
Page 6

5
WatchBP Ofce Target and components
WatchBP Ofce Target
Blood Pressure Device X 1
AC Adaptor X 1
Input: 100-240V~50/60Hz 0.7A
Output: +6V 0.6A
M size (22cm~32cm) X 1
L size (32cm~42cm) X 1
Instruction Manual X 1
Quick Start Guide X 1
3
SYS.
DIA.
PUL.
mmHg
mmHg
/min
Page 7
EN
6
Before using WatchBP Ofce Target
Two ways of activating the Device
1) Pull out the protective strip projecting from the
battery compartment.
2) Plug the adapter cable into the main adapter
socket in the blood pressure monitor; then Plug
the adapter plug into the wall socket.
M (Medium size)
22 - 32 cm (8.7 - 12.6 inches)
L (Large size)
32-42 cm (12.6 - 16.5 inches)
Selecting the correct cuff
Two different cuff sizes are provided with the
WatchBP Ofce Target: Medium and Large. Use the
cuff marker to select the cuff size that best matches
the circumference of the patient’s upper arm.
Page 8
7
Before using WatchBP Ofce Target (cont.)
Fitting the cuff properly
1) Place the cuff over the left (right) upper arm so
that the air tube and artery mark arrow point
towards the lower arm.
2) Lay the cuff on the arm. Make sure that the lower
edge of the cuff lies approximately 2 to 3cm ( ¾
to 1 inch) above the elbow.
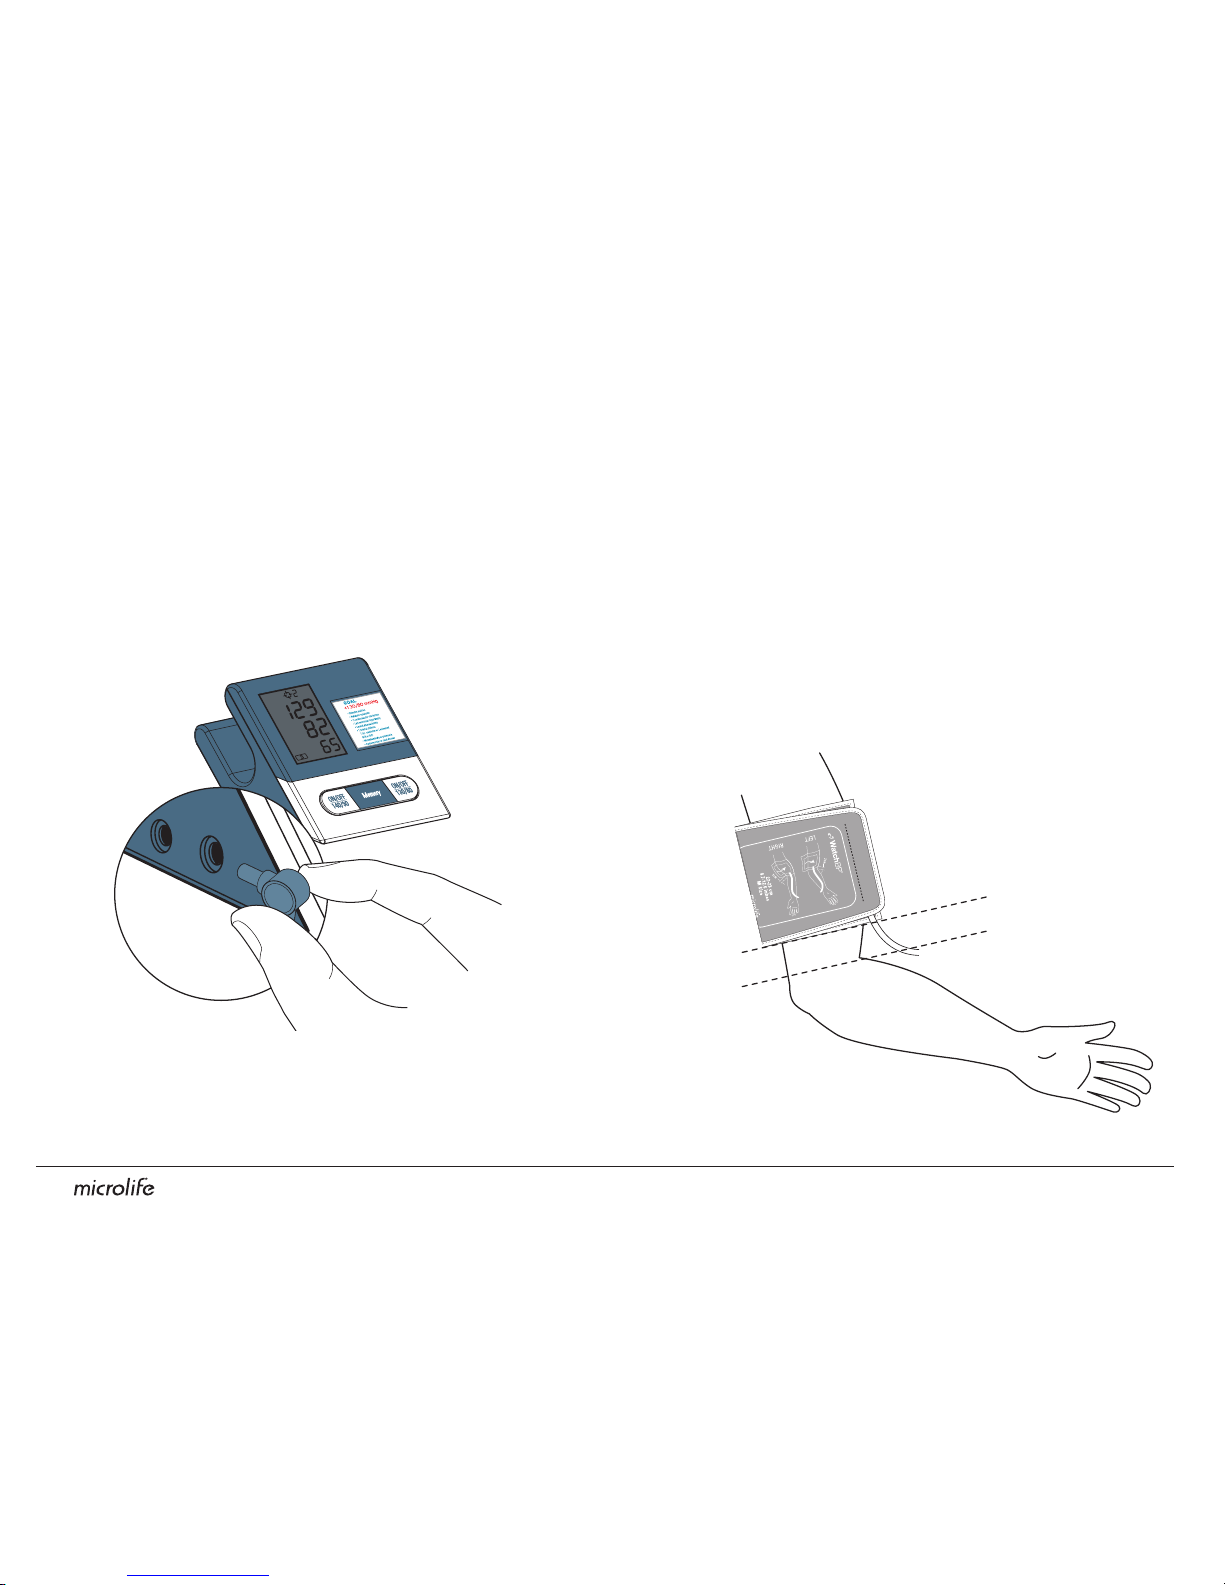
Connect the cuff to the device
Connect the cuff to the device by inserting the cuff
connector into the cuff connector socket.
2-3 cm
(3/4 to 1 inch)
Page 9

EN
8
3) Wrap and tighten the cuff around the arm.
4) Leave a little free space between the arm of the
patient and the cuff. It must be possible to t 2
ngers between the arm and the cuff. Clothing
must not restrict the arm. Remove all clothing
covering or constricting the arm to be measured.
5) It may result in incorrect blood pressure readings
if the cuff does not t properly. Use a different
size cuff if the range index at the end of the cuff
does not fall into the range specied by the
range stripes.
6) Apply the same steps to the other arm if a
measurement of the other arm is required.
*
When the cuff is wrapped
around the arm, the edge of
the cuff should be in the range
which is marked “OK”.
Page 10

9
SYS.
mmHg
DIA.
mmHg
PUL.
/min
1
3
SYS.
mmHg
1
3
Automated triple measurements
In «3» Mode, the WatchBP Ofce Target
device automatically takes three consecutive
measurements at default 15 second intervals.
Because blood pressure constantly uctuates, a
result determined in this way is more reliable than
one produced by a single measurement.
15 sec.
1 2
Selecting the operation mode: Standard or Triple mode
Select an operation mode
There are two measuring modes to be selected,
Standard mode (standard single measurement) or
Triple mode (automatic triple measurements).
To select Standard mode, slide the switch on the
right side of the device downwards to position «1».
To select Triple mode , slide this switch upwards to
position «3».
15 sec.
3
*
15 seconds of interval is adequate according to «Blood
Pressure Monitoring, 2001, 6:145-147» for oscillometric
instruments).
Page 11

EN
10
3 measurements are averaged
On the bottom of the right hand section of the
display shows a number to indicate which of
the consecutive measurement is currently
being taken. The readings of these consecutive
measurements are averaged to produce the
routine visit blood pressure measurement.
Press «140/90» or «130/80» button
Press the button ON/OFF «140/90» or ON/OFF
«130/80», to select the preferred target value. The
device will then start to inate.
Do not remove the cuff between the measurements.
If one of the individual measurements is
questionable, an extra measurement will be taken
automatically.
3
SYS.
DIA.
PUL.
mmHg
mmHg
/min
*
.Press either the ON/OFF «140/90» or ON/OFF «130/80
any time if you want to quit the measurement.
Page 12

11
Green light
If both the measured systolic and diastolic blood
pressure values are below the set target values
(140/90 or 130/80), the screen will light in green
with two «OK» signs.
Additionally, the lowest column in the screen
shows the pulse pressure «PP»
Red light
If either the measured systolic or diastolic result is
above the set target value (140/90 or 130/80),
the screen will light in red with the difference to
the desired value shown in display as number, e.g.
«+24, +22».
Trafc Light Indication in the display
Page 13

EN
12
Viewing the stored values
The device stores only the blood pressure values
of the last measurement procedure. To view
the stored values, press the M-button when the
instrument is switched off. The display rst shows
«A» and then the values.
5 seconds later, the display will change and show
the systolic/diastolic difference with the set target
values (140/90 or 130/80), together with the
pulse pressure .
PP (Pulse Pressure)
The WatchBP Ofce Target device provides the pulse
pressure (PP) of the patient: pulse pressure = systolic
- diastolic pressure. Each measurement includes
the calculation of a single PP value. The average
measurement will display the average PP value.
When viewing in Memory mode, the PP value will be
displayed with the systolic/diastolic pressure once
every 5 seconds.
3
SYS.
DIA.
PUL.
mmHg
mmHg
/min
Page 14

13
Clearing all values
If you are sure that you want to permanently
remove all stored values, hold down the M-button
(the instrument must have been switched off
beforehand) until «CL» appears and then release
the button. To permanently clear the memory,
press the M-button while «CL» is ashing. Single
values cannot be cleared.
Replacing the inserted Instruction Card
You can replace the inserted instruction card by
pulling it out to the side and replacing the paper.
Extra cards are supplied with the instrument for this
purpose.
3
SYS.
DIA.
PUL.
mmHg
mmHg
/min
Press and hold
SYS.
DIA.
PUL.
mmHg
mmHg
/min
SYS.
DIA.
PUL.
mmHg
mmHg
/min
Page 15

EN
14
Battery Indicator and Battery change
Low battery
When the batteries are approximately ¾ empty the
battery symbol will ash as soon as the instrument
is switched on (partly lled battery displayed).
Although the instrument will continue to measure
reliably, the batteries need to be replaced soon.
Battery and power adaptor
Flat battery – replacement
When the batteries are at, the battery symbol will
ash as soon as the instrument is switched on (at
battery displayed). You cannot take any further
measurements and must replace the batteries.
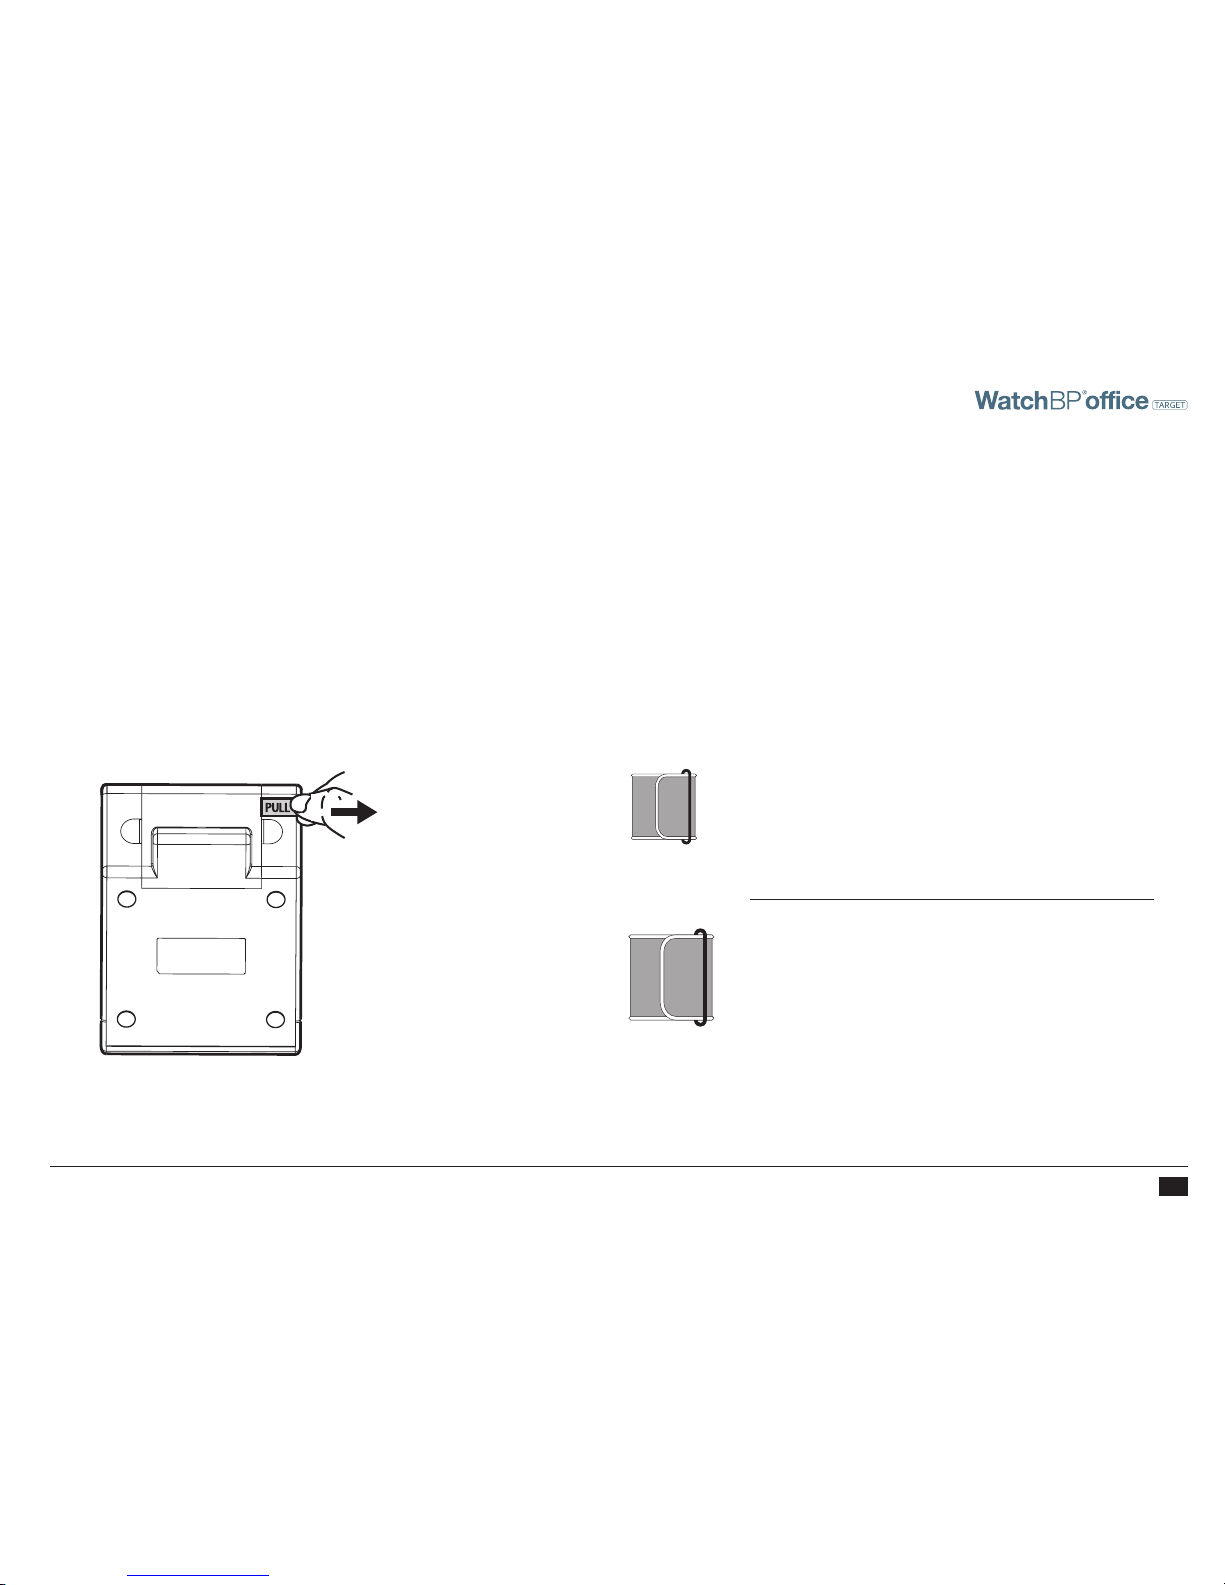
1) Open the battery compartment at the back of
the instrument by pushing inwards at the two
arrows and pulling out the battery compartment
cover.
2) Replace the batteries – ensure correct polarity as
shown by the symbols in the compartment.
*
Use 4 new, long-life 1.5V, size AA batteries.
*
Do not use batteries beyond their date of expiry.
*
Remove batteries if the instrument is not going to
be used for a prolonged period.
Page 16

15
Using a mains adaptor
Please use only the Microlife adaptor (DC 6V, 600mA)
supplied with the WatchBP Ofce Target to operate
the device.
1) Plug the adapter cable into the Power Plug of the
WatchBP Ofce Target device.
2) Plug the adaptor plug into the wall socket. When
the power adaptor is connected, no battery
power is consumed.
Page 17

EN
16
If an error occurs during measurement, the
measurement is interrupted and an error
message «Err» is displayed.
•
Please contact your local
Microlife service center if
the error persists.
•
If you think the results
are unusual, please read
through the information
in this instruction manual
carefully.
Error Description Potential cause and
remedy
«Err 1» Signal too
weak
The pulse signals on
the cuff are too weak.
Re-position the cuff and
repeat the measurement.
«Err 2» Error signal During the
measurement, error
signals were detected
by the cuff, caused for
instance by movement or
muscle tension. Repeat
the measurement,
keeping your arm still.
Error messages
Page 18

17
Error Description Potential cause and
remedy
«Err 6 Triple Mode There were too many
errors during the
measurement in
Triple mode, making it
impossible to obtain a
nal reliable result. Read
through the checklist
for performing reliable
measurements and then
repeat the measurement.
Error Description Potential cause and
remedy
«Err 3» No pressure
in the cuff
An adequate pressure
cannot be generated
in the cuff. A leak
may have occurred.
Replace the batteries if
necessary. Repeat the
measurement.
«Err 5» Abnormal
result
The measuring signals
are inaccurate and no
result can therefore
be displayed. Read
through the checklist
for performing reliable
measurements and then
repeat the measurement.
Page 19

EN
18
Error Description Potential cause and
remedy
«HI» Pulse or cuff
pressure too
high
The pressure in the
cuff is too high (over
300 mmHg) OR the
pulse is too high
(over 200 beats per
minute). Relax for 5
minutes and repeat the
measurement.
«LO» Pulse too
low
The pulse is too low
(less than 40 beats per
minute). Repeat the
measurement.
Page 20

19
Protect the device from water and moisture
Protect the device from extreme heat and cold
Protect device from impact and drops
Protect the device from direct sunlight
Avoid proximity to electromagnetic elds, such
as those produced by mobile phones
Never open device
Safety, care, accuracy test and disposal
Safety and protection
This device may be used only for the purpose
described in this booklet. The device comprises
of sensitive components and must be treated
with caution. The manufacturer cannot be held
responsible for damage caused by incorrect
application.
Observe the storage and operating conditions
described in the “Technical specications” section
of this manual.
•
Ensure that children do not use the device
unsupervised; some parts are small enough to be
swallowed.
•
Only activate the pump when the cuff tube is
installed.
•
Do not use the device if you think it is damaged or
if anything appears unusual.
•
Read the further safety instructions in the
individual sections of the instruction manual.
•
Do not connect the device to a computer
until prompted to do so by the computer software.
Page 21

EN
20
SYS.
mmHg
DIA.
mmHg
PUL.
/min
1
3
Do not wash the cuff!
Do not iron the cuff!
Accuracy test
An accuracy test is recommended every 2 years
or after mechanical impact (e.g. being dropped).
Please contact Microlife to arrange for an accuracy
test.
Cleaning the cuff
DO NOT wash the cuff. DO NOT iron the cuff cover.
Device care
Clean the device with a soft, dry cloth.
Disposal
Batteries and electronic instruments must be
disposed of in accordance with the locally applicable
regulations.
Page 22

21
Technical specications
Microlife reserves the right to alter technical
speccations without prior written notice.
Operation temperature/
humidity:
•
10 to 40 °C (50 to 104 °F)
Storage temperature/
humidity:
•
-20 to 55 °C (-4 to 131 °F)
•
15 - 90 % relative maximum humidity
Weight:
•
690 g (including batteries)
Dimensions:
•
160 x 125 x 98 mm
Measuring method:
•
Oscillometric, corresponding to
Korotkoff method: phase I systolic,
phase V diastolic.
Measurement range:
•
30 - 280 mmHg – blood pressure
•
40 - 200 beats per minute – pulse
Cuff pressure display:
•
Range: 0 - 299 mmHg
•
Resolution: 1 mmHg
•
Static accuracy: pressure within ± 3
mmHg or 2% of reading > 200mmHg
•
Pulse accuracy: ±5 % of the readout
value
Voltage source:
•
4 X 1.5V Batteries; size AA
•
Mains adapter DC 6V, 1 A
Reference to Standards:
• Device standard:
Device corresponds to the
requirements of the standard for
noninvasive blood pressure monitor.
EN 1060-1
EN 1060-3
EN 1060-4
IEC 60601-1
IEC 60601-1-2
Electromagnetic
compatibility:
• Device fullls the stipulations of the
standard IEC 60601-1-2.
The stipulations of the EU Directive 93/42/
EEC for Medical Devices Class IIa have been
fullled.
Type BF applied
part
Reference number
Serial number Manufacturer
Page 23

This device is covered by a two-year
guarantee and accessories are cover by
a one-year guarantee from the date of
purchase. This guarantee is valid only
on presentation of the guarantee card
completed by the owner conrming date of
purchase or purchase receipt.
Product: WatchBP Ofce Target
Product Number: BP 3MD1-4
Date:
Name:
Address:
Date:
Telephone:
Email:
Guarantee card
Page 24

IB WatchBP Ofce Target BP3MD1-4 031010
Europe / Middle-East / Africa
Microlife AG
Espenstrasse 139
9443 Widnau, Switzerland
Tel +41 71 727 7000
Fax +41 71 727 7011
Email: watchbp@microlife.ch
www.watchbp.com
Asia
Microlife Corporation
9F, 431, RuiGang Road, NeiHu
Taipei, 114, Taiwan, R.O.C.
Tel +886 2 8797 1288
Fax+886 2 8797 1283
Email: watchbp@microlife.com.tw
www.watchbp.com
North / Central / South America
Microlife Medical Home Solutions, Inc.
2801 Youngeld St., Suite 241
Golden, CO 80401, USA
Tel +1 303 274 2277
Fax +1 303 274 2244
Email: watchbp@mimhs.com
www.watchbp.com
Read the instructions carefully before using this device.
Page 25

 Loading...