

Page 1
WatchBP
Office
Professional
Automated Ofce
Blood Pressure
Monitor
BP 3SK1-3B
Instruction Manual
EN
1
Page 2

Preface
Microlife WatchBP Ofce (BP3SK1-3B) is an Automated Ofce Blood Pressure
(AOBP) Monitor.
The device is a non-invasive digital blood pressure device using oscillometric
technique and an upper-arm blood pressure cuff to measure systolic and diastolic
blood pressures, pulse rate, mean arterial pressure (MAP) and pulse pressure (PP)
for use in pediatric and adult populations with arm cuff circumference sizes ranging
from 14 -52 cm.
The device can be connected to a computer (PC) running the WatchBP Analyzer
software. The measured patient data can be transferred from the blood pressure
monitor to the PC by means of a USB cable connection or Bluetooth connection.
The Bluetooth 4.2 connectivity allows data transferring from the device to PC,
smartphones or tablet.
The device detects the appearance of atrial brillation during measurement and gives
a warning signal together with the measured blood pressure value if atrial brillation is
detected (optional).
The device provides aortic blood pressure parameters, includes central systolic
blood pressure (cSBP), central pulse pressure (cPP) and central diastolic pressure
(cDBP), non-invasively through the use of a brachial cuff (optional).
WatchBP product support:
https://www.microlife.com/professional-products
WatchBP Software support:
https://www.microlife.com/support/software-professional-products
Developers support:
https://www.microlife.com/developers1
2
Page 3

WatchBP Office
Table of Contents
Product description
・Contents ..........................................................................................................................................4
・Device Version .................................................................................................................................. 4
・Upgrading the version of the device ....................................................................................................4
・Product Overview ............................................................................................................................. 5
・Display .............................................................................................................................................5
Initial set up
・Attaching the power plug to the power adapter ...................................................................................6
・Power ON/OFF .................................................................................................................................6
・Set the date, time and the safeguard pressure ....................................................................................6
Before using the device
・Selecting the correct cuff ...................................................................................................................7
・Fitting the cuff properly .......................................................................................................................7
Taking measurements in MANUAL and AUTO Mode
・Turn on the power ..............................................................................................................................8
・Connect the cuff to the device ............................................................................................................8
・Select an operation mode ..................................................................................................................8
・Settings of AUTO Mode ................................................................................................................. 8-9
・Taking measurement in AUTO Mode ................................................................................................10
・Viewing stored values ......................................................................................................................10
・MANUAL Mode Settings ..................................................................................................................10
・Taking measurement in MANUAL Mode ...........................................................................................11
Special Functions
・Screening for atrial brillation during blood pressure measurement ....................................................12
・About Atrial Fibrillation .....................................................................................................................12
・Central blood pressure parameters ..................................................................................................12
・How is central blood pressure measured? ........................................................................................12
・Accuracy of the central blood pressure parameters ...........................................................................13
・MAP (Mean Arterial Pressure) ...........................................................................................................13
Using WatchBP Analyzer
・Installing the Software Program ........................................................................................................14
・Connecting the Device to a Computer ..............................................................................................14
・Start the Software Program ..............................................................................................................14
・Transferring and deleting measurement data ....................................................................................14
・Bluetooth connectivity .....................................................................................................................15
Rechargeable battery and power adapter
・Rechargeable Battery ......................................................................................................................15
・Using a power adapter .....................................................................................................................16
Safety, care, accuracy test and disposal
・Device care ............................................................................................................................... 16-17
・Cleaning the cuff ..............................................................................................................................17
・Accuracy test ..................................................................................................................................17
・Disposal .........................................................................................................................................17
Error messages and Troubleshooting ...................................................................................... 18-19
Technical specifications ..................................................................................................................20
3
EN
Page 4
Product description
The WatchBP Office consists of two major parts
• The device, cuffs and accessories.
• The WatchBP Analyzer Software.
With the WatchBP Analyzer Software
1) The device can be programmed for the blood pressure measurement procedure.
2) Measured blood pressure values can be downloaded to the PC.
3) A PDF report and Microsoft Excel spreadsheet for data analysis can be generated.
Download the latest WatchBP Analyzer Software from the Microlife website.
*
https://www.microlife.com/support/softwareprofessional-products
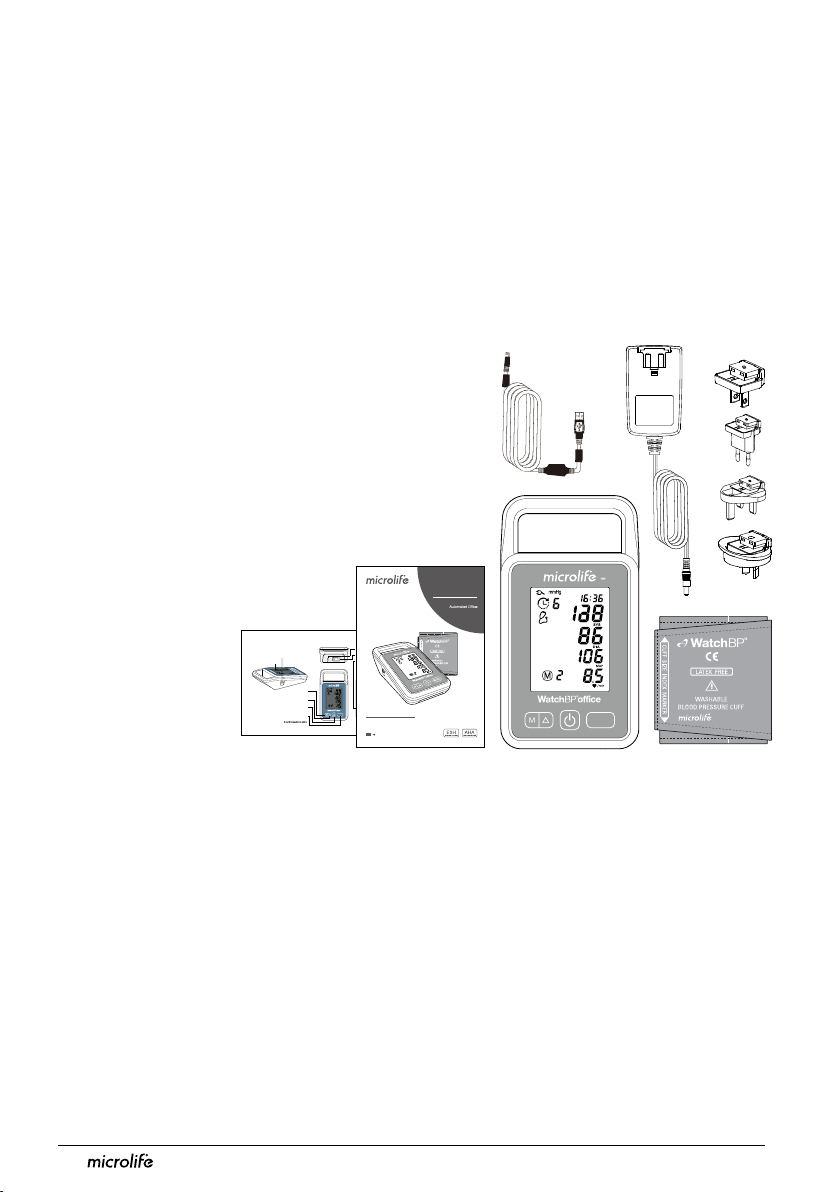
Contents
1. WatchBP Office AOBP Monitor
(dependent on purchase version*)
2. WatchBP Office Cuff – Size M (22- 32cm)
3. WatchBP Office Cuff – Size L (32- 42cm)
4. Data Cable
5. Mains adapter
6. Instruction manual
7. Quick start guide
Quick start guide
Product description
Display
Cuff Socket
M Button (Memory)
To enter memory record and
Down function in setting
To enter SETTING and scroll up/switch
Start/Stop Button
Start measurement(s) base on the
AUTO or AUS mode in standby
WatchBP Office
Power Adapter Socket
USB port
DC 7.5V 2.0A
Battery Compartment
Up Button
Mode Button
To switch the mode
MODE
BP 3SK1-3B
Instruction Manual
1
EN
WatchBP
Office
Blood Pressure
Monitoring System
Professional
MODE
Device Version
* The device can be upgraded with special features. There are three different versions of the
device:
• Standard version: standard AOPM
• AFIB version: standard AOPM with Microlife Atrial Fibrillation Detector
• CBP version: standard AOPM with Microlife Atrial Fibrillation Detector and Central Blood
Pressure measurement
Upgrading the device
The Atrial Fibrillation Detector and Central Blood Pressure measurement of the device can
be activated through the WatchBP Analyzer. An activation key is needed for activation, the
activation key is specific for the device as it matches the ID. Please contact Microlife or the local
distributor for additional information.
4
Page 5
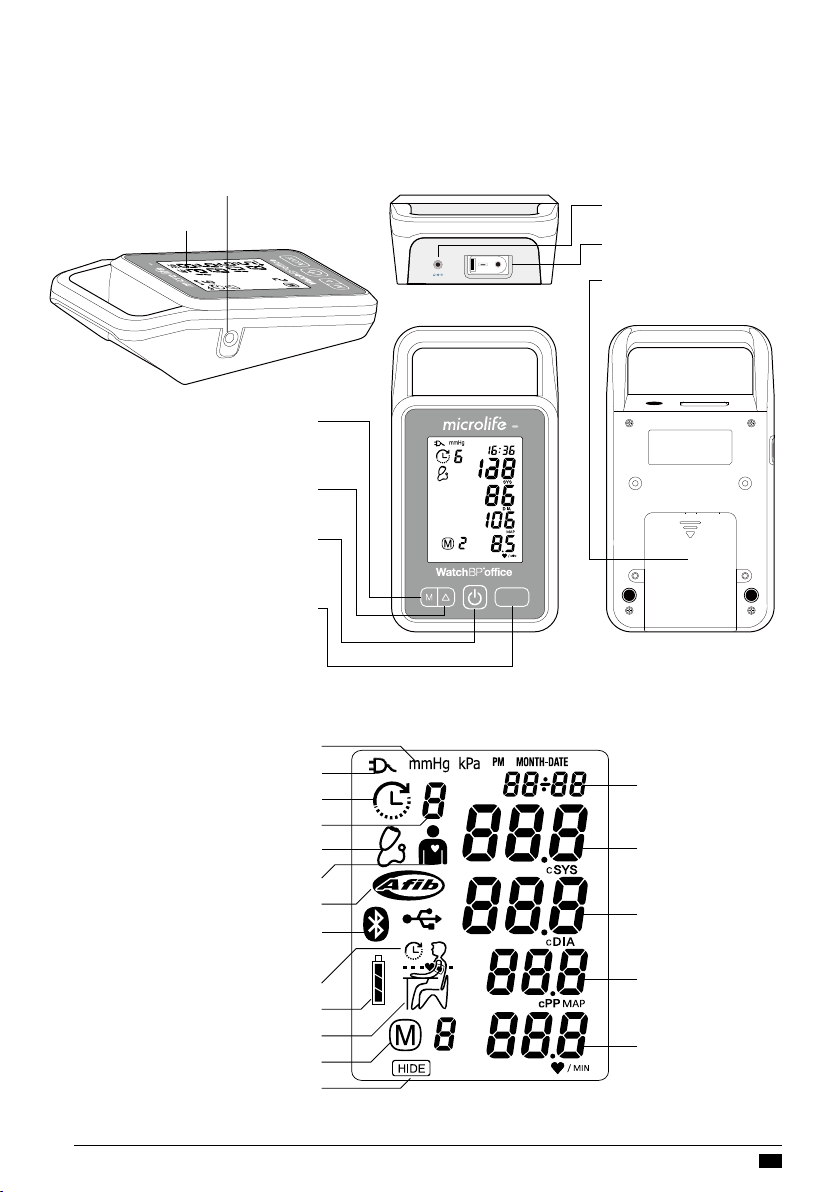
Product Overview
Cuff Socket
Display
M Button (Memory)
To enter memory record and
Down function in setting
Up Button
To enter SETTING and scroll up/switch
Start/Stop Button
Start measurement(s) base on the
AUTO or MANUAL mode in standby
Mode Button
To switch the mode
To conrm selection in setting
WatchBP Office
Power Adapter Socket
USB port
DC 7.5V 2.0A
MODE
Battery Compartment
Display
# Measurements Auto Mode
Bluetooth indicator
unlt
External power
Auto Mode
Aus Mode
CBP indicator
AFIB indicator
USB indicator
Interval time
Battery indicator
Rest indicator
Memory
HIDE
Data / Time
SYS / cSBP
DIA / cDIA
MAP / cPP
Pulse
5
EN
Page 6

Initial set up
Attaching the power plug to the power adapter
Select a proper power plug and attach to the power adapter as
shown below.
Charge the battery completely
When using the device for the first time, charge the battery until
the recharge indicator on the device turns green.
Power ON/OFF
Press button to switch on the device.
Press and hold button for 3 seconds to switch off the device
and turn off the LCD screen. The device displays ‘oFF’ before
turning off.
Set the date, time and the safeguard pressure
Set the year - Press and hold the button for 3 seconds to enter setting mode. The year
number flashes in the display. Use the or button to select the year. Use the
button to confirm your selection and move on to month setting.
Set the month – Use the or but t o n t o s e lect th e mo n th. Use th e b u t ton to
confirm your selection and move on to day setting.
Set the day – Press the or button to select the day. Use the button to confirm
your selection and move on to day setting.
Set the time – Once you have set the hour and minutes and pressed the button, the
date and time are set, and the current time is displayed.
Set the safeguard pressure - Use the or button to select the highest inflation
pressure or AUTO mode. Use the button to confirm and finish the settings. Once you
have finished the setting mode the current time is displayed.
The “highest inflation pressure” can be programmed to the device. The suggested Inflation Pressure is 30 to 40 mmHg above
*
the expected systolic value of the patient. You can select 160, 180, 200, 220 or, 240mmHg or use the default (device Displays
“- - -’) then the device will automatically inflate the cuff to the optimal cuff pressure. If the selected Highest Inflation Pressure
selected is too low to measure a patient’s blood pressure it may result in re-pumping or an error (“Err “) will be shown.
The date and time on the device automatically synchronizes with the date and time on the computer when connected with the
*
WatchBP Analyzer.
6
Page 7

WatchBP Office
Before using the device
Selecting the correct cuff
A variety of different cuff sizes are available. M and L size cuffs are provided with the device.
Use the cuff marker to select the cuff size that best matches the circumference of the
patient’s upper arm.
Cuff Size Circumference (cm) Circumference (inch)
S
M
L
L-XL
Each cuff is provided with 130 cm air tube.
*
Use only cuffs provided by Microlife!
*
Contact Microlife or its authorized distributor to purchase cuffs.
*
M and L size cuffs are included as standard accessories.
*
Fitting the cuff properly
1 Place the cuff over the upper arm so that the air tube and
artery mark arrow point towards the lower arm. The artery
mark on the cuff must be placed over the brachial artery.
2 Lay the cuff on the arm. Make sure that the lower edge of
the cuff lies approximately 2 to 3 cm ( ¾ to 1 inch) above the
elbow.
3 Wrap and tighten the cuff around the arm.
4 Leave free space with the size of 2 fingers between the arm
of the patient and the cuff. Excessive tightness may cause
venous congestion and discoloration of the limb. If the cuff is
wrapped too loosely, it cannot be inflated properlyproperly,
and the measured values may be inaccurate. Remove all
clothing covering or constricting the measurement arm.
Clothing may interfere with measurement accuracy.
5 Cuffs that do not fit properly may lead to inaccurate readings.
Use a different size cuff if the range index at the end of the
cuff does not fall into the range specified by the range stripes.
14-22 5.5-8.7
22-32 8.7-12.6
32-42 12.6-16.5
35-52 12.5-20.5
2–3cm
(¾ to 1 inch)
7
EN
Page 8
Taking measurements in MANUAL and AUTO Mode
Turn on the power
Turn on the device by pressing the button
of the device.
Connect the cuff to the device
Connect the cuff to the device by inserting the
cuff connector into the cuff connector socket.
Select an operation mode
There are two measurement modes that can
be used.
Press the button to switch between
AUTO or MANUAL Mode.
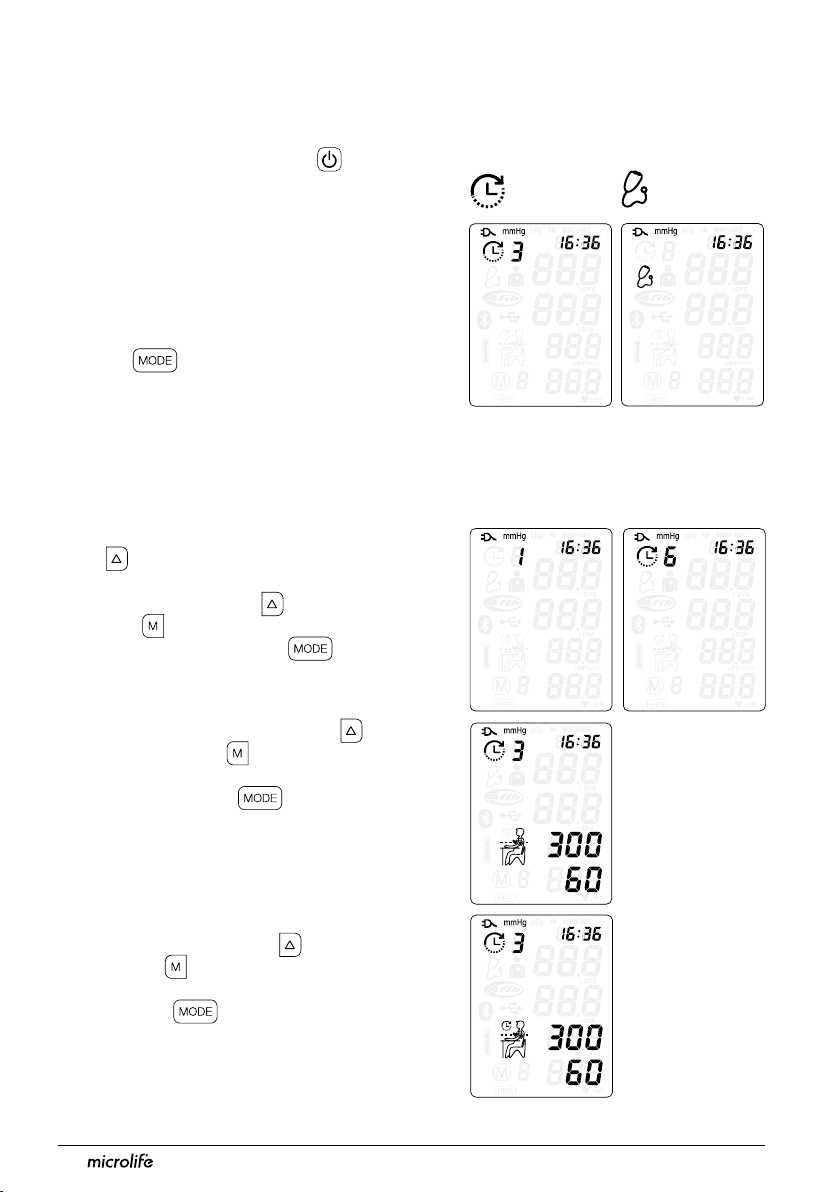
Settings of AUTO Mode
The measurement program in AUTO Mode of the device can be set, includes Number of
Measurements, Resting time (Countdown time), Interval time, AFIB detector, CBP
measurement, HIDE and Average calculation (Discard 1st measurement).
1 Set the Number of Measurements – Press
the button when the device is in AUTO
mode to first enter setting of Number of
Measurements. Use the button to scroll up
and use button to scroll down among one
to six measurements. Press button to
confirm the number of measurements and enter
Resting time setting.
2 Set the Resting Time – Press the button
to scroll up and use button to scroll down
among 15, 30, 60, 120, 180, 240, 300 seconds
of resting time. Press button to confirm
and enter Interval Time setting.
3 Set the Interval Time – between
measurements - Press the button to scroll
up and use button to scroll down among 15,
30, 60, 120, 180, 240, 300 seconds of Interval
Time. Press button to confirm and enter
Interval Time setting.
8
Page 9

4 Set the Atrial fibrillation (AFIB) detector –
Press the or button to switch the AFIB
detector ON or OFF. Press but t o n t o
confirm.
Set the AFIB detector option appears only for the device
*
version with AFIB detector. If the device has an activated AF
indicator then it is witched on in Defaul.
5 Set the Central blood pressure (CBP)
measurement – P r e s s or b u t ton to
switch ON or OFF CBP measurement. Press
button to confirm. If the device is
upgraded with CBP then it is witched on in
default.
6 Set the Hide function – The device features
a Hide function in order to prevent influence on
blood pressure in patients due to nervousness
triggered by visible blood pressure
measurements. Press or button to
switch ON or OFF the Hide Function.
WatchBP Office
7 Average calculation – The device features
allow you to discard 1st measurement from
averaging while the selected number of
measurement is 3, 4, 5, or 6 measurements.
Press or button to switch ON or OFF
and press button to confirm the setting
of Discarding 1
st
measurement (d-1) feature
and finish the setting of AUTO mode . Once
you go through the settings, the device returns
to standby.
The last settings programmed to the device are the default of AUTO mode until you set the program again.
*
9
EN
Page 10

Taking measurement in AUTO Mode
Select AUTO Mode. Press the Button to perform automatic measurements base on the
settings of AUTO mode. The device shows all the settings and then starts counting down the
Resting Time before the first measurement. The average measurement reading is displayed
and saved after the measurements are complete.
If CBP measurement is enabled, the cuff pressure is hold at around 50-150mmHg for around 10 seconds to collects sufficient
*
pulse waves.
Press Start/Stop during countdown skip the counting down.
*
Pressing Start/Stop to deflation terminate the measurement while cuff is inflating or deflating. Display the results (average) if
*
available.
Viewing stored values
The device stores blood pressure values of the last measurement procedure in AUTO Mode.
Press the Button to reveal the average of the measurements of AUTO mode. Continue
pressing the Button to review individual measurements.
MANUAL Mode Settings
The measurement program in MANUAL Mode can be set to preferences. The program
includes seting the Highest Cuff Pressure and Hide Cuff Pressure during deflation.
Set Highest Inflation Pressure – pr e s s bu tt on
when the device is in MANUAL mode to enter setting
of Highest Cuff Pressure. Use button or button
to scroll among 160, 180, 200, 220 240 mmHg and
auto ‘- - -‘. Use the button to confirm and move
to HIDE Pressure setting.
When auto ‘ - - - ‘ is selected, the device automatically inflates the cuff
*
to a proper cuff pressure;
The Highest Inflation Pressure is considered as a safeguard pressure.
*
The device automatically inflates the cuff to the optimal cuff pressure
but not higher than the selected Highest Cuff Pressure.
Hide Cuff Pressure during deflation – This option
helps you to determinetake Korotkoff K1 and K5
sound readings without digit preference. To use the
HIDE function in MANUAL mode, push button to
select the setting of HIDE function and confirm the
selection by button and finish the setting of
MANUAL mode.
10
Page 11

WatchBP Office
Taking measurement in MANUAL Mode
Select the MANUAL Mode if auscultatory blood pressure measurement is preferred above
oscillometric blood pressure measurement. In MANUAL Mode, the device serves as a
pressure gauge. No oscillometric measurements will be taken. Systolic and diastolic Korotkoff
sounds amust be determined by a stethoscope placed over the brachial artery.
Start inflation – Press the button to start cuff inflation. When the maximum inflation
pressure is reached, the device will automatically begin a linear deflation at a rate of 3 mmHg/
sec as is recommended by the guidelines.
Assess the Korotkoff K1 and K5 sound – when pushing the button during cuff
deflation the cuff pressure at the time of pushing is temporarily stored so that the systolic (K1)
and diastolic (K5) pressures can be seen afterwards. The device can store up to 4 pressures.
Push the button at any time to start fast deation and nish the measurement of MANUAL
mode and show the pressure you have marked. Alternatively, the device quickly deates and
shows the pressures after having pushed the button 4 times, or the cuff pressure has reached
20mmHg during the deation cycle.
After the measurement in MANUAL mode, the device displays all marked cuff pressures for
one minute.
Re-inflate – Push and Hold the Up button during deflation to re-inflate for as long as the
button is held up to a max of 299mmHg. Release the button to continue deflation. Exceeding
299 mmHg will result in an immediate release of cuff pressure and a ‘HI’ Error message.
Deflate faster – Push and hold the button when deflation will releases the pressure in the
cuff faster, at around 8 -12 mmHg/second.
The recommended deflation rate for auscultation is 2-3 mmHg per seconds. Do not assess K1 or K5 sound while holding the M
*
button.
If Hide of the MANUAL mode is selected, the cuff pressure during deflating the cuff will not be displayed. The display shows ‘---‘
*
during deflating the cuff
11
EN
Page 12

Special Functions
Screening for atrial fibrillation during blood pressure measurement
The device is designed to screen for atrial fibrillation during blood pressure measurements
(optional) with high accuracy: a sensitivity of 98% and a specificity value of 92%*. If atrial
fibrillation is detected this will be shown in the report.
Verberk et al. Screening for atrial fibrillation with automated blood pressure measurement: Research evidence and practice
recommendations. Int J Cardiol 2016: 465–473.
About Atrial Fibrillation
Atrial fibrillation is a common heart rhythm problem and a common cause of major strokes.
It affects 8% of those 65 years and older and about 20% of all strokes are caused by atrial
fibrillation. Atrial fibrillation is a rhythm problem that can last from a few minutes, to days or
weeks and even years. Atrial fibrillation can lead to the formation of blood clots in the heart.
These clots can break off and flow to the brain causing stroke. One sign of atrial fibrillation is
palpitations. However, many people have no symptoms and therefore may remain undetected
whereas diagnosing atrial fibrillation early followed by adequate treatment can largely reduce
the chance of getting a stroke.
Central blood pressure parameters
The device is designed to assess central blood pressure parameters (optional).
Central blood pressure is the pressure in the ascending aorta, the largest artery that originates
from the left ventricular of the heart and from where oxygen is distributed to all parts of the body
through the systemic circulation. Central Systolic Blood Pressure and Central Pulse Pressure
provided by this monitor are determined directly through pulse volume plethysmography
(PVP) waveform analysis. Central Diastolic Blood Pressure by this monitor is calculated by
subtraction of Central Systolic Blood Pressure and Central Pulse Pressure.
How is central blood pressure measured?
The device measures brachial systolic and diastolic blood pressure as usual. However, where
the cuff normally totally deflates after the blood pressure measurement, the cuff now stops
deflating at approximately 60 mmHg cuff pressure to keep a stable pressure on the brachial
artery for approximately 10 seconds which is needed to acquire brachial pulse volume
plethysmography (PVP) waveforms (pulse volume recording). During these 10 seconds
approximately 10 PVP waveforms are recorded from which one average PVP waveform is
determined and analyzed. From the average PVP waveform, some characteristic points
(parameters) are identified that are directly related to arterial compliance (stiffness) and wave
reflections. With these parameters and previously measured peripheral (regular) blood
pressure the central systolic blood pressure value and the central pulse pressure value are
then determined
The time that is needed to determine the central blood pressure value may vary among
patients; i.e. with faster heart rate, less time is required for collecting the number of required
PVP waveforms. It is very important to keep the arm still during the time the PVP waveforms
are collected.
12
1
.
Page 13

WatchBP Office
Accuracy of the central blood pressure parameters
The accuracy of central blood pressure parameters performed with this device can only reliably
be determined against intra-arterial blood pressure measurement. The device is a certified
equivalence with the WatchBP Office Central that has been validated against simultaneous
recorded intra-arterial blood pressure measurement in 85 subjects and showed high
accuracy
MAP (Mean Arterial Pressure)
The device measures the true mean arterial pressure (MAP) of the patient. Each measurement
includes a single MAP value. The MAP value will always be displayed together with the systolic
and diastolic blood pressure value.
2
.
Sung, S.H., et al., Measurement of central systolic blood pressure by pulse volume plethysmography with a noninvasive
blood pressure monitor. Am J Hypertens, 2012. 25: 542-8.
Cheng, H.M., et al., Measurement accuracy of a stand-alone oscillometric central blood pressure monitor: a validation report
for Microlife WatchBP Office Central. Am J Hypertens, 2013. 26: 42-50.
13
EN
Page 14

Using WatchBP Analyzer
Installing the Software Program
The latest WatchBP Analyzer Software is available from the Microlife website.
https://www.microlife.com/support/softwareprofessional-products
Double click the download installer and simply follow the instructions provided in the
installation window on the computer screen.
Connecting the Device to a Computer
Connect the device to the PC using the USB
cable provided with the device.
Start the Software Program
Start the software program. The date and
time on the device automatically synchronizes
with the date and time on the computer when
successfully connected with WatchBP Analyzer
PC software.
If the device and WacthBP Analyzer software is
connected successfully:
• <USb> is displayed on the LCD screen of the device.
• The device ID, model, version of the Device and batteries condition etc. are displayed on the
WatchBP Analyzer software.
DC 7.5V 2.0A
Transferring measurement data
Connect the device to the PC. Start the WatchBP Analyzer software program.
Click <Download> button of the WatchBP Analyzer to transfer the measurement data on the
device to a computer.
Deleting measurements
The measurement data on the device will be automatically deleted after clicking <Program
Device> in the WatchBP Analyzer software to program a measurement schedule for the next
patient.
Press and hold button of the device for 7 seconds displays CL, presses button again
*
to clear the memory
See instruction manual of WatchBP Analyzer for details.
14
Page 15

WatchBP Office
Bluetooth connectivity
Pairing the device
Press and hold the button for around 7
seconds, untill the Bluetooth icon flashes and starts
pairing mode. The unique 6-digit device ID of the
unit is displayed. Connect the device and confirm
pairing. The Bluetooth icon is displayed on the
LCD screen of the device to show the presence of
Bluetooth connection.
Press and hold the Start/Stop button for 5 seconds to clear the
connection.
Rechargeable battery and power adapter
Rechargeable Battery
The device has a built-in, rechargeable NiMH battery pack that can perform up to 400
measurement cycles on a full charge. The battery
can be recharged with the power adapter delivered
with the device. The empty battery indicator is
displayed when the battery is low.
• When using the device for the rst time, charge
the battery until the recharge indicator turns to
green.
• The orange recharge indicator indicates that the
recharge is in progress.
• A green recharge indicator indicates that the
recharge is completed.
• A green and orange changing recharge indicator,
means that there is a charging error. Make sure
that of the correct Mains Adapter is used. If the
condition persists, contact Microlife or the local
distributor.
15
EN
Page 16

Using a power adapter
DC 7.5V 2.0A
Only use the Mains Aadapter supplied with the
device to recharge the device.
1) Plug the adapter cable into the power
socket of the device.
2) Plug the adapter plug into the wall socket.
The battery will be recharged if the device
DC 7.5V 2.0A
is attached to an AC power source. After
the battery is fully recharged, the charging
will stop. No battery power will be used if
the adapter is plugged in. The battery must
always remain within the device thus also
when using AC power.
3) If the battery starts losing capacity, contact
your local dealer for replacement battery.
The battery can be replaced.
Safety, care, accuracy test and disposal
Safety and protection
This device may only be used for the purposes as described in these instructions. The device
comprises of sensitive components and must be treated with caution. The manufacturer
cannot be held liable for damage caused by incorrect application.
16
Follow the Instructions for Use. This document provides important product operation and safety information regarding this
Blood Pressure Monitor. Please read this document thoroughly before using the device and keep for future reference.
• Only activate the pump when the cuff is connected to the device.
• Do not use the device if you think it is damaged or if anything appears unusual.
• Read the further safety instructions in the individual sections of the instruction manual.
Page 17

WatchBP Office
M (Medium size) for upper arm
22 - 32 cm (8.7 - 12.6 inches)
With air tube 130 cm
Observe the storage and operating conditions as described in the “Technical specications”
section of this manual.
Protect the device from water and
moisture
Protect the device from direct sunlight
Protect the device from extreme heat
and cold
Device care
Use a soft cloth with one of the following recommended
cleaning solutions to wipe the exterior of the device:
• Mild soap and water.
• Hydrogen peroxide solution (3% diluted with water).
• Sodium hypochlorite solution (1:10 dilution of
household chloride bleach in water).
Cleaning the cuff
Remove the bladder. Fold and place the cuff cover
inside a washing bag. Wash the cuff cover with warm
water (43°C; 110°F) and a mild detergent in the
washing machine.
Pasteurization: wash the cuff cover in 75°C(167°F)
hot water for 30 minutes.
Avoid proximity to electromagnetic
fields, such as those produced by
mobile phones
Never open the device
Protect the device from impact and drops
MODE
Accuracy test
We recommend the device to be tested for accuracy
every 2 years or after mechanical impact (e.g. Being
dropped). Please contact Microlife to arrange an
accuracy test.
Disposal
Batteries and electronic instruments must be disposed of in accordance with the
locally applicable regulations, and not as domestic waste.
Do not iron the cuff!
17
EN
Page 18

Error messages and Troubleshooting
If an error occurs during measurement, the
measurement is interrupted and an error
message «Er» is displayed.
Error Description Potential cause and remedy
"Er 1"
"Er 2"
“Er 3”
“Er 5”
"Er 11"
"Er 12"
Signal too
weak
Error signal
No pressure in
the cuff
No valid results
Signal too
weak during
central blood
pressure
measurement
Error signal
during central
blood pressure
measurement
The pulse signals on the cuff are too weak. Reposition the cuff
and repeat the measurement.
During the measurement, error signals were detected by the
cuff, caused for instance by movement or muscle tension.
Repeat the measurement, keeping your arm still.
An adequate pressure cannot be generated in the cuff. A
leak may have occurred. Replace the blood pressure cuff if
necessary. Repeat the measurement.
The measuring signals are inaccurate, and no result can
therefore be displayed. Read through the checklist for
performing reliable measurements and then repeat the
measurement.
The pulse signals on the cuff are too weak. Re-position the
cuff and repeat the measurement.
During the measurement, error signals were detected by the
cuff, caused, for instance, by movement or muscle tension.
Repeat the measurement, when keeping the arm still.
“Er 13”
18
Cuff pressure
errors during
central blood
pressure
measurement
An adequate pressure cannot be generated in the cuff. A leak
may have occurred. Check if the cuff is correctly connected
and is not too loose. Replace the blood pressure cuff if
necessary. Repeat the measurement.
Page 19

WatchBP Office
"Er 15"
"Er F"
“Er A”
"HI"
"LO"
Abnormal
result of
central blood
pressure
reading
The device
has gone into
“single fault
condition”
Flash memory
error
Pulse or cuff
pressure too
high
Pulse too low
Troubleshooting
The measuring signals are inaccurate so that no result can be
displayed. Read through the checklist for performing reliable
measurements and then repeat the measurement.
Single fault condition means that the measurement is aborted
to protect the patient from being harmed or the device
from being damaged. Re-position the cuff and repeat the
measurement. Replace the batteries if necessary. If the error
persists, contact Microlife or the local distributor.
Possible hardware fault. Try again. If the error persists,
contact Microlife or the local distributor.
The pressure in the cuff is too high (over 299 mmHg) OR the
pulse is too high (over 239 beats per minute). Relax for 5
minutes and repeat the measurement.
The pulse is too low (less than 30 beats per minute). Repeat
the measurement.
Problem Possible cause Solutions
No power (No
LCD display)
Cuff does not
inflate properly
No result
displayed after
measurements
Power supply
is not properly
plugged in
Battery is fully
discharged
Loose
connection of the
tube
Leakage of the
tube / bladder
Device is in
MANUAL Mode
Plug the power supply into the wall socket.
Recharge the rechargeable battery by plugging in the
power supply.
Make sure the tube of the cuff is securely connected
to the device.
Check for cracks on the tube or the bladder. Replace
the blood pressure cuff if necessary.
Switch to AUTO Mode and repeat the
measurements.
19
EN
Page 20

Technical specifications
Operation temperature/
humidity:
Storage temperature/
humidity:
Weight:
Dimensions:
Measuring method:
Measurement range:
Cuff pressure display:
Pulse accuracy:
Power source:
Expected service life:
Reference to
Standards:
• 10 to 40 °C (50 to 104 °F)/ 15 - 90 % relative maximum humidity
• -20 to 55 °C (-4 to 131 °F)/ 15 - 90 % relative maximum humidity
• 620g (including rechargeable battery pack) (to be measured by real/nal
sample)
• x x mm
• Oscillometric, Systolic blood pressure = K1; Diastolic blood pressure = K5
• 60 - 255mmHg - systolic blood pressure; 30 - 200mmHg - diastolic blood
pressure; 30 - 239 beats per minute - pulse
• Range: 0 - 299 mmHg; Resolution: 1 mmHg; Static accuracy: pressure
within ± 3 mmHg;
• ±5 % of the readout value
• Rechargeable battery pack; 4.8V 2400 mAh; Mains power supply DC 7.5V,
1.5 A
• 2 years
• Device corresponds to the requirements of the standard for non-invasive
blood pressure monitor.
IEC 60601-1: 2005+A1:2012
IEC 60601-1-2: 2007/AC:2010
ANSI/AAMI/ISO 81060-2
ANSI/AAMI/ISO/IEC 80601-2-30
Electromagnetic
Compatibility:
20
• Device fullls the stipulations of the standard IEC 60601-1-2.
The stipulations of the EU Directive 93/42/EEC for Medical Devices Class all
have been fullled.
Type BF applied part
Microlife reserves the right to alter technical specications without prior written
notice.
Page 21

Guarantee Card
WatchBP Office
This device is covered by a two-year guarantee from the date of purchase.
This guarantee is valid only on presentation of the guarantee card completed
by the owner conrming date of purchase or purchase receipt. Batteries and
wearing parts are not covered by this guarantee.
Name:
Address:
Date:
Telephone:
Email:
Product: WatchBP Office
Product number: BP3SK1-3B
Date:
21
EN
Page 22

22
Page 23

WatchBP Office
23
EN
Page 24

Europe / Middle-East / Africa
Microlife AG
Espenstrasse 139
9443 Widnau, Switzerland
Tel. +41 71 727 7000
Fax. +41 71 727 7011
Email: watchbp@microlife.ch
www.watchbp.com
Asia
Microlife Corporation
9F., No.431, Ruiguang Rd., Neihu Dist.,
Taipei City 114, Taiwan (R.O.C.)
Tel. +886 2 8797 1288
Fax +886 2 8797 1283
Email: watchbp@microlife.com.tw
www.watchbp.com
North / Central / South America
Microlife USA, Inc.
1617 Gulf to Bay Blvd
2nd Floor, Suite A
Clearwater, FL 33755, USA
Tel. +1 727 442 5353
Fax +1 727 442 5377
Email: msa@microlifeusa.com
www.watchbp.com
IB WatchBP Ofce BP3SK1-3B EN 0419
 Loading...