

Page 1
Instruction Manual
Gebruiksaanwijzing
Manual de Instrucciones
Οδηγίες χρήσης
EN
3
NL
41
79
ES
EL
117
a
EN
Page 2

Page 3

Affordable ABPM and strictly
guideline-based SBPM for
accurate out-of-office blood
pressure measurement.
Instruction Manual
EN
3
3
EN
Page 4

The Microlife WatchBP O3 (Out Of Office) is designed to provide reliable and unbiased
ambulatory and self blood pressure measurement results, and strictly follows European
Society of Hypertension (ESH) and American Heart Association (AHA) recommendations
1
for out-of-office blood pressure measurement
.The WatchBP O3 device has been clinically
validated according to the ESH protocol.
1
O’Brien E, Asmar R, Beilin L, Imai Y, et al. European Society of Hypertension recommendations for conventional, ambulatory and home blood pressure
measurement. European Society of Hypertension Working Group on Blood Pressure Monitoring. J Hypertens 2003;21:821-848.
Page 5

Table of Contents
Product description
Name of parts and display .................................6 -7
Before using WatchBP O3 for the first time
Activating the device ............................................. 8
Confirm cuff size ..................................................... 9
Selecting the operation mode
«AMBULATORY» Mode ....................................10-11
«HOME» Mode ................................................. 12-14
«CASUAL» Mode ................................................... 15
Recording the taking of medication
Medication record ..........................................16-17
Measurement interval programming
Installation of the software program ................... 18
Connecting the device to computer ..................... 18
Programming the interval schedule .................... 19
Taking blood pressure measurements
«AMBULATORY» mode ....................................20-24
«HOME» mode ................................................25-26
«CASUAL» mode .............................................. 27-28
Viewing, deleting and transferring measurements
Viewing measurements ..................................29-31
Deleting measurements ...................................... 32
Transferring measurements ................................ 33
Appendix
Batteries and power adaptor ..............................34
Safety, care, accuracy test and disposal ..........35-36
Error messages ................................................37-38
Technical specifications .......................................39
EN
Page 6
SYS
mmHg
DIA
mmHg
PUL
/min
AMBULATORY HOME CASUAL
ERP NO.3MZ1-1
Microlife AG, 9443 Widnau / Switzerland
www.watchbp.com
Batteries:4xAAA 1.5VDC
SN:WWYXXXXX
Patent Pending
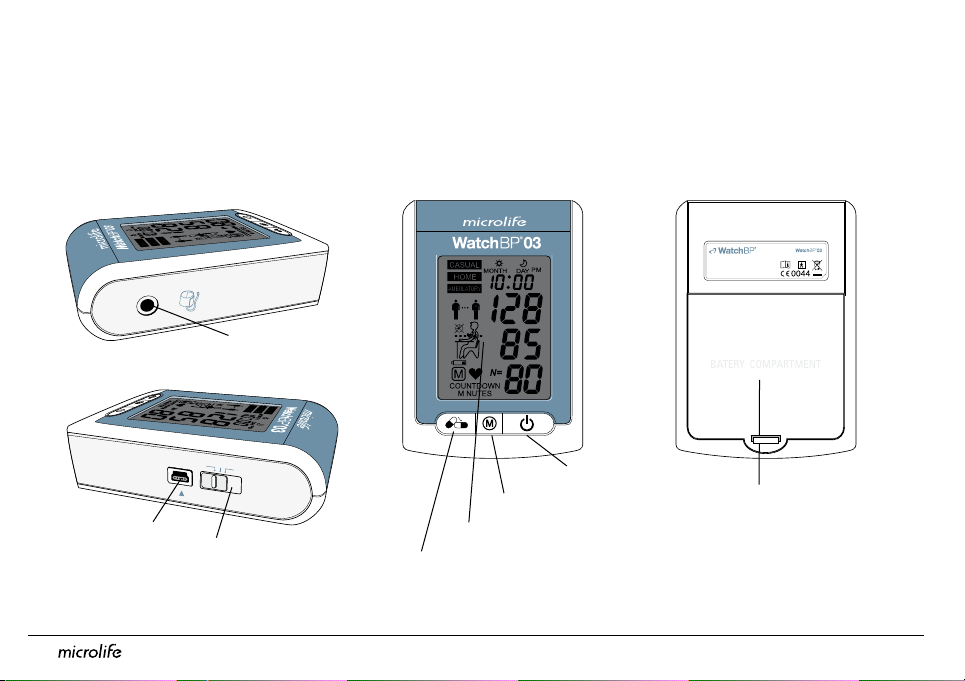
Product description
Name of parts
Cuff Socket
6
USB Port
Mode Switch
ON/OFF Button
M Button (Memory)
Display
Medication Button
Battery Compartment
Page 7
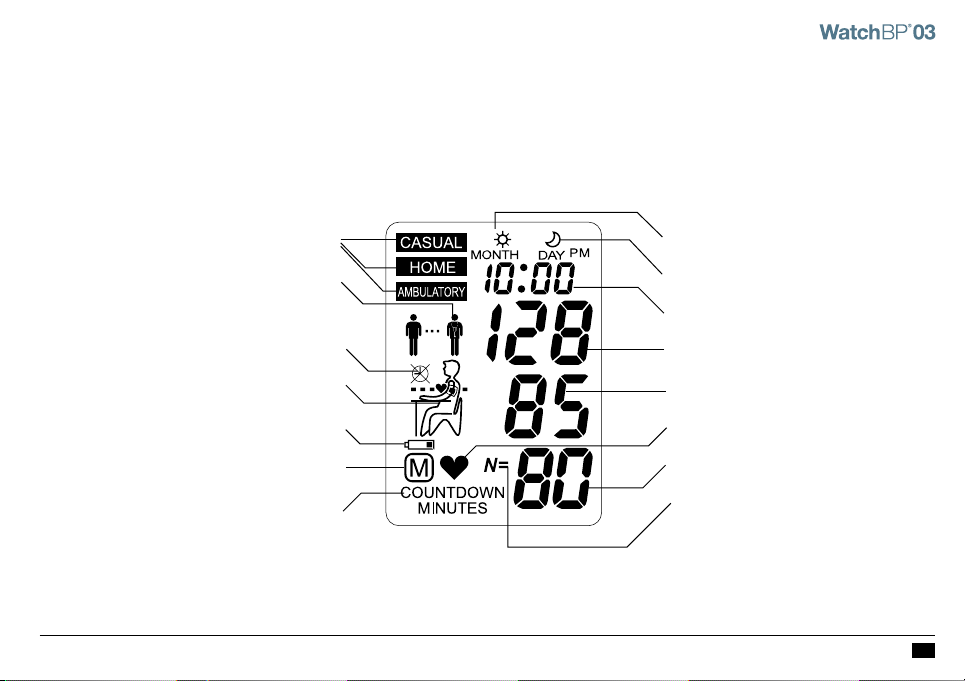
Display
Mode Indication
Doctor Symbol
Outside Measurement Time
Relax
Battery Display
Stored Value
Time Left to Next Automatic
Measurement
Morning Data
Evening Data
Date/Time
Systolic Value
Diastolic Value
Pulse Indicator
Pulse Rate
Number of Stored Data
7
EN
Page 8
SYS
mmHg
DIA
mmHg
PUL
/min
Before using WatchBP O3 for the first time
ERP NO.3MZ1-1
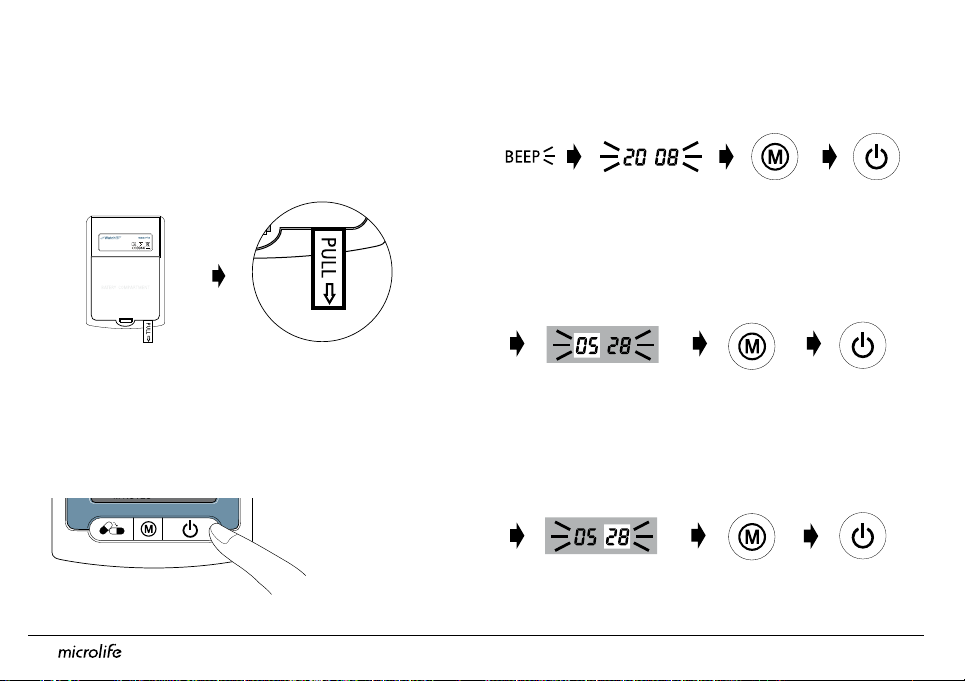
Activating the Device
Pull out the protective strip from the battery
compartment.
2) Set the month – Use M Button to set the Month.
Press the ON/OFF Button to confirm.
1) Set the year – Upon removing the protective
strip or installing new batteries, the Year number
flashes in the display. Use the M Button to select
the Year. Press the ON/OFF Button to confirm your
selection.
M Button equals select
ON/OFF Button equals confirm
3) Set the day – Press M Button to set the Day. Press
the ON/OFF Button to confirm.
8
Page 9
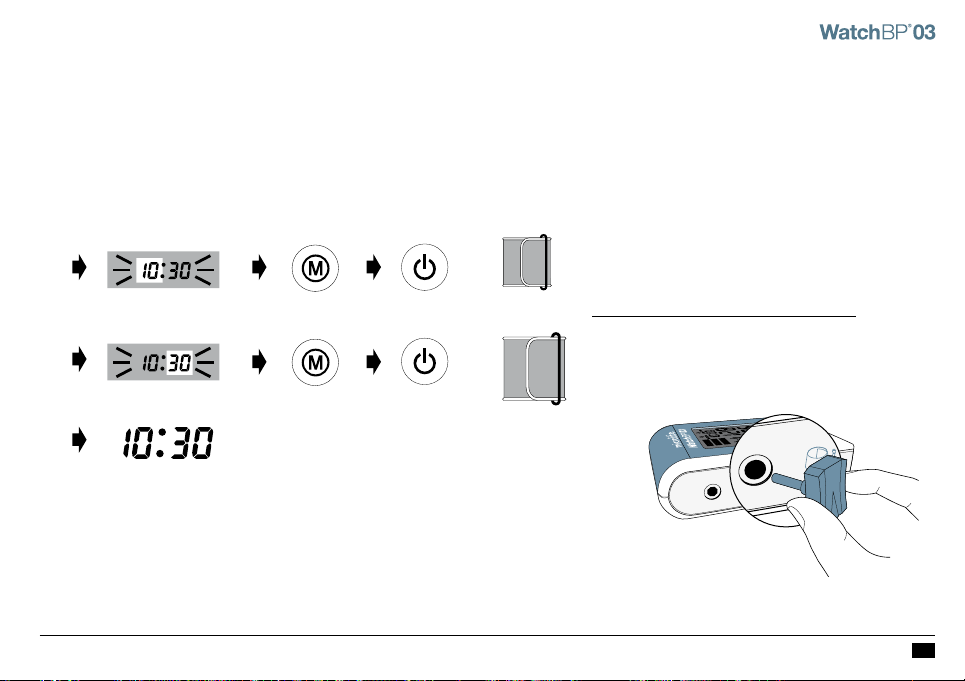
4) Set the time – Once the Hour and Minutes have
been set and the ON/OFF Button pressed, the
date and time are set, and the current time is
displayed.
5) To change the date and time, briefly take out
and put back one battery from the battery
compartment. The Year number will flash.
Complete the process as described above.
Confirm cuff size
A variety of different cuff sizes are available for use
with the WatchBP O3 device.
please use only Microlife cuffs!
*
M (Medium size)
22 - 32 cm (8.7 - 12.6 inches)
M is the correct size for most people.
L (Large size)
32-42 cm (12.6-16.5 inches)
9
EN
Page 10
AMBULATORY HOME CASUAL
AMBULATORY HOME CASUAL
AMBULATORY HOME CASUAL
Selecting the operation mode
AMBULATORY HOME CASUAL
AMBULATORY HOME CASUAL
AMBULATORY HOME CASUAL
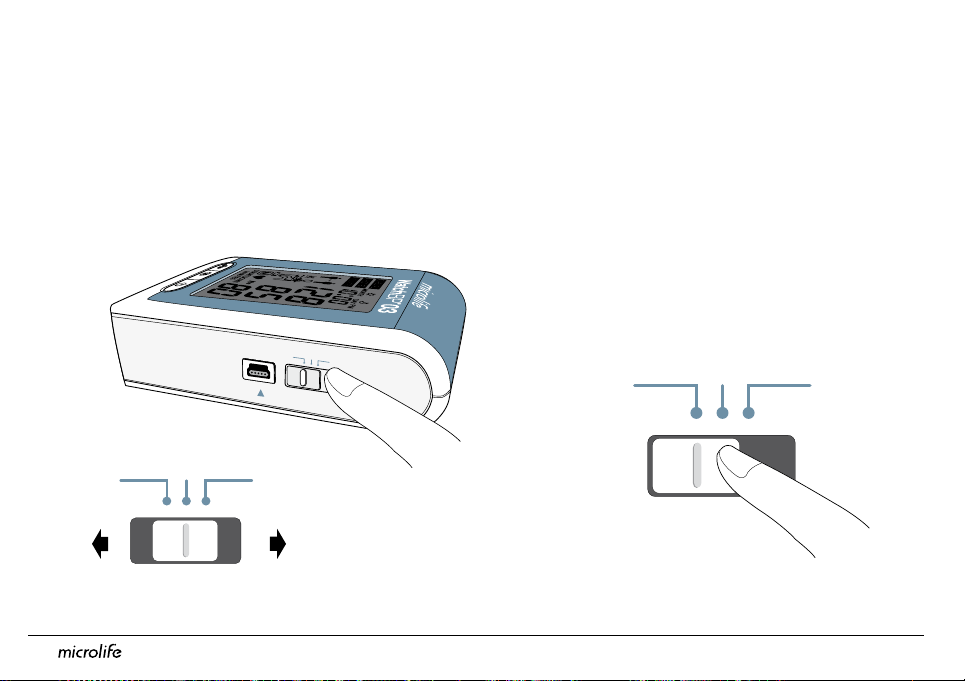
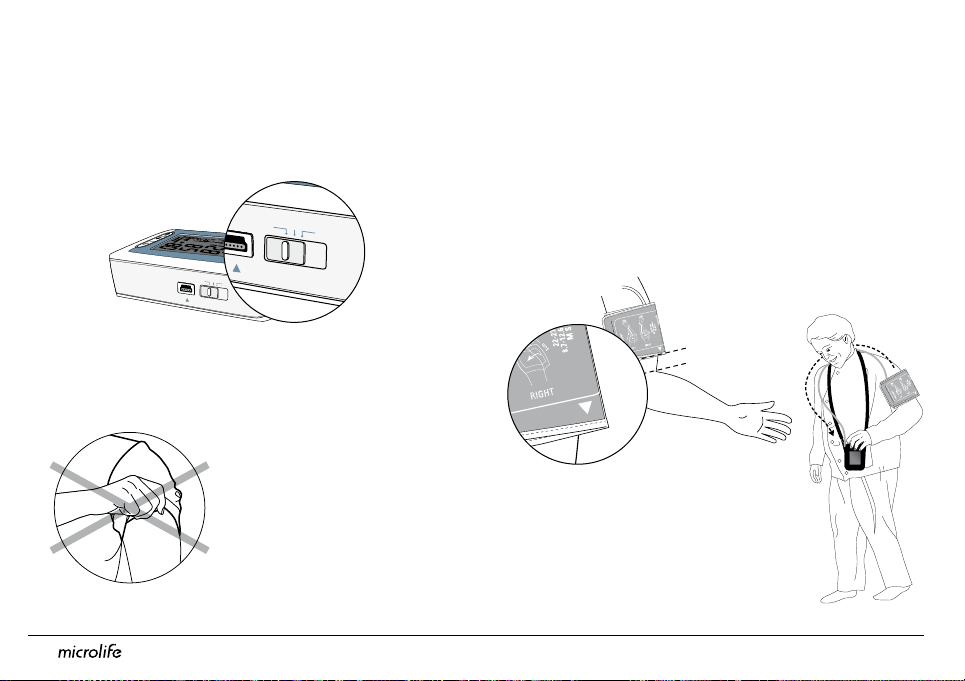
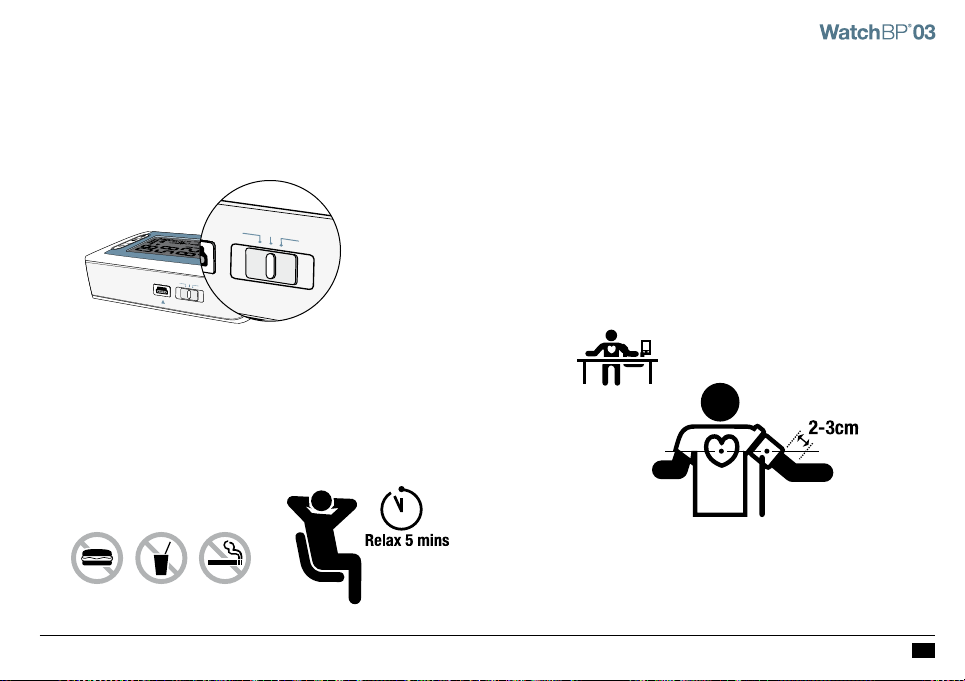
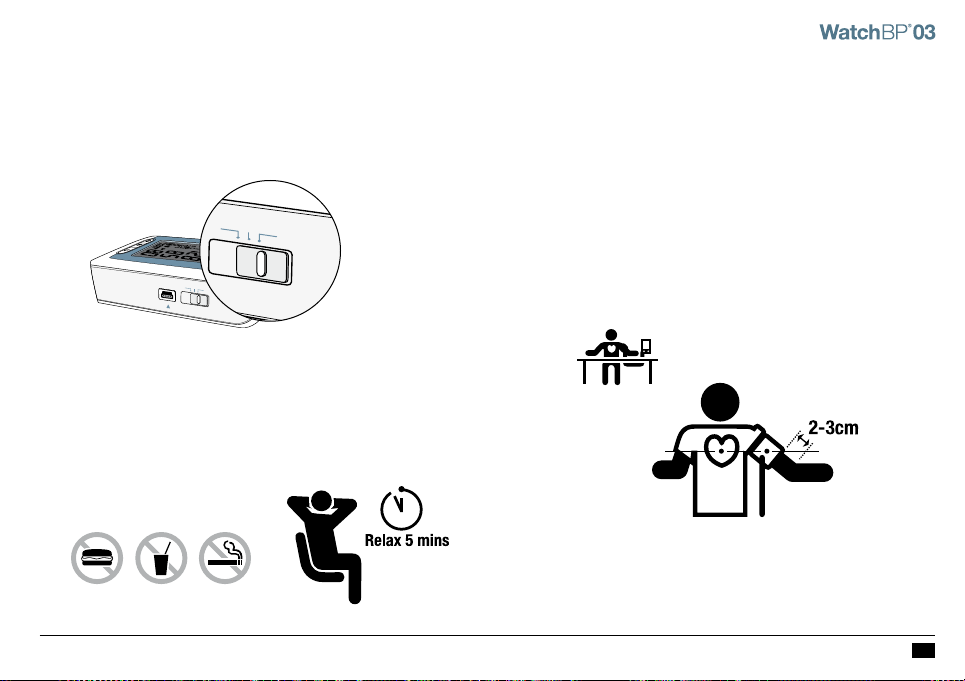
Prior to each measurement, use the Mode Switch
on the side of the device to select the proper
measurement mode. The WatchBP O3 offers three
measurement modes: «AMBULATORY», «HOME» or
«CASUAL» mode.
«AMBULATORY» Mode
Select «AMBULATORY» mode for fully programmable
24-hour patient out-of-office blood pressure
measurement.
10
Page 11
Programmable measurement intervals
The device automatically takes measurements
at fixed intervals of 15, 20, 30, or 60 minutes, as
programmed by the physician.
Set awake and asleep hours
To better suit each patient’s lifestyle, awake and
asleep hours can be programmed using the provided
WatchBP O3 software. Intervals for the awake and
asleep hours can also be programmed independently.
15
30
minutes
20
The default measurement interval is 30 minutes for the
*
awake hours and 60 minutes for the asleep hours.
60
Setting Ambulatory Measurement Schedule
Awake from with minutes interval06 AM 10 PM 30~
Asleep from with minutes interval10 PM 06 AM 60~
11
EN
Page 12
AMBULATORY HOME CASUAL
AMBULATORY HOME CASUAL
Selecting the operation mode (cont.)
Two measurement periods
The awake measurement period can be programmed
to start at anytime between 4AM to 10AM, and the
asleep measurement period can be set to anytime
between 9PM to 2AM. Measurement intervals can be
set to 15, 20, 30, or 60 minutes for both awake and
asleep time periods.
12
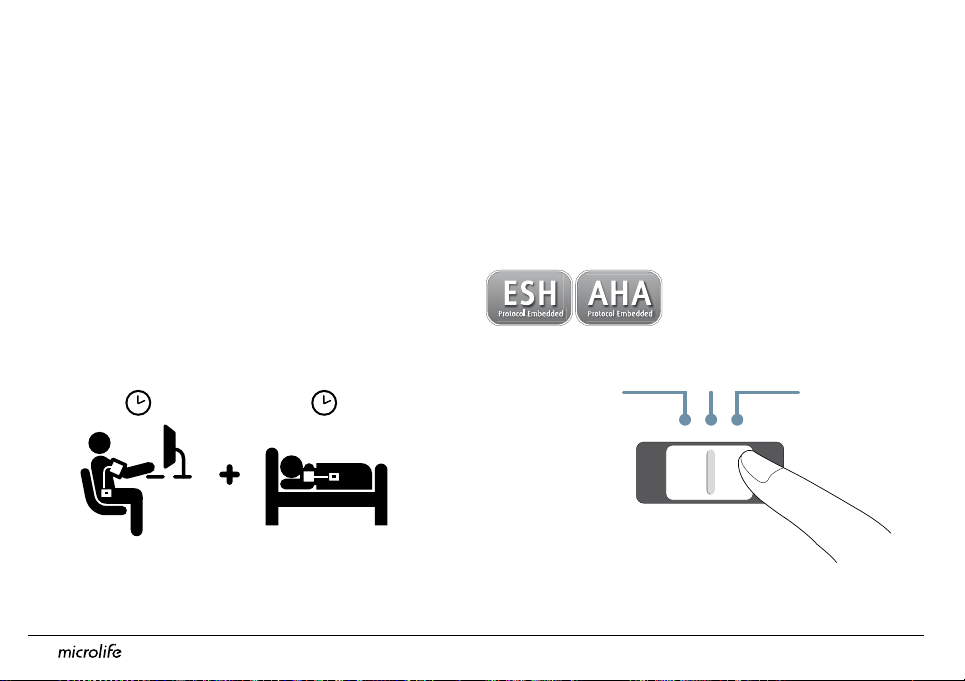
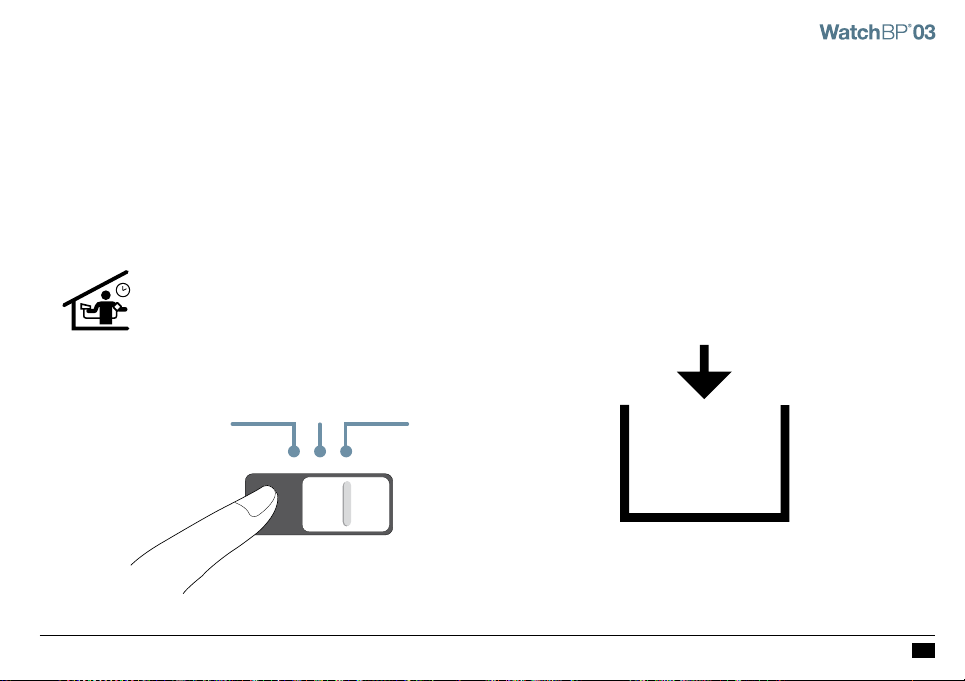
«HOME» Mode
Select «HOME» mode for patient home blood
pressure measurement in accordance with the
guidelines of the European Society of Hypertension
(ESH) and American Heart Association (AHA).
Page 13

No measurements on non-work days
The patient should carry out readings on 7
consecutive working days (or normal week days),
No readings should be taken on «non-working»
days (or particularly relaxing days) in this mode!
Two sets of measurements per day
ESH guidelines recommend one double measurement
be taken in the morning between 06:00 - 09:00
and one double measurement taken in the evening
between 18:00 - 21:00.
JAN
30
7
working
days
X1
06:00 – 09:00
X1
18:00 – 21:00
13
EN
Page 14
Selecting the operation mode (cont.)
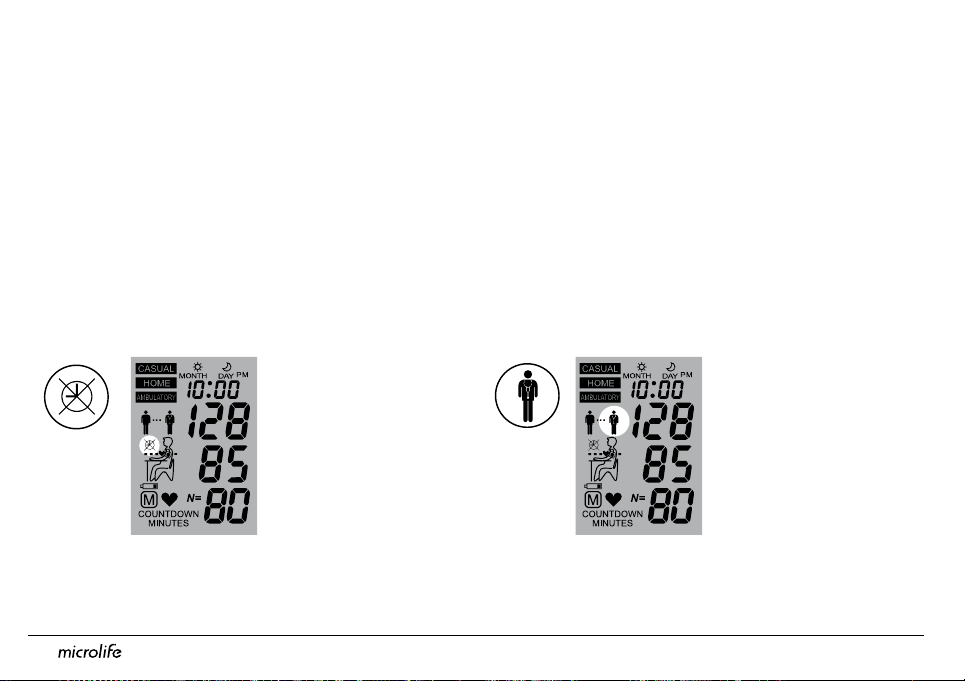
Extended measurement period
The WatchBP O3 device offers an extended
measurement period and allows morning
measurements between 04:00 - 12:00 and evening
measurements between 18:00 - 24:00.
Outside these times,
measurements
cannot be taken
and the symbol
on the left will be
displayed on the
screen.
14
Evaluation
After measurements have been carried out for a
total of 7 working days, patients return to the office
with the WatchBP O3 device for an evaluation of
their home blood pressure measurement data.
When
measurements
have been carried
out for the full 7
days, the doctor
symbol will flash on
the screen.
Page 15
AMBULATORY HOME CASUAL
«CASUAL» Mode
In «CASUAL» mode, the device functions like
a regular blood pressure monitor – single
measurements are automatically stored and can be
reviewed by the physician at a later date.
Anytime
250 measurements safely stored
The WatchBP O3 device can store up to 250 single
measurements in «CASUAL» mode.
When memory is full, each new measurement will
*
automatically overwrite the earliest measurement.
250
Measurements
15
EN
Page 16
SYS
mmHg
DIA
mmHg
PUL
/min
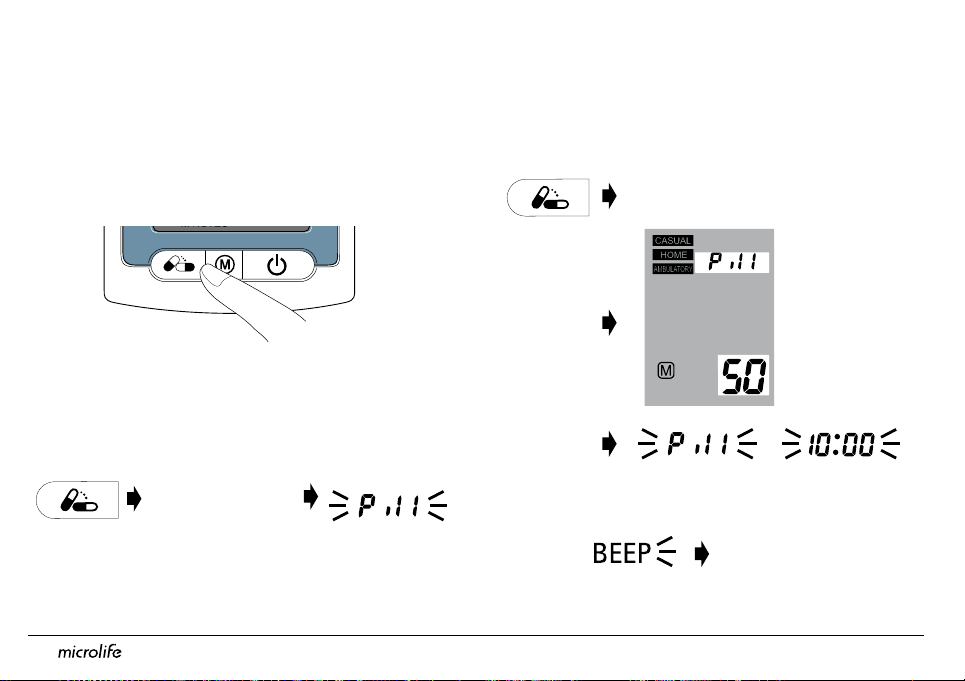
Recording the taking of medication
Medication record
The patient can record the time medication is taken
2) Release the Medication Button and the Pill icon
will flash in alternation with the recorded time.
by pressing the Medication Button.
Press and hold
1) Press and hold the Medication Button for 2 seconds
and the Pill icon will appear.
Press and hold
for 2 Seconds...
A Medication record can be recorded in any of the three modes.* The beeper can be disabled via software setting.
*
16
3) Medication record is saved after the beep sound.
Saved
Page 17
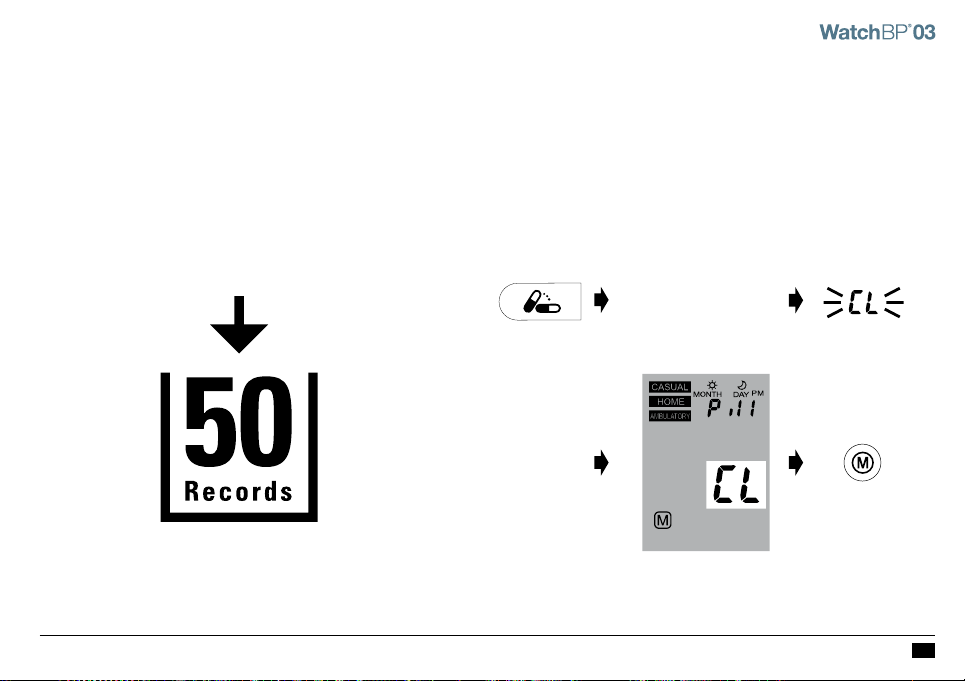
50 records safely stored
The WatchBP O3 device can store up to 50
medication records.
* When the memory is full, the device will display Full.
Delete stored medication records
To clear the memory of all medication records, press
and hold the Medication Button for 7 seconds. The
“CL” symbol will flash. Press M to delete the memory
or ON/OFF to cancel the deletion .
Press and hold
for 7 seconds...
Pressing the M Button to delete data will erase all medication
*
record data in the selected mode.
17
EN
Page 18
Measurement interval programming
©
2
0
0
8
M
i
c
r
o
l
i
f
e
C
o
r
p
o
r
a
t
i
o
n
.
A
l
l
R
i
g
h
t
s
R
e
s
e
r
v
e
d
.
System Requirements: 550MHz CPU. 256MB Memory, 1024x768
pixel resolution, 256 color, CD-ROM drive, 1 free USB port, 40MB
free hard disk space, Microsoft Windows 2000 / XP / Vista.
Install CD
WatchBP Analyzer O3
Version 1.0.2.7
AMBULATORY HOME CASUAL
AMBULATORY HOME CASUAL
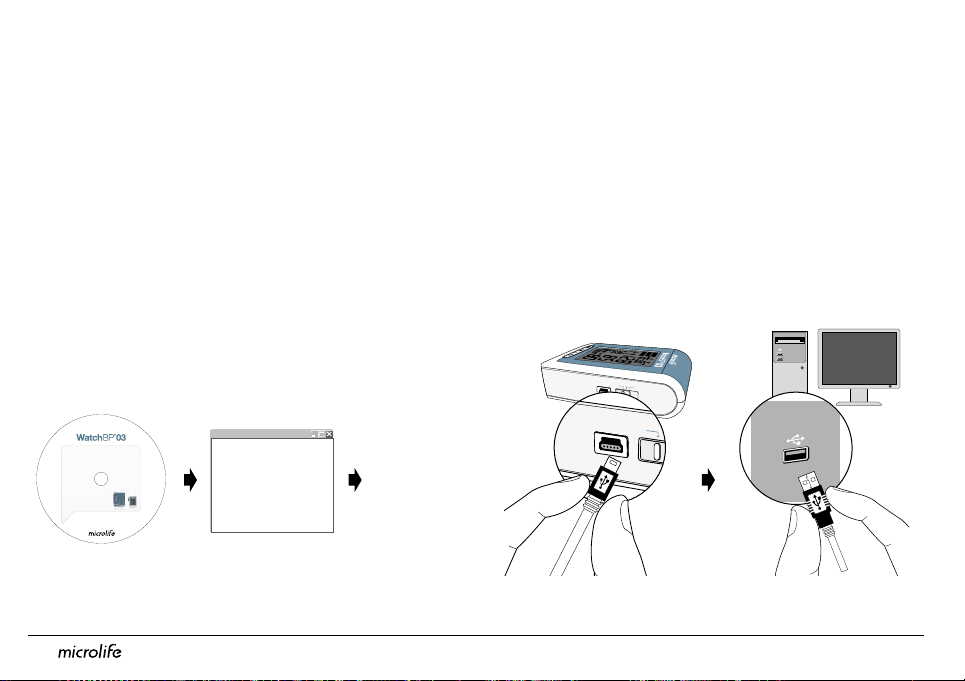
Installing the software program
1) Put the CD in the CD-ROM drive of your computer.
Alternatively click on «setup.exe» in the CD’s
directory.
2) Simply follow the instructions provide in the
installation window on the computer screen.
3) When installation is finished, be sure to restart the
computer before working with the program for the
first time.
Restart
your
computer
18
Installation
Connecting the device to a computer
1) Connect the device to computer. A successful
connection is displayed by «PC» on the device.
2) Start the software program.
3) Enter name, identity number, and date of birth to
create a new record (if required).
Page 19
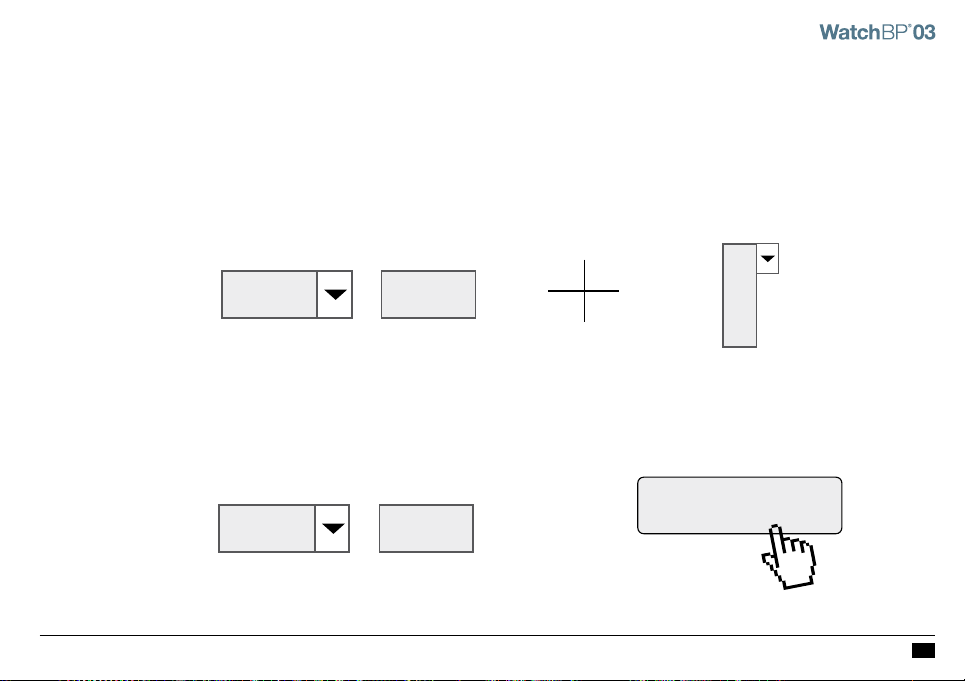
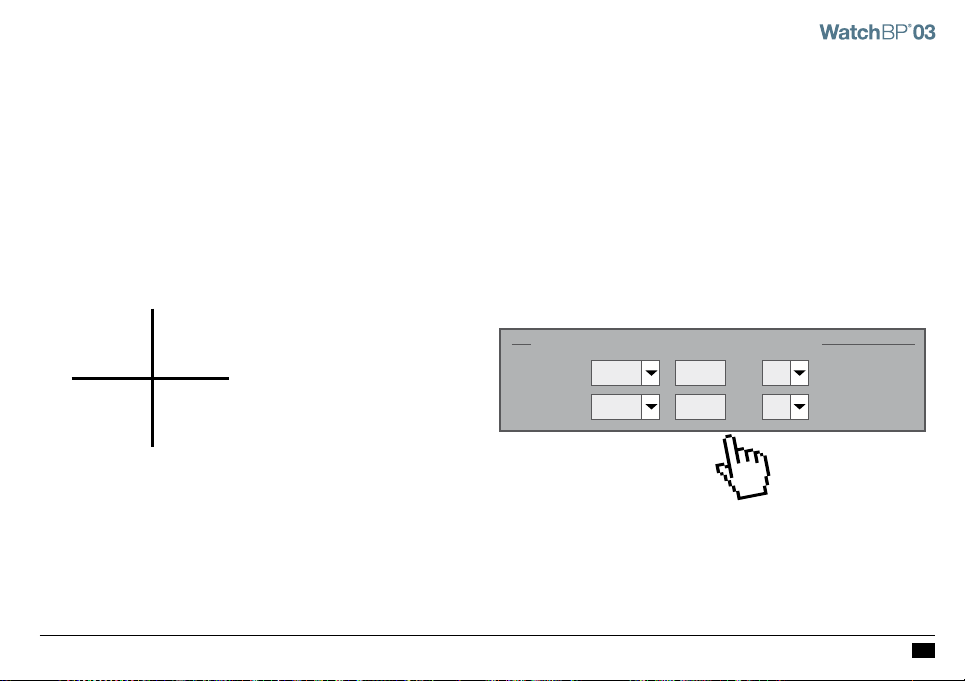
Programming the interval schedule
1) Using the drop-down menu on the lower-left of
the screen, choose from 4AM to 10AM as the start
of the awake hours.
3) Assign the measurement intervals for the awake
and asleep hours by using the drop-down menu
to choose from 15, 20, 30, and 60 minutes as the
measurement interval.
Awake from 06 AM 10 PM~
2) Using the drop-down menu on the lower-left of
the screen, choose from 9 PM to 2 AM as the start
of the asleep hours.
Asleep from 10 PM 06 AM~
152030
minutes
60
4) Once you have completed the settings, press
“Program to BP device” to program the schedule
into the device.
Program to BP device
minutes interval15
20
30
60
19
EN
Page 20
Taking blood pressure measurements
AMBULATORY HOME CASUAL
In «AMBULATORY» mode
Be sure the device is set to «AMBULATORY» Mode.
1) Preparing measurement arm – Remove
all clothing covering or constricting the
measurement arm.
Avoid rolling up long
*
sleeves, as this may
lead to constriction
of blood flow to the
measurement arm.
20
2) Positioning the cuff and device – Fit the cuff
closely, but not too tight. Make sure that the cuff
is 2~3 cm (1 inch) above the elbow with the tube
on the inside of the arm. The measurement tube
should point upward and be mounted over the
patient’s shoulder.
2–3cm
Adjust the tube holder on the belt of the
*
pouch so it is properly positioned on the
shoulder. Attach the tube to the holder
so the tube goes up over the shoulder to
the other side of the body. An alternative
method is to use a waist belt.
Page 21
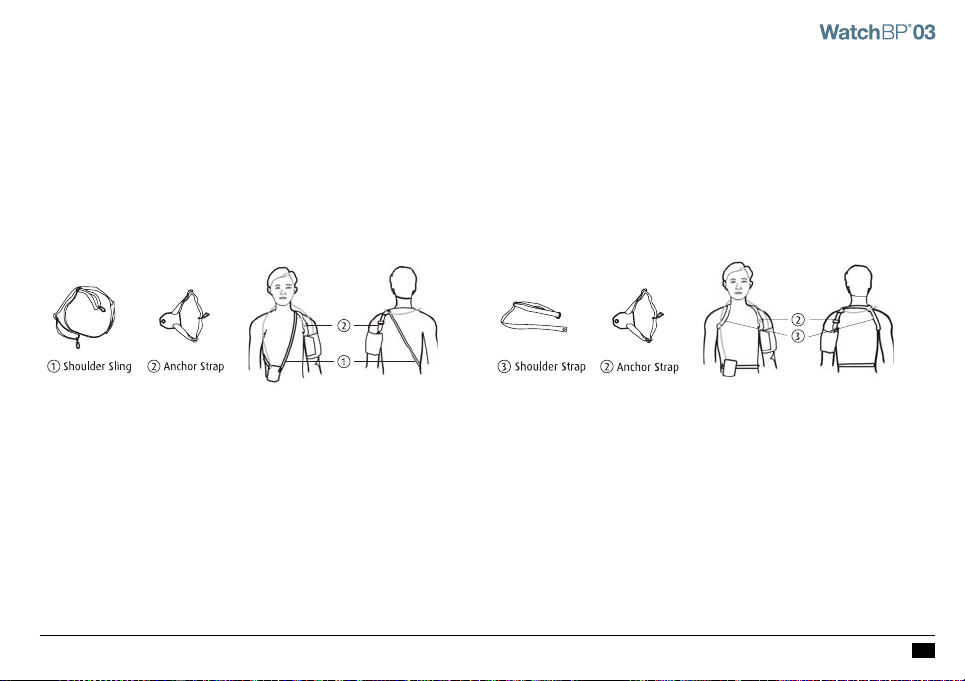
3) Proper Positioning the cuff using Anchor Strap
Option 1: Use the Shoulder Sling a and Anchor
Strap b to position the cuff as demonstrated in the
diagram below.
Instructions: Place the Shoulder Sling over the left
shoulder. Insert the device into the holster. Position
the device at front. Apply the Cuff to the arm. Buckle
up Anchor Strap with Shoulder Sling. Snap the
connector of Anchor Strap into D-ring of cuff. Adjust
length for fi t and comfort.
Option 2: Use the Shoulder Strap c and Anchor
Strap b to position the cuff as demonstrated.
Instructions: Place the Shoulder Strap over both
shoulders as demonstrated in the diagram. Connect
the device to a belt. Position the device at front.
Apply the Cuff to the arm. Buckle up Anchor Strap
with Shoulder Strap. Snap the connector of Anchor
Strap into D-ring of cuff. Adjust length for fi t and
comfort.
21
EN
Page 22
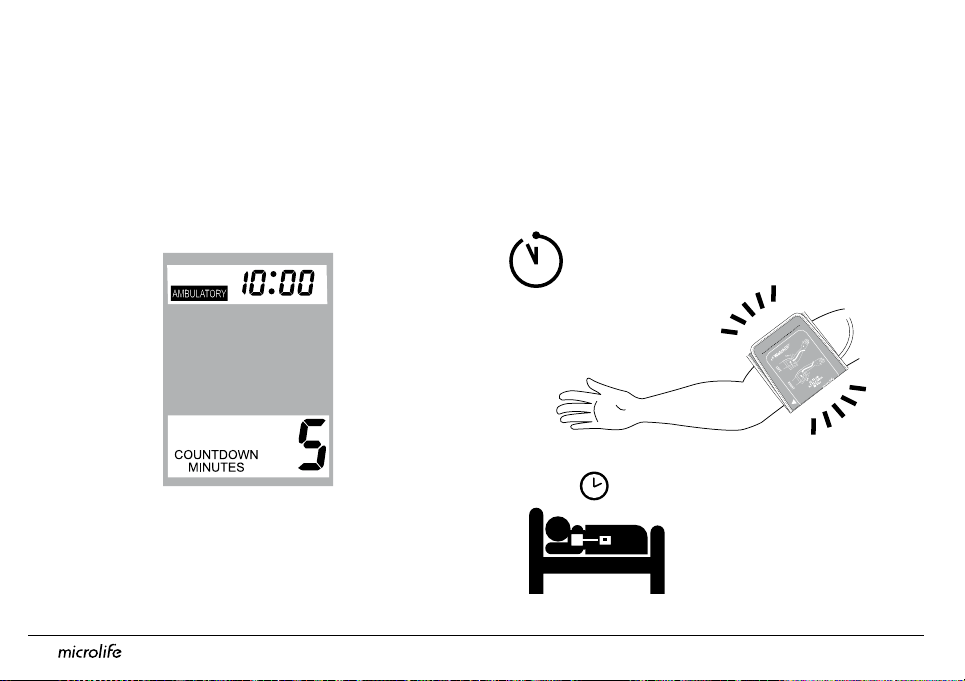
4) Next measurement indicator – The device will
display the next measurement time, indicated by
a countdown in minutes on the display.
The screen will display X countdown minutes to indicate
*
the time to the next automatic measurement.
22
5) Measurement reminder – One minute before
the next scheduled measurement, the device will
partially inflate and immediately deflate the cuff
to remind the patient of the next measurement.
1 min
Reminder
Measurement reminders
*
will be disabled for the
asleep hours.
Page 23

Taking blood pressure measurements (cont.)
6) Measurement reminder – Five seconds before
the next measurement, the device will emit a
short series of beeps to notify the patient of the
coming measurement.
5 sec
Reminder
The beeper of Ambulatory Mode can be disabled via software
*
setting.
The device will not beep prior
*
to asleep measurement in
«AMBULATORY » mode.
7) During measurements – the patient should be
reminded to remain still, refrain from talking,
and to breath normally during the measurement.
If driving or operating equipment when a
measurement begins, the patient should, when
safe, relax the measurement arm.
The patient can stop any single measurement at anytime by
*
pressing the ON/OFF Button.
23
EN
Page 24

8) Repeat measurements in the case of an
144
Measurements
error – The device will automatically repeat the
measurement after a two minute countdown
should an error occur during measurement.
A repeat
measurement
is performed
automatically if
an error occurs.
If the repeat measurement encounters an error, the device will
*
stop taking measurements. The patient should return the device
to the physician to determine the cause of error.
24
9) Storing measurement data – The WatchBP O3
automatically stores each measurement result,
along with the measurement date and time.
A total of 144 measurements can be stored in
«AMBULATORY» mode.
The display of BP reading and memory of Ambulatory Mode
*
can be disabled via software setting.
Page 25
Taking blood pressure measurements (cont.)
AMBULATORY HOME CASUAL
AMBULATORY HOME CASUAL
In «HOME» mode
Be sure the device is set to «HOME» Mode.
1) Before the measurement – Patients should be
informed to avoid physical activity, eating or
smoking before each measurement. The patient
should sit down for at least 5 minutes before the
measurement and relax.
2) Applying the cuff – Patients should be trained
on how to properly fit the cuff to their own arm.
The cuff should fit closely around the arm, but not
too tight, and be placed 2~3cm above the elbow
with the tube on the inside of the arm. The patient
should support the arm at the same height as the
heart during measurement.
Additional instructions on taking proper blood pressure
*
measurement can be found on the www.watchbp.com website.
25
EN
Page 26
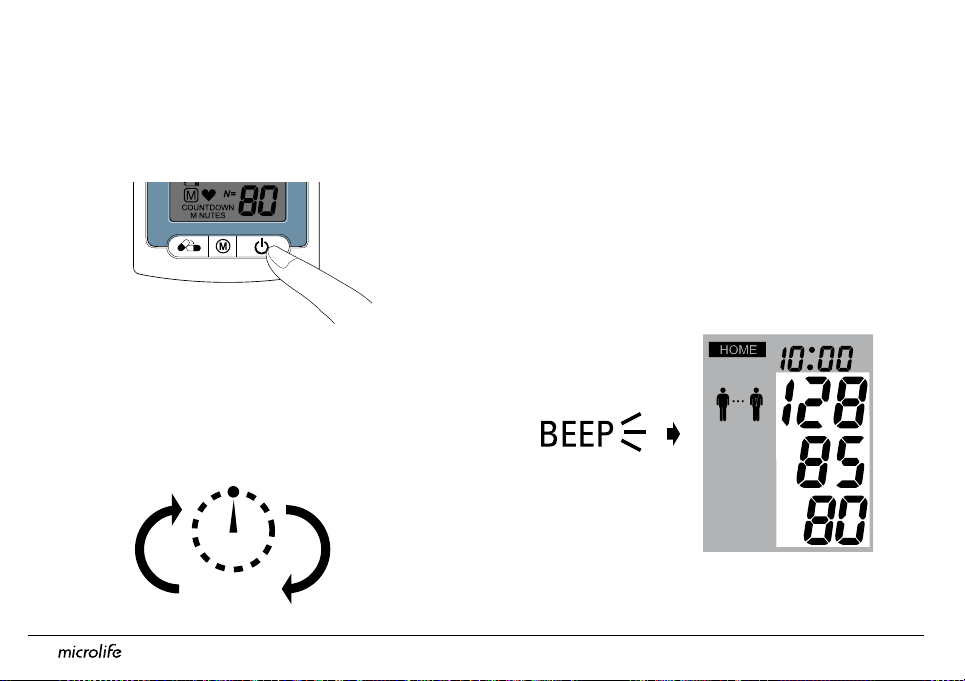
3) Start the measurement – Press the ON/OFF
SYS
mmHg
DIA
mmHg
PUL
/min
Button to start measurement.
4) During the measurement –The cuff will inflate
automatically. One measurement cycle includes
two measurements. Once the first measurement
is complete, the second measurement will begin
after 60-seconds.
12
60 sec.
26
5) Finishing the measurement – Once the two
measurements are complete, measurement
data is automatically stored for later reference
by the physician. If an error displays after the
measurements, the process should be repeated
once again.
Page 27
Taking a blood pressure measurements (cont.)
AMBULATORY HOME CASUAL
AMBULATORY HOME CASUAL
AMBULATORY HOME CASUAL
In «CASUAL» mode
Be sure the device is set to «CASUAL» Mode.
1) Before each measurement – Patients should
be informed to avoid physical activity, eating or
smoking before each measurement. The patient
should sit down for at least 5 minutes before the
measurement and relax.
2) Applying the cuff – Patients should be trained
on how to properly fit the cuff to their own arm.
The cuff should fit closely around the arm, but not
too tight, and be placed 2~3cm above the elbow
with the tube on the inside of the arm. The patient
should support the arm at the same height as the
heart during measurement.
Additional instructions on taking proper blood pressure
*
measurement can be found on the www.watchbp.com website.
27
EN
Page 28
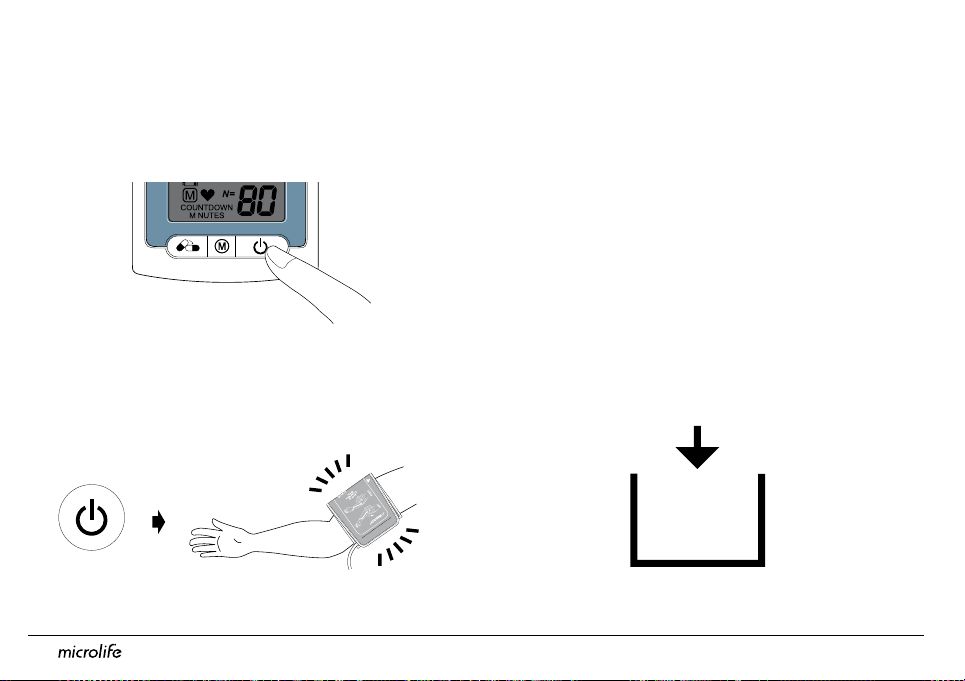
3) Start the measurement – Press the ON/OFF
SYS
mmHg
DIA
mmHg
PUL
/min
Button to start measurement.
4) During the measurement –The cuff will inflate
automatically. A single measurement will be
completed for each push of the ON/OFF Button.
28
5) Finishing the measurement – Once the
measurement is complete, measurement
data is automatically stored for later reference
by the physician. If an error displays after the
measurements, the process should be repeated
once again.
6) Storing measurement data – The WatchBP O3
automatically stores each measurement result,
along with the measurement date and time.
A total of 250 measurements can be stored in
«CASUAL» mode.
250
Measurements
Page 29
AMBULATORY HOME CASUAL
Viewing, deleting and transferring measurements
Viewing measurements
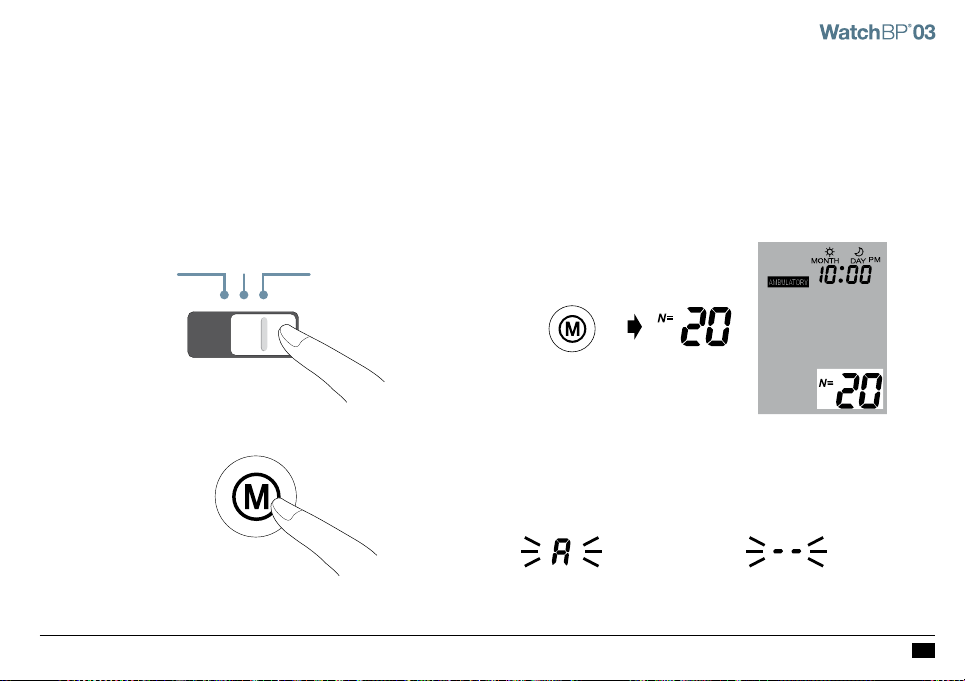
1) Use the Mode switch to first select the type of
measurements wished to be viewed.
2) Then press the M Button.
In «AMBULATORY» mode
1) When the M Button is pressed, it briefly displays
the total number of measurements stored, e.g.
N=20.
«A» is displayed when
*
the number shown is the
average of all data.
«- -» will display when the
*
number of measurements is
less than 12.
29
EN
Page 30

2) Pressing the M Button again displays the average
of all awake hours.
3) Pressing M Button once again shows the average
of all night hours.
In «Home» mode
1) When the M Button is pressed, it briefly displays
the total number of measurements stored, e.g.
N=20.
All individual readings can be viewed by repeatedly pressing
*
the M Button.
The display of BP reading and memory of Ambulatory Mode
*
can be disabled via software setting.
30
«A» is displayed when
*
the number shown is
the average of all data.
«- -» will display when the
*
number of measurements
is less than 12.
Page 31

Viewing, deleting and transferring measurements (cont.)
2) Pressing the M Button again displays the average
of all morning data.
3) Pressing M Button once again shows the average
of all evening data.
All individual readings can be viewed by repeatedly pressing
*
the M Button.
In «CASUAL» mode
1) When the M Button is pressed, it briefly displays
the total number of measurements stored, e.g.
N=63, followed immediately by the average of
all measurements stored in memory.
2) All individual readings can be viewed by
repeatedly pressing the M Button.
Individual
Reading
31
EN
Page 32

Deleting measurements
AMBULATORY HOME CASUAL
AMBULATORY HOME CASUAL
Data from «AMBULATORY», «HOME» and
«CASUAL» mode measurements can be deleted
independent of each other.
1) Use the Mode switch to first select the type of
measurements you wish to delete.
2) Press the M Button and hold it until the CL
symbol flashes.
Press and hold
3) Release the M Button and press it once more while
the delete symbol flashes.
Stand by mode
32
Each deletion will erase entire records of each mode.
*
Page 33

Viewing, deleting and transferring measurements (cont.)
AMBULATORY HOME CASUAL
AMBULATORY HOME CASUAL
Transferring measurements
1) Connect the device to computer. A successful
connection is displayed by «PC» on the device.
2) Start the software program.
3) To transfer the data in all three modes and the
medication compliance record, click «Download
BP data to PC».
Software commands
Store data
Click «Save», the file name is
formed automatically from the
patient’s identity number and
the suffix «WatchBPO3_(date).
xls».
View the data
Delete the
Click <<Open excel file>>
Click «Clear Memory»
memories
Close the
Click «Exit»
program
Please unplug and re-plug the USB cable to the PC if the
*
software instructs you to do so.
The program will prompt to synchronize the date/time of the
*
device to that of the PC.
Stored your data before using «Clear Memory» or «Exit».
*
System Requirements: 550MHz CPU. 256MB Memory, 1024x768
*
pixel resolution, 256 color, CD-ROM drive, 1 free USB port, 40MB
free hard disk space, Microsoft Windows XP / Vista.
33
EN
Page 34

Appendix
Battery indicator
When batteries are placed into battery compartment,
the battery symbol and the number indicating
battery power will be displayed. Please replace new
batteries for ABP patient test if the number is equal
or less than 50.
When the batteries have ¼ power supply left, the
Battery Symbol will flash each time the device is
switched on.
34
Replacing low batteries
When the batteries need to be replaced, the Battery
Symbol will flash each time the device is switched on.
1) Open the battery compartment at the back of the
device.
2) Replace the batteries – ensure correct polarity as
shown by the symbols in the compartment.
Use 4 new, long-life 1.5V, size AAA batteries.
*
Do not use batteries beyond their date of expiry.
*
Remove batteries, if the device will not be used for a prolonged
*
period.
Page 35

Safety, care, accuracy test and disposal
Safety and protection
This device may be used only for the purpose
described in this booklet. The device comprises of
sensitive components and must be treated with
caution. The manufacturer cannot be held liable for
damage caused by incorrect application.
Observe the storage and operating conditions
described in the “Technical specifications” section
of this manual.
Protect the device from water and moisture
Ensure that children do not use the device
•
unsupervised; some parts are small enough to be
swallowed.
Only activate the pump when cuff is installed.
•
Do not use the device if you think it is damaged or
•
if anything appears unusual.
Read the further safety instructions in the
•
individual sections of the instruction manual.
Do not connect the device to a computer until
•
prompted to do so by the computer software.
Protect the device from direct sunlight
Protect the device from extreme heat and cold
Avoid proximity to electromagnetic fields, such
as those produced by mobile phones
Never open device
Protect device from impact and drops
35
EN
Page 36

Device care
Clean the device with a soft, dry cloth.
Cleaning the cuff and straps
Use a mild disinfectant solution to clean the pouch,
straps, sling and belt. To wash these items and cuff
in washing machine, use a cuff plug (article #90273MZ11-004) to keep the inside of the bladder dry.
Fold and place the cuff inside a washing bag. Wash
these items using warm water and a mild detergent.
Air dry the cuff. DO NOT iron the cuff cover.
Do not iron the cuff!
Accuracy test
We recommend the WatchBP O3 device be tested for
accuracy every 2 years or after mechanical impact
(e.g. being dropped). Please contact Microlife to
arrange for an accuracy test.
36
Disposal
Batteries and electronic instruments must
be disposed of in accordance with the locally
applicable regulations, and not as domestic
waste.
Page 37

Error messages
If an error occurs during measurement, the
measurement is interrupted and an error
message «Er» is displayed.
Please consult your doctor, if
•
this or any other problem occurs
repeatedly.
If you think the results are
•
unusual, please read through
the information in this
instruction manual carefully.
Error Description Potential cause and
remedy
«Er 1»
Signal too
weak
The pulse signals
on the cuff are too
weak. Re-position the
cuff and repeat the
measurement.
«Er 2»
Error signal
During the
measurement,
error signals were
detected by the cuff,
caused for instance by
movement or muscle
tension. Repeat the
measurement, keeping
your arm still.
37
EN
Page 38

«Er 3»
«Er 5»
38
No pressure
in the cuff
Abnormal
result
An adequate pressure
cannot be generated
in the cuff. A leak
may have occurred.
Replace the batteries if
necessary. Repeat the
measurement.
The measuring signals
are inaccurate and no
result can therefore
be displayed. Read
through the checklist
for performing reliable
measurements and
then repeat the
measurement.
«HI»
«LO»
Pulse or cuff
pressure too
high
Pulse too
low
The pressure in the
cuff is too high (over
300 mmHg) OR the
pulse is too high
(over 200 beats per
minute). Relax for 5
minutes and repeat the
measurement.
The pulse is too low
(less than 40 beats per
minute). Repeat the
measurement.
Page 39

Technical Specifications
Operating temperature:
Storage temperature:
Weight:
Dimensions:
Measuring procedure:
Measurement range:
Cuff pressure display:
Power source:
10 - 40 °C / 50 - 104 °F
•
15 - 85 % relative maximum humidity
•
-20 - +50 °C / -4 - +122 °F
•
15 - 90 % relative maximum humidity
•
260g (including batteries)
•
115 x 80 x 35 mm
•
oscillometric, corresponding to
•
Korotkoff
30 - 280 mmHg – blood pressure
•
40 - 200 beats per minute – pulse
•
Range: 0 - 299 mmHg
•
Resolution: 1 mmHg
•
Static accuracy: pressure within
•
±3 mmHg
Pulse accuracy: ±5 % of the readout
•
value
4X1.5 V Batteries; size AAA
•
Reference to Standards:
EU Directives 93/42/EEC
•
NIBP requirements:
•
EN 1060-1 / -3/ -4,
EN 60601-2-30,
ANSI /AAMI SP10
Microlife reserves the right to alter technical
specifications without prior written notice.
39
EN
Page 40

Guarantee Card
This device is covered by a two-year
guarantee from the date of purchase. This
guarantee is valid only on presentation of
the guarantee card completed by the owner
confirming date of purchase or purchase
receipt. Batteries and wearing parts are not
covered by this guarantee.
Product: WatchBP O3
Product Number: 3MZ1-1
Serial Number:
Date:
40
Name:
Address:
Date:
Telephone:
Email:
Page 41

Betaalbare Ambulante bloeddrukmeter en richtlijnconforme
Thuis bloeddrukmeter voor
nauwkeurige bloeddrukmeting buiten de praktijk.
Gebruiksaanwijzing
NL
41
41
NL
Page 42

De Microlife WatchBP O3 (Out Of Office) is ontworpen voor het doen van betrouwbare
ambulante en zelf bloeddrukmeting, en voldoet volledig aan de aanbevelingen van de
European Society of Hypertension (ESH) en de American Heart Association (AHA) voor
1
bloeddrukmeting buiten de praktijk
. De WatchBP O3 is klinisch gevalideerd volgens het
ESH-protocol.
1
O’Brien E, Asmar R, Beilin L, Imai Y, et al. European Society of Hypertension recommendations for conventional, ambulatory and home blood pressure
measurement. European Society of Hypertension Working Group on Blood Pressure Monitoring. J Hypertens 2003;21:821-848.
Page 43

Inhoudsopgave
Productomschrijving
Namen van onderdelen en display ............... 44-45
Voordat u de WatchBP O3 de eerste keer gebruikt
Het apparaat inschakelen ...................................46
De manchetmaat kiezen ...................................... 47
De bedieningsmodus selecteren
Modus «AMBULATORY» (AMBULANT) ........... 48-49
Modus «HOME» (THUIS) ................................. 50-52
Modus «CASUAL» (TERLOOPS) .............................. 53
De inname van medicatie vastleggen
Medicatiegegevens ...................................... 54-55
Programmering van het meetinterval
Het softwareprogramma installeren ................... 56
Het apparaat op de computer aansluiten ........... 56
Het intervalrooster programmeren ..................... 57
De bloeddruk meten
Modus «AMBULATORY» (AMBULANT) ............ 58-62
Modus «HOME» (THUIS) ................................. 63-64
Modus «CASUAL» ........................................... 65-66
Meetresultaten bekijken, verwijderen en overdragen
Meetingen bekijken ........................................67-69
Meetwaarden verwijderen .................................. 70
Meetwaarden overdragen ................................... 71
Aanhangsel
Batterijen en voedingsadapter ........................... 72
Veiligheid, onderhoud, nauwkeurigheidstest en
verwijderen .....................................................73-74
Foutmeldingen ...............................................75-76
Technische gegevens ........................................... 77
NL
Page 44

SYS
mmHg
DIA
mmHg
PUL
/min
AMBULATORY HOME CASUAL
ERP NO.3MZ1-1
Microlife AG, 9443 Widnau / Switzerland
www.watchbp.com
Batteries:4xAAA 1.5VDC
SN:WWYXXXXX
Patent Pending
Productomschrijving
Namen van onderdelen
Manchetaansluiting
44
Usb-poort
Modusschakelaar
M-knop (geheugen)
Display
Medicatieknop
AAN-UIT-knop
Batterijvak
Page 45

Display
Aanduiding modus
Doktersymbool
Buiten meettijd
Ontspannen
Batterij-indicator
Opgeslagen waarde
Resterende tijd tot de volgende
automatische meting
Ochtendgegevens
Avondgegevens
Datum/Tijd
Systolische waarde
Diastolische waarde
Polsslagindicator
Polsfrequentie
Aantal opgeslagen
gegevens
45
NL
Page 46

SYS
mmHg
DIA
mmHg
PUL
/min
Voordat u de WatchBP O3 de eerste keer gebruikt
ERP NO.3MZ1-1
Het apparaat inschakelen
Trek het beschermstrookje uit het batterijvak.
2) Stel de maand in – Gebruik de knop M om de
maand in te stellen. Druk op de knop ON/OFF om
1) Stel het jaar in – Als u de beschermstrook
verwijdert of nieuwe batterijen plaatst, gaat de
jaaraanduiding op het display knipperen. Gebruik
de knop M om het jaar te kiezen. Druk op de knop
ON/OFF om uw keuze te bevestigen.
M-knop om te selecteren
Knop ON/OFF om te bevestigen
dit te bevestigen.
3) Stel de dag in – Druk op de knop M om de dag
in te stellen. Druk op de knop ON/OFF om dit te
bevestigen.
46
Page 47

4) Stel de tijd in – Als de uren en minuten zijn
ingesteld en op de knop ON/OFF wordt gedrukt,
worden de datum en tijd ingesteld en de huidige
tijd wordt getoond.
5) Om de datum en tijd te veranderen, haalt u even
een batterij uit het batterijvak en plaatst u deze
weer terug. De jaaraanduiding knippert. Rond de
procedure af zoals hierboven beschreven.
Manchetmaat kiezen
Er bestaat een groot aantal manchetmaten die bij de
WatchBP O3 kunnen worden gebruikt.
Gebruik alleen manchetten van Microlife!
*
M (Medium)
22 - 32 cm
M is voor de meeste mensen de juiste maat.
L (Large)
32 - 42 cm
47
NL
Page 48

AMBULATORY HOME CASUAL
AMBULATORY HOME CASUAL
AMBULATORY HOME CASUAL
De bedieningsmodus selecteren
AMBULATORY HOME CASUAL
AMBULATORY HOME CASUAL
AMBULATORY HOME CASUAL
Voorafgaande aan elke meting dient u de modusschakelaar aan de zijkant van het apparaat te
gebruiken om de juiste meetmodus te kiezen. De
WatchBP O3 kent drie meetmodi: «AMBULATORY»
(AMBULANT), «HOME» (THUIS) of «CASUAL»
(INCIDENTEEL).
Modus «AMBULATORY» (AMBULANT)
Kies de modus «AMBULATORY» voor volledig
programmeerbare 24-uurs bloeddrukmeting buiten
de praktijk.
48
Page 49

15
20
30
60
minuten
Programmeerbare meetintervallen
Het apparaat meet automatisch met vaste
tussenpozen van 15, 20, 30 of 60 minuten,
afhankelijk van de programmering door de arts.
Het standaard meetinterval is 30 minuten voor de
*
waakuren en 60 minuten voor de slaapuren.
Waak- en slaapuren instellen
Om beter rekening te houden met de levensstijl
van de patiënt kunnen waak- en slaapuren
worden geprogrammeerd met de meegeleverde
WatchBP O3-software. Tussenpozen voor de waaken slaapuren kunnen ook afzonderlijk worden
geprogrammeerd.
Instellen 24u meetschema
Wakker vanaf:met minuten interval06 22 30~
Slapen vanaf:met minuten interval22 06 60
~
49
NL
Page 50

AMBULATORY HOME CASUAL
AMBULATORY HOME CASUAL
De bedieningsmodus selecteren (vervolg)
Twee meetperioden
De waakmeetperiode kan zodanig worden
geprogrammeerd dat deze ze elke willekeurige
tijd tussen 04:00 en 10:00 uur begint, en de
slaapmeetperiode kan elke willekeurige tijd
tussen 21:00 en 02:00 uur worden ingesteld. De
meetintervallen kunnen voor zowel de waak- als
slaapperioden worden ingesteld op 15, 20, 30 of 60
minuten.
50
Modus «HOME» (THUIS)
Kies de modus «HOME» voor bloeddrukmeting thuis
volgens de richtlijnen van de European Society of
Hypertension (ESH) en de American Heart Association
(AHA).
Page 51

Geen metingen op vrije dagen
De patiënt dient op zeven opeenvolgende
werkdagen (of gewone weekdagen) te meten. Er
dienen in deze modus geen metingen te worden
gedaan op vrije dagen (of dagen waarop de
patiënt zich volledig ontspant)!
Twee meetseries per dag
ESH-richtlijnen bevelen aan om 's morgens een
dubbele meting te doen tussen 06:00 en 09:00 uur, en
's avonds een dubbele meting tussen 18:00 en 21:00
uur.
JAN
30
7
working
days
X1
06:00 – 09:00
X1
18:00 – 21:00
51
NL
Page 52

De bedieningsmodus selecteren (vervolg)
Langere meetperiode
Bij de WatchBP O3 kan een langere meetperiode
worden gekozen en kunnen 's morgens metingen
worden gedaan tussen 04:00 en 12:00 uur en 's
avonds tussen 18:00 en 24:00 uur.
Buiten deze tijden
kunnen er geen
metingen worden
gedaan en wordt
het linker symbool
op het scherm
getoond.
52
Evaluatie
Nadat metingen zijn gedaan gedurende in
totaal 7 werkdagen, komen patiënten met de
WatchBP O3 naar de praktijk voor een evaluatie
van de bloeddrukmetingen die ze thuis hebben
uitgevoerd.
Als er alle 7 dagen
metingen zijn
gedaan, knippert
het doktersymbool
op het scherm.
Page 53

AMBULATORY HOME CASUAL
Modus «CASUAL» (TERLOOPS)
In de modus « CASUAL» werkt het apparaat als een
gewone bloeddrukmeter: afzonderlijke metingen
worden automatisch opgeslagen en kunnen op een
later tijdstip door de arts worden bekeken.
Anytime
250 metingen veilig opgeslagen
De WatchBP O3 kan maximaal 250 afzonderlijke
metingen opslaan in de modus «CASUAL».
Als het geheugen vol is, wordt de oudste meting automatisch
*
overschreven door de nieuwste meting.
250
Measurements
53
NL
Page 54

SYS
mmHg
DIA
mmHg
PUL
/min
De inname van medicatie vastleggen
Medicatiegegevens
De patiënt kan de tijd waarop medicatie is
ingenomen, vastleggen door op de medicatieknop
te drukken.
1) Druk gedurende 2 seconden op de medicatieknop;
het pilsymbool wordt getoond.
Gedurende
2 seconden
indrukken...
De medicatiegegevens kunnen in elk van de drie modi worden
*
vastgelegd.
54
2) Laat de medicatieknop los. Het pilsymbool en de
opgeslagen tijd knipperen om beurten.
Indrukken en
ingedrukt houden
3) De medicatiegegevens worden opgeslagen na
het piepsignaal.
Opgeslagen
De pieper kan via een software-instelling worden
*
uitgeschakeld.
Page 55

50 medicatierecords opgeslagen
De WatchBP O3 kan maximaal 50 medicatierecords
opslaan.
* Als het geheugen vol is, wordt de aanduiding Full (Vol)
getoond.
Opgeslagen medicatiegegevens wissen
Om alle medicatiegegevens uit het geheugen
te wissen, drukt u gedurende 7 seconden op de
medicatieknop. Het “CL”-symbool knippert. Druk op
M om het geheugen leeg te maken of op ON/OFF om
het leegmaken te annuleren.
Druk gedurende
7 seconden op de
knop...
Als u op de knop M drukt, worden alle medicatiegegevens in de
*
geselecteerde modus gewist.
55
NL
Page 56

Programmering van het meetinterval
©
2
0
0
8
M
i
c
r
o
l
i
f
e
C
o
r
p
o
r
a
t
i
o
n
.
A
l
l
R
i
g
h
t
s
R
e
s
e
r
v
e
d
.
System Requirements: 550MHz CPU. 256MB Memory, 1024x768
pixel resolution, 256 color, CD-ROM drive, 1 free USB port, 40MB
free hard disk space, Microsoft Windows 2000 / XP / Vista.
Install CD
WatchBP Analyzer O3
Version 1.0.2.7
AMBULATORY HOME CASUAL
AMBULATORY HOME CASUAL
Het softwareprogramma installeren
1) Plaats de cd in de cd-romspeler van uw computer.
Of: klik op «setup.exe» in de directory van de cd.
2) Volg de aanwijzingen die in het installatievenster
op het computerscherm worden getoond.
3) Als het installeren voltooid is, dient u de computer
opnieuw op te starten voordat u het programma
de eerste keer gebruikt.
Start uw
computer
opnieuw op
56
Installatie
Het apparaat op een computer aansluiten
1) Sluit het apparaat aan op de computer. Als de
verbinding in orde is, wordt «PC» aangegeven op
het display van het apparaat.
2) Start het softwareprogramma.
3) Voer een naam, identiteitsnummer en de
geboortedatum in om een nieuwe record aan te
maken (indien vereist).
Page 57

Het intervalrooster programmeren
152030
60
minuten
1) Kies uit het dropdownmenu onderaan links op het
scherm het tijdstip waarop de waakuren moeten
beginnen (tussen 04:00 en 10:00 uur).
Wakker vanaf: 06 22~
3) Kies de meetintervallen voor de waak- en
slaapuren uit het dropdownmenu; u kunt kiezen
uit intervallen van 15, 20, 30 of 60 minuten.
minuten interval15
20
30
60
2) Kies uit het dropdownmenu onderaan links op het
scherm het tijdstip waarop de slaapuren moeten
beginnen (tussen 21:00 en 02:00 uur).
Slapen vanaf: 22 06~
4) Heeft u de instellingen gemaakt, klik dan op
“Meetprogramma naar apparaat versturen” om
het rooster in het apparaat op te slaan.
Meetprogramma naar
apparaat versturen
57
NL
Page 58

De bloeddruk meten
AMBULATORY HOME CASUAL
In de modus «AMBULATORY»
Controleer of het apparaat zich in de modus
«AMBULATORY» bevindt.
1) Meetarm voorbereiden – Verwijder alle kleding
die de arm waarbij moet worden gemeten,
bedekt of in de beweging belemmert.
Lange mouwen
*
moeten niet worden
opgerold omdat de
bloeddoorstroming
in de meetarm
hierdoor kan worden
belemmerd.
58
2) De manchet aanbrengen – Breng de manchet
stevig maar niet te strak aan. Zorg dat de manchet
zich 2 tot 3 cm boven de elleboog bevindt met
de slang aan de binnenkant van de arm. De
meetslang moet naar boven wijzen en over de
schouder van de patiënt worden gelegd.
2–3cm
Stel de slanghouder op de riem van de
*
bewaarzak zodanig in dat de houder correct
over de schouder is gepositioneerd. Maak
de slang vast aan de houder zodat de slang
over de schouder heen naar de andere kant
van het lichaam loopt. Een andere methode
is om de ceintuur te gebruiken.
Page 59

3) Juiste plaatsing van de manchet met de
bevestigingsband
Optie 1: Plaats de manchet met de schoudermitella
a a en bevestigingsband b als getoond in het
onderstaande diagram.diagram below.
a Schoudermitella c Schouderbandb Bevestigingsband b Bevestigingsband
Optie 2: Gebruik de schouderband c en
bevestigingsband b om de manchet als afgebeeld
te plaatsen.
Instructies: Plaats de schouderband over beide
Instructies: Plaats de schoudermitella over de linker
schouder. Steek het apparaat in de houder. Plaats
het apparaat tegen het front. Breng de manchet
op de arm aan. Gesp de bevestigingsband met de
schoudermitella vast. Klik de aansluiting van de
bevestigingsband op de D-ring van de manchet.
Stel de lengte op maat en comfort in.
schouders als weergegeven in het diagram. Sluit het
apparaat aan op een riem. Plaats het apparaat tegen
het front. Breng de manchet op de arm aan.
Gesp de bevestigingsband met de schouderband
vast. Klik de aansluiting van de bevestigingsband op
de D-ring van de manchet. Stel de lengte op maat
en comfort in.
59
NL
Page 60

4) Indicator volgende meting – Het apparaat toont
de volgende meettijd, die wordt aangegeven door
de minuten op het display af te tellen.
5) Meetherinnering – Een minuut vóór de volgende
geplande meting, wordt de manchet gedeeltelijk
opgeblazen en weer leeg gelaten om de patiënt
aan de volgende meting te herinneren.
1 min
Reminder
Op het scherm worden X aftelminuten getoond om
*
de tijd aan te geven die nog resteert tot de volgende
automatische meting.
60
Meetherinneringen
*
worden tijdens de
slaapuren uitgeschakeld.
Page 61

De bloeddruk meten (vervolg)
6) Meetherinnering – Vijf seconden vóór de
volgende meting laat het apparaat een korte
reeks piepjes horen om de patiënt op de
aanstaande meting te wijzen.
5 sec
Reminder
De pieper van de modus Ambulatory kan via de software
*
worden uitgeschakeld.
Het apparaat zal voorafgaande aan
*
een meting tijdens de slaapuren niet
piepen als de modus «AMBULATORY»
gekozen is.
7) Tijdens metingen – De patiënt moet erop
worden gewezen dat hij/zij tijdens de meting
zo weinig mogelijk moet bewegen, niet moet
praten en gewoon door moet blijven ademen. Als
de patiënt bij het begin van de meting aan het
rijden is of een apparaat bedient, dient deze de
meetarm te ontspannen zodra hij/zij daartoe in
de gelegenheid is.
De patiënt kan elke meting te allen tijde onderbreken door op
*
de knop ON/OFF te drukken.
61
NL
Page 62

8) Herhaalmetingen als er een fout is opgetreden
144
Measurements
– Als er tijdens de meting een fout is opgetreden,
zal het apparaat de meting automatisch herhalen
na een wachtperiode van twee minuten.
Als er een
fout optreedt,
wordt er
automatisch een
herhaalmeting
gedaan.
Indien er tijdens de herhaalmeting een fout optreedt, stopt
*
het apparaat met het doen van metingen. De patiënt dient
het apparaat dan terug te brengen naar de arts om de
storingsoorzaak te laten onderzoeken.
62
9) Meetgegevens opslaan – De WatchBP O3 slaat
elk meetresultaat automatisch op, samen met
de meetdatum en -tijd. In totaal kunnen 144
metingen worden opgeslagen in «AMBULATORY»
modus.
De weergave van de bloeddrukwaarde en het geheugen
*
in de modus Ambulatory kan via de software worden
uitgeschakeld.
Page 63

De bloeddruk meten (vervolg)
AMBULATORY HOME CASUAL
AMBULATORY HOME CASUAL
In de modus «HOME»
Controleer of het apparaat zich in de modus «HOME»
bevindt.
1) Voorafgaande aan de meting – Patiënten moeten
erop worden gewezen dat ze voorafgaande aan
elke meting geen lichamelijke inspanningen
moeten leveren en niet mogen eten of roken. De
patiënt moet minstens 5 minuten vóór de meting
gaan zitten en zich ontspannen.
2) De manchet aanbrengen – Patiënten moeten
worden geïnstrueerd in het correct omdoen van
de manchet aan hun eigen arm. De manchet moet
goed om de arm passen maar niet te strak zitten
en dient 2-3 cm boven de elleboog te worden
aangebracht met de slang aan de binnenkant van
de arm. De patiënt moet de arm tijdens de meting
op dezelfde hoogte houden als het hart.
Verdere instructies voor het doen van een correcte
*
bloeddrukmeting zijn te vinden op www.watchbp.nl.
63
NL
Page 64

3) De meting starten – Druk op de knop ON/OFF om
SYS
mmHg
DIA
mmHg
PUL
/min
de meting te starten.
4) Tijdens de meting – De manchet wordt
automatisch opgeblazen. Elke meetcyclus
bestaat uit twee metingen. Als de eerste meting
is voltooid, begint de tweede meting na 60
seconden.
12
60 sec.
64
5) De meting voltooien – Zodra de twee metingen
zijn gedaan, worden de meetgegevens
automatisch opgeslagen zodat de arts ze later
kan bestuderen. Als er na de metingen een
foutmelding verschijnt moet de procedure worden
herhaald.
Page 65

De bloeddruk meten (vervolg)
AMBULATORY HOME CASUAL
AMBULATORY HOME CASUAL
AMBULATORY HOME CASUAL
In de modus «CASUAL»
Controleer of het apparaat zich in de modus
«CASUAL» bevindt.
1) Voorafgaande aan elke meting – Patiënten
moeten erop worden gewezen dat ze
voorafgaande aan elke meting geen lichamelijke
inspanningen moeten doen en niet mogen eten
of roken. De patiënt moet minstens 5 minuten
vóór de meting gaan zitten en zich ontspannen.
2) De manchet aanbrengen – Patiënten moeten
worden geïnstrueerd in het correct omdoen van
de manchet aan hun eigen arm. De manchet moet
goed om de arm passen maar niet te strak zitten
en dient 2-3 cm boven de elleboog te worden
aangebracht met de slang aan de binnenkant van
de arm. De patiënt moet de arm tijdens de meting
op dezelfde hoogte houden als het hart.
Verdere instructies voor het doen van een correcte
*
bloeddrukmeting zijn te vinden op www.watchbp.nl.
65
NL
Page 66

3) De meting starten – Druk op de knop ON/OFF om
SYS
mmHg
DIA
mmHg
PUL
/min
de meting te starten.
4) Tijdens de meting – De manchet wordt
automatisch opgeblazen. Een enkele meting
wordt voltooid bij elke druk op de knop ON/OFF.
66
5) De meting voltooien – Zodra de meting voltooid is,
worden de meetgegevens automatisch opgeslagen
zodat ze later door de arts kunnen worden
bestudeerd. Als er na de metingen een foutmelding
verschijnt, moet de procedure worden herhaald.
6) Meetgegevens opslaan – De WatchBP O3 slaat
elk meetresultaat automatisch op, samen met de
meetdatum en -tijd. In totaal kunnen 250 metingen
worden opgeslagen in «CASUAL» modus.
250
Measurements
Page 67

AMBULATORY HOME CASUAL
Meetresultaten bekijken, verwijderen en overdragen
Metingen bekijken
1) Gebruik de modusschakelaar om het eerste soort
meting te selecteren dat u wilt bekijken.
2) Druk op de knop M.
In de modus «AMBULATORY»
1) Als de knop M wordt ingedrukt, wordt het totale
aantal opgeslagen metingen kort getoond,
bijvoorbeeld N=20.
«A» wordt getoond indien
*
het weergegeven getal
het gemiddelde is van alle
gegevens.
«- -» wordt getoond als het
*
aantal metingen kleiner is
dan 12.
67
NL
Page 68

2) Als u nogmaals op de knop M drukt, wordt het
gemiddelde voor alle waakuren getoond.
3) Als u nogmaals op de knop M drukt, wordt het
gemiddelde voor alle nachturen getoond.
In de modus «HOME»
1) Als de knop M wordt ingedrukt, wordt het totale
aantal opgeslagen metingen kort getoond,
bijvoorbeeld N=20.
Alle afzonderlijke meetwaarden kunnen worden bekeken door
*
herhaaldelijk op de knop M te drukken.
De weergave van de bloeddrukwaarde en het geheugen in de
*
modus Ambulatory kan via de software worden uitgeschakeld.
68
«A» wordt getoond
*
indien het weergegeven
getal het gemiddelde is
van alle gegevens.
«- -» wordt getoond als
*
het aantal metingen
kleiner is dan 12.
Page 69

Meetresultaten bekijken, verwijderen en overdragen (vervolg)
2) Als u nogmaals op de knop M drukt, wordt het
gemiddelde van alle ochtendgegevens getoond.
3) Als u nogmaals op de knop M drukt, wordt het
gemiddelde van alle avondgegevens getoond.
Alle afzonderlijke meetwaarden kunnen worden bekeken door
*
herhaaldelijk op de knop M te drukken.
In de modus «CASUAL»
1) Als op de knop M wordt gedrukt, wordt het
totale aantal opgeslagen metingen kort
getoond (bijvoorbeeld N=63), onmiddellijk
daarna gevolgd door het gemiddelde van alle
metingen die in het geheugen zijn opgeslagen.
2) Alle afzonderlijke meetwaarden kunnen
worden bekeken door herhaaldelijk op de knop
M te drukken.
Afzonderlijke
meetwaarde
69
NL
Page 70

Meetwaarden wissen
AMBULATORY HOME CASUAL
AMBULATORY HOME CASUAL
Meetwaarden, opgeslagen in de modus
«AMBULATORY», «HOME» en «CASUAL», kunnen
afzonderlijk worden gewist.
1) Gebruik de modusschakelaar om het eerste
soort meting te selecteren dat u wilt wissen.
2) Druk op de knop M en houd deze ingedrukt
totdat het CL-symbool knippert.
3) Laat de knop M los en druk deze nogmaals in
terwijl het wissymbool knippert.
Indrukken
en ingedrukt
houden
70
Stand-by-modus
Bij elke wisactie worden alle records van elke modus gewist.
*
Page 71

Meetresultaten bekijken, verwijderen en overdragen (vervolg)
AMBULATORY HOME CASUAL
AMBULATORY HOME CASUAL
Meetwaarden overdragen
1) Sluit het apparaat aan op de computer. Als de
verbinding in orde is, wordt «PC» aangegeven op
het display van het apparaat.
2) Start het softwareprogramma.
3) Om de gegevens van alle drie de modi en de
medicatiegegevens over te sturen, klikt u op
«Download BP data to PC» (BP-gegevens naar
de pc downloaden).
Softwarecommando's
Gegevens
bewaren
Klik op «Save» (Opslaan); de
bestandsnaam wordt automatisch
opgesteld aan de hand van het
identiteitsnummer van de patiënt
en de suffix «WatchBPO3_(date).
xls».
De gegevens
bekijken
De geheugens
wissen
Het programma
Klik op «Open Excel file»
(Excel-bestand openen)
Klik op «Clear Memory» (Geheugen
leegmaken)
Klik op «Exit» (Afsluiten)
sluiten
Trek de usb-kabel uit de pc en breng deze weer aan als de software
*
u daartoe instructie geeft.
Het programma zal vragen om de datum/tijd van het apparaat te
*
synchroniseren met de instellingen van de pc.
Sla uw gegevens op voordat u op «Clear Memory» of «Exit» klikt.
*
Systeemeisen: 550MHz CPU. 256MB geheugen, resolutie: 1024x768
*
pixels, 256 kleuren, cd-romspeler, 1 vrije usb-poort, 40MB vrije
schijfruimte, Microsoft Windows XP / Vista.
71
NL
Page 72

Appendix
Batterij-indicator
Als er batterijen in het batterijvak worden geplaatst,
worden het batterijsymbool en een getal getoond
om de status van de batterij aan te geven. Vervang
de batterijen voor een ambulante meting als het
getal 50 of lager is.
Als de batterijen nog een ¼ van hun oorspronkelijke
lading hebben, knippert het batterijsymbool elke
keer als het apparaat wordt ingeschakeld.
72
Lege batterijen vervangen
Als de batterijen moeten worden vervangen, knippert
het batterijsymbool elke keer als het apparaat wordt
ingeschakeld.
1) Open het batterijvak aan de achterzijde van het
apparaat.
2) Vervang de batterijen (let op de juiste positie, zoals
aangegeven door de symbolen in het batterijvak).
Gebruik vier nieuwe AAA-batterijen van 1,5V met een lange
*
levensduur.
Gebruik geen batterijen waarvan de gebruiksdatum is verstreken.
*
Verwijder de batterijen als u het apparaat gedurende lange tijd niet
*
gebruikt.
Page 73

Veiligheid, onderhoud, nauwkeurigheidstest en verwijderen
Veiligheid en bescherming
Dit apparaat mag alleen voor de doeleinden worden
gebruikt die in dit boekje worden genoemd. Het
apparaat bevat gevoelige onderdelen en moet
voorzichtig worden behandeld. De fabrikant kan
niet aansprakelijk worden gesteld voor schade
veroorzaakt door onjuist gebruik.
Pas op dat kinderen het apparaat niet zonder
•
toezicht gebruiken; sommige onderdelen zijn zo
klein dat ze kunnen worden ingeslikt.
Gebruik de pomp alleen als de manchet is
•
bevestigd.
Gebruik het apparaat niet als u denkt dat het
•
beschadigd is of als u iets ongewoons bespeurt.
Lees de verdere veiligheidsinstructies in de
•
afzonderlijke gedeelten van de handleiding.
Sluit het apparaat pas aan op een computer
•
wanneer de software hierom vraagt.
Neem de voorschriften voor opslag en gebruik
in acht zoals beschreven onder “Technische
gegevens” in deze handleiding.
Stel het apparaat niet bloot aan water of vocht
Stel het apparaat niet bloot aan rechtstreekse
zonnestraling
Stel het apparaat niet bloot aan extreme hitte
of kou
Houd het apparaat uit de buurt van
elektromagnetische velden, zoals die welke
worden veroorzaakt door mobiele telefoons
Maak het apparaat nooit open
Stel het apparaat niet bloot aan schokken en
laat het niet vallen
73
NL
Page 74

Onderhoud
Maak het apparaat schoon met een
zachte, droge doek.
Reinigen van de manchet en de banden
Gebruik een mild ontsmettingsmiddel om het zakje,
de banden de mitella en de riem te reinigen. Gebruik
om deze artikelen en de manchet in een wasmachine
te wassen een manchetplug (artikel #90- 273MZ11-
004) om de binnenzijde van de blaas droog te houden.
Vouw en plaats de manchet binnen in een waszak.
Was deze artikelen met warm water en een mild
wasmiddel. Laat de manchet aan de lucht drogen.
Strijk de hoes van de manchet NIET.
De manchet niet strijken!
Nauwkeurigheidstest
Wij bevelen aan, de WatchBP O3 elke twee jaar of na
een mechanische schok (bijvoorbeeld na een val)
op nauwkeurigheid te laten testen. Neem contact
op met Microlife om een nauwkeurigheidstest af te
spreken.
74
Verwijderen
Batterijen en elektronische instrumenten
moeten worden verwijderd met inachtneming
van de plaatselijk geldende voorschriften en
mogen niet als huisvuil worden behandeld.
Page 75

Foutmeldingen
Indien er tijdens het meten een fout optreedt,
wordt de meting onderbroken en wordt de
foutmelding «Er» getoond.
Neem contact op met uw dokter
•
als dit of een ander probleem
herhaaldelijk optreedt.
Bent u van mening dat de
•
resultaten ongewoon zijn,
lees deze handleiding dan
aandachtig door.
Fout Omschrijving Mogelijke oorzaak en
oplossing
«Er 1»
Signaal te
zwak
De trilsignalen van de
manchet zijn te zwak.
Verander de positie van
de manchet en herhaal
de meting.
«Er 2»
Foutsignaal
Tijdens de meting
zijn foutsignalen
gedetecteerd door de
manchet, bijvoorbeeld
als gevolg van een
beweging of het
aanspannen van een
spier. Herhaal de
beweging en zorg
dat de arm stil wordt
gehouden.
75
NL
Page 76

«Er 3»
«Er 5»
76
Geen druk in
de manchet
Abnormaal
resultaat
Er kan geen juiste druk
in de manchet worden
opgebouwd. Wellicht is
er sprake van een lek.
Vervang zonodig de
batterijen. Herhaal de
meting.
De meetsignalen zijn
niet accuraat waardoor
er geen resultaat kan
worden getoond.
Raadpleeg de checklist
voor het doen van
betrouwbare metingen
en herhaal de meting.
«HI»
«LO»
Polsfrequentie
of manchetdruk te hoog
Polsfrequentie
te laag
De druk in de manchet
is te hoog (meer dan
300 mmHg) OF de
polsfrequentie is te
hoog (meer dan 200
slagen per minuut).
Laat de patiënt zich 5
minuten ontspannen
en herhaal daarna de
meting.
De polsfrequentie is te
laag (minder dan 40
slagen per minuut).
Herhaal de meting.
Page 77

Technische gegevens
Bedrijfstemperatuur:
Opslagtemperatuur:
Gewicht:
Afmetingen:
Meetmethode:
Meetbereik:
Weergave
manchetdruk:
10 - 40 °C / 50 - 104 °F
•
15 – 85 % relatieve maximale
•
vochtigheid
-20 - +50 °C / -4 - +122 °F
•
15 - 90 % relatieve maximale
•
vochtigheid
260g (inclusief batterijen)
•
115 x 80 x 35 mm
•
Oscillometrisch, volgens Korotkoff
•
30 - 280 mmHg – bloeddruk
•
40 - 200 slagen per minuut – pols
•
Bereik: 0 - 299 mmHg
•
Resolutie: 1 mmHg
•
Statische nauwkeurigheid: druk
•
binnen ±3 mmHg
Polsslagnauwkeurigheid: ± 5% van de
•
uitleeswaarde
Voeding:
Relevante normen:
4X1.5 V batterijen; grootte AAA
•
EU-richtlijnen 93/42/EEC
•
NIBP-vereisten:
•
EN 1060-1 / -3/ -4,
EN 60601-2-30,
ANSI /AAMI SP10
Microlife behoudt zich het recht voor, technische
gegevens zonder voorafgaande schriftelijke
mededeling te wijzigen.
77
NL
Page 78

Garantiekaart
Op dit apparaat wordt twee jaar garantie
verleend, gerekend vanaf de aankoopdatum.
Deze garantie wordt alleen verleend indien
de eigenaar de garantiekaart met daarop
de aankoopdatum, of de garantiekaart
samen met de aankoopbon kan overleggen.
Batterijen en slijtende onderdelen vallen niet
onder deze garantie.
Product: WatchBP O3
Productnummer: 3MZ1-1
Serienummer:
Datum:
78
Naam:
Adres:
Datum:
Telefoon:
E-mail:
Page 79

MAPA asequible y AMPA
basada estrictamente en las
directrices para la medición
exacta de la presión arterial
fuera de consulta.
Manual de Instrucciones
ES
79
79
ES
Page 80

Microlife WatchBP O3 (Out Of Office / fuera de consulta) ha sido diseñado para proporcionar
lecturas fiables y objetivas en la medición ambulatoria y la automedición de la presión
arterial siguiendo estrictamente las recomendaciones de la Sociedad Europea de
Hipertensión (SEH) y la Asociación Americana del Corazón (AHA) para la medición de la
1
presión arterial fuera de consulta
. El aparato WatchBP O3 ha sido validado clínicamente de
acuerdo con el protocolo de la SEH.
1
O’Brien E, Asmar R, Beilin L, Imai Y, y col. Recomendaciones de la Sociedad Europea de Hipertensión para la medición convencional, ambulatoria y
domiciliaria de la presión arterial. Sociedad Europea de Hipertensión Grupo de Trabajo en la Monitorización de la Presión Arterial. J Hypertens 2003;21:821-
848.
Page 81

Índice
Descripción del producto
Denominación de piezas y pantalla ...............82-83
Antes de usar WatchBP O3 por primera vez
Activar el aparato ................................................ 84
Confirmar el tamaño del brazalete ...................... 85
Seleccionar el modo de operación
Modo «AMBULATORY» (Ambulatorio) .......... 86-88
Modo «HOME» (Casa) .................................... 88-90
Modo «CASUAL» ..................................................91
Registrar la toma de medicación
Registro de la medicación ............................. 92-93
Programación de los intervalos de medición
Instalación del programa de software ................ 94
Conectar el aparato al ordenador......................... 94
Programar los horarios de medición .................... 95
Tomar mediciones de la presión arterial
Modo «AMBULATORY» (Ambulatorio) ..........96-100
Modo «HOME» (Casa) .................................101-102
Modo «CASUAL» .........................................103-104
Ver, borrar y transferir lecturas
Ver lecturas ..................................................105-107
Borrar lecturas ....................................................108
Transferir lecturas ...............................................109
Apéndice
Pilas y adaptador de corriente ..........................110
Seguridad, cuidado, prueba de precisión y
eliminación .................................................111-112
Mensajes de error .......................................113-114
Especificaciones técnicas ...................................115
ES
Page 82

SYS
mmHg
DIA
mmHg
PUL
/min
AMBULATORY HOME CASUAL
ERP NO.3MZ1-1
Microlife AG, 9443 Widnau / Switzerland
www.watchbp.com
Batteries:4xAAA 1.5VDC
SN:WWYXXXXX
Patent Pending
Descripción del producto
Denominación de las piezas
Enchufe para
brazalete
82
Puerto USB
Selector de
modo
Botón M
(Memoria)
Pantalla
Botón Medicación
Botón de
Encendido/
Apagado
Compartimento de
pilas
Page 83

Pantalla
Indicación de modo
Símbolo de médico
Fuera del tiempo de medición
Relajación
Indicador de pilas
Valor guardado
Tiempo restante hasta la
próxima medición automática
Datos de mañana
Datos de tarde
Fecha/Hora
Valor sistólico
Valor diastólico
Indicador del pulso
Frecuencia del pulso
Número de datos almacenados
83
ES
Page 84

SYS
mmHg
DIA
mmHg
PUL
/min
Antes de usar WatchBP O3 por primera vez
ERP NO.3MZ1-1
Activar el aparato
Retire la tira protectora del compartimento de pilas.
2) Ajustar el mes – Use el botón M para ajustar el
mes. Pulse el botón de Encendido/Apagado para
1) Ajustar el año – Después de retirar la tira
protectora o de instalar pilas nuevas, el número
del año parpadea en la pantalla. Use el botón
M para seleccionar el año. Pulse el botón de
Encendido/Apagado para confirmar su selección.
El botón M sirve para seleccionar
El botón de Encendido/Apagado
sirve para confirmar
confirmar.
3) Ajustar el día – Pulse el botón M para ajustar el
día. Pulse el botón de Encendido/Apagado para
confirmar.
84
Page 85

4) Ajustar la hora – Una vez que haya ajustado
la hora y los minutos y pulsado el botón de
Encendido/Apagado, la fecha y la hora están
puestas y se visualiza la hora actual.
5) Para cambiar la fecha y la hora, extraiga
brevemente una pila del compartimento de pilas y
vuelva a colocarla. Parpadeará el número del año.
Finalice el procedimiento tal como se ha descrito
anteriormente.
Confirmar el tamaño del brazalete
Para el monitor WatchBP O3 están disponibles
diferentes tamaños de brazalete.
por favor, use únicamente brazaletes Microlife!
*
M (tamaño medio)
22 - 32 cm (8.7 - 12.6 pulgadas)
M es el tamaño correcto para la mayoría de la
gente.
L (tamaño grande)
32-42 cm (12.6-16.5 pulgadas)
85
ES
Page 86

AMBULATORY HOME CASUAL
AMBULATORY HOME CASUAL
AMBULATORY HOME CASUAL
Seleccionar el modo de operación
AMBULATORY HOME CASUAL
AMBULATORY HOME CASUAL
AMBULATORY HOME CASUAL
Antes de cada medición, use el Selector de Modo
situado en el lateral del aparato para seleccionar el
modo de medición apropiado. WatchBP O3 ofrece tres
modos de medición: «AMBULATORY» (Ambulatorio),
«HOME» (Casa) y «CASUAL».
Modo «AMBULATORY» (Ambulatorio)
Seleccione el modo «AMBULATORY» (Ambulatorio)
para una medición de 24 horas totalmente
programable de la presión arterial del paciente fuera
de consulta.
86
Page 87

Intervalos de medición programables
El aparato toma automáticamente mediciones
en intervalos fijados en 15, 20, 30, ó 60 minutos,
según esté programado por el médico.
Ajustar las horas de vigilia y de sueño
Para una mejor adaptación al ritmo de vida de cada
paciente, las horas de vigilia y de sueño pueden
programarse usando el software suministrado para
WatchBP O3. Los intervalos para las horas de vigilia
y las horas de sueño también pueden programarse
independientemente entre sí.
15
30
minutes
20
El intervalo de medición por defecto es de 30 minutos
*
para las horas de vigilia y de 60 minutos para las horas de
sueño.
60
Setting Ambulatory Measurement Schedule
Awake from with minutes interval06 AM 10 PM 30~
Asleep from with minutes interval10 PM 06 AM 60~
87
ES
Page 88

AMBULATORY HOME CASUAL
AMBULATORY HOME CASUAL
Seleccionar el modo de operación (cont.)
Dos períodos de medición
El período de medición para las horas de vigilia
puede programarse de tal manera que comience en
cualquier momento entre las 4:00 y las 10:00 h de
la mañana, y el período de medición para las horas
de sueño puede ajustarse a cualquier hora entre las
21:00 h de la noche y las 2:00 h de la madrugada. Los
intervalos de medición pueden ajustarse en 15, 20,
30 ó 60 minutos tanto para el período de vigilia como
para el período de sueño.
88
Modo «HOME» (Casa)
Seleccione el modo «HOME» (Casa) para la medición
de la presión arterial del paciente en casa de
acuerdo con las directrices de la Sociedad Europea
de Hipertensión (SEH) y la Asociación Americana del
Corazón (AHA).
Page 89

No tomar mediciones en días no laborables
El paciente debe realizar mediciones durante 7
días laborables (o días normales de la semana)
consecutivos. ¡ En este modo no deben tomarse
mediciones en «días no laborables» (o días
especiales de descanso)!
Dos series de medición por día
Las directrices de la SEH recomiendan tomar una
medición doble por la mañana entre las 06:00 y 09:00
h y una medición doble por la tarde entre las 18:00 y
21:00 h.
JAN
30
7
working
days
X1
06:00 – 09:00
X1
18:00 – 21:00
89
ES
Page 90

Seleccionar el modo de operación (cont.)
Período de medición extendido
El aparato WatchBP O3 ofrece un período de
medición extendido permitiendo mediciones entre
las 04:00 y 12:00 h de la mañana y las 18:00 y 24:00
h de la noche.
Fuera de estos
períodos de tiempo
no es posible
tomar mediciones
y en la pantalla
se visualizará el
símbolo que figura a
la izquierda.
90
Evaluación
Una vez que se hayan llevado a cabo mediciones
durante un total de 7 días laborables, el paciente
vuelve a acudir a la consulta llevando el monitor
WatchBP O3 para la evaluación de los datos de la
medición domiciliaria de su presión arterial.
Tras llevar a cabo
mediciones durante
7 días, parpadeará
en la pantalla el
símbolo de Médico.
Page 91

AMBULATORY HOME CASUAL
Modo «CASUAL»
En el modo «CASUAL», el aparato funciona como
un monitor de presión arterial normal - las lecturas
individuales son almacenadas automáticamente
pudiendo ser consultadas posteriormente por el
médico.
Anytime
250 lecturas almacenadas de un modo seguro
El aparato WatchBP O3 es capaz de almacenar hasta
250 lecturas individuales en el modo «CASUAL».
Cuando esté llena la memoria, cada nueva lectura
*
sobreescribirá automáticamente la lectura más antigua.
250
Measurements
91
ES
Page 92

SYS
mmHg
DIA
mmHg
PUL
/min
Registrar la toma de medicación
Registro de la medicación
El paciente puede registrar la hora para la toma de
medicación pulsando el botón Medicación.
1) Mantenga pulsado el botón Medicación durante 2
segundos y aparecerá el ícono de Píldora.
Mantener
presionado
durante 2
segundos...
El registro de medicación es posible en cualquiera de los tres
*
modos.
92
2) Suelte el botón Medicación y el ícono de Píldora
parpadeará alternando con la hora registrada.
Mantener pulsado
3) El registro de medicación queda guardado tras
sonar un pitido.
Guardado
El avisador acústico puede desactivarse a través del software.
*
Page 93

50 lecturas almacenadas de un modo seguro
El aparato WatchBP O3 es capaz de almacenar hasta
50 registros de medicación.
* Cuando esté llena la memoria, el aparato visualizará "Full".
Borrar registros de medicación almacenados
Para borrar todos los registros de medicación de la
memoria, mantenga pulsado el botón Medicación
durante 7 segundos. Parpadeará el símbolo “CL”
. Pulse M para borrar la memoria o el botón de
Encendido/Apagado para cancelar el borrado .
Mantener
presionado
durante 7
segundos...
Pulsando el botón M se borrarán todos los datos de medicación
*
registrados en el modo seleccionado.
93
ES
Page 94

Programación de los intervalos de medición
©
2
0
0
8
M
i
c
r
o
l
i
f
e
C
o
r
p
o
r
a
t
i
o
n
.
A
l
l
R
i
g
h
t
s
R
e
s
e
r
v
e
d
.
System Requirements: 550MHz CPU. 256MB Memory, 1024x768
pixel resolution, 256 color, CD-ROM drive, 1 free USB port, 40MB
free hard disk space, Microsoft Windows 2000 / XP / Vista.
Install CD
WatchBP Analyzer O3
Version 1.0.2.7
AMBULATORY HOME CASUAL
AMBULATORY HOME CASUAL
Instalar el programa de software
1) Introduzca el CD en la unidad de CD-ROM de su
ordenador. Alternativamente, pinche en «setup.
exe» en el directorio del CD.
2) Simplemente, siga las instrucciones facilitadas
en la ventana de instalación en la pantalla del
ordenador.
3) Una vez finalizada la instalación, reinicie el
ordenador antes de usar el programa por primera
vez.
Reinicie su
ordenador
94
Instalación
Conectar el aparato a un ordenador
1) Conecte el aparato al ordenador. Si la conexión se
ha realizado correctamente, se visualiza «PC» en
el aparato.
2) Inicie el programa de software.
3) Introduzca el nombre, el número de identidad y la
fecha de nacimiento para crear un nuevo registro
(si se requiere).
Page 95

Programar los horarios de medición
1) Usando el menú desplegable abajo a la izquierda
en la pantalla, seleccione una hora entre las 4:00 y
10:00 h como inicio del período de vigilia.
3) Asigne los intervalos de medición para las horas de
vigilia y de sueño seleccionando como intervalo
de medición 15, 20, 30 ó 60 minutos, a través del
menú desplegable.
Awake from 06 AM 10 PM~
2) Usando el menú desplegable abajo a la izquierda
en la pantalla, seleccione una hora entre las 21:00
y 2:00 h como inicio del período de sueño.
Asleep from 10 PM 06 AM~
152030
minutes
60
4) Una vez finalizados los ajustes, pulse “Enviar
programación al aparato BP” para programar los
ajustes en el aparato.
Program to BP device
minutes interval15
20
30
60
95
ES
Page 96

Tomar mediciones de la presión arterial
AMBULATORY HOME CASUAL
En el modo «AMBULATORY» (Ambulatorio)
Compruebe que el aparato se encuentre en el modo
«AMBULATORY» (Ambulatorio).
1) Preparar el brazo de medición – Quite cualquier
prenda que cubra o apriete el brazo en el que
tome la medición.
No se deben
*
arremangar las
mangas largas, ya
que puede conducir
a la constricción del
flujo de sangre en al
brazo de medición.
96
2) Posicionar el brazalete y el aparato – Coloque
el brazalete de tal forma que esté ajustado, pero
que no quede demasiado apretado. Asegúrese de
que el brazalete se encuentre a 2~3 cm (1 pulgada)
por encima del codo con el tubo situado en el lado
interior del brazo. El tubo de medición debe apuntar
hacia arriba extendiéndose a través del hombro del
paciente.
2–3cm
Ajuste el soporte del tubo en la correa de la
*
bolsa de tal forma que quede posicionado
correctamente en el hombro. Fije el tubo al
soporte de tal manera que el tubo pase al
otro lado del cuerpo a través del hombro. Un
método alternativo es usar un cinturón.
Page 97

3) Colocación correcta del brazalete usando la
correa de sujeción
Opción 1: Use la cinta para el hombro a y la correa
de sujeción b para colocar el brazalete tal como está
representado en la figura de abajo.
Opción 2: Use la correa para el hombro c y la correa
de sujeción b para colocar el brazalete tal como está
representado.
a Cinta para el
hombro
b Correa de
sujeción
Instrucciones: Coloque la cinta para el hombro sobre
el hombro izquierdo. Inserte el aparato en la bolsa.
Sitúe el aparato en la parte frontal. Ponga el brazalete
en el brazo. Una la correa de sujeción con la cinta para
el hombro. Encaje el conector de la correa de sujeción
en el anillo en D del brazalete. Ajuste la longitud que
le resulte más cómoda.
c Correa para el
hombro
b Correa de
sujeción
Instrucciones: Coloque la correa para el hombro sobre
los dos hombros tal como se muestra en la figura.
Fije el aparato a un cinturón. Sitúe el dispositivo en la
parte frontal. Ponga el brazalete en el brazo.
Una la correa de sujeción con la correa para el
hombro. Encaje el conector de la correa de sujeción
en el anillo en D del brazalete. Ajuste la longitud que
le resulte más cómoda.
97
ES
Page 98

4) Indicación de la siguiente medición – El aparato
visualizará la hora de la siguiente medición
indicando en la pantalla una cuenta atrás en
minutos.
En la pantalla se visualizan X minutos de cuenta atrás
*
para indicar el tiempo que queda hasta la siguiente
medición automática.
98
5) Recordatorio de medición – Un minuto antes de
la siguiente medición programada, el aparato infla
el brazalete parcialmente y lo vuelve a desinflar
inmediatamente para recordarle al paciente la
medición inminente.
1 min
Reminder
Los recordatorios de
*
medición quedan
desactivados durante las
horas de sueño.
Page 99

Tomar mediciones de la presión arterial (cont.)
6) Recordatorio de medición – Cinco segundos
antes de la siguiente medición, el aparato emitirá
una breve serie de pitidos para avisar al paciente
de la medición inminente.
5 sec
Reminder
El avisador acústico del modo Ambulatory (Ambulatorio)
*
puede desactivarse a través del software.
El aparato no sonará antes de una
*
medición durante el período de
sueño en el modo «AMBULATORY »
(Ambulatorio).
7) Durante las mediciones hay que recordarle al
paciente que se esté quieto, no hable y respire
normalmente durante la medición. En caso de
estar conduciendo u operando maquinaria al
comenzar una medición, el paciente debe relajar
el brazo de medición siempre que le sea posible
de forma segura.
El paciente puede parar cualquier medición individual en
*
cualquier momento pulsando el botón de Encendido/Apagado.
99
ES
Page 100

8) Repetir mediciones en caso de error – El aparato
144
Measurements
repetirá la medición automáticamente al cabo
de una cuenta atrás de dos minutos en caso de
producirse un error durante la medición.
En caso de
producirse un
error se efectúa
automáticamente
una medición de
repetición.
Si la medición de repetición registrase un error, el aparato
*
dejará de tomar mediciones. En este caso, el paciente deberá
devolver el aparato al médico para determinar la causa del
error.
100
9) Guardar los datos de medición – WatchBP O3
guarda automáticamente cada lectura junto
con la fecha y la hora de medición. En el modo
«AMBULATORY» (Ambulatorio) se puede guarder
un total de 144 mediciones.
La visualización de la lectura de BP y la memoria del modo
*
Ambulatorio pueden desactivarse a través del software.
 Loading...