

Page 1

Instruction Manual of WatchBP Pro
© 2007 Microlife Corporation
Document: Instruction Manual of WatchBP Pro
Page 2

b
operational sequence
Actions LCD display Description Remark
* Power –Up the WatchBP
Pro
*Power –Up the Bluetooth
Locate the black power switch
z
on the back side.
Turn it on
z
The green indicator light on the
z
top right front of the WatchBP
Pro will illuminate and remain
lit.
Locate the silver BT switch
z
on the back side.
Turn it on
z
“Antenna” icon is flashing and
z
waiting for connection
Please refer to User’s guideline
z
for WatchBP Pro Middleware
*First time switch on
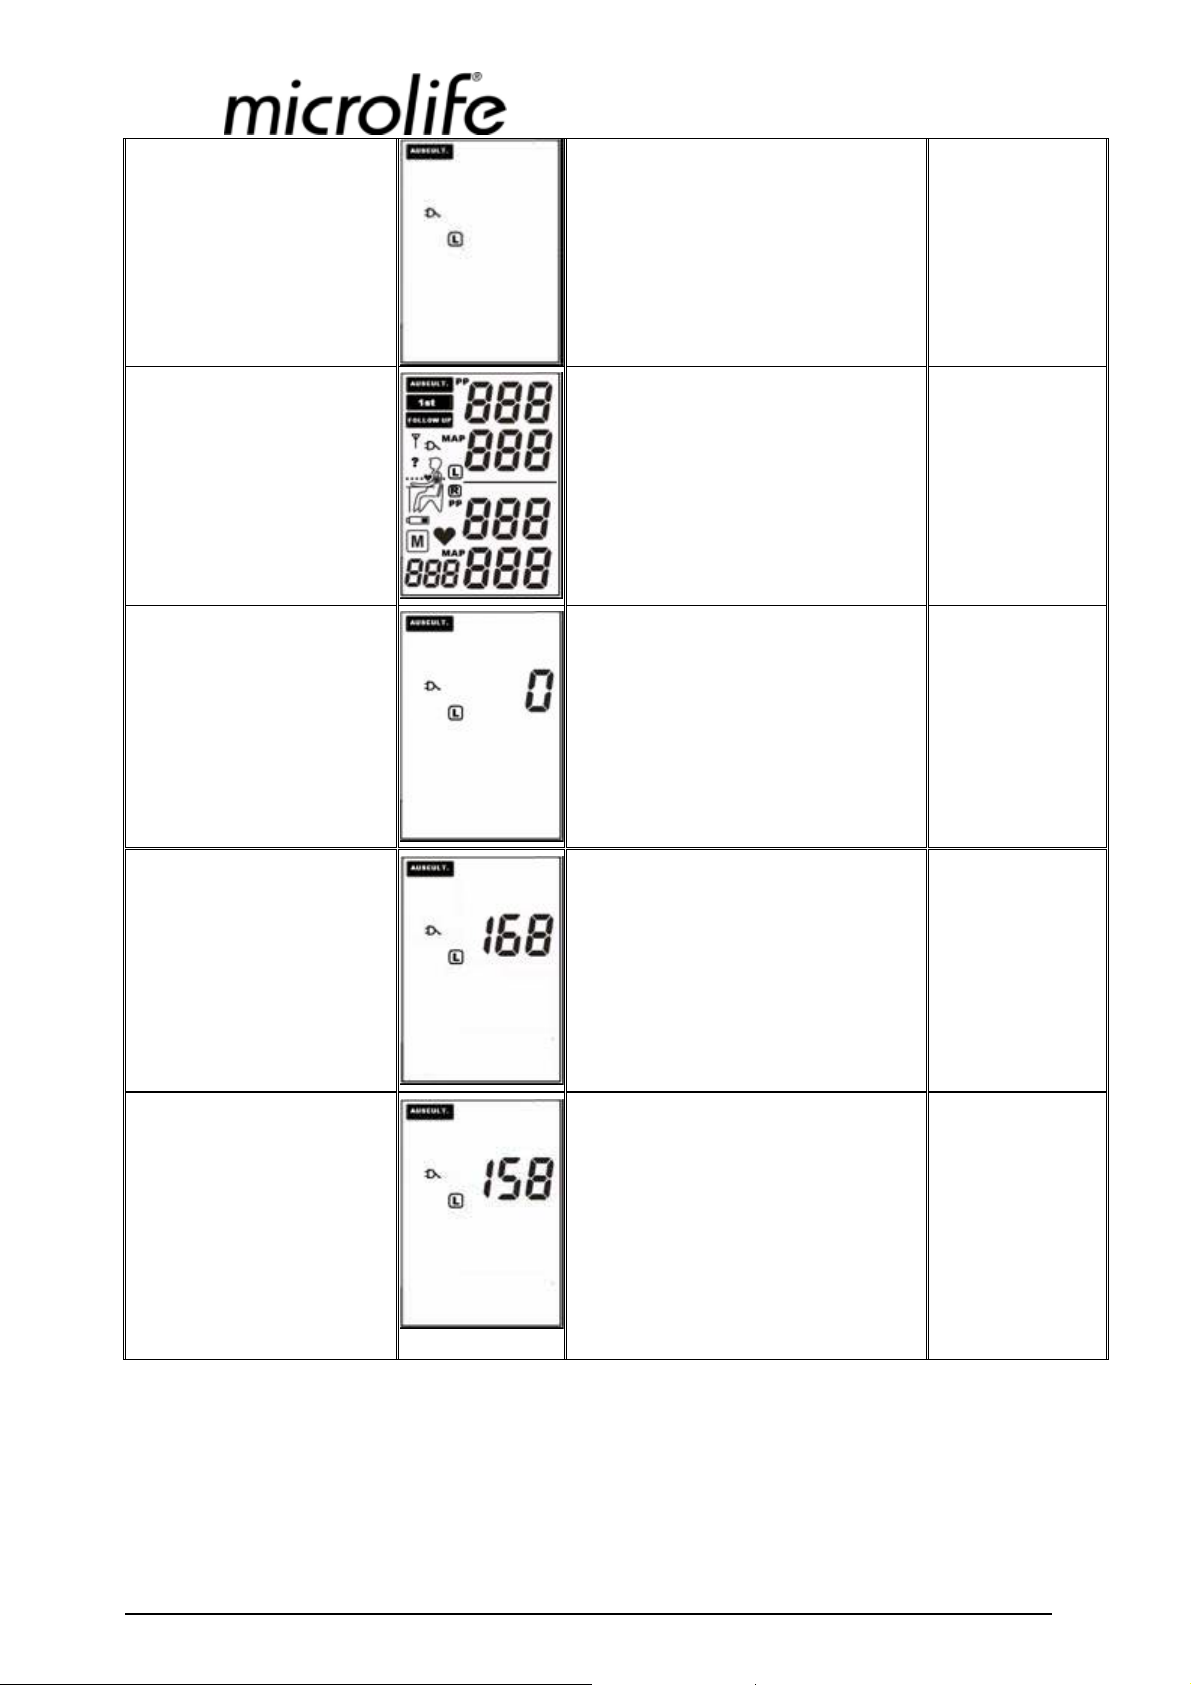
Auscultative Mode
z
(one time measurement, on left arm).
*Measuring mode selection
Switch on the O/I button at the
ack side of the unit, LCD full
segments display for 1 second
with backlight on
Mode switch to AUSCULT.,
z
device ready for measuring.
Plug icon shows on LCD if
z
7.5V, 2.0A adaptor is used.
© 2007 Microlife Corporation
Document: Instruction Manual of WatchBP Pro
Page 3
*Cuff connection
*Press Start/Stop button
*Auto zero reset
Binding left-arm cuff on your
z
left arm and place chest-piece
of stethoscope on your brachial
artery correctly.
LCD full segment displays for
z
2 seconds with backlight on
Display shows “0” when device
z
in auto zero reset.
5 short “B”s
z
* Fuzzy inflation
* Deflation
Pumping starts, and cuff
z
pressure increases to working
pressure (for fuzzy inflation).
Pumping stops, pressure in
z
deflation by 2~4 mmHg/sec.
© 2007 Microlife Corporation
Document: Instruction Manual of WatchBP Pro
Page 4
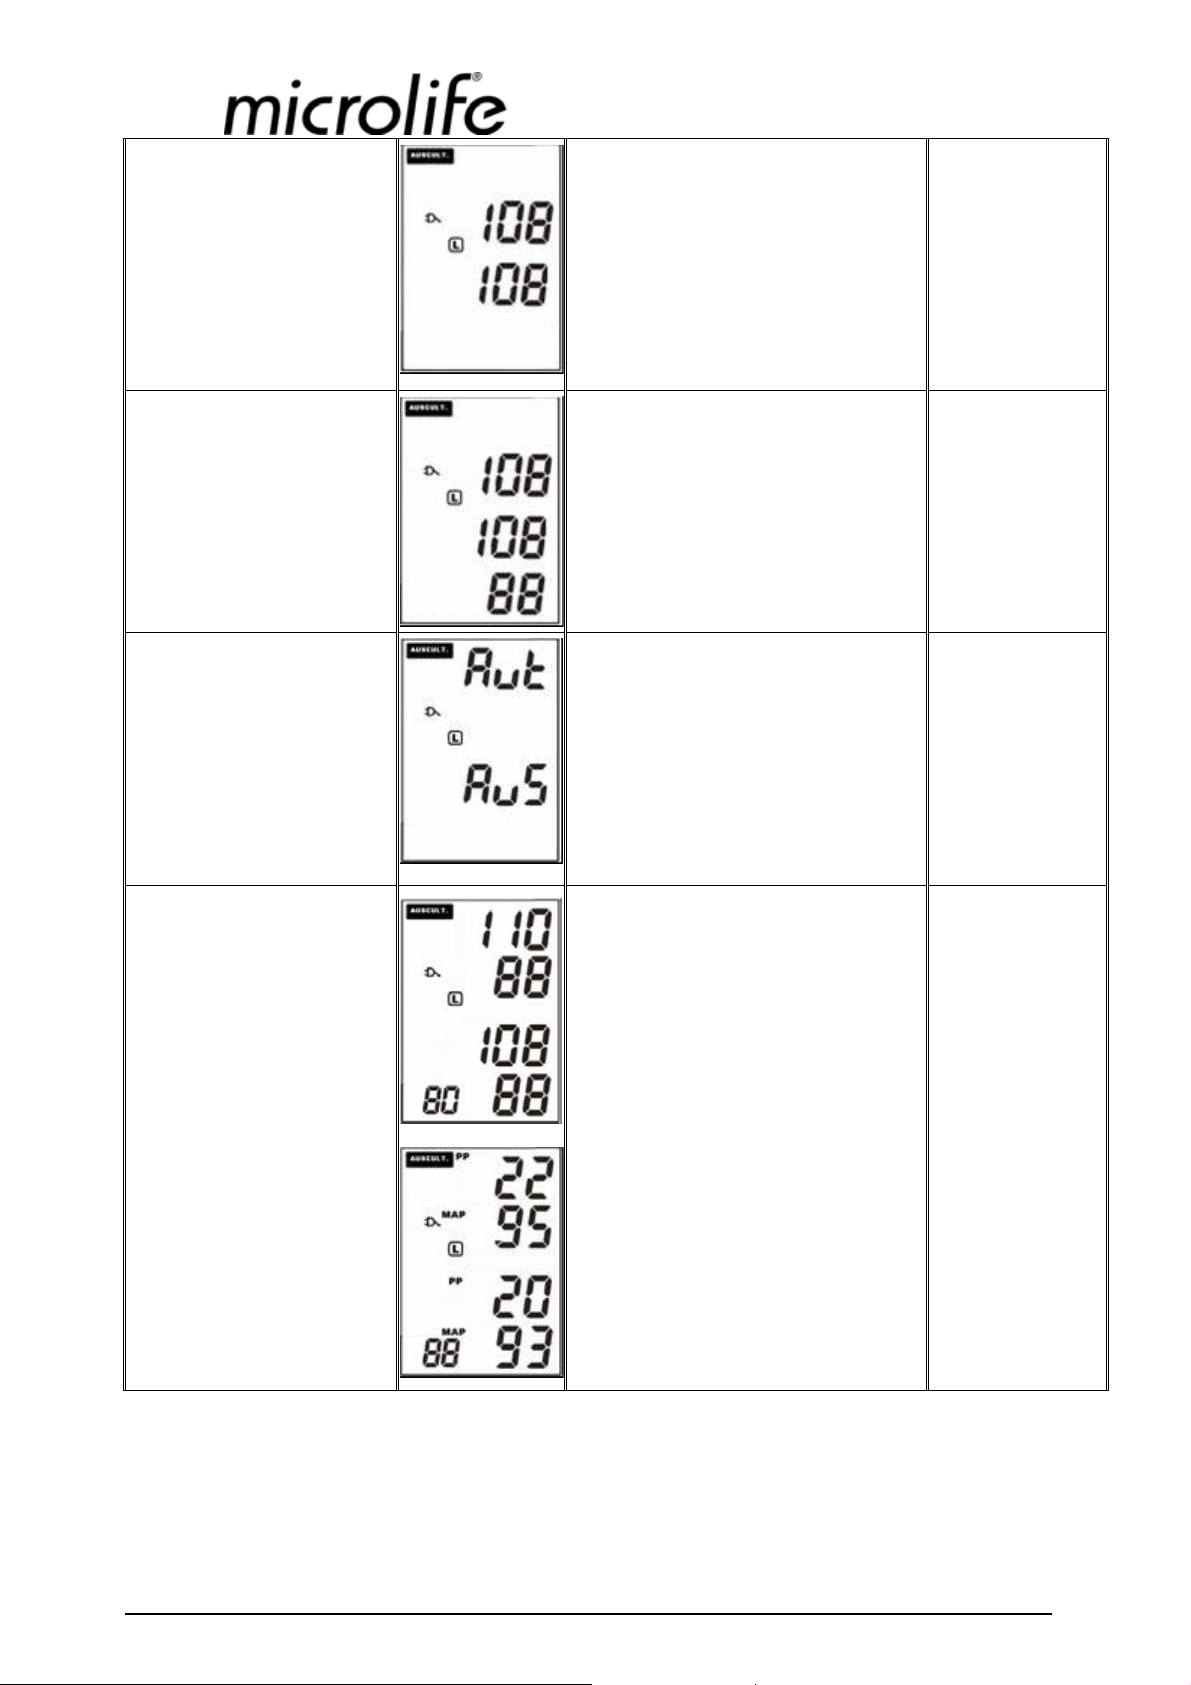
*Catch the SYS pressure.
*Catch the DIA pressure
* Measurement finishes
Press “M” button when a faint,
z
rhythmic tapping or thumping
sound is heard, which stands
for your SYS reading.
Press “M” button when your
z
diastolic reading reaches and
thumping sound stops, this is
DIA reading.
When measuring finishes, cuff
z
deflates completely and a long
beep sounds.
A long beep
z
*Display measured values
AUT (auto-measured result),
z
AUS (Aus-measured result)
display for about 2 sec with
backlight on simultaneously.
Device first displays of SP/DP,
z
followed by MAP & PP values.
SP/DP and MAP/PP values
z
display one after the other.
Backlight remains on 40 sec.
z
*Under auscult. mode, device auto
measures patient’s BP & pulse and
shows the results on the upper side
of LCD (AUT).
PP=SP-DP
z
MAP=
z
DP+1/3 PP
© 2007 Microlife Corporation
Document: Instruction Manual of WatchBP Pro
Page 5

b
b
*Memory reading
Device auto memorizes one set
z
of measured values. Press M
utton, LCD shows AUE/AUS,
then memory readings, with
backlight on simultaneously
Memory SP/DP and MAP/PP
z
displays one after the other.
Backlight remains on 40 sec.
z
z
*Withdraw from readings
First Visit mode
(3 times measurement in succession, on both arms).
*Measuring mode selection
*Cuff and blue tooth
Press Start/Stop button or put
z
the device untouched for 5’ to
terminate measurement display.
Mode switch to 1stand device
z
ready for measuring.
Binding left & right arm cuffs
z
z
connection
on your both arms correctly.
Push blue-tooth switch on the
z
ack side of device (ON/OFF
sculpted) to “ON” for computer
connection if remote control.
© 2007 Microlife Corporation
Document: Instruction Manual of WatchBP Pro
Page 6

*Press Start/Stop button or
remote control.
*60 sec count down before
measurement.
* Auto zero reset
LCD full segment displays for
z
1 second with backlight on
Beeper sounds 5 seconds before
z
the 1st measurement.
Press Start/Stop button or
z
remote control to skip over
count down and begin 1st turn
measuring immediately.
Display shows “0” for 2 sec
z
when device in auto zero reset.
5 short “B”s
z
5 short “Bs”
z
* First turn fuzzy inflation.
*First turn deflation.
Pumping starts & cuff pressure
z
increases to working pressure
(for fuzzy inflation).
Pumping stops, pressure in
z
deflation by 4~6 mmHg/sec.
© 2007 Microlife Corporation
Document: Instruction Manual of WatchBP Pro
Page 7
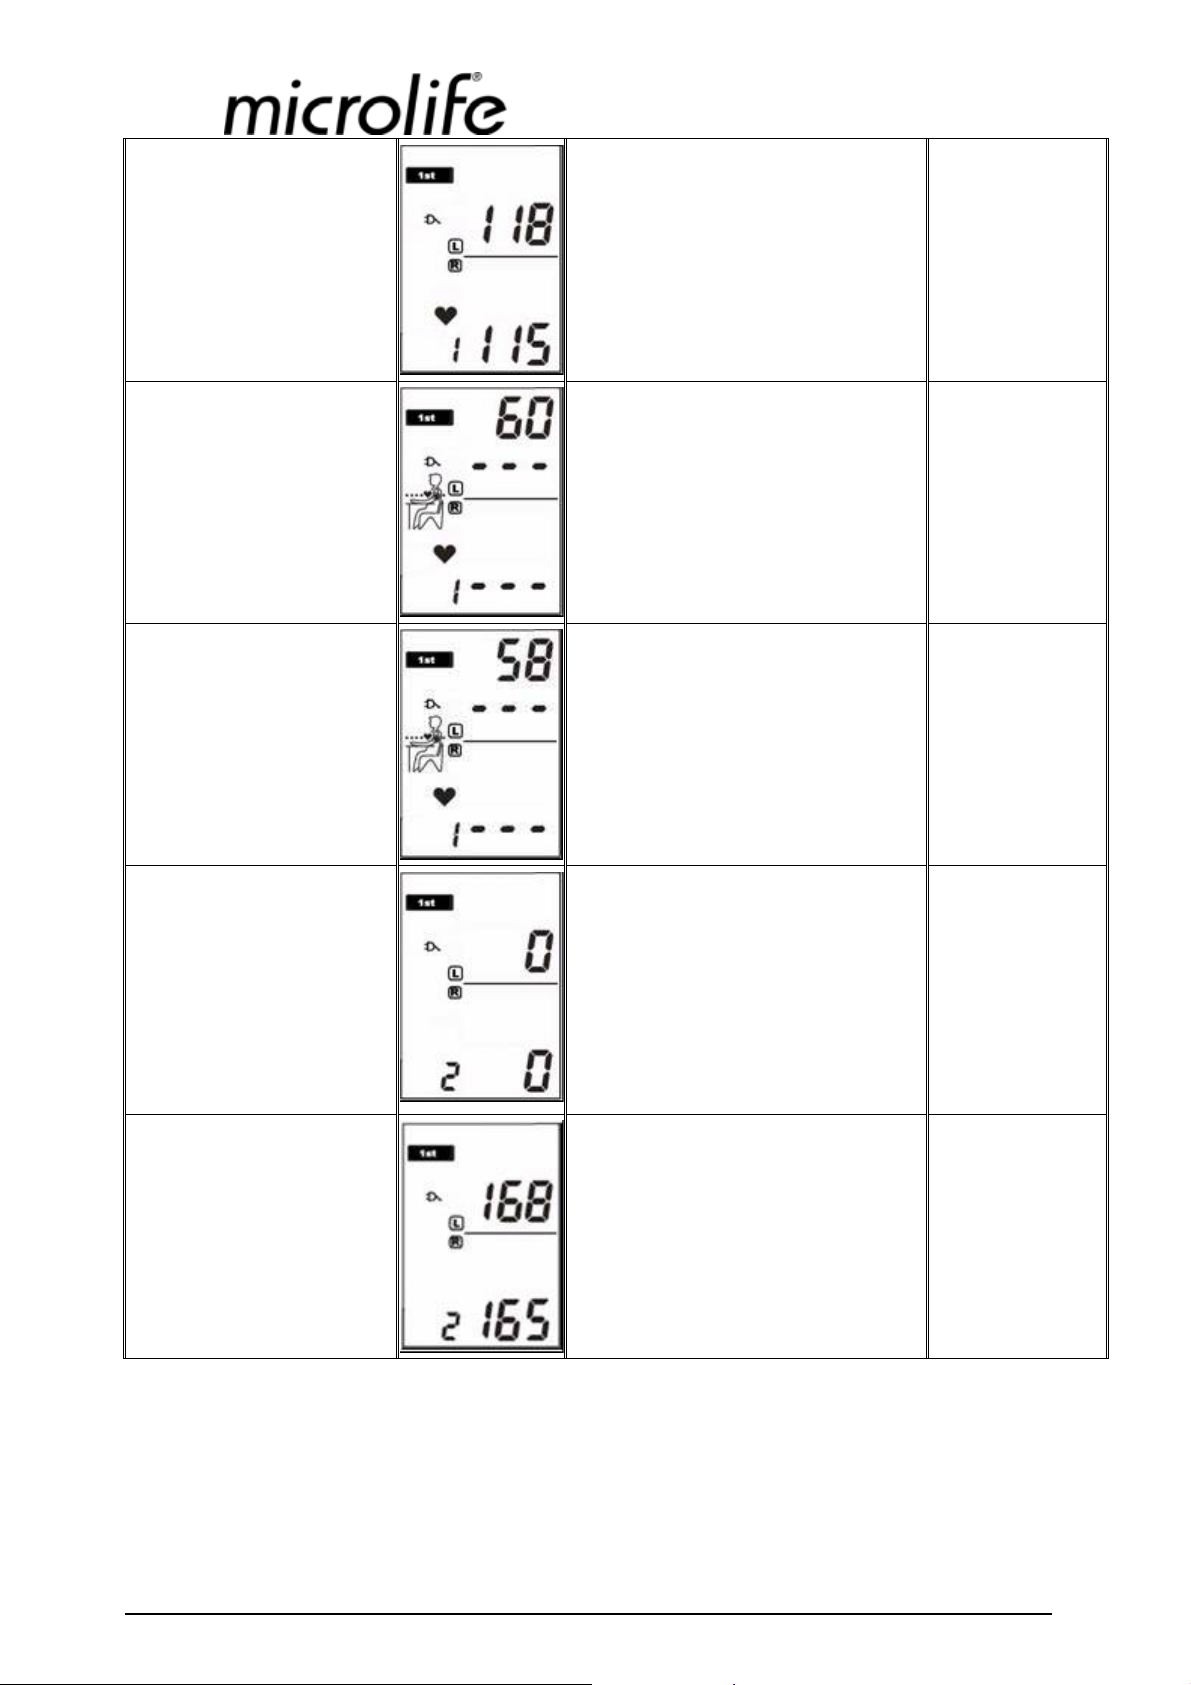
*Pulse detected
*First turn measurement
finishes
*60 sec count down
Detect the pulse, “♥” icon start
z
to flash and a beep is heard for
every heartbeat.
After first turn measuring, cuff
z
deflates completely, and a long
beeper sounds
After another two close beeps,
z
device comes into 60 sec count
down.
Beeper sounds 5 seconds before
z
the 2nd measurements.
Beeper each
z
pulse
A long “B”,
z
and 2 short
5 short “Bs”
z
* Auto zero reset
* 2nd turn fuzzy inflation.
Press Start/Stop button or
z
remote control to skip over
count down and begin 2nd turn
measuring immediately.
Display shows “0” for 2 sec
z
5 short “Bs”
z
when device in auto zero reset.
Pumping starts & cuff pressure
z
z
increases to working pressure
(for fuzzy inflation).
© 2007 Microlife Corporation
Document: Instruction Manual of WatchBP Pro
Page 8
*2nd turn deflation.
*Pulse detected
*2nd turn measurement
finishes
Pumping stops, pressure in
z
deflation by 4~6 mmHg/sec.
Detect the pulse, “♥” icon start
z
to flash and a beep is heard for
every heartbeat.
After 2ndturn measuring, cuff
z
deflates completely, and a long
beeper sounds
z
A beep each
z
pulse
A long “B”,
z
and 2 short
*60 sec count down
*Auto zero reset
After another two close beeps,
z
device comes into 60 sec count
down.
Beeper sounds 5 seconds before
z
the 2nd measurements.
Press Start/Stop button or
z
remote control to skip over
count down and begin 3rd turn
measuring immediately.
Display shows “0” for 2 sec
z
when device in auto zero reset.
5 short “Bs”
z
5 short “Bs”
z
© 2007 Microlife Corporation
Document: Instruction Manual of WatchBP Pro
Page 9

*3rd turn fuzzy inflation.
*3rd turn deflation.
*Pulse detected
Pumping starts & cuff pressure
z
increases to working pressure
(for fuzzy inflation).
Pumping stops, pressure in
z
deflation by 4~6 mmHg/sec.
Detect the pulse, “♥” icon start
z
to flash and a beep is heard for
A beep each
z
pulse
every heartbeat.
*The 3rd turn measuring
finishes
After 3
z
rd
turn measuring, cuff
deflates completely, and a long
beeper sounds
A long “B”.
z
© 2007 Microlife Corporation
Document: Instruction Manual of WatchBP Pro
Page 10

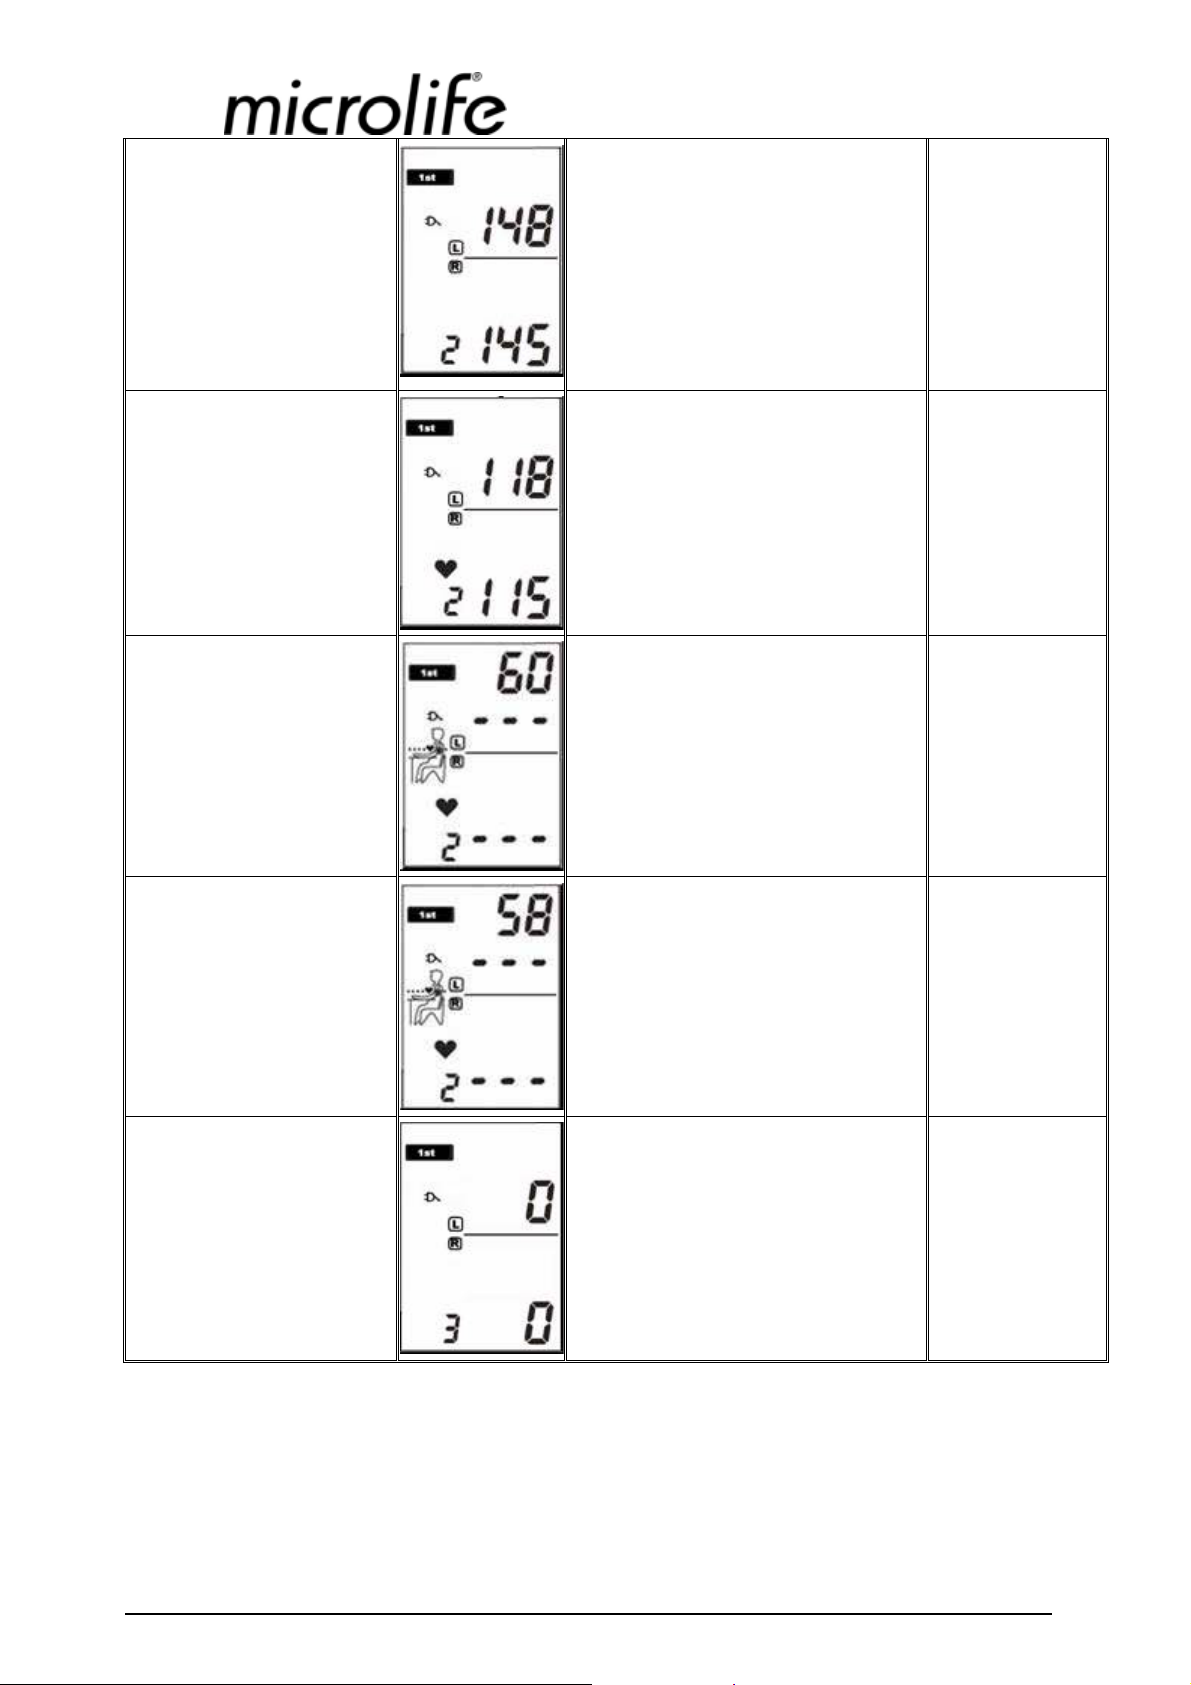
* Display of average values
LCD displays values averaged
z
from 3 times measurement with
backlight on simultaneously.
Left arm BP values will flash 5
z
times by default if difference
between L and R values are less
than 10 mmHg, otherwise, the
higher (L or R) flashes 5 times.
Display of SP/DP, following
z
which, MAP & PP shows on.
SP/DP and MAP/PP values
z
display one after the other till
device auto off.
Backlight remains on 40 sec.
z
*Data transmission.
*Memory reading--average
values display.
Through blue tooth, measured
z
values are submitted to
computer for further analysis.
Device auto memorizes 3 times
z
measured values and their
average readings.
Press M button, LCD shows an
z
“A” then average readings,
with backlight on
simultaneously
Averaged SP/DP and MAP/PP
z
displays one after the other.
Backlight remains on 40 sec.
z
© 2007 Microlife Corporation
Document: Instruction Manual of WatchBP Pro
Page 11

* Memory reading--3rd turn
measured values display.
Press M button again, LCD
z
shows a “3” then displays of
the 3rd turn measured values.
SP/DP and MAP/PP displays
z
one after the other.
© 2007 Microlife Corporation
Document: Instruction Manual of WatchBP Pro
Page 12

*Memory reading--2nd turn
measured values display.
Press M button again, LCD
z
shows a “2” then displays of
the 2nd turn measured values.
SP/DP and MAP/PP displays
z
one after the other.
© 2007 Microlife Corporation
Document: Instruction Manual of WatchBP Pro
Page 13

*Memory reading--1st turn
measured values display.
Press M button again, LCD
z
shows a “1” then display of the
1st turn measured values.
SP/DP and MAP/PP displays
z
one after the other.
*Withdraw from readings
Follow up mode
(3 times measurement in succession, optional on left or right arm).
*Measuring mode selection
Press Start/Stop button or put
z
the device untouched for 5’ to
terminate measurement display.
Mode switch to “FOLLOW UP”
z
and device ready for measuring.
© 2007 Microlife Corporation
Document: Instruction Manual of WatchBP Pro
Page 14

b
*Cuff and blue tooth
connection
*Choose one preferred arm
for measurement.
*Press Start/Stop button or
remote control.
Binding left & right arm cuffs
z
on your both arms correctly.
Push blue-tooth switch on the
z
ack side of device (ON/OFF
sculpted) to “ON” for computer
connection if remote control.
Hold down M button for 3 sec,
z
memory shows with backlight
on, till L or R flashes.
Press M button to choose that
z
preferred arm for measurement,
and press Start/Stop button for
confirmation.
LCD full segment displays for
z
1 second with backlight on
*60 sec count down before
measurement.
*Auto zero reset
Beeper sounds 5 seconds
z
before the 1st measurement.
Press Start/Stop button or
z
remote control to skip over
count down and begin 1st turn
measuring immediately.
Display shows “0” for 2 sec
z
when device in auto zero reset.
5 short “B”s
z
5 short “B”s
z
© 2007 Microlife Corporation
Document: Instruction Manual of WatchBP Pro
Page 15

P
p
w
P
o
s
* First turn fuzzy
inflation.
*First turn deflation.
*Pulse detected
z
umping starts & cuff
ressure increases to
orking pressure (for
fuzzy inflation).
Pumping stops, pressure in
z
deflation by 4~6 mmHg/sec.
Detect the pulse, “♥” icon start
z
to flash and a beep is heard for
every heartbeat.
Beeper each
z
pulse
*First turn measurement
finishes
*60 sec count down
After first turn measuring, cuff
z
deflates completely and device
comes into 60 sec count down.
Beeper sounds 5 seconds
z
before the 2nd measurements.
z
ress Start/Stop button
r remote control to
kip over count down
and begin 2
measuring immediately.
nd
turn
5
z
sh
ort
“B
”s
© 2007 Microlife Corporation
Document: Instruction Manual of WatchBP Pro
Page 16

* Auto zero reset
* 2nd turn fuzzy inflation.
*2nd turn deflation.
Display shows “0” for 2 sec
z
5 short “Bs”
z
when device in auto zero reset.
Pumping starts & cuff pressure
z
increases to working pressure
(for fuzzy inflation).
Pumping stops, pressure in
z
deflation by 4~6 mmHg/sec.
*Pulse detected
Detect the pulse, “♥” icon start
z
to flash and a beep is heard for
every heartbeat.
A beep each
z
pulse
© 2007 Microlife Corporation
Document: Instruction Manual of WatchBP Pro
Page 17

b
P
o
s
*2nd turn measurement
finishes
*60 sec count down
After 2ndturn measuring, cuff
z
deflates completely.
If a difference of 5mmHg exists
z
between 1st&2nd time measured
sys or dia pressure, device auto
comes into 60 sec count down
and takes the 3rd measurement.
*Measuring finishes with a long
eep and average values display if
difference between 1
st
& 2nd turn
measured sys or dia pressure is less
than 5 mmHg.
Beeper sounds 5 sec before the
z
3rd turn measurement.
z
ress Start/Stop button
r remote control to
kip over count down
and begin 3
measuring immediately.
rd
turn
5
z
sh
ort
“B
”s
*Auto zero reset
* 3rd turn fuzzy inflation.
Display shows “0” for 2 sec
z
5 short “Bs”
z
when device in auto zero reset.
Pumping starts & cuff pressure
z
increases to working pressure
(for fuzzy inflation).
© 2007 Microlife Corporation
Document: Instruction Manual of WatchBP Pro
Page 18

*3rd turn deflation.
*Pulse detected
Pumping stops, pressure in
z
deflation by 2~4 mmHg/sec.
Detect the pulse, “♥” icon start
z
to flash and a beep is heard for
every heartbeat.
A beep each
z
pulse
*3rd turn measurement
finishes
* Display of average values
After 3
z
rd
turn measuring, cuff
deflates completely, and a long
beeper sounds
LCD displays values averaged
z
from 3 times measurement with
backlight on simultaneously.
Display of SP/DP, following
z
which, MAP & PP shows on.
SP/DP and MAP/PP values
z
display one after the other till
device auto off.
Backlight remains on 40 sec.
z
A long “B”.
z
© 2007 Microlife Corporation
Document: Instruction Manual of WatchBP Pro
Page 19

*Data transmission.
Through blue tooth, measured
z
values are submitted to
computer for further analysis.
*Memory reading--average
values display.
Device auto memorizes 3 times
z
measured values and their
average readings.
Press M button, LCD shows an
z
“A” then average reading, with
backlight on simultaneously.
Averaged SP/DP and MAP/PP
z
displays one after the other.
Backlight remains on 40 sec.
z
© 2007 Microlife Corporation
Document: Instruction Manual of WatchBP Pro
Page 20

* Memory reading--3rd turn
measured values display.
Press M button again, LCD
z
shows a “3” then displays of
the 3rd turn measured values.
SP/DP and MAP/PP displays
z
one after the other.
© 2007 Microlife Corporation
Document: Instruction Manual of WatchBP Pro
Page 21

*Memory reading--2nd turn
measured values display.
Press M button again, LCD
z
shows a “2” then displays of
the 2nd turn measured values.
SP/DP and MAP/PP displays
z
one after the other.
© 2007 Microlife Corporation
Document: Instruction Manual of WatchBP Pro
Page 22

b
*Memory reading--1st turn
measured values display.
Press M button again, LCD
z
shows a “1” then display of the
1st turn measured values.
SP/DP and MAP/PP displays
z
one after the other.
*Withdraw from readings
*Memories deletion.
Press Start/Stop button or put
z
the device untouched for 5’ to
terminate measurement display.
Hold down M button for 7 sec
z
till 3 short beepers are heard
and bars appear on LCD with
acklight on simultaneously,
which means memory readings
are deleted successfully.
3 short “B”
z
© 2007 Microlife Corporation
Document: Instruction Manual of WatchBP Pro
Page 23

b
* Battery low indication
*Turn off the device.
When voltage inside batteries is
z
lower to 4.8V, LCD shows low
attery icon and batteries begin
to be charged if adaptor is
connected.
Once voltage inside batteries is
z
lower to 4.6V, LCD shows low
battery icon, then batteries must
be charged again.
Switch off O/I button at the
z
back side of the unit
Memories won’t be stored once
z
the device is turned off.
Federal Communications Commission (FCC) Statement
15.21
You are cautioned that changes or modifications not expressly
approved by the part responsible for compliance could void the user’s
authority to operate the equipment.
15.105(b)
This equipment has been tested and found to comply with the limits
for a Class B digital device, pursuant to part 15 of the FCC rules.
These limits are designed to provide reasonable protection against
harmful interference in a residential installation. This equipment
generates, uses and can radiate radio frequency energy and, if not
installed and used in accordance with the instructions, may cause
harmful interference to radio communications. However, there is no
guarantee that interference will not occur in a particular
installation. If this equipment does cause harmful interference to
radio or television reception, which can be determined by turning the
equipment off and on, the user is encouraged to try to correct the
interference by one or more of the following measures:
-Reorient or relocate the receiving antenna.
-Increase the separation between the equipment and receiver.
-Connect the equipment into an outlet on a circuit different from that to which the receiver is
© 2007 Microlife Corporation
Document: Instruction Manual of WatchBP Pro
Page 24

connected.
-Consult the dealer or an experienced radio/TV technician for help.
Operation is subject to the following two conditions:
1) this device may not cause interference and
2) this device must accept any interference, including interference
that may cause undesired operation of the device.
FCC RF Radiation Exposure Statement:
This equipment complies with FCC radiation exposure limits set forth
for an uncontrolled environment. End users must follow the specific
operating instructions for satisfying RF exposure compliance. This
transmitter must not be co-located or operating in conjunction with
any other antenna or transmitter.
© 2007 Microlife Corporation
Document: Instruction Manual of WatchBP Pro
 Loading...