

Page 1
PLEASE NOTE:
THIS MEDICAL INSTRUMENT MUST BE USED ACCORDING TO
INSTRUCTIONS TO ENSURE ACCURATE READINGS.
Questions: Call microlife toll-free at 1-800-568-4147
microlife Thermal Printer
Model# PR 1KA1 For Premier Automatic Blood Pressure Monitors
(#3AA1-2 and #3BU1-5) and Peak Flow Meter
Instruction Manual
Instrucciones de uso
Page 2

1
Diagnostic Printer
Instruction Manual
Table of contents
1. Introduction
2. Printer parts
3. Putting the printer into operation
3.1. Inserting the batteries
3.2. Using an AC adapter
3.3. Cable connection
3.4. Inserting the paper roll
4. Carrying out a printing operation
4.1. Power on
4.2. Paper feeding
4.3. Printing
4.4. Low voltage indication
4.5. Power off
4.6. Cutting paper
5. Malfunction and Remedy
6. Care and maintenance
7. Warranty
8. International quality standards
9. Technical specifications
10. www.microlife.com
Page 3
2
1. INTRODUCTION
The diagnostic printer PR 1KA1 is a compact and small unit for Microlife Premier Blood
Pressure Monitors and Asthma Monitors. The enhanced printer covers both character
and graphic print. High-reliability and high-quality print is assured due to the ultra
simple design and practicability. Key features are:
• Compact and lightweight
• High-quality
• Battery-powered
• Designed for versatile applications
• Simple mechanism ensures high-reliability
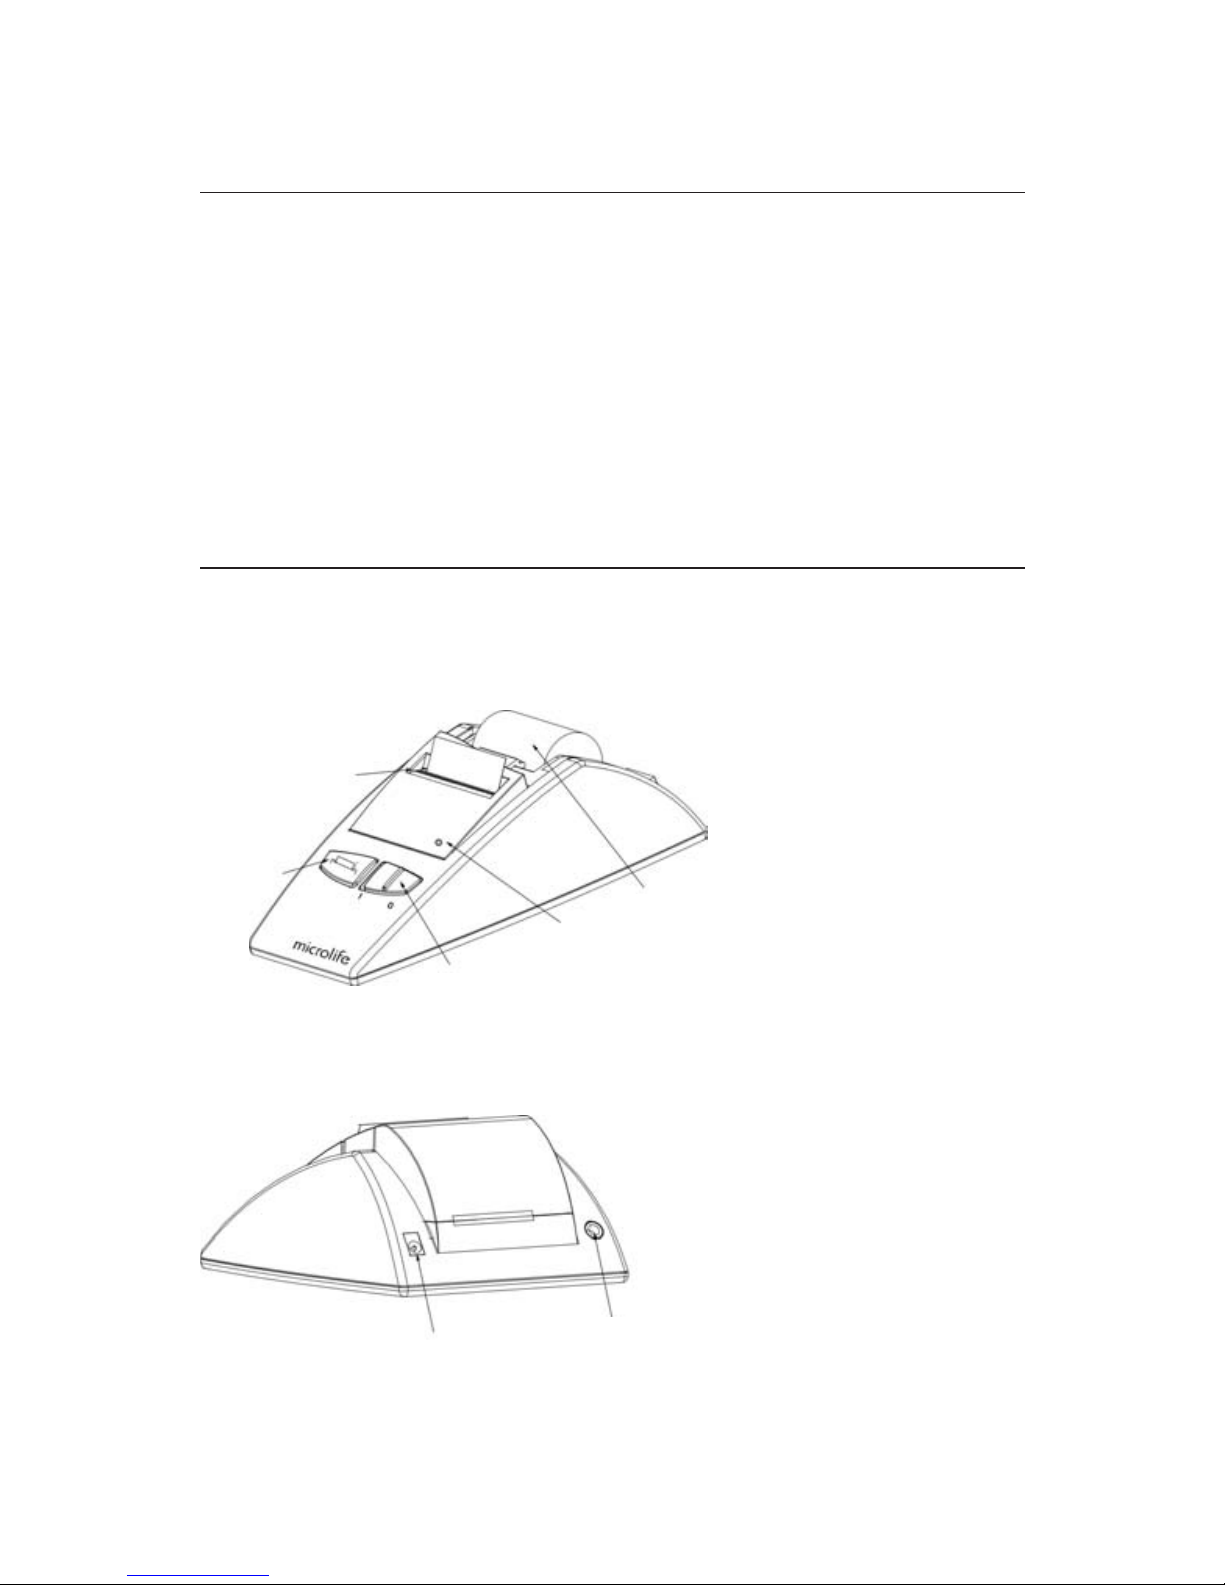
2. PRINTER PARTS
a) Front View
b) Back View
Paper cutter
Paper
feeding
(on/off) button
LED
Paper roll
AC/DC adapter socket
(AC/DC adapter sold separately)
Printer port socket
Page 4
3
3. PUTTING THE PRINTER INTO OPERATION
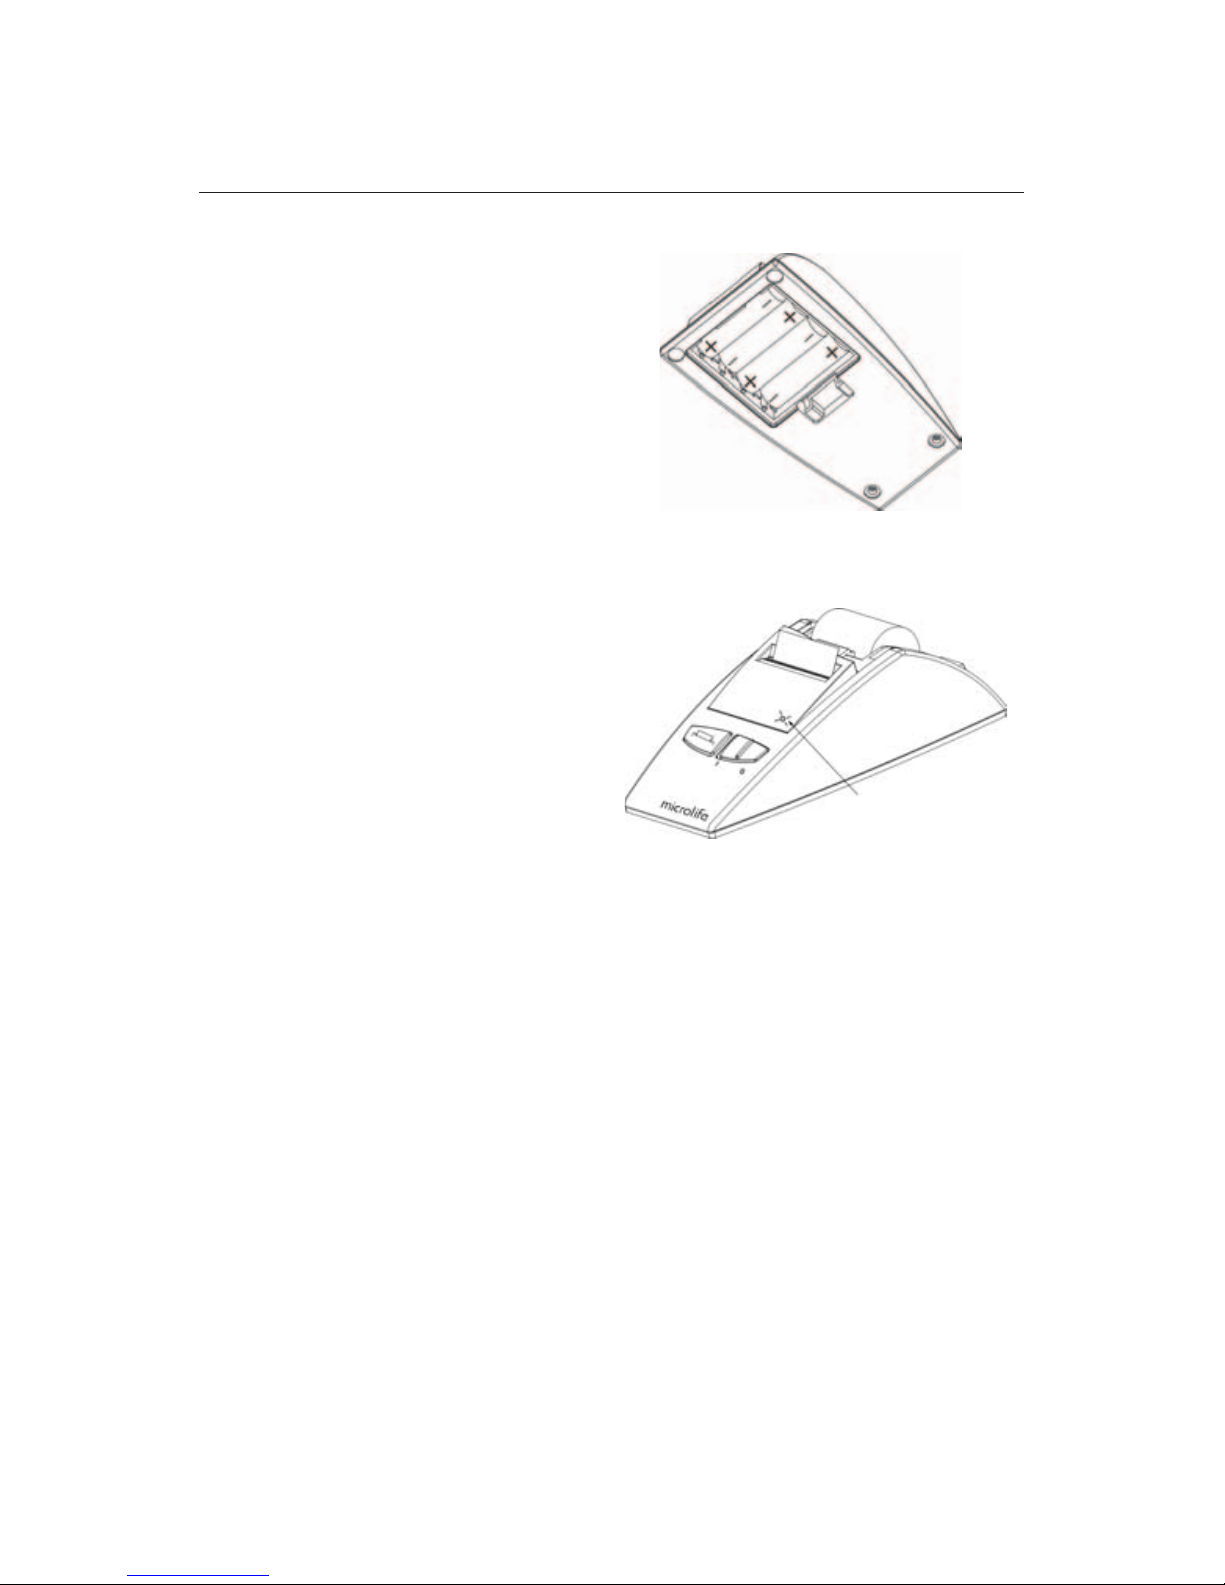
3.1. Inserting the batteries
The battery compartment is located on the
underside of the device (Please see
illustration).
a) Remove cover as illustrated.
b) Insert the batteries (4 x size AA),
thereby observing the indicated polarity.
c) If the LED starts flashing, the batteries
are empty and must be replaced.
Attention!
• If the green LED starts flashing, the
device is blocked until the batteries
have been replaced.
• Please use 'AA' Long-Life or Alkaline
1.5V Batteries. Do not use
rechargeable batteries.
• If the printer is left unused for long
periods, please remove the batteries
from the device.
LED flashing
Page 5
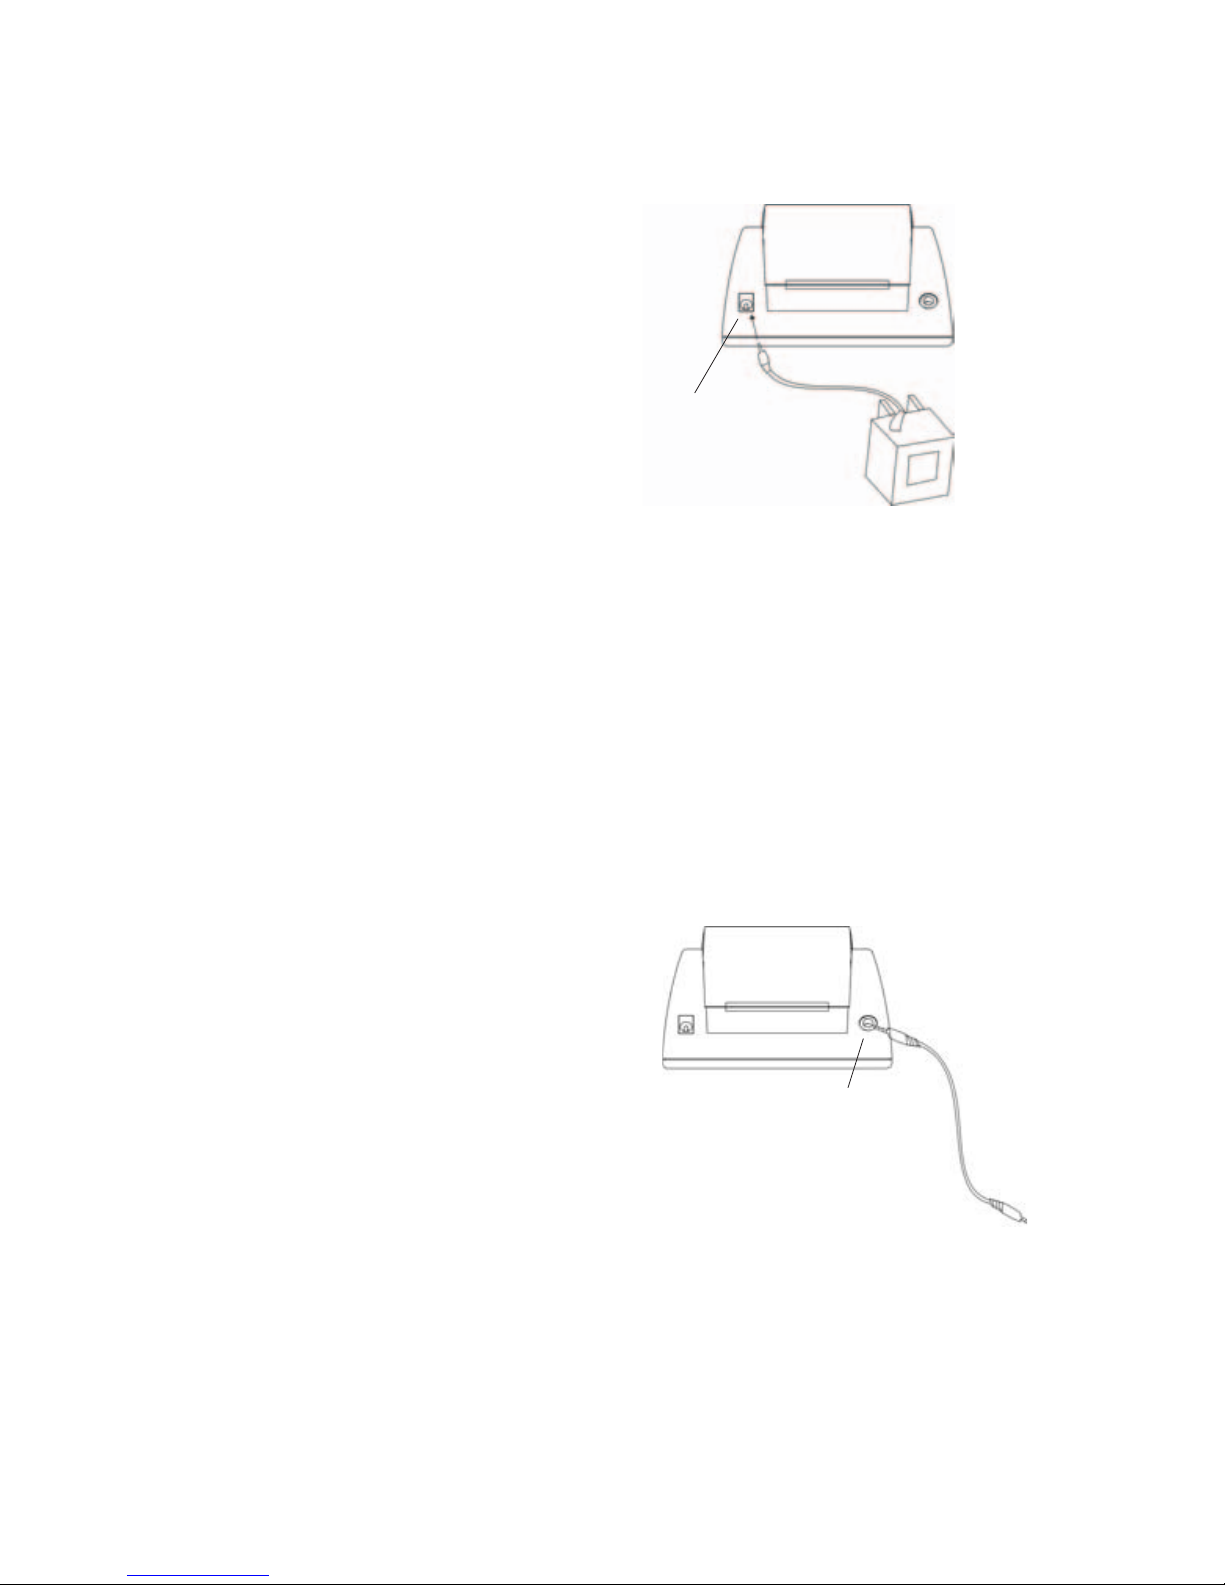
3.2. Using an AC adapter
It is possible to operate this printer
through the Microlife AC adapter
(output 6V DC / 600mA with DIN plug). Make
certain that you use an AC adapter which
fulfills the legal requirements.
(CE sign on the type plate).
a) Plug the DIN plug into the socket at the
left back of the instrument.
b) Plug the AC adapter into a 110V power
socket. Test that power is available by
sliding the 0/I (on/off) switch.
Note:
• No power is taken from the batteries while the AC adapter is connected to the
instrument.
• If the power is interrupted during the measurement (e.g. by removal of the AC
adapter from the socket), the instrument must be reset by removing the DIN plug
from its socket.
• Please consult Microlife if you have questions relating to the AC adapter.
3.3. Cable connection
Insert one end of the cable into the printer
port socket (right backside of the
instrument) as shown in the diagram.
Note:
• Connect the other end with the monitor
or asthma monitor (both connectors are
identical).
AC/DC adapter
socket
4
Printer port
socket
Page 6

5
3.4. Inserting the paper roll
• Switch the printer on.
• Insert the end of paper roll into the slot
of the internal compartment.
• Move the paper as deep as possible into
the slot.
• Press the paper feed button until paper
appears at the front.
• Put paper roll into the compartment and
close the lid (small paper roll) or put the
paper roll into the lid (big paper roll).
There are 2 kinds of paper rolls for use. The small size of paper roll is placed into
internal compartment. The big size of paper roll has to be placed into the outer
compartment which is the inside of the printer cover. Microlife sells extra paper rolls.
Note:
• The small paper roll is 1" thick (25mm-standard package) and 38mm wide.
• The big paper roll is 2" thick (50mm) and 38mm wide.
• If there are problems when inserting the paper, cut the edge of the paper so that
the corners of the paper are square (90°, see below).
✔
Small paper roll
Big paper roll
Page 7
6
4. CARRYING OUT A PRINTING OPERATION
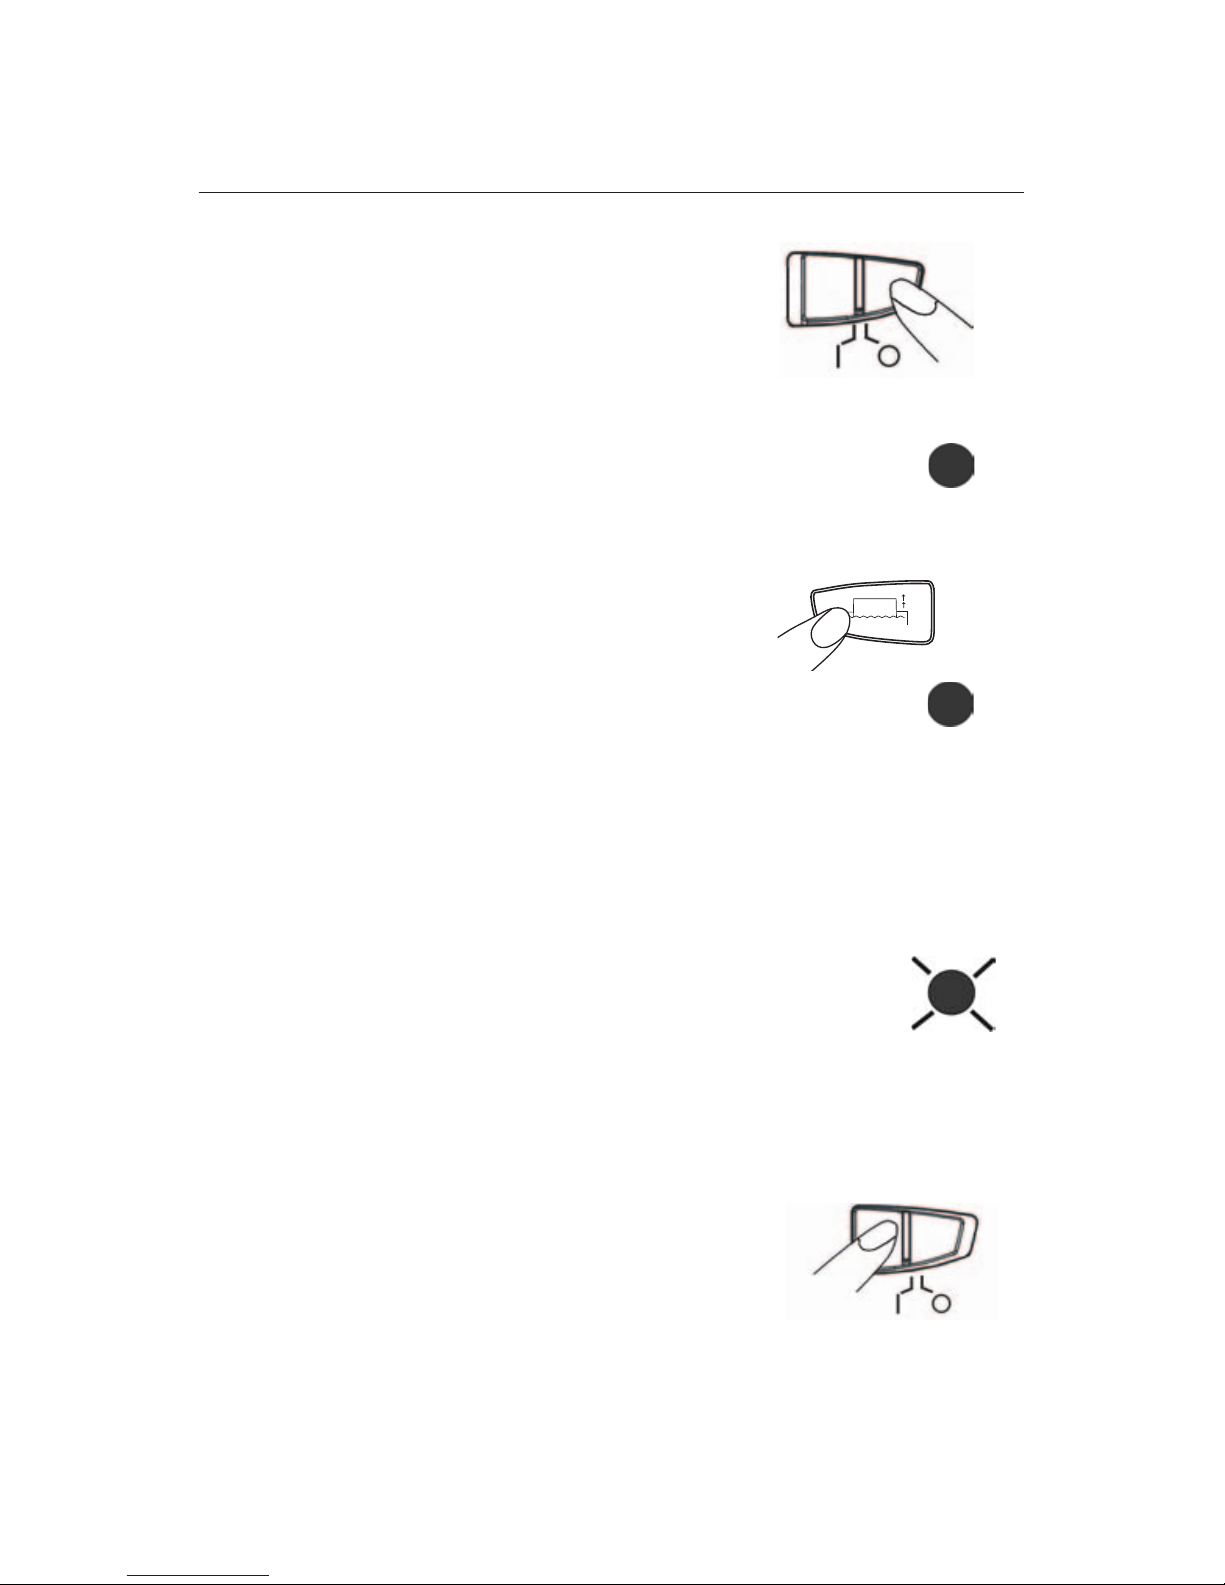
4.1. Power on
Before powering the printer, check if batteries are
inserted properly.
• Pushing the slide switch to "left" side in order
to power on the printer.
• Simultaneously, the green LED will become bright.
4.2. Paper feeding
Before you start the printing operation, check if
the paper is installed properly in the right position.
If it is not, click the paper feed button to get access
to proper location.
Note:
• Click once to get 1 line space.
• Continual depressing to get multi lines space.
4.3. Printing
• Connect the printer with the monitor as explained at 3.3.
• Push the print button on the monitor (for details please refer to the manual of
related monitor).
4.4. Low voltage indication
Once the LED is flashing under power-on operation,
it indicates that new batteries are needed.
• Once the batteries are replaced the printer will work.
Note:
• If the printer is connected with an adapter, this
will not happen.
4.5. Power off
After the printing task, just push the slide switch
to the "right” side in order to power off the printer.
• Simultaneously, the LED will become dark.
LED bright
LED flashing
LED bright
Page 8

7
4.6. Cutting paper
Once you finish the printing job, check the paper to
see if it is easy to tear off.
• If it is not long enough to tear off, please depress
the "Paper Feeding” button to lengthen the paper.
Note:
•
Don’t pull out the paper if you’d like to cut it.
• Try to lower down the paper, pulling it forward over
the paper cutter.
• The paper has to be vertical (90 degree) with the
paper cutter; otherwise, the paper will be difficult
to tear off.
• The print on the paper does not last forever. It fades over time. This is normal for
thermal printers such as the Microlife diagnostic printer. The readability lasts
longer the less the print is in contact to light. If you file the printed paper in a
folder, the print lasts very long. In case you would like to store the values forever,
we recommend to photocopy them or transfer the data to another media.
5. MALFUNCTION AND REMEDY
If problems occur when using the printer, the following points should be checked and
if necessary, the corresponding remedies taken:
Malfunction Remedy
The LED remains flashing while
the printer is switched on
although the batteries are
good.
Clicking the printing button on
the monitor, but nothing prints
There’s no response for paper
feeding
1. Check whether the batteries are installed with
the correct polarity.
2. If the LED is unusually flashing, remove the
batteries and re-install them or exchange them
for new.
1. Check whether the cable is connected with the
monitor and printer.
2. Examine whether the paper is positioned properly
ready for printing.
1. Examine whether the paper is positioned properly.
2. Check if the paper roll has been exhausted, and
needs to be replaced by a new one.
LED dark LED bright
Paper cutter
90 °
Page 9

8
6. CARE AND MAINTENANCE
a) Do not expose the device to
extreme temperatures, humidity,
dust or direct sunlight.
b) Clean the device with a soft, dry
cloth. Do not use gasoline,
thinners or similar solvent.
c) Do not drop the device or treat it
roughly in any way. Avoid strong
vibrations.
d)
Never open the device!
Otherwise the manufacturer
warranty is invalid.
Page 10

9
7. WARRANTY
The diagnostic printer PR 1KA1 is guaranteed for 2 years from date of purchase. The
warranty does not apply to damage caused by improper handling, accidents, not
following the operating instructions or alterations made to the device by third parties.
The warranty is only valid upon presentation of the completed warranty card. Batteries
or damage from batteries are not covered under warranty.
Name and company address of the responsible dealer:
8. INTERNATIONAL QUALITY STANDARDS
Meets the requirements of MDD93/92/EEC (Europe) and U.L. (USA).
Page 11

10
9. TECHNICAL SPECIFICATIONS:
Weight: 255g (with batteries)
Size: 143 (L) x 81 (W) x 51 (H) mm
Storage temperature / Humidity: -20 to +50°C / 15 to 90% relative humidity
maximum
Operation temperature / Humidity: 10 to 40°C / 15 to 90% relative humidity
maximum
Print system: Thermal serial dot system
Print direction: Left to right
Printer head model no.: SII MTP102-16B
Printer head dimension: 48(L) x 31(W x 13.8(L)
Printing timing: Synchronized with the tachogenerator
Home position detection: Mechanical switching system
Printing speed: Approx. 1.5 (lines/sec.)
Number of columns: 26 (columns)
Character matrix (HxW): 7x5 (dot)
Printing width / Paper width: 29.0 / 38.0 (mm)
Reliability: 500,000 (lines)
Paper roll: 1" 25mm (standard size); 2" 50mm (large size)
Power source: 1.5V (AA) alkaline batteries x 4
Low battery: As battery is < 5.0V, LED will flash continuously
with 3 Hz
Accessories: a) 100cm cable
b) Instruction manual
Optional: AC/DC adapter 6V DC, 600mA, 50-60 Hz
Batteries sold separately
* Technical alterations reserved!
10. www.microlife.com
Detailed user information about our products as well as services can be found at
www.microlife.com
Page 12

Impresora de diagnóstico
Manual de instrucciones
Page 13

1
Índice de capítulos
1. Introducción
2. Principales partes de la impresora
3. Puesta en servicio de la impresora
3.1. Inserción de las pilas
3.2. Uso de un adaptador de red
3.3. Conexión del cable
3.4. Inserción del rollo de papel
4. Llevar a cabo una operación de impresión
4.1. Encendido
4.2. Alimentación de papel
4.3. Impresión
4.4. Indicación de voltaje bajo
4.5. Apagado
4.6. Corte del papel
5. Funcionamiento defectuoso y remedio
6. Cuidados y mantenimiento
7. Garantía
8. Referencia a normas
9. Especificaciones técnicas
10. www.microlife.com
Page 14

2
1. INTRODUCCIÓN
La impresora de diagnóstico PR 1KA1 es una unidad pequeña y compacta para equipos
médicos. La impresora mejorada cubre tanto la impresión de caracteres como de
gráficos. Debido a su diseño ultrasencillo y práctico está asegurada una impresión
altamente fiable y de alta calidad. Las características principales son:
• Compacta y de peso ligero
• Alta calidad
• Funcionamiento a pilas
• Alta relación precio/rendimiento
• Diseñada para aplicaciones muy variadas
• La sencillez de su mecanismo asegura una alta fiabilidad
2. LAS PRINCIPALES PARTES DE LA IMPRESORA
a) Vista frontal
b) Vista posterior
Cortador
de papel
Alimentación
de papel
Botón O/I
LED
Rollo de papel
Zócalo de conexión del
adaptador c.a. / c.c.
Zócalo del puerto de la impresora
Page 15

3
3. PUESTA EN SERVICIO DE LA IMPRESORA
3.1. Inserción de las pilas
El compartimiento para las pilas está
situado en la parte inferior del equipo
(vea la figura).
a) Quite la tapa tal como muestra la figura
b) Inserte las pilas (4 del tamaño AA 1,5 V)
observando la polaridad indicada.
c) Si el LED comienza a parpadear es que
las pilas están descargadas y deben ser
sustituidas por unas nuevas
¡Atención!
• En cuanto el LED comienza a parpadar,
el equipo queda bloqueado hasta que
se sustituyen las pilas.
• Use pilas "AA" alcalinas o de larga
duración de 1,5 V. No se recomienda el
uso de baterías acumuladoras de 1,2V.
• Si va a dejar de usar la impresora
durante largo tiempo, quite las pilas
del dispositivo.
El LED
parpadea
Page 16

4
3.2. Uso de un adaptador de red
Es posible hacer funcionar esta impresora
mediante el adaptador de red Microlife
(salida 6V c.c. / 600 mA con conector DIN).
Asegúrese de que usa un adaptador de red
que cumple con todos los requisitos legales
(símbolo CE en la placa de características).
a) Enchufe el conector DIN en el
conector hembra situado en la parte
posterior izquierda del instrumento.
b) Enchufe el adaptador de red en una caja
de enchufe de 230V/110V. Compruebe que
hay corriente deslizando el interruptor 0/I.
Nota:
• Mientras el adaptador de red permanezca conectado al instrumento no se toma
corriente de las pilas.
• Si se interrumpe la tensión de red durante la medición (p. ej., retirando el
adaptador de red de la caja de enchufe de red) deberá reinicializarse del
instrumento quitando el conector DIN de su conector hembra.
• Consulte con un distribuidor especializado si tiene alguna pregunta sobre el
adaptador de red.
3.3. Conexión del cable
Inserte un extremo del cable en el zócalo
del puerto de la impresora (situado en la
parte posterior derecha del instrumento),
tal como muestra la figura.
Nota:
• Conecte el otro extremo al monitor
(ambos conectores son idénticos).
Zócalo de
conexión del
adaptador
c.a. / c.c
Zócalo del
puerto de la
impresora
Page 17

5
3.4. Inserción del rollo de papel
• Encienda la impresora.
• Inserte el extremo del rollo de papel en
la ranura del compartimiento interno.
• Introduzca el papel en la ranura lo máximo
que pueda.
• Oprima el botón de alimentación de papel
hasta que el papel aparezca por la parte frontal.
• Coloque el rollo de papel en el compartimiento
y cierre la tapa (rollo de papel pequeño) o
coloque el rollo de papel en la tapa (rollo de
papel grande).
Existen 2 tipos de rollo de papel que pueden usarse. El rollo de papel de tamaño
pequeño se coloca en el compartimiento interno. Sin embargo, el rollo de papel
grande debe ser colocado en el compartimiento externo que se hace accesible al abrir
la cubierta de la impresora.
Nota:
• El rollo de papel pequeño tiene un de 25 mm (paquete estándar)
• El rollo de papel grande tiene un de 50 mm
• Si hay problemas al insertar el papel, corte el extremo del mismo de forma que los
ángulos del papel estén en ángulo recto (90º, vea más adelante).
✔
Rollo de papel pequeño
Rollo de papel grande
Page 18

6
4. LLEVAR A CABO UNA OPERACIÓN DE IMPRESIÓN
4.1. Encendido
Antes de encender la impresora compruebe
que ésta esté equipada con las pilas o el adaptador.
• Empuje el interruptor deslizante a la "izquierda"
para activar la impresora.
• Simultáneamente el LED se iluminará.
4.2. Alimentación de papel
Antes de iniciar la operación de impresión
compruebe que el papel esté colocado la posición
correcta. Si no lo está haga clic brevemente para
acceder a la posición adecuada.
Nota:
• Breve clic para avanzar una línea.
• Oprima de forma continua para avanzar varias líneas.
4.3. Impresión
• Conecte la impresora con el monitor tal como se
explica en 3.3.
• Oprima el botón de impresión en el monitor y presiona el botón de imprimir por
tres segundos para imprimir la historia. (para más detalles remítase al manual del
monitor correspondiente).
4.4. Indicación de voltaje bajo
Si el LED comienza a parpadear con la impresora encendida,
indica que deben sustituirse las pilas.
• Sólo tiene que sustituir las pilas por unas nuevas, y la
impresora seguirá con la acción siguiente. De no
hacerlo no funcionará.
Nota:
• Si la impresora está conectada con el adaptador de red,
no se producirá un caso así.
4.5. Apagado
Una vez finalizado el trabajo de impresión, sólo tiene que
deslizar el interruptor hacia la "derecha" para apagar la
impresora.
• Simultáneamente el LED se apagará.
LED intermitente
El LED parpadea
LED intermitente
Page 19

7
4.6. Corte del papel
Una vez finalizado el trabajo de impresión compruebe
si es posible cortarlo fácilmente.
• Si no es suficientemente largo para cortarlo, pulse
el botón de alimentación de papel para aumentar
la longitud del papel.
Nota:
• No tire del papel si desea cortarlo.
• Intente tirar de él hacia abajo para que quede
apretado contra el cortador de papel.
• El papel debe estar vertical (90 grados) respecto al
cortador de papel; de lo
contrario será difícil cortarlo.
• La impresión sobre el papel no dura eternamente. Esto es algo normal en
impresoras térmicas como es el caso de la impresora de diagnóstico Microlife. La
legibilidad será más duradera cuanto menos esté la impresión expuesta a la luz. Si
archiva la impresión en una carpeta, durará mucho tiempo. Si desea almacenar los
valores para siempre, le recomendamos que los fotocopie o que transfiera los
datos a otro medio.
5. FUNCIONAMIENTO DEFECTUOSO Y REMEDIO
Si se producen problemas durante el uso de la impresora, deberán comprobarse los
siguientes puntos y si es necesario efectuar los dictámenes adecuados:
LED
iluminado
LED
intermitente
Cortador de papel
90 °
Funcionamiento defectuoso
El LED permanece parpadeando
mientras la impresora está
activada aunque las pilas estén
colocadas.
Al pulsar el botón de impresión
en el monitor no sucede nada.
No hay respuesta de la
alimentación de papel.
Remedio
1.Compruebe si las pilas están instaladas con la
polaridad correcta y corríjala si fuera necesario.
2.Si el LED parpadea de forma inusual, quite las
pilas y vuélvalas a colocar o sustitúyalas por
unas nuevas.
1.Compruebe si el cable está conectado entre el
monitor y la impresora.
2.Examine si el papel está colocado correctamente
y listo para imprimir.
1.Compruebe si el papel está colocado correctamente.
2.Compruebe si el rollo de papel se ha acabado y debe
ser sustituido por uno nuevo.
Page 20

8
6. CUIDADOS Y MANTENIMIENTO
a) No exponga el equipo a temperaturas
extremas, humedad, polvo o insolación
directa.
b) Limpie el equipo con un paño seco y
suave. No use gasolina, diluyentes ni
disolventes similares.
c) No deje caer el equipo ni lo trate
bruscamente en modo alguno. Evite las
vibraciones fuertes.
d)
¡No abra jamás el equipo! De lo
contrario la calibración del fabricante
quedará invalidada.
Page 21

9
7. GARANTÍA
La impresora de diagnóstico PR 1KA1 está garantizada por 2 años a partir de la fecha
de compra. La garantía no es aplicable en caso de daños causados por un manejo
inadecuado, accidentes, la inobservancia de las instrucciones de uso o por
modificaciones hechas en el equipo por parte de terceros.
La garantía sólo es válida previa presentación de la tarjeta de garantía.
8. REFERENCIA A NORMAS
Cumple los requisitos de MDD93/92/EEC (Europe) and U.L. (USA).
Page 22

10
9. ESPECIFICACIONES TÉCNICAS:
Peso: 255g (con pilas)
Tamaño: 143 (largo) x 81 (ancho) x 51 (alto) mm
Temperatura / humedad de almacenamiento: -20 a +50 °C / 15 a 90 % de humedad
relativa máxima
Temperatura / humedad de funcionamiento: 10 a 40 °C / 15 a 90 % de humedad
relativa máxima
Sistema de impresión: Sistema térmico de puntos seriales
Sentido de impresión: de izquierda a derecha
Cabezal impresor modelo núm.: SII MTP102-16B
Dimensiones del cabezal impresor: 48 (largo) x 31 (ancho) x 13,8 (alto)
Tiempo de impresión: Sincronizado con el tacogenerador
Detección de la posición base: Sistema mecánico de conmutación
Velocidad de impresión: Aprox. 1,5 (líneas/s)
Número de columnas: 26 (columnas)
Matriz de caracteres (altura x anchura): 7_5 (puntos)
Anchura de impresión / anchura del papel: 29,0 / 38,0 (mm)
Fiabilidad: 500.000 (líneas)
Rollo de papel: 25mm (tamaño estándar)
50mm (tamaño grande)
Fuente de energía: 4 pilas alcalinas AA de 1,5 V
Pilas descargadas: Cuando la carga de las pilas sea < 5,0V,
el LED parpadeará continuamente con
una frecuencia de 3 Hz
Accesorios: a) cable de 100 cm
b) Manual de instrucciones
Opcional: Adaptador c.a./c.c. 6V c.c., 600 mA,
50-60 Hz
* Reservado el derecho a efectuar modificaciones técnicas
10. www.microlife.com
En www.microlife.com puede encontrar información detallada para el usuario sobre
nuestros productos y servicios.
Page 23

PR1KA1
Microlife Thermal Printer
Microlife USA, Inc.
424 Skinner Blvd., Suite C
Dunedin, FL 34698
Toll Free: 800-568-4147
custserv@microlifeusa.com
www.microlifeusa.com
 Loading...