

Page 1
Microlife NC 150 BT
1
2a
2b
Microlife AG
Espenstrasse 139
9443 Widnau / Switzerland
www.microlife.com
IB NC 150 BT EN-PL 2518
NC
150 BT
Non Contact Thermometer
EN
PL
1
7
3
4
Page 2

Microlife NC 150 BT NC 150 BT
2
1
8
M
9
AT
AK
AL
AM
AN
AO
6
7
AP
AQ
AR
AS
BT
BK
BL
3
4
5
BM
BN
BO
BP
BQ
BR
Microlife Non Contact Thermometer NC 150 BT
1
Measuring sensor
2
Tracking light
3
Display
4
START button
5
ON/OFF button
6
Mode switch
7
Battery compartment cover
8
M-button (memory)
9
All segments displayed
AT
Memory
AK
Ready for measuring
AL
Measurement complete
AM
Body mode
AN
Object mode
AO
Low battery indicator
AP
Changing between Celsius and Fahrenheit
AQ
Recall mode
AR
Recall the last 30 readings
AS
Measured temperature too high
BT
Measured temperature too low
BK
Ambient temperature too high
BL
Ambient temperature too low
BM
Error function display
BN
Blank display
BO
Flat battery
BP
Date/Time
BQ
Beeper function setting
BR
Replacing the battery
Read the instructions carefully before using this device.
Type BF applied part
Keep dry
This Microlife thermometer is a high quality product incorporating
the latest technology and tested in accordance with international
standards. With its unique technology, this device can provide a
stable, heat-interference-free reading with each measurement.
The device performs a self-test every time it is switched on to
always guarantee the specified accuracy of any measurement.
This Microlife thermometer is intended for the periodic measurement and monitoring of human body temperature.
This thermometer has been clinically tested and proven to be
safe and accurate when used in accordance to the operating
instruction manual.
Please read through these instructions carefully in order for you to
understand all functions and safety information.
Table of Contents
1. The Advantages of this Thermometer
2. Important Safety Instructions
3. How this Thermometer measures Temperature
4. Control Displays and Symbols
5. Setting Date, Time and Beeper Functions
6. Changing between Body and Object Mode
7. Directions for Use
8. Changing between Celsius and Fahrenheit
9. How to recall 30 readings in Memory Mode
10. Bluetooth
11. Error Messages
12. Cleaning and Disinfecting
• Measures in a matter of seconds
• Multiple uses (wide range of measurement)
• Accurate and reliable
• Gentle and easy to use
• Multiple readings recall
• Safe and hygienic
• Fever alarm
• Bluetooth
• Downloading the «Microlife Connected Health +» App
• How the Bluetooth
• Bluetooth
®
Function
®
Function
®
Icon Indicator
®
Function Works
• App Tutorial
EN
Guarantee Card
Name of Purchaser
Imie i nazwisko
nabywcy
Serial Number
Numer seryjny
Date of Purchase
Data zakupu
Specialist Dealer
Przedstawiciel
1
Page 3

13. Battery Replacement
14. Guarantee
15. Technical Specifications
16. www.microlife.com
Guarantee Card (see Back Cover)
1. The Advantages of this Thermometer
Measures in a matter of seconds
The innovative infrared technology allows the measurement
without even touching the object. This guarantees safe and sanitary measurements within seconds.
Multiple uses (wide range of measurement)
This thermometer offers a wide range of measurement from
0 - 100.0 °C / 32.0 - 212.0 °F, meaning the unit can be used to
measure body temperature or it also has a feature allowing it to be
used to measure surface temperature of the following examples:
Milk surface temperature in a baby's bottle
Surface temperature of a baby's bath
Ambient temperature
Accurate and reliable
The unique probe assembly construction incorporates an
advanced infrared sensor, ensuring that each measurement is
accurate and reliable.
Gentle and easy to use
The ergonomic design enables simple and easy use of the ther-
mometer.
This thermometer can even be used on a sleeping child without
causing any interruption.
This thermometer is quick, therefore child-friendly.
Multiple readings recall
Users will be able to recall the last 30 readings with a record of
both time and date when entering the recall mode, enabling efficient tracking of temperature variations.
Safe and hygienic
No direct skin contact.
No risk of broken glass or mercury ingestion.
Completely safe for use on children.
Fever alarm
10 short beeps and a red LCD backlight alert the patient that he/
she may have a temperature equal to or higher than 37.5 °C.
Bluetooth
This device connects to the «Microlife Connected Health+» App by
using Bluetooth
®
Function
®
4.0 and enables easy monitoring of temperature.
2. Important Safety Instructions
Follow instructions for use. This document provides important
product operation and safety information regarding this device.
Please read this document thoroughly before using the device
and keep for future reference.
This device may only be used for the purposes described in
these instructions. The manufacturer cannot be held liable for
damage caused by incorrect application.
Never immerse this device in water or other liquids. For
cleaning please follow the instructions in the «Cleaning
and Disinfecting» section.
Do not use this device if you think it is damaged or notice
anything unusual.
Never open this device.
A basic physiological effect called vasoconstriction can occur in
the early stages of fever, resulting in a cool skin effect. The
recorded temperature using this thermometer can, therefore,
be unusually low.
If the measurement result is not consistent with the patient's finding
or unusually low, repeat the measurement every 15 minutes or
double check the result by another core body temperature
measurement.
This device comprises sensitive components and must be
treated with caution. Observe the storage and operating conditions described in the «Technical Specifications» section.
Ensure that children do not use this device unsupervised; some
parts are small enough to be swallowed.
Do not use this device close to strong electromagnetic fields such
as mobile telephones or radio installations. Keep a minimum
distance of 3.3 m from such devices when using this device.
Protect it from:
- extreme temperatures
- impact and dropping
- contamination and dust
- direct sunlight
- heat and cold
If the device is not going to be used for a prolonged period the
batteries should be removed.
EN
2NC 150 BT
Page 4

WARNING: The measurement results given by this device
is not a diagnosis. It is not replacing the need for the consultation of a physician, especially if not matching the patient’s
symptoms. Do not rely on the measurement result only,
always consider other potentially occurring symptoms and
the patient’s feedback. Calling a doctor or an ambulance is
advised if needed.
3. How this Thermometer measures Temperature
This thermometer measures infrared energy radiated from the
forehead as well as objects. This energy is collected through the
lens and converted to a temperature value.
4. Control Displays and Symbols
All segments displayed 9: Press the ON/OFF button 5 to
turn on the unit; all segments will be shown for 1 second.
Ready for measuring AK:
°C
» or «°F» icon will keep flashing while the mode icon
the «
(body or object) will be displayed.
Measurement complete AL: The reading will be shown on the
display 3 with the «°C» or «°F» icon and the mode icon
steady. The unit is ready for the next measurement as soon as
the «°C» or «°F» icon is flashing again.
Low battery indicator AO:
icon will keep flashing to remind the user to replace the batteries.
When the unit is ready for measuring,
When the unit is turned on, the «»
5. Setting Date, Time and Beeper Functions
Setting the date and time
1. After the new batteries are fitted, the year number flashes in the
display BP. You can set the year by pressing the START button
4. To confirm and then set the month, press the M-button 8.
2. Press the START button 4 to set the month. Press the Mbutton 8 to confirm and then set the day.
3. Follow the previously mentioned instructions to set the day, 12
or 24 hour mode, hours and minutes.
4. Once you have set the minutes and pressed the M-button 8,
the date and time are set and the time is displayed.
If no button is pressed for 20 seconds, the device automat-
ically switches to ready for measuring AK.
Cancel time setup: Press the ON/OFF button 5 during
time setup. The LCD will show Date/Time icons with «--:--».
After that press the ON/OFF button 5 to start the measure-
ment. If no further action is taken within 20 seconds, the
device will automatically turn off.
Change current date and time: Press and hold the M-
button 8 for approx. 3 seconds until the year number
starts to flash BP. Now you can enter the new values as
described above.
Setting the beeper
1. When the device is switched off, press and hold the ON/OFF
button 5 for 5 seconds to set the beeper BQ.
2. Press the ON/OFF button 5 again to either turn the beeper on
or off. The beeper is activated when the beeper icon BQ is not
crossed-out.
If no button is pressed for 5 seconds, the device automati-
cally switches to ready for measuring AK.
6. Changing between Body and Object Mode
For changing from body to object mode, slide the mode switch 6
at the side of the thermometer downwards. For switching back to
body mode, slide the switch up again.
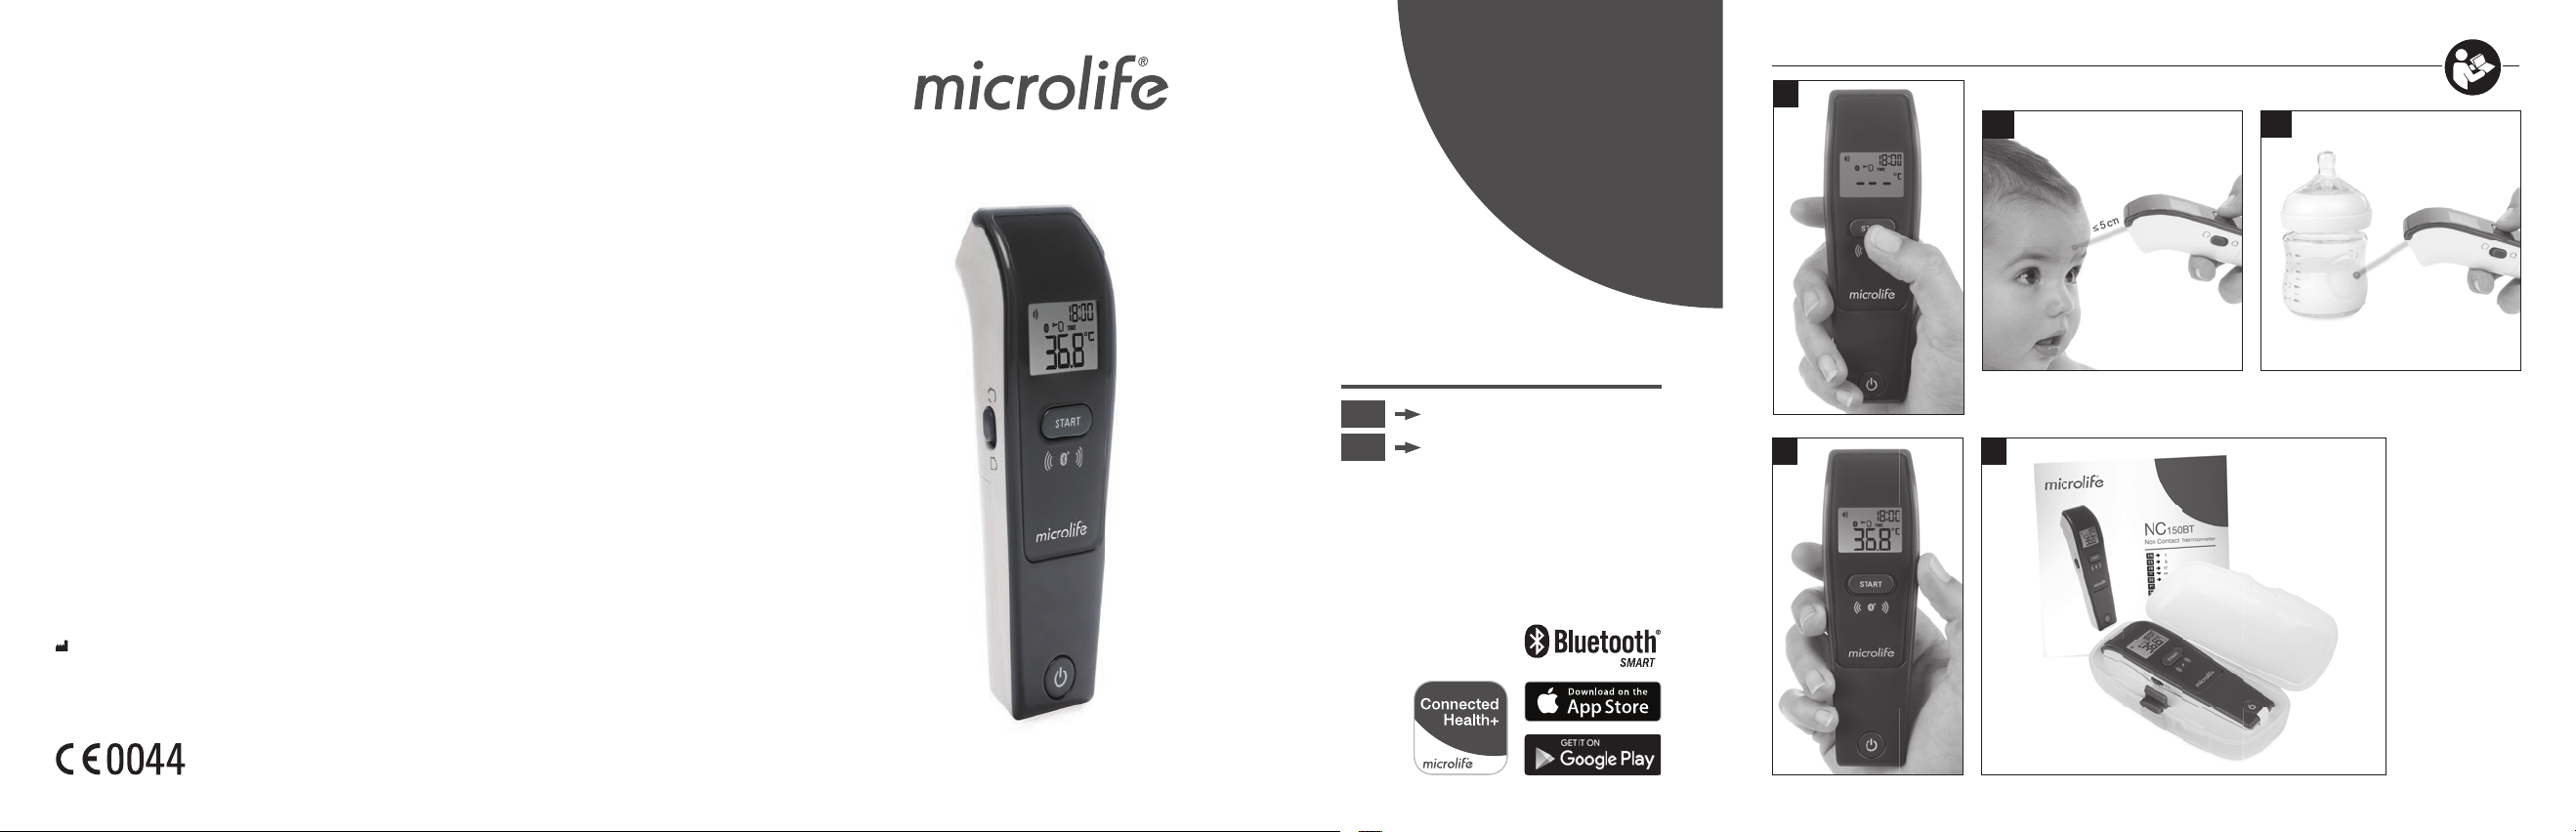
7. Directions for Use
Measuring in body mode
1. Press the ON/OFF button 5. The display 3 is activated to
show all segments for 1 second.
2. When the «°C» or «°F» icon is flashing, a beep sound is heard
and the thermometer is ready for measuring AK.
3. Aim the thermometer at the center of the forehead with a
distance of no more than 5 cm. Please remove any hair,
sweat or dirt from the forehead before measuring to improve the
accuracy of the readings.
4. Press the START button 4 and ensure that the activated
blue tracking light is aimed at the center of the forehead.
After 3 seconds a long beep will verify the completion of
measurement.
5. Read the recorded temperature from the LCD display.
Measuring in object mode
1. Follow steps 1-2 above, then aim the thermometer at the center
of the object you want to measure with a distance of no more
than 5 cm. Press the START button 4. After 3 seconds a long
beep will verify the completion of measurement.
2. Read the recorded temperature from the LCD display.
3
Page 5

NOTE:
Patients and thermometer should stay in similar room
condition for at least 30 minutes.
Don't take a measurement while or immediately after nursing a
baby.
Don't use the thermometer in high humidity environments.
Patients should not drink, eat or exercise before/while taking
the measurement.
Don't move the measurement device from the measuring area
before hearing the termination beep.
10 short beeps and a red LCD backlight alert the patient that he/
she may have a temperature equal to or higher than 37.5 °C.
Always take the temperature in the same location, since
temperature readings may vary according to locations.
Doctors recommend rectal measurement for newborn infants
within the first 6 months, as all other measuring methods might
lead to ambiguous results. If using a non contact thermometer
on those infants, we always recommend verifying the readings
with a rectal measurement.
In the following situations it is recommended that three temper-
atures are taken with the highest one taken as the reading:
1. Children under three years of age with a compromised
immune system and for whom the presence or absence of
fever is critical.
2. When the user is learning how to use the thermometer for
the first time until he/she has familiarized himself/herself with
the device and obtains consistent readings.
3. If the measurement is surprisingly low.
Readings from different measuring sites should not be
compared as the normal body temperature varies by
measuring site and time of day, being highest in the evening
and lowest about one hour before waking up.
Normal body temperature ranges:
- Axillar: 34.7 - 37.3 °C / 94.5 - 99.1 °F
- Oral: 35.5 - 37.5 °C / 95.9 - 99.5 °F
- Rectal: 36.6 - 38.0 °C / 97.9 - 100.4 °F
- Microlife NC 150 BT: 35.4 - 37.4 °C / 95.7 - 99.3 °F
8. Changing between Celsius and Fahrenheit
This thermometer can display temperature readings in either Fahrenheit or Celsius. To switch the display between °C and °F, simply
turn OFF the unit, press and hold the START button 4 for 5
seconds; after 5 seconds, the current measurement scale («°C» or
«°F» icon) will flash on the display AP. Change the measurement
scale between °C and °F by pressing the START button 4. When
the measurement scale has been chosen, wait for 5 seconds and
the unit will automatically enter the «ready for measuring» mode.
9. How to recall 30 readings in Memory Mode
This thermometer can recall the last 30 readings with a record of
both time and date.
Recall mode AQ: Press the M-button 8 to enter recall mode
when the power is off. The memory icon «M» will flash.
Reading 1 - the last reading AR: Press and release the M-
button 8 to recall the last reading. Number «1» and a flashing
«M» are displayed.
Reading 30 - readings in succession: Press and release the
M-button 8 consecutively to recall the last 30 readings in
succession.
Pressing and releasing the M-button8 after the last 30 readings
have been recalled will resume the above sequence from reading 1.
10. Bluetooth® Function
This device can be used in conjunction with a smartphone running
the «Microlife Connected Health+» App. The measurement results
will be automatically transferred via Bluetooth
Downloading the «Microlife Connected Health+» App
Download «Microlife Connected Health+» App for free from Google
Play™ (Android) or App Store (iOS) and install it on your smartphone.
How the Bluetooth® Function Works
The Bluetooth® function on your device will automatically turn on and
will be ready to connect with the «Microlife Connected Health+» App
after the device is switched on. Your device will automatically upload
the data once it is connected to the smartphone.
Bluetooth® Icon Indicator
The Bluetooth
left portion of the display, is designed to provide information about
the connection between your device and smartphone.
The Bluetooth
cator AK appears steady on the display.
The Bluetooth
a device or uploading data to the device.
®
icon indicator on your device, located in the middle
NOTE:
®
function is enabled: The Bluetooth® icon indi-
®
icon indicator AK flashes, when connecting with
®
.
EN
4NC 150 BT
Page 6

®
The Bluetooth
measurement; after measurement the device will switch it on
and upload the data to the «Microlife Connected Health+» App.
App Tutorial
To access the tutorial, select «Tutorial» in the menu of the «Microlife
Connected Health+» App (located in the upper left corner on the
screen).
function is automatically switched off during
11. Error Messages
Measured temperature too high AS: Displays «H» when
measured temperature is higher than 42.2 °C / 108.0 °F in
body mode or 100 °C / 212 °F in object mode.
Measured temperature too low BT: Displays «L» when
measured temperature is lower than 34.0 °C / 93.2 °F in body
mode or 0 °C / 32 °F in object mode.
Ambient temperature too high BK: Displays «H» and
when ambient temperature is higher than 40.0 °C / 104.0 °F.
Ambient temperature too low BL: Displays «L» and when
ambient temperature is lower than 16.0 °C / 60.8 °F in body
mode or lower than 5.0 °C / 41.0 °F in object mode.
Error function display BM: The system has a malfunction.
Blank display BN: Check if the batteries have been inserted
correctly. Also check polarity (<+> and <->) of the batteries.
Flat battery indicator BO: If only «» icon is shown on the
display, the batteries should be replaced immediately.
12. Cleaning and Disinfecting
Use an alcohol swab or cotton tissue moistened with alcohol (70%
Isopropyl) to clean the thermometer casing and the measuring
sensor. Ensure that no liquid enters the interior of the device. Never
use abrasive cleaning agents, thinners or benzene for cleaning and
never immerse the device in water or other cleaning liquids. Take
care not to scratch the surface of the sensor lens and the display.
13. Battery Replacement
This device is supplied with 2 new, long-life 1.5V, size AAA
batteries. Batteries need replacing when this icon «» BO is the
only symbol shown on the display.
Remove the battery cover BR by sliding it in the direction shown.
Replace the batteries – ensure correct polarity as shown by the
symbols in the compartment.
Batteries and electronic devices must be disposed of in
accordance with the locally applicable regulations, not with
domestic waste.
14. Guarantee
This device is covered by a 5 year guarantee from the date of
purchase. The guarantee is valid only on presentation of the guarantee card completed by the dealer (see back) confirming date of
purchase or the receipt.
The guarantee covers the device. Batteries and packaging are
not included.
Opening or altering the device invalidates the guarantee.
The guarantee does not cover damage caused by improper
handling, discharged batteries, accidents or non-compliance
with the operating instructions.
Please contact Microlife-service.
15. Technical Specifications
Type:
Measurement
range:
Resolution:
Measurement
accuracy
(Laboratory):
Display:
Acoustic:
Memory:
Non Contact Thermometer NC 150 BT
Body mode: 34.0 - 42.2 °C / 93.2 - 108.0 °F
Object mode: 0 - 100.0 °C / 32 - 212.0 °F
0.1 °C / °F
Body mode:
0.2 °C, 35.0 42.0 °C / 0.4 °F, 95.0 107.6 °F
0.3 °C, 34.0 34.9 °C and 42.1 43.0 °C /
0.5 °F, 93.2 ~ 94.8 °F and 107.8 ~ 109.4 °F
Object mode:
±1.0 °C, 0 100.0 °C / ±2 °F, 32.0 212 °F
Liquid Crystal Display, 4 digits plus special icons
The unit is turned ON and ready for the measure-
ment: 1 short beep.
Complete the measurement: 1 long beep (1 sec.) if
the reading is less than 37.5 °C / 99.5 °F, 10 short
«beep» sounds, if the reading is equal to or greater
than 37.5 °C / 99.5 °F.
System error or malfunction: 3 short «bi» sounds.
30 readings recall in the memory mode with a
record of both time and date.
5
Page 7

Backlight:
The display light will be GREEN for 4 seconds,
when the unit is turned ON.
The display light will be GREEN for 5 seconds,
when a measurement is completed with a reading
less than 37.5 °C / 99.5 °F.
The display light will be RED for 5 seconds, when
a measurement is completed with a reading equal
to or higher than 37.5 °C / 99.5 °F.
Operating
conditions:
Body mode: 15 - 40.0 °C / 59 - 104.0 °F
Object mode: 5 - 40.0 °C / 41 - 104.0 °F
15 - 95 % relative maximum humidity
Storage
conditions:
Automatic
Switch-off:
Communication: Bluetooth
Compatibility:
Battery:
Battery
lifetime:
Dimensions:
Weight:
-25 - +55 °C / -13 - +131 °F
15 - 95 % relative maximum humidity
Approx. 1 minute after last measurement has been
taken.
®
Low Energy 4.0 (Bluetooth® Smart)
iOS: iOS 9.0 or newer
Android: Android 4.4 or newer
2 x 1.5 V alkaline batteries; size AAA
approx. 1500 measurements
(using new batteries)
141.1 x 43.3 x 36.9 mm
90 g (with batteries), 67 g (w/o batteries)
IP Class: IP21
Reference to
standards:
ASTM E1965; IEC 60601-1; IEC 60601-1-2 (EMC)
IEC 60601-1-11
Expected
service life: 5 years or 12000 measurements
This device complies with the requirements of the Medical Device
Directive 93/42/EEC.
Technical alterations reserved.
According to the Medical Product User Act a biennial technical
inspection is recommended for professional users. Please
observe the applicable disposal regulations.
The Bluetooth® word mark and logos are registered trademarks
owned by Bluetooth SIG, Inc. and any use of such marks by Microlife
Corp. is under license. Other trademarks and trade names are those
of their respective owners.
16. www.microlife.com
Detailed user information about our thermometers and blood pressure
monitors as well as services can be found at
;
www.microlife.com
.
EN
6NC 150 BT
Page 8

Microlife Elektroniczny termometr bezkontaktowy NC 150 BT
1
Czujnik pomiarowy
2
Oświetlenie miejsca pomiarowego
3
Wyświetlacz
4
Przycisk START
5
Przycisk ON/OFF (wł./wył.)
6
Przełącznik trybu pracy
7
Zatyczka pojemnika na baterię
8
Przycisk PAMIĘĆ
9
Wyświetlone wszystkie segmenty
AT
Pamięć
AK
Gotowy do pomiaru
AL
Pomiar skończony
AM
Pomiar temp. ciała
AN
Pomiar temp. obiektu
AO
Wskaźnik słabych baterii
AP
Pomiar temperatury w °C lub °F
AQ
Tryb Recall - wywoływania wyników poprzednich pomiarów
AR
Wywołanie 30 ostatnich wyników pomiaru
AS
Zmierzona temperatura jest zbyt wysoka
BT
Zmierzona temperatura jest zbyt niska
BK
Temperatura otoczenia jest zbyt wysoka
BL
Temperatura otoczenia jest zbyt niska
BM
Pojawia się znak Błąd funkcji (Err)
BN
Wyświetlacz jest ciemny
BO
Wyczerpana bateria
BP
Data/godzina
BQ
Ustawienie sygnalizacji dźwiękowej
BR
Wymiana baterii
Przed rozpoczęciem eksploatacji należy dokładnie zapoznać się z niniejszą instrukcją obsługi.
Typ zastosowanych części - BF
Nie dopuścić do zamoczenia
7
Termometr Microlife jest urządzeniem wysokiej jakości wykorzystującym najnowsze technologie i przetestowanym pod kątem
zgodności z międzynarodowymi standardami. Dzięki wyjątkowej
technologii termometr zapewnia zawsze precyzyjny i niezależny
od zewnętrznych źródeł ciepła odczyt temperatury. Urządzenie
przeprowadza samosprawdzenie za każdym razem, kiedy je
włączasz, aby zagwarantować precyzję pomiaru.
Termometr Microlife przeznaczony jest do regularnych pomiarów
temperatury ciała ludzkiego.
Testy wykonane w warunkach klinicznych potwierdziły bezpieczeństwo i precyzyjność termometru pod warunkiem przestrzegania zasad zawartych w niniejszej instrukcji obsługi.
Przeczytaj tę instrukcję uważnie i zapoznaj się ze wszystkimi funkcjami oraz wskazówkami dotyczącymi bezpieczeństwa.
Spis treści
1.Zalety termometru
• Pomiar w kilka sekund
• Wielofunkcyjne zastosowanie (szeroki zakres pomiarów)
•Dokładność i pewność
• Łatwość użycia
•Wywoływanie wielokrotnych odczytów
• Bezpieczeństwo i higiena
• Alarm ostrzegający o gorączce
• Funkcja Bluetooth®
2. Ważne wskazówki bezpieczeństwa
3. W jaki sposób termometr mierzy temperaturę
4. Symbole kontrolne
5. Ustawienie daty, godziny i sygnalizacji dźwiękowej
6. Zmiana trybu pracy temp. ciała - temp. obiektu
7. Jak przeprowadzić pomiar
8. Pomiar temperatury w °C lub °F
9. Jak wywołać 30 kolejnych wyników pomiarów
10. Funkcja Bluetooth®
• Pobieranie «Microlife Connected Health+»
• Jak działa funkcja Bluetooth®
•Wskaźnik ikony Bluetooth®
PL
Page 9

• Samouczek aplikacji
11. Komunikaty o błędach
12. Czyszczenie i dezynfekcja
13. Wymiana baterii
14. Gwarancja
15. Specyfikacja techniczna
16. www.microlife.pl
Karta gwarancyjna (patrz tył okładki)
1. Zalety termometru
Pomiar w kilka sekund
Innowacyjna technologia pomiarów przy użyciu promieni IR
pozwala na pomiary bez dotykania mierzonego obiektu. To
gwarantuje bezpieczny i higieniczny pomiar w kilka sekund.
Wielofunkcyjne zastosowanie (szeroki zakres pomiarów)
Termometr oferuje szeroki zakres pomiarowy od 0 - 100,0 °C / 32,0
- 212,0 °F; oznacza to, że można go użwać do pomiaru temperatury
na czole oraz do pomiarów temperatury ciała, a także do sprawdzania temperatury powierzchni następujących substancji:
Mleka w butelce dla dziecka
Temperatury wody do kąpieli dla dziecka
Temperatury otoczenia
Dokładność i pewność
Dzięki niepowtarzalnej budowie podzespołów oraz ulepszonemu
czujnikowi na podczerwień wyrób ten zapewnia bardzo dokładny
oraz wiarygodny pomiar temperatury.
Łatwość użycia
Specjalny ergonomiczny kształt zapewnia proste i łatwe użytko-
wanie.
Termometr może być użytkowany nawet podczas snu dziecka,
nie powodując jego przebudzenia.
Czas pomiaru temperatury jest krótki, dzięki czemu urządzenie
jest szczególnie przyjazne dla dzieci.
Wywoływanie wielokrotnych odczytów
Użytkownik może wywołać 30 wyników ostatnio przeprowadzonych pomiarów przy pomocy odpowiedniej funkcji (Recall Mode),
umożliwiając efektywne śledzenie zmian temperatury.
Bezpieczeństwo i higiena
Brak bezpośredniego kontaktu ze skórą.
Nie ma ryzyka stłuczenia szkła lub zatrucia rtęcią.
Bezpieczny dla dzieci.
Alarm ostrzegający o gorączc
10 krótkich sygnałów dźwiękowych oraz czerwone podświetlenie
na wyświetlaczu ciekłokrystalicznym ostrzega pacjenta o temperaturze równej lub wyższej niż 37,5 °C.
Funkcja Bluetooth®
To urządzenie łączy się z aplikacją «Microlife Connected Health+» za
pomocą Bluetooth® 4.0 i umożliwia łatwe monitorowanie temperatury.
e
2. Ważne wskazówki bezpieczeństwa
Postępuj zgodnie z instrukcją użytkowania. Ten dokument
zawiera ważne informacje o działaniu produktu i informacje
dotyczące bezpieczeństwa dotyczące tego urządzenia. Prze-
czytaj dokładnie ten dokument przed użyciem urządzenia i
zachowaj go na przyszłość.
Urządzenie może być wykorzystywane do celów określonych w
niniejszej instrukcji. Producent nie ponosi odpowiedzialności za
szkody powstałe w wyniku niewłaściwej eksploatacji.
Nigdy nie zanurzaj urządzenie w wodzie lub innych
cieczach. Przy czyszczeniu zastosuj się do wskazówek
zamieszczonych w części «Czyszczenie i dezynfekcja».
Prosimy nie używać urządzenia, jeżeli zauważą Państwo
niepokojące objawy, które mogą wskazywać na jego uszko-
dzenie.
Nie należy otwierać urządzenia.
Ponieważ we wczesnym etapie gorączki może wy
zwężenie naczyń krwionośnych, powodując ochłodzenie skóry,
wynik temperatury na czole może być zaniżony.
Jeżeli wynik pomiaru nie jest zgodny ze spodziewanym wynikiem
pomiaru pacjenta lub jest nietypowo niski, powtarzaj pomiar co 15
minut lub porównaj wynik z pomiarem temperatury wewnętrznej
ciała przeprowadzonym za pomocą innego termometru.
Urządzenie zbudowane jest z delikatnych podzespołów i
dlatego musi być używane ostrożnie. Prosimy o przestrzeganie
wskazówek dotyczących przechowywania i użytkowania
zamieszczonych w części «Specyfikacja techniczna».
Dopilnuj, aby dzieci nie używały urządzenia bez nadzoru osób doro-
słych; jego niektóre, niewielkie części mogą zostać łatwo połknięte.
Nie używaj urządzenia w pobliżu występowania silnego pola
elektromagnetycznego powodowanego przez telefony komór-
stąpić
PL
8NC 150 BT
Page 10

kowe lub instalacje radiowe. Podczas wykonywania pomiaru
utrzymuj dystans min. 3,3 m od takich urządzeń.
Chroń urządzenie przed:
- ekstremalnymi temperaturami
-wstrząsami i upadkiem
- zanieczyszczeniem i kurzem
- światłem słonecznym
-upałem i zimnem
Jeżeli urządzenie nie będzie używane przez dłuższy czas
należy wyjąć baterie.
UWAGA: Podany przez to urządzenie wynik pomiaru nie
jest diagnozą. Nie zastępuje to konieczności konsultacji
lekarza, zwłaszcza jeśli wynik nie odpowiada objawom
pacjenta. Nie należy polegać tylko na wyniku pomiaru,
należy zawsze rozważyć inne potencjalnie pojawiające się
objawy i opinie pacjenta. W razie potrzeby zaleca się
wezwanie lekarza lub pogotowia.
3. W jaki sposób termometr mierzy temperaturę
Termometr mierzy cieplną energię podczerwieni wydzielaną przez
skórę na czole oraz przez inne obiekty. Energia ta jest następnie
pochłaniana przez soczewkę i wyświetlana w postaci wartości
temperatury.
4. Symbole kontrolne
Wyświetlone wszystkie segmenty 9: Wciśnij przycisk ON/
OFF 5, aby uruchomić przyrząd. Wszystkie segmenty
wyświetlą się na 1 sekundę.
Gotów AK: Przyrząd jest gotów do pracy gdy symbol «°C» lub
«°F» będzie migać oraz jednocześnie będzie wyświetlona
ikona rodzaju pomiaru (pomiar temp. ciała lub obiekt).
Pomiar skończony AL: Odczyt pokaże się na wyświetlaczu
3; wraz z migającymi symbolami «°C» lub «°F» oraz ikoną
rodzaju pomiaru. Urządzenie jest gotowe do następnego
pomiaru gdy ikona «°C» lub «°F» będzie migać.
Baterie za słabe AO: Po włączeniu przyrządu symbol «»
zacznie migać,
przypominając, że trzeba wymienić baterię.
5. Ustawienie daty, godziny i sygnalizacji dźwiękowej
Ustawienie daty i czasu
1. Po zainstalowaniu nowych baterii, liczba lat zacznie migać na
wyświetlaczu termometru BP. Można ustawić rok, naciskając
przycisk START 4.W celu potwierdzenia, a następnie ustawienia miesiąca, naciśnij przycisk PAMIĘĆ 8.
2. Naciśnij przycisk Start 4, aby ustawić miesiąc. Naciśnij przycisk PAMIĘĆ 8, aby potwierdzić, a następnie ustaw dzień.
3. Wykonaj powyższe instrukcje, aby ustawić dzień, tryb (12 lub
24) godzin i minut.
4. Po ustawieniu minut i wciśnięciu przycisku PAMIĘĆ 8, data i
godzina zostaną ustawione i wyświetli się czas.
Jeśli żaden przycisk nie zostanie naciśnięty w ciągu
20 sekund, urządzenie automatycznie przełączy się do
pomiaru temperatur AK.
Anulowanie ustawienia czasu:
5
podczas ustawienia czasu. Na ekranie LCD pojawi s ię data
/ czas «--:--». Następnie naciśnij przycisk ON/OFF
rozpocząć pomiar. Jeśli nie zostaną podjęte dalsze działania
w ciągu 20 sekund, urządzenie automatycznie wyłączy się.
Zmiana bieżącej daty i czasu: Naciśnij i przytrzymaj przy-
cisk PAMIĘĆ 8 przez około 3 sekundy, dopóki liczba lat
nie zacznie migać na wyświetlaczu BP. Następnie można
wprowadzić nowe wartości, jak opisano powyżej.
Ustawianie sygnału dźwiękowego
1. Gdy urządzenie jest wyłączone, naciśnij i przytrzymaj przycisk
2. Naciśnij przycisk ON / OFF 5 ponownie, aby włączyć lub wyłą-
5
ON/OFF
czyć sygnał dźwiękowy. Sygnalizator jest włączony, gdy ikona
sygnalizacji dźwiękowej BQ nie jest przekreślona.
na 5 sekund aby ustawić sygnalizację dźwiękową BQ.
Jeśli żaden przycisk nie zostanie naciśnięty w ciągu
5 sekund, urządzenie automatycznie przełączy się do
pomiaru temperatur AK.
Naciśnij przycisk ON/OFF
5
, aby
6. Zmiana trybu pracy temp. ciała - temp. obiektu
Aby zmienić tryb pracy na pomiar temp. obiektu przesuń przełącznik
trybu pracy
tryb pracy na pomiar temp. ciała przesuń przełącznik w górę.
6
umieszczony z boku termometru w dół. Aby zmienić
7. Jak przeprowadzić pomiar
Pomiar temperatury ciała
1. Wciśnij przycisk ON/OFF 5. Wyświetlacz 3 uaktywni się i
pokaże wszystkie elementy w ciągu 1 sekundy.
2. Kiedy zaczną migać symbole «°C» lub «°F» i zabrzmi sygnał
dźwiękowy, termometr jest gotów do wykonania pomiaru AK.
9
Page 11

3. Wyceluj termometr w środek czoła w odległości nie więk-
szej niż 5 cm. Aby poprawić dokładność pomiaru, usuń z czoła
włosy, pot i brud.
4. Naciśnij przycisk START 4 i upewnij się, że niebieski
wskaźnik świetlny jest wycelowany w środek czoła. Po
3 sekundach długi sygnał dźwiękowy potwierdzi dokonanie
pomiaru.
5. Odczytaj z wyświetlacza ciekłokrystalicznego zapisaną wartość
temperatury.
Pomiar temperatury obiektu
1. Postępuj wg powyższej instrukcji, punktów 1-2. Wyceluj termometr na środek mierzonego obiektu utrzymując odległość nie
wiekszą niż 5 cm. Naciśnij przycisk rozpoczęcia pomiaru
START 4. Po 3 sekundach długi sygnał d źwięk
dokonanie pomiaru.
2. Odczytaj z wyświetlacza ciekłokrystalicznego zapisaną wartość
temperatury.
UWAGA:
Pacjent razem z termometrem powinien znajdować się w
pomieszczeniu zamkniętym, w stałej temperaturze
otoczenia przez co najmniej 30 minut.
Nie należy mierzyć temperatury u dziecka podczas lub zaraz po
zakończeniu karmienia.
Nie używaj termometru w środowisku o dużej wilgotności.
Przed pomiarem temperatury lub w jego trakcie pacjentowi nie
wolno pić, jeść oraz wykonywać gwałtownych ruchów.
Nie zabieraj przyrządu z miejsca pomiaru, dopóki nie pojawi się
końcowy sygnał dźwiękowy.
10 krótkich sygnałów dźwiękowych oraz czerwone podświet-
lenie na wyświetlaczu ciekłokrystalicznym ostrzega pacjenta o
temperaturze równej lub wyższej niż 37,5 °C.
Należy zawsze dokonywać pomiaru temperatury w tym samym
miejscu. Różne obszary ciała mogą dawać odmienne wyniki.
U noworodków oraz dzieci do 6-go miesiąca życia lekarze zale-
bytniczą metodę pomiaru. Pozostałe metody pomiaru
cają od
mogą dawać niejednoznaczne wyniki. Jeżeli używasz termometru bezkontaktowego u ww dzieci zawsze weryfikuj wyniki z
odczytami uzyskanymi w sposób odbytniczy.
W następujących sytuacjach zaleca się trzykrotne wykonanie
temperatury, a jako wielkość reprezentatywną przyjęcie
wartości najwyższej:
owy potwierdzi
1. U dzieci do trzech lat z zaburzeniami systemu odporności
organizmu, dla których występowanie gorączki lub jej brak
jest wskaźnikiem krytycznym.
2. Kiedy uczysz się posługiwania termometrem, zanim przyswoisz
sobie jego funkcje i nauczysz się otrzymywać właściwe pomiary.
3. Pomiar jest wyraźnie zaniżony.
Wyniki pomiarów uzyskane z różnych miejsc pomiarowych
oraz z różnych miejsc nie powinny być porównywane jako
normalna temperatura ciała, temperatura jest najwyższa
wieczorem i najniższa około godziny przed przebudzeniem.
Zakresy odczytów temperatury uznawane za normalne:
- Pomiar pod pachą: 34,7 - 37,3 °C / 94,5 - 99,1 °F
- Pomiar w ustach: 35,5 - 37,5 °C / 95,9 - 99,5 °F
- Pomiar w odbycie: 36,6 - 38,0 °C / 97,9 - 100,4 °F
- Microlife NC 150 BT: 35.4 - 37.4 °C / 95.7 - 99.3 °F
8. Pomiar temperatury w °C lub °F
Termometr może wskazywać temperaturę w skali Celsjusza lub
Fahrenheita. Aby przełączyć stopnie °C na °F, po prostu wyłącz
termometr, wciśnij i przytrzymaj przycisk START 4 przez
5 sekund; Po 5 sekundach na wyświetlaczu AP pojawi się aktualna
skala (symbol «°C» lub «°F». Przełącz skalę pomiaru z °C na °F
przez ponowne naciśnięcie przycisku START 4. Po wyborze
potrzebnej skali odczekaj kolejnych 5 sekund, a urządzenie automatycznie włączy wybraną skalę do funkcji pomiarowych.
9. Jak wywołać 30 kolejnych wyników pomiarów
Termometr posiada funkcję pamięci, która umożliwia wyświetlenie
30 ostatnich pomiarów temperatury wraz z datą i godziną.
Tryb Recall - wywoływania wyników poprzednich
pomiarów AQ: Naciśnij przycisk PAMIĘĆ 8, aby przejść do
trybu Recall, podczas gdy termometr jest wyłączony. Symbol
pamięci «M» będzie migać.
Odczyt 1 - wynik ostatniego pomiaru AR: Naciśnij przycisk
PAMIĘĆ 8, aby wywołać wynik ostatniego pomiaru. Odczyt 1
- wyświetli się symbol pamięci «M».
Odczyt 30 - odczyty wyświetlane kolejno: Aby uzyskać
kolejne odczyty naciskaj i zwalniaj przycisk PAMIĘĆ 8, aby
uzyskać aż do 30 kolejnych wyników pomiarów.
Po uzyskaniu 30 kolejnych pomiarów wielokrotne naciskanie i
zwalnianie przycisku PAMIĘĆ 8 spowoduje powrót do pierwszego odczytu.
PL
10NC 150 BT
Page 12

10. Funkcja Bluetooth®
To urządzenie może być używane w połączeniu ze smartfonem z
aplikacją «Microlife Connected Health+». Wyniki pomiarów
zostaną automatycznie przesłane przez Bluetooth®.
Pobieranie «Microlife Connected Health+»
Pobierz aplikację «Microlife Connected Health+» za darmo z
Google Play™ (Android) lub App Store (iOS) i zainstaluj ją na
smartfonie.
Jak działa funkcja Bluetooth®
Funkcja Bluetooth® na urządzeniu automatycznie się włączy i
będzie gotowa do połączenia z aplikacją «Microlife Connected
Health+» po włączeniu urządzenia. Twoje urządzenie automatycznie prześle dane po połączeniu ze smartfonem.
Wskaźnik ikony Bluetooth®
Wskaźnik ikon Bluetooth® na urządzeniu, znajdujący się w środ-
kowej lewej części wyświetlacza, ma na celu dostarczenie informacji o połączeniu między urządzeniem i smartfonem.
UWAGA:
Włączona jest funkcja Bluetooth®: Wskaźnik ikony Bluetooth®
AK pojawia się stale na wyświetlaczu.
Wskaźnik ikony Bluetooth® AK miga podczas łączenia się z
urządzeniem lub przesyłania danych do urządzenia.
Funkcja Bluetooth® jest automatycznie wyłączana podczas
pomiaru; po pomiarze urządzenie włączy go i prześle dane do
aplikacji «Microlife Connected Health+».
Samouczek aplikacji
Aby uzyskać dostęp do samouczka, wybierz «Samouczek» w
menu aplikacji «Microlife Connected Health+» (znajduje się w
lewym górnym rogu ekranu).
11. Komunikaty o błędach
Zmierzona temperatura (np. cieczy) jest zbyt wysoka AS:
Pojawia się «H», kiedy zmierzona temperatura jest wyższa niż
42,2 °C / 108,0 °F w trybie pomiaru ciała 100 °C / 212 °F w
trybie pomiaru obiektu.
Zmierzona temperatura (np. cieczy) jest zbyt niska BT:
Pojawia się «L», kiedy zmierzona temperatura jest niższa niż
34,0 °C / 93,2 °F w trybie pomiaru ciała 0 °C / 32 °F w trybie
pomiaru obiektu.
Temperatura otoczenia jest zbyt wysoka BK: Pojawia
się «H» razem z , kiedy temperatura otoczenia jest wyższa
niż 40,0 °C / 104,0 °F.
Temperatura otoczenia jest zbyt niska BL: Pojawia się «L»
wraz z , kiedy temperatura otoczenia jest niższa niż 16,0 °C
/ 60,8 °F w trybie pomiaru ciała niższa niż 5,0 °C / 41,0 °F w
trybie pomiaru obiektu.
Pojawia się znak Err - błąd funkcji BM:
Wyświetlacz jest ciemny BN:
ciwie włożone. Sprawdź również biegunowość (<+> i <->) baterii.
Wskaźnik słabych baterii BO: Jeżeli ikona «» pojawi się na
wyświetlaczu baterie powinny być niezwłocznie wymienione.
System źle funkcjonuje.
Sprawdź, czy baterie są właś-
12. Czyszczenie i dezynfekcja
Do czyszczenia obudowy termometru oraz czujnika pomiarowego
używaj wacika lub tamponu zwilżonego alkoholem (70%
isopropyl). Dopilnuj, żeby płyn nie przedostał się do środka termo-
metru. Nigdy nie używaj materiałów ściernych, środków chemicznych lub rozpuszczalników oraz nigdy nie zanurzaj go w wodzie
lub innym płynie czyszczącym. Uważaj, aby nie zarysować
powierzchni czujnika oraz wyświetlacza.
13. Wymiana baterii
Urządzenie jest zasilane 2 bateriami 1,5V typu AAA o przedłu-
żonej żywotności. Baterie powinny być wymienione kiedy symbol
«» BO pojawi się na wyświetlaczu.
Zdejmij pokrywę baterii BR zgodnie z instrukcją.
Wymień baterie – upewnij się, że bieguny baterii odpowiadają
symbolom w pojemniku.
Zużyte baterie oraz urządzenia elektryczne muszą być
poddane utylizacji zgodnie z obowiązującymi przepisami.
Nie należy wyrzucać ich wraz z odpadami domowymi.
14. Gwarancja
Urządzenie jest objęte 5-letnią gwarancją, licząc od daty zakupu.
Gwarancja jest ważna tylko z wypełnioną przez sprzedawcę kartą
gwarancyjną (na odwrocie strony) potwierdzającą datą zakupu i
paragonem.
Gwarancja obejmuje wyłącznie przyrząd; nie obejmuje baterii i
opakowania.
Otwarcie lub dokonanie modyfikacji urządzenia unieważnia
gwarancję.
11
Page 13

Gwarancja nie obejmuje uszkodzeń powstałych na skutek
nieprawidłowego użycia, nieprzestrzegania instrukcji obsługi,
uszkodzeń przypadkowych, a także wyczerpanych baterii.
W razie wątpliwości skontaktuj się z serwisem Microlife.
15.Specyfikacja techniczna
Typ:
Zakres
pomiaru:
Rozdziel-
czość: 0,1 °C / °F
Dokładność
pomiaru
(Laboratoryjnych):
Wyświetlacz: Liquid Crystal Display (ciekłokrystaliczny), 4 cyfry
Akustyka:
Pamięć: 30 ostatnich pomiarów temperatury wraz z datą i
Podświetlenie:
Warunki
pracy:
Elektroniczny termometr bezkontaktowy NC 150 BT
Pomiar temp. ciała: 34.0 - 42.2 °C / 93.2 - 108.0 °F
Pomiar temp. obiektu: 0 - 100.0 °C / 32 - 212.0 °F
Pomiar temp. ciała:
0.2 °C, 35.0 42.0 °C / 0.4 °F, 95.0 107.6 °F
0.3 °C, 34.0 34.9 °C i 42.1 43.0 °C /
0.5 °F, 93.2 ~ 94.8 °F i 107.8 ~ 109.4 °F
Pomiar temp. obiektu:
±1,0 °C, 0 100,0 °C / ±2 °F, 32,0 212 °F
plus ikony specjalne
Przyrząd włączony i gotowy do wykonywania
pomiarów: 1 krótki sygnał.
Zakończenie pomiaru: 1 długi sygnał dźwiękowy
(1 sek.), jeśli odczyt jest niższy niż 37,5 °C /
99,5 °F, 10 krótkich sygnałów dźwiękowych, jeśli
odczyt jest równy lub wyższy niż 37,5 °C / 99,5 °F.
Błąd systemowy lub awaria: 3 krótkie sygnały
we.
dźwi
ęko
godziną.
Po włączeniu przyrządu na 4 sekundy uaktywnia
się ZIELONE podświetlenie.
Po zakończeniu pomiaru wynikiem niższym niż
37,5 °C / 99,5 °F na 5 sekund uaktywnia się
ZIELONE podświetlenie.
Po zakończeniu pomiaru wynikiem równym lub
wyższym niż 37,5 °C / 99,5 °F na 5 sekund
uaktywnia się CZERWONE podświetlenie.
Pomiar temp. ciała: 15 - 40.0 °C / 59 - 104.0 °F
Pomiar temp. obiektu: 5 - 40.0 °C / 41 - 104.0 °F
Maksymalna wilgotność względna 15 - 95 %
Warunki
przechowywania:
Automatyczne wyłą-
czanie się:
Komunikacja: Bluetooth® Low Energy 4.0 (Bluetooth® Smart)
Kompatybilność:
Bateria: 2 x 1,5 V baterie alkaliczne; rozmiar AAA
Żywotność
baterii: Około 1500 pomiarów (używają
Wymi
Waga: 90 g (z bateriami), 67 g (bez baterii)
IP Class: IP21
Normy: ASTM E1965;IEC 60601-1;
Przewidywana żywotność urzą-
dzenia: 5 lat lub 12000 pomiarów
Urządzenie spełnia wymagania zawarte w Dyrektywie Wyrobów
Medycznych 93/42/EEC.
Prawo do zmian technicznych zastrzeżone.
Zgodnie z ustawą o zastosowaniu wyrobów medycznych zalecany
jest do użycia profesjonalnego przy zachowaniu dwuletniego
okresu przeglądu technicznego. Prosimy stosować się do obowią-
zujących przepisów utylizacji.
Znak słowny Bluetooth® i logo są zarejestrowanymi znakami towarowymi firmy Bluetooth SIG, Inc., a użycie tych znaków przez Microlife Corp. jest przedmiotem odpowiedniej licencji. Inne znaki towarowe i nazwy handlowe należą do poszczególnych właścicieli.
-25 - +55 °C / -13 - +131 °F
Maksymalna wilgotność względna 15 - 95 %
Po ok. 1 minucie od wykonania ostatniego
pomiaru.
iOS: iOS 9.0 lub nowszy
Android: Android™ 4.4 lub nowszy
c nowych baterii)
ary: 141.1 x 43.3 x 36.9 mm
IEC 60601-1-2 (EMC); IEC 60601-1-11
16. www.microlife.pl
Szczegółowe informacje na temat elektronicznych termometrów,
ciśnieniomierzy oraz serwisu możecie Państwo znaleźć na naszej
stronie internetowej: www.microlife.pl lub u generalnego dystrybutora w kraju.
PL
12NC 150 BT
 Loading...