

Page 1
Digital Infrared
Ear Thermometer
1 sec. Measurement
Mesure en 1 sec. / Meettijd 1 sec.
Multiple Use (Wide Range 0 °C - 100 °C)
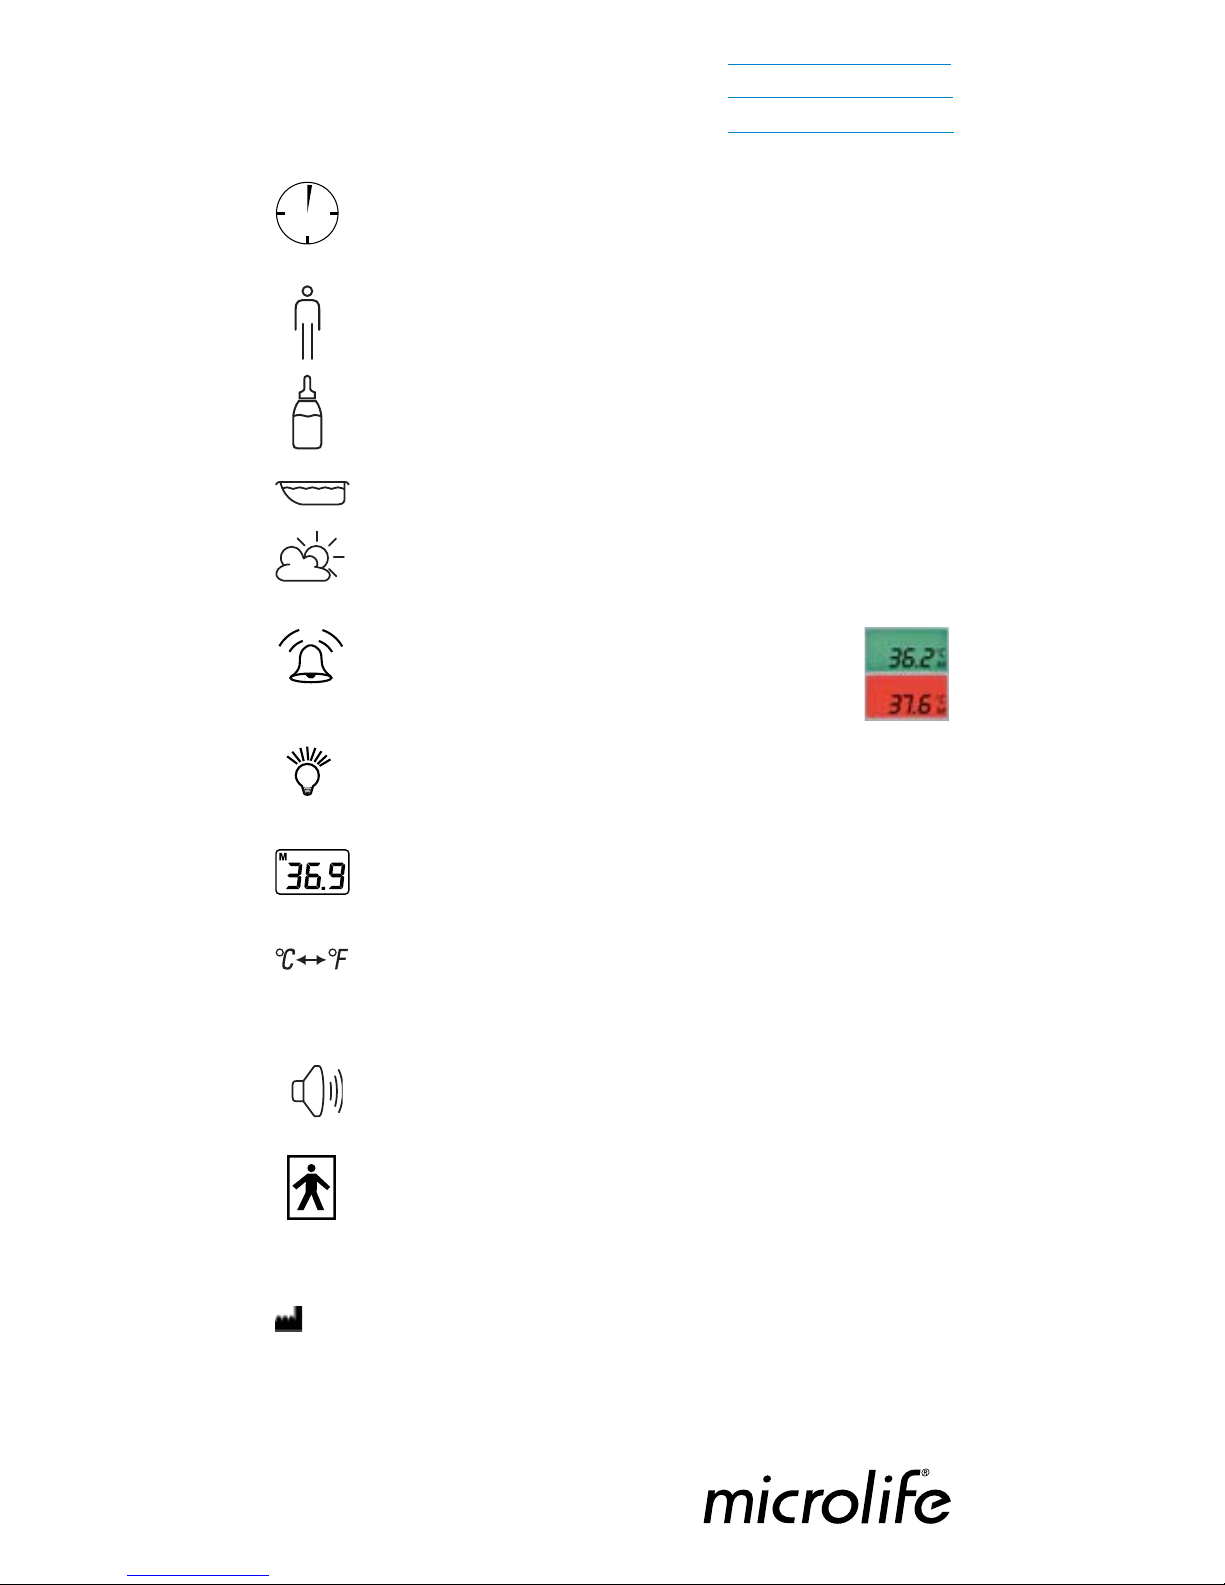
• Body temperature / Température du corps /
Lichaamstemperatuur
• Milk surface temperature / Température de surface
du lait / Oppervlaktetemperatuur melk
• Surface temperature of Baby’s bath / Température
de surface du bain de bébé / Oppervlaktetemperatuur
badwater
• Ambient temperature / Température ambiante /
Omgevingstemperatuur
Fever alarm / Silent Glow
TM
Technology
Alarme de fièvre / Silent GlowTMtechnologie
Koortsalarm / Silent GlowTMtechnologie
Illuminated Display / Nite Glow
Ecran rétro-éclairé / Verlicht Display
12 Data Memory
12 Mémoires / 12 Geheugens
Celsius - Fahrenheit switchable
Commutation Celsius - Fahrenheit
Celsius - Fahrenheit instelling
Signal tone
Signal sonore / Geluidssignaal
Type BF applied part
Partie appliquée du type BF / Geleverd onderdeel type BF
Microlife AG
Espenstrasse 139
9443 Widnau / Switzerland
Tel. +41 / 71 727 70 30
Fax +41 / 71 727 70 39
Email admin@microlife.ch
www.microlife.com
2 YEAR
GUARANTEE
BATTERIES INCLUDED
1 sec.
IB IR 1DE1-S EN-FR-NL 0410
Page 2
Microlife IR 1DE1-S
Digital Infrared Ear Thermometer
Instruction Manual (1-12)
Thermomètre auriculaire à infrarouges
Mode d’emploi (13-24)
Digitale infrarode oorthermometer met
beschermkapjes
Gebruiksaanwijzing (25 - 36)
EN
NL
FR
Page 3

Digital Infrared Ear Thermometer
Instruction Manual
Please read these instructions carefully before using the
instrument and keep them in a safe place.
The Microlife Ear Thermometer is a high quality product incorporating
the latest technology and tested in accordance with international
standards. With its unique technology, this thermometer can provide
a stable, heat-interference-free reading with each measurement.The
instrument performs a self-test every time it is switched on toalways
guarantee the specified accuracy of measurements. The Microlife Ear
Thermometer is intended for the periodic measurement and monitoring of human body temperature in the home. It is intended for use on
people of all ages.
Please read through these instructions carefully so that you understand all functions and safety information.
Table of Contents
1. The Advantages of this Ear Thermometer
2. Important Safety Instructions
3. Product Description
4. How this Thermometer Measures Ear Temperature
5. Control Displays and Symbols
6. How to Reload a New Probe Cover
7. Directions for Use
8. Changing from Fahrenheit to Celsius and vice-versa
9. How to recall 12 readings in Memory Mode
10. Cleaning and Storage
11. Error Messages
12. Replacing the Battery
13. Guarantee
14. Technical Specifications
15. www.microlife.com
Page 4

2
1. The Advantages of this Ear Thermometer
Multiple Use (Wide Range Measurement)
This thermometer offers a wide measurement range feature from
0 °C to 100.0 °C (32.0 °F to 212.0 °F), meaning the unit can be used
as an ear thermometer to measure body temperature or it can be
used to measure surface temperature of the following:
• Milk surface temperature in a baby's bottle
• Surface temperature of a baby's bath
• Ambient temperature
Measurement in 1 second
The innovative infrared technology allows measurement of ear temperature in only 1 second.
Accurate and reliable
The unique probe assembly construction, incorporating an advanced
infrared sensor, ensures that each measurement is accurate and
reliable.
Gentle and Easy to Use
• The ergonomic design enables simple and easy use of the
thermometer.
• This thermometer can even be used on a sleeping child, thereby
causing no disruption.
• This thermometer is quick, therefore child-friendly.
Auto-Display Memory
The last reading is automatically displayed for 2 seconds when the
unit is switched ON.
Multiple Reading Recalls
Users will be able to recall the last 12 readings when entering the recall
mode, enabling efficient tracking of temperature variations.
Safe and Hygienic
• No risk of broken glass or mercury ingestion.
• Completely safe for use on children.
• Disposable probe covers make this thermometer completely
hygienic for use by the whole family.
Fever Alarm
10 short beeps and a red LCD backlight alert the patient that he/she
may have a temperature above 37.5 °C.
Page 5

3
2. Important Safety Instructions
• This instrument may only be used for the purposes described in
this booklet. The manufacturer cannot be held liable for damage
caused by incorrect application.
• Always use the thermometer with a new undamaged Probe Cover
for each measurement to prevent infection. Only Microlife branded
probe covers can ensure that you get an accurate measurement.
• Never immerse this instrument in water or other liquids. For
cleaning please follow the instructions in the «Cleaning
and Disinfecting» section.
• Do not use the instrument if you think it is damaged or notice
anything unusual.
• Never open the instrument.
• Earwax in the ear canal may cause a lower temperature reading.
Therefore it is important to ensure the subject's ear canal is clean.
• This instrument comprises sensitive components and must be
treated with caution. Observe the storage and operating conditions described in the «Technical Specifications» section.
• Protect it as well as the probe covers from:
- extreme temperatures
- impact and dropping
- contamination and dust
- direct sunlight
- heat and cold
• If the instrument is not going to be used for a prolonged period
the batteries should be removed.
• Ensure that children do not use the instrument unsupervised;
some parts are small enough to be swallowed.
WARNING:
Use of this instrument is not intended as a substitute for consultation
with your physician. This instrument is NOT waterproof so do not
immerse in liquids.
Page 6

4
3. Product Description
(1) Probe Cover
(2) Probe
(3) Start button
(4) LCD Display
(5) O/I button
(6) Battery Cover
4. How this Ear Thermometer Measures Ear Temperature
This thermometer measures infrared energy radiated from the eardrum
and the surrounding tissue. This energy is collected through the lens
and converted to a temperature value. The measured reading obtained
directly from the eardrum (Tympanic Membrane) ensures the most accurate ear temperature.
Measurements taken from the surrounding tissue of the ear canal generate lower readings and may result in misdiagnosis of fever.
To avoid an inaccurate measurement:
• First slip on a probe cover.
• Switch on the thermometer by pressing the O/I button.
• After one beep is heard (and the temperature scale icon is flashing),
straighten the ear canal by gently pulling the middle of the ear back
and up.
• Place the probe firmly into the ear canal, press the START button
and keep the probe in the ear until the thermometer beeps to
signal the completion of the measurement.
This thermometer has been clinically tested and proven to be
safe and accurate when used in accordance with its operating instruction manual.
(2)
(3)
(4)
(5)
(6)
(1)
Page 7

5
5. Control Displays and Symbols
LCD Display Display
Meaning
Description
All segments
displayed
Press the O/I button to turn
on the unit, all segments
will be shown for 2 seconds.
Memory The last reading will be
shown on the display automatically for 2 seconds.
Ready The unit is ready for measu-
rement, the «°C» or «°F»
icon will keep flashing.
Measurement
complete
The reading will be shown
on the display with the
«°C» or «°F» icon steady,
the unit is ready for the
next measurement, when
the «°C» or «°F» icon is
flashing again.
Out-of-ear
temperature
indication
A crossed-ear-icon is shown
on the LCD if the reading
falls outside the range 32.0
~ 42.2 °C (89.6 ~ 108.0 °F).
Low battery
indication
When the unit is turned on,
the battery icon will keep
flashing to remind the user
to replace the battery.
Page 8
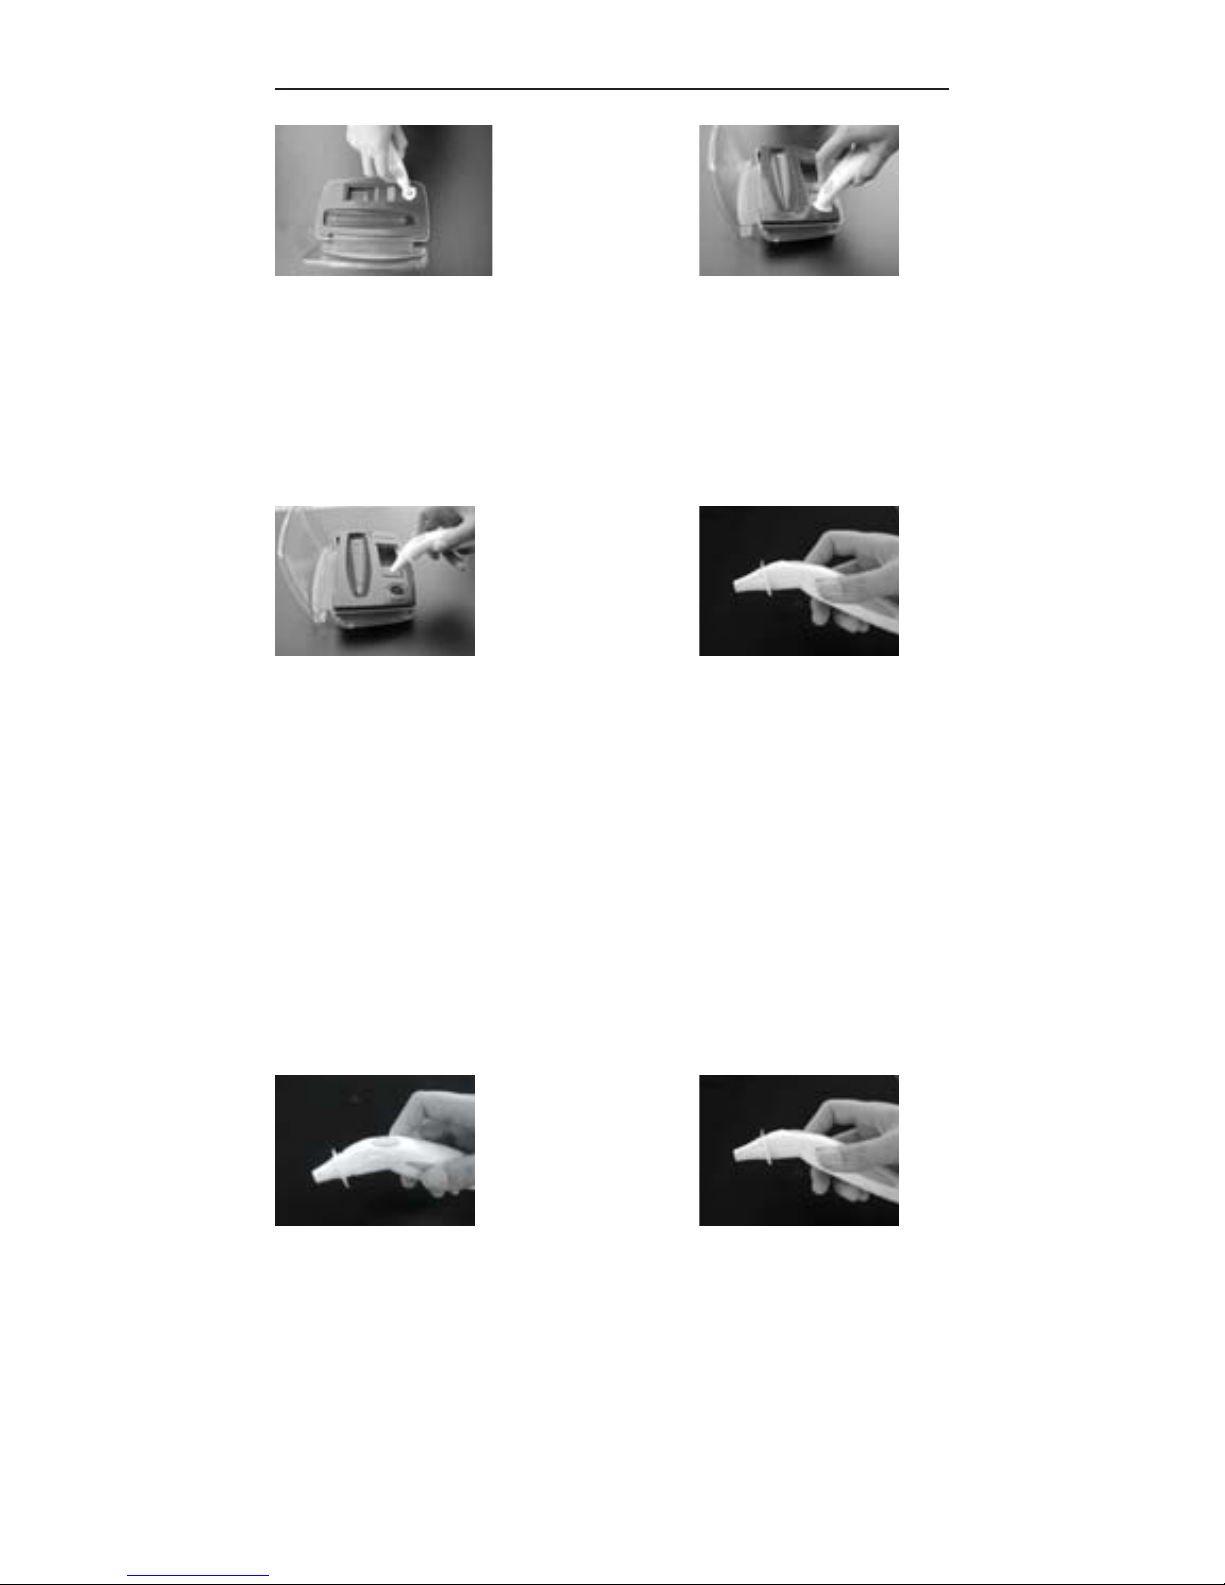
6. How to Reload a New Probe Cover
NOTE:
• In order to avoid cross-contamination, please reload a new probe
cover for each measurement.
• Please check if the probe cover is fitted on firmly before use
(please see the diagrams below); If the probe cover is broken,
discard the probe cover and reload a new one immediately.
(X) Incorrect (O) Correct
6
(3) Completely push the
probe into the probe
cover holder hole.
(4) Take out the probe with
cover attached tightly.
(1) Place a probe cover onto
the storage case hole
with paper side upwards.
(2) Take the unit,
vertically
penetrate the probe into
the center part of the
probe cover.
Page 9
7
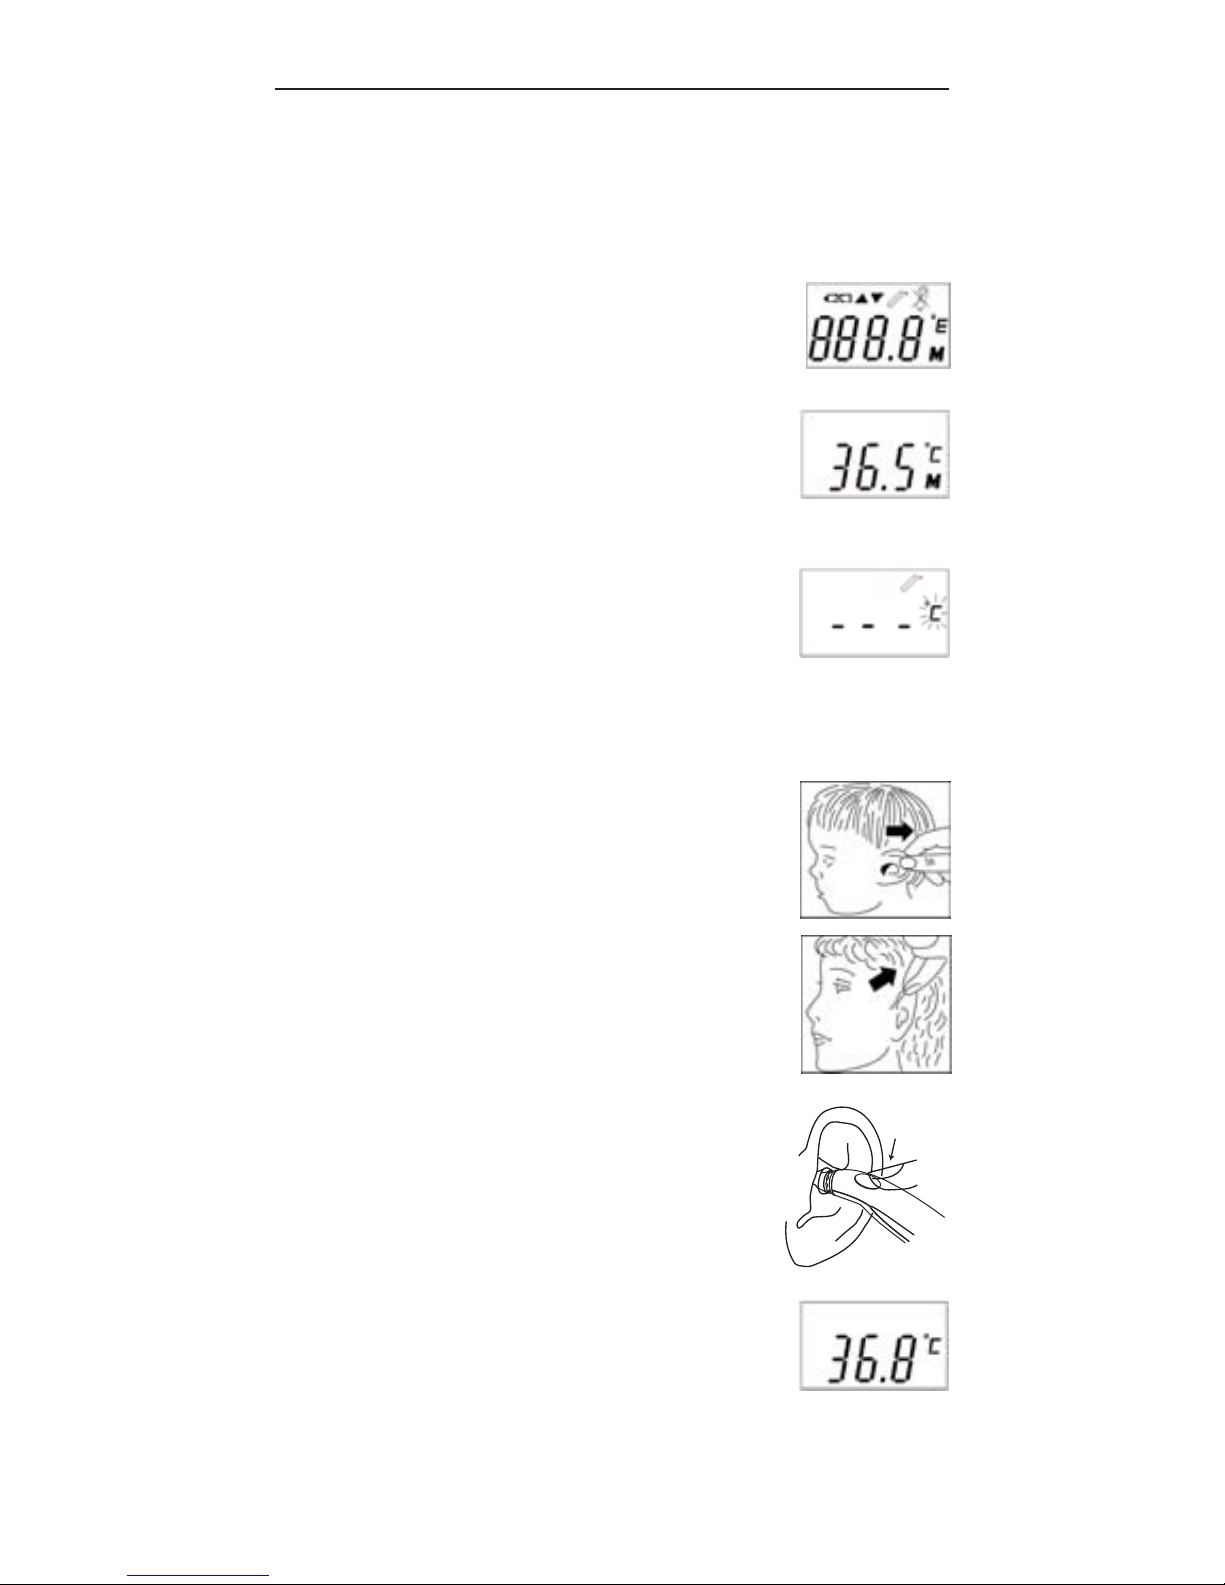
7. Directions for Use
Important: Prior to every measurement, fit a new undamaged Probe
Cover on the measuring probe. Failure to do so may result in incorrect
temperature measurement.
1. Press the O/I button. The display is activated
to show all segments for 2 seconds.
2. The last measurement reading will automati-
cally be shown on the display for 2 seconds
with the «M» icon.
3. When the «°C» or «°F» icon is flashing, a
beep sound is heard and the thermometer is
ready for measurement.
4. Straighten the ear canal by pulling the ear up and back to give a
clear view of the eardrum.
• For children under 1 year; pull the ear straight
back.
• For children of 1 year to adult; pull the ear up
and back.
Also refer to the short instructions at the front.
5. While gently pulling the ear, insert the probe
snugly into the ear canal (max. 1 sec.) and
immediately press the START button.
Release the button and wait for the beep
sound. This is the indication that confirms
the end of measurement.
6. Remove the thermometer from the ear canal.
The display shows the measured temperature.
NOTE:
To ensure accurate readings, wait at least 30 sec. after 3-5
continuous measurements.
Page 10

8
Replace the probe cover after each measurement. To do this, please
follow the instruction in point 6 «How to Reload a New Probe Cover».
• 10 short beeps and a red LCD backlight alert the patient that
he/she may have a temperature above 37.5 °C.
• For an infant, it is best to have the child lying flat with his/her head
sideways so the ear is facing upwards. For an older child or adult,
it is best to stand behind and slightly to the side of the patient.
• Always take the temperature in the same ear, since the tempera-
ture readings may be different from ear to ear.
• Wait for a few minutes to take the ear temperature after sleeping.
• In the following situations it is recommended that three tempera-
tures in the same ear be taken and the highest one taken as the
reading:
1) New born infants in the first 100 days.
2) Children under three years of age with a compromised immune
system and for whom the presence or absence of fever is critical.
3) When the user is learning how to use the thermometer for the
first time until he/she has familiarized himself/herself with the
instrument and obtains consistent readings.
4) If the measurement is surprisingly low.
8. Changing from Fahrenheit to Celsius and vice-versa
The thermometer can display temperature measurements in either
Fahrenheit or Celsius. To switch the display between °C and °F,
simply turn OFF the unit, press and hold the START button for 5
seconds until «---» and the flashing «°C» or «°F» icon is shown on
the LCD. Switch the measurement scale between °C and °F by pressing the START button again. When the measurement scale has been
chosen, wait for 5 seconds and the unit will enter the ready for measuring mode automatically.
Page 11
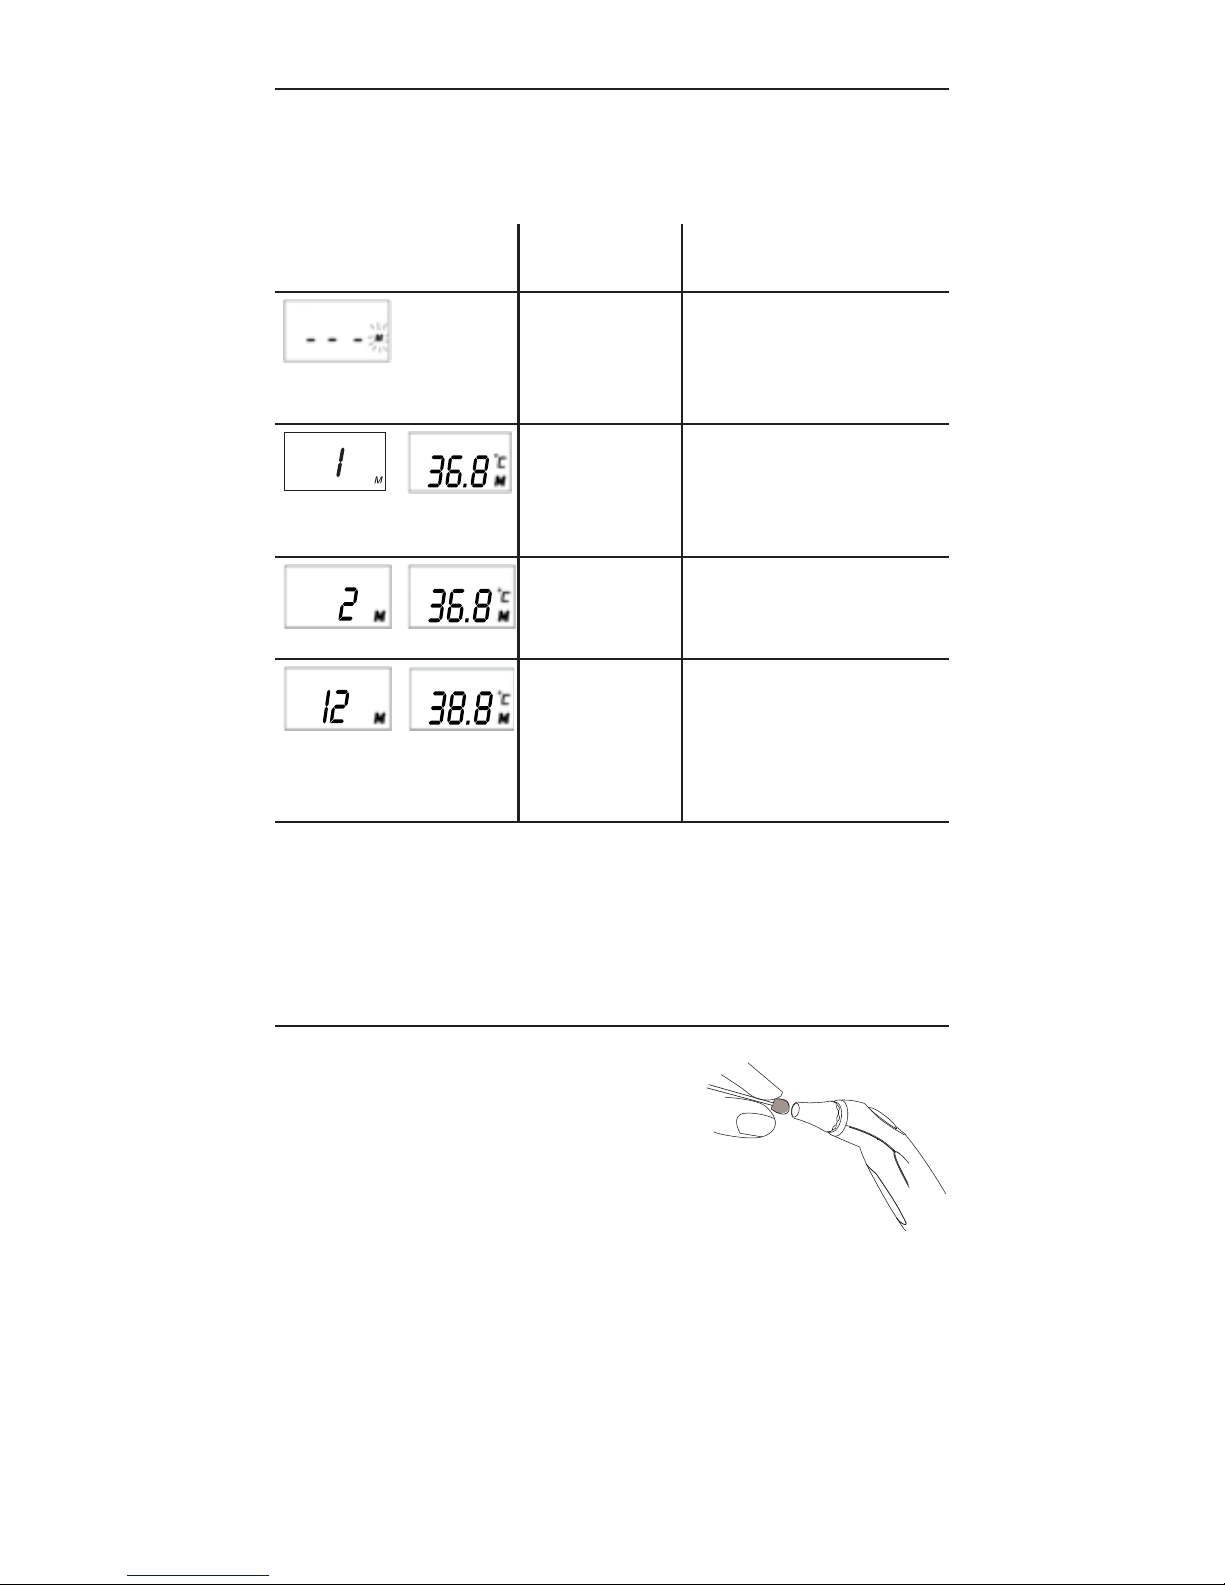
9. How to recall 12 readings in Memory Mode
This thermometer can recall the last 12 readings. To recall please
follow sequence.
Pressing and releasing the START button after the last 12 readings
have been recalled will resume the above sequence from reading 1.
10. Cleaning and Storage
Use an alcohol swab or cotton tissue moistened with alcohol (70% Isopropyl) to
clean the thermometer casing and the
measuring probe. Ensure that no liquid
enters the interior of the thermometer.
Never use abrasive cleaning agents, thinners or benzene for cleaning and never
immerse the instrument in water or other cleaning liquids.
Take care not to scratch the surface of the probe lens and the display.
Remove the battery from the instrument if it is not required for extended periods of time in order to avoid damage to the thermometer
resulting from a leaking battery.
9
LCD Display Display
Meaning
Description
Recall Mode Press the START button to
enter Recall Mode when
power is off.The memory
icon «M» flashes.
Reading 1
(the last reading)
Press and release the
START button to recall the
last reading. Display 1
alone with memory icon.
Reading 2
(the second
latest reading)
Press and release the
START button to recall the
second latest reading.
Reading 12
(the last
reading)
Press and release the
START button consecutively to recall readings in
succession, up to the last
12 readings.
Page 12
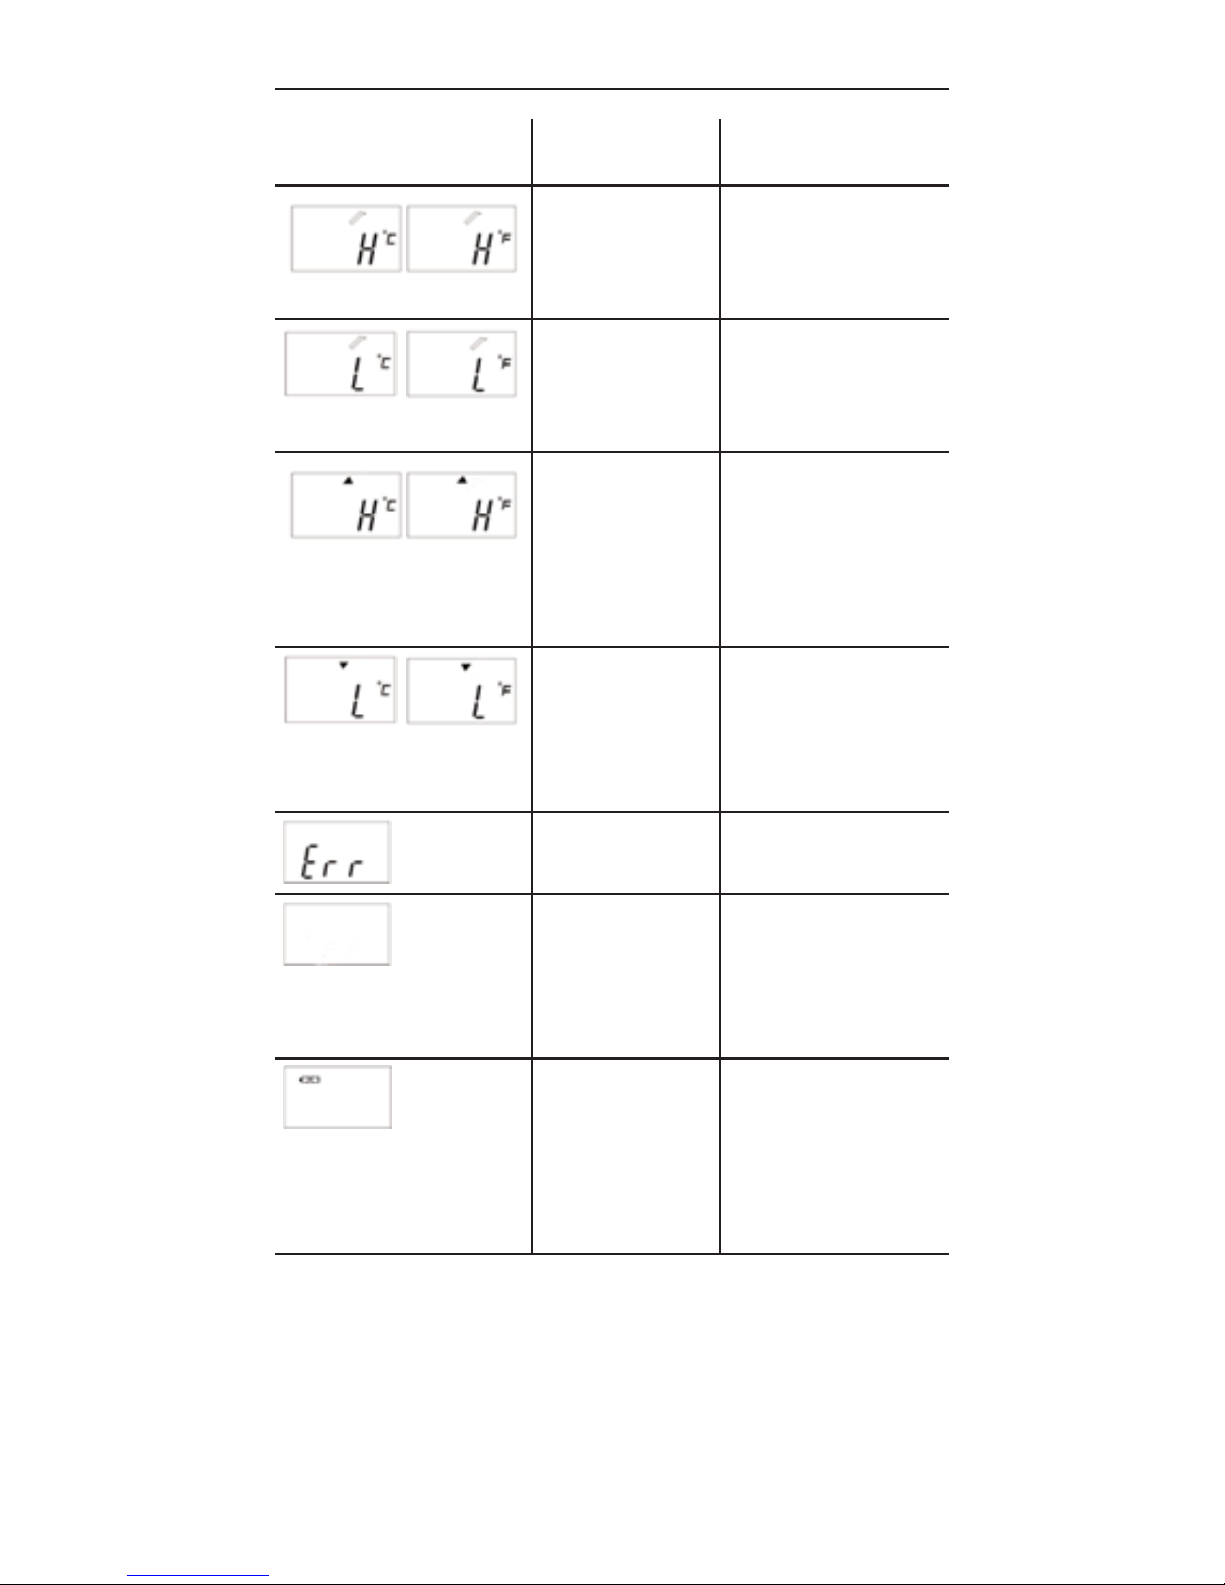
11. Error messages
10
Display / Problem Display
Meaning
Possible cause and
fault remedy
Measured
Temperature too
high
Displays «H» when
measured temperature higher than
100.0 °C or 212.0 °F.
Measured temperature too low
Displays «L» when
measured temperature lower than 0 °C or
32.0 °F.
Ambient temperature too high
Displays «H» in
conjunction with the
«L» when ambient
temperature is higher
than 40.0 °C or
104.0 °F.
Ambient temperature too low
Display «L» in conjunction with the «M»
when ambient temperature is lower than
5.0 °C or 41.0 °F.
Error function
display
When system has
malfunction.
Blank display Please check if the
battery has been loaded correctly. Also
check polarity (<+>
and <->) of battery.
Dead battery
indication
If the steady battery
icon is the only symbol shown on the display, the battery
should be replaced
immediately.
Page 13

11
12. Replacing the battery
This instrument is supplied with one lithium battery, type CR2032.
Replace with a new CR2032 battery when the flashing battery symbol
appears on the display. Remove the battery cover by sliding it in the
direction shown. Remove the battery and replace with a new one.
13. Guarantee
Subject to the following conditions this high-quality measuring instrument is covered by a 2 year guarantee from the date of purchase.
Warranty claims must be lodged within the guarantee period.
This product was manufactured with the utmost of care according to
international quality standards. Should you have reason for complaints despite this, please send the instrument, accompanied by the
completed Guarantee Card with dealer's stamp as well as original
proof of purchase directly or through your medical supplier to your
closest Microlife Distributor.
Damage resulting from incorrect use is not covered by the guarantee.
Battery and packaging are excluded from the guarantee. Claims
beyond this, including claims for damages, are excluded.
Name and adress of responsible dealer:
Batteries and electronic instruments must be disposed of in
accordance with the locally applicable regulations, not with
domestic waste.
Page 14

12
14. Technical Specifications
Type: Digital Infrared Ear Thermometer IR 1DE1
Measuring Range: 0 °C to 100.0 °C (32.0 °F to 212.0 °F)
Accuracy: Laboratory: ±0.2 °C, 32.0 ~ 42.2 °C
(±0.4 °F, 89.6 ~ 108.0 °F)
Display: Liquid Cristal Display
with indicating unit 0.1 °C/°F
Accoustic: a. The unit is turned ON and ready for the
measurement: 1 short «bi» sound.
b. Complete the measurement: 1 long beep (1sec.),
if the reading is less than 37.5 °C (99.4 °F), 10
short «beep» sounds, if the reading is equal to or
greater than 37.5 °C (99.4 °F).
c. System error or malfunction: 3 short «bi» sounds.
Memory: a. Auto-Display the last measured temperature
when switched on.
b. 12 readings recall in the Memory Mode.
Backlight: • The display will be lighted GREEN for 4 sec.,
when the unit is turned ON.
• The display light will be GREEN for 5 seconds,
when a measurement is completed with a
reading less than 37.5 °C (99.4 °F).
• The display light will be RED for 5 seconds,
when a measurement is completed with a reading
equal to or higher than 37.5 °C (99.4 °F).
Operating 5 °C to 40 °C (41.0 °F to 104 °F);
temperature: 15 - 95 % relative maximum humidity
Storage -25 °C to + 55 °C (-13 °F to 131 °F);
temperature: 15 - 95 % relative maximum humidity
Automatic Approx. 1 minute after last measurement.
Switch-off: Auto-off if START button is pressed.
Battery: CR2032 Battery (X1) - at least 1000 measurements
Dimensions: 153 mm (L) x 31 mm (W) x 20 mm (H)
Weight: 53 g (w/ battery), 50 g (w/o battery)
Standards: EN 12470-5; ASTM E1965 ; IEC 60601-1
IEC 60601-1-1-2 (EMC)
This device complies with the requirements of the Medical Device
Directive 93/42/EEC. Technical alterations reserved.
15. www.microlife.com
Detailed user information about our thermometers and blood pressure
monitors as well as services can be found at www.microlife.com.
Page 15

13
Thermomètre auriculaire à infrarouges
Mode d’emploi
Veuillez lire attentivement ces instructions avant l'utilisation de l'instrument et conservez-les dans un endroit sûr.
Le thermomètre auriculaire Microlife est un produit de haute qualité
utilisant la technologie la plus récente et testé selon les normes
internationales. Grâce à sa technologie unique, ce thermomètre
assure pour chaque mesure une lecture stable, sans interférence de
la chaleur environnante.
L'appareil effectue un autocontrôle à chaque mise en marche pour
toujours garantir des mesures conformes à la précision annoncée. Le
thermomètre auriculaire Microlife se destine à des mesures périodiques et à la surveillance de la température corporelle à domicile. Il
est conçu pour des personnes de tous les âges.
Veuillez lire ces instructions pour comprendre toutes les fonctions et
informations sur la sécurité.
Sommaire
1. Les avantages de ce thermomètre auriculaire
2. Importantes précautions d’emploi
3. Description de l’appareil
4. Comment le thermomètre mesure la température
auriculaire
5. Affichage de contrôle et symboles
6. Changement de l’embout jetable
7. Instructions d’utilisation
8. Passage de Fahrenheit en Celsius et inversement
9. Comment appeler 12 mesures en mode mémoire
10. Nettoyage et rangement
11. Messages d’erreurs
12. Remplacement de la pile
13. Garantie
14. Spécifications techniques
15. www.microlife.fr
Page 16

14
1. Les avantages de ce thermomètre auriculaire
Utilisation multiple (large étendue de mesure)
Ce thermomètre a la particularité d'offrir une large étendue de mesure,
de 0 à 100.0 °C (32.0 à 212.0 °F). L'appareil peut donc être utilisé
comme thermomètre auriculaire pour mesurer la température corporelle,
mais aussi pour mesurer la température de surface des éléments suivants:
• Température de surface du lait dans un biberon
• Température de surface d'un bain pour bébé
• Température ambiante
Mesure rapide
La technologie innovatrice de la mesure de la température par le
rayonnement infrarouge permet de prendre la température de l'oreille
en seulement 1 seconde.
Précis et fiable
Grâce au mode d'assemblage de la sonde, à son capteur à rayons infrarouges perfectionné, cet instrument offre une mesure aussi précise que
sûre de la température auriculaire.
Agréable et facile d’utilisation
• Forme ergonomique qui rend l’utilisation du thermomètre simple
et facile.
• Ce thermomètre peut être utilisé sans perturber la vie quotidienne.
Une prise de température pendant le sommeil d'un enfant est possible.
• Ce thermomètre fournit des mesures rapides et est par conséquent
agréable d'utilisation pour les enfants.
Affichage automatique de la mémoire
Le thermomètre affiche automatiquement la dernière mesure pendant
2 secondes lorsqu'il est mis en route.
Appel multiple de mesures
Les utilisateurs ont la possibilité d'appeler les 12 dernières mesures
enregistrées quand l'appareil est en mode mémoire, ce qui permet de
mieux suivre les variations de température.
Sûr et hygiénique
• Pas de risque de verre cassé et d'ingestion de mercure.
• Totalement sûr pour la prise de température des enfants.
• Embouts jetables rendant le thermomètre parfaitement
hygiénique pour toute la famille.
Signal de fièvre
10 bips courts et un rétroéclairage rouge de l'écran LCD signalent que
la température peut être supérieure à 37,5 °C.
Page 17

15
2. Importantes précautions d’emploi
• Cet instrument est réservé aux applications décrites dans ce
manuel. Le fabricant ne peut être tenu pour responsable de
dommages provoqués par une application incorrecte.
• A chaque prise, utilisez toujours le thermomètre avec un nouvel
embout jetable pour éviter toute infection. Seuls les embouts
Microlife d’origine vous garantissent l’obtention d’une mesure
parfaitement exacte avec ce thermomètre.
• Ne jamais plonger cet instrument dans l'eau ou un autre
liquide. Pour le nettoyage, se référer aux instructions de la
section «Nettoyage et désinfection».
• N'utilisez pas l'instrument si vous pensez qu'il est endommagé
ou remarquez quelque chose de particulier.
• N'ouvrez jamais l'instrument.
• La présence de cérumen dans le canal auditif peut abaisser arti-
ficiellement la température mesurée. Le canal auditif doit donc
être bien propre pour permettre une mesure précise.
• Cet instrument comprend des éléments sensibles et doit être
traité avec précaution. Respectez les conditions de stockage et
d'emploi indiquées à la section «Caractéristiques techniques»!
• Il convient de le protéger contre:
- des températures extrêmes
- des chocs et chutes
- les saletés et la poussière
- des rayons solaires directs
- la chaleur et le froid
• Si vous comptez ne pas utiliser l'instrument pendant une période
prolongée, prenez soin de retirer la pile.
• Ne laissez jamais les enfants utiliser l'instrument sans surveil-
lance. Certaines de ses parties sont si petites qu'elles peuvent
être avalées.
AVERTISSEMENT
L'utilisation de cet instrument ne peut dispenser de consulter le
médecin. Cet instrument N'EST PAS étanche! Ne JAMAIS le plonger
dans un liquide.
Page 18

16
3. Description de l’appareil
(1) Embout jetable
(2) Sonde
(3) Bouton «START»
(4) Ecran d’affichage à
cristaux liquides
(5) Bouton «O/I»
(6) Compartiment de la pile
4. Comment ce thermomètre mesure la température
auriculaire
Ce thermomètre mesure l'énergie infrarouge émise par la membrane
du tympan et les tissus avoisinants. Cette énergie est recueillie par la
lentille puis convertie en une indication de température. La mesure
affichée obtenue directement du tympan (membrane tympanique)
donne la température auriculaire la plus juste. Les mesures prises sur
le tissu environnant du canal de l'oreille génèrent une lecture de la
température plus basse, ce qui peut entraîner un mauvais diagnostic de
la fièvre.
Pour éviter une mesure inexacte:
• Placer d’abord un embout jetable sur la sonde.
• Activer le thermomètre en appuyant sur le bouton O/I.
• Après le premier bip (symbole de l'échelle de température clig-
notant), redresser le canal auriculaire en tirant doucement le
milieu de l'oreille vers l'arrière et vers le haut.
• Bien introduire l'extrémité thermosensible dans le canal de l'or-
eille. Appuyer sur le bouton START et garder l'extrémité dans
l'oreille jusqu'au bip qui signale la fin de la mesure.
Ce thermomètre, qui a été testé cliniquement, s’est avéré
particulièrement précis et sûr lorsque les consignes du mode
d’emploi sont bien respectées.
(2)
(3)
(4)
(5)
(6)
(1)
Page 19

5. Affichage de contrôle et symboles
17
Affichage de l’écran Signification de
l’affichage
Description
Tous les segments
sont affichés
Appuyer sur le bouton
O/I pour allumer l’appareil, tous les segments sont affichés
pendant 2 secondes.
Mémoire La dernière mesure
sera affichée automatiquement pendant
2 secondes.
Prêt L’appareil est prêt pour
la mesure, le symbole
«°C» ou «°F» clignote.
Mesure effectuée La température est
affichée à l'écran avec
le symbole «°C» ou
«°F» constant; l'appareil est prêt pour la
prochaine mesure.
Température auriculaire hors plage
Le symbole oreille
barrée signale que le
résultat est en dehors
de la plage 32 - 42.2 °C
(89.6 - 108.0 °F)
Signal d’usure de
la pile
Quand l’appareil est
allumé, le symbole pile
continue de clignoter
pour rappeler à l’usager
de la changer.
Page 20

6. Changement de l’embout jetable
NOTE :
• Pour éviter toute contamination croisée, mettre un nouvel emb-
out à chaque utilisation.
• Vérifier que l’embout est bien ajusté avant utilisation (se repor-
ter aux illustrations ci-dessous). Si l’embout est déchiré le
jeter et le remplacer immédiatement par un neuf.
(X) Incorrect (O) Correct
18
(3) Enfoncer complètement
la sonde dans le trou du
logement de l’embout.
(4) Après avoir senti un petit
clic, retirer la sonde
munie de son embout
bien ajusté.
(1) Placer un embout jetable
sur le trou du support de
rangement, le côte papier
au-dessus.
(2) Prendre l’appareil, intro-
duire
verticalement la
sonde dans le centre
transparent de l’embout.
Page 21

7. Instructions d’utilisation
Important : Avant chaque prise de température, placer un embout
neuf et non endommagé sur la sonde. Si cette règle n’est pas respectée, les mesures peuvent être erronées.
1. Appuyer sur le bouton O/I. L'écran s’allume et
tous les segments s’affichent pendant 2 secondes.
2. La dernière mesure s'affiche à l'écran pendant
2 secondes avec le symbole «M»
3. Quand le symbole «°C» ou «°F» clignote, un
bip est émis. Le thermomètre est alors prêt à
prendre la température
4. Redresser le canal de l'oreille en tirant l'oreille vers le haut puis
en arrière pour donner une bonne vue sur le tympan.
• Enfant de moins de 1 an - tirer le pavillon de l'oreille tout droit et en arrière.
• Enfant de plus de 1 an et adulte - tirer le
pavillon de l'oreille vers le haut et en
arrière.
Veuillez aussi vous référer aux instructions succinctes indiquées
avant!
5. Pendant que l'oreille est tirée, insérer bien
l'extrémité thermosensible dans le conduit
(max. 1 sec.) et appuyer immédiatement
sur le bouton START. Le relâcher à l'émissi-
on d'un bip. Ce signal sonore confirme la fin
de la prise de température.
6. Retirer le thermomètre de l'oreille. La
température mesurée s'affiche.
19
Page 22

NOTE :
Pour obtenir de nouvelles mesures précises, veuillez attendre
au minimum 30 secondes après 3-5 prises de température
effectuées à la suite.
Changer l’embout après chaque utilisation. Pour procéder à cette opération se reporter au section «Changement de l’embout jetable».
• 10 bips courts et un rétroéclairage rouge de l'écran LCD signalent
que la température peut être supérieure à 37,5 °C.
• Pour un enfant, la meilleure position est, allongé à plat, la tête sur
le côté, l'oreille face au plafond. S'il s'agit d'un enfant plus âgé ou
d'un adulte, il faut se placer derrière lui, légèrement sur son côté.
• Toujours prendre la température dans la même oreille car les
mesures varient d'une oreille à l'autre.
• Attendre quelques minutes après le réveil pour prendre la
température.
• Dans les situations suivantes, il est recommandé de prendre
3 fois la température dans la même oreille et de ne retenir que
la température la plus élevée:
1) Nouveau-nés les 100 premiers jours.
2) Enfants de moins de 3 ans avec une déficience du système
immunitaire et pour qui la présence ou l'absence de fièvre est
un élément critique
3) Lorsque l'utilisateur apprend à se servir du thermomètre pour la
première fois et jusqu'à ce qu'il se soit suffisamment familiarisé
avec celui-ci pour obtenir des mesures homogènes.
4) Mesure anormalement basse.
8. Passage de Fahrenheit en Celsius et inversement
Ce thermomètre peut indiquer la température en Fahrenheit ou en
Celsius. Pour passer d’une unité de mesure à une autre, éteindre
l’appareil, appuyer sans relâcher pendant 5 secondes sur le bouton
START. Quand le bouton START est relâché après ces 5 secondes,
l’unité de mesure (symbole «°C» ou «°F») va clignoter à l’écran.
Basculer de l’unité °C à °F en appuyant à nouveau sur le bouton
START. Lorsque le choix de l’unité de mesure a été fait, attendre 5
secondes et l’appareil va passer automatiquement à la position prise
de température.
20
Page 23

9. Comment appeler 12 mesures en mode mémoire
Ce thermomètre peut appeler les 12 dernières mesures. Procéder comme
suit.
Le fait de presser et de relâcher le bouton «START» après l’appel des
12 dernières mesures aura pour effet de repasser à la mesure 1.
10. Nettoyage et rangement
Utiliser un chiffon doux ou un chiffon de
coton imbibé d'alcool (70% isopropyl) pour
nettoyer la surface du thermomètre et
l'extrémité thermosensible. S'assurer
qu'aucun liquide n'entre à l'intérieur. Ne
jamais utiliser d'agent abrasif, diluant ou
benzène et ne jamais plonger l'appareil dans l'eau ou un autre
liquide. Prendre soin de ne pas rayer la lentille de l'extrémité thermosensible et l'écran d'affichage. Retirer la pile si le thermomètre ne
doit pas être utilisé pendant une longue période pour éviter que celleci ne l’endommage en coulant.
21
Affichage Signification Description
Mode mémoire Presser le bouton
«START» pour accéder
au mode mémoire. Le
symbole «M» clignote.
Mesure 1
(dernier résultat)
Presser puis relâcher le
bouton «START» pour
appeler la dernière
mesure. Affichage
1 juste avec symbole
mémoire.
Mesure 2
(le 2e résultat le
plus récent)
Presser puis relâcher le
bouton «START» pour
appeler le 2e résultat le
plus récent.
Mesure 12
(dernier résultat
dans la mémoire)
Presser puis relâcher le
bouton «START» pour
appeler successivement
les 12 dernières mesures
mémorisées.
Page 24

11. Messages d’erreurs
22
Affichage / Problème Signification
de l’affichage
Cause possible et
solution
Température
mesurée trop
élevée
Affichage «H» quand la
température mesurée
est supérieure à
100 °C ou 212.0 °F.
Température
mesurée trop
basse
Affichage «L» quand la
température mesurée
est inférieure à 0 °C ou
32.0 °F.
Température
ambiante trop
élevée
Affichage «H» et «▲»
quand la température
ambiante est supérieure
à 40 °C ou 104 °F.
Température
ambiante trop
basse
Affichage «L» et «▼»
quand la température
ambiante est inférieure
à 5 °C ou 41.0 °F.
Signal d’ erreur Dysfonctionnement de
l’appareil
Aucun affichage Vérifier la bonne mise
en place de la pile ainsi
que le respect de la
polarité (<+> et <->) de
celle-ci.
Signal pile uséeSi l’écran n’affiche que
le seul symbole pile en
continu, remplacer
immédiatement la pile
.
Page 25

12. Remplacement de la pile
Cet instrument est fourni avec une pile lithium de type CR2032.
Remplacer par une nouvelle pile CR2032 lorsque le symbole pile
clignotant s'affiche à l'écran. Enlever le couvercle de la pile en le faisant glisser dans le sens indiqué. Retirer la pile usée et insérer une
pile neuve.
13. Garantie
Sous réserve des conditions suivantes, cet appareil de haute qualité
bénéficie d’une garantie de 2 ans à compter de la date d’achat. Les
réclamations doivent être faites pendant la période de garantie.
Ce produit a été fabriqué avec le plus grand soin dans le respect des
normes internationales de qualité. Toutefois, si vous aviez une raison
de n’être pas satisfait, veuillez nous retourner l’appareil accompagné
de la carte de garantie comportant le cachet du vendeur ainsi que la
preuve d’achat soit par l’intermédiaire de votre fournisseur habituel
soit directement à l’adresse du distributeur Microlife le plus proche.
Les dommages causés par une mauvaise utilisation ne sont pas couverts
par cette garantie. La pile et l’emballage sont exclus de cette garantie.
Toutes autres demandes, y compris celles de dommages sont exclues.
Nom et adresse du distributeur responsable:
Les piles et instruments électroniques doivent être éliminés
en conformité avec les prescriptions locales, séparément des
ordures ménagères.
23
Page 26

14. Spécifications techniques
Type: Thermomètre auriculaire à infrarouge IR 1DE1
Plage de mesure: 0 °C - 100.0 °C (32.0 °F - 212.0 °F)
Précision: Laboratoire:±0.2 °C, 32.0 ~ 42.2 °C
(±0.4 °F, 89.6 ~ 108.0 °F)
Affichage: Ecran à cristaux liquides avec 0,1 °C (0,1 °F)
de résolution.
Signaux sonores: a. L’appareil est allumé et prêt pour la mesure:
un bip bref
b. Effectuez une mesure complète: 1 bip long
(1 sec.) - la lecture est inférieure à 37.5 °C;
10 bips courts - la lecture est supérieure ou
égale à 37.5 °C (99.4 °F).
c. Erreur ou dysfonctionnement: 3 bips brefs.
Mémoire: a. Auto-affichage de la dernière mesure à la mise
sous tension de l’appareil.
b. Appel de 12 mesures en mode mémoire
Rétroéclairage: • L'écran est éclairé 4 secondes en VERT à la
mise sous tension de l'instrument.
• L'écran est éclairé en VERT pendant 5 secondes
à la fin d'une mesure si la lecture est inférieure à
37.5 °C (99.4 °F).
• L'écran est éclairé en ROUGE pendant
5 secondes à la fin d'une mesure si la lecture est
supérieure ou égale à 37.5 °C (99.4 °F).
Température de 5 °C à 40 °C (41.0 °F à 104 °F);
fonctionnement: humidité relative 15 - 95 % max.
Température de -25 °C à + 55 °C (-13 °F à 131 °F);
stockage: humidité relative 15 - 95 % max.
Arrêt automatique: 1 minute environ après la fin de la mesure.
Automatique si le bouton START est pressé.
Alimentation: 1 pile CR2032 (X1) - au moins 1000 mesures
Dimensions: 153 mm (L) x 31 mm (l) x 20 mm (H)
Poids: 53 g (avec pile), 50 g (sans pile)
Normes: EN 12470-5; ASTM E1965 ; IEC 60601-1
IEC 60601-1-1-2 (EMC)
Cet appareil est conforme aux exigences de la directive relative aux
appareils médicaux 93/42/CEE.
Sous réserve de modifications techniques.
15. www.microlife.fr
Une information détaillée pour l’utilisateur de nos thermomètres et de
nos autotensiomètres ainsi que sur nos services est disponible sur
www.microlife.fr.
24
Page 27

Digitale infrarode oorthermometer met
beschermkapjes
Gebruiksaanwijzing
Lees alvorens deze instrumenten te gebruiken de
instructies aandachtig door.
Deze thermometer is een product van hoge kwaliteit dat de laatste
technologie bevat en volgens internationale normen werd getest.
Dankzij de unieke technologie krijgt u een stabiel resultaat zonder
warmte-interferentie bij iedere meting. Telkens wanneer de thermometer wordt ingeschakeld, voert het toestel automatisch zelf een test
uit om de nauwkeurigheid van de metingen te garanderen.
De thermometer is bedoeld om thuis de menselijke lichaamstemperatuur te meten en te volgen. Hij is geschikt voor personen van alle
leeftijden.
Inhoudsopgave
1. De voordelen van uw thermometer
2. Belangrijke veiligheidsvoorschriften
3. Productomschrijving
4. Hoe meet de thermometer de temperatuur in het oor?
5. Controlescherm en symbolen
6. Een nieuw beschermkapje aanbrengen.
7. Gebruiksaanwijzingen
8. Veranderen van Celsius naar Fahrenheit en omgekeerd
9. Hoe kunt u 12 resultaten terugzien in Geheugenmodus?
10. Foutmeldingen
11. Reinigen en bewaren
12. De batterij vervangen
13. Garantie
14. Technische gegevens
15. www.microlife.nl
25
Page 28

1. De voordelen van uw thermometer
Meervoudig gebruik (groot meetbereik)
De thermometer heeft een groot meetbereik van 0 - 100 °C
(32 - 212 °F); het instrument kan worden gebruikt als oorthermometer
om de lichaamstemperatuur te meten, maar ook om de oppervlaktetemperatuur te meten van:
• De melk voor de fles van de baby.
• Het water van het babybadje.
• De omgevingstemperatuur.
Meting in 1 seconde
Dankzij de vernieuwende infraroodtechnologie kan men de oortemperatuur meten in slechts 1 seconde.
Nauwkeurig en betrouwbaar
Dankzij de unieke sondeconstructie en de vooruitstrevende infraroodsensor is dit instrument bijzonder nauwkeurig en betrouwbaar.
Zacht en gemakkelijk in gebruik
• Het speciale ergonomische ontwerp maakt de thermometer een-
voudig en gemakkelijk in gebruik.
• De thermometer kan zelfs gebruikt worden bij een slapend kind, dat
rustig door kan slapen.
• De thermometer is snel en daarom kindvriendelijk.
Automatische vermelding van de laatste meting
Wanneer het wordt ingeschakeld, toont het instrument gedurende
2 seconden automatisch de laatste meting.
Meerdere metingen terugzien
Gebruikers kunnen de laatste 12 metingen terugzien door naar de
geheugenmodus te gaan. Hierdoor kunt u op een efficiënte manier
temperatuurvariaties volgen.
Veilig en hygiënisch
• Geen risico van gebroken glas of inslikken van kwik.
• Volledig veilig voor kinderen.
• Wegwerp beschermkampjes zorgen ervoor dat de thermometer
volledig hygienisch door iedereen gebruikt kan worden.
Hoge temperatuurindicatie
10 korte piepjes en een rode LCD achtergrondverlichting maken de
patiënt erop attent dat hij/zij een temperatuur heeft boven 37.5 °C.
26
Page 29

2. Belangrijke veiligheidsvoorschriften
• Dit instrument mag uitsluitend worden gebruikt voor het doel
zoals in dit boekje beschreven. De fabrikant kan niet aansprakelijk
worden gesteld voor schade veroorzaakt door onjuiste toepassing.
• Om een infectie te voorkomen dient u altijd de thermometer met
een onbeschadigd beschermkapje te gebruiken. Alleen Microlife
beschermkapjes kunnen u een accurate metingen garanderen.
• Dompel dit instrument nooit in het water of andere vloei-
stoffen. Voor het reinigen dient u de instructies uit de
«Reinigen en bewaren» paragraaf.
• Gebruik het instrument niet wanneer u vermoedt dat het bescha-
digd is of wanneer u iets ongebruikelijks constateert.
• Open het instrument nooit.
• Oorsmeer in de gehoorgang kan leiden tot een verkeerd meetre-
sultaat (lager). Zorg ervoor dat de gehoorgang van de patiënt rein
is om een nauwkeurig resultaat te verkrijgen.
• Dit instrument bevat gevoelige componenten en moet met voor-
zichtigheid worden behandeld. Neem de bewaar- en bedieningscondities beschreven in de «Technische specificaties» paragraaf
in acht!
• Bescherm de thermometer en het beschermkampje tegen:
- extreme temperaturen
- schokken en laten vallen
- vervuiling en stof
- direct zonlicht
- warmte en kou
• Wanneer het instrument voor een langere tijd niet gebruikt gaat
worden moeten de batterijen worden verwijderd.
• Laat kinderen het instrument alleen onder toezicht van een vol-
wassene gebruiken. Kleine onderdelen kunnen worden ingeslikt.
WAARSCHUWING: Deze thermometer is geen vervanging voor een
consultatie met uw arts. De thermometer is niet waterbestendig!
Gelieve hem NIET onder te dompelen in vloeistoffen!
27
Page 30

3. Productomschrijving
(1) Beschermkapje
(2) Sonde
(3) START-knop
(4) LCD-scherm
(5) O/I-toets
(6) Batterijdekseltje
4. Hoe meet de thermometer de temperatuur in het oor?
De thermometer meet infraroodenergie die het trommelvlies en het
omringende weefsel uitstraalt. Deze energie wordt opgevangen door
de lens en omgezet in een temperatuurwaarde. De gemeten waarde
die direct van het trommelvlies (membrana tympani) komt, geeft de
meest nauwkeurige temperatuur.
Metingen van het omringende weefsel van de gehoorgang geven
lagere waarden en kunnen leiden tot een verkeerde koortsdiagnose.
Onnauwkeurige metingen voorkomen:
• Breng eerst het beschermkapje aan.
• Schakel de thermometer in door op de O/I-toets te drukken.
• Nadat u een geluidssignaal heeft gehoord (en het symbool voor
de temperatuurschaal knippert), trekt u de gehoorgang recht door
zachtjes het midden van het oor naar achter en omhoog te
trekken.
• Plaats de thermometer goed in de gehoorgang en druk op de
START-toets. Houd de thermometer in het oor tot u een geluidssignaal hoort dat aangeeft dat de meting voltooid is.
Deze thermometer is klinisch getest en veilig en nauwkeurig
bevonden wanneer het wordt gebruikt in overeenstemming
met de bedieningshandleiding ervan.
28
(2)
(3)
(4)
(5)
(6)
(1)
Page 31

5. Controlescherm en symbolen
29
LCD-scherm Betekenis Omschrijving
Alle segmenten
verschijnen
Druk op de O/I-toets om
de thermometer te activeren, alle segmenten zullen
gedurende 2 seconden op
het scherm verschijnen.
Geheugen De laatste meting wordt
automatisch gedurende
2 seconden getoond.
Klaar Het instrument is klaar
voor meten, het «°C» of
«°F» symbool blijft knipperen.
Meting voltooid Het resultaat wordt geto-
ond op het LCDscherm
met een bestendig «°C»
of «°F» symbool, het
instrument is klaar voor
de volgende meting.
Indicatie
temperatuur
buiten het oor
Een doorgestreept oorsymbool verschijnt op het
scherm als de meting buiten het bereik van 32.0 ~
42.2 °C (89.6 ~ 108.0 °F)
valt.
Lage
batterijstand
Als de thermometer ingeschakeld is, blijft het batterijsymbool knipperen
om eraan te herinneren
dat de batterijen moeten
worden vervangen.
Page 32

6. Een nieuw beschermkapje aanbrengen
NOTE:
• Om kruiscontaminatie te voorkomen, raden wij u aan bij elke
meting een nieuw beschermkapje te gebruiken.
• Gelieve voor elk gebruik controleren of het beschermkapje stevig
vastzit (zie onderstaande foto’s). Indien het beschermkapje
gescheurd is, moet u het verwijderen en onmiddellijk vervangen.
(X) Verkeerd (O) Correct
30
(3) Duw de sonde helemaal
in de opening van de
houder.
(4) Verwijder de thermometer
waar het beschermkapje nu
strak omheen zit.
(1) Plaats een beschermkapje
in de daarvoor bestemde
uitsparing in de bewaardoos van de thermometer,
met de papierkant boven.
(2) Steek de sonde van de
oorthermometer verticaal
in het midden van het
geplaatste beschermkapje.
Page 33

7. Gebruiksaanwijzingen
Belangrijk: Voor u een meting doet, moet u een onbeschadigd
beschermkapje op de meet-sonde plaatsen. Indien u dit niet doet, kunnen de meetresultaten onnauwkeurig zijn.
1. Druk op de O/I-toets. Alle segmenten verschijnen gedurende 2 seconden op het LCD-scherm.
2. Gedurende 2 seconden verschijnt de laatste
meting, met de letter «M» ernaast.
3. Wanneer het symbool «°C» of «°F» knippert,
hoort u een geluidssignaal. De thermometer is
klaar voor gebruik.
4. Trek de gehoorgang recht door het oor naar boven en naar achteren te trekken tot u een duidelijk zicht heeft op het trommelvlies.
• Voor kinderen jonger dan 1 jaar:
- trek het oor recht naar achteren
• Voor kinderen vanaf 1 jaar en volwassenen:
- trek het oor omhoog en naar achteren.
Bekijk ook de korte instructie op de voorzijde.
5. Terwijl u zachtjes aan het oor trekt, plaatst u
de sonde stevig in het gehoorkanaal en drukt u
op de START-knop. Laat de knop los als u een
geluidssignaal hoort. Dit signaal duidt aan dat
de meting voltooid is.
6. Verwijder de thermometer uit de gehoorgang. Op het LCD-scherm staat de temperatuur.
OPMERKING: Voor een nauwkeurig meetresultaat dient u ten minste
30 seconden te wachten na 3 tot 5 opeenvolgende metingen.
31
Page 34

Vervang het beschermkapje na elke meting. Volg hierbij de richtlijnen
onder punt 6 «Een nieuw beschermkapje aanbrengen».
NOTA:
• 10 korte piepjes zullen weerklinken en een rode LCD achtergrondverlichting zal oplichten wanneer de temperatuur hoger is
dan 37,5 °C (99,5 °F) om een patiënt erop te attenderen dat
hij/zij een temperatuur heeft boven 37,5 °C.
• Bij kinderen kunt u het kind het beste plat neerleggen met het
hoofd opzij zodat het oor naar boven is gericht. Bij oudere kinderen en volwassenen kunt u het beste schuin achter ze gaan
staan.
• Neem de temperatuur altijd in hetzelfde oor, omdat de temperatuur in het linkeroor kan verschillen van die in het rechteroor.
• Als u net wakker bent, is het beter enkele minuten te wachten
alvorens de temperatuur in het oor te meten.
• In onderstaande omstandigheden is het aanbevolen om drie
metingen te doen in hetzelfde oor en het hoogste resultaat te
nemen:
1) Baby's jonger dan 100 dagen.
2) Kinderen jonger dan drie jaar met een deficiënt immuunsysteem
en bij wie het al dan niet hebben van koorts kritiek is.
3) Als de gebruiker de thermometer voor het eerst leert gebruiken,
tot hij/zij vertrouwd is met het instrument en regelmatige resultaten verkrijgt.
4) Als de meting onverwacht laag is.
8. Veranderen van Celsius naar Fahrenheit en omgekeerd
De thermometer kan de temperatuur weergeven in Fahrenheit en
Celsius. Om van eenheid te verwisselen schakelt u de thermometer
eenvoudigweg uit, en houdt u de START-toets gedurende 5 seconden
ingedrukt todat «-- -» en het knipperende symbool °C of °F verschijnt
op het scherm. U kan van eenheid veranderen door opnieuw op de
START-toets te drukken. Als u van meeteenheid bent veranderd, dient
u 5 seconden te wachten waarna het toestel automatisch naar de
meetstand overschakelt.
32
Page 35

9. Hoe kunt u 12 resultaten terugzien in geheugenmodus?
De thermometer onthoudt de 12 laatste resulaten. Om deze terug te
zien gaat u als volgt te werk.
Door de START-toets in te drukken en los te laten nadat de afgelopen
12 resultaten zijn opgeroepen zal de bovenstaande volgorde weer bij
resultaat 1 verder gaan.
10. Reinigen en bewaren
Gebruik een alcoholstokje of een watje dat in
alcohol is gedrenkt (70 % isopropyl) om de
thermometerhuls en de meetsonde te reinigen. Let erop dat er geen vloeistof in het binnenste van de thermometer binnendringt.
Gebruik nooit agressieve reinigingsmiddelen,
verdunningsproducten of benzeen bij het reinigen en dompel de thermometer nooit onder in water of welke
andere vloeistof dan ook. Let erop dat u geen krassen maakt op het
oppervlak van de sondelens en het LCDscherm. Verwijder de batterijen
uit de thermometer als u hem een tijdje niet zal gebruiken. Zo voorkomt
u schade aan de thermometer doordat de batterijen gaan lekken.
33
Scherm Betekenis Omschrijving
Terugzie modus Druk op de START-toets
om naar de modus voor
terugzien te gaan
wanneer het instrument
uit staat. Het geheugensymbool «M» knippert.
Resultaat 1 (het
laatste resultaat)
Druk op de START-toets
en laat deze los om het
laatste resultaat te zien.
Scherm 1 alleen met
geheugensymbool.
Resultaat 2 (het
op één na laatste
resultaat)
Druk op de START-toets
en laat deze los om het
op één na laatste resultaat te zien.
Resultaat 12 (het
laatste resultaat)
Druk op de START-toets
en laat deze weer los
om opeenvolgend de
laatste 12 resulaten te
zien.
Page 36

11. Foutmeldingen
34
Scherm / Probleem Betekenis Mogelijke oorzaak
en oplossing
Gemeten temperatuur te hoog
Op het scherm verschijnt een «H» als
de gemeten temperatuur hoger is dan
100.0 °C of 212.0 °F.
Gemeten temperatuur te laag
Op het scherm verschijnt een «L» als de
gemeten temperatuur
lager is dan 0 °C of
32.0 °F.
Omgevingstemperatuur te
hoog
Op het scherm verschijnt een «H»
samen met een «▲»
als de omgevingstemperatuur hoger
is dan 40.0 °C of
104.0 °F.
Omgevingstemperatuur te
laag
Op het scherm verschijnt een «L» samen
met een «▼» als de
omgevings-temperatuur lager is dan 5.0 °C
of 41.0 °F.
Fout in de werking Het systeem werkt
niet goed.
Leeg scherm Gelieve na te gaan of
de batterijen correct
zijn geplaatst. Ga ook
de polariteit van de
batterij na
(<+> en <->).
Lege
batterijstand
Als voortdurend het
symbool voor de batterijen wordt getoond, moet u de batterij onmiddelijk
vervangen.
Page 37

12. De batterij vervangen
De thermometer wordt geleverd met een lithiumbatterij van het type
CR2032. Vervang deze door een nieuwe CR2032-batterij zodra het
symbool voor lege batterijstand op het scherm gaat branden.
Verwijder het batterijdekseltje door het in de aangegeven richting te
schuiven. Verwijder de oude batterij en plaats een nieuwe.
13. Garantie
Op de thermometer rust een garantie van 2 jaar, te rekenen vanaf
de aankoopdatum. Garantievorderingen moeten binnen de garantieperiode worden ingediend.
Dit product werd vervaardigd volledig conform de strengste internationale kwaliteitseisen. Bent u toch ontevreden, dan kan u de thermometer naar uw dichtstbijzijnde Microlife-distributeur terugsturen. Bij
de thermometer voegt u dan de ingevulde garantiebon met stempel
van de distributeur en het originele bewijs van rechtstreekse aankoop
of aankoop via uw medische distributeur.
Schade veroorzaakt door verkeerd gebruik valt niet onder de garantie.
De batterij en de verpakking vallen niet onder de garantie. Verdere
vorderingen, zoals schadeclaims, worden uitgesloten.
Naam en adres van de verantwoordelijke distributeur:
Batterijen en elektronische instrumenten moeten volgens
de plaatselijke regelgeving worden verwijderd, niet bij het
huishoudelijke afval.
35
Page 38

14. Technische gegevens
Type: Digitale infrarode oorthermometer IR 1DE1
Meetbereik: 0 °C tot 100.0 °C (32.0 °F tot 212.0 °F)
Nauwkeurigheid: Laboratorium: ±0.2 °C, 32.0 ~ 42.2 °C
(±0.4 °F, 89.6 ~ 108.0 °F)
Scherm: Liquid Cristal Display
met vermelding van de eenheid 0.1 °C/°F
Geluid: a. Het toestel wordt ingeschakeld en is klaar voor
de meting:1 kort «bi» geluidssignaal.
b. Voltooi de meting: 1 lange piep (1 sec.) als de
uitlezing minder is dan 37.5 °C (99.4 °F), 10 korte
«piep» geluiden, als de uitlezing gelijk is of groter
dan 37.5 °C (99.4 °F).
c. Systeemfout of slechte werking: 3 korte «bi»
geluidssignalen.
Geheugen: a. Automatische vermelding van de laatst gemeten
temperatuur.
b. 12 resultaten terug te zien in de geheugenmodus.
Achtergrond- • De display zal gedurende 4 seconden GROEN
verlichting: verlicht zijn, wanneer de eenheid aan staat.
• De display zal gedurende 5 seconden GROEN
verlicht zijn, wanneer een meting is voltooid met
een uitlezing minder dan 37.5 °C (99.4 °F).
• De display zal gedurende 5 seconden ROOD verlicht zijn, wanneer een meting is voltooid met een
uitlezing gelijk aan of hoger dan 37.5 °C (99.4 °F).
Werkings- 5 °C tot 40 °C (41.0 °F tot 104 °F);
temperatuur: 15 - 95 % relatieve maximum vochtigheid
Bewarings- -25 °C tot + 55 °C (-13 °F tot 131 °F);
temperatuur : 15 - 95 % relatieve maximum vochtigheid
Automatisch Ongeveer 1 minuut na de laatste meting.
uitschakelen: Auto-off; wanneer u de start knop indrukt.
Batterij: CR2032 BATTERIJ (X1) - voor minstens
1000 metingen
Afmetingen: 153 mm (L) x 31 mm (B) x 20 mm (H)
Gewicht: 53 g (met batterij), 50 g (zonder batterij)
Verwijzing naar EN 12470-5; ASTM E1965 ; IEC 60601-1
normen: IEC 60601-1-1-2 (EMC)
Dit apparaat komt overeen met de normen van het Medical Device
Directive 93/42/EEC. Technische wijzigingen voorbehouden.
15. www.microlife.nl
Op de website www.microlife.nl vindt u gedetailleerde gebruiksinformatie over onze thermometers, bloeddrukmeters en onze diensten.
36
 Loading...