

Page 1
Microlife BP N2 Easy
Europe / Middle-East / Africa
Microlife AG
Espenstrasse 139
9443 Widnau / Switzerland
Tel. +41 / 71 727 70 30
Fax +41 / 71 727 70 39
Email admin@microlife.ch
www.microlife.com
Asia
Microlife Corporation.
9F, 431, RuiGang Road, NeiHu
Taipei, 11492, Taiwan, R.O.C.
Tel. +886 2 8797-1288
Fax +886 2 8797-1283
Email service@microlife.com.tw
www.microlife.com
North / Central / South America
Microlife USA, Inc.
1617 Gulf to Bay Blvd., 2nd Floor Ste A
Clearwater, FL 33755 / USA
Tel. +1 727 442 5353
Fax +1 727 442 5377
Email msa@microlifeusa.com
www.microlife.com
IB BP N2 Easy N-V5 3715
EN 1
LV 6
LT 12
EE 18
RU 24
Page 2
Microlife BP N2 Easy BP N2 EasyGuarantee Card
Name of Purchaser / Inköparens namn /
Ostajan nimi / Forhandlers navn / Kjøpers navn /
Pircçja vârds / Pirkëjo pavardë / Ostja nimi /
Ф.И.О. покупателя / Nafn kaupanda
Serial Number / Sarjanumero / Serienummer /
Serienummer / Serijas numurs / Serijos numeris /
Seerianumber / Серийный номер / Lotunúmer
Date of Purchase / Inköpsdatum /
Ostopäivämäärä / Købsdato / Kjøpsdato /
Iegades datums / Pardavimo data /
Ostukuupäev / Дата покупки / Kaupdagur
Specialist Dealer / Återförsäljare / Alan kauppias /
Special-forhandler / Spesialist forhandler /
Specialists - parstavis / Pardavusi istaiga /
Ametlik müügiesindaja / Специализированный
дилер / Söluaðili
Page 3

1BP N2 Easy
EN
Display
Read the instructions carefully before using this device.
Type BF applied part
Dear Customer,
Your new Microlife blood pressure monitor is a reliable medical
device for taking measurements on the upper arm. It is simple to
use, accurate and comes highly recommended for blood pressure
monitoring in your home. This device was developed in collaboration with physicians and clinical tests carried out prove its
measurement accuracy to be of a very high standard.*
Please read through these instructions carefully so that you understand all functions and safety information. We want you to be happy
with your Microlife product. If you have any questions, problems or
want to order spare parts please contact your local MicrolifeCustomer Service. Your dealer or pharmacy will be able to give you
the address of the Microlife dealer in your country. Alternatively, visit
the internet at www.microlife.com where you will find a wealth of
invaluable information on our products.
Stay healthy – Microlife AG!
* This device uses the same measuring technology as the
«BP 3BTO-H» model tested according to the protocol of the European Society for Hypertension (ESH).
Table of Contents
1. Important Facts about Blood Pressure and Self-Measurement
• How do I evaluate my blood pressure?
2. Using the Device for the First Time
• Inserting the batteries
• Selecting the correct cuff
• Connecting the pump ball
3. Taking a Blood Pressure Measurement using this Device
4. Appearance of the Pulse Arrhythmia Indicator for early
Detection
5. Appearance of the Hypertension Indicator
6. Data Memory
7. Battery Indicator and Battery change
• Low battery
• Flat battery – replacement
• Which batteries and which procedure?
• Using rechargeable batteries
8. Error Messages
Microlife BP N2 Easy
EN
1
ON/OFF button
2
Display
3
Battery Compartment
4
Cuff
5
Quick-acting Discharge Valve
6
Pump ball
7
Cuff Connector
8
Cuff Socket
9
Pump Ball Connector
AT
Pump Ball Socket
AK
Pulse and Hypertension Indicator
AL
Pulse Arrhythmia Indicator (PAD)
AM
Air Pump-up
AN
Battery Display
AO
Air Discharge
AP
Stored Value
AQ
Pulse Rate
AR
Diastolic Value
AS
Systolic Value
Keep dry
Page 4
2
9. Safety, Care, Accuracy Test and Disposal
• Safety and protection
• Device care
• Cleaning the cuff
• Accuracy test
• Disposal
10. Guarantee
11. Technical Specifications
Guarantee Card (see Back Cover)
1. Important Facts about Blood Pressure and SelfMeasurement
• Blood pressure is the pressure of the blood flowing in the
arteries generated by the pumping of the heart. Two values, the
systolic (upper) value and the diastolic (lower) value, are
always measured.
• The device indicates the pulse rate (the number of times the
heart beats in a minute).
• Permanently high blood pressure values can damage your
health and must be treated by your doctor!
• Always discuss your values with your doctor and tell him/her if
you have noticed anything unusual or feel unsure. Never rely
on single blood pressure readings.
• There are several causes of excessively high blood pressure
values. Your doctor will explain them in more detail and offer
treatment where appropriate. Besides medication, weight loss
and exercise can also lower your blood pressure.
• Under no circumstances should you alter the dosages of
any drugs prescribed by your doctor!
• Depending on physical exertion and condition, blood pressure
is subject to wide fluctuations as the day progresses. You
should therefore take your measurements in the same
quiet conditions and when you feel relaxed! Take at least
two readings every time (in the morning and in the evening) and
average the measurements.
• It is quite normal for two measurements taken in quick succes-
sion to produce significantly different results.
• Deviations between measurements taken by your doctor or in
the pharmacy and those taken at home are quite normal, as
these situations are completely different.
•
Several measurements
provide much more reliable information
about your blood pressure than just one single measurement.
• Leave a small break of at least 15 seconds between two
measurements.
• If you suffer from an irregular heartbeat (arrhythmia, see
«Section 4.»), measurements taken with this device should be
evaluated with your doctor.
• The pulse display is not suitable for checking the
frequency of heart pacemakers!
• If you are pregnant, you should monitor your blood pressure
very closely as it can change drastically during this time!
This monitor is specially tested for use in pregnancy and
pre-eclampsia. When you detect unusual high readings in
pregnancy, you should measure again after 4 hours. If the
reading is still too high, consult your doctor or gynecologist.
How do I evaluate my blood pressure?
The higher value is the one that determines the evaluation.
Example: a blood pressure value of 140/80 mmHg or a value of
130/90 mmHg indicates «blood pressure too high».
2. Using the Device for the First Time
Inserting the batteries
After you have unpacked your device, first insert the batteries. The
battery compartment
3
is on the bottom of the device. Insert the
batteries (
2
x 1.5 V, size AA), thereby observing the indicated polarity.
Selecting the correct cuff
Microlife offers different cuff sizes. Select the cuff size to match the
circumference of your upper arms (measured by close fitting in the
centre of the upper arm).
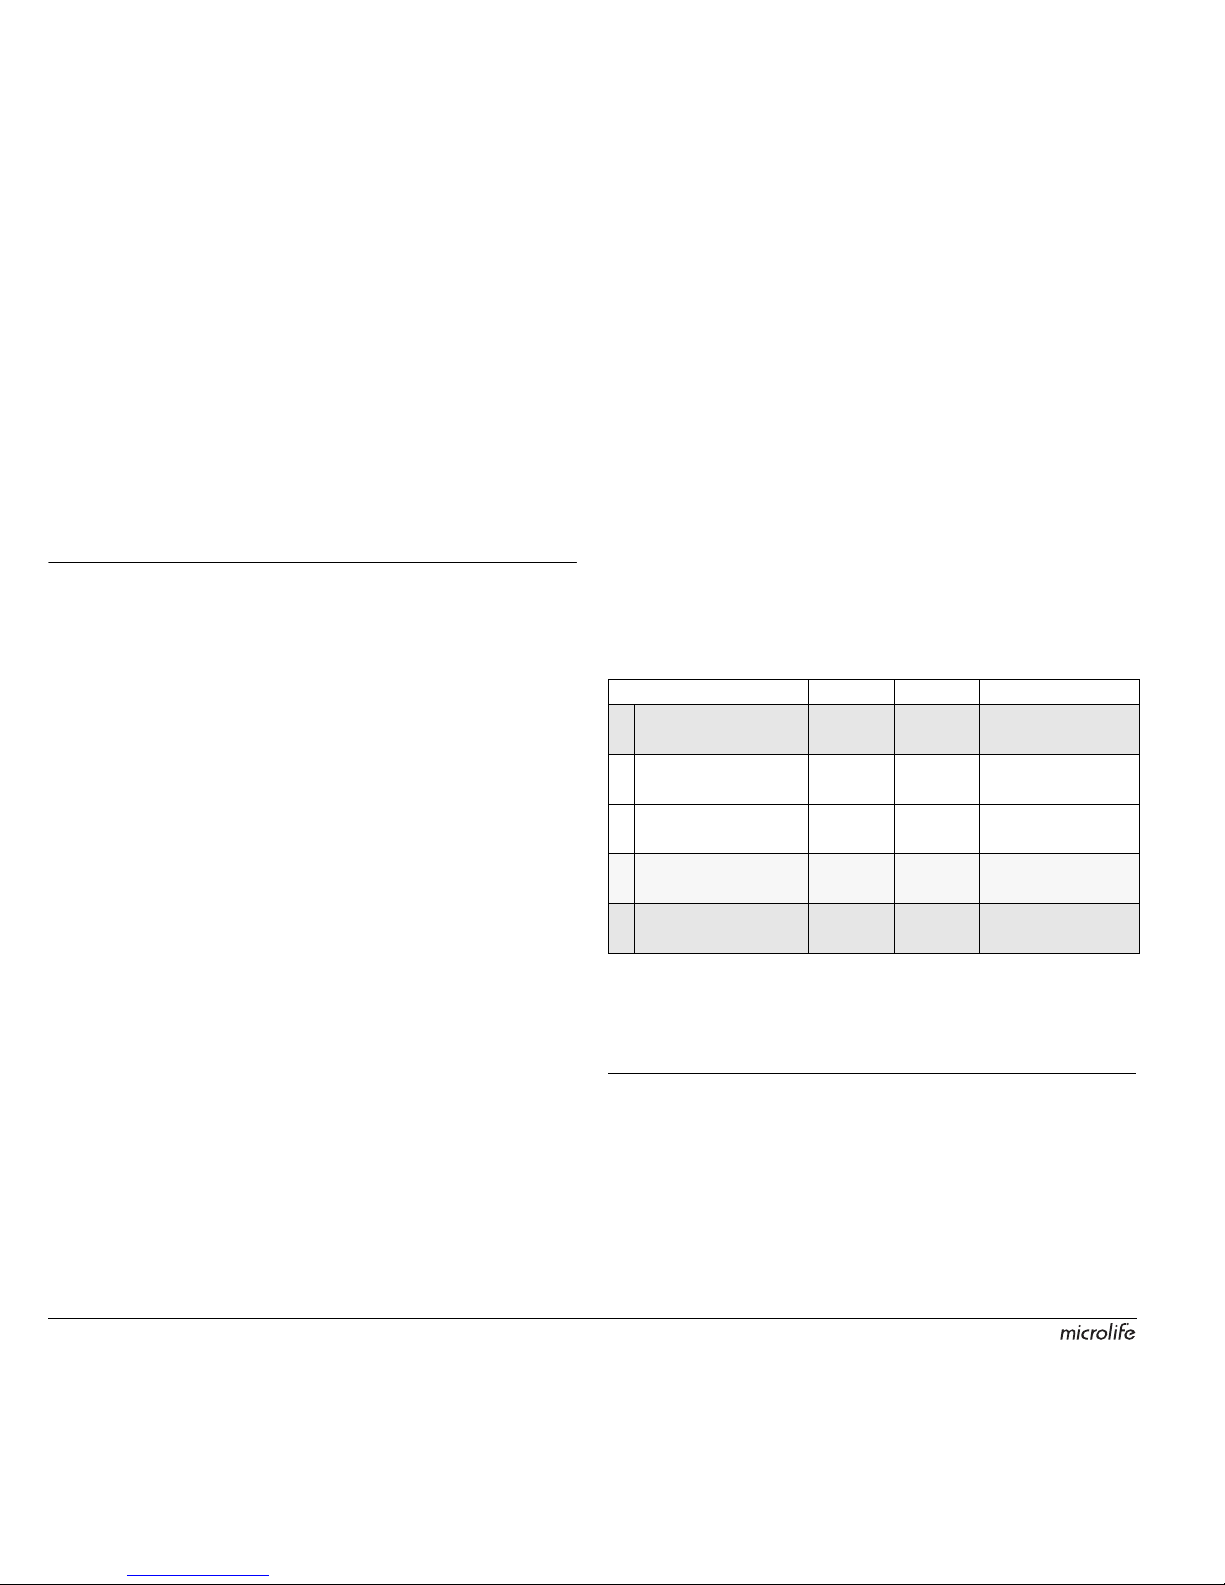
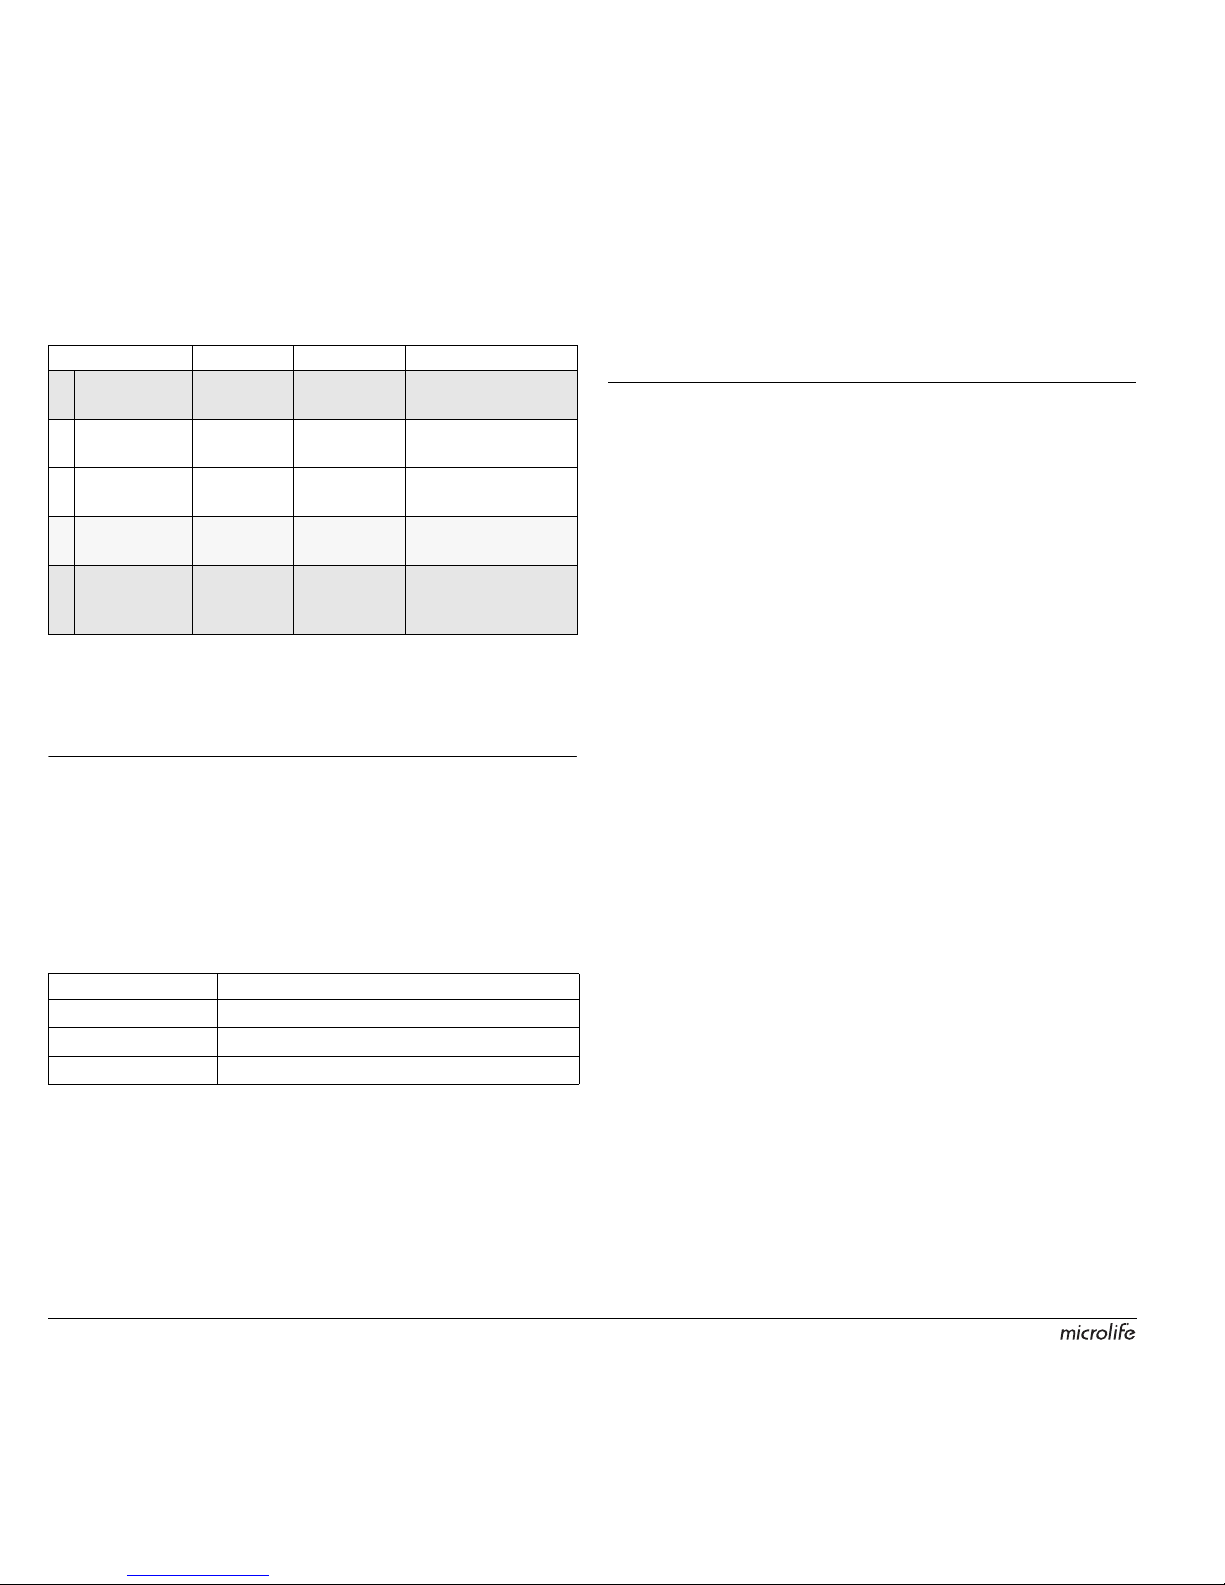
Table for classifying home blood pressure values in adults in
accordance with the international Guidelines (ESH, AHA, JSH).
Data in mmHg.
Range Systolic Diastolic Recommendation
blood pressure too
low
100 60 Consult your
doctor
1. blood pressure
optimum
100 - 130 60 - 80 Self-check
2. blood pressure
elevated
130 - 135 80 - 85 Self-check
3. blood pressure too
high
135 - 160 85 - 100 Seek medical
advice
4. blood pressure
dangerously high
160 100 Urgently seek
medical advice!
Page 5

3BP N2 Easy
EN
Only use Microlife cuffs.
When using an L cuff with this device, be sure to only use it
with the corresponding black deflation valve.
Contact your local Microlife Service if the enclosed cuff 4 does
not fit.
Connect the cuff to the device by inserting the cuff connector 7
into the cuff socket 8 as far as it will go.
Connecting the pump ball
Connect the pump ball 6 to the device by firmly inserting the
connector 9 into the pump ball socket AT.
The pump ball and cuff can be placed in either socket 8 or
AT.
3. Taking a Blood Pressure Measurement using this
Device
Checklist for taking a reliable measurement
1. Avoid activity, eating or smoking immediately before the
measurement.
2. Sit down for at least 5 minutes before the measurement and relax.
3. Always measure on the same arm (normally left). It is recom-
mended that doctors perform double arm measurements on a
patients first visit in order to determine which arm to measure in
the future. The arm with the higher blood pressure should be
measured.
4. Remove close-fitting garments from the upper arm. To avoid
constriction, shirt sleeves should not be rolled up - they do not
interfere with the cuff if they are laid flat.
5. Always ensure that the correct cuff size is used (marking on the
cuff).
• Fit the cuff closely, but not too tight.
• Make sure that the cuff is positioned 2 cm above the elbow.
• The artery mark located on the cuff (ca. 3 cm long bar) must
lie over the artery which runs down the inner side of the arm.
• Support your arm so it is relaxed.
• Ensure that the cuff is at the same height as your heart.
6. Switch on the device and wait until «0» appears in the display
and the arrow «» AM starts to flash.
7. Take the pump ball in your free hand (the arm you are not
measuring from) and pump up the cuff. Watch the pressure indication in the display and pump approx. 40 mmHg higher than
the expected systolic value (the upper value). If you have not
pumped enough, a flashing arrow «» AM will appear telling
you to pump higher.
8. After pumping, the measurement is taken automatically. Relax, do
not move and do not tense your arm muscles until the measurement result is displayed. Breathe normally and do not talk.
9. During the measurement, the pulse indicator AK flashes in the
display.
10.The result, comprising the systolic AS and the diastolic AR
blood pressure and the pulse rate AQ is displayed. Note also the
explanations on further display symbols in this booklet.
11.When the measurement has finished, press the quick-acting
discharge valve 5 in order to release any remaining air in the
cuff. Remove the cuff.
12.Switch off the device. (The monitor does switch off automatically after approx. 1 min.).
4. Appearance of the Pulse Arrhythmia Indicator for
early Detection
This symbol AL indicates that certain pulse irregularities were
detected during the measurement. In this case, the result may
deviate from your normal blood pressure – repeat the measurement. In most cases, this is no cause for concern. However, if the
symbol appears on a regular basis (e.g. several times a week with
measurements taken daily) we advise you to tell your doctor.
Please show your doctor the following explanation:
Cuff size for circumference of upper arm
S 17 - 22 cm
M 22 - 32 cm
L 32 - 42 cm
Information for the doctor on frequent appearance of the
Arrhythmia indicator
This device is an oscillometric blood pressure monitor that also
analyses pulse irregularity during measurement. The device is
clinically tested.
The arrhythmia symbol is displayed after the measurement, if pulse
irregularities occur during measurement. If the symbol appears
more frequently (e.g. several times per week on measurements
performed daily) we recommend the patient to seek medical advice.
This device does not replace a cardiac examination, but serves to
detect pulse irregularities at an early stage.
Page 6
4
5. Appearance of the Hypertension Indicator
This symbol AK flashes at the end of the measurement, if either your
systolic or diastolic blood pressure is higher than the recommended
values in accordance with the international guidelines (ESH, AHA, JSH).
Systolic blood pressure: > 135 mmHg
Diastolic blood pressure: > 85 mmHg
6. Data Memory
This device always stores the last result at the end of the measurement.
To recall the reading, press and hold the ON/OFF button
1
while the
device is switched off. All display elements are shown now. Release the
button when the stored result with the letter «
M» AP
is displayed.
7. Battery Indicator and Battery change
Low battery
When the batteries are approximately ¾ empty the battery symbol AN
will flash as soon as the device is switched on (partly filled battery
displayed). Although the device will continue to measure reliably, you
should obtain replacement batteries.
Flat battery – replacement
When the batteries are flat, the battery symbol AN will flash as soon
as the device is switched on (flat battery displayed). You cannot
take any further measurements and must replace the batteries.
1. Open the battery compartment 3 on the bottom of the device.
2. Replace the batteries – ensure correct polarity as shown by the
symbols in the compartment.
Which batteries and which procedure?
Use 2 new, long-life 1.5 V, size AA alkaline batteries.
Do not use batteries beyond their date of expiry.
Remove batteries if the device is not going to be used for a
prolonged period.
Using rechargeable batteries
You can also operate this device using rechargeable batteries.
Only use «NiMH» type reusable batteries.
Batteries must be removed and recharged when the flat
battery symbol appears. They should not remain inside the
device as they may become damaged (total discharge as a
result of low use of the device, even when switched off).
Always remove the rechargeable batteries if you do not
intend to use the device for a week or more.
Batteries cannot be charged in the blood pressure monitor.
Recharge batteries in an external charger and observe the
information regarding charging, care and durability.
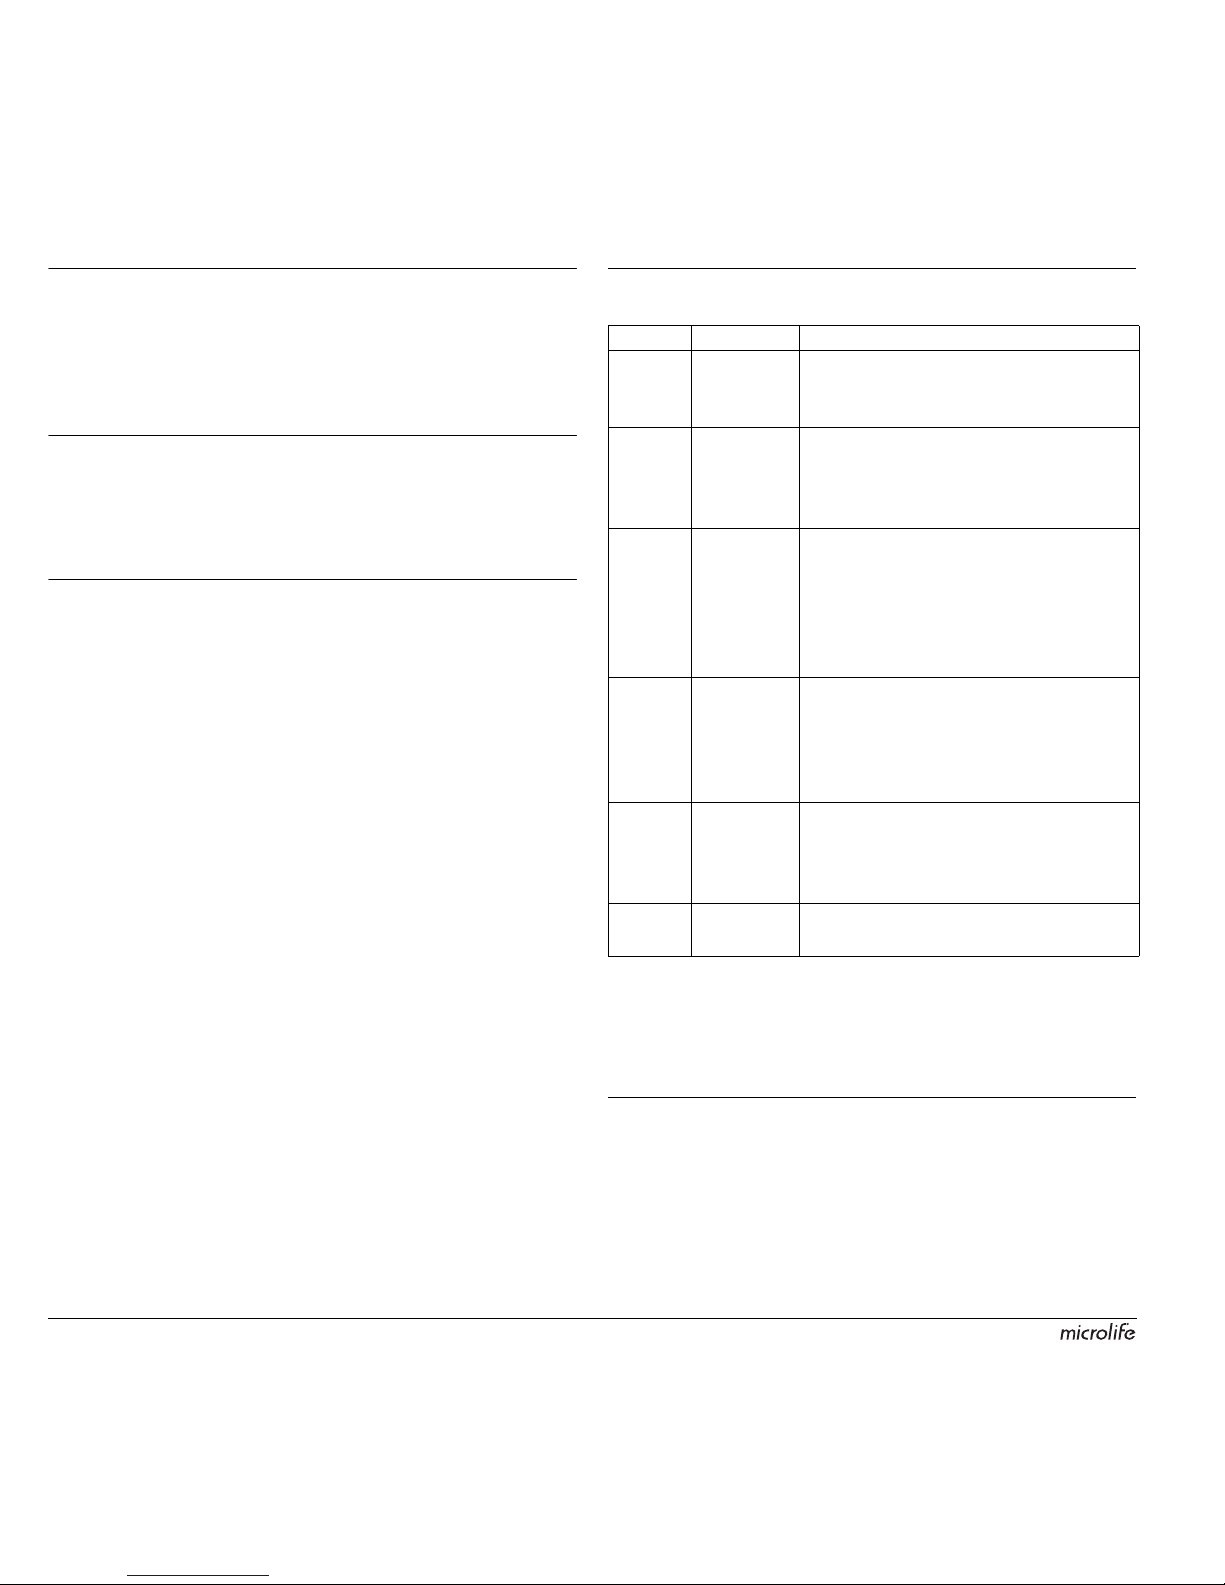
8. Error Messages
If an error occurs during the measurement, the measurement is
interrupted and an error message, e.g. «ERR 3», is displayed.
* Please consult your doctor, if this or any other problem occurs
repeatedly.
If you think the results are unusual, please read through the
information in «Section 1.» carefully.
9. Safety, Care, Accuracy Test and Disposal
Safety and protection
• This device may only be used for the purposes described in
these instructions. The manufacturer cannot be held liable for
damage caused by incorrect application.
• This device comprises sensitive components and must be
treated with caution. Observe the storage and operating conditions described in the «Technical Specifications» section.
Error Description
Potential cause and remedy
«
ERR 1
» Signal too
weak
The pulse signals on the cuff are too weak.
Re-position the cuff and repeat the
measurement.*
«
ERR 2
» Error signal
During the measurement, error signals were
detected by the cuff, caused for instance by
movement or muscle tension. Repeat the
measurement, keeping your arm still.
«
ERR 3
» No pres-
sure in the
cuff
An adequate pressure cannot be generated in the cuff. A leak may have occurred.
Check that cuff and pump ball are correctly
connected and that the cuff is not fitted too
loosely. Replace the batteries if necessary.
Repeat the measurement.
«
ERR 5
»Abnormal
result
The measuring signals are inaccurate and
no result can therefore be displayed. Read
through the checklist for performing reliable measurements and then repeat the
measurement.*
«
HI
» Pulse or cuff
pressure too
high
The pressure in the cuff is too high (over
300 mmHg) OR the pulse is too high (over
200 beats per minute). Relax for 5 minutes
and repeat the measurement.*
«
LO
»Pulse too
low
The pulse is too low (less than 40 beats per
minute). Repeat the measurement.*
Page 7
5BP N2 Easy
EN
• Protect it from:
- water and moisture
- extreme temperatures
- impact and dropping
- contamination and dust
- direct sunlight
- heat and cold
• The cuffs are sensitive and must be handled with care.
• Do not exchange or use any other kind of cuff or cuff connector
for measuring with this device.
• Only pump up the cuff once fitted.
• The function of this device may be compromised when used
close to strong electromagnetic fields such as mobile phones or
radio installations and we recommend a distance of at least
1 m. In cases where you suspect this to be unavoidable, please
verify if the device is working properly before use.
• Do not use this device if you think it is damaged or notice
anything unusual.
• Never open this device.
• If the device is not going to be used for a prolonged period the
batteries should be removed.
• Read the additional safety information provided within the individual sections of this instruction manual.
Ensure that children do not use this device unsupervised;
some parts are small enough to be swallowed. Be aware of
the risk of strangulation in case this device is supplied with
cables or tubes.
Device care
Clean the device only with a soft, dry cloth.
Cleaning the cuff
Carefully remove spots on the cuff with a damp cloth and soapsuds.
WARNING: Do not wash the cuff in a washing machine or
dishwasher!
Accuracy test
We recommend this device is tested for accuracy every 2 years or
after mechanical impact (e.g. being dropped). Please contact your
local Microlife-Service to arrange the test (see foreword).
Disposal
Batteries and electronic devices must be disposed of in
accordance with the locally applicable regulations, not with
domestic waste.
10.Guarantee
This device is covered by a 5 year guarantee from the date of
purchase. The guarantee is valid only on presentation of the guarantee card completed by the dealer (see back) confirming date of
purchase or the receipt.
• Batteries and parts that become worn with use are not included.
• Opening or altering the device invalidates the guarantee.
• The guarantee does not cover damage caused by improper
handling, discharged batteries, accidents or non-compliance
with the operating instructions.
•
The cuff has a functional guarantee (bladder tightness) for 2 years.
Please contact your local Microlife-Service (see foreword).
11.Technical Specifications
This device complies with the requirements of the Medical Device
Directive 93/42/EEC.
Technical alterations reserved.
Operating conditions: 10 - 40 °C / 50 - 104 °F
15 - 95 % relative maximum humidity
Storage conditions: -20 - +55 °C / -4 - +131 °F
15 - 95 % relative maximum humidity
Weight:
205 g (including batteries)
Dimensions:
136 x 82 x 50 mm
Measuring procedure:
oscillometric, corresponding to Korotkoff
method: Phase I systolic, Phase V
diastolic
Measurement range:
20 - 280 mmHg – blood pressure
40 - 200 beats per minute – pulse
Cuff pressure display
range:
0 - 299 mmHg
Resolution:
1 mmHg
Static accuracy:
pressure within ± 3 mmHg
Pulse accuracy:
± 5 % of the readout value
Voltage source:
2 x 1.5 V alkaline batteries; size AA
Battery lifetime: approx. 1500 measurements
(using new batteries)
IP Class: IP20
Reference to
standards:
EN 1060-1 /-3 /-4; IEC 60601-1;
IEC 60601-1-2 (EMC); IEC 60601-1-11
Expected service life: Device: 5 years or 10000 measurements
Accessories: 2 years
Page 8
6
Displejs
Pirms šīs ierīces izmantošanas uzmanīgi izlasīt
norādījumus.
Aizsardzības klase: BF
Cien./god. lietotāj!
Jūsu jaunais Microlife asinsspiediena mērītājs ir uzticams medicīnas instruments asinsspiediena mērīšanai uz augšdelma. Tas ir
vienkārši un ērti lietojams, precīzs un ļoti ieteicams asinsspiediena
mērīšanai mājas apstākļos. Šis instruments tika izstrādāts sadarbībā ar mediķiem, un klīniskie testi ir pierādījuši, ka tā mērīšanas
precizitāte ir ļoti augsta.*
Lūdzam uzmanīgi izlasīt šo instrukciju, lai izprastu visas funkcijas
un drošības informāciju. Mēs vēlamies, lai Jūs būtu apmierināti ar
Microlife produktiem. Ja Jums rodas kādi jautājumi, problēmas, vai
ja vēlaties pasūtīt
rezerves daļas
, lūdzam sazināties ar Microlife
vietējo klientu apkalpošanas dienestu. Ierīces pārdevējs vai aptiekārs palīdzēs Jums noskaidrot Microlife izplatītāja adresi Jūsu
valstī. Jūs varat arī apmeklēt tīmekļa vietni www.microlife.lv, kur
atradīsiet plašu un vērtīgu informāciju par mūsu produktiem.
Lai Jums laba veselība – Microlife AG!
* Šajā instrumentā ir izmantota tā pati mērīšanas tehnoloģija, kas
apbalvotajā «BP 3BTO-H» modelī, kurš pārbaudīts saskaņā ar
Eiropas hipertonijas sabiedrības (EHS) protokolu.
Microlife BP N2 Easy
LV
1
Poga ON/OFF (IESLĒGT/IZSLĒGT)
2
Displejs
3
Bateriju nodalījums
4
Manšete
5
Ātrais gaisa atbrīvošanas vārsts
6
Gumijas bumbieris
7
Manšetes savienotājs
8
Manšetes kontaktligzda
9
Lodveida sūkņa savienotājs
AT
Sūkņa apaļā kontaktligzda
AK
Pulsa un paaugstināta asinsspiediena indikators
AL
Pulsa aritmijas indikators (PAD)
AM
Gaisa iesūknēšana
AN
Bateriju displejs
AO
Gaisa atbrīvošana
AP
Saglabātie mērījumi
AQ
Pulsa biežums
AR
Diastoliskais asinsspiediens
AS
Sistoliskais asinsspiediens
Turēt sausumā
Page 9

7BP N2 Easy
LV
Saturs
1. Svarīgi fakti par asinsspiedienu un tā noteikšanu, pašam
veicot mērījumu
•Kā es varu novērtēt savu asinsspiedienu?
2. Instrumenta izmantošana pirmo reizi
• Bateriju ievietošana
• Pareizas manšetes izvēle
• Savienošana ar lodveida sūkni
3. Asinsspiediena mērīšana, izmantojot šo instrumentu
4. Pulsa aritmijas indikatora parādīšanās tās agrīnai konstatēšanai
5. Paaugstināta asinsspiediena indikatora izskats
6. Datu atmiņa
7. Bateriju rādītājs un bateriju nomaiņa
• Baterijas gandrīz tukšas
• Tukšas baterijas, to nomaiņa
• Bateriju veids un nomaiņas procedūra
•Atkārtoti uzlādējamu bateriju izmantošana
8. Kļūdu paziņojumi
9. Drošība, kopšana, precizitātes tests un likvidēšana
•Drošība un aizsardzība
• Instrumenta kopšana
• Manšetes tīrīšana
• Precizit
āte
s tests
•Likvidēšana
10. Garantija
11. Tehniskās specifikācijas
Garantijas talons (skatīt otru pusi)
1. Svarīgi fakti par asinsspiedienu un tā noteikšanu,
pašam veicot mērījumu
• Asinsspiediens ir artērijās plūstošo asiņu spiediens, ko rada
sirdsdarbība. Vienmēr tiek mērītas divas vērtības: sistoliskais
(augšējais) un diastoliskais (apakšējais) asinsspiediens.
• Instruments parāda arī pulsa biežumu (cik reizes sirds
saraujas vienā minūtē).
• Pastāvīgi augsts asinsspiediens var kaitēt Jūsu veselībai,
un šādā gadījumā Jums ir jāvēršas pie ārsta!
•
Vienmēr pārrunāt savu asinsspiedienu ar ārstu, un informēt viņu,
ja esat pamanījis kaut ko neparastu vai ir kādas neskaidrības.
Nekad nepaļauties uz vienu asinsspiediena mērījumu.
•
Pastāv vairāki iemesli, kāpēc ir vērojams pārmērīgi
augsts
asinsspiediens
. Jūsu ārsts pastāstīs par tiem sīkāk un, ja nepieciešams, piedāvās ārstēšanas kursu. Papildus ārstniecības
līdzeklim, asinsspiedienu samazināt var arī svara samazināšana
un vingrošana.
• Nekādā gadījumā nemainīt zāļu devu, ko Jums noteicis
ārsts!
• Atkarībā no fiziskās slodzes un sagatavotības asinsspiediens
dienas gaitā var ļoti mainīties. Tāpēc ir ieteicams veikt asins-
spiediena mērījumus vienmēr vienādos mierīgos
apstākļos, kad esat atpūties! Veikt katru reizi vismaz divus
nolasījumus (no rīta un vakarā) un vidējo mērījumu.
• Tas ir normāli, ja, veicot divus mērījumus pēc kārtas, tiek uzrā-
dīti ievērojami atšķirīgi rezultāti.
• Atšķirība
s mērījumu rezultātos, kas iegūti pie Jūsu ārsta vai
aptiekāra, un rezultātos, kas iegūti mājas apstākļos, ir normāla
parādība, jo šīs situācijas ir pilnīgi atšķirīgas.
• Vairāki mērījumi nodrošina pareizāku informāciju par asins-
spiedienu, bet nevis tikai viens atsevišķs mērījums.
• Ievērojiet nelielu, vismaz 15 sekunžu pauzi starp diviem
mērījumiem.
• Ja Jūs ciešat no neregulāras sirdsdarbības (aritmija; skatīt
4. sadaļu), ar šo ierīci veiktie mērījumi ir jānovērtē kopā ar
jūsu
ārstu.
• Pulsa displejs nav piemērots pulsa biežuma kontrolei, ja
Jums ir elektrokardiostimulators!
• Ja esat stāvoklī, Jums vajadzētu rūpīgi sekot savam asinsspie-
dienam, jo šajā periodā tas var ievērojami mainīties!
Šis monitors tiek īpaši testēts lietošanai grūtniecības un
preeklampsijas laikā. Ja konstatējat neparasti augstus
nolasījumus grūtniecības laikā, tad mērīšana ir jāatkārto
vēlreiz pēc 4 stundām. Ja nolasījums vēl joprojām ir pārāk
augsts, tad konsultēties ar savu ārstu vai ginekologu.
Page 10
8
Kā es varu novērtēt savu asinsspiedienu?
Paaugstināta vērtība ir tā, kas nosaka novērtēšanu. Piemēram:
asinsspiediena vērtība 140/80 mmHg vai vērtība 130/90 mmHg
norāda, ka «asinsspiediens ir pārāk augsts».
2. Instrumenta izmantošana pirmo reizi
Bateriju ievietošana
Pēc tam, kad ierīce ir izsaiņota, vispirms ievietojiet baterijas. Bateriju nodalījums 3 atrodas ierīces apakšdaļā. Ievietojiet baterijas
(2 x 1,5 V, izmēra AA), ievērojot norādīto polaritāti.
Pareizas manšetes izvēle
Microlife piedāvā dažādus manšetes izmērus. Izvēlieties tādu
manšetes izmēru, kas atbilst Jūsu augšdelma apkārtmēram (izmē-
riet to augšdelma vidusdaļā).
Izmantot tikai Microlife manšetes!
Izmantojot L manšeti kopā ar šo ierīci pārliecinieties, ka Jūs
to lietojat vienīgi ar atbilstošo melno gaisa izlaišanas vārstu.
Sazināties ar vietējo Microlife servisu, ja komplektācijā iekļautā
manšete 4 neder.
Savienojiet manšeti ar instrumentu, iestiprinot manšetes savienotāju 7 manšetes kontaktligzdā 8.
Savienošana ar lodveida sūkni
Savienojiet lodveida sūkni 6 ar instrumentu, cieši ievietojot savienotāju 9 lodveida sūkņa kontaktligzdā AT.
Lodveida sūkni un manšeti var ievietot ligzdās 8 vai AT.
3. Asinsspiediena mērīšana, izmantojot šo instrumentu
Norādījumi ticama mērījuma veikšanai
1. Izvairīties no aktivitātēm, ēšanas vai smēķēšanas tieši pirms
mērījuma veikšanas.
2. Apsēsties vismaz 5 minūtes pirms mērījuma veikšanas un atpū-
tieties.
3.
Vienmēr veiciet mērījumu uz vienas un tās pašas rokas
(parasti
kreisās). Ieteicams, lai ārsts pirmās vizītes laikā veiktu divus mērī-
jumus pacienta rokām, lai noteiktu, kurai rokai tas jāmēra turpmāk.
Jāmēra tai rokai, kurai ir augstāks asinsspiediens.
4. Atbrīvot augšdelmu no cieši pieguloša apģērba. Lai izvairītos
no saspiešanas, krekla piedurknes nevajadzētu uzrotīt, jo tās
netraucē manšetei, ja tās ir norotītas.
5. Vienmēr nodrošināt, lai manšete būtu pareiza izmēra (atzīme
uz manšetes).
• Stingri nostiprināt manšeti, bet ne pārāk cieši.
• Pārliecināties, ka manšete ir novietota 2 cm virs elkoņa.
• Artērijas atzīmei uz manšetes (apmēram 3 cm gara līnija)
jāatrodas uz artērijas, kas iet pa rokas iekšpusi.
• Atbalstīt roku tā, lai tā būtu atslābinātā stāvoklī.
• Nodrošināt, lai manšete atrastos vienādā augstumā ar jūsu
sirdi.
6. Ieslēdziet instrumentu un gaidiet, kamēr «0» parādās di
splejā
un bultiņa «» AM sāk mirgot.
7. Paņemiet lodveida sūkni savā brīvajā rokā (rokā, uz kuras Jūs
neveicat mērījumu) un piesūknējiet žņaugu ar gaisu. Vērojiet
spiediena rādījumu displejā un sūknējiet apmēram 40 mmHg
vairāk par paredzēto sistolisko asinsspiedienu (visaugstākais
asinsspiediens). Ja Jūs nebūsiet pieteikami piesūknējis (-usi)
gaisu, mirgojoša bultiņa «» AM parādīsies, informējot Jūs, ka
nepieciešams sūknēt vēl.
8. Pēc sūknēšanas mērījums tiek veikts automātiski. Atslābinieties,
nekustieties un nesasprindziniet Jūsu rokas muskuļus, kamēr
neparādās mērījuma rezultāts uz displeja. Elpojiet normāli un
nesarunājieties.
9. Mērīšanas laikā displejā mirgo pulsa indikators AK.
10.Displejā tiek attēlots rezultāts, kas ietver sistolisko ASun diastolisko AR asinsspiedienu, kā arī pulsa biežumu AQ. Ņemiet
Tabula asinsspiediena vērtību klasificēšanai mājās pieaugušajiem
saskaņā ar starptautiskajām vadlīnijām (ESH, AHA, JSH). Mērvie-
nība: mmHg.
Amplitūda Sistoliskais Diastoliskais Ieteikums
pazemināts
asinsspiediens
100
60
Konsultējieties ar
ārstu!
1. optimāls
asinsspiediens
100 - 130 60 - 80
Veiciet pašpārbaudi!
2. paaugstināts
asinsspiediens
130 - 135 80 - 85
Veiciet pašpārbaudi!
3. paaugstināts
asinsspiediens
135 - 160 85 - 100
Meklējiet medicīnisku
palīdzību!
4.
asinsspiediens bīstami
augsts
160
100
Nekavējoties meklējiet
medicīnisku palīdzību!
Manšetes izmērs Augšdelma apkārtmērs
S 17 - 22 cm
M 22 - 32 cm
L 32 - 42 cm
Page 11

9BP N2 Easy
LV
vērā arī pārējos skaidrojumus par displeja rādījumiem, kas
iekļauti šajā bukletā.
11.Kad mērījums ir pabeigts, spiediet ātro atbrīvošanas ventili 5,
lai izlaistu atlikušo gaisu no žņauga. Noņemiet aproci.
12.Izslēdziet instrumentu. (Asinsspiediena mērītājs automātiski
izslēdzas pēc apmēram 1 minūtes.)
4. Pulsa aritmijas indikatora parādīšanās tās agrīnai
konstatēšanai
Šis simbols AL norāda, ka mērījuma laikā tika konstatēta pulsa
nevienmērība. Šādā gadījumā rezultāts var atšķirties no Jūsu
normālā asinsspiediena – atkārtojiet mērījumu. Lielākajā daļā
gadījumu tas nav pamats bažām. Tomēr, ja šis simbols parādās
regulāri (piemēram, vairākas reizes nedēļā pie nosacījuma, ja
mērījumi tiek veikti katru dienu), mēs Jums iesakām vērsties pie
sava ārsta. Lūdzu, sniedziet savam ārstam šādu skaidrojumu:
5. Paaugstināta asinsspiediena indikatora izskats
Mērierīces galā mirgo simbols AK, ja Jūsu sistoliskais vai diastoliskais asinsspiediens ir augstāks nekā rekomendētās vērtības
saskaņā ar starptautiskajām vadlīnijām (ESH, AHA, JSH).
Sistoliskais asinsspiediens: > 135 mmHg
Diastoliskais asinsspiediens: > 85 mmHg
6. Datu atmiņa
Šis instruments vienmēr saglabā pēdējo rezultātu mērījuma veikšanas beigās. Lai atsauktu mērījumu, spiediet un turiet pogu ON/
OFF 1 (instruments vispirms ir jāizslēdz). Atlaidiet pogu, kad Jūs
redzat saglabāto mērījumu un burtu «M» AP.
7. Bateriju rādītājs un bateriju nomaiņa
Baterijas gandrīz tukšas
Kad apmēram ¾ no baterijas būs tukšas, ieslēdzot instrumentu,
sāks mirgot baterijas simbols AN, (uz displeja būs redzama
pustukša baterija). Lai gan instruments turpinās veikt uzticamus
mērījumus, ir nepieciešams sagādāt jaunas baterijas.
Tukšas baterijas, to nomaiņa
Kad baterijas būs tukšas, ieslēdzot instrumentu, sāks mirgot baterijas simbols
AN
(uz displeja būs redzama tukša baterija). Jūs neva-
rēsiet veikt turpmākos mērījumus un būs jāveic bateriju nomaiņa.
1. Atvērt bateriju nodalījumu 3 ierīces apakšdaļā.
2. Nomainiet baterijas, nodrošinot pareizu polaritāti, kā tas norādīts
ar simboliem bateriju nodalījumā.
Bateriju veids un nomaiņas procedūra
Izmantojiet 2 jaunas, ilgi kalpojošas 1,5V AA tipa sārma
baterijas.
Neizmantojiet baterijas pēc to derīguma termiņa izbeigšanās.
Izņemiet baterijas, ja instrumentu neizmantosiet ilgāku laika
periodu.
Atkārtoti uzlādējamu bateriju izmantošana
Jūs varat darbināt šo instrumentu, izmantojot atkārtoti uzlādējamas
baterijas.
Lūdzu, izmantojiet tikai «NiMH» tipa atkārtoti uzlādējamās
baterijas!
Baterijas ir jāizņem un jāuzlādē, ja ir redzams baterijas
simbols (tukša baterija)! Tās nedrīkst atstāt instrumentā, jo
tās var sabojāties (pilnīga izlādēšanās retas instrumenta
izmantošanas rezultātā pat, ja tas ir izslēgts).
Vienmēr izņemiet atkārtoti uzlādējamās baterijas, ja Jūs neplā-
nojat izmantot instrumentu nedēļu vai ilgāku laika periodu!
Baterijas nevar uzlādēt, tām esot asinsspiediena mērītājā.
Uzlādējiet šīs baterijas ārējā lādētājā, ievērojiet uzlādēšanas
un kopšanas norādījumus un informāciju par lietošanas
ilgumu.
Informācija ārstam par biežu aritmijas indikatora parādīšanos
Šī ierīce ir oscilometrisks asinsspiediena monitors, analizē arī
pulsa mērīšanas nevienmērīgumu. Šis instruments ir klīniski
pārbaudīts.
Aritmijas simbols parādās uz displeja pēc mērījuma veikšanas,
ja pulsa nevienmērīgums tiek konstatēts mērījuma veikšanas
laikā. Ja simbols parādās daudz biežāk (piemēram, vairākas
reizes nedēļā, ja mērījumi tiek veikti katru dienu), mēs iesakām
pacientam lūgt ārsta padomu.
Instruments neaizvieto sirds pārbaudi, bet kalpo, lai atklātu pulsa
nevienmērīgumu agrīnā stadijā.
Page 12

10
8. Kļūdu paziņojumi
Ja mērījuma laikā rodas kļūda, mērījums tiek pārtraukts un uz
displeja ir redzams kļūdas ziņojums, piemēram, «ERR 3».
* Lūdzu, konsultējieties ar savu ārstu, ja šāda vai cita veida problēma tiek konstatēta atkārtoti.
Ja Jums šķiet, ka rezultāti ir neparasti, uzmanīgi izlasīt
informāciju 1. sadaļā.
9. Drošība, kopšana, precizitātes tests un likvidēšana
Drošība un aizsardzība
• Šo instrumentu var izmantot tikai šajā bukletā minētajam
nolūkam. Ražotājs nav atbildīgs par bojājumiem, kas radušies
nepareizas lietošanas dēļ.
• Šajā instrumentā ir viegli sabojājamas sastāvdaļas, tādēļ pret to
ir jāizturas uzmanīgi. Nodrošiniet glabāšanas un darba
apstākļus, kas aprakstīti sadaļā «Tehniskās specifikācijas».
• Aizsargāt to pret:
- Ūdeni un mitrumu,
-Galējām temperatūrām,
- Triecieniem un nosviešanas zemē,
-Piesārņojumu un putekļiem,
- Tiešu saules gaismu,
- Karstumu un aukstumu.
• Manšetes ir viegli sabojājamas,un ar tām ir jārīkojas uzmanīgi.
• Neaizstāt
un nelietot nekāda cita veida manšeti vai manšetes
savienotāju mērīšanai ar šīs ierīces palīdzību.
• Piepildiet manšeti ar gaisu tikai tad, kad tā ir uzlikta.
•
Šīs ierīces funkcija var tikt traucēta, ja to izmanto tuvu spēcīgiem
elektromagnētiskajiem laukiem, piemēram, mobilajiem tālruņiem
vai radio instalācijām, un mēs rekomendējam ievērot vismaz 1 m
attālumu. Gadījumos, kad uzskatāt, ka no tā nav iespējams izvairī-
ties, lūdzu, pirms lietošanas pārbaudiet, vai ierīce darbojas pareizi.
• Neizmantot instrumentu, ja uzskatāt, ka tas ir bojāts, vai ja
pamanāt kaut ko neparastu.
• Nekad neatvērt instrumentu.
• Ja instruments netiks izmantots ilgāku laika periodu, izņemiet
baterijas.
• Izlasīt papildu drošības norādījumus atsevišķās šī bukleta
sadaļās.
Pārliecinieties, ka bērni neizmanto šo ierīci bez uzraudzības!
Dažas tā sastāvdaļas ir pietiekami sīkas, lai tās varētu norīt.
Jāapzinās, ka ir iespējams nožņaugšanās risks, jo ierīce ir
piegādāta kopā ar kabeļiem vai caurulēm.
Instrumenta kopšana
Tīrīt instrumentu tikai ar mīkstu, sausu lupatiņu.
Manšetes tīrīšana
Rūpīgi notīrīt traipus no manšetes ar mitru lupatiņu un ziepju putām.
BRĪDINĀJUMS: Nemazgāt manšeti veļas vai trauku
mazgājamajā mašīnā!
Precizitātes tests
Mēs iesakām pārbaudīt šī instrumenta precizitāti ik pēc 2 gadiem
vai pēc mehāniska trieciena (piemēram, pēc nomešanas zemē).
Lūdzam sazināties ar vietējo Microlife servisu, lai veiktu testu
(skatīt priekšvārdu).
Kļūda
Apraksts
Iespējamais iemesls un kļūdas
novēršana
«ERR 1»
Signāls
pārāk vājš
Pulsa signāli uz manšetes ir pārāk vāji.
Mainiet manšetes novietojumu un atkārto-
jiet mērījumu.*
«ERR 2»
Kļūdas
signāls
Mērījuma laikā ar manšeti tika konstatēti
kļūdas signāli, ko varētu izraisīt, piemēram,
pakustēšanās vai muskuļu sasprindzinā-
jums. Atkārtojiet mērījumu, turot roku mierīgi.
«ERR 3» Manšetē
nav spiediena
Manšete nevar radīt atbilstošu spiedienu.
Iespējams, ir radusies gaisa noplūde.
Pārbaudīt, vai manšete un lodveida sūknis
ir pareizi pievienoti, un vai manšete nav
pielāgota pārāk vaļīgi. Nomainiet baterijas,
ja nepieciešams. Atkārtojiet mērījumu.
«ERR 5»
Anormāls
rezultāts
Mērīšanas signāli nav precīzi un tāpēc nav
iespējams parādīt rezultātu. Pārlasiet norā-
dījumus uzticamu mērījumu veikšanai un
atkārtojiet mērījumu.*
«HI»Pulss vai
spiediens
manšetē ir
pārāk
augsts
Spiediens manšetē ir pārāk augsts (pār-
sniedz 300 mmHg) VAI pulss ir pārāk ātrs
(vairāk nekā 200 sitieni minūtē).
5minūtes atslābinieties un atkārtojiet
mērījumu.*
«LO»
Pulss
pārāk zems
Pulss ir pārāk zems (mazāk nekā 40 sitieni
minūtē). Atkārtojiet mērījumu.*
Page 13

11BP N2 Easy
LV
Likvidēšana
Baterijas un elektronikas izstrādājumi ir jālikvidē saskaņā ar
vietējo likumdošanu, nevis jāizmet sadzīves atkritumos.
10.Garantija
Uz šo instrumentu attiecas garantija, kas ir spēkā 5 gadus pēc
iegādes dienas. Garantija ir derīga, uzrādot garantijas talonu, ko
aizpildījis pārdevējs (skatīt aizmugurē) un kurā apstiprināts
iegādes datums, vai, uzrādot čeku.
• Baterijas un nodilumam pakļautās sastāvdaļas garantijā nav
iekļautas.
• Ja instruments tiek atvērts vai ja tajā kaut kas tiek izmainīts,
garantija zaudē spēku.
• Garantija nesedz zaudējumus, kas radušies neuzmanīgas
lietošanas, tukšu bateriju, negadījumu vai norādījumu neievēro-
šanas dēļ.
• Manšetei ir funkcionālā garantija (kameras hermētiskums) uz
2 gadiem.
Lūdzam sazināties ar vietējo Microlife servisu (skatīt priekšvārdu).
11.Tehniskās specifikācijas
Šī ierīce atbilst direktīvas 93/42/EEC prasībām par medicīnas
ierīcēm.
Tiek saglabātas tiesības veikt tehniskas izmaiņas.
Darbības
nosacījumi:
10 - 40 °C / 50 - 104 °F
15 - 95 % relatīvais maksimālais gaisa mitrums
Uzglabāšanas
nosacījumi:
-20 - +55 °C / -4 - +131 °F
15 - 95 % relatīvais maksimālais gaisa mitrums
Svars:
205 g (ar baterijām)
Izmēri:
136 x 82 x 50 mm
Mērīšanas
procedūra:
oscilometriska, atbilst Korotkova metodei:
I fāze sistoliska, V fāze diastoliska
Mērīšanas
diapazons:
20 - 280 mmHg – asinsspiediens
40 - 200 sitieni minūtē – pulss
Amplitūda displejā
redzamajam spiedienam manšetē:
0 - 299 mmHg
Izšķirtspēja:
1 mmHg
Statiskā precizitāte:
spiediens ± 3 mmHg robežās
Pulsa precizitāte:
±5 % no mērījuma vērtības
Spriegums:
2 x 1,5 V sārma baterijas; izmērs AA
Baterijas derī-
guma termiņš:
apmēram 1500 mērījumi (lietojot jaunas
baterijas)
IP klase: IP20
Atsauce uz
standartiem:
EN 1060-1 /-3 /-4; IEC 60601-1;
IEC 60601-1-2 (EMC); IEC 60601-1-11
Paredzētais lietderīgās kalpošanas
termiņš:
Ierīce: 5 gadi vai 10000 mērījumi
Piederumi: 2 gadi
Page 14

12
Ekranas
Prieš naudodamiesi prietaisu perskaitykite instrukciją.
Panaudotos BF tipo dalys
Gerb. Pirkėjau,
Jūsų naujasis Microlife kraujospūdžio matuoklis yra patikimas
medicininis prietaisas, skirtas kraujospūdžio matavimui ant žasto.
Jis paprastas naudotis, tikslus ir ypatingai rekomenduojamas
kraujospūdžio matavimui namų sąlygomis. Šis prietaisas buvo
kuriamas bendradarbiaujant su gydytojais, o jo didelis tikslumas
įrodytas klinikiniais tyrimais.*
Atidžiai perskaitykite šią instrukciją ir susipažinkite su visomis prietaiso funkcijomis bei atsargumo priemonėmis. Tikimės, kad šis
Microlife prietaisas pateisins Jūsų lūkesčius. Iškilus klausimams ar
norėdami įsigyti atsarginių dalių, kreipkitės į Microlife klientų aptar-
navimo tarnybą. Prietaisą pardavusi įstaiga ar vaistinė jums praneš
Microlife vietinės serviso tarnybos adresą. Platesnė informacija apie
mūsų produktus pateikta internete adresu www.microlife.lt.
Būkite sveiki su Microlife AG!
* Šiame prietaise įdiegta technologija identiška prietaise
«BP 3BTO-H» įdiegtai technologijai. Prietaisas «BP 3BTO-H» buvo
testuotas pagal Europos hipertenzijos draugijos (ESH) protokolą.
Microlife BP N2 Easy
LT
1
Įjungimo/išjungimo mygtukas
2
Ekranas
3
Baterijų skyrius
4
Manžetė
5
Greito išleidimo vožtuvas
6
Balionėlis
7
Manžetės kištukas
8
Manžetės lizdas
9
Balionėlio kištukas
AT
Balionėlio lizdas
AK
Pulso is hipertenzijos indikatorius
AL
Pulso aritmijos indikatorius (PAD)
AM
Oro pumpavimas
AN
Baterijos indikatorius
AO
Oro išleidimas
AP
Išsaugota reikšmė
AQ
Pulso dažnumas
AR
Diastolinis kraujospūdis
AS
Sistolinis kraujospūdis
Laikyti sausoje vietoje
Page 15

13BP N2 Easy
LT
Turinys
1. Svarbi informacija apie kraujospūdį ir savarankišką jo
matavimą
• Kaip įvertinti savo kraujospūdį?
2. Naudojimasis prietaisu pirmą kartą
• Baterijų įdėjimas
•Manžetės pasirinkimas
• Balionėlio prijungimas
3. Kraujospūdžio matavimas
4. Pulso aritmijų indikatorius – ankstyvam aptikimui
5. Hipertenzijos indikatorius
6. Atminties funkcija
7. Baterijų būklės indikatorius ir baterijų keitimas
• Baterijos beveik išsikrovę
• Baterijos išsikrovė. Baterijų keitimas
•Kokių reikia baterijų ir kaip jas pakeisti?
• Įkraunamų baterijų naudojimas
8. Klaidų pranešimai
9. Atsargumo priemonės, priežiūra, tikslumo patikrinimas,
utilizavimas
• Atsargumo priemonės bei sauga
• Prietaiso priežiūra
•Manžetės valymas
• Tikslumo patikrinimas
• Utilizavimas
10. Garantija
11. Techninės specifikacijos
Garantijos kortelė (Žr. paskutinį viršelį)
1. Svarbi informacija apie kraujospūdį ir savarankišką
jo matavimą
• Kraujospūdis - kraujo slėgis į arterijų sieneles, atsirandantis
dirbant širdžiai. Visą laiką matuojami du kraujospūdžio dydžiai
- sistolinis (viršutinis) ir diastolinis (apatinis).
• Prietaisas taip pat parodo pulso dažnį (širdies susitraukimų
skaičių per minutę).
• Nuolatos padidėjęs kraujospūdis žalingas Jūsų sveikatai ir
turi būti gydomas!
• Visuomet su gydytoju aptarkite savo kraujospūdžio matavimo
rezultatus bei išsakykite jam savo pastebėjimus ar abejones.
Niekuomet nepasikliaukite vienkartinio kraujospūdžio
matavimo duomenimis.
• Yra daug pernelyg aukšto kraujospūdžio atsiradimo prie-
žasčių. Gydytojas jums plačiau paaiškins situaciją ir, jei reikia,
paskirs gydymą. Be medikamentinio gydymo kraujospūdį
mažina fiziniai pratimai bei svorio mažinimas.
• Niekada nekeiskite gydytojo paskirtų vaistų ar jų dozių!
• Priklausomai nuo fizinės būsenos bei savijautos kraujospūdi
s
dienos bėgyje kinta. Kraujospūdį visą laiką matuokitės
vienodomis ramybės sąlygomis! Kraujospūdį kiekvieną kartą
(ryte ir vakare) matuokitės bent po du kartus ir paskaičiuokite
vidurkį.
• Normalu, kad dviejų matavimų, atliktų vienas po kito, rezultatai
skiriasi.
• Skirtumai tarp matavimų, atliktų gydytojo kabinete ar vaistinėje
yra įprastas reiškinys dėl sunkiai palyginamų matavimo sąlygų.
• Kelis kartus pakartotas kraujospūdžio matavimas suteikia
daug patikimesnę informaciją nei vienkartinis.
• Tarp dviejų matavimų būtina padaryti bent 15 sekundžių
trukmės trumpą pertraukėlę.
• Esant sutrikusiam ši
rdies ritmui (aritmijai, žr. «skyrių 4.»), šiuo
prietaisu gauti rodmenys turi būti įvertinti gydytojo.
• Pulso indikatorius netinka širdies stimuliatoriaus veiklos
vertinimui!
• Nėštumo metu kraujospūdį būtina matuotis labai tiksliai, nes
pokyčiai gali būti labai dideli!
Šis prietaisas buvo specialiai patikrintas dėl naudojimo
nėštumo metu ar esant pre-eklampsijai. Jei nėštumo metu
gavote neįprastai aukštus rodmenis, pakartokite procedūrą
po 4 val. Jei kraujospūdis išlieka aukštas, kreipkitės į gydytoją ar ginekologą.
Page 16

14
Kaip įvertinti savo kraujospūdį?
Aukštesnė išmatuota reikšmė yra pagrindas kraujospūdžio vertinimui.
Pavyzdys: kraujospūdžio reikšmė
140/80
mmHg ar
130/90
mmHg
parodo «padidėjusį kraujospūdį».
2. Naudojimasis prietaisu pirmą kartą
Baterijų įdėjimas
Išpakuokite prietaisą ir įdėkite baterijas. Baterijų skyrelis 3 yra
prietaiso apatinėje pusėje. Laikydamiesi nustatyto poliariškumo,
įdėkite baterijas į prietaisą (2 x 1.5 V baterijos, dydis AA).
Manžetės pasirinkimas
Microlife siūlo skirtingų dydžių manžetes. Pasirinkite manžetę,
atitinkančią Jūsų žasto apimtį (matuojama per žasto vidurį).
Naudokitės tik Microlife manžetėmis!
Naudodamiesi L manžete būtinai naudokitės juodu išleidimo
vožtuvu.
Jei pakuotėjė esanti 4 manžetė Jums netinka, kreipkitės į
vietinį Microlife servisą.
Prijunkite manžetę prie prietaiso kiek galima giliau įkišdami
manžetės kištuką 7 į manžetės lizdą 8.
Balionėlio prijungimas
Prijunkite balionėlį 6 prie prietaiso, tvirtai įkišdami kištuką 9 į
balionėlio lizdą AT.
Balionėlio ir manžetės kištukus galima kišti į bet kurį 8 ar
AT lizdą.
3. Kraujospūdžio matavimas
Patikimo matavimo patarimai
1. Prieš kraujospūdžio matavimą venkite fizinės veiklos, nevalgykite ir nerūkykite.
2. Ramiai pasėdėkite bent 5 minutes ir atsipalaiduokite.
3. Visuomet matuokite ant tos pačios rankos (paprastai
kairės). Gydytojams rekomenduojama pirmojo vizito metu
pamatuoti kraujospūdį ant abiejų rankų. Vėliau kraujospūdis
matuojamas ant tos rankos, kurioje kraujospūdis aukštesnis.
4. Pašalinkite nuo žasto pernelyg glaudžiai prigludusius drabužius.
Kad nespaustų arterijos, marškinių rankovę palikite neatraitotą.
5. Visuomet naudokitės tinkamo dydžio manžete (žr. ženklinimą
ant manžetės).
• Manžetę užvyniokite glaudžiai, bet neužveržkite
•
Manžetės apatinis kraštas turi būti 2 cm aukščiau rankos linkio.
• Arterijos žyma ant manžetės (3 cm ilgio juostelė) turi būti
vidinėje rankos pusėje virš arterijos.
• Ranką padėkite patogiai ir atpalaiduokite.
• Manžetė turi būti širdies lygyje.
6. Įjunkite prietaisą ir palaukite, kol ekrane pasirodys «0» ir pradės
mirksėti «» AM
7. Laisva ranka (kita, negu uždėta manžetė) paimkite balionėlį ir
pripumpuokite manžetę. Stebėdami ekraną pripumpuokite
maždaug 40 mmHg daugiau nei laukiamas sistolinis kraujospūdis (viršutinė riba). Jei slėgis manžetėje bus nepakankamas,
ekrane pradės mirksėti rodyklė «» AM, nurodanti, kad būtina
papildomai pripūsti oro.
8. Pripūtus manžetę kraujospudžio matavimas vyksta automatiškai.
Atsipalaiduokite, stenkitės iki matavimo pabaigos neįtempti
raumenų. Kvėpuokite ramiai. Nekalbėkite.
9. Matavimo metu, pulso indikatorius AK mirksi ekrane.
10.Ekrane parodomas matavimo rezultatas, susidedantis iš sistolinio AS ir diastolinio AR kraujospūdžio bei pulsas AQ. Atkreipkite
dėmesį ir į kitų ekrano simbolių bei parodymų paaiškinimus,
pateiktus šioje instrukcijoje.
11.Matavimui pasibaigus paspausdami greito išleidimo vožtuvą 5
sumažinkite oro slėgį manžetėje. Nuimkite manžetę.
Kraujospūdžio matavimo namų sąlygomis duomenų klasifikacija pagal
tarptautines gaires (ESH, AHA, JSH). Duomenys pateikti mmHg.
Zona
Sistolinis
kraujospūdis
Diastolinis
kraujospūdis Rekomendacijos
Kraujospūdis
per žemas
100
60
Pasitarkite su gydytoju
1. Optimalus
kraujospūdis
100 - 130 60 - 80
Savarankiškai matuokitės kraujospūdį
2. Padidėjęs
kraujospūdis
130 - 135 80 - 85
Savarankiškai matuokitės kraujospūdį
3. Per aukštas
kraujospūdis
135 - 160 85 - 100
Kreipkitės į gydytoją
4. Pavojingai
padidėjęs
kraujospūdis
160
100
Skubiai kreipkitės į
gydytoją!
Manžetės dydis žastui, kurio apimtis
S 17 - 22 cm
M 22 - 32 cm
L 32 - 42 cm
Page 17

15BP N2 Easy
LT
12.Prietaisą išjunkite. (Prietaisas automatiškai išsijungia po 1 min.).
4. Pulso aritmijų indikatorius – ankstyvam aptikimui
Šis simbolis AL parodo, kad matavimo metu buvo aptiktas tam
tikras pulso ritmo sutrikimas. Tokiais atvejais išmatuotas kraujospūdis gali skirtis nuo tikrojo, todėl matavimą reikia pakartoti.
Daugeliu atvejų nėra jokio pagrindo nerimauti. Tačiau, simboliui
pasirodant pastoviai (pvz. keletą kartų per savaitę, kai matuojama
kas dieną), rekomenduojame apie tai informuoti gydytoją.
Prašome perduoti savo gydytojui šį paaiškinimą:
5. Hipertenzijos indikatorius
Matavimo pabaigoje pradėjęs mirksėti simbolis AK parodo, kad
viena iš Jūsų kraujospūdžio verčių (sistolinis ar diastolinis) viršija
tarptautines rekomenduojamas vertes (ESH, AHA, JSH).
Sistolinis kraujospūdis: > 135 mmHg
Diastolinis kraujospūdis: > 85 mmHg
6. Atminties funkcija
Matavimo pabaigoje šis prietaisas automatiškai į atmintį įrašo
kiekvieną matavimo rezultatą Atminties peržiūrai palaikykite
nuspaustą įjungimo/išjungimo mygtuką 1 (prieš tai prietaisą
reikia išjungti). Matomi visi ekrano segmentai. Atleidus mygtuką
ekrane bus matoma išsaugotoji reikšmė bei raidė «M» AP.
7. Baterijų būklės indikatorius ir baterijų keitimas
Baterijos beveik išsikrovę
Baterijoms išsikrovus iki ¾, įjungus prietaisą ekrane pradeda mirksėti baterijos simbolis AN (dalinai užpildytos baterijos piešinėlis).
Prietaisas ir toliau dirbs patikimai, tačiau Jums reiktų įsigyti pakaitines baterijas.
Baterijos išsikrovė. Baterijų keitimas
Baterijoms išsikrovus, įjungus prietaisą ekrane pradės mirksėti
baterijos simbolis AN (tuščios baterijos piešinėlis). Tolimesnis
matavimas neįmanomas iki pakeičiant baterijas.
1. Atidarykite baterijų skyrelį 3, esantį prietaiso apatinėje pusėje.
2. Baterijas pakeiskite – atkreipkite dėmesį į poliariškumo ženklus
baterijų skyrelyje.
Kokių reikia baterijų ir kaip jas pakeisti?
Naudokite 2 naujas, didelės talpos 1.5V, AA dydžio
šarmines baterijas.
Nenaudokite baterijų su pasibaigusiu galiojimo laiku.
Išimkite baterijas iš prietaiso, jei ilgesnį laiką neketinate juo
naudotis.
Įkraunamų baterijų naudojimas
Prietaisu galima naudotis ir su įkraunamomis baterijomis.
Naudokite tik «NiMH» tipo daugkartinio naudojimo baterijas!
Pasirodžius išsikrovusių baterijų simboliui, baterijas reikia
išimti ir įkrauti! Jų negalima palikti prietaise, nes gali būti
sugadintos dėl pilno išsikrovimo (net ir retai naudojantis ar
esant išjungtam prietaisui).
Jei prietaisu neketinate naudotis savaitę ar ilgiau, būtinai
išimkite įkraunamas baterijas!
Baterijos NEGALI būti kraunamos, neišėmus jų iš kraujospūdžio matuoklio! Šias baterijas įkraukite naudodamiesi
specialiu krovikliu. Būtinai laikykitės visų nurodymų!
8. Klaidų pranešimai
Įvykus matavimo klaidai, matavimas nutraukiamas, o ekrane atsiranda klaidos pranešimas, pvz. «ERR 3».
Informacija gydytojui apie dažnai pasirodantį aritmijos
indikatorių
Šis prietaisas -oscilometrinis kraujospūdžio matuoklis, analizuojantis pulso netolygumus. Prietaisas kliniškai patikrintas.
Aritmijos simbolis parodomas po to matavimo, kurio metu buvo
aptiktas neritmiškas pulsas. Simboliui pasirodant dažniau (pvz.
keletą kartų per savaitę, kai matuojama kas dieną), pacientui
patartina kreiptis medicininės pagalbos.
Prietaisas negali pakeisti išsamaus kardiologinio patikrinimo,
tačiau padeda ankstyvoje fazėje pastebėti pulso sutrikimus
Klaida Aprašymas Galimos priežastys ir veiksmai
«ERR 1»Per silpnas
signalas
Pulso bangos signalai į manžetę per
silpni. Pakeiskite manžetės padėtį ir
pakartokite matavimą.*
«ERR 2» Klaidingas
signalas
Matavimo metu užfiksuotas klaidingas
signalas, sąlygotas judesio ar raumenų
įtempimo. Atpalaiduokite ranką ir pakartokite matavimą.
Page 18

16
* Jei ši ar kita problema kartojasi, pasitarkite su gydytoju.
Jei, Jūsų nuomone, gauti rezultatai yra neįprasti, įdėmiai
perskaitykite informaciją, pateiktą skyriuje «1.».
9. Atsargumo priemonės, priežiūra, tikslumo
patikrinimas, utilizavimas
Atsargumo priemonės bei sauga
•
Prietaisą galima naudoti tik šioje instrukcijoje nurodytais tikslais.
Gamintojas neatsako už žalą, kilusią dėl neteisingo prietaiso
naudojimo.
• Prietaise yra jautrių komponentų, todėl naudokitės juo labai
atidžiai. Laikykitės saugojimo ir naudojimosi taisyklių, išdėstytų
«Techninės specifikacijos» skyriuje!
• Saugokite prietaisą nuo:
- vandens ir drėgmės
- aukštos temperatūros
-sukrėtimo ar smūgių
-dulkių ir purvo
- tiesioginių saulės spindulių
-karščio ir šalčio
• Manžetes lengva pažeisti, todėl elkitės su jomis atsargiai.
•
Su šiuo prietaisu nenaudokite jokių kitokių manžečių ar konektorių.
• Pumpuokite tik tinkamai uždėtą manžetę
• Stiprūs elektromagnetiniai laukai, pvz. skleidžiami arti esančių
mobiliųjų telefonų ar radijo aparatų, gali sutrikdyti prietaiso
veikimą, todėl rekomenduojame išlaikyti bent 1 metro atstumą.
Jei to padaryti nėra sąlygų, prieš naudodamiesi prietaisu įsiti-
kinkite, kad jis veikia be trikdžių.
• Nesinaudokite prietaisu, jei manote, kad jis sugadintas, ar
pastebėjote ką nors neįprasta.
• Prietaiso neardykite.
• Išimkite baterijas iš prietaiso, jei ilgesnį laiką neketinate juo
naudotis.
•
Daugiau apie atsargumo priemones skaitykite kituose instrukcijos
skyriuose.
Neleiskite vaikams be priežiūros naudotis prietaisu; kai
kurios datalės yra labai smulkios ir vaikai jas gali praryti.
Prietaisų, tiekiamų su laidais ir vamzdeliais, atveju yra pasismaugimo pavojus.
Prietaiso priežiūra
Prietaisą valykite minkšta ir sausa šluoste.
Manžetės valymas
Valykite manžetę drėgna šluoste ar kempinėle.
DĖMESIO: Neskalbkite manžetės skalbimo mašinoje ar
indaplovėje!
Tikslumo patikrinimas
Kas 2 metus arba po mechaninio poveikio (pvz. nukritus ant
grindų) rekomenduojama patikrinti prietaiso tikslumą. Dėl tikslumo
patikrinimo kreipkitės į vietinį Microlife servisą.
Utilizavimas
Baterijų ir elektroninių prietaisų nemeskite į buitinių atliekų
konteinerius. Baterijos ir elektroniniai prietaisai turi būti utilizuojami pagal aplinkosaugos reikalavimus.
10.Garantija
Prietaisui suteikiama 5 metų garantija nuo pardavimo datos.
Garantija galioja tik pateikus užpildytą garantijos kortelę bei
pirkimo čekį.
• Ši garantija netaikoma baterijoms ir besidėvinčioms dalims.
• Prietaiso atidarymas ar kitoks jo modifikavimas nutraukia
garantijos galiojimą.
• Garantija negalioja pažeidimams, atsiradusiems dėl netinkamo
naudojimo, išsikrovusių baterijų, nelaimingų atsitikimų ar
instrukcijų nesilaikymo.
«ERR 3» Manžetėje
nėra slėgio
Manžetėje napavyksta pasiekti reikiamo
slėgio. Sistema praleidžia orą. Patikrinkite, ar gerai (ne per laisvai) prijungta
manžetė. Jei reikia, pakeiskite baterijas.
Pakartokite matavimą
«ERR 5» Nenormalus
rezultatas
Matavimas buvo netikslus, todėl rezultatas nebuvo parodytas. Perskaitykite
pagrindinius patikimo matavimo patarimus ir pakartokite matavimą.*
«HI» Per dažnas
pulsas arba
per aukštas
slėgis
manžetėje
Per aukštas slėgis manžetėje (daugiau
nei 300 mmHg) arba per dažnas pulsas
(daugiau nei 200 dūžių per minutę).
At
sipalaiduokite 5 minutes ir pakartokite
matavimą.*
«LO» Per retas
pulsas
Per retas pulsas (mažiau 40-ies dūžių
per minutę). Pakartokite matavimą.*
Klaida Aprašymas Galimos priežastys ir veiksmai
Page 19

17BP N2 Easy
LT
• Manžetei suteikta 2 metų sandarumo garantija (oro pūslės
sandarumui).
Prašome kreiptis į vietinį Microlife servisą (Žr. įžangą).
11.Techninės specifikacijos
Šis prietaisas atitinka Medicinos prietaisų Direktyvos 93/42/EEB
reiklavimus.
Galimi techniniai pakeitimai.
Darbinės salygos:
10 - 40 °C
15 - 95 % santykinė maksimali drėgmė
Saugojimo sąlygos:
-20 - +55 °C
15 - 95 % santykinė maksimali drėgmė
Svoris:
205 g (su baterijomis)
Dydis:
136 x 82 x 50 mm
Matavimo procedūra:
oscilometrinė, paremta Korotkovo
metodu: fazė I sistolinis, fazė V diastolinis
Matavimo ribos:
20 - 280 mmHg – kraujospūdžio
40 - 200 dūžių per minutę – pulso
Slėgio ribos:
0 - 299 mmHg
Raiška:
1 mmHg
Statinis tikslumas:
slėgio ± 3 mmHg
Pulso tikslumas:
±5 % nuo parodytos vertės
Įtampos šaltinis:
2 x 1.5 V šarminės baterijos; dydis AA
Baterijos tinkamumas:
apytiksliai 1500 matavimų (naudojant
naujas baterijas)
Saugos klasė:
IP20
Standartų nuorodos:
EN 1060-1 /-3 /-4; IEC 60601-1;
IEC 60601-1-2 (EMC); IEC 60601-1-11
Tinkamumo laikas:
Prietaiso: 5 metai ar 10000 matavimų
Priedų: 2 metai
Page 20

18
Näidik
Enne seadme kasutamist lugege hoolikalt juhiseid.
BF-tüüpi kontaktosa
Austatud klient,
Teie uus Microlife vererõhuaparaat on usaldusväärne meditsiiniseade, mille abil mõõdetakse õlavarrelt vererõhku. Aparaati on
lihtne kasutada, see on täpne ning sobib väga hästi kodustes tingimustes vererõhu mõõtmiseks. Aparaat on välja töötatud koostöös
arstidega ning selle täpsus on kliiniliste uuringutega tunnistatud
väga heaks.*
Palun lugege need juhised hoolikalt läbi, et oskaksite kõiki funktsioone kasutada ning oleksite teadlikud ohutusjuhistest. Me
soovime, et oleksite oma Microlife tootega rahul. Kui teil tekib küsimusi või probleeme või soovite tagavaraosi tellida, võtke ühendust
oma kohaliku Microlife esindajaga. Kohaliku Microlife esindaja
aadressi saate oma müügiesindajalt või apteekrilt. Teise võimalusena külastage meie veebilehte www.microlife.ee, kust leiate
väärtuslikku teavet meie toodete kohta.
Tugevat tervist – Microlife AG!
* Selle aparaadi puhul kasutatakse sama mõõtmistehnoloogiat,
mis Euroopa Hüpertensiooni Seltsi (European Society for Hypertension, ESH) protokolli järgselt testitud «BP 3BTO-H» mudelis.
Microlife BP N2 Easy
EE
1
ON/OFF nupp
2
Näidik
3
Patarei sahtel
4
Mansett
5
Kiirtühjendusklapp
6
Kummiballoon
7
Manseti ühenduslüli
8
Manseti ühenduspesa
9
Kummiballooni ühendusosa
AT
Kummiballooni ühenduspesa
AK
Pulsi ja hüpertensiooni indikaator
AL
Südame rütmihäire indikaator (PAD)
AM
Õhu juurdepumpamine
AN
Patarei näit
AO
Õhu välja laskmine
AP
Salvestatud mõõtmistulemus
AQ
Pulsisagedus
AR
Diastoolne näit
AS
Süstoolne näit
Hoida kuivana
Page 21

19BP N2 Easy
EE
Sisukord
1. Oluline teave vererõhu ja iseendal vererõhu mõõtmise
kohta
• Kuidas hinnata vererõhu väärtuseid?
2. Aparaadi esmakordne kasutus
• Patareide paigaldamine
• Valige õige suurusega mansett
• Kummiballooni ühendamine
3. Vererõhu mõõtmine selle aparaadiga
4. Südame rütmihäire indikaatori ilmumine ekraanile
haiguse varaseks hoiatuseks
5. Hüpertensiooni indikaatori ekraanile ilmumine
6. Andmemälu
7. Patarei indikaator ja patareide vahetus
• Patareid on tühjenemas
• Tühjade patareide vahetus – asendus
• Millised patareid sobivad ja kuidas neid vahetada?
• Laetavate patareide kasutus
8. Veateated
9. Ohutus, hooldus, täpsustest ja käitlus
• Ohutus ja kaitse
• Aparaadi hooldus
• Manseti puhastamine
• Täpsustest
• Käitlus
10. Garantii
11. Tehnilised andmed
Garantiikaart (vt tagakaant)
1. Oluline teave vererõhu ja iseendal vererõhu
mõõtmise kohta
• Vererõhk on südamest arteritesse pumbatud vere tekitatud
rõhk. Alati mõõdetakse kahte näitajat - süstoolset (ülemist) ja
diastoolset (alumist) vererõhku.
• Aparaat mõõdab ka pulsisagedust (arv, mis näitab, mitu lööki
teeb süda minutis).
• Pidevalt kõrge vererõhk võib kahjustada teie tervist ja see
vajab arsti juhendatud ravi!
• Arutage oma vererõhuväärtusi alati koos arstiga ja öelge talle,
kui olete täheldanud midagi tavalisest erinevat või te pole
milleski kindel. Ärge kunagi tuginege ainult ühele vererõhu-
väärtusele.
• Liiga kõrgel vererõhul võib olla palju põhjuseid. Arst selgitab
neid teile täpsemalt ja määrab vajadusel ravi. Peale ravimite
langetab vererõhku ka kehakaalu alandamine ja treening.
•
Ärge ühelgi juhul muutke arsti määratud ravimite annuseid!
• Sõltuvalt kehalisest koormusest ja tingimustest kõigub vererõhk
päeva lõikes oluliselt. Seetõttu peate vererõhku mõõtma
alati samades rahulikes tingimustes ja lõõgastununa!
Tehke vähemalt kaks mõõtmist (hommikul ja õhtul) ja arvutage
keskmine tulemus.
• Kui kaks mõõtmist on tehtud vahetult teineteise järel, on
normaalne, kui saate märkimisväärselt erinevad tulemused.
• Samuti on normaalne, et arsti (apteekri) juures ja kodus
mõõdetud tulemused ei ole sarnased, kuna need olukorrad
erinevad teineteisest täielikult.
• Mitmed mõõtmised annavad palju parema informatsiooni teie
vererõhust kui üks ja ainus mõõdetud tulemus.
• Jätke kahe mõõtmise vahele vähemalt 15-sekundiline paus.
• Kui teil on südamerütmihäired (arütmia, vt «lõik 4.»), tuleks
lasta selle aparaadi tulemusi hinnata teie raviarstil.
•
Pulsi mõõtja ei sobi südamestimulaatori sageduse kontrolliks!
• Kui olete rase, peaksite oma vererõhku hoolikalt jälgima, sest
see võib oluliselt muutuda!
See aparaat on spetsiaalselt väljatöötatud kasutamiseks
raseduse ja preeklampsia puhul. Kui te saate ebaharilikult
kõrge tulemuse raseduse ajal, peaksite mõõtmist kordama
4 tunni pärast. Kui tulemus on endiselt kõrge, konsulteerige
oma arsti või günekoloogiga.
Page 22

20
Kuidas hinnata vererõhu väärtuseid?
Vererõhku hinnatakse kõrgeima mõõdetud väärtuse järgi. Näide:
vererõhu väärtus 140/80 mmHg või 130/90 mmHg tähendab, et
«vererõhk on liiga kõrge».
2. Aparaadi esmakordne kasutus
Patareide paigaldamine
Pärast seadme lahtipakkimist, paigaldage esmalt patareid. Patarei
sahtel 3 on aparaadi all. Paigaldage patareid (2 x 1,5 V, suurus
AA) jälgides etteantud polaarsust.
Valige õige suurusega mansett
Microlife pakub erineva suurusega mansette. Valige õlavarre
ümbermõõdule sobiva suurusega mansett (mõõdetakse tihkelt
õlavarre keskelt).
Kasutage ainult Microlife mansette!
L manseti ühendamiseks selle seadmega, kasutada vaid
musta ühenduslüli (deflatsiooni ventiil).
Pöörduge oma kohaliku Microlife esindaja poole, kui kaasasolev
mansett
4
ei sobi.
Ühendage mansett aparaadi külge, sisestades manseti ühenduslüli 7 manseti pessa 8 lõpuni sisse.
Kummiballooni ühendamine
Ühendage kummiballoon 6 kindlalt aparaadi külge, sisestades
ühendusosa 9 kummiballooni pessa AT.
Kummiballooni ja manseti võib ühendada kas pessa 8 või
AT.
3. Vererõhu mõõtmine selle aparaadiga
Olulised punktid usaldusväärseteks tulemusteks
1. Vältige vahetult enne mõõtmist kehalist koormust ning ärge
sööge ega suitsetage.
2. Istuge enne iga mõõtmist vähemalt 5 minutit ja lõõgastuge.
3. Mõõtke vererõhku alati samal käel (üldiselt vasakul). Soovitatav on arsti esimesel visiidil teha mõlemalt käelt mõõtmised,
et määrata ära kummalt käelt edaspidi rõhku mõõdetakse.
Mõõdetavaks käeks peab olema kõrgema rõhuga käsi.
4. Eemaldage õlavarrelt kitsad riided. Soonimise vältimiseks ärge
käärige pluusi varrukat üles – see ei häiri manseti tööd.
5. Alati veenduge, et kasutate õige suurusega mansetti (suurus
on märgitud mansetile).
• Asetage mansett ümber käe tihed
alt, kuid m
itte liiga tugevalt.
• Veenduge, et mansett oleks paigutatud 2 cm küünarliigesest
kõrgemale.
• Mansetil olev arteri märk (3 cm pikkune joon) peab ületama
arteri, mis paikneb käsivarre sisepinna all.
• Toetage kätt, et see oleks pingevaba.
• Veenduge, et mansett on südamega samal kõrgusel.
6. Lülitage aparaat sisse ja oodake kuni näidikule ilmub «0» ja
nool «» AM süttib.
7. Võtke kummiballoon vabasse kätte (käsi, millelt te ei mõõda
vererõhku) ja pumbake mansetti õhku. Vaadake näidikul olevat
rõhunäitu ning täitke mansett rõhuga nii, et see ületaks oodatud
süstoolse (ülemise) vererõhu väärtust vähemalt 40 mm Hg. Kui
mansett ei ole piisavalt õhuga täidetud, ilmub näidikule vilkuv
nool «» AM, mis tähendab, et peate õhku juurde pumpama.
8. Pärast pumpamist mõõdab aparaat automaatselt vererõhu.
Olge rahulikult, ärge ennast liigutage ega pingutage õlavarrelihaseid enne, kui näidikule ilmub mõõtmistulemus. Hingake
tavaliselt ja ärge rääkige.
9. Mõõtmise käigus vilgub näidikul pulsi näitaja AK.
10.Näidikule ilmub tulemus, mis koosneb süstoolsest AS ja diastoolsest AR vererõhuväärtusest ja pulsisagedusest AQ. Lugege
ka teisi selles brošüüris toodud näitude selgitusi.
Tabel on täiskasvanu vererõhutulemuste hindamiseks ja vastab
rahvusvahelistele ravijuhenditele (ESH, AHA, JSH). Ühikud on
mmHg.
Vahemik Süstoolne
Diastoolne Soovitus
liiga madal vererõhk 100
60
Pidage nõu
arstiga
1. optimaalne vererõhk
100 - 130 60 - 80
Iseseisev kontroll
2.
kõrgenenud vererõhk
130 - 135 80 - 85
Iseseisev kontroll
3. liiga kõrge vererõhk
135 - 160 85 - 100
Pöörduge arsti
poole
4. ohtlikult kõrge
vererõhk
160
100
Pöörduge viivitamatult arsti poole!
Manseti suurus õlavarre ümbermõõt
S 17 - 22 cm
M 22 - 32 cm
L 32 - 42 cm
Page 23

21BP N2 Easy
EE
11.Kui mõõtmine on lõppenud, vajutage kiirtühjendusklapile 5, et
mansetti jäänud õhk väljuks. Eemaldage mansett.
12.Lülitage aparaat välja. Ekraan lülitub ligikaudu 1 minuti jooksul
automaatselt välja.
4. Südame rütmihäire indikaatori ilmumine ekraanile
haiguse varaseks hoiatuseks
Sümbol AL näitab, et mõõtmise ajal tehti kindlaks südame rütmihäire. Sellisel juhul võib mõõdetud tulemus teie tavalisest vererõhust
erineda – korrake mõõtmist. Enamikul juhtudest ei ole see põhjus
muretsemiseks. Kui see sümbol ilmub aga regulaarselt (nt mitu
korda nädalas, kui mõõdate vererõhku iga päev), siis pöörduge nõu
saamiseks arsti poole. Palun näidake oma arstile järgmist selgitust:
5. Hüpertensiooni indikaatori ekraanile ilmumine
Sümbol AK hakkab vilkuma peale vererõhumõõtmist, juhul, kui teie
süstoolne või diastoolne vererõhunäit on kõrgem kui soovitatavad
väärtused rahvusvahelistest ravijuhistes (ESH, AHA, JSH).
Süstoolne vererõhunäit: > 135 mmHg
Diastoolne vererõhunäit: > 85 mmHg
6. Andmemälu
Pärast mõõtmist salvestab aparaat alati viimase tulemuse. Et
mõõdetud näitu näha, vajutage ja hoidke all ON/OFF nuppu 1
(aparaat peab kõigepealt olema välja lülitatud). Näidikule ilmuvad
kõik näidiku elemendid. Kui näete salvestatud tulemust ja tähte
«M» AP, vabastage nupp.
7. Patarei indikaator ja patareide vahetus
Patareid on tühjenemas
Kui patareid on ligikaudu ¾ kasutatud, süttib kohe pärast aparaadi
sisselülitamist patarei sümbol AN (osaliselt täis patarei sümbol).
Aparaat töötab küll usaldusväärselt edasi, kuid peaksite peagi
uued patareid kasutusele võtma.
Tühjade patareide vahetus – asendus
Kui patareid on tühjad, süttib kohe pärast aparaadi sisselülitamist
patarei sümbol AN (tühja patarei sümbol). Aparaati ei saa enne
patareide vahetust enam kasutada.
1. Avage patareisahtel 3 aparaadi all.
2. Vahetage patareid – veenduge, et patareide poolused asuksid
õigesti, nagu patareisahtlis näidatud.
Millised patareid sobivad ja kuidas neid vahetada?
Kasutada 2 uut, pika elueaga 1,5 V, AA suurusega patareidega.
Ärge kasutage patareisid, mille kasutusaeg on lõppenud.
Kui vererõhuaparaati ei ole plaanis pikka aega kasutada,
võtke palun patareid aparaadi seest välja.
Laetavate patareide kasutus
Te saate seda aparaati kasutada ka laetavate patareidega.
Palun kasutage ainult «NiMH» tüüpi korduvkasutatavaid
patareisid!
Kui näidikule ilmub patarei («patarei tühi») sümbol, tuleb
patareid aparaadi seest välja võtta ja laadida! Tühjasid
laetavaid patareisid ei tohi aparaadi sisse jätta, see võib
patareisid kahjustada (patareid võivad täielikult tühjeneda
ka siis kui aparaat on väljalülitatud).
Eemaldage alati laetavad patareid aparaadist, kui teil jääb
kasutamisse nädalane või pikem paus.
Patareisid EI TOHI vererõhuaparaadi sees laadida!
Laadige patareisid välises laadijas. Järgige juhiseid laadimise, hoolduse ja kestvuse kohta!
8. Veateated
Kui mõõtmise ajal tekib viga, siis toiming katkestatakse ja vastav
veateade ilmub näidikule, nt «ERR 3».
Teave arstile arütmianäidu sagedase ilmumise kohta
See aparaat on ostsillomeetriline vererõhumonitor, mis samal
ajal analüüsib ka pulsi ebaregulaarset rütmi. Aparaat on läbinud
kliinilised uuringud.
Arütmia sümbol ilmub näidikule mõõtmise järgselt, kui mõõtmise
ajal on sedastatud südame rütmihäire. Kui sümbol ilmub sageli (nt
mitu korda nädalas, kui mõõta vererõhku iga päev), soovitame
patsiendil pöörduda arsti poole.
Aparaat ei asenda südameuuringuid, kuid aitab varases staadiumis
avastada südame rütmihäireid.
Viga Kirjeldus Võimalik põhjus ja kuidas toimida
«ERR 1» Liiga nõrk
signaal
Mansetini jõudvad pulsilöögid on liiga
nõrgad. Asetage mansett uuesti ja
korrake mõõtmist.*
«ERR 2» Veasignaal Mõõtmise ajal avastati manseti kaudu
veasignaal, mille võis põhjustada liigutamine või lihaste pingutamine. Korrake
mõõtmist, hoides kätt rahulikult paigal.
Page 24

22
* Selle või mõne muu vea kordumisel pidage nõu oma arstiga.
Kui teie meelest on tulemused ebatõenäolised, lugege
«1. lõigus» toodud teave hoolikalt läbi.
9. Ohutus, hooldus, täpsustest ja käitlus
Ohutus ja kaitse
• Kasutage seadet ainult selles kasutusjuhendis kirjeldatud
otstarbel. Tootja ei vastuta seadme ebaõige kasutamise tagajärjel tekkinud kahjustuste eest.
•
See seade koosneb täppisdetailidest - käsitsege seda ettevaatlikult. Järgige alalõigus «Tehnilised andmed» kirjeldatud hoiu- ja
kasutustingimusi!
• Kaitske seadet:
- vee ja niiskuse,
- ekstreemsete temperatuuride,
- põrutuste ja kukkumiste,
- määrdumise ja tolmu,
- otsese päikesevalguse ning
- kuuma ja külma eest.
• Mansetid on õrnad ning neid tuleb ettevaatlikult käsitseda.
• Mõõtes selle aparaadiga, ärge vahetage ega kasutage mõnda
muud tüüpi mansetti või ühenduslüli.
•
Alustage manseti täitmist alles siis, kui olete selle käele asetanud.
• Seadme töö võib olle häiritud kui seda kasutatakse tugeva
elektromagnetvälja läheduses nagu mobiiltelefon, raadio ning
me soovitame hoiduda neist vähemalt 1 m kaugusele. Juhtudel
kui kahtlustate et seda pole võimalik vältida, palun kontrollige
eelnevalt seademe töökorraseisundit.
• Ärge kasutage seadet, kui see on teie meelest kahjustunud või
täheldate sellel midagi ebatavalist.
• Ärge ühelgi juhul seadet avage.
• Kui seadet pole plaanis pikka aega kasutada, võtke patareid
selle seest välja.
• Lugege ohutusjuhiseid selle brošüüri vastavas lõigus.
Lapsed ei tohi seadet ilma järelevalveta kasutada; mõned
selle osad on nii väikesed, et lapsed võivad need alla
neelata. Olge teadlik kägistamise riskist kui seade on
varustatud juhtmete ja voolikutega.
Aparaadi hooldus
Puhastage vererõhuaparaati ainult pehme kuiva riidelapiga.
Manseti puhastamine
Eemaldage plekid ettevaatlikult kasutades niisket lappi ja seebivahtu.
HOIATUS: Ärge peske mansetti pesumasinas ega nõudepesumasinas!
Täpsustest
Me soovitame vererõhuaparaadi mõõtetäpsust kontrollida iga
2 aasta järel või pärast võimalikku mehhaanilist kahjustust (nt pärast
maha pillamist). Täpsustesti tegemiseks pöörduge oma kohaliku
Microlife esindaja poole (vt eessõna).
Käitlus
Patareid ja elektroonikaseadmed tuleb hävitada kooskõlas
asjakohaste kohalike seadustega. Ärge visake neid olmeprügi hulka.
10.Garantii
Sellele seadmele on antud
5 -aastane garantii
, mis algab ostukuupäevast. Garantii kehtib ainult müügiesindaja täidetud garantiikaardi
(vt tagakaas) või ostutšeki esitamisel.
• Garantii alla ei kuulu patareid ja kandeosad.
• Garantii muutub kehtetuks, kui seadet on lahti võetud või on
seda muudetud.
• Garantii ei kata valest käsitsemisest, tühjaks jooksnud patarei-
dest, õnnetusjuhtumitest või kasutusjuhiste mittejärgimisest
tekkinud kahjusid.
«ERR 3» Manseti-
rõhk ei tõuse
Mansetti ei pumbatud piisavas koguses
õhku. See võib olla tingitud manseti
õhulekkest. Kontrollige, kas mansett ja
kummiballoon on omavahel korralikult
ühendatud ja et mansett ei ole asetatud
liiga lõdvalt. Vajadusel vahetage patareid. Korrake mõõtmist.
«ERR 5» Ebatõenäo-
line tulemus
Mõõtmissignaalid on ebatäpsed ja
tulemus ei ilmu näidikule. Lugege läbi
«olulised punktid usaldusväärseks
mõõtmiseks» ja korrake mõõtmist.*
«HI»Pulss või
mansetis
olev rõhk on
liiga kõrge
Mansetis olev rõhk on liiga kõrge (üle
300 mmHg) või pulss liiga sage (üle
200 löögi minutis). Lõõgastuge 5 minutit
ja korrake mõõtmist.*
«LO»Pulss on
liiga aeglane
Pulss on liiga aeglane (alla 40 löögi
minutis). Korrake mõõtmist.*
Viga Kirjeldus Võimalik põhjus ja kuidas toimida
Page 25

23BP N2 Easy
EE
• Sellele mansetile anname 2-aastase funktsionaalse garantii
(puudutab sisekummi pingsuse püsimist).
Palun võtke ühendust oma kohaliku Microlife esindajaga (vt eessõna).
11.Tehnilised andmed
See seade vastab kõigile Meditsiiniseadme Direktiivi 93/42/EEC
nõuetele.
Võimalikud on tehnilised modifikatsioonid.
Töötingimused: 10 - 40 °C / 50 - 104 °F
15 - 95 % suhteline maksimaalne niiskus
Hoiutingimused: -20 - +55 °C / -4 - +131 °F
15 - 95 % suhteline maksimaalne niiskus
Kaal: 205 g (koos patareidega)
Mõõdud: 136 x 82 x 50 mm
Mõõtmisprotseduur:
ostsillomeetriline, vastab Korotkovi meetodile: faas I süstoolne, faas V diastoolne
Mõõtevahemik: 20 - 280 mmHg – vererõhk
40 - 200 lööki minutis – pulss
Mansetirõhu
vahemik näidikul: 0 - 299 mmHg
Resolutsioon: 1 mmHg
Staatiline täpsus: rõhu täpsus ± 3 mmHg
Pulsi täpsus: ± 5 % tegelikust
Vooluallikas:
2 x 1,5 V patareidega; suurus AA
Patareide eluiga: ligikaudu 1500 mõõtmist (uued patareid)
IP Klass: IP20
Vastavus
standarditele:
EN 1060-1 /-3 /-4; IEC 60601-1;
IEC 60601-1-2 (EMC); IEC 60601-1-11
Teeninduse välp: Aparaat: 5 aastat või 10000 mõõtmist
Tarvikud: 2 aastat
Page 26

24
Дисплей
Перед использованием прибора внимательно прочтите
данное руководство.
Изделие типа BF
Уважаемый покупатель,
Ваш новый тонометр Microlife является надежным медицинским
прибором для выполнения измерений на плече. Он прост в
использовании, точен и настоятельно рекомендован для измерения артериального давления в домашних условиях. Прибор
был разработан в сотрудничестве с врачами, а клинические
тесты подтвердили высокую точность его измерений.*
Пожалуйста, внимательно прочтите настоящие указания для
получения четкого представления обо всех функциях и
технике безопасности. Нам бы хотелось, чтобы Вы были удовлетворены качеством изделия Microlife. При возникновении
вопросов, проблем или для заказа запасных частей, пожалуйста, обращайтесь в местный сервисный центр Microlife.
Ваш дилер или аптека могут предоставить Вам адрес дилера
Microlife в Ва
шей с
тране. В качестве альтернативы, посетите
в Интернете страницу www.microlife.ru, где Вы сможете найти
ряд полезных сведений по нашему изделию.
Будьте здоровы – Microlife AG!
* В приборе использована та же технология измерений, что
и в отмеченной наградами модели «BP 3BTO-Н», которая
была протестирована в соответствии с протоколом Европейского Гипертонического Общества (ESH).
Microlife BP N2 Easy
RU
1
Кнопка ВКЛ/ВЫКЛ
2
Дисплей
3
Отсек для батарей
4
Манжета
5
Клапан спуска воздуха
6
Нагнетатель
7
Соединитель манжеты
8
Гнездо для манжеты
9
Соединитель нагнетателя
AT
Гнездо нагнетателя
AK
Индикатор пульса и гипертензии
AL
Индикатор аритмии пульса (PAD)
AM
Накачка воздуха
AN
Индикатор разряда батарей
AO
Спуск воздуха
AP
Сохраненное значение
AQ
Частота пульса
AR
Диастолическое давление
AS
Систолическое давление
Хранить в сухом месте
Page 27

25BP N2 Easy
RU
Оглавление
1. Важная информация об артериальном давлении и
самостоятельное измерение
• Как определить артериальное давление?
2. Использование прибора в первый раз
• Установка батарей
• Подбор подходящей манжеты
• Подсоединение нагнетателя воздуха
3. Выполнение измерений артериального давления при
помощи прибора
4. Появление индикатора аритмии пульса на ранней
стадии
5. Появление индикатора гипертензии
6. Память
7. Индикатор разряда батарей и их замена
• Ба
тареи почти разряжены
• Замена разряженных батарей
• Элементы питания и процедура замены
• Использование аккумуляторов
8. Сообщения об ошибках
9. Техника безопасности, уход, проверка точности и
утилизация
• Техника безопасности и защита
• Уход за прибором
• Очистка манжеты
• Проверка точности
• Утилизация
10. Гарантия
11. Технические характеристики
Гарантийный талон (см. на обратной стороне)
1. Важная информация об артериальном
давлении и самостоятельное измерение
•
Артериальное давление
- это давление крови, подаваемой
сердцем в артерии. Всегда измеряются два значения, систолическое (верхнее) давление и диастолическое (нижнее)
давление.
•
Кроме того, прибор показывает частоту пульса (число ударов
сердца в минуту).
• Постоянно повышенное артериальное давление может
нанести ущерб Вашему здоровью, и в этом случае Вам
необходимо обратиться к врачу!
•
Всегда сообщайте врачу о Вашем давлении и сообщайте ему/
ей, если Вы заметили что-нибудь необычное или чувствуете
неуверенность.
Никогда не полагайтесь на результат
однократного измерения артериального давления.
• Существует несколько причин возникновения высокого
артериального давления. Ваш доктор расскажет о них
более подробно и предложит подходящее лечение. Кроме
приема лекарственных средств, снижение веса и физические нагрузки помогут снизить артериальное давление.
• Ни при каких обстоятельствах не меняйте дозировку
любых лекарств, назначенных врачом!
•
В зависимости от физических нагрузок и состояния, артериальное давление подвержено знaчитeльным колебаниям в
течение дня.
Поэтому каждый раз процедура измерений
должна проводиться в спокойных условиях и когда Вы
не чувствуете напряжения!
Потребуется не менее двух
измерений (каждое утро и каждый вечер) для определения
среднего значения измерений.
• Совершенно нормально, если при двух измерениях подряд
полученные результаты будут отличаться друг от друга.
•
Расхождения
между результатами измерений, полученными
врачом или в аптеке, и результатами, полученными в
домашних условиях, также являются вполне нормальными,
поскольку ситуации, в которых проводятся измерения, совершенно различны.
• Несколько измерений обеспечивают гораздо более
надежную информацию об артериальном давлении, чем
одно измерение.
• Сделайте небольшой перерыв, по крайней мере, в
15 секунд между двумя измерениями.
• Если Вы страдаете нарушением сердцебиения (аритмия,
см «Раздел 4.»), измерения, сделанные с помощью этого
прибора, должны быть оценены Вашим лечащим врачом.
• Показания пульса не пригодны для испо
льзования в
качестве контроля частоты кардиостимулятора!
• Во время беременности следует тщательно следить за
артериальным давлением, поскольку на протяжении этого
периода оно может существенно меняться!
Этот прибор специально тестировался для применения в
условиях беременности и преэклампсии. Если Вы обнаружили необычно высокий результат, то Вы должны
осуществить повторное измерение в течение 4 часов.
Если результат по прежнему высокий, то проконсультируйтесь со своим лечащим врачом или гинекологом.
Page 28

26
Как определить артериальное давление?
Оценка давления определяется по наивысшему значению.
Например: давление
140/80
мм.рт.ст. и давление
130/90
мм.рт.ст.
оба оцениваются как «артериальное давление очень высокое».
2. Использование прибора в первый раз
Установка батарей
После того, как Вы вынули прибор из упаковки, прежде всего,
вставьте батареи. Отсек для батарей 3 расположен на
нижней части прибора. Вставьте батареи (2 х тип AA 1.5В),
соблюдая полярность.
Подбор подходящей манжеты
Microlife предлагает манжеты разных размеров. Выберите
манжету, размер которой соответствует обхвату Вашего плеча
(измеренному при плотном прилегании посредине плеча).
Пользуйтесь только манжетами Microlife!
Использование данного тонометра с манжетой размера
L возможно только с соответствующим клапаном спуска
черного цвета.
Обратитесь в местный сервисный центр Microlife, если
приложенная манжета 4 не подходит.
Подсоедините манжету к прибору, вставив соединитель
манжеты 7 в гнездо манжеты 8 до упора.
Подсоединение нагнетателя воздуха
Подсоедините нагнетатель 6 к прибору, плотно вставив
соединитель 9 в гнездо нагнетателя AT.
Нагнетатель и манжету можно присоединять к любому
из гнезд 8 или AT.
3. Выполнение измерений артериального
давления при помощи прибора
Рекомендации для получения надежных результатов
измерений
1. Избегайте физической активности, не ешьте и не курите
непосредственно перед измерением.
2. Перед измерением присядьте, по крайней мере, на пять
минут и расслабьтесь.
3. Всегда проводите измерения на одной и той же руке
(обычно на левой). Рекомендуется, чтобы во время
первого визита пациента, врач провел измерения на двух
ру
ках, чтобы определить на какой руке нужно производить
измерения в дальнейшем. Потом измерения проводятся
только на той руке, на которой давление оказалось выше.
4. Снимите облегающую одежду с плеча. Не следует закатывать
рукав рубашки, это может привести к сдавливанию, рукава из
тонкой ткани не мешают измерению, если прилегают свободно.
5. Убедитесь, что используется манжета правильного
размера (маркировка на манжете).
• Плотно наложите манжету, но не слишком туго.
•
Убедитесь, что манжета расположена на 2 см. выше локтя.
• Метка артерии на манжете (линия длиной около 3 см.)
должна находиться над артерией с внутренней стороны
руки.
•
Расположите руку так, чтобы она оставалась расслабленной.
• Убедитесь, что манжета находится на той же высоте, что
и сердце.
6. Включите прибор. Нажмите и удерживайте несколько
секунд клапан спуска воздуха 5 и ждите появления на
дисплее «0» и стрелки «» AM, которая начнет мигать.
7. Возьмите нагнетатель подкачки в свободную руку (рука, на
которой не проводятся измерения) и накачайте манжету.
Наблюдайте за индикацией давления на дисплее и подкачайте на приблизительно 40 мм рт. ст. выше, чем ожидаемое
систолическое давление (верхнее значение). Если произведена недостаточная накачка, мигающая стрелка «
» AM
покажет Вам, что требуется дополнительная подкачка.
Таблица для классификации значений артериального давления
взрослого человека в соответствии с международными рекомендациями ESH, AHA, JSH. Данные приведены в мм.рт. ст.
Диапазон
Систолическое
Диастолическое Рекомендация
артериальное давление
слишком низкое
100
60
Обратитесь к врачу
1. оптимальное артериальное давление
100 - 130 60 - 80
Самостоятельный
контроль
2. повышенное артериальное давление
130 - 135 80 - 85
Самостоятельный
контроль
3. артериальное давление
слишком высокое
135 - 160 85 - 100
Обратитесь за медицинской помощью
4. артериальное давление
угрожающе высокое
160
100
Срочно обратитесь
за медицинской
помощью!
Размер манжеты для обхвата плеча
S 17 - 22 см
M 22 - 32 см
L 32 - 42 см
Page 29

27BP N2 Easy
RU
8. После накачки измерение происходит автоматически.
Расслабьтесь, не двигайтесь и не напрягайте руку до тех пор,
пока не отобразится результат измерения. Дышите
нормально и не разговаривайте.
9. Во время измерения, индикатор пульса
AK
мигает на дисплее.
10.Затем отображается результат, состоящий из систолического
AS
и диастолического AR артериального давления, а
также пульса
AQ
. См. также пояснения по другим показаниям
дисплея в этом буклете.
11.По завершении измерения, нажмите на клапан спуска
воздуха 5 для того, чтобы выпустить из манжеты оставшийся воздух. Снимите манжету.
12.Отключите прибор. (Тонометр автоматически отключится
приблизительно через 1 минуту).
4. Появление индикатора аритмии пульса на
ранней стадии
Этот символ AL указывает на то, что во время измерения были
выявлены нарушения пульса. В этом случае результат может
отличаться от Вашего нормального артериального давления –
повторите измерение. В большинстве случаев это не является
причиной для беспокойства. Однако если такой символ появляется регулярно (например, несколько раз в неделю при ежедневных измерениях), рекомендуется сообщить об этом врачу.
Пок
ажите врачу приведенное ниже объяснение:
5. Появление индикатора гипертензии
Этот символ AK мигает в конце измерения, если Ваше систолическое или диастолическое давление выше чем, значения
артериального давления в соответствии с международными
рекомендациями ESH, AHA, JSH.
Систолическое давление: > 135 мм.рт. ст.
Диастолическое давление: > 85 мм.рт. ст.
6. Память
Прибор всегда сохраняет последний результат по окончании
измерения. Для вызова из памяти этого результата, нажмите
и удерживайте кнопку ВКЛ/ВЫКЛ 1 (предварительно прибор
необходимо выключить). Затем отобразятся все элементы
дисплея. Отпустите кнопку, когда увидите сохраненное
значение и букву «M» AP.
7. Индикатор разряда батарей и их замена
Батареи почти разряжены
Если батареи использованы приблизительно на ¾, то при включении прибора символ элементов питания
AN
будет мигать
(отображается частично наполненная батарея). Несмотря на
то, что прибор продолжит надежно проводить измерения, необходимо подготовить новые элементы питания на замену.
Замена разряженных батарей
Если батареи разряжены, то при включении прибора символ
элементов питания
AN
будет мигать (отображается разряженная
батарея). Дальнейшие измерения не могут производиться до
замены батарей.
1. Откройте отсек батарей 3 на нижней части прибора.
2. Замените батареи, убедившись, что соблюдена полярность
в соответствии с символами в отсеке.
Элементы питания и процедура замены
Пожалуйста, используйте 2 новые щелочные батареи
на 1,5В с длительным сроком службы размера AA.
Не используйте батареи с истекшим сроком годности.
Дocтaньте батареи, если прибор не будет использоваться в течение длительного периода времени.
Использование аккумуляторов
С прибором можно работать, используя аккумуляторные
батареи.
Пожалуйста, используйте только один тип аккумуляторных батарей «NiMH».
Батареи необходимо вынуть и перезарядить, если
появляется символ элементов питания (разряженная
Информация для врача при частом появлении на
дисплее индикатора аритмии
Этот прибор является осциллометрическим измерителем
артериального давления, который анализирует также нерегулярность пульса во время измерения. Прибор прошел
клинические испытания.
Символ аритмии отображается после измерения, если во
время измерения имели место нарушения пульса. Если этот
символ появляется достаточно часто (например, несколько
раз в неделю при ежедневных измерениях), то пациенту
рекомендуется обратиться за медицин
ской консультацией.
Прибор не заменяет кардиологического обследования, однако
позволяет выявить нарушения пульса на ранней стадии.
Page 30

28
батарея). Они не должны оставаться внутри прибора,
поскольку могут выйти из строя (даже в выключенном
приборе батареи продолжают разряжаться).
Всегда вынимайте аккумуляторы, если не собираетесь
пользоваться прибором в течение недели или более!
Аккумуляторы НЕ могут заряжаться в тонометре!
Повторно зарядите аккумуляторы во внешнем
зарядном устройстве и ознакомьтесь с информацией
по зарядке, уходу и сроку службы!
8. Сообщения об ошибках
Если во время измерения происходит ошибка, то процедура
измерения прерывается и выдается сообщение об ошибке,
например «ERR 3».
* Пожалуйста, проконсультируйтесь с врачом, если эта или какаялибо другая проблема возникнет повторно.
Если Вам кажется, что результаты отличаются от
обычных, то, пожалуйста, внимательно прочтите
информацию в «Разделе 1.».
9. Техника безопасности, уход, проверка точности
и утилизация
Техника безопасности и защита
• Прибор может использоваться только в целях, описанных в
данном буклете. Изготовитель не несет ответственности за
повреждения, вызванные неправильным использованием.
• В состав прибора входят чувствительные компоненты,
требующие осторожного обращения. Ознакомьтесь с условиями хранения и эксплуатации, описанными в разделе
«Технические характеристики»!
• Оберегайте прибор от:
- воды и влаг
и
- экстремальных температур
- ударов и падений
- загрязнения и пыли
- прямых солнечных лучей
- жары и холода
• Манжеты представляют собой чувствительные элементы,
требующие бережного обращения.
• Не меняйте другие части манжеты или коннектор манжеты
для измерений с этим устройством.
• Производите накачку только наложенной манжеты.
•
Источники сильного электромагнитного излучения, как
мобильные телефоны или радиостанции, могут повлиять на
работу прибора. Мы рекомендуем сохранять дистанцию
минимум 1 м от источников электромагнитного излучения. В
случае, если это невозможно, пожалуйста, удостоверьтесь в
правильной работе прибора перед его использованием.
•
Не используйте прибор, если Вам кажется, что он поврежден,
или если Вы заметили что-либо необычное.
• Никогда не вскрывайте прибор.
Ошибка Описание Возможная причина и устранение
«
ERR 1
» Сигнал
слишком
слабый
Импульсные сигналы на манжете
слишком слабые. Повторно наложите
манжету и повторите измерение.*
«
ERR 2
» Ошибочные
сигналы
Во время измерения манжета зафиксировала ошибочные сигналы,
вызванные, например, движением или
сокращением мышц. Повторите измерение, держа руку неподвижно.
«
ERR 3
» Отсутст-
вует
давление в
манжете
Манжета не может быть накачана до
необходимого уровня давления.
Возможно, имеет место утечка. Убедитесь в том, что манжета и груша
накачки подсоединены правильно, и
что манжета не слишком свободна. При
необходимости замените батареи.
Повторите измерение.
«
ERR 5
» Ошибочный
результат
(артефакт)
Сигналы измерения неточны, из-за чего
отображение результатов невозможно.
Прочтите рекомендации для получения
надежных результатов измерений и
затем повторите измерение.*
«HI» Пульс или
давление
манжеты
слишком
высоки
Давление в манжете слишком высокое
(свыше 300 мм рт. ст.) ИЛИ пульс
слишком высокий (свыше 200 ударов в
минуту). Отдохните в течение 5 минут и
повторите измерение.*
«LO» Пульс
слишком
низкий
Пульс слишком низкий (менее
40 ударов в минуту). Повторите измерение.*
Ошибка Описание Возможная причина и устранение
Page 31

29BP N2 Easy
RU
•
Если прибор не будет использоваться в течение длительного
периода времени, то из него следует вынуть батареи.
• Прочтите дальнейшие указания по безопасности в
отдельных разделах этого буклета.
Позаботьтесь о том, чтобы дети не могли использовать
прибор без присмотра, поскольку некоторые его мелкие
части могут быть проглочены. При поставке прибора с
кабелями и трубками возможен риск удушения.
Уход за прибором
Используйте для чистки прибора только сухую, мягкую ткань.
Очистка манжеты
Осторожно удалите пятна с манжеты с помощью влажной
тряпки и мыльной воды.
ПРЕДУПРЕЖДЕНИЕ:
Не стирать манжету в стиральной
или посудомоечной машине!
Проверка точности
Мы рекомендуем проверять точность прибора каждые 2 года
либо после механического воздействия (например, падения).
Для проведения теста обратитесь в местный сервисный центр
Microlife (см. введение).
Утилизация
Батареи и электронные приборы следует утилизировать
в соответствии с принятыми нормами и не выбрасывать
вместе с бытовыми отходами.
10.Гарантия
На прибор распространяется гарантия в течение
5 лет
с даты
приобретения. Гарантия действительна только при наличии
гарантийного талона, заполненного дилером (см. с обратной
стороны), подтверждающего дату продажи, или кассового чека.
• На батареи и комплектующие части гарантия не распро-
страняется.
• Вскрытие и механические повреждения приводят к утрате
гарантии.
• Гарантия не распространяется на повреждения,
вызванные неправильным обращением, разрядившимися
батареями, несчастными случаями или невыполнением
инструкций по эксплуатации.
• Гарантия на манжету включает гарантию на внутреннюю
камеру (герметичность камеры) на 2 года.
Пожалуйста, обратитесь в местный с
ервисный центр Microlife
(см. введение).
11.Технические характеристики
Данный прибор соответствует требованиям директивы ЕС о
медицинском оборудовании 93/42/EEC.
Право на внесение технических изменений сохраняется.
Условия применения: от 10 до 40 °C
максимальная относительная влажность 15 - 95 %
Условия хранения: от -20 до +55 °C
максимальная относительная влажность 15 - 95 %
Масса: 205г (включая батареи)
Размеры: 136 x 82 x 50 мм
Процедура измерения:
осциллометрическая, в соответствии
с методом Короткова: фаза I систолическая, фаза V диастолическая
Диапазон измерений:
20 - 280 мм рт. ст. – артериальное
давление
40 - 200 ударов в минуту – пульс
Индикация давления
в манжете: 0 - 299 мм рт.ст.
Минимальный шаг
индикации: 1 мм рт.ст.
Статическая
точность: давление в пределах ± 3 мм рт. ст.
Точность измерения
пульса: ±5 % считанного значения
Источник питания:
2 x 1,5В щелочные батареи размера AA
Срок службы
батареи:
примерно 1500 измерений (при
использовании новых щелочных
батарей)
Класс защиты:
IP20
Соответствие
стандартам:
EN 1060-1 /-3 /-4; IEC 60601-1;
IEC 60601-1-2 (EMC); IEC 60601-1-11
Ожидаемый срок
службы:
Прибор: 5 лет или 10000 измерений
Комплектующие: 2 года
 Loading...