

Page 1
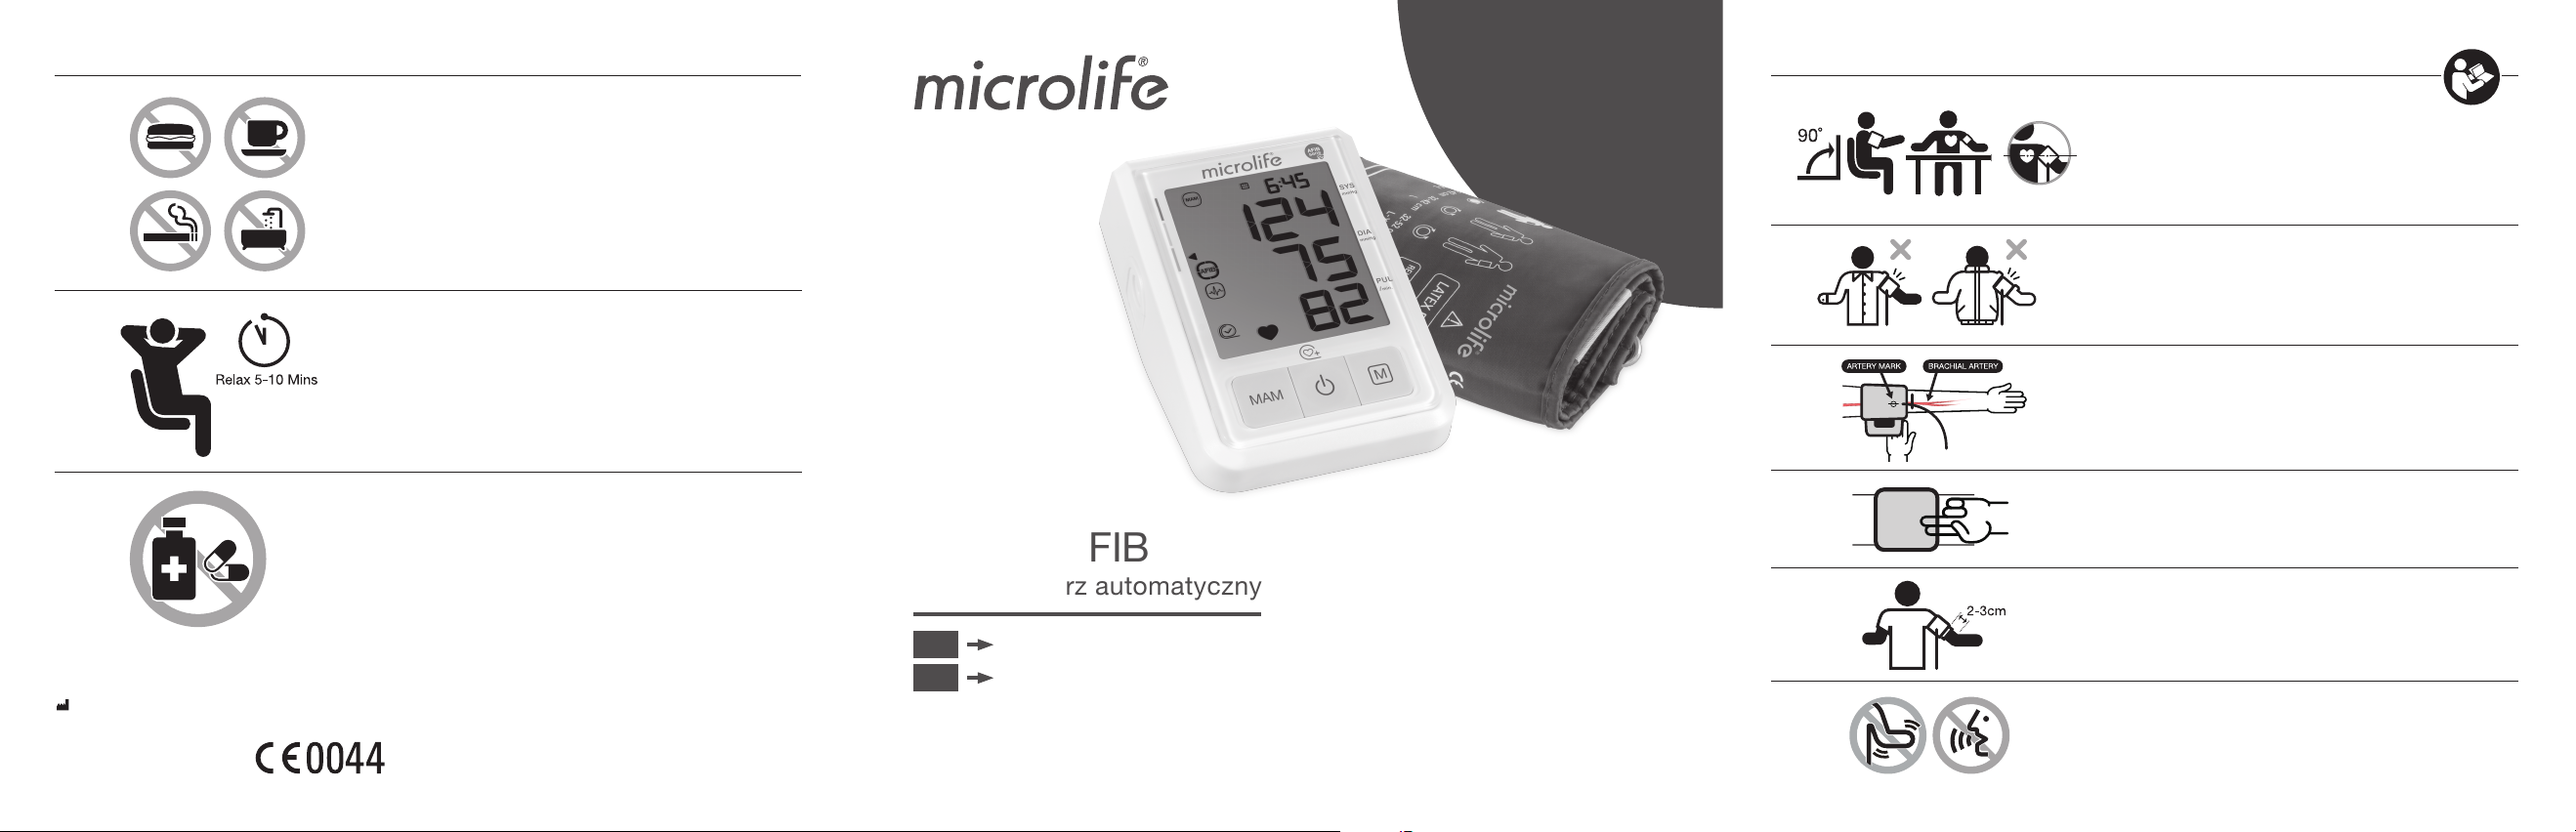
Microlife BP B3 AFIBBefore each measurement / Przed każdym pomiarem
Preparation / Przygotowanie
1.
2.
3.
Avoid eating, bathing, smoking or caffeine (approx. 30 min).
Unikaj jedzenia, kąpieli, palenia lub kofeiny (około 30 minut).
Avoid activity and relax for 5-10 min.
Unikaj aktywności i zrelaksuj się przez 5-10 minut.
Measure before medication intake.
Zmierz przed przyjęciem leku.
BP
B3 AFIB
Ciśnieniomierz automatyczny
EN
1
1.
2.
3.
4.
5.
Sit on a back-supported chair and keep your legs uncrossed.
Usiądź na krześle wspieranym plecami i nie rozstawiaj nóg.
Avoid thick or close-fitting garments on the upper arm.
Unikaj grubej lub dopasowanej odzieży na ramieniu.
Place the artery-mark on the cuff over your artery.
Umieść mankiecie na tętnicy.
Fit the cuff closely, but not too tight.
Zaciśnij mankiet dokładnie, jednak niezbyt silnie.
Position the cuff 2-3 cm above your elbow.
Ustaw mankiet na 2-3 cm powyżej łokcia.
Microlife AG
Espenstrasse 139
9443 Widnau / Switzerland
www.microlife.com
IB BP B3 AFIB EN-PL 2518
PL
9
6.
Keep your arm still and do not speak during the measurement.
Trzymaj rękę nieruchomo i nie mów podczas pomiaru.
Page 2
Microlife BP B3 AFIB
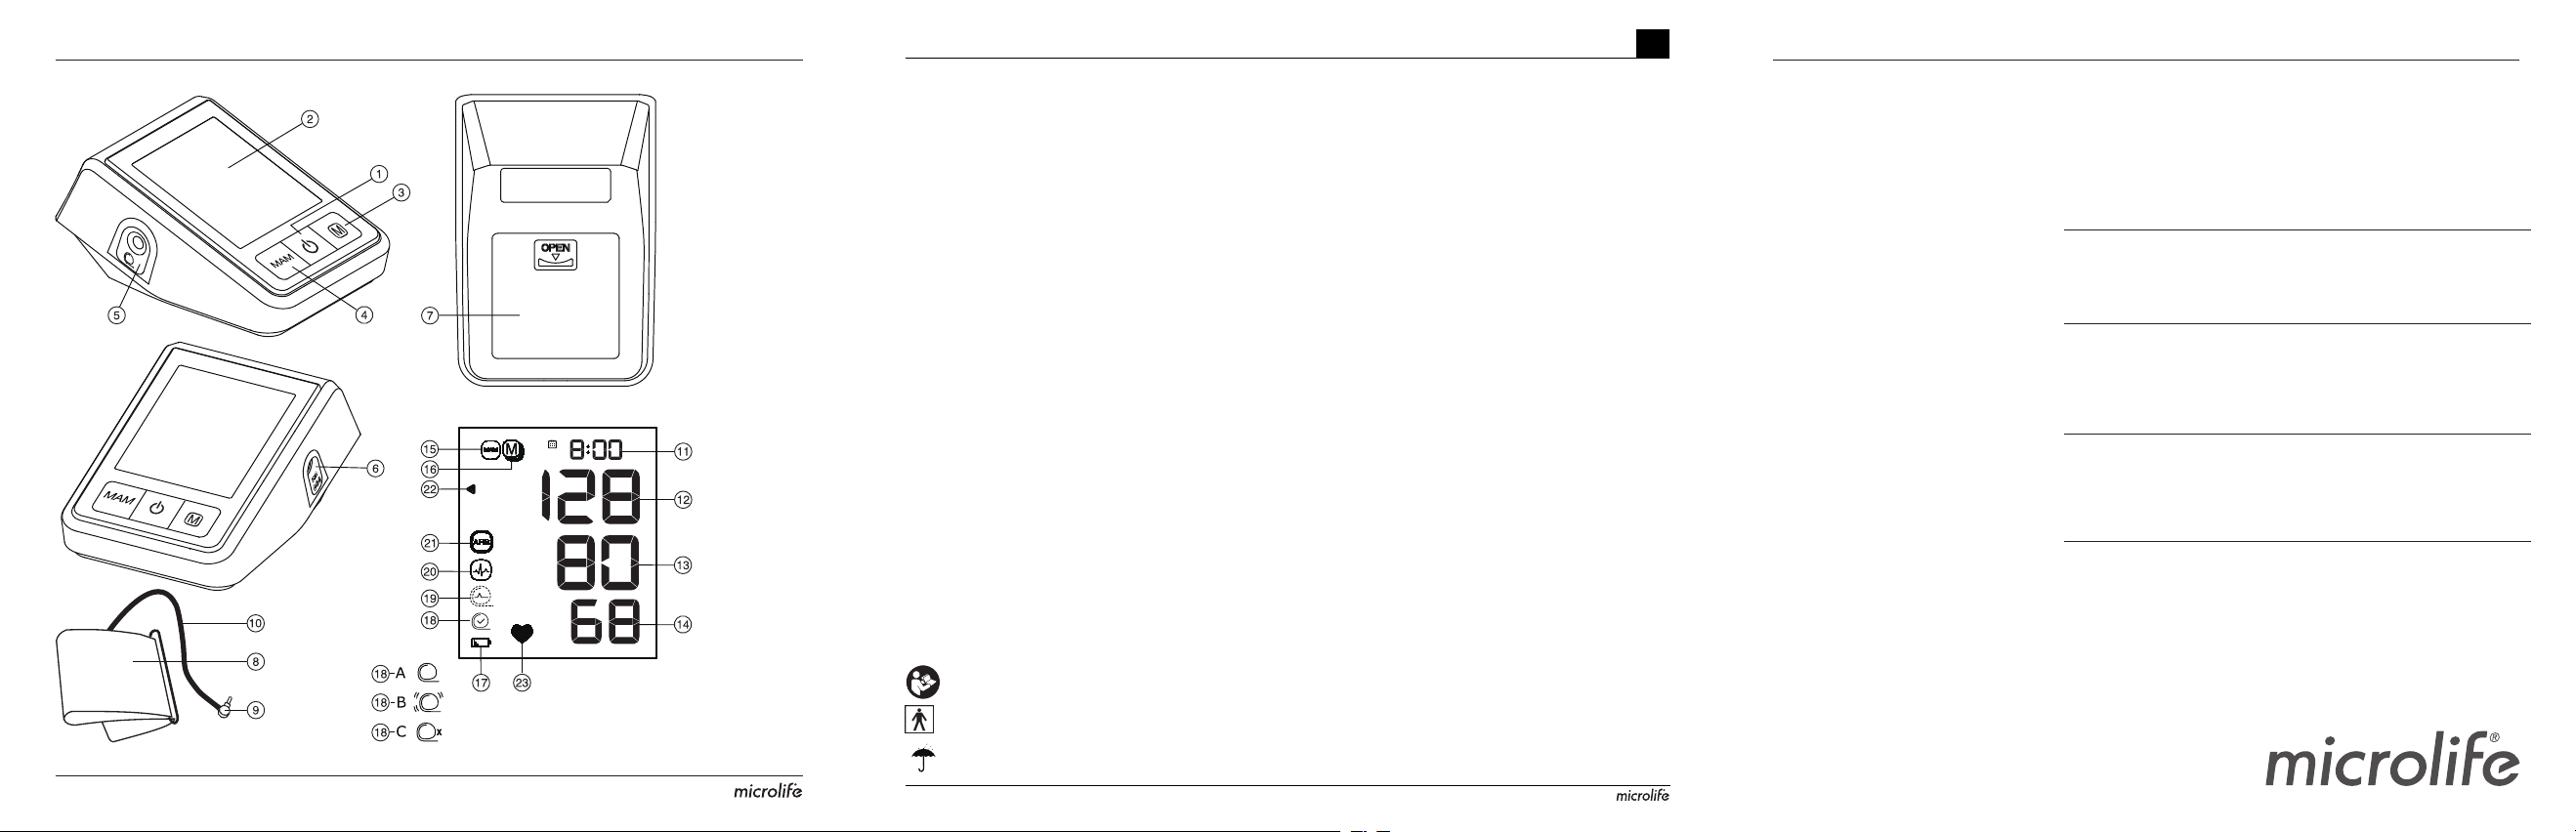
1
ON/OFF button
2
Display
3
M-button (memory)
4
MAM button
5
Cuff Socket
6
Mains Adapter Socket
7
Battery Compartment
8
Cuff
9
Cuff Connector
AT
Cuff Tube
Display
AK
Date/Time
AL
Systolic Value
AM
Diastolic Value
AN
Pulse Rate
AO
MAM Mode
AP
Stored Value
AQ
Battery Display
AR
Cuff Fit Check
-A: Suboptimal Cuff Fit
-B: Arm Movement Indicator «Err 2»
-C: Cuff Pressure Check «Err 3»
AS
Cuff Signal Indicator «Err 1»
BT
Pulse Arrhythmia Indicator (PAD)
BK
Atrial Fibrillation Indicator (AFIB)
BL
Traffic Light Indicator
BM
Pulse Indicator
Read the instructions carefully before using this device.
Type BF applied part
Keep dry
1
EN
Intended use:
This oscillometric blood pressure monitor is intended for measuring
non-invasive blood pressure in people aged 12 years or older.
It is clinically validated in patients with hypertension, hypotension,
diabetes, pregnancy, pre-eclampsia, atherosclerosis, end-stage
renal disease, obesity and the elderly.
The device can detect an irregular pulse suggestive of Atrial Fibrillation (AF). Please note that the device is not intended to diagnose
AF. A diagnosis of AF can only be confirmed by ECG. The patient
is advised to see a physician.
Dear Customer,
This device was developed in collaboration with physicians and
clinical tests carried out prove its measurement accuracy to be of
a very high standard.*
Microlife AFIBsens is the world’s leading digital blood pressure
measurement technology for the detection of atrial fibrillation (AF)
and arterial hypertension. These are the two top risk factors of
getting a stroke or heart disease. It is important to detect AF and
hypertension at an early stage, even though you may not experience any symptoms. AF screening in general and thus also with
the Microlife AFIB algorithm, is recommended for people of 65
years and older. The AFIB algorithm indicates that atrial fibrillation
may be present. For this reason, it is recommended that you visit
your doctor when the device gives an AFIB signal during your
blood pressure measurement. The AFIB algorithm of Microlife has
been clinically investigated by several prominent clinical investigators and showed that the device detects patients with AFIB at a
certainty of 97-100%.
If you have any questions, problems or want to order spare parts
please contact your local Microlife-Customer Service. Your dealer or
pharmacy will be able to give you the address of the Microlife dealer
in your country. Alternatively, visit the internet at www.microlife.com
where you will find a wealth of invaluable information on our products.
Stay healthy – Microlife AG!
* This device uses the same measuring technology as the award
winning «BP 3BTO-A» model tested according to the British
Hypertension Society (BHS) protocol.
1
Kearley K, Selwood M, Van den Bruel A, Thompson M, Mant D,
Hobbs FR et al.: Triage tests for identifying atrial fibrillation in
primary care: a diagnostic accuracy study comparing single-lead
ECG and modified BP monitors. BMJ Open 2014; 4:e004565.
1,2
Name of Purchaser
Imię i nazwisko nabywcy
Serial Number
Numer seryjny
Date of Purchase
Data zakupu
Specialist Dealer
Przedstawiciel
Microlife BP B3 AFIBGuarantee CardMicrolife BP B3 AFIB
Page 3

2
Wiesel J, Arbesfeld B, Schechter D: Comparison of the Microlife
blood pressure monitor with the Omron blood pressure monitor for
detecting atrial fibrillation. Am J Cardiol 2014; 114:1046-1048.
Table of Contents
1. Appearance of the Atrial Fibrillation Indicator for early Detection (Active only in MAM mode)
• What is Atrial Fibrillation (AF)?
• Who should be screened for Atrial Fibrillation?
• Risk factors you can control
2. Using the Device for the First Time
• Inserting the batteries
• Setting the date and time
• Selecting the correct cuff
• Selecting standard or MAM mode
3. Checklist for Taking a Reliable Measurement
4. Taking a Blood Pressure Measurement
• Manual inflation
• How not to store a reading
• How do I evaluate my blood pressure?
• Appearance of the Pulse Arrhythmia (PAD)
5. Data Memory
• Viewing the stored values
• Clearing all values
6. Battery Indicator and Battery change
• Low battery
• Flat battery – replacement
• Which batteries and which procedure?
• Using rechargeable batteries
7. Using a Mains Adapter
8. Error Messages
9. Safety, Care, Accuracy Test and Disposal
• Safety and protection
• Device care
• Cleaning the cuff
• Accuracy test
•Disposal
10. Guarantee
11. Technical Specifications
Guarantee Card (see Back Cover)
1. Appearance of the Atrial Fibrillation Indicator for
early Detection (Active only in MAM mode)
This device is able to detect atrial fibrillation (AF). This symbol BK
indicates that atrial fibrillation was detected during the measurement.
Please refer to the next paragraph for information regarding the
consultation with your doctor.
Information for the doctor on frequent appearance of the
atrial fibrillation indicator
This device is an oscillometric blood pressure monitor that also
analyses pulse irregularity during measurement. The device is
clinically tested.
The AFIB symbol is displayed after the measurement, if atrial fibrillation occurred during measuring. If the AFIB symbol appears after
having performed a full blood pressure measurement episode (triplicate measurements), the patient is advised to perform another
measurement episode (triplicate measurements). If the AFIB symbol
appears again, we recommend the patient to seek medical advice.
If the AFIB-symbol appears on the screen of the blood pressure
monitor, it indicates the possible presence of atrial fibrillation.
The atrial fibrillation diagnosis however, must be made by a
cardiologist based on ECG interpretation.
Keep the arm still during measuring to avoid false readings.
This device may not or wrongly detect atrial fibrillation in
people with pacemakers or defibrillators.
In the presence of atrial fibrillation the diastolic blood pressure
value may not be accurate.
In the presence of atrial fibrillation using MAM-mode is recom-
mended for more reliable blood pressure measurement.
What is Atrial Fibrillation (AF)?
Normally, your heart contracts and relaxes to a regular beat. Certain
cells in your heart produce electrical signals that cause the heart to
contract and pump blood. Atrial fibrillation occurs when rapid, disorganized electrical signals are present in the heart’s two upper chambers,
called the atria; causing them to contract irregularly (this is called fibrillation). Atrial fibrillation is the most common form of heart arrhythmia.
It often causes no symptoms, yet it significantly increases your risk of
stroke. You’ll need a doctor to help you control the problem.
Who should be screened for Atrial Fibrillation?
AF screening is recommended for people over 65 years of age, since
the chance of having a stroke increases with age. AF screening is
also recommended for people from the age of 50 years who have
EN
2BP B3 AFIB
Page 4

high blood pressure (e.g. SYS higher than 159 or DIA higher than 99)
as well as those with diabetes, coronary heart failure or for those who
have previously had a stroke.
In young people or in pregnancy AF screening is not recommended
as it could generate false results and unnecessary anxiety. In addition, young individuals with AF have a low risk of getting stroke as
compared to elder people.
Risk factors you can control
Early diagnosis of AF followed by adequate treatment can significantly reduce the risk of getting stroke. Knowing your blood pressure
and knowing whether you have AF is the first step in proactive stroke
prevention.
For more information visit our website: www.microlife.com/afib.
2. Using the Device for the First Time
Inserting the batteries
After you have unpacked your device, first insert the batteries. The
battery compartment
batteries (4 x 1.5 V, size AA), thereby observing the indicated polarity.
Setting the date and time
1. After the new batteries are fitted, the year number flashes in the
display. You can set the year by pressing the M-button 3. To
confirm and then set the month, press the MAM button 4.
2. Press the M-button to set the month. Press the MAM button to
confirm and then set the day.
3. Follow the instructions above to set the day, hour and minutes.
4. Once you have set the minutes and pressed the MAM button,
the date and time are set and the time is displayed.
5. If you want to change the date and time, press and hold the
MAM button for approx. 3 seconds until the year number starts
to flash. Now you can enter the new values as described above.
Selecting the correct cuff
Microlife offers different cuff sizes. Select the cuff size to match the
circumference of your upper arms (measured by close fitting in the
centre of the upper arm).
Cuff size for circumference of upper arm
S 17 - 22 cm
M 22 - 32 cm
M - L 22 - 42 cm
L 32 - 42 cm
L - XL 32 - 52 cm
7
is on the bottom of the device. Insert the
Pre-shaped cuffs are optionally available.
Only use Microlife cuffs.
Contact your local Microlife Service if the enclosed cuff 8 does
not fit.
Connect the cuff to the device by inserting the cuff connector 9
into the cuff socket 5 as far as it will go.
Selecting standard or MAM mode
Before each measurement, select standard (single measurement)
or MAM mode (automatic triple measurement). In MAM mode,
3 measurements are automatically taken in succession and the
result is then automatically analysed and displayed. Because the
blood pressure constantly fluctuates, a result obtained in this way
is more reliable than when a single measurement is performed.
To select MAM mode, press the MAM button 4 until the MAM-
symbol AO appears on the display. To change to standard mode
(single measurement), press the MAM-button again, until the
MAM-symbol disappears.
The bottom, right hand section of the display shows a 1, 2 or 3 to
indicate which of the 3 measurements is currently being taken.
There is a break of 15 seconds between the measurements.
A count down indicates the remaining time.
The individual results are not displayed. Your blood pressure will
only be displayed after all 3 measurements are taken.
Do not remove the cuff between measurements.
If one of the individual measurements was questionable, a fourth
one is automatically taken.
AF detection is only activated in MAM mode.
3. Checklist for Taking a Reliable Measurement
Avoid activity, eating or smoking immediately before the
measurement.
Sit down on a back-supported chair and relax for 5 minutes.
Keep the feet flat on the floor and do not cross your legs.
Always measure on the same arm
mended that doctors perform double arm measurements on a
patients first visit in order to determine which arm to measure in the
future. The arm with the higher blood pressur e should be measured.
Remove close-fitting garments from the upper arm. To avoid
constriction, shirt sleeves should not be rolled up - they do not
interfere with the cuff if they are laid flat.
Always ensure that the correct cuff size is used (marking on the cuff).
Fit the cuff closely, but not too tight.
Make sure that the cuff is positioned 2 cm above the elbow.
(normally left). It is recom-
3
Page 5

The artery mark on the cuff (ca. 3 cm long bar) must lie over
the artery which runs down the inner side of the arm.
Support your arm so it is relaxed.
Ensure that the cuff is at the same height as your heart.
4. Taking a Blood Pressure Measurement
1. Select standard (single measurement) or MAM mode (automatic
triple measurement): see details in chapter «2.».
2. Press the ON/OFF button 1 to start the measurement.
3. The cuff will now pump up automatically. Relax, do not move
and do not tense your arm muscles until the measurement
result is displayed. Breathe normally and do not talk.
4. The cuff fit check AR on the display indicates that the cuff is
perfectly placed. If the icon AR-A appears, the cuff is fitted
suboptimally, but it is still ok to measure.
5. When the correct pressure is reached, the pumping stops and the
pressure falls gradually. If the required pressure was not reached,
the device will automatically pump some more air into the cuff.
6. During the measurement, the pulse indicator BM flashes in the
display.
7. The result, comprising the systolic AL and the diastolic AM blood
pressure and the pulse rate AN is displayed. Note also the
explanations on further display symbols in this booklet.
8. When the device has finished measuring, remove the cuff.
9. Switch off the device. (The monitor does switch off automatically
after approx. 1 min.).
AF detection is only activated in MAM mode.
You can stop the measurement at any time by pressing the
ON/OFF button (e.g. if you feel uneasy or an unpleasant
pressure sensation).
This monitor is specially tested for use in pregnancy and
pre-eclampsia. When you detect unusual high readings in
pregnancy, you should measure after a short while again
(eg. 1 hour). If the reading is still too high, consult your
doctor or gynecologist.
In pregnancy the AFIB symbol can be ignored.
Manual inflation
In case of high systolic blood pressure (e.g. above 135 mmHg)
it can be an advantage to set the pressure individually. Press the ON/
OFF button after the monitor has been pumped up to a level of
approx. 30 mmHg (shown on the display). Keep the button pressed
until the pressure is about 40 mmHg above the expected systolic
value – then release the button.
How not to store a reading
As soon as the reading is displayed press and hold the ON/OFF
button 1 until «M» AP is flashing. Confirm to delete the reading by
pressing the MAM button 4.
«CL» is displayed when the reading is deleted from the
memory successfully.
How do I evaluate my blood pressure?
The triangle on the left-hand edge of the display BL points at the
range within which the measured blood pressure value lies. The
value is either within the optimum (green), elevated (yellow) or high
(red) range. The classification corresponds to the following ranges
defined by international guidelines (ESH, AHA, JSH). Data in mmHg.
Range Systolic Diastolic Recommendation
1. blood pressure
too high
2. blood pressure
elevated
3. blood pressure
optimum
The higher value is the one that determines the evaluation.
Example: a blood pressure value of 140/80 mmHg or a value of
130/90 mmHg indicates «blood pressure too high».
Appearance of the Pulse Arrhythmia (PAD)
The pulse arrhythmia indicator BT is displayed, when pulse irregularities occurred during the measurement. If the symbol appears,
select MAM mode and measure again: see details in chapter «2.».
In MAM mode Atrial Fibrillation (AF) will also be checked:
follow the directions in chapter «1.».
>135 >85 Seek medical
advice
130 - 135 80 - 85 Self-check
<130 <80 Self-check
5. Data Memory
This device automatically stores the last 99 measurement values.
Viewing the stored values
Press the M-button 3 briefly, when the device is switched off. The
display first shows «M» AP and «A», which stands for the average
,
of all stored values.
Pressing the M-button again displays the previous value. Pressing
the M-button repeatedly enables you to move from one stored
value to another.
Blood pressure readings with suboptimal cuff fit AR-A are
not considered in the average value.
EN
4BP B3 AFIB
Page 6

Pay attention that the maximum memory capacity of 99
memories is not exceeded.
oldest value is automatically overwritten with the 100th
value.
Values should be evaluated by a doctor before the
memory capacity is reached – otherwise data will be lost.
Clearing all values
If you are sure that you want to permanently remove all stored
values, hold down the M-button (the device must have been
switched off beforehand) until «CL ALL» appears and then
release the button. To permanently clear the memory, press the
MAM button while «CL ALL» is flashing. Individual values cannot
be cleared.
Cancel deletion:
is flashing.
When the 99 memory is full, the
press ON/OFF button 1 while «
CL ALL
6. Battery Indicator and Battery change
Low battery
When the batteries are approximatel y ¾ empty the battery symbol AQ
will flash as soon as the device is switched on (partly filled battery
displayed). Although the device will continue to measure reliably, you
should obtain replacement batteries.
Flat battery – replacement
When the batteries are flat, the battery symbol AQ will flash as soon
as the device is switched on (flat battery displayed). You cannot
take any further measurements and must replace the batteries.
1. Open the battery compartment 7 at the back of the device.
2. Replace the batteries – ensure correct polarity as shown by the
symbols in the compartment.
3. To set date and time, follow the procedure described in
«Section 2.».
The memory retains all values although date and time must
be reset – the year number therefore flashes automatically
after the batteries are replaced.
Which batteries and which procedure?
Use 4 new, long-life 1.5 V, size AA alkaline batteries.
Do not use batteries beyond their date of expiry.
Remove batteries if the device is not going to be used for a
prolonged period.
Using rechargeable batteries
You can also operate this device using rechargeable batteries.
Only use «NiMH» type reusable batteries.
Batteries must be removed and recharged when the flat
battery symbol appears. They should not remain inside the
device as they may become damaged (total discharge as a
result of low use of the device, even when switched off).
Always remove the rechargeable batteries if you do not
intend to use the device for a week or more.
Batteries cannot be charged in the blood pressure monitor.
Recharge batteries in an external charger and observe the
information regarding charging, care and durability.
7. Using a Mains Adapter
You can operate this device using the Microlife mains adapter
»
(DC 6V, 600 mA).
Only use the
accessory appropriate for your supply voltage.
Ensure that neither the mains adapter nor the cable are
damaged.
1. Plug the adapter cable into the mains adapter socket 6 in the
blood pressure monitor.
2. Plug the adapter plug into the wall socket.
When the mains adapter is connected, no battery current is
consumed.
Microlife
mains adapter available as an original
8. Error Messages
If an error occurs during the measurement, the measurement is
interrupted and an error message, e.g. «Err 3», is displayed.
Error Description Potential cause and remedy
«
Err 1
«
Err 2
AR-B
»ASSignal too
weak
»
Error signal During the measurement, error signals
The pulse signals on the cuff are too weak.
Re-position the cuff and repeat the
measurement.*
When «Err 1» occurs, the device
performs a 15 second countdown,
then repeats the measurement.
were detected by the cuff, caused for
instance by movement or muscle tension.
Repeat the measurement, keeping your
arm still.
5
Page 7

Error Description Potential cause and remedy
«
Err 3
»
AR-C
«
«
«
«
* Please immediately consult your doctor, if this or any other
problem occurs repeatedly.
Abnormal
cuff
pressure
Err 5
»Abnormal
result
Err 6»MAM
HI
» Pulse or cuff
pressure too
high
LO
» Pulse too
low
An adequate pressure cannot be generated in the cuff. A leak may have occurred.
Check that the cuff is correctly connected
and is not too loose. Replace the batteries
if necessary. Repeat the measurement.
The measuring signals are inaccurate and
no result can therefore be displayed. Read
through the checklist for performing reliable measurements and then repeat the
measurement.*
Mode There were too many errors during the
measurement in
impossible to obtain a final result. Read
through the checklist for performing reliable measurements and then repeat the
measurement.*
The pressure in the cuff is too high (over
299 mmHg) OR the pulse is too high (over
200 beats per minute). Relax for 5 minutes
and repeat the measurement.*
The pulse is too low (less than 40 beats
per minute). Repeat the measurement.*
MAM
mode, making it
9. Safety, Care, Accuracy Test and Disposal
Safety and protection
Follow instructions for use. This document provides important
product operation and safety information regarding this device.
Please read this document thoroughly before using the device
and keep for future reference.
This device may only be used for the purposes described in
these instructions. The manufacturer cannot be held liable for
damage caused by incorrect application.
This device comprises sensitive components and must be treated
with caution. Observe the storage and operating conditions
described in the «Technical Specifications» section.
Protect it from:
- water and moisture
- extreme temperatures
- impact and dropping
- contamination and dust
- direct sunlight
- heat and cold
The cuffs are sensitive and must be handled with care.
Do not exchange or use any other kind of cuff or cuff connector
for measuring with this device.
Only pump up the cuff once fitted.
Do not use this device close to strong electromagnetic fields such
as mobile telephones or radio installations. Keep a minimum
distance of 3.3 m from such devices when using this device.
Do not use this device if you think it is damaged or notice
anything unusual.
Never open this device.
If the device is not going to be used for a prolonged period the
batteries should be removed.
Read the additional safety information provided within the indi-
vidual sections of this instruction manual.
The measurement results given by this device is not a diagnosis.
It is not replacing the need for the consultation of a physician,
especially if not matching the patient’s symptoms. Do not rely on
the measurement result only, always consider other potentially
occurring symptoms and the patient’s feedback. Calling a doctor
or an ambulance is advised if needed.
Permanently high blood pressure values can damage your
health and must be treated by your doctor!
Always discuss your values with your doctor and tell him/her if
you have noticed anything unusual or feel unsure. Never rely
on single blood pressure readings.
Under no circumstances should you alter the dosages of
drugs or initiate a treatment without consulting your doctor.
Deviations between measurements taken by your doctor or in
the pharmacy and those taken at home are quite normal, as
these situations are completely different.
The pulse display is not suitable for checking the
frequency of heart pacemakers!
If you are pregnant, you should monitor your blood pressure
regularly as it can change drastically during this time.
EN
6BP B3 AFIB
Page 8

Ensure that children do not use this device unsupervised;
some parts are small enough to be swallowed. Be aware of
the risk of strangulation in case this device is supplied with
cables or tubes.
Device care
Clean the device only with a soft, dry cloth.
Cleaning the cuff
The cuff delivered with this device is washable.
1. Remove the cuff connector 9 from the cuff tube AT and carefully pull the bladder through the opening at the edge of the cuff
cover.
2. Hand wash the cuff cover in soapsuds: not hotter than 30 °C.
3. Completely dry the cuff cover by linen drying.
4. Loop the cuff tube back through its opening and carefully place
the bladder flat in the cuff cover.
5. Reattach the cuff connector on the cuff tube.
The bladder must lay straight in the cuff cover, not folded.
Do not use fabric softener.
WARNING: Do not wash the cuff in a washing machine or
dishwasher!
WARNING: Do not dry the cuff cover in a tumble dryer!
WARNING: Under no circumstances may you wash the
inner bladder!
Accuracy test
We recommend this device is tested for accuracy every 2 years or
after mechanical impact (e.g. being dropped). Please contact your
local Microlife-Service to arrange the test (see foreword).
Disposal
Batteries and electronic devices must be disposed of in
accordance with the locally applicable regulations, not with
domestic waste.
10.Guarantee
This device is covered by a 5 year guarantee from the date of
purchase. The guarantee is valid only on presentation of the guarantee card completed by the dealer (see back) confirming date of
purchase or the receipt.
Batteries and parts that become worn with use are not included.
Opening or altering the device invalidates the guarantee.
The guarantee does not cover damage caused by improper
handling, discharged batteries, accidents or non-compliance
with the operating instructions.
The cuff has a functional guarantee (bladder tightness) for 2 years.
Please contact your local Microlife-Service (see foreword).
11. Technical Specifications
Operating conditions:
Storage conditions:
Weight:
Dimensions:
Measuring procedure:
Measurement range:
Cuff pressure
display range:
Resolution:
Static accuracy:
Pulse accuracy:
Voltage source:
Battery lifetime: approx. 920 measurements
IP Class: IP20
Reference to
standards:
Expected service life: Device: 5 years or 10000 measurements
This device complies with the requirements of the Medical Device
Directive 93/42/EEC.
Technical alterations reserved.
10 - 40 °C / 50 - 104 °F
15 - 95 % relative maximum humidity
-20 - +55 °C / -4 - +131 °F
15 - 95 % relative maximum humidity
402
g (including batteries)
138 x 94.5 x 62.5
oscillometric, corresponding to Korotkoff
method: Phase I systolic, Phase V diastolic
20 - 280
40 - 200 beats per minute – pulse
0 - 299 mmHg
1 mmHg
pressure within ± 3 mmHg
± 5 % of the readout value
4 x 1.5 V alkaline batteries; size AA
Mains adapter DC 6V, 600 mA (optional)
(using new batteries)
EN 1060-1 /-3 /-4; IEC 60601-1;
IEC 60601-1-2 (EMC); IEC 60601-1-11
Accessories: 2 years
mm
mmHg – blood pressure
7
Page 9

EN
8BP B3 AFIB
Page 10

Microlife BP B3 AFIB
1
Przycisk ON/OFF (wł./wył.)
2
Wyświetlacz
3
Przycisk PAMIĘĆ
4
Przycisk MAM
5
Gniazdo mankietu
6
Gniazdo zasilacza
7
Pojemnik na baterie
8
Mankiet
9
Wtyczka mankietu
AT
Rurka do mankietu
Wyświetlacz
AK
Data/godzina
AL
Wartość skurczowa
AM
Wartość rozkurczowa
AN
Tętno
AO
Tryb MAM
AP
Zapisana wartość
AQ
Ikona baterii
AR
Kontrola dopasowania mankietów
-A: Suboptymalne dopasowanie mankietu
-B: Wskaźnik ruchu ramienia «Err 2»
-C: Kontrola ciśnienia mankietu «Err 3»
AS
Wskaźnik sygnału mankietu «Err 1»
BT
Wskaźnik wystąpienia arytmii (PAD)
BK
Znacznik migotania przedsionków (AFIB)
BL
Odczytywanie kolorowego wskaźnika klasyfikacji nadciśnienia
BM
Wskaźnik tętna
Przed rozpoczęciem eksploatacji należy dokładnie zapoznać się z niniejszą instrukcją obsługi.
Typ zastosowanych części - BF
Nie dopuścić do zamoczenia
9
PL
Przeznaczenie:
Ten automatyczny ciśnieniomierz wykorzystujący oscylometryczną
metodę pomiaru ciśnienia krwi jest przeznaczony do pomiaru nieinwazyjnego ciśnienia krwi u osób w wieku 12 lat lub starszych.
Jest walidowany klinicznie u pacjentów z nadciśnieniem, niedociśnie-
niem, cukrzycą, ciążą, stanem przedrzucawkowym, miażdżycą t ętnic,
schyłkową niewydolnością nerek, otyłością i w podeszłym wieku.
Urządzenie może wykryć nieregularny puls, sugerujący migotanie
przedsionków (AF). Należy pamiętać, że urządzenie nie jest przeznaczone do diagnozowania migotania przedsionków. Diagnozę
migotania przedsionków można potwierdzić wyłącznie za pomocą
EKG. Po pojawieniu się symbolu migotania przedsionków zaleca
się wizytę u lekarza.
Drogi Kliencie,
Przyrząd został zaprojektowany we współpracy z lekarzami oraz
posiada testy kliniczne, potwierdzające jego wysoką dokładność
pomiarową.*
Microlife AFIBsens jest wiodącą na świecie technologią cyfrowego
pomiaru ciśnienia krwi do wykrywania migotania przedsionków
(AF) i nadciśnienia tętniczego. Są to dwa najważniejsze czynniki
ryzyka wystąpienia udaru w przyszłości. Ważne jest, aby wykryć
migotanie przedsionków i nadciśnienie tętnicze we wczesnym
etapie, nawet jeśli nie wystę
wowe wykrywające migotania przedsionków w ogólnej populacji, a
więc także algorytm Microlife AFIB, jest zalecane dla osób w wieku
65 lat i starszych. Algorytm AFIB wskazuje, że z dużym prawdopodobieństwem występuje migotanie przedsionków. Dlatego, zalecana jest konsultacja z lekarzem, w sytuacji, gdy urządzenie po
wykonaniu pomiaru zasygnalizuje migotanie przedsionków. Algorytm AFIB używany przez Microlife został sprawdzony w testach
klinicznych udowadaniając skuteczność w wysokości 97-100%.
W przypadku jakichkolwiek pytań lub problemów oraz w celu
zamówienia części zapasowych, prosimy o kontakt z lokalnym
Biurem Obsługi klienta Microlife. Adres dystrybutora produktów
Microlife na terenie swojego kraju znajdziecie Państwo u sprzedawcy lub farmaceuty. Zapraszamy także na naszą stronę internetową www.microlife.pl, na której można znaleźć wiele użytecznych
informacji na temat naszych produktów.
Zadbaj o swoje zdrowie – Microlife AG!
pują żadne objawy. Badanie przesie-
1,2
Page 11

* Przyrząd wykorzystuje tę samą metodę pomiarową co nagrodzony model «BP 3BTO-A», testowany zgodnie z wytycznymi
Brytyjskiego Towarzystwa Nadciśnienia Tętniczego (BHS).
1
Kearley K, Selwood M, Van den Bruel A, Thompson M, Mant D,
Hobbs FR et al.: Testy potrójny do identyfikacji migotania przedsionków w opiece podstawowej: badanie dokładności diagnostycznej porównujące monitory EKG z jednym odprowadzeniem i
zmodyfikowane monitory ciśnienia tętniczego. BMJ Open 2014;
4:e004565.
2
Wiesel J, Arbesfeld B, Schechter D: Porównanie monitora
ciśnienia krwi Microlife z monitorem ciśnienia krwi firmy Omron do
wykrywania migotania przedsionków. Am J Cardiol 2014;
114:1046-1048.
Spis treści
1. Wskaźnik wczesnego wykrywania migotania przed-
sionków (aktywny tylko w trybie MAM)
• Co to jest migotanie przedsionków (AF)?
• Kto powinien być badany pod kątem migotania przed-
sionków?
• Czynniki ryzyka, które możesz kontrolować
2. Korzystanie z urządzenia po raz pierwszy
• Umieszczanie baterii
• Ustawianie daty i godziny
•Wybór właściwego mankietu
• Wybór trybu standardowego lub MAM
3. Lista kontrolna do wykonania prawidłowego pomiaru
4. Pomiar ciśnienia krwi
•Ręczne nadmuchiwanie
• Jak uniknąć zapisania odczytu
• Analiza wyników pomiaru ciśnienia krwi
• Pojawienie się arytmii pulsu (PAD)
5. Pamięć
•Wywołanie zapisanych wyników pomiaru
• Usuwanie wszystkich wyników
6. Wskaźnik baterii i wymiana baterii
• Niski poziom baterii
• Wyczerpane baterie – wymiana
• Rodzaj baterii i sposób wymiany
• Korzystanie z akumulatorków
7. Korzystanie z zasilacza
8. Komunikaty o błędach
9. Bezpieczeństwo, konserwacja, sprawdzanie dokładności i
utylizacja
• Bezpieczeństwo i ochrona
• Konserwacja urządzenia
• Czyszczenie mankietu
• Sprawdzanie dokładności
•Utylizacja
10. Gwarancja
11. Specyfikacja techniczna
Karta gwarancyjna (patrz tył okładki)
...
....
1. Wskaźnik wczesnego wykrywania migotania przed-
sionków (aktywny tylko w trybie MAM)
Urządzenie zdiagnozuje migotanie przedsionków. Symbol migotania przedsionków BK pojawia się na wyświetlaczu, gdy podczas
pomiaru wystąpiło migotanie przedsionków. Proszę odnieść się do
następnego akapitu, aby uzyskać informacje dotyczące konsultacji z lekarzem.
Informacja dla lekarza dotycząca wystąpienia symbolu
migotania przedsionków
Urządzenie jest oscylometrycznym ciśnieniomierzem z dodatkową funkcją pomiaru tętna. Urządzenie zostało przetestowane
klinicznie.
Symbol AFIB wyświetlany jest po pomiarze, w którym wystąpiło-
migotanie przedsionków. Jeśli po wykonaniu pełnego pomiaru
ciśnienia krwi pojawia się symbol AFIB (trzykrotne pomiary),
pacjentowi zaleca się wykonanie kolejnego pomiaru (trzykrotne
pomiary). Jeżeli symbol AFIB pojawi się kolejny raz, zaleca się
wizytę u lekarza.
Jeśli na ekranie monitora ciśnienia krwi pojawi się symbol AFIB,
wskazuje on na możliwą obecność migotania przedsionków.
Diagnoza migotania przedsionków musi być jednak wykonana
przez kardiologa na podstawie interpretacji EKG.
Nie poruszaj ramieniem podczas pomiaru, może to spowo-
dować błędne wyniki.
PL
10BP B3 AFIB
Page 12

To urządzenie może nie wykrywać lub nieprawidłowo
wykrywać migotanie przedsionków u osób z rozrusznikami
serca lub defibrylatorami.
W przypadku migotania przedsionków wartość ciśnienia
rozkurczowego może nie być dokładna.
W przypadku migotania przedsionków zaleca się stoso-
wanie trybu MAM w celu uzyskania bardziej wiarygodnego
pomiaru ciśnienia krwi.
Co to jest migotanie przedsionków (AF)?
Normalnie serce skurcza i rozkurcza się w regularnym cyklu.
Pewne komórki w sercu produkują elektryczne sygnały, które
synchronizują pracę serca jako pompy krwi. Migotanie przedsionków występuje, gdy gwałtowne desynchronizujące sygnały
elektryczne są obecne w sercu, w obu górnych komorach nazwanych przedsionkami, które wywołują szybką i niesynchroniczną
pracę zwaną migotaniem. Migotanie przedsionków występuje, gdy
szybkie, zdezorganizowane sygnały elektryczne są obecne w
dwóch górnych komorach serca, zwanych przedsionkami; powodując ich nieregularne kurczenie się (to się nazywa migotaniem).
Migotanie przedsionków jest najczęstszą postacią arytmii serca.
Często nie powoduje żadnych objawów, ale znacznie zwiększa
ryzyko udaru. Skontaktuj się z lekarzem i stale kontroluj problem
migotania przedsionków.
Kto powinien być badany pod kątem migotania przedsionków?
Badanie przesiewowe AF jest zalecane dla osób w wieku powyżej
65 lat, ponieważ prawdopodobieństwo wystąpienia udaru
zwiększa się wraz z wiekiem. Badanie przesiewowe metodą AF
zaleca się także osobom w wieku powyżej 50 lat, które mają
wysokie ciśnienie krwi (np. SYS wyższe niż 159 lub DIA wyższe
niż 99), a także osobom z cukrzycą, niewydolnością serca lub
tymi, które wcześniej przeszły udar.
U młodych ludzi lub w ciąży Badania przesiewowe w kierunku AF
nie są zalecane, ponieważ mogą powodować fałszywe wyniki i
niepotrzebny niepokój. Ponadto młode osoby z AF mają niskie
ryzyko udaru mózgu w porównaniu do osób starszych.
Czynniki ryzyka, które możesz kontrolować
Wczesne rozpoznanie AF, a następnie odpowiednie leczenie
może znacznie zmniejszyć ryzyko wystąpienia udaru. Wiedząc
jakie jest ciśnienie oraz wiedza czy występuje migotanie przedsionków możemy działać prewencyjne.
11
Aby uzyskać więcej informacji, prosimy odwiedzić naszą stronę
internetową: www.microlife.com/afib.
2. Korzystanie z urządzenia po raz pierwszy
Umieszczanie baterii
Po rozpakowaniu urządzenia należy najpierw umieścić w nim
baterie. Komora baterii 7 znajduje się na spodzie urządzenia.
Umieścić baterie (4 x 1,5 V, baterie AA), zwracając uwagę na ich
biegunowość.
Ustawianie daty i godziny
1. Po włożeniu nowych baterii na wyświetlaczu zaczną mrugać
cyfry, ustaw rok poprzez wciśnięcie przycisku PAMIĘĆ 3. Aby
potwierdzić i przejść do ustawień miesiąca, wciśnij przycisk
MAM 4.
2. Ustaw miesiąc poprzez wciśnięcie przycisku PAMIĘĆ. Aby
potwierdzić i przejść do ustawień dnia, wciśnij przycisk MAM.
3. W celu ustawienia dnia, godziny i minut postępuj zgodnie z
instrukcjami zamieszczonymi powyżej.
4. Po ustawieniu minut i wciśnięciu przycisku MAM ustawiona data i
godzina zostaną zapisane, a na wyświetlaczu ukaże się godzina.
5. Aby przestawić datę lub godzinę, należy wcisnąć i przytrzymać
przez około 3 sekundy przycisk MAM, aż zaczną mrugać cyfry
roku. Teraz można wprowadzić nowe wartości zgodnie z
opisem zamieszczonym powyżej.
Wybór właściwego mankietu
Microlife oferuje różne rozmiary mankietów. Wybierz mankiet
według obwodu ramienia (dobrze dopasowany w środkowej
części ramienia).
Rozmiar mankietu Dla obwodu ramienia
S 17 - 22 cm
M 22 - 32 cm
M - L 22 - 42 cm
L 32 - 42 cm
L - XL 32 - 52 cm
Wstępnie ukształtowane mankiety są dostępne opcjonalnie.
Używaj wyłącznie mankietów Microlife!
Skontaktuj się z lokalnym Biurem Obsługi Klienta Microlife,
jeżeli dołączony mankiet 8 nie pasuje.
Podłącz mankiet poprzez włożenie wtyczki mankietu 9 do
gniazda 5.
Page 13

Wybór trybu standardowego lub MAM
Przed każdym pomiarem wybierz tryb standardowy (pojedynczy
pomiar) lub MAM (automatyczny pomiar potrójny). W trybie MAM
wykonywane są automatycznie 3 następujące po sobie pomiary, a ich
wynik jest następnie analizowany i wyświetlany. Ponieważ ciśnienie
krwi nieustannie waha się, wynik uzyskany w ten sposób jest bardziej
niezawodny niż podczas wykonywania pojedynczego pomiaru.
Aby wybrać tryb MAM, naciśnij przycisk MAM 4, aż na
wyświetlaczu pojawi się symbol MAM AO. Aby przejść do trybu
standardowego (pojedynczy pomiar), naciśnij ponownie przycisk MAM, aż symbol MAM zniknie.
W dolnym prawym rogu ekranu pojawi się cyfra 1, 2 lub 3, infor-
mująca o tym, który z 3 pomiarów jest aktualnie wykonywany.
Pomiędzy kolejnymi pomiarami pojawia się 15-sekundowa
przerwa. Odliczanie wskaże czas, jaki pozostał do końca.
Nie zostaną wyświetlone pojedyncze wyniki. Wartość ciśnienia
krwi zostanie wyświetlona dopiero po zakończeniu trzeciego
pomiaru.
Nie zdejmuj mankietu między kolejnymi pomiarami.
Jeżeli wynik jednego z pomiarów zostanie poddany w wątpli-
wość, automatycznie wykonywany jest czwarty pomiar.
Wykrywanie AF jest aktywowane tylko w trybie MAM.
3. Lista kontrolna do wykonania prawidłowego pomiaru
Przed wykonaniem pomiaru unikaj nadmiernej aktywności,
przyjmowania pokarmów oraz palenia tytoniu.
Usiądź na krześle z oparciem i zrelaksuj się przez 5 minut.
Trzymaj stopy płasko na podłodze i nie krzyżuj nóg.
Pomiar wykonuj zawsze na tym samym ramieniu (zwykle
lewym). Zaleca się, aby lekarze przy pierwszej wizycie przeprowadzili pomiar ciśnienia na obu rękach równocześnie, w celu
określenia, na którym ramieniu powinien być przeprowadzony
pomiar. Ramię, na którym wartości ciśnienia są wyższe
powinno być wykorzystane do pomiarów ciśnienia krwi.
Zdejmij odzież, która mogłaby uciskać ramię. Nie podwijaj
rękawów, gdyż mogą one uciskać ramię. Rozprostowane
rękawy nie wpływają na pracę mankietu.
Zawsze sprawdzaj czy został użyty mankiet o właściwym obwodzie (sprawdź znaczniki na mankiecie).
Zaciśnij mankiet dokładnie, jednak niezbyt silnie.
Upewnij się, że mankiet jest założony 2 cm powyżej łokcia.
Znacznik arterii umieszczony na mankiecie (3 cm pasek)
musi znaleźć się nad arterią po wewnętrznej stronie stawu
łokciowego.
Wspieraj ramię podczas pomiaru.
Upewnij się, że mankiet znajduje się na wysokości serca.
4. Pomiar ciśnienia krwi
1. Wybierz tryb standardowy (pojedynczy pomiar) lub MAM (automa-
tyczny pomiar potrójny): patrz szczegóły w rozdziale «2.».
2. Wciśnij przycisk ON/OFF
3. Mankiet zostanie napompowany automatycznie. Odpręż się, nie
wykonuj żadnych ruchów i nie napinaj mięśni aż do wyświetlenia
wyniku. Oddychaj normalnie i nie rozmawiaj.
4. Kontrola dopasowania mankietu AR na wyświetlaczu wskazuje,
że mankiet jest idealnie umieszczony. Jeśli pojawi się ikona
AR-A, mankiet został założony nieoptymalnie, ale nadal można
mierzyć.
5. Po osiągnięciu odpowiedniego poziomu ciśnienia, pompo wanie
jest przerywane, a ciśnienie w mankiecie stopniowo maleje. W
przypadku niedostatecznego ciśnienia rękaw zostanie automatycznie dopompowany.
6. Podczas pomiaru na wyświetlaczu pojawi się migający symbol
serca BM.
7. Po pomiarze na wyświetlaczu pojawi się wynik pomiaru
ciśnienia krwi, obejmujący ciśnienie skurczowe AL i rozkurczowe AM oraz tętno AN. W dalszej części instrukcji wyjaśniono
znaczenie pozostałych wskazań wyświetlacza.
8. Po zakończonym pomiarze zdejmij mankiet.
9. Wyłącz aparat (aparat wyłącza się automatycznie po około 1 min.).
Wykrywanie AF jest aktywowane tylko w trybie MAM.
Możesz przerwać wykonywanie pomiaru w dowolnej chwili
poprzez naciśnięcie przycisku ON/OFF (np. w przypadku
złego samopoczucia związanego z ciśnieniem).
Urządzenie jest specjalnie zaprojektowane celem użycia
przez kobiety w ciąży, mające zdiagnozowany stan przedrzucawkowy. Kiedy zauważysz nietypowe wysokie
odczyty w czasie ciąży, powinieneś zmierzyć po pewnym
czasie (np. 1 godzina). Jeśli pomiary są nadal zbyt wysokie,
należy skonsultować się z lekarzem lub ginekologiem.
W ciąży symbol AFIB można zignorować.
Ręczne nadmuchiwanie
W przypadku wysokiego skurczowego ciśnienia krwi (na przykład powyżej 135 mmHg)
wienie ciśnienia. Naciśnij przycisk WŁ. / WYŁ. Po podniesieniu
monitora do poziomu około. 30 mmHg (pokazane na wyświetlaczu).
1
, aby rozpocząć pomiar.
, korzystne może być indywidualne usta-
PL
12BP B3 AFIB
Page 14

Przytrzymaj przycisk, aż ciśnienie będzie około 40 mmHg powyżej
oczekiwanej wartości skurczowej - następnie zwolnij przycisk.
Jak uniknąć zapisania odczytu
Gdy tylko wynik zostanie wyświetlony na ekranie LCD naciśnij i
przytrzymaj przycisk ON/OFF 1, aż «M» AP zacznie migać.
Potwierdź, aby usunąć odczyt naciskając przycisku MAM 4.
«CL» wyświetla się, gdy odczyt zostanie pomyślnie
usunięty z pamięci.
Analiza wyników pomiaru ciśnienia krwi
Trójkąt po lewej stronie wyświetlacza BL wskazuje na zakres, w
którym znajduje się zmierzona wartość ciśnienia krwi. Wartość
mieści się w zakresie optymalnym (zielony), podniesiony (żółty)
lub wysoki (czerwony). Klasyfikacja odpowiada następującym
zakresom określonym przez wytyczne międzynarodowe (ESH,
AHA, JSH). Dane w mmHg.
Zakres
1. Zbyt wysokie
ciśnienie krwi
2. Nieznacznie
podwyższone
ciśnienie krwi
3. Optymalne
ciśnienie krwi
Za rozstrzygającą należy uznać wartość wyższą. Przykład:
Wartość ciśnienia krwi 140/80 mmHg lub wartość 130/90 mmHg
wskazuje «ciśnienie krwi jest zbyt wysokie».
Pojawienie się arytmii pulsu (PAD)
Wskaźnik tętna pulsu BT jest wyświetlany, gdy w trakcie pomiaru
wystąpiły nieregularno
tryb MAM i zmierz ponownie: patrz szczegóły w rozdziale «2.».
W trybie MAM będzie również sprawdzane migotanie
przedsionków (AF): postępuj zgodnie z instrukcjami w
rozdziale «1.».
Skurczowe
>135 >85 Wymagana konsul-
130 - 135 80 - 85 Samodzielna
<130 <80 Samodzielna
ści pulsu. Jeśli pojawi się symbol, wybierz
Rozkurczowe Zalecenia
tacja medyczna
kontrola
kontrola
5. Pamięć
Urządzenie automatycznie przechowuje 99 ostatnich pomiarów.
Wywołanie zapisanych wyników pomiaru
Wciśnij na moment przycisk PAMIĘĆ 3, gdy urządzenie jest
wyłączone. Na wyświetlaczu pojawi się «M» AP i «A», co stanowi
średnią wszystkich przechowywanych wartości.
13
Kolejnym wciśnięciem przycisku PAMIĘĆ wyświetlisz poprzednią
wartość. Wielokrotne wciskanie przycisku PAMIĘĆ umożliwia
przechodzenie między zapisanymi wartościami.
Wyniki ciśnienia krwi z suboptymalnym dopasowaniem
mankietu AR-A nie są uwzględniane w wartości średniej.
Zwróć uwagę, aby nie przekroczyć pojemności pamięci - 99
wartości. Gdy pamięć 99 pomiarów jest zapełniona,
najstarsza 100 wartość jest automatycznie usuwana.
Wyniki zgromadzone w pamięci powinny zostać przeanalizowane przez lekarza - w przeciwnym razie dane te
zostaną bezpowrotnie utracone.
Usuwanie wszystkich wyników
Jeśli jesteś pewien, że chcesz trwale usunąć wszystkie zapisane
wartości, przytrzymaj przycisk M (urządzenie musiało być wcześniej wyłączone), aż pojawi się «CL», a następnie zwolnij przycisk.
Aby trwale wyczyścić pamięć, naciśnij przycisk czasu, gdy miga
«CL». Indywidualnych wartości nie można wyczyścić.
Anulowanie kasowania pamięci: naciśnij przycisk ON/
OFF 1, kiedy ikona «CL ALL» miga na ekranie urzą-
dzenia.
6. Wskaźnik baterii i wymiana baterii
Niski poziom baterii
Kiedy baterie są w ¾ wyczerpane, zaraz po włączeniu urządzenia
zaczyna mrugać symbol baterii AQ (ikona częściowo naładowanej
baterii). Mimo że urządzenie nadal wykonuje dokładne pomiary,
powinieneś zakupić nowe baterie.
Wyczerpane baterie – wymiana
Kiedy baterie są wyczerpane, zaraz po włączeniu urządzenia
zaczyna mrugać symbol baterii
nywanie pomiarów nie będzie możliwe, dopóki nie wymienisz baterii.
1. Otwórz znajdujący się z tyłu urządzenia pojemnik na baterie 7.
2. Wymień baterie – upewnij się, że bieguny baterii odpowiadają
symbolom w pojemniku.
3. Aby ustawić datę i godzinę, postępuj według instrukcji zamieszczonych w «punkcie 2.».
Wszystkie wyniki pomiarów nadal znajdują się w pamięci, a
ponownego ustawienia wymaga data i godzina – po
wymianie baterii automatycznie zaczną mrugać cyfry roku.
AQ
(ikona wyczerpanej baterii). Wyko-
Page 15

Rodzaj baterii i sposób wymiany
Użyj 4 nowych baterii alkaicznych o przedłużonej żywot-
ności typu AA 1,5V.
Nie używaj baterii przeterminowanych.
Wyjmij baterie, jeżeli przyrząd nie będzie używany przez
dłuższy czas.
Korzystanie z akumulatorków
Urządzenie, może być także zasilane akumulatorkami.
Używaj wyłącznie akumulatorków «NiMH».
Jeżeli na wyświetlaczu pojawi się symbol baterii (wyczer-
panej), należy je wyjąć i naładować akumulatorki! Nie
powinny one pozostawać w urządzeniu, gdyż grozi to ich
uszkodzeniem (całkowite rozładowanie spowodowane
minimalnym poborem energii przez urządzenie, nawet jeśli
pozostaje ono wyłączone).
Zawsze wyjmuj akumulatorki, jeżeli nie zamierzasz używać
przyrządu przez ponad tydzień!
Akumulatorki NIE mogą być ładowane, gdy znajdują się w
urządzeniu! Zawsze korzystaj z niezależnej ładowarki,
przestrzegając zaleceń dotyczących ładowania, konserwacji i sposobów utrzymania trwałości!
7. Korzystanie z zasilacza
Przyrząd może być zasilany przy użyciu zasilacza stabilizowanego Microlife (DC 6V, 600 mA).
Korzystaj tylko z oryginalnego zasilacza sieciowego Micro-
life dostosowanego do napięcia w Twoim gniazdku.
Upewnij się, że ani zasilacz, ani przewód nie są uszkodzone.
1. Podłącz przewód zasilacza sieciowego do gniazdka 6 w urzą-
dzeniu.
2. Włóż wtyczkę zasilacza do gniazdka sieciowego.
Po podłączeniu zasilacza nie jest pobierana energia z baterii.
8. Komunikaty o błędach
Jeżeli podczas wykonywania pomiaru pojawi się błąd, pomiar jest
przerywany i wyświetlony zostaje komunikat o błędzie, np. «
BłądOpis Możliwa przyczyna i środki zaradcze
«
Err 1
»
AS
Zbyt słaby
sygnał
Zbyt słabe tętno dla mankietu. Zmień
położenie mankietu i powtórz pomiar.*
Kiedy wystąpi «Err 1», urzą-
dzenie wykona 15-sekundowe
odliczanie, a następnie powtórzy
pomiar.
Err 3
BłądOpis Możliwa przyczyna i środki zaradcze
«
AR-B
«
AR-C
«
«
«HI»
«LO»
* Skontaktuj się z lekarzem natychmiast, jeśli ten lub inny problem
pojawia się cyklicznie.
Błąd
Err 2
»
sygnału
Nieprawid-
Err 3
»
łowe
ciśnienie
mankietu
Err 5»Nietypowy
wynik
Err 6»Tryb MAM Podczas pomiaru wystąpiło zbyt wiele
Zbyt
wysokie
tętno lub
ciśnienie w
mankiecie
Zbyt niskie
tętno
Podczas wykonywania pomiaru mankiet
wykrył b łąd sygnału spowodowany ruchem
lub napięciem mięśniowym. Powtórz
pomiar, utrzymując rękę w bezruchu.
Nie można wytworzyć właściwego
ciśnienia w mankiecie. Mogła pojawić się
nieszczelność. Upewnij się, że mankiet
jest właściwie podłączony, i że nie jest
zbyt luźny. W razie konieczności wymień
baterie. Powtórz pomiar.
Sygnały pomiarowe są niedokładne i nie
jest wyświetlany wynik. Zapoznaj się z
instrukcję obsługi a następnie powtórz
pomiar.*
błędów trybu MAM, przez co nie jest
możliwe uzyskanie końcowego wyniku.
Przeczytanie listy kontrolnej do przeprowadzania wiarygodnych pomiarów i
powtórzyć pomiar.*
Zbyt wysokie ciśnienie w mankiecie
(ponad 299 mmHg) LUB zbyt wysokie
tętno (ponad 200 uderzeń na minutę).
Odpocznij przez 5 minut, a następnie
powtórz pomiar.*
Zbyt niskie tętno (poniżej 40 uderzeń na
minutę). Powtórz pomiar.*
9. Bezpieczeństwo, konserwacja, sprawdzanie
dokładności i utylizacja
Bezpieczeństwo i ochrona
».
Postępuj zgodnie z instrukcją użytkowania. Ten dokument
zawiera ważne informacje o działaniu produktu i informacje
dotyczące bezpieczeństwa dotyczące tego urządzenia. Przeczytaj dokładnie ten dokument przed użyciem urządzenia i
zachowaj go na przyszłość.
Urządzenie może być wykorzystywane do celów określonych w
niniejszej instrukcji. Producent nie ponosi odpowiedzialności za
szkody powstałe w wyniku niewłaściwej eksploatacji.
PL
14BP B3 AFIB
Page 16

Urządzenie zbudowane jest z delikatnych podzespołów i
dlatego musi być używane ostrożnie. Prosimy o przestrzeganie
wskazówek dotyczących przechowywania i użytkowania
zamieszczonych w części «Specyfikacja techniczna».
Chroń urządzenie przed:
-wodą i wilgocią
- ekstremalnymi temperaturami
-wstrząsami i upadkiem
- zanieczyszczeniem i kurzem
- światłem słonecznym
-upałem i zimnem
Mankiety są bardzo delikatne i należy obchodzić się z nimi
ostrożnie.
Stosuj tylko oryginalne mankiety Microlife, zastosowanie
innego mankietu lub łącznika mankietu z urządzeniem spowoduje niedokładne wyniki pomiarów.
Pompuj mankiet dopiero po założeniu.
Nie używaj urządzenia w pobliżu występowania silnego pola
elektromagnetycznego powodowanego przez telefony komórkowe lub instalacje radiowe. Podczas wykonywania pomiaru
utrzymuj dystans min. 3,3 m od takich urządzeń.
Prosimy nie używać urządzenia, jeżeli zauważą Państwo niepo-
kojące objawy, które mogą wskazywać na jego uszkodzenie.
Nie należy otwierać urządzenia.
Jeżeli urządzenie nie będzie używane przez dłuższy czas
należy wyjąć baterie.
Przeczytaj dalsze wskazówki bezpieczeństwa zamieszczone w
poszczególnych punktach niniejszej instrukcji.
Podany przez to urządzenie wynik pomiaru nie jest diagnozą.
Nie zastępuje to konieczności konsultacji lekarza, zwłaszcza
jeśli wynik nie odpowiada objawom pacjenta. Nie należy
polegać tylko na wyniku pomiaru, należy zawsze rozważyć inne
potencjalnie pojawiające się objawy i opinie pacjenta. W razie
potrzeby zaleca się wezwanie lekarza lub pogotowia.
Stałe wysokie ciśnienie krwi zagraża zdrowiu i wymaga
leczenia!
Wszystkie wyniki konsultuj z lekarzem, a także informuj go o
wszelkich nietypowych lub niepokojących objawach. Poje-
dynczy pomiar nigdy nie jest miarodajny.
W żadnym wypadku nie należy zmieniać dawkowania
leków ani inicjować leczenia bez konsultacji z lekarzem.
Różnice
Wskazanie tętna nie nadaje się do kontroli częstotliwości
W czasie ciąży należy regularnie monitorować ciśnienie krwi,
Konserwacja urządzenia
Urządzenie należy czyścić miękka, suchą szmatką.
Czyszczenie mankietu
Mankiet dostarczany z tym urządzeniem można prać.
1. Odłącz złącze mankietu 9 od rurki mankietu AT i ostrożnie
2. Pierz ręcznie osłonę mankietu w roztworze mydła: nie
3. Całkowicie osusz osłonę mankietu.
4. Włóż
5. Ponownie załóż złącze mankietu na rurkę od mankietu.
Sprawdzanie dokładności
Zaleca się sprawdzenie dokładności pomiarowej urządzenia co
2 lata lub zawsze, gdy poddane zostanie ono wstrząsom mechanicznym (np. w wyniku upuszczenia). Skontaktuj się z lokalnym
serwisem Microlife w celu przeprowadzenia testów (patrz Wstęp).
pomiędzy wynikami pomiarów wykonanych u lekarza
lub farmaceuty, a wynikami uzyskanymi w domu nie powinny
dziwić, jako że sytuacje, w jakich były dokonywane pomiary,
znacznie się różnią.
pracy zastawek serca!
które w tym okresie może ulegać znacznym wahaniom!
Dopilnuj, aby dzieci nie używały urządzenia bez nadzoru
osób dorosłych; jego niektóre, niewielkie części mogą
zostać łatwo połknięte. Jeżeli urządzenie wyposażone jest
w przewody lub rurki, może powodować ryzyko uduszenia.
pociągnij pęcherz przez otwór na krawędzi mankietu.
cieplejszy niż 30 °C.
rurkę mankietu z powrotem przez otwór i ostrożnie
umieścić pęcherz płasko w pokrywie mankietu.
Pęcherz musi leżeć prosto w pokrywie mankietu, nie może
być zagięty.
Nie używaj płynu zmiękczającego.
UWAGA: Nie prać mankietu w pralce ani zmywarce!
OSTRZEŻENIE: Nie suszyć osłony mankietu w suszarce
bębnowej!
UWAGA: Pod żadnym pozorem nie wolno myć nadmuchi-
wanej części wewnętrznej!
15
Page 17

Utylizacja
Zużyte baterie oraz urządzenia elektryczne muszą być
poddane utylizacji zgodnie z obowiązującymi przepisami.
Nie należy wyrzucać ich wraz z odpadami domowymi.
10.Gwarancja
Urządzenie jest objęte 5-letnią gwarancją, licząc od daty zakupu.
Gwarancja jest ważna tylko z wypełnioną przez sprzedawcę kartą
gwarancyjną (na odwrocie strony) potwierdzającą datę zakupu i
paragonem.
Baterie i części eksploatacyjne nie są objęte gwarancją.
Otwarcie lub dokonanie modyfikacji urządzenia unieważnia
gwarancję.
Gwarancja nie obejmuje uszkodzeń powstałych na skutek
nieprawidłowego użycia, nieprzestrzegania instrukcji obsługi,
uszkodzeń przypadkowych, a także wyczerpanych baterii.
Mankiet posiada 2 lata gwarancji (szczelność balonika).
Skontaktuj się z lokalnym serwisem Microlife (patrz Wstęp).
11.Specyfikacja techniczna
Warunki pracy: 10 - 40 °C / 50 - 104 °F
Warunki przechowywania:
Waga: 402 g (z bateriami)
Wymiary: 138 x 94.5 x 62.5 mm
Sposób pomiaru: oscylometryczny, odpowiadający meto-
Zakres pomiaru: 20 - 280 mmHg – ciśnienie krwi
Zakres wyświetlania
ciśnienia w
mankiecie: 0 - 299 mmHg
Rozdzielczość: 1 mmHg
Dokładność
statyczna: ciśnienie w zakresie ± 3 mmHg
Dokładność pomiaru
tętna: ±5 % wartości odczytu
Maksymalna wilgotność względna 15 - 95 %
-20 - +55 °C / -4 - +131 °F
Maksymalna wilgotność względna 15 - 95 %
dzie Korotkoff'a: faza I skurczowa, faza V
rozkurczowa
40 - 200 uderzeń na minutę – tętno
Źródło napięcia:
Żywotność baterii: Około 920 pomiarów (używając nowych
Klasa IP: IP20
Normy: EN 1060-1 /-3 /-4; IEC 60601-1;
Przewidywana żywotność urządzenia:
Urządzenie spełnia wymagania zawarte w Dyrektywie Wyrobów
Medycznych 93/42/EEC.
Prawo do zmian technicznych zastrzeżone.
4 x 1,5 V baterie alkaliczne; rozmiar AA
Zasilacz 6 V DC; 600 mA (opcja)
baterii)
IEC 60601-1-2 (EMC); IEC 60601-1-11
Urządzenie: 5 lat lub 10000 pomiarów
Aktesoria: 2 lata
PL
16BP B3 AFIB
 Loading...