

Page 1
Microlife BP AG1-20
Europe / Middle-East / Africa
Microlife AG
Espenstrasse 139
9443 Widnau / Switzerland
Tel. +41 / 71 727 70 30
Fax +41 / 71 727 70 39
Email admin@microlife.ch
www.microlife.com
Asia
Microlife Corporation.
9F, 431, RuiGang Road, NeiHu
Taipei, 11492, Taiwan, R.O.C.
Tel. +886 2 8797-1288
Fax +886 2 8797-1283
Email service@microlife.com.tw
www.microlife.com
North / Central / South America
Microlife USA, Inc.
1617 Gulf to Bay Blvd., 2nd Floor Ste A
Clearwater, FL 33755 / USA
Tel. +1 727 442 5353
Fax +1 727 442 5377
Email msa@microlifeusa.com
www.microlife.com
IB AG1-20 N-V6 1515
EN 1
LT 6
LV 10
EE 14
RU 18
FI 24
Page 2
Microlife BP AG1-20 BP AG1-20Guarantee Card
Name of Purchaser / Pircçja vârds / Pirkëjo
pavardë / Ostja nimi / Ф.И.О. покупателя /
Ostajan nimi
Serial Number / Serijas numurs / Serijos
numeris / Seerianumber / Серийный номер /
Sarjanumero
Date of Purchase / Iegades datums /
Pardavimo data / Ostukuupäev / Дата покупки /
Ostopäivämäärä
Specialist Dealer / Specialists - parstavis /
Pardavusi istaiga / Ametlik müügiesindaja /
Специализированный дилер / Alan kauppias
Page 3

1BP AG1-20
EN
Read the instructions carefully before using this device.
Dear Customer,
this aneroid blood pressure kit is a mechanical blood pressure
measuring device for use on the upper arm and ensures you a
precise and consistent measurement.
Please read through these instructions carefully so that you understand all functions and safety information. We want you to be
happy with your Microlife product. If you have any questions or
problems please contact your local Microlife-Customer Service.
Your dealer or pharmacy will be able to give you the address of the
Microlife dealer in your country. Alternatively, visit the internet at
www.microlife.com where you will find a wealth of invaluable information on our products.
Stay healthy – Microlife AG!
Table of Contents
1. Important Facts about Blood Pressure and Self-Measurement
• How do I evaluate my blood pressure?
2. Using the Device for the First Time
• Selecting the correct cuff
3. Taking a Blood Pressure Measurement using this Device
• Checklist for taking a reliable measurement
• Measuring procedure
4. Malfunction / Troubleshooting
5. Safety, Care, Accuracy Test and Disposal
• Safety and protection
•Device care
• Cleaning the cuff
• Accuracy test
• Disposal
6. Guarantee
7. Technical Specifications
Guarantee Card (see Back Cover)
Microlife BP AG1-20
EN
1
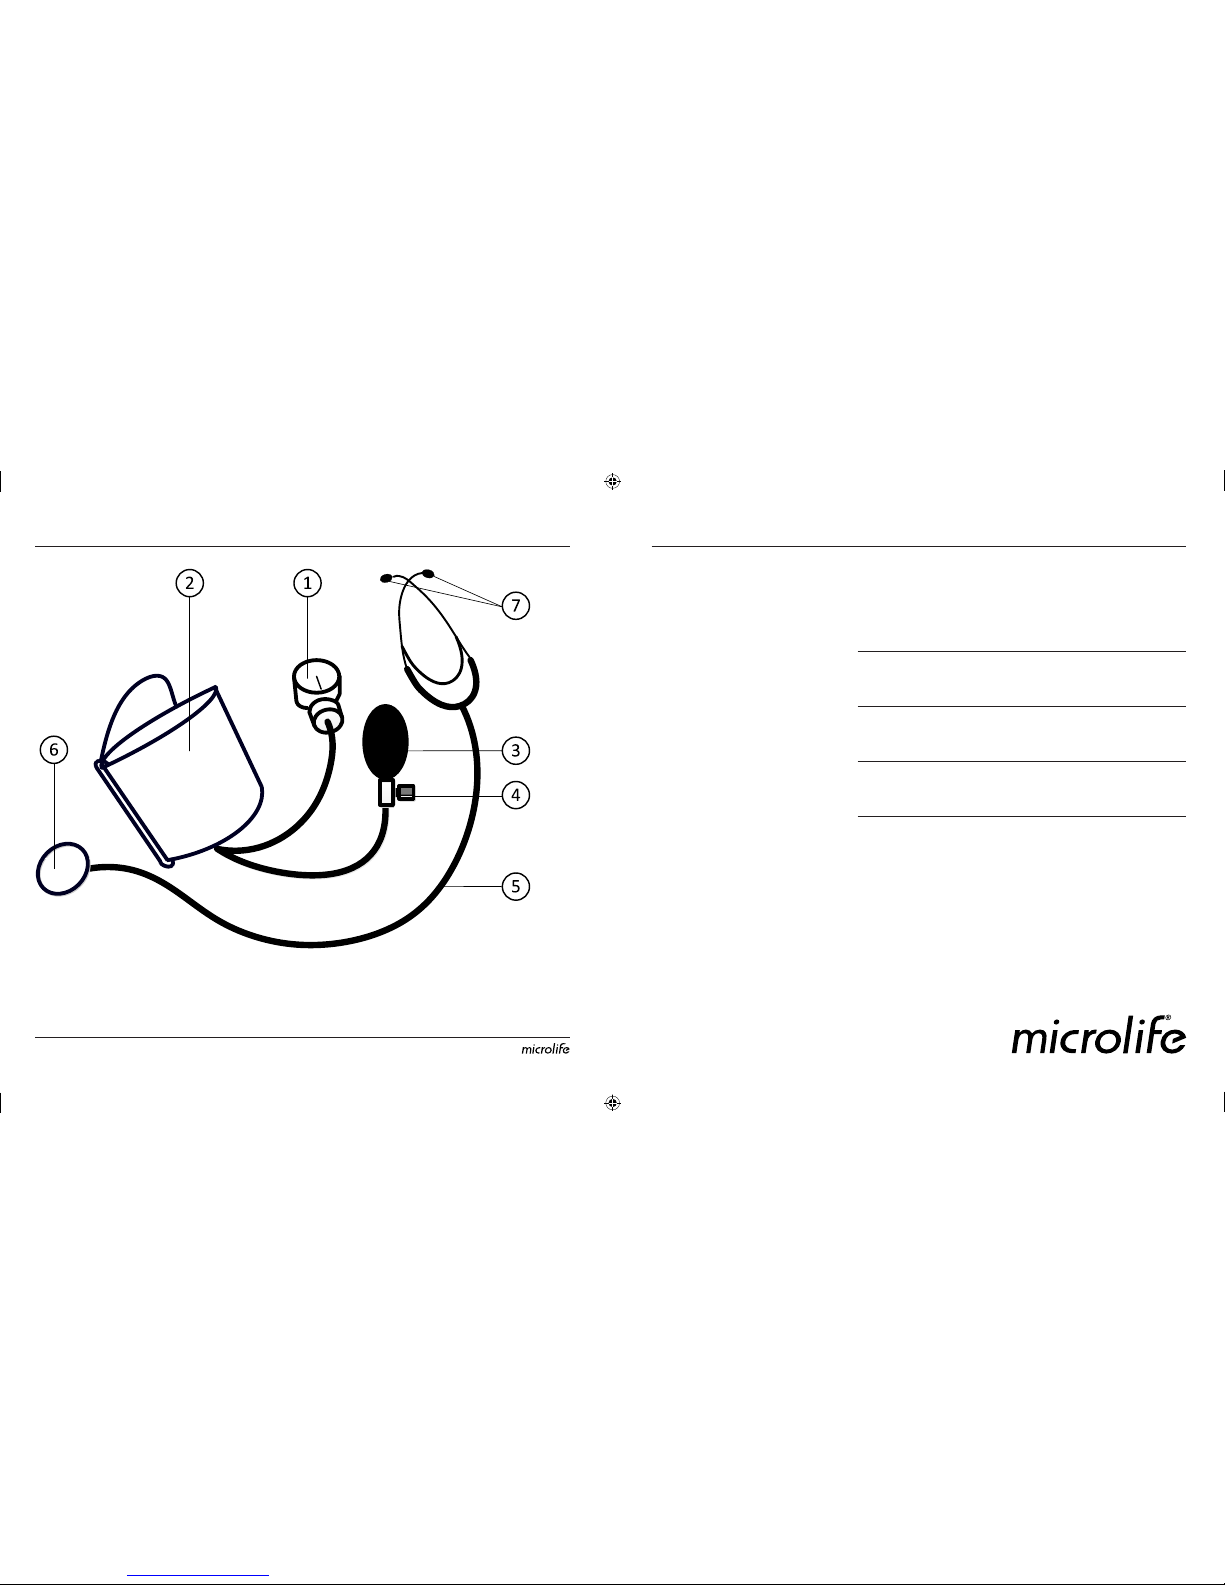
Manometer
2
Cuff
3
Pump ball
4
Adjustable deflation valve
5
Stethoscope
6
Chest piece
7
Ear piece
Page 4
2
1. Important Facts about Blood Pressure and SelfMeasurement
• Blood pressure is the pressure of the blood flowing in the
arteries generated by the pumping of the heart. Two values, the
systolic (upper) value and the diastolic (lower) value, are
always measured.
• Permanently high blood pressure values can damage your
health and must be treated by your doctor!
• Always discuss your values with your doctor and tell him/her if
you have noticed anything unusual or feel unsure. Never rely
on single blood pressure readings.
• There are many causes of excessively high blood pressure
values. Your doctor will explain them in more detail and offer
treatment where appropriate. Besides medication, relaxation
techniques, weight loss and exercise can also lower your blood
pressure.
• Under no circumstances should you alter the dosages of
any drugs prescribed by your doctor!
• Depending on physical exertion and condition, blood pressure
is subject to wide fluctuations as the day progresses. You
should therefore take your measurements in the same
quiet conditions and when you feel relaxed! Take at least
two measurements per day, one in the morning and one in the
evening.
• It is quite normal for two measurements taken in quick succes-
sion to produce significantly different results.
• Deviations between measurements taken by your doctor or in
the pharmacy and those taken at home are quite normal, as
these situations are completely different.
• Several measurements provide a much clearer picture than
just one single measurement.
• Leave a small break of at least 15 seconds between two
measurements.
• If you are pregnant, you should monitor your blood pressure
very closely as it can change drastically during this time!
How do I evaluate my blood pressure?
The higher value is the one that determines the evaluation.
Example: a blood pressure value of 140/80 mmHg or a value of
130/90 mmHg indicates «blood pressure too high».
2. Using the Device for the First Time
Selecting the correct cuff
When choosing the correct size cuff the arm circumference should
be measured at the centre of the upper arm. 22 - 32 cm (8.75 - 12.5
inches) should be the correct size for the majority of people.
Only use Microlife cuffs.
Contact your local Microlife Service if the enclosed cuff 2 does
not fit.
3. Taking a Blood Pressure Measurement using this
Device
Checklist for taking a reliable measurement
1. Avoid activity, eating or smoking immediately before the
measurement.
2. Sit down for at least 5 minutes before the measurement and relax.
3. Always measure on the same arm (normally left).
4. Remove close-fitting garments from the upper arm. To avoid
constriction, shirt sleeves should not be rolled up - they do not
interfere with the cuff if they are laid flat.
5. Always ensure that the correct cuff size is used (marking on the
cuff).
• Fit the cuff closely, but not too tight.
• Make sure that the cuff is positioned 2 cm above the elbow.
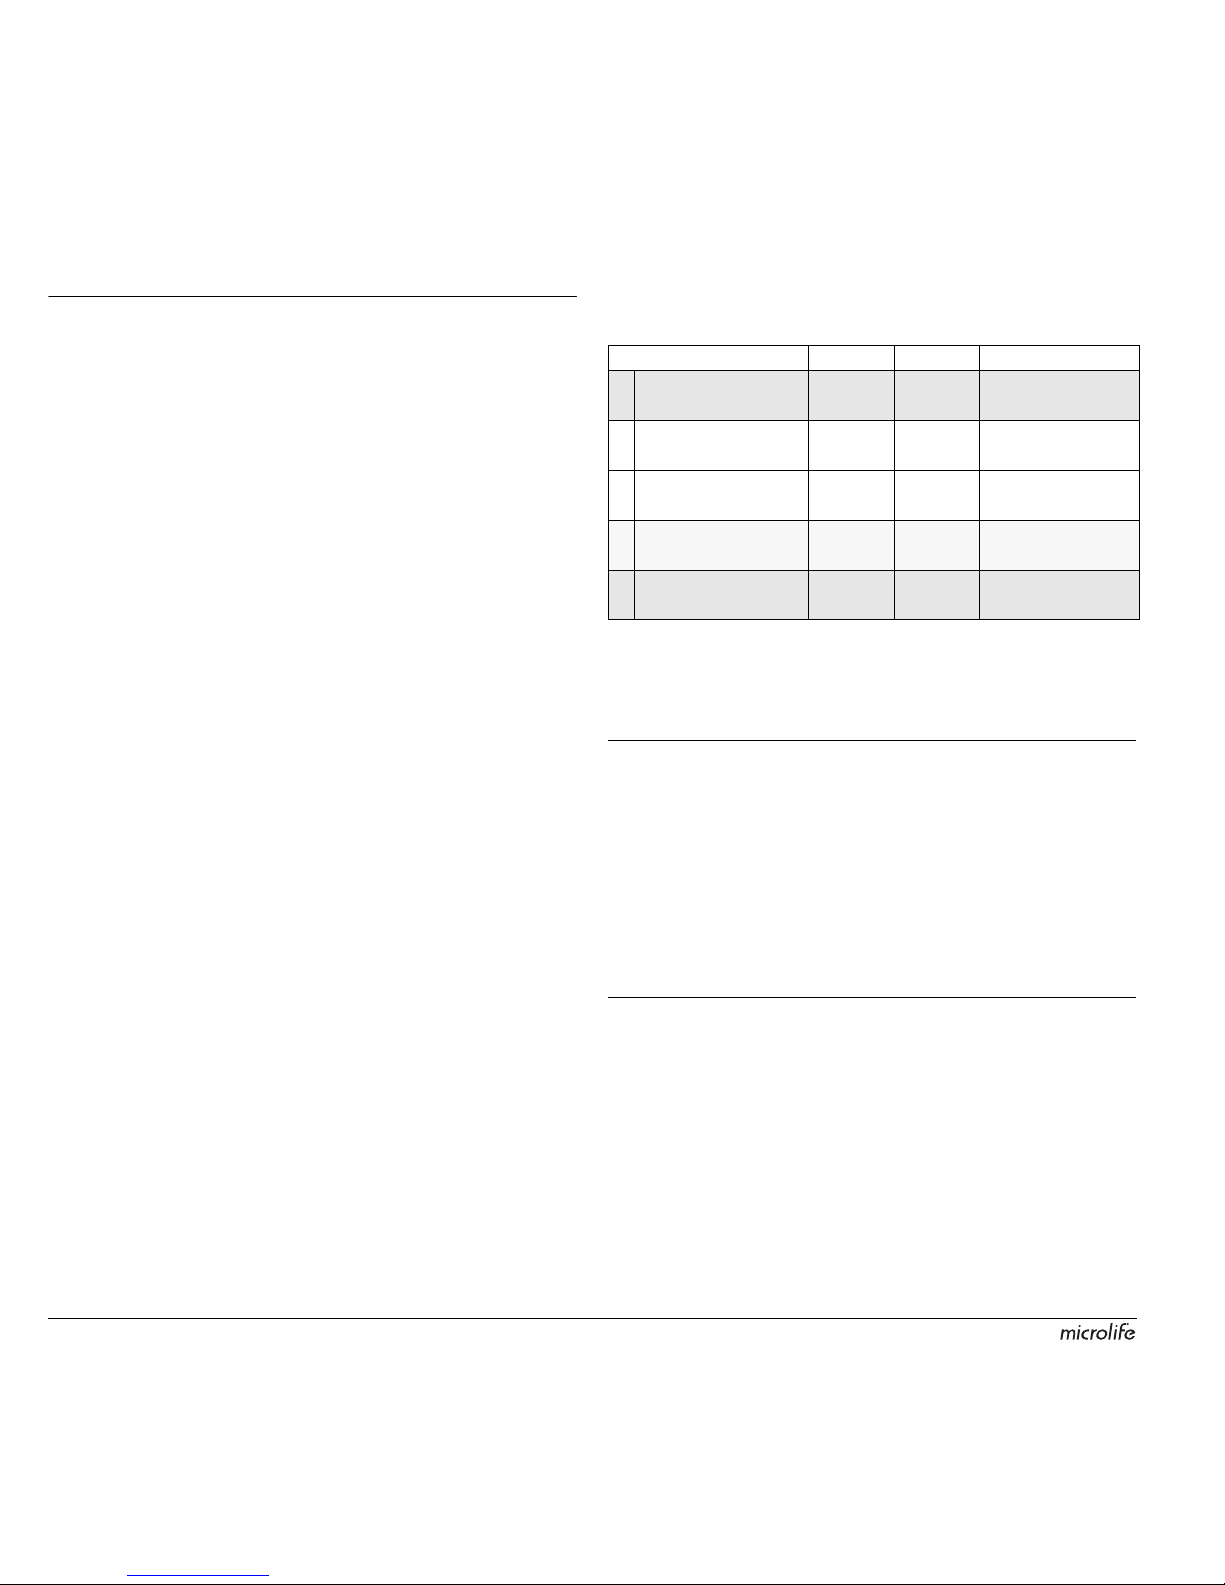
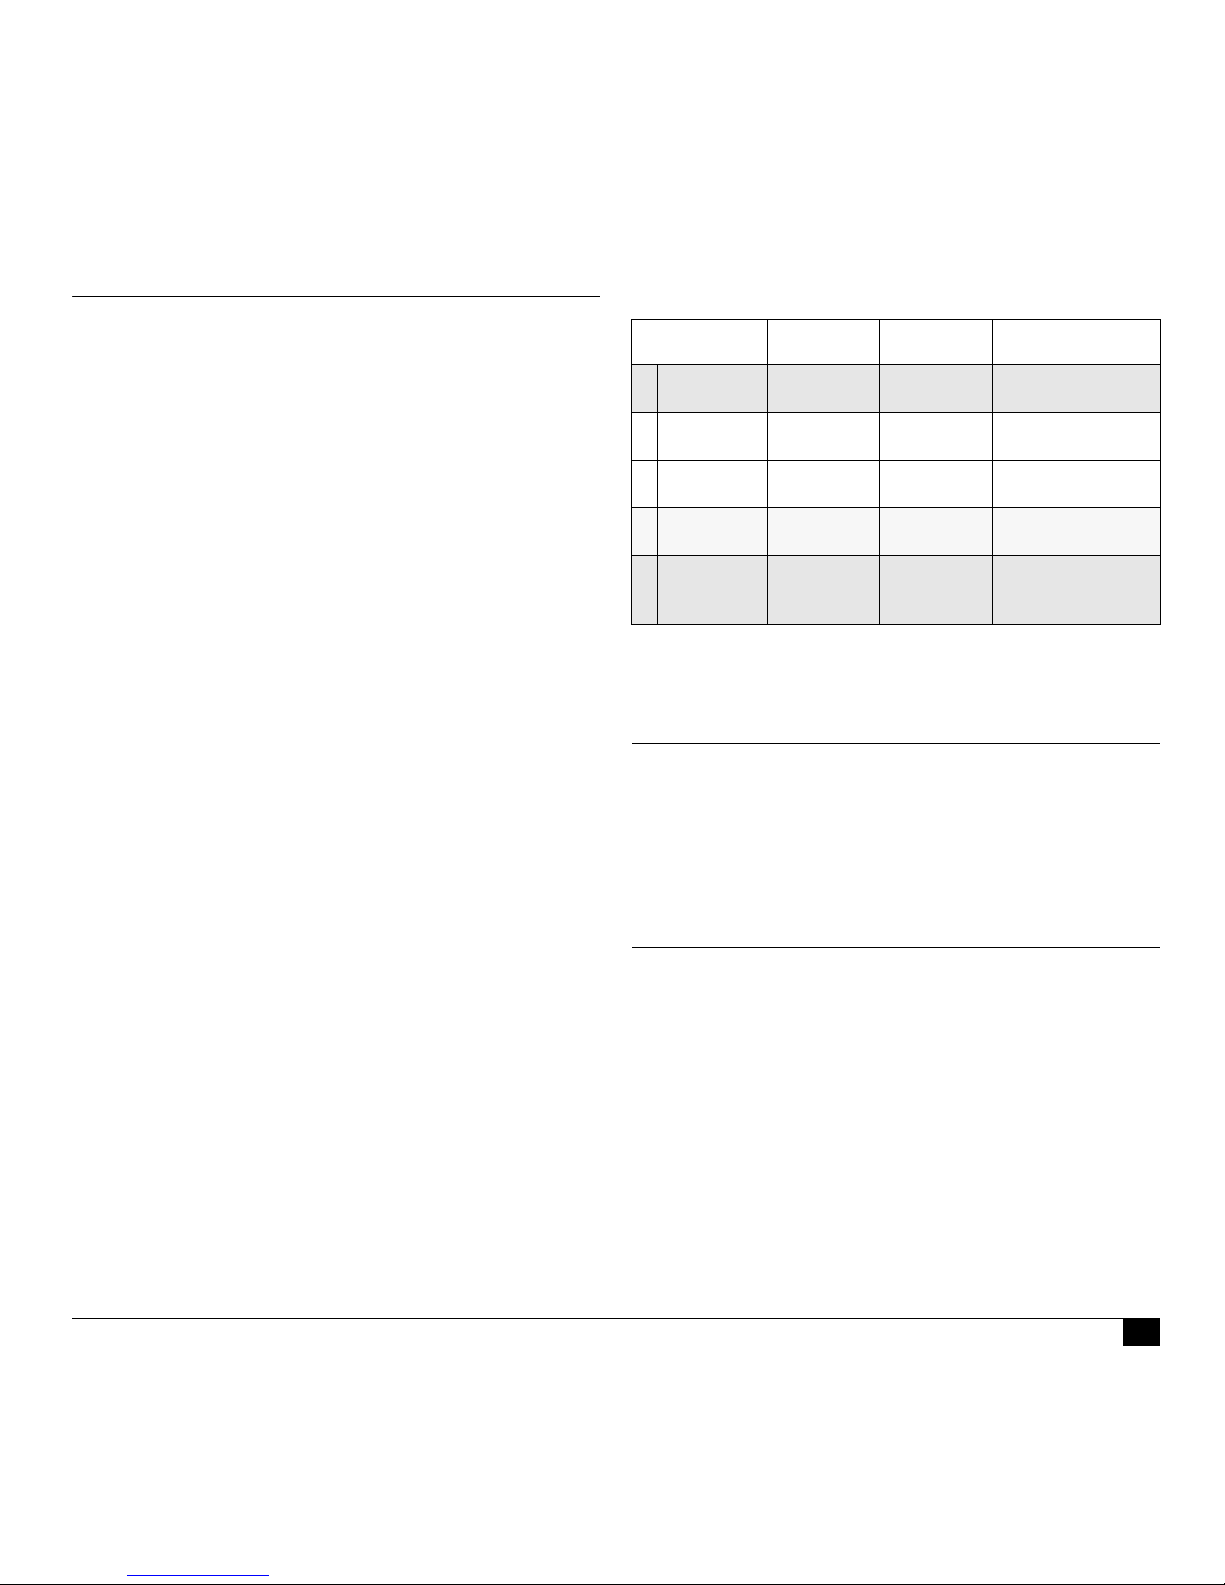
Table for classifying home blood pressure values in adults in
accordance with the international Guidelines (ESH, AHA, JSH).
Data in mmHg.
Range Systolic Diastolic Recommendation
blood pressure too
low
100 60 Consult your
doctor
1. blood pressure
optimum
100 - 130 60 - 80 Self-check
2. blood pressure
elevated
130 - 135 80 - 85 Self-check
3. blood pressure too
high
135 - 160 85 - 100 Seek medical
advice
4. blood pressure
dangerously high
160 100 Urgently seek
medical advice!
Page 5

3BP AG1-20
EN
• The artery mark located on the cuff (ca. 3 cm long bar) must
lie over the artery which runs down the inner side of the arm.
• Support your arm so it is relaxed.
• Ensure that the cuff is at the same height as your heart.
6. Any improper setup or damage to the stethoscope will cause
distorted sound or poor sound transmission causing inaccurate
readings.
7.
Proper deflation rate is essential for an accurate reading.
Practice and master a recommended deflation rate of 2-3 mmHg
per second or a drop of 1-2 marks on the manometer
1
for each
heartbeat.
Measuring procedure
1. Place the chest piece 6 underneath the cuff 2 or 1-2 cm
below it. Make sure the chest piece is in contact with the skin
and lies on the brachial artery.
2. Plug in the ear piece 7 and check, if the chest piece is placed
correctly, so that the Korotkoff sounds appear the loudest.
3. Close the valve 4 on the pump ball 3 by turning the screw
clockwise. Do not over-tighten.
4. Take the pump ball 3 in your free hand (the arm you are not
using to measure) and pump up the cuff. Watch the pressure indicator on the manometer
1
and pump up to approx. 40 mmHg
higher than the expected systolic value (the upper value).
• Inflate to 200 mmHg if you are not sure about the expected
value.
5. Open the valve 4 slowly by turning the screw counter clockwise whilst holding the stethoscope chest piece 6 on the
brachial artery. Listen carefully as the cuff begins to deflate.
Note the reading on the manometer 1 as soon as you hear a
faint, rhythmic tapping or thumping sounds. This is the
systolic blood pressure reading.
6. Allow the pressure to continue dropping at the same deflation
rate. Note the reading on the manometer 1 as soon as the
thumping sound stops. This is the diastolic blood pressure
reading.
7. Deflate the cuff completely.
8. Repeat the measurement at least two further times and record
your values, date and time immediately after finishing the
measurements.
9. Remove the cuff and the stethoscope.
4. Malfunction / Troubleshooting
If problems occur when using the device, the following points
should be checked and if necessary, the corresponding measures
are to be taken:
If you think the results are unusual, please read through the
information in «Section 1.» carefully.
Description Potential cause and remedy
The sound transmission is poor, distorted
or there is extraneous
noise.
• Check the ear pieces if they are dirty
or cracked. If not, make sure you
wear them properly.
• Check the tube if it is broken or
twisted.
• Check the chest piece if there is any
damage.
• Make sure the chest piece is in
contact with the skin and lies on the
brachial artery. Clean or replace any
defective parts if found to avoid inaccurate reading.
The pressure does not
rise although the pump
ball 3 is pumping.
• Make sure that the valve is closed.
• Make sure the cuff is properly
connected to bulb and manometer.
• Check if the cuff, tube and/or bulb is
leaking. Replace the defective parts
if any.
The deflation rate can
not be set to 23 mmHg/sec. by
adjusting the valve 4.
Disassemble the valve from pump ball
to check if there is any blockage in the
airway of the valve. Clean the blockage
and try again. If it still does not work,
replace it to avoid inaccurate readings.
The manometer needle
is not at 0 ± 3 mmHg at
rest.
• Make sure that the valve is
completely open for zero check.
• If still more than 3 mmHg deviation,
contact your dealer to recalibrate the
manometer.
Page 6
4
5. Safety, Care, Accuracy Test and Disposal
Safety and protection
• This device may only be used for the purposes described in
these instructions. The manufacturer cannot be held liable for
damage caused by incorrect application.
• This device comprises sensitive components and must be
treated with caution. Observe the storage and operating conditions described in the «Technical Specifications» section.
• Protect it from:
- water and moisture
- extreme temperatures
- impact and dropping
- contamination and dust
- direct sunlight
- heat and cold
• The cuffs are sensitive and must be handled with care.
• Only pump up the cuff once fitted.
• Never inflate beyond 300 mmHg.
• Always deflate the cuff completely before storage.
• Do not use this device if you think it is damaged or notice
anything unusual.
• Never open this device.
• Read the additional safety information provided within the indi-
vidual sections of this instruction manual.
Ensure that children do not use this device unsupervised;
some parts are small enough to be swallowed. Be aware of
the risk of strangulation in case this device is supplied with
cables or tubes.
Device care
Clean the device only with a soft, dry cloth.
Cleaning the cuff
Carefully remove spots on the cuff with a damp cloth and soapsuds.
WARNING: Do not wash the cuff in a washing machine or
dishwasher!
Accuracy test
We recommend this device is tested for accuracy every 2 years or
after mechanical impact (e.g. being dropped). Please contact your
local Microlife-Service to arrange the test (see foreword).
Disposal
Batteries and electronic devices must be disposed of in
accordance with the locally applicable regulations, not with
domestic waste.
6. Guarantee
This device is covered by a 2 year guarantee from the date of
purchase. The guarantee is valid only on presentation of the guarantee card completed by the dealer (see back) confirming date of
purchase or the receipt.
• Cuffs and parts that become worn with use are not included.
• Opening or altering the device invalidates the guarantee.
• The guarantee does not cover damage caused by improper
handling, accidents or non-compliance with the operating
instructions.
Please contact your local Microlife-Service (see foreword).
7. Technical Specifications
This device complies with the requirements of the Medical Device
Directive 93/42/EEC.
Technical alterations reserved.
Weight:
450 g
Dimensions:
175 x 70 x 103
mm
Storage conditions: -20 - +70 °C
85
% relative maximum humidity
Operating conditions: 10 - 40 °C
Measurement range:
0 - 300 mmHg
Resolution:
2 mmHg
Static accuracy:
within ± 3 mmHg between 18 - 33 °C;
within ± 6 mmHg between 34 - 46 °C
Pressure reduction
rate: 2-3 mmHg/sec.
Air leakage: < ± 4 mmHg/min
Hysteresis error: within 0 - 4 mmHg
Included accessories: M-cuff (22-32 cm), pump ball, valve,
stethoscope, softbag
Reference to
standards:
EN 1060-1/-2; ANSI / AAMI SP09
Page 7

5BP AG1-20
EN
Page 8

6
Prieš naudodamiesi prietaisu perskaitykite instrukciją.
Gerb. Pirkėjau,
Šis aneroidinis kraujospūdžio matavimo komplektas yra mechaninis kraujospūdžio matavimui ant žasto skirtas prietaisas, užtikrinantis tikslius atsikartojančius rezultatus.
Atidžiai perskaitykite šią instrukciją ir susipažinkite su visomis prietaiso funkcijomis bei atsargumo priemonėmis. Tikimės, kad šis
Microlife prietaisas pateisins Jūsų lūkesčius. Iškilus klausimams ar
problemoms, kreipkitės į Microlife klientų aptarnavimo tarnybą.
Prietaisą pardavusi įstaiga ar vaistinė jums praneš Microlife
vietinės serviso tarnybos adresą. Platesnė informacija apie mūsų
produktus pateikta internete adresu www.microlife.lt.
Būkite sveiki su Microlife AG!
Turinys
1. Svarbi informacija apie kraujospūdį ir savarankišką jo
matavimą
• Kaip įvertinti savo kraujospūdį?
2. Naudojimasis prietaisu pirmą kartą
•Manžetės pasirinkimas
3. Kraujospūdžio matavimas
• Patikimo matavimo patarimai
• Matavimo procedūra
4. Galimi gedimai / jų
šalinimas
5. Atsargumo priemonės, priežiūra, tikslumo patikrinimas,
utilizavimas
• Atsargumo priemonės bei sauga
• Prietaiso priežiūra
•Manžetės valymas
• Tikslumo patikrinimas
• Utilizavimas
6. Garantija
7. Techninės specifikacijos
Garantijos kortelė (Žr. paskutinį viršelį)
Microlife BP AG1-20
LT
1
Manometras
2
Manžetė
3
Balionėlis
4
Reguliuojamas išleidimo vožtuvas
5
Stetoskopas
6
Stetoskopo galvutė
7
Ausinės
Page 9
7BP AG1-20
LT
1. Svarbi informacija apie kraujospūdį ir savarankišką
jo matavimą
• Kraujospūdis - kraujo slėgis į arterijų sieneles, atsirandantis
dirbant širdžiai. Visą laiką matuojami du kraujospūdžio dydžiai
- sistolinis (viršutinis) ir diastolinis (apatinis).
• Nuolatos padidėjęs kraujospūdis žalingas Jūsų sveikatai ir
turi būti gydomas!
• Visuomet su gydytoju aptarkite savo kraujospūdžio matavimo
rezultatus bei išsakykite jam savo pastebėjimus ar abejones.
Niekuomet nepasikliaukite vienkartinio kraujospūdžio
matavimo duomenimis.
• Yra daug pernelyg aukšto kraujospūdžio atsiradimo priežasčių.
Gydytojas jums plačiau paaiškins situaciją ir, jei reikia, paskirs
gydymą. Be vaistų, kraujospūdį sumažinti padeda atsipalaidavimo pratimai, sumažėjęs antsvoris, mankšta.
• Niekada nekeiskite gydytojo paskirtų vaistų ar jų dozių!
• Priklausomai nuo fizinės būsenos bei savijautos kraujospūdis
dienos bėgyje kinta. Kraujospūd
į visą laiką matuokitės
vienodomis ramybės sąlygomis! Kraujospūdį matuokitės
bent du kartus per dieną - ryte ir vakare.
• Normalu, kad dviejų matavimų, atliktų vienas po kito, rezultatai
skiriasi.
• Skirtumai tarp matavimų, atliktų gydytojo kabinete ar vaistinėje
yra įprastas reiškinys dėl sunkiai palyginamų matavimo sąlygų.
• Keletas matavimų kraujospūdį atspindi tiksliau, nei vienkar-
tinis matavimas.
• Tarp dviejų matavimų būtina padaryti bent 15 sekundžių
trukmės trumpą pertraukėlę.
• Nėštumo metu kraujospūdį būtina matuotis labai tiksliai, nes
pokyčiai gali būti labai dideli!
Kaip įvertinti savo kraujospūdį?
Aukštesnė išmatuota reikšmė yra pagrindas kraujospūdžio vertinimui.
Pavyzdys: kraujospūdžio reikšmė
140/80
mmHg ar
130/90
mmHg
parodo «padidėjusį kraujospūdį».
2. Naudojimasis prietaisu pirmą kartą
Manžetės pasirinkimas
Parenkant tinkamo dydžio manžetę reikia išmatuoti žasto apimtį
ties jo viduriu. 22 - 32 cm dydis tinka daugumai žmonių.
Naudokitės tik Microlife manžetėmis!
Jei pakuotėjė esanti 2 manžetė Jums netinka, kreipkitės į
vietinį Microlife servisą.
3. Kraujospūdžio matavimas
Patikimo matavimo patarimai
1. Prieš kraujospūdžio matavimą venkite fizinės veiklos, nevalgykite ir nerūkykite.
2. Ramiai pasėdėkite bent 5 minutes ir atsipalaiduokite.
3. Visuomet matuokite ant tos pačios rankos (paprastai kairės).
4. Pašalinkite nuo žasto pernelyg glaudžiai prigludusius drabužius.
Kad nespaustų arterijos, marškinių rankovę palikite neatraitotą.
5. Visuomet naudokitės tinkamo dydžio manžete (žr. ženklinimą
ant manžetės).
• Manžetę užvyniokite glaudžiai, bet neužveržkite
•
Manžetės apatinis kraštas turi būti 2 cm aukščiau rankos linkio.
• Arterijos žyma ant manžetės (3 cm ilgio juostelė) turi būti
vidinėje rankos pusėje virš arterijos.
Kraujospūdžio matavimo namų sąlygomis duomenų klasifikacija pagal
tarptautines gaires (ESH, AHA, JSH). Duomenys pateikti mmHg.
Zona
Sistolinis
kraujospūdis
Diastolinis
kraujospūdis Rekomendacijos
Kraujospūdis
per žemas
100
60
Pasitarkite su gydytoju
1. Optimalus
kraujospūdis
100 - 130 60 - 80
Savarankiškai matuokitės kraujospūdį
2. Padidėjęs
kraujospūdis
130 - 135 80 - 85
Savarankiškai matuokitės kraujospūdį
3. Per aukštas
kraujospūdis
135 - 160 85 - 100
Kreipkitės į gydytoją
4. Pavojingai
padidėjęs
kraujospūdis
160
100
Skubiai kreipkitės į
gydytoją!
Page 10

8
• Ranką padėkite patogiai ir atpalaiduokite.
• Manžetė turi būti širdies lygyje.
6. Neteisingai surinktas ar pažeistas stetoskopas iškraipo garsą,
sutrikdo garso perdavimą ir taip sąlygoja netikslų matavimą.
7. Tinkamas oro išleidimo greitis yra esminis tikslaus mata-
vimo faktorius. Pasipraktikuokite, kad išmoktumėte išleisti orą
2-3 mmHg/sek. greičiu arba per 1-2 manometro 1 padalas
tarp dviejų širdies dūžių.
Matavimo procedūra
1. Priglauskite stetoskopo galvutę 6 po manžetės 2 kraštu ar 1-
2 cm žemiau jo. Galvutė turi gerai priglusti prie kūno ties žasto
arterija.
2. Įstatykite ausų vamzdelius 7 ir patikrinkite, ar galvutė
priglausta taisyklingai, ar Korotkovo tonai girdimi garsiausiai.
3. Uždarykite guminės kriaušės 3 oro vožtuvą 4 pasukdami
varžtą laikrodžio rodyklės kryptimi. Vožtuvo neperveržkite.
4. Laisva ranka suimkite kriaušę 3 ir pumpuokite į manžetę orą
.
Stebėdami manometro 1 rodyklę pumpuokite tol, kol pasieksite slėgį, 40 mmHg didesnį, nei laukiamas sistolinis (viršutinis)
kraujospūdis.
• Jei nesate tikri, pumpuokite iki 200 mmHg.
5. Lėtai atidarinėkite oro vožtuvą 4 pasukdami varžtą prieš
laikrodžio rodyklę ir laikydami stetoskopo galvutę 6 ant žasto
arterijos. Atidžiai klausykitės. Užfiksuokite manometro 1 rodyklės padėtį tuo momentu, kai išgirsite dukslius ritmingus tonus.
Tai yra sistolinio kraujospūdžio rodmenys.
6. Leiskite spaudimui kristi tuo pačiu greičiu. Užfiksuokite mano-
metro 1 rodyklės padėtį tuo momentu, kai dukslūs tonai
išnyks. Tai yra diastolinio kraujospūdžio rodmenys.
7. Visiškai išleiskite orą pro vožtuvą.
8. Kraujospūdį matuokte bent du kartus, o gautus rodmenis užsirašykite, pažymėdami datą ir laiką.
9. Nusiimkite manžetę ir stetoskopą.
4. Galimi gedimai / jų šalinimas
Jei naudojant prietaisą iškyla sunkumų, reikia patikrinti toliau išvardintus punktus ir, jei reikia, imtis atitinkamų priemonių::
Jei, Jūsų nuomone, gauti rezultatai yra neįprasti, įdėmiai
perskaitykite informaciją, pateiktą skyriuje «1.».
Aprašymas Galimos priežastys ir veiksmai
Prastai perduodamas
garsas, jis iškraipytas
arba yra trukdžių.
• Patikrinkite, ar įkištos ir neįtrūkusios
ausinės. Jei ne, patikrinkite, ar jos
nesusidėvėjusios.
• Patikrinkite, ar neįtrūkusi arba nesu-
sisukusi žarnelė.
• Patikrinkite, ar nepažeista galvutė.
• Patikrinkite, ar galvutė gerai
prigludus prie odos ir ar ji yra ties
žasto arterija. Jei reikia, nuvalykite
arba pakeiskite pažeistas dalis, kad
jos netrukdytų gauti teisingus rezultatus.
Slėgis nekyla, nors
kriaušė 3 orą
pumpuoja.
• Patikrinkite, ar uždarytas vožtuvas.
• Patikrinkite, ar manžetė gerai pritvir-
tinta prie guminės kriaušės ir manometro.
• Patikrinkite, ar manžetė, guminė
kriaušė ir/ar žarnelė neleidžia oro.
Negalima nustatyti 23 mmHg/s oro išleidimo
greičio reguliuojant oro
vožtuvą
4.
Atjunkite vožtuvą nuo guminės kriaušės
ir patikrinkite, ar vožtuvo kanaluose
nėra jokių kliūčių. Pašalinkite kliūtis ir
pamėginkite dar kartą. Jei vožtuvas
neveikia, pakeiskite jį.
Nenaudojamo manometro rodyklė nestovi
0 ± 3 mmHg padėtyje.
• Patikrinkite, ar vožtuvas pilnai atidarytas kalibravimui.
• Jei nukrypimas daugiau kaip
3 mmHg, kreipkitės į vietinį atstovą
dėl prietaiso kalibravimo.
Page 11

9BP AG1-20
LT
5. Atsargumo priemonės, priežiūra, tikslumo
patikrinimas, utilizavimas
Atsargumo priemonės bei sauga
•
Prietaisą galima naudoti tik šioje instrukcijoje nurodytais tikslais.
Gamintojas neatsako už žalą, kilusią dėl neteisingo prietaiso
naudojimo.
• Prietaise yra jautrių komponentų, todėl naudokitės juo labai
atidžiai. Laikykitės saugojimo ir naudojimosi taisyklių, išdėstytų
«Techninės specifikacijos» skyriuje!
• Saugokite prietaisą nuo:
- vandens ir drėgmės
- aukštos temperatūros
-sukrėtimo ar smūgių
-dulkių ir purvo
- tiesioginių saulės spindulių
-karščio ir šalčio
• Manžetes lengva pažeisti, todėl elkitės su jomis atsargiai.
• Pumpuokite tik tinkamai uždėtą manžetę
• Nepumpuokite oro daugiau nei iki 300 mmHg.
• Pabaigę naudotis visuomet pilnai išleiskite orą iš manžetės.
• Nesinaudokite prietaisu, jei manote, kad jis sugadintas, ar
pastebėjote ką nors neįprasta.
• Prietaiso neardykite.
• Daugiau apie atsargumo priemones skaitykite kituose instruk-
cijos skyriuose.
Neleiskite vaikams be priežiūros naudotis prietaisu; kai
kurios datalės yra labai smulkios ir vaikai jas gali praryti.
Prietaisų, tiekiamų su laidais ir vamzdeliais, atveju yra pasismaugimo pavojus.
Prietaiso priežiūra
Prietaisą valykite minkšta ir sausa šluoste.
Manžetės valymas
Valykite manžetę drėgna šluoste ar kempinėle.
DĖMESIO: Neskalbkite manžetės skalbimo mašinoje ar
indaplovėje!
Tikslumo patikrinimas
Kas 2 metus arba po mechaninio poveikio (pvz. nukritus ant grindų)
rekomenduojama patikrinti prietaiso tikslumą. Dėl tikslumo patikrinimo kreipkitės į vietinį Microlife servisą.
Utilizavimas
Baterijų ir elektroninių prietaisų nemeskite į buitinių atliekų
konteinerius. Baterijos ir elektroniniai prietaisai turi būti utilizuojami pagal aplinkosaugos reikalavimus.
6. Garantija
Prietaisui suteikiama 2 metų garantija nuo pardavimo datos.
Garantija galioja tik pateikus užpildytą garantijos kortelę bei
pirkimo čekį.
• Ši garantija netaikoma manžetei ir besidėvinčioms dalims.
• Prietaiso atidarymas ar kitoks jo modifikavimas nutraukia
garantijos galiojimą.
• Garantija negalioja pažeidimams, atsiradusiems dėl netinkamo
naudojimo, nelaimingų atsitikimų ar instrukcijų nesilaikymo.
Prašome kreiptis į vietinį Microlife servisą (Žr. įžangą).
7. Techninės specifikacijos
Šis prietaisas atitinka Medicinos prietaisų Direktyvos 93/42/EEB
reiklavimus.
Galimi techniniai pakeitimai.
Svoris: 450 g
Dydis: 175 x 70 x 103 mm
Saugojimo sąlygos: -20 - +70 °C
85 % santykinė maksimali drėgmė
Darbinės salygos: 10 - 40 °C
Matavimo ribos: 0 - 300 mmHg
Raiška: 2 mmHg
Statinis tikslumas: ± 3 mmHg nuo 18 - 33 °C;
± 6 mmHg nuo 34 - 46 °C
Slėgio kritimo tempas: 2-3 mmHg/sek.
Oro išleidimas: < ± 4 mmHg/min
Histerezės klaida: tarp 0 - 4 mmHg
Įtraukti priedai: M-manžetė (22-32 cm), balionėlis,
vožtuvas, stetoskopas, dėtuvė
Standartų nuorodos: EN 1060-1/-2; ANSI / AAMI SP09
Page 12

10
Pirms šīs ierīces izmantošanas uzmanīgi izlasīt norādījumus.
Cien./god. lietotāj!
Šī aneroīda asinsspiediena mērītāja komplekts ir mehāniska
asinsspiediena mērīšanas ierīce lietošanai uz augšdelma, kas
nodrošina precīzu un konsekventu mērījumu.
Lūdzam uzmanīgi izlasīt šo instrukciju, lai izprastu visas funkcijas
un drošības informāciju. Mēs vēlamies, lai Jūs būtu apmierināti ar
Microlife izstrādājumu. Ja Jums rodas kādi jautājumi vai problēmas, lūdzam sazināties ar Microlife vietējo klientu apkalpošanas
dienestu. Ierīces pārdevējs vai aptiekārs palīdzēs Jums noskaidrot
Microlife izplatītāja adresi Jūsu valstī. Jūs varat arī apmeklēt
tīmek
ļa vietni www.microlife.lv, kur atradīsiet plašu un vērtīgu
informāciju par mūsu produktiem.
Lai Jums laba veselība – Microlife AG!
Saturs
1. Svarīgi fakti par asinsspiedienu un tā noteikšanu, pašam
veicot mērījumu
•Kā es varu novērtēt savu asinsspiedienu?
2. Instrumenta izmantošana pirmo reizi
• Pareizas manšetes izvēle
3. Asinsspiediena mērīšana, izmantojot šo instrumentu
•Norādījumi ticama mērījuma veikšanai
•Mērīšanas procedūra
4. Darbības traucējums / problēmu novēršana
5. Drošība, kopšana, precizitātes tests un likvidēšana
•Drošība un aizsardzība
• Instrumenta kopšana
•Manšetes tīrīšana
• Precizitātes tests
•Likvidēšana
6. Garantija
7. Tehniskās specifikācijas
Garantijas talons (skatī
t otru pusi)
Microlife BP AG1-20
LV
1
Manometrs
2
Manšete
3
Gumijas bumbieris
4
Regulējams gaisa izlaišanas vārsts
5
Stetoskops
6
Stetoskopa galviņa
7
Uzgaļi ausīm
Page 13

11BP AG1-20
LV
1. Svarīgi fakti par asinsspiedienu un tā noteikšanu,
pašam veicot mērījumu
• Asinsspiediens ir artērijās plūstošo asiņu spiediens, ko rada
sirdsdarbība. Vienmēr tiek mērītas divas vērtības: sistoliskais
(augšējais) un diastoliskais (apakšējais) asinsspiediens.
• Pastāvīgi augsts asinsspiediens var kaitēt Jūsu veselībai,
un šādā gadījumā Jums ir jāvēršas pie ārsta!
•
Vienmēr pārrunāt savu asinsspiedienu ar ārstu, un informēt viņu,
ja esat pamanījis kaut ko neparastu vai ir kādas neskaidrības.
Nekad nepaļauties uz vienu asinsspiediena mērījumu.
• Pastāv vairāki iemesli, kāpēc ir vērojams pārmērīgi augsts
asinsspiediens. Jūsu ārsts pastāstīs par tiem sīkāk un, ja
nepieciešams, piedāvās ārstēšanas kursu. Papildus medikamentiem Jūsu asinsspiedienu var samazināt arī relaksācijas
metodes, svara zaudēšana un fiziski vingrinājumi.
• Nekādā gadījumā nemainīt zāļu devu, ko Jums noteicis
ārsts!
• Atkarībā no fiziskās slodzes un sagatavotības asinsspiediens
dienas gaitā var ļoti mainīties. Tāpēc ir ieteicams veikt asins-
spiediena mērījumus vienmēr vien
ādos mierīgos
apstākļos, kad esat atpūties! Veikt vismaz divus mērījumus
dienā: vienu no rīta un vienu vakarā.
• Tas ir normāli, ja, veicot divus mērījumus pēc kārtas, tiek uzrā-
dīti ievērojami atšķirīgi rezultāti.
• Atšķirības mērījumu rezultātos, kas iegūti pie Jūsu ārsta vai
aptiekāra, un rezultātos, kas iegūti mājas apstākļos, ir normāla
parādība, jo šīs situācijas ir pilnīgi atšķirīgas.
• Vair
āki mērījumi sniedz daudz skaidrāku priekšstatu, nekā
viens mērījums.
• Ievērojiet nelielu, vismaz 15 sekunžu pauzi starp diviem
mērījumiem.
• Ja esat stāvoklī, Jums vajadzētu rūpīgi sekot savam asinsspie-
dienam, jo šajā periodā tas var ievērojami mainīties!
Kā es varu novērtēt savu asinsspiedienu?
Paaugstināta vērtība ir tā, kas nosaka novērtēšanu. Piemēram:
asinsspiediena vērtība 140/80 mmHg vai vērtība 130/90 mmHg
norāda, ka «asinsspiediens ir pārāk augsts».
2. Instrumenta izmantošana pirmo reizi
Pareizas manšetes izvēle
Izvēloties pareiza lieluma manšeti, nepieciešams izmērīt rokas
apkārtmēru augšdelma centrā. Lielākajai daļai cilvēku pareizajam
manšetes lielumam ir jābūt 22 - 32 cm (8,75 - 12,5 collas).
Izmantot tikai Microlife manšetes!
Sazināties ar vietējo Microlife servisu, ja komplektācijā iekļautā
manšete 2 neder.
3. Asinsspiediena mērīšana, izmantojot šo instrumentu
Norādījumi ticama mērījuma veikšanai
1. Izvairīties no aktivitātēm, ēšanas vai smēķēšanas tieši pirms
mērījuma veikšanas.
2. Apsēsties vismaz 5 minūtes pirms mērījuma veikšanas un atpū-
tieties.
3. Vienmēr veikt mērījumu uz vienas un tās pašas rokas (parasti
kreisās).
4. Atbrīvot augšdelmu no cieši pieguloša apģērba. Lai izvairītos
no saspiešanas, krekla piedurknes nevajadzētu uzrotīt, jo tās
netraucē manšetei, ja tās ir norotītas.
5. Vienmēr nodrošināt, lai manšete būtu pareiza izmēra (atzīme
uz manšetes).
Tabula asinsspiediena vērtību klasificēšanai mājās pieaugušajiem
saskaņā ar starptautiskajām vadlīnijā
m (ESH, AHA, JSH). Mērvie-
nība: mmHg.
Amplitūda Sistoliskais Diastoliskais Ieteikums
pazemināts
asinsspiediens
100
60
Konsultējieties ar
ārstu!
1. optimāls
asinsspiediens
100 - 130 60 - 80
Veiciet pašpārbaudi!
2. paaugstināts
asinsspiediens
130 - 135 80 - 85
Veiciet pašpārbaudi!
3. paaugstināts
asinsspiediens
135 - 160 85 - 100
Meklējiet medicīnisku
palīdzību!
4.
asinsspiediens bīstami
augsts
160
100
Nekavējoties meklējiet
medicīnisku palīdzību!
Page 14

12
• Stingri nostiprināt manšeti, bet ne pārāk cieši.
• Pārliecināties, ka manšete ir novietota 2 cm virs elkoņa.
• Artērijas atzīmei uz manšetes (apmēram 3 cm gara līnija)
jāatrodas uz artērijas, kas iet pa rokas iekšpusi.
• Atbalstīt roku tā, lai tā būtu atslābinātā stāvoklī.
• Nodrošināt, lai manšete atrastos vienādā augstumā ar jūsu
sirdi.
6. Jebkuri nepareizi uzstādījumi vai stetoskopa bojājumi radis
skaņas izkropļojumus vai sliktu skaņas pārraidīšanu, tādēļ var
rasties neprecīzi nolasījumi.
7. Piemērots gaisa izlaišanas ātrums ir svarīgs prec
īzai nola-
sīšanai. Ieteicamais gaisa izlaišanas ātrums ir 2-3 mmHg
sekundē vai 1-2 manometra 1 zīmju samazināšanās uz katru
sirdspukstu.
Mērīšanas procedūra
1. Novietot stetoskopa galviņu 6 zem manšetes 2 vai 1-2 cm
zem tās. Pārliecināties ka stetoskopa galviņa saskaras ar ādu
un atrodas uz pleca artērijas.
2. Ielikt ausī stetoskopu 7 un pārbaudīt, vai stetoskopa galviņa ir
novietota pareizi, lai Korotkoff skaņas būtu dzirdamas visskaļāk.
3. Noslēgt gaisa vārstu 4 uz gumijas bumbiera 3, pagriežot to
pulksteņa rādītāja kustības virzienā. Neaizgriezt pārāk cieši.
4. Paņemt brīvajā rokā gumijas bumbieri 3 (roka netiek izmantota mērīšanai) un sūknēt manšeti. Skatīt manometra 1 spiediena indikatoru un sūknēt līdz apmēram par 40 mmHg augstāk
nekā paredzamā sistoliskā vērtība (augšējā vērtība).
• Lūdzam sūknēt līdz 200 mm Hg, ja neesat pārliecināts par
aptuveno paredzamo mērījumu.
5. Lēni atvērt vārstu 4, griežot skrūvi pretēji pulksteņa rādītāja
kustības virzienam un turēt stetoskopa galviņu
6
uz pleca artē-
rijas. Klausīties uzmanīgi, kad manšete sāk izlaist gaisu. Atzīmēt
nolasījumu uz manometra
1
, tiklīdz dzirdami vāji, ritmiski sitieni
vai dunošas skaņas.
Tas ir sistoliskā asinsspiediena rādījums.
6. Atkārtot mērīšanu vismaz divreiz. Atzīmēt nolasījumu mano-
metrā
1
, ja dunošās skaņas tiek pārtrauktas.
Tas ir diastoliskā
asinsspiediena rādījums.
7. Pilnībā izlaist gaisu no manšetes vārsta.
8. Atkārtot mērīšanu vismaz divas reizes un ierakstīt savu iegūto
vērtību, datumu un laiku tūlīt pēc mērījuma pabeigšanas.
9. Noņemt manšeti un stetoskopu.
4. Darbības traucējums / problēmu novēršana
Ja, lietojot ierīci, rodas problēmas, ir jāpārbauda šādi aspekti, un,
ja nepieciešams, ir jāveic attiecīgi pasākumi:
Ja Jums šķiet, ka rezultāti ir neparasti, uzmanīgi izlasīt
informāciju 1. sadaļā.
Apraksts
Iespējamais iemesls un kļūdas
novēršana
Pārraidītās skaņas ir
slikti dzirdamas, traucētas vai pastāv
papildus trokšņi.
•
Pārbaudīt vai austiņas nav netīras vai
ieplaisājušas. Ja nav, tad pārliecināties,
ka tās labi pieguļ un nav nolietotas.
•
Pārbaudīt, ka caurule nav bojāta vai
savijušies.
•
Pārbaudīt, ka uz stetoskopa galviņas un
diafragmas nav plaisu.
• Pārliecināties, ka stetoskopa galviņa
atbilstoši pieskaras ādai un atrodas uz
pleca artērijas mērīšanas laikā. Notīrīt
vai nomainīt bojātās detaļas, lai iegūtu
pareizus rādījumus.
Spiediens nepaaugstinās, neskatoties uz
to, ka gumijas
bumbieris
3
piepūšas.
•
Pārliecināties, ka vārsts ir noslēgts.
•
Pārliecināties, ka manšete ir labi savienota ar gumijas bumbieri un manometru.
• Pārbaudīt, vai nav radušās noplūdes
manšete, vadā un/vai bumbierī.
Nomainīt bojātās detaļas, ja tādas ir.
Izpūšanas ātrumu var
noregulēt tikai kā
2-3 mmHg/sekundē,
noregulējot gaisa
izpūšanas vārstu 4.
Izjaukt bumbiera vārstu, lai pārliecinātos,
ka nekas neaizsprosto gaisa plūsmu
vārstā. Iztīrīt aizsprostojumus un mēģināt
vēlreiz. Ja tas joprojām nedarbojas,
nomainīt to, lai iegūtu pareizus rādījumus.
Manometra rādītāja
bultiņa miera stāvoklī
neatrodas
0 ± 3 mmHg robežās.
•
Pārliecināties, ka vārsts ir pilnībā
atvērts, lai veiktu nulles stāvokļa
pārbaudi.
•
Ja joprojām saglabājas novirze, kas
pārsniedz 3 mmHg, sazināties ar tirgotāju, lai atkārtoti kalibrētu manometru.
Page 15

13BP AG1-20
LV
5. Drošība, kopšana, precizitātes tests un likvidēšana
Drošība un aizsardzība
• Šo instrumentu var izmantot tikai šajā bukletā minētajam
nolūkam. Ražotājs nav atbildīgs par bojājumiem, kas radušies
nepareizas lietošanas dēļ.
• Šajā instrumentā ir viegli sabojājamas sastāvdaļas, tādēļ pret to
ir jāizturas uzmanīgi. Nodrošiniet glabāšanas un darba
apstākļus, kas aprakstīti sadaļā «Tehniskās specifikācijas».
• Aizsargāt to pret:
- Ūdeni un mitrumu,
-Galējām temperatūrām,
- Triecieniem un nosviešanas zemē,
-Piesārņojumu un putekļiem,
- Tiešu saules gaismu,
- Karstumu un aukstumu.
• Manšetes ir viegli sabojājamas,un ar tām ir jārīkojas uzmanīgi.
•
Piepildiet manšeti ar gaisu tikai tad, kad tā ir uzlikta.
• Nekad nepiepūst vairāk par 300 mmHg.
• Pirms uzglabāšanas pilnībā izlaidiet gaisu no manšetes.
• Neizmantot instrumentu, ja uzskatāt, ka tas ir bojāts, vai ja
pamanāt kaut ko neparastu.
• Nekad neatvērt instrumentu.
• Izlasīt papildu drošības norādījumus atsevišķās šī bukleta
sadaļās.
Pārliecinieties, ka bērni neizmanto šo ierīci bez uzraudzības!
Dažas tā sastāvdaļas ir pietiekami sīkas, lai tās varētu norīt.
Jāapzinās, ka ir iespējams nožņaugšanās risks, jo ierīce ir
piegādāta kopā ar kabeļiem vai caurulēm.
Instrumenta kopšana
Tīrīt instrumentu tikai ar mīkstu, sausu lupatiņu.
Manšetes tīrīšana
Rūpīgi notīrīt traipus no manšetes ar mitru lupatiņu un ziepju putām.
BRĪDINĀJUMS: Nemazgāt manšeti veļas vai trauku
mazgājamajā mašīnā!
Precizitātes tests
Mēs iesakām pārbaudīt šī instrumenta precizitāti ik pēc 2 gadiem
vai pēc mehāniska trieciena (piemēram, pēc nomešanas zemē).
Lūdzam sazināties ar vietējo Microlife servisu, lai veiktu testu
(skatīt priekšvārdu).
Likvidēšana
Baterijas un elektronikas izstrādājumi ir jālikvidē saskaņā ar
vietējo likumdošanu, nevis jāizmet sadzīves atkritumos.
6. Garantija
Uz šo instrumentu attiecas garantija, kas ir spēkā 2 gadus pēc
iegādes dienas. Garantija ir derīga, uzrādot garantijas talonu, ko
aizpildījis pārdevējs (skatīt aizmugurē) un kurā apstiprināts
iegādes datums, vai, uzrādot čeku.
•
Garantija neattiecas uz manšeti un nodilumam pakļautajām daļām.
• Ja instruments tiek atvērts vai ja tajā kaut kas tiek izmainīts,
garantija zaudē spēku.
• Garantija nesedz zaudējumus, kas radušies neuzmanīgas
lietošanas, negadījumu vai norādījumu neievērošanas dēļ.
Lūdzam sazināties ar vietējo Microlife servisu (skatīt priekšvārdu).
7. Tehniskās specifikācijas
Šī ierīce atbilst direktīvas 93/42/EEC prasībām par medicīnas
ierīcēm.
Tiek saglabātas tiesības veikt tehniskas izmaiņas.
Svars: 450 g
Izmēri: 175 x 70 x 103 mm
Uzglabāšanas
nosacījumi:
-20 - +70 °C
85 % relatīvais maksimālais gaisa
mitrums
Darbības nosacījumi: 10 - 40 °C
Mērīšanas diapazons: 0 - 300 mmHg
Izšķirtspēja: 2 mmHg
Statiskā precizitāte: ± 3 mmHg – 18 - 33 °C;
± 6 mmHg – 34 - 46 °C
Spiediena krišanas
ātrums: 2-3 mmHg/sek
Gaisa noplūde: < ± 4 mmHg/min
Histerēzes izraisīta kļūme: 0 - 4 mmHg
Iekļauti piederumi: M-manšete (22-32 cm), gumijas
bumbieris, vārsts, stetoskops,
somiņa
Atsauce uz standartiem: EN 1060-1/-2; ANSI / AAMI SP09
Page 16

14
Enne seadme kasutamist lugege hoolikalt juhiseid.
Austatud klient,
See aneroidne vererõhu komplekt on mehaaniline vererõhu
mõõtmise seade kasutamiseks õlavarrel ja tagab teile täpse ja
järjepideva mõõtmise.
Palun lugege need juhised hoolikalt läbi, et oskaksite kõiki funktsioone kasutada ning oleksite teadlikud ohutusjuhistest. Me soovime,
et oleksite oma Microlife tootega rahul. Kui teil tekib küsimusi või
probleeme, võtke ühendust oma kohaliku Microlife esindajaga.
Kohaliku Microlife esindaja aadressi saate oma müügiesindajalt või
apteekrilt. Teise võimalusena külastage meie veebilehte
www.microlife.ee, kust leiate väärtuslikku teavet meie toodete kohta.
Tugevat tervist – Microlife AG!
Sisukord
1. Oluline teave vererõhu ja iseendal vererõhu mõõtmise kohta
• Kuidas hinnata vererõhu väärtuseid?
2. Aparaadi esmakordne kasutus
• Valige õige suurusega mansett
3. Vererõhu mõõtmine selle aparaadiga
• Olulised punktid usaldusväärseteks tulemusteks
• Mõõtmisprotseduur
4. Häired / tõrkeotsing
5. Ohutus, hooldus, täpsustest ja käitlus
• Ohutus ja kaitse
• Aparaadi hooldus
• Manseti puhastamine
• Täpsustest
•Käitlus
6. Garantii
7. Tehnilised andmed
Garantiikaart (vt tagakaant)
Microlife BP AG1-20
EE
1
Manomeeter
2
Mansett
3
Kummiballoon
4
Reguleeritav õhuventiil
5
Stetoskoop
6
Stetoskoobi otsik
7
Kõrvaotsik
Page 17

15BP AG1-20
EE
1. Oluline teave vererõhu ja iseendal vererõhu mõõtmise kohta
• Vererõhk on südamest arteritesse pumbatud vere tekitatud
rõhk. Alati mõõdetakse kahte näitajat - süstoolset (ülemist) ja
diastoolset (alumist) vererõhku.
• Pidevalt kõrge vererõhk võib kahjustada teie tervist ja see
vajab arsti juhendatud ravi!
•
Arutage oma vererõhuväärtusi alati koos arstiga ja öelge talle, kui
olete täheldanud midagi tavalisest erinevat või te pole milleski
kindel.
Ärge kunagi tuginege ainult ühele vererõhuväärtusele.
• Liiga kõrgel vererõhul võib olla palju põhjuseid. Arst selgitab
neid teile täpsemalt ja määrab vajadusel ravi. Peale ravimite
võivad vererõhku alandada lõõgastumine, kehakaalu langetamine ja kehaline aktiivsus.
•
Ärge ühelgi juhul muutke arsti määratud ravimite annuseid!
•
Sõltuvalt kehalisest koormusest ja tingimustest kõigub vererõhk
päeva lõikes oluliselt.
Seetõttu peate vererõhku mõõtma alati
samades rahulikes tingimustes ja lõõgastununa!
Mõõtke
vererõhku vähemalt kaks korda päevas - hommikul ja õhtul.
• Kui kaks mõõtmist on tehtud vahetult teineteise järel, on
normaalne, kui saate märkimisväärselt erinevad tulemused.
• Samuti on normaalne, et arsti (apteekri) juures ja kodus
mõõdetud tulemused ei ole sarnased, kuna need olukorrad
erinevad teineteisest täielikult.
• Korduvad mõõtmised annavad märksa tõesema pildi kui vaid
üks kord mõõdetud näit.
• Jätke kahe mõõtmise vahele vähemalt 15-sekundiline paus.
• Kui olete rase, peaksite oma vererõhku hoolikalt jälgima, sest
see võib oluliselt muutuda!
Kuidas hinnata vererõhu väärtuseid?
Vererõhku hinnatakse kõrgeima mõõdetud väärtuse järgi. Näide:
vererõhu väärtus 140/80 mmHg või 130/90 mmHg tähendab, et
«vererõhk on liiga kõrge».
2. Aparaadi esmakordne kasutus
Valige õige suurusega mansett
Valides õige suususega mansetti, tuleks mõõta ümbermõõt
õlavarre keskelt. 22 - 32 cm (8,75 - 12,5 tolli) peaks olema sobiv
mõõt enamikule inimestele.
Kasutage ainult Microlife mansette!
Pöörduge oma kohaliku Microlife esindaja poole, kui kaasasolev
mansett
2
ei sobi.
3. Vererõhu mõõtmine selle aparaadiga
Olulised punktid usaldusväärseteks tulemusteks
1. Vältige vahetult enne mõõtmist kehalist koormust ning ärge
sööge ega suitsetage.
2. Istuge enne iga mõõtmist vähemalt 5 minutit ja lõõgastuge.
3. Mõõtke vererõhku alati samal käel (üldiselt vasakul).
4. Eemaldage õlavarrelt kitsad riided. Soonimise vältimiseks ärge
käärige pluusi varrukat üles – see ei häiri manseti tööd.
5. Alati veenduge, et kasutate õige suurusega mansetti (suurus
on märgitud mansetile).
•
Asetage mansett ümber käe tihedalt, kuid mitte liiga tugevalt.
• Veenduge, et mansett oleks paigutatud 2 cm küünarliigesest
kõrgemale.
Tabel on täiskasvanu vererõhutulemuste hindamiseks ja vastab
rahvusvahelistele ravijuhenditele (ESH, AHA, JSH). Ühikud on
mmHg.
Vahemik Süstoolne
Diastoolne Soovitus
liiga madal vererõhk 100
60
Pidage nõu
arstiga
1. optimaalne vererõhk
100 - 130 60 - 80
Iseseisev kontroll
2.
kõrgenenud vererõhk
130 - 135 80 - 85
Iseseisev kontroll
3. liiga kõrge vererõhk
135 - 160 85 - 100
Pöörduge arsti
poole
4. ohtlikult kõrge
vererõhk
160
100
Pöörduge viivitamatult arsti poole!
Page 18

16
• Mansetil olev arteri märk (3 cm pikkune joon) peab ületama
arteri, mis paikneb käsivarre sisepinna all.
• Toetage kätt, et see oleks pingevaba.
• Veenduge, et mansett on südamega samal kõrgusel.
6. Vale seadistus või kahjustatud stetoskoop tekitavad moonutatud heli, või halb heli edastus põhjustavad ebaõigeid näitusid.
7. Õige õhu väljutuskiirus tagab tulemuse korrekse lugemise.
Harjuta ja omanda soovitatav õhu väljutuskiirus 2-3 mmHg
sekundis või 1-2 astet langust manomeetril 1 iga südamelöögi
kohta.
Mõõtmisprotseduur
1. Asetage stetoskoobi otsik 6 manseti 2 ääre alla või 1-2 cm
sellest allapoole. Veenduge, et stetoskoobi otsik oleks kontaktis
naha pinnaga ja paikneks brahhiaalarteril.
2. Pange kõrvaotsikud 7 kõrva ja kontrollige kas stetoskoobi
otsik on paigaldatud õigesti, nii et Kortkovi heli on hästi kuuldav.
3. Sulgege kummiballooni 3 õhuventiil 4, keerates kruvi kellaosuti liikumise suunas. Ärge keerake kruvi kinni liiga kõvasti.
4. Võtke kummiballoon 3 vabasse kätte (käsivarsmill te ei
mõõda) ja pumbake mansett täis. Jälgige rõhu indikaatorit
manomeetril 1 ja pumbake ligikaudu 40 mmHg kõrgemale
oletatavast süstoolsest vererõhu väärtusest (ülemine väärtus).
• Paisutada 200 mmHg, kui te ei tea hinnangulist väärtust.
5. Avage õhuventiil 4 aeglaselt, keerates kruvi kellaosutile vastupidises suunas ja hoidke stetoskoobi otsikut
6
õlavarrearteri kohal.
Kuulake tähelepanelikult kui mansett hakkab tühjenema. Märkige
üles manomeetri
1
väärtus siis kohe kui te kuulete nõrka rütmilist
kohisevat heli.
See ongi süstoolse vererõhu näit.
6. Jätkake rohu langetamist aeglaselt, sama kiirusega. Märkige
üles manomeetri 1 näit koheselt kui rütmilne kohisev heli
kaob. See ongi diastoolse vererõhu näit.
7. Tühjendage mansett täielikult.
8. Korrake mõõtmist vähemalt kaks korda ja märkige üles tulemused
kuupäeva ja kellaajaga koheselt peale mõõtmise lõpetamit.
9. Eemalda mansett ja stetoskoop.
4. Häired / tõrkeotsing
Kui seadme kasutamise ajal tekib probleeme, tuleb kontrollida
järgmisi punkte ja vajaduse korral võtta tarvitusele vastavad
abinõud:
Kui teie meelest on tulemused ebatõenäolised, lugege
«1. lõigus» toodud teave hoolikalt läbi.
5. Ohutus, hooldus, täpsustest ja käitlus
Ohutus ja kaitse
• Kasutage seadet ainult selles kasutusjuhendis kirjeldatud
otstarbel. Tootja ei vastuta seadme ebaõige kasutamise tagajärjel tekkinud kahjustuste eest.
Kirjeldus Võimalik põhjus ja kuidas toimida
Heli ülekanne on
nõrk, moonutatud või
seal on ekstra müra.
• Kontrollige kõrvaotsikuid, kas nad on
määrdunud või purunenud. Vastasel
juhul veenduge, et te kannate neid
õigesti.
• Kontrollige toru on katki või keerutatud.
•
Kontrollige kas stetoskoobi otsik on terve.
• Veenduge, et stetoskoobi otsik on nahal
ja täpselt brahhialarteril. Puhastage või
vahetage välja defektsed osad, et
vältida vääraid tulemusi.
Rõhk ei tõuse kuigi
kummiballon 3
pumpab õhku.
• Veenduge, et õhuventiil on suletud.
•
Veenduge, et mansett on korralikult
ühendatud õhuballooni ja manomeetriga.
•
Kontrollige, kas manseti toru ja/või
õhuballoon lekib. Vajadusel asendage
defektsed osad.
Deflatsioonimäära ei
saa valida kuni
2-3 mmHg/sek reguleerides ventiili 4.
Kummiballoon lahti, kontrollida kas pole
ummistust vooliku torudes. Vajadusel
eemaldada ummistus ja proovida uuesti.
Kui see ikka ei tööta siis asendada see
uuega, et vältida vääraid näitusid.
Rahuolekus manomeetri osuti ei näita
0 ± 3 mmHg.
• Veenduge, et õhuventiil oleks täielikult
avatud null sisse.
• Kui ikka üle 3 mmHg kõrvalekalle,
edasimüüjalt kalibreerimine harru.
Page 19

17BP AG1-20
EE
•
See seade koosneb täppisdetailidest - käsitsege seda ettevaatlikult. Järgige alalõigus «Tehnilised andmed» kirjeldatud hoiu- ja
kasutustingimusi!
• Kaitske seadet:
- vee ja niiskuse,
- ekstreemsete temperatuuride,
- põrutuste ja kukkumiste,
- määrdumise ja tolmu,
- otsese päikesevalguse ning
- kuuma ja külma eest.
• Mansetid on õrnad ning neid tuleb ettevaatlikult käsitseda.
•
Alustage manseti täitmist alles siis, kui olete selle käele asetanud.
• Mitte täita mansetti üle 300 mmHg.
• Enne ladustamist tühjendage mansett täielikult.
• Ärge kasutage seadet, kui see on teie meelest kahjustunud või
täheldate sellel midagi ebatavalist.
• Ärge ühelgi juhul seadet avage.
• Lugege ohutusjuhiseid selle brošüüri vastavas lõigus.
Lapsed ei tohi seadet ilma järelevalveta kasutada; mõned
selle osad on nii väikesed, et lapsed võivad need alla
neelata. Olge teadlik kägistamise riskist kui seade on
varustatud juhtmete ja voolikutega.
Aparaadi hooldus
Puhastage vererõhuaparaati ainult pehme kuiva riidelapiga.
Manseti puhastamine
Eemaldage plekid ettevaatlikult kasutades niisket lappi ja seebivahtu.
HOIATUS: Ärge peske mansetti pesumasinas ega nõudepesumasinas!
Täpsustest
Me soovitame vererõhuaparaadi mõõtetäpsust kontrollida iga
2 aasta järel või pärast võimalikku mehhaanilist kahjustust (nt
pärast maha pillamist). Täpsustesti tegemiseks pöörduge oma
kohaliku Microlife esindaja poole (vt eessõna).
Käitlus
Patareid ja elektroonikaseadmed tuleb hävitada kooskõlas
asjakohaste kohalike seadustega. Ärge visake neid olmeprügi hulka.
6. Garantii
Sellele seadmele on antud
2 -aastane garantii
, mis algab ostukuupäevast. Garantii kehtib ainult müügiesindaja täidetud garantiikaardi
(vt tagakaas) või ostutšeki esitamisel.
• Garantii alla ei kuulu mansett ja kandeosad.
• Garantii muutub kehtetuks, kui seadet on lahti võetud või on
seda muudetud.
• Garantii ei kata valest käsitsemisest, õnnetusjuhtumitest või
kasutusjuhiste mittejärgimisest tekkinud kahjusid.
Palun võtke ühendust oma kohaliku Microlife esindajaga
(vt eessõna).
7. Tehnilised andmed
See seade vastab kõigile Meditsiiniseadme Direktiivi 93/42/EEC
nõuetele.
Võimalikud on tehnilised modifikatsioonid.
Kaal: 450 g
Mõõdud: 175 x 70 x 103 mm
Hoiutingimused: -20 - +70 °C
85 % suhteline maksimaalne niiskus
Töötingimused: 10 - 40 °C
Mõõtevahemik: 0 - 300 mmHg
Resolutsioon: 2 mmHg
Staatiline täpsus: jooksul ± 3 mmHg vahel 18 - 33 °C;
jooksul ± 6 mmHg vahel 34 - 46 °C
Rõhu langetamise
kiirus: 2-3 mmHg/sek
Õhuleke: < ± 4 mmHg/min
Hüstereetiline viga: jooksul 0 - 4 mmHg
Lisatud lisavarustus: M-mansett (22-32 cm), kummiballoon,
ohuventiil, stetoskoop, pehme kott
Vastavus
standarditele: EN 1060-1/-2; ANSI / AAMI SP09
Page 20

18
Перед использованием прибора внимательно прочтите
данное руководство.
Уважаемый покупатель,
Этот механический прибор для измерения артериального
давления гарантирует Вам точное и последовательное измерение.
Пожалуйста, внимательно прочтите настоящие указания для
получения четкого представления обо всех функциях и
технике безопасности. Нам бы хотелось, чтобы Вы были удовлетворены качеством изделия Microlife. При возникновении
вопросов
или проблем, пожалуйста, обращайтесь в местный
сервисный центр Microlife. Ваш дилер или аптека могут предоставить Вам адрес дилера Microlife в Вашей стране. В качестве альтернативы, посетите в Интернете страницу
www.microlife.ru, где Вы сможете найти ряд полезных
сведений по нашему изделию.
Будьте здоровы – Microlife AG!
Оглавление
1. Важная информация об артериальном давлении и
самостоятельное измерение
• Как определить артериальное давление?
2. Использование прибора в первый раз
• Подбор подходящей манжеты
3. Выполнение измерений артериального давления при
помощи прибора
• Рекомендации для получения надежных результатов
измерений
• Процедура измерения
4. Неисправности / устранение неполадок
5. Техника безопасности, уход, проверка точности и
утилизация
• Техника безопасности и защита
• Уход за прибором
• Очистка манжеты
• Проверка точности
• Утилизация
6. Гарантия
7. Технические характеристики
Гарантийный талон (см. на обратной стороне)
1. Важная информация об артериальном
давлении и самостоятельное измерение
•
Артериальное давление
- это давление крови, подаваемой
сердцем в артерии. Всегда измеряются два значения, систолическое (верхнее) давление и диастолическое (нижнее)
давление.
• Постоянно повышенное артериальное давление может
нанести ущерб Вашему здоровью, и в этом случае Вам
необходимо обратиться к врачу!
•
Всегда сообщайте врачу о Вашем давлении и сообщайте ему/
ей, если Вы заметили что-нибудь необычное или чувствуете
неуверенность.
Никогда не полагайтесь на результат
однократного измерения артериального давления.
•
Чрезмерное повышение артериального давления может быть
вызвано рядом причин. Врач разъяснит Вам это более
подробно и в случае необходимости предложит метод
лечения. Кроме того, медикаментозное лечение, методики
Microlife BP AG1-20
RU
1
Манометр
2
Манжета
3
Нагнетатель
4
Регулируемый клапан спуска
5
Стетоскоп
6
Головка стетоскопа
7
Ушные оливы
Page 21

19BP AG1-20
RU
снятия напряжения, снижение веса и упражнения также
способствуют снижению артериального давления.
• Ни при каких обстоятельствах не меняйте дозировку
любых лекарств, назначенных врачом!
•
В зависимости от физических нагрузок и состояния, артериальное давление подвержено знaчитeльным колебаниям в
течение дня.
Поэтому каждый раз процедура измерений
должна проводиться в спокойных условиях и когда Вы
не чувствуете напряжения!
Выполняйте по крайней мере
два измерения в день, одно утром и одно вечером.
• Совершенно нормально, если при двух измерениях подряд
полученные результаты будут отличаться друг от друга.
• Расхождения между результатами измерений, полученными врачом или в аптеке, и результатами, полученными в
домашних условиях, также являются вполне нормальными,
поскольку ситуации, в которых проводятся измерения,
совершенно различны.
• Многократные измерения позволяют получить более
четкую картину,
чем просто однократное измерение.
• Сделайте небольшой перерыв, по крайней мере, в
15 секунд между двумя измерениями.
• Во время беременности следует тщательно следить за
артериальным давлением, поскольку на протяжении этого
периода оно может существенно меняться!
Как определить артериальное давление?
Оценка давления определяется по наивысшему значению.
Например: давление 140/80 мм.рт.ст.
и давление 130/
90 мм.рт.ст. оба оцениваются как «артериальное давление
очень высокое».
2. Использование прибора в первый раз
Подбор подходящей манжеты
При выборе правильного размера манжеты, обхват руки
должен измеряться в центре верхней части руки. 22 - 32 см
(8.75 - 12.5 дюймов) - это правильный размер для большинства людей.
Пользуйтесь только манжетами Microlife!
Обратитесь в местный сервисный центр Microlife, если
приложенная манжета 2 не подходит.
3. Выполнение измерений артериального
давления при помощи прибора
Рекомендации для получения надежных результатов
измерений
1. Избегайте физической активности, не ешьте и не курите
непосредственно перед измерением.
2. Перед измерением присядьте, по крайней мере, на пять
минут и расслабьтесь.
3. Всегда проводите измерения на одной и той же руке
(обычно на левой).
4. Снимите облегающую одежду с плеча. Не следует закаты-
вать
рукав рубашки, это может привести к сдавливанию,
рукава из тонкой ткани не мешают измерению, если прилегают свободно.
5. Убедитесь, что используется манжета правильного размера
(маркировка на манжете).
•
Плотно наложите манжету, но не слишком туго.
•
Убедитесь, что манжета расположена на 2 см. выше локтя.
•
Метка артерии
на манжете (линия длиной около 3 см.)
должна находиться над артерией с внутренней стороны
руки.
•
Расположите руку так, чтобы она оставалась расслабленной.
•
Убедитесь, что манжета находится на той же высоте, что и
сердце.
6. Неправильная установка или повреждение стетоскопа
может стать причиной искаженного звука или плохой передачи звука, которые влияют на точность показаний.
7.
Правильная скорость спуска имеет важное значение для
получения точности показаний.
Необходимо освоить рекомендованную скорость спуска 2-3 мм рт.ст. в секунду или спуск
1-2 знаков на шкале манометра
1
для каждого сердцебиения.
Таблица для классификации значений артериального давления
взрослого человека в соответствии с международными рекомендациями ESH, AHA, JSH. Данные приведены в мм.рт. ст.
Диапазон
Систолическое
Диастолическое Рекомендация
артериальное давление
слишком низкое
100
60
Обратитесь к врачу
1. оптимальное артериальное давление
100 - 130 60 - 80
Самостоятельный
контроль
2. повышенное артериальное давление
130 - 135 80 - 85
Самостоятельный
контроль
3. артериальное давление
слишком высокое
135 - 160 85 - 100
Обратитесь за медицинской помощью
4. артериальное давление
угрожающе высокое
160
100
Срочно обратитесь
за медицинской
помощью!
Page 22

20
Процедура измерения
1. Установите головку стетоскопа 6 под манжету 2 или на
1-2 см ниже манжеты. Убедитесь, что головка стетоскопа
находится в контакте с кожей и лежит на плечевой артерии.
2. Вставьте ушные оливы 7; головка стетоскопа считается
установленной правильно тогда, когда тон Короткова
слышен как самый громкий.
3. 3акройте клапан спуска 4
, расположенный на нагнетателе
3, повернув винт по часовой стрелке.
4. Возьмите нагнетатель 3 подкачки в свободную руку (рука,
на которой не проводятся измерения) и накачайте манжету.
Наблюдайте за индикацией давления на манометре 1 и
подкачайте приблизительно на 40 мм рт. ст. выше, чем
ожидаемое систолическое давление (верхнее значение).
• Eсли Вы не
уверены в этой величине, накачайте
манжету до давления 200 мм рт.ст..
5. Медленно откройте клапан 4, поворачивая винт против
часовой стрелки, и держите головку стетоскопа 6 над
плечевой артерией. Слушайте внимательно, как манжета
начинает спускать воздух. 3аметьте показание на манометре 1, как только Вы услышите четкий, ритмичный стук
или биение
. Это значение является величиной систоли-
ческого артериального давления.
6. Позволяйте давлению падать при той же скорости выпуска
воздуха. 3аметьте показание на манометре 1, как только
звук биения перестает быть слышимым. Это значение
является величиной диастолического артериального
давления.
7. Полностью выпустите воздух из манжеты.
8. Повторите измерения как минимум два раза. Запишите
свои
измерения, а также время и дату измерения сразу же
после проведения измерений.
9. Снимите манжету и стетоскоп.
4. Неисправности / устранение неполадок
Eсли во время использования устройства имеют место
проблемы, необходимо проверить следующие моменты и предпринять соответствующие меры в случае необходимости:
Если Вам кажется, что результаты отличаются от
обычных, то, пожалуйста, внимательно прочтите
информацию в «Разделе 1.».
Описание Возможная причина и устранение
Плохая передача
тона, искажения
или посторонний
шум.
• Проверьте ушные оливы, если они
грязные или с трещинами. Если нет, то
убедитесь, что вы носите их должным
образом.
• Проверьте, не имеет ли трубка
трещин
и не перекручена ли она.
• Проверьте мембрану рабочей части
стетоскопа, если есть какие-либо
повреждения.
• Удостоверьтесь, что рабочая часть
стетоскопа находится в надлежащем
контакте с кожей и располагается над
плечевой артерией во время измерения. Во избежание неточных измерений, прочистите или замените
неисправные детали.
При накачивании
манжеты нагнетателем
3
давление не
увеличивается.
• Удостоверьтесь, что клапан закрыт.
• Удостоверьтесь, что манжета
правильно подсоединена к резиновому
баллону и манометру.
• Проверьте, не имеют ли манжета,
трубка и/или резиновый баллон утечек.
При обнаружении неисправности замените неисправные детали.
Скорость выпуска
воздуха не может
быть установлена
на 2-3 мм рт. ст./сек
клапана выпуска
воздуха
4
.
Отсоедините клапан от «груши» для того,
чтобы проверить, не имеется ли препятствий для воздуха внутри клапана.
Удалите препятствия и повторите попытку
снова. Eсли клапан не работает должным
образом, замените его во избежание получения неточных результатов измерений.
Стрелка манометра в состоянии покоя находится не в положении 0 ± 3 мм
рт.ст.
•
Удостоверьтесь, что при проверке установки нуля клапан полностью открыт.
•
Eсли отклонение от нулевого значения
превышает 3 мм рт. ст., обратитесь к
торговой организации для повторной
калибровки манометра.
Page 23

21BP AG1-20
RU
5. Техника безопасности, уход, проверка точности
и утилизация
Техника безопасности и защита
• Прибор может использоваться только в целях, описанных в
данном буклете. Изготовитель не несет ответственности за
повреждения, вызванные неправильным использованием.
• В состав прибора входят чувствительные компоненты,
требующие осторожного обращения. Ознакомьтесь с условиями хранения и эксплуатации, описанными в разделе
«Технические характеристики»!
• Оберегайте прибор от:
- воды и
влаги
- экстремальных температур
- ударов и падений
- загрязнения и пыли
- прямых солнечных лучей
- жары и холода
• Манжеты представляют собой чувствительные элементы,
требующие бережного обращения.
• Производите накачку только наложенной манжеты.
• Никогда не накачивайте давление выше чем 300 мм рт. ст.
• Спустите полностью воздух из манжеты перед тем как ее
сложить.
• Не
используйте прибор, если Вам кажется, что он повре-
жден, или если Вы заметили что-либо необычное.
• Никогда не вскрывайте прибор.
• Прочтите дальнейшие указания по безопасности в
отдельных разделах этого буклета.
Позаботьтесь о том, чтобы дети не могли использовать
прибор без присмотра, поскольку некоторые его мелкие
части могут быть проглочены. При поставке прибора с
кабелями и трубками возможен риск удушения.
Уход за прибором
Используйте для чистки прибора только сухую, мягкую ткань.
Очистка манжеты
Осторожно удалите пятна с манжеты с помощью влажной
тряпки и
мыльной воды.
ПРЕДУПРЕЖДЕНИЕ:
Не стирать манжету в стиральной
или посудомоечной машине!
Проверка точности
Мы рекомендуем проверять точность прибора каждые 2 года
либо после механического воздействия (например, падения).
Для проведения теста обратитесь в местный сервисный центр
Microlife (см. введение).
Утилизация
Батареи и электронные приборы следует утилизировать
в соответствии с принятыми нормами и не выбрасывать
вместе с бытовыми отходами.
6. Гарантия
На прибор распространяется гарантия в течение
2 лет
с даты
приобретения. Гарантия действительна только при наличии
гарантийного талона, заполненного дилером (см. с обратной
стороны), подтверждающего дату продажи, или кассового чека.
•
Гарантия не распространяется на манжету и изнашиваемые
части.
• Вскрытие и механические повреждения приводят к утрате
гарантии.
•
Гарантия не распространяется на повреждения, вызванные
неправильным обращением, несчастными случаями или
невыполнением инструкций по эксплуатации.
Пожалуйста, обратитесь в местный сервисный центр Microlife
(см. введение).
7. Технические характеристики
Масса:
450г
Размеры:
175 x 70 x 103 мм
Условия
хранения:
-20 - +70 °C
максимальная относительная влажность 85 %
Условия
применения: 10 - 40 °C
Диапазон
измерений:
0 - 300 мм рт.ст.
Минимальный
шаг индикации: 2 мм рт.ст.
Статическая
точность:
в пределах ± 3 мм рт.ст, между 18 - 33 °C;
в пределах ± 6 мм рт.ст, между 34 - 46 °C
Скорость
выпуска воздуха:
2-3 мм рт. ст./с.
Page 24

22
Данный прибор соответствует требованиям директивы ЕС о
медицинском оборудовании 93/42/EEC.
Право на внесение технических изменений сохраняется.
Утечка воздуха:
< ± 4 мм рт. ст./мин
Погрешность
запаздывания:
в пределах 0 - 4 мм рт.ст.
Комплектация: манжета M (22-32 см), нагнетатель с
клапаном, стетоскоп, сумка-чехол
Соответствие
стандартам:
EN 1060-1/-2; ANSI / AAMI SP09
Page 25

23BP AG1-20
RU
Page 26

24
Lue ohjeet huolellisesti ennen kuin käytät laitetta.
Hyvä asiakas,
Tämä verenpaineen mittauspaketti sisältää mekaanisen aneroidi
verenpaineen olkavarresta tapahtuvaan mittaamiseen tarkasti ja
toistettavasti tarkoitetun laitteen.
Lue nämä ohjeet läpi huolellisesti, jotta ymmärrät kaikki toiminnot
ja turvallisuutta koskevat tiedot. Tahdomme sinun olevan tyytyväinen Microlife-tuotteeseesi. Jos sinulla on kysyttävää tai
ongelmia, ota yhteys paikalliseen Microlife-asiakaspalveluusi.
Saat paikallisen Microlife-jälleenmyyjän osoitteen kauppiaaltasi tai
apteekistasi. Voit vaihtoehtoisesti käydä www.microlife.fi-sivustollamme, josta löydät paljon tuotteitamme koskevia tärkeitä tietoja.
Pysy terveenä – Microlife AG!
Sisällysluettelo
1. Tärkeitä faktoja verenpaineesta ja omatoimisesta
mittaamisesta
• Miten arvioin verenpaineeni?
2. Laitteen käyttäminen ensimmäistä kertaa
• Oikean mansetin valitseminen
3. Verenpaineen mittaus laitteen avulla
• Luotettavan mittauksen takaava tarkistuslista
• Mittaaminen
4. Toimintahäiriö / vianmääritys
5. Turvallisuus, huolto, tarkkuustesti ja hävittäminen
• Turvallisuus ja suojaaminen
• Laitteen huolto
• Mansetin puhdistaminen
• Tarkkuustesti
• Hävittäminen
6. Takuu
7. Tekniset tiedot
Takuukortti (katso takakantta)
Microlife BP AG1-20
FI
1
Manometri
2
Mansetti
3
Pumppupallo
4
Säädettävä ilmavirtaventiili
5
Stetoskooppi
6
Rintaosa
7
Korvaosa
Page 27

25BP AG1-20
FI
1. Tärkeitä faktoja verenpaineesta ja omatoimisesta
mittaamisesta
•
Verenpaine
on valtimoissa virtaavan veren verenpaine sydämen
pumpatessa verta valtimoihin. Mittauksen yhteydessä mitataan
aina kaksi arvoa,
systolinen
(ylempi) arvo ja
diastolinen
(alempi)
arvo.
• Pysyvästi korkeat verenpainearvot saattavat olla haitallisia
terveydellesi ja niiden hoitamiseen tarvitaan lääkäriä!
• Keskustele verenpainearvoistasi aina lääkärisi kanssa ja kerro
hänelle, jos olet huomannut jotakin erikoista, tai jos olet
epävarma jostakin. Älä milloinkaan luota yksittäisiin veren-
painelukemiin.
•
Liian
korkeisiin verenpainearvoihin
on olemassa monia syitä.
Lääkärisi selittää niiden merkityksen yksityiskohtaisesti ja
ehdottaa tarpeen tullen hoitoa. Paitsi lääkitys, myös rentoutustekniikat, painon pudotus ja liikunta voivat alentaa verenpainettasi.
• Sinun ei tule missään tapauksessa muuttaa lääkärisi
määräämiä lääkeannoksia!
• Verenpaine vaihtelee suuresti päivän aikana riippuen fyysisestä kuormituksesta ja kunnosta. Tämän takia sinun tulisi
suorittaa mittaus aina samoissa rauhallisissa olosuhteissa
ja silloin kun tunnet olevasi rentoutunut! Suorita mittaus
ainakin kaksi kertaa päivässä, kerran aamulla ja kerran illalla.
• On normaalia, että kaksi peräkkäin tehtyä mittausta antaa
toisistaan huomattavasti eroavia tuloksia.
• Erot lääkärisi tai apteekkisi suorittamien mittausten ja kotona
saamiesi tulosten välillä ovat normaaleja, koska nämä tilanteet
ovat aivan erilaiset.
• Useammat mittaukset antavat paljon selvemmän kuvan kuin
ainoastaan yksi mittaus.
• Jätä kahden mittauksen väliin pieni, vähintään 15 sekunnin
mittainen tauko.
•
Jos olet
raskaana
, sinun tulisi tarkkailla verenpainettasi huolellisesti, koska se saattaa vaihdella merkittävästi tämän ajanjakson
aikana!
Miten arvioin verenpaineeni?
Korkeampi arvo määrittää arvioinnin. Esimerkki: verenpainearvo
140/80
mmHg tai
130/90
mmHg ilmaisee «liian korkea verenpaine».
2. Laitteen käyttäminen ensimmäistä kertaa
Oikean mansetin valitseminen
Oikeaa mansettikokoa valitessa, mittaa yläkäsivarren keskikohta.
Koko 22 - 32 cm (8,75 - 12,5 inches) pitäisi olla sopiva koko useimmille ihmisille.
Käytä ainoastaan Microlife-mansetteja!
Ota yhteys paikalliseen Microlife-palveluusi, jos toimitettu
mansetti 2 ei sovi.
3. Verenpaineen mittaus laitteen avulla
Luotettavan mittauksen takaava tarkistuslista
1. Vältä fyysisiä aktiviteetteja, syömistä ja tupakointia välittömästi
ennen mittausta.
2. Istuudu vähintään 5 minuutiksi ennen mittausta - ja rentoudu.
3. Mittaa aina samasta käsivarresta (normaalisti vasemmasta).
4. Poista tiukka vaatetus käsivarrelta. Paidan hihat voivat kiristää,
jos ne kääritään ylös. Sileät ja kiristämättömät hihat eivät
haittaa mansetin käyttöä.
5. Varmista aina, että käytössä on oikean kokoinen mansetti (kts.
merkintä mansetissa).
• Aseta mansetti ihonmyötäisesti, mutta älä liian tiukalle.
• Varmista, että mansetti on sijoitettu 2 cm kyynärpään
yläpuolelle.
Taulukko kotona mitattavien verenpainearvojen luokitteluun aikuisilla kansainvälisten ohjeistusten mukaisesti (ESH, AHA, JSH).
Tiedot muodossa mmHg.
Vaihteluväli Systolinen Diastolinen Suositus
liian alhainen
paine
100
60
Käänny lääkärin
puoleen
1. optimaalinen
verenpaine
100 - 130 60 - 80
Omatoiminen
seuranta
2. kohonnut verenpaine
130 - 135 80 - 85
Omatoiminen
seuranta
3. liian korkea verenpaine
135 - 160 85 - 100
Ota yhteyttä
lääkäriin
4. vaarallisen korkea
verenpaine
160
100
Ota kiireisesti
yhteyttä lääkäriin!
Page 28

26
• Mansetissa olevan valtimo-merkin (noin 3 cm pitkä palkki)
tulee sijaita käsivarren sisäpuolella olevan valtimon päällä.
• Tue käsivartesi niin, että se on rentona.
• Varmista, että mansetti on samalla korkeudella sydämesi
kanssa.
6. Sopimaton tai vahingoittunut stetoskooppi voi vääristää äänen
tai antaa vain heikon äänen ja näin epätarkan tuloksen.
7. Sopiva ilman poispäästämisen vauhti on tärkeää tarkan
tuloksen saamiseksi, joten harjoittele, sillä paras ilman poislaskuvauhti on 2-3 mmHg /sekuntti tai 1-2 merkin paineen
pudotus 1 mittavälineessä joka sydämenlyönnillä.
Mittaaminen
1. Aseta stetoskoopin 6 rintakappale mansetin 2 alle tai 1-2 cm
sen alapuolelle. Varmista, että rintakappale on ihon kanssa
kosketuksissa ja olkavarsilaskimon yläpuolella.
2. Laita stetoskoopin korvakappleet 7 korviin ja varmista että
rintakappale on oikealla paikalla, jotta kuulet Korotkoffin äänet
mittauksen aikana.
3. Sulje pumpussa 3 oleva ilmaventtiili 4 kääntämällä ruuvia
myötäpäivään. Älä ylikiristä.
4. Pumppaa ilmapumppua 3 vapaalla kädelläsi (käsi, jota et
käytä mittauksessa) ja täytä mansetti. Katso manometrin 1
paineen osoitinta ja pumppaa noin 40 mmHg yli odotetun
systolisen verenpaineesi (korkeampi arvo).
•
Jos et ole varma arvosta, niin täytä mansetti ensin 200 mmHg.
5. Avaa hitaasti ilmaventtiili
4
kääntämällä ruuvia vastapäivään ja
pidä stetoskoopin rintakappaletta
6
olkavarsilaskimon yläpuolella. Kun mansetti alkaa tyhjentyä, kuuntele huolellisesti. Ota
manometrin
1
lukema heti ylös, kun kuulet heikon rytmisen tai
hakkaavan äänen.
Tämä on systolinen verenpainelukema.
6. Anna paineen jatkaa putoamistaan. Lue manometrin 1
lukema heti, kun heikko, rytminen ääni loppuu. Tämä on dias-
tolinen verenpainelukema.
7. Tyhjennä mansetin venttiili täydellisesti.
8. Toista mittaus vähintään kaksi kertaa ja tallenna arvot välittömästi, päivämäärä, kellonaika, kun mittaus on valmis.
9. Poista mansetti ja stetoskooppi.
4. Toimintahäiriö / vianmääritys
Jos mittauksen aikana ilmenee jokin vika, niin seuraavat asiat
pitää tarkistaa ja jos tarpeellista niin vastaava mittaus pitää tehdä
uudelleen:
Jos tulokset ovat mielestäsi poikkeuksellisia, lue huolellisesti
«osiossa 1.» olevat tiedot.
Kuvaus Mahdollinen syy ja ratkaisu
Äänen toisto on heikko,
vääristynyt tai siellä on
ylimääräisiä häiriöitä.
• Tarkista, että korvaosat eivät ole
likaisia tai säröillä. Jos eivät, varmista
että käytät niitä oikein.
• Tarkasta, että letku ei ole rikki tai kierteellä.
• Tarkista, että välikalvossa tai rintakappaleessa ei ole halkeamia
• Varmista, että rintakapple on täysin
kiinni ihossa ja olkavarsilaskimon
yläpuolella mittauksen aikana.
Puhdista tai vaihda jokainen vahingoittunut osa välttääksesi epätarkan
tuloksen.
Paine ei nouse, vaikka
pumppupallo 3
pumppaa.
• Varmista, että venttiili on kiinni.
• Varmista, että mansetti on kiinnitetty
hyvin pumppuun ja manometriin.
• Tarkista, että mansetti, ilmaputki ja/
tai pumppu ovat ehjiä. Vaihda
mahdolliset rikkinäiset osat.
Ilman poispäästämis 4
tä ei voida säätää
2-3 mmHg/sekuntti.
Purkaa venttiili pumpunpallo ja tarkista
onko ilmaventtiili tukossa. Poista tukos
ja yritä uudelleen. Jos se ei vieläkään
toimi, vaihda uusi venttiili välttyäksesi
epätarkoilta tuloksilta.
Manometri osoitin ei
ole 0 ± 3 mmHg
levossa.
• Varmista, että venttiili on täysin auki
nolla kohdan tarkistamiseksi.
•
Jos edelleen enemmän kuin 3 mmHg
ero, ota yhteyttä jälleenmyyjään
manometrin uudelleen kalibroimiseksi.
Page 29

27BP AG1-20
FI
5. Turvallisuus, huolto, tarkkuustesti ja hävittäminen
Turvallisuus ja suojaaminen
• Tätä laitetta saa käyttää ainoastaan tässä kirjasessa mainittuihin tarkoituksiin. Valmistaja ei ole vastuussa väärinkäytöstä
aiheutuneista vahingoista.
• Laitteessa on herkkiä osia ja sitä täytyy käsitellä varoen.
Noudata säilytys- ja käyttöolosuhteita koskevia neuvoja, jotka
on mainittu «Tekniset tiedot» -kappaleessa!
• Suojaa laitetta seuraavilta:
- vesi ja kosteus
- äärimmäiset lämpötilat
- iskut ja putoamiset
- lika ja pöly
- suora auringonvalo
- kuumuus ja kylmyys
• Mansetit ovat herkkiä ja niitä täytyy käsitellä varoen.
• Pumppaa ilmaa mansettiin ainoastaan silloin kun se on asetettu
paikoilleen.
• Älä koskaan täytä mansettia yli 300 mmHg.
• Tyhjennä mansetti aina kokonaan ennen säilyttämistä.
• Älä käytä laitetta, jos uskot sen olevan vaurioitunut tai jos
huomaat jotakin epätavallista.
• Älä koskaan pura laitetta.
• Lue myös tämän kirjasen muissa kappaleissa olevat turvalli-
suusohjeet.
Huolehdi siitä, että lapset eivät käytä laitetta ilman
valvontaa; jotkut osat ovat tarpeeksi pieniä nieltäviksi. Ole
tietoinen tukehtumisvaaran riskistä siinä tapauksessa, että
laitteen mukana toimitetaan kaapeleita ja putkia.
Laitteen huolto
Puhdista laite ainoastaan pehmeällä, kuivalla kankaalla.
Mansetin puhdistaminen
Puhdista mansetti varovasti kostealla liinalla.
VAROITUS: Älä pese mansettia pyykinpesukoneessa tai
astianpesukoneessa!
Tarkkuustesti
Suosittelemme laitteen tarkkuuden testaamista joka 2. vuosi tai
mekaanisen iskun jälkeen (jos laite on esim. päässyt putoamaan).
Järjestä testiaika ottamalla yhteyttä paikalliseen Microlife-palveluusi (katso johdanto).
Hävittäminen
Paristot ja elektroniset laitteet täytyy hävittää paikallisten,
voimassa olevien määräysten mukaisesti eikä kotitalousjätteiden mukana.
6. Takuu
Laitteella on 2 vuoden takuu ostopäivästä lukien. Takuu on
voimassa ainoastaan silloin, kun korvausvaatimuksen yhteydessä
esitetään kauppiaan täyttämä takuukortti (katso takakantta), joka
vahvistaa laitteen ostopäivän, tai kuitti.
• Takuu ei koske mansettia eikä kuluvia osia.
• Laitteen avaaminen tai muuttaminen mitätöi takuun.
•
Takuu ei korvaa vaurioita, jotka aiheutuvat väärästä käsittelystä,
onnettomuuksista tai käyttöohjeiden noudattamatta jättämisestä.
Ota yhteys paikalliseen Microlife-palveluusi (katso johdantoa).
7. Tekniset tiedot
Tämä laite vastaa EU-direktiivin 93/42/EEC lääkinnällisistä laitteista
asetettuja vaatimuksia.
Oikeus teknisiin muutoksiin pidätetään.
Paino: 450 g
Mitat: 175 x 70 x 103 mm
Säilytysolosuhteet: -20 - +70 °C
85 % suhteellinen maksimaalinen kosteus
Käyttöolosuhteet: 10 - 40 °C
Mittausalue: 0 - 300 mmHg
Resoluutio: 2 mmHg
Staattinen tarkkuus: rajoissa ± 3 mmHg in 18 - 33 °C;
rajoissa ± 6 mmHg in 34 - 46 °C
Paineen laskunopeus: 2-3 mmHg/s.
Ilman vuoto: < ± 4 mmHg/min
Hystereesi-virhe: rajoissa 0 - 4 mmHg
Mukana tarvikkeet: M-mansetti (22-32 cm), pumppupallo,
venttiilit, stetoskooppi, säilytyslaukku
Viittaukset normeihin: EN 1060-1/-2; ANSI / AAMI SP09
 Loading...