

Page 1

IB BP 3BT0-1 Var4 0706
Europe / Middle-East / Africa
Microlife AG
Max Schmidheiny-Strasse 201
9435 Heerbrugg / Switzerland
Tel. +41 / 71 727 70 30
Fax +41 / 71 727 70 39
Email admin@microlife.ch
www.microlife.com
Asia
Microlife Corporation.
9F, 431, RuiGang Road, NeiHu
Taipei, 114, Taiwan, R.O.C.
Tel. 886 2 8797-1288
Fax.886 2 8797-1283
Email service@microlife.com.tw
www.microlife.com
North / Central / South America
Microlife USA, Inc.
424 Skinner Blvd., Suite C
Dunedin, FL 34698 / USA
Tel. +1 727 451 0484
Fax +1 727 451 0492
Email custserv@microlifeusa.com
www.microlife.com
Page 2

microlife BP 3BTO-1
Automatic Blood Pressure Monitor
Instruction Manual (1-15)
ÄÄ‚‚ÚÚÓÓÏχ‡ÚÚˢ˜ÂÂÒÒÍÍËËÈÈ ËËÁÁÏÏÂÂËËÚÚÂÂÎθ¸ ‡‡ÚÚÂÂˡ‡Îθ¸ÌÌÓÓ„„ÓÓ ‰‰‡‡‚‚ÎÎÂÂÌÌËËflfl
êÛÍÓ‚Ó‰ÒÚ‚Ó (16-31)
Automatyczny aparat do mierzenia ciÊnienia
Instrukcja
u˝ywania
(32-47)
Automatikus vérnyomásmérôôkészülék
Használati utasítás (48-63)
Page 3

Automatic Blood Pressure Monitor
Instruction Manual
Page 4

1
Table of Contents
1. Introduction
1.1. Features
1.2. Important information about self-measurement
2. Important Information on the Subject of Blood Pressure and its Measurement
2.1. How does high/low blood pressure arise?
2.2. Which values are normal?
2.3. What can be done, if regular high/low values are obtained?
2.4 MAM technology (Microlife Average Mode)
3. Components of your Blood Pressure Monitor
4. Using your Blood Pressure Monitor
4.1. Inserting the batteries
4.2. Using an mains adapter (special accessory)
4.3. Cuff connection
4.4. Setting the time and date
5. Carrying out a Measurement
5.1. Before the measurement
5.2. Common sources of error
5.3. Fitting the cuff
5.4. Measurement mode selection
5.5. Measuring procedure
5.6. Discontinuing a measurement
5.7. Memory – recall of measurements
5.8. Memory – cancellation of all measurements
6. Printer functions
6.1. How to print the last stored measurement (single data print)
6.2. How to print all measurements stored in memory (data print out with chart)
6.3. Stop printing
7. Error Messages/Malfunctions
8. Care and Maintenance, Recalibration
9. Guarantee
10. Technical Specifications
11. www.microlife.com
Page 5

1. Introduction
1.1. Features
The blood pressure monitor is a fully automatic, digital blood pressure measuring device for use on the
upper arm with integrated MAM technology. This monitor enables very fast and reliable measurement of
the systolic and diastolic blood pressure as well your pulse by use of the oscillometric method.
This device is easy to use and is proven in clinical studies to provide excellent accuracy. The large display
makes it easy to visualize operational status and cuff pressure during a measurement.
Before using, please read through this instruction manual carefully and then keep it in a safe place. For
further questions on the subject of blood pressure and its measurement, please contact your doctor.
Attention!
1.2. Important information about self-measurement
• Self-measurement means Control, not diagnosis or treatment. Y our values must always be discussed
with your doctor. Never alter the dosages of any medication without direction from your doctor.
• The pulse reading is not suitable for checking heart pacemakers!
• In cases of cardiac irregularity (Arrhythmia), measurements made with this instrument should only be
evaluated after consultation with the doctor.
Electromagnetic interference
The device contains sensitive electronic components. Therefore, avoid strong electrical or electromagnetic
fields in the direct vicinity of the device (e.g. mobile telephones, microwave ovens). These can lead to
temporary impairment of the measuring accuracy.
2. Important Information on the Subject of Blood Pressure and its Measurement
2.1. How does high/low blood pressure arise?
Your blood pressure level is determined in the circulatory center of your brain. Your nervous system allows
your body to adapt or alter blood pressure in response to different situations. Your body alters your pulse
and the width of blood vessels through changes in muscles in the walls of blood vessels.
Your blood pressure reading is highest when the heart pumps or ejects blood – this is called your Systolic
Blood Pressure. Your blood pressure reading is lowest when the heart rests (in-between beats) – this is
called your Diastolic Blood Pressure.
Note: Maintain blood pressure values within a «normal» range(s) in order to prevent particular diseases.
2.2. Which values are normal?
Blood pressure is too high if at rest, the diastolic pressure is above 90 mmHg and/or the systolic blood
pressure is over 140 mmHg. If you obtain readings in this range, consult your doctor immediately. High
blood pressure values over time damage blood vessels, vital organs such as the kidney and even your heart.
When blood pressure values are too low, i.e. systolic values under 100 mmHg and/or diastolic values under
60 mmHg, consult your doctor.
Even with normal blood pressure values, a regular self-check with your blood pressure monitor is
recommended. In this way you can detect possible changes in your values early and react appropriately.
2
Page 6
3
If you are undergoing medical treatment to control your blood pressure, please keep a record of the level of
your blood pressure by carrying out regular self-measurements at specific times of the day. Show these
values to your doctor. Never use the results of your measurements to independently alter drug
doses prescribed by your doctor.
Table for classifying blood pressure values (units mmHg): according to World Health Organization:
☞ Further information
• If your values are mostly «normal» under resting conditions but exceptionally high under conditions of
physical or psychological stress, it is possible that you are suffering from so-called «labile
hypertension». In any case, please discuss the values with your doctor.
• Correctly measured diastolic blood pressure values above 120 mmHg require immediate medical
treatment.
2.3. What can be done, if regular increased/low values are obtained?
a) Please consult your doctor.
b) Increased blood pressure values (various forms of hypertension) over time are associated with
considerable risks to health. Blood vessels in your body are endangered due to constriction caused by
deposits in the vessel walls (Arteriosclerosis). This can result in a deficient supply of blood to important
organs (heart, brain, muscles). Additionally, the heart will become structurally damaged.
c) There are many different causes of high blood pressure. We differentiate between the common primary
(essential) hypertension, and secondary hypertension. Secondary hypertension can cause organ
malfunctions. Please consult your doctor for information about the possible origins of your own
increased blood pressure values.
d) There are lifestyle changes you can make to prevent and reduce high blood pressure. These measures
must be part of a healthy lifestyle and include:
A) Eating habits
• Strive for a normal weight as prescribed by your doctor. Reduce overweight!
•Avoid excessive consumption of common salt. (Many «packaged foods» contain high levels of salt).
•Avoid fatty foods. (Packaged foods are frequently high in fats).
B) Previous illnesses
Consistently follow any medical instructions for treating previous illness such as:
• Diabetes (Diabetes mellitus or sugar diabetes)
• Fat metabolism disorder
• Gout
Range Systolic
Blood Pressure
Diastolic
Blood Pressure
Measures
Hypotension lower than 100 lower than 60 Consult your doctor
Normal range between 100 and 140 between 60 and 90 Self-check
Mild hypertension between 140 and 160 between 90 and 100 Consult your doctor
Moderate hypertension between 160 and 180 between 100 and 110 Consult your doctor
Severe hypertension higher than 180 higher than 110 Consult your doctor
immediately
Page 7

C) Habits
• Eliminate smoking
• Drink only moderate amounts of alcohol
• Restrict your caffeine consumption (Coffee, tea, chocolate, etc.)
D) Physical conditioning
•After a preliminary medical examination, exercise regularly.
• Choose sports which require endurance and avoid those which require strength.
•Avoid reaching the limit of your performance.
•With previous illnesses and/or an age of over 40 years, please consult your doctor before beginning your
exercise activities. Y our physician will help you develop an exercise routine that is appropriate for you.
2.4. MAM technology (Microlife Average Mode)
• «MAM technology» is a new type of concept for optimum reliability in self-measurement of blood
pressure.
• An advanced measurement accuracy is achieved by the automatic analysis of three successive
measurements.
• The new system provides reliable values for the doctor and can be used as the basis for reliable
diagnostics and medication therapy for high blood pressure.
A) Why MAM?
• Human blood pressure is not stable
• Scattering of devices
B) Key advantages
Reduction of:
• Device scattering
• Insufficient rest prior to measurement
• Movement artefacts
• Cuff positioning influences
C) Medical benefits
• Improved accuracy
• Reliable patient self-measurement data for the doctor
• Safe hypertension diagnostic
• Reliable therapy control
D) Measurement sequence
•With the full measurement cycles, the total measurement time remains less than 3 minutes, compared to a
single measurement time of 1.5 minute.
• Single results are not displayed.
• Due to the «Data Analysis» result, a 4th measurement
may be applied.
4
1. measurement
2. measurement
3. measurement
Result
Analysis
15 seconds resting time
15 seconds resting time
Page 8

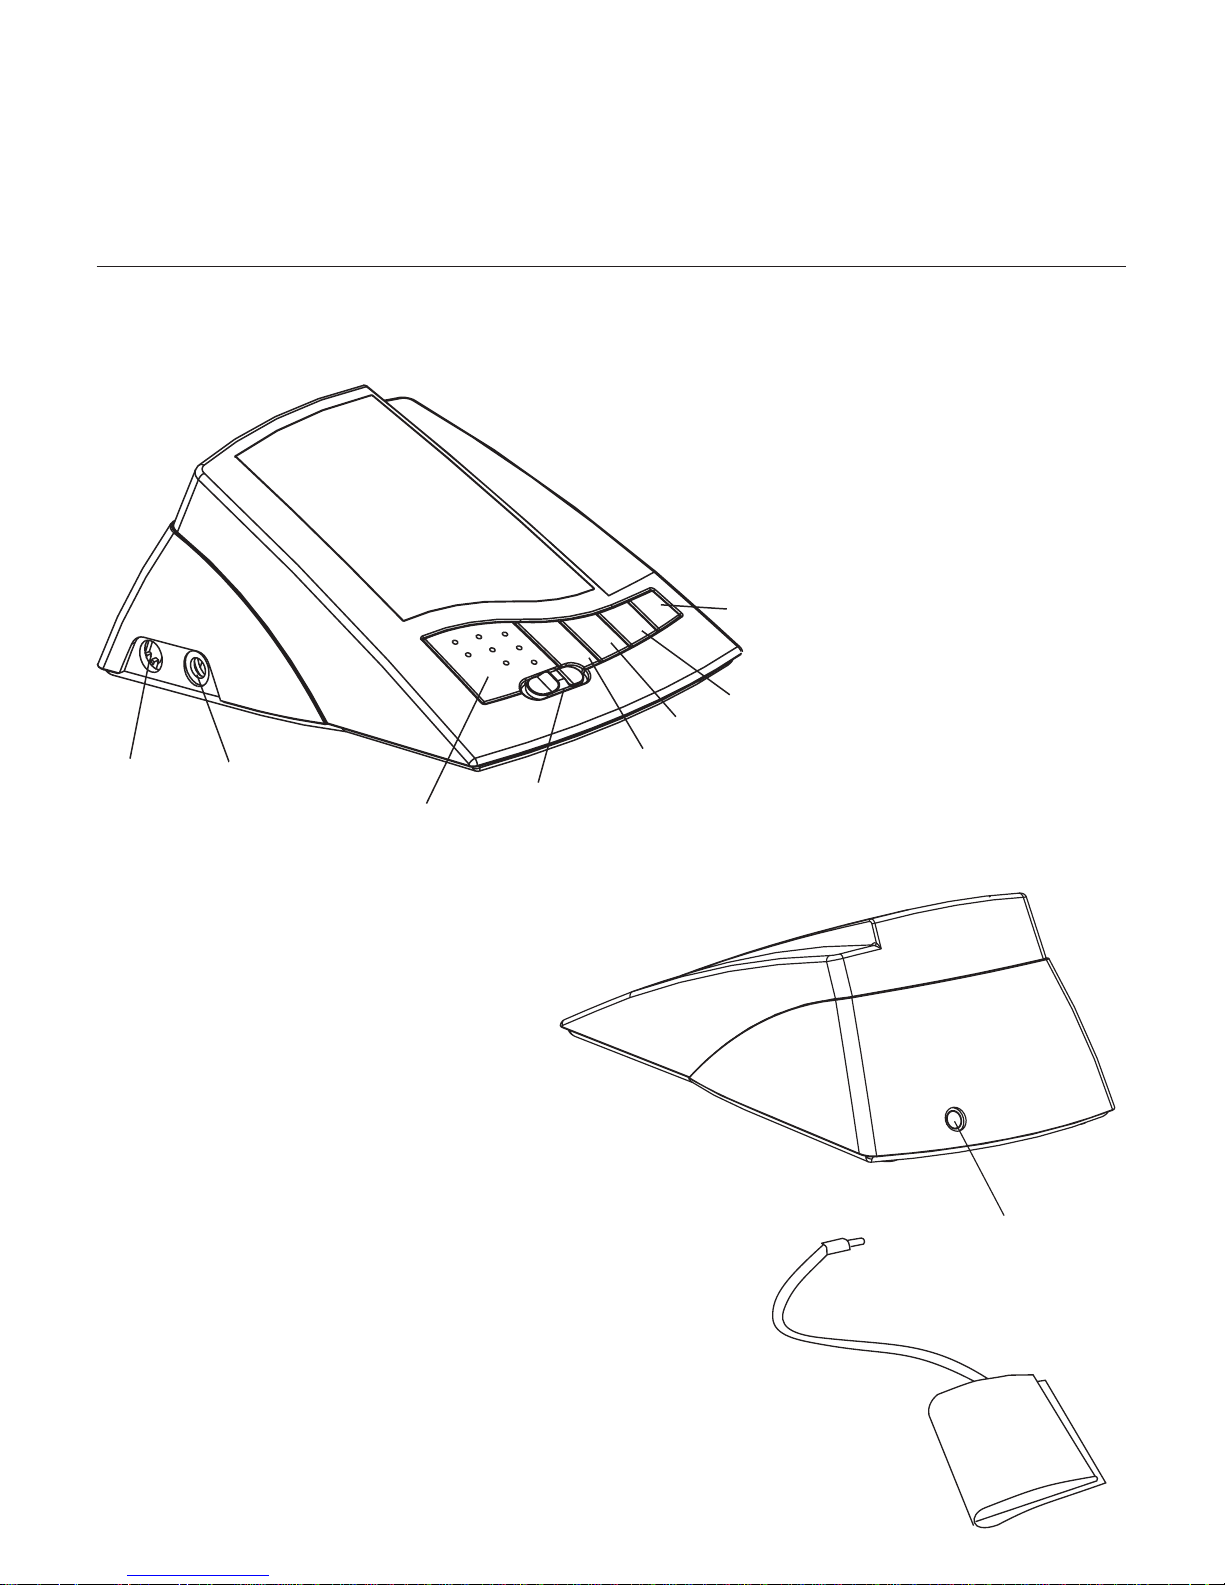
3. Components of the Blood Pressure Monitor
The illustration shows the blood pressure monitor, consisting of:
a) Measuring unit
b) Upper arm cuff
Medium cuff (AC-1 M) for arm circumference 22-32 cm
Large cuff (AC-1 L) for arm circumference 32-42 cm
Note: The large cuff is available as special accessory
5
138
80
70
AC/DC
power socket
Cuff
jacket socket
Start button
Single Mode /
Average Mode (MAM)
O/I button
Memory button
User/Time button
Printer button
Printer port socket
Page 9
4. Using your Blood Pressure Monitor
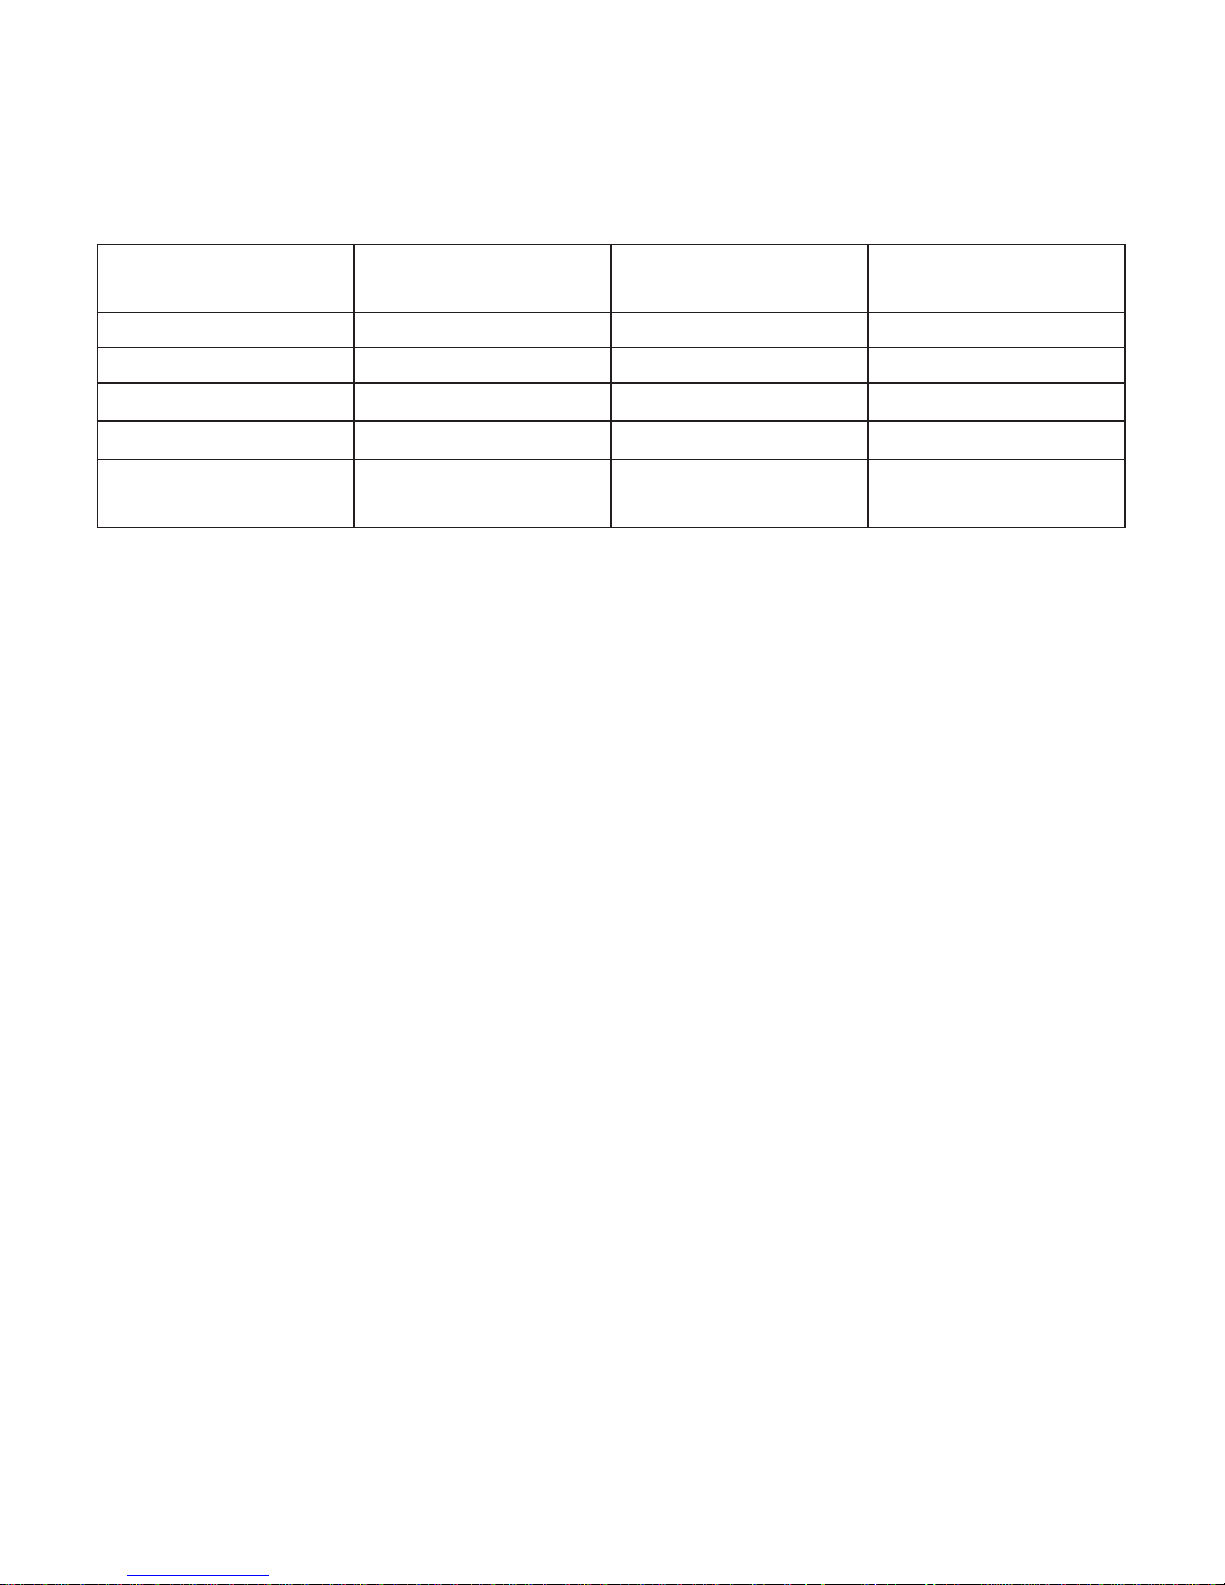
4.1. Inserting the batteries
Insert batteries immediately after unpacking the device.
The battery compartment is located on the back of the
device (see illustration).
a) Remove cover.
b) Insert the batteries (4 x size AA 1,5V), thereby
observing the indicated polarity.
c) If the battery warning appears in the display, the
batteries are empty and must be replaced.
Attention!
• After the battery warning appears, the device is
blocked until the batteries have been replaced.
• Please use «AA» Long-Life or Alkaline 1.5 V Batteries.
The use of 1.2 V Accumulators is not recommended.
• If the blood pressure monitor is left unused for long
periods, please remove the batteries from the device.
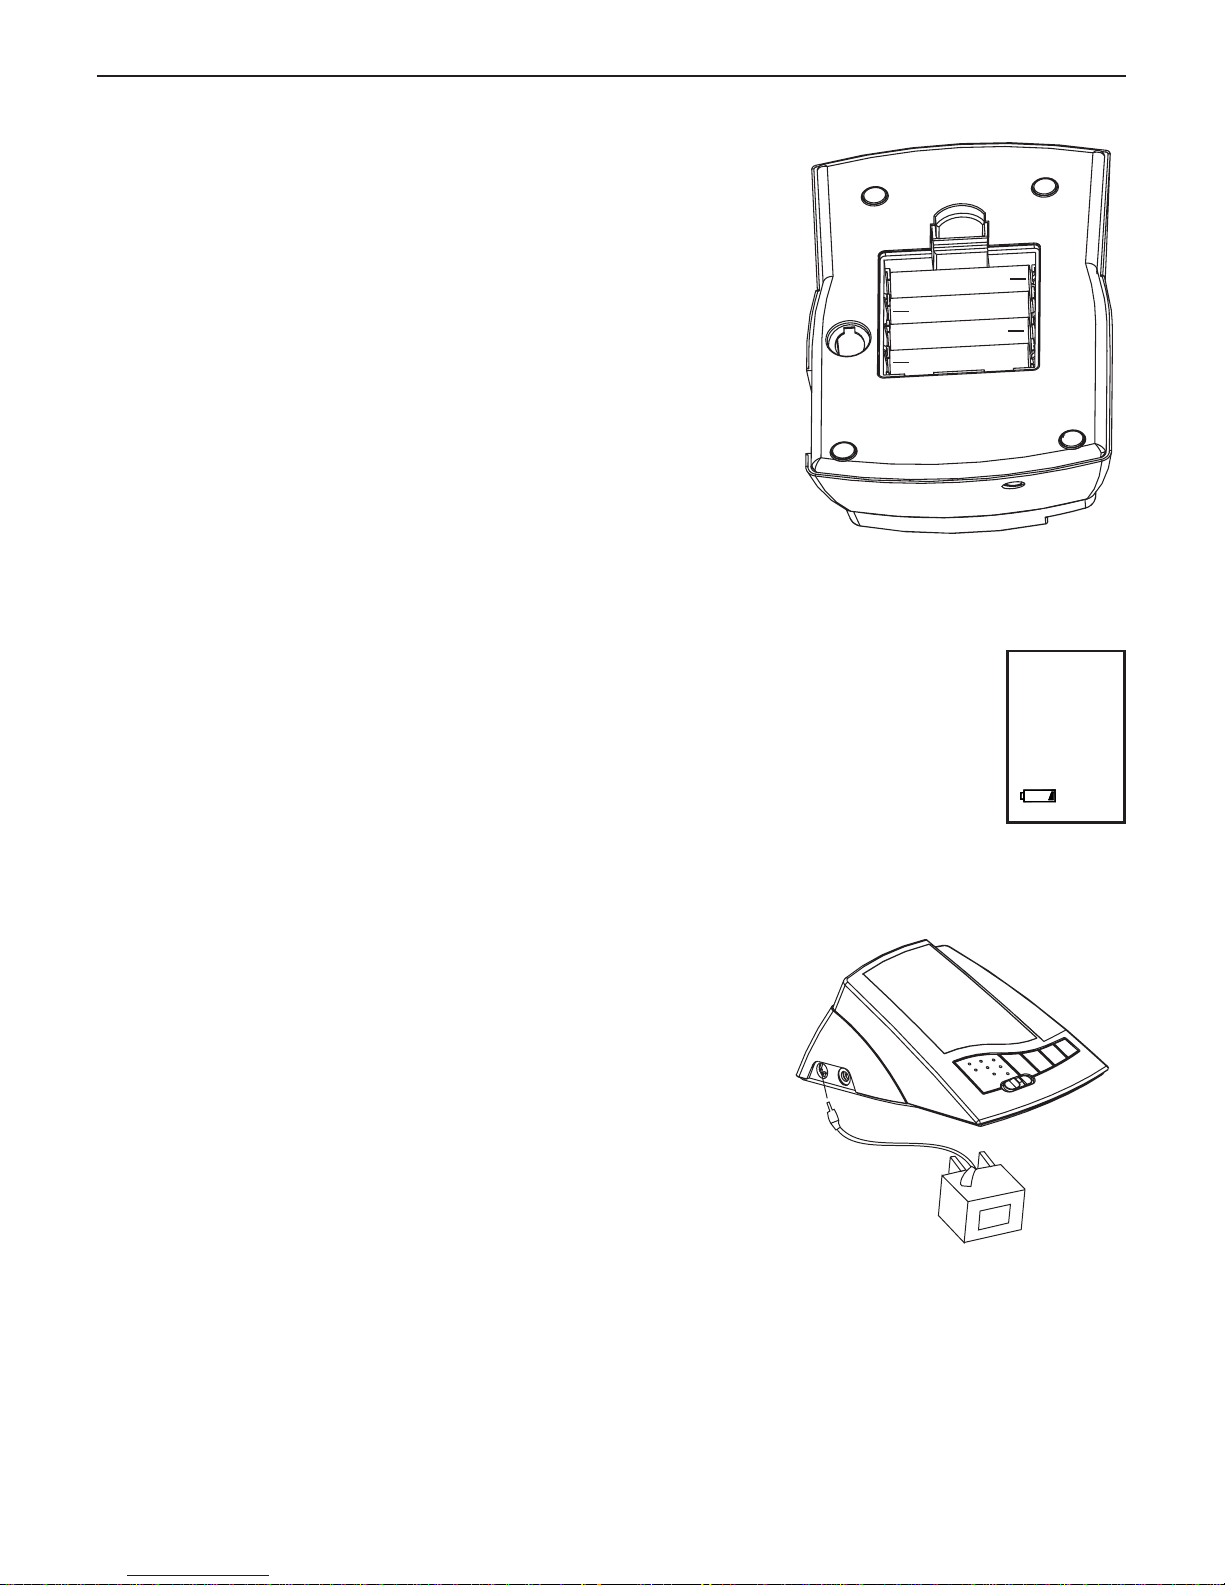
4.2. Using an mains adapter (special accessory)
This blood pressure monitor can be operated with the Microlife mains adapter (output 6 V DC / 600 mA,
DIN plug).
a) Plug the plug into the socket at the back of the
instrument.
b) Plug the mains adapter into a 230 V or 110 V power
socket. Test that power is available by pressing the
O/I button.
Note:
• No power is taken from the batteries while the mains adapter is connected to the instrument.
• If the mains voltage is interrupted during the measurement (e.g. by accidental removal of the mains
adapter from the mains socket), the instrument must be reset by removing the plug from its socket and
re-inserting the connections.
• Please consult a specialist dealer if you have questions relating to the mains adaptor.
6
+
+
+
+
138
80
70
Page 10
7
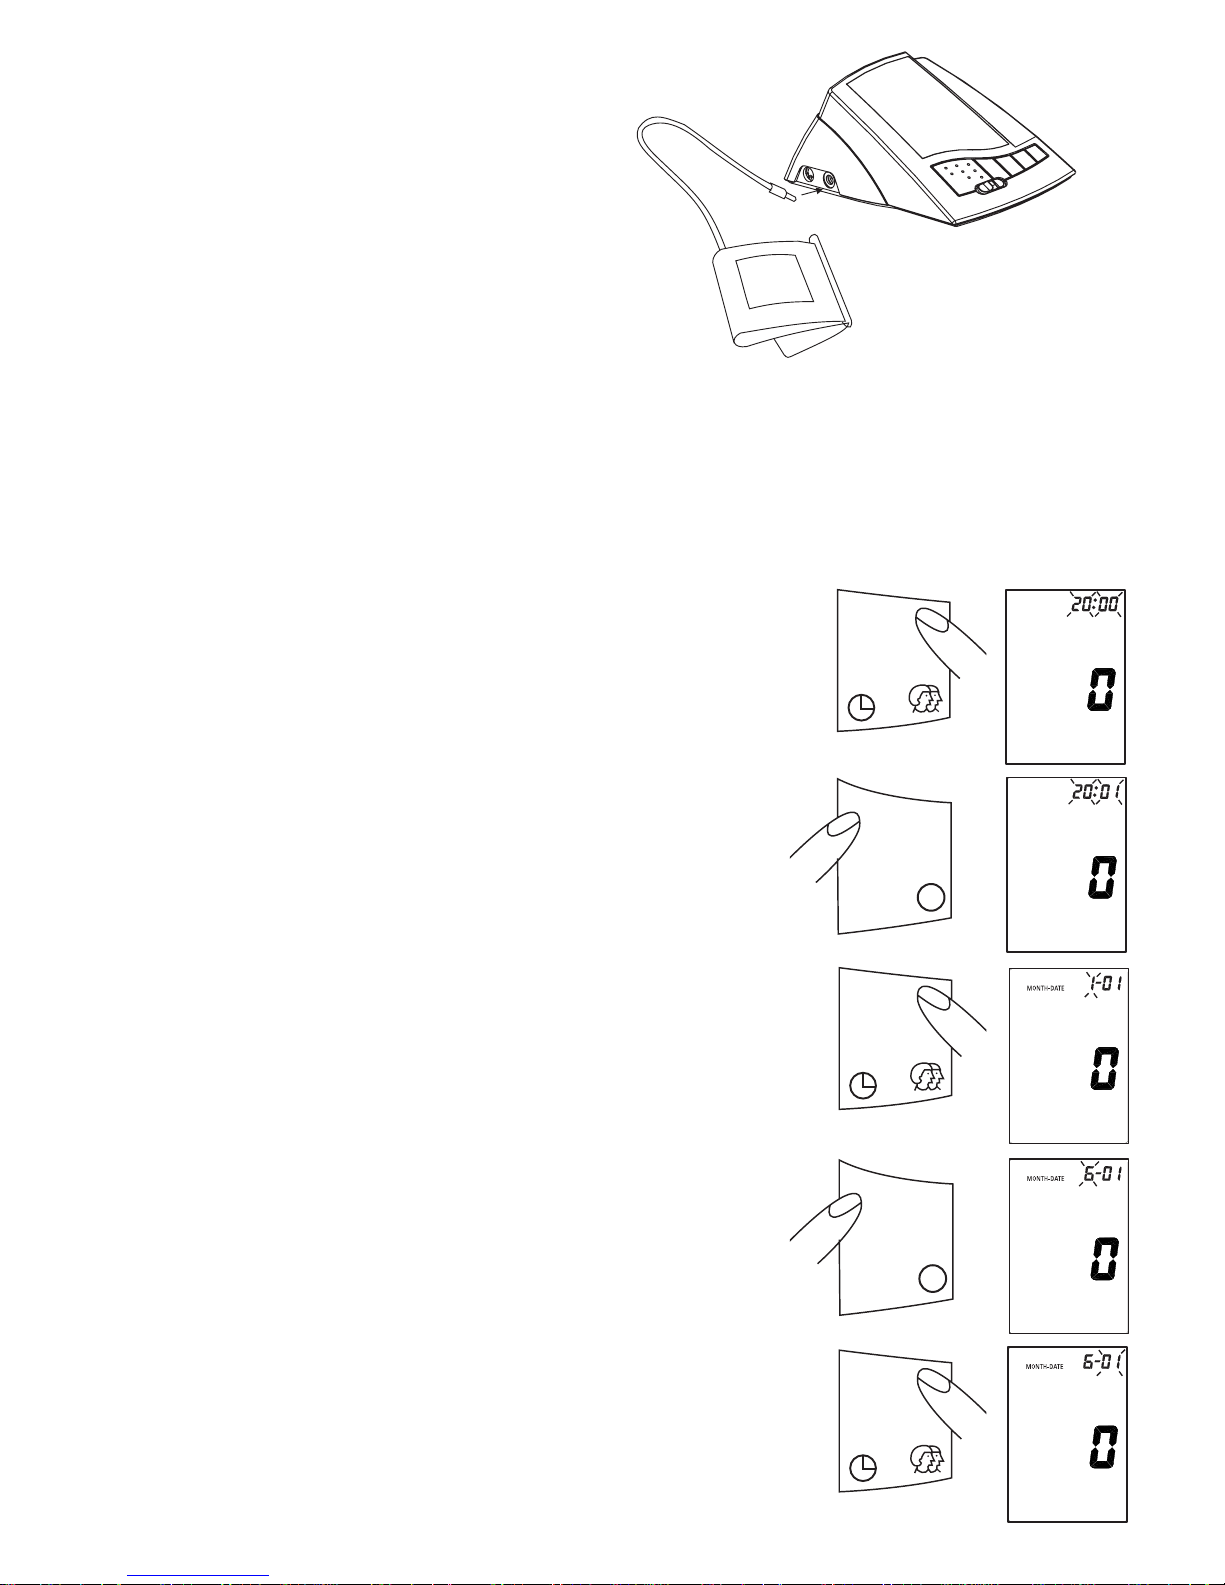
4.3. Cuff connection
Insert the cuff tube into the opening provided on the left
side of the instrument, as shown in the diagram.
4.4. Setting the time and date
This blood pressure monitor automatically records the time and date of each measurement. This is very
important information as blood pressure normally varies over the course of a day.
After new batteries have been inserted, the time/date display shows the following setting: 2000-01-01
00:00 O’clock. (year-month-day-time)
You must then re-enter the date and current time. For this, please proceed as follows (Example: Entering
(year-month-day-time) 2001-06-15 Time 09:30 O’clock):
1. Press the Time button for at least 3 seconds. The
display now indicates the set year, during which the
four characters blink.
2. The correct year can be entered by pressing the
MEMORY button. Once for each change.
(Example: 1 x press).
3. Press the Time button again. The display now switches
to the current date, during which the first character
(month) blinks.
Note:
Holding the button down speeds up the procedure.
4. The current month can now be entered by pressing
the MEMORY button. Example: pressing 6 x advances
6 months)
5. Press the Time button again. The last two characters
(day) are now blinking.
138
80
70
M
M
Page 11
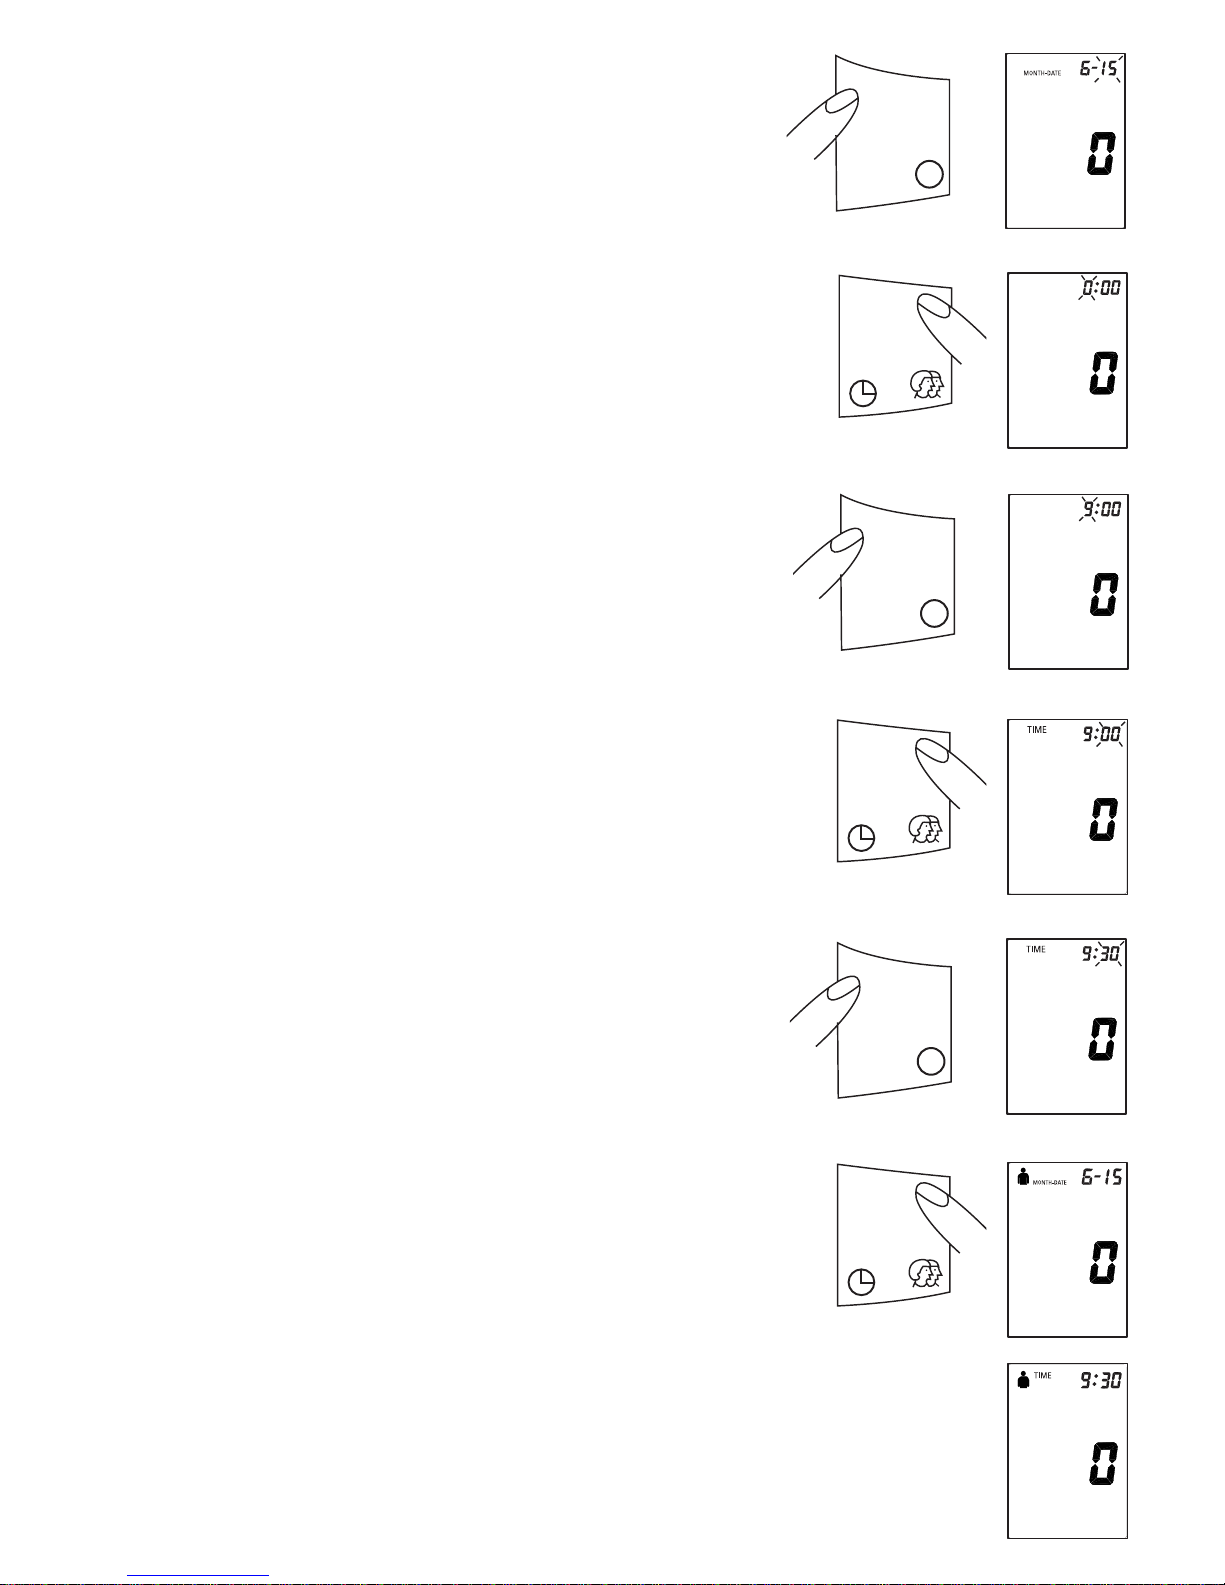
6. The current day can now be entered by pressing the
MEMORY button. (Example: 15 x presses advances
the day from the 1st to 15th)
7. Press the Time button again. The display now switches
to the current time, during which the first character
(hour) blinks.
8. The corresponding hour can now be entered by
pressing the MEMORY button. (Example: 9 x presses
advances from 0 hours to 9:00 )
9. Press the Time button again. The last two characters
(minutes) now blink.
10. The minutes can now be entered by pressing the
MEMORY button. (Example: 30 x presses advances
the time from 0 to 30 minutes)
11. Reading the set date:
After all settings have been entered, click the Time
button once. The date is briefly displayed and then
the time. The input is now confirmed and the clock
begins to run.
8
M
TIME
M
TIME
M
2
2
Page 12
5. Carrying out a Measurement
5.1. Before the measurement
•Avoid eating, smoking as well as all forms of exertion directly before the measurement. All these
factors influence the measurement result. Try to find time to relax by sitting in an armchair in a quiet
atmosphere for about 5 minutes before measurement.
• Remove any garment that fits closely to your upper arm.
• Always measure on the same arm (normally left).
•Take measurements regularly at the same time of day, since blood pressure changes during the course
of the day.
5.2. Common sources of error
Note: Comparable blood pressure measurements always require the same conditions!
These are normally always quiet conditions.
• All efforts by the patient to support their arm can increase blood pressure. Make sure you are in a
comfortable, relaxed position and do not activate any of the muscles in the measurement arm during
the measurement. Use a cushion for support if necessary.
• If the arm artery lies considerably lower (higher) than the heart, an false reading will be obtained. Each
15 cm difference in height results in a measurement error of 10 mmHg!
• Cuffs that are too narrow or too short result in false measurement values. Selecting the correct cuff is
of extraordinary importance. The cuff size is dependent upon the circumference of the arm (measured in
the center). The permissible range is printed on the cuff. If this is not suitable for your use, please
contact your dealer.
Note: Only use clinically approved Microlife Cuffs!
•A loose cuff or a sideways protruding air pocket causes false measurement values.
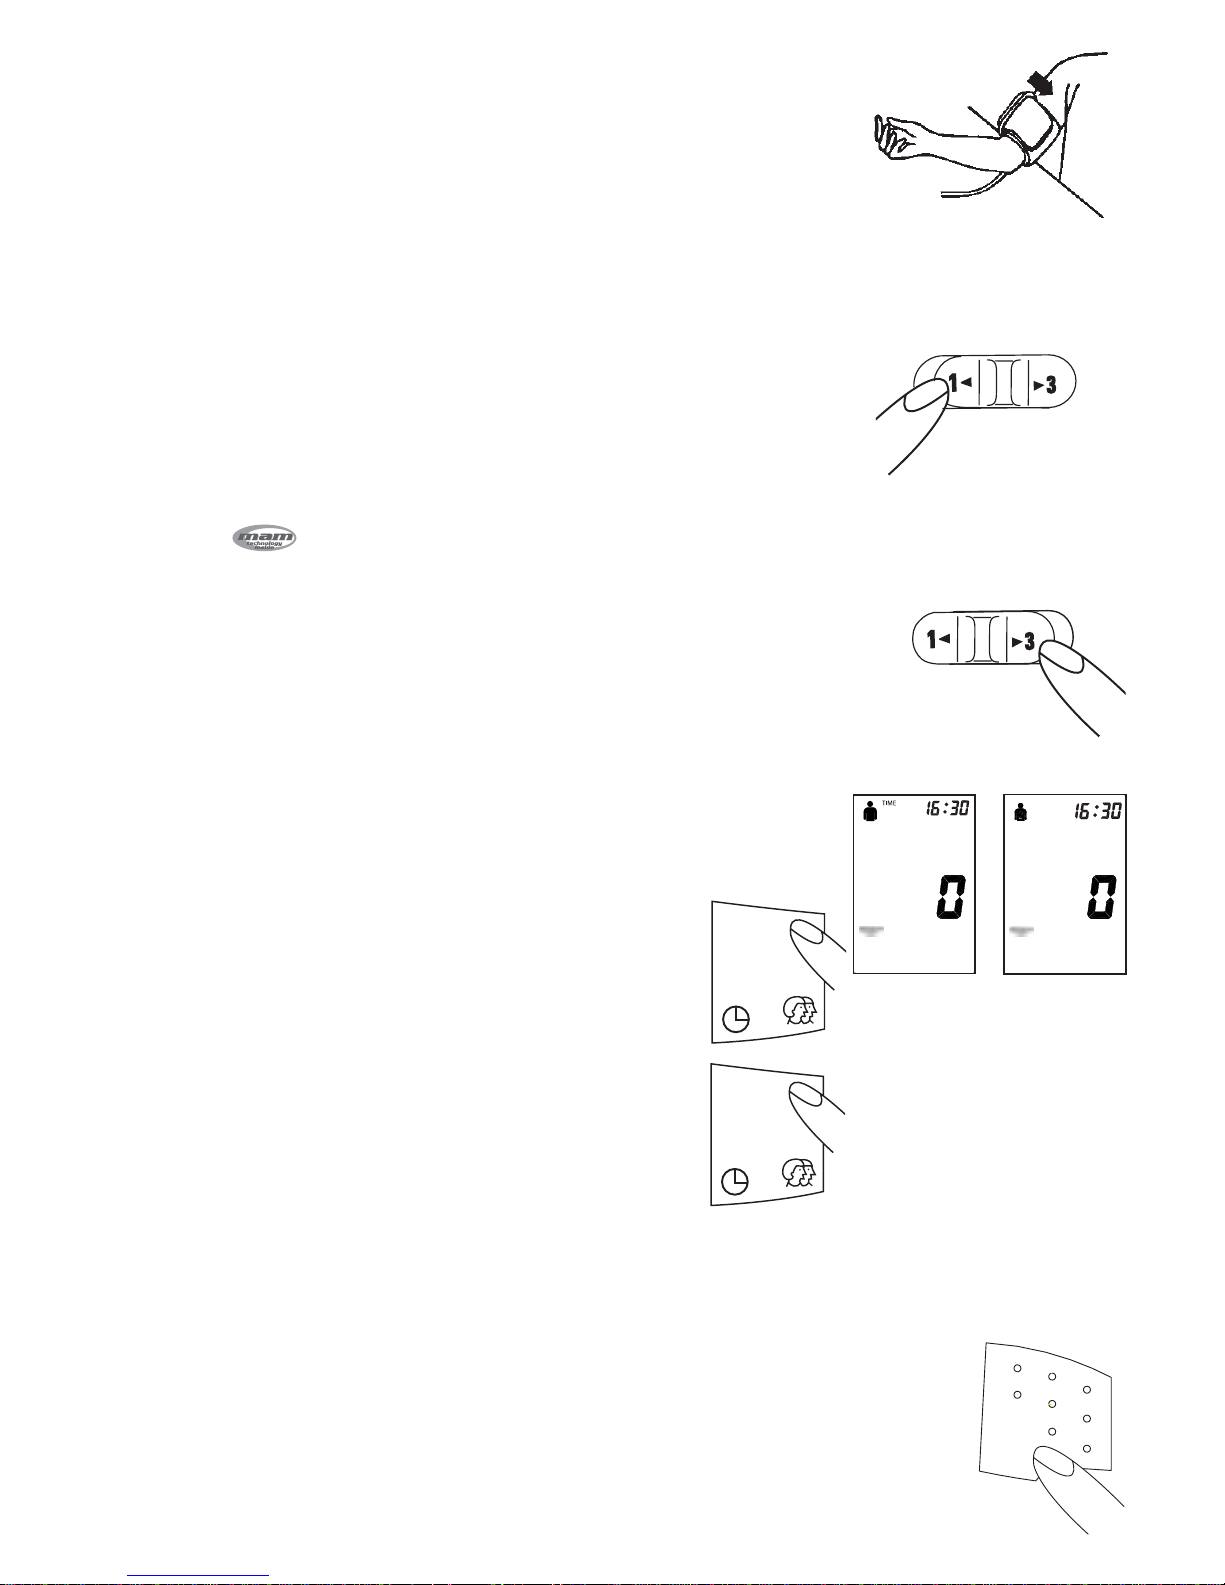
5.3. Fitting the cuff
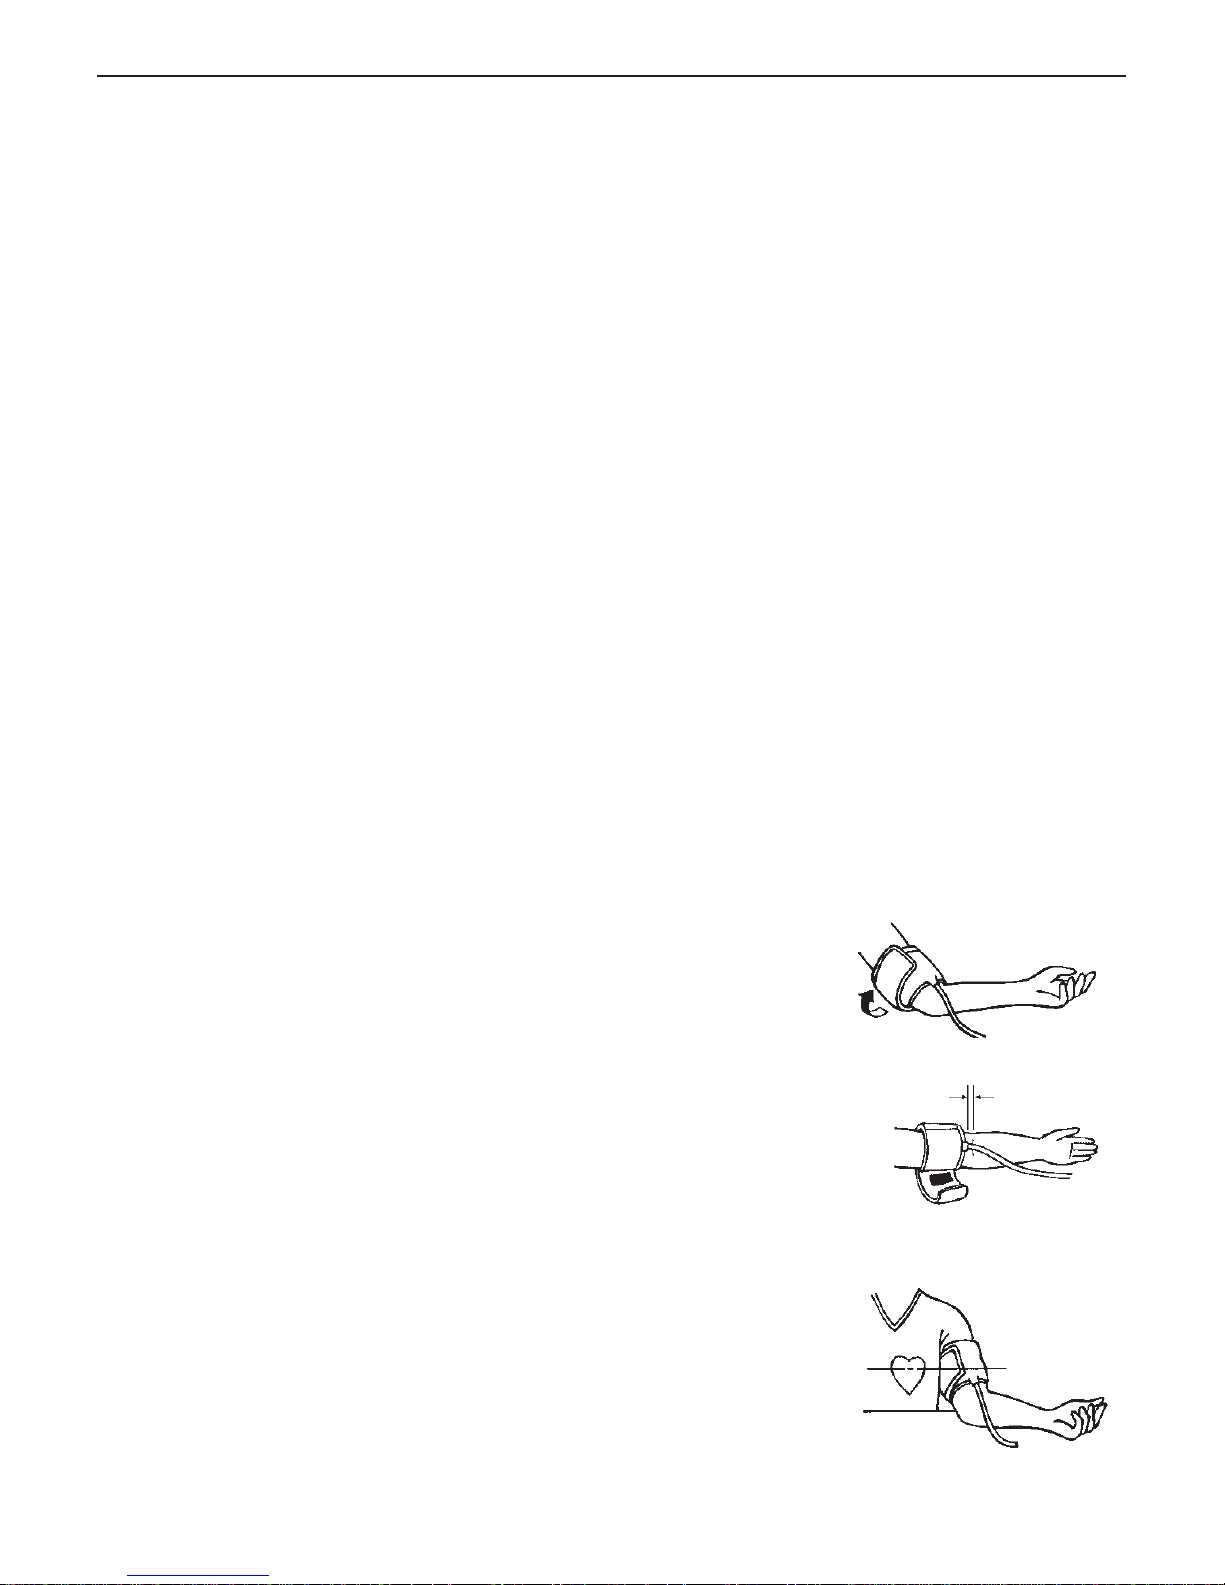
a) Push the cuff over the left upper arm so that the tube points in
the direction of the lower arm.
b) Lay the cuff on the arm as illustrated. Make certain that the
lower edge of the cuff lies approximately 2 to 3 cm above the
elbow and that the rubber tube leaves the cuff on the inner side
of the arm.
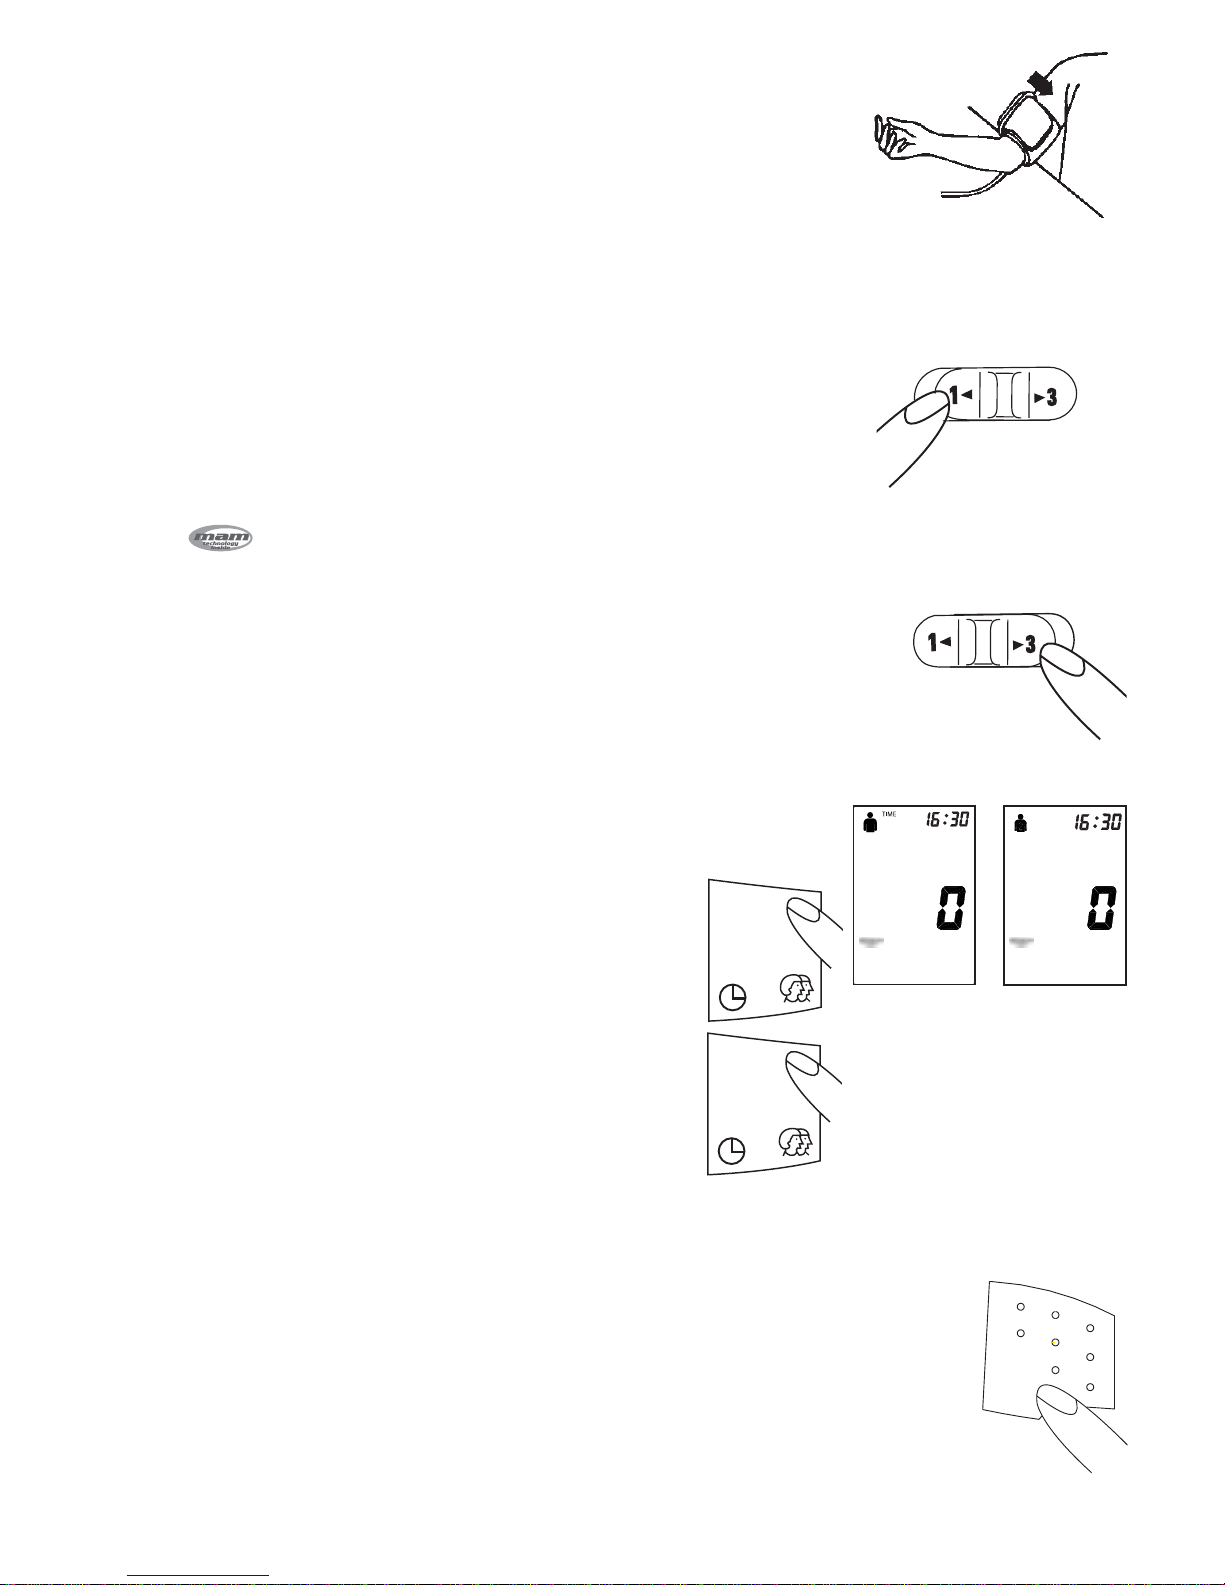
c) Tighten the free end of the cuff and close the cuff with the
Velcro.
d) The cuff should be snug on your upper arm, but not too tight. Any
clothing which restricts the arm (e.g. pullover) must be taken off.
e) Lay your arm on a table (palm upwards) so that the cuff is at the
same height as the heart. Make sure that the tube is not kinked.
9
2–3 cm
tube
Page 13
Note:
If it is not possible to fit the cuff to the left arm, it can also be
placed on the right. However all measurements should be made
using the same arm.
5.4. Measurement mode selection
Clinical studies demonstrate taking multiple blood pressure readings and calculating an «average» is more
likely to determine your true blood pressure. This blood pressure monitor allows you to switch to the special
Microlife Average Mode – MAM – that automatically takes multiple readings!
MAM Mode:
a) If you would like to take a MAM measurement, please slide the
switch to the right toward no. 3.
b) MAM mode takes generally 3 measurements in succession and
calculates the result.
c) The « » symbol in the display indicates that the device is
set to the MAM mode.
Single mode:
a) If you would like to take single measurement, please slide the
switch toward no. 1.
b) Single mode only has 1 measurement.
User selection:
This advanced blood pressure monitor allows you to track
blood pressure readings for 2 individuals independently.
a) Before measurement make sure you set the unit for
the intended user. The unit can track results for 2
individuals. (User 1, User 2)
b) The unit is set to User 1. Click the User/Time button to
change to User 2.
c) Click the User/Time button again to change into User 1
d) We suggest the first person to take their pressure to
be User 1.
5.5. Measuring procedure
After the cuff has been appropriately positioned, the measurement can begin:
a) Press the O/I button. The pump begins to inflate the cuff. The
rising pressure in the cuff is shown in the display.
b) After reaching the inflation pressure, the pump stops and the
pressure gradually falls. The cuff pressures are displayed. In
case that the inflation pressure is not sufficient, the monitor
automatically re-inflates to a higher level.
10
STARTS
TA
RT
1
TIME
Page 14

11
c) When the instrument detects a pulse, the heart symbol in the
display starts to flash and a beep is heard for every heartbeat.
d) A longer beep is sounded when the measurement has been
completed. The systolic, and diastolic blood pressures and pulse
rate now appear in the display.
e) The measurement results are displayed, until you switch the
device off. If no button is pressed for 5 minutes, the device
switches automatically off, to save the batteries.
f) When the device is set to MAM mode, generally 3 separate
measurements will take place in succession and calculates your
detected blood pressure value. There will be 15 seconds resting time
in-between each measurement. A count down indicates the remaining
time and a beep will sound 5 seconds before the 2nd and 3rd readings
will begin. In case that the single data of each cycle differ too much
from each other, a fourth measurement is performed before the result
will be displayed. In rare cases the blood pressure is such unstable
that even after four measurements the data vary too much. In this
case «ERR 6» is shown and no result can be given.
If one of measurement causes an error message it is repeated.
5.6. Discontinuing a measurement
If it is necessary to interrupt a blood pressure measurement for any
reason (e.g. the patient feels unwell), the 0/I button can be pressed
at any time.
The device immediately lowers the cuff pressure automatically.
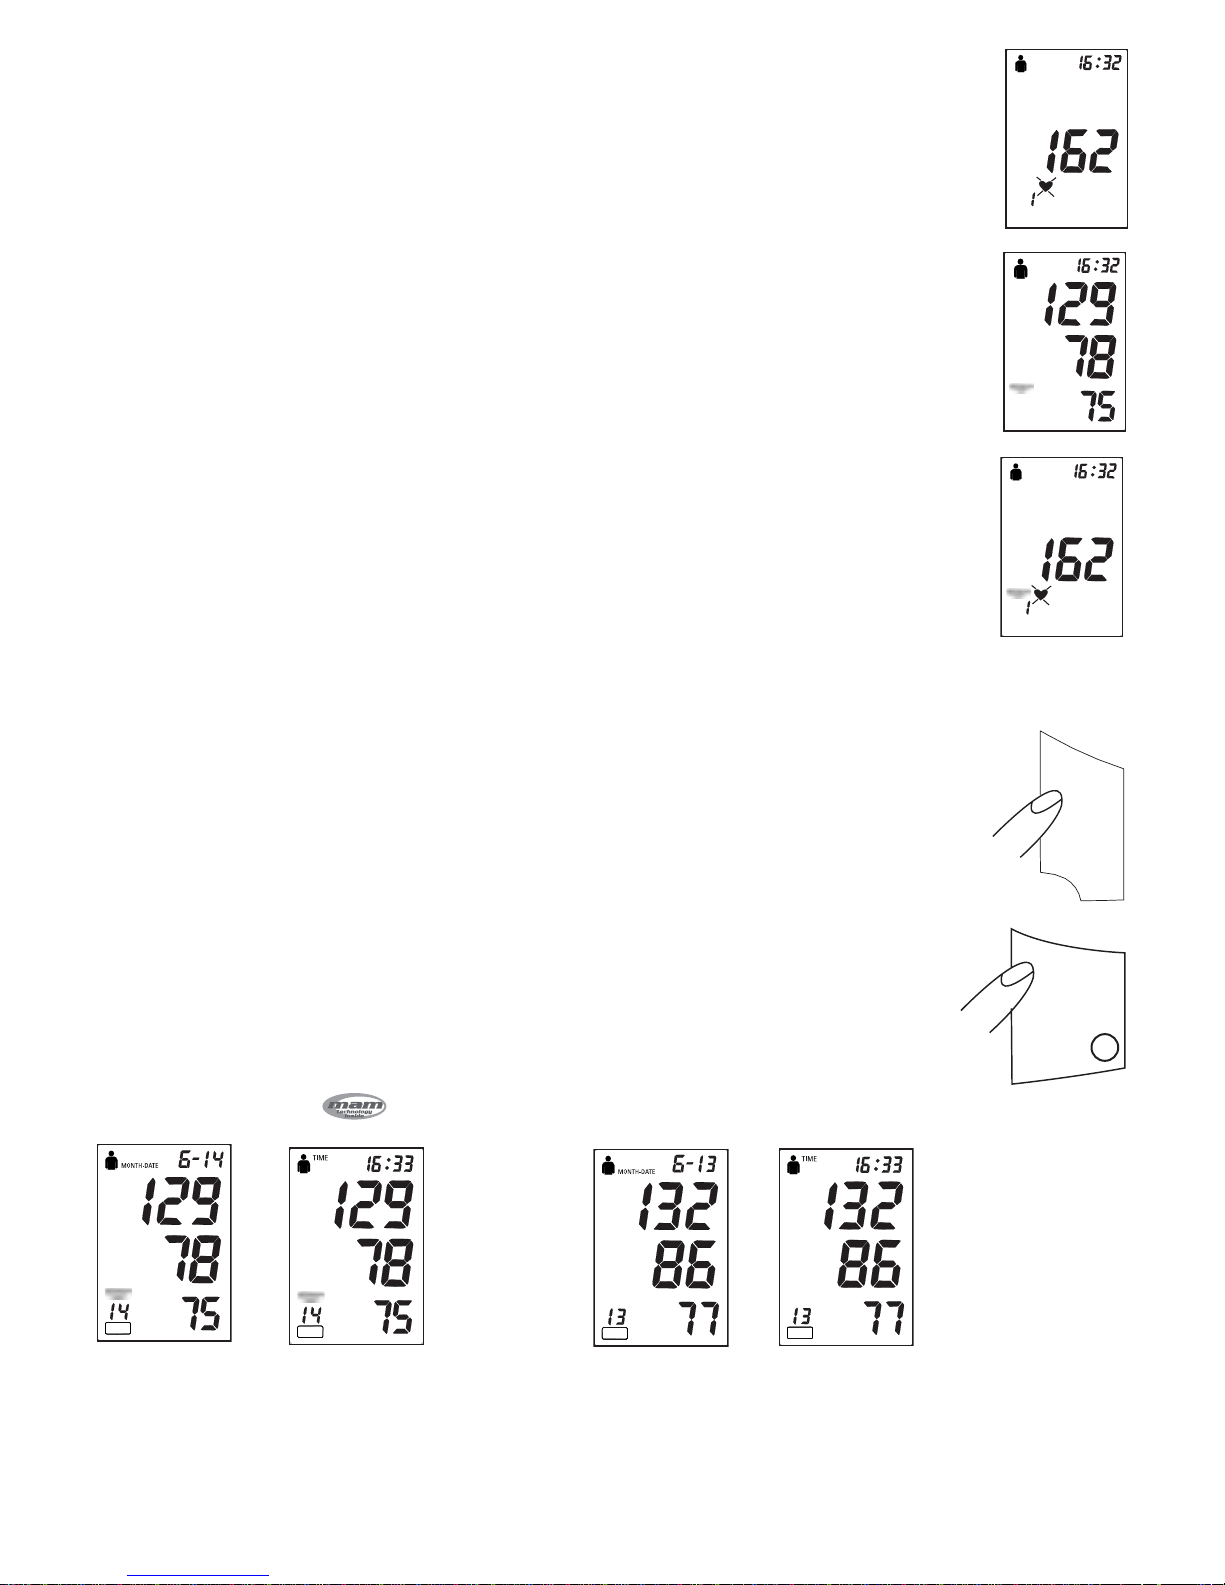
5.7. Memory - recall of measurements
This blood-pressure monitor automatically stores each of
the last 14 measurement values seperated for 2 users. By
pressing the MEMORY button, the last Measurement, e.g.
(MR14) as well as previous 13 measurements (MR13,
MR12, …MR1) can be displayed one after the other. Data
obtained in Average Mode are indicated by an « »
symbol.
(MR14: Value of the last measurement) (MR13: Value of the measurement before MR 14)
TIME
1
TIME
1
mmHg
mmHg
TIME
1
O/IO/I
M
1
mmHg
mmHg
MR
1
mmHg
mmHg
MR
1
mmHg
mmHg
MR
1
mmHg
mmHg
MR
Page 15
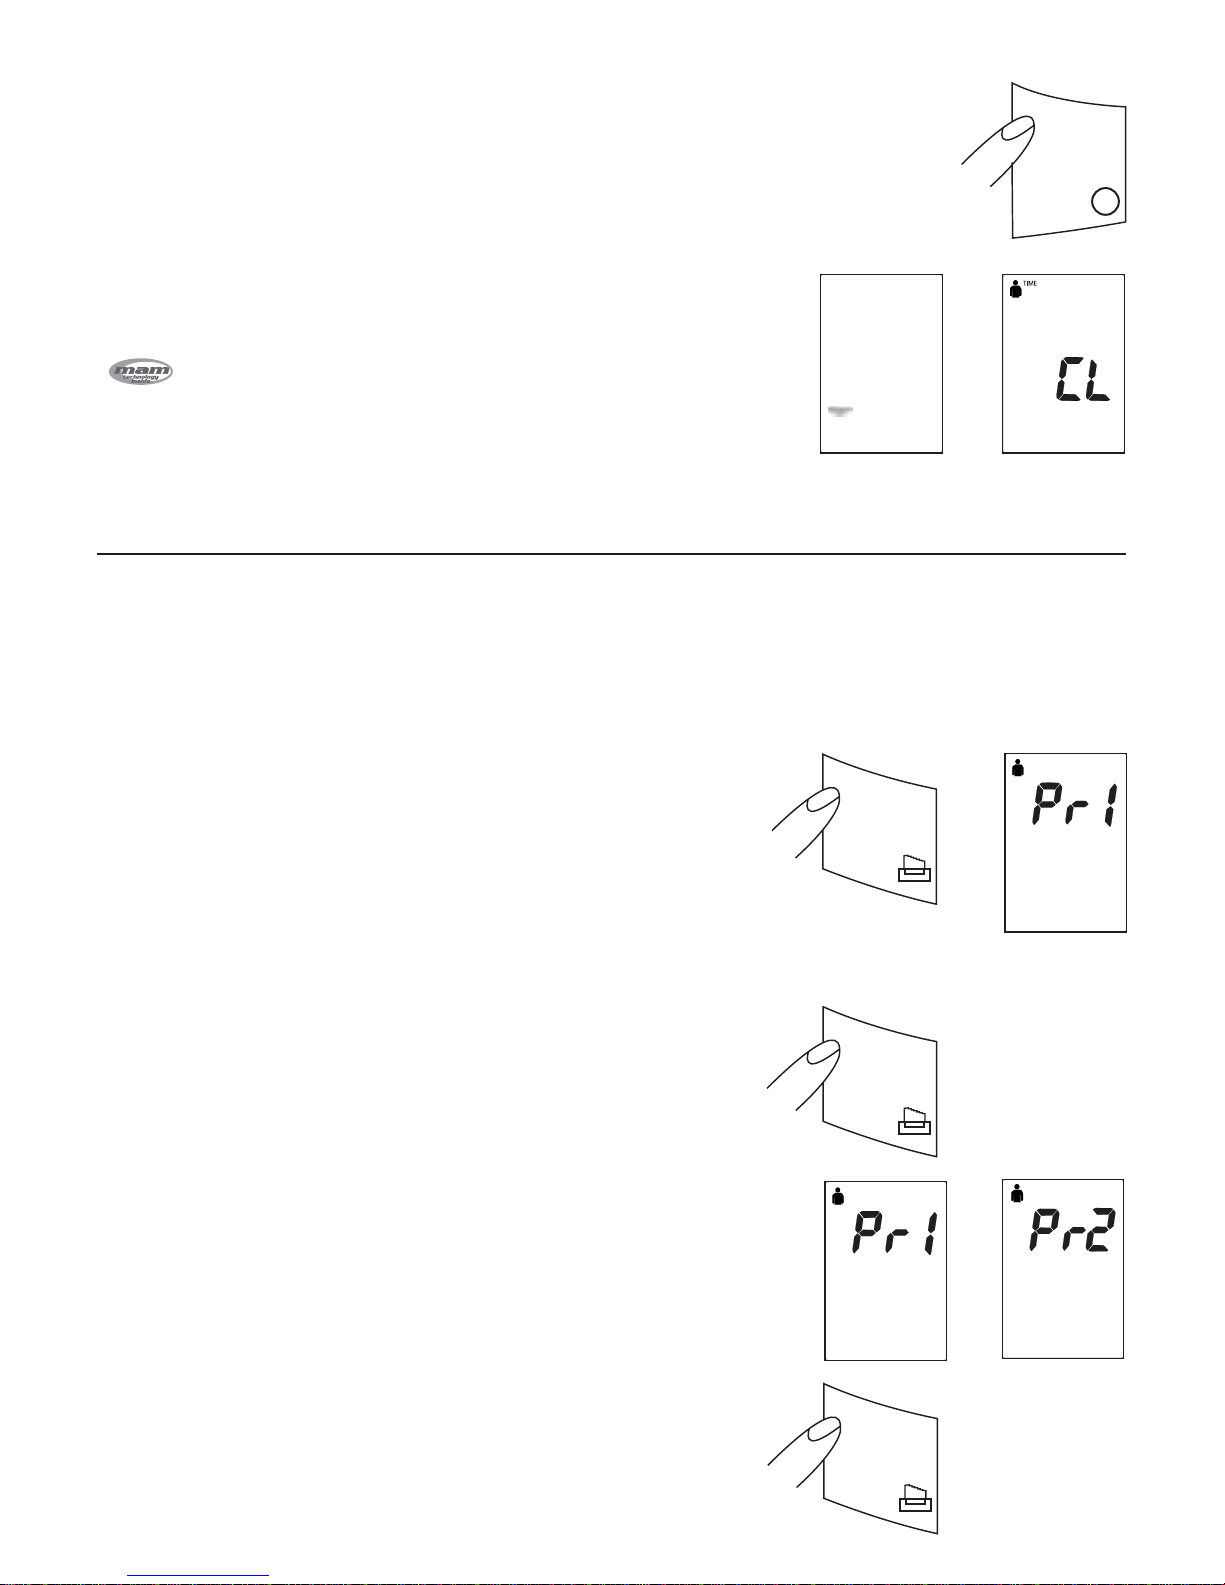
5.8.Memory– cancellation of all measurements
Attention!
Before you delete all readings stored in the memory, make sure you
will not need refer to the readings at a later date.
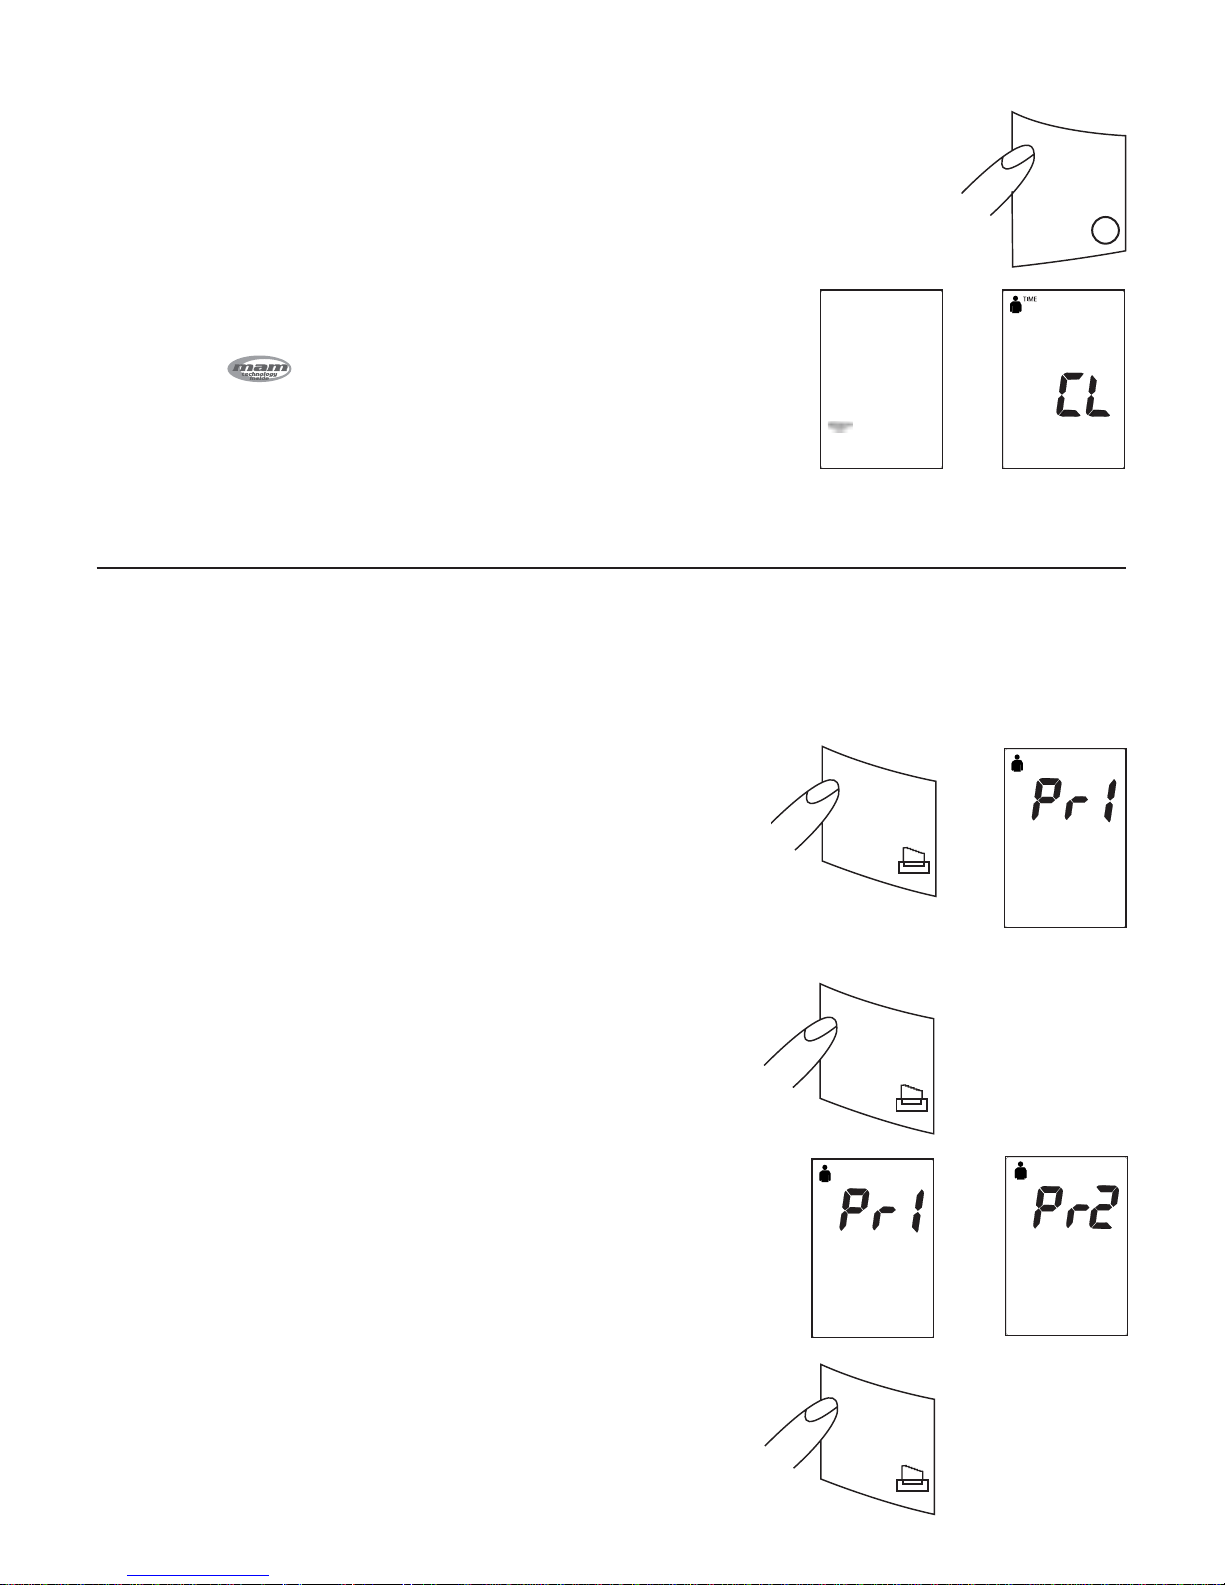
In order to delete all stored readings, depress the MEMORY button for
at least 7 seconds, the display will show the symbol «CL» and 3 short
beep sounds will be heard to indicate deletion of stored readings.
Note:
If your last stored measurement was taken in the MAM mode, you
will see the « » symbol approximately 3 seconds during the
deletion procedure. (The display will show this symbol during
deletion of all stored measurements, if the last measurement is
taken in the MAM mode).
6. Printer functions
This unit can be used in connection with the Microlife diagnostic printer. The unit can print out
measurements stored in the memory by pressing the PRINTER button. There are 2 kinds of formats
available. Please make sure you set the unit to User 1 or User 2 based on the data you want to print.
6.1. How to print the last stored measurement. (Single data print)
a) First select correct printer data tp print, before pressing the
PRINTER button.
b) Connect the printer with the monitor and switch the printer
on (for details please refer to the manual of the printer).
c) Click the PRINTER button of the monitor once. The display
will show «Pr1» and the printer will print the last stored
measurement for User 1 or 2 based on your selection.
6.2.How to print all measurements stored in memory
and a data chart, (data print out with chart).
a) Select correct printer objective first before you depress the
PRINTER button.
b) Connect the printer with the monitor and switch the printer
on (for details please refer to the manual of the printer).
c) Depress the PRINTER button for at least more than 3
seconds. The display will show «Pr1» followed by «Pr2».
d) Release the button, and the printer will print all stored
measurements with a corresponding chart.
6.3. Stop printing
If you would like to stop printing, click the PRINTER button
during the printing process.
Note:
Further details regarding the printer can be found in the
printer instruction manual.
12
M
1
1
2
1
Page 16
13
7. Error Messages/Malfunctions
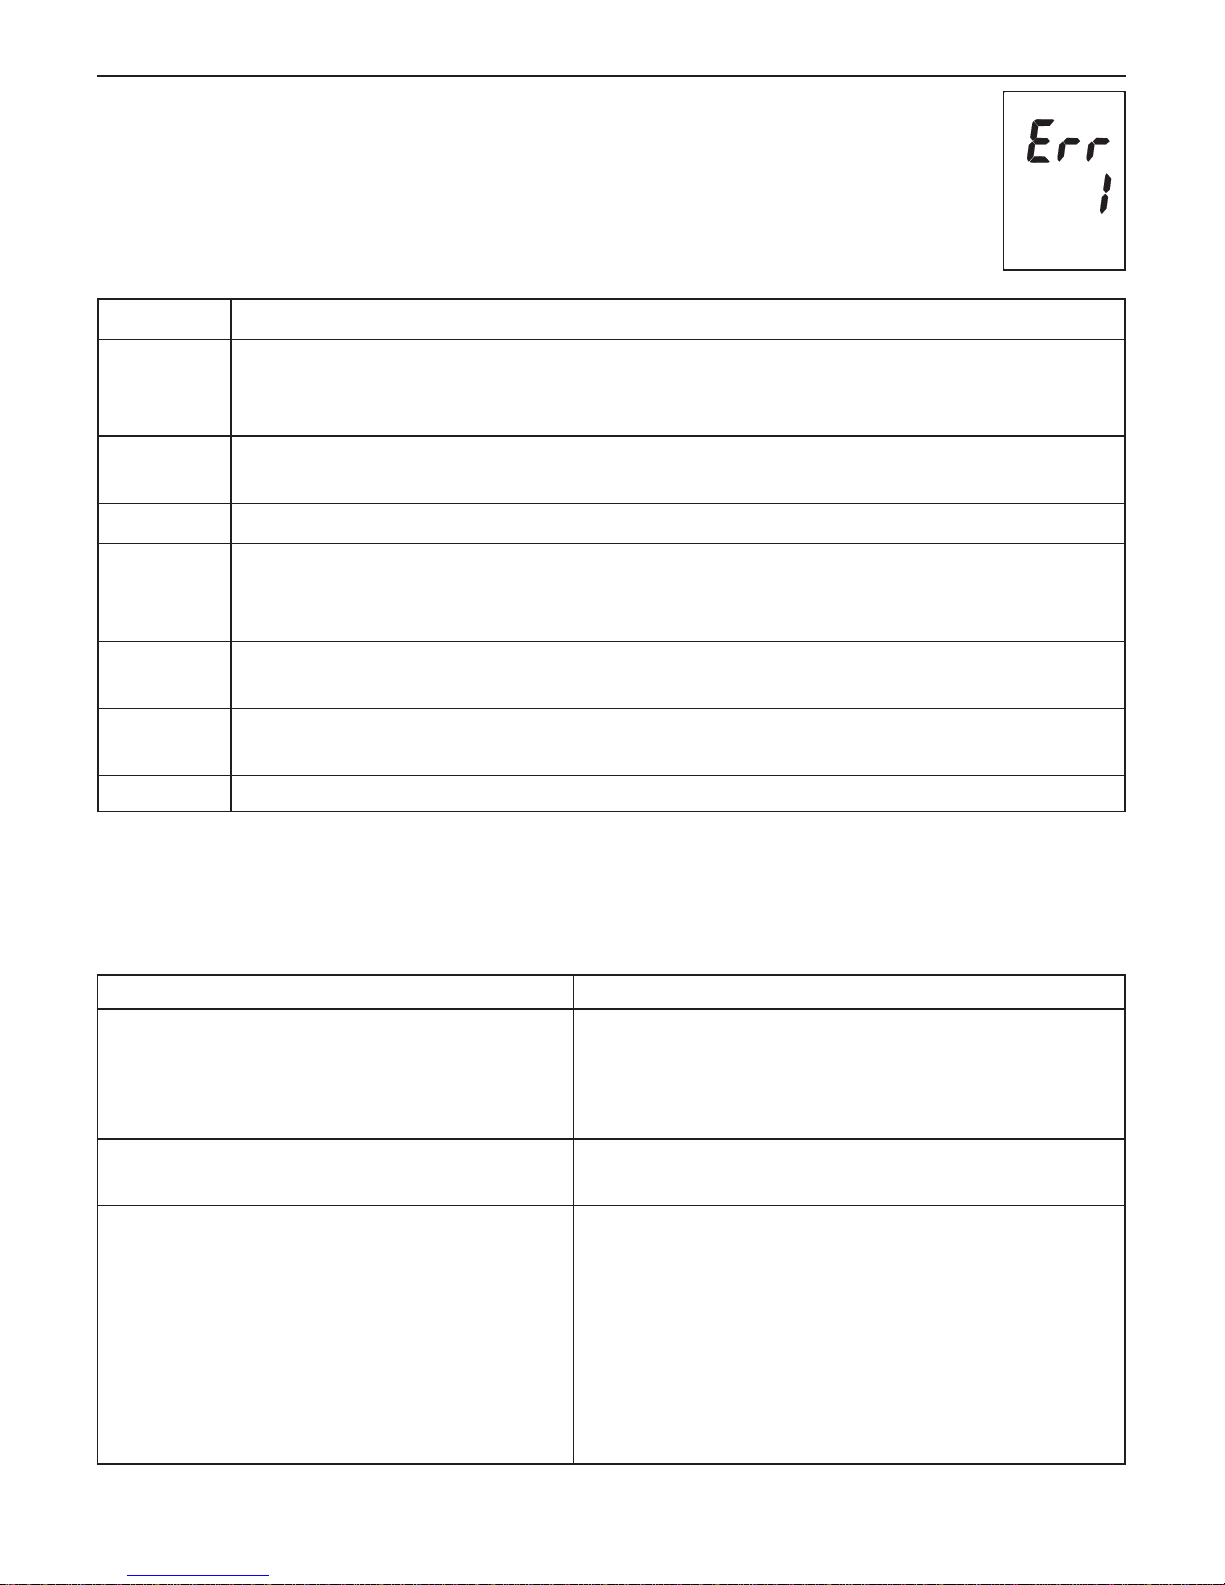
If an error occurs during a measurement, the measurement is
discontinued and a corresponding error code is displayed.
(Example: Error no. 1)
* Please consult your doctor, if this or any other problem occurs repeatedly
Other possible malfunctions and possible solutions – If problems occur when using the device, the
following points should be checked and if necessary, the corresponding measures are to be taken:
Error No. Possible cause(s)
ERR 1 The systolic pressure was determined but afterwards the cuff pressure fell below 20 mmHg.
This situation can occur, for example, if the tube becomes unplugged after the systolic blood
pressure has been measured. Further possible cause: No pulse has been detected.
ERR 2 Unnatural pressure impulses influence the measurement result. Reason: The arm was moved
during the measurement (Artefact).
ERR 3 The inflation of the cuff takes too long. The cuff is not correctly seated.
ERR 5 The measured results have indicated an unacceptable difference between the systolic and
diastolic pressure. Take another measurement, carefully following the instructions. Contact
your doctor, if you still obtain unusual results.
ERR 6 Single data differ too much during Average Mode even after 4 cycles. No average result can
be displayed.
HI The pressure in the cuff is too high (over 300 mmHg) OR the pulse is too high (over 200 beats
per minute). Relax for 5 minutes and repeat the measurement.*
LO The pulse is too low (less than 40 beats per minute). Repeat the measurement.*
Malfunction Remedy
The display remains empty when the instrument
is switched on although the batteries are in
place.
1. Check whether the batteries are installed with the
correct polarity and correct if necessary.
2. If the display is unusual, re-insert batteries or
exchange them.
The pressure does not rise although the pump is
running.
• Check the connection of the cuff tube and connect
properly if necessary.
The device frequently fails to measure the blood
pressure values, or the values measured are too
low (too high).
1. Fit the cuff correctly on the arm.
2. Before starting the measurement make sure that the
cuff is not fitted too tightly and that there is no rolledup sleeve exerting pressure on the arm above the
measuring position. Take off articles of clothing if
necessary.
3. Measure the blood pressure again in complete peace
and quiet.
Page 17
☞ Further information
The level of blood pressure is subject to fluctuations even in healthy people. It is important to compare
measurements taken under the same conditions and at the same time of day. (Quiet conditions)!
If you have any questions regarding the use of this blood pressure monitor, please ask your dealer or
pharmacist for the Microlife Service representative in your country. The Microlife Service Team will be
happy to help you. Never attempt to repair the instrument yourself!
Any unauthorized opening of the instrument invalidates all guarantee claims!
8. Care and Maintenance, Recalibration
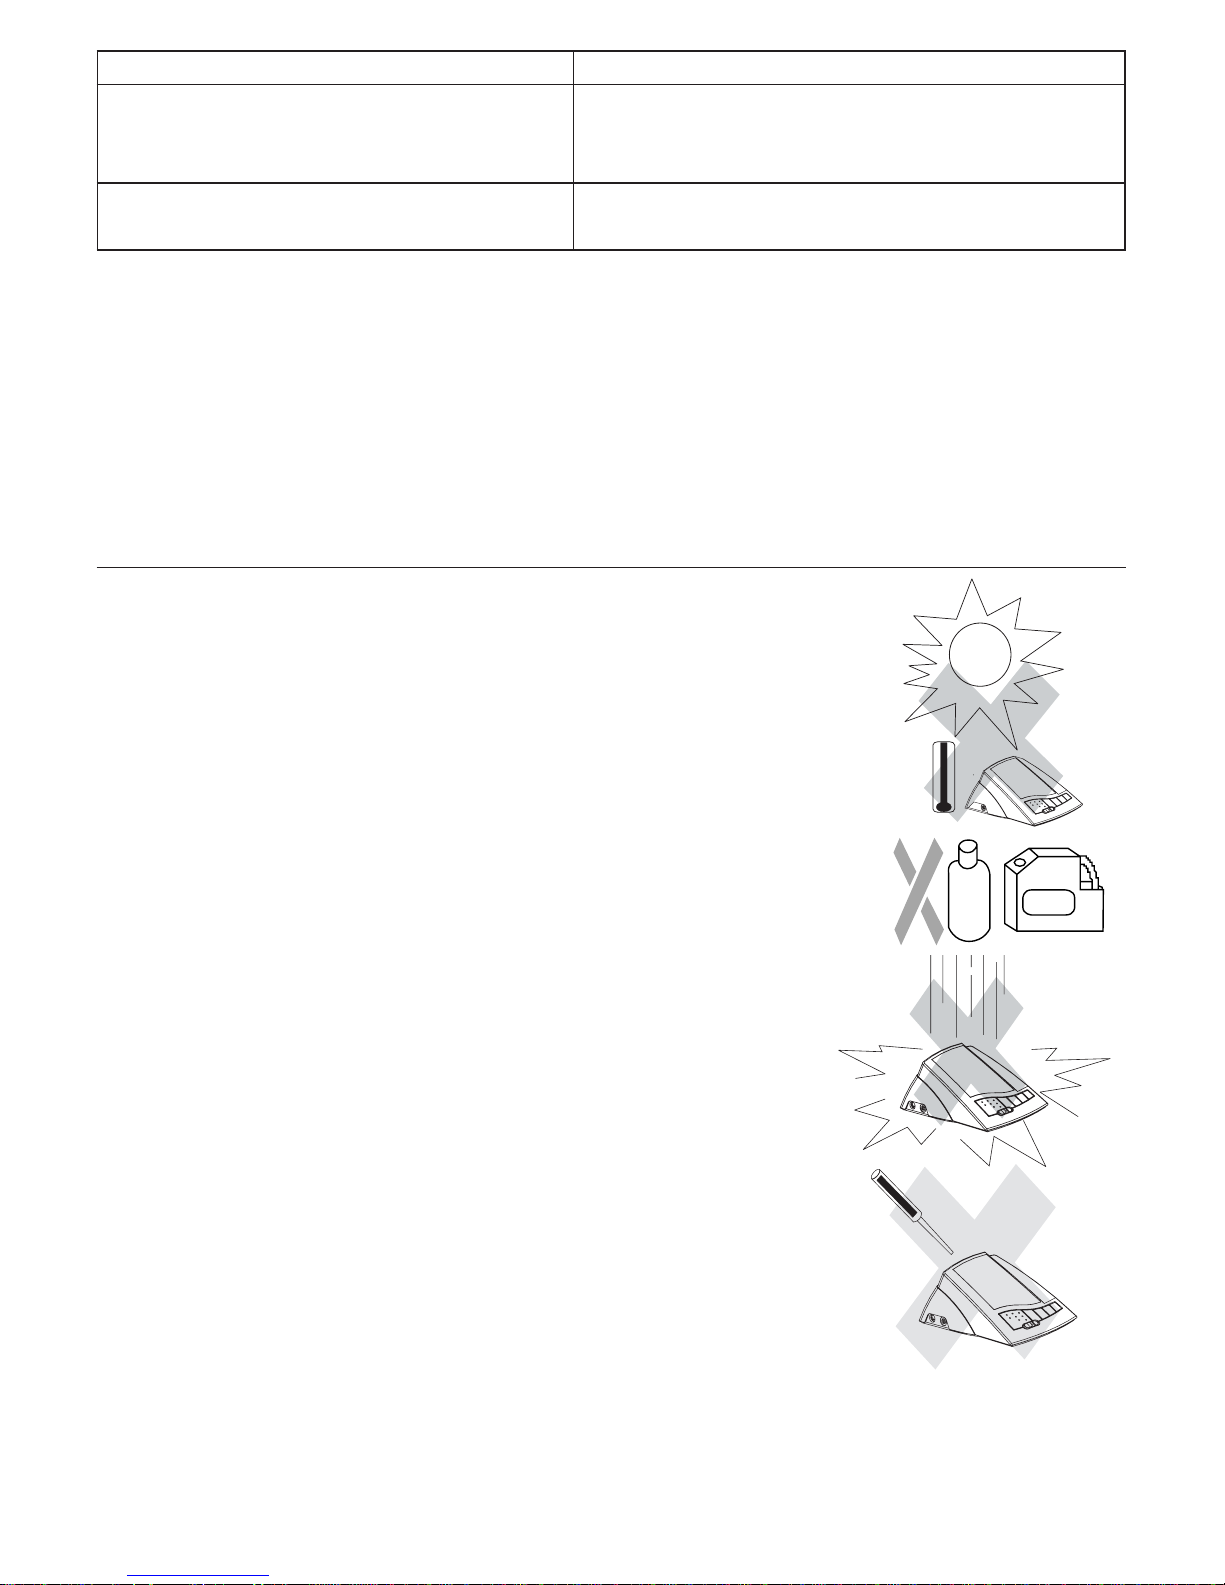
a) Do not expose the device to either extreme temperatures,
humidity, dust or direct sunlight.
b) The cuff contains a sensitive air-tight bubble. Handle the
cuff carefully and avoid all types of straining through
twisting or buckling.
c) Clean the device with a soft, dry cloth. Do not use gasoline,
thinners or similar solvents. Carefully remove spots on the
cuff with a damp cloth and soapsuds. Do not wash the
cuff in a clothes or dishwasher!
d) Handle the tube carefully. Avoid stress from pulling,
pinching and sharp edges.
e) Do not drop the instrument or treat it roughly in any way.
Avoid strong vibrations.
f) Never open the device! This can negatively impact the
calibration! (accuracy)
Periodical recalibration
Sensitive measuring devices must be checked for accuracy from time to time. We recommend a periodical
inspection of your device by an authorized microlife dealer every 2 years.
Your factory authorized Microlife dealer would be pleased to provide more information regarding
calibration.
14
Malfunction Remedy
Every measurement results in different values
although the device functions normally and the
values displayed are normal.
• Please read the following information and the points
listed under «Common sources of error». Repeat the
measurement.
The blood pressure values measured differ from
those measured by the doctor.
• Record the daily development of the values and
consult your doctor about them.
138
80
7070
Gasoline
138138
8080
70
138
138
80
70
Page 18

15
9. Guarantee
This blood pressure monitor is guaranteed for 3 years from date of purchase. This guarantee includes the
instrument and the cuff. The guarantee does not apply to damage caused by improper handling, damage
from leaking batteries, accidents, not following the operating instructions or alterations made to the
instrument by third parties.
The guarantee is only valid upon presentation of the guarantee card filled out by the dealer.
Name and company address of the responsible dealer:
10. Technical Specifications
Technical alterations reserved!
11. www.microlife.com
Detailed user information about our products as well as services can be found at www.microlife.com.
Weight: 460 g (with batteries)
Size: 115 (W) x 182 (L) x 76 (H) mm
Storage temperature: –20 to +50 °C
Humidity: 15 to 90% relative humidity maximum
Operation temperature: 10 to 40 °C
Display: LCD-Display (Liquid Crystal Display)
Measuring method: oscillometric
Pressure sensor: capacitive
Measuring range:
SYS/DIA:
Pulse:
30 to 280 mmHg
40 to 200 beats per minute
Cuff pressure display range: 0–299 mmHg
Memory: Automatically stores the last 2 x 14 measurements
Measuring resolution: 1 mmHg
Accuracy: Pressure within ± 3 mmHg
Pulse ± 5 % of the reading
Power source: DC 6 V / 600 mA
a) 4 dry cells (batteries) UM-3, size AA, 1.5 V
b) mains adaptor 6V DC 600 mA (optional)
Cuffs: M-size-cuff (22-32 cm)
or
L-size-cuff (32-42 cm)
Reference to standards: EU directive 93/42/EEC
NIBP - requirements: EN 1060-1 /-3 /-4 & ANSI / AAMI SP10
Page 19

ÄÄ‚‚ÚÚÓÓÏχ‡ÚÚˢ˜ÂÂÒÒÍÍËËÈÈ ËËÁÁÏÏÂÂËËÚÚÂÂÎθ¸ ‡‡ÚÚÂÂˡ‡Îθ¸ÌÌÓÓ„„ÓÓ ‰‰‡‡‚‚ÎÎÂÂÌÌËËflfl
Р
ÛÍÓ‚Ó‰ÒÚ‚Ó
16
Page 20

17
ëëÓÓ‰‰ÂÂÊʇ‡ÌÌËËÂÂ
11.. ÇÇ‚‚‰‰ÂÂÌÌËËÂÂ
1.1. йТУ·ВММУТЪЛ
1.2. З‡КМ‡fl ЛМЩУП‡ˆЛfl У Т‡ПУТЪУflЪВО¸МУП ЛБПВВМЛЛ ‡ЪВЛ‡О¸МУ„У ‰‡‚ОВМЛfl
22.. ÇLJ‡ÊÊÌ̇‡flfl ËËÌÌÙÙÓÓÏχ‡ˆˆËËflfl ÓÓ ÔÔ‰‰ÏÏÂÂÚÚ ‡‡ÚÚÂÂˡ‡Îθ¸ÌÌÓÓ„„ÓÓ ‰‰‡‡‚‚ÎÎÂÂÌÌËËflfl ËË Â„„ÓÓ ËËÁÁÏÏÂÂÂÂÌÌËËËË
2.1. Как появляется высокое/низкое кровяное давление?
2.2. Какие значения являются нормальными?
2.3. Что можно сделать, если регулярно регистрируются высокие/низкие значения давления?
2.4 Технология MAM (Microlife Average Mode - режим усреднения Microlife)
33.. ääÓÓÏÏÔÔÓÓÌÌÂÂÌÌÚÚ˚˚ ÇLJ‡¯¯Â„„ÓÓ ËËÁÁÏÏÂÂËËÚÚÂÂÎÎflfl ‡‡ÚÚÂÂˡ‡Îθ¸ÌÌÓÓ„„ÓÓ ‰‰‡‡‚‚ÎÎÂÂÌÌËËflfl
44.. ààÒÒÔÔÓÓÎθ¸ÁÁÓÓ‚‚‡‡ÌÌËË ÇLJ‡¯¯Â„„ÓÓ ËËÁÁÏÏÂÂËËÚÚÂÂÎÎflfl ‡‡ÚÚÂÂˡ‡Îθ¸ÌÌÓÓ„„ÓÓ ‰‰‡‡‚‚ÎÎÂÂÌÌËËflfl
4.1. Установка батареек
4.2. Использование блока питания переменного тока (приобретается отдельно)
4.3. Подсоединение манжеты
4.4. Установка времени и даты
55.. ÇÇ˚˚ÔÔÓÓÎÎÌÌÂÂÌÌËËÂÂ ËËÁÁÏÏÂÂÂÂÌÌËËÈÈ
5.1. Перед измерением
5.2. Распространенные источники ошибок
5.3. Подгонка манжеты
5.4. Выбор режима измерения
5.5. Процедура измерения
5.6. Прерывание измерения
5.7. Память – вызов измерений
5.8. Память – сброс всех измерений
66..
‘‘
ÛÛÌÌÍ͈ˆËËËË ÔÔËËÌÌÚÚ‡‡
6.1. д‡Н ‡ТФВ˜‡Ъ‡Ъ¸ ФУТОВ‰МВВ ‚МВТВММУВ ‚ Ф‡ПflЪ¸ ЛБПВВМЛВ (‡ТФВ˜‡ЪН‡ У‰МУ„У
ЛБПВВМЛfl)
6.2. ä‡Í ‡ÒÔ˜‡Ú‡Ú¸ ‚Ò ËÁÏÂÂÌËfl, ÒÓı‡ÌÂÌÌ˚ ‚ Ô‡ÏflÚË (‡ÒÔ˜‡Ú͇ „‡ÙË͇)
6.3. éÒÚ‡ÌÓ‚ Ô˜‡ÚË
7. Сообщения об ошибках и неисправностях
8. Уход и техническое обслуживание, перекалибровка
9. Гарантия
10.Технические характеристики
11. www.microlife.ru
Page 21

1. Введение
1. 1. Особенности
Прибор для измерения артериального давления представляет собой полностью автоматический
цифровой прибор измерения артериального давления для измерения давления на плечевой зоне,
использующий технологию МАМ (расчет среднего значения Microlife). Этот прибор позволяет очень
быстро и надежно измерять систолическое и диастолическое артериальное давление, а также
пульс с применением осциллометрического метода.
Прибор прост в эксплуатации, и его уникальная точность доказана в клинических исследованиях.
Большой дисплей дает прекрасную возможность наблюдать за процессом измерения и давлением в
манжете во время измерения.
Пожалуйста, внимательно ознакомьтесь с настоящей инструкцией перед использованием прибора, и
сохраняйте ее в безопасном месте. Если у Вас имеются дальнейшие вопросы по поводу
артериального давления и его измерения, пожалуйста, обратитесь к своему лечащему врачу.
Внимание!
1.2. Важная информация о самостоятельном измерении артериального давления
• Самостоятельное измерение выполняется для контроля, а не для диагностики или лечения.
Всегда обсуждайте результаты измерения с врачом. Ни в коем случае не изменяйте
дозировку каких-либо лекарств, не получив указания своего врача.
• Измеренное значение пульса не пригодно для контроля электронных стимуляторов сердца!
•В случае серьезного расстройства сердечного ритма (аритмии), измерения, произведенные этим
прибором, следует оценивать только после обсуждения с Вашим врачом.
Электромагнитные помехи
Прибор содержит чувствительные электронные компоненты. Поэтому избегайте возникновения
сильных электрических или электромагнитных полей в непосредственной близости к прибору
(например, мобильных телефонов, микроволновых печей). Они могут привести к временному
ухудшению точности измерения.
2. Важная информация об артериальном давлении и о его измерении
2.1. Как появляется высокое/низкое артериальное давление?
Уровень артериального давления определяется центром кровообращения головного мозга. Ваша
нервная система позволяет регулировать или изменять кровяное давление соответственно
различным ситуациям. Ваше тело изменяет частоту пульса, а ширина кровеносных сосудов
изменяется сокращением мышц стенок сосудов.
Артериальное давление достигает наивысшего значения, когда сердце нагнетает, то есть
выбрасывает кровь – это давление называется систолическим артериальным давлением.
Артериальное давление достигает наименьшего значения, когда сердце находится в состоянии
покоя (между ударами) – это называется диастолическим артериальным давлением.
Примечание: Чтобы предупреждать некоторые заболевания, необходимо поддерживать
артериальное давление в «нормальном» диапазоне.
2.2. Какие значения являются нормальными?
Артериальное давление считается высоким, если в состоянии покоя диастолическое давление
превышает 90 мм рт. ст. и/или систолическое давление превышает 140 мм рт. ст. Если полученные
показания находятся в этом диапазоне, немедлено обратитесь к врачу. Длительное сохранение
18
Page 22

19
высокого артериального давления приводит к выходу из строя кровеносных сосудов и жизненно
важных органов, например, печени и даже сердца.
Если значения кровяного давления слишком низки, т.е. систолическое давление ниже 100 мм рт.ст.
и/или диастолическое давление ниже 60 мм рт. ст., обратитесь к врачу.
Регулярный контроль артериального давления с помощью прибора для измерения артериального
давления рекомендуется даже при нормальных значениях артериального давления. Таким образом
Вы сможете рано распознать возможные отклонения давления и предпринять соответствующие
действия.
Если Вы проходите курс лечения по регулированию кровяного давления, записывайте результаты
измерений, полученные в результате самоконтроля в определенные часы дня. Покажите эти записи
Вашему врачу. Ни в коем случае не используйте результаты измерений, чтобы самостоятельно
изменять дозировку медикаментов, прописанных Вашим врачом.
Та б лица классификации значений артериального давления крови (в мм рт.ст.) согласно Всемирной
Организации 3дравоохранения:
☞ Прочие указания
• Если значения давления, измеренные в состоянии покоя, не являются необычными, а в
состоянии физического или душевного переутомления вы наблюдаете чрезмерно повышенные
значения, это может указывать на наличие так называемой артериальной лабильной
гипертонии. В любом случае, обсудите результаты с Вашим врачом.
• Если при правильном измерении артериального давления диастолическое кровяное давление
составляет более 120 мм рт. ст., необходимо незамедлительно вызвать врача.
2.3.Что делать, если регулярно определяется повышенное или пониженное кровяное
давление?
a) Обратитесь к врачу.
б) Повышенные значения артериального давления (различные формы гипертонии), наблюдаемые
в течение некоторого периода, связаны с существенными опасностями для здоровья.
Повышенное давление оказывает негативное влияние на кровеносные сосуды, которые
подвергаются опасности повреждения в результате отложений в стенках сосудов
(атеросклероз). Это может привести к недостаточному кровоснабжению важных органов
(сердца, мозга, мышц). Кроме того, возникают нарушения в структуре сердца.
в) Повышенное артериальное давление может быть вызвано множеством причин. Различают
часто встречаемую первичную (эссенциальную) гипертонию и вторичную гипертонию.
Вторичная гипертония может приводить к неправильной работе органов. В отношении
возможных причин повышенного давления проконсультируйтесь у Вашего врача.
г) Чтобы предупредить и снизить повышенное кровяное давление, можно произвести некоторые
изменения образа жизни. Эти изменения должны стать частью Вашего образа жизни, и к ним
относятся:
Диапазон Систолическое
давление
Диастолическое
давление
Меры
Гипотония ниже 100 ниже 60 Обратитесь к врачу
Нормальный диапазон между 100 и 140 между 60 и 90 Самостоятельный
контроль
Умеренная
гипертония
между 140 и 160 между 90 и 100 Обратитесь к врачу
Гипертония средней
тяжести
между 160 и 180 между 100 и 110 Обратитесь к врачу
Тяжелая гипертония выше 180 выше 110 Немедленно
обратитесь к врачу
Page 23

A) Привычки в отношении питания
• Стремитесь поддерживать нормальный вес, соответствующий Вашему возрасту, как предписал
Ваш врач. Снижайте избыточный вес!
• Избегайте чрезмерного потребления поваренной соли. (Многие консервированные продукты
содержат много соли).
• Избегайте потребления жирной пищи. (Консервированные продукты часто являются жирными).
Б) Имеющиеся заболевания
Последовательно, в соответствии с предписаниями врача, выполняйте лечение имеющихся
заболеваний, например:
• сахарного диабета (Diabetes mellitus)
• нарушений жирового обмена
•подагры
В) Привычки
•Полностью откажитесь от курения
• Ограничьте потребление алкоголя
• Ограничьте потребление кофеина (кофе, чая, шоколада и т.д.)
Г) Физическое состояние организма
• Предварительно пройдя врачебное обследование, регулярно занимайтесь спортом.
• Отдавайте предпочтение нагрузкам на выносливость и избегайте силовых видов спорта.
• Не допускайте полного изнеможения.
• Если у Вас имеются какие-либо заболевания и/или если Вы старше 40 лет, перед началом
занятий спортом обратитесь к врачу. Он поможет Вам разработать подходящую для Вас
программу упражнений.
2.4.Технология MAM (Microlife Average Mode - расчет среднего значения Microlife)
•«Те хнология MAM» представляет собой новый тип концепции достижения оптимальной
достоверности самостоятельных измерений артериального давления.
• Уникальная точность измерений достигается автоматическим анализом трех (а, в некоторых
случаях, четырех) последовательных измерений.
• Новая система обеспечивает достоверность показаний и может использоваться в качестве
базиса надежной диагностики и медикаментозной терапии для лечения высокого артериального
давления.
A) Почему MAM?
• Артериальное давление человека является нестабильным
•Разброс показаний приборов
Б) Основные преимущества
Снижение:
•разброса приборных показаний
• влияния недостаточного отдыха перед измерениями
• влияний, привнесенных движениями
• влияний расположения манжеты
В) Медицинские преимущества
• Повышенная точность
• Надежное самостоятельное измерение пациентом вместо врача
• Безопасная диагностика гипертонии
• Надежный контроль лечения
20
1. measurement
2. measurement
3. measurement
Result
Analysis
15 seconds resting time
15 seconds resting time
Page 24
21
Г) Последовательность измерений
• При полном цикле измерений общее время измерений остается меньшим 3 минут по сравнению
со временем однократного измерения, равного 1,5 минутам.
• Одиночные результаты измерений не отображаются.
• Благодаря результату «Анализа данных» можно провести 4-ое измерение.
3. Компоненты прибора для измерения артериального давления
На иллюстрации показан прибор для измерения артериального давления, состоящий из:
a) измерительного блока
б) плечевой манжеты
Манжета (AC-1 M) для руки окружностью 22-32 см
Примечание: Большая манжета(AC-1 L) для руки
окружностью 32-42 см приобретается отдельно.
138
80
70
Разъем
блока
питания
Разъем для
подсоедине
ния
манжеты
Кнопка
Пуск
Режим однократного
измерения/ MAM –
расчет среднего
значения Microlife
Кнопка O/I
Кнопка Память
Кнопка Пользователь/Время
Кнопка Принтер
ÉÌÂÁ‰Ó ÔÓÚ‡
ÔËÌÚ‡
Page 25

4. прибора для измерения артериального давления
4.1. Установка батареек
Установите батарейки сразу после распаковки
устройства. Батарейный отсек находится на задней
стороне прибора (см. рисунок).
a) Снимите крышку, как показано на рисунке
б) Вставьте батарейки (4 батарейки размера AA 1,5 В),
соблюдая указанную полярность.
в) Если на дисплее появляется значок
перечеркнутой батарейки, это значит, что они
разряжены и должны быть заменены.
Внимание!
• После того, как появилось предупреждение о
разряженных батарейках, прибор не будет работать
до тех пор, пока батарейки не будут заменены.
•Пожалуйста, используйте батарейки 'AA' Long-Life
или алкалиновые батарейки 1,5 В. Использование
аккумуляторов напряжением 1,2 В не рекомендуется.
• Если прибор не используется длительное время,
пожалуйста, извлеките из него батарейки.
4.2. Использование блока питания (приобретается отдельно)
Измерителем кровяного давления можно пользоваться с блоком питания Microlife (выходное
напряжение 6 В пост. тока / 600 мA, разъем DIN).
a) Вставьте разъем в гнездо в задней стенке
прибора.
б) Вставьте блок питания в электрическую розетку
напряжением 220 В. Проверить электропитание
прибора можно, нажав на кнопку.
Примечание:
•Когда к прибору подключен блок питания, батарейки не разряжаются.
• Если во время измерений происходит сбой питания (например, вследствие случайного
извлечения адаптера переменного тока из розетки), показания прибора следует сбросить,
вынув разъем блока питания из гнезда и возобновив подключение.
• Если у Вас есть вопросы, касающиеся блока питания, просим Вас обратиться к торгующей
организации.
22
+
+
+
+
138
80
70
Page 26

23
4.3. Подсоединение манжеты
Вставьте трубку манжеты в предназначенное
отверстие, расположенное на левой стенке прибора,
как показано на схеме.
4.4. Установка времени и даты
Данный прибор для измерения артериального давления автоматически регистрирует время и дату
каждого измерения. Это очень важная информация, поскольку кровяное давление обычно
изменяется в течение дня.
После установки новых батареек на дисплее времени/даты появятся следующие установки: 2000-0101 00:00. (год-месяц-день-время)
Вам следует заново ввести дату и текущее время. Для этого, пожалуйста, выполните следующее
(Пример: ввод (год-месяц-день-время) 2001-06-15, время 09:30):
1. Нажмите кнопку Time (Время) и удерживайте ее в
течение хотя бы 3 секунд. На дисплее отобразится
установленный год, четыре символа которого
мигают.
2. Правильный год можно ввести, нажимая кнопку
MEMORY (Память) один раз для каждого
изменения.
(Пример: однократное нажатие).
3. Снова нажмите кнопку Time (Время). Теперь
дисплей переключается на текущую дату, у
которой мерцает первый символ (месяц).
Примечание:
Удержание кнопки в нажатом состоянии ускоряет
процедуру.
4. Теперь нажатием кнопки MEMORY (Память) можно
ввести текущий месяц. Пример: при 6-кратном
нажатии происходит изменение на 6 месяцев)
5. Снова нажмите кнопку Time (Время). Теперь
мигают последние два символа (день).
138
80
70
M
M
Page 27

6. Нажимая кнопку MEMORY (Память), теперь можно
ввести текущий день. (Например: 15-кратное
нажатие изменяет день с 1-го на 15-ый)
7. Снова нажмите кнопку Time (Время). Теперь
дисплей переключается на текущее время, в
котором мерцает первый символ (час).
8. Нажимая кнопку MEMORY (Память), теперь можно
ввести текущий час. (Пример: 9-кратное нажатие
переводит часы вперед с 0 часов на 9:00 )
9. Снова нажмите кнопку Time (Время). Теперь
мигают последние два символа (минуты).
10.Нажимая кнопку MEMORY (Память), теперь можно
ввести текущую минуту. (Пример: 30-кратное
нажатие переводит время с 0 на 30 минут)
11. Просмотр установленной даты:
После ввода всех установок, один раз нажмите на
кнопку Time (Время). Дата, а затем время
кратковременно отображаются на дисплее. Теперь
ввод подтвержден, и часы начинают идти.
24
M
TIME
M
TIME
M
2
2
Page 28

25
5. Выполнение измерения
5.1. Перед измерением
• Перед измерениями избегайте приема пищи, курения и любых форм физического напряжения.
Все эти факторы влияют на результат измерений. Попробуйте найти время и 5 минут пять перед
измерениями, сидя в кресле.
• Снимите любую одежду, которая плотно прилегает к плечу.
• Всегда производите измерения на одной и той же руке (обычно левой).
• Выполняйте измерения регулярно в одно и то же время суток, поскольку кровяное давление
изменяется в течение дня.
5.2. Распространенные причины погрешности
Примечание: Для получения сравнимых результатов измерения всегда требуются одинаковые
условия! Обычно это условия покоя.
• Любые попытки пациента опереть руку могут стать причиной повышения артериального
давления. Удостоверьтесь, что во время измерения Вы находитесь в удобном, расслабленном
положении и не напрягаете никаких мышц в руке, на которой проводите измерение. При
необходимости удобно положите руку на подушку.
• Если артерия руки находится на уровне значительно выше или ниже сердца, будут получены
недостоверные показания. Каждые 15 см разницы в высоте приведут к ошибке измерений в 10
мм рт.ст.!
• Слишком узкая или короткая манжета приведет к недостоверным значениям измерений.
Подбор подходящей манжеты является чрезвычайно важным. Размер манжеты зависит
от окружности руки (измеренной в середине). Допустимый диапазон напечатан на манжете.
Если он не подходит для использования Вами, пожалуйста, обратитесь к торговой организации.
Примечание: Используйте только получившие одобрение после клинических испытаний
манжеты Microlife!
• Свободная манжета или выступающие боковые воздушные карманы являются причиной
недостоверных значений измерений.
5.3. Подгонка манжеты
a) Оберните манжету вокруг левой руки так, чтобы трубка
была направлена к нижней части руки.
б) Наложите манжету на руку, как показано на рисунке.
Убедитесь, что нижний край манжеты находится на
расстоянии приблизительно 2 - 3 см выше локтевого сгиба и
что резиновая трубка выходит из манжеты с внутренней
стороны руки.
в) Затяните свободный конец манжеты и застегните манжету
на «липучку».
г) Она должна быть затянута на плече, но не слишком тесно.
Любую одежду, которая ограничивает руку (например,
свитер), следует снять.
д) Положите руку на стол (ладонью вверх) так, чтобы манжета
находилась на уровне сердца. Убедитесь, что трубка не
перекручена.
2–3 cm
трубк
Page 29
Примечание:
Если невозможно надеть манжету на левую руку, ее можно
разместить и на правой. Однако все измерения должны проводиться
на одной и той же руке.
5.4. Выбор режима измерения
Клинические исследования показывают, что многократное измерение артериального давления и
вычисление «среднего» значения дают более точный результат при измерении артериального
давления. Данный прибор для измерения артериального давления позволяет перейти на специальный
расчет среднего значения Microlife – MAM, – который автоматически производит несколько измерений!
Расчет среднего значения (MAM):
a) Если Вы хотите провести измерение с помощью МАМ-технологии
(расчет среднего значения Microlife), пожалуйста, передвиньте
переключатель в положение 3.
б) В режиме усреднения производятся обычно 3 последовательных
измерения и расчет результата.
в) Символ « » на дисплее указывает, что устройство находится в
режиме усреднения MAM.
Режим однократного измерения:
a) Если Вы хотите провести измерение в обычном режиме, пожалуйста,
передвиньте переключатель в положение 1.
б) В режиме обычного измерения производится только одно измерение.
Выбор пользователя:
Этот усовершенствованный измеритель артериального давления
позволяет Вам отслеживать показания артериального давления
для 2 людей независимо друг от друга.
а) Перед тем, как приступить к выполнению измерений,
убедитесь, что Вы производите измерения именно для
того пользователя, для которого хотите произвести
измерения. Устройство может отслеживать результат
для 2 пользователей. (Пользователь 1, Пользователь 2)
б) Устройство установлено для выполнения измерений
для Пользователя 1.
в) снова щелкните кнопку Пользователь/Время
(User/Time) для того, чтобы переключиться на
Пользователя 1.
г) Мы предполагаем, что первым человеком, который
будет производить измерение давления, будет
Пользователь 1.
5.5. Процедура измерения
После того, как манжета будет расположена правильным
образом, можно начинать измерение:
a) Нажмите кнопку O/I. Насос начнет накачивать манжету.
Повышение давления в манжете показано на дисплее.
б) После того, как в манжете было достигнуто подходящее давление,
насос останавливается, и давление постепенно падает. Давление в
манжете отображается на дисплее. В случае, если давление в
манжете недостаточно, прибор автоматически производит заново
накачку манжеты до более высокого уровня давления.
26
STARTS
TA
RT
1
TIME
Page 30
27
в) Когда прибор обнаруживает пульс, на дисплее начинает вспыхивать
значок, изображающий сердце, и при каждом новом сердечном
сокращении раздается звуковой сигнал.
г) По окончании измерения раздается более длительный звуковой сигнал.
Теперь на дисплее отображаются систолическое и диастолическое
давление и частота пульса.
д) Значения измерений остаются на дисплее до тех пор, пока Вы не
выключите прибор. Если в течение 5 минут не будет нажато ни одной
кнопки, прибор автоматически отключится, чтобы сэкономить батарейки.
е) Когда прибор переведен в режим расчета среднего значения MAM, как
правило, производятся 3 отдельных последовательных измерения и
рассчитывается среднее значение артериального давления. Между двумя
последовательными измерениями имеет место пауза длительностью
15 секунд. Обратный отсчет на дисплее указывает оставшееся время, и за
5 секунд до того, как будет произведено 2 и 3 измерение, раздается
звуковой сигнал. В том случае, когда значения отдельных измерительных
циклов слишком отличаются друг от друга, выполняется четвертое
измерение, прежде чем на дисплее будет отображен результат. В редких
случаях артериальное давление бывает таким неустойчивым, что даже
после выполнения четвертого измерения данные измерений слишком
отличаются друг от друга. В этом случае на дисплее отображается
«ERR 6» и результат не может быть выдан. Если одно из измерений было
произведено с ошибкой, оно повторяется заново.
5.6. Прерывание измерения
Если по какой-то причине возникает необходимость в прерывании
измерения артериального давления (например, пациент себя плохо
чувствует), в любое время можно нажать кнопку 0/I (Вкл./Выкл).
Устройство автоматически снижает давление в манжете.
5.7. Память - вызов измерений
Измеритель кровяного давления автоматически хранит в памяти
последние 14 значений измерения давления, выделенных на каждого из
двоих пользователей. При нажатии на кнопку ПАМЯТЬ (MEMORY)
последнее значение измерения (MR14), а также предшествующие
значения 13 измерений (MR13,MR12,…MR1) могут быть показаны одно
за другим. Данные, полученные в режиме измерения среднего значения,
отмечены символом « ».
(MR14: Значение последнего измерения) (MR13: Значение измерения перед MR 14)
TIME
1
TIME
1
mmHg
mmHg
1
mmHg
mmHg
MR
1
mmHg
mmHg
MR
1
mmHg
mmHg
MR
1
mmHg
mmHg
MR
TIME
1
O/IO/I
M
Page 31
55..88.. è臇ÏÏflflÚÚ¸¸ -- ÒÒ··ÓÓÒÒ ‚‚ÒÒÂÂıı ËËÁÁÏÏÂÂÂÂÌÌËËÈÈ.. ÇÇÌÌËËÏχ‡ÌÌËËÂÂ!!
иВВ‰ ЪВП, Н‡Н З˚ Ы‰‡ОЛЪВ ‚ТВ ФУН‡Б‡МЛfl, ı‡Мfl˘ЛВТfl ‚ Ф‡ПflЪЛ,
Ы·В‰ЛЪВТ¸ ‚ ЪУП, ˜ЪУ ‚ ·Ы‰Ы˘ВП УМЛ З‡П МВ ФУМ‡‰У·flЪТfl.
СОfl ЪУ„У, ˜ЪУ·˚ Ы‰‡ОЛЪ¸ ‚ТВ ı‡Мfl˘ЛВТfl ‚ Ф‡ПflЪЛ БМ‡˜ВМЛfl, М‡КЛП‡ИЪВ
М‡ НМУФНЫ œ¿Гfl“‹ (MEMORY) ‚ ЪВ˜ВМЛВ Н‡Н ПЛМЛПЫП 7 ТВНЫМ‰. з‡
‰ЛТФОВВ УЪУ·‡БЛЪТfl ТЛП‚УО
«CL»
Ë ‡Á‰‡‰ÛÚÒfl 3 Á‚ÛÍÓ‚˚ı Ò˄̇·,
У·УБМ‡˜‡˛˘Лı Ы‰‡ОВМЛВ ı‡Мfl˘ЛıТfl ‚ Ф‡ПflЪЛ ТУУ·˘ВМЛИ.
èèËËÏϘ˜‡‡ÌÌËËÂÂ::
≈ТОЛ ФУТОВ‰МВВ ЛБПВВМЛВ, ТУı‡МВММУВ ‚ З‡¯ВИ Ф‡ПflЪЛ, ·˚ОУ
ФУЛБ‚В‰ВМУ ‚ ВКЛПВ ЛБПВВМЛfl ТВ‰МВ„У БМ‡˜ВМЛfl, З˚ Ы‚Л‰ЛЪВ ТЛП‚УО
«»
‚ ЪВ˜ВМЛВ ФЛ·ОЛБЛЪВО¸МУ 3 ТВНЫМ‰ ‚У ‚ВПfl ФУˆВ‰Ы˚
Ы‰‡ОВМЛfl. (›ЪЛ ТЛП‚УО˚ УЪУ·‡БflЪТfl М‡ ‰ЛТФОВВ ‚У ‚ВПfl Ы‰‡ОВМЛfl ‚ТВı
ТУı‡МВММ˚ı ‚ Ф‡ПflЪЛ ЛБПВВМЛИ, ВТОЛ ФУТОВ‰МВВ ЛБПВВМЛВ ·˚ОУ
Т‰ВО‡МУ ‚ ВКЛПВ ЛБПВВМЛfl ТВ‰МВ„У БМ‡˜ВМЛfl)
66..
‘‘
ÛÛÌÌÍ͈ˆËËËË ÔÔËËÌÌÚÚ‡‡
›ЪУ ЫТЪУИТЪ‚У ПУКВЪ ЛТФУО¸БУ‚‡Ъ¸Тfl ТУ‚ПВТЪМУ Т ‰Л‡„МУТЪЛ˜ВТНЛП ФЛМЪВУП Microlife. мТЪУИТЪ‚У ПУКВЪ
‡ТФВ˜‡Ъ˚‚‡Ъ¸ БМ‡˜ВМЛfl, ТУı‡МВММ˚В ‚ Ф‡ПflЪЛ, ФЛ М‡К‡ЪЛЛ М‡ НМУФНЫ œ–»Х“≈– (PRINTER). лЫ˘ВТЪ‚Ы˛Ъ 2 ‚Л‰‡
ЩУП‡Ъ‡. иУК‡ОЫИТЪ‡, Ы‰УТЪУ‚В¸ЪВТ¸, ˜ЪУ З˚ М‡ıУ‰ЛЪВТ¸ ‚ ВКЛПВ иУО¸БУ‚‡ЪВО¸ 1 (User1) ЛОЛ иУО¸БУ‚‡ЪВО¸ 2
(User 2) ‚ Б‡‚ЛТЛПУТЪЛ УЪ БМ‡˜ВМЛИ, НУЪУ˚В З˚ ıУЪЛЪВ ‡ТФВ˜‡Ъ‡Ъ¸.
66..11.. ä䇇ÍÍ ‡‡ÒÒÔÔ˜˜‡‡ÚÚ‡‡ÚÚ¸¸ ÔÔÓÓÒÒÎΉ‰ÌÌ ÒÒÓÓıı‡‡ÌÌÂÂÌÌÌÌÓÓ ‚‚ ÔÔ‡‡ÏÏflflÚÚËË ËËÁÁÏÏÂÂÂÂÌÌËËÂÂ
((––‡‡ÒÒÔÔ˜˜‡‡ÚÚÍ͇‡ ÓÓ‰‰ÌÌÓÓÍ͇‡ÚÚÌÌÓÓ„„ÓÓ ËËÁÁÏÏÂÂÂÂÌÌËËflfl))
‡) Ç˚·ÂËÚ ԇ‚ËθÌ˚È ˆÂ΂ÓÈ ÔËÌÚ Ô‰ ÚÂÏ, ͇Í
М‡КПВЪВ М‡ НМУФНЫ œ–»Х“≈– (PRINTER).
·) иУ‰ТУВ‰ЛМЛЪВ ФЛМЪВ Н ЛБПВЛЪВО˛ Л ‚НО˛˜ЛЪВ ФЛМЪВ
(ФУ‰У·МУТЪЛ ТП. ‚ ЫНУ‚У‰ТЪ‚В Н ФЛМЪВЫ).
‚) й‰МУН‡ЪМУ М‡КПЛЪВ НМУФНЫ œ–»Х“≈– (PRINTER) з‡ ‰ЛТФОВВ
УЪУ·‡БЛЪТfl "Pr1", ‡ ФЛМЪВ ‡ТФВ˜‡Ъ‡ВЪ ФУТОВ‰МВВ
ТУı‡МВММУВ ‚ Ф‡ПflЪЛ ЛБПВВМЛВ ‰Оfl иУО¸БУ‚‡ЪВОfl 1 ЛОЛ 2 ‚
Б‡‚ЛТЛПУТЪЛ УЪ З‡¯В„У ‚˚·У‡.
66..22.. ä䇇ÍÍ ‡‡ÒÒÔÔ˜˜‡‡ÚÚ‡‡ÚÚ¸¸ ‚‚ÒÒ ËËÁÁÏÏÂÂÂÂÌÌËËflfl,, ÒÒÓÓıı‡‡ÌÌÂÂÌÌÌÌ˚˚ ‚‚ ÔÔ‡‡ÏÏflflÚÚËË,, ËË
„„‡‡ÙÙËËÍÍ ((‡‡ÒÒÔÔ˜˜‡‡ÚÚÍ͇‡ ‰‰‡‡ÌÌÌÌ˚˚ıı ËË „„‡‡ÙÙËËÍ͇‡))
‡) Ç˚·ÂËÚ ԇ‚ËθÌ˚È ˆÂ΂ÓÈ ÔËÌÚ Ô‰ ÚÂÏ, ͇Í
М‡КПВЪВ М‡ НМУФНЫ œ–»Х“≈– (PRINTER).
·) иУ‰ТУВ‰ЛМЛЪВ ФЛМЪВ Н ЛБПВЛЪВО˛ Л ‚НО˛˜ЛЪВ ФЛМЪВ
(ФУ‰У·МУТЪЛ ТП. ‚ ЫНУ‚У‰ТЪ‚В Н ФЛМЪВЫ).
‚) м‰ВКЛ‚‡ИЪВ НМУФНЫ œ–»Х“≈– (PRINTER) ‚ ЪВ˜ВМЛВ ·УОВВ 3
ТВНЫМ‰. з‡ ‰ЛТФОВВ УЪУ·‡БЛЪТfl "Pr1", Б‡ НУЪУ˚П ТОВ‰ЫВЪ
"Pr2".
„) йЪФЫТЪЛЪВ НМУФНЫ, Л ФЛМЪВ М‡˜МВЪ ФВ˜‡Ъ‡Ъ¸ ‚ТВ ТУı‡МВММ˚В
‚ Ф‡ПflЪЛ ТУУ·˘ВМЛfl Т ТУУЪ‚ВЪТЪ ‚Ы˛˘ЛП „‡ЩЛНУП.
66..33.. ééÒÒÚÚ‡‡ÌÌÓÓ‚‚ ÔÔ˜˜‡‡ÚÚËË
ЦТОЛ З˚ ıУЪЛЪВ ФВН‡ЪЛЪ¸ ‚˚‚У‰ М‡ ФВ˜‡Ъ¸, М‡КПЛЪВ НМУФНЫ
œ–»Х“≈– (PRINTER) ‚У ‚ВПfl ‚˚‚У‰‡ М‡ ФВ˜‡Ъ¸.
œœ––»»ÃÃ≈≈◊◊¿¿ÕÕ»»≈≈::
С‡О¸МВИ¯Ы˛ ЛМЩУП‡ˆЛ˛ УЪМУТЛЪВО¸МУ ФЛМЪВ‡ ПУКМУ М‡ИЪЛ ‚
ЫНУ‚У‰ТЪ‚В Н ФЛМЪВЫ.
28
M
1
1
2
1
Page 32

29
7. Сообщения об ошибках и неисправности
Если во время измерений происходит ошибка, измерение
прекращается и отображается соответствующий код
ошибки.
(Пример: ERR 1)
* Пожалуйста, проконсультируйтесь с врачом, если эта или какая-либо другая проблема возникнет повторно.
Другие возможные неисправности и их причины – Если при пользовании прибором возникают
проблемы, необходимо проверить следующие пункты и, если необходимо, предпринять такие меры:
Ошибка № Возможная причина(ы)
ERR 1 Систолическое давление было определено, но затем давление в манжете упало
ниже 20 мм рт. ст. Трубка могла отсоединиться после того, как систолическое
давление было измерено. Дальнейшие возможные причины: Пульс не мог быть
определен.
ERR 2 Неестественные скачки давления ухудшают результат измерения. Возможная
причина: Рука двигалась во время измерения (артефакт).
ERR 3 Накачивание манжеты длилось слишком долго. Манжета установлена неправильно
или подсоединение шланга не герметично.
ERR 5 Измеренные значения выявили неприемлемую разницу систолического и
диастолического давлений. Еще раз выполните измерения, тщательно следуя
указаниям. Обратитесь к лечащему врачу, если продолжаете получать необычные
значения измерений.
ERR 6 Значения однократного измерения сильно отличаются от значения измерений,
производимых в режиме расчета среднего значения, даже после 4 циклов. Среднее
значение не может быть показано.
HI
Давление в манжете слишком высокое (свыше 300 мм рт. ст.) ИЛИ пульс слишком высокий
(свыше 200 ударов в минуту). Отдохните в течение 5 минут и повторите измерение.*
LO
Пульс слишком низкий (менее 40 ударов в минуту). Повторите измерение.*
Неисправность Способ устранения
Дисплей остается пустым, когда прибор
включен, хотя батарейки на месте.
1. Проверьте правильность полярности батареек и
исправьте, если необходимо.
2. Если на дисплее имеются необычные показания,
удалите батареи и замените их новыми.
Давление не поднимается, хотя насос
работает.
• Проверьте подсоединение трубки манжеты и
установите правильное подсоединение при
необходимости.
Прибор часто отказывает при
измерении значений артериального
давления или измеренные значения
слишком низкие (слишком высокие).
1. Правильно наденьте манжету на руку.
2. Перед началом измерения удостоверьтесь в том, что
манжета не прилегает слишком туго и что тесно
прилегающая одежда, такая как закатанный рукав, не
давит на руку над местом измерения. При
необходимости, снимите часть одежды.
3. Повторно измерьте давление в спокойной обстановке.
При каждом измерении получаются
различные значения, хотя прибор
функционирует нормально и значения
отображаются.
• Пожалуйста, прочтите следующую информацию и
вопросы, перечисленные в разделе
«Распространенные источники ошибок». Повторите
измерение.
Page 33

☞ Дальнейшая информация
Значения артериального давления подвергаются изменениям даже у здоровых людей. Важно
сравнивать измерения, произведенные при одинаковых условиях в одно и то же время дня. (В
состоянии покоя)!
Если у Вас есть какие-либо вопросы, относящиеся к пользованию данным прибором для измерения
артериального давления, обратитесь, пожалуйста, в торговую организацию, в аптеку за
координатами Представителя по обслуживанию Microlife в Вашей стране. Группа обслуживания
Microlife с удовольствием поможет Вам. Ни в коем случае не пытайтесь отремонтировать прибор
самостоятельно!
При любом несанкционированном вскрытии прибора все претензии по гарантии теряют силу!
8. Уход и техническое обслуживание, перекалибровка
a) Не подвергайте прибор воздействию экстремальных
температур, сырости, пыли и прямых солнечных лучей.
б) В манжете находится чувствительная
воздухонепроницаемая камера. Обращайтесь с
манжетой осторожно и старайтесь не скручивать и не
заламывать манжету, чтобы не повредить ее.
в) Для очистки прибора пользуйтесь сухой мягкой тканью.
Не используйте бензин, растворитель или тому
подобные средства. Пятна на манжете можно
осторожно удалить тканью, смоченной в мыльном
растворе. Стирать манжету в стиральной или
посудомоечной машине нельзя!
г) С соединительной воздушной трубкой обращайтесь
осторожно. Не допускайте ее повреждения вследствие
перегиба, зажатия или пореза острыми краями.
д) Не роняйте прибор и не применяйте к нему грубой
силы. Избегайте сильных сотрясений.
е) Ни в коем случае не вскрывайте прибор! Это может
отрицательно отразиться на калибровке! (точность)
Периодическая калибровка прибора
То чность чувствительных измерительных приборов должна время от времени проверяться. Мы
рекомендуем периодически, каждые два года, проводить проверку Вашего прибора
уполномоченным представителем Microlife.
Более подробную информацию о проверке вы можете получить в специализированной торговой
организации, в которой вы приобрели прибор.
30
Неисправность Способ устранения
Значения артериального давления
отличаются от измеренных врачом.
• Запишите значения Вашего давления в течения дня и
обратитесь к врачу.
138
80
7070
Gasoline
138138
8080
70
138
80
70
Page 34

31
9. Гарантия
Данный измеритель кровяного давления подлежит гарантии сроком 3 года со дня покупки. Эта
гарантия распространяется на прибор. Гарантия не распространяется на манжету, возникшие в
результате неправильного обращения, вытекания батареек, несчастных случаев, несоблюдения
руководства по эксплуатации или изменений, совершенных в приборе третьими лицами.
Гарантия действительна только в случае предъявления гарантийного талона, заполненного
сотрудником торговой организации.
Название и адрес ответственной торговой организации:
10. Технические характеристики
Могут быть внесены технические изменения!
11. www.microlife.ru
иУ‰У·МЫ˛ ФУОВБМЫ˛ ЛМЩУП‡ˆЛ˛ У ТВ‚ЛТМ˚ı ‚УБПУКМУТЪflı М‡¯Лı ЪВПУПВЪУ‚ Л ЪУМУПВЪУ‚ З˚ М‡И‰ВЪВ
М‡ М‡¯ВП Т‡ИЪВ www.microlife.ru.
Внимание!
Изделия зарегистрированы в МЗ РФ за № 2003/376 от 19 марта 2003 г.
Согласно Закону о Защите Прав Потребителей (ст. 2, п. 5) срок службы приборов - не менее 10 лет.
Дата производства: первые четыре цифры серийного номера прибора. Первая и вторая цифры неделя производства, третья и четвертая - год производства.
Масса: 460 г (с батарейками)
Габариты: 115 (Ш) x 182 (Д) x 76 (В) мм
Температура хранения: от –20 до +50 °C
Влажность: относительная влажность от 15 до 90%
Рабочая температура: от 10 до 40 °C
Дисплей: ЖК-дисплей (жидкокристаллический дисплей)
Метод измерения: осциллометрический
Датчик давления: емкостный
Диапазон измерения:
СИСТ/ДИАСТ:
Пульс:
от 30 до 280 мм рт.ст.
от 40 до 200 ударов в минуту
Диапазон отображения давления
манжеты:
0–299 мм рт.ст.
Память: Автоматически сохраняет последние 14 измерений для
двух пользователей
Разрешающая способность измерения:
1 мм рт.ст.
Точность: Давление в пределах ± 3 мм рт.ст.
Пульс ± 5 % показания
Источник питания: 6 В пост. тока / 600 мА
a) 4 сухих элемента (батарейки) UM-3, размер AA, 1.5 В
б) Блок питания 6 В пост. тока 600 мA (дополнительный)
Дополнительные принадлежности: директива ЕС 93/42/EEC
требования NIBP: EN 1060-1 /-3 /-4, ANSI / AAMI SP10
Page 35

Automatyczny aparat do mierzenia ciÊnienia
Instrukcja
u˝ywania
32
Page 36

33
Spis treÊci
1. Wst´p
1.1. Cechy aparatu
1.2. Wa˝ne informacje dotyczàce samodzielnego pomiaru
2. Wa˝ne informacje na temat ciÊnienia krwi i jego pomiaru
2.1. Jak powstaje wysokie/niskie ciÊnienie krwi?
2.2. Jakie wartoÊci mieszczà si´ w normie?
2.3. Co mo˝na zrobiç, je˝eli regularnie otrzymywane sà wysokie/niskie wyniki?
2.4. Technologia MAM (Microlife Average Mode – tryb pomiaru uÊrednionego Microlife)
3. Elementy aparatu do mierzenia ciÊnienia
4. Korzystanie z aparatu do mierzenia ciÊnienia
4.1. Wk∏adanie baterii
4.2. Korzystanie z zasilacza (wyposa˝enie dodatkowe)
4.3. Pod∏àczanie mankietu
4.4. Ustawianie czasu i daty
5. Przeprowadzanie pomiaru
5.1. Przed pomiarem
5.2. Cz´ste przyczyny b∏´dów
5.3. Dopasowywanie mankietu
5.4. Wybór trybu pomiaru
5.5. Sposób pomiaru
5.6. Przerwanie pomiaru
5.7. Pami´ç – wywo∏ywanie wyników poprzednich pomiarów
5.8. Pami´ç – kasowanie wszystkich wyników pomiarów
6. Funkcje drukowania
6.1. Jak wydrukowaç ostatnio zachowany wynik pomiaru (pojedynczy wydruk danych)
6.2. Jak wydrukowaç wszystkie wyniki pomiarów zachowane w pami´ci (wydruk danych z tabelà)
6.3. Przerwanie drukowania
7. Komunikaty o b∏´dach/wady w dzia∏aniu
8. Przechowywanie i konserwacja, rekalibracja
9. Gwarancja
10. Dane techniczne
11. www.microlife.com
Page 37

1. WST¢P
1.1. Cechy aparatu
Aparat do mierzenia ciÊnienia jest w pe∏ni automatycznym, cyfrowym urzàdzeniem do mierzenia
ciÊnienia krwi na ramieniu, w którym zintegrowano technologi´ MAM. Dzi´ki zastosowaniu metody
oscylometrycznej aparat ten umo˝liwia wykonanie bardzo szybkiego i rzetelnego pomiaru ciÊnienia
skurczowego i rozkurczowego krwi oraz t´tna.
Urzàdzenie jest ∏atwe w u˝yciu i zapewnia znakomità dok∏adnoÊç, co udowodniono w badaniach
klinicznych. Du˝y wyÊwietlacz u∏atwia wizualizacj´ stanu dzia∏ania oraz ciÊnienia mankietu podczas
pomiaru.
Prosimy o dok∏adne przeczytanie niniejszej instrukcji przed u˝yciem aparatu, a nast´pnie zachowanie jej
w bezpiecznym miejscu. Wi´cej informacji odnoÊnie ciÊnienia krwi i jego pomiaru mo˝na uzyskaç
bezpoÊrednio u lekarza.
Uwaga!
1.2. Wa˝ne informacje dotyczàce samodzielnego wykonywania pomiaru
• Nale˝y pami´taç, ˝e samodzielny pomiar oznacza kontrol´, nie diagnoz´ czy leczenie. Niepokojàce
wyniki powinny byç zawsze konsultowane z lekarzem. W ˝adnych okolicznoÊciach nie wolno
zmieniaç dawek leków przepisanych przez lekarza.
•Wynik pomiaru t´tna nie s∏u˝y do kontroli cz´stotliwoÊci uderzeñ stymulatora serca.
•W przypadku dolegliwoÊci kardiologicznych (arytmia) pomiary uzyskane tym aparatem powinny byç
oceniane po konsultacji z lekarzem.
Zak∏ócenia elektromagnetyczne
Aparat zawiera czu∏e elementy elektroniczne (mikrokomputer). Dlatego nie nale˝y nara˝aç go na dzia∏anie
silnych pól elektrycznych lub elektromagnetycznych (np. telefony komórkowe, kuchenki mikrofalowe).
Mogà one bowiem doprowadziç do chwilowego zaburzenia precyzji pomiaru.
2. Wa˝ne informacje na temat ciÊnienia krwi i jego pomiaru
2.1. Jak powstaje wysokie/niskie ciÊnienie?
Poziom ciÊnienia krwi determinowany jest w cz´Êci mózgu zwanej oÊrodkiem krà˝eniowym
iprzystosowywany do danej sytuacji poprzez sprz´˝enie z systemem nerwowym. W celu osiàgni´cia
po˝àdanego ciÊnienia zmieniajà si´ si∏a i cz´stotliwoÊç bicia serca (t´tno), jak równie˝ szerokoÊç naczyñ
krwionoÊnych, która jest regulowana za pomocà mi´Êni g∏adkich w ich Êcianach. Poziom t´tniczego
ciÊnienia krwi zmienia si´ okresowo w zale˝noÊci od aktywnoÊci serca: w momencie «wyrzucenia krwi»
(skurcz) jego wartoÊç jest najwy˝sza (ciÊnienie skurczowe), w momencie zakoñczenia – «odpoczynku
serca» (rozkurcz) – najni˝sza (ciÊnienie rozkurczowe). CiÊnienie krwi musi mieÊciç si´ w pewnym
zakresie, by nie powodowaç powstawania okreÊlonych chorób.
2.2. Jakie wartoÊci ciÊnienia sà normalne?
CiÊnienie w momencie spoczynku jest za wysokie, jeÊli ciÊnienie rozkurczowe wynosi ponad 90 mmHg
i/lub ciÊnienie skurczowe osiàga wartoÊç ponad 140 mmHg. W takim przypadku nale˝y natychmiast
skontaktowaç si´ z lekarzem. Takie wartoÊci utrzymujàce si´ przez d∏u˝szy okres zagra˝ajà zdrowiu,
poniewa˝ powodujà post´pujàce uszkodzenie naczyñ krwionoÊnych.
34
Page 38

35
Równie˝ zbyt niskie ciÊnienie, tj. skurczowe poni˝ej 100 mmHg i/lub rozkurczowe poni˝ej 60 mmHg,
wymaga konsultacji lekarza.
Nawet przy normalnym poziomie ciÊnienia zalecane sà regularne samokontrole przy u˝yciu ciÊnieniomierza. W ten sposób mo˝na wczeÊniej zaobserwowaç potencjalne zmiany i w∏aÊciwie zareagowaç.
W trakcie leczenia majàcego na celu utrzymanie ciÊnienia na w∏aÊciwym poziomie nale˝y prowadziç
rejestr poziomu ciÊnienia, przeprowadzajàc samodzielnie regularne pomiary o okreÊlonych porach dnia,
by móc przedstawiç je nast´pnie lekarzowi. Nigdy nie nale˝y na podstawie uzyskanych wyników
samodzielnie zmieniaç dawki leków przepisanych przez lekarza.
Tabela przedstawiajàca wartoÊci ciÊnienia krwi (w mmHg):
Zakres Skurczowe Rozkurczowe Dzia∏anie
ciÊnienie krwi ciÊnienie krwi
NiedociÊnienie ni˝sze od 100 ni˝sze od 60 konsultacja z lekarzem
CiÊnienie prawid∏owe mi´dzy 100 a 140 mi´dzy 60 a 90 samokontrola
Lekkie nadciÊnienie mi´dzy 140 a 160 mi´dzy 90 a 100 konsultacja z lekarzem
Umiarkowanie mi´dzy 160 a 180 mi´dzy 100 a 110 konsultacja z lekarzem
ci´˝kie nadciÊnienie
Ci´˝kie wy˝sze ni˝ 180 wy˝sze ni˝ 110 pilna konsultacja
nadciÊnienienie z lekarzem
☞ Dalsze informacje
• JeÊli ciÊnienie jest normalne w warunkach spoczynku, ale wyjàtkowo wysokie przy wysi∏ku
fizycznym lub w stresie psychicznym, istnieje mo˝liwoÊç wyst´powania tzw. «ciÊnienia labilnego».
W takim przypadku nale˝y skontaktowaç si´ z lekarzem.
• JeÊli ciÊnienie rozkurczowe po poprawnie wykonanym pomiarze wynosi ponad 120 mmHg,
wymaga natychmiastowego leczenia.
2.3. Co mo˝na zrobiç, jeÊli regularnie otrzymuje si´ wysokie/niskie wyniki?
a). Nale˝y skontaktowaç si´ z lekarzem.
b). Podwy˝szone ciÊnienie (ró˝ne formy nadciÊnienia) zwiàzane jest w d∏u˝szej i Êredniej perspektywie
ze znacznym ryzykiem dla zdrowia. Dotyczy ono naczyƒ t´tniczych, które sà zagro˝one z powodu
zw´˝enia spowodowanego z∏ogami na Êciankach naczyƒ (arterioskleroza). Skutkiem mo˝e byç
niedostateczny dop∏yw krwi do wa˝nych organów (serce, mózg, mi´Ênie). Co wi´cej, d∏ugotrwale
podwy˝szone ciÊnienie krwi mo˝e doprowadziç do strukturalnego uszkodzenia serca.
c). Jest wiele ró˝nych przyczyn powstawania wysokiego ciÊnienia. Istnieje rozró˝nienie pomi´dzy
powszechnym pierwotnym (samoistnym) nadciÊnieniem a wtórnym nadciÊnieniem, które mo˝e byç
zwiàzane z okreÊlonymi schorzeniami innych organów. W sprawie przyczyn wystàpienia
podwy˝szonego ciÊnienia nale˝y skonsultowaç si´ z lekarzem.
d). Zarówno w celu obni˝enia stwierdzonego ju˝ wysokiego ciÊnienia, jak i zapobie˝enia jego
powstaniu, mo˝na podjàç poni˝ej opisane kroki. Dzia∏ania te sà cz´Êcià codziennego trybu ˝ycia.
Nawyki dietetyczne
• Dà˝enie do normalnej wagi odpowiadajàcej wiekowi.
Zmniejszenie nadwagi.
• Ograniczenie nadmiernego spo˝ycia soli kuchennej.
• Unikanie t∏ustych potraw.
Page 39

Przebyte choroby
Post´powanie zgodne z zaleceniami lekarza dotyczàcymi przebytych chorób, takich jak:
• cukrzyca,
• zaburzenia metabolizmu t∏uszczów,
• dna moczanowa.
Na∏ogi
• Rzucenie palenia.
• U˝ywanie tylko umiarkowanych iloÊci alkoholu.
• Ograniczenie spo˝ycia kofeiny (kawy).
Kondycja fizyczna
•Po wst´pnym badaniu lekarskim regularne uprawianie sportu.
• Wybór dyscypliny wymagajàcej wytrzyma∏oÊci i unikanie sportów si∏owych.
• Unikanie maksymalnych obcià˝eƒ.
•Po przebytej chorobie i/lub w wieku powy˝ej 40 lat przed podj´ciem uprawiania sportu
nale˝y skonsultowaç si´ z lekarzem, który zdecyduje, jaki sport i w jakim zakresie b´dzie wskazany.
2.4. Technologia MAM (Microlife Average Mode – tryb pomiaru uÊrednionego Microlife)
•„Technologia MAM” to nowa koncepcja niezawodnoÊci samodzielnego pomiaru ciÊnienia krwi.
•Zaawansowana dok∏adnoÊç pomiaru zosta∏a osiàgni´ta dzi´ki automatycznej analizie trzech
kolejnych pomiarów.
• Nowy system zapewnia rzetelne wartoÊci do wykorzystania przez lekarza i mo˝e byç u˝ywany
jako podstawa dla niezawodnej diagnostyki i leczenia wysokiego ciÊnienia krwi.
A) Dlaczego MAM?
• CiÊnienie krwi u cz∏owieka nie jest stabilne.
• Nast´puje rozrzut wyników.
B) G∏ówne zalety
Zmniejszenie:
• rozrzutu wyników
• czasu potrzebnego na odpoczynek przed pomiarem
• wp∏ywu ruchów
• wp∏ywu po∏o˝enia mankietu
C) KorzyÊci lecznicze
• Zwi´kszenie dok∏adnoÊci
• RzetelnoÊç danych z samodzielnego pomiaru wykonanego przez pacjenta
• Samodzielna diagnoza nadciÊnienia
• Dok∏adny nadzór terapii
D) Porzàdek pomiarów
•W pe∏nym cyklu pomiarowym ca∏kowity czas pomiaru nie przekracza 3 minut w porównaniu z
czasem pojedynczego pomiaru wynoszàcym 1,5 minuty.
•Pojedyncze wyniki nie sà wyÊwietlane.
• Ze wzgl´du na wynik analizy danych mo˝e byç konieczne wykonanie czwartego pomiaru.
36
1. measurement
2. measurement
3. measurement
Result
Analysis
15 seconds resting time
15 seconds resting time
Page 40

37
3. ELEMENTY APARATU DO MIERZENIA CIÂNIENIA
Ilustracja przedstawia aparat do mierzenia ciÊnienia, sk∏adajàcy si´ z nast´pujàcych elementów:
a) Jednostka g∏ówna:
b) Mankiet na rami´:
Mankiet Êredni (AC-1 M) dla obwodu ramienia 22-32 cm.
Mankiet du˝y (AC-1 L) dla obwodu ramienia 32-42 cm.
(Uwaga: du˝y mankiet jest dost´pny jako
wyposa˝enie dodatkowe).
138
80
70
Gniazdo
os∏ony
mankietu
Przycisk Start
Tryb pojedynczy/tryb pomiaru
uÊrednionego (MAM)
Przycisk WY¸/W¸ (O/I)
Przycisk Pami´ç
Przycisk U˝ytkownik/czas
Przycisk drukowania
Gniazdo portu
drukarki
Gniazdo
zasilania
AC/DC
Page 41

4. KORZYSTANIE Z APARATU DO MIERZENIA CIÂNIENIA
4.1. Wk∏adanie baterii
Baterie nale˝y w∏o˝yç natychmiast po rozpakowaniu
urzàdzenia. Komora na baterie znajduje si´ z ty∏u
urzàdzenia (patrz ilustracja).
a) Zdejmij wieczko.
b) W∏ó˝ baterie (4 x rozmiar AA 1,5 V), zwracajàc
uwag´ na wskazanà biegunowoÊç.
c) Je˝eli na wyÊwietlaczu pojawi si´ komunikat
ostrze˝enia o stanie baterii, oznacza to, ˝e sà one
zu˝yte i nale˝y je wymieniç.
Uwaga!
•Po ukazaniu si´ komunikatu ostrze˝enia o stanie baterii
urzàdzenie nie b´dzie dzia∏aç do momentu wymiany baterii.
• Nale˝y u˝yç baterii AA typu Long-Life lub alkalicznych baterii
1,5 V. Nie zaleca si´ u˝ywania
baterii do∏adowywanych (akumulatorów 1,2 V).
• Je˝eli aparat do mierzenia ciÊnienia jest d∏ugo nieu˝ywany,
nale˝y wyjàç z niego baterie.
Kontrola dzia∏ania: Przytrzymaj przycisk 0/I w celu sprawdzenia, czy na wyÊwietlaczu widoczne sà
wszystkie symbole. Je˝eli urzadzenie dzia∏a poprawnie, wszystkie symbole muszà byç widoczne.
4.2. Korzystanie z zasilacza (wyposa˝enie dodatkowe)
Niniejszy aparat mo˝na obs∏ugiwaç wykorzystujàc zasilacz Microlife (moc wyjÊciowa 6 V DC / 600 mA z
wtyczkà DIN).
a) Pod∏àcz wtyczk´ AC do gniazdka z ty∏u urzàdzenia.
b) Pod∏àcz zasilacz do gniazda zasilania 230 V
lub 110 V. SprawdŸ zasilanie wciskajàc
przycisk O/I.
Uwaga!
• Gdy do urzàdzenia pod∏àczony jest zasilacz, moc nie jest pobierana z baterii.
• Je˝eli zasilanie zostanie przerwane podczas pomiaru (np. przez przypadkowe wyj´cie wtyczki zasilacza
z gniazda), nale˝y wyzerowaç urzàdzenie wyjmujàc wtyczk´ z gniazda i ponownie jà w∏àczajàc.
• Pytania dotyczàce zasilania prosimy kierowaç do
lokalnego punktu sprzeda˝y.
38
+
+
+
+
138
80
70
Page 42
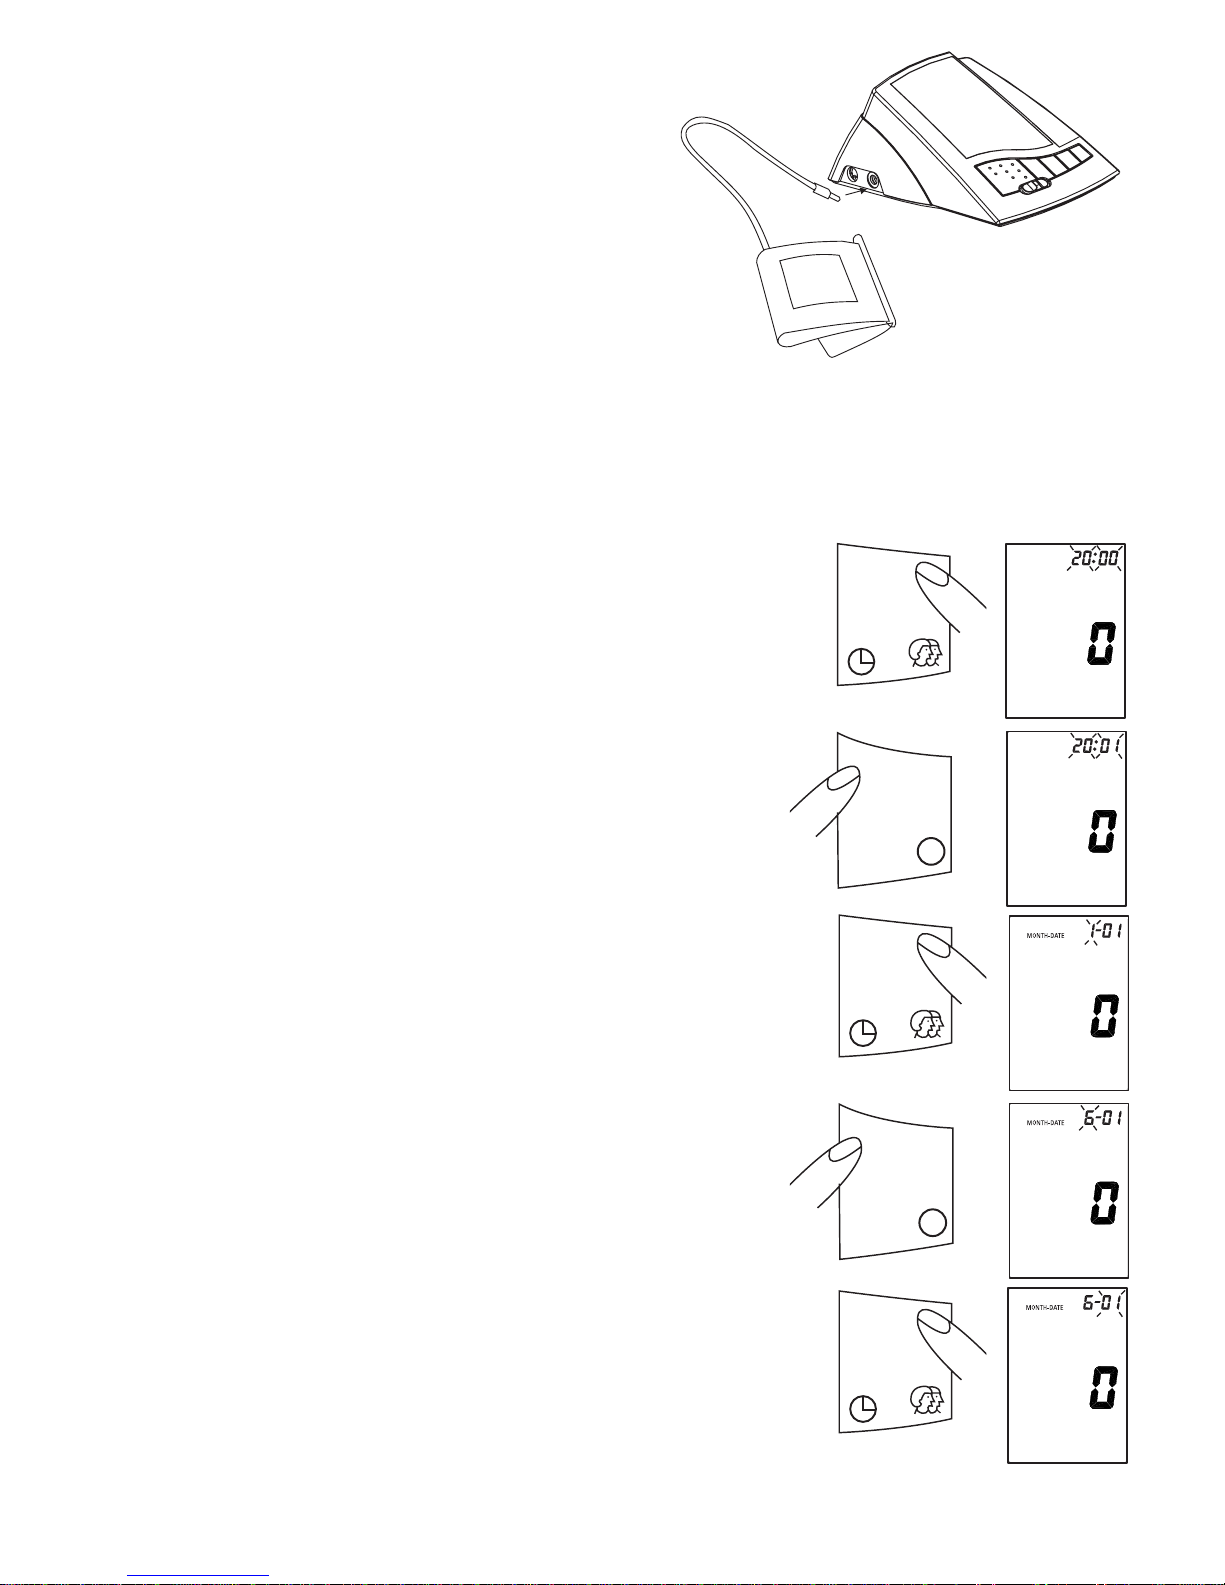
39
4.3. Pod∏àczanie mankietu
Pod∏àcz mankiet w otwór z lewej strony urzàdzenia
plastikowà z∏àczkà, jak pokazano na schemacie.
4.4. Ustawianie godziny i daty
Aparat automatycznie rejestruje godzin´ i dat´ ka˝dego pomiaru. Jest to bardzo wa˝na informacja,
poniewa˝ ciÊnienie krwi w ciàgu dnia zwykle si´ zmienia. Po w∏o˝eniu nowych baterii widoczne jest
nast´pujàce ustawienie godziny/daty: 2000-01-01 00:00 (rok-miesiàc-dzieƒ-godzina). Bie˝àcà dat´ i
godzin´ nale˝y wprowadziç ponownie w nast´pujàcy sposób (przyk∏ad: wprowadzenie (rok-miesiàcdzieƒ-godzina) 2001-06-15 godzina 09:30):
1. WciÊnij przycisk U˝ytkownik/czas na co najmniej
3 sekundy. Na wyÊwietlaczu pojawi si´ ustawiony
rok, przedstawiony za pomocà czterech migajàcych
cyfr.
2. Prawid∏owy rok mo˝na wprowadziç wciskajàc
przycisk PAMI¢å. Ka˝da zmiana wymaga jednego
naciÊni´cia przycisku.
3. WciÊnij przycisk U˝ytkownik/czas ponownie. Tym
razem na wyÊwietlaczu pojawi si´ bie˝àca data,
przy czym pierwsza cyfra (miesiàc) b´dzie migaç.
Uwaga!
D∏u˝sze przytrzymanie przycisku przyspiesza
wykonanie tej czynnoÊci.
4. Bie˝àcy miesiàc mo˝na teraz wprowadziç wciskajàc
przycisk PAMI¢å.
(Przyk∏ad: wciÊni´cie 6 razy przesuwa dat´ o 6
miesi´cy)
5. WciÊnij przycisk U˝ytkownik/czas ponownie.
Migajà dwie ostatnie cyfry (dzieƒ).
138
80
70
M
M
Page 43

6. Bie˝àcy dzieƒ mo˝na teraz wprowadziç wciskajàc
przycisk PAMI¢å. (Przyk∏ad: wciÊni´cie 15 razy
przesuwa dzieƒ od pierwszego do pi´tnastego)
7. WciÊnij przycisk U˝ytkownik/czas ponownie.
Na wyÊwietlaczu pojawi si´ bie˝àca godzina,
przy czym pierwsza cyfra (godzina) b´dzie migaç.
8. Odpowiednià godzin´ mo˝na teraz wprowadziç
wciskajàc przycisk PAMI¢å.
(Przyk∏ad: wciÊni´cie 9 razy przesuwa
godzin´ od 0 do 9:00 )
9. WciÊnij przycisk U˝ytkownik/czas ponownie.
Migajà dwie ostatnie cyfry (minuty).
10. Minuty mo˝na teraz wprowadziç wciskajàc
przycisk PAMI¢å (przyk∏ad: wciÊni´cie 30 razy
przesuwa czas od 0 do 30 minut).
11. Odczytywanie ustawionej daty:
Po wprowadzeniu wszystkich ustawieƒ nale˝y
wcisnàç przycisk U˝ytkownik/czas jeden raz.
Na chwil´ pojawi si´ data, a nast´pnie godzina.
Wprowadzone dane zosta∏y potwierdzone
i zegar zaczyna odmierzanie.
40
M
TIME
M
TIME
M
2
2
Page 44

41
5. PRZEPROWADZANIE POMIARU
5.1. Przed pomiarem
• BezpoÊrednio przed pomiarem ciÊnienia nale˝y unikaç jedzenia, palenia oraz wszelkich form wysi∏ku.
Wszystkie te czynniki majà wp∏yw na wynik pomiaru. Nale˝y spróbowaç znaleêç czas na odpr´˝enie
w fotelu, w spokojnej atmosferze przez oko∏o 5 minut przed pomiarem.
• Nale˝y zdjàç ciasne ubranie z ramienia.
•Pomiaru nale˝y zawsze dokonywaç na tym samym ramieniu (zwykle lewym).
•Pomiary powinny odbywaç si´ regularnie o sta∏ej porze dnia, poniewa˝ ciÊnienie krwi zmienia si´ w
ciàgu dnia.
5.2. Cz´ste przyczyny b∏´dów
Uwaga!Porównywalne pomiary ciÊnienia krwi zawsze wymagajà takich samych warunków! Najlepiej
zawsze wykonywaç pomiar w spokoju.
• Wysi∏ki pacjenta zmierzajàce do podparcia ramienia mogà spowodowaç wzrost ciÊnienia krwi.
Nale˝y usiàÊç w wygodnej, rozluênionej pozycji i nie napinaç mi´Êni ramienia, na którym
przeprowadzany jest pomiar. W razie koniecznoÊci mo˝na u˝yç poduszki do podparcia.
• Je˝eli t´tnica ramieniowa znajduje si´ znacznie poni˝ej lub powy˝ej serca, otrzymany odczyt b´dzie
nieprawid∏owy. Ka˝de 15 cm w ró˝nicy wysokoÊci powoduje b∏àd pomiaru wynoszàcy 10 mmHg!
• Zbyt wàskie lub zbyt krótkie mankiety wywo∏ujà nieprawid∏owoÊci w pomiarze. Wybór w∏aÊciwego
mankietu ma szczególnie wa˝ne znaczenie. Rozmiar mankietu zale˝y od obwodu ramienia (mierzonego
na Êrodku). Informacja o dopuszczalnym zakresie jest wydrukowana na mankiecie. Je˝eli nie odpowiada Paƒstwu oferowany rozmiar, prosimy skontaktowaç si´ ze sprzedawcà.
Uwaga! Nale˝y u˝ywaç tylko klinicznie zatwierdzonych mankietów Microlife Cuffs!
• Luêny mankiet lub wystajàcy z boku korek powietrzny powodujà nieprawid∏owoÊci w pomiarze.
5.3. Dopasowywanie mankietu
a) Na∏ó˝ mankiet na lewe rami´, tak by rurka by∏a
skierowana w stron´ przedramienia.
b) U∏ó˝ mankiet na ramieniu, jak pokazano na ilustracji.
Upewnij si´, czy dolna kraw´dê mankietu znajduje
si´ 2-3 cm nad ∏okciem oraz czy gumowy wà˝ utrzymuje
mankiet na wewn´trznej stronie ramienia.
c) ZaciÊnij wolny koniec mankietu i zapnij mankiet na rzep.
d) Mankiet powinien byç na∏o˝ony na rami´ wygodnie, tak
by mo˝na by∏o wsunàç pod niego dwa palce. Ubranie
ograniczajàce rami´ (np. sweter) nale˝y zdjàç.
e) Zabezpiecz mankiet zamkni´ciem na rzep tak, by le˝a∏
wygodnie i nie uciska∏ ramienia. Po∏ó˝ rami´ na stole
(d∏oƒ skierowana stronà wewn´trznà do góry), tak by
mankiet znajdowa∏ si´ na wysokoÊci serca. Upewnij si´,
czy rurka nie jest zap´tlona.
2–3 cm
wężyk
Page 45

Uwaga!
Je˝eli nie da si´ dopasowaç mankietu do lewego ramienia,
mo˝na go równie˝ za∏o˝yç na rami´ prawe. Nale˝y jednak
pami´taç, ˝e wszystkie pomiary powinny byç wykonywane
na tym samym ramieniu.
5.4. Wybór trybu pomiaru
Badania kliniczne dowodzà, ˝e wielokrotne odczyty ciÊnienia krwi i obliczenie Êredniej daje wi´ksze prawdopodobieƒstwo obliczenia prawdziwego ciÊnienia. Urzàdzenie Microlife wyposa˝one w tryb Average
Mode pozwala na prze∏àczenie aparatu w tryb Average Mode (MAM, tryb pomiaru uÊrednionego), który
automatycznie dokonuje wielokrotnych odczytów!
Tryb pomiaru uÊrednionego/MAM:
a) Aby wykonaç pomiar w trybie pomiaru uÊrednionego, nale˝y
przesunàç prze∏àcznik w prawo na pozycj´ nr 3.
b) W trybie pomiaru uÊrednionego majà zwykle miejsce
3 kolejne pomiary, po czym obliczany jest wynik.
c) Symbol «»widoczny na wyÊwietlaczu wskazuje
ustawienie urzàdzenia w trybie pomiaru uÊrednionego.
Tryb pojedynczy:
a) Aby wykonaç pojedynczy pomiar, nale˝y przesunàç
prze∏àcznik na pozycj´ nr 1.
b) W trybie pojedynczym wykonuje si´ tylko jeden pomiar.
Wybór u˝ytkownika:
Niniejszy aparat do mierzenia ciÊnienia pozwala
monitorowaç ciÊnienie krwi dwóch osób niezale˝nie.
a) Przed pomiarem nale˝y upewniç si´, czy urzàdzenie
zosta∏o ustawione dla odpowiedniego u˝ytkownika.
Urzàdzenie mo˝e monitorowaç wyniki dla dwóch
osób (U˝ytkownik 1, U˝ytkownik 2).
b) Urzàdzenie jest ustawione dla U˝ytkownika 1.
WciÊnij przycisk U˝ytkownik/czas, aby zmieniç
ustawienie dla U˝ytkownika 2.
c) WciÊnij przycisk U˝ytkownik/czas ponownie,
aby zmieniç ustawienie dla U˝ytkownika 1
d) Zalecamy, aby pierwsza osoba mierzàca
swoje ciÊnienie by∏a U˝ytkownikiem 1.
5.5. Sposób pomiaru:
Po odpowiednim u∏o˝eniu mankietu mo˝na rozpoczàç pomiar:
a) WciÊnij przycisk START. Rozpocznie si´ pompowanie
mankietu. Rosnàce ciÊnienie w mankiecie b´dzie
wskazywane na wyÊwietlaczu.
42
STARTS
TA
RT
1
TIME
Page 46

43
b) Po osiàgni´ciu odpowiedniego ciÊnienia pompowanie zostanie
zatrzymane i ciÊnienie zacznie stopniowo opadaç. CiÊnienie w
mankiecie b´dzie widoczne na wyÊwietlaczu. Je˝eli ciÊnienie w
mankiecie b´dzie za s∏abe, aparat automatycznie dopompuje mankiet
do wi´kszego poziomu.
c) Gdy przyrzàd wykryje t´tno, na wyÊwietlaczu pojawi si´ migajàcy
symbol serca, a ka˝de uderzenie b´dzie sygnalizowane dêwi´kiem.
d) Zakoƒczenie pomiaru jest sygnalizowane d∏u˝szym dêwi´kiem. Na
wyÊwietlaczu pojawià si´ ciÊnienie skurczowe i rozkurczowe oraz puls.
e) Odczyty pomiaru pozostanà na wyÊwietlaczu do momentu wy∏àczenia
przyrzàdu. Je˝eli w ciàgu 5 minut nie zostanie wciÊni´ty ˝aden przycisk, aparat wy∏àczy si´ sam w celu oszcz´dzania baterii.
f) Gdy aparat jest ustawiony w trybie pomiaru uÊrednionego, majà
miejsce 3 oddzielne pomiary, po czym zostaje obliczona wartoÊç
ciÊnienia krwi. Pomi´dzy pomiarami b´dà nastepowa∏y 15sekundowe przerwy. Odliczanie wska˝e pozosta∏y czas, natomiast na
5 sekund przed drugim i trzecim odczytem pojawi si´ sygna∏
dêwi´kowy. W przypadku, gdy dane ka˝dego pojedynczego cyklu
bardzo ró˝nià si´ mi´dzy sobà, przed wyÊwietleniem wyniku ma
miejsce czwarty pomiar. W rzadkich wypadkach ciÊnienie krwi jest
tak niestabilne, ˝e nawet po wykonaniu czterech pomiarów ró˝nice
mi´dzy danymi sà zbyt du˝e. Wówczas wyÊwietlany jest komunikat
«ERR 6» i podanie wyników jest niemo˝liwe. Gdy w jednym pomiarze
wystàpi b∏àd, komunikat jest powtarzany.
5.6. Przerwanie pomiaru
Je˝eli z jakiegokolwiek powodu wystàpi koniecznoÊç przerwania
pomiaru ciÊnienia krwi (np. pacjent êle si´ poczuje), przycisk WY¸/W¸
(0/I) mo˝na nacisnàç w dowolnym momencie. Urzàdzenie natychmiast
automatycznie zmniejszy ciÊnienie w mankiecie.
5.7. Pami´ç – wywo∏ywanie wyników poprzednich pomiarów
Niniejszy aparat do mierzenia ciÊnienia krwi automatycznie
zapami´tuje ka˝dà z ostatnich 14 wartoÊci pomiarów oddzielnie dla 2
u˝ytkowników. Naciskajàc przycisk PAMI¢å mo˝na wyÊwietliç ostatni
pomiar (np. MR14), jak równie˝ kolejno poprzednie 13 pomiarów
(MR13, MR12,… MR1). Dane otrzymane w trybie uÊrednionego
pomiaru sà oznaczane symbolem «».
(MR14: WartoÊç ostatniego pomiaru) (MR13: WartoÊç pomiaru poprzedzajàcego MR14)
TIME
1
TIME
1
mmHg
mmHg
1
mmHg
mmHg
MR
1
mmHg
mmHg
MR
1
mmHg
mmHg
MR
1
mmHg
mmHg
MR
TIME
1
O/IO/I
M
Page 47
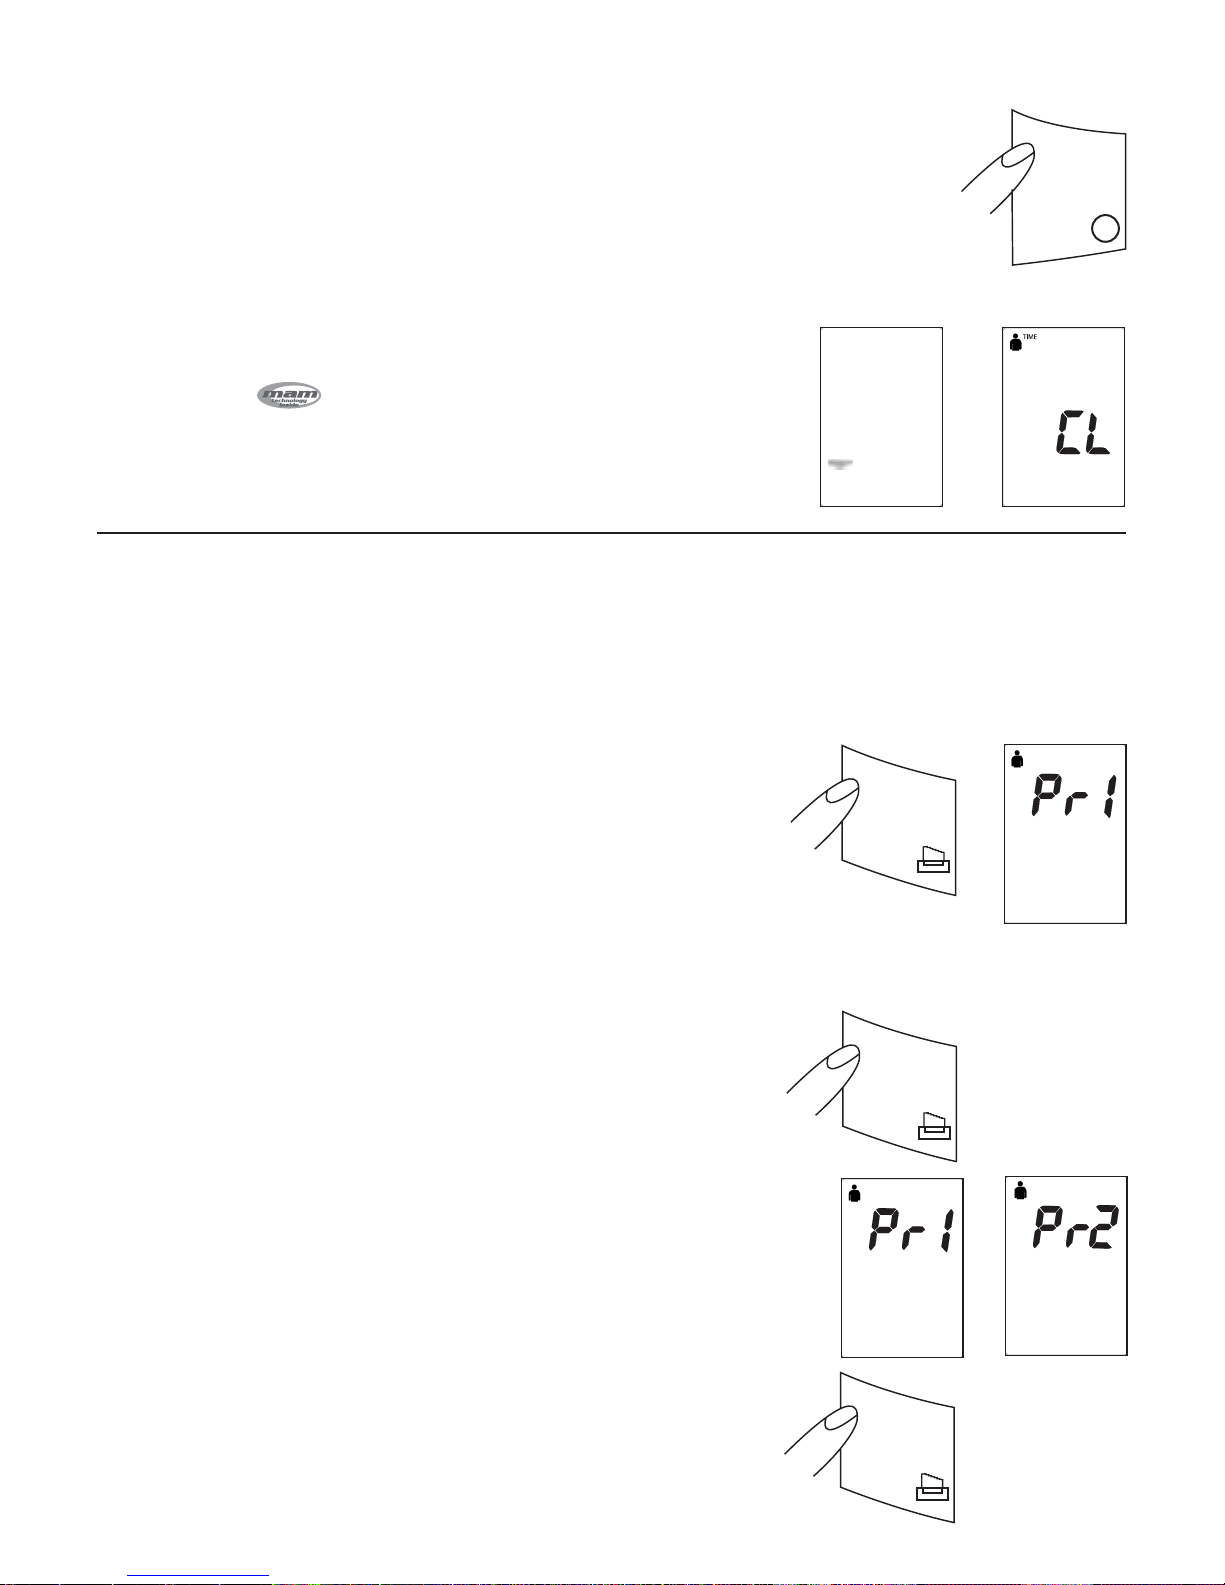
5.8. Pami´ç – kasowanie wszystkich wyników pomiarów
Uwaga!
Przed skasowaniem wszystkich odczytów zachowanych w pami´ci nale˝y si´
upewniç, czy nie b´dà one potrzebne w przysz∏oÊci.
Aby skasowaç wszystkie zachowane odczyty, nale˝y przytrzymaç przycisk
PAMI¢å przez co najmniej 7 sekund; na wyÊwietlaczu pojawi si´ symbol «CL», a
3 krótkie sygna∏y dêwi´kowe powiadomià o skasowaniu zachowanych odczytów.
Uwaga:
Je˝eli ostatni zachowany pomiar by∏ wykonany w trybie pomiaru
uÊrednionego, podczas kasowania przez oko∏o 3 sekundy widoczny
b´dzie symbol
«». (Symbole te b´dà wyÊwietlane podczas
kasowania wszystkich zachowanych pomiarów, je˝eli ostatni pomiar
by∏ wykonany w trybie pomiaru uÊrednionego).
6. FUNKCJE DRUKOWANIA
Niniejsze urzàdzenie mo˝e byç u˝ywane w po∏àczeniu z drukarkà diagnostycznà Microlife. Mo˝na za jego
pomocà sporzàdzaç wydruki pomiarów zachowanych w pami´ci, naciskajàc przycisk DRUKARKA.
Dost´pne sà dwa rodzaje formatów. Urzàdzenie nale˝y ustawiç na U˝ytkownika 1 lub U˝ytkownika 2, w
zale˝noÊci od danych, jakie majà byç wydrukowane.
6.1. Jak wydrukowaç ostatnio zachowany wynik pomiaru (pojedynczy wydruk danych)
a) Przed nacÊni´ciem przycisku DRUKARKA wybierz w∏aÊciwe
zadanie drukowania.
b) Pod∏àcz drukark´ do aparatu i w∏àcz jà (szczegó∏y znajdujà si´
w instrukcji obs∏ugi drukarki).
c) NaciÊnij jeden raz przycisk DRUKARKA na aparacie. Na wyÊwietlaczu
pojawi si´ «Pr1» i zostanie wydrukowany ostatni zachowany pomiar
dla U˝ytkownika 1 lub 2, w zale˝noÊci od wyboru.
6.2. Jak wydrukowaç wszystkie wyniki pomiarów zachowane w pami´ci oraz tabel´ danych (wydruk
danych z tabelà)
a) Przed naciÊni´ciem przycisku DRUKARKA wybierz w∏aÊciwe
zadanie drukowania.
b) Pod∏àcz drukark´ do aparatu i w∏àcz jà (szczegó∏y znajdujà si´
w instrukcji obs∏ugi drukarki).
c) Przytrzymaj przycisk DRUKARKA przez okres przekraczajàcy
co najmniej 3 sekundy. Na wyÊwietlaczu pojawi si´ «Pr1», a
nast´pnie «Pr2».
d) Zwolnij przycisk, wszystkie zachowane pomiary zostanà
wydrukowane wraz z odpowiadajàcymi im tabelami.
6.3. Przerwanie drukowania
Aby przerwaç drukowanie, nale˝y w jego trakcie nacisnàç przycisk
DRUKARKA.
Uwaga!
Dodatkowe szczegó∏y na temat drukarki znajdujà si´ w instrukcji
obs∏ugi drukarki.
44
M
1
1
2
1
Page 48

45
7. KOMUNIKATY O B¸¢DACH/WADY W DZIA¸ANIU
Je˝eli podczas pomiaru wystàpi b∏àd, pomiar zostaje
przerwany i wyÊwietlony zostaje odpowiedni kod b∏´du.
(Przyk∏ad: b∏àd nr 1).
Nr b∏´du Mo˝liwe przyczyny
ERR 1 CiÊnienie skurczowe zosta∏o okreÊlone, ale póêniej ciÊnienie w mankiecie spad∏o
poni˝ej 20 mmHg. Mog∏o nastàpiç od∏àczenie rurki po zmierzeniu ciÊnienia
skurczowego.
Dodatkowa mo˝liwa przyczyna: nie zosta∏o wykryte t´tno.
ERR 2 Nienaturalny puls wp∏ywa ujemnie na wyniki pomiaru. Mo˝liwa przyczyna: rami´
zosta∏o poruszone podczas pomiaru.
ERR 3 Nadmuchiwanie mankietu trwa zbyt d∏ugo. Mankiet jest nieprawid∏owo za∏o˝ony lub
przewód jest nieszczelny.
ERR 5 W odczytach pomiarów pojawi∏a si´ niedopuszczalna ró˝nica mi´dzy ciÊnieniem
skurczowym a rozkurczowym. Wykonaj nast´pny odczyt dok∏adnie przestrzegajàc
zaleceƒ. Skontaktuj si´ z lekarzem, je˝eli wcià˝ otrzymywane sà nietypowe odczyty.
ERR 6 Ró˝nica pojedynczych danych jest zbyt du˝a podczas pracy w trybie pomiaru
uÊrednionego nawet po 4 cyklach. Nie mo˝na wyÊwietliç wyniku uÊrednionego.
HI Zbyt wysokie ciÊnienie w mankiecie (ponad 300 mmHg) LUB zbyt wysokie t´tno (ponad
200 uderzeƒ na minut´). Odpocznij przez 5 minut, a nast´pnie powtórz pomiar.*
LO Zbyt niskie t´tno (poni˝ej 40 uderzeƒ na minut´). Powtórz pomiar.*
* Skontaktuj si´ z lekarzem, jeÊli ten lub inny problem pojawia si´ cyklicznie.
Inne mo˝liwe wady w dzia∏aniu i rozwiàzania:
Je˝eli w trakcie korzystania z urzàdzenia wystàpià problemy, nale˝y w razie potrzeby przejrzeç poni˝sze
uwagi i zastosowaç podane w nich porady:
Wady Wskazówki
WyÊwietlacz pozostaje czysty po w∏àczeniu 1.Sprawdê polaryzacj´ baterii (+/-)
przyrzàdu. Baterie zosta∏y zainstalowane. 2. Je˝eli na wyÊwietlaczu widoczne sà b∏´dy,
wyjmij baterie i wymieƒ je na nowe.
CiÊnienie nie wzrasta pomimo pracy pompki. • Sprawdê po∏àczenie w´˝a mankietu
i pod∏àcz go prawid∏owo w razie potrzeby.
Urzàdzenie cz´sto nie podaje wartoÊci ciÊnienia 1. Sprawdê u∏o˝enie mankietu.
krwi lub zmierzone wartoÊci sà zbyt niskie (zbyt 2. Upewnij si´, czy mankiet nie jest zbyt
wysokie). ciasno za∏o˝ony. Ciasne ubranie (np.
podwini´ty r´kaw) nie mo˝e wywieraç nacisku
na rami´ powy˝ej punktu pomiaru. W razie
potrzeby takie ubranie nale˝y zdjàç.
3. Zmierz ciÊnienie ponownie w ca∏kowitym
spokoju.
Wynik ka˝dego pomiaru jest inny, chocia˝ • Przeczytaj poni˝sze informacje oraz punkty
urzàdzenie dzia∏a normalnie, a wyÊwietlane w paragrafie „Cz´ste przyczyny b∏´dów”.
wartoÊci sà prawid∏owe. Powtórz pomiar.
Zmierzone wartoÊci ciÊnienia krwi ró˝nià si´ od 1. Zanotuj wartoÊci w ciàgu dnia i skonsultuj
wartoÊci mierzonych przez lekarza. si´ z lekarzem.
Page 49
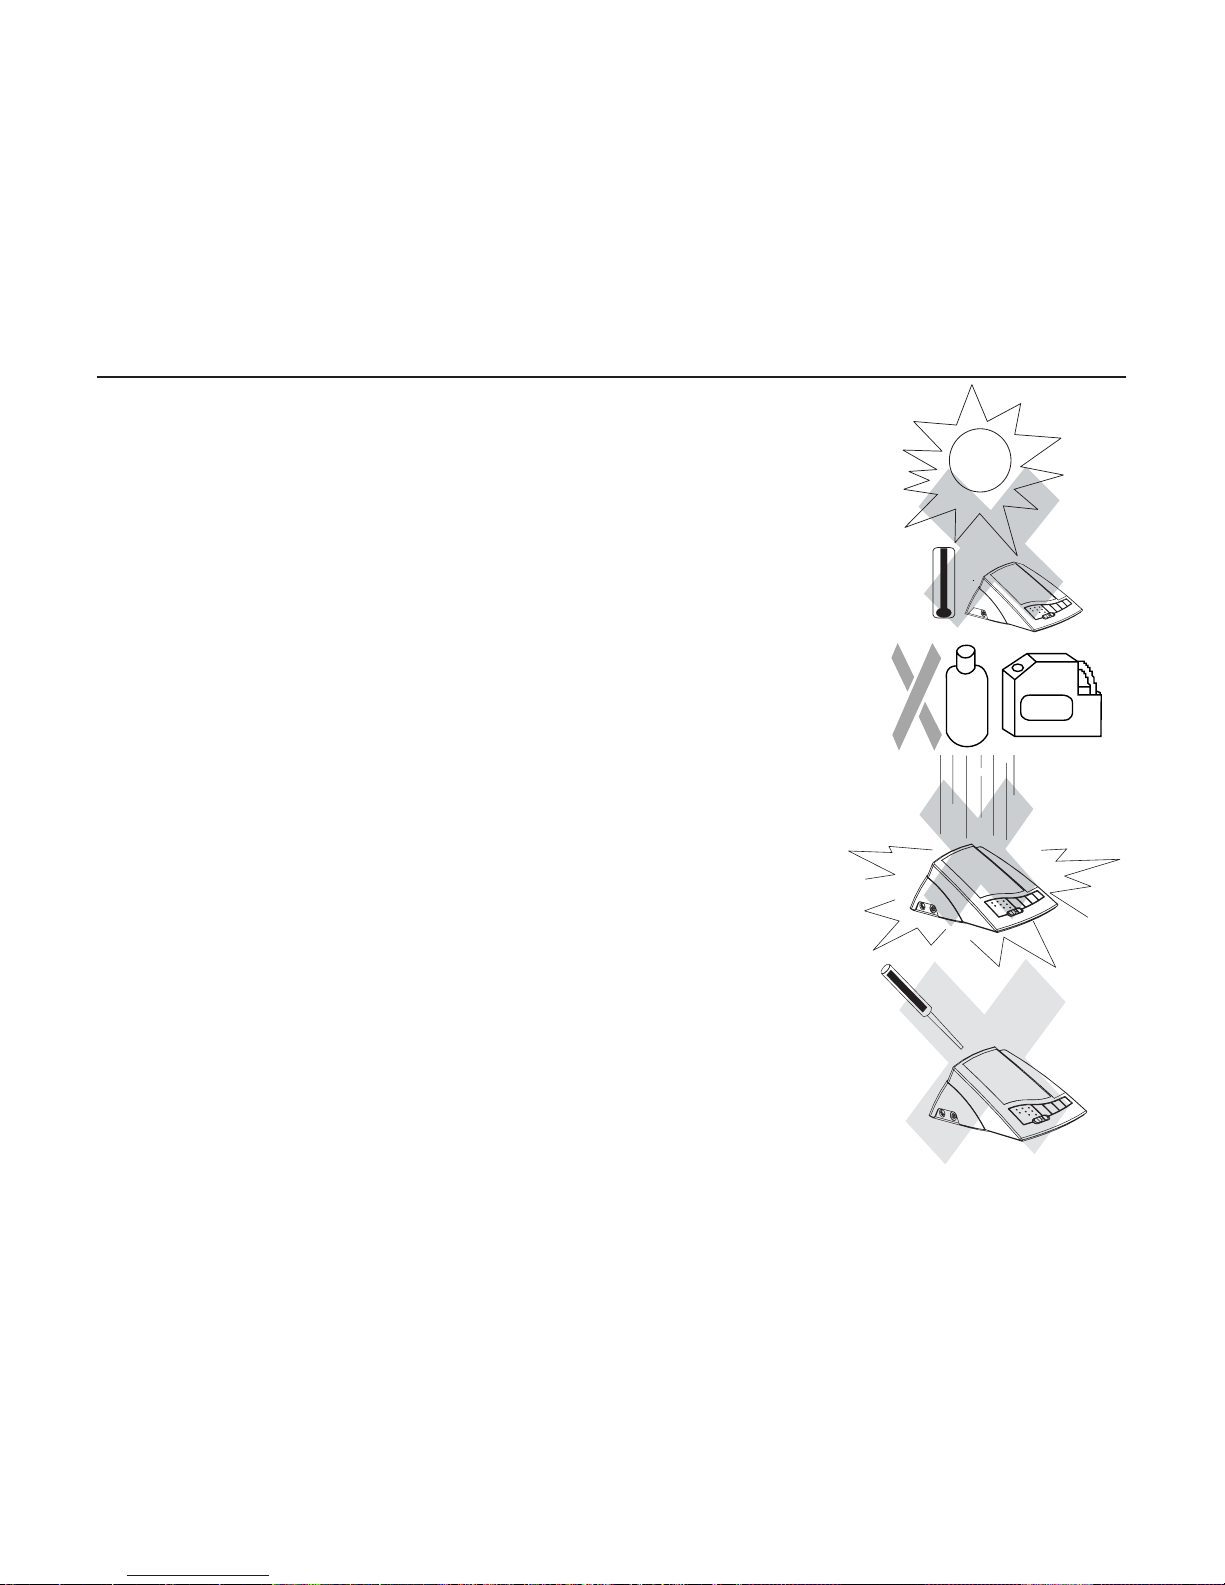
☞ Dodatkowe informacje
Poziom ciÊnienia krwi ulega wahaniom nawet u ludzi zdrowych. Wa˝ne jest, by porównywaç pomiary
wykonane w takich samych warunkach i o tej samej porze dnia (najlepiej w spokoju).
Pytania odnoÊnie u˝ycia niniejszego aparatu do mierzenia ciÊnienia prosimy kierowaç do przedstawicieli
Microlife Service w punkcie sprzeda˝y lub aptece. Zespó∏ Microlife Service z radoÊcià oka˝e Paƒstwu
pomoc. Nigdy nie nale˝y próbowaç samodzielnej naprawy aparatu!
Otwieranie urzàdzenia przez osoby nieupowa˝nione powoduje uniewa˝nienie gwarancji!
8. Przechowywanie i konserwacja, rekalibracja
a) Nie nara˝aç aparatu na dzia∏anie ekstremalnych
temperatur, wysokiej wilgotnoÊci, kurzu
i bezpoÊredniego nas∏onecznienia.
b) Mankiet ma czu∏à kieszeƒ powietrznà. Nale˝y si´
z nià obchodziç ostro˝nie i nie nara˝aç na skr´canie
i Êciskanie.
c) CzyÊciç aparat mi´kkà, suchà szmatkà, nie u˝ywaç
benzyny, rozcieƒczalnika lub podobnego rozpuszczalnika. Plamy na mankiecie mo˝na usunàç
wilgotnà namydlonà szmatkà. Mankietu nie wolno
praç.
d) Z przewodem nale˝y obchodziç si´ ostro˝nie.
Nie ciàgnàç, nie wyginaç ani nie stykaç z ostrymi
kraw´dziami.
e) Nie nale˝y aparatu upuszczaç ani gwa∏townie si´
z nim obchodziç. Unikaç silnych wibracji.
f) Nie wolno otwieraç aparatu! Kalibracja producenta
straci wa˝noÊç!
Okresowa rekalibracja
Czu∏e instrumenty pomiarowe muszà byç od czasu do czasu sprawdzane pod kàtem precyzji pomiaru.
Dlatego zaleca si´ okresowà kontrol´ wskaênika ciÊnienia statycznego co dwa lata.
Dystrybutor zapewni wi´cej informacji na ten temat.
46
138
80
7070
Gasoline
138138
8080
70
138
80
70
70
Page 50

47
9. GWARANCJA
CiÊnieniomierz ma 3-letnià gwarancj´ od daty zakupu. Gwarancja dotyczy urzàdzenia oraz mankietu.
Gwarancja nie ma zastosowania w przypadku uszkodzeƒ wynikajàcych z niew∏aÊciwego obchodzenia si´
ze sprz´tem, wycieku elektrolitu z baterii, wypadków, nieprzestrzegania instrukcji oraz zmian dokonanych
w urzàdzeniu przez osoby trzecie.
Gwarancja jest wa˝na tylko po okazaniu karty gwarancyjnej wype∏nionej przez sprzedawc´.
Nazwa i adres firmy sprzedawcy:
10. DANE TECHNICZNE
Waga: 460 g (z bateriami)
Rozmiar: 115 (W) x 182 (L) x 76 (H) mm
Temperatura przechowywania: -20 do +50°C
WilgotnoÊç: Maks. 15 do 90% wilgotnoÊci wzgl´dnej
Temperatura dzia∏ania: 10 do 40°C
WyÊwietlacz: Ciek∏okrystaliczny LCD (Liquid Crystal Display)
Metoda pomiaru: Oscylometryczna
Czujnik nacisku: PojemnoÊciowy
Zakres pomiaru:
SYS/DIA: 30 do 280 mmHg
T´tno: 40 do 200 uderzeƒ na minut´
Zakres wyÊwietlania ciÊnienia w mankiecie: 0-299 mmHg
Pami´ç: Automatyczne zachowywanie 2 x 14 pomiarów
RozdzielczoÊç pomiaru: 1 mmHg
Dok∏adnoÊç: CiÊnienie w zakresie ±3 mmHg
T´tno ±5% odczytu
èród∏o zasilania: DC 6V/600 mA
a) 4 ogniwa suche (baterie) UM-3, rozmiar AA, 1,5 V
b) zasilacz 6 V DC 600 mA (opcja)
Akcesoria: Mankiet Êredni (AC-1-M) na obwód ramienia
22-32 cm lub
Mankiet du˝y (AC-1-L) dla obwodu ramienia
32-42 cm (wyposa˝enie dodatkowe!)
Odsy∏acz do norm: Dyrektywy UE 93/42/EEC
Wymogi NIBP: EN 1060-1 /-3 /-4, ANSI /
AAMI SP10
Prawo do zmian technicznych zastrze˝one!
11. www.microlife.com
Szczegó∏owe informacje o produktach oraz us∏ugach znajdujà si´ pod adresem www.microlife.com.
Page 51

Automatikus vérnyomásmérô készülék
Használati utasítás
48
Page 52

49
Tartalomjegyzék
1. BEVEZETÉS
1.1 A típusú készülék jellemzôi
1.2. Fontos információk az otthoni vérnyomásméréssel kapcsolatban
2. FONTOS INFORMÁCIÓK A VÉRNYOMÁSRÓL ÉS ANNAK MÉRÉSÉRÔL
2.1. Az alacsony, illetve a magas vérnyomás kialakulása
2.2. Milyen értékek normálisak ?
2.3. Mit lehet tenni, ha rendszeresen magas vagy alacsony értékeket kapunk?
2.4. MAM technológia (Microlife Average Mode)
3. A VÉRNYOMÁSMÉRÔ KÉSZÜLÉK ÉS TARTOZÉKAI
4. A VÉRNYOMÁSMÉRÔ KÉSZÜLÉK HASZNÁLATA
4.1. Az elemek behelyezése
4.2. Váltóáramú adapter használata (külön tartozék)
4.3. A mandzsetta csatlakoztatása
4.4. Az idô és a dátum beállítása
5. MÉRÉS VÉGREHAJTÁSA
5.1. Mérés elôtt
5.2. Általános hibaforrások
5.3. A mandzsetta felhelyezése
5.4. Mérési mód kiválasztás
5.5. Mérési eljárás
5.6. Mérés megszakítása
5.7. Memória - a mérési értékek lehívása
5.8. Az összes mérési érték törlése
6. NYOMTATÓ FUNKCIÓK
6.1. Hogyan kell kinyomtatni az utolsó tárolt mérést (egyetlen adat kinyomtatása )?
6.2. Hogyan kell kinyomtatni a memóriában és az adattáblázatban tárolt összes mérési értéket
(adatok kinyomtatása táblázattal)?
6.3. A nyomtatás leállítása
7. HIBAÜZENETEK/HIBÁS MÛKÖDÉSEK
8. TISZTÍTÁS ÉS KARBANTARTÁS, ÚJRAHITELESÍTÉS
9. GARANCIA
10. MÛSZAKI ADATOK
11. www.microlife.com
Page 53

1. BEVEZETÉS
1.1 A típusú készülék jellemzôi
A vérnyomásmérô készülék teljesen automatikus, digitális vérnyomásmérô készülék integrált MAM
technológiával, a felkaron történô használatra. A vérnyomásmérô készülék a szisztolés és a
diasztolés vérnyomás valamint a pulzusszám történô gyors és megbízható mérését teszi lehetôvé
oszcillometrikai módszer alapján.
Az eszköz használata könnyı, és nagyon nagy pontosságot nyújt a klinikai vizsgálatokban. A nagy
kijelzô megkönnyíti az adatok leolvasását a mérés során.
Használat elôtt kérjük gondosan olvassa végig ezt a használati utasítást, és azután ôrizze meg
biztonságos helyen. A vérnyomás és mérésével kapcsolatban felmerülô további kérdések esetén
kérjük forduljon orvosához.
FIGYELEM!
1.2. Fontos információk az otthoni vérnyomásméréssel kapcsolatban
• Ne feledje, az otthoni vérnyomásmérés csupán ellenôrzés, tehát nem diagnózis vagy
gyógykezelés. A szokatlan megfigyelési eredményeket kérjük, mindig beszélje meg orvosával.
Semmilyen körülmények között se változtassa meg az orvos által felírt gyógyszerek adagolását!
•A pulzusmegfigyelés nem alkalmas a szívritmus-szabályzó rezgésszámának ellenôrzésére.
• Szabálytalan szívmûködés esetén (aritmia) a megfigyeléseket csak az orvossal való konzultáció
után szabad kiértékelni.
Elektromágneses interferencia:
A készülék érzékeny elektronikus alkatrészeket tartalmaz (mikrokomputer). Ezért kerülni kell az
elektromos vagy elektromágneses térrel való közvetlen érintkezést (pl.: mobiltelefon, mikrohullámú
sütô), mert ez átmenetileg a mérési pontosság csökkenéséhez vezethet.
2. Fontos információk a vérnyomásról és annak megfigyelésérôl
2.1. Hogyan alakul ki az alacsony, ill. magas vérnyomás?
A vérnyomás szintjét az agy keringési közponja szabályozza. A vérnyomás kialakulásában szerepet
kap a szív frekvenciája és erôssége, valamint a keringést ellátó vénák átjárhatósága. Az utóbbi
tényezôre hatással van a vénák falának finom izomzata. A szívtevékenység következtében az artériás vérnyomás periodikusan változik: a vér kiáramlásakor maximális érték keletkezik (szisztolés
érték), a szív ernyedési szakaszában pedig minimális érték jön létre (diasztolés érték).
A betegségek elkerülése végett a két vérnyomásértéknek bizonyos normális határok között kell
mozognia.
2.2. Milyen értékek normálisak ?
A vérnyomást akkor nevezzük túl magasnak, ha nyugalmi állapotban a diasztolés érték 90 Hgmm
fölött van, és/vagy a szisztolés érték 140 Hgmm fölött van. Ebben az esetben kérjük, azonnal
konzultáljon orvosával. Ha a vérnyomása huzamos ideig ilyen magas, ez veszélyeztetheti az
egészségét, mivel a testben lévô véredények károsodásához vezethet.
Abban az esetben, ha a vérnyomásértéke túl alacsony, pl. a szisztolés értéke 100 Hgmm alatt van,
és/vagy a diasztolés érték 60 Hgmm alatt, ugyancsak forduljon orvosához.
50
Page 54

51
Abban az esetben is javasolt a rendszeres önellenôrzés, ha a megfigyelt értékek a normális tartományban vannak. Így idôben észreveheti az értékek változásait, és megteheti a megfelelô lépéseket.
Ha Ön orvosi kezelés alatt áll és ellenôriznie kell vérnyomását, kérjük, hogy rendszeresen - mindig a
nap ugyanazon idôpontjában végezze el a méréseket és az értékeket jegyezze fel. Ezeket az
értékeket ismertesse orvosával. Semmilyen körülmények között se változtassa meg az orvos által
elôírt gyógyszerek adagolását!
A WHO által kiadott vérnyomásértékek osztályozási táblázata (mértékegység: Hgmm):
Skála Szisztolés Diasztolés Javaslatok
vérnyomás vérnyomás
Alacsony vérnyomás Kevesebb, mint 100 Kevesebb, mint 60 Ellenôriztesse orvosával
Normális érték 100 és 140 között 60 és 90 között Ellenôrizze saját maga
Enyhe hipertónia 140 és 160 között 90 és 100 között Beszéljen orvosával
Majdnem komoly 160 és 180 100 és 110 Konzultáljon
hipertónia közötti érték közötti érték orvosával
Komoly hipertónia Magasabb, Magasabb, Azonnal konzul-
mint 180 mint 110 táljon orvosával
☞ További információk:
• Abban az esetben, ha nyugodt körülmények között az Ön értékei általában állandóak, ám a
fizikai vagy lelki terhelés alkalmanként megemeli, akkor lehetséges, hogy Önnek ún. «ingadozó
magas vérnyomása» van. Ha gyanítja, hogy az imént említett eset áll fenn, konzultáljon
orvosával.
• Ha a helyesen megfigyelt diasztolés (alsó) értéke 120 Hgmm fölött van, Ön azonnal orvosi
kezelésre szorul.
2.3. Mit tegyen, ha állandóan magas vagy alacsony a vérnyomása?
a) Vegye fel a kapcsolatot orvosával!
b) Ha a magas vérnyomásértékek (a hipertónia különbözô formái) közepes vagy hosszú idôn
keresztül fennállnak, jelentôs veszélyt jelenthetnek az egészségére, például a test artériás
véredényeire, amelyeket a véredényfalakon található lerakódás okozta szûkület veszélyeztet
(arteriosclerosis). Ez a fontos szervek (szív, agy, izmok) elégtelen vérellátását eredményezheti.
Emellett a tartósan fennálló magas vérnyomás esetén a szív szerkezete károsodhat.
c) A magas vérnyomás megjelenésének rengeteg oka lehet. Kétféle magas vérnyomást
különböztetünk meg. Az egyik az általános, más néven elsôdleges magas vérnyomás, a másik
a másodlagos magas vérnyomás. Az utóbb említett csoport speciális szervi rendellenességnek
tulajdonítható. Kérjük, konzultáljon orvosával, hogy információt kapjon a magas
vérnyomásának lehetséges okairól.
d) A következôkben leírtak nemcsak arra szolgálnak, hogy mérsékeljék az orvosilag megállapított
magas vérnyomást, hanem megelôzés céljából is hasznosak. Ezek az intézkedések az Ön
általános életvitelének részei:
A) Étkezési szokások
• Törekedjen az életkorának megfelelô normális testsúlyra. Csökkentse a testsúlyt!
• Kerülje a konyhasó mértéktelen fogyasztását.
• Kerülje a zsíros ételek fogyasztását.
Page 55

B) Elôzô betegségek
Következetesen tartsa be az orvosi utasításokat az elôzô betegségek kezelésére vonatkozóan, mint
például:
• Cukorbetegség
• anyagcserezavarok (zsír)
• köszvény
C) Szokások
• Teljesen hagyjon fel a dohányzással!
• Csak mérsékelt mennyiségû alkoholt fogyasszon!
• Csökkentse koffeinfogyasztását (kávé)!
D) Fizikai alkat
• Elôzetes orvosi vizsgálat után rendszeresen sportoljon!
• Olyan sportot válasszon, amely állóképességét fejleszti és nem megerôltetô !
• Ne erôltesse túl magát!
• Korábbi betegségek fennállása esetén és/vagy 40 év fölött, kérjük, konzultáljon orvosával,
mielôtt sportolni kezd. Az orvosa tanácsot fog adni Önnek, hogy milyen típusú sportot
válasszon, és hogy milyen intenzitással végezze azt.
2.4. MAM technológia (Microlife Átlagolt Érték)
• Az «MAM-technológia» a vérnyomás ellenôrzésének optimális megbízhatóságú, új típusú
koncepciója.
•A megnövekedett méréspontosságot három egymást követô mérés automatikus elemzésével
érjük el.
• Az új rendszer az orvos számára megbízható értékeket szolgáltat, és azokat megbízható
diagnosztikák felállításához és a magas vérnyomást gyógyító terápiához lehet használni.
A) Miért MAM?
• Az emberi vérnyomás nem állandó,
folyamatosan változik
•A mérési eredményekben szórás mutatkozik.
B) Legfontosabb elônyök
•a szórás csökkenthetô
•a mérést megelôzô pihenés kevésbé szükséges
•a mozgással elidézett változásoknak
•a mandzsetta elhelyezése által kiváltott
hatásoknak a csökkentése
C) Gyógyászati vonatkozású elônyök
• nagyobb pontosság
•a beteg által meghatározott megbízható önellenôrzési adatok az orvos számára
• biztonságos hipertenziós diagnosztika
•megbízható terápia-felügyelet
D) Mérési sorozat
•A teljes mérési ciklus kevesebb mint 3 percig tart, szemben a 1.5 perces egyedi méréssell.
• Egyedi eredmények kijelzésére nem kerül sor
• Az «adatelemzés» eredményének megfelelôen egy 4. mérést lehet alkalmazni.
52
1. measurement
2. measurement
3. measurement
Result
Analysis
15 seconds resting time
15 seconds resting time
Page 56

53
3. A VÉRNYOMÁSMÉRÔ KÉSZÜLÉK JELLEMZÔI
Az ábra a vérnyomásmérô készüléket mutatja, amely a következôkbôl áll:
a) Fô egység:
b) Felkar mandzsetta:
Közepes mandzsetta (AC-1M) 22-32 cm-es karkerülethez
Nagy mandzsetta (AC-1 L) 32-42 cm-es karkerülethez
(Kérjük vegye figyelembe, hogy a nagy
mandzsetta külön felszerelésként kapható!)
138
80
70
Váltóáramú/
egyenáramú
aljzat
Mandzsetta
aljzat
Indítógomb
Egyedi
mérési mód /
átlagolási
mód (MAM)
O/I gomb
Memória gomb
Felhaszáló/id_ gomb
Nyomtató gomb
Nyomató port
aljzat
Page 57

4. A VÉRNYOMÁSMÉRÔ KÉSZÜLÉK HASZNÁLATA
4.1. Az elemek behelyezése
Az elemeket közvetlenül a készülék kicsomagolása
után helyezze be. Az elemtartó a készülék
hátoldalán van elhelyezve (lásd az ábrát).
a) Távolítsa el a burkolatot az ábrának megfelelôen.
b) Helyezze be az elemeket (4 x AA méretı, 1,5V),
figyelemmel a jelzett polaritásra.
c) Ha a kijelzôn az elem ikon jelenik meg, az elemek
lemerültek és ki kell cserélni ôket.
Figyelem!
• Az elem ikon megjelenése után a készülék nem fog
mıködni mindaddig, amíg az elemeket ki nem cserélik.
• Kérjük tartós «AA» vagy alkáli 1,5 V-os elemeket
használjon. Nem ajánlott újratölthetô elemek (1,2 V-os
akkumulátorok) használata.
• Ha a vérnyomásmérô készüléket hosszú ideig nem
használja, kérjük vegye ki az elemeket a készülékbôl.
Mıködés-ellenôrzés: Tartsa lenyomva az O/I gombot az összes kijelzô szimbólum teszteléséhez.
Ha a funkció korrekt, minden szimbólumnak meg kell jelennie.
4.2. Az adapter használata (külön felszerelés)
Ezt a vérnyomásmérô mıszert Microlife váltóáramú adapterrel is lehet használni. (6V egyenáram /
600 mA kimenet DIN dugasszal)
a) Csatlakoztassa az adaptert a készülékhez.
b) Dugja be az adaptert egy 230 V-os vagy
110 V-os hálózati aljzatba. Ellenôrizze az
O/I gomb lenyomásával, hogy feszültség
alatt van-e.
Figyelem:
• Az elemekbôl nem fogy energia mindaddig, amíg az adapter csatlakoztatva van a készülékre.
• Ha a feszültségellátás mérés közben megszakad (pl. úgy, hogy véletlenül kihúzzák az adaptert
az aljzatból, akkor a készüléket alaphelyzetbe kell állítani úgy, hogy a konektorból kihúzza a
dugót és újra visszadugja.
• Kérjük konzultáljon kereskedôjével, ha a váltóáramra vonatkozóan kérdései vannak.
54
+
+
+
+
138
80
70
Page 58
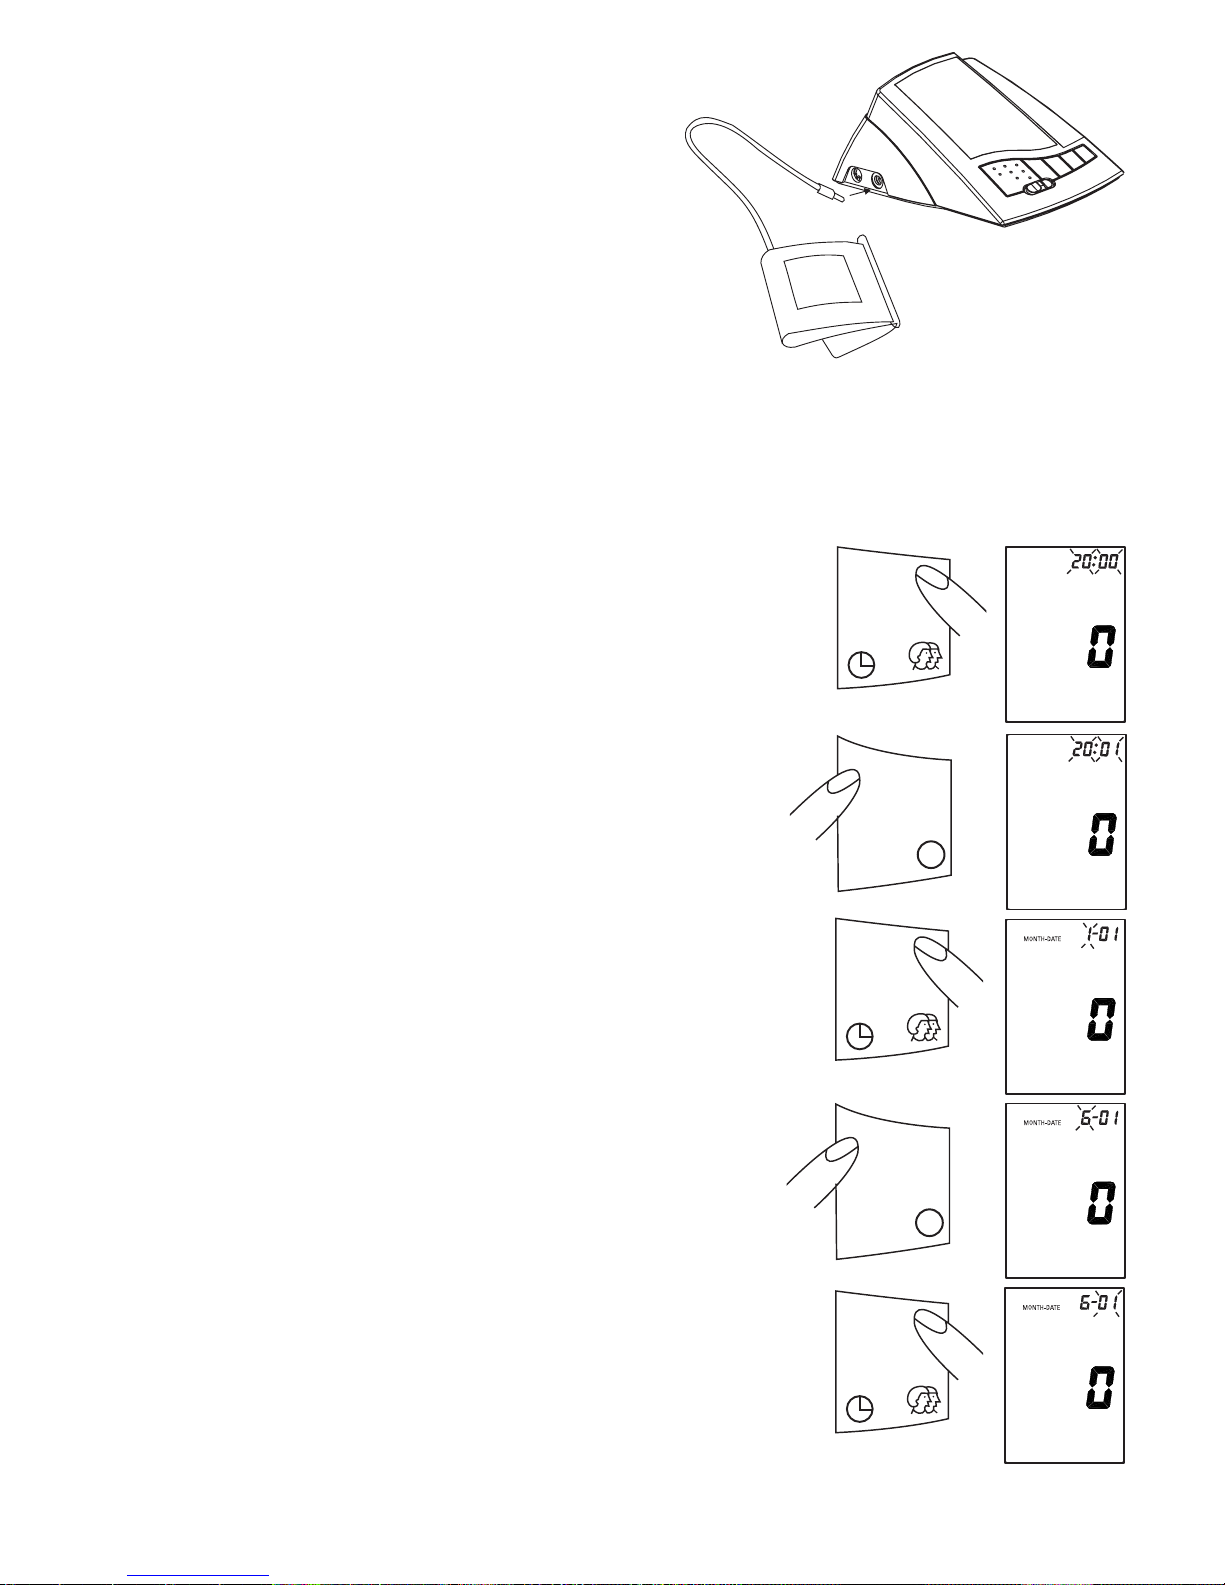
55
4.3. Mandzsetta csatlakoztatás
Helyezze be a mandzsetta csövet a készülék bal
oldalán kialakított nyílásba az ábrán látható
módon.
4.4. Az idô és a dátum beállítása
Ez a vérnyomásmérô készülék automatikusan rögzíti minden mérés idejét és dátumát. Ez nagyon
fontos információ, mivel a vérnyomás normál esetben a nap folyamán folyamatosan változik. Új
elemek behelyezése után az idô/dátum kijelzô a következô beállítást mutatja: 2000-01-01 00:00 óra.
(év-hónap-nap-idô) Újra be kell vinnie a dátumot és a pontos idôt.
Ehhez kérjük a következôképpen járjon el. (Példa: bevitel (év-hónap-nap-idô) 2001-06-15 idô-9:30 óra):
1. Tartsa lenyomva a User/Time (felhasználó/idô)
gombot legalább 3 másodpercig. A kijelzô most a
beállított évet mutatja, miközben 4 karakter villog.
2. A helyes év adatot a MEMORY gomb
megnyomásával lehet bevinni. Minden
megnyomáskor eggyel nô.
(példa: 1x lenyomás)
3. Nyomja meg a User/Time (felhasználó/idô)
gombot újra. A kijelzô most az aktuális dátumra
kapcsol, mialatt az elsô karakter (hónap) villog.
Megjegyzés:
A gomb lenyomva tartása felgyorsítja az eljárást.
4. Az aktuális hónapot a MEMORY gomb
lenyomásával most be lehet vinni.
(Példa: 6x lenyomás 6 hónapot halad elôre)
5. Nyomja meg ismét a User/Time gombot. Az
utolsó két karakter (nap) most villog.
138
80
70
70
M
M
Page 59

6. Az aktuális napot most a MEMORY gomb
lenyomásával be lehet vinni. (Példa: 15x
lenyomás a napot 1-jérôl 15-ére viszi elôre)
7. Nyomja meg ismét a User/Time gombot.
A kijelzô most az aktuális idôre kapcsol, mialatt
az elsô karakter (óra) villog.
8. A megfelelô óra adatot most a MEMORY gomb
lenyomásával be lehet vinni.
(példa: 9x lenyomás 0 óráról 9:00 órára lép elôre)
9. Nyomja meg ismét a User/Time gombot. Az
utolsó két karakter (percek) most villog.
10. A perceket most a MEMORY gomb lenyomásával
be lehet vinni. (Példa: 30x lenyomás az idôt 0-ról
30 percre viszi elôre)
11. A beállított dátum olvasása:
Miután az összes beállítás bevitele megtörtént,
kattintson rá egyszer a User/Time gombra.
Röviden megjelenik a dátum, azután pedig
az idô. A bevitel megerôsítése most megtörtént,
és az óra járni kezd.
56
M
TIME
M
TIME
M
2
2
Page 60
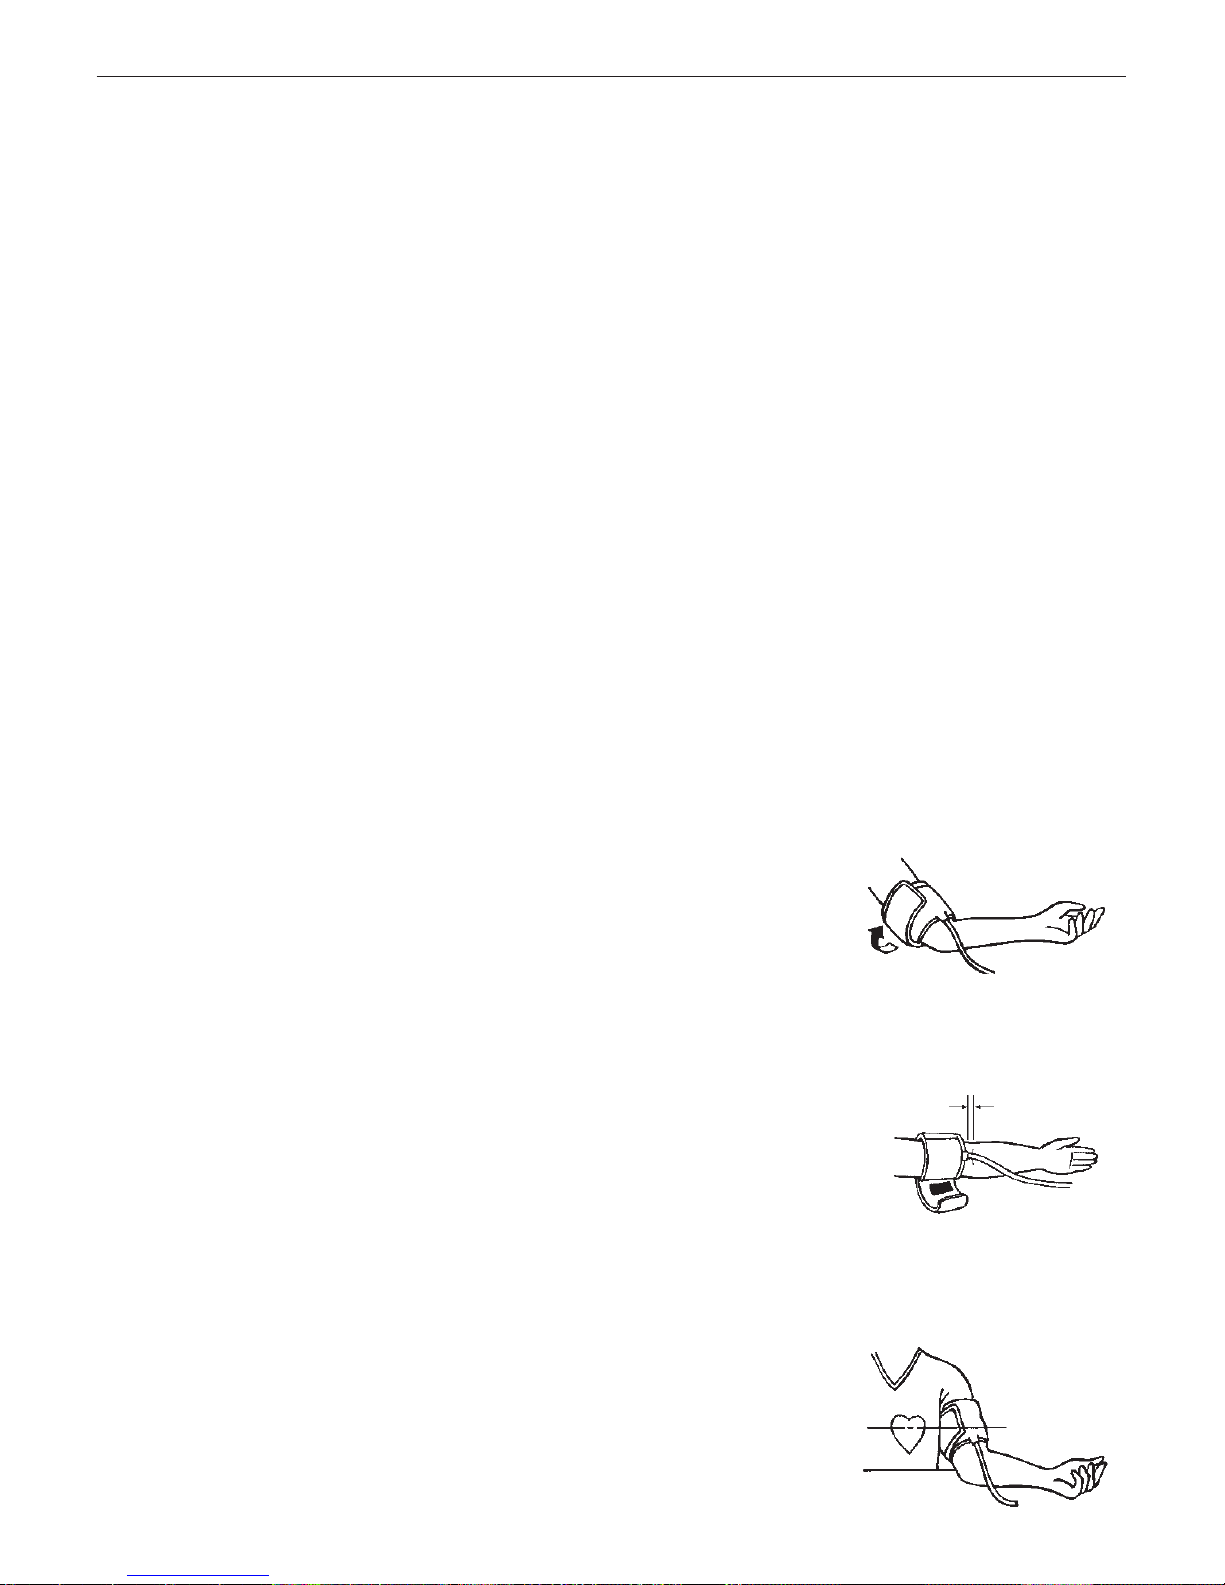
57
5. MÉRÉS VÉGREHAJTÁSA
5.1. Mérés elôtt
• Közvetlenül a mérés elôtt lehetôleg ne egyen, ne dohányozzon és semmilyen formában ne erôltesse
meg magát. Mindezek a tényezôk befolyásolják a mérési eredményt. Próbáljon idôt találni relaxálásra
úgy, hogy kellemes atmoszférában karosszékben üljön kb. 5 percig a mérés elôtt.
• Távolítson el minden olyan ruhadarabot, ami szorosan illeszkedik a felkarjára.
• Mindig ugyanazon a karon (normál esetben a bal karon) végezze a mérést.
• A méréseket szabályos idôközönként a nap ugyanazon idôpontjában végezze, mivel a
vérnyomás a nap folyamán változik.
5.2. Általános hibaforrások
Megjegyzés: Az összehasonlítható vérnyomásméréseket mindig azonos feltételek mellett kell
végezni! Ezek normál esetben mindig nyugalmi feltételek.
• Ha karunkat olyan helyzetben tartjuk, amelyben nincs kényelmes elernyesztett állapotban, a
vérnyomás megnôhet. Mérés közben a karunk minden izmát el kell lazítanunk. Szükség esetén
használjunk párnát alátámasztásként.
• Ha a kar artéria lényegesen alacsonyabban vagy magasabban van, mint a szív, rossz leolvasási
értéket kapunk. Minden 15 cm-es magasságkülönbség 10 Hgmm mérési hibát eredményez.
•A túl szoros vagy túl rövid mandzsetták hamis mérési értékeket eredményeznek. A megfelelô
mandzsetta kiválasztása rendkívül fontos. A mandzsetta méret a kar kerületétôl függ (középen
mérve). A megengedhetô tartomány rá van nyomtatva a mandzsettára. Ha ez az Ön karjára
nem alkalmas, kérjük, konzultáljon a kereskedôjével.
Megjegyzés: Csak klinikailag jóváhagyott Microlife mandzsettákat használjon!
• Laza mandzsetta, vagy oldalt kitüremkedô légzsák rossz mérési értékeket eredményez.
5.3. A mandzsetta felhelyezése
a) Tegye a mandzsettát a bal felkarra úgy, hogy a csô
az alkar irányába mutasson.
b) Helyezze a mandzsettát a karra az ábrának
megfelelôen. Bizonyosodjon meg arról, hogy a
mandzsetta alsó széle kb. 2-3 cm-rel a könyök
fölött legyen, és a gumicsô kivezetése a kar belsô
oldalán legyen.
c) Szorítsa meg a mandzsetta szabad végét, és zárja
le a mandzsettát a tépôzár rögzítésével.
d) A mandzsettát a felkarján úgy kell rögzíteni, hogy
2 ujját be tudja tenni a mandzsetta és a felkarja
közé. Minden olyan ruhadarabot, ami akadályozza
a kart (pl. pulóver) le kell vetni.
e) Biztosítsa a mandzsettát a tépôzárral úgy, hogy
kényelmesen helyezkedjen el, és ne legyen túl
szoros. Tegye a karját egy asztalra (a tenyere
fölfelé mutasson) úgy, hogy a mandzsetta a szív
magasságában legyen. Gyôzôdjön meg arról,
hogy a csô nincs megtörve.
2–3 cm
gumicső
Page 61
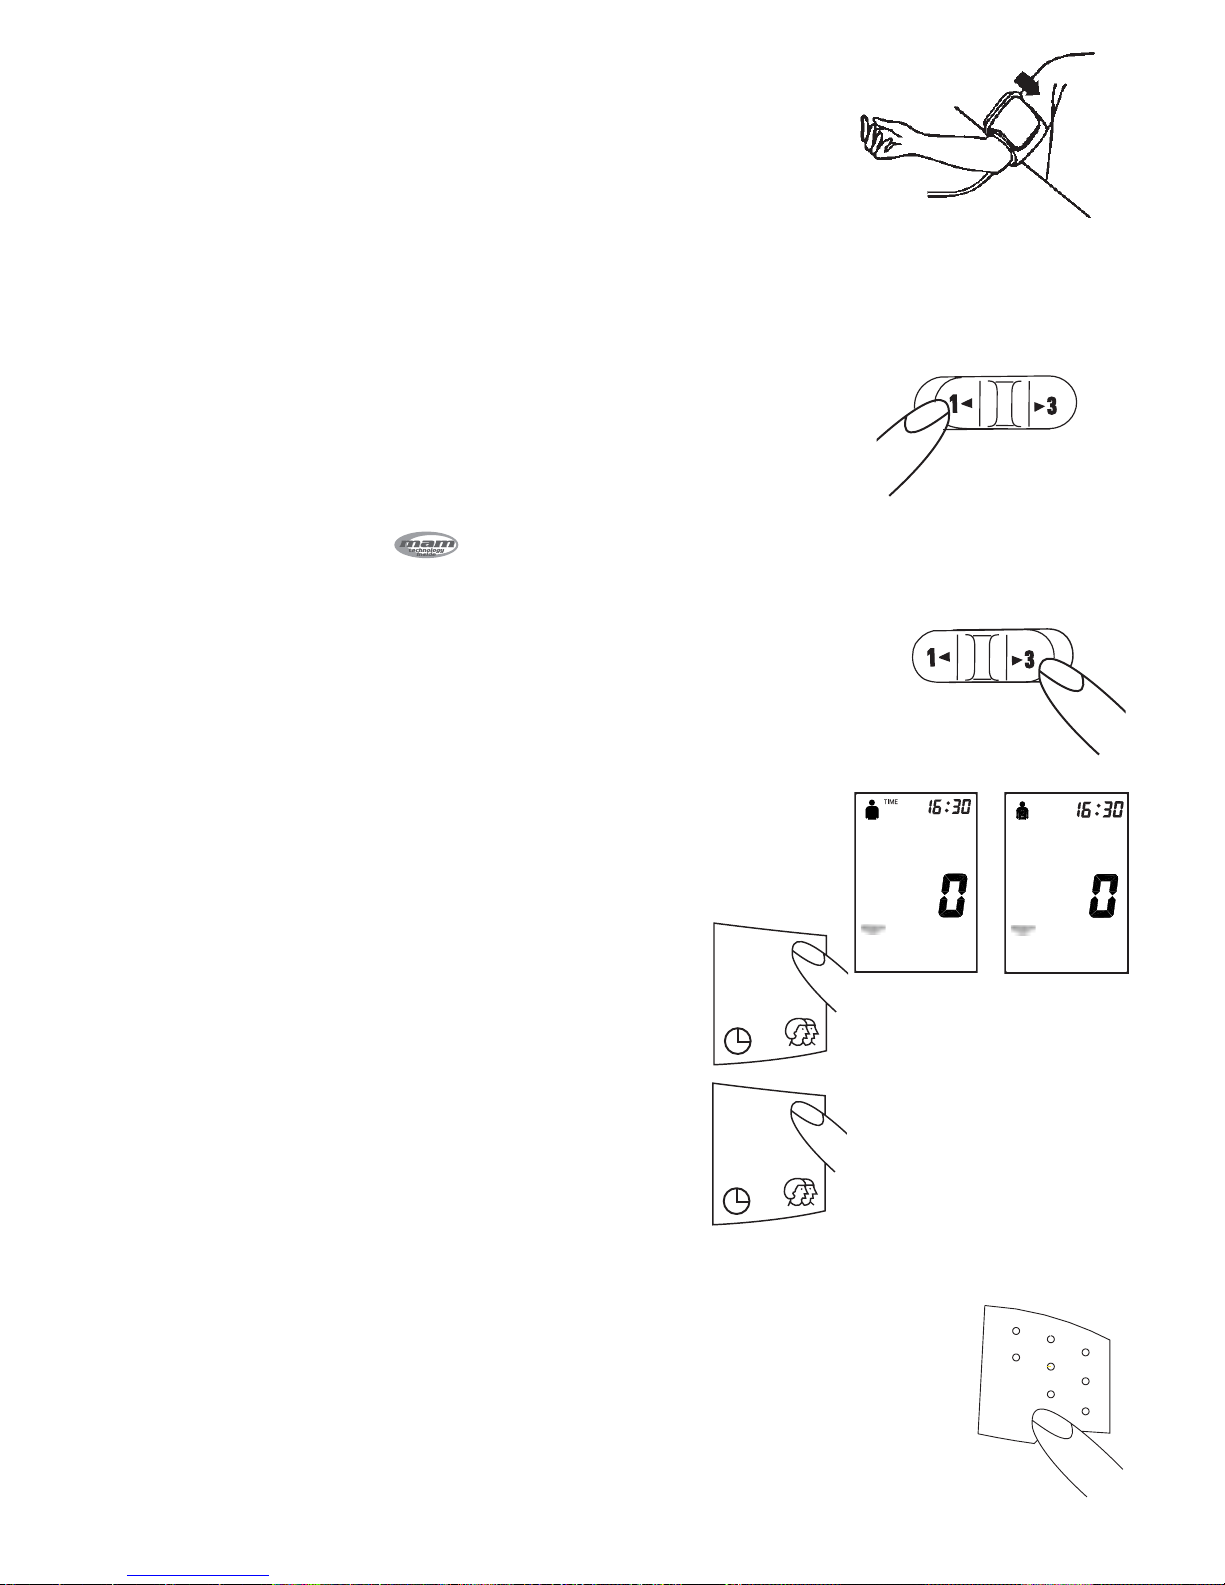
Megjegyzés:
Ha nem lehet rátenni a mandzsettát a bal karjára akkor a jobb
karjára is ráhelyezheti. Azonban minden mérést ugyanazon a karon
kell elvégezni.
5.4. Mérési mód kiválasztás
Klinikai tanulmányok azt mutatják, hogy a többszöri vérnyomásmérés átlagolása pontosabban
határozza meg a tényleges vérnyomás értékét. Az átlagolási módban mıködô Microlife készülék
lehetôvé teszi azt, hogy a készüléket egy speciális átlagolási módba állítsuk be (MAM), amely
automatikusan többszörös leolvasást végez!
Átlagolási mód / MAM:
a) Ha átlagolási módban szeretne mérést végezni, kérjük
csúsztassa a kapcsolót jobbra, a 3.sz. irányába.
b) Az átlagolási mód általában 3 mérést végez egymás után, és
kiszámítja az eredményt.
c) A kijelzôben megjelenô
«»
szimbólum azt jelzi, hogy a
készülék átlagolási módba van beállítva.
Egyedi mód:
a) Ha egyedi mérést szeretne végezni, kérjük csúsztassa a
kapcsolót az 1. sz. irányába.
b) Az egyedi módban csak egy mérés történik.
Felhasználó kiválasztás
Ez a fejlett vérnyomásmérô készülék lehetúvé teszi a
vérnyomás értékek nyomon követését két személy számára,
egymástól függetlenül.
a) A mérés elútt gyôzôdjön meg arról, hogy a készüléket
az adott felhasználó számára állította be. A készülék 2
személy számára teszi lehetôvé az eredmények
nyomonkövetését (1. felhasználó, 2. felhasználó)
b) A készülék az 1. felhasználóra van beállítva. Nyomja
meg a User/Time (felhasználó/idô) gombot ahhoz,
hogy átváltson a 2. felhasználóra.
c) Nyomja meg újból a User/Time gombot ahhoz, hogy
az 1. felhasználóra váltson.
d) Azt javasoljuk, hogy akinek a vérnyomását elôször
mérik az legyen az 1. felhasználó.
5.5. Mérési eljárás:
Miután megtörtént a mandzsetta megfelelô elhelyezése,
kezdôdhet a mérés:
a) Nyomja meg a START gombot. A pumpa kezdi felfújni a
mandzsettát. A mandzsettában növekvô nyomást a kijelzô
mutatja.
b) Miután elértük a megfelelô felfúvási nyomást, a pumpa leáll, és a
nyomás fokozatosan csökken. Az értékek megjelennek a kijelzôn.
58
STARTS
TA
RT
1
TIME
Page 62
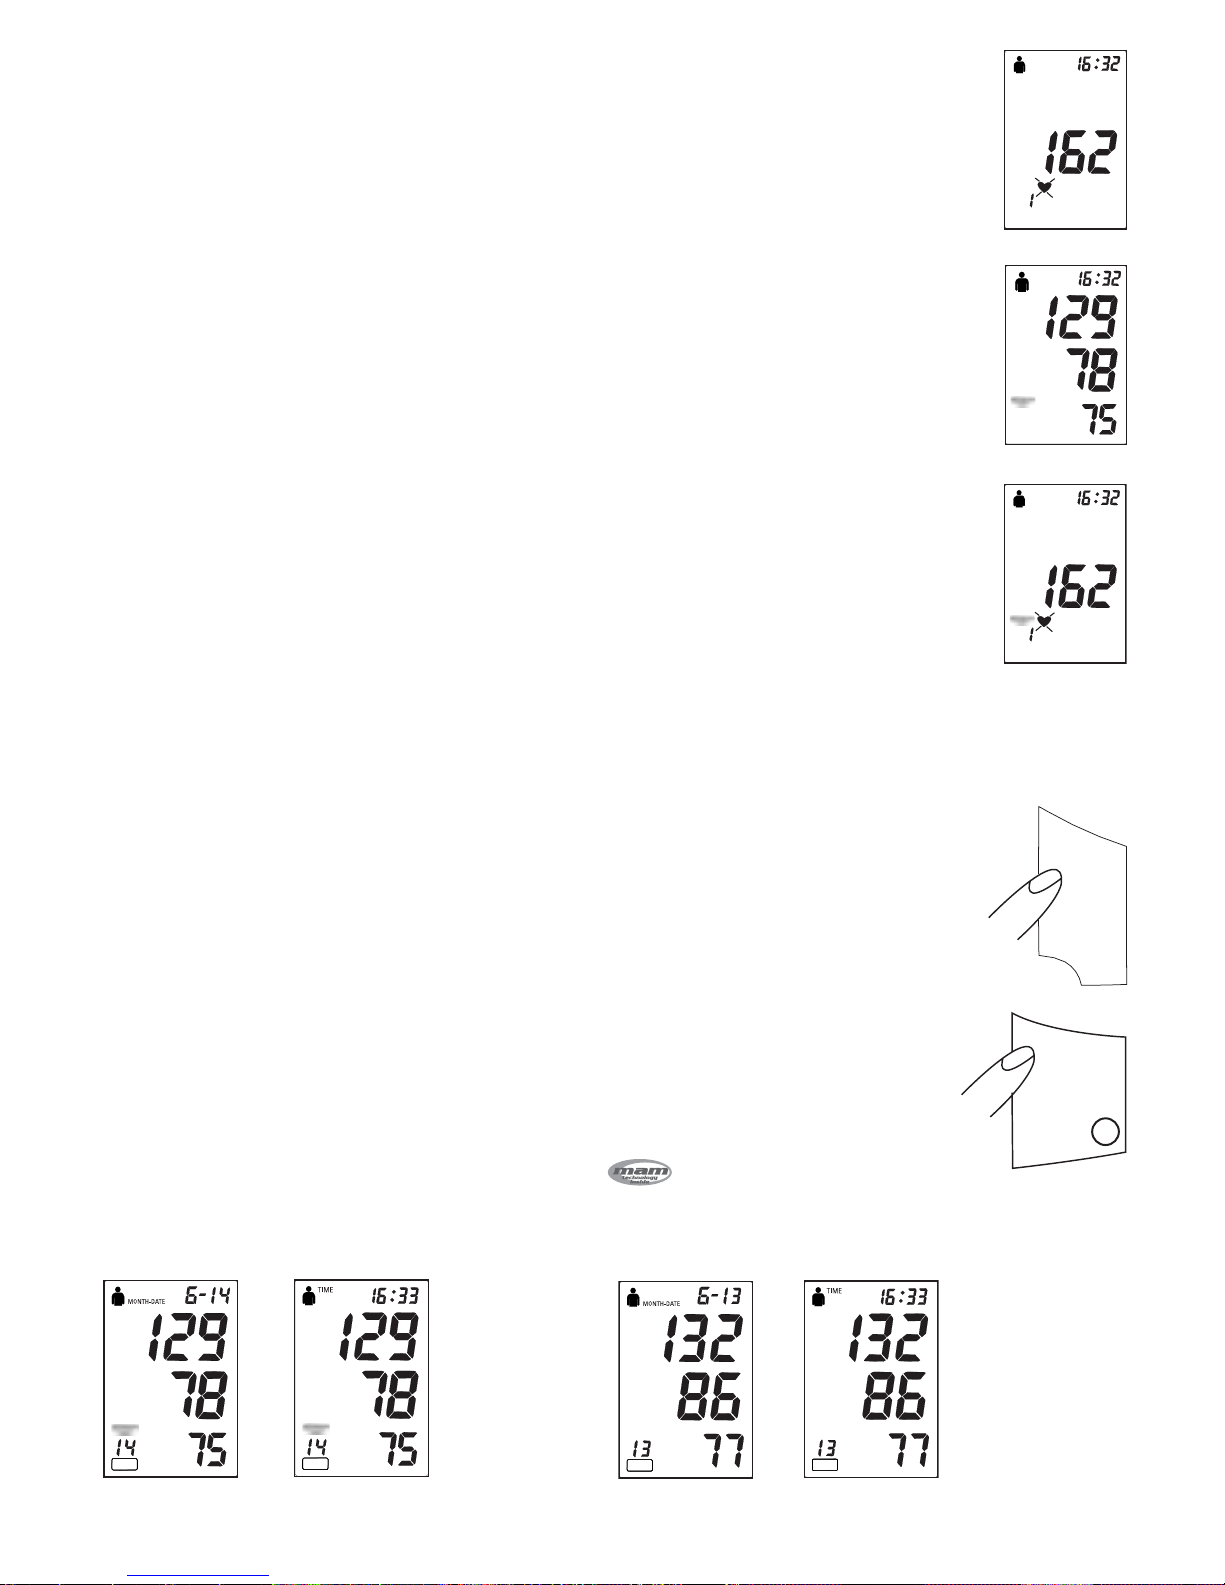
59
Ha a kezdeti nyomás nem elegendô,akkor a kászülék önmıködôen
nagyobb szintnek megfelelôen fújja fel újra a mandzsettát
c) Amikor a mıszer pulzust érzékel, a kijelzôben a szív szimbólum
villogni kezd, és minden szívdobbanáskor sípoló hang hallható.
d) Egy hosszabb sípoló hang hallatszik, amikor a mérés befejezôd-
ött. Most a kijelzôn megjelenik a szisztolés és diasztolés
vérnyomás, valamint a pulzusszám.
e) A mérési értékek a kijelzôn maradnak mindaddig, amíg a
készüléket ki nem kapcsolják. Ha 5 percig semmilyen gombot
nem nyomnak meg, a készülék kikapcsolja magát, hogy
takarékoskodjon az elemekkel.
f) Ha a készülék átlagolási módba van állítva, általában 3 külön
mérés történik egymás után, és a készülék kiszámítja az érzékelt
vérnyomás értéket. Az egyes mérések között 15 másodperces
pihenési idôt iktat be. Egy visszafelé történô számolás jelzi a
fennmaradó idôt és a 2. és 3. leolvasás elôtt 5 másodperccel
sípoló hang szólal meg. Abban az esetben, ha az egyes ciklusok
egyedi adatai nagymértékben különböznek egymástól, 4.
mérésre kerül sor az eredmény kijelzése elôtt. Ritka esetben a
vérnyomás annyira instabil, hogy még a 4 mérés után is
túlságosan ingadoznak az adatok. Ebben az esetben «ERR 6»
jelenik meg, az eredmény kijelzése nem lehetséges Ha a mérések
közül egy is hibás, akkor az megismétlôdik.
5.6. Mérés megszakítása
Ha a vérnyomásmérést valamilyen ok miatt félbe kell szakítani
(pl. a beteg rosszul érzi magát) bármikor meg lehet nyomni az
On/Off gombot. A készülék automatikusan csökkenti a
nyomást.
5.7. Memória - a mérési értékek lehívása
Ez a vérnyomásmérô készülék a 2 felhasználó számára elkülönítve
automatikusan tárolja az utolsó 14 mérési érték mindegyikét. A MEMORY
gomb lenyomásával egymás után meg lehet jeleníteni az utolsó mérési
értéket, pl. (MR14) valamint az azt megelôzô 13 mérési értéket (MR13,
MR12, …MR1) Az átlagolási módban kapott adatokat «»
szimbólummal jelezzük.
(MR14: Az utolsó mérés értéke) (MR13: Az MR 14 elôtti mérés értéke)
TIME
1
TIME
1
mmHg
mmHg
1
mmHg
mmHg
MR
1
mmHg
mmHg
MR
1
mmHg
mmHg
MR
1
mmHg
mmHg
MR
TIME
1
O/IO/I
M
Page 63

5.8. Az összes mérési érték törlése
Mielôtt a memóriában tárolt összes leolvasási értéket törli, bizonyosodjon meg
arról, hogy nem kell késôbbi idôpontban hivatkoznia a leolvasási értékekre.
Az összes tárolt leolvasási érték törléséhez nyomja le a MEMORY gombot
legalább 7 másodpercig, a kijelzô a «CL» szimbólumot fogja mutatni, és 3
rövid sípoló hang hallatszik a tárolt leolvasási értékek törlésének jelzéseként.
Megjegyzés:
Ha a legutoljára tárolt mérést átlagolási módban végezte, akkor
a törlési mıvelet alatt mintegy 3 másodpercig az
«»
szimbólumot fogja látni. (A kijelzô ezeket a szimbólumokat
fogja mutatni az összes tárolt mérés törlése alatt, ha az utolsó
mérést az átlagolási módban végezték)
6. NYOMTATÓ FUNKCIÓK
Ezt a készüléket a Micolife diagnosztikai nyomtatóval együttesen lehet használni. A készülék a
memóriában tárolt mérési értékeket a PRINTER gomb lenyomásával tudja kinyomtatni. Két féle
formátum lehetséges. Kérjük a nyomtatandó adatok alapján bizonyosodjon meg arról, hogy a
készüléket az 1. vagy a 2. felhasználóra állította-e be.
6.1. Hogyan kell kinyomtatni az utolsó tárolt mérést? (egyetlen adat kinyomtatása )
a) Válassza ki a megfelelô nyomtatási feladatot, mielôtt lenyomja
a PRINTER gombot.
b) Kapcsolja össze a nyomtatót a vérnyomásmérô készülékkel, és
kapcsolja be a nyomtatót (a részleteket kérjük olvassa el a
nyomtató kézikönyvében).
c) Nyomja meg egyszer a vérnyomásmérô készülék PRINTER
gombját. A kijelzô «Pr1»-et fog mutatni, és a nyomtató a
választás szerint az 1. vagy a 2. felhasználó számára az utoljára
tárolt mérési értéket nyomtatja ki.
6.2. Hogyan kell kinyomtatni a memóriában és az adattáblázatban
tárolt összes mérési értéket. (adatok kinyomtatása táblázattal)?
a) Válassza ki a megfelelô nyomtatási feladatot a PRINTER gomb
lenyomása elôtt.
b) Csatlakoztassa a nyomtatót a vérnyomásmérô készülékhez, és
kapcsolja be a nyomtatót (a részleteket a nyomtató kézikönyve
tartalmazza).
c) Legalább 3 másodpercnél hosszabb ideig nyomja a PRINTER
gombot. A kijelzô elôször «Pr1»-et, utána «Pr2»-t mutat.
d) Engedje el a gombot, és a nyomtató kinyomtatja az összes
tárolt mérési értéket egy megfelelô táblázattal.
6.3. A nyomtatás leállítása
Ha le szeretné állítani a nyomtatást, kattintson a PRINTER gombra a
nyomtatási folyamat alatt.
MEGJEGYZÉS:
A nyomtatóra vonatkozó további részleteket a nyomtató használati
utasítása tartalmazza.
60
M
1
1
2
1
Page 64

61
7. HIBAÜZENETEK / HIBÁS MÛKÖDÉSEK
Ha a mérés alatt hiba történik, a mérés megszakad,
és a kijelzôn egy ennek megfelelô hibakód jelenik meg.
(Például 1.sz. hiba)
Hibaszám Lehetséges ok
ERR 1 A szisztolés nyomás meghatározása megtörtént, de azután a mandzsetta nyomás
20 Hgmm alá esett. A csô dugaszolása szétcsúszott a szisztolés vérnyomás mérése
után. További lehetséges ok: nem lehetett pulzust érzékelni.
ERR 2 Nem természetes nyomás impulzusok rontják a mérési eredményt. Lehetséges ok: a
kar a mérés alatt lmozdult (elmozdulás miatti változás)
ERR 3 A mandzsetta felfújása hosszú ideig tart. A mandzsetta felhelyezése nem megfelelô ,
vagy a csôcsatlakozás tömítetlen.
ERR 5 A mért leolvasási értékek elfogadhatatlan különbséget jeleztek a szisztolés és a
diasztolés nyomás között. Végezzen egy másik mérést az utasítások pontos betartásával ! Kérdezze meg kezelô orvosát, ha továbbra is szokatlan mérési értékeket kap.
ERR 6 Az egyedi adatok az átlagolási mód közben még 4 ciklus után is túl nagymértékben
különböznek. Nem lehet megjeleníteni átlagértéket.
HI A nyomás a mandzsettában túl nagy (300 Hgmm feletti) VAGY a pulzusszám túl nagy
(több, mint 200 szívverés percenként). Pihenjen 5 percig, és ismételje meg a mérést.*
LO A pulzusszám túl kicsi (kevesebb, mint 40 szívverés percenként). Ismételje meg a mérést.*
* Konzultáljon orvosával, ha ez vagy valamelyik másik probléma újra jelentkezik.
Egyéb lehetséges hibás mıködések és lehetséges megoldások:
Ha a készülék használata során problémák fordulnak elô, a következô pontokat célszerı ellenôrizni,
és ha szükséges, a megfelelô méréseket el kell végezni.
Hibás mıködés Orvoslás
A kijelzô a mıszer bekapcsolásakor üres 1. Ellenôrizze az elemek polaritását (+/-)
marad. Az elemek be vannak helyezve. 2. Ha a kijelzô akadozik vagy szokatlan,
vegye ki az elemeket és tegyen be újakat.
A nyomás nem emelkedik, annak ellenére, • Ellenôrizze a mandzsetta csôhogy a kompresszor jár. csatlakoztatását, és ha szükséges,
megfelelôen csatlakoztassa.
A mıszer gyakran nem méri a vérnyomást, 1. Gyôzôdjön meg arról, hogy a mandzsetta
vagy a mért értékek túl alacsonyak nem túl szoros-e.
(túl magasak) 2. Ellenôrizze, hogy szoros ruházat, pl. felgyırt
ingujj nem fejt ki nyomást a mérési hely
fölött a karon. Vesse le ezeket a
ruhadarabokat, ha szükséges.
3. Mérje meg ismét a vérnyomást teljes
nyugalmi helyzetben.
Minden mérés különbözô értéket ad, annak • Kérjük olvassa el a következô információt
ellenére, hogy a mıszer normálisan mıködik, és a „szokásos hibaforrások” fejezetben
és a kijelzett értékek normálisak. szereplô pontokat ! Ismételje meg a mérést!
A mért vérnyomás értékek eltérnek az orvos • Jegyezze fel az értékek napi alakulását és
által mért értékektôl. konzultáljon kezelôorvosával.
Page 65

☞ További tájékoztatás
A vérnyomás szintje még egészséges emberekben is ingadozik. Fontos, hogy a mérési értékeket
ugyanazon feltételek között és a nap ugyanazon szakában hasonlítsuk össze. (nyugalmi feltételek!)
Ha ezzel a vérnyomásmérô készülékkel kapcsolatban bármilyen kérdése van, kérjük kérdezze meg
kereskedôjétôl vagy gyógyszerészétôl, hogy hol található országában Microlife Service képviselet.
A Microlife Service csapat örömmel segít Önnek. Soha ne kísérelje meg saját maga megjavítani a
készüléket! A készülék bármilyen jogosulatlan felnyitása minden garanciális igényt érvénytelenít!
8. Karbantartás, újrahitelesítés
a) Ne tegye ki a készüléket szélsôséges
hômérsékletnek, nedvességnek, pornak vagy
közvetlen napsütésnek.
b) A mandzsetta érzékeny, légmentes buborékot
tartalmaz. Bánjon vele óvatosan és összehajtogatás,
illetve felcsatolás közben kerülje az igénybevétel
bármilyen formáját.
c) A készüléket száraz, puha ronggyal tisztítsa. Ne
használjon benzint, hígítót vagy bármilyen hasonló
oldószert. A szennyezôdéseket a mandzsettáról
óvatosan szappanos, nedves ronggyal kell
eltávolítani. A mandzsetta mosása tilos!
d) Vigyázzon a gumicsôre. Ne húzogassa! Ne tekerje
vagy fektesse éles tárgyra.
e) Ne dobálja a készüléket és semmilyen módon ne
bánjon vele durván! Óvja a készüléket az erôs
rázkódástól!
f) Soha ne nyissa ki a készüléket, különben a gyári
kalibráció érvényét veszti!
Rendszeres újrahitelesítés
Az érzékeny mérôeszközök pontosságát idôrôl idôre ellenôrizni kell. Ezért azt javasoljuk, hogy
kétévenkénti rendszerességgel vizsgáltassa felül készülékét. Az Ön kereskedôje készséggel áll
rendelkezésére bôvebb információkkal az újrahitelesítéssel kapcsolatban.
62
138
80
7070
Gasoline
138138
80
70
138
80
70
Page 66

63
9. Garancia
A vérnyomásmérô készülék garanciaideje az eladás napjától számított 3 év. A garancia a
készülékre és a mandzsettára egyaránt kiterjed.
Helytelen kezelésbôl eredô sérülés, baleset, a használati útmutatóban leírtaktól eltérô üzemeltetés
vagy a készülékben harmadik személy által történô bárminemı változtatás, átalakítás esetén a
garancia érvényét veszti.
A garancia kizárólag az eladó által kitöltött garanciajegy és számla bemutatásával érvényesíthetô.
10. MÛSZAKI ADATOK
Súly: 460g vérnyomásmérô készülék(elemekkel)
Méret: 115 (SZ) x 182 (H) x 76 (M) mm
Tárolási hômérséklet: –20 és +50 °C között
Páratartalom: 15 - 90 % relatív páratartalom
Hôm. mıködtetés közben: 10 és 40 °C között
Kijelzô: LCD-kijelzô (folyadákkristályos kijelzô)
Mérési mód: oszcillometrikus
Nyomásérzékelô: kapacitív
Mérési tartomány:
SYS/DIA: 30 - 280 Hgmm
Pulzus: 40 - 200 szívverés percenként
Mandzsetta nyomás kijelzô tartomány: 0–299 Hgmm
Memória: Automatikusan tárol 2 x 14 mérést
Mérési felbontás: 1 Hgmm
Pontosság: Nyomás ± 3 Hgmm-en belül
Pulzus ± a leolvasási érték 5 %-a
Áramforrás: 6V/600mA egyenáram
a) 4 szárazelem (elemek) UM-3, AA méret,
1.5 V
b) adapter 6 V egyenáramra 600 mA
(választható)
Tartozékok: közepes méretı mandzsetta (AC-1-M)
22-32 cm-es karkerülethez vagy
nagyméretı (AC-1-L) típusú mandzsetta
32-42 cm-es karkerülethez
Szabványi hivatkozások: 93/42/EGK EU-irányelv
NIBP-követelmények: EN 1060-1 /-3 /-4,
ANSI / AAMI SP10
A mıszaki változtatások jogát fenntartjuk!
11. www.microlife.com
Részletes információt termékeinkröl, (lázméröinkröl ill vérnyomásméröinkröl) szervizelési lehetöségekröl
a www.microlife.com honlapunkon találhat.
 Loading...