

Page 1

3AX1-4U-LF-JUL06-FDA-2
Page 2

PLEASE NOTE:
THIS MEDICAL INSTRUMENT MUST BE USED ACCORDING TO
INSTRUCTIONS TO ENSURE ACCURATE READINGS.
Questions? Preguntas?
Call Toll Free: 1-866-464-6184
Model # BP3AX1-4U
ID # 3AX1-4U-LF (344536)
Instruction Manual
Premium Wrist
Blood Pressure
Monitor
Premium Wrist
Blood Pressure
Monitor
Page 3

Premium Wrist Blood Pressure Monitor
Instruction Manual
Model #BP3AX1-4U
ID#3AX1-4U-LF (344536)
Table of Contents
1. Introduction
1.1. Features of your blood pressure monitor
1.2. Important information about self-measurement
2. Important Information about Blood Pressure and its Measurement
2.1. How does high/low blood pressure arise?
2.2. Which values are normal?
2.3. How can you treat high blood pressure?
2.4. Benefits of Life Fitness AveragingMode Technology™
3. The Components of Your Blood Pressure Monitor
4. Using Your Blood Pressure Monitor
4.1. Inserting the batteries
4.2. Initial setup
4.3. Setting alarm times
4.4. Sleep mode
5. Taking a Measurement
5.1. Before the measurement
5.2. Common sources of error
5.3. Fitting the cuff
5.4. Measurement mode selection (LifeFitness Averaging Mode Technology™
feature)
5.5. Measurement procedure
5.6. Discontinuing a measurement
Page 4

6. Memory Recall and User Setting
6.1. Viewing measurements saved in memory
6.2. How to use the individual memory feature
6.3. Clearing the memory
7. Software Functions
7.1. Installation of software and downloading readings
8. Adjusting the Display Contrast
9. Error Messages / Malfunctions
10. Care and Maintenance
11. Warranty
12. What U.S. and International Standards is this device
manufactured to meet?
13. Technical Specifications
14. How to Contact Us
1
Page 5

1. Introduction
1.1. Features of your Premium Blood Pressure Monitor, ID # 3AX1-4U-LF
The blood pressure monitor is a fully automatic, digital blood pressure measuring
device for use on the wrist. This enables very fast and reliable measurement of
systolic and diastolic blood pressures as well as the pulse through the
oscillometric measuring method. The device offers excellent accuracy proven in
clinical studies and has been designed for ease of use.
Before using, please read this instruction manual carefully and then keep it in a
safe place. For further questions on the subject of blood pressure and its
measurement, please contact your doctor.
Caution!
1.2. Important information about self-measurement
• Self-measurement means knowledge, not diagnosis or treatment. Unusual
values must always be discussed with your doctor. You should never alter
the dosages of any drugs prescribed by your doctor.
• The pulse reading is not suitable for checking the frequency of heart
pacemakers!
• Clinical trials have shown that wrist measurements can reach similar
accuracy to upper arm measurements. However, some individuals may get a
different result between both methods. Therefore, we generally recommend
to compare the readings of this device to data obtained by your doctor.
• Make sure you keep the device at heart level during measurement to avoid a
user accuracy error.
Electromagnetic interference
The device contains sensitive electronic components. Therefore, avoid strong
electrical or electromagnetic fields in the direct vicinity of the device (e.g. mobile
telephones, microwave cookers). These can lead to temporary impairment of the
measuring accuracy.
2
Page 6

2. Important information about blood pressure and its measurement
2.1 How does high or low blood pressure arise?
Your level of blood pressure is determined in the circulatory center of your brain
and adjusts to a variety of situations through feedback from the nervous system.
To adjust blood pressure, the strength and frequency of the heart (Pulse), as well as
the width of circulatory blood vessels is altered. Blood vessel width is affected by fine
muscles in the blood vessel walls. Your level of arterial blood pressure changes
periodically during heart activity. During the "blood ejection" (Systole), the value is
highest (systolic blood pressure value). At the end of the heart’s "rest period" (Diastole)
pressure is lowest (diastolic blood pressure value). Your blood pressure values should lie
within certain normal ranges in order to prevent particular diseases.
2.2 Which values are normal?
Blood pressure is dangerously high if your diastolic pressure is above 90 mmHg and/or
your systolic blood pressure is over 160 mmHg, while at rest. In this case, please
consult your physician immediately. Long-term values at this level endanger your health
through continual damage to the blood vessels in you body. If your systolic blood
pressure values lie between 140 mmHg and 160mmHg and/or your diastolic blood
pressure values lie between 90 mmHg and 95mmHg consult your physician. Regular
self-checks will be necessary. If you have blood pressure values that are too low, (i.e.,
systolic values under 105mmHg and/or diastolic values under 60 mmHg), consult your
physician. Even with normal blood pressure values, a regular self-check with your blood
pressure monitor is recommended. You can detect possible changes in your values early
and react appropriately. If you are undergoing medical treatment to control your blood
pressure, keep a record of values along with time of day and date. Show these values
to your physician.
Never use the results of your measurements to independently
alter the drug doses prescribed by your physician.
3
Page 7

The following standards for assessing high blood pressure (without regard to age) have
been established by the U.S. National Institutes of Health JNC7, 2003.
☞ Further information
• If your values are mostly normal under resting conditions but exceptionally high
under conditions of physical or psychological stress, it is possible that you are
suffering from so-called "labile hypertension." Consult your physician.
• Correctly measured diastolic blood pressure values above 120mmHg require
immediate medical treatment.
2.3 What can be done if regular high or low values are obtained?
a) Consult your physician.
b) Increased blood pressure values (various forms of hypertension) are associated with
considerable health risks over time. Arterial blood vessels in your body may be
endangered due to narrowing caused by deposits in the vessel walls
(Arteriosclerosis). A deficient supply of blood to important organs (heart, brain,
muscles) can result. Furthermore, the heart will become structurally damaged with
increased blood pressure values.
c) There are many different causes of high blood pressure. We differentiate between
common primary (essential) hypertension, and secondary hypertension. Secondary
hypertension can be ascribed to specific organ malfunctions. Please consult your
physician for information about the possible origins of your own high blood pressure.
d) There are measures you can take to reduce and even prevent high blood
pressure. These measures should include permanent lifestyle changes.
4
Category Systolic Diastolic
(mmHg) (mmHg)
Normal <120 <80
Self-Check
Pre-Hypertension 120 - 139 80 - 89
Stage 1 140 - 159 90 - 99
Hypertension
Stage 2 >160 >100
Hypertension
Page 8

1) Eating habits:
• Strive for a normal weight corresponding to your age. See your doctor for your
ideal weight.
• Avoid excessive consumption of salt.
• Avoid fatty and fried foods.
2) Previous illnesses
• Consistently follow all medical instructions for treating illness such as:
diabetes (diabetes mellitus or sugar diabetes), fat metabolism disorder, and
gout.
3) Habits
• Give up smoking completely.
• Drink only moderate amounts of alcohol.
• Restrict your caffeine consumption (coffee, tea and chocolate).
4) Your physical condition
• After a medical examination, and with your doctor’s approval and direction,
exercise.
• Choose sports which require stamina and avoid those which require strength.
• Avoid reaching the limit of your performance.
• With previous illnesses and/or an age of over 40 years, please
consult your physician before beginning your exercise routine. You must
receive advice regarding the type and extent of exercise that is
appropriate for you.
2.4 Life Fitness AveragingMode Technology™
Life Fitness AveragingMode Technology™ is a new concept for optimum reliability in
measurement of blood pressure. A single measurement is rarely your real result. An
average of three readings is medically demonstrated to provide the most accurate
result. With the push of a single button, the Life Fitness AveragingMode Technology™
blood pressure monitor takes three consecutive measurements and calculates the
average.
5
Page 9
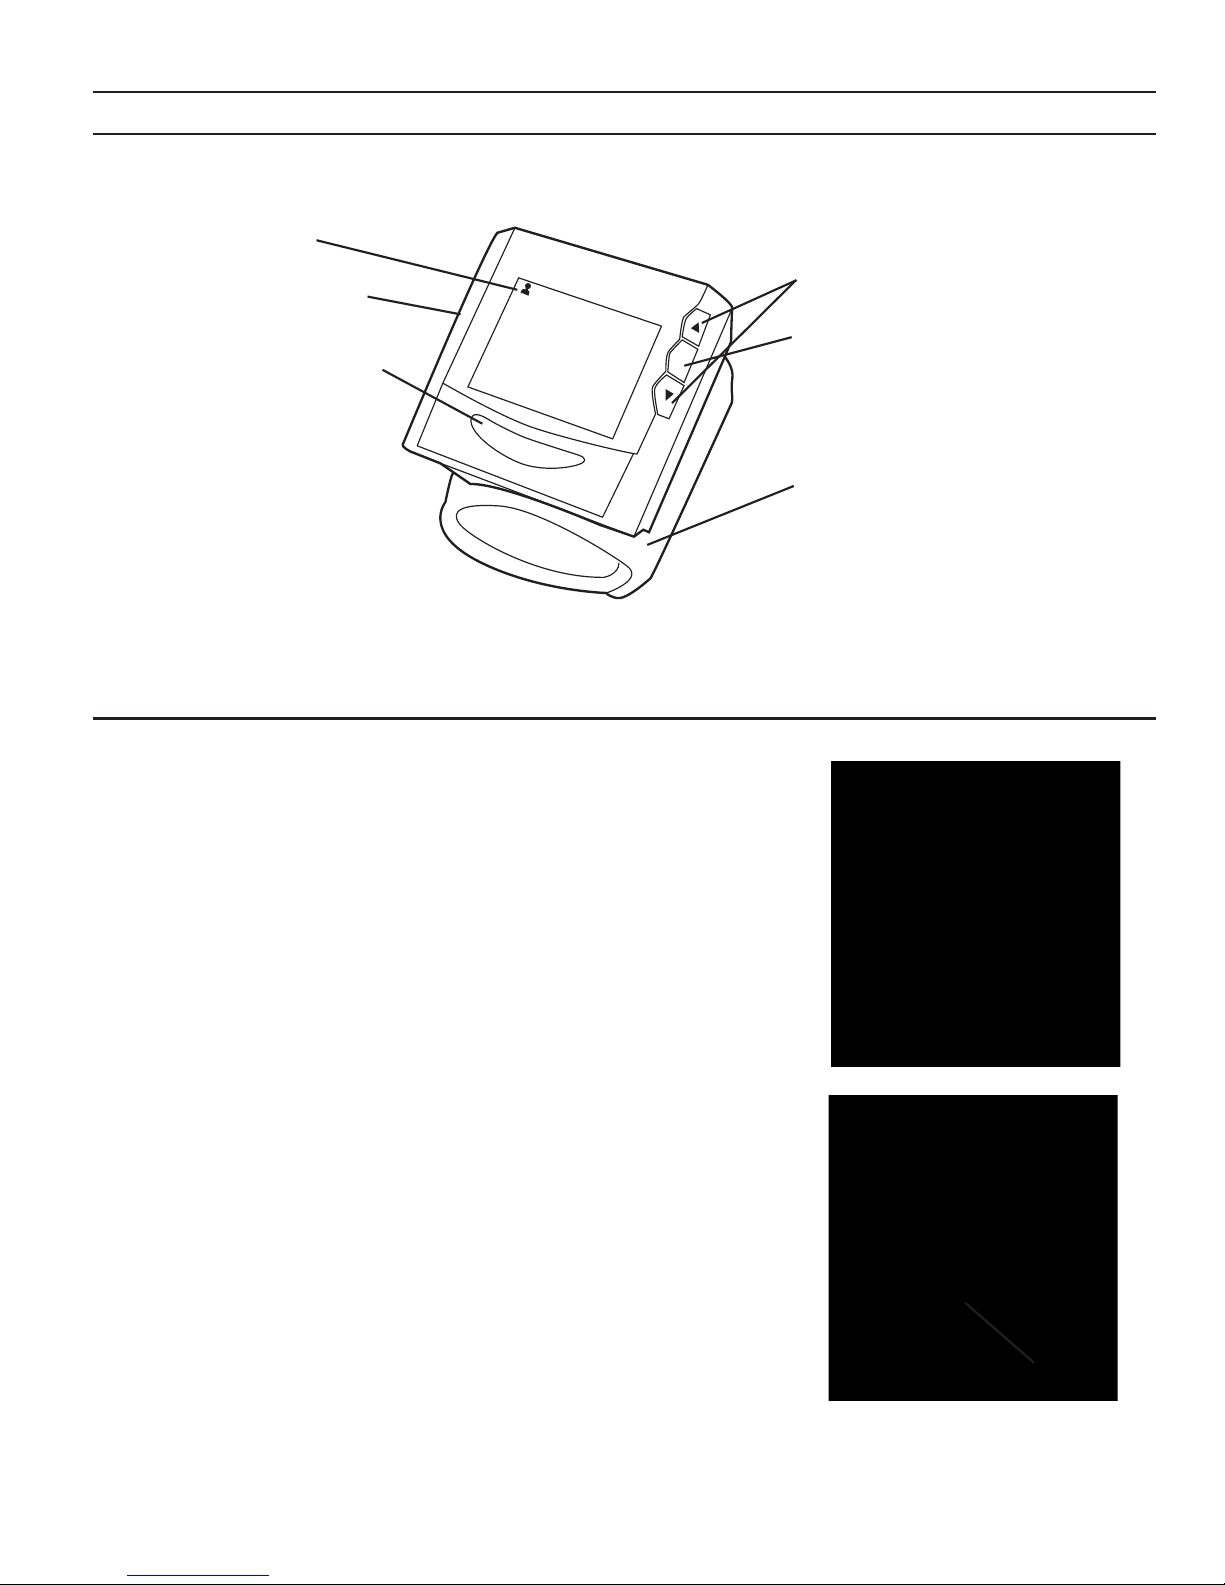
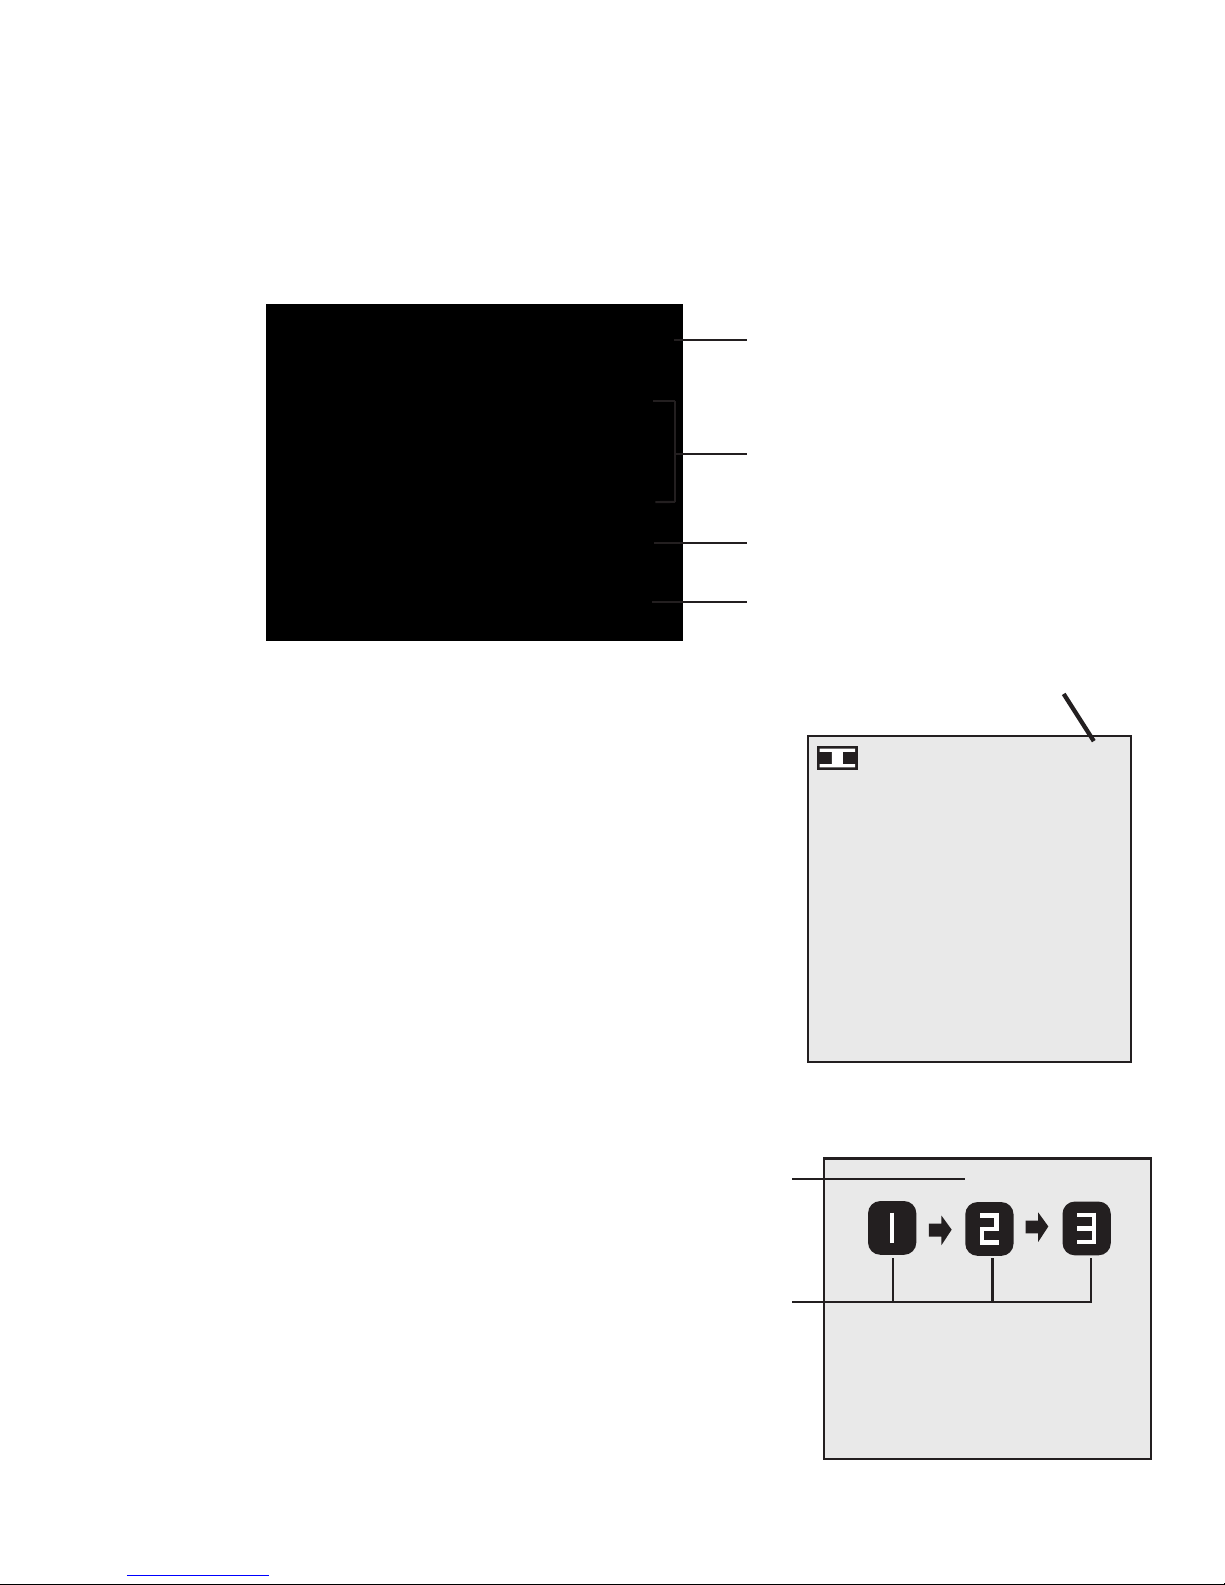
3. Components of your blood pressure monitor
The illustration below shows your blood pressure monitors key features:
This wrist cuff fits wrist circumference of 5.3” to 7.67” (13.5cm to 19.5 cm).
4. Using the blood pressure monitor
4.1. Inserting the batteries
After you have unpacked your device, insert the
batteries.
1. Remove the cover as illustrated (
A).
2. Lay the clear plastic strip (B) inside the battery
compartment, and insert 2 x size AAA 1.5V
batteries (
C), observing the indicated polarity
according to the markings on the cuff (D).
Caution!
•
After the low battery warning appears, the device
is disabled until the batteries have been replaced.
•
If the battery warning appears in the display, the
batteries are discharged and must be replaced by
new ones.
•
Use AAA Long-Life or Alkaline 1.5V Batteries. The
use of rechargeable batteries is not recommended.
•
If the blood pressure monitor is left unused for long
periods, remove the batteries from the device.
6
Scroll Buttons
M = OK/Mode Button
Cuff
Display
Battery Cover
ON/OFF/START
Button
SYS
DIA
PUL
120
mm
Hg
80
mm
Hg
68
/mi
n
11
:31
am
No. 10
4/11
1
ON/
OFF
/ST
ART
M
A
B
C
D
Page 10
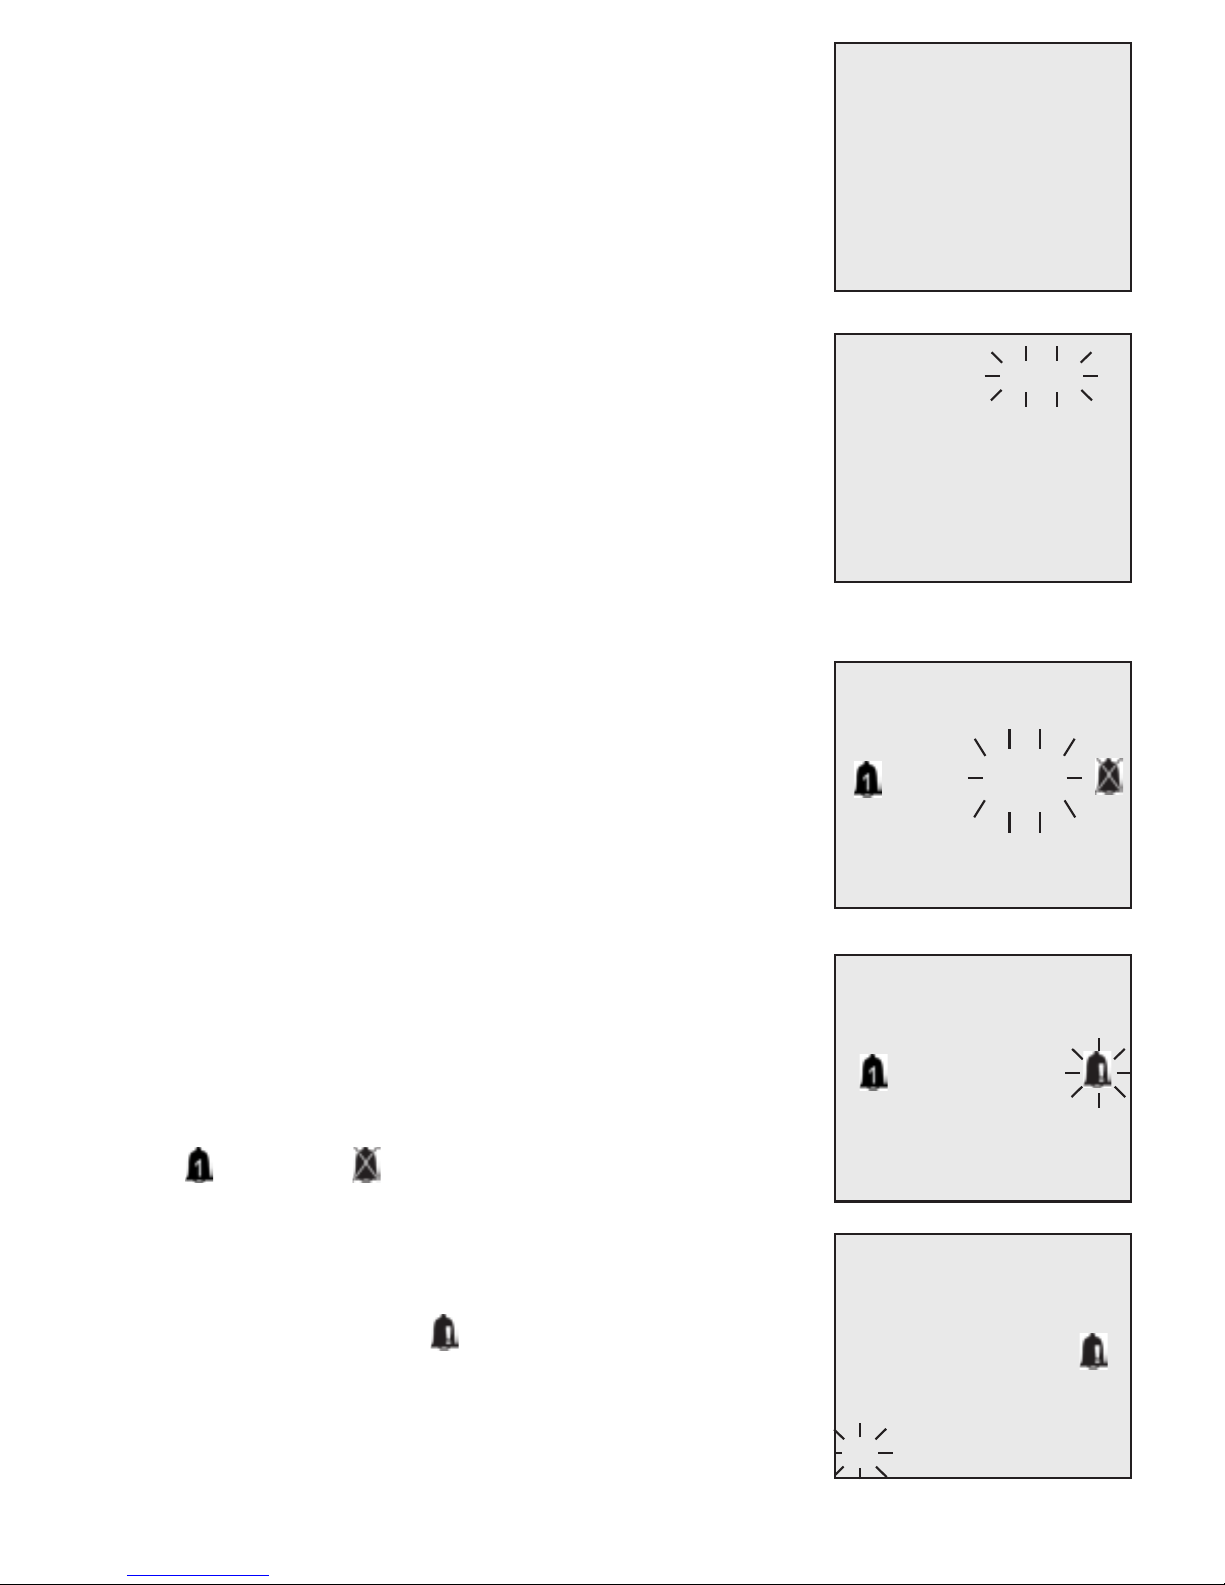
4.2. Initial Setup
When the batteries are installed, the display shows
the language selection screen.
Press ▲ or ▼ to select the display language. Press
OK (M) to confirm the selection. The default language
is English.
The device prompts you to set the time and date. The
year blinks highlighting the first field to change.
Press
▲ or ▼ to change the year. Press OK (M) to
confirm the date. The month, day, hour, and minute
are all consecutively highlighted. Press
▲ or ▼ to
change these fields and press
OK (M) to confirm. You
are then prompted to set the alarms.
4.3. Setting Alarm Times
After you have set the time, you can set one or two
alarms to alert you to take your blood pressure
measurements. An alarm icon appears in the display.
Press
▲ or ▼ to set the hour and minute for Alarm 1.
Press
OK (M) to confirm each setting.
When the alarm icon is highlighted, press
▲ or ▼ to
enable or disable Alarm 1. Press
OK to confirm.
You are then prompted to set Alarm 2. Follow the
instructions for Alarm 1 to set this alarm.
After setting the alarms, press
OK to exit the Time and
Date Setup. An alarm icon appears in the display to
indicate that the alarm is activated.
Attention!
The time display is set on a 24-hour clock.
Language
➤ English
Deutsch
Francais
Russian
Espanol
Jan 1 2006
0:00
Display
Off
7
Feb 24 2006
8:15
Display
Off
Feb 24 2006
8:15
Display
Off
Feb 24 2006
10:30
Display
Off
Page 11
When the final field (DISPLAY OFF) is highlighted, press
▲ or ▼ to select whether you want the time and date
display to remain on when the device is switched off.
Press
OK to confirm the settings and exit the time
setup screen.
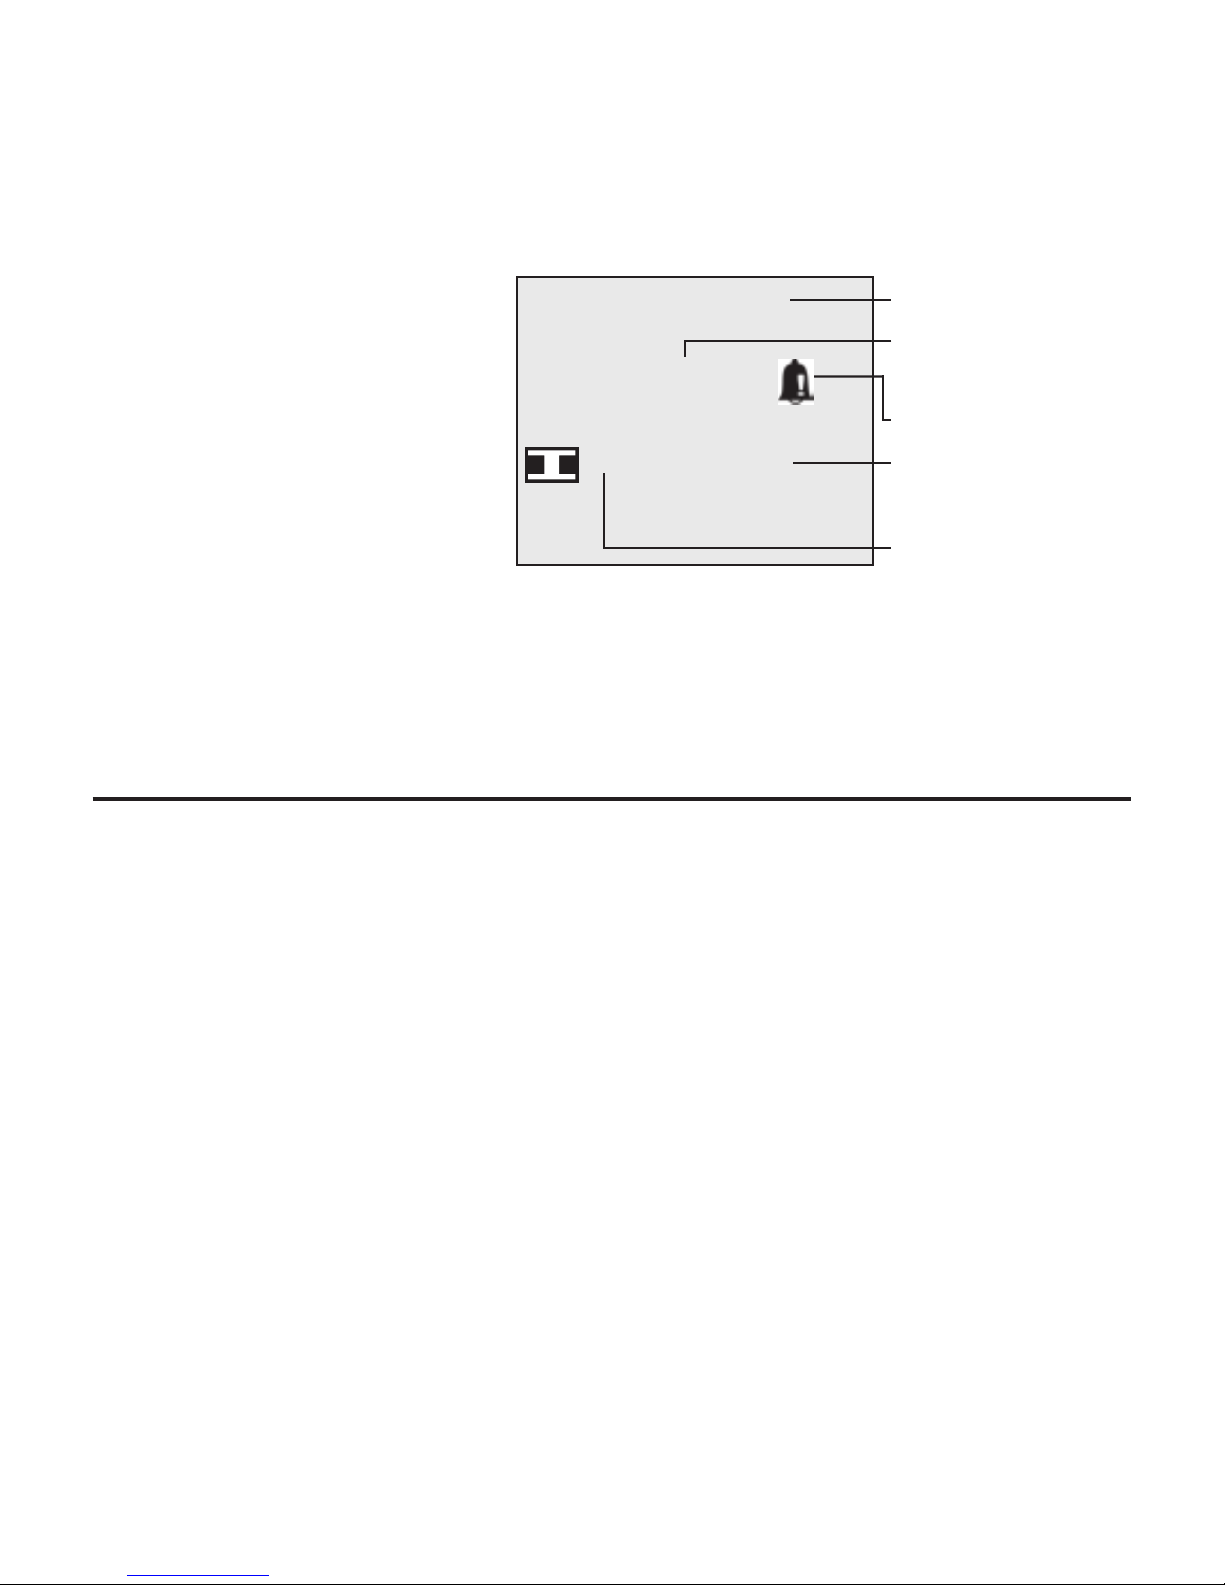
4.4. Sleep Mode
The device is designed to stay
in sleep mode as batteries are
loaded. The illustration shows
the display elements, when the
BPM is in sleep mode, and the
DISPLAY OFF feature is disabled
(see Section 4.2).
5. Taking a measurement
5.1. Before the measurement
• Avoid eating, smoking as well as all forms of exertion directly before the
measurement. All these factors influence the measurement result. Try to find
time to relax by sitting in an armchair in a quiet atmosphere for about ten
minutes before measurement on the left wrist.
• If you compare readings note the time of day as blood pressure fluctuates
throughout the day.
5.2. Common sources of error:
Note: Comparable blood-pressure measurements always require the
same conditions! Quiet conditions are always required for your
optimal measurement.
• All efforts by the patient to support the arm can increase the blood pressure.
Make sure you are in a comfortable, relaxed position and do not flex any of
the muscles in the measurement arm during the measurement. Use a cushion
8
Apr 17 2006
JOHN MAM
Date
Time (Military Time
24-hour format)
Life Fitness
AveragingMode™
Current user (#1)
15:31
Alarm active
Page 12

for support if necessary.
• If the wrist artery lies considerably lower or higher than the heart, an
erroneously higher or lower blood pressure will be measured! (Each 15cm or
5.9” difference in height results in a measurement error of 10mmHg!)
• A loose cuff causes false measurement values.
• With repeated measurements, blood can accumulate in the respective arm,
which can lead to false results. Correctly executed blood pressure
measurements should therefore first be repeated after a 1 minute pause or
after the arm has been held up in order to allow
the accumulated blood to flow away. (Does not
apply to a Life Fitness AveragingMode™
measurement.)
5.3. Fitting the cuff
a) Remove all objects and jewelry (e.g. wristwatch)
from the wrist in use. Put the cuff over the wrist
with the monitor face on the inside of the wrist.
b) The distance between the cuff and the hand should
be approx. 1/2” (10 mm).
c) Secure the cuff with the Velcro™ fastener, so that
it lies comfortably and not too tight. No space
should remain between the cuff and the wrist.
d) Lay your arm on a table, with your palm upwards.
Support your arm with a cushion, so that the cuff
rests at about the same height as your heart. Do
not hold or support the cuff with your free hand.
Remain still for 5 minutes before beginning a
measurement.
9
Page 13
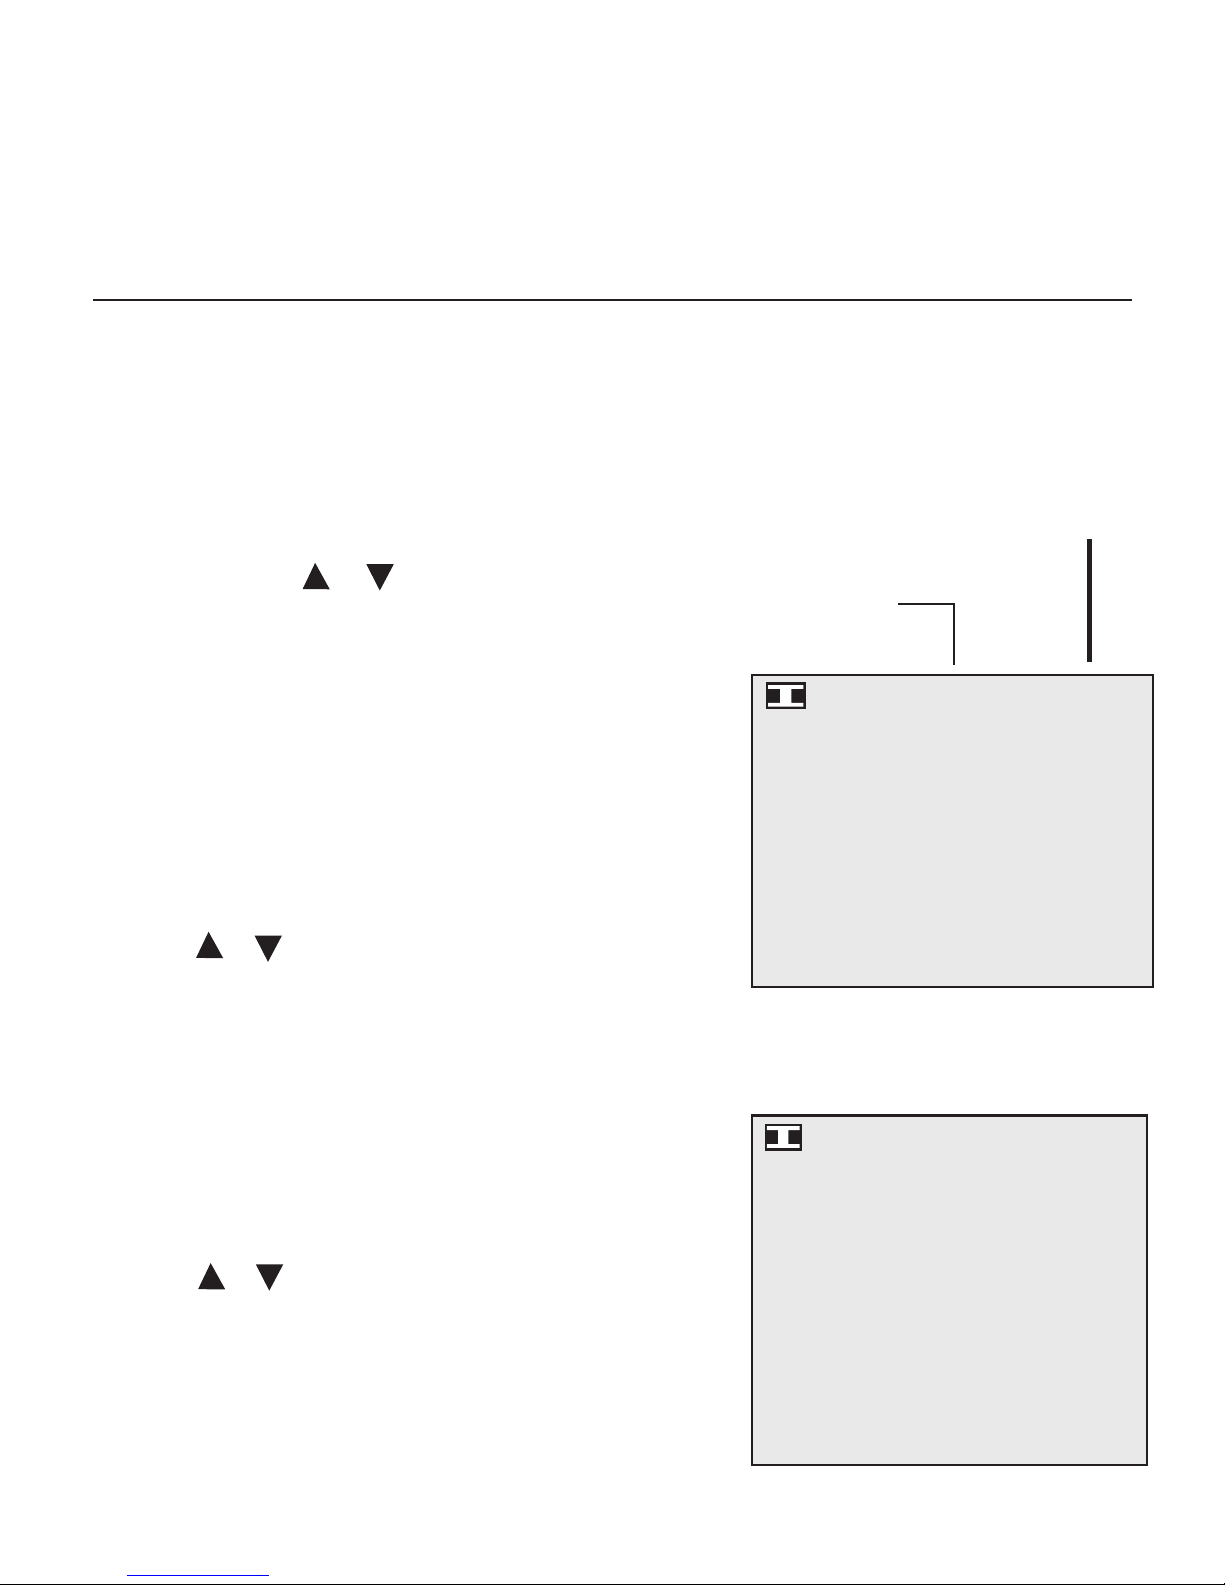
5.4. Measurement Mode Selection
Choose which measurement mode you want to use before taking a blood pressure
reading. Press
OK (M) to enter the menus, press ▲ or ▼ to select Measuring
mode, and press
OK (M) to enter the submenu Select , «1» or «3/MAM» for Life
Fitness AveragingMode Technology™ with the scroll buttons and confirm your
selection by «
OK».
Life Fitness AveragingMode Technology™
In average mode, the unit takes 3 continuous
measurements, and afterwards calculates the
result based on an average using Life Fitness
AveragingMode Technology™ (see Section 2.4).
There is a 15-second rest time between
measurements; the unit beeps during the last 5
seconds to remind you of the upcoming
measurement.
Single Mode
In single mode «1», only one measurement is taken.
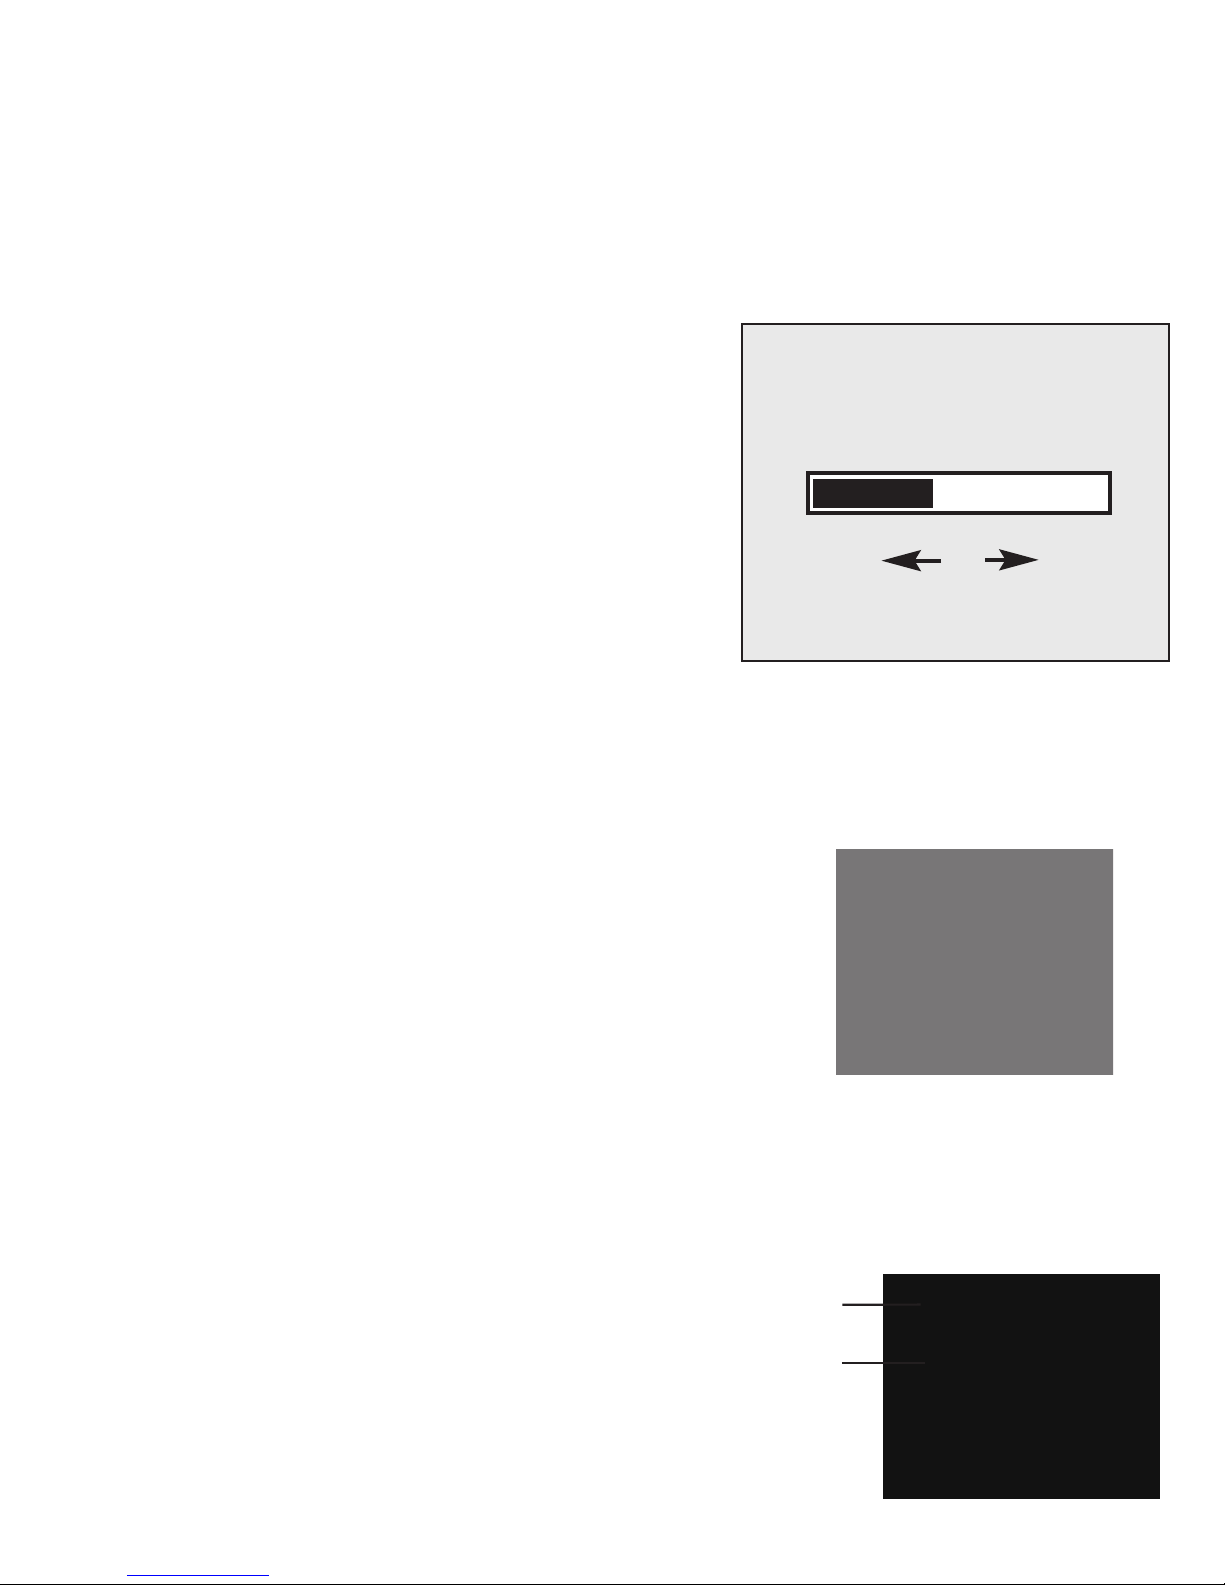
5.5. Measurement Procedure
After the cuff and arm have been appropriately
positioned and the measurement mode is set, the
measurement can be taken as follows. Press the
ON/OFF/START button. The Life Fitness Welcome
screen appears, and is followed by a screen which
shows you how to properly hold your arms. If the
display off function is enabled, the Sleep Mode
screen appears for two seconds
before measurements are taken.
The pump begins to inflate the
cuff and the increasing cuff
pressure is displayed.
10
MEASURING MODE
[
▼
] [▲
]
1 3/MAM
Numeric pressure
Graphical pressure
Hold left wrist at heart level
and remain still during
measurement.
Page 14
After the suitable inflation pressure has been reached, the pump stops, the
measurement signals are displayed and the heart icon flashes.
This curve shows each heart beat activity. Movement artifacts (excessive
movement) would become visible by large deviations within the curve.
A long beep sounds when the measurement has
been completed. The systolic and diastolic blood
pressure and pulse rate appear in the display.
The measurement reading remains on the display
for approximately 30 seconds. If no button is
pressed during the 30-second period the
instrument switches itself off in order to preserve
the batteries.
When the unit is set to MAM, it means the Life
Fitness AveragingMode Technology™
has been engaged and three separate
measurements take place as
explained under section 5.4.
11
User #1 Icon
Relative amplitude
Heart icon
Pressure
3/03 15:48
sys
124
mmHg
dia
73
mmhg
pul
77
/min.
22
Countdown
timer
Measurement
number
MAM
Life Fitness
AveragingMode
Technology™ icon
Page 15
5.6. Discontinuing a measurement
If it is necessary to interrupt a blood pressure measurement for any reason, for
example, if the patient feels ill, press the ON/OFF/START button. The device
immediately lowers the cuff pressure and enters into sleep mode.
6. Memory handling and user setting
6.1 Viewing Measurements Saved in
Memory
This blood pressure monitor automatically
stores each of the last 30 measurement
values. To view the stored measurements
for a user, press or in sleep mode. The
last measurement taken for the user is
displayed.
The user, measurement sequence number,
date, and time are displayed on the top.
Data obtained in Life Fitness
AveragingMode Technology™ are indicated
by a MAM symbol in the upper right corner.
• Press or to scroll through the list items.
• The first item in the list is the average of all
stored data.
• Press
OK and the display shows table of all
data.
• The first entry is the average. Data obtained in
Life Fitness AveragingMode Technology™ is
indicated by an «A» symbol at the very right.
• Press or to scroll through the list.
12
9 MAM
3/06 15:48
sys
124
mmHg
dia
73
mmhg
pul
77
/min.
Measurement
number
Life Fitness
AveragingMode
Technology™
3/06 15:48
No. sys dia pul
avg. 149 110 85
1 145 109 83
2 119 71 74 A
3 124 73 79
4 130 80 77 A
Page 16

Press OK and the display shows graph of
all data.The lines indicate the Systolic (top
end) and Diastolic (bottom end) values.
Press or to move the cursor between
measurements. The currently selected
measurement is indicated by a blinking line.
Press
ON/OFF/START to exit this mode.
6.2. Setting the User
This monitor allows you to track readings
for two individuals independently. Scroll to
User and press
OK to enter the submenu.
Press or to make your selection. Select
to set the device to not save readings.
Select to select user 1. Any readings
made when user 1 is selected will be
stored only in memory 1.
Select
when user 2 is selected will be stored only
in memory 2.
Note: There is a User 0, which does not store
memories. If your unit is on the User 0 setting,
no readings will be stored in memory.
After selecting user 1 or user 2 you are
prompted to enter the user name. You can
use up to six characters.
To keep the default name «User_1», press
ON/OFF/START. To enter a different name,
follow these instructions:
Press or to scroll through the
alphanumeric characters A ~ Z and 0 ~ 9.
There is also one underscore and one space
13
No.7 3/06 15:48
200
150
100
50
SYS
145
DIA
85
PUL
98
4/17 - 4/18 AVG MAM
USER
USER_1
EXIT=[ON/OFF/START]
*A friend can measure their blood
pressure without saving it in
memory by setting the user to the
symbol (User 0).
Page 17

character.
Press OK (M) to accept the character and
move to the next space.
After you have finished entering the name,
press
OK to exit the user setup menu. The
user name is displayed on the screen.
6.3. Clearing the Memory
This item enables you to clear readings for
user 1 or user 2. You can erase single
readings, or erase all readings at once.
Select user 1 or user 2 as explained under
section 6.2. Scroll to Clear Memory and
press
OK. The user you selected is shown
in the upper left corner.
Clear Single Readings
Select «SINGLE» by the selection buttons
and press OK to erase single readings.
Press or to select a reading from the
list. An arrow highlights the selected
reading. Press
OK to erase the selected
reading.
Clear All Readings
Select «All» by the selection buttons and
press OK to erase all readings of the
selected user. You are prompted to confirm
the action. Press
OK to erase all readings
of the selected user. Press the
0N/OFF/START
button to cancel deletion of all readings.
14
JAMES MAM
15:31
ALL
SINGLE
CLEAR MEMORY
Apr 17 2006
CLEAR MEMORY
3/06 15:48
No. SYS DIA PUL
1 124 84 76
2 139 95 74
3 139 98 80
4 146 106 72
CLEAR MEMORY
CLEAR ALL?
YES=[M]
NO=[ON/OFF/START]
Page 18

15
7. Software Functions
(For more detailed information, see instructions included on the CD)
Measurements stored in your wrist unit can be downloaded to your PC using the
enclosed software. Your PC will allow a capacity of monitoring 80 patients, each
with 1000 data (note: overuse will lower system efficiency). The memory data can be
transferred to the PC by connecting the monitor via the USB cable. Important: your
wrist blood pressure monitor must be set to PC LINK mode whenever the
unit is in contact with your computer
. When the software prompts you to make
the connection to your blood pressure monitor, your monitor must be in the PC LINK
mode. Push the M Button and choose PC LINK then push the M Button again to
select it. You must set your wrist blood pressure monitor to PC LINK mode to install
the software and every time you want to download your measurements to your PC.
When the unit is in PC LINK mode you will see a series of curved lines that pulsate
from a stationary dot. Note: Software does not work with MAC computers!
7.1. Installation and Data Transmission
a) Insert CD into CD ROM drive of your PC. The installation will start automatically (If
not, click on SETUP.EXE). The software will prompt you to connect your unit to the
computer via the USB cable. The wrist unit must be in PC LINK mode.
b) To transmit data you must have stored data in the memory first. To download
memories from User 1, you must set the blood pressure monitor to User 1 prior to
downloading. To download memories from User 2, you must set the monitor to User
2. There is a User 0, which does not store memories. If your unit is on the User 0
setting, no readings will be downloaded. Remember to make sure your wrist unit is
in PC LINK mode prior to connecting to your computer.
c) You cannot take a blood pressure measurement while the unit is in PC LINK mode.
During the PC connection, the device is completely controlled by the computer. Please
refer to the ‘help’ file for software instructions.
Note: For problems with installation, go to Error Messages/Troubleshooting in
Page 19

16
Section 9.
8. Adjusting the Display Contrast
This item enables you to adjust the contrast. Scroll to Contrast and
press
OK to enter the submenu. Press to increase the display
contrast. Press to decrease the display contrast. After you have
adjusted the contrast, press
OK to confirm the setting.
Note: Do not set the contrast to the lowest setting. It will
appear blank and remain that way next time you turn it on,
rendering it impossible to see. Make only minor contrast
adjustments.
9. Error messages / malfunctions
If an error occurs during
a measurement, the
measurement is discontinued and a
corresponding error
code is displayed
(Example: Error No. 2).
Error No. Possible cause(s)
ERR 1 No pulse was detected.
ERR 2 Unnatural pressure impulses influence the measurement
result.
Reason: Your arm was moved during the measurement
(Referred to as an “artifact”).
ERR 3 Inflation of the cuff takes too long. The cuff is not
correctly seated.
ERR 5 The measured readings indicated an unacceptable
difference between systolic and diastolic pressures. Take
another reading following directions carefully. Contact your
doctor if you continue to get unusual readings.
ERR 6 Single data differ too much during Life Fitness
AveragingMode™ (MAM) even after 3 cycles. No average
result can be displayed.
CONTRAST
Page 20

Other possible malfunctions and their elimination
If problems occur when using the device, the following points should be checked
and if necessary, the corresponding measures are to be taken:
Malfunction
The display remains blank when the
instrument is switched on although the
batteries are in place.
The device frequently fails to measure
the blood pressure values, or the values
measured are too low (too high).
Every measurement produces a different
value although the instrument functions
normally and the values displayed are
normal
Blood pressure measured differs from
those values measured by the doctor.
Trouble downloading measurements
to my PC
17
Remedy
1. Check batteries for correct polarity and if
necessary insert correctly.
2. If the display is unusual, re-insert batteries
or exchange them.
3. Be sure contrast is not turned too far down.
1. Check the positioning of the cuff.
2. Measure the blood pressure again in peace
and quiet. See section 5, Taking a
Measurement
1. Please read the following information and
the points listed under «Common sources of
error». Repeat the measurement.
Please note: Blood pressure fluctuates
continually so successive measurements
will show some variability
.
1. Record the daily development of the values
and consult your doctor.
Please note: Individuals visiting their
doctor frequently experience anxiety
which can result in a higher reading at
the doctor’s office than at home under
resting conditions.
Uninstall the software using uninstall feature
from the cd. Take the cd out. Restart PC.
Reinstall software. Turn on your wrist monitor
and put into PC Link mode. Make sure you have
measurements stored in User 1 or User 2 then
set on appropriate user (Not User 0). Attach
wrist monitor to computer via supplied USB
cable and click OK on computer screen.
Page 21

10. Care and maintenance
a) Do not expose the device to either extreme
temperatures, humidity, dust or direct sunlight.
b) The cuff contains a sensitive air-tight bubble.
Handle the cuff carefully and avoid all types of
stress through twisting or buckling.
c) Clean the device with a soft, dry cloth. Do not use
gasoline, thinners or similar solvents. Spots on the
cuff can be removed carefully with a damp cloth
and soapsuds. The cuff must not be washed!
d) Do not drop the instrument or treat it roughly in
any way. Avoid strong vibrations.
e) Never open the device! Otherwise the
manufacturer’s warranty becomes invalid!
☞ Further information
Blood pressure is subject to fluctuations even in healthy people.
Comparable measurements always require the same conditions (quiet
conditions)! If fluctuations in readings are larger than 15mmHg consult your
doctor.
In order to receive market clearance from governmental bodies, this device was
subjected to strict clinical tests. The computer program used to measure blood pressure
values was tested by experienced cardiac specialists in Germany.
The manufacturing of your Life Fitness blood pressure monitor is in accordance with the
terms of the European standard for blood pressure measuring devices (see technical
data) under the supervision of the Technical Monitoring Association Esses (RWTüVEssen).
Never attempt to repair the instrument yourself!
Any unauthorized opening of the instrument invalidates all warranty claims.
Periodical accuracy verification
Sensitive measuring devices must from time to time be checked for accuracy.
18
Gasoline
Page 22

We therefore recommend a periodical inspection of the static pressure display
every 2 years.
11. Warranty
Your Life Fitness blood pressure monitor is guaranteed for a lifetime against
manufacturer’s defects for the original purchaser only, from date of purchase. The
warranty does not apply to damage caused by improper handling, accidents,
professional use, not following the operating instructions or alterations made to
the instrument by third parties.
There are no user servicable parts inside. Batteries or damage from old batteries
is not covered by the warranty.
Please note: According to international standards, your monitor
should be checked for accuracy calibration every 2 years
12. Reference to standards
Device standard:
Device corresponds to the requirements of the
European standard for non-invasive bloodpressure monitor
EN1060-1 / 1995
EN1060-3 / 1997
EN1060-4 / 2004
AAMI/ANSI SP10
Electromagn. compatibility: Device fulfills the stipulations of the European
standard IEC60601-1-2
The stipulations of the EU-Guidelines 93/42/EWG for Medical Products Class IIa
have been fulfilled.
19
Page 23

12. Technical specifications
Weight: 140g (with batteries )
Size: 67 x 70 x 80 mm
Storage temperature: -20 to +50°C (23°F - 122°F)
Humidity: 15 to 90% relative humidity maximum
Operation temperature: 10 to 40°C (50°F - 104°F)
Display: dot-matrix LCD (Liquid Crystal Display)
Measuring method: oscillometric
Pressure sensor: solid-state
Measuring range:
SYS/DIA: 30 to 280 mmHg
Pulse: 40 to 200 per minute
Measuring resolution: 1 mmHg
Accuracy: Pressure within ± 3 mmHg
Pulse ± 5 % of the reading
Memory: Storing the last 30 measurements
automatically for each of two users
Power source: 2 dry cells (Batteries) UM-4, size AAA
1.5V
Accessories: Storage case
Technical and color alterations may differ.
13. How to Contact Us
Advanced Healthcare Distributors, LLC
Concord, NH 03301
Toll Free: 1-866-464-6184
Email Questions to: LifeFitnessSupport@microlifeusa.com
20
Page 24

21
Page 25

22
Tensiómetro de Muñeca Dot Matrix
Manual de instrucciones
Indice
1. Introducción
1.1. Características del 3AX1-4U-LF
1.2. Información importante sobre la automedición
2. Información importante sobre la tensión arterial y su medición
2.1. ¿Cómo se origina la tensión arterial alta/baja?
2.2. ¿Cuáles son los valores normales?
2.3. ¿Qué podemos hacer si se miden regularmente valores altos/bajos?
2.4. Tecnología MAM (Life Fitness AveragingMode Technology™)
3. Los diversos componentes del tensiómetro
4. Puesta en funcionamento del tensiómetro
4.1. Inserción de las pilas
4.2. Ajuste inicial
4.3. Ajuste de horas de alarma
4.4. Modo «espera»
5. Desarrollo de una medición
5.1. Antes de la medición
5.2. Errores frecuentes
5.3. Ajuste de la muñequera
5.4. Selección del modo de medición
5.5. Procedimiento de medición
5.6. Medición discontinua
Page 26

23
6. Manejo de la memoria y ajuste del usuario
6.1. Ver las mediciones guardadas en la memoria
6.2. Ajustar el usuario
6.3. Borrar la memoria
7. Funciones de conexión con el PC
7.1. Instalación y transferencia de datos
8. Ajustar el contraste de la pantalla
9. Mensajes de error/funcionamiento defectuoso
10. Cuidados y mantenimiento, recalibración
11. Garantía del fabricante
12. Normas de referencia
13. Especificaciones técnicas
14. Contacto para la ayuda
Page 27

1. Introducción
1.1. Características de 3AX1-4U-LF
El tensiómetro es un aparato digital totalmente automático de medición de la
tensión arterial para ser usado en la muñeca, que permite medir muy rápidamente
y de forma fiable la tensión arterial sistólica y diastólica, así como el número de
pulsaciones mediante el método de medición oscilométrico. El aparato ofrece una
precisión de medición muy elevada, clínicamente probada, y está diseñado para
proporcionar la máxima facilidad de uso.
Antes de usarlo, lea detenidamente este manual de instrucciones y luego
guárdelo por si necesita consultarlo de nuevo, en el futuro. Contacte con su
médico si tiene más preguntas sobre la tensión arterial y su medición.
Atención:
1.2. Información inportante sobre las automediciones
• Automedición significa control, no diagnóstico o tratamiento. Los valores
inusuales deben ser discutidos siempre con su médico.
No modifique bajo
ninguna circunstancia las dosis de cualquier medicamento que le
haya recetado su médico.
• El indicador de pulsaciones no es apropiado para medir la frecuencia de los
marcapasos.
• En experimentos clínicos se ha demostrado que las mediciones realizadas en
la muñeca alcanzan una precisión similar a las mediciones llevadas a cabo
en el brazo. Sin embargo, es posible que los resultados obtenidos con los
dos métodos difieran en algunas personas. Por lo tanto, generalmente es
recomendable comparar las lecturas de este aparato con los datos obtenidos
por su médico. En caso de una diferencia entre los valores de medición,
rogamos considere esta diferencia en su lectura final.
24
Page 28

Interferencia electromagnética:
El aparato contiene componentes electrónicos sensibles (microordenador). Por
ello, evite los campos eléctricos o electromagnéticos fuertes en proximidad
directa al aparato (por ejemplo, teléfonos móviles, microondas); pueden dar lugar
a la pérdida temporal de la exactitud de medición.
2. Información importante sobre la tensión arterial y su medición
2.1. ¿Cómo se origina la tensión arterial alta/baja?
El nivel de la tensión arterial se determina en una zona del cerebro, en el
llamado centro circulatorio, y se adapta a cada situación concreta por
retroalimentación, a través del sistema nervioso.Para ajustar la tensión arterial
se modifican la potencia y la frecuencia cardiacas (pulso), así como la anchura
de los vasos sanguíneos. Esto último se efectúa mediante los músculos de las
paredes de los vasos sanguíneos.
El nivel de la tensión arterial cambia periódicamente junto con la actividad
cardiaca: durante la impulsión de la sangre (sístole) el valor es máximo (valor
sistólico de la tensión arterial); al final del «periodo de relajación» del corazón
(diástole), mínima (valor diastólico de la tensión arterial).
Para evitar ciertas enfermedades, los valores de la tensión arterial deben estar
situados entre unos valores límite determinados.
2.2 ¿Cuáles son los valores normales?
La tensión arterial es excesiva si en reposo la presión diastólica es superior a
90 mmHg y/o la presión arterial sistólica es superior a 160 mmHg. En este
caso, consulte con su médico de forma inmediata. Valores de este nivel
durante largo tiempo ponen en peligro su salud debido al daño progresivo que
ello conlleva para los vasos sanguíneos de su cuerpo.
Si el valor sistólico de la tensión arterial está entre 140 mmHg y 160 mmHg
y/o el valor diastólico de la tensión arterial está entre 90 mmHg y 100 mmHg,
consulte igualmente con su médico. Además, será necesario efectuar
automediciones de forma regular.
Con valores de la tensión arterial muy bajos; esto es, valores sistólicos
inferiores a 100 mmHg y/o valores diastólicos inferiores a 60 mmHg, consulte
igualmente con su médico.
25
Page 29

Incluso con valores normales de la tensión arterial es recomendable efectuar
de forma regular automediciones con su tensiómetro. De esta forma, Ud. podrá
detectar a tiempo los posibles cambios en sus valores normales y actuar al
respecto. Si Ud. está siendo sometido a un tratamiento médico para controlar
su tensión arterial, lleve un registro de los valores de su tensión arterial,
efectuando automediciones de forma regular automediciones determinadas
horas del día. Muestre esos valores a su médico.
No use nunca los
resultados de sus comprobaciones para alterar por su cuenta el
tratamiento prescrito por su médico.
Los estandares siguientes para determinar la tension arterial alta (sin consideracion
alguna hacia edad) han sido establecidos por los institutos nacionales de la salud
JNC7, 2003.
☞ Información adicional
• Si sus valores son prácticamente normales en reposo, pero excepcionalmente
altos bajo estrés
físico o psíquico, es posible que sufra de la llamada «hipertensión lábil».
Consulte con su médico
si tiene la sospecha de que ese puede ser su caso.
• Un valor diastólico de la tensión arterial , medido correctamente, superior a
120 mmHg requiere
tratamiento médico inmediato.
2.3. ¿Qué puede hacerse si se obtienen valores altos/bajos de forma
regular?
26
Categoria Sistolicos Diastolico
Optimo <120 <80
Normal <130 <85
Normal alto 130-139 85-89
Hipertension
Etapa 1 140-159 90-99
Etapa 2 160-179 100-109
Etapa 3 ≥180 ≥110
Page 30

a) Consulte con su médico.
b) Los valores altos de la tensión arterial (diversas formas de hipertensión) están
asociadas a medio y largo plazo con riesgos importantes para la salud. Esto afecta
a los vasos sanguíneos de su cuerpo, que están en peligro debido a la constricción
causada por los depósitos que se van formando en las paredes de los vasos
(arterioesclerosis). La consecuencia puede ser una deficiencia en el aporte de
sangre a órganos importantes (corazón, cerebro, músculos). Es más, con valores
altos de la tensión arterial a largo plazo, el corazón sufrirá daños estructurales.
c) Existen muchas causas diferentes para la aparición de valores altos de la tensión
arterial. Diferenciamos entre la hipertensión primaria (esencial) y la hipertensión
secundaria. El último grupo puede ser adscrito a disfunciones orgánicas específicas.
Consulte con su médico para que le informe sobre el posible origen de sus valores
elevados de tensión arterial.
d) Hay medidas que Ud. puede tomar, no únicamente para reducir una hipertensión
médicamente diagnosticada, sino también como prevención. Estas medidas son
parte de su forma de vida general:
1) Hábitos alimentarios
• Esfuércese por mantener un peso normal que se corresponda con su edad.
Reduzca el sobrepeso.
• Evite el consumo excesivo de sal común.
• Evite los alimentos grasos.
2) Enfermedades anteriores
• Siga fielmente cualquier instrucción médica para el tratamiento de posibles
enfermedades
anteriores, tales como:
• Diabetes (Diabetes mellitus)
• Trastornos en el metabolismo de las grasas
• Gota
3) Hábitos
• Deje de fumar por completo
• Beba sólo cantidades moderadas de alcohol
• Reduzca el consumo de cafeína (café)
27
Page 31

4) Constitución física:
• Haga deporte de forma regular.
• Elija deportes que requieran vigor y evite aquellos que requieran fuerza.
• Evite llegar al límite de su capacidad física.
• En caso de haber sufrido enfermedades con anterioridad y/o tener una edad
superior a los 40 años, consulte con su médico antes de comenzar a practicar
deporte. Él le aconsejará sobre el tipo de deporte más apropiado para Ud.
2.4. Tecnología MAM (Life Fitness AveragingMode Technology™)
Tecnología MAM" es un concepto nuevo para obtener una fiabilidad máxima
en las automediciones de presión arterial. Una sencilla medida es raramente
su resultado real. Un promedio de tres medidas está médicamente
comprobado que provee los resultados más exactos. Con oprimir un sencillo
botón, el medidor de presión arterial con tecnología Life Fitness
AveragingMode™, toma tres medidas consecutivas, y calcula el promedio.
3. Los diversos componentes del tensiómetro
La figura muestra el tensiómetro 3AX1-4U-LF que consta de:
Muñequera tipo
WC1 13.5–19.5 cm,
para una circunferencia
de muñeca de
13.5 a 19.5 cm.
28
Botones de selección
Botón de confirmación (M)
Muñequera
Pantalla
Tapa de la batería
Botón ON/OFF
SYS
DIA
PUL
120
mm
Hg
80
mm
Hg
68
/mi
n
11
:31
am
No. 10
4/11
1
ON/
OFF
/ST
ART
M
Page 32

4. Puesta en funcionamiento del tensiómetro
4.1. Insertar las pilas
Después de desempaquetar el aparato, en
primer lugar, inserte las pilas.
1. Quite la tapa tal como muestra la figura
(A).
2. Coloque la cinta de plástico (
B) dentro
del compartimento de pilas e inserte 2
pilas AAA de 1,5V (C), observando la
polaridad correcta de acuerdo con las
marcas de la muñequera (
D).
¡Atención!
•
Después de la aparición del aviso sobre
las pilas, el aparato quedará bloqueado
hasta que éstas se hayan sustituido.
•
Cuando en la pantalla aparece el aviso
sobre las pilas, las pilas están vacías y
deben reemplazarse.
•
Use pilas AAA de larga duración o pilas
alcalinas de 1,5V. No se recomienda el
uso de pilas recargables de 1,2V.
•
Si no va a usar el tensiómetro durante
largo tiempo, retire las pilas del
aparato.
4.2. Ajuste inicial
Una vez instaladas las pilas, aparece la
pantalla para seleccionar el idioma.
Pulse ▲ o ▼ para seleccionar el idioma.
Pulse
OK para confirmar la selección. El
idioma por defecto es el inglés.
29
IDIOMA
English
Deutsch
Français
➤ Español
Italiano
A
B
C
D
Page 33

El aparato le pedirá ajustar la hora y la fecha. El año
parpadea resaltando el primer campo para el cambio.
Pulse ▲ o ▼ para cambiar el año. Pulse OK para
confirmar la fecha. Se resaltan sucesivamente el
mes, el día, la hora y los minutos. Pulse
▲ o ▼ para
cambiar estos campos y pulse
OK para confirmar.
Ahora, se le pedirá ajustar las alarmas.
4.3. Ajuste de horas de alarma
Después de ajustar la hora, podrá ajustar una o dos
alarmas para avisarle de que debe medir su tensión
arterial. En la pantalla aparece un icono de alarma.
Pulse
▲ o ▼ para ajustar la hora y los minutos para
la alarma 1. Pulse
OK para confirmar cada ajuste.
Cuando esté resaltado el icono de alarma, pulse ▲ o
▼ para contectar o desconectar la alarma 1.
Pulse
OK para confirmar. Ahora, se le pedirá ajustar
la alarma 2. Siga las instrucciones relativas a la
alarma 1 para ajustar esta alarma. Una vez ajustadas
las alarmas, pulse
OK para salir del Ajuste de Hora y
Fecha. En la pantalla aparece un icono de alarma
indicando que la alarma está activada.
¡Atención!
La hora se visualiza con un reloj de 24 horas.
Cuando se resalta el campo «Visualización Off», pulse
▲ o ▼ para seleccionar si desea que la hora y la
fecha se sigan visualizando después de desconectar
el aparato. Pulse
OK para confirmar los ajustes y
salga de la pantalla del ajuste de hora.
4.4. Modo «espera»
30
Ene 1 2006
0:00
Visualización
Off
Feb 24 2006
8:15
Visualización
Off
Feb 24 2006
8:15
Visualización
Off
Feb 24 2006
10:30
Visualización
Off
Page 34

El aparato está diseñado para
permanecer en el modo
«espera» después de insertar
las pilas. La ilustración
representa los elementos de la
pantalla cuando el aparato se
encuentra en el modo «espera»,
y la función «Visualización Off»
está deshabilitada (véase punto
4.2).
5. Desarrollo de una medición
5.1. Antes de la medición
• Evite comer, fumar, así como cualquier tipo de ejercicio antes de la medición.
Todos estos factores influyen en el resultado de la medición. Tómese tiempo
para relajarse sentado en un sillón en un ambiente tranquilo durante unos
diez minutos antes de la medición.
• Efectúe la medición siempre en la misma muñeca (normalmente la izquierda).
• Intente efectuar las mediciones de forma regular a la misma hora del día, ya
que la tensión arterial cambia en el transcurso del día.
5.2. Errores frecuentes:
Nota: ¡Para poder comparar los resultados de las mediciones de la
tensión arterial, es preciso que las condiciones sean siempre las
mismas! Generalmente, se consigue con condiciones de
tranquilidad.
• Los esfuerzos del paciente para mantener el brazo en la posición de medición
pueden aumentar la tensión arterial. Asegúrese de estar en una posición
cómoda y relajada y no active ningún músculo del brazo en el que se está
efectuando la medición. Si es necesario, utilice un almohadón de apoyo.
• Si la arteria de la muñeca se encuentra considerablemente más baja/alta
que el corazón, se medirá una tensión arterial errónea más alta/baja. (¡Cada
15 cm de diferencia de altura dan lugar a un error de medición de 10 mmHg!)
31
Abr 17 2006
JOHN MAM
Fecha
Hora
(Formato de 24 horas)
Modo MAM está
seleccionado para Life Fitness
AveragingMode Technology™
Usuario actual
15:31
Alarma activada
Page 35

• Una muñequera demasiado suelta da lugar a valores de medición erróneos.
• Si se repiten las mediciones, la sangre se acumulará en el brazo
correspondiente, lo que puede dar lugar a resultados erróneos. Por ello, para
efectuar la medición de la tensión arterial de forma correcta no la repita
hasta pasados 1 minuto, o hasta después de haber mantenido el brazo en
alto para permitir que la sangre acumulada fluya. Esto no aplica a las
medidas en el Modo Promedio.
5.3. Ajuste de la muñequera
a) Retire todos los posibles objetos y joyas (p.
ej., reloj de pulsera) de la muñeca en
cuestión. Coloque la muñequera sobre
la muñeca con la pantalla hacia el lado
interior de la muñeca.
b) La distancia entre la muñequera y la mano
debe ser de aprox. 10 mm ( 1/2 in).
c) Asegure la muñequera con el cierre Velcro™,
de forma que quede ajustada cómodamente y
no demasiado apretada, sin que quede ningún
espacio entre la muñequera y la muñeca.
d) Ponga el brazo sobre una mesa con la palma
de la mano hacia arriba. Apoye ligeramente el
brazo en una base (almohadón), de forma que
la muñequera quede más o menos a la altura
del corazón. Tenga cuidado de que la
muñequera quede libre. Permanezca así,
tranquilamente sentado, durante 5 minutos
antes de comenzar la medición.
5.4. Selección del modo de medición
Antes de medir la tensión arterial, seleccione el modo de medición que desee
usar. Pulse OK para entrar en los menús, pulse ▲ o ▼ para seleccionar el modo
de medición y pulse
OK para entrar en el submenú. Seleccione «1» ó «3/MAM»
32
Page 36

mediante los botones de selección y confirme su selección con OK.
Modo media (MAM) - Life Fitness
AveragingMode Technology™
En el modo media MAM, el aparato toma 3
mediciones seguidas y después, calcula el
resultado basado en un valor medio usando la
tecnología MAM (véase punto 2.4).
Entre las mediciones hay un tiempo de espera
de 15 segundos; durante los últimos 5
segundos, el aparato emite un pitido para
recordarle que la medición comenzará en
breve.
Modo sencillo
En el modo sencillo «1», se efectúa solamente
una medición.
5.5. Procedimiento de medición
Después de colocar correctamente la muñequera
y el brazo y de ajustar el modo de medición,
podrá realizar la medición de la siguiente
manera. Pulse el botón ON/OFF/START. Aparece
la pantalla de bienvenida de Microlife seguida
por una pantalla que le enseña como debe
colocar el brazo correctamente. Si está
habilitada la función «Visualización Off», aparece
durante dos segundos la pantalla del modo
«espera», antes de poder efectuar la medición.
La bomba comienza a inflar la
muñequera. Se visualiza el
33
MODO DE MEDICIÓN
[
▼
] [
▲
]
1 3/MAM
Life Fitness AveragingMode
Technology™
Page 37

incremento de la presión de la
muñequera.
Una vez alcanzada la presión
de inflado adecuada, la
bomba se detiene, se
visualizan las señales de
medición y el icono del
corazón parpadea.
Esta curva muestra cada
actividad cardíaca, las
variaciones por movimientos
quedarían reflejadas mediante
largas desviaciones de la
curva.
Una vez finalizada la medición, suena un
largo pitido. Ahora, aparecen en la
pantalla las tensiones arteriales sistólica
y diastólica y la frecuencia del pulso. La
lectura de la medición permanece en la
pantalla durante aproximadamente 30
segundos. Si durante el período de 30
segundos no se pulsa ningún botón, el
aparato se desconecta automáticamente
para no gastar las pilas. Cuando el
aparato está puesto en el modo media
(MAM), tienen lugar tres mediciones
sucesivas, tal como se describe bajo 5.4.
Si los datos de cada ciclo difieren
34
Presión numérica
Presión gráfica
Usuario
Amplidud relativa
Icono del corazón
Presión
3/06 15:48
sys
124
mmHg
dia
73
mmhg
pul
77
/min.
MAM
Page 38

demasiado unos de otros, se llevará a
cabo una cuarta medición antes de que
se visualice el resultado. Si, en casos
aislados, la tensión arterial es tan
inestable que incluso después de una
cuarta medición los datos varían
excesivamente, se visualiza un mensaje
de error. Véase Mensajes de Error y
Funcionamiento defectuoso (punto 7) al
final de este manual.
5.6. Medición discontinua
Si por alguna razón es necesario interrumpir la medición de la tensión arterial (p.
ej., el paciente no se encuentra bien), se puede apretar el botón ON/OFF/START
en cualquier momento. El aparato disminuye entonces, de forma inmediata, la
presión de la muñequera y entra en el modo "espera”.
6. Manejo de la memoria y ajuste del usuario
6.1 Ver las mediciones guardadas en la
memoria
El tensiómetro memoriza automáticamente
cada una de las últimas 30 mediciones. Para
ver las mediciones almacenadas para un
usuario, pulse o en el modo «espera».
Se visualiza la última medición realizada
para el usuario. Arriba se visualizan el
usuario, el número de secuencia de
medición, la fecha y la hora. Los datos
obtenidos en el modo media se indican con
el símbolo MAM en la esquina superior
derecha.
35
Temporizador de
cuenta atrás
Número de
medición
15
9 MAM
3/06 15:48
sys
124
mmHg
dia
73
mmhg
pul
77
/min.
Número de
medición
Page 39

Pulse o para desplazarse por los puntos
de la lista. El primer punto en la lista es el
valor medio de todos los datos almacenados.
Al pulsar
OK, la pantalla visualiza una tabla
con todos los datos. La primera entrada es el
valor medio. Los datos obtenidos en el modo
media se indican con una «A» en el margen
derecho.Pulse o para desplazarse por la
lista.
Al pulsar OK, la pantalla visualiza un gráfico
de todos los datos. Las líneas indican los
valores sistólico (extremo superior) y
diastólico (extremo inferior). Pulse o
para mover el cursor entre las mediciones.
La medición seleccionada actualmente se
indica mediante una línea intermitente. Pulse
ON/OFF/START para abandonar este modo.
6.2. Ajustar el usuario
Este aparato le permite hacer un
seguimiento de las lecturas de forma
independiente para dos individuos. Vaya a
«Usuario» y pulse
OK para entrar en el
submenú. Pulse o para hacer su
selección. Seleccione si desea que el
aparato no guarde las lecturas.
Seleccione para seleccionar el usuario
1. Cualquier lectura realizada estando
seleccionado el usuario 1 se guardará por
separado de otras lecturas.
36
3/06 15:48
No. sys dia pul
avg. 149 110 85
1 145 109 83
2 119 71 74 A
3 124 73 79
4 130 80 77 A
No.7 3/06 15:48
200
150
100
50
SYS
145
DIA
85
PUL
98
4/17 - 4/18 AVG MAM
USUARIO
Page 40

Seleccione para seleccionar el usuario
2. Cualquier lectura realizada estando
seleccionado el usuario 2 se guardará por
separado de otras lecturas.
Después de seleccionar el usuario 1 o el
usuario 2 se le pedirá entrar el nombre de
usuario. Se pueden usar hasta seis
caracteres. Para mantener el nombre por
defecto «Usuario_1», pulse ON/OFF/START.
Para introducir un nombre diferente, siga las
siguientes instrucciones:
Pulse o para desplazarse por los
caracteres alfanuméricos A ~ Z y 0 ~ 9.
Además, hay un guión bajo y un carácter de
espacio. Pulse
OK para aceptar el carácter y
desplazarse al espacio siguiente.
Una vez finalizada la entrada del nombre,
pulse
OK para salir del menú de ajuste de
usuario. El nombre de usuario se visualiza en
la pantalla.
6.3. Borrar la memoria
Este punto le permite borrar las lecturas para
el usuario 1 o el usuario 2. Se pueden borrar
lecturas individuales o todas las lecturas a la
vez. Seleccione usuario 1 o usuario 2 tal
como se describe bajo 6.2. Vaya a «Borrar
Valores» y pulse
OK. El usuario que
seleccionó se visualizará en la esquina
superior izquierda.
37
USUARIO_1
JAMES MAM
15:31
EXIT=[ON/OFF/START]
Todos
Individuales
BORRAR VALORES
Abr 17 2006
Page 41

Borrar lecturas individuales
Seleccione «Individuales» mediante los
botones de selección y pulse OK para borrar
lecturas individuales. Pulse o para
seleccionar una lectura de la lista. Una
flecha resalta la lectura seleccionada.
Pulse
OK para borrar la lectura seleccionada.
Borrar todas las lecturas
Seleccione «Todos» mediante los botones de
selección y pulse
OK para borrar todas las
lecturas del usuario seleccionado. Se le
pedirá que confirme la acción. Pulse OK para
borrar todas las lecturas del usuario
seleccionado. Pulse el botón ON/OFF/START
para cancelar el borrado de todas las
lecturas.
6. FUNCIONES DE CONEXIÓN CON EL PC
(Para información más detallada, vea las instrucciones incluídas en el CD)
Las mediciones almacenadas en su unidad para la muñeca, pueden ser
transferidas a su computador personal utilizando el programa incluido. El dato
de la memoria puede ser transferido al computador conectando el monitor por
medio del cable USB.
Importante: su monitor para la muñeca debe estar
fijado en el modo “PC Link” siempre y cuando la unidad esté en
contacto con el computador. Cuando el programa le indique efectuar la
conección con su monitor de presión arterial, su monitor debe estar en el modo
PC Link. Presione el botón M y escoja PC Link, luego presione el botón M de
nuevo para seleccionarlo. Usted debe fijar su monitor de presión en el modo
PC Link para poder instalar el programa y cada vez que usted quiera transferir
la información a su computador personal.
Cuando la unidad esta en el modo PC Link usted observará una serie de lineas
curvas que pulsan desde un punto estacionario. Nota: El programa no funciona
con computadores MAC!
38
BORRAR VALORES
3/06 15:48
No. SYS DIA PUL
1 124 84 76
2 139 95 74
3 139 98 80
4 146 106 72
BORRAR VALORES
BORRAR TODOS?
SÌ=[M]
NO=[O/I]
Page 42

6.1. Instalación y transferencia de datos
a) Inserte el disco dentro del compartimiento CD ROM de su computador. La
instalación comenzará automáticamente (si no, presione SETUP.EXE). El
programa le indicará cuando conectar la unidad al computador por medio del
cable USB. El monitor de presión para la muñeca debe estar en el modo PC
Link.
b) Para transferir datos, usted debe tener datos almacenados en la memoria.
Para transferir datos del usuario 1, usted debe tener el monitor fijado en el
usuario 1 antes de la transferencia. Para transferir datos del usuario 2, usted
debe tener el monitor fijado en el usuario 2. Hay un ususario 0 que no guarda
memoria. Si la unidad esta fijada en el usuario 0, ninguna lectura será
transferida. Recuerde que el monitor debe estar en el modo PC LINK antes de
conectarlo al computador.
c) Usted no podrá tomarse la presión cuando el monitor está fijado en el modo
PC LINK
Durante la conección, el dispositivo estará completamente controlado por el
computador. Por favor utilice la functión “help” para mas instrucciones sobre
el programa.
Nota: En caso de problemas con la instalación, consulte “Error
Messages/Malfunctions” en la Sección 9.
39
Requisitos del sistema para el Programa
Analizador de la Presion Arterial:
• Windows 98 SE, 2000, XP
• CD-ROM Drive
• Minimo 256MB RAM
• USB versión 1.0 en adelante
• Monitor de la presion arterial de
Microlife con la conecion de USB
Page 43

8. Ajustar el contraste de la pantalla
Este dispisitivo le permite ajustar el contraste en
la pantalla. Diríjase a contraste y presione OK
para tener acceso al submenu. Presione
para aumentar el contraste en la pantalla.
Pressione para disminuir el contraste en la
pantalla. Luego de haber ajustado el contraste,
presione OK para confirmar la intensidad del
contraste seleccionado.
Nota: No fije el contraste al mínimo. La pantalla
se verá negra y permanecerá de esa forma hasta
la próxima vez que encienda la unidad y por lo
tanto será imposible ver. Efectue cambios de
contraste mínimos.
9. Mensajes de error/funcionamiento defectuoso
Si durante una medición se produce un error, la
medición se interrumpe y se visualiza el código de
error correspondiente (por ejemplo: Error Nº 2).
Error No. Possible(s) causa(s)
ERR 1 No se ha detectado pulso.
ERR 2 El resultado de la medición se ve influido por impulsos de
presión no naturales.
Razón: se ha movido el brazo durante la medición
(desviación).
ERR 3 El inflado de la muñequera tarda demasiado. La
muñequera no se ha ajustado correctamente.
ERR 5 Las mediciones realizadas indican una diferencia
inaceptable entre las tensiones sistólica y diastólica.
Tome otra medición siguiendo exactamente las
instrucciones. Contacte con su médico si sigue
obteniendo lecturas inusuales.
ERR 6 Los datos individuales difieren demasiado durante el
modo medio incluso después de 4 ciclos. No se puede
visualizar ningún valor medio.
40
CONTRASTE
Page 44

Otros posibles funcionamientos defectuosos y su solución
Si aparecen problemas al usar el aparato, deben comprobarse los siguientes
puntos y, si es necesario, deben tomarse las medidas correspondientes:
Funcionamiento defectuoso
La pantalla permanece en blanco al
conectar el aparato a pesar de que
las pilas están colocadas.
El aparato falla con frecuencia al
medir la tensión arterial; o los valores
medidos son demasiado
bajos/demasiado altos.
Cada medición produce un valor
diferente aunque el instrumento
funciona normalmente y los valores
mostrados son normales.
La medición obtenida difiere de los
valores obtenidos por el médico
Problemas al transferir datos a mi
computador personal
41
Solución(es)
1. Compruebe que la polaridad de las pilas
sea la correcta y si es necesario insértelas
correctamente.
2. Si la visualización es inusual, reinstale las
pilas o sustitúyalas.
1. Compruebe la posición de la muñequera.
2. Vuelva a medir la tensión arterial otra vez
en condiciones de reposo y tranquilidad,
observando los detalles indicados en el
punto 5.
1. Por favor lea las siguientes información
bajo los siguientes puntos “Causas
communes de error” Repita la medición
Nota: La presión sanguinea fluctua
constantemente por lo tanto lecturas
sucesivas daran como resultado una
cierta variabilidad.
1. Registre el desarrollo diario de los valores
y consulte a su médico.
Nota: Individuos experimentan ansiedad
durante una visita médica, esto da como
resultado valores mas altos que los
obtenidos en confort del hogar.
Remueva el programa del computador
siguiendo las Indicaciones del cd. Remueva el
cd. Vuelva a poner en marcha el computador.
Instale el programa. Encienda su monitor de
muñeca y póngalo en el modo PC Link.
Asegúrece de que tenga datos en la memoria
del usuario 1 y 2 y póngalo en el ususario
apropiado (No usuario 0). Conecte el monitor
a su computador por medio del cable USB y
presione okay en la pantalla del computador.
Page 45

10. Cuidados y mantenimiento, recalibración
a) No exponga el instrumento a temperaturas
extremas, humedad, polvo o a la acción directa
del sol.
b) Limpie el aparato con un paño suave y seco. No
use gasolina, diluyentes o disolventes similares.
Las manchas en la muñequera pueden ser
eliminadas cuidadosamente con un paño húmedo
y un poquito de jabón. No debe lavarse la
muñequera.
c) La muñequera contiene una burbuja sensible
hermética al aire. Manéjela con cuidado y evite
cualquier tipo de deformación por doblado o
torsión.
d) No deje caer el instrumento ni lo trate con rudeza
en modo alguno. Evite las vibraciones fuertes.
e) No abra jamás el aparato. De lo contrario, se
invalida la calibración efectuada por el fabricante.
☞ Otras indicaciones al respecto
La presión arterial está sujeta a oscilaciones aún en individuos sanos.
Sin embargo es importante recalcar en este punto que a fin de obtener
mediciones comparativas entre ellos, éstas deben de realizarse siempre en las
mismas condiciones, (condiciones de reposo y tranquilidad). Si las variaciones son
mayores de 15 mmHg a pesar de haber tenido en cuenta las mencionadas
condiciones y se escuchan pulsaciones irregulares repetidamente, (señales de
tono bip), acuda al médico.
42
Gasoline
Page 46

Para poder recibir el permiso de las autoridades gubernamentales para merdadear este
producto, este ha sido sujeto a estrictas pruebas clínicas. El aparato ha sido probado
por especialistas cardiólogos en Alemania.
La manufactura del medidor de presión arterial CVS está de acuerdo con los términos
del estándar europeo para los aparatos de medición de presión arterial bajo la
supervision de Technical Monitoring Association Esses (RWTüV-Essen).
Nunca intente abrir o reparar el aparato. Esto invalida automáticamente cualquier
reclamo bajo la garantía del manufacturero.
Recalibración periódica
Los aparatos de medición sensibles deben ser comprobados, de vez en cuando,
respecto a su exactitud. Por ello, le recomendamos una inspección periódica de la
pantalla de presión estática cada 2 años.
11. Garantía
El medidor de presión arterial Life Fitness esta garantizado de por vida contra
defectos del manufacturero. Esto aplica solamente para el comprador original, y
desde la fecha de compra. Esta garantía no aplica a daños causados por el
manejo impropio, accidentes, uso profesional, el no seguir las instrucciones de
operación, ni alteraciones hechas al instrumento por terceras personas. No
existen partes reempazables por el usuario dentro de la unidad. Las baterías o el
daño causado por baterías viejas no está cubierto por esta garantía.
Nota:
Los componentes del aparato de medición son particularmente sensibles, deben
periódicamente pasar un control donde se verifica su precision.
De acuerdo a estándares internacionales, la calibración de su medidor
de presión arterial debe ser verificada cada 2 años.
43
Page 47

12. Normas de referencia
Estándar del aparato: El aparato cumple los requisitos del estándar
europeo sobre instrumentos de control de la
presión arterial no invasivos
EN1060-1 / 1995
EN1060-3 / 1997
EN1060-4 / 2004
AAMI/ANSI SP10
Compatibilidad
electromágnetica:
El aparato cumple las especificaciones del
estándar europeo
IEC 60601-1-2
Cumple las especificaciones de la directiva de la UE 93/42/CEE para productos
médicos de la clase IIa.
44
Page 48

13. Especificaciones técnicas
Peso:
140 g (con pilas)
Tamaño: 67 x 70 x 80 mm
Temperatura de almacenamiento:: -20 a +50°C
Humedad: 15 a 90% de humedad relativa
máxima
Temperatura de funcionamiento: 10 a 40°C
Pantalla: matriz de puntos LCD (Liquid Crystal
Display)
Método de medición:: oscilométrico
Sensor de presión:: estado sólido
Intervalo de medición
SIS/DIA: 30 a 280 mmHg
Pulso: 40 a 200 por minuto
Resolución de la medición: 1 mmHg
Exactitud: presión ± 3 mmHg
pulso ± 5 % de la lectura
Memoria: almacenamiento automático de las 2
x 30 últimas mediciones
Fuente de energía: 2 pilas UM-4, tamaño AAA 1,5 V
Accesorios: estuche de protección
¡Se reserva el derecho de realizar modificaciones técnicas y/o de color!
45
Page 49

14. Contacto para la ayuda
Advanced Healthcare Distributors, LLC
Concord, NH 03301 USA
Toll Free: 1-866-464-6184
Email Questions to: LifeFitnessSupport@microlifeusa.com
46
Page 50

47
 Loading...