

Page 1

MLU3AQ1-APR09-1
Page 2
PLEASE NOTE:
THIS MEDICAL INSTRUMENT MUST BE USED ACCORDING TO
INSTRUCTIONS TO ENSURE ACCURATE READINGS.
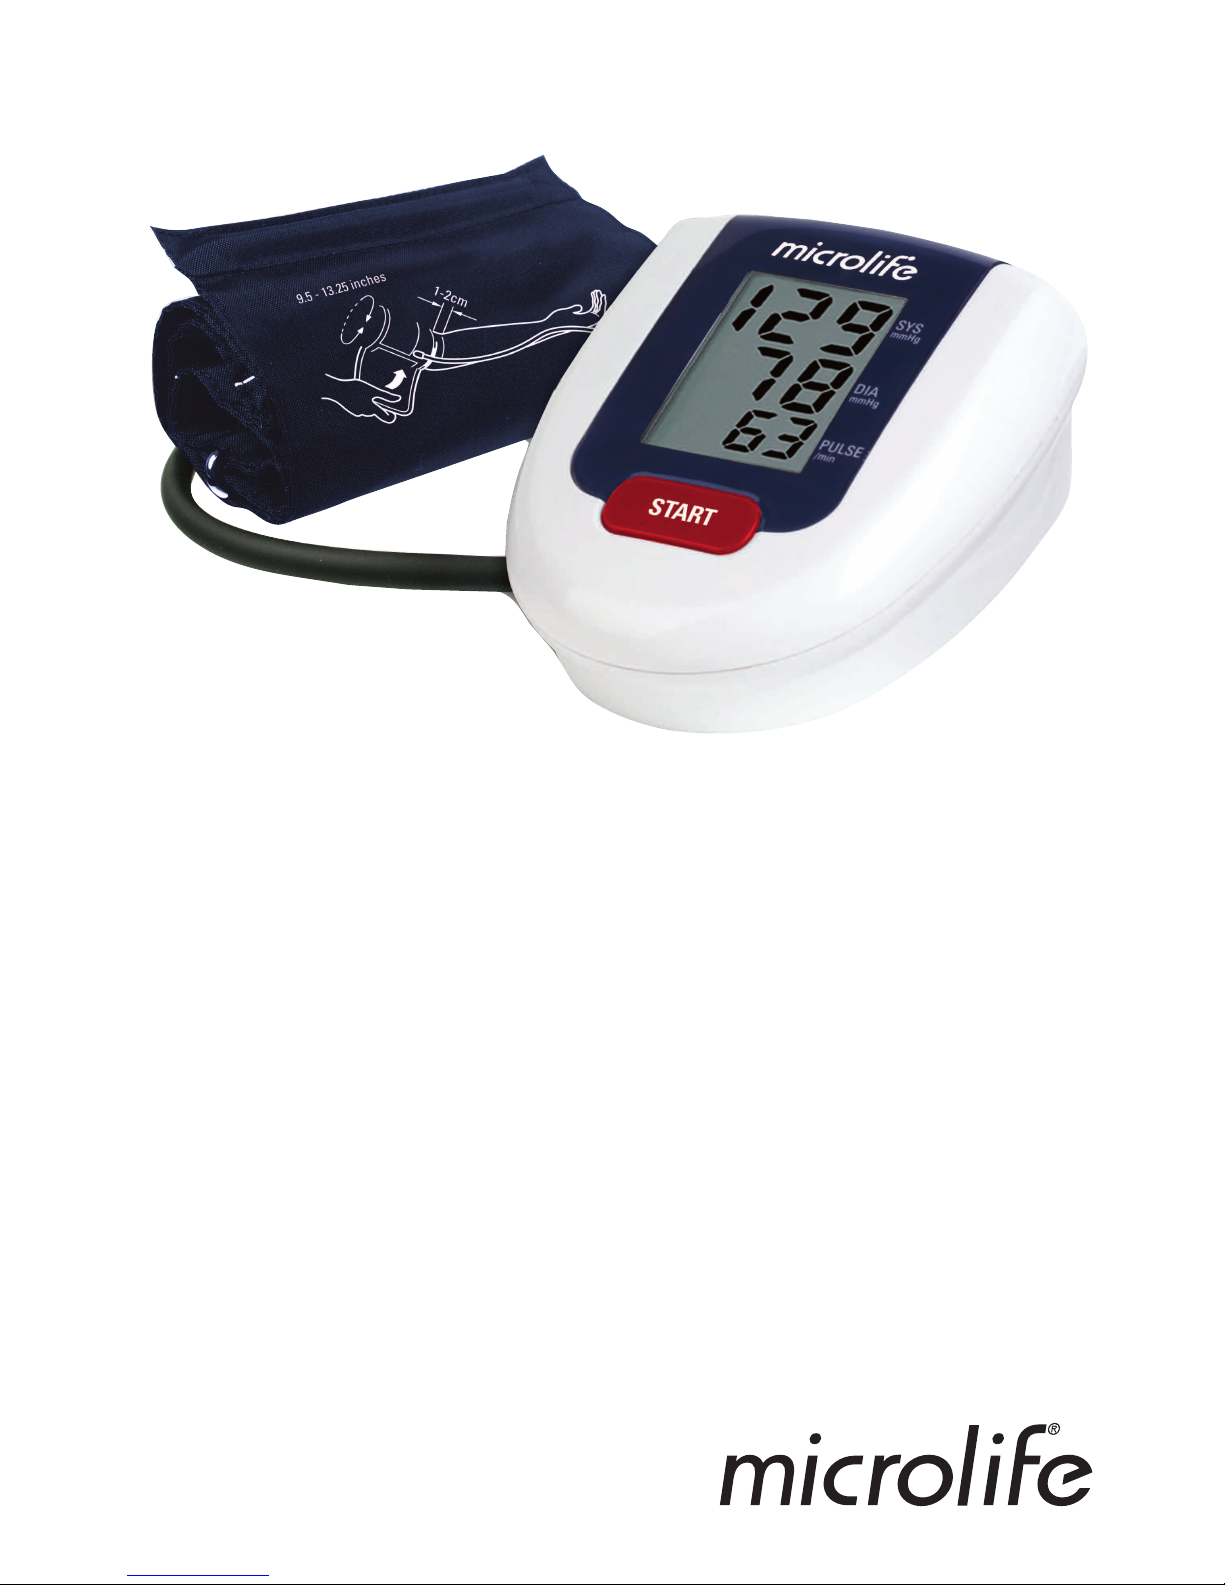
Automatic
Blood Pressure Monitor
with Clinical Accuracy
Instruction Booklet for model# BP3AQ1
Page 3

1
Microlife Automatic Blood Pressure Monitor
Instruction Manual
Table of contents
1. Introduction
1.1. Features of your blood pressure monitor
1.2. Important information about self-measurement
2. Important information on blood pressure and its measurement
2.1. How does high/low blood pressure arise?
2.2. Which values are normal?
2.3. What can be done if regular high/low values are obtained?
3. Components of your blood pressure monitor
4. Operation of your blood pressure monitor
4.1. Inserting the batteries
4.2. Using an A/C power adapter
4.3. Tube connection
5. Measurement Procedure
5.1. Before measurement
5.2. Common sources of error
5.3. Fitting the cuff
5.4 Measuring procedure
5.5. Reading Recall – displaying the last measurement
5.6. Discontinuing a measurement
6. Error Messages/Troubleshooting
7. Care and Maintenance
8. Warranty
9. Certifications
10. Technical specifications
11. How to contact us
Page 4

2
1. Introduction
1.1. Features of your Microlife automatic blood pressure monitor
Your blood pressure monitor is a fully automatic, digital blood pressure measuring device for
use on the upper arm, which enables very fast and reliable measurement of the systolic and diastolic
blood pressure as well as the pulse by way of the oscillometric method. This device offers clinically proven
accuracy and has been designed to be user friendly.
Before using, please read this instruction manual carefully and then keep it in a safe place. Please contact
your doctor for further questions on the subject of blood pressure measurement.
Attention!
1.2. Important information about self-measurement
• Self-measurement means Control, not diagnosis or treatment. Unusual values must always be
discussed with your doctor. Under no circumstances should you alter the dosages of any drugs
prescribed by your doctor.
• The pulse display is not suitable for checking the frequency of heart pacemakers!
• In cases of irregular heartbeat (Arrhythmia), measurements made with this instrument should only
be evaluated after consultation with your doctor.
Electromagnetic interference:
The device contains sensitive electronic components. Avoid strong electrical or electromagnetic fields in
the direct vicinity of the device (e.g. mobile telephones, microwave ovens). These can lead to temporary
impairment of the measuring accuracy.
Page 5

2. Important information on blood pressure and its measurement
2.1. How does high/low blood pressure arise?
Your level of blood pressure is determined in the circulatory center of the brain and adjusts to a variety of
situations through feedback from the nervous system. To adjust blood pressure, the strength and frequency
of the heart (Pulse), as well as the width of circulatory blood vessels is altered. Blood vessel width is
effected by fine muscles in the blood vessel walls.
Your level of arterial blood pressure changes periodically during heart activity: During the “blood ejection”
(Systole) the value is highest (systolic blood pressure value). At the end of the heart’s “rest period”
(Diastole) pressure is lowest (diastolic blood pressure value). Blood pressure values must lie within certain
normal ranges in order to prevent particular diseases.
2.2. Which values are normal?
Blood pressure is too high if at rest, your diastolic pressure is above 100mmHg and/or the systolic blood
pressure is over 160mmHg. In this case, please consult your doctor immediately. Long-term values at this
level endanger your health due to continual damage to the blood vessels in your body.
Should the systolic blood pressure values lie between 140mmHg and 159mmHg and/or the diastolic blood
pressure values lie between 90mmHg and 99mmHg. Consult your doctor. Regular self-checks will be
necessary.
With blood pressure values that are too low, (i.e. systolic values under 105mmHg and/or diastolic values
under 60mmHg) consult your doctor.
Even with normal blood pressure values, a regular self-check with your blood pressure monitor is
recommended. You can detect possible changes in your values early and react appropriately.
If you are undergoing medical treatment to control your blood pressure, keep a record of values along with
time of day and date. Show these values to your doctor.
Never use the results of your measurements
to independently alter the drug doses prescribed by your doctor.
The following standards for assessing high blood pressure (without regard to age) have been established by
the National Institutes of Health JNC7, 2003.
3
Category Systolic Diastolic
(mmHg) (mmHg)
Normal <120 and <80
Pre-Hypertension 120-139 or 80-89
Hypertension
Stage 1 Hypertension 140-159 or 90-99
Stage 2 Hypertension
≥160 or ≥100
Page 6

4
+ Further information
• If your values are mostly normal under resting conditions but exceptionally high under conditions of
physical or psychological stress, it is possible that you are suffering from so-called “labile
hypertension”. Consult your doctor.
• Correctly measured diastolic blood pressure values above 120mmHg require immediate
medical treatment.
*Not intended for use on children under 12 years of age.
2.3. What can be done if regular high or low values are obtained?
a) Consult your doctor.
b) Increased blood pressure values (various forms of hypertension) are associated with considerable
health risks over time. Arterial blood vessels in your body are endangered due to constriction caused by
deposits in the vessel walls (Arteriosclerosis). A deficient supply of blood to important organs (heart,
brain, muscles) can result from arteriosclerosis. Furthermore, the heart will become structurally
damaged with increased blood pressure values.
c) There are many different causes of high blood pressure. We differentiate between the common primary
(essential) hypertension, and secondary hypertension. The latter group can be ascribed to specific
organic malfunctions. Please consult your doctor for information about the possible origins of your own
increased blood pressure values.
d) There are measures which you can take to reduce and prevent high blood pressure. These measures
must be permanent lifestyle changes.
A) Eating habits
• Strive for a normal weight corresponding to your age. See your doctor for your ideal weight.
• Avoid excessive consumption of common salt.
• Avoid fatty foods.
Page 7
B) Previous illnesses
• Consistently follow all medical instructions for treating illnesses such as:
• Diabetes (Diabetes mellitus or sugar diabetes)
• Fat metabolism disorder
• Gout
C) Habits
• Give up smoking completely
• Drink only moderate amounts of alcohol
• Restrict your caffeine consumption (coffee, tea, chocolate)
D) Physical constitution
• After a preliminary medical examination, exercise regularly.
• Choose sports which require stamina and avoid those which require strength.
• Avoid reaching the limit of your performance.
• With previous illnesses and/or an age of over 40 years, please consult your doctor before beginning
your sporting activities. He/She will advise you regarding the type and extent of types of sport that are
possible for you.
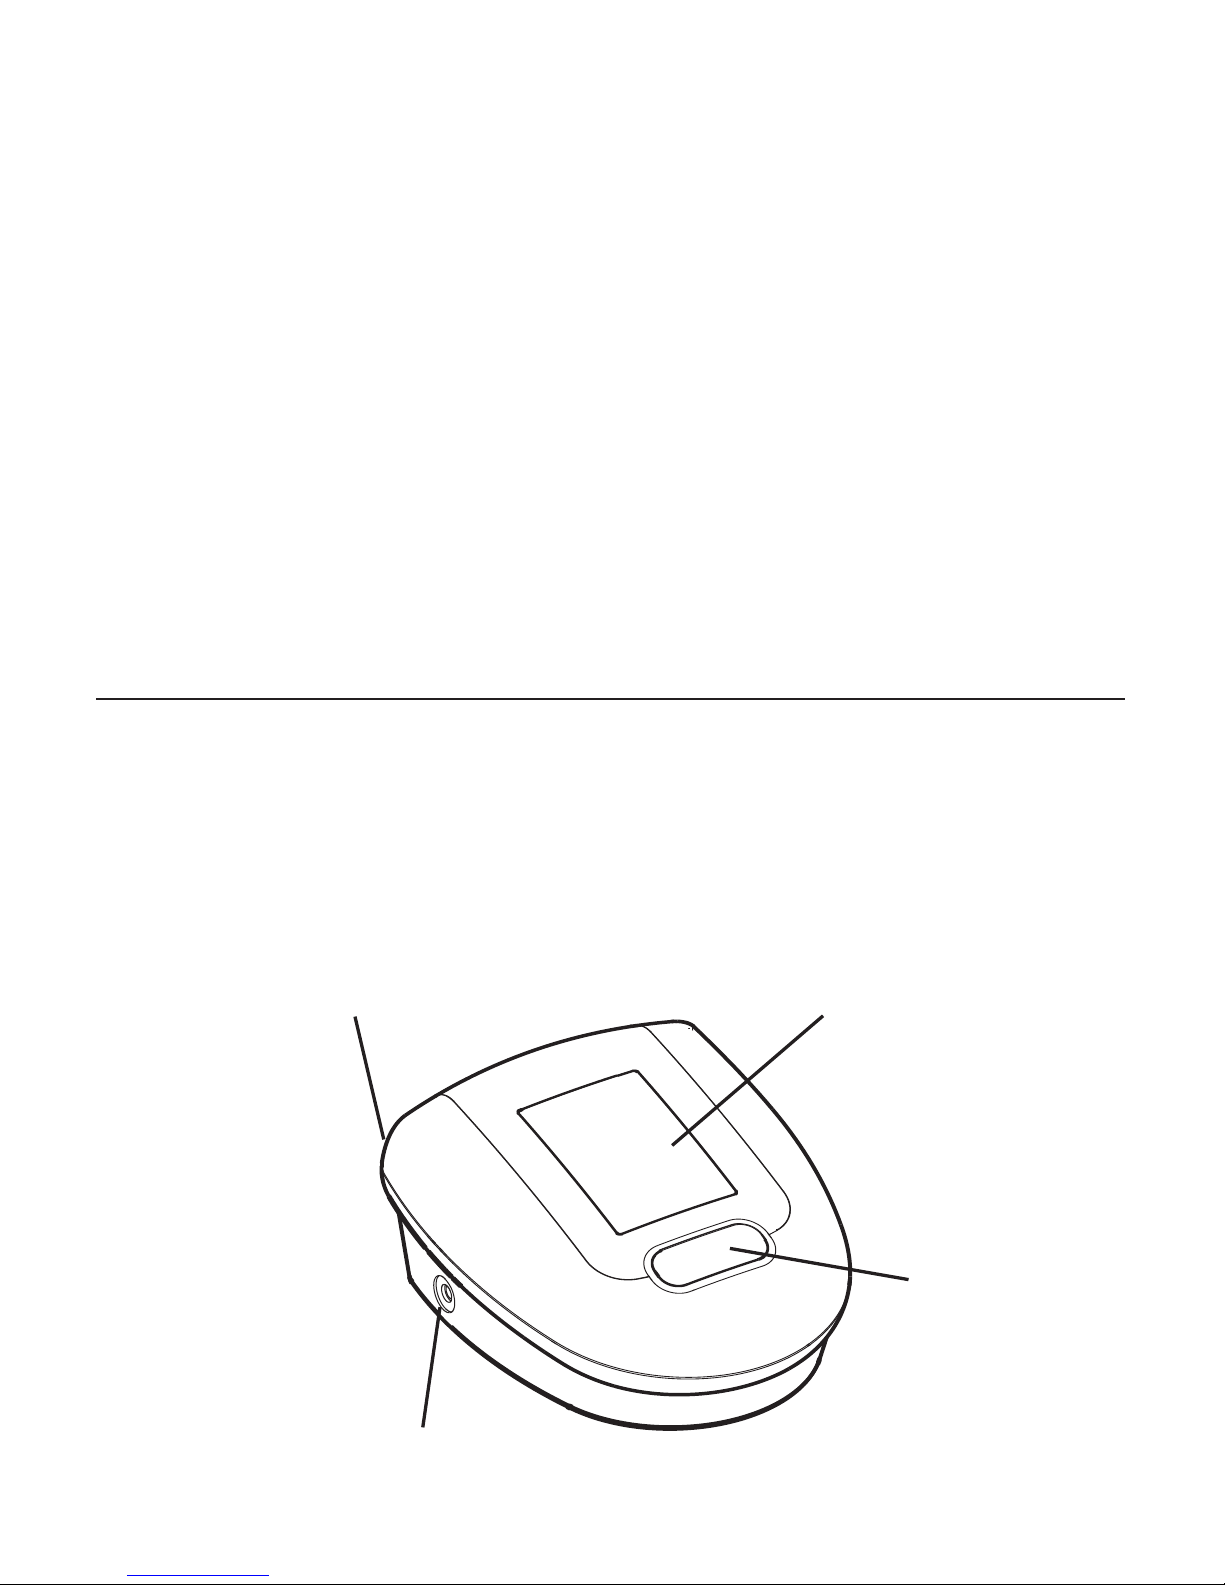
3. Components of your blood pressure monitor
The illustration shows the blood pressure monitor consisting of:
a) Measuring unit
5
Cuff connection
START
button
LCD-display
AC/DC Power Socket
Page 8

6
b) Upper arm cuffs:
The cuff is for arm circumference 22–32 cm or
9.5” - 13.25” (included)
Microlife sells a large cuff for arm circumference 32-42 cm or
12” - 16” (call 1-800-568-4147 or visit
www.microlifeusa.com)
4. Operation of your blood pressure monitor
4.1. Inserting the batteries
After you have unpacked your device insert the batteries. The battery compartment is located on the back
side of the device (see illustration).
a) Remove cover on the botton of the monitor.
b) Insert the batteries (4 x size AA 1,5 V), following the
indicated polarity. (+ -)
c) If the low battery indicator appears in the display, the
batteries are discharged and the unit will not function.
d) If the batteries are inserted incorrectly, the display
may function eratically or not at all. Check battery
polarity.
Attention!
• After the low battery indicator appears, the device
won’t function until the batteries have been replaced.
• Please use “AA” Long-Life or Alkaline 1.5V Batteries.
• Do not use rechargable batteries.
• If the blood pressure monitor is not used for long
periods, remove the batteries from the device.
Functional check: Hold on the START button down to
test all the display elements. When functioning correctly
many icons will appear.
Please Note:
Do not force cuff connection into the
opening. Make sure the cuff connection is
not pushed into the AC adapter port. If the
cuff is too small, call toll free 1-800-568-4147
for further information.
Low Battery Indicator
Page 9
4.2. Using an AC power adapter (special accessory sold separately. Call 1-800-568-4147 to order)
It is possible to operate this blood pressure instrument with an AC adaptor (output 6 V DC / 600 mA with
DIN plug). Make certain that you use an adaptor which fulfils the legal requirements and electronic
requirements in the U.S. (UL standard)
a) Push the plug into the socket on the back side of
the instrument.
b) Push the AC adaptor into a 110 V power
socket (U.S. or Canada).
c) Test that power is available by pressing the
START button.
Note:
• No power is taken from the batteries while the AC adaptor is connected to the instrument.
• If the power is interrupted during the measurement (e.g. by removal of the adaptor from the wall
socket), the instrument must be reset by removing the plug from the instrument.
• Please consult Microlife if you have questions relating to the AC adaptor.
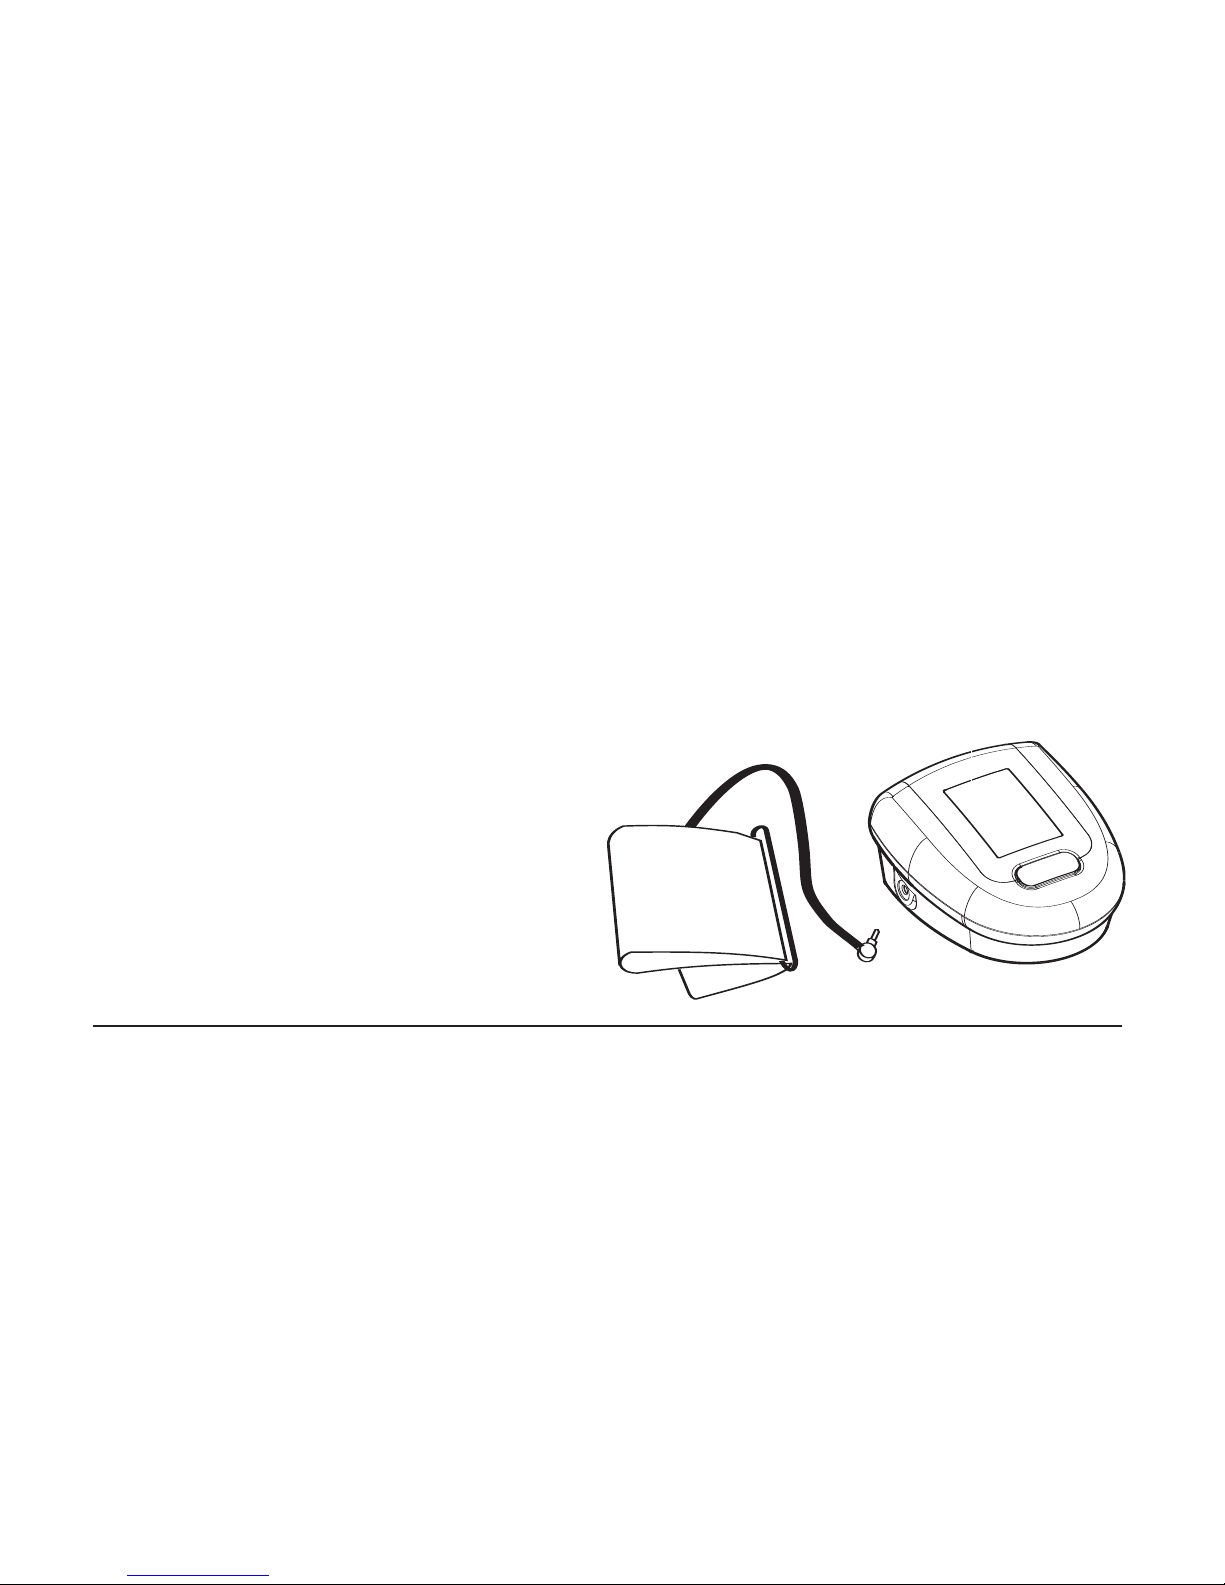
4.3. Tube connection
Insert the cuff tube into the opening provided on the left
side of the instrument, as shown in the diagram.
5. Measurement Procedure
Please note: You should always be seated before and during measurement
5.1. Before the measurement:
• Avoid eating and smoking as well as all forms of exertion directly before measurement. These factors
influence the measurement result. Find time to relax by sitting in an armchair in a quiet atmosphere for
about ten minutes before measurement.
• Remove any garment that fits closely to your upper arm.
• Always measure on the same arm (normally left).
• Always perform measurements at the same time of day, since the blood pressure changes during the
course of the day.
7
Page 10
8
5.2. Common sources of error:
Note:
Comparable blood pressure measurements always require the same conditions!
These are normally quiet conditions.
• Efforts by the patient to support the arm can increase blood pressure. Make sure you are in a
comfortable, relaxed position and do not activate any of the muscles in the measurement arm during
the measurement. Use a cushion for support and rest your arm on a table.
• If the upper arm artery lies considerably lower or higher than the heart, a false high or low blood
pressure will be measured!
*A variation of 6” between the cuff and heart level can result in a reading error of + or 10mmHg.
• Cuffs that do not fit properly result in false measurement values. Selecting the correct cuff is extremely
important. The cuff size is dependent upon the circumference or distance around your upper arm
measured in the center. The permissible range is printed on the cuff. If this is not suitable for your use,
please contact Microlife.
Note: Only use clinically approved Microlife Cuffs.
• A loose cuff or a sideways protruding air-pocket causes false measurement values.
• Measurements should be done after a 5 minute rest to ensure accuracy.
• Consecutive blood pressure measurements should be performed after a 1 minute pause.
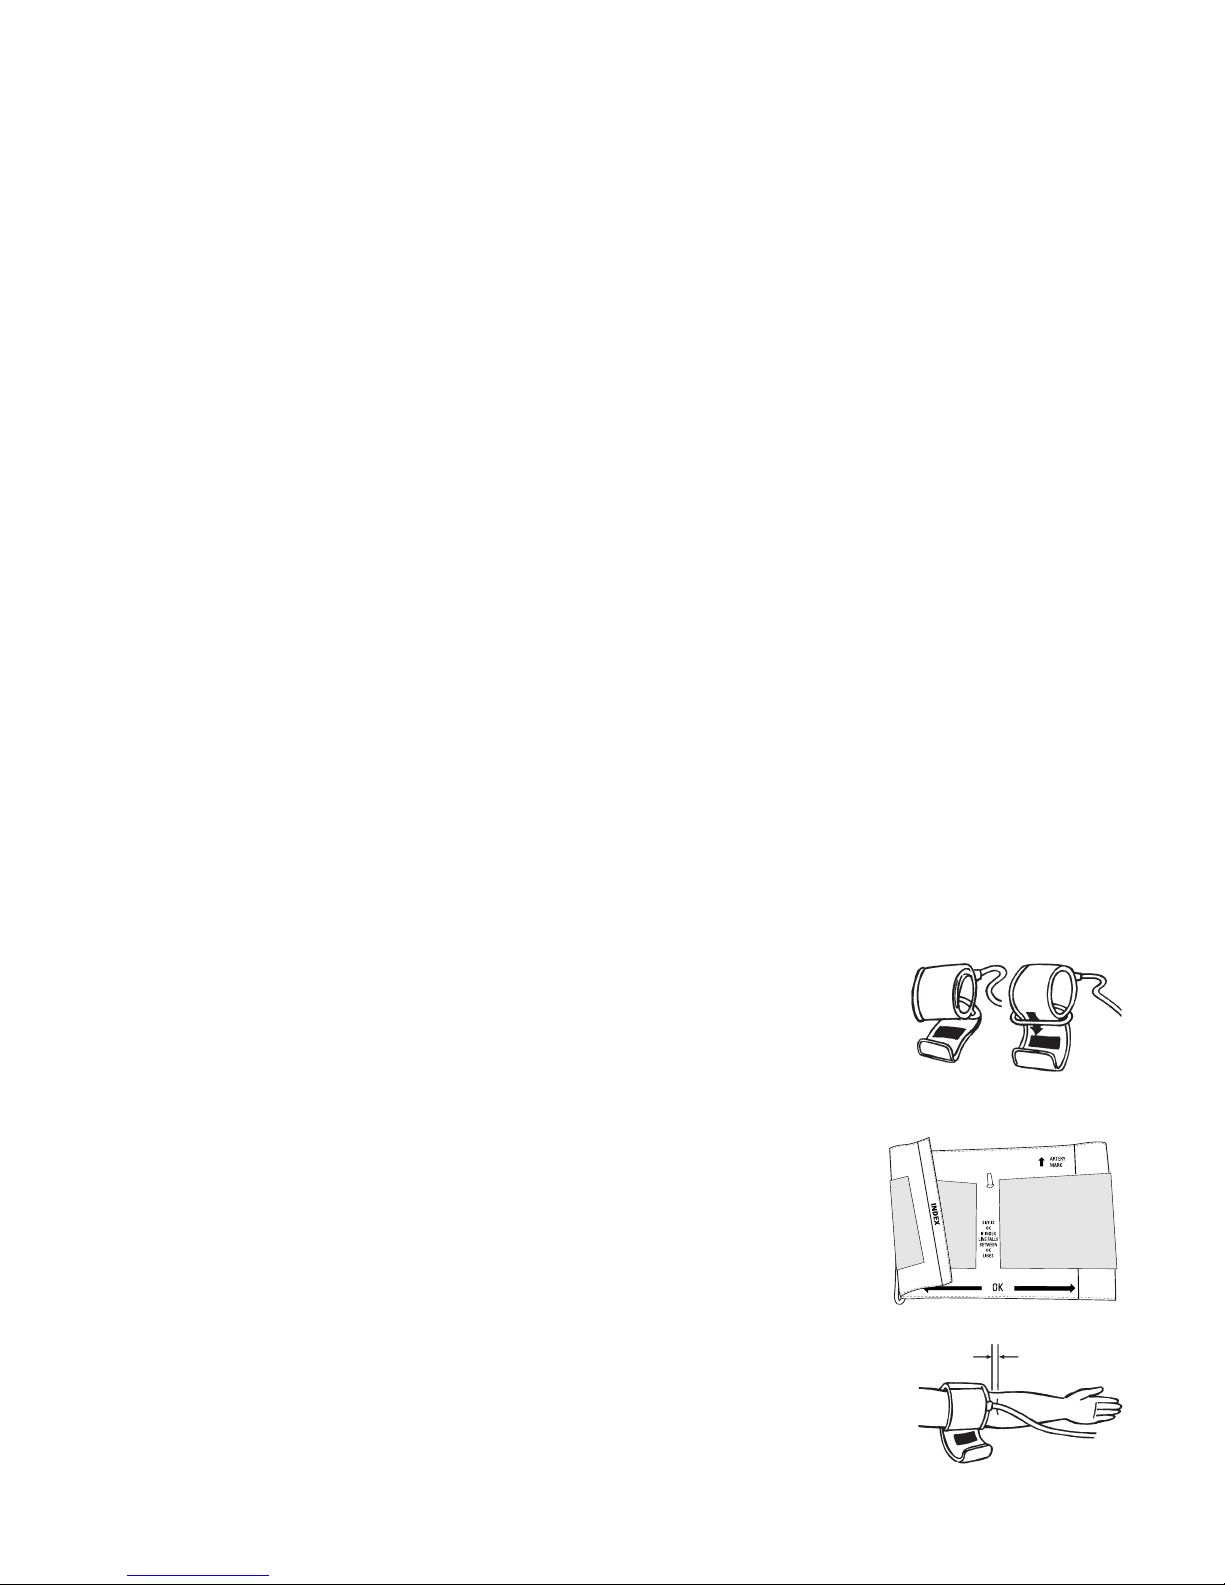
5.3. Fitting the cuff
a) Pass the end of the cuff through the flat metal ring so that a loop
is formed. The Velcro closer must be facing outwards. (Ignore
this step if the cuff has already been prepared.)
b) Place the cuff over the left upper arm so that the tube is closer to
your lower arm. Align the cuff artery mark (arrow) over the arm
artery than runs down the inner side of the arm.
c) Lay the cuff on the arm as illustrated. Make certain that the
lower edge of the cuff lies approximately 3/4” to 1” (2 to 3 cm)
above the elbow and that the tube is closer to the inner side of
the arm.
2–3 cm
tube
Page 11

9
d) Tighten the cuff by pulling the end and close the cuff by affixing
the velcro. Make sure that the cuff Index end falls between the
OK lines when the cuff is in position. If it doesn’t, you are using
the wrong cuff size.
e) There should be little free space between the arm and the cuff.
You should be able to fit 2 fingers between your arm and the
cuff. Clothing must not restrict the arm. Any piece of clothing
which does must be removed.
f) Lay your arm on a table (palm upward) so the cuff is at the same
height as the heart. Make sure that the tube is not kinked.
g) Remain seated quietly for five minutes before you begin the
measurement.
Comment:
If it is not possible to fit the cuff to the left arm, it can also
be placed on your right arm. However, all measurements
should be made using the same arm.
5.4. Measuring procedure
After the cuff has been appropriately positioned the
measurement can begin:
a) Press the START button. The pump begins to inflate
the cuff. In the display, the increasing cuff-pressure is
continually displayed.
Cuff on right arm
Page 12

10
b) After automatically reaching an individual pressure,
the pump stops and the pressure slowly falls. The cuffpressure is displayed during the measurement. If the
inflation pressure is not sufficient, the monitor
automatically re-inflates.
c) When the device has detected your pulse, the heart
symbol in the display begins to blink and a beep tone
is audible for every pulse beat.
d) When the measurement has been concluded, a long
beep tone sounds. The measured systolic and diastolic
blood pressure values as well as the pulse are now
displayed.
e) The measurement results are displayed until you
switch the device off. If no button is pressed for
5 minutes, the device switches off automatically.
5.5. Memory – displaying the last measurement
The measured results are stored in the instrument until a new
measurement is carried out or the batteries are removed.
You can call up the stored values at any time by holding the
START button for at least 3 seconds while the device is off.
5.6. Discontinuing a measurement
If it is necessary to interrupt a blood pressure
measurement for any reason (e.g the patient feels unwell),
the START button can be pressed at any time. The device
then immediately lowers the cuff pressure automatically.
MR
Page 13

6. Error Messages/Troubleshooting
If an error occurs during a measurement, the measurement
is discontinued and a corresponding error code is displayed.
(Example Error no. 1)
Error No. Possible cause(s)
ER 1 The systolic pressure was determined but after-
wards the cuff pressure fell below 20 mmHg.
This situation can occur, for example, if the tube
becomes unplugged after the systolic blood
pressure has been measured. Further possible
cause: No pulse has been detected.
ER 2 Unnatural pressure impulses influence the
measurement result. Reason: The arm was moved
during the measurement (Artefact).
ER 3 Inflation of the cuff takes too long. The cuff is
not correctly seated or the hose connection is not
sealed.
ER 5 The difference between systolic and diastolic is
excesive. Measure again carefully following proper
cuff procedures and ensure measurement under
quiet conditions. Contact your doctor if this
message occurs frequently.
11
Page 14

12
Other possible errors and their solutions
If problems occur when using the device, the following points should be checked:
Malfunction Remedy
The display remains blank when the instrument is • Check battery installation.
switched ON although the batteries are in place. • If the display is unusual, remove the batteries
and then exchange them for new ones
• Check polarity
The pressure does not rise although the pump • Check the connection of the cuff tube and
is running. connect properly.
The device frequently fails to measure the 1. Fit the cuff correctly on the arm. (see 5.3)
blood pressure values, or the values measured 2. Before starting the measurement make sure that
are too low or too high. the cuff is not too tight and that clothing is not
exerting pressure on the arm. Take off articles
of clothing if necessary.
3. Measure blood pressure again in complete
peace and quiet.
Every measurement results in different values, • Please read the following information and
although the device functions normally and the points listed under “Common sources
normal values displayed. of error”.(5.2) Repeat the measurement.
• Blood Pressure changes constantly. The observed
readings may accurately reflect your pressure.
The blood pressure values differ from • Record daily values and consult your doctor.
those measured by my doctor. • Pressure readings in your doctor’s office may be
higher due to anxiety.
• Your blood pressure fluctuates throughout the
day so record the time along with your reading.
After the instrument has inflated the cuff the • Check cuff connections.
pressure falls very slowly or not at all. (No Ensure the unit has not been tampered with.
reasonable measurement possible).
Page 15

7. Care and maintenance
a) Do not expose the device to either extreme
temperatures, humidity, dust or direct sunlight.
b) The cuff contains a sensitive air-tight bubble. Handle
this carefully and avoid all types of straining through
twisting or buckling.
c) Clean the device with a soft, dry cloth. Do not use gas,
thinners or similar solvents. Spots on the cuff can be
removed carefully with a damp cloth and soapsuds.
The cuff must not be washed in a dishwasher,
clothes washer, or submerged in water.
d) Handle the tube carefully. Do not pull on it. Do not
allow the tubing to kink and keep it away from sharp
edges.
e) Do not drop the monitor or treat it roughly in any way.
Avoid strong vibrations.
f) Never open the monitor! This invalidates the
manufacturer’s warranty.
+ Further information
Blood pressure is subject to fluctuations even in healthy people.
Comparable measurements always require the same conditions (quiet conditions)!
If fluctuations in readings are larger than 15mmHg, and/or you hear irregular pulse tones,
consult your doctor.
In order to receive market clearance from governmental bodies, this device was subjected to strict clinical
tests. The computer program used to measure blood pressure values was tested by experienced cardiac
specialists in Germany.
Never attempt to repair the instrument yourself!
Any unauthorized opening of the instrument invalidates all warranty claims!
138
80
70
O
/
I
M
E
M
O
R
Y
138
80
70
O/I
MEMORY
138
80
70
O
/I
ME
MO
RY
Page 16

8. Warranty
Your Microlife blood pressure monitor is guaranteed for 5 years against manufacturers’ defects for the
original purchaser only, from date of purchase. The warranty does not apply to damage caused by improper
handling, accidents, professional use, not following the operating instructions or alterations made to the
instrument by third parties.
There are no user serviceable parts inside. Batteries or damage from old batteries is not covered by the
warranty.
Please note: According to international standards, your monitor should be checked for
calibration every 2 years.
9. Certifications
Device standard:
This device is manufactured to meet the
European and United States standards for noninvasive blood pressure monitors
AAMI/ANSI SP10
IEC 60601-1
IEC 60601-1-2
Electromagnetic compatibility: Device fulfills the stipulations of the
standard IEC 60601-1-2
Clinical testing: Clinical performance tests were carried out in the
US according to AAMI standard.
Page 17

10. Technical specifications:
Operating temperature:
10 -40 ºC / 50 - 104 ºF
Storage temperature: -20 to +55 ºC / -4 to +131 ºF
Humidity: 15 to 85% relative humidity maximum
Weight: 400g (including batteries)
Dimensions: 140 x 120 x 70mm
Display: LCD-Display (Liquid Crystal Display)
Measuring method: oscillometric, corresponding to Korotkoff method:
Phase I systolic, Phase V diastolic
Pressure sensor: capacitive
Measuring range:
SYS/DIA: 30 to 280 mmHg
Pulse: 40 to 200 per minute
Cuff pressure display range: 0–299 mmHg
Memory: Storing the last measurment automatically
Measuring resolution: 1 mmHg
Accuracy: Pressure within ± 3 mmHg
or 2% of reading >200mmHg
Pulse ± 5 % of the reading
Power source: a) 4 dry cells (batteries) UM-3, size AA, 1.5 V
b) AC adaptor 6 V DC 600 mA
(voltage 4.5 V DC to 6 V DC)
Accessories: regular cuff for arm circumference 9.5”-13.25”
large cuff for arm circumference 12”-16” (sold
separately)
Made in China
Technical alterations reserved!
Read the instructions carefully before using this device.
Type BF applied part.
11. How to contact us:
Distributed by:
Microlife USA, Inc.
Dunedin, FL 34698
©2009 Microlife USA, Inc.
Toll Free: 1-800-568-4147
Email: custserv@microlifeusa.com
www.microlifeusa.com
15
Page 18

16
1. Introducción
1.1. Características del modelo
1.2. Información importante sobre las automediciones
2. Información importante sobre la presión sanguínea y su medición
2.1. ¿Como se origina la tensión arterial alta/baja?
2.2. ¿Cuales son los valores normales?
2.3. ¿Que podemos hacer si se miden regularmente valores altos/bajos?
3. Los diversos componentes del tensiómetro
4. Puesta en funcionamiento del tensiómetro
4.1. Colocacin de las pilas
4.2. Uso de un adaptador para corriente eléctrica
4.3. Conexión del tubo
5. Desarrollo de una medición
5.1. Antes de la medición
5.2. Fuentes de error comunes
5.3. Ajuste del brazalete
5.4. Procedimiento de medición
5.5. Indicación del último valor medido – Memoria
5.6. Interrupción de la medición
6. Mensaje de error/funcionamiento defectuoso
7. Cuidados y mantenimiento
8. Garantía
9. Referencia a estándares
10. Especificaciones técnicas
11. Contacto para la ayuda
Page 19

1. Introducción
1.1.Características del modelo
El modelo es un tensiómetro digital totalmente automático con un método de medición
oscilométrico que permite una medición rápida y fiable de la presión arterial sistólica, diastólica
y de la frecuencia del latido cardiaco.
El modelo dispone de una pantalla de cristal líquido de grandes dimensiones, gracias a la cual es
posible visualizar claramente el estado de funcionamiento y la presión del brazalete durante toda
la medición.
El aparato le ofrece una altísima precisión en la medición, clínicamente comprobada, y ha sido
diseñado de tal modo que su uso resulta sencillo.
Lea atentamente las instrucciones de uso antes de utilizar el aparato y guárdelas para posibles
consultas futuras.
Atención:
1.2. Información importante sobre las automediciones
• No lo olvide: automedición significa control, no diagnóstico o tratamiento. Los valores
inusuales deben ser discutidos siempre con su médico. No modifique bajo ninguna
circunstancia las dosis de cualquier medicamento que le haya recetado su médico.
• El indicador de pulsaciones no es apropiado para medir la frecuencia de los marcapasos.
• En casos de irregularidad cardiaca (arritmia), las mediciones realizadas con este instrumento
deben ser evaluadas sólo, previa consulta con el médico.
Interferencia electromagnética:
El aparato contiene componentes electrónicos sensibles (microordenador). Por ello, evite los
campos eléctricos o electromagnéticos fuertes en la proximidad directa del aparato (por
ejemplo, teléfonos móviles, microondas); pueden dar lugar a la pérdida temporal de la exactitud
de medición.
17
Page 20

18
2. Información importante sobre la presión sanguínea y su medición
2.1.¿Cómo se origina la tensión arterial alta/baja?
El nivel de la tensión arterial se determina en una zona del cerebro, en el llamado centro
circulatorio, y se adapta a cada situación concreta por retroalimentación, a través del sistema
nervioso. Para ajustar la tensión arterial se modifican la potencia y la frecuencia cardiacas
(pulso), así como la anchura de los vasos sanguíneos. Esto último se efectúa mediante los
músculos de las paredes de los vasos sanguíneos.
El nivel de la tensión arterial cambia periódicamente junto con la actividad cardiaca: durante la
impulsión de la sangre (sístole) el valor es máximo (valor sistólico de la tensión arterial); al final
del «periodo de relajación» del corazón (diástole), mínima (valor diastólico de la tensión arterial).
Para evitar ciertas enfermedades, los valores de la tensión arterial deben estar situados entre
unos valores límite determinados.
2.2. ¿Cuales son los valores normales?
Se produce un fenómeno de hipertensión cuando en condiciones de reposo del organismo,la
presión diastólica supera los 100 mmHg, o cuando la presión sistólica supera los 160 mmHg.
Entonces deberá dirigirse inmediatamente al médico, porque la persistencia de estos valores pone
en peligro su estado de salud, a causa del progresivo deterioramiento de los vasos sanguíneos que
se produciría.
Se deberá dirigir al médico también cuando el valor de la presión sistólica se encuentre entre 140
mmHg y 159 mmHg o cuando el valor de la presión diastólica se encuentre entre 90 mmHg y 99
mmHg. Además, se deberá automedir regularmente.
También cuando los valores de la presión sean excesivamente bajos: una presión sistólica inferior a
105 mmHg o una presión diastólica por debajo de 60 mmHg, será necesario consultar con el médico.
Aún cuando los valores estén dentro de la normalidad, es aconsejable efectuar regularmente una
automedición usando el tensiómetro, de este modo, será posible detectar eventuales variaciones de
los valores y tomar las medidas oportunas, en consulta con su médico.
Cuando se esté siguiendo una terapia médica para regular la presión sanguínea , será necesario
tomar regularmente nota de los valores de la presión que vayamos midiendo siempre a la misma
hora.
Las anotaciones pueden servir como soporte al examen médico.
No use nunca los resultados de
sus mediciones para alterar por su cuenta el tratamiento prescrito por su médico.
Los estandares siguientes para determinar la tension arterial alta (sin consideracion alguna hacia
edad) han sido establecidos por los institutos nacionales de la salud JNC7, 2003.
Category
Sístole
Diastole
(mmHg) (mmHg)
Normal <120 y <80
Prehipertensión 120-139 o 80-89
Hipertensión
Etapa 1 Hipertensión 140-159 o 90-99
Etapa 2 Hipertensión
≥160 o ≥100
Page 21

+ Otras informaciones
• En presencia de valores mayoritariamente normales en condiciones de reposo, pero
excepcionalmente altos en condiciones de esfuerzo físico o psíquico, puede presentarse una
«hipertensión lábil». Consulte a su medico si sospecha que puede ser su caso.
• Valores de la presión diastólica medidos correctamente superiores a 120 mmHg, requieren un
tratamiento médico de inmediato.
2.3. ¿Qué podemos hacer si se miden regularmente valores altos/bajos?
a) Consultar con el médico.
b) A medio-largo plazo, un aumento considerable de la tensión arterial (diversas formas de
hipertensión), supone considerables riesgos para la salud. Estos riesgos son relativos a los vasos
sanguíneos, los cuales se ven amenazados por los depósitos que se forman en sus paredes y que
los van estrechando (arteriosclerosis). Ello puede comportar un aporte insuficiente de riego
sanguíneo a los órganos principales (corazón, cerebro, músculos). Además, largos periodos de
presión arterial elevada pueden provocar daños estructurales en su corazón.
c) Las causas de la hipertensión pueden ser múltiples: es necesario antes de todo, diferenciar entre la
hipertensión primaria (esencial) que es frecuente y la hipertensión secundaria. La segunda puede
ser debida a disfunciones orgánicas específicas. A fin de establecer las posibles causas de los
valores altos obtenidos en la medición de la presión, consulte con el médico.
d) Hay ciertas medidas que se pueden adoptar no sólo para reducir la tensión arterial elevada que
haya sido diagnosticada por el médico, sinó como prevención
A) Hábitos alimenticios
• Mantener el peso y forma correctos, según su edad. Consulte con su medico para su peso ideal.
• Evitar el consumo excesivo de sal.
• Evitar los alimentos grasos.
B) Enfermedades previas
• Seguir coherentemente el tratamiento indicado por el médico, para la corrección de
patologías ya existentes, como por ejemplo, diabetes (diabetes mellitus), disfunciones del
metabolismo, gota.
C) Hábitos
• Renunciar completamente al tabaco.
• Moderar el consumo de alcohol.
• Limitar el consumo de cafeina (café).
19
Page 22

20
D) Constitución física
• Practicar regularmente alguna actividad deportiva, tras una visita médica preliminar.
• Practicar preferentemente una actividad deportiva que requiera más resistencia que fuerza.
• Evitar llegar al límite de sus posibilidades físicas.
• En caso de padecer patologías o si se han superado los 40 años de edad, antes de iniciar cualquier
actividad consulte con el médico para determinar el tipo, la intensidad y forma de practicar deporte.
3. Los diversos componentes del tensiómetro
a) Aparato de medición
b) Brazalete:
Para un brazo de 9.5”-13.25” (22-32cm) de contorno - incluído
Para un brazo de 12”-16” (31-41cm)de contorno -
accesorio opcional, vendido en las tiendas Microlife
Nota:
No fuerce la conexión del brazalete en la apertura del
medidor. Asegúrese de que la conexión del brazalete no
se intenta conectar en la aperture para la conexión
AC/DC. Si el brazalete es muy pequeño, llame libre de
cargo al 1-800-568-4147 para mayor información.
Conexion del tubo
del brazalete
Pantalla de
cristal líquido
botón
START
Conexión AC/DC
Page 23

4. Puesta en funcionamiento del tensiómetro
4.1. Colocación de las pilas
Una vez desempaquetado el aparato, inserte primero
las pilas. El compartimento de la batería está situado
en la parte inferior del aparato (vea la ilustración).
a) Retire la tapa como se indica en la figura
b) Inserte las pilas (4 x tamaño AA 1.5V),
teniendo en
cuenta la polaridad indicada
.
c) Si aparece un mensaje de advertencia sobre las
pilas en la pantalla, las pilas están descargadas y
deben ser sustituidas por otras nuevas.
d) Si las baterias son insertadas incorrectamente, la
pantalla podría funcionar erráticamente o no
funcionar. Verifique la polaridad de las baterías.
Atención:
• Una vez que aparece el mensaje de advertencia sobre
la batería queda bloqueado el aparato hasta que se
sustituyen las pilas.
• Use pilas de 1.5V «AA» de larga duración o alcalinas. No se recomienda el uso de
acumuladores recargables.
• Si no va a usar el monitor de tensión arterial por un largo periodo de tiempo, retire las pilas
del aparato.
Comprobación funcional:
Mantenga apretado el botón START para comprobar todos
los elementos de la pantalla. Si funciona correctamente
deben aparecer todos los segmentos.
21
Indicador de
bateria agotada
Page 24

22
4.2. Uso de un adaptador para corriente eléctrica (accesorio especial vendido separadamente)
Es posible utilizar el tensiómetro con un adaptador (salida 6VDC/600 mA con conector DIN).
El adaptador utilizado deberá reunir las disposiciones legales, (símbolo CE en la etiqueta) y los
requerimientos en los E.U. (estándard UL).
a) Inserte el conector DIN en la toma de corriente
situado en el lateral izquierdo del aparato.
b) Enchufe el transformador a una toma eléctrica
a 110 V.
c) Verifique, accionando el botón START, la
presencia de tensión.
Atención:
• Cuando el aparato está conectado al adaptador,
no consume corriente de las pilas.
• En caso de fallo de la red eléctrica durante la
medición (p.ej. desconexión del transformador de
la red eléctrica) el aparato deberá ser
«reiniciado», removiendo el conector de su toma
y reinsértelo cuando se haya recuperado la
tensión eléctrica.
• Si tiene dudas sobre el adaptador consulte a
Microlife.
4.3. Conexión del tubo
Introduzca el tubo del brazalete en la toma que se
encuentra a la izquierda del aparato, como
indica la ilustración.
5. Desarrollo de una medición
5.1. Antes de la medición
• No coma, ni fume y evite hacer cualquier esfuerzo antes de efectuar la medición. Son
factores que alteran el resultado. Antes de medir la presión arterial, relájese en un ambiente
tranquilo sentado en un sillón por espacio de 10 minutos.
• Si lleva ropa que le presione el brazo, quítesela.
• Efectuar la medida siempre sobre el mismo brazo (generalmente el izquierdo) y evitar cuanto
sea posible moverlo durante la medición.
• Tenga la precaución de tomar la medición siempre a la misma hora, dado que la presión
arterial cambia en el transcurso del día.
Page 25

5.2. Fuentes de error comunes
Nota:
A fin de obtener valores de medición de la presión de la sangre comparables, éstos deberán ser
obtenidos en idénticas condiciones.
• Por norma, la medición siempre debe efectuarse en condiciones de reposo.
Cada esfuerzo hecho por el paciente para sostener el brazo puede comportar un aumento de la
presión sanguínea. Mantenga el cuerpo en una posición relajada, debe sentarse cómodamente
y evitar contraer durante la medición los músculos del brazo utilizado. Es necesario apoyar el
brazo en un cojín.
• Si el brazalete se coloca muy por debajo o por encima de la altura del corazón, la medición se
verá alterada indicando una presión mayor o menor, respecto a los valores reales (por cada 15
cm. de desnivel el resultado de la medición se altera en + ó - 10 mmHg).
• Además si el brazalete es demasiado estrecho o corto, puede ser causa de errores en la
medición.
Será realmente importante seleccionar el brazalete adecuado. Las dimensiones de éste deberán
estar adecuadas a la circunferencia del brazo, medida a la mitad de este, entre el hombro y el
codo con los músculos relajados. Una vez ajustado el brazalete, el brazo debe poder ser
flexionado. En el caso de que la circunferencia del brazo del paciente no esté comprendida en
tales medidas, brazaletes de medidas especiales (accesorios) pueden encontrarse en Microlife.
Atención: Usar solamente brazaletes Microlife comprobados clínicamente.
• Un brazalete mal ajustado o una cámara de aire asomando por los lados son causas de
mediciones falsas.
• La medición se debe tomar luego de 5 minutos de relajación y descanso. De este modo se
asegura la calidad y precisión de la medida. En el caso de tomar medidas consecutivas de
presión arterial éstas se deben ejecutar luego de una pausa de por lo menos 1 minuto.
5.3. Ajuste del brazalete
a) Pasar el extremo del brazalete (con tope de goma integrado) a
través del arco metálico, formando un lazo. El cierre de velcro se
encuentra en el exterior. (si el brazalete ya está preparado como
se ha descrito, sáltese este paso).
b) Colocar el brazalete en el brazo izquierdo de tal modo que el tubo
sea dirigido hacia el antebrazo. Alinear la marca de arteria
(flecha) con la arteria que pasa por la parte interior del brazo.
c) Colocar el brazalete en el brazo como está indicado en la figura,
teniendo cuidado de que el borde inferior del brazalete se
encuentre 2–3 cm (1”) por encima del codo y que la salida del
tubo de goma del brazalete esté situada en el lado interno del
brazo.
23
2–3 cm
tubo da
goma
Page 26

24
d) Extender la extremidad libre del brazalete y
cerrarlo con el cierre de velcro. Con el brazalete en posición,
awegúrese de que el extremo Index (del brazalete) se encuentra
entre las líneas OK del brazalete. Si no es el caso, usted está
usando un brazalete de tamaño incorrecto.
e) Entre el brazo y el brazalete no deberá quedar mucho espacio
libre, que condicione el resultado de la medición. Usted debe ser
capaz de introducir 2 dedos entre el brazalete y el brazo. Además
el brazo no deberá estar comprimido por alguna pieza de ropa
(p.ej.un pullover) en ese caso quítesela.
f) Asegurar el brazalete con el cierre de velcro de modo que se
adhiera cómodamente al brazo pero que no esté demasiado
estrecho. Extender el brazo sobre la mesa (la palma de la mano
deberá estar mirando hacia arriba) de modo que el brazalete se
encuentre a la altura del corazón. Tenga cuidado de no doblar el
tubo.
g) Permanezca sentado tranquilamente cinco minutos antes de
empezar la medición.
Nota:
En el caso de que no fuera posible colocar el brazalete en el brazo
izquierdo, se podrá colocar en el derecho. Lo importante es que la
medición se haga siempre sobre el mismo brazo.
5.4. Procedimiento de medición
El aparato va provisto de lógica difusa, es decir: la
presión inicial necesaria de inflado del brazalete se
regula automáticamente.
a) Apriete el botón START para poner el aparato en
funcionamiento, la bomba iniciará el inflado del
brazalete. El visor indicará si la presión del
brazalete va subiendo.
Page 27

b) Una vez alcanzada la presión inicial del
brazalete, la bomba se para y la presión
empezará lentamente a disminuir. Veremos
visualizada la presión del brazalete y un valor de
control. En caso de que la presión de inflado no
sea suficiente, el monitor vuelve a inflar el
brazalete automáticamente hasta un nivel más
elevado.
c) Durante la verificación del latido cardíaco, en el
visor empieza a destellar el símbolo del
corazón y por cada
latido se oirá un bip.
d) Apenas terminada la medición, se oirá un bip
prolongado. El visor indicará la presión sistólica y
diastólica además de la frecuencia del latido
cardíaco del paciente.
e) El resultado de la medición continuará
visualizándose hasta que el aparato se
apague. Si no se acciona ninguna tecla en un
periodo de 5 minutos el aparato se apaga
automáticamente con el fin de preservar las
baterías.
5.5. Indicación del último valor medido
Los datos de la medición son memorizados por el aparato
hasta la próxima medición o hasta que se sustituyan las
baterías. Para recuperar los valores de la última medición,
bastará presionar la tecla de START durante 3 segundos.
5.6. Interrupción de la medición
Si por cualquier motivo la medición de la presión
sanguínea se tiene que interrumpir (p.ej. en caso de
malestar del paciente), bastará presionar en cualquier
momento la tecla START. La presión del brazalete
descenderá inmediatamente.
25
MR
Page 28

26
6. Mensaje de error/funcionamiento defectuoso
En caso de errores se visualizarán los siguientes mensajes:
Error no. Posible(s) causa(s)
ER 1 Se ha determinado la presión sistólica y después
la presión del brazalete ha descendido por debajo de 20 mmHg.Tal situación puede ocurrir p.ej.
cuando después de haber medido la presión
sistólica se ha desconectado el tubo del
brazalete.
Otras posibles causas: no ha sido posible
detectar el pulso.
ER 2 Impulsos anormales de presión comprometen el
resultado de la medición. Causas: el brazo se ha
estado moviendo durante la medición.
ER 3 El inflado del brazalete dura demasiado tiempo.
El brazalete está mal puesto o quizá la conexión
del tubo no garantice la capacidad hermética.
ER 5 La diferencia entre la presión sistólica y la
diastólica es excesiva. Repita la medida.
Consulte con su médico si persiste.
Page 29

Problemas de mal funcionamiento y su corrección
En caso de mal funcionamiento de alguno de los elementos del aparato, compruebe los
siguientes puntos y tome las medidas indicadas.
Funcionamiento defectuoso Remedio
Cuando el aparato se pone en marcha y la
pantalla no se enciende aún cuando las pilas
estén puestas.
No hay presión a pesar de que la bomba está
funcionando.
Algunas veces el aparato no mide los valores
de la presión sanguínea o bien da valores muy
bajos o muy altos.
En cada medición los resultados son distintos, a
pesar de que el aparato funciona
correctamente e indica valores normales.
Los valores de la presión sanguínea medidos
con el aparato, son diferentes a los
determinados por el médico.
Después del inflado del brazalete la presión no
desciende o desciende muy lentamente. (La
medición se desarrolla de forma incorrecta).
1. Verificar la correcta colocación de los polos
de las pilas, corrigiéndola si fuera necesario.
2. En caso de mal funcionamiento del visor,
repita la operación de colocación de las
baterías o bien sustitúyalas.
• Comprobar la conexión del tubo del brazalete
y si es necesario conectarlo correctamente.
1. Colocar correctamente el brazalete alrededor
del brazo.
2. Antes de iniciar la medición, asegúrese de
que el brazalete no esté muy estrecho o que
alguna prenda de ropa no provoque una
presión excesiva sobre la zona de medición,
en ese caso quítese la prenda.
3. Repita la medición de la presión sanguínea
con toda tranquilidad.
• Repase las notas indicadas en el apartado
«frecuentes errores» y repita la medición.
• Registrar la evolución cotidiana de los
valores y consultar con el médico.
• Verifique las conexiones del brazalete.
Asegúrese de que la unidad no haya sido
modificada.
Page 30

7. Cuidados y mantenimiento
a) Evite exponer el tensiómetro a temperaturas
extremas, a la humedad, al polvo y a la irradiación
de los rayos del sol.
b) Quite las manchas del brazalete o la goma
con un paño húmedo. No lavar el brazalete.
c) Limpiar el aparato con un trapo suave y seco.
No utilize detergentes ni disolventes. El brazalete
NO debe ser lavado en una lavadora de ropa,
lavadora de platos, ni ser sumergido en agua.
d) Evite doblar excesivamente el brazalete y el tubo.
e) Cuando no se use el aparato durante mucho
tiempo, cambie las pilas.
f) Evite las caídas, trátelo con cuidado. Evite los
golpes o vibraciones fuertes.
g) No abrir nunca el aparato, si lo hace pierde
la garantía hecha por el fabricante.
+ Otras indicaciones al respecto
La presión arterial está sujeta a oscilaciones aún en individuos sanos.
Sin embargo es importante recalcar en este punto que a fin de obtener mediciones comparativas
entre ellos, éstas deben de realizarse siempre en las mismas condiciones, (condiciones de reposo
y tranquilidad). Si las variaciones son mayores de 15 mmHg a pesar de haber tenido en cuenta las
mencionadas condiciones y se escuchan pulsaciones irregulares repetidamente, (señales de tono
bip), acuda al médico.
Para poder recibir el permiso de las autoridades gubernamentales para merdadear este producto, este
ha sido sujeto a estrictas pruebas clínicas. El aparato ha sido probado por especialistas cardiólogos en
Alemania.
Nunca intente abrir o reparar el aparato. Esto invalida automáticamente cualquier reclamo bajo la
garantía del manufacturero.
138
80
70
O
/
I
M
E
M
O
R
Y
138
80
70
O/I
MEMORY
138
80
70
O
/I
M
E
M
O
R
Y
Page 31

29
8. Garantía
Su monitor de presión microlife tiene garantía por 5 años para cubrir defectos de fabricación
válidos para el comprador únicamente, a partir de la fecha de adquisición. La garantía no cubre
daños causados por mal uso, accidentes, uso profesional, el no seguimiento de las instrucciones
de uso o alteraciones hechas al dispositivo por terceras personas.
No contiene partes utiles para el usuario. Baterias o daños causados por bateria usadas no
estan cubiertos por la garantía. La garantía es válida únicamente si se presenta la tarjeta.
Nota:
Los componentes del aparato de medición son particularmente sensibles, deben periódicamente
pasar un control donde se verifica su precision.
De acuerdo a estándares internacionales, la
calibración de su medidor de presión arterial debe ser verificada cada 2 años.
9. Estándares de referencia
Estándar del aparato: El aparato cumple los requerimientos del
estándar europeo sobre instrumentos de
control de la presión arterial no invasivos
AAMI/ANSI SP10
IEC 60601-1
IEC 60601-1-2
Compatibilidad electromagnética: El aparato cumple las especificaciones del
estándar IEC 60601-1-2
Ensayo clínico: Pruebas de funcionamiento clínico han sido
realizadas en EU de acuerdo con los
procedimientos AAMI
Page 32

30
10. Especificaciones técnicas
Peso: 400 gramos con las pilas.
Dimensiones: 140 x 120 x 70 mm
Temperatura de Almacenaje: Entre –5˚C y 55˚C.
Humedad: 15–85 % máxima humedad relativa.
Temperatura de Operación: 10 a 40°C
Pantalla: Pantalla LCD de cristal líquido.
Método de medición: Oscilométrico
Sensor de presión: Capacitivo.
Gama de medición:
Presión, sistólica /diastólica: De 30 a 280 mmHg.
Latido cardiaco: De 40 a 200 latidos por minuto.
Presión del brazalete: De 0 a 299 mmHg, a partir de 300 mmHg se
visualiza «HI».
Memoria: Guardo automáticamente el ultimo valor
medido
Resolución de medida: 1 mmHg.
Precisión de la medición:
Presión: ± 3 mmHg o 2% >200mmHg
Pulso: ± 5% del valor medido
Alimentación eléctrica: a) 4 pilas UM-3 dim. AA, 1,5 V.
b) alimentador para corriente 6 VDC 600mA
(voltage 4.5VDC to 6VDC
Accesorios: Brazalete regularpara contorno de brazo
de 9.5”- 13.25”
Brazalete grande para contorno de
brazo de 12”-16”
Hecho en China.
El fabricante se reserva el derecho de realizar modificaciones en las especificaciones técnicas
Lea las instrucciones cuidadosamente antes de usar este dispositivo.
Mecanografíe la partición aplicada FB.
11. Contacto para ayuda:
Distribuido por:
Microlife USA, Inc.
Dunedin, FL 34698
©2009 Microlife USA, Inc.
Toll Free: 1-800-568-4147
Email: custserv@microlifeusa.com
www.microlifeusa.com
 Loading...