

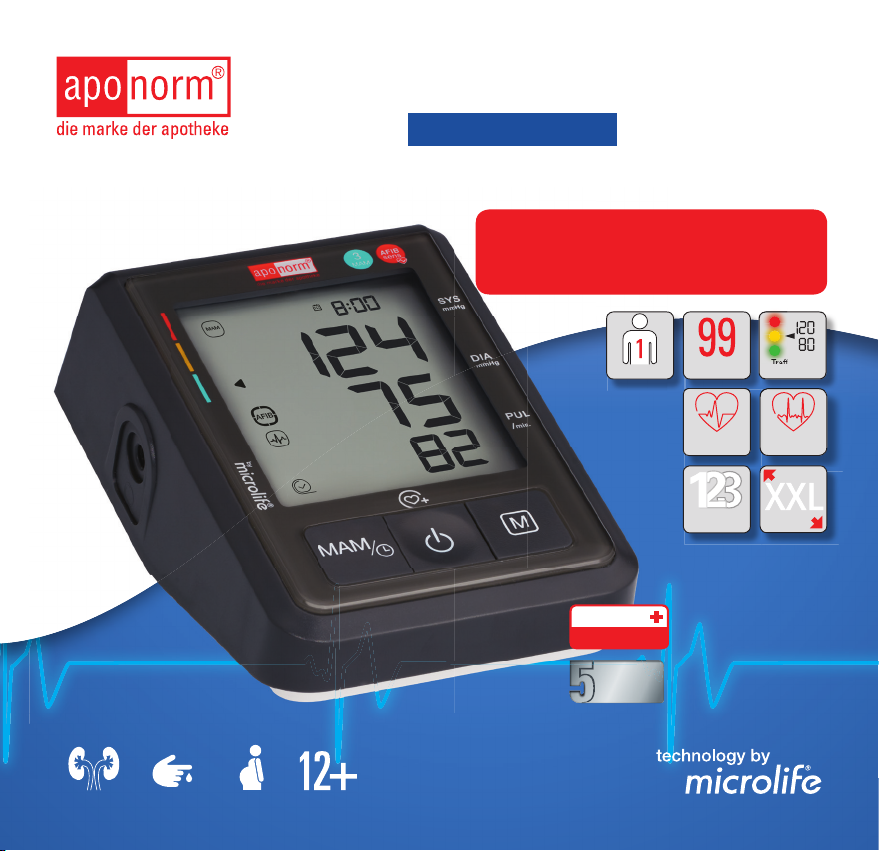
Page 1
Instructions for use
Upper arm
PROFESSIONAL CONTROL
Detects atrial fi brillation
one of the most common causes of strokes
CLINICALLY
VALIDATED
user
YEARS
WARR ANTY
*
storage slots
Arrhythmia
detection
Multiple
measurments
Traffi c-light
display
Atrial brillation
detection
display
Also suitable for:
Kidney disease
Diabetics
Pregnant
women
* 2 year functional warranty on the cuff as a wear part
Children
Page 2
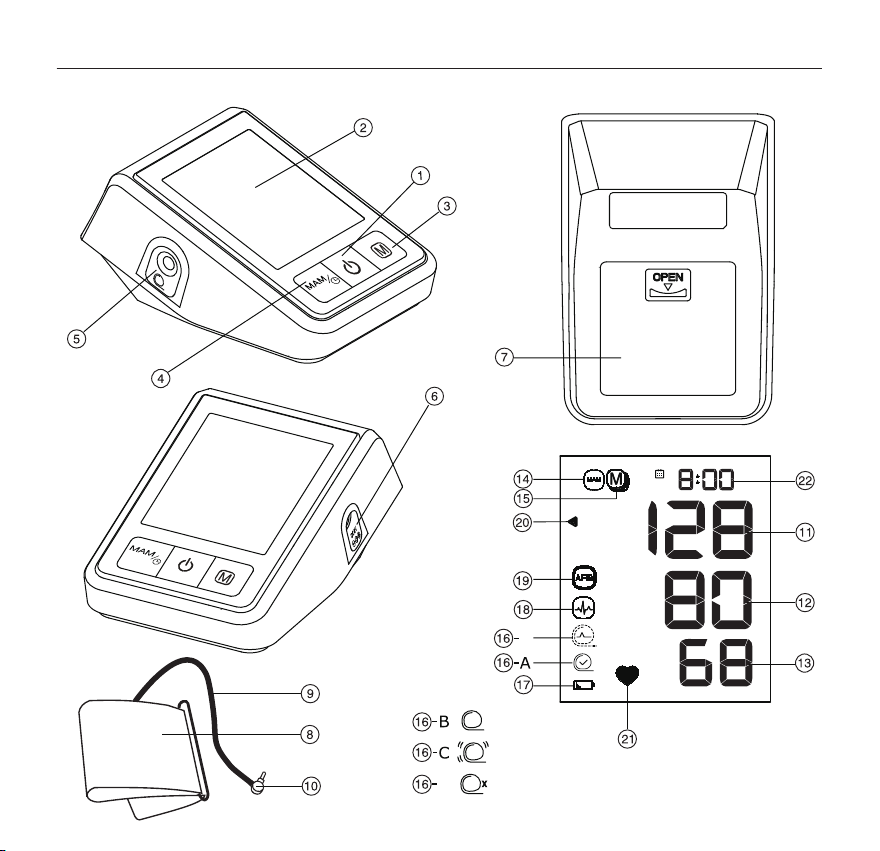
aponorm® Professional Control
E
D
Page 3
aponorm® Professional Control
Switches, housing and accessories
1
On/off switch
2
Display
3
M button (Memory)
4
MAM & time combi button
5
Cuff connection
6
Mains adapter connector
7
Battery compartment
8
Cuff
9
Cuff tube
10
Cuff connector
Important! Please observe the information in this booklet in order to
prevent damage to the device and to avoid error messages.
Display
11
Systolic value
12
Diastolic value
13
Pulse indicator
14
MAM mode (multiple measurement mode active)
15
Stored value
16
Cuff check
-A Cuff position and pressure optimal
-B Cuff position and pressure not optimal
-C Arm movement disturbance indicator «Err 2»
-D Cuff pressure disturbance indicator «Err 3»
-E Cuff signal disturbance indicator «Err 1»
17
Battery level warning light
18
Pulse arrhythmia detector (PAD)
19
MAM waiting time symbol/
Atrial fibrillation detector (AFIB)
20
Blood pressure traffic light indicator
21
Pulse measurement active
22
Date/time display
Protect from moisture.
Carefully read the operating instructions before use.
BF part.
3
Page 4

aponorm® Professional Control
Use:
This oscillometric blood pressure monitor serves
for the non-invasive blood pressure measurement
for persons aged 12 years or more.
It is clinically validated for patients suffering from
hypertension, diabetes, for pregnant women, pregnant women suffering from preeclampsia, patients
suffering from atherosclerosis, terminal kidney
diseases, obesity and for the elderly.
The monitor can detect irregular pulse rate which
suggests atrial fibrillation (A-fib). Please note that
the monitor cannot diagnose atrial fibrillation. An
A-fib diagnosis can only be confirmed by electrocardiography (ECG). We recommend you see your
doctor.
4
Page 5

Dear Customer,
This monitor was developed in collaboration with
physicians and clinical tests prove its measurement accuracy to be very high.*
Microlife AFIBsens is the world’s leading digital
blood pressure measuring technology for detecting
atrial fibrillation (A-fib) and arterial hypertension.
These are the two best known risk factors for
a stroke or future heart diseases. It is essential
that atrial fibrillation and high blood pressure are
detected at an early stage, even if the patient
does not feel any symptoms yet. An examination
for atrial fibrillation is recommended from the age
of 65 onwards, generally and with the Microlife
AFIB algorithm. The AFIB algorithm shows that
the patient possibly suffers from atrial fibrillation.
Therefore, we recommend you to see your doctor if
the AFIB symbol is displayed on a regular basis.
The Microlife AFIB algorithm was developed and
clinically tested in cooperation with internationally
renowned medical specialists. Atrial fibrillation is
detected with a certainty of 97 to 100%.
1,2
If you have any questions or problems or want to
order spare parts, please contact the aponorm
®
customer service at the product website www.
aponorm.de or the distributor where you purchased
the monitor. The product website provides much
additional useful information on your product.
Stay healthy - the aponorm® team!
* This device uses the same measuring technology as the award
winning «BP 3BTO-A» model tested according to the British and
Irish Hypertension Society (BIHS) protocol.
1 Kearley K, Selwood M, Van den Bruel A, Thompson M, Mant D,
Hobbs FR et al.: Triage tests for identifying atrial fibrillation in
primary care: a diagnostic accuracy study comparing single-lead
ECG and modified BP monitors. BMJ Open 2014; 4:e004565.
2 Wiesel J, Arbesfeld B, Schechter D: Comparison of the Microli-
fe blood pressure monitor with the Omron blood pressure monitor
for detecting atrial fibrillation. Am J Cardiol 2014; 114:1046-1048.
5
Page 6

Table of contents
1. Indication of the A-fib symbol for early
detection of atrial fibrillation
· Information for the physician in the event of
frequent appearance of the AFIB indicator 8
· What is atrial fibrillation (A-fib)?
·
Who should be checked for
atrial fibrillation? 9
·
Risk factors which you can control 9
2. Using the monitor for the first time
· Inserting the batteries
·
Setting the date and time 9
·
Selecting the correct cuff 10
· Selection of multiple/MAM or single
measurement 10
3. Checklist for taking a reliable
measurement
4. Taking the blood pressure
· Manual inflation
·
How not to store a reading 13
·
How do I evaluate my blood pressure? 13
·
Pulse arrhythmia detector (PAD) 13
5. Data memory
· Viewing the stored values
· Clearing all values
9
11
...........................................13
14
14
8
8
9
12
14
6. Battery level indicator and
battery change
· Batteries almost flat
· Batteries flat - replacement
· Which batteries and which procedure?
· Using rechargeable batteries
7. Using a mains adapter
8. Error messages and problems
9. Safety, care, accuracy test
and disposal
· Safety and protection
· Monitor care
· Cleaning the cuff
· Accuracy test
· Disposal
10. Warranty terms
11. Technical data
Warranty card 23
15
15
15
15
16
16
18
18
19
19
19
19
20
22
15
6
Page 7

1. Indication of the AFIB symbol for
early detection of atrial fibrillation
(active only in multiple-measurement mode
MAM, see page 10)
This monitor can detect atrial fibrillation. Symbol
indicates that atrial fibrillation was detected during
the measurement.
Information for the physician in the event of
frequent appearance of the AFIB indicator
This device is an oscillometric blood pressure monitor
which also analyses irregular pulse rates during the
measurement.
The monitor was clinically tested. The AFIB symbol
appears after the measurement if atrial fibrillation
was detected during the measurement. If the AFIB
symbol appears after a cycle of multiple measurements, the patient is advised to repeat the multiple
measurement.
If the AFIB symbol appears again, we recommend
that the patient see his/her doctor.
When the AFIB symbol appears on the monitor’s
display, it suggests that the patient may suffer from
atrial fibrillation. However, atrial fibrillation must be
diagnosed by a cardiologist based on his/her interpretation of an electrocardiogram.
19
· Keep your arm still during the measurement in
order to prevent incorrect results.
· In patients with pacemakers or defibrillators, this
monitor cannot detect atrial fibrillation at all or
can incorrectly detect it.
· If the patient suffers from atrial fibrillation, it is
NOT POSSIBLE that the diastolic blood pressure
indicated is correct.
· If the patient suffers from atrial fibrillation, it is
recommended to take the blood pressure in the
multiple-measurement mode (MAM) to get more
reliable readings.
What is atrial fibrillation (A-fib)?
Normally your heart contracts regularly with your
heartbeat and then relaxes again. Certain cells in
your heart produce electrical signals that cause the
heart to contract and pump blood through your body.
There is atrial fibrillation if quick and inharmonic
electrical signals occur in the two upper ventricles,
the atria, and cause them to contract irregularly
(flutter). Atrial fibrillation is the most frequent form
of heart arrhythmias. Often the patient has no
symptoms, but nevertheless the risk of suffering a
stroke is increased. Consult your doctor to keep the
problem in check.
7
Page 8

Who should be checked for atrial fibrillation?
An A-fib check is recommended to persons aged 65
years and more, as the probability of a stroke increases with age. Persons suffering from hypertension (e.g. SYS exceeding 159 or DIA exceeding 99),
diabetes, heart failure or persons having suffered a
stroke before are recommended to be checked for
atrial fibrillation from the age of 50 on. However, it is
not recommended to check youths or pregnant women for atrial fibrillation, as there can be incorrect
results which could raise undue concerns. Furthermore, young persons suffering from atrial fibrillation
have a lower risk of stroke than the elderly.
Risk factors which you can control
An early diagnosis of atrial fibrillation and adequate
treatment can significantly reduce the risk of a
stroke.
The first proactive move against a stroke is to know
your blood pressure and to know whether you suffer
from atrial fibrillation. For more information, refer to
the website of the monitor manufacturer Microlife at
www.microlife.ch/afib.
2. Using the monitor for the first time
Inserting the batteries
After having unpacked the monitor, first insert the
7
batteries. The battery compartment
bottom of the monitor. Insert the batteries (4 x 1.5 V,
size AA), observing the polarity +/- indicated on the
housing.
Setting the date and time
1.After the new batteries are fitted, the year
flashes in the display. Press the M button
several times to set the present year. To confirm
the year you want to set, press the MAM & time
combination button 4.
2.Now you can set the present month in the
same way, using the M button
your setting by pressing the MAM & time
button 4.
3.Now repeat the instructions above to set the
day, hour and minutes.
4.Once you have set the minutes and confirmed
the setting, the date/time setting is complete. When the monitor is not in operation,
22
it displays the time
. The date, however, is
only required for the memory display.
is on the
3
3
and confirm
8
Page 9

If you want to change the date and time
again, press and hold the MAM & time button 4 down for approx. three seconds until
the year starts to flash. Now you can enter
the new values as described above.
Selecting the correct cuff
Microlife offers different cuff sizes. Select the cuff
size to match the circumference of your upper arm
(measured by close fitting in the centre of the upper
arm).
8
If the cuff
coming with the monitor does not fit,
please contact your local pharmacy which can order
an alternative size for you.
Cuff size for circumference of
upper arm
S 17 - 22 cm
M 22 - 32 cm
M - L 22 - 42 cm
L - XL 32 - 52 cm
In addition to the soft cuffs in the above-
mentioned sizes, as an alternative, a
preformed comfort cuff is available in M - L,
one size fits all.
®
Use only aponorm
cuffs manufactured by
Microlife.
®
All aponorm
cuffs are latex-free.
9
Connect the cuff to the monitor by inserting the
10
cuff connector
into the cuff socket 5 as far
as it will go.
Selecting multiple/MAM or individual
measurement
Please select before each measurement whether
you want to perform a normal single measurement
14
(NO MAM symbol
in the display) or a multiple/
MAM measurement (MAM symbol 14 visible in
the display). In the MAM mode, three measurements are automatically taken one after the other,
the result from all measurements is automatically
analysed and then displayed. As the blood pressure varies constantly even within a very short time,
a result determined in such a way is slightly more
reliable than just one single measurement.
To select the MAM mode, press the MAM & time
4
button
until the MAM symbol appears in the
display. In order to return to the normal mode (individual measurement), press the MAM button again
until the MAM symbol is no longer displayed.
During the measurement in the MAM mode,
the number 1, 2 or 3 at the bottom right of the
display shows which of the three measurements is currently taken.
Between the individual measurements, there
is an automatic pause of 15 seconds each,
indicated by the spinning MAM waiting symbol
19
. A countdown indicates the remaining time.
Page 10

The results of the individual measurements
are not shown. Instead, you will be shown the
total result from the three measurements on
completion of the cycle.
Leave the cuff on your arm between the indivi-
dual measurements.
If the monitor detects that one of the individual
measurements in the cycle was unsuccessful,
a fourth measurement is automatically performed.
same arm (normally the left one). It is
recommended that doctors perform double
arm measurements on a patient’s first visit in
order to determine which arm to measure in
the future. Select the arm where the higher
blood pressure was determined.
Remove close-fitting garments from the upper
arm. To avoid constriction, shirt sleeves should
not be rolled up - sleeves do not interfere with
the cuff if they are laid flat (please take off any
heavy clothing, as it interferes with the signal).
The atrial fibrillation detection is active only
in the MAM mode. In the single mode, the
monitor screens only for simple arrhythmias
(without narrowing the results down to atrial
fibrillation).
3. Checklist for taking a reliable
measurement
Please read the enclosed flyer on the
“8 golden rules of taking the blood pressure”.
Avoid activity, eating or smoking immediately
before taking the measurement.
Sit down on a chair with a backrest and relax
for at least 5 minutes. Keep your feet flat on
the floor and do not cross your legs.
Always take your blood pressure on the
Always ensure that the correct cuff size is
used (see on the cuff for size information).
· Fit the cuff closely, but not too tight.
· Make sure that the cuff is positioned
approx. 2.5 cm above the crook of the arm.
· The artery mark on the cuff (approx. 3 cm
long yellow bar) must lie over the artery
which runs down the inner side of the arm.
· Support your arm so it is relaxed.
· Ensure that the cuff is at the same height as
your heart.
10
Page 11

4. Taking the blood pressure
After having selected whether you want to
perform a single or multiple measurement (see
chapter 2 on page 10), you can take your blood
pressure as follows:
1
1.Press the On/off button
rement.
2.The cuff will now inflate automatically. Relax,
do not move and do not tense your arm muscles until the measurement result is displayed. Breathe normally and do not talk.
3.If a cuff symbol with a check mark (
appears after a short while, the cuff signal
and pressure are optimal for measurement. If
there is no mark inside the cuff symbol (16-B),
signal and/or pressure are less than optimal,
but still sufficient for proper measurement.
If, however, the cuff signal and pressure are
absolutely too low for measuring or if there
are excessive interferences (e. g. due to the
patient moving, tensing their muscles or
talking, etc.), an error message «ERR» (Error)
will be displayed together with one of the
cuff symbols 16-C, 16 -D or 16 -E. In this case
re-position the cuff, hold your arm still and
repeat the measurement. Read also chapter 8
on page 17
.
to start the measu-
16
-A)
4.Once the correct pressure is reached, the in-
flation stops and the pressure gradually falls.
If the required pressure was not reached, the
monitor will automatically pump some more
air into the cuff until the blood pressure can
be taken.
5. During the measurement, the “pulse rate
21
measurement active” icon
display.
6. The result, comprising the systolic
12
diastolic
per minute 13 is displayed.
7. When the monitor has finished measuring,
remove the cuff from the monitor.
8. Switch off the monitor.
(The monitor does switch off automatically
after approx. 1 minute, though).
You can stop the measurement at any time by
pressing the On/off button 1 (e.g. if you feel
uneasy or an unpleasant pressure sensation).
This blood pressure monitor is specially tested
for use in pregnancy and when suffering from
preeclampsia. When you detect unusually high
readings in pregnancy, take your blood pressure
again after a short while (approx. 1 hour). If the
reading is still too high in the repeat measure-
blood pressure and the pulse rate
flashes in the
11
and the
11
Page 12

ment, please contact your doctor or gynaecologist. Important: Pregnant women may ignore
the atrial fibrillation symbol.
Manual inflation
In case of very high systolic blood pressure (e. g.
exceeding 135 mmHg), it can be of use that you
determine the cuff pressure yourself. Press the
On/off button after the monitor started inflating
and a pressure of approx. 30 mmHg appears in the
display. Keep the button pressed until the pressure
is about 40 mmHg above your average systolic
value – then release the button.
How not to store a reading
As soon as the result appears in the display, press
the On/off button
15
flashes. Confirm the deletion by pressing the
1
and keep it pressed until «M»
MAM & time button 4.
«CL» is shown after the reading was success-
fully deleted from the memory.
How do I evaluate my blood pressure?
20
The triangle at the left edge of the display
points at the range your blood pressure reading is
in. The reading is either in the optimum (green),
increased (yellow) or high (red) blood pressure
range. The classification corresponds to the following ranges defined by international guidelines
(ESH, ESC, JSH) (values in mmHg).
Range
.
blood
pressure
1.
too high
Systolic
Diastolic
≥ 135 ≥ 85
Recommendation
seek medical
advice
blood
pressure
2.
130-134 80-84
self-check
elevated
blood
pressure
3.
< 130 < 80
self-check
optimum
The higher value is the one that determines the
evaluation. Example: a blood pressure value of
140/80 mmHg or a value of 130/90 mmHg means
«blood pressure too high».
Indication of general pulse arrhythmias (PAD)
During the measurement, the monitor on principle
checks for pulse rate irregularities (e.g. bradycardia, premature heart beats, etc.), in the multiplemeasurement mode also specifically for atrial
fibrillation.
18
If the symbol
appears after the measurement,
this means that certain heart arrhythmias were
detected during the measurement. If this symbol
appears after a measurement in the single mode,
select the multiple-measurement mode to be on the
safe side and after a short rest period of about one
minute perform a multiple measurement in addition
12
Page 13

(see chapter 2 on page 8) in order to rule out that the
arrhythmia detected is dangerous atrial fibrillation
(A-fib). Only in the multiple-measurement mode can
the monitor collect sufficient data to reliably detect
atrial fibrillation (see chapter 1 on page 6).
5. Data memory
This device automatically stores the last 99 measurement values of the user.
Viewing the stored values
3
Press the M button
switched off. Now the display changes over to the
data memory display, indicated by «M» 15 (M» =
Memory). First, the average value of all measurements stored in the memory is shown, as indicated
by the «A» to the right of the value («A» = Average).
Pressing the M button again displays the last value
measured. Pressing the M button repeatedly allows you to move from one stored value to another
(from the latest to the oldest entry in the memory).
Blood pressure readings with the cuff position
and pressure being less than optimal 16-B are
not included in the average.
Ensure that the maximum memory capacity of
99 values is not exceeded. When the memory
is full, the oldest value is automatically overwritten with the 100th value. Therefore, the
13
readings should be evaluated by a doctor or
briefly while the monitor is
documented in a blood pressure diary before
the full memory capacity is reached - otherwise the data will be lost.
Clearing all values
If you are sure that you want to permanently remove all stored values, hold down the M button
(the monitor must have been switched off beforehand) until «CL ALL» («CL ALL» = Clear All) appears
and then release the button. To permanently clear
the memory, press the MAM & time button while
«CL ALL» is flashing.
Aborting the deletion:
To abort the deletion, simply press the On/off
button 1 again while «CL ALL» is flashing.
It is not possible to delete individual readings.
6. Battery level indicator
and battery change
Batteries almost flat
When the battery power is approximately ¾ down,
17
the battery symbol
monitor is switched on. Although the monitor will
continue to measure reliably, you should obtain
replacement batteries promptly. Batteries flat replacement
will flash as soon as the
Page 14

When the batteries are flat, the empty battery sym-
17
will flash as soon as the device is switched
bol
on. You cannot take any further measurements and
must replace the batteries.
In the event of a battery change/power fail-
ure, the memory retains all values measured;
the date and time must, however, be reset.
This is indicated by the year flashing.
When the flat battery symbol appears,
remove the batteries and recharge them. They
must not remain in the monitor as they may
become destroyed (exhaustive discharge due
to low consumption of the monitor even when
switched off).
Always remove the rechargeable batteries
if you do not intend to use the device for a
week or more .
For changing the batteries and resetting the date/
time please follow the instructions in chapter 1 on
page 9.
Which batteries and which procedure?
Please use 4 new, long-life 1.5 V alkaline
batteries, size AA.
Do not use batteries beyond their date of
expiry.
If the monitor is not going to be used for a
prolonged period of time the batteries must
be removed.
Using rechargeable batteries
You can also operate this monitor with rechargeable batteries.
Only use «NiMH» type reusable batteries.
The batteries CANNOT be charged while
inserted in the blood pressure monitor. Recharge the batteries in an external charger
and observe the information regarding
charging, handling and service life.
7. Using a mains adapter
You can operate this device using the Microlife
mains adapter (DC 6V, 600mA).
Only use the aponorm® mains adapter
available as an original accessory appropriate
for your supply voltage. You can purchase the
mains adapter from your local pharmacy.
Ensure that neither the mains adapter nor the
cable are damaged.
1. Plug the adapter cable into the mains adapter
6
socket
dof the blood pressure monitor.
14
Page 15

2. Plug the adapter plug into the wall socket.
When the mains adapter is connected, no battery
current is consumed. We recommend having
batteries in the monitor even with mains operation,
just as a back-up. They ensure that in the event of
a power failure date and time are retained and do
not have to be entered manually again.
8. Error messages
When an error occurs during a measurement, the
measurement is interrupted and an error message
displayed, e.g. «Err 3».
If you do not receive an error message, but
if the results seem unusual to you, please
check whether you observed all points of the
checklist on page 8 and in the enclosed flyer
“8 golden rules of taking the blood pressure ”.
For more detailed help in troubleshooting the
monitor, please refer to the download section
of the www.aponorm.de product website.
Error Designa-
tion
«ERR 1»
16
«ERR 2»
16
«ERR 3»
16
Signal too
weak
-E
Error signal During the measurement,
-C
Irregular
cuff pres-
-D
sure
Potential cause and
remedy
The pulse signals on
the cuff are too weak.
Re-position the cuff and
repeat the measurement.*
interference signals
were detected at the
cuff, caused for instance
by movement or muscle
tension. Repeat the
measurement, keeping
your arm still.
It is not possible to build
up sufficient pressure in
the cuff. There may be
a leak in the cuff. Check
that the cuff connection
is correct and that the
cuff is not too loose
around your arm. Replace
the batteries if necessary.
Repeat the measurement.
15
Page 16

Error Designa-
tion
«ERR 5»
«ERR 6»
«HI»
Irregular
measuring
result
MAM mode
Pulse or cuff
pressure too
high
Potential cause and
remedy
The measuring signals
are inaccurate and no
result can therefore be
displayed. Read through
the checklist for performing reliable measurements and repeat the
measurement.*
Too many errors occurred during the measurement in the MAM
mode so that no final
result can be determined. Read through the
checklist for performing
reliable measurements
and then repeat the
measurements.*
The pressure in the cuff
is too high (over 299
mmHg) or your pulse
rate is too high (over 200
beats per minute). Relax
for 5 minutes and repeat
the measurement.*
Error Designa-
tion
«LO»
* Please consult your doctor, if this or any other prob-
lem occurs repeatedly.
Pulse too
low
Potential cause and
remedy
The pulse rate is too
low (less than 40 beats
per minute). Repeat the
measurement.*
9 . Safety, care, accuracy test
and disposal
Safety and protection
· Carefully follow these instructions. This
document gives important information on the
operation and safety of your monitor. Before
using the monitor, please read these instructions
carefully and retain them for future reference.
· This device may only be used for the purposes
described in these instructions. The manufacturer will not accept any liability for damage
caused by improper use.
· This blood pressure monitor contains sensitive components and must be handled
carefully. Observe the storage and operating
conditions described in chapter 11 on
page 21.
16
Page 17

· Protect the monitor from:
water and moisture
extreme temperatures
impacts and falls
contamination and dust
direct sunlight
heat and cold
· The cuffs are rather delicate and must be
handled with care.
· Do not use any other cuffs or cuff connectors
for measurements with this monitor.
· Only inflate the cuff once fitted to your arm.
· Do not use this monitor close to strong electromagnetic fields such as mobile telephones
or radio installations. Observe a minimum
distance of 3.3 m from such devices/installations when using this monitor.
· Do not use the monitor if you think it is damaged or if you notice anything unusual.
· Never open the monitor.
· If the monitor is not going to be used for a
prolonged period of time the batteries must
be removed.
· Please observe the additional safety information in the different sections of these
instructions.
The measuring result showed by this monitor
·
17
is NOT a diagnosis. It is not a substitute for a
professional evaluation by a physician, in particular not if the result does not correspond to the
patient’s physical condition. Never rely on blood
pressure measurements alone. All potential
symptoms and the patient’s statements must
be taken into consideration. If necessary, call an
ambulance or contact a doctor.
· Permanently high blood pressure values
can damage your health and must be
treated by your doctor!
· Always discuss your values with your doctor
and tell them if you have noticed anything
unusual or feel unsure. Never rely on blood
pressure readings alone.
· Under no circumstances should you alter
the dosages of any drugs prescribed or
start medication without consultation
with your doctor.
· Deviations between measurements taken
by your doctor or in the pharmacy and those
taken at home are quite normal, as these
situations are completely different.
· The pulse display is not suitable for check-
ing the frequency of heart pacemakers!
· If you are pregnant, you should regularly
monitor your blood pressure as it can change
drastically during this time!
Page 18

Do not let unsupervised children use the
monitor. Some of the components are so
small that children can swallow them or
choke on them. Beware of the risk of
strangulation in case this monitor is fitted
with cables or tubes.
Monitor care
Clean the monitor with a soft, dry cloth only.
Cleaning the cuff
Remove stains on the cuff carefully with a damp
cloth and soapsuds or a commercial disinfectant.
WARNING: Do not wash the cuff in a
washing machine or a dishwasher!
WARNING: Do not dry the cuff in a tumble
dryer!
Accuracy test
We recommend having have this monitor tested for
accuracy every 2 years or after severe mechanical
impact (e.g. the device dropped to the floor).
®
Please contact the aponorm
customer service on
the website www.aponorm.de.
Disposal
Batteries and electronic devices must not be
disposed of as normal domestic trash. They
must be disposed of in accordance with the
applicable local provisions.
10. Warranty terms
We are confident in the quality of our aponorm®
blood pressure monitors. Therefore we, WEPA
Apothekenbedarf GmbH & Co. KG, grant end
customers who are private consumers, a voluntary
5 year warranty for all aponorm® blood pressure
monitors purchased in Germany, subject to the
following terms:
Subject matter and scope of the warranty
®
The warranty applies to all aponorm
pressure monitors which customers purchased in
Germany in their capacity as consumers. WEPA
Apothekenbedarf GmbH & Co. KG warrants the
customer that the product is free from defects in
material and workmanship. Should, despite proper
handling of the product, a defect occur within the
5-year warranty period, WEPA Apothekenbedarf
GmbH & Co. KG will repair the product free of
charge (except for the transport costs for returning
the monitor to WEPA) or fully replace it at its
discretion.
Exclusion of warranty
No claims can be derived from this warranty in case
of damage caused by the customer’s or third parties’ negligence such as drop, accident or improper
handling. The same applies to damage caused by
blood
18
Page 19

leaking batteries or failure to observe the operating
instructions.
Warranty by WEPA Apothekenbedarf GmbH & Co.
KG is also excluded if a defect/damage was caused
by improper repair or other third-party interventions.
The warranty does not cover wear parts, accessories
(e.g. pouches, cables, etc.), batteries and the cuff
forming part of the product.
We grant a functional guarantee of 2 years on the
cuff (tightness of the inner chamber).
Warranty period
The warranty covers a period of 5 years from the
date of purchase (warranty period). The relevant
proof is the date of the proof of purchase or of the
warranty card with purchase date filled in by the
distributor.
The warranty period is not extended by the fact
that benefits under this warranty were granted,
in particular not in the event of a repair or an exchange of the product. In such cases, the warranty
does not recommence.
Assertion of warranty claims
Within the warranty period, the customer can
claim his/her rights under this warranty by presenting the faulty product and the proof of purchase or
the warranty card filled in by the distributor directly
to WEPA Apothekenbedarf GmbH & Co. KG or the
distributor where the customer had purchased the
product.
If the fault/damage is covered by the warranty,
WEPA Apothekenbedarf GmbH & Co. KG will repair
the product free of charge (except for the transport
costs for returning the monitor to WEPA) or fully
replace it at its discretion.
If it is found that the fault/damage is not covered by
the warranty, the product can be repaired by WEPA
Apothekenbedarf GmbH & Co. KG at the customer’s
expenses. In this case, WEPA Apothekenbedarf
GmbH & Co. KG informs the customer of the estimated costs in a cost estimate before starting the
repair. In this case, the customer is free to commission the repair of the product with costs or to request
the return of the unrepaired product.
Further customer rights
WEPA Apothekenbedarf GmbH & Co. KG grants the
warranty subject to the terms and conditions stated.
The customer can have further statutory rights. The
contractual and statutory rights of customers, in particular the statutory warranty rights against the seller
of the product, shall not be affected by the warranty.
The warranty is governed by the legislation of the
Federal Republic of Germany. Date: 02/2019
19
Page 20

11. Technical data
Operating 10 - 40 °C / 50 - 104 °F
conditions: 15 - 95 % relative
maximum humidity
Storage -20 - +55 °C / -4 - +131 °F
conditions: 15 - 95% relative
maximum humidity
Weight: 402 g (with batteries)
Size: 138 x 94.5 x 62.5 mm
Measuring method: oscillometric, validated by
the Korotkoff method:
phase I systolic,
phase V diastolic
Measuring range: 20 - 280 mmHg – blood
pressure
40 - 200 beats
per minute – pulse
Cuff pressure
display range: 0 - 299 mmHg
Measuring
resolution: 1 mmHg
Voltage source: · 4 x 1.5 V alkaline
batteries, size AA
· Mains adapter DC 6V,
600 mA (optional)
Battery ca. 920 measurements
life : (with new batteries)
IP class: IP 20
Reference to EN 1060-1 /-3 /-4;
standards: IEC 60601-1;
IEC 60601-1-2 (EMC);
IEC 60601-1-11
Average Monitor: 5 years or
useful life: 10,000 mesurements;
Accessories: 2 years
This monitor complies with the requirements of the
Medical Device Directive 93/42/EEC.
Technical alterations reserved.
Static accuracy: Pressure within ± 3 mmHg
Pulse rate accuracy: ± 5% of the readout value
Wepa_IB_BP_ProfessionalControl_4G_1019
20
Page 21

Wepa_IB-cover_BP_ ProfessionalControl_4G_1019
23
Page 22

Functional overview
user
Average value
indication
storage slots
Cuff check
Traffi c-light
display
Automatic
switch-off
Arrhythmia
detection
Atrial brillation
detection
Multiple
measurments
display
Important advice:
In the download section of www.aponorm.de you fi nd these instructions with
updates in digital form for download, also in German, Turkish, French and Russian.
Homepage
Sold by:
WEPA Apothekenbedarf
GmbH & Co KG
Am Fichtenstrauch 6-10
D-56204 Hillscheid
www.aponorm.de
www.wepa-dieapothekenmarke.de
Manufactured by:
Microlife AG
Espenstraße 139
CH-9443 Widnau
www.microlife.ch
Order No. 047292
 Loading...