

Page 1
EN
3
Accurate home blood
pressure measurements
with the WatchBP Home.
Instruction Manual
Page 2

Microlife WatchBP Home is the world’s first digital blood pressure measurement device that
strictly follows European Society of Hypertension (ESH)
1, 2
and American Heart Association (AHA)
recommendations for home blood pressure measurement. Using the WatchBP Home device helps you
collect accurate home blood pressure measurement your doctor can trust. This WatchBP Home device has
been clinically validated according to the ESH protocol 3.
1
O’Brien E, Asmar R, Beilin L, Imai Y, et al. European Society of Hypertension recommendations for conventional, ambulatory and home blood pressure
measurement. European Society of Hypertension Working Group on Blood Pressure Monitoring. J Hypertens 2003;21:821-848.
2
Stergiou GS, et al. A tool for reliable self-home blood pressure monitoring designed according to the European Society of Hypertension
recommendations: The Microlife WatchBP Home monitor. Blood press Monit. 2007;12:127-131.
3
Stergiou GS, Giovas PP, Gkinos CP, Patouras JD. Validation of the Microlife WatchBP Home device for self home blood pressure measurement according
to The International Protocol. Blood Press Monit. 2007;12(3):185-188.
Page 3

EN
Before using WatchBP Home for the first time
Product description .....................................................3–4
Activating the device ...................................................... 5
Selecting the correct cuff ................................................ 6
Taking measurements using WatchBP Home
«DIAG.» Mode ..............................................................7–9
«USUAL» Mode ............................................................. 10
Eight steps for taking proper blood pressure
measurements
Blood pressure measurement procedures ............. 11–14
Viewing, deleting, and transferring measurements
Viewing measurements ......................................... 15–16
Deleting measurements ......................................... 17–18
Transferring measurements ................................... 19–20
Appendix
Batteries and power adaptor ................................. 21–22
Safety, care, accuracy test and disposal ................. 23–24
Error messages ....................................................... 25–26
Important facts ....................................................... 27–28
Technical specifications ................................................ 29
Table of Contents
Page 4
3
SYS
mmHg
DIA
mmHg
Pulse
/min
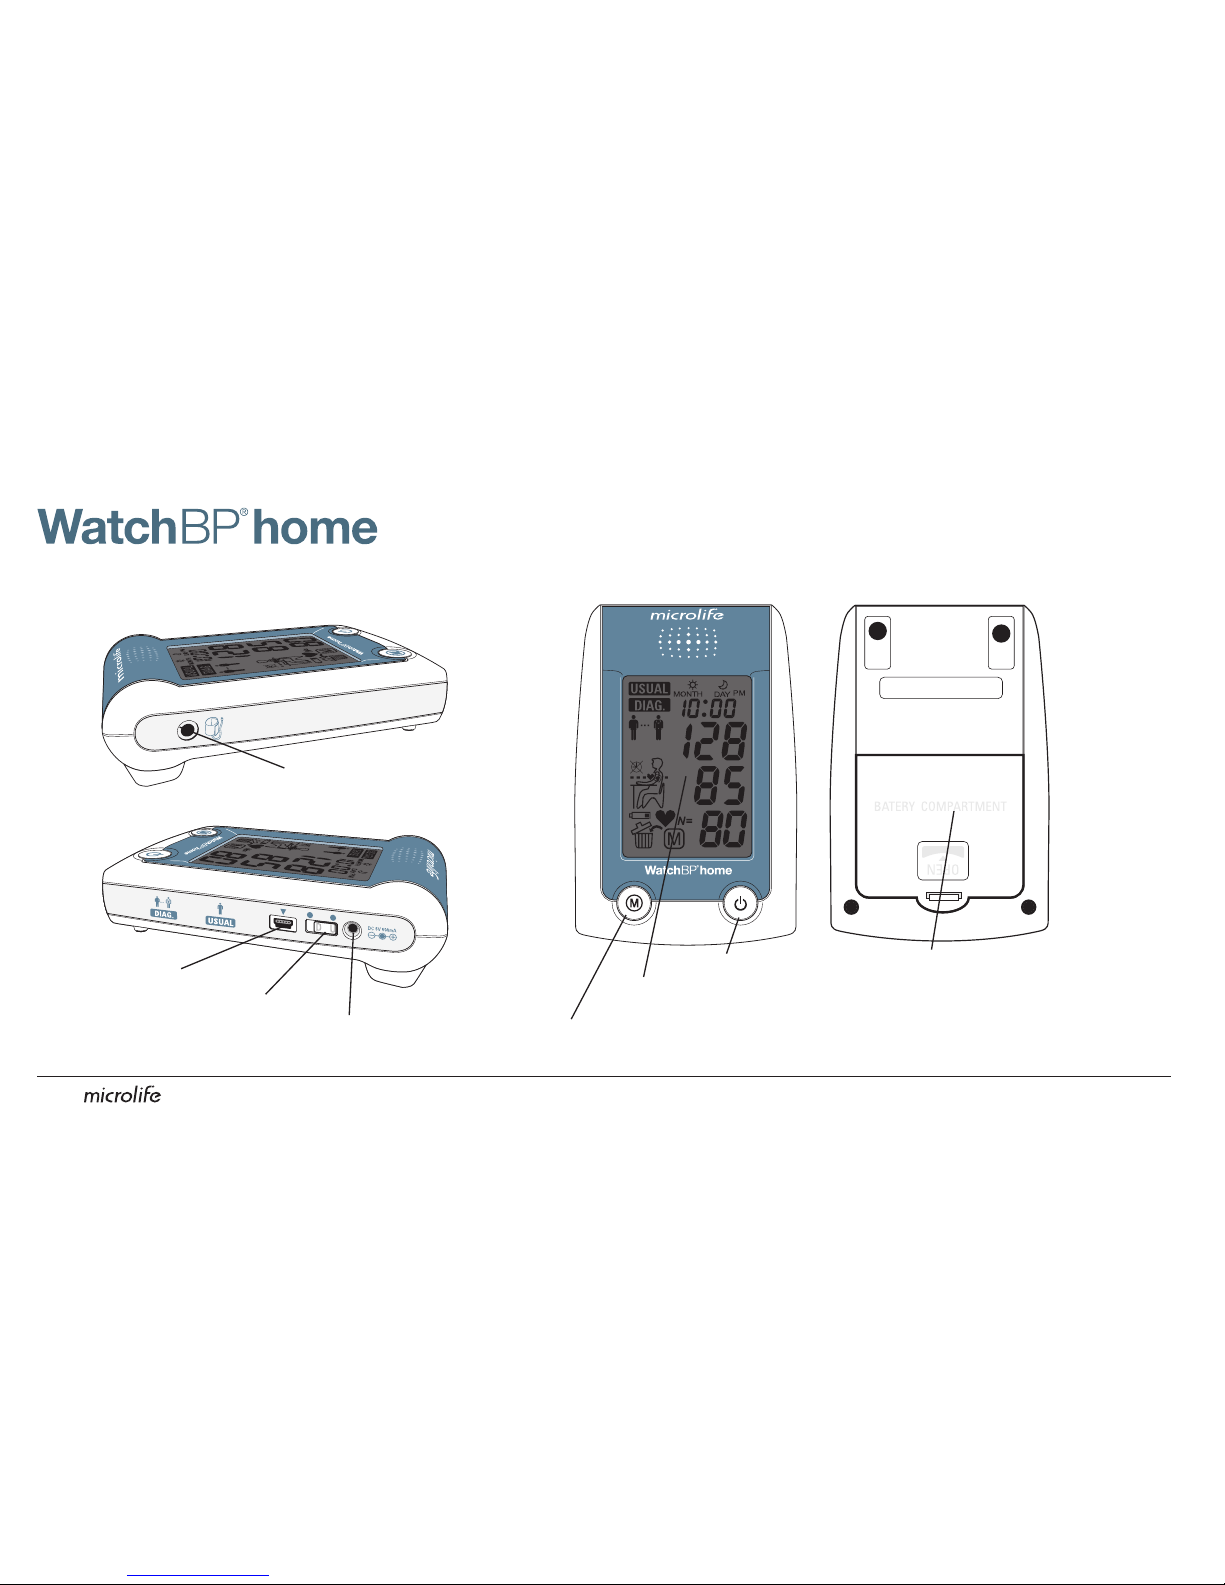
Cuff Socket
USB Port
Mode Switch
Power Socket
ON/OFF Button
Display
M Button (Memory)
Battery Compartment
Page 5
4
EN
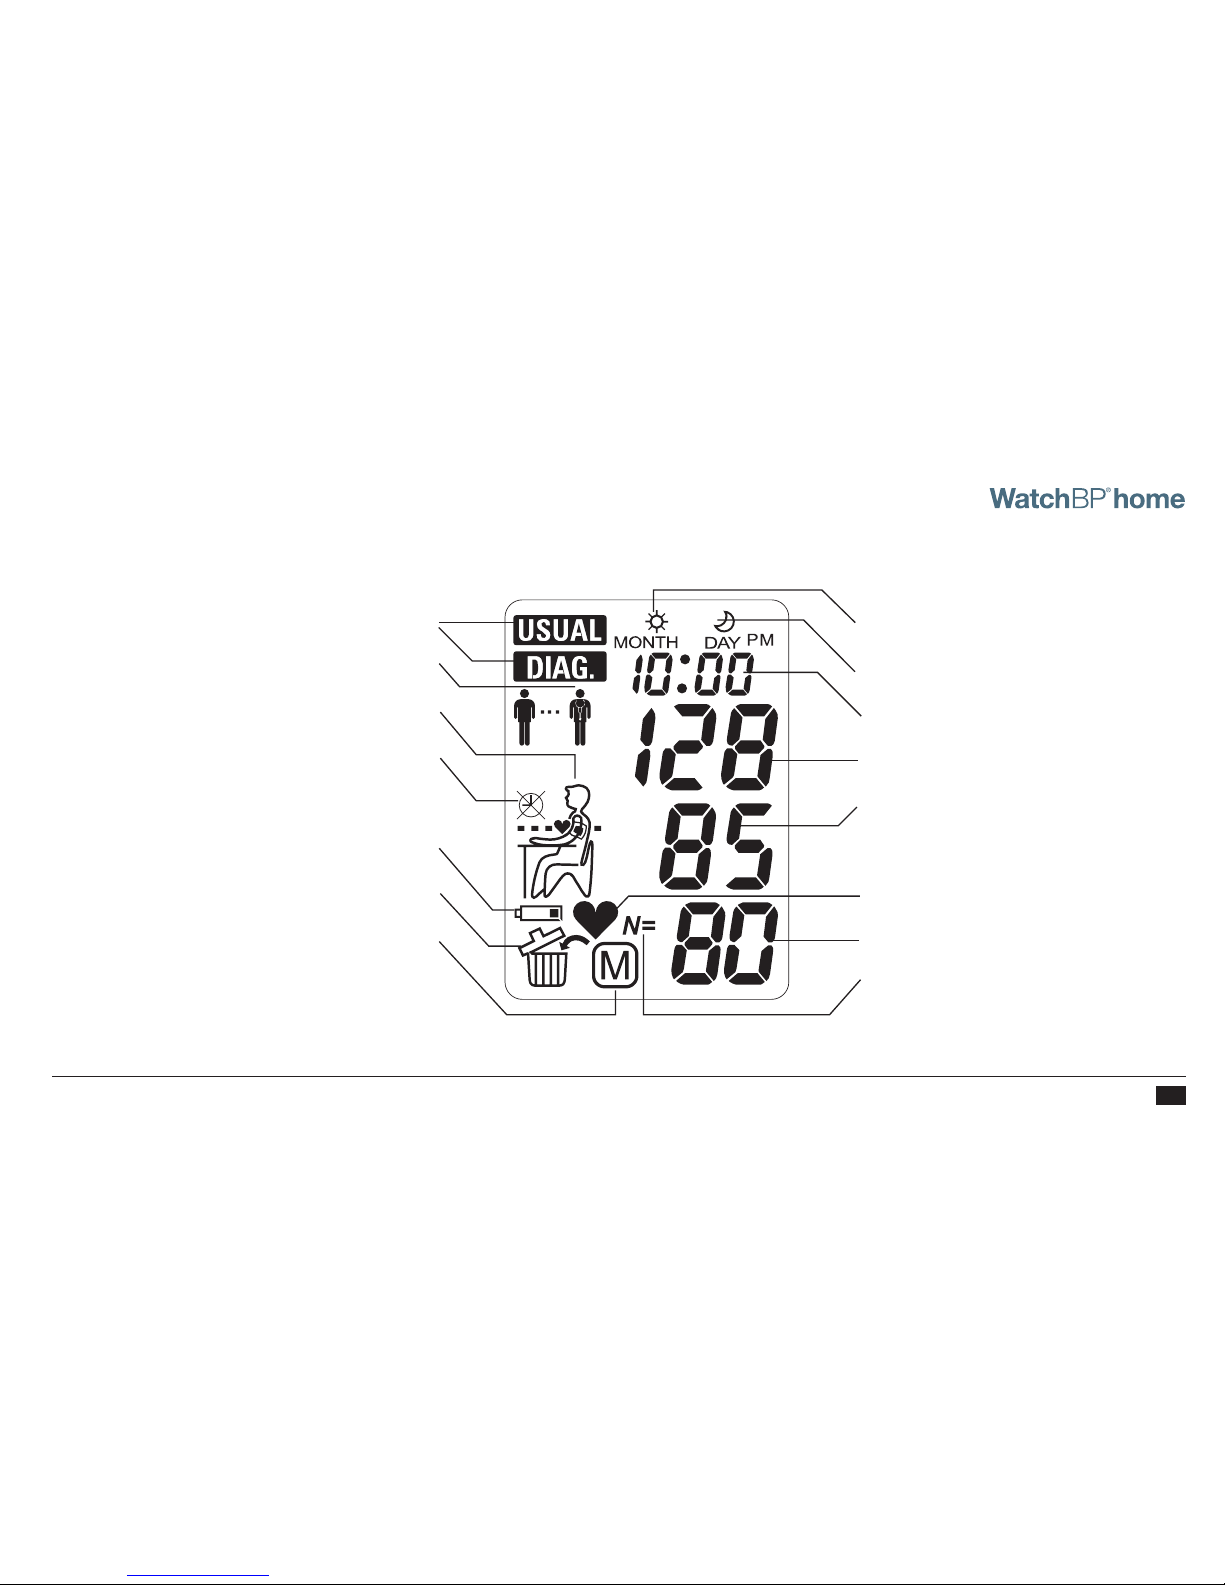
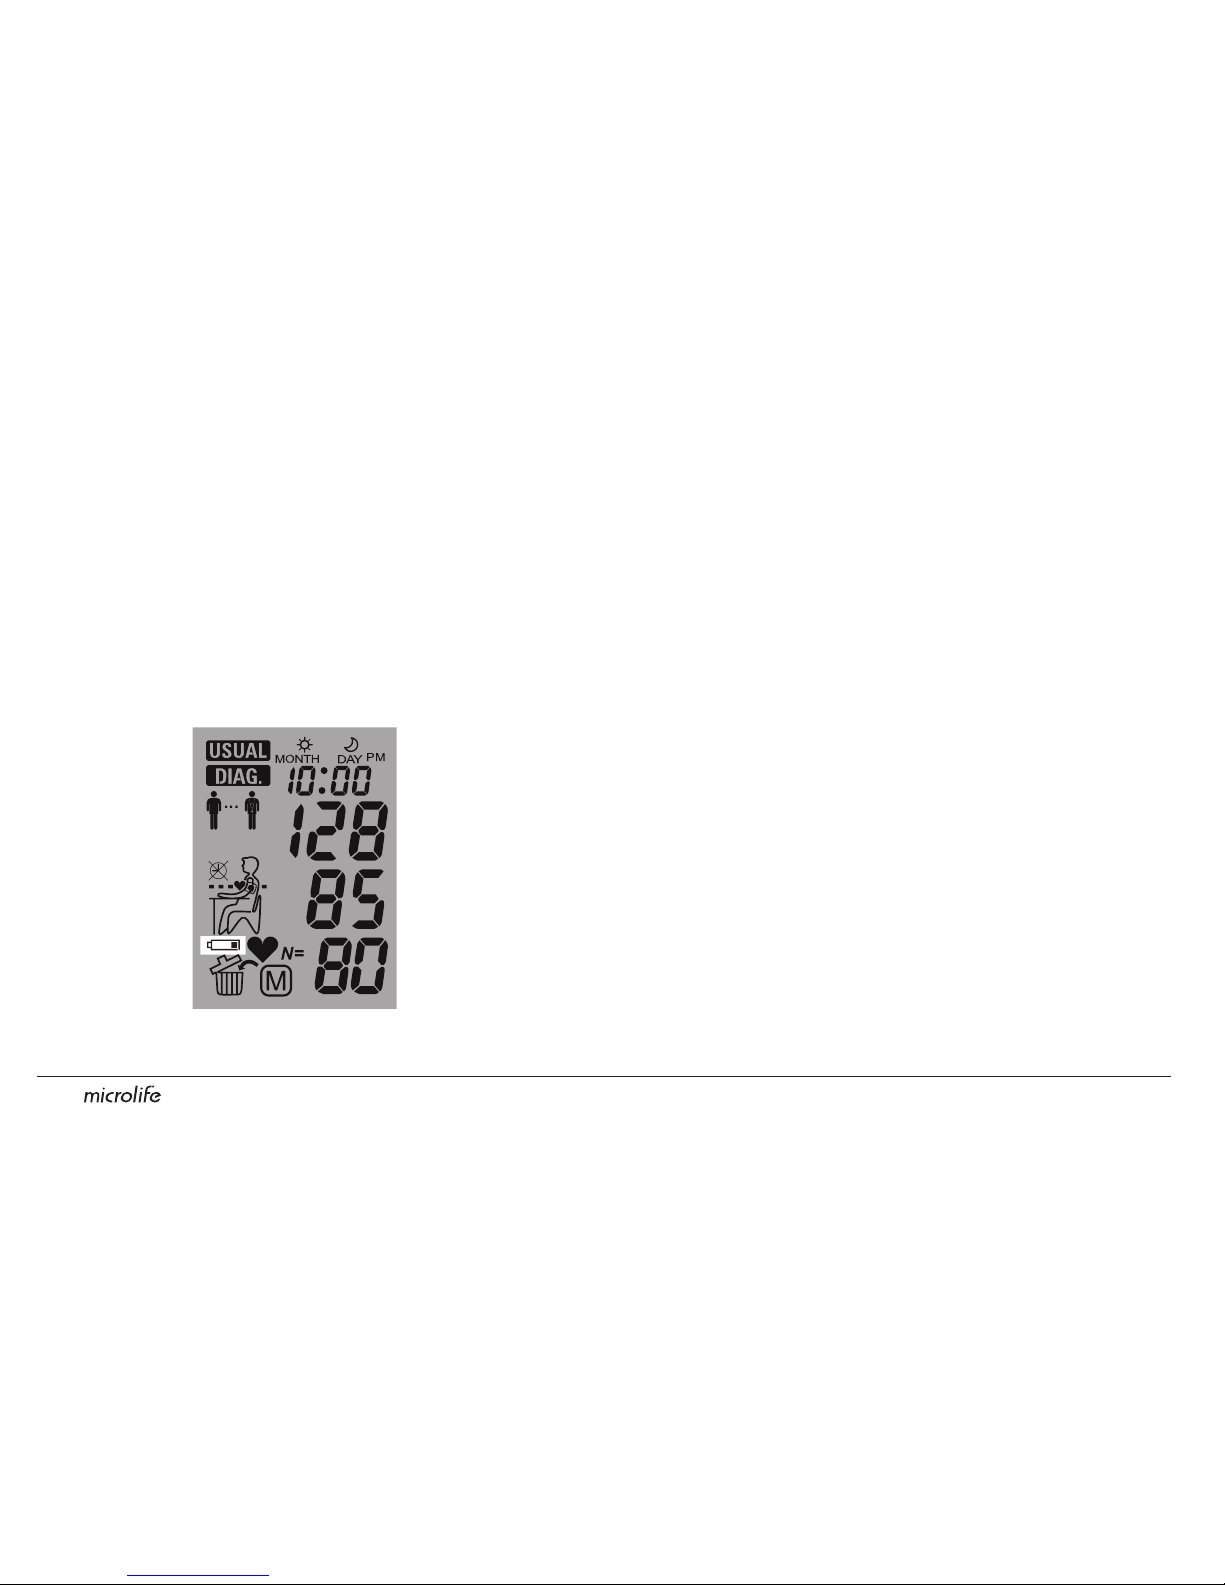
Mode Indication
Doctor Symbol
Relax
Outside Measurement Time
Battery Display
Delete Memory Data
Stored Value
Morning Data
Evening Data
Date/Time
Systolic Value
Diastolic Value
Pulse Indicator
Pulse Rate
Number of Stored Data
Page 6
5
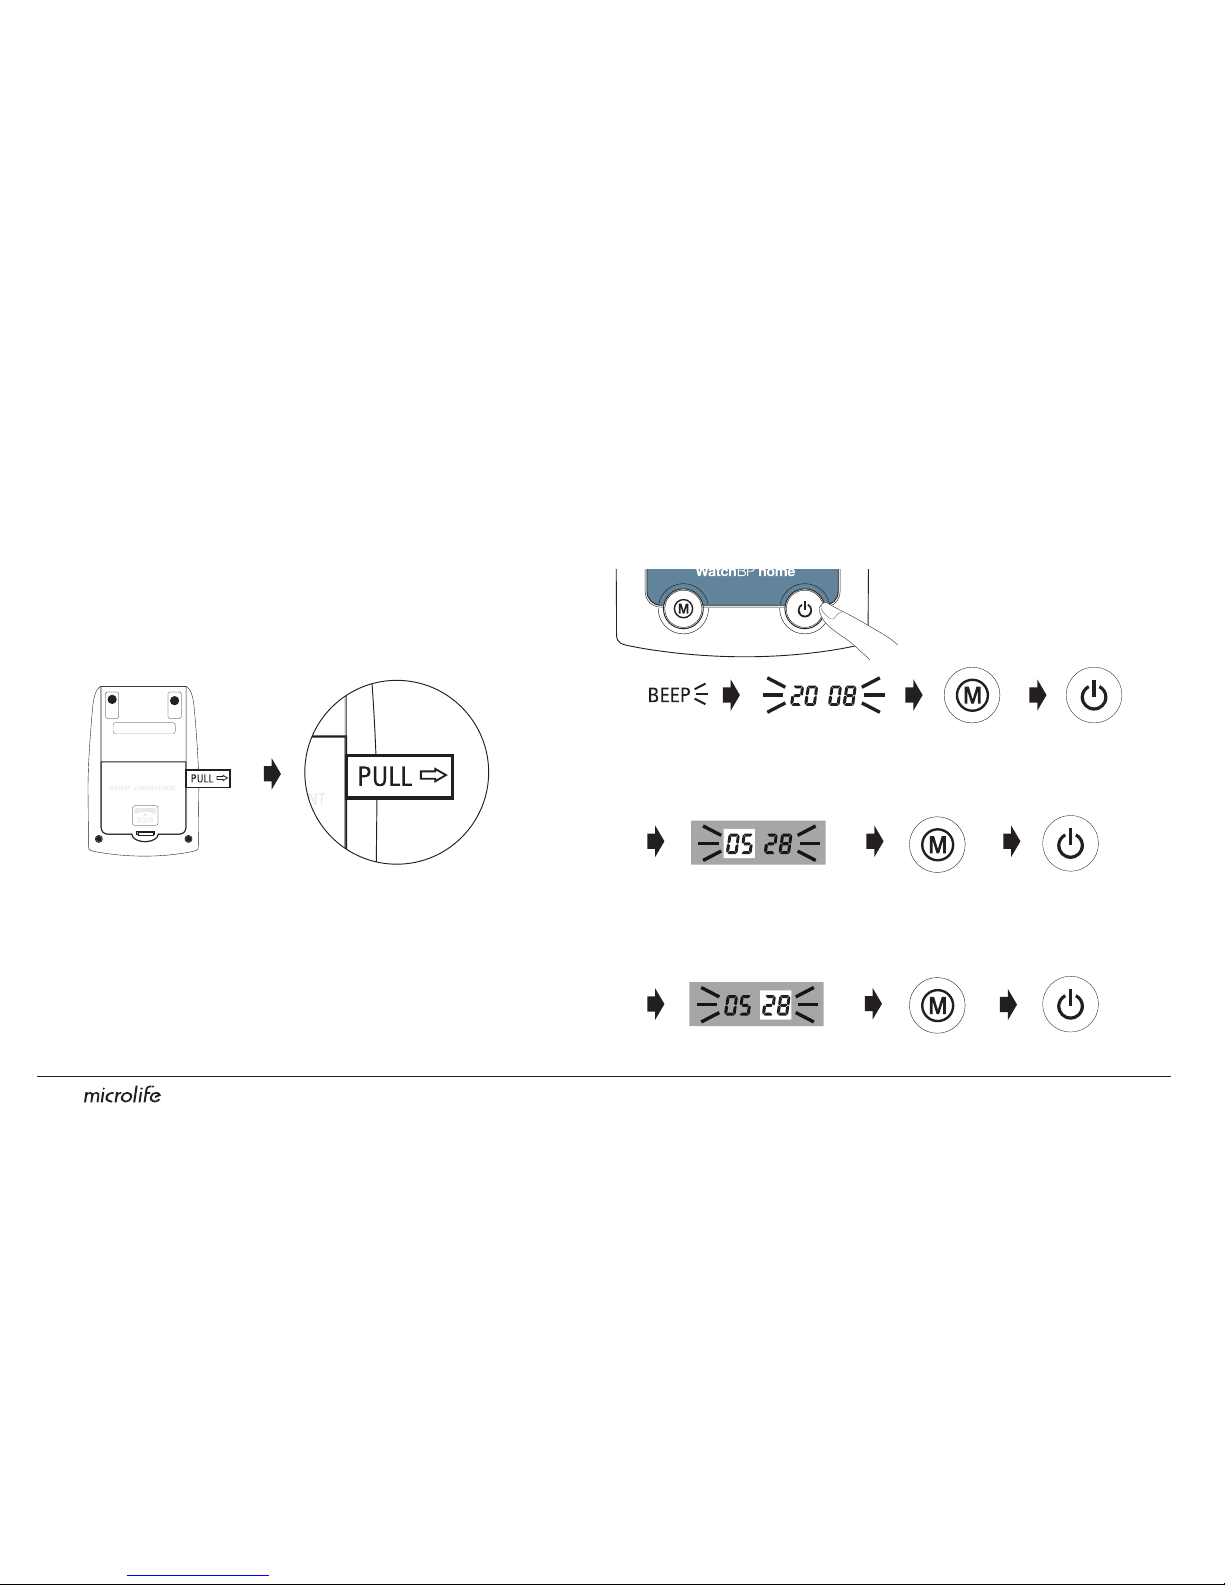
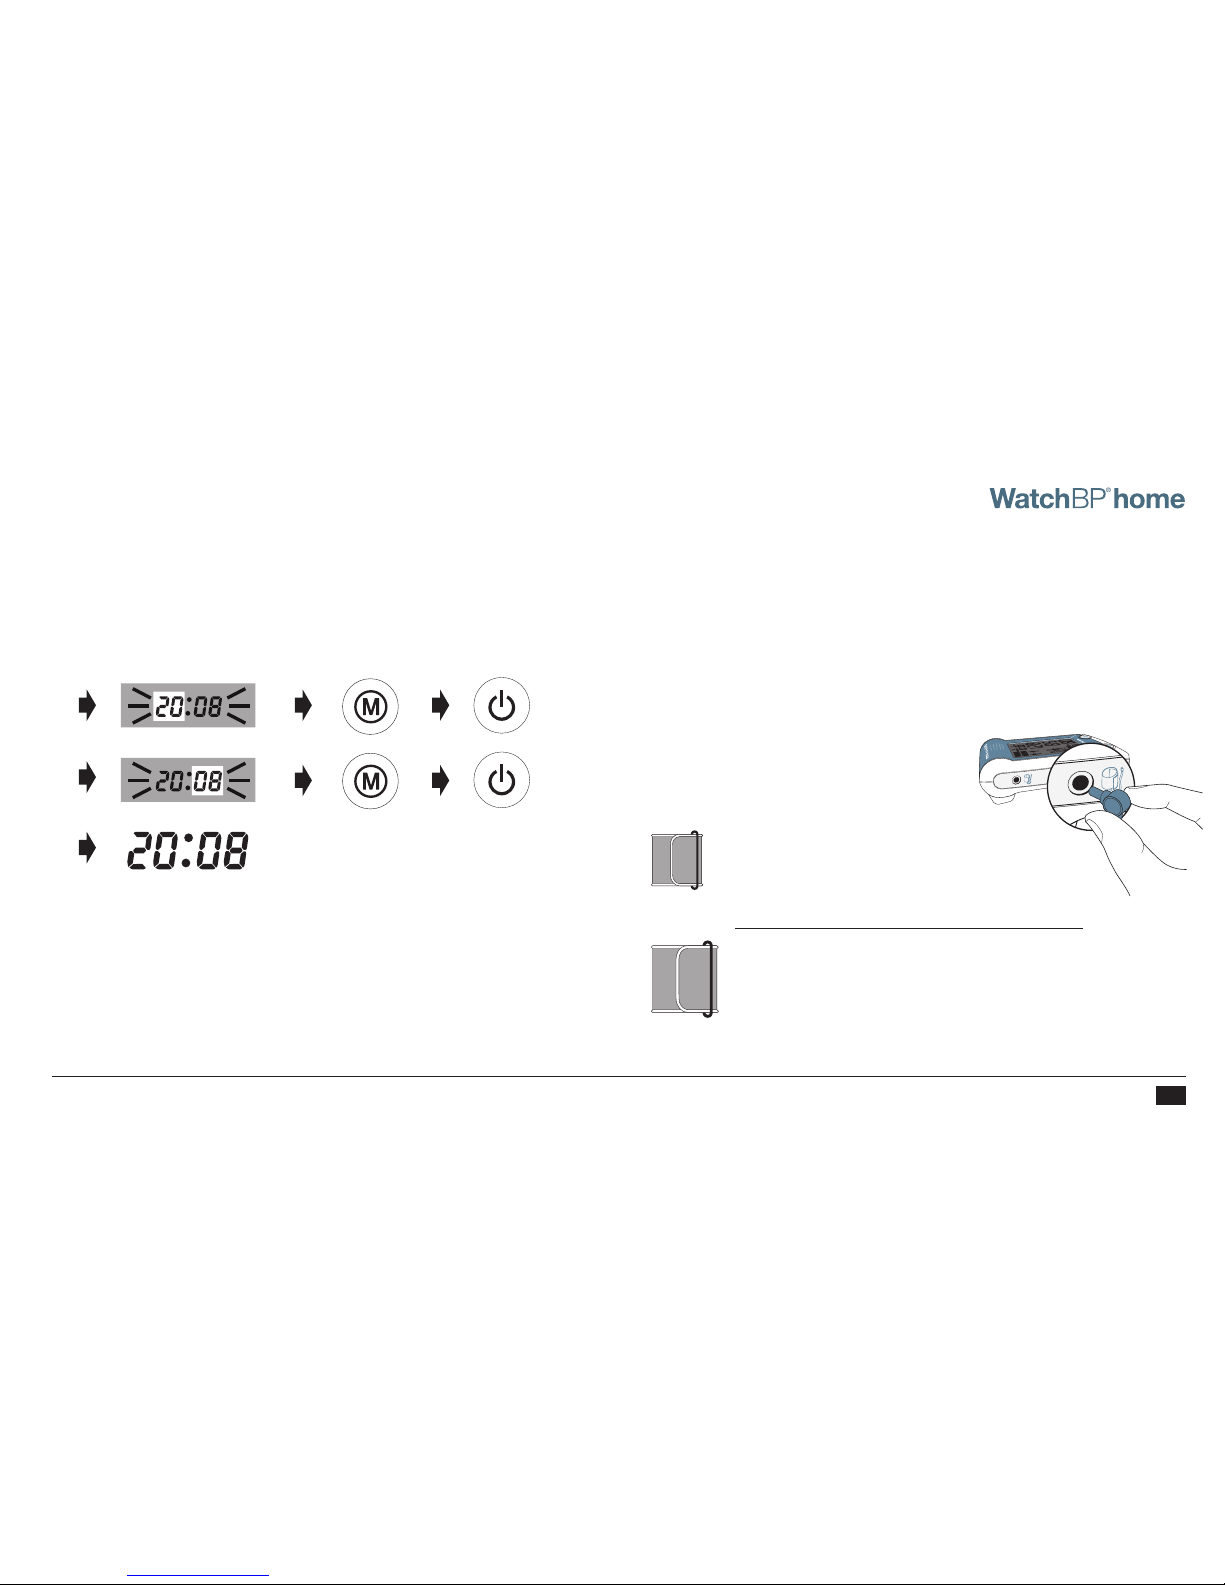
3) Set the day – Press the M Button to set the Day.
Press the ON/OFF Button to confirm.
2) Set the month – Use the M Button to set the Month.
Press the ON/OFF Button to confirm.
Press ON/OFF Button to confirm
Press M Button to make selection
1) Set the year – Upon removing the protective strip or
installing new batteries, the Year number flashes in
the display. Use the M Button to select the Year. Press
the ON/OFF Button to confirm your selection.
Activating the Device
Pull out the protective strip from the battery
compartment.
Before using WatchBP Home for the first time
SYS
mmHg
DIA
mmHg
Pulse
/min
Page 7
EN6
Selecting the correct cuff
The WatchBP Home device is available with different
cuff sizes. If you believe the cuff size provided with your
device is incorrect, please consult your doctor.
*
please use only Microlife cuffs!
5) If you want to change the date and time, briefly
take out and put back one battery from the battery
compartment. The Year number will flash. Complete
the process as described above.
4) Set the time – Once you have set the Hour and
Minutes and pressed the ON/OFF Button, the date and
time are set, and the current time is displayed.
M (Medium size)
22 - 32 cm (8.7 - 12.6 inches)
M is the correct size for most people.
L (Large size)
32 - 42 cm (12.6 - 16.5 inches)
Page 8
7
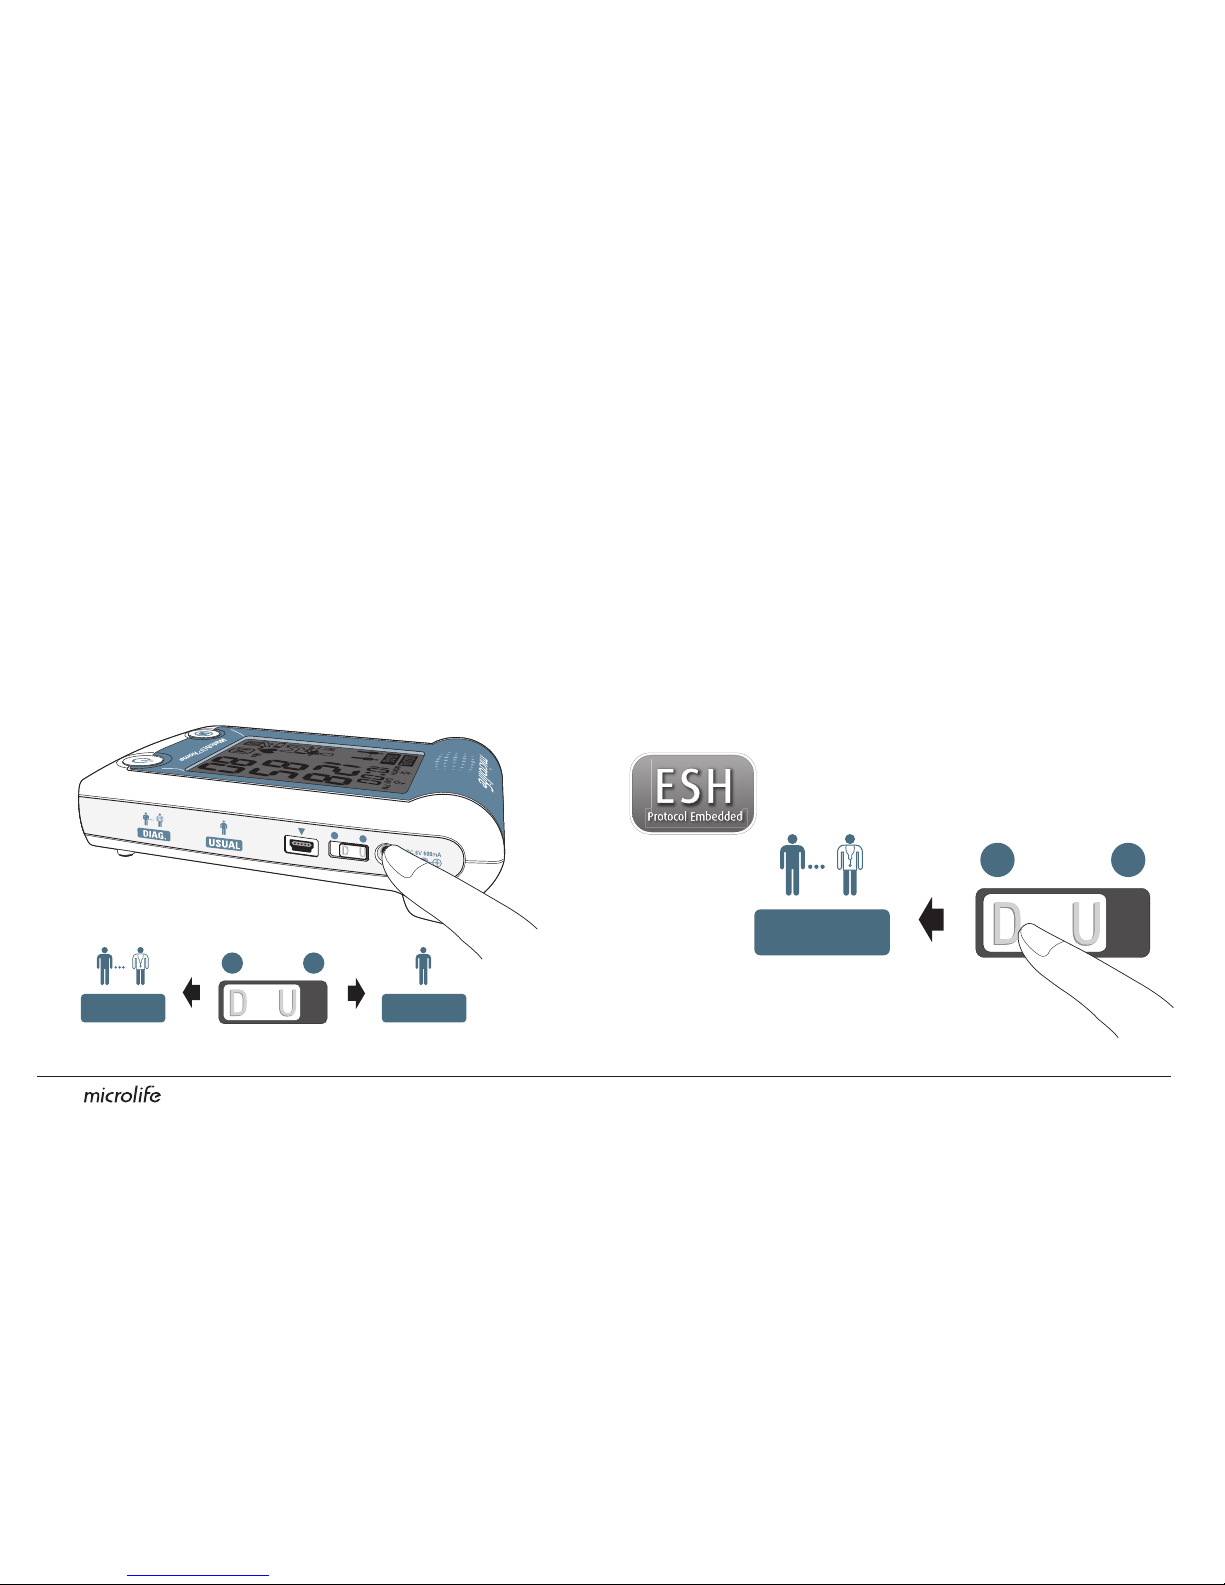
«DIAG.» Mode
The «DIAG.» mode should be selected when blood
pressure is to be measured in accordance with
measurement guidelines of the European Society of
Hypertension (ESH), and as requested by your doctor.
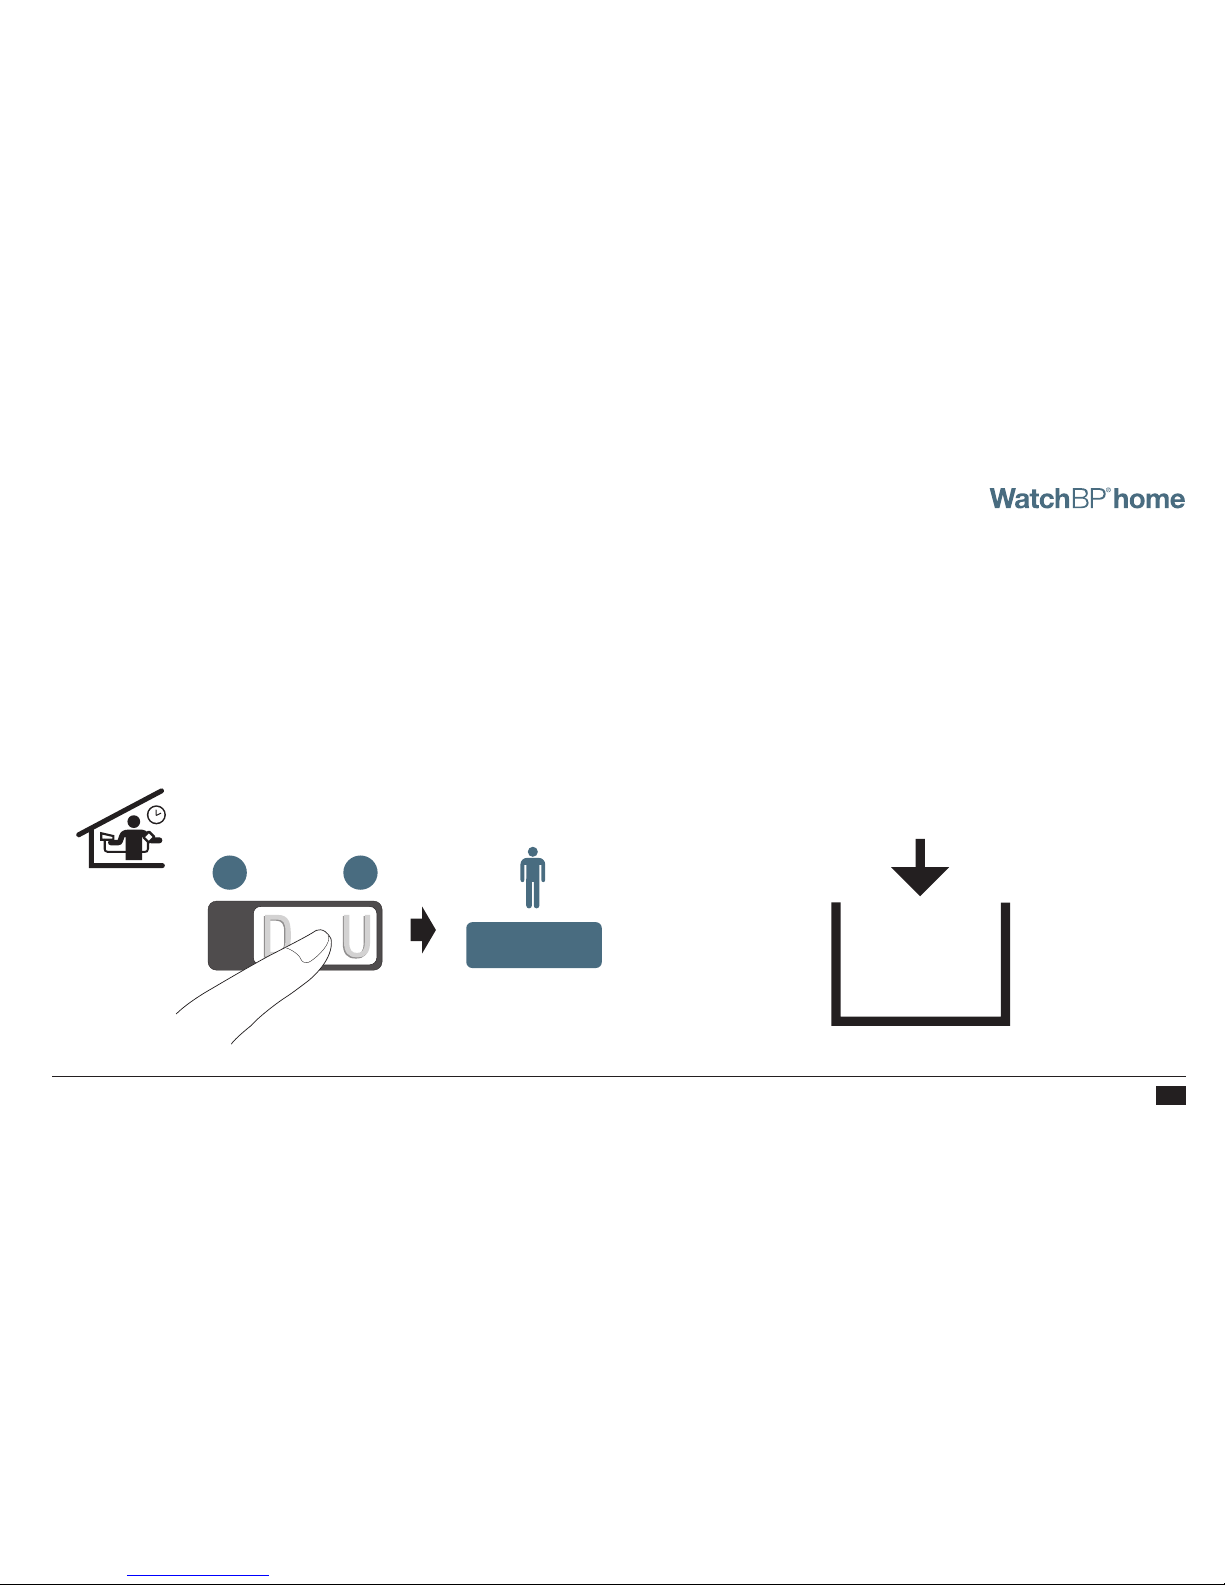
Prior to each measurement, use the Mode Switch on
the side of the device to select the proper measurement
mode. The two options include: «DIAG.» (Diagnostic) or
«USUAL» (Usual) mode.
DIAG. USUAL
Taking measurements using WatchBP Home
DIAG. USUAL
Page 9
EN8
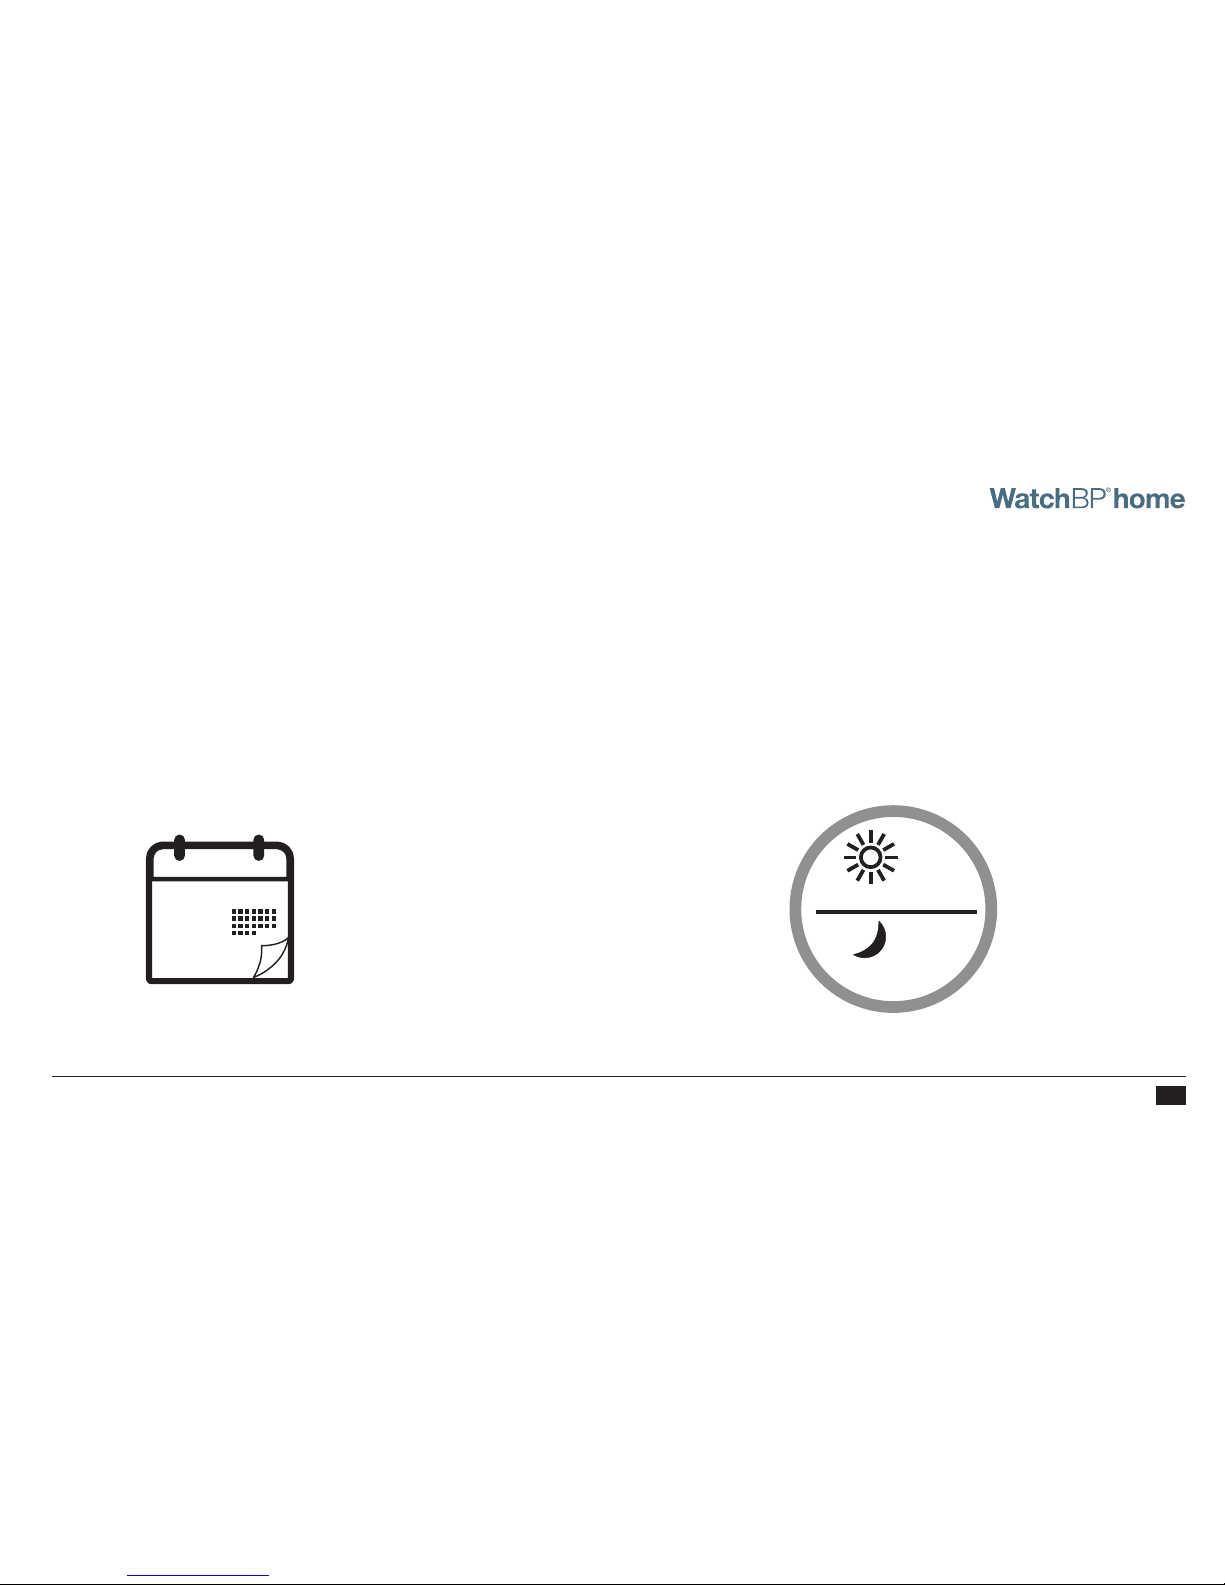
Two sets of measurements per day
ESH guidelines recommend to take two measurements
in the morning between 06:00 - 09:00 and two
measurements in the evening between 18:00 - 21:00.
Always take measurements before taking your
medication, unless otherwise directed by your
doctor.
No measurements on non-work days
In «DIAG.» mode, blood pressure measurements are
taking on 7 consecutive working days (or normal
week days). No readings should be taken on «non-
working» days (or particularly relaxing days) in this
mode!
30
JAN
7
working
days
X1
06:00 – 09:00
X1
18:00 – 21:00
Page 10
9
Evaluation
After measurements have been carried out for a total
of 7 working days, bring the device to your doctor for
evaluation of your home blood pressure.
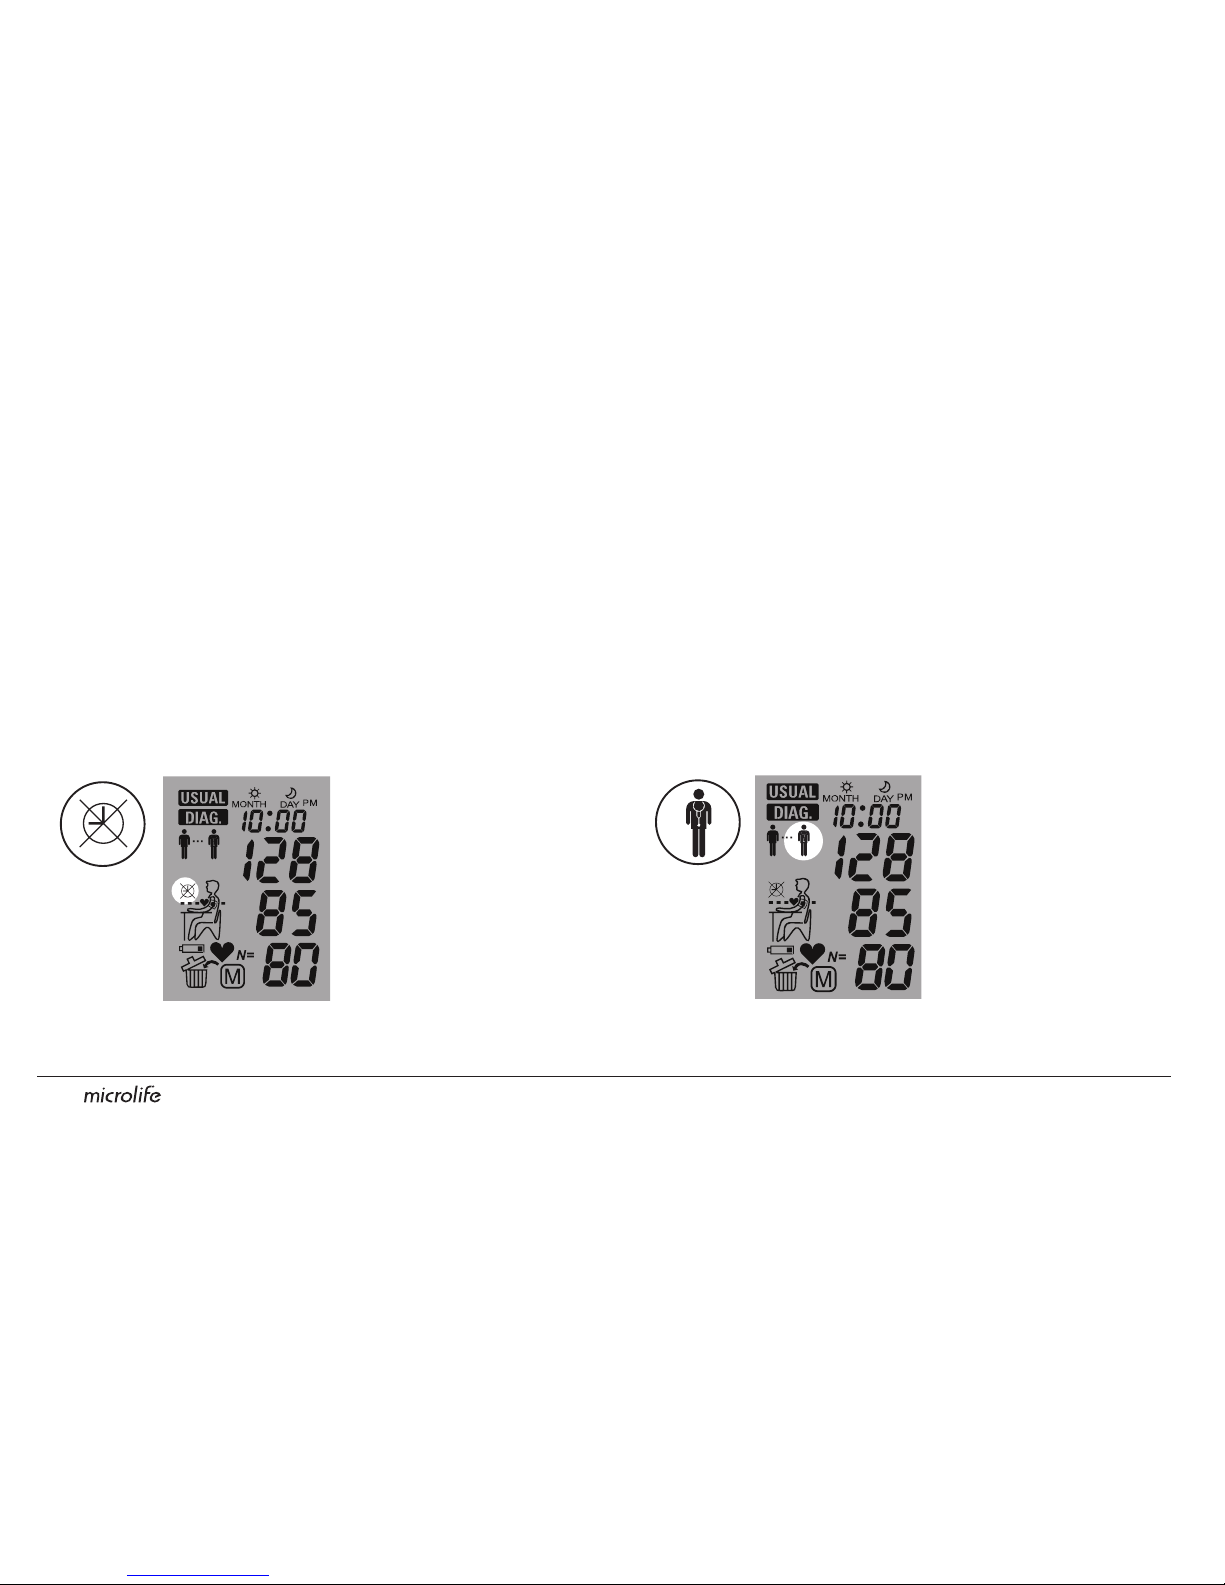
Extended measurement period
WatchBP Home has an extended measurement period and
allows morning measurements between 04:00 - 12:00
and evening measurements between 18:00 - 24:00.
Outside these times,
measurements
cannot be taken and
the symbol on the left
will be displayed on
the screen.
When measurements
have been carried out
for the full 7 days, the
doctor symbol will
flash on the screen.
Taking measurements using WatchBP Home (cont.)
Page 11
EN10
«USUAL» Mode
The «USUAL» mode should be selected when
blood pressure is to be measured independent of
recommended guidelines. In «USUAL» mode, single
measurements can be taken at any time, and results are
automatically stored for later evaluation by your doctor.
250 measurements safely stored
The WatchBP Home device can store up to 250 single
measurements in «USUAL» mode.
*
When memory is full, each new measurement will
automatically overwrite the earliest measurement.
250
Measurements
Anytime
Page 12
11
Eight steps for taking proper blood pressure
1 Hour Before
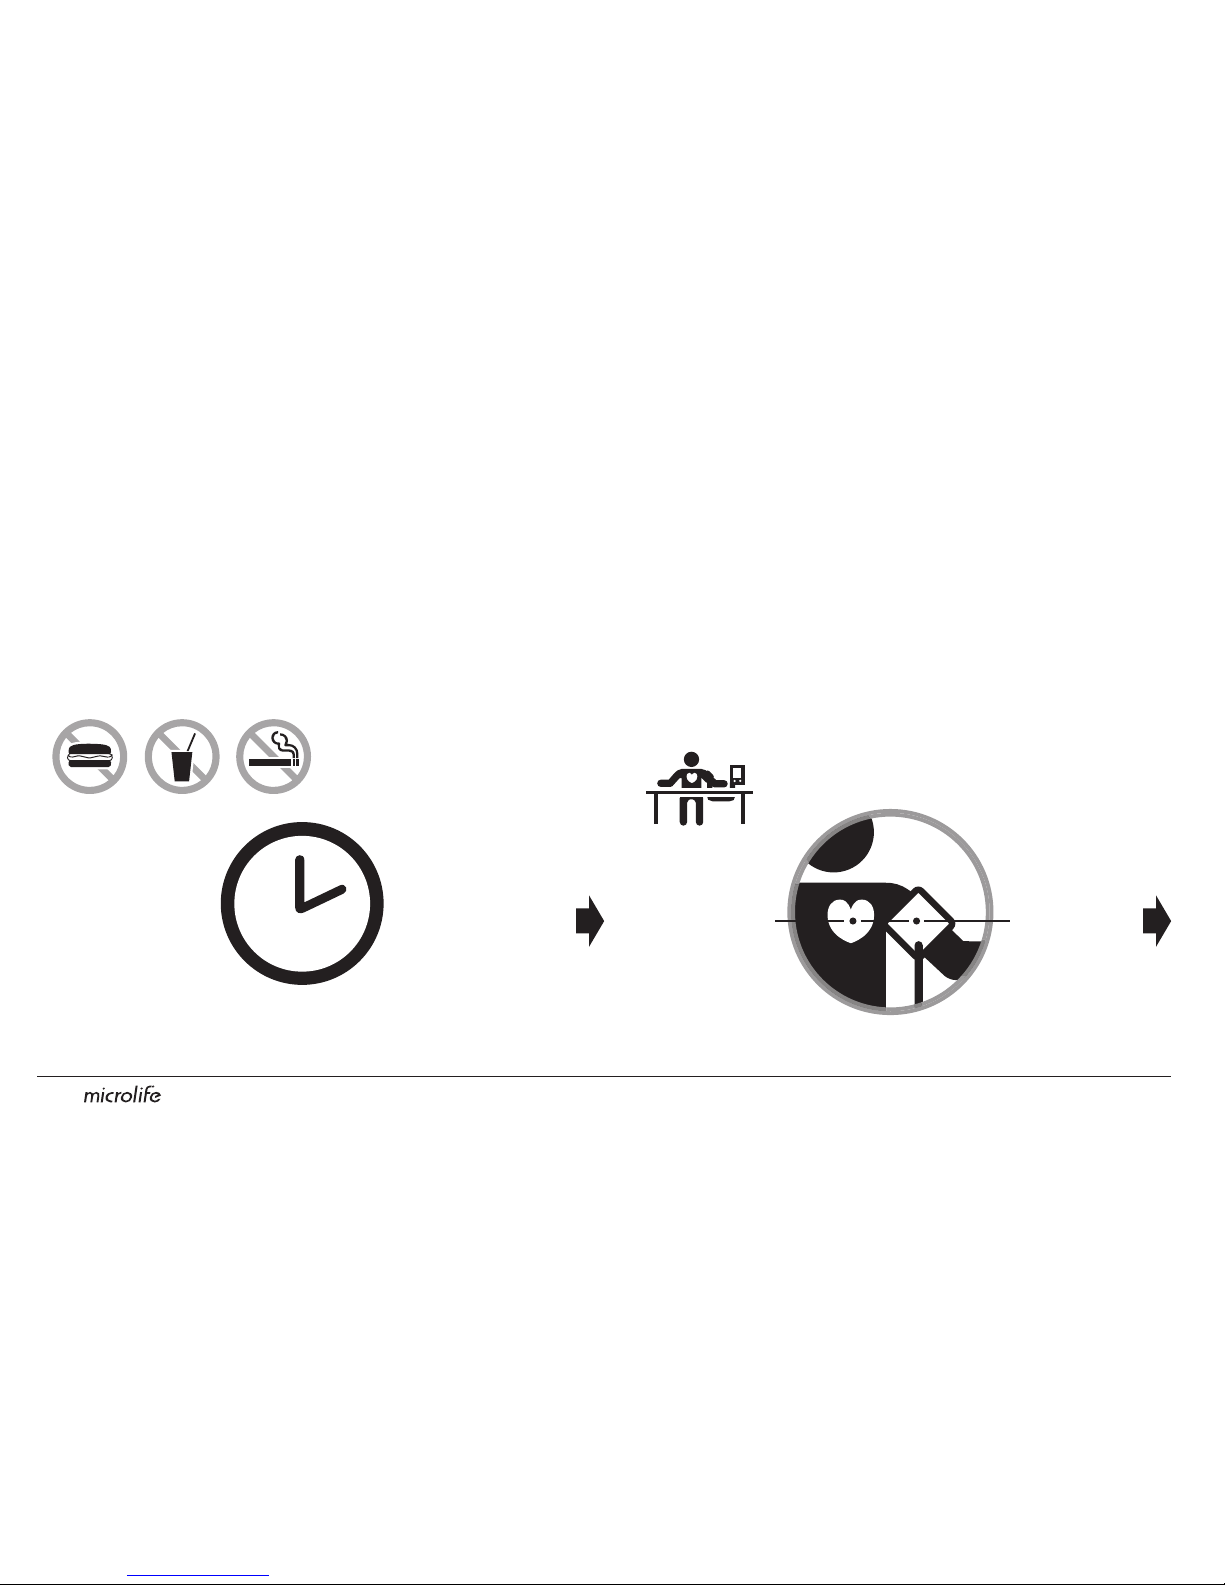
Step 1
Avoid taking measurements directly after eating,
drinking, or smoking. Allow at least one hour between
these activities and measurement of your blood pressure.
Step 2
Prepare a chair and table for the measurement. The
chair should have a vertical back-rest and the table
should allow for your upper arm to rest at the same
height as your heart.
Page 13
EN12
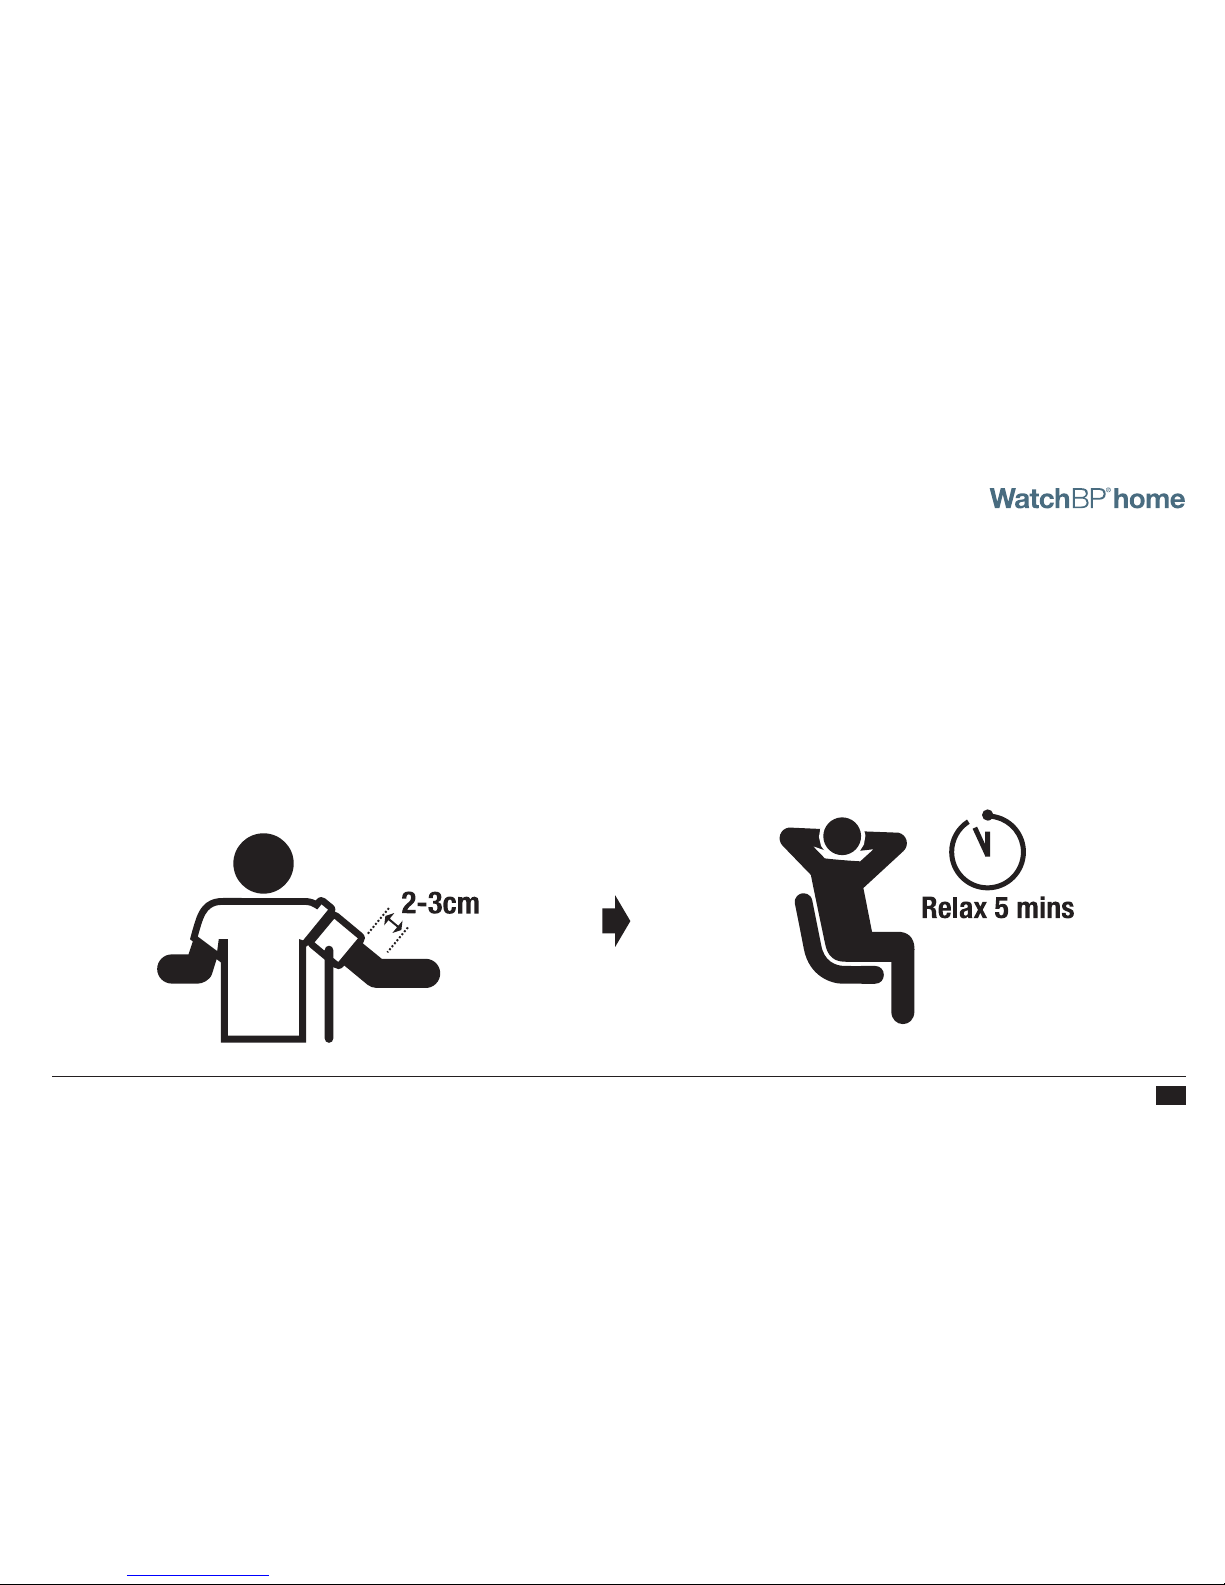
Step 3
Remove all clothing covering or constricting the
measurement arm. Apply the cuff. Make sure the lower
edge of the cuff is 2–3cm from the inner fold of your
arm. The tube connecting the cuff to the device should
be placed on the inside of the arm. (Additional visual
instruction can be found on the cuff)
Step 4
Sit down and relax for at least five minutes prior to the
measurement.
Page 14
13
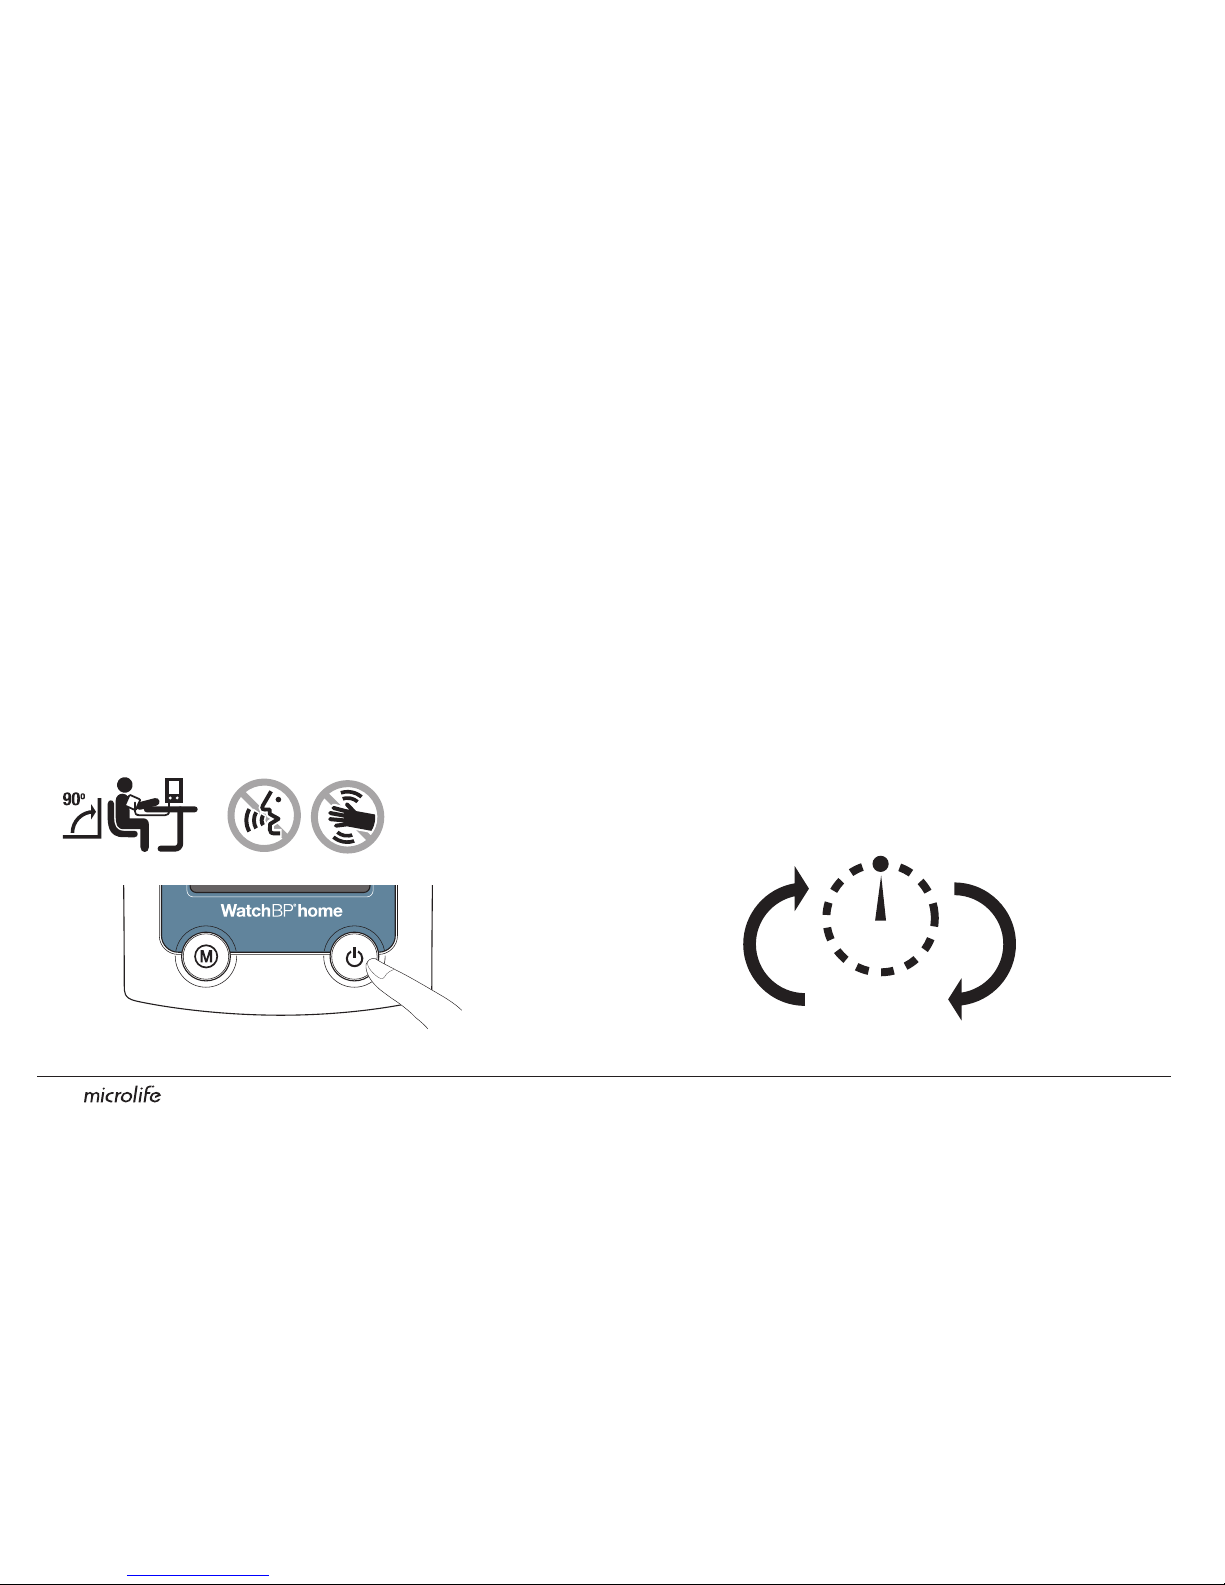
Step 5
Sit upright and lean comfortably against the chair’s
backrest. Press the start button. The device will initiate
a 60-second countdown. During the measurement do
not move, cross your legs, or tense your arm muscles.
Breath normally and do not talk.
Step 6
One measurement cycle includes two measurements.
Once the first measurement is complete, continue to
relax as you wait for the second measurement. The
second measurement will start after 60-seconds. During
this time avoid movement.
SYS
mmHg
DIA
mmHg
Pulse
/min
60 sec.
12
Eight steps for taking proper blood pressure (cont.)
Page 15

EN14
Step 7
Once the two readings are complete, measurement data
are automatically stored for future reference by your
doctor. If an error displays after the readings, please
repeat the first six steps once again.
Step 8
When seven days of measurements have been collected,
the Doctor Symbol will flash on the display. Do not
forget to bring your WatchBP Home device with you on
your next doctor visit. (Note: the doctor symbol is only
displayed for measurements in «DIAG.» Mode.)
Automatically stored
Page 16
15
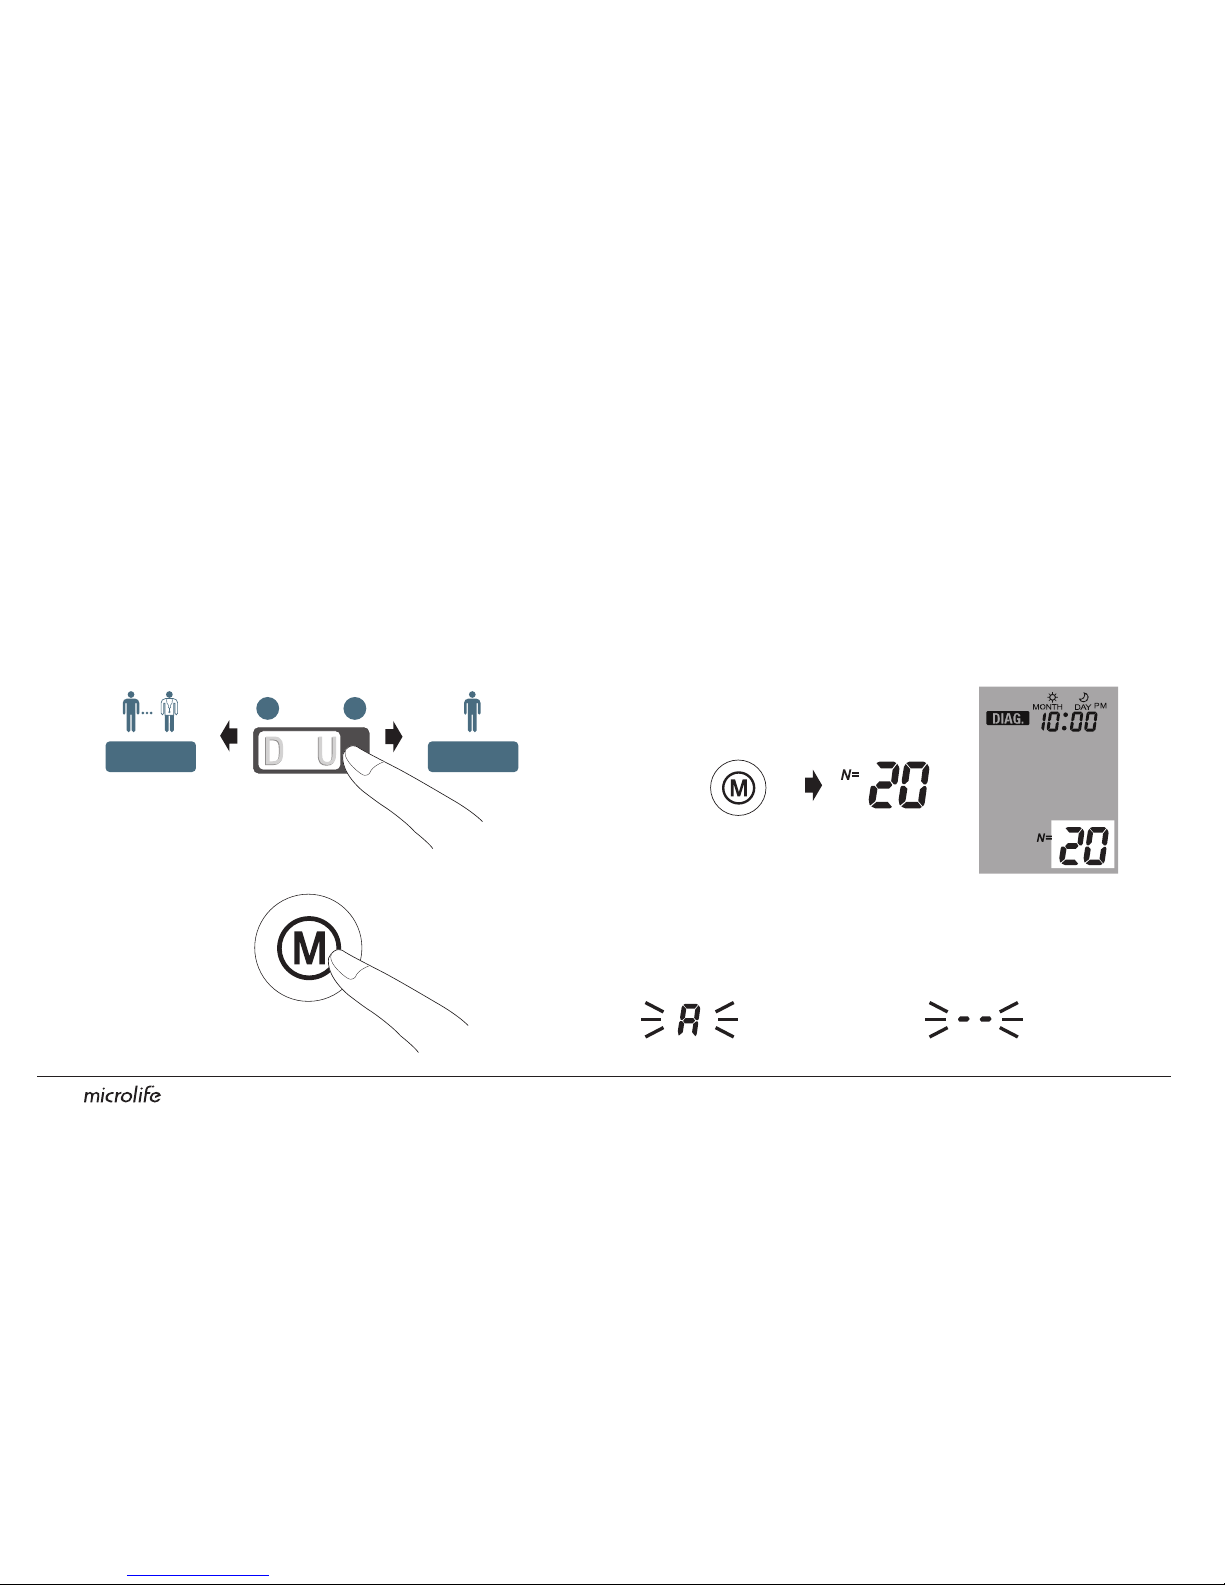
2) Then press the M Button.
In «DIAG.» Mode
1) When the M Button is pressed, it briefly displays the
total number of measurements stored, e.g. N=20.
Viewing measurements
1) Use the Mode switch to first select the type of
measurements you wish to view.
Viewing, deleting and transferring measurements
DIAG. USUAL
*
«- -» will display when the
number of measurements
is less than 12.
*
«A» is displayed when
the number shown is
the average of all data.
Page 17
EN16
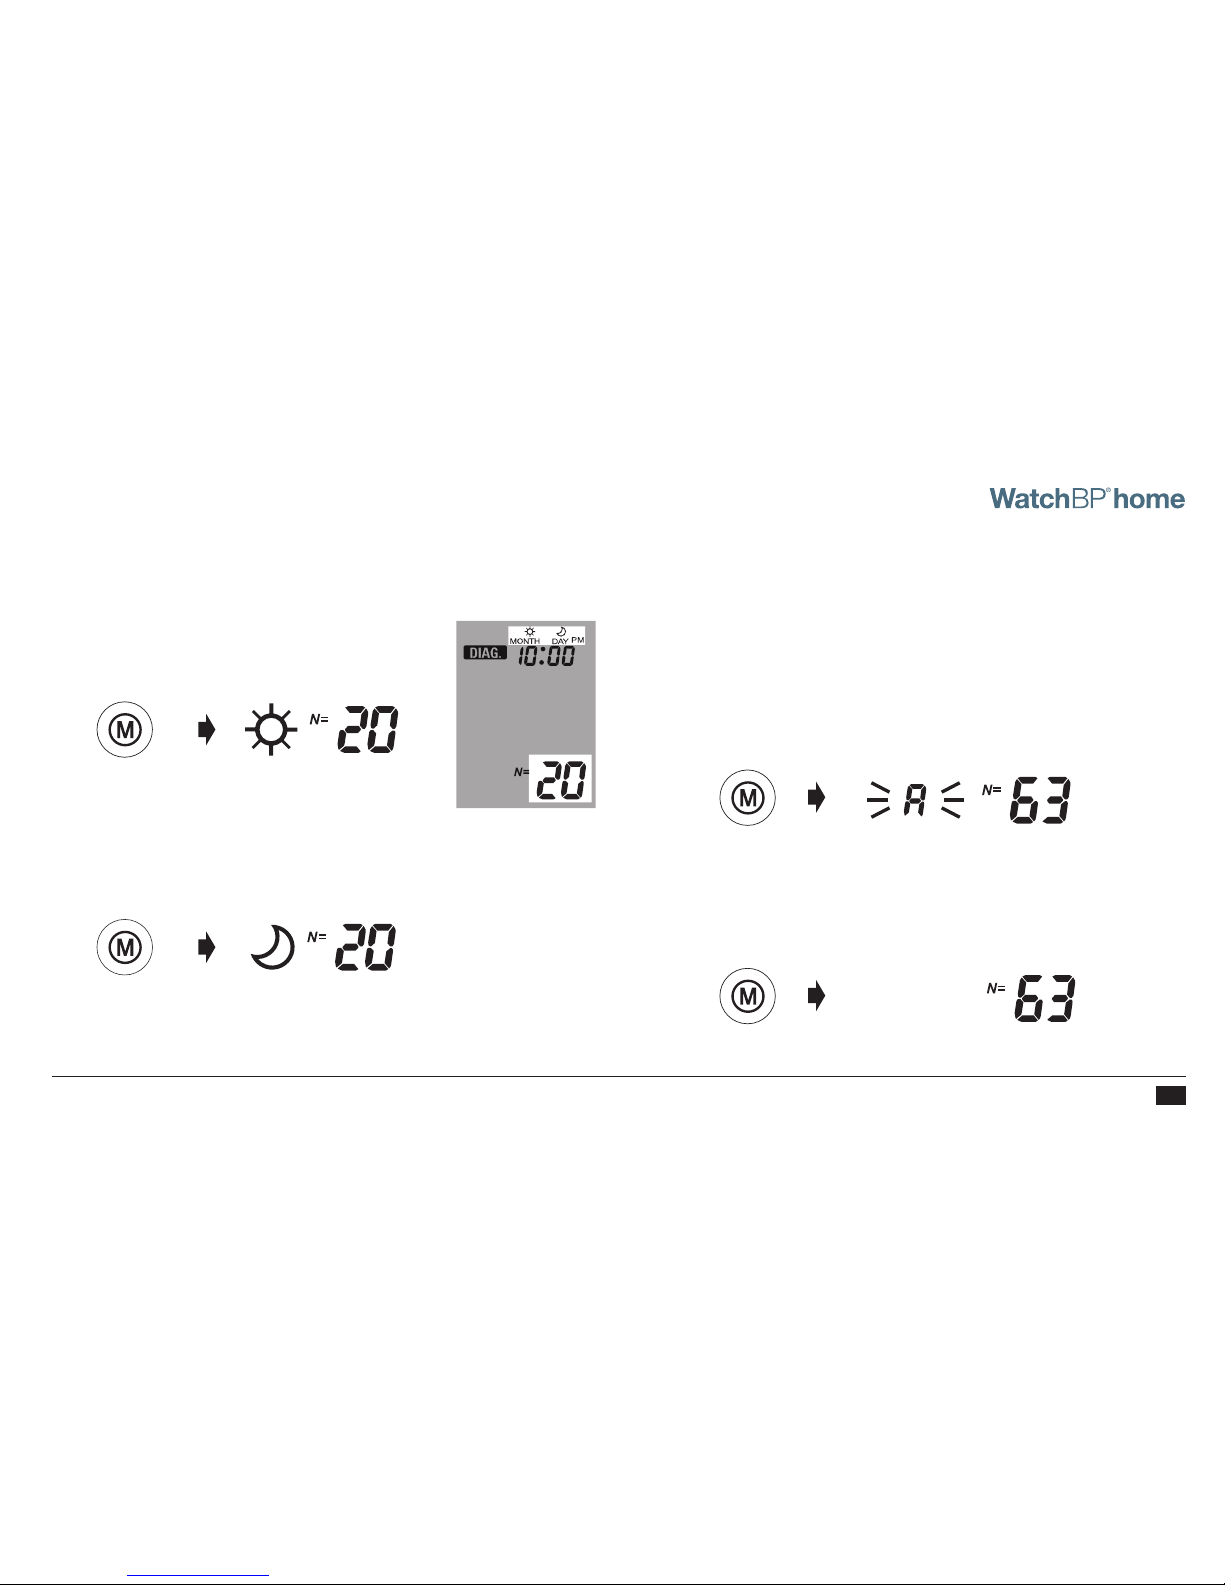
2) All individual readings can be viewed by repeatedly
pressing the M Button.
In «USUAL» Mode
1) When the M Button is pressed, it briefly displays
the total number of measurements stored, e.g.
N=63, followed immediately by the average of all
measurements stored in memory.
*
All individual readings can be viewed by repeatedly pressing
the M Button.
3) Pressing M Button once again shows the average of all
evening data.
2) Pressing the M Button again displays the average of all
morning data.
Individual
Reading
Page 18

17
*
Before deleting data, be sure to ask your doctor if the
measurement data are still required. Only delete the stored
measurements when you are sure that you no longer need
the data.
Deleting measurements
Data from «DIAG.» and «USUAL» can be deleted
independent of each other.
Viewing, deleting and transferring measurements (cont.)
DIAG. USUAL
Page 19
EN18
*
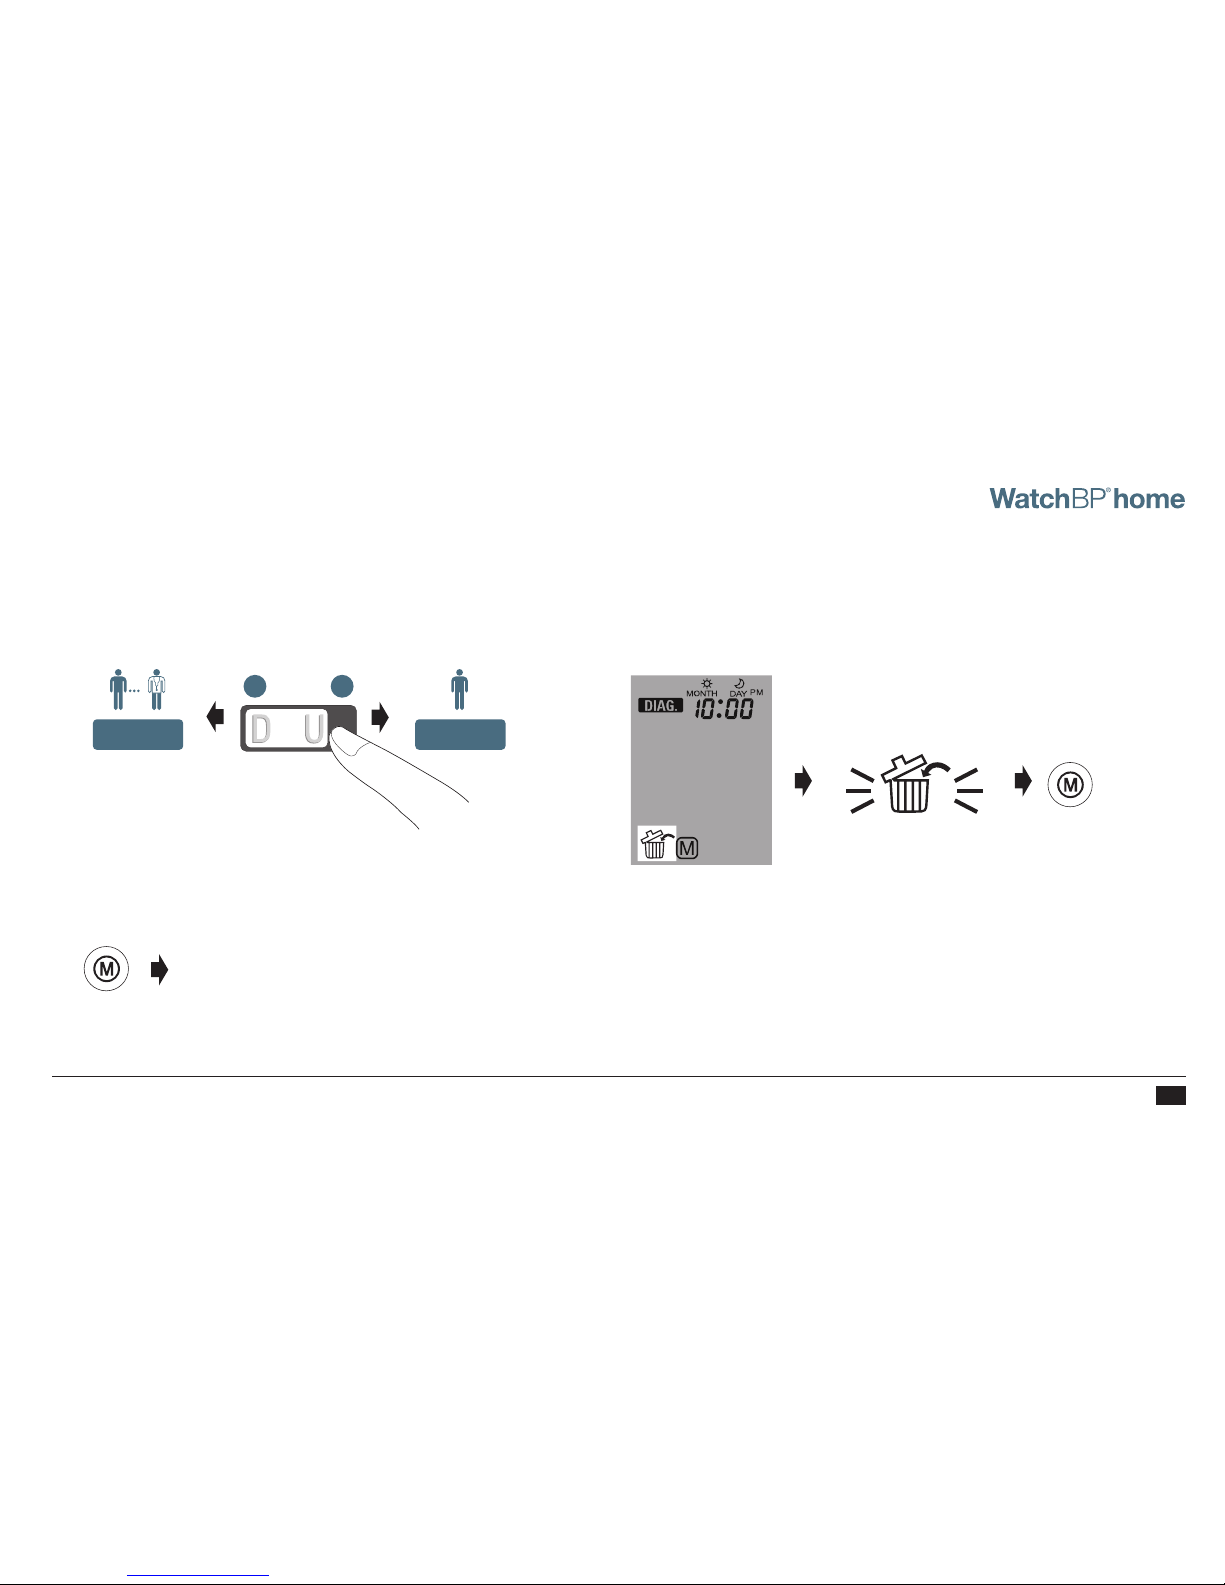
Only measurements in the selected mode will be deleted.
Measurement data in the other mode must be deleted
independently.
3) Release the M Button and press it once more while the
delete symbol flashes. Deletion is confirmed by the beep
sound.
2) Press the M Button and hold it until the delete
symbol flashes.
1) Use the Mode switch to first select the type of
measurements you wish to delete.
DIAG. USUAL
Press and hold for 7 seconds...
*
Pressing the M Button to delete data will erase all measurement
data in the selected mode.
Page 20
19
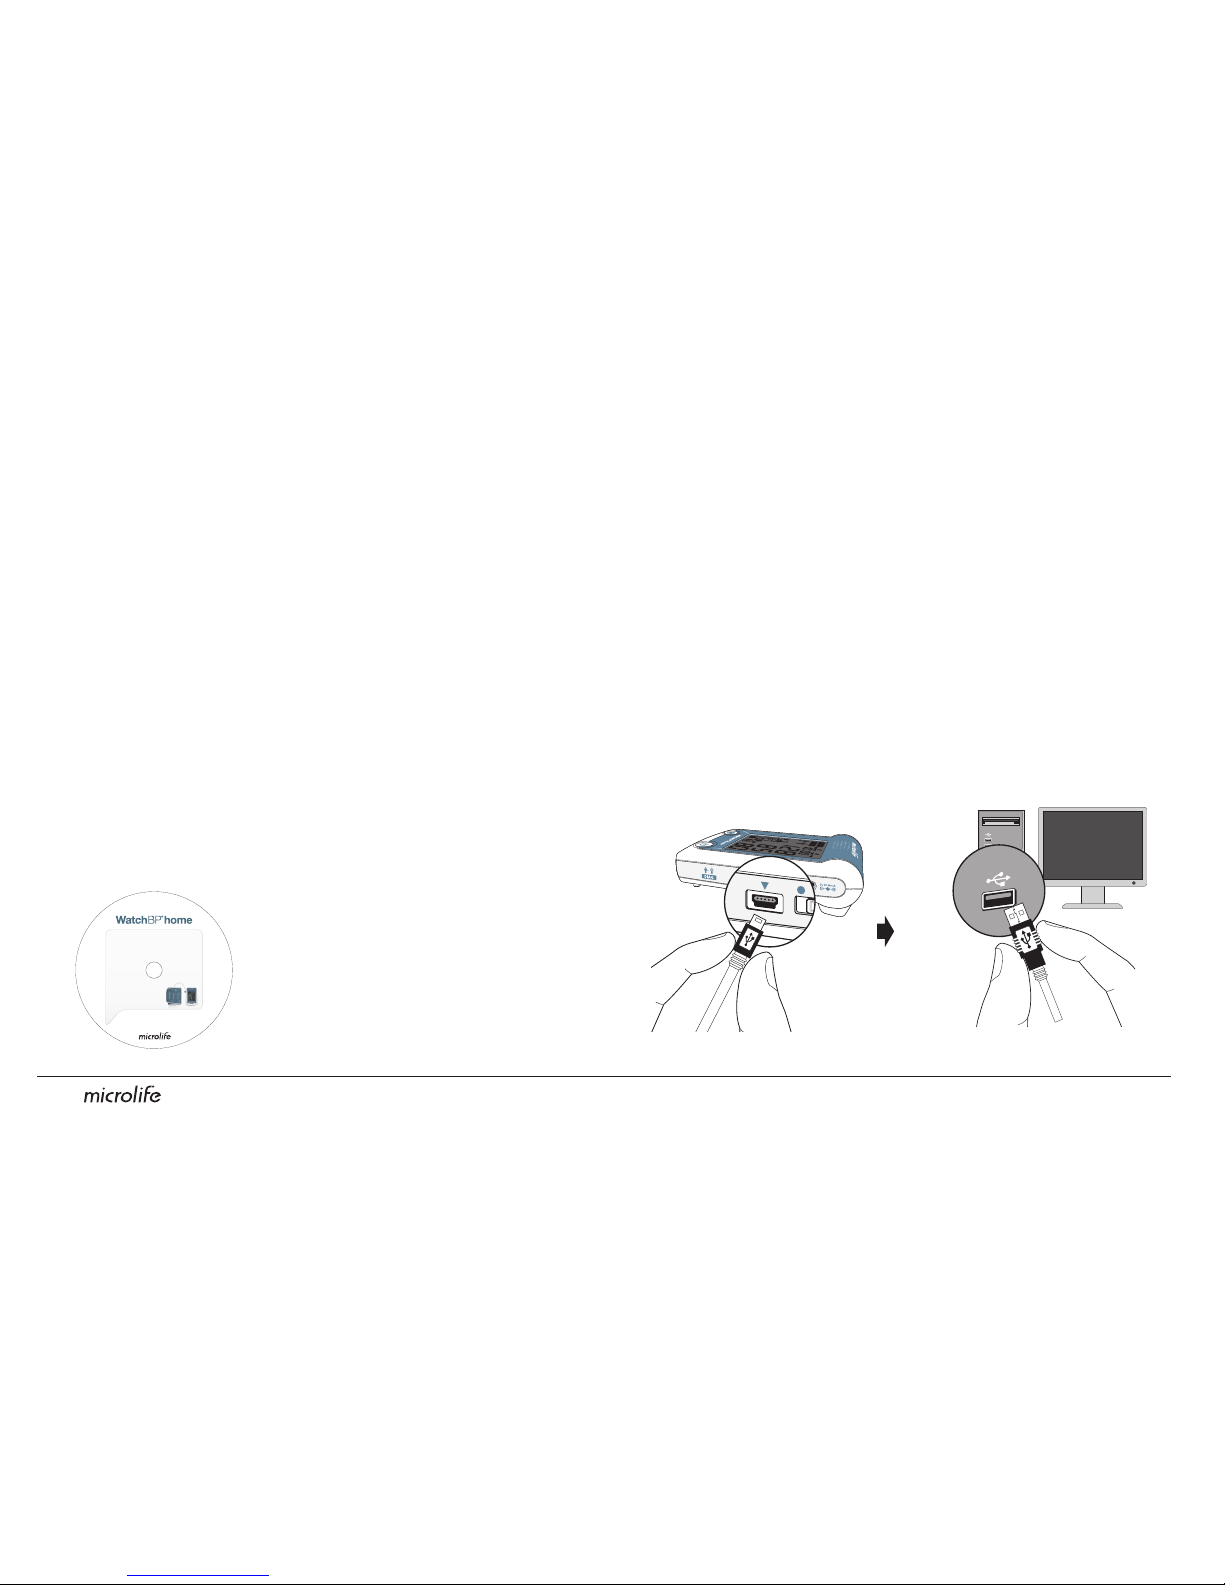
Transferring data to the computer
1) Start the software program and connect the device to
the computer using the cable supplied.
2) A successful connection is displayed by «Connected»
on the computer screen.
3) Enter name, identity number (if required), and date of
birth to create a new record.
Transferring measurements
Installation of the software program
1) Put the CD in the CD-ROM drive of your computer.
Alternatively click on «
setup.exe» in the CD’s directory.
2) Follow the instructions provided in the installation
window on the computer screen.
3) When installation is finished, be sure to restart the
computer before you work with the program.
Viewing, deleting and transferring measurements (cont.)
*
System Requirements: 550MHz
CPU. 256MB Memory, 1024x768
pixel resolution, 256 color, CDROM drive, 1 free USB port, 40MB
free hard disk space, Microsoft
Windows 2000 / XP / Vista.
©
2
0
0
8
M
i
c
r
o
l
i
f
e
C
o
r
p
o
r
a
t
i
o
n
.
A
l
l
R
i
g
h
t
s
R
e
s
e
r
v
e
d
.
System Requirements: 550MHz CPU. 256MB Memory, 1024x768
pixel resolution, 256 color, CD-ROM drive, 1 free USB port, 40MB
free hard disk space, Microsoft Windows 2000 / XP / Vista.
Install CD
WatchBP Analyzer Home
Version 1.0.0.7
Page 21

EN20
Software commands
Transfer «DIAG.» mode data
Click «Download»
Corresponding value
You can remove the check mark and the corresponding value
will not be used to calculate the average.
Store data
Click «Save», the file name is formed automatically from the
patient’s identity number and the suffix «Dmode.xls».
View the data
Click «Patient Files»
Store the «USUAL» mode data
Click «Download Usual Mode Data», the file name is formed
automatically from the patient’s identity number and the suffix
«Umode.xls».
Print the data sheet
Click «Print»
Delete the memories
Click «Clear Memory»
Close the program
Click «Exit»
*
Stored your data before using «Clear Memory» or «Exit».
Refer to the software user manual for detailed information and instructions.
Page 22
21
Replacing low batteries
When the batteries need to be replaced, the
Battery Symbol will flash each time the device is
switched on.
1) Open the battery compartment at the back of
the device.
2) Replace the batteries – ensure correct polarity as
shown by the symbols in the compartment.
*
Use 4 new, long-life 1.5V, size AA batteries.
*
Do not use batteries beyond their date of expiry.
*
Remove batteries, if the device will not be used for a
prolonged period.
Battery indicator
When the batteries have ¼ power supply left, the
Battery Symbol will flash each time the device is
switched on.
Batteries and power adaptor
Page 23
EN22
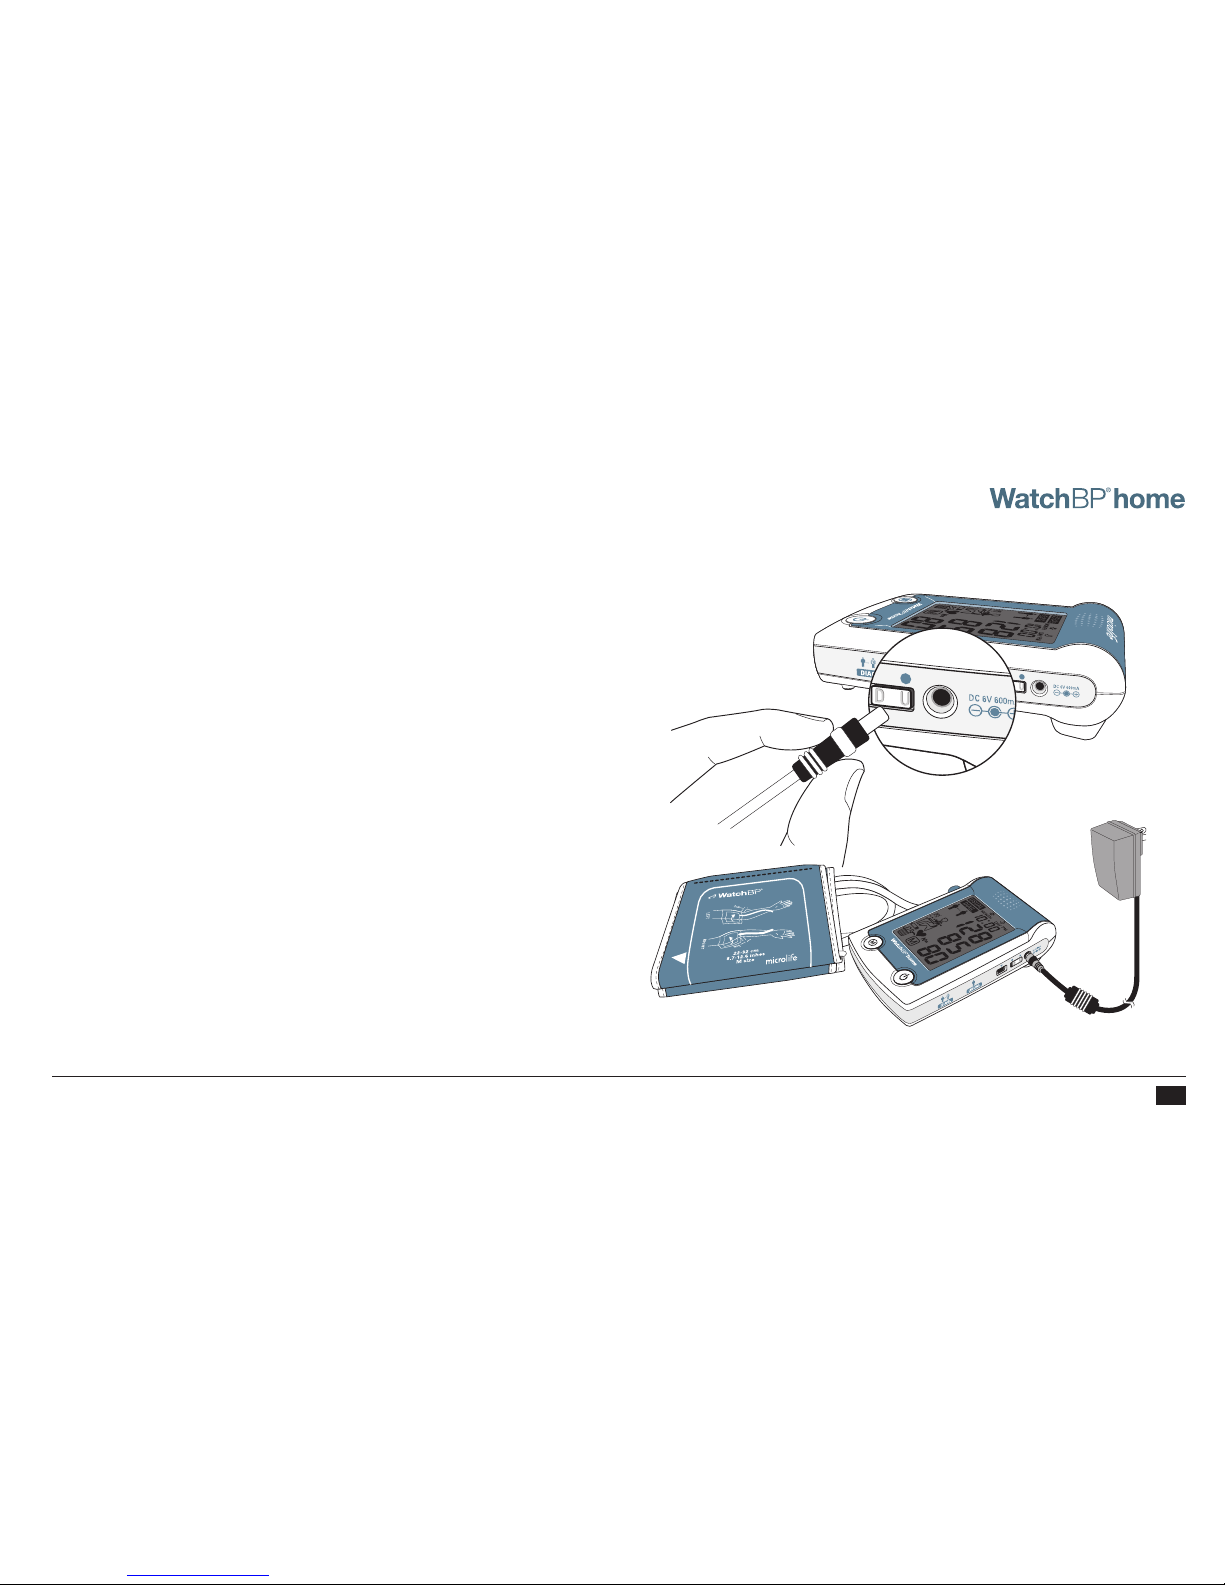
Using a power adaptor
The WatchBP Home device can also be operated using a
Microlife power adaptor (DC 6V, 600mA).
*
Only use Microlife branded power adaptors.
1) Plug the adaptor cable into the Power Plug in the
WatchBP Home device.
2) Plug the adaptor plug into the wall socket. When
the power adaptor is connected, no battery power is
consumed.
SYS
mmHg
DIA
mmHg
Pulse
/min
Page 24
23
Safety and protection
This device may be used only for the purpose described
in this booklet. The device comprises of sensetive
components and must be treated with caution. The
manufacturer cannot be held liable for damage caused
by incorrect application.
Protect the device from water and moisture
Protect the device from extreme heat and cold
Protect device from impact and drops
Protect the device from direct sunlight
Avoid proximity to electromagnetic fields, such as
those produced by mobile phones
Never open device
Safety, care, accuracy test and disposal
Observe the storage and operating conditions described
in the “Technical specifications” section of this manual.
• Ensurethatchildrendonotusethedeviceunsupervised;
some parts are small enough to be swallowed.
• Onlyactivatethepumpwhenthecuffisinstalled.
• Donotusethedeviceifyouthinkitisdamagedorif
anything appears unusual.
• Readthefurthersafetyinstructionsintheindividual
sections of the instruction manual.
• Donotconnectthedevicetoacomputer
until prompted to do so by the computer software.
Page 25
EN24
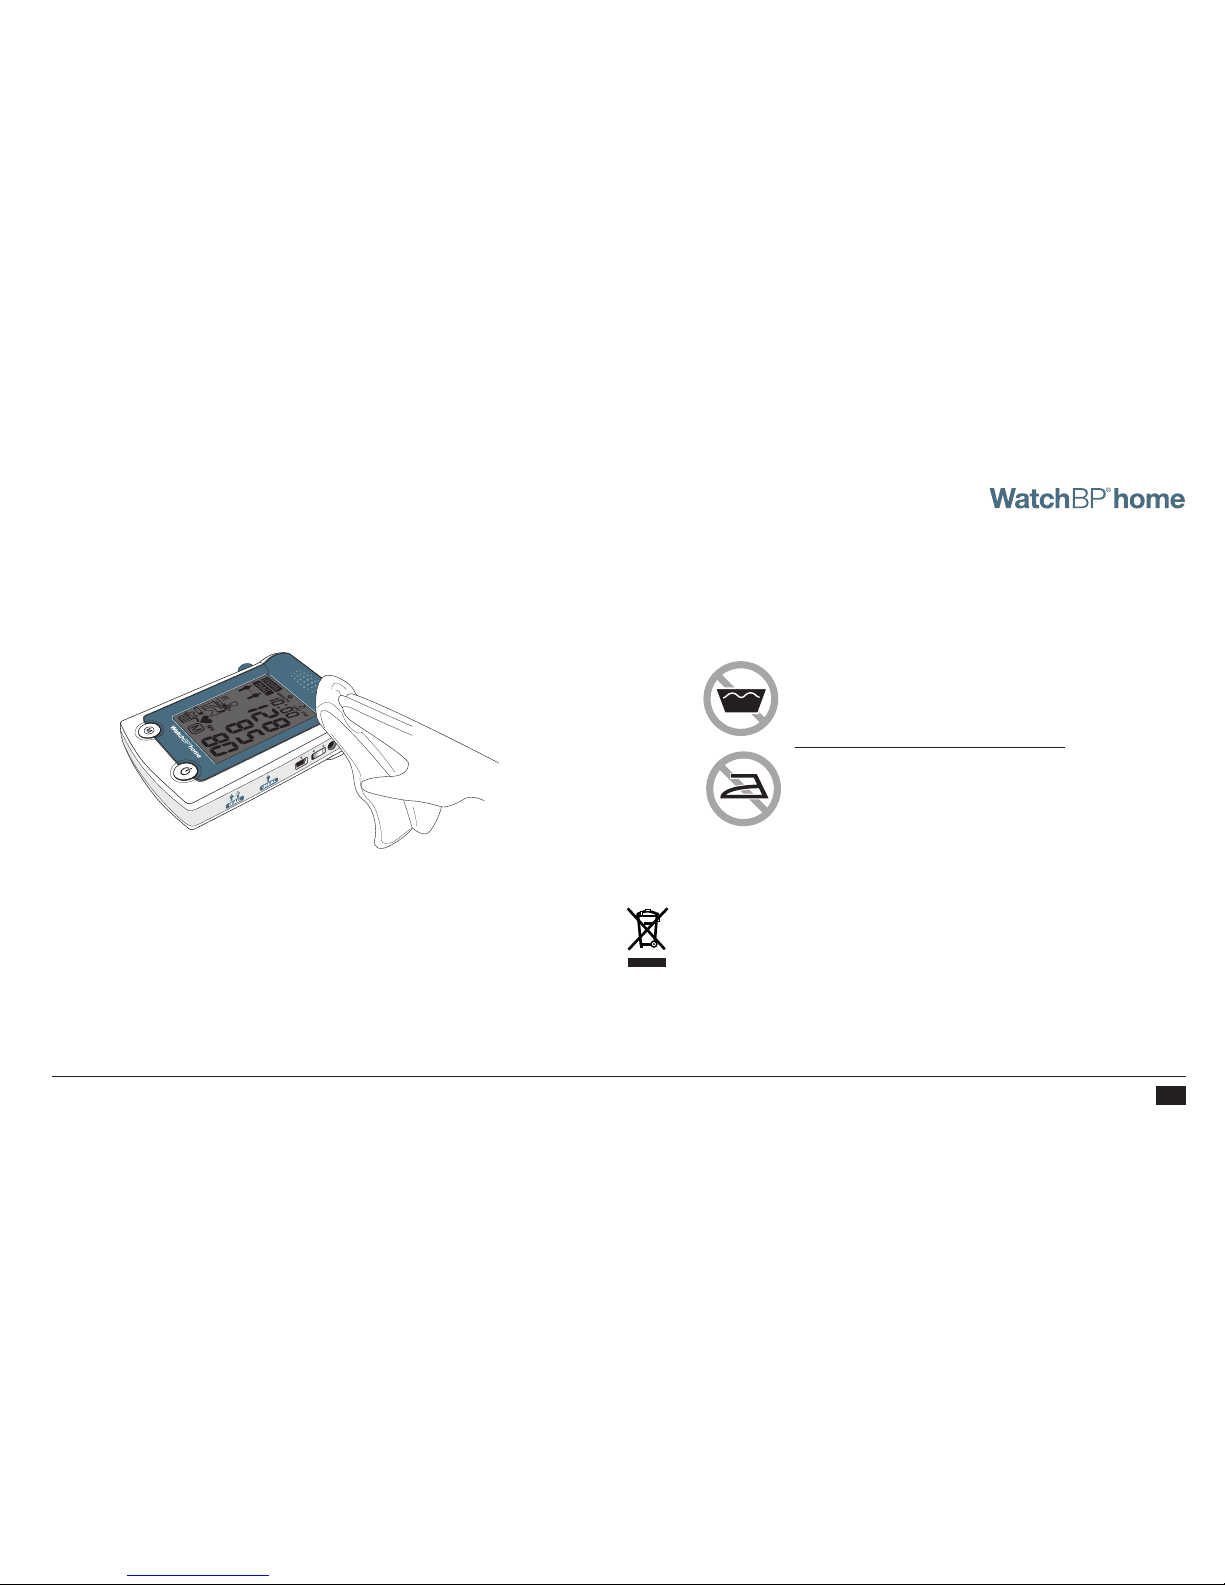
Do not wash the cuff!
Do not iron the cuff!
Accuracy test
We recommend the WatchBP Home device to be
tested for accuracy every 2 years or after mechanical
impact (e.g. being dropped). Please contact Microlife to
arrange for an accuracy test.
Cuff care
DO NOT wash the cuff. DO NOT iron the cuff cover.
Disposal
Batteries and electronic instruments must be
disposed of in accordance with the locally applicable
regulations, and not as domestic waste.
Device care
Clean the device with a soft, dry cloth.
SYS
mmHg
DIA
mmHg
Pulse
/min
Page 26
25
Error Description Potential cause and
remedy
«Er 1»
Signal too
weak
The pulse signals on the cuff
are too weak. Re-position
the cuff and repeat the
measurement.
«Er 2 »
Error signal
During the measurement,
error signals were detected
by the cuff, caused for
instance by movement or
muscle tension. Repeat the
measurement, keeping
your arm still.
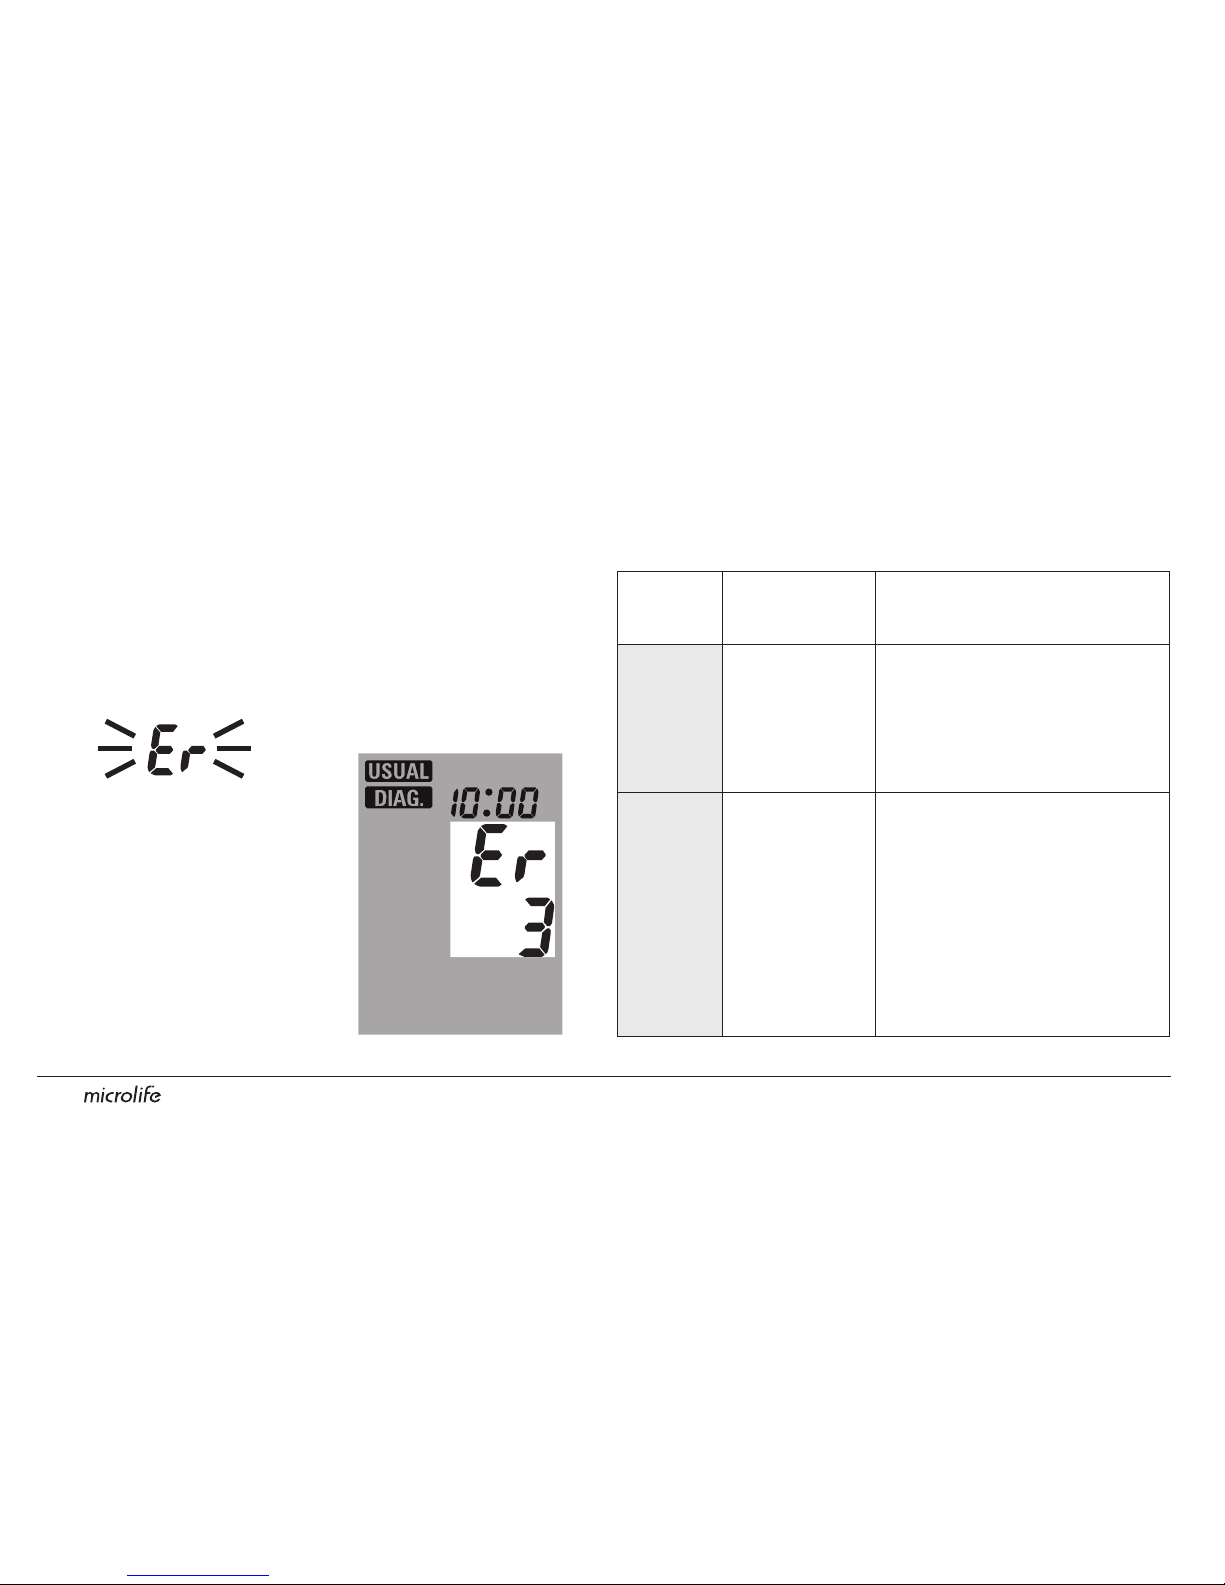
Error messages
If an error occurs during measurement, the
measurement is interrupted and an error message
«Er» is displayed.
•
Please consult your doctor,
if this or any other problem
occurs repeatedly.
•
If you think the results are
unusual, please read through
the information in this
instruction manual carefully.
Page 27
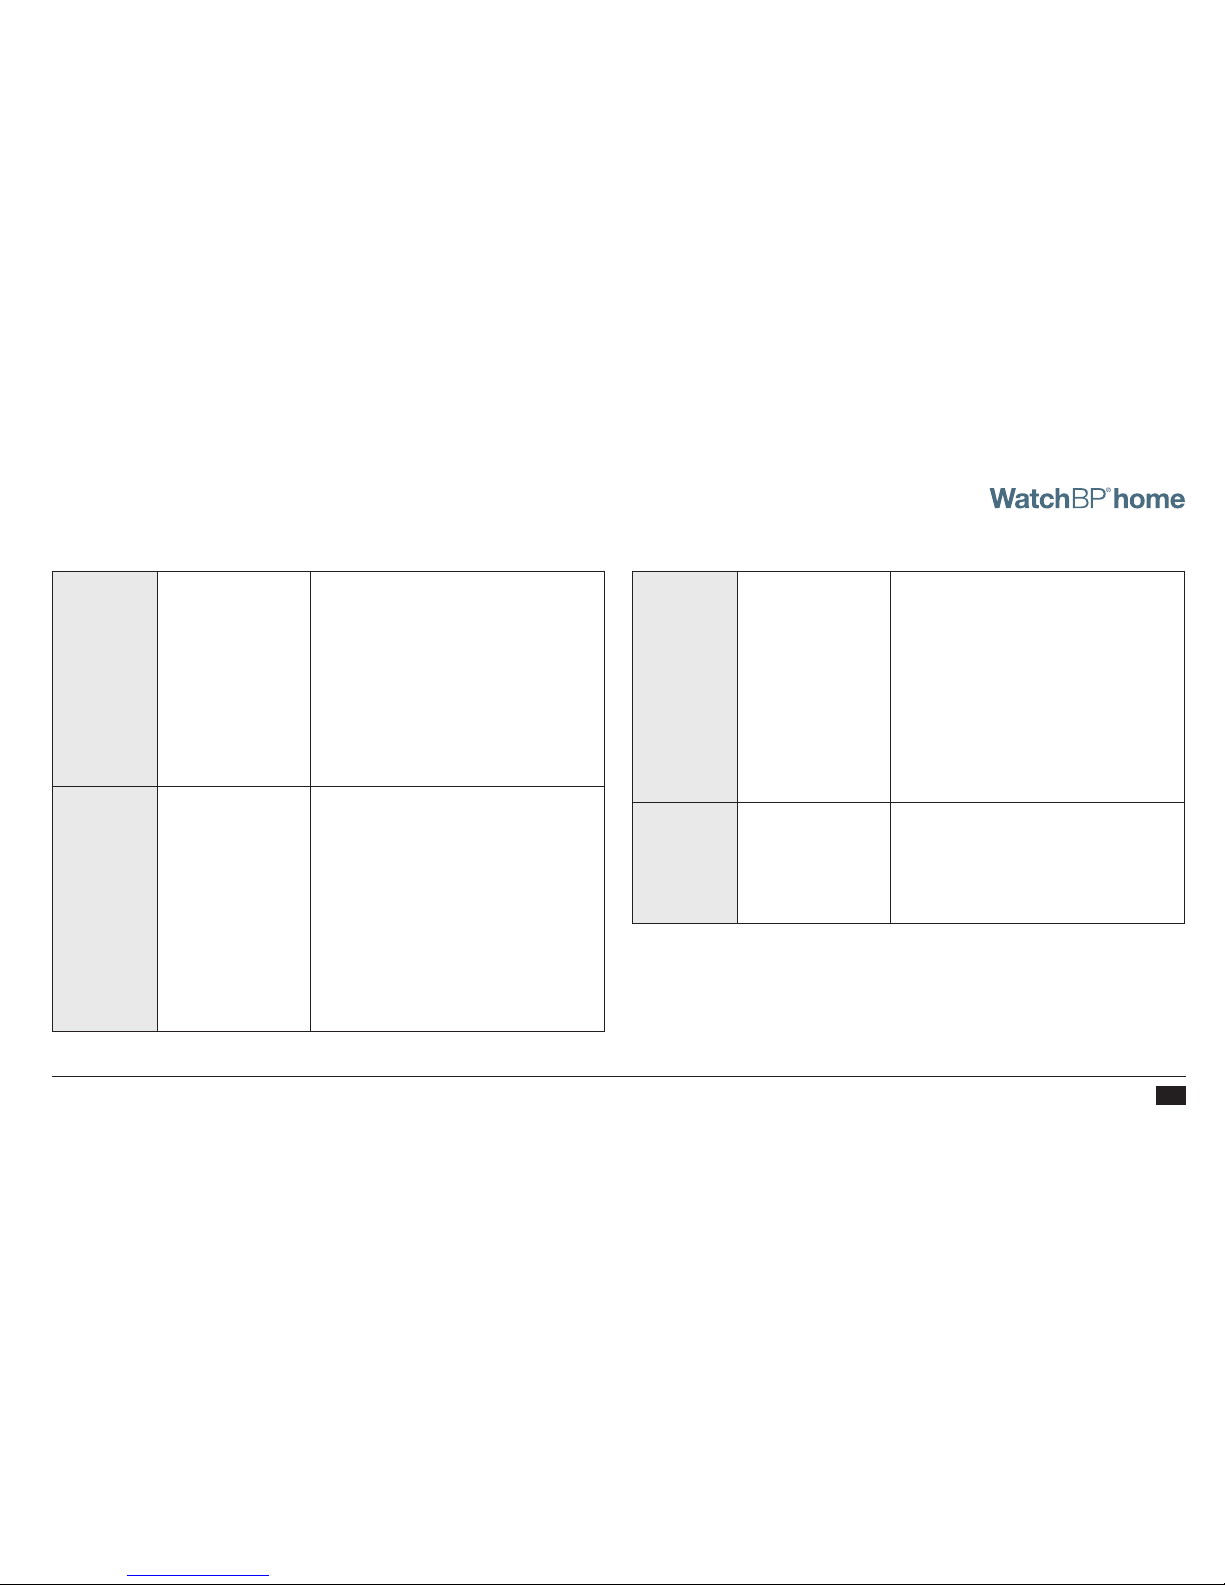
EN26
«HI»
Pulse or cuff
pressure too
high
The pressure in the cuff
is too high (over 300
mmHg) OR the pulse is
too high (over 200 beats
per minute). Relax for 5
minutes and repeat the
measurement.
«LO»
Pulse too
low
The pulse is too low (less
than 40 beats per minute).
Repeat the measurement.
«Er 3 »
No pressure
in the cuff
An adequate pressure
cannot be generated in
the cuff. A leak may have
occurred. Replace the
batteries if necessary.
Repeat the measurement.
«Er 5 »
Abnormal
result
The measuring signals are
inaccurate and no result
can therefore be displayed.
Read through the checklist
for performing reliable
measurements and then
repeat the measurement.
Page 28

27
•
There are many causes of excessively high blood
pressure readings. Your doctor will explain them in
more detail and offer treatment where appropriate.
•
Blood pressure is subject to wide fluctuations as the
day progresses, and can be impacted by emotions,
physical exertion and other conditions .
•
Blood pressure is the pressure of the blood flowing in
the arteries generated by the pumping of the heart.
Two data, the systolic (upper) value and the diastolic
(lower) value, are always measured.
•
The pulse rate is the number of times the heart beats
in a minute.
•
Permanently high blood pressure data can damage
your health and must be treated by your doctor!
•
Always discuss your home blood pressure
measurement data with your doctor and tell him/her
if you have noticed anything unusual or feel unsure.
Never rely on single blood pressure readings.
Important facts about blood pressure and home measurements
Page 29
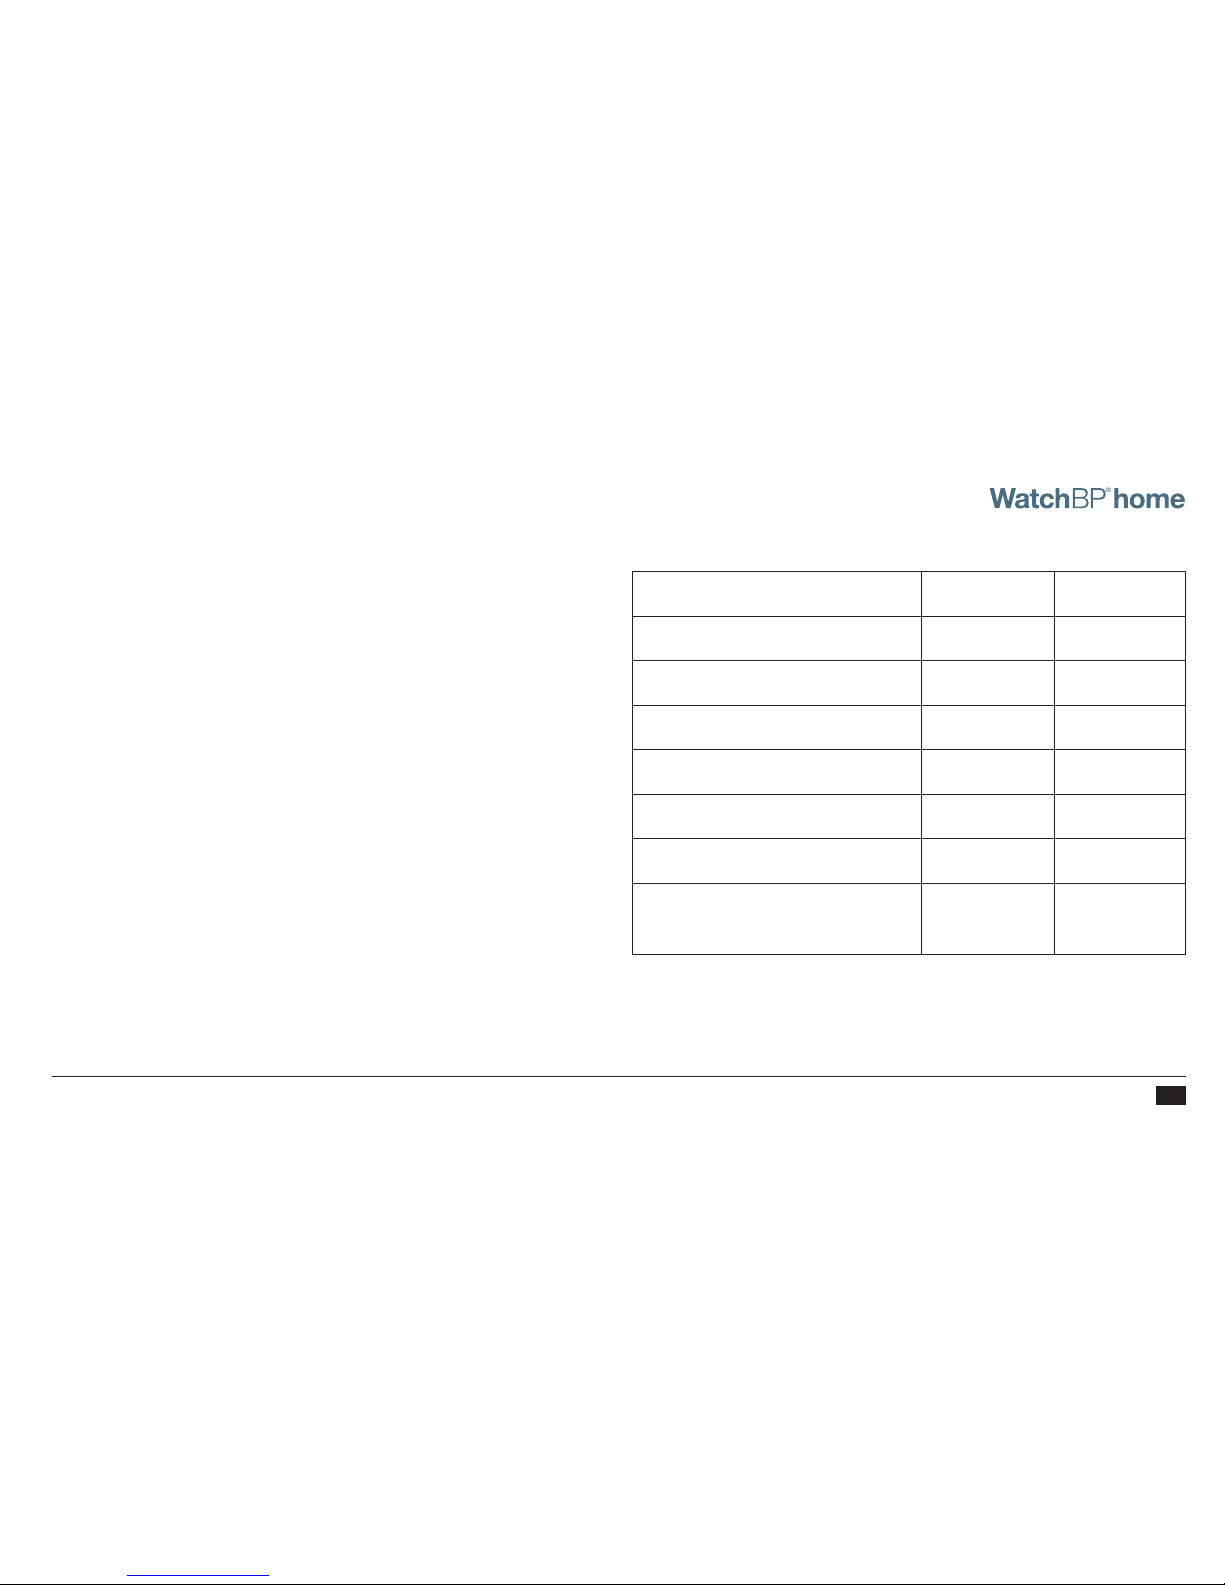
EN28
Category Systolic Diastolic
Optimal
< 120 < 80
Normal
120 - 129 80 - 84
High normal
130 - 139 85 - 89
Grade 1 Hypertension
140 - 159 90 - 99
Grade 2 Hypertension
160 - 179 100 - 109
Grade 3 Hypertension
≥ 180 ≥ 110
lsolated Systolic
Hypertension
≥ 140 < 90
Evaluating blood pressure data
The table at right classifies blood pressure data for adults
in accordance to the guidelines of the European Society of
Hypertension (ESH) in 2007. Data in mmHg.
The higher value is the one that determines the
evaluation. Example: a readout value between 150/85
or 120/98 mmHg indicates «Grade 1 Hypertension».
Page 30

29
Operating temp.:
•
10 - 40 °C / 50 - 104 °F
Storage temp.
•
-20 - +50 °C / -4 - +122 °F
•
15 - 90 % relative maximum humidity
Weight:
•
385 g (including batteries)
Dimensions:
•
150 x 100 x 50 mm
Measuring procedure:
•
Oscillometric, corresponding to Korotkoff
Method:
•
Phase I systolic, Phase V diastolic
Measurement range:
•
30 - 280 mmHg – blood pressure
•
40 - 200 beats per minute – pulse
Cuff pressure display:
•
Range: 0 - 299 mmHg
•
Resolution: 1 mmHg
•
Static accuracy:
pressure within ± 3 mmHg
•
Pulse accuracy:
± 5 % of the readout value
Voltage source:
•
4 x 1.5 V Batteries; size AA
•
Mains adapter DC 6V, 600 mA (optional)
Reference to
standards:
•
EU Directives 93/42/EEC
•
NIBP requirements: EN 1060-1/-3/-
4, ANSI / AAMI SP10, IEC 60601-1,
IEC60601-1-2
System
requirements:
•
550MHz CPU. 256MB Memory
•
1024x768 pixel resolution
•
256 color, CD-ROM drive
•
1 free USB port
•
40MB free hard disk space
•
Microsoft Windows 2000 / XP / Vista
Technical specifications
Microlife reserves the right to alter technical specfications
without prior written notice.
Page 31

SYS
mmHg
DIA
mmHg
Pulse
/min
This device is covered by a five-year guarantee from
the date of purchase. This guarantee is valid only on
presentation of the guarantee card completed by
the owner confirming date of purchase or purchase
receipt. Batteries, cuff and wearing parts are not
covered by this guarantee.
Product: WatchBP Home
Product Number: 3MX1-1
Serial Number:
Date:
Name:
Address:
Date:
Telephone:
Email:
Guarantee card
Page 32

Page 33

DE
35
Exakte Blutdruckmessungen zu Hause
mit WatchBP Home.
Bedienungsanleitung
Page 34

Microlife WatchBP Home ist das erste digitale Blutdruckmessgerät der Welt, das den Empfehlungen
der European Society of Hypertension (ESH)
1, 2
und American Heart Association (AHA) für eine
Blutdruckmessung zu Hause entspricht. Mit dem Gerät WatchBP Home können Sie exakte
Blutdruckmessungen durchführen, denen Ihr Arzt vertrauen kann. Das Gerät WatchBP Home wurde
entsprechend den Empfehlungen des ESH-Protokolls3 klinisch validiert.
.
1
O’Brien E, Asmar R, Beilin L, Imai Y, et al. European Society of Hypertension recommendations for conventional, ambulatory and home blood pressure
measurement. European Society of Hypertension Working Group on Blood Pressure Monitoring. J Hypertens 2003;21:821-848.
2
Stergiou GS, et al. A tool for reliable self-home blood pressure monitoring designed according to the European Society of Hypertension
recommendations: The Microlife WatchBP Home monitor. Blood press Monit. 2007;12:127-131.
3
Stergiou GS, Giovas PP, Gkinos CP, Patouras JD. Validation of the Microlife WatchBP Home device for self home blood pressure measurement according
to The International Protocol.Blood press Monit. 2007;12(3):185-188.
Page 35

DE
Vor der ersten Verwendung des WatchBP Home
Produktbeschreibung .............................................. 35-36
Aktivierung des Gerätes ............................................... 37
Korrekte Manschette auswählen .................................. 38
Messungen mit WatchBP Home
Betriebsart „DIAG.“ (Diagnose) ..............................39-41
Betriebsart „USUAL“ (Normal) ..................................... 42
Acht Schritte für korrekte Blutdruckmessungen
Blutdruckmessungsverfahren .................................43-46
Messungen anzeigen, löschen und übertragen
Messungen anzeigen ..............................................47-48
Messungen löschen .................................................49-50
Messungen übertragen ...........................................51-52
Anhang
Batterie und Netzteil ...............................................53-54
Sicherheit, Pflege, Genauigkeitsprüfung
und Entsorgung .......................................................55-56
Fehlermeldungen ....................................................57-58
Wichtige Hinweise ................................................. 59-60
Technische Daten ......................................................... 61
Inhaltsverzeichnis
Page 36

35
SYS
mmHg
DIA
mmHg
Pulse
/min
Manschettenbuchse
USB-Anschluss
Betriebsartschalter
Netzeingang
Ein/Aus-Taste
Display
Speichertaste (M)
Batteriefach
Page 37

36
DE
Betriebsartanzeige
Arztsymbol
Entspannung
Außerhalb der Messzeit
Batterieanzeige
Speicherdaten löschen
Speicherwert
Morgendaten
Abenddaten
Datum/Uhrzeit
Systolischer Wert
Diastolischer Wert
Pulsanzeige
Pulsfrequenz
Anzahl der gespeicherten
Daten
Page 38

37
3) Den Tag einstellen - Stellen Sie den Tag mit der
Taste „M“ ein. Drücken Sie zur Bestätigung die
Ein-/Aus-Taste.
2) Den Monat einstellen - Stellen Sie den Monat mit der
Taste „M“ ein. Drücken Sie zur Bestätigung die Ein-/
Aus-Taste.
Drücken Sie zur Bestätigung die
Ein-/Aus-Taste.
Drücken Sie zur Auswahl die Taste
„M“.
1) Das Jahr einstellen Wenn Sie den Schutzfolienstreifen
abziehen oder neue Batterien einlegen, blinkt die
Jahresanzeige auf dem Display. Wählen Sie mit der
Taste „M“ das Jahr aus. Drücken Sie zur Bestätigung der
Auswahl die Ein-/Aus-Taste.
Gerät aktivieren
Ziehen Sie den Schutzfolienstreifen vom Batteriefach ab.
Vor der ersten Verwendung des WatchBP Home
SYS
mmHg
DIA
mmHg
Pulse
/min
Page 39

DE38
Korrekte Manschette auswählen
Das Gerät WatchBP home ist mit verschiedenen
Manschettengrößen erhältlich. Wenn die Manschettengröße Ihres Gerätes Ihrer Meinung nach nicht korrekt ist,
wenden Sie sich bitte an Ihren Arzt.
*
Verwenden Sie nur Microlife-Manschetten!
5) Wenn Sie das Datum und die Uhrzeit ändern möchten,
nehmen Sie kurz eine Batterie aus dem Batteriefach
heraus und legen Sie diese wieder ein. Die Jahreszahl
blinkt. Führen Sie die oben genannten Schritte durch.
4) Die Zeit einstellen – Nachdem Sie die Stunden und
Minuten eingestellt und die Ein-/Aus-Taste gedrückt
haben, sind Datum und Uhrzeit eingestellt und die
aktuelle Zeit wird angezeigt.
M (mittlere Größe)
22 – 32 cm
Für die meisten Patienten ist M die korrekte Größe.
L (große Größe)
32 - 42 cm
Page 40

39
Betriebsart „DIAG.“ (Diagnose)
Die Betriebsart „DIAG.“ (Diagnose) sollte ausgewählt
werden, wenn der Blutdruck entsprechend den
Messungsrichtlinien der European Society of
Hypertension (ESH) gemessen werden soll oder dies der
Arzt so wünscht.
Wählen Sie vor jeder Messung mit dem Betriebsartschalter an der Seite des Gerätes die gewünschte
Betriebsart aus. Die beiden Optionen sind: Betriebsart
„DIAG.“ (Diagnose) und „USUAL“ (Normal).
DIAG. USUAL
Messungen mit WatchBP Home
DIAG. USUAL
Page 41

DE40
Zwei Messserien pro Tag
ESH-Richtlinien empfehlen eine doppelte Messung am
Morgen zwischen 6.00 und 9.00 Uhr sowie eine doppelte
Messung am Abend zwischen 18.00 und 21.00 Uhr.
Messen Sie den Blutdruck immer vor Einnahme Ihrer
Medikamente, es sei denn, der Arzt schreibt Ihnen
etwas anderes vor.
Keine Messungen an arbeitsfreien Tagen
In der Betriebsart „DIAG.“ (Diagnose) werden
Blutdruckmessungen an 7 aufeinanderfolgenden
Arbeitstagen (oder normalen Wochentagen)
durchgeführt. An „arbeitsfreien“ Tagen (insbesondere
Erholungstagen) sollten keine Messungen
vorgenommen werden, wenn diese Betriebsart
verwendet wird!
30
JAN
7
working
days
X1
06:00 – 09:00
X1
18:00 – 21:00
Page 42

41
Auswertung
Bringen Sie das Gerät nach der Messung über einen
Zeitraum von 7 Arbeitstagen zu Ihrem Arzt, der Ihre zu
Hause gemessenen Blutdruckwerte auswertet.
Erweiterte Messdauer
WatchBP Home besitzt eine erweiterte Messdauer und
erlaubt Messungen am Morgen zwischen 4.00 und 12.00
Uhr sowie Messungen am Abend zwischen 18.00 und
24:00 Uhr.
Außerhalb dieser
Zeiten können keine
Messungen durchgeführt
werden und es erscheint
auf dem Bildschirm
das links dargestellte
Symbol.
Wenn die Messungen
7 Tage lang
durchgeführt wurden,
blinkt das Arztsymbol
auf dem Bildschirm.
Messungen mit WatchBP Home (Fortsetzung)
Page 43

DE42
Betriebsart „USUAL“ (Normal)
Die Betriebsart „USUAL“ (Normal) sollte ausgewählt
werden, wenn der Blutdruck unabhängig von empfohlenen Richtlinien gemessen werden soll. In der Betriebsart „USUAL“ (Normal) können jederzeit einzelne
Messungen durchgeführt werden, und die Ergebnisse
werden automatisch zur späteren Auswertung durch
Ihren Arzt gespeichert.
Sichere Speicherung von 250 Messungen
Das Gerät WatchBP Home kann bis zu 250
Einzelmessungen in der Betriebsart „USUAL“ (Normal)
speichern.
*
Wenn der Speicher voll ist, überschreibt die nächste neue
Messung automatisch die älteste Messung.
250
Measurements
Anytime
Page 44

43
Acht Schritte für korrekte Blutdruckmessungen
1 Hour Before
Schritt 1
Messen Sie nicht direkt nach dem Essen, Trinken oder
Rauchen. Warten Sie mindestens eine Stunde zwischen
diesen Aktivitäten und der Blutdruckmessung.
Schritt 2
Bereiten Sie einen Stuhl und einen Tisch für die Messung
vor. Der Stuhl sollte eine senkrechte Rückenlehne haben
und der Tisch sollte so hoch sein, dass sich Ihr Oberarm in
der Höhe Ihres Herzens befindet.
Page 45

DE44
Schritt 3
Entfernen Sie alle Kleidungsstücke, welche die Messung
am entsprechenden Arm behindern oder einschränken.
Legen Sie die Manschette an. Achten Sie darauf, dass
die untere Kante der Manschette genau 2 bis 3 über der
Armbeuge liegt. Der Verbindungsschlauch zwischen
Manschette und Gerät sollte auf der Innenseite des
Armes liegen. (Weitere grafische Hinweise finden Sie auf
der Manschette.)
Schritt 4
Setzen Sie sich und entspannen Sie sich mindestens 5
Minuten, bevor Sie den Blutdruck messen.
Page 46

45
Schritt 5
Sitzen Sie aufrecht und lehnen Sie sich bequem gegen
die Rückenlehne des Stuhles. Drücken Sie die Starttaste.
Das Gerät beginnt mit einer 60-s-Wartezeit. Bewegen
Sie sich während der Messung nicht. Kreuzen Sie auch
nicht Ihre Beine und spannen Sie Ihre Armmuskeln
nicht an. Atmen Sie normal und reden Sie nicht.
Schritt 6
Ein Messzyklus besteht aus zwei Messungen. Entspannen
Sie sich nach Abschluss der ersten Messung und warten
Sie auf die zweite Messung. Die zweite Messung beginnt
nach 60 s. Vermeiden Sie in dieser Zeit jede Bewegung.
SYS
mmHg
DIA
mmHg
Pulse
/min
60 sec.
12
Acht Schritte für korrekte Blutdruckmessungen (Fortsetzung)
Page 47

DE46
Schritt 7
Sobald beide Messungen abgeschlossen sind, werden die
Messdaten automatisch für eine spätere Einsichtnahme
durch Ihren Arzt gespeichert. Wenn nach dem Messen ein
Fehler angezeigt wird, wiederholen Sie bitte die ersten
sechs Schritte.
Schritt 8
Nachdem Sie 7 Tage Messungen erfasst haben, blinkt
das Arztsymbol auf Ihrer Anzeige. Vergessen Sie nicht,
das Gerät WatchBP Home zu Ihrem nächsten Arztbesuch
mitzunehmen. (Hinweis: Das Arztsymbol wird nur
für Messungen in der Betriebsart „DIAG.“ (Diagnose)
angezeigt.)
Automatisch gespeichert
Page 48

47
2) Drücken Sie anschließend die Taste „M“.
In der Betriebsart „DIAG.“ (Diagnose)
1) Nach Betätigung der Taste „M“ wird kurz die
Gesamtzahl der gespeicherten Messungen angezeigt,
beispielsweise N=20.
Messungen anzeigen
1) Wählen Sie mit dem Betriebsartschalter zunächst die
Art der Messungen aus, die Sie anzeigen möchten.
Messungen anzeigen, löschen und übertragen
DIAG. USUAL
*
„- -“ wird angezeigt,
wenn die angezeigte Zahl
der Messungen kleiner
als 12 ist.
*
„A“ wird angezeigt, wenn
die angezeigte Zahl der
Mittelwert aller Daten ist.
Page 49

DE48
2) Alle Einzelmessungen können Sie anzeigen, wenn Sie
mehrfach die Taste „M“ drücken.
In der Betriebsart „USUAL“ (Normal)
1) Nach Betätigung der Taste „M“ wird kurz die
Gesamtzahl der Messungen angezeigt, beispielsweise
N=63, danach der Mittelwert aller im Speicher
abgelegten Messungen.
*
Alle Einzelmessungen können Sie anzeigen, wenn Sie
mehrfach die Taste „M“ drücken.
3) Eine erneute Betätigung der Taste „M“ zeigt den
Mittelwert aller Abenddaten.
2) Wenn Sie die Taste „M“ erneut drücken, wird der
Mittelwert aller Morgendaten angezeigt.
Einzelner
Messwert
Page 50

49
*
Vor dem Löschen der Daten sollten Sie unbedingt bei
Ihrem Arzt nachfragen, ob diese Messdaten noch benötigt
werden. Löschen Sie gespeicherte Messungen nur dann,
wenn Sie sicher sind, dass Sie diese Daten nicht länger
benötigen.
Messungen löschen
Daten von „DIAG.“ und „USUAL“ können unabhängig
voneinander gelöscht werden.
Messungen anzeigen, löschen und übertragen (Fortsetzung)
DIAG. USUAL
Page 51

DE50
*
Nur Messungen in der ausgewählten Betriebsart werden
gelöscht. Die Messdaten in der anderen Betriebsart müssen
unabhängig davon gelöscht werden.
3) Lassen Sie die Taste „M“ los und drücken Sie sie erneut,
wenn das Löschsymbol blinkt. Der Löschvorgang wird
durch ein Piepsignal bestätigt.
2) Drücken Sie die Taste „M“ und halten Sie diese,
bis das Löschsymbol blinkt.
1) Wählen Sie mit dem Betriebsartschalter zuerst die
Art von Messungen aus, die Sie löschen wollen.
DIAG. USUAL
Halten Sie die Taste 7 Sekunden
lang gedrückt...
*
Beim Drücken der Taste „M“ zum Löschen der Daten werden alle
Messdaten in der ausgewählten Betriebsart gelöscht.
Page 52

51
Daten an den Computer übertragen
1) Starten Sie das Softwareprogramm und verbinden Sie
das Gerät mit dem mitgelieferten Kabel mit dem Computer.
2) Bei einer erfolgreichen Verbindung wird die Meldung
„Connected“ (Verbunden) auf dem Computerbildschirm
angezeigt.
3) Geben Sie Name, ID-Nummer (falls benötigt) und Geburtsdatum ein, um einen neuen Datensatz anzulegen.
Messungen übertragen
Installation des Softwareprogramms
1) Legen Sie die CD in das CD-ROM-Laufwerk Ihres
Computers ein. Alternativ können Sie auch auf
„setup.
exe“ im Verzeichnis der CD klicken.
2) Folgen Sie den Anweisungen im Installationsfenster
auf dem Computerbildschirm.
3) Nach Abschluss der Installation müssen Sie den
Computer neu starten, bevor Sie mit dem Programm
arbeiten können.
Messungen anzeigen, löschen und übertragen (Fortsetzung)
*
Systemanforderungen: 550 MHz CPU,
256 MB Speicher, Auflösung 1024x768
Pixel, 256 Farben, CD-ROM-Laufwerk,
1 freier USB-Anschluss, 40 MB freier
Festplattenspeicher, Microsoft
Windows 2000/XP/Vista
©
2
0
0
8
M
i
c
r
o
l
i
f
e
C
o
r
p
o
r
a
t
i
o
n
.
A
l
l
R
i
g
h
t
s
R
e
s
e
r
v
e
d
.
System Requirements: 550MHz CPU. 256MB Memory, 1024x768
pixel resolution, 256 color, CD-ROM drive, 1 free USB port, 40MB
free hard disk space, Microsoft Windows 2000 / XP / Vista.
Install CD
WatchBP Analyzer Home
Version 1.0.0.7
Page 53

DE52
Softwarebefehle
Daten der Betriebsart „DIAG.“
(Diagnose) übertragen
Klicken Sie auf „Download“ (Herunterladen).
Entsprechender Wert
Sie können das Häkchen im Kontrollkästchen löschen; der
entsprechende Wert wird dann nicht für die Berechnung des
Durchschnitts verwendet.
Daten speichern
Klicken Sie auf „Save“ (Speichern); der Dateiname wird automatisch
aus der ID-Nummer des Patienten und der Endung „Dmode.xls“
gebildet.
Daten anzeigen
Klicken Sie auf „Patient Files“ (Patientendateien).
Daten in der Betriebsart „USUAL“
(Normal) speichern.
Klicken Sie auf „Download Usual Mode Data“ (Daten der Betriebsart
„Usual“ (Normal) herunterladen); der Dateiname wird automatisch aus
der ID-Nummer des Patienten und der Endung „Umode.xls“ gebildet.
Datenblatt drucken
Klicken Sie auf „Print“ (Drucken).
Speicher löschen
Klicken Sie auf „Clear Memory“ (Speicher löschen).
Programm schließen
Klicken Sie auf „Exit“ (Beenden).
*
Speichern Sie Ihre Daten, bevor Sie die Optionen „Clear Memory“ (Speicher löschen) oder „Exit“ (Beenden) verwenden.
Detaillierte Informationen und Anweisungen finden Sie im Softwarebenutzerhandbuch.
Page 54

53
Erschöpfte Batterien ersetzen
Wenn die Batterien ersetzt werden müssen, blinkt
das Batteriesymbol jedes Mal, wenn das Gerät
eingeschaltet wird.
1) Öffnen Sie das Batteriefach auf der Rückseite
des Geräts.
2) Ersetzen Sie die Batterien – achten Sie auf die
richtige Polarität entsprechend den Symbolen
im Batteriefach.
*
Verwenden Sie 4 neue 1,5 V-Longlife-Batterien,
Größe AA.
*
Verwenden Sie die Batterien nicht über das
Verfallsdatum hinaus.
*
Nehmen Sie die Batterien heraus, wenn das Gerät
längere Zeit nicht verwendet wird.
Batterieanzeige
Wenn die Batterie nur noch ein Viertel ihrer Kapazität
enthält, blinkt das Batteriesymbol jedes Mal, wenn das
Gerät eingeschaltet wird.
Batterie und Netzteil
Page 55

DE54
Verwendung des Netzteils
Das Gerät WatchBP Home kann auch mit einem MicrolifeNetzteil (6 V–, 600 mA) verwendet werden.
*
Verwenden Sie nur Netzteile von Microlife.
1) Schließen Sie das Netzteilkabel an der
Netzeingangsbuchse des Geräts WatchBP Home an.
2) Verbinden Sie den Stecker des Netzteils mit einer
Wandsteckdose. Sobald das Netzteil angeschlossen ist,
wird keine Batterieleistung mehr verbraucht.
SYS
mmHg
DIA
mmHg
Pulse
/min
Page 56

55
Sicherheit und Schutz
Dieses Gerät darf nur für den in dieser Broschüre
beschriebenen Einsatzzweck verwendet werden. Das
Gerät enthält empfindliche Komponenten und muss
vorsichtig behandelt werden. Der Hersteller haftet
nicht für Schäden durch falsche Anwendung.
Schützen Sie das Gerät vor Wasser und Feuchtigkeit.
Schützen Sie das Gerät vor extremer Hitze und Kälte.
Schützen Sie das Gerät vor Schlägen und Stößen.
Schützen Sie das Gerät vor direktem Sonnenlicht.
Vermeiden Sie die Nähe von elektrischen Feldern,
wie sie beispielsweise von Mobiltelefonen erzeugt
werden.
Öffnen Sie das Gerät nicht.
Sicherheit, Pflege, Genauigkeitsprüfung und Entsorgung
Beachten Sie die Hinweise zur Lagerung und zum Betrieb
im Abschnitt „Technische Daten“ dieser Anleitung.
• Achten Sie darauf, dass Kinder das Gerät nicht ohne
Aufsicht verwenden; einige Teile sind so klein, dass sie
verschluckt werden können.
• AktivierenSiediePumpenurdann,wenndie
Manschette angelegt ist.
• VerwendenSiedasGerätnicht,wennesIhrerMeinung
nach defekt ist oder nicht korrekt funktioniert.
• LesenSiedieSicherheitsanweisungenindeneinzelnen
Abschnitten der Bedienungsanleitung.
• VerbindenSiedasGeräterstmiteinemComputer,
wenn Sie dazu von der Computersoftware aufgefordert
werden.
Page 57

DE56
Waschen Sie die Manschette nicht!
Bügeln Sie die Manschette nicht!
Genauigkeitsprüfung
Wir empfehlen, das Gerät WatchBP Home alle
zwei Jahre beziehungsweise nach mechanischer
Beanspruchung (beispielsweise nach Herunterfallen)
auf Genauigkeit zu prüfen. Wenden Sie sich an Microlife,
um die Messgenauigkeit überprüfen zu lassen.
Manschettenpflege
Waschen Sie die Manschette NICHT! Bügeln Sie die
Manschette NICHT!.
Entsorgung
Batterien und elektronische Instrumente müssen
entsprechend den vor Ort geltenden gesetzlichen
Vorschriften entsorgt werden und gehören nicht In
den Hausmüll.
Gerätepflege
Reinigen Sie das Gerät mit einem trockenen, weichen
Tuch.
SYS
mmHg
DIA
mmHg
Pulse
/min
Page 58

57
Fehler Beschreibung Mögliche Ursache und
Abhilfe
„Er 1“
Signal zu
schwach
Pulssignale an der
Manschette sind zu schwach.
Legen Sie die Manschette neu
an und wiederholen Sie die
Messung.
„Er 2 “
Fehlersignal
Während der Messung
wurden durch die Manschette
Fehlersignale erkannt,
beispielsweise durch
eine Bewegung oder
eine Muskelspannung.
Wiederholen Sie die Messung
und halten Sie den Arm ruhig.
Fehlermeldungen
Wenn während der Messung ein Fehler auftritt, wird
die Messung unterbrochen und die Fehlermeldung
„Er“ angezeigt.
•
Wenden Sie sich an Ihren
Arzt, wenn dieses oder ein
anderes Problem häufiger
auftritt.
•
Wenn die Ergebnisse Ihrer
Meinung nach falsch sind,
lesen Sie die Information in
dieser Bedienungsanleitung
noch einmal sorgfältig durch.
Page 59

DE58
„HI“
Pulswert
oder Manschettendruck zu hoch
Der Druck in der Manschette
ist zu hoch (über 300 mmHg)
ODER der Pulswert ist zu
hoch (über 200 Pulsschläge
pro Minute). Entspannen
Sie sich fünf Minuten lang
und wiederholen Sie die
Messung.
„LO“
Pulswert zu
niedrig
Der Pulswert ist zu niedrig
(weniger als 40 Schläge pro
Minute). Wiederholen Sie
die Messung.
„Er 3“
Kein Druck
in der
Manschette
In der Manschette kann kein
ausreichender Druck erzeugt
werden. Möglicherweise
ist die Manschette undicht.
Ersetzen Sie gegebenenfalls
die Batterien. Wiederholen
Sie die Messung.
„Er 5“
Anormales
Messergebnis
Die Messsignale sind
falsch und daher kann
kein Ergebnis angezeigt
werden. Kontrollieren Sie
anhand der Checkliste,
wie Sie zuverlässige
Messungen durchführen,
und wiederholen Sie die
Messung.
Page 60

59
•
Besprechen Sie Ihre zu Hause gemessenen
Blutdruckwerte immer mit Ihrem Arzt und teilen Sie
ihm/ihr mit, wenn Ihnen etwas Ungewöhnliches
aufgefallen ist oder Sie sich unsicher fühlen. Verlassen
Sie sich nie auf eine einzelne Blutdruckmessung.
•
Es gibt viele Ursachen für zu hohe Blutdruckwerte. Ihr
Arzt kann Ihnen mehr Informationen geben und ggf.
eine Behandlung anbieten.
•
Der Blutdruck unterliegt im Laufe des Tages starken
Schwankungen und kann durch Gefühle, körperliche
Anstrengung und andere Bedingungen beeinflusst
werden.
•
Blutdruck ist der Druck des Blutes, das in den
Arterien durch das Pumpen des Herzens fließt. Es
werden immer zwei Daten – der systolische (obere)
Wert und der diastolische (untere) Wert – gemessen.
•
Die Pulsfrequenz bezeichnet die Anzahl der
Herzschläge in einer Minute.
•
Ständig hohe Blutdruckwerte können Ihrer
Gesundheit schaden und müssen von Ihrem Arzt
behandelt werden!
Wichtige Hinweise zu Blutdruck und Messungen zu Hause
Page 61

DE60
Kategorie Systolisch Diastolisch
Optimal
< 120 < 80
Normal
120–129 80–84
Hoch-normal
130–139 85–89
Hypertonie (Grad 1)
140–159 90–99
Hypertonie (Grad 2)
160–179 100–109
Hypertonie (Grad 3)
≥ 180 ≥ 110
lsolierte systolische
Hypertonie
≥ 140 < 90
Auswertung der Blutdruckmesswerte
Die Tabelle rechts klassifiziert die Blutdruckmesswerte
für Erwachsene entsprechend den Richtlinien der
European Society of Hypertension (ESH) aus dem Jahr
2007. Daten in mmHg.
Es zählt jeweils der höhere Wert für die Einteilung.
Beispiel: Ein Messwert zwischen 150/85 oder
120/98 mmHg entspricht „Hypertonie (Grad 1)“.
Page 62

61
Betriebstemperatur:
•
10–40 °C/50–104 °F
Lagertemperatur:
•
-20–+50 °C/-4–+122 °F
•
15–90 % relative maximale
Luftfeuchtigkeit
Gewicht:
•
385 g (inkl. Batterie)
Abmessungen:
•
150 × 100 × 50 mm
Messverfahren:
•
Oszillometrisch, entsprechend Korotkoff
Methode:
•
Phase I systolisch, Phase V diastolisch
Messbereich:
•
30–280 mmHg – Blutdruck
•
40–200 Pulsschläge pro Minute – Puls
Manschettendruckanzeige:
•
Anzeigebereich: 0–299 mmHg
•
Auflösung: 1 mmHg
•
Statische Messgenauigkeit:
Druck ±3 mmHg
•
Pulsmessgenauigkeit:
± 5 % des Anzeigewerts
Spannungsquelle:
•
4 × 1,5 V-Batterien; Größe AA
•
Netzteil 6 V–, 600 mA (optional)
Bezugnahmen auf
Normen:
•
EU-Richtlinien 93/42/EWG
•
NIBP-Anforderungen: EN 1060-1/-3/-4,
ANSI/AAMI SP10, IEC 60601-1, IEC606011-2
System-
anforderungen:
•
550 MHz CPU, 256 MB Speicher
•
Auflösung 1024x768 Pixel
•
256 Farben, CD-ROM-Laufwerk
•
1 freier USB-Anschluss
•
40 MB freier Festplattenspeicher
•
Microsoft Windows 2000/XP/Vista
Technische Daten
Microlife behält sich das Recht vor, technische Daten ohne
vorherige Ankündigung zu ändern.
Page 63

SYS
mmHg
DIA
mmHg
Pulse
/min
Für dieses Gerät gilt eine Fünf-Jahres-Garantie ab
Kaufdatum. Diese Garantie ist nur bei Vorlage der
vom Verkäufer ausgefüllten Garantiekarte mit
Bestätigung des Kaufdatums oder des Kaufbelegs
gültig. Batterien, Manschette und Verschleißteile
sind von dieser Garantie ausgeschlossen.
Produkt: WatchBP Home
Produkt-Nr.: 3MX1-1
Serien-Nr.:
Datum:
Name:
Adresse:
Datum:
Telefon:
E-Mail:
Garantiekarte
Page 64

Page 65

FR
67
Mesures précises de la
pression artérielle avec le
WatchBP Home.
Mode d'emploi
Page 66

Microlife WatchBP Home est le premier tensiomètre numérique au monde à respecter rigoureusement
les recommandations de la Société Européenne d'Hypertension (ESH)
1, 2
et de l'American Heart
Association (AHA) pour les automesures de la pression artérielle. Le WatchBP Home vous aide à relever
au domicile une pression artérielle exacte à laquelle votre médecin peut se fier. Le tensiomètre WatchBP
Home a fait l'objet d'une validation clinique conforme au protocole de l'ESH
3.
1
O’Brien E, Asmar R, Beilin L, Imai Y, et al. European Society of Hypertension recommendations for conventional, ambulatory and home blood pressure
measurement. European Society of Hypertension Working Group on Blood Pressure Monitoring. J Hypertens 2003;21:821-848.
2
Stergiou GS, et al. A tool for reliable self-home blood pressure monitoring designed according to the European Society of Hypertension
recommendations: The Microlife WatchBP Home monitor. Blood press Monit. 2007;12:127-131.
3
Stergiou GS, Giovas PP, Gkinos CP, Patouras JD. Validation of the Microlife WatchBP Home device for self home blood pressure measurement according
to The International Protocol. Blood Press Monit. 2007;12(3):185-188.
Page 67

FR
Avant le premier emploi du WatchBP Home
Description du produit .............................................67-68
Activation de l'appareil ................................................ 69
Sélection du bon brassard ............................................. 70
Mesure de la pression artérielle avec le WatchBP
Home
Mode «DIAG.» ......................................................... 71-73
Mode «USUAL» ............................................................. 74
La mesure de la pression artérielle en huit étapes
Méthodes de mesure de la pression artérielle .......75-78
Visualisation, suppression et transfert des mesures
Visualisation des mesures .......................................79-80
Suppression des mesures ........................................81-82
Transfert des mesures ..............................................83-84
Annexes
Piles et bloc secteur .................................................85-86
Sécurité, entretien, test de précision et
élimination ..............................................................87-88
Messages d'erreur .................................................. 89-90
Remarques importantes .........................................91-92
Caractéristiques techniques ......................................... 93
Table des matières
Page 68

67
SYS
mmHg
DIA
mmHg
Pulse
/min
Prise pour brassard
Port USB
Sélecteur de
mode
Prise électrique
Bouton Marche/Arrêt
Affichage
Bouton M (mémoire)
Compartiment
des piles
Page 69

68
FR
Indication du mode
Symbole Docteur
Relaxation
Hors période de mesure
Symbole Pile
Suppression des données
enregistrées
Valeur enregistrée
Valeurs du matin
Valeurs du soir
Date/Heure
Pression systolique
Pression diastolique
Indicateur de pouls
Pouls
Nombre de données
enregistrées
Page 70

69
3) Réglage du jour – appuyez sur le bouton M pour
régler le jour. Appuyez sur le bouton Marche/
Arrêt pour confirmer votre choix.
2) Réglage du mois – utilisez le bouton M pour régler
le mois. Appuyez sur le bouton Marche/Arrêt pour
confirmer votre choix.
Appuyez sur le bouton Marche/
Arrêt pour confirmer le choix
Appuyez sur le bouton M pour
effectuer une sélection
1) Réglage de l'année – après le retrait de la bande de
protection ou l'installation de nouvelles piles, le champ
de l'année clignote. Utilisez le bouton M pour régler
l'année. Appuyez sur le bouton Marche/Arrêt pour
confirmer votre choix.
Activation de l'appareil
Tirez sur la bande de protection du compartiment à piles.
Avant le premier emploi du WatchBP Home
SYS
mmHg
DIA
mmHg
Pulse
/min
Page 71

FR70
Sélection du bon brassard
Le WatchBP Home est disponible avec différentes tailles
de brassard. Si vous pensez que le brassard fourni avec
votre appareil est incorrect, veuillez consulter votre
médecin.
*
Veuillez uniquement à utiliser
des brassards Microlife !
5) Pour changer la date et l'heure, sortez brièvement une
pile du compartiment correspondant et remettez-la
en place. Le champ de l'année clignotera. Procédez
comme décrit plus haut pour le réglage.
4) Réglage de l'heure – une fois l'heure et les minutes
réglées et le bouton Marche/Arrêt pressé, la date et
l'heure actuelles s'affichent.
M (taille moyenne)
22 - 32 cm (8,7 - 12,6 pouces)
La taille M convient à la plupart des personnes.
L (grande taille)
32 - 42 cm (12,6 - 16,5 pouces)
Page 72

71
Mode «DIAG.»
Sélectionnez le mode «DIAG.» si vous devez mesurer la
pression artérielle conformément aux directives de la
Société Européenne d'Hypertension (ESH) et comme le
demande votre médecin.
Avant d'effectuer une mesure, utilisez le sélecteur situé
sur le côté de l'appareil pour choisir le mode de mesure
souhaité. Les deux options disponibles sont : «DIAG.»
(diagnostic) et «USUAL» (usuel).
DIAG. USUAL
Mesure de la pression artérielle avec le WatchBP Home
DIAG. USUAL
Page 73

FR72
Deux cycles de mesure par jour
Les directives ESH recommandent une double mesure
le matin, entre 06h00 et 09h00, et une double
mesure le soir, entre 18h00 et 21h00. Mesurez
toujours la pression artérielle avant de prendre vos
médicaments si votre médecin ne vous a pas donné
d'autres instructions.
Pas de mesures les jours non ouvrables
En mode «DIAG.», la pression artérielle est relevée
pendant 7 jours de travail consécutifs (jours ouvrés).
Pas de mesure les jours «non ouvrables» (ou les jours
de relaxation) dans ce mode !
30
JAN
7
working
days
X1
06:00 – 09:00
X1
18:00 – 21:00
Jours
ouvrés
Page 74

73
Evaluation
Après avoir mesuré votre pression artérielle pendant
7 jours ouvrés, revenez au cabinet médical pour une
analyse des relevés.
Période de mesure étendue
Le WatchBP Home propose une période de mesure
étendue et permet d'effectuer des relevés entre 04h00 et
12h00 de même qu'entre 18h00 et 24h00.
En dehors de ces
périodes, les mesures
sont impossibles et le
symbole reproduit à
gauche s'affiche.
A la fin des 7 jours de
mesure, le symbole
Docteur clignotera.
Mesure de la pression artérielle avec le WatchBP Home (suite)
Page 75

FR74
Mode «USUAL»
Sélectionnez le mode «USUAL» quand vous n'avez
pas besoin de suivre les directives recommandées. En
mode «USUAL», vous pouvez effectuer des mesures
individuelles à tout moment. Les résultats seront
automatiquement enregistrés en vue d'une analyse par
votre médecin.
250 mesures enregistrées
Le WatchBP Home peut mémoriser 250 mesures
individuelles en mode «USUAL».
*
Quand la mémoire est saturée, chaque nouvelle mesure
remplacera celle qui a été effectuée le plus tôt.
250
Measurements
Anytime
Page 76

75
La mesure de la pression artérielle en huit étapes
1 Hour Before
Etape 1
Evitez de prendre des mesures immédiatement après
avoir mangé, bu ou fumé. Respectez un intervalle d'une
heure entre ces activités et le relevé de votre pression
artérielle.
Etape 2
Préparez une table et une chaise pour la mesure. La
chaise doit être munie d'un dossier vertical et la table
doit vous permettre de maintenir le brassard à hauteur
du coeur pendant la mesure.
1 Heure avant
Page 77

FR76
Etape 3
Enlevez les vêtements qui recouvrent ou serrent le bras.
Ajustez le brassard sur le bras. Assurez-vous que le bord
inférieur du brassard se trouve 2–3 cm au-dessus du
coude. Prenez la face intérieure du bras comme repère.
Le tuyau reliant le brassard et l'appareil doit être placé
sur la face intérieure du bras. (Des instructions visuelles
additionnelles se trouvent sur le brassard)
Etape 4
Asseyez-vous et détendez-vous pendant au moins cinq
minutes avant la mesure.
Page 78

77
Etape 5
Ayez le dos droit appuyé confortablement contre
le dossier de la chaise. Appuyez sur le bouton de
déclenchement. L'appareil active un compte à rebours
de 60 secondes. Evitez de bouger, de croiser vos
jambes ou de contracter les muscles du bras pendant
la mesure. Respirez normalement et ne parlez pas.
Etape 6
Un cycle comprend deux mesures. A la fin de la première
mesure, détendez-vous pendant que vous attendez la
deuxième. La deuxième mesure démarrera au bout de 60
secondes. Evitez de bouger pendant ce temps.
SYS
mmHg
DIA
mmHg
Pulse
/min
60 sec.
12
La mesure de la pression artérielle en huit étapes (suite)
Page 79

FR78
Etape 7
Après la réalisation des deux mesures, les données
seront automatiquement enregistrées en vue d'une
analyse par votre médecin. Si une erreur s'affiche après
les lectures, répétez les six premières étapes.
Etape 8
Après les 7 jours de mesure, le symbole Docteur
clignotera. N'oubliez pas d'emporter le WatchBP Home
avec vous lors de votre prochaine consultation médicale.
(NB : le symbole Docteur apparaît seulement en mode
«DIAG.»).
Enregistrement
automatique
Page 80

79
2) Appuyez ensuite sur le bouton M.
En mode «DIAG.»
1) Après une pression du bouton M, l'appareil affiche
brièvement le nombre total de mesures enregistrées,
par ex. N=20.
Visualisation des mesures
1) Utilisez le sélecteur de mode pour choisir d'abord le
type de mesure à visualiser.
Visualisation, suppression et transfert des mesures
DIAG. USUAL
*
«- -» s'affiche quand
le nombre de mesures
indiqué est inférieur à 12.
*
«A» s'affiche quand le
nombre indiqué est la
moyenne de toutes les
données.
Page 81

FR80
2) Pour consulter toutes les mesures individuelles,
appuyez à plusieurs reprises sur le bouton M.
En mode «USUAL»
1) Après une pression du bouton M, l'appareil affiche
brièvement le nombre total de mesures enregistrées,
par ex. N=63, suivi de la moyenne de toutes les
mesures mémorisées.
*
Pour consulter toutes les mesures individuelles, appuyez à
plusieurs reprises sur le bouton M.
3) Réappuyez sur le bouton M pour visualiser la moyenne
de toutes les valeurs du soir.
2) Réappuyez sur le bouton M pour visualiser la moyenne
de toutes les valeurs du matin.
Mesure
individuelle
Page 82

81
*
Avant de supprimer des données, demandez à votre
médecin s'il en a encore besoin. Effacez les mesures
seulement si vous êtes sûr de ne plus les utiliser.
Suppression de mesures
Vous pouvez supprimer les données enregistrées dans
les modes «DIAG.» et «USUAL» séparément.
Visualisation, suppression et transfert des mesures (suite)
DIAG. USUAL
Page 83

FR82
*
Seules les mesures effectuées dans le mode choisi seront
supprimées. L'effacement de mesures réalisées dans l'autre
mode doit s'opérer séparément.
3) Relâchez le bouton M puis réappuyez dessus pendant
l'affichage de l'indication CL. La suppression est confirmée
par un bip.
2) Appuyez sur le bouton M jusqu'à ce que le
symbole Poubelle clignote.
1) Utilisez le sélecteur de mode pour choisir d'abord
le type de mesure à supprimer.
DIAG. USUAL
Appuyez pendant 7 secondes...
*
Si vous appuyez sur le bouton M pour effacer des données,
toutes les mesures enregistrées seront supprimées pour le
mode sélectionné.
Page 84

83
Transfert des données à l'ordinateur
1) Démarrez le logiciel et raccordez l'appareil à
l'ordinateur au moyen du câble fourni.
2) Une connexion réussie est signalée par le message
«Connecté» sur l'écran de l'ordinateur.
3) Entrez le nom, l'identifiant (si nécessaire) et la date de
naissance du patient pour créer un enregistrement.
Transfert des mesures
Installation du logiciel WatchBP Office
1) Insérez le CD dans le lecteur CD-ROM de votre
ordinateur. Cliquez alternativement sur
«setup.exe»
dans le répertoire du CD.
2) Suivez les instructions affichées dans la fenêtre
d'installation sur l'ordinateur.
3) Redémarrez à la fin de l'installation l'ordinateur avant
de travailler avec le programme.
Visualisation, suppression et transfert des mesures (suite)
*
Configuration système requise : unité
centrale de 550 MHz, mémoire de 256
Mo, résolution de 1 024x768 pixels,
256 couleurs, lecteur CD-ROM, 1 port
USB libre, 40 Mo de mémoire libre
sur le disque dur, Microsoft Windows
2000 / XP / Vista.
©
2
0
0
8
M
i
c
r
o
l
i
f
e
C
o
r
p
o
r
a
t
i
o
n
.
A
l
l
R
i
g
h
t
s
R
e
s
e
r
v
e
d
.
System Requirements: 550MHz CPU. 256MB Memory, 1024x768
pixel resolution, 256 color, CD-ROM drive, 1 free USB port, 40MB
free hard disk space, Microsoft Windows 2000 / XP / Vista.
Install CD
WatchBP Analyzer Home
Version 1.0.0.7
Page 85

FR84
Commandes du logiciel
Transférer des données en mode
«DIAG.»
Cliquez sur «Téléchargement»
Valeur correspondante
Vous pouvez décocher la case pour exclure la valeur
correspondante du calcul de la moyenne
Enregistrer les données
Cliquez sur «Sauvegarde». Le nom du fichier est constitué de
l'identifiant du patient et du suffixe «Dmode.xls»
Voir les données
Cliquez sur «Dossiers Patient»
Enregistrer les données en mode
«USUAL.»
Cliquez sur «Téléchargement Mode Usuel». Le nom du fichier
est constitué de l'identifiant du patient et du suffixe «Umode.
xls».
Imprimer la feuille
Cliquez sur «Impression»
Supprimer le contenu des mémoires
Cliquez sur «Effacer la mémoire»
Fermer le programme
Cliquez sur «Quitter»
*
Enregistrez les données avant de sélectionner la fonction «Effacer la mémoire» ou «Quitter».
Veuillez vous référer au mode d'emploi du logiciel pour des instructions et informations détaillées.
Page 86

85
Remplacement de piles à faible charge
Le symbole Pile clignote à chaque mise sous tension
de l'appareil quand les piles ont atteint un état de
charge critique et qu'il faut les remplacer.
1) Ouvrez le compartiment des piles au dos de
l'appareil.
2) Remplacez les piles en respectant la polarité
indiquée par les symboles du compartiment.
*
Utilisez 4 piles neuves de longue durée du type AA, de
1,5 V.
*
N'utilisez pas de piles périmées.
*
Enlevez les piles au début d'une période de non-
utilisation prolongée de l'appareil.
Symbole Pile
Quand la charge des piles est descendue à ¼, le symbole
Pile clignote à chaque mise sous tension de l'appareil.
Piles et bloc secteur
Page 87

FR86
Utilisation du bloc secteur
Vous pouvez aussi faire fonctionner le tensiomètre
WatchBP Home avec le bloc secteur fourni par Microlife
(CC 6 V, 600 mA).
*
Utilisez seulement les blocs secteurs de Microlife.
1) Insérez le câble du bloc secteur dans la prise électrique
du WatchBP Home.
2) Branchez la fiche du bloc secteur sur la prise de
courant. Une fois le bloc secteur branché, l'appareil ne
sera plus alimenté par les piles.
SYS
mmHg
DIA
mmHg
Pulse
/min
Page 88

87
Sécurité et protection
Cet appareil se destine seulement à l'application décrite
dans le présent mode d'emploi. Il renferme des éléments
sensibles devant être traités avec précaution. Le fabricant
ne saurait être tenu pour responsable de dommages
provoqués par une utilisation incorrecte.
Protégez l'appareil contre l'eau et l'humidité
Protégez l'appareil contre des températures trop
hautes ou trop basses
Evitez de faire tomber l'appareil et de lui faire
subir des chocs
N'exposez pas l'appareil directement au soleil
Evitez de placer l'appareil à proximité de champs
électromagnétiques, tels que ceux créés par un
téléphone portable
N'ouvrez jamais l'appareil
Sécurité, entretien, test de précision et élimination
Respectez les conditions de stockage et d'emploi décrites
dans le chapitre "Caractéristiques techniques” du présent
manuel.
• Nelaissezpaslesenfantsutiliserl'appareilsans
surveillance. Ils pourraient avaler certaines parties, assez
petites.
• N'activezlapompequ'aprèslamiseenplacedu
brassard.
• N'utilisezpasl'appareilsivouspensezqu'ilest
endommagé ou si quelque chose d'inhabituel se produit.
• Lisezlesconsignesdesécuritédesdifférentessections
du mode d'emploi.
• Neraccordezpasl'appareilàunordinateuravantquele
logiciel de l'ordinateur ne vous le demande.
Page 89

FR88
Ne lavez pas le brassard !
Ne repassez pas le brassard !
Test de précision
Nous vous recommandons de faire contrôler la
précision du WatchBP Home tous les 2 ans ou après un
choc mécanique (par ex. chute). Veuillez pour cela vous
adresser à Microlife.
Entretien du brassard
NE lavez PAS le brassard. NE repassez PAS le brassard.
Elimination
Eliminez les piles et les instruments électroniques en
respectant la réglementation locale en vigueur. Ne
les jetez pas avec les ordures ménagères.
Entretien de l'appareil
Nettoyez l'appareil avec un chiffon doux sec.
SYS
mmHg
DIA
mmHg
Pulse
/min
Page 90

89
Erreur Description Cause et solution possibles
«Er 1»
Signal trop
faible
Les signaux du pouls
sur le brassard sont trop
faibles. Mettez le brassard
correctement en place et
répétez la mesure.
«Er 2»
Signal
d'erreur
Le brassard a détecté des
signaux d'erreur pendant la
mesure, causés par exemple
par un mouvement ou une
contraction musculaire.
Répétez la mesure en
maintenant le bras
immobile.
Messages d'erreur
Si une erreur se produit durant la mesure, celleci sera interrompue et un message d'erreur «Er»
s'affichera.
•
Veuillez consulter le
médecin si ces problèmes,
ou d'autres, surviennent à
plusieurs reprises.
•
Si vous pensez que les
résultats sont inhabituels,
veuillez lire attentivement
les indications du présent
mode d'emploi.
Page 91

FR90
«HI»
Pouls ou
pression du
brassard trop
élevé(e)
La pression dans le brassard
est trop élevée (plus de
300 mmHg) OU le pouls
est trop élevé (plus de 200
battements par minute).
Détendez-vous pendant 5
minutes. Répétez ensuite la
mesure.
«LO»
Pouls trop
bas
Le pouls est trop bas (moins
de 40 battements par
minute). Répétez la mesure.
«Er 3»
Pas de
pression
dans le
brassard
Il est impossible d'établir
une pression adéquate
dans le brassard. Des fuites
peuvent en être à l'origine.
Remplacez les piles si
nécessaire. Répétez la
mesure.
«Er 5»
Résultat
anormal
Les signaux de mesure sont
inexacts et aucun résultat
ne peut être affiché. Lisez
la liste de contrôle pour
effectuer des mesures
fiables, puis répétez la
mesure.
Page 92

91
•
Une pression artérielle élevée peut avoir plusieurs
causes. Votre médecin pourra vous fournir des
renseignements détaillés à ce sujet et vous prescrire un
traitement adéquat.
•
La pression artérielle subit de fortes fluctuations au
cours de la journée. Elle varie selon les émotions, l'état
physique et d'autres facteurs.
•
La pression artérielle est la pression du flux sanguin
dans les artères résultant du pompage du coeur.
Les mesures renferment toujours deux valeurs :
la pression systolique (plus grande valeur) et la
pression diastolique (plus petite valeur).
•
La fréquence du pouls est le nombre de battements
de coeur par minute.
•
Une pression artérielle constamment élevée peut
nuire à votre santé et nécessite un suivi médical !
•
Informez toujours votre médecin sur la pression
artérielle mesurée ainsi que sur tout phénomène
inhabituel ou vos doutes. Ne vous basez jamais sur
des lectures de pression artérielles simples.
Informations importantes sur la pression artérielle et les automesures
Page 93

FR92
Catégorie Systolique Diastolique
Optimale
< 120 < 80
Normale
120 - 129 80 - 84
Normale élevée
130 - 139 85 - 89
Hypertension de niveau 1
140 - 159 90 - 99
Hypertension de niveau 2
160 - 179 100 - 109
Hypertension de niveau 3
≥ 180 ≥ 110
Hypertension systolique
isolée
≥ 140 < 90
Analyse de la pression artérielle
Le tableau de droite classe les valeurs de la pression
artérielle chez les adultes selon les directives de la
Société Européenne d'Hypertension (ESH) établies en
2007. Données mesurées en mmHg.
La valeur la plus haute est déterminante pour l'analyse.
Exemple : une lecture de 150/85 ou 120/98 mmHg
signale une «hypertension de niveau 1».
Page 94

93
Température de
fonctionnement :
•
10 à 40 °C / 50 à 104 °F
Température de
stockage :
•
-20 à +50 °C / -4 à +122 °F
•
15 - 90 % d'humidité relative maximum
Poids :
•
385 g (avec piles)
Dimensions :
•
150 x 100 x 50 mm
Méthode de mesure :
•
Oscillométrique, selon Korotkoff
Méthode :
•
Phase I systolique, phase V diastolique
Plage de mesure :
•
30 - 280 mmHg – pression artérielle
•
40 - 200 battements par minute – pouls
Affichage de la
pression du brassard :
•
Plage : 0 - 299 mmHg
•
Résolution : 1 mmHg
•
Précision statique :
± 3 mmHg
•
Précision du pouls :
± 5 % de la valeur indiquée
Alimentation :
•
4 piles de 1,5 V ; type AA
•
Bloc secteur CC 6V, 600 mA (en option)
Référence
aux normes :
•
Directives européennes 93/42/CEE
•
Exigences relatives aux tensiomètres
non invasifs : EN 1060-1/-3/-4, ANSI /
AAMI SP10, CEI 60601-1, CEI 60601-1-2
Configuration système
requise :
•
Unité centrale de 550 MHz, mémoire de
256 Mo
•
Résolution de 1 024 x 768 pixels
•
256 couleurs, lecteur CD-ROM
•
1 port USB libre
•
Disque dur avec 40 Mo de mémoire libre
•
Microsoft Windows 2000 / XP / Vista
Caractéristiques techniques
Microlife se réserve le droit de modifier les données
techniques sans préavis.
Page 95

SYS
mmHg
DIA
mmHg
Pulse
/min
Cet appareil est assorti d'une garantie de cinq ans
à compter de la date d'achat. Cette garantie est
seulement valable sur présentation de la carte de
garantie remplie par le propriétaire avec confirmation
de la date d'achat ou justificatif d'achat. Les piles, le
brassard et les pièces d'usure sont exclus de cette
garantie.
Produit : WatchBP Home
Code : 3MX1-1
N° de série :
Date :
Nom :
Adresse :
Date :
Téléphone :
E-mail :
Carte de garantie
Page 96

Page 97

IT
99
Misurazioni della pressione
sanguigna accurate con
WatchBP Home.
Manuale di istruzioni
Page 98

Microlife WatchBP Home è il primo dispositivo di misurazione della pressione sanguigna a livello
mondiale ad applicare completamente le raccomandazioni della European Society of Hypertension
(ESH)
1, 2
e della American Heart Association (AHA) relative alla misurazione della pressione sanguigna.
L'uso del dispositivo WatchBP Home aiuta a effettuare misurazioni accurate della pressione sanguigna su
cui il medico può fare affidamento. WatchBP Home è stato approvato clinicamente in base al protocollo
ESH3.
.
1
O’Brien E, Asmar R, Beilin L, Imai Y, et al. European Society of Hypertension recommendations for conventional, ambulatory and home blood pressure
measurement. European Society of Hypertension Working Group on Blood Pressure Monitoring. J Hypertens 2003;21:821-848.
2
Stergiou GS, et al. A tool for reliable self-home blood pressure monitoring designed according to the European Society of Hypertension
recommendations: The Microlife WatchBP Home monitor. Blood Press Monit. 2007;12:127-131.
3
Stergiou GS, Giovas PP, Gkinos CP, Patouras JD. Validation of the Microlife WatchBP Home device for self home blood pressure measurement according
to The International Protocol. Blood Press Monit. 2007;12(3):185-188.
Page 99

IT
Prima di usare WatchBP Home per la prima volta
Descrizione del prodotto .......................................99-100
Attivazione del dispositivo ......................................... 101
Selezione del bracciale adatto .................................... 102
Effettuare le misurazioni con WatchBP Home
Modalità «DIAG.» ................................................103-105
Modalità «NORMALE» ................................................106
Otto passaggi per effettuare una misurazione della
pressione sanguigna corretta
Procedure di misurazione della pressione
sanguigna ............................................................107-110
Visualizzazione, cancellazione e trasferimento delle
misurazioni
Visualizzazione delle misurazioni ....................... 111-112
Cancellazione delle misurazioni ......................... 113-114
Trasferimento delle misurazioni ......................... 115-116
Appendice
Batterie e alimentatore ...................................... 117-118
Sicurezza, cura, test di precisione e smaltimento 119-120
Messaggi di errore .............................................. 121-122
Fatti importanti ................................................... 123-124
Specifiche tecniche .................................................... 125
Indice
Page 100

99
SYS
mmHg
DIA
mmHg
Pulse
/min
Presa bracciale
Porta USB
Interruttore
modalità
Presa di
alimentazione
Pulsante ON/OFF
Display
Pulsante M (memoria)
Vano batterie
 Loading...