

Page 1

MLUBPT0-AP-APC-MAR06-1 4/5/06 9:36 AM Page 1
Advanced
Blood Pressure
Monitor
with Irregular Heartbeat Detection
Instruction Booklet for model# 3BT0-AP, 3BT0-APC
US Patent #’s 6,485,429 (Irregular Heartbeat Detector)
Page 2

MLUBPT0-AP-APC-MAR06-1 4/5/06 9:36 AM Page 2
Automatic Blood Pressure Monitor
Instruction Manual
Table of contents
1. Introduction
1.1. Features of your blood pressure monitor
1.2. Important information about self measurement
2. Important information on blood pressure and its measurement
2.1. How does high/low blood pressure arise?
2.2. Which values are normal?
2.3. What can be done if regular high/low values are obtained?
2.4. Irregular Heartbeat Detector
3. Components of your blood pressure monitor
4. Operation of your blood pressure monitor
4.1. Inserting the batteries
4.2. Using an A/C power adapter
4.3. Tube connection
Measurement Procedure
5.1. Before measurement
5.2. Common sources of error
5.3. Fitting the cuff
5.4. Setting the time and date
5.5. Measuring procedure
5.6. Memory – displaying the last measurement
5.7. Discontinuing a measurement
6. Error Messages/Troubleshooting
7. Care and maintenance
8. Warranty
9. Certifications
10. Technical specifications
11. How to Contact Us
1
Page 3

MLUBPT0-AP-APC-MAR06-1 4/5/06 9:36 AM Page 3
1. Introduction
1.1.Features of your Microlife automatic blood pressure monitor,
model # 3BT0-AP or 3BT0-APC
Your Microlife blood pressure monitor is a fully automatic digital blood pressure measuring device with an integrated Irregular Heartbeat Detector, for use by adults on the upper
arm at home or in your doctor’s/nurse’s office. It enables very fast and reliable measurement of the systolic and diastolic blood pressure as well as the pulse by way of the oscillometric method. This device offers clinically proven accuracy and has been designed to
be user friendly.
Before using, please read this instruction manual carefully and then keep it in a safe
place. Please contact your doctor for further questions on the subject of blood pressure
and its measurement.
Attention!
1.2.Important information about self-measurement
• Self-measurement means Control, not diagnosis or treatment. Unusual values
must always be discussed with your doctor. Under no circumstances should you
alter the dosages of any drugs prescribed by your doctor.
• The pulse display is not suitable for checking the frequency of heart pacemakers!
• In cases of irregular heartbeat (Arrhythmia), measurements made with this instrument
should only be evaluated after consultation with your doctor.
Electromagnetic interference:
The device contains sensitive electronic components. Avoid strong electrical or electromagnetic fields in the direct vicinity of the device (e.g. mobile telephones, microwave
ovens). These can lead to temporary impairment of the measuring accuracy.
2. Important information on blood pressure and its measurement
2.1. How does high/low blood pressure arise?
Your level of blood pressure is determined in the circulatory center of the brain and
adjusts to a variety of situations through feedback from the nervous system. To adjust
blood pressure, the strength and frequency of the heart (Pulse), as well as the width of circulatory blood vessels is altered. Blood vessel width is effected by fine muscles in the
blood vessel walls.
Your level of arterial blood pressure changes periodically during heart activity: During the
“blood ejection” (Systole) the value is highest (systolic blood pressure value). At the end
2
Page 4

MLUBPT0-AP-APC-MAR06-1 4/5/06 9:36 AM Page 4
of the heart’s “rest period” (Diastole) pressure is lowest (diastolic blood pressure value).
Blood pressure values must lie within certain normal ranges in order to prevent particular
diseases.
2.2. Which values are normal?
Blood pressure is too high if your diastolic pressure is above 90 mmHg and/or your
systolic blood pressure is over 160 mmHg,
while at rest. In this case, please con-
sult your physician immediately. Long-term values at this level endanger your health
due to continual damage to the blood vessels in you body.
If your systolic blood pressure values are between 140 mmHg and 160mmHg and/or
the diastolic blood pressure values between 90 mmHg and 95mmHg, consult your
physician. Regular self-checks are necessary.
If you have blood pressure values that are too low, (i.e., systolic values under
105mmHg and/or diastolic values under 60 mmHg), consult your physician.
Even with normal blood pressure values, a regular self-check with your blood pressure monitor is recommended. You can detect possible changes in your values early
and react appropriately.
If you are undergoing medical treatment to control your blood pressure, keep a
record of values along with time of day and date. Show these values to your physi-
Never use the results of your measurements to independently alter the
cian.
drug doses prescribed by your physician.
Which values are normal?
The following standards for assessing high blood pressure (without regard to age)
have been established by the National Institutes of Health JNC7.
Category Systolic Diastolic
(mmHg) (mmHg)
Normal <120 <80
Pre-Hypertension 120-139 80-89
Hypertension
Stage 1 Hypertension 140-159 90-99
Stage 2 Hypertension >160 >100
3
Page 5

MLUBPT0-AP-APC-MAR06-1 4/5/06 9:36 AM Page 5
☞ Further information
• If your values are mostly normal under resting conditions but exceptionally high under
conditions of physical or psychological stress, it is possible that you are suffering from
so-called “labile hypertension.” Consult your doctor.
Correctly measured diastolic blood pressure values above 120mmHg and
•
require immediate medical treatment.
2.3. What can be done if regular high or low values are obtained?
a) Consult your doctor.
b) Increased blood pressure values (various forms of hypertension) are associated with
considerable health risks over time. Arterial blood vessels in your body are endangered
due to constriction caused by deposits in the vessel walls (Arteriosclerosis). A deficient
supply of blood to important organs (heart, brain, muscles) can result from arteriosclerosis. Furthermore, the heart will become structurally damaged with increased blood
pressure values.
c) There are many different causes of high blood pressure. We differentiate between the
common primary (essential) hypertension, and secondary hypertension. The latter
group can be ascribed to specific organ malfunctions. Please consult your doctor for
information about the possible origins of your own increased blood pressure values.
d) There are measures which you can take to reduce and even prevent high blood pres-
sure. These measures must be permanent lifestyle changes.
A) Eating habits
• Strive for a normal weight corresponding to your age. See your doctor for your ideal
weight.
• Avoid excessive consumption of common salt.
• Avoid fatty foods.
B) Previous illnesses
• Consistently follow all medical instructions for treating illness such as:
- Diabetes (Diabetes mellitus or sugar diabetes)
- Fat metabolism disorder
- Gout
C) Habits
• Give up smoking completely.
• Drink only moderate amounts of alcohol.
• Restrict your caffeine consumption (coffee, tea, chocolate).
4
Page 6
MLUBPT0-AP-APC-MAR06-1 4/5/06 9:36 AM Page 6
D) Your Physical condition
• After a medical examination, and with your doctor’s approval and direction;
exercise.
• Choose sports which require stamina and avoid those which require strength.
• Avoid reaching the limit of your performance.
• With previous illnesses and/or an age of over 40 years, please consult your doctor
before beginning your exercise routine. You must receive advise regarding the type and
extent of exercise that is appropriate for you.
2.4. Irregular Heartbeat Detector
The appearance of this symbol signifies that a certain irregular heartbeat
was detected which could cause cardiovascular disease. This indicator is only a
caution. The Microlife Fully Automatic Blood Pressure Monitor with Irregular
Heartbeat Detection can detect blood pressure and pulse rate measurement with
specifications even when the patient is having an irregular heartbeat interval. It is
important that you be relaxed, remain still and do not talk during the measurements.
Note: We recommend contacting your physician if you see this “ “ icon frequently.
CAUTION: An irregular heartbeat can be a serious medical condition requiring
medical attention. See your doctor if you suspect you have an irregular heartbeat.
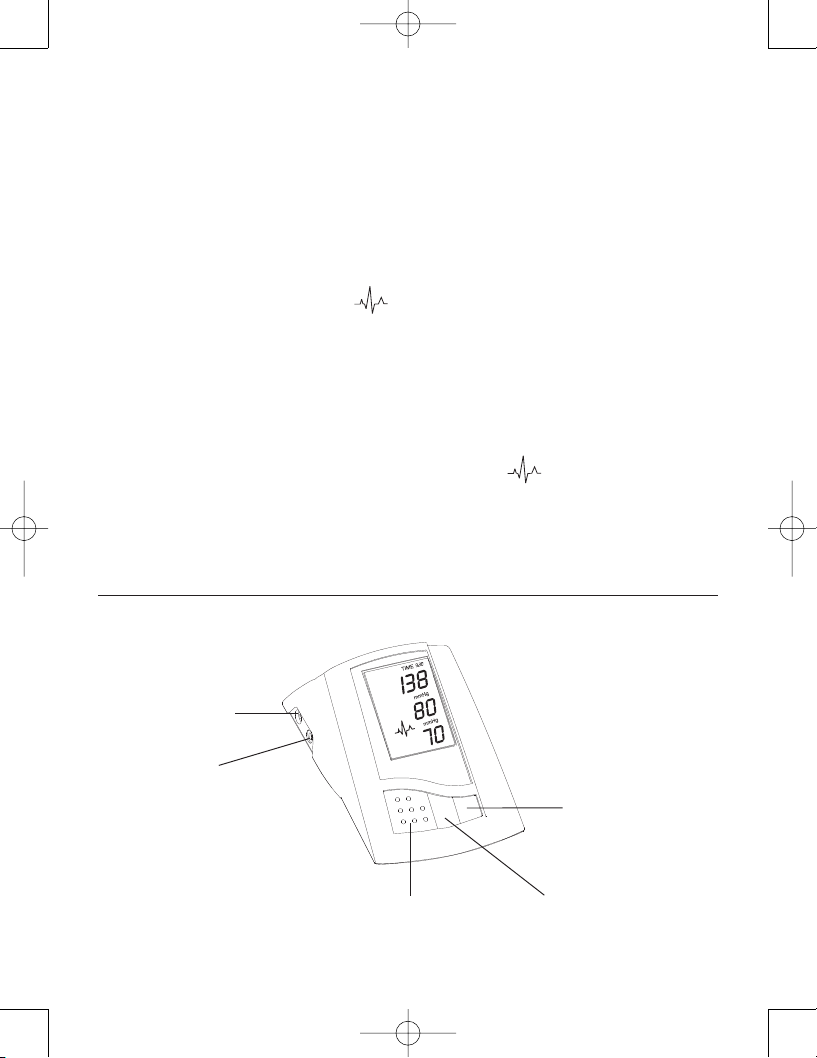
3. Components of your blood pressure monitor
a) Measuring unit
AC/DC Power Port
Cuff Connection Port
5
Time Button
START/STOP Button Memory Button
Page 7
++
++
++
++
MLUBPT0-AP-APC-MAR06-1 4/5/06 9:36 AM Page 7
b) Upper arm cuffs:
Type S101 for arm circumference 22-33.7 cm or
9.5” - 13.25” (included)
Type S102 for arm circumference 30.5-40.64 cm
12” - 16” (order as a special accessory/included
with Model #3BT0-APC)
Please Note:
Arm circumference should be measured with a measuring tape in the middle of the relaxed
upper arm. Do not force cuff connection into the opening. Make sure the cuff connection is
not pushed into the AC adapter port. If the cuff is too small, call Microlife for further information at 1-800-568-4147.
4. Operation of your blood pressure monitor
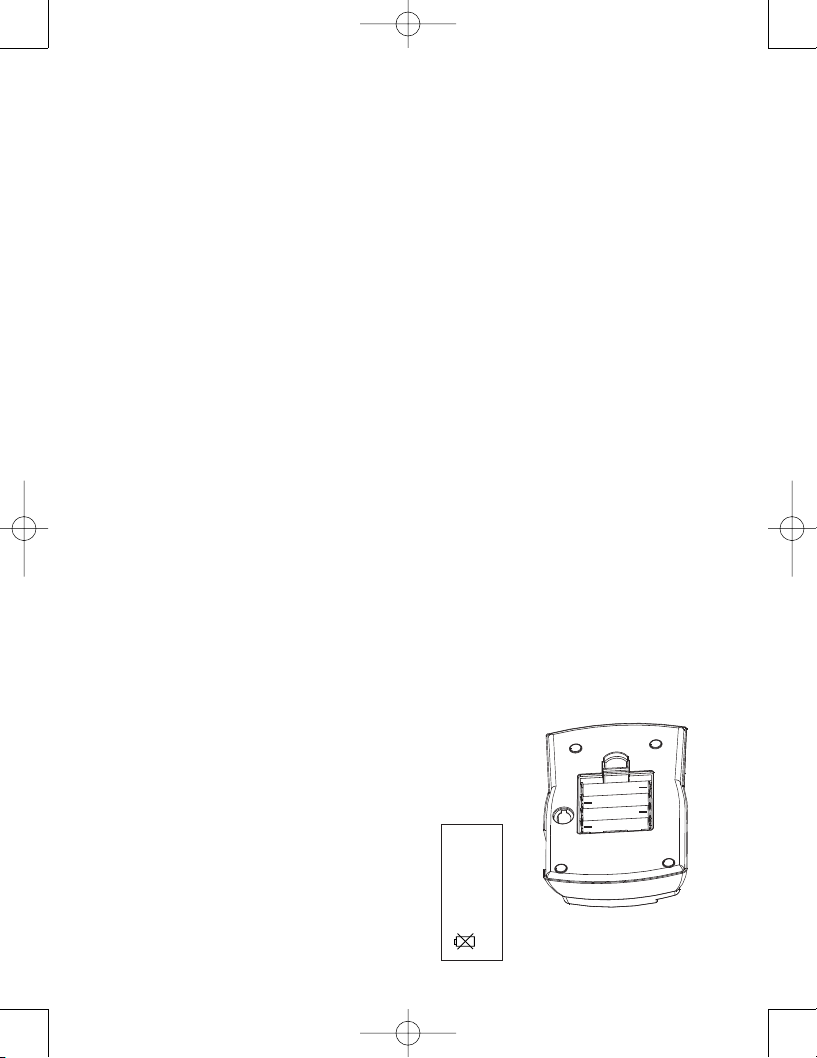
4.1. Inserting the batteries
After you have unpacked your device insert the batteries. The battery compartment is located on the back side of the device (see illustration).
a) Remove cover as illustrated.
b) Insert the batteries (4 AA, 1.5 V), following the
indicated polarity. (+ -)
c) If the low battery indicator appears in the dis-
play, the batteries are discharged and the unit
will not function.
d) If batteries are inserted incorrectly, the display
may function erratically or not at all.
Check battery polarity.
Low Battery Indicator
6
Page 8

MLUBPT0-AP-APC-MAR06-1 4/5/06 9:36 AM Page 8
Attention!
• After the low battery indicator appears, the device won’t function until the batteries
have been replaced.
• Please use “AA” Long-Life or Alkaline 1.5V Batteries.
Do not use rechargeable batteries.
•
• If the blood pressure monitor is not used for long periods, remove the batteries from
the device.
Functional check: Hold the On/Off button down to test all the display elements. When
functioning correctly many icons will appear.
4.2. Using an AC power adapter (special accessory/included with Model #3BT0-APC)
It is possible to operate this blood pressure instrument with an AC adapter. (output 6 V DC
/ 600 mA with DIN plug). Make certain that you use an adapter which fulfills the legal
requirements and electronic requirements in the U.S. (UL standard). Use of an AC adapter
other than a Microlife adapter may invalidate your warranty.
a) Push the plug into the socket at the left side
of the instrument.
b) Plug the AC adapter into a 110 V
Left Opening
power socket (U.S. or Canada).
c) Test that power is available by
pressing the On/Off button.
Note:
• No power is taken from the batteries while the AC adapter is connected to the instrument.
• If the power is interrupted during a measurement (e.g. by removal of the adapter from
the wall socket), the instrument must be reset by removing the plug from the instrument.
• Please call 1-800-568-4147 if you have questions
relating to the AC adapter.
4.3. Tube connection
Insert the cuff tube into the opening
provided on the side of the instrument,
as shown in the diagram.
Right Opening
7
Page 9

MLUBPT0-AP-APC-MAR06-1 4/5/06 9:36 AM Page 9
5. Measurement Procedure
Please note: You should always be seated before and during measurement.
5.1. Before measurement:
• Avoid eating and smoking as well as all forms of exertion directly before measurement. These factors influence the measurement result. Find time to relax by sitting in
an armchair in a quiet atmosphere for about ten minutes before measurement.
• Remove any garment that fits closely to your upper arm.
• Always measure on the same arm (normally left).
• Always perform measurements at the same time of day, since blood pressure changes
during the course of the day.
5.2. Common sources of error:
Note: Comparable blood pressure measurements always require the same conditions! Conditions should always be quiet.
•All efforts by the user to support the arm can increase blood pressure. Make sure you
are in a comfortable, relaxed position and do not flex any of the muscles in the measurement arm during the measurement. Use a cushion for support if necessary.
•If the arm artery lies considerably lower or higher than the heart, an erroneously high or
low blood pressure will be measured! Each 15cm (6 inch) difference in height between
your heart and the cuff results in a measurement error of 10 mmHg!
•Cuffs that are too narrow or too short result in false measurement values. Selecting the
correct cuff is extremely important. Cuff size is dependent upon the circumference of the
arm (measured in the center). The permissible range is printed on the cuff. If this is not
suitable for your use, please contact microlife USA. Large cuff sizes are sold separately.
Note: Only use clinically approved Microlife Cuffs!
•A loose cuff or a sideways protruding air pocket causes false measurement values.
•With repeated measurements, blood accumulates in the arm, which can lead to false
results. Consecutive blood pressure measurements should be repeated after a 1 minute
pause or after your arm has been held up in order to allow the accumulated blood to
flow away.
8
Page 10
MLUBPT0-AP-APC-MAR06-1 4/5/06 9:36 AM Page 10
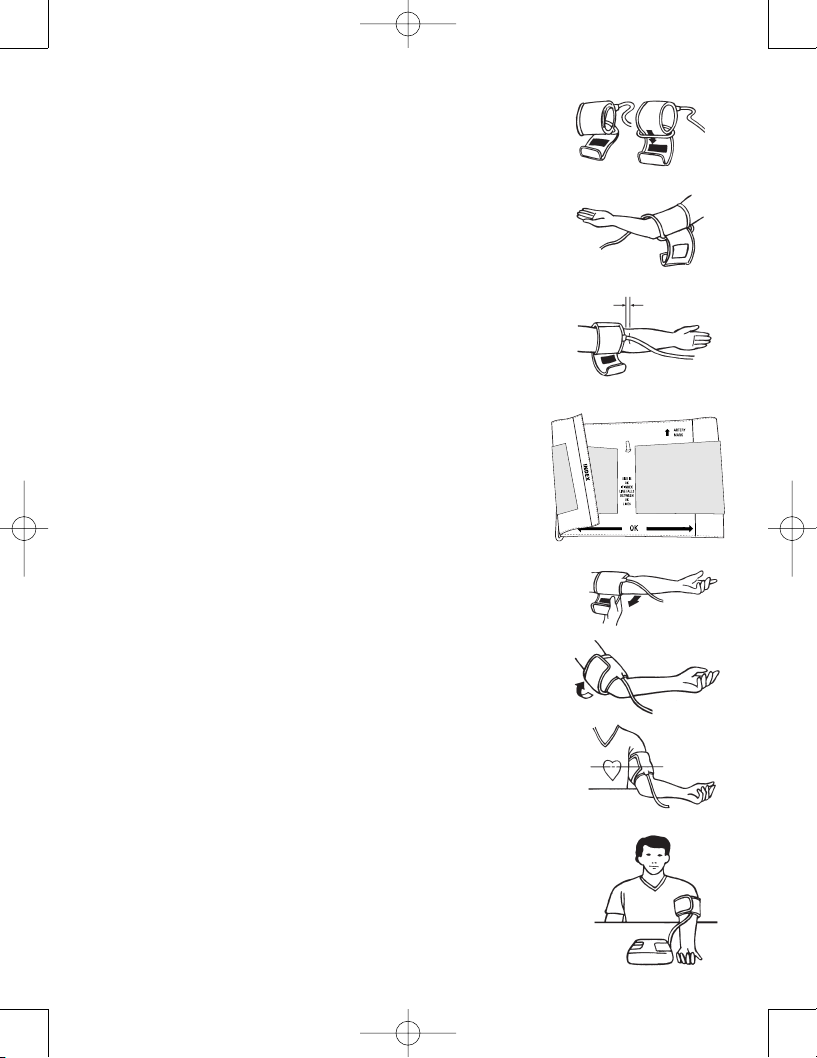
5.3. Fitting the cuff
a) Pass the end of the cuff through the flat
metal ring so that a loop is formed. The velcro closer must be facing outward. (Ignore
this step if the cuff has already been prepared.)
b) Place the cuff over the left upper arm so that
the tube is closer to your lower arm.
c) Lay the cuff on the arm as illustrated. Make
certain that the lower edge of the cuff lies
approximately 3/4” to 1”(2 to 3cm) above the
elbow and that the tube is closer to the inner
side of the arm.
Important! The small white arrow on the
cuff must lie exactly over the artery which
runs down the inner side of the arm.
d) Tighten the cuff by pulling the end and close
the cuff by affixing the velcro.
e) There should be little free space between the
arm and the cuff. You should able to fit 2 fingers between your arm and the cuff. Clothing
must not restrict the arm. Any piece of clothing which does must be removed. Cuffs that
don’t fit properly result in false measurement
values. Measure your arm circumference if
you are not sure of proper fit. Larger cuffs are
available (Section 3B).
f) Lay your arm on a table (palm upward) so the
cuff is at the same height as your heart.
Make sure the tube is not kinked.
g) Remain seated quietly for two minutes
before you begin the measurement.
Left Arm
3
/4”-1”
tube
9
Page 11
M
M
M
TIME
MLUBPT0-AP-APC-MAR06-1 4/5/06 9:36 AM Page 11
Comment:
If it is not possible to fit the cuff to your left arm, it can also be
placed on your right arm. However, all measurements should be
made using the same arm.
Comparable blood pressure measurements always require the
same conditions (Relax for several minutes before a reading).
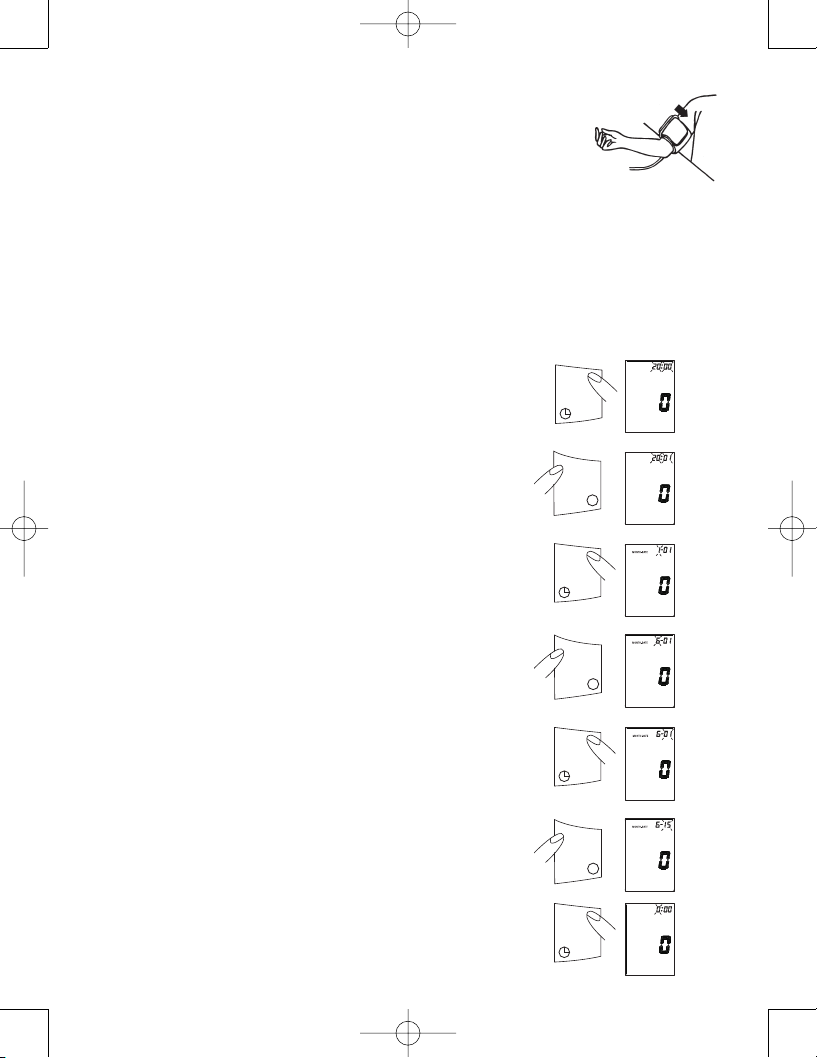
5.4. Setting the time and date
This blood pressure monitor incorporates an integrated clock with date display. Time and
date are recorded along with pressure and pulse. After new batteries have been inserted,
the clock begins to run from the following setting: 2000-01-01 00:00 O’clock.
You must then re-enter the date and current time. Please proceed as follows (Example:
Entering 2002-06-15 Time 09:30 AM):
1. Press the Time button for at least 3 seconds. The display
now indicates the set year, during which the four characters
blink.
2. The correct year can be entered by pressing the MEMORY
button. Once for each change.
(Example: 1 x press).
3. Press the Time button again. The display now switches to
the current date, during which the first character (month)
blinks.
Note: Holding the button down speeds up the procedure.
Cuff on
right arm
4. The current month can now be entered by pressing the
MEMORY button.
Example: pressing 6 x advances 6 months)
5. Press the Time button again. The last two characters (day)
are now blinking.
6. The current day can now be entered by pressing the MEM-
ORY button. (Example: 15 x presses advances the day from
the 1st to 15th)
7. Press the Time button again. The display now switches to
the current time, during which the first character (hour)
blinks.
10
Page 12
MLUBPT0-AP-APC-MAR06-1 4/5/06 9:36 AM Page 12
9. Press the User/Time button again. The last two characters (Minutes) now blink.
10. The minutes can now be entered by pressing the MEMORY button. (Example: 30 x
presses advances the time from 0 to 30 minutes)
5.5. Reading the set date
After all settings have been made, click the Time/Date button once. The date is briefly displayed and then the time. The input is now confirmed and the clock begins to run.
5.6. Measuring procedure
After the cuff has been appropriately positioned the
measurement can begin:
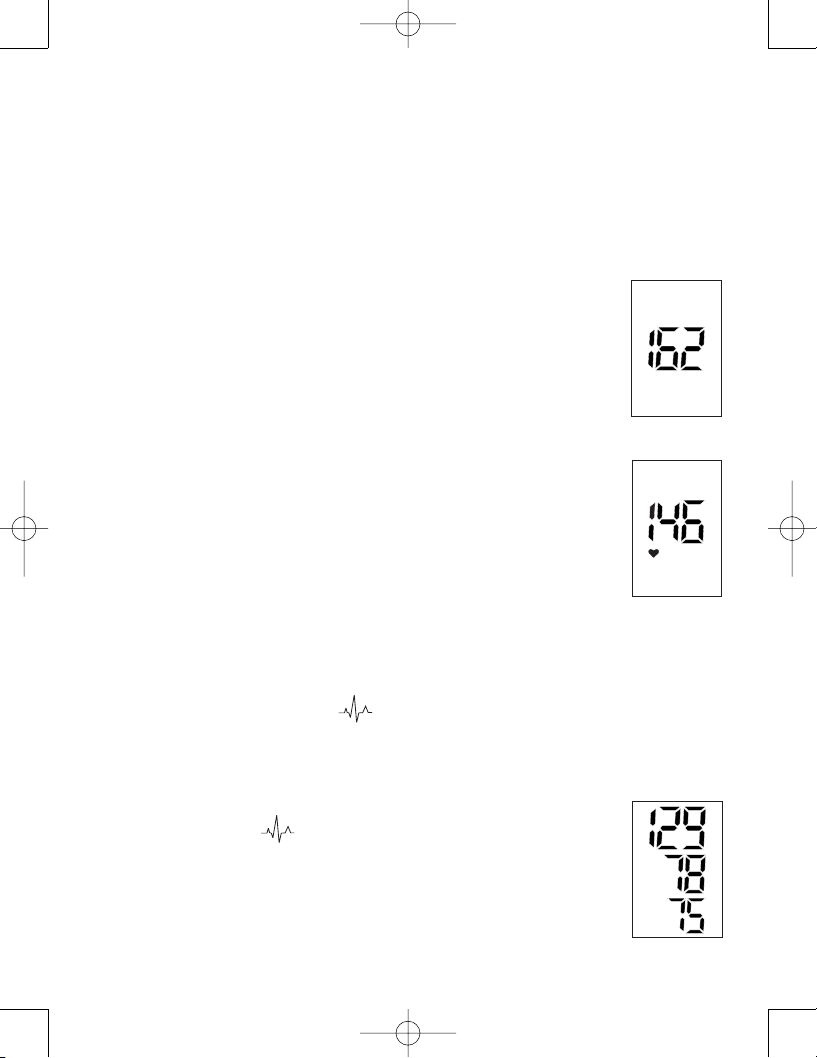
Pumping
Pressure
a) Press the ON/OFF/START button. The pump begins to
inflate the cuff. In the display, the increasing cuff pressure is continually displayed.
b) After automatically reaching an individual pressure,
the pump stops and the pressure slowly falls. The cuff
pressure is displayed during the measurement.
c) When the device has detected your pulse, the heart
Measuring
symbol in the display begins to blink and a beep tone
is audible for every pulse beat.
d) When the measurement has been concluded, a long
beep tone sounds. The measured systolic and diastolic
blood pressure values, as well as the pulse are now
displayed.
e) The appearance of this symbol signifies that a
certain irregular heartbeat was detected. This indicator is only a caution. It is important that you be
relaxed, remain still and do not talk during measurements. NOTE: We recommend contacting your physician if you see this icon frequently.
f) The measurement results are displayed until you
switch the device off. If no button is pressed for 5 minutes, the device switches off automatically.
Systolic
Diastolic
Pulse
ement
Measur
11
complete
Page 13

MR
MLUBPT0-AP-APC-MAR06-1 4/5/06 9:36 AM Page 13
5.7. Memory – displaying the last 99 measurements
The measured results are stored in the instrument until a new
measurement is carried out. With the unit in the OFF position,
press the MEMORY button twice. The screen will show the last reading along with time
and date. The MR symbol is displayed in the lower left. Each time you press the memory
button an earlier measurement will be displayed along with time and date.
If an irregular heartbeat was detected in any measurements
stored in memory, the icon will be displayed.
Last
reading
To clear all of the stored memories, press and hold the memory
button until the CL symbol appears on the screen.
14 readings
in memory
5.8. Discontinuing a measurement
If it is necessary to interrupt a blood pressure measurement for any reason
(e.g the patient feels unwell), the ON/OFF button can be pressed at any
time. The device then immediately lowers the cuff pressure automatically.
6. Error Messages/Troubleshooting
If an error occurs during a measurement, the measurement is discontinued and a corresponding error code is displayed. We recommend you
switch the device off and take a new measurement making sure you
allow time for relaxation.
(example: error no. 1)
14
MR
Error No. Possible cause(s) / Solutions
ERR 1 The tube may have loosened, or no pulse
was detected.
*Ensure cuff connections are tight with
proper cuff placement. See section (5.3)
ERR 2 Unnatural pressure impulses. Reason:
The arm was moved during the
measurement (Artefact).
Repeat measurement keeping arm still.
12
Page 14

MLUBPT0-AP-APC-MAR06-1 4/5/06 9:36 AM Page 14
ERR 3
Repeat measurement keeping arm still.
If inflation of the cuff takes too long, the
cuff is not correctly seated or the hose
connection’s not tight.
Check connections and repeat.
ERR 5
The difference between systolic and diastolic is excessive. Measure again carefully
following proper cuff procedures and
ensure measurement under quiet conditions.
Other possible errors and their solutions
If problems occur when using the device, the following points should be checked:
Malfunction Remedy
The display remains blank when the instrument
is switched on although the batteries are in
place.
The pressure does not rise although the pump
is running.
The device frequently fails to measure,
or the values measured are too low or high.
Every measurement results in different values,
although the device functions normally and
normal values are displayed.
Blood pressure values differ from those measured by my doctor
After the instrument has inflated the cuff, the
pressure falls very slowly, or not at all. (No reasonable measurement possible).
• Check battery installation.
• If the display is unusual, remove the batteries
and then exchange them for new ones.
Check polarity.
• Check the connection of the cuff tube and
connect properly.
1. Fit the cuff correctly on the arm. (see 5.3)
2. Before starting measurement make sure
that the cuff is not too tight and that clothing
is not exerting pressure on the arm. Take
articles of clothing off if necessary.
3. Measure blood pressure again in complete
peace and quiet.
• Please read the following information and
the points listed under “Common sources of
error”.(5.2) Repeat the measurement.
• Blood pressure changes constantly. The
observed readings may accurately reflect
your pressure.
• Record daily values and consult your doctor.
• Pressure readings in your doctor’s office may
be higher due to anxiety.
•Check cuff connections.
Ensure the unit has not been tampered with.
13
Page 15

MLUBPT0-AP-APC-MAR06-1 4/5/06 9:36 AM Page 15
7. Care and maintenance
a) Do not expose the device to either extreme
temperatures, humidity, dust or direct sunlight.
b) The cuff contains a sensitive air-tight bubble.
Handle this cuff carefully and avoid all types
of stress through twisting or buckling.
c) Clean the device with a soft, dry cloth. Do not
use gas, thinners or similar solvents. Spots
on the cuff can be removed carefully with a
damp cloth and soapsuds.
The cuff must
not be washed in a dishwasher,
clothes washer, or submerged in water.
d) Handle the tube carefully. Do not pull on it.
Do not allow the tubing to kink and keep it
away from sharp edges.
e) Do not drop the monitor or treat it roughly in
any way. Avoid strong vibrations.
f)
Never open the monitor! This invalidates
the manufacturer’s warrantee.
9. Warranty
Your microlife blood pressure monitor is guaranteed for 5 years against manufacturers’ defects for the original purchaser only, from date of purchase. The warranty
does not apply to damage caused by improper handling, accidents, professional use,
not following the operating instructions or alterations made to the instrument by
third parties.
There are no user serviceable parts inside. Batteries or damage from old batteries is
not covered by the warranty. The warranty is only valid upon presentation of the
warranty card.
Please note: According to international standards, your monitor should be checked
for accuracy every 2 years.
14
Page 16

MLUBPT0-AP-APC-MAR06-1 4/5/06 9:36 AM Page 16
If fluctuations in readings are larger than 15 mmHg, and/or you hear irregular
pulse tones, and/or the Heartbeat Interval Irregularity Indicator appears frequently, consult your doctor.
In order to receive market clearance from governmental bodies, this device was subjected
to strict clinical tests. The computer program used to measure blood pressure values was
tested by experienced cardiac specialists in Germany.
The manufacture of your blood pressure monitor is in accordance with the
terms of the European standard for blood pressure measuring devices (see technical data)
under the supervision of the Technical Monitoring Association Essen (RWTüV-Essen).
Never attempt to repair the instrument yourself!
Any unauthorized opening of the instrument invalidates all warrantee claims!
9. Certifications
Device standard: This device is manufactured to meet the
European and United States standards for
non-invasive blood pressure monitors:
EN1060-1 / 1995
EN1060-3 / 1997
ANSI / AAMI SP10, NIBP – requirements
Electromagnetic compatibility: Device fulfills the stipulations of the
International standard IEC60601-1-2
Clinical testing: Clinical performance tests were
successfully completed against AAMI
SP10-1992 and British Hypertension
Society protocol B.H.S.: 1993.
Studies available on request.
The B.H.S. (British Hypertension Society) has rated this product “Recommended for clinical
and home use.” This is the highest grading available for blood pressure monitors. Please
see the B.H.S. web site. (Uses the same algorithm as B.H.S. graded “AA” model number
3BT0-1). For more information, visit www.bhsoc.org.
15
Page 17

MLUBPT0-AP-APC-MAR06-1 4/5/06 9:36 AM Page 17
10. Technical specifications:
Weight: 483 g (with batteries)
Size: 124 (W) x 205 (L) x 81 (H) mm
Storage temperature: –5 to +50°C (23°F - 122°F)
Humidity: 15 to 85% relative humidity maximum
Operation temperature: 10 to 40°C ( 50°F - 104°F)
Display: LCD-Display (Liquid Crystal Display)
Measuring method: oscillometric
Pressure sensor: capacitive
Measuring range:
SYS/DIA: 30 to 280 mmHg
Pulse: 40 to 200 per minute
Cuff pressure display range: 0–299 mmHg
Memory: Automatically stores the last 99
measurements.
Measuring resolution: 1 mmHg
Accuracy: pressure within ± 3 mmHg
pulse ± 5 % of the reading
Power source: a) 4 AA batteries, 1.5 V
b) AC adapter 6 V DC 600 mA
(voltage 4.5 V DC to 6 V DC)
Accessories: cuff type S101 for arm circumference
24–33.7 cm (9.5” -13.25”) (included)
cuff type S102 for arm circumference
30.5-40.64 cm (12” - 16”)
(call Microlife for details)
Made in China.
Manufactured by Microlife Corporation
Distributed by:
Microlife USA, Inc.
424 Skinner Blvd. Suite C
Dunedin, FL 34698
Toll free: 800-568-4147
Email: custserv@microlifeusa.com
www.microlifeusa.com
Technical alterations reserved!
US patent # 6,485,429
(Irregular Heartbeat Detector)
16
Page 18

MLUBPT0-AP-APC-MAR06-1 4/5/06 9:36 AM Page 18
12. How to Contact Us
Toll Free Help Line: 1-800-568-4147
Fax (727) 451-0492
Microlife USA, Inc.
424 Skinner Blvd.
Suite C
Dunedin, FL 34698
custserv@microlifeusa.com
www.microlifeusa.com
MLUBPTO-AP-APC-MAR06-1
Page 19

MLUBPT0-AP-APC-MAR06-1 4/5/06 9:36 AM Page 19
Microlife Monitor de Presión Arterial
Digital, Totalmente Automático con
Detector de Latido Irregular Patentado
Modelo # 3BTO-AP/3BT0-APC
Manual de Instrucción
Precaucion: Si el ícono de Latido Irregular se observa con frecuencia, vea a su doctor.
Ud. Podría necesitar atención médica. Solo un profesional médico puede diagnosticar irregularidad en el latido.
Patente US # 6,485,429
(Detector de Latido Irregular)
Page 20

MLUBPT0-AP-APC-MAR06-1 4/5/06 9:36 AM Page 20
Monitor Automático de Presión Arterial
Manual de Instrucción
Tabla de Contenido
1. Introducción
1.1 Características de su monitor de presión sanguinea
1.2 Información importante sobre la automedición
2. Información Importante sobre la presión sanguinea y su medición
2.1 Como sube la presión alta/baja ?
2.2 Cuales son los valores normales ?
2.3 Que se puede hacer si se obtienen valores altos o bajos ?
2.4 Detector de Latido Cardiaco Irregular
3. Componentes de su Monitor de Presión arterial
4. Funcionamiento de su Monitor de Presión arterial
4.1 Insersión de las baterías
4.2 Utilización del adaptador de corriente alterna
4.3 Conección del tubo
5. Procedimiento para la medición
5.1 Antes de la medición
5.2 Causas comunes de errores
5.3 Prueba de la bocamanga
5.4 Fijación de la hora y la fecha
5.5 Procedimieno para la medición
5.6 Memoria – despliegue de la última medición
5.7 Como descontinuar la medición
6. Mensajes de Error/Como se detectan y eliminan
7. Cuidado y mantenimiento
8. Garantía
9. Certificaciones
10. Especificaciones técnicas
11. Como contactarnos
Page 21

MLUBPT0-AP-APC-MAR06-1 4/5/06 9:36 AM Page 21
1. Introducción
1.1 Características de su monitor automático de presión arterial Microlife,
modelo # 3BTO-AP o #3BT0-APC
Su monitor de presión sanguinea Microlife es un dispositivo digital, completamente
automático, dotado de un Detector de Latido Irregular para uso en adultos en la
parte superior del brazo, tanto en el hogar como en el consultorio médico/enfermería. Hace posible un rápida y confiable lectura de la presión arterial sistólica y
diastólica, como también del pulso, por medio del método de oscilación. Este artefacto ofrece precisión clínicamente comprobada y ha sido designado para fácil
manejo.
Antes de usarlo, for favor, lea cuidadosamente las instrucciones del manual y manténgalo en un lugar seguro. Por favor contacte a su médico para mejor información
sobre la presión sanguinea y su medición
Atención !
1.2 Información importante sobre la automedición
• Automedición significa Control, no diagnóstico o tratamiento. Valores
inusuales deben ser discutidos con su médico. Bajo ninguna cincunstancia debe
usted alterar la dosis de ninguno de los medicamentos prescriptos por su doctor.
• La lectura del pulso no es la indicada para chequear la frecuencia de latidos de
los marcapasos !
• En casos de latidos irregulares (arritmia), las mediciones tomadas con este instu-
mento deben ser evaluadas sólamente luego de una consulta con su médico.
Interferencia Electromagnética :
Este dispositivo contiene componentes electrónicos bien sencibles. Evite la cercanía
a fuertes campos electrónicos o electromagnéticos. (Ej. Teléfonos celulares, hornos
micro-ondas). Estos pueden causar daño temporal y afectaría la exactitud de la
medición.
2. Información importante sobre la presión arterial y su medición
2.1 Como sube la presión alta/baja ?
Su nivel de presión sanguinea se determina en el centro circulatorio del cerebro y se
ajusta a una variedad de situaciones conforme a la retroalimentación del sistema
Page 22

MLUBPT0-AP-APC-MAR06-1 4/5/06 9:36 AM Page 22
nervioso. Para ajustar la presión sanguinea se altera la intensidad y frecuencia del
corazón (pulso), así como también la dilatación de los vasos sanguineos.
Su nivel de presión arterial cambia periodicamente durante la actividad cardiaca :
Durante la « eyección de sangre » (sístole) el valor es más alto (valor de presión de
la sangre sistolítica). Al final del periodo de « descanzo del corazón » (diástole) la
presión es la más baja (valor de la presión de la sangre diastólica).
Los valores de la presión sanguinea deben encontrarse entre parámetros normales
para prevenir enfermedades particulares.
2.2 Cuales son los valores normales ?
La presión sanguinea es alta si la presión diastólica está por encima de 90 mmHg
y/o la presión sistólica está por encima de 160 mmHg, durante un periodo de
descanso. En este caso, por favor consulte a su médico inmediatamente.
Mediciones de este tipo por prolongados períodos ponen en peligro su salud, debido
al continuo daño que se ocasiona a los vasos sanguineos de su cuerpo.
Si los valores de su presión sanguinea sistólica están entre 140 mmHg y 160 mmHg
y/o la presión sanguinea diastólica está entre 90 mmHg y 95 mmHg, consulte a su
médico. Un auto-examen periódico es necesario
Si los valores de su presión sanguinea son demasiado bajos (ej. Valores sistólicos
por debajo del 150 mmHg y/o valores diastólicos por debajo de 60 mmHg), consulte
con su médico.
Aún con valores normales de presión, se recomienda un auto-control regular con su
monitor de presión sanguinea. Usted podría detectar posibles cambios a tiempo y
reaccionar apropiadamente.
Si usted esta bajo tratamiento para controlar la presión, lleve un registro de las lecturas obtenidas junto con la fecha y la hora. Enseñe estas lecturas a su médico.
Nunca utilice los resultados de las mediciones para alterar, por su cuenta,
la dosis del medicamento perscripto por su doctor.
Page 23

MLUBPT0-AP-APC-MAR06-1 4/5/06 9:36 AM Page 23
Cuales son los valores normales ?
Los siguientes parámetros para evaluar la presión sanguinea alta (sin distinción de
edad) han sido establecidos por el Instituto Nacional de la Salud JNC7.
Category Systolic Diastolic
(mmHg) (mmHg)
Normal <120 <80
Pre-Hypertension 120-139 80-89
Hypertension
Stage 1 Hypertension 140-159 90-99
Stage 2 Hypertension >160 >100
Información Adicional
• Si sus valores son mayormente normales bajo períodos de descanso pero excepcionalmente altos bajo condiciones de stress físico o mental, es posible que usted
sufra de lo que se denomina “hipertensión lábil ». Consulte con su médico.
• La presión sanguinea diastólica correctamente medida que esta por enci-
ma de 120 mmHg, requiere tratamiento médico inmediato.
2.3 Que se puede hacer si se obtienen valores altos o bajos con regulari-
dad?
a) Consulte con su médico.
b) Valores altos de presión sanguinea (varias formas de hipertensión) se asocian con
considerables riezgos de salud a largo plazo. Las arterias de su cuerpo se encuentran bajo peligro debido a la constricción causada por los depósitos en las paredes de las venas (Arteriosclerosis). Una provisión deficiente de la sangre a los
órganos importantes (corazón, cerebro, músculos) puede resultar de la arteriosclerosis. Además, el corazón sufriría daños con el aumento de la presión sanguinea.
c) Hay diferentes causas de presión alta. Diferenciamos entre común primaria (esen-
Page 24

MLUBPT0-AP-APC-MAR06-1 4/5/06 9:36 AM Page 24
cial) hipertensión y secundaria hipertensión. Esta última se debe al mal funcionamiento de los órganos específicos. Por favor consulte con su médico para
obtener información sobre los posibles orígenes de su presión arterial alta.
d) Hay medidas de precaución que usted puede tomar para reducir y hasta prevenir
la presión alta. Estas medidas deben resultar en cambios permanentes en su estilo de vida.
A) Hábitos de comida
• Mantenga el peso correspondiente a su edad.
• Evite el consumo excesivo de sal.
• Evite comidas con grasa.
B) Previas enfermedades
• Siga consistentemente todas las instrucciones médicas para el tratamiento de
enfermedades tales como :
• Diabetes (Diabetes mellitus o diabetes de azucar).
• Mal funcionamiento del metabolismo graso.
• Gota.
C) Hábitos
• Deje de fumar completamente.
• Beba cantidades moderadas de alcohol.
• Restrinja el consumo de cafeína (café, té, chocolate).
D) Su Estado Físico
• Luego de un examen médico, con el consentimiento del doctor y bajo su dirección;
haga ejercicios.
• Elija deportes que requieran estámina y evite los que demandan fuerza.
• Evite alcanzar el límite de su capacidad.
• Con previas enfermedades y/o sobre los 40 años de edad, consulte con su médico
antes de comenzar una rutina de ejercicios. Usted debe asesorarce con respecto
al tipo y duración de los ejercicios que se recomiendan para usted.
2.4 Detector de Latido Irregular
Cuando aparece en su pantalla este símbolo significa que se han detectado
latidos irregulares que pueden causar o indicar una enfermedad cardiovascular.
Este indicador es una advertencia. El Monitor de Presión Automático de Microlife
con Detector de Latidos Irregulares puede detectar presión arterial y pulso con
Page 25

MLUBPT0-AP-APC-MAR06-1 4/5/06 9:36 AM Page 25
especificaciones aún cuando el paciente está experimentando latidos irregulares
con intérvalos. Es importante que usted esté relajado, se mantenga inmóvil y no
hable durante la medición.
Nota : Recomendamos contacte a su médico si usted ve este símbolo con frecuencia.
PRECAUCION : Latidos del corazón irregulares pueden resultar en una condición
seria que requiera atención médica. Vea a su doctor si usted sospecha tener un latido irregular.
3. Componentes de su monitor para la presión
a)Unidad de medida
Portal para corriente
alterna AC/orriente
directa Dc
Enchufe de la bocamanga
Botón para fijar la
hora
Botón de Encendido y Apagado
Botón de memoria
b) Bocamangas del brazo
Tipo S101 para brazos de circunferencia 22 – 33.7 cm o 9.5 – 13.25 (inclusive)
Tipo S102 para brazos de circunferencia 30.5 – 40.64 cm
12 » - 16 » (pedido especial).
Page 26

++
++
++
++
MLUBPT0-AP-APC-MAR06-1 4/5/06 9:36 AM Page 26
Nota:
La circunferencia del brazo debe medirse con una cinta métrica en el medio de la
parte superior del brazo en estado de relajación. No forcejee la bocamanga.
Asegurece de que la conección de la bocamanga no se introduja en el portal del
adaptador de corriente alterna AC. Si la bocamanga es muy pequeña, llame a microlife para mayor información.
4. Como operar su monitor de presión sanguinea
4.1 Inserción de baterías
Introduzca las baterías inmediatamente luego de abrir el paquete de la unidad. El
compartimiento de las baterías está localizado en la parte posterior del dispositivo
(vea la ilustración).
a) Remueva la cubierta como se ilustra
b) Inserte las baterías (4 AA 1,5V), observando la
indicada polaridad (+ - ).
c) Si el símbolo de la batería aparece en la pantalla,
significa que las baterías no están cargadas y
deben ser reemplazadas.
d) Si las baterías han sido insertadas
incorrectamente, la pantalla podría no
funcionar del todo o irregularmente.
Indicador de baterias con
baja potencia.
Atencion !
• Una vez que el indicador de baterias con baja potencia aparezca, el dispositivo no
funcionará hasta que las mismas hayan sido reemplazadas.
• Por favor utilice Baterías Alkalinas de larga vida « AA 1.5V ».
• No utilice baterías recargables.
• Si su monitor de presión arterial no será utilizado por mucho tiempo, por favor
remueva las baterías.
Chequeo de funcionamiento: Presione el botón de encendido/apagado (On/OFF)
Page 27

MLUBPT0-AP-APC-MAR06-1 4/5/06 9:36 AM Page 27
para verificar el despliegue en la pantalla. Cuando funciona correctamente, se
observarán varios íconos.
4.2 Utilizando un adaptador de corriente alterna AC (accesorio especial)
Este instrumento para medir la presión puede utilizarce con un adaptador de corriente alterna AC(salida 6V corriente directa/600 mA con toma corriente DIN).
Asegúrece de utilizar un adaptador que llene los requisitos legales en los Estados
Unidos (UL Stantard). El uso de un adaptador de corriente alterna que no sea
Microlife podría invalidar su garantía.
a) Introduja el enchufe en el hueco de
la parte izquierda del instrumento.
b) Conecte el Adaptador AC en un toma
corriente de 110V (US o Canada).
c) Verifíque si hay corriente disponible
presionando el botón On/Off.
Nota :
• Las baterías no se descargan mientras el adaptador AC está conectado al instrumento.
• Si la corriente se interrumpe durante una medición (ej. Por desconección del
enchufe), el instrumento debe ser reajustado removiendo el enchufe del mismo.
• Por favor llame al 1-800-568-4147 si tiene preguntas con respecto al adaptador de
corriente alterna AC.
4.3 Conección del tubo
Inserte el tubo de la bocamanga en el
orificio del lado del monitor, tal como se
indica en el diagrama.
Orificio derecho
Page 28

MLUBPT0-AP-APC-MAR06-1 4/5/06 9:36 AM Page 28
5. Procedimiento de Medición
Nota : Usted siempre debe estar sentado antes y durante la medición.
5.1 Antes de la medición
• Evite comer y fumar como también toda forma de ejercicio inmediatamente antes
de la medición. Estos factores influencian el resultado de la medición. Siéntese
en una silla confortable en una atmósfera de calma por aproximadamente diez
minutos antes de la medición.
• Quitese toda ropa que se ajuste a la parte superior del brazo.
• Siempre tome la medición del mismo lado (normalmente el brazo izquierdo).
• Siempre tome la medición a la misma hora del día, ya que la presión sanguinea
varía durante el curso del día.
5.2 Causas comunes de errores :
Nota : Las mediciones de la presión sanguinea siempre requieren las mismas condiciones ! Las condiciones deber ser el silencio/calma.
• Todo esfuerzo del usuario para sostener el brazo aumenta la presión arterial.
Asegúrece que usted se encuentre en una cómoda y relajada posición y no flexione ninguno de los músculos del brazo durante la medición. Utilice un almohadón para soporte si es necesario.
• Si la vena del brazo se encuentra a una posición considerablemente mas baja o
alta que el corazón, se podría obtener una lectura erronea o muy alta o muy baja.
Cada 15 cm (6 pulgadas) de diferencia en altura entre el corazón y la bocamanga,
puede resultar en una lectura errada de 10 mmHg !
• Bocamangas muy estrechas o cortas resultan en lecturas falsas. La selección de
la bocamanga apropiada es extremadamente importante. El tamaño de la bocamanga depende de la circunferencia del brazo (medida en el centro). La fluctuación permitida se halla impresa en la bocamanda. Si la misma no se adapta a
su necesidad, por favor contacte a microlife USA. Tamaños mayores se venden
por separado.
Nota : Use solamente las bocamangas clínicamente aprobadas de microlife.
• Una bocamanga floja o con protuberancias de aire a los costados causaría lecturas incorrectas.
• Mediciones seguidas hace que se acumule sangre en el brazo, que podría llevar a
obtener falsos resultados. Mediciones consecutivas deben repetirse luego de
Page 29

MLUBPT0-AP-APC-MAR06-1 4/5/06 9:36 AM Page 29
una pausa de 1 minuto o luego de haber levantado el brazo para que la sangre
acumulada fluya.
5.3 Prueba de la bocamanga
a) Pase el extremo de la bocamanga a travez del pasador
de metal para formar un lazo. La parte que tiene el
velcro debe quedar orientada hacia afuera. (Ignore
este paso si la bocamanga ya ha sido preparada).
b) Ponga la bocamanga en el brazo izquierdo para que el
tubo quede mas cercano a la parte extrema inferior
del miembro.
c) Fije la bocamanga en el brazo como se ilustra.
Asegúrece que el borde de la misma quede aproximadamente a 3/4" o a 1» (2 o 3 cm) por encima del
codo y que el tubo quede hacia el lado de adentro del
brazo. Importante! La flecha en la bocamanga
debe quedar
exactamente sobre la arteria que se
encuentra en el lado interior del brazo.
d) Ajuste la bocamanga jalando el extremo y cierre la
misma sobre el velcro.
e) Debe de quedar un poco de espacio entre el brazo y la
bocamanga. Debería caber 2 dedos entre la bocamanga y su brazo. La ropa no debe restringir el brazo.
Cualquier atuendo que moleste o se interponga debe
ser removido. La bocamanga que no quede perfectamente resultará en una lectura falsa. Mídase la circunferencia del brazo si no está segura de que le va
perfectamente. Bocamangas mas grandes se encuentran a su disposición (Section 3B).
f) Descance el brazo sobre la mesa (la palma de la mano
hacia arriba) para que la bocamanga esté a la misma
altura que su corazón. Asegúrece que el tubo no esté
doblado.
g) Permanezca sentado y tranquilo por dos minutos antes
de iniciar la medición.
Left Arm
3
/4”-1”
tube
Page 30

M
M
M
TIME
MLUBPT0-AP-APC-MAR06-1 4/5/06 9:36 AM Page 30
Comentario :
Si no le es posible poner la bocamanga en el brazo izquierdo,
también se puede poner en el derecho. Sin embargo, todas las
mediciones deben ser tomadas en el mismo brazo.
Para poder comparar las lecturas obtenidas se requiere que
siempre se cumplan las mismas condiciones.
5.4 Fijación de la hora y la fecha
Este monitor de la presión trae incorporado un reloj con fecha. La hora y la fecha se
graban conjuntamente con la presión y el pulso. Luego de que se hayan insertado
baterias nuevas, el reloj comienza a funcionar a partir de los siguientes datos :
2000-01-01 00 :00 O’ clock.
Usted debe proporcionar los datos de la fecha y la hora
correcta. Por favor proceda de la siguiente manera (Ej.
Para entrar 2002-06-15 Hora 09 :30 AM)
1. Mantenga presionado el botón de la hora por mínimo de 3 segundos. La pantalla ahora indica el año establecido, durante el cual
los cuatro dígitos se observarán en forma intermitente.
2. El año correcto se puede entrar presionando el botón de la MEMORIA. Una vez por cada cambio. (Ej. : 1 x presione).
3. Presione el botón de la hora otra vez. La pantalla ahora ha cambiado a la fecha corriente, y el primer caracter (mes) está titilando.
Nota : mantenga el botón presionado para acelerar el procedimiento.
4. El mes corriente puede entrarse ahora presionando el botón de la
MEMORIA. (Ej. Presionando 6 X avanzará 6 meses).
5. Presione el botón de la hora de Nuevo. Los dos últimos caracteres
(día) están ahora titilando.
6. Ahora se puede entrar el día presionando el botón de la MEMORIA. (Ej. 15 x presione avance el día desde el 1ro. Al 15)
7. Presione el botón de la hora de nuevo. La pantalla cambiará a la
hora correta, el primer dígito (la hora) se obervará intermitentemente.
Cuff on
right arm
Page 31

MLUBPT0-AP-APC-MAR06-1 4/5/06 9:36 AM Page 31
8. Presione el botón Horario/Usuario de nuevo. Los dos últimos dígitos (minutos) se obser-
varán intermitentes.
9. Entre ahora los minutos presionando el botón de MEMORIA. (Ej. : 30 X presiones avanza
la hora de 0 a 30 minutos).
5.5 Lectura de la fecha establecida
Luego de que todos los datos hayan sido fijados, presione una vez el botón
Usuario/Horario. La fecha será exhibida primero y luego la hora. La información
suministrada esta confirmada y el reloj comienza a correr.
5.6 Procedimientos para la medición
Luego de que la bocamanga haya sido posicionada correctamente, usted puede
comenzar la medición :
a) Presione el botón ON/OFF/START. La bomba comienza a
inflar la bocamanga. Se verá en la pantalla como va aumentando la presión en la bocamanga.
Presión de
bombeo
b) Cuando se llega a una presión individual, la bomba se
detiene y la presión comienza a bajar lentamente. La presión
de la bocamanga se despliega en la pantalla durante la
medición.
c) Cuando el dispositivo detecta su pulso el símbolo del
corazón comienza a titilar en la pantalla y se oye un sonido
por cada latido.
Medición
d) Cuando la medicion ha sido calculada, se escuchará un
sonido prolongado. Los valores de la presion sistólica y
diastólica se desplegarán en la pantalla.
e) La aparición de este símbolo significa que un latido
irregular fue detectado. Este indicador es solo una precausión. Es importante que usted esté relajado, permanezca
Sistolica
quieto y no hable durante la medición. NOTA :
Recomendamos que usted contacte con su médico si usted
ve este indicador con frecuencia.
f) Los resultados de la medición permanecerán en la pantalla
Diastólica
Pulso
hasta que usted apague el dispositivo. Si ningún botón es
presionado por un periodo de 5 minutos, el dispositivo se
apagará automáticamente.
Medición
completa
Page 32

MR
MLUBPT0-AP-APC-MAR06-1 4/5/06 9:36 AM Page 32
5.7. Memoria – exhibición de las últimas 99 mediciones
Los resultados de las mediciones se guardan en la memoria del instrumento hasta que se tome una nueva
medición. Con la unidad apagada presione el botón de
Memory dos veces. La pantalla le enseñará la última
medición junto con la fecha. El símbolo MR se desplegará en la ezquina inferior izquierda. Suelte el botón. Se
Ultima lectura
14 mediciones en
la memoria.
leerá la última medición. Cada vez que usted presione el
botón de la memoria se verá una medición anterior junto
con la fecha y hora. Si un latido irregular ha sido detectado en alguna de las mediciones en la memoria, el ícono
será desplegado.
5.8 Como descontinuar la medición
Si por alguna razón, se hace necesario interrumpir el procedimiento (ej. El paciente
no se siente bien), se puede presionar el botón ON/OFF en cualquier momento.
El dispositivo inmediátamente comenzará a disminuir automáticamente la presión en
la bocamanga.
6. Mensajes de Error/Como se detectan y eliminan
Si ocurre un error durante la medición, la misma será
descontinuada y el código de error ser observará en la
pantalla. Recomendamos una nueva medición, siempre y cuando usted se tome el tiempo necesario para
relajarse. (ej. Error no. 1).
14
MR
ERROR NO. POSIBLE(S)/SOLUCION(ES)
ERR 1 El tubo pudo haberse aflojado, no
se detectó Pulso.
*Asegúrece de que las conecciones de la
bocamanga esten en posición correcta.
Vea la sección (5.3)
ERR 2 Impulsos no naturales. Razón :
Page 33

MLUBPT0-AP-APC-MAR06-1 4/5/06 9:36 AM Page 33
El brazo se movio durante la medicion.
(Artefacto)
Vuelva a repetir la medicion, mangenga el
brazo inmóvil.
ERR 3 Repita la medición manteniendo el brazo
inmóvil. Si el inflado de la bocamanga
toma mucho tiempo, la misma no está
correctamente puesta o la conección del
tubo no esta bien ajustada.
Chequee las conecciones y repita el
Procedimiento.
ERR 5 La diferencia entre sistólica y diastólica es
excesiva. Mídase otra vez siguiendo
cuidadosamente las instrucciones de la
bocamanga y que el procedimiento se realice
en un ambiente de calma.
Otros Posibles errores y soluciones
Si ocurren problemas durante el uso del dispositivo, verifique los siguientes puntos :
Mal funcionamiento Remedio
La pantalla permanece en blanco • Revise la instalación de las baterias
cuando se enciende el dispositivo, • Si el despliegue es inusual, remueva
aún cuando las baterías han sido las baterías y cámbielas por nuevas.
colocadas. Revise la polaridad.
La presión no aumenta aun cuando • Controle la conección del tubo de la
la bomba está funcionando. bocamanga y conéctela
correctamente
El disposivo no logra una medición, 1- Ajuste la bocamanga al brazo
o los valores son muy bajos o altos. Correctamente (vea 5.3)
2- Antes de comenzar la medición asegurese
de que la bocamanga no esté demasiado
Page 34

MLUBPT0-AP-APC-MAR06-1 4/5/06 9:36 AM Page 34
ajustada y que la vestimenta no obstruya
la lectura. Remueva toda obstrucción.
3- Mida la presión otra vez en completo
silencio y calma.
Cada medición obtiene valores • Por favor lea las siguiente información
diferentes, aún cuando el dispositivo bajo los siguientes puntos « Causas
funciona normalmente y los valores comunes de error ». (5.2)
obtenidos son mormales Repita la medición.
• La presión sanguinea cambia constantemente. Las lecturas obtenidas reflejan
exactamente su presión.
La medición obtenida difiere de los • Registre sus mediciones diarias y
valores obtenidos por el médico consulte a su médico.
• Las lecturas obtenidas en el consultorio
médico podrían ser mas altas debido a la
anciedad.
Luego de que el dispositivo haya • Verifique las conecciones de la
inflado la bocamanga, la presión bocamanga.
baja lentamente o no se registra Asegúrece de que la unidad no haya
presión alguna. (Se hace imposible sido maltratada.
obtener una medición).
7. Cuidado y Mantenimiento
a) No exponga este dispositivo a temperaturas extremas,
humedad, polvo o rayos del sol.
b) Las bocamangas contienen burbujas de aire muy sensi-
tivas.
Manéjelas con cuidado para evitar todo tipo de stress
al doblarlas o abrocharlas.
c) Limpie el dispositivo con un paño limpio y seco. No use
ninguna clase de solventes ni gas. Manchas en la
bocamanga pueden ser removidas muy cuidadosa-
Page 35

MLUBPT0-AP-APC-MAR06-1 4/5/06 9:36 AM Page 35
mente con un paño humedo. Las bocamangas no se
pueden introducir en el lavarropas, lavaplatos ni
ser sumergidas en agua.
d) Manipule el tubo cuidadosamente. No lo jale. No per-
mita que el tubo se doble y manténgalo alejado de
objetos filósos.
e) No deje caer el monitor, ni permita maltratros. Evite
vibraciones fuertes.
f)
Nunca abra el monitor! Ello anularía la garantía del
fabricante.
8. Garantía
Su monitor de presión microlife tiene garantía por 5 años para cubrir defectos de
fabricación válidos para el comprador únicamente, a partir de la fecha de adquisición. La garantía no cubre daños causados por mal uso, accidentes, uso profesional,
el no seguimiento de las instrucciones de uso o alteraciones hechas al dispositivo
por terceras personas.
No contiene partes utiles para el usuario. Baterías o daños causados por baterías
usadas no estan cubiertos por la garantía. La garantía es válida únicamente si se
presenta la tarjeta.
Nota : Conforme a las reglas internacionales, su monitor debe ser revisado para calibración cada dos años.
Si las fluctuaciones en las lecturas son mayores de 15 mmHg, y/o usted oye
tonos de pulso irregular, y /o el ícono del Detector de Latidos aparece frencuentemente, consulte a su médico
.
Con el objeto de obtener permiso del gobierno para sacar a la venta, este dispositivo
fué sometido a pruebas clínicas estrictas. El programa de computación utilizado
para medir los valores de presión sanguinea fué probado por especialistas del
corazón en Alemania.
El fabricante de su monitor de presión sanguinea microlife está suscrito a los términos standards europeos para los dispositovos de medición de la presión sanguinea
(vea los datos técnicos) bajo la supervisión de la Asociación Técnica de Monitores
Essen (RWTüV-Essen).
Page 36

MLUBPT0-AP-APC-MAR06-1 4/5/06 9:36 AM Page 36
Nunca trate de reparar el instrumento usted mismo!
La apertura sin autorización del instrumento invalida todos los reclamos de garantía.!
9. Certificaciones
Regulación del dispositivo :
Este dispositivo para procedimientos no
invasivos, está diseñado conforme a las
reglas de fabricacion Europeas y de los
Estados Unidos de America :
EN1060-1 / 1995
EN1060-3 / 1997
ANSI / AAMI SP10, NIB – requerimientos
Compatibilidad electromagnética :
Este dispositivo cumple con las
estipulaciones Internacionales IEC60601-1-2
Pruebas clínicas : Pruebas clínicas de funcionamiento fueron
realizadas, con éxito, en conformidad con
AAMI – SP10-1992 y con el protocolo de La
Sociedad Británica de Hipertension B.H.S. :
1993
La B.H.S. (Sociedad Britanica de Hipertensión) ha calificado a este producto
“Recomendado para el uso clínico y doméstico.” Esta es la calificación mas alta
disponible para un monitor de presón arterial. Por favor vea la página de B.H.S. (Se
carateriza por el mismo fundamento Utilizado en el producto de B.H.S, calificado
como modelo « AA » número 3BTO-1)
10. Especificaciones Técnica
Peso : 483 g (con baterias)
Tamaño: 124 (A) x 205 (L) x 81 (Alt) mm
Page 37

MLUBPT0-AP-APC-MAR06-1 4/5/06 9:36 AM Page 37
Temperatura de almacenamiento: -5 a 50ºC (23ºF- 122º)
Humedad : 15 a 85% relativa humedad máxi-
ma
Temperatura de operación: 10 to 40ºC (50ºF - 104ºF)
Pantalla : Pantalla-LCD (Pantalla Cristal
Liquido)
Metodo de Medición : oscilación
Sensor de Presión : capacidad eléctrica
Area de medición :
SYS/DIA:
30 a 280 mmHg
Pulso: 40 a 200 por minuto
Capacidad de la bocamanga: 0-299 mmHg
Memoria: Almacena automáticamente las
últimas 99 mediciones
Medida de resolución: 1 mmHg
Precisión: presión dentro de un pulso de +- 3
mmHg, pulso +- 5% de lectura
Fuente de energía: a) 4 baterías AA, 1.5 V
b) Adapatador AC 6 V DC 600 mA
(voltage 4.5 V DC a 6 V DC)
Accesorios: bocamanga tipo S101 para brazso
de circumferencia 24 –33.7 cm
(9.5 » - 13.25 ») (incluido)
bocamanga tipo S102 para brazo
de circurferencia 30.5-40.64 cm (12
» - 16 »)
(llame a Microlife para detalles)
Hecho en China Alteraciones técnicas reservadas
Manufacturado por Microlife Corporation
Page 38

MLUBPT0-AP-APC-MAR06-1 4/5/06 9:36 AM Page 38
Distribuido por:
Microlife USA, Inc.
424 Skinner Blvd. Suite C
Dunedin, FL 34698
Tel. : 800-451-0492 Patente :
Email : custserv@microlifeusa.com 6,485,429 (Latido Irregular)
www.microlifeusa.com
11. Como Contactarnos
Numero sin cargo : 1-800-568-4147
Fax (727)451-0492
Micr
olife USA, Inc.
424 Skinner Blvd.
Suite C
Dunedin, FL 34698
custserv@microlifeusa.com
www.microlifeusa.com
 Loading...